Работа с корпоративными и автономными центрами сертификации CA Центр сертификации Certification Authority (CA), называемый компанией Microsoft сервером сертификатов (Certificate Server) или службами сертификатов (Certificate Services), является ключевым компонентом программного обеспечения
Работа с корпоративными и автономными центрами сертификации CA
Центр сертификации Certification Authority (CA), называемый компанией Microsoft сервером сертификатов (Certificate Server) или службами сертификатов (Certificate Services), является ключевым компонентом программного обеспечения инфраструктуры открытых ключей PKI (Public Pey Infrastructure) в среде Windows Server 2003. Центр CA принимает и обрабатывает запросы на получение сертификатов от пользователей PKI, идентифицирует эти запросы и проверяет их правомерность, выдает сертификаты в соответствии с политикой безопасности PKI, обновляет и аннулирует сертификаты, размещает сертификаты на различных узлах хранения, создает и публикует списки аннулированных сертификатов CRL (Сertificate Revocation Lists), а также регистрирует в соответствующей базе данных все транзакции по сертификатам и CRL. Центр сертификации Windows 2003 CA может выполнять в безопасном режиме архивирование и восстановление секретных ключей. Чтобы оценить степень развития возможностей центров CA и PKI в среде Windows 2003, в этой статье мы рассмотрим компоненты архитектуры последней реализации служб Certificate Services, а также различия в процедурах развертывания корпоративного и автономного центра CA в среде Windows 2003.
Архитектура Windows 2003 Certificate Services. Архитектура Windows 2003 Certificate Services почти идентична той, которая использовалась Microsoft при реализации предыдущих версий названных служб. Основное различие состоит в том, что здесь Microsoft изменила структуру базы данных CA для реализации поддержки процедур архивирования и восстановления секретных ключей пользователей. Схема данной архитектуры показана на рисунке. Она включает в себя различные модули, базы данных, инструментальные средства администрирования, посредников и прикладной интерфейс CryptoAPI.

|
Рисунок. Архитектура CA |
Модули. Сердцем Certificate Services является исполнительный механизм CA (certsrv.exe), который генерирует сертификаты и занимается управлением потоками сообщений между CA и другими компонентами служб Certificate Services. Серверный механизм CA взаимодействует с другими компонентами архитектуры через входные модули, модули политики и выходные модули.
Входной модуль принимает запросы на сертификаты, соответствующие формату криптографического стандарта открытых ключей № 10 (Public-Key Cryptography Standards, PKCS #10) или криптографического протокола управления, использующего синтаксис криптографических сообщений (Cryptographic Management protocol using Cryptographic Message Syntax, CMS). После приема запроса входной модуль помещает его в очередь для дальнейшей обработки модулем политики.
Модуль политики реализует правила политики центра CA в соответствии с установками, заданными администратором CA. Данный модуль передает исполнительному механизму CA информацию о структуре сертификата и принимает решение о выдаче сертификата, об отказе в его выдаче или о переводе запроса сертификата в режим ожидания. Для обновления информации о структуре сертификата модуль политики может обращаться к информации, хранящейся в каком-либо каталоге (например, Active Directory) либо в базе данных. Модуль политики, имеющийся в Windows 2003, называется certpdef.dll. Он поддерживает два типа политики: режим корпоративной политики и режим автономной политики. Эти режимы будут подробно рассмотрены ниже. Чтобы убедиться в том, что на данном центре CA установлен модуль политики, следует запустить оснастку Certification Authority консоли MMC, щелкнуть правой кнопкой на объекте CA, выбрать в контекстном меню пункт Properties и перейти к закладке Policy Module, показанной на экране 1.
|
|
Экран 1. Вкладка Policy Module в свойствах объекта |
Выходные модули занимаются распространением и публикацией сертификатов, цепочек сертификатов, а также полных списков CRL и списков изменений CRL. Выходной модуль может записывать данные PKI в файл или передавать эти данные на удаленный узел, используя в качестве транспорта протокол HTTP или механизм удаленного вызова процедур RPC. Windows 2003 CA может поддерживать несколько выходных модулей, соответственно распространение и публикация сертификатов, цепочек сертификатов, полных cписков CRL и списков изменений CRL может выполняться одновременно в различные пункты назначения, включая каталоги LDAP, файловые ресурсы совместного пользования, каталоги Web и, наконец, ODBC-совместимые базы данных. По умолчанию в Windows 2003 CA входит выходной модуль, называемый certxds.dll, в котором реализована поддержка LDAP, FTP, HTTP и SMTP (в центрах Windows 2000 CA также поддерживаются все эти протоколы, за исключением последнего). Выходной модуль позволяет организовать автоматическую рассылку уведомлений от центра CA пользователям PKI и администраторам. Чтобы убедиться в том, что на данном центре CA установлен модуль политики, нужно запустить оснастку Certification Authority консоли MMC, щелкнуть правой кнопкой на объекте CA, выбрать в контекстном меню пункт Properties и перейти к закладке Exit Module, показанной на экране 2.
|
|
Экран 2. Вкладка Exit Module в свойствах объекта |
Модули политики и выходные модули являются настраиваемыми и заменяемыми компонентами, поэтому любая организация может разработать на языках C++ или Visual Basic (VB) собственные модули и интегрировать их в архитектуру Certificate Services. Вся необходимая информация о процессах создания и замещения модулей имеется в комплекте документации Software Development Kit (SDK) для платформы Windows 2003.
Настройка модулей политики и выходных модулей осуществляется с помощью оснастки Certification Authority или через утилиту командной строки certutil.exe. Используя окно свойств объекта CA оснастки Certification Authority, можно добавлять выходные модули, настраивать расширения X.509 для сертификатов (например, определять узлы CDP (CRL Distribution Points) и узлы AIA (Authority Information Access)), а также настраивать параметры публикации для полных списков CRL и списков изменений CRL.
Базы данных. Центр CA имеет собственную базу данных, которая называется CAname.edb. В этой базе хранится информация по транзакциям, связанным с сертификатами, и собственно сертификаты. Здесь же хранятся архивированные секретные ключи. По умолчанию эта база данных хранится в каталоге %systemroot%system32certlog. Исполнительный механизм центра CA взаимодействует с базой данных с помощью файла certdb.dll. С появлением службы Windows 2000 Certificate Services изменилась используемая Microsoft технология работы с базами данных. Теперь здесь используется процессор баз данных Jet, что позволило сделать архитектуру Windows 2000 CA масштабируемой. Отметим, что аналогичная технология используется в базах данных AD и Microsoft Exchange Server.
Средства администрирования. В большинстве случаев для администрирования центра сертификации Windows 2003 CA используется оснастка Certification Authority, но это можно делать и с помощью утилиты командной строки certutil.exe. Оба средства взаимодействуют с исполнительным механизмом центра CA через библиотеку certadm.dll.
Посредники (intermediaries). Прикладные программы, помогающие клиенту корректно сформировать запрос сертификата, соответствующий формату PKCS #10 или CMS, называются посредниками или Registration Authorities (RA). Эти программы собирают специальные данные о пользователе и о запросе, которые необходимы для формирования корректного запроса сертификата. Например, любой запрос, направляемый корпоративному центру Windows 2003 CA, должен содержать ссылку на шаблон сертификата. Программы RA могут добавлять к запросу описание шаблона. Следует отметить, что эти программы используют определенные транспортные протоколы (например, HTTP и RPC), соответственно при этом и исполнительный механизм CA не должен использовать для работы другие типы транспорта.
Примерами посредников в Windows 2003 могут служить Web-страницы регистрации сертификатов, которые являются посредниками HTTP, а также оснастка Certificates консоли MMC, вызывающая мастер Certificate Request Wizard, которая играет роль RPC-посредника. При генерации секретных ключей на клиентской машине посредник HTTP обращается к библиотеке xenroll.dll, а при генерации секретных ключей на смарт-картах он использует библиотеку scenroll.dll. Посредник RPC для выполнения данных процедур вызывает библиотеку certcli.dll.
Прикладной интерфейс CryptoAPI. Для реализации всех криптографических функций, включая доступ и использование секретных ключей CA, центр сертификации задействует вызовы интерфейса CryptoAPI. Центр CA может хранить свой секретный ключ на жестком диске или на специальном аппаратном устройстве (например, на аппаратном модуле безопасности Hardware Security Module, HSM).
Установка Windows 2003 Certificate Services
При выполнении установки Windows 2003 Certificate Services может быть развернут корневой CA, подчиненный CA, корпоративный CA (интегрированный в AD) или автономный CA (не интегрированный в AD). Если служба Certificate Services устанавливается в корпоративном режиме, то в этом случае активируется аналогичный режим и для модуля политики центра Windows 2003 CA. Рассмотрим, чем отличаются корпоративный и автономный режимы. В таблице приведены сравнительные характеристики параметров, установленных по умолчанию, для автономного и корпоративного центров Windows 2003 CA.
При установке корпоративного центра CA та учетная запись, от имени которой выполняется установка, должна иметь привилегии Enterprise administrator и Domain administrator в корневом домене леса AD. Кроме того, сервер, на который устанавливается корпоративный CA, должен являться членом домена с функционирующей в нем службой AD. Если эти условия не выполнены, в CA installation Wizard будут недоступны возможности перехода в режим установки enterprise CA, соответственно развернуть центр CA можно будет только в автономном режиме.
Для того чтобы установить автономный центр CA, использовать AD необязательно. CA может устанавливаться как на автономный сервер, так и на сервер, входящий в домен, или на контроллер домена (DC). При такой установке не требуются и полномочия Enterprise administrator и Domain administrator, вполне достаточно прав локального администратора на данном сервере. Если при установке автономного центра CA все-таки использовать привилегии Enterprise administrator, в этом случае данный центр будет обладать некоторой дополнительной функциональностью. В частности, если пользователь с правами Enterprise administrator устанавливает автономный центр CA на сервер, входящий в состав домена, то в этом случае центр CA сможет публиковать выпущенные им сертификаты в AD.
Шаблоны сертификатов
Корпоративный центр CA использует шаблоны сертификатов, которые хранятся в структуре AD в контексте имен конфигурации. Шаблон определяет содержание и характеристики сертификата. Кроме того, с помощью шаблонов можно контролировать типы выпускаемых центром CA сертификатов и определять, какие пользователи могут запрашивать сертификаты у корпоративного центра CA, а также сертификаты какого типа могут им выдаваться. В инфраструктуре PKI среды Windows 2003 поддерживаются шаблоны сертификатов версии 2, которые, в отличие от шаблонов версии 1, являются полностью настраиваемыми. Настройка шаблонов осуществляется с помощью оснастки Certificate Templates консоли MMC.
Автономный центр CA не может использовать шаблоны сертификатов AD, в этом случае нельзя выполнять контроль типов сертификатов и пользователей, их получающих. По умолчанию автономный CA может выдавать только сертификаты, предназначенные для Web-аутентификации (Secure Sockets Layer, SSL; или Transport Layer Security, TLS), защиты электронной почты (Secure MIME, S/MIME), аутентификации сервера, цифровой подписи и для работы с протоколом IP Security (IPSec). Тем не менее можно модифицировать Web-интерфейс автономного центра CA (например, для того чтобы в списке отображались другие типы сертификатов) или запрашивать другие типы сертификатов, используя для этого значения специальных идентификаторов объектов (OID), которые хранятся в X.509-расширении сертификата Extended Key Usage.
Получение дополнительной информации при запросе сертификата
В процессе регистрации сертификата корпоративный центр CA ищет в структуре Active Directory информацию о пользователе, которая потребуется центру для заполнения определенных полей сертификата. Например, в поле X.509 SubjectAltName сертификата, выданного корпоративным центром CA, содержится ссылка на имя пользователя, определяющее его в AD, — User Principal Name (UPN). Если центр CA является автономным, он не имеет доступа к AD, поэтому информация, идентифицирующая пользователя и необходимая для получения сертификата с Web-сайта регистрации, должна вводиться пользователем вручную.
Как в корпоративных, так и в автономных центрах CA можно изменять установленные по умолчанию параметры, добавляемые центром CA к запросу сертификата. Это делается в процессе регистрации сертификатов путем редактирования файла certdat.inc, который находится в каталоге %systemroot%system32certsrv. Допускается изменение значений, установленных по умолчанию, для следующих параметров сертификата: sDefaultCompany, sDefaultOrgUnit, sDefaultLocality, sDefaultState, и sDefaultCountry. Если привести значения этих параметров в соответствие с используемыми в организации наименованиями, можно будет сократить объем вводимой пользователем информации при запросе сертификата.
Автоматическая регистрация сертификатов
Центр CA корпоративного типа поддерживает технологию автоматической регистрации сертификатов, причем в Windows 2003 возможности данной технологии расширены и теперь распространяются как на пользовательские сертификаты, так и на сертификаты компьютеров. Более подробно эти вопросы рассматриваются в статье «Технология регистрации PKI сертификатов в Windows 2003 Server», опубликованной на сайте журнала Windows IT Pro/RE (http://www.osp.ru/win2000/safety/511_29.htm). Отметим, что если пользователь запрашивает сертификат от автономного центра CA, процесс регистрации должен быть запущен вручную, так как в данном случае какие-либо процедуры автоматизации отсутствуют.
Централизованное архивирование ключей
Корпоративный центр CA поддерживает механизмы централизованного архивирования ключей в базе данных CA, а автономный центр — нет. Возможности технологии архивирования и восстановления ключей CA более подробно обсуждаются в статье «Автоматическое архивирование и восстановление ключей в инфраструктуре Windows Server 2003 PKI», опубликованной в № 3 журнала Windows IT Pro/RE за 2006 г.
Утверждение запроса сертификата
В корпоративных центрах CA имеется поддержка механизмов автоматического и ручного утверждения запросов сертификатов. Для того чтобы настроить свойства режима обработки запросов сертификатов, можно воспользоваться либо свойствами корпоративного CA (через свойства модуля политики), либо свойствами шаблона сертификата версии 2 (с помощью вкладки Issuance Requirements окна свойств шаблона сертификата). Если настройка режима обработки запросов выполняется через свойства шаблона сертификата версии 2, то следует иметь в виду, что внесенные при этом изменения будут применены только к сертификатам того типа, который определяется данным шаблоном. Можно задать настройку, обязывающую администратора утверждать все поступающие запросы сертификатов вручную, независимо от установок в шаблоне сертификата. Для этого при настройке режима обработки запросов в свойствах CA нужно выбрать пункт Set the certificate request status to pending. The administrator must explicitly issue the certificate. Эти же пункты доступны и для автономного центра CA, с той лишь разницей, что автономный CA не может использовать шаблоны сертификатов, и, следовательно, не удастся настроить свойства обработки запросов для отдельного шаблона сертификата. В отличие от корпоративного центра, автономный CA при аутентификации поступающих запросов не использует внутренние механизмы аутентификации Windows, соответственно компания Microsoft не рекомендует устанавливать режим автоматического утверждения в свойствах обработки запросов для автономных центров CA. В этих случаях всегда следует оставлять установку, сделанную по умолчанию, в соответствии с которой каждый поступающий запрос сертификата должен утверждаться администратором вручную.
Опубликование сертификатов и списков CRL
Корпоративные центры CA хранят и публикуют сертификаты, а также полные списки CRL и списки изменений CRL в Active Directory. В то же время как корпоративные центры, так и автономные CA могут осуществлять размещение данных в файловой системе. Каждый размещенный в AD сертификат автоматически отображается на учетную запись того, кто его запрашивал. Служба Active Directory добавляет сертификат к многозначному атрибуту UserCertificate пользователя или объекта AD inetOrgPerson. Отметим, что не каждый выданный корпоративным центром CA сертификат автоматически публикуется в AD. Примерами сертификатов, которые не будут публиковаться автоматически, могут служить сертификат агента регистрации или сертификат для подписи списка CTL (certificate trust list).
В принципе автономный центр CA тоже может публиковать выпущенные им сертификаты в AD, но по умолчанию этот режим не поддерживается. Данная возможность может быть реализована только при развертывании автономного центра CA на сервере, который является членом домена. Отметим, что всегда можно явно размещать сертификаты в AD в ручном режиме.
Выбор типа CA, оптимального для решаемых задач
Итак, мы определили различия между корпоративным и автономным центром CA и теперь, на основании полученных знаний, можем выбирать конфигурацию центра CA, оптимальную для конкретной ситуации. Развертывание корпоративного центра Windows 2003 CA будет наилучшим решением для работы с сертификатами пользователей, имеющих учетные записи в AD и использующих протокол Kerberos для их аутентификации в инфраструктуре AD. Для внешних пользователей (например, пользователей из внешней сети, не имеющих учетных записей в инфраструктуре Windows внутренней сет) оптимальным решением будет использование автономного центра Windows 2003 СA.
Жан де Клерк — Член Security Office компании HP. Специализируется на управлении идентификационными параметрами и безопасности в продуктах Microsoft. Автор книги Windows Server 2003 Security Infrastructures (издательство Digital Press). jan.declercq@hp.com
Таблица. Сравнение основных характеристик автономного и корпоративного центров сертификатов Windows2003 CA
| Свойство | Автономный Windows 2003 CA | Корпоративный Windows 2003 CA |
| Возможность интеграции в AD | По умолчанию отсутствует | Интегрированный в AD |
| Протоколы взаимодействия с CA | Клиенты взаимодействуют с CA по протоколам HTTP или HTTP Secure (HTTPS) | Взаимодействие клиентов с CA может осуществляться через RPC или Distributed COM DCOM), а также по протоколам HTTP или HTTPS |
| Распространение сертификатов | Центр CA загружает CA в пользовательский профиль, когда пользователь получает в ручном режиме сертификат с Web-сайта центра CA. Есть возможность автоматического размещения списков CRL и сертификатов в AD | В зависимости от настройки шаблона сертификата центр CA может автоматически загрузить сертификат в пользовательский профиль, поместить сертификат в AD либо выполнить оба действия |
| Утверждение запросов сертификатов | Процедура выдачи разрешений на регистрацию сертификатов может быть автоматической или ручной. Режим работы данной процедуры контролируется в центре CA с помощью одной общей настройки для всех типов сертификатов | Процедура выдачи разрешений на регистрацию может быть автоматической или ручной. Есть возможность как глобального контроля данного режима на уровне центра CA, так и задания различных режимов для разных типов сертификатов, что достигается соответствующей настройкой шаблонов сертификатов. В процессе выдачи разрешений на регистрацию сертификатов могут также использоваться имеющиеся в AD механизмы аутентификации и контроля доступа, базирующиеся на списках контроля доступа (ACL), которые могут быть заданы в шаблонах сертификатов |
| Ограничения по типам пользователей инфраструктуры PKI | Ориентируется на работу с инфраструктурой PKI пользователей Internet и внешних сетей | Ориентируется на работу с инфраструктурой PKI пользователей корпоративной сети |
| Требования по платформе | Данная версия может устанавливаться на контроллер домена (DC) Windows 2003, на сервер домена или на авто- номный сервер, не являющийся членом какого-либо домена. | Данная версия устанавливается только на контроллер домена (DC) Windows 2003 или на сервер домена |
| Поддерживаемые типы сертификатов | Может выдавать ограниченный набор типов сертификатов и сертификаты, требующие наличия специального идентификатора OID в расширении Extended Key Usage. Работа с шаблонами сертификатов не поддерживается | Может выпускать для среды Windows 2003 сертификаты любых типов из тех, которые представлены в оснастке Windows 2003 Certificate Templates. Поддерживаются шаблоны сертификатов версии 1 (Windows 2000 PKI) и версии 2 (Windows 2003 PKI) |
| Идентификация пользователей | При запросе сертификата пользователь должен ввести идентифицирующую его информацию вручную | Центр CA автоматически получает информацию, идентифицирующую пользователя, из AD |
| Управление пользователями | Пользователь регистрируется через Web-интерфейс. Можно также использовать утилиту командной строки c ertreq.exe | Пользователь регистрируется через Web-интерфейс или с помощью оснастки Certificates. Также существуют возможности автоматической регистрации сертификатов и регистрации с помощью утилиты командной строки certreq.exe |
Введение
Даная статья описывает инфраструктуру открытых ключей (PKI — Public Key Infrastructure), реализованную на платформе Microsoft Windows Server 2003. В статье рассмотрены основные понятия и концепции PKI, а также те новые возможности, которые предоставляет Windows Server 2003 в плане использования PKI для решения прикладных задач.
Рассмотрение PKI следует начать с таких фундаментальных основ, как центр сертификации. Прежде всего, необходимо выяснить, что собой представляет центр сертификации в составе Windows Server 2003, какова его структура и, конечно же, какие новые возможности реализованы в самой новой версии серверной операционной системы от компании Microsoft. Уже несколько лет Microsoft движется четким курсом, который подразумевает реализацию средств и концепций безопасности во всех продуктах и проектах. Концепция безопасности платформы Windows — это реализация технологии защиты информации на всех уровнях информационной системы. Если выделить вертикальные уровни (то есть посмотреть вглубь), то можно увидеть три основных направления, на которых покоится система защиты информации: аутентификация субъектов, контроль доступа к объектам и защита потоков данных с помощью средств шифрования. Это хорошо известная профессионалам азбука безопасности. Далее мы не будем рассматривать аутентификацию и контроль доступа, а остановимся лишь на средствах шифрования. Чтобы разобраться с PKI, необходимо выяснить, как реализованы средства шифрования, а также какую роль они играют в системе безопасности.

Средства шифрования и система безопасности
Значение средств шифрования трудно переоценить. На рисунке выше можно видеть довольно много прямоугольников, каждый из которых обозначает определенную службу. Например, службы удаленного доступа, аутентификации с помощью смарт-карт, шифрующая файловая система, аутентификация в рамках IP Security. Все это использует инфраструктуру открытых ключей, а фундаментом всех этих служб выступает набор программных интерфейсов CryptoAPI. В основе представленной выше модели лежат так называемые криптопровайдеры — слой модулей, которые, собственно, и выполняют операции шифрования, а также создания и хранения ключей. Таким образом, из всех служб, отвечающих за безопасность в рамках Microsoft Windows, на рисунке не представлена только одна — система контроля доступа. Дело в том, что система контроля доступа оперирует понятием списка контроля доступа и не использует криптографию. Все остальные службы, напротив, так или иначе, используют средства шифрования. Большая часть этих служб использует шифрование именно на основе инфраструктуры открытых ключей, то есть с PKI начинается управление системой безопасности на платформе Windows Server 2003. Именно поэтому инфраструктуре открытых ключей уделяется такое большое внимание.
Мы не будем останавливаться на теоретических аспектах: что такое PKI, цифровые сертификаты, открытые и личные ключи. Предполагается, что читатель либо уже хорошо знаком с этими понятиями, либо представляет себе, по крайней мере, как эти объекты устроены. Таким образом, мы пропустим начальный уровень, на котором рассказывают про двух известных людей — абонентов Алису и Боба, которые обмениваются между собой различными сообщениями, а противник Ева их перехватывает и пытается расшифровать. Теоретические протоколы и технологии, которые используются при таком рассмотрении, представляют интерес для научной криптографии. На практике же почти всегда с самого начала известно, что на предприятии необходимо развернуть инфраструктуру открытых ключей. Какие преимущества получит информационная инфрастуктура от использования PKI, рассмотрено в следующей главе.
Что следует сделать, чтобы развернуть PKI? Прежде всего, нужно иметь центр сертификации. Центр сертификации отвечает за выдачу сертификатов клиентам, контролирует жизненный цикл этих сертификатов (то есть отзывает сертификаты, которые уже недействительны), гарантирует публикацию информации об отозванных сертификатах, хранит историю всех выданных сертификатов, предоставляет интерфейсы, позволяющие запросить и получить сертификат. Функций довольно много, а так как центры сертификации в большой организации могут охватывать достаточно распределенную инфраструктуру, стандарт PKI подразумевает возможность построить иерархию из нескольких центров сертификации. В этом случае мы получаем дерево, дерево доверий центров сертификации. Данное дерево обязательно содержит один корневой центр, самый главный. С него начинается инфраструктура, и им же она может и заканчиваться. В простейшем случае в системе есть один единственный центр сертификации, который выполняет все вышеперечисленные функции. В более сложном случае уровней может быть два, три и больше, но рекомендуется ограничить свое дерево не более чем тремя уровнями.

Архитектура Центра Сертификации
Служба «Центр Сертификации» или Microsoft Certification Authority, как она называется в оригинале, реализована в виде сервиса, который включен в состав операционной системы. Центр сертификации построен по модульному принципу. Архитектура модулей схематически представлена на рисунке выше.
Модульность логично рассматривать в виде четырех компонентов. Первый компонент, вероятно, самый важный — это криптопровайдер (CSP — Crypto Service Provider), который определяет, какой алгоритм шифрования используется, и как хранятся ключи. По умолчанию, центр сертификации Microsoft использует криптопровайдер, реализующий алгоритм RSA. Для России есть реализация ГОСТов — это решения компании «Крипто-Про»: КриптоПро CSP и Удостоверяющий Центр.
Удостоверяющий Центр — это центр сертификации в составе Microsoft Windows, использующий КриптоПро CSP. В самом криптопровайдере КриптоПро реализованы алгоритмы ГОСТ и дополнительные возможности для ведения бизнес-процессов (их часто называют «бизнес-обвязка»).
Следующий важный модуль — это модуль политики (Policy Module). Он определяет то, каким образом центр сертификации обрабатывает запросы, приходящие от пользователя. По умолчанию в составе Microsoft Windows поставляются два модуля политики — первый называется Standalone Policy, а второй — Enterprise Policy. В соответствии с тем, какая политика установлена, центр сертификации выбирается один из этих двух.
Центр сертификации Standalone предназначен для автономного обслуживания клиентов, при котором администратор самостоятельно анализирует запросы и принимает решение о выдаче сертификата персонально. Подобные решения обычно используются без какой-либо интеграции с инфраструктурой предприятия. Например, выдача сертификатов всем желающим для коммерческих целей, как это делает компания VeriSign.
Рассмотрим теперь корпоративный центр сертификации, в котором используется модуль Policy Module Enterprise. С его помощью можно полностью автоматизировать процесс выдачи сертификатов и произвести интеграцию с Active Directory. Благодаря этому все действия, начиная от запроса сертификата и заканчивая его применением, будут полностью прозрачны для пользователя. Пользователю не понадобится совершать вообще никаких дополнительных действий, он будет работать со своими данными, не замечая того, что операционная система защищает информацию с помощью шифрования.
Policy Module может быть написан самостоятельно: можно придумать самые разнообразные механизмы обслуживания запросов. Другими словами, Policy Module, который по умолчанию встроен в центр сертификации, может быть заменен другим.
Еще два важных компонента — Entry Module и Exit Module. Это, соответственно, входящий и выходящий модули. Entry Module принимает запросы от клиентов. По большому счету этот компонент не требует аутентификации, хотя при желании его тоже можно заменить (все же в большинстве случаев стандартного входящего модуля вполне достаточно). Exit Module отвечает за доставку сертификата пользователю и за публикацию такой информации, как список отозванных сертификатов. Задачи выходящего модуля зависят еще и от инфраструктуры предприятия и тех механизмов, которые там задействованы. Опять же, всегда остается возможность написать свой Exit Module и использовать его вместо стандартного.
Таким образом, установив центр сертификации в Windows Server 2003, заказчик получает, в какой-то степени, конструктор. Конструктор выполняет базовый функционал, но его можно сколь угодно сложно модифицировать, настроить и даже перестроить.
Центр сертификации — это служба, которая, по сути, является базовой частью информационной инфраструктуры. Инфраструктура центров сертификации — это и есть PKI, но «такая PKI» сама по себе не имеет никакого смысла. Инфраструктура открытых ключей (PKI) необходима для того, чтобы клиенты могли ею пользоваться. Задача PKI — обеспечить клиента сертификатом и дать ему (а также другим клиентам) возможность использовать этот сертификат для осуществления каких-то своих действий. Поэтому второй участник PKI — это клиент.
По умолчанию, клиентом PKI является любая операционная система семейства Windows 2000, Windows XP и Windows 2003. Клиент встроен в операционную систему.
Клиент PKI состоит из того же стандартного набора средств шифрования, который входит в любую систему Microsoft Windows. Это тот же Crypto Service Provider, который отвечает за создание и хранение ключей, а также некоторое хранилище, в котором в соответствии со стандартом PKI хранятся сертификаты. Сертификаты могут быть выданы конкретному клиенту, могут быть сертификатами корневых центров (которым клиент доверяет) и т.д. В различных хранилищах хранятся различные сертификаты, применяемые для различных целей.

Клиент инфраструктуры
Инфраструктура, представленная на рисунке выше, состоит из двух центров. Один из них — корневой. Он специально все время находится в режиме offline, это стандартная рекомендация. Построение PKI рекомендуется делать в виде двух уровневой системы. Наверху корневой центр является наиболее ответственным участником инфраструктуры, поэтому обычно его используют для того, чтобы выдать сертификат подчиненному центру, а потом переводят в режим offline и «запирают где-нибудь в бункере». Дело в том, что если будет скомпрометирован личный ключ корневого центра сертификации, то вся инфраструктура потеряет доверие. Именно поэтому на рисунке корневой центр сертификации показан в режиме offline. Реальную же работу выполняет выдающий центр сертификации, на рисунке он работает в режиме Enterprise и интегрирован с Active Directory. Выдающий центр сертификации использует шаблоны сертификатов, для формирования сертификатов для каждой задачи своего клиента. Также он отвечает за публикацию списков отозванных сертификатов.
Таким образом, когда возникает необходимость получить сертификат, клиент производит все действия полностью автоматически. Прежде всего, формируется запрос на получение сертификата. В этот запрос включается в соответствии со стандартом PKCS открытый ключ клиента. Запрос посылается центру сертификации с указанием, для какой задачи клиенту требуется данный сертификат. На самом деле, выбор задачи клиент осуществляет из списка доступных ему шаблонов. То есть клиенту не нужно «объяснять» центру сертификации, какой в действительности сертификат он хочет и что в этом сертификате ему нужно. Клиент, например, сообщает: «Необходим сертификат для аутентификации сервера по протоколу SSL». Этого достаточно. Сервер знает, какой должен быть сертификат и что в нем должно быть. Его интересует лишь личная информация клиента.
Получив запрос, центр сертификации аутентифицирует его в Active Directory. Это нужно для того, чтобы убедиться в подлинности запроса (что прислал запрос тот самый пользователь, который прописан в Active Directory и о котором есть информация). Далее центр сертификации выдает сертификат, который помещается в персональное хранилище клиента. С этого момента клиент является полноценным участником инфраструктуры открытых ключей и может полноправно работать.
Теперь посмотрим, что нового в данном контексте привнесла операционная система Windows Server 2003. Прежде всего, система делает работу пользователей комфортнее, позволяя автоматизировать процесс получения сертификатов абсолютно для всех служб, которые их используют. В Windows 2000 такая опция была возможна только для получения сертификатов машин при установлении IP Security. Во всех остальных случаях запрос сертификата и обновление (если его срок истекал) клиент должен был делать вручную. В случае с Windows Server 2003 и Windows XP у каждой службы есть очень простая настройка Enroll Certificates Automatically (смотрите рисунок ниже).

Автоматическое обновление и получение сертификатов
Достаточно лишь активизировать эту опцию и можно забыть о том, как все дальше будет функционировать. Таким образом, клиент полностью избавлен от забот о получении и обновлении сертификатов.
Стоит немного остановиться на шаблонах (на рисунке выше можно видеть слово «templates»). Что такое шаблон? Шаблон в общем виде представляет собой некий документ или некую заготовку. Для каждой задачи существует своя собственная заготовка, но все заготовки хранятся в Active Directory. Типичный пример задачи, для которой существует шаблон — идентификация сервера или идентификация клиента. Вообще же есть шаблоны для шифрующей файловой системы, IP Security, смарт-карт и т.д. Widows Server 2003 вводит новую версию шаблонов (версию 2), при этом все старые шаблоны из Windows 2000 остаются. Набор шаблонов в Windows 2000 был фиксированным и неизменяемым. Версия 2, реализованная в Windows Server 2003, представляет расширенные шаблоны, которые можно модифицировать и копировать. На базе новых шаблонов можно создавать свои собственные шаблоны.

Active Directory Sites and Services
Если открыть консоль Active Directory Sites and Services, раздел Services и далее Public Key Services, то можно найти место, где на самом деле хранится и зарегистрирована вся информация, касающаяся центра сертификации.

Active Directory Sites and Services->Services->Public Key Services
Там есть специальный раздел, который показывает список шаблонов сертификатов. Часть из них относится к версии 1, часть — к версии 2. Например, сертификат под названием Work Station — это сертификат по шаблону версии 2. Можно вносить информацию в него и модифицировать его параметры. Администратор имеет право самостоятельно выбрать алгоритм, ключи, имена, особенности выдачи и т.д.

Сертификат Work Station
Сертификат по шаблону версии 1 выглядит значительно проще. Его нельзя изменять, можно лишь просматривать имеющиеся у него значения.
Таким образом, для получения сертификата на конкретную задачу клиент должен указать имя шаблона. На каждый из шаблонов администратор может установить права: на закладке Security есть специальное правило, которое называется Enroll. Соответственно, если у пользователя эта опция (правило) активирована, значит, он имеет право запрашивать сертификат по данному шаблону. Если нет, то данный сертификат клиент никогда не получит.

Вот как выглядит свойство Enroll
Когда клиент обращается к центру сертификации с запросом на сертификат, центр сертификации аутентифицирует клиента и выдает список доступных данному конкретному клиенту шаблонов. Лишь из этого списка клиент выбирает тот сертификат, который ему нужен.
В самом центре сертификации есть дополнительная градация (закладка под названием Certificate Template). В отличие от шаблонов, которые были показаны в закладке Services, в Certificate Template показаны те шаблоны, которые выдает данный центр сертификации. Иными словами, клиент может запрашивать сертификаты именно из этого списка (данный список меньше, чем список всех существующих шаблонов). Администратор может добавлять какие-то новые шаблоны и расширять список шаблонов центра сертификации.

Шаблоны сертификатов в Центре Сертификации
Следующим важным компонентом инфраструктуры открытых ключей является список отозванных сертификатов (CRL, Certificate Revocation List). Если клиенту выдан сертификат, то «отобрать» его обратно невозможно. Но бывают случаи, когда пользоваться данным сертификатом больше нельзя. Например, это может быть не безопасно, так как личный ключ пользователя скомпрометирован. В этом случае информация об отзыве сертификата помещается в специальный список, который называется CRL — список отозванных сертификатов. Одной из обязанностей центра сертификации является поместить серийный номер отзываемого сертификата в список CRL и обеспечить его целостность с помощью цифровой подписи на основе личного ключа центра сертификации. В этом случае неавторизованные клиенты не смогут модифицировать список отозванных сертификатов. Между тем сам список помещается в общедоступном месте.
В каждом сертификате, который выдает конкретный центр сертификации, обязательно присутствует указание на точку публикации списка отозванных сертификатов. Таким образом, когда в рамках PKI два участника инфраструктуры взаимодействуют друг с другом и обмениваются сертификатами, каждый из них может проверить соответствие чужого сертификата, обратившись к списку отозванных сертификатов и посмотрев, нет ли в этом списке номера присланного ему сертификата. Если номер сертификата присутствует в списке отозванных, то доверять этому сертификату нельзя.

Настройка параметров публикации списка отозванных сертификатов
Windows Server 2003 предлагает еще одну дополнительную возможность, предназначенную для публикации отозванных сертификатов. Речь идет о Delta CRL. Для чего нужно публиковать Delta CRL? Дело в том, что когда у предприятия много клиентов инфраструктуры открытых ключей и, следовательно, используется много сертификатов, вполне логично предположить, что и список отозванных сертификатов тоже окажется достаточно большим. На рисунке выше представлен интерфейс, позволяющий настраивать параметры публикации списка отозванных сертификатов. На рисунке видно, что срок публикации полного списка измеряется неделями. Что делать, если CRL публикуется раз в неделю, например, по понедельникам, а во вторник центр сертификации отозвал чей-то сертификат? Хотя формально сертификат отозван, но информация об этом будет опубликована только через неделю, когда выйдет следующая версия списка CRL. Получается, что целых 6 дней клиент потенциально может продолжать работу со своим сертификатом (которому уже нельзя доверять).
Инфраструктура PKI может быть устроена таким образом, что публиковать CRL чаще одного раза в неделю является проблемой. Список отозванных сертификатов может быть очень большим, и, вполне возможно, существуют какие-то аппаратные или сетевые условия, которые препятствуют тому, чтобы публиковать CRL чаще. В этом случае надо воспользоваться Delta CRL. Публикация Delta может происходить хоть каждый час. Delta CRL содержит список всех сертификатов, отозванных с момента полной публикации списка. Таким образом, клиент, который проверяет правомочность сертификата, всегда имеет под рукой более свежую информацию. Возвращаясь к описанной выше ситуации, имеем: полный список уже опубликован, через день отозван еще какой-то сертификат, согласно расписанию публикуется Delta и информация об этом отзыве доступна, на самом деле, почти сразу же. То есть ждать целую неделю не нужно. Delta CRL позволяет существенно сократить время фактического отзыва сертификата и повысить тем самым безопасность всей инфраструктуры.

Обратите внимание на check box внизу рисунка. Эта опция позволяет архивировать личные ключи пользователей.
Еще одной важной возможностью центра сертификации в Windows Server 2003 по сравнению с Windows Server 2000 является архивирование личных ключей. На рисунке выше представлен фрагмент графического интерфейса шаблона сертификата, позволяющего архивировать личный ключ пользователя. В настройках же самого центра сертификации есть еще одна опция, которая определяет, будет ли архивирование ключей работать вообще. По умолчанию архивирование ключей отключено, но его можно включить. Тогда для тех запросов на сертификаты, которые используют шаблон с отмеченной опцией архивирования, личный ключ клиента будет попадать в защищенный архив (откуда его потом можно извлечь по необходимости). Для работы этого архива используется специальная учетная запись, которой присваивается статус «Агент восстановления ключей». Агент восстановления ключей (KRA — Key Recovery Agent) должен получить соответствующий сертификат и иметь свой личный ключ. Сертификат, принадлежащий агенту восстановления ключей, должен быть занесен в политику восстановления в настройках центра сертификации.
Процесс архивирования личных ключей выполняется таким образом, что архив с личными ключами (архив размещается на каком-то конкретном компьютере) невозможно раскрыть с помощью только той информации, которая есть на этом самом компьютере. Даже если архив или сам компьютер украдут, извлечь информацию о личных ключах и сами личные ключи без агента восстановления невозможно. Следует подробнее разобраться, почему так происходит.

Процесс архивирования ключей
Для того чтобы ключ попал в архив, клиент должен обратиться к центру сертификации с запросом несколько иного формата. По протоколу CMS он посылает серверу не просто свой открытый ключ (с информацией о себе), но еще и свой личный ключ. Для этого используется дополнительный формат этого запроса. Центр сертификации получает оба ключа вместе с запросом и проводит дополнительную проверку. Понятно, что открытый и личный ключи должны взаимнооднозначно друг другу соответствовать. Не бывает так, что одному личному ключу соответствуют два открытых. Поэтому проверка, осуществляемая центром сертификации, проводится с помощью элементарных вычислений. После того, как появилась уверенность, что личный и открытый ключи соответствуют друг другу и образуют пару, генерируется 128-битный ключ для алгоритма 3DES. Это симметричный алгоритм и ключ для него создается индивидуальным образом для каждого запроса. Далее с помощью алгоритма 3DES и уникального ключа происходит процесс шифрования личного ключа пользователя. Результат шифрования представляет собой первый блок данных, помещаемый в архив. Следующий этап защиты заключается в том, чтобы защитить сам симметричный ключ. Для этого используется открытый ключ агента восстановления из его (агента) сертификата, который в свою очередь был занесен в политику центра сертификации. Таким образом, в архив укладывается два блока: симметричный ключ, которым зашифрован личный ключ пользователя, и симметричный ключ, который сам зашифрован открытым ключом агента восстановления. Для того чтобы извлечь данные из архива, нужно взять личный ключ агента восстановления, расшифровать симметричный ключ, а уже с помощью симметричного ключа расшифровать личный ключ пользователя.
Получается следующая ситуация. Есть компьютер, на нем расположен архив, но нет личного ключа агента восстановления. Этот личный ключ хранится где-то на смарт-карте или дискете — где угодно, но только не на этом самом компьютере с архивом. Поэтому даже если эту машину украдут, извлечь данные из архива без агента восстановления (без его личного ключа) — невозможно.
В конце процесса клиенту выдается сертификат. Клиент продолжает работать, а его личный ключ размещается в архиве. Если клиент потеряет свой личный ключ, то всегда сможет обратиться к агенту восстановления. Агент восстановления вернет клиенту ключ из архива, и пользователь сможет, по крайней мере, восстановить ту информацию, которую перед этим зашифровал.
В контексте обсуждения центра сертификации следует остановиться и на иерархии центров сертификации. В соответствии со стандартами PKI иерархия может состоять из нескольких уровней, при этом центр сертификации каждого уровня выполняет строго определенную роль. Иерархия начинается с корневого центра сертификации, который определяет пространство имен иерархии, сертифицирует сам себя. Это означает, что корневой центр сертификации является первой и последней точкой в иерархии, его нельзя переподчинить любому другому центр сертификации или какой-то другой инфраструктуре.

Иерархия центров сертификации
Вторая функция корневого центра, если речь идет об иерархии в несколько уровней (то есть корневой центр не является последним в этой иерархии) — это сертификация нижестоящих центров сертификации. Они называются промежуточными центрами.
Промежуточные центры сертификации выполняют только одну функцию — они сертифицируют нижестоящий уровень, хотя при этом, конечно же, могут выдавать сертификаты и клиентам. Типовой является следующая иерархия: для того чтобы построить PKI на всей территории предприятия, создается трехуровневая инфраструктура. На выходе последним элементом в этой инфраструктуре является выдающий центр сертификации. Цепочка от корневого центра до выдающего — может быть достаточно длинной. Конечных пользователей обслуживает именно выдающий центр сертификации. Важно, что в каждый сертификат обязательно включается вся цепочка всех центров сертификации. Эта цепь называется «Certification Path» и показывает имена центров, которые были задействованы во всей иерархии от конкретного пользователя до корневого центра сертификации. Этот путь обязательно отслеживается, когда идет проверка сертификатов. Если участник инфраструктуры прислал сертификат на проверку, то проверяющий должен, на самом деле, убедиться в том, что он может доверять каждому участнику Certification Path. Иными словами, он должен проверить все центры, которые в этой иерархии задействованы. Для этого ему, естественно, нужно знать цепочку сертификации.
Windows 2000 и центр сертификации на базе этой операционной системы предполагали прозрачный механизм субординации. То есть корневой центр сертифицировал подчиненный центр сертификации, который находится уровнем ниже. При этом подчиненный центр сертификации, с точки зрения своей работы, становится полностью равноправным корневому центру, хотя формально он не является корневым. Windows Server 2003 предлагает более сложный и более мощный механизм ограниченной субординации. В сертификате, который получает подчиненный центр, заложено ограничение на его деятельность. Например, можно ограничить пространство имен обслуживаемых клиентов. Можно установить ограничение иерархии и запретить данному центру сертификации выдавать сертификаты другим центрам, расположенным уровнем ниже. То есть данный центр сертификации будет работать в качестве конечного элемента инфраструктуры. В этих же ограничениях можно прописать политики центров сертификации и определить их функционал.
С помощью механизма ограниченной субординации и механизма маркирования политик, можно построить так называемую кросс-сертификацию инфраструктур. Она уместна в том случае, когда есть, например, два независимых предприятия (у каждого своя инфраструктура). Необходимо, чтобы клиенты одной инфраструктуры доверяли клиентам другой инфраструктуры. Такое доверие выполняется с помощью механизма кросс-сертификации, который в Windows 2003 реализован посредством ограниченной субординации и маркирования политик в рамках этого механизма.
Для удовлетворения требований Common Criteria центр сертификации имеет административные роли. В Windows 2000 были только две роли — администратор и пользователь, который получает сертификаты. В Windows 2003 центр сертификации содержит более широкий набор административных ролей, которые делятся на администратора, backup оператора, аудитора и т.д. При этом обязательно ведется аудит всех событий, которые происходят в центре сертификации. По умолчанию этот аудит выключен, то есть администратор должен включить его самостоятельно.
Службы защиты информации Windows Server 2003, использующие PKI
Предположим, что инфраструктура открытых ключей построена: центр сертификации развернут, все ограничения наложены, система архивирования ключей настроена, клиенты работают и сертификаты выдаются. Важно разобраться, что подобная инфраструктура дает на практике.
Прежде всего, служба аутентификации, которая реализована в системах Windows (разные версии системы могут использовать разные протоколы для разных ситуаций), может использовать цифровые сертификаты в том или ином режиме своей работы.
Любой учетной записи пользователя можно сопоставить сертификат. Соответственно, каждый, кто предъявит этот сертификат и подтвердит свое знание личного ключа (соответствующего именно этому сертификату), будет аутентифицирован в системе в контексте той учетной записи, к которой этот сертификат приписан. Формально можно одной учетной записи приписать много сертификатов и раздать их, например, партнерам информационной системы. Тогда эти партнеры, не имея своей персональной учетной записи в системе, смогут заходить в систему и регистрироваться в ней. Работать же они будут в строго ограниченном контексте той учетной записи, которая им была приписана.
Когда между хостами устанавливается соединение по IP Security, то в соответствии с протоколом IP Security выполняется взаимная аутентификация хостов. Она может проводиться либо по протоколу Kerberos, либо по цифровым сертификатам. Во втором варианте, чтобы получить сертификаты, потребуется PKI.
Установление защищенного канала по протоколу SSL/TLS также базируется на цифровых сертификатах и инфраструктуре открытых ключей. Необходимо получить сертификаты, аутентифицирующие серверы и клиентов. В рамках протокола SSL/TLS используется PKI.
Аутентификация удаленного пользователя по протоколу EAP-TLS (EAP, Extensible Authentication Protocol) — наиболее мощный механизм аутентификации с использованием цифровых сертификатов. Фактически, по этому протоколу клиент аутентифицируется так же, как и в рамках протокола SSL, но только происходит это не при установлении web-сеанса, а при подключении к службе удаленного доступа.
Чрезвычайно важным применением PKI в службе аутентификации является аутентификация пользователя в домене с использованием смарт-карт. Этот механизм построен на базе стандарта Kerberos PKINIT. Что касается поддержки смарт-карт, то она встроена во все операционные системы, начиная с Windows 2000. В состав системы также входят криптопровайдеры и драйверы для смарт-карт Schlumberger, Gem-Plus и других крупных поставщиков. К этому набору всегда можно подключить и другие решения. Например, компания Aladdin выпускает e-token, которые по своей природе и являются смарт-картами, только в другом оформлении — в виде USB-ключа. Для этих смарт-карт тоже нужен криптопровайдер. Механизм работы при аутентификации с использованием e-token абсолютно тот же, что и при использовании смарт-карт.
Понятно, что аутентификация по смарт-картам является более надежной по сравнению с простой аутентификацией по паролю. Дело в том, что смарт-карта предполагает двухфакторную аутентификацию. Нужно иметь смарт-карту с защищенным микрочипом, в который встроен в шифровальный механизм и на котором надежно хранятся личный ключ и сертификат пользователя. Единственное, что остается пользователю — запомнить свой pin-код. Таким образом, аутентификация проходит в два этапа: сначала пользователь должен подтвердить свое владение смарт-картой и ввести правильный pin-код, а уже потом в системе он будет аутентифицирован в соответствии со стандартом PKINIT.


Kerberos PKINIT
Рассмотрим процесс аутентификации по смарт-карте подробнее (предполагается, что читатель знаком с тем, как работает протокол Kerberos). На первом этапе аутентификации по Kerberos клиент должен получить билет TGT (Ticket Grand Ticket). Для этого требуется пройти долгий путь. Пользователь вставляет смарт-карту в считывающее устройство и вводит pin-код. Если pin-код — правильный, то смарт-карта выходит из состояния блокировки и модуль Kerberos формирует стандартный запрос к центру распределения ключей. Запрос включает в себя специальный аутентификатор, который представляет собой некий набор информации, уникальной для данного пользователя. В этот аутентификатор входит штамп текущего времени, а сам аутентификатор подписывается личным ключом пользователя (личный ключ находится на смарт-карте). Вторая составляющая этого запроса — это сертификат пользователя. Вся эта информация отсылается на центр распределения ключей. Центр распределения ключей получает сертификат, который ему прислали, и проверяет его правомочность. Для этого требуется обратиться к Active Directory, проверить наличие там учетной записи, потом проверить целостность сертификата и цифровую подпись, которой был подписан этот сертификат, найти центр сертификации, который выдал данный сертификат и проверить валидность уже самого центра и т.д. Цепочка очень длинная, но важен итог. Если все завершилось успешно и сертификат проверен, значит можно ему доверять. После этого KDC берет открытый ключ пользователя из сертификата и проверяет аутентификатор.
Цифровая подпись, которая была создана с помощью личного ключа пользователя, может быть проверена его открытым ключом. Если проверка проходит успешно, то центр распределения ключей считает, что информация, которая была прислана от имени пользователя, на самом деле является правильной и тот, кто прислал свой сертификат, действительно владеет личным ключом, соответствующим данному сертификату. Поэтому в ответ центр распределения ключей посылает клиенту билет TGT (Ticket Grand Ticket). В этот же ответ входит сеансовый ключ для дальнейшего взаимодействия клиента с данным сервером. Естественно, сеансовый ключ зашифровывается с помощью открытого ключа пользователя, который берется из сертификата. В ответ включается и собственный сертификат сервера. Все эти сведения подписываются личным ключом сервера.
Клиент получает ответ и проверяет сертификат сервера точно также, по очень длинной цепочке. Он обращается по всем инстанциям проверки сертификата, убеждается в правомочности сертификата, берет открытый ключ из сертификата и проверяет цифровую подпись пришедшего запроса. Если она верна, то клиент извлекает свой личный ключ из смарт-карты, расшифровывает сеансовый ключ и сохраняет у себя билет TGT. Далее пользователь считается аутентифицированным.
Для дальнейшего взаимодействия с сервером клиент посылает билет TGT, а данные зашифровываются с помощью сеансового ключа, который знает теперь только клиент. Сервер всегда может извлечь ключ из билета TGT, так как тот всегда присылается при дальнейшем взаимодействии.
Приведенный выше протокол — это стандартный механизм аутентификации по смарт-карте. Этот алгоритм точно также функционировал в Windows 2000, ничего принципиально нового в этом контексте Windows Server 2003 не принес.
Улучшение, касающиеся смарт-карт, представляют собой некоторое развитие интерфейса взаимодействия. В частности, Windows XP и Windows 2003 поддерживают аутентификацию по смарт-картам в терминальной сессии, правда, при условии, что терминальным сервером является Windows 2003, а терминальным клиентом — Windows XP. Кроме того, утилита Run As позволяет теперь задать пользователя, не вводя его имя и пароль. Эти данные замещаются сертификатом. Утилита Run As позволяет запускать приложения от имени другого пользователя, то есть не того, который в данный момент зарегистрирован на станции.

На рисунке выше показан графический интерфейс, иллюстрирующий поддержку смарт-карт. Пользователь может выбрать механизмы аутентификации самостоятельно: указать имя и пароль пользователя или предоставить всю необходимую информацию на смарт-карте.
Но не одна лишь служба аутентификации использует инфраструктуру открытых ключей. Следующее очень важное приложение PKI — это шифрующая файловая система (EFS). Смысл EFS заключается в том, чтобы обеспечить шифрование данных прямо на уровне файловых операций. Такой подход избавляет пользователя от необходимости запускать команды «Зашифровать файл» и «Расшифровать файл». Пользователю надо лишь активизировать свойство файла: «Шифровать файл». Все остальные операции будут проходить прозрачно и пользователь даже не заметит, что операционная система работает с файлом как-то по-другому.
Все операции выполняются на уровне кластеров файловой системы. При этом нужно понимать, что файл будет зашифрован в тот момент, когда он будет помещен на диск. Во время того, как пользователь открывает файл, операционная система расшифровывает его на лету. Таким образом, загружается уже расшифрованный файл. Соответственно, перемещение файла куда-либо за пределы тома NTFS приведет к передаче файлов в открытом виде. Если файл зашифрован на диске, а необходимо его скопировать на дискету, то операционная система сначала расшифрует файл (абсолютно прозрачно для пользователя), а потом перенесет его на другую файловую систему. То же самое происходит, когда пользователь пересылает файл по сети. В сеть этот файл попадает уже в расшифрованном виде.
Новая возможность Windows Server 2003 и Windows XP заключается в появлении графического интерфейса для подключения других пользователей к зашифрованному файлу. Windows 2000 позволяла работать с зашифрованным файлом только его владельцу. Никто другой никаким образом доступа к этому файлу не имел (за исключением агента восстановления файлов, который прописывался в политике восстановления файлов). Windows XP и Windows 2003 позволяют не использовать агента восстановления зашифрованных файлов. В этом случае единственный способ сохранить (спасти) зашифрованную информацию при потере ключа — это использование архива ключей. Если не велся архив ключей и не был включен агент восстановления файлов, то при потере личного ключа пользователь безвозвратно теряет данные, которые он зашифровал в EFS.

Процесс шифрования файла
Рассмотрим теперь процессы шифрования и расшифрования. Здесь нет коренных изменений по сравнению с Windows 2000. Единственная новинка заключается в небольшом дополнении под словами «Шифрование данных». Раньше использовались только алгоритмы DESX, а сейчас Windows XP и Windows Server 2003 могут использовать алгоритм AES (Advanced Encryption Standard) — современный стандарт шифрования в США с ключом 128 бит. На картинке выше (процесс шифрования) можно видеть слева незашифрованный файл и внизу шифровальные модули, которые генерируют индивидуальный ключ File Encryption Key (FEK) специально для данного файла. С помощью этого ключа файл зашифровывается по алгоритму DESX или AES. Далее из шаблона EFS извлекается открытый ключ пользователя, с его помощью шифруется секретный симметричный ключ File Encryption Key. Получается заголовок расшифрования файлов, который называется Data Decryption Field. Этот процесс повторяется еще раз, но уже симметричный ключ шифруется на открытом ключе агента восстановления, получается поле восстановления Data Recovery Field. На этом этапе уже становится ясно, где на самом деле есть возможности для добавления еще одного пользователя. В Windows 2000 на этом процедура заканчивалась (было только два поля). Windows Server 2003 позволяет повторить процесс и для других пользователей. В этом случае будет создано несколько заголовков Data Decryption Field. Соответственно, тот, кто на этом этапе был подключен, сможет с этим файлом полноправно работать.

Процесс расшифрования файла
Для полноты описания рассмотрим процесс расшифрования файла, который выполняется, естественно, в обратном порядке. Сначала с помощью личного ключа пользователя расшифровывается заголовок DDF, из него извлекается File Encryption Key, с помощью которого расшифровываются данные. Если личный ключ пользователя недоступен, то можно провести ту же процедуру, но используя личный ключ агента восстановления. Если агент восстановления не был определен, но было организовано архивирование ключей, можно восстановить личный ключ пользователя из архива. Если архивирование ключей тоже не работает, то доступ к файлу получить не удастся.
Выбор алгоритма, который используется для шифрования файла, производится путем перевода системы из стандартного режима в так называемый режим «FIPS 140-1 Compliant». В этом режиме система начинает использовать шифровальные модули уровня ядра. Это переключение делается в настройках локальной политики безопасности и требует указать всего один-единственный параметр «Enable». После этого система переходит в режим поддержки совместимости с требованиями FIPS 140-1. В этом случае симметричным алгоритмом шифрования файла будет AES.

Режим «FIPS 140-1 Compliant»
Механизм восстановления данных в случае потери личного ключа пользователя, который зашифровал информацию, может выполняться с помощью агента восстановления. Политика восстановления может быть отключена. Windows 2000 не позволяла работать EFS без создания хотя бы одного агента восстановления. В этой операционной системе такой подход был оправдан. Опустошение политики восстановления было равносильно отключению работы EFS вообще. Windows Server 2003 и Windows XP позволяют создавать пустую политику восстановления. Еще один способ восстановления — это архивирование личных ключей, которое позволит спасти информацию при потере личного ключа и при отсутствии агента восстановления.
Ссылки
В заключение хочется порекомендовать список ресурсов, позволяющих детально ознакомиться с возможностями PKI в Windows Server 2003.
Механизм выдачи сертификатов (AutoEnrollment)
Шаблоны сертификатов
Архивирование ключей
Руководство по управлению всей инфраструктурой
Written on 05 Декабря 2008. Posted in Администрирование Windows
В этой статье, состоящей из трех частей, я кратко расскажу вам, как устанавливать, проектировать и отлаживать PKI (Public Key Infrastructure – инфраструктуру открытого ключа) с помощью служб сертификатов Microsoft Certificate Services в операционной системе Windows Server 2003. Я расскажу вам о наиболее часто встречающихся подводных камнях, а также о лучших рекомендациях по построению и работе с PKI на платформе Microsoft, а также сфокусируюсь на основах построения правильной и гибкой PKI с самого начала.
Для чего вам нужна PKI
Несколько лет назад все говорили о 2000 годе, как о годе PKI. Многие верили, что основной рынок был, наконец, готов воспользоваться всеми теми преимуществами, которые могла предложить PKI. Однако, как вы, вероятно, догадались, сертификаты и PKI в действительности не пользовались особой популярностью. Это было просто недостаточно сексуально в управлении для прессы и технического персонала (которые одновременно являлись единственными людьми, которые могли увидеть значимость PKI). Однако, по прошествии времени PKI снова стала одной из самых горячих тем, как для большого, так и для среднего бизнеса, хотя в этот раз мы можем наблюдать менее амбициозный и более реалистичный подход к использованию сертификатов (certificate) и PKI среди администраторов IT и людей, принимающих бизнес решения. Сдвиг в сторону безопасности, когда безопасность и усовершенствование Интернет и технологий мобильных коммуникаций стали частью работы многих компаний, означает, что сертификаты и PKI более готовы для основного рынка бизнеса в настоящее время, чем когда-либо ранее.
Так что же такое PKI и почему необходимо о ней заботиться, можете задать вы такой вопрос? В своей основе все это сводится к управлению сертификатами (certificate management). Как вы можете заметить, сертификаты сегодня повсюду, и часто их используют, даже не беспокоясь об их существовании. Некоторые наиболее часто встречающиеся сценарии, когда используются сертификаты (по порядку):
- Шифрование диска и файлов (сертификаты используются для защиты симметричного крипто ключа symmetric crypto key)
- Многофакторная аутентификация (Multifactor authentication) с помощью смарт карт
- IPSec
- Цифровая подпись (Digital signature)
- Аутентификация RADIUS и 802.1x authentication
- Беспроводные сети (Wireless networks)
- NAP (Network Access Control) и NAQ (Network Access Quarantine) соответственно для подписи кода и драйверов
- SSL/TLS для защиты HTTP трафика
Как вы видите, сертификаты используются во многих местах, и их основное назначение для усиления безопасности вашей инфраструктуры и решений IT. Но если вы посмотрите на наш список, представленный выше, то сможете представить, что необходимо управлять большим количеством сертификатов, в зависимости от того, какими преимуществами вы хотите воспользоваться в своей инфраструктуре, и как вы захотите их реализовать. Именно тут вам и может помочь PKI. PKI – это просто способ центрального управления, выпуска, обновления и аннулирования сертификатов, а также способ построения вашего маршрута доверия. Сертификаты и PKI, о которых мы расскажем в этой статье работают на X.509 v3, что значит, мы можем разносторонне использовать сертификаты, что мы и рассмотрим подробнее во второй части этой статьи.
Важно:
Перед тем, как мы продолжим, я бы хотел немного рассказать о терминах, которые будут использоваться этой статье. Цель этой статьи заключается в том, чтобы кратко познакомить вас с самыми важными областями, чтобы вы с минимальными усилиями могли получить базовые знания о PKI. Однако, построение PKI может быть большим проектом, и если вы слишком серьезно относитесь к безопасности и такие вещи, как передача ролей (role delegation) и совместимость с FIPS-140 очень важна для вас, то вы должны более подробно рассмотреть на ссылки, приведенные в конце этой статьи. Помня обо всём об этом, давайте начнем и перейдем на фазу планирования.
Планирование PKI
Итак, я соглашусь, что при знакомстве с фазой планирования в нашей первой статье, мы еще не обладаем достаточным багажом технических знаний, на который вы может быть надеялись. Но кроме всего прочего, фаза планирования очень важно, и мы расскажем вам о том, как пройти эту фазу с минимальными усилиями, показав вам области, на которых вам стоило бы сфокусироваться. Самую частую ошибку компании допускают при установке служб сертификатов Microsoft Certificate Services (и таким образом устанавливают PKI), и она заключается в том, что они игнорируют фазу планирования, в результате чего им приходится потратить гораздо больше ресурсов и денег, когда понимают, что упустили из виду некоторые важные проблемы, когда перешли к меню Add/Remove Windows Components на своем сервере с операционной системой Windows 2000 или Windows 2003 и поставили галочку напротив компонентов служб сертификатов Certificate Services.
Области, которые необходимо рассмотреть при планировании вашей будущей PKI, следующие:
- Проверить, обновляется ли ваша политика безопасности (security policy) и готова ли она для PKI
- Создать одну или несколько политик для сертификатов (certificate policies)
- Создать предложение для сертификата
Давайте подробнее рассмотрим все эти области
Проверьте, обновляется ли ваша политика безопасности (security policy) и приготовьтесь к PKI
Брайен Комар (Brian Komar), который является автором превосходной книги «Microsoft Windows Server 2003 PKI and Certificate Security» (смотрите ссылку в конце статьи) и который написал несколько статей для Microsoft и давал лекции по различным субъектам Microsoft PKI, часто говорит, что: «PKI усиливает политики безопасности в вашей организации». Это утверждение, на мой взгляд, очень хорошо все выражает. Убедитесь, что в вашей компании существует политика безопасности (security policy), которая направлена на бизнес и стратегию IT. Затем необходимо подготовить эту стратегию для приложений и служб безопасности, которые будут зависеть от сертификатов (certificates). Т.к. политики безопасности необходимо согласовать с управляющими или даже с главами (в конце концов, эти люди отвечают за бизнес стратегию вашей компании), то у вас зажжется зеленый цвет, и вы можете приступить к вашей реализации PKI. Если вы достаточно несчастливы, и в вашей компании нет корпоративной политики безопасности (security policy), то вы можете прейти по следующей ссылке и посмотреть примеры различных политик безопасности, включая примеры политик безопасности, которые работают по стандарту ISO 17799 standard.
Создание одной или нескольких политик для сертификатов (Certificate Policies)
Я согласен. Политике это не самая волнительная вещь в мире, но кроме всего прочего, они по-прежнему очень важны. И если вы хотите избежать всех проблем с вашей инфраструктурой PKI, то лучше правильно создать политику для сертификата Certificate Policy (CP). Политика для сертификата (certificate policy) описывает, как и кто выпускает и распределяет сертификаты для субъектов (т.е. субъектами могут быть пользователи, компьютеры, устройства и т.д.). Это может быть очень сложная задача, хотя и очень важная, но не волнуйтесь. Просто выполните шаги, представленные ниже, и вы будете на правильном пути к созданию политики сертификата для вашей PKI.
- Взгляните на RFC 3647, которую вы можете найти здесь
- Затем посмотрите, как должна выглядеть хорошая политика для сертификата (certificate policy), хотя эта политика, вероятно, будет более детальной, чем та, которая понадобится вам.
The X.509 Certificate Policy for the United States Department of Defense (DoD)
Создание предложения для сертификата
Мы почти закончили с этапом планирования, но нам все еще нужно создать предложение Certificate Practice Statement (CPS). Это предложение CPS очень похоже на политику для сертификата Certificate Policy, за исключением того, что она фокусируется на безопасности полномочий сертификатов Certificate Authority (CA) во время операций и управления сертификатами, выпущенных CA. CPS обычно гораздо короче, чем политика безопасности Security Policy и содержит информацию относительно того, кто отвечает в случае, если сертификат не может адекватно защитить то, что он должен защищать. Примером может служить безопасное соединение SSL/TLS, если пользователь вводит номер своей кредитной карты. Другие области (как минимум), которые должны быть включены в CPS – это как обрабатывается проверка, обновление и аннулирование CA, ответственным за выпуск сертификатов. Вы можете рассматривать CPS, как соглашение между пользователем сертификата и компанией, которая отвечает за выпуск CA. И как вы уже могли догадаться, у нас есть несколько великолепных примеров для CPS, которая может показаться вам знакомой.
- Точно также, как в случае с политикой сертификатов Certificate Policy, вы можете посмотреть на информацию RFC 3647 для CPS, которую вы можете найти здесь
- И для вдохновения, посмотрите на VeriSign CDP здесь
В отличие от политики сертификатов Certificate Policy, CPS необходимо всегда делать общедоступной, чтобы пользователь сертификата всегда имел доступ к CPS. В каждом сертификате, выпущенном вашей CA должны быть ссылка, которая указывает место, где опубликовано CPS.
Проектирование PKI
Когда вы проектируете ваш PKI, то необходимо учитывать следующие вещи:
- Как должен выглядеть ваша иерархия CA (в том числе количество CA, и их роли)
- Как вы собираетесь защищать закрытые ключи (private key) CA
- Где вы будете создавать точки публикации
Давайте поближе посмотрим на каждую из этих проектных проблем.
Проектирование иерархии CA, которая хорошо масштабируется
Количество и уровни CA вы должны учитывать сразу, в зависимости от ваших требований к безопасности и доступности. Вы должны постараться организовать вашу иерархию в соответствии с вашими нуждами. В действительности не существует каких- либо рекомендаций относительно того, сколько уровней CA вам нужно, хотя очень редко кому-либо необходимо 4 или более уровней. Однако, существует правило большого пальца, которое мы представили в таблице 1 ниже, которое здорово поможет вам идти в верном направлении:
| Уровень CA | Комментарии |
|---|---|
|
|
|
|
|
|
|
|
|


Как дополнительное примечание, вы можете вспомнить из предыдущей статьи, что существует нечто, называемое политикой сертификата (certificate policy), которая описывает как и кто будет выпускать и распределять сертификаты для субъектов (субъекты – это пользователи, компьютеры, устройства и т.п.). Если вам кажется, что вам может понадобиться более одной политики сертификата (certificate policy) из-за правовой, географической организационной особенности, то вам определенно нужна трехуровневая иерархия PKI hierarchy, т.к. для соблюдения этого требования необходимо 2 или более политики CA второго уровня.
Когда вы реализуете PKI, вы всегда должны начинать с корневого (root) CA, вне зависимости от того, имеем ли мы дела с одноуровневой, двухуровневой или трехуровневой иерархией PKI hierarchy. Т.к. корневой (root) CA всегда будет в основании доверительных отношений (trust), и очень часто реализуется с использованием самовыпускающегося сертификата (self-issued certificate), то очень важно защищать закрытый ключ (private key) вашего корневого (root) CA всеми доступными способами. Так должно быть всегда, вне зависимости от количества уровней, из которых состоит ваша иерархия PKI. Если ваша иерархия PKI состоит из 2 или более уровней, то для вашего корневого (root) CA необходим минимальный доступ, т.к. к корневому CA будет необходим доступ только для второстепенного CA. Однако, по мере того, как увеличивается расстояние до корневого (root) CA (т.е. увеличивается количество уровней), требования к безопасности снижаются и доступ увеличивается. Это очень важный фактор, когда мы начнем установку CA, о котором мы расскажем позднее в этой статье.
Закрытые ключи CA (private key)
Перед тем, как вы начнете установку CA, вы должны спланировать, какой будет размер закрытого ключа (private key) для CA, а также, как он должен быть защищен. Давайте посмотрим на размер ключа, который является очень важным по причине безопасности и совместимости. В таблице 2 ниже представлены рекомендуемые размеры ключей:
| CA роль | Размер ключа |
|---|---|
| Root CA (корневой) | 4096 |
| Policy CA (политика) | 4096 |
| Issuing CA (выпускающий) | 2048 |
Обычно, целях безопасности рекомендуется использовать ключ размером 4096, особенно для корневого (root) CA. Однако, в результате этого могут возникнуть различные проблемы с совместимостью, примером могут служить сетевые продукты компании Cisco (в зависимости от используемой версии Cisco IOS). Это возникает в результате того, что многие продукты сторонних производителей имеют проблемы с обработкой ключа, размер которого больше 2048. А т.к. сетевое оборудование может быть интегрировано в решения, как 802.1x для проверки и совместимости, размер ключа имеет значение. Поэтому необходимо быть абсолютно уверенными, что вы знаете используемое вами оборудование, а также его ограничения для обработки сертификатов перед тем, как вы начнете реализовывать ваш PKI.
После того, как вы определились с размером ключа CA, который вы будете использовать, пришло время узнать о том, как защищать закрытый ключ CA private key.
Защита закрытого ключа CA
По умолчанию, CA использует поставщика услуг по шифрованию Microsoft Cryptographic Service Provider (CSP) и защищает свой закрытый ключ (private key) с помощью встроенного программного интерфейса для защиты данных Data Protection API (DPAPI). В результате этого возникает проблема, т.к. все члены группы локальных администраторов (local administrators group) имеют доступ к закрытому ключу CA, и любой член этой группы может экспортировать закрытый ключ CA, а затем создать фальшивый CA, который сможет выпускать фальшивые сертификаты. Еще одна проблема с безопасностью заключается в атаках с переполнением буфера (buffer overrun) с помощью вредоносного программного обеспечения.
Итак, что же делать? Самый лучше ответ – это зависит от… Вам придется выбирать между требованиями к безопасности и стоимостью и удобством, связанными с защитой закрытого ключа (private key) CA, и очень часто иерархия CA диктует свои правила. Ниже в таблице 3 приведены некоторые из наиболее общих способов для защиты закрытого ключа (private key) CA. Мы оставим это на ваше собственное усмотрение. Просто помните, что это, вероятно, один из самых важных компонентов в вашем PKI.
| Метод защиты | Pros (+) | Cons (-) |
|---|---|---|
| Local Certificate Store (локальное хранилище) |
|
|
| Chip based authentication (чиповая аутентификация — Смарт карты или USB ключи) |
|
|
| Encrypted Virtual machines (зашифрованные виртуальные машины) |
|
|
| Hardware Security Module (HSM — аппаратные модули безопасности) |
|
|
В дополнение к рекомендациям, представленным в таблице 3, вы также можете увеличить безопасность CA, убедившись, что все CA, за исключением выпускающего CA, работают в автономном режиме (offline). Под этим мы понимаем, что они должны быть вне сети и подключаться к сети лишь тогда, когда для CRL и выпущенным сертификатам для всех CAs во всем PKI необходимо обновление. Обычно, корневой и стратегический CA выключаются полностью, но опять же это зависит от того, насколько хороша у вас физическая безопасность, и как защищаются закрытые ключи CA private keys, а также насколько надежно ваше аппаратное обеспечение.
Где создавать точки публикации
Последняя область, на которую мы обратим внимание перед тем, как начнем реализацию PKI, это размещение публикации для списков Certificate Revocation Lists (CRL) и общих ключей (public key) CA. Их также называют точки размещения сертификатов (Certificate Distribution Points или CDP). Существуют различные протоколы, которые можно использовать для описания CDP. Это:
- HTTP
- LDAP (под которым обычно подразумевают Active Directory)
- FTP
- File share (SMB)
Ниже на рисунке 1, мы изобразили, где публиковать CRL и открытые ключи CA (public key), а также рекомендуемый порядок протоколов.

Рисунок 1: Рекомендуемый порядок протоколов для CDP
Как вы можете увидеть, основной рекомендуемый протокол – это HTTP, и на это есть очень важная причина. Рекомендуется использовать HTTP, т.к. это лучший протокол для внутренних и внешних точек публикации. HTTP великолепен, если вам необходимо одновременно выпускать протоколы для внутренних и внешних пользователей. Особенно важно рассмотреть внешнее использование, т.к. вы должны быть уверены, что сертификаты, используемые для доступа к VPN, NAQ или Wi-Fi проверены на аннулирование до того, как пользователям будет разрешен доступ к внутренней сети. Очень важно обратить внимание, что если CDP не доступен для какого-то протокола, то по прошествии тайм-аута (обычно после 30 секунд), мы переходим к следующему протоколу из списка. Таким образом, если у вас с самого начала правильная конфигурация, вы заслуживаете доверие пользователей, т.к. CRL можно проверить для внутренних и внешних размещений без проблем с тайм-аутом, и не подвергая опасности установки вашей сети. Однако, если в том или ином случае вы должны выбрать протокол по умолчанию, которым является LDAP, то в этом нет ничего плохого, особенно, если ваш PKI планируется использовать для внутреннего пользования. Просто знайте, что если вы используете PKI, интегрированный в Active Directory и выпускаете сертификаты для внешних пользователей, то необходимо, чтобы они смогли выполнять LDAP запросы к вашей Active Directory (предполагается, что вы используете Active Directory в качестве хранилища для CDP LDAP).
Однако, вы также должны убедиться, что у вас установлен избыточный веб сервер, использующий DNS, если вы предпочитаете использовать протокол HTTP. Если вы хотите использовать LDAP, то вы у вас уже есть избыточная установка, если в вашем домене более одного контроллера домена.
Установка PKI
Основываясь на некоторых знаниях об оформлении, полученных из предыдущих частей, пришло время начать установку вашего PKI. Так как это краткое руководство, мы рассмотрим сразу несколько вещей, потому что они принадлежат к оформлению. Также мы покажем вам, как установить 2-х уровневую иерархию, состоящую из отключенного корневого Certificate Authority (CA) и включенного «выпускающего» CA в том же PKI, использующем наилучшие практические методы. Однако прежде, чем мы начнем установку, давайте объясним кое-что на практике.
На Рисунке 1 мы проиллюстрировали наилучшее применение периода допустимости для каждого CA на каждом уровне (базирующегося на 3-х уровневой иерархии для полного обзора). Преимуществом этой модели является то, что она будет всегда гарантировать вам совместимость «выпускаемых» сертификатов на каждом уровне. Если вы только хотите использовать 2- уровневую иерархию, просто переместите CA на уровень 3. Модель все еще будет использовать.

Рисунок 1: Наилучшее применение периода допустимости для каждого CA на каждом уровне
Еще вам следует подготовить текстовый файл CAPolicy.inf прежде, чем мы начнем установку. Этот файл используется для управления вашими настройками сервиса сертификатов Windows. В этом файле, вы найдете такие важные вещи, как:
- CDP оператор
- Обновленные установки сертификата, такие как период допустимости и размер ключа
- Каналы связи для CDP и AIA маршрутов
- Как часто следует публиковать CRL
Создайте файл, используя Notepad и сохраните его в %windir%capolicy.inf (например, C:Windowscapolicy.inf).
Мы упростили для вас задачу, поставив файлы в ниже приведенном пошаговом руководстве. Запомнив эту информацию, настало время приступить к практике.
Установка отключенного корневого CA
Чтобы установить отключенный корневой CA, вам нужно выполнить следующие операции:
- Подготовить файл CAPolicy.inf
- Установить сервис сертификатов Windows
- Опубликовать список CRL
- Запустить пост-настроечнный командный файл
Вот как вы можете сделать это:
- Установить сервер с Windows Server 2003 Standard Edition, включая SP1 или более свежие версии и убедиться, что он запущен как автономный сервер (например, он не должен быть элементом никакого домена)
- Make the necessary parameter replacements in the CAPOlicy.inf file below (highlighted with red) Сделать необходимые замены параметров в файле CAPOlicy.inf, приведенном ниже (выделены красным цветом)

Рисунок 2: Имя файла: CAPolicy.inf
- Копировать файл CAPolicy.INF в %windir%capolicy.inf
- Пройти по Start Menu / Control Panel / Add or Remove Programs |нажать на Add/Remove Windows Components
- В Windows Components Wizard, вы выбираете Certificates Services и нажимаете Next
- Обратите внимание на окно сообщений. Вы не должны переименовывать компьютер, раз установлены сервисы сертификата Windows. Нажмите Yes
Рисунок 3
- В поле типа центра сертификации нажмите Stand-alone root CA, и поставьте галочку напротив “Use custom settings to generate the key pair and CA certificate” и нажмите Next
Примечание: Это нормально, что опции Enterprise root CA и Enterprise subordinate CA не могут быть выбраны, так как этот сервер не является элементом домена.
Рисунок 4
- Выберите CSP, который вы хотите использовать для вашего отключенного корневого CA. Для простоты мы выбрали Microsoft Strong Cryptographic Provider v1.0, однако, вы также можете выбрать другой CSP, если вы, например, установили Hardware Security Module (HSM) и соединились с сервером через HSM, прежде чем вы начали процедуру установки.
Выберите по умолчанию хешированный алгоритм SHA-1
Установите длину ключа 4096
Убедитесь, что обе опции “Allow this CSP to interact with the desktop” и“Use an existing key” не выбраны. Нажмите Next
Рисунок 5
- Введите полное имя для вашего корневого CA, настройте суффикс отличительного имени (O=домен, C=локальный) и установите период допустимости на 20 лет, затем нажмите Next
Рисунок 6
- Примите рекомендации по умолчанию для базы данных сертификата и регистрирующих файлов (или поменяйте их, по желанию) и нажмите Next
Рисунок 7
- Так как это отключенный корневой CA, то нет необходимости устанавливать IIS (Внутренний информационный сервис) и по этой причине выводится окно сообщения. Нажмите OK
Рисунок 8
- Нажмите Finish
Рисунок 9
- Нажмите Start / Programs / Administrative Tools / Certificate Authority
- Откройте подокно вашего сервера центра сертификации и правой кнопкой мыши щелкните на Revoked Certificates. Нажмите All tasks / Publish
Рисунок 10
- Выберите New CRL и нажмите OK
- Скопируйте %windir%system32certsrvcertenroll*.crt и *.crl в USB ключ. Вам понадобятся эти файлы для следующего подчиненного(subordinate) CA, который будет установлен
- Вам также потребуется скопировать эти файлы в расположение CDP HTTP, как показано в представленном ранее файле caconfig.inf
- Сделайте необходимые замены параметра в ниже приведенном файле (выделены красным цветом) и запустите файл с командной строки
Рисунок 11
- Вы установили корневой CA.


Мы говорили, что есть причины безопасности, по которым необходимо держать корневой CA и политику CA (root and policy CA) отключенными. Только «выпускающие» CA рекомендуется держать включенными. Так как root and policy CA отключены, они не будут являться элементами домена. Если устройство, являющееся элементом домена, не зарегистрировано в домене в течение 6 месяцев (значение по умолчанию), тогда аккаунт устройства «зависнет» и больше не будет допущен к регистрации в домене.
Установка включенного «выпускающего» корпоративного CA
Чтобы установить включенный «выпускающий» CA, вам нужно выполнить следующие операции:
- Подготовить файл CAPolicy.inf
- Установить IIS (Internet Information Services)
- Установить Windows Certificate Services
- Подтвердите запрос sub-CA сертификата к родительскому CA
- Установить sub-CA сертификат в корпоративный подчиненный CA
- Запустить постконфигурационный скрипт
- Опубликовать список CRL
Вот как вы можете сделать это:
- Установить сервер с Windows Server 2003 Standard Edition, включая SP1 или более свежие версии и убедиться, что он является элементом домена
- Убедитесь, что IIS (internet Information Services) установлены. Однако, если вы действительно хотите сделать это правильно, тогда пропустите часть IIS. Единственным предостережением является то, что вам определенно нужно знать ваш PKI прежде, чем вы пропустите компонент IIS. Преимуществом является более простая установка и на один вектор атаки меньше.
- Сделайте необходимые замены параметров в файле CAPOlicy.inf, приведенном ниже (выделены красным цветом)
Рисунок 12: Имя файла: CAPolicy.inf
- Скопируйте файл CAPolicy.INF в %windir%capolicy.inf
- Пройдите по Start Menu / Control Panel / Add or Remove Programs / нажмите Add/Remove Windows Components
- В Windows Components Wizard, Выберите Certificates Services и нажмите Next
Рисунок 13
- Обратите внимание на окно сообщений. Вы не должны переименовывать компьютер, раз установлены сервисы сертификата Windows. Нажмите Yes
- В поле типа центра сертификации, нажмите на Enterprise subordinate CA и поставьте «галочку» напротив “Use custom settings to generate the key pair and CA certificate” и нажмите Next
Рисунок 14
- Выберите CSP, который вы хотите использовать для вашего «выпускающего» CA. Для простоты мы выбрали Microsoft Strong Cryptographic Provider v1.0, однако, вы также можете выбрать другой CSP, если вы, например, установили Hardware Security Module (HSM) и соединились с сервером через HSM, прежде чем вы начали процедуру установки CA.
Выберите по умолчанию хешированный алгоритм SHA-1
Установите длину ключа 2048
Убедитесь, что опции “Allow this CSP to interact with the desktop” и “Use an existing key” не выбраны. Нажмите Next
Рисунок 15
- Введите полное имя для вашего «выпускающего» CA и установите период доступности (Validity period) на 5 лет, затем нажмите Next
Рисунок 16
- Примите рекомендации по умолчанию для базы данных сертификата и регистрирующих файлов (или поменяйте их, по желанию) и нажмите Next
- Отображено окно запроса сертификата СА. Выберите Save the request to a file и введите путь и имя файла (модуль оперативной помощи автоматически добавит .req расширение в имя файла). Скопируйте файл в USB ключ для дальнейшего использования. Нажмите Next. Мы будем использовать этот запрос файла потом в нашем кратком руководстве
Рисунок 17
- Будут добавлены некоторые компоненты прикладной программы сертификата IIS. Нажмите Yes
Рисунок 18
- (Дополнительно) Если вы не включили ASP поддержку в IIS, то появится следующее окно сообщений. Нажмите Yes
Рисунок 19
- Вы еще не все выполнили. Как показано в окне сообщений – вам нужно создать личный ключ для вашего нового «выпускающего» центра сертификации.
Рисунок 20
Нажмите OK для продолжения.
- Нажмите Finish
Рисунок 21
- Прежде, чем вы продолжите, вам нужно опубликовать сертификат и список отмен для вашего корневого CA в Active Directory. Это легко делается следующим образом:
a) Скопируйте созданные во время установки корневого CA файлы *.crt и *.crl в папку %systemroot%system32certsrvcertenroll в сервере «выпускающего» CA.
b) Запустите ниже приведенный скрипт из командной строки в той же папке вашего «выпускающего» CA. Вы должны запустить скрипт как пользователь, являющийся членом группы Cert Publishers в Active Directory (кто-либо с правами админа домена).
Рисунок 22
Скрипт автоматически обработает полное имя файла и выполнит необходимые команды.
- Убедитесь, что у вас есть сертификат запрашиваемого файла, созданного в Шаге 12. Зарегистрируйтесь на сервере корневого CA.
- Из корневого CA сервера нажмите Start / Programs / Administrative Tools / Certificate Authority
- Откройте панель вашего CA сервера и правой кнопкой мыши щелкните на имени сервера. Нажмите All tasks / Submit new request…
Рисунок 23
- Сохраните запрашиваемый файл, созданный в Шаге 12 и нажмите OK
- В левой панели нажмите Pending Requests. Расположите запрос сертификата в правой панели / Правой кнопкой мыши щелкните на запросе сертификата и выберите All Tasks / Issue
- Дальше нам нужно экспортировать сертификат. В левой панели нажмите Issued Certificates. В правой панели щелкните правой кнопкой мыши на сертификате и нажмите Open
Рисунок 24
- Нажмите на ярлык details и щелкните на Copy to file…
Рисунок 25
- Показан Certificate Export Wizard. Нажмите Next
Рисунок 26
- Выберите ”Cryptografic Message Syntax Standard ….” и ”Include all certificates in the certification path if possible”. Нажмите Next
Рисунок 27
- Сохраните сертификат в тот USB ключ, используемый в Шаге 12. Нажмите Next
Рисунок 28
- Нажмите Finish, а затем OK
- Теперь вы возвратитесь к «выпускающему» CA и нажмите Start / Programs / Administrative Tools / Certificate Authority
- Откройте панель сервера CA и правой кнопкой мыши щелкните на имени сервера. Нажмите All tasks / Install CA certificate
Рисунок 29
- Сохраните сертификат, который вы выпустили в Шаге 27 и нажмите OK
- Откройте панель вашего сервера CA и правой кнопкой мыши щелкните на имени сервера. Нажмите Start service
Рисунок 30
- Скопируйте %windir%system32certsrvcertenroll*.crt и *.crl в USB ключ. Вам нужно будет скопировать эти файлы в ваши Веб-серверы, используемые, как Certificate Distribution Points (CDP), которые используют HTTP протокол. Это HTTP, базирующийся на CDP URL, который вы ранее определили в caconfig.inf «выпускающего» CA.
Примечание: Эта задача будет распланирована и автоматически запущена.
- Сделайте необходимые замены параметров в ниже приведенном файле (выделены красным цветом) и запустите файл через командную строку.
Рисунок 31
- Откройте панель вашего сервера CA и правой кнопкой мыши щелкните на Revoked Certificates. Нажмите All tasks / Publish
Рисунок 32
- Выберите New CRL и нажмите OK
- И, наконец, вы завершили установку.


Панель инструментов
Одна из вещей, которая будет иметь важное значение для вас и вашей PKI – это панель инструментов, которая содержит правильные инструменты. Она поможет вам поддерживать вашу PKI в стабильном состоянии и решать некоторые проблемы быстро и безболезненно. Однако, это непростая задача, т.к. существует очень много инструментов, поэтому мы должны выбрать самые лучшие из них. Ниже приведены параметры вашей панели инструментов Microsoft PKI (не в обязательном порядке):
- Certificate Services или службы сертификатов (certsrv.msc) – Эта MMC содержит основные функции, необходимые для настройки и поддержки вашей PKI.
- Certificate Templates или шаблоны сертификатов (certtmpl.msc) – Эта MMC используется для поддержки и обеспечения безопасности шаблонов сертификатов.
- Certificate Manager или менеджер сертификатов (certmgr.msc) – Эта MMC используется для контроля сертификатов, которые установлены на компьютере или используются определенным пользователем.
- Certutil.exe – это утилита, работающая из командной строки, которая делает то же самое, что консоль Certificate Services MMC, плюс многое другое.
- Event Viewer или просмотр событий (Eventvwr.msc) –Консоль Event Viewer MMC нетипичная. Этот инструмент очень важен при устранении неисправностей с вашей PKI, в чем вы скоро убедитесь.
- Инструменты корпоративной Enterprise PKI (PKIview.msc) – Консоль MMC для контроля состояния PKI, которая должна стать вашим лучшим новым другом.
- Capimon.exe – позволяет администратору контролировать безопасность вызовов CryptoAPI и результатов.
Набор из этих инструментов обеспечит хорошее функционирование вашей PKI, а также поможет узнать некую очень важную информацию, которая поможет вам устранить неисправности, связанные с вашей PKI. Лучше всего при устранении неисправностей с PKI использовать структурный процесс. Ниже приводится один из подходов:
- Всегда начинать устранение неисправностей с проверки журналов событий (event log). Это может показаться очевидным, но практически все ошибки, связанные с PKI, заносятся в журналы событий (event log). Хотя вы и можете отображать сообщения об ошибках от различных программ, как Certificate Services MMC, журнал событий – это гораздо более простой способ для просмотра и устранения ошибок, связанных с PKI.
- Используйте инструменты PKIview.msc для быстрого просмотра состояния вашей PKI. PKIview.msc обычно позволяет обнаружить некоторые из наиболее часто встречающихся ошибок, включая потерю или просрочку CRL или просроченный сертификат CA certificate. Если все выглядит нормально, то вы можете сконцентрироваться на проблемах, связанных с сертификатами, таких, как настройки безопасности для шаблонов сертификатов и т.п.
- Если ошибка по-прежнему неочевидна, или же ее трудно устранить с помощью предыдущих этапов, то просмотрите информацию из списка ресурсов в конце этой статьи, или поищите решение в новостях или на форуме на сайте support.microsoft.com
Еще одна вещь, которая может очень сильно помочь – это список, согласно которому необходимо действовать после установки и в процессе поддержки. Ниже приводится один пример, который можно взять за основу:
- Что с доступностью вашей PKI и ваших корневых сертификатов (root certificate)?
- Доступен ли CRL?
- Правильно ли работают выпущенные сертификаты?
- Правильно ли работают компоненты инфраструктуры или приложения, которые используют сертификаты вашей PKI?
- Что с производительностью систем, которые используют сертификаты вашей PKI?
- Появлялись ли какие-нибудь сообщения об ошибках, связанные с сертификатами, установленными на компьютере?
Давайте продолжим и посмотрим на несколько утилит из набора инструментов, а также, как они могут облегчить нам жизнь по отношению к PKI.
Консоли Certificate Services и Certificates Templates MMC
Консоль Certificate Services MMC (службы сертификатов или certsrv.msc) – это ваша основная консоль для администрирования PKI. Вы должны потратить немного времени и познакомиться с этой консолью лучше, так как с ее помощью можно глубже заглянуть в мир Microsoft PKI. С помощью этой консоли вы можете лучше понять, что такое AIA, CDP, шаблоны сертификатов V2 certificate templates, и т.п., как они связаны с областями, о которых мы рассказывали в предыдущих статьях. Встроенная помощь может также существенно помочь, т.к. она содержит небольшой раздел с рекомендациями (как и многие другие встроенные файлы помощи в операционной системе Windows Server 2003). Большинство проблем с Microsoft PKI чаще всего связано с проблемой прав, при выпуске сертификата, или с доступностью CRL. Поэтому давайте посмотрим на пару примеров, где этот инструмент может быть очень полезен для устранения проблем с вашей PKI.
Одна из наиболее частых ошибок, связанных с PKI – это устаревший или недоступный CRL. Самый быстрый способ ее решения – это опубликовать CRL с помощью консоли Certificate Services MMC, но это можно также выполнить из командной строки, о чем вы очень скоро узнаете.

Рисунок 1: Публикация CRL
Это должно войти у вас в привычку проверять, выпущен сертификат или нет, проверяя в подменю “Failed Requests (невыполненные запросы)” в левой части консоли MMC console. Из этого меню вы сможете выяснить, почему возникла ошибка при попытке выпустить сертификат. Очень часть эту ошибку очень сложно прочитать в разделе “Failed Request (невыполненные запросы)”. Но эта же самая ошибка будет записана в прикладной журнал (application log). И поэтому проще скопировать запись из журнала событий (event log) из Event Viewer (просмотр событий), чем просмотреть в консоли Certificate Services MMC, то это будет более предпочтительным способом проверить наличие ошибок, связанный с PKI, если конечно, вы не используете некий способ для передачи администрирования и настройки вашей консоли.
Еще одна частая ошибка – это неправильные настройки безопасности для шаблонов сертификатов (certificate template). Вы можете изменить безопасность для шаблонов сертификатов с помощью консоли Certificate Services MMC, либо щелкнув правой кнопкой мыши на Certificate Templates (шаблоны сертификатов) и выбрав пункт Manage (управление) или запустить новую консоль MMC, в которую вы добавите шаблоны сертификатов Certificate Templates (certtmpl.msc). В любом случае в консоли Certificate Templates MMC, вы должны выбрать свойства для шаблона сертификата, который вы хотите использовать. Затем перейдите на закладку Security (безопасность) и убедитесь, что правильной группе безопасности (security group) разрешено получать сертификаты, задав для этой групп права на чтение “Read” и на внесение в список “Enroll”.

Рисунок 2: Проверьте правильность настроек безопасности для шаблонов сертификатов
PKIview.msc
Один из самых важных инструментов для устранение неполадок с Microsoft PKI — это PKIview.msc, который можно найти в Windows Server 2003 Resource Kit. С помощью этого инструмента, вы можете проверить статус вашей PKI. Если вы запустите графический инструмент, то вы увидите различные индикаторы, которые позволят вам оценить состояние вашей PKI. Зеленые отметки сообщают, что все в порядке с вашей PKI. Однако, желтый знак предупреждения, говорит о том, что сертификат или список вызовов сертификатов Certificate Revocation List (CRL) закрыт по истечении срока. Если вы видите красные ошибки, то это означает, что CRL или Authority Information Access (AIA) недоступны. Красные ошибки могут также говорить о том, что CA нельзя доверять. Если это так, что щелкните правой кнопкой мыши на ошибке и выберите “Copy URL”. Вставьте URL в веб браузер, и если этот адрес на доступность, или используйте инструмент под названием adsiedit.msc из средств поддержки Windows Support Tools для проверки, что опубликованный CDP содержит список вызовов или доверия.
Этот инструмент способен на гораздо больше, и вы должны запускать его, как минимум, один раз в неделю для проверки состояния вашей PKI. Описание ошибки позволит быстро определить, где именно возникла ошибка, но это не предоставить вам окончательного решения. Вам по-прежнему необходимо будет выполнить некую детективную работу, используя другие инструменты и списка в этой статьи, или поискать с помощью Google.

Рисунок 3: PKIview.msc – великолепный инструмент для отладки
{mosimageCertutil.exe}
Certutil.exe
Но самым главным инструментом для Microsoft PKI без сомнения является Certutil.exe. Эта мощная утилита, работающая из командной строки заменяет набор инструментов в Windows 2000 под названием Dsstore.exe. Есть несколько преимуществ использования Certutil.exe. Во-первых, его легко использовать в сценариях, и он способен на гораздо больше по отношению к настройке, документации и устранению неисправностей, по сравнению с другими инструментами из набора инструментов, входящих в состав PKI toolbox. Еще одно преимущество, которое очень часто упоминается, заключается в том, что он позволяет запустить много инструментов для сбора данных для обычного пользователя. Это особенно хорошо для устранения проблем с сертификатами, не нарушая безопасности вашей PKI. Причина, по которой устранение проблем у вашей PKI с помощью Certutil.exe не нарушает безопасность вашей PKI, заключается в том, что многие из основных параметров настройки не доступны до тех пор, пока вы не раздадите необходимые права.
Еще одним преимуществом Certutil.exe является встроенная возможность изменения управления. Многие настройки служб сертификатов (Certificates Services) хранятся в реестре Windows в разделе:
“My ComputerHKEY_LOCAL_MACHINESYSTEMCurrentControlSetServicesCertSvc”
Если вы произвели какие-нибудь изменения в вашей PKI с помощью параметра “certutil –setreg” то утилита отобразит сперва старое значение параметра, а затем его новое значение.
Мы не будем рассматривать все различные возможности и параметры Certutil.exe, т.к. их слишком много. Однако, вы можете ввести команду “Certutil -?”, чтобы узнать обо всех параметрах. Есть также возможность переноса версии Certutil.exe для операционной системы Windows Server 2003 на операционную систему Windows Vista, Windows XP и Windows 2000. Все, что вам необходимо сделать – это просто скопировать файлы Certutil.exe, Certcli.dll и Certadm.dll в папку на вашем компьютере с операционной системой Windows Vista, XP или Windows 2000. Не нужно регистрировать никаких файлов DLL и т.п. Просто запустите утилиту в командной строке из этой папки.
Заключение
Во многих случаях может быть очевидным то факт, что использование структурного процесса при устранении неисправностей поможет вам быстро и точно определить ошибки. Мы постарались представить вам краткое описание инструментов и утилит, имеющихся в вашем распоряжении, а также привели пару примеров по использованию некоторых из этих инструментов. Но существует гораздо больше возможностей в зависимости от того, какие инструменты вы будете использовать. Примеры, приведенные в этой статье – это лишь предположения, которые могут служить намеком. В списке внешних ресурсов ниже вы можете найти ссылки на важные статьи, в которых рассказывается гораздо подробнее о настройках для устранения ошибок. Ресурсы, упомянутые в этой статье помогут вам содержать в порядке вашу PKI.
Внешние ресурсы
Эта статья была написана при помощи огромного количества ресурсов. Все самые лучшие статьи, посвященные Microsoft PKI, были собраны в одном месте, которое вы можете найти на веб портале Microsoft PKI Web Portal http://www.microsoft.com/pki
Хотите увидеть, как компания Microsoft делает PKI, то посмотрите IT Showcase -Deploying PKI Inside Microsoft http://www.microsoft.com/technet/itsolutions/msit/security/deppkiin.mspx
Simply put, Public Key Infrastructure (PKI) is software, certificates, encryption algorithms, and other services that allow you to secure your communications on the Internet. Digital certificates issued by trusted certificate authorities are used to enable and protect vital services in today’s world of communication and commerce on the public Internet. PKI services with digital certificates help to verify the identity of users using services.
Windows 2000 also provided Certificate Services, but for Windows Server 2003 Microsoft has enhanced the services to provide additional security and to ease the related administrative burden. Windows Server 2003 includes some new features including the ability to separate administrative roles between different administrators, auto-enroll users in certain certificates, and more. This article will discuss common CA functions as well as the role separation features found in Windows 2003.
Installing Certificate Services
The Certificate Services are not installed as a server role like IIS and DNS. Rather, they are installed as optional Windows components. Service installation is accomplished by selecting Start | Control Panel | Add or Remove Programs | Add/Remove Windows Components. From the list of Windows components, select Certificate Services. As you can see in Figure A, you will be warned that changing the name of the machine or the domain membership will invalidate any certificates that this server is responsible for. As such, make sure that the server name and domain membership are finalized before installing the services. Click Yes followed by Next to continue with the installation.
| Figure A |
 |
| Certificate Services installation warning |
The next screen, shown in Figure B, asks for you to specify the type of Certificate Authority (CA) for this server. You have four choices.
- Enterprise Root CA: Requiring the use of Active Directory, an Enterprise root CA is the foundation for an enterprise-wide certificate hierarchy. An Enterprise Root CA signs its own certificate and does not typically provide services directly to end users.
- Enterprise Subordinate CA: Also requiring Active Directory, an Enterprise subordinate CA obtains its certificate from an already existing CA. These types of CAs are used to provide smart-card-enabled logons by Windows XP and other Windows Server 2003 machines.
- Stand-Alone Root CA: While a Stand-alone root CA does not require the use of Active Directory, it will use AD if it is present for the purposes of publishing certificates and certificate revocation lists. As a stand-alone service, this type of CA can be disconnected from the network and placed in a secure area.
- Stand-Alone Subordinate CA: This type of CA also does not require Active Directory and obtains its own certificate from a different CA.
| Figure B |
 |
| Select the type of CA to install. |
Enterprise CAs can be used to issue certificates to support such services as digital signatures, Secure Multipurpose Internet Mail Extensions (S/MIME) secure mail, Secure Sockets Layer (SSL) or Transport Layer Security (TLS) secured web access and smart card authentication. Enterprise CAsare used to provide certificate services to internal users who have user accounts in the domain.
Stand-alone CAs are used to provide similar services but are targeted at extranets and Internet users. Issuing stand-alone certificates requires that the requestor provide all identifying information. This is not required for Enterprise CAs since the Active Directory contains much of the pertinent user information for internal users.
Group Policy is used to propagate the root certificate to the Trusted Root Certification Authorities certificate store for the users and computers in the domain. A certificate store is a permanent storage area where certificate, certificate revocation lists, and certificate trust lists are stored.
For this example, install an Enterprise root CA. Click Next to continue.
Next, you need to supply some identifying information for the new CA, including its name and validity period. As you can see in Figure C, this CA is called “eca” (example CA) and has a validity period of six months. The validity period defines the range during which the certificate can be accepted as an authoritative credential verifying the identity of the user. Click Next to continue.
| Figure C |
 |
| Provide CA identifying information. |
Next, on the screen shown in Figure D, provide the locations for the certificate database and certificate database log. By default, these are located at C:WINDOWSsystem32. Click Next to continue.
| Figure D |
 |
| Provide a location for the certificate database. |
If you have IIS installed and running, you will be prompted with an indication that it must be temporarily stopped. This is done in order to install web enrollment services. Select Yes.
Finally, the Certificate Services component is installed. It takes a minute for the files to be copied and the service installed. During the installation, if you have IIS installed without ASP, you’ll get the notice shown in Figure E. This indicates that Active Server Pages (ASP) is required for web enrollment services but that ASP is a potential security risk. For this example, I’ve selected to enable ASP.
| Figure E |
 |
| Should ASP be enabled? |
Managing Certificate Services
Certificate Services in Windows Server 2003 is managed by the Certificate Authority administrative tool available at Start | Administrative Tools | Certificate Authority. When you start it, you’ll see the MMC start, as shown in Figure F.
| Figure F |
 |
| The Certificate Authority administrative tool |
In Windows Server 2003, some functions require the distribution of certificates to each user that attempts to make use of specific services. A perfect example is the Encrypting File System (EFS). EFS is used to encrypt the contents of a file in order to protect the contents from unauthorized use.
You don’t have to manually provide users with certificates to use EFS. When a user that doesn’t already have a certificate attempts to encrypt a file for the first time, he is issued a certificate for this purpose. To see who has been issued certificates, click the Issued Certificates option. In Figure G below, you can see that the Administrator has been issued a certificate for EFS services. This certificate was issued as a result of a file encryption operation.
| Figure G |
 |
| A certificate was issued to support an EFS operation. |
To see the certificate details, double-click the desired selection in the right-hand side of the window. In Figure H, notice that this certificate was issued for the purpose of encrypting a file.
| Figure H |
 |
| The details of the aforementioned EFS certificate |
Notice the tab marked Certification Path. This tab lists the path back to the root certificate authority that was used to eventually provide this certificate. In Figure I, you can see that the EFS certificate was issued to Administrator from eca (the name of the root CA in this example).
| Figure I |
 |
| Certificate details |
Double-click the name of each CA up the line to view its certificate details. Figure I also shows the eca certificate and its purposes. In this case, the eca certificate— the self-signed root certificate— allows the eca certificate to be used for all issuances and application purposes.
Revoke a certificate
If you feel that the security of a certificate has been compromised or you need to disable the use of a certificate for some reason, you can easily revoke it using the Certificate Authority administrative tool. To do so, from the Issued Certificates tab, right-click the certificate you wish to revoke and select All Tasks | Revoke Certificate, as shown in Figure J.
| Figure J |
 |
| Revoke a certificate. |
When you elect to revoke a certificate, you are asked to provide a reason for the revocation on the screen shown in Figure K. You don’t have to do this, but it provides a good record for the future when you need to analyze the effectiveness of your PKI infrastructure and security policies. For this example, I’ll choose Key Compromise. Select your revocation reason and click Yes to revoke the certificate.
| Figure K |
 |
| Optionally provide a reason for the certificate revocation. |
After revocation, the certificate is listed in the Revoked Certificates section. Notice that the revocation reason is listed in this screen. You can unrevoke a certificate but only if the revocation reason was Certificate Hold. Attempting to unrevoke with any other revocation reason results in an error.
Role separation
You can now use what is called role separation to separate administrators into predefined roles. This is a new feature in Windows Server 2003. When an administrator has permission to perform certain CA roles, they are the only activities that he can perform.
By default, role-based administration is not enabled in Windows Server 2003’s certificate services. To enable it, execute the following command from a command prompt:
certutil -setreg caRoleSeparationEnabled 1
After executing this command, stop and restart the Certificate Service service. There are five different CA roles that can be assigned:
- Auditor – The user or group assigned to this role is allowed to view and maintain the audit logs associated with the certificate services. You can get to it by clicking OS role (Local or Domain Security Policy | Security Settings | Local Policies | User Rights Assignment | Manage auditing and security log). See Figure L.
- Backup Operator – The user or group in the role can back up and restore the certificate store. You can get to it by clicking OS role (Local or Domain Security Policy | Security Settings | Local Policies | User Rights Assignment | Back up files and directories). See Figure M.
- CA Administrator – The user or group is allowed to maintain the CA including the ability to renew the CA certificate. You can get to it by clicking CA role (Security tab in CA properties) | Manage CA.
- Certificate Manager– The user or group can approve certificate enrollment and revocation requests. You can get to it by clicking (Security tab in CA properties) | Issue and Manage Certificates. See Figure N.
- Enrollees – These users and group can request certificates from the CA by virtue of OS/AD membership.
| Figure L |
 |
| Assign members to the CA Audit role. |
| Figure M |
 |
| Assign members to the Backup Operators role. |
| Figure N |
 |
| Assign members to CA roles. |
OS roles related to CA are handled in either the Local or the Domain Security Policy tool at Start | Administrative Tools | Domain (or Local) Security Policy | Security Settings | Local Policies | User Rights Assignment | Manage Auditing And Security Log or Back Up Files And Directories. Add users or groups by double-clicking the role and clicking the Add User Of Group button. Select the user or group to add to the role.
CA roles are handled on the Certificate Authority tool’s Security tab. You can add a user or group to the security list by clicking the Add button and selecting the user or group. To assign a role to a user, select the desired role from the Permissions for user or group box and click Apply.
That’s it
PKI services are critical to today’s business needs. You need to know who you’re doing business with, and username/password just doesn’t cut it for truly sensitive information. PKI can help with this endeavor by helping to verify that the people with access to your information are who they say they are.
In the previous chapters we explained some of the technical nuts and bolts of Windows Server 2003 PKI. In this chapter, we look at the different steps you need to consider when planning, designing, and building a Windowsrooted PKI.
16.1 Building a PKI
Like any other IT project, a PKI project can be split into four key phases: assessment, design, implementation, and management (administration and maintenance). The phases are illustrated in Figure 16.1. A PKI project can be iterative: During the implementation phase, for example, issues may arise that require a new assessment and changes to the original design.
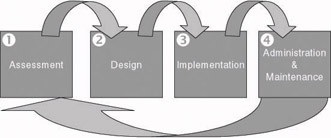
Figure 16.1: The four major phases of a PKI project.
During the assessment phase, the current and future security requirements of an organization are analyzed. This can be done by running a security audit, performing a penetration test, or just analyzing existing processes. The assessment phase also includes a business requirement analysis.
The design phase deals with the technological and nontechnological design of the PKI solution. Nontechnological design topics include the creation of certificate policies and certification practice statements (CPS).
The implementation phase takes care of the rollout of the PKI solution, its integration with the existing IT environment, and, before the rollout, the development of customized PKI-enabled applications (PKA) or PKI software plug-ins.
Once the PKI is installed and deployed across your enterprise, you must manage and maintain it. In the management phase, you must set up the support model for the PKI (Helpdesk), PKI administrator, and user training and the management of the PKI components.
16.1.1 Assessing the organizational needs for a PKI
During a PKI assessment, you must analyze your company’s current and future security needs. As part of the assessment, you may need to gather some extra information. To do so, you can organize a security audit or a penetration test.
The next sections focus on three key areas of the assessment phase: the business requirement analysis, the decision on whether to insource or to outsource the PKI infrastructure, and the analysis of the applications that need PKI-based security.
Analyzing business requirements
The rollout of a PKI in an enterprise is typically driven by core business needs such as advanced security requirements for information storage and network communication. The size of the investment that a company makes in a PKI will depend on the criticality of the business problem that it wishes to resolve with it or the importance of the business processes whose security level it wants to improve by installing a PKI.
Some business security requirements do not need a certificate-based security solution and can be resolved with simpler arrangements. Also, not every certificate-based solution requires rolling out an enterprise PKI: For some solutions it is enough to buy a limited set of certificates from a commercial certification authority.
The business your organization is in may impose special requirements in the following areas:
-
Availability: What level of availability does the PKI need within the organization? This affects the CAs, the CA databases, and the directories used in the PKI solution.
-
Scalability: How scalable must the PKI be? Will it have to deal with rapid growth of the number of required certificates? Does planning have to take into account company mergers and acquisitions? Will more and more PKI-based applications be deployed in the future?
-
Performance: PKI and its public key cryptography operations create an additional performance load for computer systems. Is this extra load acceptable? Should the existing hardware be upgraded? Should you install additional hardware that speeds up PKI operations?
-
Cost: PKI products come in different flavors, with different features and in different price classes.
PKI-enabled applications
A PKI is an infrastructure, and many Windows applications can take advantage of it to provide strong security services to their users. Among these applications are networking systems, VPN systems, ERP software, document signing, and smart card–based applications.
You can build the following PKI-enabled applications (PKA) on top of a Windows PKI:
-
Secure Web: You can use certificates for strong authentication using the Secure Sockets Layer (SSL) and Transport Layer Security (TLS) protocols.
-
Secure mail: Signing and sealing electronic mail messages using S/
MIME (Secure Multi-Purpose Internet Mail Extensions) also build on public-key cryptography.
-
File system encryption: Windows 2000 and later Microsoft OSs come with the Encryption File System (EFS) extension to the NTFS version 5 file system.
-
Code signing: Code signing protects against the downloading of malicious code. The Microsoft code-signing technology is known as Authenticode.
-
Document signing: Document signing technology provides the capability to add a digital signature to for example a Word document. This functionality overlaps with the features provided by the Microsoft Rights Management Services discussed in Chapter 12.
-
Smart card logon: Smart card logon provides strong two-factor authentication in a Windows 2000 or Windows Server 2003 domain environment.
-
Virtual private networking: Windows 2000 and later Microsoft OSs support the IPsec tunneling protocol, which can use certificates to authenticate IPsec tunnel endpoints.
-
Remote access authentication: The Windows 2000 and Windows Server 2003 Remote Access Service (RAS) both support the Extensible Authentication Protocol (EAP), which can deal with certificate- based TLS authentication.
-
Wireless authentication: Windows Server 2003 and Windows XP support certificate-based authentication for wireless network access.
-
Securing SMTP site connections: You can connect Windows 2000 and Windows Server 2003 AD sites using asynchronous SMTP connections. In that case the bridgehead domain controllers authenticate to one another using certificates. This setup also protects the confidentiality and integrity of the AD replication traffic.
-
Any custom PKI-enabled application that uses CryptoAPI
Insource or outsource?
You have three choices to implement and manage a PKI: insource, out- source, or a hybrid approach. See Figure 16.2.
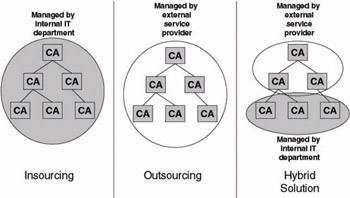
Figure 16.2: Insourcing and outsourcing models.
Insourced PKI solutions are solutions that you install, implement, administer, and maintain all by yourself. This means that your IT department must take the lead in implementing all related PKI technologies: CA hardware, CA database, RAs, directories, and the communication links between all participating entities. This path offers you complete independence. You can create your own liability rules and security policies and can decide how to implement, administer, and maintain the PKI.
Outsourced solutions turn most of these responsibilities over to another company. The degree of outsourcing can range from a little (generating some server certificates) to a lot (outsourcing multiple CA services that are dedicated to your company). This is often the best solution for smaller companies or for those without the funds and resources required to install and maintain a proper PKI.
Hybrid solutions combine insourcing and outsourcing: Your company maintains a part of the CAs and another company maintains the rest. The CAs that are issuing certificates for applications with high security needs can, for example, be implemented and managed by the company itself. The implementation and management of CAs issuing certificates to applications with less strong security needs can then be outsourced.
Table 16.1 can help you choose between an insourced and an outsourced PKI approach.
|
|
|
|
Pros |
|
|
|
Cons |
|
|
16.1.2 Designing, planning, and implementing a windows PKI
In the following sections, we focus on the different steps you must consider when designing, planning, and implementing a Windows-rooted PKI.
PKI policy definition
An important nontechnical aspect that is often overlooked or neglected by technology-focused PKI planners is the definition of the certificate policies (CPs) and certification practice statements (CPSs). Both document categories are derived from a company’s security policy (SP). This section gives an introduction to PKI policy definition, CPs, and CPSs.
A CP focuses on certificates and the CA’s responsibilities regarding these certificates. It defines certificate characteristics such as certificate use, enrollment procedures, liability issues, and so on. The X.509 standard defines a CP as “a named set of rules that indicates the applicability of a certificate to a particular community and/or class of application with common security requirements.” The X.509 standard can be downloaded from http://www.itu.int/rec/recommendation.asp?type=folders&lang=e&parent=T-REC-X.509.
A CP answers the following questions:
-
For what applications can the certificate be used?
-
How can a user enroll for the certificate?
-
How are users identified when they request a certificate?
-
What is a certificate’s lifetime?
-
How is renewal defined? Is a new key pair generated every time a certificate is renewed?
-
What key lengths and ciphers are used to generate the certificate?
-
Where is the private key stored? How is it protected? Can it be exported?
-
What is the CA’s liability when its private key is compromised?
-
How should users react when they lose their private keys?
A CP is defined by a group of people within your organization that is known as the policy authority. This group should consist of representatives of the different key departments of your organization: management, legal, audit, human resources, and so forth. In most organizations, the policy authority members are also members of the group that defined the SP. This assures that the CP is in line with the SP.
The certification practice statement (CPS) translates CPs into operational procedures for CAs. Whereas a CP focuses on a certificate, a CPS focuses on a CA. Both the European Electronic Signature Standardization Initiative (EESSI) and the American Bar Association (ABA) define a CPS as “a statement of the practices that a certification authority employs in issuing certificates.”
A CPS answers the following questions:
-
What certificate policy or policies does the CA implement?
-
What are the policies for issuing certificates? How are certificates issued? Are they issued directly to users or published into a directory? What types of certificates can the CA issue and to which users?
-
Who can administer the CA? What subtasks are delegated to the different administrators?
-
What are the revocation policies? How is certificate revocation handled?
-
When is a certificate revoked? Where are CRLs published? How often are CRLs updated?
-
How is access to the CA physically and logically secured?
-
Who is responsible for backing up the CA?
-
What is the quality of the CA certificate and private key? What is the lifetime of the CA keys and the certificate? What is the CA key length?
-
Where and how is the CA private key stored?
-
What is the procedure for CA rollover?
The CPS should be defined by members of your IT department, people who are operating and administering the IT infrastructure, and the people who defined the CP. Good examples of a CPS can be found on the Web sites of the following commercial CAs:
-
Globalsign: http://www.globalsign.net/repository
-
Verisign: http://www.verisign.com/repository/CPS
-
Entrust.net: http://www.entrust.net/about/cps.htm
A reference to the CP and CPS to which the CA adheres are made available in the CA certificate and every certificate the CA issues. To do so, the CA embeds a unique CP Object Identifier (OID; see also the following sidebar) in its certificate’s CertificatePolicies extension. This will allow the user of the certificate to reject certificates that were issued under a policy to which the user does not adhere. More detailed policy information can be added by including a URL pointer to the CPS or a short text notice in the certificate extensions.
Introducing Object Identifiers (OIDs) An OID is an object identifier. It is a string of numbers structured using a hierarchical dot notation. The OID format has been defined in the ITU X.209 standard. OIDs are maintained by the ISO standardization organization. To get an OID for your certificate policy, you must contact your local ISO naming authority.
An easy way to look up an OID assignment is available from the following Web site: http://www.alvestrand.no/objectid. This Web site also contains general OID information.
More information on CPs and CPSs is available in documents down- loadable from the following Web sites:
-
RFC 2527 (also known as PKIX part 4), “Internet X.509 Public Key
Infrastructure Certificate Policy and Certification Practices Framework,” available from http://www.ietf.org
-
Entrust white paper, “Certificate Policies and Certification Practice
Statements,” available from http://www.entrust.com
Defining Your Topology
When designing your Windows PKI topology, you must consider the four topics outlined next. Most of them were discussed in Chapter 14.
-
Decide on the number of CAs. Your organization may require multiple CAs for scalability, business, geographical, CA policy, or political reasons.
-
Choose a PKI trust model. Windows Server 2003 PKI supports the hierarchical, networked, hybrid, and constrained trust models.
-
Map the trust model to the Windows domain and site model. The PKI trust model is totally independent of the Windows domain trust model: A single CA can span multiple domains and a single domain can host multiple CAs.
-
Define relationships with external CAs or PKIs. To provide PKI interoperability between different PKIs, Windows Server 2003 PKI supports cross-certification and Certificate Trust Lists (CTLs). No matter which of the two you use, you must always define a trust policy. Will the trust be unidirectional or bidirectional? What will be the constraints of the trust?
Specifications of the individual CAs
Certification authorities are key PKI components, so you need to spend enough time to create a detailed design for each individual CA. Part of the CA parameters are set during the installation; another part is set post installation, in the CA configuration phase. Table 16.2 shows the different installation and configuration options you must consider. Besides these installation and configuration options, you must also consider CA hardware sizing.
|
Preliminary Planning |
During CA Installation |
As Part of the CA Configuration |
|---|---|---|
|
CA hardware sizing |
CA role (root, subordinate—stand-alone, enterprise) |
Revocation policy |
|
CA architecture (exit and policy modules) |
CA key and certificate properties |
Supported certificate types (certificate templates) |
|
Offline CA? |
CA naming conventions |
Certificate characteristics |
|
Advanced CA private key protection (Hardware Security Module) |
CA data storage locations |
Enrollment policy (identification options, who can enroll for what?) |
|
— |
Reference to CPS |
Recovery agent configuration |
|
— |
CA X.509 certificate extensions |
CA server hardening |
Preliminary planning
Before installation of a CA, you must make sure that you think about the CA hardware sizing, its architecture (are special exit and/or policy modules required?), whether the CA will be an online or offline CA, and if you will provide advanced CA private key protection. Next we will only discuss CA hardware sizing and the concept of an offline CA; the other topics were discussed in the previous PKI chapters.
CA Hardware sizing Table 16.3 provides some hardware sizing guidelines for a Windows Server 2003 CA. As far as the scalability of the Windows Server 2003 CA is concerned, Microsoft claims it is unlimited. Microsoft tested Windows Server 2003 PKI on a single four-processor, Intel-based computer, issuing more than 35 million certificates.
|
Hardware Parameter |
Comment |
|---|---|
|
Processor |
Is the most important CA resource. A powerful state-of-the-art CPU is strongly advised. Multiple CPUs will also enhance CA performance. |
|
Memory |
Microsoft recommendation is 512 Mb; 256 Mb is a minimum. |
|
Disks |
RAID configuration is advisable. Use separate physical disks for CA database and log files. As for the CA database size, each issued certificates takes about 16 Kb, and each archived private key takes about 4 Kb. |
Offline CAs To minimize the risk of CA private key compromise, you may want to set up offline CAs. Within a certificate hierarchy, for example, it is advisable to take the nonissuing CAs (root CAs and intermediate CAs) offline. Making a CA an offline CA can include different things:
-
Take it off the network.
-
Protect it from the rest of the network by putting it behind a firewall or a router.
-
Shut down the CA service.
-
Shut down the machine hosting the CA.
-
Install the CA on a stand-alone Windows server and set it up as a stand-alone CA.
-
Remove a CA server’s hard disk and store it in a vault to which only a limited number of people have access.
-
Provide strong CA private key protection by storing the CA’s private key on a Hardware Security Module (HSM).
You must bring an offline CA online to issue certificates and CRLs, and every time its certificate must be renewed.
PKI users must also be able to access an offline CA’s CRLs and CA certificate using CDP and AIA certificate pointers. When setting up an offline CA, you must make sure that the CDP and AIA pointers of both the CA certificate and all the certificates it issues refer to an online location. CDP and AIA configuration are explained in more detail later in this chapter.
When the offline CA is not connected to the network, you can use the following procedure to obtain a certificate for the new subordinate CA:
-
During the subordinate CA installation, select “save the request to a file.” The MS Certificate Services will inform you that the installation is incomplete. Put the request file (*.req) on a floppy disk and transport the floppy to the offline CA.
-
Bring the offline CA online. Open the subordinate CA’s request file from the offline CA, and copy the text starting with “BEGIN NEW CERTIFICATE REQUEST” and ending with “END NEW CERTIFICATE REQUEST.” Paste this text into the “Submit a saved request” page (Advanced certificate request) of the offline CA’s Web enrollment interface. Submit the request and save the newly generated certificate to the floppy disk. In Windows Server 2003 you can also submit a certificate request file to a CA from the CA MMC snap-in: right-click the CA object and select All TasksSubmit new request… This action will allow you to select the certificate request file from some file system location.
-
Transport the floppy to the subordinate CA. Then from the CA MMC snap-in, right-click the CA object and select “Install CA certificate.” The CA certificate will be installed and the subordinate CA service will be started.
CA installation options
During CA installation, you need to think about the following CA-related parameters: the CA role (enterprise or stand-alone, root or subordinate), its keys and certificate properties, the CA naming conventions, the CA X.509 certificate extensions, and the CA’s database specifications. In the following sections we will only cover the topics that were not discussed in earlier chapters.
CA role The very first screen of the CA installation wizard will ask you whether you want to install the CA as a stand-alone or enterprise CA, or root or subordinate CA. These installation options were discussed in detail in Chapters 13 and 14.
CA keys and certificate Next during CA installation, you must choose the CA key length, the Cryptographic Service Provider (CSP), and the hash functions the CA will use for its cryptographic operations (as illustrated in Figure 16.3). This can only be done if you check the “Use custom settings to generate the key pair and CA certificate” CA installation option.
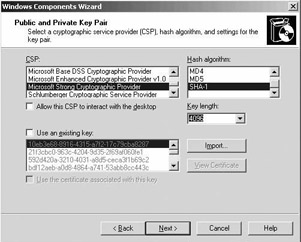
Figure 16.3: CA key and certificate options during CA installation.
When installing a root CA, you can also set the lifetime of its certificate—this can be done from the CA identifying information screen illustrated in Figure 16.4. When installing a subordinate CA, this field says “Determined by parent CA.” In that case the subordinate CA certificate’s lifetime is dependent on a V2 certificate template setting (if the parent CA is an enterprise CA) or the value of registry key (if the parent CA is a stand- alone CA). How to change these settings was explained in Chapter 15.
Figure 16.4 gives an example of how the CA certificate and key lifetime and the CA key length could be defined for different CAs in a PKI hierarchy. Notice that the deeper you go in the certification hierarchy, the shorter the certificate lifetime, key lifetime, and key length become.
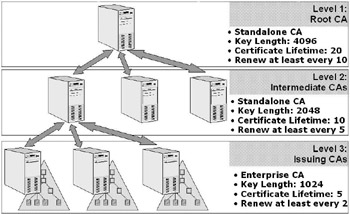
Figure 16.4: Certificate lifetime and key length in a typical PKI hierarchy.
A key topic to remember is that the CA is the heart of your security system, and if its private key is compromised, so is the entire PKI. Protect against attacks by choosing the longest key possible—at least 1,024 bits— and by storing the CA private key in a secure place. Secure private key storage was discussed in Chapter 13. See Figure 16.5.
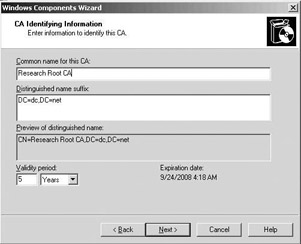
Figure 16.5: CA naming and certificate lifetime options.
CA naming conventions The CA installation wizard prompts you for the CA’s identification information: the CA common name and distinguished name suffix. Make sure you agreed on the naming conventions before you start the installation. The naming choices made during installation not only affect the CA, but they are also reflected in the CA’s Common Name that is stored in AD and in every certificate the CA issues.
Besides the CA’s common name, Windows PKI also generates a sanitized CA name. This is the short CA name not including any non-ASCII characters and ASCII punctuation characters. It is needed for file names, key container names, and AD object names that cannot handle a CA name including special characters. Sanitized names are limited to 64 characters: If a CA’s name is longer than 64, it is truncated and appended with a hash that is calculated over the truncated part. This name is also referred to as the CATruncatedName in MS documentation.
To retrieve a CA’s sanitized name, run certutil with the -cainfo switch. As Figure 16.6 shows, this command also brings up other interesting CA configuration information.
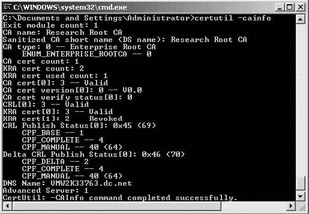
Figure 16.6: Using certutil to check the CA’s sanitized names.
Once you installed a CA, you cannot change the CA server’s name or change its Windows domain membership. To change the server name or domain membership after installation, you have to uninstall the Certification Authority, change the server’s name or domain membership, and then reinstall the Certification Authority. The CA installation program warns you for this problem, as illustrated in Figure 16.7.
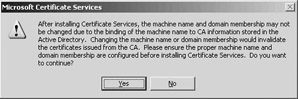
Figure 16.7: A installation warning.
CA database The CA installation wizard allows you to specify the location of the CA database and its log files (as illustrated in Figure 16.8). You will also be asked whether you want to store the CA’s configuration information on the file system. When you check this option, the CA installation program will copy the CA’s naming information and the CA’s certificate to the file system. The configuration directory is automatically shared as certconfig.
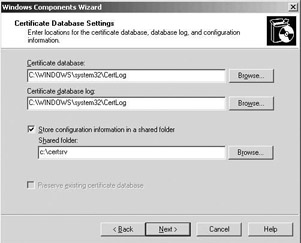
Figure 16.8: CA database installation options.
The Windows CA database is a JET Blue database. It has been designed to support an unlimited amount of certificates and is using the same database engine—the Extensible Storage Engine (esent.dll)—that is used in Exchange and the Active Directory. Just as for any other JET database, it is a best practice to split the database and its log files across different physical disk drives. By default, all CA database files are located in the certlog subdi- rectory of the system directory. To find out the location of your CA database files, type certutil -databaselocations at the command prompt or go to the Storage tab in the CA properties—available from the CA MMC snap-in. The CA database files are listed in Table 16.4.
|
Database File |
Goal |
|---|---|
|
<CA name>.edb |
The CA store |
|
edb.log |
The transaction log file for the CA store |
|
res1.log |
Reservation log file to store transactions if disk space is exhausted |
|
res2.log |
Reservation log file to store transactions if disk space is exhausted |
|
edb.chk |
Database checkpoint file |
|
tmp.edb |
Temporary CA store |
The CA database layout used in Windows Server 2003 PKI is different from the layout that was used in previous releases. When upgrading from Windows 2000 to Windows Server 2003, the database format is automatically converted. You can look at the layout of the CA database by typing certutil -schema at the command prompt.
Other CA installation options: During CA installation or certificate renewal, you can also add several customized X.509 extensions and properties to the CA certificate:
-
CRL Distribution Points (CDP) extensions
-
Cross-certificate distribution point extensions
-
Authority Information Access (AIA) extensions
-
Enhanced Key Usage extensions
-
Basic constraint extensions
-
Issuance policy constraint extensions
-
Application policy constraint extensions
-
Name constraint extensions
-
CA certificate renewal settings
-
CRL and delta CRL validity settings
To set these certificate extensions and properties, you must create a policy statement file called capolicy.inf and store it in the Windows system directory before the installation of the CA. Chapter 14 contains a sample capolicy.inf file.
CA configuration options
Once a CA is installed, you must configure it. In this phase you must consider revocation settings, Authority Information Access (AIA) settings, policy and exit module properties, certificate template settings, delegation of administrative control, identification options, key recovery agent settings, and CA server hardening. Again, in the following sections we will not come back to the topics that were discussed extensively in the previous chapters: CA identification options, enrollment interfaces, certificate templates, and key recovery agent settings.
Revocation settings In a Windows PKI design, you must think about the following revocation-related parameters: the CRL and delta CRL lifetime and publication interval, and the number and type of CRL Distribution Points (CDPs).
All of these parameters are CA-dependent and can be configured once for each CA. If your PKI-enabled applications have different CRL or delta CRL requirements, you can install multiple CAs. For example, you can install one CA with a short publication schedule used for an application with high security requirements and another one with a longer schedule used for an application with lower security requirements.
CRL and Delta CRL Lifetime and Publication Interval The CRL and delta CRL publication intervals can be set from the properties of the Revoked Certificates container in the CA MMC snap-in or from the registry (as outlined next). In the CA MMC snap-in, automatic CRL publication cannot be disabled—this can be done for delta CRLs. Automatic CRL publication can be disabled from the registry by setting the CRLPeriod- Units parameter to 0. For delta CRLs, you must set the CRLDeltaPeriod- Units parameter to 0. When you disable automatic CRL or delta CRL publication, you must fall back to manual publication (which was explained in Chapter 15).
It is a best practice to disable delta CRL publication and set a long CRL publication interval for offline CAs. In that case, the administrative over- head or publishing CRLs and delta CRLs is not outweighed by the number of revoked certificates.
If a CA cannot publish its CRL on time, the revocation information is not updated and the old CRL will expire. Most PKI-enabled applications consider certificates invalid if the CRL has expired or is unavailable. That is why a CRL must at least be valid for the amount of time it takes for a CA recovery in case of a hardware or software failure. A 1-hour CRL publication interval is very likely not enough to perform a complete CA hardware and software restoration. This also explains why you must bring an offline CA online at regular intervals for CRL publication. See also the following sidebar on “Publishing the CRL of an Offline CA.”
In Windows PKI, the CRL lifetime and publication interval are, although closely related, not the same. The CRL lifetime is derived from the publication interval and is by default 10% longer than the publication interval. This allows Windows PKI to deal with the replication delay of CRLs that are published in AD. The CRL overlap can be set in the registry of a CA server using the CRLOverlapPeriod, CRLOverlapUnits, and Clockskewminutes parameters. These parameters are located in the HKEY_ LOCAL_MACHINESYSTEMCurrentControlSetServicesCertSvcConfiguration<CA Name> registry container.
The following example illustrates the use of the parameters. Imagine you must deal with an AD replication delay of 4 hours. To deal with this delay, you can set the CRL overlap period to 5 hours. The following are the registry settings you would use in this example. They result in a CRL lifetime of 1 week, 5 hours, and 10 minutes. This is the sum of the CRLPeriod, CRLOverlapPeriod, and Clockskewminutes parameters. The CRL will be published every week, as specified in the CRLPeriod and CRLPeriodUnits parameters.
CRLPeriod REG_SZ = Weeks CRLPeriodUnits REG_DWORD = 1 CRLOverlapPeriod REG_SZ = Hours CRLOverlapUnits REG_DWORD = 5 ClockSkewMinutes REG_DWORD = a CRLDeltaPeriod REG_SZ = Days CRLDeltaPeriodUnits REG_DWORD = 1 CRLDeltaOverlapPeriod REG_SZ = Minutes CRLDeltaOverlapUnits REG_DWORD = 0
Setting the CRLOverlapUnits parameter in the registry to 0 activates the default algorithm—CRL lifetime is 10% longer than the publication inter- val—for the calculation of the CRL overlap. The same is true for delta CRLs. In this example, the default algorithm has been activated for delta CRLs.
CRL Distribution Points Windows PKI supports three CDP types: LDAP, file system, and HTTP-based CDPs. CDPs are used for both CRL and delta CRL distribution. For CRL downloads within your AD infrastructure, LDAP CDPs are the best choice. If you share PKI-enabled applications and certificates with external entities that do not have access to your AD, or with entities that are not using a Windows operating system, consider alternative CDP locations such as Web pages. In that case you use HTTP-based CDPs. Make sure that these CDPs do not reveal internal namespaces to the external entities.
Publishing the CRL of an Offline CA The following is a procedure for publishing the CRL of an offline CA:
Bring the offline CA online.
Start the CA MMC snap-in and publish the CRL to the local file system.
Copy the CRL to a floppy disk or another removable medium.
Shut down the CA.
Publish the CRL at the different CDPs.
For file system and HTTP CDPs, copy the CRL from the floppy disk or other removable medium to the appropriate file system location.
For LDAP CDPs, copy the CRL to the file system, then use certutil together with the -dspublish switch to publish the CRL to AD.
To ensure revocation information redundancy and to make CRLs available through more than one location, it is a best practice to define multiple CDP types (LDAP, HTTP, and so forth). An AD-rooted LDAP CDP automatically provides redundancy (but only on the AD level) because the CRL is replicated in the AD to all domain controllers in the forest. Also, an LDAP CDP refers to a location in the AD configuration naming context, which is available on all AD DCs. To provide the same level of redundancy with HTTP CDPs, add a virtual Web server name pointing to several physical Web servers to the CDP.
Root CA certificates must have an empty CDP. The CDP point is always defined by the certificate issuer (because this is also the entity that is issuing the CRL). Because the root’s certificate issuer is the root CA itself, it does not make sense to include a CDP in the root CA certificate.
The CDPs of an offline CA must point to a location different from the server hosting the offline CA. Otherwise, users would never be able to download an offline CA’s CRLs.
To make these CDP changes to a root CA’s and an offline CA’s certificate, you must define the CDP settings in a capolicy.inf configuration file and make this file available on the CA machine during the CA installation. The capolicy.inf file and how to use it were explained in Chapter 14.
The CDPs of the certificates a CA issues are configured in the Extensions tab of the CA properties dialog box, which is available from the CA MMC snap-in. You can also change these settings from the command line using the following certutil commands:
certutil -setreg CACRLPublicationURLs “<list of CDPs>”
To define CDPs, you can use text string variables that are formatted using the replaceable parameter syntax. Microsoft added these variables to make the life of a CA administrator easier. The variables are also referred to as replacement tokens and are defined in Table 16.5.
|
Text String Variable |
Number Variable |
Value |
|---|---|---|
|
<ServerDNSName> |
%1 |
DNS name of CA |
|
<ServerShortName> |
%2 |
NetBIOS name of CA |
|
<CaName> |
%3 |
Name of CA |
|
<CertificateName> |
%4 |
Certificate Name |
|
<ConfigurationContainer> |
%6 |
Location of AD configuration container |
|
<CaTruncatedName> |
%7 |
Sanitized name of CA |
|
<CRLNameSuffix> |
%8 |
CRL base file name and renewal extension |
|
<DeltaCRLAllowed> |
%9 |
Substitutes Delta CRL name suffix for CRL name suffix |
|
<CDPObjectClass> |
%10 |
Used in LDAP URLs for CDP extension |
|
<CAObjectClass> |
%11 |
Used in LDAP URLs for AIA extension |
In Windows Server 2003 PKI, Microsoft offers a new interface (illustrated in Figure 16.9) that facilitates the creation of CDPs using the replacement tokens. In the registry, these tokens are translated into number variables. The number variables must be used when you are using the replacement tokens in a capolicy.inf configuration file or in a batch file. The same tokens can be used for AIA and cross-certificate distribution point definition.
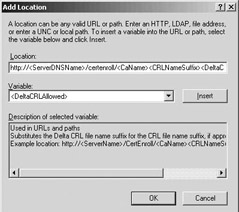
Figure 16.9: Defining CDPs using the replaceable parameter syntax.
If an offline CA is not connected to the network and you provide an AD-rooted CDP, you must manually change the value of the %6 replacement token. The %6 replacement token holds the location of the AD configuration container. You can do so by typing:
certutil.exe –setreg caDSConfigDN <path to AD configuration naming context>
For example:
certutil.exe –setreg ca DSConfigDN CN=Configuration,DC=mydomain,DC=com
The following are examples of an LDAP, file system, and HTTP CDP as they are defined in the CA properties (using the replaceable parameter syntax) and how these will show up in the CDP certificate extension of a certificate issued by a CA named ResearchCA located on a machine called myserver. The HTTP CDP is published on a Web server called mywebserver.mydomain.net:
Ldap:/// CN:<CATruncatedName><CRLNameSuffix>,CN=<ServerShortName> ,CN=CDP,CN=Public Key Services,CN=Services,<ConfigurationContainer>,<CDPObject Class>
will show up as:
URL=ldap:/// CN=ResearchCA,CN=Myserver,CN=CDP,CN=Public%20Key%20Services, CN=Services,CN=Configuration,DC=mydomain,DC=net?certificate RevocationList?base?objectClass=cRLDistributionPoint File://\<ServerDNSName>CertEnroll <CaName><CRLNameSuffix><DeltaCRLAllowed>.crl
will show up as:
URL=file://\mywebserver.mydomain.net/CertEnroll/ ResearchCA.crl Http://<ServerDNSName>/CertEnroll/ <CaName><CRLNameSuffix><DeltaCRLAllowed>.crl
will show up as:
URL=http://mywebserver.mydomain.net/CertEnroll/ ResearchCA.crl
Other revocation-related settings By default, a Windows CA automatically removes expired certificates from a CRL. In some PKA scenarios, it is desirable to maintain expired certificates on the CRL. To do so, you can use the following certutil command:
certutil –setreg caCRLFlags +CRLF_PUBLISH_EXPIRED_CERT_CRLS
By default, a Windows CA maintains expired CRLs in the CA database and in the AD. This is a best practice for long-term validation and auditing purposes. You can remove expired CRLs from the CA database by using the certutil command listed below. This only applies to the very last CRL the CA publishes for a given CA certificate.
certutil –setreg caCRLFlags + CRLF_DELETE_EXPIRED_CRLS
Authority information access settings A certificate’s Authority Information Access (AIA) fields hold pointers to storage locations for CA certificates. As explained in Chapter 15, they play an important role in the certificate validation process.
For the certificates a CA issues, the AIA settings are—like the CDP settings—configured from the Extensions tab in the CA properties, available from the CA MMC snap-in (illustrated in Figure 16.10). You can also use the following certutil command line:
certutil -setreg CACACertPublicationURLs “<list of AIAs>”
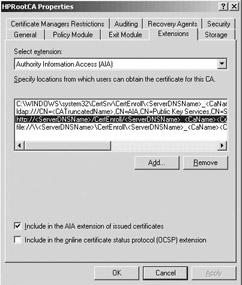
Figure 16.10: Configuring AIAs from the CA properties.
As for CDPs, you can specify the AIA settings in a CA’s proper certificate in the capolicy.inf file; how to do this was explained in Chapter 14. In any case, when configuring AIA settings, you can also use the replaceable parameter syntax and the replacement tokens as they were defined earlier.
As for CDPs, the AIAs of the certificates an offline CA issues must point to a location different from the server hosting the offline CA. Otherwise, users would never be able to download an offline CA’s certificate. If the offline CA is not connected to the network and you provide an AD-rooted AIA, make sure you change the value of the %6 replacement token (location of the AD configuration container) by typing:
certutil.exe –setreg caDSConfigDN <path to AD configuration naming context>
For example:
certutil.exe –setreg ca DSConfigDN CN=Configuration,DC=mydomain,DC=com
An AIA storage location can hold more than a single CA certificate. An LDAP-rooted AIA storage location can be used to download all CA certificates available from the AIA at once. This is because in the AD, AIA CA certificates are stored in a multivalued attribute called caCertificate of a CA object. When dealing with an HTTP-rooted or file system–rooted AIA storage location, only a single CA certificate can be downloaded at once. This is because HTTP and file system AIA pointers must point to individual CA certificates—they always end in a .cer or .crt certificate extension.
Other certificate characteristics The bulk of the certificate characteristics (with the exception of the CDP and AIA extension) can be configured from the Certificate Templates MMC snap-in. Remember that this is only true for version 2 certificate templates. Certificate templates and their properties were covered in Chapter 13.
Two very important certificate characteristics are the certificate lifetime and renewal period. When planning for these characteristics, you must consider the following:
-
The trust your organization has in the certificate subjects: If you are issuing certificates to users of your corporate extranet, the certificate lifetime should be shorter than when you are issuing certificates to users of your corporate intranet. Generally, the level of trust that an organization has in its internal users is higher than the level of trust it has in the external users of the corporate IT infrastructure.
-
Certificate lifetime impacts the number of certificate renewal requests that are sent across your network. In environments with limited network bandwidth (e.g., when users in a remote site are connecting to a CA across a slow WAN), this can be a reason to lengthen certificates’ lifetimes.
CA administrative delegation and role separation Windows Server 2003 PKI provides a role-based administration model. Also, it allows for role and task separation between the different CA administrators. As will be explained next, this role-based model piggybacks on the Windows access control model (permissions and user rights). This new administration model is in line with the role definitions defined in version 1.0 of Certificate Issuing and Management Components (CIMC) Family of Protection Profiles. The latter can be downloaded from http://csrc.nist.gov/pki/documents/CIMC_PP_20011031.pdf.
To assign a PKI role to a user or group, you must assign the role’s corresponding security permissions or user rights to the user or group. Permissions can be set from the Security tab in the properties of the CA object (accessible from the CA MMC snap-in), as illustrated in Figure 16.11.[1 ]User rights can be set from the GPO MMC snap-in. Table 16.6 shows the administrative roles and their associated permissions/user rights available in Windows Server 2003 PKI. Table 16.7 shows the tasks associated with every administrative role.
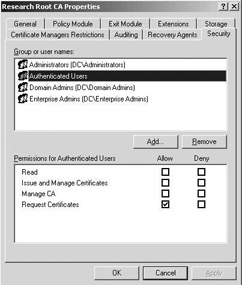
Figure 16.11: Setting CA object permissions.
|
Administrative Role (CIMC Equivalent) |
Associated Permissions—User Rights |
Meaning |
|---|---|---|
|
CA Administrator |
Manage CA permission |
Configure and maintain the CA. This includes the ability to assign all other CA roles and renew the CA certificate. |
|
Certificate Manager (Officer) |
Issue and manage Certificates CA permission |
Approve certificate enrollment and revocation requests. |
|
Backup Operator (Operator) |
Back up files and directories and restore files and directories user rights |
Perform system backup and recovery. |
|
Auditor (Auditor) |
Manage auditing and security log user right |
Configure, view, and maintain audit logs. |
|
Enrollees |
Request Certificates CA permission |
Enrollees are clients who are authorized to request certificates from the CA. |
|
Read |
Read CA permission |
Allows an entity to read records from the CA database. |
|
Activity |
Local Admin |
CA Admin |
Cert Manager |
Backup Operator |
Auditor |
|---|---|---|---|---|---|
|
Install CA |
X |
— |
— |
— |
— |
|
Configure policy and exit module |
— |
X |
— |
— |
— |
|
Stop and start the Certificate Services service |
— |
X |
— |
X (only stop) |
— |
|
Configure extensions |
— |
X |
— |
— |
— |
|
Configure roles |
— |
X |
— |
— |
— |
|
Renew CA keys and certificates |
X |
— |
— |
— |
— |
|
Define key recovery agents |
— |
X |
— |
— |
— |
|
Configure Certificate Managers restrictions |
— |
X |
— |
— |
— |
|
Delete single row in database |
— |
X |
— |
— |
— |
|
Delete multiple rows in database |
X |
— |
— |
— |
— |
|
Enable role separation |
X |
— |
— |
— |
— |
|
Issue and approve certificates |
— |
— |
X |
— |
— |
|
Deny certificates |
— |
— |
X |
— |
— |
|
Revoke certificates |
— |
— |
X |
— |
— |
|
Reactivate certificates placed on hold |
— |
— |
X |
— |
— |
|
Enable, publish, or configure CRL schedule |
— |
X |
— |
— |
— |
|
Recover archived key* |
— |
— |
X |
— |
— |
|
Configure audit parameters |
— |
— |
— |
— |
X |
|
Audit logs |
— |
— |
— |
— |
X |
|
Back up system |
— |
— |
— |
X |
— |
|
Restore system |
— |
— |
— |
X |
— |
|
Read CA database |
X |
X |
X |
— |
X |
|
Read CA configuration information |
X |
X |
X |
X |
X |
* Extracting the recovery blob from the CA database requires certificate manager privileges. Decrypting the blob and extracting the private key require a Key Recovery Agent (KRA) certificate; see also Chapter 15.
On a default Windows Server 2003 CA installation, the CA roles are assigned and modified by local administrators on a stand-alone machine or Enterprise Admins and Domain Admins when the CA is part of a domain.
CA Administrators have the Manage CA and Issue and Manage Certificates permissions on the CA object. Local administrators, Enterprise Admins, and Domain Admins are CA Administrators by default on an Enterprise CA. Only local administrators are CA Administrators by default on a stand-alone CA. If the stand-alone CA is joined to an AD domain, the Domain Admins are also CA Administrators.
The local administrator will always have full control of the CA system and cannot be blocked from taking control of the CA. Local administrator privileges are also required for tasks like CA key and certificate renewal, enabling role separation, and so forth.
Certificate Managers are the accounts that have been assigned the Issue and Manage Certificates permission in the security properties of the CA object. Certificate Manager roles can be fine-tuned from the CA MMC snap-in: You can restrict which users and/or groups’ certificates that a Certificate Manager group can manage. To do so, open the properties of the CA object, and then go to the Certificate Managers Restrictions tab (as illustrated in Figure 16.12).
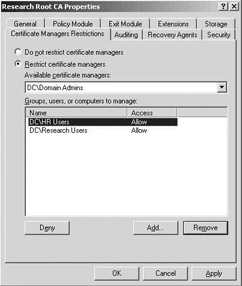
Figure 16.12: Assigning certificate managers restrictions.
The Backup Operator role is based on the system backup user right. A CA Backup Operator has the ability to stop the CA service but not start it. The Auditor role is based on the system audit user right. By default, the local system administrator has these user rights.
The Enrollee role is based on the Request Certificates permission on the CA object. The Read role is based on the Read permission on the CA object. See Table 16.7
Windows Server 2003 PKI also allows for strict role separation between the different administrative roles. If role separation is enabled, a user can only be assigned to a single role. If a user is assigned to multiple roles and attempts to perform a CA administrative operation, the operation will be denied. To enable role separation, type the following commands at the command line:
certutil -setreg caRoleSeparationEnabled 1net stop certsvcnet start certsvc
To disable role separation, type the following:
certutil -delreg caRoleSeparationEnablednet stop certsvcnet start certsvc
To see whether role separation is enabled, type the following:
certutil -getreg caRoleSeparationEnabled
CA server hardening A CA’s private key is the most critical element of PKI security. If a root or intermediate CA’s private key is compromised, the entire or part of your PKI-trust infrastructure falls down. The security level provided for a CA’s private key will also have an important impact on the amount of trust people have in the CA. This is why it is so important to store the CA’s private key securely, to keep root and intermediate CAs offline, and to harden your CA server by boosting its physical, logical, communications, and organizational security.
-
Physical security: Install Certificate Servers on computers that are located in secure areas with physical access control and adequate protection against fire, power loss, and other disasters.
-
Logical security: In a Windows Server 2003 environment, logical security depends on the quality of the operating system’s authentication, access control, and auditing system.
-
You can provide high-quality authentication by equipping all servers with smart-card readers, which provide two-factor authentication.
-
You can implement strict access control settings on all of the CA server’s resources. You must lock down the server wherever possible and not install any unneeded services or software components. A good resource for Windows Server 2003 hardening is the Windows Server 2003 Security Guide available from the Microsoft Web site.
-
You can use the built-in Windows and CA auditing system and the Security Configuration and Analysis (SCA) tool to audit the security- and PKI-related events on Windows Server 2003 machines.
-
Communications security: To provide communications security for the CAs (issuing CAs or other online CAs) connected to your production network, you can install them on a separate subnet or behind a dedicated firewall or router that filters all non-PKI related traffic.
-
Organizational security: Make the CA administrators and operators aware of the important security role of the CA. Convince them that this is not an ordinary file and print server but a server that is used to secure the rest of your corporate IT environment.
CA fault tolerance
Neither Windows 2000 PKI nor Windows Server 2003 PKI supports CA service or database clustering. Also, a Windows 2000 or Windows Server 2003 machine can only host a single CA instance.
Certificate enrollment fault tolerance is provided when using multiple enterprise CAs in an AD environment. AD-enabled PKI clients can query the AD to find out about the location of an enterprise CA and can contact another enterprise CA when one is not available.
Revocation checking fault tolerance can be provided by making sure that you can always—independent of the CA’s availability—issue a new CRL and make it available to your PKA and PKI clients. In Windows PKI, this is possible thanks to a feature known as CRL resigning.
CRL resigning allows you to issue a new CRL using the old CRL provided you have access to a copy of the CA’s private key. A CA’s private key can be exported using the Certification Authority Backup Wizard, which can be accessed by right-clicking the CA object in the CA MMC snap-in and then selecting All TasksBack up CA. In the wizard, make sure that you select the “Private key and CA certificate” option (as illustrated in Figure 16.13). The wizard will save the exported private key and certificate in a PKCS#12-formatted file (*.p12). The old CRL can always be retrieved from a CDP. To resign an old CRL, use the following certutil command:
certutil -sign <old CRL name> <resigned CRL name>
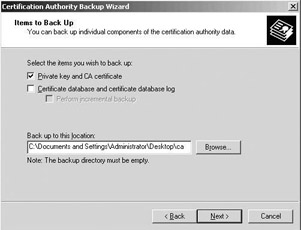
Figure 16.13: Exporting a CA’s private key and certificate.
Defining public key policy settings (GPO)
Windows Server 2003 GPO objects include the following PKI-related entries: Encrypting File System, Automatic Certificate Request Settings, Trusted Root Certification Authorities, Enterprise Trust, and Autoenrollment Settings. They are located in the Windows SettingsSecurity Settings Public Key Policies GPO container.
The Encrypting File System GPO container is used to define accounts that have the ability to recover encrypted EFS data. The Automatic Certificate Request container is used to define machine certificate autoenrollment settings. The Trusted Root Certification Authorities container is used to distribute trusted root CA certificates to clients. The Enterprise Trust container is used to define Certificate Trust Lists (CTLs). The Autoenrollment object is used to define user autoenrollment settings.
Table 16.8 shows on which GPO level (domain, site, OU, or local) and for which GPO portion (user or computer) the PKI-related GPO settings are available. GPO settings that are defined on the machine level are shared with all users logging on to that machine and all services running on it.
|
GPO Level |
User GPO Portion |
Machine GPO Portion |
|
|---|---|---|---|
|
Encrypting File System |
Domain Site OU Local |
— — — — |
X X X X |
|
Automatic Certificate Request |
Domain Site OU Local |
— — — — |
X X X — |
|
Trusted Root CAs |
Domain Site OU Local |
— — — — |
X X X — |
|
Enterprise Trust |
Domain Site OU Local |
X X X — |
X X X — |
|
Autoenrollment |
Domain Site OU Local |
X X X — |
X X X — |
[1 ]The Security tab shows a simplified view of the ACL editor; there is no advanced view (which was available for a Windows 2000 CA).
Applies to
- Windows Server 2003,
- Windows Server 2003 R2,
- Windows Server 2008,
- Windows Server 2008 R2,
- and Windows Server 2012.
This article describes best practices and provides procedures for key archival and recovery operations with certification authorities (CAs) in Active Directory® Certificate Services (AD CS) in Windows Server® operating systems.
Table of Contents
- Applies to
- Key archival and recovery
- Overview / Survival Guide
- Media Type/Task/Feature 1
- References
- EFS data recovery
- Choosing between data recovery and key recovery
- System requirements for automated key archival and recovery
- Key Recovery Best Practices
- Protecting Key Recovery Agent Keys
- Renewing Key Recovery Agent Certificates
- Auditing Key Recovery
- Other Best Practices
- Understanding Manual Key Archival
- Exporting Keys and Certificates
- Exporting Keys from the MMC
- Import a Key Manually on a CA
- Understanding Automatic Key Archival
- Understanding the Archival Process
- Certificate Request
- CA Exchange Certificate Retrieval
- CA Exchange Certificate Generation
- Restricting Key Archival
- Private Key Payload
- Key Verification
- Key Encryption
- Key Archival
- Understanding User Key Recovery
- Understanding Role Separation
- Understanding the Key Recovery Agent Role
- Key Recovery Agent Certificate
- Understanding the Key Recovery Process
- Finding Recovery Candidates
- Finding Recovery Candidates by Using Command-Line Tools
- Finding Recovery Candidates by Using the Certification Authority MMC Snap-In
- Key Recovery
- Retrieving the Key BLOB from the CA Database
- Recovery Batch File
- CA Officer Does Not Have a KRA Certificate
- Setting the Timeout Option for Recovery Commands
- Importing Recovered Keys
- Implementing Key Archival Walkthrough
- Enrolling a Key Recovery Agent
- Configuring the Certificate Templates
- Certificate Template Permissions
- Smart Card Support
- Configuring an Enterprise CA to Issue KRA Certificates
- Enrolling a User with a KRA Certificate
- KRA Enrollment with Certificates MMC
- Approving the Request
- KRA Web Enrollment
- Configuring the CA to Allow Key Archival
- Enabling a Key Recovery Agent
- Configuring Certificate Managers
- Key Archival and renew with the same key
- Troubleshooting
- Event Log Messages Related to Key Archival and Recovery
- Loading KRA Certificates
- KRA Certificate Status
- Importing Exchange KMS Export File
- Certificate Template Not Supported by the CA
- Client CSP Does Not Permit Key Export
- Certification Authority CSP Not Supported for Key Archival Functions
- Certificate and Key Import Issues
- Unable to Recover User
- Missing KRA Certificate in the CA Registry
- Appendix A: Certificate Request Structure
- ASN.1 Structure
- Understanding the PKCS #7 Message Content Structure
- Understanding the controlSequence TaggedAttribute Element
- Understanding the reqSequence TaggedRequest Element
- Understanding the cmsSequence TaggedContentInfo Element
- Understanding the otherMsgSequence OtherMsg Element
- Understanding the Signatures Structure
- Understanding the Authenticated Attributes Structure
- Understanding the Unauthenticated Attributes Structure
- Performing Binary Export for a Request
- Binary Request Export Using the Certification Authority MMC Snap-In Walkthrough
- Binary Request Export Using the CertUtil.exe Command-Line Tool Walkthrough
- CMC Request and Response Examples
- Recovery BLOB Structure
- ASN.1 Structure
- Appendix B: Additional Information
Active Directory Certificate Services (AD CS) in Windows Server 2003 Enterprise operating system introduced significant advancements for data protection, and private key archival and recovery. Starting with the Windows Server 2008 Enterprise operating system new
capabilities and advancements were added, including advanced cryptography support so that data protection and key archival operations can be performed using the latest cryptographic algorithms and longer key lengths.
Encrypting File System (EFS) supports the use of Data Recovery Agents (DRAs) to decrypt files that have been encrypted by other users. Introduced with Windows Server 2003, AD CS includes key archival and recovery capabilities. With both data recovery and
key recovery available as options, organizations can deploy the recovery technology that best meets their business requirements.
AD CS key archival can be performed either manually or automatically. Manual key archival requires users to export private keys and send them to a CA Administrator who imports them to the protected CA database. Automatic key archival is performed during
the certificate enrollment process when a certificate template is configured to require key archival. During the certificate enrollment process, the private key is securely sent to the CA as part of the certificate request and is archived by the CA. For more
information about manual key archival, see
Understanding Manual Key Archival later in this article.
return to top
Key archival and recovery
Overview / Survival Guide
An overview/survival guide topic provides a guided view of a technology, solution or technology-related concept or activity through links to internal (TechNet Wiki) and external Microsoft and community information. For example, an overview of hyper-v
for beginners or SQL Server pivot table survival guide. Typically, this type of topic will grow over time as other users contribute useful links and descriptions so it is okay to start with a short topic!
Begin with a description of the problem using general terms and broad concepts. This will provide context for the solutions that follow as well as set expectations for the reader. In separate sections, provide scoped guidance using appropriate headers by
media type (videos, documents, white papers, blogs), task (plan, design, develop, deploy, maintain), feature (join, insert, delete, update, select), etc.
Media Type/Task/Feature 1
Describe the media type, task or feature. Media type requires less description, other classifications may require more.
- First Link. Brief description of how reference is useful.
- …
Repeat as needed.
References
Increase the credibility of the article by including useful references. This includes references used for the solution as well as relevant links to the TechNet Library, your blog, and other sites in community.
- First Reference. Brief description of how reference is useful.
- …
Don’t forget to tag the article with appropriate keywords so other users can find and learn from your experiences!
Key recovery requires that a certificate’s private key must be archived. Key recovery does not recover encrypted data or messages, but does enable a user or administrator to recover keys that can subsequently be used for data recovery, that is, data decryption.
The following steps are an example of a key archival and recovery scenario.
- A user submits a certificate request to an enterprise CA with a copy of the private key included in the certificate request. The CA encrypts and archives the certificate’s private key in the CA database and issues the certificate to the user.
- The certificate is used to encrypt data files; for example, by using EFS.
- Because the certificate’s private key is required to decrypt files that have been encrypted with the certificate, corruption of the key or loss of access to the key results in loss of the decrypted data. Under these circumstances a Certificate Manager can
retrieve the archived private key from the CA database and, with assistance from a key recovery agent, can decrypt the private key to perform data recovery procedures or securely provide the key to the user. - The recovered private key can be imported to a user’s local keys store to restore access to the key and encrypted files.
return to top
EFS data recovery
During the encryption process, EFS generates a random symmetric encryption key for each file that it encrypts. This symmetric encryption key is referred to as a file encryption key (FEK) and is used for both encryption and decryption of the data in a file.
After the data in the file is encrypted, the FEK is encrypted using the public keys associated with each account that is included in the file’s access control list (ACL). All of the encrypted FEKs are stored in the encrypted file with the encrypted data. In
this way, any of the accounts with access to the file can also decrypt the file by using their private key to decrypt the FEK.
Because an encrypted file can be decrypted only by using a private key that can decrypt the file’s FEK, encryption of a file creates a risk of data loss if the owner’s access to their private key is lost; for example, in the case of data corruption, a lost
or stolen smart card, or when the owner of the private key leaves the organization without providing access to the key. An organization can mitigate the risk of data loss by using data recovery agents and creating a data recovery policy to define secure data
recovery procedures. The data recovery agents’ public keys, along with the file owner’s public key, are used to encrypt the file’s FEK. This ensures that, in addition to the file owner, there is also another individual that can decrypt the file’s data. Because
of the security implications of having data recovery agents, it is important to define secure processes and procedures for data recovery.
For more information about data recovery, see
Data Recovery and Encrypting File System (EFS) (http://go.microsoft.com/fwlink/?LinkID=153668).
return to top
Choosing between data recovery and key recovery
Whether an organization chooses data recovery or key recovery depends on the organization’s requirements and policies. Each technology can be implemented independently or they can be used together. For example, some organizations may have
policies that restrict access to a private key to only the owner of the key. Key recovery would not be consistent with this policy. Likewise, some organizations may have policies restricting access to data to only the individual that originated the data. Neither
key recovery nor data recovery is consistent with such a policy.
Some key considerations are:
- Key recovery
- Requires access to private keys by individuals other than the key owner.
- Some private keys can be used for digital signatures, which could enable impersonation of the private key’s owner.
- Private keys can be recovered regardless of which applications use the keys.
- Key recovery also enables EFS data recovery.
- Data recovery
- Requires access to encrypted data by individuals other than the data owners.
- Supported by EFS but not by all encryption systems.
|
Security Note |
|---|
|
A private key that is known or suspected to be compromised should be revoked as soon as possible. Data encrypted with the compromised key should be recovered by using the revoked key and encrypted with a new key. |
For more information about the differences between key recovery and data recovery, see
Key Recovery vs Data Recovery Differences.
return to top
System requirements for automated key archival and recovery
- Active Directory® Domain Services (AD DS) domain with at least Windows Server 2003 schema extensions.
- Enterprise CA running on one of the following operating systems:
- Windows Server 2003 Enterprise Edition or Windows Server 2003 Datacenter Edition
- Windows Server 2008 Enterprise or Windows Server 2008 Datacenter
- All editions of Windows Server 2008 R2
- All editions of Windows Server 2012
- Version 2 or version 3 certificate templates.
- Enrollment can be performed on any of the following operating systems:
- Windows 2000 and Windows Millennium Edition — Enrollment with key archival in Windows 2000 and Windows Millennium Edition can be performed only by using CA Web enrollment pages and the private key must be marked as exportable during enrollment.
- Windows XP
- Windows Vista
- Windows 7
- Windows 8
- Windows Server 2003
- Windows Server 2003 R2
- Windows Server 2008
- Windows Server 2008 R2
- Windows Server 2012
return to top
Key Recovery Best Practices
Best practices should be followed when implementing key archival and recovery in an organization. First, key recovery by an administrator implies impersonation. In other words, the act of recovering an archived private key enables the person performing the
recovery (in most cases, an administrator) to access and potentially to use the private key of another individual. Because of this potential, administrators who perform key recovery should be highly trusted. Implementation and operation of a key archival and
recovery solution should be carefully planned and monitored for security purposes.
return to top
Protecting Key Recovery Agent Keys
How KRA keys are protected comes down to a balance between security versus ease of administration and management. KRA private keys are critical to key recovery and should be both protected from compromise and guarded against loss or misplacement.
For smaller organizations that have not implemented role separation between CA administrators and KRAs, it is recommended to implement three to five KRA Certificates and to store them in a central place, either on dedicated hardware or smart cards.
For larger organizations that have implemented a KRA role, ensure that there is a process for tracking and renewing KRA certificates.
return to top
Renewing Key Recovery Agent Certificates
The default lifetime of a KRA certificate is two years. When a KRA certificate expires, the keys must be preserved to maintain recoverability of content that was encrypted using keys currently protected with this KRA certificate. However, the certificate
must be renewed, or a new certificate enrolled, to preserve automatic key recovery functionality. The certificate can be renewed with the same keys, renewed with new keys, or new KRA certificates can be enrolled. If a KRA certificate and its private key are
known not to have been compromised, it may be a good choice to renew with the same key. This means the number of KRA keys the organization must keep track of remains at a minimum. If a key has not been compromised, it can still be used for a number of years,
depending on the strength of the cryptographic algorithm used.
return to top
Auditing Key Recovery
Since the act of retrieving an encryption key and using a KRA certificate to decrypt it is highly sensitive, consider enabling auditing of these events. This can be done in the Certification Authority Microsoft Management Console (MMC) by right-clicking
the CA node, choosing Properties, clicking the Auditing tab, and selecting “Store and retrieve archived keys”. Once this setting is enabled, an event will appear in the Security log for each key archival and/or recovery action.
return to top
Other Best Practices
- If a key is known to be compromised, it should be revoked immediately and never used again.
- Keys or certificates that are used to secure high-value transactions or are identified as high-value certificates should not be recovered except under extreme circumstances.
- Private keys that are used for signing should never be archived or recovered because the potential for more than one person to possess and use a private key introduces non-repudiation issues.
- When a key has been compromised or lost, it should be revoked before allowing key recovery. Despite key compromise, it may be necessary to recover a key for the purpose of decrypting old data and encrypting with a new key.
- Issue the least number of certificates and key pairs possible to ease key management and reduce user confusion.
- Issue encryption certificates with longer lifetimes than signing certificates.
- Issue only one valid key pair for a given application purpose at one time.
- Develop a recovery process that includes role separation of Certificate Managers and KRAs.
- Minimize the number of CAs that archive keys for a certificate purpose, that is, if possible, do not archive keys for users across a large number of CAs because this can make recovery operations confusing.
- If performing key archival over the Certification Services Web enrollment pages, it is important to use Secure Sockets Layer (SSL) on the enrollment Web site to protect the enrollment traffic from tampering or malicious interception.
- Use roaming user profiles or certificate roaming, if possible, to reduce user confusion, accidental key loss, and the need for manual import and export operations to enable key roaming.
return to top
Understanding Manual Key Archival
Manual key archival is supported in Active Directory Certificate Services as a separate operation from enrollment while still offering centralized key archival. Users may export their private keys into *.pfx files [Public Key Certificate Standard (PKCS)
#12 format] or through Outlook into the *.epf format. The following section describes the procedure to export private keys manually from a Windows client so that they may be manually archived on the CA. This is especially useful for users who have enrolled
with third-party CAs that do not support key archival.
Exporting Keys and Certificates
Keys and certificates may be exported to Windows clients by one of three methods.
- PKCS #12 (*.pfx file) export from the Certificates MMC snap-in on Windows 2000, Windows XP, Windows Server 2003, Windows Vista, or Windows Server 2008, Windows Server 2008 R2, Windows Server 2012.
- PKCS #12 (*.pfx file) export from the Outlook 2003 or 2007 client.
- *.epf file format from the Outlook 2000 or Outlook 2002 client.
If a user has enrolled for Exchange Advanced Security with version 1 certificates (first offered with Exchange 5.0 Key Management Server), direct export from Outlook into the *.epf file format will be necessary. X.509 version 1 certificates and keys may
not be exported into PKCS #12 format on the Windows client.
If only X.509 version 3 certificates have been used, the PKCS #12 format may be used.
return to top
Exporting Keys from the MMC
To export the certificate and private key while logged on as the user
- Click the Start button, and then click Run.
- Type mmc.exe, and then press Enter. An empty MMC shell appears.
- Select the Console File menu, and then select Add/Remove Snap-in.A dialog box appears with a list of all the snap-ins that have been added to this MMC shell. (For Windows XP users only) Click
Add. - A list appears with all the registered snap-ins on the current machine. (starting in Windows Vista, the list appears without clicking
Add). - Click the Certificates snap-in and click Add, choose
My User Account, and then click Finish. (For Windows XP users only) In the
Add/Remove Snap-in dialog box, click Close. - In the Add/Remove Snap-in dialog box, click OK.
- The MMC now contains the personal certificate store for the currently logged-on user.
- Expand the tree view of the certificate store. Click Certificates — Current User,
Personal, and then Certificates. When you click the
Certificates folder on the left, the right-hand pane will display a list of all the certificates for the currently logged-on user. - Right-click the certificate intended for export.
- Click All Tasks, and then click Export on the context menu. A wizard will guide you through the export process.
- Click Yes, export the private key, and then click Next.
- When exporting a private key, the *.pfx file format is used. The *.pfx file format is based on the PKCS #12, which is used to specify a portable format for storing or transporting a user’s private keys, certificates, and miscellaneous secrets.
- Select the appropriate check boxes, and then click Next. As a best practice, strong private key protection should also be used as an extra level of security on the private key when exporting. The private key should be deleted only if you
are performing archival and will no longer use the key on that machine. - The *.pfx file format (PKCS #12) allows a password to protect the private key stored in the file. Choose a strong password, and then click
Next. - The last step is to save the actual *.pfx file. The certificate and private key can be exported to any writeable device, including a network drive or disk. After typing or browsing for a file name and path, click
Next.
Once the *.pfx file and private key have been exported, the file should be secured on a stable media and transferred in a secure manner to the CA on which the key will be imported in accordance with the organization’s security guidelines and practices.
return to top
Import a Key Manually on a CA
To import a key manually on a CA, on the CA server, open a command prompt window, and run the following command.
C:CertUtil.exe –f –importKMS <name of file>
Note: The –f flag is required when the key and certificate pair have not been issued from the CA in question.
The file may be in one of three formats.
- KMS export file
- PKCS #12 format (*.pfx file)
- Outlook export format (*.epf)
The previous command will work only after the CA was configured for key archival. For more information about the actions required for enabling key archival, see
Implementing Key Archival Walkthrough.
return to top
Understanding Automatic Key Archival
The following sections document in detail how the key archival and key recovery processes work in Windows Server 2003 and later versions of Certificate Services, as well as step-by-step guides for implementing the features in production.
return to top
Understanding the Archival Process
The general steps in the process of certificate enrollment with automatic archival of a user’s private key are described in the following steps and in Figure 5.
- The client finds CAs in Active Directory Domain Services (AD DS) enrollment services container in the Configuration partition.
- The client makes an authenticated Distributed Component Object Model (DCOM) connection to the CA and requests the CA’s Exchange certificate (encryption certificate).
- The CA sends the exchange certificate to the client.
- The client validates that the CA’s exchange certificate has been signed by the same key as the CA signing certificate and performs a revocation status check. This ensures that only the intended CA may decrypt the certificate request containing the private
key. - The client encrypts the private key corresponding to the request with the CA exchange certificate public key, builds a CMC request, and sends a CMC full PKI request to the CA.
- The CA validates that the encrypted private key cryptographically pairs with the public key in the certificate request.
- The CA validates the signature on the request with the public key in the request.
- The CA encrypts the private key from the user request with a random Triple Data Encryption Standard (3DES) or Advanced Encryption Standard (AES) symmetric key and then encrypts the symmetric key with one or more KRA public keys. AES will be used for the
symmetric key only if a Windows Server 2008 CA has been configured to use a CNG key provider that supports AES and the correct registry settings have been configured by entering the following commands at the command line on the CA.- certutil -setreg CAEncryptionCSPCNGEncryptionAlgorithm AES
- certutil -setreg CAEncryptionCSPSymmetricKeySize 256
- Note: that other AES key lengths supported on Windows Server 2008 are 128 and 192.
- Note: that if the CA is configured to use the AES symmetric key algorithm, ensure that all computers on which key recovery will be performed by the KRAs also support AES.
- The CA saves the encrypted key binary large object (BLOB) containing the encrypted private key and the symmetric key encrypted with one or more KRA public keys to the CA database.
- The CA processes the certificate request normally.
- The CA responds to the client with a CMC full PKI response.
- Note: Signature only keys will not be archived by default.
- Note: Denied and resubmitted requests will also not archive private keys.

return to top
Certificate Request
A certificate request can be driven from at least three different sources in Windows Server 2003 and Windows Server 2008. The sources built into the operating system are the Web browser (Microsoft Windows Internet Explorer®), the certificate enrollment wizard,
and auto-enrollment. One of the formats the certificate request uses is the CMC format for certificate requests, which supports an optional encrypted data payload. This is the format required for certificate requests with private key archival. Technically,
any client that supports the CMC protocol may enroll with an Enterprise CA and request that the private key be archived by the CA. The CA enforces the archival option through a template flag. For more information about the CMC request format, see
Appendix A: Certificate Request Structure.
return to top
CA Exchange Certificate Retrieval
Before the private key can be encrypted and delivered to the CA server, the client must first retrieve the CA’s exchange certificate. The CA exchange certificate is an encryption certificate for the CA that can be used by clients to encrypt their private
keys as part of their certificate request. The CA exchange certificate is issued by the CA itself, with a subject name set to the CA name plus a suffix to distinguish the certificate from a root CA certificate. The client will verify that the exchange certificate
is signed by the same key that issued the CA certificate; this step is performed to provide additional security and to prevent man-in-the-middle attacks. For that reason, a CA may not use a certificate issued by another CA for an exchange certificate.
return to top
CA Exchange Certificate Generation
A Windows Server 2003 or Windows Server 2008 CA will automatically generate a short-lived exchange certificate for key archival usage. Starting with Windows Server 2008, the administrator will be able to specify a CNG provider and an advanced cryptographic
algorithm to generate CA Exchange certificates. The provider name and key length are set by configuring the following registry keys, the same two keys used to specify key exchange certificate provider name and key length in Windows Server 2003 CAs.
HKEY_LOCAL_MACHINESYSTEMCurrentControlSetServicesCertSvcConfiguration{CA Name}EncryptionCSPProvider and
HKEY_LOCAL_MACHINESYSTEMCurrentControlSetServicesCertSvcConfiguration{CA Name}EncryptionCSPKeySize
Further, in Windows Server 2008, two new registry settings are introduced to configure a provider type (CNG or Cryptography API) and the CNG algorithm name.
HKEY_LOCAL_MACHINESYSTEMCurrentControlSetServicesCertSvcConfiguration{CA Name}EncryptionCSPProviderType, (set to 0 for a CAPI CSP and 1 for a CNG provider) and
HKEY_LOCAL_MACHINESYSTEMCurrentControlSetServicesCertSvcConfiguration{CA Name}EncryptionCSPEncryptionAlgorithm
By default, if the CA Exchange template is available, it will be used for extensions and the validity and overlap periods, but not for the Cryptographic Service Provider (CSP) information specified in the previous registry settings. If the validity and overlap
periods specified in the registry differ from the template, the registry values are rewritten, so there will be consistent behavior if the template is unavailable in the future. If the template is not available, hard-coded extensions will be used along with
the registry validity and overlap period settings.
If the following registry flag is configured using certutil.exe, the template must be available or the attempt to generate a CA Exchange certificate will fail. In addition, the machine object of the CA (LOCAL SYSTEM) must have Enroll access to the template.
This flag is not currently set during setup; it must be manually applied.
certutil -setreg caCRLFlags +CRLF_USE_XCHG_CERT_TEMPLATE
The CA Exchange certificate template has a default expiration of one week and a template overlap period of one day. Note that the previous settings apply to both Enterprise CAs and stand-alone CAs.
return to top
Restricting Key Archival
Certificate Services may be effectively prevented from archiving private keys through the use of qualified subordination and policy constraints. When submitting and processing a request to a parent or root CA for a subordinate CA certificate, the parent
CA may exclude the key archival policy in the subordinate CA. For more information about Qualified Subordination, see
Qualified Subordination Overview.
return to top
Private Key Payload
The encrypted private key is stored in an unauthenticated attribute as a CMS EnvelopedData object. This poses no concern from a security perspective as the private key is later validated to cryptographically match the public key in the certificate request,
which is also signed by the same private key. For more information about the format and object structure, see
Appendix A: Certificate Request Structure.
Note that in Windows Server 2008, the symmetric key used by the client can also be specified in the Certificate Templates MMC on the Request Handling tab. If “Use advanced Symmetric algorithm to send the key to the CA” is checked, the client will use the
AES algorithm. Note that you will have to ensure any CA’s that process requests based on templates with this checkbox enabled support the AES algorithm.
return to top
Key Verification
The CA must check that the encrypted private key is cryptographically associated with the public key in the certificate request. Because the client encrypted the private key using the public key from the CA’s exchange certificate, the CA can decrypt the
private key payload contained in the request. For encryption keys, the CA encrypts randomly generated data with the public key in the request, and then decrypts the data with the private key passed in the unauthenticated attributes of the CMC request. The
decrypted data is verified against the original random data. If any of the validation steps fail, or if the data does not match, the request is rejected. For signing keys, the CA will reject the request and will not archive a key that is marked for signature
only.
To verify the cryptographic association between the public and private keys, the CA loads the key pair into a CSP that supports the specified algorithms. A Windows Server 2003 CA will use the default-enhanced RSA CSP on the CA by default or a hardware CSP,
if available. Both the encrypted private key material payload and the private key loaded into the server-based CSP are securely discarded since the private key will be archived using a different key controlled by a recovery agent and is not available for the
CA after verification of the payload. The decrypted private key memory is cleared prior to freeing the memory.
Note that the Windows Vista and Windows Server 2008 operating systems introduce a new security capability called process isolation, which means that the private key material never exists in user memory space.
return to top
Key Encryption
Once the private key has been successfully verified, the CA must then encrypt the private key and archive it for future recovery. To provide separation between the recovery agent role and the CA administrator role, the certificate request process and certificate
issuance are completed after key archival has occurred. For more information about role separation, see
Configuring the CA to Allow Key Archival.
The CA will not use its own key to encrypt the private key. Instead, it will use a dynamically generated symmetric key. This symmetric key will be encrypted using a public key from a KRA certificate (or certificates) configured on the CA. Each certificate
request and private key archival operation will generate a new random 3DES or AES symmetric key using the same provider that was used to generate the CA signing key. This ensures that a hardware security module (HSM) can be used to generate the long-term keys
that protect the individual private keys. In a Windows Server 2003 CA, the symmetric key algorithm is 3DES by default and cannot be changed. In Windows Server 2008, the algorithm and key length can be specified using registry settings.
AES will be used for the symmetric key only if a Windows Server 2008 CA has been configured to use a CNG key provider that supports AES. Also, the correct registry settings must be configured by entering the following commands at the command line on the
CA (see section
CA Exchange Certificate Generation for the exact registry keys).
certutil -setreg CAEncryptionCSPCNGEncryptionAlgorithm AES
certutil -setreg CAEncryptionCSPSymmetricKeySize 256
Note: other AES key lengths supported on Windows Server 2008 are 128 and 192.
Note: if the CA is configured to use the AES symmetric key algorithm, ensure that all computers on which key recovery will be performed by the KRAs also support AES.
If multiple recovery agents are associated with the CA, the symmetric key will be encrypted individually with each recovery agent’s public key to allow any one recovery agent to perform a recovery operation. The actual KRA(s) used may randomly vary if a round-robin
selection of KRAs is chosen. For example, if a CA Administrator configures four KRA certificates on a CA for use, but requires a minimum of two KRAs to be used, when the CA service starts, a random start point in the KRA list is chosen. Two of the four KRAs
will be chosen from that start list, start point, and then for each subsequent archival operation, the list order will be incremented by two. Therefore, a round robin affect is achieved for all key archival operations. These encrypted keys along with the issued
certificate will be collectively referred to as the recovery BLOB and are stored as a PKCS #7–encrypted BLOB in the database.
return to top
Key Archival
The private key database is the same as the database used to store the certificate requests. The CA supports storing the encrypted private key along with the associated encrypted symmetric key and issued certificate. The recovery BLOB will be stored in the
same row as the signed certificate request and any other information the CA persists in its database for each request transaction. The actual encrypted BLOB is stored as an encrypted PKCS #7 BLOB. For more information about the format and object structure,
see
Appendix A: Certificate Request Structure.
The Microsoft Certification Authority uses the Microsoft Jet database engine upon which various Jet utilities may be used for maintenance purposes.
return to top
Understanding User Key Recovery
A recovery operation is initiated by an end-entity that has lost access to a private key.

The following are the key recovery steps.
- The Certificate Manager (CA Officer) locates and retrieves the user’s encrypted private key from the CA database. The encrypted BLOB is protected by access control lists (ACLs) to ensure that only a valid Certificate Manager is able to copy the BLOB from
the database. Since it is encrypted with the KRA’s public key, the Certificate Manager cannot extract the user’s private key, but it can retrieve it from the CA. The encrypted PKCS #7 BLOBs in the database contain the Issuer name and serial number of each
KRA certificate for KRA identification purposes. Once extracted, the Certificate Manager sends it to the appropriate KRA for decryption. For more information about the format and structure of the recovery BLOB, seeAppendix A: Certificate Request Structure.
- The KRA decrypts the user’s private key and stores it in a password-protected file format (PKCS #12) and sends it to the user.
- The user imports the key to the user’s local, protected, keys store.
Organizational policy determines whether a KRA and a Certificate Manager may be combined into one role or separate roles. For better security, it is recommended that the Certificate Manager and the KRA roles be separated. Because Certificate Services supports
role separation, an organization could easily implement a two-step process to recover the private key(s) of a user.
Understanding Role Separation
Role-based administration is used to organize CA administrators into separate, predefined task-based roles. It is recommended that the management roles are distributed among several individuals in your organization to ensure that a single individual cannot
compromise PKI services. Role separation enables one person to audit the actions of another person.
The Common Criteria PKI management roles in Windows Server 2003 and Windows Server 2008 include the following:
- CA Administrator. Configures and maintains the CA, designates other CA administrators and certificate managers, and renews CA certificates.
- Certificate Manager. Approves or denies certificate enrollment requests and revokes issued certificates.
- Backup Operator. Performs backups of the CA database, the CA configuration, and the CA’s private and public key pair (also known as a key pair).
- Auditor. Defines what events are audited for Certificate Services and reviews the security log for success and failure audit events that are related to Certificate Services.
Note: Role-based administration is supported by Enterprise CAs and stand-alone CAs running Windows Server 2008 and Windows Server 2003, Enterprise Edition or Datacenter Edition.
To help determine role separation, you can use the Common Criteria specification, which defines security standards for all forms of network security and includes specifications for managing PKIs.
For more information about Role Separation, see
Role-based administration. For more information on Common Criteria, see
Common Criteria Portal.
return to top
Understanding the Key Recovery Agent Role
KRAs are information technology (IT) administrators who can decrypt users’ archived private keys. An organization can assign KRAs by issuing KRA certificates to designated administrators and configure them on the CA. The KRA role is not one of the default roles
defined by the Common Criteria specifications but a virtual role that can provide separation between Certificate Managers and the KRAs. This allows the separation between the Certificate Manager, who can retrieve the encrypted key from the CA database but
not decrypt it, and the KRA, who can decrypt private keys but not retrieve them from the CA database. For more information about how to implement KRAs, see
Implementing Key Archival Walkthrough.
return to top
Key Recovery Agent Certificate
A pre-defined certificate template called “Key Recovery Agent” exists in the Windows Server 2008 and Windows Server 2003 versions of Certificate Services to support the KRA role. This certificate uses a unique “Key Recovery Agent” object identifier (OID) (1.3.6.1.4.1.311.21.6)
in the Extended Key Usage extension to identify it as a KRA certificate. A Windows Server 2003 or Windows Server 2008 CA will only use KRA certificates that have been properly formatted as per the following information, although it is not necessary for the
certificate to contain the Microsoft-specific extensions.
KRA certificates, when issued by an Enterprise CA, are automatically published in the configuration container of Active Directory. The actual certificates are published to the userCertificate attribute of the KRA object when issued to an IT administrator.
The location in the configuration container is as follows:
CN=KRA,CN=Public Key Services,CN=Services,CN=Configuration,DC=<domainname>
The KRA certificate contains the following X.509v1 fields.
- Version
- Serial Number
- Signature Algorithm
- Valid From
- Valid To
- Subject
- Issuer
- Public Key
The KRA certificate contains the following X.509v3 extensions identified in RFC 3280.
- Authority Key Identifier
- Subject Key Identifier
- Authority Information Access
- Key Usage
- Subject Alternative Name
- CDP (CRL Distribution Point)
- Extended Key Usage (Key Recovery Object Identifier = 1.3.6.1.4.1.311.21.6)
- Application Policies (Policy Identifier = Key Recovery Agent)
The KRA certificate will contain the following X.509v3 extensions specific to Microsoft.
- Certificate Template Name
- Certificate Template Information
Note: None of the extensions are marked as critical; however, the Key Recovery Object Identifier must exist in the Extended Key Usage (EKU) extension for the certificate to be used.
return to top
Understanding the Key Recovery Process
Users may require their private keys to be recovered for a multitude of reasons. Key recovery from a Windows Server 2003 or Windows Server 2008 CA may be accomplished using the command-line tool, certutil.exe.
The recovery of a private key is a manual process that requires the user(s) to contact an administrative authority to perform the necessary processes. The following best practices should be considered by any organization.
- Validate the identity of a user requesting key recovery.
- Separate the roles of CA Officer and KRA as a minimum of two physical persons.
- Develop a mechanism to securely deliver the private keys and passwords to end users. Examples could include e-mail of the *.pfx file and leaving a voice mail with the password for the *.pfx file for the user. Discussion of these best practices is beyond
the scope of this white paper.
The key recovery process consists of three major steps.
- Finding recovery candidates. In this step, the certificate manager or CA administrator locates the correct certificate entry in the CA database and obtains its serial number and the serial number of the KRA certificate(s) required to recover the key. Both
pieces of information will be required to perform key recovery. - Retrieve PKCS #7 BLOB from Database. This is the first half of the actual key recovery step, in which a certificate manager or CA administrator retrieves the correct BLOB from the CA database. This PKCS #7 BLOB contains the certificate and the encrypted
private key to be recovered. The private key is encrypted with the public key of one or more KRAs. - Recover key material and save to protected PKCS #12 (.pfx) file. This is the second half of the key recovery step, in which the holder of one of the KRA private keys decrypts the private key to be recovered and generates a password-protected .pfx file containing
the certificate and private key. - Importing recovered keys. The password-protected .pfx file is delivered out of band to the end user, and the end user imports it into his local user certificate store. Alternatively, the KRA or an administrator can perform this step on behalf of the user.
return to top
Finding Recovery Candidates
A CA Officer (Certificate Manager) can perform recovery of private key(s) using the CN (CommonName), UPN (UserPrincipalName), down-level name (domainnameusername), certificate serial number of the certificate, or an SHA1 (Secure Hash algorithm) hash (thumbprint)
of the certificate. The process is known as finding candidate certificates for recovery.
Examples:
- User1@nwtraders.com (denotes UPN)
- nwtradersuser1 (denotes the down-level name)
- Usersnuser1 (denotes a user in the default users container of Active Directory)
- User1 (denotes the CN)
- <serial number of the certificate>
- <SHA1 hash (thumbprint) of certificate>
return to top
Finding Recovery Candidates by Using Command-Line Tools
To recover a user using their CN, type the following command.
Certutil -getkey <”cn of user”> outputblob
If only one certificate has been issued to that user, that certificate and private key will be generated into the specified <outputblob> file. If more than one certificate has been issued to that CN, certutil.exe will list the serial number(s) of all the certificates
issued to that CN on a specific CA.
Example:
«user1.nwtraders.comCA1»
Serial Number: 1464be10000000000007
Subject: CN=user1, CN=Users, DC=nwtraders, DC=com
NotBefore: 1/13/2001 11:51 AM
NotAfter: 1/13/2002 11:51 AM
Template: KeyA, KeyArchival
Cert Hash(sha1): a2 7f 77 bc 2f 7b eb 26 bd 3e ed 43 b8 2a 24 04 2e 55 b8 64
Serial Number: 1464fcbc000000000008
Subject: CN=user1, CN=Users, DC=nwtraders, DC=com
NotBefore: 1/13/2001 11:51 AM
NotAfter: 1/13/2002 11:51 AM
Template: KeyA, KeyArchival
Cert Hash(sha1): 21 bd 88 2c 2a 84 0c e5 57 7b 2a bf f0 43 4b b3 ed bf 02 5a
return to top
Finding Recovery Candidates by Using the Certification Authority MMC Snap-In
A CA Officer may determine the serial number of a certificate that has been archived. To determine the serial number of an archived certificate
- Log on to a CA as a CA Officer who has Certificate Management authority of the user(s) in question.
- On the Administrative Tools menu, open the Certification Authority.
- In the console tree, expand Certification Authority, and then click
Issued Certificates. - On the View menu, click Add/Remove Columns.
- In the Add/Remove Columns dialog box, in the Available Column list, select
Archived Key, and then click Add. Archived Key should now appear in the Displayed Columns listing. - Click OK.
- In the details pane, scroll to the right and ensure that the certificate in question has a value in the Archived Key column.
- Double-click the certificate.
- Click the Details tab.
- Write down the serial number of the certificate (do not include spacing between digit pairs). This is required for recovery.
- Click OK.
- Close the Certification Authority.
return to top
Key Recovery
Key recovery is done by using the certutil.exe command-line tool. This tool is installed by default on the CA and on Windows Vista. The certutil.exe command structure was designed to perform batch and scripted processes.
return to top
Retrieving the Key BLOB from the CA Database
After performing the previous steps the serial number(s) of the certificate(s) to be recovered should be known. Key recovery is performed using the certutil.exe command- line tool. The following command will retrieve the actual recovery BLOB from the CA
database and save it to a file called “outputblob”.
certutil -getkey <serial#> outputblob
The “outputblob” is a PKCS #7 file containing the certificate and one or more copies of the private key, encrypted with the public key of one or more KRAs.
Note that the serial number(s) of the KRA certificate or certificate(s) required for key recovery are listed in the output of the
certutil -getkey command as Recipient Info.
Important: If a CA Administrator has configured the server to use, for example, three of a possible five available KRAs, certutil –getkey will list the three KRAs that were used to encrypt the selected subject’s private key. At the time of archival, the
three KRAs were randomly selected (out of five possible) by the CA to encrypt the subject’s private key. To perform the recovery operation, it will be necessary to have one of any of the KRAs whose serial numbers are listed by certutil –getkey.
To recover private key(s)
- If the CA Officer is not a KRA, the CA Officer must transfer the encrypted BLOB file to a user that holds a KRA private key for further processing.
- At the command prompt on a computer on which the KRA certificate and private key are available, the KRA should type the following command.
- Certutil -recoverkey outputblob user.pfx where:
- outputblob is the encrypted PKCS #7 file containing the key to be decrypted.
- user.pfx is the output file name for the user private keys in PKCS #12 format.
- Important: If the KRA certificate was generated using an advanced CryptoAPI Next Generation (CNG) algorithm, such as ECC, you must specify the provider using the “-CSP” flag in the “recoverkey” command. For example:
- certutil –csp “Microsoft Software Key Storage Provider” –recoverkey user.pfx
- Important: If the KRA certificate was generated using an advanced CryptoAPI Next Generation (CNG) algorithm, such as ECC, it cannot be used to provide key recovery for end-user certificates generated with third-party– (non-Microsoft) or smart card–based
CSPs.
- The PKCS #12 format allows for the private key file to be protected with a password. Certutil.exe will prompt the KRA for a password when generating the PKCS #12 file.
- The system will search for a valid private key in the store of the logged on user that corresponds to a valid KRA certificate that was used to encrypt the recovery BLOB. If the user does not have the proper private key in the user’s local store, an error
will display.
- Enter and confirm a password for the file that cannot be randomly guessed. The user should be given the password through a secure out-of-band mechanism that is separate from the file itself to ensure strong security in the recovery process.
Note: If auditing is enabled for key recovery, an event log message will be generated when a private key is recovered from the database. The event log message will be similar to the following:
- Event Type: Success Audit
- Event Source: Security
- Event Category: Object Access
- Event ID: 787
- Date: 2/19/2001
- Time: 5:23:45 PM
- User: NWTRADERSUser1
- Computer: SERVER1
- Description: Certificate Services retrieved an archived key.
- Request ID 12
return to top
Recovery Batch File
The certutil.exe -getkey command is an advanced tool that can be used with explicit commands. It can also build batch file syntax to perform a complete recovery operation. The following is the command-line syntax for certutil.exe -getkey.
Usage:
CertUtil -GetKey [Options] SearchToken [RecoveryBlobOutFile]
Retrieve archived private key recovery blob
SearchToken — Used to select the keys and certificates to be recovered.
RecoveryBlobOutFile — Output file containing a certificate chain and an associated private key, still encrypted to one or more KRA certificates.
If the following command is performed using any of the previous SearchToken criteria, the certutil.exe tool will output the complete syntax that can be used.
Example: certutil -v -getkey user1@northwindtraders.com >myBatchfile.bat
Output file:
@goto start
Querying northwind5.nwtraders.comTestCA9…………………
«northwind5.nwtraders.comTestCA9»
Serial Number: 611e23c200030000000e
Subject: E=user1@nwtraders.com, CN=user1, CN=Users, DC=nwtraders, DC=com
UPN:user1@nwtraders.com
NotBefore: 1/12/2002 1:24 PM
NotAfter: 1/12/2003 1:24 PM
Template: EFS2
Version: 3
Cert Hash(sha1): d6 41 99 e7 e7 24 73 34 02 41 53 2d 29 11 a8 3b e6 aa 12 2f
Serial Number: 6131f9c300030000000f
Subject: E=user1@nwtraders.com, CN=user1, CN=Users, DC=nwtraders, DC=com
UPN:user1@nwtraders.nttest.microsoft.com
NotBefore: 1/12/2002 1:45 PM
NotAfter: 1/12/2003 1:45 PM
Template: EFS2
Version: 3
Cert Hash(sha1): 1a cc 8d 26 7f 9f 70 6c 65 05 a0 84 8c 4c e9 b7 b4 6c 66 a3
:start
@echo Version 3 certificates and keys:
CertUtil -config «northwind5.nwtraders.comTestCA9» -getkey
611e23c200030000000e «user1-611e23c200030000000e.rec»
CertUtil -config «northwind5.nwtraders.comTestCA9» -getkey
6131f9c300030000000f «user1-6131f9c300030000000f.rec»
CertUtil -p «UQcYLsJ(57s]FuBl» -recoverkey -user «user1-611e23c200030000000e.rec» »
user1-611e23c200030000000e.p12″
CertUtil -p «UQcYLsJ(57s]FuBl» -recoverkey -user «user1-6131f9c300030000000f.rec» »
user1-6131f9c300030000000f.p12″
CertUtil -p «UQcYLsJ(57s]FuBl,iG1-bOt&tqdvJiu1» -MergePFX -user «user1-611e23c20003
0000000e.p12,user1-6131f9c300030000000f.p12″ «user1.p12»
@del user1-611e23c200030000000e.rec
@del user1-611e23c200030000000e.p12
@del user1-6131f9c300030000000f.rec
@del user1-6131f9c300030000000f.p12
@echo PASSWORD: «iG1-bOt&tqdvJiu1»
@goto exit
CertUtil: -GetKey command FAILED: 0x8002802c (-2147319764)
CertUtil: Ambiguous name.
The following is an explanation of the previous syntax, which can be run by Certificate Managers that hold a valid KRA private key.
- The tool finds all possible CAs that are registered in Active Directory. It then will query each CA for keys that have been archived for the specified user.
- @goto start
- Querying northwind5.nwtraders.comTestCA9…………………
- The tool will show the archived keys found for the user on each CA that is queried. It will list the most important details on each archived key found that will be useful for Certificate Managers and administrators.
- «northwind5.nwtraders.comTestCA9»
- Serial Number: 611e23c200030000000e
- Subject: E=user1@nwtraders.com, CN=user1, CN=Users, DC=nwtraders, DC=com
- UPN:user1@nwtraders.com
- NotBefore: 1/12/2002 1:24 PM
- NotAfter: 1/12/2003 1:24 PM
- Template: EFS2
- Version: 3
- Cert Hash(sha1): d6 41 99 e7 e7 24 73 34 02 41 53 2d 29 11 a8 3b e6 aa 12 2f
- Serial Number: 6131f9c300030000000f
- Subject: E=user1@nwtraders.com, CN=user1, CN=Users, DC=nwtraders, DC=com
- UPN:user1@nwtraders.nttest.microsoft.com
- NotBefore: 1/12/2002 1:45 PM
- NotAfter: 1/12/2003 1:45 PM
- Template: EFS2
- Version: 3
- Cert Hash(sha1): 1a cc 8d 26 7f 9f 70 6c 65 05 a0 84 8c 4c e9 b7 b4 6c 66 a3
- The tool will retrieve the encrypted recovery BLOB(s) from the CA. Note that the administrator must be a Certificate Manager for the recovered user(s) on the CA.
- @echo Version 3 certificates and keys:
- CertUtil -config «northwind5.nwtraders.comTestCA9» -getkey 611e23c200030000000e «user1-611e23c200030000000e.rec»
- CertUtil -config «northwind5.nwtraders.comTestCA9» -getkey 6131f9c300030000000f «user1-6131f9c300030000000f.rec»
- The tool will decrypt the recovery BLOB(s) and generate *.pfx files (PKCS #12 format) for each recovered key and set a random password as denoted after the –p parameter. Note that the administrator must have a valid KRA private key to perform this step.
- CertUtil -p «UQcYLsJ(57s]FuBl» -recoverkey -user «user1-611e23c200030000000e.rec» «user1-611e23c200030000000e.p12»
- CertUtil -p «UQcYLsJ(57s]FuBl» -recoverkey -user «user1-6131f9c300030000000f.rec» «user1-6131f9c300030000000f.p12»
- The tool will merge the multiple *.pfx files (if applicable) into a single *.pfx file to simplify the process for the user installing recovered keys. The certutil.exe –MergePFX command is automatically used to perform this process.
- CertUtil -p «UQcYLsJ(57s]FuBl,iG1-bOt&tqdvJiu1» -MergePFX -user «user1-611e23c200030000000e.p12,user1-6131f9c300030000000f.p12» «user1.p12»
- The tool will clean up any temporary files used during the process.
- @del user1-611e23c200030000000e.rec
- @del user1-611e23c200030000000e.p12
- @del user1-6131f9c300030000000f.rec
- @del user1-6131f9c300030000000f.p12
- @echo PASSWORD: «iG1-bOt&tqdvJiu1»
- @goto exit
- The following output is expected when the user has multiple archived keys. This following output implies that a full key recovery could not be performed because the command line was not specific enough to retrieve a specific recovery BLOB.
- CertUtil: -GetKey command FAILED: 0x8002802c (-2147319764)
- CertUtil: Ambiguous name.
return to top
CA Officer Does Not Have a KRA Certificate
As mentioned previously, a CA Officer need not also hold a KRA certificate. In the case where the CA Officer does not hold a valid KRA certificate and only has permissions to retrieve a recovery BLOB, running certutil.exe –getkey <serial number> will list
the certificate serial numbers of all of the KRA(s) that may be used to decrypt (recover) the recovery BLOB in question. The CA Officer can then determine which KRA(s) may be used and send the recovery BLOB to one of the valid KRA(s).
The previous procedure is extremely useful in an organization that has a round-robin selection of KRA(s) when archiving private keys. In a round-robin archival, it may be difficult to always predict which KRA(s) were used to encrypt any specific private
key of a user. It is a good best practice to keep the list of all KRA certificate hashes accessible so that they may be readily identified in the previous scenario.
The following certutil command may be used to list all the information from Active Directory, including KRA certificate hashes.
Certutil.exe –DS – v > c:output.txt
Note: This command will dump all PKI information and certificates from Active Directory and may be more usable when placing the output in a text file as shown.
Setting the Timeout Option for Recovery Commands
When keys are recovered from a CA using the command line, the recovery tool(s) will build a complete chain for the end-entity certificate, if possible. Sometimes a chain may not be able to be built after a long time due to infrastructure changes, CA certificate
availability, and so on; the tool may also timeout when trying to build these chains. The certutil –recoverkey command and other commands that verify chains or construct *.pfx files accept a –t MilliscondCount option. This allows key recovery to avoid a 15-second
timeout for each user key when building a chain. Fetching the certificate specified in the Authority Information Access (AIA) extension Uniform Resource Locators (URLs) can time out when the recovered keys are associated with expired encryption certificates
and the CAs have been decommissioned. For more information about certificate chains and status, see
Windows XP: Certificate Status and Revocation Checking and
How Certificate Revocation Works.
return to top
Importing Recovered Keys
Importing recovered keys can be done with either the command line or the Certificate Import Wizard (available on the Certificates MMC).
To import the recovered certificate and key material into the user’s certificate store, use the following command where user.pfx is the file created from the earlier “recoverkey” command performed by the CA administrator or KRA.
certutil –user –importPFX {user.pfx}
Note that the certutil tool will prompt the end user for a password. This password should be delivered out of band from the administrator or KRA to the end user.
Important: If the end-user certificate has either of the following properties, you must specify the CSP in the “importPFX” command.
- It uses a third-party CSP or a smart card CSP.
- It was generated using an advanced CryptoAPI Next Generation (CNG) algorithm, such as ECC.
For example: certutil -CSP “Microsoft Software Key Storage Provider” -importPFX user.pfx
If either is true, you will not be able to use the following Certificate Import Wizard steps to import the certificate and key, and you must use the command line.
The following steps would be performed by an end user who has received the recovered key file (*.pfx file) and associated password from an administrator. It is assumed that the password and associated file have been transmitted to the user in a method consistent
with the organization’s security policy.
Note: See the previous command-line steps if the certificate being recovered was generated using a third-party, smart card, or advanced CNG provider.
To import a recovered key for an individual user
- Log on as the user who needs to recover their private key(s).
- Open the Certificates MMC.
- Expand the tree view of the certificate store. Click Certificates,
Current User, Personal, and then click
Certificates. - In the console tree, right-click Personal, click All Tasks, and then click
Import. - In the Certificate Import Wizard dialog box, click Next.
- On the Files to Import page, in the File name box, type the name and path of the recovered key file (*.pfx), and then click
Next. - On the Password page, in the Password box, type the password for the key file, and then click
Next. - On the Certificate Store page, click Automatically select the certificate store based on the type of certificate, and then click
Next. - On the Completing the Certificate Import Wizard page, click
Finish. The wizard will report that the import was successful.
Note: A *.pfx file can also be selected (double-click) to invoke the certificate import wizard.
return to top
Implementing Key Archival Walkthrough
Use the following procedure to configure a CA for key archival. The first step in enabling key archival on a CA is enrolling for one or more KRA certificates.
return to top
Enrolling a Key Recovery Agent
The following section explains the steps for enrolling a KRA.
return to top
Configuring the Certificate Templates
A certificate template suitable for creating KRA certificates, called “Key Recovery Agent” is installed in Active Directory by default when a Windows Server 2008 or Windows Server 2003 CA is installed (or when certificate templates are upgraded to the Windows
Server 2003 or Windows Server 2008 version). By default, only Enterprise Administrators or Domain Administrators may request a KRA certificate because these are the only groups configured by default with the “Enroll” permission on the template. Using the Certificate
Templates MMC snap-in, the administrator can view and update certificate template permissions, as well as duplicate templates and edit other template properties.
Note: Only a domain with the Windows Server 2003 schema or higher will support version 2 templates, and only a Windows Server 2008, Enterprise Edition or Windows Server 2003, Enterprise Edition CA may issue a version 2 template certificate.
To configure a certificate template
- Log on to the CA computer as an Enterprise or Domain Administrator.
- Click the Start button, click Run, and then type
certtmpl.msc and press ENTER.
- In the details pane, double-click Key Recovery Agent.
- In the Key Recovery Agent Properties dialog box, click the
Security tab. - Add the appropriate user(s) or group(s) with both Read and Enroll permissions.
- Click OK to close the dialog box.


Next, the Certification Authority must be configured to issue this type of certificate.
return to top
Certificate Template Permissions
For a user or a computer to enroll for a certificate template, it must have appropriate permissions set on the template in Active Directory. A user or computer must have both Enroll and Read permissions to enroll for a selected certificate template. The
Read permission allows the template to be discovered by the user and the Enroll permission is enforced by the enterprise CA when a user requests a certificate for a selected template. The enterprise CA must also have Read permissions on a template to enumerate
the template in the directory and issue certificates based on that template. Normally, the enterprise CA is included in the Authenticated Users group, which has Read permissions by default on a template.
Read, Write, and Enroll permissions are given to Enterprise Administrators by default on installation of a fresh Windows Server 2008 or Windows Server 2003 enterprise CA. If the domain has been upgraded from Windows 2000, Enterprise Administrators will not
have this permission by default. The Write permission allows a user to set or modify the permissions on a selected template.
The Autoenroll permission is set on a template to enable the designated user(s) or computer(s) to enroll automatically for a certificate based on the selected certificate template. The Autoenroll permission is needed in addition to the Enroll permission
for a user to enroll automatically.
The Write permission allows a user to modify the contents of a certificate template. Note that version 2 or higher certificate templates may be modified. Version 1 certificate templates may only have the ACLs modified.
return to top
Smart Card Support
Smart cards are supported for use in conjunction with KRA certificates. It may be necessary to use a smart card and CSP that supports at least an 8-KB smart card to enroll for a KRA certificate on a smart card. If a smart card does not have adequate memory
to support a KRA certificate, the following error will be generated on enrollment.
Error: 0x80100028
An attempt was made to write more data than would fit in the target object.
All recovery operations are supported using a smart card. The system will prompt the recovery agent to insert an appropriate smart card when the key is needed to decrypt the recovery BLOB.
return to top
Configuring an Enterprise CA to Issue KRA Certificates
An Enterprise CA must be configured to issue a KRA certificate.
To configure an Enterprise CA to issue a KRA certificate
- On the Administrative Tools menu, open the Certification Authority snap-in.
- In the console tree, expand Certification Authority, and then click
Certificate Templates. - Right-click the Certificate Templates node, click New, and then click
Certificate Template to Issue. - In the Select Certificate Template dialog box, click
Key Recovery Agent, and then click OK.
- Close the Certification Authority MMC snap-in.

return to top
Enrolling a User with a KRA Certificate
A user may enroll for a certificate with a CA by using the Certificates MMC snap-in, through the CA Enrollment Web pages, or (though not recommended) via auto-enrollment. The KRA template is marked to be “pended” by the CA, which means that the certificate
request must first be approved by a CA Administrator or a Certificate Manager before the KRA certificate is issued. After approval, pended certificate requests may only be retrieved through the Web enrollment interface or through the auto-enrollment process.
Important: It is strongly recommended not to automatically enroll KRA certificates without some kind of manual intervention, as this may cause a proliferation of KRA certificates and confusion for CA Administrators when recovery is required.
return to top
KRA Enrollment with Certificates MMC
To enroll for a KRA certificate using the Certificates MMC
- Log on to as a user with Read and Enroll permissions on the
Key Recovery Agent template. - Launch the Certificates MMC.
- Expand Certificates – Current User, and then select the
Personal node. - Right-click and choose All Tasks, and then select Request New Certificate.
- On the Certificate Enrollment wizard, click Next.
- Select Key Recovery Agent, and then click Enroll.
- Once the Certificate Enrollment wizard is finished, the KRA certificate will be shown as STATUS:Enrollment Pending. This is the default behavior of the KRA certificate template. The CA Manager or Administrator must now approve the certificate request. Click
Finish.


return to top
Approving the Request
To approve the pending KRA certificate request
1. Log on to the CA as the CA administrator or another user with authority to issue certificates.
2. Launch the Certification Authority MMC and select the Pending Requests folder.
3. Right-click the pending request, select All Tasks, and then click
Issue.
As a result of the CA administrator or manager issuing the KRA certificate, the certificate is added to the local machine KRA store on the CA itself, as well as to the Active Directory KRA object.
All certificates in the local machine KRA store can be viewed by entering the following command.
certutil -viewstore KRA
All KRA certificates in Active Directory can be viewed by entering the following command.
certutil -viewstore «ldap:///CN=contoso-CONTOSO-LHS2-CA,CN=KRA,CN=Public Key Services,CN=Services,CN=Configuration,DC=contoso,DC=msft”
Completing the Enrollment
To complete the enrollment and ensure that the KRA user has possession of the private key required for Key Recovery
- Log on to as the user who previously requested the KRA certificate.
- Launch the Certificates MMC.
- Select Certificate – Current User.
- Right-click, select All Tasks, click Automatically Enroll and Retrieve Certificates.
- Select Key Recovery Agent, and then click Enroll.
- Click View Certificate.
The certificate is now in the current user’s Personal Certificates store on the machine, and the private key is available to the logged on user.
return to top
KRA Web Enrollment
To enroll through a Web page
- Connect to the CA using a Web URL, for example: http://<CA_Computer_Name>/Certsrv
- The Web enrollment pages that ship with the Windows Server 2003 version of Certificate Services are supported by Windows 2000, Windows XP, and Windows Server 2003 clients. The Web enrollment pages that ship with Windows Server “Longhorn” edition are supported
by Windows Vista and Windows Server 2008 clients. Unfortunately, the Web enrollment pages that shipped with the Windows Server 2003 version of Certificate Services cannot be used by out-of-the-box Windows Vista clients. For more information, see the Knowledge
Base article 922706 http://support.microsoft.com/kb/922706
- The Web enrollment pages that ship with the Windows Server 2003 version of Certificate Services are supported by Windows 2000, Windows XP, and Windows Server 2003 clients. The Web enrollment pages that ship with Windows Server “Longhorn” edition are supported
- A Web site will open allowing you to request a certificate. Click Request a Certificate.
- On the next Web page, click Advanced Certificate Request.
- Select Create and submit a request to this CA. The next page will allow the user to select various configuration options, including the type of certificate to request.
- Choose Key Recovery Agent as the Certificate Template. The keys should be marked as exportable. This will enable an administrator (KRA) to export the private keys from the local store of the workstation to a disk or other medium for safe
storage. Strong private key protection is also recommended, as this will require a password to be used when accessing the private key. - When finished, click Submit. The Web page will show that the request is being generated. When the key generation and request is complete, if the request had included
Enable strong private key protection, a dialog box will appear showing that a protected item is being created (KRA private key). In this dialog box, you can set the security level on the private key. If the workstation will be used for KRA
operations and the private key is to be kept in the protected store, it is recommended that the security level be set to High. This will ensure that access to the private key will require a separate password. - Click Next.
- Choose a password, confirm it, and then click Finish.
- Click OK to confirm. The Web page will appear and offer a link to install the certificate. If the Certification Authority is configured to set all certificate requests to pending, the user will have to return to the Web link to install
the certificate after the CA administrator or a CA Officer has approved the request.
Important:
- The user may have to return to the Web link using the same machine that was used to generate the request. This is due to the fact that certificate pending information is stored as a browser cookie. If auto-enrollment is enabled in Active Directory for the
user, the user will not be required to actually return to the Web page. The auto-enrollment process will automatically retrieve the certificate for the user when available. For more information about the auto-enrollment process, see theCertificate Auto-Enrollment in Windows XP.
- If the issuing CA is in a hierarchy, a second option will appear on the Web page to download the entire path (certificate chain). You should choose to download the entire chain.
The default KRA certificate template requires that the certificate request be pended and not issued automatically. When a certificate request is pended, a CA Officer (Certificate Manager) must manually issue the certificate, assuming that the request was
valid. Pending certificate requests can be issued through the Certification Authority MMC and by selecting the pending request node.
The Certificate Manager (or administrator of the server, if role separation is not enabled) can right-click the certificate request and choose to issue or deny the request. For more information about Certificate Managers, see
Configuring Certificate Managers.
After the certificate has been issued, the user (KRA) can return to the Web pages to retrieve the pending request.
The user should select View the status of a pending certificate request.
The Web page will display all the pending requests for that user that have been requested from that machine. As mentioned previously, this is managed through Web browser cookies. The user should select the appropriate certificate.
The last page allows the user to install the selected certificate and private key into the local MY store of the user.
return to top
Configuring the CA to Allow Key Archival
This section details the steps required to configure the CA to allow key archival.
Note that if the CA is enabled to enforce role separation, only a CA Administrator may configure KRAs on a CA. Role separation is enabled through the registry and only a local server administrator may configure the registry. The easiest way to enable the
CA for role separation is to use the following certutil.exe command-line tool.
certutil -setreg caRoleSeparationEnabled 1
It is necessary to stop and start certificate services for the setting to take effect:
net stop certsvc && net start certsvc
Note: Certutil.exe and other tools may be installed on a Windows XP Professional machine by installing the Administrative Tools (adminpak.msi) that are found in the i386 directory on all Windows Server 2003 CD-ROM media.
return to top
Enabling a Key Recovery Agent
To enable a KRA
- Log on as Administrator of the server or CA Administrator, if role separation is enabled.
- On the Administrative Tools menu, open Certification Authority.
- In the console tree, select the CA.
- Right-click the CA name, and then click Properties.
- Click the Recovery Agents tab.
- To enable key archival, click Archive the key.
- By default, the CA will only use one KRA. However, a KRA certificate must first be selected for the CA to begin archival. To select a KRA certificate, click
Add. The system will find valid KRA certificates and display the available KRA certificates. KRA certificates are normally published to Active Directory by an Enterprise CA when enrollment occurs. KRA certificates are stored under the KRA container
in the Public Key Services branch of the configuration partition in Active Directory. Since a CA may issue multiple KRA certificates, each KRA certificate will be added to the multi-valued userAttribute attribute of the CA object. - Select one certificate and click OK. You may view the highlighted certificate to ensure that you have selected the intended certificate.
- After one or more KRA certificates have been added, click OK
to enable key archival on the CA. However, Certificate Services must be stopped and started to enable the use of the selected KRAs. KRA certificates are only processed at service start.
return to top
Configuring Certificate Managers
To recover the private keys of a user, the CA enforces that a person be a Certificate Manager (if defined) and also holds a private key for a valid KRA certificate. As a best practice, most organizations separate these two roles. By default, the CA Administrator
is a Certificate Manager for all users unless otherwise explicitly defined. A KRA is not necessarily a CA Officer (Certificate Manager). They may be segmented as separate roles. A KRA is defined as a person who holds a private key for a valid KRA certificate.
A CA Officer is defined as a Certificate Manager who has the security permission on the CA to Issue and Manage Certificates. The security permissions are configured on a CA using the Security tab on the CA Properties in the Certification Authority MMC snap-in.
A CA Administrator can define more specific CA Officer Roles on a CA by using the Certificate Managers tab (called Certificate Managers Restrictions tab in Windows Server 2003 CAs). By default, any user or group that has the permission to Issue and Manage
Certificates is also a CA Officer and can issue, revoke, or export a recovery BLOB for any other user who has been issued a certificate from that CA.

A CA Administrator can define that individual CA Officers have the ability to issue, revoke, and recover certificates for defined sets of user(s) and group(s) by selecting the Restrict certificate managers option. Once the option has been selected, a CA
Administrator may define CA Officers’ roles as required. Starting with Windows Server 2008 CAs, certificate managers can also be restricted by certificate template
Configuring User Templates
Finally, for key archival to happen automatically upon user enrollment, you must enable the corresponding certificate template for key archival.
- In the Certificate Templates MMC, right-click the template that should enforce key archival, and then select
Properties. - On the Request Handling tab, select the Archive subject’s encryption private key check box. Once the check box has been selected, the CA will always enforce key archival for that template. In Windows Server 2008 CAs, you can optionally
select the option to “Use advanced symmetric algorithm to send the key to the CA”.
Important: Before enabling this option, ensure that both the clients and the CAs that will issue certificates for this template are capable of using the AES encryption algorithm. Otherwise, enrollments for this template will fail.
Note: A Windows Server 2003 CA will not allow archival of a key marked for signature only and will reject the request, even if sent programmatically to the CA.
return to top
Key Archival and renew with the same key
Windows Server 2012 and Windows 8 introduce the ability to
Renew with the same key. Renewal with the same key will work even if the key is marked as non-exportable.
Key archival issues can occur when certificate templates are changed after certificates are issued. For example, if a certificate template is initially configured such that the private key cannot be exported and renew with the same key is enabled and certificates
are issued from that template. Then at some later point, the certificate template is changed to require key archival. When the certificates that were issued before the change to require key archival are renewed, those keys will not be archived.
The user interface warns the certificate administrator of this situation when key archival is enabled and Renew with the same key is already enabled with the following message: will warn of such a potential issue with the following message: Key archival
is only enabled for future certificates. Keys for certificates that are already issued will not be archived. The following certification authorities are currently issuing certificates based on this template.

return to top
Troubleshooting
This section identifies a number of common mistakes in configuring the KRAs on a CA. The most common error in archiving user private keys on a CA is that the CA is either not configured for key archival or does not have any valid KRA certificate(s) added.
- The number of recovery agents required by the CA must be less than or equal to the number of available KRA certificates. If an invalid number of recovery agents is entered, the following error message will appear:
The number of recovery agents to use must be between one and the number of recovery agents defined. - If an error occurs in trying to validate the KRA certificate when Certificate Services is started, the Recovery Agents tab on the Certification Authority will show that the selected KRA certificate is invalid. This can occur due to a corrupted certificate,
corrupted registry entry, deleted certificate, revoked certificate, and so on. The following figure shows an example of a corrupted certificate or registry entry on the
Recovery Agents tab as shown in the Status column of the selected KRA.
- Similarly, a revoked KRA certificate will also show an error on the Recovery Agents tab when Certificate Services is stopped and started. The error will be displayed in the status column of the KRAs certificates listing.

return to top
Event Log Messages Related to Key Archival and Recovery
The following table lists the Windows Server 2008 CA event log messages related to key archival and recovery. Note that a new event, a warning event for KRA certificate expiration, has been added.
| Event Name | ID | Level | Text | Variables |
| MSG_E_KRA_NOT_ADVANCED_SERVER | 81 | Error | Active Directory Certificate Services key archival is only supported on Advanced Server. %1 | ErrorCode |
| MSG_E_TOO_FEW_VALID_KRA_CERTS | 82 | Error | Active Directory Certificate Services could only verify %1 of %2 key recovery certificates required to enable private key archival. Requests to archive private keys will not be accepted. | NumberofValidKRACerts, RequiredNumberofValidKRACerts |
| MSG_E_LOADING_KRA_CERTS | 83 | Error | Active Directory Certificate Services encountered an error loading key recovery certificates. Requests to archive private keys will not be accepted. %1 | ErrorCode |
| MSG_E_INVALID_KRA_CERT | 84 | Error | Active Directory Certificate Services will not use key recovery certificate %1 because it could not be verified for use as a Key Recovery Agent. %2 %3 | KRACertIndex, KRACertSubjectName, ErrorCode |
| MSG_E_CANNOT_LOAD_KRA_CERT | 85 | Error | Active Directory Certificate Services ignored key recovery certificate %1 because it could not be loaded. %2 %3 | KRACertIndex, KRACertSubjectName, ErrorCode |
| MSG_E_BAD_REGISTRY_CA_XCHG_CSP | 86 | Warning | Active Directory Certificate Services could not use the provider specified in the registry for encryption keys. %1 | ErrorCode |
| MSG_E_BAD_DEFAULT_CA_XCHG_CSP | 87 | Error | Active Directory Certificate Services could not use the default provider for encryption keys. %1 | ErrorCode |
| MSG_E_USE_DEFAULT_CA_XCHG_CSP | 88 | Warning | Active Directory Certificate Services switched to the default provider for encryption keys. %1 | DefaultProvider
Name |
| MSG_E_CANNOT_CREATE_XCHG_CERT | 96 | Error | Active Directory Certificate Services could not create an encryption certificate. %1. %2. | Disposition, ErrorCode |
| MSG_E_TOO_MANY_KRA_INVALID | 98 | Error | Active Directory Certificate Services encountered errors validating configured key recovery certificates. Requests to archive private keys will no longer be accepted. | none |
| MSG_W_EXPIRATION_KRA_CERT | 127 | Warning | Key recovery certificate %1 is about to expire soon and will not be used upon expiration. Contact your adminstrator to renew this certificate. %2 %3 | KRACertIndex, KRACertSubjectName, ErrorCode |
return to top
Loading KRA Certificates
When certificate services starts on a CA, the CA attempts to load the KRA(s) defined by the CA Administrator. If the CA is unable to load one or more KRA(s), event log messages will be generated; however, certificate services will continue to start. If the
CA is unable to load a KRA(s) successfully as defined by a CA Administrator, the CA will deny all requests for key archival and not issue any certificates that have key archival defined in the certificate template. The following event log messages may appear
in the Certification Authority’s Application Log when an error occurs in loading KRA certificates. The event log messages indicate that action is required by a CA Administrator to properly configure or reconfigure KRAs.
Event Type: Error
Event Source: CertSvc
Event Category: None
Event ID: 83
Date: 12/20/2000
Time: 8:24:24 AM
User: N/A
Computer: SERVER1
Description:
Certificate Services encountered an error loading key recovery certificates. Requests to archive private keys will not be accepted. The system cannot find the file specified.0x80070002 (WIN32: 2)
This is a global error that can be caused by one of several conditions.
• The Certification Authority cannot open the KRA store on the local machine.
• The Certification Authority cannot find a corresponding certificate in the KRA store on the local machine that matches the hash of a certificate set in the registry as a KRA.
• The registry has been edited incorrectly or is corrupted.
• The count of KRA certificate hashes in the registry equals zero.
• A certificate hash in the registry corresponds to a certificate in the KRA store that is not a KRA certificate type.
• The KRA certificates are revoked, expired, or invalid.
Event Type: Error
Event Source: CertSvc
Event Category: None
Event ID: 82
Date: 12/27/2000
Time: 9:05:25 AM
User: N/A
Computer: SERVER1
Description:
Certificate Services could not load any valid key recovery certificates. Requests to archive private keys will not be accepted.
This error is usually caused when none of the certificates specified in the user interface (UI) (which corresponds to the registry) is a valid KRA certificate. This event log message is usually accompanied by the previous global event log message.
Event Type: Error
Event Source: CertSvc
Event Category: None
Event ID: 84
Date: 1/24/2003
Time: 08:49:27
User: N/A
Computer: SERVER1
Description:
Certificate Services will not use key recovery certificate 6 because it could not be verified for use as a Key Recovery Agent. CN=User1, OU=Users, DC=nwtraders, DC=com The revocation function was unable to check revocation because the revocation server
was offline. 0x80092013 (-2146885613)
This error usually occurs when the CA receives an error when retrieving the CRL to check the status of the KRA certificate.
Event Type: Error
Event Source: CertSvc
Event Category: None
Event ID: 98
Date: 1/24/2003
Time: 08:49:28
User: N/A
Computer: SERVER1
Description:
Certificate Services encountered errors validating configured key recovery certificates. Requests to archive private keys will no longer be accepted.
Event Type: Error
Event Source: CertSvc
Event Category: None
Event ID: 85
Date: 12/27/2000
Time: 9:05:25 AM
User: N/A
Computer: SERVER1
Description:
Certificate Services ignored key recovery certificate 0 because it could not be loaded. Cannot find object or property. 0x80092004 (-2146885628)
This error usually occurs when a specific KRA certificate cannot be found in the KRA store on the local machine of the Certification Authority. Specifically, a KRA certificate has been specified in the UI or registry, and the certificate has been deleted
or corrupted in the KRA store. This event log message is usually accompanied by a more global event log message.
return to top
KRA Certificate Status
When certificate services starts on a Certification Authority, the CA attempts to load the configured KRA(s). The CA must validate the status of each KRA certificate. If the CA is unable to retrieve a current CRL for each KRA certificate, the CA will not
be able to load and use that KRA.
The following event log message will be logged in the application event log of the CA.
Event Type: Error
Event Source: CertSvc
Event Category: None
Event ID: 84
Date: 1/12/2001
Time: 11:47:23 AM
User: N/A
Computer: SERVER1
Description:
Certificate Services ignored key recovery certificate 1 because it could not be verified for use as a Key Recovery Agent. CN=User1, OU=Users, DC=nwtraders, DC=com The revocation function was unable to check revocation because the revocation server was offline.
0x80092013 (-2146885613)
return to top
Importing Exchange KMS Export File
The Windows Server 2003 CA may fail during the importation of the KMS data file if the key size used for the export certificate is greater than 1024 bits in size. The Windows Server 2003 CA may fail with the following message when a key size of greater than
1024 bits is used.
Processing KMS exports from:
CN=Certification Authority, OU=Test, O=Contoso, C=US
KMS export file signature verifies
CertUtil: -ImportKMS command FAILED: 0x80070057 (WIN32: 87)
CertUtil: The parameter is incorrect.
User Enrollment Errors
A user certificate request for a template that requires key archival will be denied if one of the following conditions exists.
• No KRA has been defined on the CA.
• No KRA can be successfully loaded. (KRA certificates are revoked, expired, and so on.)
• The minimum number of KRA certificates defined by the CA Administrator cannot be loaded.
If the user enrolls through a Web page, the following text will display on the Web page.
Your request failed. An error occurred while the server was processing your request.
Contact your administrator for further assistance.
Request Mode:
newreq — New Request Disposition:
(never set) Disposition message:
(none) Result:
Cannot archive private key. The certification authority is not configured for key archival. 0x8009400a (-2146877430) COM Error Info:
CCertRequest::Submit Cannot archive private key. The certification authority is not configured for key archival. 0x8009400a (-2146877430) LastStatus:
Cannot archive private key. The certification authority is not configured for key archival. 0x8009400a (-2146877430) Suggested Cause:
No suggestions.
If enrolling through the MMC, the following error will be displayed: The certificate request is incorrect. Cannot archive private key. The certification authority is not configured for key archival.
The CA will also log the following error to the application event log of the CA.
Event Type: Error
Event Source: CertSvc
Event Category: None
Event ID: 21
Date: 1/12/2001
Time: 4:23:39 PM
User: N/A
Computer: SERVER1
Description:
Certificate Services could not process request 16094 due to an error: Cannot archive private key. No valid key recovery agent is defined for this certification authority. 0x8009400b (-2146877429). The request was for NWTRADERSUser1.
If the CA is unable to retrieve a current CRL for the CA itself or any of its parent CA(s), it will be unable to issue a certificate when a user submits a request. If the CA does not have a valid CRL for itself, the following error message will be displayed
in the application event log of the CA.
Event Type: Warning
Event Source: CertSvc
Event Category: None
Event ID: 53
Date: 1/6/2001
Time: 11:24:05 AM
User: N/A
Computer: SERVER1
Description:
Certificate Services denied request 1471 because the revocation function was unable to check revocation because the revocation server was offline. 0x80092013 (-2146885613). The request was for CN=user1, OU=»Test», O=»NWTraders», L=Redmond, S=WA, C=US, E=user1@nwtraders.com.
Additional information: Denied by Policy Module
return to top
Certificate Template Not Supported by the CA
If a user tries to enroll with a CA for a template that is not supported by that CA, the following event log message will be entered in the CA application event log.
Event Type: Warning
Event Source: CertSvc
Event Category: None
Event ID: 53
Date: 1/16/2001
Time: 2:07:02 PM
User: N/A
Computer: SERVER1
Description:
Certificate Services denied request 8 because the requested certificate template is not supported by this CA. 0x80094800 (-2146875392). The request was for NWTRADERSAdministrator. Additional information: Denied by Policy Module The request was for certificate
template (1.3.6.1.4.1.311.21.8.4144336743.1329436349.2065260953.3989445610.1.27) that is not supported by the Certificate Services policy.
return to top
Client CSP Does Not Permit Key Export
For the client enrollment process to generate and send a private key to the CA, the key must be marked as exportable when the key is generated. If the certificate template is not set to allow key exportable or if the third-party CSP (if applicable) does
not support exportable keys, enrollment will fail and the enrollment wizard will return an error that the key is not exportable. Third-party CSPs may report varying errors, such as “catastrophic failure”, when this occurs. If a Windows 2000 or Windows Millennium
Edition client performs enrollment with key archival, the following error may appear if the key is not marked for export.
0x80090009 — NTE_BAD_FLAGS
Note: If the CSP supports the one-time flag for key archival, known as (CRYPT_ARCHIVABLE), the key export flag is not required. The Microsoft default software CSPs support this flag. However, Windows 2000 and Windows Millennium Edition clients do not support
this flag and must allow the key to be exported for enrollment to work with key archival.
return to top
Certification Authority CSP Not Supported for Key Archival Functions
If a software or hardware CSP is not capable of performing the symmetric and public operations for encrypting the private key(s) of users in the CA database, the CA will log an event in the application event log:
Event Type: Warning
Event Source: CertSvc
Event Category: None
Event ID: 86
Date: 12/27/2001
Time: 8:13:54 AM
User: N/A
Computer: NORTHWIND5
Description:
Certificate Services could not use the provider specified in the registry for encryption keys. The keyset is not defined. 0x80090019 (-2146893799)
For more information, see the Help and Support Center at http://go.microsoft.com/fwlink/events.asp
Event Type: Warning
Event Source: CertSvc
Event Category: None
Event ID: 88
Date: 12/27/2001
Time: 8:13:54 AM
User: N/A
Computer: NORTHWIND5
Description: Certificate Services switched to the default provider for encryption keys.
For more information, see the Help and Support Center at http://go.microsoft.com/fwlink/events.asp
To verify which CSP the CA is using for encryption operations associated with key archival, run the following command from the CA.
Certutil –getreg caEncryptionCSPProvider
return to top
Certificate and Key Import Issues
If the CA has not been configured for key archival or if the CA has not been configured for foreign key import, the following error will occur when attempting to import a KMS export file or a foreign key import. Note that the keys were not archived in the
following message.
Processing KMS exports from:
O=microsoft, C=US
KMS export file signature verifies
Lock box opened, symmetric key successfully decrypted
CertUtil: Invalid Signature.
CertUtil: Invalid Signature.
CertUtil: Invalid Signature.
CertUtil: Invalid Signature.
CertUtil: Invalid Signature.
CertUtil: Invalid Signature.
CertUtil: Invalid Signature.
CertUtil: Invalid Signature.
CertUtil: Invalid Signature.
CertUtil: Invalid Signature.
CertUtil: Invalid Signature.
CertUtil: Invalid Signature.
CertUtil: Invalid Signature.
CertUtil: Invalid Signature.
CertUtil: Invalid Signature.
CertUtil: Invalid Signature.
CertUtil: Invalid Signature.
Users: 6
Ignored signature certificates: 25
Certificates with keys: 17
Certificates not imported: 17
Keys: 17
Keys not archived: 17
CertUtil: -ImportKMS command completed successfully.
return to top
Unable to Recover User
If a CA performing key archival is also enabled for role separation with specific Certificate Manager restrictions, a Certificate Manager may not be able to recover a user certificate until the machine account of the CA has been added to the Pre W2K Compatible
Access Group of the domain in which the recover user belongs. This is a necessary requirement for the CA to enumerate the group memberships of Certificate Managers and recovered users to ensure that proper restrictions are enforced.
return to top
Missing KRA Certificate in the CA Registry
If one of the recipient KRA certificates from the HKEY_LOCAL_MACHINE KRA certificate store on the Certification Authority is deleted, key recovery tools, such as certutil –getkey, will fail because the server cannot find the KRA certificate to include in
the recovery BLOB. The following error message will be displayed when this error occurs.
certutil -getkey «1b 4a b7 1e 00 00 00 00 00 1d»
Querying server1.nwtraders.comCA1…………
«server1.nwtraders.comCA1»
1b4ab71e00000000001d CN=»Users
Administrator»
CertUtil: -GetKey command FAILED: 0x80092004 (-2146885628)
CertUtil: Cannot find object or property
Note that the KRA certificate must be available in the registry on the CA, not the machine where the recovery tool(s) are used.
return to top
Appendix A: Certificate Request Structure
This appendix provides additional detailed information about the key archival process regarding the certificate request structure.
return to top
ASN.1 Structure
A certificate request for key archival to the CA is a CMC Full PKIRequest message as specified in RFC 2797. The ASN.1 structure used by the Windows Server 2003 CA is demonstrated in the following figure.

return to top
Understanding the PKCS #7 Message Content Structure
The first section of the CMC message contains a PKCS #7 message that has the relevant elements for generating a certificate request.
return to top
Understanding the controlSequence TaggedAttribute Element
The TaggedAttribute element in the message contains the following information.
Extensions—The Extensions section of the TaggedAttribute element contains the following extensions.
- Application Policies
- Template Information
- Key Usage
- Enhanced Key Usage
- Attributes—The Attributes section of the TaggedAttribute element contains the following data.
- Common Name
- Template Name to be used
- Hash of the encrypted private key BLOB
- Other request information
return to top
Understanding the reqSequence TaggedRequest Element
The reqSequence TaggedRequest element contains a nested PKCS #10 message. This message contains the user’s public key in addition to other information relevant for generating the certificate.
return to top
Understanding the cmsSequence TaggedContentInfo Element
The cmsSequence TaggedContentInfo element can contain nested PKCS #7 and CMC messages. In a standard archival request, this element is not used.
return to top
Understanding the otherMsgSequence OtherMsg Element
Not Used
return to top
Understanding the Signatures Structure
The signatures section of the CMC message contains one or more signatures used to sign the request. The following is an example of the signatures section.
Signer Count: 1
Signer Info[0]:
Signature matches request Public Key
CMSG_SIGNER_INFO_CMS_VERSION(3)
CERT_ID_KEY_IDENTIFIER(2)
0000 81 92 56 3a c4 31 f8 82 0c 54 c9 d0 98 4f d8 c5
0010 34 63 9e cc
Hash Algorithm:
Algorithm ObjectId: 1.3.14.3.2.26 sha1
Algorithm Parameters: NULL
Encrypted Hash Algorithm:
Algorithm ObjectId: 1.2.840.113549.1.1.1 RSA
Algorithm Parameters: NULL
Encrypted Hash:
0000 c1 ae 90 a7 a3 0b 52 66 ea c4 d0 04 17 2e 94 95
0010 14 20 06 …
return to top
Understanding the Authenticated Attributes Structure
The authenticated attributes section contains additional authenticated attributes, such as Content Type, Message Digest, and Client Information. The following is an example of the authenticated attributes section.
Authenticated Attributes[0]:
3 attributes:
Attribute[0]: 1.2.840.113549.1.9.3 (Content Type)
Value[0][0]:
Unknown Attribute type
1.3.6.1.5.5.7.12.2 CMC Data
Attribute[1]: 1.2.840.113549.1.9.4 (Message Digest)
Value[1][0]:
Unknown Attribute type
Message Digest:
5e 1f 0f f0 28 a4 fe 91 0d c2 2f 1a 18 78 7e 2e 10 7f 17 39
Attribute[2]: 1.3.6.1.4.1.311.21.20 (Client Information)
Value[2][0]:
Unknown Attribute type
Client Id: = 1
XECI_XENROLL — 1
User: CONTOSO0avibm
Machine: dcross-stress.contoso.com
Process: certreq
return to top
Understanding the Unauthenticated Attributes Structure
The unauthenticated attributes section contains the encrypted private key. The private key is contained in an enveloped PKCS #7 message that is encrypted to the CA’s exchange key. Since this is an unauthenticated attribute, the SHA1 hash of the PKCS #7 message
is included as one of the attributes of the controlSequence TaggedAttribute attributes.
The following is an example of the unauthenticated attributes section.
Unauthenticated Attributes[0]:
1 attributes:
Attribute[0]: 1.3.6.1.4.1.311.21.13 (Encrypted Private Key)
Value[0][0]:
Unknown Attribute type
================ Begin Nesting Level 1 ================
PKCS7 Message:
CMSG_ENVELOPED(3)
CMSG_ENVELOPED_DATA_PKCS_1_5_VERSION(0)
Content Type: 1.2.840.113549.1.7.1 PKCS 7 Data
PKCS7 Message Content:
0000 d4 a6 31 b6 5a ee 62 90 cc 17 b1 7a 6a 0d 40 9a
..1.Z.b….zj.@.
0010 33 fd 11 14 0b ae 12 bd 3b 32 b8 73 af cc 1b 76
3…….;2.s…v …
return to top
Performing Binary Export for a Request
To view and decode a CMS key archival request from a Windows Server 2003 CA, it is necessary to do a binary export directly from the CA database. A binary export can be easily achieved through the Certification Authority MMC snap-in or by using the certutil.exe
command-line tool.
return to top
Binary Request Export Using the Certification Authority MMC Snap-In Walkthrough
To export a binary request using the Certification Authority MMC Snap-in
- Log on to the CA machine using a CA Administrator account.
- Open the Certification Authority MMC snap-in.
- Click the Issued Certificates folder.
- If the binary request column has not been previously added to the database view, it must be added to support a binary request export. To add a column to the view, click
View on the menu bar, and then select the Add/Remove Columns menu option. - In the Add/Remove Columns dialog box, select the Binary Request field in the Available Columns list box on the left.
- Click Add, and then click OK.
Next, a binary request can be exported.
- Select a request from the issued certificates view, and then click the Action menu.
- Select Export Binary Data on the All Tasks menu.
- In the Export Binary Data dialog box, choose Binary Request as the column you want to export.
- Click OK.
The data will be exported into ASCII format that can be opened in Notepad using notepad.exe.
Note: Following the previous steps will generate a dump of the certificate archival request only; it does not include the private key material. To dump a full certificate archival request including the private key material, follow the command-line option.
return to top
Binary Request Export Using the CertUtil.exe Command-Line Tool Walkthrough
To use the certutil.exe to view the certificate request including private key material, a request file has to be generated first.
To generate a request file
Run Notepad.exe.
Paste the following certificate request information into Notepad.
[Version]
Signature= «$Windows NT$»
[NewRequest]
Subject = «CN=Test Subject»
KeySpec = 1
Exportable = FALSE
PrivateKeyArchive = TRUE
[RequestAttributes]
CertificateTemplate = EFS
Note: Make sure that the CA is configured for key archival before starting this process. In this example, the EFS template is used; this should be changed to an existing certificate template that allows private key archival.
Save the file as CertificateRequest.inf, and then close Notepad.
From a Command Prompt, type the following command.
Certreq –new CertificateRequest.inf CertificateRequest.req
Notes:
- This command will prompt you to select the CA to fetch the CA exchange certificate from, and to encrypt the private key to.
- This command will write the request to a file named by the last argument on the command line: CertificateRequest.req.
- To avoid using the CA selection dialog, you can specify the CA via -config CAMachineDNSNameCACertCommonName before or after the –new option.
5. Type the following command.
certreq -submit CertificateRequest.req KeyArchival.cer KeyArchival. p7b KeyArchival.rsp
This command will prompt you to select the CA to submit the request to.
Notes:
- This command will write the newly issued certificate, a PKCS7 containing only the issued certificate and chain, and the full CMC response to files named by the last three arguments on the command line: KeyArchival.cer, KeyArchival.p7b, and KeyArchival.rsp,
respectively.- To avoid the U/I, you can specify the CA via -config CAMachineDNSNameCACertCommonName before or after the –submit.
6. Type the following command.
certreq -accept KeyArchival.rsp
This command verifies the response, installs the certificate, and associates it with the private key.
7. Type the following command.
Certutil –privatekey –dump CertificateRequest.req >CertificateRequest.txt
This command will generate a dump of the certificate archival request into the CertificateRequest.txt file.
8. Type the following command.
Certutil –privatekey –dump KeyArchival.rsp >CertificateResponse.txt
This command will generate a dump of the certificate archival response into the CertificateResponse.txt file.
For non-Windows Server 2003 clients or servers enrolling to a Windows Server 2003 CA, the format of the request may be different. The reason is that non-Windows Server 2003 platforms may not support CMC data structures and, therefore, may not be able to encode
the request information inside a PKIData object. Instead, the request information may be inside the Data body but not encoded as a PKIData object.
Note: certreq.exe and other tools may be installed on a Windows Server 2003 Professional machine by installing the Administrative Tools (adminpak.msi) that are located in the i386 directory on all Windows Server 2003 CD-ROM media.
return to top
CMC Request and Response Examples
Request:
SEQUENCE :
OBJECT IDENTIFIER : signedData [1.2.840.113549.1.7.2]
CONTEXT SPECIFIC (0) :
SEQUENCE :
INTEGER : 3
SET :
SEQUENCE :
OBJECT IDENTIFIER : sha1 [1.3.14.3.2.26]
NULL :
SEQUENCE :
OBJECT IDENTIFIER : [1.3.6.1.5.5.7.12.2]
CONTEXT SPECIFIC (0) :
OCTET STRING :
SEQUENCE :
SEQUENCE :
SEQUENCE :
INTEGER : 2
OBJECT IDENTIFIER : [1.3.6.1.5.5.7.7.8]
SET :
SEQUENCE :
INTEGER : 0
SEQUENCE :
INTEGER : 1
SEQUENCE :
SEQUENCE :
OBJECT IDENTIFIER : [1.3.6.1.4.1.311.21.10]
OCTET STRING :
SEQUENCE :
SEQUENCE :
OBJECT IDENTIFIER : encryptedFileSystem [1.3.6.1.4.1.311.10.3.4]
SEQUENCE :
OBJECT IDENTIFIER : keyUsage [2.5.29.15]
OCTET STRING :
BIT STRING UnusedBits:5 :
20
SEQUENCE :
OBJECT IDENTIFIER : extKeyUsage [2.5.29.37]
OCTET STRING :
SEQUENCE :
OBJECT IDENTIFIER : encryptedFileSystem [1.3.6.1.4.1.311.10.3.4]
SEQUENCE :
OBJECT IDENTIFIER : [1.3.6.1.4.1.311.21.7]
OCTET STRING :
SEQUENCE :
OBJECT IDENTIFIER :
[1.3.6.1.4.1.311.21.8.4014942.3497959.5914804.3829722.12246394.103.3066650.1537810]
INTEGER : 100
INTEGER : 2
SEQUENCE :
INTEGER : 3
OBJECT IDENTIFIER : [1.3.6.1.4.1.311.10.10.1]
SET :
SEQUENCE :
INTEGER : 0
SEQUENCE :
INTEGER : 1
SET :
SEQUENCE :
OBJECT IDENTIFIER : [1.3.6.1.4.1.311.21.21]
SET :
OCTET STRING :
9231E6C0B87445190EA2CA934B2807FF799
3C59F
SEQUENCE :
INTEGER : 4
OBJECT IDENTIFIER : [1.3.6.1.5.5.7.7.18]
SET :
OCTET STRING :
436572746966696361746554656D706C6174653D4172636
869766554657374426173696345465326
SEQUENCE :
CONTEXT SPECIFIC (0) :
INTEGER : 1
SEQUENCE :
SEQUENCE :
INTEGER : 0
SEQUENCE :
SET :
SEQUENCE :
OBJECT IDENTIFIER : commonName [2.5.4.3]
PRINTABLE STRING :
‘Test Subject’
SEQUENCE :
SEQUENCE :
OBJECT IDENTIFIER : rsaEncryption [1.2.840.113549.1.1.1]
NULL :
BIT STRING UnusedBits:0 :
SEQUENCE :
INTEGER :
00DAFF7C6859557C698CDA4598222E8E90E
EB481889531E9F67F10C081F2545B060BE7
714E755325AC710774764DCA8120C6BEB7B
6EF74B0260EDD56DD299B242A94EE83C420
AC7FF0E694122E26EF67670782223C4E8D8
12C98047F24E10CF6A26FEBEEB826638924
F36B697CEA02EFC4CA0D108CB85047266AD
27DE582D181A1
INTEGER : 65537
CONTEXT SPECIFIC (0) :
SEQUENCE :
OBJECT IDENTIFIER : [1.3.6.1.4.1.311.13.2.3]
SET :
IA5 STRING :
‘5.2.3790.2’
SEQUENCE :
OBJECT IDENTIFIER : [1.3.6.1.4.1.311.21.20]
SET :
SEQUENCE :
INTEGER : 1
UTF8 STRING :
‘dcross-stress.contoso.com’
UTF8 STRING :
‘CONTOSO0avibm’
UTF8 STRING :
‘certreq’
SEQUENCE :
OBJECT IDENTIFIER : [1.3.6.1.4.1.311.13.2.2]
SET :
SEQUENCE :
INTEGER : 1
BMP STRING :
‘Microsoft Strong Cryptographic P’
‘rovider’
BIT STRING UnusedBits:0 :
00000000000000000000000000000000
00000000000000000000000000000000
00000000000000000000000000000000
00000000000000000000000000000000
00000000000000000000000000000000
00000000000000000000000000000000
00000000000000000000000000000000
00000000000000000000000000000000
0000000000000000
SEQUENCE :
OBJECT IDENTIFIER : extensionReq [1.2.840.113549.1.9.14]
SET :
SEQUENCE :
SEQUENCE :
OBJECT IDENTIFIER : sMIMECapabilities [1.2.840.113549.1.9.15]
OCTET STRING :
SEQUENCE :
SEQUENCE :
OBJECT IDENTIFIER : rc2CBC [1.2.840.113549.3.2]
INTEGER : 128
SEQUENCE :
OBJECT IDENTIFIER : rc4 [1.2.840.113549.3.4]
INTEGER : 128
SEQUENCE :
OBJECT IDENTIFIER : desCBC [1.3.14.3.2.7]
SEQUENCE :
OBJECT IDENTIFIER : DES-EDE3-CBC [1.2.840.113549.3.7]
SEQUENCE :
OBJECT IDENTIFIER : subjectKeyIdentifier [2.5.29.14]
OCTET STRING :
OCTET STRING :
8192563AC431F8820C54C9D098
4FD8C534639ECC
SEQUENCE :
OBJECT IDENTIFIER : [1.3.6.1.4.1.311.21.10]
OCTET STRING :
SEQUENCE :
SEQUENCE :
OBJECT IDENTIFIER : encryptedFileSystem [1.3.6.1.4.1.311.10.3.4]
SEQUENCE :
OBJECT IDENTIFIER : keyUsage [2.5.29.15]
OCTET STRING :
BIT STRING UnusedBits:5 :
20
SEQUENCE :
OBJECT IDENTIFIER : extKeyUsage [2.5.29.37]
OCTET STRING :
SEQUENCE :
OBJECT IDENTIFIER : encryptedFileSystem [1.3.6.1.4.1.311.10.3.4]
SEQUENCE :
OBJECT IDENTIFIER : [1.3.6.1.4.1.311.21.7]
OCTET STRING :
SEQUENCE :
OBJECT IDENTIFIER :
[1.3.6.1.4.1.311.21.8.4014942.3497959.5914804.3829722.12246394.103.3066650.1537810]
INTEGER : 100
INTEGER : 2
SEQUENCE :
OBJECT IDENTIFIER : sha1withRSAEncryption [1.2.840.113549.1.1.5]
NULL :
BIT STRING UnusedBits:0 :
31E945A575155D8F91E972DB26A52C8FAE16D7F5074365D
C2E585C8718AB09A4FBB67D8A78A63C76B14482A1DEDCAA
5B234035F3CFFABCAF3DEC24C5944ACE46A1BAFE857F310
7C21105C817FA88C0CCB23B88D2684327B40CB99E9A059F
3B95BAC6423740CA1B46B4DC58664863325004DCA2857C2
2B4117942CC7D39E86900
SEQUENCE :
SEQUENCE :
SET :
SEQUENCE :
INTEGER : 3
CONTEXT SPECIFIC (0) :
8192563AC431F8820C54C9D0984FD8C534639ECC
SEQUENCE :
OBJECT IDENTIFIER : sha1 [1.3.14.3.2.26]
NULL :
CONTEXT SPECIFIC (0) :
SEQUENCE :
OBJECT IDENTIFIER : contentType [1.2.840.113549.1.9.3]
SET :
OBJECT IDENTIFIER : [1.3.6.1.5.5.7.12.2]
SEQUENCE :
OBJECT IDENTIFIER : messageDigest [1.2.840.113549.1.9.4]
SET :
OCTET STRING :
5E1F0FF028A4FE910DC22F1A18787E2E107F1739
SEQUENCE :
OBJECT IDENTIFIER : [1.3.6.1.4.1.311.21.20]
SET :
SEQUENCE :
INTEGER : 1
UTF8 STRING :
‘dcross-stress.contoso.com’
UTF8 STRING : ‘CONTOSO0avibm’
UTF8 STRING : ‘certreq’
SEQUENCE :
OBJECT IDENTIFIER : rsaEncryption [1.2.840.113549.1.1.1]
NULL :
OCTET STRING :
C1AE90A7A30B5266EAC4D004172E949514200653AA5EA3C2BF17C7731DA8EB
1A635CE1DC4F5AD9FB44EF2D9E8C9F961800DBEBC1ADE14E0459A8B46880DF
01A177FC9B02B89113638F3A6A3B3ED0765BD16B905D6BCB404F65E79AAB12
97F2F9F52D68D13373D41D510D97A954800368F8DEDEE13D8635EBF4364512
17407F1A
CONTEXT SPECIFIC (1) :
SEQUENCE :
OBJECT IDENTIFIER : [1.3.6.1.4.1.311.21.13]
SET :
SEQUENCE :
OBJECT IDENTIFIER : envelopedData [1.2.840.113549.1.7.3]
CONTEXT SPECIFIC (0) :
SEQUENCE :
INTEGER : 0
SET :
SEQUENCE :
INTEGER : 0
SEQUENCE :
SEQUENCE :
SET :
SEQUENCE :
OBJECT IDENTIFIER : domainComponent [0.9.2342.19200300.100.1.25]
IA5 STRING :
‘com’
SET :
SEQUENCE :
OBJECT IDENTIFIER : domainComponent [0.9.2342.19200300.100.1.25]
IA5 STRING :
‘contoso’
SET :
SEQUENCE :
OBJECT IDENTIFIER : commonName [2.5.4.3]
PRINTABLE STRING :
‘TestEnrollment’
INTEGER :
18D0100D00000000005B
SEQUENCE :
OBJECT IDENTIFIER : rsaEncryption [1.2.840.113549.1.1.1]
NULL :
OCTET STRING :
A41AAE9CDA66F283D6D4BC829D2F58BCECFD3F
5A57EC8AE14021179AE5F93F03AE90747FD300
4573ED78F802E02AB3C6ADEDEAA367069DA399
8E1D2D34ABEEFF0F8DE2CB76078C56D883BD94
D7CE9C5CD75F5E3F442A467F74E07C5A434E4A
F1BDD6EC493F3A870764B6CC6446FA5D674255
D93F248DE23E0D96902C79901800
SEQUENCE :
OBJECT IDENTIFIER : data [1.2.840.113549.1.7.1]
SEQUENCE :
OBJECT IDENTIFIER : DES-EDE3-CBC [1.2.840.113549.3.7]
OCTET STRING :
06003B8D3EB4B44C
CONTEXT SPECIFIC (0) :
D4A631B65AEE6290CC17B17A6A0D409A33FD11140
BAE12BD3B32B873AFCC1B76A4022D0FB2B50E431A
1E48C8D45865EC5B730D7357D61C9495235143381
19CDBF34C5455B73C9FF38AEFBC4E32DD8145647B
46B0B4A60D29D062051F116C6BA49253D4590944A
7CCB70F43E7E850B34DE55074B3C5FF5AE1C5A18C
6BC271D1F2BC3FBBE19558252C894110CC801292D
63DA1485BDB957270E6C1A38FE33D672EA3E8D031
CD7BCFEF5C738818DCC43A6F76F3EC81701C561DF
9FA6032C47236D9A16973BDF6A033F4925CC5B491
C00C635C65F744C8FEBE19B1EDD2172AE3A7CFB70
87A6BCAE7BB52BCEEF412889C4A45ACAE0ACC0E43
A14C7AA34FB4B4C49360ADD0C65D1494B792E04D7
8D43C2EDB79974B5C08C87E0C72767C26A2EBF6F0
E273269D139F2D6F451301944B76218D9BD4C5931
50C79FA5DA1AF1383E5342EC2F5318E2404774345
B82A0CB4EE26FC0D59A1D18EDBBEFF6135675D014
293470B301CC59387C4E627E1F6B038A158A927B9
160387104BFC5466B7FB4107DF02D136E076F2CAD
94718ADD9F93C0D376A80A6E3796C6236888E6517
1D36A0F3BFAA8B8E44FC8DA426F3F19128A910D83
71A7D68CDFEFCA0BBF32888D8AC679975AE43BB6D
209D61F82EEA2463616E905177E929CFD3D85C8ED
8ED1EDCECA01CA1580960E87D57591817C863FE33
757F527DC7C6457ED5CEDC3BE1597A05BFB10A145
522C98AF266A992CC607434D3421D57A80195D052
557AE89652193B840FC27CB343C2C242445453E78
9E6E397DFC84363B4EAE801DF1BE2993D1AF13256
A1390C4B7D51127CC55FF0B1184D4E87967961E86
B722E1048C0
Response
SEQUENCE :
OBJECT IDENTIFIER : signedData [1.2.840.113549.1.7.2]
CONTEXT SPECIFIC (0) :
SEQUENCE :
INTEGER : 3
SET :
SEQUENCE :
OBJECT IDENTIFIER : sha1 [1.3.14.3.2.26]
NULL :
SEQUENCE :
OBJECT IDENTIFIER : [1.3.6.1.5.5.7.12.3]
CONTEXT SPECIFIC (0) :
OCTET STRING :
SEQUENCE :
SEQUENCE :
SEQUENCE :
INTEGER : 1
OBJECT IDENTIFIER : [1.3.6.1.5.5.7.7.1]
SET :
SEQUENCE :
INTEGER : 0
SEQUENCE :
INTEGER : 1
UTF8 STRING : ‘Issued’
SEQUENCE :
INTEGER : 2
OBJECT IDENTIFIER : [1.3.6.1.4.1.311.10.10.1]
SET :
SEQUENCE :
INTEGER : 0
SEQUENCE :
INTEGER : 1
SET :
SEQUENCE :
OBJECT IDENTIFIER : [1.3.6.1.4.1.311.21.17]
SET :
OCTET STRING :
DE73D68A50323310A01EEDDF66188213DC9
CD490
SEQUENCE :
OBJECT IDENTIFIER : [1.3.6.1.4.1.311.21.21]
SET :
OCTET STRING :
9231E6C0B87445190EA2CA934B2807FF799
3C59F
SEQUENCE :
SEQUENCE :
CONTEXT SPECIFIC (0) :
SEQUENCE :
SEQUENCE :
CONTEXT SPECIFIC (0) :
INTEGER : 2
INTEGER :
172B1FB96BBBF2BA49A64EBEA41833EF
SEQUENCE :
OBJECT IDENTIFIER : sha1withRSAEncryption [1.2.840.113549.1.1.5]
NULL :
SEQUENCE :
SET :
SEQUENCE :
OBJECT IDENTIFIER : domainComponent [0.9.2342.19200300.100.1.25]
IA5 STRING : ‘com’
SET :
SEQUENCE :
OBJECT IDENTIFIER : domainComponent [0.9.2342.19200300.100.1.25]
IA5 STRING : ‘contoso’
SET :
SEQUENCE :
OBJECT IDENTIFIER : commonName [2.5.4.3]
PRINTABLE STRING :
‘TestEnrollment’
SEQUENCE :
UTC TIME : ‘040210162354Z’
UTC TIME : ‘090210162738Z’
SEQUENCE :
SET :
SEQUENCE :
OBJECT IDENTIFIER : domainComponent [0.9.2342.19200300.100.1.25]
IA5 STRING : ‘com’
SET :
SEQUENCE :
OBJECT IDENTIFIER : domainComponent [0.9.2342.19200300.100.1.25]
IA5 STRING : ‘contoso’
SET :
SEQUENCE :
OBJECT IDENTIFIER : commonName [2.5.4.3]
PRINTABLE STRING :
‘TestEnrollment’
SEQUENCE :
SEQUENCE :
OBJECT IDENTIFIER : rsaEncryption [1.2.840.113549.1.1.1]
NULL :
BIT STRING UnusedBits:0 :
SEQUENCE :
INTEGER :
00E23136361B94412ABD67C376C6AC882B50F45D9AD28719C1
5B0F3125CB352E19F5A381A33FF2971CC4702747BD94C3EE93
75493C1A48F5174BE1F8135CCFB641F3EE6042C4771E8E176A
7B65E49E407903072C28E2CC92153454664630FDA3CC70A805
086B586592AF45BFFE5CC82DCF1ED622DD9BE4ECF64D635600
9338C96F7D2EF77447F3ACD2AFC9C76EBC7A77DAAA9245A0EE
0398D041B37DD78BD77C46D84A808AECDB88EC4319B1E6ADB9
19053A84D3403163003EE696F65E0A55F5EA7A4955870D451E
E4A0AB684EE6ED503437A3F4388DC96A00A9F7D26E3527B3D0
F657EFB8E431B24A97ADBD1475DAF545B9754856200E640E42
CA8BF78614A953
INTEGER : 65537
CONTEXT SPECIFIC (3) :
SEQUENCE :
SEQUENCE :
OBJECT IDENTIFIER : [1.3.6.1.4.1.311.20.2]
OCTET STRING :
BMP STRING : ‘CA’
SEQUENCE :
OBJECT IDENTIFIER : keyUsage [2.5.29.15]
OCTET STRING :
BIT STRING UnusedBits:1 :
86
SEQUENCE :
OBJECT IDENTIFIER : basicConstraints [2.5.29.19]
BOOLEAN : ‘FF’
OCTET STRING :
SEQUENCE :
BOOLEAN : ‘FF’
SEQUENCE :
OBJECT IDENTIFIER : subjectKeyIdentifier [2.5.29.14]
OCTET STRING :
OCTET STRING :
10C8E49879236E65350924C24EFB074EFB5F4AA0
SEQUENCE :
OBJECT IDENTIFIER : cRLDistributionPoints [2.5.29.31]
OCTET STRING :
SEQUENCE :
SEQUENCE :
CONTEXT SPECIFIC (0) :
CONTEXT SPECIFIC (0) :
CONTEXT SPECIFIC (6) :
‘ldap:///CN=TestEnrollment,CN=dcross’
‘-stress,CN=CDP,CN=Public%20Key%20Se’
‘rvices,CN=Services,CN=Configuration’
‘,DC=contoso,DC=com?certificateRevoc’
‘ationList?base?objectClass=cRLDistr’
‘ibutionPoint’
CONTEXT SPECIFIC (6) :
‘http://dcross-stress.contoso.com/Ce’
‘rtEnroll/TestEnrollment.crl’
SEQUENCE :
OBJECT IDENTIFIER : [1.3.6.1.4.1.311.21.1]
OCTET STRING :
INTEGER : 0
SEQUENCE :
OBJECT IDENTIFIER : sha1withRSAEncryption [1.2.840.113549.1.1.5]
NULL :
BIT STRING UnusedBits:0 :
CA9E6760A8DFB0D213E90D7450B5C7A7C5C920760D01EB45E4F46A23780841
40EDE1A37BA123934C06A39F9638F86C9A50258E43E71DE44239A20DFD6EAE
C636F6B50C964EF23A72B349F35530A96CC99AF8937F22F684AF5E39E64C90
F49C0D87621BBB13DE9FAF84609C26C5ECEB37F479CAEF826D36C19FD5C80D
B865D0C6FF287DE8FF0CD3FE0476E514ED82D9A23DCB684D28E3B93A229A7B
D4DAF89E9A2F2D62599B91E8746830BCF88947611A82E9893137ABBA74B489
6C9C1492DCA2A7FA75F46451C7838EC0E9FB5D9222D3895C116C2C13E3995F
6D56ACB5F62FD7B764FAAB5AF0B5EA73AF3211B40AE44697DCB6E0D28E88E9
00037A506832C0BA
SEQUENCE :
SEQUENCE :
CONTEXT SPECIFIC (0) :
INTEGER : 2
INTEGER : ’18E922D0000000000060′
SEQUENCE :
OBJECT IDENTIFIER : sha1withRSAEncryption [1.2.840.113549.1.1.5]
NULL :
SEQUENCE :
SET :
SEQUENCE :
OBJECT IDENTIFIER : domainComponent [0.9.2342.19200300.100.1.25]
IA5 STRING : ‘com’
SET :
SEQUENCE :
OBJECT IDENTIFIER : domainComponent [0.9.2342.19200300.100.1.25]
IA5 STRING : ‘contoso’
SET :
SEQUENCE :
OBJECT IDENTIFIER : commonName [2.5.4.3]
PRINTABLE STRING :
‘TestEnrollment’
SEQUENCE :
UTC TIME : ‘040812185455Z’
UTC TIME : ‘050812185455Z’
SEQUENCE :
SET :
SEQUENCE :
OBJECT IDENTIFIER : domainComponent [0.9.2342.19200300.100.1.25]
IA5 STRING : ‘com’
SET :
SEQUENCE :
OBJECT IDENTIFIER : domainComponent [0.9.2342.19200300.100.1.25]
IA5 STRING : ‘contoso’
SET :
SEQUENCE :
OBJECT IDENTIFIER : commonName [2.5.4.3]
PRINTABLE STRING : ‘Users’
SET :
SEQUENCE :
OBJECT IDENTIFIER : commonName [2.5.4.3]
PRINTABLE STRING :
‘Avi Ben-Menahem’
SEQUENCE :
SEQUENCE :
OBJECT IDENTIFIER : rsaEncryption [1.2.840.113549.1.1.1]
NULL :
BIT STRING UnusedBits:0 :
SEQUENCE :
INTEGER :
00DAFF7C6859557C698CDA4598222E8E90EEB481889531E9F6
7F10C081F2545B060BE7714E755325AC710774764DCA8120C6
BEB7B6EF74B0260EDD56DD299B242A94EE83C420AC7FF0E694
122E26EF67670782223C4E8D812C98047F24E10CF6A26FEBEE
B826638924F36B697CEA02EFC4CA0D108CB85047266AD27DE5
82D181A1
INTEGER : 65537
CONTEXT SPECIFIC (3) :
SEQUENCE :
SEQUENCE :
OBJECT IDENTIFIER : sMIMECapabilities [1.2.840.113549.1.9.15]
OCTET STRING :
SEQUENCE :
SEQUENCE :
OBJECT IDENTIFIER : rc2CBC [1.2.840.113549.3.2]
INTEGER : 128
SEQUENCE :
OBJECT IDENTIFIER : rc4 [1.2.840.113549.3.4]
INTEGER : 128
SEQUENCE :
OBJECT IDENTIFIER : desCBC [1.3.14.3.2.7]
SEQUENCE :
OBJECT IDENTIFIER : DES-EDE3-CBC [1.2.840.113549.3.7]
SEQUENCE :
OBJECT IDENTIFIER : subjectKeyIdentifier [2.5.29.14]
OCTET STRING :
OCTET STRING :
8192563AC431F8820C54C9D0984FD8C534639ECC
SEQUENCE :
OBJECT IDENTIFIER : [1.3.6.1.4.1.311.21.10]
OCTET STRING :
SEQUENCE :
SEQUENCE :
OBJECT IDENTIFIER : encryptedFileSystem [1.3.6.1.4.1.311.10.3.4]
SEQUENCE :
OBJECT IDENTIFIER : keyUsage [2.5.29.15]
OCTET STRING :
BIT STRING UnusedBits:5 :
20
SEQUENCE :
OBJECT IDENTIFIER : extKeyUsage [2.5.29.37]
OCTET STRING :
SEQUENCE :
OBJECT IDENTIFIER : encryptedFileSystem [1.3.6.1.4.1.311.10.3.4]
SEQUENCE :
OBJECT IDENTIFIER : [1.3.6.1.4.1.311.21.7]
OCTET STRING :
SEQUENCE :
OBJECT IDENTIFIER :
[1.3.6.1.4.1.311.21.8.4014942.3497959.5914804.3829722.12246394.103.3066650.1537810]
INTEGER : 100
INTEGER : 2
SEQUENCE :
OBJECT IDENTIFIER : authorityKeyIdentifier [2.5.29.35]
OCTET STRING :
SEQUENCE :
CONTEXT SPECIFIC (0) :
10C8E49879236E65350924C24EFB074EFB5F4AA0
SEQUENCE :
OBJECT IDENTIFIER : cRLDistributionPoints [2.5.29.31]
OCTET STRING :
SEQUENCE :
SEQUENCE :
CONTEXT SPECIFIC (0) :
CONTEXT SPECIFIC (0) :
CONTEXT SPECIFIC (6) :
‘ldap:///CN=TestEnrollment,CN=dcross’
‘-stress,CN=CDP,CN=Public%20Key%20Se’
‘rvices,CN=Services,CN=Configuration’
‘,DC=contoso,DC=com?certificateRevoc’
‘ationList?base?objectClass=cRLDistr’
‘ibutionPoint’
CONTEXT SPECIFIC (6) :
‘http://dcross-stress.contoso.com/Ce’
‘rtEnroll/TestEnrollment.crl’
SEQUENCE :
OBJECT IDENTIFIER : authorityInfoAccess [1.3.6.1.5.5.7.1.1]
OCTET STRING :
SEQUENCE :
SEQUENCE :
OBJECT IDENTIFIER : caIssuers [1.3.6.1.5.5.7.48.2]
CONTEXT SPECIFIC (6) :
‘ldap:///CN=TestEnrollment,CN=AIA,CN=Publi’
‘c%20Key%20Services,CN=Services,CN=Configu’
‘ration,DC=contoso,DC=com?cACertificate?ba’
‘se?objectClass=certificationAuthority’
SEQUENCE :
OBJECT IDENTIFIER : caIssuers [1.3.6.1.5.5.7.48.2]
CONTEXT SPECIFIC (6) :
‘http://dcross-stress.contoso.com/CertEnro’
‘ll/dcross-stress.contoso.com_TestEnrollme’
‘nt.crt’
SEQUENCE :
OBJECT IDENTIFIER : subjectAltName [2.5.29.17]
OCTET STRING :
SEQUENCE :
CONTEXT SPECIFIC (0) :
OBJECT IDENTIFIER : [1.3.6.1.4.1.311.20.2.3]
CONTEXT SPECIFIC (0) :
UTF8 STRING :
‘avibm@contoso.com’
SEQUENCE :
OBJECT IDENTIFIER : sha1withRSAEncryption [1.2.840.113549.1.1.5]
NULL :
BIT STRING UnusedBits:0 :
9D0000D2CC5668BEE443EBDE5EE4CADA5D61C17C00B262A3F231726FD2E7A8
500603B89BE123D577FA2AE592567FB96743A6AE9B57AE089B1C205D6552F5
5D60DD825D94D27301527FDB275035473DFC16A4F0C4886036A50CA1D320E3
D284744CC0E552D1FFB24CD6110E6B17C86F830B5CC7A7E1791930320373CA
C4E667BC372983597713CF8608389A6C82F9079FF8666C867BF2243DE5A22C
20DBDBAD788A77758B68D9260EA5040A2F5C97C1AD80144F06F714D20BF671
96BE5774D16080A9EAA5933C3C7EA34AE3F41DC001E0C2F83EA7AFAADA4812
D0F27C48E288A20C44F085F328CCE6F478D6E4E89131D8EF43DA7B23DA39C9
8CB15DE2EBA2BC8F
SET :
SEQUENCE :
INTEGER : 1
SEQUENCE :
SEQUENCE :
SET :
SEQUENCE :
OBJECT IDENTIFIER : domainComponent [0.9.2342.19200300.100.1.25]
IA5 STRING : ‘com’
SET :
SEQUENCE :
OBJECT IDENTIFIER : domainComponent [0.9.2342.19200300.100.1.25]
IA5 STRING : ‘contoso’
SET :
SEQUENCE :
OBJECT IDENTIFIER : commonName [2.5.4.3]
PRINTABLE STRING :
‘TestEnrollment’
INTEGER :
172B1FB96BBBF2BA49A64EBEA41833EF
SEQUENCE :
OBJECT IDENTIFIER : sha1 [1.3.14.3.2.26]
NULL :
CONTEXT SPECIFIC (0) :
SEQUENCE :
OBJECT IDENTIFIER : contentType [1.2.840.113549.1.9.3]
SET :
OBJECT IDENTIFIER : [1.3.6.1.5.5.7.12.3]
SEQUENCE :
OBJECT IDENTIFIER : messageDigest [1.2.840.113549.1.9.4]
SET :
OCTET STRING :
17CEEAA968CDD0A92DFC7E9AA174F87755AD8A87
SEQUENCE :
OBJECT IDENTIFIER : rsaEncryption [1.2.840.113549.1.1.1]
NULL :
OCTET STRING :
C5D3AC35D5AAE5766640A2EF87D8ED005BB9BD63D51B10D803EEFEA1261161
3031241F695A2EDFF0240EE624D22FECB5AB6B74FD97A5DB12B3B873558AD5
0BC6DB59E438A7150A27749F53CBA447CD0751D7D49EEE3EBD1BBB20234887
5DD11DE26764DDEB2EBFA1E0023DD8CECF9C2530E2D0886FF26EAB747635A7
A57B7CA154BD0083A1DA891A35C3CD7EF5BA735FBCD2FD811FABE68C988C4D
172572BE63AE0575CF646756D4E66B2B127A699119368AAFB8B54661D317AF
2DF2622A0FFF01F18D5EF261E830107BD7F58848813CA6C0F8BF681A214E37
13618340D6DE9594829FB2B2DB1CFF973DC01F22D982846E474DDB9767D1BF
51E8C66F934593B5
return to top
Recovery BLOB Structure
When stored in the CA database, the private key is stored as a PKCS #7 message, encrypted with a 3DES symmetric key that is encrypted to the KRA(s) public key as a column in the CA database. When the recovery BLOB is retrieved by the certutil –getkey command,
the encrypted PKCS #7 and the KRA certificate hashes are retrieved from the database. Also, the encrypted PKCS #7 is wrapped inside a signed PKCS #7 to allow collecting the previous certificates and attaching them to the signed PKCS #7. The PKCS #7 is not
protected with a password since it is already protected by the public key of the recovery agent(s). The outer PKCS #7 wrapper can contain the certificate chains for the recovery agent(s) and the end-entity to facilitate the recovery operations and construction
of the end-entity PKCS #12 file. The following figure illustrates the recovery BLOB structure.

The recovery BLOB consists of wrapping the encrypted PKCS #7 in the database in another (signed) PKCS #7 to allow a number of certificates to be included in the recovery BLOB. The returned certificates include the full chain of the user certificate being
recovered, the chain of the signing CA certificate (which may differ from the CA certificate under which the user certificate was issued), and the KRA certificates to which the key was encrypted. The szOID_ARCHIVED_KEY_CERT_HASH(1.3.6.1.4.1.311.21.16) is an
attribute containing the SHA-1 hash of the certificate for the key being recovered, attached as an authenticated attribute to the CA signature of the recovery BLOB. This allows
certutil -recoverkey recoveryblobfile to also display the Subject name of the KRA certificate(s) used to protect the private key BLOB.
Note: If a Key Recovery Agent (KRA) certificate is stored in a Cryptography Next Generation (CNG) Key Service Provider (KSP), the
certutil -RecoverKey command will by default recover a key as a CNG certificate. This default behavior could cause an issue if you are recovering a Rivest, Shamir and Adleman (RSA) key for the Encrypting File System (EFS). EFS supports KSPs
only for Elliptic Curve Diffie-Hellman (ECDH) keys.
A workaround for this problem is to specify the switch -csp “Microsoft Strong Cryptographic Provider” with
certutil -importpfx to ensure that the key is recovered in the appropriate format.
return to top
ASN.1 Structure
The following is the ASN.1 structure of the PKCS #7 EnvelopedData object.
EnvelopedData ::= SEQUENCE {
version Version,
recipientInfos RecipientInfos,
encryptedContentInfo EncryptedContentInfo
}
Storing the recovery BLOB as an enveloped PKCS #7 enables a recovery agent to retrieve the recovery BLOB from the CA database. The recovery agent’s private key is used to decrypt the EncryptedContentInfo to extract the PKCS #12 data. The following is the
ASN.1 structure of the EncryptedContentInfo body.
EncryptedContentInfo ::= SEQUENCE {
contentType ContentType,
contentEncryptionAlgorithm ContentEncryptionAlgorithmIdentifier,
encryptedContent[0] IMPLICIT EncryptedContent OPTIONAL
}
By definition, there can be multiple recovery agent certificates specified by RecipientInfo, where IssuerAndSerialNumber is used to disambiguate between multiple recovery agent certificates. Only the recovery agent certificates included in the RecipientInfo
body of the enveloped PKCS #7 object can be used to recover the archived key material. The following is the ASN.1 structure of the RecipientInfo body.RecipientInfo ::= SEQUENCE {
version Version,
issuerAndSerialNumber IssuerAndSerialNumber,
keyEncryptionAlgorithm KeyEncryptionAlgorithmIdentifier,
encryptedKey EncryptedKey
}
return to top
Appendix B: Additional Information
- Understanding Key Archival
- Key archival and recovery
- AD CS Key Archival and Recovery Event IDs
- Internet X.509 Public Key Infrastructure – Certificate and Certificate Revocation List (CRL) Profile
- Certificate Management Messages over CMS (CMC)
- PKCS #12 — Personal Information Exchange Syntax Standard
- Common Criteria
- Migrating Exchange KMS to Windows Server 2003 CA
return to top