
Update ALL your missing drivers with just 1 click
Microsoft has released a USB Troubleshooter for Windows 7, 8 & Windows 10. This tool will help Windows users to rectify common issues related to USB. Errors/issues such as “USB Device not recognized”, “USB Device Not Installing”, “Computer no longer connects to the phone via USB” can be fixed using this USB troubleshooting tool. Errors related to flash drives, keyboards, mice, external hard drives, Printers, Scanner, Mobile, cameras etc. can be rectified using this troubleshooter tool if the issue is not hardware-related. Find more about USB device errors and solutions here.

How to use USB troubleshooter for Windows ?
- Download and run the Windows USB Troubleshooter for Windows 7, 8 & 10 (WinUSB.diagcab)
- Run this troubleshooter as administrator
- Click “Next” to begin the diagnostics.

Next, The troubleshooter starts detecting problems..

This tool will automatically detect and clear issues with USB. USB audio, storage, and print devices—such as thumb drives, USB hard drives, and USB printers—that do not eject using the Safely Remove Hardware dialog box.
Download USB Troubleshooter for Windows 7, 8 & 10 (WinUSB.diagcab)
- How to Troubleshoot and Fix USB C Issues ?
- [SOLVED] Problem Ejecting USB Mass Storage Device
Issues that can be fixed using this troubleshooter
| USB Devices Not Recognized |
| USB Stopped Working After Latest Update |
| Device Not Installing |
| USB Not Detected |
| USB Mouse Is Not Working On Windows 10 |
| USB Drive Will Not Open |
| USB Driver Problem |
| USB Ports Are Not Detecting Any Devices |
| USB Reconnecting Continuously With Blank Screen |
| The computer no longer connects to the phone via USB |
| USB not working |
How to Diagnose and Fix the Most Common Windows USB Issues
The most common windows usb issues are device install error code 0x80070005 and the device is not recognized by the computer.
There are different ways to fix this issue. One way is to uninstall and reinstall the USB device, another way is to disable driver signature enforcement, and lastly, you can use a third-party utility like Driver Easy to scan for corrupted or outdated drivers. The Windows 10 Device Install Error Code 0x80070005 error occurs when your computer does not recognize the new USB device you are trying to install. This error can be caused by any of the following:
- The USB port on your computer may be damaged or defective.
- The USB device may be incompatible with your system’s hardware or software configuration.
- The USB cable connecting the device to your computer is defective.To fix this issue, try reinstalling the USB driver or disconnecting and reconnecting your USB device. If you don’t see any improvement after trying these fixes, try disabling Driver Signature Enforcement in Windows 10. .If the issue persists, try using a different USB cable. If you’re not using a USB device such as a mouse or keyboard and are just trying to charge your device through the USB port, try moving it to another USB port on your computer.
- The USB device may be incompatible with your system’s hardware or software configuration.
- The USB cable connecting the device to your computer is defective.To fix this issue, try reinstalling the USB driver or disconnecting and reconnecting your USB device. If you don’t see any improvement after trying these fixes, try disabling Driver Signature Enforcement in Windows 10
List of Builtin Windows System USB Drivers
- Usbccgp.sys
- Usb.inf
- WudfUsbBID.dll
- WudfUsbBIDAdvanced.inf
- Wpdusb.sys
- Winusb.sys
- Winusb.inf
How to Verify Drivers installed on Windows 10/11 ?
Windows have a built-in tool called “Driver Verifier Manager”. This tool is built to verify and validate device drivers installed on Windows OS. Driver Verifier Manager is capable of a variety of functions such as displaying all drivers installed on the computer, Signed and unsigned driver list, schedule & verifying drivers, etc.

SYNTAX:

    verifier {/? | /help}
    verifier /standard /all
    verifier /standard /driver <name> [<name> ...]
    verifier {/ruleclasses | /rc} <options> [<ruleclass_1> <ruleclass_2> ...] /all
    verifier /flags <options> [<options> ...] /all
    verifier /flags <options> [<options> ...] /driver <name> [<name> ...]
    verifier /rules {query | reset | default <id> | disable <id>}
    verifier /query
    verifier /querysettings
    verifier /bootmode {persistent | resetonbootfail | oneboot | resetonunusualshutdown}
    verifier /persistthroughupgrade
    verifier /reset
    verifier /faults [probability [pool_tags [applications [delay_minutes]]]]
    verifier /faultssystematic [<options> ...]
    verifier /log <file_name> [/interval <seconds>]
    verifier /volatile /flags <options> [<options> ...]
    verifier /volatile /adddriver <name> [<name> ...]
    verifier /volatile /removedriver <name> [<name> ...]
    verifier /volatile /faults [probability [pool_tags [applications
                [delay_minutes]]]]
    verifier /domain {wdm | ndis | ks | audio} [rules.all | rules.default ]
                /driver ... [/logging | /livedump]
    verifier /logging
    verifier /livedump

PARAMETERS:

    /? or /help
        Displays this help message.

    /standard
        Specifies standard Driver Verifier flags.

    /all
        Specifies that all installed drivers will be verified after the next
        boot.

    /driver <name> [<name> ...]
        Specifies one or more drivers (image names) that will be verified.
        Wildcard values (e.g. n*.sys) are not supported.

    /driver.exclude <name> [<name> ...]
        Specifies one or more drivers (image names) that will be excluded
        from verification. This parameter is applicable only if all drivers
        are selected for verification. Wildcard values (e.g. n*.sys) are not
        supported.

    /flags <options> [<options> ...]
        Specifies one or more options that should be enabled for verification.
        Flags are applied to all drivers being checked by Driver Verifier. The
        provided options values must be either in decimal, hexadecimal ("0x"
        prefix), octal ("0o" prefix) or binary ("0b" prefix) format.

        Standard Flags:
          Standard Driver Verifier options can be specified using '/standard'.
          WDF verification is included in /standard but is not shown here.

          0x00000001 (bit  0) - Special pool
          0x00000002 (bit  1) - Force IRQL checking
          0x00000008 (bit  3) - Pool tracking
          0x00000010 (bit  4) - I/O verification
          0x00000020 (bit  5) - Deadlock detection
          0x00000080 (bit  7) - DMA checking
          0x00000100 (bit  8) - Security checks
          0x00000800 (bit 11) - Miscellaneous checks
          0x00020000 (bit 17) - DDI compliance checking

        Additional Flags:
          These flags are intended for specific scenario testing. Flags marked
          with (*) require I/O Verification (bit 4) that will be automatically
          enabled. Flags marked with (**) support disabling of individual
          rules.

          0x00000004 (bit  2) - Randomized low resources simulation
          0x00000200 (bit  9) - Force pending I/O requests (*)
          0x00000400 (bit 10) - IRP logging (*)
          0x00002000 (bit 13) - Invariant MDL checking for stack (*)
          0x00004000 (bit 14) - Invariant MDL checking for driver (*)
          0x00008000 (bit 15) - Power framework delay fuzzing
          0x00010000 (bit 16) - Port/miniport interface checking
          0x00040000 (bit 18) - Systematic low resources simulation
          0x00080000 (bit 19) - DDI compliance checking (additional)
          0x00200000 (bit 21) - NDIS/WIFI verification (**)
          0x00800000 (bit 23) - Kernel synchronization delay fuzzing
          0x01000000 (bit 24) - VM switch verification
          0x02000000 (bit 25) - Code integrity checks

    /ruleclasses or /rc [<ruleclass_1> <ruleclass_2> ... <ruleclass_k>]
        This parameter is larger set of '/flags' above. While '/flags' is
        limited to 32 bit bitmap expression, this can include more than 32
        verification classes. Each positive decimal integer represents a
        verification class. Multiple classes can be expressed by separating
        each class id with space character. Following rule classes IDs are
        available and leading 0's can be omitted.

        Standard Rule Classes:

                   1 - Special pool
                   2 - Force IRQL checking
                   4 - Pool tracking
                   5 - I/O verification
                   6 - Deadlock detection
                   8 - DMA checking
                   9 - Security checks
                  12 - Miscellaneous checks
                  18 - DDI compliance checking
                  34 - WDF Verification

        Additional Rule Classes:
          These rule classes are intended for specific scenario testing. Rule
          classes are marked with (*) require I/O Verification (5) that will
          be automatically enabled. Flags marked with (**) support disabling
          of individual rules.

                   3 - Randomized low resources simulation
                  10 - Force pending I/O requests (*)
                  11 - IRP logging (*)
                  14 - Invariant MDL checking for stack (*)
                  15 - Invariant MDL checking for driver (*)
                  16 - Power framework delay fuzzing
                  17 - Port/miniport interface checking
                  19 - Systematic low resources simulation
                  20 - DDI compliance checking (additional)
                  22 - NDIS/WIFI verification (**)
                  24 - Kernel synchronization delay fuzzing
                  25 - VM switch verification
                  26 - Code integrity checks

    /log.code_integrity
        This option suppresses Code Integrity violation breaks and collects
        only statistics for verified drivers. Statistics could be extracted
        via /log option or kernel debugger. This parameter is applicable only
        if Code Integrity checks are enabled.

    /rules {query | reset | default <id> | disable <id>}
        Specifies rules level control (advanced).

          query           Shows current status of controllable rules.
          reset           Resets all rules to their default state.
          default <id>    Sets rule ID to its default state.
          disable <id>    Disables specified rule ID.

    /query
        Display runtime Driver Verifier statistics and settings.

    /querysettings
        Displays a summary of the options and drivers that are currently
        enabled, or options and drivers that will be verified after the
        next boot. The display does not include drivers and options added
        using /volatile.

    /bootmode
        Specifies the Driver Verifier boot mode. This option requires system
        reboot to take effect.

          persistent        Ensures that Driver Verifier settings are
                            persistent across reboots. This is the default
                            value.
          resetonbootfail   Disables Driver Verifier for subsequent reboots
                            if the system failed to start.
          resetonunusualshutdown
                            Driver Verifier persists until unusual shutdown
                            happens. Its abbrevation, 'rous', can be used.
          oneboot           Enables Driver Verifier only for the next boot.

    /persistthroughupgrade
        Makes the Driver Verifier settings persist through upgrade. Driver
        Verifier will be active during system upgrade.

    /reset
        Clears Driver Verifier flags and driver settings. This option requires
        system reboot to take effect.

    /faults [probability [pool_tags [applications [delay_minutes]]]]
        Enable the Randomized low resources simulation feature and optionally
        control parameters for the Randomized low resources simulation.

          Probability     Specifies the probability that Driver Verifier will
                          fail a given allocation. The value represents the
                          number of chances in 10,000 that Driver Verifier will
                          fail the allocation. The default value 600, means
                          600/10000 or 6.
          Pool Tags:      Specifies a space separated list of the pool tags to
                          be injected with faults. By default, any pool
                          allocation can be injected with faults.
          Applications    Specifies a space separated list of image file names
                          (an executable) that will be injected with faults. By
                          default, any pool allocation can be injected with
                          faults.
          DelayMinutes    Specifies the number of minutes after booting during
                          which Driver Verifier does not intentionally fail any
                          allocations. This delay allows the drivers to load
                          and the system to stabilize before the test begins.
                          The default value is 8 minutes.

    /faultssystematic [<options> ...]
        Controls the Systematic low resources simulation parameters.

          enableboottime          Enables fault injections across reboots.
          disableboottime         Disables fault injections across reboots.
                                  This is the default value.
          recordboottime          Enables fault injections in 'what if' mode
                                  across reboots.
          resetboottime           Disables fault injections across reboots and
                                  clears the stack exclusion list.
          enableruntime           Dynamically enables fault injections.
          disableruntime          Dynamically disables fault injections.
          recordruntime           Dynamically enables fault injections in
                                  'what if' mode.
          resetruntime            Dynamically disables fault injections and
                                  clears the previously faulted stack list.
          querystatistics         Shows the current fault injection statistics.
          incrementcounter        Increments the test pass counter used to
                                  identify when a fault was injected.
          getstackid <counter>    Retrieves the indicated injected stack id.
          excludestack <stack_id> Excludes the stack from fault injection.

    /log <file_name> [/interval <seconds>]
        Creates a log file with the specified name and periodically writes the
        runtime statistics to this file. The interval between log file updates
        is controlled by the '/interval' parameter. The default value is 30
        seconds. Use CTRL+C to close the log and return.

    /volatile
        Changes Driver Verifier settings without rebooting the computer.
        Volatile settings take effect immediately and are in effect until the
        next system reboot.

    /volatile /adddriver <name> [<name> ...]
        Starts the verification for the specified driver or drivers.

    /volatile /removedriver <name> [<name> ...]
        Stops the verification for the specified driver or drivers.

    /domain {wdm | ndis | ks | audio} [rules.all | rules.default] /driver ...
        [/logging | /livedump]
        Controls the verifier extension settings. The following verifier
        extension types are supported:

          wdm               Enabled verifier extension for WDM drivers.
          ndis              Enabled verifier extension for networking drivers.
          ks                Enabled verifier extension for kernel mode
                            streaming drivers.
          audio             Enabled verifier extension for audio drivers.

        The following extension options are supported:

          rules.default     Enables default validation rules for the selected
                            verifier extension.
          rules.all         Enables all validation rules for the selected
                            verifier extension.

        /logging
          Enables logging for violated rules detected by the selected verifier
          extensions.

        /livedump
          Enables live memory dump collection for violated rules detected by
          the selected verifier extensions.

Download PC Repair Tool to quickly find & fix Windows errors automatically
Most Windows users are familiar with Microsoft’s Automated Troubleshooting Services and its Fix It‘s. They are really a convenient way of fixing problems you may be facing on your Windows computer. If you are facing issues using your USB device with your Windows computer – maybe while ejecting the device, you might want to use Windows USB Troubleshooter and see if it helps fix your problem.

You may want to check out if you have the latest drivers for the USB devices installed. If that does not work for you, this new Windows USB Troubleshooter from Microsoft may be able to help you.
This Fix It tool will diagnose and fix Windows USB problems automatically. Some examples of USB’s would be Thumb drives, USB hard drives, Pen drives, USB printers, etc.
Windows USB Troubleshooter will fix USB Audio, storage, and print devices that do not eject using the Safely Remove Hardware dialog. It will release the USB storage device. Moreover, if your USB device is not being recognized, it will remove the upper and lower filters for portable devices. It will also check if Windows Updates have been configured to never update drivers – just so to confirm that you are not using outdated drivers.
Visit Microsoft to download and run the tool. Once you run the Windows USB Troubleshooter, it will scan your system for potential problem areas and then present you with a detailed report. You can opt to let it automatically fix all for you or you can choose and decide which of the presented issues you’d like the tool to fix.
UPDATE: Microsoft Easy Fix solutions are no longer supported. Running the built-in Hardware and Devices Troubleshooter may also be an option you may want to consider.
See this post if you receive The USB Controller is in a failed state or is not currently installed message.
These posts may also interest you:
- USB Device Not Recognized in Windows
- PC turns off when USB is plugged in
- USB 3.0 External Hard Drive not recognized in Windows
- USB Devices not working in Windows.

Anand Khanse is the Admin of TheWindowsClub.com, a 10-year Microsoft MVP (2006-16) & a Windows Insider MVP (2016-2022). Please read the entire post & the comments first, create a System Restore Point before making any changes to your system & be careful about any 3rd-party offers while installing freeware.
UPDATE (24/09/2020): USB troubleshooter is no longer available from Microsoft.
We all use USB or flash drives with Windows, as they’re very much convenient to carry data. Additionally, they’re light weight, affordable, easy to use and available in plenty, hence used massively. Earlier, we’ve seen what to do, if Windows stop recognizing your USB devices, in the following article:
FIX : Unknown USB Device (Device Descriptor Request Failed) In Windows 10
Apart from this, there are many others issues with USB drives which you may came around. To deal with these unknown issues, you can use Microsoft‘s official Windows USB troubleshooter. Windows USB troubleshooter has been specially designed to take care of USB related problems, which generally users may experience. So if you’ve a problem with USB drive, you must give it a try.
Here’s how do you download and use Windows USB troubleshooter in Windows 10.
Fix Flash Drive Problems With USB Troubleshooter On Windows 10
1. Firstly, download Windows USB troubleshooter for Windows 10 using this link.
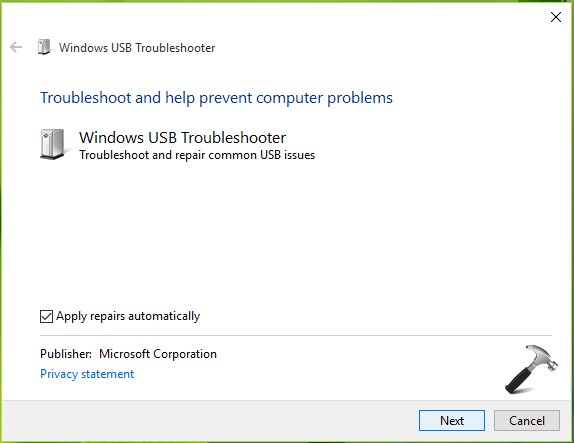
2. Once you downloaded WinUSB.diagcab using above mentioned link, run the cabinet file and you’ll see below shown screen. Click Advanced and then check Apply repairs automatically. Hit Next.
3. Then you’ll see troubleshooter is verifying the problems. No user input required at this stage.

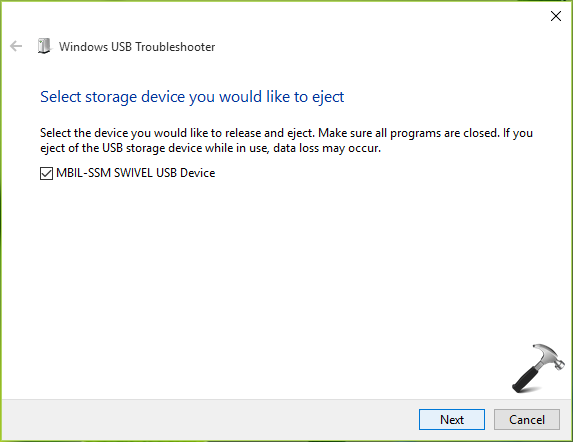
4. Now you’ll be asked to select the USB device to eject. Choose carefully if you’ve multiple USB devices loaded into the system and click Next.
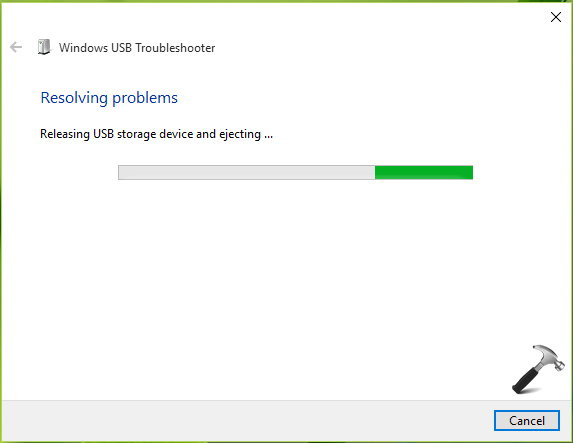
5. Its time the troubleshooter will fix the issues, it already found. Again, no user action required here.
Finally, you’ll be able to spot what things were detected as an issue and whether is it fixed or not. In our case, troubleshooter found one issue with the USB device and fixed it.
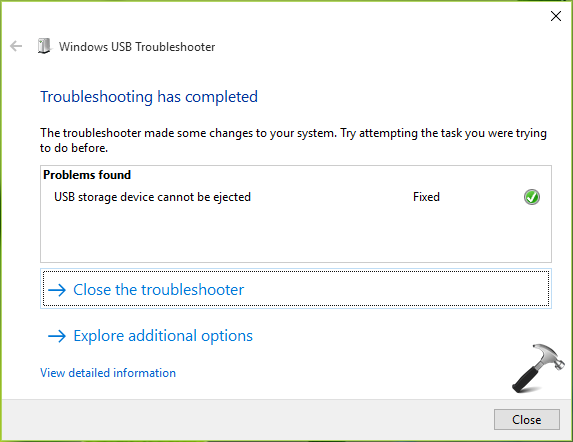
After having done, click Close to exit USB troubleshooting wizard.
So this is how you can fix issues with USB drives using the troubleshooter. Hope you find it useful!
Read this post, if you get ‘The USB Controller is in a failed state or is not currently installed‘ error with Windows USB troubleshooter.
READ THESE ARTICLES NEXT
- Fix: USB drive not working in Windows 11
- Solved: Unknown USB Device (Device Descriptor Request Failed) in Windows 11
- Block access to removable storage devices in Windows 11/10
- How to disable USB ports in Windows 11
- Fix: USB Devices Not Recognized in Windows 11
- Turn On Or Off Notifications For USB Issues In Windows 10
- FIX: USB Drive Not Showing Up In Windows 10
- FIX: USB Device Not Recognized In Windows 10/8/7
- [FIX] USB Ports Not Working In Windows 10
- [FIX] The USB Controller Is In A Failed State Or Is Not Currently Installed
Собраны популярные программы для устранения неполадок в Windows от Microsoft. С помощью этих утилит вы исправите не работающий магазин windows, сетевые адаптеры, подключение WiFi и интернета, работу принтера, ошибки обновления windows, USB, меню пуск, панель задач и многое другое.
![]()
![]()
![]()
![]()
![]()
![]()
![]()
Исправление ошибок в Центре обновления Windows

Решает множество проблем с ошибками при установке и скачивания обновлений Windows от Microsoft. Избавит от ошибок: 0x80073712, 0x800705B4, 0x80004005, 0x8024402F, 0x80070002, 0x80070643, 0x80070003, 0x8024200B, 0x80070422, 0x80070020.
Скачать Windows 10Скачать Windows 8/7 зеркало
Устранение проблем с принтерами
Просканирует автоматически систему на наличие ошибок связанных с принтером и печатью и исправит их по возможности.
Скачать
зеркало
Устранение проблем с USB в Windows

Автоматически диагностирует и исправляет распространенные проблемы с USB . Решит проблему с зависанием «Безопасное извлечение устройства».
Скачать зеркало
Устранение неполадок в работе приложений и Магазина Windows

Если есть проблемы с приложениями из магазина Windows, то воспользуйтесь средством устранения неполадок для приложений. Также, вы можете решить многие ошибки с самими Microsoft Store.
Скачать
зеркало
Устранения неполадок меню Пуск и Панели задач для Windows 10

Утилита для устранения неполадок и устранения проблем с меню Пуск в windows 10. Вы можете исправить общие проблемы, такие как меню пуск не открывается, не отображаются приложения, пустые ярлыки, фрагменты и устраняет известные проблемы для панели задач.
Устранение проблем с Поиском и Индексированием
Автоматически устранит, такие проблемы как поиск в windows не работает, работает не правильно, не показывает результатов, и многие другие известные проблемы Windows Search.
Диагностика сетевых адаптеров и интернета
Устранение проблем с подключением интернета, WiFi и подключения к веб-сайтами через интернет. Устранит и исправит сетевые и беспроводные адаптеры в windows, исправит брандмауэр Windows, общий доступ к папкам и другому компьютеру, входящие подключения, домашнюю группу, локальные подключения.
Поиск и устранение проблем с устройствами и оборудованием

Устранение проблем и ошибок с оборудованием и устройствами. Ошибки при подключении или просто коды ошибок клавиатуры, колонок, видеокарты, ОЗУ, звуковой карты и всего остального.
Устранение неполадок с установкой и удалением программ

Устраняет проблемы при установке или удалении программ в системе Windows. Также исправляет поврежденные ключи реестра.
Sign in with Microsoft
Sign in or create an account.
Hello,
Select a different account.
You have multiple accounts
Choose the account you want to sign in with.
Thank you for your feedback!
×
На чтение 6 мин. Просмотров 3.9k. Опубликовано 22.04.2021
Если вы только что купили новый ноутбук или настольный компьютер, велика вероятность, что все ваши USB-порты – USB 3.0. USB 3.0 намного надежнее и быстрее, и весь мир постепенно принимает его как новый технологический стандарт.
Но если все ваши USB-порты 3.0, вы рискуете столкнуться с серьезной совместимостью проблемы при работе со старыми устройствами, которые умеют использовать только USB 2.0. Безусловно, самые большие препятствия возникают при попытке подключить старый принтер к порту USB 3.0. Типичные сообщения об ошибке для этой проблемы: « Составное USB-устройство является устаревшим USB-устройством и может не работать с USB 3 » или « Составное USB-устройство не может правильно работать с USB. 3.0 ″.
Теоретически USB 3.0 имеет обратную совместимость и должен нормально работать с USB 2.0. . Но на самом деле многое зависит от возраста вашего принтера и драйверов, с которыми вы работаете. Если вы попытаетесь подключить старый принтер, использующий USB 2.0, к порту USB 3.0, скорее всего, все будет не так, как вы ожидали. Это еще более распространено, если вы используете Windows 10. Некоторые пользователи даже сообщали, что их принтеры USB 2.0 перестали работать после обновления Windows 10. Хотя мы не можем точно сказать, было ли это намеренно, глобальная тенденция определенно отходит от USB 2.0.
Но не спешите выбрасывать принтер из окна. Прежде чем смириться с неизбежным будущим, вы можете попробовать сделать свой принтер USB 2.0 совместимым с портом USB 3.0.
Содержание
- Метод 1. Установка драйвера принтера вручную
- Метод 2: Подключите принтер к порту зарядки
- Метод 3: Отключение и повторное включение контроллеров USB
- Метод 4. Использование инструмента автоматического восстановления печати (только HP )
- Метод 5: Использование Windows USB Troubleshooter
- Метод 6. Включение поддержки устаревших версий USB для контроллеров USB
- Метод 7. Предотвращение ting Windows от выключения устройства
- Метод 8: Использование концентратора USB 2.0 или карты расширения USB 2.0
Метод 1. Установка драйвера принтера вручную
Windows 10 очень хорошо умеет автоматически находить драйверы для устройств, которые вы подключаете. Но я бы не стал слишком полагаться на эту функцию, если вы подключаете старый принтер. Если ваш компьютер обнаруживает принтер, но он не работает должным образом, вам следует сначала начать поиск драйверов.
Быстрый способ узнать, есть ли у вас проблема с драйвером, – это перейти выберите Панель управления> Оборудование и звук> Устройства и принтеры. Если значок принтера включает восклицательный знак, вам необходимо загрузить некоторые драйверы.

Начните копаться в материалах для этого установочного диска принтера и установить драйвер оттуда. Если это невозможно, поищите его в Интернете. Если вы ищете в Интернете, убедитесь, что вы остаетесь в пределах официальных страниц загрузки и репозиториев. Маловероятно, что вы найдете драйвер для Windows 10 для своего старого принтера, но вы можете согласиться на драйвер, совместимый с Windows 8. Он должен работать нормально.
Метод 2: Подключите принтер к порту зарядки
Если вам не удалось исправьте мост между вашим старым принтером и портом USB 3.0, давайте воспользуемся другим подходом. Даже если на вашем ноутбуке/настольном компьютере есть только порты USB 3.0, один из них обязательно будет портом для зарядки.. Обычно его легко найти, поскольку рядом с ним есть значок зарядки.

Это маловероятно, но некоторые пользователи намекнули, что порт зарядки позволяет им снова начать печать с устройства USB 2.0. Я не уверен в технических деталях, стоящих за этим, но предполагаю, что это как-то связано с тем, что порт зарядки способен обеспечивать большую мощность, чем стандартные. В любом случае, попробовать стоит.
Метод 3: Отключение и повторное включение контроллеров USB
Если первые два метода были неудачными, давайте попробуем удалить и переустановить родные драйверы USB. Возможно, вы столкнулись с повреждением драйверов USB-контроллера. Не бойтесь этой процедуры, она совершенно безвредна. Windows автоматически просканирует оборудование на предмет изменений и автоматически переустановит правильные драйверы. Вот что вам нужно сделать:
- Нажмите клавишу Windows + R , чтобы открыть команду «Выполнить». Введите « devmgmt.msc » и нажмите Enter , чтобы открыть Диспетчер устройств.

- Зайдя в Диспетчер устройств , прокрутите вниз до Контроллеры универсальной последовательной шины и разверните запись.
- Щелкните правой кнопкой мыши первый USB-контроллер и выберите Удалить , чтобы удалить его.
- Повторите процедуру с каждым USB-контроллером , который указан в разделе Контроллеры последовательной шины . После того, как вы удалите их все, перезагрузите компьютер.
- После перезагрузки Windows автоматически выполнит поиск изменений оборудования и установит отсутствующие драйверы. После этого снова подключите принтер и проверьте, можете ли вы печатать.


Метод 4. Использование инструмента автоматического восстановления печати (только HP )
Я не уверен, есть ли у всех производителей принтеров такой инструмент, но у HP есть программное обеспечение под названием Print and Scan Doctor , которое способен диагностировать и решать подобные проблемы совместимости. Все, что вам нужно сделать, это загрузить инструмент с официального сайта HP и запустить исполняемый файл.

Print and Scan Doctor автоматически обнаружит проблемы с USB-соединением и применит серию автоматических исправления. Если у вас нет принтера HP, поищите в Интернете аналогичный инструмент для вашего производителя.
Метод 5: Использование Windows USB Troubleshooter
Если пока ничего не помогло, давайте попробуем инструмент, разработанный Microsoft. У Microsoft есть супер мощное веб-приложение для автоматической диагностики и ремонта. Проблема в том, что он не связан ни с одной версией Windows.. Чтобы использовать средство устранения неполадок Windows USB, загрузите инструмент по этой официальной ссылке.

После загрузки просто откройте инструмент и следуйте инструкциям на экране. Если обнаруживаются какие-либо несоответствия, средство устранения неполадок USB в Windows автоматически применяет необходимые исправления.
Метод 6. Включение поддержки устаревших версий USB для контроллеров USB
Если у вас все еще нет принтера, войдите в настройки BIOS/UEFI и посмотрите, включена ли Поддержка устаревших USB-устройств для ваших контроллеров USB. Вы можете найти его в аналогичной формулировке или в двух отдельных категориях для контроллеров Standard и USB 3.0. В моей биографии ASUS USB Legacy Support можно найти на вкладке Advanced.

Метод 7. Предотвращение ting Windows от выключения устройства
Если ваш принтер подключается только на мгновение перед тем, как исчезнуть с вашего ПК с Windows, возможно, сбой Windows автоматически выключает устройство для экономии энергии. Известно, что это происходит с различными планами энергосбережения ноутбуков. Вот что вам нужно сделать:
- Нажмите клавишу Windows + R , чтобы открыть команду «Выполнить». Введите « devmgmt.msc » и нажмите Enter , чтобы открыть Диспетчер устройств.
- Прокрутите вниз до Контроллеры последовательных USB-устройств и найдите Корневой USB-концентратор .
- Щелкните правой кнопкой мыши на корневом USB-концентраторе и перейдите на вкладку Свойства> Управление питанием . Здесь снимите флажок рядом с Разрешить компьютеру выключать это устройство для экономии энергии. Нажмите Ok , чтобы сохранить ваш выбор.
- Перезагрузите компьютер и повторно подключите принтер.

Метод 8: Использование концентратора USB 2.0 или карты расширения USB 2.0
Если ничего из вышеперечисленного не помогло, единственный вариант – купить какое-то оборудование. Но я не говорю о новом принтере, это будет слишком дорого. Самым дешевым решением было бы купить концентратор USB 2.0 и подключить его к порту USB 3.0. Это устранит все возможные проблемы совместимости.

Если у вас есть настольный компьютер, вы также можете выбрать карту расширения PCIe USB 2.0. Они, как правило, даже дешевле, чем концентратор USB 2.0.