Процедура миграция службы DHCP со всеми настройками со старого сервера на новый под управлением Windows Server 2016 довольно проста. Если старый сервер DHCP работает под управлением Windows Server 2008 / R2 или Windows Server 2012 / R2, вы можете напрямую перенести настройки, зоны и резервации DHCP.
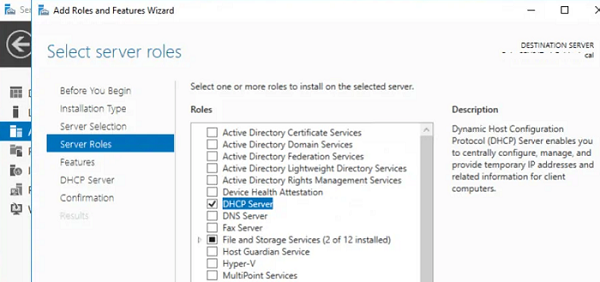
В первую очередь на новом сервере под управлением Windows Server 2016 необходимо установить роль DHCP. Эту роль можно установить с помощью консоли Server Manager, где нужно запустить мастер добавления ролей Manage -> Add Roles and Features и выбрать роль DHCP Server.
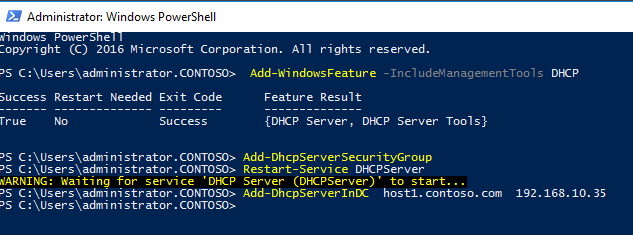
Но гораздо проще и быстрее установить данную роль вместе с инструментами для ее управления (консоль DHCP и модуль PowerShell для работы с сервером DHCP) с помощью PowerShell.
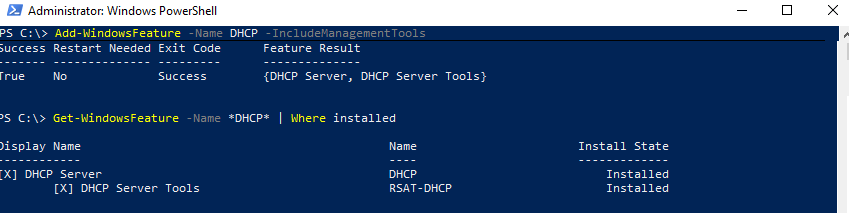
Add-WindowsFeature -IncludeManagementTools DHCP
Параметр -IncludeManagementTools нужен, чтобы дополнительно установить MMC консоль управления сервером DHCP (по умолчанию командлет Add-WindowsFeature устанавливает роль DHCP без соответствующей консоли).
Затем нужно создать локальные группы безопасности для управления сервером DHCP (группы DHCP Administrators и DHCP Users):
Add-DhcpServerSecurityGroup
Чтобы включить параметры безопасности DHCP и связать их с созданными группами безопасности, перезапустите службу DHCP-сервера:
Restart-Service DHCPServer
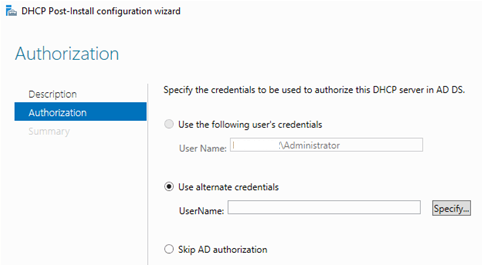
Авторизуйте новый сервер DHCP в домене Active Directory:
Add-DhcpServerInDC host1.contoso.com 192.168.10.35
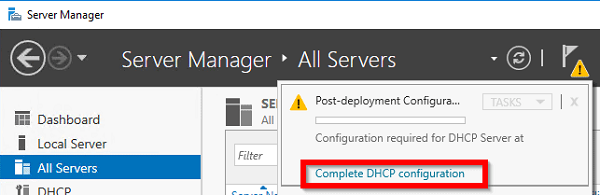
Однако после установки роли DHCP и выполнения первичных настроек, при попытке подключится к серверу через Server Manager появится предупреждение о том, что требуется дополнительная донастройка роли (хотя по факту мы ее уже сделали). Убрать это предупреждение не поможет даже перезагрузка сервера.
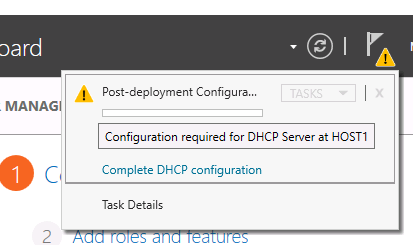
Чтобы исправить эту проблему, нужно изменить ключ в реестре, отвечающий за статус настройки роли:
Set-ItemProperty –Path registry::HKEY_LOCAL_MACHINESOFTWAREMicrosoftServerManagerRoles12 –Name ConfigurationState –Value 2
В Windows Server 2012 появились специальные командлеты PowerShell, позволяющие импортировать / экспортировать любые настройки DHCP-сервера. Microsoft максимально упростила процедуру миграцию, которую можно провести с помощью всего двух команд PowerShell: Export-DhcpServer и Import-Dhcpserver, которые могут быть выполнены удаленно с одного сервера (например, с того, куда планируется выполнить перенос службы):
Создайте каталог c:dhcp и выполните следующую команду для выполнения экспорта настроек старого сервера DHCP в XML файл с именем OldDHCPConf.xml
new-item c:dhcp -type directory
Export-DhcpServer -ComputerName "oldDhcp.contoso.com" -Leases -File "C:DHCPOldDHCPConf.xml" –Verbose
Теперь можно выполнить импорт настроек из полученного файла на новый сервер
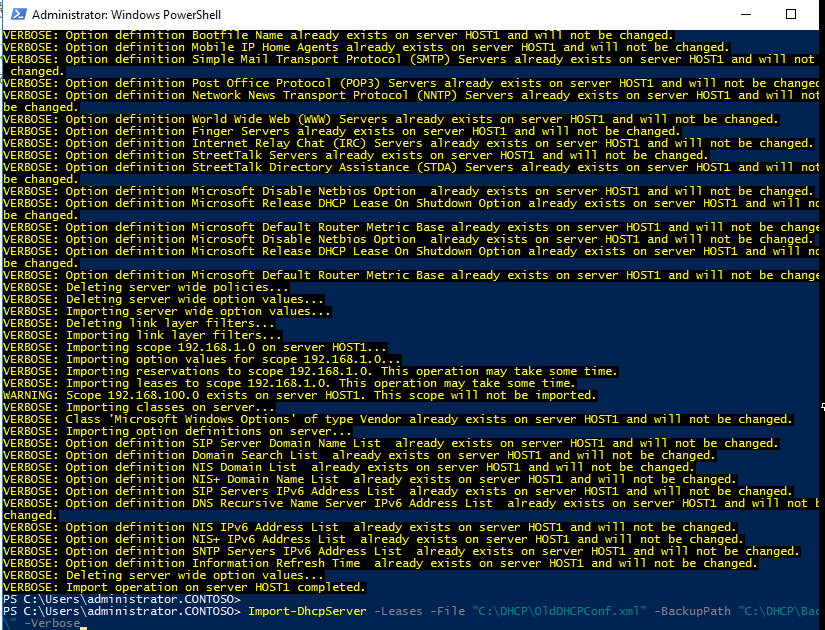
Import-DhcpServer -Leases –File "C:DHCPOldDHCPConf.xml" -BackupPath "C:DHCPBackup" –Verbose
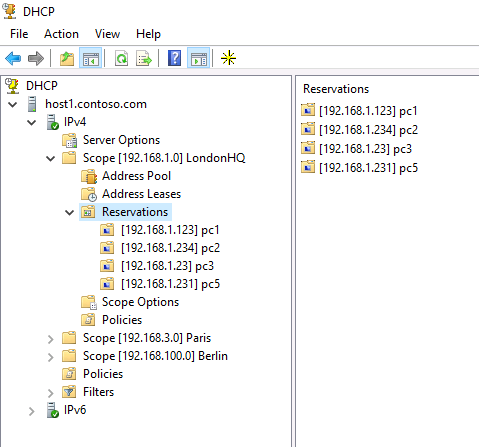
Все готово! Откройте консоль DHCP и проверьте, что все зоны DHCP, резервации, арендованные IP адреса были перенесены успешно.
Если вы создаете отказоустойчивую конфигурацию DHCP с использованием DHCP Failover, конфигурацию DHCP-сервера нужно импортировать также и на второй сервер
Import-DhcpServer -Leases –File "C:DHCPOldDHCPConf.xml" -ServerConfigOnly -BackupPath "C:DHCPBackup" –Verbose
После завершения миграции сервера DHCP не забудьте повторно настроить агентов DHCP Relay (IP Helper) на сетевых маршрутизаторах и коммутаторах 3 уровня.
Migrating the DHCP service from the old server to the new Windows Server 2016/2019/2022 host with the saving of all the DHCP scope settings of the old server is quite easy. If the old DHCP server is running Windows Server 2008/R2 or Windows Server 2012/R2, you can directly transfer DHCP settings, zones, and DHCP reservations.
Deploying DHCP Server Role on Windows Server 2022/2019/2016
First of all, you need to install the DHCP Server role on a new server that is running Windows Server 2016/2019/2022. You can install the DHCP Server role using the Server Manager console, where you need to run the Add Roles Wizard in the Manage > Add Roles and Features menu and select the DHCP Server.
But it’s much easier to install the DHCP role and role management tools (the DHCP MMC console and PowerShell module to interact with DHCP server) using PowerShell. Run the PowerShell console as an Administrator and run the following command:
Add-WindowsFeature -IncludeManagementTools DHCP
The -IncludeManagementTools parameter must be specified to install the DHCP server management console. By default, the Add-WindowsFeature cmdlet installs only the DHCP server role without the appropriate console.
Next, you need to create local DHCP security groups (DHCP Administrators and DHCP Users):
Add-DhcpServerSecurityGroup
Note. These security groups are used to manage the local DHCP server:
- DHCP Administrators — these are users with full permissions on the DHCP server (they can change any settings), but without local admin permissions on Windows Server;
- DHCP Users — users with the rights to view DHCP server settings and statistics (including the DHCP Leases info).
To enable DHCP security settings associated with the local security groups created, restart the DHCP Server service:
Restart-Service DHCPServer
Authorize DHCP Server in Active Directory
Next, you need to authorize the new DHCP server in the Active Directory domain. Authorization in Active Directory is performed under an account with Enterprise Admins permissions and is needed to prevent rogue DHCP servers from working on the network.
The list of authorized DHCP servers in the AD domain can be displayed as follows:
Get-DhcpServerInDC
To authorize the new DHCP server in the Active Directory domain:
Add-DhcpServerInDC host1.contoso.com 192.168.10.35

If you want to start a DHCP server without authorization in AD, you need to change the DisableRogueDetection registry parameter with the following PowerShell command:
Set-ItemProperty -Path "HKLM:SYSTEMCurrentControlSetServicesDHCPServerParameters" -Name DisableRogueDetection -Value 1 -Force
However, after the DHCP role is installed and the post-installation settings with PowerShell are performed, you can’t connect to the DHCP Server. You can see an alert message in the Server Manager console: a post-installation configuration is required, even though it has already been performed. In this case, even the server reboot won’t help to make this alert disappear.

To remove this warning message and notify Server Manager that post-install DHCP configuration is completed, you need to modify the ConfigurationState registry parameter. Use the following PowerShell command to indicate that the actual DHCP server role has already been configured:
Set-ItemProperty –Path registry::HKEY_LOCAL_MACHINESOFTWAREMicrosoftServerManagerRoles12 –Name ConfigurationState –Value 2
After that, you need to restart the DHCP service:
Restart-Service -Name DHCPServer -Force
Moving DHCP Server from Windows Server 2008/R2/2012 to 2016/2019/2022
In Windows Server 2012 special PowerShell cmdlets have been added, allowing you to import/export any DHCP server settings. Note that Microsoft simplified the procedure as much as possible, and we will need to execute only two PowerShell commands: Export-DhcpServer and Import-Dhcpserver, which can work remotely. All commands can be executed on one machine (the one to which the DHCP service migrates).
Create the folder C:DHCP (New-Item C:DHCP -type directory) and run the command to export the configuration of the old DHCP server to the XML file named OldDHCPConf.xml.
Export-DhcpServer -ComputerName "oldDhcp.contoso.com" -Leases -File "C:DHCPOldDHCPConf.xml" –Verbose

Now you can perform a full import of the DHCP configuration on the new server:
Import-DhcpServer -Leases –File "C:DHCPOldDHCPConf.xml" -BackupPath "C:DHCPBackup" –Verbose
Everything is ready. Run the DHCP console and check that all the DHCP scopes, reservations, and IP leases are in place.

After the migration of the DHCP server is completed, do not forget to reconfigure the DHCP Relay (IP Helper) agents on the routing network devices. Reconfigure them to use the IP address of the new DHCP server.
When you run the command Import-DhcpServer -Leases –File…. you may get an errorGet-DhcpServerVersion : Failed to get version of the DHCP server DC3.
In this case, make sure you run PowerShell console as Administrator. Also, check if your account is a member of the local DHCP Administrators group.
Migrating the DHCP Role on Windows Server Using the Backup/Restore Feature
In Windows Server 2016+, you can backup and restore your DHCP server configuration via the graphical MMC snap-in DHCP Management (dhcpmgmt.msc). You can use these features to migrate your DHCP server.
- Open the RSAT DHCP console;
- Right-click on the DHCP server and select Backup;

- Specify the directory where you want to save the backup copy of the DHCP server settings.

You can use this backup copy to restore the DHCP server settings on the current or another Windows Server host. However, if you simply copy the DHCP backup files to a new server and try to restore the configuration using the Restore option in dhcpmgmt.msc, an error will appear when importing the DHCP database:
The database was not restored correctly. No changes were made. For more information, please see Event Viewer on the specified server.

To successfully migrate your DHCP server config to a new device, you need to copy your DHCP1 backup to the %SystemRoot%System32DHCPbackup directory on the DHCP2 server. Then select the Restore option in the DHCP console and select to restore the configuration from this folder.

If everything was successful, the following message should appear:
The database was restored successfully.

As you can see, we successfully migrated DHCP from one server to another using a DHCP backup.
Note that by default, Windows backs up the DHCP configuration and leases every 60 minutes to the %SystemRoot%System32DHCPbackup directory.
The backup directory is configured in the DHCP server settings.

You can also list the current DHCP backup settings using the PowerShell command:
Get-DhcpServerDatabase
FileName : C:Windowssystem32dhcpdhcp.mdb
BackupPath : C:Windowssystem32dhcpbackup
BackupInterval(m) : 60
CleanupInterval(m) : 60
LoggingEnabled : True
RestoreFromBackup : False

This means that if your Windows Server DHCP server fails, you can manually copy the DHCP database files from the backup directory on the failed server’s disk and restore its configuration to the new server.
DHCP Server Migration from Windows Server 2003 to 2016/2019
If you are using a legacy DHCP server on Windows Server 2003/R2, you need to use a different migration method. This is because Windows Server 2003 does not support the PowerShell cmdlets for exporting DHCP settings that are available in newer versions of Windows Server.
Log in to the Windows Server 2003 and open the command prompt. Run the following command to export DHCP server configuration to a binary file:
netsh dhcp server export C:psdhcp2003_config.dat all
Now copy the dhcp2003_config.dat file to the new DHCP server running Windows Server 2016/2019 and import the configurations from a local file or over the network (using a UNC path):
netsh dhcp server import \winsrv2003dhcpc$psdhcp2003_config.dat all
Migrating DHCP Failover Configuration
If you are using a DHCP failover or DHCP load balancing configuration, after importing the DHCP settings on the first server, you only need to import only the server configuration on the second Windows Server:
Import-DhcpServer -Leases –File "C:DHCPOldDHCPConf.xml" -ServerConfigOnly -BackupPath "C:DHCPBackup" –Verbose
After that, you need to perform the standard DHCP Failover configuration.
Remove the Old DHCP Server
Now you need to disable the DHCP service on the old server:
Stop-Service DHCPserver

Set-Service -Name DHCPServer -StartupType "Disabled"
And unauthorize the old DHCP server from Active Directory using the DHCP console (right-click on the DHCP server name > Unauthorize)

Or unauthorize your old DHCP Server in AD using the following PowerShell command:
Remove-DhcpServerInDC -DnsName "oldDhcp.contoso.com” -IPAddress 192.168.10.36
Then uninstall the DHCP Server Role:
Uninstall-windowsfeature dhcp -remove

Uninstall-WindowsFeature RSAT-DHCP
And reboot the server:
Restart-Computer -Force
- About
- Latest Posts

I enjoy technology and developing websites. Since 2012 I’m running a few of my own websites, and share useful content on gadgets, PC administration and website promotion.
Migrating a DHCP from Server 2012 R2 to Server 2016 involves only two commands. The first command is to export the DHCP data and is run on Server 2012 R2. The second command imports the DHCP data and it is run on the Windows 2016 server.
The following steps illustrate how to use those two commands.
Import and Export DHCP Data
1. Log in with an administrator account to the Windows Server 2012 R2 system.
2. Open Powershell and then type in the following command:
Export-DhcpServer -File C:DHCPdata.xml -Leases -Force -ComputerName old.network.local –Verbose
3. Copy the file C:DHCPdata.xml the Windows Server 2016 system.
4. Install and configure the DHCP role on Server 2016 (Same Server 2012 R2 installation steps, Check my related article on DHCP Server 2012 R2 for help).
5. Start the DHCP service.
6. Type in the following command on Powershell to import the DHCP Data.
Import-DhcpServer -File C:DHCPdata.xml -BackupPath C:DHCP -Leases -ScopeOverwrite -Force -ComputerName new.network.local –Verbose
7. Restart the DHCP service.
Verify your DHCP scope, IP leases, reservations etc and they should match with DHCP Server 2012 R2.
I recently had a client project that involved upgrading their Active Directory to Windows 2016. Their domain and functional levels were both Windows 2000 (!) so we had to do some work to get them up to date.
Their primary DHCP services were running out of two locations, with two DHCP servers at each—all of them running windows 2003. Normally when you do a DHCP migration from newer versions of windows server, you can simply use the GUI tools to do a DHCP backup and restore, but since there are so many version differences here, we must use NETSH.
Step One: Export the DHCP Database
To start off, you’ll need to log into the Windows 2003 server and open a command prompt. Then issue the following commands:
Mkdir c:tempdhcpexport
NETSH
DHCP
Server \<server ip address>
Export c:tempdhcpexportserver-database all
Exit
This will export the entire database with scope options and leases—the leases are the important part as we don’t want the new server giving out duplicate IP addresses since it doesn’t know what clients have already been issued which IP addresses from the scope.
Step Two: Import the Database
Next, copy the database file to your new Windows Server 2016; preferably, make a new directory on that server. Once you have copied the file to your 2016 server, open an administrative command prompt and issue the following commands:
NETSH
DHCP
Server \<server ip address>
import c:tempdhcpexportserver-database all
Exit
Now you can open the DHCP management console and verify that the scopes, reservations, scope options, and leases have all successfully been imported.
Configuring DHCP Failover
For my customer, they were using split scopes, so once I had the primary scope imported, I removed the scope exclusions for the second server, then made my new secondary windows 2016 server a failover partner. DHCP failover is a much better option for a modern DHCP deployment than the old split scope method and allows for a much easier and simpler-to-manage DHCP server.
This can be configured by right-clicking your IPv4 (or IPv6) option under your new server and selecting “Configure Failover”
At the first screen, click next, then select your target failover server. Your target must be at least Windows 2012 or greater revision.
On the next screen, you can then select your failover options.

Then click next

Joe Hanning, PEI
When you migrate a DHCP Server to another server, what you need to move is the database and server settings. These are the basic components of the DHCP Server.
Of course, depending on the needs and infrastructure of an enterprise, you may need to make even more changes such as setting up routers to use the new DHCP Server, etc. Obviously, this is something you need to include in your own your plan as I can not cover all these cases in an article.
For migrations from Windows 2008/2008 R2 and 2012/2012 R2 versions of Windows Server, you can use the Netsh command line tool. For Windows Server 2012/2012 R2 and 2016 versions, it is recommended to use PowerShell for migrating the DHCP Server.
Since it is an asynchronous way of migrating settings from one DHCP Server to another, that means there will be a downtime, at least small, until all the steps are completed.
A general practice followed in such cases is what I will describe immediately in the following scenario.
Suppose we have two DHCP Servers, DHCP01 and DHCP02. We will export the settings from DHCP01 and then import them to DHCP02.
DHCP01 should stop responding to client requests and take over DHCP02 entirely. We assume that the DHCP Server role is installed on both servers.
DHCP Server Migration, how it’s done
After connecting to the existing DHCP Server, DHCP01 in our example, open PowerShell, and export the settings.
Export-DhcpServer -ComputerName DHCP01 -File "C:DHCP-Config.xml" -Force
Once completed, transfer the file that will be created to the new DHCP Server, DHCP02.
Next, you will need to stop sharing IP addresses from the existing server so that the newcomer will take over soon. This can be done in two basic ways, either to stop the DHCP Service or to unauthorize it. The choice is yours, as the case may be.
For example, you can stop the DHCP Service via PowerShell with the following command.
Stop-Service -Name DHCPServer
Set-Service -Name DHCPServer -StartupType "Disabled"
Or through the Services console. You should also set the Startup type to Disabled so that it does not automatically start for any reason.
Log in to the new DHCP Server and make sure the DHCP Server service is already running. With PowerShell, this is done in seconds.
Get-Service -Name DHCPServer
Next, import the settings you extracted from the “old” DHCP Server.
Import-DhcpServer -ComputerName DC02 -File "C:DHCP-Config.xml -Force
Once completed, you can authorize the new DHCP Server so that it is now operational on your infrastructure.
At this point, you will need to check that all scopes, server options, etc. have been introduced, and that clients are normally receiving IP settings from the new DHCP Server.
When everything is working properly, reconnect to the old DHCP Server and remove the corresponding role to completely remove it from your infrastructure.
This is how a basic migration process of the DHCP Server is completed. I hope I helped.
- Remove From My Forums
-
Вопрос
-
I am replacing an older 2008r2 server with Server 2016. I need to move the DHCP services from the 2008r2 over to the 2016 server. I have done this before but it has been a long time and I am can’t remember all the details. I have an article
I compiled and used a few years ago. Please look over my steps and let me know if this is a good way to do it. thanks- Log on to the old/source DHCP server.
- Open a command prompt as Administrator.
- Type netsh dhcp server export C:Users\Desktopdhcp.txt all, and then press ENTER.
- Install the DHCP role on the new (2012/2016) DHCP server.
- Copy the exported DHCP text file to the desktop of the new DHCP server.
- Verify that the DHCP service is installed and started on the new DHCP server.
- Open an elevated command prompt on the new server.
- Type netsh dhcp server import C:Users\Desktopdhcp.txt all, and then press ENTER
- Open DHCP management console on the new server.
- In the console tree, right-click DHCP.
- Select “Authorize”.
If your old DHCP server is in the same network/subnet as the new DHCP server, you’ll notice that the old DHCP server has been de-authorized automatically. This is to prevent two DHCP servers from
handing out conflicting addresses.Check to make sure that your new DHCP has all of the same settings, options, scopes, and reservations set as the current one. If done correctly, everything should have been brought over.
Ответы
-
Hi,
After careful inspection and comparison with our usual method, I think your method is fine.
However, please note that the migration method may not be successful on different computers due to the situation of each computer.
If you have any problems during the migration process,
please feel free to post the problem below the response so we will be notified to follow it up.Note:
since this is a public forum, everyone could view your information, please remove private information that might leak your privacy.Hope this can help you, if you have anything unclear, please let me know.
Have a nice day!
Allan
Please remember to mark the replies as answers if they help and unmark them if they provide no help.
If you have feedback for TechNet Subscriber Support, contact
tnmff@microsoft.com.-
Помечено в качестве ответа
17 февраля 2020 г. 14:49
-
Помечено в качестве ответа
-
#1
Здравствуйте коллеги, подскажите как осуществляется перенос dhcp на другой сервер? Мне нужно с windows server 2008 r2 перенести на windows server 2016 и ничего не обвалить..:think2:

Nick
Случайный прохожий
-
#2
1. Создаем резервную копию на текущем сервере DHCP
Для этого сделаем специальную папку например c:backup
2. Далее из оснастки выбираем сервер и нажимаем Архивировать (см картинку) для windows server 2008

Для windows server 2012 и больше экспорт настроек dhcp
Код:
new-item c:dhcp -type directory
Export-DhcpServer -ComputerName "old_dhcp.domen.org" -Leases -File "C:DHCPold_dhcp.domen.xml" –Verbose
2. На новом сервере
Manage -> Add Roles and Features и выбрать роль DHCP Server или тоже самое через powershell
Код:
Add-WindowsFeature -IncludeManagementTools DHCPДобавляем группы безопасности
Код:
Add-DhcpServerSecurityGroupАвторизуем новый сервер DHCP в домене Active Directory:
Код:
Add-DhcpServerInDC newDHCP.domen.org 172.29.1.56Импорт настроек из полученного файла на новый сервер
Код:
Import-DhcpServer -Leases –File "C:DHCPold_dhcp.domen.xml" -BackupPath "C:DHCPBackup" –VerboseВроде все
-
#3
Последнее редактирование модератором: 05.06.2020
Данная статья описывает процедуру установки и настройки DHCP сервера на базе Windows Server 2019. В статье описаны особенности установки и настройки DHCP роли, создания областей DHCP, настройки их параметров и резервации статических адресов. Мы рассмотрим как привычный способ настройки параметров DHCP сервера через графическую консоль, так и настройку DHCP из командной строки PowerShell.
Протокол DHCP (Dynamic Host Configuration Protocol) используется для автоматического назначения сетевых настроек (IP адрес, маска подсети, шлюз, DNS сервера и т.д.) устройствам в вашей сети (компьютеры, ноутбуки, сканеры, принтеры и т.д.). Также DHCP сервер позволяет более эффективно использовать адресное пространство, избегать конфликта IP адресов в сети и централизованно управлять сетевыми параметрами на клиентских устройствах.
Содержание:
- Установка роли DHCP сервера в Windows Server 2019/2016
- Настройка DHCP областей в Windows Server
- Резервация IP адресов на DHCP сервере
- Настройка и управление DHCP сервером с помощью PowerShell
Установка роли DHCP сервера в Windows Server 2019/2016
В этом примере мы установим DHCP сервер на хосте с Windows Server 2019 и IP адресом 192.168.13.4. Вы можете использовать как Server Core версию, так и Full GUI. В маленькой инфраструктуре допустимо устанавливать DHCP сервер на сервер с ролью контроллера домена Active Directory.
Обязательно назначьте статический IP адрес серверу с ролью DHCP сервер. При установке роли DHCP из консоли PowerShell на сервере с автоматическим получением IP адреса появляется предупреждение:
Configure at least one static IP address on your computer before installing DHCP.
WARNING: The following recommended condition is not met for DHCP: No static IP addresses were found on this computer. If the IP address changes, clients might not be able to contact this server. Please configure a static IP address before installing DHCP Server.
Установить роль DHCP Server можно из консоли Server Manager (Add Roles and Features -> Server Roles).
После установки роли DHCP роли нужно выполнить Post-Deployment Configuration. Для этого в консоли Server Manager щелкните по уведомлению и выберите Complete DHCP configuration.
Вам будет предложено аутентифицировать новый DHCP сервер в Active Directory (экран Authorization). Для авторизации DHCP сервера в AD учетная запись должна состоять в доменной группе Enterprise Admins.
Если у вас нет прав на авторизацию DHCP в AD, вы можете указать, чтобы ваш DHCP сервер запускался без проверки авторизации в домене:
Set-ItemProperty -Path "HKLM:SYSTEMCurrentControlSetServicesDHCPServerParameters" -Name DisableRogueDetection -Value 1 -Force
Также вы можете установить и настроить DHCP роль в Windows Server из консоли PowerShell.
Установка роли DHCP:
Install-WindowsFeature DHCP –IncludeManagementTools
Проверьте, что роль и инструменты управления RSAT-DHCP установлены:
Get-WindowsFeature -Name *DHCP*| Where Installed
Авторизуйте DHCP сервер в Active Directory (укажите DNS имя сервера и IP адрес, который будет использоваться DHCP клиентами):
Add-DhcpServerInDC -DnsName hq-dc01.contoso.com -IPAddress 192.168.13.4
Создайте локальные группы безопасности DHCP сервера:
Add-DhcpServerSecurityGroup
Чтобы Server Manager перестал показывать уведомление о том, что DHCP роль требует настройки, выполните команду:
Set-ItemProperty -Path HKLM:SOFTWAREMicrosoftServerManagerRoles12 -Name ConfigurationState -Value 2
Перезапустите службу DHCPServer:
Restart-Service -Name DHCPServer -Force
База данных и логи DHCP сервера находятся в каталоге
%systemroot%system32dhcp
.
- dhcp.mdb — файл базы данных сервера DHCP’;
- j50.log – транзакционный журнал (используется при восстановлении конфигурации DHCP);
- j50.chk — файл контрольной точки;
- tmp.edb — временный рабочий файл DHCP-сервера.
Настройка DHCP областей в Windows Server
После установки роли DHCP вам нужно создать DHCP области (Scopes), которые описывают диапазоны IP адресов и другие настройки, выдающиеся сервером клиентам.
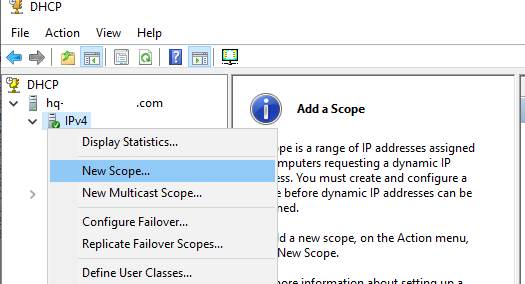
Для управления сервером DHCP используется консоль dhcpmgmt.msc (вы можете управлять DHCP сервером локально или с удаленного компьютера с установленным RSAT). Запустите консоль DHCP, разверните ваш сервер -> IPv4.
Чтобы создать новую область выберите New Scope.
Укажите название DHCP области.
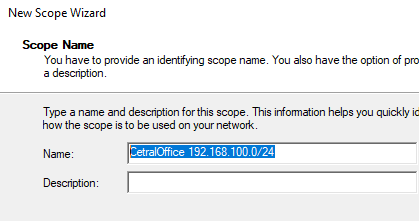
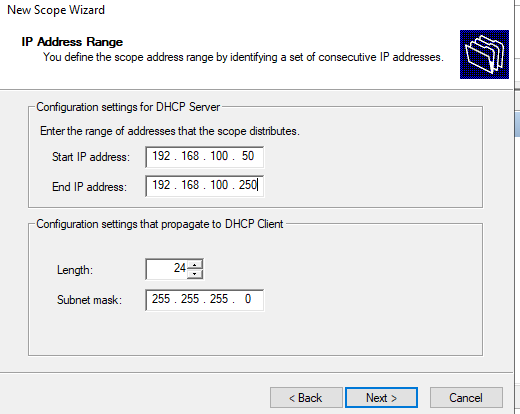
Укажите диапазон IP адресов, который будет выдаваться этой областью и маску сети. В этом примере я хочу использовать эту DHCP область для обслуживания подсети 192.168.100.0/24. В рамках этой сети DHCP сервером будет назначаться динамические IP адреса из диапазона 192.168.100.50 — 192.168.100.250. В следующем окне можно добавить исключения в этот диапазон (Add Exclusions and Delay).
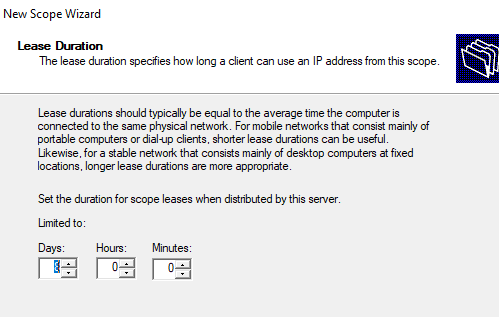
Далее нужно указать длительность аренды (Lease Duration) IP адреса DHCP клиентом (по умолчанию 8 дней, менять без особой необходимости не нужно).
Укажите, что вы хотите настроить дополнительный параметры DHCP области.
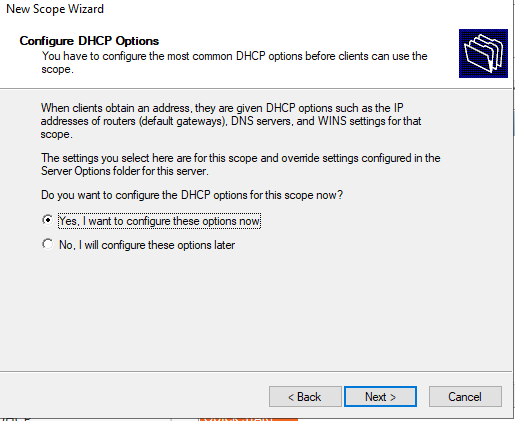 .
.
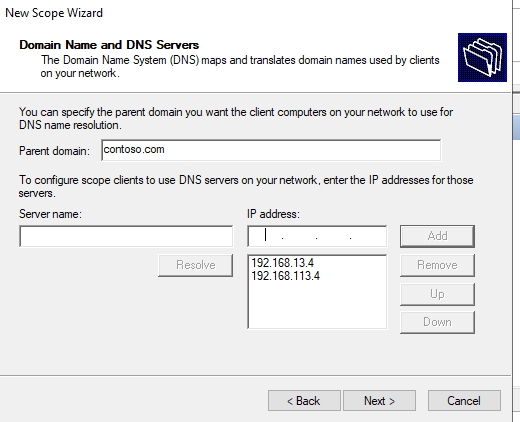
Укажите IP адрес шлюза в подсети, который должен назначаться клиентам (в нашем примере это 192.168.100.1).

Затем укажите имя домена и адреса DNS серверов, которые будут назначены клиентам DHCP.
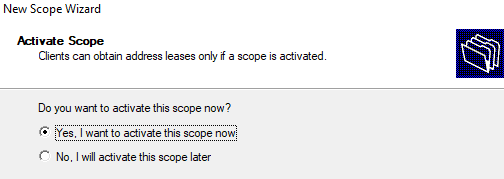
Осталось активировать DHCP область (разрешить ей обслуживать клиентов).
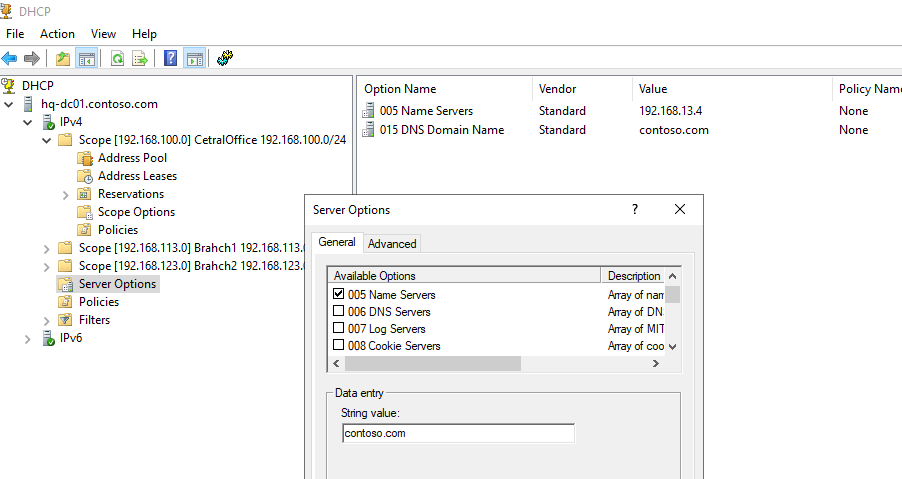
DHCP сервер может выдавать клиентам различный настройки (кроме IP адреса). Для этого используются Scope Options.
В Windows Server DHCP можно настроить глобальные настройки области или Scope Options для каждой области.

Ранее мы уже настроили три опции области:
-
003 Router -
006 DNS Server -
015 DNS Domain Name
Можно добавить и другие опции (NTP сервера, PXE и т.д.).
В разделе Server Options DHCP сервера можно настроить глобальные опции, которые будут наследуются всеми областями. Но вы можете переопределить глобальные настройки в настройках каждой области (опции области имеют приоритет над опциями сервера).
Один DHCP сервер может обслуживать сотни удаленных подсетей и VLAN. Поэтому вы можете создать на нем несколько областей. Главное, чтобы в каждой из подсетей был настроен ретранслятор (DHCP relay agent), который пересылает широковещательные DHCP-запросы на указанный DHCP сервер. В терминах Cisco DHCP ретранслятор называется ip helper. Вы можете настроить DHCP Relay даже на Windows Server.
Протокол DHCP в качестве транспорта использует протокол UDP. Пакеты от клиента к серверу передаются по порту 67 UDP, обратно через UDP 68
Резервация IP адресов на DHCP сервере
По умолчанию DCHP сервер выдает клиентам динамические адреса. Это означает что IP адрес у любого клиента может меняться. Если вы хотите, чтобы определенные устройства всегда получали от DHCP сервера один и тот же адрес, вы можете его зарезервировать (например, для сетевых принтеров, которые настроены у пользователей).
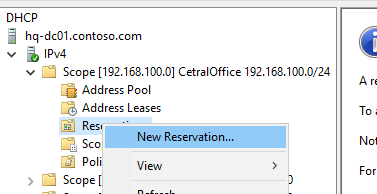
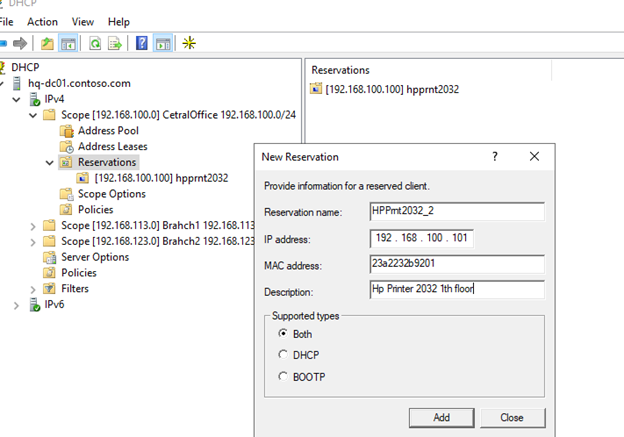
Для DHCP резервации выберите область и перейдите в секции Reservation. В меню выберите New Reservation.
При создании резервации нужно указать IP адрес, который нужно сохранить за клиентом и его MAC адрес (уникальное значение). MAC адрес в Windows можно получить из результатов команды
ipconfig /all
или с помощью PowerShell
get-netadapter|select name,macaddress
). Опционально можно указать имя и описание устройства.
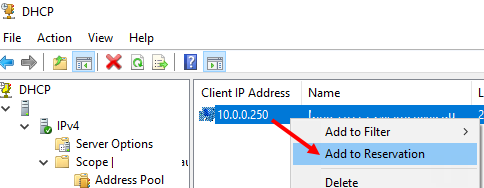
Также вы можете зарезервировать текущий динамический адрес за устройством, найдя его в разделе Address Leases. Щелкните по устройству и выберите Add to Reservation.
Настройка и управление DHCP сервером с помощью PowerShell
Все операции по настройке и управлению DHCP сервером на Windows Server 2019/2016 можно выполнять из консоли PowerShell. Рассмотрим основные команды управления DHCP. Для этого используется модуль DHCPServer. Импортируйте модуль в сессию:
Import-Module DHCPServer
Вывести полный список командлетов в моделе DHCP можно так:
Get-Command -Module DHCPServer

Следующая команда выведет список авторизованных DHCP серверов в Active Directory:
Get-DhcpServerInDC

Вывести список DHCP областей на указанном сервере:
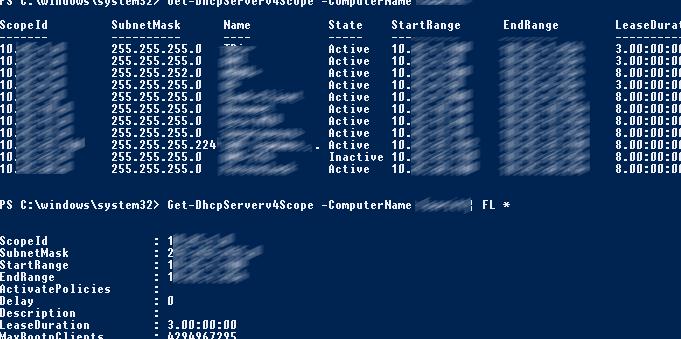
Get-DhcpServerv4Scope –ComputerName msk-dhcp1
Если нужно показать все параметры области (Delay, Description, Name и т.д.):
Get-DhcpServerv4Scope –ComputerName msk-dhcp1| FL *
Если нужно отобразить данные о IPv6 областях:
Get-DHCPServerv6Scope
Получить настройки для конкретной области:
Get-DhcpServerv4Scope –ComputerName msk-dhcp1 –ScopeID 10.10.1.0
Создадим новую (неактивную) область с диапазоном адресов с 192.168.113.50 до 192.168.113.250:
Add-DhcpServerv4Scope -Name “Brahch1 192.168.113.0” -StartRange 192.168.113.50 -EndRange 192.168.113.250 -SubnetMask 255.255.255.0 -State InActive
Настроить следующие параметры DHCP сервера: DNS сервер, домен и адрес шлюза по-умолчанию:
Set-DhcpServerv4OptionValue -ScopeID 192.168.113.0 -DnsDomain contoso.com -DnsServer 192.168.13.4 -Router 192.168.113.1
Добавить исключения в DHCP область:
Add-DhcpServerv4ExclusionRange -ScopeID 192.168.113.0 -StartRange 192.168.113.90 -EndRange 192.168.113.100
Активировать DHCP область:
Set-DhcpServerv4Scope -ScopeID 192.168.113.0 -State Active

Для удобства можно использовать такую команду PowerShell при создании новой области:
$HashArgs = @{
'Name' = 'EKB Office Scope';
'Description' = 'workstations';
'StartRange' = '192.168.140.10';
'EndRange' = '192.168.140.200';
'SubnetMask' = '255.255.255.0';
'State' = 'Active';
'LeaseDuration' = '1.00:00:00';
}
Add-DhcpServerv4Scope @HashArgs
Опции для DHCP сервера добавляется так (к примеру, WPAD):
Add-DhcpServerv4OptionDefinition -ComputerName msk-dhcp1 -Name WPAD -OptionId 252 -Type String
Вывести список настроенных опций DHCP сервера можно так:
Get-DHCPServerv4OptionValue -ComputerName msk-dhcp1 | Format-List
Выведем список настроенных параметров зоны:
Get-DHCPServerv4OptionValue -ComputerName msk-dhcp1 -ScopeId 10.10.1.0 | Format-List
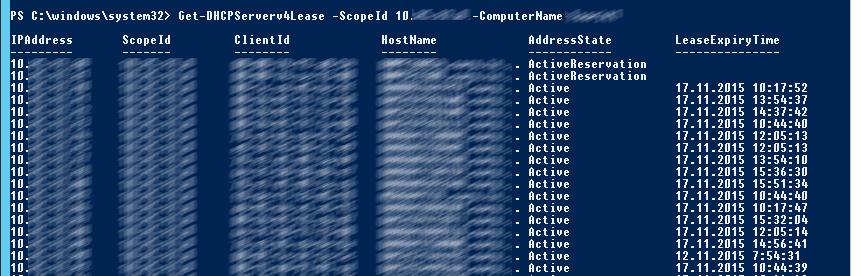
Показать текущий список арендованных адресов для области 10.10.1.0:
Get-DHCPServerv4Lease -ScopeId 10.10.1.0 -ComputerName msk-dhcp1
Создать DHCP резервацию для клиента, которому назначен динамический IP адрес 10.10.1.88 (конвертировать выданный адрес в зарезервированный):
Get-DhcpServerv4Lease -ComputerName msk-dhcp1 -IPAddress 10.10.1.88| Add-DhcpServerv4Reservation -ComputerName msk-dhcp1
Можно массово зарезервировать IP адреса для компьютеров по списку из csv файла. Для этого создайте текстовый файл в формате:
ScopeId,IPAddress,Name,ClientId,Description
10.10.1.0,10.10.1.88,Client1,ba-ab-5c-3d-4e-6f,Reservation PC-msk-s1
10.10.1.0,10.10.1.89,Client2,ba-ab-5c-5d-2e-3f,Reservation PC-msk-s2
Сохраните файл с именем
c:dhcpDHCPReservations.csv
и запустите следующую команду, которая импортирует данные из csv файла и создаст DHCP резервации для клиентов:
Import-Csv –Path c:dhcpDHCPReservations.csv | Add-DhcpServerv4Reservation -ComputerName msk-dhcp1
Отключить область на DHCP сервере:
Set-DhcpServerv4Scope -ComputerName msk-dhcp1-ScopeId 10.10.1.0-State InActive
Удалить область с DHCP сервера:
Remove-DHCPServerv4Scope -ComputerName msk-dhcp1-ScopeId 10.10.1.0 -Force
Возможно получить статистику DHCP сервера (количество областей, резерваций, процент использования адресов и пр.).
Get-DhcpServerv4Statistics -ComputerName msk-dhcp1
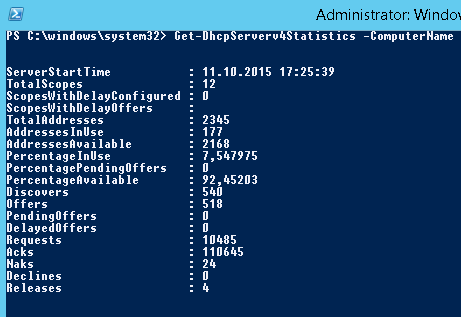
Аналогичная информация для конкретной области может быть получена с помощью командлета Get-DhcpServerv4ScopeStatistics.
Конфигурацию DHCP сервера можно экспортировать в указанный XML файл с помощью команды:
Export-DHCPServer -ComputerName msk-dhcp1 -File C:dhcpdhcp-export.xml
Совет. Заданием с такой командой в планировщике задач можно реализовать регулярное резервное копирование конфигурации DHCP сервера.
В дальнейшем эти настройки DHCP сервера можно импортировать (перенести) на другой DHCP сервер:
Import-DHCPServer -ComputerName msk-dhcp2 -File C:dhcpdhcp-export.xml -BackupPath C:dhcpbackup