Active Directory Migration – In this blog, we’ll move the roles on our Server2008 (Windows Server 2008 R2 SP1) AD server to Server2019 (new Windows Server 2019 Standard).
Before proceeding to migrate an Active Directory from Windows Server 2008 R2 to Windows Server 2019, you want to first install Windows Server 2019 on a replacement machine which can then be promoted to Active Directory Server 2019.
Install Windows Server 2019.
How to Install Windows Server 2019, Click here
Rename Windows Server 2019.
How to rename Windows Server 2019, Click here
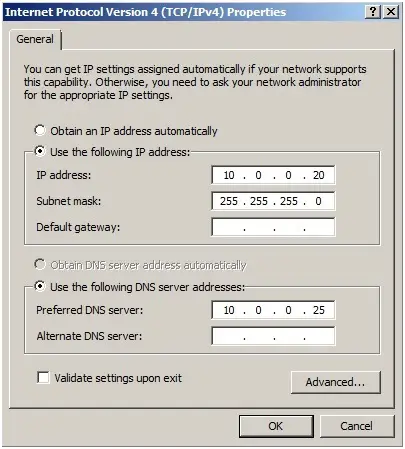
Configure the IP Addresses in Server 2019.
The next step is to configure the IP and the DNS Addresses on the new server.
Windows Server 2008
R2
Windows Server 2019
Computer Name: Server2008 Server2019
Domain Name:
xpertstec.local
IP Address (Static): 10.0.0.20
10.0.0.22
Subnet Mask:
255.255.255.0 255.255.255.0
Default Gateway: 10.0.0.1 10.0.0.1
Preferred DNS Server: 10.0.0.20 10.0.0.20
Active Directory Migration 2008
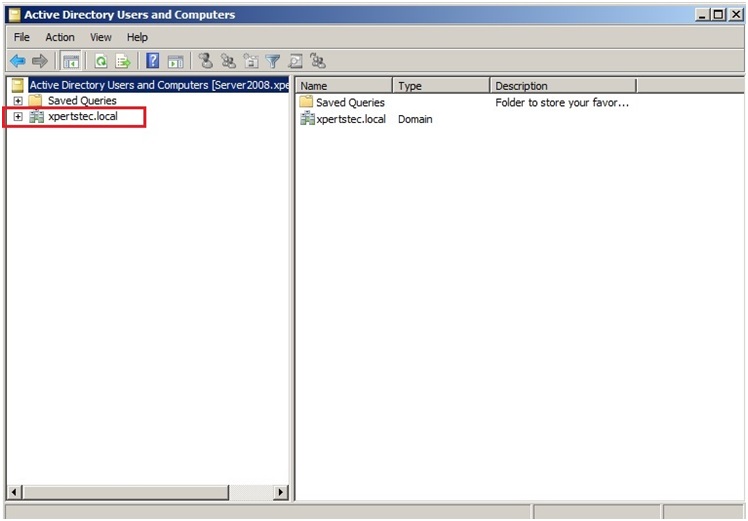
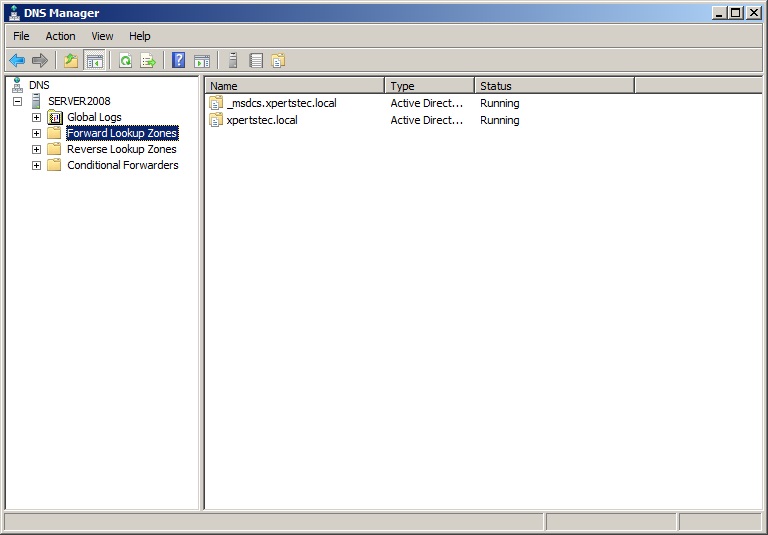
1- First, let’s have a glance at my environment. we have a domain controller xpertstec.local which is installed on Windows Server 2008 R2.
Raise the Forest Functional Levels and Domain Functional Levels in Windows Server 2008 R2.
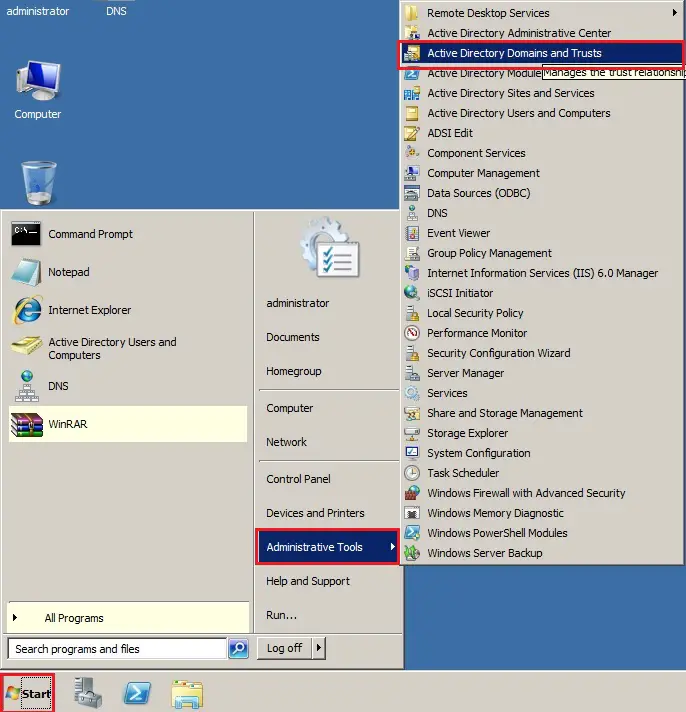
2- Click Start and select Administrative Tools and then Active Directory Domains and Trusts.
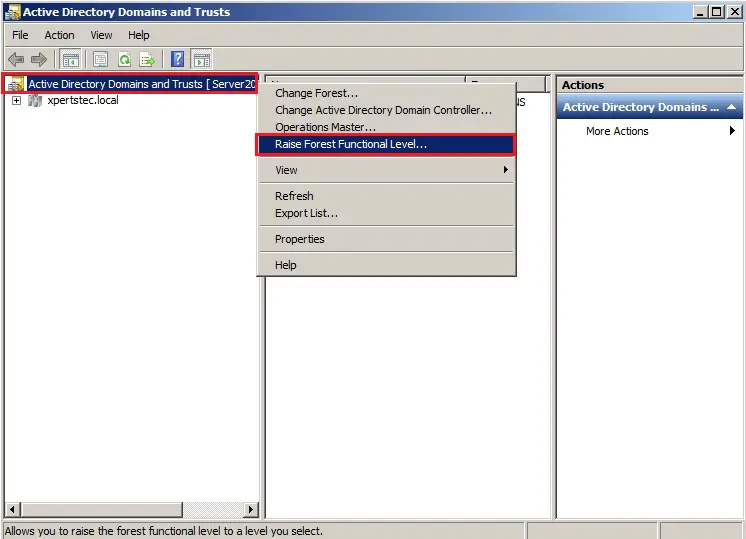
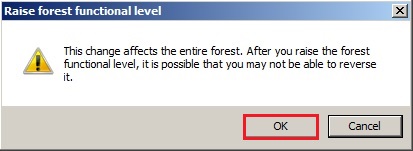
3- Right click on Active Directory Domains and Trusts and choose Raise Forest Functional Level.
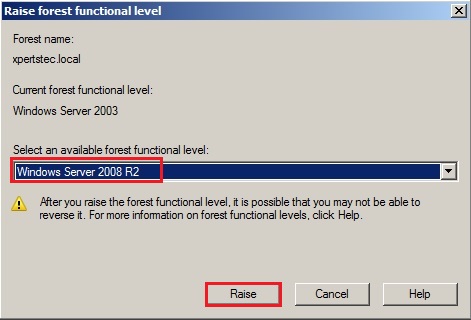
4- Select an available forest functional level “Windows Server 2008 R2 and click Raise.
5- Now click on OK.
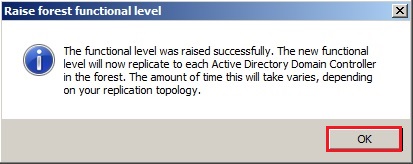
6- The forest functional level was raised successfully so click on ok.
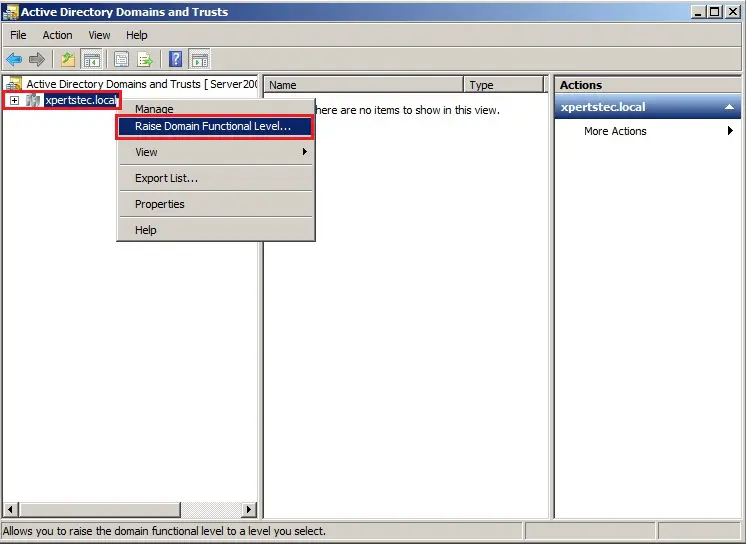
Now Raising the Function Level of the Domain
7- Right click on the Domain name (xpertstec.local) and click Raise Domain Functional Level.
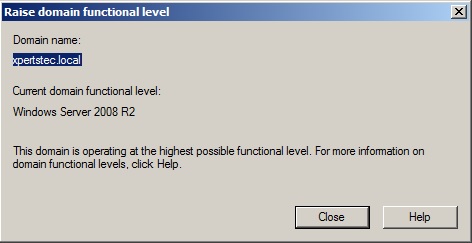
8- It has already got raised the Domain Functional Level to Windows Server 2008 R2 so click on close.
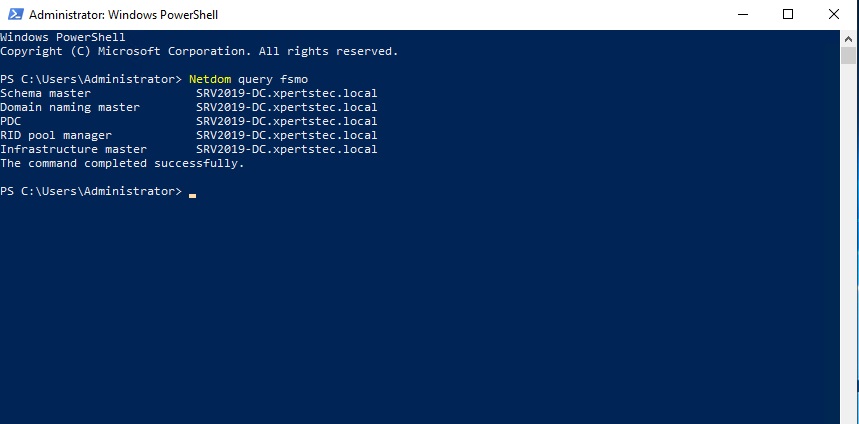
9- Now type the Netdom query fsmo command to check which server has installed FSMO roles.

10- DNS Manager.
Active Directory Migration Steps
Join Windows Server 2019 to an Active Directory Domain.
How to Join Windows Server 2019 to an Active Directory Domain, Click here
Now sign in Windows Server 2019 with the domain administrator account.
Create Additional Domain Controller (ADC) In Windows Server 2019
How to Create Additional Domain Controller (ADC) In Windows Server 2019 so Click here
11- Now have a look at my active directory Domain Controllers Server2008. We can now see that our server Server2019 is in the domain role.

Transferring the Flexible Single
Master Operations (FSMO) Role
I have a Windows Server 2008 Domain Controller (server2008) and have a further Windows Server 2019 domain controller (Server2019). To finish the migration. We’d like to transfer 5 FSMO roles to the new domain controller.
- Schema Master
- Domain Naming Master
- PDC
- RID pool manager
- Infrastructure Master
12- To find which server is currently holding FSMO then run the following command. netdom query fsmo
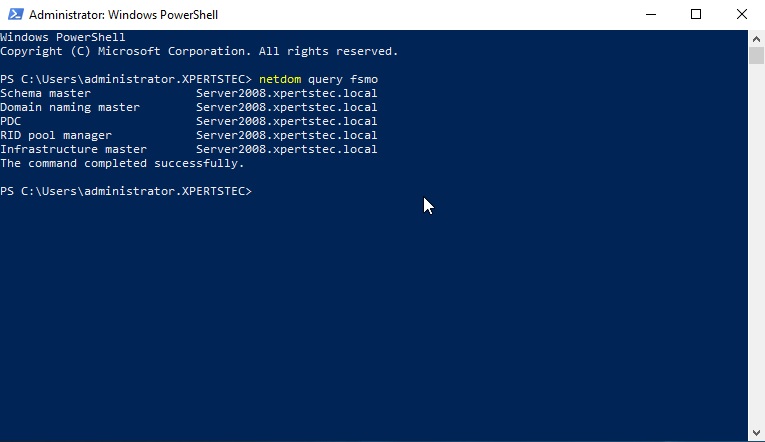
The FSMO roles are currently with the Windows Server 2008 R2 Active Directory domain controller (server2008)
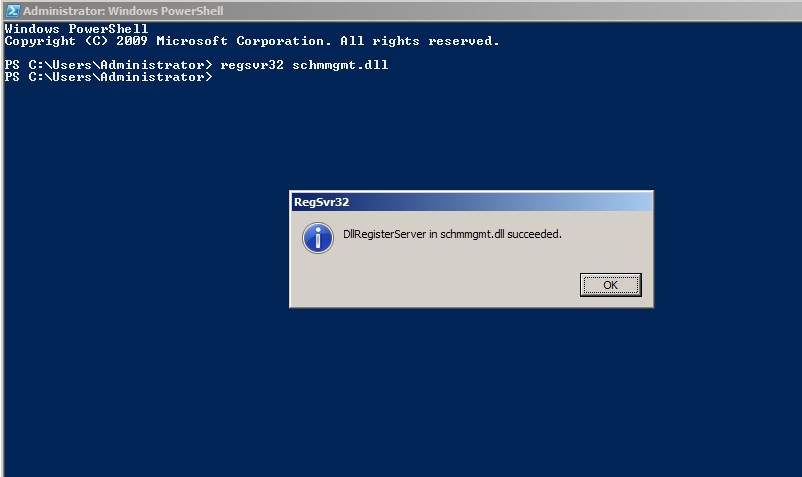
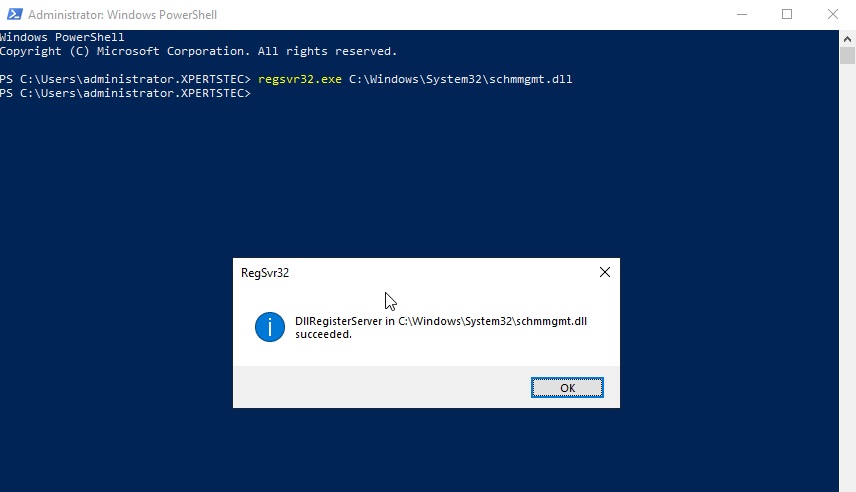
Using Active Directory Schema snap-in to transfer the Schema Master role 13- Open Command Prompt in administrative mode and type regsvr32 schmmgmt.dll and then click on ok.
Operations Master Roles Tranfer
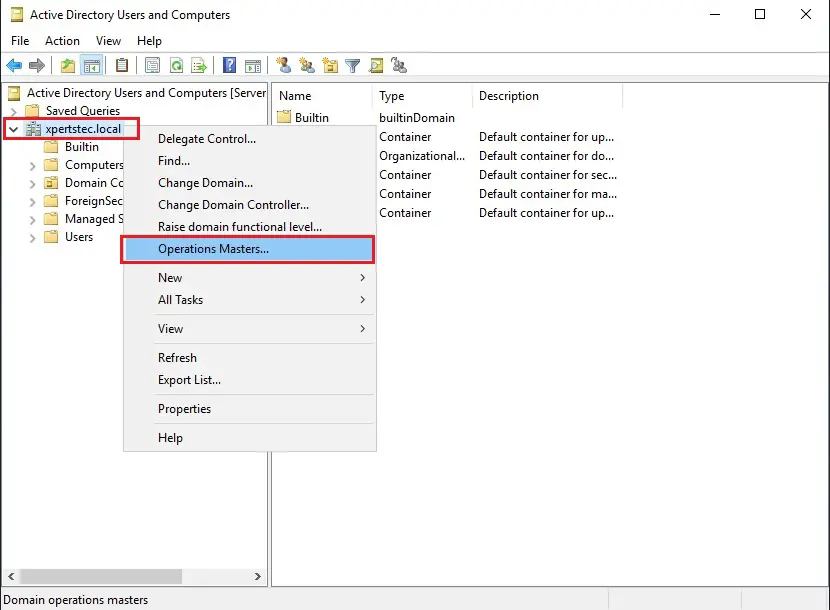
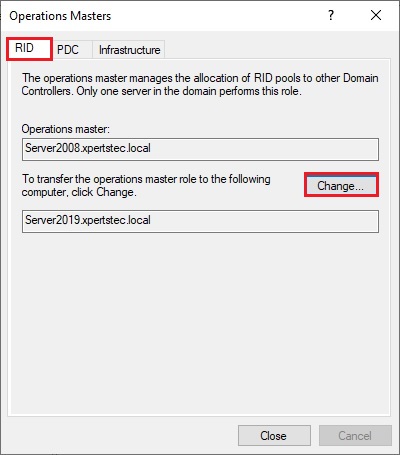
14- On the Server2019 server, open Active Directory Users and Computers, right click domain xpertstec.local and then click Operations Masters.
15- On the Operations Masters, Select the RID tab and select the Change button.
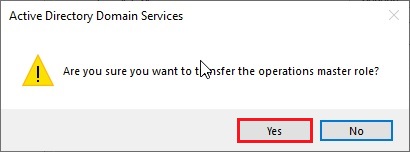
16- Now click Yes.
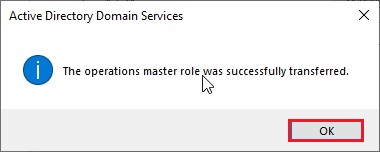
17- The operations master role was successfully transferred so click ok.
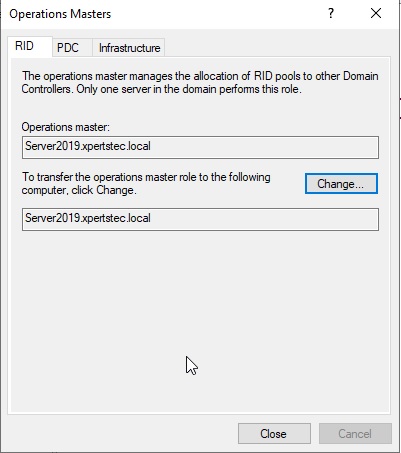
18- Now you can verify that Operation master now transferred to our new Server Server2019.xpertstec.local
19- On the Operations Masters, select the PDC tab and then click the change button.
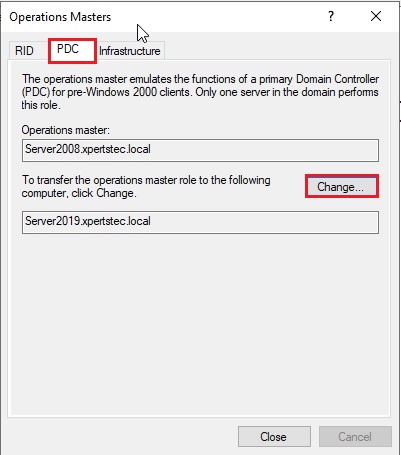
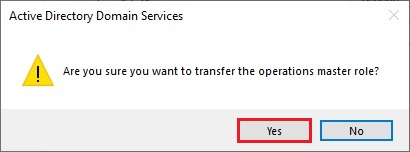
20- Now click Yes.
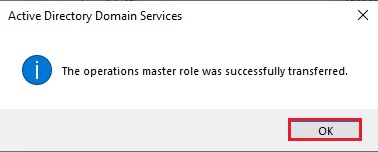
21- The operations master role was successfully transferred, then click ok.
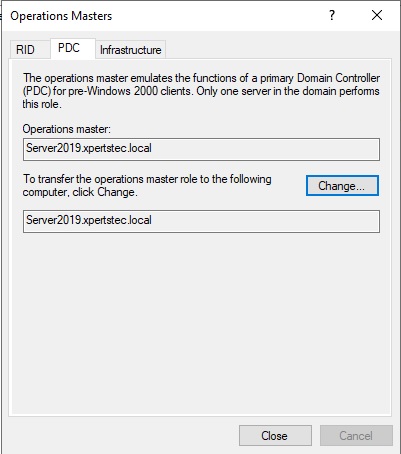
22- Now you can verify that Operation master now transferred to our new Server Server2019.xpertstec.local
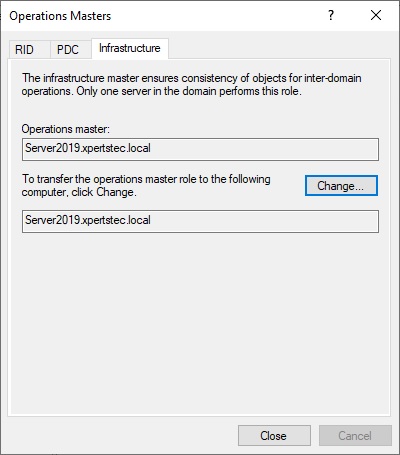
23- On the Operations Masters, select the Infrastructure tab and click on change button.
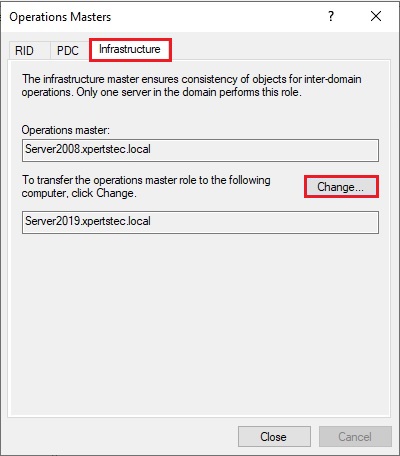
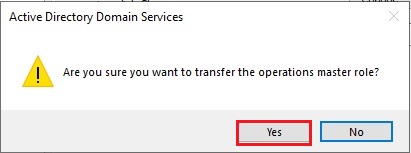
24- Then click Yes.
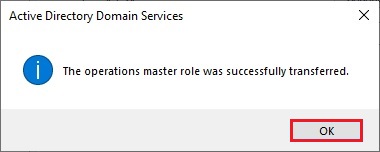
25- The operations master role was successfully transferred, then click ok.
26- Now you can verify that Operation master now transferred to our new Server Server2019.xpertstec.local
27- Open Server Manager and select Tools and then click Active Directory Domains and Trusts.
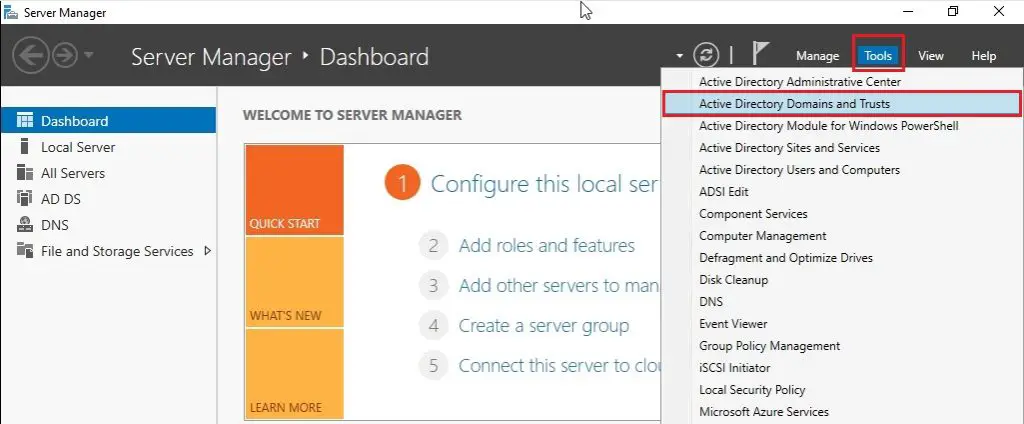
28- Right click on Active Directory Domains and Trusts and then select change active directory domain controller.
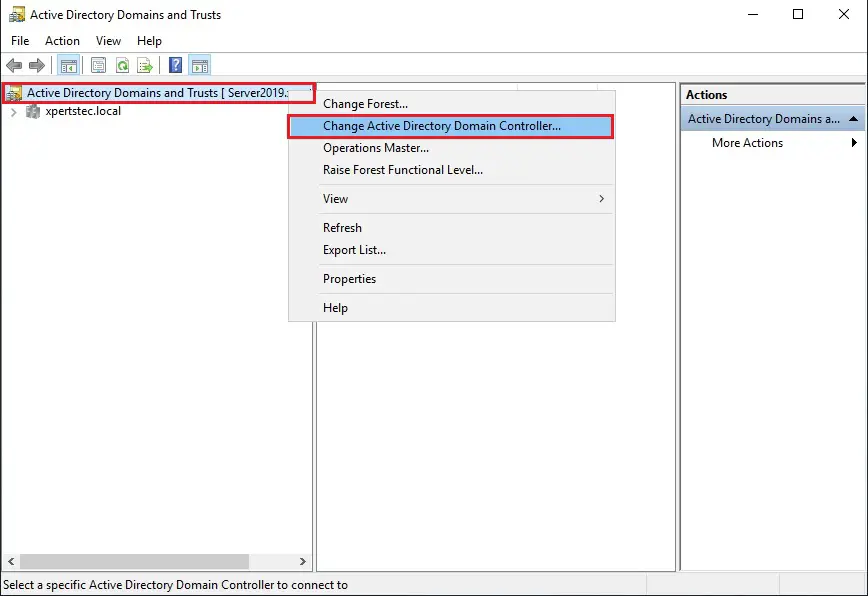
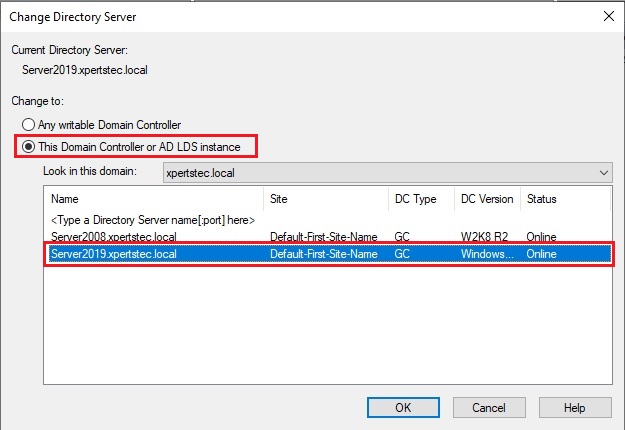
29- Select this Domain Controller or AD LDS Instance and click on the domain controller that you want to be the schema master role and then click ok.
Transfer Domain Master Role
30- Right click Active Directory Domains and Trusts and then select Operations Master.
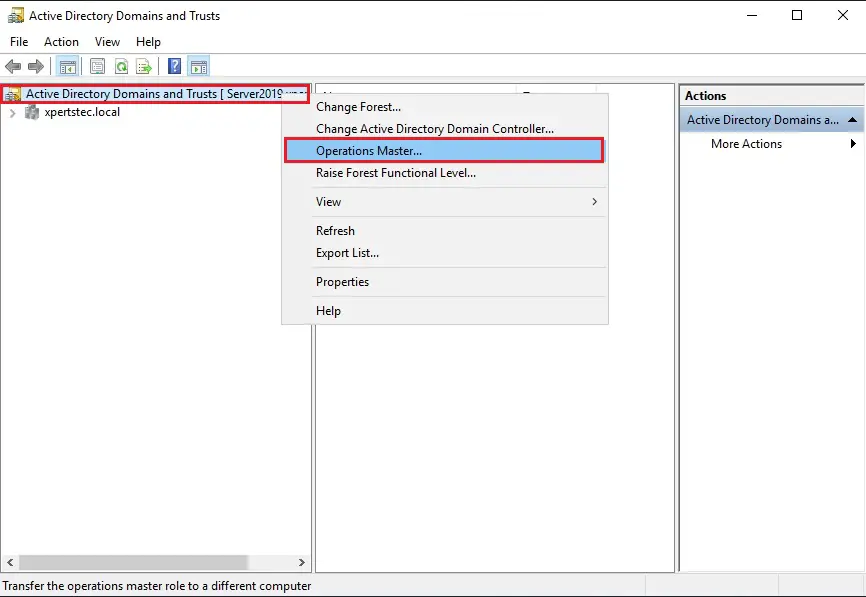
31- Now click on Change
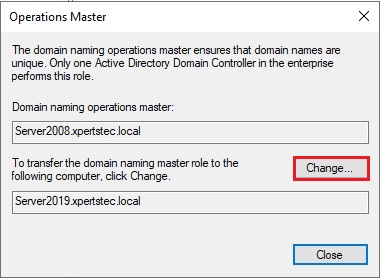
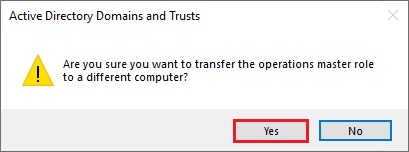
32- then click Yes.
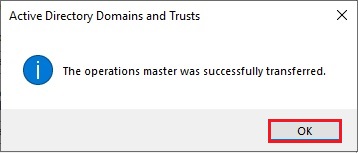
33- The operations master was successfully transferred then click ok.
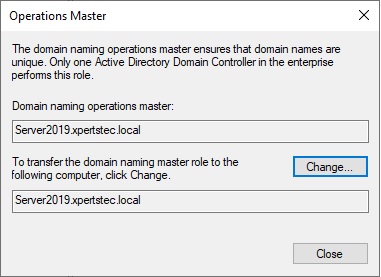
34- Confirmed the domain naming operation master role and click on Close.
35- Now we need to move our Schema Master role, so we need to register the schmmgmt.dll open command prompt and run the command below.
Regsvr32.exe C: windows system32 schmmgmt.dll
The process was completed successfully so click on ok.
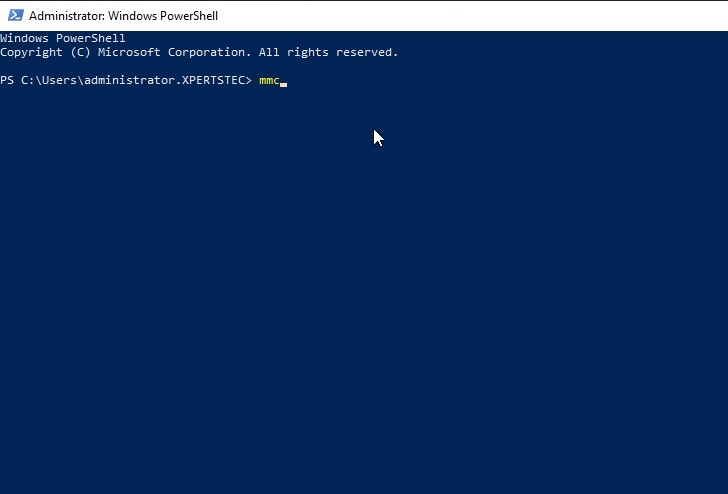
36- Open Microsoft Management Console mmc type mmc and then hit enter.
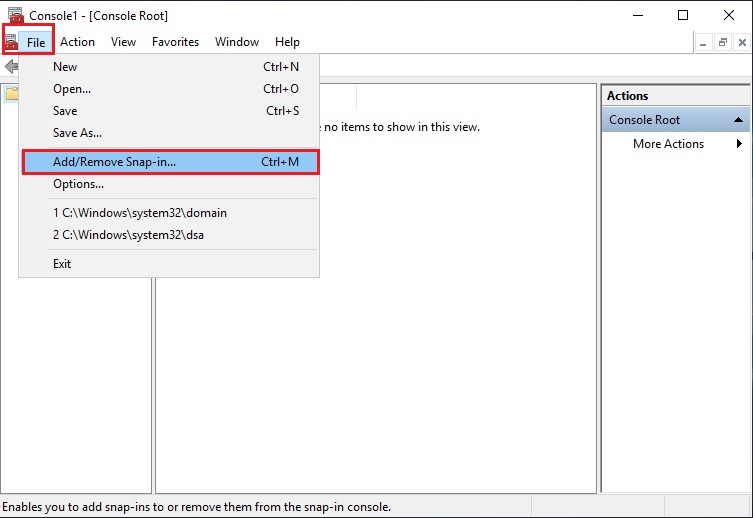
Console
37- Select the File tab and then select Add/Remove Snap-in.
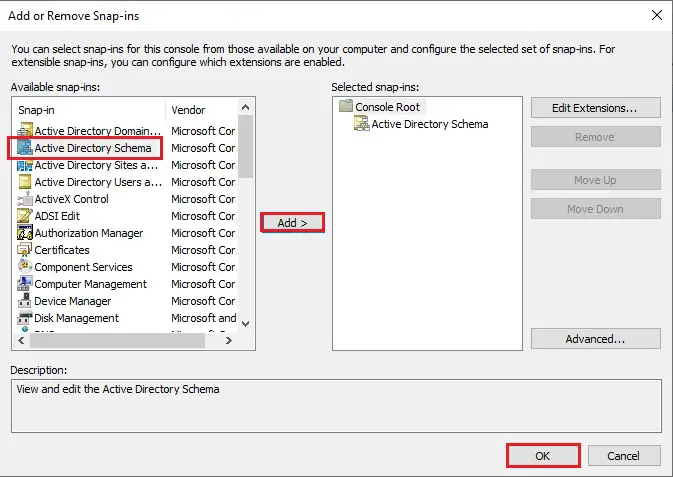
38- From the left side, under Available Snap-ins, Select Active Directory Schema, click Add button and then click ok.
39- Right click Active Directory Schema, and then select Change Active Directory Domain Controller.
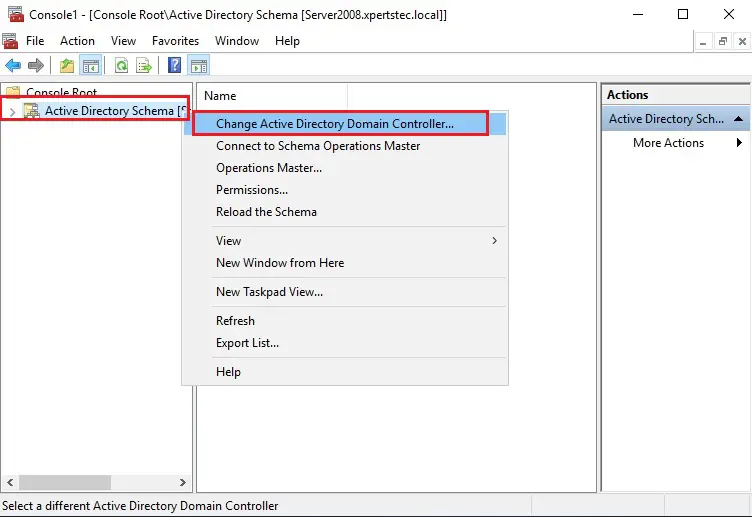
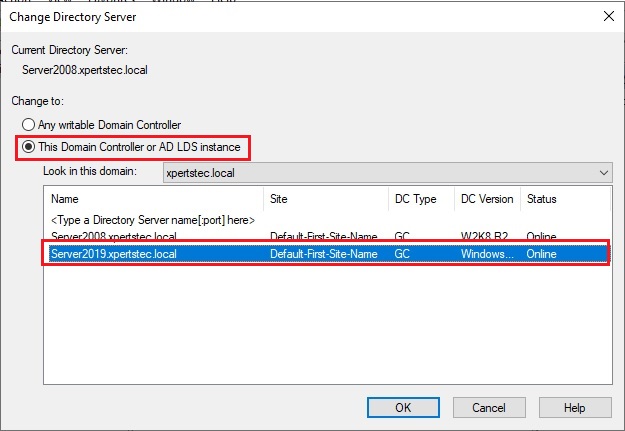
40- Select this Domain Controller or AD LDS Instance, click on the domain controller that you want to be the schema master role and then click on ok.
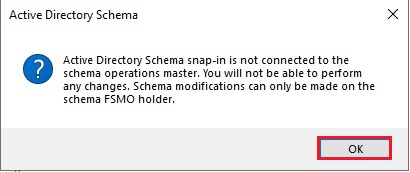
41- Now click OK.
42- In the console1, right click Active Directory Schema (Server2019.xpertstec.local) and then select Operations Master.
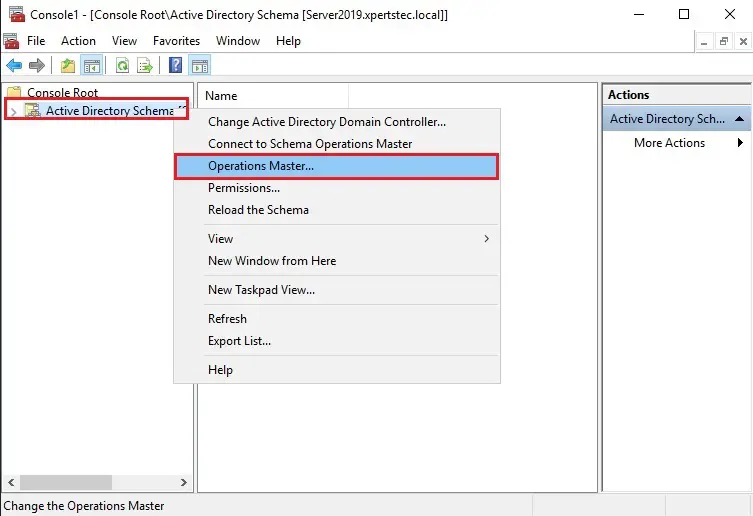
43- Select the Change button.
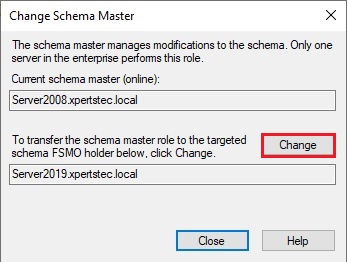
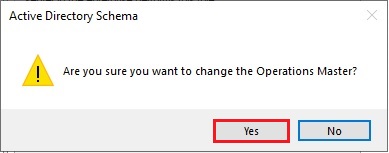
44- then click Yes.
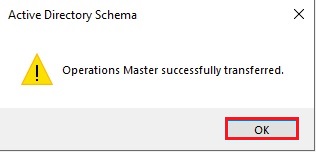
45- The active directory schema Operations Master successfully transferred then click ok.
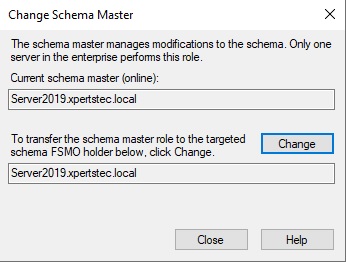
46- Now confirm your current schema master which is Server2019 and then click Close.
47- Now run the Netdom query fsmo command, so we can now see that our roles have been moved to our Windows Server 2019 Additional Domain Controller.
48- Now change the DNS address of our additional Domain Controller server to be the IP address of our Windows Server 2019 Domain Controller server.
After completing Active Directory Migration, Now the ultimate step is to get rid of (uninstalling) server2008 Active Directory domain controller.
Remove Active Directory Domain Controller 2008
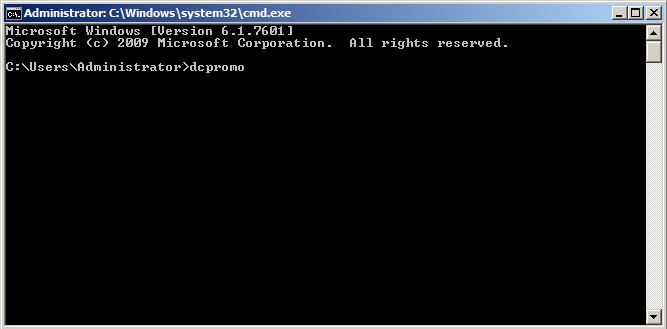
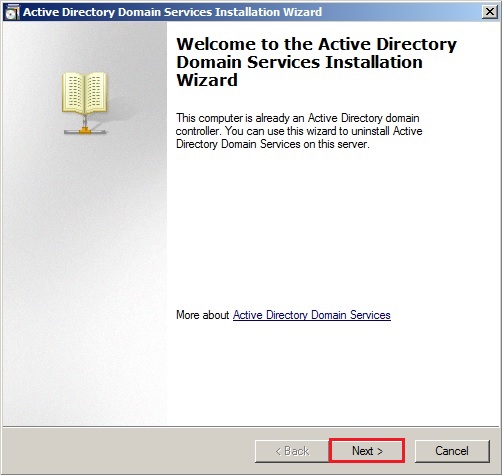
49- Open command prompt Type dcpromo and then hit Enter.
50- Click Next.
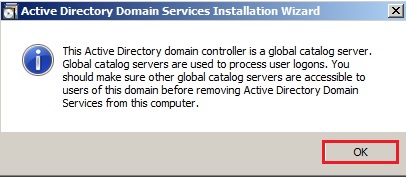
51- The Active Directory domain controller has the global catalog service, make sure your primary DC also has the service enabled and click on ok.
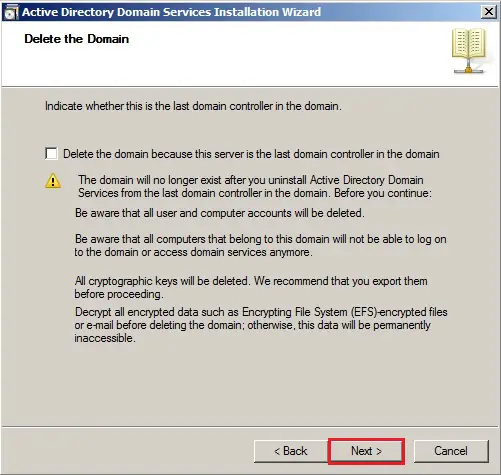
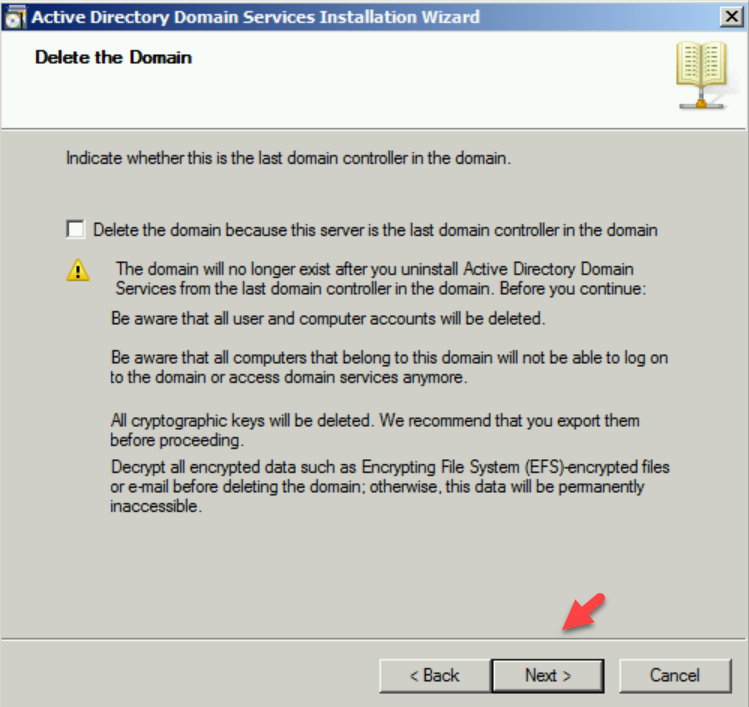
52- Confirmed that the delete this domain, because this server is the last domain controller in the domain, is UNCHECKED and then click next.
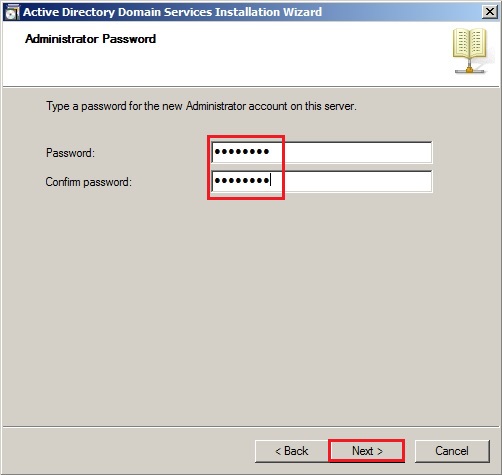
53- Type a password for the new Administrator account on this server and click next.
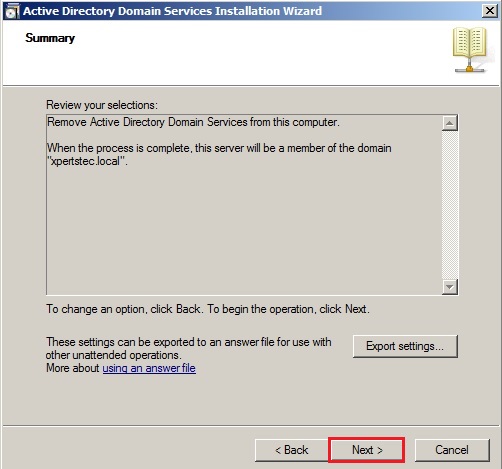
54- Review the remove active directory domain services Summary and click Next.
55- Check the Reboot on completion box to restart the server after the service has been removed

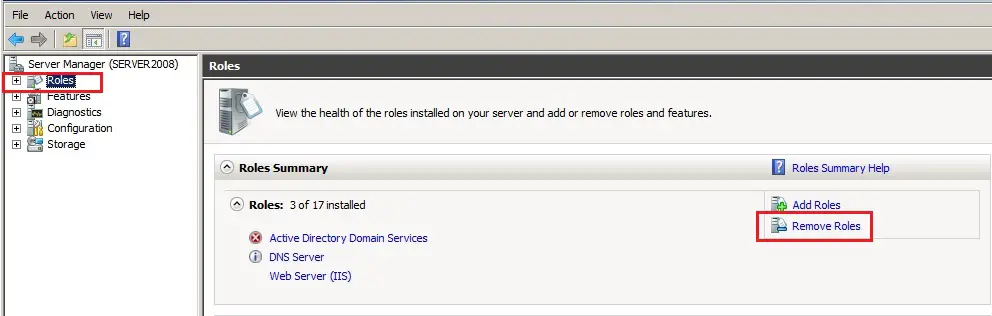
56- After rebooting server2008 DC. Now log in with the local administrator account and then open Server Manager.

57- In Server Manager click Roles under Roles Summary and click Remove Roles.
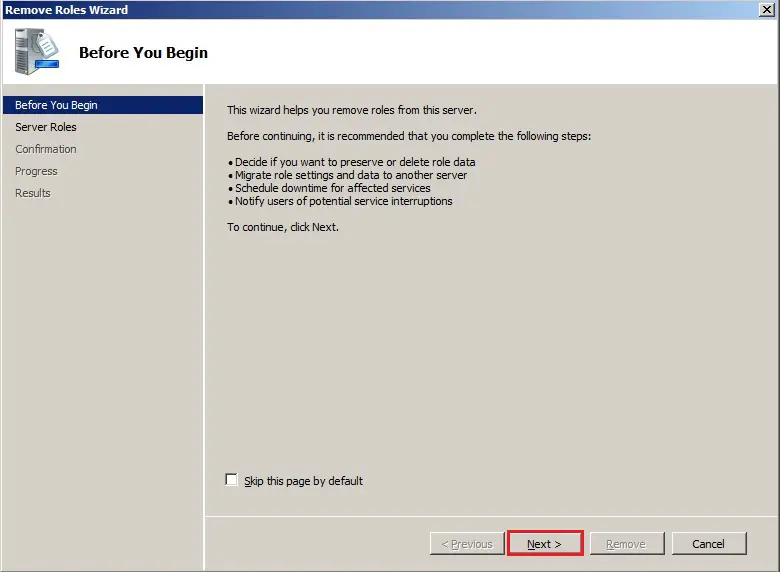
58- Remove active directory domain controller 2008 Roles wizard, click next.
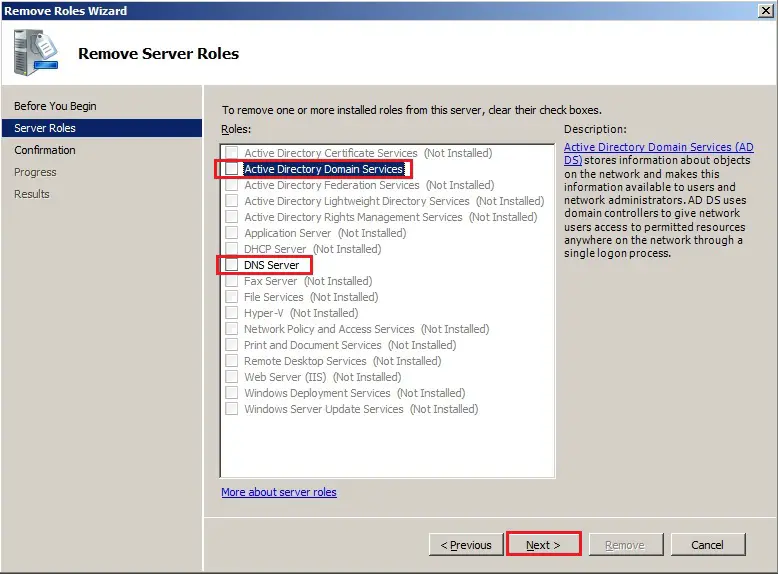
59- Uncheck Active Directory Domain Services and DNS Server box and click next.
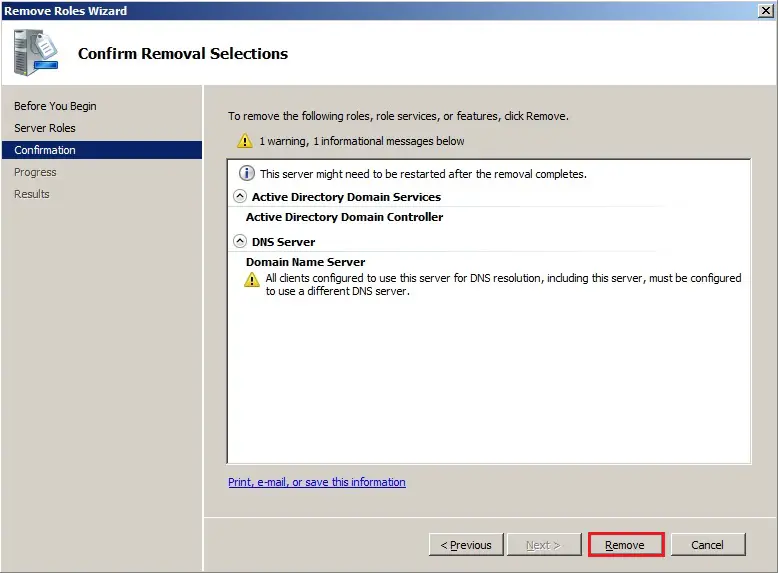
60- Click Remove.
61- Now click Close.
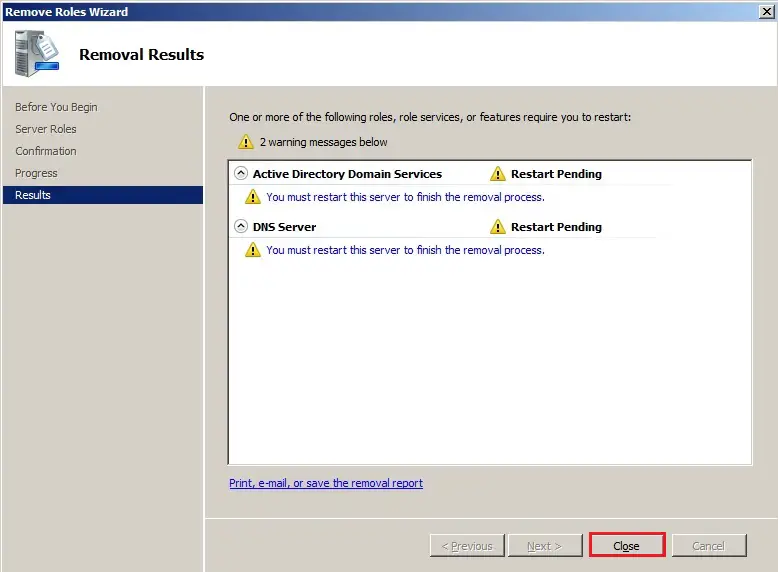
62- Do you want to restart now so click on Yes.
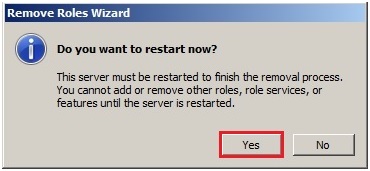
63- After rebooting server Log back to server2008, active directory domain services removal succeeded and click Close.
64- Disjoin the machine from the domain
Join to Workgroup
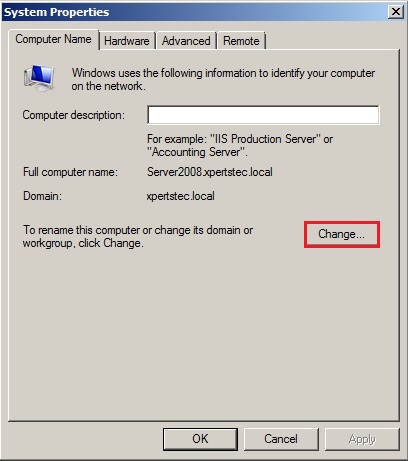
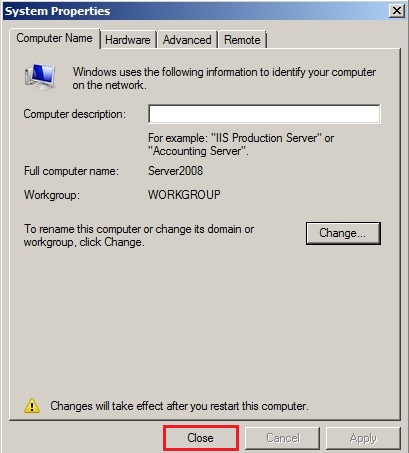
In the Server Manager, under Server Summary and click Change System Properties.
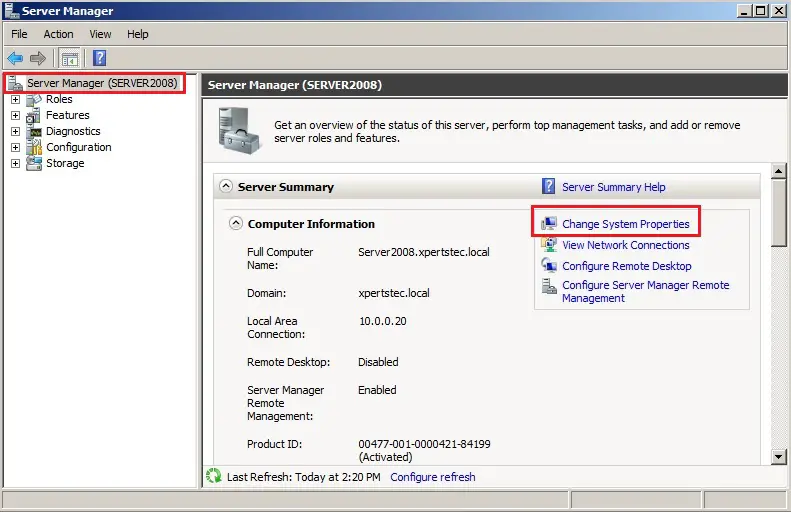
65- On the System Properties and click the change button.
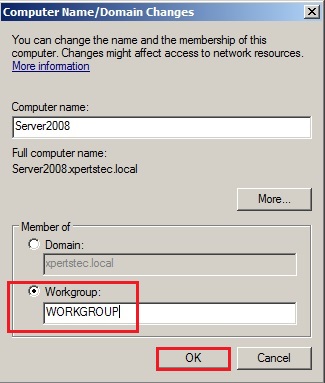
66- Select Workgroup type in a workgroup name and then click on ok.
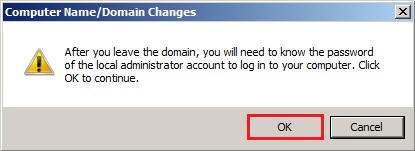
67- After leaving the domain Warning message so click ok.
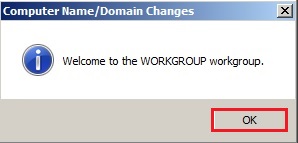
68- Welcome to the workgroup and click on ok.
69- Click OK to restart the server.
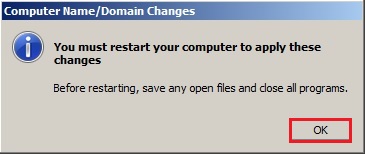
70- System Properties, click Close.
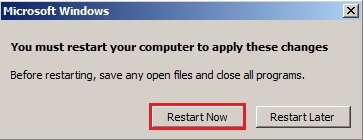
71- Click Restart Now or Restart Later and shut down this server.
Like and subscribe our YouTube channel to watch updated videos.
For more information click here
Last Updated on August 12, 2020 by
As you may already know, Windows Server 2008 and 2008 R2 products reached End of Extended support on 1/14/2020. So if your Active Directory is running on Windows Server 2008, It is time to look for upgrade options.
In this blog post, I am going to demonstrate how to migrate Active Directory from Windows Server 2008 to Windows Server 2019.
AD Migration task itself is very straight forward. But there are other things you need to consider before you do an AD migration. Below I listed a checklist you can use on many occasions.
Active Directory Migration Check List
• Evaluate business requirement for Active Directory migration
• Perform Audit on Existing Active Directory Infrastructure to make sure there are no existing health issues
• Provide Plan for implementation Process
• Prepare Physical / Virtual resources for Domain Controller
• Install Windows server 2019 Standard / Datacenter
• Patch Servers with latest Windows Updates
• Assign Dedicate IP address to Domain Controller
• Install AD DS Role
• Migrate Application and Server Roles from the Existing Domain Controllers.
• Migrate FSMO roles to new Domain Controllers
• Add New Domain controllers to the Existing Monitoring system
• Add New Domain controllers to the Existing DR Solution
• Decommission old domain controllers
• Raise the Domain and Forest Functional level
• On-Going Maintenance (Group Policy Review, New Features Implementations, Identify and fix active directory infrastructure issues)
If organizations running AD DS, it’s obvious it to have active directory integrated applications. Some of those may use it just for LDAP authentication and some may use advanced integration with modified active directory schema. with active directory migration, some of these applications may require modifications or upgrades to match with the new AD DS version. Therefor before the implementation process, it is important to recognize these active directory integrated applications and evaluate its impact on the migration.
LDAP Connection String Modifications – To use single-sign-on (SSO) with applications it may use LDAP connections to domain controllers. sometimes applications use hardcoded hostnames or IP addresses of domain controllers to define the connections. If domain migration involves IP address changes and Hostname changes, alternation to these records will be needed.
Schema Version Changes – Some legacy applications only support certain versions of active directory schema. This is specifically applying for custom made active directory integrated applications. This is very rare but I have to face these in my active directory migrations projects. Therefore if it’s not well-known applications, check with the application vendor if it supported new AD DS schema version.
Application Migrations – Some organizations have legacy application versions that no longer support or develop by its vendor. There are occasions where these types of issues turn to be bottlenecks for AD Migration projects. Once I was working on AD DS 2003 to AD DS 2012 R2 migration project. The organization had a legacy application that runs on windows server 2000 system. AD DS 2012 R2 does not support windows server 2000-member servers. The vendor who created the application no longer in business. Then we had to users to similar type application which supports new operating systems before we start the Active Directory migrations.
Server Roles/Applications installed on Domain Controllers – In the majority of the cases, once FSMO roles migrated to new domain controllers, old domain controllers will be decommissioned. Even though Microsoft recommends not to install applications or other server roles in domain controllers, people still do it. Some of the common roles installed in domain controllers are DHCP, File Servers, Licensing Server. If existing domain controllers are subject decommission these applications and server roles need to migrate new servers.
Most Common Questions About Active Directory Migrations
In below I listed some of the most common questions I get about AD migration,
1. Can I keep the same IP address for the PDC? Yes, you can. Active Directory fully supports for IP address changes. Once FDMO role migration is completed, you can swap the IP addresses of Domain Controllers.
2. Can I downgrade forest/domain functional levels? Yes, you can do it from Windows server 2008 R2.
3. Do I need to migrate the DNS role? No, it is part of the AD. When you add a new domain controller, you can make it as DNS server too.
4. Do I need to change SYSVOL replication from FRS to DFS? If your domain is built based on Windows server 2008 or Windows Server 2008 R2, you are already using DFS for SYSVOL replication. If you originally migrated from Windows server 2003, it’s more likely you are still using FRS. In that case, after the migration, you can also change the SYSVOL replication method from FRS to DFS. I already have a blog post covering this topic https://www.rebeladmin.com/2015/04/step-by-step-guide-for-upgrading-sysvol-replication-to-dfsr-distributed-file-system-replication/
5. Can I keep Windows 2008 Domain Controllers and upgrade forest and domain functional level to Windows Server 2016? (Windows server 2019 does not have the forest and domain functional level name as Windows server 2019. it is still called Windows server 2016) – No, you can’t. Before forest and domain functional level upgrade, you need to decommission Windows server 2008 domain controllers.
Demo Environment
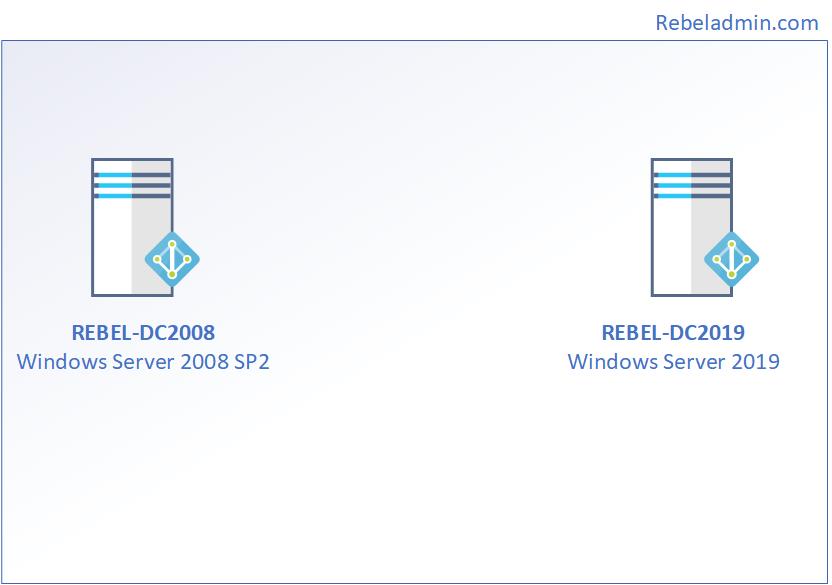
As per the above figure, rebeladmin.com domain has two domain controllers. The FSMO role holder (REBEL-DC2008) is running a domain controller based on windows server 2008. Domain and forest functional level currently operating at Windows server 2008. A new domain controller with Windows Server 2019 (REBEL-DC2019) will be introduced and it will be the new FSMO role holder for the domain. once FSMO role migration completed, Domain controller running windows server 2008 will be decommissioned. After that forest and domain, the functional level will be raised to the windows server 2019.
Note – When you introduce new domain controllers to the existing infrastructure it is recommended to introduce to the forest root level first and then go to the domain tree levels.
Add Windows server 2019 Domain Controller
As the first part of the configuration, we need to make REBEL-DC2019 as an Additional Domain Controller. To do that,
1. Log in to the Server as a member of the local administrators’ group.
2. Add server to the existing domain as a member.
3. Log in to the domain controller as an enterprise administrator.
4. Verify the static IP address allocation using ipconfig /all.
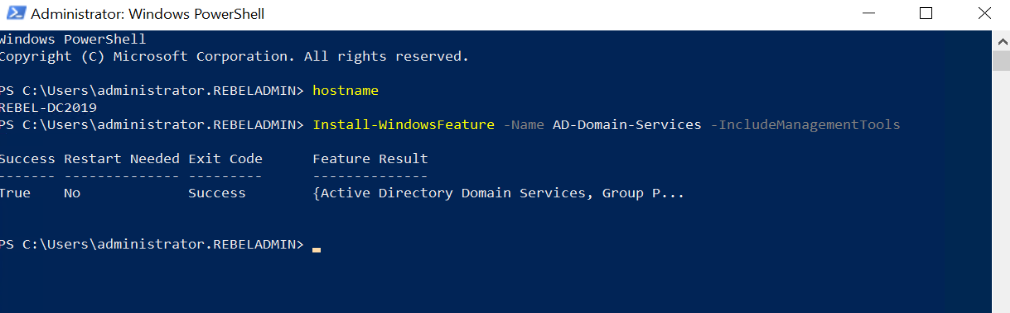
5. Launch the PowerShell Console as an Administrator
6. Before the configuration process, we need to install the AD DS Role in the given server. To do that we can use the following command.
Install-WindowsFeature –Name AD-Domain-Services -IncludeManagementTools
7. Configure the new server as an additional domain controller using,
Install-ADDSDomainController
-CreateDnsDelegation:$false
-InstallDns:$true
-DomainName “rebeladmin.com”
-SiteName “Default-First-Site-Name”
-ReplicationSourceDC “REBEL-DC2008.rebeladmin.com”
-DatabasePath “C:WindowsNTDS”
-LogPath “C:WindowsNTDS”
-SysvolPath “C:WindowsSYSVOL”
-Force:$true
Note – There are no line breaks for the command and I have listed it as above to allow readers to focus on the parameters.
The following table explain the PowerShell arguments and what it will do.
| Argument | Description |
| Install-ADDSDomainController | This cmdlet will install the domain controller in active directory infrastructure. |
| -CreateDnsDelegation | Using this parameter can define whether to create DNS delegation that reference active directory integrated DNS. |
| -InstallDns | Using this can specify whether DNS role need to install with active directory domain controller. For new forest, it is default requirement to set it to $true. |
| -DomainName | This parameter defines the FQDN for the active directory domain. |
| -SiteName | This Parameter can use to define the active directory site name. the default value is Default-First-Site-Name |
| -ReplicationSourceDC | Using this parameter can define the active directory replication source. By default, it will use any available domain controller. But if need we can be specific. |
| -DatabasePath | This parameter will use to define the folder path to store active directory database file (Ntds.dit) |
| -LogPath | Log path can use to specify the location to save domain log files. |
| -SysvolPath | This is to define the SYSVOL folder path. Default location for it will be C:Windows |
| -Force | This parameter will force command to execute by ignoring the warning. It is typical for the system to pass the warning about best practices and recommendations. |
Once execute the command it will ask for SafeModeAdministrator Password. Please use a complex password to proceed. This will be used for DSRM.
After the server is rebooted, log back in as an administrator to check the AD DS status.
Get-Service adws,kdc,netlogon,dns
Will confirm the status of the AD DS service.

Then run following to confirm the current FSMO role holder.
$FormatEnumerationLimit =-1
Get-ADDomainController -Filter * | Select-Object Name, Domain, Forest, OperationMasterRoles | Where-Object {$_.OperationMasterRoles} | out-string -Width 160

In the above, I used $FormatEnumerationLimit to show more data in output without truncating.
As we can see in output REBEL-DC2008 holds all five FSMO roles.
Move Active Directory FSMO roles
The next part of the migration is to move FSMO roles to the new Windows Server 2019 Domain controller (REBEL-DC2019).
We can do this by running,
Move-ADDirectoryServerOperationMasterRole -Identity REBEL-DC2019 -OperationMasterRole SchemaMaster, DomainNamingMaster, PDCEmulator, RIDMaster, InfrastructureMaster

This command needs to run in the new windows 2019 domain controller as Enterprise Administrator.
Then rerun the following command to verify the new FSMO role owner.
Get-ADDomainController -Filter * | Select-Object Name, Domain, Forest, OperationMasterRoles | Where-Object {$_.OperationMasterRoles} | out-string -Width 160

Decommission Old Domain Controller
Now we moved FSMO roles over and the next step is to decommission old DC which is running with windows server 2008.
To do that,
1. log in to old DC as enterprise administrator
2. Go to Run | dcpromo
3. It will open up the dcpromo wizard. Click on Next to continue.

4. In the next page also click on Next.
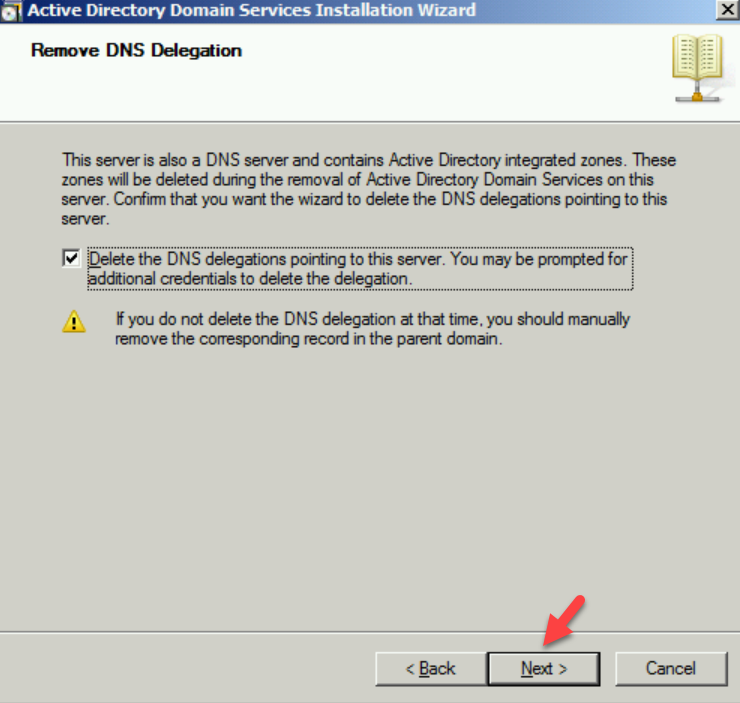
5. In Remove DNS Delegation page keep the default selection and click on Next.
6. Then the system will prompt for credentials. Provide Domain Admin credentials here.
7. On the next page, type a new password for the local administrator account.

8. In summary, page, click on Next to complete the process.

Once the process is completed, reboot the server.
Raise Domain and Forest Functional level
After you demote your last domain controller running with windows server 2008 we can raise Domain and Forest Functional level to windows server 2016 ( Windows server 2019 is the same).
To upgrade the domain functional level, you can use the following PowerShell command in the Windows server 2019 domain controller.
Set-ADDomainMode –identity rebeladmin.com -DomainMode Windows2016Domain

To upgrade the forest function level, you can use the following command
Set-ADForestMode -Identity rebeladmin.com -ForestMode Windows2016Forest

After the migration completes, we still need to verify if it completes successfully.
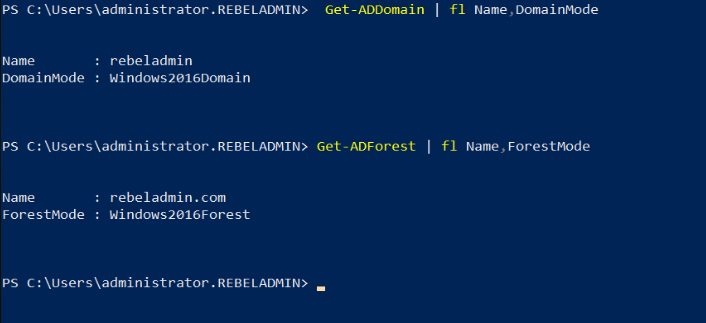
Get-ADDomain | fl Name,DomainMode
This command will show the current Domain functional level of the domain after the migration.
Get-ADForest | fl Name,ForestMode
The above command will show the current forest functional level of the domain.
This marks the end of this blog post. Hope now you know how to migrate Active Directory from Windows server 2008 to Windows Server 2019. If you have any questions feel free to contact me on rebeladm@live.com also follow me on twitter @rebeladm to get updates about new blog posts.
As you know the Windows Server 2008 and Windows Server 2008 R2 are out of support on January 14th, 2020. Customer will need to upgrade their Windows Server 2008 and Windows Server 2008 R2 to a newer version of Windows Server or migrate these servers to Microsoft Azure and get three years of extended security support for free, which will give you more time to upgrade your servers, redeploy your apps or rearchitect your applications. If you want to have more information about how to migrate your servers to Azure, check out the Azure migration center. There are many ways you can migrate your server applications to a newer version of Windows Server. This blog post covers how you in-place upgrade Windows Server 2008 R2 to Windows Server 2019. You can find more information about Windows Server 2019 installations and upgrades on Microsoft Docs.
To help you with Windows Server upgrades, the Windows Server team created Windows Server Upgrade Center, which gives you step-by-step guidance for modernizing your datacenter.
Upgrade path
You can directly do an in-place upgrade to Windows Server 2019 from Windows Server 2016 and Windows Server 2012 R2. This means, to upgrade from Windows Server 2008 R2 to Windows Server 2019, you will have two consecutive upgrade processes.
- First, you upgrade Windows Server 2008 R2 to Windows Server 2012 R2
- Secondly, you will upgrade Windows Server 2012 R2 to Windows Server 2019
 Windows Server Upgrade Paths Diagram
Not all server roles and applications are supported to be migrated in older versions of Windows Server. Read the specific documentation for your operating system scenario, for example upgrading roles to Windows Server 2016. As an alternative, you can also redeploy the applications on a fresh installation of Windows Server 2019.
Planning the Upgrade
Before you start in-place upgrade your servers, make sure you plan your upgrade and make sure you have all the information, to avoid surprises at the end of the migration. The Windows Server Upgrade Center helps you with a checklist which includes, for example, the following:
- What software and roles are installed on the server and are they supported and working with newer versions of Windows Server. I recommend doing a software inventory and check if the applications and roles are supported.
- Have some tests ready to check if the application still works after the upgrade. It is a good thing to run through these tests before the upgrade as well, so you can confirm everything is working correctly.
- If it is a physical server, do you have drivers and firmware updates for the new Windows Server version available?
- Think about backup software and antivirus, you might need to uninstall these during the update process and reinstall it after the upgrade is done.
- Make sure your server is up-to-date and fully patched before doing an in-place upgrade.
- Planning the timeframe for the upgrade. In-place upgrades take some time, make sure you have a long enough maintenance window planned. Also make sure you communicate the maintenance window, so users know that the application or service is not available.
- Make sure you have a backup of the server before you start the upgrade process, and make sure you can also restore from that specific backup.
- If possible, test the upgrade process with a non-production server.
- Make sure you have enough disk space for the upgrade.
- Gather your system information before the upgrade.
Collect system information
Before you start the upgrade process you should also collect the following system information. You can use the following to commands. Please save the output on another location.
mkdir C:info
systeminfo > C:infosysteminfo.txt
ipconfig /all > C:infoipconfig.txt
Please copy and save the systeminfo.txt and ipconfig.txt file on another system.
 Windows Server Systeminfo
Before proceeding with the In-place Upgrade
I know I have mentioned it before, make sure you have a backup you can restore of the server you are performing the in-place upgrade. Also, make sure that you are aware that the following upgrade processes cause downtime.
Upgrade Windows Server 2008 R2 to Windows Server 2012 R2
Insert the setup media for Windows Server 2012 R2 and start the setup.exe.
Click Install now.

If your server is connected to the internet, make sure you click on Go online to install updates now (recommended). This will download the latest updates to the installer.

Enter the Windows Server License Key for Windows Server 2012 R2 if needed. If you are not asked for the license key, you can skip that step.

Select the right Windows Server edition you want to install. Also make sure you select Server with a GUI or Server Core Installation, depending on your needs.

Read and accept the license terms. Select I accept the license terms.

For an in-place upgrade select Upgrade: Install Windows and keep files, settings, and applications.

The setup will check the application compatibility and create a compatibility report.

Next, press Confirm to start upgrading Windows.

The setup will complete and automatically reboot. When the upgrade is done, you will see the Windows Server 2012 R2 logon screen.

Post Upgrade to Windows Server 2012 R2
After the upgrade to Windows Server 2012, log in and check if the server has been successfully upgraded. Make sure you test if the applications are running like expected and if users can access the application. Make sure that the IP and firewall configuration of your server still allows clients to access your system.
You can run the following command to see that you successfully upgraded to Windows Server 2012:
systeminfo
 Windows Server 2012 Systeminfo
If there has been an issue with the upgrade, make a copy and zip the %SystemRoot%Panther (usually C:WindowsPanther) directory and contact support.
If everything works as expected, you can install the latest Windows Server 2012 R2 updates, and make sure your server is fully patched. Before you move to the Windows Server 2012 R2 to Windows Server 2019 upgrade, I also recommend that you create a backup of the server, in that case, you don’t lose the work you did from 2008 R2 to 2012 R2.
Upgrade Windows Server 2012 R2 to Windows Server 2019
Insert the setup media for Windows Server 2019 and start the setup.exe.
Click Install now.
If your server is connected to the internet, make sure you click Download and install updates, drivers and optional features (recommended). This will download the latest updates to the installer.
 Windows Server 2019 Update Installer
Enter the Windows Server License Key for Windows Server 2019 if needed. If you are not asked for the license key, you can skip that step.
 Windows Server 2019 Product Key
Select the right Windows Server edition you want to install. Also make sure you select Windows Server 2019 Datacenter (Desktop Experience) or Windows Server 2019 Datacenter (Core), depending on your needs.
 Windows Server 2019 select image edition
Read and accept the license terms. Select I accept the license terms.
 Windows Server 2019 license terms
For an in-place upgrade, select Keep personal files and app and click Next.
 Windows Server 2019 in-place upgrade
The setup will check the application compatibility and create a compatibility report.
Next, press Install to start upgrading Windows.
 Windows Server 2019 in-place upgrade install
The setup will complete and automatically reboot. When the upgrade is done, you will see the Windows Server 2019 logon screen.
 Windows Server 2019 Logon Screen 2
Post Upgrade to Windows Server 2019
After the upgrade to Windows Server 2019, log in and check if the server has been successfully upgraded. Make sure you test if the applications are running like expected and if users can access the application. Make sure that the IP and firewall configuration of your server still allows clients to access your system.
You can run the following command to see that you successfully upgraded to Windows Server 2019:
systeminfo
If there has been an issue with the upgrade, make a copy and zip the %SystemRoot%Panther (usually C:WindowsPanther) directory and contact support.
If everything works as expected, you can install the latest Windows Server 2019 updates, and make sure your server is fully patched. I also recommend that you create a backup of the server; in that case, you don’t lose the work you did.
I also highly recommend that you have a look at Windows Containers to modernize your applications. Check out our full video here on Microsoft Channel 9:
Conclusion
There are many ways you can upgrade or migrate your applications, in-place upgrade is just one of them, and might not always fit. However, in some scenarios, it is the easiest way to get to a newer version of Windows Server. I hope this gives you an overview about how you can do in-place upgrades from Windows Server 2008 R2 to Windows Server 2019. If you have any questions or tips for the upgrades, leave a comment below.

- Remove From My Forums
-
Вопрос
-
Hi,
Can we directly upgrade a domain environment from Windows Server 2008 R2 to Windows Server 2019?
(Install New Servers, Transfer Roles)
Regards,
Kavindu
Ответы
-
-
Помечено в качестве ответа
Mr POP
7 мая 2019 г. 10:49
-
Помечено в качестве ответа
Все ответы
-
Hello Kavindu,
Short answer: No.
Long Answer:
Windows Server 2008 R2 can be upgraded to Windows Server 2019 in three (3) consecutive upgrade processes — first by upgrading to
Windows Server 2012, and then upgrading Windows Server 2012 to
Windows Server 2016, and then upgrading from Windows Server 2016 to
Windows Server 2019.Note: The recommended way to upgrade a domain is to promote domain controllers that run newer versions of Windows Server and demote the older domain controllers as needed
More information about the upgrade:
Upgrade Windows Server 2008 R2 to Windows Server 2019
https://www.microsoft.com/upgradecenter/scenario/WS2008R2-on-prem-to-WS2019Best regards,
Leon
Blog:

https://thesystemcenterblog.com
LinkedIn:
-
Изменено
Leon Laude
7 мая 2019 г. 8:40
-
Изменено
-
Hello,
May be this link can be help you :
https://www.microsoft.com/upgradecenter/scenario/WS2008R2-on-prem-to-WS2019
Best Regards
Benoit
-
Hi ,
Thanks for the information.
I’ve found this article «https://www.microsoft.com/upgradecenter/scenario/WS2008R2-on-prem-to-WS2019»
before. But it is a general article about in-place upgrade Windows Server 2008 R2 to Windows Server 2019. It doesn’t say anything about domain controller upgrade.As you’ve mentioned we generally install newer version of Windows Server OS> Promote it as an additional domain controller > Transfer Roles > Decommission old Domain Controller.
This is what my question is. Can we install Windows Server 2009 server as an additional domain controller in existing forest>Transfer roles to 2019 server ?
Mr.POP
-
-
Помечено в качестве ответа
Mr POP
7 мая 2019 г. 10:49
-
Помечено в качестве ответа
-
Hi Leos,
Thank you very much for this article.
Regards
Mr.POP
-
One of things you need to be aware of in such a scenario is that you migrate FRS to DFSR before you can introduce the 2019 replica DC
Mariëtte Knap [alumna Microsoft SBS MVP]
www.server-essentials.com |
Linkedin | Migrations done the easy way
Please remember to mark the replies as answers if they help and unmark them if they provide no help. -
Hello,
Thank you for posting in our TechNet forum.I’m very glad that the problem has been solved.
As always, if there is any question in future, we warmly welcome you to post in this forum again. We are happy to assist you!Have s nice day!
Best Regards,
Daisy Zhou
Please remember to mark the replies as answers if they help.
If you have feedback for TechNet Subscriber Support, contact
tnmff@microsoft.com. -
This has nothing to do with Active Directory Domain Controllers Migration.
VGomez Ch.
As you might have noticed, Windows Server 2008 R2 (Windows Server) will reach its end of support on January 14th, 2020. This means no additional security patches will be issued after that date. If you haven’t done so already, you should upgrade your systems to a newer OS. In this post, I’ll outline a checklist of an Active Directory 2008 R2 upgrade to 2019, for small AD environments.
Contents
- In-place upgrade vs. new install
- Azure option
- Active Directory 2008 R2 upgrade to 2019 checklist
- Conclusion
- Author
- Recent Posts

Vladan Seget is an independent consultant, professional blogger, vExpert 2009-2021, VCAP-DCA/DCD and MCSA. He has been working for over 20 years as a system engineer.
Usually, Active Directory is replicated among several members to enable redundancy. However, I’ve often seen small IT shops running a single copy of AD with almost no backup or other protections. If you want to migrate Microsoft AD on a single server, you can choose between an in-place upgrade and a clean installation of Windows Server 2019, with reinstallation of all your existing applications.
In-place upgrade vs. new install
There is no single way to approach these issues; it always depends on your situation. In addition, there is always an unknown variable which could mean your applications won’t work after an upgrade.
Note: You could ask the relevant vendor if a particular application has been tested under Windows Server 2019, or you can test whether it is working simply by installing a clean copy of Windows Server 2019 as a virtual machine and then test your critical applications.
Microsoft published a detailed guide to an in-place upgrade for systems running Windows Server 2008 R2, however you should always check whether the in-place upgrade will actually works at the end. For example, you could check with your hardware manufacturer if your old server supports WS 2019.
It is not possible to do a direct, in-place upgrade of Windows Server 2008 R2 to Windows Server 2019. If you want to do an in-place upgrade, the process would require three steps:
- First step – Upgrade from Windows Server 2008 to 2012 or 2012 R2.
- Second step – Upgrade from Windows Server 2012 to Windows Server 2016.
- Third step – Upgrade Windows Server 2016 to Windows Server 2019.
That’s quite a lot of upgrades. In addition, as being said, the hardware on which your old Windows Server 2008 R2 is installed would have to support Windows Server 2019.
Azure option
There is another option from Microsoft which basically extends the support for Windows Server 2008 R2 with security patches and updates. However, you would have to migrate your servers to Azure for three years. This might be an option for customers not willing to invest money in new hardware.
Active Directory 2008 R2 upgrade to 2019 checklist
We’ll try to provide a detailed checklist, but as I said earlier, the upgrade scenario always depends on your specific situation, the application set you’re running, and support for those applications on Windows Server 2019. This checklist is by no means intended to be a detailed, step-by-step guide; rather, it only gives you an overview of the issues you should consider.
Let’s assume we’re doing a single server update and that we do not have any other server with a copy of AD. I also assume you have bought new hardware so your physical server has the latest drivers and firmware to run Windows Server 2019.
- Your Microsoft AD is working – Ensure your AD is working properly and that nothing is broken before you start the upgrade process. Many command line options and GUI tools are provided by Microsoft.
- Backup – It is highly recommended to create a backup of your Windows Server 2008 R2. You can use many free backup tools. Just be sure to stop any enterprise application that might be running (MS SQL Server, Exchange, and any other database servers). This helps to make your backup application consistent. Ensure your backup tool also backs up the system’s state as well as Active Directory.
- Update AD schema – Every new operating system introduces changes to your AD schema to allow for new functionality and features. Therefore, you have to update your AD schema before the upgrade to Windows Server 2019. This happens when you promote the 2019 server as an additional domain controller. There is no automatic rollback scenario for a schema update. If it goes wrong or if you applied it by mistake, you’ll have to go back and restore your domain controller. You can find a detailed guide how-to update AD schema here.
- Install and configure Windows Server 2019 – This is perhaps the easiest part. Ensure your disk size and partition layout suits your needs and that your IP addressing scheme suits your environment. Make sure you create static DNS records (forward and reverse) on your DNS server.
- Promote Windows Server 2019 to DC – You will need to promote this newly installed system to be an additional domain controller within your domain. This is a common scenario of adding an additional domain controller to the domain. Then restart the system and check whether everything works as expected.
- Migrate resources – If any shares are defined on the old server, you’ll need to migrate your shares and files to the new Windows Server 2019. I recommend using the Storage Migration Service, which allows you to migrate and transfer all files and configuration settings (shares, NTFS permissions, and ownerships) from older Windows Servers to new operating systems.

Microsoft Storage Migration Service
- Wait – Observe the behavior of your AD for at least a week. More than once, I’ve seen strange behavior occur after a day or two. Waiting allows you to detect any anomalies and gives you the chance to fix them before you decommission the old server.
- Move FSMO roles – The next step is to move Flexible Single Master Operation Roles (FSMO) to the new Windows Server 2019. There are many guides available on how to do this.
- Demote Windows Server 2008 R2 – Here, Microsoft AD is properly uninstalled from Windows Server 2008 R2. Microsoft has step-by-step guides on how to do this here. If errors occur and the assistant fails, use the force switch; however, only do this as a last resort because you’ll have to manually «clean» AD of orphaned objects. It’s possible and not that difficult, but it must be done with precision. Once this step is done, leave the server as a member server for a couple of days and observe it to ensure everything is working.
- Decommission Windows 2008 R2 – You can now disjoin the server from your domain. It’s not recommended to keep it in your network once it cannot be no longer patched and protected against malware or hackers. Keeping this server on your network makes your network more vulnerable.
Conclusion
This was, in essence, a small guide for migrating a Windows Server 2008 R2 single host with Active Directory to Windows Server 2019. These instructions only apply to situations where you do not want to do an in-place upgrade. Personally, I prefer doing it this way as you can easily manage downtime (if any). If you do an in-place upgrade and something goes wrong (firmware/drivers) and your server won’t reboot, you’ll have to initiate a bare metal restore, which might take quite a while depending on how much data was stored on that server.
Subscribe to 4sysops newsletter!
If you do a side-by-side migration, you also have redundancy; you’ll have time to observe your systems, and if something does not work, you can roll back the changes and start again.
![]()
Hi,
As you know the End of support for Windows Server 2008 R2 has been slated by Microsoft for January 14th 2020.
We have a DC with Windows 2008 R2(physical machine) that holds all FSMOs and I have two DCs with Windows Server 2019 (vmware machines) live on the production.
DC with Windows 2008 R2 that hold all FSMOs is called
SRV
DCs with Windows server 2019 are called as following:
1) srvdc
2) srvdc1
That means I dont need to run «adprep.exe /forestprep or adprep.exe /domainprep or
adprep.exe /domainprep /gpprep«
Am I here right?
Here are my Steps to migrate.
1) Transfer all FSMO with Power Shell from DC with Windows 2008 R (SRV) to the DC with Windows Server 2019 (srvdc)
2) run netdom query fsmo on the DC with Windows Server 2019 (srvdc) and check the FSMO are transfered
3) run netdom query fsmo on the DC with Windows Server 2008 R2 (SRV) and check the FSMO are not hold here
4) Check DNS, DHCP, Site and Services and replication between all DCs
5) Remove Ad services from Server 2008 R2 with «dcpromo»
on that step I get the following message:
That means I have to remove the «Active Directory Certificate Services»
first from Windows 2008 R2 (SRV).
I am sure our all certificate for exchange server 2013, scom, sccm server are running on that machine.
Here are my questions:
1) Can I backup the certificate of the windows 2008 R2(SRV) and Registry
HKEY_LOCAL_MACHINESYSTEMCurrentControlSetServicesCertSvc and
add the role «Active Directory Certificate Services»
on the Windows server 2019 (srvdc) and import the certificate, before remove the certificate from DC with windows 2008 R2(SRV)?
2) Could add the roles «Active Directory Certificate Services»
on DC the Windows 2019 (srvdc) now before backup the Certificate
Services or remove the Certificate Services? If yes what happens?
2) Could I have two Certificate Authority at the same time
on the DCs Windows 2008 R2(SRV) and Windows 2019 (srvdc)
3) Or I have to backup my Certificate Authority with Registry
CertSvc and then remove the roles on the DC windows 2008 R2 (SRV)
and then add the role «Active Directory Certificate Services»
on the DC windows 2019 (srvdc)and import from backup I created before?
What is the best method?
We have a exchange server 2013 and it should not effected with migration the DC or certificate.
Thanks for help
Nick
In our company we are planning to do Windows 2008 R2 migration due to End of Support it reached. We’re not that fans of living on edge but this time it appear to be wiser target to Windows Server 2019, not 2016 (so we’ll live with for years further).
While reading on this topic and looking for best practice approaches I can see many people recommend to do step-by-step migration (2008R2 -> 2012 -> 2016 -> 2019), but in our case it appears to be very lengthy and error-prone way, isn’t it? At the same time, looks like we can do that in one giant step (2008R2 -> 2019) so I would like to ask your advice, is it true?
asked May 6, 2019 at 13:24
![]()
3
If you want to upgrade the actual servers by performing an in-place upgrade (which I highly advise against), you need to go through multiple steps.
But if you want to add new 2019 Domain Controllers to replace the existing ones, then yes, you can definitely add 2019 DCs in a 2008R2 domain, after the standard preparatory steps (adprep).
Also make sure your SYSVOL uses DFS replication instead of FRS; which it should, but sometimes FRS just stays there because nobody bothered changing that after upgrading from 2003. FRS is not supported anymore and you can’t add a 2019 DC in domain which still uses it.
Also, take extra care if you have non-Windows (or old Windows such as XP) devices that use Active Directory for authentication; they might be not compatible with 2019 DCs due to their stronger security settings.
answered Dec 27, 2020 at 23:26
![]()
MassimoMassimo
69.3k57 gold badges197 silver badges319 bronze badges
According to Microsoft’s Upgrade Scenario Planner, you must upgrade to Windows Server 2019 from Server 2008 R2 in three steps:
- Upgrade to Server 2012
- Upgrade to Server 2016
- Upgrade to Server 2019
There’s no way around this. Attempting to skip one of these steps will not work because the installer for the new version of Windows Server will refuse to run if the prior version is not supported for upgrade.
answered May 6, 2019 at 13:55
![]()
4
We upgraded over 100 virtual 2008R2 Servers with only two version changes.
We had no issues with drivers because they were all VMs.
There was no DC among the machines, we join 2019 DCs to the AD and remove the old ones after that.
Maybe driver support issues could be a reason why the migration info from MS states that it needs to be a three step version upgrade.
This is what we do with every server 2008R2:
1. Go offline
2. Upgrade 2008R2 to Server 2012R2
3. Upgrade 2012R2 to Server 2019
4. Go online
5. Get Updates for Server 2019
answered Nov 27, 2019 at 15:26
![]()
1