Прочитано:
1 658
Итак появилось свободное время в которое никто не отвлекает, все налажено и все работает, а потому пора заняться самообразование ведь никто кроме меня не заинтересован чтобы я был квалификационным сотрудником. Но это все лирика, а т. к. мой блог в последнее время что-то замер в наполнении практический заметок, то пора это дело исправлять. Может конечно всему виной хорошая погода, а не загруженность, но это не важно. Когда в твою команду приходит новый сотрудник и рассказывает что он успешно переводил всю инфраструктуру на новый уровень в частности серверной операционной системы становится как-то жалко себя, — а почему же я сам этого не сделал и сижу на отлаженном старом. Без думно переходить на что-то не опробовав самостоятельно я не делаю — только тест тест тест и потом практика. И вот сейчас я покажу все шаги через которые я прошел дабы произвести миграцию с домена уровня Server 2008 R2 до уровня Server 2012 R2.
Ну что ж пора:
1) Домен (polygon.local) на системе Server 2008 R2 Ent (srv-dc) развернутый по шагам заметки. Текущие действующие роли: AD + DHCP + DNS, IP Address = 10.9.9.1
2) Развернут Server 2012 R2 Standard (srv-ad), IP Address = 10.9.9.20 получен от DHCP сервера.
3) Поставлены все обновления на Server 2012 R2, предварительно у Вас должен быть развернут сервис обновления Windows систем именуемый, как WSUS, IP Address = 10.9.9.3
4) Ввести в текущий домен систему Server 2012 R2
Win + X — Control Panel — Category (Small icons) — System — Advanced system settings — вкладка Computer Name — Change
Computer name: srv-ad
Member of (Domain:) polygon.local
и нажимаю кнопку OK, затем указываю идентификационные данные учетной записи у которой есть права ввода станций в домен, в моем случае:
Login: ekzorchik
Pass: 712mbddr@
и нажимаю кнопку OK, успехом считается появление сообщения: Welcome to the polygon.local domain
и нажимаю кнопку Ok, OK (соглашаемся о том чтобы изменения применились текущую систему следует перезагрузить), Close (окна System Properties), Restart Now (окна Microsoft Windows).
5) Опираясь на инструкцию (не которые моменты будут отличаться) установки AD сделать данную систему как домен контроллер, а до этого авторизуюсь под учетной записью ekzorchik&712mbddr@, данная учетная запись является Администратором домена и обладает всеми группами которые нужны для полного администрирования AD (Domain Admins, Enterprise Admins, Schema Admins) и обязательно не забудьте сделать статический IP адрес у данного сервера.
6) Текущее положение FSMO ролей
srv-ad.polygon.local: Win + X — Command Prompt (Admin) —
C:Windowssystem32>netdom query fsmo
Schema master srv-dc.polygon.local
Domain naming master srv-dc.polygon.local
PDC srv-dc.polygon.local
RID pool manager srv-dc.polygon.local
Infrastructure master srv-dc.polygon.local
The command completed successfully.
, как видно всеми ролями владеет сервер под управлением Windows Server 2008 R2 (Ent), ну что же буду мигрировать на текущий:
Текущий список всех контроллеров домена:
C:Windowssystem32>dsquery server -forest
«CN=SRV-DC,CN=Servers,CN=Default-First-Site-Name,CN=Sites,CN=Configuration,DC=polygon,DC=local»
«CN=SRV-AD,CN=Servers,CN=Default-First-Site-Name,CN=Sites,CN=Configuration,DC=polygon,DC=local»
Дальнейшие действия опираются на следующую заметку.
Важно добиться чтобы вывод команды netdom query fsmo показал что все роли у srv-ad.polygon.local. У меня уже первая ошибка (или не знаю как по другому выразится), при попытке смены владельца Schema появляется всплывающее сообщение вида:
Active Directory Schema snap-in is not connected to the schema operations master. You will not be able to perform any changes Schema modifications can only be made on the schema FSMO holder.
Изменив шаги на:
Win + X — Command Prompts (Admin)
C:Windowssystem32>ntdsutil
ntdsutil: roles
fsmo maintenance: connections
server connections: connect to server srv-ad.polygon.local
Binding to srv-ad.polygon.local …
Connected to srv-ad.polygon.local using credentials of locally logged on user.
server connections: quit
fsmo maintenance: seize RID Master
fsmo maintenance: seize PDC
fsmo maintenance: seize infrastructure master
fsmo maintenance: seize naming master
fsmo maintenance: seize schema master
C:Windowssystem32>netdom query fsmo
Schema master srv-ad.polygon.local
Domain naming master srv-ad.polygon.local
PDC srv-ad.polygon.local
RID pool manager srv-ad.polygon.local
Infrastructure master srv-ad.polygon.local
The command completed successfully.
Отлично все роли на новом сервере под управлением Windows Server 2012 R2 (Std), теперь удаляю контроллер домена под управлением Windows Server 2008 R2 из глобального каталога (Global Catalog):
Win + X — Control Panel — Administrative Tools — Active Directory Sites and Services —
Sites — Default-First-Site-Name — Server — разворачиваю и нахожу SRV-DC — затем открываю свойства (Properties) на NTDS Settings и внутри вкладки General снимаю галочку Global Catalog после чего нажимаю Apply , OK. Когда откроем оснастку Active Directory Users and Computer в организационном юните Domain Controllers будет видно, что сервер srv-dc больше не является глобальным каталогом:

Отлично, теперь ранее имевший место быть контроллер домена со всеми ролями по обслуживанию инфраструктуры можно деинсталлировать с помощью команды запущенной с правами администратора — dcpromo:
Start — All Programs — Accessories — Command Prompts (Run as Administrator) —
dcpromo, Next — отмечаю галочкой: Delete the domain because this server is the last domain controller in the domain, Next — Yes — указываю пароль на административный аккаунт указываемый при разворачивании домена:
Password: 712mbddr@
Confirm password: 712mbddr@
И нажимаю кнопку Next , Next но вот почему-то не все так просто как должно быть:
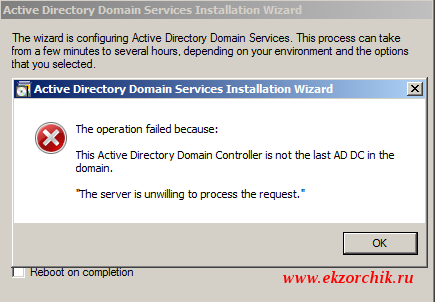
раз установщик не хочет по хорошему буду по плохому — удалю принудительно:
С:Windowssystem32dcpromo /forceremoval, Yes — Next — Next — указываю пароль на административный аккаунт указываемый при разворачивании домена:
Password: 712mbddr@
Confirm password: 712mbddr@
И нажимаю кнопку Next, — Next — отмечаю галочкой Reboot on competion и вот только после принудительно удаления контроллер домена удаляется без каких либо проблем:
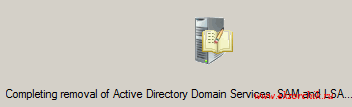
По окончании процедуры удаления нажимаем Finish — Restart Now.
Теперь нужно с мигрировать роль DHCP сервера с сервера srv-dc:
На srv-dc экспортирую настройки DHCP в файл:
Start — Control panels — Administrative Tools — DHCP — DHCP — srv-dc.polygon.local и через правый клик выбираю Backup… и указываю путь сохранения: c:1 — внутри сохраняется файл: DhcpCfg
копирую данный файл (каталог net и файл DhcpCfg) на srv-ad:
c:>xcopy c:1* \10.9.9.20c$1
но сперва поднять роль DHCP на srv-ad делать это лучше через мастер добавления ролей:
Win + X — Control Panel — Administrative Tools — Server Manager — и добавляю роль DHCP (и устанавливаю в довесок компоненты DHCP Server Tools. Почему в Microsoft ни как не могут сделать чтобы при добавлении/удалении ролей системы не нужно было перезагружать не понимаю. Перезагружаю, после запускаю оснастку DHCP:
Win + X — Control Panel — Administrative Tools — DHCP — DHCP — srv-ad.polygon.local и через правый клик мышью импортирую настройки DHCP взятые с ранее имевшего место быть сервера srv-dc.polygon.local — Restore — C:DhcpCfg
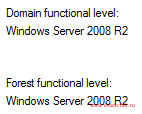
Следующим шагом проверяю какой функциональный уровень домена и леса через оснастку Active Directory Users and Computer — polygon.local — Properties и вижу не порядок (разве все это затевалось чтобы остаться как и было):
или же посмотреть текущий уровень домена можно через консоль командной строки PowerShell:
Win + X — Command Prompts (Admin) —
C:Windowssystem32>cd c:WindowsSystem32WindowsPowerShellv1.0
c:WindowsSystem32WindowsPowerShellv1.0>powershell.exe
Windows PowerShell
Copyright (C) 2013 Microsoft Corporation. All rights reserved.
c:WindowsSystem32WindowsPowerShellv1.0> import-module -name activedirectory
PS C:WindowsSystem32WindowsPowerShellv1.0> get-adforest | format-table name,
ForestMode
name ForestMode
—- ———-
polygon.local Windows2008R2Forest
PS C:WindowsSystem32WindowsPowerShellv1.0> exit
C:Windows>cd %systemroot%system32
Буду изменять:
через оснастку Active Directory Users and Computer — polygon.local — Raise domain functional level и опачки, мастер говорит что я не могу изменить функциональность домена потому что это домен включен в Active Directory Domain Controllers
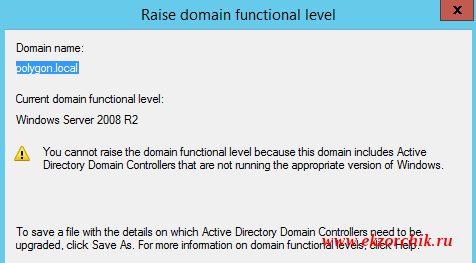
Ладно значит нужно удалить из текущего домена (За основу беру заметку по удалению неисправного контроллера домена:) все упоминания об ранее имевшем место быть srv-dc:
C:Windowssystem32>ntdsutil
ntdsutil: metadata cleanup
metadata cleanup: connections
server connections: connect to server srv-ad
Binding to srv-ad …
Connected to srv-ad using credentials of locally logged on user.
server connections: quit
metadata cleanup: select operation target
select operation target: list sites
Found 1 site(s)
0 — CN=Default-First-Site-Name,CN=Sites,CN=Configuration,DC=polygon,DC=local
select operation target: select site 0
Site — CN=Default-First-Site-Name,CN=Sites,CN=Configuration,DC=polygon,DC=local
No current domain
No current server
No current Naming Context
select operation target: list servers in site
Found 2 server(s)
0 — CN=SRV-DC,CN=Servers,CN=Default-First-Site-Name,CN=Sites,CN=Configuration,DC
=polygon,DC=local
1 — CN=SRV-AD,CN=Servers,CN=Default-First-Site-Name,CN=Sites,CN=Configuration,DC
=polygon,DC=local
select operation target: select server 0
Site — CN=Default-First-Site-Name,CN=Sites,CN=Configuration,DC=polygon,DC=local
No current domain
Server — CN=SRV-DC,CN=Servers,CN=Default-First-Site-Name,CN=Sites,CN=Configurati
on,DC=polygon,DC=local
DSA object — CN=NTDS Settings,CN=SRV-DC,CN=Servers,CN=Default-First-Site
-Name,CN=Sites,CN=Configuration,DC=polygon,DC=local
DNS host name — srv-dc.polygon.local
Computer object — CN=SRV-DC,OU=Domain Controllers,DC=polygon,DC=local
No current Naming Context
select operation target: list domains
Found 1 domain(s)
0 — DC=polygon,DC=local
select operation target: select domain 0
Site — CN=Default-First-Site-Name,CN=Sites,CN=Configuration,DC=polygon,DC=local
Domain — DC=polygon,DC=local
Server — CN=SRV-DC,CN=Servers,CN=Default-First-Site-Name,CN=Sites,CN=Configurati
on,DC=polygon,DC=local
DSA object — CN=NTDS Settings,CN=SRV-DC,CN=Servers,CN=Default-First-Site
-Name,CN=Sites,CN=Configuration,DC=polygon,DC=local
DNS host name — srv-dc.polygon.local
Computer object — CN=SRV-DC,OU=Domain Controllers,DC=polygon,DC=local
No current Naming Context
select operation target: quit
metadata cleanup: remove selected server
Transferring / Seizing FSMO roles off the selected server.
Removing FRS metadata for the selected server.
Searching for FRS members under «CN=SRV-DC,OU=Domain Controllers,DC=polygon,DC=local».
Deleting subtree under «CN=SRV-DC,OU=Domain Controllers,DC=polygon,DC=local».
The attempt to remove the FRS settings on CN=SRV-DC,CN=Servers,CN=Default-First-
Site-Name,CN=Sites,CN=Configuration,DC=polygon,DC=local failed because «Element not found.»;
metadata cleanup is continuing.
«CN=SRV-DC,CN=Servers,CN=Default-First-Site-Name,CN=Sites,CN=Configuration,DC=po
lygon,DC=local» removed from server «srv-ad»
metadata cleanup: quit
ntdsutil: quit
Удаляю хост srv-dc из оснастки Active Directory Sites and Services
Удаляю все записи в DNS относящиеся к хосту srv-dc
и вот только после этого появляется возможность изменить функциональный уровень текущего домен контроллера с Server 2008 R2 на более высокий:
Active Directory Users and Computer — polygon.local — Raise domain functional level… — теперь доступны следующие уровни: Windows Server 2012 & Windows Server 2012 R2 — выбираю R2 и нажимаю Raise, OK, OK
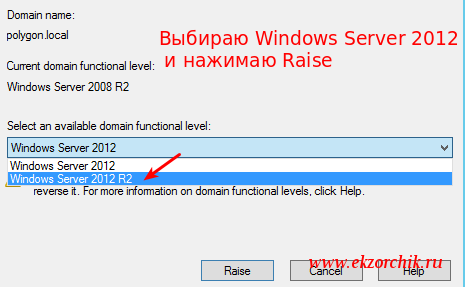
И по такому же принципу изменяем функциональный уровень и для всего леса:
Active Directory Domains and Trusts — Active Directory Domains and Trusts [srv-ad.polygon.local] —
Raise Forest Functional Level… — Select an available forest functional level: сейчас установлено Windows Server 2012 изменяю на Windows Server 2012 R2 и нажимаю Raise, OK, OK. Изменения применяют сейчас, но все же это же Windows по возможности осуществите перезагрузку всего сервера: Win + X — Shut down or sign out — Restart — Continue — после перезагрузки проверяю какой функциональный уровень и вуаля и там и там значится Windows Server 2012 R2, а это новые возможности. Вот теперь я готов чтобы перевести все имеющее место быть собственно развернутое на самое последнее и стабильное. На этом я прощаюсь, с уважением автор блога — ekzorchik.
Хочу рассказать о том, как я обновлял главный контроллер домена (PDC) с Windows Server 2008 R2 на Windows Server 2012 R2. Матерым тру админам статья скорее всего не пригодится. Тут будут описаны очевидные им вещи. Однако, для простых эникейщиков эта заметка (слишком мала для статьи) вполне может быть полезна.
В моем распоряжении небольшая сеть. Развернут домен и всего 1 контроллер домена на базе Windows Server 2008 R2. Цель — обновить контроллер домена так, чтобы домен не вышел из стоя. В качестве рабочей машины у меня используется Windows 8.1. Это важно, потому что начиная с Windows 8 в клиентские версии операционных систем стали добавлять Hyper-V.
Общий план моих действий был примерно такой:
- Создаем виртуальную машину и устанавливает на нее Windows Server 2012 R2.
- Добавляем его в домен.
- Добавляем серверу роль AD DS.
- Делаем его масретом инфраструктуры, PDC, мастером RID, мастером схемы и мастером имен.
- Удаляем с обновляемого сервера роль AD DS и все другие роли, которые реплицируются между контроллерами домена.
- Выводим обновляемый сервер из домена вообще.
- Устанавливаем (предварительно отформатировав диски) на нем Windows Server 2012 R2.
- Добавляем новому серверу роль AD DS.
- Делаем его масретом инфраструктуры, PDC, мастером RID, мастером схемы и мастером имен.
- Удаляем с виртуального сервера роль AD DS и все другие роли, которые реплицируются между контроллерами домена.
- Выводим виртуальный сервер из домана.
- Удаляем виртуальную машину.
Т.е. все очень просто. На момент пока реального сервера не будет в живых, его функции будет выполнять виртуальный сревер.
Узнать кто у нас кто в домене можно командой:
netdom query /domain:%userdomain% fsmo
Как переносить роли контроллеров домена:
Делается это с помощью команды ntdsutil. Запускать ее мы будем на %servername%, т.е. сервере, который хотим сделать самым главным.
После запуска утилиты вводим заклинания:
roles— будем управлять владельцами NTDS ролейconnections— будем подключаться к какой AD DSconnect to server %servername%— подключаемся к серверу %servername%.q— выходим из режима подключений?— смотрим что мы можем делатьtransfer infrastructure mastertransfer naming mastertransfer PDCtransfer RID mastertransfer schema master- выходим из утилиты набрав два раза
q.
Разумеется после того, как контроллер домена (уже обновленный) вернулся на свое место, на нем необходимо развернуть все те роли, что были развернуты раньше. Вы ведь не забыли сделать бекап?
В этой статье мы поговорим о процедуре обновления домена с версии Windows Server 2008 R2 до Windows Server 2012 с последующим понижением роли старого контроллера домена до рядового сервера AD.
Итак, что имеется:
- Домен Active Directory как минимум с одним контроллером домена на Windows Server 2008 R2
- Уровень леса и домена AD должен быть как минимум Windows Server 2003
- Дополнительный рядовой сервер домена с Windows Server 2012 , который в дальнейшем станет контроллером домена (как включить сервер в домен подробно описано в статье Как включить Windows в домен).
- Учетная запись с правами администратора домена, схемы и леса.
Прежде чем добавлять новый контроллер домена на Windows 2012 необходимо обновить схему домена и леса. Классически подготовка и повышение уровня домена осуществлялась вручную с помощью утилиты Adprep.exe. В документации новой серверной платформы от Microsoft указано, что при повышении первого сервера с Windows Server 2012 до уровня контроллера домена, повышение уровня домена происходит автоматически при установке роли AD DS на первый сервер Windows 2012 в домене. Так что, теоретически, для подготовки домена ничего делать не нужно.
Однако, предпочтительнее контролировать результат такого ответственного процесса, как обновление схемы. Выполним процедуру обновления схемы вручную.
Обновление схемы AD до Windows Server 2012 с помощью adprep
Для обновления схемы нам понадобится утилита adprep.exe, взять которую можно в каталоге supportadprep на диске с дистрибутивом Windows Server 2012. Данная утилита бывает только 64-разрадной (утилиты adprep32.exe больше не существует), соответственно, запустить ее можно будет только на 64 разрядном контроллере домена.
Необходимо скопировать утилиту на текущий DC с ролью Schema Master (Хозяин схемы) и в командной строке с правами администратора выполнить команду подготовки леса к установке нового DC на Windows Server 2012:
adprep /forestprep

Версия схемы Active Directory в Windows Server 2012 — 56.
Далее обновим схему домена:
adprep /domainprep
Далее осталось дожидаться окончания репликации изменений в схеме по всему лесу и проверить существующие контроллеры домена на наличие ошибок. Если все прошло хорошо – продолжаем. Пришла пора развернуть контроллер домена на Windows Server 2012.
Установка контроллер домена на Windows Server 2012
Первой интересной новостью является тот факт, что знакомой администраторам утилиты DCPROMO, позволяющей добавить или удалить контроллер домена в AD больше не существует. При ее запуске появляется окно, в котором сообщается, что мастер установки Active Directory Domain Services перемещен в консоль Server Manager.

Что ж, откроем консоль Server Manager и установим роль Active Directory Domain Services (Внимание! Установка роли автоматически не означает тот факт, что сервер стал контроллером домена, роль нужно сначала настроить)

После окончания установки роли появится окно, в котором сообщается, что сервер готов стать контроллером домена, для чего нужно нажать на ссылку “Promote this server to domain controller” (далее мы рассмотрим только значимые шаги мастера создания нового контроллера домена).

Затем нужно указать, что данный контроллер домена будет добавлен в уже существующий домен (Add a domain controller to an existing domain), указать имя домен и учетную запись из-под которой будет проводится операция.

Затем укажите, что данный контроллер домена будет содержать роли GC (Global Catalog) и DNS сервера. Также укажите пароль восстановления DSRM (Directory Services Restore Mode) и, если необходимо имя сайта, к которому будет относиться данный контроллер домена.

В разделе “Paths” указываются пути к базе Active Directory (NTDS), файлам логов и каталогу SYSVOL. Учтите, что данные каталоги должны находиться на разделе с файловой системой NTFS, тома с новой файловой системой Windows Server 2012 — Resilient File System (ReFS) – использовать для этих целей нельзя! 
По окончании работы мастера установки роли AD DS, сервер нужно перезагрузить. После перезагрузки вы получаете новый контроллер домена с ОС Windows Server 2012.
Удаление старого контроллера домена на Windows Server 2008 R2
Прежде, чем понизить роль старого контроллера домена с Windows Server 2008 R2 до рядового сервера, нужно перенести все FSMO роли на новый контроллер домена .
Процедура переноса ролей FSMO с одного контролера домена на другой нами уже рассматривалась, подробнее с ней можно познакомится в статье Передача ролей FSMO в Active Directory. Процедуру можно осуществить через графический GUI (проще) или из командной строки с помощью утилиты ntdsutil
После передачи роли FSMO PDC Emulator, необходимо настроить синхронизацию времени на новом контроллере домена с внешним сервером (с которым время синхронизировалось ранее). Подробно процедура настройки синхронизации времени на PDC описана в статье: Синхронизация времени с внешним NTP сервером в Windows 2008 R2 . Формат команды примерно такой (ntp_server_adress – адрес NTP сервера):
w32tm /config /manualpeerlist:ntp_server_adress /syncfromflags:manual /reliable:yes /update
После того, как все роли FSMO перенесены на новый DC Windows Server 2012, убедитесь, что домен работает корректно: проверьте прохождение репликации AD, журналы DNS и AD на наличие ошибки. Не забудьте в настройках сетевой карты на новом сервере в качестве предпочтительного DNS сервера указать собственный адрес.
Если все прошло корректно, можно понизить роль старого контроллера домена 2008 R2 до рядового сервера домена. Это можно сделать, запустив на нем мастер DCPROMO, и указать, что данный сервер более не является контроллером домена. После того, как данный сервер станет рядовым сервером, его можно полностью отключить.
- Remove From My Forums
-
Question
-
How do i upgrade windows server 2008 r2 32bit enterprise version to windows server 2012 r2?
Answers
-
Hi,
In my opinion, you can always add additional domain controller. I would highly recommend to switch to x64 version since there is no upgrade path to Windows 2008 R2 x32.
Installing new x64 Windows 2008 R2 machine, promote it to domain controller, then move all AD roles to this new DC, decommission the old x32 one and if you can afford it add another x64 DC for best practice. Never run AD on a single DC except if you are
testing. For production always use 2. If you are going to do as I suggest, please be patient. Add DC, wait for replication to take place, check DNS records and then move on. After each step check your logs.Some related article for your reference:
Upgrading an Active Directory Domain from Windows Server 2008 or Windows Server 2008 R2 to Windows Server 2012 or Windows Server 2012 R2
Best Regards,
Alvin Wang
Please remember to mark the replies as answers if they help and un-mark them if they provide no help. If you have feedback for TechNet Subscriber Support, contact tnmff@microsoft.com.
-
Marked as answer by
Tuesday, May 17, 2016 5:33 AM
-
Marked as answer by
What is a migration?
In a general way, a migration consist in transferring data or program from an operating system to another. Here, we will transfer our Active Directory from a Windows Server 2008 R2 to a Windows Server 2012 R2.
Why doing a migration?
We will do a migration when we want to take benefits from the latest functionalities provided by the latest operating system version and functional levels.
It can also be done if you are extending your infrastructure with a new version of operating system and or plan to replace the old one because of performances issues.
What are the risk while doing a migration?
When you are doing a migration, you are taking the risk to have incompatibilities between application, software and your new operating system. You must ensure the compatibility of the software or applications with the operating system you are migrating to, otherwise planned an update of the softwares / applications incompatible.
Also, if your Active Directory is not healthy (not stable) doing a migration will not resolve your problems, if it is not making them worst.
I’m using 2 Hyper-V Machine, which is my Previous domain Server (Sifad.ae).
Check the Schema version of AD DS,
| AD version | objectVersion |
| Windows Server 2000 | 13 |
| Windows Server 2003 | 30 |
| Windows Server 2003 R2 | 31 |
| Windows Server 2008 | 44 |
| Windows Server 2008 R2 | 47 |
| Windows Server 2012 | 56 |
| Windows Server 2012 R2 | 69 |
| Windows Server 2016 | 87 |
1 – Open Run type Regedit –>ComputerHKEY_LOCAL_MACHINESYSTEMCurrentControlSetServicesNTDSParameters.


2 – Insert the Windows Server 2012 R2 DVD into the DVD drive of the Windows Server 2008 R2 AD DS.
3 – Open command prompt, and type the following commands and press enter.
1 – cd D:supportadprep
2 – adprep /forestprep


Type C and then press Enter.


Success

Let’s check back into registry. Schema version now is 69.

4 – Login to windows Server 2012 R2 machine with local admin credentials, Open server manager dashboard, click Add Roles and features.

5 – Click Next, Choose “Role-based or feature-based installation” radio button and click Next, Scroll down and choose Active Directory Domain Services from server roles. When a new window appears, click Add Features, Click Next until confirm installation selections page, When an installation has been completed and server prompts you for further configuration, click Promote this server to a domain controller. (refer picture).


6 – Deployment Configuration interface, click Add a domain controller to an existing domain, then click select button and browse to (Sifad.ae), verify that credentials is Administrator, and then click Next. (refer picture).


7 – Once your Server 2012 R2 restart, log in as domain Administrator.

8 – Follow this steps must :– Migrating FSMO (Flexible Single Master Operation) roles to Windows Server 2012 R2.
1. Open the Command Prompt and type netdom query fsmo.
2. Verify the FSMO Roles on Windows Server 2008 R2 Server (DC-2008 R2) before we transfers FSMO roles to new Windows Server 2012 Server( Dc-Server 2012 R2).
3. In the command prompt, type ntdsutil and press enter.

4. Type roles and press Enter. The prompt will display “fsmo maintenance:”

5. Type connections and press Enter. The prompt will display “server connections:”

6. In the “server connections:”, type connect to server Dc-Server.Sifad.ae and press enter (where Dc-Server-2012R2 is the name of the target Windows Server 2012 R2).

7. Type quit and press enter. The prompt will display “fsmo maintenance:”

8. In the “fsmo maintenance:“, type transfer schema master and Press enter and Click Yes On Role Transfer Confirmation Dialog box to confirm the Operations Master change.


9. Do the same process for: transfer naming master, transfer PDC, transfer RID master and transfer infrastructure master. (refer picture).


10. Type quit and press enter; the type quit and press enter again to exit the ntdsutil.

11. Verify the FSMO Roles on new Windows Server 2012 Domain Controller, Dc-Server-2012R2.

9 – Remove the legacy domain controller:
1. On Dc-2008 R2, Click Start, Click Run, type dcpromo and then click OK.


2. On the Welcome to the Active Directory Installation Wizard page, Click Next.


3. On the Delete the Domain page, leave Delete the domain because this server is the last domain controller in the domain.


4. On the Administrator Password Page, type asd@123 in both password text boxes and click Next.

5. On the Summary page, click Next. Wait for the process to complete and then click Finish.


6. On the Completing the Active Directory Domain Services Installation Wizard, click Finish.

7. On the Active Directory Domain Services Installation Wizard page, click Restart Now to Restart the server.

8. After restart the server, Dc-2008R2 computer account will automatically move from Domain Controller OU to Computers OU because now Dc-2008R2 is only the member server.

9. Lastly disjoin Windows Server 2008 R2 (Dc-2008R2) from the domain to a workgroup and remove any unnecessary record from Active Directory Sites and Services.


Finally, we successfully Migrated Active Directory Domain Controller from Windows Server 2008 R2 to Windows Server 2012 R2, which is an easy process. I hope this article will help you…. 🙂
that’s all for now.., any Doubts type a commend.. 🙂
Table of Contents
- Steps
- PowerShell
- CA Registry Settings
- Certificate Templates
- CAPolicy.inf File
- Install and Configure the AD CS Role New server
- Restore the CA Database and Registry Settings
- Restore the CA Registry Settings
- Restore the CA Templates
- Video
Steps
PowerShell
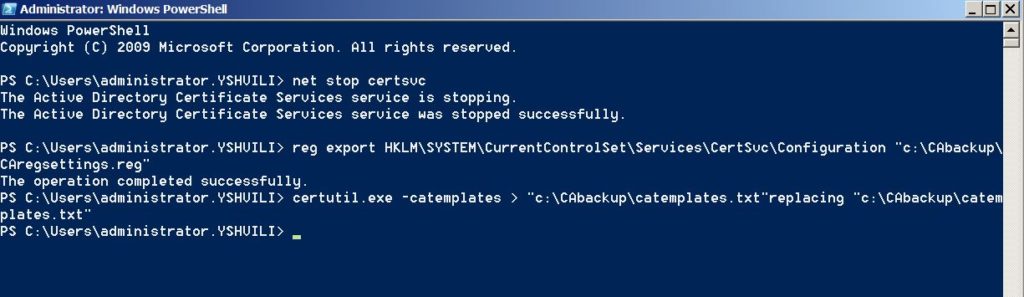
Run a Powershell command window as administrator with required privileges
net stop certsvc and press Enter
CA Registry Settings
Open PowerShell command prompt we opened in the previous instructions, type
reg export HKLMSYSTEMCurrentControlSetServicesCertSvcConfiguration “c:CAbackupCAregsettings.reg”
Press ENTER
Certificate Templates
Open PowerShell command prompt, type
certutil.exe –catemplates > “c:CAbackupcatemplates.txt”replacing “c:CAbackupcatemplates.txt”
with the correct path and file name for your backup folder
Press Enter
CAPolicy.inf File
If your CA was configured using a CAPolicy.inf file, make sure that you copy this file from the %SystemRoot% directory and the new location on the new server %SystemRoot% directory
Remove the Active Directory Certificate Services Role and Server from the Domain
right-click the PowerShell icon on the desktop taskbar and select Run as Administrator from the context menu
Type Remove WindowsFeature Adcs-Cert-Authority and press Enter
Install and Configure the AD CS Role New server
Open PowerShell console, type Add-WindowsFeature ADCS-Cert-Authority –IncludeManagementTools and press Enter
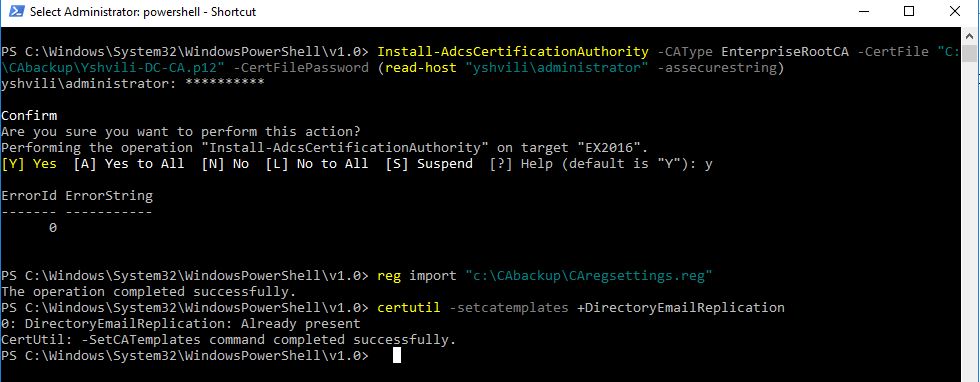
AD CS role has installed, type Install-AdcsCertificationAuthority –CAType EnterpriseRootCA -CertFile “C:CAbackupYshvili-DC-CA.p12” -CertFilePassword (read-host “yshviliadministrator” -assecurestring) and press Enter Type the password for the file when
prompted then confirm that you want to configure the CA
Restore the CA Database and Registry Settings
Restore the CA Registry Settings
Right-click the PowerShell icon on the desktop taskbar and select Run as Administrator
Now type reg import “c:CAbackupCAregsettings.reg” and press Enter
Restore the CA Templates
Right-click the PowerShell icon on the desktop taskbar and select Run as Administrator from the context menu.
In the command prompt type certutil -setcatemplates +DirectoryEmailReplication and press Enter
Reboot server.
Video
In this post we will see how to upgrade Windows Server 2008 R2 to Windows Server 2012. It’s been an year that Microsoft has released Windows Server 2012, when Windows Sever 2012 was released the IT professionals were eager to know what’s new in Windows Server 2012 and i was one of them. Microsoft releases all of its operating systems in multiple editions, which provides consumers with varying price points and feature sets. While choosing the edition make sure you choose the edition that suits your requirements. Before we go ahead and deploy Server 2012, let’s take a look at editions of Windows Server 2012.
1) Windows Server 2012 Datacenter Edition – The Datacenter edition is designed for large and powerful servers with up to 64 processors and fault-tolerance features such as hot add processor support. This edition is available only through the Microsoft volume licensing program and from original equipment manufacturers bundled with a server.
2) Windows Server 2012 Standard Edition – This is a fully functional edition of Windows Server 2012. Frankly speaking there is no much difference between Datacenter and Standard Edition of Windows Server 2012. What differentiates these 2 editions is the number of virtual machine instances that is permitted by the license. A Standard edition license will entitle you to run up to two VMs on up to two processors. A Datacenter edition license will entitle you to run an unlimited number of VMs on up to two processors.

3) Windows Server 2012 Essentials – The Essentials edition is suited for small organizations, this edition includes all the features of Standard and Datacenter edition except the Server Core, Hyper-v and ADFS (Active Directory Federation Services).
4) Windows Server 2012 Foundation – This edition is designed for small businesses that require only basic server features such as file and print services and application support. The edition includes no virtualization rights and is limited to 15 users.

If i were to upgrade my existing windows server 2008 R2 Enterprise server to windows server 2012 i would first choose the edition and then i would check the upgrade paths. I have created a table which shows whether you can upgrade to windows server 2012 with you present operating system.

Lets take a look at hardware requirements for upgrading our server to windows server 2012. Windows Server 2012 requires minimum of 16 GB to 32 GB of disk space. When you install Windows Server 2012 it occupies 15.1 GB of space approximately but its good to allocate at least 32 GB of drive space for Windows Server 2012. You would require 1.4 GHz 64-bit processor, 512 MB of RAM, 32 GB of disk space, DVD Drive, Super VGA (800×600) or higher resolution monitor, keyboard and mouse.
The Windows Server 2012 evaluation software is available in Standard and Datacenter editions, you can download Windows Server 2012 from here :- http://technet.microsoft.com/en-in/evalcenter/hh670538.aspx.
In this post i will be showing you how to upgrade a windows server 2008 R2 Enterprise SP1 to Windows Server 2012 Datacenter. Note that the existing server is in workgroup, do not consider this post to upgrade your domain controller to windows server 2012. I will be creating a separate post to show the upgrade of domain controller running on windows server 2008 r2 to windows server 2012.

Insert the windows server 2012 DVD into the DVD-ROM and click on Run Setup.exe.

On the Windows Setup screen, click on Install now.

If you want to get security updates and latest drivers for your operating system select Go online to install updates now. We can also do a windows update once the upgrade is completed, so select No, Thanks.

Enter your product key for windows server 2012 and click on Next. In this step i have entered server 2012 Datacenter edition key. Click on Next.

Server core installation has no Server Manager or any other MMCs to manage roles and features. The management must be done either remotely from a client machine or through the command prompt or Powershell at the console. There is no Start menu, no desktop Explorer shell, no Microsoft Management Console, and virtually no graphical applications. All you see when you start the computer is a single window with a command prompt. In this step i will select the second installation mode, Windows Server 2012 Datacenter (Server with a GUI). Click on Next.

Select Upgrade: Install Windows and Keep files, settings and applications. This will keep existing files, settings and applications and upgrade our server to windows 2012.

The upgrade will take close to 20 minutes. Sit back and relax until the upgrade is complete.

The upgrade from windows server 2008 R2 Enterprise to windows server 2012 Datacenter is complete. Let’s login to the server and check for the edition.

Click on Server Manager, Click on Local Server, check the properties of server. We see that the operating system version is Microsoft Windows Server 2012 Datacenter. The upgrade process has been completed successfully.


Prajwal Desai is a Microsoft MVP in Enterprise Mobility. He writes articles on SCCM, Intune, Configuration Manager, Microsoft Intune, Azure, Windows Server, Windows 11, WordPress and other topics, with the goal of providing people with useful information.
From our previous post we have discussed the importance of implementing security best practices for Active directory. And I have recommended to keep updated with the latest active directory domain services. Which is the windows server 2012 R2 ADDS.
Here are some benefits of moving to Windows server 2012R2 ADDS
-
Active Directory Recycle Bin User Interface
Active Directory Administrative Center (ADAC) adds GUI management of recycle bin feature originally introduced in Windows Server 2008 R2.
-
Active Directory Replication and Topology Windows PowerShell cmdlets
Supports the creation and management of Active Directory sites, site-links, connection objects, and more using Windows PowerShell.
-
Fine-Grained Password Policy User Interface
ADAC adds GUI support for the creating, editing and assignment of PSOs originally added in Windows Server 2008.
-
Direct-Access Offline Domain Join
Extends offline domain-join by including Direct-Access prerequisites.
-
Rapid deployment via virtual domain controller (DC) cloning
Virtualized DCs can be rapidly deployed by cloning existing virtual domain controllers using Windows PowerShell cmdlets.
-
Active Directory-Based Activation (AD BA)
Simplifies the task of configuring the distribution and management of volume software licenses.
There are two ways to do this upgrade
1. In-Place Upgrade
This is the easiest and the quickest, only require to put the windows 2012 installation media to the DVD rom and do the OS Upgrade. But this method is more risky and require downtime.
2. AD migration to 2012R2 version
This is the method that recommended by most of the consultants. Which does not require a down time. From this article I’m expecting to provide detail information about the AD migration to 2012R2.
Solution Overview

According to this solution you have to domain join a windows server 2012R2 server to the existing active directory 2008 domain. Then after completing the prerequisites and domain perp, this new server will be promoted as an additional domain controller. All the directory objects will be replicated to the new server and it will work as an active domain controller to the existing active directory services.
Then you can transfer the FSMO roles to the new windows server 2012R2. After transferring the roles, new windows server 2012R2 DC will work as the primary domain controller and then you can decommission the existing Domain controllers. Before doing so please add another Windows server 2012R2 DC as an Additional domain controller to handle the load and also as a DR. This method does not need a downtime and if you follow the steps correctly, you can do a smooth upgrade to 2012R2 ADDS.
Step By Step Approach
1. Complete the Prerequisites
- Require New server hardware or VM with minimum following configurations
- Window server 2012R2 installation media
- Forest and Domain functional level should be Windows Server 2003 or higher
- If this condition not met, please upgrade the functional level
- Meta data cleanup (Optional) – remove any DC’s that was not demoted properly
Meta data clean up required only when you are having Domain controllers which is not operational right now, DC’s that was forcefully removed from the system, DC’s that was stopped replication and Tombstone life time expired or DC’s were formatted without demoting first.
If you are having DC’s Meta data in your ADDS, use Event viewer to track down. Or you can easily check this by navigating to the Active directory users and computers-Domain controllers OU and check whether there are any Domain controller exists that was not operational right now.
If you are having DC Meta data, you have to remove them before doing the upgrade. There are two ways to do the cleanup, GUI and Command prompt. In windows server 2003 GUI is not supported. But after 2008 its supported but I always prefer to use the Command prompt.
Clean up Meta data using command line
1. Login to one of DC’s and Get the command prompt using run as administrator
2. Type- Ntdsutil
3. Type in ntdsutil: metadata cleanup
4. At the metadata cleanup: Type the server name which is removed forcefully.
remove selected server <ServerName>
5. Confirm the removal

For more information refer the technet article
https://technet.microsoft.com/en-us/library/cc816907(v=ws.10).aspx
2. Preparing the Forest Schema
Before adding a 2012R2 domain controller to the existing 2008 environment, it is mandatory to update the Active Directory schema to windows server 2012. You must update the schema from the domain controller that hosts the schema operations master role (FSMO). To do this you have to login to the Schema role holder DC using Enterprise admin and schema admin privileged account. Please follow the detail steps
- Log on to the schema master as a member of the Enterprise Admins, Schema Admins, and Domain Admins groups privileged account
- Note the schema version from registry
ComputerHKEY_LOCAL_MACHINESYSTEMCurrentControlSetservicesNTDSParameters - Insert the windows server 2012R2 Installation DVD to the Rom.
- Open the command prompt using run as administrator
- Locate the following path — ‘D:supportadprep’
- Run- ‘Adprep/forestprep’


- After ADPrep successfully updated, run the domain prep ‘Adprep/ domainprep’
- Check the schema version from registry key.
3. Join the Windows server 2012R2 server as a member server to the domain.

4. Promote the windows server 2012R2 server as an Additional Domain controller.
Set a static IP address and DNS should be the primary domain controllers IP. Follow the screens to promote as a DC.
- Login to the server using Domain admin credentials
- Server Manager – Add roles and features
- Press next and select Active Directory Domain Services
-
Press next, next and install

- After the installation go to the server manager and select Prompt this server to a domain controller

-
Select Add a domain controller to an existing domain

- Type a domain restore mode password


- Type next till the installation window, and after the installation DC will be restarted.
5. Verify the successfully prompted domain controller
You can verify the DC by checking the DNS, Active directory users and computers and event viewer.
6. FSMO Role transfer to new Windows server 2012R2 Domain controller.
To finish up the AD Upgrade/Migration you have to move the FSMO roles to the new windows server 2012R2 Environment. Moving this roles will make 2012R2 DC as the primary server and after only you can demote the windows server 2008R2 DC’s from your network. You can do this process can do using GUI or Command prompt. I prefer to do this using the command prompt which is less hassle.
- Login to the Window server 2012R2 DC
- Open the command prompt using run as administrator
- Type following command and verify the server name of the windows server 2008 DC
Netdom query fsmo

- Next type ntdsutil
- Type roles
- Type Connections
- In connections type
Connect to server <FQDN of win2012R2 DC>
Ie — Connect to server TestDC2012R2.Lordstar.int

- Type Quit, this will bring back the fsmo maintenance prompt
- Type ?, enter
- Type transfer schema master and press yes to transfer the role

- Then transfer other roles
Transfer naming master
Transfer PDC
Transfer RID master
Transfer infrastructure master - After all roles are transferred, type quit and type netdom query fsmo and verify all roles are placed in 2012R2 DC.

7. Demote the existing windows server 2008R2 Domain controllers
Its not mandatory to demote the old servers right away, first you should have to implement other domain controllers to handle the load. After that you can demote the 2008 servers from the domain. Follow these steps.
- Login to the 2008R2 DC and Type DCPromo in Run, press next
- Don’t select the Delete the domain because this server is the last domain controller in the domain, press next
- Type the local administrator password and press next.
- Restart the server.
Now DC role is removed and it’s just a member server. If you want you can remove it from domain also.
Hope this is useful
Asitha De Silva
https://lk.linkedin.com/pub/asitha-de-silva/27/b09/429
References
https://technet.microsoft.com/en-us/library/hh994618.aspx?f=255&MSPPError=-2147217396
http://blogs.technet.com/b/canitpro/archive/2015/02/11/step-by-step-migrating-windows-server-2003-fsmo-roles-to-windows-server-2012-r2.aspx
https://technet.microsoft.com/en-us/library/cc816907(v=ws.10).aspx