| Workable Solutions | Step-by-step Troubleshooting |
|---|---|
| Windows Server Migration Checklist | #1. Download essential Windows server migration tool; #2. Find out your goals in Windows server migration…Full steps |
| Solution 1. Migration (Data, Apps, Account) | Step 1. Launch EaseUS Todo PCTrans on your source and target computers, connect both PCs via the internet…Full steps |
| Solution 2. In-place Upgrade (Everything) | Step 1. Create an image of all important data, apps, and even accounts on Windows Server 2012…Full steps |
Methods on this page are also applicable to Windows Server 2008/2008 R2/2012/2012 R2/2016/2019. It also works to upgrade and migrate Windows Server essentials to standards.
According to Microsoft, the new end-of-extended support date for Windows Server 2012 is October 10, 2023. The original date had been January 10, 2023.
It’s confirmed that Windows Server 2012 and Windows Server 2012 R2 supports will end by Oct.10th, 2023. And Microsoft has released two new Windows Servers — 2016 and 2019 for personal and enterprise users to explore their businesses on the new Windows Server systems. And it’s a smart choice to get things ready in advance. Therefore, it’s time to make a full plan of upgrading or migrating Windows Server 2012/2012 R2 to new Windows Server 2016/2019.
So how to successfully migrate your Windows Server 2012 to 2016 with all applications, data, and even accounts? If you are having the same doubts as listed here, stay calm and follow the provided tips in the following to get problems resolved:
- 1. Will I lose data while migrating Windows Server 2012 to 2016?
- 2. How do I upgrade Windows Server 2012 to 2019?
- 3. How to keep applications, data, accounts while migrating Windows Server 2012 to 2016/2019?
Windows Server Migration Checklist (2 Steps)
Here is a checklist that can be applied to upgrade and migrate Windows Servers applications, data, and accounts, etc., for all Windows Server users. Take the following two steps to get the right tool and resolution for Windows Server Migration:
- #1. Download Essential Windows Server Migration Tool
For most Windows Server users, the biggest challenge of migrating Windows Server is about how to fully transfer data, installed applications, and even Windows Server accounts to the new Windows Server machine. Advanced Windows Server PC transfer software — EaseUS Todo PCTrans Technician specializes in Windows Server data, app, account and settings migration between Windows Servers.
EaseUS Todo PCTrans Technician supports to transfer data, application, accounts via network or image on all Windows Servers, including Windows Server 2019/2016/2012/2012 R2/2008/2008 R2, etc.
EaseUS Todo PCTrans Technician
- ☆ Deploy & install Todo PCTrans on multiple PCs.
- Transfer unlimited files, programs, apps between Servers.
- Transfer account, domain account, and settings.
- Data rescue, find product key of installed programs.
- One license for multiple PCs.
- #2. Find Out Your Goals in Windows Server Migration
To find out the right way to migrate Windows Server, you should first find out your goals.
- If you want to transfer Windows Server OS to a new computer, try EaseUS Windows Server Migration Tool. You will successfully migrate Windows Server OS to a new computer without reinstalling the Server OS.
- If you only want to transfer Windows Server 2012 data, installed applications, account and settings to Windows Server 2016/2019 computer, follow Solution 1 listed below for help.
- If you want to perform an in-place upgrade from Windows Server 2012 to 2016/2019 or fresh install Windows Server 2016/2019 on old Windows Server 2012 but keep all data, installation apps, and account, follow Solution 2 on this page for help.
Solution 1. Migrate Windows Server 2012 to New Server 2016/2019 (Data, Apps, Account)
Applies to: Transfer data, installed applications, account and settings from Windows Server 2012 to new Windows Server 2016/2019 computers. No reinstallation is required.
To transfer Windows Server 2012 data, applications, and account, etc., to a new Windows server computer like 2016 or 2019, all you need is a reliable Windows Server PC Transfer software. EaseUS Todo PCTrans Technician is capable to help. It enables all levels of users to efficiently transfer everything from an old Windows Server computer to a new Server machine via the network connection.
See how to migrate Windows Server 2012 data, application, and even account to new Server step by step:
Step 1. Launch EaseUS Todo PCTrans on your source and target computers, connect both PCs via the internet.
1. At the «PC to PC» section, click «PC to PC» to continue.

2. Select your target computer via its device name, then enter its account password or verification code and select the transfer direction. Then click «Connect» to continue.
You can check the verification code on the right top of «PC to PC» mainscreen on the target computer.

Step 2. Select the categories Applications, Files, and Accounts to transfer via the internet.
If you want to transfer data selectively, click «Edit» under each category, and choose the specific items.

Step 3. Click «Transfer» to start transferring your apps/files/accounts from one computer to another computer via the Internet.

After the migration, you can restart the new Windows Server 2016 or 2019 computer and then continue using the software again. If some applications require reactivation, use your old key to activate the programs again.
Solution 2. In-place Upgrade Windows Server 2012 to 2016/2019, Keep Everything on Server
Applies to: In-place upgrade Windows Server 2012 to 2016 or 2019 and keep everything on the Server, including data, applications, and account, etc.
If you need to in-place upgrade Windows Server 2012 to newer Windows Server, keeping everything on the machine, follow the tutorial steps below carefully.
Step 1. Create an image of all important data, apps, and even accounts on Windows Server 2012
EaseUS Todo PCTrans with its Backup and Restore feature supports you to create an image backup of all important data, applications, accounts, etc., from Windows Server 2012 to an external hard drive.
Video Tutorial of Image Transfer using EaseUS Todo PCTrans:
Step 2. Perform in-place upgrade from Windows Server 2012 to 2016/2019, or fresh install Windows server 2016 on old Server PC.
If you don’t know how to perform Windows Server in-place upgrade, follow to the Microsoft tutorial: Upgrade Windows Server 2012 to Windows Server 2016 for help.
If you need to fresh install Windows Server 2016 or 2019 on the old Server machine, you need first download a Windows Server ISO and then follow the video below to clean install the Windows Server:
Video Tutorial to Install Windows Server 2016 produced by Server Academy on YouTube:
Step 3. Restore data, applications, accounts to new Windows Server via EaseUS Todo PCTrans using its Image Transfer feature.
If you lost some apps or data, you can use EaseUS Todo PCTrans Technician to selectively restore applications, data, and accounts to your new Windows Server 2016/2019.
Conclusion
On this page, we collected two solutions to help Windows Server users migrating Windows Server 2012 with data, applications, and accounts, etc., to Windows Server 2016/2019 using reliable PC transfer — EaseUS Todo PCTrans.
We also provide extra tips to help users to perform in-place upgrade or fresh install Windows Server 2016/2019 on old Windows Server machine. By following the provided tips, you can effortlessly move everything to the new Windows Server computer.
Windows Server 2012 Migration FAQs
If you have more questions about Windows Server migration, check the following questions and find answers here immediately.
1. Can Windows Server 2012 be upgraded to 2016?
Yes. Windows Server 2012 can be upgraded to 2016 in many ways. Here, we have collected all the possible ways that you can try to upgrade to Windows Server 2016 from 2012:
- Method 1. Use Windows Server migration tool: back up Windows Server 2016 OS and restore to the Windows Server 2012.
- Method 2. Perform in-place Windows Server upgrade from 2012 to 2016.
- Method 3. Clean install Windows Server 2016 on the old Windows Server 2012 computer.
2. Can Windows Server 2008 r2 be upgraded to 2016?
Sure. You can upgrade Windows Server 2008 r2 to 2016 by performing an in-place upgrade or fresh installing Windows Server 2016 on the computer. If you need to move data, applications, and account from the old Windows Server 2008 to new Windows server 2016, refer to Migrate Windows Server 20018 (R2) to 2016 step by step guide for help.
3. How do I migrate Windows Server 2012 R2 to 2019?
The ways to migrate Windows Server 2012 R2 to 2019 is similar to the ways as recommended on this page — migrating Windows Server 2012 to 216.
First, you need a reliable Windows PC transfer software that supports you to migrate old Windows Server data, apps, accounts to the new server computer.
Next, confirm your goals — to transfer data, apps, accounts between server machines, or to upgrade Windows server to 2019 but keep everything on the computer.
Last, take the right solution to migrate Windows Server 2012 R2 to 2019:
- If you need to migrate everything to a new Server computer, use the PC to PC feature in EaseUS Todo PCTrans Technician and migrate data, apps, accounts to Windows Server 2019 without losing anything.
- If you need to perform in-place upgrade or clean install Windows Sever 2019 on the old Server 2012 R2 computer, use Image Transfer feature in EaseUS Todo PCTrans to create an image of all important things, in-place upgrade or fresh install new Server, and then recover the image back to the computer.
| Workable Solutions | Step-by-step Troubleshooting |
|---|---|
| Windows Server Migration Checklist | #1. Download essential Windows server migration tool; #2. Find out your goals in Windows server migration…Full steps |
| Solution 1. Migration (Data, Apps, Account) | Step 1. Launch EaseUS Todo PCTrans on your source and target computers, connect both PCs via the internet…Full steps |
| Solution 2. In-place Upgrade (Everything) | Step 1. Create an image of all important data, apps, and even accounts on Windows Server 2012…Full steps |
Methods on this page are also applicable to Windows Server 2008/2008 R2/2012/2012 R2/2016/2019. It also works to upgrade and migrate Windows Server essentials to standards.
According to Microsoft, the new end-of-extended support date for Windows Server 2012 is October 10, 2023. The original date had been January 10, 2023.
It’s confirmed that Windows Server 2012 and Windows Server 2012 R2 supports will end by Oct.10th, 2023. And Microsoft has released two new Windows Servers — 2016 and 2019 for personal and enterprise users to explore their businesses on the new Windows Server systems. And it’s a smart choice to get things ready in advance. Therefore, it’s time to make a full plan of upgrading or migrating Windows Server 2012/2012 R2 to new Windows Server 2016/2019.
So how to successfully migrate your Windows Server 2012 to 2016 with all applications, data, and even accounts? If you are having the same doubts as listed here, stay calm and follow the provided tips in the following to get problems resolved:
- 1. Will I lose data while migrating Windows Server 2012 to 2016?
- 2. How do I upgrade Windows Server 2012 to 2019?
- 3. How to keep applications, data, accounts while migrating Windows Server 2012 to 2016/2019?
Windows Server Migration Checklist (2 Steps)
Here is a checklist that can be applied to upgrade and migrate Windows Servers applications, data, and accounts, etc., for all Windows Server users. Take the following two steps to get the right tool and resolution for Windows Server Migration:
- #1. Download Essential Windows Server Migration Tool
For most Windows Server users, the biggest challenge of migrating Windows Server is about how to fully transfer data, installed applications, and even Windows Server accounts to the new Windows Server machine. Advanced Windows Server PC transfer software — EaseUS Todo PCTrans Technician specializes in Windows Server data, app, account and settings migration between Windows Servers.
EaseUS Todo PCTrans Technician supports to transfer data, application, accounts via network or image on all Windows Servers, including Windows Server 2019/2016/2012/2012 R2/2008/2008 R2, etc.
EaseUS Todo PCTrans Technician
- ☆ Deploy & install Todo PCTrans on multiple PCs.
- Transfer unlimited files, programs, apps between Servers.
- Transfer account, domain account, and settings.
- Data rescue, find product key of installed programs.
- One license for multiple PCs.
- #2. Find Out Your Goals in Windows Server Migration
To find out the right way to migrate Windows Server, you should first find out your goals.
- If you want to transfer Windows Server OS to a new computer, try EaseUS Windows Server Migration Tool. You will successfully migrate Windows Server OS to a new computer without reinstalling the Server OS.
- If you only want to transfer Windows Server 2012 data, installed applications, account and settings to Windows Server 2016/2019 computer, follow Solution 1 listed below for help.
- If you want to perform an in-place upgrade from Windows Server 2012 to 2016/2019 or fresh install Windows Server 2016/2019 on old Windows Server 2012 but keep all data, installation apps, and account, follow Solution 2 on this page for help.
Solution 1. Migrate Windows Server 2012 to New Server 2016/2019 (Data, Apps, Account)
Applies to: Transfer data, installed applications, account and settings from Windows Server 2012 to new Windows Server 2016/2019 computers. No reinstallation is required.
To transfer Windows Server 2012 data, applications, and account, etc., to a new Windows server computer like 2016 or 2019, all you need is a reliable Windows Server PC Transfer software. EaseUS Todo PCTrans Technician is capable to help. It enables all levels of users to efficiently transfer everything from an old Windows Server computer to a new Server machine via the network connection.
See how to migrate Windows Server 2012 data, application, and even account to new Server step by step:
Step 1. Launch EaseUS Todo PCTrans on your source and target computers, connect both PCs via the internet.
1. At the «PC to PC» section, click «PC to PC» to continue.
2. Select your target computer via its device name, then enter its account password or verification code and select the transfer direction. Then click «Connect» to continue.
You can check the verification code on the right top of «PC to PC» mainscreen on the target computer.
Step 2. Select the categories Applications, Files, and Accounts to transfer via the internet.
If you want to transfer data selectively, click «Edit» under each category, and choose the specific items.
Step 3. Click «Transfer» to start transferring your apps/files/accounts from one computer to another computer via the Internet.
After the migration, you can restart the new Windows Server 2016 or 2019 computer and then continue using the software again. If some applications require reactivation, use your old key to activate the programs again.
Solution 2. In-place Upgrade Windows Server 2012 to 2016/2019, Keep Everything on Server
Applies to: In-place upgrade Windows Server 2012 to 2016 or 2019 and keep everything on the Server, including data, applications, and account, etc.
If you need to in-place upgrade Windows Server 2012 to newer Windows Server, keeping everything on the machine, follow the tutorial steps below carefully.
Step 1. Create an image of all important data, apps, and even accounts on Windows Server 2012
EaseUS Todo PCTrans with its Backup and Restore feature supports you to create an image backup of all important data, applications, accounts, etc., from Windows Server 2012 to an external hard drive.
Video Tutorial of Image Transfer using EaseUS Todo PCTrans:
Step 2. Perform in-place upgrade from Windows Server 2012 to 2016/2019, or fresh install Windows server 2016 on old Server PC.
If you don’t know how to perform Windows Server in-place upgrade, follow to the Microsoft tutorial: Upgrade Windows Server 2012 to Windows Server 2016 for help.
If you need to fresh install Windows Server 2016 or 2019 on the old Server machine, you need first download a Windows Server ISO and then follow the video below to clean install the Windows Server:
Video Tutorial to Install Windows Server 2016 produced by Server Academy on YouTube:
Step 3. Restore data, applications, accounts to new Windows Server via EaseUS Todo PCTrans using its Image Transfer feature.
If you lost some apps or data, you can use EaseUS Todo PCTrans Technician to selectively restore applications, data, and accounts to your new Windows Server 2016/2019.
Conclusion
On this page, we collected two solutions to help Windows Server users migrating Windows Server 2012 with data, applications, and accounts, etc., to Windows Server 2016/2019 using reliable PC transfer — EaseUS Todo PCTrans.
We also provide extra tips to help users to perform in-place upgrade or fresh install Windows Server 2016/2019 on old Windows Server machine. By following the provided tips, you can effortlessly move everything to the new Windows Server computer.
Windows Server 2012 Migration FAQs
If you have more questions about Windows Server migration, check the following questions and find answers here immediately.
1. Can Windows Server 2012 be upgraded to 2016?
Yes. Windows Server 2012 can be upgraded to 2016 in many ways. Here, we have collected all the possible ways that you can try to upgrade to Windows Server 2016 from 2012:
- Method 1. Use Windows Server migration tool: back up Windows Server 2016 OS and restore to the Windows Server 2012.
- Method 2. Perform in-place Windows Server upgrade from 2012 to 2016.
- Method 3. Clean install Windows Server 2016 on the old Windows Server 2012 computer.
2. Can Windows Server 2008 r2 be upgraded to 2016?
Sure. You can upgrade Windows Server 2008 r2 to 2016 by performing an in-place upgrade or fresh installing Windows Server 2016 on the computer. If you need to move data, applications, and account from the old Windows Server 2008 to new Windows server 2016, refer to Migrate Windows Server 20018 (R2) to 2016 step by step guide for help.
3. How do I migrate Windows Server 2012 R2 to 2019?
The ways to migrate Windows Server 2012 R2 to 2019 is similar to the ways as recommended on this page — migrating Windows Server 2012 to 216.
First, you need a reliable Windows PC transfer software that supports you to migrate old Windows Server data, apps, accounts to the new server computer.
Next, confirm your goals — to transfer data, apps, accounts between server machines, or to upgrade Windows server to 2019 but keep everything on the computer.
Last, take the right solution to migrate Windows Server 2012 R2 to 2019:
- If you need to migrate everything to a new Server computer, use the PC to PC feature in EaseUS Todo PCTrans Technician and migrate data, apps, accounts to Windows Server 2019 without losing anything.
- If you need to perform in-place upgrade or clean install Windows Sever 2019 on the old Server 2012 R2 computer, use Image Transfer feature in EaseUS Todo PCTrans to create an image of all important things, in-place upgrade or fresh install new Server, and then recover the image back to the computer.
Reading Time: 3 minutes
Microsoft recommend upgrading your server OS to the latest version, but this is not always possible. Your business may be running third party applications that are not compatible with later Windows Server Operating Systems.
Before upgrading, always check whether the applications running on your current Operating System are supported. It will save you a lot of time and disappointment.
So let’s continue on the basis that you have carried out your checks and the applications currently running on your server supports Server 2019.
Firstly, ensure you have a full backup of your server, so in the event the upgrade goes horribly wrong, you have a backup.
Note: If you have Microsoft Endpoint Protection installed, you will be prompted to remove this app. This app is not compatible with server 2019
Now, that you are all set, you may be thinking, can I upgrade directly from server 2012 or server 2012 R2 to Server 2016? The answer is yes, you can and it’s a supported method. See support matrix from Microsoft below. So whether you decide to upgrade from Server 2012 to 2019 or from 2016 to 2019 a one hop in-place upgrade is supported.
Ok, so we now have a full system backup, and we know that third party apps are supported with server 2016/2019.
Before we get started with the upgrade, Microsoft recommend that you collect some information from your device, for diagnostic and troubleshooting purposes. Because this information is intended for troubleshooting purposes only, store the information at a location where it’s easy accessible and not on the server being upgraded.
To collect your info
- Open a command prompt, go to
c:Windowssystem32, and then type systeminfo.exe. - Copy, paste, and store the resulting system information somewhere off of your device.
- Type ipconfig /all into the command prompt, and then copy and paste the resulting configuration information into the same location as above.
- Open the Registry Editor, go to the HKEY_LOCAL_MACHINESOFTWAREMicrosoftWindowsNTCurrentVersion hive, and then copy and paste the Windows Server BuildLabEx (version) and EditionID (edition) into the same location as above.
Upgrade Server 2012 to 2019
1) Patch your server with the latest windows updates if not already up to date
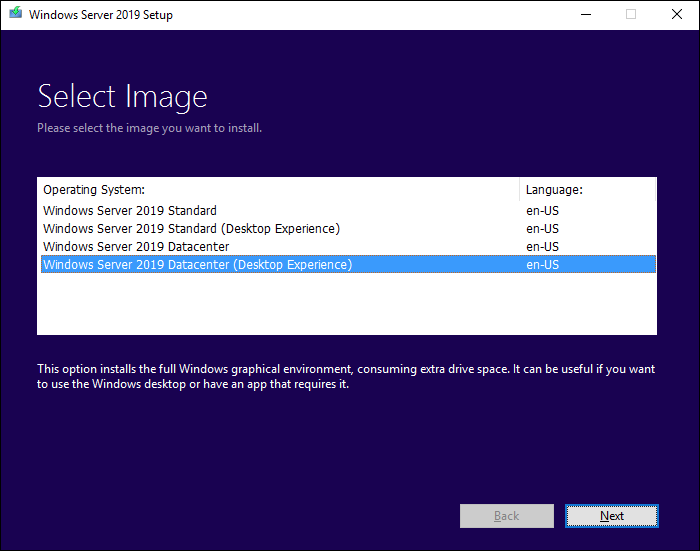
2) Locate the Windows Server 2019 Setup media, and then select setup.exe
3) Select the Windows Server version you wish to upgrade to
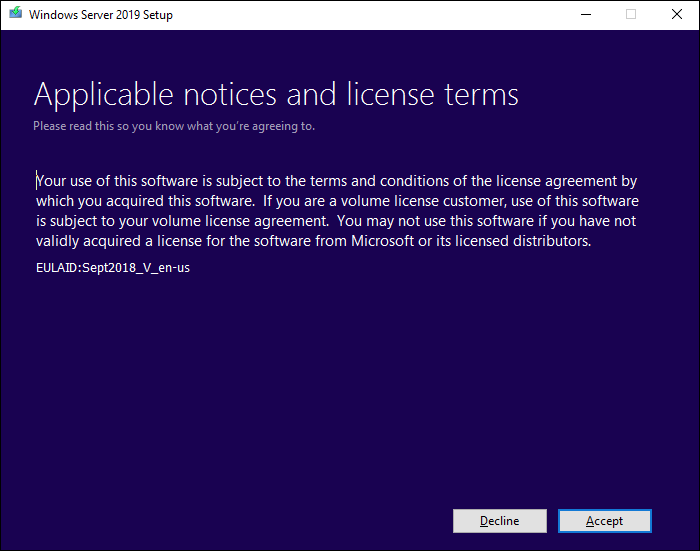
4) Accept the licensing terms
5) If you’re running Microsoft Endpoint Protection on your server, setup will prompt for this app to be removed as it isn’t compatible with Windows Server 2019
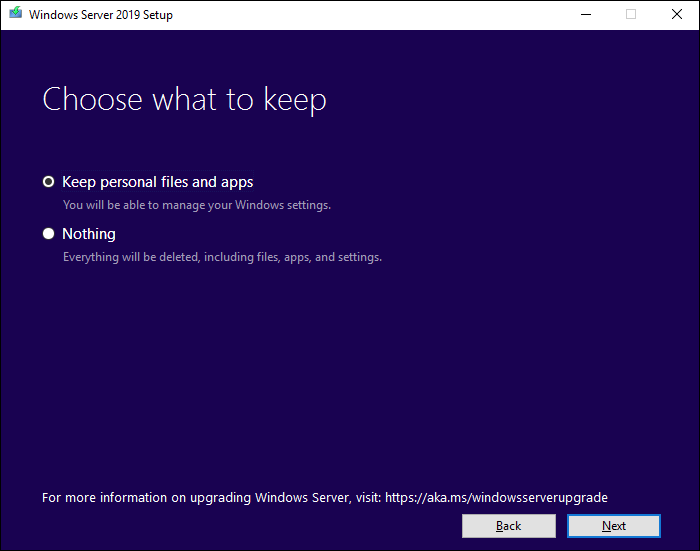
6) Select Keep personal files and apps, and then select Next
7) After Setup analyses your server, setup will prompt you to proceed with your upgrade by clicking install
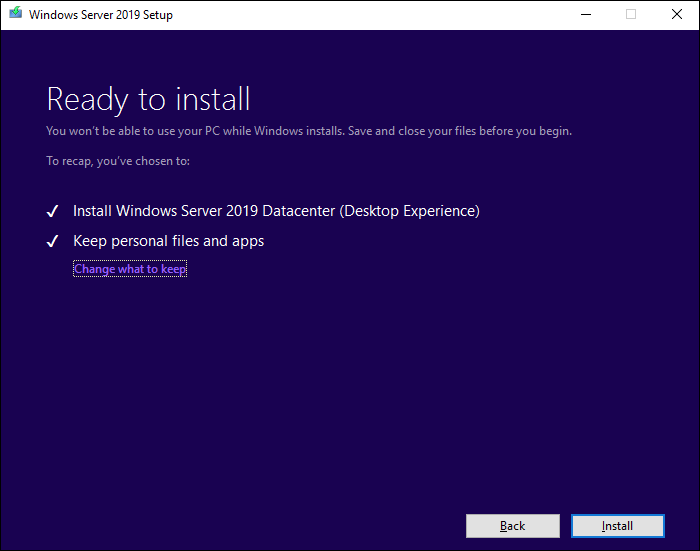
 Wait for the upgrade to complete

9) To ensure the upgrade completed successfully
– Open the Registry Editor, go to the HKEY_LOCAL_MACHINESOFTWAREMicrosoftWindowsNTCurrentVersion hive, and view the ProductName. You should see your edition of Windows Server 2019, for example Windows Server 2019 Standard. Make sure all of your applications are running and that your client connections to the applications are successful.
If you think something might have gone wrong during your upgrade, copy and zip the %SystemRoot%Panther (usually C:WindowsPanther) directory and contact Microsoft support.
- Remove From My Forums
-
Question
-
Hi!
I need some help as to best move from the old 2012 R2 to a new server with 2019 Essentials on it (small clinic, no need for standard server).
I have the old server running DC, DHCP and DNS, not much else, so that is what I need migrated, but how do I do this best?
I can find some guides but they all go from Standard to Standard, or Esentials to Essentials, not Standard to Essentials.
Would be nice if it was not using lots of PowerShell commands as I am not too familiar with them.
Any help would be very appreciated!
Answers
-
HI
since server 2019 essentials has been removed «server essentials experience» role, there is no RWA ,no WSE dashboard ,no wse connector used for win10 computer.Steps are same as migration from server 2012r2 standard to server 2019 standard/2016 standard. General steps as below:
1. Prepare your Source Server for Windows Server Essentials migration
2. Install new wse 2019, add it to existing w2012r2 AD domain and prompt it to be replica DC.
migrate full fsmo from w2012r2 std to wse2019.
3. Move settings and data to new WSE 2019.
4. Uninstall Connector on client system, the uninstallation operation will not exit system from server 2012r2 standard, so, there is no need to re-join client system to wse2019 AD domain.
5. Migrate other server roles DHCP and etc. to new WSE 2019 or your hardware router.
6. Demote and remove the w2012r2 from the new Windows Server Essentials 2019 networkMigrate from Previous Versions to Windows Server Essentials or Windows Server Essentials Experience
https://docs.microsoft.com/en-us/windows-server-essentials/migrate/migrate-from-previous-versions-to-windows-server-essentials-or-windows-server-essentials-experienceStep-by-Step guide to migrate active directory FSMO roles from windows server 2012 R2 to windows server 2016
http://www.rebeladmin.com/2016/10/step-step-guide-migrate-active-directory-fsmo-roles-windows-server-2012-r2-windows-server-2016/DHCP Server Migration: Migrating the DHCP Server Role
https://docs.microsoft.com/en-us/previous-versions/windows/it-pro/windows-server-2012-R2-and-2012/dn495428(v=ws.11)
Best Regards
Andy YOU
Please remember to mark the replies as answers if they help.
If you have feedback for TechNet Subscriber Support, contact
tnmff@microsoft.com.-
Edited by
Tuesday, June 30, 2020 3:20 PM
-
Marked as answer by
Davur Leon
Friday, July 10, 2020 4:07 PM
-
Edited by
Windows Server 2019 was available for public (GA) from early October 2018. In past I have written many articles about domain migrations by covering different Active Directory versions. So, it is time me to write about AD 2019 migrations. In this demo I am going to demonstrate how to migrate from Active Directory 2012 R2 to Active Directory 2019. The same procedure is going to apply for any AD version from Windows Server 2008.
Migration itself is very straight forward task, however, there are other things you need to consider before you do an AD migration. I have listed a checklist below you can use in many occasions.
- Evaluate business requirement for active directory migration
- Perform Audit on Existing Active Directory Infrastructure
- Provide Plan for implementation Process
- Prepare Physical / Virtual resources for Domain Controller
- Install Windows server 2019 Standard / Datacenter
- Patch Servers with latest Windows Updates
- Assign Dedicate IP address to Domain Controller
- Install AD DS Role
- Migrate Application and Server Roles from the Existing Domain Controllers.
- Migrate FSMO roles to new Domain Controllers
- Add New Domain controllers to the Existing Monitoring system
- Add New Domain controllers to the Existing DR Solution
- Decommission old domain controllers
- Raise the Domain and Forest Functional level
- On Going Maintenance

As per the above figure therebeladmin.com domain has two domain controllers. In here, the FSMO role holder is running windows server 2012 R2. Domain and forest functional level currently operating at Windows server 2012 R2. A new domain controller with Windows server 2019 will be introduce and it will be the new FSMO role holder for the domain. once FSMO role migration completed, Domain controller running windows server 2012 R2 will be decommissioned. After that forest and domain function level will raised to the windows server 2019.
In the demonstration, REBEL-DC2012 is the domain controller with windows server 2012 R2 and REBEL-DC2016 is the domain controller with windows server 2019.
Note – When you introduce new domain controllers to the existing infrastructure it is recommended to introduce to the forest root level first and then go to the domain tree levels.

- Log in to the Server 2019 as a member of local administrators group.
- Add server to the existing domain as member

- After restart, log in to the server as Enterprise Administrator
- Assign static IP address to the server
- Launch the PowerShell Console as an Administrator
- Before the configuration process, we need to install the AD DS Role in the given server. In order to do that we can use Following command.
Install-WindowsFeature –Name AD-Domain-Services -IncludeManagementTools

- Configure the new server as additional domain controller.
Install-ADDSDomainController
-CreateDnsDelegation:$false
-NoGlobalCatalog:$true
-InstallDns:$true
-DomainName «therebeladmin.com»
-SiteName «Default-First-Site-Name»
-ReplicationSourceDC «REBEL-DC2012.therebeladmin.com»
-DatabasePath «C:WindowsNTDS»
-LogPath «C:WindowsNTDS»
-NoRebootOnCompletion:$true
-SysvolPath «C:WindowsSYSVOL»
-Force:$true

There are no line breaks for the command and I have listed it as above to allow readers to identify on the parameters clearly.
|
Argument |
Description |
|
Install-ADDSDomainController |
This cmdlet will install the domain controller in active directory infrastructure. |
|
-NoGlobalCatalog |
If you do not need to create the domain controller as global catalog server, this parameter can use. By default, system will enable global catalog feature. |
|
-SiteName |
This Parameter can use to define the active directory site name. the default value is Default-First-Site-Name |
|
-DomainName |
This parameter defines the FQDN for the active directory domain. |
|
-ReplicationSourceDC |
Using this parameter can define the active directory replication source. By default, it will use any available domain controller. But if need we can be specific. |
Once execute the command it will ask for SafeModeAdministrator Password. Please use complex password to proceed. This will be used for DSRM.
- After configuration completed, restart the system and log back in as administrator to check the AD DS status.
Get-Service adws,kdc,netlogon,dns

Will confirm the status of the AD DS service.
Get-ADDomainController -Filter * | Format-Table Name, IPv4Address, Site

Will list down the domain controllers along with the IP address and Sites it belongs to.
- Migrate all five FSMO roles to the New domain controller using following command,
Move-ADDirectoryServerOperationMasterRole -Identity REBEL-DC2019 -OperationMasterRole SchemaMaster, DomainNamingMaster, PDCEmulator, RIDMaster, InfrastructureMaster
In above the REBEL-DC2019 is domain controller running with Windows Server 2019.

Once its completed, we can verify the new FSMO role holder using
Netdom query fsmo

- The new step of the process is to decommission the old windows domain controller which running with Windows Server 2012 R2. To do that execute the following command as enterprise administrator from the relevant DC.
Uninstall-ADDSDomainController -DemoteOperationMasterRole -RemoveApplicationPartition
After execute the command it will ask to define password for the local administrator account.

Once its completed it will be a member server of the rebeladmin.com domain.
- Next step is to raise the domain and forest functional level to windows server 2019. To do that can use the following commands.
To upgrade domain functional levels
Set-ADDomainMode –identity therebeladmin.com -DomainMode Windows2016Domain
To upgrade forest function levels
Set-ADForestMode -Identity therebeladmin.com -ForestMode Windows2016Forest

Note – With Windows Server 2019, there is no domain or forest functional level called windows2019. It is still 2016.
Now we have completed the migration from AD DS 2012R2 to AD DS 2019. Same steps apply when migrate from windows server 2008, Windows server 2008 R2, Windows server 2012 & Windows server 2016.
- After the migration completes, we still need to verify if its completes successfully.
Get-ADDomain | fl Name,DomainMode
This command will show the current Domain functional level of the domain after the migration.
Get-ADForest | fl Name,ForestMode
Above command will show the current forest functional level of the domain.


As another part of my series for Windows Server 2019, this blog post covers the in-place upgrade feature. The in-place upgrade allows you to upgrade your existing LTSC versions of Windows Server 2012 R2 or Windows Server 2016 servers to Windows Server 2019. Windows Server 2019 In-place Upgrade will enable businesses to update to the latest version quickly. Especially if you have servers which you might need to install some dependencies for the applications. I saw a lot of customers who not have documented their server installations and neither used infrastructure as code to deploy them. For these customers, it can be hard to upgrade to newer versions of Windows Server. With the Windows Server 2019 In-Place Upgrade feature, this should get a lot easier. Especially since Windows Server 2019 brings a lot of improvements.
Upgrade Matrix
You can in-place upgrade to Windows Server 2019 from
- Windows Server 2012 R2
- Windows Server 2016
If you run older versions of Windows Server, you might have to upgrade to Windows Server 2012 R2 or Windows Server 2016 first.
Windows Server In-place Upgrade Matrix
To find out more about the in-place upgrade on the Microsoft Docs page.
How to in-place upgrade to Windows Server 2019
To in-place upgrade to Windows Server 2019, insert the Windows Server 2019 media into the existing server, by attaching an ISO file, copying the sources, adding a USB drive or even a DVD drive and start the setup.exe.
The setup will discover the existing installation and will let you perform an in-place upgrade. The installation will run for a couple of minutes; it will take quite some time depending on the speed of your server hardware and the installed roles and features.
Microsoft MVP Didier Van Hoye did write a great blog post about Upgrade testing. In that blog post, he has a quick look at upgrading to Windows Server 2019.
You can also find an overview of what is coming new in Windows Server 2019, in my blog: Windows Server 2019 – What’s coming next.
Tags: Hyper-V, in-place uprgade, Microsoft, setup, update, Upgrade, Windows Server, Windows Server 2012 R2, Windows Server 2016, Windows Server 2019 Last modified: April 25, 2020
About the Author / Thomas Maurer

Thomas works as a Senior Cloud Advocate at Microsoft. He engages with the community and customers around the world to share his knowledge and collect feedback to improve the Azure cloud platform. Prior joining the Azure engineering team, Thomas was a Lead Architect and Microsoft MVP, to help architect, implement and promote Microsoft cloud technology.
If you want to know more about Thomas, check out his blog: www.thomasmaurer.ch and Twitter: www.twitter.com/thomasmaurer

mace
Windows Server Expert
-
check
120
Best Answers -
thumb_up
970
Helpful Votes
Sorry for the late response Supaplex, correct me if I am wrong anywhere with my plan of action below.
Yep, the plan seems absolutely correct. In my humble opinion, it is also a preferred way of doing such things since you are establishing a new virtualized infrastructure while keeping everything DC-related unchanged. Moreover, working with virtual machines while migrating is much faster and convenient due to better performance overall, shorter reboot times, the ability to make checkpoints and backups, etc.
Talking about the risks, I have P2Ved hundreds of domain controllers literally over the years and never had a single issue.
1 found this helpful
thumb_up
thumb_down