In this Python tutorial, we will discuss the modulenotfounderror: no module named ‘matplotlib’ and we shall also cover the following topics:
- modulenotfounderror: no module named matplotlib windows 10
- modulenotfounderror: no module named ‘matplotlib’ ubuntu
- modulenotfounderror no module named ‘matplotlib’ python 3
- modulenotfounderror no module named ‘matplotlib’ jupyter notebook
- modulenotfounderror no module named ‘matplotlib’ anaconda
- modulenotfounderror: no module named ‘matplotlib’ pycharm
- modulenotfounderror: no module named ‘matplotlib.pyplot’; ‘matplotlib’ is not a package
Check if you have pip installed already, simply by writing pip in the python console. If you don’t have pip, get a python script called get-pip.py from the internet and save it to your local system. pip is the python package installer.
Take note of where the file got saved and change the current directory to that directory from the command prompt.
pip  -- Press Enter

-- If you don't have a pip then

cd path_of_directory_of_get-pip_script
Run the get-pip.py script to install pip by writing the following code in cmd (command prompt) to install pip:
"python .get-pip.py"Now in cmd type the following code to install matplotlib with its dependencies:
pip install matplotlibThe error will be resolved, if not then follow through the end of this post.
Read: What is Matplotlib
modulenotfounderror: no module named ‘matplotlib’ ubuntu
If you don’t have matplotlib installed then to install Matplotlib for Python 3 through the APT package manager, you need the package python3-matplotlib:
sudo apt-get install python3-matplotlibIf you want to install it with pip for python 2.7, you need to use pip:
sudo pip install matplotlibIf the error still arises, follow through to the end of the post.
Read: How to install matplotlib
modulenotfounderror no module named ‘matplotlib’ python 3
You can install matplotlib with pip for python 3 and above, you just need to use pip3.
Open the python console and execute the command given below:
sudo pip3 install matplotlibBy executing the above code, the matplotlib for your python will be installed.
modulenotfounderror no module named ‘matplotlib’ jupyter notebook
Create a virtual environment inside your project directory. If you don’t have it, you have to install virtualenv by executing the following command in the cmd/terminal.
virtualenv environment_name   -- environment_name specifies the name of
                              -- the environment variable created
Install matplotlib inside of your virtual environment.
pip3 install matplotlibNow, install ipykernel inside your virtual environment.
pip3 install ipykernelConnect your jupyter kernel to your new environment.
sudo python3 -m ipykernel installWhen you start your jupyter notebook, you will see the option to select an environment, select the environment you have created which has matplotlib installed. Now, you are good to go with it.
Read: What is a Python Dictionary
modulenotfounderror no module named ‘matplotlib’ anaconda
If you have Python installed previously, before installing Anaconda, the reason could be that it’s running your default Python installation instead of the one installed with Anaconda. You have to try prepending this to the top of your script:
#!/usr/bin/env pythonIf that does not work, restart the terminal and try installing matplotlib with conda in conda prompt or cmd, and see if it works.
conda install matplotlibIf the problem still not resolves, maybe you have to create a virtual environment as given in the above topics.
modulenotfounderror: no module named ‘matplotlib’ pycharm
You can get this error if you are using pycharm and have matplotlib.py in your current working directory. You have to just delete or rename the matplotlib.py file to resolve the issue, most probably it will work.
modulenotfounderror: no module named ‘matplotlib.pyplot’; ‘matplotlib’ is not a package
The error is caused because of the following reasons, check them out:
- Make sure that the version of matplotlib you are installing is compaitible with your python version installed.
- If the python installed is 64 bits version with matplotlib is 32bits. Make sure they are the same.
- Make sure to add PATH variable for system and environment variables with path to the python.
- If pip version is outdated, upgrade it to the latest version.
python -m pip install- Also make sure that there is no typos in the import statement.
- If the error still exist then, try to check if there is any file matplotlib.py in your working directory. Remove that file, restart the kernel and import matplotib again. That should work.
You may also like reading the following articles.
- How to install Django
- Python Django vs Flask
- Python NumPy shape
- module ‘matplotlib’ has no attribute ‘plot’
In this Python tutorial, we have discussed the modulenotfounderror: no module named ‘matplotlib’ and we have also covered the following topics:
- modulenotfounderror: no module named matplotlib windows 10
- modulenotfounderror: no module named ‘matplotlib’ ubuntu
- modulenotfounderror no module named ‘matplotlib’ python 3
- modulenotfounderror no module named ‘matplotlib’ jupyter notebook
- modulenotfounderror no module named ‘matplotlib’ anaconda
- modulenotfounderror: no module named ‘matplotlib’ pycharm
- modulenotfounderror: no module named ‘matplotlib.pyplot’; ‘matplotlib’ is not a package

Python is one of the most popular languages in the United States of America. I have been working with Python for a long time and I have expertise in working with various libraries on Tkinter, Pandas, NumPy, Turtle, Django, Matplotlib, Tensorflow, Scipy, Scikit-Learn, etc… I have experience in working with various clients in countries like United States, Canada, United Kingdom, Australia, New Zealand, etc. Check out my profile.
A common error you may encounter when using Python is modulenotfounderror: no module named ‘matplotlib’. This error occurs when Python cannot detect the Matplotlib library in your current environment. This tutorial goes through the exact steps to troubleshoot this error for the Windows, Mac and Linux operating systems.
Table of contents
- ModuleNotFoundError: no module named ‘matplotlib’
- What is ModuleNotFoundError?
- What is Matplotlib?
- How to Install Matplotlib on Windows Operating System
- How to Install Matplotlib on Mac Operating System
- How to Install Matplotlib on Linux Operating Systems
- Installing pip for Ubuntu, Debian, and Linux Mint
- Installing pip for CentOS 8 (and newer), Fedora, and Red Hat
- Installing pip for CentOS 6 and 7, and older versions of Red Hat
- Installing pip for Arch Linux and Manjaro
- Installing pip for OpenSUSE
- Check Matplotlib Version
- Installing Matplotlib Using Anaconda
- Importing matplotlib.pyplot
- Summary
ModuleNotFoundError: no module named ‘matplotlib’
What is ModuleNotFoundError?
The ModuleNotFoundError occurs when the module you want to use is not present in your Python environment. There are several causes of the modulenotfounderror:
The module’s name is incorrect, in which case you have to check the name of the module you tried to import. Let’s try to import the re module with a double e to see what happens:
import ree---------------------------------------------------------------------------
ModuleNotFoundError Traceback (most recent call last)
1 import ree
ModuleNotFoundError: No module named 'ree'To solve this error, ensure the module name is correct. Let’s look at the revised code:
import re

print(re.__version__)2.2.1You may want to import a local module file, but the module is not in the same directory. Let’s look at an example package with a script and a local module to import. Let’s look at the following steps to perform from your terminal:
mkdir example_package

cd example_package

mkdir folder_1

cd folder_1

vi module.py
Note that we use Vim to create the module.py file in this example. You can use your preferred file editor, such as Emacs or Atom. In module.py, we will import the re module and define a simple function that prints the re version:
import re

def print_re_version():

    print(re.__version__)
Close the module.py, then complete the following commands from your terminal:
cd ../

vi script.py
Inside script.py, we will try to import the module we created.
import module

if __name__ == '__main__':

    mod.print_re_version()
Let’s run python script.py from the terminal to see what happens:
Traceback (most recent call last):
  File "script.py", line 1, in <module>
    import module
ModuleNotFoundError: No module named 'module'
To solve this error, we need to point to the correct path to module.py, which is inside folder_1. Let’s look at the revised code:
import folder_1.module as mod

if __name__ == '__main__':

    mod.print_re_version()
When we run python script.py, we will get the following result:
2.2.1Lastly, you can encounter the modulenotfounderror when you import a module that is not installed in your Python environment.
What is Matplotlib?
Matplotlib is a data visualization and graphical plotting library for Python. Matplotlib is an open-source alternative to MATLAB. Pyplot is a Matplotlib module, which provides a MATLAB-like interface. You can use pyplot to create various plots, including line, histogram, scatter, 3D, image, contour, and polar.
The simplest way to install Matplotlib is to use the package manager for Python called pip. The following installation instructions are for the major Python version 3.
How to Install Matplotlib on Windows Operating System
First, you need to download and install Python on your PC. Ensure you select the install launcher for all users and Add Python to PATH checkboxes. The latter ensures the interpreter is in the execution path. Pip is automatically on Windows for Python versions 2.7.9+ and 3.4+.
You can check your Python version with the following command:
python3 --versionYou can install pip on Windows by downloading the installation package, opening the command line and launching the installer. You can install pip via the CMD prompt by running the following command.
python get-pip.pyYou may need to run the command prompt as administrator. Check whether the installation has been successful by typing.
pip --versionTo install matplotlib with pip, run the following command from the command prompt.
pip3 install matplotlibHow to Install Matplotlib on Mac Operating System
Open a terminal by pressing command (⌘) + Space Bar to open the Spotlight search. Type in terminal and press enter. To get pip, first ensure you have installed Python3:
python3 --versionPython 3.8.8Download pip by running the following curl command:
curl https://bootstrap.pypa.io/get-pip.py -o get-pip.pyThe curl command allows you to specify a direct download link. Using the -o option sets the name of the downloaded file.
Install pip by running:
python3 get-pip.pyFrom the terminal, use pip3 to install Matplotlib:
pip3 install matplotlibHow to Install Matplotlib on Linux Operating Systems
All major Linux distributions have Python installed by default. However, you will need to install pip. You can install pip from the terminal, but the installation instructions depend on the Linux distribution you are using. You will need root privileges to install pip. Open a terminal and use the commands relevant to your Linux distribution to install pip.
Installing pip for Ubuntu, Debian, and Linux Mint
sudo apt install python-pip3Installing pip for CentOS 8 (and newer), Fedora, and Red Hat
sudo dnf install python-pip3Installing pip for CentOS 6 and 7, and older versions of Red Hat
sudo yum install epel-release

sudo yum install python-pip3
Installing pip for Arch Linux and Manjaro
sudo pacman -S python-pipInstalling pip for OpenSUSE
sudo zypper python3-pipOnce you have installed pip, you can install Matplotlib using:
pip3 install matplotlibCheck Matplotlib Version
Once you have successfully installed Matplotlib, you can use two methods to check the version of Matplotlib. First, you can use pip show from your terminal. Remember that the name of the package is Matplotlib.
pip show matplotlibName: matplotlib
Version: 3.3.4
Summary: Python plotting package
Home-page: https://matplotlib.orgSecond, within your python program, you can import Matlotlib and then reference the __version__ attribute:
import matplotlib

print(matplotlib.__version__)3.3.4Installing Matplotlib Using Anaconda
Anaconda is a distribution of Python and R for scientific computing and data science. You can install Anaconda by going to the installation instructions. Once you have installed Anaconda, you can install Matplotlib using the following command:
conda install -c conda-forge matplotlibImporting matplotlib.pyplot
You can import the Pyplot API to create plots using the following lines in your program
import matplotlib.pyplot as pltIt is common to abbreviate the pyplot import to plt.
Summary
Congratulations on reading to the end of this tutorial. The modulenotfounderror occurs if you misspell the module name, incorrectly point to the module path or do not have the module installed in your Python environment. If you do not have the module installed in your Python environment, you can use pip to install the package. However, you must ensure you have pip installed on your system. You can also install Anaconda on your system and use the conda install command to install Matplotlib.
Go to the online courses page on Python to learn more about Python for data science and machine learning.
Have fun and happy researching!
17 авг. 2022 г.
читать 1 мин
Одна распространенная ошибка, с которой вы можете столкнуться при использовании Python:
no module named ' matplotlib '
Эта ошибка возникает, когда Python не обнаруживает библиотеку matplotlib в вашей текущей среде.
В этом руководстве представлены точные шаги, которые вы можете использовать для устранения этой ошибки.
Шаг 1: pip устанавливает matplotlib
Поскольку matplotlib не устанавливается автоматически вместе с Python, вам нужно будет установить его самостоятельно. Самый простой способ сделать это — использовать pip , менеджер пакетов для Python.
Вы можете запустить следующую команду pip для установки matplotlib:
pip install matplotlib
В большинстве случаев это исправит ошибку.
Шаг 2: Установите пип
Если вы все еще получаете сообщение об ошибке, вам может потребоваться установить pip. Используйте эти шаги , чтобы сделать это.
Вы также можете использовать эти шаги для обновления pip до последней версии, чтобы убедиться, что он работает.
Затем вы можете запустить ту же команду pip, что и раньше, чтобы установить matplotlib:
pip install matplotlib
На этом этапе ошибка должна быть устранена.
Шаг 3: проверьте версии matplotlib и pip
Если вы все еще сталкиваетесь с ошибками, возможно, вы используете другую версию matplotlib и pip.
Вы можете использовать следующие команды, чтобы проверить, совпадают ли ваши версии matplotlib и pip:
which python
python --version
which pip
Если две версии не совпадают, вам нужно либо установить более старую версию matplotlib, либо обновить версию Python.
Шаг 4: Проверьте версию matplotlib
После того, как вы успешно установили matplotlib, вы можете использовать следующую команду, чтобы отобразить версию matplotlib в вашей среде:
pip show matplotlib

Name: matplotlib
Version: 3.1.3
Summary: Python plotting package
Home-page: https://matplotlib.org
Author: John D. Hunter, Michael Droettboom
Author-email: matplotlib-users@python.org
License: PSF
Location: /srv/conda/envs/notebook/lib/python3.7/site-packages
Requires: cycler, numpy, kiwisolver, python-dateutil, pyparsing
Required-by: seaborn, scikit-image
Note: you may need to restart the kernel to use updated packages.
Примечание. Самый простой способ избежать ошибок с версиями matplotlib и Python — просто установить Anaconda , набор инструментов, предустановленный вместе с Python и matplotlib и бесплатный для использования.
Дополнительные ресурсы
В следующих руководствах объясняется, как исправить другие распространенные проблемы в Python:
Как исправить: нет модуля с именем numpy
Как исправить: нет модуля с именем plotly
Как исправить: имя NameError ‘pd’ не определено
Как исправить: имя NameError ‘np’ не определено
No module named matplotlib error comes because either matplotlib is not installed or its path is not set properly. We can reinstall it to fix it. Sometimes we need to uninstall the older version if that is causing this Modulenotfounderror. In this article, We will see many ways of installing it.
As we have already mentioned that we need to install/ reinstall matplotlib. Here we will mention a few different methods. Let’s see one by one.
Method 1: Installing matplotlib using pip –
pip package manager is one the easiest way for installing any python package. You may use the below command for installing matplotlib.
pip install matplotlib
Please ignore “!” before pip if you are running at local. It is specific to the collab notebook. For your local system, It works the same as we have mentioned.
In some scenarios, Like with the python 3. x version, You may alter the command-
python3 -m pip install matplotlibNote –
1. If you have still an issue with the existing/older version of matplotlib. You may uninstall matplotlib. Here is the command for this.
pip uninstall matplotlibIt will remove the older version which is causing the issue of “no module named matplotlib”.
2. In some scenarios, We do not have pip install on the system. In that case, We need to install the pip manager first.
python -m pip install -U pip
python -m pip install -U matplotlib
This will install pip package. On top of it, It will install the matplotlib package for you.
Method 2: Matplotlib Installation using Conda Manager –
Similar to pip, We have another option as conda manager. Open the Anaconda Prompt and use the below command.
conda install matplotlibAnother way is to go with the conda-forge.
conda install -c conda-forge matplotlibConclusion –
I hope now you may easily resolve the bug no module named matplotlib. Still, if you are stuck with it. Please let us know. Your many comments below in the comment box.
Thanks
Data Science Learner Team

Join our list
Subscribe to our mailing list and get interesting stuff and updates to your email inbox.
We respect your privacy and take protecting it seriously
Thank you for signup. A Confirmation Email has been sent to your Email Address.
Something went wrong.
In today’s post i would like to provide some troubleshooting information for people installing the matplotlib library package in their computers.
ModuleNotFoundError: no module named ‘matplotlib’ pyplot
This error is thrown when Python can’t find the Matplotlib package in your development environment. Most probably you’ll be able to troubleshoot this error by downloading the library from the Python repository using the PIP utility.
Install matplotlib with pip
In order to troubleshoot this error follow this process (explained for Windows, might require minor adjustments for MAC and Linux). Note that the process is identical for most Python add on libraries / packages such as Seaborn, NumPy, Pandas and many others.
- Save your work, and close your Jupyter Notebooks/Lab, Spyder or other development environment you might be using.
- Open your Command Prompt.
- Type cmd.
- Then in the command prompt type, type the following command:
pip install matplotlib- Now, go ahead and hit Enter.
- Python will download the latest version of the matplotlib library from the Python package repository.
- Once done, open your development environment and import matplotlib.
- That’s it!
Anaconda environments
If you are have installed Anaconda, then by default, the basic Data Analysis packages, including Pandas and Matplotlib are already installed in your base environment. If for some reason you still receive an import error proceed as following.
- From the Start mane, open Anaconda Navigator.
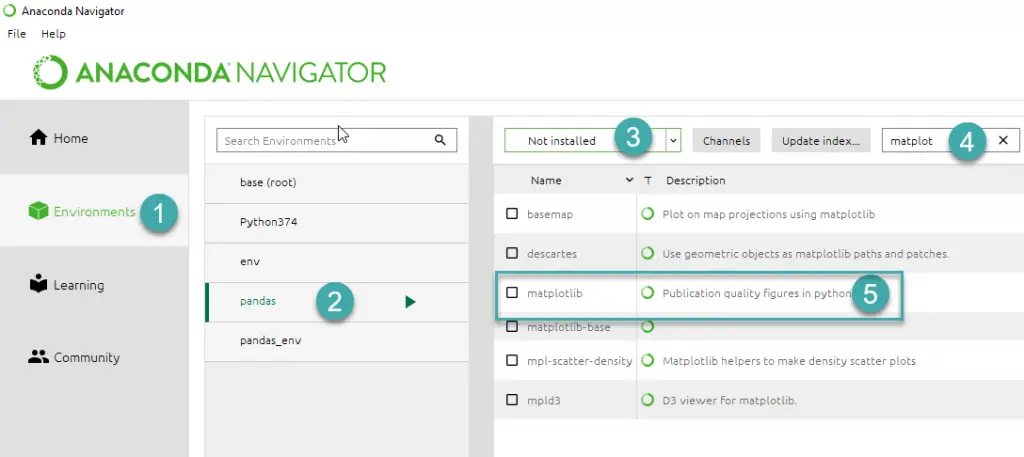
- On the left hand side, hit the Environments tab (step 1)
- Then highlight your Anaconda environment (step 2).
- Then in the dropdown box (step 3), select Not Installed.
- In the Search box, type matplotlib and hit Enter.
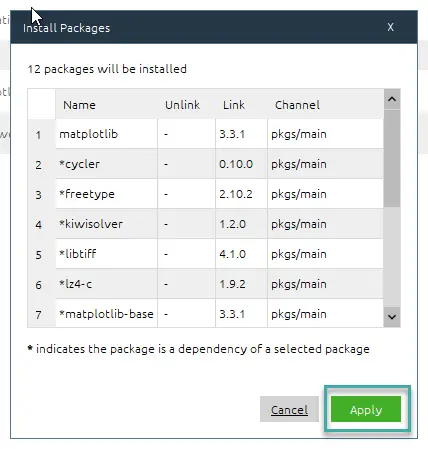
- Then check the box near the package and hit Apply.
- Then in the Install Packages dialog, click Apply again.
- Once Anaconda Navigator is done, close it and reopen your development environment and download matplotlib.
Note: for completeness, you can also update your Anaconda environment manually (this is specially useful if you use MiniConda.
- From the Windows Start Menu open the Anaconda Prompt
- Type the following command
conda activate <path_to_your_environment>
- Hit Enter.
- Now type
conda install matplotlib- Hit Enter.
- Matplotlib will be downloaded and installed.
- That’s it.
Importerror no module named matplotlib.pyplot / matplotlib.path
This error is the base class of the ModuleNotFound error, and available since Python 3.3. The troubleshooting process we just described will remedy this error as well.
Questions? Feel free to leave us a comment

The Python
«ModuleNotFoundError: No module named ‘matplotlib'»
error appears when:
- Not having the
matplotlib
module installed - Installing and using different Python versions
- Using python <= 2
- Creating a virtual environment with Python 2
- Installing
matplotlib
globally
In this article, we’ll see the possible solutions to solve this error. If you are ready, let’s get started.
Solution 1: Installing the matplotlib module
About 90% of the «ModuleNotFoundError: No module named ‘matplotlib'» error is because the
matplotlib
module is not installed. However, To solve the problem, we need to install the module.
Choose your preferred way to install matplotlib
(PIP is recommended)
Pip:
# 👇️ Python 2
pip install matplotlib
PIp 3:
# 👇️ Python 3
pip3 install matplotlib
If you get something like a permission error, Run the following command:
sudo pip3 install matplotlibAnaconda:
conda install -c conda-forge matplotlibAfter installing the module packages, execute your code again. If the error has been fixed, congratulation. If not, then move to the next solution.
Solution 2: Ensure Using Python > 2
As you know, most python libraries don’t support
Python 2
anymore. And probably you use a new version of
matplotlib
that dropped using Python 2.
At this current date, Matplotlib 2.0. x supports Python versions 2.7 through 3.10. However, we recommended using Python 3.
If Python 3 is not installed on your device, Let’s install it.
Installing Python 3 on Linux
If you are in Ubuntu
16.10
or newer, You can run these commands to install Python 3.
$ sudo apt-get update
$ sudo apt-get install python3.6
If you’re using another version of Ubuntu:
$ sudo apt-get install software-properties-common
$ sudo add-apt-repository ppa:deadsnakes/ppa
$ sudo apt-get update
$ sudo apt-get install python3.6
If you are using other Linux distributions:
sudo dnf install python3Installing Python 3 on Windows:
To install Python 3 on Windows, follow these steps.
- Go to the
Downloads for Windows section
of the
official Python website
on your browser. - Search for your desired version of Python. Python 3 release is version Python 3.10.7.
- Click a link to download the
Windows x86-64 (64bit)
or
Windows x86 (32bit)
. - Run the program and follow the steps to install it.
Installing Python 3 on Mac:
Before installing Python 3, you must install
GCC
.
GCC
by downloading
Xcode
, the smaller
Command Line Tools
. You also need to install
brew.
Here is the brew installation command:
$ /bin/bash -c "$(curl -fsSL https://raw.githubusercontent.com/Homebrew/install/master/install.sh)"Add the following line at the end of your
~/.profile
file.
export PATH="/usr/local/opt/python/libexec/bin:$PATH"Use this If you have
OS X 10.12
(Sierra) or older :
export PATH=/usr/local/bin:/usr/local/sbin:$PATHNow, let’s install Python 3:
brew install pythonAfter installing Python 3:
- Create a new virtual env using
Python 3 - Install
matplotlib
using PIP3 - Execute your code
If you don’t have virtualenv, You will find out how to install it in the next solution.
Solution 3:Instaling matplotlib In virtualenv
Another reason for
«ModuleNotFoundError: No module named ‘matplotlib'»
is you install the matplotlib package
globally
without a
Virtual Environment
. However, Let’s see how to set up a virtualenv with Python 3
Linux
Update all Linux packages:
root@Py:~# apt-get update -yInstall python3-venv:
root@py:~# apt-get install -y python3-venvInstall virtualenv using pip:
pip3 install virtualenv
Create Virtual Environment:
root@py:~# python3 -m venv py_venvpy_venv
is the name of my virtual envormment. Now let’s activate the Virtual Environment:
root@py:~# source py_venv/bin/activate
Congratulations, Our Virtual Environment is ready to install the module packages.
Windows
Install virtualenv using pip:
pip3 install virtualenvCreate the virtual environment:
cd my-project
virtualenv --python C:PathToPythonpython.exe py_env
Activate it:
.py_envScriptsactivateDone!
Mac
Install virtualenv using pip
sudo pip install virtualenvIf for any error, run the following command:
sudo -H pip install virtualenvCreate
py_env
virtual environment :
virtualenv py_envActivate virtualenv:
source py_env/bin/activate
After activating the virtual environment, run the following command (pip3) to install
matplotlib:
pip3 install matplotlibThis command works with all systems (Linux, Windows, Mac)
Solution 4: Installing and executing with the same Python version
You probably got the error because you have installed the module and executed your code with different versions of python. For example:
We use pip (
Python 2
) to install the matplotlib module and run the code with
Python 3
.
# 👇️ Python 2
pip install matplotlib
And execute our code with Python 3:
# 👇️ Execute The code with Python 3
python3 my_code.py
So, If you install with
pip
, execute using
Python 2
otherwise, if you install with
pip3
, execute
Python 3
.
Conclusion
In this article, we’ve learned about 4 solutions to solve
«ModuleNotFoundError: No module named ‘matplotlib'»
. I Hope You have solved the error. For more info about
ModuleNotFoundError
, visit
modulenotfounderror no module named in python
.
Happy Codding </>
Quick Fix: Python raises the ImportError: No module named 'matplotlib' when it cannot find the library matplotlib. The most frequent source of this error is that you haven’t installed matplotlib explicitly with pip install matplotlib. Alternatively, you may have different Python versions on your computer, and matplotlib is not installed for the particular version you’re using.
Problem Formulation
You’ve just learned about the awesome capabilities of the matplotlib library and you want to try it out, so you start your code with the following statement:
import matplotlib
This is supposed to import the Pandas library into your (virtual) environment. However, it only throws the following ImportError: No module named matplotlib:
>>> import matplotlib
Traceback (most recent call last):
  File "<pyshell#6>", line 1, in <module>
    import matplotlib
ModuleNotFoundError: No module named 'matplotlib'
Solution Idea 1: Install Library matplotlib
The most likely reason is that Python doesn’t provide matplotlib in its standard library. You need to install it first!
Before being able to import the Pandas module, you need to install it using Python’s package manager pip. Make sure pip is installed on your machine.
To fix this error, you can run the following command in your Windows shell:
$ pip install matplotlib
This simple command installs matplotlib in your virtual environment on Windows, Linux, and MacOS. It assumes that your pip version is updated. If it isn’t, use the following two commands in your terminal, command line, or shell (there’s no harm in doing it anyways):
$ python -m pip install --upgrade pip
$ pip install pandas
💡 Note: Don’t copy and paste the $ symbol. This is just to illustrate that you run it in your shell/terminal/command line.
Solution Idea 2: Fix the Path
The error might persist even after you have installed the matplotlib library. This likely happens because pip is installed but doesn’t reside in the path you can use. Although pip may be installed on your system the script is unable to locate it. Therefore, it is unable to install the library using pip in the correct path.
To fix the problem with the path in Windows follow the steps given next.
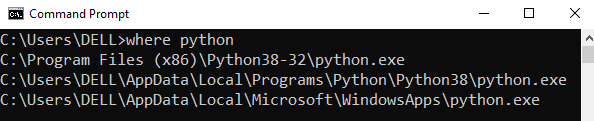
Step 1: Open the folder where you installed Python by opening the command prompt and typing where python
Step 2: Once you have opened the Python folder, browse and open the Scripts folder and copy its location. Also verify that the folder contains the pip file.
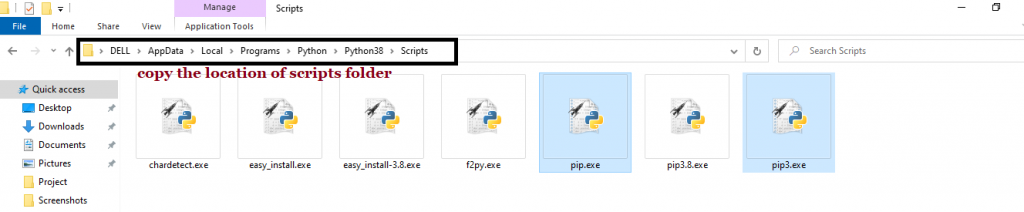
Step 3: Now open the Scripts directory in the command prompt using the cd command and the location that you copied previously.

Step 4: Now install the library using pip install matplotlib command. Here’s an analogous example:
After having followed the above steps, execute our script once again. And you should get the desired output.
Other Solution Ideas
- The
ModuleNotFoundErrormay appear due to relative imports. You can learn everything about relative imports and how to create your own module in this article. - You may have mixed up Python and pip versions on your machine. In this case, to install
matplotlibfor Python 3, you may want to trypython3 -m pip install matplotlibor evenpip3 install matplotlibinstead ofpip install matplotlib - If you face this issue server-side, you may want to try the command
pip install --user matplotlib - If you’re using Ubuntu, you may want to try this command:
sudo apt install matplotlib - You can check out our in-depth guide on installing
matplotlibhere. - You can also check out this article to learn more about possible problems that may lead to an error when importing a library.
Understanding the “import” Statement
import matplotlib
In Python, the import statement serves two main purposes:
- Search the module by its name, load it, and initialize it.
- Define a name in the local namespace within the scope of the
importstatement. This local name is then used to reference the accessed module throughout the code.
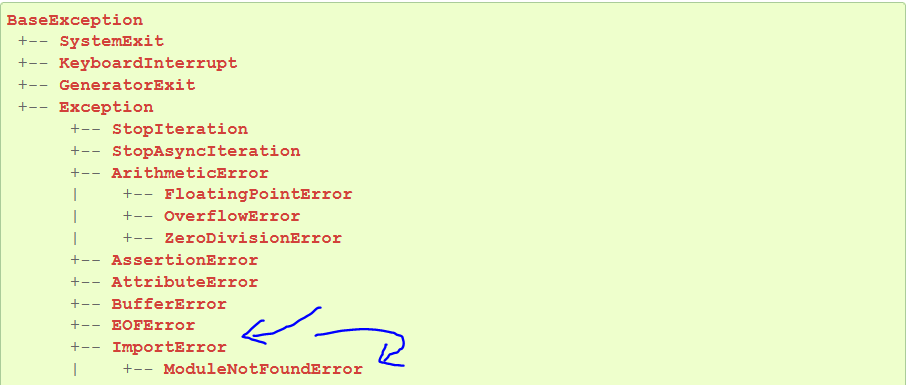
What’s the Difference Between ImportError and ModuleNotFoundError?
What’s the difference between ImportError and ModuleNotFoundError?
Python defines an error hierarchy, so some error classes inherit from other error classes. In our case, the ModuleNotFoundError is a subclass of the ImportError class.
You can see this in this screenshot from the docs:
You can also check this relationship using the issubclass() built-in function:
>>> issubclass(ModuleNotFoundError, ImportError)
True
Specifically, Python raises the ModuleNotFoundError if the module (e.g., matplotlib) cannot be found. If it can be found, there may be a problem loading the module or some specific files within the module. In those cases, Python would raise an ImportError.
If an import statement cannot import a module, it raises an ImportError. This may occur because of a faulty installation or an invalid path. In Python 3.6 or newer, this will usually raise a ModuleNotFoundError.
Related Videos
The following video shows you how to resolve the ImportError:
How to Fix : “ImportError: Cannot import name X” in Python?
The following video shows you how to import a function from another folder—doing it the wrong way often results in the ModuleNotFoundError:
How to Call a Function from Another File in Python?
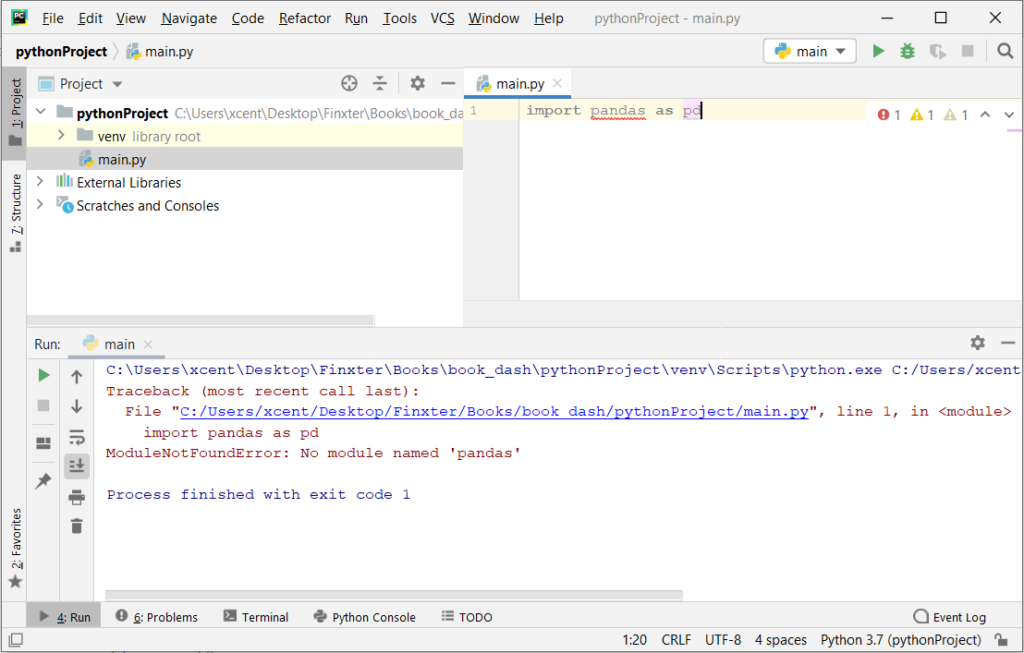
How to Fix “ModuleNotFoundError: No module named ‘matplotlib’” in PyCharm
If you create a new Python project in PyCharm and try to import the matplotlib library, it’ll raise the following error message:
Traceback (most recent call last):
  File "C:/Users/.../main.py", line 1, in <module>
    import matplotlib
ModuleNotFoundError: No module named 'matplotlib'

Process finished with exit code 1
The reason is that each PyCharm project, per default, creates a virtual environment in which you can install custom Python modules. But the virtual environment is initially empty—even if you’ve already installed matplotlib on your computer!
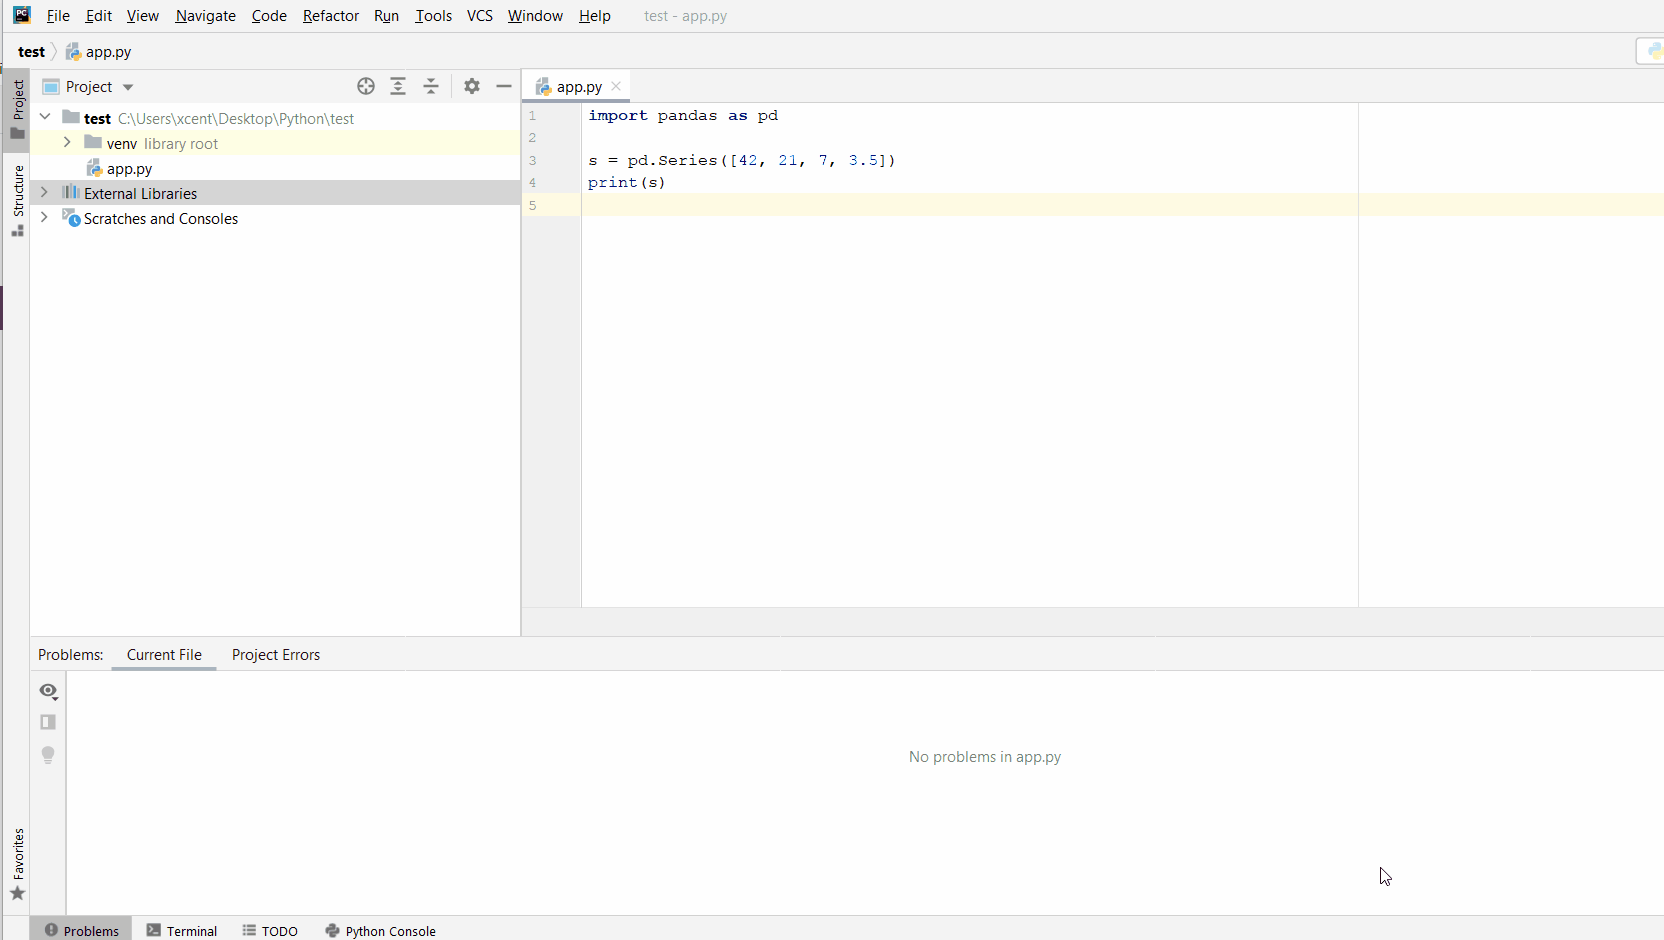
Here’s a screenshot exemplifying this for the pandas library. It’ll look similar for matplotlib.
The fix is simple: Use the PyCharm installation tooltips to install Pandas in your virtual environment—two clicks and you’re good to go!
First, right-click on the pandas text in your editor:

Second, click “Show Context Actions” in your context menu. In the new menu that arises, click “Install Pandas” and wait for PyCharm to finish the installation.
The code will run after your installation completes successfully.
As an alternative, you can also open the Terminal tool at the bottom and type:
$ pip install matplotlib
If this doesn’t work, you may want to set the Python interpreter to another version using the following tutorial: https://www.jetbrains.com/help/pycharm/2016.1/configuring-python-interpreter-for-a-project.html
You can also manually install a new library such as matplotlib in PyCharm using the following procedure:
- Open
File > Settings > Projectfrom the PyCharm menu. - Select your current project.
- Click the
Python Interpretertab within your project tab. - Click the small
+symbol to add a new library to the project. - Now type in the library to be installed, in your example Pandas, and click
Install Package. - Wait for the installation to terminate and close all popup windows.
Here’s an analogous example:
Here’s a full guide on how to install a library on PyCharm.
- How to Install a Library on PyCharm

While working as a researcher in distributed systems, Dr. Christian Mayer found his love for teaching computer science students.
To help students reach higher levels of Python success, he founded the programming education website Finxter.com. He’s author of the popular programming book Python One-Liners (NoStarch 2020), coauthor of the Coffee Break Python series of self-published books, computer science enthusiast, freelancer, and owner of one of the top 10 largest Python blogs worldwide.
His passions are writing, reading, and coding. But his greatest passion is to serve aspiring coders through Finxter and help them to boost their skills. You can join his free email academy here.
I use Eclipse + Pydev to develop my python examples. But one day when I am coding a Matplotlib example in the Eclipse PyDev project, and when I run the example, I meet the following error messages. This article will tell you how to fix it.
1. ModuleNotFoundError: No Module Named ‘matplotlib.pyplot’; ‘matplotlib’ Is Not A Package.
- Below are the detailed error messages.
Traceback (most recent call last):
File "D:Workdev2qa.com-example-codePythonExampleProjectcomdev2qaexamplecode_learner_dot_com_examplematplotlib.py", line 7, in <module>
import matplotlib.pyplot as plt
File "D:Workdev2qa.com-example-codePythonExampleProjectcomdev2qaexamplecode_learner_dot_com_examplematplotlib.py", line 7, in <module>
import matplotlib.pyplot as plt
ModuleNotFoundError: No module named 'matplotlib.pyplot'; 'matplotlib' is not a package
2.How To Fix ModuleNotFoundError: No Module Named ‘matplotlib.pyplot’; ‘matplotlib’ Is Not A Package.
- First, you should make sure the python Matplotlib module has been installed, you can refer to the article Python 3 Matplotlib Draw Point/Line Example section 1. Verify matplotlib Has Been Installed.
- Then you should confirm that you have added the Matplotlib library in your Eclipse PyDev project Python interpreter. You can refer to the article How To Add Library In Python Eclipse Project to learn more.
- But in my example, the error still exists. I finally find that the reason is that my example python file name is matplotlib.py, so when I run the example file, the imports code import matplotlib.pyplot as plt will import the pyplot class from the current example module file, but there does not have the pyplot class in the example module, so the error occurred.
- So I change the example python file name to matplotlib_example.py, then the error has been fixed.
- what a simple and silly error.