I have some automated test (using CUnit) which require a «disk-image»-file (raw copy of a disk) to be «mounted» in windows and explored. I have previously used a tool/library called «FileDisk-17» , but this doesn’t seem to work on my Windows 7 (64bit).
Update
I should point out, that changing the image-format (to say VHD) is not at option.
Any suggestions as to other (perhaps better supported) tools or libraries for mouting the file? The project is coded in ANSI C and compiled using MinGW.
Best regards!
Søren
asked Mar 17, 2011 at 9:18
![]()
S.C. MadsenS.C. Madsen
4,9625 gold badges31 silver badges49 bronze badges
1
I faced this problem recently and found ImDisk to be an extremely nice solution:
- Free, with source available and a very flexible open source license
- Trivial setup (I have seen filedisk64 (in the accepted answer) described as having a «technical» setup)
- Straightforward GUI and command-line access
- Worked on Windows 7 64-bit
- Seems to happily mount any kind of filesystem recognised by Windows (in my case, FAT16)
- Works with files containing
- Raw partitions
- Entire raw disks (i.e. including the MBR and one or more partitions; which partition to mount can be selected)
- VHD files (which it turns out are just raw partitions or disks with a 512-byte footer appended!)
- Also can create RAM drives — either initially empty or based on an existing disk image! (Very neat I must say!)
I did encounter minor issues trying to unmount drives. I was unable to unmount a drive from the GUI right-click context menu as the drive appeared to be «in use» by the explorer.exe process. Closing the Explorer window and using imdisk -d -m X: also didn’t work; however imdisk -D -m X: (-D «forces» an unmount, whatever that means) did. This worked even if the drive was visible in an open Explorer window, without appearing to create any problems. However even after the drive appeared to have fully unmounted, an imdisk -l to list all available devices would still report that DeviceImDisk0 exists, and if you remount the drive later, both that and DeviceImDisk1 will appear in the output of imdisk -l (and so on with more unmount/remount cycles). This didn’t create any problems with actually using the mounted drive when I tried a few unmount/remount cycles, though it theoretically might if you perform this many times between reboots.
ImDisk was invaluable for transferring the contents of a 1.5Gb disk drive with one FAT16 DOS partition from an ancient 486 machine.
answered Feb 25, 2013 at 1:57
![]()
j_random_hackerj_random_hacker
49.9k10 gold badges105 silver badges167 bronze badges
1
I have been experimenting with mounting a large HDD to a folder on an NVMe drive to facilitate my Lightroom workflow. I sort of like it but I’ll have to give it some time. I have my import folder, on the NVMe part and then move the RAW files to the «Long Term Storage» folder, once my initial edits are complete, which is an 8TB HDD. There is a lot more to it but that’s the short version. I think this might help me maintain my workflow and catalogs even if adding additional HDDs at some point.
I’ve found that it is easy enough in Windows 10 to switch between mounting to a folder or a drive letter, without loosing any data. You can also do both and have the same files available through a drive letter or a folder structure. To do both Just choose «Add» without first removing what you currently have.
When mounted to a folder only, the folder will display the full size of the drive in the file size column of Windows Explorer. That large number is easy to spot and let’s you know there is something different going on with that folder. I also changed the folder icon. To see the used and remaining disk space you must right-click the folder, choose ‘Properties’, and then click the ‘Properties’ button on the ‘Properties’ page. Hopefully that makes sense. Not as easy as just looking at ‘This PC’.
I’ve found is that I cannot run a Samsung Magician benchmark unless mounted as a drive letter. I also do not see the drive separated out with utilities like CCleaner or Norton AV. Running a scan on my NVMe will also scan the HDD drive, for example.
You also cannot set a paging file on the mounted folder drive unless there is also a drive letter, if that matters to you.
Charlie was probably right that in practice it may just be too much trouble and confusing. I also have to consider if anyone else in the family could make sense of the configuration if I wasn’t around to explain it.
Свежая инсайдерская сборка Windows 10 с индексом «20211» позволяет монтировать физические диски внутри WSL 2, тем самым открывая возможность получить доступ к файловым системам, не поддерживающимся Windows нативно (например, ext4). Если вы используете две системы параллельно на разных дисках, то теперь вы сможете получать доступ к файлам Linux из под Windows.
Подготовка
Для монтирования диска, необходимо открыть PowerShell с привилегиями администратора и выполнить следующую команду:
wsl —mount <Путь к диску>
Для отображения всех доступных дисков надо выполнить:
wmic diskdrive list brief
Демонтировать диск из WSL 2 можно командой
wsl —unmount <Путь к диску>
Пути к дискам можно узнать в колонке DeviceID. Обычно он представлен в виде \.\.PHYSICALDRIVE*.
Доступ к файлам через «Проводник»
Как только диск смонтирован, к нему можно получить доступ через «Проводник», перейдя по пути wsl$ и смонтировав папку.
Ограничения
По стандарту wsl —mount пытается смонтировать диск как ext4. Для того, чтобы указать другую файловую систему, необходимо использовать команду
wsl —mount <Путь к диску> -t <Тип файловой системы>
Список всех доступных файловых систем можно узнать, введя
cat /proc/filesystems
Также важно отметить, что только целые физические диски могут быть смонтированы в WSL 2. На текущий момент невозможно присоединить только один раздел. Кроме того, хотя и есть поддержка дисков USB, устройства USB Flash не могут подключаться к WSL 2.
Внимание: Это перевод статьи из блога Microsoft.
- 10 приложений, которые нужно сразу установить на новый компьютер
- 5 альтернатив «Проводника» в Windows: они лучше и по функциям, и по дизайну
- 15 тем для Windows 10, меняющих систему до неузнаваемости. Долго искал четвёртую!
- 3 программы, которые прокачают Пуск в Windows 10. Он станет удобнее и функциональнее
- Как выполнять Linux-команды внутри Windows: официальный и сторонние способы
objfs — Object Storage File System
The objfs repository and its companion repository objfs.pkg contain the implementation of objfs, the «object storage file system».
Objfs exposes objects from an object storage, such as a cloud drive, etc. as files in a file system that is fully integrated with the operating system. Programs that run on the operating system are able to access these files as if they are stored in a local «drive» (perhaps with some delay due to network operations).
- Supported operating systems: Windows, macOS, and Linux.
- Supported object storages: OneDrive
How to use
Objfs is implemented as a command-line program that accepts commands such as auth and mount, but also shell-like commands, such as ls, stat, etc.
$ ./objfs help
usage: objfs [-options] command args...

commands:
  version
    	get current version information
  config
    	get or set configuration options
  keyring
    	get or set keys
  auth
    	perform authentication/authorization
  mount
    	mount file system
  statfs
    	get storage information
  ls
    	list files
  stat
    	display file information
  mkdir
    	make directories
  rmdir
    	remove directories
  rm
    	remove files
  mv
    	move (rename) files
  get
    	get (download) files
  put
    	put (upload) files
  cache-pending
    	list pending cache files
  cache-reset
    	reset cache (upload and evict files)

options:
  -accept-tls-cert
    	accept any TLS certificate presented by the server (insecure)
  -auth name
    	auth name to use
  -config path
    	path to configuration file
  -credentials path
    	auth credentials path (keyring:service/user or /file/path)
  -datadir path
    	path to supporting data and caches
  -keyring string
    	keyring type to use: system, private (default "private")
  -storage name
    	storage name to access (default "onedrive")
  -storage-uri uri
    	storage uri to access
  -v	verbose
Default Storage
Objfs uses defaults to simplify command line invocation. In the default build of objfs, the default storage is onedrive.
Auth
Objfs supports multiple «auth» (authentication or authorization) mechanisms through the -credentials path option and the auth command.
In general before an object storage service can be used it requires auth. The specific auth mechanism used depends on the service and it ranges from no auth, to username/password, to Oauth2, etc. Auth mechanisms require credentials, which can be supplied using the -credentials path option.
In some cases the object storage service cannot readily accept the supplied credentials, they must be converted to other credentials first. As an authentication example, a particular service may require username/password credentials to be converted to some form of service-level token before they can be used. As an authorization example Oauth2 requires application-level credentials together with user consent to form a service-level token that can be used to access the service.
The auth command can be used for this purpose. It takes user-level or application-level credentials and converts them to service-level credentials.
Credentials can be stored in the local file system or the system keyring. The syntax /file/path is used to name credentials stored in the file system. The syntax keyring:service/user is used to name credentials stored in the system keyring.
Example — Oauth2 Flow
- Prepare the Oauth2
client_secretcredentials in a file or the system keyring:client_id="XXXXXXXX" client_secret="XXXXXXXX" redirect_uri="http://localhost:xxxxx" scope="files.readwrite.all offline_access" - Issue the command:
$ ./objfs -credentials=CLIENT_SECRET_PATH auth TOKEN_PATH - This will launch your browser and ask for authorization. If the access is authorized the Oauth2
access_tokenandrefresh_tokenwill be stored in the specified path. - The object storage can now be mounted using the command:
$ ./objfs -credentials=TOKEN_PATH mount MOUNTPOINT
Mount
The objfs mount command is used to mount an object storage as a file system on a mountpoint. On Windows the mount point must be a non-existing drive or directory; it is recommended that an object storage is only mounted as a drive when the object storage is case-sensitive. On macOS and Linux the mount point must be an existing directory.
To mount on Windows:
> objfs -credentials=TOKEN_PATH mount -o uid=-1,gid=-1 mount X:
To mount on macOS and Linux:
$ ./objfs -credentials=TOKEN_PATH mount MOUNTPOINT
Objfs uses a local file cache to speed up file system operations. This caches files locally when they are first opened; subsequent I/O operations will be performed against the local file and are therefore fast. Modified files will be uploaded to the object storage when they are closed. File system operations such as creating and deleting files and listing directories are sent directly to the object storage and are therefore slow (although some of their results are cached).
The Objfs cache was inspired by an early version of the Andrew File System (AFS). For more information see this paper.
Diagnostics
Objfs includes a tracing facility that can be used to troubleshoot problems, to gain insights into its internal workings, etc. This facility is enabled when the -v option is used.
The environment variable GOLIB_TRACE controls which traces are enabled. This variable accepts a comma separated list of file-style patterns containing wildcards such as * and ?.
$ export GOLIB_TRACE=pattern1,...,patternN
Examples:
$ export GOLIB_TRACE=github.com/billziss-gh/objfs/fs.*      # file system traces
$ export GOLIB_TRACE=github.com/billziss-gh/objfs/objio.*   # object storage traces
$ export GOLIB_TRACE=github.com/billziss-gh/objfs/fs.*,github.com/billziss-gh/objfs/objio.*
$ ./objfs -v -credentials=TOKEN_PATH mount MOUNTPOINT
How to build
Objfs is written in Go and uses cgofuse to interface with the operating system. It requires the relevant FUSE drivers/libraries for each operating system.
Prerequisites:
- Windows: WinFsp, gcc (e.g. from Mingw-builds)
- macOS: FUSE for macOS, command line tools
- Linux: libfuse-dev, gcc
To build the following is usually sufficient:
$ go get -d github.com/billziss-gh/objfs
$ make      # on windows you may have to update the PATH in make.cmd
This will include all supported storages. Objfs storage and auth mechanisms are maintained in the separate repository objfs.pkg. You can customize the supported storages for licensing or other reasons by modifying the Makefile Packages variable.
License
The objfs and objfs.pkg repositories are available under the AGPLv3 license.
The project has the following dependencies and their licensing:
- cgofuse — Cross-platform FUSE library for Go.
- License: MIT
- boltdb — An embedded key/value database for Go.
- License: MIT
- golib — Collection of Go libraries.
- License: MIT
- oauth2-helper — OAuth 2.0 for Native Apps
- License: MIT
- WinFsp — Windows File System Proxy — FUSE for Windows.
- License: GPLv3 w/ FLOSS exception
- FUSE for macOS — File system integration made easy.
- License: BSD-style
- libfuse — The reference implementation of the Linux FUSE (Filesystem in Userspace) interface.
- License: LGPLv2.1
How do I create a file of size 10M, format it with ext3 filesystem and then mount it in /media/fuse?
I tried with
mkfs -t ext3 file
then to mount it
mount -t ext3 file /media/fuse
It didn’t work because it said that file wasn’t a block device. Can anybody help me?
![]()
enzotib
90.3k11 gold badges162 silver badges175 bronze badges
asked Dec 7, 2011 at 19:52
![]()
6
Your procedure is correct, but when mounting a file image as a filesystem you have to add the -o loop option to the mount command:
mount -t ext3 -o loop file /media/fuse
Also, the -t ext3 option is not strictly required, because mount can automatically determine the filesystem type.
answered Feb 28, 2012 at 18:47
![]()
enzotibenzotib
90.3k11 gold badges162 silver badges175 bronze badges
4
I tried to apply the steps and comments from the previous answer.
It still took some work to figure it out, so I’ve added another answer for people after me.
The following procedure creates a local file named file and mounts it on a local directory named mounted_file.
- Create a fixed size file with e.g.
dd if=/dev/zero of=file bs=1000 count=100which creates a file of 100 times 1000 bytes (100 kB) filled with zeroes.
- Format it with the desired file system, create a directory, mount it, and get permission to use it (owner is root):
mkfs.ext3 file
mkdir mounted_file/
sudo mount -o loop file mounted_file/
sudo chmod -R 777 mounted_file/
The
-o loopparameter is optional nowadays. - To clean up afterwards:
sudo umount mounted_file/
rmdir mounted_file/
rm file
Use mkfs.ext3 -n file to see the details of the file system that will created. If desired e.g. the block size (-b block-size) and number of inodes (-N number-of-inodes) can be changed.
Note that we can also run out of inodes (total number of files and directories) instead of diskspace, which is usually not clearly communicated.
answered Jul 5, 2020 at 2:18
![]()
2
Personally, I prefer using truncate -s 10M filename (then mkfs) because truncate expands dynamically unlike fallocate or dd and can also be resized larger (or smaller) without damaging data with losetup and resize2fs. And of course it can be mounted as a filesystem.
See here for more detail: https://unix.stackexchange.com/a/698656/346155
answered Apr 12, 2022 at 4:41
![]()
alchemyalchemy
6681 gold badge7 silver badges24 bronze badges
On Windows 11, the Windows Subsystem for Linux (WSL) ships with a new feature that allows you to attach and mount physical drives to access Linux file systems (for example, ext4) not natively supported on Windows.
The new feature allows users to access Linux files using File Explorer on a dual-boot system running Windows 11 and a Linux distro on a different drive.
In this guide, you will learn the steps to mount and unmount drives using the Windows Subsystem for Linux.
- Mount Linux file system on Windows 11
- Mount any Linux file system on Windows 11
- Access Linux file system on Windows 11
- Unmount Linux file system on Windows 11
To mount a Linux file system using WSL, use these steps:
-
Open Start on Windows 11.
-
Search for PowerShell, right-click the top result, and select the Run as administrator option.
-
Type the following command to list the available physical disks and press Enter:
wmic diskdrive list brief
-
Confirm the drive path under the “Device ID” column.
-
Type the following command to mount the Linux file system and press Enter:
wsl --mount DISKPATH

In the command, make sure to replace DISKPATH for the drive path with the Linux distribution you want to mount. For example,
wsl --mount \.PHYSICALDRIVE2. If you’re going to mount a specific partition, you’ll need to use the--partitionoption with the partition number. For example,wsl --mount \.PHYSICALDRIVE2 --partition 1.

Once you complete the steps, the drive with Linux files will mount, and it’ll be visible from Windows 11.
Mount any Linux file system on Windows 11
The previous steps only attempt to mount a physical drive as ext4. If you want to specify another file system, you will need to use a different command with the Windows Subsystem for Linux 2 (WSL2).
To mount a specific Linux file system on Windows 11, use these steps:
-
Open Start.
-
Search for PowerShell, right-click the top result, and select the Run as administrator option.
-
Type the following command to list the available physical disks on Windows 11 and press Enter:
wmic diskdrive list brief
-
Confirm the drive path under the “Device ID” column.
-
Type the following command to mount a drive and press Enter:
wsl --mount DISKPATH -t FILESYSTEM
In the command, make sure to replace DISKPATH and FILESYSTEM for the path of the Linux drive and file system you want to mount. For example, to mount a disk as
fat, use this command:wsl --mount DISKPATH -t vfat.
After you complete the steps, the drive with Linux files will mount, and it will be accessible using File Explorer.
Access Linux file system on Windows 11
To access files from a Linux file system on Windows 11, use these steps:
-
Open File Explorer.
-
Click the Linux item from the left navigation pane.
-
In the address bar, navigate to
wsl$and then access the mount folder. For example,\wsl$\DISTRO-NAME\MOUNT-POINT.

Once you complete the steps, you should be able to browse the Linux files from a natively unsupported file system on Windows 11. In addition to using File Explorer, you can access file systems like “ext4” from the WSL2 console using command lines once the drive is mounted.
Unmount Linux file system on Windows 11
To unmount the Linux file system on Windows 11, use these steps
-
Open Start.
-
Search for PowerShell, right-click the top result, and select the Run as administrator option.
-
Type the following command to unmount and detach the drive and press Enter:
wsl --unmount DISKPATH

In the command, make sure to replace DISKPATH for the Device ID of the drive you want to unmount.

After you complete the steps, the drive with the Linux file system will unmount and detach from Windows 11.
We may earn commission for purchases using our links to help keep offering the free content. Privacy policy info.
All content on this site is provided with no warranties, express or implied. Use any information at your own risk. Always backup of your device and files before making any changes. Privacy policy info.
A Guide on How to Mount Amazon S3 as a Drive for Cloud File Sharing
Amazon S3 (Simple Storage Services) is a scalable cloud storage service from Amazon Web Services (AWS) used by many customers in the world. The basic unit of data storage in Amazon S3 is a bucket. You can create multiple buckets in Amazon S3 cloud storage and configure permissions for users who need to access the buckets. By default, users can access data stored in Amazon S3 buckets by using the AWS web interface.
However, a user may need to access a bucket in Amazon S3 cloud by using the interface of an operating system such as Linux or Windows. Access to Amazon S3 cloud storage from the command line of an operating system is useful for working in operating systems that don’t have a graphical user interface (GUI), in particular virtual machines running in the public cloud. It is also useful for automating tasks such as copying files or making cloud data backups. This blog post explains how to mount Amazon S3 cloud storage to a local directory on a Linux, Windows, and macOS machine to allow using Amazon S3 for file sharing without a web browser.
Data Protection with NAKIVO Backup & Replication
Designed for businesses of all sizes, NAKIVO Backup & Replication offers complete data protection for all of your production workloads, including VMware vSphere Backup, Hyper-V Backup, Microsoft 365 Backup and more. Get the Free Trial now!
Mounting Amazon S3 Cloud Storage in Linux
AWS provides an API to work with Amazon S3 buckets using third-party applications. You can even write your own application that can interact with S3 buckets by using the Amazon API. You can create an application that uses the same path for uploading files to Amazon S3 cloud storage and provide the same path on each computer by mounting the S3 bucket to the same directory with S3FS. In this tutorial we use S3FS to mount an Amazon S3 bucket as a disk drive to a Linux directory.
S3FS, a special solution based on FUSE (file system in user space), was developed to mount S3 buckets to directories of Linux operating systems similarly to the way you mount CIFS or NFS share as a network drive. S3FS is a free and open source solution. After mounting Amazon S3 cloud storage with S3FS to your Linux machine, you can use cp, mv, rm, and other commands in the Linux console to operate with files as you do when working with mounted local or network drives. S3FS is written on Python and you can familiarize yourself with the source code on GitHub.
Let’s find out how to mount an Amazon S3 bucket to a Linux directory with Ubuntu 18.04 LTS as an example. A fresh installation of Ubuntu is used in this walkthrough.
Update the repository tree:
sudo apt-get update
If any existing FUSE is installed on your Linux system, remove that FUSE before configuring the environment and installing fuse-f3fs to avoid conflicts. As we’re using a fresh installation of Ubuntu, we don’t run the sudo apt-get remove fuse command to remove FUSE.
Install s3fs from online software repositories:
sudo apt-get install s3fs
You need to generate the access key ID and secret access key in the AWS web interface for your account (IAM user). The IAM user must have S3 full access. You can use this link:
https://console.aws.amazon.com/iam/home?#/security_credentials
Note: It is recommended to mount Amazon S3 buckets as a regular user with restricted permissions and use users with administrative permissions only for generating keys.
These keys are needed for AWS API access. You must have administrative permissions to generate the AWS access key ID and AWS secret access key. If you don’t have enough permissions, ask your system administrator to generate the AWS keys for you. The administrator can generate the AWS keys for a user account in the Users section of the AWS console in the Security credentials tab by clicking the Create access key button.

In the Create access key popup window click Download .csv file or click Show under the Secret access key row name. This is the only case when you can see the secret access key in the AWS web interface. Store the AWS access key ID and secret access key in a safe place.

You can open the downloaded CSV file that contains access keys in Microsoft Office 365 Excel, for example.

Go back to the Ubuntu console to create a configuration file for storing the AWS access key and secret access key needed to mount an S3 bucket with S3FS. The command to do this is:
echo ACCESS_KEY:SECRET_ACCESS_KEY > PATH_TO_FILE
Change ACCESS_KEY to your AWS access key and SECRET_ACCESS_KEY to your secret access key.
In this example, we will store the configuration file with the AWS keys in the home directory of our user. Make sure that you store the file with the keys in a safe place that is not accessible by unauthorized persons.
echo AKIA4SK3HPQ9FLWO8AMB:esrhLH4m1Da+3fJoU5xet1/ivsZ+Pay73BcSnzP > ~/.passwd-s3fs
Check whether the keys were written to the file:
cat ~/.passwd-s3fs
Set correct permissions for the passwd-s3fs file where the access keys are stored:
chmod 600 ~/.passwd-s3fs
Create the directory (mount point) that will be used as a mount point for your S3 bucket. In this example, we create the Amazon cloud drive S3 directory in the home user’s directory.
mkdir ~/s3-bucket
You can also use an existing empty directory.
The name of the bucket used in this walkthrough is blog-bucket01. The text1.txt file is uploaded to our blog-bucket01 in Amazon S3 before mounting the bucket to a Linux directory. It is not recommended to use a dot (.) in bucket names.

Let’s mount the bucket. Use the following command to set the bucket name, the path to the directory used as the mount point and the file that contains the AWS access key and secret access key.
s3fs bucket-name /path/to/mountpoint -o passwd_file=/path/passwd-s3fs
In our case, the command we use to mount our bucket is:
s3fs blog-bucket01 ~/s3-bucket -o passwd_file=~/.passwd-s3fs
The bucket is mounted. We can run the commands to check whether our bucket (blog-bucket-01) has been mounted to the s3-bucket directory:
mount | grep bucket
df -h | grep bucket
Let’s check the contents of the directory to which the bucket has been mounted:
ls -al ~/s3-bucket
As you can see on the screenshot below, the test1.txt file uploaded via the web interface before is present and displayed in the console output.

Now you can try to create a new file on your hard disk drive and copy that file to the S3 bucket in your Linux console.
echo test2 > test2.txt
cp test2.txt ~/s3-bucket/
Update the AWS web page where your files in the bucket are displayed. You should see the new test2.txt file copied to the S3 bucket in the Linux console by using the directory to which the bucket is mounted.

How to mount an S3 bucket on Linux boot automatically
If you want to configure automatic mount of an S3 bucket with S3FS on your Linux machine, you have to create the passwd-s3fs file in /etc/passwd-s3fs, which is the standard location. After creating this file, you don’t need to use the -o passwd_file key to set the location of the file with your AWS keys manually.
Create the /etc/passwd-s3fs file:
vim /etc/passwd-s3fs
Note: If vim the text editor has not been installed yet in your Linux, run the apt-get install vim command.
Enter your AWS access key and secret access key as explained above.
AKIA4SK3HPQ9FLWO8AMB:esrhLH4m1Da+3fJoU5xet1/ivsZ+Pay73BcSnzcP
As an alternative you can store the keys in the /etc/passwd-s3fs file with the command:
echo AKIA4SK3HPQ9FLWO8AMB:esrhLH4m1Da+3fJoU5xet1/ivsZ+Pay73BcSnzcP > /etc/passwd-s3fs
Set the required permissions for the /etc/passwd-s3fs file:
chmod 640 /etc/passwd-s3fs
Edit the FUSE configuration file:
/etc/fuse.conf
Uncomment the user_allow_other string if you want to allow using Amazon S3 for file sharing by other users (non-root users) on your Linux machine.

Open /etc/fstab with a text editor:
vim /etc/fstab
Add the line in the end of the file:
s3fs#blog-bucket01 /home/user1/s3-bucket/ fuse _netdev,allow_other,url=https://s3.amazonaws.com 0 0
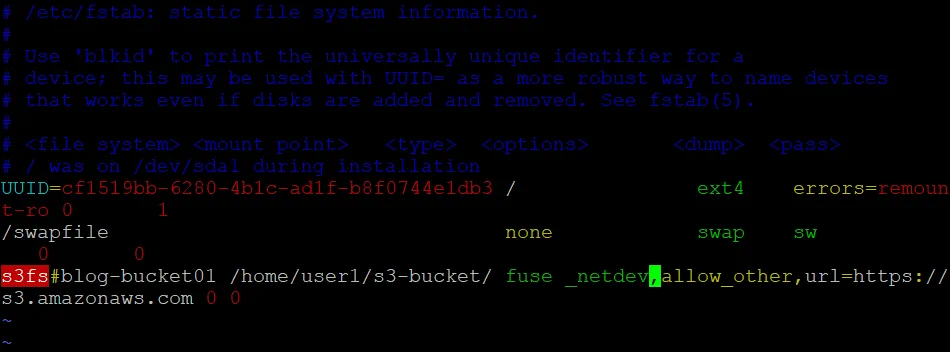
Save the edited /etc/fstab file and quit the text editor.
Note: If you want to set the owner and group, you can use the -o uid=1001 -o gid=1001 -o mp_umask=002 parameters (change the digital values of the user id, group id and umask according to your configuration). If you want to enable cache, use the -ouse_cache=/tmp parameter (set a custom directory instead of /tmp/ if needed). You can set the number of times to retry mounting a bucket if the bucket was not mounted initially by using the retries parameter. For example, retries=5 sets five tries.
Reboot the Ubuntu machine to check whether the S3 bucket is mounted automatically on system boot:
init 6
Wait until your Linux machine is booted.
You can run commands to check whether the AWS S3 bucket was mounted automatically to the s3-bucket directory son Ubuntu boot.
mount | grep bucket
df -h | grep bucket
ls -al /home/user1/s3-bucket/
In our case, the Amazon cloud drive S3 has been mounted automatically to the specified Linux directory on Ubuntu boot (see the screenshot below). The configuration was applied successfully.

S3FS also supports working with rsync and file caching to reduce traffic.
Mounting S3 as a File System in macOS
You can mount Amazon S3 cloud storage to macOS as you would mount an S3 bucket in Linux. You should install S3FS on macOS and set permissions and Amazon keys. In this example, macOS 10.15 Catalina is used. The name of the S3 bucket is blog-bucket01, the macOS user name is user1, and the directory used as a mount point for the bucket is /Volumes/s3-bucket/. Let’s look at configuration step by step.
Install homebrew, which is a package manager for macOS used to install applications from online software repositories:
/bin/bash -c «$(curl -fsSL https://raw.githubusercontent.com/Homebrew/install/master/install.sh)»
Install osxfuse:
brew cask install osxfuse
Reboot the system:
sudo shutdown -r now
Install S3FS:
brew install s3fs
Once S3FS is installed, set the access key and secret access key for your Amazon S3 bucket. You can define keys for the current session if you need to mount the bucket for one time or you are going to mount the bucket infrequently:
export AWSACCESSKEYID=AKIA4SK3HPQ9FLWO8AMB
export AWSSECRETACCESSKEY=esrhLH4m1Da+3fJoU5xet1/ivsZ+Pay73BcSnzP
If you are going to use a mounted bucket regularly, set your AWS keys in the configuration file used by S3FS for your macOS user account:
echo AKIA4SK3HPQ9FLWO8AMB:esrhLH4m1Da+3fJoU5xet1/ivsZ+Pay73BcSnzP > ~/.passwd-s3fs
If you have multiple buckets and keys to access the buckets, define them in the format:
echo bucket-name:access-key:secret-key > ~/.passwd-s3fs
Set the correct permissions to allow read and write access only for the owner:
chmod 600 ~/.passwd-s3fs
Create a directory to be used as a mount point for the Amazon S3 bucket:
sudo mkdir -p /Volumes/s3-bucket/
Your user account must be set as the owner for the created directory:
sudo chown user1 /Volumes/s3-bucket/

Mount the bucket with S3FS:
s3fs blog-bucket01 /Volumes/s3-bucket/
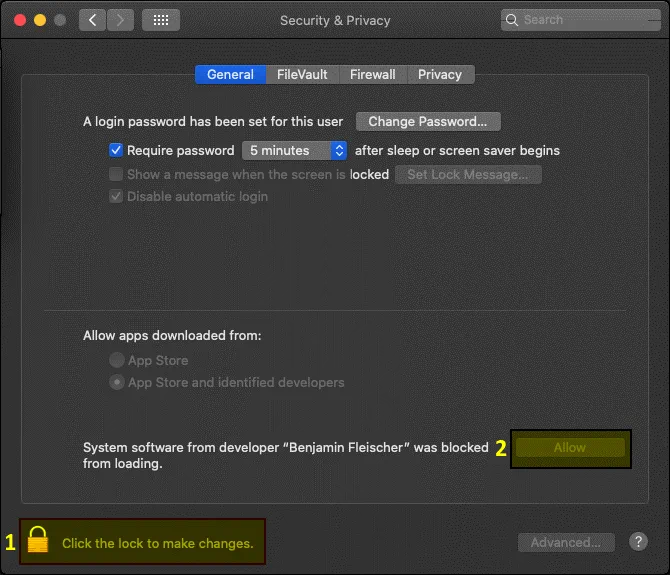
The macOS security warning is displayed in the dialog window. Click Open System Preferences to allow the S3FS application and related connections.

In the Security & Privacy window click the lock to make changes and then hit the Allow button.
Run the mounting command once again:
s3fs blog-bucket01 /Volumes/s3-bucket/
A popup warning message is displayed: Terminal would like to access files on a network volume. Click OK to allow access.
Check whether the bucket has been mounted:
mount | grep bucket
Check the contents of the bucket:
ls -al /Volumes/s3-bucket/
The bucket is mounted successfully. You can view, copy and delete files in the bucket.

You can try to configure mounting an S3 bucket on user login with launchd.
Mounting Amazon S3 Cloud Storage in Windows
You can try wins3fs, which is a solution equivalent to S3FS for mounting Amazon S3 cloud storage as a network disk in Windows. However, in this section we are going to use rclone. Rclone is a command line tool that can be used to mount and synchronize cloud storage such as Amazon S3 buckets, Google Cloud Storage, Google Drive, Microsoft OneDrive, DropBox, and so on.
Rclone is a free opensource tool that can be downloaded from the official website and from GitHub. You can download rclone by using one of these links:
https://rclone.org/downloads/
https://github.com/rclone/rclone/releases/tag/v1.51.0
Let’s use the direct link from the official website:
https://downloads.rclone.org/v1.51.0/rclone-v1.51.0-windows-amd64.zip
The following actions are performed in the command line interface and may be useful for users who use Windows without a GUI on servers or VMs.
Open Windows PowerShell as Administrator.
Create the directory to download and store rclone files:
mkdir c:rclone
Go to the created directory:
cd c:rclone
Download rclone by using the direct link mentioned above:
Invoke-WebRequest -Uri «https://downloads.rclone.org/v1.51.0/rclone-v1.51.0-windows-amd64.zip» -OutFile «c:rclonerclone.zip»
Extract files from the downloaded archive:
Expand-Archive -path ‘c:rclonerclone.zip’ -destinationpath ‘.’
Check the contents of the directory:
dir

The files are extracted to C:rclonerclone-v1.51.0-windows-amd64 in this case.
Note: In this example, the name of the rclone directory after extracting files is rclone-v1.51.0-windows-amd64. However, it is not recommended to use dots (.) in directory names. You can rename the directory to rclone-v1-51-win64, for example.
Let’s copy the extracted files to C:rclone to avoid dots in the directory name:
cp C:rclonerclone-v1.51.0-windows-amd64*.* C:rclone

Run rclone in the configuring mode:
.rclone.exe config

The configurator is working as a wizard in the command line mode. You have to select the needed parameters at each step of the wizard.
Type n and press Enter to select the New remote option.
n/s/q> n
Enter the name of your S3 bucket:
name> blog-bucket01
After entering the name, select the type of cloud storage to configure. Type 4 to select Amazon S3 cloud storage.
Storage> 4
Choose your S3 provider. Type 1 to select Amazon Web Services S3.
provider> 1

Get AWS credentials from runtime (true or false). 1 (false) is used by default. Press Enter without typing anything to use the default value.
env_auth> 1
Enter your AWS access key:
access_key_id> AKIA4SK3HPQ9FLWO8AMB
Enter your secret access key:
secret_access_key> esrhLH4m1Da+3fJoU5xet1/ivsZ+Pay73BcSnzcP
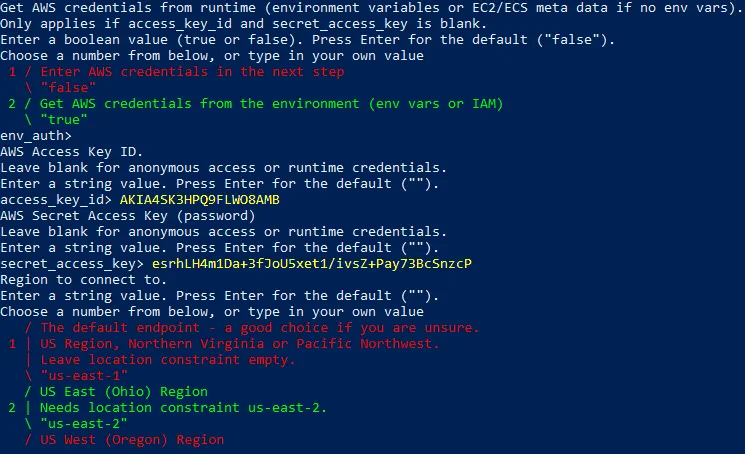
Region to connect to. EU (Ireland) eu-west-1 is used for our bucket in this example and we should type 6.
region> 6

Endpoint for S3 API. Leave blank if using AWS to use the default endpoint for the region. Press Enter.
Endpoint>
Location constraint must be set to match the Region. Type 6 to select the EU (Ireland) Region «eu-west-1».
location_constraint> 6
Canned ACL used when creating buckets and storing or copying objects. Press Enter to use the default parameters.
acl>
Specify the server-side encryption algorithm used when storing this object in S3. In our case encryption is disabled, and we have to type 1 (None). Read more about S3 encryption in How to Secure S3 Objects with Amazon S3 Encryption.
server_side_encryption> 1

If using KMS ID, you must provide the ARN of Key. As encryption is not used, type 1 (None).
sse_kms_key_id> 1
Select the storage class to use when storing new objects in S3. Enter a string value. The standard storage class option (2) is suitable in our case.
storage_class> 2

Edit advanced config? (y/n)
y/n> n
Check your configuration and type y (yes) if everything is correct.
t/e/d> y

Type q to quit the configuration wizard.
e/n/d/r/c/s/q> q
Rclone is now configured to work with Amazon S3 cloud storage. Make sure you have the correct date and time settings on your Windows machine. Otherwise an error can occur when mounting an S3 bucket as a network drive to your Windows machine: Time may be set wrong. The difference between the request time and the current time is too large.
Run rclone in the directory where rclone.exe is located and list buckets available for your AWS account:
.rclone.exe lsd blog-bucket01:

You can enter c:rclone to the Path environment variable. It allows you to run rclone from any directory without switching to the directory where rclone.exe is stored.
As you can see on the screenshot above, access to Amazon S3 cloud storage is configured correctly and a list of buckets is displayed (including the blog-bucket01 that is used in this tutorial).
Install Chocolately, which is a Windows package manager that can be used to install applications from online repositories:
Set-ExecutionPolicy Bypass -Scope Process -Force; `
iex ((New-Object System.Net.WebClient).DownloadString(‘https://chocolatey.org/install.ps1’))
WinFSP (Windows File System Proxy) is the Windows analog of the Linux FUSE and it is fast, stable and allows you to create user mode file systems.
Install WinFSP from Chocolatey repositories:
choco install winfsp -y

Now you can mount your Amazon S3 bucket to your Windows system as a network drive. Let’s mount the blog-bucket01 as S:
.rclone mount blog-bucket01:blog-bucket01/ S: —vfs-cache-mode full
Where the first “blog-bucket” is the bucket name entered in the first step of the rclone configuration wizard and the second “blog-bucket” that is defined after “:” is the Amazon S3 bucket name set in the AWS web interface.

List all connected disks and partitions:
gdr -PSProvider ‘FileSystem’
Check the content of the mapped network drive:
ls S:
The S3 bucket is now mounted as a network drive (S:). You can see three txt files stored in the blog-bucket01 in Amazon S3 cloud storage by using another instance of Windows PowerShell or Windows command line.

If your Windows has a graphical user interface, you can use that interface to download and upload files to your Amazon S3 cloud storage. If you copy a file by using a Windows interface (a graphical user interface or command line interface), data will be synchronized in a moment and you will see a new file in both the Windows interface and AWS web interface.

If you press Ctrl+C or close the CMD or PowerShell window where rclone is running (“The service clone has been started” is displayed in that CMD or PowerShell instance), your Amazon S3 bucket will be disconnected from the mount point (S: in this case).
How to automate mounting an S3 bucket on Windows boot
It is convenient when the bucket is mounted as a network drive automatically on Windows boot. Let’s find out how to configure automatic mounting of the S3 bucket in Windows.
Create the rclone-S3.cmd file in the C:rclone directory.
Add the string to the rclone-S3.cmd file:
C:rclonerclone.exe mount blog-bucket01:blog-bucket01/ S: —vfs-cache-mode full
Save the CMD file. You can run this CMD file instead of typing the command to mount the S3 bucket manually.
Copy the rclone-S3.cmd file to the startup folder for all users:
C:ProgramDataMicrosoftWindowsStart MenuProgramsStartUp
As an alternative, you can create a shortcut to C:WindowsSystem32cmd.exe and set arguments needed to mount an S3 bucket in the target properties:
C:WindowsSystem32cmd.exe /k cd c:rclone & rclone mount blog-bucket01:blog-bucket01/ S: —vfs-cache-mode full

Then add the edited shortcut to the Windows startup folder:
C:ProgramDataMicrosoftWindowsStart MenuProgramsStartUp
There is a small disadvantage – a command line window with the “The service rclone has been started” message is displayed after attaching an S3 bucket to your Windows machine as a network drive. You can try to configure automatic mounting of the S3 bucket by using Windows scheduler or NSSM, which is a free tool to create and configure Windows services and their automatic startup.
Conclusion
When you know how to mount Amazon S3 cloud storage as a file system to the most popular operating systems, sharing files with Amazon S3 becomes more convenient. An Amazon S3 bucket can be mounted by using S3FS in Linux, macOS and by using rclone or wins3fs in Windows. Automating the process of copying data to Amazon S3 buckets after mounting the buckets to local directories of your operating system is more convenient compared to using the web interface. You can copy your data to Amazon S3 for making a backup by using the interface of your operating system. You can try to use special backup applications that use AWS APIs to access S3 buckets.
Use NAKIVO Backup & Replication to back up your data including VMware VMs and EC2 instances to Amazon S3. Read also the blog post about backup to AWS.

A computer’s file system is a method of storing and organizing computer data, which makes it easy to access and find. A file system uses the abstract logical concept of files and tree directories instead of using the concept of data blocks for physical devices such as hard disks and CD-ROMs, so that users using a file system to save data do not have to care about how much data is actually saved on the hard disk (or CD-ROM) at the address of the data block, but only need to You only need to remember the directory and file name of the file. Before writing new data, the user does not have to care about which block address on the hard disk is not used, the storage space management (allocation and release) function on the hard disk is done automatically by the file system, the user only needs to remember which file the data is written to.
Strictly speaking, a file system is a set of abstract data type that implements operations such as storage, hierarchical organization, access and retrieval of data.

Linux file system
The basic components of Linux I/O: everything is a file
Things in Linux like documents, directories (called folders under Mac OS X and Windows), keyboards, monitors, hard disks, removable media devices, printers, modems, virtual terminals, and input/output resources like inter-process communication (IPC) and network communication are all streams of bytes defined in file system space. The most significant benefit of everything being considered a file is that for the input/output resources listed above, only the same set of Linux tools, utilities and APIs are required. you can use the same set of api’s (read, write) and tools (cat , redirect, pipe) for most resources in unix.
Everything is a file means that for all file (directories, character devices, block devices, sockets, printers, etc.) operations, reading and writing can be handled with functions like fopen()/fclose()/fwrite()/fread(). The hardware distinction is masked, and all devices are abstracted into files, providing a unified interface to the user. Although the types are different, the same set of interface is provided for them. Further, operations on files can also be performed across file systems.

The disadvantage of everything being a file is that to use any hardware device you have to perform a mount operation with a directory in the root directory, otherwise you can’t use it. We know that Linux itself has a file directory structure with the root directory as the root of the tree, and so does each device, which is independent of each other. If we want to find the directory structure of the device files through the root directory on Linux, we have to merge these two file system directories into one, and that is what mounting really means.
File System
VFS, a software layer in the Linux kernel, is used to provide a file system interface to user-space programs; it also provides an abstraction in the kernel that allows different file systems to coexist. All file systems in the system not only rely on VFS to coexist, but also to work together. In addition to the standard Linux file systems Ext2/Ext3/Ext4, Windows’ vfat NTFS, etc., there are many other file systems such as reiserfs, xfs, and the network file system nfs. Linux provides support for these file systems through VFS, an intermediate layer.
VFS, upwards, provides a standard file manipulation interface to the application layer. Downward, it provides a standard interface to file systems so that file systems from other operating systems can be easily ported to Linux.

VFS provides as large a generic model of the underlying file system as possible, making this model contain an ensemble of all file system functions. Thus VFS encapsulates all the functionality and abstractions of the underlying file system, and VFS is responsible for forwarding requests from the application layer to a specific file system.
Most current Linux filesystems use the ext4 filesystem by default, just as previous Linux distributions used ext3, ext2, and the older ext by default.
Disks
Disk refers to the system’s storage device, commonly mechanical hard drives, solid state drives, etc. If it is found that the data the application wants to read is not in the page cache, it is time to actually initiate an I/O request to the disk. The process of disk I/O goes through the generic block layer of the kernel, the I/O scheduling layer, the device driver layer, and finally to the specific hardware device for processing.

- Generic block layer. Receives disk requests from the upper layer and eventually issues I/O requests. It is similar to the role of VPS.
- I/O Scheduling Layer. Merges and sequences requests according to the set scheduling algorithm. Disk requests that cannot be received are immediately handed off to the driver layer for processing.
- Block device driver layer. Depending on the specific physical device, the corresponding driver is selected to complete the final I/O request by manipulating the hardware device.
A Brief History of EXT
MINIX File System
Before ext was available, the MINIX file system was used. If you are not familiar with the history of Linux, it is understood that MINIX was a very small Unix-like system for IBM PC/AT microcomputers. Andrew Tannenbaum developed it for educational purposes and released the source code (in print format!) in 1987. .
Although you can read the source code of MINIX in detail, it is not actually free and open source software (FOSS). The publisher of Tannebaum’s book required you to pay a $69 license fee to run MINIX, which was included in the cost of the book. Nevertheless, it was very inexpensive for the time, and the use of MINIX grew rapidly, quickly outstripping Tannebaum’s original intent to use it to teach operating system coding. Throughout the 1990s, you could find MINIX installations in universities all over the world. At this time, a young Linus Torvalds used MINIX to develop the original Linux kernel, which was first announced in 1991 and then released under the GPL open source agreement in December 1992.
MINIX had its own filesystem, which early versions of Linux relied on. Like MINIX, the Linux file system was as small as a toy; the MINIX file system could handle file names of up to 14 characters and only 64 MB of storage space. By 1991, the average hard drive size had reached 40-140 MB, and it was clear that Linux needed a better file system.
ext
While Linus was developing the fledgling Linux kernel, Rémy Card worked on the first generation of the ext file system. ext was first implemented and released in 1992, and ext used the new Virtual File System (VFS) abstraction layer in the Linux kernel. Unlike the previous MINIX file system, ext could handle up to 2 GB of storage and handle 255 character file names, solving the worst problems of the MINIX file system. But ext did not dominate for long, mainly due to its primitive timestamps (only one timestamp per file, rather than the familiar timestamp with inode, most recent file access time, and latest file modification time we are familiar with today.) Just a year later, ext2 replaced it.
ext2
Rémy soon realized the limitations of ext, so a year later he designed ext2 to replace it. While ext was still rooted in a “toy” operating system, ext2 was designed from the start as a commercial-grade filesystem, following the design principles of BSD’s Berkeley filesystem. ext2 offered a maximum file size at the GB level and a filesystem size at the TB level, putting it firmly in the big league of filesystems in the 1990s. ext2 was firmly entrenched in the file system league in the 1990s. It was soon widely used, both in the Linux kernel and eventually in MINIX, and third-party modules were used to make it available for MacOS and Windows.
But there were still some problems to be solved here: the ext2 file system, like most file systems of the 1990s, was prone to catastrophic data corruption if the system crashed or lost power while writing data to disk. Over time, they also suffered severe performance losses due to fragmentation (a single file stored in multiple locations, physically its scattered across a spinning disk). Despite these problems, today ext2 is used in some special cases. Most commonly, as a file system format for portable USB drives
ext3
In 1998, six years after ext2 was adopted, Stephen Tweedie announced that he was working on improving ext2. This became ext3, and was adopted into the Linux kernel mainline in November 2001 in kernel version 2.4.15.
For the most part, ext2 worked well in Linux distributions, but like FAT, FAT32, HFS and other file systems of the time, it was prone to catastrophic damage in the event of a power failure. If a power failure occurs while writing data to a filesystem, it can be left in what is called an “inconsistent” state — where things are only half done and the other half is not. This can result in the loss or corruption of a large number of files that are unrelated to the file being saved or even cause the entire file system to be unmountable.
ext3 and other file systems from the late 1990s, such as Microsoft’s NTFS, use logs to solve this problem. A log is a special allocated area on disk whose writes are stored in a transaction; if that transaction completes a disk write, the data in the log is committed to the file system itself. If the system crashes before that operation is committed, the restarted system recognizes it as an incomplete transaction and rolls it back as if it had never happened. This means that the files being processed may still be lost, but the file system itself remains consistent and all other data is safe.
Three levels of logging are implemented in Linux kernels using the ext3 file system: journal, ordered, and writeback.
- journal: the lowest risk mode, writes data and metadata to the journal before committing it to the file system. This ensures that the file being written is consistent with the entire file system, but it significantly reduces performance.
- Sequential : The default mode for most Linux distributions; sequential mode writes metadata to the log and commits the data directly to the file system. As the name implies, the order of operations here is fixed: first, metadata is committed to the log; second, data is written to the file system before the metadata associated with the log is updated to the file system. This ensures that metadata associated with incomplete writes remains in the log in the event of a crash, and that the file system can clean up those incomplete write transactions when the log is rolled back. In sequential mode, a system crash may cause errors in files to be actively written during the crash, but the file system itself – and the files that were not actively written – are guaranteed to be safe.
- Write-back: The third mode – and the least secure – logging mode. In write-back mode, like sequential mode, metadata is recorded to the log, but data is not. Unlike sequential mode, both metadata and data can be written in any order that is conducive to getting the best performance. This can significantly improve performance, but is much less secure. While write-back mode still guarantees the security of the file system itself, files written before a crash or collapse can easily be lost or corrupted.
Similar to ext2 before it, ext3 uses 16-bit internal addressing. This means that ext3 can handle a maximum file size of 2 TiB on a file system with a maximum size of 16 TiB for a 4K block size.
ext4
Theodore Ts’o (who was the lead developer of ext3 at the time) published ext4 in 2006, which was added to the Linux mainline two years later in kernel version 2.6.28. Ts’o describes ext4 as an interim technology that significantly extends ext3 but still relies on older technologies. Ts’o describes ext4 as an interim technology that significantly extends ext3 but still relies on older technologies. He expects that ext4 will eventually be replaced by a true next-generation file system.
ext4 is functionally very similar to ext3 in terms of features, but supports large filesystems, improved resistance to fragmentation, higher performance, and better timestamps.
Differences between ext3 and ext4:
- Backward compatibility
- ext4 is specifically designed to be as backwards compatible with ext3 as possible. this not only allows ext3 filesystems to be upgraded to ext4 in-place; it also allows ext4 drivers to automatically mount ext3 filesystems in ext3 mode, thus making it unnecessary to maintain two separate codebases.
- Large file systems
- ext3 filesystem uses 32-bit addressing, which limits it to supporting only 2 TiB file sizes and 16 TiB filesystem system sizes (this assumes a block size of 4 KiB; some ext3 filesystems use smaller block sizes and are therefore further limited to them).
- ext4 uses 48-bit internal addressing and can theoretically allocate files up to 16 TiB in size on the filesystem, where the filesystem size can be up to 1,000,000 TiB (1 EiB).
- Allocation improvements
- ext4 makes significant improvements to the way blocks are allocated before they are written to disk, which can significantly improve read and write performance.
- Sections
- A segment (extent) is a series of contiguous physical blocks (up to 128 MiB, assuming a block size of 4 KiB) that can be reserved and addressed at once. Using sectors reduces the number of inodes required for a given file and significantly reduces fragmentation and improves performance when writing large files.
- Multiblock Allocation
- ext3 calls the block allocator once for each newly allocated block. When multiple writes open the allocator at the same time, it can easily lead to severe fragmentation. However, ext4 uses deferred allocation, which allows it to consolidate writes and better determine how to allocate blocks for writes that have not yet been committed.
- Persistent pre-allocation
- When pre-allocating disk space for a file, most file systems must write zeros to that file’s blocks at creation time. ext4 allows for the alternative use of fallocate(), which guarantees the availability of space (and tries to find contiguous space for it) without writing to it first. This significantly improves the performance of writing and future reading of written data from streams and database applications.
- Delayed allocation
- This is an intriguing and controversial feature. Deferred allocation allows ext4 to wait to allocate the actual block of data that will be written until it is ready to commit the data to disk. (By contrast, ext3 allocates blocks immediately even if data is still being written to the write cache.) Delaying block allocation allows the file system to make better choices about how to allocate blocks as data accumulates in the cache, reducing fragmentation (writes and, later, reads) and significantly improving performance. Unfortunately, however, it increases the possibility of data loss for programs that have not yet called the fsync() method specifically (when the programmer wants to ensure that the data is completely flushed to disk).
- Unlimited subdirectories
- ext3 is limited to 32,000 subdirectories; ext4 allows an unlimited number of subdirectories. Starting with the 6.23 kernel release, ext4 uses HTree indexing to reduce the performance loss of large numbers of subdirectories.
- Log validation
- ext3 does not perform checksumming of logs, which causes problems for controller devices with disks or self-contained caches that are outside the direct control of the kernel. If a controller or disk with its own cache is out of write order, it could break ext3’s journaling transaction order, potentially destroying files written during (or some time before) a crash. In theory, this problem could improve performance (and performance benchmarks against competitors) using write barriers, but increases the likelihood of data corruption that should be prevented.
- Checksumming the logs and allowing the file system to realize that some of its entries are invalid or out of order when it is first mounted after a crash. Thus, this avoids the error of rolling back partial entries or out-of-order log entries and further corrupting the file system – even if parts of the storage device falsely do or do not comply with write barriers.
- Fast filesystem checks
- Under ext3, the entire filesystem is checked when fsck is called – including deleted or empty files. In contrast, ext4 marks blocks and sectors in the inode table as unallocated, thus allowing fsck to skip them entirely. This greatly reduces the time it takes to run fsck on most file systems, and it was implemented in kernel 6.24.
- Improved timestamps
- ext3 provides timestamps at a granularity of one second. While sufficient for most purposes, mission-critical applications often require tighter time control. ext4 makes it possible to use it for those enterprise, scientific, and mission-critical applications by providing timestamps at the nanosecond level.
- The ext3 file system also does not provide enough bits to store dates after January 18, 2038. ext4 adds two bits here, extending the Unix epoch by 408 years. If you’re reading this in 2446 AD, you’ve probably moved to a better file system – if you’re still measuring time since January 1, 1970 at 00:00 (UTC), this will give me peace of mind when I die.
- Online defragmentation
- Neither ext2 nor ext3 directly support online defragmentation – that is, they defragment the filesystem when mounted. ext2 has an included utility, e2defrag, whose name implies – it needs to be run offline when the filesystem is not offline when the filesystem is unmounted. (Obviously, this is very problematic for the root filesystem.) The situation is even worse in ext3 – while ext3 is less susceptible to severe fragmentation than ext2, running e2defrag on ext3 filesystems can lead to catastrophic corruption and data loss.
- Although ext3 was initially considered “fragmentation free”, the use of massively parallel write processes for the same file (e.g. BitTorrent) clearly shows that this is not entirely the case. There are some user-space means and workarounds, but they are slower and less satisfactory in every way than a true, filesystem-aware, kernel-level defragmentation process.
- ext4 solves this problem with e4defrag and is an online, kernel-mode, filesystem-aware, block- and sector-level defragmentation utility.
On-going ext4 development
While the lead developers of ext consider it only a stopgap measure for a true next-generation file system, there are no likely candidates ready (due to technical or licensing issues) to be deployed as a root file system for some time. There are still some key features to be developed in future versions of ext4, including metadata checksums, first-class quota support, and large allocation blocks.
- Metadata checksums
- Since ext4 has redundant superblocks, it provides a way for the file system to checksum the metadata within them, determining for itself whether the primary superblock is corrupted and requires the use of a spare block. It is possible to recover from a corrupted superblock without a checksum – but the user first needs to realize that it is corrupted and then try to mount the filesystem manually using the alternate method. Since in some cases mounting a file system read/write with a corrupt primary superblock may cause further damage that even experienced users cannot avoid, this is not a perfect solution either!
- The metadata checksum of ext4 is very weak compared to the extremely powerful per-block checksums offered by next-generation file systems such as Btrfs or ZFS. But it’s better than nothing. While checksumming everything sounds simple! – in fact, there are some significant challenges in linking checksums to the filesystem.
- First-class quota support
- Quotas? We’ve had these since the day ext2 came along! Yes, but they’ve always been an afterthought to add things, and they’ve always been guilty of being silly. It’s probably not worth going into detail here, but the design docs list the ways in which quotas will move from user space to the kernel and can be implemented more correctly and efficiently.
- Large allocation blocks
- Those pesky storage systems keep getting bigger and bigger as time goes on. Since some SSDs already use 8K hardware block sizes, ext4’s current limit on 4K blocks is becoming increasingly restrictive. Larger blocks can significantly reduce fragmentation and improve performance at the cost of increased “slack” space (the space left over when you only need a portion of a block to store the last piece of a file or files).
ext4’s practical limitations
ext4 is a robust and stable filesystem. Most people today should be using it as a root filesystem, but it can’t handle all the demands. Let’s briefly touch on some things you shouldn’t expect – now or possibly in the future.
While ext4 can handle data up to 1 EiB in size (equivalent to 1,000,000 TiB), you really shouldn’t try to do so. In addition to being able to remember the addresses of many more blocks, there are issues with scale. And right now ext4 will not handle (and probably never will) more than 50-100 TiB of data.
ext4 is also insufficient to guarantee data integrity. With significant advances in logging it is back to a time when ext3 did not cover many of the common causes of data corruption. If data has been corrupted on disk – due to faulty hardware, the effects of cosmic rays (yes, really), or just data degradation over time – ext4 cannot detect or repair that corruption.
Based on the above two points, ext4 is just a pure file system, not a storage volume manager. This means that even if you have multiple disks – that is, parity or redundancy – you could theoretically recover corrupted data from ext4, but there is no way to know if using it would be to your advantage. While it is theoretically possible to separate the file system and storage volume management system in separate layers without losing automatic corruption detection and repair capabilities, this is not how current storage systems are designed, and it would present significant challenges for new designs.
Other file systems under Linux
XFS
XFS has the same status as a non-ext filesystem in the mainline in Linux. It is a 64-bit logging file system that has been built into the Linux kernel since 2001, providing high performance for large file systems and high concurrency (i.e., a large number of processes all writing to the file system immediately). Starting with RHEL 7, XFS became the default file system for Red Hat Enterprise Linux. For home or small business users, it still has some drawbacks: retooling an existing XFS file system is a huge pain, and it makes less sense to create another one and replicate the data.
While XFS is stable and high-performance, there are not enough specific end-use differences between it and ext4 to warrant recommending its use anywhere other than by default (e.g. RHEL7), unless it solves a specific problem for ext4, such as file systems larger than 50 TiB capacity. XFS is not in any way a “next generation” file system to ZFS, Btrfs, or even WAFL (a proprietary SAN file system). Like ext4, it should be seen as a stopgap for a better way.
ZFS
Developed by Sun Microsystems, ZFS is named after the zettabyte – the equivalent of 1 trillion gigabytes – because it can theoretically address large storage systems. As a true next-generation file system, ZFS offers volume management (the ability to handle multiple individual storage devices in a single file system), block-level cryptographic checksums (allowing for extremely accurate data corruption detection), automatic corruption repair (where redundant or parity-checked storage is available), fast asynchronous incremental replication, inline compression, and more.
The biggest problem with ZFS from the Linux user’s point of view is the license, which is a CDDL license, a semi-licensed license that conflicts with the GPL. There is a lot of controversy about the implications of using ZFS in the Linux kernel, ranging from “it’s a GPL violation” to “it’s a CDDL violation” to “it’s perfectly fine, it hasn’t been tested in court. It hasn’t been tested in court.” Most notably, Canonical has had ZFS code inlined in its default kernel since 2016, and there has been no legal challenge.
Btrfs
Btrfs is short for B-Tree Filesystem, often pronounced “butter” – released by Chris Mason in 2007 during his tenure at Oracle. Btrfs is intended to have most of the same goals as ZFS, providing multiple device management, per-block checksums, asynchronous replication, inline compression, and more.
As of 2018, Btrfs is fairly stable and can be used as a standard single-disk file system, but should probably not rely on a volume manager. It has serious performance issues compared to ext4, XFS, or ZFS in many common use cases, and its next-generation features – replication, multi-disk topology, and snapshot management – can be so numerous that the results can range from catastrophic performance degradation to actual data loss.
The maintenance status of Btrfs is controversial; SUSE Enterprise Linux adopted it as the default file system in 2015, and Red Hat announced in 2017 that it would no longer support Btrfs starting with RHEL 7.4. It may be worth noting that the product supports Btrfs deployments as single-disk file systems, rather than multi-disk volume managers as in ZFS. volume manager, even Synology uses Btrfs for its storage devices, but it manages disks in layers on top of traditional Linux kernel RAID (mdraid).
Mac OS file system
Mac OS has a long history of development and has gone through many different file systems. The more famous file systems: UFS, HFS+, and APFS.
UFS
In 1985, Steve Jobs left Apple and founded NeXT, which developed the NeXTSTEP operating system based on BSD, the predecessor of the now familiar Mac OS. This was the most advanced file system at the time, and had a huge impact on the design of later file systems.
UFS, or the Unix File System, also known as the Berkeley Fast File System, was not an Apple original, but was first published in 1984 by Marshall Kirk McKusick and William Joy (founders of Sun). UFS is arguably the progenitor of the modern file system, making it truly usable in production environments. While pre-UFS file systems used up to 5% of the disk bandwidth, UFS increased that number to 50%. This is primarily due to two design features in UFS.
- Increasing the base block size from 1024 bytes to 4096 bytes
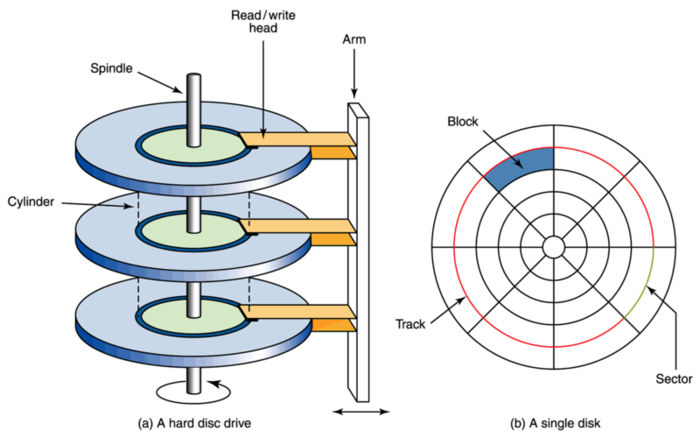
- The addition of the Cylinder Group concept, which optimizes the distribution of data and metadata on the disk and reduces the number of head seeks when reading and writing files (reducing the number of head seeks is a major performance optimization direction for HDD-era file systems)

The disk layout for UFS is shown above. The disk is divided into multiple Cylinder Groups, each of which contains a copy of the Superblock and the meta-information inside the Cylinder Group. If the Inode and Data Block are placed next to each other on the disk, it means that no additional seek time is needed.
UFS was first implemented on BSD systems, and has since been ported to Unix operating systems such as Sun’s Solaris, IBM’s System V, and HP-UX, including many storage products from the current storage giant EMC, where the operating system is Unix and the file system is based on UFS. There is no UFS implementation on Linux, but the famous ext2 file system is heavily based on UFS in its design. Ext3 and ext4 were extensions of the ext2 design, and also inherited UFS ideas.
In February 1997, Apple completed its acquisition of NeXT, and Steve Jobs returned to Apple. UFS support remained in the Mac OS until Mac OS X Lion, when it was removed.
HFS+
UFS did not remain the default file system in Mac OS for long after Apple acquired NeXT. In January 1998, one year after Apple acquired NeXT, Mac OS 8.1 was released with the HFS Plus (HFS+) file system to replace UFS. By design, HFS+ had a number of improvements over its predecessor, including a 16-bit to 32-bit upgrade, Unicode support, maximum file support of 2^63 bytes, and more. The most attractive feature of HFS+ is Time Machine. Anyone who has used the Time Machine feature knows that it is a very cool and useful feature that can be used to roll back a file system to a previous point in time, to back up a file system, to retrieve historical versions of files, and to do system migrations.
Despite this, HFS+ is a controversial file system, and has even been denounced by Linus as the worst file system ever made. The main criticisms of HFS+ are the following.
- case insensitivity (the latest version supports case sensitivity, but the default configuration is still not case insensitive)
- no checksum verification of data content
- timestamp is only supported down to the second level
- concurrent access is not supported
- Snapshots are not supported
- sparse file is not supported
- Use big-endian for storage
From a technical point of view, HFS+ doesn’t look like a modern file system at all. Although it can do cool things like Time Machine, it is too backward and has too many hard parts compared to other file systems, such as case insensitivity and no support for Sparse File. So HFS+ can hardly be called a good file system.
APFS
In 2017, Apple officially released the Apple File System with the Mac OS High Sierra release, and at WWDC 2016, Apple already announced the APFS project. To distinguish it from AFS (Apple File Service), APFS is used as an acronym.
HFS is the predecessor of HFS+, which was designed in 1985, more than 30 years ago. With the development of CPU, memory, and storage media technologies, the hardware we use today has changed dramatically compared to 30 years ago. CPUs have evolved in the direction of multi-core, memory capacity has increased and single machines can now support terabytes of memory, and storage media has gradually shifted from HDDs to SSDs. After 30 years of development, HFS has reached the end of its technical life and it is very difficult to improve HFS anymore.
Starting in 2014, under Giampaolo’s leadership, Apple began designing and developing a new file system, APFS, which was not based on an existing file system, but rather built from the ground up and released and brought online in just three years, when it typically takes at least 10 years for a file system to go from development to stability.
Apple’s requirements for the new file system were as follows.
- Be adaptable to multiple application scenarios, from smartwatches, to smartphones, to laptops
- Secure and reliable data
- Ability to take advantage of multi-core CPUs and the concurrency of new hardware devices
At the same time, APFS offers more features than HFS+.
- Guaranteed crash safe
- 64-bit file system (HFS+ is a 32-bit file system)
- sparse file support (HFS+ does not support sparse file!)
- Scalable metadata design
- Snapshot and clone support
- Metadata support for checksum checksum
Mac OS users who upgrade to High Sierra will automatically upgrade their file system from HFS+ to APFS, which is possible because Apple has designed a clever upgrade process.
- Read the Inode from the disk in the HFS+ format
- Find a free space on the disk and write the new Inode to the free space in APFS format
- Modify the Superblock on disk, write the new Superblock to disk in APFS format, and the new Superblock will index the APFS Inode and free up the space occupied by the original HFS+ Inode
In terms of performance, although Apple claims that APFS is optimized for SSDs, a number of websites have tested the performance of APFS and found that APFS performance on SSDs is lower than HFS+.
Windows file system
The common file system formats under Windows are: FAT32, NTFS, exFAT
FAT32
Windows platform’s traditional file format universal format, any USB storage device will be pre-installed this file system, can be used on any operating platform. Windows 95 version 2 was first introduced to replace FAT16 (support file maximum capacity of 2GB), compatibility is very good, but the disadvantage is that there is a limit on the file size, does not support more than 4GB files. So, for many large games, image files, compressed packages, videos, it is not a solution. In addition, the maximum capacity of the FAT32 format hard drive partition is 2TB, FAT32 is behind the times, so don’t use it if you can. Now when formatting a USB drive, FAT32 is still the default operation, as is Windows 10, more for conservative considerations of compatibility.
exFAT
The most suitable file format for USB flash drives, which is tailored by Microsoft for flash USB flash drives, with advanced performance and technical support, while optimizing protection for flash memory without causing excess damage.
exFAT (Extended File Allocation Table File System, also known as FAT64, i.e. Extended File Allocation Table) is a format introduced by Microsoft in Windows Embeded 5.0 and above (including Windows CE 5.0, 6.0, Windows Mobile5, 6, 6.1), a file system suitable for flash memory, was introduced to solve the problem that FAT32 and others do not support 4G and larger files. For flash memory, NTFS file system is not suitable for use, exFAT is more suitable. The main benefits include: enhanced interoperability between desktops/laptops, mobile devices, maximum 16EB for a single file, improved space allocation lines in the remaining space allocation table, up to 65536 files in the same directory, and support for access control. The biggest disadvantage is that there is no file logging feature, so that the modification records of files on the disk cannot be recorded.
exFAT uses the remaining space bitmap to manage capacity allocation and improve deletion performance, which is important to improve write performance, especially compared to NTFS. but note that it is not possible to install Windows on exFAT partitions. both Windows Vista/7 rely heavily on NTFS for features such as file licensing. However, due to the limitations of Microsoft’s licensing mechanism, exFAT is not widely available and is not particularly used in consumer electronics.
NTFS
The most widely used format for Windows platform is also the best available, supporting large capacity files and very large partitions, and has many advanced technologies including long file names, compressed partitions, event tracking, file indexing, high fault tolerance, data protection and recovery, encrypted access, etc. However, NTFS is still designed for mechanical hard drives and will record detailed hard drive read and write operations, so it can be very burdensome and harmful for flash memory (such as USB drives, SSDs, SD cards, etc.) and can easily affect the lifetime. Flash memory storage chips are limited in the number of reads and writes, and using a logging file system means that all operations on the disk are logged. The large number of small files read and write is extremely harmful to the flash memory and will shorten its life. That’s why NTFS is not recommended for USB drives.
Why do computers still use the NTFS file system designed for mechanical disks when using solid state drives? Because there is no better choice!
ReFS
Resilient File System (ReFS). It is a proprietary file system introduced by Microsoft in Windows Server 2012 and is intended to be the “next generation” file system after NTFS, which is designed to overcome the significant problems that have arisen since NTFS was conceived and is geared towards changing data storage needs. This includes automatic integrity checking and data cleanup, avoidance of the need to run chkdsk, data decay prevention, built-in hard drive failure and redundancy handling, integrated RAID functionality, data and metadata update switching to copy/allocate on write, handling of very long paths and filenames, and storage virtualization and storage pooling, including logical volumes of almost any size (independent of the physical size of the drive used). . Starting with Win10 1709 Fall Creators Update, only Win10 Enterprise and Win10 Pro Workstation editions offer the ReFS partitioning option; other Win10 editions are no longer supported.
ReFS is mostly compatible with NTFS and its main purpose is to maintain a high level of stability by automatically verifying that data is not corrupted and doing its best to recover it. When used in conjunction with the introduced Storage Spaces, it provides better data protection. There are also performance improvements for processing hundreds of millions of files.