In my previous article, Interoperability: Getting started with Samba, I covered installing and configuring Samba shares on a Linux server. The real power of Samba comes when Windows clients can communicate with Linux file servers. In this article, I will cover how you can access Samba shares from both Linux and Windows clients.
Install the Samba client packages
To access Samba share from Linux clients we need to install a few Samba client packages.
On the client machine, install the samba-common and samba-client packages.
# yum install samba-client samba-common -yCheck for available shares
Let’s check if we can access our shares from the server. We can use either the hostname or ip address of the server. If you use the hostname, make sure DNS is working.
# smbclient -U user -L 192.168.1.122

Enter SAMBAuser's password:

        Sharename       Type      Comment
        ---------       ----      -------
        print$          Disk      Printer Drivers
        myshare         Disk      my share
        IPC$            IPC       IPC Service (Samba 4.9.1)
        user      Disk      Home Directories

Reconnecting with SMB1 for workgroup listing.

        Server               Comment
        ---------            -------

        Workgroup            Master
        ---------            -------
        SAMBA                SAMBA-SERVER
Create a directory that we can use as our mount point. I’m going to create a directory under /mnt, but you can use any directory you would like to. You may need to configure SELinux on that directory.
# mkdir /mnt/myshareNow, mount the share.
# mount -t cifs -o username=user //192.168.1.122/myshare /mnt/share

Password for user@//192.168.1.122/myshare:  ********
Now that we’ve mounted our share, we can check the mounts with the following command:
# df -hPersistent mount
Let’s make that directory mount persistently so it can withstand a reboot. Using the text editor of your choice, edit the /etc/fstab file. You can do this in multiple ways, but I’m going to demonstrate two ways to mount the Samba share at boot in /etc/fstab.
# vim /etc/fstabThe first option provides a username and password for the Samba user in the fstab.
//192.168.1.122/myshare /mnt/share cifs username=user,password=password,_netdev 0 0The other option is to create a credential file. You can call this file anything, but I would like to call it cred. I would like to place credentials files in the home directory of the user. In our demonstration it will be /home/user/.cred.
//192.168.1.122/myshare /mnt/share cifs credentials=/home/user/.cred,_netdev 0 0The _netdev option is important since we are mounting a network device. Clients may hang during the boot process if the system encounters any difficulties with the network.
Now create that .cred file inside the user’s home directory.
# vim /home/user/.credNext, add the Samba user’s username and password.
username=user
password=password
Finally, mount all filesystems.
# mount -aAccess a share from a Windows client
I will be using Windows 10 as my client machine with a workgroup called SAMBA. We need to create a local user account on the Windows machine that matches the username and password of the Samba user account we created in my previous article. Although account creation is not necessary, this will make things simpler when accessing the share.
Like I mentioned above, this step is optional and you can skip it completely. Although there are multiple approaches to adding a new local user on a Windows machine, for the simplicity of this article I will be using PowerShell. Launch PowerShell as an administrator and issue following commands:
PS > $password = Read-Host -AsSecureString
PS > New-LocalUser -Name “user” -Password $password
Now that we have created a new local user account matching the Samba user account, we can log in to Windows with our newly created user account.
Access a share from Windows Explorer
To access the Samba share from Windows Explorer, start typing the IP address to our share in the search area. I am using the hostname of the Samba server. In my case, it is centos. You can also access the share by using the IP address of the Samba server.
You might be prompted to enter the username and password to access the share if you skipped the local user creation process. If you get prompted for credentials, enter the Samba username and password we created in the previous article.
You will need to enter the Samba share path every time you want to access the share. There is a better way to access the share by mapping a drive to Samba share in Windows.
Mapping a drive to a Samba share
To map a drive to the Samba share, open PowerShell and issue following command:
PS > NET USE M: \centosmyshareWrap up
Accessing a Samba share on Linux and Windows is easy. With this basic setup, you will be able to access file shares from client machines in your network. With somewhat more configuration, you can deploy Samba shares in a domain environment. Samba can do more than file share. If you would like to learn more about Samba, read this article about Windows and Linux interoperability. This is a basic set up, but you can do so much more with Samba.
[ Want to test your sysadmin skills? Take a skills assessment today. ]
If you work with different operating systems, it’s handy to be able to share files between them. This article explains how to set up file access between Linux (Fedora 33) and Windows 10 using Samba and mount.cifs.
Samba is the Linux implementation of the SMB/CIFS protocol, allowing direct access to shared folders and printers over a network. Mount.cifs is part of the Samba suite and allows you to mount the CIFS filesystem under Linux.
Caution: These instructions are for sharing files within your private local network or in a virtualized host-only network between a Linux host machine and a virtualized Windows guest. Don’t consider this article a guideline for your corporate network, as it doesn’t implement the necessary cybersecurity considerations.
Access Linux from Windows
This section explains how to access a user’s Linux home directory from Windows File Explorer.
1. Install and configure Samba
Start on your Linux system by installing Samba:
dnf install sambaSamba is a system daemon, and its configuration file is located in /etc/samba/smb.conf. Its default configuration should work. If not, this minimal configuration should do the job:
[global]
        workgroup = SAMBA
        server string = %h server (Samba %v)
        invalid users = root
        security = user
[homes]
        comment = Home Directories
        browseable = no
        valid users = %S
        writable = yes
You can find a detailed description of the parameters in the smb.conf section of the project’s website.
2. Modify LinuxSE
If your Linux distribution is protected by SELinux (as Fedora is), you have to enable Samba to be able to access the user’s home directory:
setsebool -P samba_enable_home_dirs onCheck that the value is set by typing:
getsebool samba_enable_home_dirsYour output should look like this:
![]()
3. Enable your user
Samba uses a set of users and passwords that have permission to connect. Add your Linux user to the set by typing:
smbpasswd -a <your-user>You will be prompted for a password. This is a completely new password; it is not the current password for your account. Enter the password you want to use to log in to Samba.
To get a list of allowed user types:
pdbedit -L -vRemove a user by typing:
smbpasswd -x <user-name>4. Start Samba
Because Samba is a system daemon, you can start it on Fedora with:
systemctl start smbThis starts Samba for the current session. If you want Samba to start automatically on system startup, enter:
systemctl enable smbOn some systems, the Samba daemon is registered as smbd.
4. Configure the firewall
By default, Samba is blocked by your firewall. Allow Samba to access the network permanently by configuring the firewall.
You can do it on the command line with:
firewall-cmd --add-service=samba --permanentOr you do it graphically with the firewall-config tool:

5. Access Samba from Windows
In Windows, open File Explorer. On the address line, type in two backslashes followed by your Linux machine’s address (IP address or hostname):

You will be prompted for your login information. Type in the username and password combination from step 3. You should now be able to access your home directory on your Linux machine:

Access Windows from Linux
The following steps explain how to access a shared Windows folder from Linux. To implement them, you need Administrator rights on your Windows user account.
1. Enable file sharing
Open the Network and Sharing Center either by clicking on the
Windows Button > Settings > Network & Internet
or by right-clicking the little monitor icon on the bottom-right of your taskbar:

In the window that opens, find the connection you want to use and note its profile. I used Ethernet 3, which is tagged as a Public network.
Caution: Consider changing your local machine’s connection profile to Private if your PC is frequently connected to public networks.
Remember your network profile and click on Change advanced sharing settings:

Select the profile that corresponds to your connection and turn on network discovery and file and printer sharing:

2. Define a shared folder
Open the context menu by right-clicking on the folder you want to share, navigate to Give access to, and select Specific people… :

Check whether your current username is on the list. Click on Share to tag this folder as shared:

You can display a list of all shared folders by entering \localhost in File Explorer’s address line:


Image by:
<p class=»rtecenter»><sup>(Stephan Avenwedde, <a href=»https://opensource.com/%3Ca%20href%3D»https://creativecommons.org/licenses/by-sa/4.0/» rel=»ugc»>https://creativecommons.org/licenses/by-sa/4.0/» target=»_blank»>CC BY-SA 4.0</a>)</sup></p>
3. Mount the shared folder under Linux
Go back to your Linux system, open a command shell, and create a new folder where you want to mount the Windows share:
mkdir ~/WindowsShareMounting Windows shares is done with mount.cifs, which should be installed by default. To mount your shared folder temporarily, use:
sudo mount.cifs //<address-of-windows-pc>/MySharedFolder ~/WindowsShare/ -o user=<Windows-user>,uid=$UIDIn this command:
<address-of-windows-pc>is the Windows PC’s address info (IP or hostname)<Windows-user>is the user that is allowed to access the shared folder (from step 2)
You will be prompted for your Windows password. Enter it, and you will be able to access the shared folder on Windows with your normal Linux user.
To unmount the shared folder:
sudo umount ~/WindowsShare/You can also mount a Windows shared folder on system startup. Follow these steps to configure your system accordingly.
Summary
This shows how to establish temporary shared folder access that must be renewed after each boot. It is relatively easy to modify this configuration for permanent access. I often switch back and forth between different systems, so I consider it incredibly practical to set up direct file access.
 This work is licensed under a Creative Commons Attribution-Share Alike 4.0 International License.

on
August 5, 2022, 9:50 AM PDT
How to connect to Linux Samba shares from Windows
If you’re having trouble figuring out how to connect Windows 10 or 11 to your data center Samba shares, Jack Wallen eases your concern with the simple steps to make this work.
When Windows 10 was released, it seemingly broke the ability to easily connect to Linux Samba shares. It appeared one could not write to Linux share from Windows 10. Considering how many businesses rely on Samba for the sharing of folders, this was a bad move on the part of Microsoft. Fortunately, the ability to connect to Samba shares wasn’t actually removed from the Windows platform, it was merely tucked a bit out of sight.
I want to walk you through the process of making that connection between Windows 10/11 and your Linux shares.
For this tutorial, I will assume you have both Windows 10 or 11 installed on a machine (or multiple machines) and a Samba share at the ready from your data center. With that said: Let’s connect.
Connecting to your server
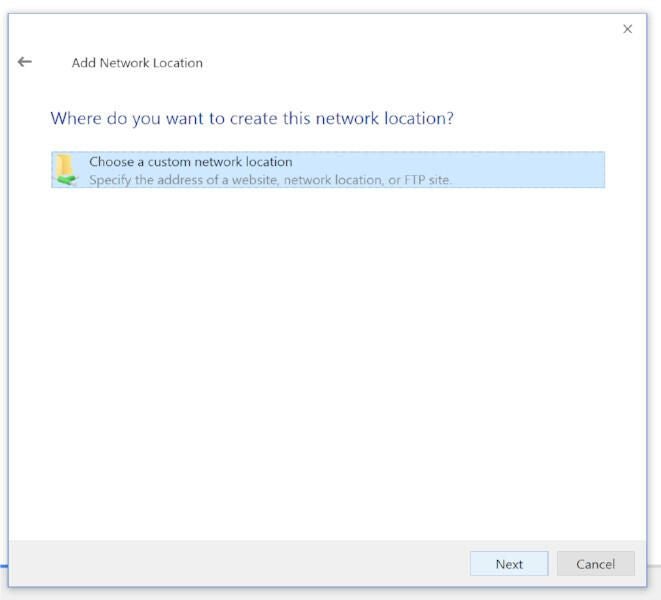
Open up File Explorer and then right-click on This PC (in the left pane). From the resulting context menu, select Add A Network Location (Figure A).
Figure A

A new wizard will open, one that will walk you through the process of creating a shortcut for a new network location within File Explorer. Click Next in the Welcome window. In the resulting screen (Figure B), click Choose A Custom Network Location (the only option) and then click Next.
Figure B
Next you must enter the IP address of your Samba server (Figure C) in the form of //SERVER_IP/SHARE, where SERVER_IP is the IP address of your Samba server and SHARE is the name of the share you want to add.
Figure C

Click Next to continue on. In the next window (Figure D), type a name for the network location. A default name will be picked up by the Samba server, you can either use that or enter a custom name that makes it easier for you to remember either where the share is or what is housed within the share.
Figure D

Click Next to reach the final screen of the wizard. Here (Figure E) click Finish and the share is now ready for you to use.
Figure E

And that is all there is to connecting a Windows 10 machine to a Samba share in your data center. It’s not quite as easy as it once was, but the feature is, in fact, still there.
How to connect from Windows 11
With Windows 11, it is much easier to make the connection. Simply open the file manager and in the address bar (Figure F) and type \SERVERSHARE, where SERVER is the IP address of the machine hosting the Samba share and SHARE is the name of the actual share.
Figure F
After hearing a number of people coming to me asking why they can not write to Linux share from Windows 10, I’m happy to tell you that it is not, in fact, broken. Although it’s a bit hidden away, you can still make that much needed desktop to data center connection.
Also See
-
How to protect Samba from the SambaCry exploit
(TechRepublic) -
How to set up Samba shares for groups
(TechRepublic) -
How to configure Ubuntu Linux server as a Domain Controller with samba-tool
(TechRepublic) -
Ethical Hacking Using Kali Linux From A to Z
(TechRepublic Academy)
-
Data Centers
-
Microsoft
-
Open source
A way to copy files in windows from a Samba Share is by using Windows Explorer. You can mount your Linux VPS disk in Windows using the SMB/CIFS protocol, this guide will show you how to do that by installing Samba on a VPS and then by mounting that directory on a Windows machine.
Create a specific user that will not be able to login via SSH and the Samba share will point to that user’s home directory, there should be no access outside of this directory.
Installation
The installation begins with the following command:
After the command is executed and the packages are successfully installed, let’s update the configuration.
First a copy of the configuration file as backup:
Then let’s open the config file with nano so we can edit the configuration:
The following configuration allows authentication of added Samba users and give them access to save data in the user’s home directory. That is, each user added can access the server via Samba/SMB/CIFS and access the files in their home directory.
[Global]
workgroup = workgroup
server string =% h server (Samba% v)
log file = /var/log/samba/log.%m
max log size = 1000
encrypt passwords = true
invalid users = root
socket options = TCP_NODELAY
security = user
unix extensions = yes[Homes]
comment = Home Directories
browseable = no
valid users =%S
read only = no
create mask = 0600
directory mask = 0700
Save the config file and exit nano.
Then we restart the Samba server to load the updated configuration:
Create users and add to Samba
As a security measure we do not allow the samba users to login to the system, this way if a username/password combination gets out, only the files in that shared directory is accessible, not the rest of the VPS.
In this example, the username will be shareuser1:
adduser –disabled-login -shell /bin/false -home /home/shareuser1 shareuser1
Follow the on screen instructions and enter the information about the account you are creating.
When the user has been created, we add the user to the Samba database and assign a password.
This is the command which is used to add the user shareuser1 to the Samba database and enable access to the shared folder.
If you get this error message in return when trying to set the password:
This means that the user account is not found and the adduser command above failed. Go back and add the user again, watch for error messages.
Short note on some Samba commands that is good to know about
Some/all options are only available when running smbpasswd as root, so to make sure they are working, execute as root.
Add and activate user accounts (there must be a system user with that username)
This option specifies that the username following should be deleted from the local smbpasswd file.
This option specifies that the username following should be disabled in the local smbpasswd file
This option specifies that the username following should be enabled in the local smbpasswd file, if the account was previously disabled.
Time to get back to the guide and the last part, adding the Samba folder in Windows.
Map Network drive in Windows:
Press the WINDOWS + E keys on your keyboard to open Windows Explorer.
Images shown here are from a Windows Server 2008 installation
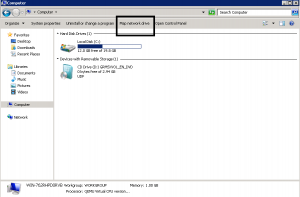
Click on the Computer menu and then on the Map Network Drive icon to open the Map Network Drive Dialog.
Select the Drive letter that you would like it to have on your local desktop and enter the network path in the Folder box.
Make sure you tick the Connect using different credentials box.
When clicking on the Finish button you will be presented with a login dialog where you enter the username and password that you used above.
Your network hard drive is successfully installed, configured and integrated into Windows.
If you can’t connect to your samba share, make sure you check other applications as your firewall and/or services that are disabled that is needed.
Contents
-
Client Access — Browsing SMB shares
- Ubuntu Clients
- Windows Clients (XP,Server,Vista, Win7)
-
Samba Client — Manual Configuration
- Connecting using CIFS
- Connecting using SMBFS (deprecated)
The samba package is a meta-package intended to be installed on file and printer sharing servers. Clients do not need this meta-package (you are acting as a client if you need to access files on another computer). For example, installing samba is not necessary if you only need your Ubuntu system to do any of the following:
-
Access shared folders, drives and printers on a Windows computer (that is, act as a client with Windows servers). To do this, you only need the smbfs plugin. See MountWindowsSharesPermanently for more information.
- Have your Windows computer use (via a network) a printer that is attached to a Linux computer. CUPS can be configured to make the printer accessible to the network.
-
Share directories between two Linux computers. You can use NFS or setup an SSH server on one computer and access it from other computers using an scp or sftp client, or Places -> Connect to Server… and choose «SSH» as the service type.
Ubuntu Clients
Ubuntu and Gnome make it easy to access files on a Windows network share. Open the Places Menu, then click on Network. You will see a Windows network icon. Double-click to open it. The next window shows all the domains/workgroups found on your network. Inside each domain/workgroup you will see all the computers on the domain/workgroup with sharing enabled. Double-click on a computer icon to access its shares and files.
-
If you want to be able to share folders with nautilus (the file browser), install the nautilus-share package (installed by default in Ubuntu 9.10 Desktop edition):
sudo apt-get install nautilus-share
Alternate: From the menu at the top select «Location» -> «Connect to a server». In the «Service type» pull down select «Windows share». Enter the server ip address in the «Server:» box and the share name in the «Share:» box. Click «Connect» and then «Connect» again on the second dialog box
Alternate 12.04: Double clicking on ‘Windows network’ did not work for me. So I went to ‘Go’ menu in the nautilus file browser and clicked ‘Location’. I got an address bar at the top of the window. I entered «smb://192.168.2.148» (substitute the IP address of your Samba server) — I was presented with user/password window — After typing in user/passwd I was able to see the samba shares on the server and browse the files/folders.
Note: The default installation of Samba does not synchronize passwords. You may have to run «smbpasswd» for each user that needs to have access to his Ubuntu home directory from Microsoft Windows.
Windows Clients (XP,Server,Vista, Win7)
Microsoft Windows clients connect and browse through their corresponding network interface.
Example: XP clients can open Windows Network Neighborhood or My Network Places to browse available SMB shares.
Samba Client — Manual Configuration
This section covers how to manually configure and connect to a SMB file server from an Ubuntu client. smbclient is a command line tool similar to a ftp connection while smbfs allows you to mount a SMB file share. Once a SMB share is mounted it acts similar to a local hard drive (you can access the SMB share with your file browser (nautilus, konqueror, thunar, other).
Connecting to a Samba File Server from the command line
Connecting from the command line is similar to a ftp connection.
List public SMB shares with
smbclient -L //server -U user
Connect to a SMB share with
smbclient //server/share -U user
Enter you user password.
You can connect directly with
smbclient //server/share -U user%password
but your password will show on the screen (less secure).
Once connected you will get a prompt that looks like this :
smb: >
Type «help» , without quotes, at the prompt for a list of available commands.
Connecting using CIFS
CIFS is included in the smbfs package and is a replacement for smbfs (I know, the terminology here is a little confusing).
Reference : http://linux-cifs.samba.org/
As above, install by any method, smbfs, on Ubuntu 12.10, smbfs has been replaced by cifs-utils.
Allow non-root users to mount SMB shares
By default only root may mount SMB shares on the command line. To allow non-root users to mount SMB shares you could set the SUID, but I advise you configure sudo. You should configure sudo with visudo
You may either allow the group «users» to mount SMB shares, or add a group, samba, and add users you wish to allow to mount SMB shares to the samba group.
sudo groupadd samba
sudo adduser user samba
Change «user» to the username you wish to add to the samba group.
sudo visudo
In the «group» section add your group you wish to allow to mount SMB shares
Add a line  in the "group" section :
## Members of the admin group may gain root privileges
%admin ALL=(ALL) ALL
%samba   ALL=(ALL) /bin/mount,/bin/umount,/sbin/mount.cifs,/sbin/umount.cifs
Change «%samba» to «%users» if you wish to allow members of the users group to mount SMB shares.
The following will mount the myshare folder on myserver to ~/mnt (it will be in your home directory):
mkdir ~/mnt
sudo mount -t cifs //myserver_ip_address/myshare ~/mnt -o username=samb_user,noexec
Note: «samba_user» = the user name on the samba server (may be different from your log-in name on the client).
The «noexec» option prevents executable scripts running from the SMB share.
You will be asked for BOTH your sudo and then your samba_user password.
To umount,
sudo umount ~/mnt
Automagically mount SMB shares
In order to have a share mounted automatically every time you reboot, you need to do the following:
With any editor, create a file containing your Windows/Samba user account details:
gksu gedit /etc/samba/user
KDE users must use kdesu rather than gksu and instead of Gedit they can use Kwrite as editor.
… it should contain two lines as follows:
username=samba_user
password=samba_user_password
Note: «samba_user» = the user name on the samba server (may be different from your log-in name on the client). «samba_user_password» is the password you assigned to the samba_user on the samba server.
Save the file and exit gedit.
Change the permissions on the file for security:
sudo chmod 0400 /etc/samba/user # permissions of 0400 = read only
Now create a directory where you want to mount your share (e.g. /media/samba_share):
sudo mkdir /media/samba_share
Now, using any editor, and add a line to /etc/fstab for your SMB share as follows:
sudo cp /etc/fstab /etc/fstab.bak
gksu gedit /etc/fstab
Add a line for your SMB share:
//myserver_ip_address/myshare /media/samba_share cifs credentials=/etc/samba/user,noexec 0 0
The share will mount automatically when you boot. The «noexec» option prevents executable scripts running from the SMB share.
To mount the share now, without rebooting,
sudo mount /media/samba_share
You can unmount the share with :
sudo umount /media/samba_share
If you wish to increase security at the expense of convenience, use this line in /etc/fstab
//myserver_ip_address/myshare /media/samba_share cifs noauto,credentials=/etc/samba/user,noexec 0 0
The noexec» option prevents executable scripts running from the SMB share.
Edit /etc/samba/user, remove the password (leave just the samba user).
Now the share will NOT automatically mount when you boot and you will be asked for your samba password.
Mount the share with :
sudo mount /media/samba_share
CIFS may cause a shutdown error.
CIFS VFS: Server not responding.
There is a fix in the troubleshooting section of this forum post.
Back to top
Connecting using SMBFS (deprecated)
Note: This method still works, but as outlined under the «CIFS» section above is «deprecated» (no longer maintained and pending removal from the kernel).
Mounting a share on the local filesystem allows you to work around programs that do not yet use GnomeVFS to browse remote shares transparently. To mount a SMB share, first install smbfs:
sudo apt-get update
sudo apt-get install smbfs
To allow non root accounts to mount shares, change the permissions on the smbmnt program thus:
sudo chmod u+s /usr/bin/smbmnt /usr/bin/smbumount
Note: This may be a security risk as after setting the SUID bit anyone can mount a SMB share. I advise you configure sudo, as above.
The working line in /etc/sudoers is as follows (see CIFS section above):
%samba ALL=(ALL) /bin/mount,/bin/umount,/sbin/mount.cifs,/sbin/umount.cifs,/usr/bin/smbmount,/usr/bin/smbumount
This allows any user in the samba group to mount SMB shares (you will need to create a samba group and add users).
The following will mount the myshare folder on myserver to ~/mnt (it will be in your home directory):
mkdir ~/mnt
smbmount //myserver/myshare ~/mnt
To umount,
smbumount ~/mnt
In order to have a share mounted automatically every time you reboot, you need to do the following:
Open a shell as root
sudo -s
Create a file containing your Windows/Samba user account details:
vi /etc/samba/user
…it should contain two lines as follows:
username=george
password=secret
Change the permissions on the file for security:
chmod 0600 /etc/samba/user
Now create a directory where you want to mount your share (e.g. /mnt/data):
mkdir /mnt/data
Now edit the file system table (/etc/fstab) and add a line as follows:
//server/share /mnt/data smbfs credentials=/etc/samba/user,rw,uid=bob 0 0
…where ‘bob’ is the non-root user you log into ubuntu with, ‘server’ is the name or address of the Windows machine and ‘share’ is the name of the share.
To mount the share now, just use the following command as root. It will mount automatically on subsequent reboots.
mount /mnt/data
to be continued…
Ubuntu Client
On the Ubuntu client using the menu at the top, go to «Places» -> «Network». You will see an icon «Windows network» and should be able to browse to your shared folder. You will be asked for a password, leave it blank. Click the «Connect button.
(no need for a password).
If you would like to mount your SMB share using your (server) hostname rather than the IP Address, edit /etc/hosts and add your samba server (syntax IP Address hostname).
192.168.1.100 hostname
Where «hostname» = the name of your samba server.
Windows Client
On Windows open «My Computer» and navigate to «My Network Places». Navigate to your Ubuntu server and your share will be available without a password.
Alternate : From the menu at the top select «Tools» -> «Map Network Drive». Select an available letter for your SMB share (Default is z: ). In the «Folder:» box enter \samba_server_ipaddressshare. Tic (Select with the mouse) the option «Reconnect at login» if you want the share to be automatically mounted when you boot Windows. Click the «Finish» box. A dialog box will appear, enter your samba user name and password. Click «OK».
If you would like to mount your SMB share using your (server) hostname rather than the IP Address, edit C:WINDOWSsystem32driversetchosts and add your samba server (syntax IP Address hostname).
192.168.1.100 hostname
Where «hostname» = the name of your samba server.
Since computers seldom work as isolated systems, it is to be expected that as a system administrator or engineer, you know how to set up and maintain a network with multiple types of servers.
In this article and in the next of this series we will go through the essentials of setting up Samba and NFS servers with Windows/Linux and Linux clients, respectively.
This article will definitely come in handy if you’re called upon to set up file servers in corporate or enterprise environments where you are likely to find different operating systems and types of devices.
Since you can read about the background and the technical aspects of both Samba and NFS all over the Internet, in this article and the next we will cut right to the chase with the topic at hand.
Step 1: Installing Samba Server
Our current testing environment consists of two RHEL 7 boxes and one Windows 8 machine, in that order:
1. Samba / NFS server [box1 (RHEL 7): 192.168.0.18],
2. Samba client #1 [box2 (RHEL 7): 192.168.0.20]
3. Samba client #2 [Windows 8 machine: 192.168.0.106]
![]()
On box1, install the following packages:
# yum update && yum install samba samba-client samba-common
On box2:
# yum update && yum install samba samba-client samba-common cifs-utils
Once the installation is complete, we’re ready to configure our share.
Step 2: Setting Up File Sharing Through Samba
One of the reason why Samba is so relevant is because it provides file and print services to SMB/CIFS clients, which causes those clients to see the server as if it was a Windows system (I must admit I tend to get a little emotional while writing about this topic as it was my first setup as a new Linux system administrator some years ago).
Adding system users and setting up permissions and ownership
To allow for group collaboration, we will create a group named finance with two users (user1 and user2) with useradd command and a directory /finance in box1.
We will also change the group owner of this directory to finance and set its permissions to 0770 (read, write, and execution permissions for the owner and the group owner):
# groupadd finance
# useradd user1
# useradd user2
# usermod -a -G finance user1
# usermod -a -G finance user2
# mkdir /finance
# chmod 0770 /finance
# chgrp finance /finance
Step 3: Configuring SELinux and Firewalld
In preparation to configure /finance as a Samba share, we will need to either disable SELinux or set the proper boolean and security context values as follows (otherwise, SELinux will prevent clients from accessing the share):
# setsebool -P samba_export_all_ro=1 samba_export_all_rw=1
# getsebool –a | grep samba_export
# semanage fcontext –at samba_share_t "/finance(/.*)?"
# restorecon /finance
In addition, we must ensure that Samba traffic is allowed by the firewalld.
# firewall-cmd --permanent --add-service=samba
# firewall-cmd --reload
Step 4: Configure Samba Share
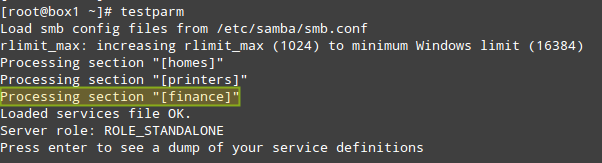
Now it’s time to dive into the configuration file /etc/samba/smb.conf and add the section for our share: we want the members of the finance group to be able to browse the contents of /finance, and save / create files or subdirectories in it (which by default will have their permission bits set to 0770 and finance will be their group owner):
smb.conf
[finance]
comment=Directory for collaboration of the company's finance team
browsable=yes
path=/finance
public=no
valid [email protected]
write [email protected]
writeable=yes
create mask=0770
Force create mode=0770
force group=finance
Save the file and then test it with the testparm utility. If there are any errors, the output of the following command will indicate what you need to fix. Otherwise, it will display a review of your Samba server configuration:
Should you want to add another share that is open to the public (meaning without any authentication whatsoever), create another section in /etc/samba/smb.conf and under the new share’s name copy the section above, only changing public=no to public=yes and not including the valid users and write list directives.
Step 5: Adding Samba Users
Next, you will need to add user1 and user2 as Samba users. To do so, you will use the smbpasswd command, which interacts with Samba’s internal database. You will be prompted to enter a password that you will later use to connect to the share:
# smbpasswd -a user1
# smbpasswd -a user2
Finally, restart Samba, enable the service to start on boot, and make sure the share is actually available to network clients:
# systemctl start smb
# systemctl enable smb
# smbclient -L localhost –U user1
# smbclient -L localhost –U user2
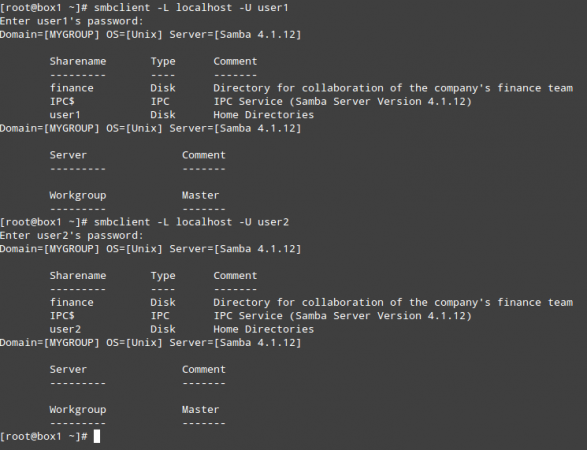
At this point, the Samba file server has been properly installed and configured. Now it’s time to test this setup on our RHEL 7 and Windows 8 clients.
Step 6: Mounting the Samba Share in Linux
First, make sure the Samba share is accessible from this client:
# smbclient –L 192.168.0.18 -U user2
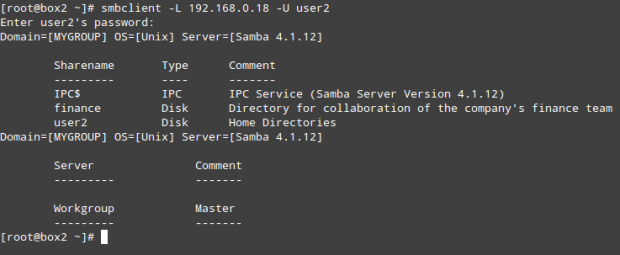
(repeat the above command for user1)
As any other storage media, you can mount (and later unmount) this network share when needed:
# mount //192.168.0.18/finance /media/samba -o username=user1

(where /media/samba is an existing directory)
or permanently, by adding the following entry in /etc/fstab file:
fstab
//192.168.0.18/finance /media/samba cifs credentials=/media/samba/.smbcredentials,defaults 0 0
Where the hidden file /media/samba/.smbcredentials (whose permissions and ownership have been set to 600 and root:root, respectively) contains two lines that indicate the username and password of an account that is allowed to use the share:
.smbcredentials
username=user1
password=PasswordForUser1
Finally, let’s create a file inside /finance and check the permissions and ownership:
# touch /media/samba/FileCreatedInRHELClient.txt

As you can see, the file was created with 0770 permissions and ownership set to user1:finance.
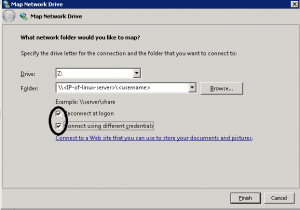
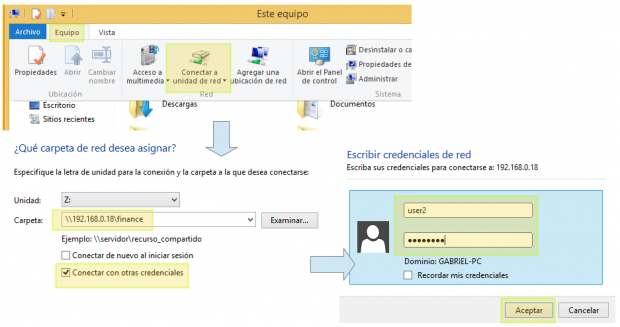
Step 7: Mounting the Samba Share in Windows
To mount the Samba share in Windows, go to My PC and choose Computer, then Map network drive. Next, assign a letter for the drive to be mapped and check Connect using different credentials (the screenshots below are in Spanish, my native language):
Finally, let’s create a file and check the permissions and ownership:
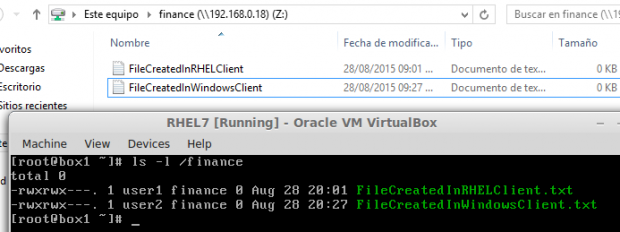
# ls -l /finance
This time the file belongs to user2 since that’s the account we used to connect from the Windows client.
Summary
In this article we have explained not only how to set up a Samba server and two clients using different operating systems, but also how to configure the firewalld and SELinux on the server to allow the desired group collaboration capabilities.
Last, but not least, let me recommend the reading of the online man page of smb.conf to explore other configuration directives that may be more suitable for your case than the scenario described in this article.
As always, feel free to drop a comment using the form below if you have any comments or suggestions.
If You Appreciate What We Do Here On TecMint, You Should Consider:
TecMint is the fastest growing and most trusted community site for any kind of Linux Articles, Guides and Books on the web. Millions of people visit TecMint! to search or browse the thousands of published articles available FREELY to all.
If you like what you are reading, please consider buying us a coffee ( or 2 ) as a token of appreciation.

We are thankful for your never ending support.
Пожалуй нет ни одного офиса, в котором не применялись бы общие ресурсы локальной сети, будь то папки или принтеры. Крупные и средние компании используют возможности Active Directory, компании поменьше — используют штатные средства ОС Windows или Samba, но на серверах под управлением ОС Linux. Рассмотрим все случаи.
Как настроить Samba?
- Что такое Samba?
- Как настроить общую папку
- Как настроить общую папку в Linux
- Как настроить общую папку в Windows
- Как подключиться к общей папке
- Как подключиться к общей папке Linux
- Как подключиться к общей папке Windows
- Как создать общий сетевой ресурс в Samba
Что такое Samba?
Samba — серверное приложение, реализующее доступ клиентских терминалов к папкам, принтерам и дискам про протоколу SMB/CIFS.

Настройка общих папок
Linux
Установка и настройка Samba-сервер для Ubuntu выполняется следующими этапами.
Обновляем информацию о репозиториях и устанавливаем обновления для существующих пакетов в системе:
apt-get update && apt-get upgrade
Устанавливаем пакет Samba:
apt-get install -y samba samba-client
Создадим резервную копию файла конфигурации:
cp /etc/samba/smb.conf /etc/samba/smb.conf_sample
Создадим директории для файлов, например в каталоге /media:
mkdir /media/samba
Важно! По умолчанию, директория /media располагается в корне системы /, для нее редко создается свой раздел. По этой причине возможно переполнение корневого раздела. Во избежание этой неприятной ситуации, рекомендуем монтировать отдельный жесткий диск в /media/samba.
Создаем каталог для всех пользователей:
mkdir /media/samba/public
Изменим права доступа к каталогу:
chmod -R 0755 /media/samba/public
Также следует воспользоваться командой chown для смены владельца и/или группы.
Создаем директорию для ограниченного круга лиц:
mkdir /media/samba/private
С помощью системных инструментов создадим группу пользователей:
groupadd smbgrp
Добавляем пользователей Samba:
useradd user1
Созданных пользователей добавляем в группу:
usermod -aG smbgrp user1
Изменим группу, которой принадлежит приватная директория:
chgrp smbgrp /media/samba/private
С помощью инструментов Samba создадим пароль для добавленного пользователя:
smbpasswd -a user1
С помощью текстового редактора, например, nano, редактируем конфигурационный файл samba:
nano /etc/samba/smb.conf
Удаляем все строки из файла. Вставляем следующие:
[global]

workgroup = WORKGROUP

security = user

map to guest = bad user

wins support = no

dns proxy = no

[public]

path = /media/samba/public

guest ok = yes

force user = nobody

browsable = yes

writable = yes

[private]

path = /media/samba/private

valid users = @smbgrp

guest ok = no

browsable = yes

writable = yes
Сохраняем используя сочетание Ctrl + X, затем нажимаем Y и Enter.
Объясним значения строк. конфигурационный файл состоит из трех секций:
global — данная секция отвечает за общие настройки Samba-сервера;
public и private — секции описания настроек директорий общего доступа.
В секции global присутствуют пять параметров:
- workgroup — рабочая группа. Для упрощения работы пользователей WORKGROUP указывается, как группа по умолчанию. Если в вашей сети имя рабочей группы изменено, то следует изменить это значение и для Samba;
- security — уровень безопасности сервера. Значение user означает авторизацию по паре логин/пароль;
- map to guest — параметр определяет способ обработки запросов. Значение bad user означает, что запросы с неправильным паролем будут отклонены, даже если такое имя пользователя существует;
- wins support — включить или выключить поддержку WINS;
- dns proxy — возможность проксирования запросов к DNS.
Настройки директорий выполняются в соответствующих секциях:
path — полный путь до директории на жестком диске;
guest ok — возможность доступа к каталогу без пароля (гостевой);
browsable — показывать ли каталог (“шару”) на сервере среди прочих. Если параметр установлен как “no”, то доступ будет возможен по полному пути, например ip-addresshidden_directory;
force user — пользователь от которого ведется работа с каталогом. Для повышения безопасности сервера, обычно используют nobody. Главное, не использовать пользователя root — это небезопасно.
writable — установка значения как “yes” позволяет пользователю выполнять действия над файлами внутри каталога — переименование, добавление, удаление, перемещение в подкаталог и копирование;
valid users — список пользователей у которых есть доступ к каталогу. Если пользователей несколько, их имена указываются через запятую. Если необходим доступ для пользователей принадлежащих группе, перед именем группы устанавливается символ ”at” @ (“собака”).
Важно! Имя директории общего доступа, отображаемое пользователям, равно имени секции в которой оно описано.
Проверяем настройки с помощью команды:
testparm -s
Перезапускаем сервер:
service smbd restart
service nmbd restart
Настроим межсетевой экран. Для этого в правилах откроем TCP-порты 139 и 445, а также UDP-порты 137 и 138, но только для тех подсетей, которым доверяете. Для указания собственного диапазона адресов, замените значение после ключа “-s”:
iptables -A INPUT -p tcp -m tcp --dport 445 -s 10.0.0.0/24 -j ACCEPT

iptables -A INPUT -p tcp -m tcp --dport 139 -s 10.0.0.0/24 -j ACCEPT
iptables -A INPUT -p udp -m udp --dport 137 -s 10.0.0.0/24 -j ACCEPT
iptables -A INPUT -p udp -m udp --dport 138 -s 10.0.0.0/24 -j ACCEPT
Для сохранения правил и применения их после перезагрузки сервера следует воспользоваться пакетом iptables-persistent. Установим его:
apt-get install iptables-persistent
Входе установки пакета, программа предложит запомнить существующие правила iptables. Подтверждаем это действие.
Для проверки существующих правил используем:
iptables -L
Windows
По аналогии с Linux, настроим общий доступ к папкам public и private, но в ОС Windows.
Для создания общего доступа к каталогу без парольной защиты, необходимо настроить ограничения защиты в панели управления. Для этого открываем:
Панель управления → Сеть → Центр управления сетями и общим доступом → Расширенные настройки общего доступа.
В обновленном окне открываем раздел “Все сети” и ищем секцию “Общий доступ с парольной защитой”. Устанавливаем параметр в положение “Отключить общий доступ с парольной защитой”. Для сохранения значений параметра кликаем по кнопке “Сохранить изменения”.

Теперь откроем доступ к самому каталогу. Кликаем по папке правой кнопкой мыши, в контекстном меню выбираем “Свойства”. Открываем вкладку “Доступ” и кликаем по “Расширенная настройка”.

В открывшемся окне расширенных настроек общего доступа отмечаем галочкой “Открыть общий доступ к этой папке”, в поле “Имя общего ресурса” указываем название, которое будет отображено пользователям. Кликаем по кнопке “Разрешения”.
В открывшемся окне, в группах пользователей выбираем “Все”, а в разрешениях для группы, устанавливаем галку “Полный доступ”. Нажимаем “OK” в этом и остальных окнах.

В окне свойств папки public кликаем по кнопке “Общий доступ”.

В открывшемся окне добавляем пользователя “Все”, а также делегируем права на “Чтение и запись”. Кликаем по кнопке “Поделиться”.

В обновленном окне нажимаем “Готово”.

Настроим папку общего доступа, но для ограниченного круга лиц.
Кликаем правой кнопкой мыши по папке, выбираем “Свойства”.
В открывшемся окне переходим на вкладку “Доступ”. Кликаем по кнопке “Расширенные настройки”.
В новом открывшемся окне, устанавливаем галку “Открыть общий доступ к этой папке”. Затем кликаем по кнопке “Разрешения”.

В открывшемся окне, в поле “Группы или пользователи” выбираем “Все” и нажимаем кнопку “Удалить”.

Таким образом установлен запрет на анонимный доступ к папке.
Окно обновится. Кликаем по кнопке “Добавить”.
В открывшемся окне кликаем по кнопке “Дополнительно”.

Окно изменится в размере. Кликаем по кнопке “Поиск”. Двойным кликом выбираем пользователя, которому необходим доступ к этому каталогу, например, buhgalter.

В открывшемся окне, при желании, можем добавить еще одного пользователя через “Дополнительно” — “Поиск”. Аналогичным образом можно добавить группу пользователей, например, “Администраторы”, при этом следует понимать, что доступ будет предоставлен всем пользователям из этой группы.

Установим права доступа для пользователя “buhgalter”. Если требуется полный доступ к директории, устанавливаем галку в соответствующем месте.

Нажимая кнопки “OK” возвращаемся к окну свойств папки, в котором кликаем по кнопке “Общий доступ”.

В данном окне необходимо найти и добавить пользователя “бухгалтер”.

В окне выбора пользователей и групп кликаем по кнопке “Дополнительно”.

Окно снова изменит свои размеры. Кликаем по кнопке “Поиск”. В найденном ниже списке пользователей и групп выбираем искомого пользователя. Выбираем его двойным кликом.

В оставшемся окне проверяем правильно ли указан пользователи и нажимаем кнопку “OK”.

Устанавливаем требуемый уровень разрешений для пользователя и кликаем по кнопке “Поделиться”.

Кликаем по кнопке “Готово”.

Подключение к общим папкам
Из Linux
Для подключения к общим папкам из среды Linux требуется установка отдельного программного обеспечения — smbclient. Установим:
sudo apt-get install smbclient
Для подключения к серверу используется следующий формат комангды:
smbclient -U <Имя_пользователя> <IP-адрес><Имя_каталога_на_сервере>
Пример:
smbclient -U buhgalter 10.0.0.1public
Для того, Чтобы не вводить эту команду каждый раз, можно настроить монтирование общей директории как сетевого диска. Для этого установим пакет cifs-utils:
sudo apt-get install cifs-utils
Монтирование выполняется по следующему шаблону:
mount -t cifs -o username=<Имя_пользователя>,password= //<IP-адрес>/<Общий каталог> <Точка монтирования>
Пример:
mount -t cifs -o username=Everyone,password= //10.0.0.1/public /media
Важно! Если требуется подключение к общим папкам расположенным на Windows-сервере, то в для не защищенных паролем директорий, в качестве имени пользователя, следует использовать “Everyone”. Для подключения к Linux-серверу рекомендуем использовать в качестве имени пользователя “nobody”. В случае доступа к защищенным директориям следует использовать те учетные данные, которые вы указали.
Из Windows
Подключение к удаленным папкам из среды Windows выполняется немного иначе. Для этого в проводнике или окне запуска программ (Windows + R), следует использовать следующий шаблон:
<IP-адрес><имя_папки>
Указав просто IP-адрес сервера вы получите список общих папок.

При подключении к Windows-сервер, система безопасности может потребовать ввод учетных данных. Для подключения к общей открытой папке используем Everyone, а поле пароля оставляем пустым.

При подключении к Linux-серверу из ОС Windows, следует использовать указанный ранее шаблон:
<IP-адрес><имя_папки>
или просто адрес сервера:
<IP-адрес>
Как создать общий сетевой ресурс в Samba
Создайте директорию, которую в хотите сделать общей:
mkdir /home/<user_name>/<folder_name></folder_name></user_name>
Создайте бэкап, если что-то пойдет не так:
sudo cp /etc/samba/smb.conf ~
Отредактируйте файл «/etc/samba/smb.conf»:
sudo nano /etc/samba/smb.conf
Добавьте следующее содержимое в файл:
[<folder_name>]

path = /home/<user_name>/<folder_name>

valid users = <user_name>

read only = no</user_name></folder_name></user_name></folder_name>
Заполните файл своими данными, сохраните его и затем закройте
Перезапустим Samba:
sudo service smbd restart
Использую данную команду проверьте вашу директорию smb.conf на ошибки:
testparm
Чтобы получить доступ к вашему общему сетевому ресурсу:
sudo apt-get install smbclient

# Просмотр всех общих ресурсов:

smbclient -L //<host_ip_or_name>/<folder_name> -U <user>

# Подключение:

smbclient //<host_ip_or_name>/<folder_name> -U <user></user></folder_name></host_ip_or_name></user></folder_name></host_ip_or_name>
Note 1: Чтобы подключиться к вашему общему сетевому ресурсу используйте имя вашего пользователя () и пароль, который находится «smb:////»
Учтите, что «» значение передается в «[]»,
другими словами, имя общего ресурса, которое вы ввели в «/etc/samba/smb.conf».
Note 2: Группа пользователей samba по умолчанию это — «WORKGROUP».
Для работы бывает необходимо подключаться из Linux к общей папке Windows, чтобы забрать или передать файлы. В организациях в 99% используются компьютеры под управлением Windows, поэтому приходится подключаться из Linux к Windows.
Установка Samba клиента в Linux
sudo apt-get update
sudo apt-get install samba-client
sudo apt-get install cifs-utils
Для удобства просмотра сетевого окружения в GUI удобен файловый менеджер Nautilus с дополнением Nautilus-share
sudo apt-get install nautilus nautilus-shareПросмотр общих сетевых ресурсов с помощью командной строки
Вызов клиента Samba для просмотра ресурсов сервера из командной строки:
1) просмотр общих папок, предоставленных в общий доступ по сети для локальных пользователей сервера
smbclient -L //192.168.100.10 -U Username%Passwordлибо
smbclient -L //servername -U Username%Passwordгде: 192.168.100.10 — IP адрес сервера, servername — имя сервера, Username — локальный пользователь сервера, Password — пароль пользователя Username
2) просмотр общих папок, предоставленных в общий доступ по сети для пользователей домена
smbclient -L //192.168.100.10 -U Domain/Username%Passwordлибо
smbclient -L //192.168.100.10 -U Username%Password -W Domainили по имени
smbclient -L //servername -U Username%Password -W Domainгде Domain — имя домена Active Directory.
Либо (чтобы каждый раз не сообщать пароль в параметрах команды) создать файл ~/.smbcredentials
с данными входа:
username=имя_пользователя
password=пароль
domain=имя_standalone_сервера_или_домена
Тогда, присоединение к сетевому каталогу:
smbclient //server/share --authentication-file=/home/vladimir/.smbcredentials Подключение к общей папке Samba в интерактивном режиме
То же самое, но без ключа -L, но с параметром — именем общей папки, в данном случае «share»
smbclient //192.168.100.10/share -U Domain/Username%Passwordлибо
smbclient //servername/share -U Domain/Username%Passwordлибо
smbclient //servername/share -U Username%Password -W DomainПосле успешного входа появится приглашение
smb: >можно вводить команды, например, help или dir. Интерфейс для управления smbclient с помощью команд напоминает ftp клиент.
Подключение к общим папкам с помощью файлового менеджера Nautilus
После запуска nautilus, выберите в левой части окна «+ Другие места» — откроется просмотр локальной сети, где можно просматривать компьютеры в сети, у которых имеются общие папки.
Решение проблемы с подключением: избавляемся от ошибки -13 Access Denied, либо NT_STATUS_ACCESS_DENIED
Ошибка: CIFS: VFS: cifs_mount failed w/return code = -13"
Данную ошибку можно решить только настройкой прав на сервере. Чтобы открыть общую папку на просмотр, нужны три условия:
1) Пользователь указан среди пользователей сервера или домена (либо доступ типа guest разрешён)
2) Предоставлен (не ограничен) доступ к файловой системе.
3) Дан доступ к конкретной сетевой папке — например, пользователь входит в группу пользователей, к которой дан доступ к общей папке.
Последнее, третье условие самое строгое. Нужно, чтобы Администратор сервера предоставил права пользователю (включил его в группу пользователей общей папки).
Самое интересное, что права Администратора не гарантируют даже ему полных прав доступа к общей папке, т.к. необходимо, чтобы пользователь «Администратор» входил в группу, которой предоставлены права к данной сетевой папке. В этом плане администратор не отличается от группы other/nobody: получит ошибку mount error(13): Permission denied, потому что он не входит в группу пользователей сетевой папки.
Использование команды «mount»
Вместо smbclient можно использовать команду mount.
Вначале нужно создать точки монтирования и дать права доступа к папке, например:
sudo mkdir /mnt/cifs
sudo chmod 0777 /mnt/cifs
Примеры использования команды mount с сетевым папками:
sudo mount -t cifs //192.168.20.222/share /mnt/cifs -o user=Vlad,pass=Str0ngPa$$word
ls  /mnt/cifs
sudo umount //192.168.20.222/share
ls  /mnt/cifs
Либо то же самое с файлом .smbcredentials :
sudo mount -t cifs //192.168.20.222/share /mnt/cifs -o credentials=/home/vladimir/.smbcredentialsЕсли имя сетевой папки содержит пробелы («share with spaces in name»), нужно вводить следующим образом:
sudo mount -t cifs //192.168.20.222/share with spaces in name /mnt/cifs -o credentials=/home/vladimir/.smbcredentialsПримечание: Чтобы после выполнения команды mount примонтированная папка работала бы не только на чтение, но и на запись в удалённую общую папку, нужно сопоставить удаленного пользователя с локальным пользователем Linux, при помощи параметров uid=1000,gid-1000. Где 1000 — заменить на uid и gid пользователя Linux (выводятся командой id).
Либо добавить в параметры -o noperm,iocharset=utf8.
В ключах команды можно задать версию Samba, которую используем для подключения. Например,
для SMB2: vers=2.0 или для SMB3 vers=3.0.
Примеры:
sudo mount -t cifs //192.168.20.222/share with spaces in name /mnt/cifs -o user=username,pass=password,uid=1000,gid=1000

sudo mount -t cifs //192.168.20.222/share with spaces in name /mnt/cifs -o credentials=/home/vladimir/.smbcredentials,vers=2.0,noperm
Если заданная версия Samba (например, SMB3) не поддерживается сервером, будет выведена ошибка "mount error(95): Operation not supported.".
Добавление параметра «nofail» пригодится, когда не известно, включен ли удалённый компьютер (сервер) или нет.
Монтирование сетевой папки во время загрузки (файл /etc/fstab)
Синтаксис строки в /etc/fstab:
//[URL]/[sharename] /mnt/[mountpoint] cifs vers=3.0,credentials=/home/username/.sharelogin,iocharset=utf8,file_mode=0777,dir_mode=0777,uid=[username],gid=[username],nofail 0 0где:
//[URL]/[sharename] — имя сервера и сетевой папки
/mnt/[mountpoint] — точка монтирования на локальном компьютере
vers=3.0 — принудительно установить версию протокола SMB3 (либо vers=2.0 — если клиент и сервер поддерживают лишь SMB2)
credentials=/home/username/.sharelogin — указание файла с именем пользователя, паролем и доменом для входа
iocharset=utf8 — прямое указание набора символов utf8 (не обязательно, если без него работает)
file_mode=0777,dir_mode=0777 — права доступа при выполнении mount
uid=[username],gid=[username] — данные uid и gid из результата вывода команды cat /etc/passwd | grep username
nofail — загрузка ОС будет продолжена даже в случае недоступности сервера URL
Другие параметры:
defaults — включает опции rw, suid, dev, exec, auto, nouser, and async. Обычно идёт первой, т.к. можно переопределить отдельные опции в строке позднее, например: defaults, noexec, ro — нет исполнения, только чтение.
rw — очевидно, чтение-запись со стороны клиента (является противоположностью ro — только чтение (защита от записи).
suid — запрещает использование бит полномочий SUID (Set-User-IDentifier — установка идентификатора владельца) или SGID (Set-Group-IDentifier). Грубо говоря, запрещает передачу части прав при помощи битов SUID и SGID — права должны быть заданы явно.
auto — используется в /etc/fstab — разрешает автоматическое монтирование сетевых ресурсов при выполнении команды mount -a
noauto — запрет для fstab монтировать папку автоматически при выполнении команды mount -a.
nouser — прямой запрет на «ручное» монтирование всеми пользователями, кроме root (не влияет на монтирование во время загрузки ОС)
guest — для доступа к «гостевым» общим папкам, которые доступны по сети без указания имени пользователя и пароля.
async — запись данных в сетевую папку производится по мере возможности — значение по умолчанию. Повышает производительность.
sync — немедленная запись на удаленный компьютер (без использования буферов), не рекомендуется.
noperm — отключает встроенную в клиент проверку прав. Используют noperm в том случае, если права вроде бы есть, но создать файл на запись, например, программно, не получается, из-за несовместимости в реализации CIFS на клиенте и сервере.
noexec — прямой запрет запуска исполнимых файлов из сетевой папки
noatime — не обновлять время создания файла (повышает производительность, но понижает информативность)
nounix — отключение расширений Linux: не использовать символические ссылки. Используется, чтобы отключить символьные ссылки для обеспечения совместимости с Windows.
mfsymlinks — ключ для символьных ссылок в стиле Minshall+French. Этот стиль ссылок поддерживается Windows и Mac.
Примеры строки в fstab (где данные входа указаны в файле /etc/.smbcredentials):
//192.168.20.222/share_name rw,auto,nofail,credentials=/etc/.smbcredentials 0 0Если в /etc/hosts или локальном DNS сервере прописаны имена машин, вместо IP-адреса можно подключать общую папку по имени: //server/share .
Команда для монтирования на основе fstab:
sudo mount -aБудет перемонтированы все диски на основе /etc/fstab за исключением помеченных параметром «noauto».
Краткая информация по настройки Samba в Windows (протоколы SMB1, SMB2, SMB3)
Samba протокол имеет три версии 1, 2 и 3.
Протокол SMB1 включают, если в организации имеются машины под Windows XP. В остальных случаях стараются отключить SMB1 как небезопасный.
Включение и выключение в Windows 7 и Windows Server 2008r2 производится с помощью реестра, параметры
HKEY_LOCAL_MACHINESYSTEMCurrentControlSetservicesLanmanServerParameters
параметры типа DWORD
SMB1=0
SMB2=1
В Windows 8, Windows 10, 11, Windows Server 2012, 2016 и выше используется командлет PowerShell
Get-SmbServerConfiguration | select EnableSMB1Protocol,EnableSMB2Protocol
Set-SmbServerConfiguration -EnableSMB2Protocol $true
Указанные командлеты не работают в ранний версиях Windows 7 и Windows Server 2008r2.
Также, SMB3 не работает в Win7 — подробнее см. здесь — сайт winitpro.ru.
Ссылки:
- man mount.cifs