| title | description | ms.custom | ms.date | ms.service | ms.reviewer | ms.subservice | ms.topic | f1_keywords | helpviewer_keywords | ms.assetid | author | ms.author | monikerRange | ||||||||||
|---|---|---|---|---|---|---|---|---|---|---|---|---|---|---|---|---|---|---|---|---|---|---|---|
|
Create a Login | Microsoft Docs |
Learn how to create a login in SQL Server or Azure SQL Database by using SQL Server Management Studio or Transact-SQL. |
03/31/2022 |
sql |
security |
conceptual |
|
|
fb163e47-1546-4682-abaa-8c9494e9ddc7 |
VanMSFT |
vanto |
>=aps-pdw-2016||=azuresqldb-current||=azure-sqldw-latest||>=sql-server-2016||>=sql-server-linux-2017||=azuresqldb-mi-current |
[!INCLUDE SQL Server]
This article describes how to create a login in [!INCLUDEssnoversion] or Azure [!INCLUDEssSDS] by using SQL Server Management Studio (SSMS) or [!INCLUDEtsql]. A login is the identity of the person or process that is connecting to an instance of [!INCLUDEssNoVersion].
Background
A login is a security principal, or an entity that can be authenticated by a secure system. Users need a login to connect to [!INCLUDEssNoVersion]. You can create a login based on a Windows principal (such as a domain user or a Windows domain group) or you can create a login that isn’t based on a Windows principal (such as an [!INCLUDEssNoVersion] login).
[!NOTE]
To use [!INCLUDEssNoVersion] Authentication, the [!INCLUDEssDE] must use mixed mode authentication. For more information, see Choose an Authentication Mode.Azure SQL has introduced Azure Active Directory server principals (logins) to be used to authenticate to Azure SQL Database, Azure SQL Managed Instance, and Azure Synapse Analytics (dedicated SQL pools only).
As a security principal, permissions can be granted to logins. The scope of a login is the whole [!INCLUDEssDE]. To connect to a specific database on the instance of [!INCLUDEssNoVersion], a login must be mapped to a database user. Permissions inside the database are granted and denied to the database user, not the login. Permissions that have the scope of the whole instance of [!INCLUDEssNoVersion] (for example, the CREATE ENDPOINT permission) can be granted to a login.
[!NOTE]
When a login connects to [!INCLUDEssNoVersion], the identity is validated at the master database. Use contained database users to authenticate [!INCLUDEssNoVersion] and [!INCLUDEssSDS] connections at the database level. When using contained database users, a login is not necessary. A contained database is a database that is isolated from other databases and from the instance of [!INCLUDEssNoVersion] or [!INCLUDEssSDS] (and the master database) that hosts the database. [!INCLUDEssNoVersion] supports contained database users for both Windows and [!INCLUDEssNoVersion] authentication. When using [!INCLUDEssSDS], combine contained database users with database level firewall rules. For more information, see Contained Database Users — Making Your Database Portable.
Security
[!INCLUDEssNoVersion] requires ALTER ANY LOGIN or ALTER LOGIN permission on the server.
[!INCLUDEssSDS] requires membership in the loginmanager role.
Create a login using SSMS for SQL Server
-
In Object Explorer, expand the folder of the server instance in which you want to create the new login.
-
Right-click the Security folder, point to New, and select Login….
-
In the Login — New dialog box, on the General page, enter the name of a user in the Login name box. Alternately, select Search… to open the Select User or Group dialog box.
If you select Search…:
-
Under Select this object type, select Object Types… to open the Object Types dialog box and select any or all of the following: Built-in security principals, Groups, and Users. Built-in security principals and Users are selected by default. When finished, select OK.
-
Under From this location, select Locations… to open the Locations dialog box and select one of the available server locations. When finished, select OK.
-
Under Enter the object name to select (examples), enter the user or group name that you want to find. For more information, see Select Users, Computers, or Groups Dialog Box.
-
Select Advanced… for more advanced search options. For more information, see Select Users, Computers, or Groups Dialog Box — Advanced Page.
-
Select OK.
-
-
To create a login based on a Windows principal, select Windows authentication. This is the default selection.
-
To create a login that is saved on a [!INCLUDEssNoVersion] database, select SQL Server authentication.
-
In the Password box, enter a password for the new user. Enter that password again into the Confirm Password box.
-
When changing an existing password, select Specify old password, and then type the old password in the Old password box.
-
To enforce password policy options for complexity and enforcement, select Enforce password policy. For more information, see Password Policy. This is a default option when SQL Server authentication is selected.
-
To enforce password policy options for expiration, select Enforce password expiration. Enforce password policy must be selected to enable this checkbox. This is a default option when SQL Server authentication is selected.
-
To force the user to create a new password after the first time the login is used, select User must change password at next login. Enforce password expiration must be selected to enable this checkbox. This is a default option when SQL Server authentication is selected.
-
-
To associate the login with a stand-alone security certificate, select Mapped to certificate and then select the name of an existing certificate from the list.
-
To associate the login with a stand-alone asymmetric key, select Mapped to asymmetric key to, and then select the name of an existing key from the list.
-
To associate the login with a security credential, select the Mapped to Credential check box, and then either select an existing credential from the list or select Add to create a new credential. To remove a mapping to a security credential from the login, select the credential from Mapped Credentials and select Remove. For more information about credentials in general, see Credentials (Database Engine).
-
From the Default database list, select a default database for the login. Master is the default for this option.
-
From the Default language list, select a default language for the login.
-
Select OK.
Additional options
The Login — New dialog box also offers options on four additional pages: Server Roles, User Mapping, Securables, and Status.
Server roles
[!NOTE]
These server roles are not available for SQL Database.
The Server Roles page lists all possible roles that can be assigned to the new login. The following options are available:
bulkadmin check box
Members of the bulkadmin fixed server role can run the BULK INSERT statement.
dbcreator check box
Members of the dbcreator fixed server role can create, alter, drop, and restore any database.
diskadmin check box
Members of the diskadmin fixed server role can manage disk files.
processadmin check box
Members of the processadmin fixed server role can terminate processes running in an instance of the [!INCLUDEssDE].
public check box
All SQL Server users, groups, and roles belong to the public fixed server role by default.
securityadmin check box
Members of the securityadmin fixed server role manage logins and their properties. They can GRANT, DENY, and REVOKE server-level permissions. They can also GRANT, DENY, and REVOKE database-level permissions. Additionally, they can reset passwords for [!INCLUDEssNoVersion] logins.
serveradmin check box
Members of the serveradmin fixed server role can change server-wide configuration options and shut down the server.
setupadmin check box
Members of the setupadmin fixed server role can add and remove linked servers, and they can execute some system stored procedures.
sysadmin check box
Members of the sysadmin fixed server role can perform any activity in the [!INCLUDEssDE].
User mapping
The User Mapping page lists all possible databases and the database role memberships on those databases that can be applied to the login. The databases selected determine the role memberships that are available for the login. The following options are available on this page:
Users mapped to this login
Select the databases that this login can access. When you select a database, its valid database roles are displayed in the Database role membership for: database_name pane.
Map
Allow the login to access the databases listed below.
Database
Lists the databases available on the server.
User
Specify a database user to map to the login. By default, the database user has the same name as the login.
Default Schema
Specifies the default schema of the user. When a user is first created, its default schema is dbo. It’s possible to specify a default schema that does not yet exist. You can’t specify a default schema for a user that is mapped to a Windows group, a certificate, or an asymmetric key.
Guest account enabled for: database_name
Read-only attribute indicating whether the Guest account is enabled on the selected database. Use the Status page of the Login Properties dialog box of the Guest account to enable or disable the Guest account.
Database role membership for: database_name
Select the roles for the user in the specified database. All users are members of the public role in every database and can’t be removed. For more information about database roles, see Database-Level Roles.
Securables
The Securables page lists all possible securables and the permissions on those securables that can be granted to the login. The following options are available on this page:
Upper Grid
Contains one or more items for which permissions can be set. The columns that are displayed in the upper grid vary depending on the principal or securable.
To add items to the upper grid:
-
Select Search.
-
In the Add Objects dialog box, select one of the following options: Specific objects…, All objects of the types…, or The serverserver_name. Select OK.
[!NOTE]
Selecting The serverserver_name automatically fills the upper grid with all of that servers’ securable objects. -
If you select Specific objects…:
-
In the Select Objects dialog box, under Select these object types, select Object Types….
-
In the Select Object Types dialog box, select any or all of the following object types: Endpoints, Logins, Servers, Availability Groups, and Server roles. Select OK.
-
Under Enter the object names to select (examples), select Browse….
-
In the Browse for Objects dialog box, select any of the available objects of the type that you selected in the Select Object Types dialog box, and then select OK.
-
In the Select Objects dialog box, select OK.
-
-
If you select All objects of the types…, in the Select Object Types dialog box, select any or all of the following object types: Endpoints, Logins, Servers, Availability Groups, and Server roles. Select OK.
Name
The name of each principal or securable that is added to the grid.
Type
Describes the type of each item.
Explicit Tab
Lists the possible permissions for the securable that are selected in the upper grid. Not all options are available for all explicit permissions.
Permissions
The name of the permission.
Grantor
The principal that granted the permission.
Grant
Select to grant this permission to the login. Clear to revoke this permission.
With Grant
Reflects the state of the WITH GRANT option for the listed permission. This box is read-only. To apply this permission, use the GRANT statement.
Deny
Select to deny this permission to the login. Clear to revoke this permission.
Status
The Status page lists some of the authentication and authorization options that can be configured on the selected [!INCLUDEssNoVersion] login.
The following options are available on this page:
Permission to connect to database engine
When you work with this setting, you should think of the selected login as a principal that can be granted or denied permission on a securable.
Select Grant to grant CONNECT SQL permission to the login. Select Deny to deny CONNECT SQL to the login.
Login
When you work with this setting, you should think of the selected login as a record in a table. Changes to the values listed here will be applied to the record.
A login that has been disabled continues to exist as a record. But if it tries to connect to [!INCLUDEssNoVersion], the login won’t be authenticated.
Select this option to enable or disable this login. This option uses the ALTER LOGIN statement with either the ENABLE or DISABLE option.
SQL Server Authentication
The check box Login is locked out is only available if the selected login connects using [!INCLUDEssNoVersion] Authentication and the login has been locked out. This setting is read-only. To unlock a login that is locked out, execute ALTER LOGIN with the UNLOCK option.
Create a login using Windows Authentication with T-SQL
-
In Object Explorer, connect to an instance of [!INCLUDEssDE].
-
On the Standard bar, select New Query.
-
Copy and paste the following example into the query window and select Execute.
-- Create a login for SQL Server by specifying a server name and a Windows domain account name.

CREATE LOGIN [<domainName><loginName>] FROM WINDOWS;
GO
Create a login using SQL Server Authentication with T-SQL
-
In Object Explorer, connect to an instance of [!INCLUDEssDE].
-
On the Standard bar, select New Query.
-
Copy and paste the following example into the query window and select Execute.
-- Creates the user "shcooper" for SQL Server using the security credential "RestrictedFaculty"
-- The user login starts with the password "Baz1nga," but that password must be changed after the first login.

CREATE LOGIN shcooper
   WITH PASSWORD = 'Baz1nga' MUST_CHANGE,
   CREDENTIAL = RestrictedFaculty;
GO
For more information, see CREATE LOGIN (Transact-SQL).
Follow up: Steps to take after you create a login
After creating a login, the login can connect to [!INCLUDEssNoVersion], but doesn’t necessarily have sufficient permission to perform any useful work. The following list provides links to common login actions.
-
To have the login join a role, see Join a Role.
-
To authorize a login to use a database, see Create a Database User.
-
To grant a permission to a login, see Grant a Permission to a Principal.
See also
- Security Center for SQL Server Database Engine and Azure SQL Database
- Azure Active Directory server principals (logins)
- Tutorial: Create and utilize Azure Active Directory server logins

This SQL Server tutorial explains how to use the SQL Server CREATE LOGIN statement with syntax and examples.
Description
The CREATE LOGIN statement creates an identity used to connect to a SQL Server instance. The Login is then mapped to a database user (so before creating a user in SQL Server, you must first create a Login).
There are four types of Logins that you can create in SQL Server:
- You can create a Login using Windows Authentication.
- You can create a Login using SQL Server Authentication.
- You can create a Login from a certificate.
- You can create a Login from an asymmetric key.
Syntax
The syntax for the CREATE LOGIN statement using Windows Authentication is:
CREATE LOGIN [domain_namelogin_name]
FROM WINDOWS
[ WITH DEFAULT_DATABASE = database_name
| DEFAULT_LANGUAGE = language_name ];
OR
The syntax for the CREATE LOGIN statement using SQL Server Authentication is:
CREATE LOGIN login_name
WITH PASSWORD = { 'password' | hashed_password HASHED } [ MUST_CHANGE ]
[ , SID = sid_value
  | DEFAULT_DATABASE = database_name
  | DEFAULT_LANGUAGE = language_name
  | CHECK_EXPIRATION = { ON | OFF }
  | CHECK_POLICY = { ON | OFF }
  | CREDENTIAL = credential_name ];
OR
The syntax for the CREATE LOGIN statement using a certificate is:
CREATE LOGIN login_name
FROM CERTIFICATE certificate_name;
OR
The syntax for the CREATE LOGIN statement using an asymmetric key is:
CREATE LOGIN login_name
FROM ASYMMETRIC KEY asym_key_name;
Parameters or Arguments
- domain_name
- The name of the Windows domain account.
- login_name
- The name of the Login.
- database_name
- The default database to assign to the Login.
- language_name
- The default language to assign to the Login.
- CHECK_EXPIRATION
- By default, it set to OFF. This option determines whether password expiration policy is enforced. You must specifiy CHECK_EXPIRATION = ON when you use the MUST_CHANGE option.
- password
- The password to assign to the Login.
- hashed_password
- The hashed value of the password to assign to the Login.
- MUST_CHANGE
- It is used when you want to force the password to be changed the first time that the Login is used.
- sid_value
- The GUID of the login. If this parameter is omitted, SQL Server will assign a GUID to the Login.
- credential_name
- The name of a credential to assign to the Login.
- certificate_name
- The name of the certificate to assign to the Login.
- asym_key_name
- The name of an asymmetric key to assign to the Login.
Note
- See also the ALTER LOGIN statement and the DROP LOGIN statement.
Example — Windows Authentication
Let’s look at how to create a Login using Windows Authentication in SQL Server (Transact-SQL).
For example:
CREATE LOGIN [test_domaintechonthenet]
FROM WINDOWS;
This CREATE LOGIN example would create a new Login called [test_domaintechonthenet] that uses Windows authentication.
Example — SQL Server Authentication
Next, let’s look at how to create a Login using SQL Server Authentication.
For example:
CREATE LOGIN techonthenet
WITH PASSWORD = 'pwd123';
This CREATE LOGIN example would create a new Login called techonthenet that uses SQL Server authentication and has a password of ‘pwd123’.
If we want to force the password to be changed the first time that the Login is used, we could modify our example as follows:
CREATE LOGIN techonthenet
WITH PASSWORD = 'pwd123' MUST_CHANGE,
CHECK_EXPIRATION = ON;
This example uses the MUST_CHANGE option to force the password to be changed on the first login. It is important to note that the MUST_CHANGE option cannot be used when the CHECK_EXPIRATION is OFF.
Therefore, this example also specifies «CHECK_EXPIRATION = ON». Otherwise, the CREATE LOGIN statement would raise an error.
Example — Certificate
Let’s look at how to create a Login from a certificate in SQL Server (Transact-SQL).
For example:
CREATE LOGIN techonthenet
FROM CERTIFICATE certificate1;
This CREATE LOGIN example would create a new Login called techonthenet that uses a certificate called certificate1.
Example — Asymmetric Key
Let’s look at how to create a Login from an asymmetric key in SQL Server (Transact-SQL).
For example:
CREATE LOGIN techonthenet
FROM ASYMMETRIC KEY asym_key1;
This CREATE LOGIN example would create a new Login called techonthenet that uses an asymmetric key called asym_key1.
Всем привет! Сейчас мы с Вами рассмотрим примеры создания и удаления пользователей в СУБД Microsoft SQL Server как с использованием инструкций Transact-SQL, так и с использованием среды Management Studio.

Процесс создания пользователей в MS SQL Server включает два этапа:
- Создание имени входа на SQL Server. Данное имя необходимо, для того чтобы предоставить пользователю возможность подключиться к экземпляру SQL Server;
- Создание пользователя базы данных. В данном случае мы уже предоставляем пользователю разрешения на объекты базы данных.
Примечание! В качестве SQL сервера у меня для примера будет выступать версия Microsoft SQL Server 2012 Express. На данном SQL сервере создана тестовая база данных Test.
Содержание
- Создание имени входа на MS SQL Server
- Создание имени входа с использованием среды SQL Server Management Studio
- Создание имени входа с использованием языка Transact-SQL
- Создание имени входа на SQL Server с проверкой подлинности Windows
- Отключение и включение имен входа в MS SQL Server
- Создание пользователя базы данных в MS SQL Server
- Создание пользователя базы данных с помощью Management Studio
- Создание пользователя базы данных с помощью языка Transact-SQL
- Удаление пользователя базы данных и имени входа в MS SQL Server
Прежде чем приступать к созданию имени входа на SQL сервер необходимо определиться с методом аутентификации. Существует два варианта:
- Проверка подлинности Windows – это когда имя входа может идентифицировать пользователя как учетную запись Windows или как члена группы Windows (в том числе и доменные учетные записи, и группы);
- Проверка подлинности SQL Server. В данном случае имя входа существует только в SQL Server.
Примечание! Рекомендовано по возможности использовать проверку подлинности Windows. Проверку подлинности SQL Server можно использовать тогда, когда необходимо создать служебное или тестовое имя входа.
Давайте рассмотрим пару примеров создания имени входа на SQL сервер. Сначала мы это сделаем с помощью среды SQL Server Management Studio, а затем с использованием языка Transact-SQL.
Создание имени входа с использованием среды SQL Server Management Studio
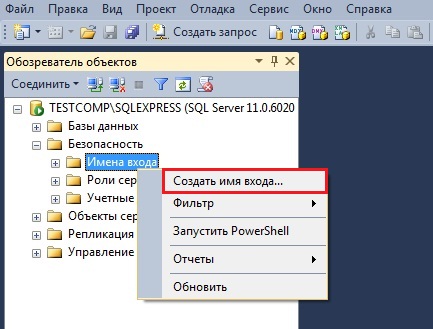
Запускаем Management Studio, затем в обозревателе объектов находим пункт «Безопасность», раскрываем его плюсиком, кликаем правой кнопкой мыши по пункту «Имена входа» и выбираем пункт «Создать имя входа».
Далее для примера давайте создадим тестовое имя входа с проверкой подлинности SQL Server. Мы указываем имя входа, придумываем пароль и подтверждаем его. Также мы можем отметить несколько опций, например, использование политики паролей, база данных по умолчанию, язык по умолчанию и другие.
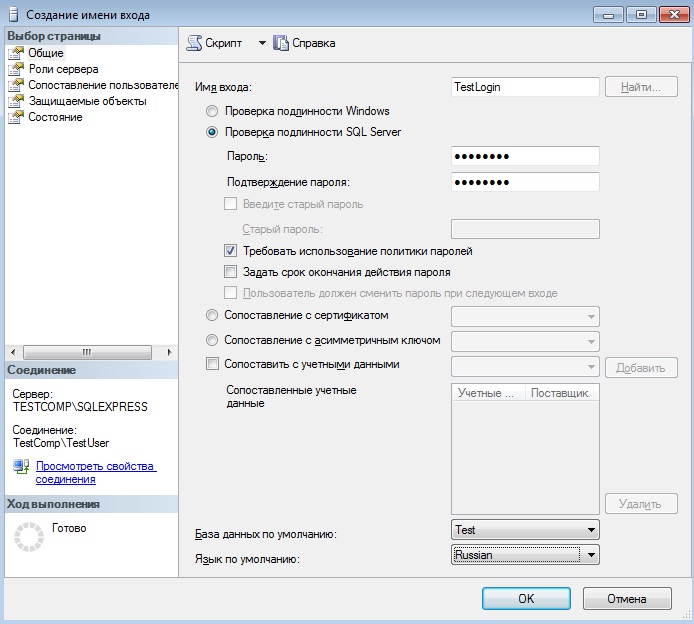
Затем нажимаем на кнопку «ОК», после чего будет создано имя входа TestLogin. По умолчанию данное имя входа будет включено, и оно будет иметь права роли сервера «public».
Создание имени входа с использованием языка Transact-SQL
Для того чтобы создать имя входа на языке Transact-SQL необходимо в Management Studio открыть редактор запросов и выполнить следующую инструкцию (она делает ровно то же самое, что и наши действия выше в графическом интерфейсе Management Studio).

   CREATE LOGIN [TestLogin]
        WITH PASSWORD=N'Pa$$w0rd',
        DEFAULT_DATABASE=[Test],
        DEFAULT_LANGUAGE=[русский],
        CHECK_EXPIRATION=OFF,
        CHECK_POLICY=ON
   GO
Другими словами для создания имени входа в SQL сервер используется инструкция CREATE LOGIN.
Создание имени входа на SQL Server с проверкой подлинности Windows
Для того чтобы создать имя входа с проверкой подлинности Windows выполните следующую SQL инструкцию:
   CREATE LOGIN [ComputerNameNameUser]
        FROM WINDOWS
        WITH DEFAULT_DATABASE=[Test],
        DEFAULT_LANGUAGE=[русский];
   GO
Где,

- ComputerNameNameUser – это Имя компьютераИмя пользователя;
- FROM WINDOWS – указывает, что будет использоваться проверка подлинности Windows;
- WITH DEFAULT_DATABASE=[Test] – база данных по умолчанию;
- DEFAULT_LANGUAGE=[русский] – язык по умолчанию.
Отключение и включение имен входа в MS SQL Server
В случае необходимости Вы можете временно отключить имя входа, для того чтобы пользователю заблокировать доступ к серверу.
   --Отключение
   ALTER LOGIN TestLogin DISABLE;
   --Включение
   ALTER LOGIN TestLogin ENABLE;
Создание пользователя базы данных в MS SQL Server
После того как имя входа создано, можно переходить к созданию пользователя базы данных, т.е. сопоставлению пользователя с именем входа.
Давайте создадим пользователя TestLogin также двумя способами, т.е. с помощью Management Studio и языка T-SQL.
Создание пользователя базы данных с помощью Management Studio
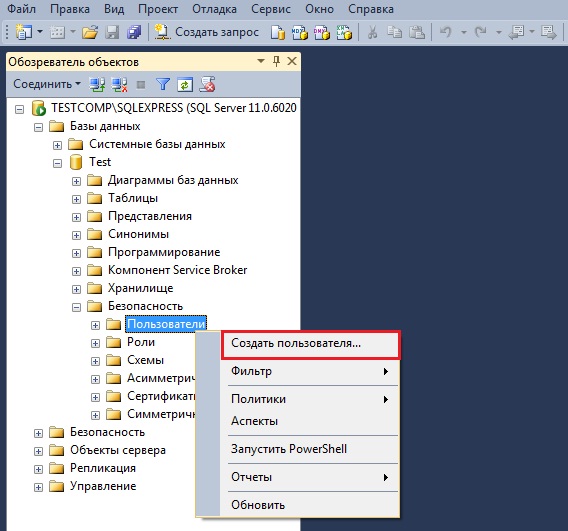
Открываем Management Studio, в обозревателе объектов находим нужную базу данных и открываем ее плюсиком. Затем также плюсиком открываем пункт «Безопасность» и кликаем по папке «Пользователи» правой кнопкой мыши и выбираем пункт «Создать пользователя».
Далее вводим имя пользователя и имя входа, которое соответствует данному пользователю (в моем случае имена совпадают), а также указываем схему по умолчанию (если не указывать, то присвоится схема dbo).
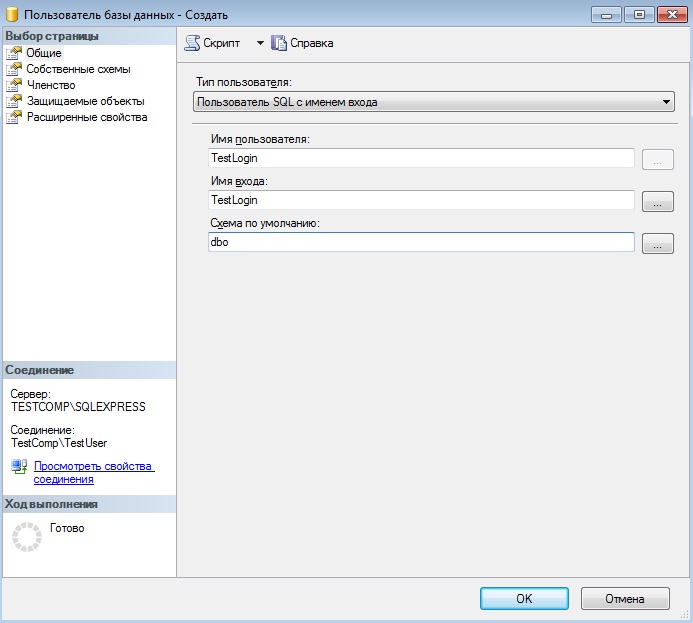
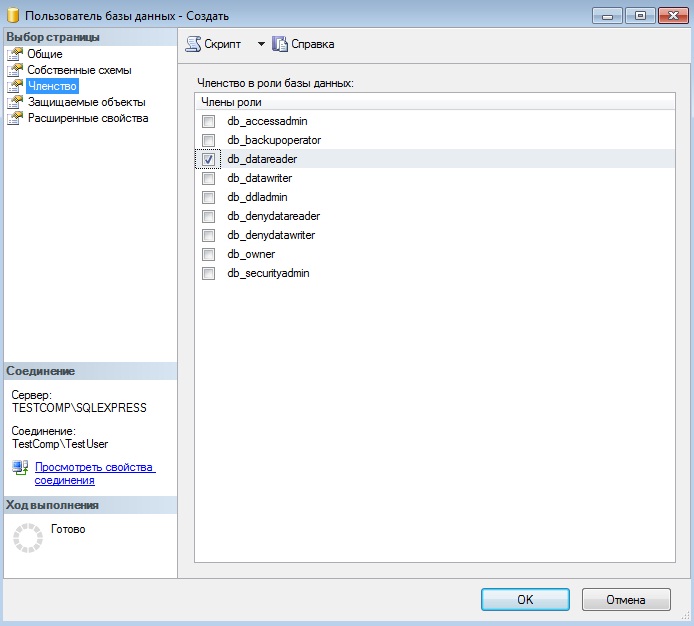
Также давайте сразу отметим роль базы данных, которую будет иметь данный пользователь. На странице «Членство» я поставил галочку напротив роли db_datareader, т.е. пользователь будет иметь права на чтение данных из пользовательских таблиц. Жмем «ОК».
Создание пользователя базы данных с помощью языка Transact-SQL
Следующая инструкция T-SQL создает пользователя базы данных (схема по умолчанию dbo) и назначает ему роль db_datareader, т.е. делает то же самое, что и мы чуть ранее в графическом интерфейсе Management Studio.
   USE Test
   GO
   CREATE USER [TestLogin] FOR LOGIN [TestLogin] WITH DEFAULT_SCHEMA=[dbo]
   GO
   ALTER ROLE [db_datareader] ADD MEMBER [TestLogin];
   GO
Таким образом, инструкция CREATE USER используется для создания пользователя базы данных.
Удаление пользователя базы данных и имени входа в MS SQL Server
Для того чтобы удалить пользователя базы данных можно написать простую SQL инструкцию, например
DROP USER Testlogin;
Или использовать графический инструмент Management Studio, т.е. в обозревателе объектов, в нужной базе данных выбираем «Безопасность -> Пользователи» и щелкаем правой кнопкой мыши по пользователю, которого необходимо удалить, и выбираем «Удалить».
Примечание! Пользователи, которые владеют защищаемыми объектами, не могут быть удалены из базы данных.
Для удаления имени входа можно также использовать и графический инструмент Management Studio (т.е. «Безопасность -> Имена входа» правой кнопкой мыши по имени, а затем нажать на пункт «Удалить») и инструкцию Transact-SQL т.е.
DROP LOGIN TestLogin;
Примечание! Удалить текущее имя входа нельзя, как и имя входа, владеющее любым защищаемым объектом уровня сервера или заданием агента SQL Server. Также имя входа нельзя удалить, если в данный момент пользователь подключен к системе. Удалить имя входа без удаления сопоставленного пользователя базы данных можно, но это приведет к появлению пользователей, утративших связь с учетными записями.
Заметка! Если Вы хотите освоить язык SQL и T-SQL, рекомендую посмотреть мои видеокурсы по T-SQL.
На этом у меня все надеюсь, материал был Вам полезен, пока!
В этом учебном пособии вы узнаете, как использовать CREATE LOGIN в SQL Server с синтаксисом и примерами.
Описание
Оператор CREATE LOGIN создает идентификатор, используемый для подключения к экземпляру SQL Server. Login затем сопоставляется с пользователем базы данных (поэтому перед созданием пользователя на SQL Server вы должны сначала создать Login).
Существует четыре типа логинов, которые можно создать в SQL Server:
- Вы можете создать Login с использованием проверки подлинности Windows.
- Вы можете создать Login с использованием проверки подлинности SQL Server.
- Вы можете создать Login из сертификата.
- Вы можете создать Login из асимметричного ключа.
Синтаксис
Синтаксис оператора CREATE LOGIN с использованием проверки подлинности Windows:
CREATE LOGIN [domain_namelogin_name]
FROM WINDOWS
[ WITH DEFAULT_DATABASE = database_name
| DEFAULT_LANGUAGE = language_name ];
ИЛИ Синтаксис оператора CREATE LOGIN с использованием проверки подлинности SQL Server:
CREATE LOGIN login_name
WITH PASSWORD = { ‘password’ | hashed_password HASHED } [ MUST_CHANGE ]
[ , SID = sid_value
| DEFAULT_DATABASE = database_name
| DEFAULT_LANGUAGE = language_name
| CHECK_EXPIRATION = { ON | OFF }
| CHECK_POLICY = { ON | OFF }
| CREDENTIAL = credential_name ];
ИЛИ
Синтаксис оператора CREATE LOGIN с использованием сертификата:
CREATE LOGIN login_name
FROM CERTIFICATE certificate_name;
ИЛИ
Синтаксис оператора CREATE LOGIN с использованием асимметричного ключа:
CREATE LOGIN login_name
FROM ASYMMETRIC KEY asym_key_name;
Параметры или аргументы
domain_name — имя учетной записи домена Windows.
login_name – наименование login.
database_name — база данных по умолчанию для которой назначен Login.
language_name — язык по умолчанию для назначения Login.
CHECK_EXPIRATION — по умолчанию он установлен в положение OFF. Этот параметр определяет, будет ли применяться политика истечения срока действия пароля. Вы должны указать CHECK_EXPIRATION = ON, когда вы используете опцию MUST_CHANGE.
password — пароль для Login.
hashed_password — хешированное значение пароля для Login.
MUST_CHANGE — используется, когда вы хотите принудительно изменить пароль при первом входе в систему.
sid_value — GUID логина. Если этот параметр опущен, SQL Server назначит идентификатор GUID для входа.
credential_name — имя учетных данных для присвоения имени входа.
CERTIFICATE_NAME — имя сертификата для присвоения имени.
asym_key_name — имя асимметричного ключа для назначения для входа.
Примечание
- См. также оператор ALTER LOGIN и оператор DROP LOGIN.
Пример — проверка подлинности Windows
Рассмотрим, как создать вход с использованием проверки подлинности Windows в SQL Server (Transact-SQL).
Например:
|
CREATE LOGIN [my_domainadmin] FROM WINDOWS; |
Этот пример CREATE LOGIN создаст новый Login, называемый [my_domainadmin], который использует проверку подлинности Windows.
Затем давайте посмотрим, как создать Login с помощью проверки подлинности SQL Server.
Например:
|
CREATE LOGIN admin WITH PASSWORD = ‘my_pass’; |
Этот пример CREATE LOGIN создаст новый Login, называемый admin, который использует аутентификацию SQL Server и имеет пароль ‘my_pass’.
Если мы хотим, чтобы пароль был изменен при первом входе в систему, то мы могли бы изменить наш пример следующим образом:
|
CREATE LOGIN admin WITH PASSWORD = ‘my_pass’ MUST_CHANGE, CHECK_EXPIRATION = ON; |
В этом примере используется параметр MUST_CHANGE, чтобы принудительно изменить пароль при первом входе в систему. Важно отметить, что опция MUST_CHANGE не может использоваться, когда CHECK_EXPIRATION выключен.
Поэтому в этом примере также указывается «CHECK_EXPIRATION = ON». В противном случае оператор CREATE LOGIN вызовет ошибку.
Пример — сертификат
Давайте посмотрим, как создать вход из сертификата в SQL Server (Transact-SQL).
Например:
|
CREATE LOGIN admin FROM CERTIFICATE certificate1; |
Этот пример CREATE LOGIN создаст новый Login, называемый admin, который использует сертификат под названием certificate1.
Пример — Асимметричный ключ
Давайте посмотрим, как создать вход с использованием асимметричного ключа в SQL Server (Transact-SQL).
|
CREATE LOGIN admin FROM ASYMMETRIC KEY asym_key1; |
Этот пример CREATE LOGIN создаст новый Login, называемый admin, который использует асимметричный ключ, называемый asym_key1.
Summary: in this tutorial, you’ll learn how to use the SQL Server CREATE LOGIN statement to create a login.
Introduction to the SQL Server CREATE LOGIN statement
Before creating a user that accesses the databases in an SQL Server, you need to follow these steps:
- First, create a login for SQL Server.
- Second, create a user and map the user with the login.
To create a login, you use the CREATE LOGIN statement. The following shows the basic syntax of the CREATE LOGIN statement:
Code language: SQL (Structured Query Language) (sql)
CREATE LOGIN login_name WITH PASSWORD = password;
In this syntax:
- First, specify the login name after the
CREATE LOGINkeywords. - Second, specify the password in the
WITH PASSWORDclause.
The password is case-sensitive. It needs to be between 8 and 128 characters and can include a-z, A-Z, 0-9, and most non-alphanumeric characters.
Notice that the password cannot contain the login_name or single quotes.
Internally, SQL Server stores the hash of the password using SHA-512. When you migrate a database, you can reuse the hashed passwords of the logins from the legacy database in the new database.
To create a login with a hashed password, you specify the hashed password with the HASHED keyword like this:
Code language: SQL (Structured Query Language) (sql)
CREATE LOGIN login_name WITH PASSWORD = hashed_password HASHED;
For security reasons, you should use the hashed password for database migration purposes only.
SQL Server CREATE LOGIN statement example
The following statement creates a new login called bob with the password Ebe2di68.:
Code language: SQL (Structured Query Language) (sql)
CREATE LOGIN bob WITH PASSWORD='Ebe2di68.';
The login bob can log in to the SQL Server, and view the database names, but cannot access any databases.
To view all the logins of an SQL Server instance, you use the following query:
Code language: SQL (Structured Query Language) (sql)
SELECT sp.name AS login, sp.type_desc AS login_type, CASE WHEN sp.is_disabled = 1 THEN 'Disabled' ELSE 'Enabled' END AS status, sl.password_hash, sp.create_date, sp.modify_date FROM sys.server_principals sp LEFT JOIN sys.sql_logins sl ON sp.principal_id = sl.principal_id WHERE sp.type NOT IN ('G', 'R') ORDER BY create_date DESC;
Output:

SQL Server CREATE LOGIN statement options
Let’s discuss more options for the CREATE LOGIN statement.
The CHECK_POLICY option
The CHECK_POLICY option allows you to specify that the Windows password policies of the server on which the SQL Server is running should be applied to the login. The CHECK_POLICY can be ON or OFF. Its default value is ON.
The following shows the CREATE LOGIN statement with the CHECK_POLICY option:
Code language: SQL (Structured Query Language) (sql)
CREATE LOGIN login_name WITH PASSWORD = password, CHECK_POLICY = {ON | OFF};
Note that the CHECK_POLICY option is applied to SQL Server logins only.
The CHECK_EXPIRATION option
The CHECK_EXPIRATION option determines whether the password expiration policy should be enforced on this login. The CHECK_EXPIRATION can be ON or OFF. The default value is OFF.
The following shows the CREATE LOGIN statement with the CHECK_EXPIRATION option:
Code language: SQL (Structured Query Language) (sql)
CREATE LOGIN login_name WITH PASSWORD = password, CHECK_EXPIRATION = {ON | OFF};
Note that the CHECK_EXPIRATION option is applied to SQL Server logins only.
The MUST_CHANGE option
To prompt the users for a new password the first time they log in, you use the MUST_CHANGE option. When you use the MUST_CHANGE option, the CHECK_POLICY and CHECK_EXPIRATION must be ON. Otherwise, the statement will fail.
Code language: SQL (Structured Query Language) (sql)
CREATE LOGIN login_name WITH PASSWORD = password MUST_CHANGE, CHECK_POLICY=ON, CHECK_EXPIRATION=ON;
For example:
Code language: SQL (Structured Query Language) (sql)
CREATE LOGIN alice WITH PASSWORD = 'UcxSj12.' MUST_CHANGE, CHECK_POLICY=ON, CHECK_EXPRIATION=ON;
In this example, SQL Server will prompt the user who uses the alice login name for a new password the first time the user logs in.
Note that the MUST_CHANGE option is applied to SQL Server logins only.
Creating a login from a Windows domain account
To create a login from a Windows domain account, you use the following statement:
Code language: SQL (Structured Query Language) (sql)
CREATE LOGIN domain_namelogin_name FROM WINDOWS;
The following example creates a login from the sqlservertutorialpeter windows domain account:
Code language: SQL (Structured Query Language) (sql)
CREATE LOGIN sqlservertutorialpeter FROM WINDOWS;
Note that the sqlservertutorialpeter windows domain account must exist.
Summary
- Use the
CREATE LOGINstatement to create a login for SQL Server.
Improve Article
Save Article
Improve Article
Save Article
A login is an user account that you can use to access the SQL server. Logins are attached to users by the security identifier (SID).
Permissions to create login :
Users with membership in the security-admin or sysadmin fixed server role can create logins on the server.
- Creating a login with a password :
Syntax –
CREATE LOGIN <loginname> WITH PASSWORD = '<Password>';
Note : Passwords are case-sensitive.
Example to create a login for a particular user with password.
CREATE LOGIN geeks
WITH PASSWORD = 'gEe@kF0rG##ks';
- Creating a login with a password that has got to be changed :
Syntax –
CREATE LOGIN <loginname> WITH PASSWORD = '<Password>'
MUST_CHANGE, CHECK_EXPIRATION = ON;
Example to create a login for a user with password.
CREATE LOGIN geeks WITH PASSWORD = 'gEe@kF0rG##ks'
MUST_CHANGE, CHECK_EXPIRATION = ON;
Note –
The MUST_CHANGE option requires users to change this password the first time they connect to the server. The MUST_CHANGE option can’t be used when CHECK_EXPIRATION is OFF. - Creating a login from a Windows domain account :
Syntax –
CREATE LOGIN [<domainname><loginname>]
FROM WINDOWS;
Example to create a login from a Windows domain account.
CREATE LOGIN [ADgeeks] FROM WINDOWS;
- Creating a login from a SID :
Syntax –
CREATE LOGIN <loginname>
WITH PASSWORD = '<Password>',
SID = 0x241C11948AEEB749B0D22646DB1AXXXX;
Example to create a login from SID.
CREATE LOGIN geeks
WITH PASSWORD = 'gEe@kF0rG##ks',
SID = 0x241C11948AEEB749B0D22646DB1AXXXX;
- Creating a login with multiple arguments
Syntax –
CREATE LOGIN <loginname>
WITH PASSWORD = '<Password>',
DEFAULT_DATABASE = <Databasename>,
CHECK_POLICY = OFF,
CHECK_EXPIRATION = OFF ;
Example to create login using multiple arguments together.
CREATE LOGIN geeks WITH PASSWORD = 'gEe@kF0rG##ks'
DEFAULT_DATABASE = GeeksDB,
CHECK_POLICY = OFF,
CHECK_EXPIRATION = OFF ;
Note :
A combination of CHECK_POLICY = OFF and CHECK_EXPIRATION = ON is not supported.