There are multiple editions of SQL Server 2014 (Enterprise Edition, Enterprise Core Edition, Business Intelligence Edition, Standard Edition, Web Edition, Express and Developer Edition). SQL Server 2014 has a free edition – Express and while the server itself lacks some options that other editions have, SQL Server 2014 Management Studio is the same and can be used with each of these.
Obtaining the installation file
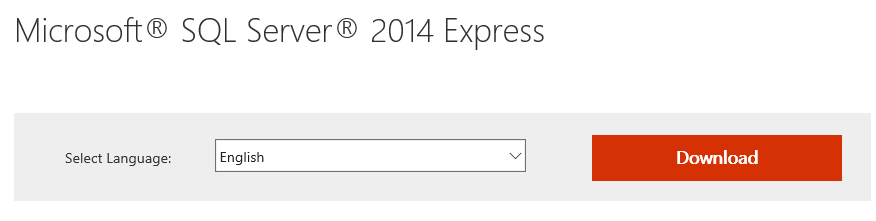
The entire SQL Server Express edition can be downloaded from this link, however, for downloading only SQL Server 2014 Management Studio, clicking the Download button will present a list of all files the complete installation is contained of, but you’ll need only one of these:
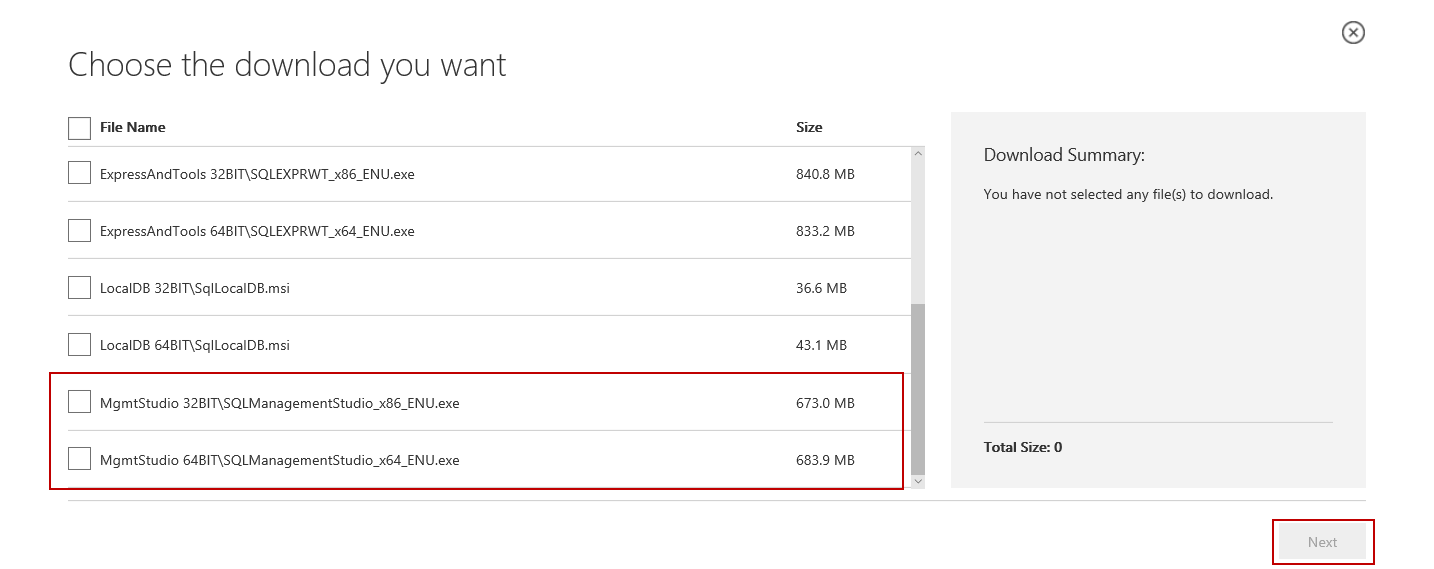
The bottom two files are MgmtStudio 32BITSQLManagementStudio_x86_ENU.exe and MgmtStudio 64BITSQLManagementStudio_x64_ENU.exe and you should choose one of these according to the operating system running on the machine(32 or 64 bit), on which SQL Server Management Studio will be installed.
If you aren’t sure which operating system type is installed on your machine, you can check it by right-clicking in My Computer>Properties. The current operating system will be specified under System type.
After selecting the desired file, click on the Next button in the bottom-right corner and the download will begin.
Installation
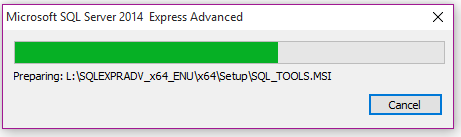
The downloaded file should be in .exe format with size of approximately 650 MB. Double-click on it to run the installation:
-
The window for choosing directory to which the extracted files will be saved is shown. After choosing the directory click the Ok button and extraction will begin
-
When the extraction is completed, it’ll take a couple of seconds until the SQL Server 2014 setup processes the current operation. After that, the following window will open:

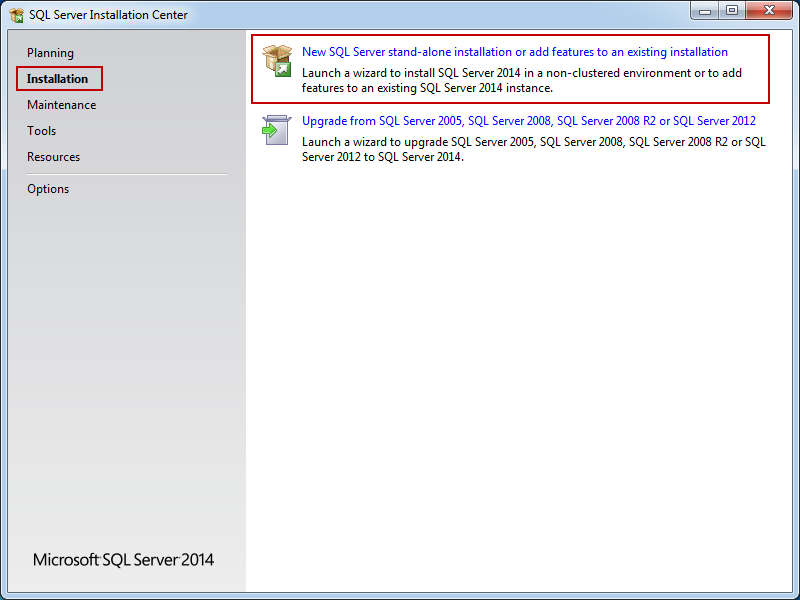
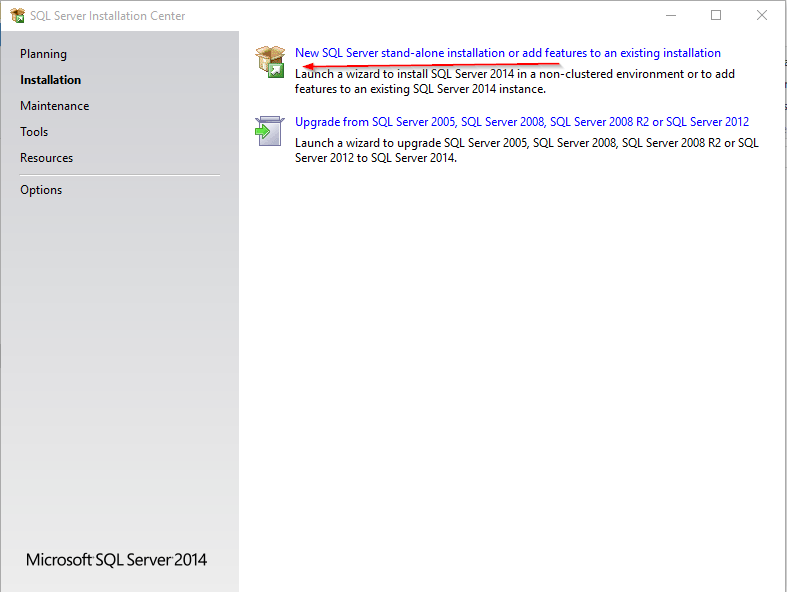
This is the primary installation screen and the other SQL tools installation can be started here as well. If not already selected – select the Installation tab in the top-left corner of the SQL Server Installation Center.
For installing SQL Server Management Studio alone, select the New SQL Server stand-alone installation or add features to an existing installation option (as in the screenshots above).
Once the installation wizard starts the SQL Server Installation Center can be closed.
-
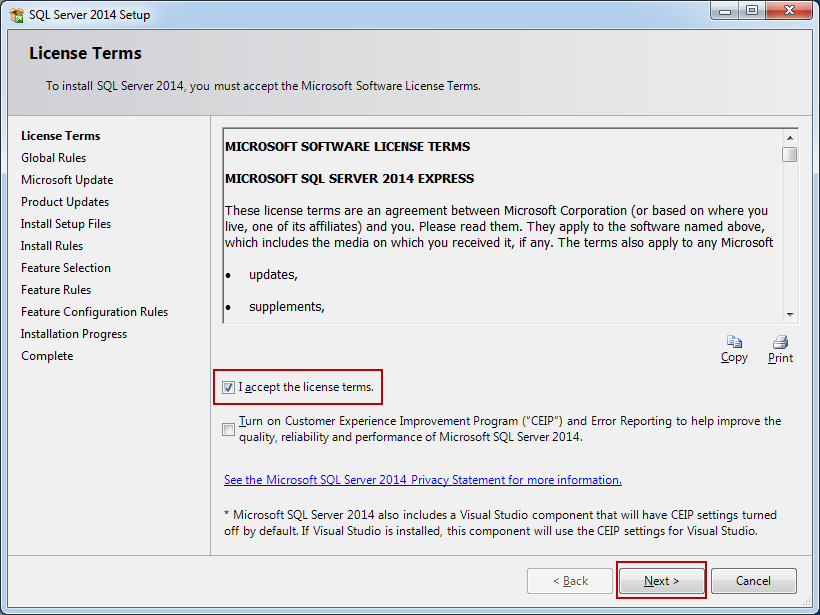
It’ll take a couple of seconds for the setup rules to be checked (pre-requisites on the operating system). If all the requirements are meet, the SQL Server 2014 setup will start with the License Terms tab as a first step:
To proceed with the installation, read the license terms and then check the I accept the license terms checkbox. The CEIP (Customer Experience Improvement Program) checkbox is optional, but if it’s checked, the program will be able to collect information about the computer hardware and how the product is being used (without interrupting users); the next releases of SQL Server are upgraded based on this information.
After checking the I accept the license terms, the Next button can be clicked to proceed.
-
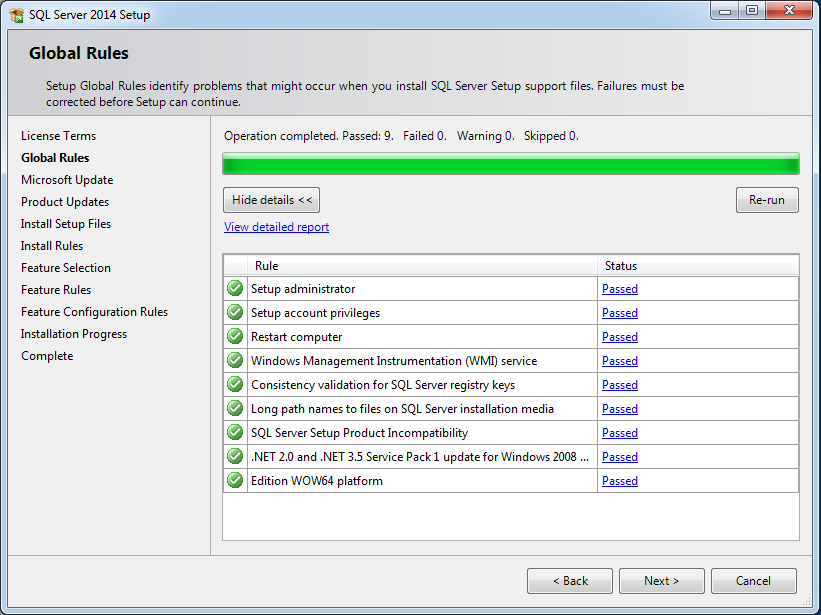
The next step is the Global Rules. Setup Global Rules identify problems that might occur when installing SQL Server 2014. Which rules are those in some extent depends on which operating system you are installing to but usually include the following:
- Whether the logged-in user is a system administrator with appropriate privileges (a must be)
- Whether there are any reboots pending from other installers
- Whether required .NET components are available
- Whether there is support for long pathnames where the installation media resides
- The consistency of any SQL Server Registry keys
If all the rules are passed, the Global Rules step will be processed and skipped automatically. If some rules don’t pass, you must correct these in order for setup to be able to continue:
Most of the known issues are elaborated with solutions and workarounds on the Microsoft forum
-
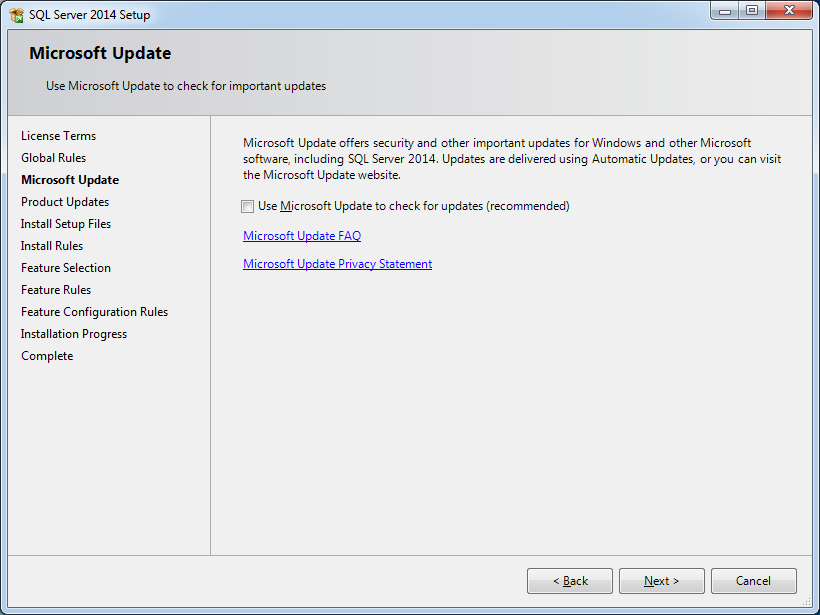
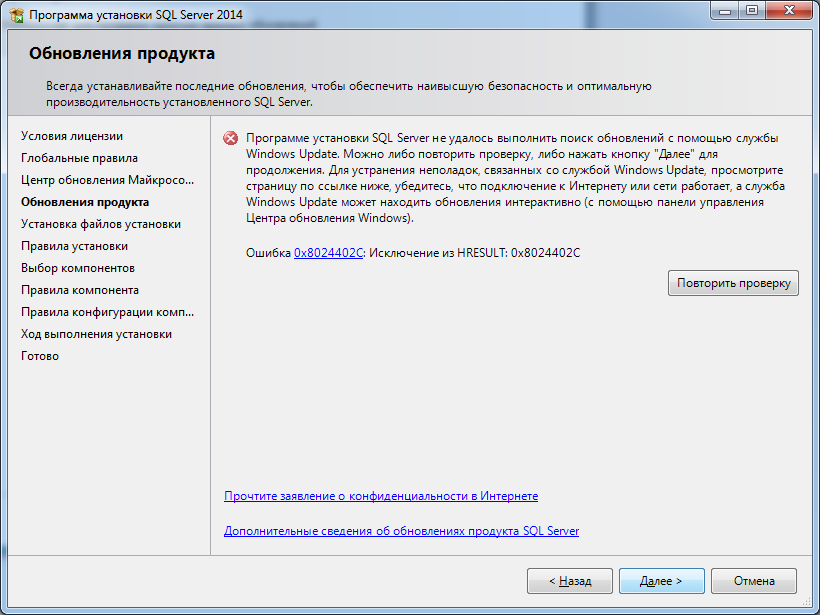
The next step of the setup is the Microsoft Update. It’s optional and whether you select it or not, the installation will be able to proceed after clicking the Next button.
Once checked this option gives the opportunity to download the update and incorporate it with the installation. This action will take some time, as those updates need to be downloaded as well.
If you proceeded without checking for updates or it is checked, but there aren’t any updates available, the Product Updates step will be skipped:
It’s recommend that the Microsoft update option is checked to ensure all patches are applied.
-
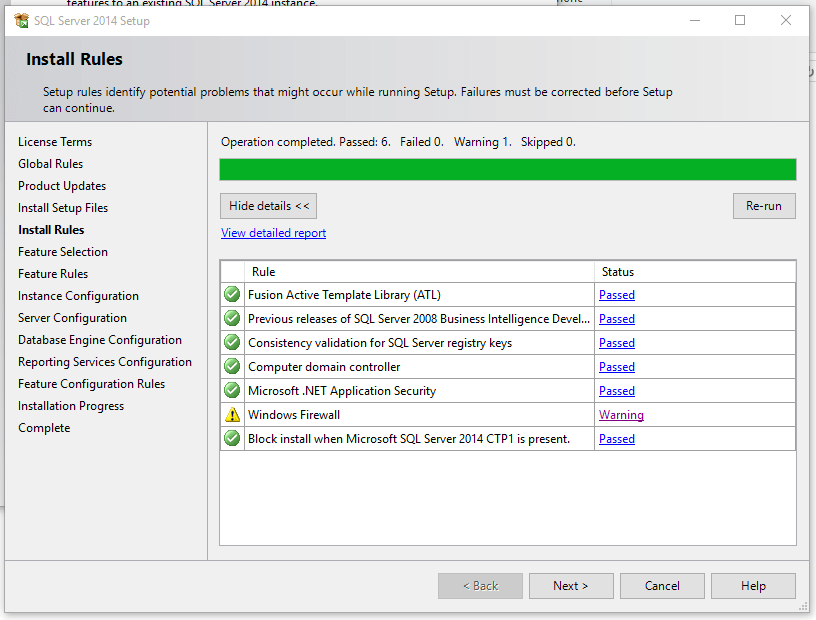
Install Setup Files and Install Rules steps are automatically processed. However, the Install Rules is yet another step where the setup wizard is checking if certain software requirements are met:
- Need for reboot in order for changes to apply
- Whether there are some previous releases of SQL Server
- Validation of SQL Server registry keys
- Whether the computer is a domain controller
- Security settings
Every rule in the list has a status (whether it’s passed or failed); clicking those links provides additional information if something went wrong.
One rule that will almost certainly throw a warning is Window Firewall. This issue specifically can be solved by adding SQL Server and its features to Windows Firewall exception list. Otherwise, SQL Server Management Studio is unable to connect to remote servers.
If some of these don’t pass, they must be corrected in order that setup can be continued:
Additional information for solving certain issues with the Install Rules can be found on Microsoft SQL Server forum
-
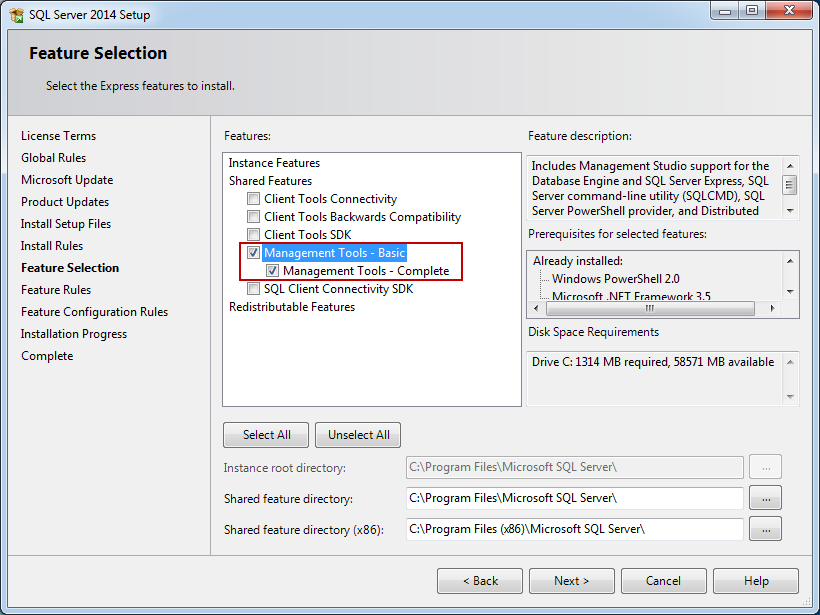
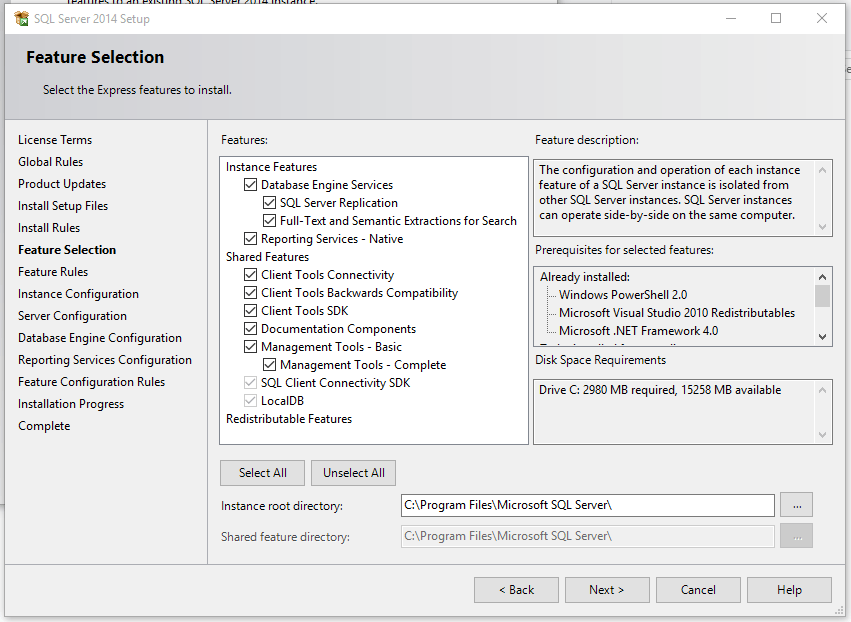
In Feature Selection step the only options that needs to be checked in order to install SQL Server Management Studio is Management tools – basic and sub item: Management tools – Complete, however, SQL Client Connectivity SDK will be installed by default, whether you checked it or not.
Each feature has prerequisites which are shown in the Prerequisites for selected features field located right of the Features field, and if some are missing, those will be installed along with SQL Server Management Studio:
In addition, there is a short description for each feature in the Feature description field for more details.
SQL Server Management Studio will be installed in default directory on system partition, but below the Features field it can be altered in which directory you want these shared components installed (as shown in image above)
-
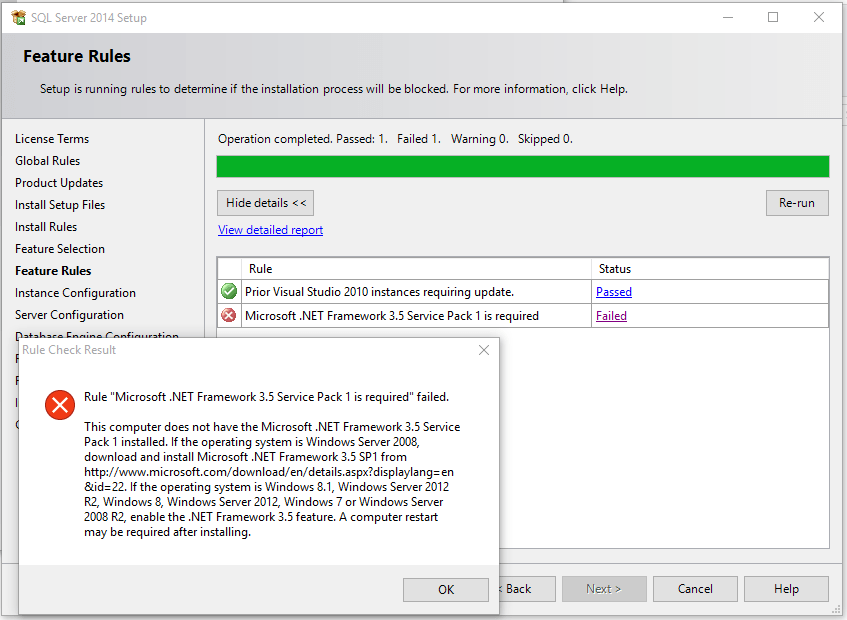
After you proceeded on the Next button, Feature Rules and Feature Configuration Rules steps will be processed automatically if all the Feature Rules are met:
- Prior Visual Studio 2010 instances requiring update
- Microsoft .NET Framework 3.5 Service Pack 1 is required.
You must repair failures for the installation to be able to proceed.
The update required for Visual Studio is contained on the SQL Server installation media and it’s named VS10sp1-KB983509.msp.
The Microsoft .NET Framework 3.5 Service Pack 1 can be found on this link.
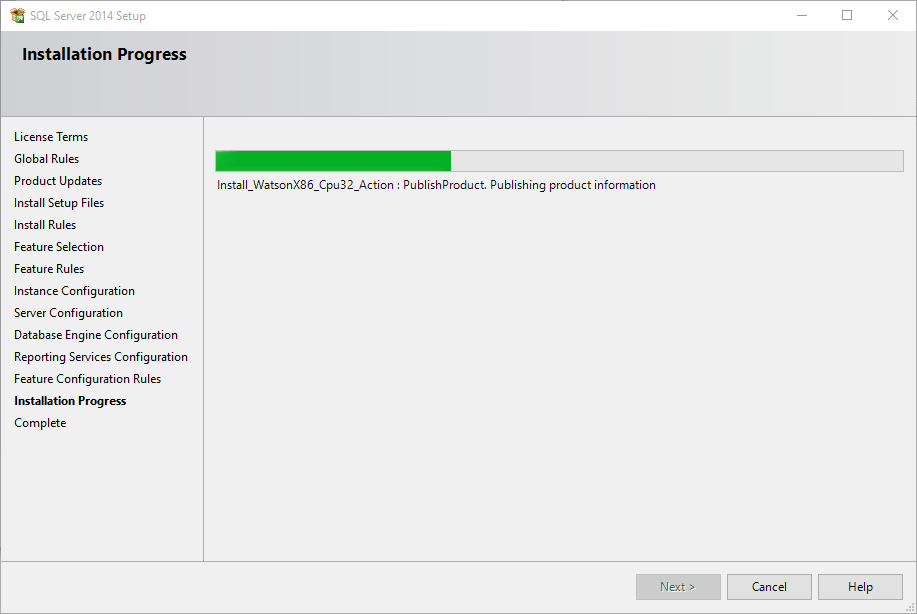
When all the rules are passed and the Feature Rules and the Feature Configuration Rules steps are processed automatically, the installation process will start in Installation Progress step.
-
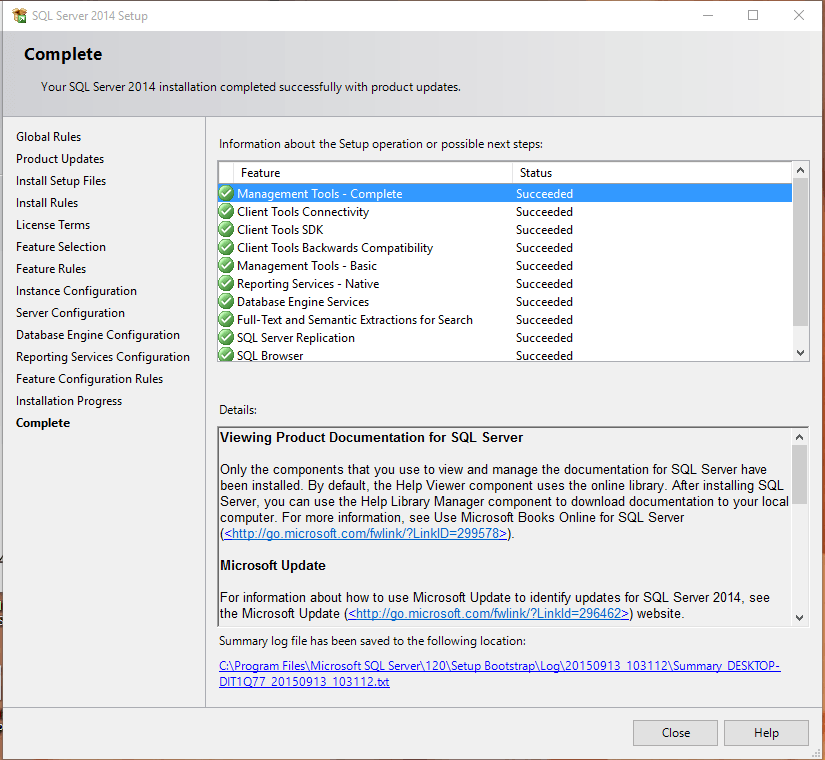
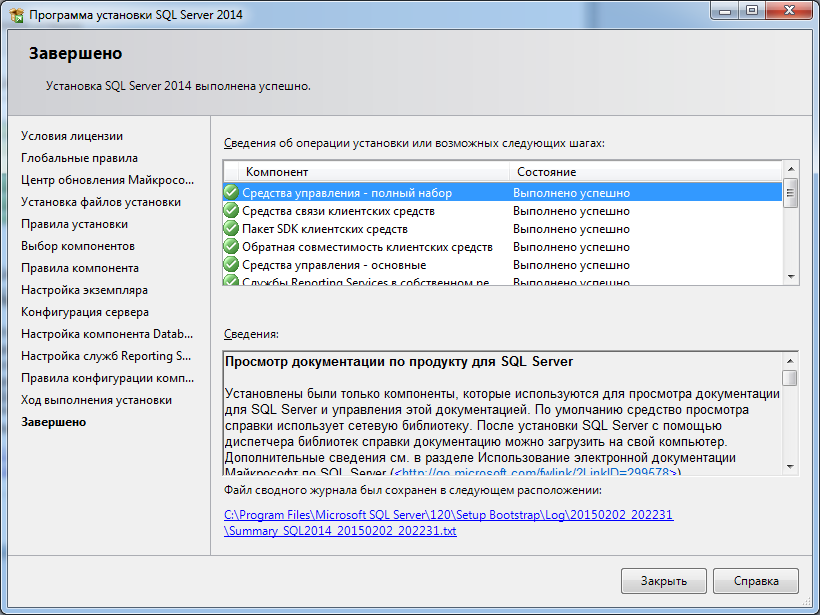
The SQL Server Management Studio installation process should take no more than approximately 4 minutes if there is no actual server installed on the machine After the installation process is completed, the last step of the installation wizard will be presented:
In the Complete step, the summary for all the installed features and status of installation for each one, will be shown.
In the field bellow, labeled Details, will be additional links for Release notes, Sample databases (applicable only if you have server installed on the machine), Microsoft Updates, etc.
Also, a link will be presented on which you can find Summary log saved as txt file.


Installing SQL Server 2014 Management Studio with previously installed SQL Server 2014
If you’re installing SQL Server Management Studio on the machine on which there is a previously installed SQL Server, there will be minor differences and an additional step in the installation process:
-
First step will be the Global Rules instead of License Terms.
-
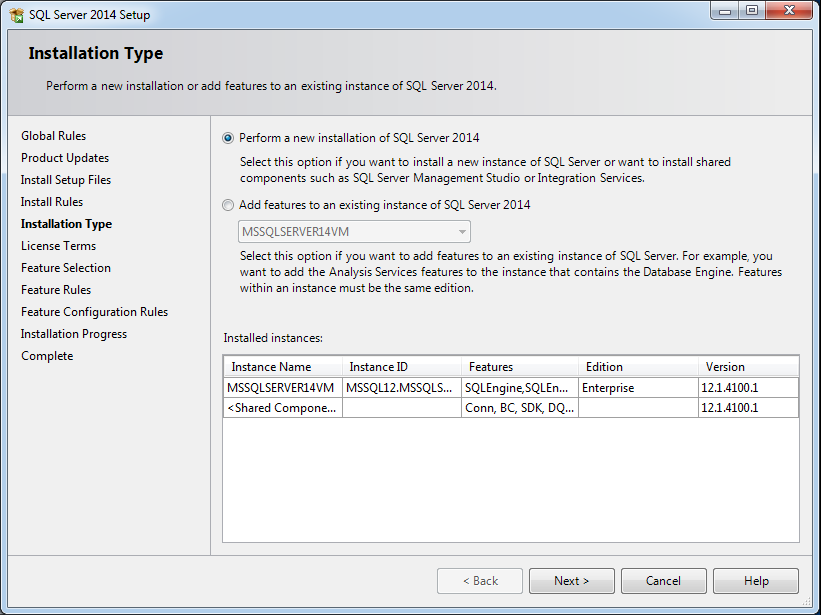
After the Install Rules are passed, the additional step – Installation Type – will be next:
As SQL Server Management Studio is a shared component and it is installed as a feature of SQL Server, but can also function as a stand-alone application (not as a feature of a specific server), it’s up to you how will you install it, because it’ll work either way.
Just note that if you select Add features to an existing instance of SQL Server 2014, you must define instance to which you’re adding feature in the drop-down list below the second radio-button
- The final difference is that instead as a first step, License Terms will follow the Installation Type. In order to proceed with the installation, read the license terms and then check the I accept the license terms checkbox
- For the rest of the installation, continue from the step number 7, as these are identical
Whichever type of installation you’re performing, after the installation is finished, on the Close button the installation wizard will close and your SQL Server Management Studio will be set for the first use.
Now that you have installed SQL Server 2014 Management Studio, you can update this software with some free add-ins from ApexSQL that will add formatting, auto-complete, refactoring and search capabilities. Click here to see how to install these.
- Author
- Recent Posts

Stefan Bozovic is a student at Faculty of technical sciences, Mechanical engineering.
His studies required advanced knowledge in 2D and 3D modeling and in static, kinematic and dynamic simulations of mechanisms.
His interests for IT got him to learn about RDBMS and eventually start working as a Software Sales Engineer in the ApexSQL LLC, where he assists in development of tools for SQL Server DBAs and Developers.
View all posts by Stefan Bozovic
I had planned installation of SQL Server Express 2014 on Windows 10 PRO OS. During this, I encountered minor road blocks, which I overcame to install SQL Server Express 2014. This article summarizes the step by step process of installing it.
These steps are not confined to SQL Server Express 2014, they are almost similar to other SQL Server Express like 2012, 2008 R2, 2008.
What is Microsoft SQL Server 2014 Express?
MSDN defines it as Microsoft SQL Server 2014 Express is a free, feature-rich edition of SQL Server that is ideal for learning, developing, powering desktop, web & small server applications, and for redistribution by ISVs.
SQL Server 2014 Express can be installed on Windows 10/ Windows 8.1/ Windows 7. These steps are almost similar for any SQL Server Express edition installation on any Windows OS.
Step 1 – Download SQL Server 2014 Express Edition
In this very first step, there was minor road block, from where to download SQL Server installation? Naturally, you will open Download SQL Server Express 2014 link. I tried downloading it, but it wasn’t working. Then, I found this link — The 12 step process to download Microsoft SQL Server Express 2014.
Oh !! 12 steps to be followed for downloading, then think of its installation. Scott Hanselman made our life easy by writing this post Download SQL Server. It has not only 2014 edition but SQL Server 2012, 2008 R2. Everyone just download it from this link, save your time.
I choose this “Express with Advanced Services (SQLEXPRADV)” option because of my need for:
- Reporting Services
- Full Text Search
- Full version of SQL Server 2014 Management Studio which gives us SQL Profiler
- It gives almost full working SQL Server database system with lots of tools
Download it from Scott’s blog link for Download SQL Server, I used 64 bit download (32 bit also available). It’s around 1+GB. This will take time to download, meanwhile let’s see briefly what are other editions of SQL Server 2014 Express.
LocalDB (SqlLocalDB)
LocalDB is a lightweight version of Express that has all its programmability features, yet runs in user mode and has a fast, zero-configuration installation and short list of pre-requisites. It can be bundled with Application and Database Development tools like Visual Studio or embedded with an application that needs local databases.
Express (SQLEXPR)
Express edition includes the SQL Server database engine only. Best suited to accept remote connections or administer remotely.
Express with Tools (SQLEXPRWT)
This package contains everything needed to install and configure SQL Server as a database server including the full version of SQL Server 2014 Management Studio. Choose either LocalDB or Express depending on your needs above.
SQL Server Management Studio Express (SQLManagementStudio)
This does not contain the database, but only the tools to manage SQL Server instances, including LocalDB, SQL Express, SQL Azure, full version of SQL Server 2014 Management Studio, etc. Use this if you already have the database and only need the management tools.
Step 2 – Extraction of Downloaded Installation EXE
This is fairly simple, double-click downloaded file “SQLEXPRADV_x64_ENU.exe“; it will extract all install files to directory where EXE is present, you can change that also.
Extraction of downloaded SQL Server 2014 Installation file.
Step 3 – Run Setup, Start Installation and Accept Terms
After extraction of EXE, run the Setup and click “New SQL Server Stand alone installation…” from window open. You should and must “Accept terms”.
Start window of installation process.

Accept License Terms
Step 4 – Install Rules and Disable Installed ANTI VIRUS Software
Setup or Install Rules identify potential problems that might occur for SUCCESSFUL installation of SQL Server Express 2014 edition. All rules passed but “Windows Firewall” gives a warning.
“Windows Firewall” warning is related to ANTI VIRUS installation might block enabling ports, settings for SQL Server to use.
DON’T FORGET TO DISABLED ANTI VIRUS PROGRAM. It will save time during the installation process.
I have an anti-virus program with full protection, not thinking much I moved ahead without disabling. Installation was not progressing and was struck at point for hours. So Please Disable IT NOW.
Others might not come across this issue based on anti-virus program and its protection levels, but still do disable it.
Install Rules with Windows Firewall warning
Step 5 – Feature Selection
In this step, we can select the features that need to be installed, SQL Server gives us the option Database Engine, Reporting Services (only if you had downloaded appropriate version), Client Tools for connectivity and SQL Management Tools (do select SQL Profiler)
It also displays disk space requirements, make sure you have enough disk space before installation.
Features Selection
Step 6 – Rule “Microsoft .NET Framework 3.5 SP1” Required
I was installing SQL Server 2014 on fresh Windows 10 installation, it’s obviously that .NET Framework is not found. But SQL Server installation needs .NET 3.5 SP1 for proceeding. It is one of the requirements in Hardware and Software Requirements for Installing SQL Server 2014. We face this error as shown:
Rule “Microsoft .NET Framework 3.5 SP1” required
Two ways we can install .NET 3.5 framework – Download the .NET Framework 3.5 SP1 or Install using “Windows Features”as shown in images below
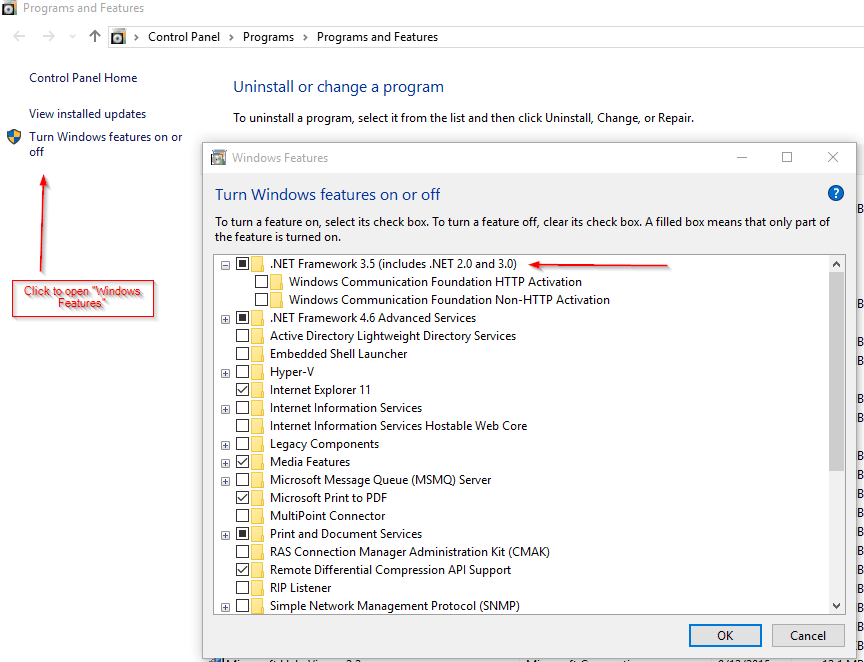
Enable .NET Framework 3.5 from ‘Turn Windows feature on or off’.
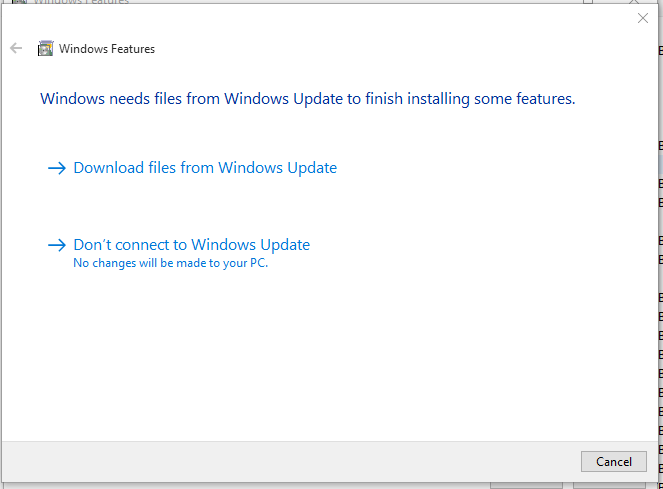
Download files from Windows Update.
Restart the machine to ensure everything is properly installed (Recommended) and then run “Features Rule” to verify that it’s ready to proceed installation.

Verified Microsoft .NET Framework 3.5 SP1 exists.
Step 7 – Instance and Server Configuration Settings
We are installing “SqlExpress” edition, it’s better to keep NAMED instance as “SQLEXPRESS” itself and proceed further.

Instance Configuration
Server Configuration is important as it deals with account names under which database engine runs. It’s better not to play around with these settings. Click NEXT to go ahead.
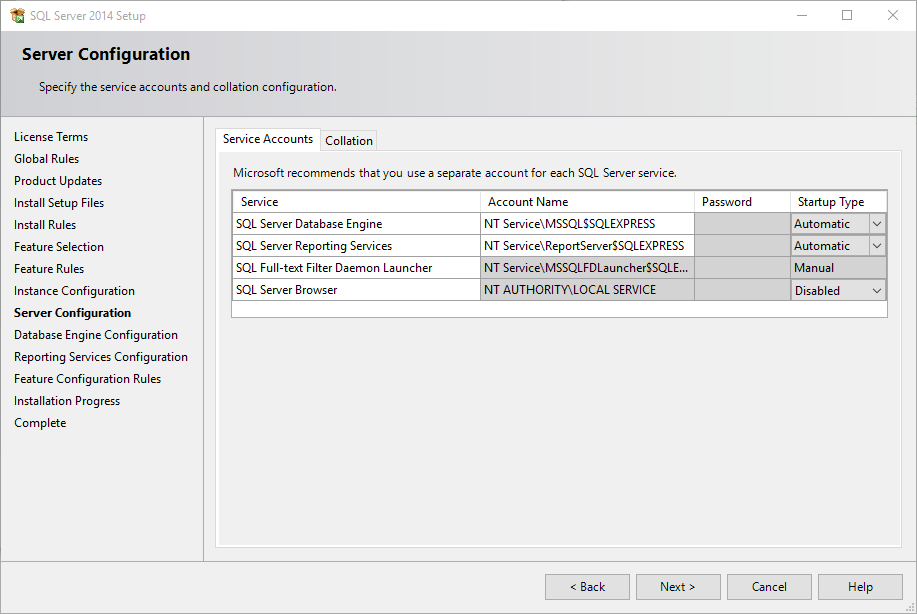
Server Configuration.
Step 8 – Database Engine Configuration
It’s the heart and soul of your SQL Server installation process, database engine is one which does all the work. It’s mainly split into “Server Configurations”, “Data Directories”, “User Instances” and “FILESTREAM”.
Server Configurations deal with “Who can get access to the database engine?”. We have “Windows mode” and “Mixed mode” type of authentication.
Use Mixed Mode authentication mode so that we can Windows mode and sa ‘SQL Server System administrator’ account.

Database Engine Configuration.
Since we are installing Reporting Services along with SQL Server Express, select “Install and Configure” so that it starts operational.

Reporting Service Configurations.
Step 10 – Installation Progress and Completion
Installation in progress.
Database engine, reporting service, management tools etc. are successfully installed.
Sql Server Installation Completed.
Step 11 – Connecting to Installed Sql Server Express using Management Tools
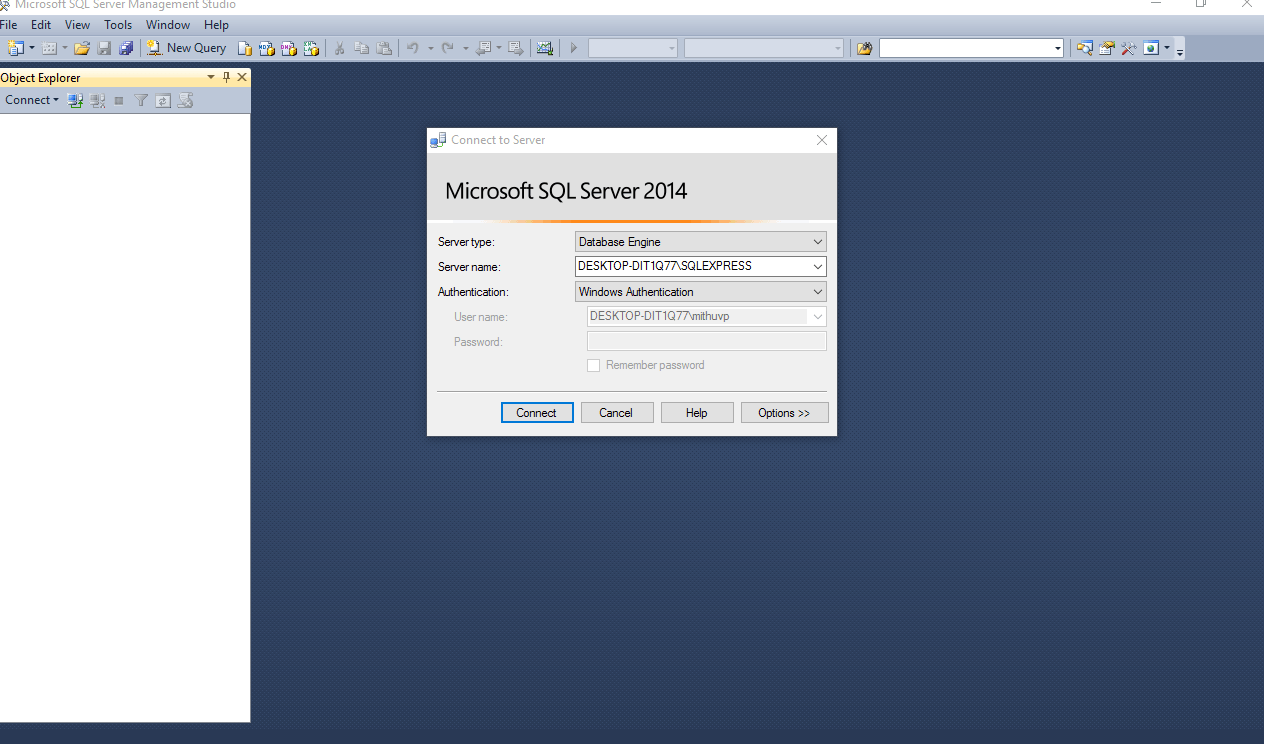
After installation, let’s open “SQL Server Management Studio” from Program files directory.
Connecting to SQL Server Express using Windows Authentication.

Connecting to SQL Server Express using Mixed Mode Authentication.
It’s a bit time-consuming but still installation process is clear and simple.
The post Installation of SQL Server Express 2014 on Windows 10 appeared first on Mithunvp.com.
CodeProject
Среда SQL Server Management Studio — это интегрированная среда для управления инфраструктурой SQL Server и базы данных SQL Azure.
Среда Management Studio предоставляет средства для настройки, наблюдения и администрирования экземпляров SQL Server.
Она также предоставляет средства для развертывания, отслеживания и обновления данных-уровня компонентов, таких как базы данных и хранилищ данных, используется приложениями, а также для создания запросов и скриптов.
- Download SQL Server Management Studio (SSMS)
- SQL Server Management Studio — Changelog (SSMS)
- SQL Server Management Studio (SSMS) — Release Candidate
- Previous SQL Server Management Studio Releases
- SQLSentry Latest Builds of Management Studio
- SQL Server Tools
- SQL Server Management Studio (SSMS)
- Microsoft Download Center SSMS
- Add Transact-SQL Snippets
Поддерживаемые версии SQL Server
- Эта версия SSMS работает со всеми поддерживаемыми версиями SQL Server (SQL Server 2008–SQL Server 2017) и предоставляет превосходную поддержку новейших облачных функций базы данных SQL Azure и хранилища данных SQL Azure.
- SQL Server 2000 или SQL Server 2005 напрямую не блокируются, однако некоторые функции могут работать неправильно.
- Кроме того, SSMS 17.X можно установить одновременно с SSMS 16.X или SQL Server 2014 SSMS и более ранними версиями.
Поддерживаемые операционные системы
При использовании последнего пакета обновления этот выпуск SSMS поддерживает следующие платформы: Windows 10, Windows 8, Windows 8.1, Windows 7 (SP1), Windows Server 2016, Windows Server 2012 (64-bit), Windows Server 2012 R2 (64-bit), Windows Server 2008 R2 (64-bit)
Примечание
SSMS 17.X основана на изолированной оболочке Visual Studio 2015, которая была выпущена до Windows Server 2016.
Корпорация Майкрософт уделяет большое внимание совместимости приложений и гарантирует, что уже выпущенные приложения продолжат работать в последних выпусках Windows. Чтобы минимизировать проблемы с запуском SSMS в Windows Server 2016, убедитесь, что для SSMS установлены все последние обновления.
При возникновении каких-либо проблем с SSMS в Windows Server 2016, обратитесь в службу поддержки. Служба поддержки определит, связана ли проблема с SSMS, с Visual Studio или с совместимостью SSMS и Windows.
Затем ваш запрос будет перенаправлен соответствующей группе для дальнейшего изучения.
Доступные языки
SQL Server Management Studio для других языков:
Chinese (People’s Republic of China) |
Chinese (Taiwan) |
English (United States) |
French |
German |
Italian |
Japanese |
Korean |
Portuguese (Brazil) |
Russian |
Spanish
Ссылки для загрузки и информация о релизах SSMS
- GA — Стабильная версия
- PP — Предварительная версия
- Размер в мегабайтах для Английской версии
| Версия/Ссылка для загрузки | Примечание | Билд | Дата релиза | Размер, Мб |
|---|---|---|---|---|
| 18.9.2 GA Release | Latest GA | 15.0.18386.0 | 2021-07-15 | 642 |
| 18.9.1 GA Release | 15.0.18384.0 | 2021-04-20 | 635 | |
| 18.9 GA Release | 15.0.18382.0 | 2021-04-15 | 635 | |
| 18.8 GA Release | 15.0.18369.0 | 2020-12-17 | 640 | |
| 18.7.1 GA Release | 15.0.18358.0 | 2020-10-27 | 635 | |
| 18.7 GA Release | 15.0.18357.0 | 2020-10-20 | 635 | |
| 18.6 GA Release | 15.0.18338.0 | 2020-07-22 | 534 | |
| 18.5.1 GA Release | 15.0.18333.0 | 2020-06-09 | 535 | |
| 18.5 GA Release | 15.0.18183.0 | 2020-04-07 | 535 | |
| 18.4 GA Release | 15.0.18206.0 | 2019-11-04 | 539 | |
| 18.3.1 GA Release | 15.0.18183.0 | 2019-10-02 | 534 | |
| 18.3 GA Release | 15.0.18178.0 | 2019-09-23 | 534 | |
| 18.2 GA Release | 15.0.18142.0 | 2019-07-25 | 528 | |
| 18.1 GA Release | 15.0.18131.0 | 2019-06-11 | 527 | |
| 18.0 GA Release | 15.0.18118.0 | 2019-04-24 | 524 | |
| 18.0 RC1 Release | 15.0.18098.0 | 2019-03-28 | 484 | |
| 18.0 Preview 7 Release | 15.0.18092.0 | 2019-03-01 | 478 | |
| 18.0 Preview 6 Release | 15.0.18075.0 | 2018-12-18 | 457 | |
| 18.0 Preview 5 Release | 15.0.18068.0 | 2018-11-15 | 457 | |
| 18.0 Preview 4 Release | 15.0.18040.0 | 2018-09-24 | 456 | |
| 17.9.1 Release | Latest 17 | 14.0.17289.0 | 2018-11-21 | 807 |
| 17.9 Release | 14.0.17285.0 | 2018-09-04 | 807 | |
| 17.8.1 Release | 14.0.17277.0 | 2018-06-26 | 806 | |
| 17.8 Release | Deprecated | 14.0.17276.0 | 2018-06-21 | 806 |
| 17.7 Release | 14.0.17254.0 | 2018-05-09 | 803 | |
| 17.6 Release | 14.0.17230.0 | 2018-03-20 | 802 | |
| 17.5 Release | 14.0.17224.0 | 2018-02-15 | 802 | |
| 17.4 Release | 14.0.17213.0 | 2017-12-07 | 802 | |
| 17.3 Release | 14.0.17199.0 | 2017-10-09 | 801 | |
| 17.2 Release | 14.0.17177.0 | 2017-08-07 | 819 | |
| 17.1 Release | 14.0.17119.0 | 2017-05-24 | 784 | |
| 17.0 Release | 14.0.17099.0 | 2017-04-25 | 729 | |
| 17.0 RC3 Release | 14.0.17028.0 | 2017-03-09 | 677 | |
| 17.0 RC2 Release | 14.0.16150.0 | 2017-02-01 | 682 | |
| 17.0 RC1 Release | 14.0.16000.64 | 2016-11-16 | 687 | |
| 16.5.3 Release | Latest 16 | 13.0.16106.4 | 2017-01-26 | 898 |
| 16.5.2 Release | Deprecated | 13.0.16105.4 | 2017-01-18 | 898 |
| 16.5.1 Release | 13.0.16100.1 | 2016-12-05 | 894 | |
| 16.5 Release | 13.0.16000.28 | 2016-10-26 | 894 | |
| 16.4.1 Release | 13.0.15900.1 | 2016-09-23 | 894 | |
| 16.4 Release | Deprecated | 13.0.15800.18 | 2016-09-20 | |
| 16.3 Release | 13.0.15700.28 | 2016-08-15 | 806 | |
| July 2016 Hotfix Update | 13.0.15600.2 | 2016-07-13 | 825 | |
| July 2016 Release | Deprecated | 13.0.15500.91 | 2016-07-01 | |
| June 2016 Release | 13.0.15000.23 | 2016-06-01 | 825 | |
| SQL Server 2014 SP1 | 12.0.4100.1 | 2015-05-14 | 815 | |
| SQL Server 2012 SP3 | 11.0.6020.0 | 2015-11-21 | 964 | |
| SQL Server 2008 R2 | 10.50.4000 | 2012-07-02 | 161 |
SQL Server 2014 RTM Management Studio download links
- SQL Management Studio x64
- SQL Management Studio x86
SQL Server 2012 SP1 Management Studio download links
- SQL Management Studio x64
- SQL Management Studio x86
SQL Server 2008 R2 Management Studio download links
- SQL Management Studio x64
- SQL Management Studio x86
Документация VOGBIT — система управления производством
В настоящей инструкции кратко описан порядок установки бесплатной системы управления данными Microsoft SQL Server 2019 Express
Эта инструкция может быть полезной для начинающих пользователей, не имеющих опыта работы с СУБД Microsoft SQL Server. Она поможет вам быстро и правильно установить на ваш компьютер Microsoft SQL Server Express в той конфигурации, которая требуется для работы программы VOGBIT – система управления производством.
Следуйте инструкции, выполняйте по порядку указанные действия.
Обратите особенное внимание на Рис. 2 и Рис. 12. По статистике, если в дальнейшем возникают проблемы с развертыванием системы VOGBIT, то в большинстве случаев, из-за неверно выбранных параметров на этих этапах установки.
1. Установка SQL Server Express
Данное руководство ни в коей мере не заменяет официальную документацию разработчика, а является лишь краткой памяткой для начинающих пользователей
Microsoft SQL Server Express — это бесплатная многофункциональная и надежная система управления данными, которая предоставляет удобное и надежное хранилище данных для упрощенных веб-сайтов и классических приложений.
Скачайте с сайта microsoft.com пакет для установки Microsoft SQL Server Express под вашу операционную систему.
Запустите скачанный исполняемый файл (Рис. 1).
 Рис. 1. Программа для установки Microsoft SQL Server.
На стартовой странице процесса установки выберите тип установки «Пользовательский» (Рис. 2).
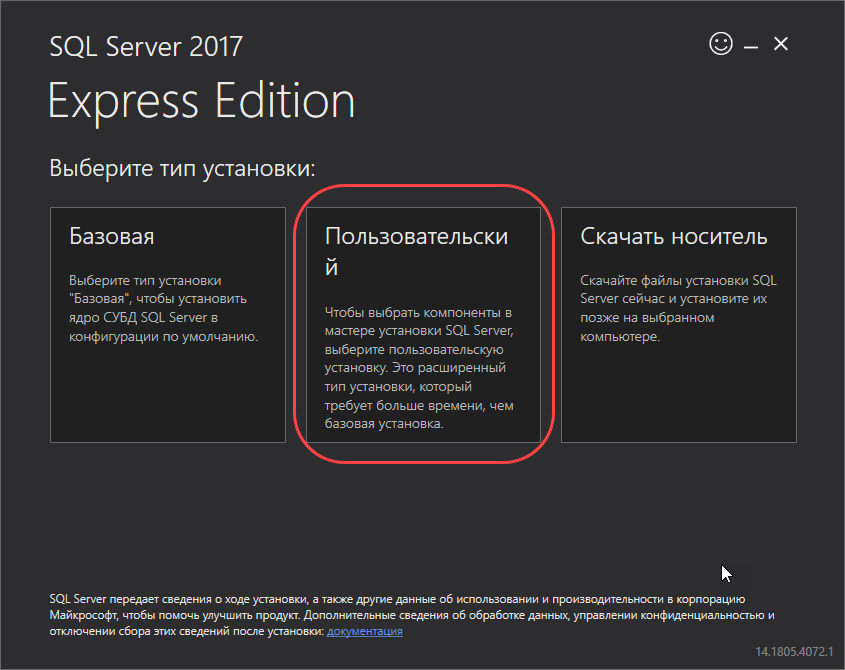 Рис. 2. Выберите тип установки «Пользовательский»
Нажмите «Установить» (Рис. 3).
 Рис. 3. Начало установки
Программа начнёт скачивание файлов для установки Microsoft SQL Server (Рис. 4).
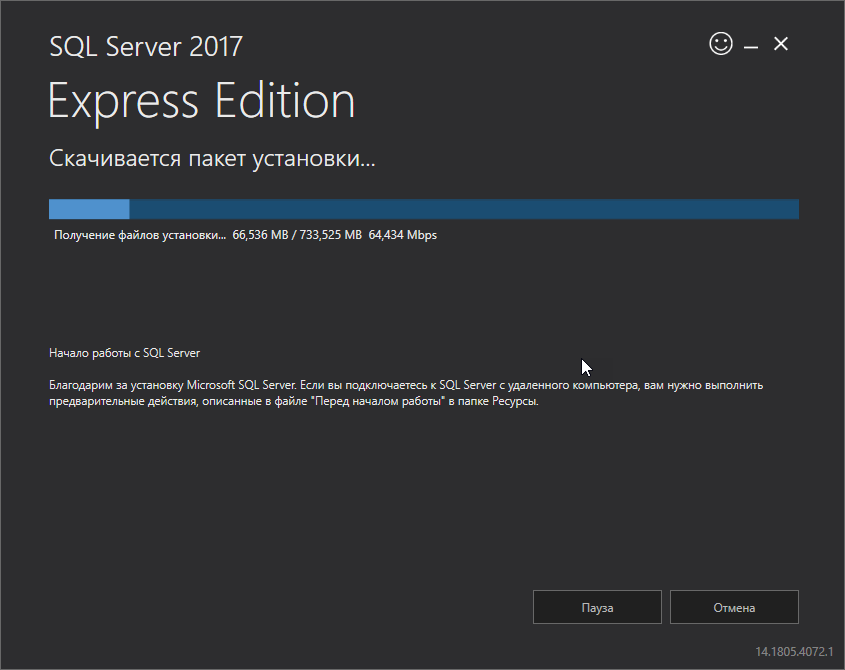 Рис. 4. Скачивание пакета установки.
После завершения процесса скачивания, на экране появится окно «Центра установки SQL Server». Выберите в нём пункт «Новая установка изолированного экземпляра SQL Server … » (Рис. 5).
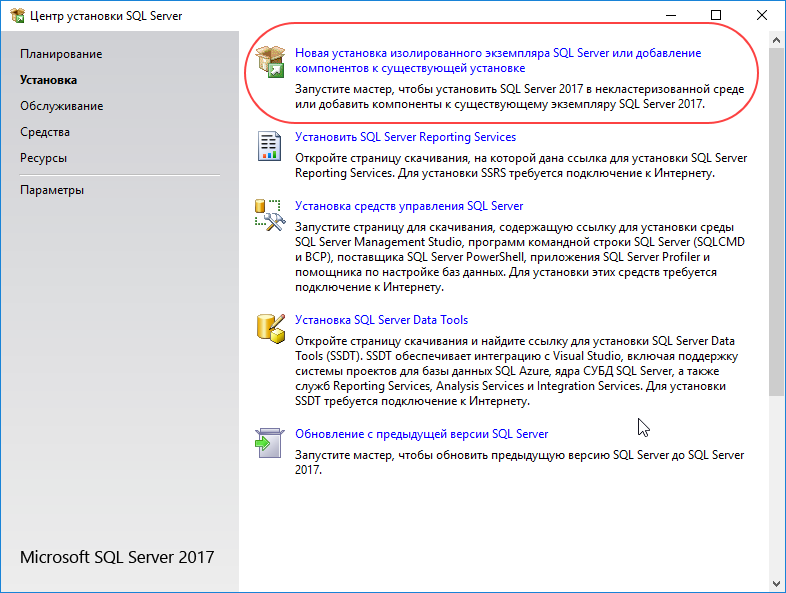 Рис. 5. Выберите установку нового экземпляра SQL Server.
Для продолжения установки нужно согласиться с условиями лицензионного соглашения (Рис. 6).
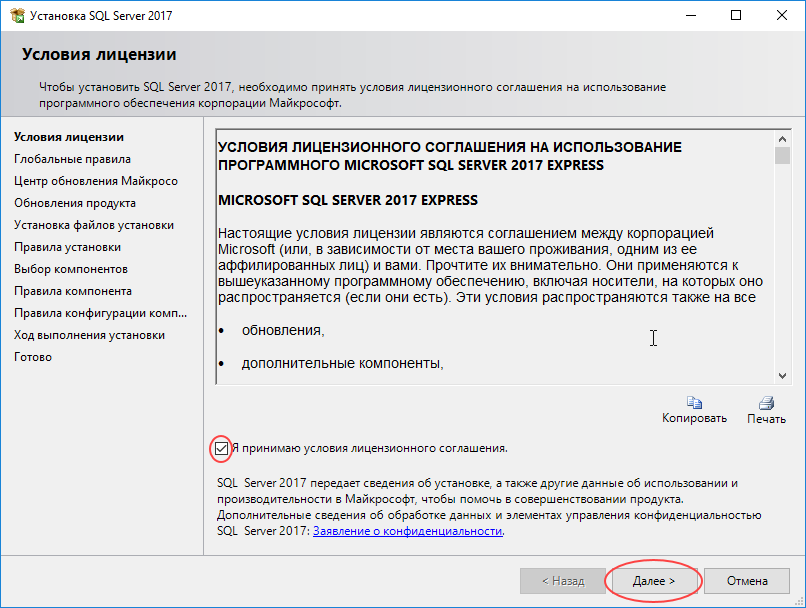 Рис. 6. Лицензионное соглашение.
Выберите, хотите ли вы, чтобы в дальнейшем ваш SQL Server автоматически обновлялся через Центр обновления Майкрософт, или нет, и нажмите «Далее» (Рис. 7)
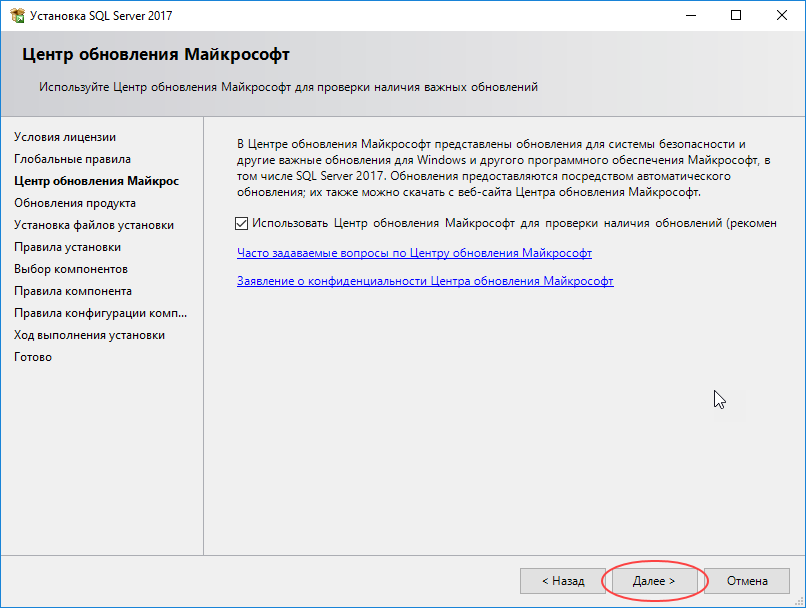 Рис. 7. Настройка обновления SQL Server.
После этого, на экране появится окно «Правила установки». Скорее всего, оно будет выглядеть, как на Рис. 8. Программа определяет потенциальные проблемы, которые могут возникнуть установке SQL Server и показывает результаты этой проверки.
Символ предупреждения в графе «Брандмауэр Windows» показывает, что если вы хотите, чтобы данный SQL Server использовался в сети (к базе данных, расположенной на этом компьютере, могли подключаться по сети пользователи с других компьютеров), то вам придётся для этого выполнить определённые дополнительные настройки безопасности на вашем компьютере после установки SQL Server.
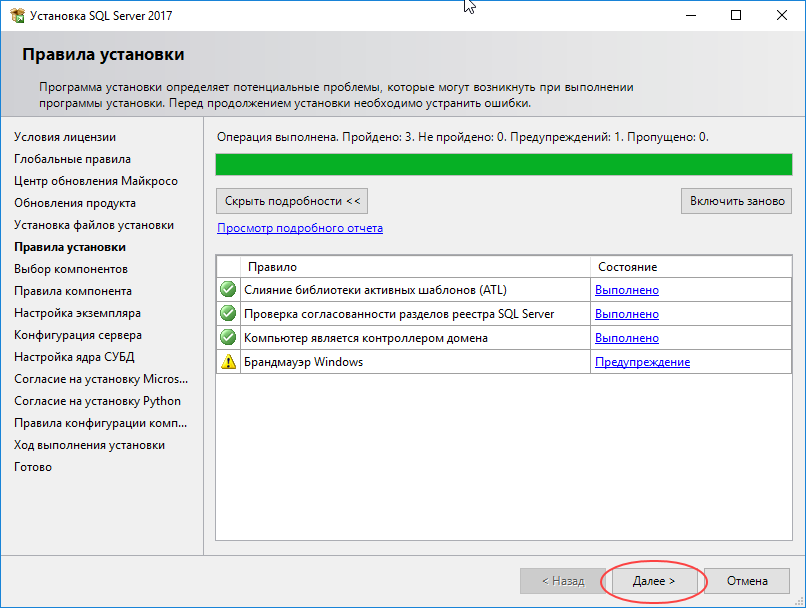 Рис. 8. Окно «Правила установки»
Нажмите «Далее», чтобы перейти к окну выбора компонентов для установки (Рис. 9). Все «галочки» в этом окне можно оставить по умолчанию. Можно, если хотите, снять в разделе «Компоненты экземпляра» все галочки, кроме первой – «Службы ядра СУБД» (остальное не требуется для VOGBIT).
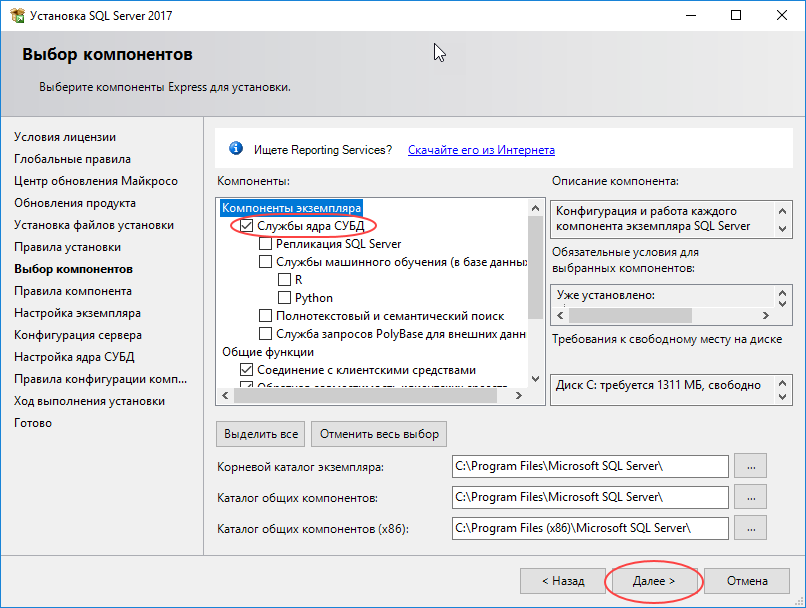 Рис. 9. Выбор компонентов для установки.
В окне Настройка экземпляра выберите вариант Именованный экземпляр и введите имя, как будет называться ваш экземпляр SQL сервера. Например, STP (Рис. 10). Затем нажмите Далее.
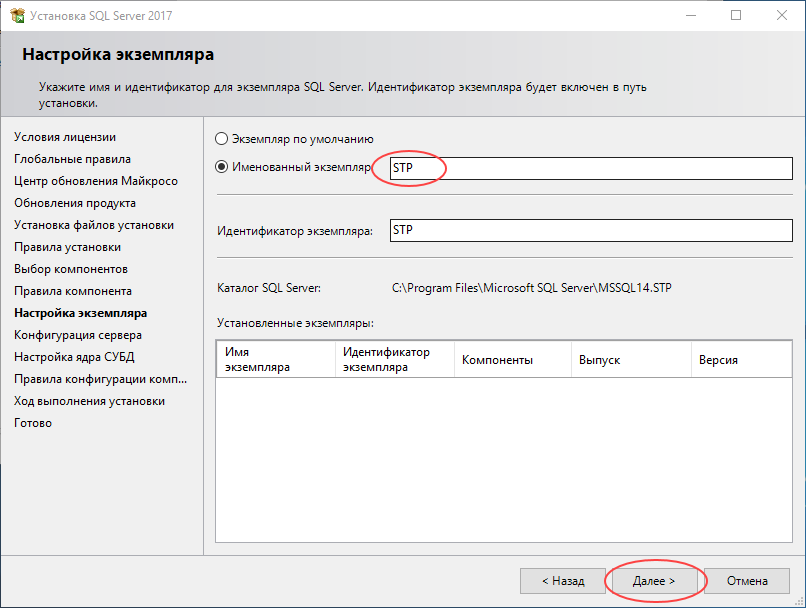 Рис. 10. Задайте имя своего экземпляра SQL сервера.
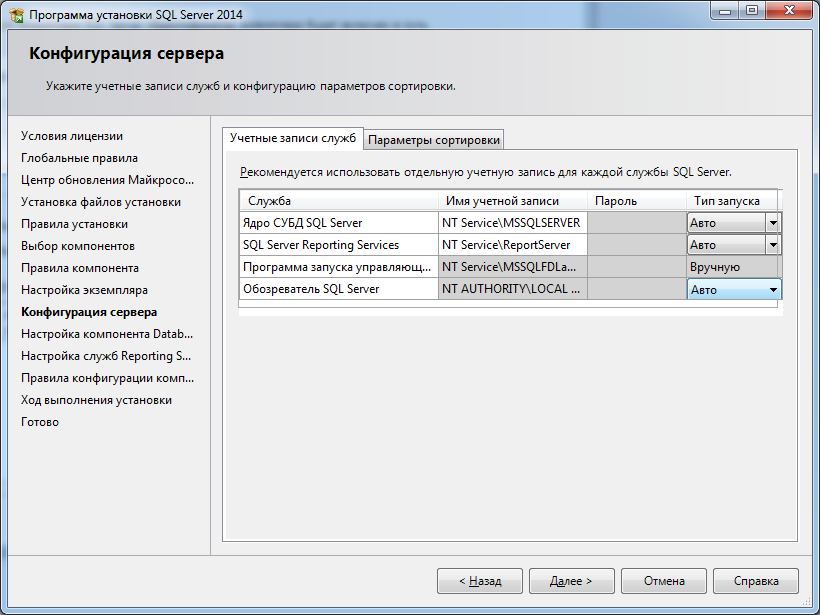
В окне «Конфигурация сервера» на закладке «Учётные записи служб» установите для служб «Ядро СУБД SQL Server» и «Обозреватель SQL Server» Тип запуска = Авто (Рис. 11) и нажмите Далее.
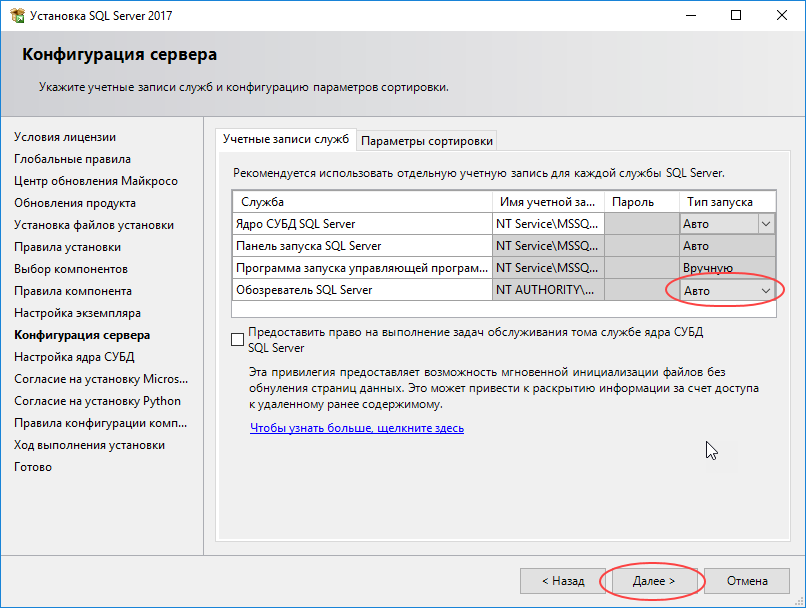 Рис. 11. Для использования в сети установите автоматический запуск служб SQL сервер.
ВАЖНО!
На закладке «Настройка ядра СУБД» обязательно выберите Смешанный режим (проверка подлинности SQL Server и Windows), как на Рис. 12. Введите пароль администратора SQL сервера. Например, 0 (Ноль). Запомните пароль администратора, который вы установили! Этот пароль устанавливается для администратора SQL SERVER (имя уч.записи администратора sa), и в дальнейшем будет использован для авторизации в VOGBIT при подключении с правами администратора. После того, как вы ввели и подтвердили пароль администратора, можно нажимать Далее.
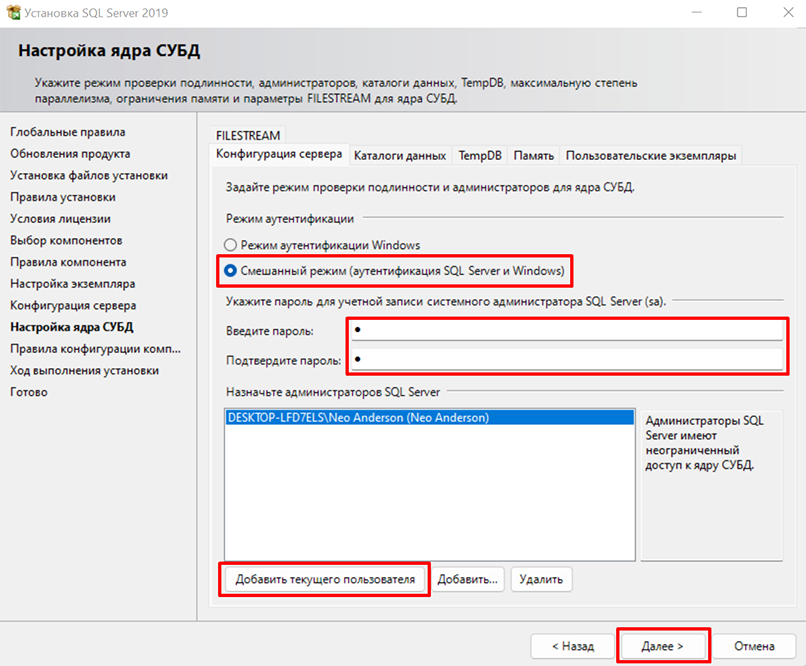 Рис. 12. Выберите смешанный тип аутентификации, задайте пароль администратора SQL сервера.
После этого начнётся установка SQL сервера (Рис. 13). Программа выполнит все необходимые операции автоматически. Просто подождите завершения процесса.
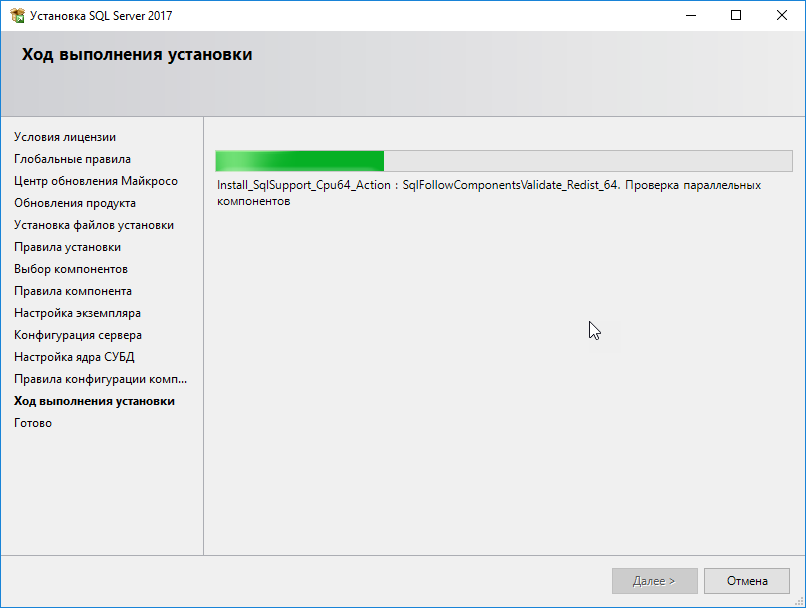 Рис. 13. Выполняется установка и настройка SQL сервера.
Когда установка и настройка будут закончены, появится окно, как на Рис. 14. Нажмите в нём Закрыть. Затем закройте и окно «Центр установки SQL Server» (Рис. 15).
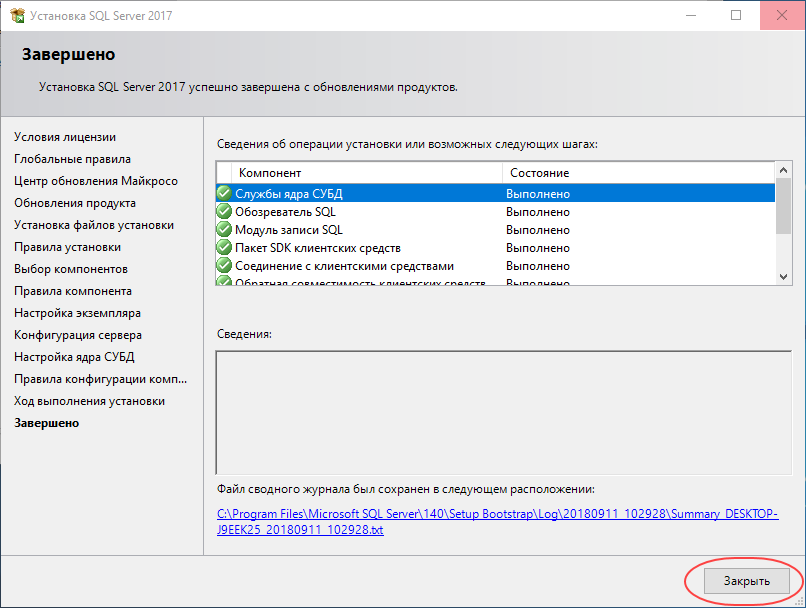 Рис. 14. Установка SQL Server завершена.
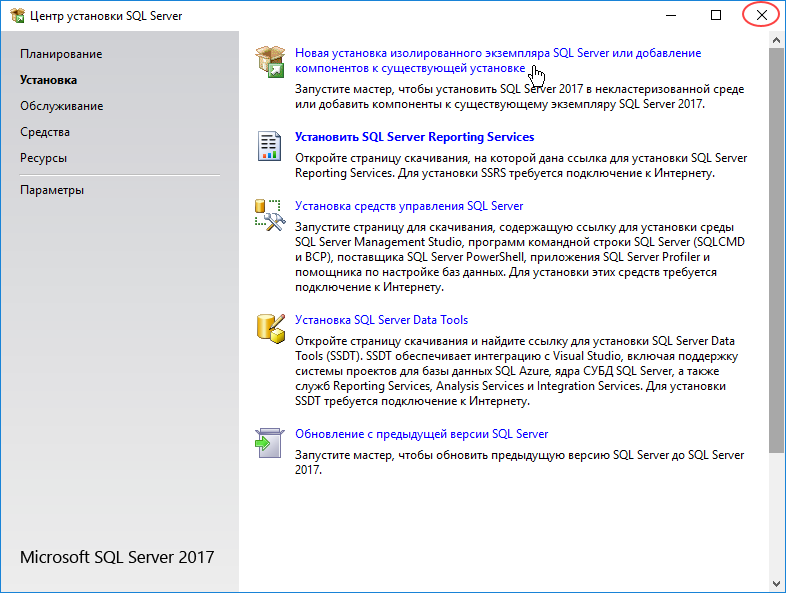 Рис. 15. Окно Центра установки SQL Server можно закрыть.
Убедиться, что SQL Server успешно установлен и работает, можно следующим образом. Нажмите правую кнопку мыши на значке Мой компьютер, чтобы вызвать контекстное меню. Выберите Управление (Рис. 16).
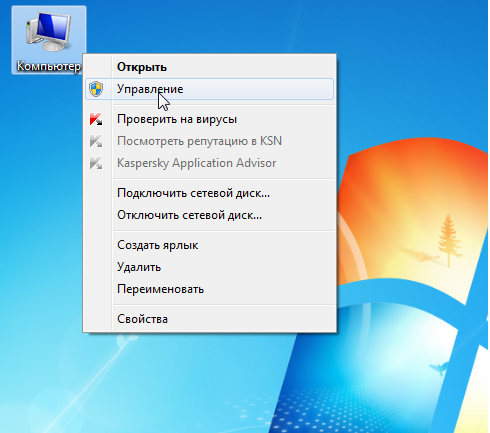 Рис. 16. Откройте окно Управление компьютером.
Выберите Службы и приложения – Службы (Рис. 17).
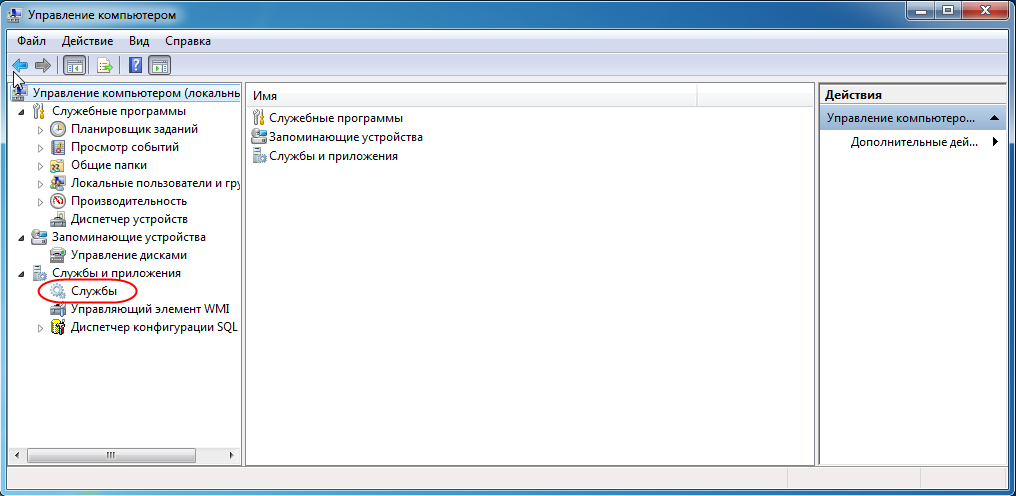 Рис. 17. Выберите Службы и приложения — Службы.
В списке должна присутствовать служба SQL Server и напротив неё должно высветится Работает (Рис. 18).
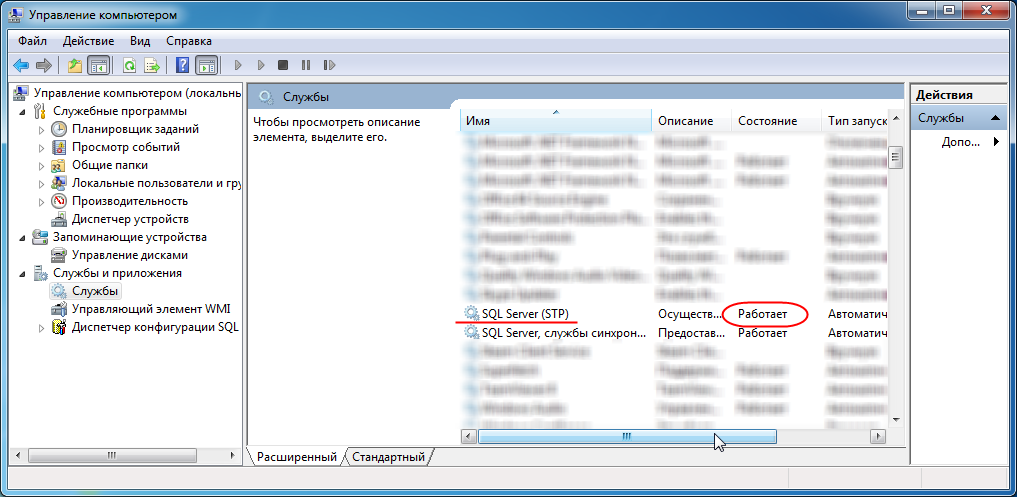 Рис. 18. Служба SQL Server работает.
Теперь на вашем компьютере установлена мощная система управления данными Microsoft SQL Server Express. Вы можете создать базу данных VOGBIT и работать с ней.
Подробнее о создании новой базы данных VOGBIT смотрите
в руководстве по установке VOGBIT.
Там же можно найти видеоролик Часть 1. Установка, новая база данных из серии Начало работы, в котором показан процесс установки VOGBIT и создания новой базы данных.
2. Установка SQL Server Management Studio
Данное руководство ни в коей мере не заменяет официальную документацию разработчика, а является лишь краткой памяткой для начинающих пользователей
SQL Server Management Studio – это полезная, свободно распространяемая, программа для управления SQL Server. С её помощью можно выполнять множество действий, в том числе, например, создавать резервные копии базы данных или восстанавливать базу данных из ранее созданной резервной копии.
Если вы планируете только ознакомиться с демо-версией VOGBIT, то установка ПО SQL Server Management Studio не требуется. Если вы планируете полноценно работать с VOGBIT, то мы рекомендуем вам при установке SQL Server сразу же установить и среду SQL Server Management Studio.
Скачать пакет для установки можно, например, здесь:
https://aka.ms/ssmsfullsetup
Для установки английской версии нажмите на ссылку «Скачать SQL Server Management Studio» (Рис. 19).
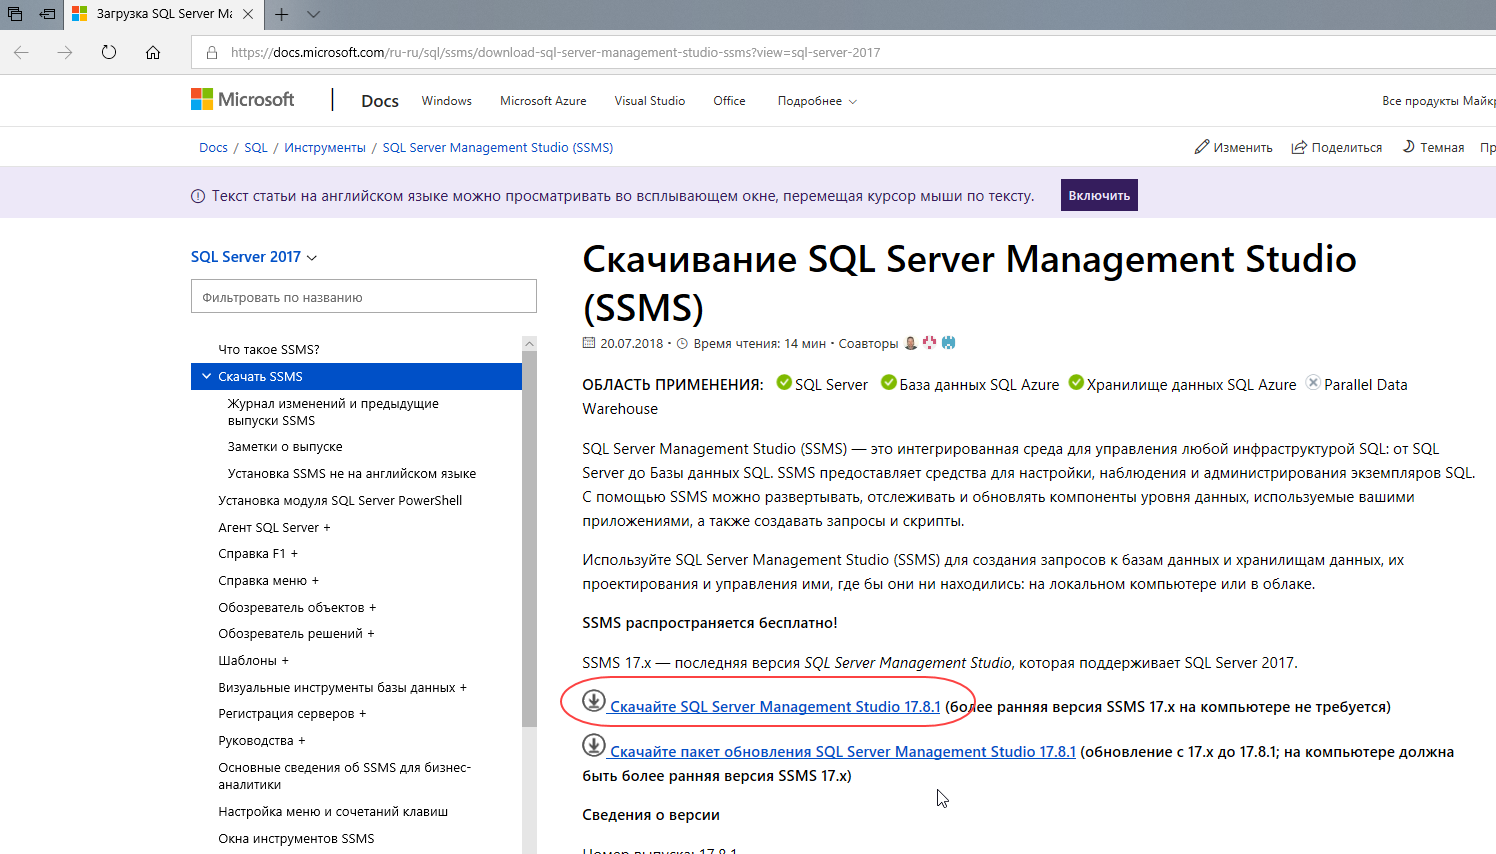 Рис. 19. Выберите для установки английской версии SQL Server Management Studio.
Если вы хотите установить русскую версию, то промотайте страницу немного ниже и в разделе «Доступные языки» нажмите на ссылку «Русский» (Рис. 20).
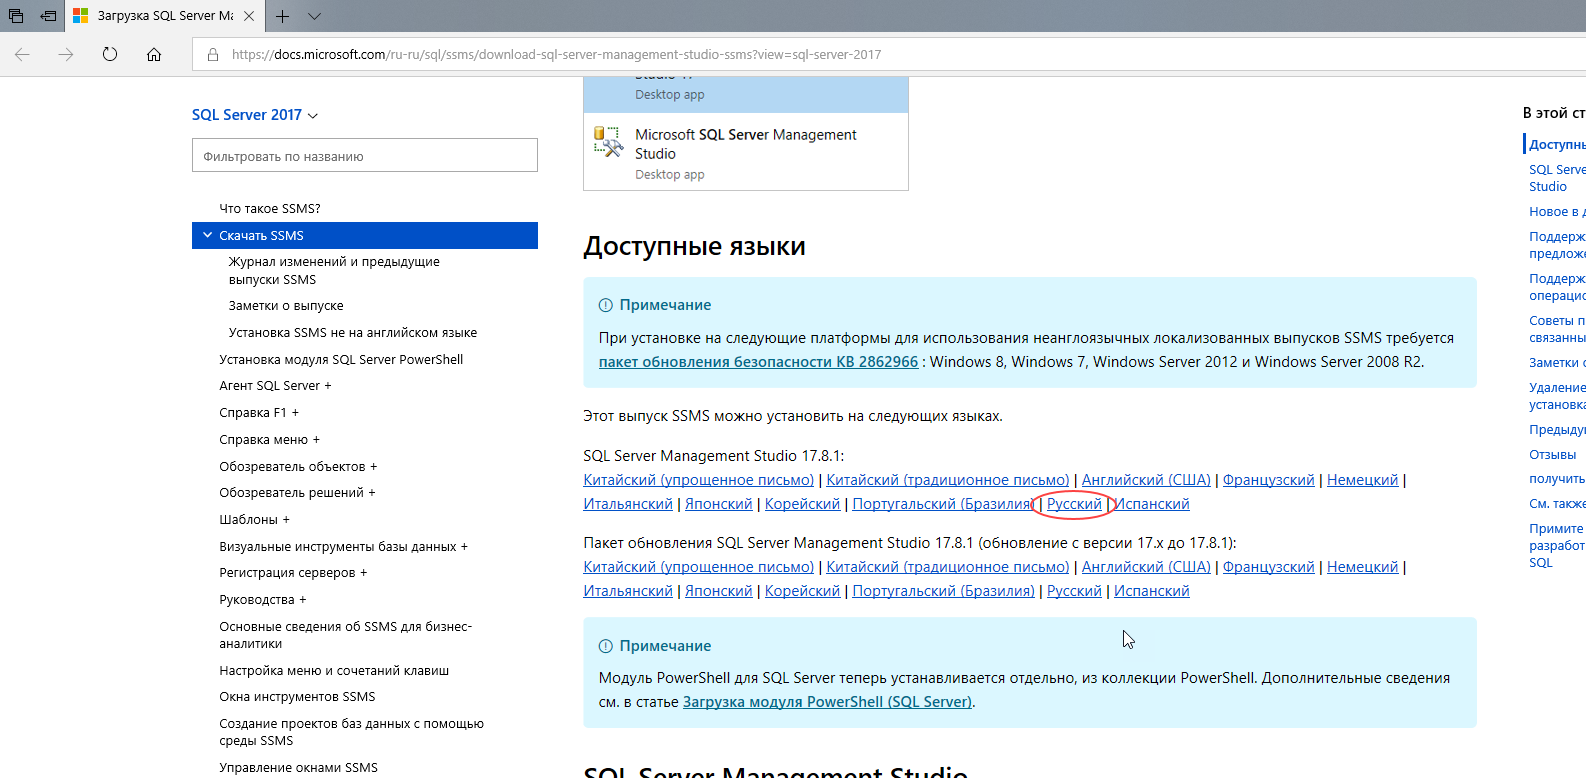 Рис. 20. Выберите для установки русской версии SQL Server Management Studio
Запустите скачанный исполняемый файл (Рис. 21).
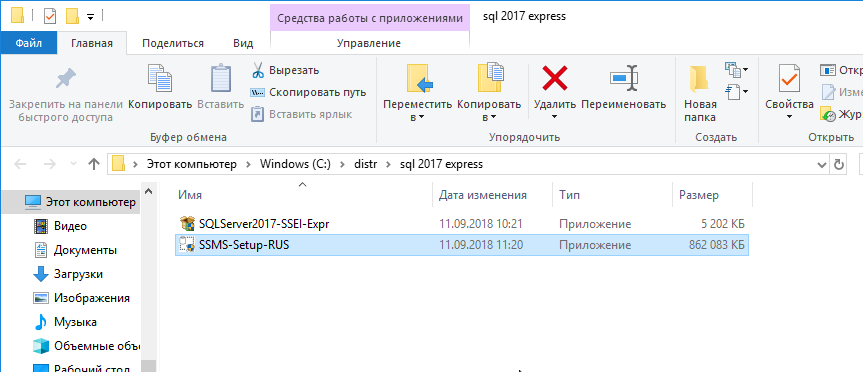 Рис. 21. Программа для установки SQL Server Management Studio.
Выберите «Установить» (Рис. 22).
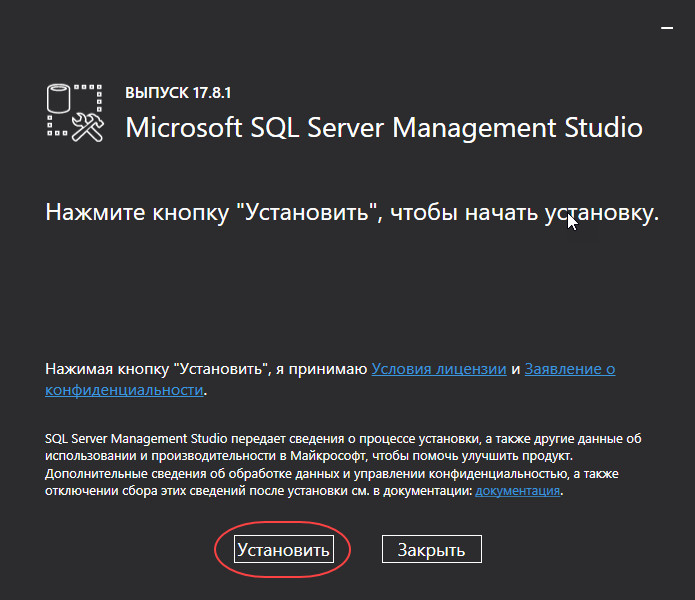 Рис. 22. Запуск процесса установки SQL Server Management Studio.
Начнётся процесс установки среды SQL Server Management Studio (Рис. 23).
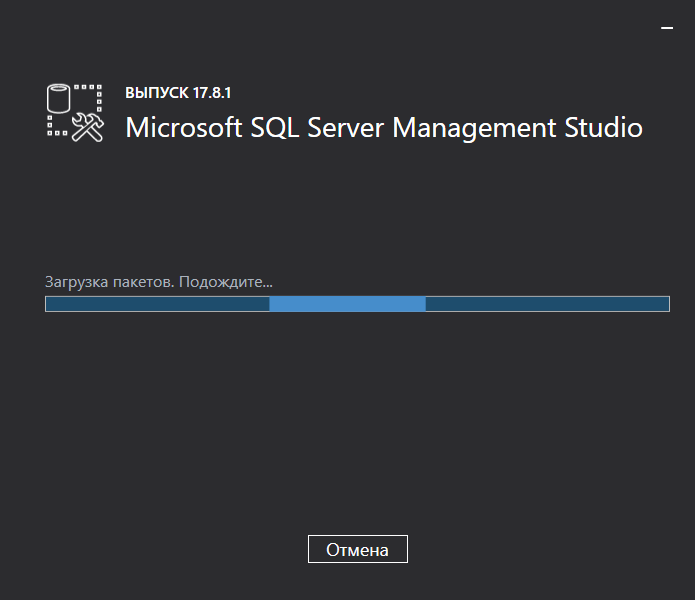 Рис. 23. Установка SQL Server Management Studio
По завершении установки нажмите Закрыть (Рис. 24).
 Рис. 24. Среда SQL Server Management Studio установлена.
Теперь вы можете использовать среду SQL Server Management Studio для резервного копирования-восстановления базы данных, для выполнения запросов и т.п.
3. Настройка SQL Server для работы в сети
Данное руководство ни в коей мере не заменяет официальную документацию разработчика, а является лишь краткой памяткой для начинающих пользователей
Нажимаем правой кнопкой мыши на кнопке «Пуск» из контекстного меню выбираем «Управление компьютером».
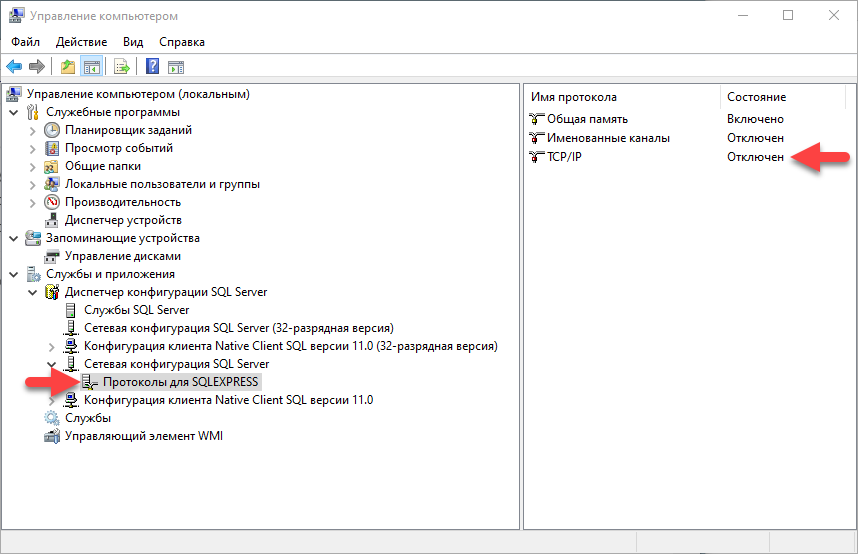 Рис. 25. Управление компьютером
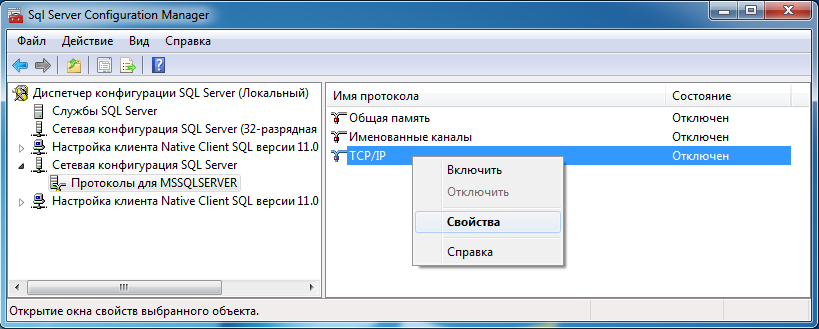
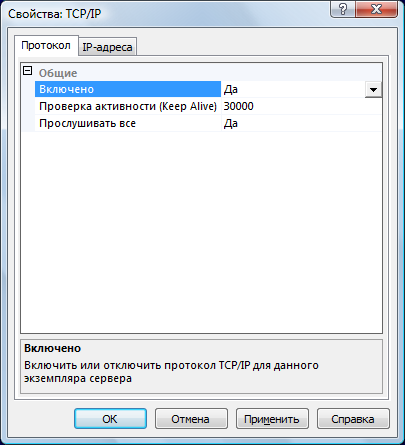
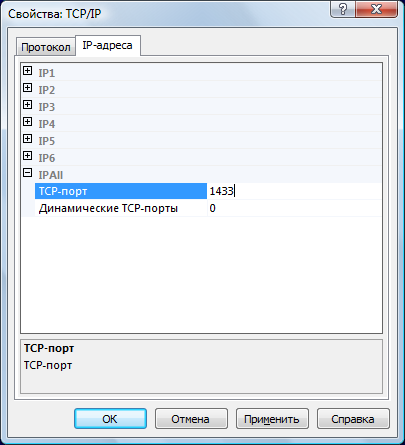
В дереве компонентов диспетчера (слева) выбрать раздел: Службы и приложения — Диспетчер конфигурации SQL Server – Сетевая конфигурация SQL Server – Протоколы для SQLEXPRESS (возможно MSSQL зависит от версии) – TCP/IP. Во вкладке «Протокол» устанавливаем «Да», во вкладке «IP-адреса» мотаем вниз до раздела «IPAll» и устанавливаем параметр «TCP-порт» равный 1433.
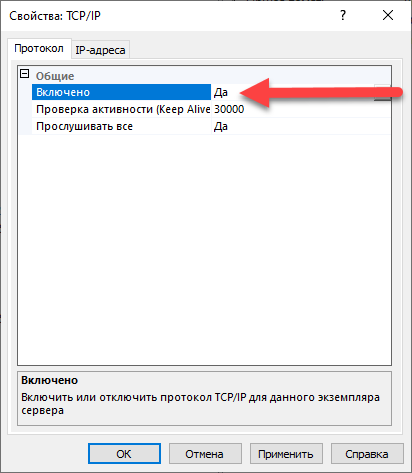 Рис. 26. Сетевая конфигурация SQL Server
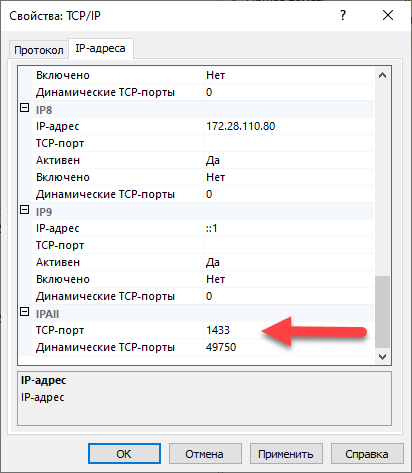 Рис. 27. Сетевая конфигурация SQL Server
Далее необходимо настроить «Брандмауэр Windows»
Найдите, например, через «Проводник Windows» по пути C:WindowsSystem32 файл cmd.exe и запустите его с повышенными правами администратора. Для этого на файле cmd.exe нажмите правой кнопкой мыши и выберите «Запуск от имени администратора».
Если у вас установлен Windows 10, то для открытия порта достаточно выполнить команду:
netsh advfirewall firewall add rule name = SQLPort dir = in protocol = tcp action = allow localport = 1433 remoteip = localsubnet profile = DOMAIN
Если у вас установлен Windows 7, то для открытия порта запускаем команду WF.msc
Откроется окно «Брандмауэр Windows»
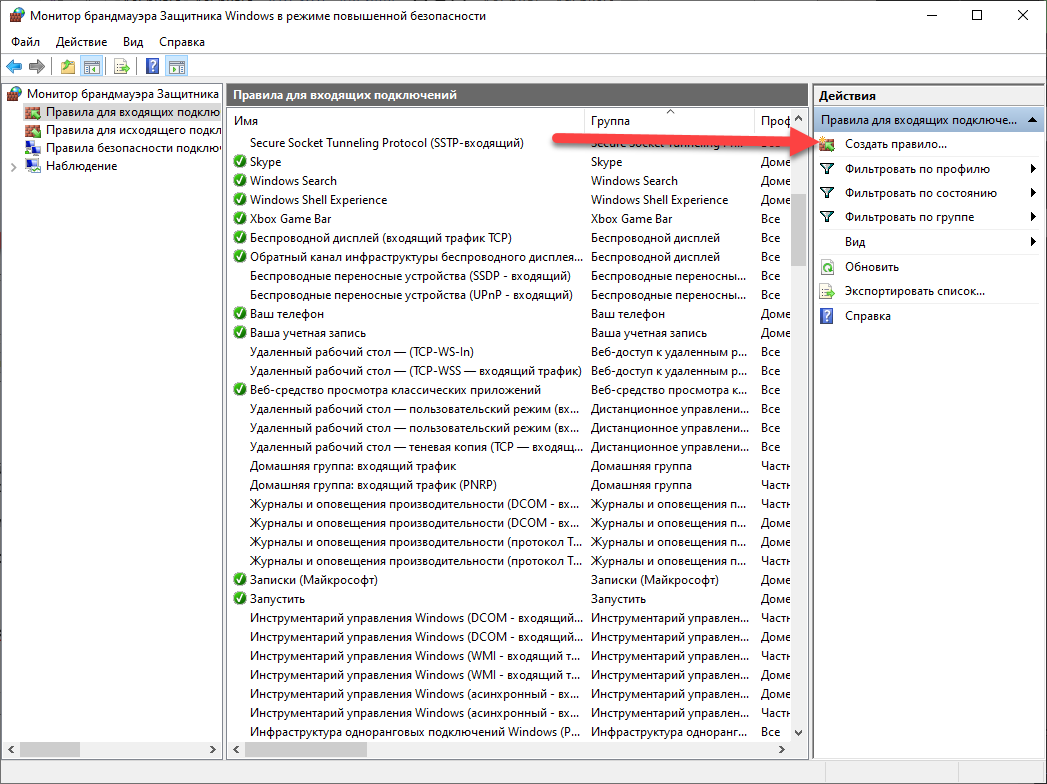 Рис. 28. Окно «Брандмауэр Windows»
Создаем правило для входящих подключений
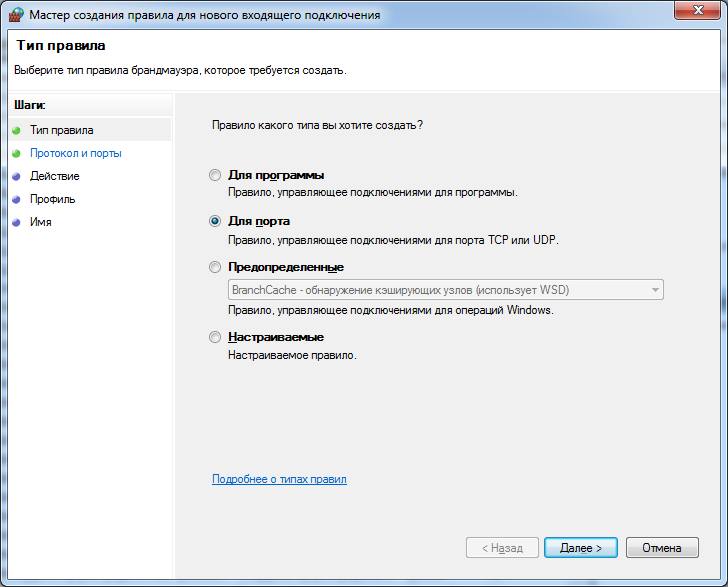
В диалоговом окне «Тип правила» выберите «Порт» и нажмите кнопку «Далее»
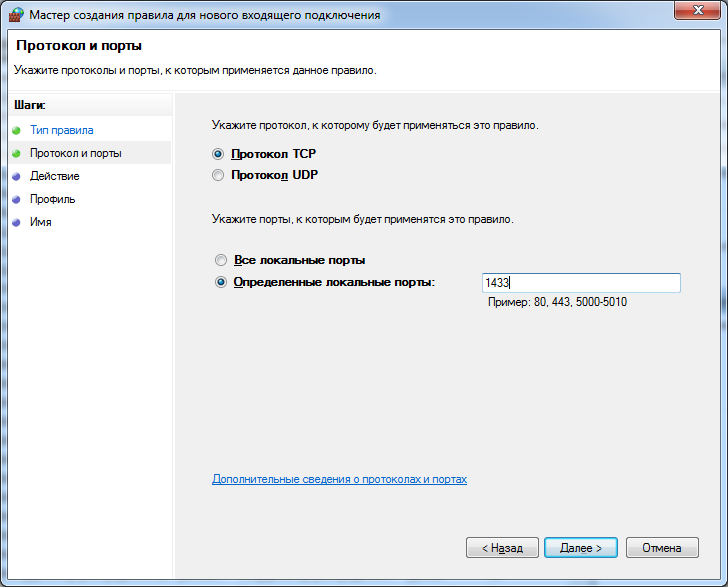
В диалоговом окне «Протокол и порты» выберите протокол «TCP».
Выберите «Определенные локальные порты» и введите номер порта экземпляра по умолчанию введите 1433.
Нажмите кнопку Далее.
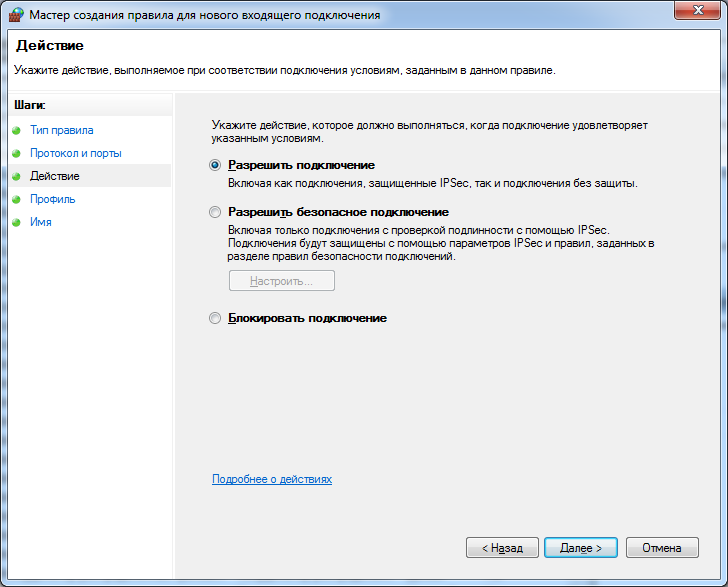
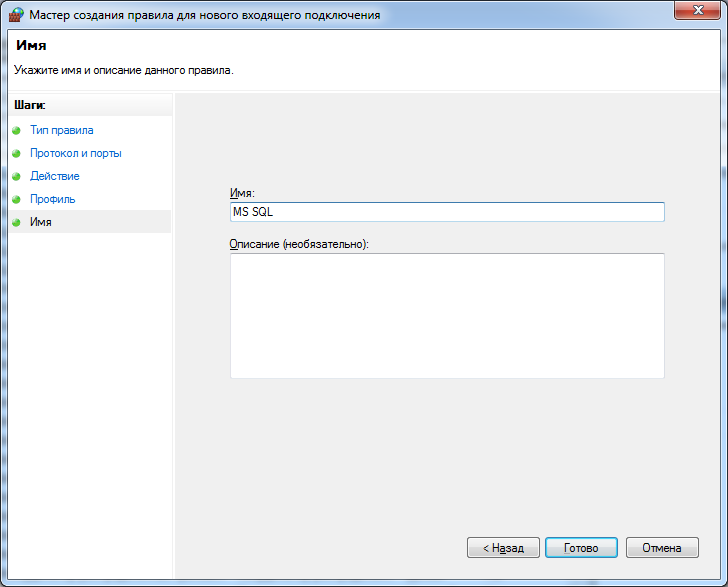
В диалоговом окне Имя введите имя и описание для этого правила, например, SQLPort, а затем нажмите кнопку Готово.
Настройка завершена
4. Создание резервной копии базы данных
Данное руководство ни в коей мере не заменяет официальную документацию разработчика, а является лишь краткой памяткой для начинающих пользователей
Для создания резервной копии базы данных, можно воспользоваться свободно распространяемой, программой SQL Server Management Studio.
Подробная инструкция по установке SQL Server Management Studio есть на нашем сайте.
Через меню «Пуск» запустите программу запускаем программу SQL Server Management Studio.
Выберите нужный сервер (экземпляр), введите имя и пароль администратора SQL Server’а и подключитесь к серверу.
 Рис. 29. Подключение к серверу
Если ваш SQL SERVER настроен на не стандартный порт, отличный от 1433, то в строке соединение необходимо указать его после запятой. Например: 10.0.0.30SQLEXPRESS2019, 18544 (где SQLEXPRESS2019 — имя именованного экземпляра, если имеется, а 18544 — порт сервера)
В дереве в левой части экрана выберите раздел «Базы данных» и установите курсор на нужную базу данных.
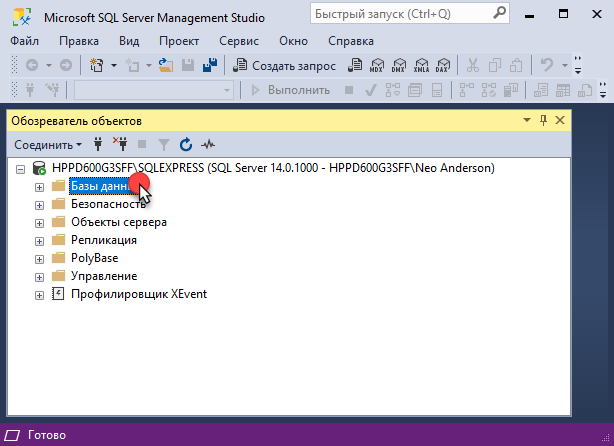 Рис. 30. Обозреватель объектов
Откройте правой кнопкой мыши контекстное меню. Выберите «Задачи» — «Создать резервную копию. Если в области «Назначение» ещё не указан файл, в который будет сохранена резервная копия, то его нужно указать. Для этого нажмите «Добавить».
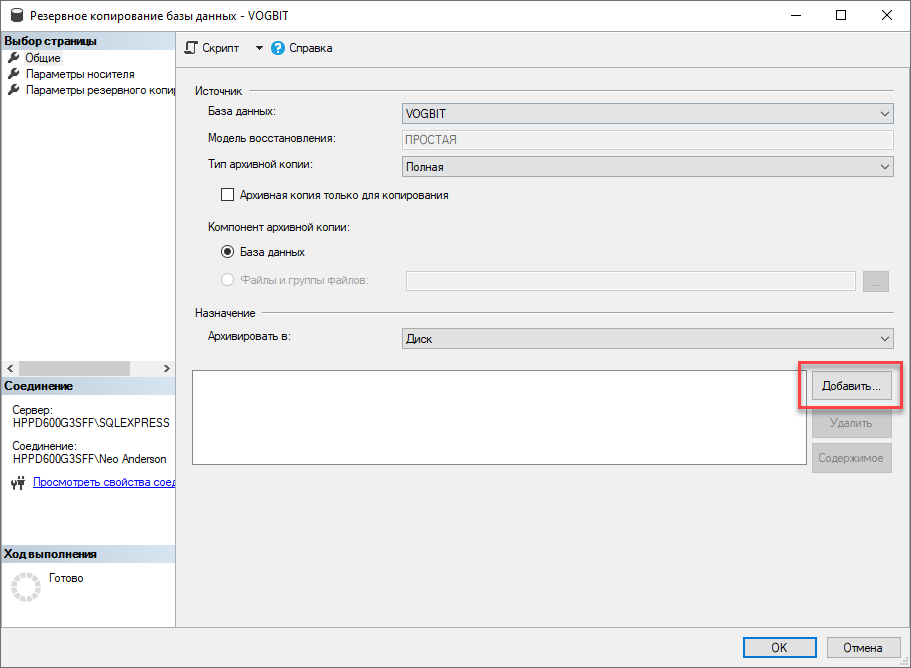 Рис. 31. Создание резервной копии
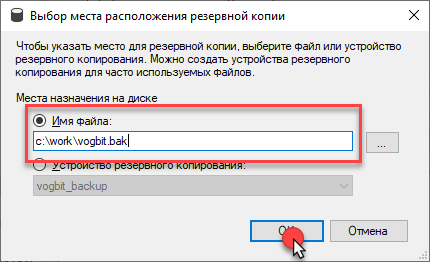 Рис. 32. Создание резервной копии
Если Вы сохраняете резервную копию базы данных в выбранный файл уже не первый раз, то в разделе «Параметры носителя» Вы можете выбрать один из двух вариантов:
- Добавить в существующий резервный набор данных;
- Перезаписать все существующие резервные наборы данных.
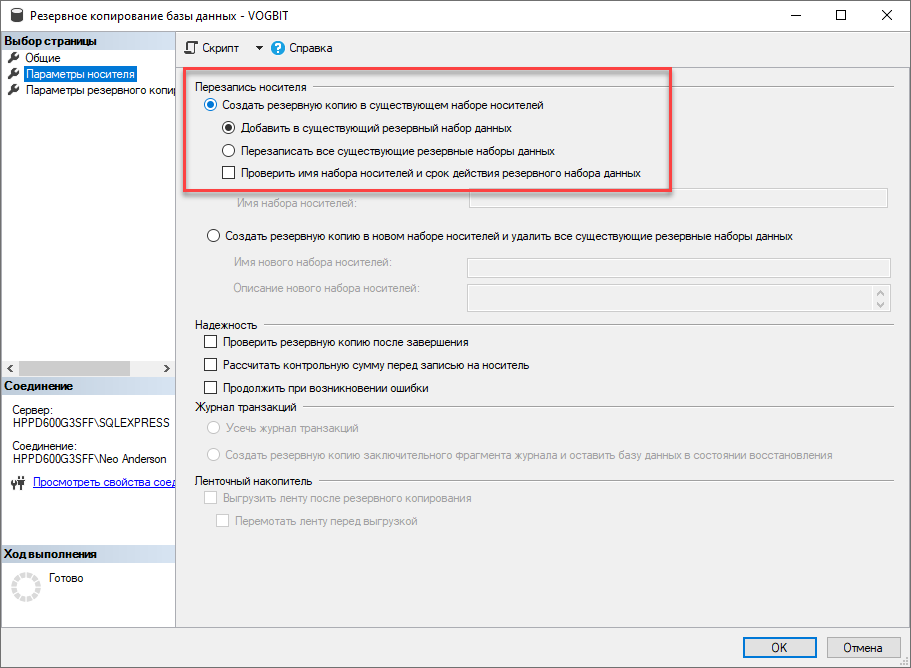 Рис. 33. Создание резервной копии
Для создания резервной копии нажмите «Ок».
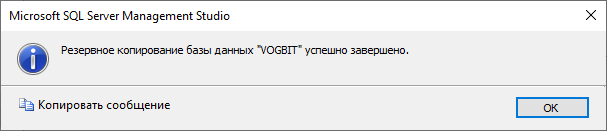 Рис. 34. Создание резервной копии
5. Восстановление базы данных из резервной копии
Данное руководство ни в коей мере не заменяет официальную документацию разработчика, а является лишь краткой памяткой для начинающих пользователей
Через меню «Пуск» запустите программу запускаем программу SQL Server Management Studio.
Выберите нужный сервер (экземпляр), введите имя и пароль администратора SQL Server’а и подключитесь к серверу.
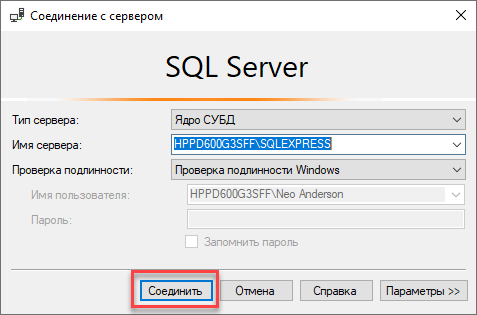 Рис. 35. Восстановление базы данных
В дереве в левой части экрана выберите раздел «Базы данных» откройте правой кнопкой мыши контекстное меню. Выберите «Восстановить базу данных».
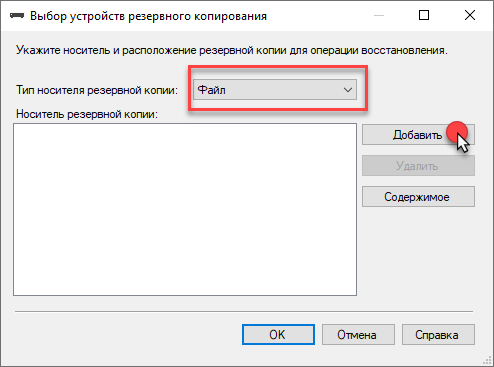 Рис. 36. Восстановление базы данных
В области «Назначение — База данных» выберите имя восстанавливаемой базы. В поле «Источник» выберите «Устройство» и нажмите «…» для выбора места расположения файла с резервной копией.
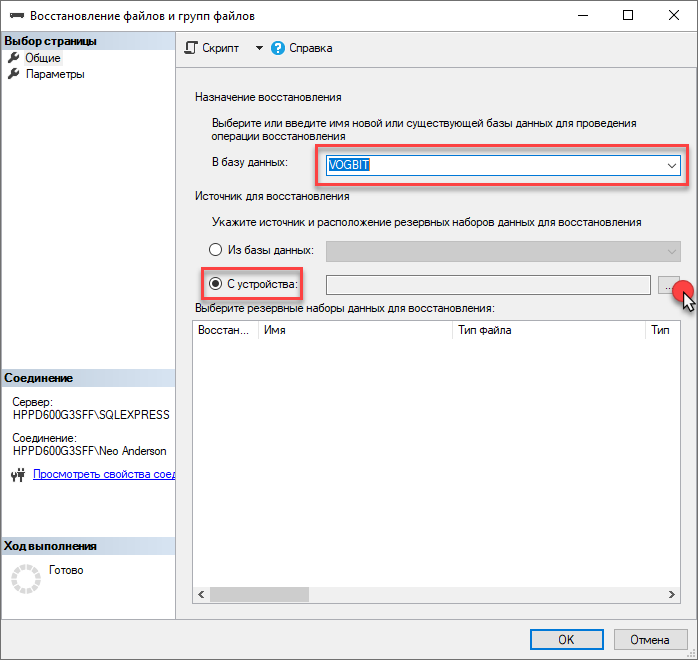 Рис. 37. Восстановление базы данных
В окне «Выбор устройства резервного копирования» выберите «Файл» и нажмите кнопку «Добавит».
 Рис. 38. Восстановление базы данных
Выберите файл с резервной копией базы данных.
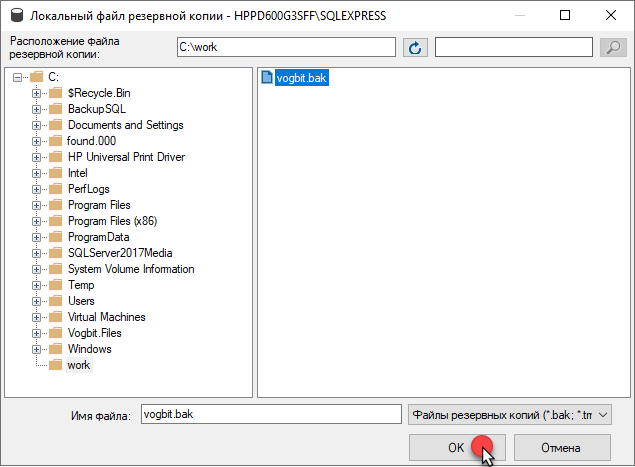 Рис. 39. Восстановление базы данных
Убедитесь, что выбрано правильное имя базы данных назначения, в противном случае впишите/выберите нужное. Если база данных с введенным именем не существует, она создастся автоматически.
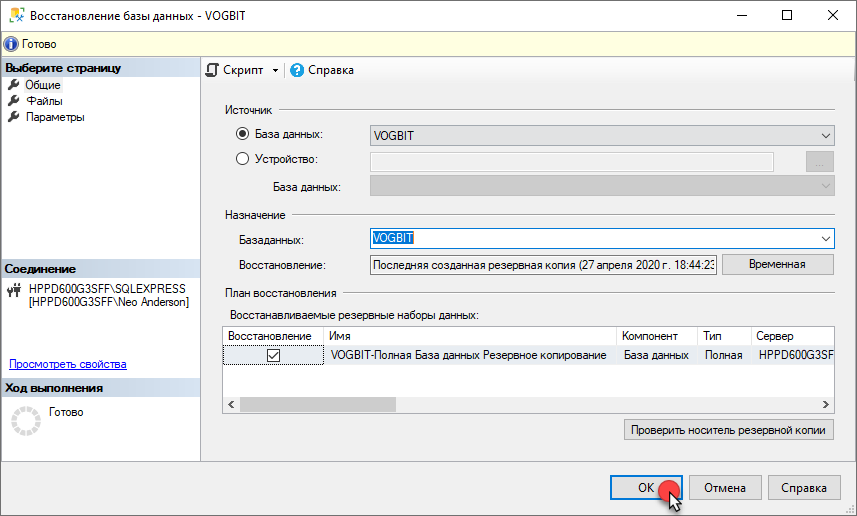 Рис. 40. Восстановление базы данных
Нажмите «Ок» для начала восстановления базы данных.
 Рис. 41. Восстановление базы данных
31 aug 2022
Beginner
503K Views
Microsoft SQL Server Express is a powerful and reliable free data management system that delivers a rich and reliable data store for lightweight Web Sites and desktop applications. The Express edition is free and ideal for learning, developing, and powering desktop, web & small server applications.
The SQL Server 2019 is the latest version of SQL Server which can be run on Windows and Linux. Even you run SQL Server 2019 on Mac using containers. You can download the Microsoft SQL Server 2019 Express download by following the link: SQL Server 2019 Express Download
With the release of the SQL Server 2019 version, it comes with new features and a few of them are given below.
- Accelerated Database Recovery (ADR)
- Always Encrypted with Secure Enclaves
- Replication in Linux
- Big Data Clusters
- Memory-optimized TempDB Metadata
- Intelligent Query Processing (IDQ) Improvements
- Columnstore Index Enhancements
- SQL Data Discovery and Classification (SDDC)
- Better Scale-out with the automatic redirection of the connections based on various read & write intent
The SQL Server 2014 Express release includes the full version of SQL Server 2014 Management Studio. Microsoft SQL Server 2014 Express download link: SQL Server 2014 Express Download
SQL Server 2014 downloads
Before downloading SQL Server 2014 Express version, let’s understand the various files and their importance.
-
LocalDB (SqlLocalDB)
LocalDB is a lightweight version of Express that has all its programmable features, yet runs in user mode and has a fast, zero-configuration installation and a short list of pre-requisites. Use this if you need a simple way to create and work with databases from code. It can be bundled with Application and Database Development tools like Visual Studio and or embedded with an application that needs local databases. You will see two files one for the 32-bit system (ENUx86SqlLocalDB.msi) and the other for the 64-bit system (ENUx64SqlLocalDB.msi).
-
Express (SQLEXPR)
This package includes the SQL Server database engine only. Best suited to accept remote connections or administer remotely. You will see two files one for a 32-bit system (SQLEXPR_x86_ENU.exe) and the other for a 64-bit system (SQLEXPR_x64_ENU.ex
-
Express with Tools (SQLEXPRWT)
This package contains everything needed to install and configure SQL Server as a database server including the full version of SQL Server 2014 Management Studio. Choose either LocalDB or Express depending on your needs above. You will see two files one for a 32-bit system (SQLEXPRWT_x86_ENU.exe) and the other for a 64-bit system (SQLEXPRWT_x64_ENU.exe
-
SQL Server Management Studio Express (SQLManagementStudio)
This does not contain the database, but only the tools to manage SQL Server instances, including LocalDB, SQL Express, SQL Azure, a full version of SQL Server 2014 Management Studio, etc. If you already have the database and only need the management tools, download this one. You will see two files one for a 32-bit system (SQLManagementStudio_x86_ENU.exe) and the other for a 64-bit system (SQLManagementStudio_x64_ENU.
-
Express with Advanced Services (SQLEXPRADV)
This package contains all the components of SQL Server Express including the full version of SQL Server 2014 Management Studio. This is a larger download than “with Tools,” as it also includes both Full-Text Search and Reporting Services. You will see two files one for the 32-bit system (SQLEXPRADV_x86_ENU.exe) and the other for the 64-bit system (SQLEXPRADV_x64_ENU.ex
Read More Articles Related to SQL Server
What do you think?
The SQL Server Express edition is one of the entry-level and free-to-use editions of SQL Server. SQL Server can be used to deploy a small application or the enterprise application alone with multiple exiting features as discussed above in this article. We do not have to pay the license fees for using the developer version even though you are using it in a production environment. It can be used to reduce the overall license cost as well; for example, you’re deploying a database mirroring certainly.
I hope you will enjoy the SQL Server 2014 Express. I would like to have feedback from my blog readers. Your valuable feedback, question, or comments about this article are always welcome.
Microsoft SQL Server Management Studio (SSMS) is an all-in-one place for you to go if you want to manage your databases. SSMS gives you a graphical interface so you can manage your SQL databases from a local SQL server to an on-cloud database stack.
The SQL Server Management Studio can be used to deploy, monitor, and upgrade existing SQL databases. Some might even consider it an all-in-one solution.
This article gives you direct download links for all available SSMS versions that you can use to meet your requirements. But before we begin, let us give you a little insight into the different requirements and prerequisites.
Table of contents
- What is SQL Server Management Studio
- SQL Server Management Studio System Requirements
- SQL Server Management Studio Download Links
- How to Install SQL Server Management Studio
- SQL Server Management Studio Available Languages
- Uninstall SQL Server Management Studio
- FAQs
- Is SQL Server the same as SSMS?
- Can I use SSMS without SQL Server?
As mentioned above, SQL Server Management Studio, or SSMS, is an integrated management environment for a SQL Server architecture. It offers a user interface, a set of tools, and sophisticated script editors that communicate with SQL Server.
The user-friendly interface and convenient manageability of the SSMS make it easier for the developers to manage the many SQL databases, perform maintenance works, and access them when required.
SQL Server Management Studio System Requirements
Before you begin installing SSMS on your device, you’ll need to meet these minimum hardware requirements:
- Processor: 1.8 GHz or faster x86 (Intel, AMD) processor
- RAM: 2GB (2.5GB if running on a virtual machine)
- Storage: Minimum of 2 GB (Can go up to 10 GB depending upon installed features)
Apart from the hardware requirements, you also need to ensure that you have the right operating system. The following operating systems are currently supported:
- Windows Server 2022 (64-bit)
- Windows 11 (64-bit)
- Windows 10 (64-bit) version 1607 (10.0.14393) or later
- Windows 8.1 (64-bit)
- Windows Server 2019 (64-bit)
- Windows Server 2016 (64-bit)
- Windows Server 2012 R2 (64-bit)
- Windows Server 2012 (64-bit)
- Windows Server 2008 R2 (64-bit)
Download all versions of Windows Server.
SQL Server Management Studio Download Links
Here’s the list of the latest builds of SQL Server Management Studio. Click the Download button to immediately begin downloading the tool.
| Version | Latest version | Release | Download link |
|---|---|---|---|
| SQL Server Management Studio 18 | 18.1 (Build 15.0.18390.0) | 2019 | Download |
| SQL Server Management Studio 17 | 17.9.1 (Build 14.0.17289.0) | 2017 | Download |
| SQL Server Management Studio 16 | 16.5.3 (Build 13.0.16106.4) | 2016 | Download |
| SQL Server Management Studio 14 | 2014 SP3 (Build 12.0.6024.0) | 2014 | Download |
| SQL Server Management Studio 12 | 2012 SP4 (Build 11.0.7001.0) | 2012 | Download |
| SQL Server Management Studio 2008 R2 | 2008 R2 SP2 (Build 10.50.4000.0) | 2010 | Download |
| SQL Server Management Studio 2008 | 2008 | 2008 | Download |
| SQL Server Management Studio 2005 | 2005 | 2005 | Download |
You can also download a specific version if you don’t want the latest build of SSMS:
| Version | Build | Download link | Release date |
|---|---|---|---|
| 18.10 | 15.0.18390.0 | SQL Server Management Studio (SSMS) 18.10 | 5 Oct 2021 |
| 18.9.2 | 15.0.18386.0 | SQL Server Management Studio (SSMS) 18.9.2 | 15 Jul 2021 |
| 18.9.1 | 15.0.18384.0 | SQL Server Management Studio (SSMS) 18.9.1 | 20 Apr 2021 |
| 18.9 | 15.0.18382.0 | SQL Server Management Studio (SSMS) 18.9 | 15 Apr 2021 |
| 18.8 | 15.0.18369.0 | SQL Server Management Studio (SSMS) 18.8 | 17 Dec 2020 |
| 18.7.1 | 15.0.18358.0 | SQL Server Management Studio (SSMS) 18.7.1 | 27 Oct 2020 |
| 18.7 | 15.0.18357.0 | SQL Server Management Studio (SSMS) 18.7 | 20 Oct 2020 |
| 18.6 | 15.0.18338.0 | SQL Server Management Studio (SSMS) 18.6 | 22 Jul 2020 |
| 18.5.1 | 15.0.18333.0 | SQL Server Management Studio (SSMS) 18.5.1 | 9 Jun 2020 |
| 18.5 | 15.0.18330.0 | SQL Server Management Studio (SSMS) 18.5 | 7 Apr 2020 |
| 18.4 | 15.0.18206.0 | SQL Server Management Studio (SSMS) 18.4 | 4 Nov 2019 |
| 18.3.1 | 15.0.18183.0 | SQL Server Management Studio (SSMS) 18.3.1 | 2 Oct 2019 |
| 18.2 | 15.0.18142.0 | SQL Server Management Studio (SSMS) 18.2 | 25 Jul 2019 |
| 18.1 | 15.0.18131.0 | SQL Server Management Studio (SSMS) 18.1 | 11 Jun 2019 |
| 18.0 | 15.0.18118.0 | SQL Server Management Studio (SSMS) 18.0 | 24 Apr 2019 |
| 17.9.1 | 14.0.17289.0 | SQL Server Management Studio (SSMS) 17.9.1 | 21 Nov 2018 |
| 17.9 | 14.0.17285.0 | SQL Server Management Studio (SSMS) 17.9 | 4 Sep 2018 |
| 17.8.1 | 14.0.17277.0 | SQL Server Management Studio (SSMS) 17.8.1 | 26 Ju 2018 |
| 17.7 | 14.0.17254.0 | SQL Server Management Studio (SSMS) 17.7 | 9 May 2018 |
| 17.6 | 14.0.17230.0 | SQL Server Management Studio (SSMS) 17.6 | 20 Mar 2018 |
| 17.5 | 14.0.17224.0 | SQL Server Management Studio (SSMS) 17.5 | 15 Feb 2018 |
| 17.4 | 14.0.17213.0 | SQL Server Management Studio (SSMS) 17.4 | 7 Dec 2017 |
| 17.3 | 14.0.17199.0 | SQL Server Management Studio (SSMS) 17.3 | 9 Oct 2017 |
| 17.2 | 14.0.17177.0 | SQL Server Management Studio (SSMS) 17.2 | 7 Aug 2017 |
| 17.1 | 14.0.17119.0 | SQL Server Management Studio (SSMS) 17.1 | 27 Jun 2017 |
| 17.0 | 14.0.17099.0 | SQL Server Management Studio (SSMS) 17.0 | 25 Apr 2017 |
| 16.5.3 | 13.0.16106.4 | SQL Server Management Studio (SSMS) 16.5.3 | 30 Jan 2017 |
| 16.5.1 | 13.0.16100.1 | SQL Server Management Studio (SSMS) 16.5.1 | 5 Dec 2016 |
| 16.5 | 13.0.16000.28 | SQL Server Management Studio (SSMS) 16.5 | 26 Oct 2016 |
| 16.4.1 | 13.0.15900.1 | SQL Server Management Studio (SSMS) 16.4.1 | 23 Sep 2016 |
| 16.3 | 13.0.15700.28 | SQL Server Management Studio (SSMS) 16.3 | 20 Aug 2016 |
There have also been preview releases for some of these versions that have not been mentioned in the table above.
To download any SSMS version in any other language, please visit Microsoft’s Release Notes page for direct download links.
How to Install SQL Server Management Studio
Once you have downloaded the SSMS, here is how to install it:
-
Download the setup file for the SSMS version from the given links above.
-
Run the downloaded file.
The installation wizard will then run.
-
Click Install.

Begin SQL Server Management Studio installation SSMS will now begin installing on your PC. The process should take about 5 minutes but can vary depending on your system’s specifications.
-
Once installed, click Close.
Close the installation wizard


You can now launch SSMS by searching for it through the Windows Search bar and begin using it.

SQL Server Management Studio Available Languages
SSMS can be downloaded and installed in the following languages:
- English (US)
- Chinese (Simplified)
- Chinese (Traditional)
- French
- German
- Italian
- Japanese
- Korean
- Portuguese (Brazil)
- Russian
- Spanish
Uninstall SQL Server Management Studio
If you ever want to uninstall the SSMS, here is how to do it:
-
Run the downloaded setup file for SSMS previously used for installation.
If you don’t already have it, you can download the setup file from the direct download links shared above.
-
Click Uninstall from the wizard.
Uninstall SSMS The wizard will then remove SSMS from your device.
-
Click Close when it is finished.
Close the uninstallation wizard


FAQs
Is SQL Server the same as SSMS?
SQL Server Management Studio (SSMS) is a tool that allows you to create and manage SQL databases, whereas an SQL Server is a database designed to manage and store information. SSMS is included in Microsoft SQL Servers.
Can I use SSMS without SQL Server?
Yes, you can use SQL Server Management Studio without the server itself. This way you can manage and control on-premises SQL databases as well as on-cloud databases.
Also see:
Subhan Zafar is an established IT professional with interests in Windows and Server infrastructure testing and research, and is currently working with Itechtics as a research consultant. He has studied Electrical Engineering and is also certified by Huawei (HCNA & HCNP Routing and Switching).
How to download SQL Server?
What are the available options and versions?
Isn’t there any Free version to play with, learn and practice SQL?
I get emails regarding these question many a times from my readers, sometime from my friends and old colleagues too. So I thought to collate all this information into this single post so that people won’t have to search here and there on internet and finally end up nowhere or to any junk sites.
Currently the latest version of SQL Server from Microsoft is SQL Server 2014 released last year on 1st April 2014, and its first Service Pack (SP1) was released just few days back (15th May 2015). You have following options to choose from:
1. SQL Server Full version contains the Database Engine with whole BI suit and is a paid version and you have to buy license key from your MSDN Subscriptions. It is also available for free download for evaluation of 180 days, but post that you have to buy a license key.
2. SQL Server Express is a Free version that can be used by anyone, like students, small setups and companies, etc. It is a lite version which contains the Database Engine with some limitations like: max size of a DataBase is set to 10GB (but you can create multiple databases), no SQL Agent, single CPU utilization & max 1 GB RAM allocation. I think this is a good package and configuration you are getting it for free. And a best option for students and for beginners in SQL if they want to learn and practice SQL Querying without investing anything.
–> Check this video on how to download SQL Server with above two options:
You can also directly download the Express bits from here:
– SQL Server 2014 Express and Tools (DB Engine with SSMS): x64 | x86
– SQL Server Management Studio (SSMS only) 2014: x64 | x86
– SQL Server 2014 Express and Tools with Advanced Services: x64 | x86
… with the Advanced Services option you get extra tools like Fulltext Search and Reporting Services.
After downloading the bits from Microsoft site you are now ready to install SQL Server.
–> Check this video on how to install SQL Server (its very easy, but just in case):
–> After install completes you can download the sample database AdventureWorks2014 for SQL Server 2014 from CodePlex and restore the Backup (.BAK) file to SQL Server, click on the image below:

-
Эта информация была полезна?
0
m
n
0 -
‘
Требования к аппаратному обеспечению
Минимальные:
Процессор: Intel (или совместимый) 2000 МГц или выше;
Память: 4 ГБ или более;
Жесткий диск: 20 ГБ или более.
Рекомендуемые:
Процессор: Intel Core i7 3000 МГц или выше;
Память: 4 ГБ или более;
Жесткий диск: 100 ГБ или более.
Требования к программному обеспечению
Необходимо наличие установленных пакетов:
- Microsoft .NET Framework 3.5 SP1 (просто включить в списке компонентов ОС);
- Microsoft .NET Framework 4 + Языковой пакет (в Windows 8, Server 2012 и более поздних входит в состав ОС);
- Windows PowerShell 2.0 (просто включить в списке компонентов ОС при наличии там такого пункта).
Поддерживаемые операционные системы:
- Windows 7 SP1,
- Windows Server 2008 R2 SP1,
- Windows 8,
- Windows Server 2012,
- Windows 8.1,
- Windows Server 2012 R2.
Более подробную информацию можно найти на сайте корпорации Microsoft.
Примечание. Бесплатную версию Microsoft SQL Server 2014 Express Edition можно скачать на сайте корпорации Microsoft:
- SQLEXPRADV_x64_RUS.exe – для 64-разрядных ОС;
- SQLEXPRADV_x86_RUS.exe – для 32-разрядных ОС или установки в режиме WOW64.
Внимание! Для установки ПО «Альта-ГТД» необходимо скачивать именно редакцию «Express с расширенными службами»!
Установка Microsoft SQL Server 2014
- Запустить программу-установщик с правами администратора на данном компьютере.
- В разделе «Планирование» нажать пункт «Средство проверки конфигурации» и убедиться, что все проверки будут успешно пройдены:
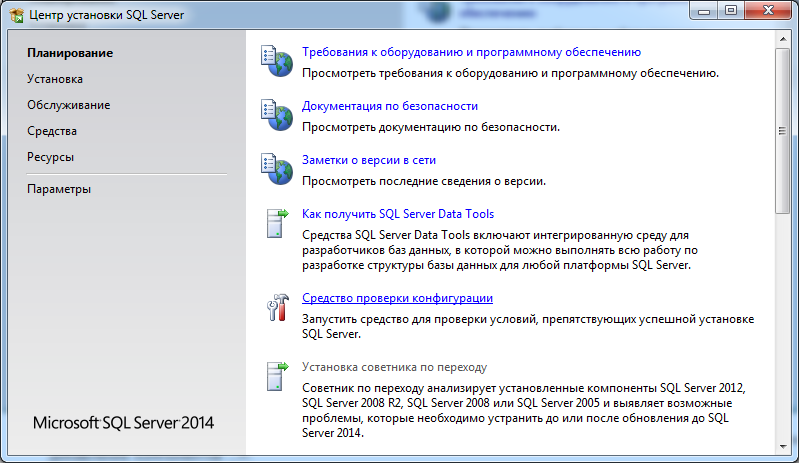
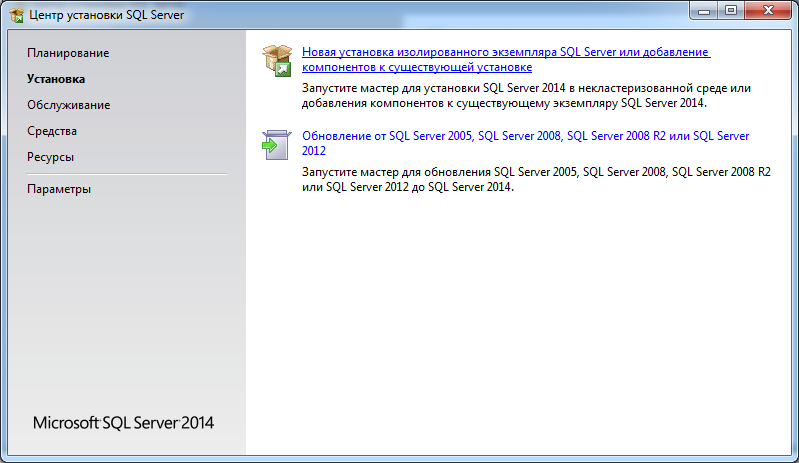
- Нажать на раздел «Установка» и затем пункт «Новая установка изолированного экземпляра SQL Server или добавление компонентов …»:
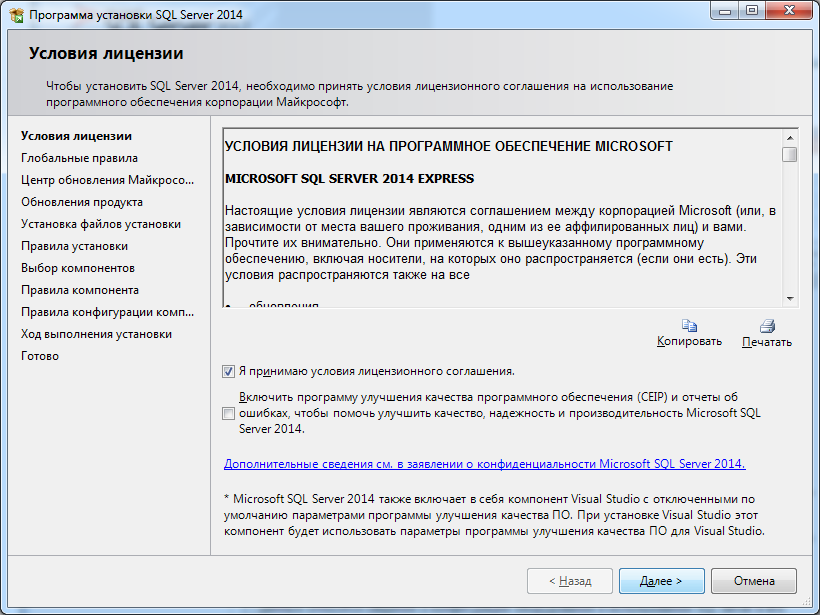
- Прочитать лицензию, установить галочку «Я принимаю условия…» и нажать кнопку «Далее»:
- Нажать кнопку «Далее»:
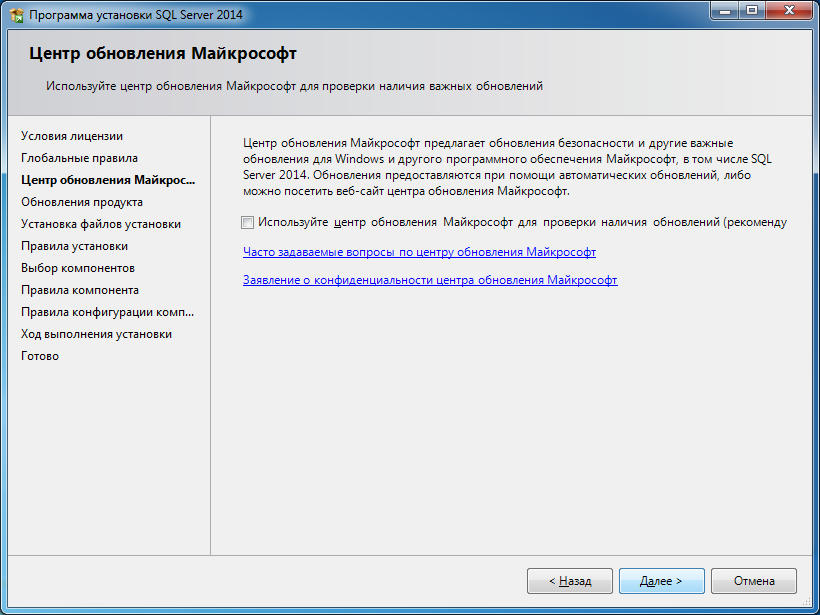
- Если компьютер не подключен к интернету, то может выводиться ошибка – просто нажать кнопку «Далее»:
- Выбрать компоненты для установки (рекомендуется воспользоваться кнопкой «Выделить все») и нажать кнопку «Далее»:

Внимание! Для нормального функционирования ПО «Альта-ГТД» требуется установить компонент «Полнотекстовый и семантический поиск»! Кроме того, для управления самим SQL Server необходимо установить компонент «Средства управления — основные»! Также настоятельно рекомендуется установить «Средства управления – полный набор», если такой пункт доступен (он включает утилиту SQL Server Profiler, полезную для диагностики возможных проблем с производительностью SQL Server).
- Выбрать опцию «Экземпляр по умолчанию» и нажать кнопку «Далее»:

- Выбрать опции, как показано на рисунке, и перейти на закладку «Параметры сортировки»:
Примечание. Если Вы хотите использовать «SQL Server Agent» (встроенный планировщик заданий, в бесплатную версию не входит) для выполнения регулярного резервного копирования файлов БД на другой компьютер в своей локальной сети (рекомендуется) и Ваша сеть построена с использованием домена Windows NT, то необходимо завести в Вашем домене отдельную учетную запись для SQL Server Agent и предоставить ей права на соответствующие ресурсы (более подробную информацию можно найти в справочной системе SQL Server). При такой конфигурации, в этом окне необходимо в поля «Имя учетной записи» и «Пароль» ввести имя созданной учетной записи (вида ДОМЕНИМЯ) и ее пароль, как минимум для службы «SQL Server Agent».
- Выбрать опции, как показано на рисунке, и нажать кнопку «Далее»:
Примечание. Чтобы изменить опцию нажмите расположенную рядом кнопку «Настройка» и установите параметры, как показано на следующем рисунке:
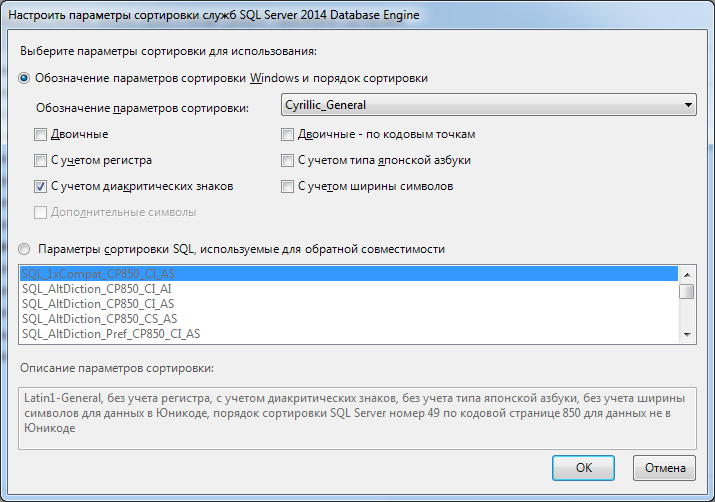
Внимание! Данную настройку нельзя будет изменить после установки. Будьте внимательны!
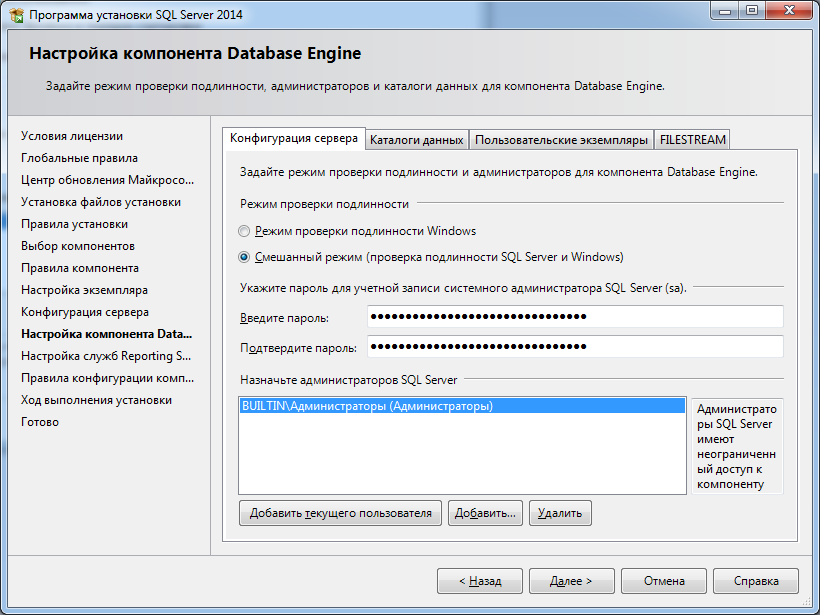
- Выбрать опцию «Смешанный режим» и задать пароль для встроенной учетной записи администратора «sa» (эта учетная запись обладает максимальными правами доступа ко всем функциям и объектам на SQL-сервере). Дополнительно можно указать учетные записи пользователей Windows или целые группы пользователей Windows, которые должны обладать максимальными правами доступа к SQL Server (например, встроенную группу «Администраторы»). Затем перейти на закладку «Каталоги данных»:
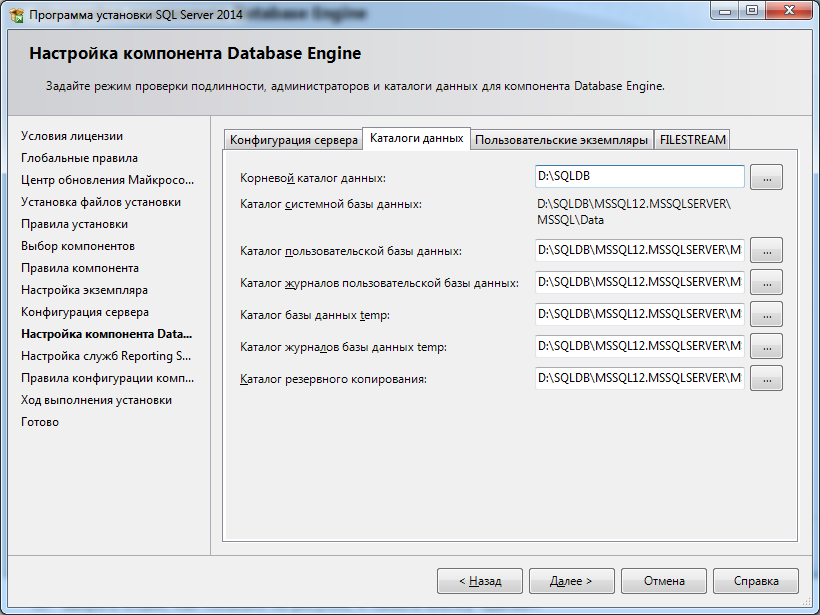
- В поле «Корневой каталог данных» ввести путь к папке, где будут размещаться файлы баз данных (рекомендуется использовать отдельный от ОС физический диск), и перейти на закладку «Пользовательские экземпляры»:
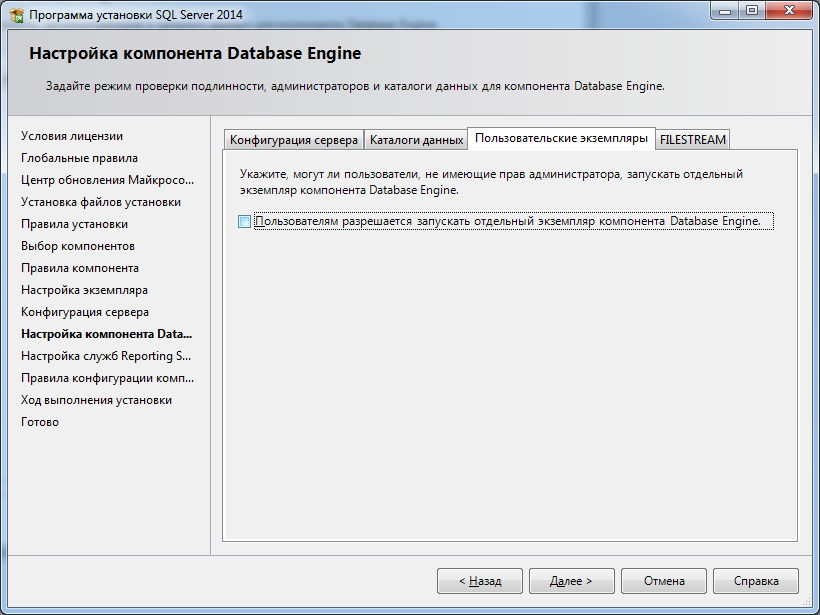
- Выбрать опции, как показано на рисунке, и нажать кнопку «Далее»:
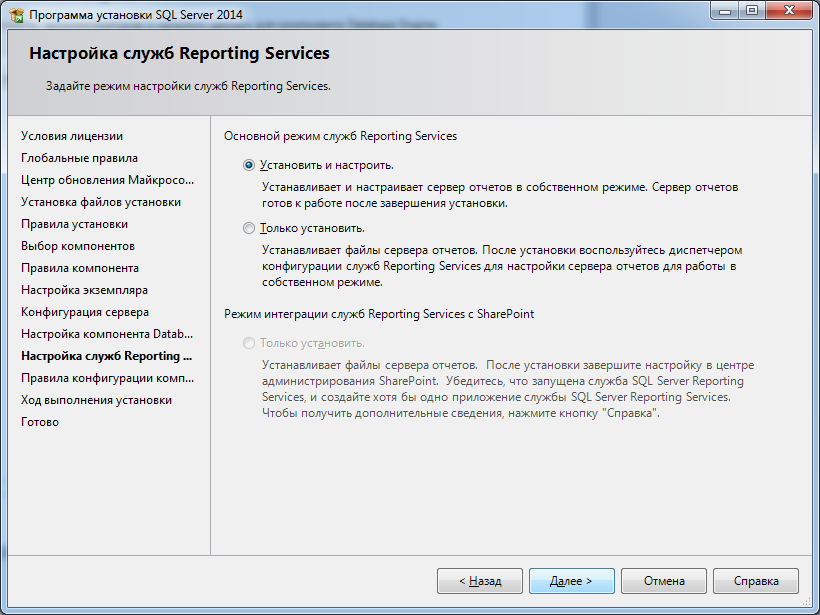
- Выбрать опции, как показано на рисунке, и нажать кнопку «Далее»:
- После завершения установки нажать кнопку «Закрыть»:
Дальнейшие шаги следует выполнять только, если требуется обеспечить
доступ к SQL Server с других компьютеров в сети!
- Запустить утилиту «Диспетчер конфигурации SQL Server» (Пуск→Все программы→Microsoft SQL Server 2014→Средства настройки→Диспетчер конфигурации SQL Server). В разделе «Сетевая конфигурация SQL Server»→«Протоколы для …» нажать правой кнопкой мыши на строке «TCP/IP» и в контекстном меню выбрать пункт «Свойства»:
- На закладке «Протокол» установить параметр «Включено» = «Да», а на закладке «IP-адреса» в разделе «IPAll» параметр «TCP-порт» = «1433». Затем нажать кнопку «ОК»:
Примечание. Аналогичным способом настоятельно рекомендуется отключить все остальные протоколы, кроме TCP/IP.
- В разделе «Службы SQL Server» нажать правой кнопкой мыши на строке «SQL Server (…)» и в контекстном меню выбрать пункт «Перезапустить» (этот пункт можно пропустить, если Вы перезагрузите компьютер после завершения остальных настроек):

- Если на компьютере установлен какой-либо FireWall, то в нем необходимо разрешить входящие соединения по протоколу TCP/IP на порт 1433 (для подключения к SQL Server с других компьютеров), а также по протоколу UDP на порт 1434 (для того чтобы другие компьютеры могли обнаруживать данный экземпляр SQL Server). В стандартном «Брандмауэре Windows» (Панель управления→Брандмауэр Windows) для этого необходимо в разделе «Дополнительные параметры→Правила для входящих подключений» дважды «Создать правило»:
a) Выбрать вариант «Для порта» и нажать кнопку «Далее»:
b) Выбрать протокол TCP (на второй раз – UDP), ввести номер порта 1433 (на второй раз – 1434) и нажать кнопку «Далее»:
c) Выбрать «Разрешить подключение» и нажать кнопку «Далее»:
d) Рекомендуется снять галочку «Публичный», затем нажать кнопку «Далее»:

e) Ввести любое имя и нажать кнопку «Готово»:
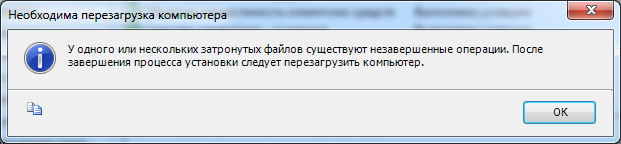
- После завершения установки и настройки рекомендуется перезагрузить компьютер, особенно если на шаге 15 появлялось сообщение:
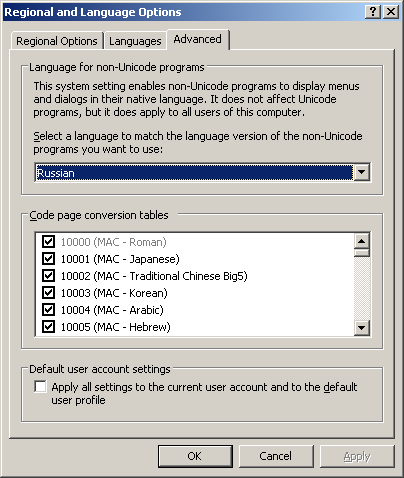
ВНИМАНИЕ! При установке SQL Server на НЕ русскоязычную ОС Windows необходимо в «Control Panel»→«Regional and Language Options» на закладке «Advanced» поставить язык «Russian» в параметре «Language for non-Unicode programs», затем перезагрузить компьютер:
-
Эта информация была полезна?
0
m
n
0 -
‘