MSCOMCTL.OCX — это модуль управления ActiveX, который требуется некоторым программам для правильной работы. По сути, это набор библиотек, которые предоставляются в среде программирования Microsoft Visual Basic 6.0. Если вы столкнусь с ошибкой «Component MSCOMCTL.OCX or one of its dependencies not correctly registered: a file is missing or invalid«, то не торопитесь скачивать отдельно файл mscomctl.ocx со сторонних источников и закидывать его к себе в систему. Очень много пиратских DLL файлов в интернете, которые могут нанести вашим данным колоссальный ущерб. В этой инструкции о том, как скачать оригинальный файл mscomctl.ocx и зарегистрировать его в системе Windows, чтобы устранить ошибку.
Скачать MSCOMCTL.OCX
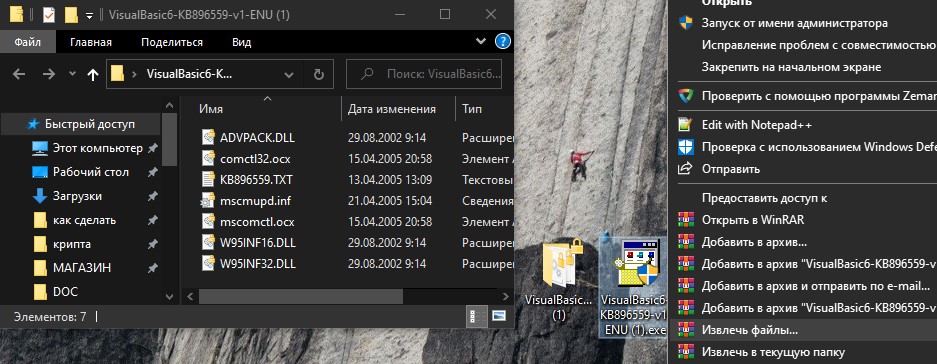
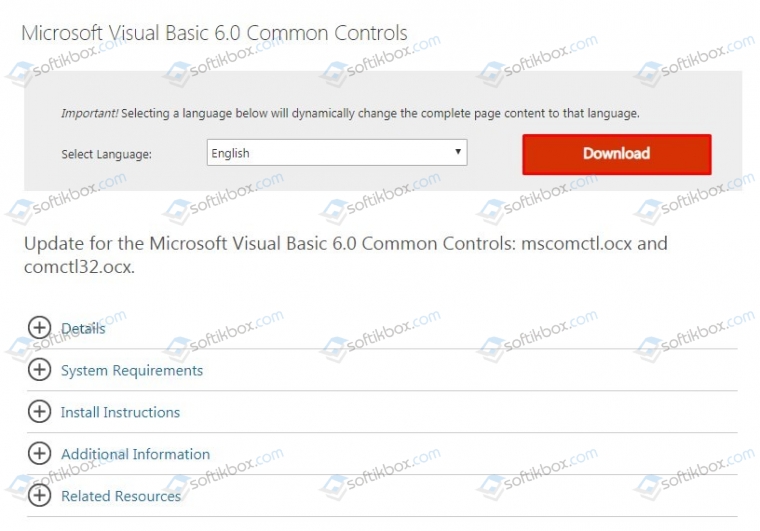
Перейдите на официальный сайт Microsoft и скачайте Visual Basic 6.0.
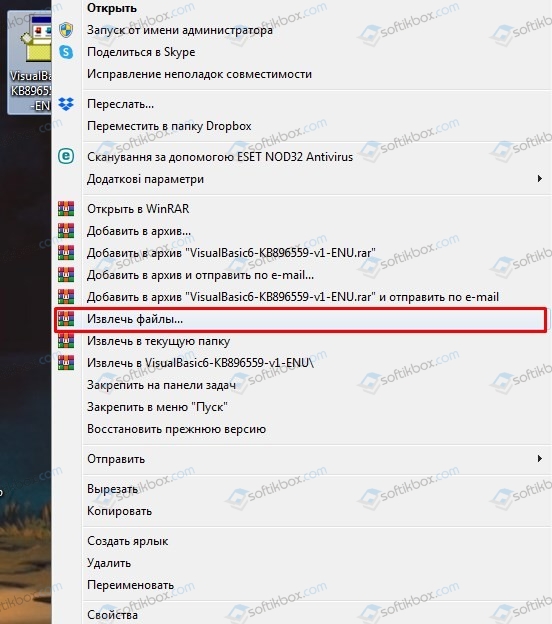
- Не запускайте, а нажмите по нему правой кнопкой мыши и «Извлечь файлы«.
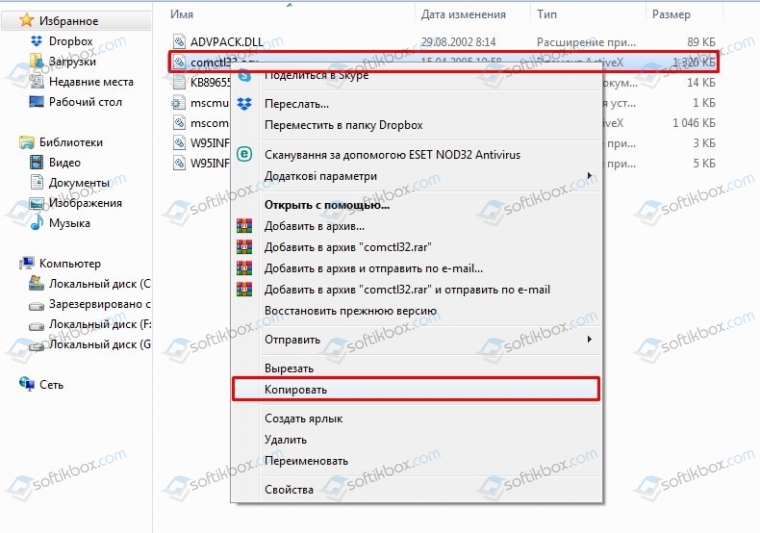
- В извлеченной папке будет находиться сам файл mscomctl.ocx.
Куда кидать файл mscomctl.ocx?
Если вы используете 32-битную Windows 10/7, то файл нужно закинуть по пути:
- C:WindowsSystem32
Если вы используете 64-битную Windows 10/7, то файл нужно закинуть по двум путям:
- C:WindowsSysWOW64
- C:WindowsSystem32
Регистрация mscomctl.ocx в Windows 10/7
Когда закинули файлы по нужным путям, то его нужно зарегистрировать в системе. Даже, если mscomctl.ocx присутствовал в системе, то могут быть проблемы, и его нужно перегистрировать. Запустите командую строку от имени администратора и введите следующие команды, нажимая Enter после каждой:
regsvr32 mscomctl.ocx— регистрация файла по пути C:WindowsSystem32.CD C:WindowsSysWOW64— переходим на путь C:WindowsSysWOW64.regsvr32 mscomctl.ocx— регистрация файла по пути C:WindowsSysWOW64.

Смотрите еще:
- Что за файл msdia80.dll и можно ли его удалить в Windows 10
- Скачать MSVCR120.dll для Windows 10/7
- Файл MSVCR90.dll отсутствует — Скачать и исправить ошибку
- Как исправить ошибку dxgmms1.sys на синем экране
- msvcrt.dll: Скачать и исправить ошибку в Windows 10/8/7
[ Telegram | Поддержать ]
-
Partition Wizard
-
Partition Manager
- What Is MSCOMCTL.OCX? How to Fix MSCOMCTL.OCX Missing Windows 10?
By Sherry | Follow |
Last Updated December 01, 2020
What is MSCOMCTL.OCX? What can you do when you receive MSCOMCTL.OCX missing error message? In this post provided by MiniTool Partition Wizard, you can find a brief introduction to MSCOMCTL.OCX as well as how to fix MSCOMCTL.OCX missing Windows 10.
What is MSCOMCTL.OCX?
MSCOMCTL.OCX is a set of 32-bit controls provided with Microsoft Visual Basic 6.0 programming environment and stored on the hard drive in a PC. It includes common controls used by Windows, such as ToolBar, Slider, ImageCombo, etc.
Some programs require the access to MSCOMCTL.OCX file while installing. To use MSCOMCTL.OCX, you have install or register it with your operating system, which stores the entry of the file in the database and lets your operating system know it is present in the specific directory. Then the access of MSCOMCTL.OCX can be given to the applications which require the file.
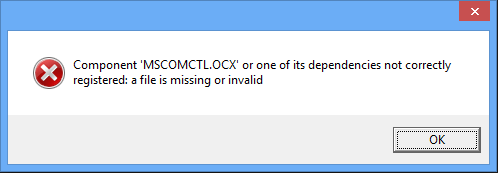
If you receive an error message “Component ‘MSCOMCTL.OCX’ or one of its dependencies not correctly registered: a file is missing or invalid” while installing a certain application, the MSCOMCTL.OCX in your computer might be missing or unregistered. To fix the problem and install the application successfully, you need to check the file and register it.
How to Fix MSCOMCTL.OCX Missing Windows 10
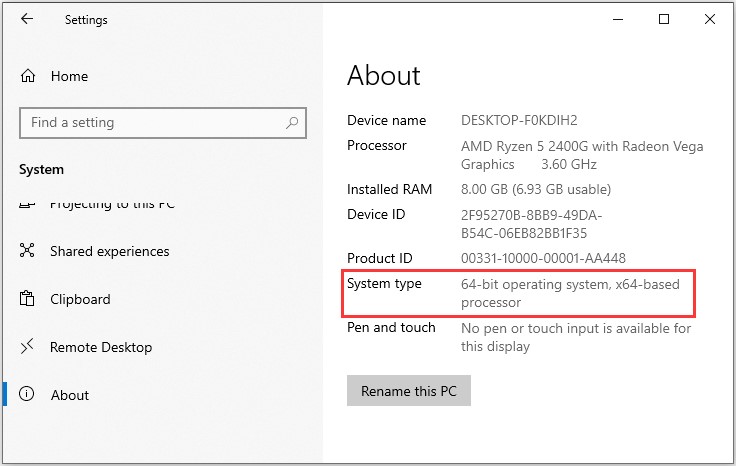
As the MSCOMCTL.OCX is stored on different directories in different types of systems (32-bit or 64-bit), you should check your system type at first. Please press Win + I to open Windows Settings. In Settings, click System category. Then, in the left pane, select About tab, and you can check your System type in the right pane.
After that, you can follow the tutorial below to fix the MSCOMCTL.OCX missing Windows 10 according to your own case.
For 64-bit System:
If you are facing problems related to MSCOMCTL.OCX on Windows 10 which is 64-bit, here is what you need to do:
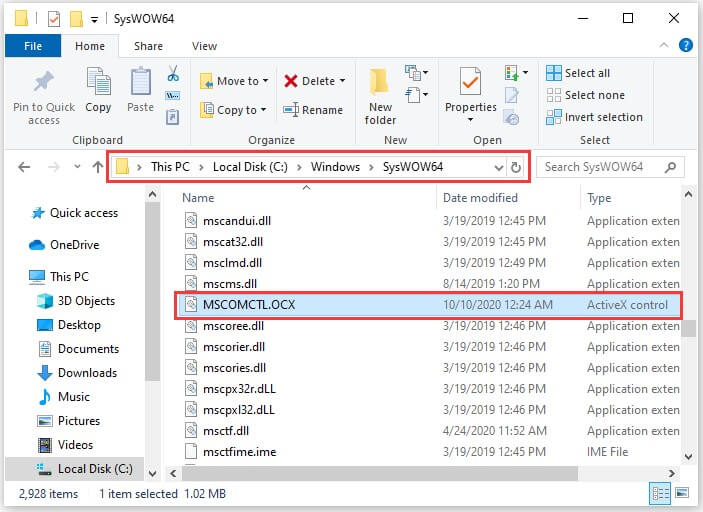
Step 1: Check if you have the MSCOMCTL.OCX file on Windows 10 PC. You can press Win + E to open File Explorer, and then navigate to the location C:WindowsSysWOW64.
Step 2: If you can find the target file in this location, you can go to the next step to register it. Otherwise, you need to copy one from another computer with the same operating system version and type.
Warning: You can also download the file from the website, but you are great likely to face the risk of being attacked by virus or malware, as some virus or malware might pretend to be a system file.
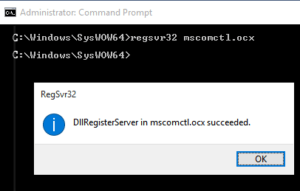
Step 3: Press Win + S to open Search utility and type cmd in the search box. In the search result, right-click Command Prompt and select Run as administrator.
Step 4: In Command Prompt, input the following commands one by one and press Enter after each:
- cd C:WindowsSysWOW64 (to change the current directory of Command Prompt)
- regsvr32 mscomctl.ocx (to register MSCOMCTL.OCX on Windows 10)

After you see a pop-up message which says “DIIRegisterServer in mscomctl.ocx succeeded”, you can exit Command Prompt and try installing the program that is stopped by MSCOMCTL.OCX missing error again to check if the problem has been solved.
For 32-bit System
The method to solve MSCOMCTL.OCX missing error on 32-bit Windows 10 is similar to that of 64-bit system. The differences locate on the file location and the commands you should use. Now, let’s see how to do it.
Step 1: Open File Explorer and navigate to C:WindowsSystem32. Then make sure the MSCOMCTL.OCX file is in the involved location.
Step 2: Run Command Prompt as administrator and execute the following commands:
- cd C:WindowsSystem32
- regsvr32 mscomctl.ocx
Wait until the file is registered successfully, and the problem should have been solved.
About The Author

Position: Columnist
Sherry has been a staff editor of MiniTool for a year. She has received rigorous training about computer and digital data in company. Her articles focus on solutions to various problems that many Windows users might encounter and she is excellent at disk partitioning.
She has a wide range of hobbies, including listening to music, playing video games, roller skating, reading, and so on. By the way, she is patient and serious.
-
Partition Wizard
-
Partition Manager
- What Is MSCOMCTL.OCX? How to Fix MSCOMCTL.OCX Missing Windows 10?
By Sherry | Follow |
Last Updated December 01, 2020
What is MSCOMCTL.OCX? What can you do when you receive MSCOMCTL.OCX missing error message? In this post provided by MiniTool Partition Wizard, you can find a brief introduction to MSCOMCTL.OCX as well as how to fix MSCOMCTL.OCX missing Windows 10.
What is MSCOMCTL.OCX?
MSCOMCTL.OCX is a set of 32-bit controls provided with Microsoft Visual Basic 6.0 programming environment and stored on the hard drive in a PC. It includes common controls used by Windows, such as ToolBar, Slider, ImageCombo, etc.
Some programs require the access to MSCOMCTL.OCX file while installing. To use MSCOMCTL.OCX, you have install or register it with your operating system, which stores the entry of the file in the database and lets your operating system know it is present in the specific directory. Then the access of MSCOMCTL.OCX can be given to the applications which require the file.
If you receive an error message “Component ‘MSCOMCTL.OCX’ or one of its dependencies not correctly registered: a file is missing or invalid” while installing a certain application, the MSCOMCTL.OCX in your computer might be missing or unregistered. To fix the problem and install the application successfully, you need to check the file and register it.
How to Fix MSCOMCTL.OCX Missing Windows 10
As the MSCOMCTL.OCX is stored on different directories in different types of systems (32-bit or 64-bit), you should check your system type at first. Please press Win + I to open Windows Settings. In Settings, click System category. Then, in the left pane, select About tab, and you can check your System type in the right pane.
After that, you can follow the tutorial below to fix the MSCOMCTL.OCX missing Windows 10 according to your own case.
For 64-bit System:
If you are facing problems related to MSCOMCTL.OCX on Windows 10 which is 64-bit, here is what you need to do:
Step 1: Check if you have the MSCOMCTL.OCX file on Windows 10 PC. You can press Win + E to open File Explorer, and then navigate to the location C:WindowsSysWOW64.
Step 2: If you can find the target file in this location, you can go to the next step to register it. Otherwise, you need to copy one from another computer with the same operating system version and type.
Warning: You can also download the file from the website, but you are great likely to face the risk of being attacked by virus or malware, as some virus or malware might pretend to be a system file.
Step 3: Press Win + S to open Search utility and type cmd in the search box. In the search result, right-click Command Prompt and select Run as administrator.
Step 4: In Command Prompt, input the following commands one by one and press Enter after each:
- cd C:WindowsSysWOW64 (to change the current directory of Command Prompt)
- regsvr32 mscomctl.ocx (to register MSCOMCTL.OCX on Windows 10)
After you see a pop-up message which says “DIIRegisterServer in mscomctl.ocx succeeded”, you can exit Command Prompt and try installing the program that is stopped by MSCOMCTL.OCX missing error again to check if the problem has been solved.
For 32-bit System
The method to solve MSCOMCTL.OCX missing error on 32-bit Windows 10 is similar to that of 64-bit system. The differences locate on the file location and the commands you should use. Now, let’s see how to do it.
Step 1: Open File Explorer and navigate to C:WindowsSystem32. Then make sure the MSCOMCTL.OCX file is in the involved location.
Step 2: Run Command Prompt as administrator and execute the following commands:
- cd C:WindowsSystem32
- regsvr32 mscomctl.ocx
Wait until the file is registered successfully, and the problem should have been solved.
About The Author
Position: Columnist
Sherry has been a staff editor of MiniTool for a year. She has received rigorous training about computer and digital data in company. Her articles focus on solutions to various problems that many Windows users might encounter and she is excellent at disk partitioning.
She has a wide range of hobbies, including listening to music, playing video games, roller skating, reading, and so on. By the way, she is patient and serious.
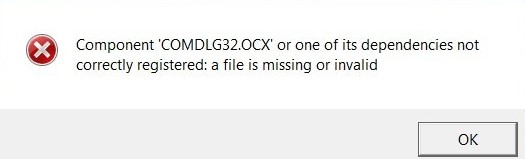
Однажды у меня возникла проблема, при запуске утилит Ultra TC Editors для файлового менеджера Total Commander, стала появляться следующая ошибка: “Component ‘MSCOMCTL.OCX’ or one of its dependencies not correctly registered: a file is missing or invalid.”

Как выяснилось, Windows 10 больше не поставляет библиотеку MSCOMCTL.OCX, которая используется в среде Visual Basic 6 Runtime для визуализации графического интерфейса приложений. На ранних же версиях Windows этот файл мог быть случайно поврежден или удален, например, после вирусной атаки, в результате чего могла наблюдаться подобная ошибка.
Решение проблемы оказалось довольно простым и требует выполнения следующих действий:
- Скачайте архив по этой ссылке. В нем находится файл MSCOMCTL.OCX
- Распакуйте архив, и скопируйте файл MSCOMCTL.OCX в C:WindowsSysWOW64
- Запустите командную строку от имени администратора
- Выполните в командной строке команду
regsvr32 C:WindowsSysWOW64MSCOMCTL.OCX, после чего должно появится сообщение об успешной регистрации библиотеки.

После этих несложных манипуляций, сообщение об ошибке больше не будет появляться.
Содержание
- Скачать MSCOMCTL.OCX и исправить ошибку в Windows 10/7
- Скачать MSCOMCTL.OCX
- Куда кидать файл mscomctl.ocx?
- mscomctl.ocx — как скачать чтобы исправить ошибку?!
- Как исправить ошибку?
- Как исправить ошибку 339 в Windows?
- Причины ошибки 339 в Windows
- Решения для исправления ошибки 339 в Windows
- Метод №1 Переустановка программы
- Метод №2 Регистрация .ocx файла
- Метод №3 Исправление с помощью “Командной строки”
- Как исправить ошибку Component MSCOMCTL.OCX or one of its dependencies not correctly registered?
- Решение ошибки Component MSCOMCTL OCX not correctly registered
- How to Fix Runtime Error 339 Instantly?
- What is Runtime Error 339?
- How to fix Runtime Error 339 in Windows 10
- Run the troubled application as an administrator:
- Anyway, these are the instructions you must follow to run an app as an administrator in Windows:
- Reregister the problematic OCX or DLL file:
- Reinstall the troubled program:
- Get the missing or corrupted file from another computer:
- These instructions cover everything that you have to do here:
- Execute some commands to fix issues:
- Use a registry cleaner:
- Install important applications and components:
- Run the troubled application in compatibility mode for a different Windows build.
Скачать MSCOMCTL.OCX и исправить ошибку в Windows 10/7
MSCOMCTL.OCX — это модуль управления ActiveX, который требуется некоторым программам для правильной работы. По сути, это набор библиотек, которые предоставляются в среде программирования Microsoft Visual Basic 6.0. Если вы столкнусь с ошибкой «Component MSCOMCTL.OCX or one of its dependencies not correctly registered: a file is missing or invalid«, то не торопитесь скачивать отдельно файл mscomctl.ocx со сторонних источников и закидывать его к себе в систему. Очень много пиратских DLL файлов в интернете, которые могут нанести вашим данным колоссальный ущерб. В этой инструкции о том, как скачать оригинальный файл mscomctl.ocx и зарегистрировать его в системе Windows, чтобы устранить ошибку.
Скачать MSCOMCTL.OCX
Перейдите на официальный сайт Microsoft и скачайте Visual Basic 6.0 .
- Не запускайте, а нажмите по нему правой кнопкой мыши и «Извлечь файлы«.
- В извлеченной папке будет находиться сам файл mscomctl.ocx.
Куда кидать файл mscomctl.ocx?
Если вы используете 32-битную Windows 10/7, то файл нужно закинуть по пути:
Если вы используете 64-битную Windows 10/7, то файл нужно закинуть по двум путям:
Источник
mscomctl.ocx — как скачать чтобы исправить ошибку?!

При запуске программ или игр в Windows 7 или Windows 8, Вы можете столкнуться вот с такой ошибкой:
«Runtime error 339: component ‘MSCOMCTL.OCX’ or one of itd depencies not correctly registered: a file is missing or invalid.»
Что в переводе означает:
«Компонент ‘MSCOMCTL.OCX’ или одна из его зависимостей зарегистрирована некорректно: файл отсутствует или содержит ошибки.»
Системный файл MSCOMCTL.OCX — это один из перемещаемых элементов управления ActiveX, являющийся частью библиотеки Microsoft Windows Common Controls. Он тесно связан с MSDN, используется для организации взаимодействия интерфейса с пользователем.
MSCOMCTL.OCX представляет собой разновидность файла OCX, связанного с MSDN Disc 2455.7, который разработан Microsoft для ОС Windows. Последняя известная версия MSCOMCTL.OCX: 1.0.0.0, разработана для Windows. OCX фактически то же самое, что и динамическая библиотека dll.
Причиной появления ошибки могут быть разные: сбой работы самой Виндовс, атака вируса на системные файлы. Часто эта проблема возникает после удаления приложений — какая то программа за собой утянула и системный файлик.
Как исправить ошибку?
Делаем следующее. Скачать файл MSCOMCTL.OCX бесплатно и без рекламы можно здесь.
После этого Вы должны будете скопировать его в следующую системную папку:
Windows 7 и Windows 8 x32 — C:Windowssystem32
На версиях Виндовс x64 — C:WindowsSysWOW64
После того, как библиотека находится в нужной папке, надо нажать комбинацию клавиш Win+R для вызова диалогового окна «Выполнить». В нём нужно написать команду:
REGSVR32 MSCOMCTL.OCX
Если вдруг система будет ругаться — попробуйте ввести команду с ключом -U:
REGSVR32 /U MSCOMCTL.OCX
Нажимаем кнопку ОК и ждём пока завершиться регистрация OCX-файла.
После этого перезагружаем компьютер и проверяем работу. Ошибка не должна больше появляться.
Источник
Как исправить ошибку 339 в Windows?
Ошибка 339 возникает когда программа требует некоторые файлы для своей нормальной работы, но реестр не может найти эти файлы. Также причина может заключаться в повреждении, удалении, перемещении файлов или в неточностях самого реестра.

Причины ошибки 339 в Windows
- Поврежденные файлы с расширением .OCX.
- Программа была установлена некорректно.
- Файлы DLL программы могли быть повреждены или удалены.
- Вредоносное программное обеспечение или заражение вирусами.
Решения для исправления ошибки 339 в Windows
Утерянные или поврежденные файлы с расширением .OCX скорее всего являются главным виновником в этой ситуации. В системе находятся почти 10,000 .ocx файлов и определить, который из них причиняет вам проблемы довольно проблематично. Однако, когда ошибка появляется, то она указывает имя файла доставляющего неудобства.
Метод №1 Переустановка программы
Если вы недавно устанавливали некоторые программы и после этого возникла ошибка, то логично будет произвести переустановку этих утилит. Неправильная установка вполне может послужить причиной различных ошибок.
Метод №2 Регистрация .ocx файла
Для регистрации определенного файла сделайте следующее: Нажмите на “Пуск” и выберите “Командная строка(администратор)”. Потом наберите в “Командной строке” команду regsvr32 comdlg32.ocx
После этого, вы получите сообщение об удачной регистрации файла.
Метод №3 Исправление с помощью “Командной строки”
Если ошибка 339 все еще преследует вас, то откройте “Командная строка(администратор)” как было показано в предыдущем и введите поочередно эти команды:
- regsvr32 WindowsSystem32msflxgrd.ocx /u
- regsvr32 WindowsSystem32msflxgrd.ocx
Файл msflxgrd.ocx приведен для примера. В команду нужно вставить то имя файла, из-за которого возникает ошибка 339.
После проделанных действий выйдите из “Командной строки” и проверьте, исправили ли вы проблему.
Источник
Как исправить ошибку Component MSCOMCTL.OCX or one of its dependencies not correctly registered?

На компьютерах с Windows 7 и Windows 10 пользователи ПК могут столкнуться с ошибкой Component MSCOMCTL.OCX or one of its dependencies not correctly registered: a file is missing or invalid, которая появляется как при запуске операционной системы, так и при открытии какой-то программы. Причина такой неполадки кроется в том, что некоторому софту для нормального функционирования нужен модуль управления ActiveX. В его состав входит файл MSCOMCTL.OCX. Из-за его отсутствия или повреждения может появиться такая ошибка.
Решение ошибки Component MSCOMCTL OCX not correctly registered
Поскольку файл MSCOMCTL.OCX может отсутствовать на ПК или быть повреждённым, то многие пользователи часто загружают его из сети. Однако DLL файлы часто имеют в себе вредоносный код, а поэтому лучше скачать с официального сайта программу Visual Basic 6.0, в состав которой как раз и входит этот файл.
- Нужно нажать правой кнопкой мыши на архиве и выбрать «Извлечь файлы».
- Находим в папке файл mscomctl.ocx. Его нужно скопировать в соответствующие папки.
- Если у вас 32-битная версия Windows 7 или 10, то нужно поместить файл по адресу C:WindowsSystem32.
- Если у вас 64-битная версия операционной системы, то файл mscomctl.ocx нужно поместить по адресу C:WindowsSysWOW64 и C:WindowsSystem32.
- Теперь этот файл нужно зарегистрировать.
ВАЖНО! Даже если у вас на ПК есть файл mscomctl.ocx его можно попробовать перерегистрировать.
- Открываем командную строку с правами Администратора и вводим такие команды. Их нужно вводить по очереди.
- regsvr32 mscomctl.ocx — регистрация файла по пути C:WindowsSystem32.
- CD C:WindowsSysWOW64 — переходим на путь C:WindowsSysWOW64.
- regsvr32 mscomctl.ocx — регистрация файла по пути C:WindowsSysWOW64.
Перезагружаем систему, чтобы изменения вступили в силу. Проверяем, появляется ли ошибка. Если ошибка не исчезла, стоит проверить Windows на целостность системных файлов, а также откатить ОС до более раннего состояния.
Источник
How to Fix Runtime Error 339 Instantly?
Download and try Outbyte PC Repair right now to see what it can do for your Windows.
Developed for Windows 10/11 (8, 7, Vista, XP)
Special offer. See more information about Outbyte and uninstall instructions. Please review EULA and Privacy Policy.

Runtime errors usually manifest themselves on computers that have been used for a long time or an extended period. Runtime errors are said to border on standard or regular events in computing. When compared to other errors or the issues that they define, runtime errors are relatively easy to troubleshoot.
If you pay enough attention to the error code for the runtime error – if you consider the issues or variables that define the error in your case – you will be able to figure out the cause (or source) of the problem and resolve things quickly. In this guide, we intend to examine Runtime Error 339, which is one of the most common errors plaguing computers in recent times.
What is Runtime Error 339?
By definition, runtime errors are errors that occur (or manifest themselves) when programs are running (or executing operations). The term ‘runtime’ is typically used to define the contrast or difference between a specific class of errors and other program error types (for example, syntax errors, compile-time errors, and so on).
Runtime Error 339 is a runtime error that shows up to inform users that an OCX or DLL file is missing and warn them of the issues associated with Windows’ inability to retrieve, access, or use the needed data. The appearance of Runtime Error 339 might also point towards the corruption of certain programs or files.
Most runtime errors – which are associated with missing or corrupted OCX or DLL files – typically come up when users try to install a program, and in rarer cases, they appear when Windows tries to execute operations for a specific application.
These are the most popular error message descriptions or notifications associated with Runtime Error 339:
- Error – Runtime error 339: Component DUZOCX32.OCX is not correctly registered or file is missing.
- Error – Runtime Error 339. Component MSMASK32.ocx or one of its dependencies is not correctly registered; a file is missing or invalid.
- Error – Runtime error ‘339’: Component “FM20.DLL” or one of its dependencies is not correctly registered: a file is missing or invalid.
- Error – Runtime error 339 MSCOMCTL.OCX
After going through the error message descriptions above, you might have come to notice that a specific file or package always appears in the error notification. Something probably went wrong because the stated file was not found or it could not be used.
OCX and DLL files are legitimate files that exist in the Windows operating system environment for various purposes. On a single computer, you might find up to 10,000 OCX files. Some of those files form crucial program parts that are employed to perform specialized tasks or used to maintain the stability of applications in Windows.
Since the appearance of a runtime error is an indicator that something is wrong with an important file, you have to take note of the troubled or problematic file. To fix the error, you will probably have to repair the file or undo the damage done to it.
Consider this error notification: “Runtime error 339: Component MSMASK32.OCX or one of its dependencies is not correctly registered: or file is missing”. From the message description, one can easily figure out that MSMASK32.OCX is the troubled or problematic file.
How to fix Runtime Error 339 in Windows 10
While Runtime Error 339 can manifest itself on machines running any modern version of Windows (Windows XP, Windows Vista, Windows 7, Windows 8 or 8.1, and Windows 10), we intend to use Windows 10 as the base point or reference OS for our fixes.
We will describe the procedures or operations used to resolve Runtime Error 339 on a Windows 10 PC, but users with devices running older versions will be able to use and apply the same solutions.
Ideally, you should begin with the first fix on the list. If it fails, you will have to work your way through the other solutions in the order they have been arranged below.
Run the troubled application as an administrator:
Here, we are considering the possibility that the error notification where Runtime Error 339 appeared only came up because the application involved was not allowed to access certain directories (or folders), use or modify certain files, or perform certain tasks. If any of these assumptions holds true, then the issue will be resolved once Windows grants the app administrator privileges.
When you run an application as an administrator, Windows gets forced to provide the program with admin rights or powers, which it can then use to execute advanced operations or perform top-level tasks without restrictions or disruptions. In that case, the app will be able to do all it needs to do (access folders or make changes to stuff), which means the chances of an error occurring get reduced significantly.
The same proposal applies to other tasks. For example, if you encounter Runtime Error 339 during the installation operation for an application, then the next time, you must run the app installer as an administrator. Similarly, if the error came up when you tried to launch a program (that is already installed), then you have to run the program’s launcher or main executable as an administrator.
Before you continue with the proposed operation, you will do well to check and confirm that you are currently signed in to your computer as the administrator. Otherwise – if you are currently logged in on a regular or standard Windows account – you have to force your way out and then come back in using the admin profile.
Anyway, these are the instructions you must follow to run an app as an administrator in Windows:
- First, you have to locate the installer file, program launcher, or main executable.
You can use the Windows logo button + letter E shortcut to open the File Explorer app quickly and then navigate through the appropriate path to get to the directory where the installer, launcher, or executable for the application is kept.
- Click on the installer, launcher, or executable (to get it highlighted). Right-click on the now highlighted item to see the available options.
- From the list of options displayed, you must choose Run as administrator.
Windows will now work to run the selected app using admin or top-level rights.
If the problem persists, then you must restart your computer and then reattempt the same operation to fix the problem.
If Runtime Error 339 does not come up when you run the troubled app as an administrator, then you might want to configure Windows to always run the application as an administrator to make this fix permanent. This way, you will be able to launch the application normally without having to right-click on it to see some options and so on.
Go through these steps to set Windows to run the troubled app as an administrator (a permanent fix – if applicable):
- Here too, you have to locate the program launcher or main executable for the application that you worked on earlier.
- Click on the launcher or executable (to get it highlighted). Right-click on it to see the available context menu.
- This time, from the options displayed, you have to choose Properties.
The Properties window for the chosen application launcher or executable will be displayed now.
- Click on the Compatibility tab (close to the top of the window) to go there.
- Click on the box for Run this program as an administrator, which is usually the last parameter (close to the bottom of the window).
- Click on the Apply button and then click on the OK button to save the new launch configuration for the problematic or troubled program.
Windows will take note of the changes. Given the new configuration, your system will always launch the program with elevated access, so you will not have to worry about anything.
Note: We advise that you only grant administrative rights to trusted third-party programs. If you give admin powers to a malicious or harmful app, then the application might wreak havoc on your computer – and your antivirus or protection utilities might struggle to restrict or disrupt its operations. Precautions are advised here.
Reregister the problematic OCX or DLL file:
Pro Tip: Run a dedicated PC optimization tool to get rid of incorrect settings, junk files, harmful apps, and security threats that can cause system issues or slow performance.
Here, we want you to deregister the missing or troubled OCX or DLL file and then register it. The processes that make the deregistering and registering operations for the component in view will do enough to induce changes that will fix the inconsistencies or discrepancies causing problems.
Some users confirmed that they managed to resolve Runtime Error 339 by simply reregistering the named OCX or DLL file. If you do what they did, then you too might get the same (good) results from your work.
These are the steps you must go through to reregister the file in view (deregister and then register the component):
- First, you have to open an elevated Command Prompt window. The next steps will be focused on showing you how to do that.
- Click on the Windows icon in the bottom-left corner of your machine’s screen to see the options and objects that make up the Windows Start menu screen (or give the Windows logo button on your device’s keyboard a tap for the same outcome).
- Input Command Prompt into the text box (that appears the moment you begin to type) to run a search task using those keywords as the query.
- Assuming Command Prompt (App) has now appeared as the main entry on the results list returned, you have to right-click on it to see the available context menu.
- From the list of options that show up, you have to select Run as administrator.
Windows will bring up the admin Command Prompt window now.
- Now, you must execute this code (by typing the command in first and then hitting Enter on your device’s keyboard to force Windows to run the command):
(Note: We provided the code for reregistering MSMASK32.OCX. A different OCX or DLL file might be involved in your case. In that case, you will have to replace the MSMASK32.OCX part of the code with the name of the file that was referenced in the notification or error message description that appeared on your screen)
If everything goes well, you will see a message stating that the file was registered successfully or you will see a notification confirming the success of the task.
On the other hand, if the operation fails, then you have to try to deregister the file first and then register it afresh. Continue with the instructions below:
- Execute this code on the Command Prompt window (by typing the command in first and then giving the Enter button a tap to run the code):
regsvr32 MSMASK32.OCX /u
(Note: Replace the MSMASK32.OCX part of the code with the appropriate file or component name – if you have to)
- Now, you must execute this code to reregister the file that got deregistered:
- At this point, regardless of how the operation went, you have to close the Command Prompt window and then restart your computer to finish things.
After the reboot operation, your computer will get the chance to take the changes that occurred into account.
- Now, you must try to recreate Runtime Error 339 by reattempting the task or operation you were busy with when the error message or notification came up to inform you of the problem.
You can initiate the installation process (that failed earlier) for the same program to see how things go this time. You can instruct the application to perform the same task that caused Error 339 to manifest itself on your computer to see what happens.
Reinstall the troubled program:
If you get the message where Runtime Error 339 appears as a key term only when you try to open or use a specific program, then there is a good chance the problem in your case is restricted or limited to the runtime operations for that particular application. Nevertheless, you will do well to confirm things by launching other apps to see if the same issue plays out.
If the assumptions about the runtime issue affecting a single program hold true, then you might be able to fix the problem by simply reinstalling the troubled application. Here, the changes resulting from the uninstallation and installation processes for the app will do enough to make things right with the application code, settings, and other stuff that matters.
To uninstall an application, you have to locate it in the Programs and Features menu in Control Panel and then initiate the removal task from the platform provided. You can do the same thing from the Apps menu in Settings, which is a relatively new application in Windows 10 for such purposes.
If you want to remove an app through the Programs and Features menu in Control Panel, then you must follow these instructions:
- Use the Windows logo button + letter S keyboard to bring up the Search box function for the Windows Start menu screen.
- Type Control Panel into the text field provided to run a search task using those keywords as the query.
- Assuming Control Panel has now emerged as the main entry on the results list returned, you have to click on it to launch the program.
The Control Panel window will be displayed now.
- If the View by parameter is set to Category (in the top-right corner of your screen), then you have to click on the Uninstall a program link (under Programs) to get to your destination.
On the other hand, if the View by parameter is set to Small icons or Large icons, then you have to click on Programs and Features.
- Assuming you are now on the Uninstall or Change a program screen in Control Panel, you have to go through the list of applications there and locate the troubled application (the one affected by Runtime Error 339).
- Click on the application to get it highlighted and then right-click on it to see the available context menu.
- From the small list of options that appear, you must select Uninstall.
The uninstaller or uninstallation wizard window for the chosen application is supposed to come up now.
- You will probably have to click on Uninstall again to proceed. Or you might have to click on the Continue button to get on with the operation here.
- At this point, you have to follow the on-screen directions, carefully go through the prompts and messages, and make the appropriate decisions by clicking on the right buttons (where necessary).
The unwanted application will eventually be removed.
- Now, you must close Control Panel and the windows for other applications. Restart your computer.
If you are more familiar with the Settings application – which means you might prefer to remove an app from the Apps menu there – then these are the instructions you must follow instead:
- First, you have to launch the Settings application. This keyboard shortcut probably provides users with the fastest means of doing so: Window logo button + letter I.
- Once the Settings window gets brought up, you have to click on Apps (on the main screen) to enter the needed menu.
- Now, you must look to the pane close to the right border of the window (under Apps and Features) and then go through the applications listed there to locate the one you intend to remove.
- Click on the troubled application (to get it highlighted) and then click on the Uninstall button (which most likely appeared recently).
- Click on the Uninstall button again on the small dialog or window on your screen – if Windows brings up a prompt to get some form of confirmation for the uninstallation operation for the chosen application.
- Pay attention to the proceedings and follow the on-screen directions to do the job – if this step applies.
The selected application will be gotten rid of eventually.
- Here too, you have to close the Settings app and other applications and then restart your PC to finish things.
After the recommended reboot operation, you have to install the troubled application. We recommend you search for it online and go to its official page. Ideally, you should get the application package or installer executable from trusted or safe sources. We also advise that you download the latest stable version of the app released and get the build designed for your computer or OS configuration.
If you take our recommendations seriously, then you are likely to avoid the hiccups or complications that typically arise during the installation operations for certain apps. Furthermore, the inconsistencies or discrepancies that trigger the issue defined by Runtime Error 339 are likely to be a nonfactor – if everything goes well.
Get the missing or corrupted file from another computer:
The procedure here is as unorthodox as it gets, but it is nevertheless effective. Here, we want you to identify the broken, corrupted, or missing OCX or DLL file that appeared in the notification or error description, get a normal copy of that file from a regular computer, and then place the good copy in the appropriate location on your computer. If you replace the faulty or broken component that triggers the issue defined by Runtime Error 339, then you will have managed to fix the problem – and this is what matters, after all.
Nevertheless, we must warn you of certain things here. You must get the troubled file from a computer that is similar to yours – at least, in terms of Windows version and operating system edition. All the descriptions we made in this guide are based on Windows 10, so both computers (yours and the donor PC) must be running the 64-bit version of Windows 10 or the 32-bit version of the same OS. The donor machine must also be in a perfect or ideal condition. You do not want to get a DLL or OCX file from a computer burdened by the same runtime issues as yours.
To be fair, you might be able to find copies of the troubled OCX or DLL file on some websites, but we are generally against users getting OCX or DLL files (sensitive components) online – since we cannot vouch for the authenticity of the sites or download centers involved. In your quest to replace the bad file on your computer, you might end up downloading a malicious program, which might cause problems even more serious than the one you are currently trying to resolve. Due to the stated risks (and other reasons), you will do well to get the OCX or DLL file from another computer (owned by a friend, for example) instead of obtaining it from the internet.
These instructions cover everything that you have to do here:
- First, you have to deregister the troubled DLL or OCX – since you intend to remove or replace it (with another file).
- Open an admin Command Prompt window. We described the steps on doing this in the second fix in this guide, so you might want to scroll up a bit to go through the same instructions (in case you have forgotten).
- Once the elevated Command Prompt window comes up, you have to execute the following code there:
regsvr32 MSMASK32.OCX /u
(Note: Replace the MSMASK32.OCX part of the code with the appropriate file or component name – if you have to)
Windows will now act to deregister the file or component in view.
At this point, you have to move on to locate the file on your computer, take note of the directory where it resides, and then delete the file. Continue with these instructions:
- Open the File Explorer application by clicking on the application icon, which is likely to be on your taskbar.
Otherwise – if the app icon is missing – this keyboard shortcut provides you with the fastest means of doing the same thing: Window logo button + letter E key.
- Once the File Explorer window gets brought up, you have to double-click on This PC to see your system’s disk.
- Now, you must enter your system’s disk (C:) by double-clicking on it. From your present location (inside your system’s disk), you have to run a search task for the troubled DLL or OCX file.
- Fill the text box in the top-right corner of the File Explorer window with the name of the DLL or OCX file. For example, OCX.
Wait for Windows to search for the file. It might take a while.
If the search task returns no relevant results or if no matches are found, then you have to enable the functions that allow your computer to search hidden and protected folders. You might also need to disable the hidden property of the directories you believe to be housing the file.
- Here, assuming Windows has located the file (that you searched for), you must right-click on the entry to see the available options and then select Open file location.
You will be directed to the folder on your system’s disk where the DLL or OCX file in view resides.
- You have to take note of the directory you are currently in or the path (to get to it) – because you will have to come back here.
- Now, you can delete the DLL or OCX file. Click on it to get it highlighted, right-click on it to see the available options, and then choose Delete.
Windows will now act to get rid of the unwanted or troubled file.
Now, you must leave your computer (the one burdened by issues defined by Runtime Error 339) and go to the donor computer (from which you need to obtain the file). The task we are about to describe must be performed on the donor PC.
- Open the File Explorer window on the second computer by clicking on the application icon on the taskbar there or through the Windows logo button + letter E keyboard shortcut.
- Now, you must enter the system disk there and then search for the troubled DLL or OCX file.
Alternatively, you can navigate through the appropriate path to get to the folder where the needed DLL or OCX file is stored. You are supposed to know the relevant file path, after all – given the work you did earlier on your PC.
- In any case, after you find the needed DLL or OCX file, you have to right-click on it and then choose Copy.
- At this point, you will do well to insert a flash USB drive into the machine you are on currently and then paste the copied DLL or OCX to a folder there.
Once you get the needed DLL or OCX file somewhere on a flash drive, then your work on the second computer (donor PC) is done. You have to eject the drive and take it with you.
It is time you left the donor PC and moved back to your computer to finish the work you started. The next set of instructions is focused on getting the needed file to the appropriate location and activating it:
- Plug the flash drive into your computer. Open the File Explorer application through whatever means necessary.
- After the File Explorer window comes up, you have to go inside the flash drive and then enter the folder housing the DLL or OCX file that you copied from the donor computer.
- Click on the DLL or OCX file to get it highlighted, right-click on it to see the available options, and then choose Copy.
The needed DLL or OCX file will be copied to your computer’s clipboard.
- Now, you have to leave your current location and then navigate through the appropriate path to get to the directory where the DLL or OCX file is supposed to be on your system’s disk.
Perhaps, you now understand why we asked you to take note of the directory or file path earlier.
- Assuming you are now in the appropriate directory, you have to right-click on any spot free of icons or objects to see the available options and then choose Paste.
Windows will now place the copied DLL or OCX file inside your current location.
- You might have to click on the appropriate button to confirm a prompt. Or you might even have to enter the password for the admin account before your system allows the operation to be executed.
Your work is not yet done, though. You still have to do something to force Windows to recognize or take note of the introduced component to ensure that programs that need it are able to call upon and use it.
- Here, you have to open an elevated Command Prompt window (as you did several times in previous procedures) and then execute this code to register the file:
(Note: We provided the code for registering MSMASK32.OCX. A different OCX or DLL file might be involved in your case. In that case, you will have to replace the MSMASK32.OCX part of the code with the name of the relevant file or component.)
- Assuming the execution operation for the command has reached completion – and if everything went well – you have to close the Command Prompt app and other applications.
- Restart your computer.
- Run the necessary checks to verify that Runtime Error 339 has been resolved for good.
- Here too, you have to open an elevated Command Prompt window.
- Click on the Windows icon in the bottom-left corner of your machine’s screen to see the options and objects that make up the Windows Start menu screen (or give the Windows logo button on your device’s keyboard a tap for the same outcome).
- Input Command Prompt into the text box (that appears the moment you begin to type) to run a search task using those keywords as the query.
- Assuming Command Prompt (App) has now appeared as the main entry on the results list returned, you have to right-click on it to see the available context menu.
- From the list of options that show up, you have to select Run as administrator.
- Now, you must execute this code to deregister the named OCX file (by typing the command in first and then hitting the Enter button on your device’s keyboard to force Windows to run the command):
- It is time you executed this one to reregister the named OCX file:
- Well, you must execute these commands too (one after the other):
- regsvr32 \Windows\System32\ comdlg32.ocx /u
- regsvr32 \Windows\System32\ comdlg32.ocx
- If you know other DLL or OCX files, then you will do well to execute commands in this format for them:
- regsvr32 \Windows\System32\ InsertFileNameHere /u
- regsvr32 \Windows\System32\ InsertFileNameHere
- Try to deregister and reregister as many DLL and OCX files or components as you can.
- Assuming you are done with the deregistering and reregistering operations for all the needed components, you have to close the Command Prompt app and other programs.
- Restart your computer – since a reboot operation is the only thing that ensures Windows takes all the changes resulting from your work into account.
- Run some tests to confirm that Runtime Error 339 is no longer in play. Reattempt the task or operation with which you encountered the error message or notification to see what happens this time.
Execute some commands to fix issues:
You are probably already familiar with tasks performed on an elevated Command Prompt window. Well, the work here is more of the same thing, but it is more comprehensive than the previous procedures. We want you to run some commands to fix problems affecting DLL and OCX files. Perhaps, if you resolve the issues affecting as many troubled components as possible on your computer, you will stop seeing Runtime Error 339.
Here, we want you to deregister and then reregister as many DLL and OCX files as you can to make things right. These instructions cover everything you need to do:
Windows will bring up the admin Command Prompt window now.
regsvr32 WindowsSystem32 msflxgrd.ocx /u
regsvr32 WindowsSystem32 msflxgrd.ocx
(Note: You must replace the InsertFileNameHere part of the code with the name of the file or component that you are looking to deregister and then register.)
Other things you can try to resolve Runtime Error 339 on a Windows 10 computer
At this point, if you are yet to apply a fix that does enough to resolve the issues defined by Error 339 on your PC, then you have little choice but to try out procedures on our final list of solutions and workarounds to the problem.
Use a registry cleaner:
A registry cleaner will execute operations to remove the invalid, broken, and corrupted entries from your registry. We advise you to download and run Auslogics Registry Cleaner. After the cleaning operation, you will have to restart your PC to finish things.
Install important applications and components:
There is a good chance you are struggling with Runtime Error 339 because your computer is missing certain programs and components that other apps need to run or work. Some users managed to fix the problems by checking for and installing all the following applications and packages: DirectX, Java, Flash, and Visual C++ Redistributables.
Run the troubled application in compatibility mode for a different Windows build.
Try out as many Windows versions as you can to see if one of them works.
Final Fix: Run a dedicated PC optimization tool to get rid of incorrect settings, junk files, harmful apps, and security threats that can cause system issues or slow performance.
Источник
15.05.2020
Просмотров: 7913
На компьютерах с Windows 7 и Windows 10 пользователи ПК могут столкнуться с ошибкой Component MSCOMCTL.OCX or one of its dependencies not correctly registered: a file is missing or invalid, которая появляется как при запуске операционной системы, так и при открытии какой-то программы. Причина такой неполадки кроется в том, что некоторому софту для нормального функционирования нужен модуль управления ActiveX. В его состав входит файл MSCOMCTL.OCX. Из-за его отсутствия или повреждения может появиться такая ошибка.
Читайте также: Способы исправления ошибки ERR SOCKET NOT CONNECTED в браузере Google Chrome
Поскольку файл MSCOMCTL.OCX может отсутствовать на ПК или быть повреждённым, то многие пользователи часто загружают его из сети. Однако DLL файлы часто имеют в себе вредоносный код, а поэтому лучше скачать с официального сайта программу Visual Basic 6.0, в состав которой как раз и входит этот файл.
- Ссылка на загрузку Visual Basic 6.0.
- Нужно нажать правой кнопкой мыши на архиве и выбрать «Извлечь файлы».
- Находим в папке файл mscomctl.ocx. Его нужно скопировать в соответствующие папки.
- Если у вас 32-битная версия Windows 7 или 10, то нужно поместить файл по адресу C:WindowsSystem32.
- Если у вас 64-битная версия операционной системы, то файл mscomctl.ocx нужно поместить по адресу C:WindowsSysWOW64 и C:WindowsSystem32.
- Теперь этот файл нужно зарегистрировать.
ВАЖНО! Даже если у вас на ПК есть файл mscomctl.ocx его можно попробовать перерегистрировать.
- Открываем командную строку с правами Администратора и вводим такие команды. Их нужно вводить по очереди.
- regsvr32 mscomctl.ocx — регистрация файла по пути C:WindowsSystem32.
- CD C:WindowsSysWOW64 — переходим на путь C:WindowsSysWOW64.
- regsvr32 mscomctl.ocx — регистрация файла по пути C:WindowsSysWOW64.
Перезагружаем систему, чтобы изменения вступили в силу. Проверяем, появляется ли ошибка. Если ошибка не исчезла, стоит проверить Windows на целостность системных файлов, а также откатить ОС до более раннего состояния.

При запуске программ или игр в Windows 7 или Windows 8, Вы можете столкнуться вот с такой ошибкой:
«Runtime error 339: component ‘MSCOMCTL.OCX’ or one of itd depencies not correctly registered: a file is missing or invalid.»
Что в переводе означает:
«Компонент ‘MSCOMCTL.OCX’ или одна из его зависимостей зарегистрирована некорректно: файл отсутствует или содержит ошибки.»
Системный файл MSCOMCTL.OCX — это один из перемещаемых элементов управления ActiveX, являющийся частью библиотеки Microsoft Windows Common Controls. Он тесно связан с MSDN, используется для организации взаимодействия интерфейса с пользователем.
MSCOMCTL.OCX представляет собой разновидность файла OCX, связанного с MSDN Disc 2455.7, который разработан Microsoft для ОС Windows. Последняя известная версия MSCOMCTL.OCX: 1.0.0.0, разработана для Windows. OCX фактически то же самое, что и динамическая библиотека dll.
Причиной появления ошибки могут быть разные: сбой работы самой Виндовс, атака вируса на системные файлы. Часто эта проблема возникает после удаления приложений — какая то программа за собой утянула и системный файлик.
Как исправить ошибку?
Делаем следующее. Скачать файл MSCOMCTL.OCX бесплатно и без рекламы можно здесь.
После этого Вы должны будете скопировать его в следующую системную папку:
Windows 7 и Windows 8 x32 — C:Windowssystem32
На версиях Виндовс x64 — C:WindowsSysWOW64
После того, как библиотека находится в нужной папке, надо нажать комбинацию клавиш Win+R для вызова диалогового окна «Выполнить». В нём нужно написать команду:
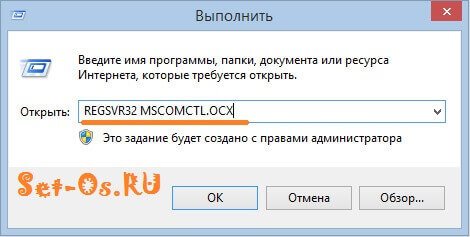
REGSVR32 MSCOMCTL.OCX
Если вдруг система будет ругаться — попробуйте ввести команду с ключом -U:
REGSVR32 /U MSCOMCTL.OCX
Нажимаем кнопку ОК и ждём пока завершиться регистрация OCX-файла.
После этого перезагружаем компьютер и проверяем работу. Ошибка не должна больше появляться.
If you are working for an old application you may be presented with the error:
Component ‘MSCOMCTL.OCX’ or one if its dependencies not correctly registered: a file is missing or invalid:
In this case you have two tasks to complete and neither of them are obvious:
MSCOMCTL.OCX is part of Visual Basic 6 Package and you can download you can just download the MSCOMCTL.OCX directly from us HERE.
UPDATE – MAY 2020- Alternately you can surf to the following address but we removed the clickable link because one of our security checks has marked it as an “aggressive site” so use at your own peril: daydownloads.com/microsoft-visual-basic-6-common-controls/
INSTALL MSCOMCTL.OCX
You need to know if you are using a 32bit or 64bit version of Windows and because this is not 2002, we are assuming you want to install it on a 64bit PC. If you try to register MSCOMCTL.OCX (which is 32 bit) on a 64 bit system and you put it in the typical C:WINDOWSSYSTEM32 folder you will get:
THE MODULE ‘MSCOMTRL.OCX’ WAS LOADED BUT THE CALL TO DLLREGISTERSERVER FAILED WITH ERROR CODE 0X8002801C
 If you are using 64 bit Windows copy the MSCOMCTL.OCX to C:WINDOWSSYSWOW64
(If you are using 32 bit Windows copy MSCOMCTL.OCX to C:WINDOWSSYSTEM32)
.- Open a CMD or PowerShell prompt (as an administrator) and change into C:WINDOWSSYSWOW64
. - Type
regsvr32 mscomctl.ocx
- Press ENTER
- Enjoy
 If you are using 64 bit Windows copy the MSCOMCTL.OCX to C:WINDOWSSYSWOW64
The process of downloading and installing MSCOMCTL.OCX is quite easy. Also, it’s a wise idea to scan everything you download from the internet using an antivirus software. Most top-notch antivirus software do this automatically anyway.
Если программа при установке выбрасывает ошибку «Component MSCOMCTL.OCX or one of its dependencies not correctly registered», это указывает на то, что она не может обнаружить файл в каталоге или он неправильно зарегистрирован в системе.
Файл динамической библиотеки MSCOMCTL.OCX — это набор 32-разрядных элементов управления ActiveX, который предоставляется со средой программирования Microsoft Visual Basic 6. Чтобы приложения смогли его использовать, он должен быть установлен и зарегистрирован в ОС. Регистрация означает, что ОС сохраняет запись файла в своей базе данных, которая указывает расположение в системе. Поэтому, когда приложение запрашивает его, ОС предоставляет к нему доступ.

Для 64-разрядной версии
Если не удается установить программу по причине отсутствия MSCOMCTL.OCX, проверьте наличие в указанной папке. При п рисутствии, попробуйте зарегистрировать библиотеку, чтобы решить проблему. Если отсутствует, рекомендуется скопировать с другого компьютера, поскольку при загрузке с интернета, существует высокая вероятность скачать вредоносный код, скрывающийся под именем этой библиотеки.
В проводнике перейдите по пути:
C:WindowsSysWOW64
Проверьте, есть ли здесь MSCOMCTL.OCX. Если отсутствует, скопируйте из безопасного источника и вставьте в эту папку.

Теперь запустите командную строку от имени администратора с помощью системного поиска.

В консоли выполните следующую команду, чтобы перейти в папку расположения этого компонента:
cd C:WindowsSysWOW64
Для регистрации выполните команду:
regsvr32 mscomctl.ocx

После перезагрузите компьютер и попробуйте установить приложение, который не удавалось из-за ошибки.
Для 32-разрядной версии
В проводнике перейдите в каталог:
C:WindowsSystem32
Если файл отсутствует, скопируйте в этот каталог. В строке системного поиска наберите «cmd», при отображении найденного результата кликните на запуск от имени администратора.

В консоли выполните следующую команду, чтобы перейти в каталог расположения:
cd C:WindowsSystem32
Для регистрации запустите команду:
![]()

После перезапуска системы проверьте, прерывается ли установка приложения ошибкой. Если проблема остается, удалите этот компонент и снова запустите установку. В некоторых случаях программа автоматически заменяет файл.