First published on MSDN on Apr 10, 2017
Step-by-step guide for setting up
LDAPS
(LDAP over SSL)
The guide is split into 3 sections :
- Create a Windows Server VM in Azure
- Setup LDAP using AD LDS (Active Directory Lightweight Directory Services)
- Setup LDAPS (LDAP over SSL)
NOTE : The following steps are similar for Windows Server 2008, 2012, 2012 R2 , 2016. In this article, we will use Windows Server 2012 R2.
Create a Windows Server VM in Azure
Create a VM named “ldapstest” Windows Server 2012 R2 Datacenter Standard DS12 using the instructions here:
Create a Windows virtual machine with the Azure portal
Connect to the VM ldapstest using Remote Desktop Connection.
Setup LDAP using AD LDS
Now let us add AD LDS in our VM ldapstest
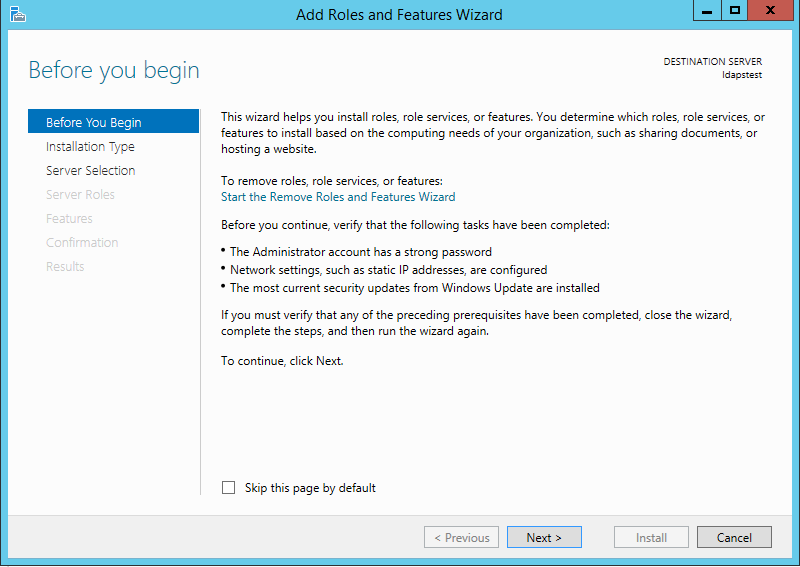
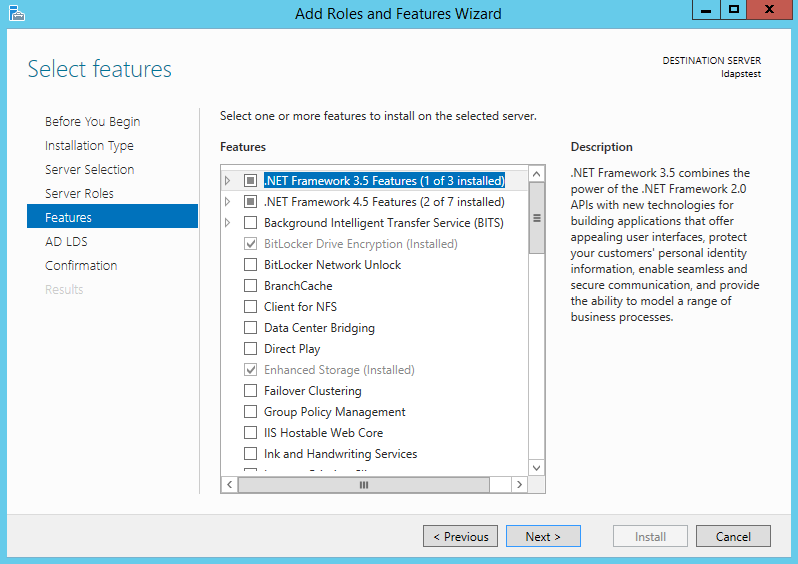
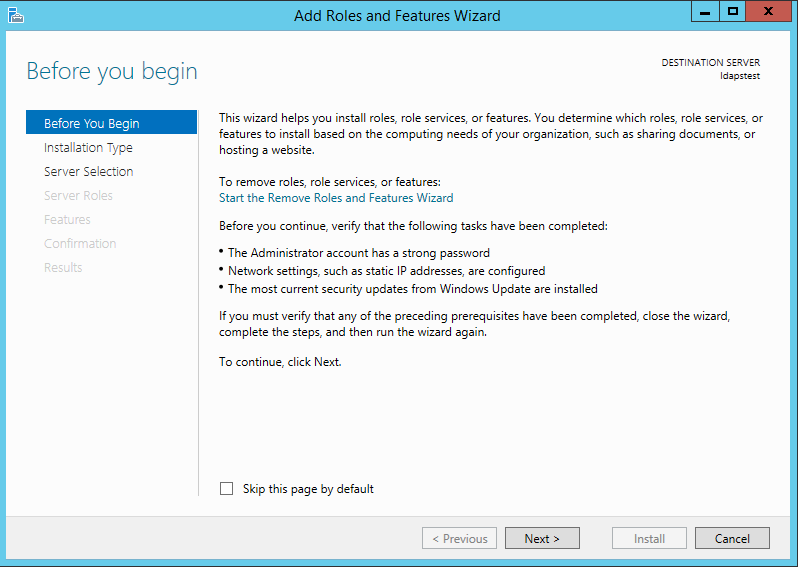
Click on Start —> Server Manager —> Add Roles and Features. Click Next.
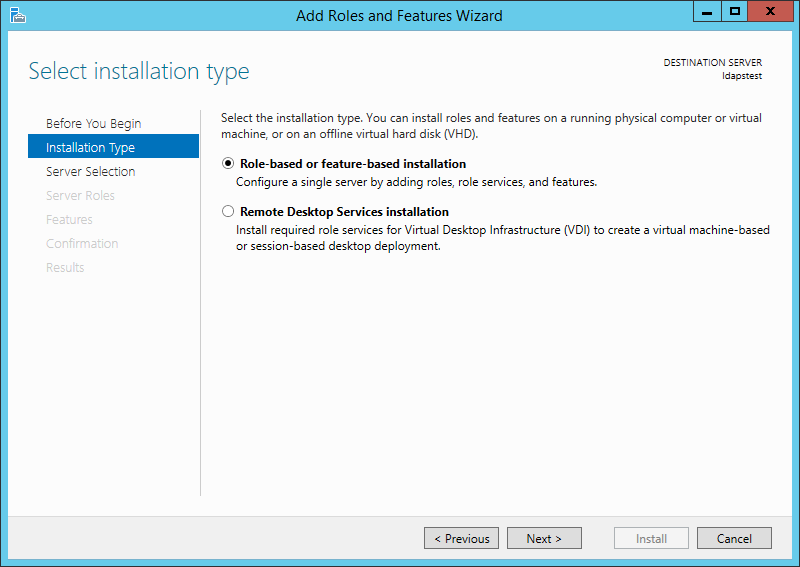
Choose Role-based or feature-based installation. Click Next.
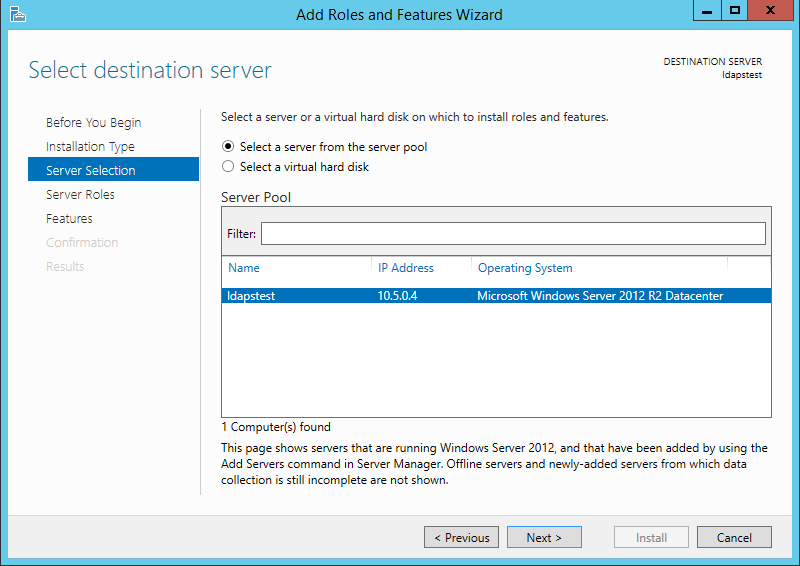
Select ldapstest server from the server pool. Click Next.
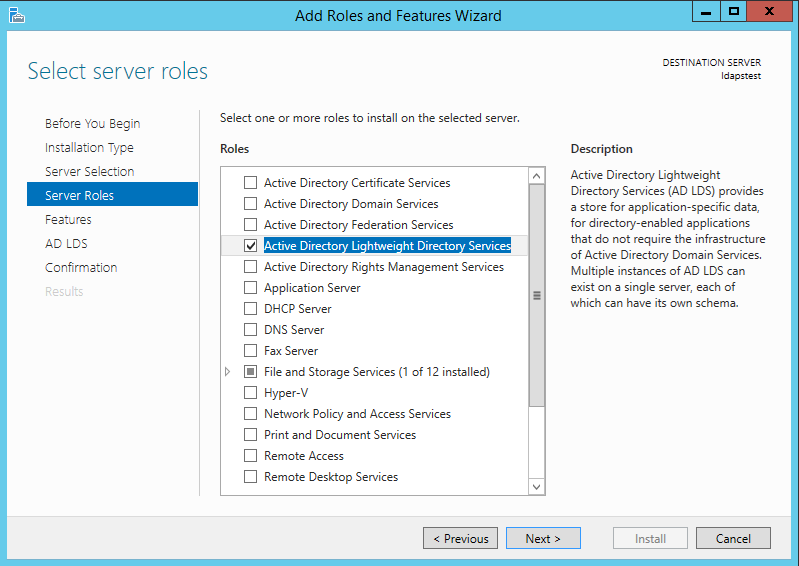
Mark Active Directory Lightweight Directory Services from the list of roles and click Next.
From the list of features, choose nothing – just click Next.
Click Next.

Click Install to start installation.

Once installation is complete, click Close.

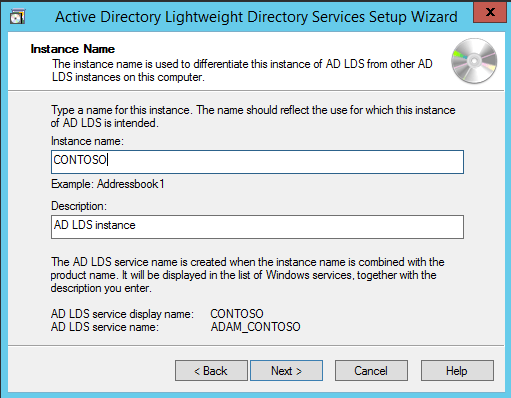
Now we have successfully set up AD LDS Role. Let us create a new AD LDS Instance “CONTOSO” using the wizard. Click the “Run the Active Directory Lightweight Directory Services Setup Wizard” in the above screen. And then Click Close.

Choose Unique Instance since we are setting it up for the first time.

Type “CONTOSO” in Instance Name and click Next.
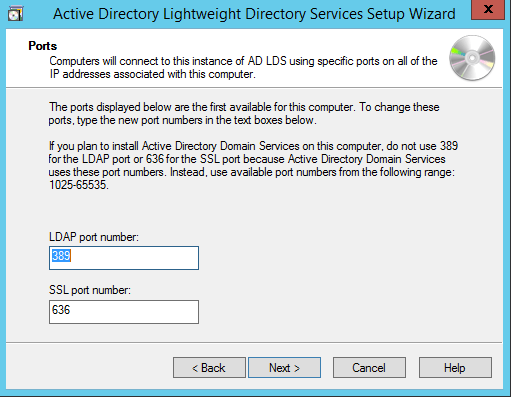
By Default, LDAP Port is 389 and LDAPS port is 636, let us choose the default values — click Next.
Create a new Application Directory Partition named “CN=MRS,DC=CONTOSO,DC=COM”. Click Next.

Using the default values for storage location of ADLDS files- Click Next.

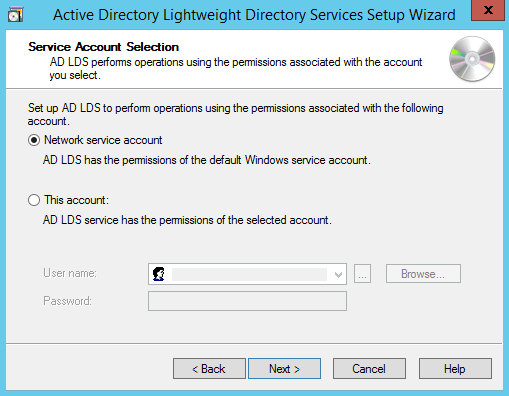
Choosing Network Service Account for running the AD LDS Service.
You will receive a prompt warning about data replication. Since we are using a single LDAP Server, we can click Yes.

Choosing the currently logged on user as an administrator for the AD LDS Instance. Click Next.

Mark all the required LDIF files to import (Here we are marking all files). Click Next.

Verify that all the selections are right and then Click Next to confirm Installation.
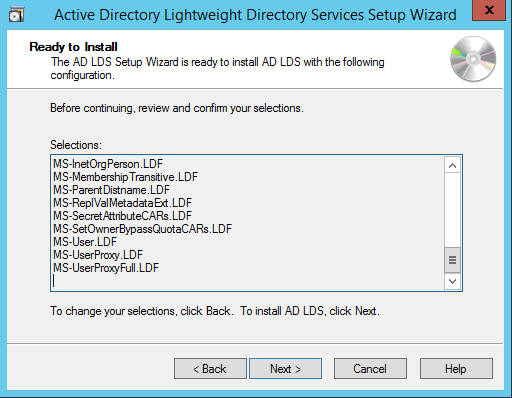
Once the instance is setup successfully, click Finish.

Now let us try to connect to the AD LDS Instance CONTOSO using ADSI Edit.
Click on Start —> Search “ADSI Edit” and open it.
Right Click on ADSI Edit Folder (on the left pane) and choose Connect To.. . Fill the following values and Click OK.
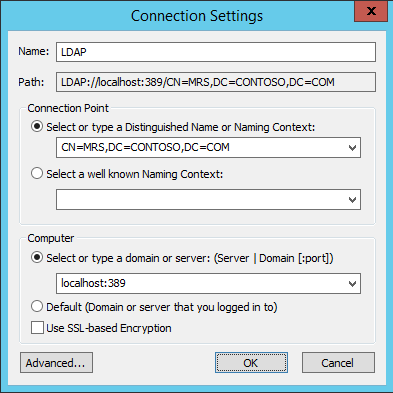
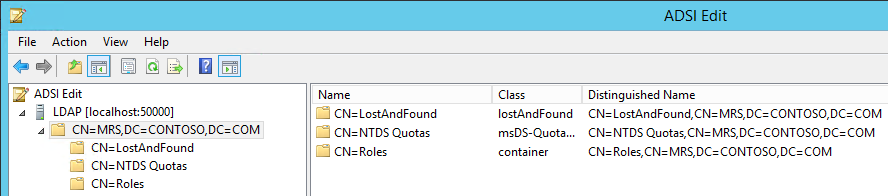
If the connection is successful, we will be able to browse the Directory CN=MRS,DC=CONTOSO,DC=COM :
Setup LDAPS (LDAP over SSL)
The Certificate to be used for LDAPS must satisfy the following 3 requirements:
• Certificate must be valid for the purpose of Server Authentication. This means that it must also contains the Server Authentication object identifier (OID): 1.3.6.1.5.5.7.3.1
• The Subject name or the first name in the Subject Alternative Name (SAN) must match the Fully Qualified Domain Name (FQDN) of the host machine, such as Subject:CN=contosoldaps. For more information, see How to add a Subject Alternative Name to a secure LDAP certificate .
• The host machine account must have access to the private key.
Now, let’s use Active Directory Certificate Services to create a certificate to be used for LDAPS. If you already have a certificate satisfying the above requirements, you can skip this step.
Click on Start —> Server Manager —> Add Roles and Features. Click Next.
Choose Role-based or feature-based installation. Click Next.

Select ldapstest server from the server pool. Click Next.

Choose Active Directory Certificate Services from the list of roles and click Next.

Choose nothing from the list of features and click Next.
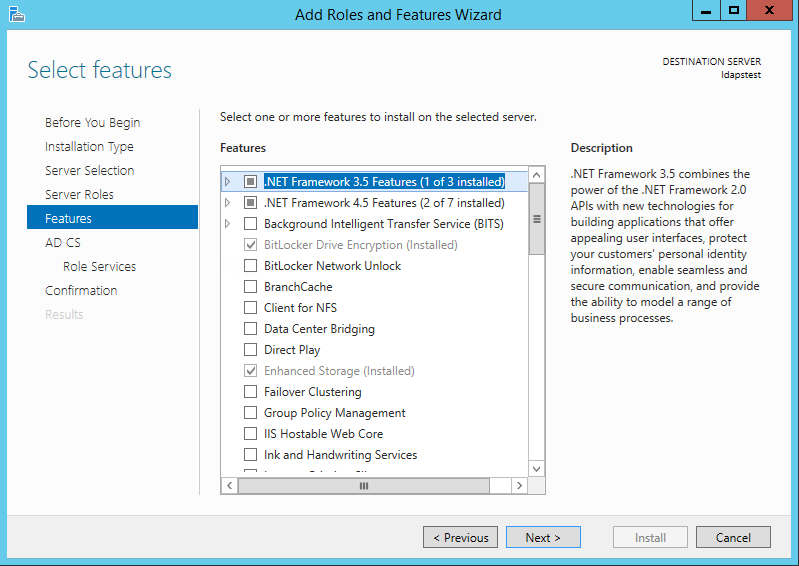
Click Next.

Mark “Certificate Authority” from the list of roles and click Next.
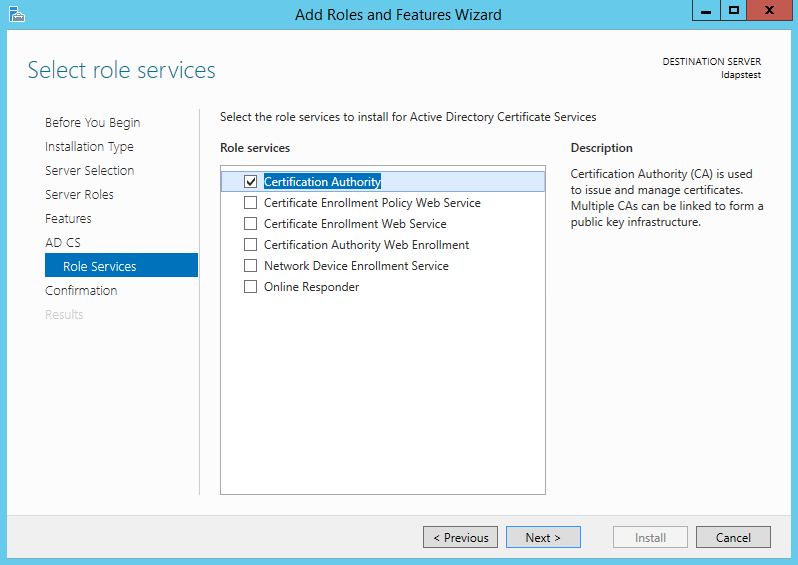
Click Install to confirm installation.

Once installation is complete, Click Close.

Now let’s create a certificate using AD CS Configuration Wizard. To open the wizard, click on “Configure Active Directory Certificate Services on the destination server” in the above screen. And then click Close. We can use the currently logged on user azureuser to configure role services since it belongs to the local Administrators group. Click Next.
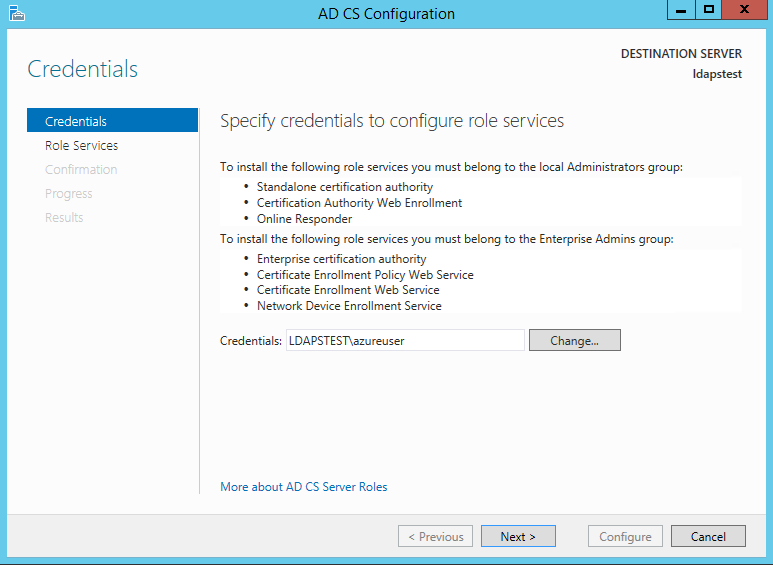
Choose Certification Authority from the list of roles. Click Next.

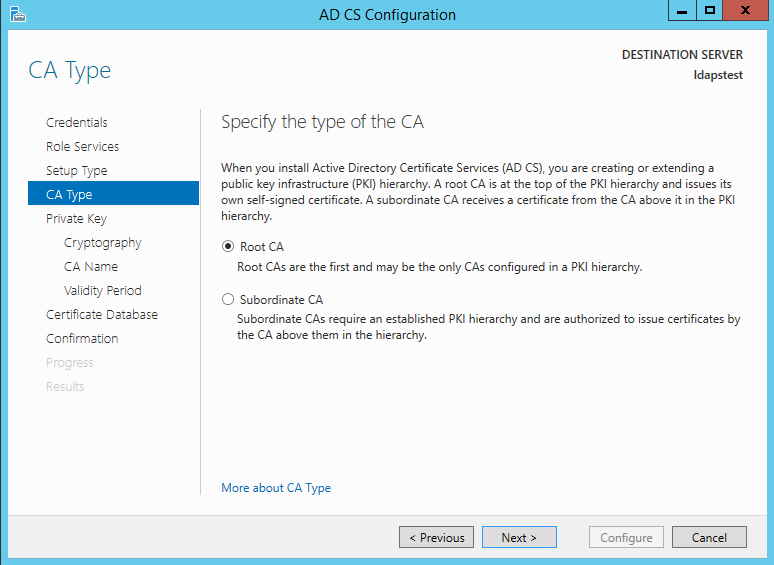
Since this is a local box setup without a domain, we are going to choose a Standalone CA. Click Next.

Choosing Root CA as the type of CA, click Next.
Since we do not possess a private key – let’s create a new one. Click Next.

Choosing SHA1 as the Hash algorithm. Click Next.
UPDATE : Recommended to select the most recent hashing algorithm since
SHA-1 deprecation countdown
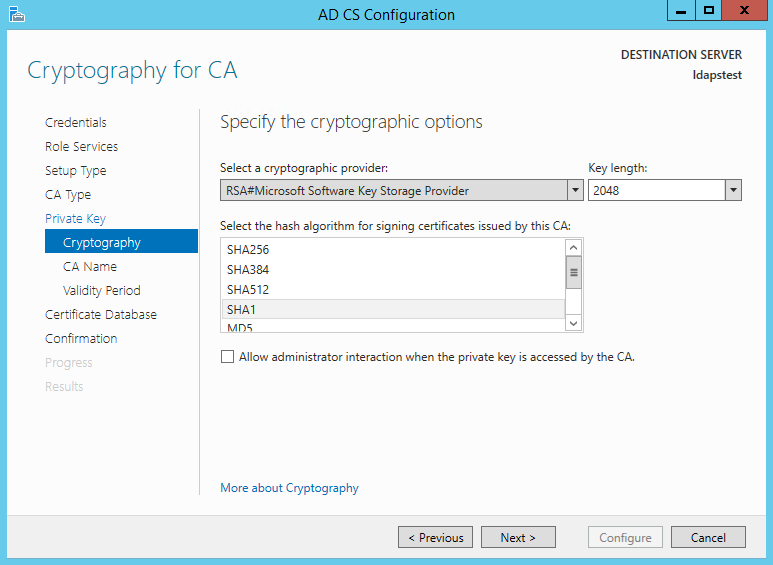
The name of the CA must match the Hostname (requirement number 2). Enter “LDAPSTEST” and Click Next.

Specifying validity period of the certificate. Choosing Default 5 years. Click Next.

Choosing default database locations, click Next.

Click Configure to confirm.
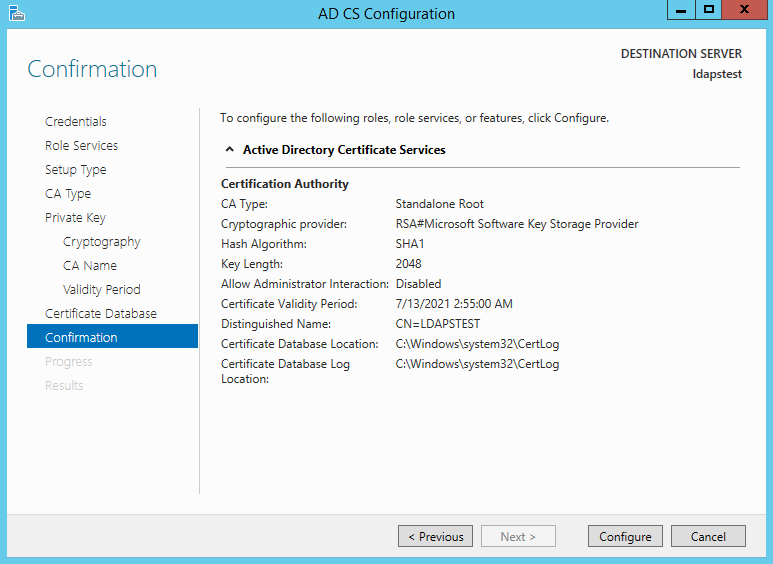
Once the configuration is successful/complete. Click Close.

Now let us view the generated certificate.
Click on Start à Search “Manage Computer Certificates” and open it.
Click on Personal Certificates and verify that the certificate “LDAPSTEST” is present:

Now to fulfill the third requirement, let us ensure host machine account has access to the private key. Using the Certutil utility, find the Unique Container Name. Open Command Prompt in Administrator mode and run the following command: certutil -verifystore MY

The private key will be present in the following location C:ProgramDataMicrosoftCryptoKeys<UniqueContainerName>
Right Click C:ProgramDataMicrosoftCryptoKeys874cb49a696726e9f435c1888b69f317_d3e61130-4cd8-4288-a344-7784647ff8c4 and click properties —> Security and add read permissions for NETWORK SERVICE.

We need to import this certificate into JRE key store since our certificate “CN=LDAPSTEST” is not signed by any by any trusted Certification Authority(CA) which is configured in you JRE keystore e.g Verisign, Thwate, goDaddy or entrust etc. In order to import this certificate using the keytool utility, let us first export this cert as a .CER from the machine certificate store:
Click Start —> Search “Manage Computer Certificates” and open it. Open personal, right click LDAPSTEST cert and click “Export”.

This opens the Certificate Export Wizard. Click Next.

Do not export the private key. Click Next.

Choose Base-64 encoded X .509 file format. Click Next.

Exporting the .CER to Desktop. Click Next.

Click Finish to complete the certificate export.

Certificate is now successfully exported to “C:UsersazureuserDesktopldapstest.cer”.
Now we shall import it to JRE Keystore using the keytool command present in this location:
C:Program FilesJavajre1.8.0_92binkeytool.exe.
Open Command Prompt in administrator mode. Navigate to “C:Program FilesJavajre1.8.0_92bin” and run the following command:
keytool -importcert -alias «ldapstest» -keystore «C:Program FilesJavajre1.8.0_92libsecuritycacerts» -storepass changeit -file «C:UsersazureuserDesktopldapstest.cer»

Type “yes” in the Trust this certificate prompt.
Once certificate is successfully added to the JRE keystore, we can connect to the LDAP server over SSL.
Now let us try to connect to LDAP Server (with and without SSL) using the ldp.exe tool.
Connection strings for
LDAP:\ldapstest:389
LDAPS:\ldapstest:636
Click on Start —> Search ldp.exe —> Connection and fill in the following parameters and click OK to connect:
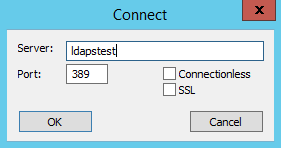
If Connection is successful, you will see the following message in the ldp.exe tool:

To Connect to LDAPS (LDAP over SSL), use port 636 and mark SSL. Click OK to connect.

If connection is successful, you will see the following message in the ldp.exe tool:

REFERENCES
https://technet.microsoft.com/en-us/library/cc770639(v=ws.10)
https://technet.microsoft.com/en-us/library/cc725767(v=ws.10).aspx
http://social.technet.microsoft.com/wiki/contents/articles/2980.ldap-over-ssl-ldaps-certificate….
https://blogs.technet.microsoft.com/askds/2008/03/13/troubleshooting-ldap-over-ssl/
http://javarevisited.blogspot.com/2011/11/ldap-authentication-active-directory.html
Enable LDAP over SSL (LDAPS) for Microsoft Active Directory servers.
Microsoft active directory servers will default to offer LDAP connections over unencrypted connections (boo!).
The steps below will create a new self signed certificate appropriate for use with and thus enabling LDAPS for an AD server. Of course the «self-signed» portion of this guide can be swapped out with a real vendor purchased certificate if required.
Steps have been tested successfully with Windows Server 2012R2, but should work with Windows Server 2008 without modification. Requires a working OpenSSL install (ideally Linux/OSX) and (obviously) a Windows Active Directory server.
- Create root certificate
- Import root certificate into trusted store of domain controller
- Create client certificate
- Accept and import certificate
- Reload active directory SSL certificate
- Test LDAPS using
ldp.exeutility - Reference
Create root certificate
Using OpenSSL, create new private key and root certificate. Answer country/state/org questions as suitable:
$ openssl genrsa -aes256 -out ca.key 4096
$ openssl req -new -x509 -days 3650 -key ca.key -out ca.crt
Hold onto the resulting ca.key and ca.crt.
Import root certificate into trusted store of domain controller
- From the active directory server, open
Manage computer certificates. - Add the generated
ca.crtto the certificate pathTrusted Root Certification AuthoritiesCertificates. - Done.
Create client certificate
We will now create a client certificate to be used for LDAPS, signed against our generated root certificate.
From the active directory server:
-
Create a new
request.infdefinition with the following contents — replacingACTIVE_DIRECTORY_FQDNwith the qualified domain name of your active directory server:[Version] Signature="$Windows NT$" [NewRequest] Subject = "CN=ACTIVE_DIRECTORY_FQDN" KeySpec = 1 KeyLength = 2048 Exportable = TRUE MachineKeySet = TRUE SMIME = FALSE PrivateKeyArchive = FALSE UserProtected = FALSE UseExistingKeySet = FALSE ProviderName = "Microsoft RSA SChannel Cryptographic Provider" ProviderType = 12 RequestType = PKCS10 KeyUsage = 0xa0 [EnhancedKeyUsageExtension] OID = 1.3.6.1.5.5.7.3.1 ; Server Authentication -
Run the following to create a client certificate request of
client.csr(note: it’s critical this is run from the active directory server itself to ensure correct private key -> certificate association):C:> certreq -new request.inf client.csr
Back to our OpenSSL system:
-
Create
v3ext.txtcontaining the following:keyUsage=digitalSignature,keyEncipherment extendedKeyUsage=serverAuth subjectKeyIdentifier=hash -
Create a certificate
client.crtfrom certificate requestclient.csrand root certificate (with private key):$ openssl x509 -req -days 3650 -in client.csr -CA ca.crt -CAkey ca.key -extfile v3ext.txt -set_serial 01 -out client.crt
-
Verify generated certificate:
$ openssl x509 -in client.crt -text
-
Ensure the following
X509v3 extensionsare all present:X509v3 Key Usage: Digital Signature, Key EnciphermentX509v3 Extended Key Usage: TLS Web Server AuthenticationX509v3 Subject Key Identifier
Accept and import certificate
-
From the active directory server with
client.crtpresent, run the following:C:> certreq -accept client.crt
-
Open
Manage computer certificates, the new certificate should now be present underPersonalCertificates. Ensure that:- Certificate has a private key association.
- The «Intended Purposes» is defined as «Server Authentication».
- Certificate name is the FQDN of the active directory server.
Reload active directory SSL certificate
Alternatively you can just reboot the server, but this method will instruct the active directory server to simply reload a suitable SSL certificate and if found, enable LDAPS:
-
Create
ldap-renewservercert.txtcontaining the following:dn: changetype: modify add: renewServerCertificate renewServerCertificate: 1 - -
Run the following command:
C:> ldifde -i -f ldap-renewservercert.txt
Test LDAPS using ldp.exe utility
-
From another domain controller, firstly install our generated root certificate
ca.crtto the certificate pathTrusted Root Certification AuthoritiesCertificates. -
Open utility:
-
From
Connection, selectConnect. -
Enter name of target domain controller.
-
Enter
636as port number (this is the LDAPS port). -
Click
OKto confirm the connection works. -
You’re all done!
Reference
- Enable LDAP over SSL with a third-party certification authority: https://support.microsoft.com/en-us/kb/321051
- LDAP renewServerCertificate: https://msdn.microsoft.com/en-us/library/cc223311.aspx
- How to Enable LDAPS in Active Directory (similar outcome to above): http://www.javaxt.com/tutorials/windows/how_to_enable_ldaps_in_active_directory
- DigiCert LDAPS certificate install guide: https://www.digicert.com/ssl-certificate-installation-microsoft-active-directory-ldap-2012.htm
Cookie Preferences
Privacy Policy
This privacy statement applies to miniorange websites describing how we handle the personal
information.
When you visit any website, it may store or retrieve the information on your browser, mostly in the
form of the cookies. This information might be about you, your preferences or your device and is
mostly used to make the site work as you expect it to. The information does not directly identify
you, but it can give you a more personalized web experience.
Click on the category headings to check how we handle the cookies.
For the privacy statement of our solutions you can refer to the privacy policy.
Strictly Necessary Cookies
Always Active
Necessary cookies help make a website fully usable by enabling the basic functions like site
navigation, logging in, filling forms, etc. The cookies used for the functionality do not store any
personal identifiable information. However, some parts of the website will not work properly without
the cookies.
Performance Cookies
Always Active
These cookies only collect aggregated information about the traffic of the website including —
visitors, sources, page clicks and views, etc. This allows us to know more about our most and least
popular pages along with users’ interaction on the actionable elements and hence letting us improve
the performance of our website as well as our services.
I’ve got a configuration issue with my test domain controller (Server 2019) where I can’t connect via 636 using LDP. (using the full domain name)
On 2008 and 2012 I didn’t have to do any additional configuration; it just worked.
However, in 2019 is may appear that I need to manually configure an SSL cert for this to work. I found this article on MS: https://docs.microsoft.com/en-us/troubleshoot/windows-server/identity/enable-ldap-over-ssl-3rd-certification-authority and it appears that I need to get a public certificate for each domain that I will be connecting to (which will be a lot). If this is true, those certs would expire and I’m not sure what the effect will be (will it still work or fail?). If it will fail, how do I watch the certs and fix ahead of time?
But this doesn’t make sense to me since 2008 and 2012 both work «out of the box» with 636.
When I check the 2019 server with:
certutil -v -urlfetch -verify serverssl.cer > output.txt
I get:
DecodeFile returned The system cannot find the file specified 0x80070002 (Win32: 2 ERROR_FILE_NOT_FOUND)
LoadCert(Cert) returned The system cannot find the file specified 0x80070002 (Win32: 2 ERROR_FILE_NOT_FOUND)
CertUtil -verify command FAILED: 0x80070002 (WIN32: 2 ERROR_FILE_NOT_FOUND)
CertUtil: The system cannot find the file specified.
So that’s telling me the cert does not exist.
Each of the domains I will be connecting to, the computer connecting to them will not be in the same domain. In that above article it was referring to having a cert that can be trusted by both devices.
From the testdomain I can run LDP and connect back into the 2008 or 2012 domain with zero issues on 636 using the builtin configured certificate… But this is a new version and it appears to be different.
Has anyone run into this on 2019 and can share a little more information of what I’m encountering?
Important Info:
The scheduled update (ADV190023), regarding LDAP Signing and Channel Binding for new and existing domain controllers, scheduled for March 10, 2020, has been postponed to the second half of calendar year 2020. The March 2020 update will only provide additional auditing capabilities to identify and configure LDAP systems before they become inaccessible with the later update.
The later update results in no more connections to the domain controller, via unsigned / Clear Text LDAP on port 389. Then it is only possible to use either LDAPS via port 636 or Signed LDAP (StartTLS) on port 389.
Affected Domain Controller Versions
- Windows Server 2019
- Windows Server 2016
- Windows Server 2012 R2
- Windows Server 2012
- Windows Server 2008 R2 SP 1
- Windows Server 2008 SP 2
Affected LDAP Clients
The topic concerns not only the Microsoft environment, but all systems that serve as LDAP client and send LDAP requests. The following is a small list of systems that occurred to me.
- Citrix Gateway
- Citrix AAA
- Citrix LoadBalancer for LDAP
- Citrix Endpoint Management
- VPN (e.g. Sophos)
- Igel UMS Console
- Ticket Systems (e.g. Remedy or Helpdesk)
- ERP /CRM Systems (e.g. SAP)
- Database Systems (e.g. Oracle)
- Webserver (e.g. TomCat or Apache)
- Security Components (Firewall or Proxy)
- Backup / Storage Repository
Some manufacturers, e.g. Igel, have already reacted and it is now possible to switch the connection to LDAPS via the GUI of the UMS console.

How can I check if unsigned LDAP is used?
The first step, to determine if the environment is affected by the transition, is to scan the event logs on the Active Directory server for event IDs 2886, 2887 and 2888. After installing the March updates, the event IDs 3039, 3040 and 3041 still point to unsecured LDAP traffic. All event IDs can be found under Applications and Services Logs / Directory Service.
This is checked manually on all DCs or by the script entered below, which performs the manual steps for you.
LDAP signing events
Following are the event logs regarding LDAP signing.
| Description | Trigger | |
| 2886 | The security of these domain controllers can be significantly improved by configuring the server to enforce validation of LDAP signing. | Triggered every 24 hours, on startup or start of service if the Group Policy is set to None. Minimum Logging Level: 0 or higher |
| 2887 | The security of these domain controllers can be improved by configuring them to reject simple LDAP bind requests and other bind requests that do not include LDAP signing. | Triggered every 24 hours when Group Policy is set to None and at least one unprotected bind was completed. Minimum Logging Level: 0 or higher |
| 2888 | The security of these domain controllers can be improved by configuring them to reject simple LDAP bind requests and other bind requests that do not include LDAP signing. | Triggered every 24 hours when Group Policy is set to Require Signing and at least one unprotected bind was rejected. Minimum Logging Level: 0 or higher |
| 2889 | The security of these domain controllers can be improved by configuring them to reject simple LDAP bind requests and other bind requests that do not include LDAP signing. | Triggered when a client does not use signing for binds on sessions on port 389. Minimum Logging Level: 2 or higher |
If event 2886 is present on a domain controller, this indicates that signed LDAP is not forced by the DCs and it is possible to perform a simple (Clear Text) LDAP binding over an unencrypted connection. The security option “Domain controller: LDAP server signing requirements” is then configured to “None“.

The next checkpoint is event 2887, this event ID occurs every 24 hours and reports how many unsigned and clear text connections to the DC have occurred.

If the Active Directory servers are configured to reject unsigned or simple LDAP connections over a non-SSL/TLS connection, the Active Directory servers log these attempts and write a summary to the event log every 24 hours under event ID 2888.
Changes with March Update
Important:
The March 10, 2020 updates do not change the default policies for LDAP signing or LDAP channel binding on new or existing Active Directory domain controllers.
It only adds the following functions:
- New events are logged in the Event Log in combination with the LDAP Channel Bindings.
- A new GPO setting “Domain controller: LDAP server channel binding token requirements” to configure LDAP channel binding on supported devices. Possible settings are None, When Supported or Always. Event ID 3039 is only created if this setting is not set to None.
LDAP Channel Binding events
Following are the new events that will be released with the March update.
| Event | Description | Trigger |
| 3039 | The following client performed an LDAP bind over SSL/TLS and failed the LDAP channel binding token validation. | Triggered when a client attempts to bind without valid CBT. Minimum logging level: 2
Note Event can only be generated when Channel Binding is set to When Supported or Always |
| 3040 | During the previous 24 hour period, # of unprotected LDAPs binds were performed. | Triggered every 24 hours when CBT Group Policy is set to Never and at least one unprotected bind was completed. Minimum logging level: 0 |
| 3041 | The security of this directory server can be significantly improved by configuring the server to enforce validation of LDAP channel binding tokens. | Triggered every 24 hours, on startup or start of service if the CBT Group Policy is set to Never. Minimum logging level: 0 |
Activation LDAP Event Diagnostic Logging
With the event IDs mentioned above we only get the information that we still receive Clear Text LDAP requests to the domain controller, but not who is sending them. To change this we can increase the log level on our domain controller to see who requested the Clear Text LDAP connection (Event ID 2889).
Enable LDAP Event Diagnostic Logging
Copy the bottom line into a REG file and execute it on the DC. No restart is required.
|
# Enable Simple LDAP Bind Logging Reg Add HKLMSYSTEMCurrentControlSetServicesNTDSDiagnostics /v «16 LDAP Interface Events» /t REG_DWORD /d 2 |

Disable LDAP Event Diagnostic Logging
Copy the bottom line into a REG file and execute it on the DC to disable it again.
|
# Disable Simple LDAP Bind Logging. Reg Add HKLMSYSTEMCurrentControlSetServicesNTDSDiagnostics /v «16 LDAP Interface Events» /t REG_DWORD /d 0 |
Note:
It may be necessary to replace the double quotation marks after copying and pasting.
After activation of the extended log level, an event with the ID 2889 is created for each access via Clear Text LDAP (under Applications and Services Logs / Directory Service). These events contain which IP addresses and which user accounts have established this connection.

PowerShell script for testing the DCs
To make it easier to check the environment, I have adapted the following PowerShell scripts by Arne Tiedemann to the Microsoft March Updates.
- Connect to a domain controller
- Go to this link and download the two scripts
(Further instructions are stored in the README.md file) - Run the script ActiveDirectory-DCLDAPEvents.ps1 to search your domain controllers for event ID 2887 & 3040

- The script then create a CSV file (InsecureLDAPCount.csv) with the displayed information

Only the event entries are counted and you will not get any further information from this file!
To get more information, like user account or IP address of the LDAP client, you have to execute the script ActiveDirectory-LDAPInterfaceEventLogging.ps1
- Start the script on the domain controller

The script will detect if you have run one of the two available scripts in the last 15 minutes and would not search all DCs for the known events again.

It uses the created InsecureLDAPCount.csv file to identify the affected DCs and, based on the list, starts the increased log level for 30 minutes on the DCs. As a result, you will get a detailed list for each affected DC with the following information.
DomainController – LDAP Client IP-Address – Port – User – BindType

If the increased log level should not run for 30 minutes, the time can be adjusted with the following parameters.
|
.ActiveDirectory-LDAPInterfaceEventLogging.ps1 -Runtime «Minutes» |
Action plan for ADV190023
- Install the March Windows Updates
- Check environment automatically via script or with the following manual steps
- Configure LDAP Event Diagnostic Logging to 2 or higher
- Monitor the event log under Applications and Services Logs / Directory Service on all domain controllers
- LDAP Signing failure event 2887
- LDAP Channel Binding failure event 3040
Note:
Event 3039 can only be generated if Channel Binding is set to When Supported or Always.
- Identify the devices for each IP address named at Event 2887 (unsigned LDAP) or Event 3039 (no LDAP Channel Binding)
- Enable LDAPS on domain controller (Signed LDAP is always accepted and should not be set to Required in the phase)
- Enable LDAPS or Signed LDAP (StartTLS) on the mentioned devices

Activation LDAPS & Signed LDAP (StartTLS) on DC
Short guide to enable LDAPS & Signed LDAP (StartTLS) on your domain controllers.
Method 1
The first method is the simplest:
The DC automatically accept LDAPS & Signed LDAP (StartTLS) if a Microsoft Enterprise Root CA is installed on a domain controller. If the Active Directory Certificate Services (AD CS) role is installed and the type of CA setup on the DC is specified as “Enterprise”, all DCs in the overall structure are automatically configured to accept both.
Note:
Although it’s generally a good thing to have a CA in the organization, placement on the DC is not a good idea overall.
Method 2
In most cases a certificate is used where the root CA is not located on a DC. So the second method is to simply put a certificate (Server Authentication enabled) on each DC.
Important:
Remember that regardless of which CA is used to obtain this certificate, both the DCs and the systems running the LDAP client application must trust this certificate.
Note:
For a Windows Server 2008 / R2 / 2012 DC, the certificate must be imported into the AD DS Personal Store (NTDSPersonal).
For older servers (older than 2003 R2) the certificate must be imported into the Computer Personal Store.
For Windows Server 2016 & 2019 both methods work.
Requirements
- Installed & Activated CA
Publication of a compatible Certificate Template
We need a certificate template that supports Server Authentication and has an Exportable private key.
- Connect to your server that has the AD CA role installed
- Open the Certificate Console via Start > Run and the command certsrv.msc

- Expand the display, by double clicking on the name of your CA
- Now click with the right mouse button on Certificate Templates and then on Manage

- In the Certificate Template Console, right-click on Web Server and select Duplicate Template
It is not necessary to use the Web Server template. You can create your own template or use one of the other existing templates that have server authentication as their purpose.

- In the window that appear, the duplicated template is edited. Change the following under General
- Change the Template display name
- Change the Validity period and Renewal period to your security parameters

- Under Request Handling click on Allow private key to be exported

- Under Subject Name select DNS name and Service principal Name (SPN)

Note:
If the certificate template is to be used for wildcards, Supply in the request must be selected here

- Under Security click Add

- In the following window click on Locations…

- Select Computers and confirm with OK

- Enter your DCs and confirm this with Check Names and OK

- Under Security click on your newly added DCs and extend the Allow permissions with Read, Write & Enroll

- Under Extensions, check again that Server Authentication is also selected as the Application Policies. Confirm the entries with OK.

- Close the Certificate Template Console
- Go back to the Certificate Console and right click in the details area of Certificate Templates
- Click here on New and then on Certificate Template to be Issue

- In the window Enable Certificate Templates select the newly created template (here Server Authentication) and click on OK

Requesting a Server Authentication Certificate
For LDAPS we can use either a SAN certificate or a Wildcard certificate. Both types of certificates must be created with Server Authentication permission. Follow these instruction for either SAN certificate or Wildcard certificate.
Request SAN Certificate
- Connect to the first DC
- Open a console there via Start > Run with the command mmc

- In the MMC console click on File and on Add/Remove Snap-in…

- In the following window select Certificates on the left side and click on Add

- In the Certificate Snap-in window, select Computer account and click Next

- Under Select Computer, select Local Computer and click Finish
- Extend the console to the folder Certificates (Local Computer) > Personal > Certificates
- Right-click on the folder and click on All Tasks and Request New Certificate

- Click the first two windows with Next through
- In the window Request Certificates select your newly created certificate template (here Server Authentication)
- Click on Enroll

- If the creation was successful, this is displayed under Status. Confirm this with Finish

- Double-click the new certificate in the results area to open the Certificate Properties dialog box
- Click on the Details tab and select the Enhanced Key Usage option. Check that Server Authentication (1.3.6.1.5.5.7.3.1) has been added

Perform these steps for each domain controller.
Request Wildcard Certificate
If a load balancer (e.g. Citrix ADC) is used in front of the domain controllers, not every DC has to receive its own certificate. Only the load balancer needs a certificate (e.g. Wildcard certificate), which is then imported and accepted on all DCs.

- Connect to the first DC
- Open a console there via Start > Run with the command mmc
- In the MMC console click on File and on Add/Remove Snap-in…
- In the following window select Certificates on the left side and click on Add
- In the Certificate Snap-in window, select Computer account and click Next
- Under Select Computer, select Local Computer and click Finish
- Extend the console to the folder Certificates (Local Computer) > Personal > Certificates
- Right-click on the folder and click on All Tasks and Request New Certificate
- Click the first two windows with Next through
- In the window Request Certificates select your newly created certificate template (here Server Authentication)
- Click on the warning notice More information is required to enroll for this certificate…
Note:
If you do not see this warning, the certificate template is not defined with Supply in the request under Subject Name in the template

- In the Certificate Properties window under the Subject tab enter the following
- Type (Common name)
- Value (Your domain for the Wildcard, e.g. *.deyda.local)
- Click on Add

- In the tab General enter the display name of the certificate under Friendly name (e.g. *.deyda.local)

- Check in the tab Extensions that both Digital signature & Key encipherment is selected

- Check in the Private Key tab that Make private key exportable is selected and confirm this with OK

- When all requirements are filled out click on Enroll

- If the creation was successful, this is displayed under Status. Confirm this with Finish
- Double-click the new certificate in the results area to open the Certificate Properties dialog box

- Click on the Details tab and select the Enhanced Key Usage option. Check that Server Authentication (1.3.6.1.5.5.7.3.1) has been added

This only need to be done once for all DCs.
Export the LDAPS certificate
The following steps show how to export an LDAPS-enabled certificate from the local certificate store of a domain controller. The following steps apply to Wildcard and SAN certificates.
- Connect to the first DC
- Open a console there via Start > Run with the command mmc
- In the MMC console click on File and on Add/Remove Snap-in…
- In the following window select Certificates on the left side and click on Add
- In the Certificate Snap-in window, select Computer account and click Next
- Under Select Computer, select Local Computer and click Finish
- Extend the console to the folder Certificates (Local Computer) > Personal > Certificates
- Click with the right mouse button on the previously created certificate (here DC01.deyda.net, you can recognize it by the column Certificate Template) and click on All Tasks and Export

- Click Next on the Welcome Screen of the Certificate Export Wizard
- In the Export Private Key window, select Yes, export private key and confirm with Next
- If it is not possible to export the private key, then the wrong certificate template was selected or it was created incorrectly

- In the Export File Format window, Export all extended properties should be selected. Confirm this with Continue.
- The other selection options are optional.

- On the Security window, enter a Password to use for importing the certificate. Then click Next

- Select a path in the File to Export window via Browse and define a file name. Then click on Next

- Confirm the settings by clicking on Finish

- This is followed by a pop-up message indicating that The export was successful. Click OK.

Import for use with AD DS
The certificate must now be imported into the certificate store of the Active Directory Domain Services (NTDSPersonal). This step must be performed for each domain controller that is to provide LDAPS. These certificates must be manually renewed when they expire. The following steps apply to Wildcard and SAN certificates.
Note:
The following steps must be performed on Windows Server 2008 / R2 / 2012 DCs.
For Windows Server 2016 & 2019 the following steps are optional.
- Connect to the first DC
- Open a console there via Start > Run with the command mmc
- In the MMC console click on File and on Add/Remove Snap-in…
- In the following window select Certificates on the left side and click on Add
- In the Certificates snap-in window, select Service account and click Next

- Under Select Computer, select Local Computer and click Next
- Select Active Directory Domain Services and confirm with Finish

- Expand the console to the folder Certificates – Service (Active Directory Domain Services) > NTDSPersonal
- Right click on the NTDSPersonal folder and click on All Tasks and Import

- At the Certificate Import Wizard window click Next
- Click the Browse button in the File to Import window and then browse to the previously exported certificate file
- Ensure that Personal Information Exchange (pfx, .p12) is selected as the file type

- Confirm the selection with Next

- In the following Private key protection window, enter the Password for the certificate and click Next

- On the Certificate Store page, make sure the Place all certificates in the following store option is selected and the certificate store is NTDSPersonal.
- Confirm this with Next

- Confirm the settings with a click on Finish

- A message should then appear that The import was successful. Click on OK

- Check the successful import. Expands the navigation area under NTDSPersonal > Certificates. Here you should see the imported certificate

Checking the connections
After installing a certificate, perform the following steps to verify that LDAPS and Signed LDAP (StartTLS) are working.
- Connect to the first DC
- Open a console there via Start > Run with the command mmc
- Start the Active Directory Administration Tool (Ldp.exe)
- For non-domain controllers, the Remote server administration tools must be installed

- Click on Connection and then on Connect

- Enter the name of the LDAPS server (e.g. Domain Controller or LDAP Load Balancer) you want to test
- Change the port to 636 and check the box SSL to test LDAPS
- Start the test with OK

- Successful connection via LDAPS

- Change the port to 389 and uncheck the SSL box to test signed LDAP (StartTLS)
- Start the test with OK

- The LDAP connection is established

- Now click on Options > TLS > StartTLS to start Signed LDAP (StartTLS)

- Signed LDAP (StartTLS) could establish connection

Check without certificate
For test cases you can delete the imported certificate from the DC again or connect against a DC without certificate. There you can try to establish the same connections.

- LDAPS connection (Port 636 SSL) not successful

- LDAP connection (Port 389) still works

- But the switch to Signed LDAP (StartTLS) no longer works

Configure Citrix ADC
As mentioned above, the Citrix ADC with its DC connections may be affected by the upcoming change. Therefore here is a short instruction to change the required settings in the Citrix ADC.
Requirements
- The domain controller has bound a certificate (Server Authentication) for LDAPS or Signed LDAP (StartTLS) (e.g. Wildcard Certificate)
- If LDAPS is to be used, the affected firewalls must still be adapted (Port change from 389 to 636)
Authentication LDAPS Server
- Connect to the Management IP of the affected system

- Go in the navigantion panel to System > Authentication > Basic Policies > LDAP

- Switch to the Servers tab

- Open your existing LDAP server (here 10.0.0.4_LDAP)

- Change the Security Type to SSL, which directly change the Port to 636

- Now you can test this change directly with Test LDAP Reachability. This can be found under Connection Settings


Another advantage of switching to LDAPS is that the user can change his password independently.
- Activate the item Allow Password Change under Other Settings

CLI Command
|
set authentication ldapAction <Authentication Server Name> -serverIP <Authentication Server IP> -serverPort 636 -secType SSL |
Example:
|
set authentication ldapAction 10.0.0.4_LDAP -serverIP 10.0.0.4 -serverPort 636 -secType SSL |
Authentication Signed LDAP (StartTLS) Server
- Connect to the Management IP of the affected system
- Go to System > Authentication > Basic Policies > LDAP in the Navigation Menu
- Switch to the Servers tab
- Open your existing LDAP server (here 10.0.0.4_LDAP)
If the firewalls are not to be adjusted, Signed LDAP (StartTLS) can also be used in the Citrix ADC.
- Change the Security Type to TLS, the Port remains at 389

- Now you can test this change directly with Test LDAP Reachability. This can be found under Connection Settings

CLI Command
|
set authentication ldapAction <Authentication Server Name> -serverIP <Authentication Server IP> -serverPort 389 -secType TLS |
Example:
|
set authentication ldapAction 10.0.0.4_LDAP -serverIP 10.0.0.4 -serverPort 389 -secType TLS |
Load Balanced LDAPS Server
TCP or SSL_TCP can be selected as Load Balancing Protocol for LDAPS. SSL_TCP is recommended for higher compatibility (e.g. with Linux appliances) (SSL termination is done on the Citrix ADC).
For existing LDAP load balancing, the following must be recreated for LDAPS:
- Load Balancing Monitor
- Load Balancing Service Groups
- Load Balancing vServer
- Connect to the Management IP of the affected system
Configuration LDAPS Monitor
- Go to Traffic Management > Load Balancing > Monitors in the Navigation Menu

- Now click on Add, if you do not have an existing LDAPS monitor

- Configure the new Monitor
- Name (Name of the Monitor, e.g. LDAPS)
- Type (Type of the Monitor, LDAP)
- Password (The password of the Service Account stored under Bind DN)
- Base DN (Domain names in LDAP format, e.g. dc=deyda, dc=local)
- Bind DN (Service Account for communication with the AD, e.g. service_ldap@deyda.local)
- Filter (Restriction of search results, cn=builtin)
- Secure (Activate the Secure checkbox)
- Confirm the entry with Create

CLI Command
|
add lb monitor <Monitor Name> -scriptName nsldap.pl -dispatcherIP 127.0.0.1 -dispatcherPort 3013 -password <Password for Bind DN User> -secure YES -baseDN «<Base DN Path>« -bindDN «<Service Account for Connect>« -filter cn=builtin |
Example:
|
add lb monitor LDAPS -scriptName nsldap.pl -dispatcherIP 127.0.0.1 -dispatcherPort 3013 -password Password1 -secure YES -baseDN «dc=deyda,dc=local« -bindDN «service_ldap@deyda.local« -filter cn=builtin |
Configuration of the LDAPS Service Group
- Go to Traffic Management > Load Balancing > Service Groups in the Navigation Menu

- Now click on Add to create a new Service Group for LDAPS

- Configure the new Service Group for LDAPS
- Name (Name of the Service Group, e.g. LDAPS-svc_group)
- Protocol (Protocol, SSL_TCP)
- Confirm the entry with OK

- Click on No Service Group Member in the following window to include the existing DCs for LDAPS

- Change the server methode to Server Based and click on Click to select if existing servers are to be included. If new servers are to be included, click Add

- Select the DCs that are configured for LDAPS and add them via Select

- Configure the required port (636) and confirm the entry with Create

- In the following Load Balancing Service Group window, select Monitors on the right side

- Now click on No Service Group to Monitor Binding to bind the previously created LDAPS Monitor

- Now select the Monitor (here LDAPS) and confirm this with Select

- Confirm the integration of the Monitor by clicking on Bind

- Confirm the entries with Done. The Effective State must be displayed as Up

CLI Command
|
add serviceGroup <Service Group Name> SSL_TCP bind serviceGroup <Service Group Name> <Server Name> 636 bind serviceGroup <Service Group Name> <Server Name> 636 bind serviceGroup <Service Group Name> -monitorName <Monitor Name> |
Example:
|
add serviceGroup LDAPS-svc_group SSL_TCP bind serviceGroup LDAPS-svc_group 10.0.0.4 636 bind serviceGroup LDAPS-svc_group 10.0.0.5 636 bind serviceGroup LDAPS-svc_group -monitorName LDAPS |
Configuration of the LDAPS virtual Server
- Go to Traffic Management > Load Balancing > Virtual Servers in the Navigation Menu

- Now click on Add to create a new Virtual Server for LDAPS

- Configure the new Virtual Server for LDAPS
- Name (Name of the Virtual Servers, e.g. LDAPS-LB)
- Protocol (Protocol, SSL_TCP)
- IP Address Type (IP Address)
- IP Address (IP Address of the Virtual Server, e.g. 10.0.0.200)
- Port (LDAPS Port, 636)
- Confirm the entries with OK

- Click No Load Balancing Virtual Server ServiceGroup Binding in the following window to bind the newly created Service Group

- Click on Click to select to get to the selection list of Service Groups

- Select the previously configured Service Group (LDAPS-svc_group) and add it via Select
- Click Continue after binding

- Click under Certificate on No Server Certificate

- Now select a suitable certificate for this load balancer. Select a Wildcard certificate of the local domain (Wildcard-deyda-local) and confirm with Select

- Now click on Continue and then on Done
CLI Command
|
add lb vserver <Load Balancing Name> SSL_TCP <Load Balancing IP Address> 636 -persistenceType NONE -cltTimeout 9000 bind lb vserver <Load Balancing Name> <Service Group Name> |
Example:
|
add lb vserver LDAPS-LB SSL_TCP 10.0.0.200 636 -persistenceType NONE -cltTimeout 9000 bind lb vserver LDAPS-LB LDAPS-svc_group |
Configuration of the LDAPS Authentication Server
- Go to System > Authentication > Basic Policies > LDAP in the Navigation Menu
- Switch to the Servers tab
- Open the existing LDAP server (here 10.0.0.4_LDAP) or create a new one
- Change the following settings of the existing Authentication Server
- IP Address (IP Address of the LB Virtual Server, 10.0.0.200)
- Security Type (Type of the connection, SSL)
- Port (Port of the connection, 636)
The port is automatically changed when SSL is selected under Security Type.

- Now you can test this change directly with Test LDAP Reachability. This can be found under Connection Settings

Another advantage of switching to LDAPS is that the user can change his password independently.
- Activate the item Allow Password Change under Other Settings
CLI Command
|
set authentication ldapAction <Authentication Server Name> -serverIP <Load Balancing IP Address> -serverPort 636 -secType SSL |
Example:
|
set authentication ldapAction 10.0.0.4_LDAP -serverIP 10.0.0.200 -serverPort 636 -secType SSL |
Load Balanced Signed LDAP (StartTLS)
If the firewalls should not be changed, Signed LDAP (StartTLS) should be used in the Citrix ADC. Nothing need to be adjusted in the load balancing chain for this, because port 389 is still used.
- Connect to the Management IP of the affected system
- Go to System > Authentication > Basic Policies > LDAP in the Nagivation Menu
- Switch to the Servers tab
- Open the existing LDAP server (here 10.0.0.4_LDAP) or create a new one
- Change the Security Type to TLS, the port remain at 389

- Now you can test this change directly with Test LDAP Reachability. This can be found under Connection Settings

CLI Command
|
set authentication ldapAction <Authentication Server Name> -serverIP <Load Balancing IP Address> -serverPort 389 -secType TLS |
Example:
|
set authentication ldapAction 10.0.0.4_LDAP -serverIP 10.0.0.200 -serverPort 389 -secType TLS |
Microsoft Active Directory поддерживает протокол LDAPv3. С его помощью можно авторизовать пользователей из сторонних приложений. Чтобы обеспечить безопасность при передаче учетной информации серверу необходимо использовать LDAPS (SSL). В этой статье мы рассмотрим настройку контролера доме, для обеспечения поддержки SSL.
Для того, чтобы SSL нормально функционировал нам потребуются сертификат.
Проверяем наличие сертификата
Для начала будет полезно проверить наличие сертификата в вашем домене, для этого запустим на нашем ПК утилиту ldp.exe.
Она не поставляется с Windows 10, чтобы использовать её, вам придется установить компоненты администрирования RSAT.
Нажмите Подключение — подключить, заполните окно аналогично рисунку.

Используйте имя домена, не сервера — тогда сервер для подключения будет выбран автоматически.
Если в ответ вы получили сообщение:
ld = ldap_sslinit("altuninvv.local", 636, 1);
Error 0 = ldap_set_option(hLdap, LDAP_OPT_PROTOCOL_VERSION, 3);
Error 81 = ldap_connect(hLdap, NULL);
Server error: <empty>
Error <0x51>: Fail to connect to altuninvv.local.Это означает, что либо недоступен ни один контролер домена, либо неправильно настроен DNS, либо ПК не является членом домена, либо не установлен SSL сертификат на контролере домена.
Если сообщение похоже на такое:
Established connection to xxxx.xxxxxxxxx.xxx.
Retrieving base DSA information...
Getting 1 entries:
Dn: (RootDSE)
configurationNamingContext:
...
forestFunctionality: 6 = ( WIN2012R2 );
highestCommittedUSN: 2153249;
isGlobalCatalogReady: FALSE;
isSynchronized: TRUE;
ldapServiceName: XXXXXXXX$@XXXXXXXXXXXXX;
....
supportedCapabilities (6): 1.2.840.113556.1.4.800 = ( ACTIVE_DIRECTORY ); 1.2.840.113556.1.4.1670 = ( ACTIVE_DIRECTORY_V51 ); 1.2.840.113556.1.4.1791 = ( ACTIVE_DIRECTORY_LDAP_INTEG ); 1.2.840.113556.1.4.1935 = ( ACTIVE_DIRECTORY_V61 ); 1.2.840.113556.1.4.2080 = ( ACTIVE_DIRECTORY_V61_R2 ); 1.2.840.113556.1.4.2237 = ( ACTIVE_DIRECTORY_W8 );
supportedControl (37): 1.2.840.113556.1.4.319 = ( PAGED_RESULT ); 1.2.840.113556.1.4.801 = ( SD_FLAGS ); 1.2.840.113556.1.4.473 = ( SORT ); 1.2.840.113556.1.4.528 = ( NOTIFICATION ); 1.2.840.113556.1.4.417 = ( SHOW_DELETED ); 1.2.840.113556.1.4.619 = ( LAZY_COMMIT ); 1.2.840.113556.1.4.841 = ( DIRSYNC ); 1.2.840.113556.1.4.529 = ( EXTENDED_DN ); 1.2.840.113556.1.4.805 = ( TREE_DELETE ); 1.2.840.113556.1.4.521 = ( CROSSDOM_MOVE_TARGET ); 1.2.840.113556.1.4.970 = ( GET_STATS ); 1.2.840.113556.1.4.1338 = ( VERIFY_NAME ); 1.2.840.113556.1.4.474 = ( RESP_SORT ); 1.2.840.113556.1.4.1339 = ( DOMAIN_SCOPE ); 1.2.840.113556.1.4.1340 = ( SEARCH_OPTIONS ); 1.2.840.113556.1.4.1413 = ( PERMISSIVE_MODIFY ); 2.16.840.1.113730.3.4.9 = ( VLVREQUEST ); 2.16.840.1.113730.3.4.10 = ( VLVRESPONSE ); 1.2.840.113556.1.4.1504 = ( ASQ ); 1.2.840.113556.1.4.1852 = ( QUOTA_CONTROL ); 1.2.840.113556.1.4.802 = ( RANGE_OPTION ); 1.2.840.113556.1.4.1907 = ( SHUTDOWN_NOTIFY ); 1.2.840.113556.1.4.1948 = ( RANGE_RETRIEVAL_NOERR ); 1.2.840.113556.1.4.1974 = ( FORCE_UPDATE ); 1.2.840.113556.1.4.1341 = ( RODC_DCPROMO ); 1.2.840.113556.1.4.2026 = ( DN_INPUT ); 1.2.840.113556.1.4.2064 = ( SHOW_RECYCLED ); 1.2.840.113556.1.4.2065 = ( SHOW_DEACTIVATED_LINK ); 1.2.840.113556.1.4.2066 = ( POLICY_HINTS_DEPRECATED ); 1.2.840.113556.1.4.2090 = ( DIRSYNC_EX ); 1.2.840.113556.1.4.2205 = ( UPDATE_STATS ); 1.2.840.113556.1.4.2204 = ( TREE_DELETE_EX ); 1.2.840.113556.1.4.2206 = ( SEARCH_HINTS ); 1.2.840.113556.1.4.2211 = ( EXPECTED_ENTRY_COUNT ); 1.2.840.113556.1.4.2239 = ( POLICY_HINTS ); 1.2.840.113556.1.4.2255 = ( SET_OWNER ); 1.2.840.113556.1.4.2256 = ( BYPASS_QUOTA );
supportedLDAPPolicies (19): MaxPoolThreads; MaxPercentDirSyncRequests; MaxDatagramRecv; MaxReceiveBuffer; InitRecvTimeout; MaxConnections; MaxConnIdleTime; MaxPageSize; MaxBatchReturnMessages; MaxQueryDuration; MaxTempTableSize; MaxResultSetSize; MinResultSets; MaxResultSetsPerConn; MaxNotificationPerConn; MaxValRange; MaxValRangeTransitive; ThreadMemoryLimit; SystemMemoryLimitPercent;
supportedLDAPVersion (2): 3; 2;
supportedSASLMechanisms (4): GSSAPI; GSS-SPNEGO; EXTERNAL; DIGEST-MD5;
-----------
Это значит, что SSL сертификат уже установлен посредством Службы сертификатов Active Directory и дальнейших действий не потребуется.
Установка OpenSSL
В этой статье я буду использовать виртуальный сервер, созданный для цикла статей.
Имя домена — altununvv.local
Имя контролера домена – addc1.altuninvv.local
Виртуальная организация — Altunin Soft
Скачаем свежую версию OpenSSL — вы можете скачать её отсюда — https://slproweb.com/products/Win32OpenSSL.html
Я рекомендую все команды выполнять сразу на сервере, но вы можете так же работать и на вашем ПК, если используете MSYS2.
Те, кто использует, как и я, MSYS2, могут ввести в консоли:
pacman -Sy opensslСоздаем локальный центр сертификации
Создадим папку и назовем её CA.
Создадим в ней файл ca.conf с содержимым:
[ req ]
distinguished_name = req_distinguished_name
req_extensions = v3_ca
[ req_distinguished_name ]
# Descriptions
countryName=RU
stateOrProvinceName=Magadan region
localityName=Magadan
0.organizationName= Altunin Soft
1.organizationName=IT
commonName=altuninvv.local
#Modify for your details here or answer the prompts from openssl
countryName_default=RU
stateOrProvinceName_default= Magadan region
localityName_default= Magadan
0.organizationName_default= Altunin Soft
1.organizationName_default=IT
commonName_default= altuninvv.local
[ v3_ca ]
keyUsage=critical,keyCertSign
basicConstraints=critical,CA:TRUE,pathlen:1
extendedKeyUsage=serverAuth
subjectAltName = @alt_names
[alt_names]
DNS.1 = *. altuninvv.local
DNS.2 = altuninvv.localСгенерируем приватный ключ для CA
openssl genrsa -des3 -out ca.key 4096Укажите пароль для ключа, в нашем случае это будет Pa$$w0rd:
Generating RSA private key, 4096 bit long modulus (2 primes)
......................................................................................................................................
........................................................................................................................................
....++++..........................++++e is 65537 (0x010001)
Enter pass phrase for ca.key:
Verifying - Enter pass phrase for ca.key:Создадим сертификат для нашего CA:
openssl req -new -x509 -extensions v3_ca -days 3659 -key ca.key -out ca.crt -config ca.confПросто нажимайте Enter все поля будут заполнены автоматически!
Enter pass phrase for ca.key:
You are about to be asked to enter information that will be incorporated into your certificate request.
What you are about to enter is what is called a Distinguished Name or a DN.
There are quite a few fields but you can leave some blank
For some fields there will be a default value,
If you enter '.', the field will be left blank.
-----
RU [RU]:
Magadan region [Magadan region]:
Magadan [Magadan]:
Altunin Soft [Altunin Soft]:
IT [IT]:
altuninvv.local [altuninvv.local]:Теперь нужно импортировать созданный сертификат в хранилище доверенных CA на нашем контролере домена.
Скопируем файл ca.crt на контролер домена. Откроем PowerShell от имени администратора, перейдем в папку с файлом ca.cert и введем команду:
Import-Certificate –Verbose -FilePath ca.crt -CertStoreLocation 'Cert:LocalMachineRoot'
VERBOSE: Performing the operation "Import certificate" on target "Item: C:caca.crt Destination: Root".
PSParentPath: Microsoft.PowerShell.SecurityCertificate::LocalMachineRoot
Thumbprint Subject
---------- -------
D5D1306CFFDAF63EDA10710F13F69C0228005350 CN=altuninvv.local, O=IT, O=Altunin Soft, L=Magadan, S=Magadan region, C=RU Сертификат успешно добавлен.
Теперь пришло время создать запрос на клиентский сертификат, который будет использовать контролер домена.
На контролере домена создадим текстовый файл — req.txt
;----------------- request.inf -----------------
[Version]
Signature="$Windows NT$"
;The Subject will need to be your active directory domain name
[NewRequest]
Subject = "CN=altuninvv.local
KeySpec = 1
KeyLength = 4096
Exportable = TRUE
SMIME = FALSE
MachineKeySet = TRUE
PrivateKeyArchive = FALSE
UseExistingKeySet = FALSE
UserProtected = FALSE
ProviderName = "Microsoft RSA SChannel Cryptographic Provider"
ProviderType = 12
RequestType = PKCS10
KeyUsage = 0xa0
[EnhancedKeyUsageExtension]
OID = 1.3.6.1.5.5.7.3.1 ; Server Authentication
;The following will add a subject alternative name of a wildcard cert on *.example.com
;so any ad controller with a hostname of somththing.example.com can use it.
[Extensions]
2.5.29.17 = "{text}"
_continue_ = "dns=*.altuninvv.local&"
_continue_ = "dns=altuninvv.local&"
Выполним запрос на сертификат:
certreq -new req.txt addc1.csr
CertReq: Request Created
Выполним запрос на сертификат:
certreq -new req.txt addc1.csr
CertReq: Request CreatedСкопируем созданный файл на свой ПК в папку нашего CA
В папке CA создадим файл v3ext.txt с содержимым:
# v3ext.txt
 keyUsage=digitalSignature,keyEncipherment
 extendedKeyUsage=serverAuth
 subjectKeyIdentifier=hash
subjectAltName = @alt_names
#Modify for your details. Must include the commonName in the list below also.
#The *.example.com will allow all Domain controllers with
#the hostname somthing.example.com to use the cert.
[alt_names]
DNS.1 = *.altuninvv.local
DNS.2 = altuninvv.localСгенерируем сертификат для addc1
openssl x509 -req -days 825 -in addc1.csr -CA ca.crt -CAkey ca.key -extfile v3ext.txt -set_serial 01 -out addc1-server.crt
Signature ok
subject=CN = altuninvv.local
Getting CA Private Key
Enter pass phrase for ca.key:Введите пароль закрытого ключа: Pa$$w0rd
Скопируем файл с сертификатом addc1-server.crt обратно на контролер домена addc1 и применим сертификат:
certreq -accept addc1-server.crt
Installed Certificate:
Serial Number: 01
Subject: CN=altuninvv.local (DNS Name=*.altuninvv.local, DNS Name=altuninvv.local)
NotBefore: 2/18/2021 5:37 PM
NotAfter: 5/24/2023 5:37 PM
Thumbprint: 4721d27e9fe34aaa672d20d68c0ec01fd9f7a82cИз PowerShell проверим наличие сертификата:
PS C:ca> Get-ChildItem "Cert:LocalMachineMy"
PSParentPath: Microsoft.PowerShell.SecurityCertificate::LocalMachineMy
Thumbprint Subject
---------- -------
4721D27E9FE34AAA672D20D68C0EC01FD9F7A82C CN=altuninvv.local
Теперь вы должны перегрузить контролер домена, чтобы все настройки вступили в силу.
Обратите внимание, чтобы подключиться к серверу вы должны указать его полное доменное имя, в нашем случае:
addc1.altuninvv.localЕсли ПК входит в состав домена altuninvv.local, вы можете использовать для подключение его имя:
altuninvv.localТогда контролер домена для подключения будет выбран автоматически из списка доступных, возможно, это будет работать только, при наличии Службы сертификатов на одном из серверов в AD!
Так как мой ПК не входит в домен altuninvv.local и не использует его DNS-сервера, я прописал в файле
C:WindowsSystem32driversetchostsстроку:
192.168.0.10 addc1.altuninvv.localПроверяем подключение
Для проверки подключения мы будет использовать утилиту ldp.exe.
Она не поставляется с Windows 10, чтобы использовать её, вам придется установить компоненты администрирования RSAT.
Запустим ldp.exe, откроется окно:

В этом окне выберите подключение – подключить
Введем:
Сервер: addc1.altuninvv.local
Порт: 636
Установим галочку SSL

Нажмем Ок, будет осуществлено подключение и выведена дополнительная информация:

Теперь мы может сделать bind к серверу
Выберите Подключение – Привязка
Заполните поля:
Пользователь: CN=ldap-bind,CN=Users,DC=altuninvv,DC=local
Пароль: Pas#w0rds#1
Установите: Простая привязка
нажмите Ок

Будет выведено сообщение:
res = ldap_simple_bind_s(ld, 'CN=ldap-bind,CN=Users,DC=altuninvv,DC=local', <unavailable>); // v.3
Authenticated as: 'ALTUNINVVldap-bind'.Это означает, что подключение прошло успешно.
Далее выберем пункт меню Вид – Дерево
И в окне выберем — DC=altuninvv,DC=local

Нажмем Ок
Откроется дерево с разделами домена,

Таким образом вы можете просматривать каталог AD через LDAP по SSL.
Заключение
Сегодня мы рассмотрели подключение к контролеру домена AD с использованием протокола LDAP по SSL.
Мы создали свой локальный центр сертификации CA с помощью OpenSSL.
Был выпущен сертификат и установлен на контролере домена.
С помощью утилиты ldp.exe было осуществлено подключение к контролеру домена по SSL.
В этой статье будет рассмотрена установка и первоначальная настройка контроллера Active Directory. В цикле статей по миграци с Exchange Server 2010 на 2019 уже рассматривалась установка и добавление контроллеров домена. Например, установка контроллера на Windows Server 2008 R2. И добавление контроллера Windows Server 2012 R2. Однако, для кого-то такая операция является обыденной, но для других такая операция может оказаться совершенно новой и ранее не выполнявшейся задачей. Поэтому установка и первоначальная настройка контроллера выделена в отдельную статью. Дополнительно показан пример на базе одной из последней серверной операционной системе – Windows Server 2019.
Предварительные требования
Особых предварительных требований для установки нет, но крайне желательно установить все последние обновления операционной системы перед началом процесса установки.
Установка роли контроллера домена может быть выполнена как на сервер с GUI (Desktop Experience), так и без него (вариант Server Core).
Установка и первоначальная настройка контроллера Active Directory будет рассмотрена на базе Windows Server 2019. Редакция (Standard или Datacenter) роли не играет.
Немного теории
Непосредственно перед началом процесса установки разберем небольшой кусок теории.
Доменные службы Active Directory – это широко используемая технология для централизации хранения и управления учетными записями пользователей, нахождении ресурсов в сети предприятия, а также реализация механизма Single Sign-On (SSO) от компании Microsoft. В основе доменных служб Active Directory лежит реализация протокола LDAP. Грубо говоря Active Directory Domain Services – это реализация протокола LDAP от компании Microsoft.
По механизму и тонкостям работы Active Directory написаны отдельные книги. И даже кратко изложить основные момент – дело не простое. Однако, для понимания общей концепции в контексте установки контроллера домена необходимо ознакомится со следующими основными понятиями:
- Схема Active Directory. Нечто мифическое, которое обвешано кучей тайн и не редко вызывает трепещущий страх и ужас при сочетании слов “нужно выполнить обновление схемы” 🙂 А если серьезно, то это описание шаблонов всех возможных объектов в Active Directory – пользователей, компьютеров, принтеров и т.д. Содержит информацию о том, какие свойства есть у объектов и какие они могут иметь типы значений и непосредственно значения.
- Лес Active Directory. Это совокупность всех доменов, которые объединены общей конфигурацией схемы объектов Active Directory. Лес содержит как минимум один домен. Такие тяжелые продукты, как, например Microsoft Exchange или Skype for Business могут быть установлены только одни в пределах всего леса, т.к. он вносит необходимые ему изменения в схему Active Directory. Установить рядом еще один независимый экземпляр этих продуктов не получится.
- Домен. Граница, в пределах которой осуществляется управление настройками безопасности. Например, у вас есть два домена. В каждом из них администратор может управлять своим набором учетных записей пользователей, компьютеров, параметров безопасности и политики. Администратор Домена А не может управлять объектами в Домене Б (если не настроено необходимое делегирование).
- Дерево доменов. Совокупность всех доменов в пределах леса.
- Пространство имен. В передлах леса у вас может быть несколько имен. Например, один домен называется itproblog.ru, второй домен называется sale.itproblog.ru. В таком случае пространство имен продолженное (continuous). В тоже время у вас может быть еще один домен в том же лесу, например, hmmail.ru. Как видите – имя у него совершенно другое. Однако, это нисколько не мешает ему находится в том же лесу, что и домен с именем itproblog.ru.
Примеры топологий Active Directory
Рассмотрим немного примеров.
Ниже изображена схема одной из наиболее распространенной и простой топологии – один лес и один домен. Важно понимать, что в одном домене может быть установлено несколько контроллеров домена (для отказоустойчивости). Именно этот сценарий мы рассмотрен в данной статье. Пример схемы:

Следующей по уровню сложности следует топологи с несколькими доменами в одном лесу. Причем домены находятся в одном пространстве имен. Скажем, itproblog.ru. В каждом из доменов можем быть от одного до нескольких контроллером домена. Пример схемы:

Одна из наиболее комплексных топологий – это несколько доменов в одном лесу. Причем, не все домены используют одно пространство имен. Пример такой схемы ниже:

Домены в разных лесах Active Directory никак не заимосвязаны друг с другом (без установки дополнительных доверительных отношений). Домены в пределах одного леса автоматически доверяют друг другу, т.е. пользователям из Домена А могут быть назначены разрешения в домене Б. Пример схемы с несколькими отдельными лесами ниже:

Самым первым шагом нам необходимо создать лес и установить самый первый контроллер – корневой контроллер в лесу Active Directory. Лес будет создан автоматически в процессе установки самого первого контроллера в самом первом домене. Мы рассмотрим два варианта установки – через графический интерфейс и через командлеты PowerShell.
Установка первого контроллера через графический интерфейс
Для установки контроллера домена через графический интерфейс необходимо выполнить следующие действия:
1. Запустить Server Manager.
2. В меню сверху выбрать пункты “Manage” – “Add Roles and Features”:

3. Запустится мастер установки ролей и компонентов. На первой странице мастера нажмите кнопку “Next”.
4. На странице выбора сценария установки нужно выбрать пункт “Role-based or feature-based installation” и нажать кнопку “Next”.

5. В появившемся списке серверов выберите необходимый сервер (если он не один) и нажмите кнопку “Next”.

6. В появившемся списке ролей необходимо выбрать “Active Directory Domain Services”.

7. В появившемся диалоговом окне с запросом на установку дополнительных ролей и компонентов нажмите кнопку “Add Features”.

8. В окне мастера установки на шаге выбора ролей нажмите кнопку “Next”.
9. На шаге выбора компонентов нажмите кнопку “Next”.
10. На шаге с описание возможности интеграции с Azure AD нажмите кнопку “Next”.

11. На последнем шаге мастер установки предствит сводку по параметрам установки. Нажмите кнопку “Install”, чтобы начать процесс добавление необходимых для Active Directory компонентов.

12. Дождитесь окончания процесса установки компонентов. По окончанию процесса установки можете закрыть мастер добавления ролей и компонентов.
13. Следующим шагом необходимо повысить роль сервера до контроллера домена. В секции с последними событиями выберите пункт “Promote this server to a domain controller”:

14. Поскольку мы конфигурируем первый домен в лесу (т.е. создаем новый лес Active Directory), то нужно выбрать соответствующую опцию – “Add a new forest”. Также необходимо указать имя корневого домена. Далее нажмите кнопку “Next”.

15. На следующем шаге мастера необходимо выбрать функциональный уровень домена и леса. Например, в нашем случае это уровень “Windows Server 2016”. Что это значит? Если кратко, то мы не сможем добавить в Active Directory контроллеры домена с операционной системой ниже Windows Server 2016. Зачем это нужно? Чем выше функциональный уровень, тем больше доступно новых возможностей Active Directory. С полным перечнем всех возможностей для каждого из функционального уровня домена и леса можно ознакомится в документации Microsoft. Указываем пароль DSRM (своеобразный безопасный режим Active Directory) и нажимаем “Next”.

16. На странице настройки опций DNS нажмите кнопку “Next”.
17. На следующей странице мастера необходимо выбрать NetBIOS имя вашего домена и нажать “Next”.

18. На странице с выбором расположений файлов базы данных, транзакционных логов и папки SYSVOL вы можете выбрать иные директории, но, как правило, здесь оставляются значения по умолчанию. Нажмите кнопку “Next”.

19. На странице со сводкой по выбранным параметрам установки нажмите кнопку “Next”.
20. Мастер установки выполнит проверку предварительных требований. Если все проверки завершатся успешно, то будет активна кнопка “Install”. Нажмите её.

21. Запуститься процесс повышения роли сервера до контроллера домена. В процессе повышения сервер несколько раз перезагрузится. Дождитесь окончания процесса.

22. После завершения процесса повышения сервера до контроллера домена вы можете открыть оснастку “Active Directory Users and Computers” и убедиться, что оснастка запускается и отображает информацию об объектах вашего домена успешно.

Установка первого контроллера через Powershell
Вот за что я люблю процесс установки через PowerShell – так это за его лаконичность 🙂 Позволяет буквально за пару команд, например, быстро развернуть контроллер домена в тестовой среде. И в статье описывать процесс долго не приходится 🙂
Если вы используете вариант операционной системы Server Core, то это один из единственных способов повышения сервера до контроллера домена.
Итак, для повышения сервера до контроллера домена через PowerShell необходимо выполнить следующее:
1. Запустить консоль PowerShell от имени администратора.
2. Запустить следующий командлет для добавления роли контроллера домена (для сервера с GUI):
Add-WindowsFeature AD-Domain-Services -IncludeManagementToolsДля сервера в варианте Server Core запустите следующий командлет:
Add-WindowsFeature AD-Domain-ServicesРазница лишь в том, что для сервера с GUI параметр -IncludeManagementTools установит соответствующие оснастки для управления. Например, Active Directory Users and Computers.
3. Дождитесь окончания процесса установки:

4. Теперь необходимо повысить роль сервера до контроллера домена и создать новый лес (и первый домен в лесу). Для этого выполните следующий командлет PowerShell:
Install-ADDSForest -DomainName itproblog.ru -InstallDNSФункциональный уровень леса и домена автоматически будет установлен в значение “Windows Server 2016” (т.к. операционная система нашего сервер Windows Server 2019). Если вам необходимо указать другое значение, то можете использовать соответствующие параметры – DomainMode и ForestMode. Например:
Install-ADDSForest -DomainName itproblog.ru -InstallDNS -DomainMode Win2012R2 -ForestMode Win2012R25. Укажите пароль для DSRM (своеобразный безопасный режим Active Directory):

6. Далее нужно утвердительно ответить на запрос и том точно ли мы хотим повысить уровень сервера до контроллера домена. Нажмите клавишу Y, а затем Enter.

7. Запуститься процесс повышения сервера до контроллера домена. Сервер будет несколько раз перезагружен. Дождитесь окончания процесса установки.

8. После завершения процесса повышения сервера до контроллера домена вы можете открыть оснастку “Active Directory Users and Computers” и убедиться, что оснастка запускается и отображает информацию об объектах вашего домена успешно.
Установка дополнительного контроллера домена (при необходимости)
Добавление второго контроллера домена не обязательная процедура, но крайне желательная. Второй контроллер домена обеспечивает вам отказоустойчивость. Если что-то случится с один из контроллеров домена, то оставшийся в живых контроллер сможет обрабатывать запросы к Active Directory.
Добавление дополнительного контроллера домена через графический интерфейс
Для добавления еще одного контроллера домена через графический интерфейс необходимо выполнить следующие действия:
1. Запустить Server Manager.
2. В меню сверху выбрать пункты “Manage” – “Add Roles and Features”:
3. Запустится мастер установки ролей и компонентов. На первой странице мастера нажмите кнопку “Next”.
4. На странице выбора сценария установки нужно выбрать пункт “Role-based or feature-based installation” и нажать кнопку “Next”.

5. В появившемся списке серверов выберите необходимый сервер (если он не один) и нажмите кнопку “Next”.
6. В появившемся списке ролей необходимо выбрать “Active Directory Domain Services”.

7. В появившемся диалоговом окне с запросом на установку дополнительных ролей и компонентов нажмите кнопку “Add Features”.
8. В окне мастера установки на шаге выбора ролей нажмите кнопку “Next”.
9. На шаге выбора компонентов нажмите кнопку “Next”.
10. На шаге с описание возможности интеграции с Azure AD нажмите кнопку “Next”.

11. На последнем шаге мастер установки предствит сводку по параметрам установки. Нажмите кнопку “Install”, чтобы начать процесс добавление необходимых для Active Directory компонентов.

12. Дождитесь окончания процесса установки компонентов. По окончанию процесса установки можете закрыть мастер добавления ролей и компонентов.
13. Следующим шагом необходимо повысить роль сервера до контроллера домена. В секции с последними событиями выберите пункт “Promote this server to a domain controller”:

14. У нас уже создан домен Active Directory. Теперь нам нужно добавить дополнительный контроллер домена. Выбираем пункт “Add a domain controller to an existing domain” и в поле “Domain” указываем имя домена, в который будет добавлен дополнительный контроллер.

15. Также необходимо указать учетные данные администратора домена, от имени которого будет выполнена процедура добавления дополнительного контроллера. Для указания учетных данных нажмите кнопку “Change…”.

16. Появится диалоговое окно с указанием учетных данных. Укажите учетные данные администратора домена. Нажмите “ОК”, а затем “Next”.

17. Укажите, что вы планируете установить DNS сервер на дополнительном контроллере и глобальный каталог. Укажите пароль DSRM. Нажимаем “Next”.

18. На странице настройки опций DNS нажмите кнопку “Next”.
19. Отличительный шаг процедуры добавления еще одного контроллера – необходимость указать, откуда делать копию директории в процессе установки роли контроллера Active Directory. Вы можете либо оставить опцию “Any domain controller”, либо выбрать какой-то определенный контроллер (например, как в нашем случае). Выбор контроллера источника для репликации играет важную роль в том случае, если у вас географически распрtделенная инфраструктура, т.е. чтобы при добавлении контроллера в Москве он не побежал за данными на Сахалин. Нажимаем “Next”.

20. На странице с выбором расположений файлов базы данных, транзакционных логов и папки SYSVOL вы можете выбрать иные директории, но, как правило, здесь оставляются значения по умолчанию. Нажмите кнопку “Next”.

21. На странице со сводкой по выбранным параметрам установки нажмите кнопку “Next”.
22. Мастер установки выполнит проверку предварительных требований. Если все проверки завершатся успешно, то будет активна кнопка “Install”. Нажмите её.

23. Запуститься процесс повышения роли сервера до контроллера домена. В процессе повышения сервер несколько раз перезагрузится. Дождитесь окончания процесса.

24. После завершения процесса добавления еще одного контроллера домена вы можете открыть оснастку “Active Directory Users and Computers” и убедиться, что новый контроллер присутствует в списке контроллеров домена в соответствующей OU:

Так же список контроллером домена можно посмотреть через следующий PowerShell комендлет:
(Get-ADForest).Domains | %{ Get-ADDomainController -Filter * -Server $_ | ft HostName,Enabled,Forest}
Добавление дополнительного контроллера домена через PowerShell
Если вы используете вариант операционной системы Server Core, то PowerShell один из единственных способов добавления текущего сервера в качестве контроллера домена в уже существующий домен.
Итак, для повышения сервера до контроллера домена через PowerShell необходимо выполнить следущее:
1. Запустить консоль PowerShell от имени администратора.
2. Запустить следующий командлет для добавления роли контроллера домена (для сервера с GUI):
Add-WindowsFeature AD-Domain-Services -IncludeManagementToolsДля сервера в варианте Server Core запустите следующий командлет:
Add-WindowsFeature AD-Domain-ServicesРазница лишь в том, что для сервера с GUI параметр -IncludeManagementTools установит соответствующие оснастки для управления. Например, Active Directory Users and Computers.
3. Дождитесь окончания процесса установки:

4. Теперь необходимо повысить роль сервера до контроллера домена и создать новый лес (и первый домен в лесу). Для этого выполните следующий командлет PowerShell:
Install-ADDSDomainController -InstallDns -Credential (Get-Credential "ITPROBLOGAdministrator") -DomainName "itproblog.ru" -ReplicationSourceDC sr-dc01.itproblog.ruПараметр InstallDns указывает, что на сервере будет установлена роль сервера DNS. Параметр ReplicationSourceDC указывает с какого из контроллеров домена будет производиться репликация актуальной базы данных Active Directory в процессе установки.
5. Укажите пароль для учетной записи администратора домена.

6. Дважды укажите пароль для DSRM:

7. Далее нужно утвердительно ответить на запрос и том точно ли мы хотим повысить уровень сервера до контроллера домена. Нажмите клавишу Y, а затем Enter.
8. Запуститься процесс повышения сервера до контроллера домена. Сервер будет несколько раз перезагружен. Дождитесь окончания процесса установки.

9. После завершения процесса добавления еще одного контроллера домена вы можете открыть оснастку “Active Directory Users and Computers” и убедиться, что новый контроллер присутствует в списке контроллеров домена в соответствующей OU:

Так же список контроллером домена можно посмотреть через следующий PowerShell комендлет:
(Get-ADForest).Domains | %{ Get-ADDomainController -Filter * -Server $_ | ft HostName,Enabled,Forest}
Первоначальная настройка
После создания леса и домена, а также после добавления одного или нескольких контроллером домена я обычно, как минимум делаю две вещи:
1. Конфигурирую зону (или зоны) обратного просмотра в DNS.
2. Конфигурирую привязки подсетей в настройках топологии сайтов Active Directory.
Настройка DNS зоны обратного просмотра
Зона обратного просмотра необходима для того, чтобы можно было найти имя компьютера по его IP-адресу.
Для настойки зоны обратного просмотра необходимо:
1. Запустить оснастку управления DNS.

2. В контекстном меню узла “Reverse Lookup Zone” выбрать пункт “New zone”.

3. На странице приветствия мастера настройки зоны обратного просмотра нажмите “Next”.
4. На странице выбора типа зоны выберите основной тип зоны (Primary zone) и укажите, что необходимо хранить зону в Active Directory (Store the zone in Active Directory). Нажмите “Next”.

5. Теперь укажем область репликации зоны. Мы будем реплицировать зону на все контроллеры домена в пределах нашего домена. Нажмите “Next”.

6. Мы будем создавать зону обратного просмотра только для протокола IPv4. Нажмите “Next“.

7. Один из ключевых шагов – правильно указать ID вашей подсети. Например, в моем случае базовый адрес сети следующий – 10.10.10.0/24. На соответствующей странице мастера мы указываем адрес сети в прямой последовательности, как показано ниже. Мастер автоматически преобразуем этот адрес в адрес зоны обратного просмотра. Нажмите “Next:.

8. На странице настройки динамического обновления нажмите “Next”.
9. На последней странице мастера нажмите “Finish”.
Привязка подсетей в настройках сайтов Active Directory
Для того, чтобы компьютер или сервер мог определить к какому сайту Active Directory он принадлежит необходимо выполнить настройки подсетей в соответствующей оснастке.
Настройка подсетей – важный шаг, если у вас географически распределенная инфраструктура. При неверном сопоставлении IP-подсетей и сайтов (или отсутствии сопоставления) компьютеры и серверы могут бегать, например, за данными через весь континент, вместо того, что отправить запрос серверу в соседнем кабинете.
С тем, что такой сайты Active Directory можно ознакомиться в документации Microsoft.
Настроим привязку нашей подсети 10.10.10.0/24 к нашему единственному сайту Active Directory:
1. Запустим оснастку “Active Directory Sites and Services”.

2. В контекстном меню узла “Subnets” выберите пункт “New Subnet…”.

3. В появившемся диалоговом окне в поле “Prefix” укажите базовый адрес сети (в нашем случае 10.10.10.0/24) и выберите в какому сайту Active Directory необходимо привязать подсеть (в нашем случае всего один сайт). Нажмите “ОК”.

4. В свойствах конкретного сайта вы можете посмотреть список IP-подсетей, которые к нему привязаны:

Заключение
В этой статье была рассмотрена установка и первоначальная настройка контроллера Active Directory. Мы рассмотрели вариант установки на сервере с графическим интерфейсом, а также вариант установки через комендлеты PowerShell.
Так же мы рассмотрели процедуру добавление контроллера домена в уже существующий домен. Причем на примере сервера с графическим интерфейсов и через командлеты PowerShell.
Мы немного поговорили о терминологии Active Directory.
Последним шагом мы выполнили минимальные первоначальные настройки Active Directory: настроили сопоставление сайтов Active Directory и IP-подсетей, а также настроили зону обратного просмотра.
Надеюсь, статья окажется вам полезна.
In March 2020, systems will stop working if:
-
They are integrated with Active Directory using non-secure LDAP.
-
Domain controller servers do have the latest patches installed.
-
Sysadmins don’t proactively take steps such as the ones we’ve detailed below.
There are numerous existing guides for setting up secure LDAP but none were as thorough, up to date, or user friendly as we’d like for ourselves or our clients so we decided to try to plug the gap by creating this one.
Update 2020/02/12 11:17: According to a couple of Microsoft articles (1, 2), it seems that the decision has been made to push back this default behaviour to “the second half of calendar year 2020”.
Update 2020/03/24 09:41: It seems that Microsoft have decided not to enforce these changes after all. The following is an excerpt from the same Microsoft articles:
“Note that these March 10, 2020 updates and updates in the foreseeable future will not make changes to LDAP signing or LDAP channel binding policies or their registry equivalent on new or existing domain controllers.”
Links to each section:
-
Explanation
-
Identification
-
Resolution
-
Certificate Signing Request (CSR)
-
Certificate
-
Commercial CA
-
Let’s Encrypt
-
Active Directory Certificate Services (AD CS)
-
Self-signed
-
-
Bindings
-
Testing
-
Clients
-
-
Workaround
-
Sign-off
Many systems are integrated via the Lightweight Directory Access Protocol (LDAP) because it allows systems to use a central directory of user and computer details which, in turn, allows systems to be consistent and user-aware and it allows users to access multiple services using the same set of credentials. For example:
-
Users can use their “PC” username and password with their Virtual Private Network (VPN) connections.
-
Secure Email Gateway (SEG) accounts can be automatically created.
-
Multi-Function Printer (MFP) address books can be automatically updated.
-
Firewalls can allow or reject traffic based on group membership.
etc
The problem with LDAP is that, because people tend to follow the path of least resistance, the most common method is Simple Bind which is not encrypted by default so usernames and passwords are moving around the networks just waiting to be intercepted.
On the 13th of August 2019, Microsoft published security advisory ADV190023 and support article 4520412 stating that, in order to resolve these Man-in-the-Middle (MITM) attacks / vulnerabilities such as CVE-2017-8563, they are planning to release a Windows update in March 2020 to enforce the following:
-
Simple Bind LDAP over SSL / TLS (LDAPS).
or
-
Simple Authentication and Security Layer (SASL) LDAP with digital signing requests.
Both of these options require the use of public key authentication via trusted end-entity SSL / TLS certificates.
If steps are not taken then LDAP connections will cease to work as soon as the Windows update is installed.
↑ Back to Index.
The first step is to identify what systems are integrated, if any.
Microsoft Advanced Threat Analytics (ATA) can be used for this purpose but if you don’t have that then continue reading this section.
To quickly determine if domain controller servers are being used as LDAP servers, the following PowerShell commands will retrieve the events (ID 2887) that are logged if this is the case.
$DCs = "<DC #1 hostname>", "<DC #2 hostname>";
ForEach ($DC in $DCs) {
Get-WinEvent -ComputerName $DC -ProviderName Microsoft-Windows-ActiveDirectory_DomainService | Where-Object { $_.Id -Eq 2887 } | Format-List;
}
If events are found and you require more, identifying information such as the client IP address, the username, etc, running the following PowerShell command or manually creating the registry value on each DC will cause the LDAP service to log more useful information in the events (ID 2889):
New-ItemProperty -Path "HKLM:SystemCurrentControlSetServicesNTDSDiagnostics" -Name "16 LDAP Interface Events" -PropertyType DWORD -Value 2 -Force
-
Hive and key path:
HKEY_LOCAL_MACHINESystemCurrentControlSetServicesNTDSDiagnostics
-
Value type:
DWORD (32-bit) Value/REG_DWORD -
Value name:
16 LDAP Interface Events -
Value data:
2(decimal)
Once that is in place, you can use the following PowerShell commands to extract the identifying information too:
$DCs = "<DC #1 hostname>", "<DC #2 hostname>";
ForEach ($DC in $DCs) {
Get-WinEvent -ComputerName $DC -ProviderName Microsoft-Windows-ActiveDirectory_DomainService | Where-Object { $_.Id -Eq 2887 -Or $_.Id -Eq 2889 } | Format-List;
}
Alternatively, on each DC, you can open Event Viewer and view the log Applications and Services Logs → Directory Service.
Now that you’ve identified which systems need to be reconfigured, it’s time to resolve the problem.
This section is only relevant if you’re not planning to use Let’s Encrypt or Active Directory Certificate Services (AD CS). If you’re not sure, skip ahead to the section “Certificate” then come back.
The first step is to generate the CSR.
As stated by Microsoft and confirmed by us, in this particular scenario, the Fully-Qualified Domain Name (FQDN) of the DC must be present in one of the following two places in the certificate:
-
The Common Name (CN) in the Subject field. We will be covering this option.
-
A DNS entry in the Subject Alternative Name (SAN) extension.
Customise the following content (particularly, the line starting with Subject) then save it as a text-based file named something like ldapcert.inf.
[Version] Signature="$Windows NT$ [NewRequest] Subject = "CN=DC01.example.local,O=Astrix Example,OU=IT,ST=RCT,L=Abercynon,C=GB" ; Replace the example between the quotation marks with the Fully-Qualified Domain Name (FQDN) of your domain controller computer account and, optionally, your organisation's information. KeySpec = 1 KeyLength = 2048 ; This can be 1024, 2048, 4096, 8192, or 16384. Larger key sizes are more secure, but have a greater impact on performance. Exportable = TRUE MachineKeySet = TRUE SMIME = False PrivateKeyArchive = FALSE UserProtected = FALSE UseExistingKeySet = FALSE ProviderName = "Microsoft RSA SChannel Cryptographic Provider" ProviderType = 12 RequestType = PKCS10 KeyUsage = 0xa0 [EnhancedKeyUsageExtension] OID=1.3.6.1.5.5.7.3.1 ; This denotes Server Authentication.
Once you have that file, run the following command:
certreq -new <path to input information file> <path to output CSR file>
certreq -new "C:UsersAdministratorDesktopldapcert.inf" "C:UsersAdministratorDesktopldapcert.csr"
If you’ve done this correctly, the output file will start with -----BEGIN NEW CERTIFICATE REQUEST----- and end with -----END NEW CERTIFICATE REQUEST-----.
The next step is to submit the CSR to a Certificate Authority (CA) to get an end-entity SSL / TLS certificate issued and installed. If a public CA is used, only a basic, Domain-Validated (DV) one is required.
Because of the DC FQDN requirement, your choice of CA depends entirely on whether your AD DNS domain name uses a valid Internet Top-Level Domain (TLD) or not. A full list of valid Internet TLDs is available on Wikipedia but here’s a quick summary of the common ones to give you an idea:
| Invalid TLD examples | Valid TLD examples |
| .local | .co.uk |
| .internal | .com |
| .corp | .org |
| .lan | .net |
| .localhost | .edu |
We have summarised the various pros and cons of the most common CAs below and linked each heading to the respective section:
DCs are usually the most valuable assets in the IT infrastructure so they should be hardened to reduce the attack surface by:
1. Installing as few applications as possible.
2. Not forwarding traffic to it from the Internet. This may be acceptable if Let’s Encrypt published a list of public IP addresses that they use for the DV process so that the firewall rule can be restricted but they confirmed in their FAQs that they do not.
In any case, the submission and issuance process is quite different depending on which CA you chose so we will cover each of these below.
For demonstration purposes, we will be using a Comodo PositiveSSL Certificate via CheapSSLSecurity with domain validation via DNS.
First, submit the CSR text to your chosen commercial CA and choose a domain validation option.
Second, complete the CA’s domain validation process, wait for the certificate to be issued, and download the certificate package.
Third, if required, install any intermediate or root CA certificates to the Local Machine’s store Intermediate Certification Authorities or Trusted Root Certification Authorities. This can be done by opening the missing CA certificate’s properties and selecting Install Certificate…, as demonstrated below.
Installing the certificate for the intermediate CA “Sectigo RSA Domain Validation Secure Server CA” to complete the chain of trust for the end-entity certificate.
Fourth, run the following command to install the certificate:
certreq -accept <path to CRT file>
First, install an ACME Client. For demonstration purposes, we will be using Certify SSL Manager and authorization / domain validation via DNS.
Second, open Certify SSL Manager and:
-
As prompted, register a contact email address. This will be used to notify you of upcoming certificate expiries / renewals, etc.
-
Add a new certificate and:
-
In the section
Certificate Domains, add the FQDN of the DC. For example,DC01.ad.example.astrix.co.uk. -
In the section
Authorization, set the following:-
Challenge type:
dns-01 -
DNS Update Method:
(Update DNS Manually)
-
-
Save the changes.
-
-
Select the button
Request a certificate. -
As prompted, create the DNS TXT Resource Record (RR) in the domain’s authoritative name servers.
-
Select the button
Request a certificateagain to continue.
The certificate should now be issued and installed.
First, install Active Directory Certificate Services (AD CS) by doing the following:
-
Open Server Manager.
-
Select
Dashboard→Add roles and features. -
In the section
Before You Begin, simply select the buttonNext >. -
In the section
Installation Type, keep the radio buttonRole-based or feature-based installationenabled and select the buttonNext >. -
In the section
Server Selection, choose the server that you wish to be the root CA and select the buttonNext >. -
In the section
Server Roles, tickActive Directory Certificate Services, select the buttonAdd Features, and select the buttonNext >. -
In the section
Features, simply select the buttonNext >. -
In the section
AD CS, ensure that you’re happy with the server’s hostname because it cannot be changed then select the buttonNext >. -
In the section
Role Services, simply select the buttonNext >. -
In the section
Confirmation, simply select the buttonInstall.
Second, configure AD CS by doing the following:
-
Open Server Manager.
-
Select the flag and warning symbol then the link
Configure Active Directory Certificate Services on the destination server. -
In the section
Credentials, assuming you’re signed in as an administrator, simply select the buttonNext >. -
In the section
Role Services, check the tickboxCertification Authoritythen select the buttonNext >. -
In the section
Setup Type, choose your preferred CA type then select the buttonNext >. -
In the section
CA Type, select the radio buttonRoot CAthen select the buttonNext >. -
In the section
Private Key, select the radio buttonCreate a new private keythen select the buttonNext >. -
In the section
Cryptography, select the following then select the buttonNext >:-
Cryptographic provider:
RSA#Microsoft Software Key Storage Provider -
Key length:
2048(at least) or4096(recommended) -
Hash algorithm:
SHA256(at least)
-
-
In the section
CA Name, change the defaults to the following then select the buttonNext >:-
Common name for this CA: This must be the same as the server’s FQDN.
DC01.example.local, for example. -
Distinguished name suffix: Blank.
-
Preview of distinguished name: This should automatically be
CN=<server’s FQDN>.
-
-
In the section
Validity Period, simply select the buttonNext >. -
In the section
Certificate Database, simply select the buttonNext >. -
In the section
Confirmation, simply select the buttonConfigure. -
In the section
Results, simply select the buttonClose.
Third, run the following command and make a note of the value after Unique container name for the new certificate.
Fourth, open Explorer and do the following:
-
Browse to
C:ProgramDataMicrosoftCryptoKeys. -
View the properties of the file named
<unique container name>. -
Select the tab
Securitythen select the buttonEdit…. -
Select the button
Add…, enterNetwork Service, select the buttonCheck Names, then select the buttonOK.
This should add the security principalNETWORK SERVICEwith allow permissionsRead & executeandRead. -
Close all windows applying changes.
In cases such as this (“inter-component authentication”, as McAfee describes it here), using a self-signed certificate is better than nothing but whether it can be considered as “secure” or “safe” is a debate for another time…
First, install OpenSSL.
Second, create a text-based file named something like v3ext.txt with the following content:
keyUsage=digitalSignature,keyEncipherment extendedKeyUsage=serverAuth subjectKeyIdentifier=hash
Third, run the following PowerShell commands. Only the OpenSSL path needs to be customised. When prompted, ensure that you use a strong passphrase for the CA’s private keyfile.
& "<path>openssl.exe" genrsa -aes256 -out ca_private.key 4096; & "<path>openssl.exe" req -new -x509 -days 3650 -key ca_private.key -out ca_public.crt; Import-Certificate -FilePath ca_public.crt -CertStoreLocation Cert:LocalMachineRoot; & "<path>openssl.exe" x509 -req -days 365 -in ldapcert.csr -CA ca_public.crt -CAkey ca_private.key -extfile v3ext.txt -set_serial 01 -out ldapcert.crt; & "<path>openssl.exe" x509 -in ldapcert.crt -text; certreq -accept ldapcert.crt
Once the certificate has been installed, the DC server’s bindings need to be updated.
This can be done by simply rebooting the DC server or, alternatively, by doing the following two steps.
First, create a text-based file named something like ldap-renewservercert.txt with the following content:
 dn:
 changetype: modify
 add: renewServerCertificate
 renewServerCertificate: 1
 -
Second, run the following command:
ldifde -i -f ldap-renewservercert.txt
That’s it!
↑ Back to Index.
Once everything has been set up, it’s a good idea to test that it’s all actually working as required.
To do this, you can use tools such as ldp.exe (available on DC servers and as part of the AD DS management tools) or LDAP Admin. We will be using the latter on a PC so as to test external connections.
If the following configurations connect successfully then you should be good to go:
-
Host: FQDN of DC server. For example,
DC01.ad.example.astrix.co.uk. This is so that there are no name mismatches when validating the certificate. -
Security:
Simple authenticationwith:-
SSL( / TLS) on port636 -
TLSon port389or
-
SASLon port389
-
The final step is to actually reconfigure the clients to use one of the following connection methods:
-
Simple Bind LDAP using SSL / TLS (usually on port 636) or StartTLS (usually on port 389).
or
-
Simple Authentication and Security Layer (SASL) LDAP with digital signing requests.
Using a Sophos XG UTM / NGFW and an AD CS-issued certificate as an example, we can see that, by default, it can connect to the LDAP / DC server with SSL / TLS or StartTLS encryption enabled but not when certificate validation is enabled because it doesn’t trust the CA.
So, to install the CA certificate, do the following:
-
On the AD CS CA server:
-
Open
certmgr.msc. -
Expand the folder
Trusted Root Certification Authorities→ select the folderCertificates. -
Right-click on your CA certificate (it will be issued to and by the server’s FQDN) → hover over
All Tasks→ selectExport…. -
Select the button
Next→ ensure that the radio buttonDER encoded binary X.509 (.CER)is selected → select the buttonNext→ enter a path and file name to save the certificate as → select the buttonNext→ select the buttonFinish.
-
-
On the Sophos XG:
-
In the group
SYSTEM, select the tabCertificates→ select the tabCertificate authorities→ select the buttonAdd. -
Enter the following information:
-
Name: A descriptive name that will be displayed in the list. The subject (including the FQDN) will be automatically listed alongside it.
Astrix Example AD CS Root CAfor example. -
Certificate file format:
DER -
Certificate: The
CERfile exported as part of 1.4.
-
-
Select the button
Save.
-
Now that the chain of trust is complete, the device can validate the LDAPS certificate.
We do not recommend working around this problem but if you legitimately have a reason that you cannot use one of the above options then you can do so in one of two ways.
LDAP server Channel Binding can be disabled by running the following command or manually creating the following registry value:
New-ItemProperty -Path "HKLM:SystemCurrentControlSetServicesNTDSParameters" -Name "LdapEnforceChannelBinding" -PropertyType DWORD -Value 0 -Force
-
Hive and key path:
HKEY_LOCAL_MACHINESystemCurrentControlSetServicesNTDSParameters
-
Value type:
DWORD (32-bit) Value/REG_DWORD -
Value name:
LdapEnforceChannelBinding -
Value data:
0(decimal). This indicates «disabled” – No channel binding validation is performed. This is the behavior of all servers that have not been updated.
LDAP server signing can be disabled by setting the following policy:
-
Location:
Computer Configuration→Policies→Windows Settings→Security Settings→Local Policies→Security Options -
Policy name:
Domain controller: LDAP server signing requirements -
Policy setting:
None
We sincerely hope that this has been useful.
Feel free to subscribe to our newsletter to be automatically notified of future posts.
Until next time! 😊
Download PC Repair Tool to quickly find & fix Windows errors automatically
LDAP signing is an authentication method in Windows Server that can improve the security of a directory server. Once enabled, it will reject any request that doesn’t ask for signing or if the request is using non-SSL/TLS-encrypted. In this post, we will share how you can enable LDAP signing in Windows Server and client machines. LDAP stands for Lightweight Directory Access Protocol (LDAP).
To make sure that the attacker doesn’t use a forged LDAP client to change server configuration and data, it is essential to enabling LDAP signing. It is equally important to enable it on the client machines.
- Set the server LDAP signing requirement
- Set the client LDAP signing requirement by using Local computer policy
- Set the client LDAP signing requirement by using the Domain Group Policy Object
- Set the client LDAP signing requirement by using Registry keys
- How to verify configuration changes
- How to find clients that do not use the “Require signing” option
The last section helps you to figure out clients that do not have Require signing enabled on the computer. It is a useful tool for IT admins to isolate those computers, and enable the security settings on the computers.
1] Set the server LDAP signing requirement

- Open Microsoft Management Console (mmc.exe)
- Select File > Add/Remove Snap-in > select Group Policy Object Editor, and then select Add.
- It will open the Group Policy Wizard. Click on the Browse button, and select Default Domain Policy instead of Local Computer
- Click on the OK button, and then on the Finish button, and close it.
- Select Default Domain Policy > Computer Configuration > Windows Settings > Security Settings > Local Policies, and then select Security Options.
- Right-click Domain controller: LDAP server signing requirements, and then select Properties.
- In the Domain controller: LDAP server signing requirements Properties dialog box, enable Define this policy setting, select Require signing in the Define this policy setting list, and then select OK.
- Recheck the settings and apply them.
2] Set the client LDAP signing requirement by using local computer policy

- Open Run prompt, and type gpedit.msc, and press the Enter key.
- In the group policy editor, navigate to Local Computer Policy > Computer Configuration > Policies > Windows Settings > Security Settings > Local Policies, and then select Security Options.
- Right-click on Network security: LDAP client signing requirements, and then select Properties.
- In the Network security: LDAP client signing requirements Properties dialog box, select Require signing in the list and then choose OK.
- Confirm changes and apply them.
3] Set the client LDAP signing requirement by using a domain Group Policy Object
- Open Microsoft Management Console (mmc.exe)
- Select File > Add/Remove Snap-in > select Group Policy Object Editor, and then select Add.
- It will open the Group Policy Wizard. Click on the Browse button, and select Default Domain Policy instead of Local Computer
- Click on the OK button, and then on the Finish button, and close it.
- Select Default Domain Policy > Computer Configuration > Windows Settings > Security Settings > Local Policies, and then select Security Options.
- In the Network security: LDAP client signing requirements Properties dialog box, select Require signing in the list and then choose OK.
- Confirm changes and apply the settings.
4] Set the client LDAP signing requirement by using registry keys
The first and foremost thing to do is take a backup of your registry
- Open Registry Editor
- Navigate to HKEY_LOCAL_MACHINE SYSTEM CurrentControlSet Services <InstanceName> Parameters
- Right-click on the right pane, and create a new DWORD with name LDAPServerIntegrity
- Leave it to its default value.
<InstanceName>: Name of the AD LDS instance that you want to change.
5] How to verify if configuration changes now require sign-in
To make sure the security policy is working here is how to check its integrity.
- Sign in to a computer that has the AD DS Admin Tools installed.
- Open Run prompt, and type ldp.exe, and press the Enter key. It is a UI used for navigating through the Active Directory namespace
- Select Connection > Connect.
- In Server and Port, type the server name and the non-SSL/TLS port of your directory server, and then select OK.
- After a connection is established, select Connection > Bind.
- Under Bind type, select Simple bind.
- Type the user name and password, and then select OK.
If you receive an error message saying Ldap_simple_bind_s() failed: Strong Authentication Required, then you have successfully configured your directory server.
6] How to find clients that do not use the “Require signing” option
Every time a client machine connects to the server using an insecure connection protocol, it generates Event ID 2889. The log entry will also contain the IP addresses of the clients. You will need to enable this by setting the 16 LDAP Interface Events diagnostic setting to 2 (Basic). Learn how to configure AD and LDS diagnostic event logging here at Microsoft.
LDAP Signing is crucial, and I hope the was able to help you clearly understand how you can enable LDAP signing in Windows Server, and on the client machines.

Ashish is a veteran Windows and Xbox user who excels in writing tips, tricks, and features on it to improve your day-to-day experience with your devices. He has been a Microsoft MVP (2008-2010).