В этой статье мы рассмотрим самые базовые настройки Windows Server 2022 — это Active Directory, DNS, DHCP, настройки терминальных лицензий, добавление пользователей… Эти настройки являются не обязательными, но как правило применяются как базовые для большинства задач.
— Скачать бесплатно дистрибутив Windows Server 2022 Standard и Datacenter можете в нашем каталоге.
— Пошаговая инструкция по установке Windows Server 2022 в нашей прошлой статье.
— Приобрести ключи активации для Windows Server 2022 Standard и Datacenter можете так же в нашем каталоге.
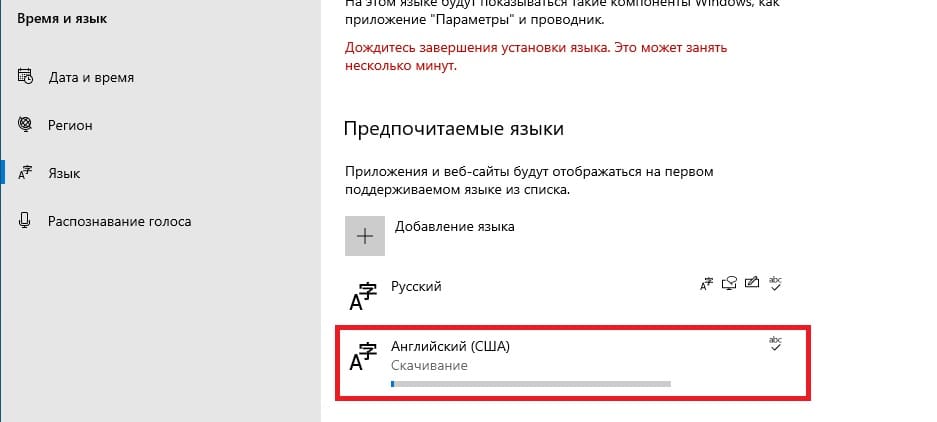
1) При установке Windows Server 2022 например на русском языке, добавляется по умолчанию только одна раскладка клавиатуры — «Русский язык», для настроек нам необходима еще английская раскладка клавиатуры. Добавим ее.
Заходим в меню «Пуск» => Параметры => Время и язык.
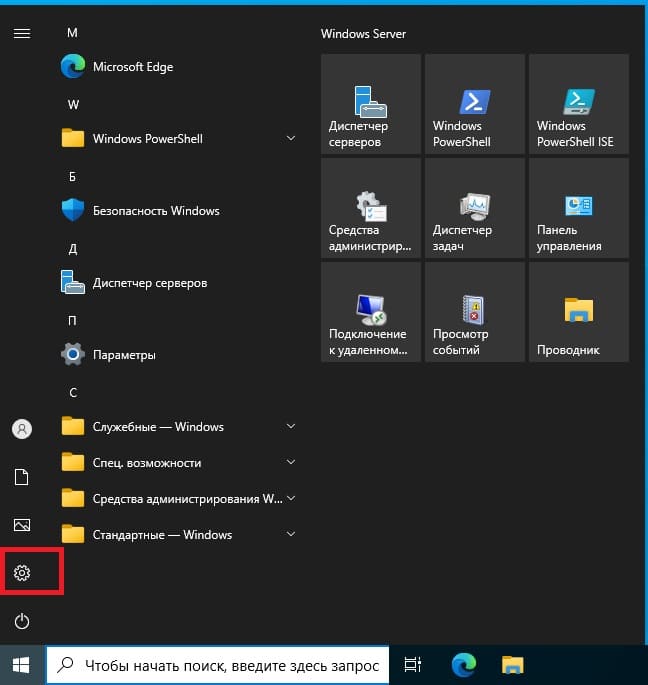
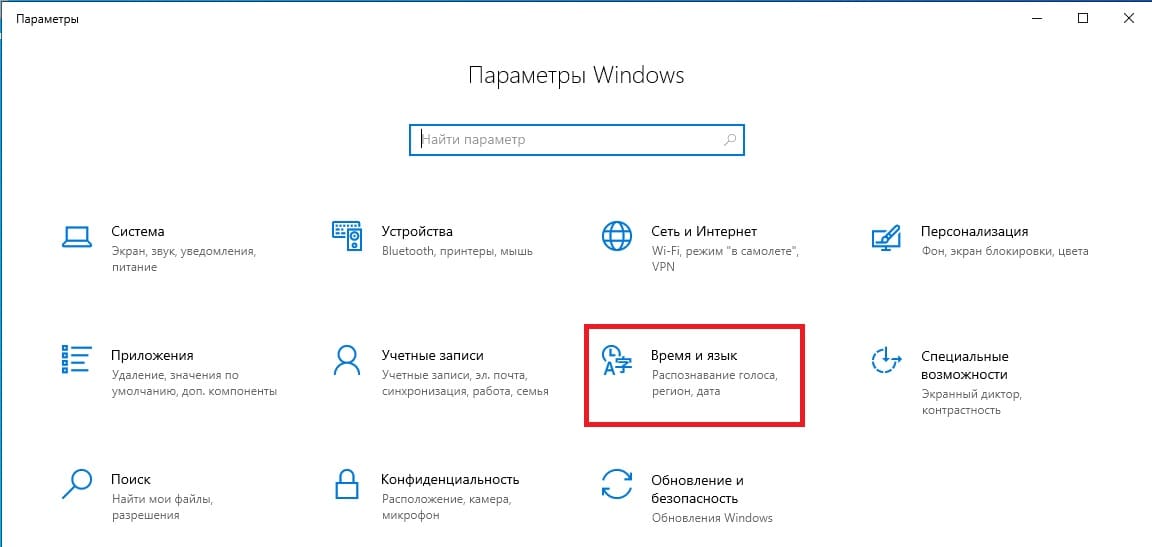
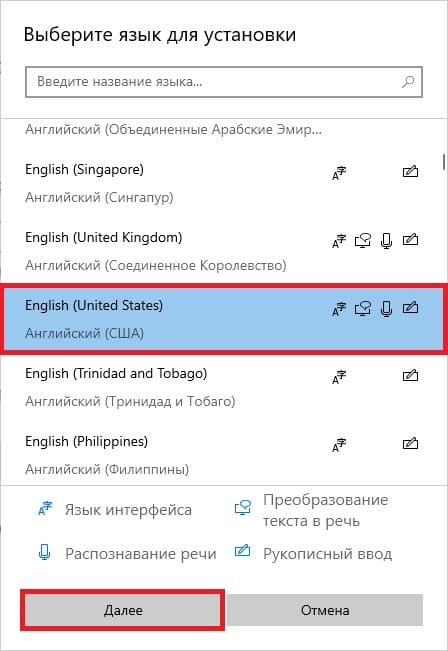
Во вкладке «Язык» нажимаем на «Добавление языка».

Выбираем «Английский» => Далее.
Можем оставить все галки, кроме назначения языком интерфейса и нажимаем «Установить».
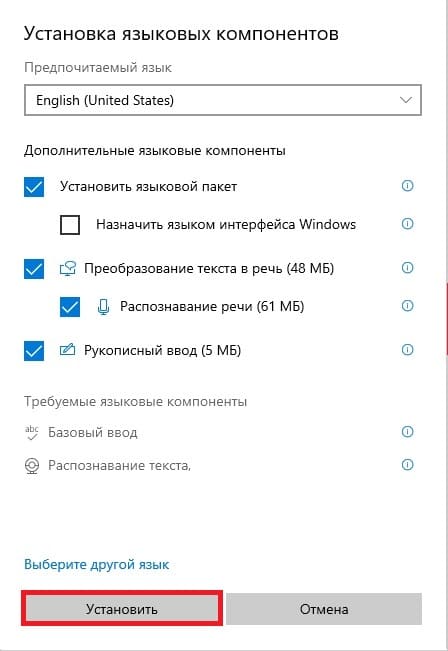
Теперь дожидаемся установки языкового пакета, после установки можете перезагрузить сервер и у Вас появится возможность переключения языка раскладки на английский язык.
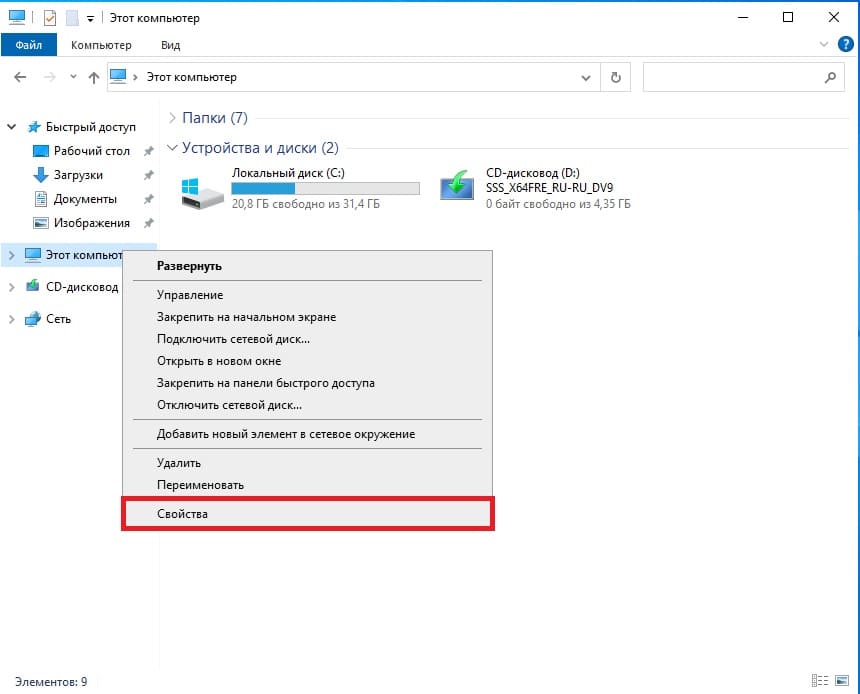
2) Следующим шагом, нам нужно задать имя серверу для более простого подключения к нему. Заходим в проводник => Слева «Этот компьютер» => Свойства.
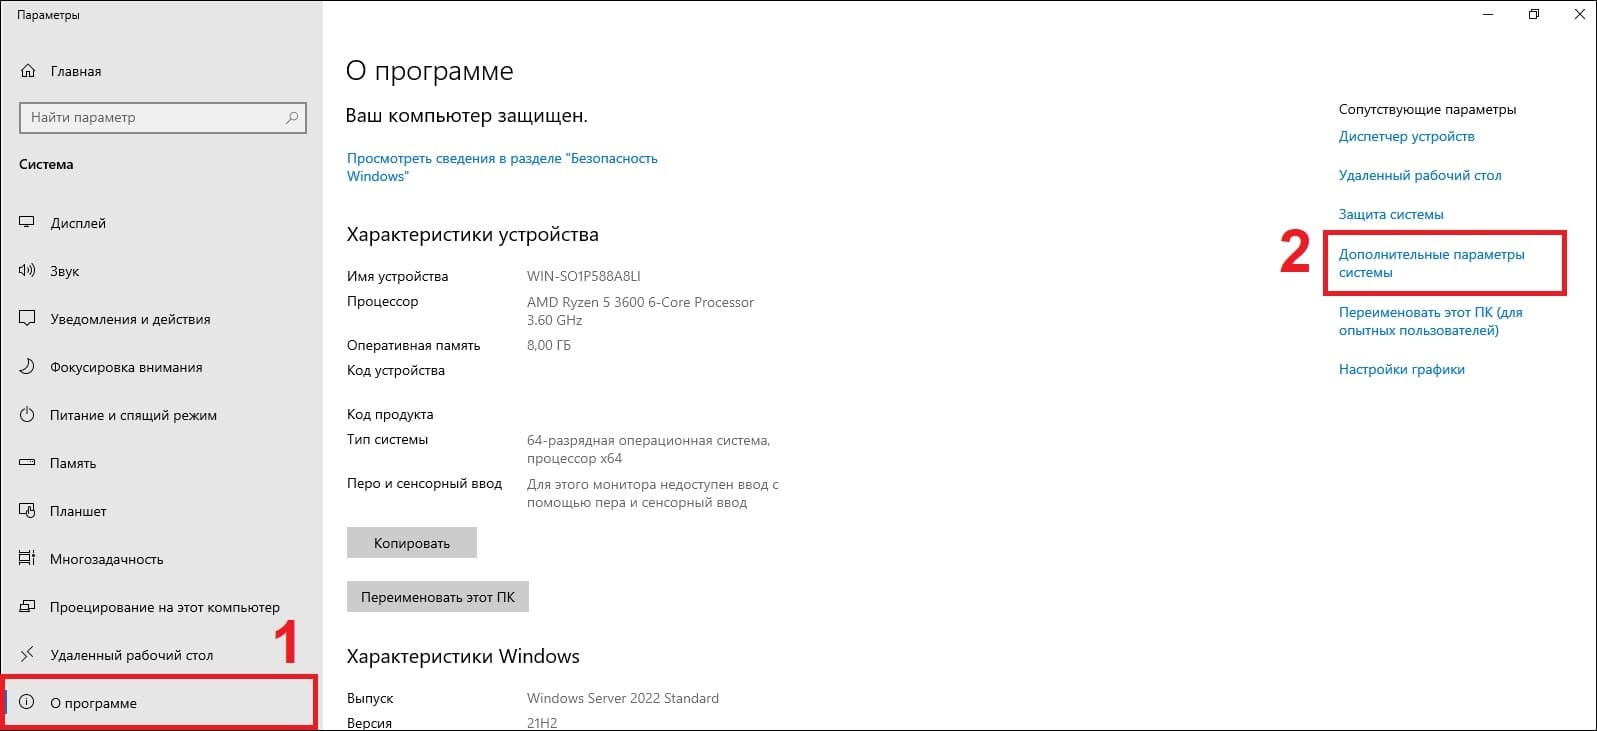
В меню «О программе» нажимаем «Дополнительные параметры системы».
В новом окне выбираем вкладку «Имя компьютера» => Изменить.
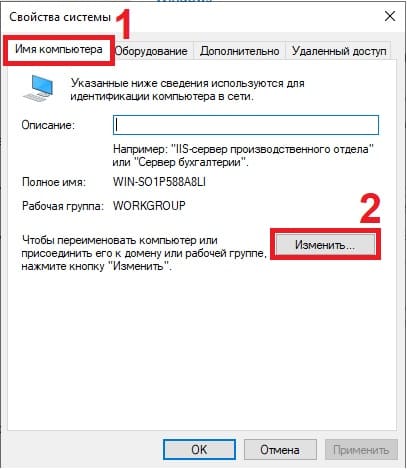
Задаем имя компьютера, имя может быть любое. Рекомендуем не использовать кириллицу, а только латиницу и цифры.
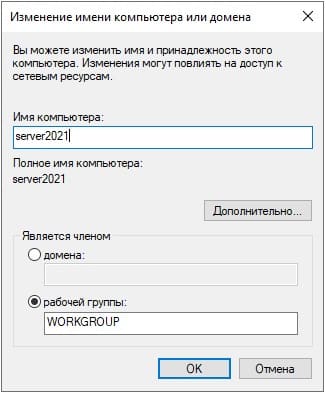
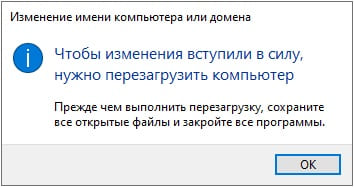
Для применения настроек — перезагружаем сервер.
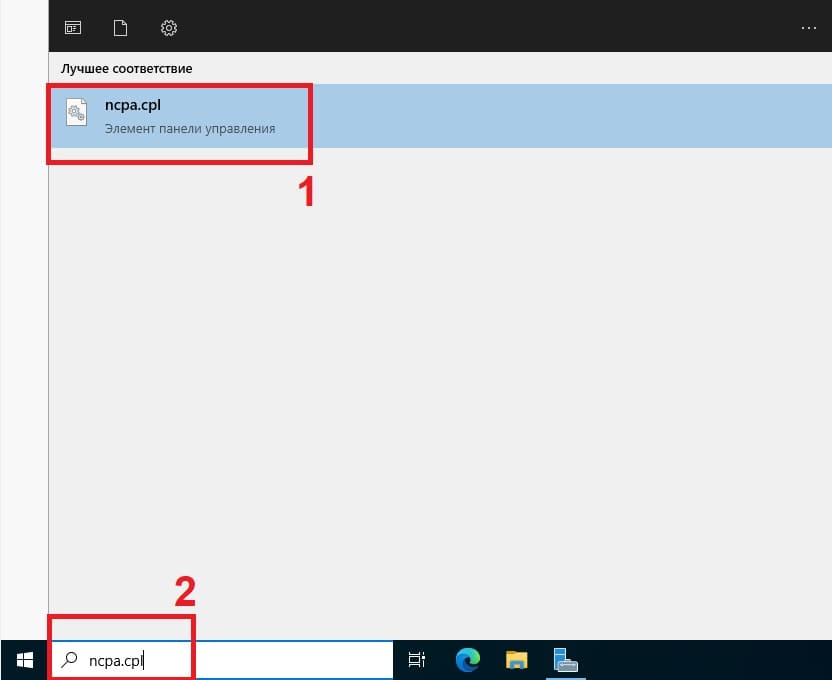
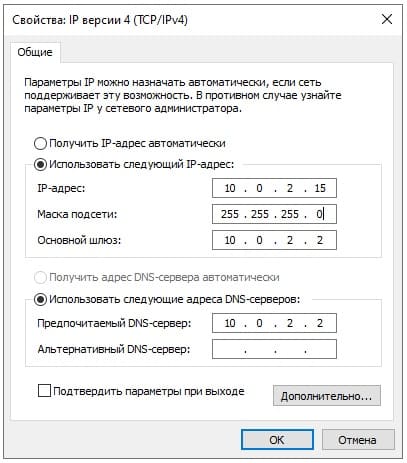
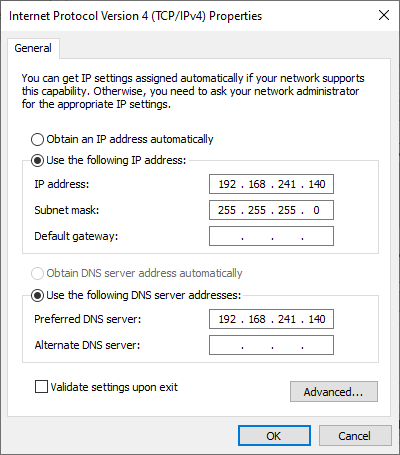
3) Далее, зададим локальный статический IP адрес сервера. Это так же необходимо для бесперебойного подключения к нему. (мы рекомендуем помимо всего использовать так же статический публичный IP для корректного подключения к нему из внешней сети интернет). Так же, данная настройка обязательна для последующей настройки DHCP сервера.
В поиск вводим ncpa.cpl
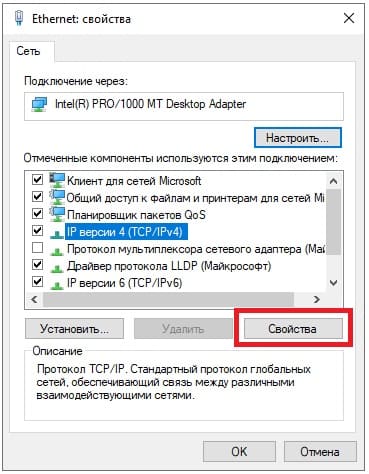
Правой кнопкой мыши на сетевую карточку => Свойства.
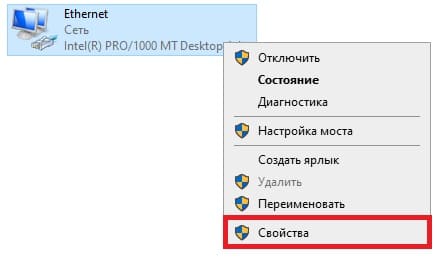
Мы будем настраивать Ipv4, выделяем его курсором и нажимаем «Свойства».
Задаем настройки IP Вашей сети. Внимание! На скриншоте ниже — это пример, у вас должны быть Ваши собственные настройки под Вашу сеть.
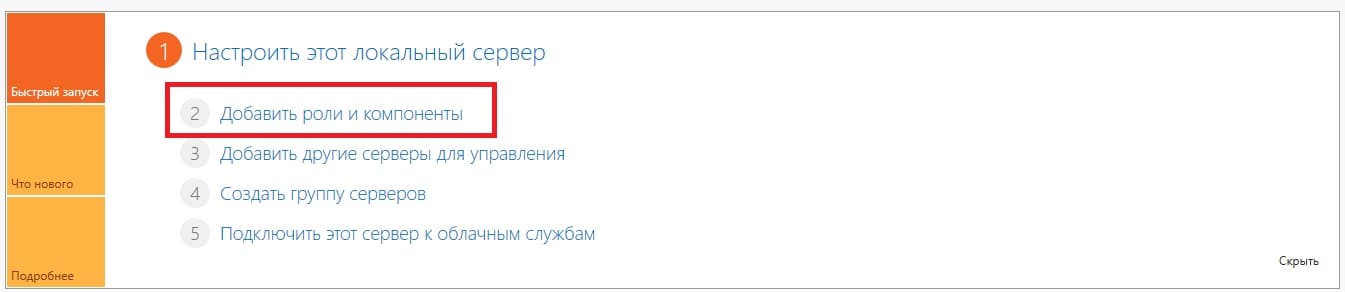
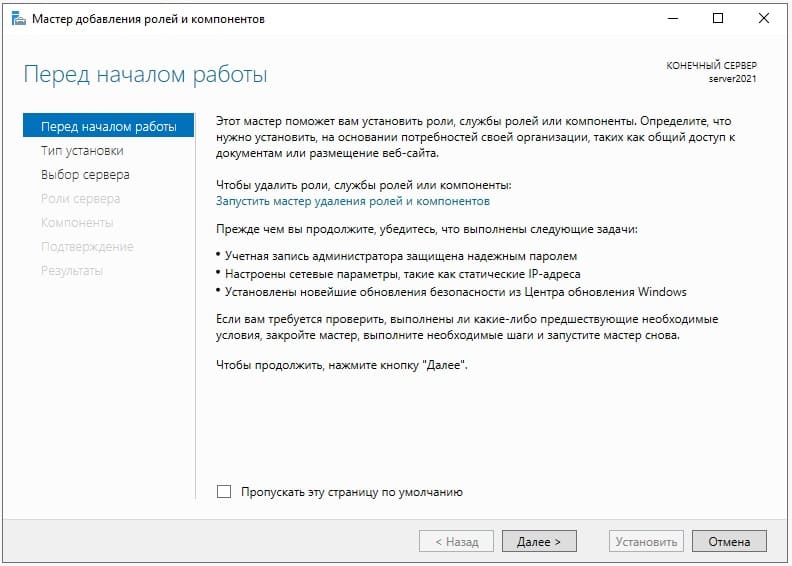
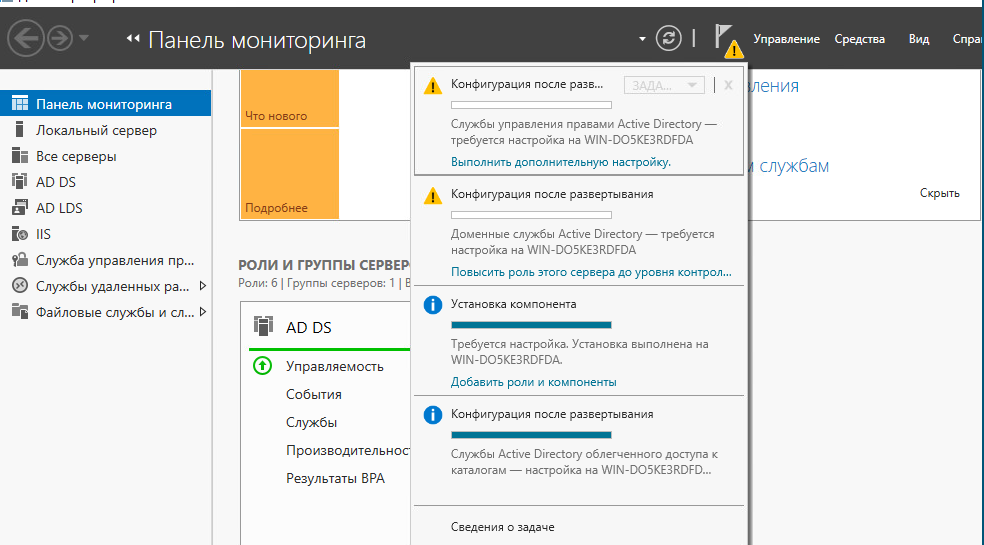
3) Теперь переходим к добавлению ролей и компонентов в Active Directory (Диспетчере серверов).
Нажимаем меню «Пуск» => Диспетчер серверов.
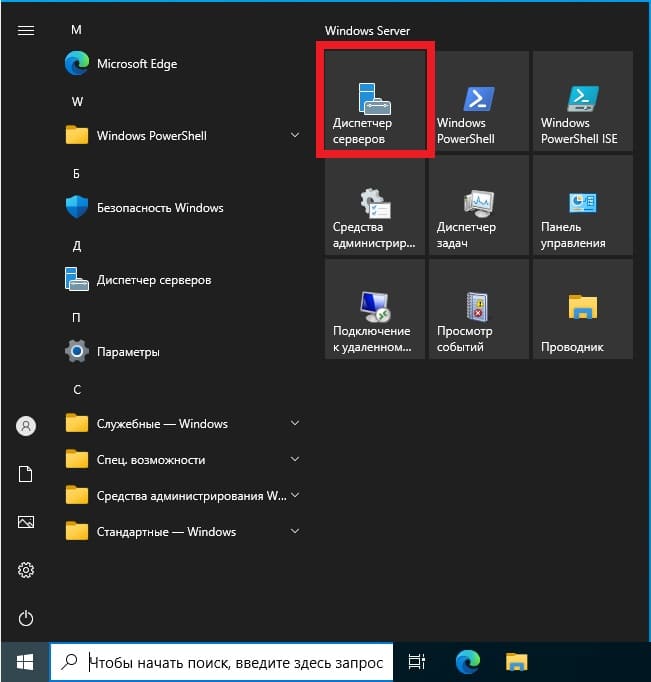
Добавить роли и компоненты.
В следующем окне просто нажимаем «Далее».
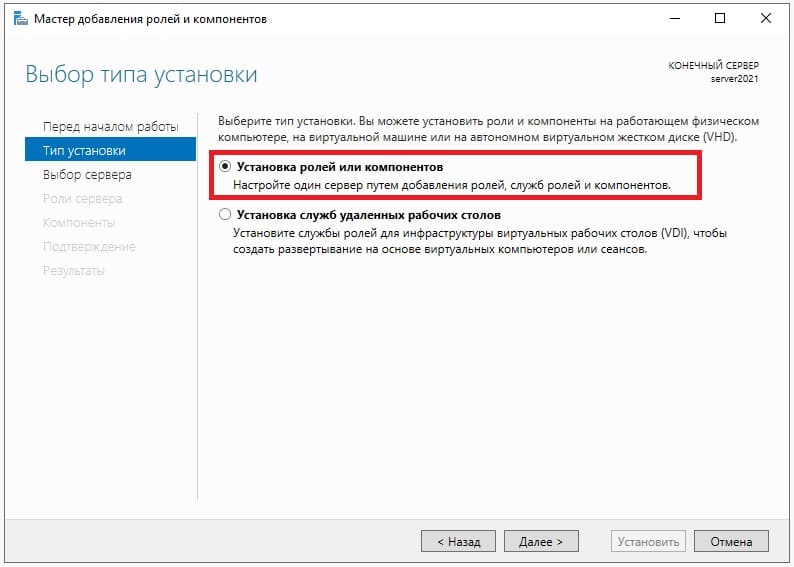
В меню «Тип установки» выбираем пункт => Установка ролей и компонентов.
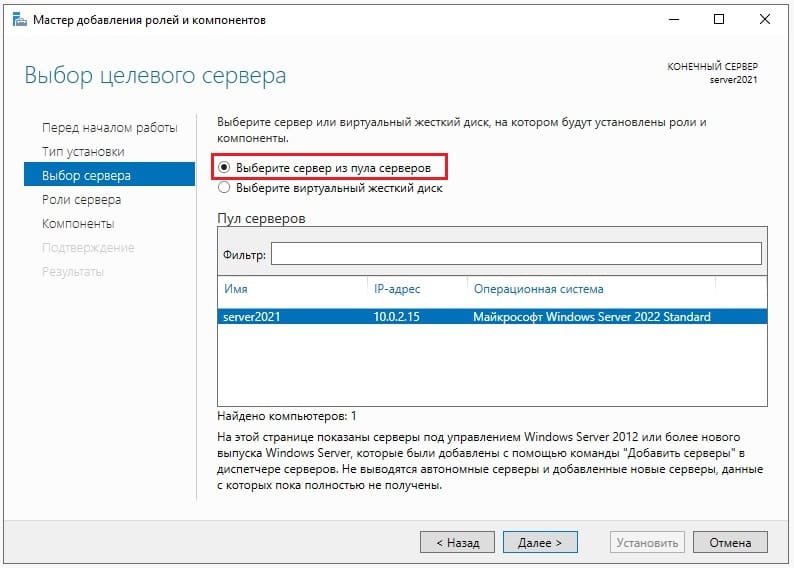
Далее «Выбираем сервер из пула». Он у нас должен быть один.
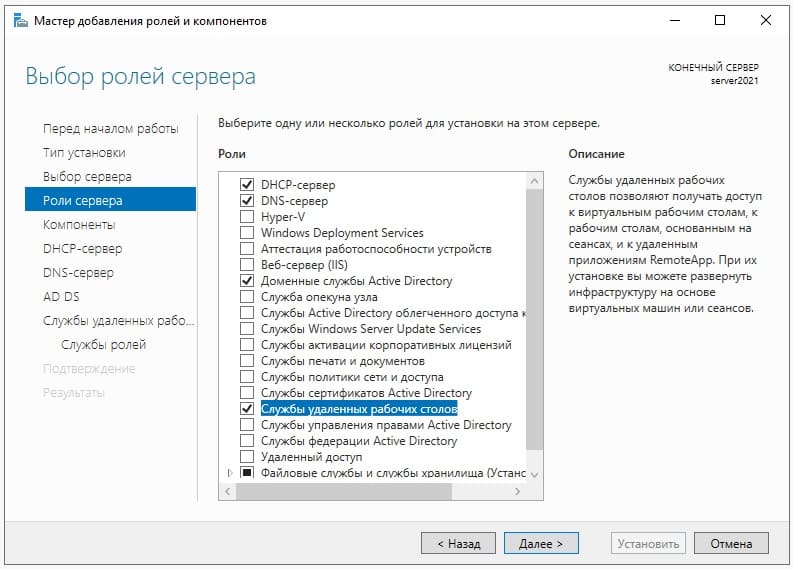
Далее, выбираем нужные Вам роли (функионал сервера), в случае чего, вы всегда сможете добавить что-либо еще, если что-то понадобится дополнительное.
Мы выберем на примере DHCP-сервер, DNS-сервер (Внимание! DNS (домен) не всегда нужен под рабочие задачи, убедитесь, что он нужен именно Вам, прежде чем его выбирать для установки. Мы его устанавливаем лишь для примера.), Доменные службы и Службы для удаленных рабочих столов (для подключения к серверу по RDP).
После выбора нужных служб идем далее.
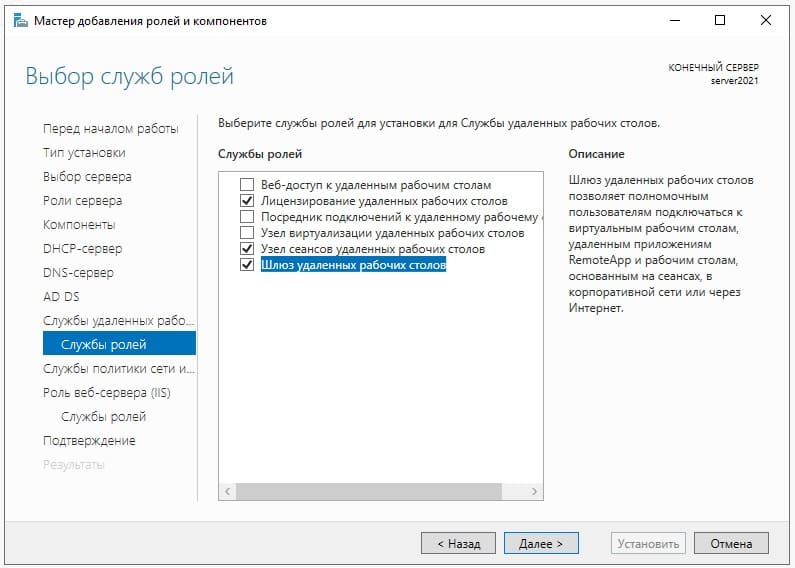
Далее, пролистываем до меню «Службы ролей» в подпункт «Службы удаленных рабочих столов» и выбираем здесь пункты «Лицензирование удаленных рабочих столов», «Узел сеансов удаленных рабочих столов» и «Шлюз удаленных рабочих столов».
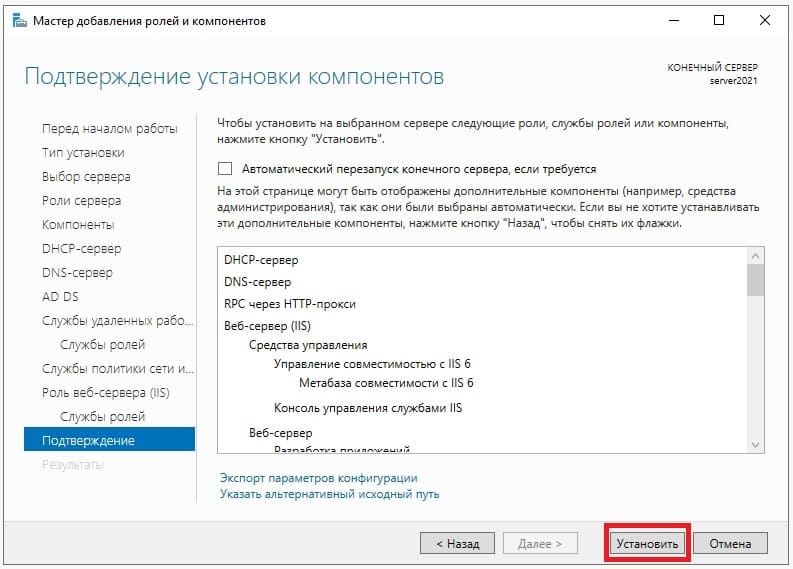
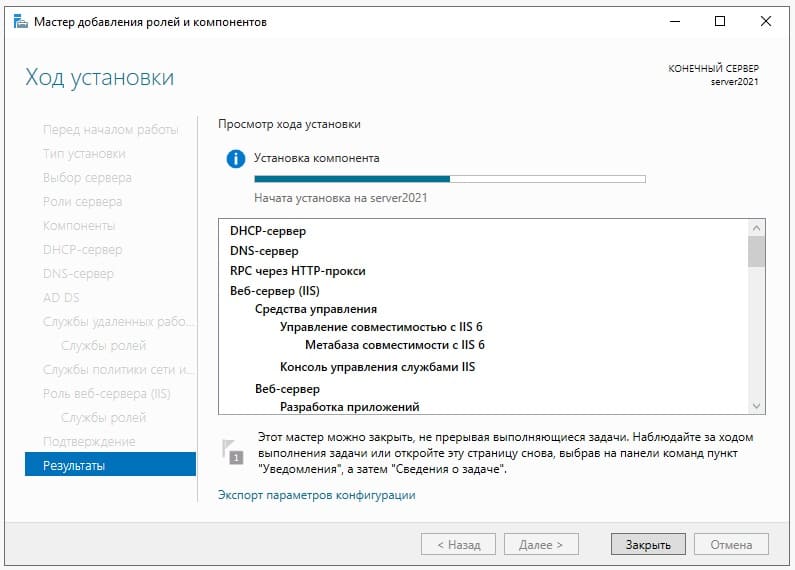
Пролистываем до конца в меню «Подтверждение», нажимаем «Установить» и дожидаемся установки служб.
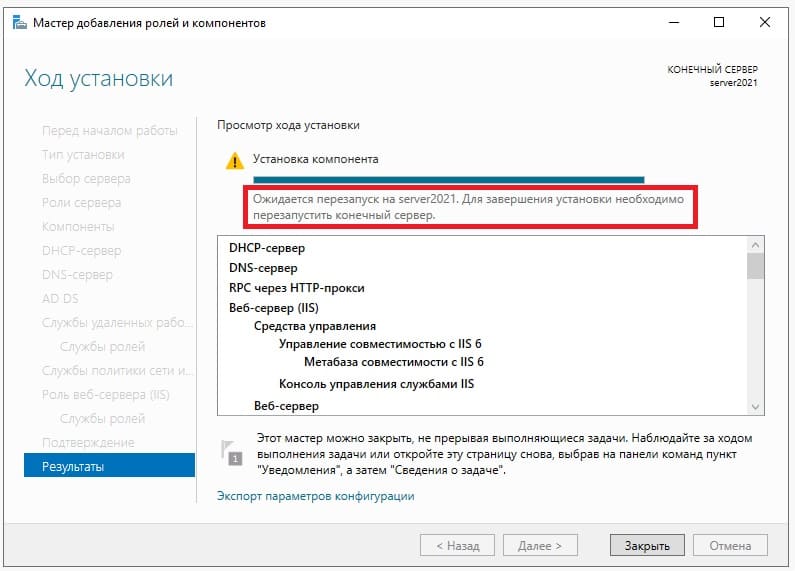
После перезагрузите сервер для применения настроек.
4) После перезагрузки заходим в меню Active Directory (Диспетчер серверов) и перейдем в настройки доменных служб (DNS), если вы не выбирали данную службу, то пропустите этот пункт настройки.
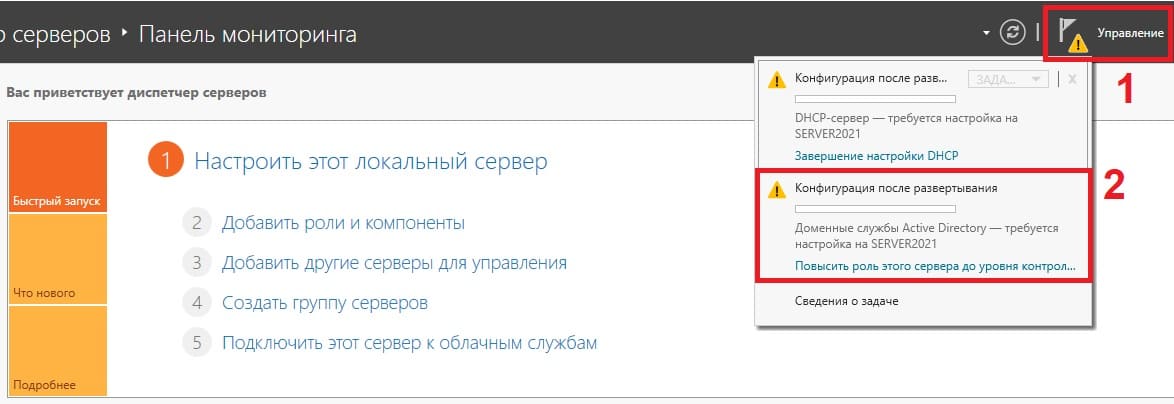
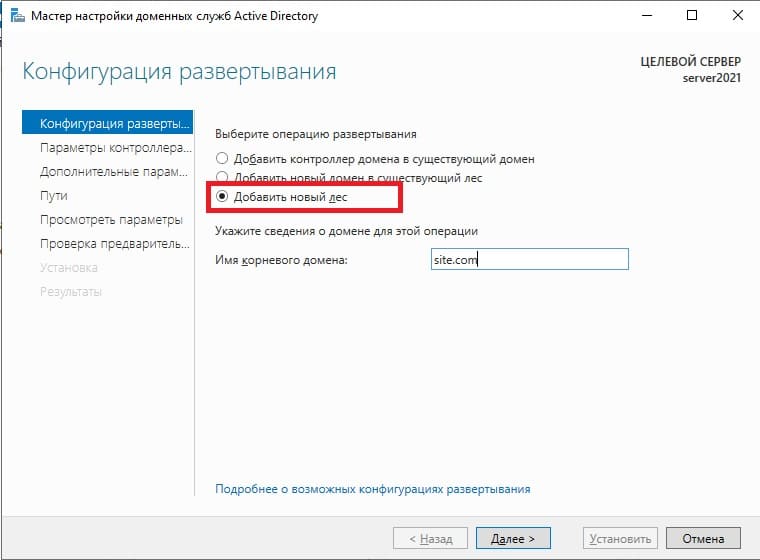
Выбираем пункт «Добавить новый лес» => и задаем имя для домена, он может быть любым, например названием вашей компании, или название вашего сайта. Настоятельно рекомендуем задавать только на латинице (или цифры).
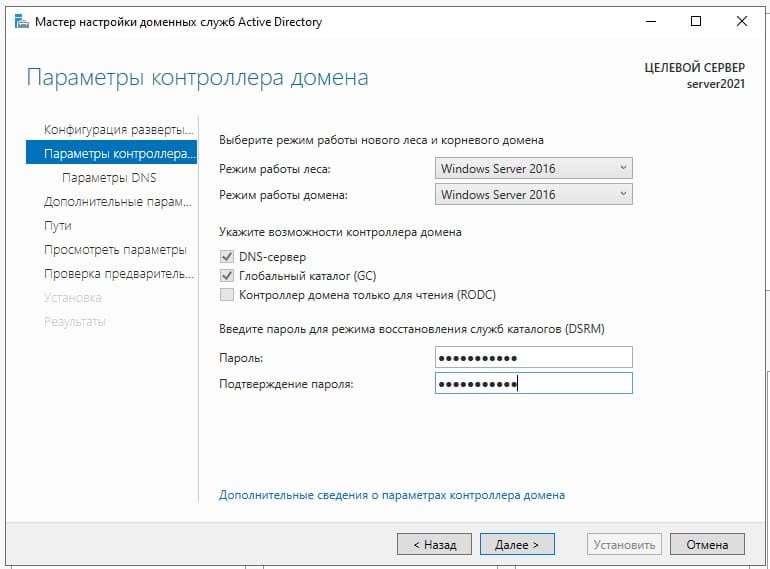
В параметрах контроллера домена задаем пароль для Вашего домена.
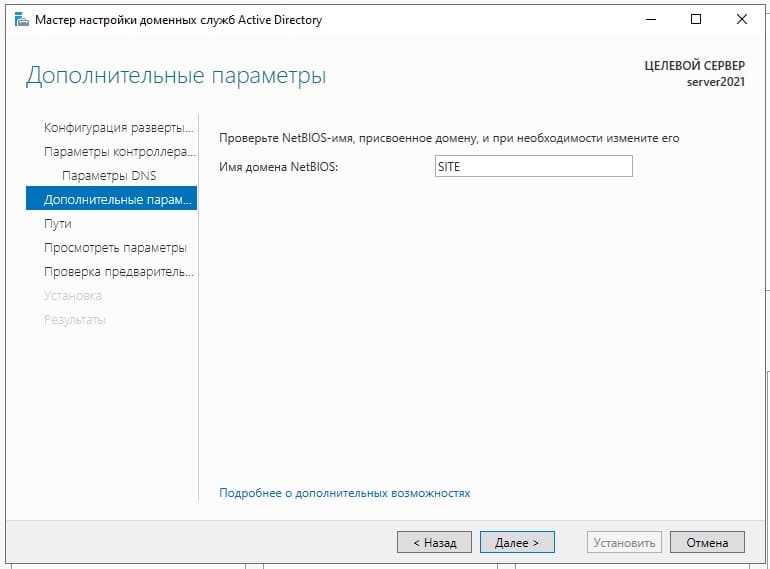
Параметр NetBIOS как правило задается автоматически от имени домена.
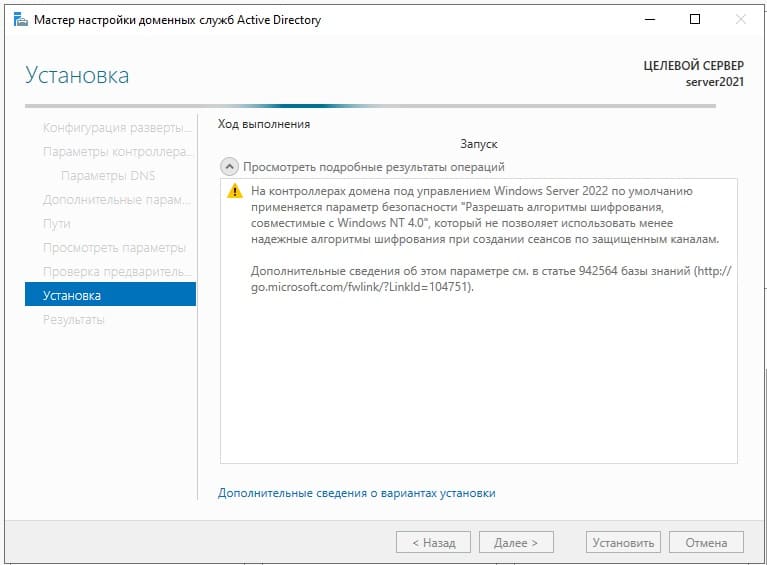
Доходим до проверки предварительных требований и нажимаем «Установить». Дождитесь установки.
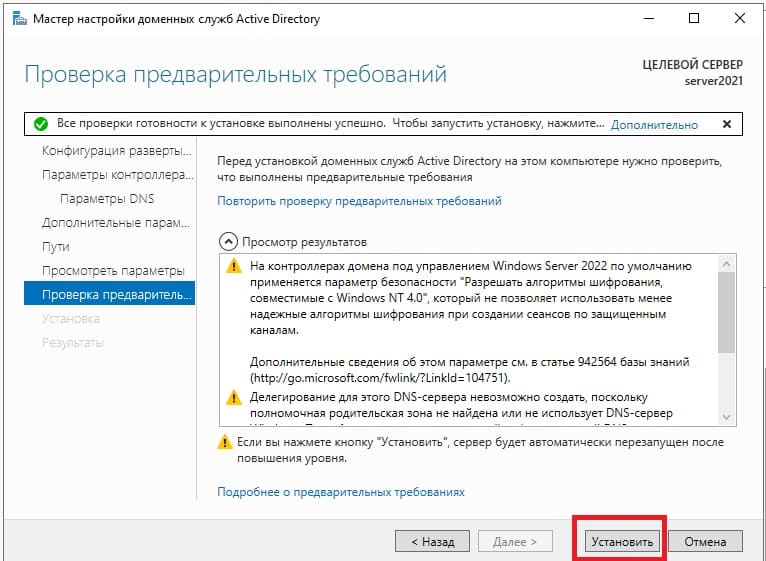
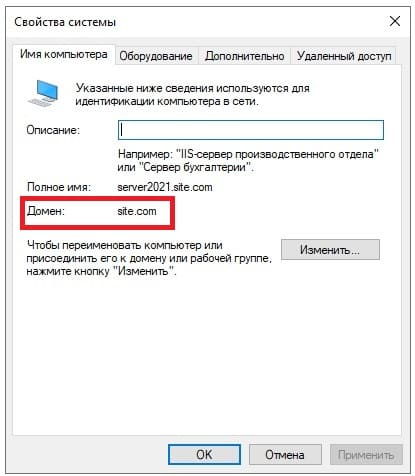
После установки домена можете проверить в свойствах системы, что Ваш сервер добавлен в домен.
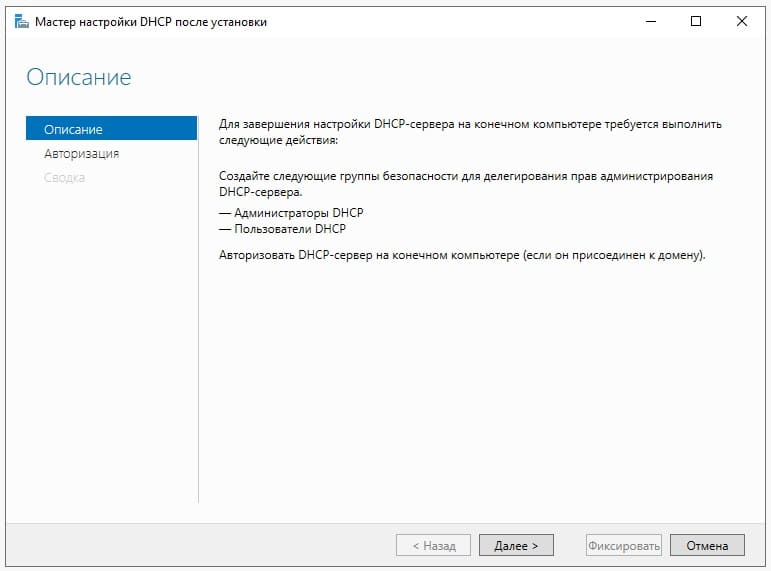
5) Перейдем к настройке DHCP, чтобы сервер мог раздавать IP адреса на клиентские ПК.

Нажимаем «Далее».
Оставляем по умолчанию.
В этой настройке готово.

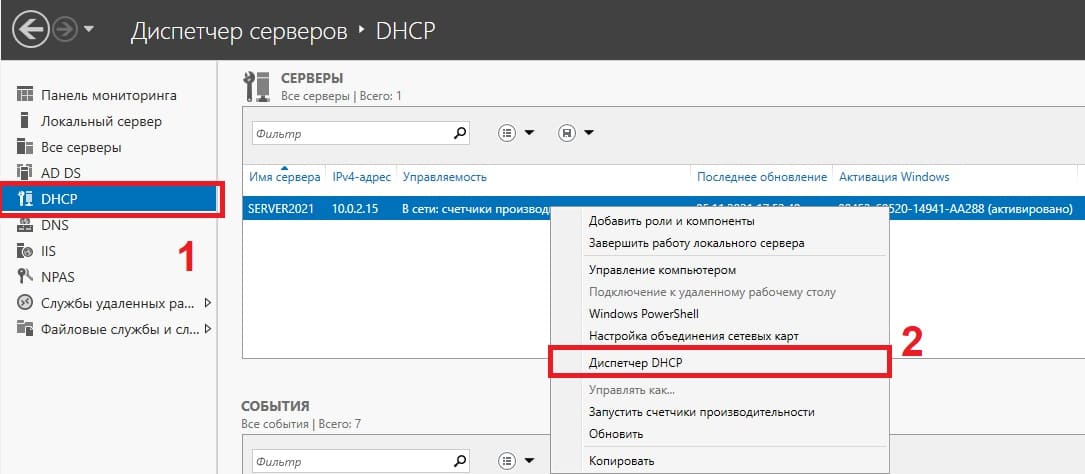
Теперь в диспетчере серверов, в меню слева выбираем пункт DHCP => Правой кнопкой мыши на Ваш сервер => Диспетчер DHCP
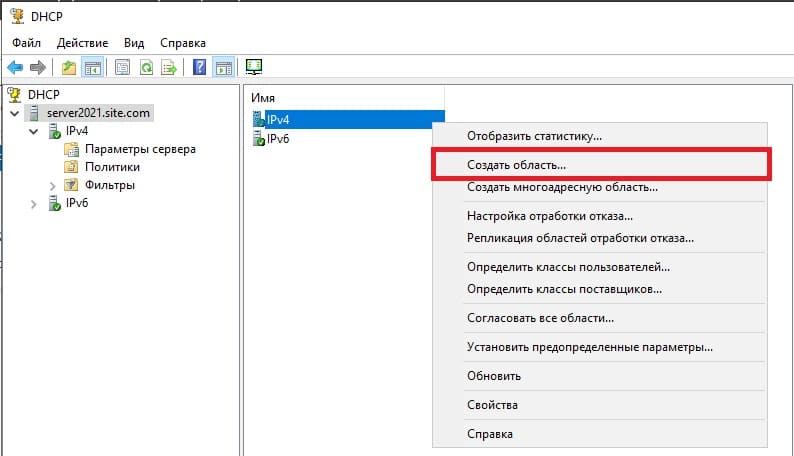
Раскрываем ветку DHCP => Ваш сервер => IPv4, правой кнопкой мыши на этот пункт => Создать область.
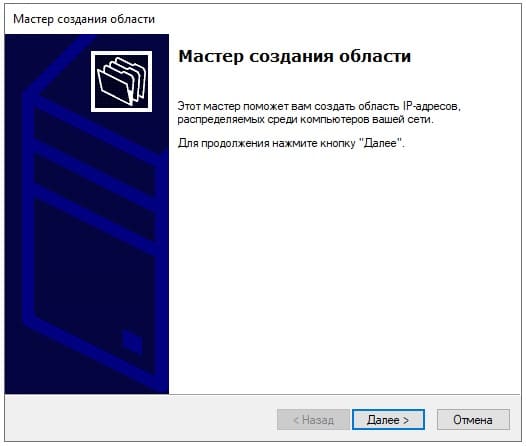
В новом окне «Далее».
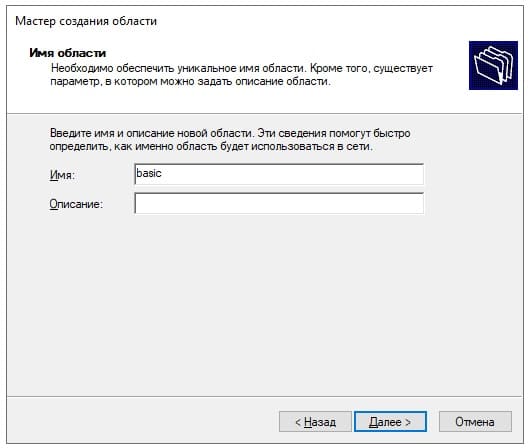
Задаем любое имя области.
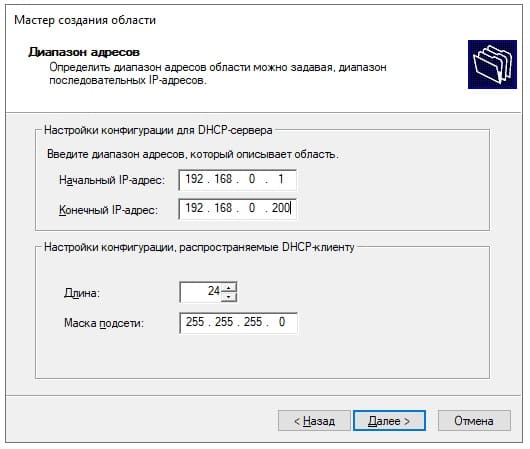
Далее задаем диапазон IP адресов, который будет раздавать сервер на локальные компьютеры, а так же маску подсети. (На скриншоте ниже — это пример, у вас может быть свой диапазон).
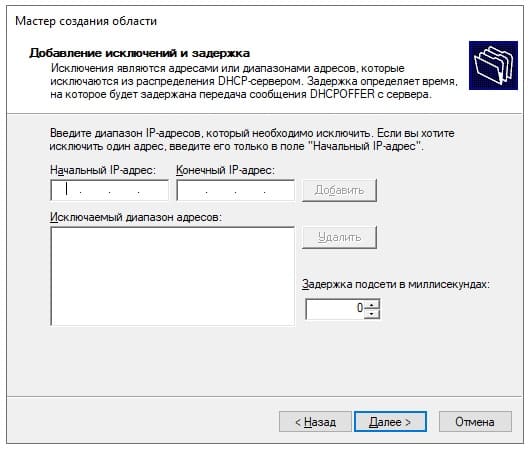
При желании, можете исключить какой-либо промежуток IP адресов, либо просто нажмите «Далее».
Задаем срок действия раздачи IP адреса на компьютеры. Мы зададим большой срок в 365 дней, у вас он может быть любой под Ваши задачи.

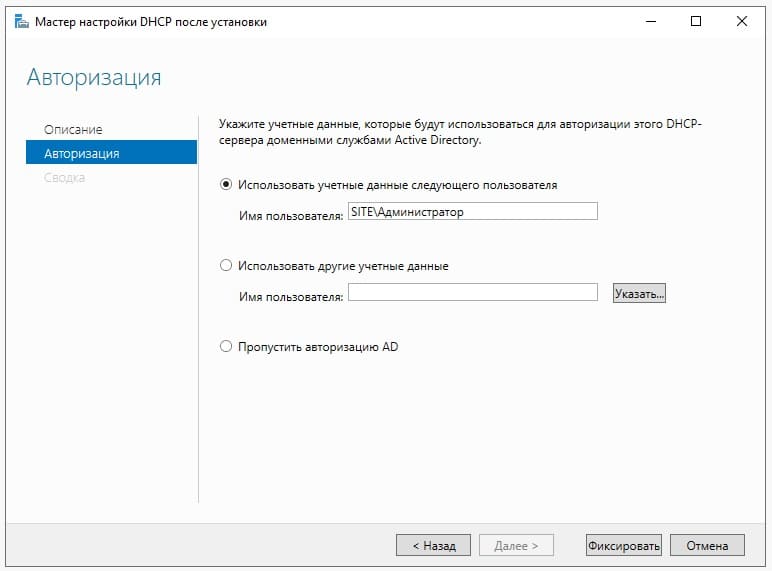
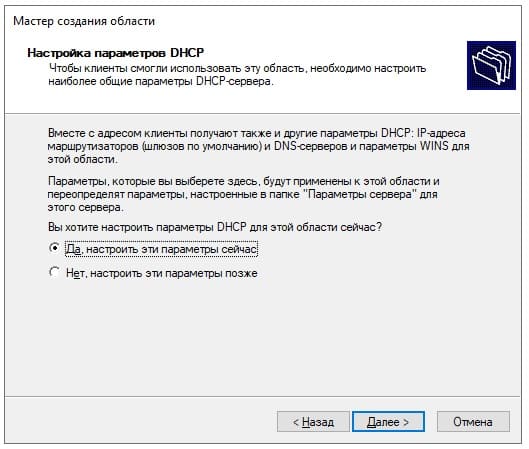
Выбираем пункт «Да, настроить эти параметры сейчас».
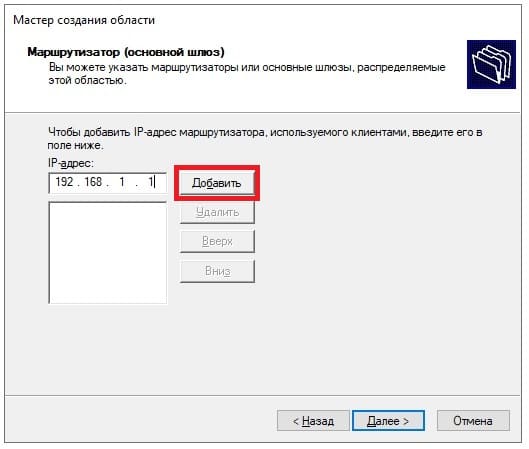
Можете добавить адрес маршутизатора (роутера) из вашей сети.
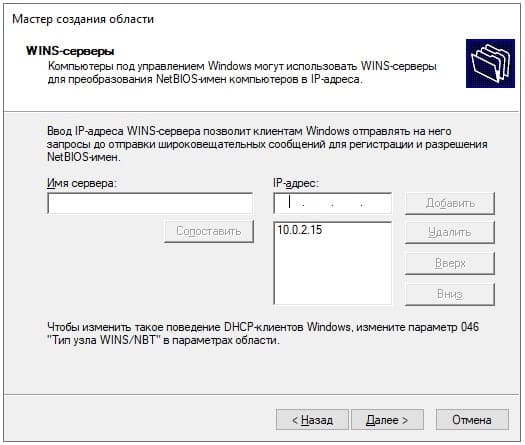
Можете добавить WINS-сервер, если у вас уже он был ранее настроен на сервере, то он добавится автоматически. Либо можете пропустить данный пункт настройки.
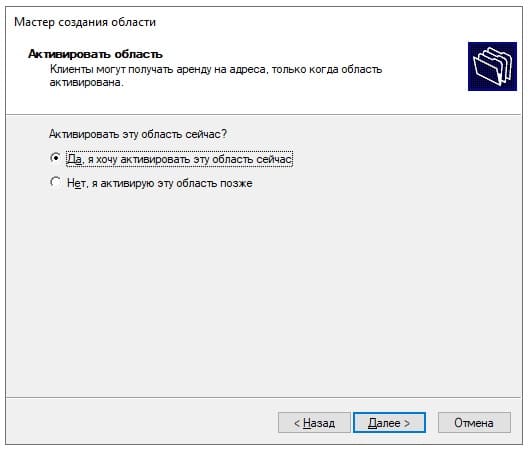
Активировать эту область сейчас.
Готово.
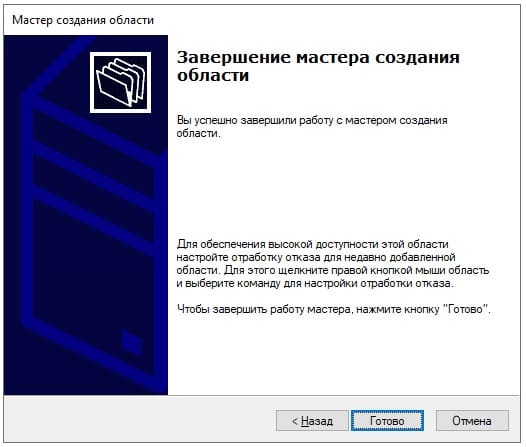
Теперь видим, что область успешно создана.

6) Теперь приступим к лицензированию удаленных рабочих столов (RDP / RDS), чтобы Вы могли подключаться к серверу с клиентских ПК по RDP.
— Первое, что для этого нужно — это ключ активации Windows Server 2022 RDS User или Device CAL. Приобрести его можете в нашем каталоге на следующей странице.
— Чем отличается User CAL от Device CAL можете ознакомиться в нашей прошлой статье.
— Для активации ключа RDS теперь можете воспользоваться следующей инструкцией по настройке и активации данного функционала в нашей прошлой статье. Инструкция является универсальной, начиная от 2012r2 версии до 2022 версии Windows Server.
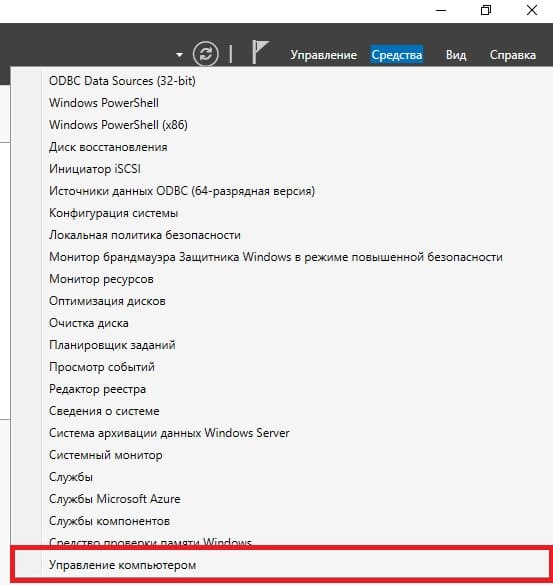
7) Следующим шагом рассмотрим как добавить пользователя в Windows Server, в случае, если Вы не устанавливали на сервер домен (DNS). С созданными пользователями Вы можете под их данными подключаться к серверу по RDP.
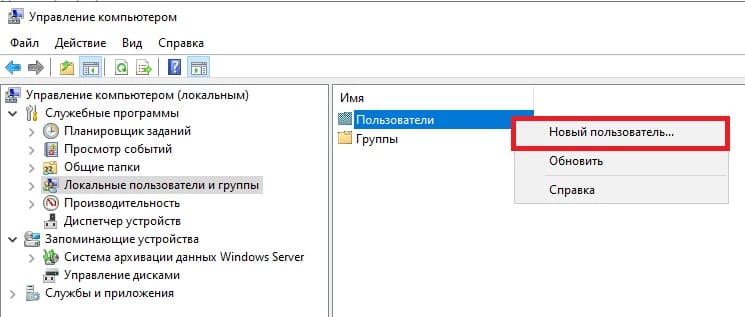
Заходим в Active Directory => Средства => Управление компьютером => Локальные пользователи и группы => Пользователи => Новый пользователь.
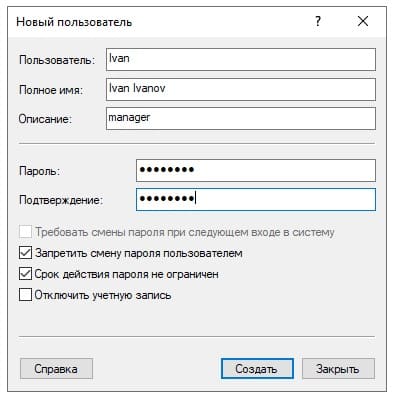
Задаем имя пользователя, можете так же указать его должность, или краткое описание. Обязательно задаем ему пароль для входа. При желании можете установить пункты запрета на смену пароля пользователю и отключение срока действия пароля.
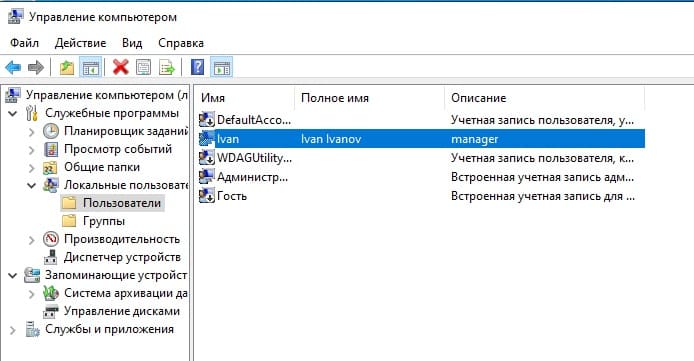
Пользователь создан. Нажав на него двойным кликом курсором мыши можете задать пользователю более детальные настройки, при необходимости.

Windows Server 2022 doesn’t include any significant changes to Active Directory (AD). But you will want to use it going forwards for your new domain controllers because of the improved security it provides over earlier versions of Windows Server.
There are two ways for system administrators to add Windows Server 2022 as a domain controller (DC). The first is using Server Manager, which has been the standard way to add, or ‘promote’ as is more commonly referred to, Windows Server 2022 as a DC. The second way, and easier way in my opinion, is to use PowerShell.
Table of Contents
- Install Active Directory Domain Services on Windows Server 2022 with PowerShell
- Windows Server 2022 prerequisites
- Install the Active Directory Domain Services role
- Install Active Directory Domain Services on Windows Server 2022 with Server Manager
- Windows Server 2022 prerequisites
- Install the Active Directory Domain Services role
- Configure (promote) Windows Server 2022 as a domain controller with PowerShell
- Configure (promote) Windows Server 2022 as a domain controller with Server Manager
Whichever method you choose, adding Windows Server 2022 as a DC involves two main steps:
- Installing the Active Directory Domain Services (AD DS) server role binaries.
- Promoting the server to a domain controller.
But it’s also noting that there are some prerequisites that you should meet before adding Windows Server 2022 as a DC. For instance, the server should be assigned a static IP address. And it’s also worth making sure that the server name is something relevant, like DC1, so that it can easily be identified.
Install Active Directory Domain Services on Windows Server 2022 with PowerShell
Before we install AD DS, let’s make sure we meet the basic prerequisites for a DC in Windows Server 2022.
Windows Server 2022 prerequisites
We’ll start by renaming the server.
- Log in to Windows Server 2022 as an administrator.
- Open the Start menu and click the Windows PowerShell
- In the PowerShell window, run the command below and press ENTER. Replace ‘DC1’ with the name that you would like to use for your domain controller.
Rename-Computer -NewName DC1
- Restart the server.
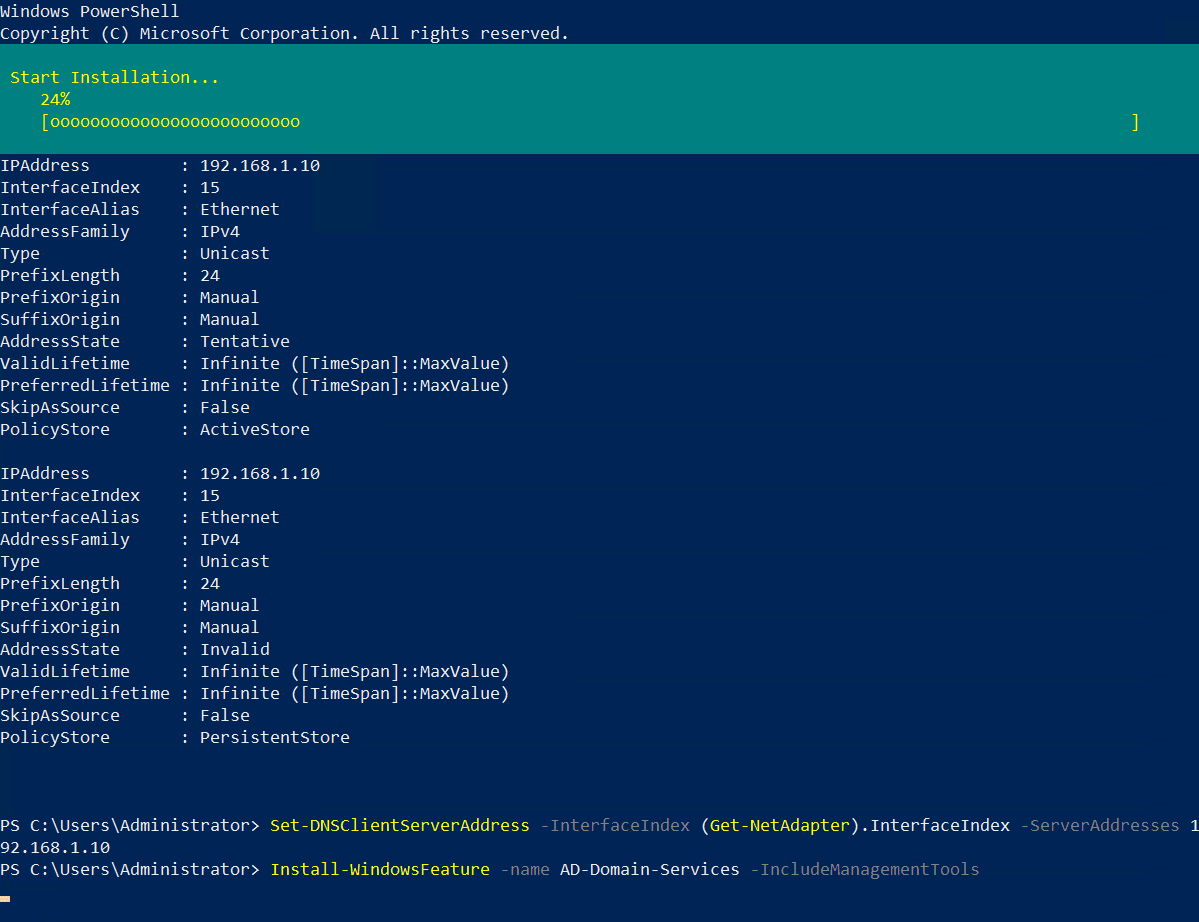
Once the server has rebooted, we can configure the network adapter with a static IP address. On my network, I will assign a static IP address of 192.168.1.10/24 and the default gateway is 192.168.1.1.
- Log in to Windows Server 2022 as an administrator.
- Open the Start menu and click the Windows PowerShell
- In the PowerShell window, run the New-NetIPAddress command below and press ENTER. Replace the values for IPAddress, DefaultGateway, and PrefixLength to those provided by your network administrator.
New-NetIPAddress –IPAddress 192.168.1.10 -DefaultGateway 192.168.1.1 -PrefixLength 24 -InterfaceIndex (Get-NetAdapter).InterfaceIndex
- Now configure the adapter’s DNS settings. We’ll set the preferred DNS server to be our domain controller’s IP address because the domain controller will also perform the function of DNS server for the domain. So, replace 192.168.1.10 with the same IP address you configured for the adapter. Run Set-DNSClientServerAddress as shown, and press ENTER.
Set-DNSClientServerAddress –InterfaceIndex (Get-NetAdapter).InterfaceIndex –ServerAddresses 192.168.1.10
Install the Active Directory Domain Services role
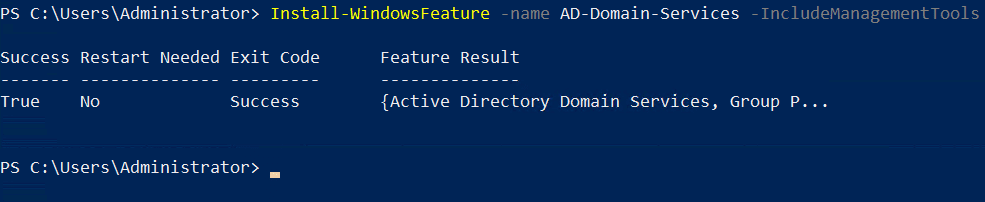
The next step is to install the AD DS server role. It’s easy to do using the Install-WindowsFeature cmdlet as shown below.
Install-WindowsFeature -name AD-Domain-Services -IncludeManagementTools
Once the AD DS server role is installed, you’ll get a message in the PowerShell window. The Success column should read True.
Install Active Directory Domain Services on Windows Server 2022 with Server Manager
If you’d prefer to install AD DS the hard way, here is a step-by-step guide using Server Manager.
Windows Server 2022 prerequisites
Let’s deal with the server’s name and IP address first.
- Log in to Windows Server 2022 with a local administrator account.
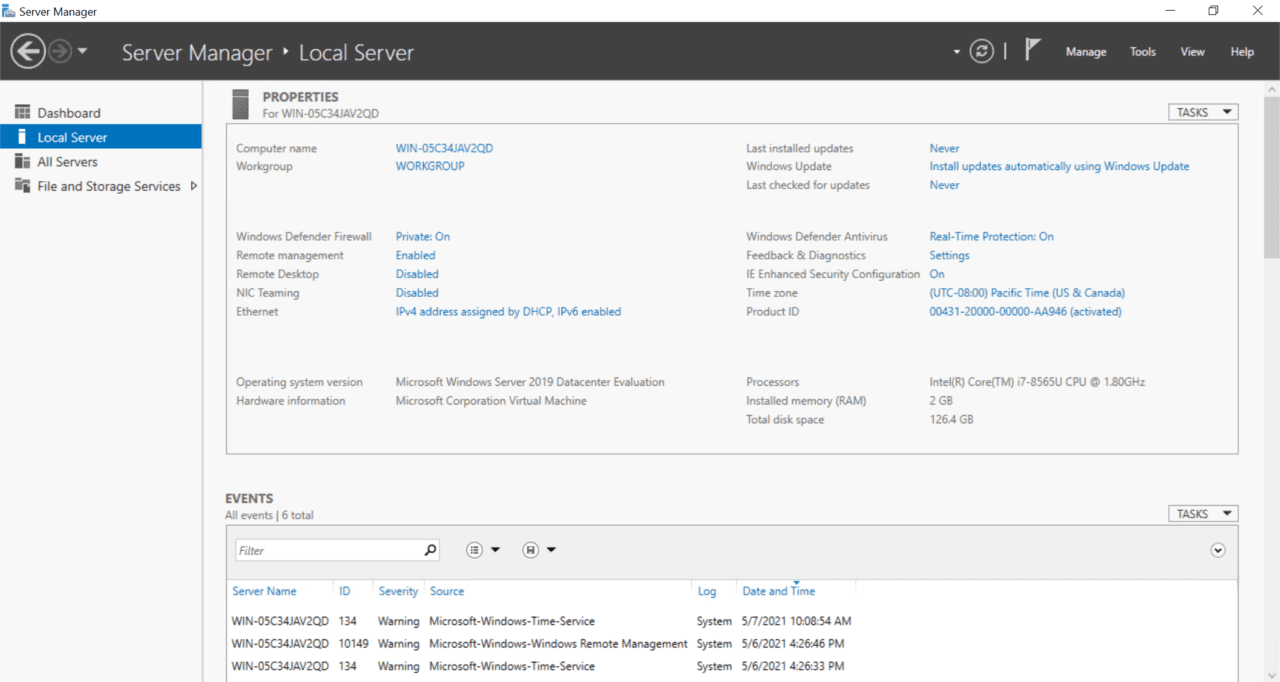
- Open Server Manager from the Start menu.
- In Server Manager, click Local Server in the left pane.
- In the Properties section on the right, click your server’s computer name to the right of the Computer name
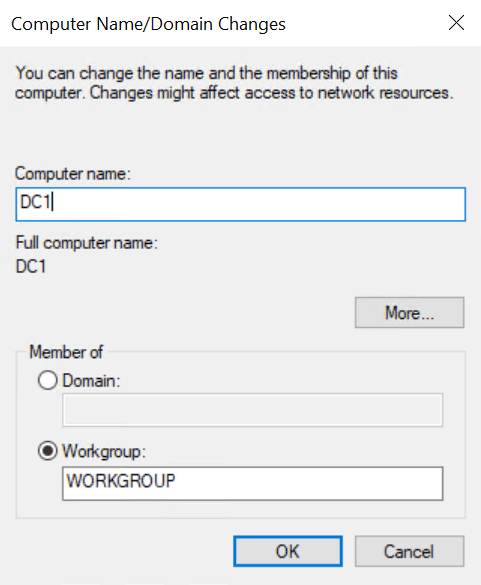
- In the System Properties dialog, click the Change button on the Computer Name tab.
- In the Computer Name/Domain Changes dialog, type a name for your server in the Computer name field and click OK.
- You’ll be prompted to restart the server. Click OK and then click Close in the System Properties dialog.
- Click Restart Now in the popup dialog.
Now let’s set a static IP address.
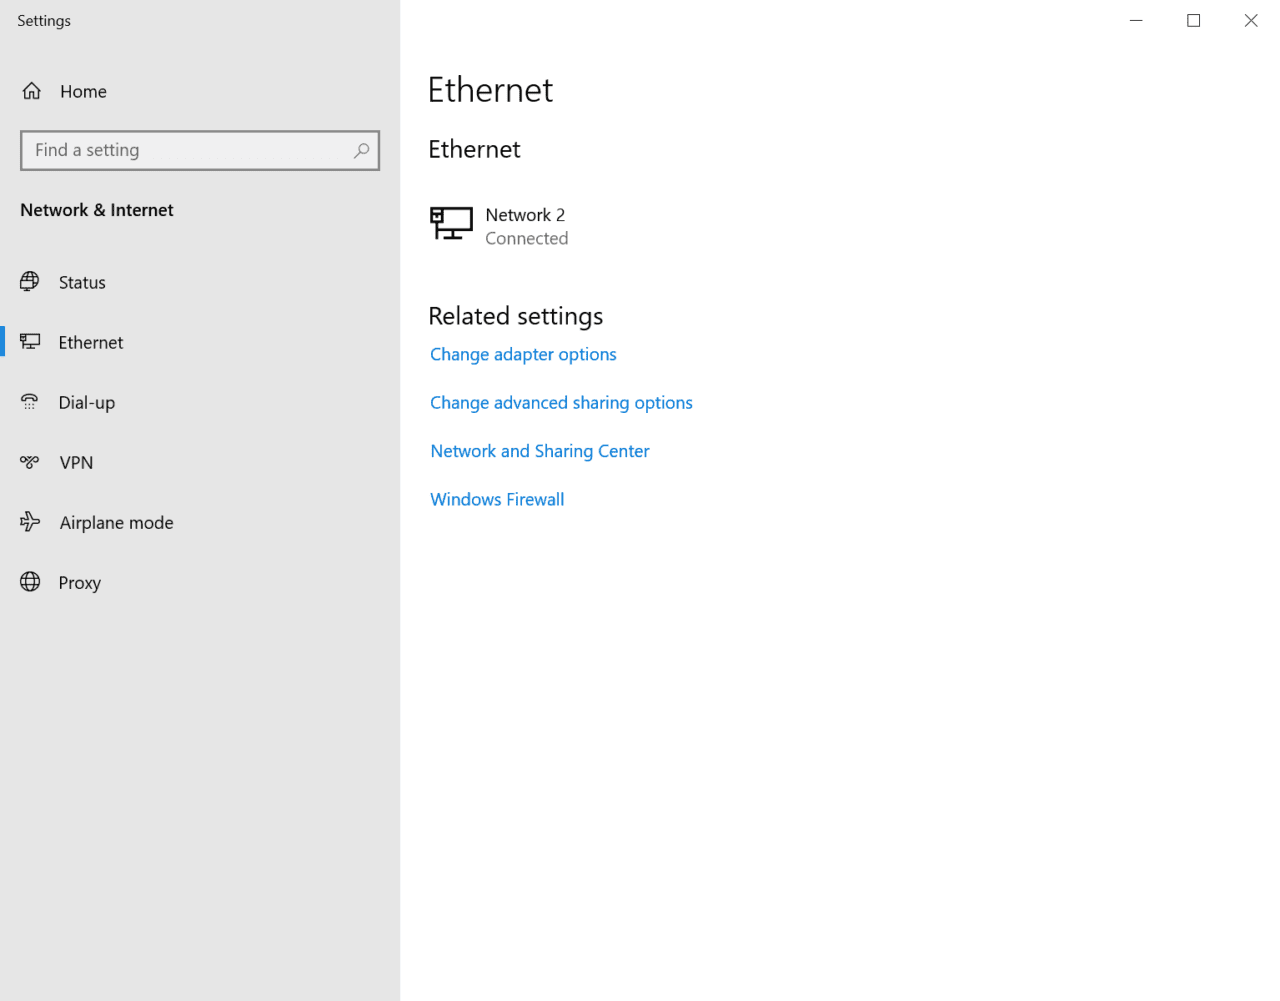
- Right click the network icon in the system tray in the bottom right of the taskbar and click Open Network & Internet settings.
- In the left pane of the Settings app, click Ethernet under Network & Internet.
- In the right pane under Related settings, click Change adapter options.
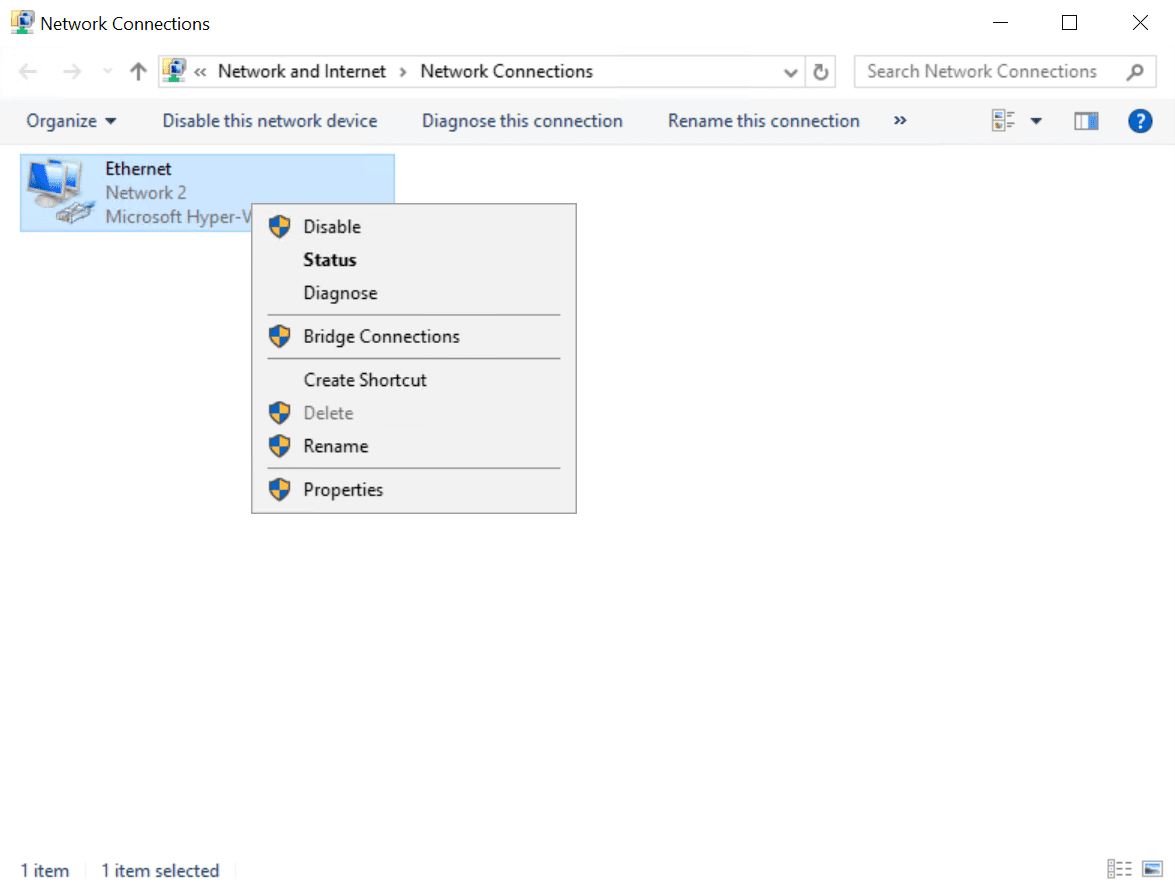
- In the Network Connections window, right click your server’s network adapter and select Properties from the menu.
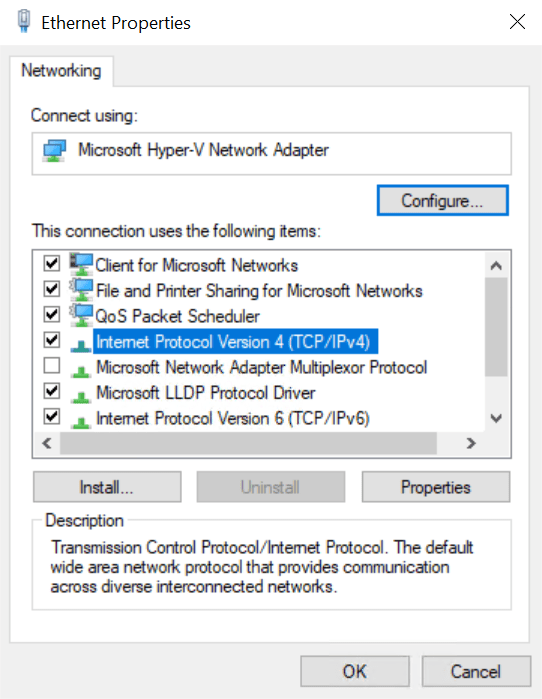
- In the Ethernet Properties dialog, click Internet Protocol Version 4 (TCP/IPv4), and then click Properties.
- In the Internet Protocol Version 4 (TCP/IPv4) Properties dialog, check Use the following IP address. You’ll need to fill out the following three fields: IP address, Subnet mask, Default gateway.
On my network, I will assign a static IP address of 192.168.1.10, subnet mask of 255.255.255.0, and the default gateway is 192.168.1.1.
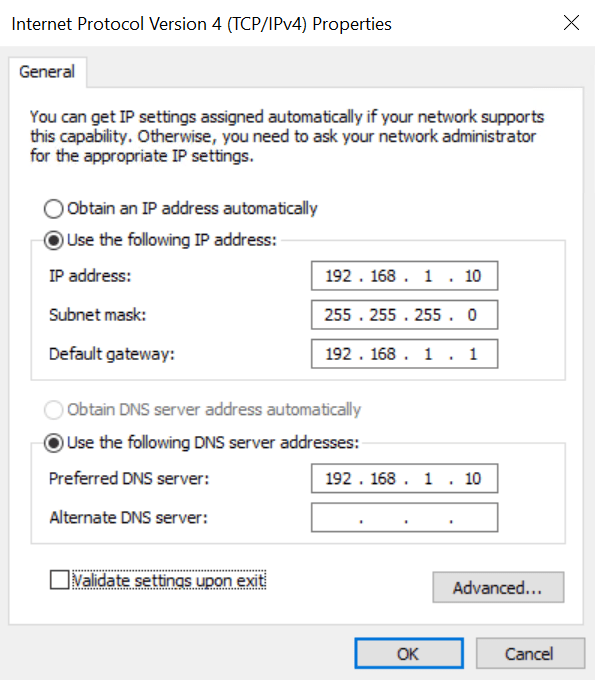
- Check Use the following DNS server addresses. Set Preferred DNS server to the same IP address that you assign Windows Server. So, in my example, I will use 192.168.1.10. Click OK when you’re done.
The first DC in your domain will also be a DNS server. The Active Directory Domain Services Configuration Wizard will automatically configure a DNS server for you.
- Close the Ethernet Properties dialog, Network Connections window, and the Settings app.
Install the Active Directory Domain Services role
Now let’s install the AD DS server role.
- Log in to Windows Server 2022 with a local administrator account.
- Server Manager should open by default. If it doesn’t, click the Start menu and find Server Manager in the list of installed apps and click it.
- In Server Manager, click the Manage menu in the top-right corner and select Add Roles and Features from the menu.

- In the Add Roles and Features Wizard, click Next on the Before You Begin screen.
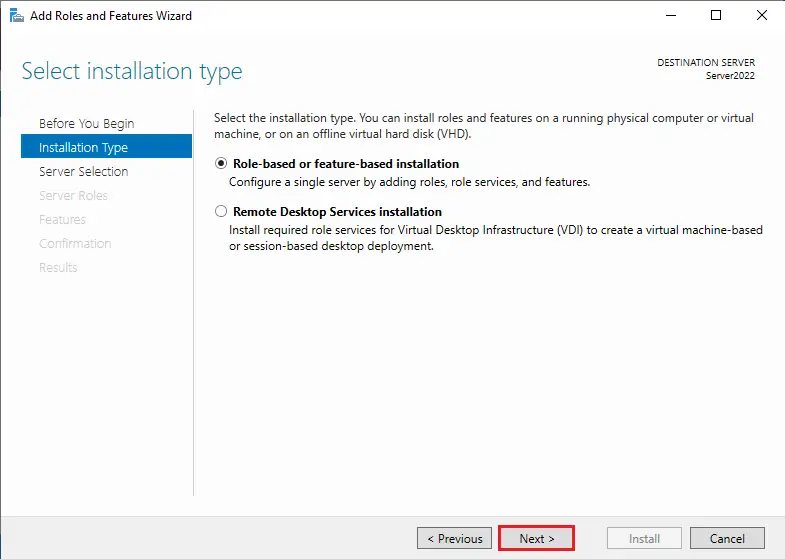
- On the Installation Type screen, make sure that Role-based or feature-based installation is selected and click Next.
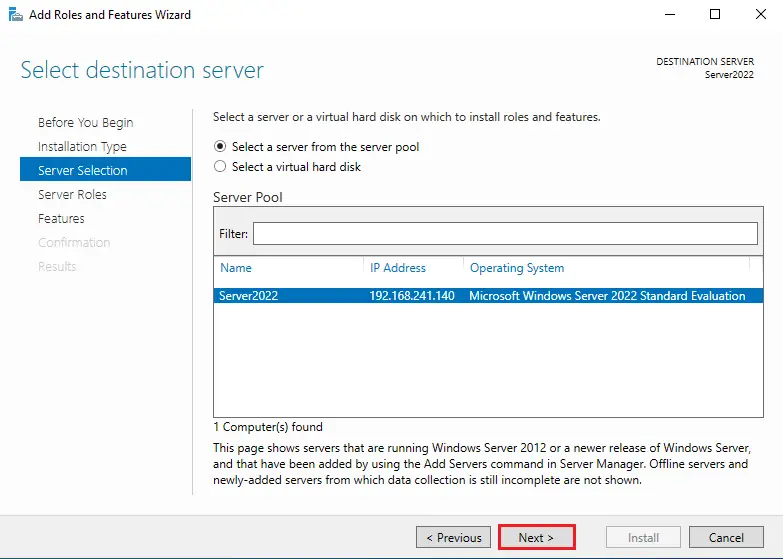
- On the Server Selection screen, make sure that your Windows Server is selected in the list and click Next.
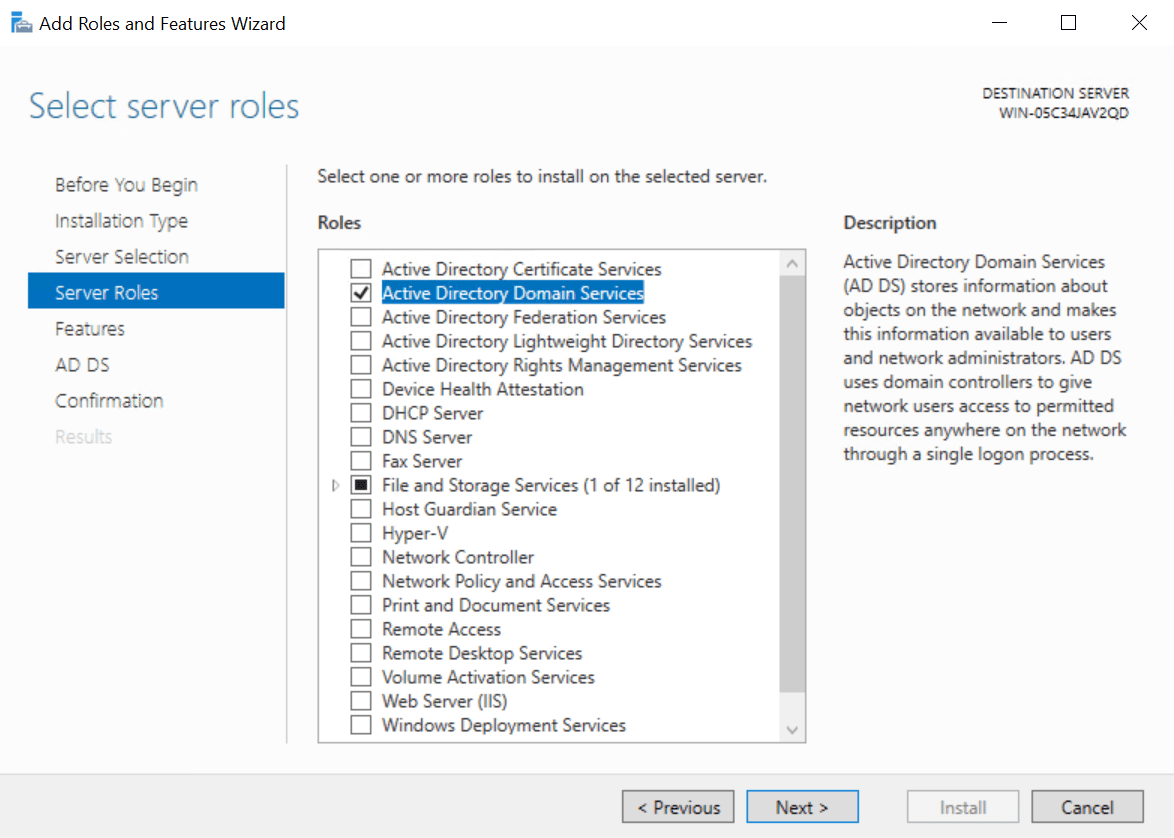
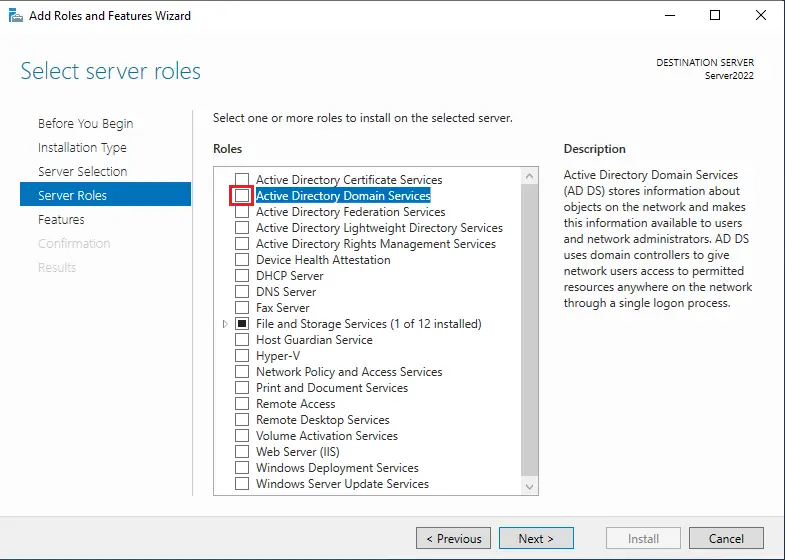
- On the Server Roles screen, check Active Directory Domain Services in the list of roles.
- In the Add Roles and Features Wizard popup dialog, make sure that Include management tools (if applicable) is checked and then click Add Features.
- Click Next on the Server Roles screen to continue.
- Click Next on the Features screen.
- Read the information on the AD DS screen and click Next.

- Now click Install on the Confirmation screen.
- When the installation is complete, click Close in the Add Roles and Features Wizard.
Configure (promote) Windows Server 2022 as a domain controller with PowerShell
In this example, we will add Windows Server 2022 as a domain controller in a new forest and domain. Before you continue, you should decide on a Fully Qualified Domain Name (FQDN) for your domain. I’m going to use ad.contoso.com in this example. Where ‘ad’ is the name of my new domain and contoso.com is the top-level domain (TLD). You should make sure that you own the public TLD. In this example, I should own the contoso.com domain name. AD in the FQDN defines my internal DNS namespace for Active Directory.
To configure Windows Server 2022 as a domain controller, run Install-ADDSForest as shown in the example below. Replace ad.contoso.com with your chosen FQDN. DomainNetBIOSName is usually set to the part of your FQDN that identifies your internal AD DNS namespace. So, the part that comes to the left of the first period. In this case, ‘ad’.
Install-ADDSForest -DomainName ad.contoso.com -DomainNetBIOSName AD -InstallDNS
You should note that Install-ADDSForest is only used when you are installing the first domain controller in a new AD forest. Install-ADDSDomain and Install-ADDSDomainController are used respectively to create a new domain in an existing forest and install a new DC in an existing AD domain.
DomainName and DomainNetBIOSName are the only two compulsory parameters for the Install-ADDSForest cmdlet. If you want to explore what other options you can configure, run the command line below:
Get-Help Install-ADDSForest
When you run the Install-ADDSForest cmdlet, you’ll be prompted to enter a password for Directory Services Restore Mode (DSRM). Or Safe Mode password as it’s sometimes referred to. Enter a password and confirm it when prompted.
You’ll then see a message:
The target server will be configured as a domain controller and restarted when this operation is complete.
Do you want to continue with this operation?
Type y in the PowerShell window and press ENTER to confirm that you want to configure the server as a domain controller.
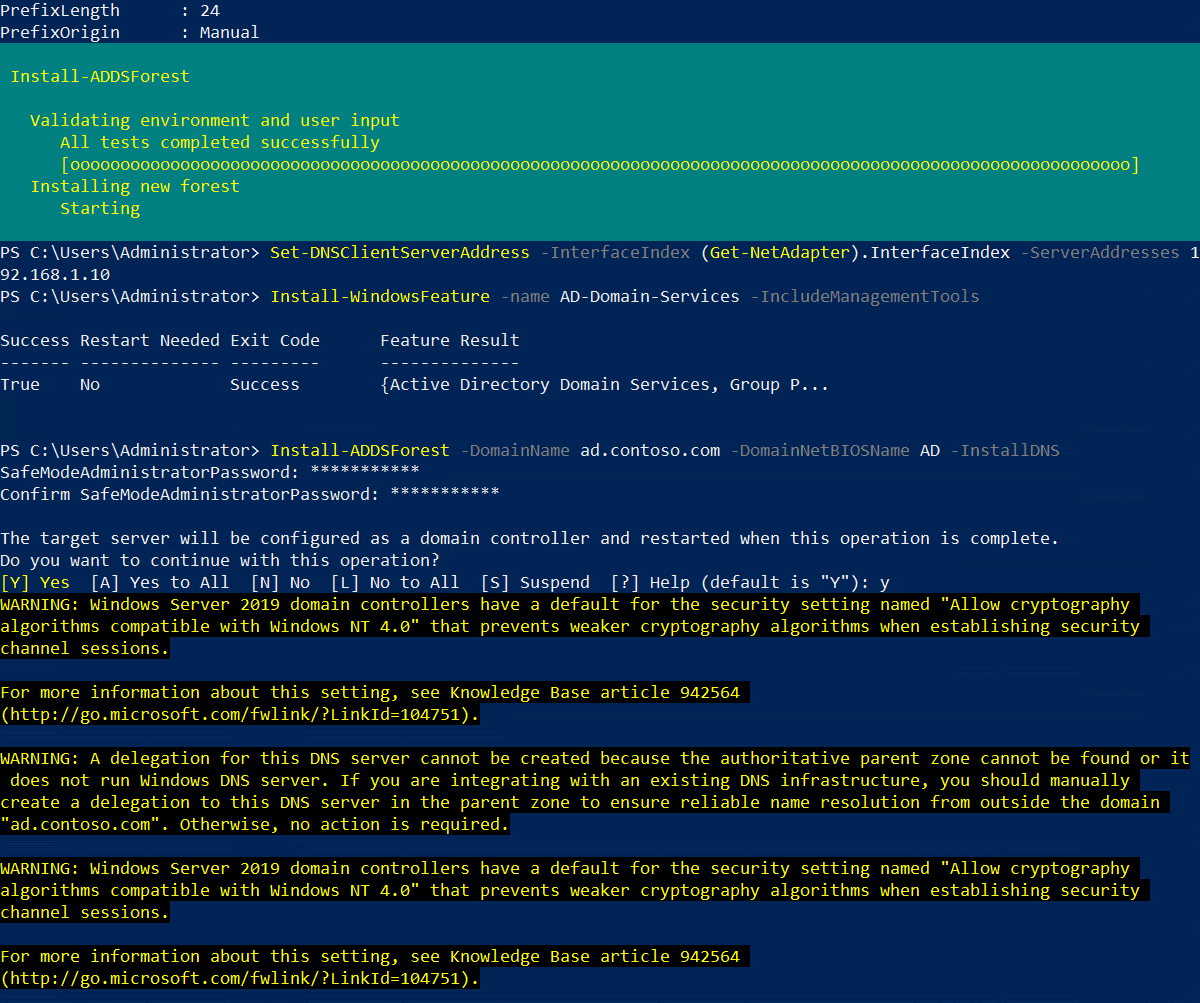
As AD is configured, you’ll see some yellow warnings appear in the PowerShell window. They are normal and you can safely ignore them. The server will automatically reboot. Once Windows Server has rebooted, you will need to log in with the domain administrator account. The domain administrator account is assigned the same password as the built-in administrator account.
On the sign-in page, type administrator in the User name field. Type the password for the administrator account, which is the same as the password for the previous built-in administrator account, and press ENTER.

And that is it! You are now logged in to your AD domain’s first domain controller. You can access Server Manager from the Start menu. In Server Manager, click the Tools menu and then select Active Directory Users and Computers to start managing your domain.
Configure (promote) Windows Server 2022 as a domain controller with Server Manager
Now that the AD DS role is installed in Windows Server 2022, you can configure your first AD domain controller. Let’s go back to Server Manager and start the configuration.
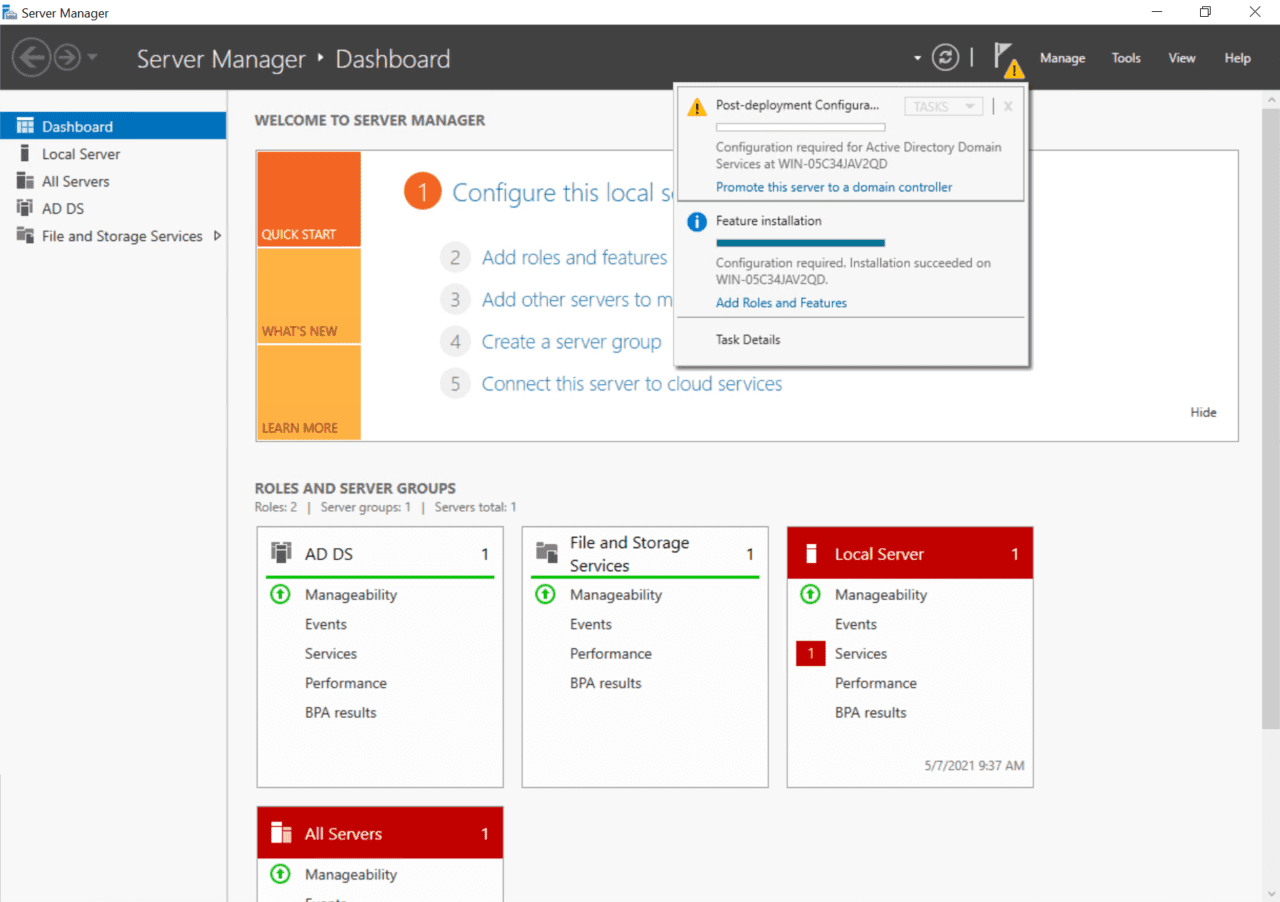
- Back in Server Manager, you should see a yellow exclamation mark by the notifications flag in the top-right corner. Click it and then click Promote this server to a domain controller.
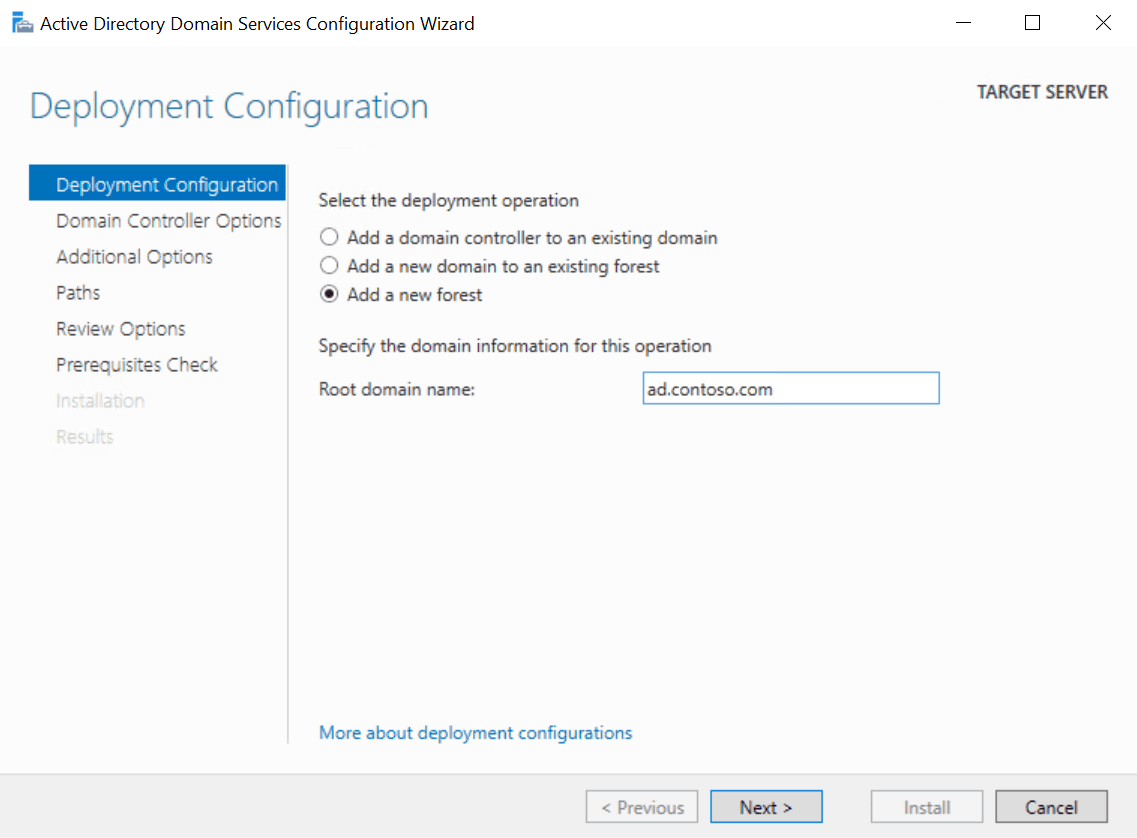
- In the Active Directory Domain Services Configuration Wizard dialog, check Add a new forest under Select the deployment operation.
- In the Root domain name box, type the Fully Qualified Domain Name (FQDN) for your new AD forest. I’m going to use contoso.com for my AD domain name. Click Next to continue.
You should make sure that you own the public top-level domain name (TLD). In this example, I should own the contoso.com domain name. AD in the FQDN defines my internal DNS namespace for Active Directory.
- On the Domain Controller Options screen, type and confirm a Directory Services Restore Mode (DSRM) password. You will need this if you want to restore AD from backup. Click Next to continue.
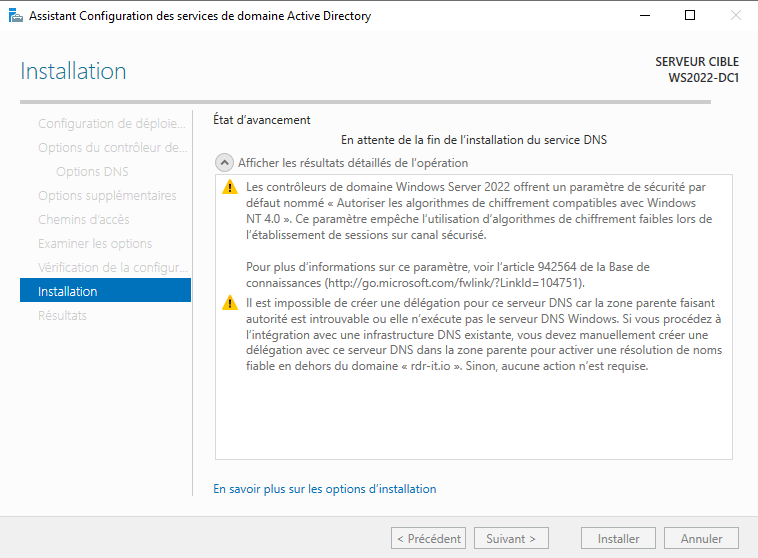
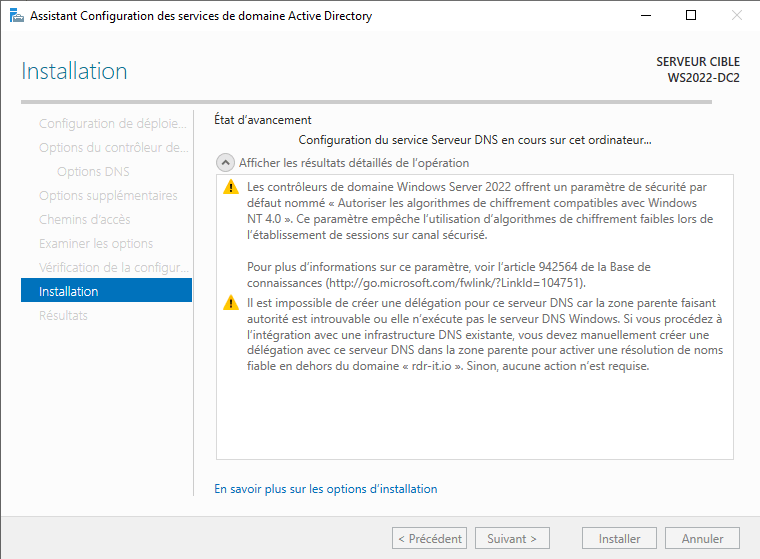
- On the DNS Options screen, you can safely ignore the delegation warning and click Next.
- On the Additional Options screen, click Next to accept the assigned NetBIOS name.
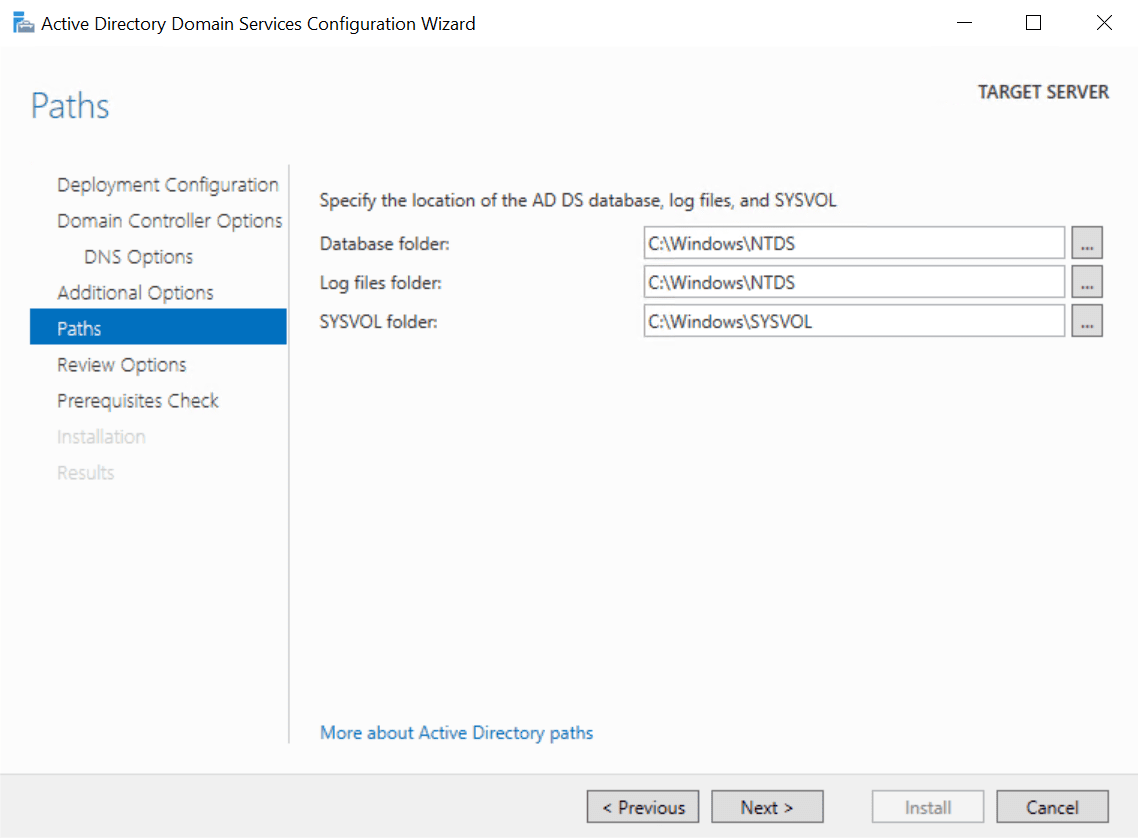
- Click Next again on the Paths screen to accept the default database, log files, and SYSVOL folder locations.
- Now click Next on the Review Options screen.
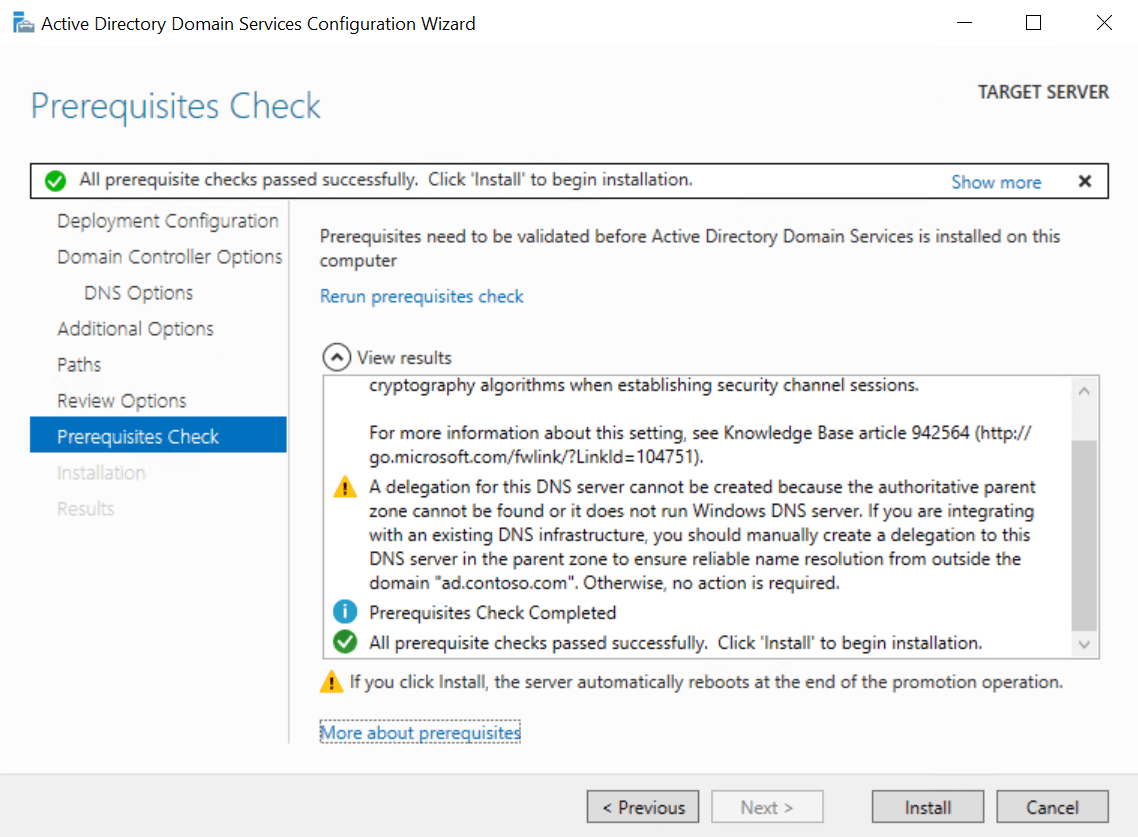
The wizard will run some prerequisite checks to make sure AD can be installed on the server. Hopefully your server will pass the checks and you can continue installing AD. It’s normal to get a few warnings as you can see in the image below. You will not be able to proceed with the install if the server fails the prerequisite checks.
- Now click Install to configure AD on the server. The server will automatically reboot to complete the install process.
Once Windows Server has rebooted, you will need to log in with the domain administrator account. The domain administrator account is assigned the same password as the built-in administrator account.
- On the sign-in page, type administrator in the User name Type the password for the administrator account, which is the same as the password for the previous built-in administrator account, and press ENTER.
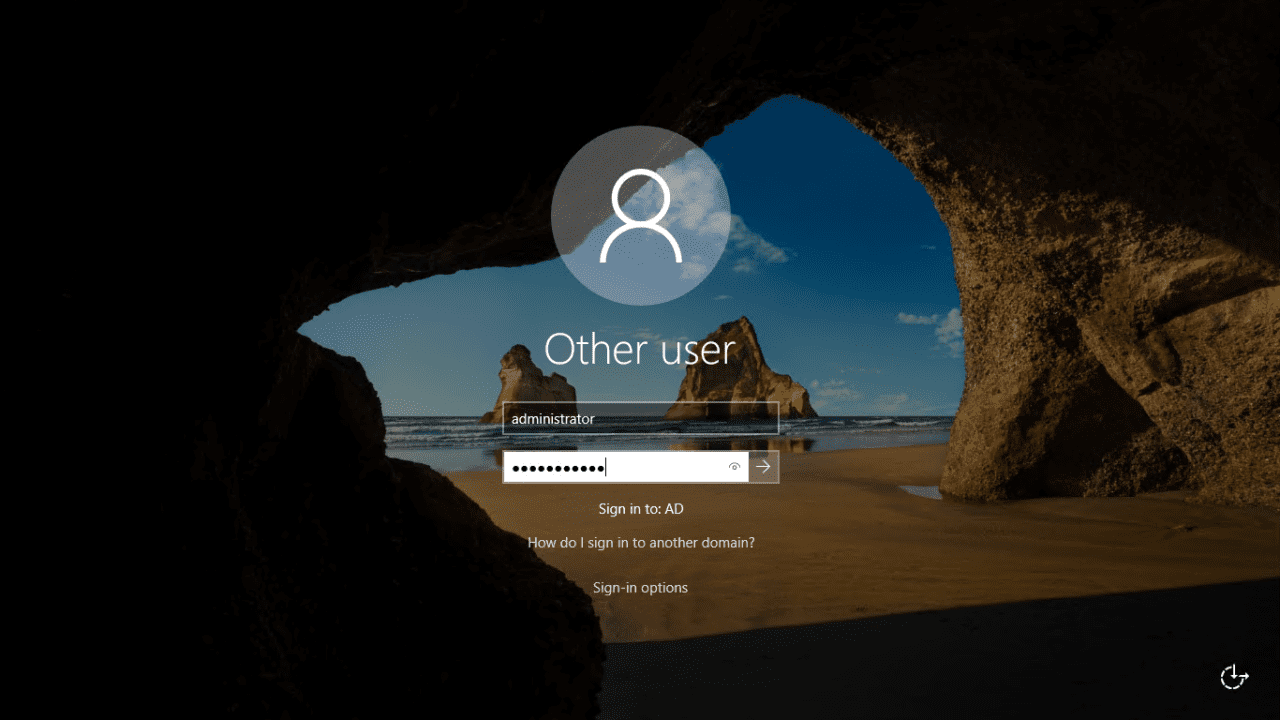
And that is it! You are now logged in to your AD domain’s first domain controller.
Related Article:
- How to add a new domain controller to an existing domain
In this first tutorial dedicated to Windows Server 2022, I will show you how to install an Active Directory domain controller.
Si vous débutez avec les services Active Directory, je vous invite à suivre le cours j’ai créé avant :
In this tutorial, here is what we will see:
- Installing the Active Directory Domain Services (AD DS) role
- Promotion of a domain controller to create a new Active Directory domain
- Adding a Windows Server 2022 domain controller to an existing domain.
Before starting, you should know that Windows Server 2022 does not provide a new level of forest and domain functionality, so we remain on a Windows Server 2016 level.
Windows Server 2022 also does not bring a schema update, which is a first, the highest schema version is 88 which arrived with Windows Server 2019.
- Prerequisites before installing the AD DS role
- Installing the AD DS role on Windows Server 2022
- Create a new Active Directory domain by promoting the first domain controller
- Add a Windows Server 2022 Active Directory domain controller to an existing domain
Si vous êtes habitué à l’installation de contrôleur de domaine, il n’y a pas réellement d’évolution par rapport à Windows Serveur 2019 ou 2016.
Prerequisites before installing the AD DS role
Before launching the role installation wizard you must:
- Having correctly named the server, even if it is possible to rename a domain controller, it is better to name it correctly beforehand.
- Configure a fixed IP address to the server.
- The server must be dedicated to this role.
If you add a Windows Server domain controller to an existing environment, you must also:
- Have an existing domain controller as DNS
- Check the Active Directory domain name is resolved by the server
- Ensure the compatibility of the existing environment with Windows Server 2022
- Add the account that you are going to use in the Enterprise Admins and Schema Administrator groups if the schema is not in version 88, that is, you do not have a domain controller with Windows Server 2019.


Installing the AD DS role on Windows Server 2022
From the server manager, click on Add roles and features 1.

When the wizard starts, click on the Next 1 button.

Type of installation choose Installation based on a role or a feature 1 then click on Next 2.

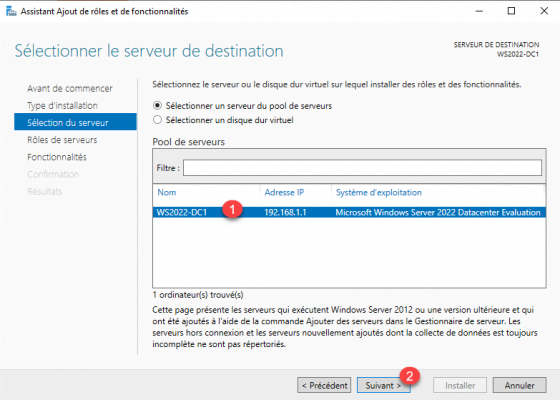
Select the server 1 where the AD DS role will be installed and click the Next button 2.
In the list of roles, check the box for AD DS 1.

Confirm the addition of the administration consoles by clicking on Add features 1.

Now that the AD DS role is selected, click Next 1.

Skip the functionalities by clicking on the Next 1 button.

A summary of Active Directory Domain Services is displayed, click Next 1.

Confirm the installation of the AD DS role by clicking Install 1.

Wait during the installation …
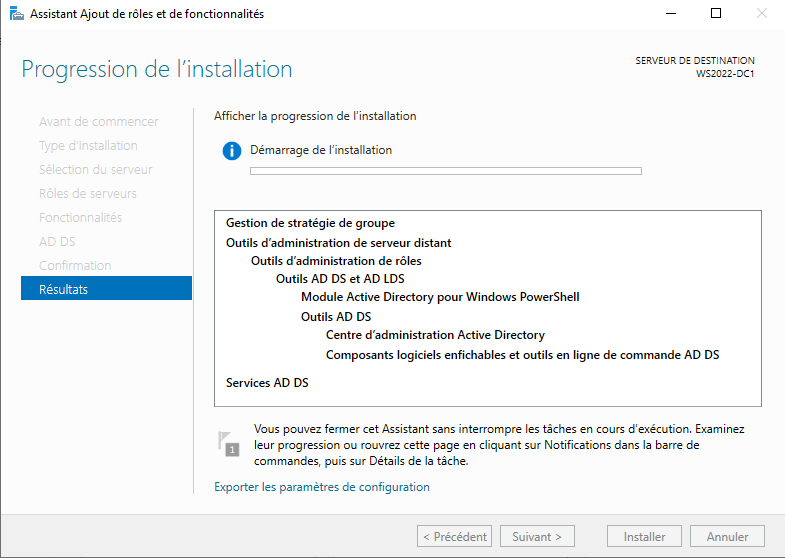

Once the installation, exit the wizard by clicking on Close 1.

From Server Manager, we can see that AD DS role 1 is installed and action is required 2 to promote the server as a Domain Controller.

Install-windowsfeature -name AD-Domain-Services –IncludeManagementToolsCreate a new Active Directory domain by promoting the first domain controller
In this part, we will see how to create an Active Directory environment with the promotion of the first domain controller.
In production, it is recommended to have at least 2 domain controllers.
From the server manager, click on the notification icon then on Promote this server to a domain controller 2 to start the wizard.

The promotion wizard starts, before Windows Server 2012, we used the dcpromo.exe command

Select the operation: Add a new forest 1 then enter the domain root name 2 and click on Next 3.

The root name must be composed of a tld (Top Level Domain) public or not (.lan, .corp, .com …) and a name which can be that of your company for example.
The domain does not have to be registered.
For practical reasons, we avoid using a public domain that we use, such as that of the company’s Internet site.
Also take into account, that this name will be used for user logon in the form [email protected]
If you want users to open their session with their email address, it is possible to add a UPN suffix later, which allows you to have [email protected]
Enter a password for Directory Services Restore Mode 1 and click Next 2.

The DSRM password must imperatively be noted somewhere, it allows you to connect to the server if the AD DS services no longer work and to allow a repair.
The DNS server role is installed on the domain controller, which is normal, a lot of Active Directory services rely on DNS records, which allows the client to find domain controllers.
On the screenshot, we can see that the functional level is Windows Server 2016.
Skip the DNS options by clicking Next 1.

The DNS delegation warning message can be ignored because we are not going to publish the Active Directory environment to the Internet.
Once the NETBIOS name is generated 1, click Next 2.

The NETBIOS name is still used primarily for compatibility reasons.
To learn more about NETBIOS : NetBIOS – Wikipedia
The wizard suggests changing the NTDS and SYSVOL directories, generally, the default directories are used. Click on Next 1.

An option summary is displayed, verify the information then click Next 1.

The wizard will check the configuration, if no blocking error is detected, start the creation of the domain (forest) by clicking on Install 1.

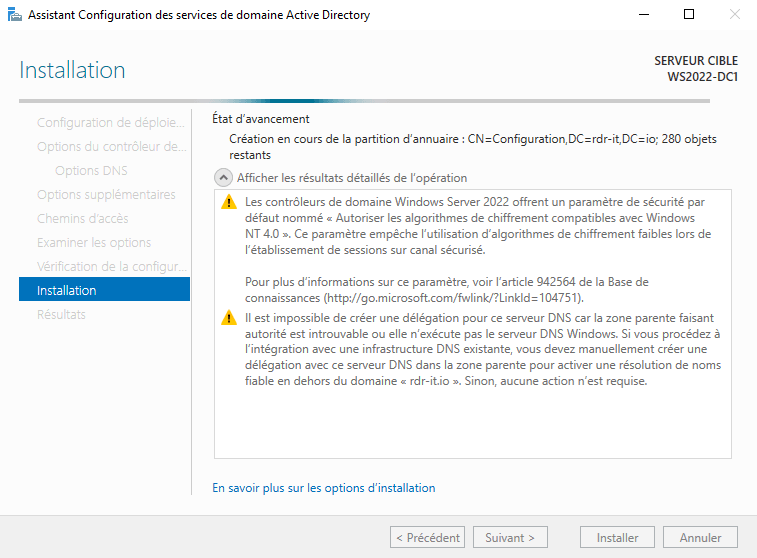
Wait during the installation … at the end of the installation, the server restarts and will be a domain controller.

Once the server has restarted, connect with the password of the Administrator account of the server, on the capture, we can that the login is now NOM_NETBIOS administrator.

The server is now a domain controller, it can be seen through the server manager.


If you also look at the IP configuration, you can see the DNS server is configured on itself DNS server.
A domain controller no longer has its local user database (SAM), to add users, you must now go through the Active Directory Users and Computers console.
For security reasons, it is recommended not to use the Administrator account, you must now create a dedicated user who will be a member of the Domain Admins group.
To join computers to the domain, they must have the domain controller as their DNS server, and so that the computers can go to the Internet, it is advisable to configure a DNS forwarder.
In addition to the course on Active Directory that I advised you at the beginning of this tutorial, if you are new to AD DS, I invite you to read this tutorial: Active Directory: installation and configuration of a domain controller
Now that you are ready, we will see how to add a controller to ensure the redundancy of Active Directory services.
For the installation of the AD DS role, I let you reread the beginning of the tutorial.
Before launching the Active Directory services configuration wizard, we will make sure that the server resolves the domain.
From a command prompt, ping the domain.

From the notification area, start the wizard by clicking on Promote this server to a domain controller 1.

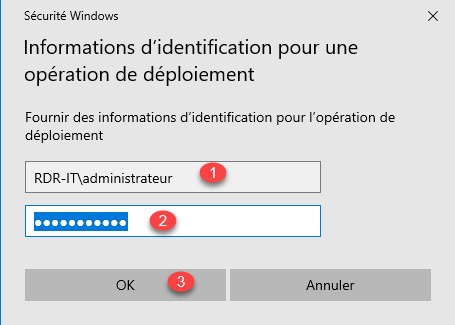
When the wizard is launched, let select: Add a domain controller to an existing domain 1 and click on the Modify button 2 to indicate an account that is a member of the Domain Admins group.

Enter the username (DOMAIN login or [email protected]) 1 then the password 2 and click OK 3.
Reminder: in the event of a schema version upgrade (existing domain controller prior to Windows Server 2019), the account indicated must be a member of the Company Administrators and Schema Administrators group. Once the operation is complete, the account will need to be removed from the groups.
If the information is correct, the domain is automatically added 1, click on Next 2.

If the domain is not added, click on the Select button to choose it.
In the Domain controller options part, check the box DNS server (Domain Name System) 1 then enter the DSRM password 2 and click Next 3.

Check that the Global Catalog (GC) box is checked. In a single-domain environment, the recommendation is to leave all domain controllers with the Global Catalog option.
More information here: What is a Global Catalog (GC)? – Definition from Techopedia
In the DNS options, uncheck the Update DNS delegation 1 box and click Next 2.

Skip the installation options by clicking Next 1.

If necessary, change the default folders, otherwise click on Next 1.

A summary of the options is displayed, click Next 1 after viewing them.

Once the checks have been validated, click on the Install button 1.

Wait during the promotion, after restarting the server will be domain controller.


After the restart, log on with an account that is a member of the Domain Admins group.

The server is a domain controller and a member of it:

From the Active Directory Users and Computer console, the server is located in the Domain Controllers organizational unit.

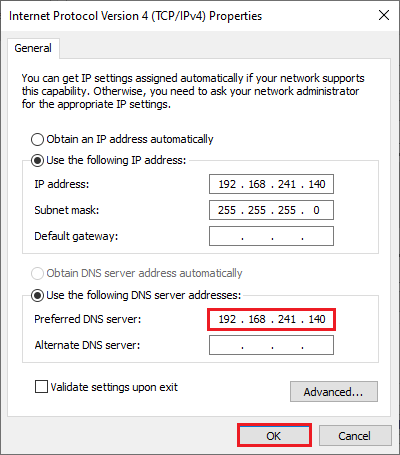
At the configuration level, if the DNS role has been added, the DNS server points to the address 127.0.0.1.

You now know how to install the AD DS role, configure an Active Directory domain and add a domain controller with Windows Server 2022.
If you are familiar with the AD DS role on earlier versions of Windows Server, Windows Server 2022 does not add anything new to configuring and administering an On-premise Active Directory environment.
Сегодня мы затронем тему настройки среды Active Directory в облаке под управлением VMware vCloud Director. Развертывание службы каталогов на базе MS Active Directory является достаточно частой практикой, с помощью которой администраторы ИТ систем предприятий повышают гибкость и безопасность управления учетными данными пользователей, а также правами доступа пользователей к информационным ресурсам предприятия. Даже если у вас есть уже настроенный локальный контроллер домена не в облаке, то вам пригодится и резервный контроллер домена, на случай проблем с сетью или другими проблемами или сбоями в офисе. Поскольку самой современной версией операционной системы является Windows Server 2022, то и настройку службы Active Directory мы проведем именно на ней.
Процесс настройки службы в облаке будет состоять из следующих этапов:
- Настройка и подготовка сетевого окружения в среде VMware vCloud Director
- Развернем виртуальную машину с Windows Server 2022
- Настроим Active Directory на базе Windows Server 2022
Все действия ниже мы выполняем в нашем облаке под управлением VMware vCloud Director 10. Из особенностей на которые стоит обратить внимание. Облако на базе VMware обеспечивает следующие возможности:
- Простая настройка Firewall, VPN, DHCP, NAT и пр. из понятной графической оболочки.
- Упрощает работу со многими сервисами.
- Работа с технологией группировки виртуальных машин vApp позволяет группировать виртуальные машины и управлять ими, как кластером.
Мы создадим сеть и vApp, в которых будут находиться все сервисы. Также настроим AD в Windows Server 2022 и IPSec VPN.
Открываем веб интерфейс датацентра, переходим во вкладку «Networks» и создаём новую сеть. Выберем Routed network. Затем выберем необходимый шлюз и тип интерфейса «Internal». Укажем название сети и шлюз по умолчанию в формате CIDR. В настройках DNS введём DNS сервера для данной сети. Кстати, эту часть мы подробно рассмотрели в нашем видео.
Перед созданием виртуальных машин, нам следует настроить DHCP сервер, для того, чтобы машины автоматически получили адреса. Перейдём в Edges -> Services -> DHCP и создадим новый пул. Настроим следующие параметры:
- IP-Range — диапазон раздаваемых IP адресов
- Primary/Secondary Name Server — IP адреса DNS серверов
- Default gateway — шлюз по умолчанию
- Subnet mask — маска подсети
Эти параметры будут передаваться нашим машинам в будущем. Не забудьте включить «DHCP Service Status» — это запустит сервис.
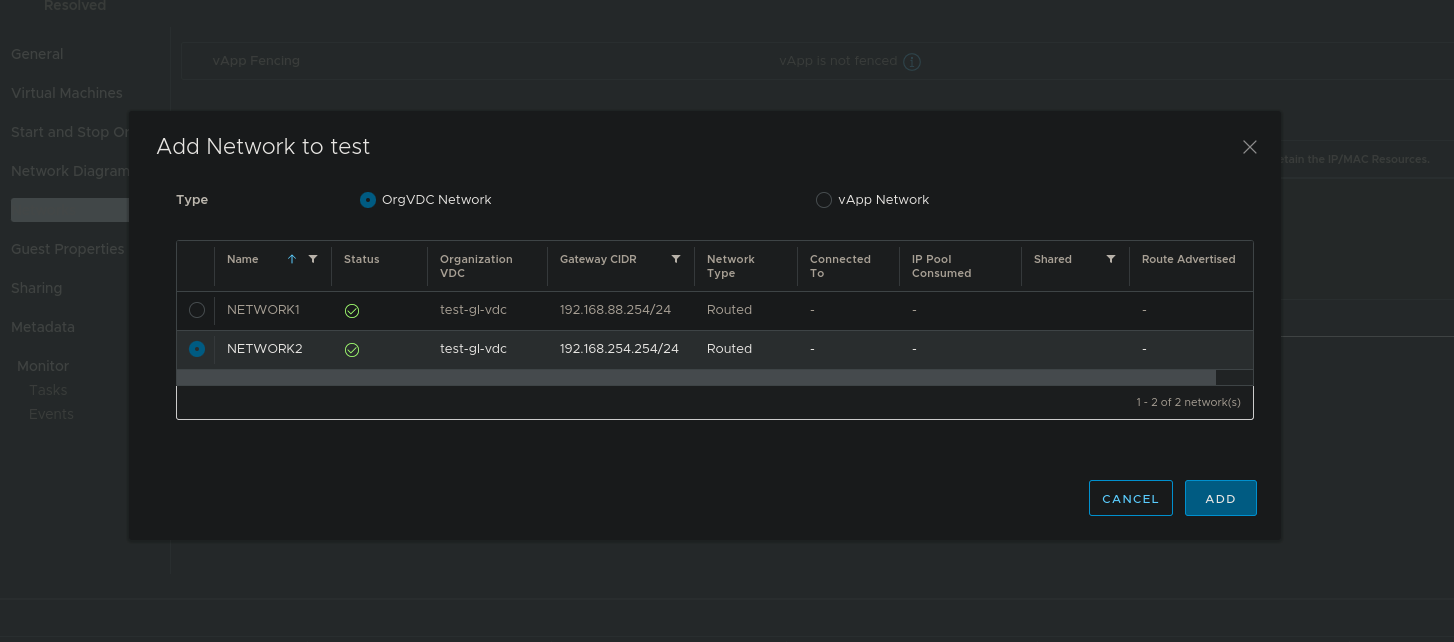
Теперь создадим новый vApp и добавим в него OrgVDC Network с ранее созданной сетью. Также создадим в нём следующие виртуальные машины: Windows Server 2022, Ubuntu 22.04, Ubuntu 18. Виртуальные машины устанавливаются стандартно. Виртуальная машина на базе Ubuntu 22.04 пригодится нам в следующей статье, где мы развернем корпоративный облачный диск на базе Nextcloud.
Как настроить Active Directory в Windows Server 2022
Перейдём к конфигурации Active Directory в Windows Server 2022
Установите следующие роли через диспетчер сервера:
- Доменные службы Active Directory
Выполните настройки, требуемые диспетчером серверов
После настроек можете перейти в Средства -> «Пользователи и компьютеры Active Directory» -> ваш домен -> Users. Здесь можно добавить новые группы и пользователей. Это приходится для настройки LDAP в будущем.
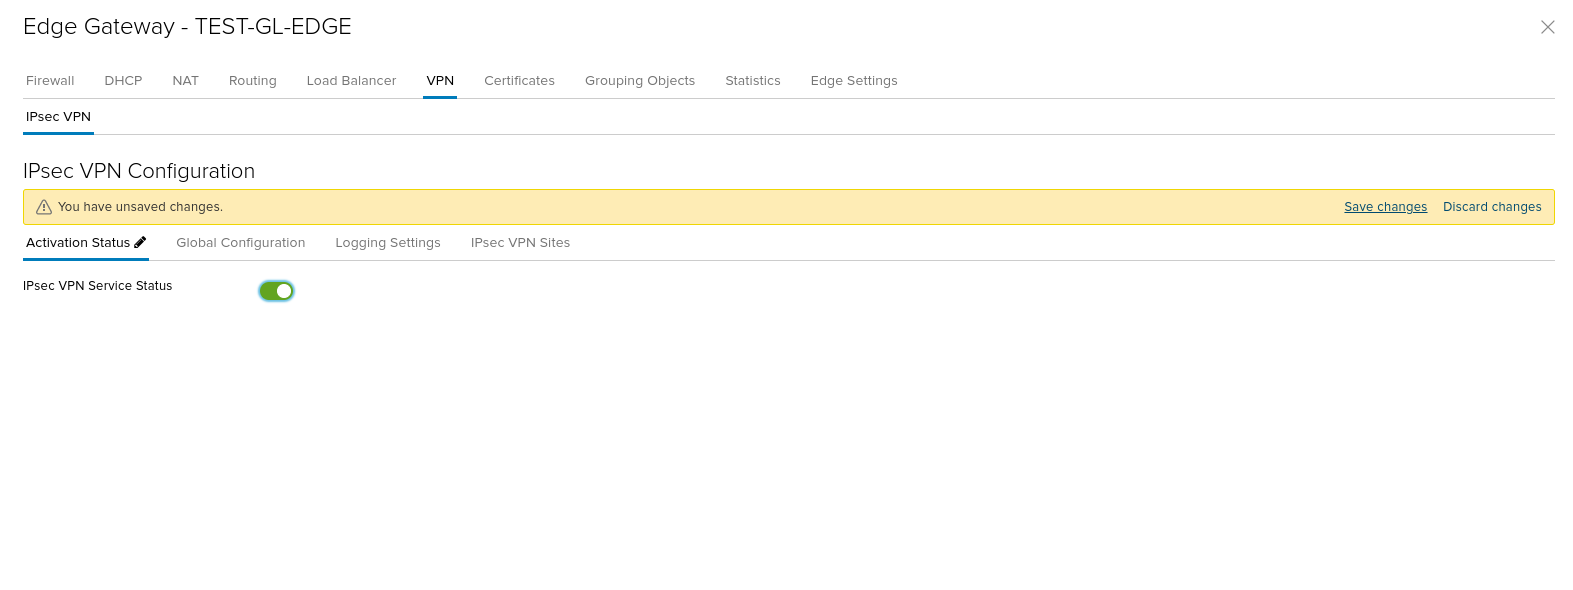
Теперь настроим IPSec VPN. Перейдите в Edges -> Services -> VPN -> IPSec VPN Sites и нажмите «+».
Здесь настройте следующие пункты:
- Enable — включить интерфейс
- Name — имя интерфейса
- Local Id, Peer Id — Ваш внешний IP
- Local Subnets — Ваша внутренняя подсеть в формате CIDR
- Peer Id, Peer Endpoint — IP удалённой площадки
- Peer Subnets — Подсеть удалённой стороны
- Pre-Shared Key — Ключ аутентификации. Одинаковый с обеих сторон
Применим настройки, перейдём в пункт Activation Status и активируем «IPSec VPN Service Status». IPSec VPN со стороны облака успешно настроен.
Вот и все, служба настроена и работает. В следующей статье мы рассмотрим работу облачного диска на базе Nextcloud с аутентификацией через LDAP службы каталогов.

Наш телеграм-канал
Регулярно пишем о технологиях.
Подписаться
Here, we have a look at how to install Active Directory in Windows Server 2022. We are going to show you the Domain controller installation and configuration of Active Directory domain services Role in Windows Server 2022 and promote Windows Server 2022 as a Domain Controller. First, I will show you how to install the ADDS binaries and then 2nd promote Windows Server 2022 to a Domain Controller.
The Windows Server 2022 operating system is the latest and often advanced Windows Server OS to date. Microsoft has constantly been making their Server operating system more cloud base with a lot of Azure features incorporated into the operating system natively. Using the new features and capabilities untied using Windows Admin Center, New Windows Server 2022 will have the most direct integration with Microsoft Azure of any server OS.
Microsoft is surely wanting to get everybody focused on Azure. The new combination with Azure makes Windows Server 2022 a simple way that customers get a powerful on-premises OS with all the Azure bells and whistles offered by Microsoft and unlocked potential with Windows Admin Center.
Table of Contents
- Change Computer Name
- Install Active Directory Services
- Domain Name System Server (AD & DNS)
- Promote Server to a Domain Controller
- How to configure DNS Server
Note:
Before you start, verify that the following things have been completed.
Change Computer Name
Change the computer name or server name, easy to an understandable format.
(In this Example: Server name: Server2022, Active Directory Server)
In the Network settings, use a static IP address is configuration is best practice.
How to Install Active Directory Domain Services
We are going to install an active directory & domain controller. It’s will be a physical computer or a virtual machine.
Once you changed the computer name and assign a static IP address to the server. Launch the Server Manager, click on Dashboard and then click on Add Roles and Features.
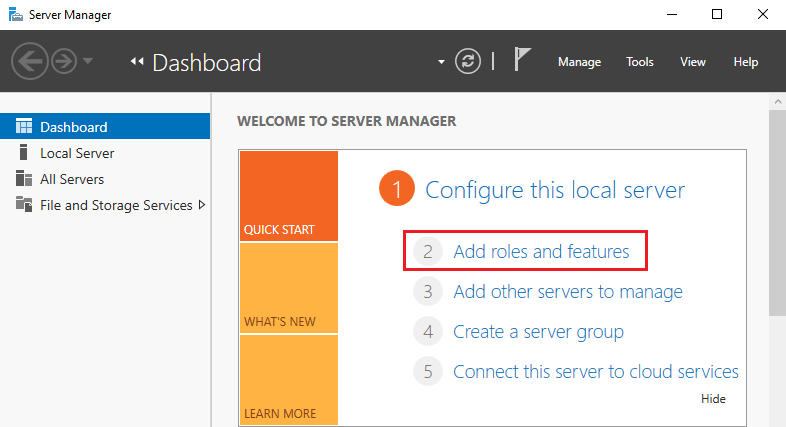
Add roles and features wizard, select next.
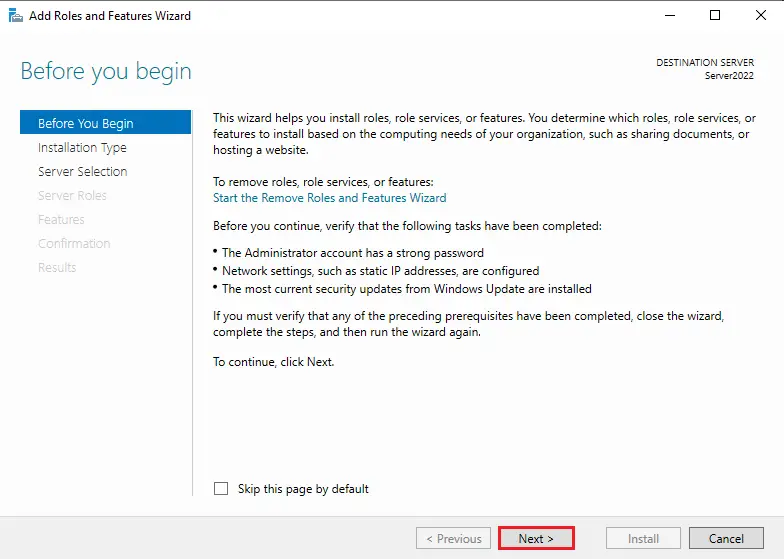
Installation type, select the radio button Role-based or feature-based installation, and then click on next.
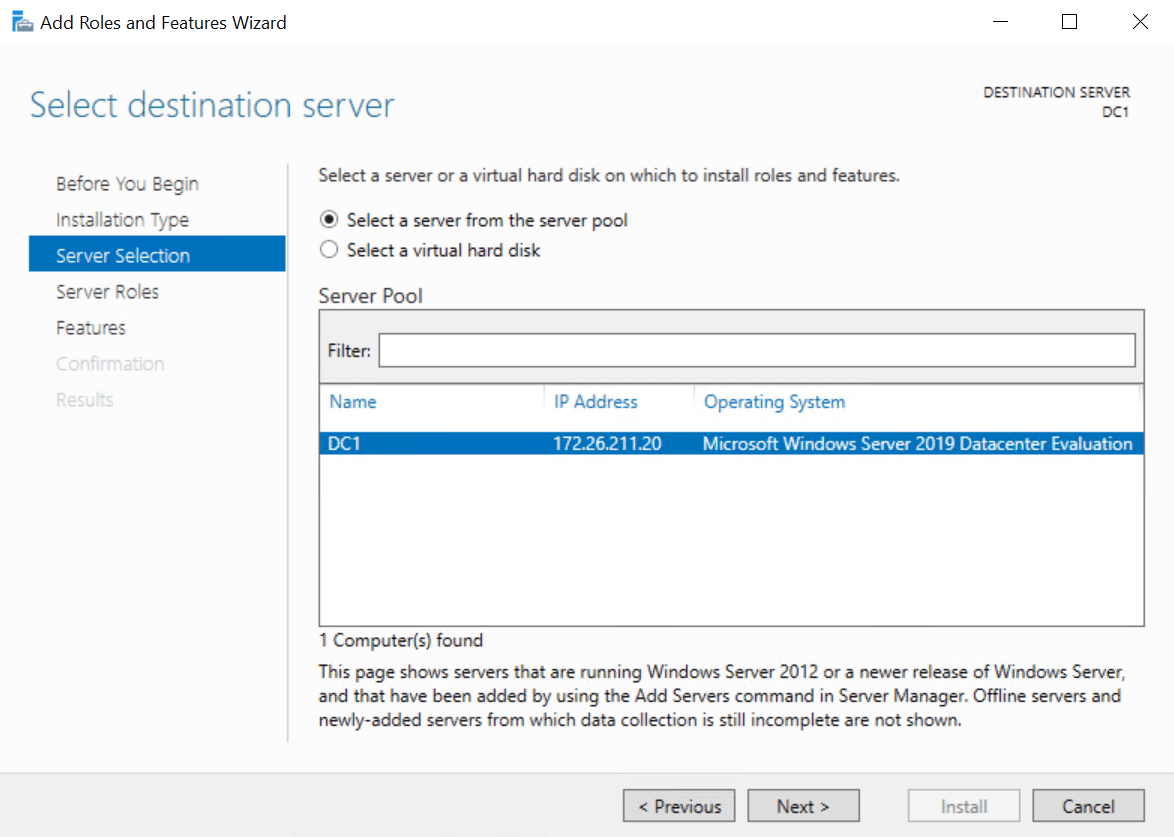
In the Select destination server option, choose the option Select a server from the server pool and then click on next. In the image below you can see what servers are available, select the one you wish to install the active directory on.
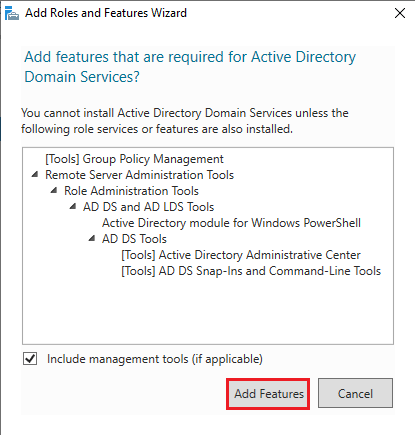
Choose server roles window, I am going to install Active Directory so I am selecting Active Directory Domain Services roles.
Click on Add features button to add features that are required for Active Directory Domain Services.
Domain Name Server (AD & DNS)
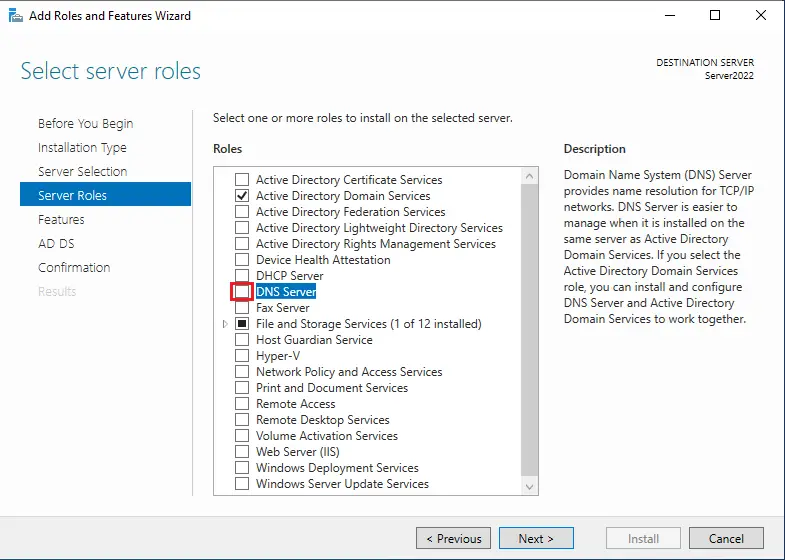
In the Select one more role to install wizard, select the DNS Server role name.
We need to install and configure Active Directory and DNS server roles to work together.
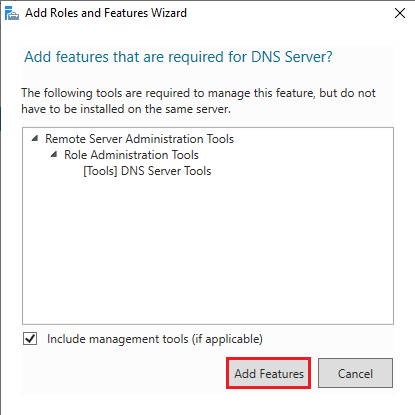
Click on Add Features button to add features that are required for the DNS server including management tools.
Please ensure the Active Directory Domain Services and DNS Server options are selected and then click on next.
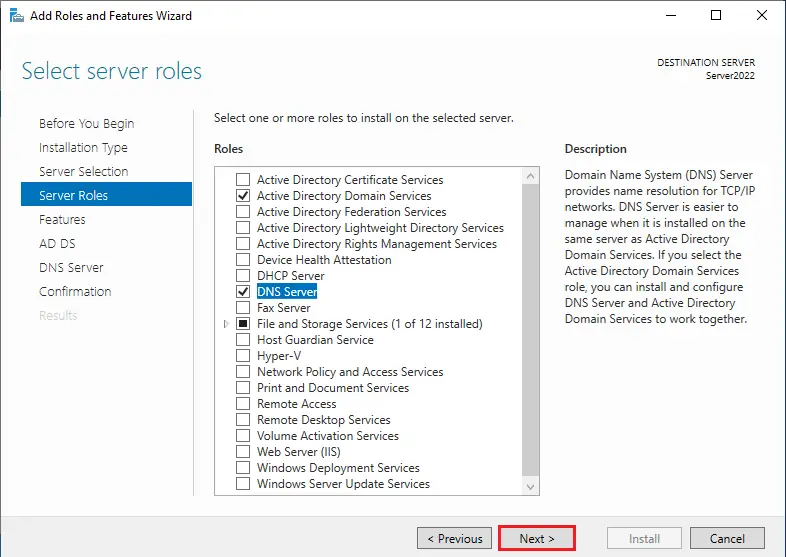
Choose the checkbox .NET Framework 3.5 Features and then click on the next option to continue.
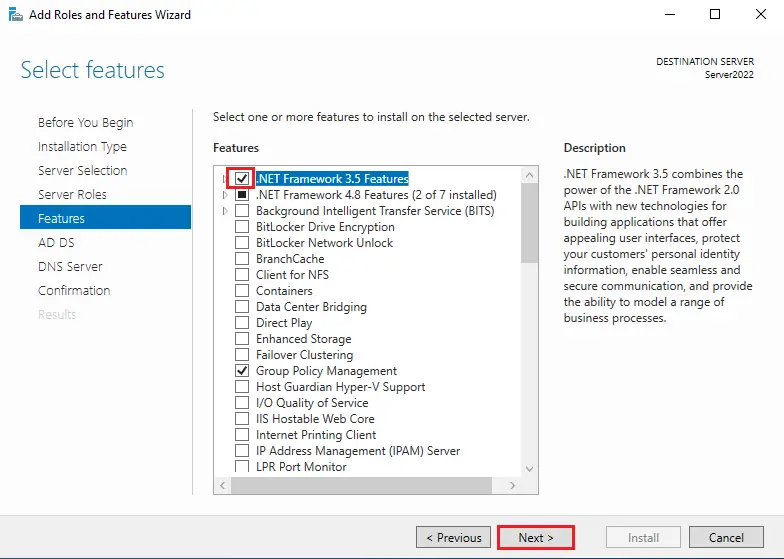
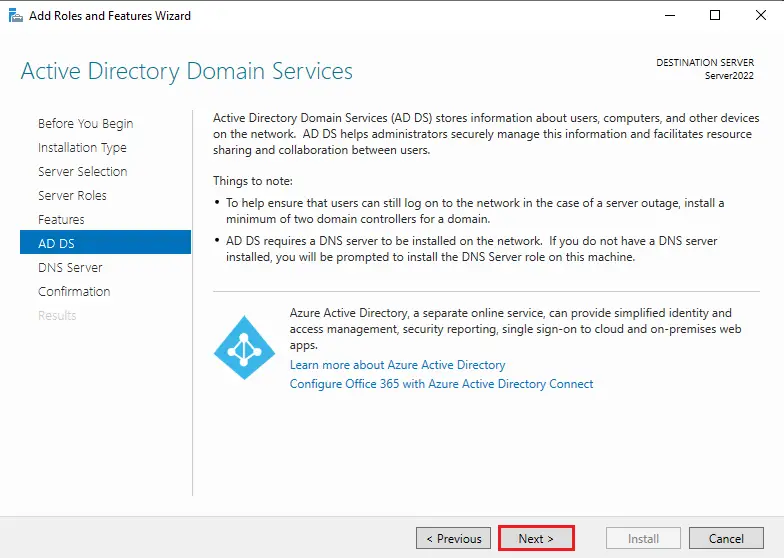
Active directory domain services, click next.
DNS Server option click next.

Click the next button to start the active directory and DNS server installation.
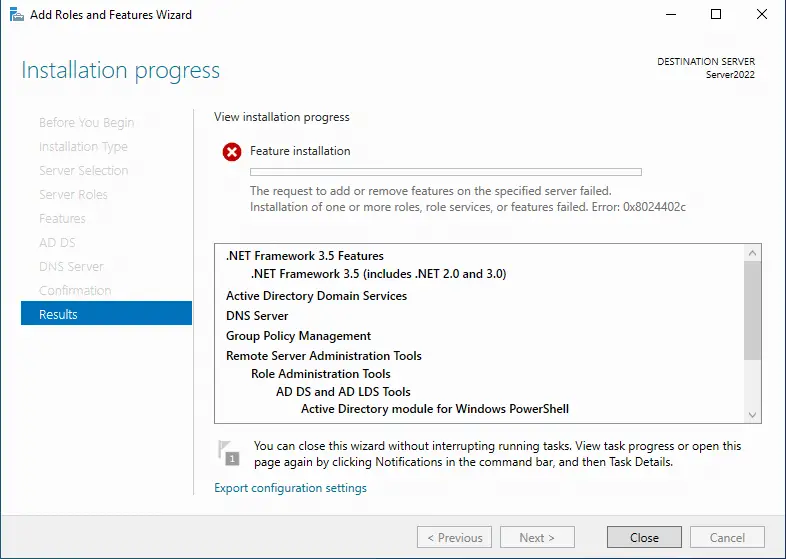
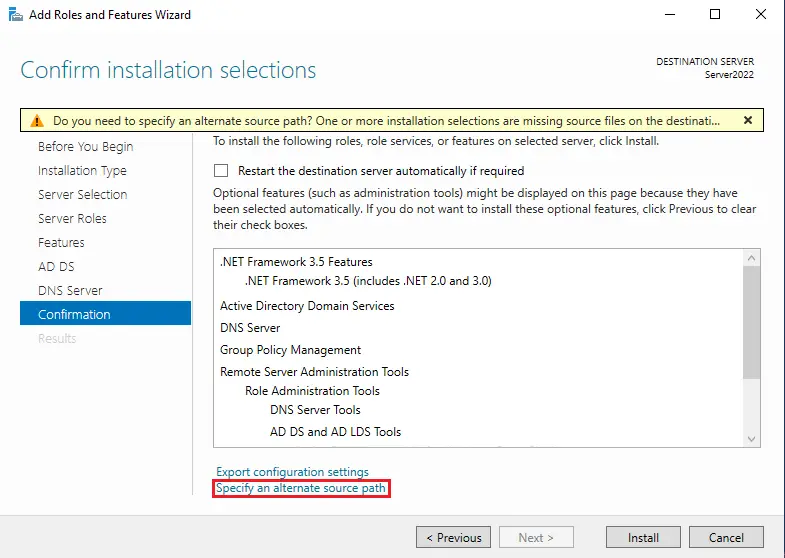
If you get the below error, its means we need to install .net framework 3.5
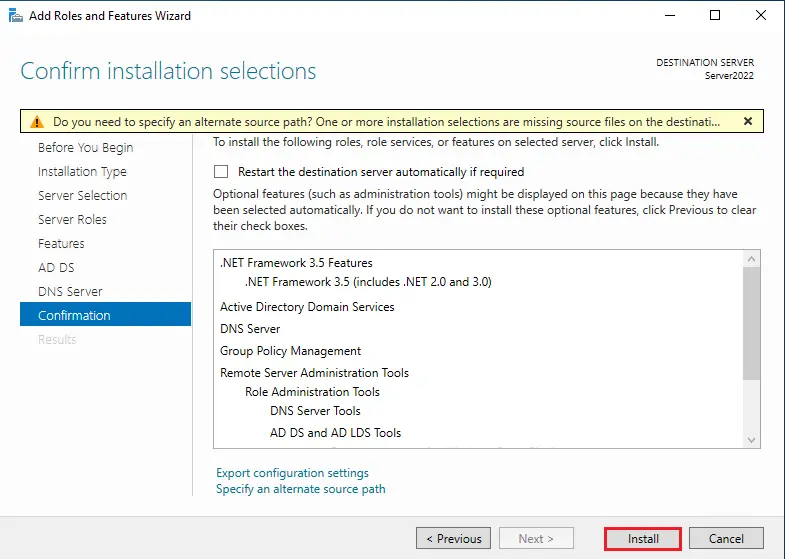
Follow the above steps to reach the confirmed installation selection window. Click on the Specify an alternate source path.
.Net Framework 3.5 Installation failed
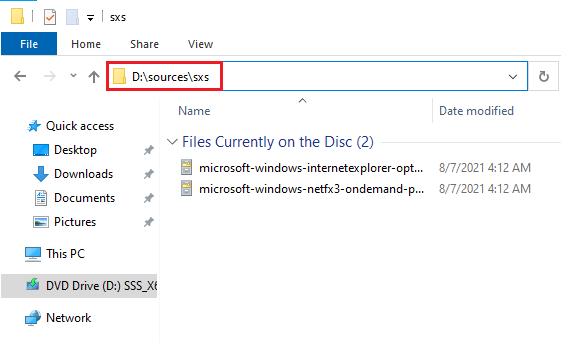
Insert the windows server 2022 installation media or mount the Server 2022 ISO file as a drive. Then go to the location of the source path drive lettersourcessxs. (My drive letter is D:sourcessxs). Copy the path D:sroucesxs
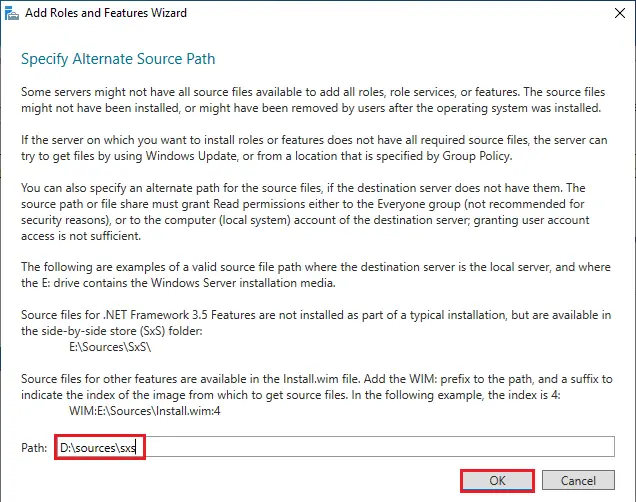
Then paste the copied path in the path option or type manually. Then click on the ok and select the Install button to continue.
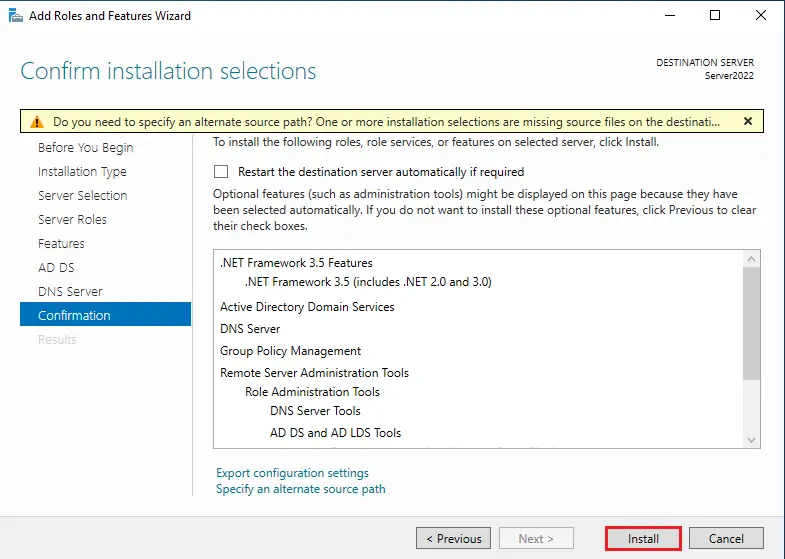
Click Install.
Active Directory and DNS server feature installation are in progress.
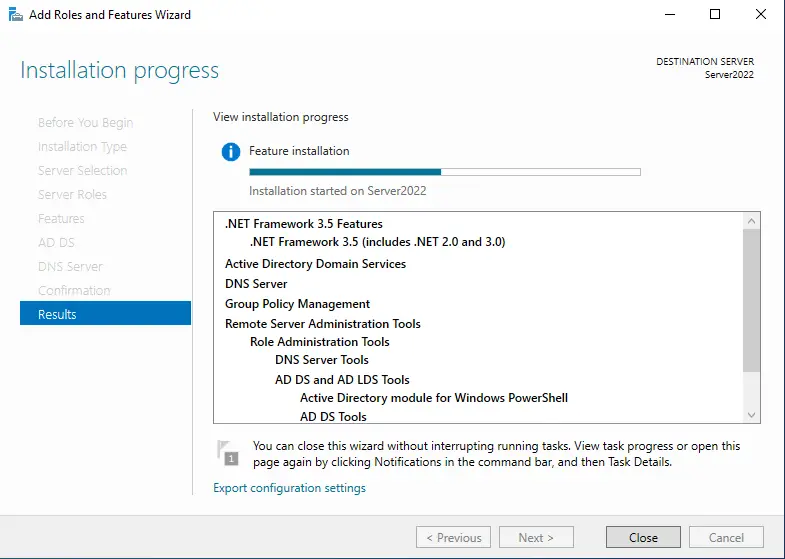
The Active Directory and DNS server installation process has been completed. Click close.
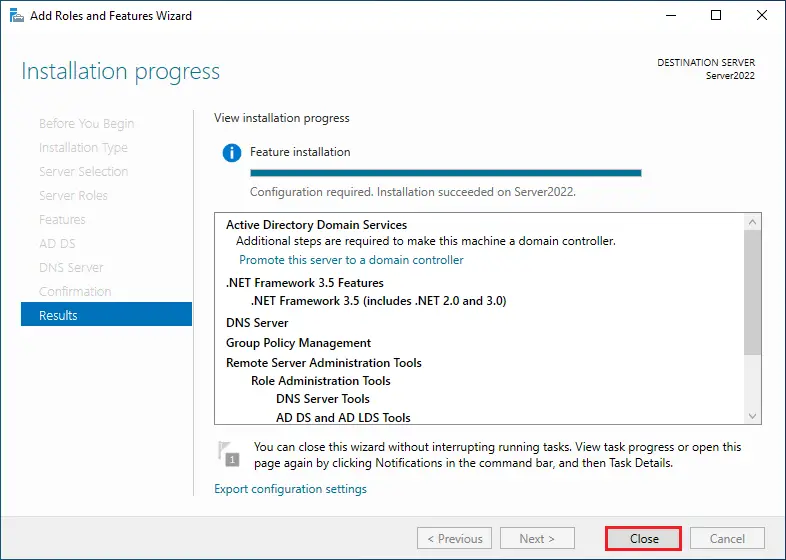
Promote Server to a Domain Controller
How to Configure DNS (Domain Name System)
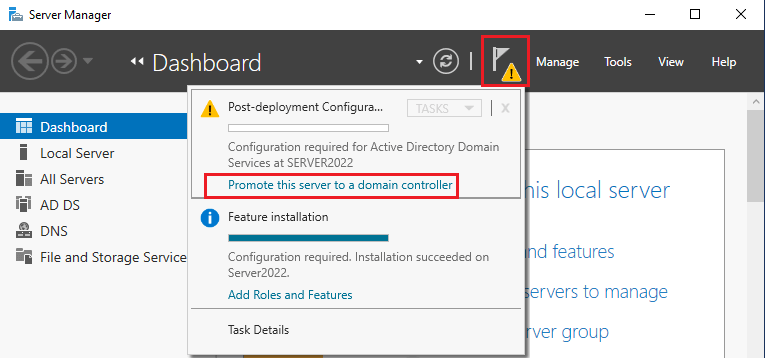
How to deploy and configure the Domain Controller 2022. In the Server Manager click on the notification button and then click on Promote this server to a domain controller.
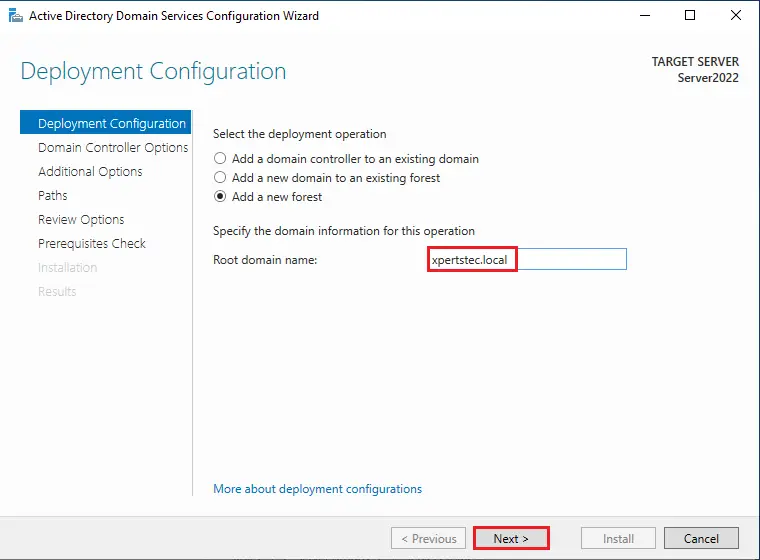
Active Directory Domain Services Configuration, deployment configuration. Now we are going to install new forest and new domain.
Select Add a new forest checkbox and then specify the domain information for this operation. Type your domain name next to the root domain name and then click on next.
(Example: xpertstec.local you can use xpertstec.com).
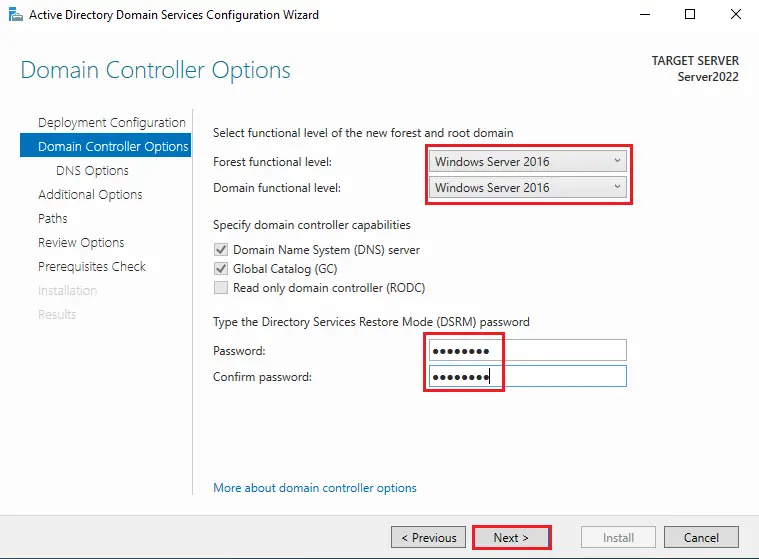
Domain controller options, select the forest functional level and domain functional level as per your requirement.
Specify domain controller capabilities.
Domain name system (DNS) server selected
Global Catalog (GC) selected
Type Directory Services Restore Mode (DSRM) password and then select Next.
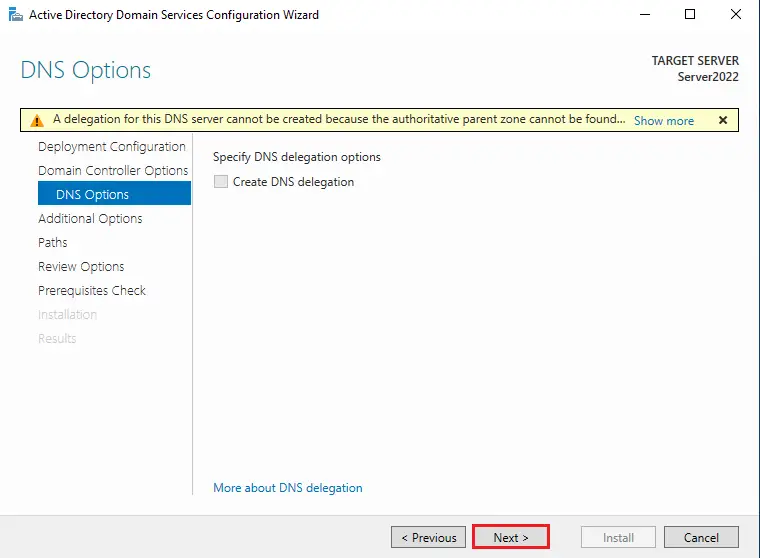
DNS Options windows, select next.
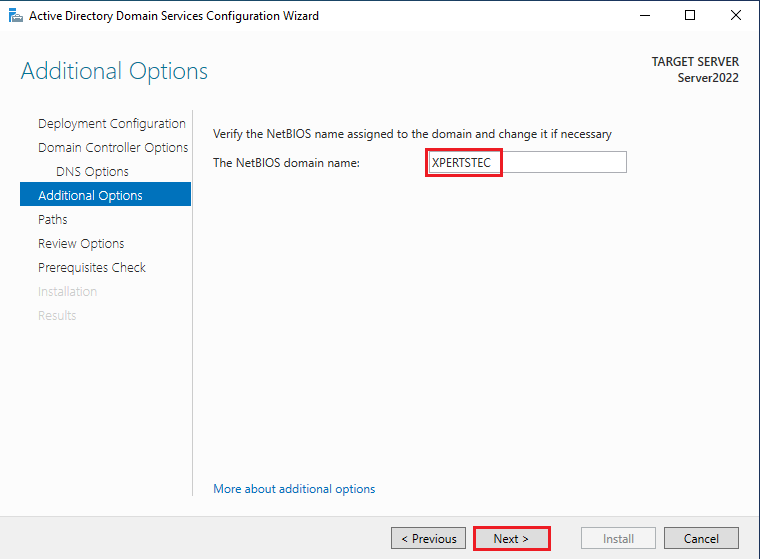
Verify the NetBIOS domain name. Mostly, it’s automatically picked from your domain name related. Then click next
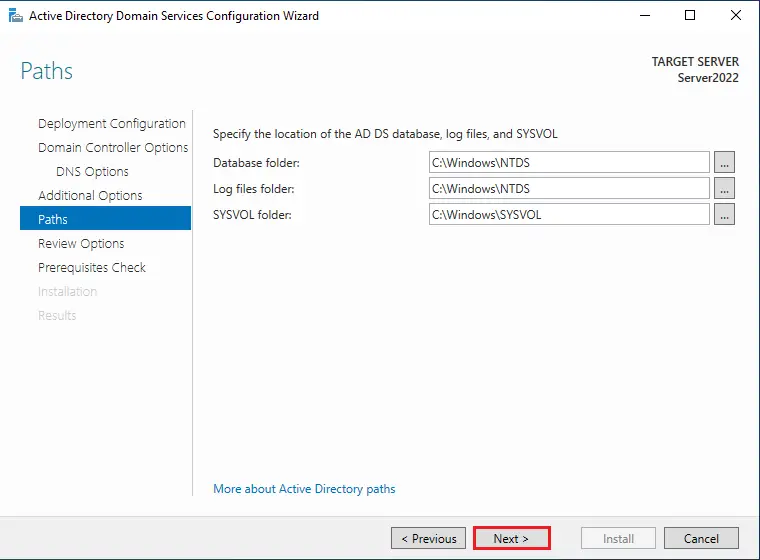
Specify the location of the AD DS database,
Database folder
Log files folder
SYSVOL folder
Keep it is as it is and click next.
Verify all the settings with your requirements and then click on next to continue.
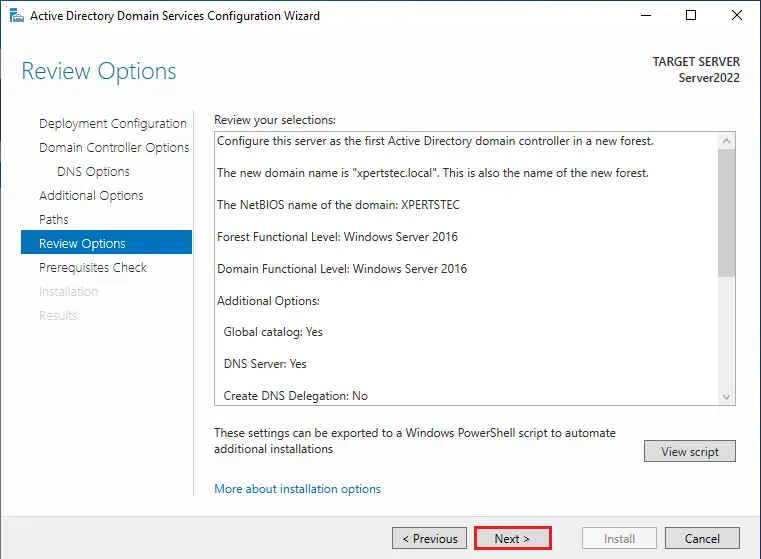
Prerequisites check done automatically

Click on the install button to start the Active Directory Domain Controller installation.
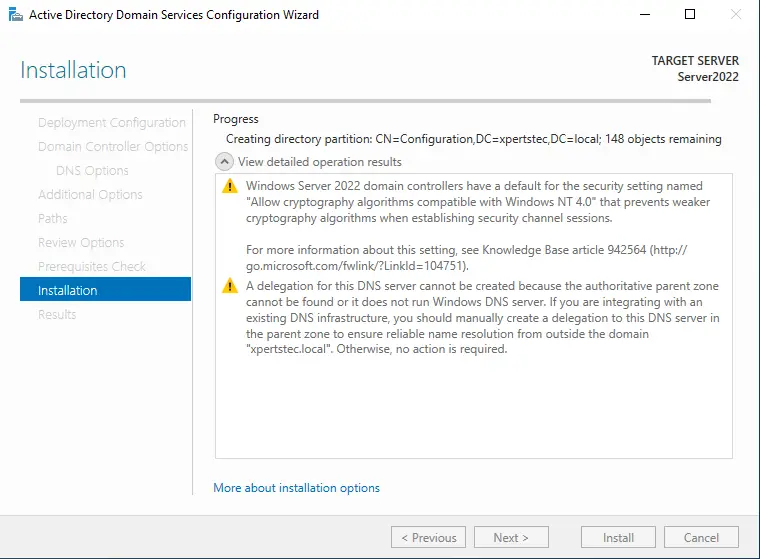
Domain Controller Installation is in Progress…
The domain controller server is successfully configured, then select close.
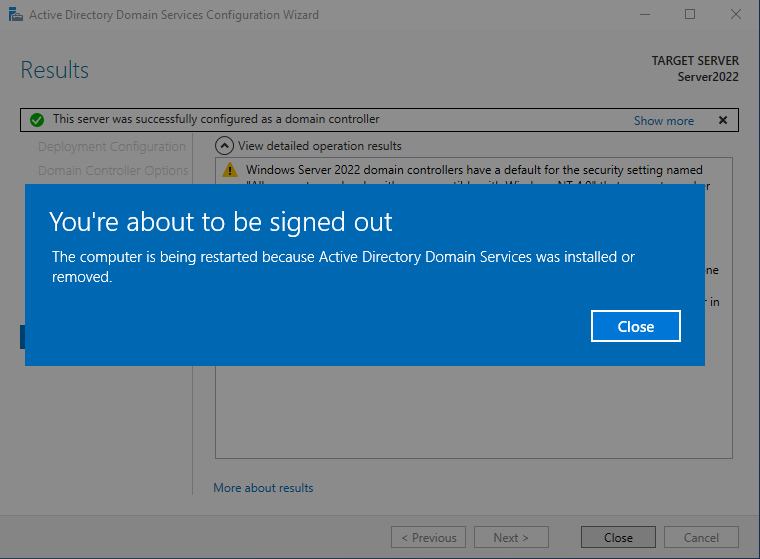
After configuration of the domain controller your server reboot automatically.
Domain Administrator Login screen windows, type your domain controller password.
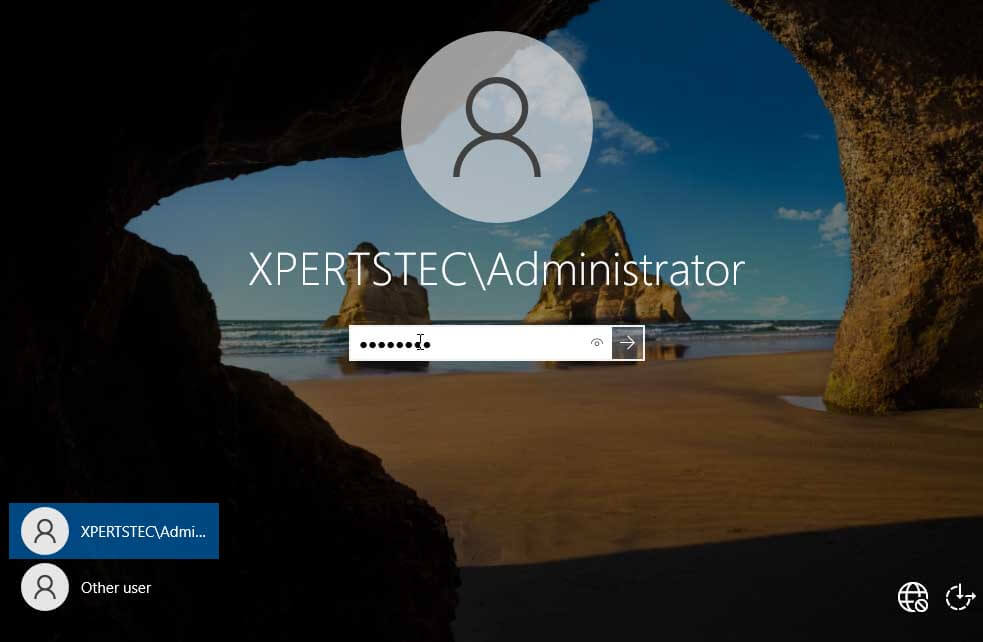
After login with your Active Directory Domain Controller, open your network connection TCP/IP properties. You can see the preferred DNS server IP Addresses.
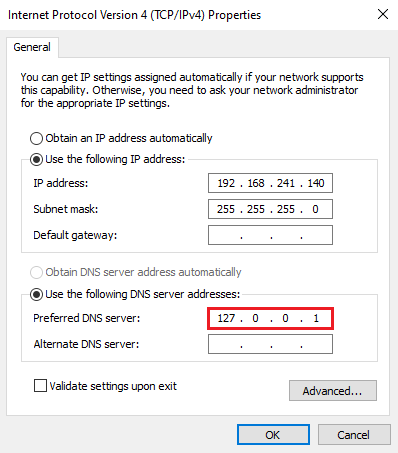
Change it with your DNS Server IP Address.

In this write-up, I will take you through the step-by-step guide on how to Install and Configure Active Directory Domain Services on Windows Server 2022. Before we delve into the hands-on session of this write-up, let’s take a look at some of the amazing new features that Windows Server 2022 brings. A quick peep into when Windows Server 2022 was released as it that a preview program started in March 2021. The general availability of Windows Server 2022 was announced on 1 September 2021, with a launch event as part of the Windows Server Summit on 16 September. Kindly refer to some of these related guides: How to delete and restore objects using Active Directory Administrative Center, Active Directory Ports: Service and network port requirements for Windows, How to find disabled Active Directory User accounts, What are Active Directory Forest, Trees, Domain, and Sites, and how to Setup a Domain Controller.
Windows Server 2022 is built on the strong foundation of Windows Server 2019 brings new security capabilities to combine with other security capabilities in Windows Server across multiple areas to provide defense-in-depth protection against advanced threats. Advanced multi-layer security in Windows Server 2022 provides the comprehensive protection that servers need today.
In addition, it brings many innovations on three key themes: security, Azure hybrid integration and management, and application platform. Also, Windows Server 2022 Datacenter: Azure Edition helps you use the benefits of the cloud to keep your VMs up to date while minimizing downtime. You can get the evaluation copy which is valid for 180 days of Windows Server 2022 here.
Active Directory Domain Services is a technology that allows us to build and centrally manage a scalable Microsoft Enterprise network. Looking at the overview of the lab session we’re going to carry out in this post, we are going to do the following:
- Installing a new instance of Active Directory
- Adding and configuring a new forest which is the overall container for Active Directory Domain Services and all its subjects
- We will create the first Domain in the Forest which is known as the
Forest Root Domain. We will give a fully qualified domain name (FQDN). Here, I am going to useblog.techdirectarchive.comas domain. - We will install DNS because we must have the Microsoft Active Directory Integrate with the DNS Server.
After we have successfully installed and configured the Active Directory Domain Name Services, the Server will become a Domain Controller which is popularly codenamed DC.😀
So let’s get started.
All you need to get started with me in the demo session is a copy of Windows Server 2022 installed on your PC. To download the ISO file under the evaluation copy click here. Don’t forget you can also try a copy of it directly on Azure (see screenshot below). To get started on Azure, signup for a 30-days free subscription here.

You can also install a copy of the Windows Server 2022 via Oracle VirtualBox or VMWare. To learn how to do this, kindly refer to these related posts how to Install Windows 11 in Oracle VirtualBox with no TPM Support. In case you run into the failed to open session error while trying to launch your VM Image on VirtualBox, kindly refer to this post on how to fix “Failed to open session in VirtualBox to install Windows 11 Image” . You can read about my other previous topics of interest such as how to block upgrade to Windows 11 through Local Group Policy or Registry Editor from Windows 10, how to back up an Azure VM from the VM settings, Azure virtual networks: How to prepare Azure and on-premises virtual networks using Azure CLI commands and Network File System: How to install NFS Server on Windows Server.
Installing of Active Directory Domain Name Services on Windows Server 2022.
As confirmed by the screenshot below, we have our Windows Server 2022 set up completely on our PC.

Now let’s take the following steps to have the Active Directory Domain Services (ADDS) installed.
Step 1. Open Server Manager – To open the server manager, hit the Windows key on your keyboard and type “Server Manager” to search for the application. Once it is open as illustrated by the figure below, we would proceed to the next step of installing Active Directory Domain Services.

Step 2: Add Roles and Features
Right-click on “Manage” on the “Server Manager” window and choose “Add Roles and Features“. This will open the “Add Roles and Features Wizard” which ushers us to the part where we install Active Directory Domain Services. Click on next.


Step 3: Installation Type
On the “Installation Type”, leave “Role-based or feature-based installation” radio button selected and click on next (see screenshot below).

Step 4: Server Selection
On this interface titled “Select destination server“, select the server you are to install AD DS and click next. I am going to choose my local server.

Step 5: Server Roles
The previous step will lead you to the next page as shown below. Here, you will see many options with square checklist box beside them. As you can see, we are choosing “Active Directory Domain Services“.

Step 6: Add Features
Immediately you choose that option, a new part pops up. On the page, just click on “Add Features” tab and hit “Next“.

Step 7: Select Features
On the next page after Step 6 titled “Select features“, just hit “Next” to lead you to installations of AD DS.

As shown below, you will be presented with the next page titled “Active Directory Domain Services“. Here, click on “Next“

Step 9: Confirm your selections
The next page is about Confirming that you want to install AD DS before actually installing it. Here, if you are sure about the installation, click on install. You can optionally choose the option that restarts the server whenever required which we are not choosing it in our own case. Click on close once it is done.

Close the Installation Compete Screen Wizard or go ahead with the next configuration of promoting the server to a domain controller which will be our next step as shown on the screenshot below

Now that the installation has completed successfully. We going to go ahead to configure the AD DS following the steps below:
Step 1: Promote to Domain Controller and Add the Forest
After you have finished installing Active Directory Domain Services, the next step is to promote it to a Domain Controller (DC). On the same “Installation Complete Window” as shown on the screenshot above, Click on "Promote this server to a domain controller". Since this is a brand new Active Directory Domain Name Services, so we’re going to choose "Add a New Forest" (see the screenshot below).

Since a forest is the overall container for AD DS and its services, we are going create the first domain within the forest which is known as the "Forest Root Domain" and specify a name which must be a fully qualified domain name (FQDN) as blog.techdirectarchive.com. You are free to specify your fully qualified domain name based on your organization’s needs. Remember to specify the Active Direct Domain Services restored mode password as well.
Note: One suggested methods is to use a subdomain of a public registered domain. In my case techdirectarchive.com is my public registered domain name while blog.techdirectarchive.com is the subdomain. In some situations, you may see something like techdirectarchive.local. Now, one thing to note here is the .local is an unofficial top-level domain name which is not supported by internet standard and unofficial domain name should really only be used in a test lab environment. Avoid using it in the production environment because it causes issue with certificates. But for he purpose if the demo session in this post, if you don't have your public registered domain name you can go ahead and use the .local. 
At this stage, this is where you are to specify the forest and domain functional levels. This determines the AD DS and forest capabilities as well as determine which operating system can be run in the controller.
Note one time that as shown on the screenshot above, the current functional level is Windows Server 2016. This means that all Domain Controller within the forest must have Windows Server 2016 and above because Windows Server 2016 is the latest we can choose because there have not been any significant changes since the Windows Server 2016 version.Step 2: DNS Options
On the next page ( DNS Options ), you will probably see an error on top with the words “A delegation for this DNS server cannot be created because the authoritative parent zone nameserver cannot be found” (see the screenshot below). Ignore it and click “Next“

Step 3: NetBIOS domain name
On the next page, leave the NetBIOS domain name as default or you can change it as long as it is not longer than 15 characters. Click “Next” after that.

Step 4: Paths
Leave paths as default and click “Next” as shown below.

Step 5: Review Selections
In this step, the server allows you to review what you have done so far. If you are good with the selections you have done, click “Next” to proceed to the next stage.

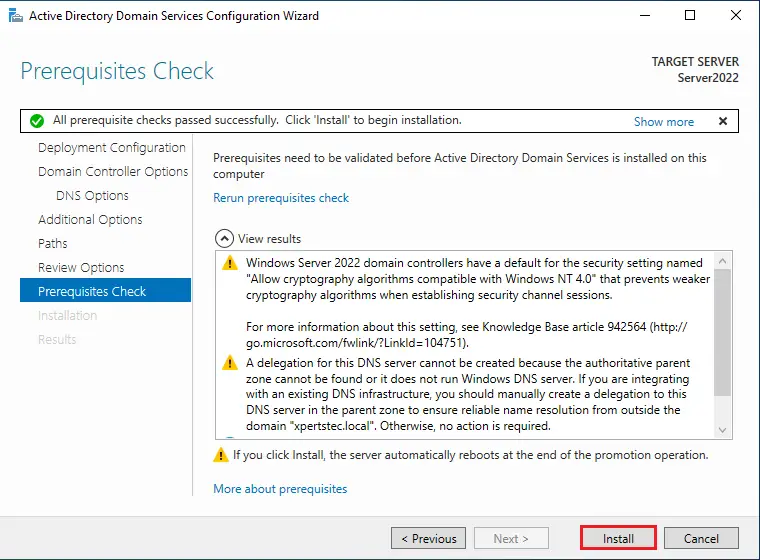
Step 6: Prerequisites Check
In the prerequisites step, the system will be validated before Active Directory Domain Services is installed. If you get any errors here, please look at it and fix anything in the previous steps. If all is okay, click “Install“. In our own case as shown in the screenshot below, all prerequisite check have been passed.


After that, the Server will reboot and you can then log into the Domain with the credentials you set in Step 1 as shown below:

Finally, if we check through the Server Manager and click on the “Tools” then select the “Active Directory Users and Computers” you will see that our domain name is there. In our case we have created on Organizational Unit (OU) which serves as department and created an account for myself as the user (see the screenshot below).


In conclusion, one of the best features that make Windows Server to be widely adopted in the Enterprise environments is Active Directory. This single Sign-on feature that seamlessly and easily integrates with most of Microsoft products makes user management among other tasks quite easy and fun. Congratulations, in this articles you have learnt how to set it up from start to finish on Windows Server 2022.