Брандмауэр Microsoft Defender Firewall встроен во все современные версии Windows и Windows Server и позволяет настраивать правила фильтрации входящего и/или исходящего сетевого трафика на компьютере. Правила Windows Firewall можно настраивать локально на компьютере пользователя (с помощью консоли
wf.msc
, команды
netsh
или встроенного PowerShell модуля NetSecurity). На компьютерах Windows, которые добавлены в домен Active Directory вы можете централизованно управлять правилами и настройками Microsoft Defender Firewall с помощью групповых политик.
В крупных организациях правила фильтрации портов обычно выносятся на уровень маршрутизаторов, L3 коммутаторов или выделенных межсетевых экранах. Однако ничего не мешает вам распространить ваши правила ограничения сетевого доступа Windows Firewall к рабочим станциям или серверам Windows.
Содержание:
- Включить Windows Defender с помощью GPO
- Создать правила файервола Windows с помощью групповой политики
- Применить политики брандмауэра Microsoft Defender к компьютерам Windows
- Импорт и экспорт правил брандмауэра Windows в GPO
- Доменные и локальные правила Microsoft Defender
Включить Windows Defender с помощью GPO
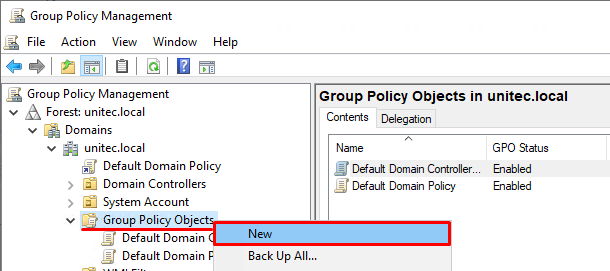
Запустите консоль управления доменными групповыми политиками (Group Policy Management Console,
gpmc.msc
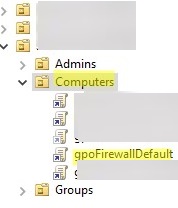
), создайте новую GPO с именем gpoFirewallDefault и перейдите в режим редактирования (Edit).
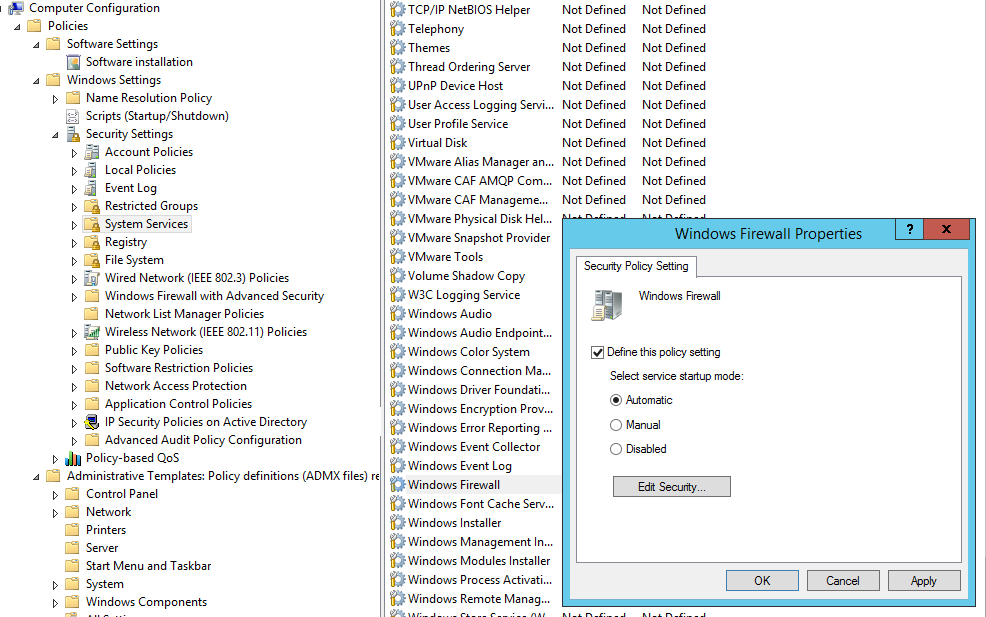
Чтобы пользователи (даже с правами локального админа) не могли выключить службу брандмауэра, желательно настроить автоматический запуск службы Windows Firewall через GPO. Для этого перейдите в раздел Computer Configuration -> Windows Settings -> Security Settings -> System Services. Найдите в списке служб Windows Firewall и измените тип запуск службы на автоматический (Define this policy setting -> Service startup mode Automatic). Убедитесь, что у пользователей нет прав на остановку служб.
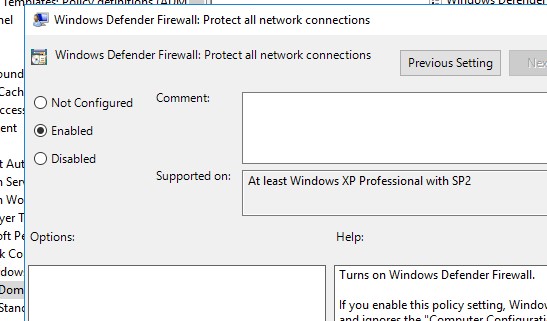
Затем перейдите в раздел Computer Configuration -> Policies -> Administrative Templates -> Network -> Network Connections -> Windows Defender -> Firewall -> Domain Profile и включите политику Windows Defender Firewall: Protect all network connections.
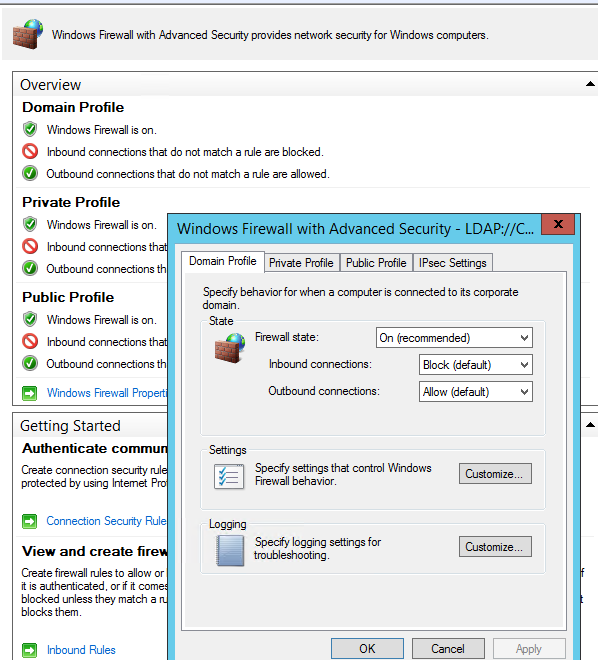
Откройте свойства Windows Firewall with Advanced Security в разделе GPO Computer Configuration -> Windows Settings -> Security Settings.
На всех трех вкладках Domain Profile, Private Profile и Public Profile (что такое профиль сети в Windows) измените состояние Firewall state на On (recommended). В зависимости от политик безопасности в вашей организации вы можете указать, что все входящие подключения по умолчанию запрещены (Inbound connections -> Block), а исходящие разрешены (Outbound connections -> Allow). Сохраните изменения.
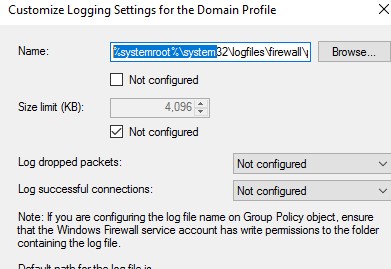
В целях отладки правил файервола вы можете включить запись логов Windows Defender в текстовый файл %systemroot%system32logfilesfirewallpfirewall.log (по умолчанию). Можно включить логирование отклоненных пакетов (Log dropped packets) или пакетов, который были разрешены правилами файервола (Log successfully connections). По-умолчанию логирование сетевых соединений в Windows отключено.
Создать правила файервола Windows с помощью групповой политики
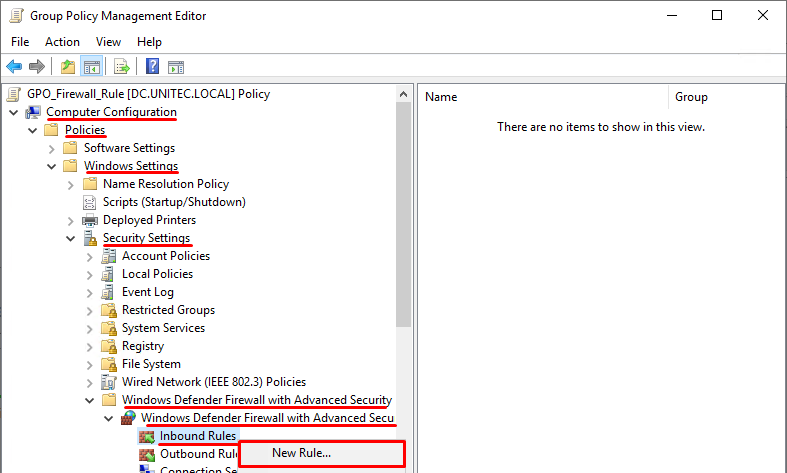
Теперь рассмотрим, как создать правила файервола Microsoft Defender с помощью GPO. Для настройки правил, перейдите в раздел Computer Configuration -> Windows Settings -> Security Settings -> Windows Firewall with Advanced Security.
Интерфейс этого раздела напоминает локальную консоль управления брандмауэром Windows и состоит из трех секций:
- Inbound rules
- Outbound rules
- Connection security rules
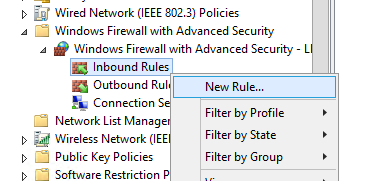
Попробуем создать разрешающее входящее правило файервола. Например, мы хотим разрешить подключение к компьютерам по RDP (порт по умолчанию TCP 3389). Щелкните ПКМ по разделу Inbound Rules и выберите пункт меню New Rule. Запустится мастер создания нового правила брандмауэра.
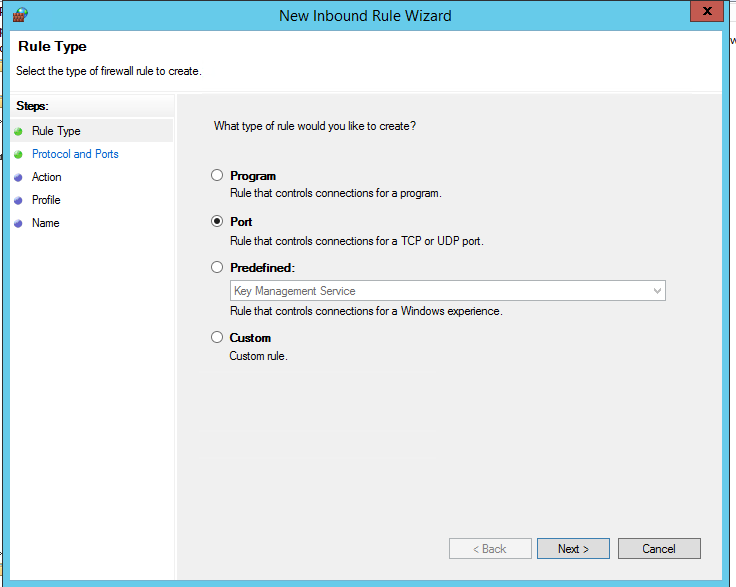
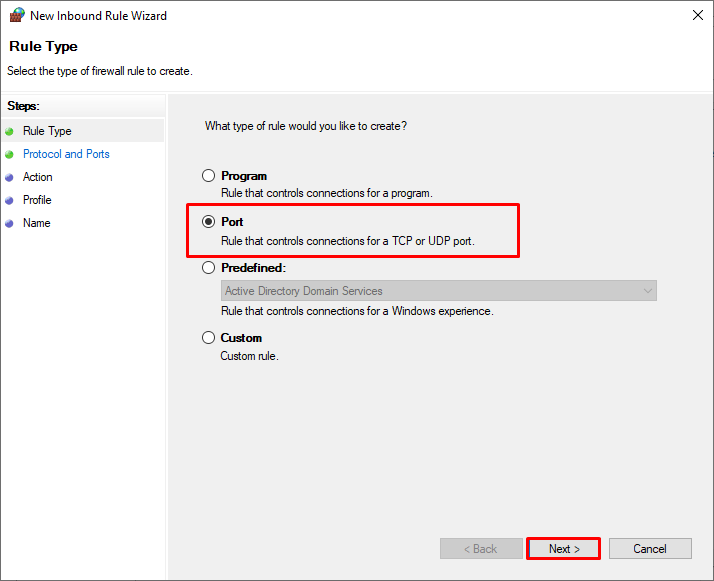
Выберите тип правила. Можно разрешить доступ для:
- Программы (Program) – можно выбрать исполняемый exe программы;
- Порта (Port) – выбрать TCP/UDP порт или диапазон портов;
- Преднастроенное правило (Predefined) – выбрать одно из стандартных правил Windows, в которых уже имеются правила доступа (описаны как исполняемые файлы, так и порты) к типовым службам (например, AD, Http, DFS, BranchCache, удаленная перезагрузка, SNMP, KMS, WinRM и т.д.);
- Собственное правило (Custom) – здесь можно указать программу, протокол (другие протоколы помимо TCP и UDP, например, ICMP, GRE, L2TP, IGMP и т.д.), IP адреса клиентов или целые IP подсети.
В нашем случае мы выберем правило Port. В качестве протокола укажем TCP, в качестве порта – Specific local ports -> 3389.
Далее нужно выбрать что нужно сделать с таким сетевым подключением: разрешить (Allow the connection), разрешить если оно безопасное или заблокировать (Block the connection).

Осталось выбрать профили сети, для которых нужно применить это правило. Можно оставить все профили (Domain, Private и Public).
На последнем шаге нужно указать имя правило и его описание. Нажмите кнопку Finish и оно появится в списке правил брандмауэра.
В современных версиях Windows для трафика удаленного рабочего стола RDP также используется порт UDP 3389. Поэтому создайте второе правила Microsoft Defender и для этого порта.
Аналогичным образом вы можете настроить другие правила для входящего трафика, которые должны применятся к вашим клиентам Windows.

Вы можете создать правила как для входящего и исходящего трафика.
Выше мы рассмотрели, как использовать графический мастер для создания правил Windows Defender Firewall. Также вы можете сформировать список правил в простом текстовой форме и быстро создать правила для групповой политики Defender.
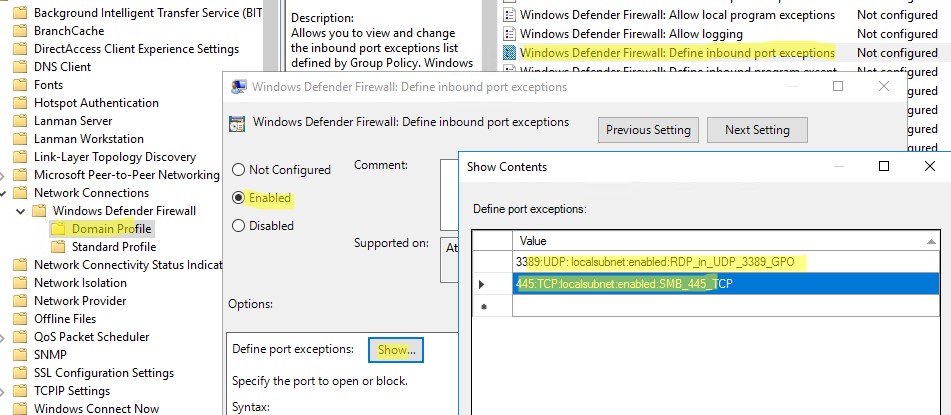
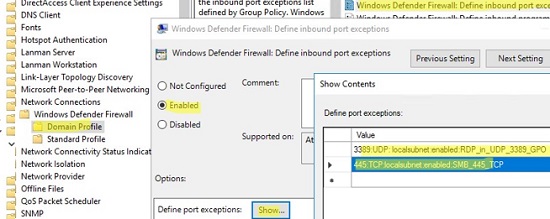
Перейдите в раздел Computer Configuration -> Policies -> Administrative Templates -> Network -> Network Connections -> Windows Defender Profile -> Domain Profile и откройте параметр Windows Defender Firewall: Define inbound port exceptions. Здесь вы можете создать список правил с помощью простых текстовых строчек.
Ниже представлен список правил, который я хочу добавить в групповую политику
3389:UDP:localsubnet:enabled:RDP_in_UDP_3389_GPO
445:TCP:localsubnet:enabled:SMB_445_TCP
443:TCP:192.168.100.10:enabled:HTTP_in_445_TCP
Нажмите кнопку Show и построчно скопируйте ваши правила в окно Define port exceptions.
Этот способ позволяет вам быстро создать большое количество входящих правил для файервола Windows.
Применить политики брандмауэра Microsoft Defender к компьютерам Windows
Теперь осталось назначить политику Firewall-Policy на OU (Organizational Unit) с компьютерами пользователей. Найдите в консоли Group Policy Management нужный OU, щелкните по нему правой кнопкой и выберите Link an Existing GPO. Выберите в списке вашу политику.
Важно. Прежде, чем применять политику файервола к OU с продуктивными компьютерами, настоятельно рекомендуется проверить ее на тестовых компьютерах. Из-за некорректной настройки брандмауэра вы можете полностью заблокировать сетевой доступ компьютерам. Для диагностики применения групповых политик используйте утилиту gpresult.exe.
Обновите настройки групповых политик на клиентах (
gpupdate /force
). Проверьте, что указанные вами порты открыты на компьютерах пользователей (можно использовать командлет Test-NetConnection или утилиту Portqry).
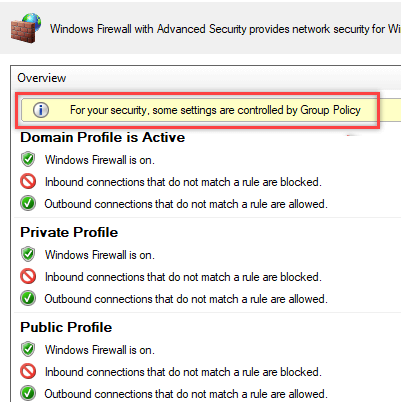
На компьютере пользователя откройте Панель управленияСистема и безопасностьБрандмауэр Защитника Windows и убедитесь, что появилась надпись: Для обеспечения безопасности, некоторые параметры управляются групповой политикой (For your security, some settings are controlled by Group Policy), и используются заданные вами настройки брандмаэера.

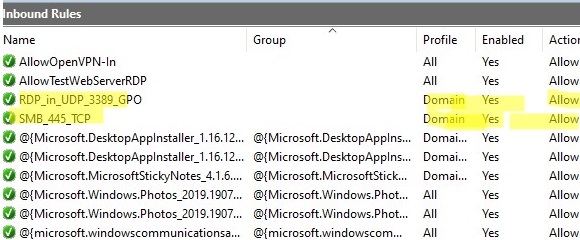
Пользователь теперь не может изменить настройки брандмауэра, а в списке Inbound Rules должны быть указаны все созданные вами правила. Обратите внимание, что по умолчанию новые правила из GPO добавляются к уже существующим локальным правилам файервола.
Также вы можете вывести текущие настройки Windows Defender с помощью команды:
netsh firewall show state
Или можно представить список правил в табличной форме с помощью скрипта PowerShell:
Get-NetFirewallRule -Action Allow -Enabled True -Direction Inbound |
Format-Table -Property Name,
@{Name='Protocol';Expression={($PSItem | Get-NetFirewallPortFilter).Protocol}},
@{Name='LocalPort';Expression={($PSItem | Get-NetFirewallPortFilter).LocalPort}},
@{Name='RemotePort';Expression={($PSItem | Get-NetFirewallPortFilter).RemotePort}},
@{Name='RemoteAddress';Expression={($PSItem | Get-NetFirewallAddressFilter).RemoteAddress}},
Enabled,Profile,Direction,Action

Импорт и экспорт правил брандмауэра Windows в GPO
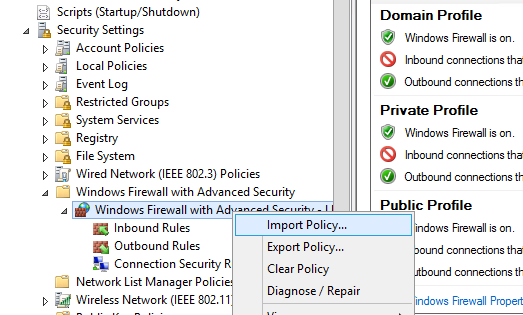
Консоль Windows Defender Firewall позволяет экспортировать и импортировать текущие настройки файервола в текстовый файл. Вы можете настроить правила брандмауэра на эталонном компьютере и экспортировать их в консоль групповых политики.
Настройте нужные правила, замет встаньте на корень оснастки брандмауэра (Монитор Брандмауэра Защитника Windows в режиме повышенной безопасности) и выберите пункт Действие -> Экспорт политики
Политика выгружается в WFW файл, который можно импортировать в редакторе Group Policy Management Editor, выбрав пункт Import Policy и указав путь к файлу wfw (текущие настройки будут перезаписаны).
Доменные и локальные правила Microsoft Defender
В GPO вы можете настроить, хотите ли вы разрешить локальным администраторам создавать на своих компьютерах собственные правила брандмауэра и как эти правила должны объединяться с правилами, назначенными через GPO.
Откройте в GPO свойства политики (Windows Firewall Properties), выберите вкладку с профилем (Domain) и нажмите кнопку Customize.
Обратите внимание на настройки в разделе Rule merging. По умолчанию режим объединения правил включен. Вы можете принудительно указать, что локальный администратор может создавать собственные правила брандмауэра: в параметре Apply local firewall rules выберите Yes (default).

Совет. Блокирующие правила файервола имеют приоритет над разрешающими. Т.е. пользователь не сможет создать собственное разрешающее правило доступа, противоречащее запрещающему правилу, настроенному администратором через GPO. Однако пользователь может создать локальное запрещающее правило, даже если этот доступ разрешен администратором в политике.
Несколько советов об управлении брандмауэром Windows через GPO
- Создавайте отдельные политики с правилами брандмауэра для серверов и рабочих станций (для каждой группы одинаковых серверов возможно придется создать собственные политики в зависимости от их роли). Т.е. правила файервола для контроллера домена, почтового Exchange сервера, сервера с ролью Remote Desktop Services Host (RDSH) или Microsoft SQL Server будут отличаться;
- Для более точного нацеливания политики на клиентов можно использовать WMI фильтры GPO (например, вы можете привязать политику к хостам определенной IP подсети)
- Какие порты нужно открыть для той или иной службы нужно искать в документации на сайте разработчика. Процесс довольно кропотливый и на первый взгляд сложный. Но постепенно вполне реальной прийти к работоспособной конфигурации Windows файервола, который разрешает только одобренные подключения и блокирует все остальное. По опыту хочу отметить, что на ПО Microsoft можно довольно быстро найти список используемых TCP/UDP портов.
GPO — Настройка брандмауэра Windows
GPO — Настройка брандмауэра Windows
Хотите узнать, как использовать групповую политику для включения и настройки брандмауэра компьютера под управлением Windows? В этом учебнике мы покажем вам, как включить службу брандмауэра и создать сетевые правила на всех компьютерах в домене с помощью GPO.
• Windows 2012 R2
• Windows 2016
• Windows 2019
• Windows 10
• Windows 7
Список оборудования:
В следующем разделе представлен список оборудования, используемого для создания этого учебника.
Каждую часть оборудования, перечисленных выше, можно найти на веб-сайте Amazon.
Windows Связанные Учебник:
На этой странице мы предлагаем быстрый доступ к списку учебников, связанных с Windows.
Учебник GPO — Настройка брандмауэра Windows
На контроллере домена откройте инструмент управления групповой политикой.

Создание новой групповой политики.

Введите имя для новой политики группы.

В нашем примере, новый GPO был назван: MY-GPO.
На экране управления групповой политикой расширьте папку под названием «Объекты групповой политики».
Нажмите правой кнопкой мыши на новый объект групповой политики и выберите опцию редактирования.

На экране редактора групповой политики расширьте папку конфигурации компьютера и найдите следующий элемент.
Выберите опцию под названием Windows Firewall с расширенной безопасностью

Доступ к опции, названной свойствами брандмауэра Windows.

Выберите нужный сетевой профиль и выполните следующую конфигурацию:
• Состояние брандмауэра — Дальше.
• Входящие соединения — Блок.
• Исходящие соединения — Разрешить.
Нажмите на кнопку OK.

В нашем примере мы собираемся включить брандмауэр Windows, когда компьютер подключен к сети доменов.
В нашем примере мы позволим исходящие соединения.
В нашем примере мы будем блокировать входящие соединения.
Компьютеру будет разрешено начать общение с любым устройством.
Другим устройствам не разрешается начинать связь с компьютером.
Дополнительно включите журнал заблокированных пакетов.

Включить опцию под названием Пакеты, вырубаемые журналом.

Это путь по умолчанию для журнала брандмауэра Windows.
Чтобы сохранить конфигурацию групповой политики, необходимо закрыть редактор групповой политики.
Поздравляю! Вы закончили создание GPO.
Учебник GPO — Создать правило брандмауэра
В качестве примера мы создадим белый список.
Это правило будет содержать список IP-адресов, которые могут начать сетевое подключение к компьютеру.
В редакторе групповой политики выберите опцию под названием Windows Firewall с расширенной безопасностью.
Создайте новое правило входящих.

Выберите пользовательский вариант.

Выберите опцию «Все программы» и нажмите кнопку «Следующий».

Нажмите на кнопку «Следующая».

Введите список авторизованных IP-адресов и нажмите на кнопку Next.
IP-адреса, включенные в список, будут уполномочены начинать связь без ограничений.

Выберите опцию, чтобы разрешить соединение.

Выберите нужный профиль сети и нажмите на кнопку Next.

Введите имя для определения нового входящих правил.

Чтобы сохранить конфигурацию групповой политики, необходимо закрыть редактор групповой политики.
Поздравляю! Вы закончили создание входящих правил с помощью GPO.
Учебник GPO — Включить брандмауэр Windows
На экране управления политикой Группы необходимо правильно нажать на желаемую Организационную группу и выбрать возможность связать существующий GPO.

В нашем примере мы собираемся связать групповую политику под названием MY-GPO с корнем домена.

После применения GPO вам нужно подождать 10 или 20 минут.
В течение этого времени GPO будет реплицироваться на другие контроллеры доменов.
В нашем примере мы использовали GPO для включения и настройки брандмауэра Windows.
VirtualCoin CISSP, PMP, CCNP, MCSE, LPIC22020-12-23T18:22:22-03:00
Related Posts
Page load link
Join Our Newsletter

Ok
Правила Windows Firewall можно настроить несколькими способами, первый вариант это настройка правил на каждом компьютере либо в случае компьютера в домене мы можем использовать групповые политики (GPO).
В этой статье мы рассмотрим настройку Windows Firewall используя групповую политику.
1 . Создаем новый объект групповой политики
Для этого открываем консоль управления групповой политикой Group Policy Management и создаем новый объект.
2 . Редактируем групповую политику
На следующем этапе у нас есть несколько вариантов:
— Program — Программы – можно выбрать исполняемый exe программы.
— Port – Выбрать TCP/UDP порт или диапазон портов.
— Predefined – Выбрать одно из преднастроенного правила.
— Custom – Задать собственное правило, здесь можно указать программу, протокол и другие протоколы помимо TCP и UDP, например, ICMP, GRE, L2TP, IGMP и т.д.
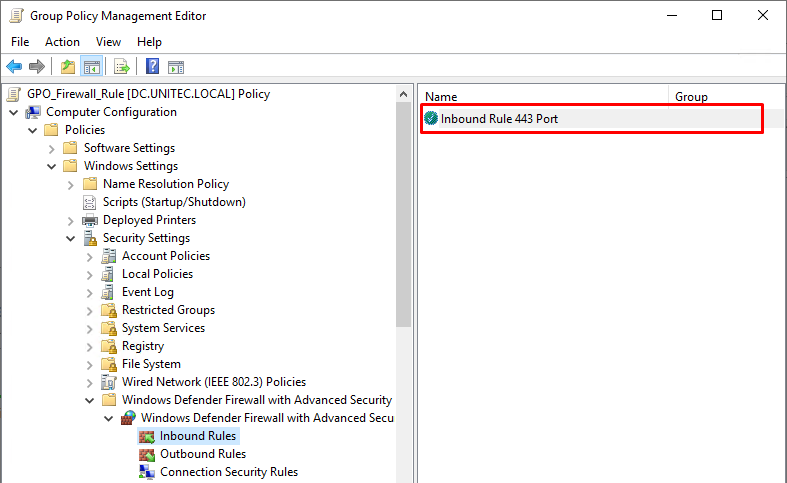
В нашем примере нам необходимо открыть порт TCP 443, поэтому выбираем Port
Выбираем протокол TCP и указываем порт 443
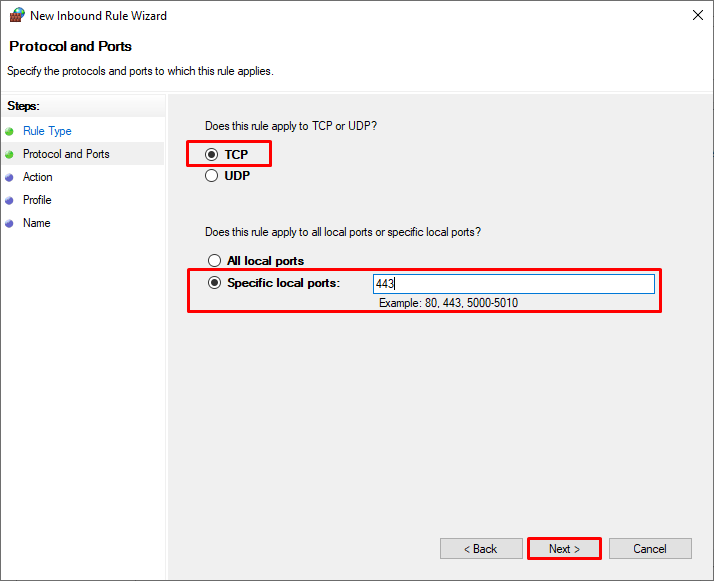
Разрешаем входящие соединения
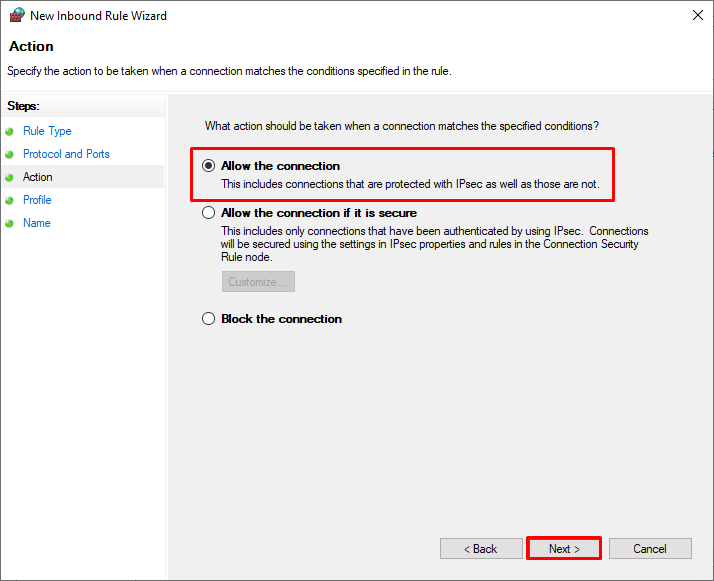
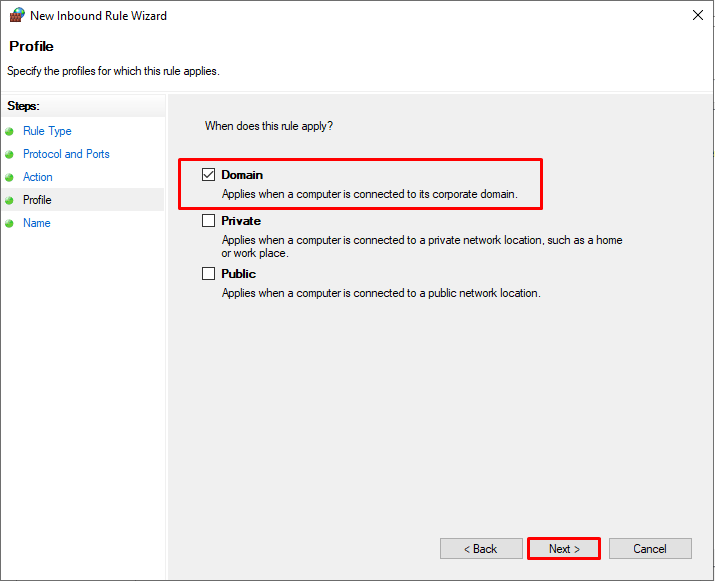
Так как наш компьютер в домене, применяем политику к профилю для Domain ( также можно выбрать все профили )
Задаем имя для правила
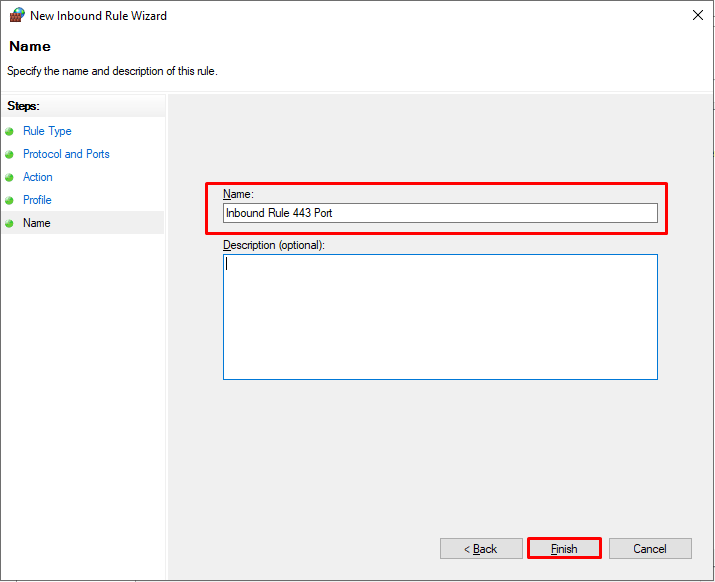
На этом создание правила завершено
Траблшутинг
# После обновление политики на клиенте командой
gpupdate /force
# Выводим правила командой
netsh firewall show state
The Microsoft Defender Firewall is built into all modern versions of Windows and Windows Server and allows you to configure rules for filtering incoming and/or outgoing network traffic on your computer. Windows Firewall rules can be configured locally on the user’s computer (using the wf.msc console, the netsh command, or the built-in NetSecurity PowerShell module). On Windows computers joined to an Active Directory domain, you can centrally manage Microsoft Defender Firewall rules and settings using Group Policies.
In enterprise networks, the port filtering rules are usually set at the level of routers, L3 switches, or dedicated firewall devices. However, nothing prevents you from deploying your Windows Firewall network access rules to workstations or Windows servers.
Contents:
- Enable Microsoft Defender Firewall via GPO
- How to Create Windows Firewall Rule with GPO?
- Applying Microsoft Defender Firewall Rules to Windows Computers
- How to Export and Import Firewall Rules on Windows?
- Merging Domain and Local Microsoft Defender Firewall Rules
Enable Microsoft Defender Firewall via GPO
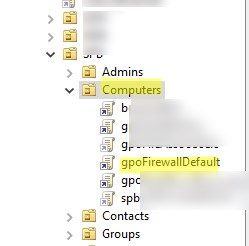
Open the domain Group Policy Management console (gpmc.msc), create a new GPO object (policy) with the name gpoFirewallDefault, and switch to Edit mode.
In order to prevent users (even having local admin permissions) to stop the firewall service, it is recommended to configure the automatic startup of the Windows Firewall using GPO. To do it, go to Computer Configuration- > Windows Settings -> Security Settings -> System Services. Find Windows Firewall in the list of services and change the startup type to automatic (Define this policy setting -> Service startup mode Automatic). Make sure that your users don’t have the permission to stop the service.

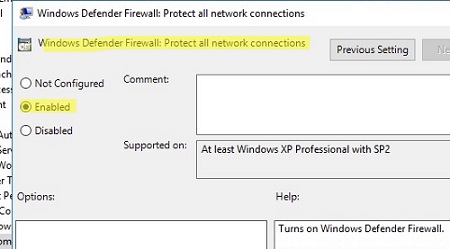
Then go to Computer Configuration -> Policies -> Administrative Templates -> Network -> Network Connections -> Windows Defender -> Firewall -> Domain Profile and enable the policy Windows Defender Firewall: Protect all network connections.
Go to the Computer Configuration -> Windows Settings -> Security Settings section in the GPO console. Right-click Windows Firewall with Advanced Security and open the properties.
Change the Firewall state to On (recommended) in all three tabs: Domain Profile, Private Profile, and Public Profile (What are network profiles (locations) in Windows?). Depending on the security policies in your company, you can specify that all inbound connections are blocked by default (Inbound connections -> Block), and outbound connections are allowed (Outbound connections -> Allow). Save the changes.

You can debug your Windows Defender Firewall rules on clients’ computers by enabling logging in %systemroot%system32logfilesfirewallpfirewall.log. By default, network connection logging is disabled in Windows. You can log only rejected packets (Log dropped packets) or packets that were allowed by firewall rules (Log successful connections).

How to Create Windows Firewall Rule with GPO?
Now let’s look at how to create Microsoft Defender firewall rules via Group Policy. To configure your rules, go to Computer Configuration -> Windows Settings -> Security Settings -> Windows Firewall with Advanced Security.
The following sections are available in Firewall GPO:
- Inbound rules
- Outbound rules
- Connection security rules
Let’s try to create an allowing inbound firewall rule. For example, we want to allow the incoming RDP connection on Windows (the default RDP port is TCP 3389). Right-click the Inbound Rules section and select New Rule. The New Firewall Rule Wizard starts.
The firewall rule wizard has an interface similar to that of the local Windows Firewall on the user’s desktop computer.

Select the rule type. You can allow access to:
- Program – you can select a program executable (.exe);
- Port – you can select a TCP/UDP port or a port range;
- Predefined – select one of the standard Windows rules, which already contain access rules (both executable files and ports are described) to typical services (e. g., AD, HTTP(s), DFS, BranchCache, Remote restart, SNMP, KMS, WinRM, etc.);
- Custom – here you can specify a program, a protocol (protocols other than TCP or UDP, like ICMP, GRE, L2TP, IGMP, etc.), client IP addresses, or an entire IP network (subnet).

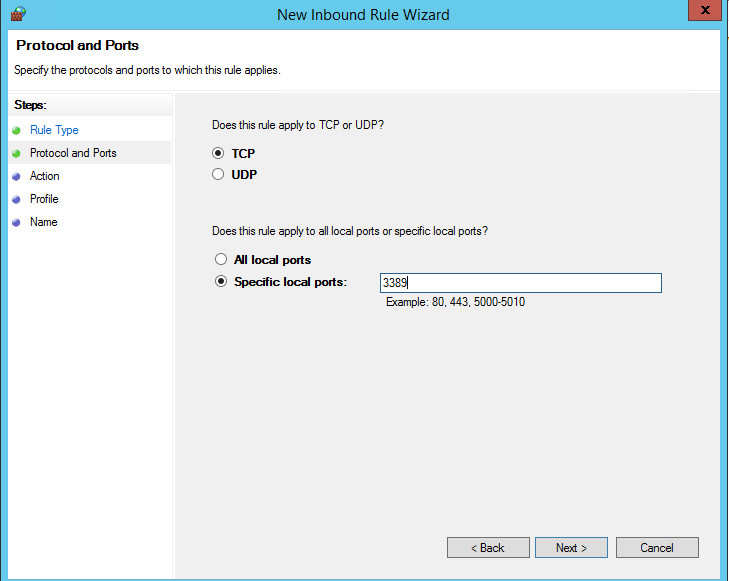
In our case, we’ll select the Port rule. Let’s specify TCP as the protocol, and 3389 as the local port number.

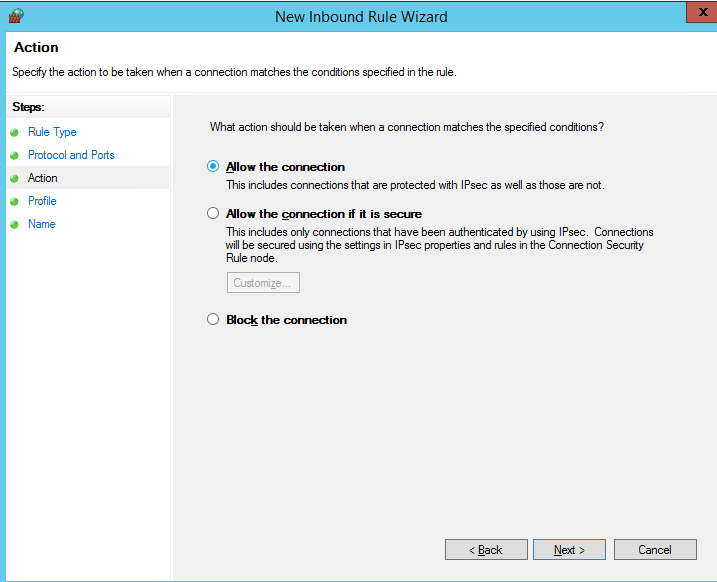
Then you must select what to do with such a network connection: Allow the connection, Allow the connection if it is secure, or Block the connection.
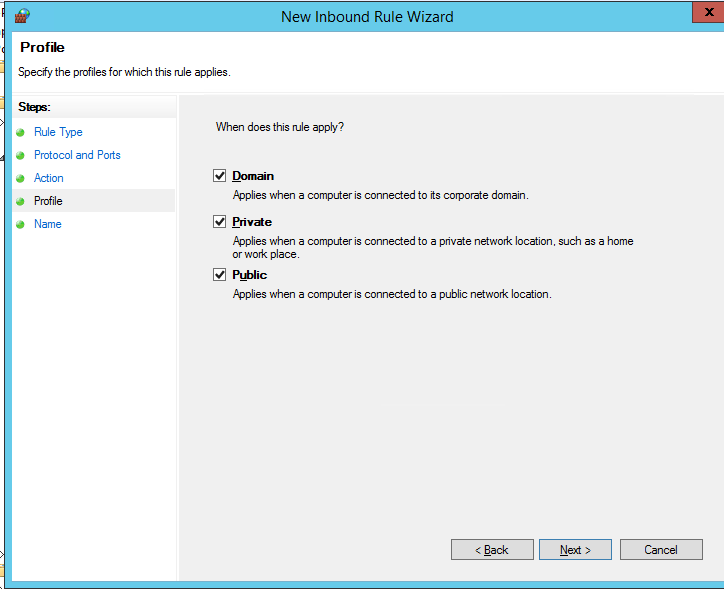
Then select the network profiles to apply the firewall rule. You can leave all profiles enabled (Domain, Private and Public).

In the last step, specify the name and description of the rule. Click Finish, and it will appear in the list of firewall rules.
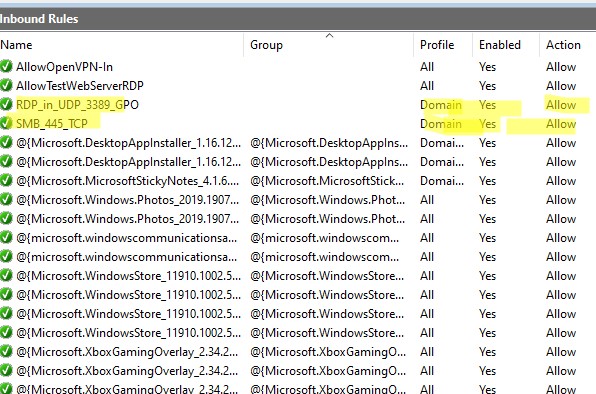
Modern versions of Windows also use UDP port 3389 for Remote Desktop (RDP) traffic. Therefore, create a second Microsoft Defender rule for that port as well.
In the same way, you can configure other inbound firewall rules to apply to your Windows clients. You can create rules for both inbound and outbound traffic.
Above, we looked at how to use the graphical wizard to create Windows Defender Firewall rules. You can also create a list of rules in plain text form and quickly add a large number of exceptions to Defender Firewall GPO.
Go to Computer Configuration -> Policies -> Administrative Templates -> Network -> Network Connections -> Windows Defender Profile -> Domain Profile and open the Windows Defender Firewall: Define inbound port exceptions policy. Here you can create a list of firewall rules with simple text strings.
Below is the list of inbound firewall rules that I want to add to the Group Policy:
3389:UDP:localsubnet:enabled:In_RDP_UDP_3389
445:TCP:localsubnet:enabled:In_SMB_TCP_443
443:TCP:192.168.110.11:enabled:In_HTTP_TCP_445
Click the Show button and copy your rules line by line into the Define Port Exceptions form.
This method allows you to quickly create a large number of inbound rules for the Windows firewall.
Applying Microsoft Defender Firewall Rules to Windows Computers
Now it remains to assign the Firewall-Policy policy to the OU (Organizational Unit) with the user’s computers. Locate the desired OU in the Group Policy Management console, right-click on it, and select Link an Existing GPO. Select your firewall policy from the list.
Important. Before applying a firewall policy to OU with production computers, it is strongly recommended to try it out on some test computers. Otherwise, due to wrong firewall settings, you can completely block network access on computers. To diagnose how your Group Policy is applied, use the gpresult tool.
Update the Group Policy settings on your clients (gpupdate /force). Verify that the ports you specified are open on users’ computers (you can use Test-NetConnection cmdlet or Portqry tool to check for open ports).
On a user’s computer, open the Control Panel -> System and Security -> Windows Defender Firewall and make sure that there is the message For your security, some settings are controlled by Group Policy and your firewall settings are used.
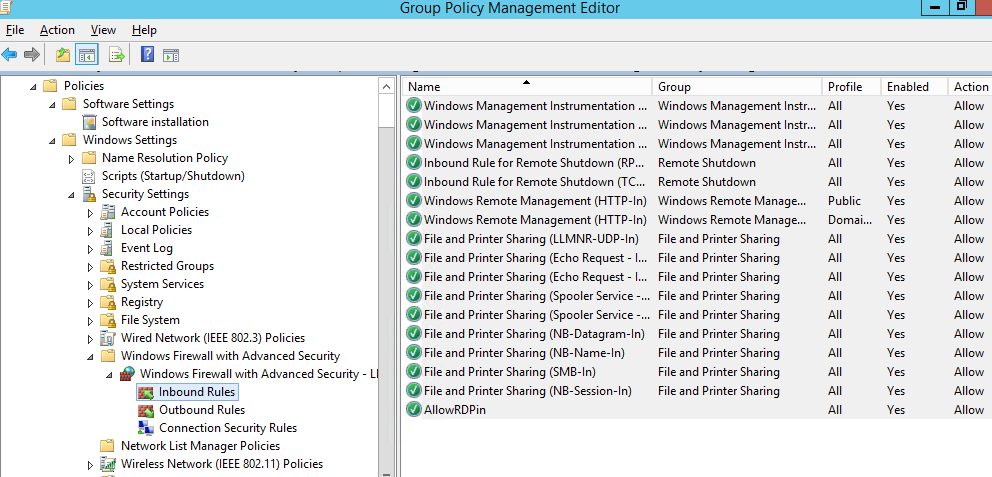
Now a user cannot change the firewall settings, and all rules that you have created must appear in the Inbound Rules list. Note that by default, new rules from the GPO are added to existing local firewall rules.
You can also display the current Windows Defender settings with the command:
netsh firewall show state
Or you can get the list of inbound rules in a table form using a PowerShell script:
Get-NetFirewallRule -Action Allow -Enabled True -Direction Inbound |

Format-Table -Property Name,

@{Name='Protocol';Expression={($PSItem | Get-NetFirewallPortFilter).Protocol}},

@{Name='LocalPort';Expression={($PSItem | Get-NetFirewallPortFilter).LocalPort}},

@{Name='RemotePort';Expression={($PSItem | Get-NetFirewallPortFilter).RemotePort}},

@{Name='RemoteAddress';Expression={($PSItem | Get-NetFirewallAddressFilter).RemoteAddress}},

Enabled,Profile,Direction,Action

How to Export and Import Firewall Rules on Windows?
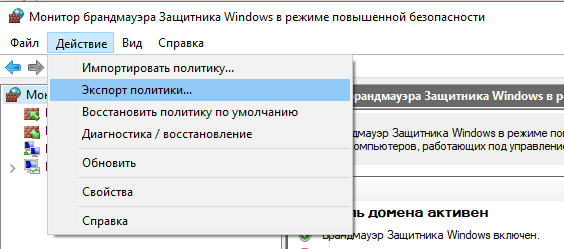
The Windows Defender Firewall Console allows you to export and import the current firewall settings to a text file. You can configure firewall rules on the reference computer and export them to the Group Policy console.
Configure the rules you need, then go to the root of the firewall snap-in (Windows Defender Firewall Monitor with Advanced Security) and select Action -> Export Policy
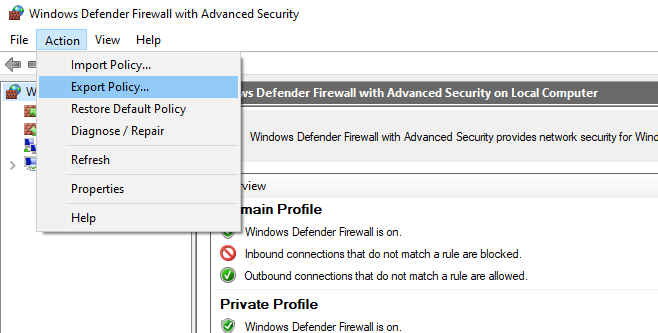
Your firewall rules will be exported into a WFW file, which can be imported to the Group Policy Management Editor by selecting the Import Policy option and specifying the path to the .wfw file (the current policy settings will be overwritten).

Merging Domain and Local Microsoft Defender Firewall Rules
In the GPO, you can specify whether you want to allow local administrators to create their own firewall rules on their computers, and how these rules should be merged with the rules assigned through the GPO.
Open the Windows Firewall policy properties in the GPO, select the tab with the profile (Domain) and click the Customize button. Check the settings in the Rule merging section. By default, rule merging is enabled. You can force a local administrator can create their own firewall rules: select Yes (default) in the Apply local firewall rules option.
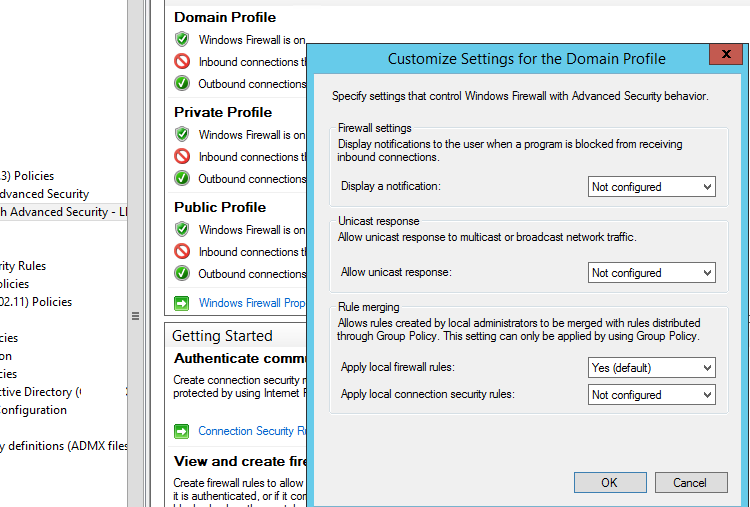
Tip. Blocking firewall rules have a higher priority than allowing ones. It means that a user cannot create an allowing access rule if it contradicts the deny rule configured by an administrator using GPO. However, a user will be able to create a local blocking rule, even if the access is allowed in the policy by the administrator.
Some tips on managing the Windows Firewall using a GPO:
- Create separate GPOs with firewall rules for servers and workstations (you may need to create your own policies for each group of similar servers depending on their role. This means that the firewall rules for a domain controller, an Exchange server, a server with the Remote Desktop Services Host (RDSH) role, or Microsoft SQL Server will differ;
- You can use WMI GPO filters to target policies more precisely to clients (for example, you can apply the policy to hosts on a specific IP subnet);
- You can find out which ports must be opened for each service in the documentation on the vendor’s website. The process is quite painstaking and complicated at the first glance. However, you can finally get a working Windows Firewall configuration that allows only approved network connections and blocks the rest. From my experience, I’d like to note that you can quickly find the list of used TCP/UDP ports for most Microsoft services.
- Remove From My Forums
-
Вопрос
-
Ребят привет!
Входные данные:
Сервер AD: Windows Server 2016, лес AD 2016 уровня.
Клиентские сервера: все Windows Server 2016, лес AD 2016 уровня.Столкнулся тут с интересной проблемой, не могу понять как ещё решить. Возникла потребность мониторить Windows 2016 сервера сервером Zabbix. Всё хорошо шло до шага, когда серверам нужно открыть 10050 TCP порт. А так как все сервера
находятся в домене, то задачка казалось очень простой. Но не тут то было.В общем создаю я политику
Мой компьютер — Политики — Конфигурация Windows — Параметры безопасности — Брандмауэр Windows в режиме повышенной безопасности — Брандмауэр Windows — Правило для входящих соединений
создаю там правило, применяю на компьютерах, ожидая что на компьютерах в настройках Firewall появиться правило. Я ожидаю штатного поведения Windows.А по факту, политика разлетелась по компьютерам и примирилась так: появился раздел (Вывод программы «rsop.msc»)
Конфигурация компьютера — Административные шаблоны — дополнительные параметры реестраПоявились значения системного реестра для Windows Firewall. А рядом с ними написано:
Этот параметр реестра не соответствует политике административных шаблонов. Например он не задан файлом .adm или .admx. Возможно он был определён другой оснасткой.
Вот так. А настройки Firewall на клиентских серверах не поменялась. То есть политика применилась, но настройки Firewall не изменила. И так происходит с любыми настройками для Firewall. Остальные gpo отрабатывают штатно.
Ребят подскажите что это? Нападение инопланетян или заговор коммунистов?
-
Изменено
27 апреля 2020 г. 11:25
-
Изменено
Ответы
-
Андрей, есть 2 сценария настройки — gpo и gpp о чем если не ошибаюсь написано во втором линке первого ответа
Я так понимаю что вы настраиваете gpo, и я бы предложил попробовать перенастроить политику через gpp
тут об этом прямо написано
The opinion expressed by me is not an official position of Microsoft
-
Изменено
Vector BCOModerator
27 апреля 2020 г. 13:34 -
Предложено в качестве ответа
Vector BCOModerator
28 апреля 2020 г. 10:56 -
Помечено в качестве ответа
Petko KrushevMicrosoft contingent staff, Moderator
30 апреля 2020 г. 6:00
-
Изменено
In this article I am going to talk about how you can use Group Policy to control the firewall that comes out of the box with Windows but first I want to give you a bit of history of the evolution of host based firewall in Windows. Firewalls have long been around for year protecting internal corporate networks from outside attackers (see image below).

With the explosion of mobile workers in the late 90’s more and more people were connecting their laptops directly to the internet without the benefit of protection of a corporate firewall. As a result back in the early 2000’s third-party firewall products such as ZoneAlarm became a very popular way to security against attacks. Microsoft then added a host based firewall with the release of Windows XP/2003 that was unfortunately turned off by default. As a result of having the firewall turned off by default in there were a number of computer worms of which most notably were the Blaster worm and Sasser worm that spread like wildfire to pretty much any Windows computer that had not been specifically secured.
As a result Microsoft decided to make a major change with how Windows XP was configured with the release of Service Pack 2. When users installed service pack 2 they were now prompted to turn on the firewall thus protecting them from malicious communications. The problem with enabling a firewall however is that you generally block all incoming traffic by default which means product such as Skype and/or Windows Messenger could no longer receive incoming call’s or messages. To get around this issues end users would be prompted when an application wanted to open up a incoming port on the network. Corporate IT staff could control this for the users using Group Policy via the Windows Firewall section under Administrative Templates > Network > Network Connections.

This was a good first step however creating a set of firewall rules using the native group policy setting under Windows Firewall was challenging at best as there most setting had to be configured manually.
With the release of Windows Vista/2008 Microsoft totally revamped the Windows Firewall to allow for much easier administration. IT Admins now have much more granular control over how they can manage the firewall rules and they now have the ability to control both inbound and outbound communication as well as being able to selective enable rules depending on what network the computer is connected. They also changed where you configured the firewall via group policy to Windows Settings > Security Settings > Windows Firewall with Advanced Security which has enable some cool features such as importing and exporting firewall rules which I will go into later.

Below I will go though an example of a IT administrator wanting to setup a default set of firewall rules for a Windows 7 laptop computers and with a rule to allow Skype when connected at home and on the Internet but not when connected to the domain. Normally in the real world you would have many more inbound exceptions however you should be able to use this as a guide to get you started to build your firewall rule setup specifically for your environment.
Before you begin: If you have already configured firewall setting under the older “Windows Firewall” section these policy rule will also apply and the two rule sets will try to merge with unpredictable results. I recommend that you make sure that no “Windows Firewall” setting are applied to your Vista/2008 or greater computers and that you solely apply the firewall setting to these newer computers via the “Windows Firewall with Advanced Security” group policy security option.
Configuring Windows Firewall Rule
First we will setup a reference computer with the firewall rule the way we want and then explore them so we can import them into a group policy. Configuring the firewall rules on the PC first gives us an opportunity to properly test the rules before deploying them to other computers. If also allows us to export all the rules in one action so that you don’t have to go through the lengthy process of setting up all the rules manually one by one.
In this example this computer is running Windows 7 and already has Skype 4.2 installed.
Step 1. Right click on the network status icon in the system tray and click on «Open Network and Sharing Center”

Step 2. Click on “Windows Firewall” in the lower left hand corner.

Step 3 optional. We are going to have a quick high level overview of the firewall rules by clicking on on “Allow a program or feature through Windows Firewall” in the left hand pane.

As you can see Skype has been setup to work in the Domain, Private and Public profiles. In this example we are going to configure this so that it will only work in the Home/Work and Public profiles so that users cannot use Skype when they are connected to the corporate domain via the LAN.
Note: that the options here are locked out as you have not yet elevated your credentials.
Step 4 optional. Click Cancel

Step 5. Click on “Advanced Settings” on the left hand pane.
![image[76]](https://www.grouppolicy.biz/wp-content/uploads/2010/07/image76_thumb.png "image[76]")
Step 6. Click on “Inbound Rules” and then double click on the “Skype” firewall rule entry on the right hand column.
Note: The currently configured Profile is set to “All”

Now we will configure the Skype rule to be disable using the domain profile however you can also use this properties dialogue box to configured other granular setting. I recommend that you go though all these tabs and become familiar with all the setting you can control using this dialogue box.
Step 7. Click on the “Advanced” tab

Step 8. Un-tick the “Domain” check box and then click “OK”

Note: The Profile is now configured to “Private, Public”

If you go back into the “Allow programs to communicate thought Windows Firewall” option you will now see that the Domain options for Skype has been un-ticked.

Now you need to test your firewall rule set to make sure that it behaves as you expect. Assuming everything is OK then you export your firewall rules so you can import them into a Group Policy. You may also want to save export the rule set before you begin to make sure you have something to role back to in case you totally stuff up the rule set and break your network.
Exporting Windows Firewall Rules
Step 1. In the Windows Firewall with Advance Security section click on “Action” in the menu and then “Export Policy”

Step 2. Select a location to save your firewall rules and then type the name of the file you want to save them as (e.g. default_rules.wfw) then click “Save”.
Note: If you have had to elevate as another user to modify the firewall rules then you will be saving the file in the administrator accounts profile.

Step 3. Click “OK”

Importing Windows Firewall Rules into a Group Policy
Now that you have exported the firewall rules we will now import the exported file into a group policy so that you can apply the same rule set to all the workstations on your network.
Step 1. Edit a Group Policy Object (GPO) that targets the computer that you want apply these firewall rules applied.
Step 2. Open Computer Configuration > Policies > Windows Settings > Security Settings > Windows Firewall with Advanced Security and click on “Windows Firewall with Advanced Security”

Step 3. In the menu click on “Action” and then “Import Policy…”

Step 4. Click “Yes”
Note: This is ok if you have not done this before however if this is the second time you have done this you might want to create a new GPO and import the rules into that one so as to not to blow away your existing policy rules.

Step 5. Select the firewall rule export file that created before and click “Open”

Wait…

Step 6. Click “OK”

Done.
You can now review the rules that have been imported into the GPO.
Note: You can see how the Skype rule is configured as Private, Public as we configured before on the local computer. If you want to change the again you can simple double click on the rule and customise the rule how you want from within here.

You can also selectively disable rules and cut, copy & paste rules between separate GPO’s. This is how you would merge rules if you imported the rule set from into a new GPO back in step 4.
How to copy, delete or disable a rule… 
How to paste a rule into an existing policy… 
You should now be notified that in all the firewall dialogue boxes (see images below) on the workstation that the firewall policy is now being controlled via group policy.


Note the new column that states weather this is configured by Group Policy. Each rule is list twice as one represent the firewall rule controlled via Group Policy that cannot be configured and the other represent the local rule which can still be enabled by the local administrator.

How to exclusively apply Group Policy Firewall rules
If you don’t want the local administrator to be able to apply additional firewall rules to the network then you can also configured it so that the Group Policy rules are exclusively applied to the local firewall.
Step 1. Again open the same GPO that you have the firewall rules applied and navigate to Computer Configuration > Policies > Windows Settings > Security Settings > Windows Firewall with Advanced Security and right click on “Windows Firewall with Advanced Security” and click “Properties”

Step 2. Click on the “Customize..” button in the Setting section

Step 3. Change the “Apply local firewall rules:” option to “No” and click OK

Now if you go back to the “Allowed Programs” under “Windows Firewall” you will notice that the Domain column is now totally greyed out and no rules can be applied to the domain profile even if you are a local admin.

Hopefully you this will have given enough to start controlling your windows firewall using group policy.
If you are feeling really adventurous you can also do the same thing to your servers to keep them secure as they are a lot more static with the firewall rule requirements which makes them even easier to manage. For example you could export the firewall rules of your SQL server and then import them into a GPO that is applied to all your other SQL Servers. This way when ever you move a computer object into the SQL Server OU the firewall rules are automatically setup and enforced… Nice..