Question & Answer
Question
How do I configure my Windows 2012 R2 Servers to allow QRadar to retrieve scan data from Microsoft SCCM scanners and events over WMI?
Answer
Administrators can follow the procedures listed to configure DCOM and verify that Windows Server 2012 R2 data can be retrieved from a remote system by using WMI. This article serves two purposes for administrators.
Note: Support for Windows Server R12 ends in October 2023.
- Required for Microsoft SCCM scanners.
QRadar leverages multiple WMI queries to make successive calls to the Microsoft SCCM scanner to retrieve asset information. In the first WMI request, the scanner retrieves asset information (IP addresses, MAC, hostname). In the second pass the system retrieves data for installed patches. It then makes a third request to retrieve pending patch information.
- Required for administrators who collect event data by using the Microsoft Security Event Log protocol (WMI) to collect events from Windows 2012 R2 Servers.
This is a rare configuration option due to the limitations of WMI and the limit of 50 events per second. Administrators who want to collect events from Windows 2012 R2 Servers should use WinCollect or the MSRPC protocol, depending on the event rate being generated.
Before you begin
Event collection over WMI by using Windows 2012 R2 Servers is only supported on 64-bit operating systems.
Configuration Overview
To configure DCOM on Windows 2012 R2 Servers, administrators must complete the following steps:
- Verify the required services are enabled and configured to start automatically when the operating system boots.
- Enable DCOM.
- Configure DCOM communications.
- Configure User Accounts for DCOM.
- Configure Windows Firewall.
- Configure WMI.
- Test the WMI configuration.
Required DCOM and WMI services for Windows Server 2012 R2
The following Windows services must be started and configured for automatic startup:
- Server
- Remote Registry
- Windows Management Instrumentation
The procedure outlines the steps required to configure the Server, Remote Registry, and WMI services for automatic startup.
- Procedure
- To open the Run menu, press the Windows logo key + R.
- Type the following: services.msc
- Click OK.
- In the details pane, verify these services are started and set to automatic startup:
a. Server
b. Remote Registry
c. Windows Management Instrumentation - To change a service property, right-click on the service name, and then click Properties.
- From the Startup type list box, select Automatic.
- If the Service status is not started, click Start.
- Click OK.
- Close the Services window.
Results
You are now ready to enable DCOM on your Windows Server 2012 R2.
Enabling DCOM for Windows Server 2012 R2
- Procedure
- To open the Run menu, press the Windows logo key + R.
- Type the following: dcomcnfg
- Click OK.
The Component Services window is displayed. - Under Component Services, expand Computers, and then click My Computer.
- On the Action menu, click Properties.
- Select the Default Properties tab.
- Configure the following Default Properties:
a. Select the Enable Distributed COM on this computer check box.
b. Using the Default Authentication Level list box, select Connect.
c. Using the Default Impersonation Level list box, select Identify. - Click OK.
Note: The system displays a message about changing the DCOM Machine wide settings. - Click Yes to continue.
Results
You are now ready to configure the DCOM protocol for Windows Server 2012 R2.
Configuring DCOM communications for Windows Server 2012 R2
- Procedure
- From the DCOM Configuration (dcomcnfg) window, expand Component Services, expand Computers, and select My Computer.
- On the Action menu, click Properties.
- Select the Default Protocols tab.
- Configure the following options:
a. If Connection-oriented TCP/IP is listed in the DCOM Protocols window, go to Step 5.
b. If Connection-oriented TCP/IP is not listed in the DCOM Protocol window, select Add.
c. From the Protocol Sequence list box, select Connection-oriented TCP/IP. - Click OK.
Results
You are now ready to configure a user account with permission to access DCOM.
Configuring Windows Server 2012 R2 user accounts for DCOM
After you enabled DCOM, you must assign an account the proper permission to access DCOM on the host. You must select an existing account with administrative access or create a normal user account that is a member of an administrative group to access the host. The user you grant DCOM permissions is the user you must configure in the QRadar log source.
- Procedure
- From the DCOM Configuration (dcomcnfg) window, expand Component Services, expand Computers, and select My Computer.
- On the Action menu, click Properties.
- Select the COM Security tab.
- In Access Permissions, click Edit Default.
- Select the user or group requiring DCOM access.
Note: If the user or group requiring DCOM access is not listed in the permissions list, you must add the user to the configuration. - Configure the following user permissions:
a. Local Access — Select the Allow check box.
b. Remote Access — Select the Allow check box. - Click OK.
- In Launch and Activation Permissions, click Edit Default.
- Select the user or group requiring DCOM access.
Note: If the user or group requiring DCOM access is not in the permissions list, you must add the user to the configuration. - Configure the following user permissions:
a. Local Launch — Select the Allow check box.
b. Remote Launch — Select the Allow check box.
c. Local Activation — Select the Allow check box.
d. Remote Activation — Select the Allow check box. - Click OK.
- Click OK to close the Component Services window.
Results
You are now ready to configure the Windows firewall to allow DCOM communications.
Configuring the Windows Server 2012 R2 firewall
If a firewall is located between your Windows Server 2012 R2 and the QRadar appliance, you must configure the firewall with an exception to permit DCOM communications.
Note: You must be an administrator to change Windows Firewall settings or add an exception to the Windows Firewall.
- Procedure
- To open the Run menu, press the Windows logo key + R.
- Type the following: wf.msc.
- Click OK.
- Select Inbound Rules.
- On the Action menu, click New Rule.
- Select Custom and click Next. The Program window is displayed.
- Select All programs, and click Next. The Protocol and Ports window is displayed.
- From the Protocol type list box, select TCP and click Next.
Note: We recommend you do not limit Local and Remote ports or local IP addresses, but define firewall connection rules by remote IP address. The remote IP address defined should be the appliance defined in the Managed Host in your Microsoft SCCM scanner configuration. For Windows event collect, the IP address should be the Target Event Collector in the Microsoft Windows Security Event Login QRadar. - Under Which remote IP addresses does this rule apply to field, select the radio button These IP addresses.
- Click Add.
- In the IP address or subnet text box, type the IP address of QRadar appliance managing the Microsoft Windows Security Event Log source or Microsoft SCCM scanner.
- Click OK.
- Click Next.
- Select Allow the connection, and click Next.
- Select one or more network profiles to which the rule applies and click Next.
- Type a name and description for the firewall rule.
- Click Finish. You can now exit the Windows Firewall with Advanced Security panel.
Results
You are now ready to configure Windows Management Instrumentation (WMI) for Windows Server 2012 R2.
Configuring WMI user access for Windows Server 2012 R2
The user or group you configured for DCOM access must also have Windows Management Instrumentation (WMI) permission to access the Windows event logs required by QRadar.
- Procedure
- To open the Run menu, press the Windows logo key + R.
- Type the following: wmimgmt.msc
- Click OK.
- Right-click on WMI Control (Local), select Properties. The WMI Control (Local) Properties window is displayed.
- Click the Security tab. The Namespace navigation is displayed.
- From the Namespace menu tree, expand Root, click CIMV2.
- Click the Security button the menu tree. The Security for ROOTCIMV2 window is displayed.
- Select the user or group requiring WMI access.
Note: If the user or group requiring WMI access is not listed in the permissions list, you must add the user to the configuration. - Select the check boxes to add the following permissions:
a. Execute Methods — Select the Allow check box.
b. Provider Write — Select the Allow check box.
c. Enable Account — Select the Allow check box.
d. Remote Enable — Select the Allow check box.
Note: If the user or group you are configuring is a system administrator, the allow permission check boxes might be selected as the permissions are inherited. - Click OK.
- Close the WMIMGMT — WMI Control (Local) window.
Results
Windows Server 2012 R2 is configured for WMI user access
Configuring DCOM access for Windows Server 2012 R2
By default, the access to specific registry values is owned by the Trusted Installer. This procedure provides guidance on how to set the Administrator as the DCOM owner, who can then provide permissions to your QRadar user. The QRadar user specified in your log source configuration must have full control to DCOM and both of the DCOM objects defined in this procedure. Only an administrator can provide another user access to both of the DCOM objects outlines.
NOTE: If the WMI is polling from a parent to a child domain, the domain user and local administrators group in the child domain require Full Control to both of the registry keys discussed in this procedure. The user making the WMI request might also be required to be a member of the local administrators group.
- Procedure
- To open the Run menu, press the Windows logo key + R.
- Type the following command to open the registry editor: regedit
- Click OK. Note: You must be a system administrator to edit registry settings.
- Locate the following registry location: HKEY_CLASSES_ROOTCLSID{76A64158-CB41-11D1-8B02-00600806D9B6}
- Right-click the entry {76A64158-CB41-11D1-8B02-00600806D9B6}, then click Permissions.
- Click the Advanced button. The Advanced Security Settings are displayed.
- In the Owner field, click Change.
- In the Enter the object name field, set the owner as Administrators.
- Click OK.
- In the Permissions entries field, select your user and click Edit.
Note: If the QRadar user is not listed in the permissions list, you must click Add and define your user as a Principal. To search for a user, type the user name, click Check Names, then click OK to add your user. - Configure the following parameters for your user:
- In the Type field, select Allow.
- In the Applies to field, select This key and subkeys.
- In the Basic permissions field, select Full Control. By default, selecting Full Control adds Read as a permission type.
- Click OK to return to the Advanced Security Settings window.
- In the Owner field, click Change.
- In the Enter the object name field, set the owner as your QRadar user.
- Click OK until you return to the Registry Editor.
- Repeat this process for the following registry key: HKEY_LOCAL_MACHINESOFTWAREClassesWow6432NodeCLSID{76A64158-CB41-11D1-8B02-00600806D9B6}
- Close the Registry Editor.
To complete the DCOM configuration, administrators need to verify WMI communications by either scheduling a Microsoft SCCM scan in QRadar, or by using the test tool to query for events. The test tool can prove that your users has the correct permissions to poll for data that uses WMI.Results
Windows Server 2012 R2 has DCOM access
Verifying and testing your WMI configuration
To assist with verifying your WMI communications, the Microsoft Windows Event Log protocol RPM includes a test tool that allows QRadar to query the remote server for Windows event log information. To use this test tool, your QRadar system must be installed with the latest version of the Windows Event Log protocol.
- Procedure
- Using SSH, log in to QRadar as the root user.
Username: root
Password: <password> - Type the following command:
cd /opt/qradar/jars - Type the following command:
java -jar WMITestTool-<date>.jar - Configure the following parameters:
- Remote Windows Host — Type the IP address of your Windows 2012 R2 Server.
- Active Directory Domain, or Hostname if in a Workgroup — Type the domain for your Windows 2012 R2 Server.
- Username — Type the username required to access the remote Windows 2012 R2 Server.
- Password — Type the password for the username defined in step 3.
- NTLM Version (1 or 2) — Type 2.
Note: In almost every case, the Windows operating systems use NTLM version 2.
If you receive an error, go back and recheck the settings on the Windows specified in the DCOM section of the Log Source Users Guide. If the connection is successful, you should see the following response:Connecting to <host> as <domain>DCOM ... Using Raw WMI: false Attempting to create a COM object implemented by class: WbemLocator on remote host [<host>] Using CLSID=[76a64158-cb41-11d1-8b02-00600806d9b6] PROGID=[] INTERFACEID=[76A6415B-CB41-11D1-8B02-00600806D9B6] Attempting to create server clsid=[76a64158-cb41-11d1-8b02-00600806d9b6] and progid=[] Proxy class derived from ScriptableComObject: narrowing to IDispatch reference. Using WMI IWmiServices implemented via: WbemServices WQL Query (enter quit to exit):The test tool attempts to connect to your remote Windows server.
- In the WQL Query parameter, type the following: Select NumberOfRecords From Win32_NTEventLogFile WHERE LogFileName=’Security’
Note: The example query provided functions with 32-bit and 64-bit versions of Windows.Results
If QRadar can successfully query your Windows server, the number of records in the security event log are returned. For example,instance of Win32_NTEventlogFile Name = C:WindowsSystem32WinevtLogsSecurity.evtx NumberOfRecords = 5786If the returned query states total records = 0, or if there is an error, you must verify the proper services are running, your DCOM configuration, the WMI configuration, and your Windows firewall settings. If you have verified the configuration of your Windows server, contact support.
If you are having connection issues, we recommend the Windows Firewall be temporarily disabled with the use of the test tool. If the test tool returns security event log results, enable the Windows Firewall and see your Network Administrator.
- Using SSH, log in to QRadar as the root user.
Related Information
Microsoft, Windows, Windows NT, and the Windows logo are trademarks of Microsoft Corporation in the United States, other countries, or both.
[{«Type»:»MASTER»,»Line of Business»:{«code»:»LOB24″,»label»:»Security Software»},»Business Unit»:{«code»:»BU059″,»label»:»IBM Software w/o TPS»},»Product»:{«code»:»SSBQAC»,»label»:»IBM Security QRadar SIEM»},»ARM Category»:[{«code»:»a8m0z000000cwsyAAA»,»label»:»Admin Tasks»}],»ARM Case Number»:»»,»Platform»:[{«code»:»PF025″,»label»:»Platform Independent»}],»Version»:»All Versions»}]
 Добрый день! Уважаемые читатели и гости, популярного IT блога pyatilistnik.org. Сегодня я продолжу пополнять свою копилку знаний в разделе 1С. Вчера меня один из разработчиков, попросил ему помочь настроить компоненты DCOM для Excel.Application в связке с приложением 1С. Я ранее этого не делал, так что пришлось в этом разбираться. По итогам найденного решения, появилась и эта заметка. Уверен, что на этот материал найдутся желающие.
Что такое DCOM
Distributed Component Object Model (DCOM) — программная архитектура, разработанная компанией Microsoft для распределения приложений между несколькими компьютерами в сети. Программный компонент на одной из машин может использовать DCOM для передачи сообщения (его называют удаленным вызовом процедуры) к компоненту на другой машине. DCOM автоматически устанавливает соединение, передает сообщение и возвращает ответ удаленного компонента. С данным компонентов мы уже знакомились, когда решали ошибку 10016.
Настройка DCOM для Excel.Application
И так у меня есть виртуальная машина под управлением Windows Server 2012 R2, на ней установлены серверные компоненты 1С, есть задача для Excel.Application модуля, настроить DCOM компоненты.
Для выполнения нижеописанных действий, вам будут необходимы права локального администратора, на том сервере, где все будет выполняться
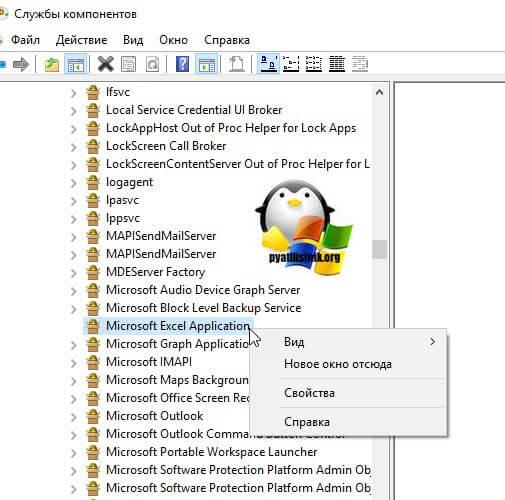
Нам необходимо открыть в панели управления Windows, компонент «Службы компонентов».

Полный путь «Панель управленияВсе элементы панели управленияАдминистрированиеСлужбы компонентов»
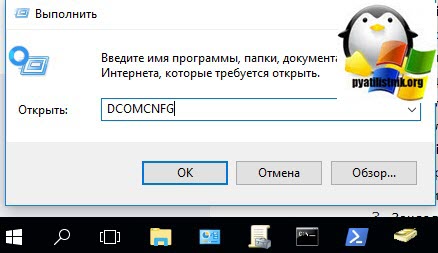
Либо можете, через окно выполнить ввести DCOMCNFG, откроется, тоже самое.
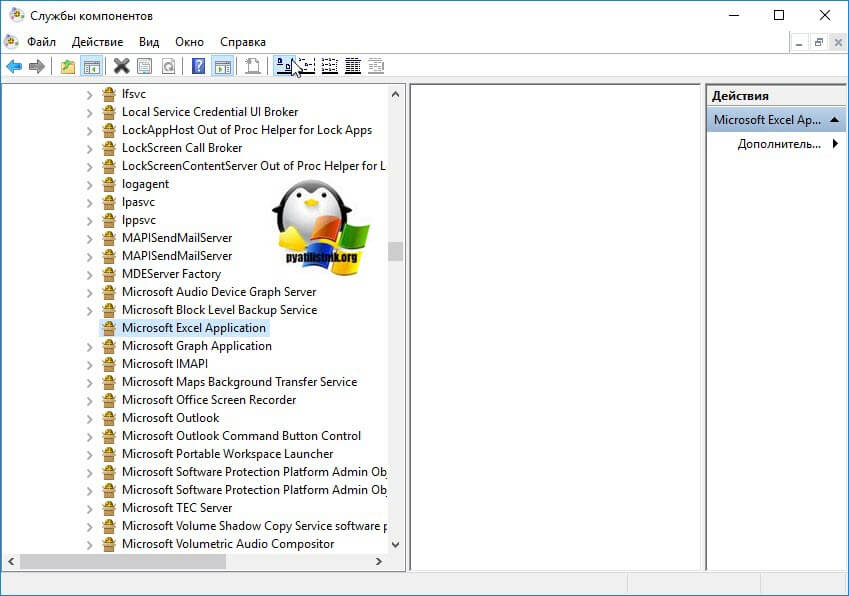
В службах компонентов (Component Services) откройте ветку:
Компоненты — Мой компьютер — Настройка DCOM — Microsoft Excel Application (Component Services — Computers — My computer — DCOM Config)
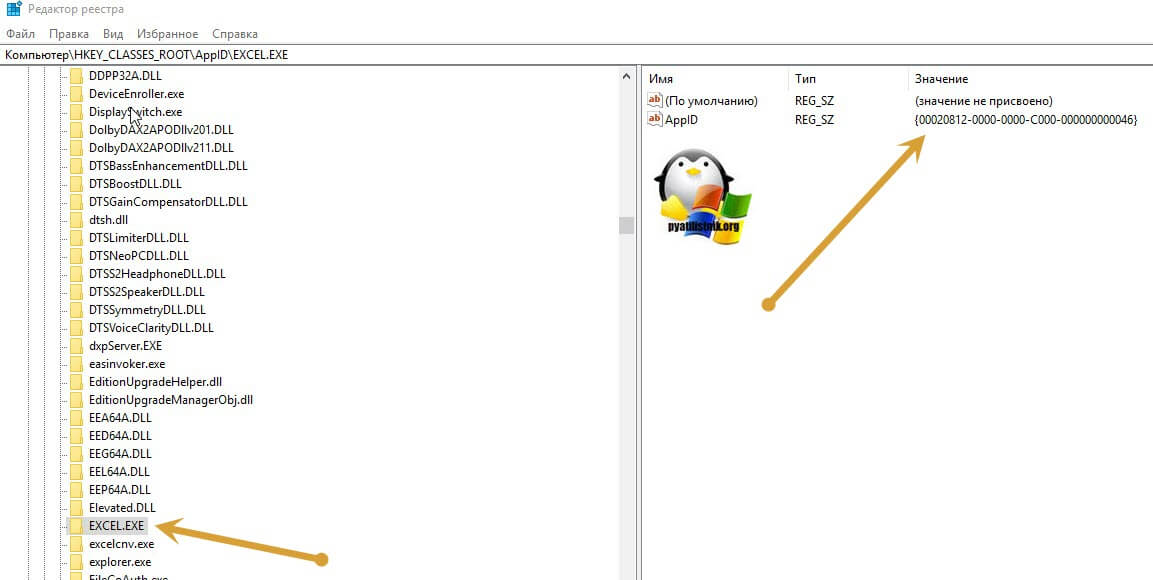
Если по каким-то причинам у вас нет пункта Microsoft Excel Application, откройте реестр Windows, найдите ветку: HKEY_CLASSES_ROOTAppIDEXCEL.EXE, если ее нет, то создаем ее. В ней должен быть ключ REG_SZ со значением {00020812-0000-0000-C000-000000000046}.
КОМУ ЛЕНЬ самому создавать, то можете скачать данный ключ реестра у меня. Просто запустите потом и подтвердите, что согласны добавить. Затем откройте командную строку от имени администратора и выполните команду:
У вас откроется mmc оснастка «Службы компонентов», которая делает то же что и DCOMCONFIG, но позволяет видеть 32 битные компоненты. В результате этих манипуляций компонент Microsoft Excel Application у вас должен появиться. Открываем свойства Microsoft Excel Application.
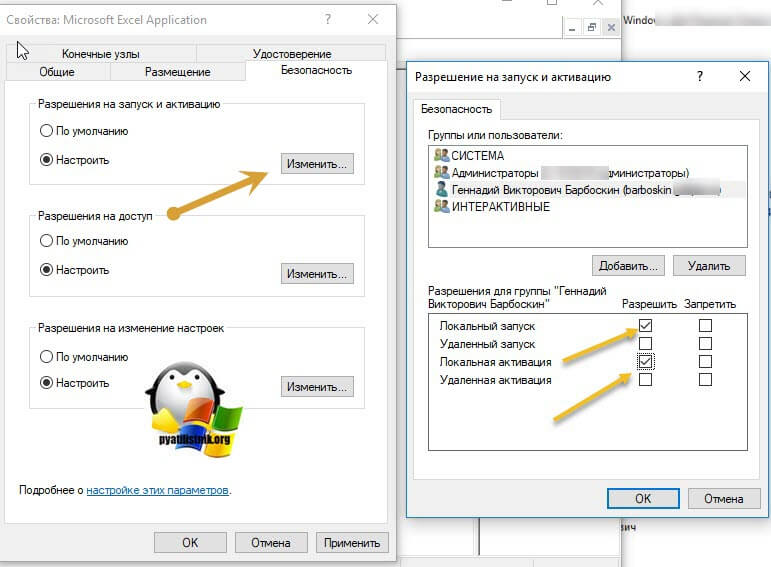
Переходим на вкладку «Безопасность (Secutity)». В пункте «Разрешения на запуск и активацию (Launch and Activation Permissions)», выберите «Настроить (Customize )» и изменить. Вам нужно добавить сюда учетную запись, от имени которой запускается служба 1С и предоставить ей права:
- Локальный запуск — Local Launch
- Локальная активация — Local Activation
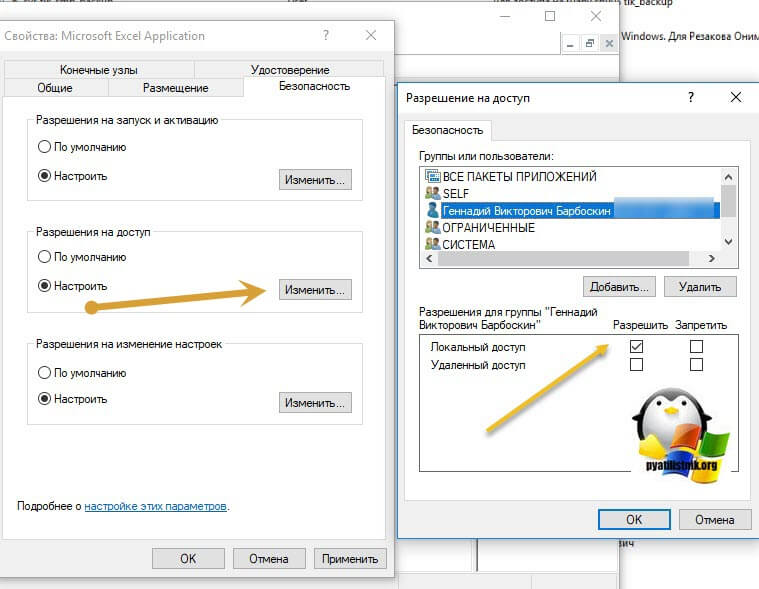
Далее переходим к пункту «Разрешения на доступ (Access Permissions)» и так же меняем их. Добавьте там ту же учетную запись, от имени которой запускается сервис 1С, и дайте ей права «Локальный доступ (Local Access)». Сохраните настройки.
Закрываем окно служб компонентов, теперь для того, чтобы закончит ьнастройку DCOM для 1С и Microsoft Excel Application, вам необходимо дать права на две папки.
Вам нужно убедиться, что у вас есть две папки:
C:WindowsSysWOW64configsystemprofileDesktop
и
C:WindowsSystem32configsystemprofileDesktop
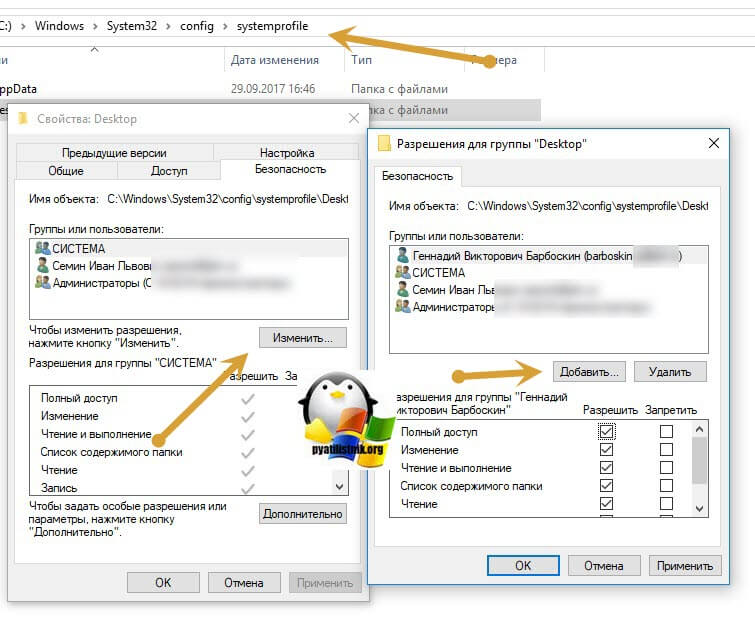
Если их нет, то создайте их. Далее даем полные права на эту папку, для все той же учетной записи, сервиса 1С. Надеюсь, что было не сложно, и вы разобрались в конфигурировании DCOM для компонента Excel.Application в связке с 1С. С вами был Семин Иван, автор и основатель IT портала Pyatilistnik.org,
Опубликовано в Статьи по 1С 02.09.2019
Добрый день! Уважаемые читатели и гости, популярного IT блога pyatilistnik.org. Сегодня я продолжу пополнять свою копилку знаний в разделе 1С. Вчера меня один из разработчиков, попросил ему помочь настроить компоненты DCOM для Excel.Application в связке с приложением 1С. Я ранее этого не делал, так что пришлось в этом разбираться. По итогам найденного решения, появилась и эта заметка. Уверен, что на этот материал найдутся желающие.
Что такое DCOM
Distributed Component Object Model (DCOM) — программная архитектура, разработанная компанией Microsoft для распределения приложений между несколькими компьютерами в сети. Программный компонент на одной из машин может использовать DCOM для передачи сообщения (его называют удаленным вызовом процедуры) к компоненту на другой машине. DCOM автоматически устанавливает соединение, передает сообщение и возвращает ответ удаленного компонента. С данным компонентов мы уже знакомились, когда решали ошибку 10016.
Настройка DCOM для Excel.Application
И так у меня есть виртуальная машина под управлением Windows Server 2012 R2, на ней установлены серверные компоненты 1С, есть задача для Excel.Application модуля, настроить DCOM компоненты.Для выполнения нижеописанных действий, вам будут необходимы права локального администратора, на том сервере, где все будет выполняться
Нам необходимо открыть в панели управления Windows, компонент «Службы компонентов».
Полный путь «Панель управленияВсе элементы панели управленияАдминистрированиеСлужбы компонентов»
Либо можете, через окно выполнить ввести DCOMCNFG, откроется, тоже самое.
В службах компонентов (Component Services) откройте ветку:Компоненты — Мой компьютер — Настройка DCOM — Microsoft Excel Application (Component Services — Computers — My computer — DCOM Config)
Если по каким-то причинам у вас нет пункта Microsoft Excel Application, откройте реестр Windows, найдите ветку: HKEY_CLASSES_ROOTAppIDEXCEL.EXE, если ее нет, то создаем ее. В ней должен быть ключ REG_SZ со значением {00020812-0000-0000-C000-000000000046}.
КОМУ ЛЕНЬ самому создавать, то можете скачать данный ключ реестра у меня. Просто запустите потом и подтвердите, что согласны добавить. Затем откройте командную строку от имени администратора и выполните команду:mmc comexp.msc /32
У вас откроется mmc оснастка «Службы компонентов», которая делает то же что и DCOMCONFIG, но позволяет видеть 32 битные компоненты. В результате этих манипуляций компонент Microsoft Excel Application у вас должен появиться. Открываем свойства Microsoft Excel Application.
Переходим на вкладку «Безопасность (Secutity)». В пункте «Разрешения на запуск и активацию (Launch and Activation Permissions)», выберите «Настроить (Customize )» и изменить. Вам нужно добавить сюда учетную запись, от имени которой запускается служба 1С и предоставить ей права:
- Локальный запуск — Local Launch
- Локальная активация — Local Activation
Далее переходим к пункту «Разрешения на доступ (Access Permissions)» и так же меняем их. Добавьте там ту же учетную запись, от имени которой запускается сервис 1С, и дайте ей права «Локальный доступ (Local Access)». Сохраните настройки.
Закрываем окно служб компонентов, теперь для того, чтобы закончит ьнастройку DCOM для 1С и Microsoft Excel Application, вам необходимо дать права на две папки.
Вам нужно убедиться, что у вас есть две папки:C:WindowsSysWOW64configsystemprofileDesktop
и
C:WindowsSystem32configsystemprofileDesktop
Если их нет, то создайте их. Далее даем полные права на эту папку, для все той же учетной записи, сервиса 1С. Надеюсь, что было не сложно, и вы разобрались в конфигурировании DCOM для компонента Excel.Application в связке с 1С. С вами был Семин Иван, автор и основатель IT портала Pyatilistnik.org,
- Также рекомендуется дать полный доступ на папку
C:WindowsSystem32configsystemprofileAppData
Оригинл статьи: http://pyatilistnik.org/dcom-in-excel-application/
- Remove From My Forums
-
Вопрос
-
I have been pulling my hair out, trying to figure out which registry keys I need to grant access to for remote DCOM and WMI calls on Server 2012 R2. The Internet is full of different opinions. Can someone who has done this clarify this question. I believe
I have narrowed it down to one of these two pairs:HKEY_CLASSES_ROOTCLSID{76A64158-CB41-11D1-8B02-00600806D9B6}
HKEY_CLASSES_ROOTWow6432NodeCLSID{76A64158-CB41-11D1-8B02-00600806D9B6}HKEY_CLASSES_ROOTCLSID{76A64158-CB41-11D1-8B02-00600806D9B6}
HKEY_LOCAL_MACHINESOFTWAREClassesWow6432NodeCLSID76A64158-CB41-11D1-8B02-00600806D9B6}Thanks.
-
Изменено
31 марта 2016 г. 11:51
-
Изменено
Ответы
-
Had to use this pair:
HKEY_CLASSES_ROOTCLSID{76A64158-CB41-11D1-8B02-00600806D9B6}
HKEY_LOCAL_MACHINESOFTWAREClassesWow6432NodeCLSID76A64158-CB41-11D1-8B02-00600806D9B6}The first pair mentioned above, should have worked, but did not for some reason.
-
Изменено
Steven_A_C
12 апреля 2016 г. 11:23 -
Помечено в качестве ответа
Hello_2018
13 апреля 2016 г. 7:12
-
Изменено
Содержание
- C windows syswow64 config systemprofile desktop
- Что такое DCOM
- Настройка DCOM для Excel.Application
- C windows syswow64 config systemprofile desktop
- Лучший отвечающий
- Вопрос
- ПолучитьCOMОбъект не работает на сервере.
- C windows syswow64 config systemprofile desktop
- Вопрос
- Все ответы
- C windows syswow64 config systemprofile desktop
C windows syswow64 config systemprofile desktop
Добрый день! Уважаемые читатели и гости, популярного IT блога pyatilistnik.org. Сегодня я продолжу пополнять свою копилку знаний в разделе 1С. Вчера меня один из разработчиков, попросил ему помочь настроить компоненты DCOM для Excel.Application в связке с приложением 1С. Я ранее этого не делал, так что пришлось в этом разбираться. По итогам найденного решения, появилась и эта заметка. Уверен, что на этот материал найдутся желающие.
Что такое DCOM
И так у меня есть виртуальная машина под управлением Windows Server 2012 R2, на ней установлены серверные компоненты 1С, есть задача для Excel.Application модуля, настроить DCOM компоненты.
Нам необходимо открыть в панели управления Windows, компонент «Службы компонентов».
Либо можете, через окно выполнить ввести DCOMCNFG, откроется, тоже самое.
В службах компонентов (Component Services) откройте ветку:
КОМУ ЛЕНЬ самому создавать, то можете скачать данный ключ реестра у меня. Просто запустите потом и подтвердите, что согласны добавить. Затем откройте командную строку от имени администратора и выполните команду:
У вас откроется mmc оснастка «Службы компонентов», которая делает то же что и DCOMCONFIG, но позволяет видеть 32 битные компоненты. В результате этих манипуляций компонент Microsoft Excel Application у вас должен появиться. Открываем свойства Microsoft Excel Application.
Переходим на вкладку «Безопасность (Secutity)». В пункте «Разрешения на запуск и активацию (Launch and Activation Permissions)», выберите «Настроить (Customize )» и изменить. Вам нужно добавить сюда учетную запись, от имени которой запускается служба 1С и предоставить ей права:
Далее переходим к пункту «Разрешения на доступ (Access Permissions)» и так же меняем их. Добавьте там ту же учетную запись, от имени которой запускается сервис 1С, и дайте ей права «Локальный доступ (Local Access)». Сохраните настройки.
Закрываем окно служб компонентов, теперь для того, чтобы закончит ьнастройку DCOM для 1С и Microsoft Excel Application, вам необходимо дать права на две папки.
Вам нужно убедиться, что у вас есть две папки:
Источник
C windows syswow64 config systemprofile desktop
![]()
![]()
Лучший отвечающий

Вопрос
На Windows 10 и windows 7 все работает без проблем.
На Windows server 2012r2 процесс в диспетчере запускается, а сам Excel нет. Данные не выгружаются и документ не открывается.
Ошибка сервера в приложении ‘/’.
Исключение из HRESULT: 0x800A03EC
Описание: Необработанное исключение при выполнении текущего веб-запроса. Изучите трассировку стека для получения дополнительных сведений о данной ошибке и о вызвавшем ее фрагменте кода.
Сведения об исключении: System.Runtime.InteropServices.COMException: Исключение из HRESULT: 0x800A03EC
Необработанное исключение при выполнении текущего веб-запроса. Информацию о происхождении и месте возникновения исключения можно получить, используя следующую трассировку стека исключений.
Трассировка стека:
Источник
ПолучитьCOMОбъект не работает на сервере.
При использование ПолучитьCOMОбъект() на файловой базе прекрасно работает, при запуске на серверной базе выдает ошибку
Windows 2008 R2, MS SQL 2008, 1c 8.3.4.437. Агент запускается от пользователя USR1CV который имеет права администратора. Установлен MS office 2010.
Если использовать:
Файл = Новый Файл(ВремФайл);
Файл.Удалить();
Не находить процедуру Удалить().
Видимо дело в правах и доступе, но не пойму, где забыл открыть доступ.
ОболочкаActiveDocument.Записать (ActiveDocumentShell.Write)
ОболочкаActiveDocument (ActiveDocumentShell)
Записать (Write)
Синтаксис:
Записывает Active document в файл.
(16) tiz7, Воспользуйтесь другой функцией работы с COM объектом
О = Новый COMОбъект()
O.Open
.
И второе вынесете код работы с COM объектом во внешний модуль
Если работа идёт в режиме управляемых форм, то перед началом функции, которая вызывает ПолучитьCOMОбъект() должно стоять НаСервере.
Файл = Новый Файл(ВремФайл);
Файл.Удалить();
Такой файл удалить нельзя, так как он не сохранён. Его можно только Файл.Закрыть();
Часть кода.
&НаСервере
Функция ПолучитьМакетНаСервереИП()
ВремФайл = ПолучитьИмяВременногоФайла(«doc»);
Попытка
КомОбъект = ПолучитьCOMОбъект(ВремФайл);
Исключение
Сообщить(ОписаниеОшибки(), СтатусСообщения.ОченьВажное);
Сообщить(«Ошибка создания»);
Возврат неопределено;
КонецПопытки;
//.
КонецФункции
Все это работало до на другом сервере и в серверной базе. Просто видимо забыл про какие то права пользователя(
Загружаем данные из Excel
Все работает великолепно. Но сжирает лицензии. После этой обработки уже никто не может зайти в подсистему. Приходится перегружать сервер. Подскажите, как с этим можно бороться?
ЗЫ. Обработка работает 1 раз в неделю. Пользователи могут быть разными.
Источник
C windows syswow64 config systemprofile desktop
Вопрос
Все ответы
Hi, I was also looking for a solution to this.. and I was able to come up with a «hack» to make it work.
It seems that even if you impersonate the service, or assign a specific user to it, or impersonate Excel with DCOM, when the Excel object is instantiated it still uses the Local System as its security profile. Because of this, it uses the registry hive of the Local System and it ends up with properties like StartupPath = «C:windowssystem32configsystemprofileAppDataRoamingMicrosoftExcelXLSTART», etc..
Now, open up REGEDIT and navigate to HKEY_LOCAL_MACHINESoftwareMicrosoftWindows NTCurrentVersionProfileListS-1-5-18ProfileImagePath and make a backup of its value. Next from within the ProfileList registry hive, locate a valid desktop user profile (it should start with S-1-5-21-[xxxx]). Copy the value for its ProfileImagePath and overwrite the one assigned to the Local System profile. Restart your system before trying out the solution.
Note, however, that this is a «registry hack» and I discourage sticking to it. I’m still looking for an alternative solution, so please post your ideas here too if you have them.
There is a better solution than the registry hack I mentioned above. It still involves fooling the system profile into acting like a user profile.
Источник
C windows syswow64 config systemprofile desktop
При попытке подключится к Excel через COM объект приводило к неудаче.
ExcelApp = Новый COMОбъект(«Excel.Application»);
Для устранения ошибки требуется предоставить права на запуск DCOM Microsoft Excel Application пользователю от которого запушена служба 1С.
Для этого необходимо:
1. На сервере должен быть установлен Office.
2. Пуск Выполнить.
3. Запускаем mmc.
Если Office 64-х разрядный, то запускаем mmc.

Для Office 32-x запускаем mmc /32.


5. В левой панели окна Службы компонентов->Мой Компьютер
6. Выбрать папку Настройка DCOM

7. В окне сведений найти объект Microsoft Excel Application, щелкнуть его правой кнопкой и выбрать пункт Свойства
8. Открыть вкладку Безопасность

9. В разделе Разрешения на запуск выбрать пункт Настроить и нажать кнопку Изменить
10. Добавить пользователя
11. Создаем папки:
для Windows Server x64 C:WindowsSysWOW64configsystemprofileDesktop
для Windows Server x86 C:WindowsSystem32configsystemprofileDesktop
12. Так же необходимо дать права на созданную папку пользователя.
Источник
У вас давно работает новая база на платформе 8.2 или даже 8.3, но бухгалтерия до сих пор сидит на платформе 7.7.
Что делать? Переводить пока не планируем, а обмен нужен в реальном времени? Так мало того, у нас новый 64-битный сервер!
Не беда, есть решение!
Справка
OLE (англ. Object Linking and Embedding) — технология связывания и внедрения объектов в другие документы и объекты, разработанная корпорацией Майкрософт.
В 1996 году Microsoft переименовала технологию в ActiveX.
Более подробно пишет Википедия: https://ru.wikipedia.org/wiki/Object_Linking_and_Embedding
Вступление
Сейчас у вас есть база на платформе 1С 8.Х, а также база на платформе 1С 7.7. И вам нужно их подружить.
В интернете есть информация по взаимодействию, но вся она разбросана. И мало того никто не учитывает, что сейчас сервера идут 64-битные, а клиенты 32-битные.
Итак давайте знакомить платформу 8 с 7. Для этого нам нужно использовать OLE Automation сервер.
По этому вопросу уже есть готовая публикация, привожу для примера: //infostart.ru/public/57224/
Подготовка технической части
Будем рассматривать пример на базе Windows Server 2012 R2, где уставновлена платформа 1С 8.Х для сервера 64-битная, для клиента 32-битная. Также нужно установить последний релиз платформы 1С 7.7 у нас 7.70.027.
Рабочая база 1С 7.7 расположена на другом сервере, вариант установки SQL.
Поэтому на нашем сервере также выбираем вариант установки SQL.
Установка 1С 7.7:
Устанавливаем под администратором: 
Перезагружаемся.
Далее чтобы 1С 7.7 прописалась в реестре важно запустить ее также под администратором, создать пустую базу и зайти в нее.
Перезагружаемся.
Так же скорее всего вам понадобится подменить в папке (BIN) «BkEnd.dll» и добавить туда пустой файл «OrdNoChk.prm» (файлы внизу публикации).
Далее важно, чтобы у вас в реестре появились записи:
V77.GeneralPropPage
V77.Application
V77S.Application и прочие.
А также как минимум DCOM (нужно проверить, за давностью установки, не уверен в надобности).
Пуск — Выполнить — DCOMCNFG.
Там разворачиваем «Службы компонентов» — «Компьютеры» — «Мой компьютер» — «Настройка DCOM»:
V77.GeneralPropPage
Если их нет, значит у вас что-то с доступом. Настраиваем и начинаем заново установку.
Настройка Windows Server 2012 R2
Для открытия 1С 7.7 по OLE на сервере потребует больше, чем по умолчанию, памяти для запуска приложений в «не интерактивном» режиме (т.е. в регламентном задании) для этого в реестре нужно изменить/добавить запись:
HKEY_LOCAL_MACHINE>SYSTEM>CurrentControlSet>Control>Session Manager>SubSystems
Меняем значение Windows, было:
%SystemRoot%system32csrss.exe ObjectDirectory=Windows SharedSection=1024,3072,512
Windows=On SubSystemType=Windows ServerDll=basesrv,1 ServerDll=winsrv:UserServerDllInitialization,3
ServerDll=winsrv:ConServerDllInitialization,2 ProfileControl=Off MaxRequestThreads=16
SharedSection=1024,3072,512
Вот здесь редактируем 3 значение, мы поставили 5 мб (было 512 кб). Важно чтобы 2 и 3 значение не превысило 48 мб.
Этот параметр отвечает в Windows за «кучу» для неинтерактивного сеанса.
Про изменение «кучи» подробно написали в статье: http://www.techarp.com/showarticle.aspx?artno=238&pgno=1
Первый нюанс с «кучей» решили, теперь осталось разобраться с правами у пользователя, который запускает службу «Агент сервера 1С:Предприятия 8.Х (x86-64)»
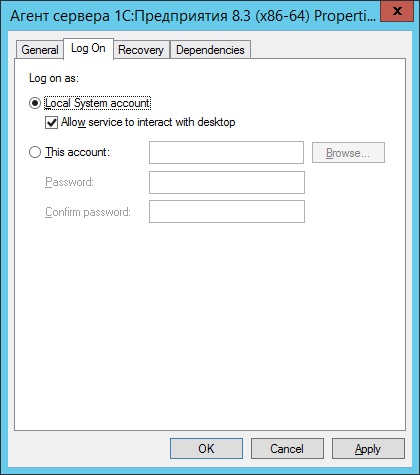
Если у вас служба настроена в таком режиме, то потребуется прописать в реестре путь до базы 1С 7.7:
KEY_USERSS-1-5-18Software1C1Cv77.7Titles
Для каждой новой базы, нужно создать новую запись(New->String value или Создать->Строковый параметр):
Name: Путь_и_Имя_базы
Type: REG_SZ
Data: Ваше_название_для_базы
В итоге код для системной учетной записи заработает.
Но в этом случае сеть не доступна (нам такой вариант не подходит).
В таком случае нужно выбрать конкретного пользователя и проверить чтобы у него был доступ на сеть!
Так же у этого пользователя должна быть прописана база в реестре или вы можете зайти интерактивно под этим пользователем и добавить в список нужную сетевую базу 1С 7.7.
Делаем регламентное задание
Систему к работе мы подготовили теперь дело за малым написать код!
Создаем регламентное задание и определяем процедуру в которой записан код:
Попытка
v7=Новый COMОбъект("V77.Application");
Исключение
v7=Новый COMОбъект("V1CEnterprise.Application");
КонецПопытки;
КаталогБазыОЛе = "ВашСерверD$КаталогНаДискеДВашейБазы";//пример сетевого каталог на диске D
ПользовательОле = "Пользователь1С8СозданныйВ1С7";
ПарольОле = "ПарольПользователяОле";
МонопольныйРежимOLE = "";
//МонопольныйРежимOLE = " /m";
//для немонопольного запуска указать пустую строку!
ЗапускБезЗаставки = 1;
// для появления заставки поставьте "0"
РезультатПодключения = v7.Initialize (v7.RMTrade,"/d"+Сокрлп(КаталогБазыОле)+" /n"+Сокрлп(ПользовательОле)+" /p"+Сокрлп(ПарольОле)+МонопольныйРежимOLE, ?(ЗапускБезЗаставки=1,"NO_SPLASH_SHOW",""));
Если РезультатПодключения=1 Тогда
Сообщить("Соединение установлено");
Иначе
Сообщить(""+КаталогБазыОле);
Сообщить("Соединение не установлено");
КонецЕсли;
Все, подключение работает!
Теперь можете написать код в 1С 7.7 при старте системы или опишите на языке 1С 7.7 нужный алгоритм прямо в 1С 8.Х.