Распределенная файловая система DFS ( Distributed File System) – это технология, обеспечивающая возможности упрощения доступа к общим файловым ресурсам и глобальной репликации данных. Благодаря DFS распределённые по различным серверам общие ресурсы (каталоги и файлы) можно объединить в единую логическую UNC структуру, которая для пользователя выглядит, как единый сетевой ресурс. Даже при изменении физического местоположения целевой папки, это не влияет на доступ пользователя к ней.
Реализация служб DFS в Windows Server 2012 отличается от предыдущих версиях Windows. В первую очередь отметим, что технологии DFS в Windows Server 2012 реализованы в виде двух отдельных, независимых друг от друга служб — DFS Namespaces и DFS Replication , включенных в роль файлового сервера (File and Storage Services).
- DFS Namespaces (DFSN или DFS-N) – пространство имен DFS. Позволяет объединять в единую логическую структуру общие папки, расположенные на различных серверах организации. Каждое пространство имен для пользователя выглядит как единая сетевая папка с подкаталогами. Реальная структура данного пространства имен DFS является скрытой от пользователя, и может включать в себя различные сетевые папки, расположенные на различных серверах и сайтах.
- DFS Replication (DFSR или DFS-R) — служба DFS репликации. Позволяет организовать эффективную службу репликации каталогов (в том числе включенных в пространство имен DFS) между различными серверами и сайтами AD. Данная служба для репликации использует специальный алгоритм удаленного разностного сжатия – RDC- remote differential compression. Благодаря RDC, которая отслеживает изменения в файлах, при репликации копируются не файлы целиком (как в случае с FRS репликацией), а только их блочные изменения.
Установка служб DFS в Windows Server 2012
Установить службы DFS можно с помощью консоли Server Manager или же при помощи Windows PowerShell.
Как мы уже говорили, службы DFS являются элементами роли Files and Storage Services:

Но проще и быстрее установить все DFS службы и консоль управления DFS с помощью PowerShell:
Install-WindowsFeature FS-DFS-Namespace, FS-DFS-Replication, RSAT-DFS-Mgmt-Con

Совет. Естественно, службы и консоль управления DFS можно установить и по отдельности.
, где FS-DFS-Namespace – служба DFS Namespaces
FS-DFS-Replication – служба репликации DFS Replication
RSAT-DFS-Mgmt-Con– mmc консоль управления службами DFS — DFS Management Tools (также входит в состав Remote Server Administration Tools для Windows 10)
Настройка пространства имен DFS в Windows Server 2012
Перейдем к описанию процедуры настройки пространство имен DFS, для чего необходимо открыть панель управления DFS Management tool.
Создадим новое пространство имен (New Namespace).
Необходимо указать имя сервера, который будет содержать пространство имен (это может быть как контроллер домена, так и рядовой сервер).

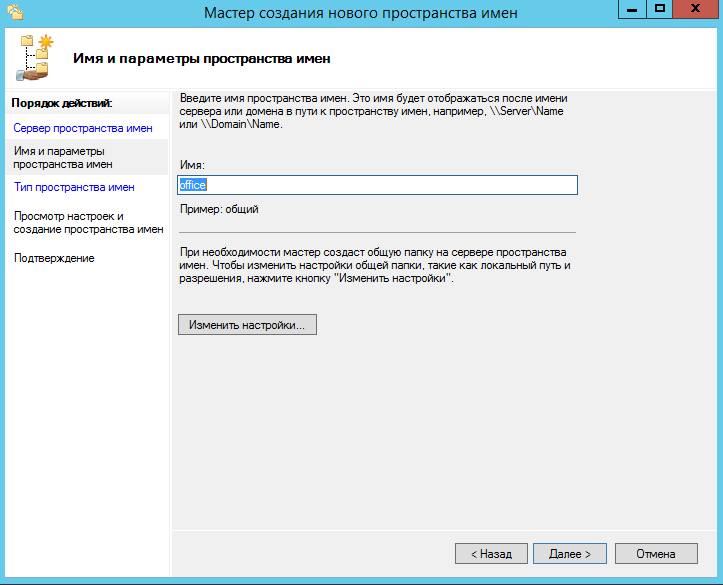
Затем следует указать имя создаваемого пространства имен DFS и перейти в расширенные настройки (Edit Settings).

Здесь следует указать имя пространства имен DFS и права доступа к данному каталогу. Обычно рекомендуется указать, что доступ к сетевой папке разрешен Всем (Everyone), в этом случае права доступа проверяются на уровне файловой системы NTFS.

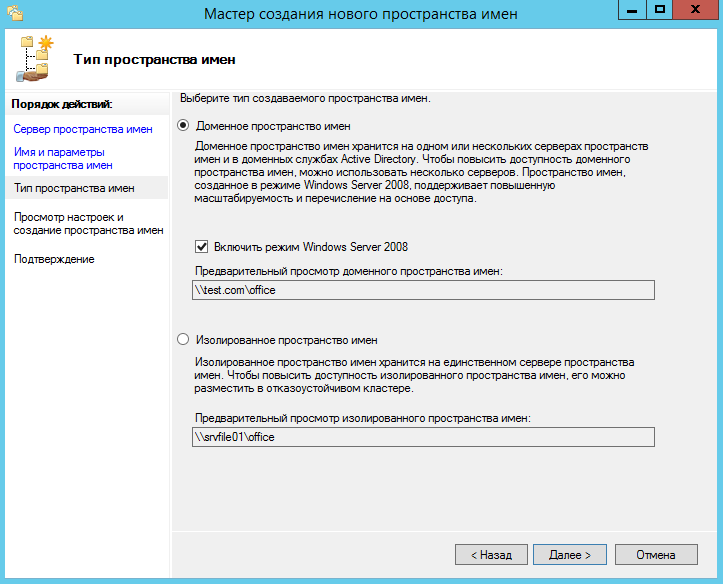
Далее мастер предложит указать тип создаваемого пространства имен. Это может быть Domain-based namespace (доменное пространство имен) или Stand-alone namespace (отдельное пространство имен). Domain-based namespace обладает ряд преимуществ, но для его работы нужен, собственно домен Active Directory и права администратора домена (либо наличие делегированных прав на создание доменных пространств имен DFS).

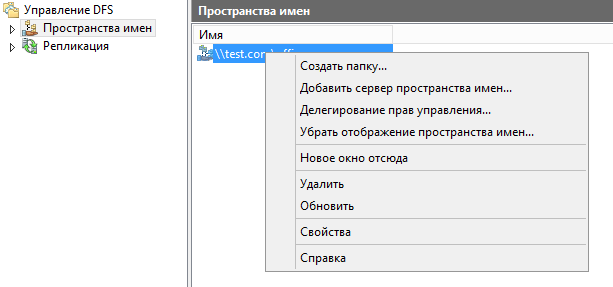
После окончания работы мастера в ветке Namespaces консоли управления DFS появится созданное нами новое пространство имен DFS. Чтобы пользователи при доступе к DFS каталогам видели только те каталоги, к которым у них имеется доступ, включим для данного пространства DFS Access-Based Enumeration (подробнее о данной технологии в статье Access-Based Enumeration в Windows). Для этого откройте окно свойств созданного пространства имен.

И на вкладке Advanced включите опцию Enable access-based enumeration for this namespace.

Чтобы посмотреть содержимое нового пространства DFS, просто наберите в окне проводника UNC путь: \имя_домена_или_сервераDFS
Добавление дополнительного DFS сервера
В доменное пространство имен DFS можно добавить дополнительный сервер (пункт меню Add Namespace Server), который его будет поддерживать. Делается это для увеличения доступности пространства имен DFS и позволяет разместить сервер пространства имен в том же сайте, в котором находится пользователи.
Примечание. Отдельно стоящие пространства имен DFS поддерживают только один сервер.
Добавление нового каталога в существующее пространство имен DFS
Теперь нужно добавить новый сетевой каталог в иерархию созданного нами пространства имен DFS. Нажмите кнопку Add Folder Target.
Укажите наименование каталога в DFS пространстве и его реальное местоположение на существующем файловом сервере (Folder targets).

Настройка DFS-репликации на Windows Server 2012
Технология репликации DFS-R предназначена для организации отказоустойчивости пространства имен DFS и балансировки нагрузки между серверами. DFS-R автоматически балансирует трафик между репликами в зависимости от их загрузки и в случае недоступности одного из серверов перенаправляет клиентов на другой сервер-реплику. Но прежде, чем говорить о DFS репликации и ее настройке в Windows Server 2012перечислим основные системные требования и ограничения:
- Служба DFS Replication должна быть установлена на всех серверах, которые планируется включить в группу репликации
- Все сервера в группе репликации должны находиться в одном лесу AD
- Уровень леса Active Directory должен быть как минимум Windows Server 2003 R2 (при установке первого домена контроллера на Windows Server 2012 схема обновляется автоматически).
- Функциональный уровень домена — как минимум Windows Server 2008
- Необходимо убедиться, что антивирусное обеспечение на файловых серверах совместимо с технологией репликации DFS
- Реплицируемые каталоги должны располагаться на томах с файловой системой NTFS (файловые системы ReFS и FAT не поддерживаются). Также не поддерживается репликация данных, хранящихся на on Cluster Shared Volumes
В консоли DFS Managment выберите нужный вам DFS Namespace и щелкните ПКМ по каталогу, для которого необходимо создать реплику и выберите пункт Add Folder Target.
И укажите полный (UNC) путь к сетевому каталогу другого сервера, в котором и будет храниться реплика.
На вопрос хотите ли вы создать группу репликации отвечаем Yes.
Запускается мастер настройки репликации. Проверяем имя группы репликации и каталог.

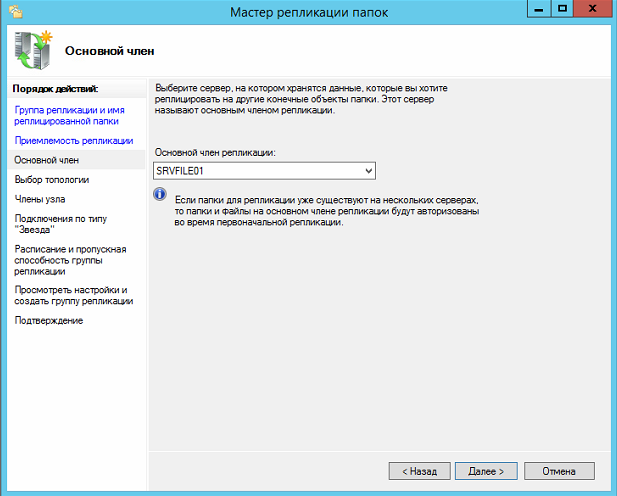
Указываем первичный (Primary) сервер. Именно этот сервер будет источником данных при инициальной (первичной) репликации. dfs сервер")
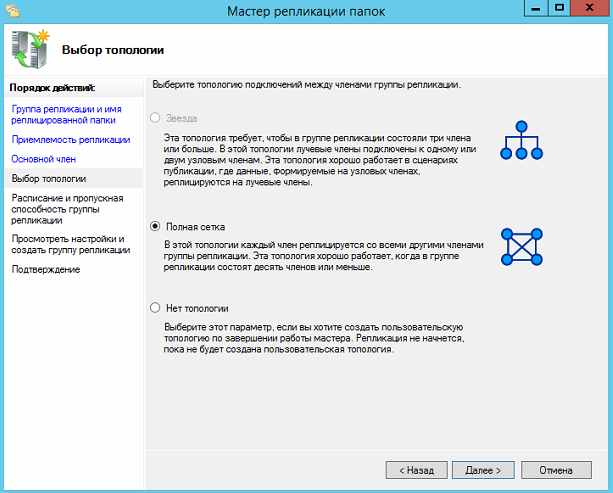
Затем выбираем тип топологии (соединения) между членами группы репликации. В нашем примере выбираем Full Mesh (все со всеми).
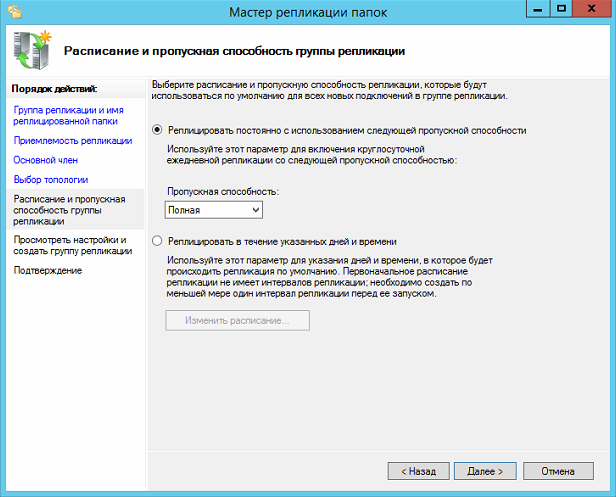
И, наконец, указываем расписание репликации и параметры bandwidth throttling – ограничение доступной для репликации полосы пропускания. 
После окончания работы мастера, запуститься первоначальная синхронизация.
В случае необходимости, настройки расширенных параметры расписания репликации и максимальную полосу пропускания под данный трафик, можно задать в ветке Replication.

 Опубликовано: 06.09.2016
Что такое пространство DFS простыми словами и зачем оно нужно.
Инструкция написана на примере Windows Server 2012 R2 Full. Если используется версия Core, то читайте инструкцию Установка и настройка DFS с помощью Powershell.
Установка DFS
Открываем Диспетчер серверов. Он может быть запущен из панели быстрого запуска.

Нажимаем Управление — Добавить роли и компоненты.

В открывшемся окне оставляем Установка ролей и компонентов и нажимаем Далее.

В следующем окне выбираем нужный сервер (выбран по умолчанию, если работаем на сервере, а не через удаленную консоль) и нажимаем Далее.
Среди ролей находим Файловые службы и службы хранилища, раскрываем их и ставим галочки напротив следующих компонентов:
- Службы хранения;
- Файловый сервер;
- Пространство имен DFS.

* некоторые из служб уже могут быть установлены. В таком случае ставим галочки только напротив тех, которых не хватает.
** мастер может выдать предупреждение, что для установки службы потребуется установка дополнительных компонентов — соглашаемся.
Нажимаем Далее.
В следующем окне Выбор компонентов просто нажимаем Далее.
Откроется окно Подтверждение установки компонентов. Нажимаем Установить и после окончания процесса перезагружаем сервер.
Создание пространства имен
Открываем Диспетчер серверов. Выбираем Средства

И Управление DFS.

В открывшемся окне кликаем правой кнопкой по корневому разделу Управление DFS и выбираем Создать пространство имен:

В появившемся окне вводим или выбираем сервер пространства имен — это может быть сам файловый сервер.

Нажимаем Далее. Теперь вводим имя пространства, по которому пользователи будут к нему обращаться, например dfs:

Нажимаем Далее.
Теперь выбираем тип пространства. В доменной среде лучше оставить Доменное пространство имен:

В противном случае, ставим Изолированное пространство имен и нажимаем Далее.
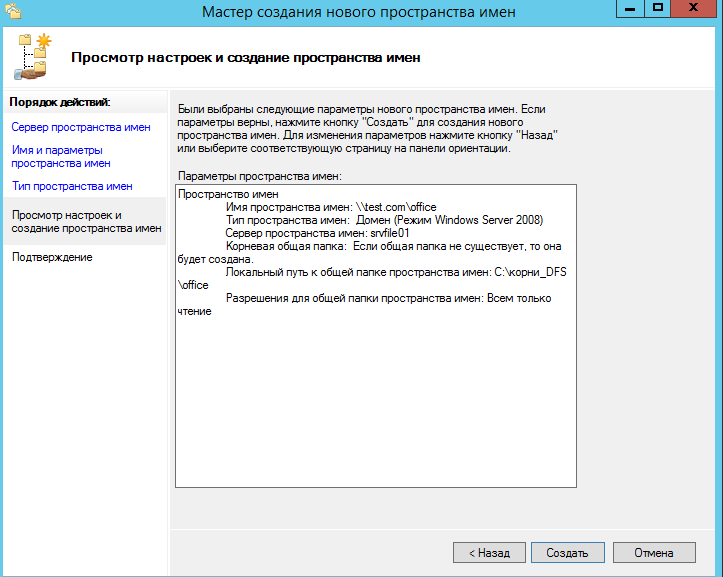
На следующем шаге проверяем данные и нажимаем Создать.
Создание общей папки в пространстве DFS
Прежде чем настраивать DFS, создаем общую папку на самом файловом сервере.
Теперь в уже открытом инструменте Управление DFS раскрываем Пространства имен, кликаем правой кнопкой мыши по созданному пространству и выбираем Создать папку:

В открывшемся окне задаем имя общей папки DFS и нажмите кнопку Добавить:

Теперь выбираем среди общих папок на сервере нужную и нажимаем OK — еще раз OK — и еще раз OK. Среди списка папок в пространстве DFS появится наша новая папка.
Она будет доступна по пути \путь к пространству DFSимя шары или как в нашем примере \fs1share
![]()
Была ли полезна вам эта инструкция?
Да Нет
Дата: 06.02.2015 Автор Admin
В данной статье я расскажу как настроить отказоустойчивый файловый сервер на Windows Server 2012 R2 в домене Active Directory Первым делом убедитесь что сервер введен в домен Active Directory, далее установите роли DFS и файлового сервера
Выберите следующие роли и установите их.

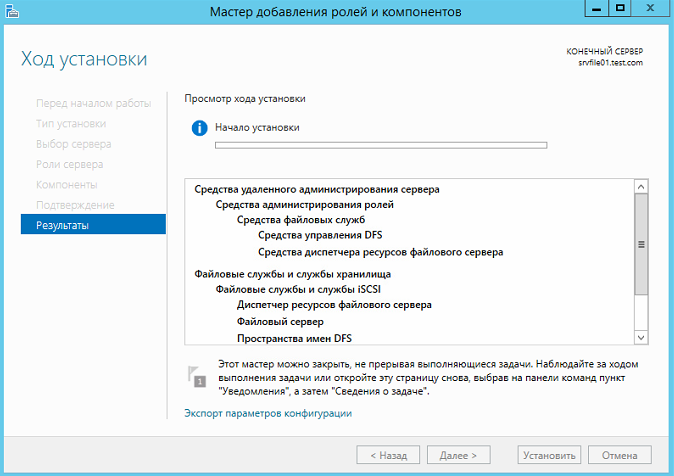
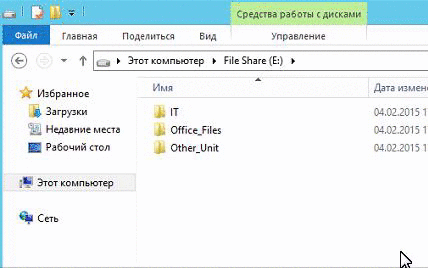
Далее создайте структуру папок на отдельном диске.

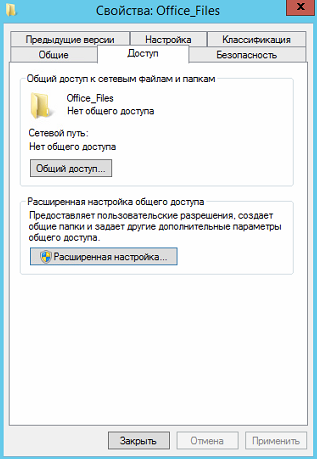
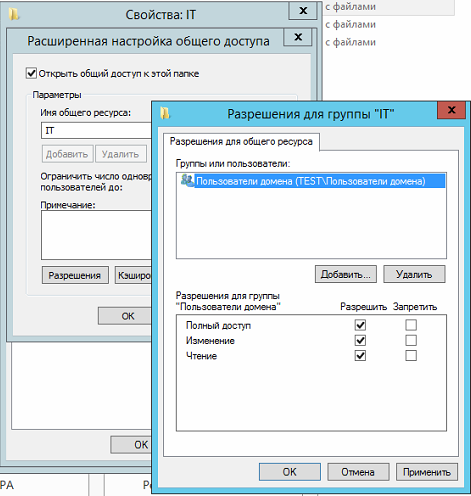
Теперь включим общий доступ.
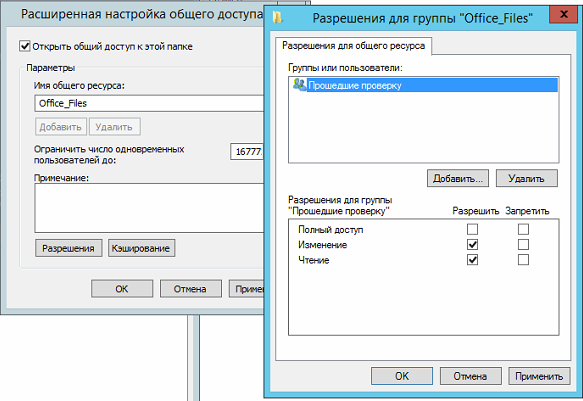
Выберите «расширенная настройка»
Далее выберите «Разрешения» и установите права как на скриншоте.
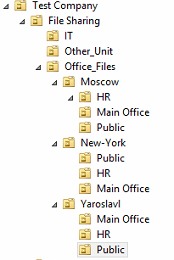
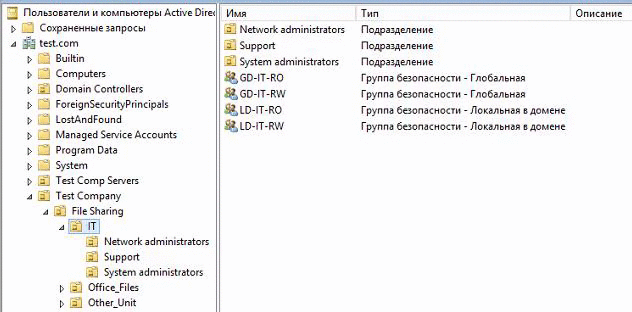
Теперь нам нужно создать структуру прав для наших каталогов в Active Directory.
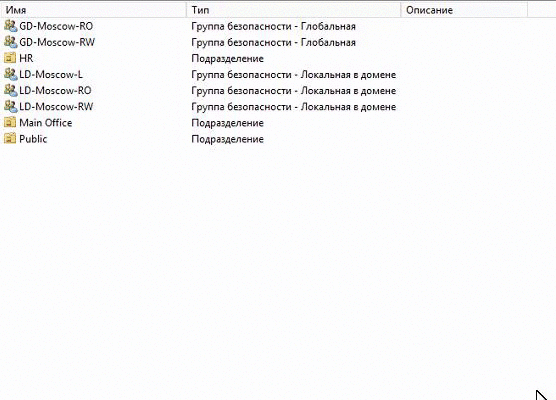
Для начала рассмотрим из чего состоит наша файловая структура.
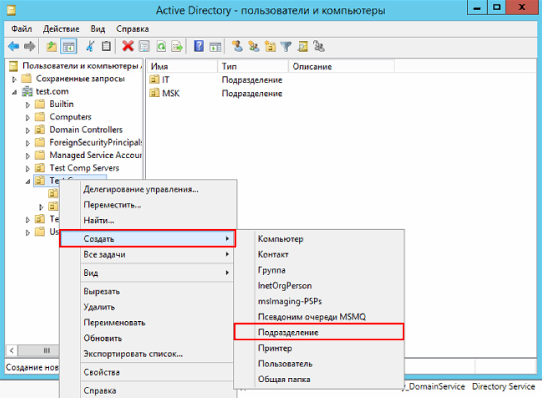
Теперь на ее основе создадим в Active Directory OU — File Sharing
Переходим в консоль пользователи и компьютеры, и создаем OU

Аналогичным путем создадим структуру наших папок
Теперь создадим комплекты прав.
Начнем мы с верхних папок.
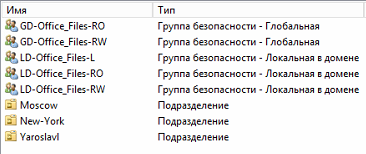
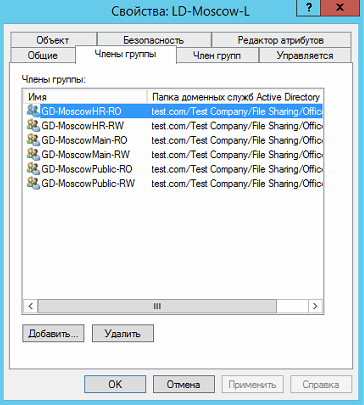
Создадим 2-е локальные группы с правами RW и RO , и 2-е глобальные группы с правами RW и RO, и одну локальную L группу для листинга.
Разберем почему именно так.
В глобальных группах хранятся пользователи, для правильной работы глобальные группы входят в локальные.
Локальные группы назначаются на папки. Их членами являются глобальные группы.
Локальные группы лучше использовать если у вас 1 домен, если доменов несколько и между ними настроено доверие нужно использовать универсальные группы.
Рассмотрим на практике, создадим комплект прав для папки Office_Files.
Создадим 2-е глобальные группы :
GD-Office_Files-RO
GD-Office_Files-RW
Создадим локальные группы:
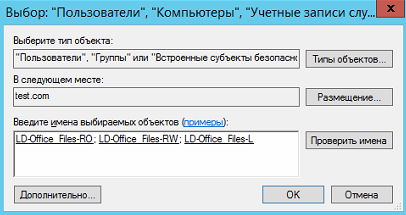
LD-Office_Files-RO
LD-Office_Files-RW
LD-Office_Files-L
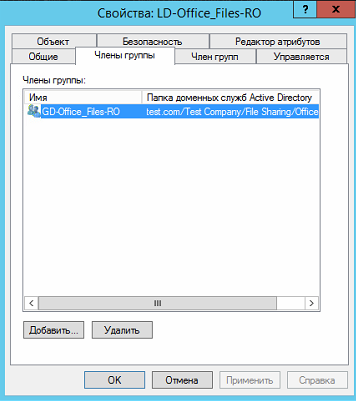
Глобальные группы входят в локальные
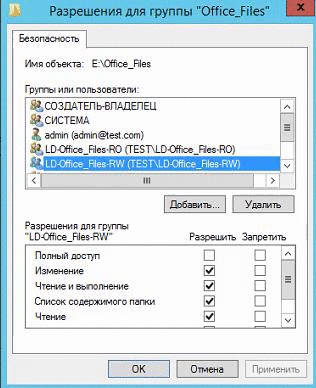
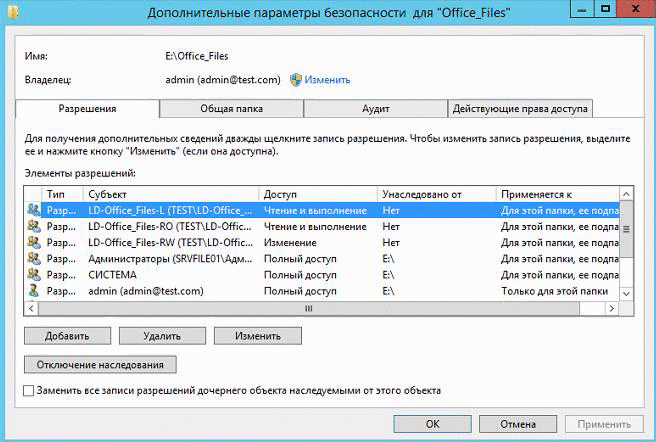
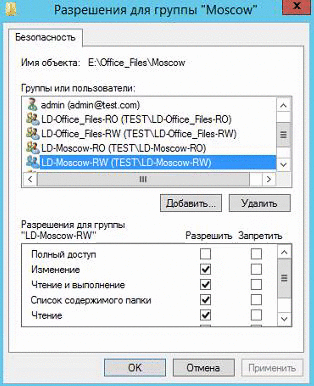
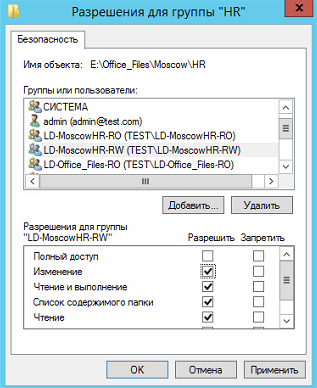
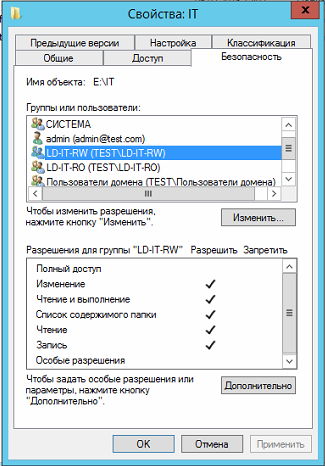
Теперь настроим права на папке.
Откройте свойство папки и выберите вкладку безопасность
Добавьте созданные локальные группы
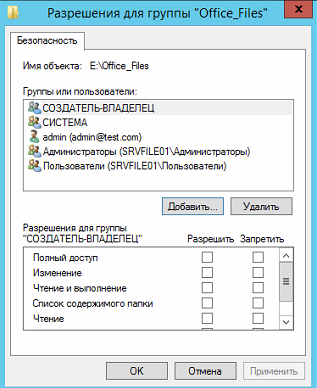
Расставьте права на чтение и запись
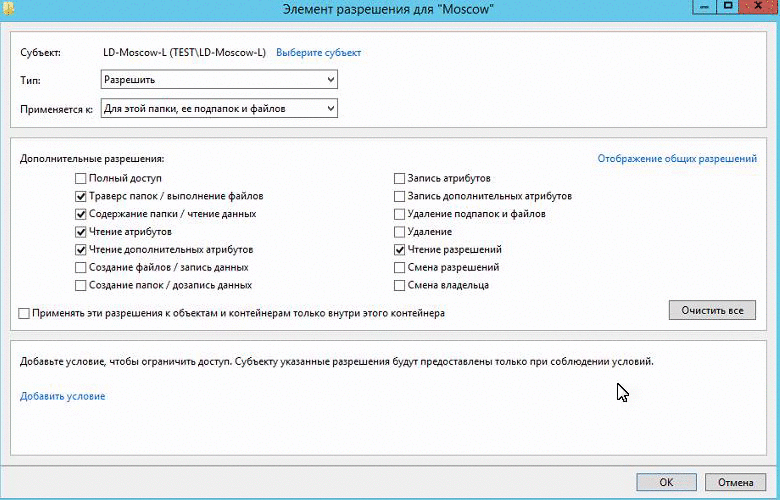
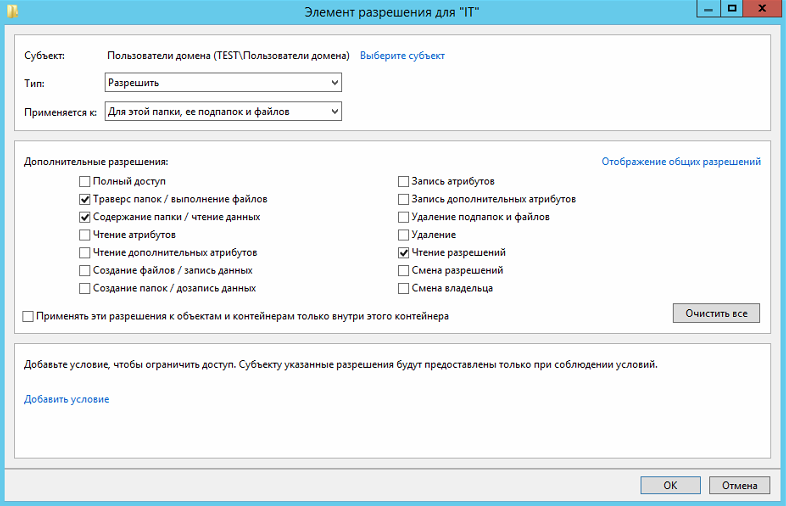
Теперь нажмите кнопку «Дополнительно»
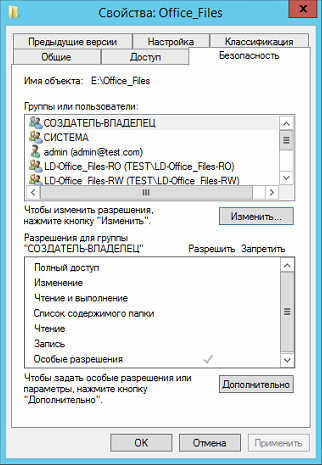
Теперь нужно установить права на листинг
Выберите L группу и нажмите изменить
Теперь установите параметры как на скриншоте ниже
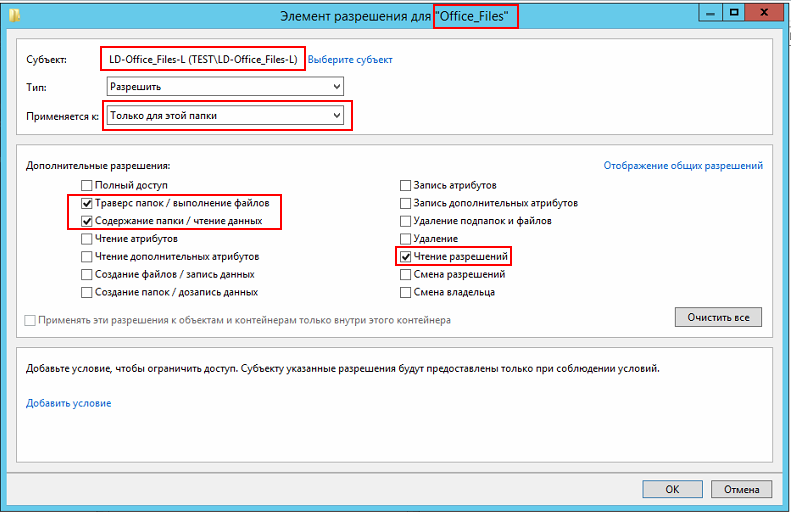
Обратите внимание что мы даем доступ только на листинг и только для данной папки.
Это нужно для того чтобы пользователь получивший права на папку не смог попасть в каталоги ниже если у него нет соответствующих прав.
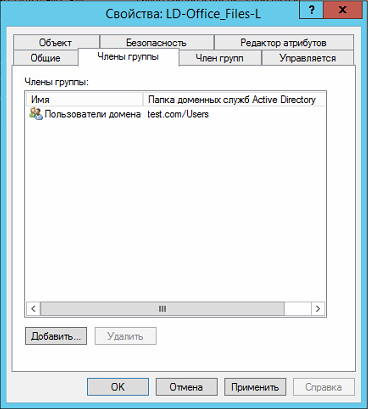
Для корректной работы добавим в эту группу пользователей домена, чтобы они могли видеть корень каталога.
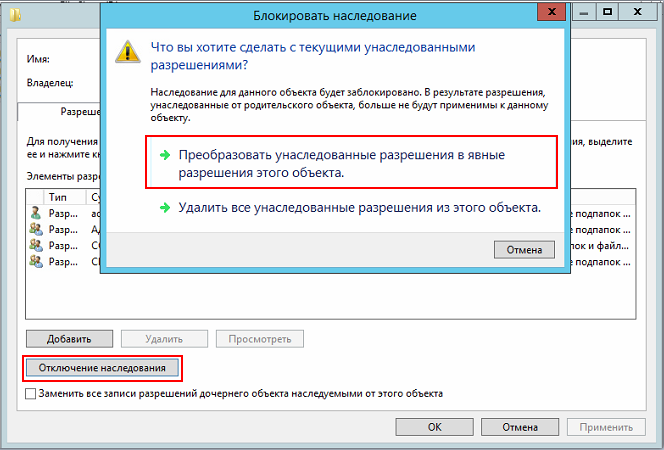
Также отключите наследование прав от корневого каталога диска.
По аналогии настроим права на каталог Moscow.
Создадим группы:
GD-Moscow-RO
GD-Moscow-RW
LD-Moscow-RO
LD-Moscow-RW
LD-Moscow-L
В Active Directory это должно выглядеть так:
Теперь настроим права на папку:
Настроим листинг.
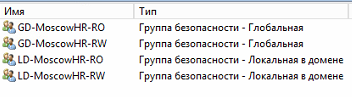
Теперь настроим нижний каталог — HR.
Создаем группы по аналогии.
GD-MoscowHR-RO
GD-MoscowHR-RW
LD-MoscowHR-RO
LD-MoscowHR-RW
Должно получится так
Теперь добавим группы GD-MoscowHR-RO и GD-MoscowHR-RW в группу LD-Moscow-L
Это нужно для того чтобы пользователи у которых нет прав на папку Moscow могли попасть во вложенную папку HR.
При этом открывать файлы в папке Moscow они не смогут.
Настроим права на папку.
По аналогии создадим права на остальные папки.
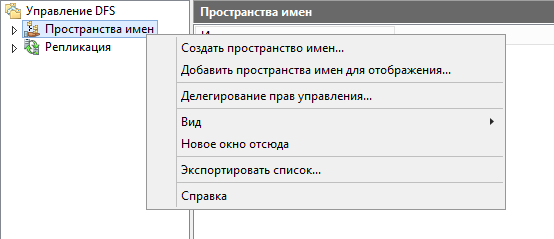
Теперь добавим пространство имен.
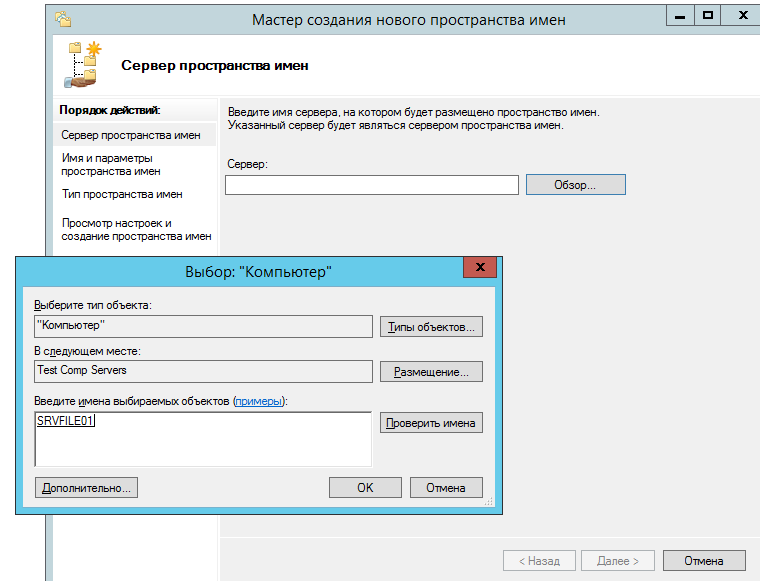
Откроем консоль DFS и создадим пространство имен.
Указываем наш сервер.
Указываем название пути DFS.
Включаем режим 2008.
Создаем пространство.
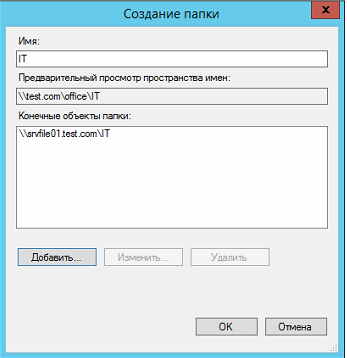
Теперь создадим папку.
Далее указываем путь к папке. Путь можно посмотреть тут, выбрав «open share».
Создаем папку.
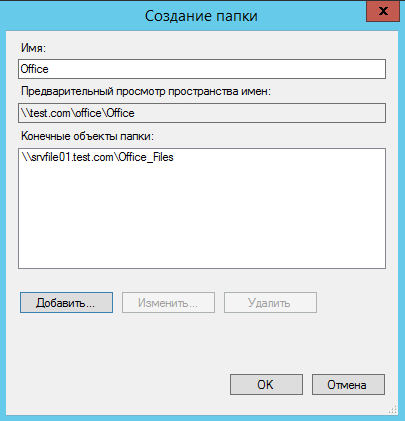
Теперь по данному пути — \test.comofficeOffice Мы видим нашу общую папку.
Теперь если добавить пользователя в группу GD-MoscowHR-RW, он сможет попасть в папку HR, но не сможет открывать или редактировать файлы в папке Moscow.
В другие папки пользователь тоже попасть не сможет.
Если мы добавим пользователя в группу GD-Moscow-RW, он будет иметь доступ на всю папку Moscow, на чтение и запись.
Если мы добавим пользователя в группу GD-Office_Files-RW, он получит доступ ко всем каталогам.
Теперь рассмотрим настройку ABE.
Создайте следующую структуру в Active Directory.
Откройте общий доступ к папке.
Настройте права на папках.
И так далее.
Теперь создайте папку в DFS.
Должно получится так.

Теперь включим ABE.
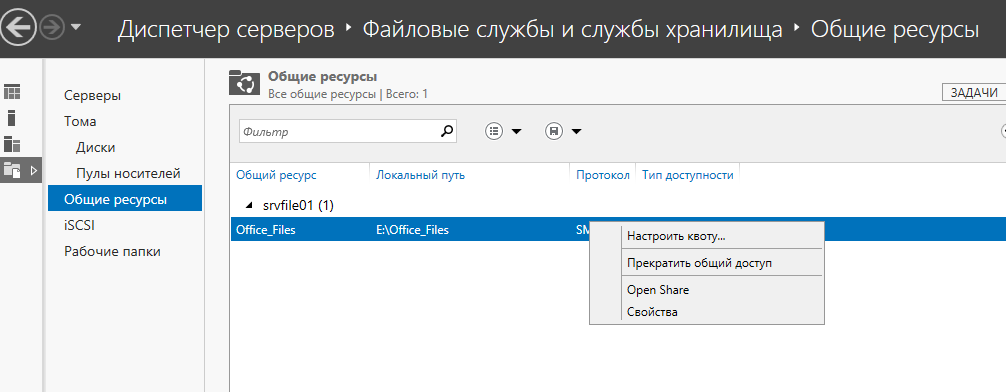
В диспетчере сервера откройте «Файловые службы» — «Общие ресурсы».
Выберите каталог IT, и нажмите свойства.
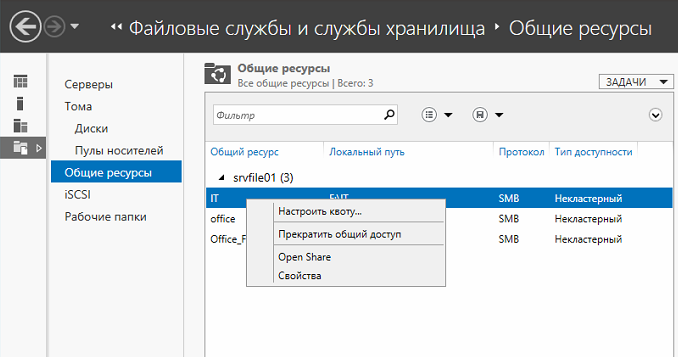
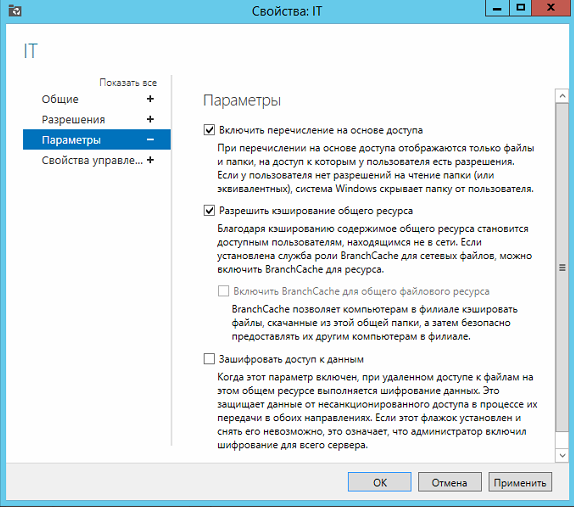
Далее выбираем параметры, и включаем функцию — «Перечисление на основе доступа».
Особенность функции ABE в том что она проверяет права пользователя до того как нужно показать папки в проводнике.
Другими словами, пользователь видит только те папки на которые у него есть права.
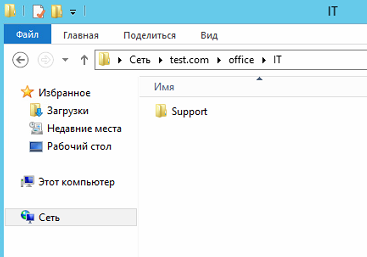
Для примера дадим пользователю support права на папку Support (добавим его в группу — GD-IT-Support-RW)
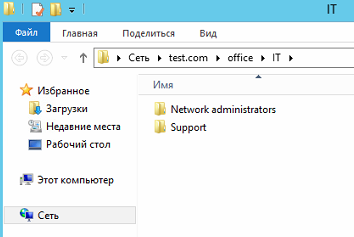
Теперь перейдем по пути — \test.comofficeIT
Как видите пользователь видит только папку Support.
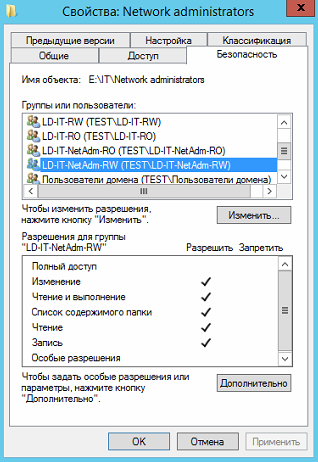
Если мы добавим его в группу GD-IT-NetAdm-RO , то у него появится папка Network administrators с правами на чтение.
На этом настройка ABE закончена.
Учтите, что если в вашей файловой структуре нужно давать права пользователям на под каталоги, минуя корневые папки, то ABE вам не подойдет, т.к. ABE просто скроет от пользователя корневую папку, через которую пользователь попадает в подкаталог.
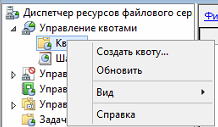
Перейдем в оснастку — Диспетчер ресурсов файлового сервера.
Настроим квоты.
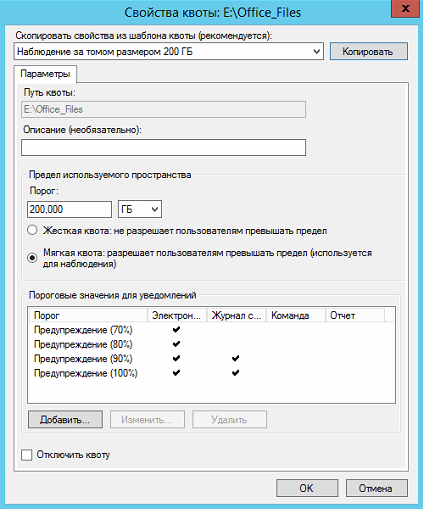
Настроим мягкую квоту для папки Office_Files.
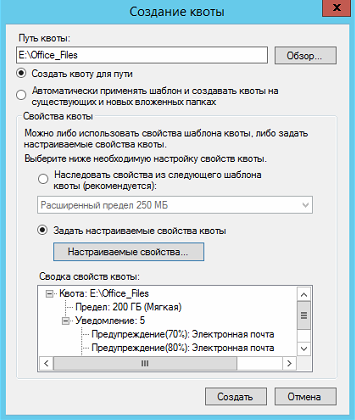
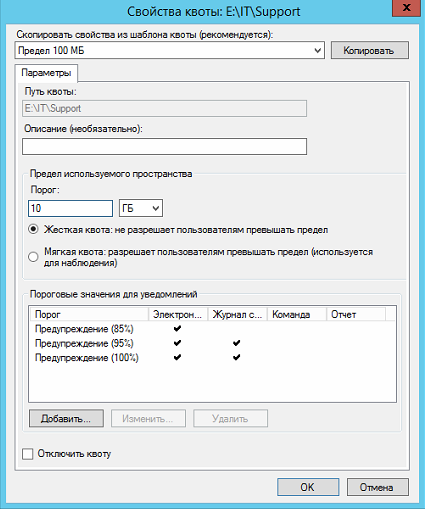
Настроим жесткую квоту для папки Support.

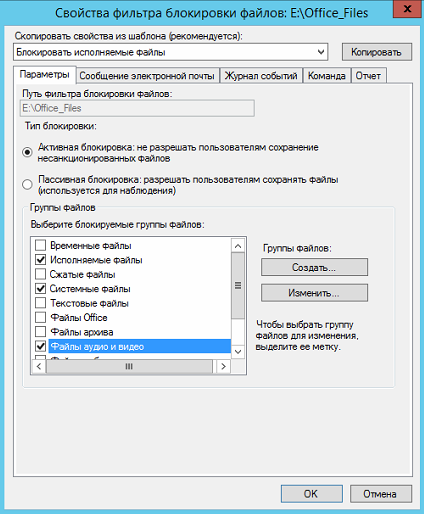
Теперь настроим блокировку файлов для папки Office_Files.
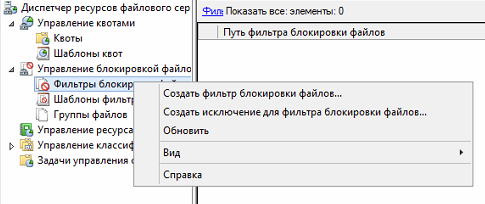
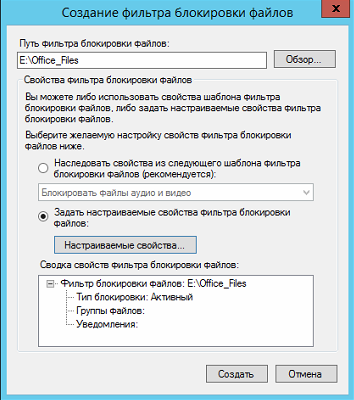
Выберем типы файлов, которые мы будем блокировать.
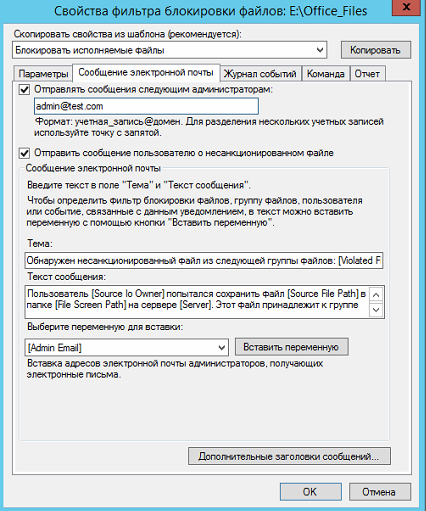
Настроим отправку сообщений по электронной почте.
Включим журнал.
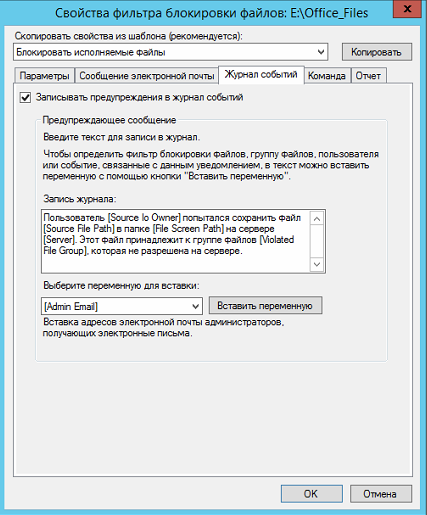
Включим отчеты.
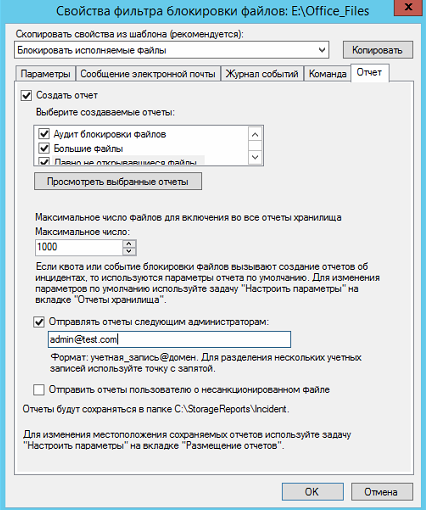
Учтите, без SMTP сервера отправка отчетов работать не будет.
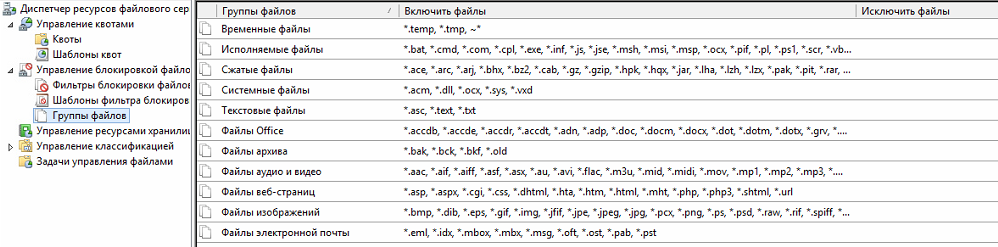
Если вы хотите изменить группы файлов, то это можно сделать тут:
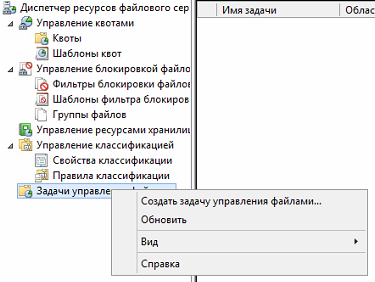
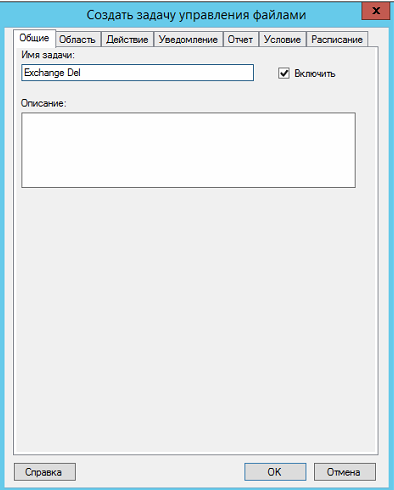
Создадим задачу управления файлами.
Представим что у нас есть папка Exchange. в которой пользователи обмениваются файлами.
Нам нужно сделать так, чтобы раз в период данная папка очищалась, а удаленные данные перемещались в папку Temp
Создаем задачу.
Задаем имя задачи.
Задаем путь и область.
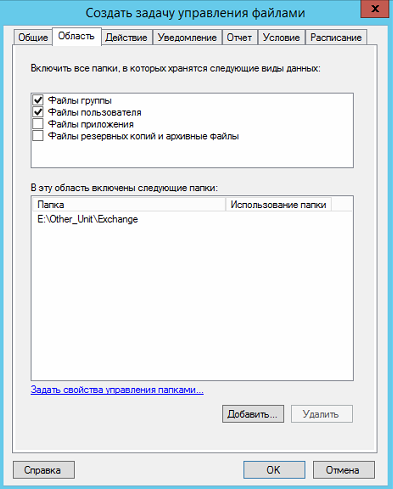
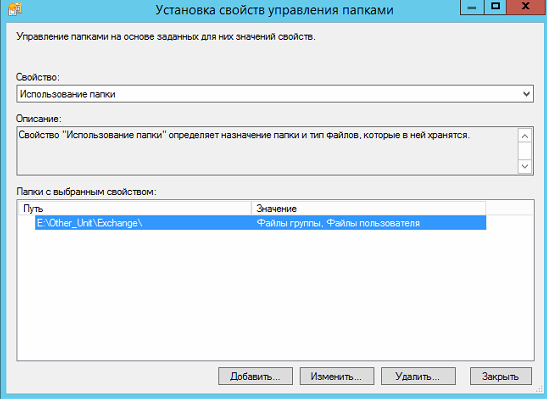
Задаем свойства управления папками.
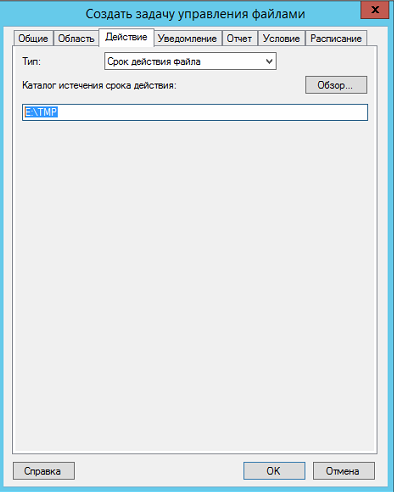
Задаем срок действия папки.
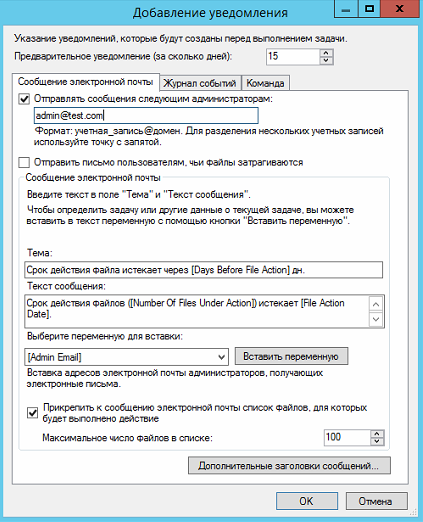
Настраиваем уведомление.
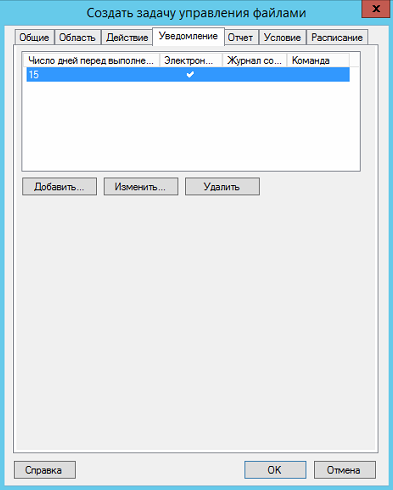
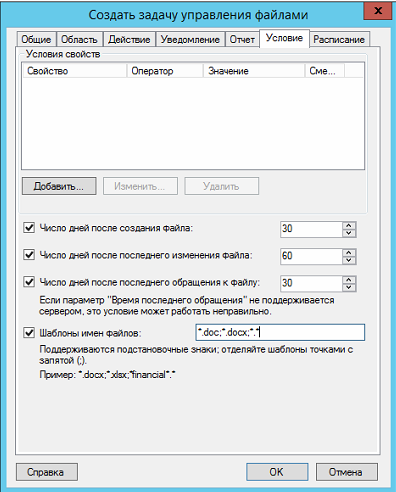
Задаем условие.
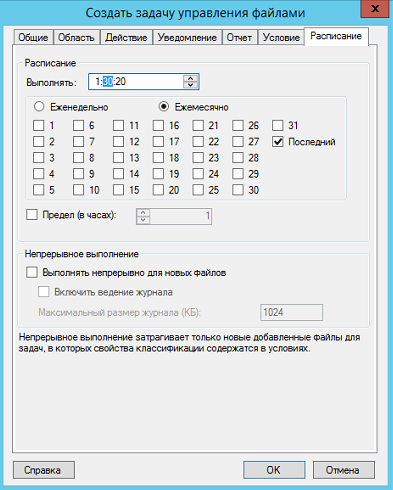
Настраиваем расписание.
Готово!
Теперь перейдем к настройке репликации.
Настройте сервер реплику (роли и доступы), введите его в домен.
Создаем на сервере реплике общую папку и отключаем наследование.
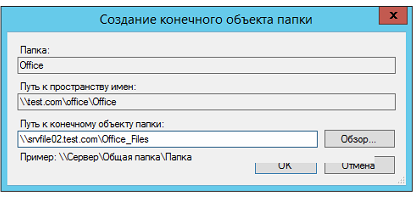
Назовем ее Office_Files, она будет репликой папки — Office_Files с основного файлового сервера.

Переходим на основной файловый сервер, и открываем консоль DFS.
Выбираем пространство имен, которое хотим реплицировать, и выбираем пункт «Добавить конечный объект папки».

Указываем общую папку со 2-го сервера.
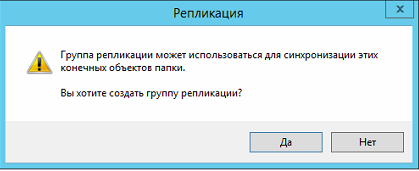
На вопрос о создании группы репликации отвечаем — да.
Оставляем заполненное по-умолчанию.
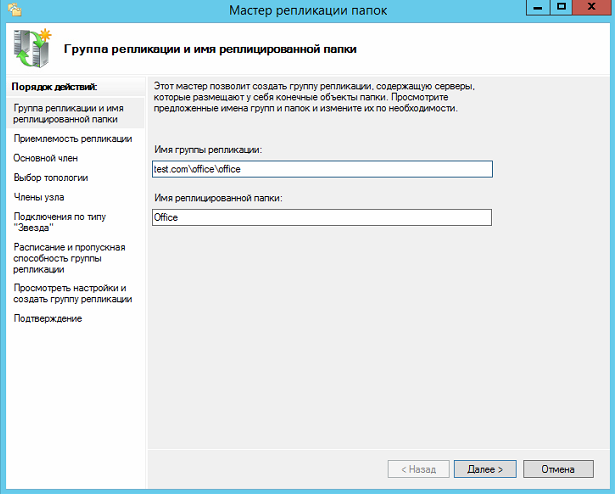
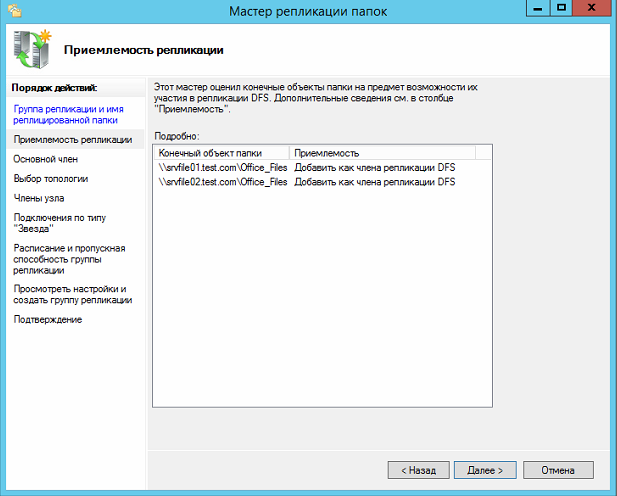
Проверяем что указаны 2-а наших сервера, основной и резервный.
Указываем основной сервер.
Выбираем топологию — полная сетка.
Выбираем пропускную способность канала между серверами.
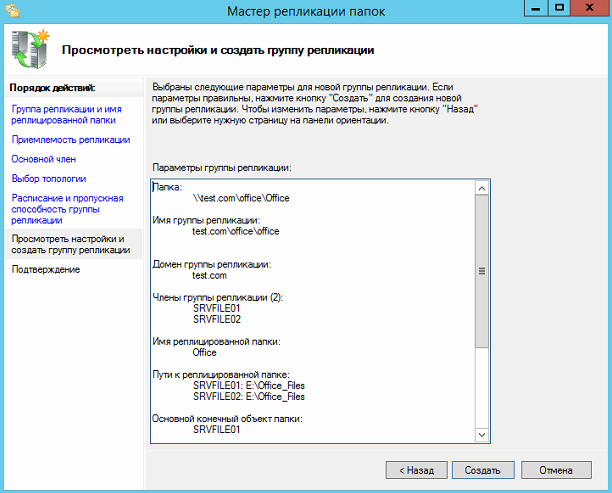
Проверяем все, и выбираем — создать.
Если все прошло успешно, то вы увидите это:

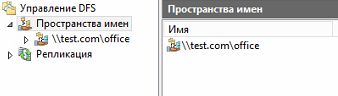
Для отказоустойчивости добавим пространство имен для отображения, на 2-м нашем сервере.
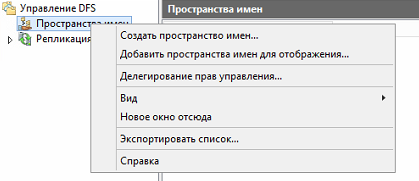
И выберем наше пространство имен.
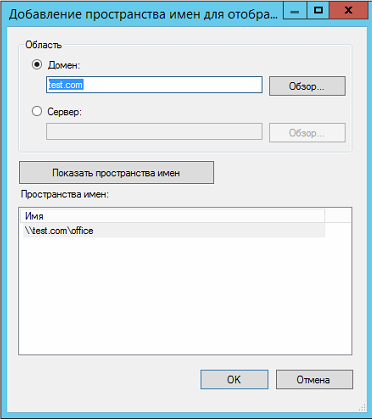
Должно получится так.
Теперь добавьте 2-й в «серверы пространства имен» на основном сервере.

Теперь пространство имен будет доступно на 2-х серверах.
Также обратите внимание, что настройки диспетчера ресурсов файлового сервера, настройки ABE, не реплицируются на 2-й сервер.
Настройку данного сервера нужно будет производить заново.
Также помните, что DFS репликация файлов работает по принципу — кто последний тот и прав.
Например, если 2 пользователя одновременно отредактируют или создадут один и тот же файл, то DFS реплицирует тот файл, который был создан последним.
А предыдущий файл будет сохранен в папке DfsrPrivateConflictandDeleted на сервере разрешившем проблему.
На этом все! Удачной настройки!
Related posts:

Distributed File System (DFS) — роль сервера используемая для упрощения доступа и управления файлами, физически распределёнными по сети. DFS позволяет к распределённым по серверам файлам иметь доступ в едином месте.
DFS может быть реализована двумя способами:
- Распределенная файловая система с изолированным корнем;
- Доменная распределенная файловая система.
Для использования DFS устанавливаем необходимые роли. Если у Вас один файловый сервер, тогда пункт «Репликация DFS» можно не устанавливать. Я выделил его на будущее, в рамках этого поста репликация настраиваться не будет.

Включаем автоматический перезапуск сервера и нажимаем установить. Забегая немного вперёд, скажу что перезагрузка не потребуется )

Переходим к настройке DFS

Указываем сервер на котором будет размещено пространство имён. В данном примере используется сервер на котором и установлена роль DFS, но как вариант можно использовать и контроллер домена.

Указываем имя для нового пространства имён. Я указал для теста «dfs», вы можете использовать любое другое. Права на запись тоже дал ради теста, хотя правильнее было бы администратору дать полные права. Вы же настройте в зависимости от задачи.
![]()
для повышения отказоустойчивости выбраем «Доменное пространство имен».
![]()
Проверяем все настройки и нажимаем «Создать»

Дожидаемся успешного окончания создания.
![]()
Создаём новую сетевую папку в пространстве имён. для этого я предварительно на сервере создал папку «share» и предоставил к ней сетевой доступ

Для полноты эксперимента, по аналогичной схеме создал папку на контроллере домена, где храню дистрибутивы

Тестируем доступ. Как видим единая точка доступа к сетевым папка, хотя по факту папки находятся на разных серверах.

Ссылки и документация по DFS для вкуривания:
- http://www.techstaty.com/setting-up-dfs-file-servers-with-microsoft-server-2012/
- http://ru.wikipedia.org/wiki/Distributed_File_System
- http://technet.microsoft.com/ru-ru/magazine/gg690154.aspx
First published on TECHNET on Jul 31, 2013
This post is a part of the nine-part “
What’s New in Windows Server & System Center 2012 R2
” series that is featured on Brad Anderson’s
In the Cloud
blog. Today’s blog post covers DFSR and how it applies to the larger topic of “Transform the Datacenter.” To read that post and see the other technologies discussed, read today’s post: “
What’s New in 2012 R2: IaaS Innovations
.”
Hi folks,
Ned
here again. You might have read my post on
DFSR changes in Windows Server 2012
back in November and thought to yourself, “
This is ok, but come on… this took three years? I expected more.”
We agreed.
Background
Windows Server 2012 R2 adds substantial features to DFSR in order to bring it in line with modern file replication scenarios for IT pros and information workers on enterprise networks. These include database cloning in lieu of initial sync, management through Windows PowerShell, file and folder restoration from conflicts and preexisting stores, substantial performance tuning options, database recovery content merging, and huge scalability limit changes.

Today I’ll talk at a high level about how your business can benefit from this improved architecture.
It assumes that you have a previous working knowledge of DFSR, to include basic replication concepts and administration using the previous tools
DfsMgmt.msc
or
DfsrAdmin.exe
and
Dfsrdiag.exe
.
Everything I discuss below you can do
right now
with the Windows Server 2012…
I have a series of deeper articles as well to get you rolling with more walkthroughs and architecture, as well as plenty of TechNet for the blog-a-phobic. Currently these are:
DFS Replication Initial Sync in Windows Server 2012 R2: Attack of the Clones
DFS Replication in Windows Server 2012 R2: If You Only Knew the Power of the Dark Shell
DFS Replication in Windows Server 2012 R2: Restoring Conflicted, Deleted and PreExisting files …
Database Cloning
DFSR Database Cloning is an optional alternative to the classic initial sync process introduced in Windows Server 2003 R2. DFSR spends most of its time in initial sync—even when administrators preseed files on the peer servers—examining metadata, staging files, and exchanging version vectors. This can make setup, disaster recovery, and hardware replacement very slow. Multi-terabyte data sets are typically infeasible due to the extended setup times; the estimate for a 100TB dataset is 159 days to complete initial sync on a LAN, if performance is linear (spoiler alert: it’s not).
DB cloning bypasses this process. At a high level, you:
1. Build a primary server with no partners (or use an existing server with partners)
2. Clone its database
3. Preseed the data on
N
servers4. Build
N
servers using that database clone
The existing initial sync portion of DFSR is now instantaneous if there are no differences. If there are differences, DFSR only has to catch up the real delta of changes as part of a shortened initial sync process.
Cloning provides three levels of file validation during the export and import processing. These ensure that if you are allowing users to alter data on the upstream server while cloning is occurring, files are later reconciled on the downstream.
-
None
— No validation of files on source or destination server. Fastest and most optimistic. Requires that you preseed data perfectly and do not allow any modification of data during the clone processing on either server. -
Basic
— (Default behavior). Hash of ACL stored in the database record for each file. File size and last modified date-time stored in the database record for each file. Good mix of fidelity and performance. -
Full
— Same hashing mechanism used by DFSR during normal operations. Hash stored in database record for each file. Slowest but highest fidelity (and still faster than initial sync)
Some early test results
What does this mean in real terms? Let’s look at a test run with 10 terabytes of data in a single volume comprising 14,000,000 files:
|
“Classic” initial sync
|
Time to convergence
|
|
Preseeded
|
~24 days
|
Now, with DB cloning:
|
Validation Level
|
Time to export
|
Time to import
|
Improvement %
|
|
2 – Full
|
9 days, 0 hours
|
5 days, 10 hours
|
40%
|
|
|
|
|
|
|
0 – None
|
1 hour, 13 minutes
|
6 hours, 8 minutes
|
99%
|
With the recommended
Basic
validation, we’re down to 12 hours! Our 64TB tests with 70 million files only take a couple
days
! Our 500GB/100,000 file small-scale tests finish in
3 minutes
! I like exclamation points!
The Export-DfsrClone provides sample robocopy command-line at export time. You are free to preseed data any way you see fit (backup and restore, robocopy, removable storage, snapshot, etc.) as long as the hashes match and the file security/data stream/alternate data stream copy intact between servers.
You manage this feature using Windows PowerShell. The cmdlets are:
Export-DfsrClone
Import-DfsrClone
Get-DfsrCloneState
Reset-DfsrCloneState
I have a separate post coming with a nice walk through on this feature.
Wait – did I say DFSR Windows PowerShell? Oh yeah.
Windows PowerShell and WMIv2
With Windows Server 2012 and prior versions, file server administrators do not have modern object-oriented Windows PowerShell cmdlets to create, configure and manage DFS Replication. While many of the existing command line tools provide the ability to administer a DFS Replication server and a single replication group, building advanced scripting solutions for multiple servers often involves complex output file parsing and looping.
Windows Server 2012 R2 adds a suite of 42 Windows PowerShell cmdlets built on a new WMIv2 provider. Businesses benefit from a complete set of DFSR Windows PowerShell cmdlets in the following ways:
1. Allows the switch to modern Windows PowerShell cmdlets as your “common language” for managing enterprise deployments.
2. Can develop and deploy complex automation workflows for all stages of the DFSR life cycle, including provisioning, configuring, reporting and troubleshooting.
3. Allows creation of new graphical or script-based wrappers around Windows PowerShell to replace use of the legacy DfsMgmt snap-in, without the need for complex API manipulation.
List all DFSR cmdlets
To examine the 42 new cmdlets available for DFSR:
PS C:> Get-Command –Module DFSR
For further output and explanation, use:
PS C:> Get-Command –Module DFSR | Get-Help | Select-Object Name, Synopsis | Format-Table -Auto
We made sure to document every single
DFSR Windows PowerShell cmdlet online
with more than 80 sweet examples, before RTM!
Create a new two-server replication group and infrastructure
Just to get your juices flowing, you can use DFSR Windows PowerShell to create a simple two-server replication configuration using the
F:
drive, with my two sample servers SRV01 and SRV02:
PS C:> New-DfsReplicationGroup -GroupName «RG01» | New-DfsReplicatedFolder -FolderName «RF01» | Add-DfsrMember -GroupName «RG01» -ComputerName SRV01,SRV02
PS C:> Add-DfsrConnection -GroupName «RG01» -SourceComputerName SRV01 -DestinationComputerName SRV02
PS C:> Set-DfsrMembership -GroupName «RG01» -FolderName «RF01» -ContentPath «F:RF01» -ComputerName SRV01 -PrimaryMember $True
PS C:> Set-DfsrMembership -GroupName «RG01» -FolderName «RF01» -ContentPath «F:RF01» -ComputerName SRV02
PS C:> Get-DfsrMember | Update-DfsrConfigurationFromAD
Some slick things happening here, such as creating the RG, RF, and members all in a single step, only having to run one command to create connections in both directions, and even polling AD on all computers at once! I have a lot more to talk about here – things like wildcarding, collections, mass edits, multiple file hashing; this is just a taste. I have a
whole new post on this you can see here
.
Performance Tuning
Microsoft designed DFSR initial sync and ongoing replication behaviors in Windows Server 2003 R2 for the enterprises of 2005: smaller files, slower networks, and smaller data sets. Eight years later, much more data in larger files over wider networks have become the norm.
Windows Server 2012 R2 modifies two aspects of DFSR to allow new performance configuration options:
- Cross-file RDC toggling
- Staging minimum file size
Cross-File RDC Toggling
Remote Differential Compression (RDC) takes a staged and compressed copy of a file and creates MD-4 signatures based on “chunks” of files.
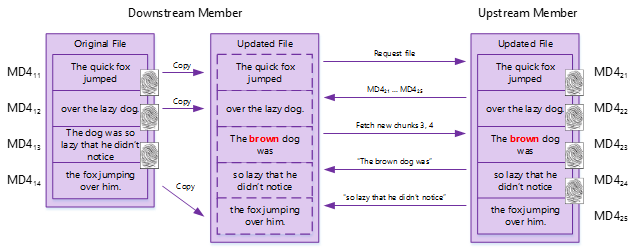
Mark, I stole your pretty diagram and owe you one beer.
When a user alters a file (even in the middle), DFSR can efficiently see which signatures changed and then send along the matching data blocks. E.g., a 50MB document edited to change one paragraph only replicates a few KB.
Cross-file RDC takes this further by using special hidden sparse files (located in
<drive>:
system volume informationdfsrsimilaritytable_x and idrecordtable_x) to track all these signatures. With them, DFSR can use other similar files that the server already has to build a copy of a new file locally. DFSR can use up to five of these similar files. So if an upstream server decides “I have file X and here are its RDC signatures”, the downstream server can decide “I don’t have file X. But I do have files Y and Z that have some of the same signatures, so I’ll grab data from them locally and save having to request all of file X.” Since files are often just copies of other files with a little modification, DFSR gains considerable over-the-wire efficiency and minimizes bandwidth usage on slower, narrower WAN links.
The downside to cross-file RDC is that over time with many millions of updates and signatures, DFSR may see increased CPU and disk IO while processing similarity needs. Additionally, when replicating on low-latency, high-bandwidth networks like LANS and high-end WANs, it may be faster to disable RDC and Cross-File RDC and simply replicate file changes without the chunking operations. Windows Server 2012 R2 offers this option using
Set-DfsrConnection
and
Add-DfsrConnection
Windows PowerShell cmdlets with the
–DisableCrossFileRdc
parameter.
Staging File Size Configuration
DFSR creates a staging folder for each replicated folder. This staging folder contains the marshalled files sent between servers, and allows replication without risk of interruption from subsequent handles to the file. By default, files over 256KB stage during replication, unless RDC is enabled and using its default minimum file size, in which case files over 64KB are staged.
When replicating on low-latency, high-bandwidth networks like LANS and high-end WANs, it may be faster to allow certain files to replicate without first staging. If users do not frequently reopen files after modification or addition to a content set – such as during batch processing that dumps files onto a DFSR server for replication out to hundreds of nodes without any later modification – skipping the RDC and the staging process can lead to significant performance boosts. You configure this using
Set-DfsrMembership
and the
–MinimumFileStagingSize
parameter.
Database Recovery
DFSR can suffer database corruption when the underlying hardware fails to write the database to disk. Hardware problems, controller issues, or write-caching preventing flushing of data to the storage medium can cause corruption. Furthermore, when the DFSR service does not stop gracefully – such as during power loss to the underlying operating system – the database becomes “dirty”.
DB Corruption Merge Recovery
When DFSR on Windows Server 2012 and older operating systems detects corruption, it deletes the database and recreates it without contents. DFSR then walks the file system and repopulates the database with each file fenced FRS_FENCE_INITIAL_SYNC (1). Then it triggers non-authoritative initial sync inbound from a partner server. Any file changes made on that server that had not replicated outbound prior to the corruption move to the ConflictAndDeleted or PreExisting folders, and end-users will perceive this as data loss, leading to help desk calls. If multiple servers experienced corruption – such as when they were all on the same hypervisor host or all using the same malfunctioning storage array –all servers may stop replicating, as they are all waiting on each other to return to a normal state. If the writable server with corruption was replicating with a read-only server, the writable server will not be able to return to a normal state.
In Windows Server 2012 R2, DFSR changes its DB corruption recovery behavior. It deletes and recreates the database, then walks the file system and populates the DB with all file records. All files are fenced with the FRS_FENCE_DEFAULT (3) flag though, marking them as normal. The service then triggers initial sync. When subsequent version vector sync reconciles the new DB content with a remote partner, DFSR handles conflicts in the usual way (last writer/creator wins) – since most (if not all) records are marked normal already though, there is no need for conflict handling on matching records. If the remote partner is read-only, DFSR skips attempting to pull changes from the remote partner (since none can come), and goes back to a healthy state.
DB Dirty Shutdown Recovery
DFSR on Windows Server 2012 and Windows Server 2008 R2 detects dirty database shutdown and pauses replication on that volume, then writes DFSR event log warning 2213:
Warning
5/1/2013 13:15
DFSR
2213
None
«The DFS Replication service stopped replication on volume C:. This occurs when a DFSR JET database is not shut down cleanly and Auto Recovery is disabled. To resolve this issue, back up the files in the affected replicated folders, and then use the ResumeReplication WMI method to resume replication.
Additional Information:
Volume: C:
GUID: <some GUID>
Recovery Steps
1. Back up the files in all replicated folders on the volume. Failure to do so may result in data loss due to unexpected conflict resolution during the recovery of the replicated folders.
2. To resume the replication for this volume, use the WMI method ResumeReplication of the DfsrVolumeConfig class. For example, from an elevated command prompt, type the following command:
wmic /namespace:\rootmicrosoftdfs path dfsrVolumeConfig where volumeGuid=»<some GUID>» call ResumeReplication
Until you manually resume replication via WMI or disable this functionality via the registry, DFSR does not resume. When resumed, DFSR performs operations similar to DB corruption recovery, marking the files normal and synchronizing differences. The main problem here with this strategy is far too many people were missing the event and not noticing that replication wasn’t running anymore.
Another good reason to monitor your DFSR servers.
(although in this case, there is no specific warning for 2213 events — there would be various other warnings about backlogs, failure to replicate, etc. from the other servers though, and you can add a custom event. Since this 2213 was added out of band and is no longer on by default, it rather slipped through the MP cracks; we’ll try to get it into an updated MP someday).
In Windows Server 2012 R2, DFSR role installation sets the following registry value by default (and if not set to a value, the service treats it as set):
Key: HKey_Local_MachineSystemCurrentControlSetServicesDFSRParameters
Value [DWORD]: StopReplicationOnAutoRecovery
Data: 0
We performed code reviews to ensure that no issues with dirty shutdown recovery would lead to data loss; we released one hotfix for previous OSes based on this (see KB:
http://support.microsoft.com/kb/2780453
) but find further issues here.
Furthermore, the domain controller SYSVOL replica was special-cased so that if it is the only replica on a specific volume and that volume suffers a dirty shutdown, SYSVOL always automatically recovers regardless of the registry setting. The AD admins who don’t know or care that DFSR is replicating their SYSVOL no longer have to worry about such things.
Preserved File Recovery (The Big Finish!)
DFSR uses a set of conflict-handling algorithms during initial sync and ongoing replication to ensure that the appropriate files replicate between servers.
1. During non-authoritative initial sync, cloning, or ongoing replication: files with the same name and path modified on multiple servers move to the following folder on the losing server:
<rf>
DfsrprivateConflictAndDeleted2. Initial sync or cloning: files with the same name and path that exist only on the downstream server go to
<rf>
DfsrprivatePreExisting3. During ongoing replication: files deleted on a server move to the following folder on all other servers:
<rf>
DfsrprivateConflictAndDeleted
The ConflictAndDeleted folder has a 4GB first in/first out quota in Windows Server 2012 R2 (660MB in older operating systems). The PreExisting folder has no quota. When content moves to these folders, DFSR tracks it in the
ConflictAndDeletedManifest.xml
and
PreExistingManifest.xml.
DFSR deliberately mangles all files and folders in the ConflictAndDeleted folder with version vector information to preserve uniqueness. DFSR deliberately mangles the top-level files and folders in the PreExisting folder with version vector information to preserve uniqueness. Previous operating systems did not provide a method to recover data from these folders, and required use of out-of-band script options like RestoreDfsr.vbs (I am rather embarrassed to admit that I wrote that script; my excuse is that it was supposed to be a quick fix for a late night critsit and was never meant to live on for years. Oh well).
Windows Server 2012 R2 now includes Windows PowerShell cmdlets to recover this data. These cmdlets offer the option to either move or copy files, restore to original or a new location, restore all versions of a file or just the latest, as well as perform inventory operations.
A few samples
To see conflicted and deleted files on the H:rf04 replicated folder:
PS C:> Get-DfsrPreservedFiles –Path h:rf04DfsrPrivateConflictAndDeletedManifest.xml
Let’s get fancier. To see only the conflicted and deleted DOCX files and their preservation times:
PS C:> Get-DfsrPreservedFiles –Path H:rf04DfsrPrivateConflictAndDeletedManifest.xml | Where-Object path -like *.docx | Format-Table path,preservedtime -auto -wrap
How about if we restore all files from the PreExisting folder, moving them rather than copying them, placing them back in their original location, super-fast:
PS C:> Restore-DfsrPreservedFiles –Path H:rf04DfsrPrivatePreExistingManifest.xml -RestoreToOrigin
Slick!
Summary
We did a ton of work in DFSR in the past few months in order to address many of your long running concerns and bring DFSR into the next decade of file replication; I consider the DB cloning feature to be truly state of the art for file replication or synchronization technologies. We hope you find all these interesting and useful. There are more new blog posts on cloning, Windows PowerShell, reliability, and more here:
http://blogs.technet.com/b/filecab/archive/2013/08/20/dfs-replication-in-windows-server-2012-r2…
http://blogs.technet.com/b/filecab/archive/2013/08/21/dfs-replication-initial-sync-in-windows-s…
http://blogs.technet.com/b/filecab/archive/2013/08/23/dfs-replication-in-windows-server-2012-r2…
Update May 2014: See it all in video! TechEd North America 2014 with live demos and walkthroughs:
—
Ned “there were no prequels” Pyle
To see all of the posts in this series, check out the
What’s New in Windows Server & System Center 2012 R2
archive.
The Distributed File System (DFS) provides a simplified view of file resources in Windows Server across multiple servers and sites while enabling efficient replication of folder contents between servers. In this article we are going show you the installation and configuration of distributed files system (DFS) in Windows Server 2012 R2.
For testing purpose of DFS configuration, at least you must have two Windows Serve 2012 R2 installed in your lab. Here I have installed both of them in Hyper-V. The first Server is the domain Controller (DC). It has installed Active Directory, DNS Server, DHCP Server and will install file server with DFS-N and DFS-R. The second server will be the member of DFS Server.
Installing and configuring DFS-N
So let’s install the installing and configuring DFS Namespaces and replication roles in firs Server (DC). In the real world, don’t install too much roles in one server. So we are in the testing Lab.
1. Login to DC Server as domain admin and go to server manager dashboard. I assume that you already can install Server roles and features.
2. Click Manage then click Add roles and Features. On the add roles and features page, select Rule-based or feature-based installation and click Next.
3. On the Server Selection page do noting, just click Next.
4. On the Server Roles page expand the Files and Storage Services then expand File and iSCSI Services. Now select DFS Namespace, DFS Replication and File Server Resources Manager. Accept the default features as well then click Next.

5. On the Features page leave the default settings and click Next.
6. Click Install on the Confirmation page in order to install DFS. It will take a minute to complete the installation task.

7. When the installation process has finished, click Close and go for configuration.
OK, the Distributed File System installation has finished successfully.
Install Distributed File System (DFS) with PowerShell
Try to install the File Server, DFS-N and DFS-R on the member server. It is better to do it with PowerShell command line. It will help you to understand the process of installing DFS with PowerShell.
The second server must be joined to domain, change the default name and set static IP address.
1. Login to second server (FS2) as domain admin and open Windows PowerShell.
2. Type “get-windowsfeatures -name fs*” and hit enter to show the File Server and DFS components.

The result shows that no roles are installed yet.
3. So try to install with the following Install-WindowsFeature command.
Install-WindowsFeature -Name FS-DFS-Namespace,FS-DFS-Replication – IncludeManagementTools

When the installation finished successfully, execute the Get-WindowsFeature -Name fs* again to the changes result.
OK, the the File Server and Distributed File System are installed on both servers. Now it’s time to create a namespace for servers.
Create a DFS NameSpace
1. On the DC Server open the DFS Management from Server Manager Dashboard and Toolsmenu.

2. On the DFS Management console click New Namespace on the Actions menu to open the New Namespace Wizard.

3. Type the server name you want to use it as namespace host and click Next. I set on dc1server.
4. On the namespace setting page, type a name (public) then click Edit Settings.

5. Select Administrators have full access: other users have read and write permission on the Edit namespaces Settings page then click OK to apply changes.

On the Namespace setting page click Next.
6. Select the Domain-based namespace on the Namespace Type page then click Next.

7. Once review the information and click Create to create the namespace on Review Settings and Create namespace page.

8. Finally click Close to close the namespace processing wizard page.

Remember, the namespace creating should done without errors.
The namespace created successfully. Now try to add another namespace server to replicate with each other.
Add a Namespace Server
Let’s add the second server (FS2) as second file server in order to replicate the shared resources between file servers.
1. Go to DFS Management page, expand Namespaces then select the created namespace and Namespace Servers tab.

2. Click add a namespace server form action menu. Type the name of second files server and click Edit Settings.

3. Select the Administration have full access: other users have read and write permission on the edit permission settings page and click OK twice to add the namespace server without any erros.

The result should be like screenshot.
Add Shared Folders to Root Namespace
We need a shared folder within our both file servers. These shared folder with keep the shared files and resources. So let’s create the folders and share them.
1. From File and Storage Services on Server Manager dashboard, right click on the main page and click New Share to create a share folder.

2. Select the Type a custom path on the Share Location page and type the location of folder in which you want to share it then hit Next.

3. Specify the share name and description then click Next. If ask you the path is not exist, just click OK to create the folder.

4. Select Enable access-based enumeration option and click Next.

5. On the Permission page click Next. If you want to set permission to domain user, click customize permissions and set permission for domain users group and domain admins group.
6. Click Next on Management Properties page. On the Quota page set quota for path if you want then click Next. On the Confirmation page click Create then click Close to complete the task.
Now you have successfully created a share folder for DC server, but need to create the same folder for second server (FS2) as well. Try to create folder and simply share it like simple file sharing then set modify permission to domain admins group and domain users group.
Add Folder to DFS-N and Configure Replication
Try to add the two shared folder to DFS namespace server. These tow folder will keep the shared resources and replicate.
1. From the DFS Management console, click New Folder from action menu and add the shared folders of both file servers like the screenshot.

When don, just click OK and replication configuration will start.
2. For configuring replication between tow file servers click Yes on the Replication page.

3. Simply click Next on the Replication Group and Replication Folder Name page.

4. On Replication Eligibility page click Next.
5. Select the first server (DC1) as primary member server and click Next.

6. Select the Full Mesh topology on the Topology Selection page and hit Next.

7. Leave the default setting on the Replication Group Schedule and Bandwidth then click Next.

8. Do noting on the Review Settings and Create Replication Group only click Next go to the next page.
9. On the Confirmation page. Click Close and close the page.

Finally the configuration should finish successfully. Expand namespace to Files and see the result.

To test the replication between first file server and second file server, just copy a file to shared folder (Files) from first server and see the file should be on the second server as well.
That is it a simple practical to install and configure Distributed File System on Windows Server 2012 R2 or 2016. Hope you get something from distributed file system article and ask your related questions to distributed file system through comment are.
In this Ask the Admin, I’ll show you how to replicate folders between two servers using Distributed File System Replication (DFSR).
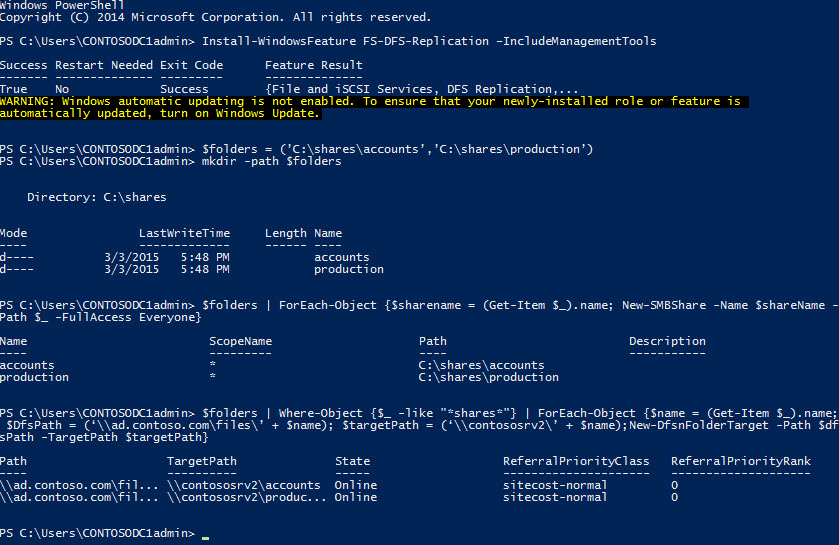
Install DFS Replication
Before DFS replication can be configured, the DFS replication service needs to be installed on participating file servers. In my lab, contososrv1 already exists, and I want to replicate two shared folders (accounts and production) to contososrv2.
Log in to contososrv2 with a domain administrator account, open a PowerShell prompt and run the command below to install DFSR on both servers using the Install-WindowsFeature cmdlet:
Remember that the DFS replication and namespace features are mutually exclusive, and while contososrv1 is a namespace server in my lab, contososrv2 doesn't necessarily need to be a namespace server to host DFS folder targets, shared folders or take part in replication. In a real-world environment, contososrv2 might well be configured as a namespace server for redundancy. For more information on DFS namespaces, see Create a Distributed File System Namespace in Windows Server 2012 R2 on the Petri IT Knowledgebase. The accounts and production folders I want to replicate from contososrv1 need to be created on contososrv2, so let's do that using the mkdir cmdlet:
Add Folder Targets to a DFS Namespace
If you don’t have a DFS namespace configured or don't want to add the folders we created above as folder targets to a namespace, you can skip this section. It's not required for replication to work. On contososrv2, let's share the accounts and production folders using the New-SMBShare cmdlet so they can be added as folder targets to a DFS namespace:
Once the folders are shared, I'll add them as folder targets to my existing DFS namespace using the New-DfsnFolderTarget cmdlet:
Configure folders to be replicated on a new file server (Image Credit: Russell Smith)
The results of the New-DfsnFolderTarget cmdlet will be displayed in the console. You can get this information again at any time by replacing New-DfsnFolderTarget with Get-DfsnFolderTarget in the above code.Set Up a Replication Group
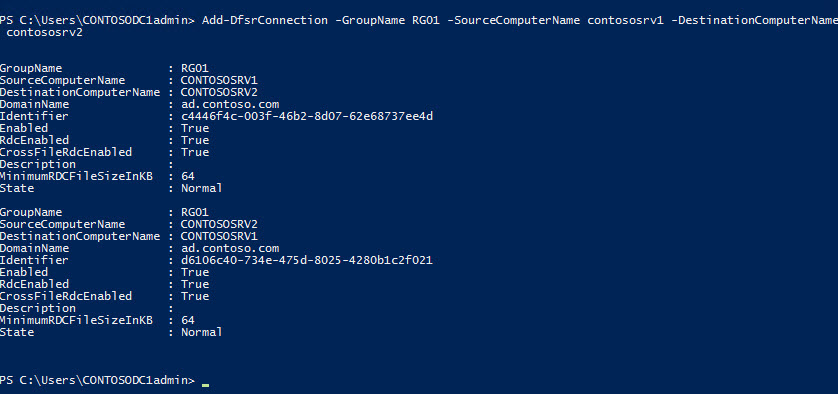
First we need to create a replication group (RG01) and add the two servers. The New-DfsReplicatedFolder cmdlet creates logical folder objects (accounts and production) that represent the physical folders to be replicated, the actual paths of which will be configured later.
Set Connections and Membership
In this example, I'm going to set up bidirectional replication between the two file servers in the group. The Add-DfsrConnection cmdlet creates a logical partnership between the source (outbound or upstream) and destination (inbound or downstream) computers. Partnerships are always bidirectional unless the –CreateOneWay parameter is specified. For more information on the available replication topology options, see Planning a DFS Architecture, Part 2 on the Petri IT Knowledgebase.
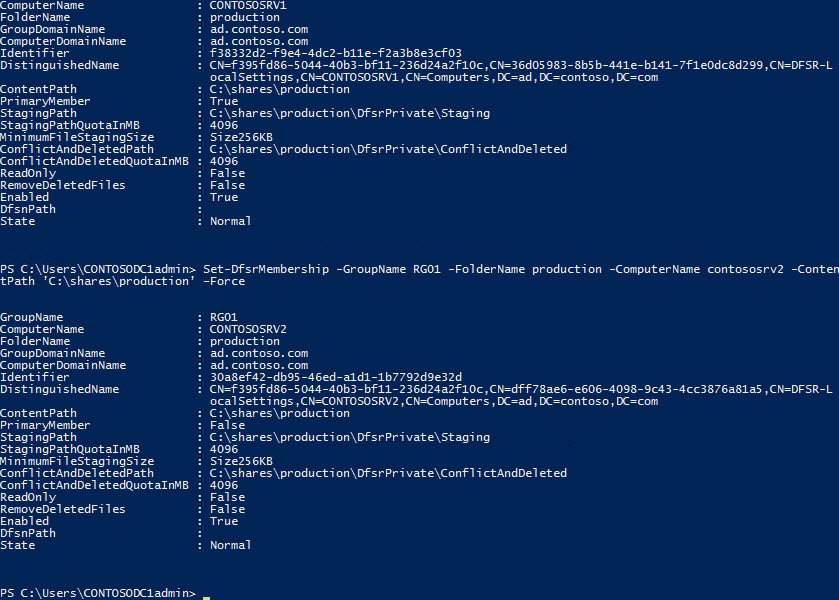
Finally, I'll enable replication for the folders on both servers using the Set-DfsrMembership cmdlet, setting the –PrimaryMember parameter to $true for contososrv1. One server must be designated as the primary member for each group and is used during initial replication as the master copy, i.e. the content on other replica servers in the group will look like the primary server. Once initial replication is complete, changes can be made on any of the replication group member servers, and the primary member flag loses its significance.
Set up a connection between two servers in a replication group (Image Credit: Russell Smith)
And the same commands for the production folder on both servers with the exception that I've added the –Force parameter, so I don't have to confirm each operation:
Configure DFS folder replication (Image Credit: Russell Smith)
Update the Local DFSR Configuration Information
The commands above change the DSFR objects in AD, so let's run the Update-DfsrConfigurationFromAD cmdlet to force an update of the cached DFSR configuration information on each file server, kick starting the initial replication process:
It's worth noting at this point that if the accounts and production folders are published in a DFS namespace, which is not a requirement for replication to work, that the Publication Status for the folders on the Replicated Folders tab in the DFS Management GUI tool is not updated when replication is configured using PowerShell. Nevertheless, files should start replicating between contososrv1 and contososrv2.