Третья, заключительная статья о DHCP. В завершение темы я расскажу о том, как обеспечить отказоустойчивую работы DHCP-сервера с помощью технологии DHCP failover.
Но сначала немного истории.
До выхода Windows Server 2012 единственным способом обеспечить отказоустойчивость DHCP-сервера была так называемая схема 8020. Суть этой схемы заключается в том, что для обслуживания одной области используются два DHCP-сервера. Область делится между ними в пропорции 8020, соответственно основному серверу отдается 80%, а резервному 20% имеющихся IP-адресов. В нормальном режиме работы область обслуживается основным сервером, а при выходе из его строя резервный берет на себя нагрузку и выдает клиентам адреса из оставшихся 20%, тем самым поддерживая работу сети.
Данный способ вполне рабочий и используется до сих пор, но у него есть некоторые недостатки:
• При разделении области имеющиеся адреса используются не самым оптимальным образом;
• Клиенты не могут продлить аренду с имеющимся адресом;
• Проблемы при использовании резервирования.
Примечание. Резервирование (DHCP reservation) — настройка DHCP-сервера, при которой к MAC-адресу клиента привязывается постоянный IP-адрес. Это гарантирует, что клиент всегда будет получать в аренду один и тот же адрес. Резервирование настраивается на конкретном сервере и при его недоступности клиент не сможет получить зарезервированный за ним адрес.
Недостатки конечно некритичные, но доставляющие много неудобств. Видимо поэтому в Windows Server 2012 была добавлена новая фича под названием DHCP failover, предназначенная для обеспечения высокой доступности DHCP-серверов. DHCP failover позволяет обеспечить высокую доступность службы DHCP и не имеет недостатков, описанных выше. При использовании DHCP failover два DHCP-сервера реплицируют между собой текущие настройки и данные об аренде, что позволяет одному серверу обслуживать всех клиентов (выдавать новые адреса, продлевать аренду и т.п.) в том случае, когда другой недоступен.
DHCP failover может работать в двух режимах.
Режим балансировки (Load balance)
В этом режиме область делится на две части в определенной пропорции и обслуживается обоими серверами одновременно. При получении запроса каждый сервер вычисляет хэш MAC-адреса клиента в соответствии с алгоритмом, описанным в RFC 3074. MAC-адреса хэшируются в диапазоне от 1 до 256, балансировка происходит по следующему принципу: если нагрузка распределена в пропорции 5050 и если при вычислении хэша получено значение от 1 до 128, то отвечает первый сервер, если же от 129 до 256 — то отвечает второй. При изменении коэффициента распределения нагрузки распределение хэш-блоков между серверами изменяется в той же пропорции. Такой подход гарантирует, что за одного конкретного клиента отвечает только один сервер.
Если же один из серверов перестает отвечать, то второй забирает всю область и продолжает обслуживать как своих клиентов, так и клиентов партнера.
Режим горячей замены (Hot Standby)
В таком режиме область обслуживается одним сервером (основным). В отличие от режима балансировки в режиме горячего резерва сервера не вычисляют хэш MAC-адреса клиента. Основной сервер отвечает на все запросы клиентов, резервный в нормальном состоянии не отвечает вообще. Только когда основной сервер становится недоступным, резервный переходит в состояние потери партнера (PARTNER_DOWN) и начинает отвечать на запросы клиентов. Когда основной сервер возвращается в строй, резервный переходит в режим ожидания и перестает обслуживать клиентов.
Обратите внимание, что термин основнойрезервный относится к конкретной DHCP-области. К примеру DHCP-сервер может являться основным для одной области и резервным для другой.
От теории перейдем к практике. Для создания отказоустойчивой конфигурации возьмем 2 сервера — SRV1 и SRV2, находящихся в одной подсети. На SRV1 создаем область (Scope) и полностью настраиваем ее, на SRV2 только устанавливаем роль DHCP, никаких настроек не производим. После этого приступаем к настройке DHCP failover.
Настройка DHCP failover
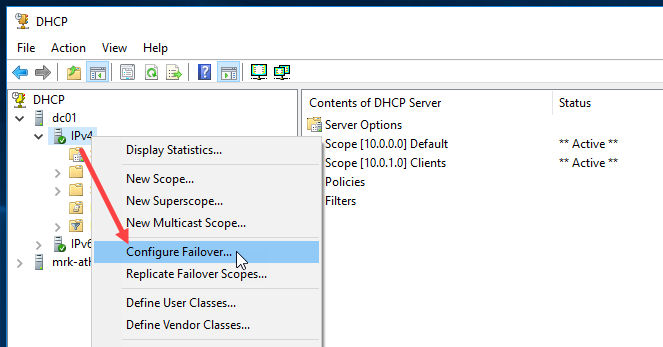
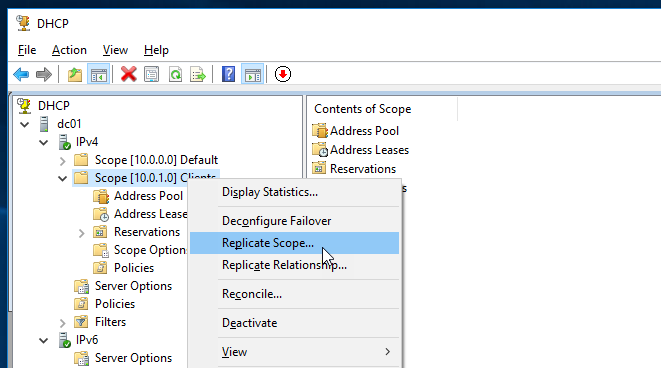
Для начала настроим режим балансировки (Load balance). Для этого заходим на сервер SRV1 и открываем оснастку DHCP. Выбираем область, кликаем на ней правой клавишей и в контекстном меню отмечаем пункт «Configure Failover».

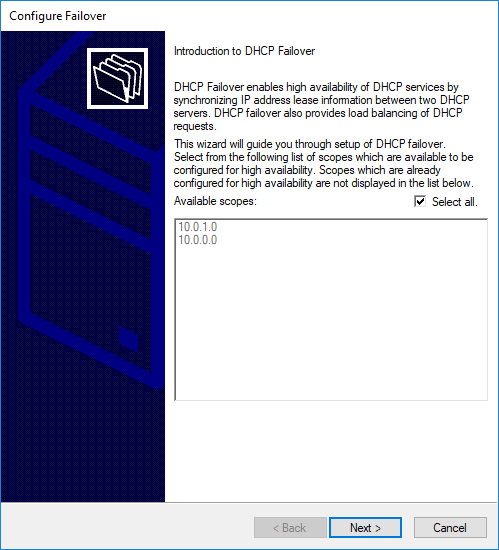
Запускается мастер настройки. В первом окне мастера выбираем области, для которых будет настраиваться отказоустойчивость. Впрочем, в нашем случае выбора нет, поскольку область всего одна.

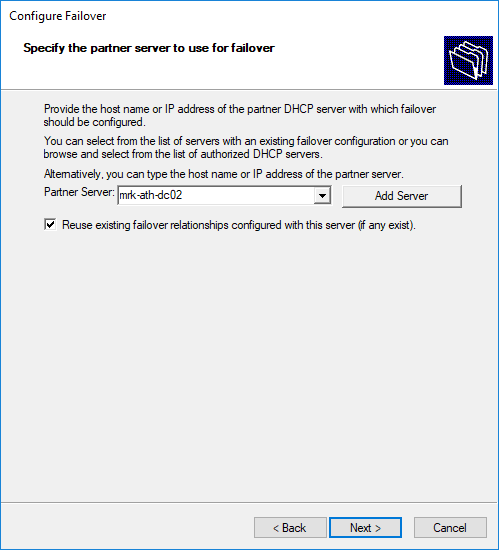
Добавляем сервер-партнер, на котором будет находится второй экземпляр области.

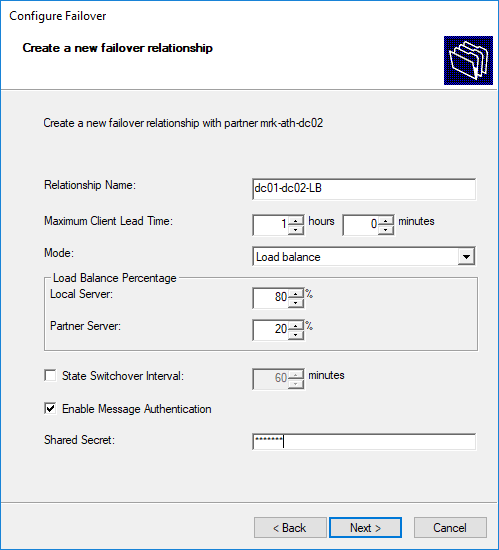
На следующем этапе выбирается режим работы и основные настройки.
В качестве имени для создаваемых доверительных отношений (Relationship Name) по умолчанию используются имена серверов, но в принципе можно указывать что угодно. Режим работы (Mode) выбираем балансировку (Load balance) и в поле «Load Balance Percentage» указываем в процентах пропорции, в которых будет разделена область между двумя серверами. По умолчанию нагрузка делится в соотношении 5050, но мы сделаем по привычной схеме 8020, т.е. 80% обслуживает основной сервер и 20% резервный.
Теперь два очень важных параметра, на которых надо обратить внимание:
• State Switchover Interval — интервал времени, по истечении которого партнер считается недоступным (PARTNER_DOWN). Если не задавать этот параметр, то при падении партнера автоматического переключения не произойдет и переключатся придется вручную;
• Maximum Client Lead Time — очень интересный параметр, определяющий срок продления аренды в случае падения основного сервера. Когда клиент пытается продлить аренду, полученную на основном сервере, то резервный сервер продлевает ее не на срок аренды, указанный в свойствах области, а на время, указанное в данном параметре. И так пока основной сервер не восстановит работу. Также этот параметр определяет, сколько времени сервер будет ждать возвращения партнера из состояния PARTNER_DOWN прежде чем забрать контроль над всей областью. А еще этот параметр определяет время перехода в нормальное состояние при возвращении партнера.
Примечание. Параметры State Switchover Interva и Maximum Client Lead Time определяют скорость срабатывания failover-а. Каждый из партнеров обслуживает свой диапазон адресов до того момента, пока один из серверов не перейдет в состояние PARTNER_DOWN и не пройдет время, указанное в параметре Maximum Client Lead Time. Только после этого ″оставшийся в живых″ сервер возьмет на себя контроль над всей областью.
Сервера должны безопасно общаться друг с другом. Для этого включаем параметр «Enable Message Authentication» и в поле «Shared Secret» задаем кодовое слово, которое сервера будет использоваться для связи.

В заключение проверяем настройки, подтверждаем создание failover-а

и ждем завершения процесса.

Посмотреть настройки и текущее состояние партнеров можно в свойствах области, на вкладке «Failover».

То же самое можно сделать с помощью PowerShell. Создаем доверительные отношения:
Add-DhcpServerv4Failover -ComputerName srv1.test.local -Name ″srv1-srv2″ -PartnerServer srv2.test.local -ScopeId 10.0.0.0 -LoadBalancePercent 80 -MaxClientLeadTime 00:10:00 -AutoStateTransition $true -StateSwitchInterval 00:10:00 -SharedSecret ″12345678″ -Force
Проверяем результат:
Get-DhcpServerv4Failover -Name ″srv1-srv2″ | fl

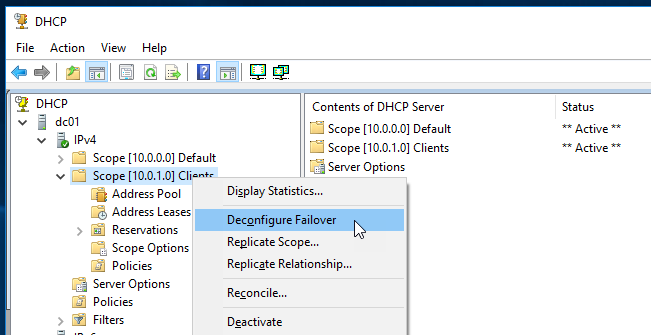
Теперь сменим конфигурацию, сначала отключив failover. Для этого в оснастке DHCP кликаем на область и выбираем пункт меню «Deconfigure Failover».

Затем подтверждаем удаление доверительных отношений,

еще раз подтверждаем удаление

и ждем завершения. При удалении на сервере-партнере будут удалены все области, для которых был настроен failover.

Для удаления с помощью PowerShell достаточно выполнить одну команду:
Remove-DhcpServerv4Failover -Name ″srv1-srv2″ -Force

Теперь настроим DHCP failover в режиме Hot standby. Для этого опять запускаем мастер на SRV1 и выбираем сервер-партнер. Обратите внимание, что если между серверами ранее уже были настроены доверительные отношения, то их можно использовать повторно.

Выбираем режим Hot standby и производим настройки. Для режима Hot standby они несколько отличаются:
• Role of Partner Server — серверы делятся на основной (Active) и резервный (Standby) и надо выбрать роль для сервера-партнера. Если мы выбираем Standby, то текущий сервер соответственно становится Active, и наоборот.
• Addresses reserved for standby server — еще один важный параметр, задающий процент адресов, выделенный для резервного сервера. Суть этого параметра в том, что после выхода из строя основного сервера и перехода в состояние PARTNER_DOWN должно пройти время, заданное в параметре Maximum Client Lead Time. Только после этого резервный сервер забирает контроль над над всем диапазоном IP-адресов. В промежутке между этими двумя событиями резервный сервер может обслуживать клиентов, выдавая им адреса из данного резерва. Если этот параметр установить в ноль, то резервный сервер не сможет выдавать адреса до тех пор, пока не захватит всю область.

Дальше все так же — проверяем настройки, подтверждаем их

и ждем завершения.

То же из консоли PowerShell:
Add-DhcpServerv4Failover -ComputerName srv1.test.local -Name ″srv1-srv2″ -PartnerServer srv2.test.local -ScopeId 10.0.0.0 -ReservePercent 10 -MaxClientLeadTime 00:10:00 -AutoStateTransition $true -StateSwitchInterval 00:10:00 -SharedSecret ″12345678″ -Force

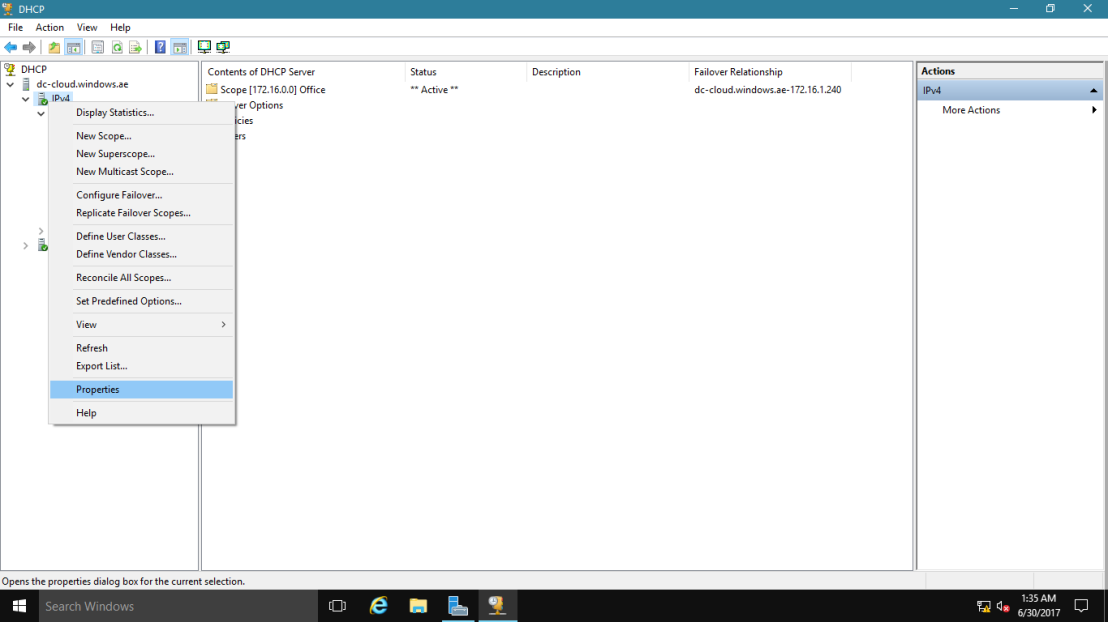
Изменить настройки и режим работы DHCP failover можно ″на лету″, не удаляя текущую конфигурацию. Для этого в оснастке управления надо выбрать раздел IPv4 (или IPv6, если failover настраивался для этого протокола), кликнуть правой клавишей мыши и выбрать пункт «Properties».

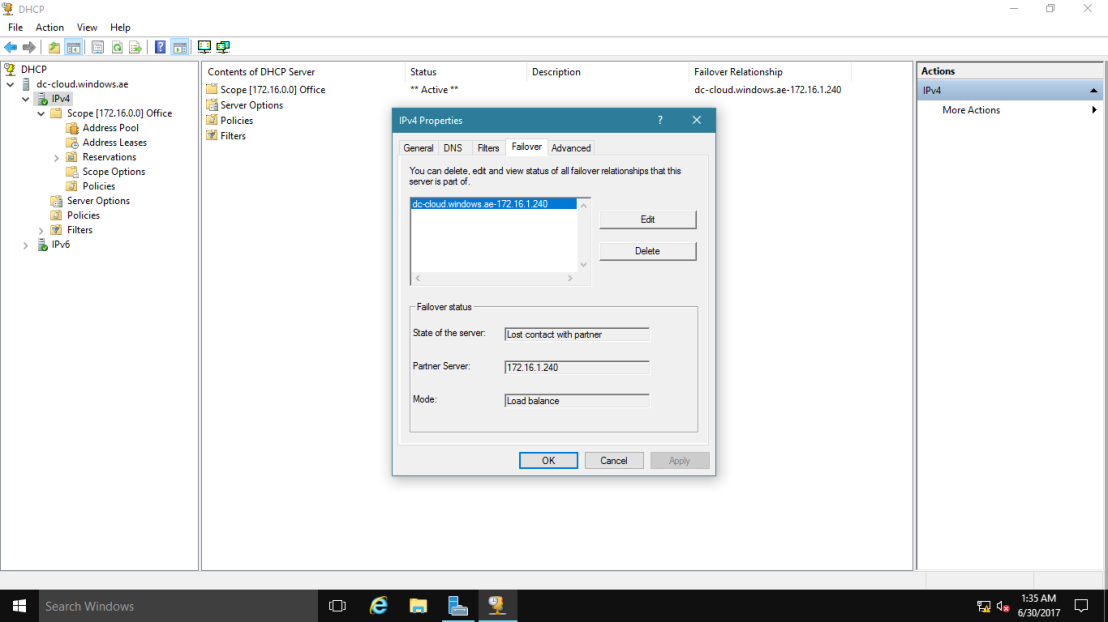
Затем перейти на вкладку «Failover», выбрать доверительные отношения и нажать «Edit».

В открывшемся окне мы можем поменять абсолютно любые настройки и даже изменить режим работы failover-а, например перейти с Load Balance на Hot Standby.

А теперь с помощью PowerShell вернемся обратно к режиму балансировки, попутно изменив интервалы MaxClientLeadTime и StateSwitchInterval:
Set-DhcpServerv4Failover -Name ″srv1-srv2″ -Mode LoadBalance -LoadBalancePercent 80 -MaxClientLeadTime 00:02:00 -StateSwitchInterval 00:02:00 -Force

Тестирование работы DHCP failover
В завершение давайте протестируем работу DHCP failover. На предыдущем шаге мы уменьшили до 2 минут временные интервалы, отвечающие за переключение. Также для ускорения процесса в свойствах области уменьшим время аренды до 10 минут.

Теперь зайдем в свойства DHCP failover и проверим состояние серверов-партнеров.

Запомним полученные настройки на клиенте. Как видите, клиент имеет адрес 10.0.0.20, полученный с сервера 10.0.0.1 (SRV1).

Теперь погасим сервис DHCP на SRV1 и перейдем на SRV2. Здесь откроем оснастку DHCP и перейдем в настройки доверительных отношений. Как видите, после потери связи с партнером здесь стала активна кнопка ″Change to partner down″. С помощью этой кнопки можно перевести сервер в состояние PARTNER_DOWN, не дожидаясь пока истечет State Switcover Interval.

Еще раз проверяем состояние серверов. Резервный сервер перешел в состояние Partner down и готов к захвату контроля над областью.

Ждем 2 минуты и еще раз проверяем настройки на клиенте. Как можно увидеть, IP-адрес не изменился, при этом в качестве DHCP-сервера указан уже 10.0.0.2 (SRV2). Т.е. клиент успешно продлил на SRV2 аренду адреса, полученного от SRV1.

Возвращаем SRV1 в строй, ждем пока клиент обновит аренду и еще раз проверяем его настройки. Как видите, IP-адрес не изменился, а адрес DHCP-сервера опять SRV1.

Вот так и работает DHCP-failover.
What is DHCP Failover?
enables two Microsoft DHCP servers to share service availability information with each other, providing DHCP high availability. DHCP failover works by replicating IP address leases and settings in one or more DHCP scopes from a primary DHCP server to a failover partner server.

All scope information is shared between the two DHCP servers, including active leases. This enables either DHCP server to assume responsibility for DHCP clients if the other server becomes unavailable.
Introduction to DHCP failover
With DHCP failover, DHCPv4 scopes can be replicated from a primary DHCP server to a partner DHCP server, enabling redundancy and load balancing of DHCP services. DHCP servers that share a failover-enabled DHCP scope are called failover partners. Microsoft’s implementation of DHCP failover is based on the Internet Engineering Task Force (IETF) DHCP Failover Protocol draft.
When two DHCP servers are configured for failover, they will share scope information, including all active leases. This enables both DHCP servers to provide leases to the same subnet for load balancing or redundancy purposes. Scope settings are replicated when you first configure DHCP failover, and can be replicated again later if configuration changes are made.
So let begin with the process,
The DHCP server failover feature provides the ability to have two DHCP servers serve IP addresses and option configuration to the same subnet or scope.
~*~ i assume most of you already know how to install DHCP Services on the Windows Server 2016 ~*~
1 – open Server Manager and click Tools, you will see DHCP stated in the list, click the DHCP to open the console.
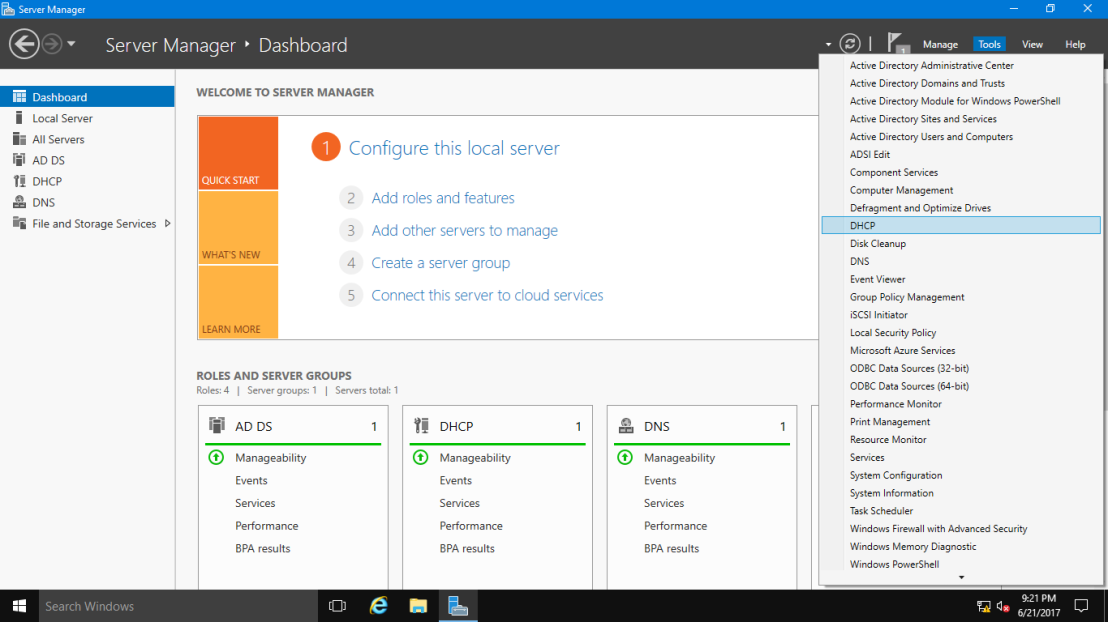
2 – Right Click IPv4 and click Configure Failover.

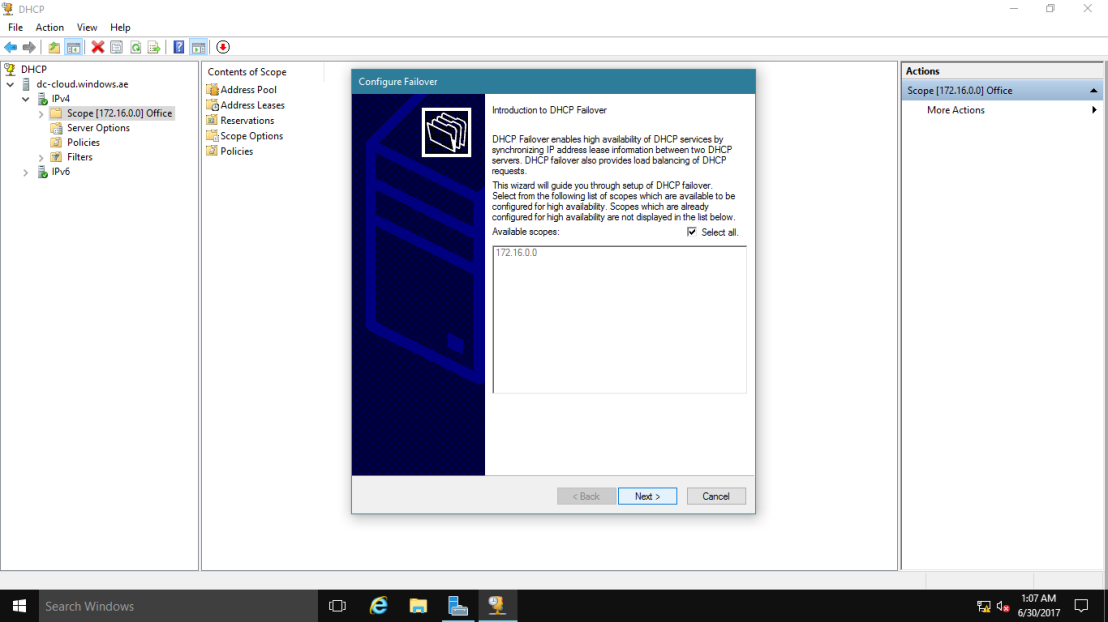
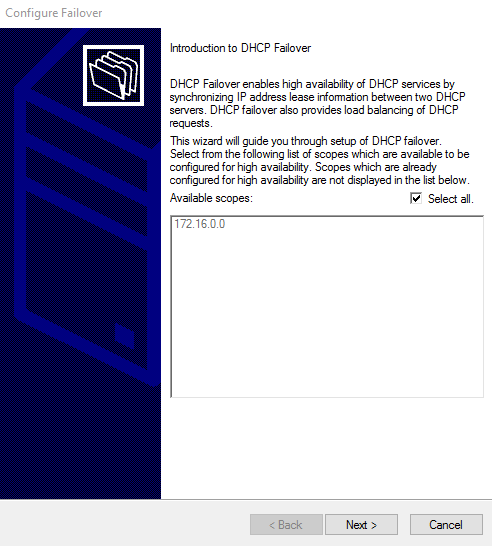
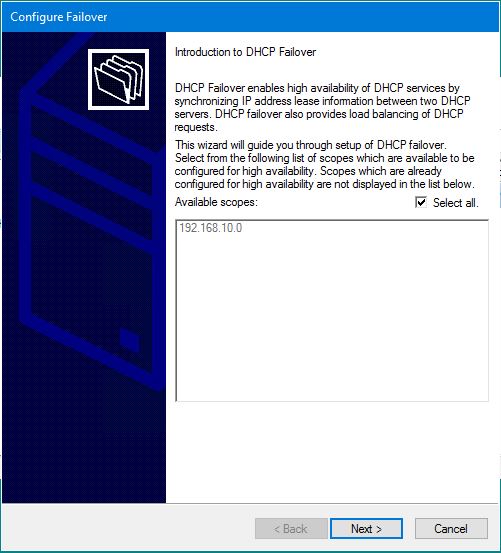
3 – On the Configure Failover introduction page, confirm the Available scopes and click Next.
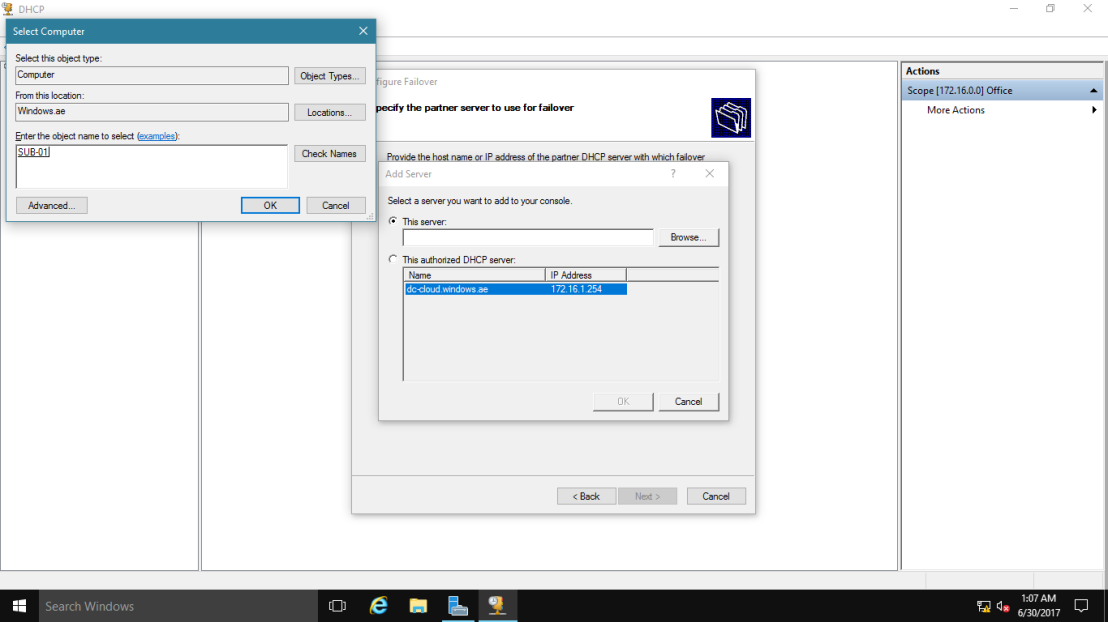
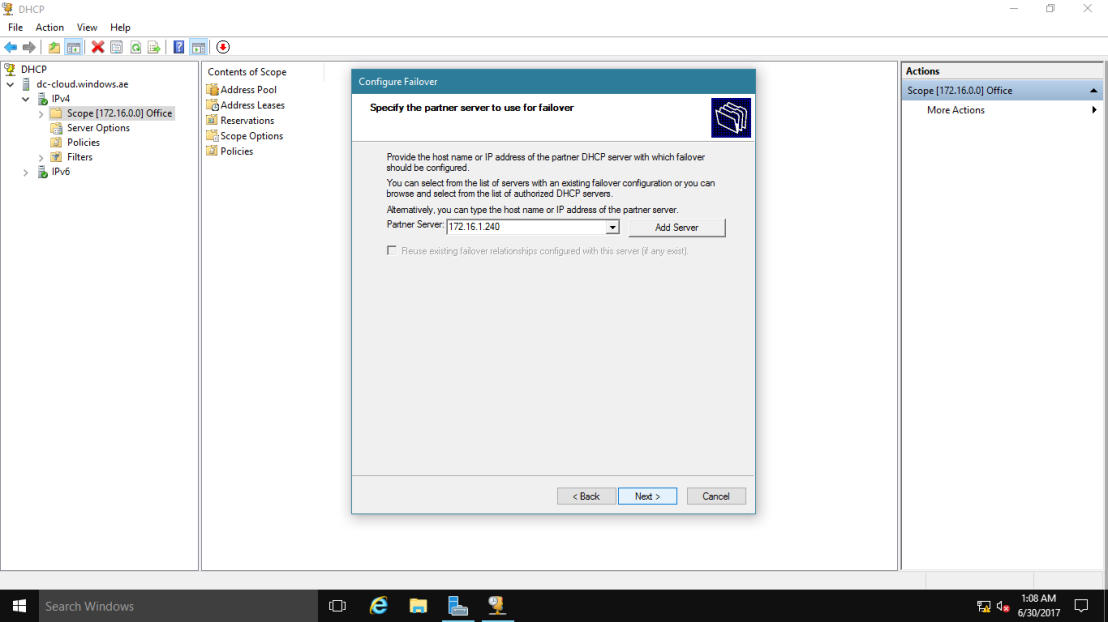
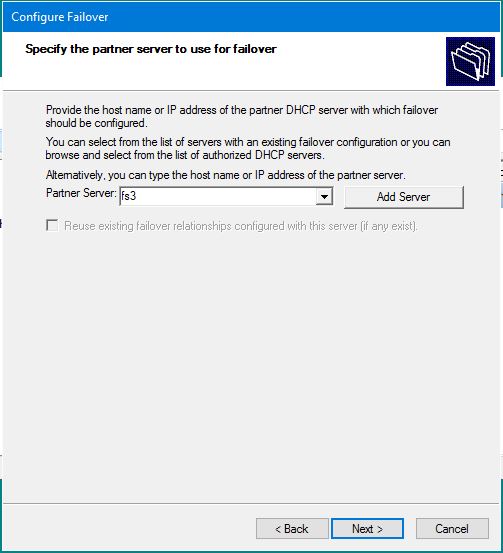
4 – Next, on the Specify the partner server to use for failover page, click Add Server and choose your 2nd DHCP Server.
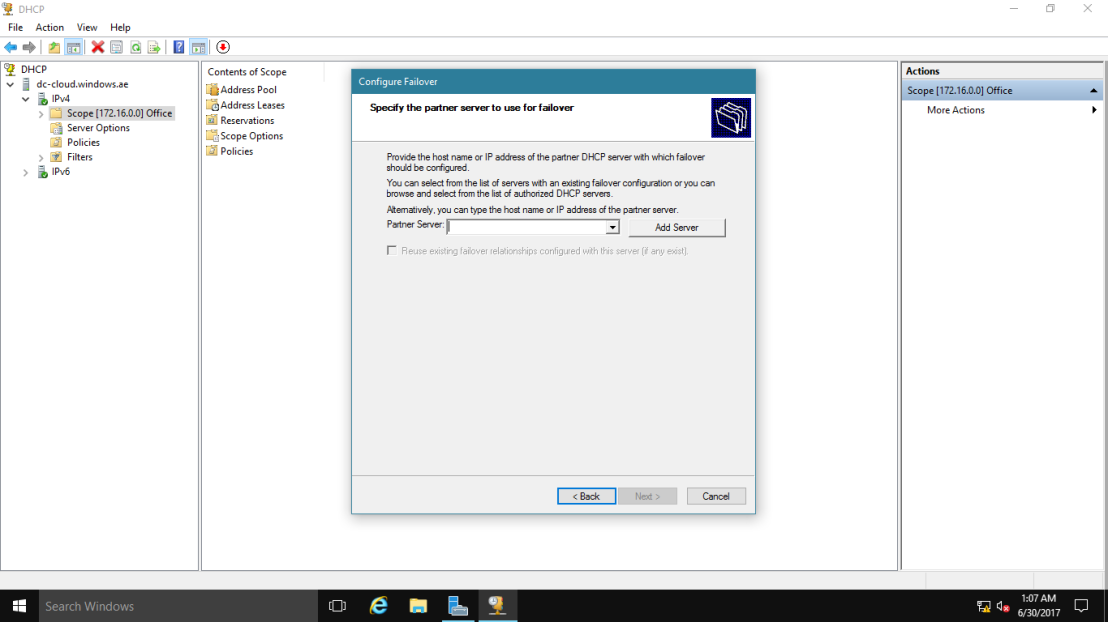


5 – Next, confirm that 2nd DHCP Server IP address listed in the Partner Server box and click Next.
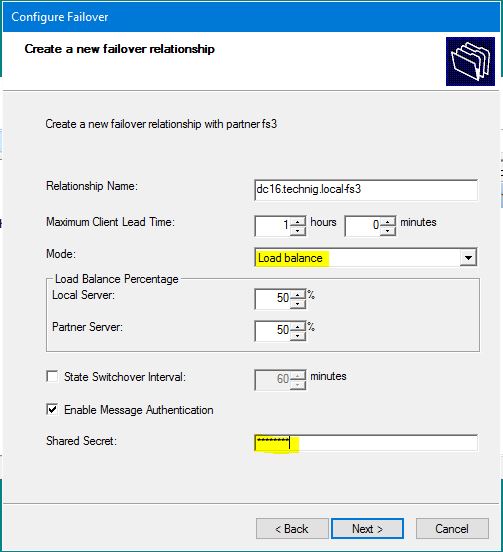
6 – On the Create a new failover relationship box, there are some configuration that you need to take point :
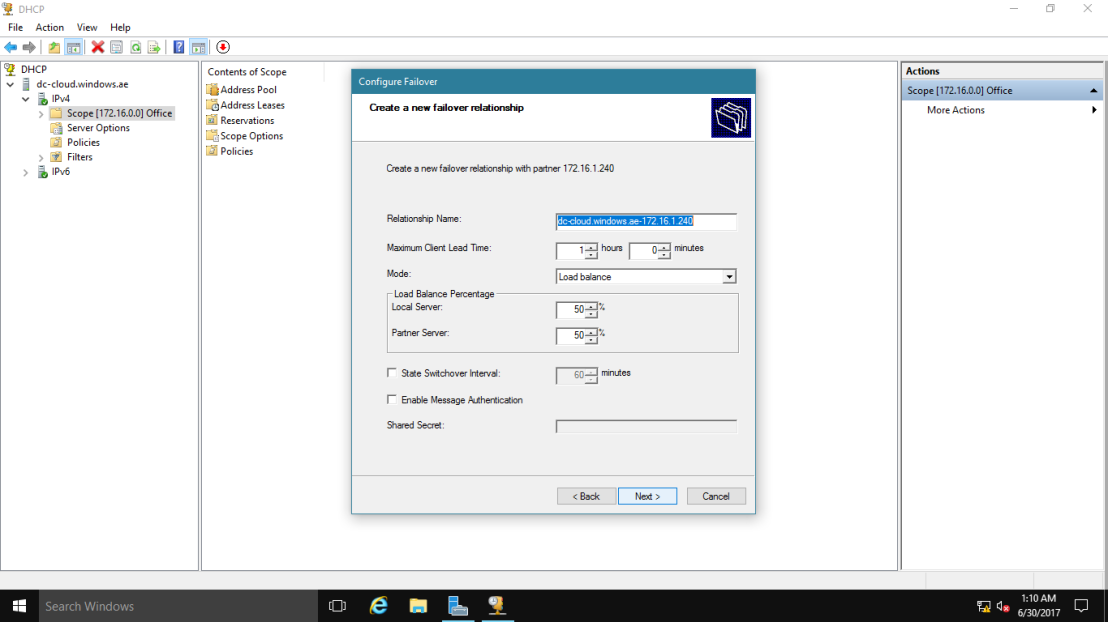 Relation name : Each relationship name is required to be unique on a server.
Maximum Client Lead Time : It defines the temporary lease period given by the failover server to a new client.
Mode : There are two modes for DHCP failover which are “Hot Standby” and “Load balance“.
In hot standby mode, 2 servers operate in a failover relationship where an active server is responsible for leasing IP addresses and configuration information to all clients in a scope or subnet, while a secondary server assumes this responsibility if the primary server becomes unavailable. A server is primary or secondary in the context of a subnet.
In a load balance mode deployment, which is the default mode of operation, the two servers simultaneously serve IP addresses and options to clients on a given subnet. The client requests are load balanced and shared between the two servers.
Auto State Switchover Interval : A server that loses communication with a partner server transitions into a communication interrupted state. The loss of communication may be due to a network outage or the partner server may have gone offline. Since there is no way for the server to detect the reason for loss of communication with its partner, the server will continue to remain in communication interrupted state until the administrator manually changes the state to partner down. Alternatively, DHCP failover has a provision for automatic transition to partner down state based on a time out interval. This is a configurable element called the auto state switchover interval. The default value for auto state switchover interval is 10 minutes.
Enable Message Authentication : To configure message authentication, the DHCP failover setup wizard prompts the administrator to provide a shared secret. As part of the failover relationship creation, the failover setup wizard provisions the shared secret for message authentication to each of the servers in the failover relationship.
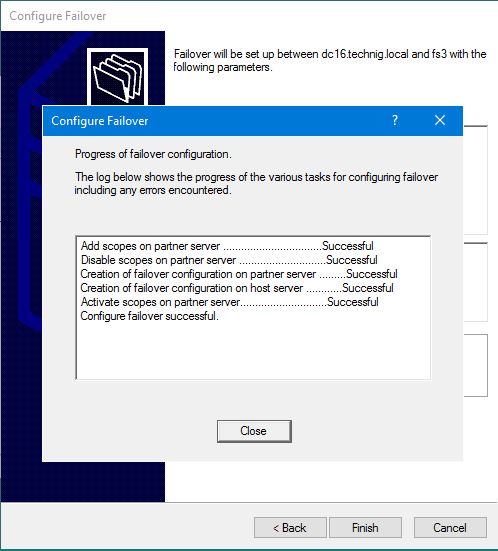
7 – Next, confirm the settings and click Finish.
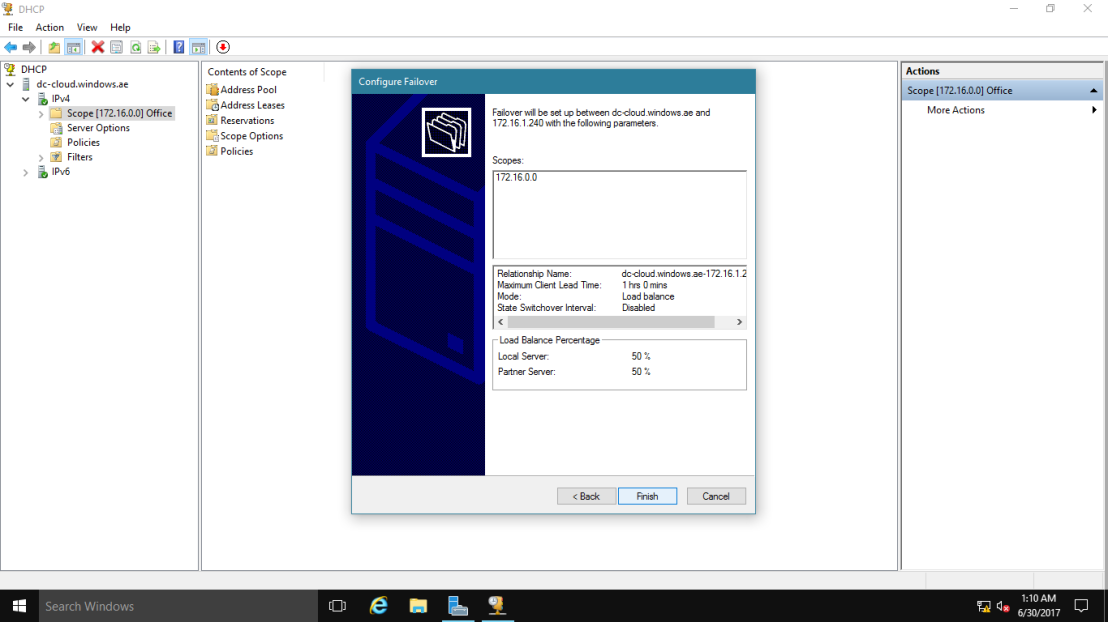

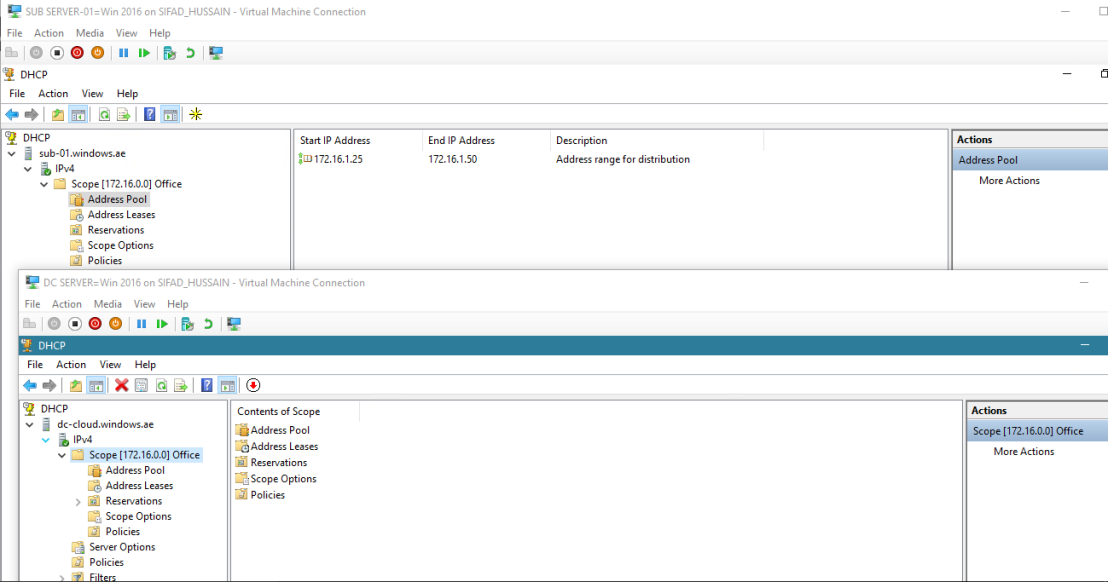
8 – Now log in to both of the DHCP Server (in my demo DC-CLOUD and SUB-01, which both Server hosted my DHCP). Confirm that both DHCP Services is running and you can have both Server having same settings.
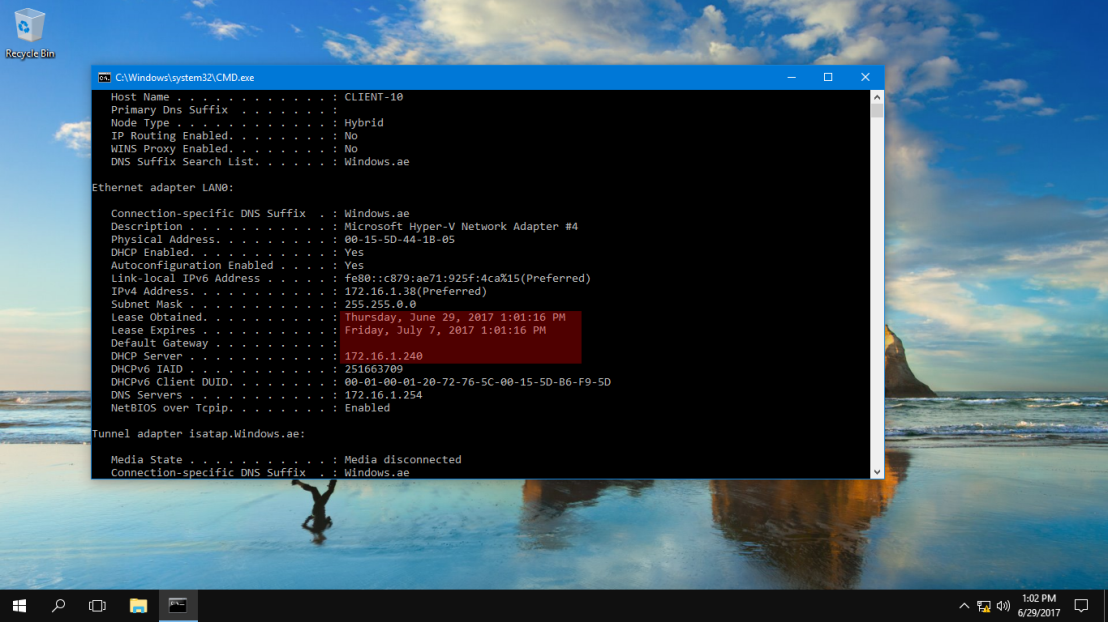
9 – Next, log in to your client PC, in my Demo i have Windows 10 machine and now open command prompt and type ipconfig /all to get IP information.
– Confirm that your client machine is receiving IP from DHCP Server. in my Demo the IP is coming from my SUB-01 server (172.16.1.240)
– to test the DHCP Failover, disconnect the network on the 1 of the DHCP Server (in my Demo it SUB-01 server)
10 – now, release and renew the IP from your client machine “(ipconfig /release.. ipconfig /renew)” please refer to picture.
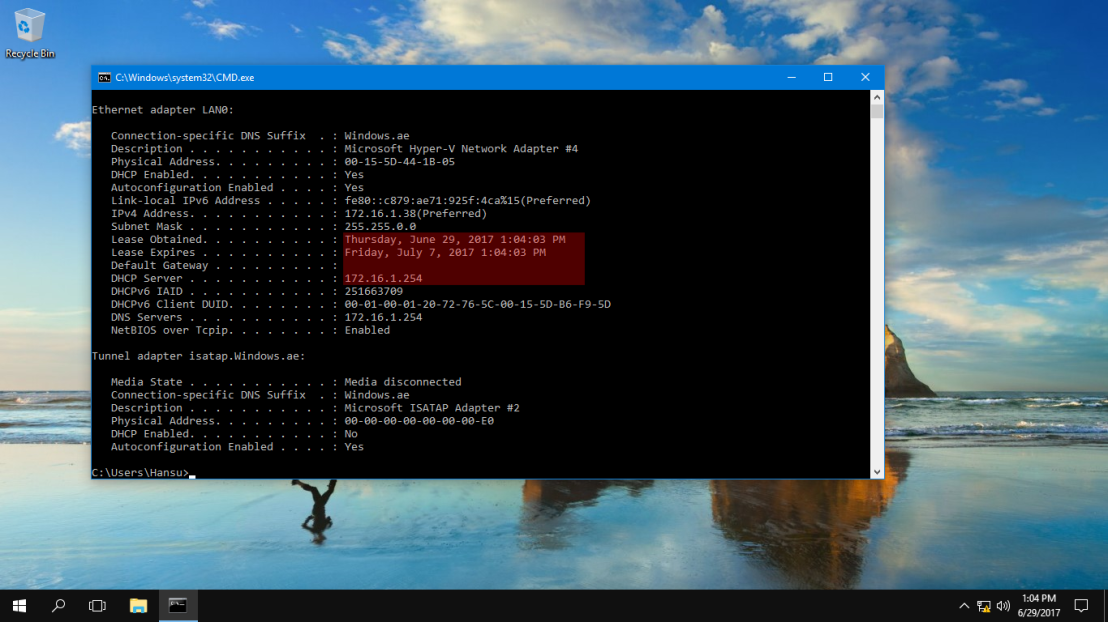
11 – confirm that you now receive IP from another DHCP Server (in my Demo its DC-CLOUD with IP 172.16.1.254).
– So it prove that our DHCP Failover is working.
that’s all for now.., any Doubts type a commend.. 🙂
By using Failover on DHCP Server, what we do is share the load between the two servers with load balancing as well as provide fault tolerance. Thus, even if one of the two DHCP servers is not online, then the clients continue to be served by the second server.
The DHCP Failover can be configured with two basic modes.
- Load Balance Mode, where both DHCP servers are active at the same time and the load is shared between them.
- Hot Standby Mode, where one DHCP server is active (as primary) and the other is passive (as secondary) so that when the primary is unavailable, secondary is automatically enabled.
These two modes can be applied either at the DHCP Scope level, for each scope separately, or at the Server level for all Scopes universally.
In order to implement this scenario, we will assume that we have two DHCP servers, DC01 and DC02, which they are both DCs and DNS servers as well. These extra roles are not required, though.
We assume that the DHCP role has been installed on the two servers and the appropriate Scopes have been configured on one DHCP server.
DHCP Failover – Load Balance Mode
Open the DHCP console, right-click IPv4, and then click Configure Failover.
In the window that will appear, you will see the list of available Scopes that you can set for failover. Select all is turned on by default, you can turn it off and select only those you want to configure. Click Next to continue.
Click the Add Server button to select the second DHCP server from the list of authorized DHCP servers or simply type the hostname or IP address in the corresponding field and click Next to continue.
In the next step, you’ll need to go through some settings.
- In the Relationship Name field, type a name for the specific “relationship” of the two servers.
- In the Mode field, select Load Balance.
- In the Load Balance Settings field, select the load percent of each server to share with each other.
- In the State Switchover Interval field, you can leave it blank. This setting is used for Hot Standby mode.
- In the Enable Message Authentication field, you can enable it if desired, and then enter a password in the Shared Secret field. This password is used to authenticate messages sent between the two servers participating in DHCP Failover.
Click Next to continue.
Finally, click Finish to complete the Failover set up.
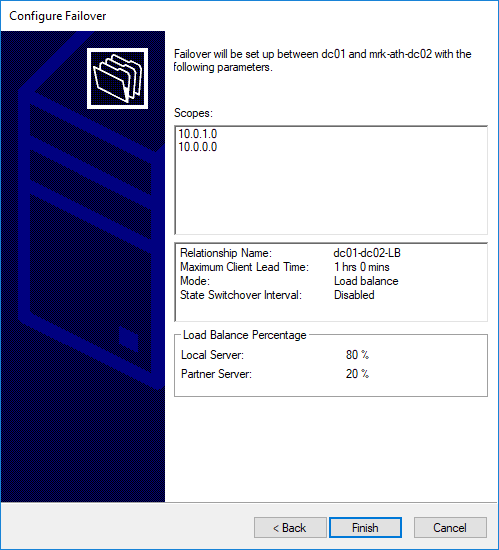
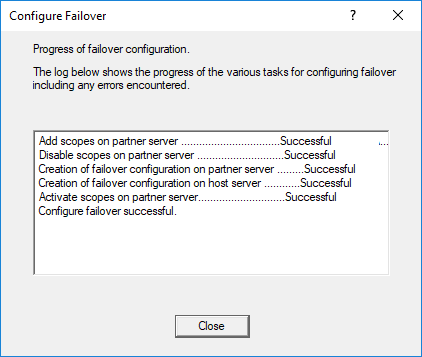
Immediately after, the corresponding progress window will appear and as everything went well you will see the Configure failover successful message.

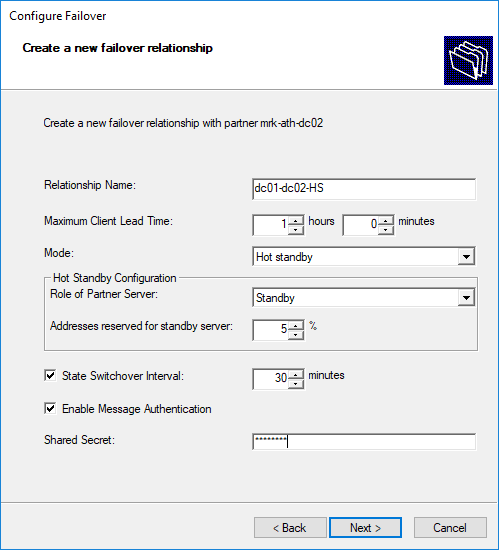
DHCP Failover – Hot Standby Mode
The steps to configure Hot Standby mode are the same as those described above, but we’ll only stop at the last step that is a bit different.
- In the Relationship Name field, type a name for the specific “relationship” of the two servers.
- In the Mode field, select Hot Standby.
- In the Hot Standby Settings field, select the percentage of addresses that the standby server will reserve.
- In the State Switchover Interval field, select the time that will be required until the status of the DHCP Server change from passive to active.
- In the Enable Message Authentication field, you can enable it if desired, and then enter a password in the Shared Secret field. This code is used to authenticate messages sent between the two servers participating in DHCP Failover.
Click Next to continue.
Immediately after, the corresponding progress window will appear and as everything went well you will see the Configure failover successful message.
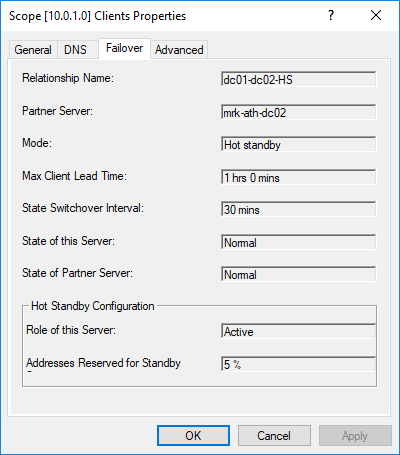
View and edit DHCP Failover settings
So, after you have set up your DHCP Failover on your server, you may need to view again how it was configured and possibly edit some of its settings. This is done through the DHCP Properties window.
Right-click on IPv4 and then click Properties. In the window that opens, go to the Failover tab. Here, you can see the status of failover settings, edit and delete them.

Correspondingly, through the settings window of each DHCP Scope, you can view the failover settings for each Scope separately.
Force Scope and Relationship replication
If you’ve made changes to a server and want to force the replication from one partner server to another, then this is how it’s done.
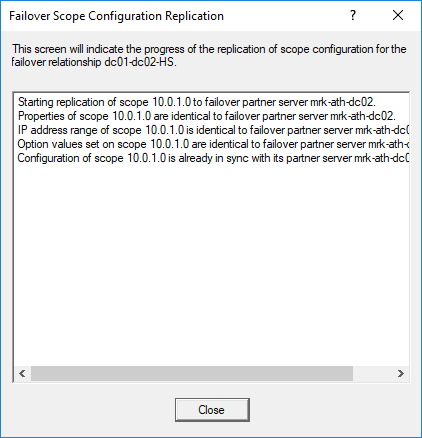
To replicate Scope settings, right-click a Scope, and then click Replicate Scope.
Correspondingly, to replicate settings of all Scopes, right-click on IPv4 and then click Replicate Failover Scopes.

Finally, to replicate settings of all Scopes in a particular relationship, right-click on a Scope and then click Replicate Relationship.
In any case, the corresponding confirmation message will be displayed.
Remove (deconfigure) DHCP Failover
Removing DHCP Failover settings between two partner servers is very easy and fast, again at both server and Scope level.
To remove a DHCP Failover Scope, right-click on the Scope and then Deconfigure Failover.
You will need to confirm your action and then the corresponding message will be displayed.

When removing the DHCP Failover, Scopes and Relationships will be removed from the partner server.
DHCP Failover via PowerShell
Of course, all of the above actions can be done through PowerShell. However, due to the fact that DHCP Failover settings do not change often, it might have been quicker and easier to do it using the DHCP console instead of PowerShell’s advanced parameters. So I will not focus more on this point, apart from mentioning the basic cmdlets.
- Add-DhcpServerv4Failover
- Add-DhcpServerv4FailoverScope
- Get-DhcpServerv4Failover
- Remove-DhcpServerv4Failover
- Remove-DhcpServerv4FailoverScope
- Set-DhcpServerv4Failover
- Invoke-DhcpServerv4FailoverReplication
If you are interested, you can search for more information about the parameters you will need through Microsoft documentation.
How to Deploy DHCP Failover on Windows Server 2016
The (DHCP) failover in Windows Server 2016 enables high availability of DHCP services by synchronizing IP address lease information between two DHCP servers ensuring continuous availability of DHCP service to clients.
Previous Posts on DHCP Services Role:
- How to Deploy DHCP Services Role on Windows Server 2016
- How to create a DHCP Scope on Windows Server 2016 step by step
Prerequisites:
- 2 Windows 2012/16 Servers with DHCP Role installed and authorized.
- Scopes defined and configured.
Important: DHCP failover to function correctly make sure both servers have their time synchronized.
Planned Topology

Creating a DHCP Failover Cluster step by step
Go to your DHCP Management Console, expand your DHCP server, IPv4 the right click and select Configure Failover…
![clip_image001[8]](https://lh3.googleusercontent.com/-QTLnuTrJDmo/WP0_qbZ053I/AAAAAAAABGo/_2ghnE9VDQU1PmPaAxLbz_eRvFKqJwc2wCHM/clip_image001%255B8%255D_thumb%255B2%255D?imgmax=800 "clip_image001[8]")
On the Configure Failover page, select the Scopes you will like to add into the cluster then Next.
In my case I will start with one and then add more as I go.

On the Partner server page, select the secondary DHCP Server then Next.


On the Failover relationship page, select Mode Load Balance or Hot standby, set Secret(My pass: secret) and adjust if necessary then Next.
Note: In this example I have configured to Load Balance.

Click on Finish to complete your first DHCP Failover.


Confirm the replicated scope is now visible on the HA DHCP Server and also confirm on a client machine by unitizing ipconfig/all to verify the active DHCP server.

That’s it you have now configured your first DHCP Failover cluster.
DHCP failover is used to load balance client requests among two DHCP servers and provides fault tolerance. If one of the DHCP servers is down, then the other keeps serving IP addresses to clients. DHCP failover can be configured in the following two ways:
- Load balance mode (Both DHCP servers are active and the load is shared among the two).
- Hot standby mode (One of the DHCP servers is active and the other is passive. When active goes down, passive takes over and becomes active).
Prerequisites
Your systems must meet the following two minimum requirements:
- An active DHCP scope on which you want to configure failover.
- A running partner DHCP server.
Step 1. Open DHCP management console. Right-click IPv4 and click «Configure Failover…»

Step 2. Choose the scope you want to configure for failover and click Next.
Step 3. Add an IP address of the partner server and click Next.
Step 4. Choose the mode (I am choosing Load balance for this tutorial). Keep other options at their defaults.

Step 5. Click Finish.
Step 6. Click Close.
 A DHCP failover with the partner server on Windows 2016 has been configured successfully.
This article “configure DHCP failover on Windows Server” is apply-able on Windows server 2012 and higher for DHCP High Availability. The DHCP server failover feature provides the ability to have two DHCP servers provide IP addresses and option configuration to the same subnet or scope, providing for continuous availability of DHCP service to clients. The two DHCP servers replicate lease information between them, allowing one server to assume responsibility for servicing of clients for the entire subnet when the other server is unavailable. It is also possible to configure failover in a load-balancing configuration with client requests distributed between the two servers in a failover relationship.
The DHCP failover in Windows Server enables administrators to deploy a highly resilient DHCP service to support a large enterprise without the challenges of the options discussed earlier. The main goals of the feature are the following:
- Provide DHCP service availability at all times on the enterprise network.
- If a DHCP server is no longer reachable, the DHCP client is able to extend the lease on its current IP address by contacting another DHCP server on the enterprise network.
Read the Understand and Deploy DHCP Failover article on Microsoft technet.
You need to have two DHCP servers to configure DHCP failover on Windows Server. Install DHCP on both servers and don’t create scope on the second one. Just create a scope on the primary DHCP server.
- On Windows server type “dhcpmgmt.msc” on Run and press enter to open DHCP Manager.
- On the DHCP console right click the DHCP and click Add Server. Select the second DHCP server and add it to current DHCP console.
3. To configure DHCP Failover on Windows Server, right click on IPv4 of primary DHCP and select Configure Failover. On the welcome page of Configure Failover select Select all and click Next.
4. Add the second DHCP server and click Next.
5. On the Create a new failover relationship page, select Load balance mode and type a password then click Next.
6. Finally click Finish to set up failover between two servers. Make sure the process should be finished successfully. Close the page and to to see the changes on DHCP management console.
7. Once refresh the DHCP console or reconnect the server to see the final result. Now the DHCP servers are ready to work as DHCP load balancing service and your clients never fail to obtain IP address.
That is all about DHCP High Available or configure DHCP Failover on Windows Server 2016. The same configuration works on Windows Server 2012 also.
An IT Pro, here is my online knowledge sharing platform. I would like to write and share my experience for computer enthusiasts and technology geeks.
DHCP servers are one of the key elements of the network infrastructure. However, unlike DNS servers or domain controllers, before the release of Windows Server 2012, Windows Server didn’t have the integrated mechanisms for the DHCP role high availability and load balancing. Earlier the high availability task was solved by dividing the DHCP scope into two parts, each of which served its own server. But this approach had a lot of inconvenience, starting from the fact that all the settings needed to be duplicated between servers and ending with the fact that in case of a fault, a manual intervention would still be required.
How to Configure DHCP Load Balancing?
Starting from Windows Server 2012, the ability to create DHCP failover configurations has been added. In this article we will show you how to configure load balancing on a DHCP server running Windows Server 2016.
To ensure fault tolerance and load balancing, you need two servers with DHCP Server role installed. But before this, both servers need to assign the correct DNS names, static IP addresses and join the servers to the AD domain.
Install the DHCP Server role from the Server Manager console or using the PowerShell command:
Add-WindowsFeature DHCP –IncludeManagementTools

After installation, be sure to authorize a DHCP server in the Active Directory.

On one of the servers, add and configure a new IPv4 DHCP scope.

Then right-click on the root of the ipv4 or on a specific scope and select Configure Failover in the drop-down menu.

A wizard will appear prompting you to select the scopes for which you want to implement fault tolerance.

In the next step, you will be prompted to select a partner server. This can be any available DHCP server based on Windows Server 2016. In the domain network, you will see a list of authorized servers, or select the server using the Browse button.

It remains to choose the DHCP server operation mode, if necessary, correct some parameters and set a shared secret (the key phrase to create an encryption key).
Two failover modes are available for the DHCP server:
- Load Balance – two servers simultaneously issue IP addresses and options for clients in some subnet. Client requests to load balancing servers are distributed between two servers (you can set the desired percentage). This is the default operation mode.
- Hot standby – in this mode, the two servers operate in a fault-tolerant configuration, in which the active server is responsible for the IP addresses leasing and configuration information for all clients in the scope or subnet, while the secondary (standby) server takes over its functions if the primary server becomes unavailable. A server is considered primary or secondary in the context of an IP subnet.

Consider the available options:
- Maximum Client Lead Time – the time at which the partner server extends the lease of IP addresses to the clients of the second server if communication with it is lost;
- Load Balance Percent – sets the proportion of requests distributed between servers;
- State Switchover Interval – time after the loss of communication with the partner, when the server goes from the state of “connection lost” to the state “partner is disabled”;
- Enable Message Authentication – between servers, a secure communication channel is established using a passphrase.
In hot standby mode, the set of options is a little bit different:

- Role of Partner Server – allows you to select server roles. By default, the server on which the failover is configured becomes active, the partner is put into standby mode;
- Addresses reserved for standby server – part of the scope allocated to the standby server to serve new clients in the “lost connection” mode.
After selecting all the necessary settings, click Next. This is where the DHCP failover setup wizard is complete.
Only information about the issued IP addresses is replicated between partner servers; changes in the scope settings, including reservation, should be synchronized manually. To do this, in the DHCP console, click on the scope and select Replicate Failover Scopes.

Or you can start all scopes replication from the host1 using PowerShell:
Invoke-DhcpServerv4FailoverReplication -ComputerName host1.contoso.com
There is the following limitation in DHCP failover in Windows Server 2016: two DHCP servers per scope. You should remember and understand that the high availability of DHCP is implemented not on the basis of servers, but on the basis of scopes. If a single server contains multiple areas, then it can be a part of several high-availability configurations. In addition, the failover relationship for IPv6 scopes is not supported.
- About
- Latest Posts

I enjoy technology and developing websites. Since 2012 I’m running a few of my own websites, and share useful content on gadgets, PC administration and website promotion.

In this guide, Karim Buzdar illustrates how the configuration of DHCP failover in a test environment with two Windows 2016 servers and one Windows 10 client.
DHCP failover is a new feature (available in Server 2012 and later versions) for ensuring high availability of DHCP server on an enterprise network. The two servers in a failover relationship share lease information including reservations, scope options, exclusion, policies, and filters. They know their existence by exchanging heart beat messages. When one DHCP server is unavailable, other takes responsibility of assigning IP address configuration to client computers.
In this guide, I have tried to illustrate the configuration of DHCP failover in a test environment with two Windows 2016 servers and one Windows 10 client.
DHCP Failover Architecture Overview
DHCP failover relationship is created in one of the following two modes.
- Hot standby mode
- Load sharing mode
In hot standby mode, primary and secondary DHCP servers in a failover relationship work in active – passive modes. Primary DHCP server is used to be an active DHCP server and it has the responsibility of leasing out IP address configuration to client computers while secondary DHCP server is used to be passive server. It takes the responsibility of leasing out IP address configuration only when an active DHCP server is down or unavailable.

In load sharing mode, both primary DHCP server and secondary DHCP server work in active-active mode and provide an IP address configuration to client computers simultaneously. The client requests are load balanced and shared among two DHCP servers.

In this guide, I have configured the DHCP failover in hot standby mode.
Limitations
The implementation of DHCP failover in Windows Server 2016 has following two limitations.
- It can support only two DHCP servers in failover relationship
- The failover relationship doesn’t support IPv6 scope
Prerequisites
You need to meet the following two minimum requirements for this guide to work.
- An active scope on primary DHCP server
- An already configured DHCP on secondary or partner server
Configuring DHCP Failover Using Server Manager
Step 1. Open DHCP console of your primary server, right-click the scope you want to configure for failover and then click Configure Failover…

Step 2. Click Next

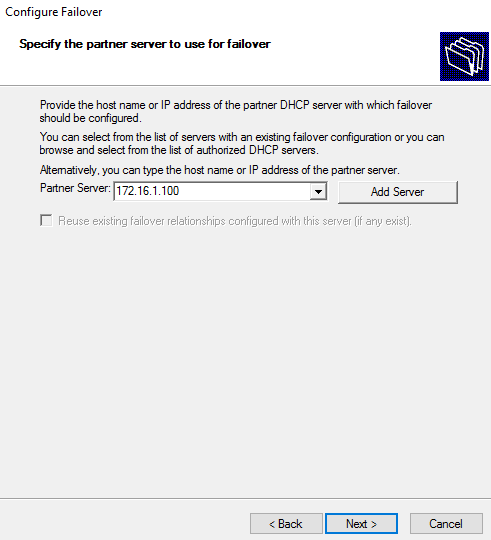
Step 3. Type the host name or IP address of the partner server and click Next

Step 4. Choose Hot standby mode, leave other options as default and click Next

Step 5. Click Finish

Step 6. Click Close

Configuring DHCP Failover Using PowerShell
Step 1. In your primary DHCP server, open PowerShell with elevated privileges
Step 2. Execute the following command. Make sure to replace the values of -ComputerName, -PartnerServer and -ScopeID
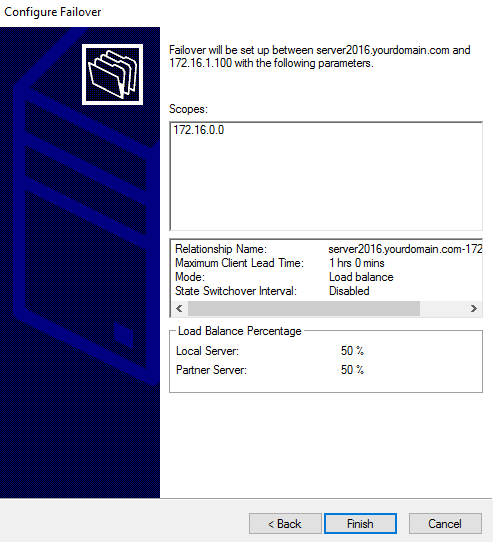
Add-DhcpServerv4Failover –ComputerName dhcp1.contoso.com –PartnerServer dhcp2.contoso.com –Name server2016.yourdomain.com-172.16.1.100-2 –ScopeID 172.16.0.0 –ServerRole Active -Force
Testing the Configuration
There are few work around you can perform to test your DHCP failover configuration.
Step 1. Open DHCP console of primary or active server and expand IPv4 node. Right-click the scope you configured for failover and then click Properties. Open the failover tab, verify the IP address and state of partner server

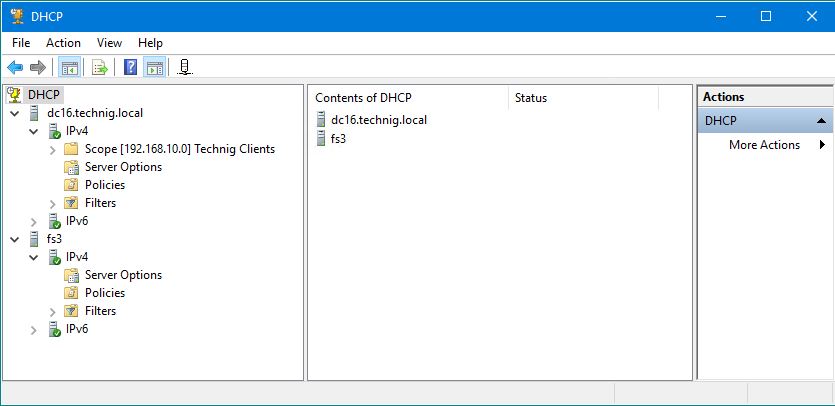
Step 2. Open DHCP console of secondary or partner server and expand IPv4 node. You should see the same scope (including reservations, options etc.) you configured for failover from primary server

Step 3. On Windows 10 client, open network adapter (TCP/IPv4 Properties) settings and set it to obtain an IP address automatically. Execute the ipconfig/all on command prompt. Note down the DHCP server IP address. It should be an IP address of active DHCP server.

Step 4. Open DHCP console of primary or active DHCP server and stop the DHCP service. Right-click your server name -> All Tasks -> click Stop

Step 5. Open command prompt of Windows 10 client and execute the following two commands. Note down the DHCP server IP address. It should be an IP address of standby DHCP server
Ipconfig /release
Ipconfig /renew

References Used:
- https://technet.microsoft.com/en-us/library/dn338975(v=ws.11).aspx
- https://technet.microsoft.com/en-us/library/hh831385(v=ws.11).aspx
- https://technet.microsoft.com/en-us/library/dn338983(v=ws.11).aspx
- http://techgenix.com/implementing-dhcp-server-failover/

In this time, we will configure the DHCP failover on Windows Server. DHCP Failover is a feature on the Windows DHCP server to ensure the High Availability of DHCP server for the enterprise network. The two servers in a failover relationship share lease information including reservations, scope options, exclusion, policies, and filters.
DHCP Failover Mode
DHCP failover relationship mode is created in one of the following two modes.
- Hot Standby mode
- Load Balance Mode
In hot standby mode, primary and secondary DHCP servers in a failover relationship work in active-passive modes. Primary DHCP server is used to be an active DHCP server and it has the responsibility of leasing out IP address configuration to client computers while the secondary DHCP server is used to be a passive server. It takes the responsibility of leasing out IP address configuration only when an active DHCP server is down or unavailable.

In load balance mode, both primary DHCP server and secondary DHCP server work in active-active mode and provide an IP address configuration to client computers simultaneously. The client requests are load balanced and shared among two DHCP servers.

DHCP failover in Windows Server 2016 has following two limitations.
1. It can support only two DHCP servers in the failover relationship.
2. The failover relationship doesn’t support IPv6 scope.
Before we continue, you need to install the DHCP Role on the windows server and configure at least one DHCP Scope on the first DHCP server.

Configure DHCP Failover
Step 1. Open DHCP console on your primary server, right-click on the scope that you want to configure for DHCP failover and then click Configure Failover…

Step2. Select which scope that you want to configure for DHCP Failover.

Step 3. Type the host name or IP address of the partner server. You can also select from the registered/authorized DHCP Server in ADDS.

Step 4. Select the DHCP Replication mode detail.

Step 5. Review the configuration and click finish to run the DHCP Failover.

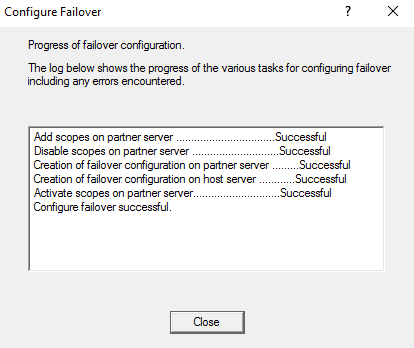
Step 6. DHCP Failover setup process.

After the process is done. You can verify and see the scope that you configure for DHCP failover on the pair server.

We hope this article helped you learn how to Configure the DHCP Failover on the Windows server. If you liked this article, then please share with the others. You can also find us on Twitter and Facebook.
Данная статья описывает процедуру установки и настройки DHCP сервера на базе Windows Server 2019. В статье описаны особенности установки и настройки DHCP роли, создания областей DHCP, настройки их параметров и резервации статических адресов. Мы рассмотрим как привычный способ настройки параметров DHCP сервера через графическую консоль, так и настройку DHCP из командной строки PowerShell.
Протокол DHCP (Dynamic Host Configuration Protocol) используется для автоматического назначения сетевых настроек (IP адрес, маска подсети, шлюз, DNS сервера и т.д.) устройствам в вашей сети (компьютеры, ноутбуки, сканеры, принтеры и т.д.). Также DHCP сервер позволяет более эффективно использовать адресное пространство, избегать конфликта IP адресов в сети и централизованно управлять сетевыми параметрами на клиентских устройствах.
Содержание:
- Установка роли DHCP сервера в Windows Server 2019/2016
- Настройка DHCP областей в Windows Server
- Резервация IP адресов на DHCP сервере
- Настройка и управление DHCP сервером с помощью PowerShell
Установка роли DHCP сервера в Windows Server 2019/2016
В этом примере мы установим DHCP сервер на хосте с Windows Server 2019 и IP адресом 192.168.13.4. Вы можете использовать как Server Core версию, так и Full GUI. В маленькой инфраструктуре допустимо устанавливать DHCP сервер на сервер с ролью контроллера домена Active Directory.
Обязательно назначьте статический IP адрес серверу с ролью DHCP сервер. При установке роли DHCP из консоли PowerShell на сервере с автоматическим получением IP адреса появляется предупреждение:
Configure at least one static IP address on your computer before installing DHCP.
WARNING: The following recommended condition is not met for DHCP: No static IP addresses were found on this computer. If the IP address changes, clients might not be able to contact this server. Please configure a static IP address before installing DHCP Server.
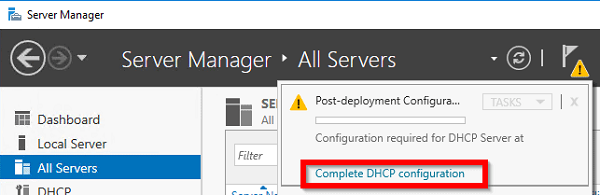
Установить роль DHCP Server можно из консоли Server Manager (Add Roles and Features -> Server Roles).
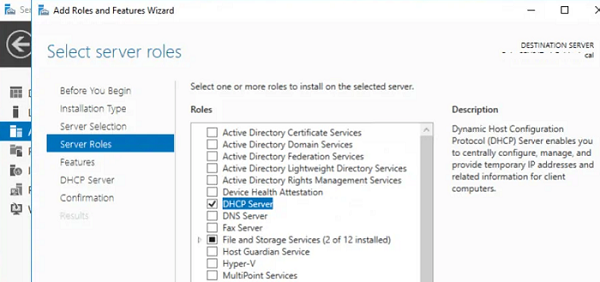
После установки роли DHCP роли нужно выполнить Post-Deployment Configuration. Для этого в консоли Server Manager щелкните по уведомлению и выберите Complete DHCP configuration.
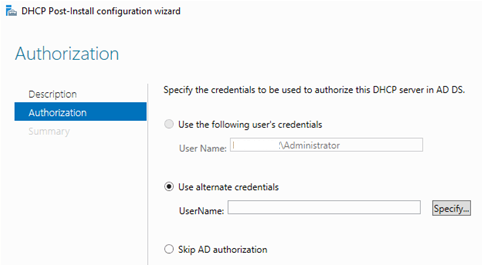
Вам будет предложено аутентифицировать новый DHCP сервер в Active Directory (экран Authorization). Для авторизации DHCP сервера в AD учетная запись должна состоять в доменной группе Enterprise Admins.
Если у вас нет прав на авторизацию DHCP в AD, вы можете указать, чтобы ваш DHCP сервер запускался без проверки авторизации в домене:
Set-ItemProperty -Path "HKLM:SYSTEMCurrentControlSetServicesDHCPServerParameters" -Name DisableRogueDetection -Value 1 -Force
Также вы можете установить и настроить DHCP роль в Windows Server из консоли PowerShell.
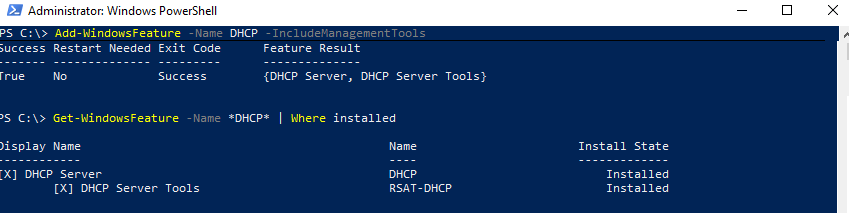
Установка роли DHCP:
Install-WindowsFeature DHCP –IncludeManagementTools
Проверьте, что роль и инструменты управления RSAT-DHCP установлены:
Get-WindowsFeature -Name *DHCP*| Where Installed
Авторизуйте DHCP сервер в Active Directory (укажите DNS имя сервера и IP адрес, который будет использоваться DHCP клиентами):
Add-DhcpServerInDC -DnsName hq-dc01.contoso.com -IPAddress 192.168.13.4
Создайте локальные группы безопасности DHCP сервера:
Add-DhcpServerSecurityGroup
Чтобы Server Manager перестал показывать уведомление о том, что DHCP роль требует настройки, выполните команду:
Set-ItemProperty -Path HKLM:SOFTWAREMicrosoftServerManagerRoles12 -Name ConfigurationState -Value 2
Перезапустите службу DHCPServer:
Restart-Service -Name DHCPServer -Force
База данных и логи DHCP сервера находятся в каталоге
%systemroot%system32dhcp
.
- dhcp.mdb — файл базы данных сервера DHCP’;
- j50.log – транзакционный журнал (используется при восстановлении конфигурации DHCP);
- j50.chk — файл контрольной точки;
- tmp.edb — временный рабочий файл DHCP-сервера.
Настройка DHCP областей в Windows Server
После установки роли DHCP вам нужно создать DHCP области (Scopes), которые описывают диапазоны IP адресов и другие настройки, выдающиеся сервером клиентам.
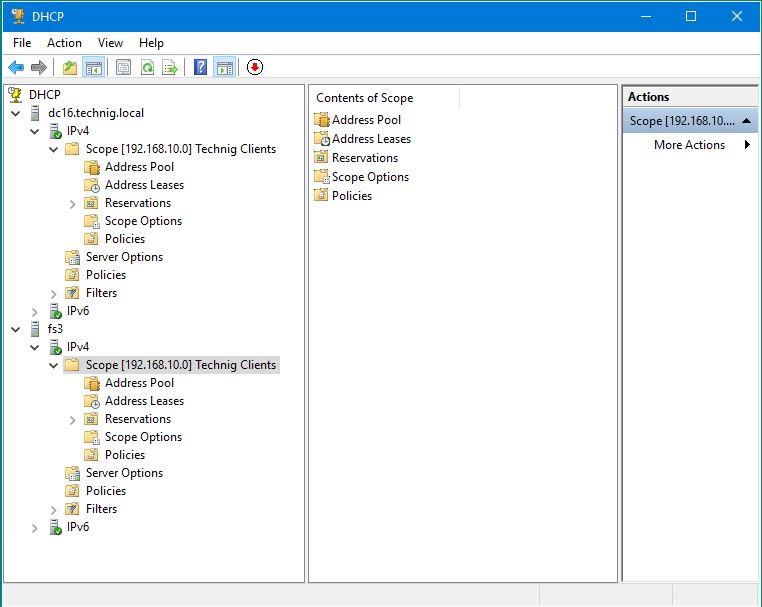
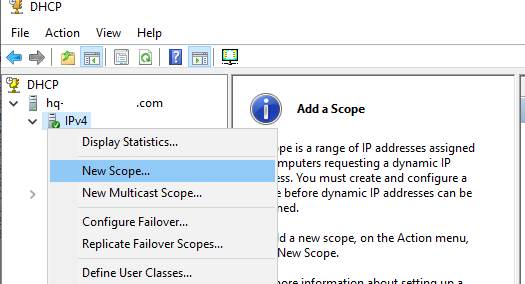
Для управления сервером DHCP используется консоль dhcpmgmt.msc (вы можете управлять DHCP сервером локально или с удаленного компьютера с установленным RSAT). Запустите консоль DHCP, разверните ваш сервер -> IPv4.
Чтобы создать новую область выберите New Scope.
Укажите название DHCP области.
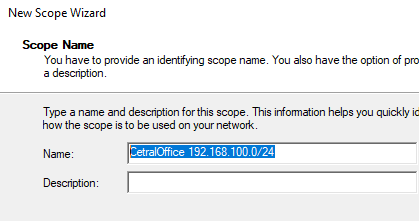
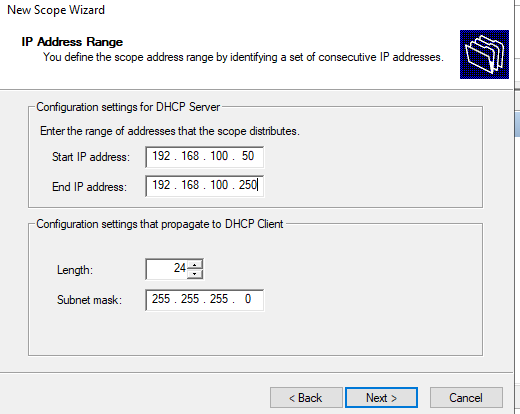
Укажите диапазон IP адресов, который будет выдаваться этой областью и маску сети. В этом примере я хочу использовать эту DHCP область для обслуживания подсети 192.168.100.0/24. В рамках этой сети DHCP сервером будет назначаться динамические IP адреса из диапазона 192.168.100.50 — 192.168.100.250. В следующем окне можно добавить исключения в этот диапазон (Add Exclusions and Delay).
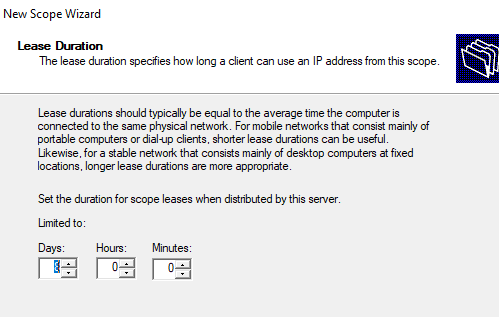
Далее нужно указать длительность аренды (Lease Duration) IP адреса DHCP клиентом (по умолчанию 8 дней, менять без особой необходимости не нужно).
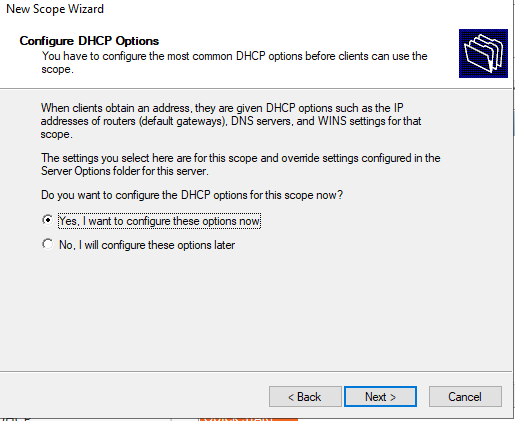
Укажите, что вы хотите настроить дополнительный параметры DHCP области.
 .
.
Укажите IP адрес шлюза в подсети, который должен назначаться клиентам (в нашем примере это 192.168.100.1).

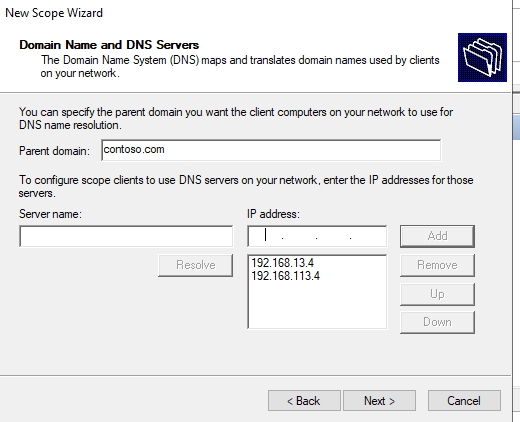
Затем укажите имя домена и адреса DNS серверов, которые будут назначены клиентам DHCP.
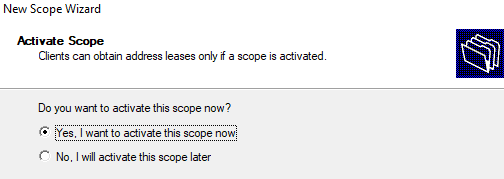
Осталось активировать DHCP область (разрешить ей обслуживать клиентов).
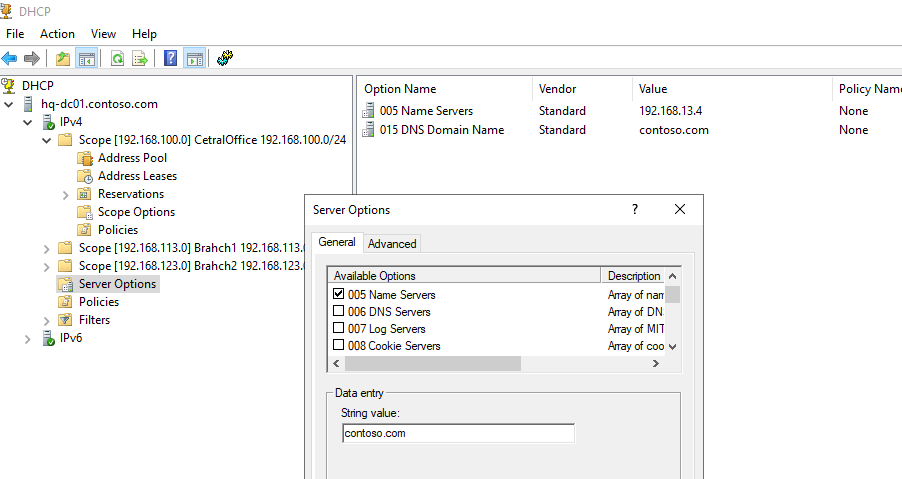
DHCP сервер может выдавать клиентам различный настройки (кроме IP адреса). Для этого используются Scope Options.
В Windows Server DHCP можно настроить глобальные настройки области или Scope Options для каждой области.

Ранее мы уже настроили три опции области:
-
003 Router -
006 DNS Server -
015 DNS Domain Name
Можно добавить и другие опции (NTP сервера, PXE и т.д.).
В разделе Server Options DHCP сервера можно настроить глобальные опции, которые будут наследуются всеми областями. Но вы можете переопределить глобальные настройки в настройках каждой области (опции области имеют приоритет над опциями сервера).
Один DHCP сервер может обслуживать сотни удаленных подсетей и VLAN. Поэтому вы можете создать на нем несколько областей. Главное, чтобы в каждой из подсетей был настроен ретранслятор (DHCP relay agent), который пересылает широковещательные DHCP-запросы на указанный DHCP сервер. В терминах Cisco DHCP ретранслятор называется ip helper. Вы можете настроить DHCP Relay даже на Windows Server.
Протокол DHCP в качестве транспорта использует протокол UDP. Пакеты от клиента к серверу передаются по порту 67 UDP, обратно через UDP 68
Резервация IP адресов на DHCP сервере
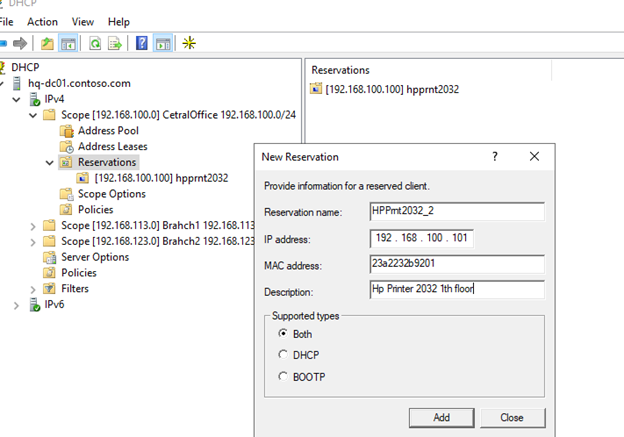
По умолчанию DCHP сервер выдает клиентам динамические адреса. Это означает что IP адрес у любого клиента может меняться. Если вы хотите, чтобы определенные устройства всегда получали от DHCP сервера один и тот же адрес, вы можете его зарезервировать (например, для сетевых принтеров, которые настроены у пользователей).
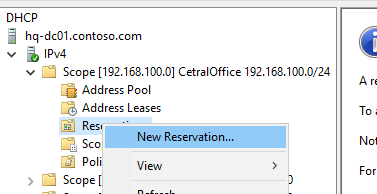
Для DHCP резервации выберите область и перейдите в секции Reservation. В меню выберите New Reservation.
При создании резервации нужно указать IP адрес, который нужно сохранить за клиентом и его MAC адрес (уникальное значение). MAC адрес в Windows можно получить из результатов команды
ipconfig /all
или с помощью PowerShell
get-netadapter|select name,macaddress
). Опционально можно указать имя и описание устройства.
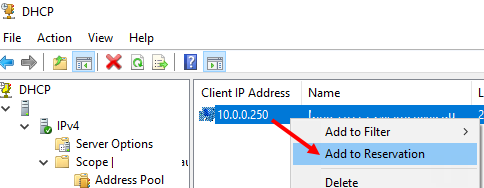
Также вы можете зарезервировать текущий динамический адрес за устройством, найдя его в разделе Address Leases. Щелкните по устройству и выберите Add to Reservation.
Настройка и управление DHCP сервером с помощью PowerShell
Все операции по настройке и управлению DHCP сервером на Windows Server 2019/2016 можно выполнять из консоли PowerShell. Рассмотрим основные команды управления DHCP. Для этого используется модуль DHCPServer. Импортируйте модуль в сессию:
Import-Module DHCPServer
Вывести полный список командлетов в моделе DHCP можно так:
Get-Command -Module DHCPServer

Следующая команда выведет список авторизованных DHCP серверов в Active Directory:
Get-DhcpServerInDC

Вывести список DHCP областей на указанном сервере:
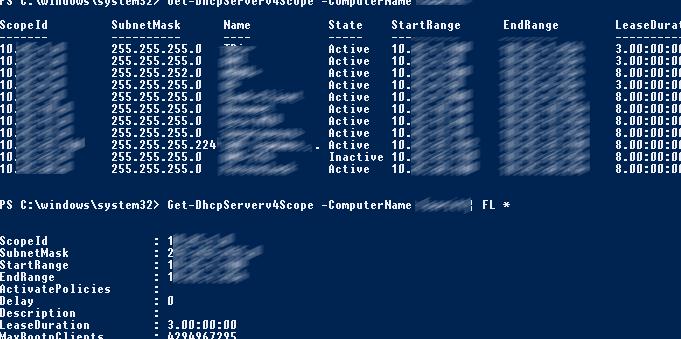
Get-DhcpServerv4Scope –ComputerName msk-dhcp1
Если нужно показать все параметры области (Delay, Description, Name и т.д.):
Get-DhcpServerv4Scope –ComputerName msk-dhcp1| FL *
Если нужно отобразить данные о IPv6 областях:
Get-DHCPServerv6Scope
Получить настройки для конкретной области:
Get-DhcpServerv4Scope –ComputerName msk-dhcp1 –ScopeID 10.10.1.0
Создадим новую (неактивную) область с диапазоном адресов с 192.168.113.50 до 192.168.113.250:
Add-DhcpServerv4Scope -Name “Brahch1 192.168.113.0” -StartRange 192.168.113.50 -EndRange 192.168.113.250 -SubnetMask 255.255.255.0 -State InActive
Настроить следующие параметры DHCP сервера: DNS сервер, домен и адрес шлюза по-умолчанию:
Set-DhcpServerv4OptionValue -ScopeID 192.168.113.0 -DnsDomain contoso.com -DnsServer 192.168.13.4 -Router 192.168.113.1
Добавить исключения в DHCP область:
Add-DhcpServerv4ExclusionRange -ScopeID 192.168.113.0 -StartRange 192.168.113.90 -EndRange 192.168.113.100
Активировать DHCP область:
Set-DhcpServerv4Scope -ScopeID 192.168.113.0 -State Active

Для удобства можно использовать такую команду PowerShell при создании новой области:
$HashArgs = @{
'Name' = 'EKB Office Scope';
'Description' = 'workstations';
'StartRange' = '192.168.140.10';
'EndRange' = '192.168.140.200';
'SubnetMask' = '255.255.255.0';
'State' = 'Active';
'LeaseDuration' = '1.00:00:00';
}
Add-DhcpServerv4Scope @HashArgs
Опции для DHCP сервера добавляется так (к примеру, WPAD):
Add-DhcpServerv4OptionDefinition -ComputerName msk-dhcp1 -Name WPAD -OptionId 252 -Type String
Вывести список настроенных опций DHCP сервера можно так:
Get-DHCPServerv4OptionValue -ComputerName msk-dhcp1 | Format-List
Выведем список настроенных параметров зоны:
Get-DHCPServerv4OptionValue -ComputerName msk-dhcp1 -ScopeId 10.10.1.0 | Format-List
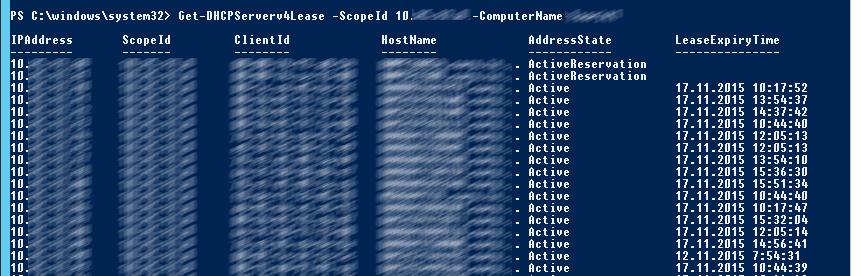
Показать текущий список арендованных адресов для области 10.10.1.0:
Get-DHCPServerv4Lease -ScopeId 10.10.1.0 -ComputerName msk-dhcp1
Создать DHCP резервацию для клиента, которому назначен динамический IP адрес 10.10.1.88 (конвертировать выданный адрес в зарезервированный):
Get-DhcpServerv4Lease -ComputerName msk-dhcp1 -IPAddress 10.10.1.88| Add-DhcpServerv4Reservation -ComputerName msk-dhcp1
Можно массово зарезервировать IP адреса для компьютеров по списку из csv файла. Для этого создайте текстовый файл в формате:
ScopeId,IPAddress,Name,ClientId,Description
10.10.1.0,10.10.1.88,Client1,ba-ab-5c-3d-4e-6f,Reservation PC-msk-s1
10.10.1.0,10.10.1.89,Client2,ba-ab-5c-5d-2e-3f,Reservation PC-msk-s2
Сохраните файл с именем
c:dhcpDHCPReservations.csv
и запустите следующую команду, которая импортирует данные из csv файла и создаст DHCP резервации для клиентов:
Import-Csv –Path c:dhcpDHCPReservations.csv | Add-DhcpServerv4Reservation -ComputerName msk-dhcp1
Отключить область на DHCP сервере:
Set-DhcpServerv4Scope -ComputerName msk-dhcp1-ScopeId 10.10.1.0-State InActive
Удалить область с DHCP сервера:
Remove-DHCPServerv4Scope -ComputerName msk-dhcp1-ScopeId 10.10.1.0 -Force
Возможно получить статистику DHCP сервера (количество областей, резерваций, процент использования адресов и пр.).
Get-DhcpServerv4Statistics -ComputerName msk-dhcp1
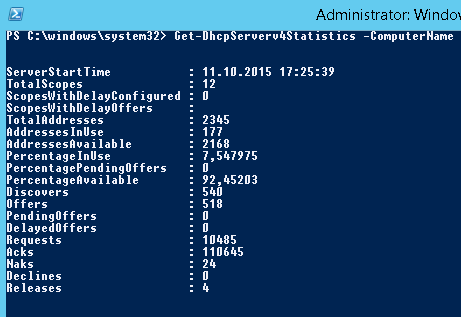
Аналогичная информация для конкретной области может быть получена с помощью командлета Get-DhcpServerv4ScopeStatistics.
Конфигурацию DHCP сервера можно экспортировать в указанный XML файл с помощью команды:
Export-DHCPServer -ComputerName msk-dhcp1 -File C:dhcpdhcp-export.xml
Совет. Заданием с такой командой в планировщике задач можно реализовать регулярное резервное копирование конфигурации DHCP сервера.
В дальнейшем эти настройки DHCP сервера можно импортировать (перенести) на другой DHCP сервер:
Import-DHCPServer -ComputerName msk-dhcp2 -File C:dhcpdhcp-export.xml -BackupPath C:dhcpbackup