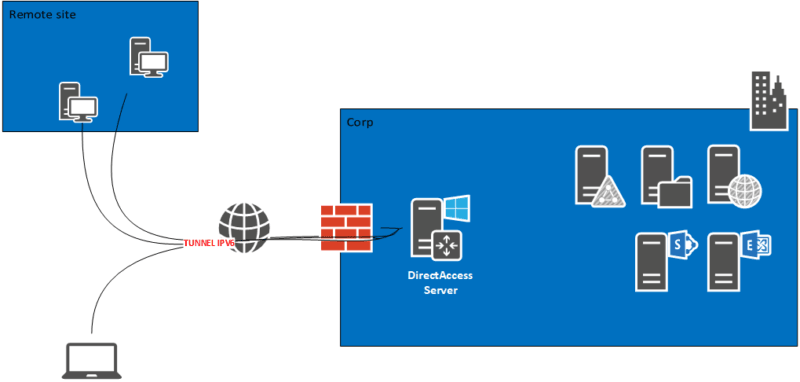
How DirectAccess Works
When a client provisioned for DirectAccess is outside of the corporate network, it will automatically attempt to establish a secure remote connection to the DirectAccess server over the Internet. The DirectAccess connection takes place at the machine level and requires no user interaction. Most commonly, the DirectAccess client will be on the IPv4 Internet, so an IPv6 transition technology will be selected and a tunnel will be established with the DirectAccess server.
Inside the IPv6 transition tunnel, authenticated and encrypted IPsec tunnels are established between the client and the server. It is over these tunnels that communication to resources on the corporate network takes place. The DirectAccess IPsec tunnels are defined as Connection Security Rules (CSR) in the Windows Firewall with Advanced Security on both the DirectAccess client and the server.
DirectAccess provides support only for Domain-joined clients that include operating system support for DirectAccess.
The following server operating systems support DirectAccess.
- You can deploy all versions of Windows Server 2016 as a DirectAccess client or a DirectAccess server.
- You can deploy all versions of Windows Server 2012 R2 as a DirectAccess client or a DirectAccess server.
- You can deploy all versions of Windows Server 2012 as a DirectAccess client or a DirectAccess server.
- You can deploy all versions of Windows Server 2008 R2 as a DirectAccess client or a DirectAccess server.
The following client operating systems support DirectAccess.
- Windows 10 Enterprise
- Windows 10 Enterprise 2015 Long Term Servicing Branch (LTSB)
- Windows 8 and 8.1 Enterprise
- Windows 7 Ultimate
- Windows 7 Enterprise
DirectAccess vs. VPN
- VPN connections are user initiated and therefore optional. It is up to the user to decide when they want to connect to the corporate network. By comparison, DirectAccess is seamless and transparent in nature, is completely automatic, and requires no user interaction to establish a connection.
- Many VPN protocols aren’t firewall friendly, which can impede the successful establishment of a VPN connection. DirectAccess can establish its secure remote connection using HTTPS, which is commonly allowed through most firewalls.
- VPNs often require investments in proprietary hardware and per-user licensing. DirectAccess can be deployed on existing virtual infrastructure and does not require additional user licensing.
- Proprietary software is commonly required to leverage all of the features provided by VPN solutions. This software must be deployed and managed by IT administrators. DirectAccess requires no additional third-party software to be installed. All settings for DirectAccess are managed through Group Policy Objects (GPOs) in Active Directory.
- A VPN connection can be established from any client machine with the VPN client software installed.This makes integration with a multifactor authentication solution an essential requirement, which makes the solution more complex and difficult to support. A DirectAccess connection can only be established from a client computer that has been provisioned for DirectAccess by IT, reducing the need to employ strong authentication for DirectAccess connections.
System Requirements
Windows Server 2016 and DirectAccess should be installed on a dedicated physical server for optimum performance. However, Windows Server 2016 and DirectAccess can be installed on a virtual machine hosted on any Microsoft Server Virtualization Validation Program (SVVP) validated hypervisor, including Microsoft Hyper-V, VMware, and many others. It is recommended that the server (physical or virtual) be provisioned with a minimum of four processor cores, 8GB of RAM, and 60GB of hard disk space.
For more information, please browse to : https://docs.microsoft.com/en-us/windows-server/remote/remote-access/directaccess/directaccess-deployment-paths-in-windows-server
For this demo purposes, i will be using 3 VM, consists of 2 Windows Server 2016 VM and 1 Windows 10 client VM which is all running in Hyper-V.
Infrastructure Requirement (this is based on the Isolated Environment) it might different in the Real Production implementation.
- 1 Domain Controller Server (DC-CLOUD)
- 1 Member Server (SUB-01 )
- 1 Client PC running Windows 10 (CLIENT-10)
01 – lets verify the network configuration for all our VM’s (Please Refer to the Pictures)
(SUB-01.Windows.ae)
1 – Open Network Connections by pressing Window Key + X and clicking Network Connections.

2 – Rename the network connections intuitively so they can be quickly identified in the future. Renaming them Internal and External should be sufficient. Network adapters can be renamed by right-clicking them and choosing Rename or by simply highlighting a network adapter and pressing.

3 – To configure the Internal network interface, right-click the Internal network connection and choose Properties. Highlight Internet Protocol Version 4 (TCP/IPv4) and then click Properties. Provide an IPv4 address and a subnet mask. DO NOT specify a default gateway! Provide the IP addresses for DNS servers on the corporate LAN as necessary.

02 – External Interface
1 – To configure the External interface, right-click the External adapter and choose Properties. Highlight Internet Protocol Version 4 (TCP/IPv4) and then click Properties. Provide an IPv4 address, subnet mask, and default gateway. DO NOT specify any DNS servers.

2 – Click Advanced. If Teredo support is required, click Add under the IP addresses section and specify the next consecutive public IPv4 address and subnet mask.

3 – Select the DNS tab and uncheck the box next to Register this connection’s addresses in DNS.

4 – Select the WINS tab and uncheck the box next to Enable LMHOSTS lookup. In addition, in the NetBIOS setting section select the option to Disable NetBIOS over TCP/IP.
 Note : As the External network interface is public facing and connected to an untrusted network (public Internet or perimeter/DMZ network), it is recommended that all protocols and services other than IPv4 and IPv6 be disabled to reduce the attack surface of the DirectAccess server.
03 – Creating DirectAccess OU & Group in Active Directory
(DC-CLOUD.Windows.ae)
~*~ You need to create the OU & Group because we going to add CLIENT-10 into this group so that the client can have DirectAccess connection. ~*~
1 – Create a new OU – In the New Object – Organizational Unit dialog box, in the Name box, type “DirectAccess Clients”, and then click OK.

2- In the Active Directory Users and Computers console, expand Windows.ae, right-click DirectAccess Clients OU, click New, and then click Group.

3 – In the New Object – Group dialog box, in the Group name box, type DA Clients.

4 – Next, right-click DA Clients, and then click Properties.

5 – In the DA Clients Properties dialog box, click the Members tab, and then click Add and then click Object Types.

6 – Next, click Computers check box, and then click OK.

7 – In the Enter the object names to select (examples) box, type CLIENT-10, and then click OK.

8 – Verify that CLIENT-10 is displayed under Members, and then click OK.

04 – Installing the Remote Access server role
(SUB-01.Windows.ae)
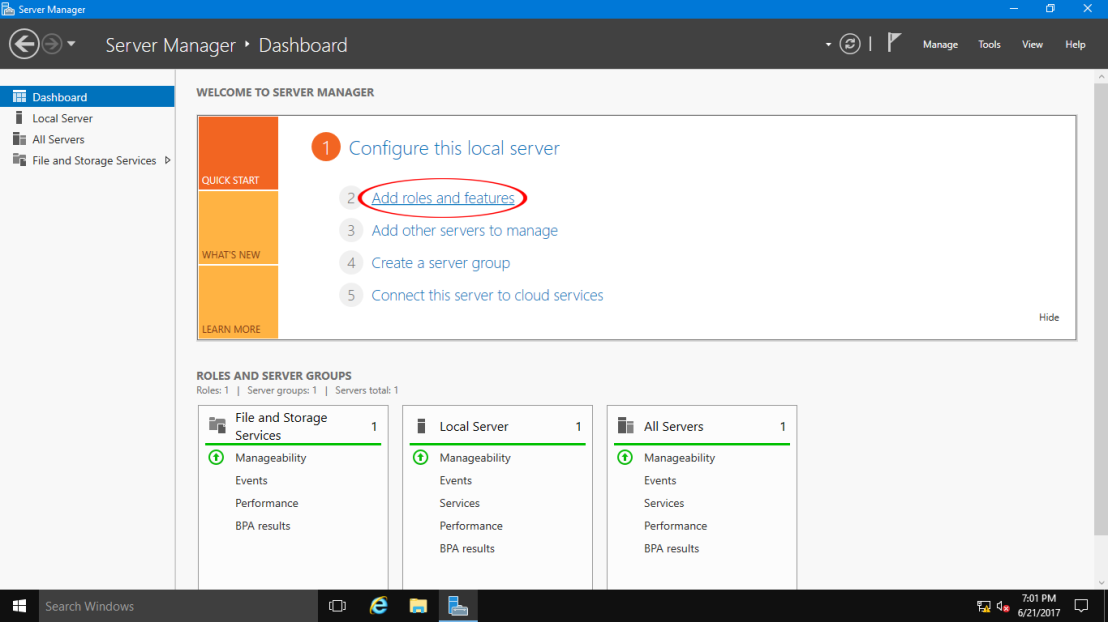
1 – Open Server Manager, click Add Roles and Features. (Please Refer to the Pictures)
2 – On the Before You Begin page, click Next.

3 – On the Select installation type page, click Next.

4 – On the Select destination server page, click Next.

5 – On the Select server roles page, click Remote Access, and then click Next.

6 – On the Select Features page, click Next.

7 – On the Remote Access page, click Next.

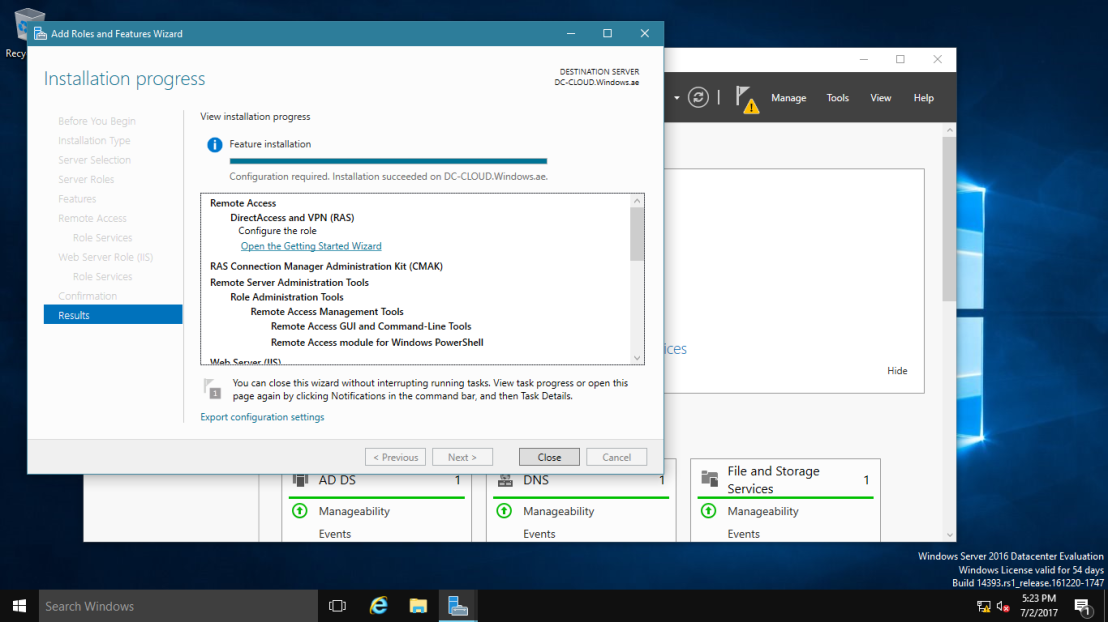
8 – On the Select role services page, click DirectAccess and VPN (RAS) and Add Roles and Features Wizard dialog box, click Add Features, and then verify that DirectAccess and VPN (RAS) is selected.


9 – On the Select role services page, click Next.

10 – On the Confirm installation selections page, click Install.

11 – When the installation completes, click Close.
05 – Configure DirectAccess by running the Getting (Please Refer to the Pictures)
1 – Open Server Manager, click Tools, and then click Remote Access Management.

2 – In the Remote Access Management console, under Configuration, click DirectAccess and VPN, and then click Run the Getting Started Wizard.

3 – In the Getting Started Wizard, on the Configure Remote Access page, click Deploy DirectAccess only.

4 – On the Network Topology page, verify that Edge is selected, in the Type the public name or IPv4 address used by clients to connect to the Remote Access server text box, type 131.10.15.254, and then click Next.

5 – In the Configure Remote Access interface, click the here link.

6 – On the Remote Access Review interface, verify that two GPOs are created, DirectAccess Server Settings and DirectAccess Client settings, and then next to Remote Clients, click the Change.

7 – Next, select Domain Computers (WindowsDomain Computers), and then click Remove.

8 – Next, on the same interface, click Add, and then type DA Clients, and then click OK.

9 – Make sure you clear the Enable DirectAccess for mobile computers only check box, and then click Next.

10 – On the DirectAccess Client Setup interface, click Finish.
DirectAccess connection name: NewHelpTech connection

11 – On the Remote Access Review interface, verify that WindowsDA Clients listed under Remote Clients and then click OK.

12 – On the Configure Remote Access page, click Finish and wait for the configuration to finish.
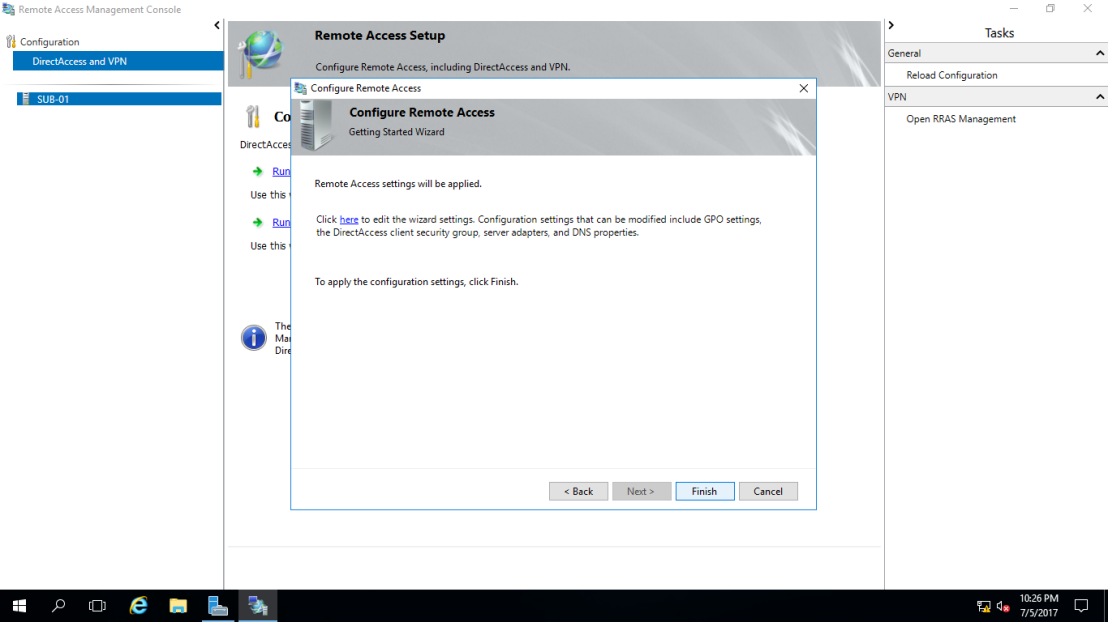
13 – In the Applying Getting Started Wizard Settings dialog box, verify that the configuration was successful, and then click Close.


06 – DirectAccess connectivity to Client Windows 10 (Please Refer to the Pictures)
Verify DirectAccess Group Policy configuration settings for Windows 10 clients
1 – Switch to CLIENT-10.

2 – Restart CLIENT-10, and then sign in again as WindowsAdministrator with the password of asd@123.

3 – Open a Command Prompt window, and then type the following commands, pressing Enter at the end of each line:
gpupdate /force
gpresult /R

 Verify that DirectAccess Client Settings GPO displays in the list of Applied Policy objects for the Computer Setting, Close the Command Prompt window.
Move the client computer to the Internet virtual network (Please Refer to the Pictures)
1 – Open Network Connections by pressing Window Key + X and clicking Network Connections.

2 – In the Network Connections window, right-click Internal, and then click Disable.

3 – Right-click External, and then click Enable.

4 – Open the External IPv4 to verify the IP settings.

Verify connectivity to the DirectAccess server
1. On CLIENT-10, open a command prompt, type the following command, and then press Enter:
ipconfig
 Notice the IPv6 address that starts with 2002. This is an IP-HTTPS address
2 – At the command prompt, type the following command, and then press Enter:
Netsh name show effectivepolicy

3 – Click Start, and then click Settings

4 – In Settings, select Network & Internet, and then click DirectAccess.

5 – Verify that Your PC is set up correctly for single-site DirectAccess is displayed under Location.
 Notice the Collect button under Troubleshooting info
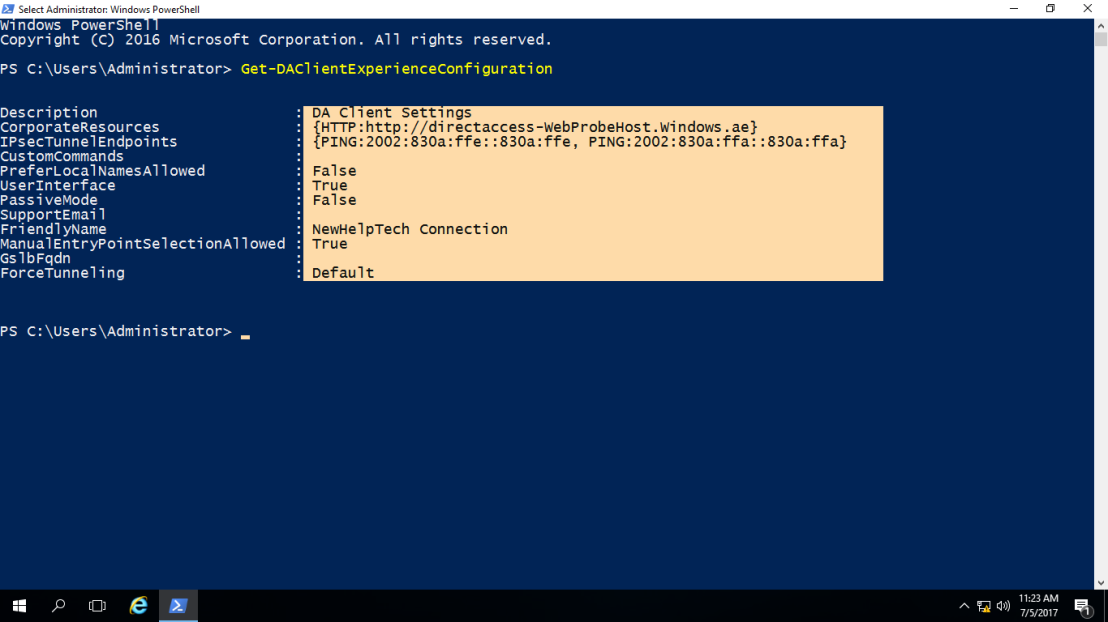
2 – Next, in the CLIENT-10, open PowerShell and type :
~*~ this command just to get the DirectAccess client settings ~*~
Get-DAClientExperienceConfiguration
3 – Now, its time for us to test the DirectAccess connectivity.
~*~ In CLIENT-10, open IE and then type : http://www.Windows.ae ~*~

DirectAccess Server (SUB-01.Windows.ae) : Monitoring DirectAccess connectivity
1 – click Remote Client Status, and then in the central pane, review the information
under the Connected Clients list.
 Close the Remote Access Management Console
Common Issues and Troubleshooting Tips
| Common Issue | Troubleshooting Tip |
| You have configured DirectAccess, but users are complaining about connectivity issues. You want an efficient way to troubleshoot their issues. | Basic troubleshooting is integrated in the Network Connectivity assistance, so educate users how to access it and to determine what is preventing the client computer from communicating with the DirectAccess server. |
| The DirectAccess client tries to connect to the DirectAccess server by using IPv6 and IPsec with no success. | If you are using Teredo as the IPv6 transition technology, verify whether you have two public addresses on the external network adapter of the DirectAccess server. This is required for establishing |
that’s all for now.., any Doubts type a commend.. 🙂
Contents
DirectAccess is a feature available with the Remote Access role, which allows you to set up an automatic connection solution to the corporate network for mobile computers or for small remote sites.
Unlike a VPN, the connection is initiated directly by a service on the remote computer, which allows for similar behavior if the workstation is in the corporate network:
- Applying group policies.
- Ability to open another user session in the Active Directory.
DirectAccess also has two other benefits that are:
- The automatic connection without manipulation on the part of the user.
- The ability to force internet traffic through the corporate network which allows to apply the rules of web filtering (proxy).
DirectAccess relies on the IPv6 protocol for communication between the corporate network and the customer.
Before establishing the connection, the client tests access to a probe to find out if it is in the company network or outside.
For DNS resolution, a Group Policy configures the NRPT table so that the computer when it is connected to the corporate network sends the requests from the local domain to the DirectAccess server.
It is possible to increase the security of connections by identifying computers with a certificate.
In this tutorial, we will see how to deploy DirectAccess with a server with a single network card behind a firewall.
This tutorial can also be used to deploy DirectAccess with Windows 2012R2
To work you have to make the server accessible from the Internet by correctly configuring the NAT / PAT.
Documentation Microsoft : https://docs.microsoft.com/fr-fr/windows-server/remote/remote-access/directaccess/directaccess
| title | description | ms.date | ms.topic | ms.assetid | author | ms.author | manager |
|---|---|---|---|---|---|---|---|
|
Configure DirectAccess in Windows Server Essentials |
Learn how to configure DirectAccess to enable your mobile workforce to connect to your network from any remote location without establishing a VPN connection. |
10/03/2016 |
article |
c959b6fc-c67e-46cd-a9cb-cee71a42fa4c |
nnamuhcs |
wscontent |
mtillman |
Configure DirectAccess in Windows Server Essentials
Applies To: Windows Server 2016 Essentials, Windows Server 2012 R2 Essentials, Windows Server 2012 Essentials
This topic provides step-by-step instructions for configuring DirectAccess in Windows Server Essentials to enable your mobile workforce to seamlessly connect to your organization’s network from any Internet-equipped remote location without establishing a virtual private network (VPN) connection. DirectAccess can offer mobile workers the same connectivity experience inside and outside the office from their Windows 8.1, Windows 8, and Windows 7 computers.
In Windows Server Essentials, if the domain contains more than one Windows Server Essentials server, DirectAccess must be configured on the domain controller.
[!NOTE]
This topic provides instructions for configuring DirectAccess when your Windows Server Essentials server is the domain controller. If the Windows Server Essentials server is a domain member, follow the instructions to configure DirectAccess on a domain member in Add DirectAccess to an Existing Remote Access (VPN) Deployment instead.
Process overview
To configure DirectAccess in Windows Server Essentials, complete the following steps.
[!IMPORTANT]
Before you use the procedures in this guide to configure DirectAccess in Windows Server Essentials, you must enable VPN on the server. For instructions, see Manage VPN.
-
Step 1: Add Remote Access Management Tools to your server
-
Step 2: Change the network adapter address of the server to a static IP address
-
Step 3: Prepare a certificate and DNS record for the network location server
-
Step 3a: Grant full permissions to Authenticated Users for the Web server’s certificate template
-
Step 3b: Enroll a certificate for the network location server with a common name that is unresolvable from the external network
-
Step 3c: Add a new host on the DNS server and map it to the Windows Server Essentials server address
-
-
Step 4: Create a security group for DirectAccess client computers
-
Step 5: Enable and configure DirectAccess
-
Step 5a: Enable DirectAccess by using the Remote Access Management Console
-
Step 5b: Remove the invalid IPv6Prefix in RRAS GPO (Windows Server Essentials only)
-
Step 5c: Enable client computers running Windows 7 Enterprise to use DirectAccess
-
Step 5d: Configure the network location server
-
Step 5e: Add a registry key to bypass CA certification when you establish an IPsec channel
-
-
Step 6: Configure Name Resolution Policy Table settings for the DirectAccess server
-
Step 7: Configure TCP and UDP firewall rules for the DirectAccess server GPOs
-
Step 8: Change the DNS64 configuration to listen to the IP-HTTPS interface
-
Step 9: Reserve ports for the WinNat service
-
Step 10: Restart the WinNat service
[!NOTE]
Appendix: Set up DirectAccess by using Windows PowerShell provides a Windows PowerShell script that you can use to perform the DirectAccess setup.
Step 1: Add Remote Access Management Tools to your server
To add Remote Acc®ss Management Tools ®
-
On the server, in the bottom left corner of the Start page, click the Server Manager icon.
In Windows Server Essentials, you will need to search for Server Manager to open it. On the Start page, type Server Manager, and then click Server Manager in the search results. To pin Server Manager to the Start page, right-click Server Manager in the search results, and click Pin to Start.
-
If a User Account Control warning message displays, click Yes.
-
On the Server Manager Dashboard, click Manage, and then click Add Roles and Features.
-
In the Add Roles and Features Wizard, do the following:
-
On the Installation Type page, click Role-based or feature-based installation.
-
On the Server Selection page (or the Select destination server page in Windows Server Essentials), click Select a server from the server pool.
-
On the Features page, expand Remote Server Administration Tools (Installed), expand Remote Access Management Tools (Installed), expand Role Administration Tools (Installed), expand Remote Access Management Tools, and then select Remote Access GUI and Command-Line Tools.
-
Follow the instructions to complete the wizard.
-
Step 2: Change the network adapter address of the server to a static IP address
DirectAccess requires an adapter with a static IP address. You need to change the IP address for the local network adapter on your server.
To add a static IP address
-
On the Start page, open Control Panel.
-
Click Network and Internet, and then click View network status and tasks.
-
In the task pane of the Network and Sharing Center, click Change adapter settings.
-
Right-click the local network adapter, and then click Properties.
-
On the Networking tab, click Internet Protocol Version 4 (TCP/IPv4), and then click Properties.
-
On the General tab, click Use the following IP address, and then type the IP address that you want to use.
A default value for subnet mask appears automatically in the Subnet mask box. Accept the default value, or type the subnet mask value that you want to use.
-
In the Default gateway box, type the IP address of your default gateway.
-
In the Preferred DNS server box, type the IP address of your DNS server.
[!NOTE]
Use the IP address that is assigned to your network adapter by DHCP (for example, 192.168.X.X) instead of a loopback network (for example, 127.0.0.1). To find out the assigned IP address, run ipconfig at a command prompt. -
In the Alternate DNS Server box, type the IP address of your alternate DNS server, if any.
-
Click OK, and then click Close.
[!IMPORTANT]
Ensure that you configure the router to forward ports 80 and 443 to the new static IP address of the server.
Step 3: Prepare a certificate and DNS record for the network location server
To prepare a certificate and DNS record for the network location server, perform the following tasks:
-
Step 3a: Grant full permissions to Authenticated Users for the Web server’s certificate template
-
Step 3b: Enroll a certificate for the network location server with a common name that is unresolvable from the external network
-
Step 3c: Add a new host on the DNS server and map it to the Windows Server Essentials server address.
Step 3a: Grant full permissions to Authenticated Users for the Web server’s certificate template
Your first task is to grant full permissions to authenticate users for the Web server’s certificate template in the certification authority.
To grant full permissions to Authenticated Users for the Web server’s certificate template
-
On the Start page, open Certification Authority.
-
In the console tree, under Certification Authority (Local), expand <servername>-CA, right-click Certificate Templates, and then click Manage.
-
In Certification Authority (Local), right-click Web Server, and then click Properties.
-
In Web Server properties, on the Security tab, click Authenticated Users, select Full Control, and then click OK.
-
Restart Active Directory Certificate Services. In Control Panel, open View local services. In the list of services, right-click Active Directory Certificate Services, and then click Restart.
Step 3b: Enroll a certificate for the network location server with a common name that is unresolvable from the external network
Next, enroll a certificate for the network location server with a common name that is unresolvable from the external network.
To enroll a certificate for the network location server
-
On the Start page, open mmc (the Microsoft Management Console).
-
If a User Account Control warning message appears, click Yes.
The Microsoft Management Console (MMC) opens.
-
On the File menu, click Add/Remove Snap-ins.
-
In the Add or Remote Snap-ins box, click Certificates, and then click Add.
-
On the Certificates snap-in page, click Computer account, and then click Next.
-
On the Select Computer page, click Local computer, click Finish, and then click OK.
-
In the console tree, expand Certificates (Local Computer), expand Personal, right-click Certificates, and then, in All Tasks, click Request New Certificate.
-
When the Certificate Enrollment Wizard appears, click Next.
-
On the Select Certificate Enrollment Policy page, click Next.
-
On the Request Certificates page, select the Web Server check box, and then click More information is required to enroll this certificate.
-
In the Certificate Properties box, enter the following settings for Subject Name:
-
For Type, select Common name.
-
For Value, type the name of the network location server (for example, DirectAccess-NLS.contoso.local), and then click Add.
-
Click OK, and then click Enroll.
-
-
When certificate enrollment completes, click Finish.
Step 3c: Add a new host on the DNS server and map it to the Windows Server Essentials server address
To complete the DNS configuration, add a new host on the DNS server and map it to the Windows Server Essentials server address.
To map a new host to the Windows Server Essentials server address
-
On the Start page, open DNS Manager. To open DNS Manager, search for dnsmgmt.msc, and then click dnsmgmt.msc in the results.
-
In the DNS Manager console tree, expand the local server, expand Forward Lookup Zones, right-click the zone with server’s domain suffix, and then click New Host (A or AAAA).
-
Type the name and IP address of the server (for example, DirectAccess-NLS.contoso.local) and its corresponding server address (for example, 192.168.x.x).
-
Click Add Host, click OK, and then click Done.
Step 4: Create a security group for DirectAccess client computers
Next, create a security group to use for DirectAccess client computers, and then add the computer accounts to the group.
To add a security group for client computers that use DirectAccess
-
On the Server Manager Dashboard, click Tools, and then click Active Directory Users and Computers.
[!NOTE]
If you do not see Active Directory Users and Computers on the Tools menu, you need to install the feature. To install Active Directory Users and Groups, run the following Windows PowerShell cmdlet as an administrator:Install-WindowsFeature RSAT-ADDS-Tools. For more information, see Installing or Removing the Remote Server Administration Tool Pack. -
In the console tree, expand the server, right-click Users, click New, and then click Group.
-
Enter a group name, group scope, and group type (create a security group), and then click OK.
The new security group is added to the Users folder.
To add computer accounts to the security group
-
On the Server Manager Dashboard, click Tools, and then click Active Directory Users and Computers.
-
In the console tree, expand the server, and then click Users.
-
In the list of user accounts and security groups on the server, right-click the security group that you created for DirectAccess, and then click Properties.
-
On the Members tab, click Add.
-
In the dialog box, type the names of the computer accounts that you want to add to the group, separating the names with a semicolon (;). Then click Check Names.
-
After the computer accounts are validated, click OK. Then click OK again.
[!NOTE]
You can also use the Member of tab in the computer account properties to add the account to the security group.
Step 5: Enable and configure DirectAccess
To enable and configure DirectAccess in Windows Server Essentials, you must complete the following steps:
-
Step 5a: Enable DirectAccess by using the Remote Access Management Console
-
Step 5b: Remove the invalid IPv6Prefix in RRAS GPO (Windows Server Essentials only)
-
Step 5c: Enable client computers running Windows 7 Enterprise to use DirectAccess
-
Step 5d: Configure the network location server
-
Step 5e: Add a registry key to bypass CA certification when you establish an IPsec channel
Step 5a: Enable DirectAccess by using the Remote Access Management Console
This section provides step-by-step instructions to enable DirectAccess in Windows Server Essentials. If you have not configured VPN on the server yet, you should do that before you start this procedure. For instructions, see Manage VPN.
To enable DirectAccess by using the Remote Access Management Console
-
On the Start page, open Remote Access Management.
-
In the Enable DirectAccess Wizard, do the following:
-
Review DirectAccess Prerequisites, and click Next.
-
On the Select Groups tab, add the security group that you created earlier for DirectAccess clients. (If you have not created the security group, see Step 4: Create a security group for DirectAccess client computers for instructions.)
-
On the Select Groups tab, click Enable DirectAccess for mobile computers only if you want to enable mobile computers to use DirectAccess to remotely access the server, and then click Next.
-
In Network Topology, select the topology of the server, and then click Next.
-
In DNS Suffix Search List, add the additional DNS suffix for the client computers, if needed, and then click Next.
[!NOTE]
By default, the Enable DirectAccess Wizard already adds the DNS suffix for current domain. However, you can add more if needed. -
Review the Group Policy Objects (GPOs) that will be applied, and modify them if needed.
-
Click Next, and then click Finish.
-
Restart the Remote Access Management service by running the following Windows PowerShell command in elevated mode:
Restart-Service RaMgmtSvc
-
Step 5b: Remove the invalid IPv6Prefix in RRAS GPO (Windows Server Essentials only)
This section applies to a server running Windows Server Essentials.
Open Windows PowerShell as an Administrator and run the following commands:
gpupdate
$key = Get-ChildItem -Path HKLM:SOFTWAREPoliciesMicrosoftWindowsRemoteAccessconfigMachineSIDs | Where-Object{$_.GetValue("IPv6RrasPrefix") -ne $null}
Remove-GPRegistryValue -Name "DirectAccess Server Settings" -Key $key.Name -ValueName IPv6RrasPrefix
gpupdate
Step 5c: Enable client computers running Windows 7 Enterprise to use DirectAccess
If you have client computers running Windows 7 Enterprise, complete the following procedure to enable DirectAccess from those computers.
To enable Windows 7 Enterprise computers to use DirectAccess
-
On the server’s Start page, open Remote Access Management.
-
In the Remote Access Management Console, click Configuration. Then, in the Setup Details pane, under Step 2, click Edit.
The Remote Access Server Setup Wizard opens.
-
On the Authentication tab, choose the certification authority (CA) certificate that will be the trusted root certificate (you can choose the CA certificate of the Windows Server Essentials server). Click Enable Windows 7 client computers to connect via DirectAccess, and then click Next.
-
Follow the instructions to complete the wizard.
[!IMPORTANT]
There is a known issue for Windows 7 Enterprise computers connecting over DirectAccess if the Windows Server Essentials server did not come with UR1 pre-installed. To enable DirectAccess connections in that environment, you must perform these additional steps:
Install the hotfix described in Microsoft Knowledge Base (KB) article 2796394 on the Windows Server Essentials server. Then restart the server.
2. Then install the hotfix described in Microsoft Knowledge Base (KB) article 2615847 on each Windows 7 computer.This issue was resolved in Windows Server Essentials.
Step 5d: Configure the network location server
This section provides step-by-step instructions to configure the network location server settings.
[!NOTE]
Before you begin, copy the contents of the <SystemDrive>inetpubwwwroot folder to the <SystemDrive>Program FilesWindows ServerBinWebAppsSiteinsideoutside folder. Also copy the default.aspx file from the <SystemDrive>Program FilesWindows ServerBinWebAppsSite folder to the <SystemDrive>Program FilesWindows ServerBinWebAppsSiteinsideoutside folder.
To configure the network location server
-
On the Start page, open Remote Access Management.
-
In the Remote Access Management Console, click Configuration, and in the Remote Access Setup details pane, in Step 3, click Edit.
-
In the Remote Access Server Setup Wizard, on the Network Location Server tab, select The network location server is deployed on the Remote Access server, and then select the certificate that was previously issued (in Step 3: Prepare a certificate and DNS record for the network location server).
-
Follow the instructions to complete the wizard, and then click Finish.
Step 5e: Add a registry key to bypass CA certification when you establish an IPsec channel
Your next step is to configure the server to bypass CA certification when an IPsec channel is established.
To add a registry key to bypass the CA certification
-
On the Start page, open regedit (the Registry Editor).
-
In the Registry Editor, expand HKEY_LOCAL_MACHINE, expand System, expand CurrentControlSet, expand Services, and expand IKEEXT.
-
Under IKEEXT, right-click Parameters, click New, and then click DWORD (32 bit) Value.
-
Rename the newly added value to ikeflags.
-
Double-click ikeflags, set the Type to Hexadecimal, set the value to 8000, and then click OK.
[!NOTE]
You can use the following Windows PowerShell command in elevated mode to add this registry key:
Set-ItemProperty -Path HKLM:SYSTEMCurrentControlSetServicesIKEEXTParameters -Name ikeflags -Type DWORD -Value 0x8000
Step 6: Configure Name Resolution Policy Table settings for the DirectAccess server
This section provides instructions for editing the Name Resolution Policy Table (NPRT) entries for internal addresses (for example, entries with a contoso.local suffix) for DirectAccess client GPOs, and then set the IPHTTPS interface address.
To configure Name Resolution Policy Table entries
-
On the Start page, open Group Policy Management.
-
In the Group Policy Management console, click the default forest and domain, right-click DirectAccess Client Settings, and then click Edit.
-
Click Computer Configurations, click Policies, click Windows Settings, and then click Name Resolution Policy. Choose the entry that has the namespace that is identical to your DNS suffix, and then click Edit Rule.
-
Click the DNS Settings for DirectAccess tab; then select Enable DNS settings for DirectAccess in this rule. Add the IPv6 address for the IP-HTTPS interface in the DNS server list.
[!NOTE]
You can use the following Windows PowerShell command to get the IPv6 address:(Get-NetIPInterface -InterfaceAlias IPHTTPSInterface | Get-NetIPAddress -PrefixLength 128)[1].IPAddress
Step 7: Configure TCP and UDP firewall rules for the DirectAccess server GPOs
This section includes step-by-step instructions to configure TCP and UDP firewall rules for the DirectAccess server GPOs.
To configure firewall rules
-
On the Start page, open Group Policy Management.
-
In the Group Policy Management console, click the default forest and domain, right-click DirectAccess Server Settings, and then click Edit.
-
Click Computer Configuration, click Policies, click Windows Settings, click Security Settings, click Windows Firewall with Advanced Security, click next-level Windows Firewall with Advanced Security, and then click Inbound Rules. Right-click Domain name Server (TCP-In), and then click Properties.
-
Click the Scope tab, and in the Local IP address list, add the IPv6 address of the IP-HTTPS interface.
-
Repeat the same procedure for Domain Name Server (UDP-In).
Step 8: Change the DNS64 configuration to listen to the IP-HTTPS interface
You must change the DNS64 configuration to listen to the IP-HTTPS interface by using the following Windows PowerShell command.
Set-NetDnsTransitionConfiguration -AcceptInterface IPHTTPSInterface
Step 9: Reserve ports for the WinNat service
Use the following Windows PowerShell command to reserve ports for the WinNat service. Replace «192.168.1.100» with the actual IPv4 address of your Windows Server Essentials server.
Set-NetNatTransitionConfiguration -IPv4AddressPortPool @("192.168.1.100, 10000-47000")
[!IMPORTANT]
To avoid port conflicts with applications, be sure that the port range that you reserve for the WinNat service does not include port 6602.
Step 10: Restart the WinNat service
Restart the Windows NAT Driver (WinNat) service by running the following Windows PowerShell command.
Appendix: Set up DirectAccess by using Windows PowerShell
This section describes how to set up and configure DirectAccess by using Windows PowerShell.
Preparation
Before you begin configuring your server for DirectAccess, you must complete the following:
-
Follow the procedure in Step 3: Prepare a certificate and DNS record for the network location server to enroll a certificate named DirectAccess-NLS.contoso.com (where contoso.com is replaced by your actual internal domain name), and to add a DNS record for the network location server (NLS).
-
Add a security group named DirectAccessClients in Active Directory, and then add client computers for which you want to provide the DirectAccess functionality. For more information, see Step 4: Create a security group for DirectAccess client computers.
Commands
[!IMPORTANT]
In Windows Server Essentials, you do not need to remove the unnecessary IPv6 prefix GPO. Delete the code section with the following label:# [WINDOWS SERVER 2012 ESSENTIALS ONLY] Remove the unnecessary IPv6 prefix GPO.
# Add Remote Access role if not installed yet
$ra = Get-WindowsFeature RemoteAccess
If ($ra.Installed -eq $FALSE) { Add-WindowsFeature RemoteAccess }

# Server may need to restart if you installed RemoteAccess role in the above step

# Set the internet domain name to access server, replace contoso.com below with your own domain name
$InternetDomain = "www.contoso.com"
#Set the SG name which you create for DA clients
$DaSecurityGroup = "DirectAccessClients"
#Set the internal domain name
$InternalDomain = [System.DirectoryServices.ActiveDirectory.Domain]::GetCurrentDomain().Name

# Set static IP and DNS settings
$NetConfig = Get-WmiObject Win32_NetworkAdapterConfiguration -Filter "IPEnabled=$true"
$CurrentIP = $NetConfig.IPAddress[0]
$SubnetMask = $NetConfig.IPSubnet | Where-Object{$_ -like "*.*.*.*"}
$NetConfig.EnableStatic($CurrentIP, $SubnetMask)
$NetConfig.SetGateways($NetConfig.DefaultIPGateway)
$NetConfig.SetDNSServerSearchOrder($CurrentIP)

# Get physical adapter name and the certificate for NLS server
$Adapter = (Get-WmiObject -Class Win32_NetworkAdapter -Filter "NetEnabled=$true").NetConnectionId
$Certs = dir cert:LocalMachineMy
$nlscert = $certs | Where-Object{$_.Subject -like "*CN=DirectAccess-NLS*"}

# Add regkey to bypass CA cert for IPsec authentication
Set-ItemProperty -Path HKLM:SYSTEMCurrentControlSetServicesIKEEXTParameters -Name ikeflags -Type DWORD -Value 0x8000

# Install DirectAccess.
Install-RemoteAccess -NoPrerequisite -DAInstallType FullInstall -InternetInterface $Adapter -InternalInterface $Adapter -ConnectToAddress $InternetDomain -nlscertificate $nlscert -force

#Restart Remote Access Management service
Restart-Service RaMgmtSvc

# [WINDOWS SERVER 2012 ESSENTIALS ONLY] Remove the unnecessary IPv6 prefix GPO

gpupdate
$key = Get-ChildItem -Path HKLM:SOFTWAREPoliciesMicrosoftWindowsRemoteAccessconfigMachineSIDs | Where-Object{$_.GetValue("IPv6RrasPrefix") -ne $null}
Remove-GPRegistryValue -Name "DirectAccess Server Settings" -Key $key.Name -ValueName IPv6RrasPrefix
gpupdate

# Enable client computers running Windows 7 to use DirectAccess
$allcertsinroot = dir cert:LocalMachineroot
$rootcert = $allcertsinroot | Where-Object{$_.Subject -like "*-CAA*"}
Set-DAServer -IPSecRootCertificate $rootcert[0]
Set -DAClient -OnlyRemoteComputers Disabled -Downlevel Enabled

#Set the appropriate security group used for DA client computers. Replace the group name below with the one you created for DA clients
Add-DAClient -SecurityGroupNameList $DaSecurityGroup
Remove-DAClient -SecurityGroupNameList "Domain Computers"

# Gather DNS64 IP address information
$Remoteaccess = get-remoteaccess
$IPinterface = get-netipinterface -InterfaceAlias IPHTTPSInterface | get-netipaddress -PrefixLength 128
$DNS64IP=$IPInterface[1].IPaddress
$Natconfig = Get-NetNatTransitionConfiguration

# Configure TCP and UDP firewall rules for the DirectAccess server GPO
$GpoName = 'GPO:'+$InternalDomain+'DirectAccess Server Settings'
Get-NetFirewallRule -PolicyStore $GpoName -Displayname "Domain Name Server (TCP-IN)"|Get-NetFirewallAddressFilter | Set-NetFirewallAddressFilter -LocalAddress $DNS64IP
Get-NetFirewallrule -PolicyStore $GpoName -Displayname "Domain Name Server (UDP-IN)"|Get-NetFirewallAddressFilter | Set-NetFirewallAddressFilter -LocalAddress $DNS64IP

# Configure the name resolution policy settings for the DirectAccess server, replace the DNS suffix below with the one in your domain
$Suffix = '.' + $InternalDomain
set-daclientdnsconfiguration -DNSsuffix $Suffix -DNSIPAddress $DNS64IP

# Change the DNS64 configuration to listen to IP-HTTPS interface
Set-NetDnsTransitionConfiguration -AcceptInterface IPHTTPSInterface

# Copy the necessary files to NLS site folder
XCOPY 'C:inetpubwwwroot' 'C:Program FilesWindows ServerBinWebAppsSiteinsideoutside' /E /Y
XCOPY 'C:Program FilesWindows ServerBinWebAppsSiteDefault.aspx' 'C:Program FilesWindows ServerBinWebAppsSiteinsideoutside' /Y

# Reserve ports for the WinNat service
Set-NetNatTransitionConfiguration -IPv4AddressPortPool @("192.168.1.100, 10000-47000")

# Restart the WinNat service
Restart-Service winnat
Additional References
-
Manage Anywhere Access
-
Manage Windows Server Essentials
This article is going to explain the process of install and configure DirectAccess VPN in Windows Server 2016. In Windows Server 2016 and Windows Server 2012, you can deploy both DirectAccess and Routing and Remote Access Service (RRAS) on the same server. These allowing you to provide DirectAccess connectivity to supported clients as well as providing VPN access to remote clients that do not support.
The clients which support DirectAccess are Windows 10 Enterprise, 10 Enterprise 2015 Long Term Servicing Branch (LTSB), Windows 8 Enterprise, Windows 7 Ultimate and Windows 7 Enterprise.
Install and Configure DirectAccess VPN
I’m going to install DirectAccess-VPN with PowerShell command. You can install it from server manager dashboard using GUI. As a system administrator, improving your command line skill is necessary.
- From your Windows Server open Windows PowerShell and type “Get-WindowsFeature RemoteAccess” then press enter. It shows the Remote Access is status. Also to see the DirectAccess, type DirectAccess-VPN.
2. Now, for installing DirectAccess-VPN, type the “Install-WindowsFeature DirectAccess-VPN -IncludeManagementTools” command and press enter.
Note: This command will install Remote Access Management and Routing and Remote Access. In order to configure a traditional VPN server, you should configure with Routing and Remote Access. But to configure DirectAccess VPN server, you need to configure it through Remote Access Management.
3. Type “ramgmtui” on Windows run and open the Remote Access Management to configure DirectAccess VPN Server.
4. On Remote Access Management console, click Run Getting Stared Wizard. This wizard will configure DirecetAccess and VPN server quickly.
5. On Configure Remote Access page, click Deploy both DirectAccess and VPN (recommended). This option will configure DirectAccess VPN server. This will allow remote client computers that not supported for DirectAccecss to connect over VPN.
The second option will only deploy DirectAccess, and the third option will configure a traditional VPN server with Routing and Remote Access.
6. On the Remote Access Server Setup page, select Behind an edge device (with a single network adapter) and type IP address used by client to connect to the remote access server, then click Next.
7. Now click Finish to apply remote access settings. If you want to bring changes or review the configuration settings of GPO settings, Remote clients settings, Remote Access Server settings and Infrastructure Server, click on Click here link to open the Remote Access Review page.
8. Finally the configuration of DirectAccess VPN will be completed successfully.
Try to navigate Remote Access Management console, to see more settings and find out he new features you need to understand. See the VPN section relevant to this article.
8. On Remote Access Management Console, click Open RRAS Management under VPN. Select the ports on Routing and Remote Access to see the active and inactive VPN connections.
That’s all bout configure DirectAccess VPN in Windows Server 2016. This configuration works for Server 2012 R2 also. So don’t worry, just configure on Server 2012.
To test the DirectAccess-VPN whether it’s work or not. Create a VPN connection on a client machine and connect to DirectAccess. From Windows 7 and newest version support DirectAccess. But the older versions are non supported DirectAccess devices.
| title | description | manager | ms.topic | ms.assetid | ms.author | author | ms.date |
|---|---|---|---|---|---|---|---|
|
DirectAccess Offline Domain Join |
This guide explains the steps to perform an offline domain join with DirectAccess in Windows Server 2016. |
brianlic |
article |
55528736-6c19-40bd-99e8-5668169ef3c7 |
jgerend |
JasonGerend |
08/07/2020 |
DirectAccess Offline Domain Join
Applies to: Windows Server 2022, Windows Server 2019, Windows Server 2016
This guide explains the steps to perform an offline domain join with DirectAccess. During an offline domain join, a computer is configured to join a domain without physical or VPN connection.
This guide includes the following sections:
-
Offline domain join overview
-
Requirements for offline domain join
-
Offline domain join process
-
Steps for performing an offline domain join
Offline domain join overview
Introduced in Windows Server 2008 R2, domain controllers include a feature called Offline Domain Join. A command line utility named Djoin.exe lets you join a computer to a domain without physically contacting a domain controller while completing the domain join operation. The general steps for using Djoin.exe are:
-
Run djoin /provision to create the computer account metadata. The output of this command is a .txt file that includes a base-64 encoded blob.
-
Run djoin /requestODJ to insert the computer account metadata from the .txt file into the Windows directory of the destination computer.
-
Reboot the destination computer, and the computer will be joined to the domain.
Offline domain join with DirectAccess policies scenario overview
DirectAccess offline domain join is a process that computers running Windows Server 2016, Windows Server 2012, Windows 10 and Windows 8 can use to join a domain without being physically joined to the corporate network, or connected through VPN. This makes it possible to join computers to a domain from locations where there is no connectivity to a corporate network. Offline domain join for DirectAccess provides DirectAccess policies to clients to allow remote provisioning.
A domain join creates a computer account and establishes a trust relationship between a computer running a Windows operating system and an Active Directory domain.
Prepare for offline domain join
-
Create the machine account.
-
Inventory the membership of all security groups to which the machine account belongs.
-
Gather the required computer certificates, group policies, and group policy objects to be applied to the new client(s).
. The following sections explain operating system requirements and credential requirements for performing a DirectAccess offline domain join using Djoin.exe.
Operating system requirements
You can run Djoin.exe for DirectAccess only on computers that run Windows Server 2016, Windows Server 2012 or Windows 8. The computer on which you run Djoin.exe to provision computer account data into AD DS must be running Windows Server 2016, Windows 10, Windows Server 2012 or Windows 8. The computer that you want to join to the domain must also be running Windows Server 2016, Windows 10, Windows Server 2012 , or Windows 8.
Credential requirements
To perform an offline domain join, you must have the rights that are necessary to join workstations to the domain. Members of the Domain Admins group have these rights by default. If you are not a member of the Domain Admins group, a member of the Domain Admins group must complete one of the following actions to enable you to join workstations to the domain:
-
Use Group Policy to grant the required user rights. This method allows you to create computers in the default Computers container and in any organizational unit (OU) that is created later (if no Deny access control entries (ACEs) are added).
-
Edit the access control list (ACL) of the default Computers container for the domain to delegate the correct permissions to you.
-
Create an OU and edit the ACL on that OU to grant you the Create child — Allow permission. Pass the /machineOU parameter to the djoin /provision command.
The following procedures show how to grant the user rights with Group Policy and how to delegate the correct permissions.
Granting user rights to join workstations to the domain
You can use the Group Policy Management Console (GPMC) to modify the domain policy or create a new policy that has settings that grant the user rights to add workstations to a domain.
Membership in Domain Admins, or equivalent, is the minimum required to grant user rights. Review details about using the appropriate accounts and group memberships at Local and Domain Default Groups (https://go.microsoft.com/fwlink/?LinkId=83477).
To grant rights to join workstations to a domain
-
Click Start, click Administrative Tools, and then click Group Policy Management.
-
Double-click the name of the forest, double-click Domains, double-click the name of the domain in which you want to join a computer, right-click Default Domain Policy, and then click Edit.
-
In the console tree, double-click Computer Configuration, double-click Policies, double-click Windows Settings, double-click Security Settings, double-click Local Policies, and then double-click User Rights Assignment.
-
In the details pane, double-click Add workstations to domain.
-
Select the Define these policy settings check box, and then click Add User or Group.
-
Type the name of the account that you want to grant the user rights to, and then click OK twice.
Offline domain join process
Run Djoin.exe at an elevated command prompt to provision the computer account metadata. When you run the provisioning command, the computer account metadata is created in a binary file that you specify as part of the command.
For more information about the NetProvisionComputerAccount function that is used to provision the computer account during an offline domain join, see NetProvisionComputerAccount Function (https://go.microsoft.com/fwlink/?LinkId=162426). For more information about the NetRequestOfflineDomainJoin function that runs locally on the destination computer, see NetRequestOfflineDomainJoin Function (https://go.microsoft.com/fwlink/?LinkId=162427).
Steps for performing a DirectAccess offline domain join
The offline domain join process includes the following steps:
-
Create a new computer account for each of the remote clients and generate a provisioning package using the Djoin.exe command from an already domain joined computer in the corporate network.
-
Add the client computer to the DirectAccessClients security group
-
Transfer the provisioning package securely to the remote computers(s) that will be joining the domain.
-
Apply the provisioning package and join the client to the domain.
-
Reboot the client to complete the domain join and establish connectivity.
There are two options to consider when creating the provisioning packet for the client. If you used the Getting Started Wizard to install DirectAccess without PKI, then you should use option 1 below. If you used the Advanced Setup Wizard to install DirectAccess with PKI, then you should use option 2 below.
Complete the following steps to perform the offline domain join:
Option1: Create a provisioning package for the client without PKI
-
At a command prompt of your Remote Access server, type the following command to provision the computer account:
Djoin /provision /domain <your domain name> /machine <remote machine name> /policynames DA Client GPO name /rootcacerts /savefile c:filesprovision.txt /reuse
Option2: Create a provisioning package for the client with PKI
-
At a command prompt of your Remote Access server, type the following command to provision the computer account:
Djoin /provision /machine <remote machine name> /domain <Your Domain name> /policynames <DA Client GPO name> /certtemplate <Name of client computer cert template> /savefile c:filesprovision.txt /reuse
Add the client computer to the DirectAccessClients security group
-
On your Domain Controller, from Start screen, type Active and select Active Directory Users and Computers from Apps screen.
-
Expand the tree under your domain, and select the Users container.
-
In the details pane, right-click DirectAccessClients, and click Properties.
-
On the Members tab, click Add.
-
Click Object Types, select Computers, and then click OK.
-
Type the client name to add, and then click OK.
-
Click OK to close the DirectAccessClients Properties dialog, and then close Active Directory Users and Computers.
Copy and then apply the provisioning package to the client computer
-
Copy the provisioning package from c:filesprovision.txt on the Remote Access Server, where it was saved, to c:provisionprovision.txt on the client computer.
-
On the client computer, open an elevated command prompt, and then type the following command to request the domain join:
Djoin /requestodj /loadfile C:provisionprovision.txt /windowspath %windir% /localos -
Reboot the client computer. The computer will be joined to the domain. Following the reboot, the client will be joined to the domain and have connectivity to the corporate network with DirectAccess.
See Also
NetProvisionComputerAccount Function
NetRequestOfflineDomainJoin Function
Время прочтения
13 мин
Просмотры 26K
Наиболее частым, применяемым способом удаленного доступа к внутренним ресурсам организаций является настройка VPN-соединения. Данная технология имеет ряд минусов таких как:
- необходимость установки на клиентский компьютер дополнительного программного обеспечения, что не всегда удобно, в некоторых случаях невозможно;
- необходимость прохождения пользователем дополнительной процедуры аутентификации;
- отсутствие возможности контролировать клиентский компьютер службами, отвечающими за техническую поддержку и информационную безопасность организации;
- отсутствие возможности контролировать своевременное обновление системного и прикладного ПО, наличие на нем антивирусного ПО и актуальности антивирусных баз;
- при перемещении удаленный пользователь должен перевозить не всегда легкий ноутбук.
Я предлагаю рассмотреть замену VPN технологией, разработанной компанией Microsoft – DirectAccess. Это позволит расценивать удаленный компьютер в качестве компонента вычислительной сети организации, благодаря чему можно будет выполнять следующие операции по обеспечению информационной безопасности:
- применять к удалённому компьютеру групповые политики;
- подключаться к компьютеру, используя штатные средства – RDP, mmc, удаленный помощник;
- контролировать интернет трафик;
- применять DLP-системы;
- использовать централизованное управление антивирусной защитой;
- и другие средства доступные внутри домена.
DirectAccess я буду рассматривать совместно с Windows To Go. Windows To Go — это операционная система Windows 8 и выше, установленная на внешний USB-носитель со всем необходимым ПО. Установленную таким образом ОС можно загрузить на любом оборудовании соответствующем минимальным требованиям. При этом ПО и данные, на используемом компьютере не затрагиваются.
Microsoft DirectAccess 2012
Описание ключевых используемых технологий начну с Microsoft DirectAccess, так как она будет основным компонентом создаваемой системы мобильного удаленного доступа к корпоративной среде. Рассматривать имеет смысл наиболее актуальную версию на базе Microsoft Windows Server 2012 R2 и клиентской операционной систем Windows 8.1.
Технология DirectAccess впервые была представлена в качестве компонента Micrisoft Windows Server 2008 R2 и предназначалась для организации прозрачного доступа удаленных компьютеров к внутренним ресурсам сети компании. DirectAccess позволяет удаленным пользователям полноценно использовать ресурсы корпоративной сети и пользоваться сервисами домена.
Также, технология DirectAccess позволяет сотрудникам различных технических подразделений (Help Desk, администраторы ИТ и ИБ), управлять учетными записями удаленных пользователей, компонентами антивирусной защиты, локальными политиками безопасности, осуществлять мониторинг своевременной установки обновлений операционной системы и прикладных программ. Это позволяет поддерживать удаленную систему в актуальном с точки зрения информационной безопасности состоянии.
По своей сути DirectAccess во многом напоминает традиционное VPN подключение к корпоративной сети, но разница есть, и довольно существенна. DirectAccess на базе Windows Server 2012 делает отличия между компьютерами внутренней корпоративной сети и компьютерами удаленных клиентов менее заметными.
Ниже приведу сравнение нового DirectAccess с технологией VPN.
- DirectAccess 2012 можно настроить только для удаленно управления, без возможности доступа удаленных клиентов во внутреннюю сеть организации.
- Пользователю нет необходимости запускать клиентское приложение и отдельно вводить учетные данные для организации VPN – соединения и авторизации в домене. В DirectAccess подключение к корпоративной сети происходит автоматически в момент загрузки операционной системы, пользователю необходимо только ввести идентификационные данные для прохождения аутентификации и авторизации в корпоративном домене.
- Так как компьютер уже находится в корпоративной сети еще на стадии загрузки, то он получает обновления доменных групповых политик и других изменений, которые возможны только на этапе загрузки компьютера.
- Компьютеру достаточно просто загрузится, чтобы появлялась возможность подключения к нему, например по RDP. Прохождение процедур идентификации и аутентификации, с целью загрузить учетную запись удаленного пользователя при этом не требуется.
- Канал связи между компьютером и корпоративной сетью шифруется стойкими алгоритмами с использованием IPsec. Для реализации IPsec в технологии VPN понадобится дополнительное аппаратное обеспечение.
- Есть возможность добавить нативную поддержку двухфакторной аутентификации с использованием одноразовых паролей (OTP). Для VPN такой встроенной поддержки нет, требуется использовать дополнительное ПО сторонних производителей.
- Для соединения удаленного клиента и сервера DirectAccess используется единственный порт – 443. Так как этот порт обычно открыт на фаэрволах, у клиента не будет проблемы с подключением, где бы он ни был. В VPN этого можно достичь, используя только протокол SSTP.
- Есть возможность добавить удаленную машину в домен, используя технологию Offline Domain Join, то есть ввести компьютер в домен без соединения с контроллером домена. При следующей загрузке АРМ будет частью корпоративной сети, используя подключения DirectAccess.
- К плюсам VPN можно отнести то, что удаленным клиентам не обязательно быть членами домена, для DirectAccess это обязательное требование, следовательно, DirectAccess не замещает VPN. То есть удаленному пользователю необходимо либо выдать корпоративный ноутбук, либо вводить в домен его личный компьютер.
Протокол DirectAccess построен поверх IPv6 и требует, чтобы все устройства в конечных точках поддерживали IPv6. В настоящее время в Интернете превалирует протокол IPv4, в связи с этим для связи между устройствами IPv6 через сети IPv4 применяются следующие технологии: туннелирования IPv6 поверх IPv4:
- ISATAP – протокол, который используется для автоматического назначения адресов IPv6 внутри интрасети IPv4 организации.
- 6tо4 — этот протокол используется для автоматического назначения адресов IPv6 и маршрутизации через публичную сеть Интернет на базе IPv4.
- Teredo — протокол, применяющийся к устройствам, находящимся за NAT, для автоматического назначения адресов IPv6 и маршрутизации через публичную сеть Интернет на базе IPv4. Для работы этого протокола необходимы два последовательных публичных IРv4-адреса.
Операционные системы Windows Server 2012, Windows 7 и Windows 8 поддерживают переходные протоколы ISATAP, 6tо4 и Teredo. В конечном результате клиенты соединяются с хостами, используя IPv6.

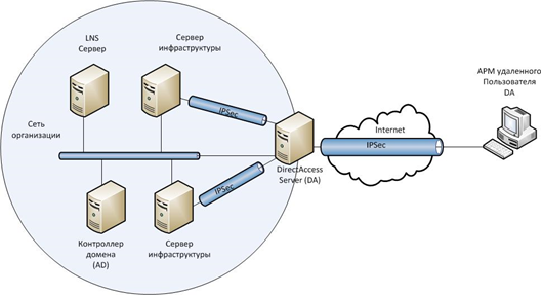
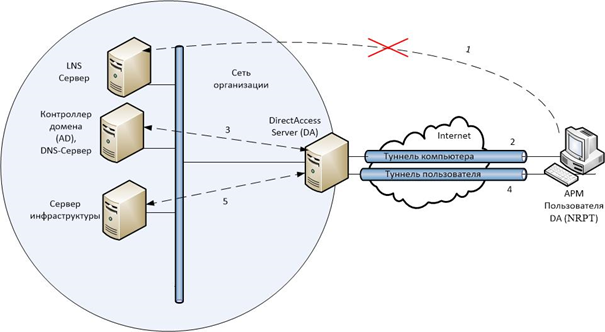
Клиент DirectAccess устанавливает два туннеля, которые являются ключом к разносторонности этого метода дистанционного доступа. Это туннели IPsec ESP — полезная нагрузка со встроенной защитой, которые аутентифицируются и шифруются для обеспечения конфиденциальности.
Туннель компьютера устанавливается первым, когда запускается клиент DirectAccess. Этот туннель аутентифицируется только сертификатом компьютера и обеспечивает доступ к DNS интрасети и контроллерам доменов. Этот туннель также используется для загрузки групповой политики компьютера и запроса аутентификации пользователя.
Туннель пользователя аутентифицируется сертификатом компьютера и регистрационными данными пользователя и обеспечивает доступ к ресурсам интрасети. Этот туннель также применяется для загрузки групповой политики пользователей.
Оба эти туннеля устанавливаются прозрачно для пользователя. Для установки дистанционного доступа пользователю не нужно вводить регистрационную информацию помимо той, что он вводит при входе в Windows.
Существует три модели работы DirectAccess:
- Модель полного доступа (end-to-edge) — клиент DirectAccess установит туннель IPsec к серверу DirectAccess. Затем сервер DirectAccess переадресует незащищенный трафик к ресурсам интрасети.

- Модель ограниченного доступа (end-to-end) — клиент DirectAccess, устанавливающего туннель IPsec с каждым сервером приложений, с которым он соединяется. Это гарантирует защиту трафика, в том числе и передаваемого по интрасети.
- Модель поддержки дистанционного управления используется для управления устройствами без предоставления пользовательского доступа. Эта модель развертывания предоставляет клиентам DirectAccess доступ только к выделенным серверам управления, которые в свою очередь имеют доступ к клиентским DirectAccess.


Одним из преимуществ DirectAccess является способность отделять трафик интрасети от трафика сети Интернет, что положительно сказывается на пропускной способности корпоративной сети. Однако, в некоторых случаях, администраторы могут направлять весь трафик через соединение DirectAccess. Например, для полного контроля Интернет трафика удаленного пользователя.
В DA 2012, в отличие от предыдущей версии, реализованной в Windows Server 2008, наличие PKI — инфраструктуры не является обязательным требованием. Инфраструктура PKI требуется, в случае использования клиентов на ОС Windows 7 Enterprise или Ultimate, либо когда требуются расширенные опции. Когда планируется в качестве клиентской ОС использовать Windows 8 Enterprise, то можно обойтись без PKI. В этом случае аутентификация клиентских компьютеров будет проходить по протоколу Kerberos. Сервер DA будет использоваться в качестве Kerberos-прокси, то есть запросы на проверку подлинности от клиентов передаются прокси-службе Kerberos, которая выполняется на сервере DirectAccess. Затем прокси-служба Kerberos от имени клиента отправляет запросы Kerberos контроллерам домена.
Рассмотрим процесс подключения клиента к серверу DirectAccess.
Компьютер становится клиентом DirectAccess после применения к нему групповых политик, передающих ему настройки для подключения через DA. Групповые политики создаются на этапе конфигурирования сервера DirectAccess и распространяются на группы безопасности в Active Directory.
После применения групповых политик клиент определяет свое местоположение относительно корпоративной сети. Для этого проверяется доступность NLS сервера(Сервер местоположения в сети). NLS сервер – это обычный веб-сервер, использующий в своей работе протокол HTTPS. В качестве сервера NLS может выступать любой веб-сервер (IIS, Apache и т.д.). В Windows Server 2012 сервер DirectAccess может выполнять функции NLS. Для принятия решения о дальнейших действиях клиента, в зависимости от доступности NLS сервера, используются политики преобразования имен – NRPT. Если идет обращение к NLS серверу по имени, суффикс которого совпадает с суффиксом домена локальной сети, то клиент будет использовать DNS сервера корпоративной сети, если не совпадает, то использовать DNS сервера указанные в настройках сетевого адаптера клиента. Для правильной проверки NLS его DNS-имя заносится в исключения NRPT, чтобы разрешение имени происходило через DNS серверы указанные на сетевом адаптере. Когда клиент находится внутри корпоративной сети — внутренние DNS серверы знают соответствующий адрес NLS сервера.
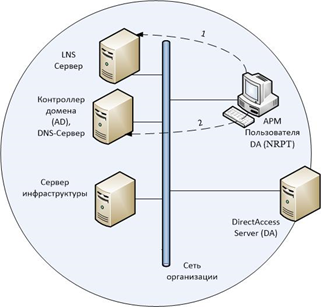
Находясь вне корпоративной сети, клиент использует внешние DNS-серверы (местного интернет провайдера), на которых не указано, как преобразовывать имя NLS сервера. Если NLS сервер обнаружен, клиент работает в сети как обычная рабочая станция, то есть IPsec не применяется.
В случае, когда клиент находится вне корпоративной сети, при попытке установить соединение с сервером NLS по DNS-имени, которое добавлено в исключения NRPT, клиент обращается к DNS-серверам, указанным в настройках сетевого адаптера. Так как при этом используются DNS-сервера Интернет-провайдера, на которых не прописано правило преобразования DNS-имени NLS сервера, клиент получает отказ в разрешении имени. Получив отказ от DNS сервера, клиентский компьютер применяет политики IPsec и обращается к серверу DirectAccess по его DNS-имени, которое должно быть прописано во внешней зоне корпоративного домена.
Клиент DirectAccess устанавливает туннель на сервер DirectAccess, используя IPv6. Если между ними находится сеть IPv4, то клиент использует протокол Teredo или 6to4 для инкапсуляции IPv6 в IPv4, либо попытается подключиться с помощью протокола IP-HTTPS. Установив связь, клиент и сервер DirectAccess выполняют взаимную аутентификацию в процессе установки туннеля компьютера IPsec. Далее клиент DirectAccess подключается к контроллеру домена для получения групповых политик.
Далее пользователь DirectAccess входит в систему либо применяет регистрационные данные уже вошедшего пользователя в сочетании с сертификатами, чтобы установить туннель пользователя IPsec. Групповая политика пользователя применяется к клиенту DirectAccess. Сервер DirectAccess начинает пересылать трафик от клиента DirectAccess на авторизованные ресурсы интрасети.
Windows To Go
В связи с тем, что для DirectAccess необходимо, чтобы компьютер клиента был включен в корпоративный домен, этот вариант не подходит пользователям, использующим личные компьютеры. Но есть технология, Windows To Go применение которой позволит использовать DirectAccess на любом компьютере, отвечающим минимальным требованиям запуска Windows 8 и подключенном к Интернет.
Технология Windows To Go – одна из новых возможностей Windows 8, позволяющая создать должным образом сконфигурированный образ ОС с установленным необходимым ПО, который будет загружаться непосредственно с USB-носителя вне зависимости от того, какая ОС установлена на компьютере.
Различия между Windows To Go и типовой установкой Windows:
- Во избежание случайного нарушения конфиденциальности данных внутренние жесткие диски главного компьютера при загрузке в рабочее пространство WTG по умолчанию работают автономно. Аналогично, если диск подключается к компьютеру с загруженной ОС, диск WTG не отображается в проводнике.
- Для обеспечения безопасности при шифровании диска WTG с помощью BitLocker вместо доверенного платформенного модуля используется загрузочный пароль системы начальной загрузки, поскольку доверенный платформенный модуль привязан к конкретному компьютеру, в то время как диски Windows To Go перемещаются между компьютерами.
- Чтобы гарантировать, что рабочее пространство Windows To Go может легко перемещаться между компьютерами, режим гибернации отключен по умолчанию. Однако режим гибернации можно включить в параметрах групповой политики.
- Среда восстановления Windows недоступна. В тех редких случаях, когда требуется восстановление диска WTG, следует переустановить его из образа, создав новый образ Windows.
- Обновление и сброс рабочего пространства Windows To Go не поддерживается. Сброс к стандарту производителя не применяется для компьютера при выполнении рабочего пространства WTG, поэтому возможность была отключена.
- Магазин отключен по умолчанию. Приложения, лицензированные через Магазин, привязаны к оборудованию для лицензирования. Так как WTG разработан для перемещения по разным компьютерам, доступ к Магазину отменен. Вы можете разрешить использование Магазина, если ваши рабочие пространства Windows To Go не будут перемещаться по нескольким компьютерам.
Для установки и загрузки Windows To Go необходимо соблюдение следующих требований:
Существует список
сертифицированных
для использования с WTG USB-носителей:
- IronKey Workspace W300
- Kingston DataTraveler Workspace для WTG
- Spyrus Portable Workplace
- Spyrus Secure Portable Workplace
- Super Talent Express RC4 для WTG и Super Talent Express RC8 для WTG
- Western Digital My Passport Enterprise
Если для установки Windows To Go будет использоваться носитель, не входящий в данный список, то это может наложить дополнительные требования к компьютеру, на котором будет запускаться WTG, например поддержка USB 3.0. Так же из-за этого на техподдержку Microsoft не стоит рассчитывать.
При выборе компьютера для использования в качестве узла рабочего пространства Windows To Go, необходимо учитывать следующие критерии:
- Компьютер должен отвечать минимальным требованиям для использования с операционными системами Windows 7 или Windows 8.
- Компьютер, выбранный в качестве хоста для WTG должен поддерживать загрузку с USB.
- Использование WTG на компьютере, работающем под управлением Windows RT(Windows 8 ARM), не поддерживается.
- Выполнение рабочего пространства Windows To Go с компьютера Mac не поддерживается.
При первом запуске Windows To Go на компьютере, она определяет все оборудование компьютера и устанавливает необходимые драйверы. Впоследствии рабочее пространство Windows To Go загружается на этом компьютере быстрее, так как необходимый набор драйверов уже установлен.
Существует три способа развертывания WTG:
- с помощью мастера Windows To Go Creator Wizard;
- с помощью скрипта (PowerShell + утилиты работы с образами DISM или ImageX);
- с помощью инструмента User Self-Provisioning в System Center 2012 Configuration Manager SP1.
Если для развёртывания WTG выбран мастер Windows To Go Creator Wizard, то на компьютере, на котором вы планируете создавать WTG, необходимо будет использовать Windows 8 Enterprise
Каждый из выше описанных способов предполагает предварительную подготовку wim-файла (Windows Imaging Format — это ориентированный формат образа диска). WIM-файл может содержать не только файлы операционной системы, но и предварительно настроенную ОС с установленным стандартным набором ПО.
Данный файл можно получить несколькими способами:
- Использовать файл install.wim, расположенный на диске с дистрибутивом ОС в папке /sources. В этом случае мы получим «чистую» ОС. Однако в последних версиях Windows образ с файлами ОС имеет формат ESD, поэтому может потребоваться конвертация ESD в формат WIM.
- Создать wim-образ подготовленной заранее ОС, используя средства автоматической установки WAIK от Microsoft. Безусловно, плюсом данного способа является тот факт, что при подготовке ОС можно сделать необходимые настройки и установить стандартный набор ПО.
- Так же, используя ПО сторонних производителей wim-файл можно создать, конвертировав файл виртуального жесткого диска vhd.
WIN-файл должен содержать ОС Windows 8 Enterprise. Другие редакции ОС технологией Windows To Go не поддерживаются.
BitLocker
В случае применения Windows To Go шифрование отчуждаемого носителя, используя технологию BitLocker Drive Encryption, считаю обязательным требованием, так как на диске может быть записана конфиденциальная информация, содержащая данные, которые можно отнести к коммерческой тайне или к персональным данные партнеров, сотрудников или клиентов компании, BitLocker (полное название BitLocker Drive Encryption) – технология защиты данных путём полного шифрования диска, являющаяся частью операционных систем Microsoft Windows Vista Ultimate/Enterprise, Windows 7 Ultimate/Enterprise, Windows Server 2008 R2, Windows 8, Windows 8.1 и Windows 10 При помощи BitLocker можно зашифровать Логический диск, SD карту или USB-носитель. При этом поддерживаются алгоритмы шифрования AES 128 и AES 256.
Сам ключ может храниться на USB-носителе, в аппаратном модуле TPM или на жестком диске.
Для получения ключа из TPM, может быть настроен дополнительный способ аутентификации пользователя при помощи USB-ключа и/или пароля.
В случае, если доверенный платформенный модуль отсутствует на используемой материнской плате, либо если в качестве загрузки и объекта шифрования будет использоваться USB-носитель с Windows To Go, ключ шифрования необходимо хранить на внешнем USB-носителе либо вместо ключа шифрования можно будет использовать пароль. Для того чтобы настроить доступ к зашифрованному носителю по USB-носителю либо по паролю, необходимо внести изменения в локальные групповые политики.
Заключение
В результате рассмотренной комбинации технологий DirectAccess, Windows To Go и BitLocker мы получаем решение, которые позволит:
- удаленным сотрудникам чувствовать себя «как на рабочем месте», находясь при этом в любой точке мира, где есть компьютер, подключенный к сети Интернет;
- не модифицировать и не дополнять программное обеспечение используемого компьютера;
- сотрудникам работать в любом подразделении компании, на любом свободном компьютере, используя при этом предварительно настроенное программное обеспечение и необходимые файлы;
- обеспечить конфиденциальность данных, хранящихся на переносном устройстве, в случае утери носителя либо попадания его к лицам, не имеющим санкционированного доступа к указанным данным и ресурсам корпоративной сети;
- использовать встроенную возможность двухфакторной аутентификации с OTP;
- подразделениям организации, отвечающие за техническую поддержку пользователей, администрирование системного и прикладного ПО, а так же обеспечение ИБ, не терять связь с удаленными системами и поддерживать их в актуальном состоянии;
- управлять интернет-трафиком удаленных клиентов, направив его через корпоративный прокси-сервер.
Из всего выше изложенного можно сделать вывод, что совместное использование описанных технологий позволяет реализовать, контролируемое со стороны служб организации удаленное подключение к корпоративной среде, не привязанное к конкретному клиентскому оборудованию и имеющее высокую степень защищенности.
В следующей главе я опишу практическую реализацию, описанной выше системы удаленного доступа.