В этой статье мы разберем методику использования функционала File Server Resource Manager (FSRM) на файловом сервере Windows Server 2012 R2 для детектировании и блокировки работы вирусов-шифровальщиков (троянов-энкодеров, Ransomware или CryptoLocker). В частности, разберемся, как установить службу FSRM, настроить детектирование определенных типов файлов и, в случае детектирования таких файлов, заблокировать доступ пользователя к каталогу на файловом сервере.
Содержание:
- Детектирование шифровальщиков с помощью FSRM
- Настройка SMTP параметров FSRM для отправки email уведомлений
- Создание группы расширений файлов, создаваемых шифровальщиками
- Настройка File Screen Templates
- Применение шаблона File Screen к диску или папке
- Автоматическая блокировка доступа пользователя, зараженного шифровальщиком
- Тестирование защиты FSRM
Детектирование шифровальщиков с помощью FSRM
Если компонент File Server Resource Manager еще не установлен на сервере, его можно установить с помощью графической консоли Server Manager или из командной строки PowerShell:
Install-WindowsFeature FS-Resource-Manager -IncludeManagementTools
Проверим, что роль установилась:
Get-WindowsFeature -Name FS-Resource-Manager
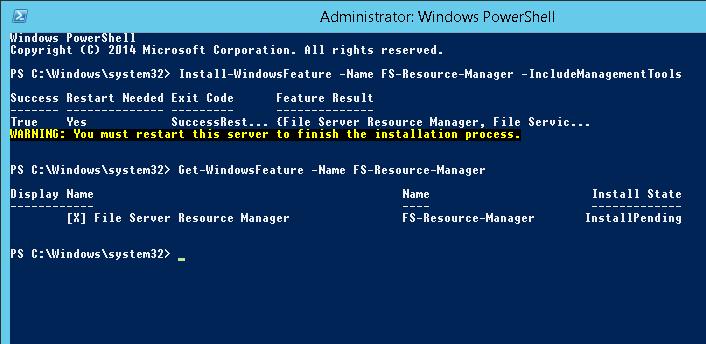 После установки компонента сервер нужно перезагрузить.
Настройка SMTP параметров FSRM для отправки email уведомлений
Следующий этап — конфигурация SMTP параметров службы FSRM, благодаря которым администратор может настроить отправку email уведомлений на свой ящик. Для этого запустите консоль fsrm.msc, щелкните ПКМ по корню консоли File Server Resource Manager и выберите пункт Configure Options.
Укажите адрес SMTP сервера, почтовый ящик администратора и имя отправителя.
Совет. Если у вас отсутствует внутренний почтовый сервер, можно настроить пересылку через SMTP релей на внешние ящики.
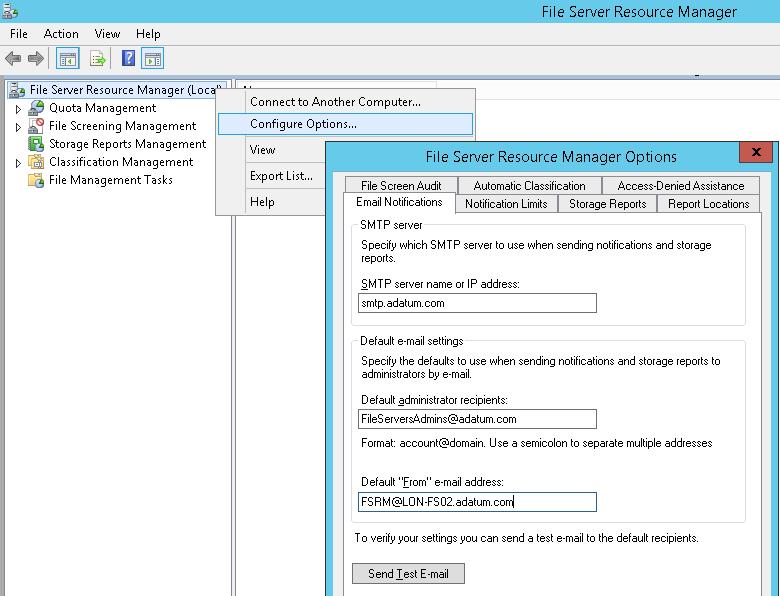
Проверить корректность настройки SMTP сервера можно, отправив тестовое письмо с помощью кнопки Send Test E-mail.
Настроить параметры SMTP службы FSRM также можно выполнить с помощью Powershell:
Set-FsrmSetting -AdminEmailAddress "[email protected]" –smtpserver smtp.adatum.com –FromEmailAddress "[email protected]"
Создание группы расширений файлов, создаваемых шифровальщиками
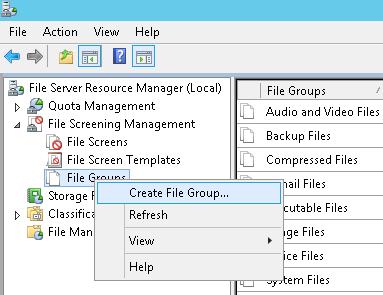
Следующий шаг – создать группу файлов, в которой будут содержаться известные расширения и имена файлов, которые создают шифровальщики в процессе работы.
Этот список можно задать из консоли FSRM. Для этого разверните раздел File Screening Management -> File Groups и в меню выберите Create File Group.
 Нужно указать имя группы (к примеру, Crypto-files) и внести все известные расширения в список с помощью поля Files to include.
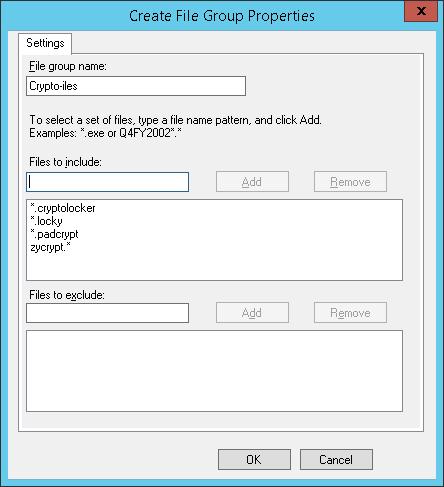 Список известных расширений файлов, создаваемых шифровальщиками довольно большой, поэтому намного проще создать его с помощью PowerShell.
В Windows Server 2012 создать группу файлов с помощью PowerShell можно так:
New-FsrmFileGroup -Name "Crypto-files" –IncludePattern @("_Locky_recover_instructions.txt","DECRYPT_INSTRUCTIONS.TXT", "DECRYPT_INSTRUCTION.TXT", "HELP_DECRYPT.TXT", "HELP_DECRYPT.HTML", "DecryptAllFiles.txt", "enc_files.txt", "HowDecrypt.txt", "How_Decrypt.txt", "How_Decrypt.html", "HELP_RESTORE_FILES.txt", , "restore_files*.txt", "restore_files.txt", "RECOVERY_KEY.TXT", "how to decrypt aes files.lnk", "HELP_DECRYPT.PNG", "HELP_DECRYPT.lnk", "DecryptAllFiles*.txt", "Decrypt.exe", "AllFilesAreLocked*.bmp", "MESSAGE.txt","*.locky","*.ezz", "*.ecc", "*.exx", "*.7z.encrypted", "*.ctbl", "*.encrypted", "*.aaa", "*.xtbl", "*.abc", "*.JUST", "*.EnCiPhErEd", "*.cryptolocker","*.micro","*.vvv")
В Windows Server 2008 R2 придется воспользоваться утилитой filescrn.exe:
filescrn.exe filegroup add /filegroup:"Crypto-files" /members:"DECRYPT_INSTRUCTIONS.TXT|DECRYPT_INSTRUCTION.TXT| DecryptAllFiles.txt|enc_files.txt|HowDecrypt.txt|How_Decrypt.txt| How_Decrypt.html|HELP_TO_DECRYPT_YOUR_FILES.txt|HELP_RESTORE_FILES.txt| HELP_TO_SAVE_FILES.txt|restore_files*.txt| restore_files.txt|RECOVERY_KEY.TXT|HELP_DECRYPT.PNG|HELP_DECRYPT.lnk| DecryptAllFiles*.txt|Decrypt.exe|ATTENTION!!!.txt|AllFilesAreLocked*.bmp| MESSAGE.txt|*.locky|*.ezz|*.ecc|*.exx|*.7z.encrypted|*.ctbl| *.encrypted|*.aaa|*.xtbl|*.EnCiPhErEd|*.cryptolocker|*.micro|*.vvv| *.ecc|*.ezz|*.exx|*.zzz|*.xyz|*.aaa|*.abc|*.ccc|*.vvv|*.xxx| *.ttt|*.micro|*.encrypted|*.locked|*.crypto|*_crypt|*.crinf| *.r5a|*.XRNT|*.XTBL|*.crypt|*.R16M01D05|*.pzdc|*.good| *.LOL!|*.OMG!|*.RDM|*.RRK|*.encryptedRSA|*.crjoker| *.LeChiffre|*[email protected]_com|*.0x0|*.bleep|*.1999| *.vault|*.HA3|*.toxcrypt|*.magic|*.SUPERCRYPT|*.CTBL|*.CTB2|*.locky"
Совет. Список известных расширений файлов различных шифровальщиков можно составить самостоятельно, или воспользоваться готовыми периодически обновляемым списками, ведущимися энтузиастами:
https://www.bleib-virenfrei.de/ransomware/
https://fsrm.experiant.ca/api/v1/combined
Во втором случае актуальный список расширений файлов для FSRM можно грузить прямо с веб сервера с помощью Invoke-WebRequest
new-FsrmFileGroup -name "Anti-Ransomware File Groups" -IncludePattern @((Invoke-WebRequest -Uri "https://fsrm.experiant.ca/api/v1/combined").content | convertfrom-json | % {$_.filters})
Либо воспользоваться готовым файлом: crypto_extensions.txt. Данный файл можно сохранить на диск и обновить с его помощью созданную группу файлов FSRM:
$ext_list = Get-Content .crypto_extensions.txt
Set-FsrmFileGroup -Name "Crypto-files" -IncludePattern ($ext_list)
Настройка File Screen Templates
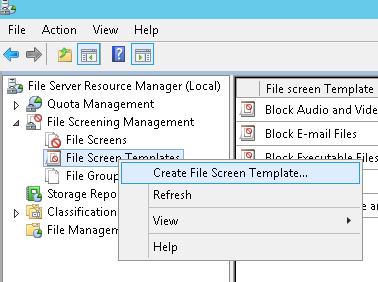
Создадим новый шаблон File Screen Template, в котором определяются действия, которые FSRM должен выполнить при обнаружении указанных файлов. Для этого в консоли FSRM перейдите в раздел File Screen Management -> File Screen Templates. Создадим новый шаблон Create File Screen Template.
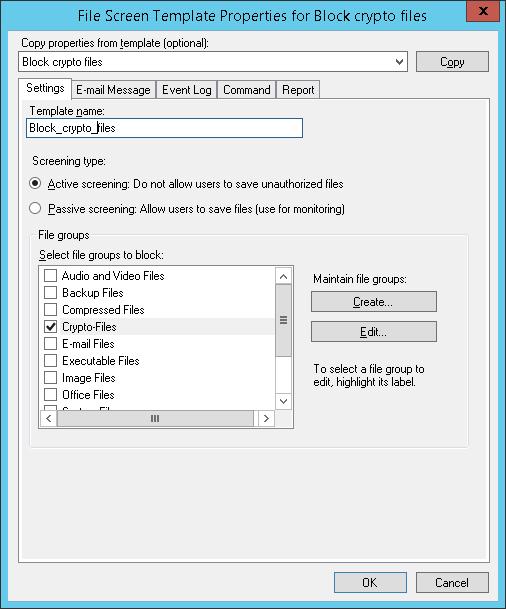
 На вкладке настроек укажем имя шаблона “Block_crypto_files”, тип скрининга – Active screening (запрещается создавать указанные типы файлов) и в списке групп файлов выбрать Crypto-Files.
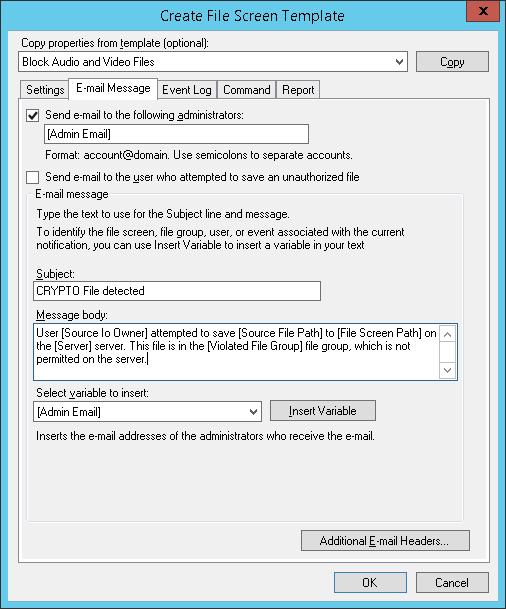
 На вкладке E-mail Message включим отправку почтовых уведомлений, настроив текст оповещения по-своему вкусу.
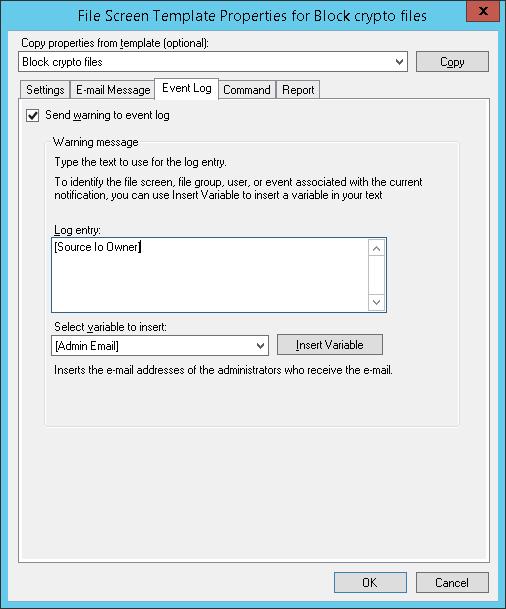
 На вкладке Event Log включим запись события в системный журнал. С указанием записывать только имя пользователя: [Source Io Owner]
На вкладке Command можно указать действие, которое нужно выполнить при обнаружении такого типа файла. Об этом чуть ниже.
Сохраните изменения. В списке шаблонов должен появится еще один.
Применение шаблона File Screen к диску или папке
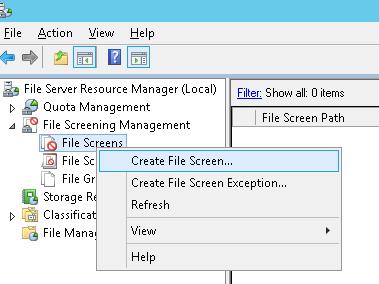
Осталось назначить созданный шаблон к диску или сетевой папке на сервере. В консоли FSRM создадим новое правило Create File Screen.
 В поле File screen path нужно указать локальный диск или путь к каталогу, для которого мы хотим включить систему защиты от шифровальщика, а в списке шаблонов выбрать созданный ранее шаблон Block_crypto_files.
Автоматическая блокировка доступа пользователя, зараженного шифровальщиком
Осталось настроить действие, которое FSRM будет выполнять при обнаружении файлов, созданных шифровальщиками. Мы воспользуемся готовым скриптом: Protect your File Server against Ransomware by using FSRM and Powershell (https://gallery.technet.microsoft.com/scriptcenter/Protect-your-File-Server-f3722fce). Что делает этот скрипт? При попытке записать «запрещенный» тип файла в сетевой каталог, FSRM запускает данный скрипт, который анализирует журнал событий и на уровне шары запрещает запись пользователю, из-под осуществлялась попытка записать запрещенный тип файла. Таким образом, мы заблокируем доступ зараженного пользователя к сетевой папке.
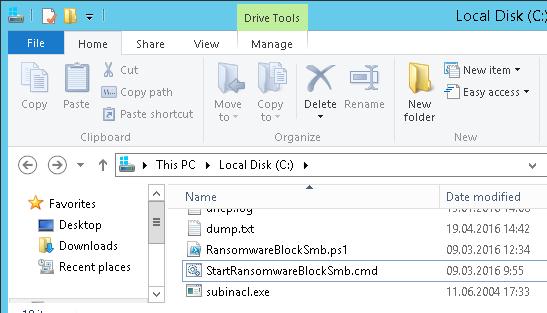
Скачайте указанный скрипт и распакуйте его в корень каталога C: на файловом сервере. В эту же папку скопируйте утилиту SubInACL (нужна для изменения разрешений на сетевой каталог). В каталоге должны оказаться следующие файлы:
- RansomwareBlockSmb.ps1
- StartRansomwareBlockSmb.cmd
- subinacl.exe
Примечание. В PS скрипте пришлось изменить строки:
$SubinaclCmd = "C:subinacl /verbose=1 /share \127.0.0.1" + "$SharePart" + " /deny=" + "$BadUser"
и
if ($Rule -match "Crypto-Files")
Осталось в настройках шаблона “Block crypto files” на вкладке Command указать, что должна запуститься командная строка с аргументом StartRansomwareBlockSmb.cmd:
Run this command or script:
c:windowssystem32cmd.exe
Command arguments:
/c “c:StartRansomwareBlockSmb.cmd”
Команда должна выполняться с правами локальной системы (Local System).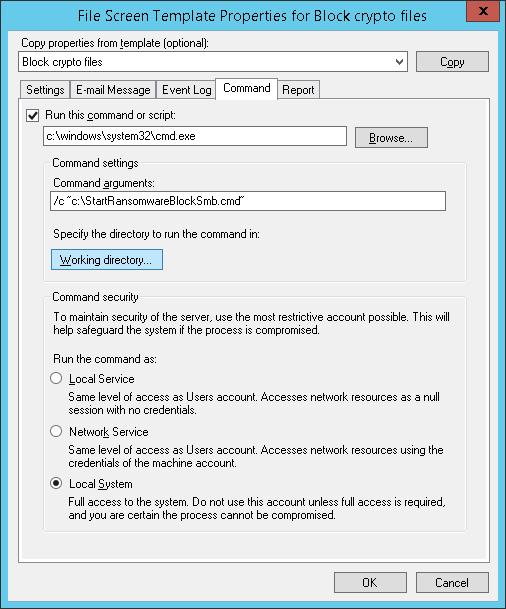
Тестирование защиты FSRM
Протестируем, как работает защита FSRM от шифровальщиков. Для чего в защищаемом каталоге создадим файл с произвольным расширением, и попробуем изменить его на запрещенное .locky.
При попытке сохранить запрещенный файл FSRM запишет в журнал событие:
Event ID: 8215
Source: SRMSVC
Скрипт RansomwareBlockSmb.ps1на основании данных из события запретит текущему пользователю доступ к данному каталогу, выставив в разрешениях на шару персональный deny:
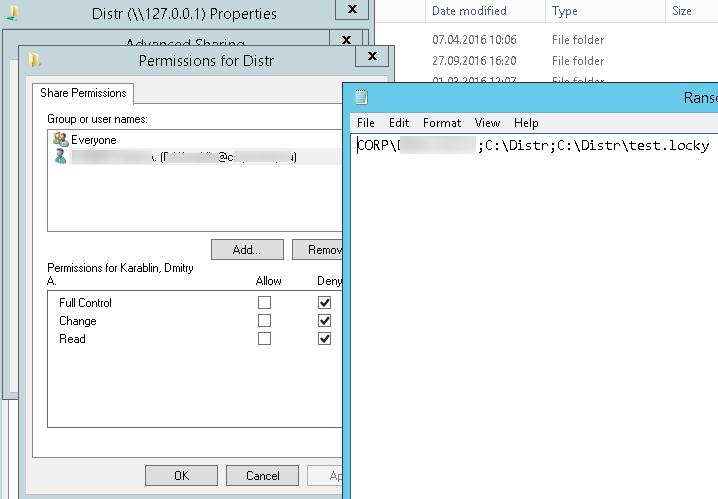 Защита работает! В корне диска в логе можно посмотреть каталог и пользователя, из-под которого пытался запустится шифровальщик.
Если нужно обеспечить еще более высокий уровень зашиты, можно перейти от черного списка файлов к белому, когда на файловом сервере можно сохранять только файлы разрешенных типов.
Итак, мы рассмотрели, как с помощью FSRM автоматически блокировать доступ к сетевым каталогам пользователям, компьютеры которых заражены вирусом-шифровальщиком. Естественно, использование FSRM в таком режиме не может дать 100% гарантию защиты файлов на серверах от этого класса вирусов, но как один из эшелонов защиты, методика вполне себе пригодна. В следующих статьях мы рассмотрим еще несколько вариантов противодействия вирусам-шифровальщикам:
- Как восстановить файлы пользователя из снимков VSS после заражения шифровальщиком
- Блокировка вирусов и шифровальщиков с помощью Software Restriction Policies
The File Server Resource Manager (FSRM) is a part of the File Services Role in Windows Server that gives you greater control over the data stored on your file servers. In this part, I’ll show you how to install the FSRM with both PowerShell and the GUI on Windows Server 2008 R2 and Windows Server 2012.
Contents
- Install FSRM on Windows Server 2012 with PowerShell
- Install FSRM on Server 2008 R2 using PowerShell
- Install FSRM on Server 2012 using Server Manager
- Install FSRM on Server 2008 R2 using Server Manager
- Author
- Recent Posts

Kyle Beckman works as a systems administrator in Atlanta, GA supporting Office 365 in higher education. He has 17+ years of systems administration experience.
If you’re running file servers, I highly recommend running FSRM. I’m always surprised at how many people either haven’t heard of FSRM or have never used it and complain about several of the problems it can help you solve. The FSRM gives you greater control over folder quotas, let’s you block file types (file screening), and generate storage reports just to name a few things it can do. So, let’s get started by installing the File Server Resource Manager on a file server.
Install FSRM on Windows Server 2012 with PowerShell
Installing the FSRM on Server 2012 with the Install-WindowsFeature cmdlet is definitely the fastest way to get up and going. With Administrator rights, run the following PowerShell command and you’re done:
Install-WindowsFeature –Name FS-Resource-Manager –IncludeManagementTools

Install FSRM on Server 2008 R2 using PowerShell
Installing FSRM on Server 2008 R2 with PowerShell takes slightly more work, but is still much faster than with the GUI. With Administrator rights, run the following PowerShell command:
Import-Module Servermanager
Add-WindowsFeature FS-FileServer,FS-Resource-Manager

Install FSRM on Server 2012 using Server Manager
Installing FSRM from the GUI is slightly more involved. First, start off in the Server Manager and go to Manage, then Add Roles and Features.

Click through the Before you begin dialog and the installation type since we won’t be setting up Remote Desktop Services.


Depending on how many servers you are managing in your Server Manager, you may see multiple servers. Select your file server and click Next.

When you get to the Select server roles screen, scroll down to the File And Storage Services area and check File Server Resource Manager. When you do this, you’ll be prompted to add additional features that are necessary for the FSRM… namely the File Server role and the management tools (which you’ll definitely need if they’re not already installed). After clicking Add Features, you’ll be taken back to the Select server rolls screen and you should see that File Server and File Server Resource Manager are both checked now. Click Next to move on.


On the Select features screen, there is nothing to change. However, if you scroll down, you should see that the File Services Tools option has been checked under Remote Server Administration Tools, Role Administration Tools. Click Next to move on.

On the Confirmation installation selections screen, you can click Install. Now you can sit back and wait for FSRM to install.


If you were installing directly on the server console, the File Server Resource Manager administrative tool should now be on the Start screen.

Install FSRM on Server 2008 R2 using Server Manager
To install the File Server Resource Manager in Windows Server 2008 R2, click on Roles in the Server Manager and then click on Add Roles. Click through the Before You Begin dialog.


In the Server Roles screen, click File Services and then Next.

In the File Services screen, click Next. In the ‘Role Services’ screen that comes up next, you’ll want to check File Server Resource Manager and then click Next. For now, we’ll skip configuring FRSM and click Next to bypass Configure Storage Usage Monitoring.


On the Confirm Installation Selections, click Install and wait for the installation to finish.


The File Server Resource Manager administrative tool should now be available on the Start menu.

In my next post I will outline the initial FSRM configuration.
Welcome to this step by step tutorial, you will be learning about How to Install and Configure File Screening using File Server Resource Manager (FSRM) on Windows Server 2012 R2.
File Server Resource Manager is a pack of tools for Windows Server® 2008 or above that allows administrators to control and manage the quantity and type of data files that is stored on their network or servers.
Furthermore, File Screening is a tool part of the FSRM Pack of tools. It helps to Manage the type of data format stored on the server or network storage media.
The Step by step process below shows how to Install FSRM and Configure File Screening
Installing FSRM.
Prerequisite: Most of all, you should have a Domain Network configured and at least one client computer for testing after configuration. Also, Configure File Share or DFS for central file access to spice up our FSRM Configuration
Computers Used: DC1 (Domain Controller installed with Server 2012 R2) and a Client Computer (Installed with Windows 10)
Installing FSRM on DC1
Step 1
First of all, Go to Server Manager

Step 2
Select Manager – Add Roles and Features Wizard
Step 3
In addition, Select the “installation Type on the left panel” and choose “Role-Based or feature-based installation” and go for “Next”

Step 4
Also, expand “File and Storage Services” – Expand “File and iSCSI Services” and Select “File Server Resource Manager” Select Add Features from Pop up Dialog. And Select “Next”

Step 5
In addition, Select “Next” on the Select Features page
Step 6
As a result, Select “Install” on the confirm Installation Selections page

Configuring File Screening Using FSRM on DC1
When installation completes, Restart is not required
Step 1
On the Server Manager Console. Select “Tools” on the right top corner and choose “File Server Resource Manager”

Step 2
On the File Server Resource Manager console, Select “File Screening Management -> File Group”.
Right-Click on “File Groups”. Select “Create File Group

Step 3
Name your file group and add file extensions, then select “OK”

Step 4
Thereafter, Switch to File Screen utility on the left pane. Right-Click and Select Create File Screen

Step 5
From here, Browser for File Screen Path

Step 6
Furthermore, Select “Define Custom File Screen Properties” and choose “custom Properties”

Step 7
Allso, under the “File Groups” Section, select “Your file group you created. Ours is “Graphic Files” and choose OK

Step 8
In addition, Select “Create”

Step 9
Finally, Save as a template with your preferred name. Our is “Graphic files template” and choose OK

We are done.
Therefore, next is to test the File path selected by Storing Graphic Files with the format we block and see our file screen in operation.
OR
Watch Video Tutorial
The Windows Server 2008 first carried FSRM or Fie Server Resources Manager, which allowed administrators to define the file types that users could save to file servers. Windows FSRM has been a part of all succeeding Windows Servers, and administrators can now block defined file types from being uploaded to a specific folder or to an entire volume on the server.
Before you can begin blocking file extensions, you may need to install and configure FSRM on your Windows Server 2012 R2. Installation of FSRM can be achieved through the Server Manager GUI or by using the PowerShell console.
This article will examine the installation of FSRM using both methods, Server Manager GUI and Windows Server PowerShell console, while providing all necessary information to ensure a successful deployment and configuration of FSRM services.
FREE Hyper-V & VMware Backup: Easy to use — Powerful features — Just works, no hassle: It’s FREE for Firewall.cx readers! Download Now!
Installing FSRM on Server 2012 using the Server Manager GUI
Assuming you are logged in as the administrator, start with the Server Manager – click on the second icon from left on the bottom toolbar on the desktop as shown below:

Figure 1. Launching the Server Manager Dashboard
This brings up the Server Manager Dashboard. Proceed to the top right hand corner and click on Manage, then click on Add Roles and Features.

Figure 2. Opening Add Roles and Features console
This opens the Add Roles and Features Wizard, where you need to click on Server Selection. Depending on how many servers you are currently managing, the right hand side will show one or multiple servers in the pool. Select the file server on which you want to install FSRM, and click on Next to proceed.

Figure 3. Selecting a Server to add the FSRM role
The next screen shows the server roles that you can install on the selected server. On the right hand side, locate File and Storage Services and expand it. Locate the File and iSCSI services and expand it. Now, locate the File Server Resource Manager entry.

Figure 4. Selecting the File Server Resource Manager role for installation
Click on the check box in front of the entry File Server Resource Manager. This will open up the confirmation dialog box for the additional features that you must first install before installing FSRM.

Figure 5. Confirming the installation of additional role services required for FSRM
Click on Add Features and you are all set to install FSRM, as the check box for File Server Resource Manager now has a tick mark (shown below).

Figure 6. Back to the Server Role installation – Confirming FSRM Role Selection
Clicking on Next allows you to Select one or more features to install on the selected server. We don’t need to add anything here at this stage, so click Next to go to the next step.
This brings up a screen asking you to Confirm installation selections. This is the stage where you have the last chance to go back and make any changes, before the actual installation starts.

Figure 7. Confirm installation selections
Click on Install to allow the installation to commence and show the progress on the progress bar on the Results screen. Once completed, you can see the Installation successful on … under the progress bar.

Figure 8. Completion of FSRM role installation
Click on Close to exit the process.
To check if the FSRM has actually started running, go to the Server Manager Dashboard and click on File and Storage Services on the left hand side of the screen.

Figure 9. Server Manager Dashboard
The Dashboard now shows all the servers running under the File and Storage Services. Go down to Services and you will see FSRM running with an automatic start up.

Figure 10. File and Storage Services – Confirming FSRM Service
Installing FSRM on Server 2012 using the PowerShell Console
This is a comparatively easier and faster process compared to the GUI method.
To invoke the PowerShell, click the third icon from left on the bottom toolbar on the desktop.

Figure 11. Launching Windows PowerShell
This will open up a console with an administrative level command prompt. At the command prompt, type:
C:UsersAdministrator> Add-WindowsFeature –Name FS-Resource-Manager –IncludeManagementTools

Figure 12. Executing PowerShell command to install FSRM
A successful installation will be indicated as True , under the Success column as shown above.
FREE Hyper-V & VMware Backup: Easy to use — Powerful features — Just works, no hassle: It’s FREE for Firewall.cx readers! Download Now!
Configuring File Screening
Invoke FSRM from the Tools menu on the top right hand corner of the Server Manager Dashboard.

Figure 13. Running the File Server Resource Manager component
The File Server Resource Manager screen opens up. On the left panel, expand the File Screening Management and go to File Groups. The central panel shows the File Groups, the Include Files and the Exclude Files in three columns.
Under the column File Groups, you will find file types conveniently grouped together. The column Include Files lists all file extensions that are included in the specific file group. For a new server, the column Exclude Files is typically empty.

Figure 14 – File Groups, Include File and Exclude Files
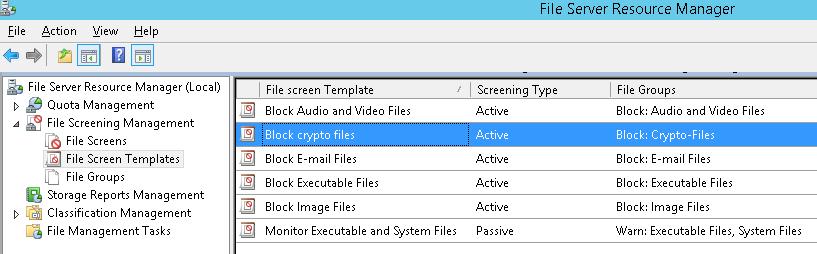
On the left panel, go to File Screen Templates and click on it. The central panel shows predefined rules that apply to folders or volumes.

Figure 15. File Server Resource Manager — File Screen Templates
For instance, double-click on Block Image Files in the central panel. This opens up the File Screen Template Properties for Block Image Files. Here you can define all the actions that the server will take when it encounters a situation where a user is trying to save a file belonging to the excluded group.

Figure 16. FSRM — File Screen Template Properties for Block Image Files
You can choose to screen the specified file type either actively or passively. Active screening disallows users from saving the specified file group. With passive screening, users are not prevented from saving the files while the administrator can monitor their actions.
The server can send from one to four basic alerts when it encounters an attempt to save a forbidden file. The server can send an Email message to the administrator, create an entry in the Event Log, run a specified Command or Script and or generate a Report. You can set up the details for each action on individual tabs. When completed, exit by clicking on OK or Cancel.
To edit the existing template or to create a new one based on the chosen template, go to the File Screen Templates and in the central panel, right-click on the predefined template you would like to edit. From the Actions menu on the right panel, you can either Create File Screen Template or Edit Template Properties.

Figure 17. FSRM – Creating or editing a File Screen Template
Clicking on Create File Screen Template opens up a dialog where you can click on Browse to select a folder or volume on which the new rule would be applied. Under How do you want to configure file screen properties? You can either Derive or Create the file screen properties. Click on Create to allow the new file screen rule to appear in the central panel.

Figure 18. FSRM — Creating a File Screen
Creating Exceptions
Exceptions are useful when you want to allow a blocked file type to be saved in a specific location. Go to the left panel of the FSRM screen and right-click on File Screens.

Figure 19. FSRM – Creating a File Screen Exception
From the menu on the right panel, click on Create File Screen Exception. On the menu that opens up, click on Browse to select a folder or volume on which the new rule would be applied and select the group you would like to exclude under the File groups. Click OK and complete the process.

Figure 20. FSRM – File Screen Exception settings and options
This article showed how to we can use Windows Server File Server Resources Manager (FSRM) to block file types and extensions from being uploaded or saved to a directory or volume on a Windows 2012 R2 server. We explained how to perform installation of FSRM via GUI interface and Powershell, and covered the creation or editing of File Screen Templates used to block or permit access for specific files.
Back to Windows 2012 Server Section
In this article, we’ll consider the methods of using File Server Resource Manager (FSRM) features on a file server running Windows Server 2012 R2 to detect and block ransomware. In particular, we’ll tell how to install FSRM service on the file server, configure file screening, and in the case ransomware detection block user access to the share.
Contents:
- How to Detect Ransomware Using FSRM
- How to Configure the SMTP Settings of FSRM to Send E-Mail Notifications
- How to Create a Group of File Extensions for the Ransomware
- File Screen Templates Configuration
- How to Apply File Screen Template to a Disk or Folder
- Automatic Block of the User Infected by Ransomware
- FSRM Protection Test
How to Detect Ransomware Using FSRM
If File Server Resource Manager (FSRM) feature is not installed on your file server, install it using Server Manager graphic console or PowerShell command prompt:
Install-WindowsFeature FS-Resource-Manager -IncludeManagementTools
Make sure that the role has been installed:
Get-WindowsFeature -Name FS-Resource-Manager

After the feature has been installed, restart the server.
How to Configure the SMTP Settings of FSRM to Send E-Mail Notifications
The next step is the configuring of SMTP settings of FSRM to sending e-mail notifications to admins. To do it, start fsrm.msc, right-click the root of File Server Resource Manager console and select Configure Options.
Specify the SMTP server name or IP address, the administrator and sender e-mail addresses.

To make sure that the SMTP server is configured correctly, send a test e-mail using Send Test E-mail button.
SMTP settings of FSRM can also be configured from PowerShell:
Set-FsrmSetting -AdminEmailAddress "FileServerAdmins@adatum.com" –smtpserver smtp.adatum.com –FromEmailAddress "FSRM@LON-FS02.adatum.com"
How to Create a Group of File Extensions for the Ransomware
The next step is to create a group of files containing known extensions and file names, created by encryption malware during its work.
This list can be created in the FSRM console. To do it, expand File Screening Management -> File Groups and select Create File Group.

You have to specify group name (for example, Crypto-files) and enter all known extensions to the list using Files to include field.

The list of known file extensions created by ransomware is quite long, so it is easier to create it using PowerShell.
In Windows Server 2012, you can create the file group using PowerShell as follows:
New-FsrmFileGroup -Name "Crypto-files" –IncludePattern @("_Locky_recover_instructions.txt","DECRYPT_INSTRUCTIONS.TXT", "DECRYPT_INSTRUCTION.TXT", "HELP_DECRYPT.TXT", "HELP_DECRYPT.HTML", "DecryptAllFiles.txt", "enc_files.txt", "HowDecrypt.txt", "How_Decrypt.txt", "How_Decrypt.html", "HELP_RESTORE_FILES.txt", , "restore_files*.txt", "restore_files.txt", "RECOVERY_KEY.TXT", "how to decrypt aes files.lnk", "HELP_DECRYPT.PNG", "HELP_DECRYPT.lnk", "DecryptAllFiles*.txt", "Decrypt.exe", "AllFilesAreLocked*.bmp", "MESSAGE.txt","*.locky","*.ezz", "*.ecc", "*.exx", "*.7z.encrypted", "*.ctbl", "*.encrypted", "*.aaa", "*.xtbl", "*.abc", "*.JUST", "*.EnCiPhErEd", "*.cryptolocker","*.micro","*.vvv")
In Windows Server 2008 R2, you will have to use filescrn.exe:
filescrn.exe filegroup add /filegroup:"Crypto-files" /members:"DECRYPT_INSTRUCTIONS.TXT|DECRYPT_INSTRUCTION.TXT| DecryptAllFiles.txt|enc_files.txt|HowDecrypt.txt|How_Decrypt.txt| How_Decrypt.html|HELP_TO_DECRYPT_YOUR_FILES.txt|HELP_RESTORE_FILES.txt| HELP_TO_SAVE_FILES.txt|restore_files*.txt| restore_files.txt|RECOVERY_KEY.TXT|HELP_DECRYPT.PNG|HELP_DECRYPT.lnk| DecryptAllFiles*.txt|Decrypt.exe|ATTENTION!!!.txt|AllFilesAreLocked*.bmp| MESSAGE.txt|*.locky|*.ezz|*.ecc|*.exx|*.7z.encrypted|*.ctbl| *.encrypted|*.aaa|*.xtbl|*.EnCiPhErEd|*.cryptolocker|*.micro|*.vvv| *.ecc|*.ezz|*.exx|*.zzz|*.xyz|*.aaa|*.abc|*.ccc|*.vvv|*.xxx| *.ttt|*.micro|*.encrypted|*.locked|*.crypto|*_crypt|*.crinf| *.r5a|*.XRNT|*.XTBL|*.crypt|*.R16M01D05|*.pzdc|*.good| *.LOL!|*.OMG!|*.RDM|*.RRK|*.encryptedRSA|*.crjoker| *.LeChiffre|*.keybtc@inbox_com|*.0x0|*.bleep|*.1999| *.vault|*.HA3|*.toxcrypt|*.magic|*.SUPERCRYPT|*.CTBL|*.CTB2|*.locky"
Tip. You can make a list of known file extensions yourself or use ready regularly updated lists from the following pages:
https://www.bleib-virenfrei.de/ransomware/
https://fsrm.experiant.ca/api/v1/combined
In the second case, you can download an up-to-date list of file extensions for FSRM directly from the webserver using Invoke-WebRequest
new-FsrmFileGroup -name "Anti-Ransomware File Groups" -IncludePattern @((Invoke-WebRequest -Uri "https://fsrm.experiant.ca/api/v1/combined").content | convertfrom-json | % {$_.filters})
Or use a ready file crypto_extensions.txt. You can save this file to the disk and update the created FSRM file group with it:
$ext_list = Get-Content .ransomware_extensions.txt
Set-FsrmFileGroup -Name "Crypto-files" -IncludePattern ($ext_list)
File Screen Templates Configuration
Create a new File Screen Template to determine the actions FSRM has to perform if it detects these files. To do it, in the FSRM console go to File Screen Management -> File Screen Templates. Create a new template by selecting Create File Screen Template.

In the Settings tab, specify the template name “Block_crypto_files”, screening type Active screening (do not allow to save these file types) and select Crypto-Files in the list of file groups.

In the E-mail Message tab, enable sending e-mail notifications and specify text of message subject and body.

In the Event Log tab, check making an entry to the system log with the note to specify only the name of the user: [Source Io Owner]

In the Command tab, you can select what to do if one of these file types is detected. We’ll discuss it a bit later.
Save the changes. One more template will appear in the list.

How to Apply File Screen Template to a Disk or Folder
Now you only have to assign the created template to a disk or network share on your server. In the FSRM console, create a new rule Create File Screen.

In File screen path field, specify the local disk or the path to the directory you want to protect from the ransomware, and select the template Block_crypto_files created earlier in the list of templates.

Automatic Block of the User Infected by Ransomware
Now you have to configure the action FSRM will perform if files created by encryption malware are detected. We’ll use a ready script: Protect your File Server against Ransomware by using FSRM and Powershell (https://gallery.technet.microsoft.com/scriptcenter/Protect-your-File-Server-f3722fce). What does this script do? At the attempt of writing a prohibited file type to the network share, FSRM runs this script, which analyses the event log and prohibits a user to write files to the shared folder. Thus, the access of the infected user to the network share will be blocked.
Download this script and unpack it to the root of C: directory on your file server. Copy SubInACL (a tool that allows to change permissions for the network share) in to the same directory. The following files have to be located in the directory:
- RansomwareBlockSmb.ps1
- StartRansomwareBlockSmb.cmd
- subinacl.exe

Note. I had to change these strings in PS script:
$SubinaclCmd = "C:subinacl /verbose=1 /share \127.0.0.1" + "$SharePart" + " /deny=" + "$BadUser"
and
if ($Rule -match "Crypto-Files")
In the Command tab of “Block crypto files” template settings, specify that the command prompt containing the argument StartRansomwareBlockSmb.cmd must be started:
Run this command or script: c:windowssystem32cmd.exe
Command arguments: /c “c:StartRansomwareBlockSmb.cmd”
The command has to be run as Local System.

FSRM Protection Test
Let’s test how the FSRM protection against ransomware. To do it, create a file with any extension in the protected directory and try to change this extension to the prohibited one .locky.
When trying to save the prohibited file, FSRM will make an entry in the log:
Event ID: 8215

Source: SRMSVC
Based on the data from the log, RansomwareBlockSmb.ps1 script will prohibit the current user from accessing this directory, by changing share access permissions.

The protection works! In the log located in the root of the disk you can see the directory and the user account the ransomware has been attempted to be run from.
If you need a higher protection level, you can switch from the black list of files to the white list, and then you’ll be able to save only allowed file types.
So, we have considered how to automatically block network share access to the users whose computers are infected by ransomware. Naturally, using FSRM in this way cannot fully protect files on your servers from this kind of malware, but it is suitable as one of the protection levels. In the next articles, we’ll consider another variant of protection against encryption ransomware:
- How to Recover User Files from VSS Snapshots After Getting Infected with the Ransomware
- Software Restriction Policies to Prevent Ransomware