Протокол HTTPS позволяет передавать данные между сайтом и пользователем в зашифрованном виде, то есть посторонние лица не могут увидеть содержимое передаваемых данных и изменить их.
Веб-сервер Apache поддерживает работу HTTPS. Для настройки HTTPS на Apache нужен SSL сертификат. Точнее говоря, «SSL сертификат» включает в себя приватный ключ и публичный ключ (сертификат). Также вместе с SSL ключами дополнительно могут присылаться сертификаты центра сертификации, корневой сертификат.
Сертификаты SSL
SSL сертификаты можно разделить на два вида: валидные и самоподписанные.
Сертификат SSL можно сгенерировать у себя на компьютере. Причём можно сгенерировать для любого доменного имени. Но к таким сертификатам у веб-браузеров нет доверия. Поэтому если открыть сайт, защищённый таким сертификатом, то веб-браузер напишет ошибку, что сертификат получен из ненадёжного источника и либо запретит открывать этот сайт, либо предложит перейти на сайт на ваш страх и риск. Это так называемые «самоподписанные сертификаты». Чтобы браузер не выдавал ошибку о ненадёжного сертификате, его нужно добавить в список доверенных. Такие сертификаты подойдут для тестирования веб-сервера и обучению настройки веб-сервера для работы с SSL и HTTPS. Ещё такой сертификат можно использовать на сайте, к которому имеет доступ ограниченный круг лиц (несколько человек) — например, для сайтов в локальной сети. В этом случае они все могут добавить сертификат в доверенные.
Для реального сайта такой сертификат не подойдёт.
Для рабочего окружения нужен валидный сертификат, его можно получить двумя способами:
1) получить тестовый сертификат на 3 месяца (затем его можно продлить)
2) купить сертификат — в этом случае он действует от года и более
Валидный сертификат отличается от самоподписанного тем, что сторонний сервис удостоверяет подлинность этого сертификата. Собственно, оплачивается именно эта услуга удостоверения, а не выдача сертификата.
Данная статья посвящена вопросу, как настроить Apache в Windows для работы с протоколом HTTPS, будет показано, как подключить SSL сертификаты к Apache в Windows. Поэтому для целей тестирования и обучения нам хватит самоподписанного сертификата.
Как сгенерировать SSL сертификат в Windows
У меня веб-сервер установлен в папку C:ServerbinApache24, поэтому если у вас он в другой директории, то подправьте команды под свои условия.
Откройте командную строку Windows (Win+x, далее выберите «Windows PowerShell (администратор)»). В командной строке введите команды:
cmd
cd C:ServerbinApache24bin
set OPENSSL_CONF=C:ServerbinApache24confopenssl.cnf
openssl.exe genpkey -algorithm RSA -pkeyopt rsa_keygen_bits:2048 -out localhost.key
openssl.exe req -new -key localhost.key -out localhost.csr
При вводе последней команды появятся запросы на английском языке. Ниже следует их перевод.
You are about to be asked to enter information that will be incorporated
into your certificate request.
What you are about to enter is what is called a Distinguished Name or a DN.
There are quite a few fields but you can leave some blank
For some fields there will be a default value,
If you enter '.', the field will be left blank.
-----
Перевод:
Вас попросят ввести информацию, которая будет включена в запрос вашего сертификата. То, что вы будете вводить, называется Distinguished Name или DN. Там всего несколько полей, которые можно оставить пустыми. В некоторых полях будут значения по умолчанию. Если вы введёте ‘.’, то поле будет оставлено пустым.
Далее:
Country Name (2 letter code) [AU]:
Перевод:
Двухбуквенное имя страны (двухбуквенный код)
Далее:
State or Province Name (full name) [Some-State]:
Перевод:
Название штата или провинции/области (полное имя)
Далее:
Locality Name (eg, city) []:
Перевод:
Название населённого пункта (например, города)
Далее:
Organization Name (eg, company) [Internet Widgits Pty Ltd]:
Перевод:
Название организации (т.е. компании).
Далее:
Organizational Unit Name (eg, section) []:
Перевод:
Подразделение организации (т.е. отдел)
Далее:
Common Name (e.g. server FQDN or YOUR name) []:
Перевод:
Общее имя (например, FQDN сервера или ВАШЕ имя). Это самая важная часть — здесь нужно ввести доменное имя. Можете ввести localhost.
Далее:
Email Address []:
Перевод:
Адрес электронной почты
Далее:
Please enter the following 'extra' attributes
to be sent with your certificate request
A challenge password []:
An optional company name []:
Перевод:
Пожалуйста, введите следующие «дополнительные» атрибуты для отправки с вашим запросом сертификата
Пароль запроса:
Опциональное имя компании:
Теперь выполните команду:
openssl.exe x509 -req -days 365 -in localhost.csr -signkey localhost.key -out localhost.crt
В результате в каталоге C:ServerbinApache24bin должны появиться три новых файла:
- localhost.key
- localhost.csr
- localhost.crt
Из них нам понадобятся только два:
- localhost.key
- localhost.crt
Как в Windows для Apache подключить SSL сертификаты
При использовании сертификатов для настройки реального веб-сайта, удобнее создать виртуальный хост с примерно следующими настройками:
LoadModule ssl_module modules/mod_ssl.so

Listen 443
<VirtualHost *:443>
    ServerName www.example.com
    SSLEngine on
    SSLCertificateFile "/путь/до/www.example.com.crt"
    SSLCertificateKeyFile "/путь/до/www.example.com.key"
</VirtualHost>
Для настройки использования SSL на локальном веб-сервере Apache в Windows следуйте инструкции ниже (в моём случае веб-сервер установлен по этой инструкции, если у вас не так, то отредактируйте пути до файлов).
В каталоге C:Server создайте новую папку certs и переместите туда файлы localhost.key и localhost.crt.
В директории C:ServerbinApache24conf откройте текстовым редактором файл httpd.conf. В самый низ добавьте туда строки:
LoadModule ssl_module modules/mod_ssl.so

Listen 443
<VirtualHost _default_:443>
    DocumentRoot "c:/Server/data/htdocs/"
    ServerName localhost:443
    ServerAdmin admin@example.com
    ErrorLog "${SRVROOT}/logs/error-ssl.log"
    TransferLog "${SRVROOT}/logs/access-ssl.log"

    SSLEngine on

    SSLCertificateFile "C:Servercertslocalhost.crt"
    SSLCertificateKeyFile "C:Servercertslocalhost.key"
</VirtualHost>
Обратите внимание, что вам может понадобиться отредактировать следующие директивы
- DocumentRoot — укажите путь до сайтов на сервере
- ServerName — укажите имя вашего хоста, если это не локалхост
Обратите внимание, что мы не просто поместили эти строки в конфигурационный файл, а заключили их в контейнер VirtualHost. Дело в том, что если этого не сделать, то директива SSLEngine on включит SSL для всего веб-сервера, и даже при попытке открыть сайты на 80 порту, эти подключения будут обрабатываться как HTTPS, что вызовет ошибку «Bad Request. Your browser sent a request that this server could not understand». По этой причине эти настройки помещены в контейнер виртуального хоста. Обратите внимание, что используется ключевое слово _default_ — то есть сюда будут собираться все запросы на 443 порт если они не предназначены для другого хоста, который также настроен. То есть при желании вы можете создать больше виртуальных хостов для работы с HTTPS, при этом вместо _default_ указывайте IP хоста или символ * (звёздочка).
Связанная статья: Виртуальный хост Apache по умолчанию. _default_ и catch-all в Apache
После этого сохраните изменения, закройте файл и перезапустите веб-сервер.
c:ServerbinApache24binhttpd.exe -k restart
Для проверки сделанных изменений, перейдите по адресу https://localhost/ (протокол HTTPS). Поскольку сертификат является самоподписанным, то появится такое сообщение:
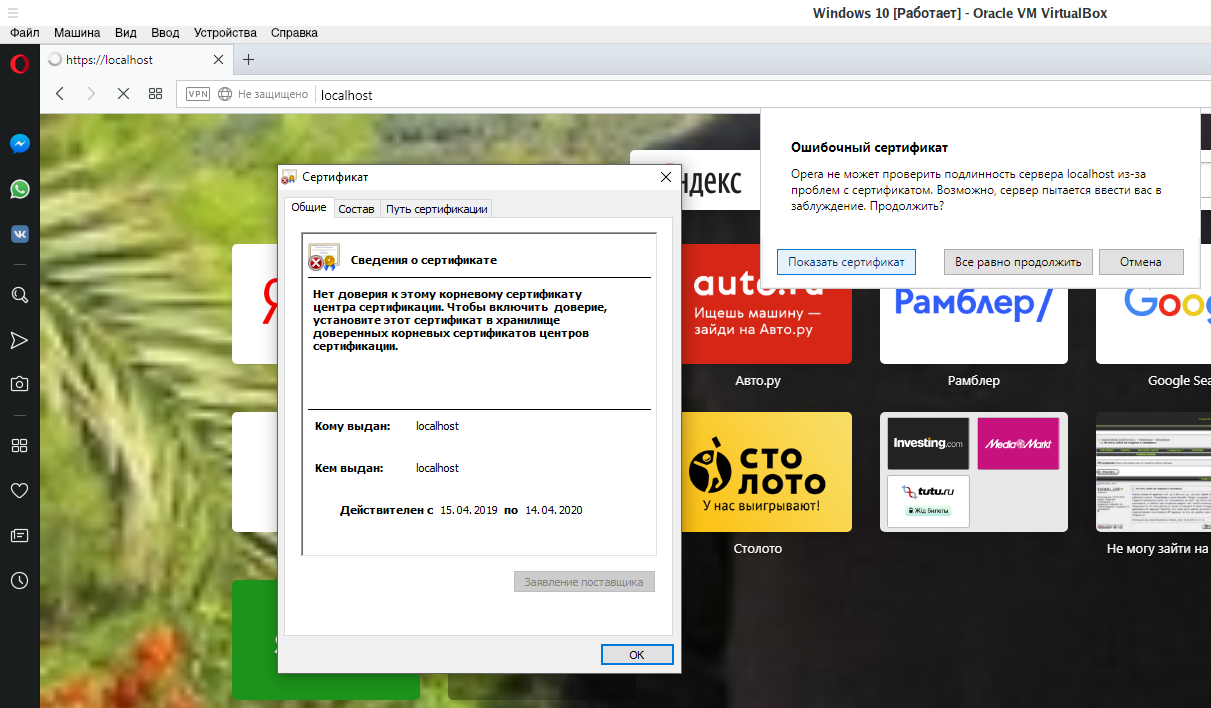
К самоподписанным сертификатам нет доверия и эту ошибку нельзя убрать без добавления таких сертификатов в доверенные. Для перехода нажмите «Всё равно продолжить».
Как уже было сказано, валидные сертификаты нужно покупать, либо использовать тестовые. В чём подвох использования тестовых сертификатов? Формально, в какой-то момент их могут перестать выдавать, но, на самом деле, уже сейчас многие сайты годами живут с такими тестовыми сертификатами. На современных хостингах настроено автоматическое подключение и продление таких сертификатов — это просто супер удобно. Обычно на хостингах предусмотрено некоторое количество абсолютно бесплатных SSL сертификатов с автоматическим продлением, но за небольшую плату (10 рублей в месяц), можно подключить тестовые сертификаты для любого количества сайтов. Пример такого хостинга здесь.
Решение проблем
При некоторых условиях может возникнуть следующая ошибка:
Can't open C:Program FilesCommon FilesSSL/openssl.cnf for reading, No such file or directory
9112:error:02001003:system library:fopen:No such process:cryptobiobss_file.c:72:fopen('C:Program FilesCommon FilesSSL/openssl.cnf','r')
9112:error:2006D080:BIO routines:BIO_new_file:no such file:cryptobiobss_file.c:79:
unable to find 'distinguished_name' in config
problems making Certificate Request
9112:error:0E06D06A:configuration file routines:NCONF_get_string:no conf or environment variable:cryptoconfconf_lib.c:270:
Главная подсказка в первой строке: Can’t open C:Program FilesCommon FilesSSL/openssl.cnf for reading, No such file or directory — она означает, что возникла ошибка чтения файла C:Program FilesCommon FilesSSL/openssl.cnf из-за того, что он отсутствует.
Файл openssl.cnf поставляется с самим веб-сервером Apache и находится в папке conf. Поэтому есть несколько вариантов, как исправить эту ошибку. Например, можно создать нужные папки и скопировать туда этот файл. Но можно пойти более простым путём — на время создания сертификатов установить переменную окружения OPENSSL_CONF указав в ней правильный путь до файла.
Также нужно переключиться из PowerShell в обычную командную строку Windows, поскольку иначе переменная окружения почему-то не устанавливается. Допустим, сервер размещён в папке C:ServerbinApache24bin, тогда файл openssl.cnf расположен по пути C:ServerbinApache24confopenssl.cnf, в этом случае, чтобы исправить ошибку Can’t open C:Program FilesCommon FilesSSL/openssl.cnf for reading, No such file or directory нужно выполнить:
cmd
cd C:ServerbinApache24bin
set OPENSSL_CONF=C:ServerbinApache24confopenssl.cnf
Отредактируйте пути в этих командах в соответствии с вашей структурой папок.
Связанные статьи:
- Ошибка «You’re speaking plain HTTP to an SSL-enabled server port» (РЕШЕНО) (100%)
- Apache для Windows (51.2%)
- Как запустить Apache на Windows (51.2%)
- Документация по Apache на русском языке (51.2%)
- Как подключить PHP к Apache на Windows (51.2%)
- Окно Apache появляется и сразу пропадает (РЕШЕНО) (RANDOM — 51.2%)
 Обновлено: 17.02.2022
Опубликовано: 31.01.2017
Используемые термины: Apache, CentOS, Ubuntu, FreeBSD.
Инструкция написана для операционных систем на базе UNIX.
Получение сертификата
Модуль Apache для работы с SSL
Настройка веб-сервера
Проверка
Редирект с http на https
Apache + NGINX
Шаг 1. Создание сертификата
Для боевого сервера, сертификат должен быть получен от доверенного центра сертификации — либо локального для компании, либо коммерческого. Или получен бесплатно от Let’s Ecnrypt.
Для тестовой среды можно сгенерировать самоподписанный сертификат. Для этого сперва переходим в рабочую папку.
а) на Red Hat / CentOS:
cd /etc/httpd
б) на Debian / Ubuntu:
cd /etc/apache2
в) во FreeBSD:
cd /usr/local/etc/apache24
Создаем папку для сертификатов и переходим в нее:
mkdir ssl ; cd ssl
И генерируем сертификат:
openssl req -new -x509 -days 1461 -nodes -out cert.pem -keyout cert.key -subj «/C=RU/ST=SPb/L=SPb/O=Global Security/OU=IT Department/CN=test.dmosk.local/CN=test»
* в данном примере созданы открытый и закрытый ключи на 4 года (1461 день); значения параметра subj могут быть любыми в рамках тестирования.
Шаг 2. Установка модуля SSL для Apache
Прежде, чем устанавливать модуль, выполняем команду:
apachectl -M | grep ssl
Если видим строчку, на подобие:
ssl_module (shared)
Спускаемся к шагу 3 данной инструкции.
Иначе, устанавливаем httpd ssl_module.
а) Для CentOS:
yum install mod_ssl
б) Для Ubuntu/Debian:
a2enmod ssl
в) Для FreeBSD:
Открываем файл конфигурации apache:
ee /usr/local/etc/apache24/httpd.conf
* подразумевается, что используется apache 2.4.
Находим и снимаем комментарии со следующих строчек:
…
LoadModule ssl_module libexec/apache24/mod_ssl.so
…
Include etc/apache24/extra/httpd-ssl.conf
…
И ставим комментарии в следующих строках:
#<IfModule ssl_module>
#SSLRandomSeed startup builtin
#SSLRandomSeed connect builtin
#</IfModule>
Чтобы настройки применились, необходимо перезапустить веб-сервер одной из команд:
systemctl restart httpd
systemctl restart apache2
service apache2 restart
* первая, как правило, используется в системах на базе RPM, вторая — DEB, третья — BSD.
Шаг 3. Настройка Apache
Выходим из папки ssl:
cd ..
Открываем файл с настройкой виртуальный доменов.
Для CentOS:
vi conf.d/site.conf
* где site.conf — конфигурационный файл для конкретного сайта
Для Ubuntu/Debian:
vi sites-enabled/site
Для FreeBSD:
ee extra/httpd-vhosts.conf
В открытый файл добавляем следующее:
<VirtualHost *:443>
ServerName site.ru
DocumentRoot /var/www/apache/data
SSLEngine on
SSLCertificateFile ssl/cert.pem
SSLCertificateKeyFile ssl/cert.key
#SSLCertificateChainFile ssl/cert.ca-bundle
</VirtualHost>
* где:
- ServerName — домен сайта;
- DocumentRoot — расположение файлов сайта в системе;
- SSLCertificateFile и SSLCertificateKeyFile — пути до файлов ключей, которые были сгенерированы на шаге 1;
- SSLCertificateChainFile — при необходимости, путь до цепочки сертификатов (если используем не самоподписанный сертификат).
Проверяем корректность настроек в Apache:
apachectl configtest
Если видим:
Syntax OK
Перечитываем конфигурацию apache:
apachectl graceful
Шаг 4. Проверка работоспособности
Открываем браузер и переходим на наш сайт, добавив https://. При использовании самоподписного сертификата (как в нашем случае), обозреватель выдаст предупреждение, что передача данных не безопасна. Подтверждаем наше намерение открыть сайт. Если все работает, переходим к шагу 5.
Если сайт не заработал, пробуем найти причину по log-файлу. Как правило, он находится в каталоге /var/log/apache или /var/log/httpd.
Шаг 5. Настройка редиректа
Чтобы все запросы по http автоматически перенаправлялись на https, необходимо настроить перенаправление (redirect). Есть несколько способов это сделать.
В конфигурационном файле
Открываем файл с настройкой виртуальных доменов (как в шаге 3) и дописываем следующее:
<VirtualHost *:80>
ServerName site.ru
RewriteEngine On
RewriteCond %{HTTPS} off
RewriteRule (.*) https://%{HTTP_HOST}%{REQUEST_URI} [R=301,L]
</VirtualHost>
* в конкретном примере, мы перенаправили все запросы для сайта site.ru.
** обратите особое внимание, что если у Вас уже есть VirtualHost *:80 для настраиваемого сайта, необходимо его закомментировать или отредактировать.
В файле .htaccess
RewriteCond %{SERVER_PORT} ^80$
RewriteRule ^.*$ https://%{SERVER_NAME}%{REQUEST_URI} [R=301,L]
Установка модуля rewrite
Чтобы перенаправление работало в Apache, необходимо установить модуль rewrite.
а) в CentOS открываем конфигурационный файл и проверяем наличие строки:
vi /etc/httpd/conf.modules.d/00-base.conf
LoadModule rewrite_module modules/mod_rewrite.so
* если ее нет, добавляем; если она закомментирована, снимаем комментарий.
systemctl restart httpd
б) в Ubuntu:
a2enmod rewrite
systemctl restart apache2
Apache + NGINX
При использовании веб-сервера на базе и Apache и NGINX, как правило, наружу смотрит последний. В таком случае, именно он будет отвечать на http-запросы, и в таком случае нужно настраивать SSL на NGINX.
Running Apache on Windows 10 here. I couldn’t get Chrome to trust the certificate made in the top answer by Simon. What I ended up doing was using PowerShell to generate a self signed certificate.
Step 1 — Generate Self-Signed certificate
In PowerShell
New-SelfSignedCertificate -DnsName "localhost" -CertStoreLocation "cert:LocalMachineMy" 1
Step 2 — Configure and Export Certificate
Type Certificate into the Windows search bar, click the Manage Computer Certificates control panel item that is suggested.
From the Certificate Management program that comes up (certlm), you should now see a localhost key under Personal >> Certificates.
I copied this certificate into Trusted Root Certification Authorities. I’ll be honest in that I’m not sure if that’s necessary.
Selecting the newly copied certificate, double click on it (the localhost certificate). From the Certificate modal, click the Details tab, then the Copy to File... button.
This will bring up and Export Wizard, I chose to export the private key, click next. I also chose to Export all extended properties (again, I’m not certain if that was necessary). I chose to use a simple password (pass) and the default encryption.
Choose a folder to export to and name the file. You can always move and rename the file if necessary. For simplicity’s sake let’s copy it to your conf folder under your Apache installation (In my case: C:apacheconf) and name the file myCert (the resulting file will be a .pfx file)
Step 3 — Convert .pfx file for use with Apache
From here I basically followed the tutorial here, but I’ll add instructions here (tweaked for our settings) in case that site goes down.
Open your Command Prompt in the /apache/conf/ folder
Run the following commands: Note: This assumes you have openssl.exe in the bin folder in the apache root folder (this should be standard/default)
..binopenssl pkcs12 -in myCert.pfx -nocerts -out privateKey.pem
This will prompt you for a password, enter what you input for Step 2 when you exported the .pfx file. In my case, this is pass. I entered the same password for the PEM phrase and again to verify. This will create a new file called privateKey.pem in your conf folder.
Then, run
..binopenssl rsa -in privateKey.pem -out private.pem
Again you will be prompted for a password (Enter pass phrase for privateKey.pem:), use the password you set for privateKey.pem. (In my case, pass)
You should see a message that says writing RSA key and a new file called private.pem in your conf/ folder. This will be your SSLCertificateKeyFile.
Now to generate the corresponding Server Certificate. Run:
..binopenssl pkcs12 -in myCert.pfx -clcerts -nokeys -out EntrustCert.pem
This will prompt you for a password, enter what you input for Step 2 when you exported the .pfx file. Enter it and you will now have a file called EntrustCert.pem in your conf folder. This is your SSLCertificateFile
Step 4 — Configure httpd.conf
Use the new files created as you server’s key and certificate. Be sure to change your document root to where your files are!
ServerName localhost:80
Protocols h2 h2c http/1.1
<Directory />
    Options FollowSymLinks
    AllowOverride All
</Directory>

<VirtualHost _default_:443>
  ServerName localhost:443
  DocumentRoot ${SRVROOT}/htdocs/MYSITE
  SSLEngine on
  SSLCertificateFile "${SRVROOT}/conf/EntrustCert.pem"
  SSLCertificateKeyFile "${SRVROOT}/conf/private.pem"
</VirtualHost>
Also in httpd.conf:
- Make sure
LoadModule ssl_module modules/mod_ssl.sois uncommented (no#in front) - Uncomment
LoadModule socache_shmcb_module modules/mod_socache_shmcb.so - Uncomment
LoadModule http2_module modules/mod_http2.so - Uncomment
Include conf/extra/httpd-ssl.conf(NOTE: Ensure that’s where the file is!)
I also have curl and open ssl libraries included:
# load curl and open ssl libraries
LoadFile "C:phplibeay32.dll"
LoadFile "C:phpssleay32.dll"
LoadFile "C:phplibssh2.dll"
These modules shouldn’t be necessary, but I’ll note that I have them enabled:
LoadModule rewrite_module modules/mod_rewrite.so
LoadModule filter_module modules/mod_filter.so
LoadModule deflate_module modules/mod_deflate.so
Step 5 — Config httpd-ssl.conf
In the extra/ folder in the conf/ folder you should see a file called httpd-ssl.conf.
5a. Change the DocumentRoot —
Change the DocumentRoot from the default to the directory where your files are.
5b. Change the ServerName —
Change the ServerName from the default (something like www.example.com:443) to localhost:443
5c. Change the SSLCertificateFile
Change the SSLCertificateFile from the default (${SRVROOT}/conf/server.crt) to ${SRVROOT}/conf/EntrustCert.pem
5c. Change the SSLCertificateKeyFile
Change the SSLCertificateKeyFile from the default (${SRVROOT}/conf/server.key) to ${SRVROOT}/conf/private.pem
All together, in the <VirtualHost _default_:443> tag.
#   General setup for the virtual host
DocumentRoot "${SRVROOT}/htdocs/MYSITE"
ServerName localhost:443
ServerAdmin admin@example.com
ErrorLog "${SRVROOT}/logs/error.log"
TransferLog "${SRVROOT}/logs/access.log"

#   SSL Engine Switch:
#   Enable/Disable SSL for this virtual host.
SSLEngine on

#   Server Certificate:
#   Point SSLCertificateFile at a PEM encoded certificate.  If
#   the certificate is encrypted, then you will be prompted for a
#   pass phrase.  Note that a kill -HUP will prompt again.  Keep
#   in mind that if you have both an RSA and a DSA certificate you
#   can configure both in parallel (to also allow the use of DSA
#   ciphers, etc.)
#   Some ECC cipher suites (http://www.ietf.org/rfc/rfc4492.txt)
#   require an ECC certificate which can also be configured in
#   parallel.
SSLCertificateFile "${SRVROOT}/conf/EntrustCert.pem"
#SSLCertificateFile "${SRVROOT}/conf/server-dsa.crt"
#SSLCertificateFile "${SRVROOT}/conf/server-ecc.crt"

#   Server Private Key:
#   If the key is not combined with the certificate, use this
#   directive to point at the key file.  Keep in mind that if
#   you've both a RSA and a DSA private key you can configure
#   both in parallel (to also allow the use of DSA ciphers, etc.)
#   ECC keys, when in use, can also be configured in parallel
SSLCertificateKeyFile "${SRVROOT}/conf/private.pem"
#SSLCertificateKeyFile "${SRVROOT}/conf/server-dsa.key"
#SSLCertificateKeyFile "${SRVROOT}/conf/server-ecc.key"
Restart Apache
After making these changes you should be able to restart Apache and navigate to https://localhost without a security warning and a little padlock!

I hope this helps someone! 😊
Sources:
1.) Auri Rahimzadeh’s answer on creating a self-signed certificate
2.) Entrust Datacard — How do I convert a .pfx to be used with an Apache server?
Running Apache on Windows 10 here. I couldn’t get Chrome to trust the certificate made in the top answer by Simon. What I ended up doing was using PowerShell to generate a self signed certificate.
Step 1 — Generate Self-Signed certificate
In PowerShell
New-SelfSignedCertificate -DnsName "localhost" -CertStoreLocation "cert:LocalMachineMy" 1
Step 2 — Configure and Export Certificate
Type Certificate into the Windows search bar, click the Manage Computer Certificates control panel item that is suggested.
From the Certificate Management program that comes up (certlm), you should now see a localhost key under Personal >> Certificates.
I copied this certificate into Trusted Root Certification Authorities. I’ll be honest in that I’m not sure if that’s necessary.
Selecting the newly copied certificate, double click on it (the localhost certificate). From the Certificate modal, click the Details tab, then the Copy to File... button.
This will bring up and Export Wizard, I chose to export the private key, click next. I also chose to Export all extended properties (again, I’m not certain if that was necessary). I chose to use a simple password (pass) and the default encryption.
Choose a folder to export to and name the file. You can always move and rename the file if necessary. For simplicity’s sake let’s copy it to your conf folder under your Apache installation (In my case: C:apacheconf) and name the file myCert (the resulting file will be a .pfx file)
Step 3 — Convert .pfx file for use with Apache
From here I basically followed the tutorial here, but I’ll add instructions here (tweaked for our settings) in case that site goes down.
Open your Command Prompt in the /apache/conf/ folder
Run the following commands: Note: This assumes you have openssl.exe in the bin folder in the apache root folder (this should be standard/default)
..binopenssl pkcs12 -in myCert.pfx -nocerts -out privateKey.pem
This will prompt you for a password, enter what you input for Step 2 when you exported the .pfx file. In my case, this is pass. I entered the same password for the PEM phrase and again to verify. This will create a new file called privateKey.pem in your conf folder.
Then, run
..binopenssl rsa -in privateKey.pem -out private.pem
Again you will be prompted for a password (Enter pass phrase for privateKey.pem:), use the password you set for privateKey.pem. (In my case, pass)
You should see a message that says writing RSA key and a new file called private.pem in your conf/ folder. This will be your SSLCertificateKeyFile.
Now to generate the corresponding Server Certificate. Run:
..binopenssl pkcs12 -in myCert.pfx -clcerts -nokeys -out EntrustCert.pem
This will prompt you for a password, enter what you input for Step 2 when you exported the .pfx file. Enter it and you will now have a file called EntrustCert.pem in your conf folder. This is your SSLCertificateFile
Step 4 — Configure httpd.conf
Use the new files created as you server’s key and certificate. Be sure to change your document root to where your files are!
ServerName localhost:80
Protocols h2 h2c http/1.1
<Directory />
    Options FollowSymLinks
    AllowOverride All
</Directory>

<VirtualHost _default_:443>
  ServerName localhost:443
  DocumentRoot ${SRVROOT}/htdocs/MYSITE
  SSLEngine on
  SSLCertificateFile "${SRVROOT}/conf/EntrustCert.pem"
  SSLCertificateKeyFile "${SRVROOT}/conf/private.pem"
</VirtualHost>
Also in httpd.conf:
- Make sure
LoadModule ssl_module modules/mod_ssl.sois uncommented (no#in front) - Uncomment
LoadModule socache_shmcb_module modules/mod_socache_shmcb.so - Uncomment
LoadModule http2_module modules/mod_http2.so - Uncomment
Include conf/extra/httpd-ssl.conf(NOTE: Ensure that’s where the file is!)
I also have curl and open ssl libraries included:
# load curl and open ssl libraries
LoadFile "C:phplibeay32.dll"
LoadFile "C:phpssleay32.dll"
LoadFile "C:phplibssh2.dll"
These modules shouldn’t be necessary, but I’ll note that I have them enabled:
LoadModule rewrite_module modules/mod_rewrite.so
LoadModule filter_module modules/mod_filter.so
LoadModule deflate_module modules/mod_deflate.so
Step 5 — Config httpd-ssl.conf
In the extra/ folder in the conf/ folder you should see a file called httpd-ssl.conf.
5a. Change the DocumentRoot —
Change the DocumentRoot from the default to the directory where your files are.
5b. Change the ServerName —
Change the ServerName from the default (something like www.example.com:443) to localhost:443
5c. Change the SSLCertificateFile
Change the SSLCertificateFile from the default (${SRVROOT}/conf/server.crt) to ${SRVROOT}/conf/EntrustCert.pem
5c. Change the SSLCertificateKeyFile
Change the SSLCertificateKeyFile from the default (${SRVROOT}/conf/server.key) to ${SRVROOT}/conf/private.pem
All together, in the <VirtualHost _default_:443> tag.
#   General setup for the virtual host
DocumentRoot "${SRVROOT}/htdocs/MYSITE"
ServerName localhost:443
ServerAdmin admin@example.com
ErrorLog "${SRVROOT}/logs/error.log"
TransferLog "${SRVROOT}/logs/access.log"

#   SSL Engine Switch:
#   Enable/Disable SSL for this virtual host.
SSLEngine on

#   Server Certificate:
#   Point SSLCertificateFile at a PEM encoded certificate.  If
#   the certificate is encrypted, then you will be prompted for a
#   pass phrase.  Note that a kill -HUP will prompt again.  Keep
#   in mind that if you have both an RSA and a DSA certificate you
#   can configure both in parallel (to also allow the use of DSA
#   ciphers, etc.)
#   Some ECC cipher suites (http://www.ietf.org/rfc/rfc4492.txt)
#   require an ECC certificate which can also be configured in
#   parallel.
SSLCertificateFile "${SRVROOT}/conf/EntrustCert.pem"
#SSLCertificateFile "${SRVROOT}/conf/server-dsa.crt"
#SSLCertificateFile "${SRVROOT}/conf/server-ecc.crt"

#   Server Private Key:
#   If the key is not combined with the certificate, use this
#   directive to point at the key file.  Keep in mind that if
#   you've both a RSA and a DSA private key you can configure
#   both in parallel (to also allow the use of DSA ciphers, etc.)
#   ECC keys, when in use, can also be configured in parallel
SSLCertificateKeyFile "${SRVROOT}/conf/private.pem"
#SSLCertificateKeyFile "${SRVROOT}/conf/server-dsa.key"
#SSLCertificateKeyFile "${SRVROOT}/conf/server-ecc.key"
Restart Apache
After making these changes you should be able to restart Apache and navigate to https://localhost without a security warning and a little padlock!
I hope this helps someone! 😊
Sources:
1.) Auri Rahimzadeh’s answer on creating a self-signed certificate
2.) Entrust Datacard — How do I convert a .pfx to be used with an Apache server?
SSL certificate helps you improve web traffic between client browser and your server, and increase data security. Here’s how to install SSL certificate on Apache Windows.
Here are the steps to install SSL certificate on Apache Windows.
1. Enable mod_ssl
mod_ssl is an Apache module required to install and manage SSL/TLS certificates. You can enable it in your Apache server by editing the main server configuration file.
Open Apache server configuration httpd.conf file at c:Program FilesApache Software FoundationApache2.2conf
Uncomment the following lines by removing # at their beginning:
#Loadmodule ssl_module modules/mod_ssl.so
#Include conf/extra/httpd-default.conf
Now they should appear as:
Loadmodule ssl_module modules/mod_ssl.so
Include conf/extra/httpd-default.conf
Bonus Read : How to Generate CSR for SSL Certificate
2. Get SSL Certificate
Next, get the SSL/TLS certificate bundle from your certificate authority such as Namecheap, RapidSSL, Comodo, GoDadddy, Let’s Encrypt, etc. You can also use a free SSL provider like SSLForFree.
You will get 3 files from certificate authority.
- key (e.g private.key) – your key file. Don’t share this with anyone publicly
- Certificate (e.g certificate.crt) – actual SSL/TLS certificate for your domain
- Ca_bundle (e.g ca_bundle.crt) – Root/intermediate certificate
Bonus Read : How to Redirect non-www to www in Apache
3. Apache SSL Configuration
Now that we have setup the prerequisites, we will configure SSL certificate in Apache
Download the 3 files mentioned in step 2 to c:Program FilesApache Software FoundationApache2.2conf
Next, open Apache SSL configuration file httpd-ssl.conf at c:Program FilesApache Software FoundationApache2.2confextras
Add the following lines in VirtualHost tag before </VirtualHost> line.
SSLEngine On
SSLCertificateFile "C:/Program Files/Apache Software Foundation/Apache2.2/conf/certificate.crt"
SSLCertificateChainFile "C:/Program Files/Apache Software Foundation/Apache2.2/conf/ca_bundle.crt"
SSLCertificateKeyFile "C:/Program Files/Apache Software Foundation/Apache2.2/conf/private.key"
You VirtualHost block will look something like this
<VirtualHost _default_:443>
DocumentRoot “Your Website's Root folder location”
ServerName www.example.com:443
SSLEngine On
SSLCertificateFile "/etc/apache2/ssl/certificate.crt"
SSLCertificateChainFile "/etc/apache2/ssl/ca_bundle.crt"
SSLCertificateKeyFile "/etc/apache2/ssl/private.key"
</VirtualHost>
In the above lines, we use 3 Apache server directives
- SSLCertificateFile – Certificate CRT file path
- SSLCertificateKeyFile – Private key file path
- SSLCertificateChainFile – CA bundle file path
Bonus Read : How to Redirect URL to Another URL
4. Test Apache Configuration and Restart Server
Restart Apache Server using its Server Manager
Now you have installed SSL certificate in Apache web server. Open a browser and visit https:// version of your domain (e.g https://www.example.com).
You will see a lock symbol next to your URL, in browser’s address bar, indicating that your website’s SSL/TLS certificate is working properly.

Hopefully, now you can configure SSL certificate in Apache for Windows.
Ubiq makes it easy to visualize data in minutes, and monitor in real-time dashboards. Try it Today!
Related posts:
- About Author
![]()
 Сегодня защищенное соединение перестало быть уделом сайтов, работающих с пользовательскими данными, а стало насущной необходимостью для всех, даже если у вас простой блог о личном увлечении. Большинство современных браузеров при заходе на простой HTTP-сайт уже указывают в адресной строке, что подключение не защищено, но в скором будущем начнут помечать такие сайты как небезопасные. Тем более что с приходом Let’s Encrypt шифрование стало доступно каждому и настроить его несложно, о чем мы и расскажем в данной статье.
Научиться настраивать MikroTik с нуля или систематизировать уже имеющиеся знания можно на углубленном курсе по администрированию MikroTik. Автор курса, сертифицированный тренер MikroTik Дмитрий Скоромнов, лично проверяет лабораторные работы и контролирует прогресс каждого своего студента. В три раза больше информации, чем в вендорской программе MTCNA, более 20 часов практики и доступ навсегда.
Начнем мы с наиболее популярного веб-сервера Apache, первоначальная настройка которого выполнена по нашей статье: Настраиваем веб-сервер на базе Apache в Debian / Ubuntu Server. В данной статье будет использоваться Apache 2.4 установленный в среде Debian 10, но все сказанное ниже будет справедливо для любого основанного на Debian или Ubuntu дистрибутива, а с некоторыми поправками — для любой Linux системы.
Будем считать, что у нас уже настроен как минимум один виртуальный хост, на котором работает сайт, допустим, example.com, минимальная конфигурация виртуального хоста должна выглядеть примерно так:
<VirtualHost *:80>
    ServerName example.com
    ServerAdmin mail@example.com
    ServerAlias www.example.com
    DocumentRoot /var/www/example.com
    CustomLog ${APACHE_LOG_DIR}/example.com.access.log combined
    ErrorLog ${APACHE_LOG_DIR}/example.com.error.log   <Directory /var/www/example.com>
     Options -Includes -Indexes -ExecCGI
     AllowOverride All
  </Directory>
</VirtualHost>
Мы не будем подробно описывать значение опций, это сделано в указанной нами статье, а конфигурация приведена для примера, на который мы будем опираться в дальнейшем по ходу статьи.
Прежде всего нам потребуется настроить веб-сервер для работы с Let’s Encrypt, сделав так, чтобы сертификаты можно было легко получать для любого обслуживаемого сервером сайта без дополнительных настроек. Создадим для этого специальную директорию:
mkdir /var/www/letsencryptИ сделаем ее владельцем веб сервер:
chown -R www-data:www-data /var/www/letsencryptЗатем создадим файл конфигурации для Аpache:
touch /etc/apache2/conf-available/le.confи внесем в него следующий текст:
Alias /.well-known/acme-challenge/ /var/www/letsencrypt/.well-known/acme-challenge/<Directory "/var/www/letsencrypt/.well-known/acme-challenge/">
    Options None
    AllowOverride None
    ForceType text/plain
    Require all granted
    RedirectMatch 404 "^(?!/.well-known/acme-challenge/[w-]{43}$)"
</Directory>
Эта настройка будет перенаправлять все запросы к /.well-known/acme-challenge любого сайта в созданную нами директорию /var/www/letsencrypt.
Подключим конфигурационный файл:
a2enconf leи проверим конфигурацию на ошибки:
apachectl -tЗатем перезапустим веб-сервер
service apache2 restartСледующим шагом установим certbot, в современных дистрибутивах он включен в репозитории, поэтому достаточно выполнить:
apt install certbotЕсли вы используете более старые дистрибутивы, то обратитесь к нашей статье: Получаем сертификаты Let’s Encrypt при помощи Certbot
Пакет не требует начальной настройки и готов к работе сразу после установки. Перед тем, как получать сертификат, убедитесь, что к вашему серверу есть доступ из интернета. В любом случае советуем сначала выполнить пробное получение:
certbot certonly --dry-run --webroot -w /var/www/letsencrypt -d example.com -d www.example.comЗа тестовый режим отвечает ключ —dry-run, ключ —webroot указывает используемый плагин, в нашем случае отвечающий за работу с уже имеющемся веб-сервером. Опция -w указывает корневую директорию для Let’s Encrypt, которую мы создали и настроили ранее, а через ключи -d перечисляются домены и поддомены, для которых требуется получить сертификат. Если все прошло успешно вы получите лаконичное сообщение:
 После того, как тест прошел успешно можно выполнить настоящее получение сертификатов, для этого просто уберите ключ —dry-run из команды.
certbot certonly --webroot -w /var/www/letsencrypt -d example.com -d www.example.comТеперь вы получите более информативное сообщение, содержащее информацию о расположении полученных сертификатов и сроков их действия:
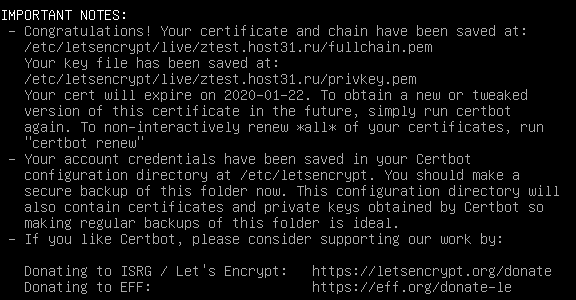 Все полученные сертификаты, точнее символические ссылки на них, хранятся в /etc/letsencrypt/live в директориях с именами доменов. Настройки продления можно найти в /etc/letsencrypt/renewal, откроем настройку нашего домена /etc/letsencrypt/renewal/example.com.conf и внесем в секцию [renewalparams] следующую опцию:
[renewalparams]
...
renew_hook = service apache2 reload
Порядок расположения опций значения не имеет. Параметр renew_hook позволяет указать действие, которое следует выполнить при успешном продлении сертификата, в нашем случае это перезапуск веб-сервера Apache.
Сертификат получен, можно переходить к настройке виртуального хоста для работы сайта по защищенному протоколу, рекомендуем скопировать текущий файл конфигурации и вносить настройки в него:
cp /etc/apache2/sites-available/example.com.conf /etc/apache2/sites-available/example.com-ssl.conf Затем откроем его и сразу изменим порт с 80 на 443:
<VirtualHost *:443>Также советуем изменить имена файлов логов:
CustomLog ${APACHE_LOG_DIR}/example.com-ssl.access.log combined
 ErrorLog ${APACHE_LOG_DIR}/example.com-ssl.error.log
Ниже добавим:
SSLEngine onSSLCertificateFile /etc/letsencrypt/live/example.com/cert.pem
SSLCertificateChainFile /etc/letsencrypt/live/example.com/fullchain.pem
SSLCertificateKeyFile /etc/letsencrypt/live/example.com/privkey.pem
SSLCACertificateFile /etc/letsencrypt/live/example.com/chain.pem
Эти опции включают SSL и указывают пути к сертификатам. В теории этого достаточно, но в современных условиях такие настройки не будут надежными, так как разрешают использование устаревших протоколов и нестойких шифров. Для получения современной и актуальной конфигурации SSL мы советуем воспользоваться сервисом moz://a SSL Configuration Generator, который предлагает несколько вариантов настроек, оптимальным является использование опции Intermediate.
Но не следует добавлять сразу все опции, ряд из них могут иметь достаточно «неожиданное» действие на неподготовленного пользователя. Поэтому сначала разберемся с шифрами и протоколами:
SSLProtocol all -SSLv3 -TLSv1 -TLSv1.1
 SSLCipherSuite ECDHE-ECDSA-AES128-GCM-SHA256:ECDHE-RSA-AES128-GCM-SHA256:ECDHE-ECDSA-AES256-GCM-SHA384:ECDHE-RSA-AES256-GCM-SHA384:ECDHE-ECDSA-CHACHA20-POLY1305:ECDHE-RSA-CHACHA20-POLY1305:DHE-RSA-AES128-GCM-SHA256:DHE-RSA-AES256-GCM-SHA384
Первая опция отключает устаревшие и небезопасные протоколы SSLv3, TLS 1.0 и TLS 1.1, вторая задает доступные к использованию шифры. Создание набора шифров — это наиболее сложная задача, поэтому лучше довериться специалистам Mozilla, нежели изобретать велосипед самостоятельно.
Затем добавим:
SSLHonorCipherOrder off
 SSLSessionTickets off
Первая строка определяет приоритет при выборе шифра, включенная опция отдает приоритет серверу, выключенная — браузеру клиента. В целях совместимости следует отдавать приоритет выбору клиента, а выбор сервера использовать только тогда, когда требуется принудительно использовать максимально стойкое шифрование. Вторая отключает использование сессионных билетов SSL, что требуется для обеспечения режима совершенной прямой секретности.
Также разрешим использование протокола HTTP/2, если это возможно:
Protocols h2 http/1.1Сохраним файл конфигурации и подключим его:
a2ensite example.com-sslТакже нам потребуется модуль SSL:
a2enmod sslПроверим конфигурацию и перезапустим веб-сервер:
apachectl -t
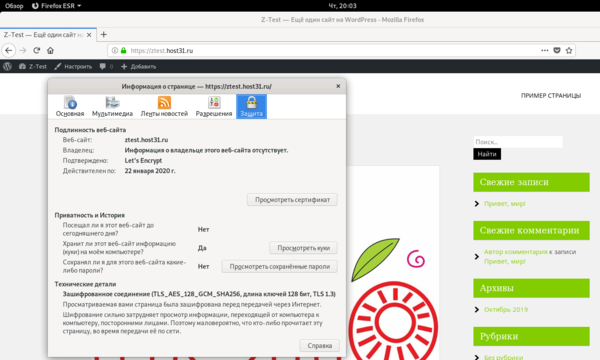
service apache2 restartПосле чего откройте сайт, явно указав протокол https://example.com
 На этом этапе вы можете столкнуться с проблемой смешанного содержимого, когда определенные ресурсы сайта, например, изображения или скрипты загружаются по незащищенному протоколу HTTP. Если к первым браузеры относятся относительно лояльно, просто убирая «замочек» в адресной строке, то вторые по умолчанию блокируются. Поэтому внимательно изучите код вашего сайта и замените везде, где это возможно, получение ресурсов на защищенный протокол HTTPS. Если это невозможно, то от таких ресурсов следует отказаться.
Добившись идеальной работы сайта по HTTPS, двинемся дальше, сначала включим технологию HSTS, которая принудительно активирует защищенное соединение, если сайт хоть один раз был успешно через него загружен. При использовании данного механизма браузер будет принудительно переключаться на HTTPS даже если в строке подключения пользователь явно укажет протокол HTTP, это позволяет успешно бороться с атаками на понижение степени защиты.
Для этого добавим в конфигурацию виртуального хоста строку:
Header always set Strict-Transport-Security "max-age=63072000"Также включим механизм OCSP Stapling, который позволяет ускорить проверку сертификата клиентом, что особенно важно для мобильных пользователей. Добавим строку:
SSLUseStapling OnОднако этого недостаточно, сохраним настройки виртуального хоста и снова откроем файл /etc/apache2/conf-available/le.conf, куда добавим:
SSLStaplingCache "shmcb:logs/ssl_stapling(32768)"Для работы вышеперечисленных опций нам потребуется модуль Headers:
a2enmod headersСнова проверяем конфигурацию и перезапускаем сервер:
apachectl -t
service apache2 restart
Самое время проверить HSTS в действии: перейдите на сайт по защищенному протоколу, а затем попробуйте открыть его HTTP версию, если HSTS работает, то у вас это не получится.
И в завершение настроим перенаправление клиентов с HTTP версии сайта на HTTPS, для этого откроем настройки виртуального хоста HTTP версии /etc/apache2/sites-available/example.com.conf и удалим из него все строки кроме:
<VirtualHost *:80>
 ServerName example.com
 ServerAdmin mail@example.com
 ServerAlias www.example.com</VirtualHost>
А затем добавим:
RewriteEngine On
 RewriteCond %{HTTPS} off
 RewriteRule (.*) https://%{HTTP_HOST}%{REQUEST_URI}
Сохраним файл конфигурации и подключим модуль Rewrite:
a2enmod rewriteИ еще раз перезапустим сервер, не забыв проверить конфигурацию:
apachectl -t
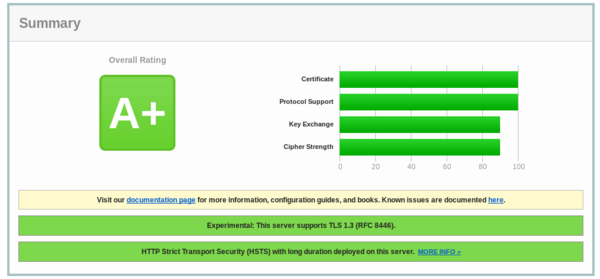
service apache2 restartТеперь наш сервер настроен с учетом всех современных методик, проверить это можно на сайте SSL Labs, с текущими настройками была получена высшая оценка A+:
 Как видим, настроить веб-сервер Apache для работы по HTTPS совсем несложно. А Let’s Encrypt обеспечит бесплатное получение и обновление сертификатов в автоматическом режиме. Если вы заметили, то мы ничего не писали про настройку автообновления, Certbot все уже сделал за нас.
Научиться настраивать MikroTik с нуля или систематизировать уже имеющиеся знания можно на углубленном курсе по администрированию MikroTik. Автор курса, сертифицированный тренер MikroTik Дмитрий Скоромнов, лично проверяет лабораторные работы и контролирует прогресс каждого своего студента. В три раза больше информации, чем в вендорской программе MTCNA, более 20 часов практики и доступ навсегда.