Home » How To » How to set up IKEv2 VPN Connection on Windows 10 with Certificate or EAP-MSCHAP v2 Authentication
-
- Posted by
- in How To
- on October 10, 2019
This guide assumes that you have obtained a Personal Information Exchange (p12) file from your VPN service provider. The file contains the server certificate and maybe the client private key & certificate (if using certificate authentication instead of EAP-MACHAP v2).
There are two major tasks: install the certificates and create a VPN connection.
Task 1: install the certificates.
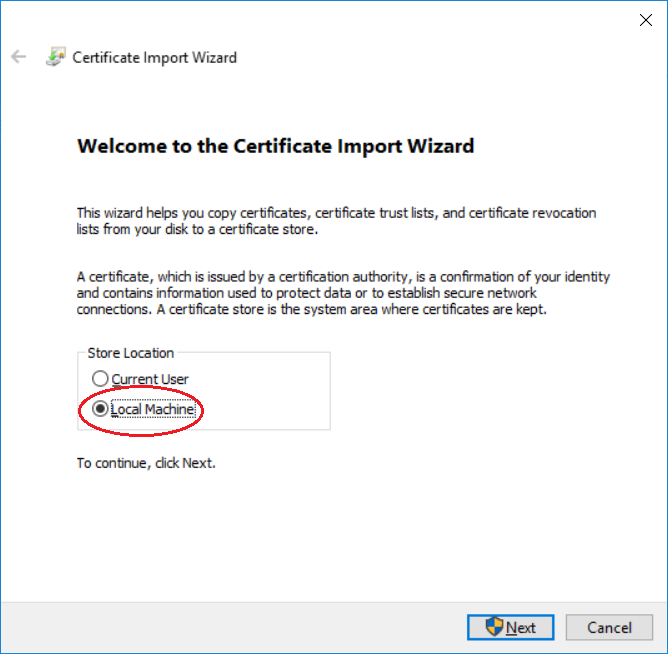
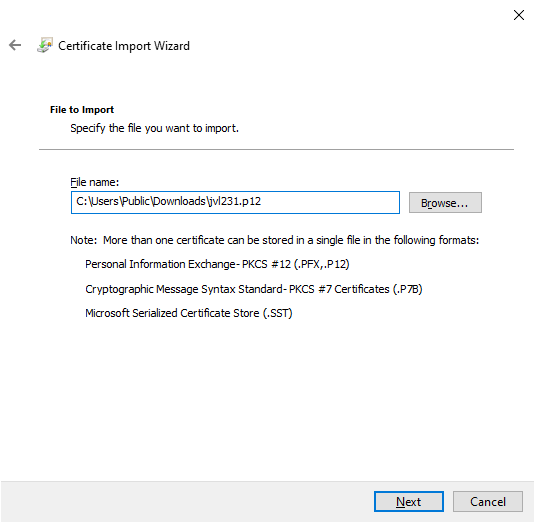
- Double click the p12 file. Select “Local Machine” on the “Certificate Import Wizard” dialog.

- Click “Next”.

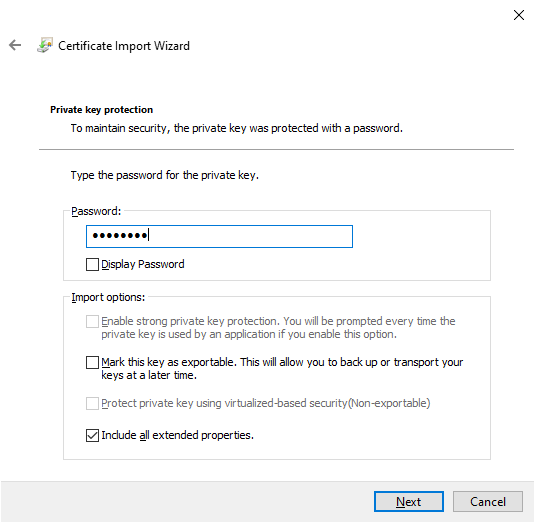
- Enter the password (if there is one).
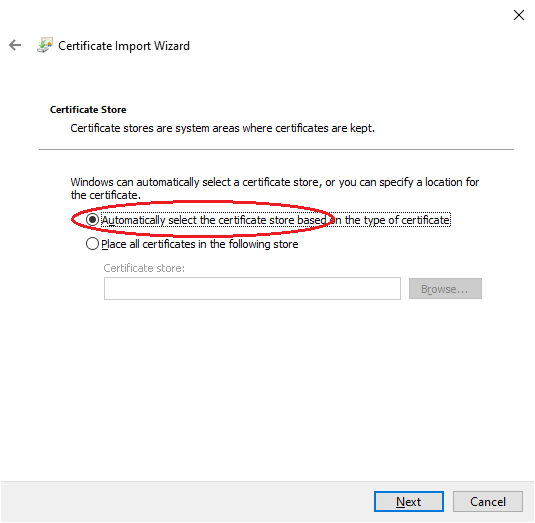
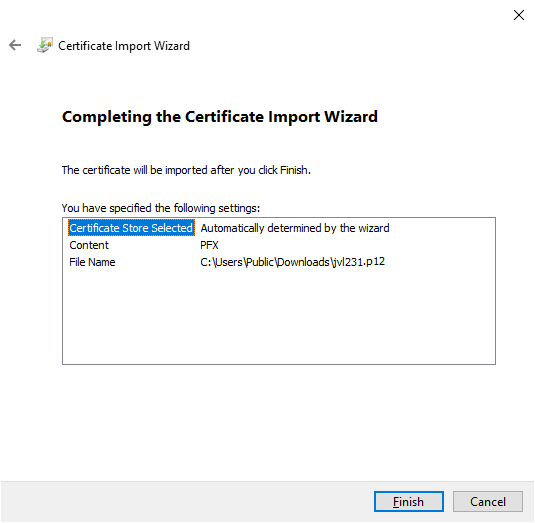
- Select “Automatic…” for the certificate store.
- Click “Finish”.
Task 2: create the VPN connection.
- Click the network icon at the bottom right corner of the screen, then click “Network & Internet Settings”.

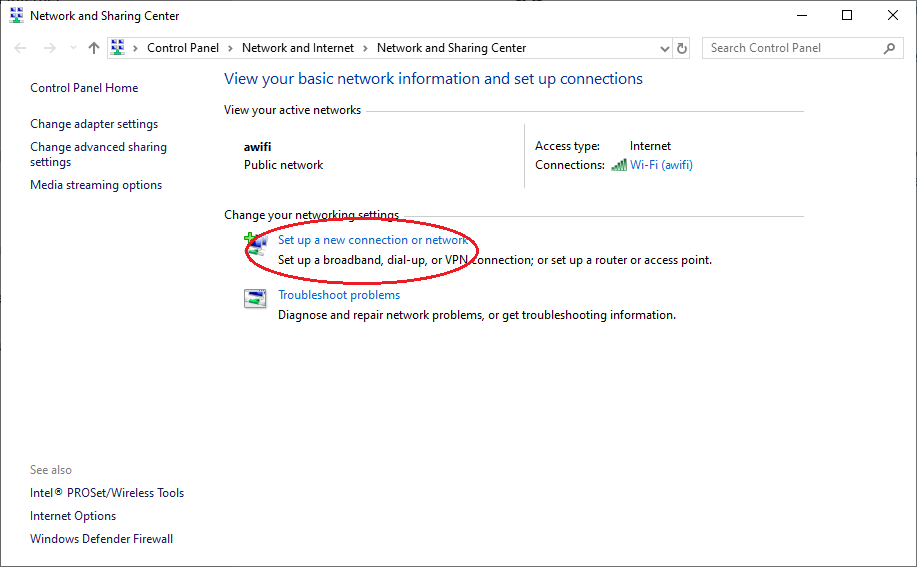
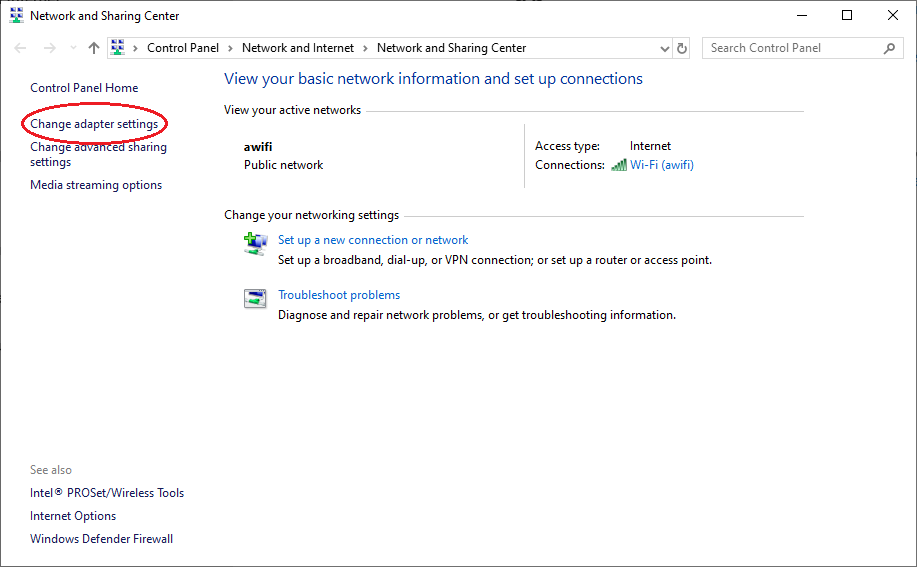
- Click on the “Network and Sharing Center” link (you might need to scroll down a bit).

- Click on “Set up a new connection or network”.

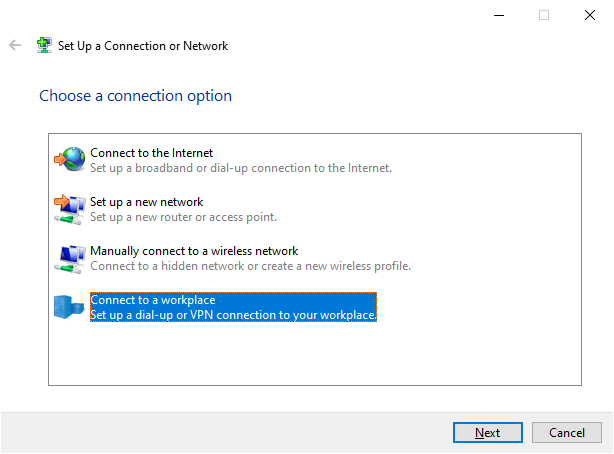
- Select “Connect to a workplace”.

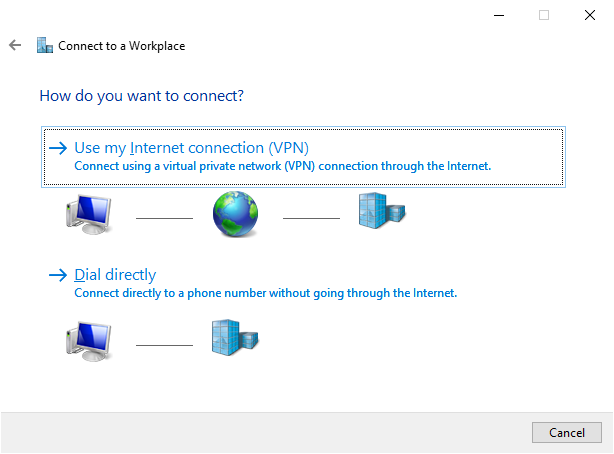
- Click on “Use my Internet connection (VPN)”.
- Enter the VPN server domain name or IP address, give a name to the VPN connection. Then click “Create”.
- Go back to the “Network and Sharing Center” dialog and click “Change adapter settings”.
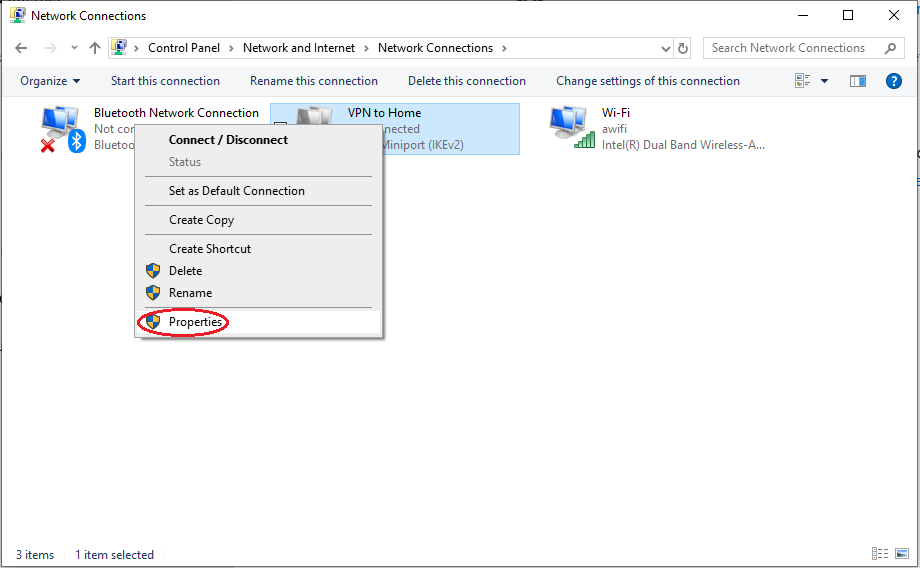
- Right click on the newly created VPN connection, select “Properties”.

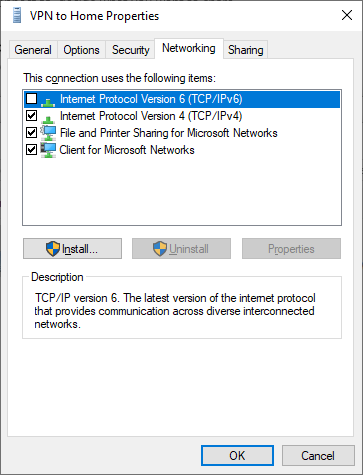
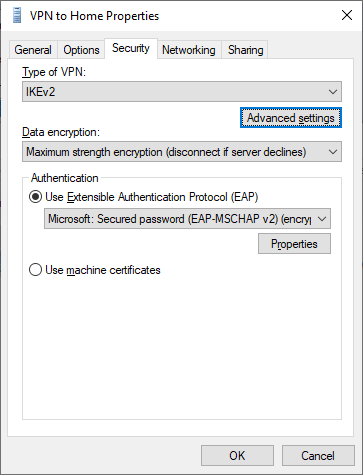
- Click on the “Security” tab, select “IKEv2” for “Type of VPN”. Select “Maximum strength encryption”, and “Use machine certificate” for Authentication (if you are authenticating with EAP-MSCHAP v2 user name and password, see alternative task below).

- Click on the “Networking” tab. Uncheck TCP/IPv6.
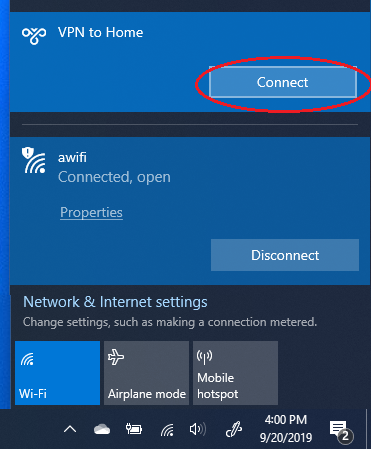
- Click the network icon at the bottom right corner of the screen, then click on the VPN connection to connect to the VPN.

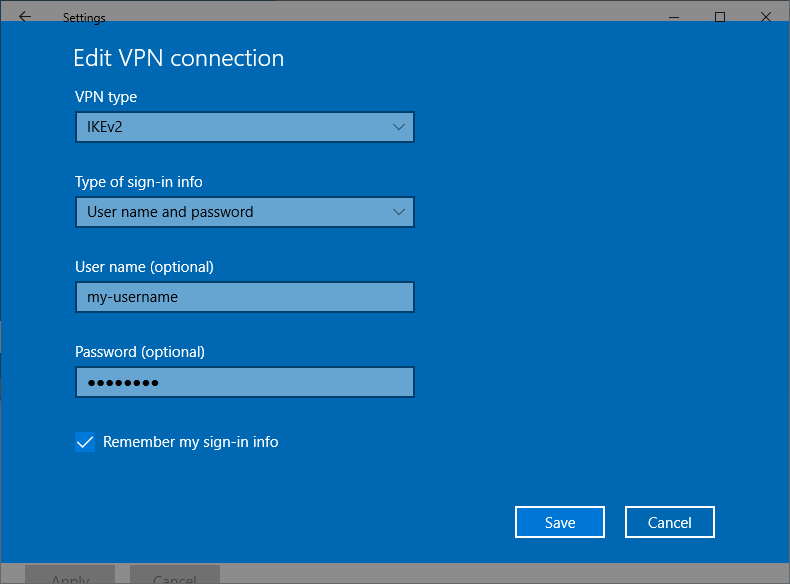
Alternative task 2: if authenticating with EAP-MSCHAP v2.
- In step 9 above, select “Use Extensible Authentication Protocol (EAP), then EAP-MSCHAP v2.
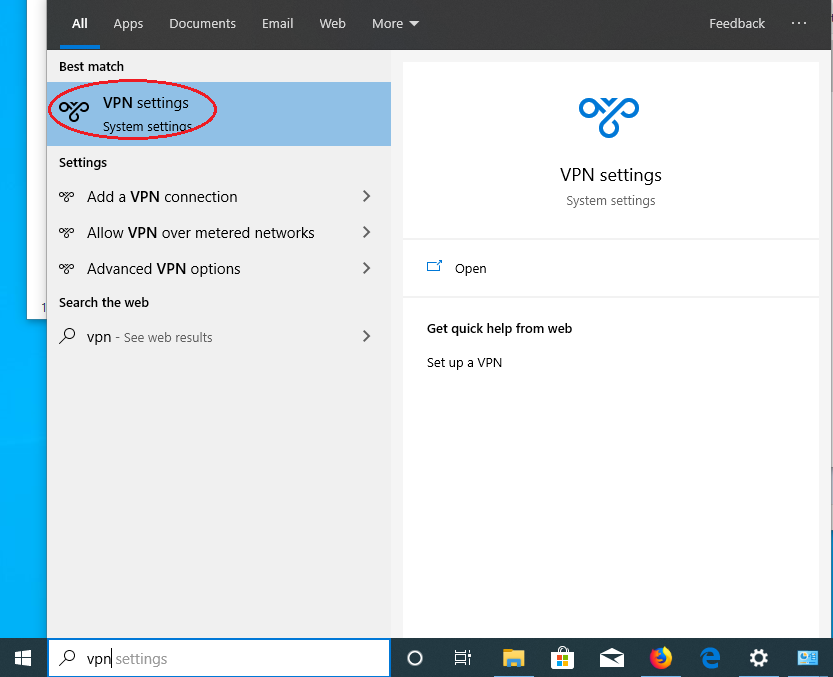
- Click the Windows icon at the left bottom corner of the screen and enter “vpn”. Then click on “VPN settings”.

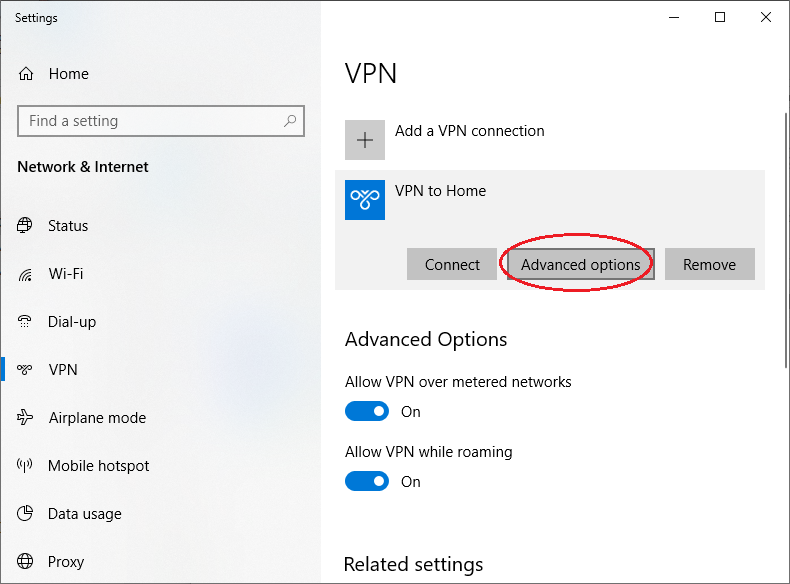
- Click on the VPN connection, then click “Advanced options”.

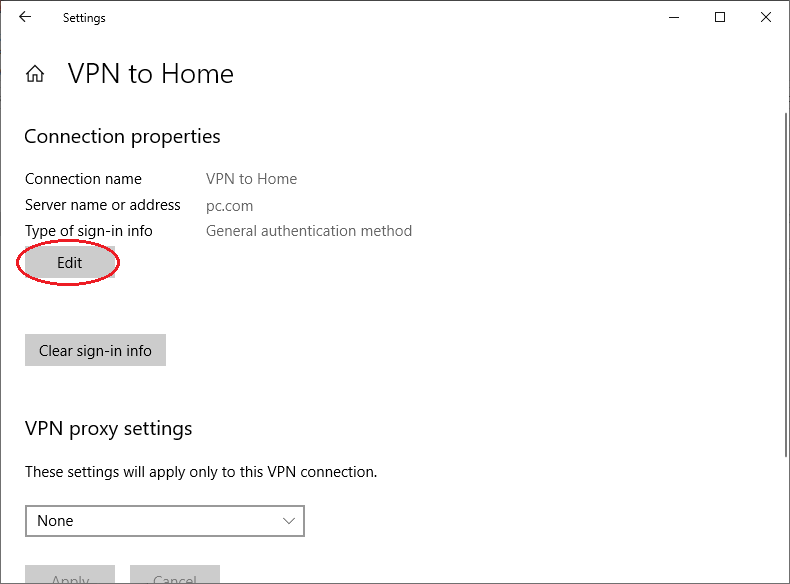
- Click “Edit”.
- Select “User name and Password” for “Type of sign-in info”. Enter user name and password. Click “Save”.
Task 3: Check that your VPN connection is working
- Open a web browser, enter https://ipleak.net/. Make sure that your IP address is that of the VPN service (i.e., no longer your ISP assigned IP address), and DNS addresses are also that from the VPN service.
- If your VPN server is located in the same geographical region as your ISP connection, sometimes it’s hard to tell if your DNS service has changed to that provided by the VPN. This page will tell you who is your DNS provider: http://whoismydns.com/
- There are instances that your browser is stuck with the ISP assigned DNS server. In that case, manually set the DNS service on your ISP connection (WiFi or Ethernet adapter) to a third party DNS service, for example, Cloudflare DNS. Just to be safe, disable IPv6 on the WiFi or Ethernet adapter too.


English | 中文
Guide: How to Set Up and Use IKEv2 VPN
- Introduction
- Configure IKEv2 VPN clients
- IKEv2 troubleshooting
- Manage IKEv2 clients
- Change IKEv2 server address
- Update IKEv2 helper script
- Set up IKEv2 using helper script
- Manually set up IKEv2
- Remove IKEv2
Introduction
Modern operating systems support the IKEv2 standard. Internet Key Exchange (IKE or IKEv2) is the protocol used to set up a Security Association (SA) in the IPsec protocol suite. Compared to IKE version 1, IKEv2 contains improvements such as Standard Mobility support through MOBIKE, and improved reliability.
Libreswan can authenticate IKEv2 clients on the basis of X.509 Machine Certificates using RSA signatures. This method does not require an IPsec PSK, username or password. It can be used with Windows, macOS, iOS, Android, Chrome OS, Linux and RouterOS.
By default, IKEv2 is automatically set up when running the VPN setup script. If you want to learn more about setting up IKEv2, see Set up IKEv2 using helper script. Docker users, see Configure and use IKEv2 VPN.
Configure IKEv2 VPN clients
Note: To add or export IKEv2 clients, run sudo ikev2.sh. Use -h to show usage. Client config files can be safely deleted after import.
- Windows 7, 8, 10 and 11
- OS X (macOS)
- iOS (iPhone/iPad)
- Android
- Chrome OS (Chromebook)
- Linux
- Mikrotik RouterOS
Learn how to change the IKEv2 server address.
In certain circumstances, you may need to change the IKEv2 server address. For example, to switch to use a DNS name, or after server IP changes. Learn more in this section.
Windows 7, 8, 10 and 11
Auto-import configuration
Screencast: IKEv2 Auto Import Configuration on Windows
Windows 8, 10 and 11 users can automatically import IKEv2 configuration:
- Securely transfer the generated
.p12file to your computer. - Right-click on ikev2_config_import.cmd and save this helper script to the same folder as the
.p12file. - Right-click on the saved script, select Properties. Click on Unblock at the bottom, then click on OK.
- Right-click on the saved script, select Run as administrator and follow the prompts.
To connect to the VPN: Click on the wireless/network icon in your system tray, select the new VPN entry, and click Connect. Once connected, you can verify that your traffic is being routed properly by looking up your IP address on Google. It should say «Your public IP address is Your VPN Server IP«.
If you get an error when trying to connect, see Troubleshooting.
Manually import configuration
[Supporters] Screencast: IKEv2 Manually Import Configuration on Windows
Alternatively, Windows 7, 8, 10 and 11 users can manually import IKEv2 configuration:
-
Securely transfer the generated
.p12file to your computer, then import it into the certificate store.To import the
.p12file, run the following from an elevated command prompt:# Import .p12 file (replace with your own value) certutil -f -importpfx "pathtoyourfile.p12" NoExport
Note: If there is no password for client config files, press Enter to continue, or if manually importing the
.p12file, leave the password field blank.Alternatively, you can manually import the .p12 file. Make sure that the client cert is placed in «Personal -> Certificates», and the CA cert is placed in «Trusted Root Certification Authorities -> Certificates».
-
On the Windows computer, add a new IKEv2 VPN connection.
For Windows 8, 10 and 11, it is recommended to create the VPN connection using the following commands from a command prompt, for improved security and performance.
# Create VPN connection (replace server address with your own value)
powershell -command ^"Add-VpnConnection -ServerAddress 'Your VPN Server IP (or DNS name)' ^
  -Name 'My IKEv2 VPN' -TunnelType IKEv2 -AuthenticationMethod MachineCertificate ^
  -EncryptionLevel Required -PassThru^"
# Set IPsec configuration
powershell -command ^"Set-VpnConnectionIPsecConfiguration -ConnectionName 'My IKEv2 VPN' ^
  -AuthenticationTransformConstants GCMAES128 -CipherTransformConstants GCMAES128 ^
  -EncryptionMethod AES256 -IntegrityCheckMethod SHA256 -PfsGroup None ^
  -DHGroup Group14 -PassThru -Force^"
Windows 7 does not support these commands, you can manually create the VPN connection.
Note: The server address you specify must exactly match the server address in the output of the IKEv2 helper script. For example, if you specified the server’s DNS name during IKEv2 setup, you must enter the DNS name in the Internet address field.
-
This step is required if you manually created the VPN connection.
Enable stronger ciphers for IKEv2 with a one-time registry change. Download and import the
.regfile below, or run the following from an elevated command prompt. Read more here.-
For Windows 7, 8, 10 and 11 (download .reg file)
REG ADD HKLMSYSTEMCurrentControlSetServicesRasManParameters /v NegotiateDH2048_AES256 /t REG_DWORD /d 0x1 /f
-
To connect to the VPN: Click on the wireless/network icon in your system tray, select the new VPN entry, and click Connect. Once connected, you can verify that your traffic is being routed properly by looking up your IP address on Google. It should say «Your public IP address is Your VPN Server IP«.
If you get an error when trying to connect, see Troubleshooting.
Remove the IKEv2 VPN connection.
Using the following steps, you can remove the VPN connection and optionally restore the computer to the status before IKEv2 configuration import.
-
Remove the added VPN connection in Windows Settings — Network — VPN. Windows 7 users can remove the VPN connection in Network and Sharing Center — Change adapter settings.
-
(Optional) Remove IKEv2 certificates.
-
Press Win+R, or search for
mmcin the Start Menu. Open Microsoft Management Console. -
Open
File - Add/Remove Snap-In. Select to addCertificatesand in the window that opens, selectComputer account -> Local Computer. Click onFinish -> OKto save the settings. -
Go to
Certificates - Personal - Certificatesand delete the IKEv2 client certificate. The name of the certificate is the same as the IKEv2 client name you specified (default:vpnclient). The certificate was issued byIKEv2 VPN CA. -
Go to
Certificates - Trusted Root Certification Authorities - Certificatesand delete the IKEv2 VPN CA certificate. The certificate was issued toIKEv2 VPN CAbyIKEv2 VPN CA. Before deleting, make sure that there are no other certificate(s) issued byIKEv2 VPN CAinCertificates - Personal - Certificates.
-
-
(Optional. For users who manually created the VPN connection) Restore registry settings. Note that you should backup the registry before editing.
-
Press Win+R, or search for
regeditin the Start Menu. Open Registry Editor. -
Go to
HKEY_LOCAL_MACHINESystemCurrentControlSetServicesRasmanParametersand delete the item with nameNegotiateDH2048_AES256, if it exists.
-
OS X (macOS)
[Supporters] Screencast: IKEv2 Import Configuration and Connect on macOS
First, securely transfer the generated .mobileconfig file to your Mac, then double-click and follow the prompts to import as a macOS profile. If your Mac runs macOS Big Sur or newer, open System Preferences and go to the Profiles section to finish importing. When finished, check to make sure «IKEv2 VPN» is listed under System Preferences -> Profiles.
To connect to the VPN:
- Open System Preferences and go to the Network section.
- Select the VPN connection with
Your VPN Server IP(or DNS name). - Check the Show VPN status in menu bar checkbox.
- Click Connect.
(Optional feature) Enable VPN On Demand to automatically start a VPN connection when your Mac is on Wi-Fi. To enable, check the Connect on demand checkbox for the VPN connection, and click Apply. You can customize VPN On Demand rules to exclude certain Wi-Fi network(s) such as your home network. See «Guide: Customize IKEv2 VPN On Demand rules for macOS and iOS» in 📖 Book: Set Up Your Own IPsec VPN, OpenVPN and WireGuard Server.
If you manually set up IKEv2 without using the helper script, click here for instructions.
First, securely transfer the generated .p12 file to your Mac, then double-click to import into the login keychain in Keychain Access. Next, double-click on the imported IKEv2 VPN CA certificate, expand Trust and select Always Trust from the IP Security (IPsec) drop-down menu. Close the dialog using the red «X» on the top-left corner. When prompted, use Touch ID or enter your password and click «Update Settings».
When finished, check to make sure both the new client certificate and IKEv2 VPN CA are listed under the Certificates category of login keychain.
- Open System Preferences and go to the Network section.
- Click the + button in the lower-left corner of the window.
- Select VPN from the Interface drop-down menu.
- Select IKEv2 from the VPN Type drop-down menu.
- Enter anything you like for the Service Name.
- Click Create.
- Enter
Your VPN Server IP(or DNS name) for the Server Address.
Note: If you specified the server’s DNS name (instead of its IP address) during IKEv2 setup, you must enter the DNS name in the Server Address and Remote ID fields. - Enter
Your VPN Server IP(or DNS name) for the Remote ID. - Enter
Your VPN client namein the Local ID field.
Note: This must match exactly the client name you specified during IKEv2 setup. Same as the first part of your.p12filename. - Click the Authentication Settings… button.
- Select None from the Authentication Settings drop-down menu.
- Select the Certificate radio button, then select the new client certificate.
- Click OK.
- Check the Show VPN status in menu bar checkbox.
- Click Apply to save the VPN connection information.
- Click Connect.
Once connected, you can verify that your traffic is being routed properly by looking up your IP address on Google. It should say «Your public IP address is Your VPN Server IP«.
If you get an error when trying to connect, see Troubleshooting.
Remove the IKEv2 VPN connection.
To remove the IKEv2 VPN connection, open System Preferences -> Profiles and remove the IKEv2 VPN profile you added.
iOS
[Supporters] Screencast: IKEv2 Import Configuration and Connect on iOS (iPhone & iPad)
First, securely transfer the generated .mobileconfig file to your iOS device, then import it as an iOS profile. To transfer the file, you may use:
- AirDrop, or
- Upload to your device (any App folder) using File Sharing, then open the «Files» App on your iOS device, move the uploaded file to the «On My iPhone» folder. After that, tap the file and go to the «Settings» App to import, or
- Host the file on a secure website of yours, then download and import it in Mobile Safari.
When finished, check to make sure «IKEv2 VPN» is listed under Settings -> General -> VPN & Device Management or Profile(s).
To connect to the VPN:
- Go to Settings -> VPN. Select the VPN connection with
Your VPN Server IP(or DNS name). - Slide the VPN switch ON.
(Optional feature) Enable VPN On Demand to automatically start a VPN connection when your iOS device is on Wi-Fi. To enable, tap the «i» icon on the right of the VPN connection, and enable Connect On Demand. You can customize VPN On Demand rules to exclude certain Wi-Fi network(s) such as your home network, or to start the VPN connection both on Wi-Fi and cellular. See «Guide: Customize IKEv2 VPN On Demand rules for macOS and iOS» in 📖 Book: Set Up Your Own IPsec VPN, OpenVPN and WireGuard Server.
If you manually set up IKEv2 without using the helper script, click here for instructions.
First, securely transfer the generated ca.cer and .p12 files to your iOS device, then import them one by one as iOS profiles. To transfer the files, you may use:
- AirDrop, or
- Upload to your device (any App folder) using File Sharing, then open the «Files» App on your iOS device, move the uploaded files to the «On My iPhone» folder. After that, tap each file and go to the «Settings» App to import, or
- Host the files on a secure website of yours, then download and import them in Mobile Safari.
When finished, check to make sure both the new client certificate and IKEv2 VPN CA are listed under Settings -> General -> VPN & Device Management or Profile(s).
- Go to Settings -> General -> VPN & Device Management -> VPN.
- Tap Add VPN Configuration….
- Tap Type. Select IKEv2 and go back.
- Tap Description and enter anything you like.
- Tap Server and enter
Your VPN Server IP(or DNS name).
Note: If you specified the server’s DNS name (instead of its IP address) during IKEv2 setup, you must enter the DNS name in the Server and Remote ID fields. - Tap Remote ID and enter
Your VPN Server IP(or DNS name). - Enter
Your VPN client namein the Local ID field.
Note: This must match exactly the client name you specified during IKEv2 setup. Same as the first part of your.p12filename. - Tap User Authentication. Select None and go back.
- Make sure the Use Certificate switch is ON.
- Tap Certificate. Select the new client certificate and go back.
- Tap Done.
- Slide the VPN switch ON.
Once connected, you can verify that your traffic is being routed properly by looking up your IP address on Google. It should say «Your public IP address is Your VPN Server IP«.
If you get an error when trying to connect, see Troubleshooting.
Remove the IKEv2 VPN connection.
To remove the IKEv2 VPN connection, open Settings -> General -> VPN & Device Management or Profile(s) and remove the IKEv2 VPN profile you added.
Android
[Supporters] Screencast: Connect using Android strongSwan VPN Client
- Securely transfer the generated
.sswanfile to your Android device. - Install strongSwan VPN Client from Google Play, F-Droid or strongSwan download server.
- Launch the strongSwan VPN client.
- Tap the «more options» menu on top right, then tap Import VPN profile.
- Choose the
.sswanfile you transferred from the VPN server.
Note: To find the.sswanfile, tap the three-line menu button, then browse to the location you saved the file. - On the «Import VPN profile» screen, tap IMPORT CERTIFICATE FROM VPN PROFILE, and follow the prompts.
- On the «Choose certificate» screen, select the new client certificate, then tap Select.
- Tap IMPORT.
- Tap the new VPN profile to connect.
Alternatively, Android 11+ users can also connect using the native IKEv2 client.
[Supporters] Screencast: Connect using Native VPN Client on Android 11+
- Securely transfer the generated
.p12file to your Android device. - Launch the Settings application.
- Go to Security -> Advanced -> Encryption & credentials.
- Tap Install a certificate.
- Tap VPN & app user certificate.
- Choose the
.p12file you transferred from the VPN server.
Note: To find the.p12file, tap the three-line menu button, then browse to the location you saved the file. - Enter a name for the certificate, then tap OK.
- Go to Settings -> Network & internet -> VPN, then tap the «+» button.
- Enter a name for the VPN profile.
- Select IKEv2/IPSec RSA from the Type drop-down menu.
- Enter
Your VPN Server IP(or DNS name) in the Server address field.
Note: This must exactly match the server address in the output of the IKEv2 helper script. - Enter anything (e.g.
empty) in the IPSec identifier field.
Note: This field should not be required. It is a bug in Android. - Select the certificate you imported from the IPSec user certificate drop-down menu.
- Select the certificate you imported from the IPSec CA certificate drop-down menu.
- Select (receive from server) from the IPSec server certificate drop-down menu.
- Tap Save. Then tap the new VPN connection and tap Connect.
If your device runs Android 6.0 or older, click here for additional instructions.
If your device runs Android 6.0 (Marshmallow) or older, in order to connect using the strongSwan VPN client, you must make the following change on the VPN server: Edit /etc/ipsec.d/ikev2.conf on the server. Append authby=rsa-sha1 to the end of the conn ikev2-cp section, indented by two spaces. Save the file and run service ipsec restart.
(Optional feature) You can choose to enable the «Always-on VPN» feature on Android. Launch the Settings app, go to Network & internet -> Advanced -> VPN, click the gear icon on the right of «strongSwan VPN Client», then enable the Always-on VPN and Block connections without VPN options.
If you manually set up IKEv2 without using the helper script, click here for instructions.
Android 10 and newer:
- Securely transfer the generated
.p12file to your Android device. - Install strongSwan VPN Client from Google Play, F-Droid or strongSwan download server.
- Launch the Settings application.
- Go to Security -> Advanced -> Encryption & credentials.
- Tap Install a certificate.
- Tap VPN & app user certificate.
- Choose the
.p12file you transferred from the VPN server, and follow the prompts.
Note: To find the.p12file, tap the three-line menu button, then browse to the location you saved the file. - Launch the strongSwan VPN client and tap Add VPN Profile.
- Enter
Your VPN Server IP(or DNS name) in the Server field.
Note: If you specified the server’s DNS name (instead of its IP address) during IKEv2 setup, you must enter the DNS name in the Server field. - Select IKEv2 Certificate from the VPN Type drop-down menu.
- Tap Select user certificate, select the new client certificate and confirm.
- (Important) Tap Show advanced settings. Scroll down, find and enable the Use RSA/PSS signatures option.
- Save the new VPN connection, then tap to connect.
Android 4 to 9:
- Securely transfer the generated
.p12file to your Android device. - Install strongSwan VPN Client from Google Play, F-Droid or strongSwan download server.
- Launch the strongSwan VPN client and tap Add VPN Profile.
- Enter
Your VPN Server IP(or DNS name) in the Server field.
Note: If you specified the server’s DNS name (instead of its IP address) during IKEv2 setup, you must enter the DNS name in the Server field. - Select IKEv2 Certificate from the VPN Type drop-down menu.
- Tap Select user certificate, then tap Install certificate.
- Choose the
.p12file you transferred from the VPN server, and follow the prompts.
Note: To find the.p12file, tap the three-line menu button, then browse to the location you saved the file. - (Important) Tap Show advanced settings. Scroll down, find and enable the Use RSA/PSS signatures option.
- Save the new VPN connection, then tap to connect.
Once connected, you can verify that your traffic is being routed properly by looking up your IP address on Google. It should say «Your public IP address is Your VPN Server IP«.
If you get an error when trying to connect, see Troubleshooting.
Chrome OS
First, on your VPN server, export the CA certificate as ca.cer:
sudo certutil -L -d sql:/etc/ipsec.d -n "IKEv2 VPN CA" -a -o ca.cer
Securely transfer the generated .p12 and ca.cer files to your Chrome OS device.
Install user and CA certificates:
- Open a new tab in Google Chrome.
- In the address bar, enter chrome://settings/certificates
- (Important) Click Import and Bind, not Import.
- In the box that opens, choose the
.p12file you transferred from the VPN server and select Open. - Click OK if the certificate does not have a password. Otherwise, enter the certificate’s password.
- Click the Authorities tab. Then click Import.
- In the box that opens, select All files in the drop-down menu at the bottom left.
- Choose the
ca.cerfile you transferred from the VPN server and select Open. - Keep the default options and click OK.
Add a new VPN connection:
- Go to Settings -> Network.
- Click Add connection, then click Add built-in VPN.
- Enter anything you like for the Service name.
- Select IPsec (IKEv2) in the Provider type drop-down menu.
- Enter
Your VPN Server IP(or DNS name) for the Server hostname. - Select User certificate in the Authentication type drop-down menu.
- Select IKEv2 VPN CA [IKEv2 VPN CA] in the Server CA certificate drop-down menu.
- Select IKEv2 VPN CA [client name] in the User certificate drop-down menu.
- Leave other fields blank.
- Enable Save identity and password.
- Click Connect.
Once connected, you will see a VPN icon overlay on the network status icon. You can verify that your traffic is being routed properly by looking up your IP address on Google. It should say «Your public IP address is Your VPN Server IP«.
(Optional feature) You can choose to enable the «Always-on VPN» feature on Chrome OS. To manage this setting, go to Settings -> Network, then click VPN.
If you get an error when trying to connect, see Troubleshooting.
Linux
Before configuring Linux VPN clients, you must make the following change on the VPN server: Edit /etc/ipsec.d/ikev2.conf on the server. Append authby=rsa-sha1 to the end of the conn ikev2-cp section, indented by two spaces. Save the file and run service ipsec restart.
To configure your Linux computer to connect to IKEv2 as a VPN client, first install the strongSwan plugin for NetworkManager:
# Ubuntu and Debian
sudo apt-get update
sudo apt-get install network-manager-strongswan

# Arch Linux
sudo pacman -Syu  # upgrade all packages
sudo pacman -S networkmanager-strongswan

# Fedora
sudo yum install NetworkManager-strongswan-gnome

# CentOS
sudo yum install epel-release
sudo yum --enablerepo=epel install NetworkManager-strongswan-gnome
Next, securely transfer the generated .p12 file from the VPN server to your Linux computer. After that, extract the CA certificate, client certificate and private key. Replace vpnclient.p12 in the example below with the name of your .p12 file.
# Example: Extract CA certificate, client certificate and private key.
#          You may delete the .p12 file when finished.
# Note: You may need to enter the import password, which can be found
#       in the output of the IKEv2 helper script. If the output does not
#       contain an import password, press Enter to continue.
# Note: If using OpenSSL 3.x (run "openssl version" to check),
#       append "-legacy" to the 3 commands below.
openssl pkcs12 -in vpnclient.p12 -cacerts -nokeys -out ca.cer
openssl pkcs12 -in vpnclient.p12 -clcerts -nokeys -out client.cer
openssl pkcs12 -in vpnclient.p12 -nocerts -nodes  -out client.key
rm vpnclient.p12

# (Important) Protect certificate and private key files
# Note: This step is optional, but strongly recommended.
sudo chown root.root ca.cer client.cer client.key
sudo chmod 600 ca.cer client.cer client.key
You can then set up and enable the VPN connection:
- Go to Settings -> Network -> VPN. Click the + button.
- Select IPsec/IKEv2 (strongswan).
- Enter anything you like in the Name field.
- In the Gateway (Server) section, enter
Your VPN Server IP(or DNS name) for the Address. - Select the
ca.cerfile for the Certificate. - In the Client section, select Certificate(/private key) in the Authentication drop-down menu.
- Select Certificate/private key in the Certificate drop-down menu (if exists).
- Select the
client.cerfile for the Certificate (file). - Select the
client.keyfile for the Private key. - In the Options section, check the Request an inner IP address checkbox.
- In the Cipher proposals (Algorithms) section, check the Enable custom proposals checkbox.
- Leave the IKE field blank.
- Enter
aes128gcm16in the ESP field. - Click Add to save the VPN connection information.
- Turn the VPN switch ON.
Once connected, you can verify that your traffic is being routed properly by looking up your IP address on Google. It should say «Your public IP address is Your VPN Server IP«.
If you get an error when trying to connect, see Troubleshooting.
RouterOS
Note: These steps were contributed by @Unix-User. It is recommended to run terminal commands via an SSH connection, e.g. via Putty.
-
Securely transfer the generated
.p12file to your computer.Click to see screencast.

-
In WinBox, go to System > certificates > import. Import the
.p12certificate file twice (yes, import the same file two times!). Verify in your certificates panel. You will see 2 files, the one that is marked KT is the key.Click to see screencast.
Or you can use terminal instead (empty passphrase):
[admin@MikroTik] > /certificate/import file-name=mikrotik.p12
passphrase:

  certificates-imported: 2
  private-keys-imported: 0
         files-imported: 1
    decryption-failures: 0
  keys-with-no-certificate: 0

[admin@MikroTik] > /certificate/import file-name=mikrotik.p12
passphrase:

     certificates-imported: 0
     private-keys-imported: 1
            files-imported: 1
       decryption-failures: 0
  keys-with-no-certificate: 0
-
Run these commands in terminal. Replace the following with your own values.
YOUR_VPN_SERVER_IP_OR_DNS_NAMEis your VPN server IP or DNS name.
IMPORTED_CERTIFICATEis the name of the certificate from step 2 above, e.g.vpnclient.p12_0
(the one flagged with KT — Priv. Key Trusted — if not flagged as KT, import certificate again).
THESE_ADDRESSES_GO_THROUGH_VPNare the local network addresses that you want to browse through the VPN.
Assuming that your local network behind RouterOS is192.168.0.0/24, you can use192.168.0.0/24
for the entire network, or use192.168.0.10for just one device, and so on./ip firewall address-list add address=THESE_ADDRESSES_GO_THROUGH_VPN list=local /ip ipsec mode-config add name=ike2-rw responder=no src-address-list=local /ip ipsec policy group add name=ike2-rw /ip ipsec profile add name=ike2-rw /ip ipsec peer add address=YOUR_VPN_SERVER_IP_OR_DNS_NAME exchange-mode=ike2 name=ike2-rw-client profile=ike2-rw /ip ipsec proposal add name=ike2-rw pfs-group=none /ip ipsec identity add auth-method=digital-signature certificate=IMPORTED_CERTIFICATE generate-policy=port-strict mode-config=ike2-rw peer=ike2-rw-client policy-template-group=ike2-rw /ip ipsec policy add group=ike2-rw proposal=ike2-rw template=yes -
For more information, see #1112.


tested on
mar/02/2022 12:52:57 by RouterOS 6.48
RouterBOARD 941-2nD
IKEv2 troubleshooting
Read this in other languages: English, 中文.
See also: Check logs and VPN status, IKEv1 troubleshooting and Advanced usage.
- Cannot connect to the VPN server
- Unable to connect multiple IKEv2 clients
- IKE authentication credentials are unacceptable
- Policy match error
- Parameter is incorrect
- Cannot open websites after connecting to IKEv2
- Windows 10 connecting
- Other known issues
Cannot connect to the VPN server
First, make sure that the VPN server address specified on your VPN client device exactly matches the server address in the output of the IKEv2 helper script. Refer to the sections below and Check logs and VPN status.
For servers with an external firewall (e.g. EC2/GCE), open UDP ports 500 and 4500 for the VPN. Aliyun users, see #433.
Unable to connect multiple IKEv2 clients
To connect multiple IKEv2 clients from behind the same NAT (e.g. home router) at the same time, you will need to generate a unique certificate for each client. Otherwise, you could encounter the issue where a later connected client affects the VPN connection of an existing client, which may lose Internet access.
To generate certificates for additional IKEv2 clients, run the helper script with the --addclient option. To customize client options, run the script without arguments.
sudo ikev2.sh --addclient [client name]
IKE authentication credentials are unacceptable
If you encounter this error, make sure that the VPN server address specified on your VPN client device exactly matches the server address in the output of the IKEv2 helper script. For example, you cannot use a DNS name to connect if it was not specified when setting up IKEv2. To change the IKEv2 server address, read this section.
Policy match error
To fix this error, you will need to enable stronger ciphers for IKEv2 with a one-time registry change. Download and import the .reg file below, or run the following from an elevated command prompt.
- For Windows 7, 8, 10 and 11 (download .reg file)
REG ADD HKLMSYSTEMCurrentControlSetServicesRasManParameters /v NegotiateDH2048_AES256 /t REG_DWORD /d 0x1 /f
Parameter is incorrect
If you encounter «Error 87: The parameter is incorrect» when trying to connect using IKEv2 mode, try the solutions in this issue, more specifically, step 2 «reset device manager adapters».
Cannot open websites after connecting to IKEv2
If your VPN client device cannot open websites after successfully connecting to IKEv2, try the following fixes:
-
Some cloud providers, such as Google Cloud, set a lower MTU by default. This could cause network issues with IKEv2 VPN clients. To fix, try setting the MTU to 1500 on the VPN server:
# Replace ens4 with the network interface name on your server
sudo ifconfig ens4 mtu 1500
This setting does not persist after a reboot. To change the MTU size permanently, refer to relevant articles on the web.
-
If changing the MTU size does not fix the issue, try the fix in Android MTU/MSS issues.
-
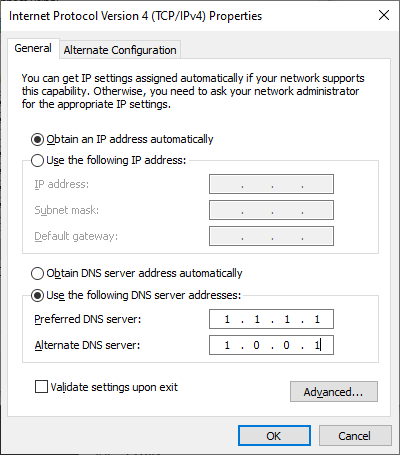
In certain circumstances, Windows does not use the DNS servers specified by IKEv2 after connecting. This can be fixed by manually entering DNS servers such as Google Public DNS (8.8.8.8, 8.8.4.4) in network interface properties -> TCP/IPv4.
Windows 10 connecting
If using Windows 10 and the VPN is stuck on «connecting» for more than a few minutes, try these steps:
- Right-click on the wireless/network icon in your system tray.
- Select Open Network & Internet settings, then on the page that opens, click VPN on the left.
- Select the new VPN entry, then click Connect.
Other known issues
The built-in VPN client in Windows may not support IKEv2 fragmentation (this feature requires Windows 10 v1803 or newer). On some networks, this can cause the connection to fail or have other issues. You may instead try the IPsec/L2TP or IPsec/XAuth mode.
Manage IKEv2 clients
- List existing clients
- Add a client certificate
- Export configuration for an existing client
- Delete a client certificate
- Revoke a client certificate
List existing clients
To list the names of existing IKEv2 clients, run the helper script with the --listclients option. Use option -h to show usage.
sudo ikev2.sh --listclients
Add a client certificate
To generate certificates for additional IKEv2 clients, run the helper script with the --addclient option. To customize client options, run the script without arguments.
sudo ikev2.sh --addclient [client name]
Alternatively, you may manually add a client certificate. Refer to step 4 in this section.
Export configuration for an existing client
By default, the IKEv2 helper script exports client configuration after running. If later you want to export an existing client, you may use:
sudo ikev2.sh --exportclient [client name]
Delete a client certificate
Important: Deleting a client certificate from the IPsec database WILL NOT prevent VPN client(s) from connecting using that certificate! For this use case, you MUST revoke the client certificate instead of deleting it.
First, read the important note above. Then click here for instructions.
Warning: The client certificate and private key will be permanently deleted. This cannot be undone!
To delete an existing client:
sudo ikev2.sh --deleteclient [client name]
Alternatively, you can manually delete a client certificate.
-
List certificates in the IPsec database:
certutil -L -d sql:/etc/ipsec.d
Example output:
Certificate Nickname Trust Attributes SSL,S/MIME,JAR/XPI IKEv2 VPN CA CTu,u,u ($PUBLIC_IP) u,u,u vpnclient u,u,u -
Delete the client certificate and private key. Replace «Nickname» below with the nickname of the client certificate you want to delete, e.g.
vpnclient.certutil -F -d sql:/etc/ipsec.d -n "Nickname" certutil -D -d sql:/etc/ipsec.d -n "Nickname" 2>/dev/null
-
(Optional) Delete the previously generated client configuration files (
.p12,.mobileconfigand.sswanfiles) for this VPN client, if any.
Revoke a client certificate
In certain circumstances, you may need to revoke a previously generated VPN client certificate.
To revoke an existing client:
sudo ikev2.sh --revokeclient [client name]
Alternatively, you can manually revoke a client certificate.
Alternatively, you can manually revoke a client certificate. This can be done using crlutil. See example steps below, commands must be run as root.
-
Check the database, and identify the nickname of the client certificate you want to revoke.
certutil -L -d sql:/etc/ipsec.d
Certificate Nickname Trust Attributes SSL,S/MIME,JAR/XPI IKEv2 VPN CA CTu,u,u ($PUBLIC_IP) u,u,u vpnclient-to-revoke u,u,uIn this example, we will revoke the certificate with nickname
vpnclient-to-revoke, issued byIKEv2 VPN CA. -
Find the serial number of this client certificate.
certutil -L -d sql:/etc/ipsec.d -n "vpnclient-to-revoke"Certificate: Data: Version: 3 (0x2) Serial Number: 00:cd:69:ff:74 ... ...From the output, we see that the serial number is
CD69FF74in hexadecimal, which is3446275956in decimal. It will be used in the next steps. -
Create a new Certificate Revocation List (CRL). You only need to do this once for each CA.
if ! crlutil -L -d sql:/etc/ipsec.d -n "IKEv2 VPN CA" 2>/dev/null; then crlutil -G -d sql:/etc/ipsec.d -n "IKEv2 VPN CA" -c /dev/null fi
CRL Info: : Version: 2 (0x1) Signature Algorithm: PKCS #1 SHA-256 With RSA Encryption Issuer: "O=IKEv2 VPN,CN=IKEv2 VPN CA" This Update: Sat Jun 06 22:00:00 2020 CRL Extensions: -
Add the client certificate you want to revoke to the CRL. Here we specify the certificate’s serial number in decimal, and the revocation time in GeneralizedTime format (YYYYMMDDhhmmssZ) in UTC.
crlutil -M -d sql:/etc/ipsec.d -n "IKEv2 VPN CA" <<EOF addcert 3446275956 20200606220100Z EOF
CRL Info: : Version: 2 (0x1) Signature Algorithm: PKCS #1 SHA-256 With RSA Encryption Issuer: "O=IKEv2 VPN,CN=IKEv2 VPN CA" This Update: Sat Jun 06 22:02:00 2020 Entry 1 (0x1): Serial Number: 00:cd:69:ff:74 Revocation Date: Sat Jun 06 22:01:00 2020 CRL Extensions:Note: If you want to remove a certificate from the CRL, replace
addcert 3446275956 20200606220100Zabove withrmcert 3446275956. For othercrlutilusage, read here. -
Finally, let Libreswan re-read the updated CRL.
Change IKEv2 server address
In certain circumstances, you may need to change the IKEv2 server address after setup. For example, to switch to use a DNS name, or after server IP changes. Note that the server address you specify on VPN client devices must exactly match the server address in the output of the IKEv2 helper script. Otherwise, devices may be unable to connect.
To change the server address, run the helper script and follow the prompts.
wget https://get.vpnsetup.net/ikev2addr -O ikev2addr.sh sudo bash ikev2addr.sh
Important: After running this script, you must manually update the server address (and remote ID, if applicable) on any existing IKEv2 client devices. For iOS clients, you’ll need to export and re-import client configuration using the IKEv2 helper script.
Update IKEv2 helper script
The IKEv2 helper script is updated from time to time for bug fixes and improvements (commit log). When a newer version is available, you may optionally update the IKEv2 helper script on your server. Note that these commands will overwrite any existing ikev2.sh.
wget https://get.vpnsetup.net/ikev2 -O /opt/src/ikev2.sh chmod +x /opt/src/ikev2.sh && ln -s /opt/src/ikev2.sh /usr/bin 2>/dev/null
Set up IKEv2 using helper script
Note: By default, IKEv2 is automatically set up when running the VPN setup script. You may skip this section and continue to configure IKEv2 VPN clients.
Important: Before continuing, you should have successfully set up your own VPN server. Docker users, see here.
Use this helper script to automatically set up IKEv2 on the VPN server:
# Set up IKEv2 using default options sudo ikev2.sh --auto # Alternatively, you may customize IKEv2 options sudo ikev2.sh
Note: If IKEv2 is already set up, but you want to customize IKEv2 options, first remove IKEv2, then set it up again using sudo ikev2.sh.
When finished, continue to configure IKEv2 VPN clients. Advanced users can optionally enable IKEv2-only mode.
Error: «sudo: ikev2.sh: command not found».
This is normal if you used an older version of the VPN setup script. First, download the IKEv2 helper script:
wget https://get.vpnsetup.net/ikev2 -O /opt/src/ikev2.sh
chmod +x /opt/src/ikev2.sh && ln -s /opt/src/ikev2.sh /usr/bin
Then run the script using the instructions above.
You may optionally specify a DNS name, client name and/or custom DNS servers.
When running IKEv2 setup in auto mode, advanced users can optionally specify a DNS name for the IKEv2 server address. The DNS name must be a fully qualified domain name (FQDN). Example:
sudo VPN_DNS_NAME='vpn.example.com' ikev2.sh --auto
Similarly, you may specify a name for the first IKEv2 client. The default is vpnclient if not specified.
sudo VPN_CLIENT_NAME='your_client_name' ikev2.sh --auto
By default, IKEv2 clients are set to use Google Public DNS when the VPN is active. You may specify custom DNS server(s) for IKEv2. Example:
sudo VPN_DNS_SRV1=1.1.1.1 VPN_DNS_SRV2=1.0.0.1 ikev2.sh --auto
By default, no password is required when importing IKEv2 client configuration. You can choose to protect client config files using a random password.
sudo VPN_PROTECT_CONFIG=yes ikev2.sh --auto
View usage information for the IKEv2 script.
Usage: bash ikev2.sh [options]
Options:
--auto run IKEv2 setup in auto mode using default options (for initial setup only)
--addclient [client name] add a new client using default options
--exportclient [client name] export configuration for an existing client
--listclients list the names of existing clients
--revokeclient [client name] revoke an existing client
--deleteclient [client name] delete an existing client
--removeikev2 remove IKEv2 and delete all certificates and keys from the IPsec database
-h, --help show this help message and exit
To customize IKEv2 or client options, run this script without arguments.
Manually set up IKEv2
As an alternative to using the helper script, advanced users can manually set up IKEv2 on the VPN server. Before continuing, it is recommended to update Libreswan to the latest version.
The following example shows how to manually configure IKEv2 with Libreswan. Commands below must be run as root.
View example steps for manually configuring IKEv2 with Libreswan.
-
Find the VPN server’s public IP, save it to a variable and check.
PUBLIC_IP=$(dig @resolver1.opendns.com -t A -4 myip.opendns.com +short) [ -z "$PUBLIC_IP" ] && PUBLIC_IP=$(wget -t 2 -T 10 -qO- http://ipv4.icanhazip.com) printf '%sn' "$PUBLIC_IP"
Check to make sure the output matches the server’s public IP. This variable is required in the steps below.
Note: Alternatively, you may specify the server’s DNS name here. e.g.
PUBLIC_IP=myvpn.example.com. -
Add a new IKEv2 connection:
if ! grep -qs '^include /etc/ipsec.d/*.conf$' /etc/ipsec.conf; then echo >> /etc/ipsec.conf echo 'include /etc/ipsec.d/*.conf' >> /etc/ipsec.conf fi
Note: If you specified the server’s DNS name (instead of its IP address) in step 1 above, you must replace
leftid=$PUBLIC_IPin the command below withleftid=@$PUBLIC_IP.cat > /etc/ipsec.d/ikev2.conf <<EOF conn ikev2-cp left=%defaultroute leftcert=$PUBLIC_IP leftid=$PUBLIC_IP leftsendcert=always leftsubnet=0.0.0.0/0 leftrsasigkey=%cert right=%any rightid=%fromcert rightaddresspool=192.168.43.10-192.168.43.250 rightca=%same rightrsasigkey=%cert narrowing=yes dpddelay=30 retransmit-timeout=300s dpdaction=clear auto=add ikev2=insist rekey=no pfs=no ike=aes256-sha2,aes128-sha2,aes256-sha1,aes128-sha1 phase2alg=aes_gcm-null,aes128-sha1,aes256-sha1,aes128-sha2,aes256-sha2 ikelifetime=24h salifetime=24h EOF
We need to add a few more lines to that file. First check your Libreswan version, then run one of the following commands:
For Libreswan 3.23 and newer:
cat >> /etc/ipsec.d/ikev2.conf <<EOF modecfgdns="8.8.8.8 8.8.4.4" encapsulation=yes mobike=no EOF
Note: The MOBIKE IKEv2 extension allows VPN clients to change network attachment points, e.g. switch between mobile data and Wi-Fi and keep the IPsec tunnel up on the new IP. If your server (or Docker host) is NOT running Ubuntu Linux, and you wish to enable MOBIKE support, replace
mobike=nowithmobike=yesin the command above. DO NOT enable this option on Ubuntu systems or Raspberry Pis.For Libreswan 3.19-3.22:
cat >> /etc/ipsec.d/ikev2.conf <<EOF modecfgdns1=8.8.8.8 modecfgdns2=8.8.4.4 encapsulation=yes EOF
For Libreswan 3.18 and older:
cat >> /etc/ipsec.d/ikev2.conf <<EOF modecfgdns1=8.8.8.8 modecfgdns2=8.8.4.4 forceencaps=yes EOF
-
Generate Certificate Authority (CA) and VPN server certificates.
Note: Specify the certificate validity period (in months) with «-v». e.g. «-v 120».
Generate CA certificate:
certutil -z <(head -c 1024 /dev/urandom) -S -x -n "IKEv2 VPN CA" -s "O=IKEv2 VPN,CN=IKEv2 VPN CA" -k rsa -g 3072 -v 120 -d sql:/etc/ipsec.d -t "CT,," -2
Generating key. This may take a few moments... Is this a CA certificate [y/N]? y Enter the path length constraint, enter to skip [<0 for unlimited path]: > Is this a critical extension [y/N]? NGenerate VPN server certificate:
Note: If you specified the server’s DNS name (instead of its IP address) in step 1 above, you must replace
--extSAN "ip:$PUBLIC_IP,dns:$PUBLIC_IP"in the command below with--extSAN "dns:$PUBLIC_IP".certutil -z <(head -c 1024 /dev/urandom) -S -c "IKEv2 VPN CA" -n "$PUBLIC_IP" -s "O=IKEv2 VPN,CN=$PUBLIC_IP" -k rsa -g 3072 -v 120 -d sql:/etc/ipsec.d -t ",," --keyUsage digitalSignature,keyEncipherment --extKeyUsage serverAuth --extSAN "ip:$PUBLIC_IP,dns:$PUBLIC_IP"
Generating key. This may take a few moments... -
Generate client certificate(s), then export the
.p12file that contains the client certificate, private key, and CA certificate.Note: You may repeat this step to generate certificates for additional VPN clients, but make sure to replace every
vpnclientwithvpnclient2, etc. To connect multiple IKEv2 clients from behind the same NAT (e.g. home router) at the same time, you will need to generate a unique certificate for each client.Generate client certificate:
certutil -z <(head -c 1024 /dev/urandom) -S -c "IKEv2 VPN CA" -n "vpnclient" -s "O=IKEv2 VPN,CN=vpnclient" -k rsa -g 3072 -v 120 -d sql:/etc/ipsec.d -t ",," --keyUsage digitalSignature,keyEncipherment --extKeyUsage serverAuth,clientAuth -8 "vpnclient"
Generating key. This may take a few moments...Export
.p12file:pk12util -d sql:/etc/ipsec.d -n "vpnclient" -o vpnclient.p12Enter password for PKCS12 file: Re-enter password: pk12util: PKCS12 EXPORT SUCCESSFULEnter a secure password to protect the exported
.p12file (when importing into an iOS or macOS device, this password cannot be empty). -
(For iOS clients) Export the CA certificate as
ca.cer:certutil -L -d sql:/etc/ipsec.d -n "IKEv2 VPN CA" -a -o ca.cer -
The database should now contain:
certutil -L -d sql:/etc/ipsec.d
Certificate Nickname Trust Attributes SSL,S/MIME,JAR/XPI IKEv2 VPN CA CTu,u,u ($PUBLIC_IP) u,u,u vpnclient u,u,uNote: To display a certificate, use
certutil -L -d sql:/etc/ipsec.d -n "Nickname". To revoke a client certificate, follow these steps. For othercertutilusage, read here. -
(Important) Restart the IPsec service:
Before continuing, you must restart the IPsec service. The IKEv2 setup on the VPN server is now complete. Follow instructions to configure VPN clients.
Remove IKEv2
If you want to remove IKEv2 from the VPN server, but keep the IPsec/L2TP and IPsec/XAuth («Cisco IPsec») modes (if installed), run the helper script. Warning: All IKEv2 configuration including certificates and keys will be permanently deleted. This cannot be undone!
sudo ikev2.sh --removeikev2
After removing IKEv2, if you want to set it up again, refer to this section.
Alternatively, you can manually remove IKEv2.
To manually remove IKEv2 from the VPN server, but keep the IPsec/L2TP and IPsec/XAuth («Cisco IPsec») modes, follow these steps. Commands must be run as root.
Warning: All IKEv2 configuration including certificates and keys will be permanently deleted. This cannot be undone!
-
Rename (or delete) the IKEv2 config file:
mv /etc/ipsec.d/ikev2.conf /etc/ipsec.d/ikev2.conf.bak
Note: If you used an older version (before 2020-05-31) of the IKEv2 helper script or instructions, file
/etc/ipsec.d/ikev2.confmay not exist. In this case, please instead remove theconn ikev2-cpsection from file/etc/ipsec.conf. -
(Important) Restart the IPsec service:
-
List certificates in the IPsec database:
certutil -L -d sql:/etc/ipsec.d
Example output:
Certificate Nickname Trust Attributes SSL,S/MIME,JAR/XPI IKEv2 VPN CA CTu,u,u ($PUBLIC_IP) u,u,u vpnclient u,u,u -
Delete the Certificate Revocation List (CRL), if any:
crlutil -D -d sql:/etc/ipsec.d -n "IKEv2 VPN CA" 2>/dev/null
-
Delete certificates and keys. Replace «Nickname» below with each certificate’s nickname. Repeat these commands for each certificate. When finished, list certificates in the IPsec database again, and confirm that the list is empty.
certutil -F -d sql:/etc/ipsec.d -n "Nickname"
certutil -D -d sql:/etc/ipsec.d -n "Nickname" 2>/dev/null
References
- https://libreswan.org/wiki/VPN_server_for_remote_clients_using_IKEv2
- https://libreswan.org/wiki/HOWTO:_Using_NSS_with_libreswan
- https://libreswan.org/man/ipsec.conf.5.html
- https://docs.strongswan.org/docs/5.9/interop/windowsClients.html
- https://docs.strongswan.org/docs/5.9/os/androidVpnClient.html
- https://firefox-source-docs.mozilla.org/security/nss/legacy/tools/nss_tools_certutil/index.html
- https://firefox-source-docs.mozilla.org/security/nss/legacy/tools/nss_tools_crlutil/index.html
License
Copyright (C) 2016-2023 Lin Song
This work is licensed under the Creative Commons Attribution-ShareAlike 3.0 Unported License
Attribution required: please include my name in any derivative and let me know how you have improved it!
English | 中文
Guide: How to Set Up and Use IKEv2 VPN
- Introduction
- Configure IKEv2 VPN clients
- IKEv2 troubleshooting
- Manage IKEv2 clients
- Change IKEv2 server address
- Update IKEv2 helper script
- Set up IKEv2 using helper script
- Manually set up IKEv2
- Remove IKEv2
Introduction
Modern operating systems support the IKEv2 standard. Internet Key Exchange (IKE or IKEv2) is the protocol used to set up a Security Association (SA) in the IPsec protocol suite. Compared to IKE version 1, IKEv2 contains improvements such as Standard Mobility support through MOBIKE, and improved reliability.
Libreswan can authenticate IKEv2 clients on the basis of X.509 Machine Certificates using RSA signatures. This method does not require an IPsec PSK, username or password. It can be used with Windows, macOS, iOS, Android, Chrome OS, Linux and RouterOS.
By default, IKEv2 is automatically set up when running the VPN setup script. If you want to learn more about setting up IKEv2, see Set up IKEv2 using helper script. Docker users, see Configure and use IKEv2 VPN.
Configure IKEv2 VPN clients
Note: To add or export IKEv2 clients, run sudo ikev2.sh. Use -h to show usage. Client config files can be safely deleted after import.
- Windows 7, 8, 10 and 11
- OS X (macOS)
- iOS (iPhone/iPad)
- Android
- Chrome OS (Chromebook)
- Linux
- Mikrotik RouterOS
Learn how to change the IKEv2 server address.
In certain circumstances, you may need to change the IKEv2 server address. For example, to switch to use a DNS name, or after server IP changes. Learn more in this section.
Windows 7, 8, 10 and 11
Auto-import configuration
Screencast: IKEv2 Auto Import Configuration on Windows
Windows 8, 10 and 11 users can automatically import IKEv2 configuration:
- Securely transfer the generated
.p12file to your computer. - Right-click on ikev2_config_import.cmd and save this helper script to the same folder as the
.p12file. - Right-click on the saved script, select Properties. Click on Unblock at the bottom, then click on OK.
- Right-click on the saved script, select Run as administrator and follow the prompts.
To connect to the VPN: Click on the wireless/network icon in your system tray, select the new VPN entry, and click Connect. Once connected, you can verify that your traffic is being routed properly by looking up your IP address on Google. It should say «Your public IP address is Your VPN Server IP«.
If you get an error when trying to connect, see Troubleshooting.
Manually import configuration
[Supporters] Screencast: IKEv2 Manually Import Configuration on Windows
Alternatively, Windows 7, 8, 10 and 11 users can manually import IKEv2 configuration:
-
Securely transfer the generated
.p12file to your computer, then import it into the certificate store.To import the
.p12file, run the following from an elevated command prompt:# Import .p12 file (replace with your own value) certutil -f -importpfx "pathtoyourfile.p12" NoExport
Note: If there is no password for client config files, press Enter to continue, or if manually importing the
.p12file, leave the password field blank.Alternatively, you can manually import the .p12 file. Make sure that the client cert is placed in «Personal -> Certificates», and the CA cert is placed in «Trusted Root Certification Authorities -> Certificates».
-
On the Windows computer, add a new IKEv2 VPN connection.
For Windows 8, 10 and 11, it is recommended to create the VPN connection using the following commands from a command prompt, for improved security and performance.
# Create VPN connection (replace server address with your own value) powershell -command ^"Add-VpnConnection -ServerAddress 'Your VPN Server IP (or DNS name)' ^ -Name 'My IKEv2 VPN' -TunnelType IKEv2 -AuthenticationMethod MachineCertificate ^ -EncryptionLevel Required -PassThru^" # Set IPsec configuration powershell -command ^"Set-VpnConnectionIPsecConfiguration -ConnectionName 'My IKEv2 VPN' ^ -AuthenticationTransformConstants GCMAES128 -CipherTransformConstants GCMAES128 ^ -EncryptionMethod AES256 -IntegrityCheckMethod SHA256 -PfsGroup None ^ -DHGroup Group14 -PassThru -Force^"
Windows 7 does not support these commands, you can manually create the VPN connection.
Note: The server address you specify must exactly match the server address in the output of the IKEv2 helper script. For example, if you specified the server’s DNS name during IKEv2 setup, you must enter the DNS name in the Internet address field.
-
This step is required if you manually created the VPN connection.
Enable stronger ciphers for IKEv2 with a one-time registry change. Download and import the
.regfile below, or run the following from an elevated command prompt. Read more here.-
For Windows 7, 8, 10 and 11 (download .reg file)
REG ADD HKLMSYSTEMCurrentControlSetServicesRasManParameters /v NegotiateDH2048_AES256 /t REG_DWORD /d 0x1 /f
-
To connect to the VPN: Click on the wireless/network icon in your system tray, select the new VPN entry, and click Connect. Once connected, you can verify that your traffic is being routed properly by looking up your IP address on Google. It should say «Your public IP address is Your VPN Server IP«.
If you get an error when trying to connect, see Troubleshooting.
Remove the IKEv2 VPN connection.
Using the following steps, you can remove the VPN connection and optionally restore the computer to the status before IKEv2 configuration import.
-
Remove the added VPN connection in Windows Settings — Network — VPN. Windows 7 users can remove the VPN connection in Network and Sharing Center — Change adapter settings.
-
(Optional) Remove IKEv2 certificates.
-
Press Win+R, or search for
mmcin the Start Menu. Open Microsoft Management Console. -
Open
File - Add/Remove Snap-In. Select to addCertificatesand in the window that opens, selectComputer account -> Local Computer. Click onFinish -> OKto save the settings. -
Go to
Certificates - Personal - Certificatesand delete the IKEv2 client certificate. The name of the certificate is the same as the IKEv2 client name you specified (default:vpnclient). The certificate was issued byIKEv2 VPN CA. -
Go to
Certificates - Trusted Root Certification Authorities - Certificatesand delete the IKEv2 VPN CA certificate. The certificate was issued toIKEv2 VPN CAbyIKEv2 VPN CA. Before deleting, make sure that there are no other certificate(s) issued byIKEv2 VPN CAinCertificates - Personal - Certificates.
-
-
(Optional. For users who manually created the VPN connection) Restore registry settings. Note that you should backup the registry before editing.
-
Press Win+R, or search for
regeditin the Start Menu. Open Registry Editor. -
Go to
HKEY_LOCAL_MACHINESystemCurrentControlSetServicesRasmanParametersand delete the item with nameNegotiateDH2048_AES256, if it exists.
-
OS X (macOS)
[Supporters] Screencast: IKEv2 Import Configuration and Connect on macOS
First, securely transfer the generated .mobileconfig file to your Mac, then double-click and follow the prompts to import as a macOS profile. If your Mac runs macOS Big Sur or newer, open System Preferences and go to the Profiles section to finish importing. When finished, check to make sure «IKEv2 VPN» is listed under System Preferences -> Profiles.
To connect to the VPN:
- Open System Preferences and go to the Network section.
- Select the VPN connection with
Your VPN Server IP(or DNS name). - Check the Show VPN status in menu bar checkbox.
- Click Connect.
(Optional feature) Enable VPN On Demand to automatically start a VPN connection when your Mac is on Wi-Fi. To enable, check the Connect on demand checkbox for the VPN connection, and click Apply. You can customize VPN On Demand rules to exclude certain Wi-Fi network(s) such as your home network. See «Guide: Customize IKEv2 VPN On Demand rules for macOS and iOS» in 📖 Book: Set Up Your Own IPsec VPN, OpenVPN and WireGuard Server.
If you manually set up IKEv2 without using the helper script, click here for instructions.
First, securely transfer the generated .p12 file to your Mac, then double-click to import into the login keychain in Keychain Access. Next, double-click on the imported IKEv2 VPN CA certificate, expand Trust and select Always Trust from the IP Security (IPsec) drop-down menu. Close the dialog using the red «X» on the top-left corner. When prompted, use Touch ID or enter your password and click «Update Settings».
When finished, check to make sure both the new client certificate and IKEv2 VPN CA are listed under the Certificates category of login keychain.
- Open System Preferences and go to the Network section.
- Click the + button in the lower-left corner of the window.
- Select VPN from the Interface drop-down menu.
- Select IKEv2 from the VPN Type drop-down menu.
- Enter anything you like for the Service Name.
- Click Create.
- Enter
Your VPN Server IP(or DNS name) for the Server Address.
Note: If you specified the server’s DNS name (instead of its IP address) during IKEv2 setup, you must enter the DNS name in the Server Address and Remote ID fields. - Enter
Your VPN Server IP(or DNS name) for the Remote ID. - Enter
Your VPN client namein the Local ID field.
Note: This must match exactly the client name you specified during IKEv2 setup. Same as the first part of your.p12filename. - Click the Authentication Settings… button.
- Select None from the Authentication Settings drop-down menu.
- Select the Certificate radio button, then select the new client certificate.
- Click OK.
- Check the Show VPN status in menu bar checkbox.
- Click Apply to save the VPN connection information.
- Click Connect.
Once connected, you can verify that your traffic is being routed properly by looking up your IP address on Google. It should say «Your public IP address is Your VPN Server IP«.
If you get an error when trying to connect, see Troubleshooting.
Remove the IKEv2 VPN connection.
To remove the IKEv2 VPN connection, open System Preferences -> Profiles and remove the IKEv2 VPN profile you added.
iOS
[Supporters] Screencast: IKEv2 Import Configuration and Connect on iOS (iPhone & iPad)
First, securely transfer the generated .mobileconfig file to your iOS device, then import it as an iOS profile. To transfer the file, you may use:
- AirDrop, or
- Upload to your device (any App folder) using File Sharing, then open the «Files» App on your iOS device, move the uploaded file to the «On My iPhone» folder. After that, tap the file and go to the «Settings» App to import, or
- Host the file on a secure website of yours, then download and import it in Mobile Safari.
When finished, check to make sure «IKEv2 VPN» is listed under Settings -> General -> VPN & Device Management or Profile(s).
To connect to the VPN:
- Go to Settings -> VPN. Select the VPN connection with
Your VPN Server IP(or DNS name). - Slide the VPN switch ON.
(Optional feature) Enable VPN On Demand to automatically start a VPN connection when your iOS device is on Wi-Fi. To enable, tap the «i» icon on the right of the VPN connection, and enable Connect On Demand. You can customize VPN On Demand rules to exclude certain Wi-Fi network(s) such as your home network, or to start the VPN connection both on Wi-Fi and cellular. See «Guide: Customize IKEv2 VPN On Demand rules for macOS and iOS» in 📖 Book: Set Up Your Own IPsec VPN, OpenVPN and WireGuard Server.
If you manually set up IKEv2 without using the helper script, click here for instructions.
First, securely transfer the generated ca.cer and .p12 files to your iOS device, then import them one by one as iOS profiles. To transfer the files, you may use:
- AirDrop, or
- Upload to your device (any App folder) using File Sharing, then open the «Files» App on your iOS device, move the uploaded files to the «On My iPhone» folder. After that, tap each file and go to the «Settings» App to import, or
- Host the files on a secure website of yours, then download and import them in Mobile Safari.
When finished, check to make sure both the new client certificate and IKEv2 VPN CA are listed under Settings -> General -> VPN & Device Management or Profile(s).
- Go to Settings -> General -> VPN & Device Management -> VPN.
- Tap Add VPN Configuration….
- Tap Type. Select IKEv2 and go back.
- Tap Description and enter anything you like.
- Tap Server and enter
Your VPN Server IP(or DNS name).
Note: If you specified the server’s DNS name (instead of its IP address) during IKEv2 setup, you must enter the DNS name in the Server and Remote ID fields. - Tap Remote ID and enter
Your VPN Server IP(or DNS name). - Enter
Your VPN client namein the Local ID field.
Note: This must match exactly the client name you specified during IKEv2 setup. Same as the first part of your.p12filename. - Tap User Authentication. Select None and go back.
- Make sure the Use Certificate switch is ON.
- Tap Certificate. Select the new client certificate and go back.
- Tap Done.
- Slide the VPN switch ON.
Once connected, you can verify that your traffic is being routed properly by looking up your IP address on Google. It should say «Your public IP address is Your VPN Server IP«.
If you get an error when trying to connect, see Troubleshooting.
Remove the IKEv2 VPN connection.
To remove the IKEv2 VPN connection, open Settings -> General -> VPN & Device Management or Profile(s) and remove the IKEv2 VPN profile you added.
Android
[Supporters] Screencast: Connect using Android strongSwan VPN Client
- Securely transfer the generated
.sswanfile to your Android device. - Install strongSwan VPN Client from Google Play, F-Droid or strongSwan download server.
- Launch the strongSwan VPN client.
- Tap the «more options» menu on top right, then tap Import VPN profile.
- Choose the
.sswanfile you transferred from the VPN server.
Note: To find the.sswanfile, tap the three-line menu button, then browse to the location you saved the file. - On the «Import VPN profile» screen, tap IMPORT CERTIFICATE FROM VPN PROFILE, and follow the prompts.
- On the «Choose certificate» screen, select the new client certificate, then tap Select.
- Tap IMPORT.
- Tap the new VPN profile to connect.
Alternatively, Android 11+ users can also connect using the native IKEv2 client.
[Supporters] Screencast: Connect using Native VPN Client on Android 11+
- Securely transfer the generated
.p12file to your Android device. - Launch the Settings application.
- Go to Security -> Advanced -> Encryption & credentials.
- Tap Install a certificate.
- Tap VPN & app user certificate.
- Choose the
.p12file you transferred from the VPN server.
Note: To find the.p12file, tap the three-line menu button, then browse to the location you saved the file. - Enter a name for the certificate, then tap OK.
- Go to Settings -> Network & internet -> VPN, then tap the «+» button.
- Enter a name for the VPN profile.
- Select IKEv2/IPSec RSA from the Type drop-down menu.
- Enter
Your VPN Server IP(or DNS name) in the Server address field.
Note: This must exactly match the server address in the output of the IKEv2 helper script. - Enter anything (e.g.
empty) in the IPSec identifier field.
Note: This field should not be required. It is a bug in Android. - Select the certificate you imported from the IPSec user certificate drop-down menu.
- Select the certificate you imported from the IPSec CA certificate drop-down menu.
- Select (receive from server) from the IPSec server certificate drop-down menu.
- Tap Save. Then tap the new VPN connection and tap Connect.
If your device runs Android 6.0 or older, click here for additional instructions.
If your device runs Android 6.0 (Marshmallow) or older, in order to connect using the strongSwan VPN client, you must make the following change on the VPN server: Edit /etc/ipsec.d/ikev2.conf on the server. Append authby=rsa-sha1 to the end of the conn ikev2-cp section, indented by two spaces. Save the file and run service ipsec restart.
(Optional feature) You can choose to enable the «Always-on VPN» feature on Android. Launch the Settings app, go to Network & internet -> Advanced -> VPN, click the gear icon on the right of «strongSwan VPN Client», then enable the Always-on VPN and Block connections without VPN options.
If you manually set up IKEv2 without using the helper script, click here for instructions.
Android 10 and newer:
- Securely transfer the generated
.p12file to your Android device. - Install strongSwan VPN Client from Google Play, F-Droid or strongSwan download server.
- Launch the Settings application.
- Go to Security -> Advanced -> Encryption & credentials.
- Tap Install a certificate.
- Tap VPN & app user certificate.
- Choose the
.p12file you transferred from the VPN server, and follow the prompts.
Note: To find the.p12file, tap the three-line menu button, then browse to the location you saved the file. - Launch the strongSwan VPN client and tap Add VPN Profile.
- Enter
Your VPN Server IP(or DNS name) in the Server field.
Note: If you specified the server’s DNS name (instead of its IP address) during IKEv2 setup, you must enter the DNS name in the Server field. - Select IKEv2 Certificate from the VPN Type drop-down menu.
- Tap Select user certificate, select the new client certificate and confirm.
- (Important) Tap Show advanced settings. Scroll down, find and enable the Use RSA/PSS signatures option.
- Save the new VPN connection, then tap to connect.
Android 4 to 9:
- Securely transfer the generated
.p12file to your Android device. - Install strongSwan VPN Client from Google Play, F-Droid or strongSwan download server.
- Launch the strongSwan VPN client and tap Add VPN Profile.
- Enter
Your VPN Server IP(or DNS name) in the Server field.
Note: If you specified the server’s DNS name (instead of its IP address) during IKEv2 setup, you must enter the DNS name in the Server field. - Select IKEv2 Certificate from the VPN Type drop-down menu.
- Tap Select user certificate, then tap Install certificate.
- Choose the
.p12file you transferred from the VPN server, and follow the prompts.
Note: To find the.p12file, tap the three-line menu button, then browse to the location you saved the file. - (Important) Tap Show advanced settings. Scroll down, find and enable the Use RSA/PSS signatures option.
- Save the new VPN connection, then tap to connect.
Once connected, you can verify that your traffic is being routed properly by looking up your IP address on Google. It should say «Your public IP address is Your VPN Server IP«.
If you get an error when trying to connect, see Troubleshooting.
Chrome OS
First, on your VPN server, export the CA certificate as ca.cer:
sudo certutil -L -d sql:/etc/ipsec.d -n "IKEv2 VPN CA" -a -o ca.cer
Securely transfer the generated .p12 and ca.cer files to your Chrome OS device.
Install user and CA certificates:
- Open a new tab in Google Chrome.
- In the address bar, enter chrome://settings/certificates
- (Important) Click Import and Bind, not Import.
- In the box that opens, choose the
.p12file you transferred from the VPN server and select Open. - Click OK if the certificate does not have a password. Otherwise, enter the certificate’s password.
- Click the Authorities tab. Then click Import.
- In the box that opens, select All files in the drop-down menu at the bottom left.
- Choose the
ca.cerfile you transferred from the VPN server and select Open. - Keep the default options and click OK.
Add a new VPN connection:
- Go to Settings -> Network.
- Click Add connection, then click Add built-in VPN.
- Enter anything you like for the Service name.
- Select IPsec (IKEv2) in the Provider type drop-down menu.
- Enter
Your VPN Server IP(or DNS name) for the Server hostname. - Select User certificate in the Authentication type drop-down menu.
- Select IKEv2 VPN CA [IKEv2 VPN CA] in the Server CA certificate drop-down menu.
- Select IKEv2 VPN CA [client name] in the User certificate drop-down menu.
- Leave other fields blank.
- Enable Save identity and password.
- Click Connect.
Once connected, you will see a VPN icon overlay on the network status icon. You can verify that your traffic is being routed properly by looking up your IP address on Google. It should say «Your public IP address is Your VPN Server IP«.
(Optional feature) You can choose to enable the «Always-on VPN» feature on Chrome OS. To manage this setting, go to Settings -> Network, then click VPN.
If you get an error when trying to connect, see Troubleshooting.
Linux
Before configuring Linux VPN clients, you must make the following change on the VPN server: Edit /etc/ipsec.d/ikev2.conf on the server. Append authby=rsa-sha1 to the end of the conn ikev2-cp section, indented by two spaces. Save the file and run service ipsec restart.
To configure your Linux computer to connect to IKEv2 as a VPN client, first install the strongSwan plugin for NetworkManager:
# Ubuntu and Debian sudo apt-get update sudo apt-get install network-manager-strongswan # Arch Linux sudo pacman -Syu # upgrade all packages sudo pacman -S networkmanager-strongswan # Fedora sudo yum install NetworkManager-strongswan-gnome # CentOS sudo yum install epel-release sudo yum --enablerepo=epel install NetworkManager-strongswan-gnome
Next, securely transfer the generated .p12 file from the VPN server to your Linux computer. After that, extract the CA certificate, client certificate and private key. Replace vpnclient.p12 in the example below with the name of your .p12 file.
# Example: Extract CA certificate, client certificate and private key. # You may delete the .p12 file when finished. # Note: You may need to enter the import password, which can be found # in the output of the IKEv2 helper script. If the output does not # contain an import password, press Enter to continue. # Note: If using OpenSSL 3.x (run "openssl version" to check), # append "-legacy" to the 3 commands below. openssl pkcs12 -in vpnclient.p12 -cacerts -nokeys -out ca.cer openssl pkcs12 -in vpnclient.p12 -clcerts -nokeys -out client.cer openssl pkcs12 -in vpnclient.p12 -nocerts -nodes -out client.key rm vpnclient.p12 # (Important) Protect certificate and private key files # Note: This step is optional, but strongly recommended. sudo chown root.root ca.cer client.cer client.key sudo chmod 600 ca.cer client.cer client.key
You can then set up and enable the VPN connection:
- Go to Settings -> Network -> VPN. Click the + button.
- Select IPsec/IKEv2 (strongswan).
- Enter anything you like in the Name field.
- In the Gateway (Server) section, enter
Your VPN Server IP(or DNS name) for the Address. - Select the
ca.cerfile for the Certificate. - In the Client section, select Certificate(/private key) in the Authentication drop-down menu.
- Select Certificate/private key in the Certificate drop-down menu (if exists).
- Select the
client.cerfile for the Certificate (file). - Select the
client.keyfile for the Private key. - In the Options section, check the Request an inner IP address checkbox.
- In the Cipher proposals (Algorithms) section, check the Enable custom proposals checkbox.
- Leave the IKE field blank.
- Enter
aes128gcm16in the ESP field. - Click Add to save the VPN connection information.
- Turn the VPN switch ON.
Once connected, you can verify that your traffic is being routed properly by looking up your IP address on Google. It should say «Your public IP address is Your VPN Server IP«.
If you get an error when trying to connect, see Troubleshooting.
RouterOS
Note: These steps were contributed by @Unix-User. It is recommended to run terminal commands via an SSH connection, e.g. via Putty.
-
Securely transfer the generated
.p12file to your computer.Click to see screencast.
-
In WinBox, go to System > certificates > import. Import the
.p12certificate file twice (yes, import the same file two times!). Verify in your certificates panel. You will see 2 files, the one that is marked KT is the key.Click to see screencast.
Or you can use terminal instead (empty passphrase):
[admin@MikroTik] > /certificate/import file-name=mikrotik.p12 passphrase: certificates-imported: 2 private-keys-imported: 0 files-imported: 1 decryption-failures: 0 keys-with-no-certificate: 0 [admin@MikroTik] > /certificate/import file-name=mikrotik.p12 passphrase: certificates-imported: 0 private-keys-imported: 1 files-imported: 1 decryption-failures: 0 keys-with-no-certificate: 0
-
Run these commands in terminal. Replace the following with your own values.
YOUR_VPN_SERVER_IP_OR_DNS_NAMEis your VPN server IP or DNS name.
IMPORTED_CERTIFICATEis the name of the certificate from step 2 above, e.g.vpnclient.p12_0
(the one flagged with KT — Priv. Key Trusted — if not flagged as KT, import certificate again).
THESE_ADDRESSES_GO_THROUGH_VPNare the local network addresses that you want to browse through the VPN.
Assuming that your local network behind RouterOS is192.168.0.0/24, you can use192.168.0.0/24
for the entire network, or use192.168.0.10for just one device, and so on./ip firewall address-list add address=THESE_ADDRESSES_GO_THROUGH_VPN list=local /ip ipsec mode-config add name=ike2-rw responder=no src-address-list=local /ip ipsec policy group add name=ike2-rw /ip ipsec profile add name=ike2-rw /ip ipsec peer add address=YOUR_VPN_SERVER_IP_OR_DNS_NAME exchange-mode=ike2 name=ike2-rw-client profile=ike2-rw /ip ipsec proposal add name=ike2-rw pfs-group=none /ip ipsec identity add auth-method=digital-signature certificate=IMPORTED_CERTIFICATE generate-policy=port-strict mode-config=ike2-rw peer=ike2-rw-client policy-template-group=ike2-rw /ip ipsec policy add group=ike2-rw proposal=ike2-rw template=yes -
For more information, see #1112.
tested on
mar/02/2022 12:52:57 by RouterOS 6.48
RouterBOARD 941-2nD
IKEv2 troubleshooting
Read this in other languages: English, 中文.
See also: Check logs and VPN status, IKEv1 troubleshooting and Advanced usage.
- Cannot connect to the VPN server
- Unable to connect multiple IKEv2 clients
- IKE authentication credentials are unacceptable
- Policy match error
- Parameter is incorrect
- Cannot open websites after connecting to IKEv2
- Windows 10 connecting
- Other known issues
Cannot connect to the VPN server
First, make sure that the VPN server address specified on your VPN client device exactly matches the server address in the output of the IKEv2 helper script. Refer to the sections below and Check logs and VPN status.
For servers with an external firewall (e.g. EC2/GCE), open UDP ports 500 and 4500 for the VPN. Aliyun users, see #433.
Unable to connect multiple IKEv2 clients
To connect multiple IKEv2 clients from behind the same NAT (e.g. home router) at the same time, you will need to generate a unique certificate for each client. Otherwise, you could encounter the issue where a later connected client affects the VPN connection of an existing client, which may lose Internet access.
To generate certificates for additional IKEv2 clients, run the helper script with the --addclient option. To customize client options, run the script without arguments.
sudo ikev2.sh --addclient [client name]
IKE authentication credentials are unacceptable
If you encounter this error, make sure that the VPN server address specified on your VPN client device exactly matches the server address in the output of the IKEv2 helper script. For example, you cannot use a DNS name to connect if it was not specified when setting up IKEv2. To change the IKEv2 server address, read this section.
Policy match error
To fix this error, you will need to enable stronger ciphers for IKEv2 with a one-time registry change. Download and import the .reg file below, or run the following from an elevated command prompt.
- For Windows 7, 8, 10 and 11 (download .reg file)
REG ADD HKLMSYSTEMCurrentControlSetServicesRasManParameters /v NegotiateDH2048_AES256 /t REG_DWORD /d 0x1 /f
Parameter is incorrect
If you encounter «Error 87: The parameter is incorrect» when trying to connect using IKEv2 mode, try the solutions in this issue, more specifically, step 2 «reset device manager adapters».
Cannot open websites after connecting to IKEv2
If your VPN client device cannot open websites after successfully connecting to IKEv2, try the following fixes:
-
Some cloud providers, such as Google Cloud, set a lower MTU by default. This could cause network issues with IKEv2 VPN clients. To fix, try setting the MTU to 1500 on the VPN server:
# Replace ens4 with the network interface name on your server sudo ifconfig ens4 mtu 1500This setting does not persist after a reboot. To change the MTU size permanently, refer to relevant articles on the web.
-
If changing the MTU size does not fix the issue, try the fix in Android MTU/MSS issues.
-
In certain circumstances, Windows does not use the DNS servers specified by IKEv2 after connecting. This can be fixed by manually entering DNS servers such as Google Public DNS (8.8.8.8, 8.8.4.4) in network interface properties -> TCP/IPv4.
Windows 10 connecting
If using Windows 10 and the VPN is stuck on «connecting» for more than a few minutes, try these steps:
- Right-click on the wireless/network icon in your system tray.
- Select Open Network & Internet settings, then on the page that opens, click VPN on the left.
- Select the new VPN entry, then click Connect.
Other known issues
The built-in VPN client in Windows may not support IKEv2 fragmentation (this feature requires Windows 10 v1803 or newer). On some networks, this can cause the connection to fail or have other issues. You may instead try the IPsec/L2TP or IPsec/XAuth mode.
Manage IKEv2 clients
- List existing clients
- Add a client certificate
- Export configuration for an existing client
- Delete a client certificate
- Revoke a client certificate
List existing clients
To list the names of existing IKEv2 clients, run the helper script with the --listclients option. Use option -h to show usage.
sudo ikev2.sh --listclients
Add a client certificate
To generate certificates for additional IKEv2 clients, run the helper script with the --addclient option. To customize client options, run the script without arguments.
sudo ikev2.sh --addclient [client name]
Alternatively, you may manually add a client certificate. Refer to step 4 in this section.
Export configuration for an existing client
By default, the IKEv2 helper script exports client configuration after running. If later you want to export an existing client, you may use:
sudo ikev2.sh --exportclient [client name]
Delete a client certificate
Important: Deleting a client certificate from the IPsec database WILL NOT prevent VPN client(s) from connecting using that certificate! For this use case, you MUST revoke the client certificate instead of deleting it.
First, read the important note above. Then click here for instructions.
Warning: The client certificate and private key will be permanently deleted. This cannot be undone!
To delete an existing client:
sudo ikev2.sh --deleteclient [client name]
Alternatively, you can manually delete a client certificate.
-
List certificates in the IPsec database:
certutil -L -d sql:/etc/ipsec.d
Example output:
Certificate Nickname Trust Attributes SSL,S/MIME,JAR/XPI IKEv2 VPN CA CTu,u,u ($PUBLIC_IP) u,u,u vpnclient u,u,u -
Delete the client certificate and private key. Replace «Nickname» below with the nickname of the client certificate you want to delete, e.g.
vpnclient.certutil -F -d sql:/etc/ipsec.d -n "Nickname" certutil -D -d sql:/etc/ipsec.d -n "Nickname" 2>/dev/null
-
(Optional) Delete the previously generated client configuration files (
.p12,.mobileconfigand.sswanfiles) for this VPN client, if any.
Revoke a client certificate
In certain circumstances, you may need to revoke a previously generated VPN client certificate.
To revoke an existing client:
sudo ikev2.sh --revokeclient [client name]
Alternatively, you can manually revoke a client certificate.
Alternatively, you can manually revoke a client certificate. This can be done using crlutil. See example steps below, commands must be run as root.
-
Check the database, and identify the nickname of the client certificate you want to revoke.
certutil -L -d sql:/etc/ipsec.d
Certificate Nickname                               Trust Attributes
                                                   SSL,S/MIME,JAR/XPI

IKEv2 VPN CA                                       CTu,u,u
($PUBLIC_IP)                                       u,u,u
vpnclient-to-revoke                                u,u,u
In this example, we will revoke the certificate with nickname
vpnclient-to-revoke, issued byIKEv2 VPN CA. -
Find the serial number of this client certificate.
certutil -L -d sql:/etc/ipsec.d -n "vpnclient-to-revoke"Certificate: Data: Version: 3 (0x2) Serial Number: 00:cd:69:ff:74 ... ...From the output, we see that the serial number is
CD69FF74in hexadecimal, which is3446275956in decimal. It will be used in the next steps. -
Create a new Certificate Revocation List (CRL). You only need to do this once for each CA.
if ! crlutil -L -d sql:/etc/ipsec.d -n "IKEv2 VPN CA" 2>/dev/null; then
  crlutil -G -d sql:/etc/ipsec.d -n "IKEv2 VPN CA" -c /dev/null
fi
CRL Info: : Version: 2 (0x1) Signature Algorithm: PKCS #1 SHA-256 With RSA Encryption Issuer: "O=IKEv2 VPN,CN=IKEv2 VPN CA" This Update: Sat Jun 06 22:00:00 2020 CRL Extensions: -
Add the client certificate you want to revoke to the CRL. Here we specify the certificate’s serial number in decimal, and the revocation time in GeneralizedTime format (YYYYMMDDhhmmssZ) in UTC.
crlutil -M -d sql:/etc/ipsec.d -n "IKEv2 VPN CA" <<EOF
addcert 3446275956 20200606220100Z
EOF
CRL Info:
:
    Version: 2 (0x1)
    Signature Algorithm: PKCS #1 SHA-256 With RSA Encryption
    Issuer: "O=IKEv2 VPN,CN=IKEv2 VPN CA"
    This Update: Sat Jun 06 22:02:00 2020
    Entry 1 (0x1):
        Serial Number:
            00:cd:69:ff:74
        Revocation Date: Sat Jun 06 22:01:00 2020
    CRL Extensions:
Note: If you want to remove a certificate from the CRL, replace
addcert 3446275956 20200606220100Zabove withrmcert 3446275956. For othercrlutilusage, read here. -
Finally, let Libreswan re-read the updated CRL.
Change IKEv2 server address
In certain circumstances, you may need to change the IKEv2 server address after setup. For example, to switch to use a DNS name, or after server IP changes. Note that the server address you specify on VPN client devices must exactly match the server address in the output of the IKEv2 helper script. Otherwise, devices may be unable to connect.
To change the server address, run the helper script and follow the prompts.
wget https://get.vpnsetup.net/ikev2addr -O ikev2addr.sh
sudo bash ikev2addr.sh
Important: After running this script, you must manually update the server address (and remote ID, if applicable) on any existing IKEv2 client devices. For iOS clients, you’ll need to export and re-import client configuration using the IKEv2 helper script.
Update IKEv2 helper script
The IKEv2 helper script is updated from time to time for bug fixes and improvements (commit log). When a newer version is available, you may optionally update the IKEv2 helper script on your server. Note that these commands will overwrite any existing ikev2.sh.
wget https://get.vpnsetup.net/ikev2 -O /opt/src/ikev2.sh
chmod +x /opt/src/ikev2.sh && ln -s /opt/src/ikev2.sh /usr/bin 2>/dev/null
Set up IKEv2 using helper script
Note: By default, IKEv2 is automatically set up when running the VPN setup script. You may skip this section and continue to configure IKEv2 VPN clients.
Important: Before continuing, you should have successfully set up your own VPN server. Docker users, see here.
Use this helper script to automatically set up IKEv2 on the VPN server:
# Set up IKEv2 using default options
sudo ikev2.sh --auto
# Alternatively, you may customize IKEv2 options
sudo ikev2.sh
Note: If IKEv2 is already set up, but you want to customize IKEv2 options, first remove IKEv2, then set it up again using sudo ikev2.sh.
When finished, continue to configure IKEv2 VPN clients. Advanced users can optionally enable IKEv2-only mode.
Error: «sudo: ikev2.sh: command not found».
This is normal if you used an older version of the VPN setup script. First, download the IKEv2 helper script:
wget https://get.vpnsetup.net/ikev2 -O /opt/src/ikev2.sh
chmod +x /opt/src/ikev2.sh && ln -s /opt/src/ikev2.sh /usr/bin
Then run the script using the instructions above.
You may optionally specify a DNS name, client name and/or custom DNS servers.
When running IKEv2 setup in auto mode, advanced users can optionally specify a DNS name for the IKEv2 server address. The DNS name must be a fully qualified domain name (FQDN). Example:
sudo VPN_DNS_NAME='vpn.example.com' ikev2.sh --auto
Similarly, you may specify a name for the first IKEv2 client. The default is vpnclient if not specified.
sudo VPN_CLIENT_NAME='your_client_name' ikev2.sh --auto
By default, IKEv2 clients are set to use Google Public DNS when the VPN is active. You may specify custom DNS server(s) for IKEv2. Example:
sudo VPN_DNS_SRV1=1.1.1.1 VPN_DNS_SRV2=1.0.0.1 ikev2.sh --auto
By default, no password is required when importing IKEv2 client configuration. You can choose to protect client config files using a random password.
sudo VPN_PROTECT_CONFIG=yes ikev2.sh --auto
View usage information for the IKEv2 script.
Usage: bash ikev2.sh [options]

Options:
  --auto                        run IKEv2 setup in auto mode using default options (for initial setup only)
  --addclient [client name]     add a new client using default options
  --exportclient [client name]  export configuration for an existing client
  --listclients                 list the names of existing clients
  --revokeclient [client name]  revoke an existing client
  --deleteclient [client name]  delete an existing client
  --removeikev2                 remove IKEv2 and delete all certificates and keys from the IPsec database
  -h, --help                    show this help message and exit

To customize IKEv2 or client options, run this script without arguments.
Manually set up IKEv2
As an alternative to using the helper script, advanced users can manually set up IKEv2 on the VPN server. Before continuing, it is recommended to update Libreswan to the latest version.
The following example shows how to manually configure IKEv2 with Libreswan. Commands below must be run as root.
View example steps for manually configuring IKEv2 with Libreswan.
-
Find the VPN server’s public IP, save it to a variable and check.
PUBLIC_IP=$(dig @resolver1.opendns.com -t A -4 myip.opendns.com +short)
[ -z "$PUBLIC_IP" ] && PUBLIC_IP=$(wget -t 2 -T 10 -qO- http://ipv4.icanhazip.com)
printf '%sn' "$PUBLIC_IP"
Check to make sure the output matches the server’s public IP. This variable is required in the steps below.
Note: Alternatively, you may specify the server’s DNS name here. e.g.
PUBLIC_IP=myvpn.example.com. -
Add a new IKEv2 connection:
if ! grep -qs '^include /etc/ipsec.d/*.conf$' /etc/ipsec.conf; then
  echo >> /etc/ipsec.conf
  echo 'include /etc/ipsec.d/*.conf' >> /etc/ipsec.conf
fi
Note: If you specified the server’s DNS name (instead of its IP address) in step 1 above, you must replace
leftid=$PUBLIC_IPin the command below withleftid=@$PUBLIC_IP.cat > /etc/ipsec.d/ikev2.conf <<EOF conn ikev2-cp left=%defaultroute leftcert=$PUBLIC_IP leftid=$PUBLIC_IP leftsendcert=always leftsubnet=0.0.0.0/0 leftrsasigkey=%cert right=%any rightid=%fromcert rightaddresspool=192.168.43.10-192.168.43.250 rightca=%same rightrsasigkey=%cert narrowing=yes dpddelay=30 retransmit-timeout=300s dpdaction=clear auto=add ikev2=insist rekey=no pfs=no ike=aes256-sha2,aes128-sha2,aes256-sha1,aes128-sha1 phase2alg=aes_gcm-null,aes128-sha1,aes256-sha1,aes128-sha2,aes256-sha2 ikelifetime=24h salifetime=24h EOF
We need to add a few more lines to that file. First check your Libreswan version, then run one of the following commands:
For Libreswan 3.23 and newer:
cat >> /etc/ipsec.d/ikev2.conf <<EOF
  modecfgdns="8.8.8.8 8.8.4.4"
  encapsulation=yes
  mobike=no
EOF
Note: The MOBIKE IKEv2 extension allows VPN clients to change network attachment points, e.g. switch between mobile data and Wi-Fi and keep the IPsec tunnel up on the new IP. If your server (or Docker host) is NOT running Ubuntu Linux, and you wish to enable MOBIKE support, replace
mobike=nowithmobike=yesin the command above. DO NOT enable this option on Ubuntu systems or Raspberry Pis.For Libreswan 3.19-3.22:
cat >> /etc/ipsec.d/ikev2.conf <<EOF
  modecfgdns1=8.8.8.8
  modecfgdns2=8.8.4.4
  encapsulation=yes
EOF
For Libreswan 3.18 and older:
cat >> /etc/ipsec.d/ikev2.conf <<EOF
  modecfgdns1=8.8.8.8
  modecfgdns2=8.8.4.4
  forceencaps=yes
EOF
-
Generate Certificate Authority (CA) and VPN server certificates.
Note: Specify the certificate validity period (in months) with «-v». e.g. «-v 120».
Generate CA certificate:
certutil -z <(head -c 1024 /dev/urandom)
  -S -x -n "IKEv2 VPN CA"
  -s "O=IKEv2 VPN,CN=IKEv2 VPN CA"
  -k rsa -g 3072 -v 120
  -d sql:/etc/ipsec.d -t "CT,," -2
Generating key.  This may take a few moments...

Is this a CA certificate [y/N]?
y
Enter the path length constraint, enter to skip [<0 for unlimited path]: >
Is this a critical extension [y/N]?
N
Generate VPN server certificate:
Note: If you specified the server’s DNS name (instead of its IP address) in step 1 above, you must replace
--extSAN "ip:$PUBLIC_IP,dns:$PUBLIC_IP"in the command below with--extSAN "dns:$PUBLIC_IP".certutil -z <(head -c 1024 /dev/urandom) -S -c "IKEv2 VPN CA" -n "$PUBLIC_IP" -s "O=IKEv2 VPN,CN=$PUBLIC_IP" -k rsa -g 3072 -v 120 -d sql:/etc/ipsec.d -t ",," --keyUsage digitalSignature,keyEncipherment --extKeyUsage serverAuth --extSAN "ip:$PUBLIC_IP,dns:$PUBLIC_IP"
Generating key. This may take a few moments... -
Generate client certificate(s), then export the
.p12file that contains the client certificate, private key, and CA certificate.Note: You may repeat this step to generate certificates for additional VPN clients, but make sure to replace every
vpnclientwithvpnclient2, etc. To connect multiple IKEv2 clients from behind the same NAT (e.g. home router) at the same time, you will need to generate a unique certificate for each client.Generate client certificate:
certutil -z <(head -c 1024 /dev/urandom)
  -S -c "IKEv2 VPN CA" -n "vpnclient"
  -s "O=IKEv2 VPN,CN=vpnclient"
  -k rsa -g 3072 -v 120
  -d sql:/etc/ipsec.d -t ",,"
  --keyUsage digitalSignature,keyEncipherment
  --extKeyUsage serverAuth,clientAuth -8 "vpnclient"
Generating key. This may take a few moments...Export
.p12file:pk12util -d sql:/etc/ipsec.d -n "vpnclient" -o vpnclient.p12Enter password for PKCS12 file: Re-enter password: pk12util: PKCS12 EXPORT SUCCESSFULEnter a secure password to protect the exported
.p12file (when importing into an iOS or macOS device, this password cannot be empty). -
(For iOS clients) Export the CA certificate as
ca.cer:certutil -L -d sql:/etc/ipsec.d -n "IKEv2 VPN CA" -a -o ca.cer -
The database should now contain:
certutil -L -d sql:/etc/ipsec.d
Certificate Nickname                               Trust Attributes
                                                   SSL,S/MIME,JAR/XPI

IKEv2 VPN CA                                       CTu,u,u
($PUBLIC_IP)                                       u,u,u
vpnclient                                          u,u,u
Note: To display a certificate, use
certutil -L -d sql:/etc/ipsec.d -n "Nickname". To revoke a client certificate, follow these steps. For othercertutilusage, read here. -
(Important) Restart the IPsec service:
Before continuing, you must restart the IPsec service. The IKEv2 setup on the VPN server is now complete. Follow instructions to configure VPN clients.
Remove IKEv2
If you want to remove IKEv2 from the VPN server, but keep the IPsec/L2TP and IPsec/XAuth («Cisco IPsec») modes (if installed), run the helper script. Warning: All IKEv2 configuration including certificates and keys will be permanently deleted. This cannot be undone!
sudo ikev2.sh --removeikev2
After removing IKEv2, if you want to set it up again, refer to this section.
Alternatively, you can manually remove IKEv2.
To manually remove IKEv2 from the VPN server, but keep the IPsec/L2TP and IPsec/XAuth («Cisco IPsec») modes, follow these steps. Commands must be run as root.
Warning: All IKEv2 configuration including certificates and keys will be permanently deleted. This cannot be undone!
-
Rename (or delete) the IKEv2 config file:
mv /etc/ipsec.d/ikev2.conf /etc/ipsec.d/ikev2.conf.bak
Note: If you used an older version (before 2020-05-31) of the IKEv2 helper script or instructions, file
/etc/ipsec.d/ikev2.confmay not exist. In this case, please instead remove theconn ikev2-cpsection from file/etc/ipsec.conf. -
(Important) Restart the IPsec service:
-
List certificates in the IPsec database:
certutil -L -d sql:/etc/ipsec.d
Example output:
Certificate Nickname Trust Attributes SSL,S/MIME,JAR/XPI IKEv2 VPN CA CTu,u,u ($PUBLIC_IP) u,u,u vpnclient u,u,u -
Delete the Certificate Revocation List (CRL), if any:
crlutil -D -d sql:/etc/ipsec.d -n "IKEv2 VPN CA" 2>/dev/null
-
Delete certificates and keys. Replace «Nickname» below with each certificate’s nickname. Repeat these commands for each certificate. When finished, list certificates in the IPsec database again, and confirm that the list is empty.
certutil -F -d sql:/etc/ipsec.d -n "Nickname"
certutil -D -d sql:/etc/ipsec.d -n "Nickname" 2>/dev/null
References
- https://libreswan.org/wiki/VPN_server_for_remote_clients_using_IKEv2
- https://libreswan.org/wiki/HOWTO:_Using_NSS_with_libreswan
- https://libreswan.org/man/ipsec.conf.5.html
- https://docs.strongswan.org/docs/5.9/interop/windowsClients.html
- https://docs.strongswan.org/docs/5.9/os/androidVpnClient.html
- https://firefox-source-docs.mozilla.org/security/nss/legacy/tools/nss_tools_certutil/index.html
- https://firefox-source-docs.mozilla.org/security/nss/legacy/tools/nss_tools_crlutil/index.html
License
Copyright (C) 2016-2023 Lin Song
This work is licensed under the Creative Commons Attribution-ShareAlike 3.0 Unported License
Attribution required: please include my name in any derivative and let me know how you have improved it!
Для L2TP/IPSec с общим ключом
Важно: L2TP IPsec клиенты, находящиеся за одним NAT’ом, могут испытывать проблемы подключения если их более одного. Решить проблему может помочь
инструкция
. Рекомендуем вместо L2TP IPsec использовать IKEv2 IPSec.
Имя подключения — название создаваемого подключения;
-
Имя или адрес сервера — адрес VPN-сервера;
-
Тип VPN — Протокол L2TP/IPSec с общим ключом;
-
Общий ключ — значение строки PSK в разделе Пользователи -> VPN-подключение -> Основное -> Подключение по L2TP/IPSec;
-
Тип данных для входа — Имя пользователя и пароль;
-
Имя пользователя — имя пользователя, которому разрешено подключение по VPN;
-
Пароль — пароль пользователя.

При настройке подключения по VPN из сети Интернет, в свойствах VPN-подключения нужно указать следующие параметры:
-
Перейдите в Настройки параметров адаптера;
-
Нажмите на созданное подключение правой кнопкой мыши и выберите Свойства;
-
Перейдите во вкладку Безопасность и установите:
-
Шифрование данных — обязательное (отключиться, если нет шифрования)
-
Протокол расширенной проверки подлинности (EAP) — Microsoft защищенный пароль (EAP MSCHAPV2)
-
Если вы создаете VPN-подключение к UTM через проброс портов, рекомендуем выполнить следующие действия:
-
1.
Откройте Редактор реестра;
-
2.
Перейдите в
HKEY_LOCAL_MACHINESYSTEMCurrentControlSetServicesPolicyAgentи создайте DWORD-параметр с именем AssumeUDPEncapsulationContextOnSendRule и значением2;
-
1.
Неправильно указан логин или пароль пользователя. Часто при повторном соединении предлагается указать домен. Старайтесь создавать цифро-буквенные пароли, желательно на латинице для ваших учетных записей. Если есть сомнения в этом пункте, то временно установите логин и пароль пользователю «user» и «123456».
-
2.
Для того, чтобы пакеты пошли через VPN-туннель, надо убедиться, что в настройках этого подключения стоит чекбокс Использовать основной шлюз в удалённой сети в разделе Настройка параметров адаптера -> Правой кнопкой мыши по подключению -> Свойства -> Сеть -> Свойства опции «Протокол Интернета версии 4 (TCP/IPv4)» ->Дополнительно. Если же маршрутизировать все пакеты в этот интерфейс не обязательно, то маршрут надо писать вручную.
-
3.
Подключение происходит через DNAT, т.е. внешний интерфейс Ideco UTM не имеет «белого» IP-адреса, а необходимые для работы порты (500 и 4500) «проброшены» на внешний интерфейс устройства, расположенного перед Ideco UTM и имеющего «белый» IP-адрес. В данном случае VPN-подключение либо вообще не будет устанавливаться, либо будут периодические обрывы. Решение — исключить устройство перед Ideco UTM и указать на внешнем интерфейсе Ideco UTM «белый» IP-адрес, к которому в итоге и будут осуществляться L2TP/IPsec-подключения. Либо используйте протокол SSTP, потому что его проще опубликовать с помощью проброса портов.
-
4.
Если в OC Windows 10 повторно подключиться по L2TP, но при этом использовать невалидный ключ PSK (введя его в дополнительных параметрах (скриншот ниже)), подключение все равно будет установлено успешно. Это связано с особенностями работы ОС.
Убедитесь, что локальная сеть (или адрес на сетевой карте) на удалённой машине не пересекается с локальной сетью организации. Если пересекается, то доступа к сети организации не будет (трафик по таблице маршрутизации пойдёт в физический интерфейс, а не в VPN). Адресацию необходимо менять.
Как настроить IPsec VPN-соединение в Windows 10 (поддержка прошивки доступна для 3.0.0.4.386_4xxxx)
IKEv2 — это функция, доступная только в версиях прошивки 3004.386.4xxxx и выше. Найдите маршрутизатор, поддерживающий такие версии прошивки. Вы можете скачать последнюю версию прошивки в ASUS Центре загрузок
[Примечание] Поддержка прошивки доступна для 3.0.0.4.386_4xxxx
RT-AC3100
RT-AC5300
RT-AC86U
RT-AC88U
RT-AX88U
RT-AX92U
GT-AC2900
GT-AC5300
GT-AX11000
ZenWiFi XT8
Настройте роутер ASUS
- Включите VPN Сервер
- Настройте логин и пароль для VPN клиента
- Экспорт сертификации
Настройте ПК с Windows 10
- Добавьте параметр в реестр
- Установите сертификат в Windows
- Создайте VPN соединение
Настройте роутер ASUS
Шаг 1. Включите VPN сервер
1. Откройте веб-браузер и введите http://router.asus.com. Войдите в веб-интерфейс вашего маршрутизатора.

Для получения дополнительных сведений см. [Беспроводной маршрутизатор] Как войти в графический интерфейс маршрутизатора (ASUSWRT).
2. Нажмите [VPN] слева в дополнительных настройках > [VPN Сервер].
3. Включите IPsec VPN Сервер
Примечание: убедитесь, что WAN IP это публичный IP адрес и рекомендуется также настроить DDNS.
4. Введите учетные данные в поле Pre-shared Key.
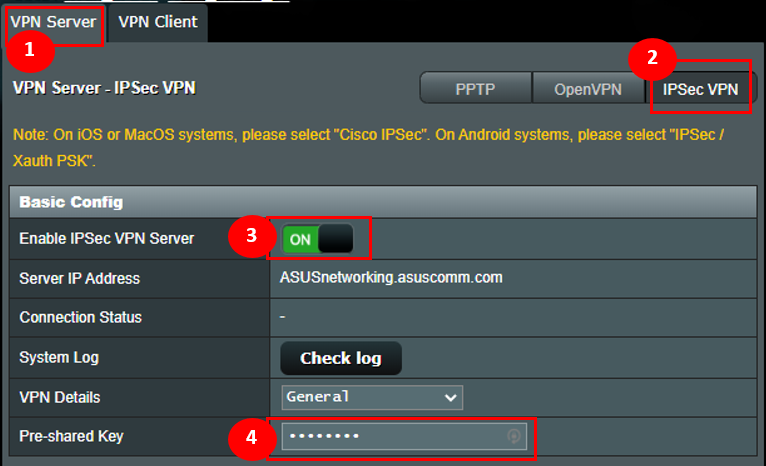
Шаг 2. Настройте логин и пароль для VPN клиента
- Введите имя пользователя и пароль для доступа к серверу VPN.
- Выберите “V2” для Поддерживаемая версия IKE.
- Щелкните значок [+], затем щелкните Применить для сохранения.
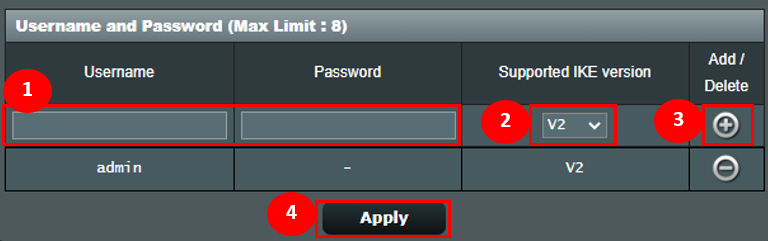
Шаг 3. Экспортируйте сертификат
1. Кнопка экспорта будет доступна после нажатия кнопки Применить.
2. Выберите [для Windows].
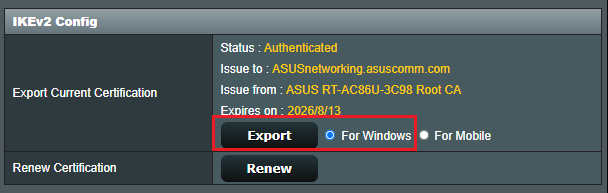
3. Нажмите кнопку Экспорт, после чего вы загрузите файл сертификации с именем cert ikev2_cert_windows.der.
Настройте ПК с Windows 10
Шаг 4. Добавьте параметр в реестр
1. Нажмите клавишу Windows  +
+ одновременно.
2. Укажите: [regedit] и нажмите OK.
Примечание: нажмите да, если вас спросят, хотите ли вы разрешить приложению вносить изменения в ваш компьютер.
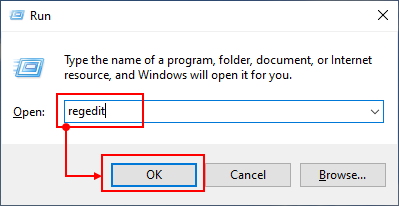
3. На левой панели найдите и щелкните папку: HKEY_LOCAL_MACHINESYSTEMCurrentControlSetservicesRasManParameters
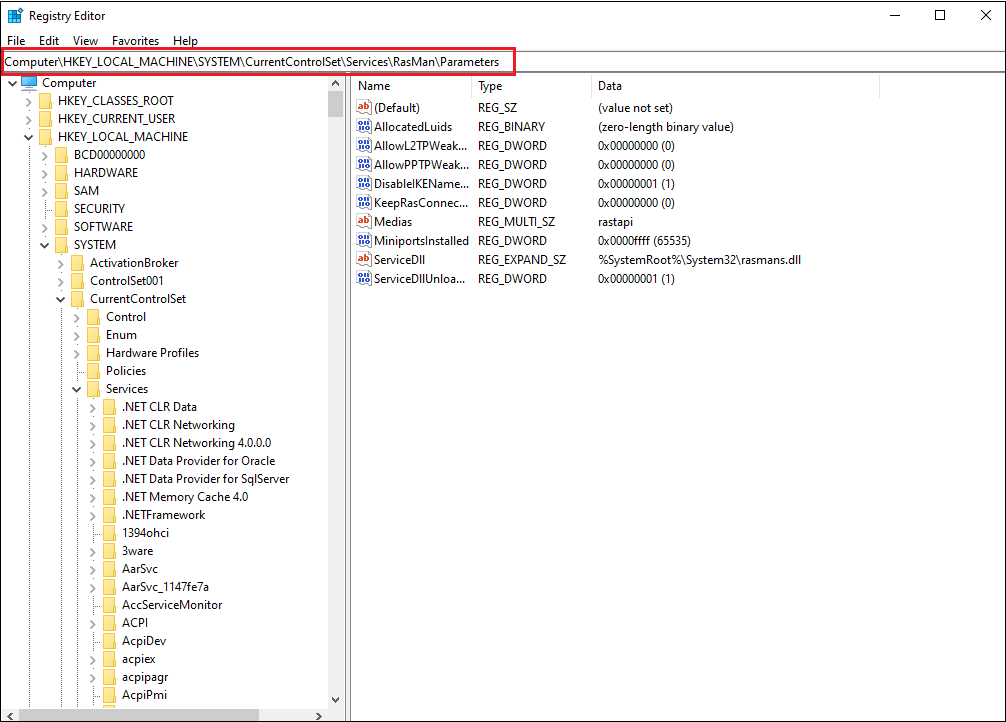
4. Щелкните меню Правка и наведите курсор на Создать. Щелкните Значение DWORD.
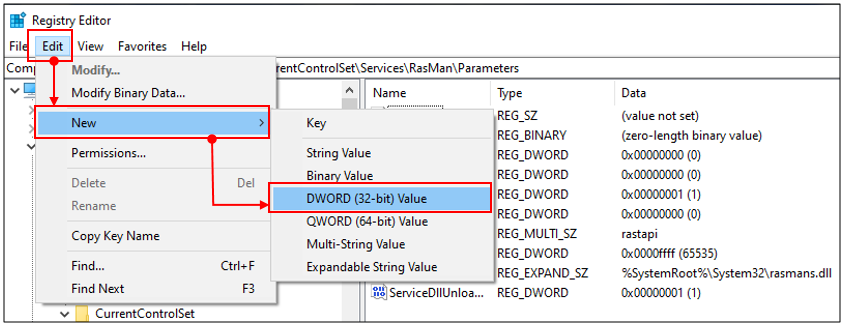
На правой панели появится новый реестр с именем DisableIKENameEkuCheck.

и установите значение 1.
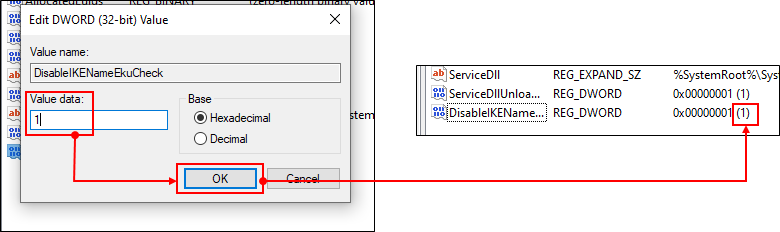
5. Перезагрузите компьютер.
Шаг 5. Установите сертификат в Windows
1. Дважды кликните на сертификат.

2. Нажмите на “Установить сертификат”
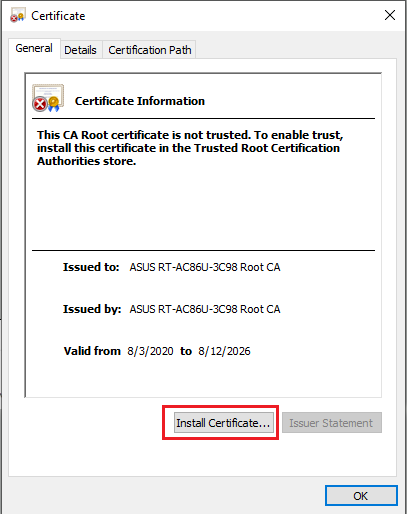
3. Выберите “Данное устройство” и нажмите Далее.
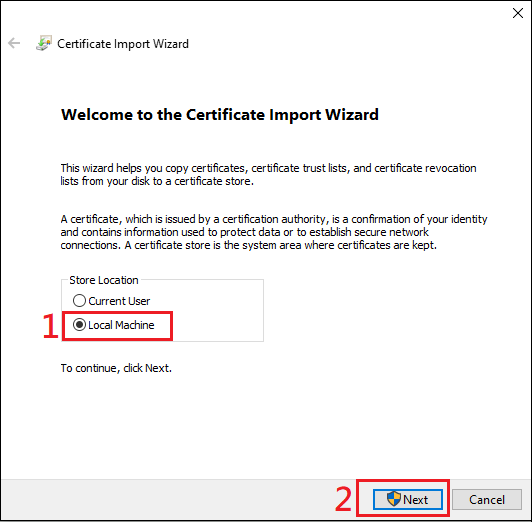
4. Выберите “Поместить все сертификаты в следующее хранилище” и нажмите “Обзор”.
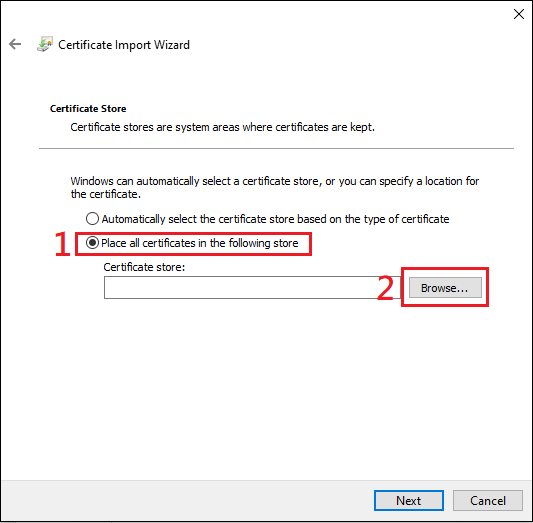
5. Выберите “Доверенные корневые центры сертификации” нажмите ОК.
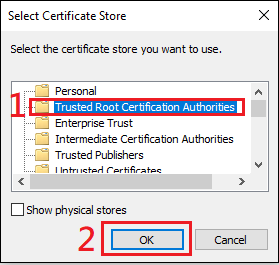
6. Затем нажмите “Далее”
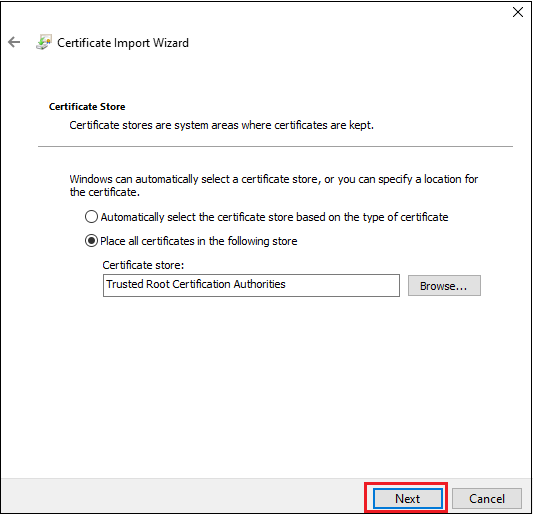
7. Нажмите Готово.

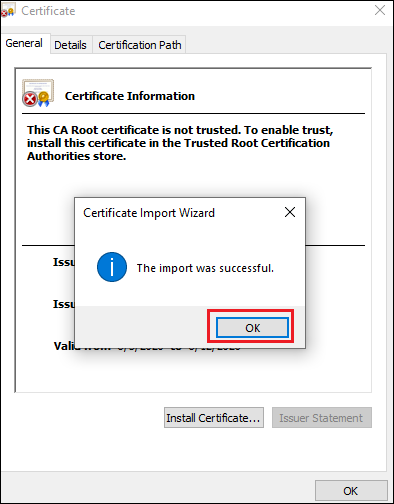
8. Дважды щелкните файл сертификации, чтобы проверить. Вы можете проверить, как показано ниже, если сертификация успешно установлена.
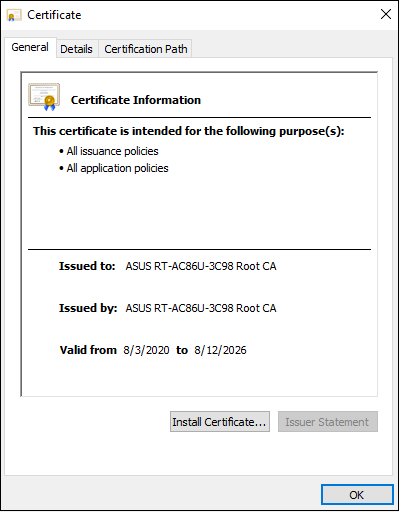
Шаг 6. установите подключение VPN
1. Откройте Параметры сети и Интернета
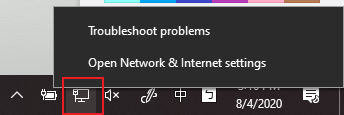
2. Перейдите на страницу настроек VPN. Нажмите кнопку [+], чтобы добавить VPN-соединение.
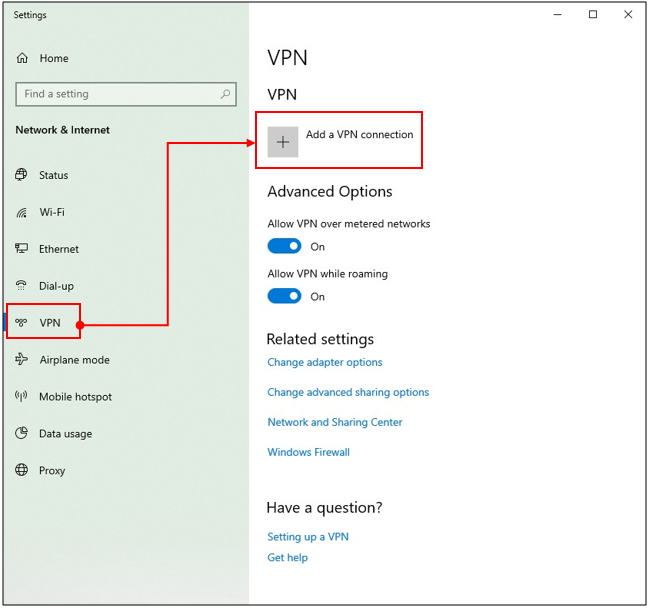
3. В поле Имя или адрес сервера на экране конфигурации VPN введите имя домена или IP-адрес, отображаемый в поле IP-адрес сервера на странице Сервер VPN. Нажмите Сохранить, чтобы завершить настройку.
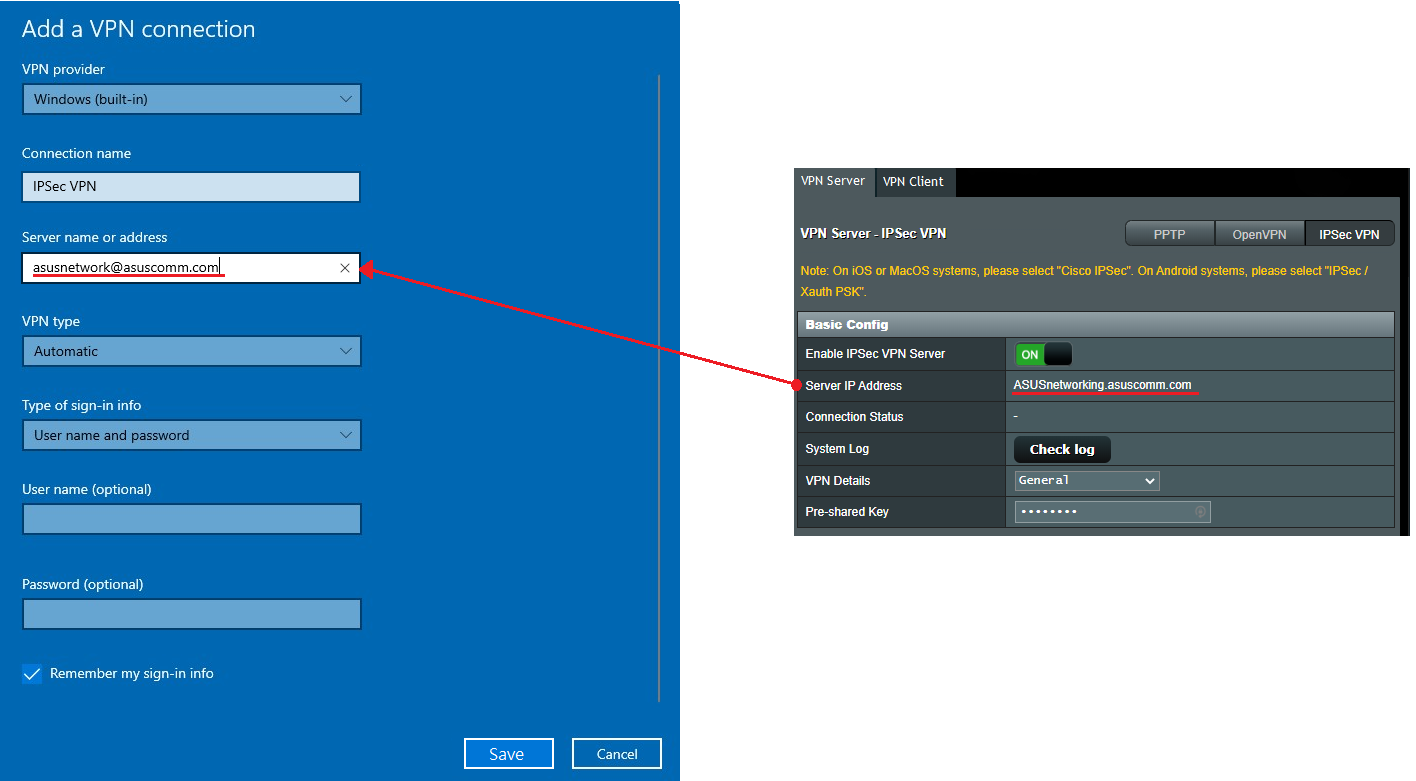
4. Нажмите кнопку Подключиться над созданным профилем VPN.
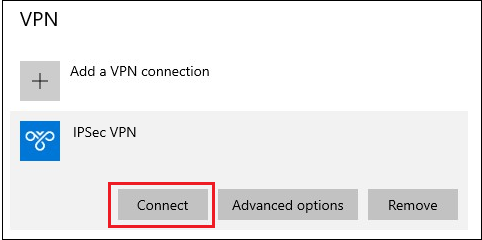
5. Введите имя пользователя и пароль, затем нажмите OK, чтобы подключиться к VPN-серверу. Готово!
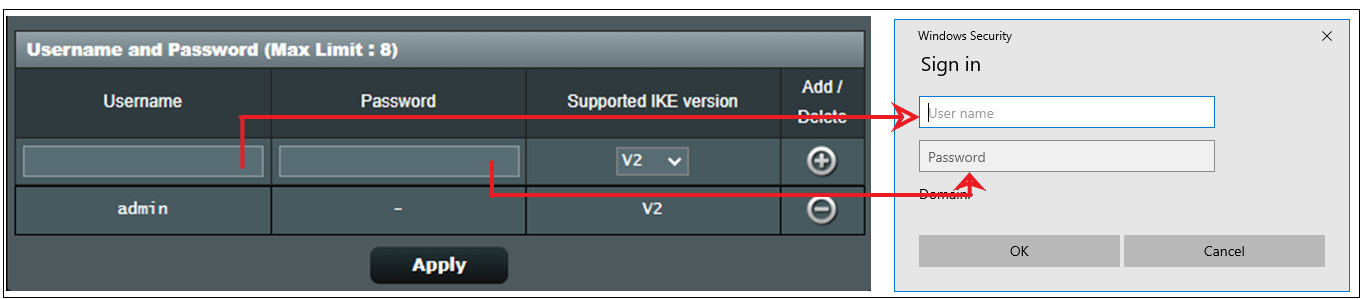
Примечание:
1. Если вы подключаетесь к маршрутизатору из Интернета через IPSec VPN и не можете получить доступ к серверу внутри локальной сети, отключите или проверьте настройки брандмауэра сервера локальной сети.
2. Если вы одновременно настроили соединение IPSec VPN с мобильным устройством или ПК, подключенным к маршрутизатору, после его завершения вы можете подключиться к другим устройствам в локальной сети через IPSec VPN без доступа в Интернет. В этом случае отключите Wi-Fi на своем мобильном устройстве или ПК, а затем подключитесь к Интернету через мобильную сеть 3G / 4G. Теперь вы в другой сети. Попробуйте снова подключиться к VPN.
3. Может быть максимум 8 клиентов с соединениями IPSec.
4. Одна учетная запись / пароль IPsec может позволить подключаться только одному клиенту (максимум до 8 правил учетной записи / пароля).
5. IPsec требует учетной записи / пароля для подключения, а не поддержки бесплатного входа.
Как скачать (Утилиты / ПО)?
Вы можете загрузить последние версии драйверов, программного обеспечения, микропрограмм и руководств пользователя из ASUS Центраз агрузок.
Узнать больше о Центре загрузок ASUS можно по ссылке.
 Сейчас, когда многие настраивают VPN для работы удаленных сотрудников, выбор протокола становится как никогда актуальным. С одной стороны стоят поддерживаемые современными ОС протоколы PPTP и L2TP, которые имеют ряд существенных недостатков и ограничений, с другой OpenVPN, который всем хорош, но требует установки стороннего ПО. При этом как-то забывают о быстром и безопасном IKEv2, основанном на IPsec новом протоколе, также поддерживаемом всеми современными ОС.
Научиться настраивать MikroTik с нуля или систематизировать уже имеющиеся знания можно на углубленном курсе по администрированию MikroTik. Автор курса, сертифицированный тренер MikroTik Дмитрий Скоромнов, лично проверяет лабораторные работы и контролирует прогресс каждого своего студента. В три раза больше информации, чем в вендорской программе MTCNA, более 20 часов практики и доступ навсегда.
Почему именно IKEv2? Данный протокол входит в группу протоколов IPsec и обеспечивает высокий уровень безопасности, включая аутентификацию клиента с использованием сертификата, а также проверку подлинности сервера клиентом, что исключает атаки типа «человек посередине». При поддержке аппаратного ускорения IPsec со стороны оборудования показывает хорошую скорость соединения относительно других типов VPN в RouterOS и весьма прост в настройке с клиентской стороны, не требует добавления маршрутов.
К недостаткам можно отнести достаточную сложность настройки серверной части, которая требует выполнения определенных условий и наличия базового объема знаний о работе IPsec. В данной статье мы не будем углубляться в теорию, сделав упор на практическую сторону вопроса, ограничившись краткими пояснениями необходимости тех или иных настроек.
Создание центра сертификации и выпуск сертификатов
Когда мы говорим об использовании сертификатов для аутентификации, то подразумеваем наличие инфраструктуры открытых ключей (PKI), образующей область доверия, за счет чего появляется возможность проверки подлинности любого субъекта инфраструктуры без привлечения третьих служб и списков пользователей. В основе PKI лежит центр сертификации — CA, выпускающий сертификаты и дающий возможность убедиться в их подлинности при помощи корневого публичного сертификата.
В нашем случае центр сертификации будет создан средствами RouterOS прямо на маршрутизаторе. Для этого перейдем в System — Certificate и выпустим корневой сертификат нашего CA.
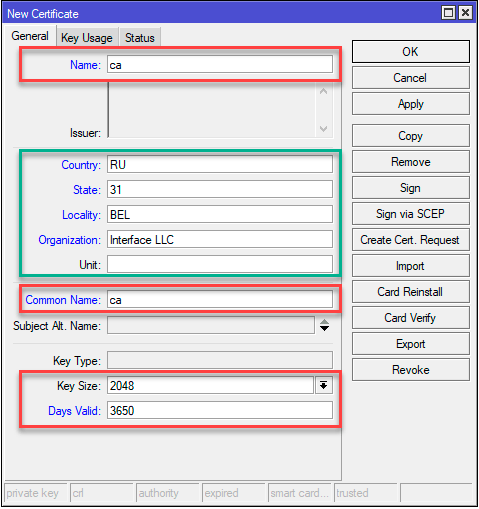 Красным указаны обязательные к заполнению поля. Name — видимое имя сертификата и Common Name — имя субъекта, которому выдан сертификат, в нашем случае это ca. Key Size — размер ключа, ключи размером менее 2048 байт не считаются безопасными, Days Valid — время действия сертификата, в нашем случае 10 лет.
Выделенный зеленым блок не является обязательным, но мы советуем его заполнять, дабы в дальнейшем не пришлось угадывать, что это за сертификат и кому и кем он выдан.
Затем перейдем на закладку Key Usage и оставим только crl sign и key cert. sign, затем нажмем Apply, чтобы применить изменения, после чего подпишем сертификат. нажав кнопку Sign, в открывшемся окне укажем CA CRL Host, в качестве которого следует использовать один из IP-адресов роутера.
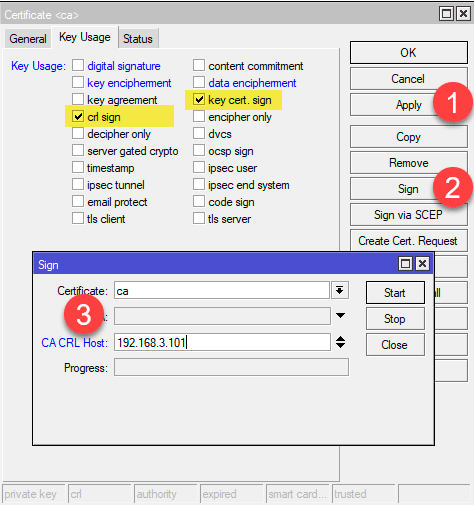
В терминале эти же действия можно выполнить командой:
/certificate
add name=ca country="RU" state="31" locality="BEL" organization="Interface LLC" common-name="ca" key-size=2048 days-valid=3650 key-usage=crl-sign,key-cert-sign
sign ca ca-crl-host=192.168.103.1
Следующим шагом выпустим сертификат сервера. Обратите внимание, что сервер обязательно должен иметь выделенный IP адрес и, желательно, доменное имя. Последнее условие не является обязательным, но предпочтительно, так как позволит отвязаться от использования адреса и в случае изменения IP вам не придется перевыпускать сертификаты и менять настройки клиентских подключений.
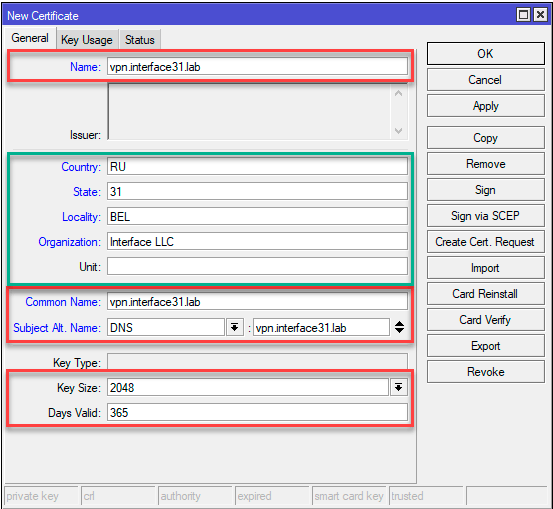 Заполнение полей в целом повторяет предыдущий пример, за исключением Common Name и Subject Alt. Name. Здесь мы указываем IP-адрес или FQDN по которому клиенты будут подключаться к серверу. Если вы используете IP-адрес, то тип записи в поле Subject Alt. Name нужно сменить на IP.

Обратите внимание, если вы выпустили сертификат с указанием FQDN, а подключить клиента попытаетесь по IP-адресу, либо наоборот, то такое соединение окажется невозможным.
На закладке Key Usage укажем единственное значение tls server и подпишем наш сертификат закрытым ключом центра сертификации CA.
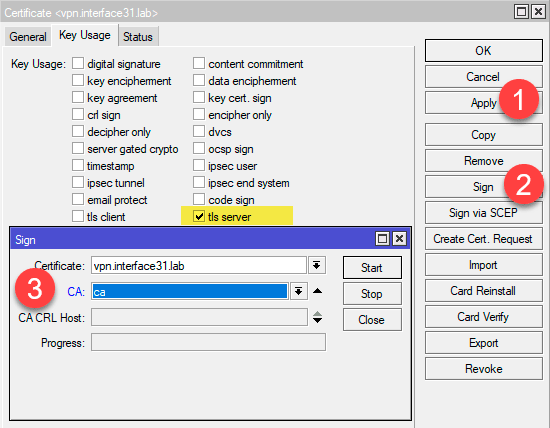
Эти же действия в терминале:
/certificate
add name=vpn.interface31.lab country="RU" state="31" locality="BEL" organization="Interface LLC" common-name="vpn.interface31.lab" subject-alt-name=DNS:"vpn.interface31.lab" key-size=2048 days-valid=3650 key-usage=tls-server
sign vpn.interface31.lab ca="ca"
Теперь можно выпускать клиентские сертификаты, это можно сделать как сразу, так и потом. Никаких особых требований здесь нет, в качестве имени указывайте максимально понятное значение, скажем, ФИО сотрудника или наименование офиса. Потому как понять кому принадлежит сертификат с CN IvanovIA не составит особого труда, в отличие от какого-нибудь безликого client3. Также обратите внимание на опцию Days Valid, не следует выдавать клиентские сертификаты на большой срок.
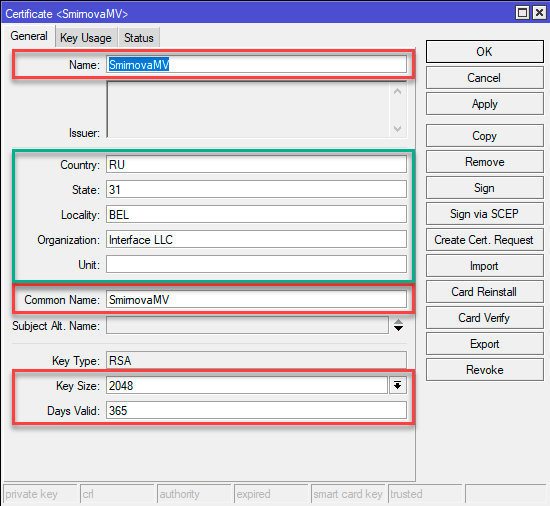 В Key Usage также указываем единственное назначение сертификата — tls client и подписываем его закрытым ключом CA.
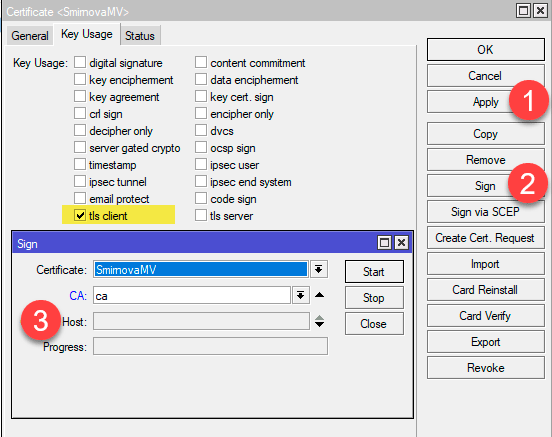 Команды для терминала:
/certificate
add name=SmirnovaMV country="RU" state="31" locality="BEL" organization="Interface LLC" common-name="SmirnovaMV" key-size=2048 days-valid=365 key-usage=tls-client
sign SmirnovaMV ca="ca"
Для использования на клиентских устройствах сертификаты следует экспортировать, наиболее удобно использовать для этого формат PKCS12, который в одном файле содержит закрытый ключ клиента, его сертификат и корневой сертификат CA. Для этого выберите сертификат в списке и в меню правой кнопки мыши укажите действие Export. В поле Type укажите PKCS12, а в Export Passphrase следует указать пароль (не менее 8 символов), в противном случае закрытый ключ выгружен не будет.

Это же можно сделать командой:
/certificate
export-certificate SmirnovaMV type=pkcs12 export-passphrase=0123456789
Скачать экспортированные сертификаты можно из раздела Files.
 Настройка IKEv2 VPN-сервера
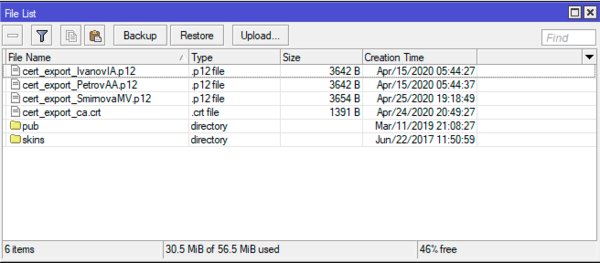 Настройка IKEv2 VPN-сервера
Здесь мы вступаем в достаточно сложную область настройки IPsec, объем статьи не позволяет подробно останавливаться на назначении каждой настройки, поэтому если вы не уверены в своих действиях, то мы не рекомендуем отклоняться от указанных ниже настроек.
Перейдем в IP — IPsec — Profiles и создадим новый профиль, который задает параметры для установления соединения. Все параметры оставляем по умолчанию, кроме наименования, которому следует дать осмысленное имя.
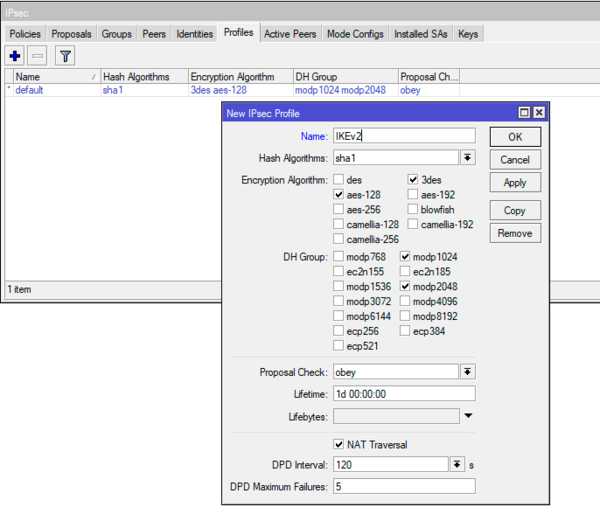 Либо выполните команду в терминале:
/ip ipsec profile
add name=IKEv2
Затем перейдем на закладку Proposals — предложения, который содержит параметры криптографии предлагаемые для соглассования подключающимся клиентам. Создадим новое предложение, которое сформировано с учетом используемых современными ОС алгоритмов и изменение его состава может либо ослабить безопасность, либо сделать подключение некоторых клиентов невозможным.
Параметры по умолчанию нам не подойдут, поэтому в блоке Encr. Algorithms убираем 3des и добавляем aes-128-cbc, aes-192-cbc, aes-256-cbc.
 В терминале достаточно простой команды:
/ip ipsec proposal
add name=IKEv2 pfs-group=none
Здесь мы сталкиваемся с одной особенностью: создаваемые через терминал и Winbox предложения содержат различный набор параметров. То, что создается в терминале полностью соответствует приведенным выше на скриншоте требованиям.
Для выдачи VPN-клиентам нам потребуется отдельный диапазон адресов, перейдем в IP — Pool и создадим новый пул, в нашем случае будет использован диапазон адресов 10.20.0.100 — 10.20.0.199:
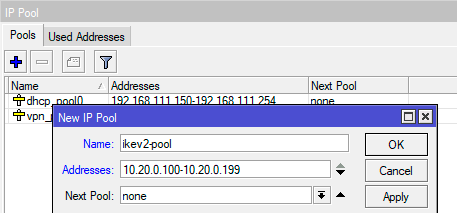 Снова вернемся к настройкам IPsec и создадим конфигурацию, передаваемую клиенту для настройки его сетевых параметров, для этого перейдем на в IP — IPsec — Mode Configs. При создании новой конфигурации установим флаг Responder, в поле Address Pool укажем имя созданного нами пула, в поле Address Prefix Lenght укажем префикс адреса — 32, поле Split Include указываем подсети, запросы к которым следует направлять в туннель, здесь следует указать одну или несколько внутренних сетей, доступ к которым должны получать удаленные клиенты. В нашем случае это сеть условного офиса — 192.168.111.0/24. Наконец флаг System DNS предписывает клиенту использовать DNS сервера указанные в IP — DNS роутера. Если передавать DNS-сервера не требуется, то данный флаг следует снять.
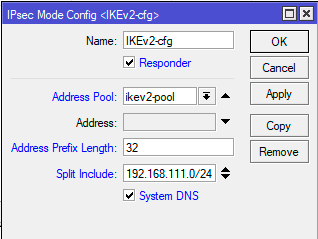 Это же действие в терминале:
/ip ipsec mode-config
add address-pool=ikev2-pool address-prefix-length=32 name=IKEv2-cfg split-include=192.168.111.0/24
Если же вам нужно, чтобы клиенты использовали внутренние сервера имен, например, в Active Directory, то флаг System DNS также следует снять и указать адреса требуемых DNS-серверов.
 Команда для терминала будет выглядеть так:
/ip ipsec mode-config
add address-pool=ikev2-pool address-prefix-length=32 name=IKEv2-cfg split-include=192.168.111.0/24 static-dns=192.168.111.101,192.168.111.201 system-dns=no
На закладке Groups создадим новую группу, никаких настроек здесь нет, просто укажите уникальное имя:
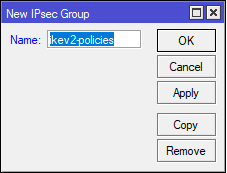
/ip ipsec policy group
add name=ikev2-policies
Затем на закладке Policices создадим шаблон политики, которая будет указывать какой именно трафик будет подвергаться обработке IPsec и отправляться в туннель. В поле Src. Address оставляем 0.0.0.0/0, в поле Dst. Address указываем выделенный для VPN-сети диапазон: 10.20.0.0/24, устанавливаем флаг Template и указываем созданную нами ранее группу в поле Group.
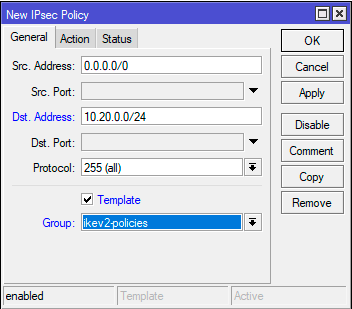
На закладке Action в поле Proposal укажите созданный нами ранее набор предложений.

Эти же действия в терминале:
/ip ipsec policy
add dst-address=10.20.0.0/24 group=ikev2-policies proposal=IKEv2 src-address=0.0.0.0/0 template=yes
После чего перейдем в IP — IPsec — Peers создадим новый пир для приема подключений. Сразу установим флаг Passive, в поле Address указываем 0.0.0.0/0 (разрешаем подключаться из любого места), в поле Profile указываем созданный нами профиль, а в поле Exchange Mode укажем протокол обмена ключами — IKE2.

В терминале для получения аналогичного результата выполните:
/ip ipsec peer
add exchange-mode=ike2 name=IKEv2-peer passive=yes profile=IKEv2
На закладке Identities создадим новую настройку идентификации подключающихся клиентов. Здесь много настраиваемых полей и нужно быть предельно внимательными, чтобы ничего не упустить и не перепутать. В поле Peer — указываем созданный нами пир, Auth. Method — способ аутентификации — digital signature, Certificate — сертификат сервера. Policy Template Group — группа шаблонов политик — выбираем созданную нами группу, Mode Configuration — указываем созданную нами конфигурацию для клиентов, Generate Policy — port strict.
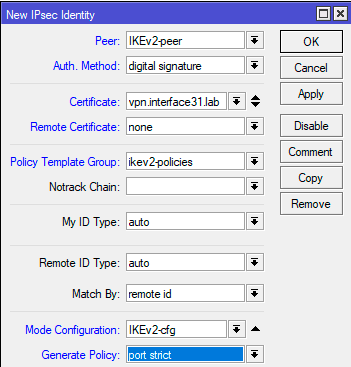 Команда для терминала:
/ip ipsec identity
add auth-method=digital-signature certificate=vpn.interface31.lab generate-policy=port-strict mode-config=IKEv2-cfg peer=IKEv2-peer policy-template-group=ikev2-policies
На этом настройка сервера завершена, осталось лишь добавить правила брандмауэра, разрешающие работу с ним. Для того, чтобы клиенты могли подключаться к серверу перейдем в IP — Firewall — Filter Rules и добавим правило: Chain — input, Protocol — udp, Dst. Port — 500, 4500, In. Interface — ваш внешний интерфейс (в нашем случае это ether1). Действие не указываем, так как по умолчанию применяется accept.
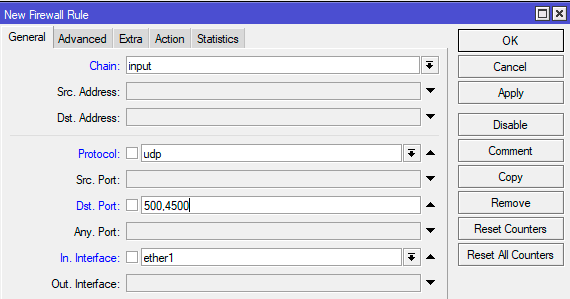 Для добавления правила в терминале:
/ip firewall filter
add action=accept chain=input dst-port=500,4500 in-interface=ether1 protocol=udp
Но это еще не все, чтобы VPN-клиенты могли получить доступ к внутренней сети, следует добавить еще одно правило. На закладке General укажите Chain — forward и Interface — внешний интерфейс, затем на Advanced: IPsec Policy — in:ipsec.
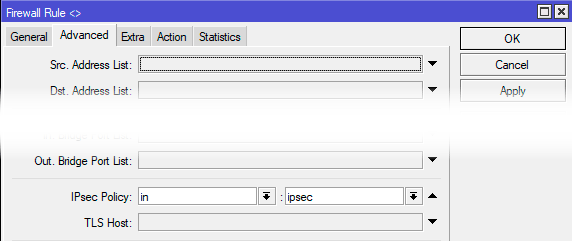
/ip firewall filter
add action=accept chain=forward in-interface=ether1 ipsec-policy=in,ipsec
Оба правила следует расположить выше, чем запрещающие в каждой из цепочек.
Настройка подключения клиента в Windows
Прежде всего импортируем сертификат, для этого можно просто выполнить двойной клик на файле сертификата, в открывшемся Мастере импорта в качестве Расположения хранилища укажите Локальный компьютер, остальные параметры принимаются по умолчанию.
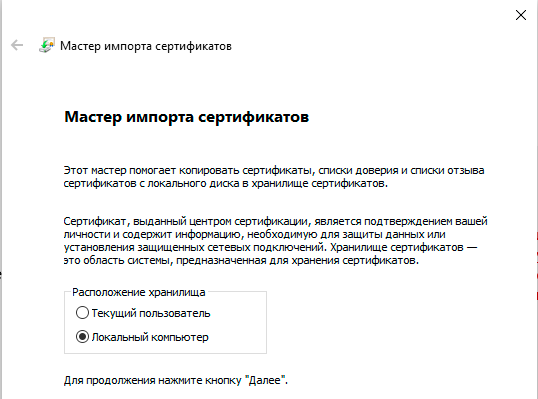 Затем создадим новое подключение штатными инструментами. А качестве Типа VPN укажем IKEv2, а в качестве Типа данных для входа — Сертификат. Также обратите внимание, что в строка Имя или адрес сервера должно совпадать с Common Name сертификата сервера, в противном случае подключение установить не удастся.
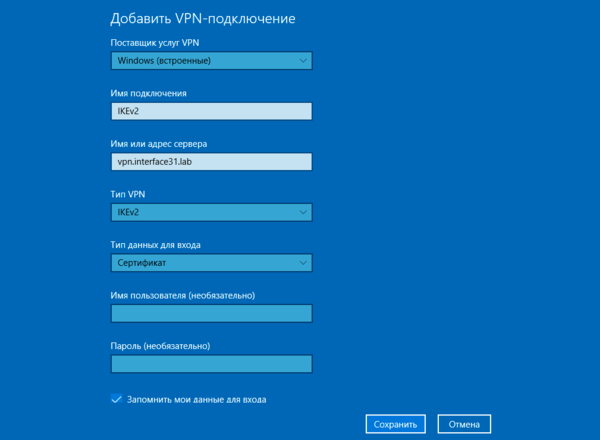 После чего откроем свойства созданного подключения и перейдем на закладку Безопасность, где установим переключатель Проверка подлинности в положение Использовать сертификаты компьютеров.
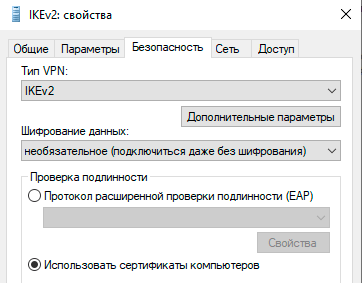 Теперь можно подключаться, если все сделано правильно — подключение будет успешно. Проверим таблицу маршрутов:
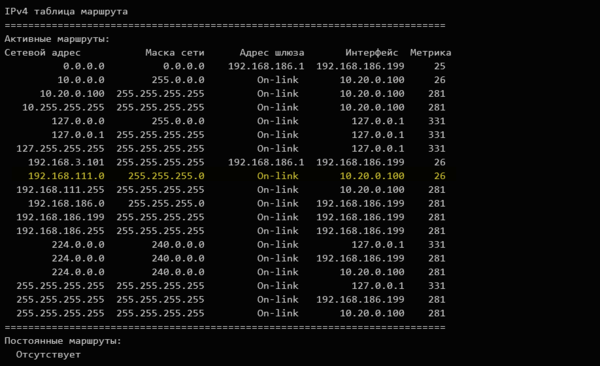 Как видим, маршрут к нашей внутренней сети 192.168.111.0/24 был добавлен автоматически и никаких ручных настроек клиента не требуется.
Настройка подключения клиента в Linux
Точно также начнем с сертификата, но в данном случае нам потребуется немного больше действий. Будем считать, что сертификат находится в корневой директории пользователя, для которого мы настраиваем подключение. Все последующие команды также следует выполнять от его имени.
Перейдем в домашнюю директорию и создадим скрытую папку для хранения ключей и сертификатов:
cd ~
mkdir .ikev2
Теперь нам нужно экспортировать из PKCS12 файла корневой сертификат CA, а также ключ и сертификат пользователя. Начнем с корневого сертификата:
openssl pkcs12 -in cert_export_SmirnovaMV.p12 -out .ikev2/IKEv2_CA.crt -nodes -nokeys -cacerts Затем экспортируем сертификат клиента:
openssl pkcs12 -in cert_export_SmirnovaMV.p12 -out .ikev2/SmirnovaMV.crt -nodes -nokeysИ его закрытый ключ. При экспорте закрытого ключа нас попросят установить для него пароль, минимальная длинна пароля 8 символов. Пропустить этот шаг нельзя.
openssl pkcs12 -in cert_export_SmirnovaMV.p12 -out .ikev2/SmirnovaMV.pass.key -nocertsНа каждом из этих этапов нам нужно будет вводить парольную фразу, указанную при экспорте сертификата пользователя на роутере.
И наконец уберем пароль с закрытого ключа пользователя:
openssl rsa -in .ikev2/SmirnovaMV.pass.key -out .ikev2/SmirnovaMV.keyВо время этого действия вы должны будете ввести пароль, который указали при создании ключа.
Для того, чтобы иметь возможность создавать VPN-подключения в графическом интерфейсе установим необходимый плагин для Network Manager:
sudo apt install network-manager-strongswanПосле чего вам станут доступны настройки VPN IKEv2 соединения.

Настройки соединения достаточно просты. В секции Gateway указываем адрес сервера и путь к корневому сертификату CA. В секции Client устанавливаем Authentication: Certificate/private key и указываем пути к сертификату и закрытому ключу клиента. И в секции Option обязательно устанавливаем флаг Request an inner IP address. На этом настройка соединения окончена, можно подключаться.
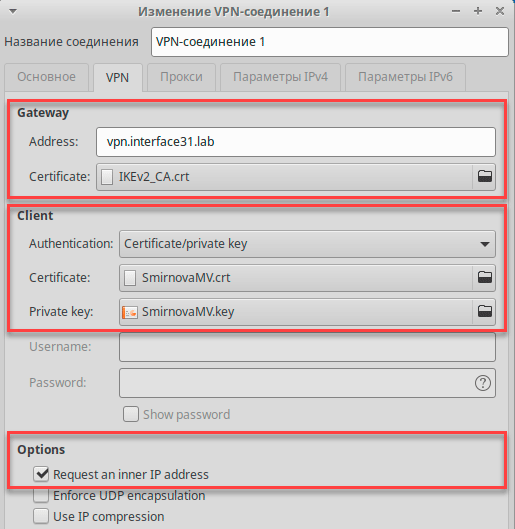 Если мы после подключения проверим таблицу маршрутизации, то не обнаружим маршрута к офисной сети, но при этом она будет доступна:
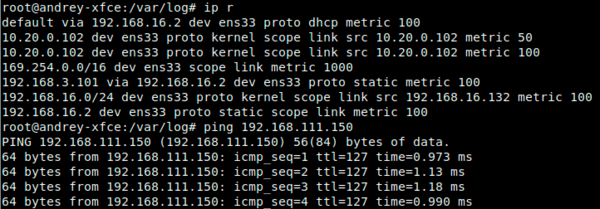 Но никакой ошибки здесь нет. Просто Linux в данной ситуации поступает более правильно, вместо маршрута в системе создается соответствующая политика IPsec, которая направляет трафик к внутренней сети в туннель согласно тому, что мы указали в конфигурации клиента (Mode Configs) на роутере.
Научиться настраивать MikroTik с нуля или систематизировать уже имеющиеся знания можно на углубленном курсе по администрированию MikroTik. Автор курса, сертифицированный тренер MikroTik Дмитрий Скоромнов, лично проверяет лабораторные работы и контролирует прогресс каждого своего студента. В три раза больше информации, чем в вендорской программе MTCNA, более 20 часов практики и доступ навсегда.