По-умолчанию в Active Directory трафик по протоколу LDAP между контроллерами домена и клиентами не шифруется, т.е. данные по сети передаются в открытом виде. Потенциально это означает, что злоумышленник с помощью снифера пакетов может прочитать эти данные. Для стандартной среды Windows среды это в общем-то не критично, но ограничивает возможности разработчиков сторонних приложений, которые используют LDAP.
Так, например, операция смены пароля должна обязательно осуществляться через безопасный канал (например Kerberos или SSL/TLS). Это означает, что например, с помощью функции-php, обеспечивающей работу с AD по протоколу LDAP изменить пароль пользователя в домене не удастся.
Защитить данные, передаваемых по протоколу LDAP между клиентом и контроллером домена можно с помощью SSL версии протокола LDAP – LDAPS, который работает по порту 636 (LDAP «живет» на порту 389). Для этого на контроллере домена необходимо установить специальный SSL сертификат. Сертификат может быть как сторонним, выданным 3-ей стороной (например, Verisign), самоподписанным или выданным корпоративным центром сертификации.
В этой статье мы покажем, как с помощью установки сертификата задействовать LDAPS (LDAP over Secure Sockets Layer) на котроллере домена под управление Windows Server 2012 R2. При наличии требуемого сертификата служба LDAP на контроллере домена может устанавливать SSL соединения для передачи трафика LDAP и трафика сервера глобального каталога (GC).
Отметим, что LDAPS преимущественно используется сторонними приложениями (имеются в виде не-Microsoft клиенты) в целях защиты передаваемых по сети данных (обеспечить невозможности перехвата имена и паролей пользователей и других приватных данных).
Предположим, в вашей инфраструктуре уже развернут корпоративный удостоверяющий сервер Certification Authority (CA). Это может быть как полноценная инфраструктура PKI, так и отдельной-стоящий сервер с ролью Certification Authority.
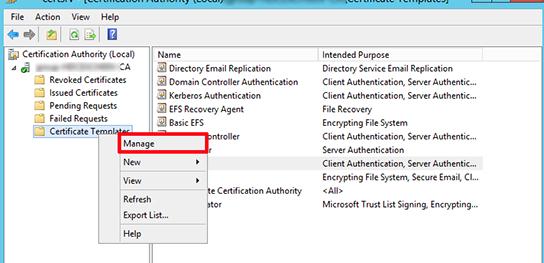
На севере с ролью Certification Authority запустите консоль Certification Authority Management Console, выберите раздел шаблонов сертификатов (Certificate Templates ) и в контекстном меню выберите Manage.
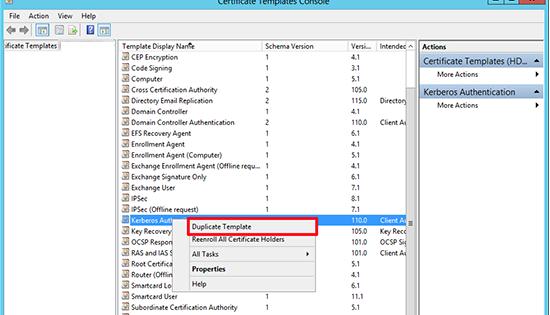
Найдите шаблон Kerberos Authentication certificate и создайте его копию, выбрав в меню Duplicate Template.
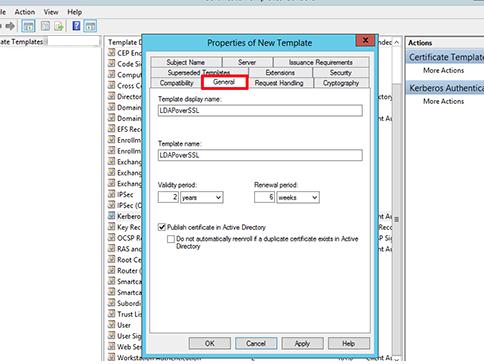
На вкладке General переименуйте шаблон сертификата в LDAPoverSSL, укажите период его действия и опубликуйте его в AD (Publish certificate in Active Directory).
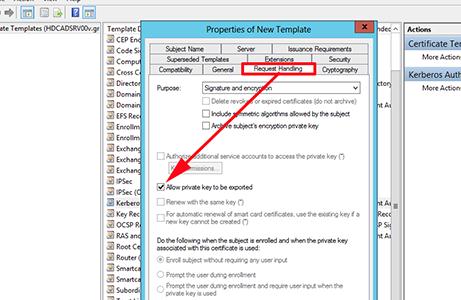
На вкладке Request Handling поставьте чекбокс у пункта Allow private key to be exported и сохраните шаблон.
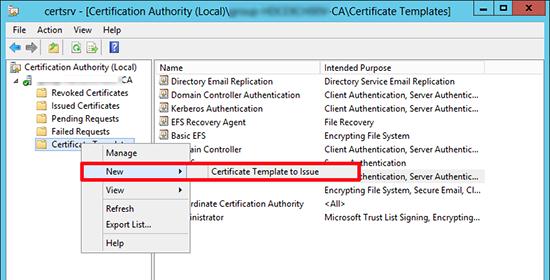
На базе созданного шаблона, опубликуем новый тип сертификата. Для этого, в контекстном меню раздела Certificate Templates выберем пункт New -> Certificate Template to issue.
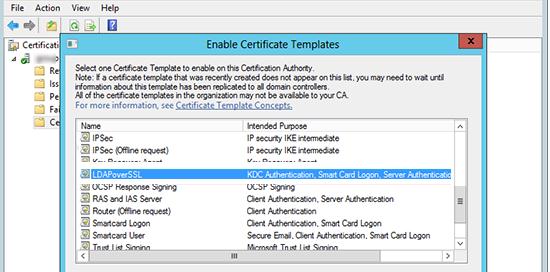
Из списка доступных шаблонов выберите LDAPoverSSL и нажмите OK.
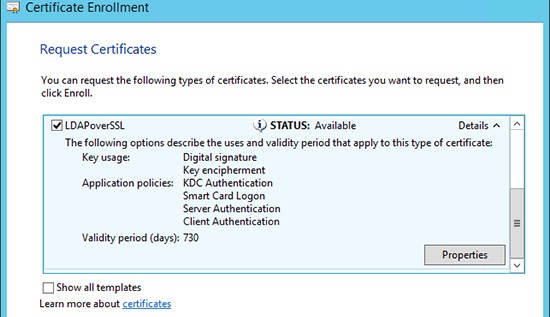
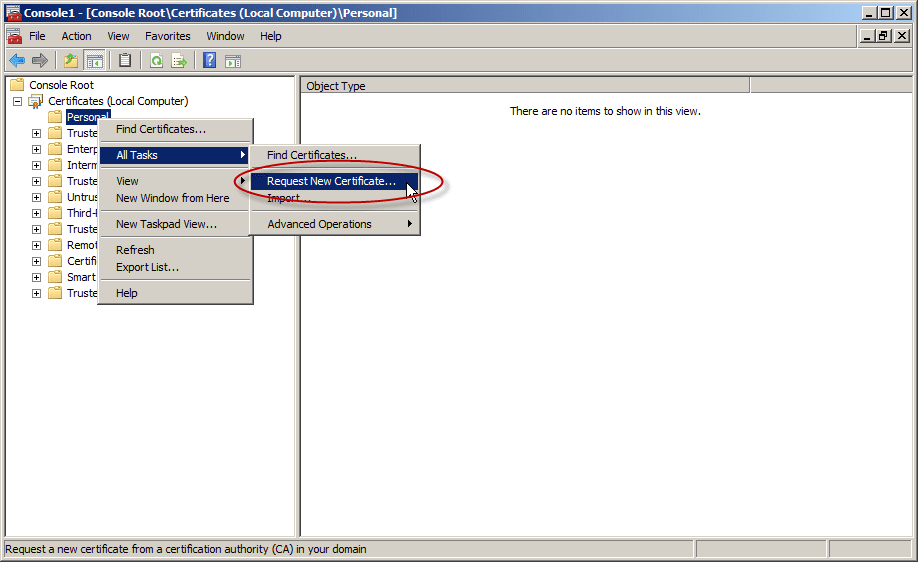
На контроллере домена, для которого планируется задействовать LDAPS, откройте оснастку управления сертификатами и в хранилище сертификатов Personal запросим новый сертификат (All Tasks -> Request New Certificate).
В списке доступных сертификатов выберите сертификат LDAPoverSSL и нажмите Enroll (выпустить сертификат).
Следующее требование – необходимо, чтобы контроллер домена и клиенты, которые будут взаимодействовать через LDAPS доверяли удостоверяющему центру (CA), который выдал сертификат для контроллера домена.
Если это еще не сделано, экспортируем корневой сертификат удостоверяющего центра в файл, выполнив на сервере с ролью Certification Authority команду:
certutil -ca.cert ca_name.cer
Совет. Файл сертификата сохранится в профиле текущего пользователя и в нашем случае имеет имя ca_name.cer.
А затем добавьте экспортированный сертификат в контейнере сертификатов Trusted Root Certification Authorities хранилища сертификатов на клиенте и контроллере домена. Сделать это можно через вручную через оснастку управления сертификатами, через GPO или из командной строки (подробнее здесь).
certmgr.exe -add C:ca_name.cer -s -r localMachine ROOT
Необходимо перезапустить службы Active Directory на контроллере домена, либо целиком перезагрузить DC.
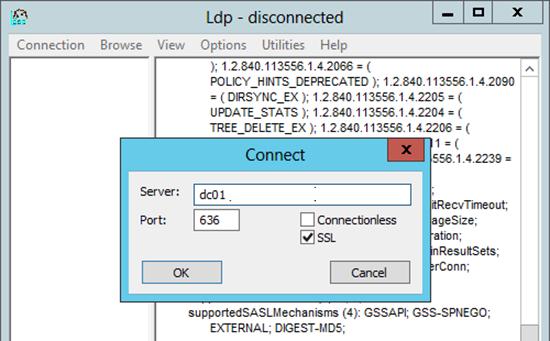
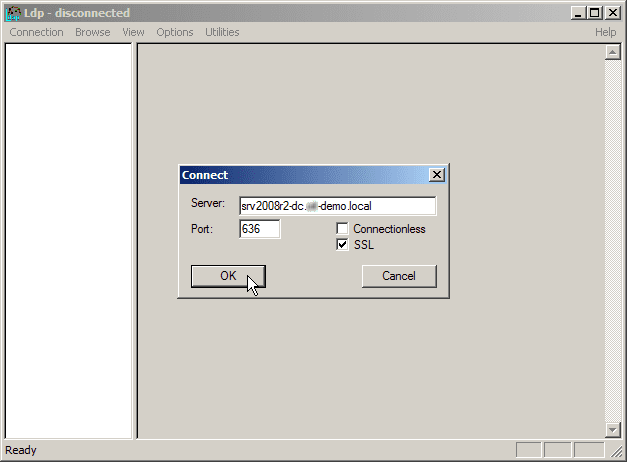
Осталось протестировать работу по LDAPS. Для этого на клиенте запустим утилиту ldp.exe и в меню выбираем Connection-> Connect->Укажите полное (FQDN) имя контроллера домена, выберите порт 636 и отметьте SSL -> OK. Если все сделано правильно, подключение должно установиться.
Примечание. Утилита ldp.exe на клиентах устанавливается в составе пакета Remote Server Administration Kit (RSAT): RSAT для Windows 10, для 8.1.
First published on MSDN on Apr 10, 2017
Step-by-step guide for setting up
LDAPS
(LDAP over SSL)
The guide is split into 3 sections :
- Create a Windows Server VM in Azure
- Setup LDAP using AD LDS (Active Directory Lightweight Directory Services)
- Setup LDAPS (LDAP over SSL)
NOTE : The following steps are similar for Windows Server 2008, 2012, 2012 R2 , 2016. In this article, we will use Windows Server 2012 R2.
Create a Windows Server VM in Azure
Create a VM named “ldapstest” Windows Server 2012 R2 Datacenter Standard DS12 using the instructions here:
Create a Windows virtual machine with the Azure portal
Connect to the VM ldapstest using Remote Desktop Connection.
Setup LDAP using AD LDS
Now let us add AD LDS in our VM ldapstest
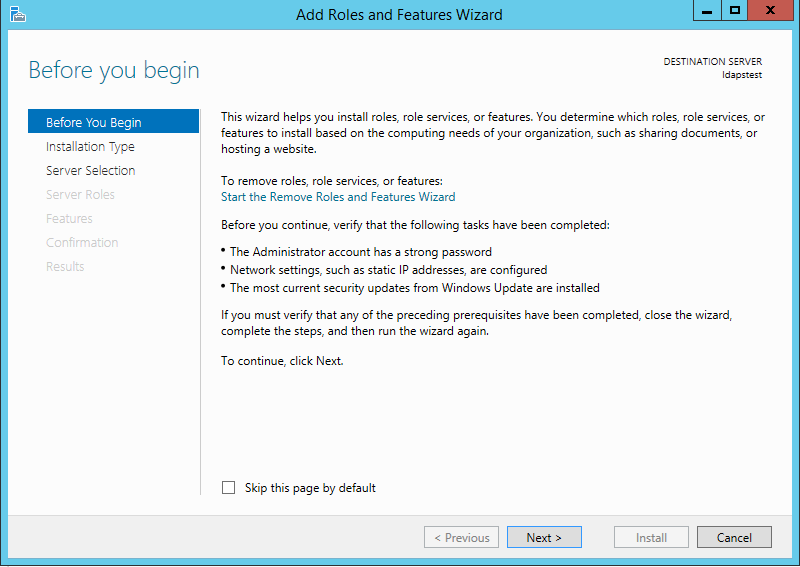
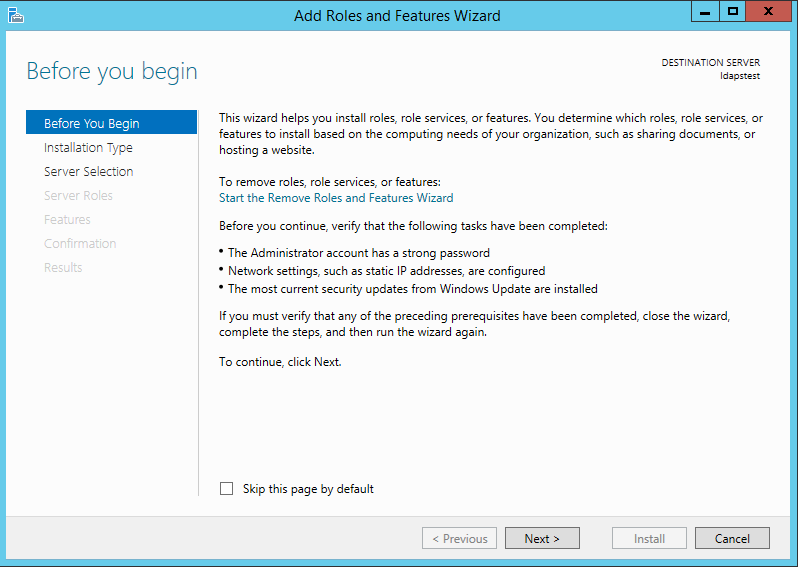
Click on Start —> Server Manager —> Add Roles and Features. Click Next.
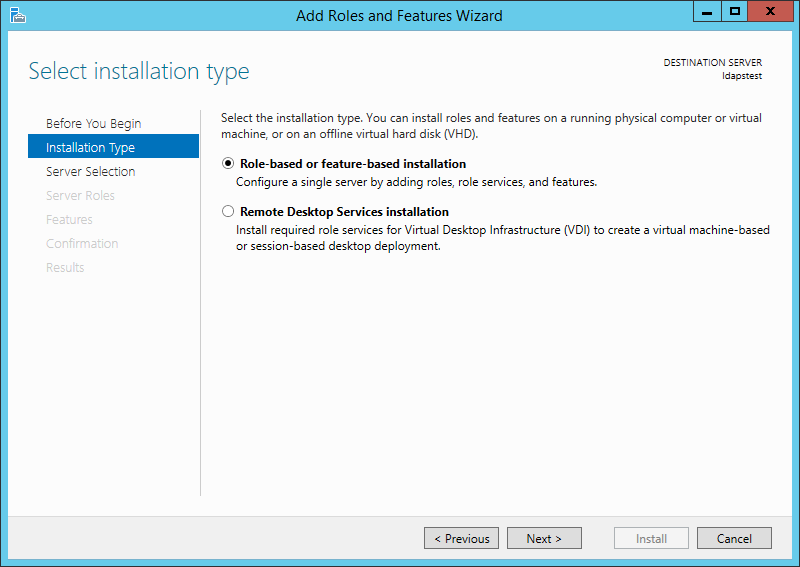
Choose Role-based or feature-based installation. Click Next.
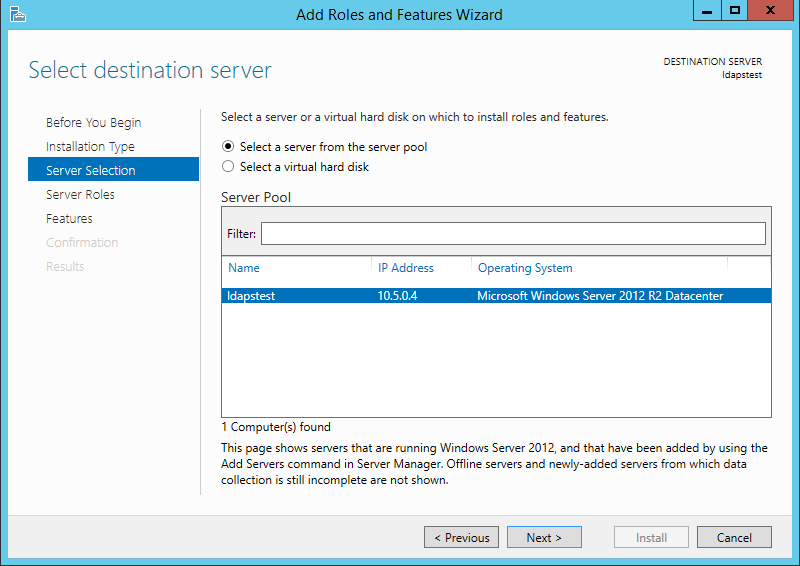
Select ldapstest server from the server pool. Click Next.
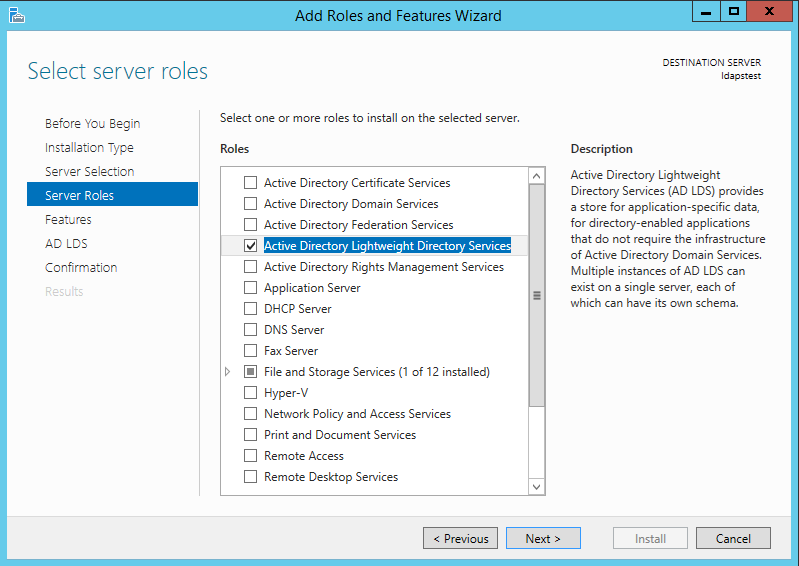
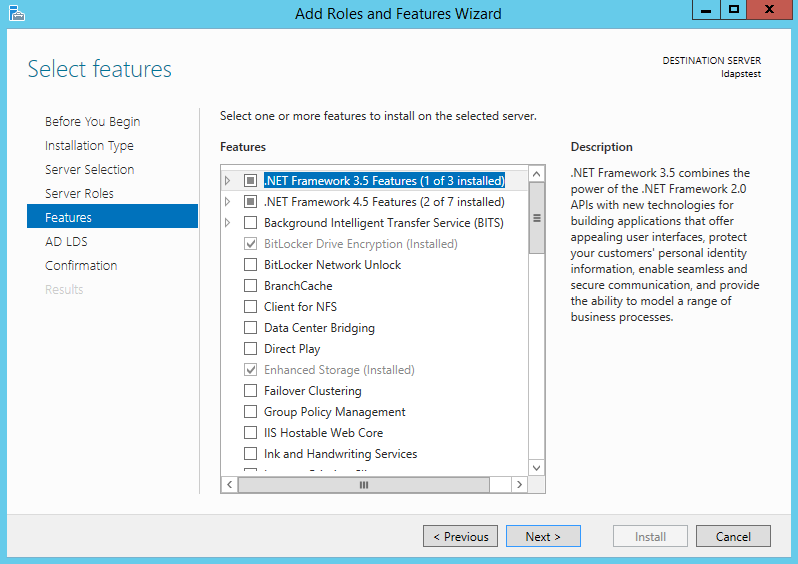
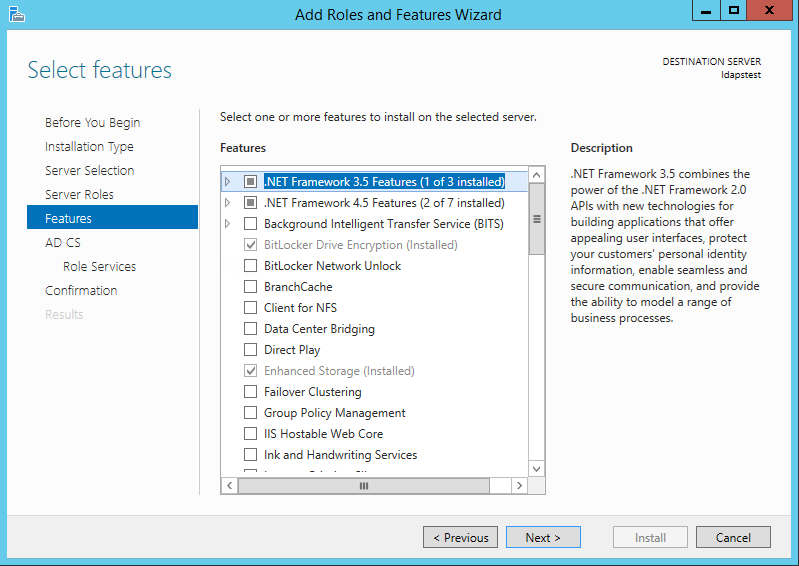
Mark Active Directory Lightweight Directory Services from the list of roles and click Next.
From the list of features, choose nothing – just click Next.
Click Next.
Click Install to start installation.
Once installation is complete, click Close.
Now we have successfully set up AD LDS Role. Let us create a new AD LDS Instance “CONTOSO” using the wizard. Click the “Run the Active Directory Lightweight Directory Services Setup Wizard” in the above screen. And then Click Close.
Choose Unique Instance since we are setting it up for the first time.
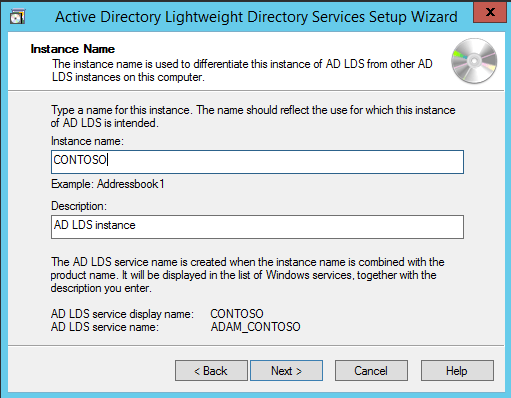
Type “CONTOSO” in Instance Name and click Next.
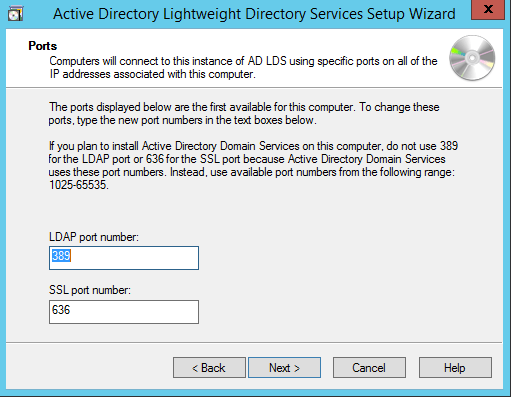
By Default, LDAP Port is 389 and LDAPS port is 636, let us choose the default values — click Next.
Create a new Application Directory Partition named “CN=MRS,DC=CONTOSO,DC=COM”. Click Next.
Using the default values for storage location of ADLDS files- Click Next.
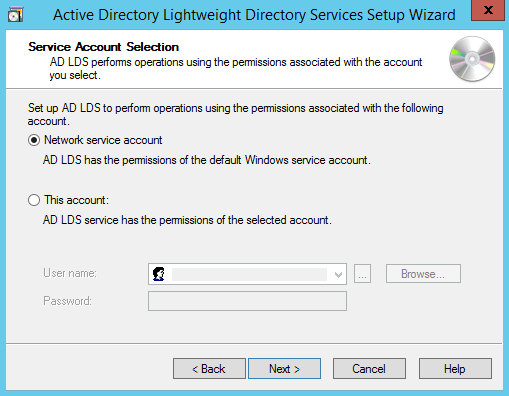
Choosing Network Service Account for running the AD LDS Service.
You will receive a prompt warning about data replication. Since we are using a single LDAP Server, we can click Yes.
Choosing the currently logged on user as an administrator for the AD LDS Instance. Click Next.
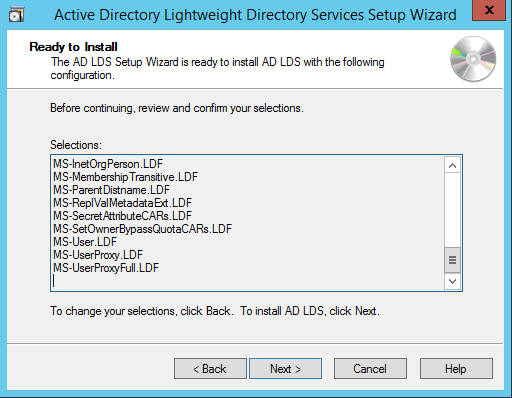
Mark all the required LDIF files to import (Here we are marking all files). Click Next.
Verify that all the selections are right and then Click Next to confirm Installation.
Once the instance is setup successfully, click Finish.
Now let us try to connect to the AD LDS Instance CONTOSO using ADSI Edit.
Click on Start —> Search “ADSI Edit” and open it.
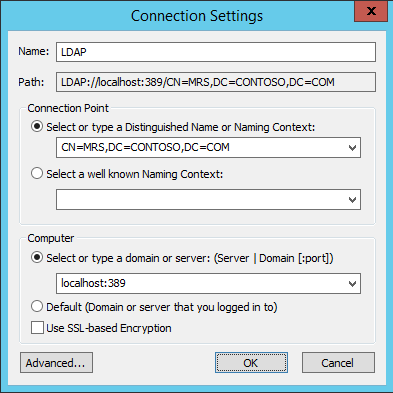
Right Click on ADSI Edit Folder (on the left pane) and choose Connect To.. . Fill the following values and Click OK.
If the connection is successful, we will be able to browse the Directory CN=MRS,DC=CONTOSO,DC=COM :
Setup LDAPS (LDAP over SSL)
The Certificate to be used for LDAPS must satisfy the following 3 requirements:
• Certificate must be valid for the purpose of Server Authentication. This means that it must also contains the Server Authentication object identifier (OID): 1.3.6.1.5.5.7.3.1
• The Subject name or the first name in the Subject Alternative Name (SAN) must match the Fully Qualified Domain Name (FQDN) of the host machine, such as Subject:CN=contosoldaps. For more information, see How to add a Subject Alternative Name to a secure LDAP certificate .
• The host machine account must have access to the private key.
Now, let’s use Active Directory Certificate Services to create a certificate to be used for LDAPS. If you already have a certificate satisfying the above requirements, you can skip this step.
Click on Start —> Server Manager —> Add Roles and Features. Click Next.
Choose Role-based or feature-based installation. Click Next.
Select ldapstest server from the server pool. Click Next.
Choose Active Directory Certificate Services from the list of roles and click Next.
Choose nothing from the list of features and click Next.
Click Next.
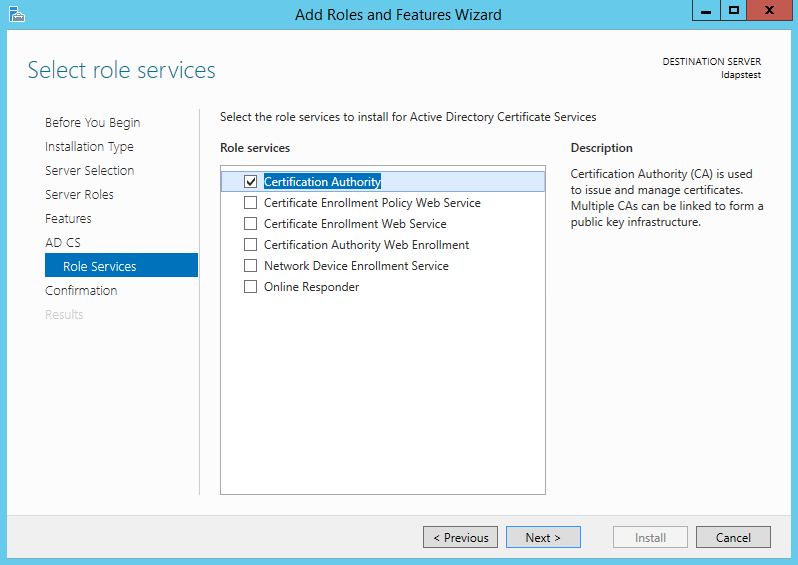
Mark “Certificate Authority” from the list of roles and click Next.
Click Install to confirm installation.
Once installation is complete, Click Close.
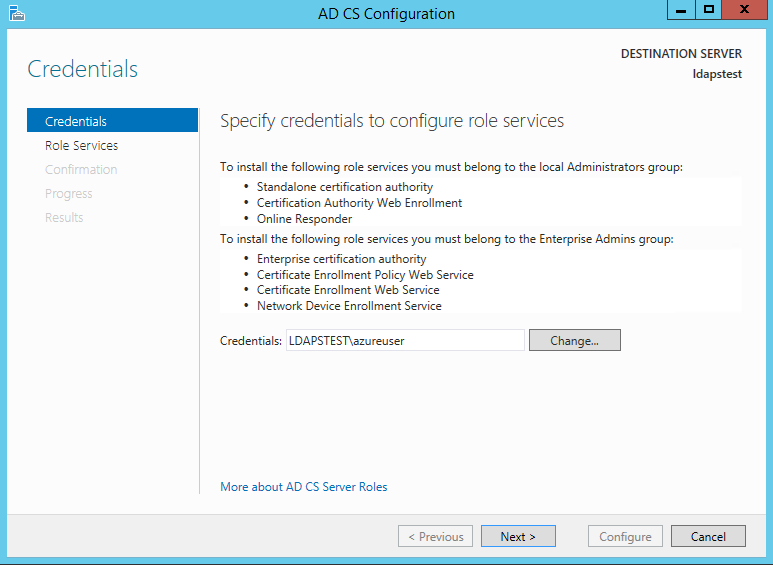
Now let’s create a certificate using AD CS Configuration Wizard. To open the wizard, click on “Configure Active Directory Certificate Services on the destination server” in the above screen. And then click Close. We can use the currently logged on user azureuser to configure role services since it belongs to the local Administrators group. Click Next.
Choose Certification Authority from the list of roles. Click Next.
Since this is a local box setup without a domain, we are going to choose a Standalone CA. Click Next.
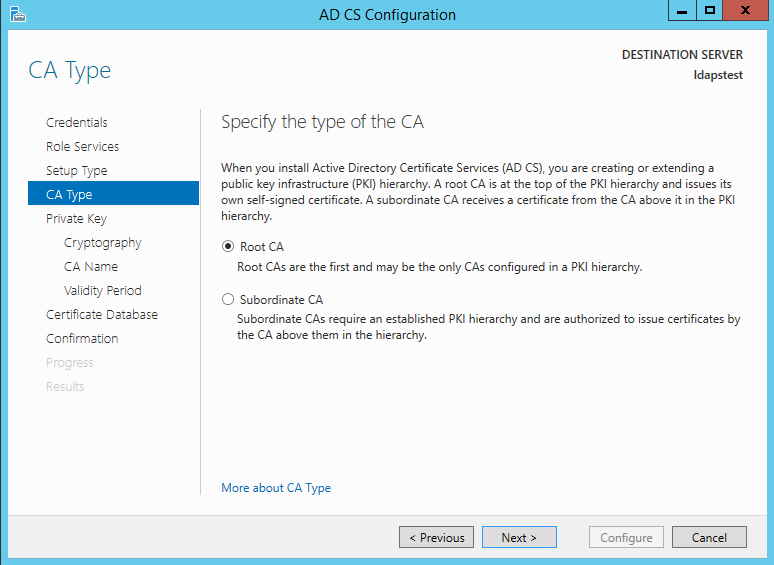
Choosing Root CA as the type of CA, click Next.
Since we do not possess a private key – let’s create a new one. Click Next.
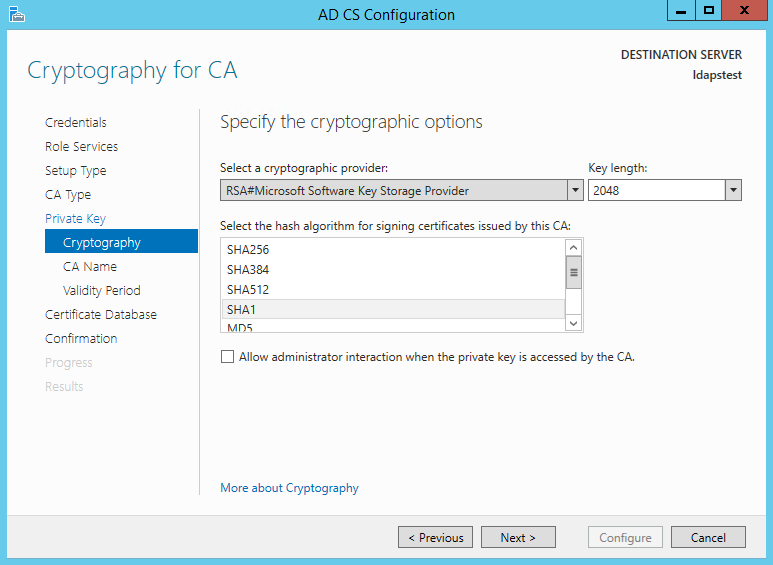
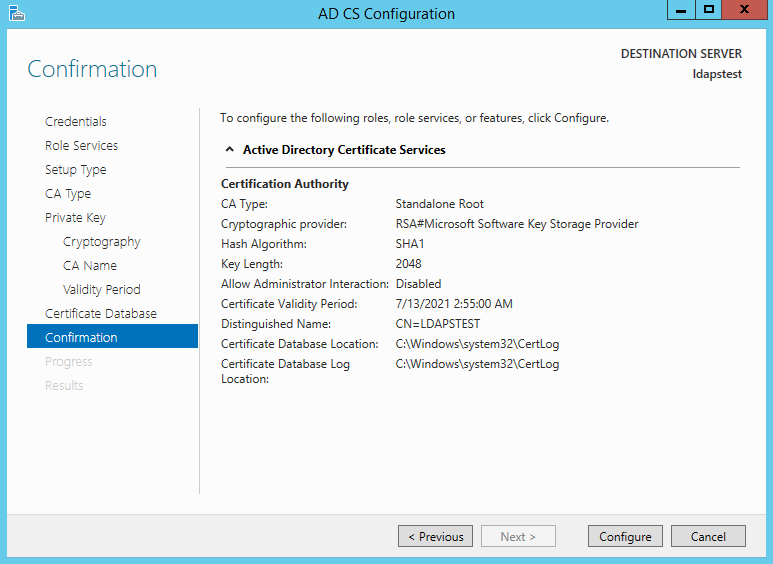
Choosing SHA1 as the Hash algorithm. Click Next.
UPDATE : Recommended to select the most recent hashing algorithm since
SHA-1 deprecation countdown
The name of the CA must match the Hostname (requirement number 2). Enter “LDAPSTEST” and Click Next.
Specifying validity period of the certificate. Choosing Default 5 years. Click Next.
Choosing default database locations, click Next.
Click Configure to confirm.
Once the configuration is successful/complete. Click Close.
Now let us view the generated certificate.
Click on Start à Search “Manage Computer Certificates” and open it.
Click on Personal Certificates and verify that the certificate “LDAPSTEST” is present:
Now to fulfill the third requirement, let us ensure host machine account has access to the private key. Using the Certutil utility, find the Unique Container Name. Open Command Prompt in Administrator mode and run the following command: certutil -verifystore MY
The private key will be present in the following location C:ProgramDataMicrosoftCryptoKeys<UniqueContainerName>
Right Click C:ProgramDataMicrosoftCryptoKeys874cb49a696726e9f435c1888b69f317_d3e61130-4cd8-4288-a344-7784647ff8c4 and click properties —> Security and add read permissions for NETWORK SERVICE.
We need to import this certificate into JRE key store since our certificate “CN=LDAPSTEST” is not signed by any by any trusted Certification Authority(CA) which is configured in you JRE keystore e.g Verisign, Thwate, goDaddy or entrust etc. In order to import this certificate using the keytool utility, let us first export this cert as a .CER from the machine certificate store:
Click Start —> Search “Manage Computer Certificates” and open it. Open personal, right click LDAPSTEST cert and click “Export”.
This opens the Certificate Export Wizard. Click Next.
Do not export the private key. Click Next.
Choose Base-64 encoded X .509 file format. Click Next.
Exporting the .CER to Desktop. Click Next.
Click Finish to complete the certificate export.
Certificate is now successfully exported to “C:UsersazureuserDesktopldapstest.cer”.
Now we shall import it to JRE Keystore using the keytool command present in this location:
C:Program FilesJavajre1.8.0_92binkeytool.exe.
Open Command Prompt in administrator mode. Navigate to “C:Program FilesJavajre1.8.0_92bin” and run the following command:
keytool -importcert -alias «ldapstest» -keystore «C:Program FilesJavajre1.8.0_92libsecuritycacerts» -storepass changeit -file «C:UsersazureuserDesktopldapstest.cer»
Type “yes” in the Trust this certificate prompt.
Once certificate is successfully added to the JRE keystore, we can connect to the LDAP server over SSL.
Now let us try to connect to LDAP Server (with and without SSL) using the ldp.exe tool.
Connection strings for
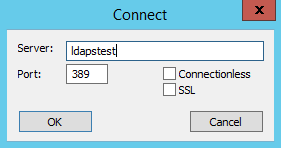
LDAP:\ldapstest:389
LDAPS:\ldapstest:636
Click on Start —> Search ldp.exe —> Connection and fill in the following parameters and click OK to connect:
If Connection is successful, you will see the following message in the ldp.exe tool:
To Connect to LDAPS (LDAP over SSL), use port 636 and mark SSL. Click OK to connect.
If connection is successful, you will see the following message in the ldp.exe tool:
REFERENCES
https://technet.microsoft.com/en-us/library/cc770639(v=ws.10)
https://technet.microsoft.com/en-us/library/cc725767(v=ws.10).aspx
http://social.technet.microsoft.com/wiki/contents/articles/2980.ldap-over-ssl-ldaps-certificate….
https://blogs.technet.microsoft.com/askds/2008/03/13/troubleshooting-ldap-over-ssl/
http://javarevisited.blogspot.com/2011/11/ldap-authentication-active-directory.html
Welcome back to our two-part series on how to enable secure LDAP (LDAPS) communications between client/server applications on Windows Server 2008/2012 domain controllers. In part one, I went over what you should know about LDAPS, your options, and prerequisites. After we understood the concepts of why, where and when we should be looking to use LDAPS, let’s move on to the actual configuration.
Enabling Secure LDAP: Configuring LDAPS
1. Create the right certificate template to issue
First, we need to make sure that your CA is allowed to issue the correct types of certificates. Remember, these must contain the Server Authentication OID 1.3.6.1.5.5.7.3.1.
I’ve described the steps you need to take in order to create such a template in my Creating a Digital Certificate Template for the purpose of Server Authentication in Windows Server 2008/R2/2012 article.
2. Request a certificate for server authentication
To request a certificate from your LDAPS server, do the following on each DC that requires LDAPS connections:
- In Start, type MMC, and then press Enter. If User Account Control prompts it, go ahead and ensure it displays the action you want. After that, select Yes.
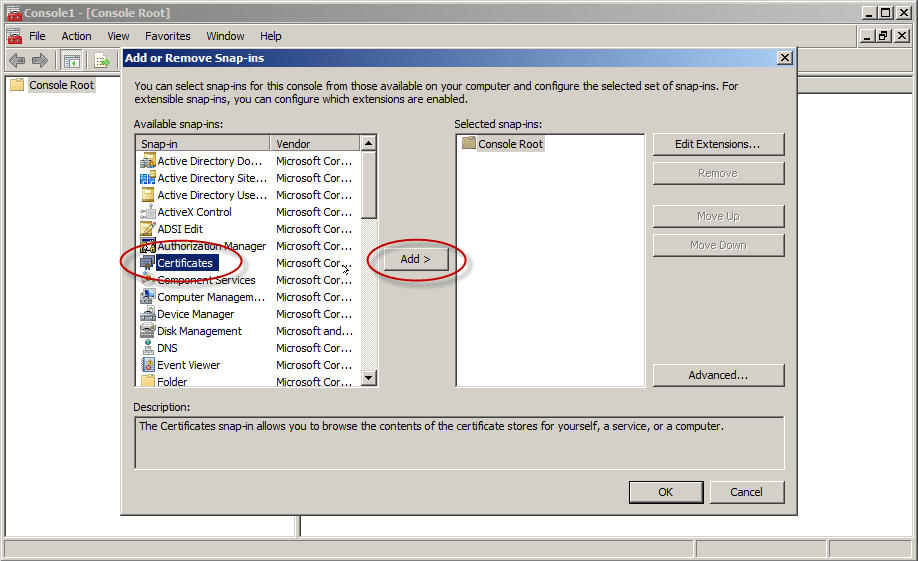
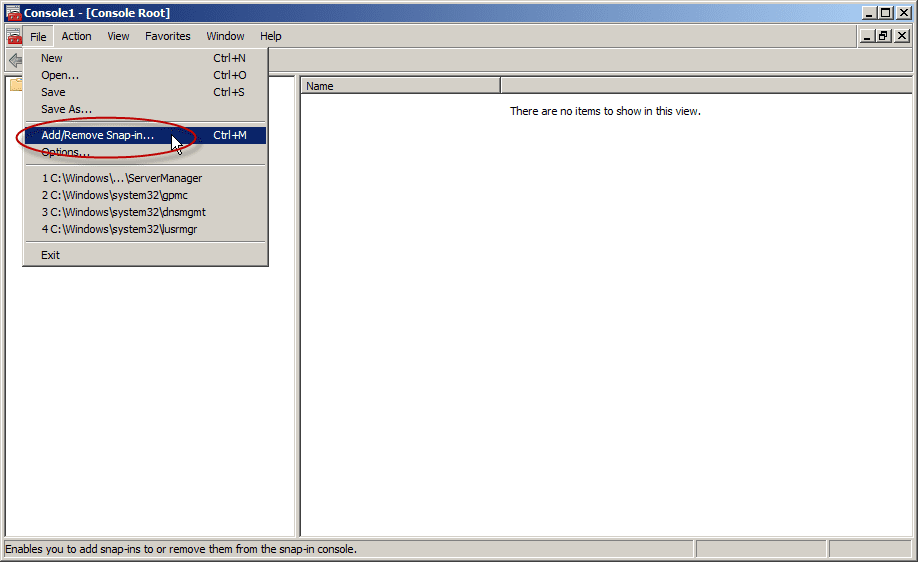
- In the MMC console that opens, click File and then click Add/Remove Snap-in.
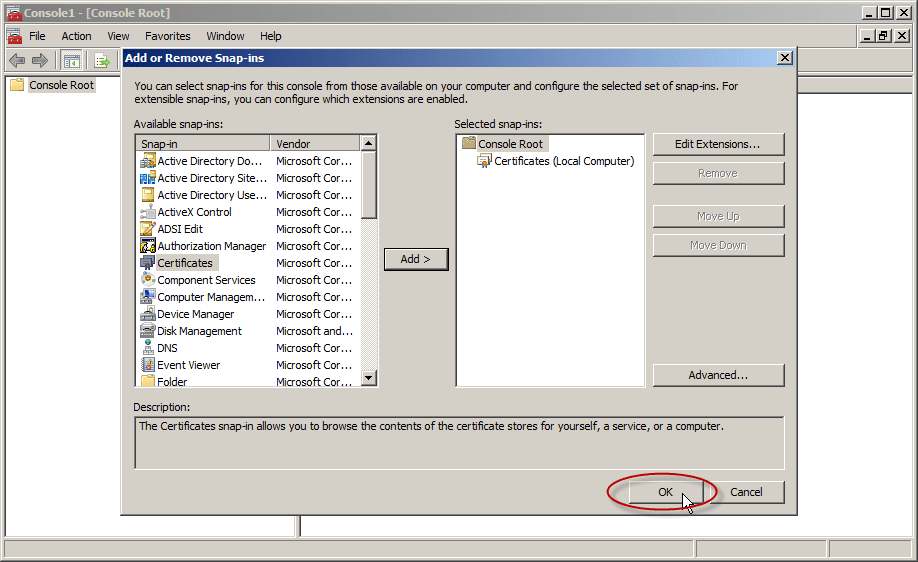
- Under Available Snap-ins, in Add or Remove Snap-ins, go ahead and select Certificates, and then click Add.
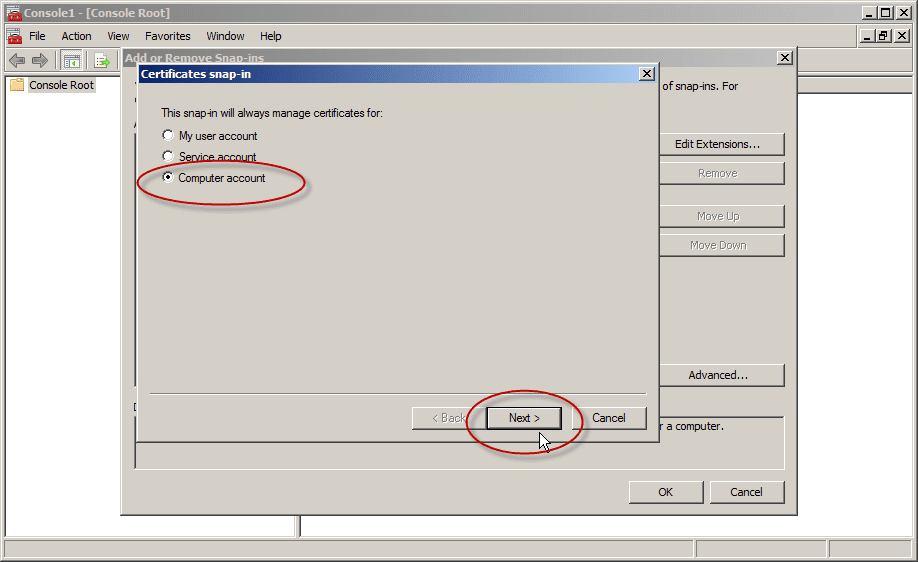
- In the Certificates snap-in, select Computer account and then click Next.
Note: If you plan to have more than one digital certificate for that DC, and if you are using Windows Server 2008/R2/2012, please read this following article BEFORE you proceed: The issue with Active Directory Domain Services (NTDSPersonal) certificate store
If you only plan to have one digital certificate on that DC, please proceed to the next step.
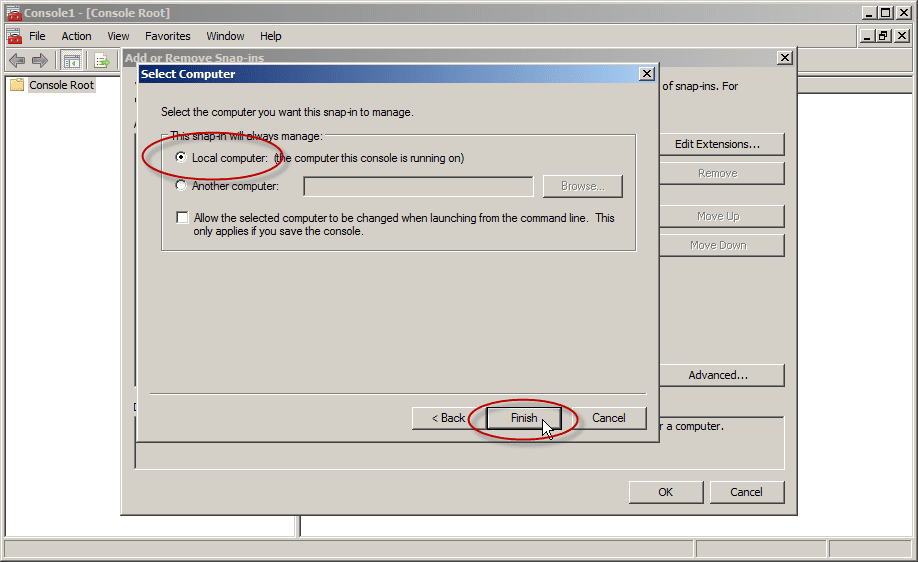
- In Select Computer, select Local. Once you have the correct computer selected, click OK and then click Finish.
- In Add or Remove Snap-ins, select OK.
- In the console tree, expand Certificates (<computer>), right-click Certificates, click All Tasks, and then click Request New Certificate. Note: You cannot do this if you’re connected to a remote DC.
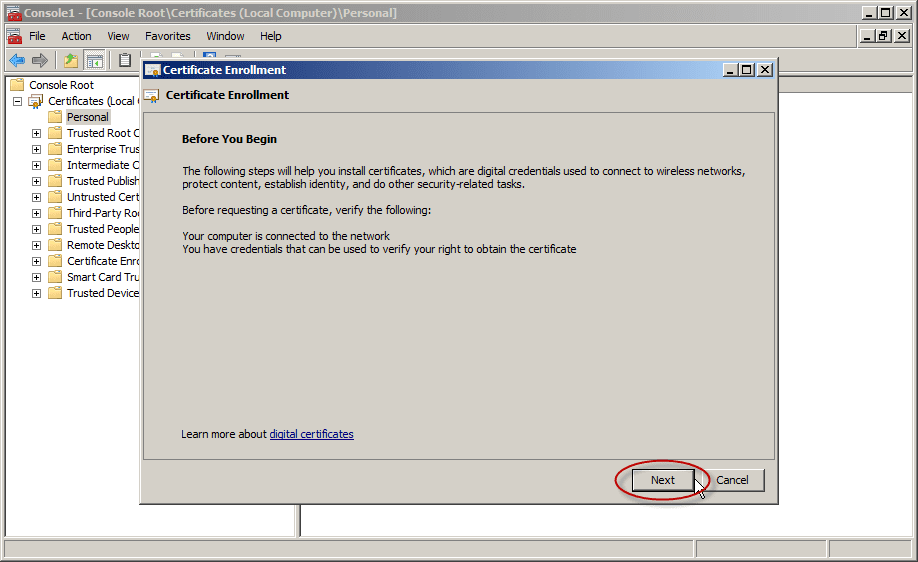
In Certificate Enrollment, click Next.
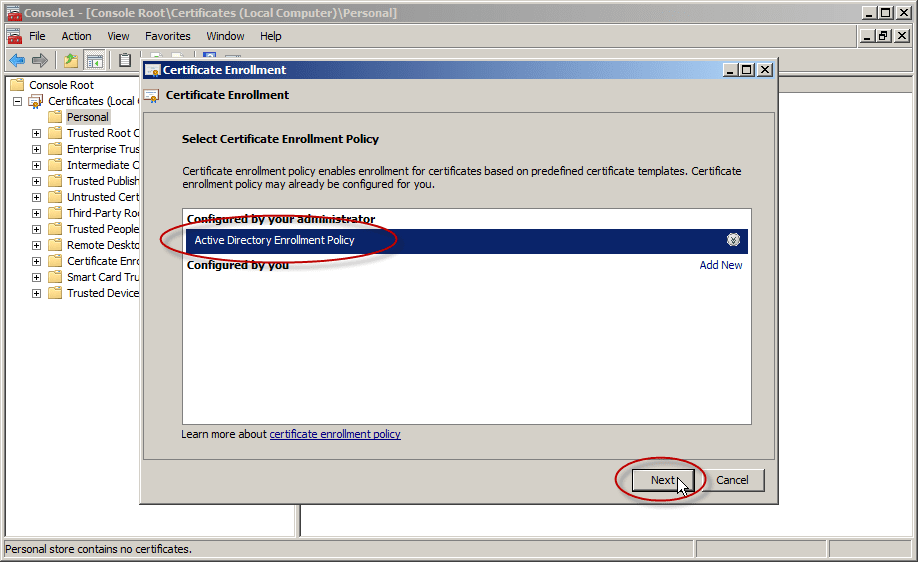
In the Select Certificate Enrollment Policy, choose Active Directory Enrollment Policy (default) and click Next.
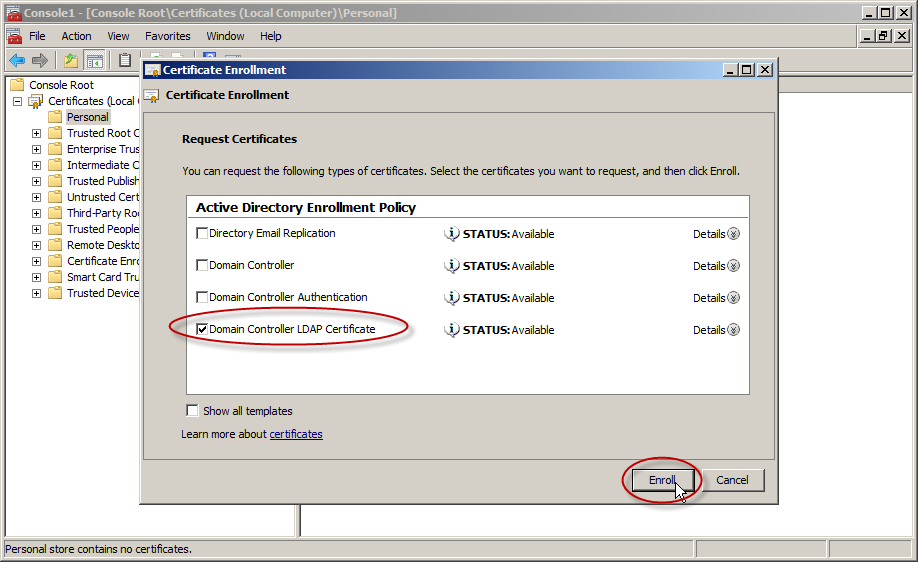
- Select a certificate that allows for server authentication. You may want to use a custom certificate as described in Publishing a Certificate that Supports Server Authentication. Now go ahead and click Enroll.
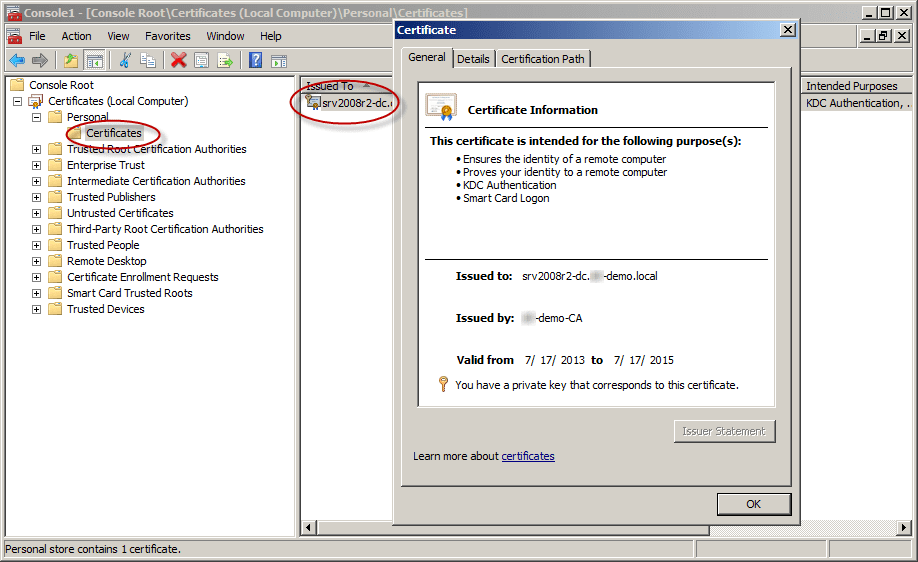
- The process may take a few seconds to complete. Click Finish in the Certificate Enrollment dialog box. Now you have a digital certificate for the first DC!
- To check your shiny new certificate, in the results pane double-click the certificate that you received to open Certificate properties.
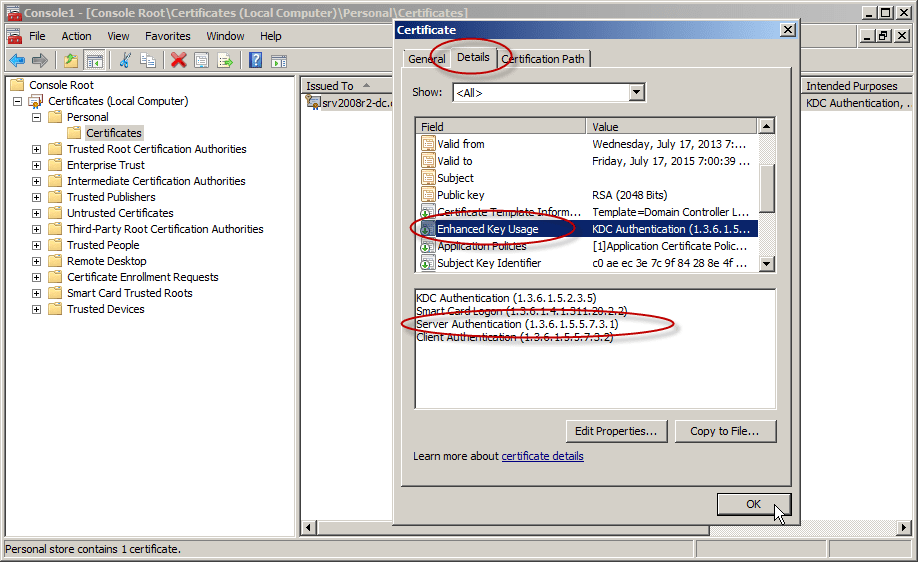
Click the Details tab. In the Field column, go ahead and select Enhanced Key Usage. You’ll want to confirm that the Server Authentication (1.3.6.1.5.5.7.3.1) is listed.
- Repeat this on all the DCs on which you need to enable LDAPS.
Test the LDAP over a TLS Connection
To test if LDAP over TLS works properly, use the ldp.exe tool.
Note: If ldp.exe is not available on your system, you will need to install the Active Directory Directory Services (AD-DS) management tools from the Windows Remote Server Administration Kit (RSAT):
Download Remote Server Administration Tools for Windows 7 with SP1Download Remote Server Administration Tools for Windows 8
- Open a command prompt and type ldp. Click Enter. The LDP application window appears.
- Select Connection, then Connect. The Connect dialog box appears.
- In the Server text box, type the name of your AD server. For this example, type the fully qualified domain name (FQDN) of the DC, just as it appears in the Subject Alternative Name (SAN) of the Digital Certificate.
- In the Port text box, type 636.
- Check the box for SSL.
- Click OK. Now, without the above procedure you will not be able to connect.
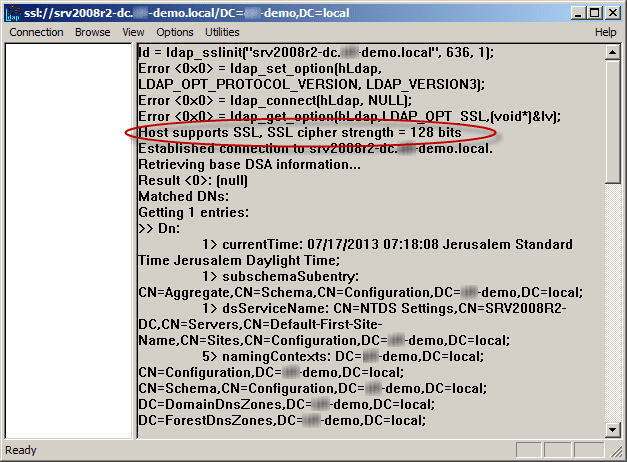
After the procedure, note that “Host supports SSL, SSL cipher strength = 128 bits”.
Note: If you try to connect to the right DC but do not use the same FQDN as was listed inside the issued certificate (for example, using the IP address instead), you will not be able to connect using LDAPS.
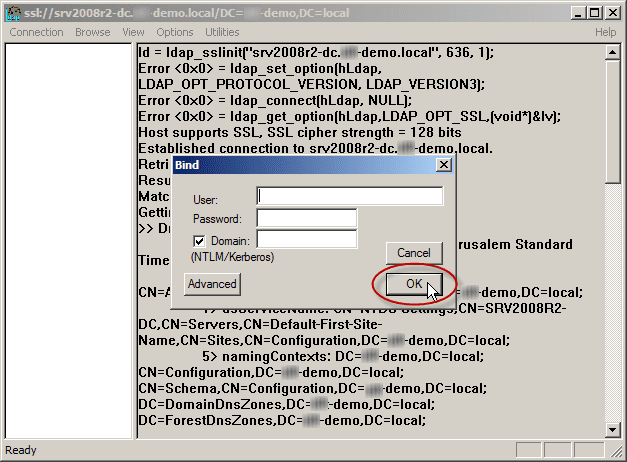
- Select the Connection menu, click Bind, and then click OK.
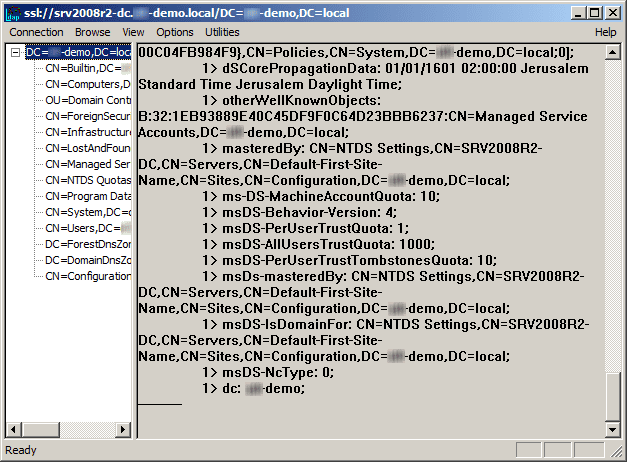
The command output should display the user name and domain name that you used for binding, if LDAPS is configured properly. You can start browsing through the AD tree.
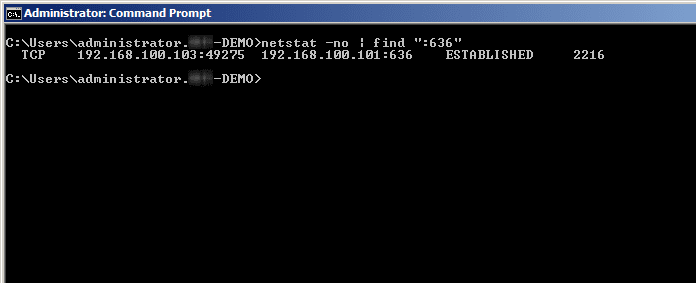
If you use the command: netstat -no | find “:636”, you will find the connection to the DC.
Enjoy.
Введение
Данная глава руководства администратора рассказывает о
возможности импорта объектов ARTA Synergy из
сторонних каталогов посредством
Active Directory. В ней детально описано как
настроить и эксплуатировать LDAP а рамках
ARTA Synergy.
Что такое LDAP
LDAP — это аббревиатура от
Lightweight Directory Access Protocol. Как
следует из названия, это облегчённый протокол доступа к
службам каталогов, предназначенный для доступа к службам
каталогов на основе X.500.
LDAP работает поверх
TCP/IP или других ориентированных на
соединение сетевых протоколов. LDAP
стандартизирован в качестве протокола IETF.
Информационная модель LDAP основана на
записях (entry). Запись — это коллекция
атрибутов (attribute), обладающая
уникальным именем (Distinguished Name, DN).
DN глобально-уникально для всего каталога и
служит для однозначного указания на запись. Каждый атрибут
записи имеет свой тип (type) и одно или
несколько значений (value). Обычно типы —
это мнемонические строки, в которых отражено назначение
атрибута, например cn — для общепринятого
имени (common name), или
mail — для адреса электронной почты.
Синтаксис значений зависит от типа атрибута.
Записи каталога LDAP выстраиваются в виде
иерархической древовидной структуры. Традиционно, эта
структура отражает географическое и/или организационное
устройство хранимых данных. В вершине дерева располагаются
записи, представляющие собой страны. Под ними располагаются
записи, представляющие области стран и организации. Еще ниже
располагаются записи, отражающие подразделения организаций,
людей, принтеры, документы, или просто всё то, что Вы захотите
включить в каталог.
Кроме того, LDAP, посредством специального
атрибута objectClass, позволяет
контролировать, какие атрибуты обязательны и какие допустимы в
той или иной записи. Значения атрибута
objectClass определяются правилами схемы
(schema), которым должны подчиняться
записи.
В LDAP определены операции для опроса и
обновления каталога. К числу последних относятся операции
добавления и удаления записи из каталога, изменения
существующей записи и изменения названия записи. Однако,
большую часть времени LDAP используется для
поиска информации в каталоге. Операции поиска
LDAP позволяют производить поиск записей в
определённой части каталога по различным критериям, заданным
поисковыми фильтрами. У каждой записи, найденной в
соответствии с критериями, может быть запрошена информация,
содержащаяся в её атрибутах.
LDAP и Arta Synergy
При синхронизации LDAP и
Arta Synergy можно выделить некоторые
особенности:
-
Синхронизация
LDAPи
Arta Synergyосуществима из
LDAPкаталога в
ARTA Synergy, причем за тот период,
который указан в конфигурационном файле. -
Синхронизация возможна сразу с несколькими каталогами.
-
Списки синхронизируемых пользователей и групп определяются
фильтрами, указанными в конфигурационном файле. -
Ключ соответствия (поле, по которому будет определяться
связка «Объект каталога LDAP <-> Пользователь
Synergy») настраиваемый, например, можно
использовать для этого ИИН. -
Пароли пользователей не синхронизируются, авторизация
происходит непосредственно наLDAP
каталоге посредствомSimple Bind. -
Помимо стандартных полей карточки пользователя (ФИО,
доступ в систему и т.п.) можно синхронизировать
произвольные поля — с добавлением в карточку пользователя
на формах.
Установка и настройка Active Directory
Active Directory — LDAP-совместимая
реализация службы каталогов корпорации Microsoft для
операционных систем семейства Windows Server. Позволяет
администраторам использовать групповые политики для
обеспечения единообразия настройки пользовательской рабочей
среды, разворачивать программное обеспечение на множестве
компьютеров через групповые политики или посредством System
Center Configuration Manager, устанавливать обновления
операционной системы, прикладного и серверного программного
обеспечения на всех компьютерах в сети, используя Службу
обновления Windows Server.
Подробно рассмотрим установку и настройку Active Directory в
ОС Windows Server 2012 R2.
-
Перейдите в Server Manager и нажмите
на Add roles and features. -
Откроется мастер установки ролей и компонентов.
-
В шаге Installation Type выберите
пункт Role-based of feature-based
installation. -
В шаге Server Selection выберите
пункт сервер, для которого будет установлена роль. -
В шаге Server Roles выберите пункт
Active Directory Domain Services. -
Подтвердите добавление компонентов роли, нажав на кнопку
Add Features. -
Пропустите шаг Features и подтвердите
установку роли Active Directory. -
После успешной установки роли мастер установки отобразит
окно подтверждения. -
После успешной установки необходимо настроить Active
Directory. Откройте Server Manager и
нажмите на пиктограмму флага. В открывшемся выпадающем
списке нажмите на Promote this server to a
domain controller. -
В открывшемся мастере настройки Active Directory добавьте
новый лес. Для этого в шаге Deployment
Configuration выберите пункт Add a
new forest и укажите название корневого домена. -
В шаге Domain Controller Service
задайте пароль для режима восстановления служб каталогов. -
В шаге Additional Options измените
имя домена NetBIOS. -
В шаге Paths укажите папки базы
данных, файлов журнала и SVSVOL. -
В шаге Review Options отобразится
список всех настраиваемых опций. -
В шаге Prerequisites Check
подтвердите настройку выбранных опций. -
После успешной настройки компьютер будет перезагружен
автоматически.
Создание пользователей в Active Directory
После успешных установки и настройки Active Directory добавим
пользователей для доступа к ARTA Synergy.
-
Откройте Active Directory Users and
Computers. -
Выделите ноду Вашего домена (в примере
synergy.tm) и нажмите кнопку
добавления подразделения. -
Введите название будущего подразделения.
-
Выбрав новое созданное подразделение, нажмите на кнопку
создания пользователей. -
Укажите имя, фамилию и логин будущего пользователя.
-
Задайте пароль и включите флаг, отвечающий за устаревание
пароля (если включен — пароль никогда не устаревает). -
Подтвердите создание нового пользователя.
-
Повторив пп. 4-7 создайте требуемых пользователей.
-
Теперь необходимо выдать этим пользователям доступ в
систему ARTA Synergy. Для этого нажмите на кнопку создания
новых групп. -
Укажите название будущей группы. В данную группу будет
входить Администратор Active Directory. -
Нажмите на кнопку Add.
-
Введите имя пользователя и нажмите на кнопку
Check Names. -
Мастер автоматически дополнит значение учетной записи
соответствующего пользователя. -
Создайте еще одну группу для доступа всех пользователей к
системе ARTA Synergy. -
Повторив пп. 11-13 добавьте всех пользователей в группу
доступа.
Работа с LDAP-каталогами
Для работы с LDAP-каталогами возможно
использовать любой клиент с поддержкой
LDAP-протокола. Одним их таких клиентов
является JXplorer.
JXplorer — кроссплатформенный
LDAP браузер и редактор с поддержкой
безопасности (в том числе SSL,
SASL и GSSAPI), перевода
на многие языки, онлайн-помощью, коммерческой поддержкой,
пользовательскими формами и многими другими возможностями.
Соответствует общим стандартам клиентов LDAP,
которые можно использовать для поиска, чтения и редактирования
любого стандартного каталога LDAP или любой
службы каталогов с LDAP или интерфейсом
DSML.
Рассмотрим его функциональность на примере поиска пользователя в
одном из каталогов.
-
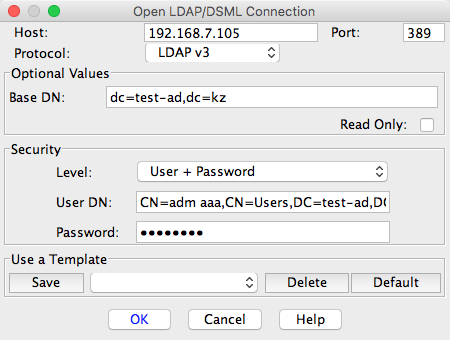
Подключимся к серверу с данными Администратора:
Рисунок 7.17. Рисунок 1
-
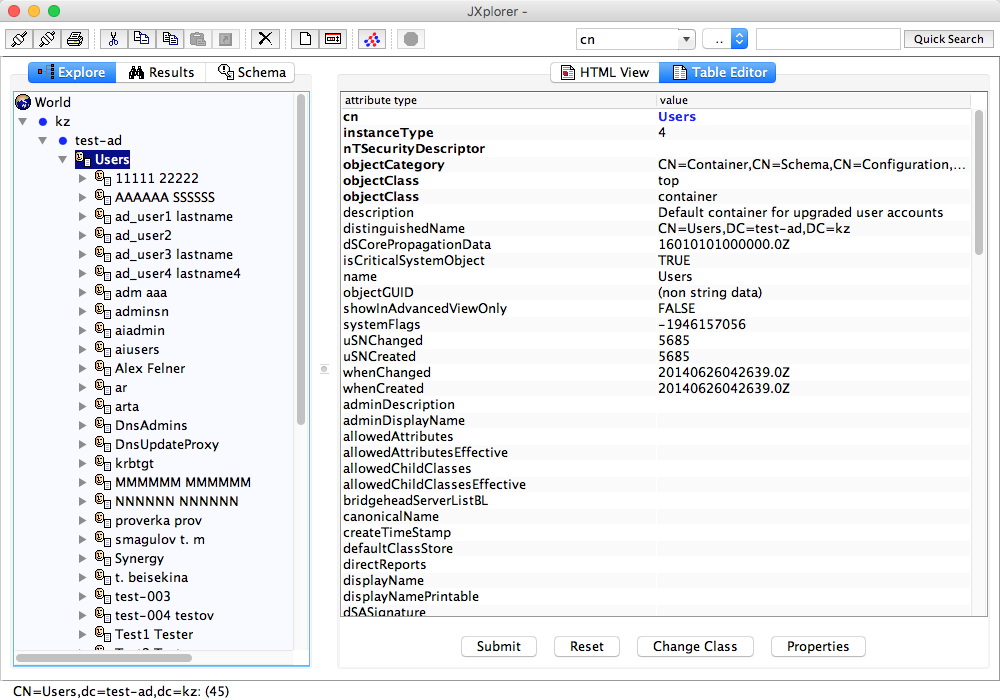
В открывшейся закладке
Explore
отобразилось дерево со всеми объектами каталога, доступные
авторизованному Администратору. При выборе объекта из
навигатора в основной рабочей области отобразились все
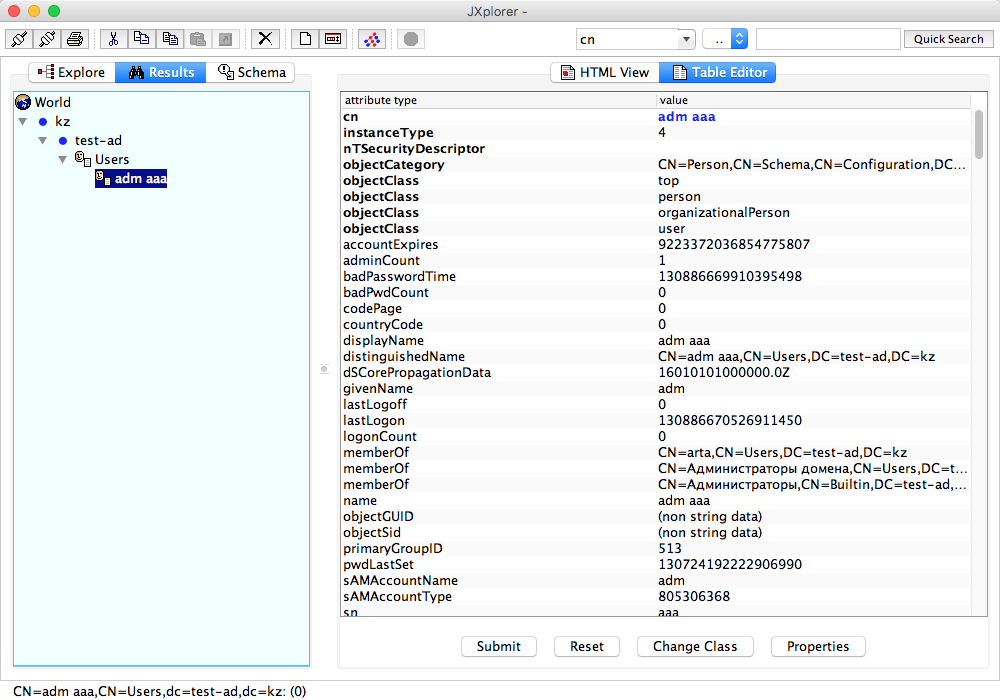
атрибуты данного объекта, а также их значения:
Рисунок 7.18. Рисунок 2
Примечание
Полный список возможных атрибутов представлен
здесь
-
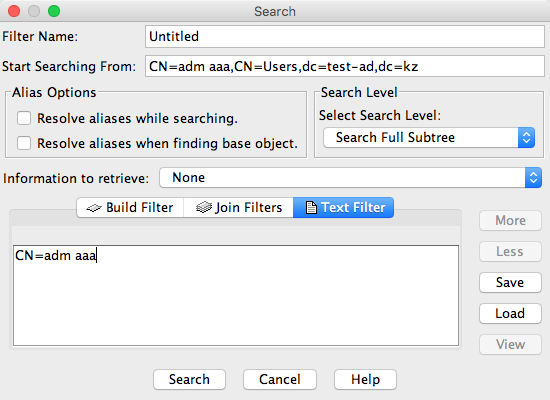
Вызовем окно поиска по каталогу —
Search
->Search Dialog. В открывшемся
диалоге укажем базовый узел поиска, от которого он будет
осуществляться, и сам фильтр:
Рисунок 7.19. Рисунок 3
-
Клиент автоматически перешел на вкладку
Resultsс найденными результатами
запроса:
Рисунок 7.20. Рисунок 4
Описание конфигурационного файла
Для конфигурирования синхронизации используется файл
/opt/synergy/jboss/standalone/configuration/arta/ldap-sync.xml.
ARTA Synergy поддерживает одновременную
синхронизацию с несколькими LDAP каталогами.
Вся конфигурация хранится в одном файле и разделена на секции
(item). Секции же должны иметь уникальный
номер (ID). По умолчанию файл содержит две
секции — первая для OpenLDAP, вторая для
Active Directory. Данные секции указаны для
примера и отключены.
Обозначения тегов:
| Тег | Значение и содержание |
|---|---|
|
|
Секция параметров |
|
|
|
|
|
Доменное имя сервера |
|
|
Секция параметров |
|
|
|
|
|
Данные учетной записи для подключения к |
|
|
Пароль от учетной записи, указанной в теге |
|
|
Параметр включения / отключения работы секции |
|
|
Интервал синхронизации (в милисекундах) |
|
|
Расписание синхронизации (по времени сервера), |
|
|
Параметр перехода по ссылкам (по умолчанию |
|
|
Предоставлять ли импортируемым пользователям доступ в |
|
|
Код группы пользователей, в котороую нужно включить |
|
|
Параметры доступа |
|
|
Общая группа доступа — пользователям данной группы |
|
|
Параметры учетных записей, которые буду иметь права |
|
|
Параметры |
|
|
Атрибут объекта
Значения данного атрибута должны быть уникальны |
|
|
Атрибут объекта |
|
|
Имя пользователя |
|
|
Отчество пользователя |
|
|
Фамилия пользователя |
|
|
Почта пользователя (при наличии) |
|
|
Базовый узел поиска |
|
|
Фильтр для синхронизации (по умолчанию |
|
|
Параметры групп |
|
|
|
|
|
Импортировать ли группы (если указано |
|
|
Имя группы |
|
|
Члены группы |
|
|
Базовый узел поиска |
|
|
Фильтрация импортируемых классов объектов, например, |
|
|
Поле LDAP, из которого будет записан код группы (см. |
|
|
Для версий Synergy, начиная с |
Конфигурационный файл
ldap-sync.xml с полями
<code> и
<application>
?xml version="1.0" encoding="UTF-8" standalone="yes"?>
<configuration xmlns="http://www.arta.kz/xml/ns/as/ldap-sync"
  <!-- ... -->
  <!-- синхронизация с OpenLDAP -->
  <item>
    <!-- ... -->
    <group>
      <!-- ... -->
      <!-- поле ldap, из которого будет записан код группы -->
      <code>group_code</code>
      <!-- код приложения, куда будет записана группа -->
      <application>app1</application>
    </group>
  </item>
  <!-- ... -->
<configuration>
* - если параметр пуст или отсутствует, в код группы записывается `ldap_$sha1($DN)`,
т. е. префикс ldap и sha1-хэш от
Distiguished Name объекта. Можно записать в
<code> название атрибута LDAP, из
которого будет взят код группы. При импорте для кода проводится
валидация на уникальность и соответствие правилам кода. Если
валидация не прошла, невалидная группа пропускается, в лог
записывается ошибка, а импорт продолжается.
** - обязательный параметр, может использоваться несколько раз. Код группы в Synergy
будет сформирован по следующим правилам:
-
если указано поле
<code>, то при
импорте в код группы будет добавлен префикс кода приложения,
например,app1_group_code; -
если приложение не указано, либо указано приложение по
умолчанию (default_application), либо код
сформирован из
ldap_$sha1($DN + $application_code),
префикс добавляться не будет; -
если указанного приложения в Synergy нет, в лог записывается
ошибка; -
если приложение не указано, группа будет добавлена в
приложение по умолчанию при его наличии.
Файл конфигурации представлен в одной их следующих версий:
-
Сопоставление пользователя
LDAPпользователю
ARTA Synergyтолько по его идентификатору
вARTA Synergy:
    <?xml version="1.0" encoding="UTF-8" standalone="yes"?>
    <configuration
        xmlns="http://www.arta.kz/xml/ns/as/ldap-sync"
        xmlns:xsi="http://www.w3.org/2001/XMLSchema-instance"
        xsi:schemaLocation="http://www.arta.kz/xml/ns/as/ldap-sync ldap-sync.xsd">
    <!-- синхронизация с OpenLDAP -->
    <item>
       <!-- id синхронизации -->
       <id>1</id>
       <!-- домен -->
       <domain>test.ldap.com</domain>
       <!-- синхронизация -->
       <sync>
            <!-- LDAP хост -->
            <host>10.20.30.1</host>
            <!-- учетная запись для подключения к каталогу LDAP -->
            <user-dn>cn=syncuser,dc=test,dc=ldap,dc=com</user-dn>
            <!-- пароль -->
            <password>password</password>
            <!-- активно, неактивно -->
            <active>false</active>
            <!-- интервал синхронизации в мс -->
            <interval>1800000</interval>
            <!-- расписание синхронизации; параметр указан, поэтому интервал синхронизации игнорируется -->
            <schedules>19:00,00:00</schedules>
            <!-- следовать ссылкам -->
            <referral>ignore</referral>
            <!-- код группы пользователей, в которую будут включены все импортированные пользователи -->
            <defaultGroup>client_access</defaultGroup>
            <!-- предоставлять ли импортированным пользователям доступ в систему, пока позволяет лицензия -->
            <!-- после превышения лимита пользователи будут импортированы, но у них будет заблокирован доступ в систему -->
            <defaultAccess>true</defaultAccess>
        </sync>
        <access>
            <!-- группа доступа -->
            <allow>cn=aiusers,ou=Groups,ou=People,dc=test,dc=ldap,dc=com</allow>
            <!-- группа админов -->
            <admin>cn=aiadmin,ou=Groups,ou=People,dc=test,dc=ldap,dc=com</admin>
        </access>
        <!-- пользователи -->
        <account>
            <!-- поле id пользователя, если пусто - будет использоваться md5 от DN (как раньше было), иначе md5 от поля -->
            <id></id>
            <!-- поле логин -->
            <login>cn</login>
            <!-- поле имя -->
            <firstname>firstName</firstname>
            <!-- поле отчество -->
            <middlename>middleName</middlename>
            <!-- поле фамилия -->
            <lastname>sn</lastname>
            <!-- поле почта -->
            <email>mail</email>
            <!-- базовый узел -->
            <base>dc=test,dc=ldap,dc=com</base>
            <!-- фильтр -->
            <filter>(objectClass=inetOrgPerson)</filter>
        </account>
        <!-- группы -->
        <group>
         <!-- поле id группы, если пусто - будет использоваться hashCode от DN (как раньше было), иначе hashCode от поля -->
            <id></id>
            <!-- при импорте игнорировать группы -->
            <importGroups>false</importGroups>
            <!-- поле имя -->
            <name>cn</name>
            <!-- поле члены -->
            <member>member</member>
            <!-- базовый узел -->
            <base>dc=test,dc=ldap,dc=com</base>
            <!-- фильтр -->
            <filter>(objectClass=groupOfNames)</filter>
        </group>
    </item>

    <!-- синхронизация с Active Directory -->
    <item>
        <id>2</id>
        <domain>msad.com</domain>
        <sync>
            <host>10.20.30.2</host>
            <user-dn>Administrator@msad.com</user-dn>
            <password>secret</password>
            <active>false</active>
            <interval>1800000</interval>
            <referral>follow</referral>
        </sync>
        <access>
        <!-- userAccountControl указывает на поле "Активен" в AD, вместо него можно использовать просто группу -->
            <allow>userAccountControl</allow>
            <admin>CN=aiadmin,CN=Users,dc=msad,dc=com</admin>
        </access>
        <account>
            <id>objectGUID</id>
            <login>sAMAccountName</login>
            <firstname>givenName</firstname>
            <middlename>initials</middlename>
            <lastname>sn</lastname>
            <email>mail</email>
            <base>dc=msad,dc=com</base>
            <filter>(objectClass=person)</filter>
        </account>
        <group>
            <id>objectGUID</id>
            <name>cn</name>
            <member>member</member>
            <base>dc=msad,dc=com</base>
            <filter>(objectClass=group)</filter>
        </group>
    </item>
    </configuration>
-
Сопоставление пользователя
LDAPпользователю
ARTA Synergyпо любому полю объекта,
полученного изLDAP:
    <?xml version="1.0" encoding="UTF-8" standalone="yes"?>
    <configuration
        xmlns="http://www.arta.kz/xml/ns/as/ldap-sync"
        xmlns:xsi="http://www.w3.org/2001/XMLSchema-instance"
        version= "2"
        xsi:schemaLocation="http://www.arta.kz/xml/ns/as/ldap-sync ldap-sync_2.xsd">
    <!-- Наборы синхронизации, таких может быть несколько -->
    <item>
        <!-- id синхронизации -->
        <id>1</id>
        <!-- домен -->
        <domain>test.ldap.com</domain>
        <!-- синхронизация -->
        <sync>
            <!-- LDAP хост -->
            <host>10.20.30.1</host>
            <!-- учетная запись для подключения к каталогу LDAP -->
            <user-dn>cn=syncuser,dc=test,dc=ldap,dc=com</user-dn>
            <!-- пароль -->
            <password>password</password>
            <!-- активно, неактивно -->
            <active>false</active>
            <!-- интервал синхронизации в мс -->
            <interval>1800000</interval>
            <!-- следовать ссылкам -->
            <referral>ignore</referral>
        </sync>
        <!-- доступ -->
        <access>
            <!-- группа доступа -->
            <!-- значение userAccountControl в этом поле указывает на поле "Активен" в AD, вместо него можно
            использовать просто группу
            -->
            <allow>cn=aiusers,ou=Groups,ou=People,dc=test,dc=ldap,dc=com</allow>
            <!-- группа админов -->
            <admin>cn=aiadmin,ou=Groups,ou=People,dc=test,dc=ldap,dc=com</admin>
        </access>
        <!-- пользователи -->
            <user>
            <!-- базовый узел поиска в LDAP -->
            <base>dc=test,dc=ldap,dc=com</base>
            <!-- фильтр -->
            <filter>(objectClass=inetOrgPerson)</filter>
            <!-- По какому полю сравнивать пользователей -->
            <identity>
                <!-- Откуда из Synergy брать поле для сравнения, из учётной записи -->
                <source type="account"/>
                <!-- либо из произвольной карточки
                <source type="personalrecord" id="id личной карточки"/>
                -->
                <!-- Поля для сравнения. Блок id может быть только один в этом блоке. -->
                <id>
                    <!-- Идентификатор поля Synergy. Для типа источника account возможные значения: id, login, email.
                    Для типа источника personalrecord — идентификатор поля формы карточки пользователя.
                    -->
                        <synergy>id</synergy>
                        <!-- Поле id пользователя из LDAP, если пусто - будет использоваться md5 от DN объекта. Eсли указанное поле отсутствует в импортируемом объекте, либо оно является пустым, то импорт этого объекта не производится, о чём делается запись в лог -->
                        <ldap></ldap>
                    </id>
                </identity>
                <!-- Сопоставление полей учётной записи -->
                <account>
                    <!-- поле логин -->
                    <login>cn</login>
                    <!-- поле имя -->
                    <firstname>firstName</firstname>
                    <!-- поле отчество -->
                    <middlename>middleName</middlename>
                    <!-- поле фамилия -->
                    <lastname>sn</lastname>
                    <!-- поле почта -->
                    <email>mail</email>
                </account>
                <!-- Сопоставление полей карточки пользователя. Блоков personalrecord может быть несколько
                -->
                <personalrecord>
                    <!-- Идентификатор карточки пользователя. Обязательно должен быть непустым -->
                    <id>какой-то id</id>
                    <!-- Блок field указывает на связь поля из LDAP с полем карточки пользователя. Таких блоков может быть несколько -->
                    <field>
                        <ldap>IIN</ldap>
                        <synergy>form-iin</synergy>
                    </field>
                </personalrecord>
            </user>
                <!-- группы -->
                <group>
                    <!-- базовый узел -->
                    <base>dc=test,dc=ldap,dc=com</base>
                    <!-- фильтр -->
                    <filter>(objectClass=groupOfNames)</filter>
                    <!-- поле id группы, если пусто - будет использоваться hashCode от DN (как раньше было), иначе hashCode от поля -->
                    <id></id>
                    <!-- поле имя -->
                    <name>cn</name>
                    <!-- поле члены -->
                    <member>member</member>
                 </group>
            </item>
        </configuration>
Настройка синхронизации
Данная глава содержит инструкцию по настройке синхронизации и
разделена на два подраздела:
-
создание группы пользователей для последующей синхронизации
сLDAPкаталогами; -
настройка конфигурационного файла.
Для настройки синхронизации необходимо иметь права
Администратора AD. Перед началом настройки
настоятельно рекомендуется сделать резервную копию базы
mySQL, чтобы в случае возникновения ошибок
иметь возможность восстановления базы до текущего состояния.
Создание групп в JXplorer
-
Подключимся к серверу с данными Администратора:
Рисунок 7.21. Рисунок 1
-
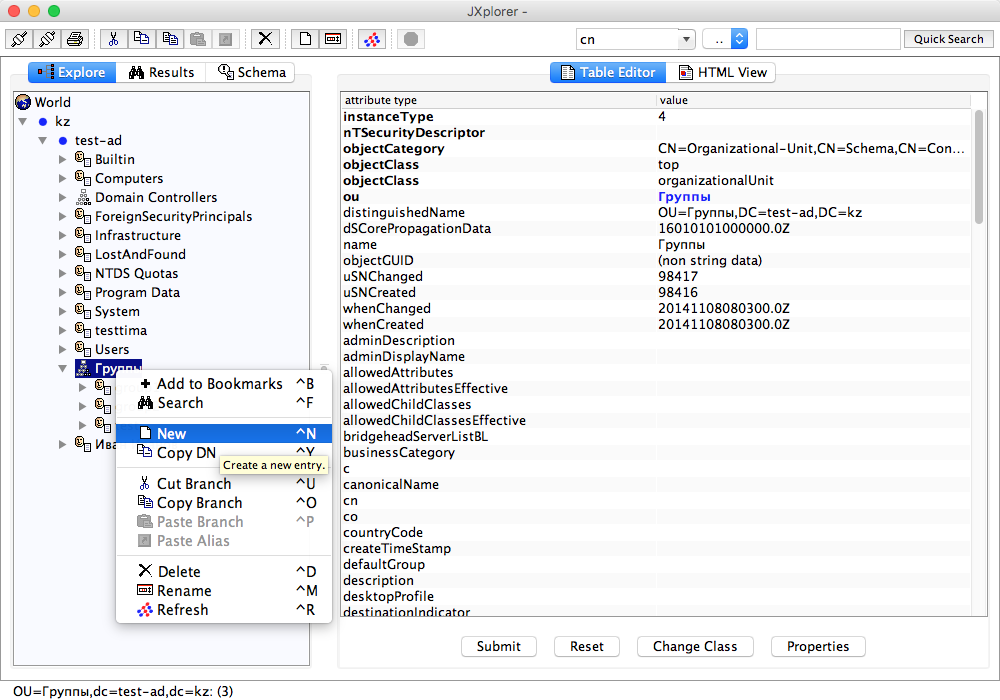
Вызовем меню создания группы:
Рисунок 7.22. Рисунок 2
-
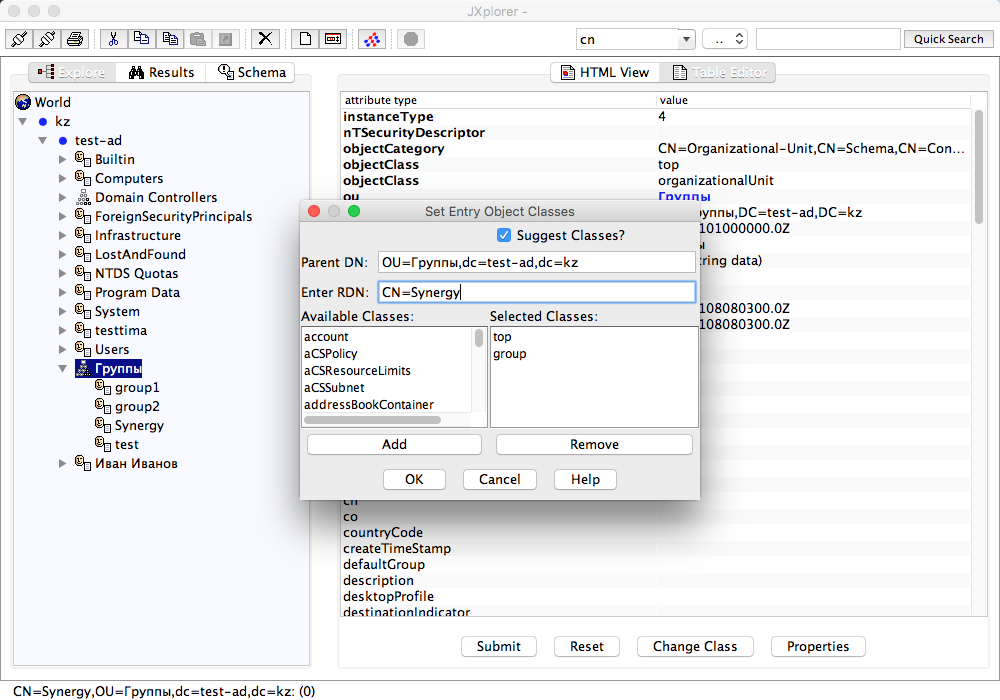
Указываем уникальное имя
DN:
Рисунок 7.23. Рисунок 3
-
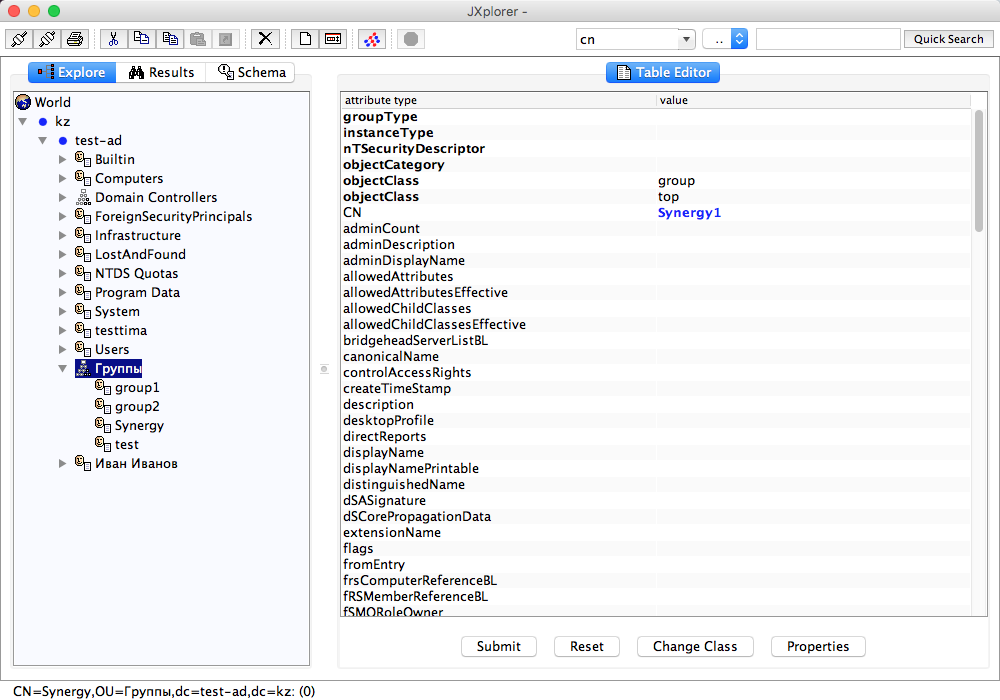
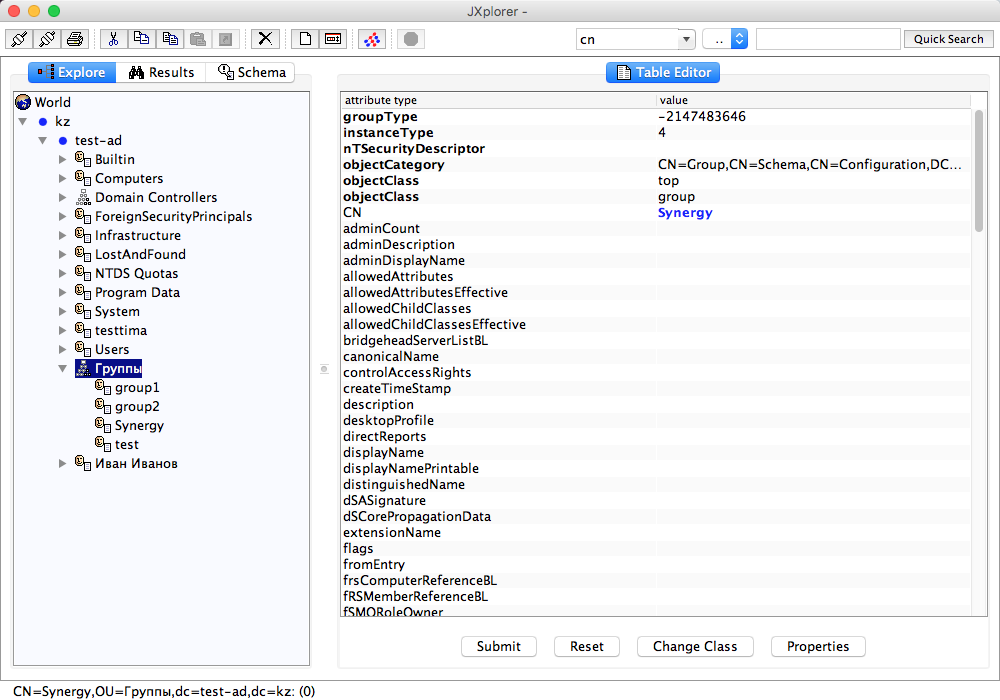
Заполним все обязательные параметры (выделены жирным
начертанием):-
groupType;
-
instanceType;
-
nTSecurityDescriptor;
-
objectCategory;
-
objectClass;
-
Рисунок 7.24. Рисунок 4
Рисунок 7.25. Рисунок 5
-
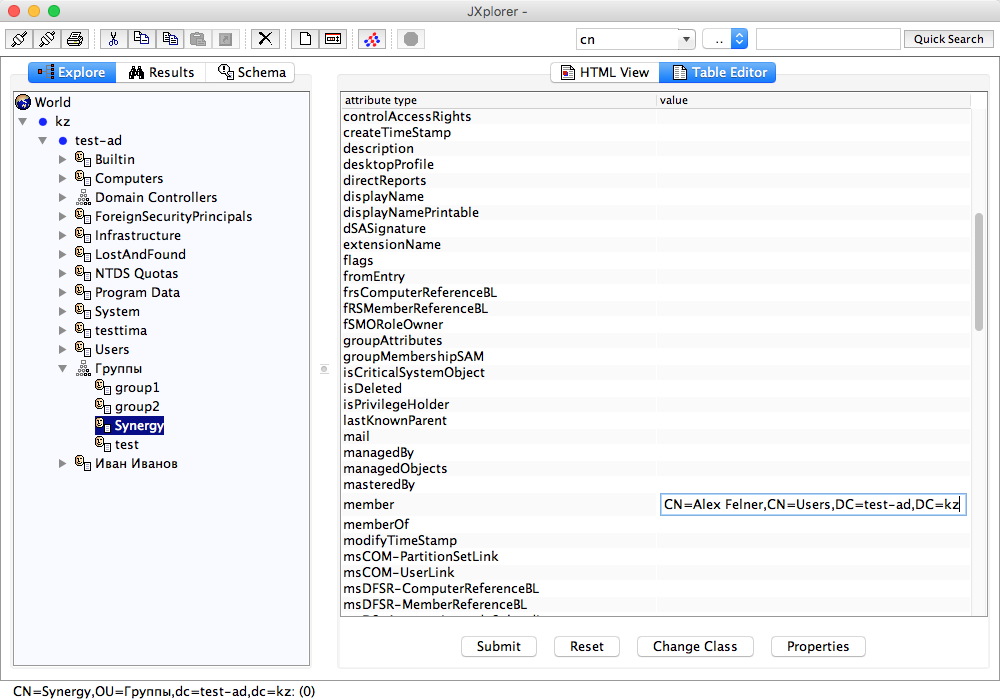
Добавим пользователей в группу:
Рисунок 7.26. Рисунок 6
-
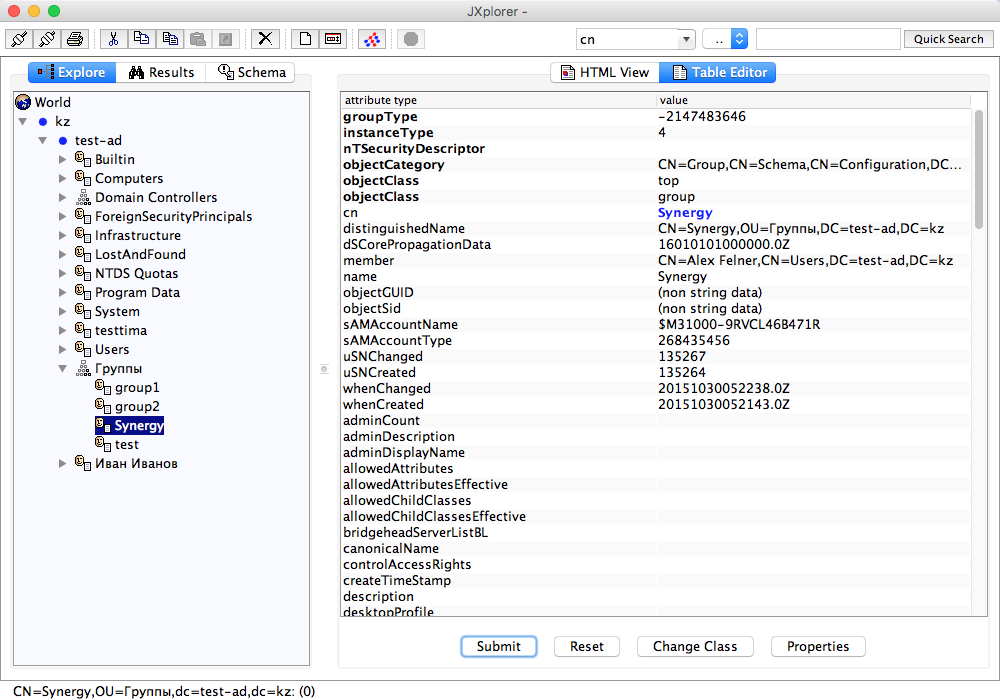
Группа успешно создана:
Рисунок 7.27. Рисунок 7
Создание групп в Active Directory
-
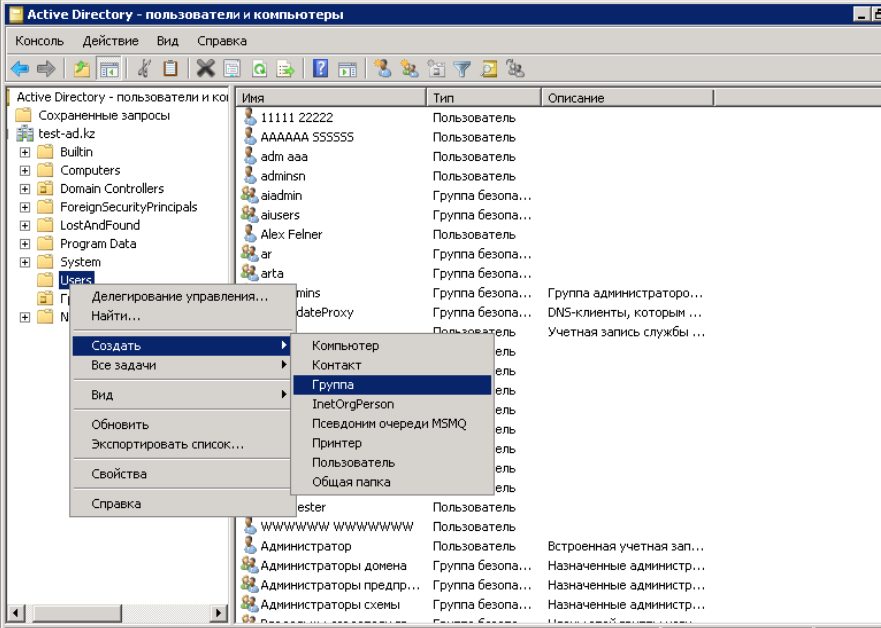
Вызовем меню создания группы:
Рисунок 7.28. Рисунок 1
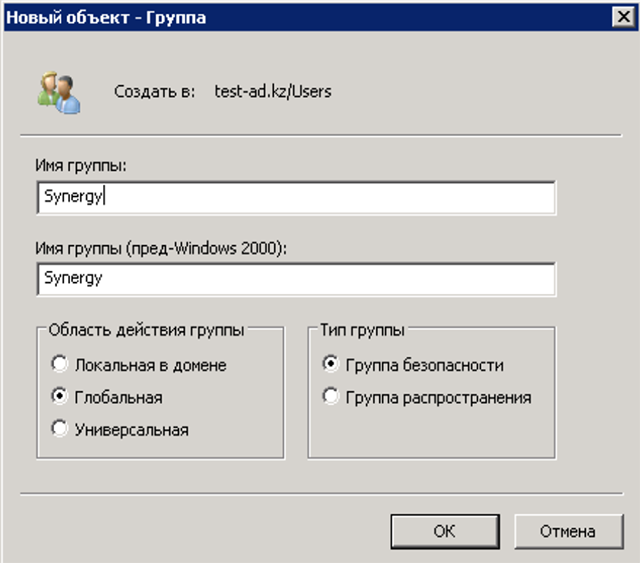
-
В окне создания группы указываем имя и параметры группы:
Рисунок 7.29. Рисунок 2
-
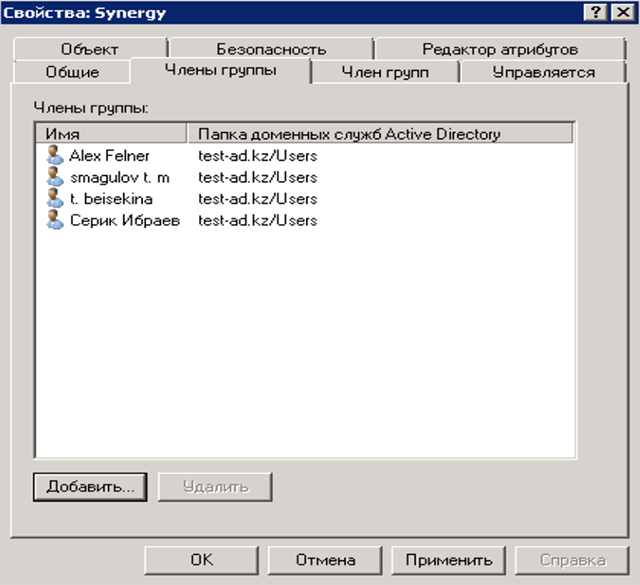
Добавляем пользователй в данную группу, которые будут
иметь доступ к платформеARTA Synergy:
Рисунок 7.30. Рисунок 3
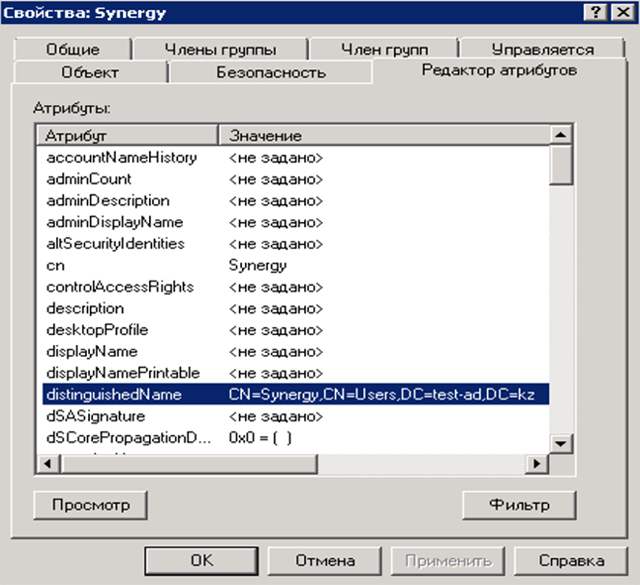
-
Для импользования фильтрации пользователей для объекта
понадобится уникальное имяDN. Для
этого перейдем во вкладку «Редактор
атрибутов»:
Рисунок 7.31. Рисунок 4
Настройка конфигурационного файла
-
Переходим в консоль сервера.
-
Открываем файл для конфигурирования синхронизации:
nano /opt/synergy/jboss/standalone/configuration/arta/ldap-sync.xml -
Изменим данный файл в соответствии поставленной задачи
(добавлен комментарийизменено):
-
Без фильтрации — если
необходима полная синхронизация со всеми пользователями и
группами:<!-- синхронизация с Active Directory --> <item> <id>2</id> <!-- изменено --> <domain>test-ad.kz</domain> <sync> <!-- изменено --> <host>192.168.7.105</host> <!-- изменено --> <user-dn>adm@test-ad.kz</user-dn> <!-- изменено --> <password>123456Qw</password> <!-- изменено --> <active>true</active> <!-- изменено --> <interval>900000</interval> <referral>follow</referral> </sync> <access> <!-- userAccountControl указывает на поле "Активен" в AD, вместо него можно использовать просто группу --> <allow>userAccountControl</allow> <!-- изменено --> <admin>CN=Users,dc=test-ad,dc=kz</admin> </access> <account> <id>objectGUID</id> <login>sAMAccountName</login> <firstname>givenName</firstname> <middlename>info</middlename> <lastname>sn</lastname> <email>mail</email> <!-- изменено --> <base>dc=test-ad,dc=kz</base> <!-- изменено --> <filter>(objectClass=person)</filter> </account> <group> <id>objectGUID</id> <name>cn</name> <member>member</member> <!-- изменено --> <base>dc=test-ad,dc=kz</base> <filter>(objectClass=group)</filter> </group> </item> -
С фильтрацией — если
необходима синхронизация только с пользователями, которые
будут иметь доступ к платформе
ARTA Synergy(рекомендуется):<!-- синхронизация с Active Directory --> <item> <id>2</id> <!-- изменено --> <domain>test-ad.kz</domain> <sync> <!-- изменено --> <host>192.168.7.105</host> <!-- изменено --> <user-dn>adm@test-ad.kz</user-dn> <!-- изменено --> <password>123456Qw</password> <!-- изменено --> <active>true</active> <!-- изменено --> <interval>900000</interval> <referral>follow</referral> </sync> <access> <!-- userAccountControl указывает на поле "Активен" в AD, вместо него можно использовать просто группу --> <allow>userAccountControl</allow> <!-- изменено --> <admin>CN=Users,dc=test-ad,dc=kz</admin> </access> <account> <id>objectGUID</id> <login>sAMAccountName</login> <firstname>givenName</firstname> <middlename>info</middlename> <lastname>sn</lastname> <email>mail</email> <!-- изменено --> <base>dc=test-ad,dc=kz</base> <!-- изменено --> <filter>(memberOf=CN=Synergy,CN=Users,DC=test-ad,DC=kz)</filter> </account> <group> <id>objectGUID</id> <name>cn</name> <member>member</member> <!-- изменено --> <base>dc=test-ad,dc=kz</base> <filter>(objectClass=group)</filter> </group> </item>Примечание
Данные для фильтра берутся из атрибутов группы.
-
Без названия группы —
если нет необходимости в отображении названий групп в
ARTA Synergy:<!-- синхронизация с Active Directory --> <item> <id>2</id> <!-- изменено --> <domain>test-ad.kz</domain> <sync> <!-- изменено --> <host>192.168.7.105</host> <!-- изменено --> <user-dn>adm@test-ad.kz</user-dn> <!-- изменено --> <password>123456Qw</password> <!-- изменено --> <active>true</active> <!-- изменено --> <interval>900000</interval> <referral>follow</referral> </sync> <access> <!-- userAccountControl указывает на поле "Активен" в AD, вместо него можно использовать просто группу --> <allow>userAccountControl</allow> <!-- изменено --> <admin>CN=Users,dc=test-ad,dc=kz</admin> </access> <account> <id>objectGUID</id> <login>sAMAccountName</login> <firstname>givenName</firstname> <middlename>info</middlename> <lastname>sn</lastname> <email>mail</email> <!-- изменено --> <base>dc=test-ad,dc=kz</base> <!-- изменено --> <filter>(memberOf=CN=Synergy,CN=Users,DC=test-ad,DC=kz)</filter> </account> <group> <id>objectGUID</id> <name>cn</name> <member>member</member> <!-- изменено --> <base>dc=test-ad,dc=kz</base> <!-- изменено --> <filter>(objectClass=NONEXISTENTANDWILLNOTEXISTFOREVER)</filter> </group> </item>
-
Перезапускаем
jboss.
В приложении администратора Synergy
«Картотека -> Управление пользователями»
появится список пользователей. Синхронизация осуществляется в
одностороннем порядке: при добавлении пользователя в
AD, он отображается в
ARTA Synergy, но не наоборот.
Enable LDAP over SSL (LDAPS) for Microsoft Active Directory servers.
Microsoft active directory servers will default to offer LDAP connections over unencrypted connections (boo!).
The steps below will create a new self signed certificate appropriate for use with and thus enabling LDAPS for an AD server. Of course the «self-signed» portion of this guide can be swapped out with a real vendor purchased certificate if required.
Steps have been tested successfully with Windows Server 2012R2, but should work with Windows Server 2008 without modification. Requires a working OpenSSL install (ideally Linux/OSX) and (obviously) a Windows Active Directory server.
- Create root certificate
- Import root certificate into trusted store of domain controller
- Create client certificate
- Accept and import certificate
- Reload active directory SSL certificate
- Test LDAPS using
ldp.exeutility - Reference
Create root certificate
Using OpenSSL, create new private key and root certificate. Answer country/state/org questions as suitable:
$ openssl genrsa -aes256 -out ca.key 4096
$ openssl req -new -x509 -days 3650 -key ca.key -out ca.crt
Hold onto the resulting ca.key and ca.crt.
Import root certificate into trusted store of domain controller
- From the active directory server, open
Manage computer certificates. - Add the generated
ca.crtto the certificate pathTrusted Root Certification AuthoritiesCertificates. - Done.
Create client certificate
We will now create a client certificate to be used for LDAPS, signed against our generated root certificate.
From the active directory server:
-
Create a new
request.infdefinition with the following contents — replacingACTIVE_DIRECTORY_FQDNwith the qualified domain name of your active directory server:[Version] Signature="$Windows NT$" [NewRequest] Subject = "CN=ACTIVE_DIRECTORY_FQDN" KeySpec = 1 KeyLength = 2048 Exportable = TRUE MachineKeySet = TRUE SMIME = FALSE PrivateKeyArchive = FALSE UserProtected = FALSE UseExistingKeySet = FALSE ProviderName = "Microsoft RSA SChannel Cryptographic Provider" ProviderType = 12 RequestType = PKCS10 KeyUsage = 0xa0 [EnhancedKeyUsageExtension] OID = 1.3.6.1.5.5.7.3.1 ; Server Authentication -
Run the following to create a client certificate request of
client.csr(note: it’s critical this is run from the active directory server itself to ensure correct private key -> certificate association):C:> certreq -new request.inf client.csr
Back to our OpenSSL system:
-
Create
v3ext.txtcontaining the following:keyUsage=digitalSignature,keyEncipherment extendedKeyUsage=serverAuth subjectKeyIdentifier=hash -
Create a certificate
client.crtfrom certificate requestclient.csrand root certificate (with private key):$ openssl x509 -req -days 3650 -in client.csr -CA ca.crt -CAkey ca.key -extfile v3ext.txt -set_serial 01 -out client.crt
-
Verify generated certificate:
$ openssl x509 -in client.crt -text
-
Ensure the following
X509v3 extensionsare all present:X509v3 Key Usage: Digital Signature, Key EnciphermentX509v3 Extended Key Usage: TLS Web Server AuthenticationX509v3 Subject Key Identifier
Accept and import certificate
-
From the active directory server with
client.crtpresent, run the following:C:> certreq -accept client.crt
-
Open
Manage computer certificates, the new certificate should now be present underPersonalCertificates. Ensure that:- Certificate has a private key association.
- The «Intended Purposes» is defined as «Server Authentication».
- Certificate name is the FQDN of the active directory server.
Reload active directory SSL certificate
Alternatively you can just reboot the server, but this method will instruct the active directory server to simply reload a suitable SSL certificate and if found, enable LDAPS:
-
Create
ldap-renewservercert.txtcontaining the following:dn: changetype: modify add: renewServerCertificate renewServerCertificate: 1 - -
Run the following command:
C:> ldifde -i -f ldap-renewservercert.txt
Test LDAPS using ldp.exe utility
-
From another domain controller, firstly install our generated root certificate
ca.crtto the certificate pathTrusted Root Certification AuthoritiesCertificates. -
Open utility:
-
From
Connection, selectConnect. -
Enter name of target domain controller.
-
Enter
636as port number (this is the LDAPS port). -
Click
OKto confirm the connection works. -
You’re all done!
Reference
- Enable LDAP over SSL with a third-party certification authority: https://support.microsoft.com/en-us/kb/321051
- LDAP renewServerCertificate: https://msdn.microsoft.com/en-us/library/cc223311.aspx
- How to Enable LDAPS in Active Directory (similar outcome to above): http://www.javaxt.com/tutorials/windows/how_to_enable_ldaps_in_active_directory
- DigiCert LDAPS certificate install guide: https://www.digicert.com/ssl-certificate-installation-microsoft-active-directory-ldap-2012.htm
Microsoft Active Directory поддерживает протокол LDAPv3. С его помощью можно авторизовать пользователей из сторонних приложений. Чтобы обеспечить безопасность при передаче учетной информации серверу необходимо использовать LDAPS (SSL). В этой статье мы рассмотрим настройку контролера доме, для обеспечения поддержки SSL.
Для того, чтобы SSL нормально функционировал нам потребуются сертификат.
Проверяем наличие сертификата
Для начала будет полезно проверить наличие сертификата в вашем домене, для этого запустим на нашем ПК утилиту ldp.exe.
Она не поставляется с Windows 10, чтобы использовать её, вам придется установить компоненты администрирования RSAT.
Нажмите Подключение — подключить, заполните окно аналогично рисунку.
Используйте имя домена, не сервера — тогда сервер для подключения будет выбран автоматически.
Если в ответ вы получили сообщение:
ld = ldap_sslinit("altuninvv.local", 636, 1);
Error 0 = ldap_set_option(hLdap, LDAP_OPT_PROTOCOL_VERSION, 3);
Error 81 = ldap_connect(hLdap, NULL);
Server error: <empty>
Error <0x51>: Fail to connect to altuninvv.local.Это означает, что либо недоступен ни один контролер домена, либо неправильно настроен DNS, либо ПК не является членом домена, либо не установлен SSL сертификат на контролере домена.
Если сообщение похоже на такое:
Established connection to xxxx.xxxxxxxxx.xxx.
Retrieving base DSA information...
Getting 1 entries:
Dn: (RootDSE)
configurationNamingContext:
...
forestFunctionality: 6 = ( WIN2012R2 );
highestCommittedUSN: 2153249;
isGlobalCatalogReady: FALSE;
isSynchronized: TRUE;
ldapServiceName: XXXXXXXX$@XXXXXXXXXXXXX;
....
supportedCapabilities (6): 1.2.840.113556.1.4.800 = ( ACTIVE_DIRECTORY ); 1.2.840.113556.1.4.1670 = ( ACTIVE_DIRECTORY_V51 ); 1.2.840.113556.1.4.1791 = ( ACTIVE_DIRECTORY_LDAP_INTEG ); 1.2.840.113556.1.4.1935 = ( ACTIVE_DIRECTORY_V61 ); 1.2.840.113556.1.4.2080 = ( ACTIVE_DIRECTORY_V61_R2 ); 1.2.840.113556.1.4.2237 = ( ACTIVE_DIRECTORY_W8 );
supportedControl (37): 1.2.840.113556.1.4.319 = ( PAGED_RESULT ); 1.2.840.113556.1.4.801 = ( SD_FLAGS ); 1.2.840.113556.1.4.473 = ( SORT ); 1.2.840.113556.1.4.528 = ( NOTIFICATION ); 1.2.840.113556.1.4.417 = ( SHOW_DELETED ); 1.2.840.113556.1.4.619 = ( LAZY_COMMIT ); 1.2.840.113556.1.4.841 = ( DIRSYNC ); 1.2.840.113556.1.4.529 = ( EXTENDED_DN ); 1.2.840.113556.1.4.805 = ( TREE_DELETE ); 1.2.840.113556.1.4.521 = ( CROSSDOM_MOVE_TARGET ); 1.2.840.113556.1.4.970 = ( GET_STATS ); 1.2.840.113556.1.4.1338 = ( VERIFY_NAME ); 1.2.840.113556.1.4.474 = ( RESP_SORT ); 1.2.840.113556.1.4.1339 = ( DOMAIN_SCOPE ); 1.2.840.113556.1.4.1340 = ( SEARCH_OPTIONS ); 1.2.840.113556.1.4.1413 = ( PERMISSIVE_MODIFY ); 2.16.840.1.113730.3.4.9 = ( VLVREQUEST ); 2.16.840.1.113730.3.4.10 = ( VLVRESPONSE ); 1.2.840.113556.1.4.1504 = ( ASQ ); 1.2.840.113556.1.4.1852 = ( QUOTA_CONTROL ); 1.2.840.113556.1.4.802 = ( RANGE_OPTION ); 1.2.840.113556.1.4.1907 = ( SHUTDOWN_NOTIFY ); 1.2.840.113556.1.4.1948 = ( RANGE_RETRIEVAL_NOERR ); 1.2.840.113556.1.4.1974 = ( FORCE_UPDATE ); 1.2.840.113556.1.4.1341 = ( RODC_DCPROMO ); 1.2.840.113556.1.4.2026 = ( DN_INPUT ); 1.2.840.113556.1.4.2064 = ( SHOW_RECYCLED ); 1.2.840.113556.1.4.2065 = ( SHOW_DEACTIVATED_LINK ); 1.2.840.113556.1.4.2066 = ( POLICY_HINTS_DEPRECATED ); 1.2.840.113556.1.4.2090 = ( DIRSYNC_EX ); 1.2.840.113556.1.4.2205 = ( UPDATE_STATS ); 1.2.840.113556.1.4.2204 = ( TREE_DELETE_EX ); 1.2.840.113556.1.4.2206 = ( SEARCH_HINTS ); 1.2.840.113556.1.4.2211 = ( EXPECTED_ENTRY_COUNT ); 1.2.840.113556.1.4.2239 = ( POLICY_HINTS ); 1.2.840.113556.1.4.2255 = ( SET_OWNER ); 1.2.840.113556.1.4.2256 = ( BYPASS_QUOTA );
supportedLDAPPolicies (19): MaxPoolThreads; MaxPercentDirSyncRequests; MaxDatagramRecv; MaxReceiveBuffer; InitRecvTimeout; MaxConnections; MaxConnIdleTime; MaxPageSize; MaxBatchReturnMessages; MaxQueryDuration; MaxTempTableSize; MaxResultSetSize; MinResultSets; MaxResultSetsPerConn; MaxNotificationPerConn; MaxValRange; MaxValRangeTransitive; ThreadMemoryLimit; SystemMemoryLimitPercent;
supportedLDAPVersion (2): 3; 2;
supportedSASLMechanisms (4): GSSAPI; GSS-SPNEGO; EXTERNAL; DIGEST-MD5;
-----------
Это значит, что SSL сертификат уже установлен посредством Службы сертификатов Active Directory и дальнейших действий не потребуется.
Установка OpenSSL
В этой статье я буду использовать виртуальный сервер, созданный для цикла статей.
Имя домена — altununvv.local
Имя контролера домена – addc1.altuninvv.local
Виртуальная организация — Altunin Soft
Скачаем свежую версию OpenSSL — вы можете скачать её отсюда — https://slproweb.com/products/Win32OpenSSL.html
Я рекомендую все команды выполнять сразу на сервере, но вы можете так же работать и на вашем ПК, если используете MSYS2.
Те, кто использует, как и я, MSYS2, могут ввести в консоли:
pacman -Sy opensslСоздаем локальный центр сертификации
Создадим папку и назовем её CA.
Создадим в ней файл ca.conf с содержимым:
[ req ]
distinguished_name = req_distinguished_name
req_extensions = v3_ca
[ req_distinguished_name ]
# Descriptions
countryName=RU
stateOrProvinceName=Magadan region
localityName=Magadan
0.organizationName= Altunin Soft
1.organizationName=IT
commonName=altuninvv.local
#Modify for your details here or answer the prompts from openssl
countryName_default=RU
stateOrProvinceName_default= Magadan region
localityName_default= Magadan
0.organizationName_default= Altunin Soft
1.organizationName_default=IT
commonName_default= altuninvv.local
[ v3_ca ]
keyUsage=critical,keyCertSign
basicConstraints=critical,CA:TRUE,pathlen:1
extendedKeyUsage=serverAuth
subjectAltName = @alt_names
[alt_names]
DNS.1 = *. altuninvv.local
DNS.2 = altuninvv.localСгенерируем приватный ключ для CA
openssl genrsa -des3 -out ca.key 4096Укажите пароль для ключа, в нашем случае это будет Pa$$w0rd:
Generating RSA private key, 4096 bit long modulus (2 primes)
......................................................................................................................................
........................................................................................................................................
....++++..........................++++e is 65537 (0x010001)
Enter pass phrase for ca.key:
Verifying - Enter pass phrase for ca.key:Создадим сертификат для нашего CA:
openssl req -new -x509 -extensions v3_ca -days 3659 -key ca.key -out ca.crt -config ca.confПросто нажимайте Enter все поля будут заполнены автоматически!
Enter pass phrase for ca.key:
You are about to be asked to enter information that will be incorporated into your certificate request.
What you are about to enter is what is called a Distinguished Name or a DN.
There are quite a few fields but you can leave some blank
For some fields there will be a default value,
If you enter '.', the field will be left blank.
-----
RU [RU]:
Magadan region [Magadan region]:
Magadan [Magadan]:
Altunin Soft [Altunin Soft]:
IT [IT]:
altuninvv.local [altuninvv.local]:Теперь нужно импортировать созданный сертификат в хранилище доверенных CA на нашем контролере домена.
Скопируем файл ca.crt на контролер домена. Откроем PowerShell от имени администратора, перейдем в папку с файлом ca.cert и введем команду:
Import-Certificate –Verbose -FilePath ca.crt -CertStoreLocation 'Cert:LocalMachineRoot'
VERBOSE: Performing the operation "Import certificate" on target "Item: C:caca.crt Destination: Root".
PSParentPath: Microsoft.PowerShell.SecurityCertificate::LocalMachineRoot
Thumbprint Subject
---------- -------
D5D1306CFFDAF63EDA10710F13F69C0228005350 CN=altuninvv.local, O=IT, O=Altunin Soft, L=Magadan, S=Magadan region, C=RU Сертификат успешно добавлен.
Теперь пришло время создать запрос на клиентский сертификат, который будет использовать контролер домена.
На контролере домена создадим текстовый файл — req.txt
;----------------- request.inf -----------------
[Version]
Signature="$Windows NT$"
;The Subject will need to be your active directory domain name
[NewRequest]
Subject = "CN=altuninvv.local
KeySpec = 1
KeyLength = 4096
Exportable = TRUE
SMIME = FALSE
MachineKeySet = TRUE
PrivateKeyArchive = FALSE
UseExistingKeySet = FALSE
UserProtected = FALSE
ProviderName = "Microsoft RSA SChannel Cryptographic Provider"
ProviderType = 12
RequestType = PKCS10
KeyUsage = 0xa0
[EnhancedKeyUsageExtension]
OID = 1.3.6.1.5.5.7.3.1 ; Server Authentication
;The following will add a subject alternative name of a wildcard cert on *.example.com
;so any ad controller with a hostname of somththing.example.com can use it.
[Extensions]
2.5.29.17 = "{text}"
_continue_ = "dns=*.altuninvv.local&"
_continue_ = "dns=altuninvv.local&"
Выполним запрос на сертификат:
certreq -new req.txt addc1.csr
CertReq: Request Created
Выполним запрос на сертификат:
certreq -new req.txt addc1.csr
CertReq: Request CreatedСкопируем созданный файл на свой ПК в папку нашего CA
В папке CA создадим файл v3ext.txt с содержимым:
# v3ext.txt
 keyUsage=digitalSignature,keyEncipherment
 extendedKeyUsage=serverAuth
 subjectKeyIdentifier=hash
subjectAltName = @alt_names
#Modify for your details. Must include the commonName in the list below also.
#The *.example.com will allow all Domain controllers with
#the hostname somthing.example.com to use the cert.
[alt_names]
DNS.1 = *.altuninvv.local
DNS.2 = altuninvv.localСгенерируем сертификат для addc1
openssl x509 -req -days 825 -in addc1.csr -CA ca.crt -CAkey ca.key -extfile v3ext.txt -set_serial 01 -out addc1-server.crt
Signature ok
subject=CN = altuninvv.local
Getting CA Private Key
Enter pass phrase for ca.key:
Введите пароль закрытого ключа: Pa$$w0rd
Скопируем файл с сертификатом addc1-server.crt обратно на контролер домена addc1 и применим сертификат:
certreq -accept addc1-server.crt
Installed Certificate:
  Serial Number: 01
  Subject: CN=altuninvv.local (DNS Name=*.altuninvv.local, DNS Name=altuninvv.local)
  NotBefore: 2/18/2021 5:37 PM
  NotAfter: 5/24/2023 5:37 PM
  Thumbprint: 4721d27e9fe34aaa672d20d68c0ec01fd9f7a82c
Из PowerShell проверим наличие сертификата:
PS C:ca> Get-ChildItem "Cert:LocalMachineMy"

   PSParentPath: Microsoft.PowerShell.SecurityCertificate::LocalMachineMy

Thumbprint                                Subject
----------                                -------
4721D27E9FE34AAA672D20D68C0EC01FD9F7A82C  CN=altuninvv.local
Теперь вы должны перегрузить контролер домена, чтобы все настройки вступили в силу.
Обратите внимание, чтобы подключиться к серверу вы должны указать его полное доменное имя, в нашем случае:
addc1.altuninvv.localЕсли ПК входит в состав домена altuninvv.local, вы можете использовать для подключение его имя:
altuninvv.localТогда контролер домена для подключения будет выбран автоматически из списка доступных, возможно, это будет работать только, при наличии Службы сертификатов на одном из серверов в AD!
Так как мой ПК не входит в домен altuninvv.local и не использует его DNS-сервера, я прописал в файле
C:WindowsSystem32driversetchostsстроку:
192.168.0.10 addc1.altuninvv.localПроверяем подключение
Для проверки подключения мы будет использовать утилиту ldp.exe.
Она не поставляется с Windows 10, чтобы использовать её, вам придется установить компоненты администрирования RSAT.
Запустим ldp.exe, откроется окно:
В этом окне выберите подключение – подключить
Введем:
Сервер: addc1.altuninvv.local
Порт: 636
Установим галочку SSL
Нажмем Ок, будет осуществлено подключение и выведена дополнительная информация:
Теперь мы может сделать bind к серверу
Выберите Подключение – Привязка
Заполните поля:
Пользователь: CN=ldap-bind,CN=Users,DC=altuninvv,DC=local
Пароль: Pas#w0rds#1
Установите: Простая привязка
нажмите Ок
Будет выведено сообщение:
res = ldap_simple_bind_s(ld, 'CN=ldap-bind,CN=Users,DC=altuninvv,DC=local', <unavailable>); // v.3

Authenticated as: 'ALTUNINVVldap-bind'.
Это означает, что подключение прошло успешно.
Далее выберем пункт меню Вид – Дерево
И в окне выберем — DC=altuninvv,DC=local
Нажмем Ок
Откроется дерево с разделами домена,
Таким образом вы можете просматривать каталог AD через LDAP по SSL.
Заключение
Сегодня мы рассмотрели подключение к контролеру домена AD с использованием протокола LDAP по SSL.
Мы создали свой локальный центр сертификации CA с помощью OpenSSL.
Был выпущен сертификат и установлен на контролере домена.
С помощью утилиты ldp.exe было осуществлено подключение к контролеру домена по SSL.
Table of Contents
- Applies To:
- DoLdapInitialize
- PortQry output after promoting a DC for SSL ports.
- LDP.EXE output after connecting the SSL ports.
- NETMON capture for SSL Ports
- Network capture without netmon
- Cert server into a domain controller is not recommended.
- Publish a cert Template
- certutil -v -template LDAPSSL
- Find the Template Details using «V» switch.
- Enabling/Disabling CryptoAPI 2.0
- More details for Troubleshooting PKI Problems on Windows
- PKI Info; those are stored in AD ; See the following Snap.using ADSIEDIT.MSC
- Also you can see the ADCS info using DSSITE.MSC
- Some key Points.
- PKI Events.
- Certificate Server Registry Key (Path)
- Some Useful Links
Applies To:
Windows Server 2012, Windows Server 2012 R2 Preview
DoLdapInitialize
ADDS standard ports are opened during DCPROMO mainly LDAP initiation. Ports are opened during dsa init, specifically in ‘ DoLdapInitialize’ — If we stop the ‘Active Directory Domain Service’ in service.msc neither of the port is listening.
My main purpose of this article is ldaps service & msft-gc-ssl service . Port 636 & 3269 are listing after promoting a DC. We can test that using Telnet, PortQuery , Netmon or Wireshark etc. The result below is taken from newly built DC using PortQry.
PortQry output after promoting a DC for SSL ports.
TCP port 636 (ldaps service): LISTENING
portqry.exe -n msft.net -e 636 -p TCP exits with
return code 0x00000000.
TCP port 3269 (msft-gc-ssl service): LISTENING
portqry.exe -n msft.net -e 3269 -p TCP exits with
return code 0x00000000.
There is fantastic tool called LDP.EXE which was the part of the windows support tools in earlier version of windows OS (2003). Now days if we installed a DC automatically that is available into a DC due to RSAT. We can connect port 389 & 3268 through ldp
but not 636/3269. Those SSL ports are only listened LDAPS when we put the valid certificate into DCs. We need valid SAN, Intended purpose for that certificate (EKU).
LDP.EXE output after connecting the SSL ports.
If your certificate server itself a DC then you no need to worry for SSL ports. Those ports are connected through LDP.EXE.
ld = ldap_sslinit("ADS01HAMLOK.ms.net", 636, 1);
Error
0 = ldap_set_option(hLdap, LDAP_OPT_PROTOCOL_VERSION, 3);
Error
0 = ldap_connect(hLdap, NULL);
Error
0 = ldap_get_option(hLdap,LDAP_OPT_SSL,(void*)&lv);
Host supports SSL, SSL cipher strength = 128 bits
Established connection to ADS01HAMLOK.ms.net.
Retrieving base DSA information...
Getting 1 entries:
Dn: (RootDSE)
configurationNamingContext: CN=Configuration,DC=ms,DC=net;
currentTime: 7/6/2013 7:39:46 PM India Standard Time;
defaultNamingContext: DC=ms,DC=net;
dnsHostName: ADS01HAMLOK.ms.net;
domainControllerFunctionality: 4 = ( WIN2008R2 );
domainFunctionality: 2 = ( WIN2003 );
dsServiceName: CN=NTDS Settings,CN=ADS01HAMLOK,CN=Servers,CN=Default-First-Site-Name,CN=Sites,CN=Configuration,DC=ms,DC=net;
forestFunctionality: 2 = ( WIN2003 );
highestCommittedUSN: 24762;
isGlobalCatalogReady: TRUE;
isSynchronized: TRUE;
ldapServiceName: ms.net:ads01hamlok$@MS.NET;
namingContexts (5): DC=ms,DC=net; CN=Configuration,DC=ms,DC=net; CN=Schema,CN=Configuration,DC=ms,DC=net; DC=DomainDnsZones,DC=ms,DC=net; DC=ForestDnsZones,DC=ms,DC=net;
rootDomainNamingContext: DC=ms,DC=net;
schemaNamingContext: CN=Schema,CN=Configuration,DC=ms,DC=net;
serverName: CN=ADS01HAMLOK,CN=Servers,CN=Default-First-Site-Name,CN=Sites,CN=Configuration,DC=ms,DC=net;
subschemaSubentry: CN=Aggregate,CN=Schema,CN=Configuration,DC=ms,DC=net;
supportedCapabilities (5): 1.2.840.113556.1.4.800 = ( ACTIVE_DIRECTORY ); 1.2.840.113556.1.4.1670 = ( ACTIVE_DIRECTORY_V51 ); 1.2.840.113556.1.4.1791 = ( ACTIVE_DIRECTORY_LDAP_INTEG ); 1.2.840.113556.1.4.1935 = (

 ACTIVE_DIRECTORY_V61 ); 1.2.840.113556.1.4.2080;
supportedControl (28): 1.2.840.113556.1.4.319 = ( PAGED_RESULT ); 1.2.840.113556.1.4.801 = ( SD_FLAGS ); 1.2.840.113556.1.4.473 = ( SORT ); 1.2.840.113556.1.4.528 = ( NOTIFICATION ); 1.2.840.113556.1.4.417 = ( SHOW_DELETED

 ); 1.2.840.113556.1.4.619 = ( LAZY_COMMIT ); 1.2.840.113556.1.4.841 = ( DIRSYNC ); 1.2.840.113556.1.4.529 = ( EXTENDED_DN ); 1.2.840.113556.1.4.805 = ( TREE_DELETE ); 1.2.840.113556.1.4.521 = ( CROSSDOM_MOVE_TARGET ); 1.2.840.113556.1.4.970 = ( GET_STATS );

 1.2.840.113556.1.4.1338 = ( VERIFY_NAME ); 1.2.840.113556.1.4.474 = ( RESP_SORT ); 1.2.840.113556.1.4.1339 = ( DOMAIN_SCOPE ); 1.2.840.113556.1.4.1340 = ( SEARCH_OPTIONS ); 1.2.840.113556.1.4.1413 = ( PERMISSIVE_MODIFY ); 2.16.840.1.113730.3.4.9 = ( VLVREQUEST

 ); 2.16.840.1.113730.3.4.10 = ( VLVRESPONSE ); 1.2.840.113556.1.4.1504 = ( ASQ ); 1.2.840.113556.1.4.1852 = ( QUOTA_CONTROL ); 1.2.840.113556.1.4.802 = ( RANGE_OPTION ); 1.2.840.113556.1.4.1907 = ( SHUTDOWN_NOTIFY ); 1.2.840.113556.1.4.1948 = ( RANGE_RETRIEVAL_NOERR

 ); 1.2.840.113556.1.4.1974 = ( FORCE_UPDATE ); 1.2.840.113556.1.4.1341 = ( RODC_DCPROMO ); 1.2.840.113556.1.4.2026 = ( DN_INPUT ); 1.2.840.113556.1.4.2064 = ( SHOW_RECYCLED ); 1.2.840.113556.1.4.2065 = ( SHOW_DEACTIVATED_LINK );
supportedLDAPPolicies (14): MaxPoolThreads; MaxDatagramRecv; MaxReceiveBuffer; InitRecvTimeout; MaxConnections; MaxConnIdleTime; MaxPageSize; MaxQueryDuration; MaxTempTableSize; MaxResultSetSize; MinResultSets; MaxResultSetsPerConn;

 MaxNotificationPerConn; MaxValRange;
supportedLDAPVersion (2): 3; 2;
supportedSASLMechanisms (4): GSSAPI; GSS-SPNEGO; EXTERNAL; DIGEST-MD5;
-----------
53 = ldap_set_option(ld, LDAP_OPT_ENCRYPT, 1)
res = ldap_bind_s(ld, NULL, &NtAuthIdentity, NEGOTIATE (1158)); // v.3
{NtAuthIdentity: User='NULL'; Pwd=<unavailable>; domain = 'NULL'}
Authenticated as: 'MSAdministrator'.
NETMON capture for SSL Ports
Also Netmon results are taken after putting the valid certificate into a Domain Controller. Used the filter » LDAP». Also you can use «.Protocol.LDAP». You will get the same result. Here I have installed the netmon in DC.
Listening the ldaps Port (636) into the below Capture
Listening the gc-ssl Port (3269) into the below Capture
Network capture without netmon
Also you can trace without the Netmon/WireShare. Using Netsh but it is applicable Windows 2008R2 and Windows 7 and upper version OS.
For starting the capture.
netsh trace start capture=yes tracefile=cap.etl
For stopping the capture
netsh trace stop
For reading the .etl file you need the netmon anywhere.
Netsh trace will be created two files. see the below snap. For reading the .etl file you need to select the Windows Parser in Netmon.
Cert server into a domain controller is not recommended.
We need additional steps for listening the ssl ports for DCs If cert server in a member server .We need to publish the certificate template into the cert server & that certificate template need to put DC’s local computer->personal or NTDS->Personal store.
Local computer->personal store
NTDS->Personal store
(This store is available only in DC. When we have more than one cert template for Server Authentication, we can use this store for avoiding the conflict)
Publish a cert Template
Here I have used «Kerberos Authentication» template for publishing the new certificate template.
Log into the certificate server . Run » certtmpl.msc» & chose the Kerberos Authentication Template.
We need to set few properties before publishing a certificate template. Those are marked as green.
Click on Duplicate Templete.
Publish cert in AD.
Allow Pvt. key to be exported.
Subject Name format
After publishing that cert you can check the properties using » certutil -v -template <Template_Name>». Here my cert template name is LDAPSSL. See the following output.
certutil -v -template LDAPSSL
PS C:> certutil -v -template LDAPSSL
Name: Active Directory Enrollment Policy
Id: {32376692-6063-4EDC-A375-572FED78C626}
Url: ldap:
34 Templates:
Template[21]:
TemplatePropCommonName = LDAPSSL
TemplatePropFriendlyName = LDAPSSL
TemplatePropEKUs =
4 ObjectIds:
1.3.6.1.5.2.3.5 KDC Authentication
1.3.6.1.4.1.311.20.2.2 Smart Card Logon
1.3.6.1.5.5.7.3.1 Server Authentication
1.3.6.1.5.5.7.3.2 Client Authentication
TemplatePropCryptoProviders =
0: Microsoft RSA SChannel Cryptographic Provider
TemplatePropMajorRevision = 64 (100)
TemplatePropDescription = Computer
TemplatePropSchemaVersion = 2
TemplatePropMinorRevision = 1
TemplatePropRASignatureCount = 0
TemplatePropMinimumKeySize = 800 (2048)
TemplatePropOID =
1.3.6.1.4.1.311.21.8.1546289.5796744.12012220.14775765.9035062.224.8004685.4056790 LDAPSSL
TemplatePropV1ApplicationPolicy =
4 ObjectIds:
1.3.6.1.5.2.3.5 KDC Authentication
1.3.6.1.4.1.311.20.2.2 Smart Card Logon
1.3.6.1.5.5.7.3.1 Server Authentication
1.3.6.1.5.5.7.3.2 Client Authentication
TemplatePropEnrollmentFlags = 28 (40)
CT_FLAG_PUBLISH_TO_DS -- 8
CT_FLAG_AUTO_ENROLLMENT -- 20 (32)
TemplatePropSubjectNameFlags = 18c00000 (415236096)
CT_FLAG_SUBJECT_ALT_REQUIRE_DOMAIN_DNS -- 400000 (4194304)
CT_FLAG_SUBJECT_ALT_REQUIRE_SPN -- 800000 (8388608)
CT_FLAG_SUBJECT_ALT_REQUIRE_DNS -- 8000000 (134217728)
CT_FLAG_SUBJECT_REQUIRE_DNS_AS_CN -- 10000000 (268435456)
TemplatePropPrivateKeyFlags = 10 (16)
CT_FLAG_EXPORTABLE_KEY -- 10 (16)
TemplatePropGeneralFlags = 20060 (131168)
CT_FLAG_AUTO_ENROLLMENT -- 20 (32)
CT_FLAG_MACHINE_TYPE -- 40 (64)
CT_FLAG_IS_MODIFIED -- 20000 (131072)
TemplatePropSecurityDescriptor = O:LAG:EAD:PAI(OA;;RPCR;0e10c968-78fb-11d2-90d4-00c04f79dc55;;RO)(OA;;RPCR;a05b8cc2
bc-4802-a710-e7c15ab866a2;;RO)(OA;;RPWPCR;0e10c968-78fb-11d2-90d4-00c04f79dc55;;DA)(OA;;RPWPCR;0e10c968-78fb-11d2-90d
0c04f79dc55;;DD)(OA;;RPWPCR;0e10c968-78fb-11d2-90d4-00c04f79dc55;;EA)(OA;;RPWPCR;a05b8cc2-17bc-4802-a710-e7c15ab866a2
D)(OA;;RPWPCR;0e10c968-78fb-11d2-90d4-00c04f79dc55;;ED)(OA;;RPWPCR;a05b8cc2-17bc-4802-a710-e7c15ab866a2;;ED)(A;;CCDCL
RPWPDTLOSDRCWDWO;;;DA)(A;;CCDCLCSWRPWPDTLOSDRCWDWO;;;EA)(A;;CCDCLCSWRPWPDTLOSDRCWDWO;;;LA)(A;;LCRPLORC;;;AU)
Allow Enroll CONTOSOEnterprise Read-only Domain Controllers
Allow Auto-Enroll CONTOSOEnterprise Read-only Domain Controllers
Allow Enroll CONTOSODomain Admins
Allow Enroll CONTOSODomain Controllers
Allow Enroll CONTOSOEnterprise Admins
Allow Auto-Enroll CONTOSODomain Controllers
Allow Enroll NT AUTHORITYENTERPRISE DOMAIN CONTROLLERS
Allow Auto-Enroll NT AUTHORITYENTERPRISE DOMAIN CONTROLLERS
Allow Full Control CONTOSODomain Admins
Allow Full Control CONTOSOEnterprise Admins
Allow Full Control CONTOSOAdministrator
Allow Read NT AUTHORITYAuthenticated Users
TemplatePropExtensions =
4 Extensions:
Extension[0]:
1.3.6.1.4.1.311.21.7: Flags = 0, Length = 30
Certificate Template Information
Template=LDAPSSL(1.3.6.1.4.1.311.21.8.1546289.5796744.12012220.14775765.9035062.224.8004685.4056790)
Major Version Number=100
Minor Version Number=1
Extension[1]:
2.5.29.37: Flags = 0, Length = 2b
Enhanced Key Usage
KDC Authentication (1.3.6.1.5.2.3.5)
Smart Card Logon (1.3.6.1.4.1.311.20.2.2)
Server Authentication (1.3.6.1.5.5.7.3.1)
Client Authentication (1.3.6.1.5.5.7.3.2)
Extension[2]:
2.5.29.15: Flags = 1(Critical), Length = 4
Key Usage
Digital Signature, Key Encipherment (a0)
Extension[3]:
1.3.6.1.4.1.311.21.10: Flags = 0, Length = 33
Application Policies
[1]Application Certificate Policy:
Policy Identifier=KDC Authentication
[2]Application Certificate Policy:
Policy Identifier=Smart Card Logon
[3]Application Certificate Policy:
Policy Identifier=Server Authentication
[4]Application Certificate Policy:
Policy Identifier=Client Authentication
TemplatePropValidityPeriod = 1 Years
TemplatePropRenewalPeriod = 6 Weeks
CertUtil: -Template command completed successfully.
PS C:>
Find that Template from computer store using «certutil -store my». See the below snap.
Find the Template Details using «V» switch.
PS C:> certutil -store -v my 1
my
================ Certificate 1 ================
X509 Certificate:
Version: 3
Serial Number: 611b0cbe000000000004
Signature Algorithm:
Algorithm ObjectId: 1.2.840.113549.1.1.5 sha1RSA
Algorithm Parameters:
05 00
Issuer:
CN=contoso-PKIROOTCA-CA
DC=contoso
DC=com
NotBefore: 6/26/2013 1:42 PM
NotAfter: 6/26/2014 1:42 PM
Subject:
CN=BAN-ADS01.contoso.com
Public
Key Algorithm:
Algorithm ObjectId: 1.2.840.113549.1.1.1 RSA (RSA_SIGN)
Algorithm Parameters:
05 00
Public
Key Length: 2048 bits
Public
Key: UnusedBits = 0
0000 30 82 01 0a 02 82 01 01 00 d2 97 d0 1d 7d 8a 2a
0010 f9 1f ac 21 b2 ae 0b e7 b8 69 83 5c e5 d3 52 0c
0020 91 ed 6f cf c6 33 25 f2 b3 2a 47 da 66 2e 82 f9
0030 17 65 f8 ee 83 27 e6 64 9c 13 70 bb 2a 5e 6b 9c
0040 ed d6 a4 1a 1f de 7d 82 73 4b 98 38 ec 85 f0 f1
0050 fc ed 01 74 2b dc 93 19 e8 d1 21 c7 2c ff e4 8d
0060 03 67 f7 ce b6 01 e1 86 29 91 55 d1 0c d5 73 a6
0070 84 ad 78 5f c3 38 60 43 20 6b 72 25 42 90 df bf
0080 44 93 d8 09 f9 19 93 05 b3 98 8d b3 d6 a3 cd be
0090 86 1d d7 db 57 db 29 36 27 8f f6 84 d0 5b 1e f5
00a0 c1 01 fc d4 a6 6e 1e c7 77 ed 28 d5 98 3e 9f 45
00b0 99 fc 9c f7 dc 9d 05 70 dd 69 5f b1 83 26 a8 51
00c0 cd ae f5 f6 83 5b d7 67 bf 0b dc 89 1b 40 77 cc
00d0 df 87 99 83 77 a4 61 4d c9 78 ce be 75 bf b4 60
00e0 9b 39 1a 96 ff bf 98 9f c2 8d 89 1d 7c 28 33 09
00f0 33 e1 cc 8c f9 6e 83 10 d3 2c 42 99 57 d6 4d cf
0100 45 05 44 21 70 e1 ad c4 3d 02 03 01 00 01
Certificate Extensions: 9
1.3.6.1.4.1.311.21.7: Flags = 0, Length = 30
Certificate Template Information
Template=LDAPSSL(1.3.6.1.4.1.311.21.8.1546289.5796744.12012220.14775765.9035062.224.8004685.4056790)
Major Version Number=100
Minor Version Number=1
2.5.29.37: Flags = 0, Length = 2b
Enhanced Key Usage
KDC Authentication (1.3.6.1.5.2.3.5)
Smart Card Logon (1.3.6.1.4.1.311.20.2.2)
Server Authentication (1.3.6.1.5.5.7.3.1)
Client Authentication (1.3.6.1.5.5.7.3.2)
2.5.29.15: Flags = 1(Critical), Length = 4
Key Usage
Digital Signature, Key Encipherment (a0)
1.3.6.1.4.1.311.21.10: Flags = 0, Length = 33
Application Policies
[1]Application Certificate Policy:
Policy Identifier=KDC Authentication
[2]Application Certificate Policy:
Policy Identifier=Smart Card Logon
[3]Application Certificate Policy:
Policy Identifier=Server Authentication
[4]Application Certificate Policy:
Policy Identifier=Client Authentication
2.5.29.14: Flags = 0, Length = 16
Subject Key Identifier
ae 5f a1 12 09 ef c9 35 2c e7 31 89 38 e1 f9 2a c2 78 5e f4
2.5.29.35: Flags = 0, Length = 18
Authority Key Identifier
KeyID=36 e5 92 e8 53 3b 14 fe 23 ec 64 d3 22 49 0b eb cb a8 45 f6
2.5.29.31: Flags = 0, Length = cc
CRL Distribution Points
[1]CRL Distribution Point
Distribution Point Name:
Full Name:
=Configuration,DC=contoso,DC=com?certificateRevocationList?base?objectClass=cRLDistributionPoint
1.3.6.1.5.5.7.1.1: Flags = 0, Length = b9
Authority Information Access
[1]Authority Info Access
Access Method=Certification Authority Issuer (1.3.6.1.5.5.7.48.2)
Alternative Name:
contoso,DC=com?cACertificate?base?objectClass=certificationAuthority
2.5.29.17: Flags = 0, Length = 57
Subject Alternative Name
Other Name:
Principal Name=BAN-ADS01$@contoso.com
DNS Name=BAN-ADS01.contoso.com
DNS Name=contoso.com
DNS Name=CONTOSO
Signature Algorithm:
Algorithm ObjectId: 1.2.840.113549.1.1.5 sha1RSA
Algorithm Parameters:
05 00
Signature: UnusedBits=0
0000 b4 40 8b 4c f9 83 ae c0 68 8b 05 1f a2 37 f8 a1
0010 14 42 5b ae 2c 37 60 9b 3c 95 24 c4 ed 86 ee b5
0020 22 f7 e3 90 bd 74 e2 f9 0f 51 bd 72 f6 03 75 53
0030 fb dd 70 3f 5c 44 11 2b 3b f8 a4 f8 91 59 73 f4
0040 b2 bb 04 00 4d 80 34 be db 65 31 2a 96 f7 7f ef
0050 bf 1d 42 56 9d 98 b2 be f3 7d 21 47 fb 94 12 6f
0060 ee 42 89 64 a2 c1 38 a3 db 75 a5 02 48 e1 44 c5
0070 af d3 48 ba 33 ed 49 1c ec dd f2 35 83 8b c6 61
0080 db 24 bc fc 38 27 8c 0d d7 df e1 1a f7 dd c1 22
0090 aa 4e 4c b5 b5 ad f1 f7 b3 fe 6e e5 e2 e3 53 cf
00a0 2f 57 27 bf 8a c6 f5 87 b0 79 43 24 3b a3 35 db
00b0 0b 6a b2 9c d6 e4 e9 c3 77 85 e9 07 e4 2e 15 fc
00c0 2d 24 13 fa e9 7e f9 37 f2 96 10 41 f3 ae 26 e1
00d0 22 a3 1b 87 13 71 04 02 b3 f0 10 bb 36 3a a9 cb
00e0 f4 a8 9e dc 27 56 7a a1 2c 69 dc 61 e6 6f bc 8f
00f0 5a 67 f1 34 1c 9e c9 e2 9e f4 b9 54 3e 93 87 7f
Non-root Certificate
Key Id Hash(rfc-sha1): ae 5f a1 12 09 ef c9 35 2c e7 31 89 38 e1 f9 2a c2 78 5e f4
Key Id Hash(sha1): c7 c8 c4 4c 19 84 b8 11 45 03 6d 78 f0 0f 85 a3 61 a2 45 30
Cert Hash(md5): 46 78 5a 30 c8 67 58 33 d0 59 7b 8a 55 89 a2 ac
Cert Hash(sha1): ed 80 d4 35 e9 97 f2 59 b5 29 ca ff 72 60 ad 78 e4 d4 6d 7e
CERT_REQUEST_ORIGINATOR_PROP_ID(71):
BAN-ADS01.contoso.com
CERT_CEP_PROP_ID(87):
Enrollment Policy Url: ldap:
Enrollment Policy Id: {32376692-6063-4EDC-A375-572FED78C626}
Enrollment Server Url: PKIRootCA.contoso.comcontoso-PKIROOTCA-CA
Request Id: 4
Flags = 0
DefaultNone -- 0
Url Flags = 20 (32)
PsfAllowUnTrustedCA -- 20 (32)
Authentication = 2
Kerberos -- 2
Enrollment Server Authentication = 2
Kerberos -- 2
CERT_KEY_PROV_INFO_PROP_ID(2):
Key Container = 8f97dfc0a002a569360e48e62702d8d8_f1f08ee9-bf5c-4df4-aaed-e26f8eaa8ea6
Simple container name: le-LDAPSSL-a7c1c867-6c1b-488b-b519-463156b8d26f
Provider = Microsoft RSA SChannel Cryptographic Provider
ProviderType = c
Flags = 20
KeySpec = 1 -- AT_KEYEXCHANGE
CERT_ISSUER_PUBLIC_KEY_MD5_HASH_PROP_ID(24):
ac 47 4e aa 5d 0a 63 d4 0c 90 09 8f b8 09 b2 97
CERT_SUBJECT_PUBLIC_KEY_MD5_HASH_PROP_ID(25):
27 40 4a d2 6b 5f 0e a9 48 bc 24 00 91 1c c9 e9
CERT_KEY_IDENTIFIER_PROP_ID(20):
ae 5f a1 12 09 ef c9 35 2c e7 31 89 38 e1 f9 2a c2 78 5e f4
CERT_SIGNATURE_HASH_PROP_ID(15):
f2 2f 01 a4 6e 1d 2f 1b 96 a8 95 41 5e 2b d2 fc 80 5a 4c 21
CERT_MD5_HASH_PROP_ID(4):
46 78 5a 30 c8 67 58 33 d0 59 7b 8a 55 89 a2 ac
CERT_SHA1_HASH_PROP_ID(3):
ed 80 d4 35 e9 97 f2 59 b5 29 ca ff 72 60 ad 78 e4 d4 6d 7e
Simple container name: le-LDAPSSL-a7c1c867-6c1b-488b-b519-463156b8d26f
PP_KEYSTORAGE = 1
CRYPT_SEC_DESCR -- 1
KP_PERMISSIONS = 3f (63)
CRYPT_ENCRYPT -- 1
CRYPT_DECRYPT -- 2
CRYPT_EXPORT -- 4
CRYPT_READ -- 8
CRYPT_WRITE -- 10 (16)
CRYPT_MAC -- 20 (32)
D:PAI(A;;GAGR;;;SY)(A;;GAGR;;;BA)
Allow Full Control NT AUTHORITYSYSTEM
Allow Full Control BUILTINAdministrators
Private
Key:
PRIVATEKEYBLOB
Version: 2
aiKeyAlg: 0xa400
CALG_RSA_KEYX
Algorithm Class: 0xa000(5) ALG_CLASS_KEY_EXCHANGE
Algorithm Type: 0x400(2) ALG_TYPE_RSA
Algorithm Sub-id: 0x0(0) ALG_SID_RSA_ANY
0000 52 53 41 32 RSA2
0000 ...
048c
Encryption test passed
CertUtil: -store command completed successfully.
PS C:>
Enabling/Disabling CryptoAPI 2.0
Enabling CryptoAPI 2.0 Diagnostic Logging
wevtutil sl microsoft-windows-capi2/operational /e:True
Disabling CryptoAPI 2.0 Diagnostic Logging
wevtutil sl microsoft-windows-capi2/operational /e:False
More details for Troubleshooting PKI Problems on Windows
Troubleshooting PKI Problems on Windows
PKI Info; those are stored in AD ; See the following Snap.using ADSIEDIT.MSC
Also you can see the ADCS info using DSSITE.MSC

Some key Points.
- Cert Templates are stored in AD (Configuration Partition).
- Enterprise Certificate Server in a Domain controller is enabled LDAPS(636) & GC SSL(3269) ports for all the Domain controller)
- [Due to Certificate Template Domain Controller]
- If all Sub CAs host the same certificate templates for enrolment those servers we can use for Redundancy & fault tolerance.
- Also you can use Certificate server cluster for Redundancy & fault tolerance.
PKI Events.
(Snap is taken from Windows Server 2008 PKI — Brian Komar)
Certificate Server Registry Key (Path)
We are used «certutil -setreg» for changing those keys.
___________________________________________________
Some Useful Links
- How to enable LDAP signing in Windows Server 2008
- TroubleshootingLDAP Over SSL
- Reading LDAP SSL Network Traffic with NetMon 3.4 and NMDecrypt
- How to decrypt an SSL or TLS session by using Wireshark
- How to enable LDAP over SSL with a third-party certification authority
- Certutil Examples for Managing Active Directory Certificate Services (AD CS)
from the Command Line - Configure SSL/TLS on a Web site in the domain with an Enterprise CA
- What’s New in AD CS and PKI?
- How to add a Subject Alternative Name to a secure LDAP certificate
- Custom Certificate Request in Windows Vista
- Step-by-Step Example Deployment of the PKI Certificates for Configuration Manager: Windows Server 2008 Certification Authority
- Publish certificates in a foreign Active Directory forest
- Exporting Certificates using CertUtil
- VPN Client Compatibility with Windows 7 and Windows Server 2008 R2
- Online Responder Installation, Configuration, and Troubleshooting Guide
- LDAP client tracing… using Tracelog
- HowTo: Determine if a user has logged on via smart card

