Содержание
- Общее описание NLB
- Как работает балансировка сетевой нагрузки
- Установка компонента Network Load Balancing на Windows Server 2016
- Настройка NLB Cluster in Windows Server 2016
- Unicast или Multicast NLB
- Unicast
- Multicast NLB
- Добавьте второй узел NLB в существующий кластер NLB:
- Тестируем конфигурацию NLB с веб-сайтом по умолчанию:
- Настройка параметров кластера
- Настройка параметров отдельного узла
- Управление кластером
Общее описание NLB
В этой статье мы рассмотрим шаги по использованию функции балансировки сетевой нагрузки (NLB) в Windows Server 2016. Мы можем использовать NLB для управления двумя или более серверами как единым виртуальным кластером.
NLB — это масштабируемая функция высокой доступности, которую можно установить во всех выпусках Windows Server 2016. NLB распределяет сетевой трафик по набору серверов, балансируя рабочую нагрузку, которую должен обрабатывать каждый сервер. Он масштабируется, поскольку позволяет добавлять дополнительные серверы (также называемые узлами или хостами). Узел (или хост) в кластере NLB в Windows Server 2016 — это компьютер, физический или виртуальный, на котором установлена операционная система Windows Server 2016. На каждом узле или хосте работает копия серверных приложений, которые также работают на других хостах в кластере.
Кластеры NLB Windows Server 2016 могут иметь от 2 до 32 узлов. Когда вы создаете кластер NLB, он создает виртуальный сетевой адрес и виртуальный сетевой адаптер. Виртуальный сетевой адаптер имеет IP-адрес и mac адрес. Сетевой трафик на этот адрес распределяется равномерно по узлам кластера. В базовой конфигурации NLB каждый узел в кластере NLB обслуживает запросы со скоростью, примерно равной скорости всех остальных узлов в кластере. Когда кластер NLB получает запрос, он перенаправляет этот запрос узлу, который в настоящее время используется меньше всего. Вы также можете настроить NLB для направления трафика на определенный хост, который называется хостом по умолчанию.
Новым в Windows Server 2016 является то, что он включает в себя новый программный балансировщик нагрузки (SLB), вдохновленный Azure, в качестве компонента инфраструктуры программно-определяемой сети (SDN). Используйте SLB вместо NLB, если вы используете SDN, используете рабочие нагрузки, отличные от Windows, нуждаетесь в преобразовании исходящих сетевых адресов (NAT) или балансировке нагрузки на уровне 3 (L3) или не на основе TCP. Вы можете продолжать использовать NLB с Windows Server 2016 для развертываний без SDN.
Как работает балансировка сетевой нагрузки

Когда вы настраиваете приложение для использования NLB, клиенты обращаются к приложению, используя адрес кластера NLB, а не адреса узлов, которые участвуют в кластере NLB. Адрес кластера NLB — это виртуальный адрес, совместно используемый узлами в кластере NLB.
Установка компонента Network Load Balancing на Windows Server 2016
Участники тестовой лаборатории:
Мы будем использовать виртуальную тестовую лабораторию, созданную в Hyper-V.
DC1: Контроллер домена и DNS (pentagon.loc)
SERVER1: NLB1 — ip адресс 10.0.0.3 (Role — IIS, NLB)
SERVER2: NLB2 — ip адресс 10.0.0.2 (Role — IIS, NLB)
NLB CLUSTER IP — 10.0.0.200
Примечание: Нам необходимо выполнить следующие действия на обоих серверах-участниках, которые будут участвовать в кластере NLB.
1.На Сервере откройте Server Manager. Нажмите на Инструменты и выберите Add Role and Features.

2. На следующей странице, нажмите Next.

3. Выберите Role-based or feature-based installation и нажмите Далее.

4. Выберите сервер из пула серверов, на котором вы хотите установить функцию балансировки сетевой нагрузки, нажмите «Далее».

5. На странице выбора ролей сервера нажмите Далее.

6. Из списка найдите, Network Local Balancing и отметьте птичкой.

7. Появится новое окно, нажмите Add Features чтобы включить необходимые функции для управления NLB

8. Убедитесь, что выбрана NLB. Нажмите «Next.

9. Нажмите кнопку «Install», чтобы начать процесс установки.

10. Нажмите на Close.

Напоминание : нам нужно выполнить те же действия, на Server2
Помимо GUI , есть возможность также и установить через powershell
Invoke-Command -Computername Server1,Server2 -command {Install-WindowsFeature NLB, RSAT-NLB}

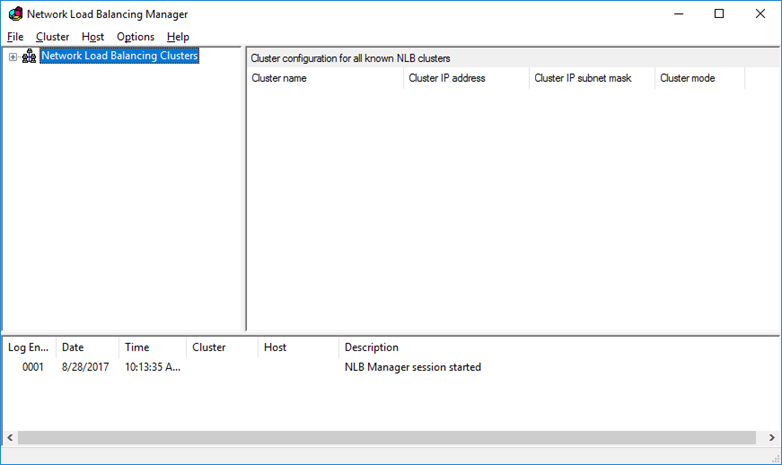
После установки функции NLB следующим шагом будет создание кластера NLB с использованием Windows Server 2016. Для выполнения этих шагов нам нужно открыть Network Load Balancing Manager на одном из узлов NLB.
Настройка NLB Cluster in Windows Server 2016
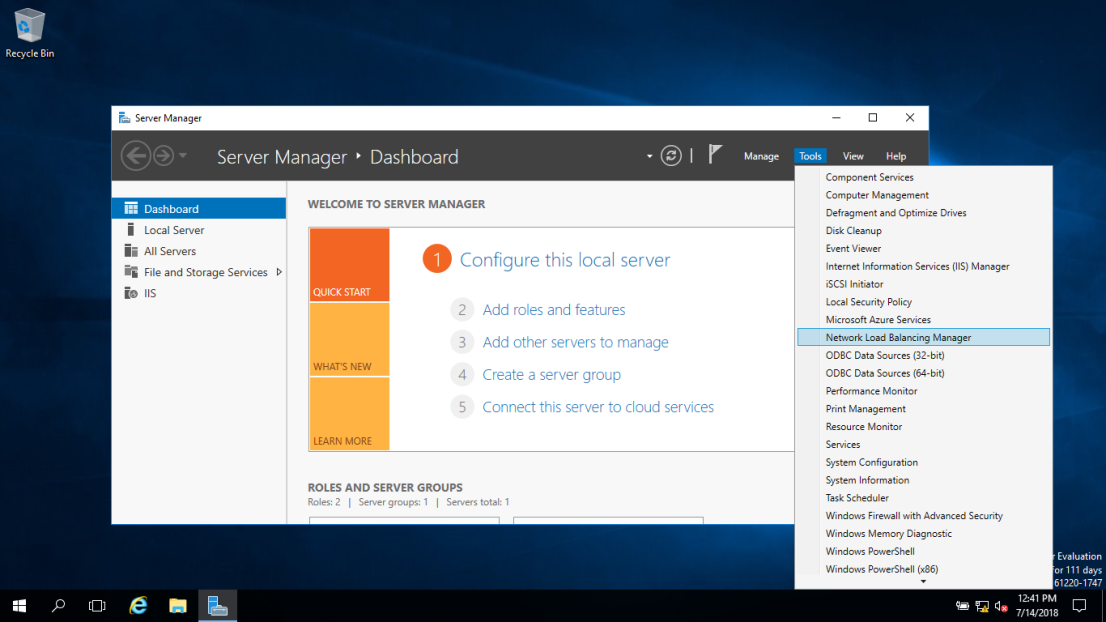
11. В консоли диспетчера серверов рядового сервера Server1 нажмите «Tools » и выберите «Network Load Balancing Manager».

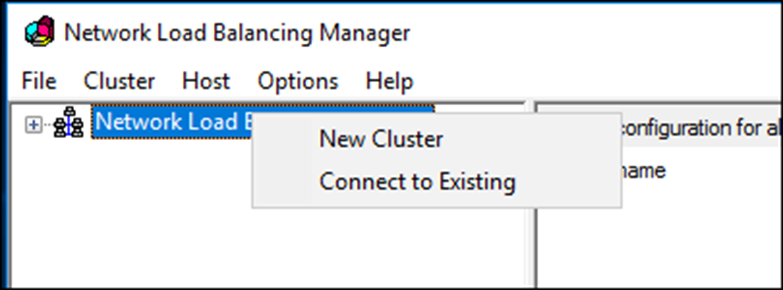
12. Выберите и щелкните правой кнопкой мыши Network Load Balancing Clusters , а затем щелкните New Cluster.

13. Введите IP-адрес или имя второго рядового сервера в поле Host и нажмите Connect. Убедитесь, что имя интерфейса указано в списке, а затем нажмите next.

14. На странице New Cluster: Host Parameters , измените значение приоритета в соответствии с требованиями. Кроме того, убедитесь, что статус по умолчанию установлен как «Started«. Нажмите Next

15. На странице Новый кластер: IP-адреса кластера щелкните Add, чтобы добавить новый IP-адрес кластера.

16. Укажите IP-адрес кластера и нажмите кнопку ОК

Примечание. Этот IP-адрес является новым виртуальным IP-адресом кластера NLB, на котором будет работать служба хоста.
17. При необходимости вы можете добавить более одного IP-адреса, выполнив те же действия. Нажмите «Next.

18. Выберите режим работы кластера NLB.
Задаем имя кластера (Full Internet name) соответствующее указанному IP-адресу. В принципе это имя ни на что не влияет, но правильнее будет вписать сюда FQDN-имя, по которому клиенты будут обращаться к кластеру. Также не забудьте создать в DNS соответствующую запись.
Указываем режим работы кластера, который определяет, будет ли для операций кластера использоваться встроенный MAC-адрес адаптера:
Unicast или Multicast NLB
Network Load Balancing (NLB) может работать в двух режимах:
- Unicast
- Multicast
- IGMP multicast
Unicast
Стандартным рабочим режимом является режим Unicast. В режиме Unicast компенсация NLB изменяет MAC адрес сетевого адаптера, для которого включена NLB. Все узлы в кластере получают одинаковый MAC адрес. Входящий сетевой трафик приходит на все узлы кластера и направляется на привод фильтра NLB.
Multicast NLB
В режиме Multicast компенсация NLB присваивает каждому сетевому адаптеру (с активированной для него NLB) адрес Layer-2-Multicast. Оригинальный MAC адрес каждого узла остается неизменным.
Оба режима имеют свои сильные и слабые стороны. Преимуществом режима Unicast является то, что он работает в большинстве сетевых сред с практически всеми маршрутизаторами и коммутаторами. Одним из недостатков этого режима является то, что все узлы в кластере NLB имеют одинаковый IP и MAC адреса.
Одним из преимуществ режима Multicast является то, что все узлы в кластере сохраняют свои оригинальные MAC адреса. А недостатком такого режима является то, что Multicast NLB требует дополнительной конфигурации на подключенных коммутаторах, поэтому нужно создавать статическую ARP запись на коммутаторе, который связывает Кластерный IP адрес (VIP = виртуальный (Virtual) IP адрес) с общим кластерным MAC адресом.
Заметка: возможность поддерживать режим Multicast на коммутаторе зависит от производителя коммутатора. Есть также дополнительная информация о режиме Multicast, которую необходимо прочесть перед включением Multicast NLB в вашей сети.
Многоадресный IGMP (IGMP Multicast) — Многоадресный режим с поддержкой протокола групповой передачи данных (Internet Group Management Protocol, IGMP). Включение поддержки IGMP дает возможность ограничить широковещательный трафик, т.е. обеспечить прохождение трафика к NLB-кластеру только через порты, обслуживающие узлы кластера, а не через все порты коммутатора. Для обеспечения этого режима необходимо включить поддержку IGMP на сетевом оборудовании.
Примечание. Все узлы кластера должны работать в одном режиме — либо в одноадресном, либо в многоадресном. NLB не поддерживает смешанную среду одноадресной и многоадресной рассылки внутри одного кластера.

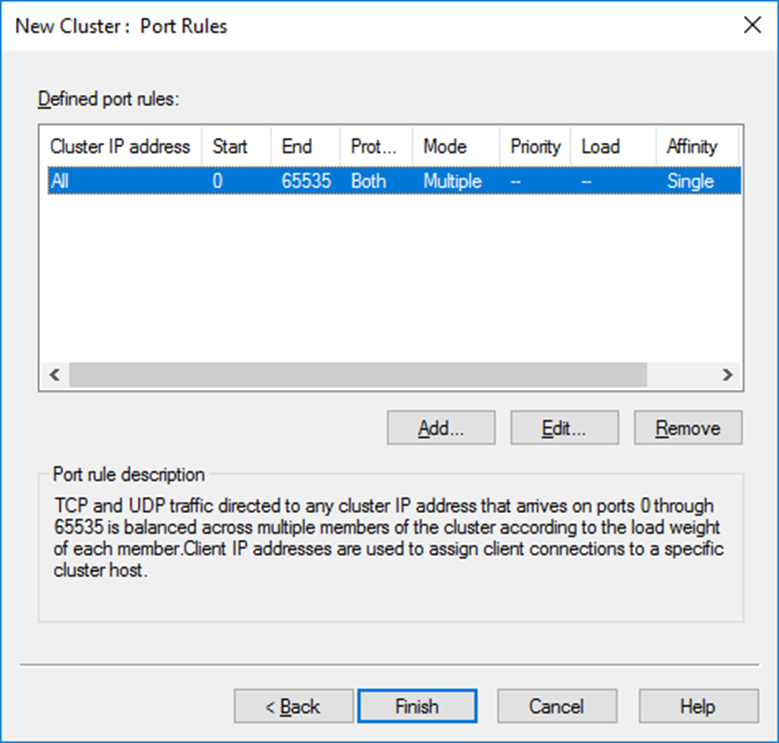
19. На странице New Cluster: Port Rules выберите существующее правило для порта и щелкните edit.

20. Введите диапазон портов. От 80 до 80 (поскольку нам нужен только номер порта 80 для кластера IIS NLB). Выберите режим привязки равным нулю. Нажмите кнопку ОК.

21. Нажмите кнопку ADD чтобы добавить новое правило для порта 443, выполнив те же действия.

22. Нажмите Finish.

23. Подождите, пока узел Server2 не будет успешно добавлен. Цвет значка добавленного узла NLB должен быть зеленым.

Создать кластер через powershell
New-NlbCluster -InterfaceName "Ethernet 3" -OperationMode Unicast -ClusterPrimaryIP 192.168.0.101 -ClusterName nlb.pentagon.loc
Add-NlbClusterNode -InterfaceName "Ethernet 3" -NewNodeName "server2" -NewNodeInterface "Ethernet 5"Создать А запись в DNS через powershell
invoke-command -computername dc1 {Add-DnsServerResourceRecord -ZoneName «pentagon.loc» -A -Name «nlb» -IPv4Address «10.0.0.200»}
Добавьте второй узел NLB в существующий кластер NLB:
24. Щелкните правой кнопкой мыши существующий кластер NLB и выберите Add Host To Cluster.

25. Введите Server2 в поле Хост и нажмите Connect. Убедитесь, что имя интерфейса указано в списке, а затем перейдите к следующему.

26.На странице New Cluster: Host Parameters измените значение приоритета в соответствии с требованиями (2). Кроме того, убедитесь, что состояние по умолчанию установлено как «Started». Когда будете готовы, нажмите Next.

27. Нажмите Finish, чтобы завершить процесс добавления второго узла NLB в существующий кластер NLB.

28. Убедитесь, что второй узел NLB успешно добавлен. Цвет значка должен быть зеленым.

Тестируем конфигурацию NLB с веб-сайтом по умолчанию:
Я уже установил службу IIS на обоих рядовых серверах, чтобы протестировать кластер NLB. Мы получим доступ к веб-сайту по умолчанию, используя IP-адрес кластера NLB.
Установить IIS можно через powershell
Import-Module ServerManager
Add-WindowsFeature Web-Server -IncludeAllSubfeature
Устанавливать нужно будет на каждом сервере
29. Откройте веб-браузер. Введите IP-адрес кластера балансировки сетевой нагрузки в адресной строке.
Также можно создать свою страницу
<!DOCTYPE html>
<html>
<title>ADLUKASHIN.RU Support</title>
<body>
<h1>Welcome to TEST LAB</h1>
<p>Hello world!</p>
<em>This page is generated from SERVER1 node.</em>
</body>
</html>

Убедитесь, что вы можете получить доступ к веб-сайту по умолчанию. Вы обращаетесь к серверу SERVER1 из-за приоритета NLB 1.
30. Удалите историю просмотров веб-страниц и снова получите доступ к IP-адресу кластера балансировки сетевой нагрузки с помощью Internet Explorer.

31. На этот раз вы обращаетесь к серверу Server 2 из-за балансировки нагрузки NLB.

В результате у нас получился NLB кластер, состоящий из двух узлов.
Настройка параметров кластера
После добавления всех узлов можно приступать к настройке кластера. Кликаем правой клавишей на имени кластера и переходим на пункт «ClusterProperties».

На вкладке Cluster IP Addresses можно изменить существующий адрес кластера или добавить новый. Балансировки сетевой нагрузки позволяет настроить для одного кластера несколько IP-адресов, для каждого адреса назначить собственное имя и настроить правила обработки трафика. Для этого не требуется выделять отдельный адаптер, так что можно настраивать несколько виртуальных NLB кластеров на одном сетевом адаптере.

На вкладке Cluster Parameters можно настроить соответствие имени и IP-адреса кластера и изменить режим его работы.

И на вкладке Port Rules настраиваются правила обработки трафика всеми узлами кластера. При создании кластера создается правило по умолчанию, которое надо изменить, поэтому выделяем его и жмем «Edit».

Правило порта включает в себя следующие настройки:
Cluster IP Addresses — IP-адрес кластера, для которого будет действовать это правило. По умолчанию отмечен чекбокс All, что означает воздействие данного правила на все адреса в кластере.
Port Range — диапазон портов, на которых будет обрабатываться трафик кластера. По умолчанию указаны все порты, что не очень правильно. Например, если у вас кластеризовано веб-приложение, использующее для клиентского доступа порт 80 TCP, то указываем этот порт как начало и конец диапазона. Если нужно указать несколько портов, то для каждого придется создать отдельное правило.
Protocols — протоколы, к которым будет применяться данное правило: TCP, UDP или оба.
Filtering Mode — режим фильтрации. Здесь мы указываем, как именно будет обрабатываться трафик кластера. Можно выбрать из двух режимов:
1) Multiple host — трафик по указанным портам будет распределяться среди всех узлов кластера. В этом случае нужно выбрать режим сходства (affinity), который определяет привязку клиента к определенному узлу кластера:
- None — привязка не используется. Все новые соединения распределяются по разным узлам в зависимости от нагрузки;
- Single — привязка осуществляется по IP-адресу клиента. После того, как клиент осуществил подключение к определенному узлу кластера, в течение установленного сеанса все новые соединения с его IP будут направлены на тот же узел кластера;
- Network — привязка основана на принадлежности клиента к определенной частной подсети. Когда один клиент устанавливает соединение к некоторому узлу, все соединения из этой подсети будут направлены на тот же узел.
Также обратите внимание на чекбокс Timeout minutes. Установка галки включает режим расширенного сходства (Extended Affinity), который обеспечивает привязку в отсутствие активных текущих подключений от клиента к узлу, а также позволяет клиентам сохранять соответствие с узлом при изменении конфигурации кластера. Здесь мы можем указать время, в течение которого клиент будет привязан к определенному узлу при отсутствии активного текущего подключения с его стороны.
2) Single host — весь трафик по указанным портам будет обрабатываться одним узлом кластера, а если этот узел недоступен — то направлен на следующий узел, вычисляемый по номеру Handling Priority (приоритет обработки). Приоритет присваивается узлу при добавлении сервера в кластер и может быть изменен в свойствах узла.
Disable this Port Range — отметив этот пункт, мы запретим обработку трафика на указанных портах. Как я уже говорил, весь сетевой трафик, не подпадающий под действие правил портов, обрабатывается действующим узлом кластера с минимальным идентификатором хоста. Чтобы избежать ненужной нагрузки, весь нецелевой трафик можно запретить. Так в случае с 80 портом достаточно создать 2 правила и запретить весь трафик на портах 0-79 и 81-65535.

При создании правил порта нужно учесть, что:
• Правила на всех узлах кластера должны быть идентичны. При попытке присоединить к кластеру узел с иными правилами или с другим числом правил он не будет принят в кластер;
• Чтобы балансировка сетевой нагрузки корректно обрабатывала IP-фрагменты, не следует использовать значение None для сходства, если выбран протокол UDP или Both;
• Если NLB используется для балансировки нагрузки трафика VPN (напр. PPTP/GRE или IPSEC/L2TP), то для правил порта используйте режим сходства Single или Network.
Настройка параметров отдельного узла
Кроме настройки всего кластера есть возможность настраивать параметры отдельных его узлов. Для этого выбираем узел, кликаем на нем правой клавишей и выбираем «Host Properties».

В окне Host Parameters мы сможем:
• Изменить идентификатор узла, изменив тем самым его приоритет при обработке нецелевого трафика;
• Изменить выделенный IP — изменить, удалить или добавить новый. Кстати, выделенный IP-адрес для работы NLB вовсе не обязателен, и при желании его можно вообще не использовать;
• Изменить дефолтное состояние узла. Так по умолчанию после перезагрузки узел сразу стартует и начинает обрабатывать клиентские подключения. Изменив дефолтное состояние узла на Stopped и указав хранить это состояние, тем самым мы предотвратим автоматический старт и начало обработку клиентских подключений сервером после перезагрузки. Это может понадобиться для проверки корректности работы сервера, например после установки обновлений.

Также заглянем в правила портов. Здесь нас интересуют два пункта:
Load Weight — процент нагрузки. В режиме фильтрации Multiple Hosts параметр Load Weight используется для того, чтобы задать процент трафика, который должен обрабатываться этим узлом по соответствующему правилу. По умолчанию используется вариант Equal, при котором происходит равномерное распределение нагрузки между всеми узлами кластера. Чтобы задать для узла определенный процент, нужно убрать галку и указать значение от 1 до 100. Значение 0 вообще исключает данный узел из обработки трафика.
Обратите внимание, что сумма значений Load Weight для каждого узла параметра не обязательно должна составлять 100 процентов. Реальная часть трафика для каждого узла рассчитывается динамически как частное от деления процента, заданного для узла, на суммарный процент для всего кластера.
Handling Priority — приоритет обработки трафика в режиме фильтрации Single host. Этот параметр указывает приоритет узла для трафика по данному правилу. Узел с наиболее высоким приоритетом будет обрабатывать весь трафик для этого правила, а при его недоступности трафик будет перенаправлен на следующий по приоритетности узел. Чем меньше значение Handling Priority, тем выше приоритет, значение 1 соответствует наиболее высокому приоритету.

Управление кластером
И немного об управлении кластером NLB. Управление можно осуществлять как на уровне отдельного узла, так и на уровне всего кластера. Для управления узлом кликаем на нем и выбираем «Control Host». Дальше на выбор, можно:
- Start — запустить обработку трафика на данном узле;
- Stop — остановить обработку трафика на данном узле. При этом все текущие соединения будут закрыты;
- Drainstop — остановить обработку трафика на узле, предварительно обработав все текущие подключения. В этом варианте остановки узел обрабатывает текущие клиентские подключения, но не принимает новых;
- Suspend — приостановить обработку трафика на данном узле;
- Resume — соответственно возобновить приостановленную работу.
Для того, чтобы совсем удалить узел из кластера, надо выбрать пункт «Delete Host».

Выбрав пункт «Control Ports» можно управлять действием правил: включить (Enable), отключить (Disable) или приостановить обработку новых подключений (Drain). Это может потребоваться для того, чтобы временно исключить узел из обработки трафика кластера, например в целях диагностики.

Все то же на уровне кластера — кликаем на имени кластера и выбираем «Control Hosts». Здесь изменения применяются уже ко всем узлам.

Это руководство по установке и настройке функции балансировки сетевой нагрузки (NLB) в Windows Server 2016. Спасибо за чтение.
Introduction
NLB is a scalable, high-availability feature that you can install on all editions of Windows Server 2016. NLB distributes network traffic across a set of servers, balancing the workload each server must handle. It is scalable because it enables you to add additional servers (also called nodes or hosts). A node (or host) in an NLB cluster in Windows Server 2016 is a computer, either physical or virtual, that is running the Windows Server 2016 operating system. Each node or host runs a copy of the server applications that are also running on the other hosts in the cluster.
Windows Server 2016 NLB clusters can have between 2 and 32 nodes. When you create an NLB cluster, it creates a virtual network address and virtual network adapter. The virtual network adapter has an IP address and a media access control (MAC) address. Network traffic to this address is distributed evenly across the nodes in the cluster. In a basic NLB configuration, each node in an NLB cluster services requests at a rate that is approximately equal to that of all other nodes in the cluster. When an NLB cluster receives a request, it forwards that request to the node that currently is the least used. You also can configure NLB to direct traffic to a specific host, called a default host.
New in Windows Server 2016 is it includes a new Azure-inspired Software Load Balancer (SLB) as a component of the Software Defined Networking (SDN) infrastructure. Use SLB instead of NLB if you are using SDN, are using non-Windows workloads, need outbound network address translation (NAT), or need Layer 3 (L3) or non-TCP based load balancing. You can continue to use NLB with Windows Server 2016 for non-SDN deployments.
How NLB works 
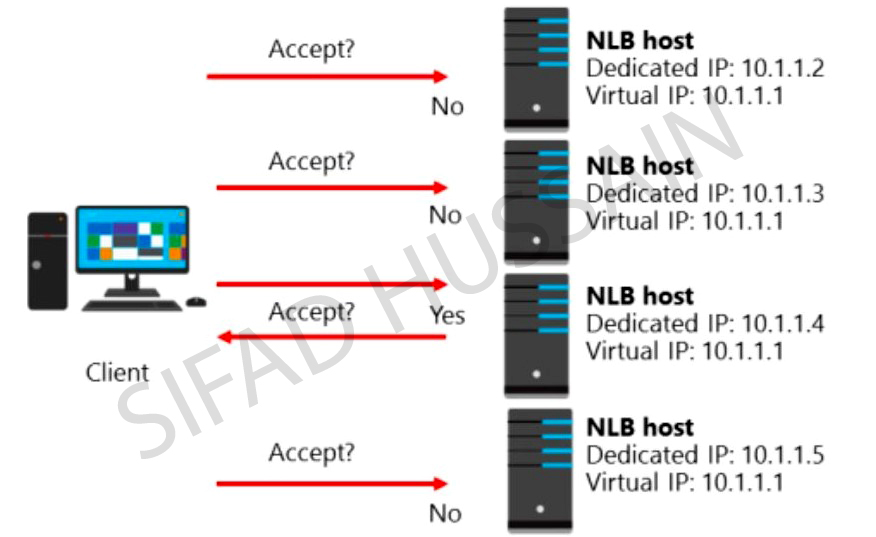
When you configure an application to use NLB, clients address the application using the NLB cluster address rather than the address of nodes that participate in the NLB cluster. The NLB cluster address is a virtual address that is shared between the hosts in the NLB cluster.
For this NLB demo this time, I will be using 03 Server, which is 01 Domain Server and 02 Member Server.
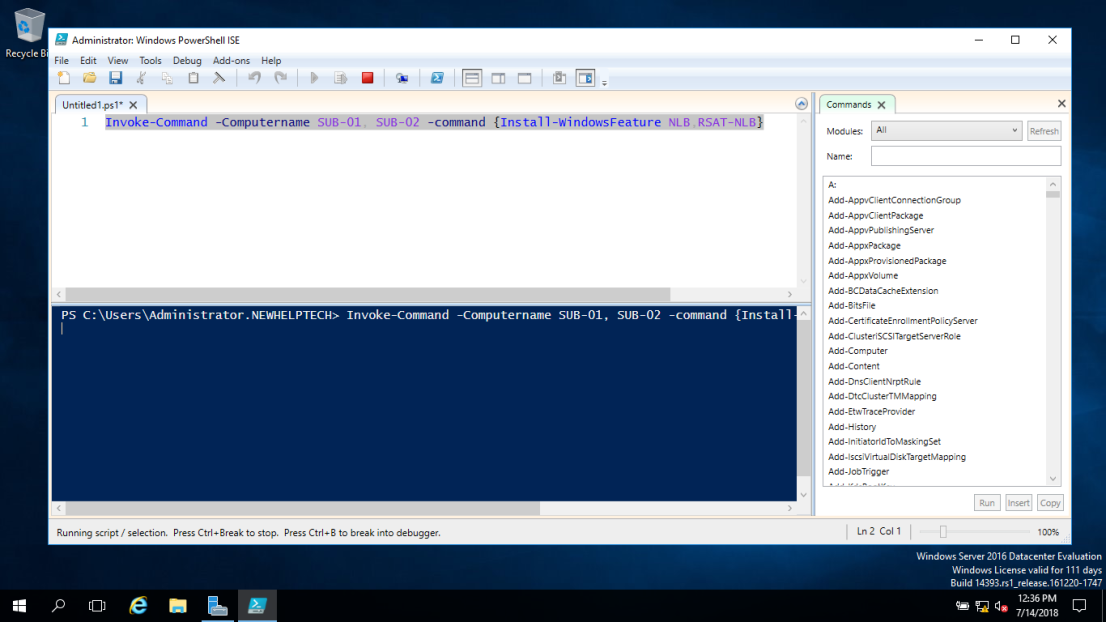
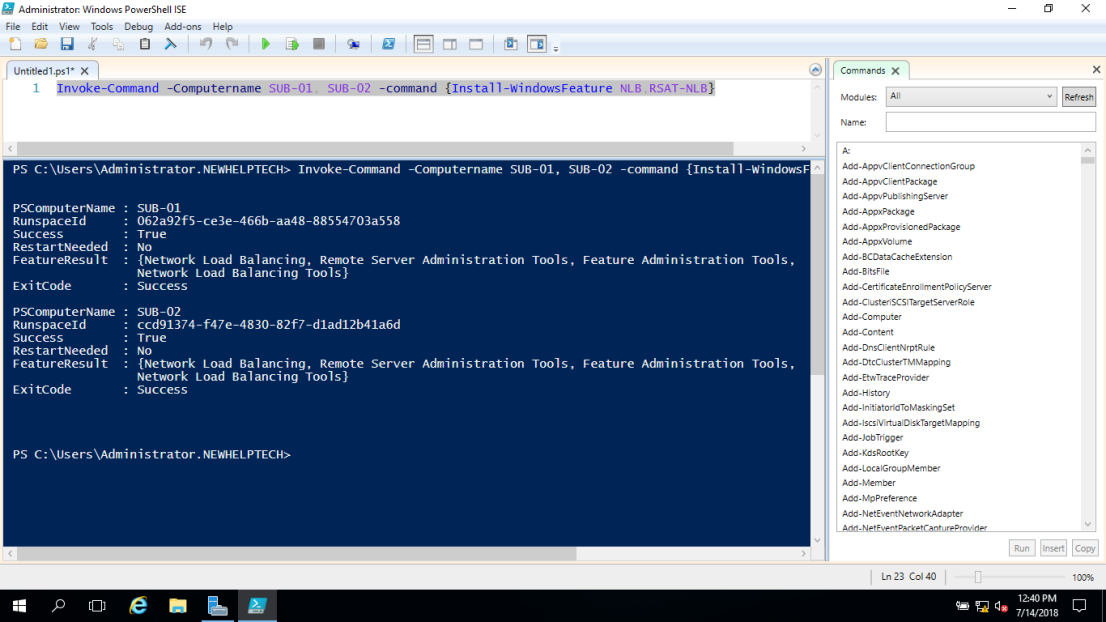
1 – Now switch to the SUB-01 server and open Windows PowerShell ISE
2 – In the Windows PowerShell ISE type
Invoke-Command -Computername SUB-01,SUB-02 -command {Install-WindowsFeature NLB,RSAT-NLB}
3 – Once the process complete, open Server Manager, click Tools and verify that Network Load Balancing Manager is installed
4 – Now switch to SUB-02, open Server Manager, click Tools and verify also that Network Load Balancing Manager is installed

5 – On the SUB-01 server, in the Windows PowerShell ISE, type
New-NlbCluster -InterfaceName “Ethernet” -OperationMode Multicast -ClusterPrimaryIP 172.16.1.100 -ClusterName NewHelpTech-NLB
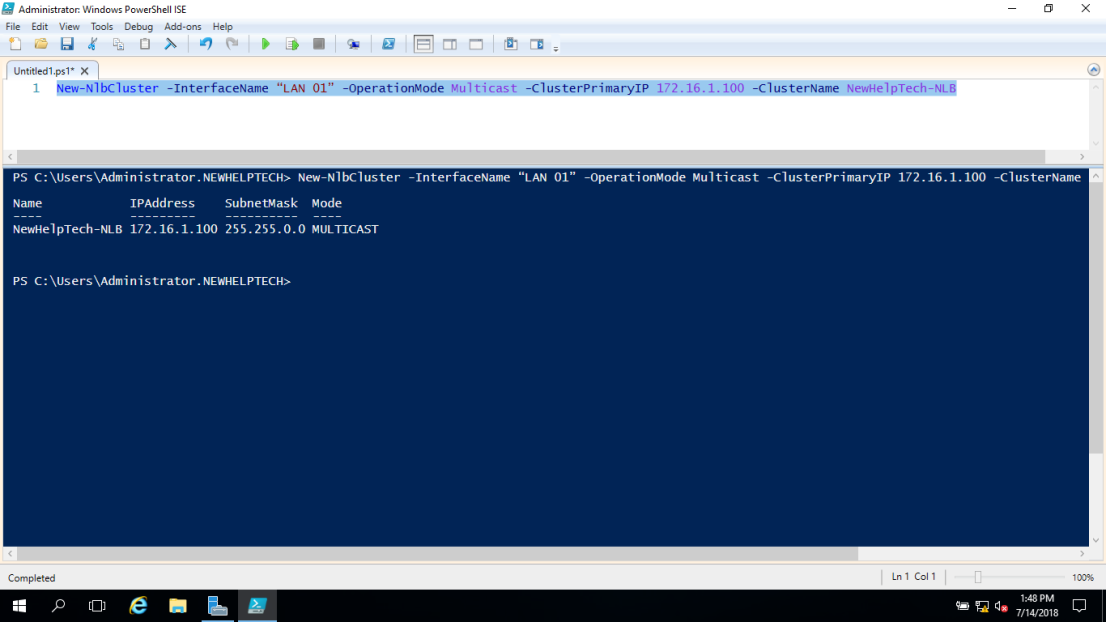
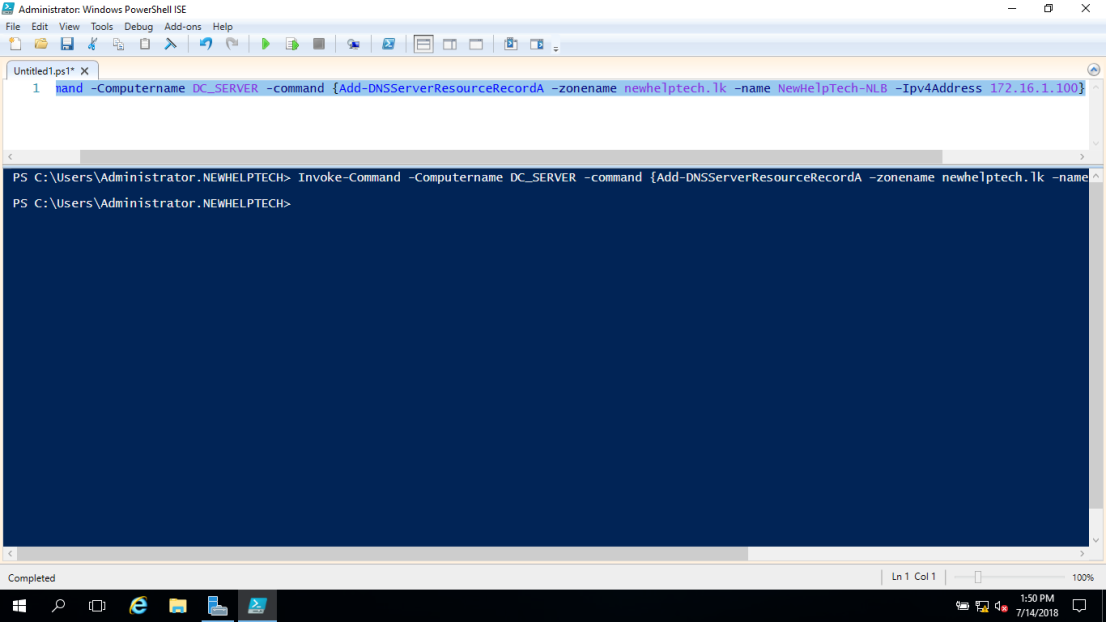
6 – Once the command complete, still in the Windows PowerShell ISE, type
Invoke-Command -Computername DC-SERVER -command {Add-DNSServerResourceRecordA – zonename adatum.com –name NewHelpTech-NLB –Ipv4Address 172.16.1.100}
7 – Now to add a second host to the cluster, still in Windows PowerShell ISE, type
Add-NlbClusterNode -InterfaceName “Ethernet” -NewNodeName “SUB-02” –NewNodeInterface “Ethernet”
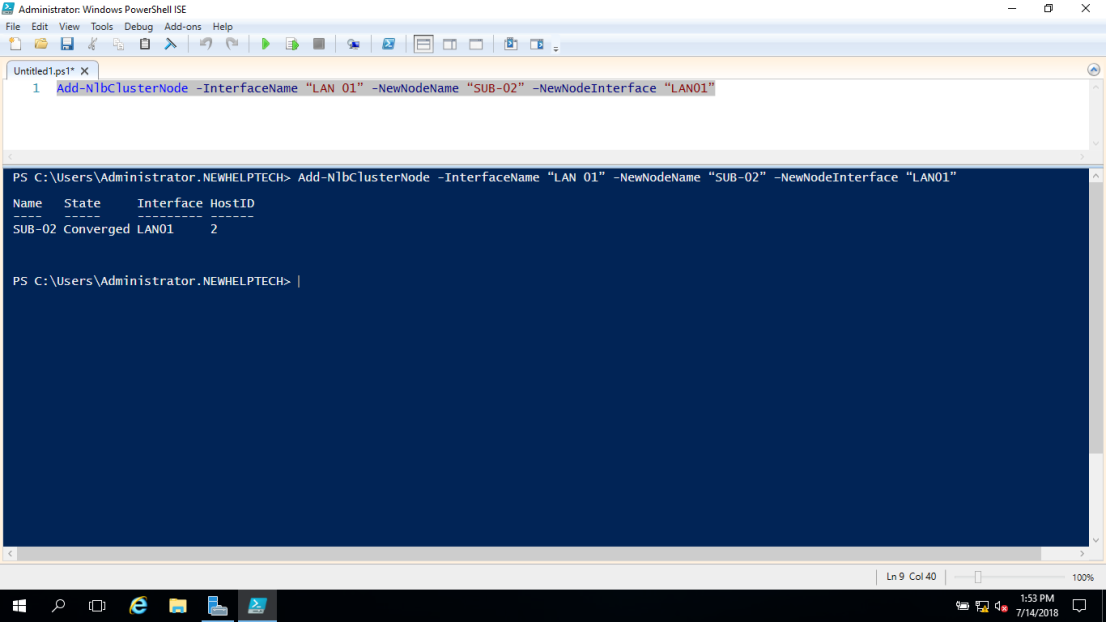
8 – On the SUB-01 Server, open Server Manager, click the Tools and then click Network Load Balancing Manager
9 – In the Network Load Balancing Manager console, verify that nodes SUB-01 and SUB-02 display with the status of Converged for the New HelpTeh-NLB cluster
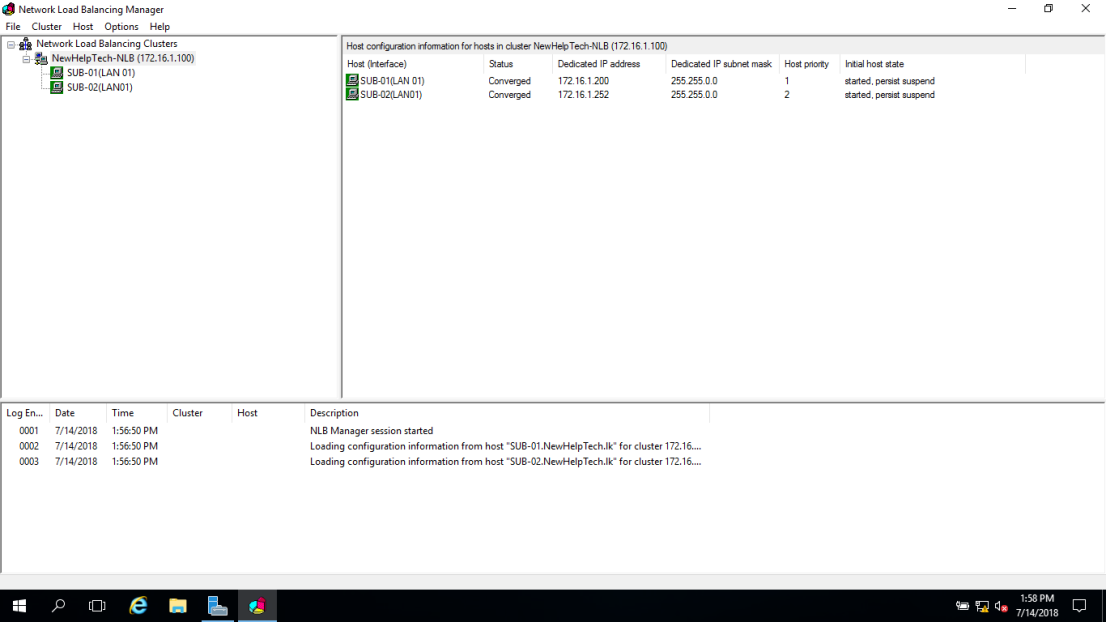
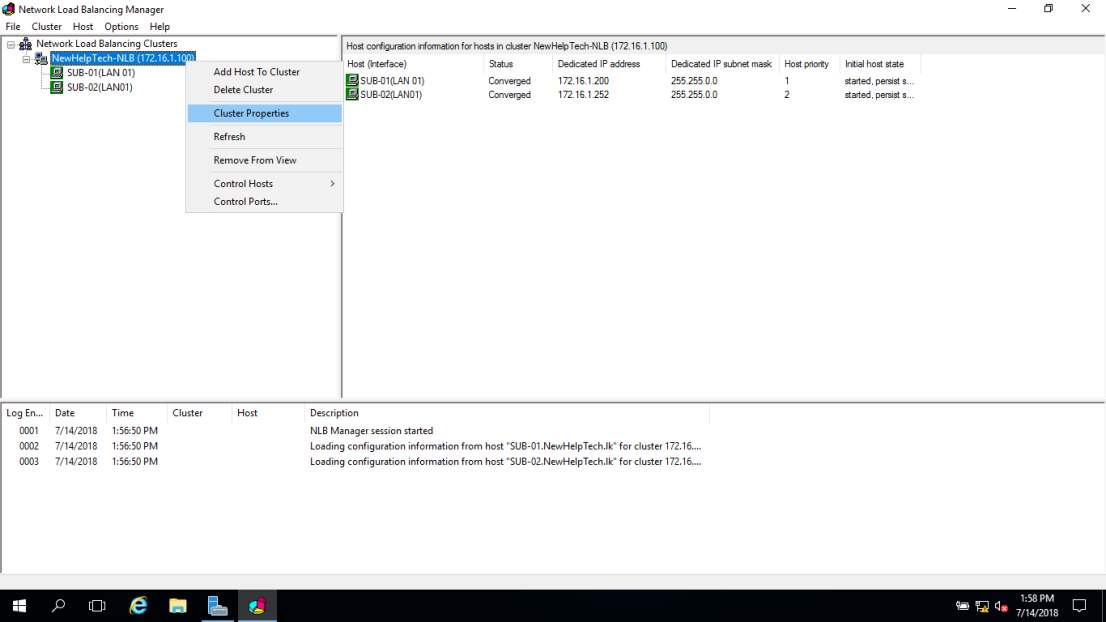
10 – Next, right-click the NewHelpTech-NLB cluster, and then click Cluster properties
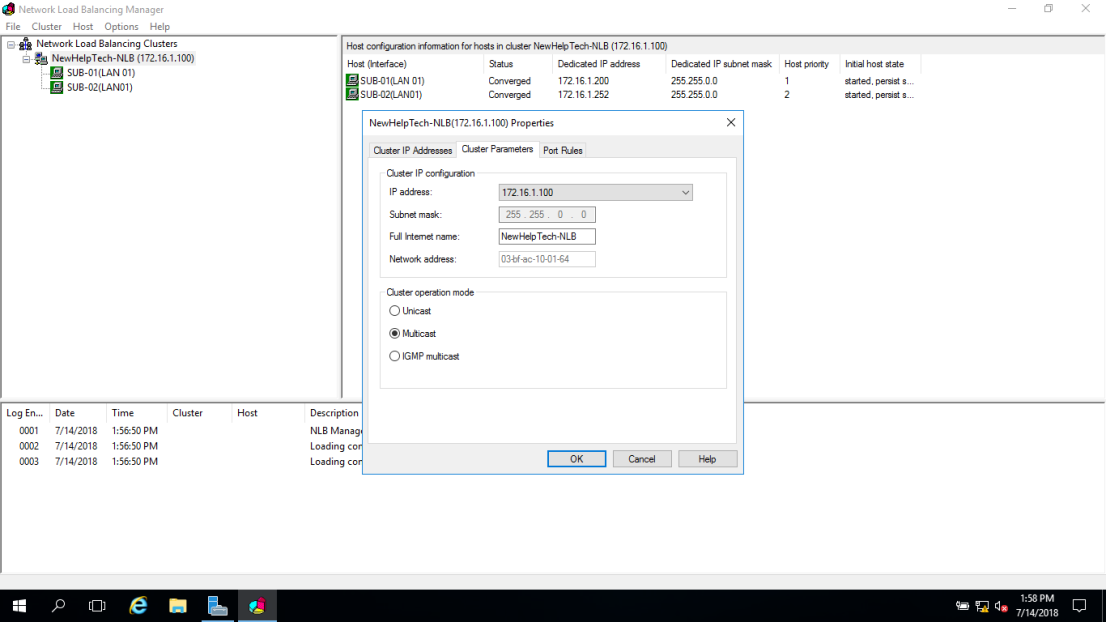
11 – In the NewHelpTech-NLB(172.16.1.100), on the Cluster Parameters tab, verify that the cluster is set to use the Multicast operations mode
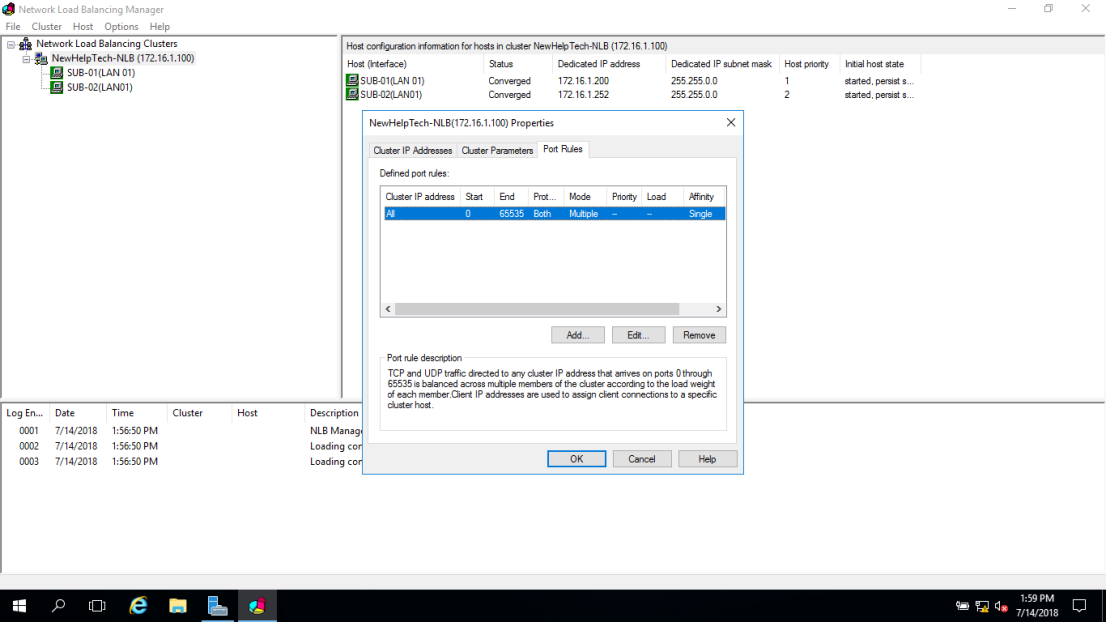
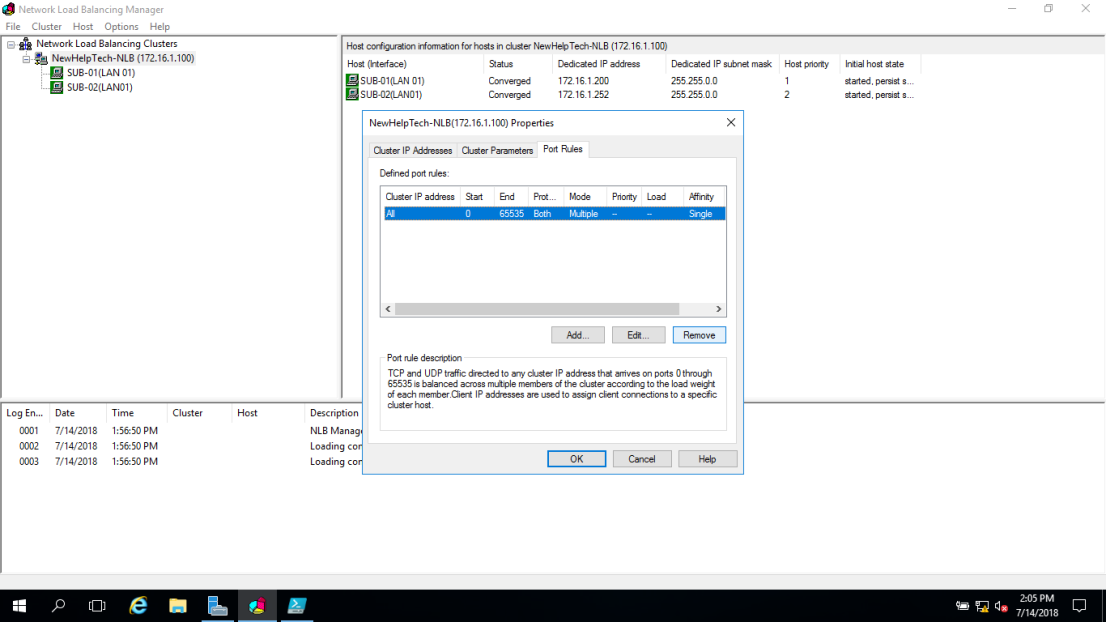
12 – On the Port Rules tab, verify that there is a single port rule named All that starts at port 0 and ends at port 65535 for both TCP and UDP protocols and that it uses Single affinity
Configuring and Managing the NLB Cluster
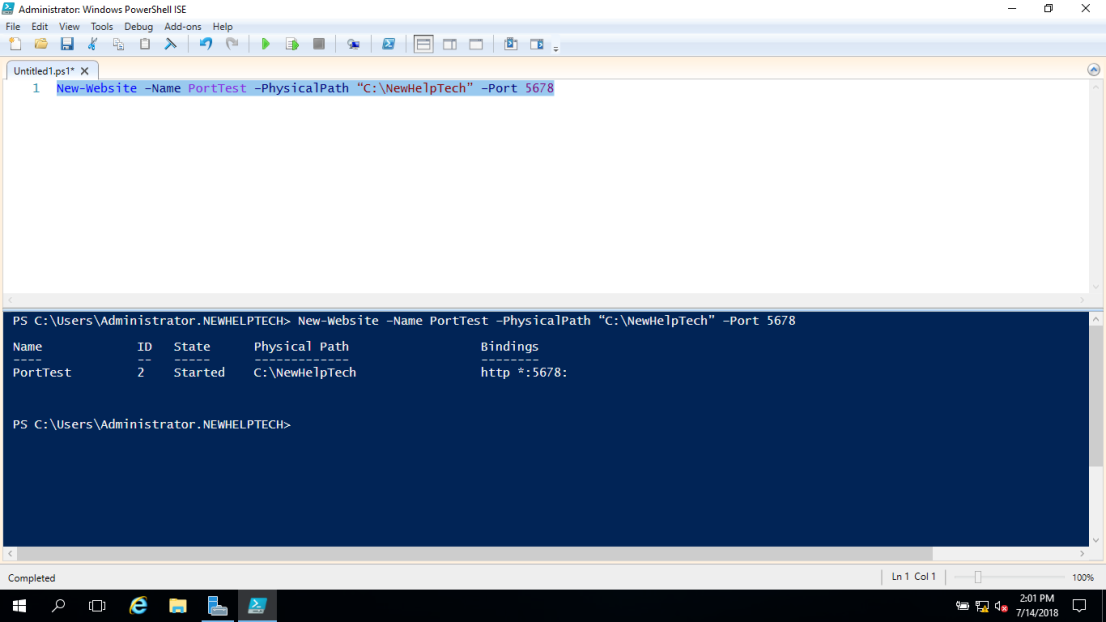
1 – Before we start to configure and manage the NLB Cluster, log on to the SUB-02 server, and create 01 folder named NewHelpTech in C:
2 – then copy all C:inetpubwwwroot to C:NewHelpTech folder
3 – Open PowerShell and type
New-Website –Name NewHelpTech –PhysicalPath “C:NewHelpTech” –Port 5678
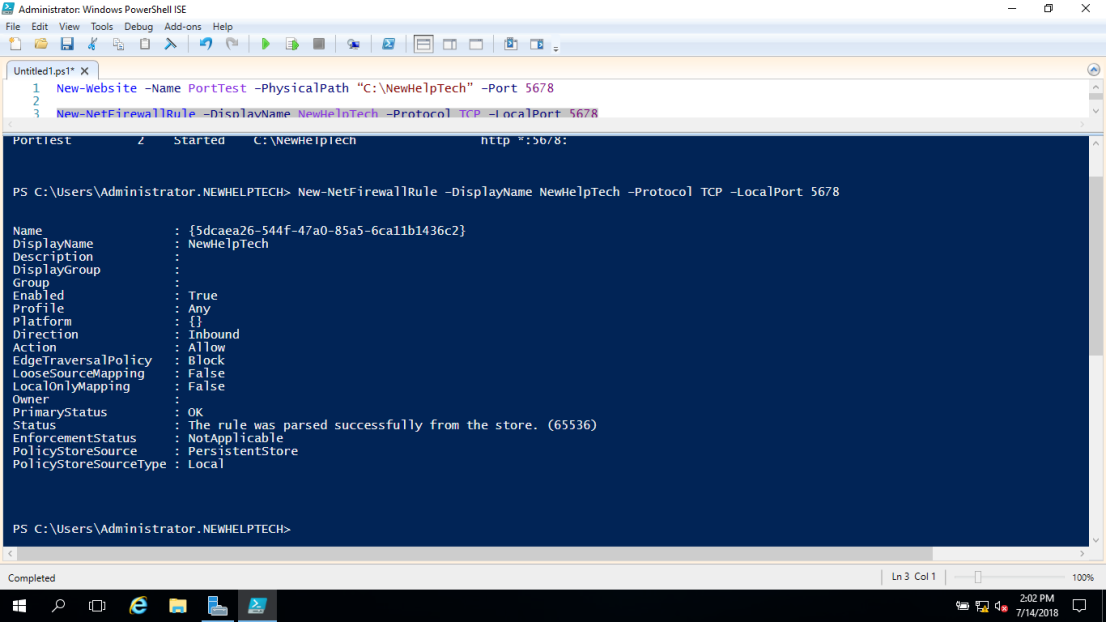
4 – Open PowerShell and type
New-NetFirewallRule –DisplayName NewHelpTech –Protocol TCP –LocalPort 5678
5 – Now switch to Domain Server and in the IE type http://SUB-02:5678
Verify that the static basic website
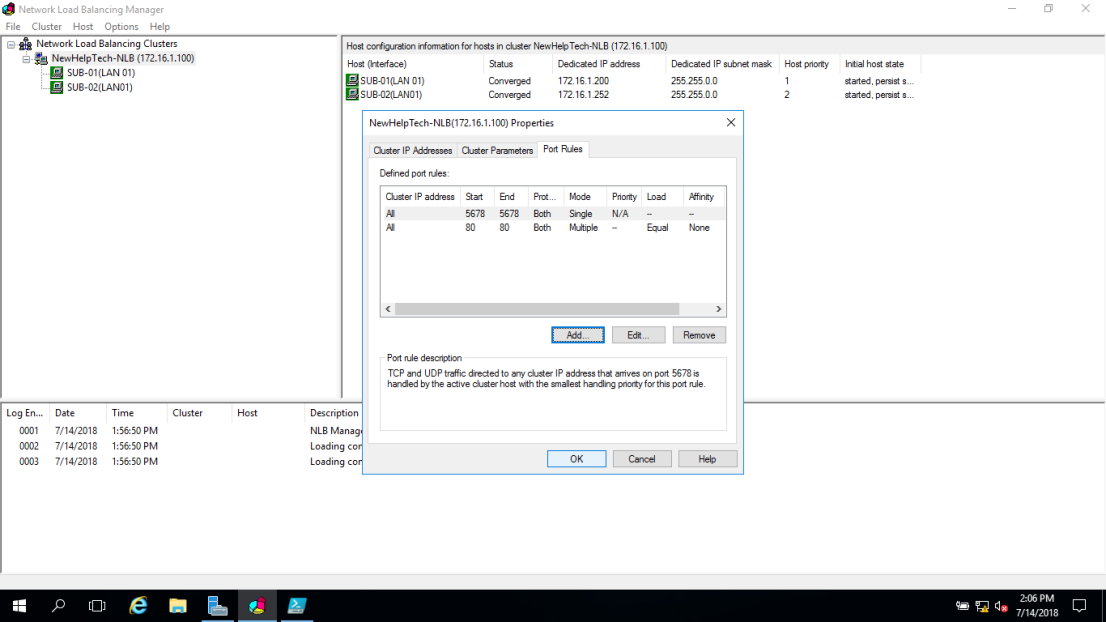
6 – Now switch back to the SUB-01 server and open Network Load Balancing Manager, in the Network Load Balancing Manager console, right-click NewHelpTech-NLB, and then click Cluster Properties
#_# In the NewHelpTech-NLB(172.16.1.100), on the Port Rules tab, select the All port rule, and then click Remove
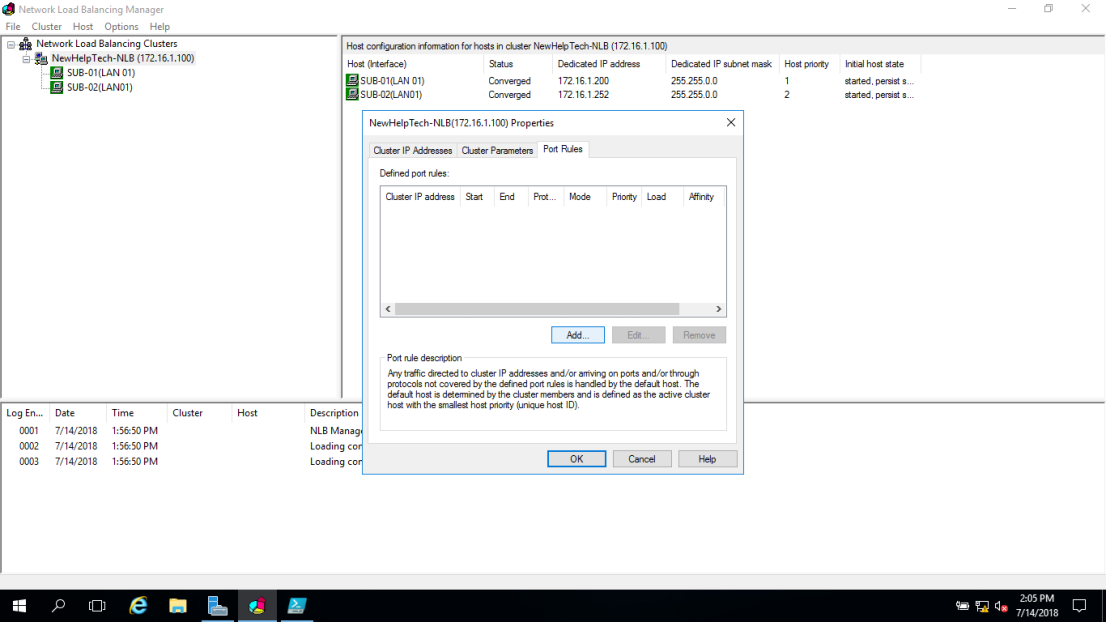
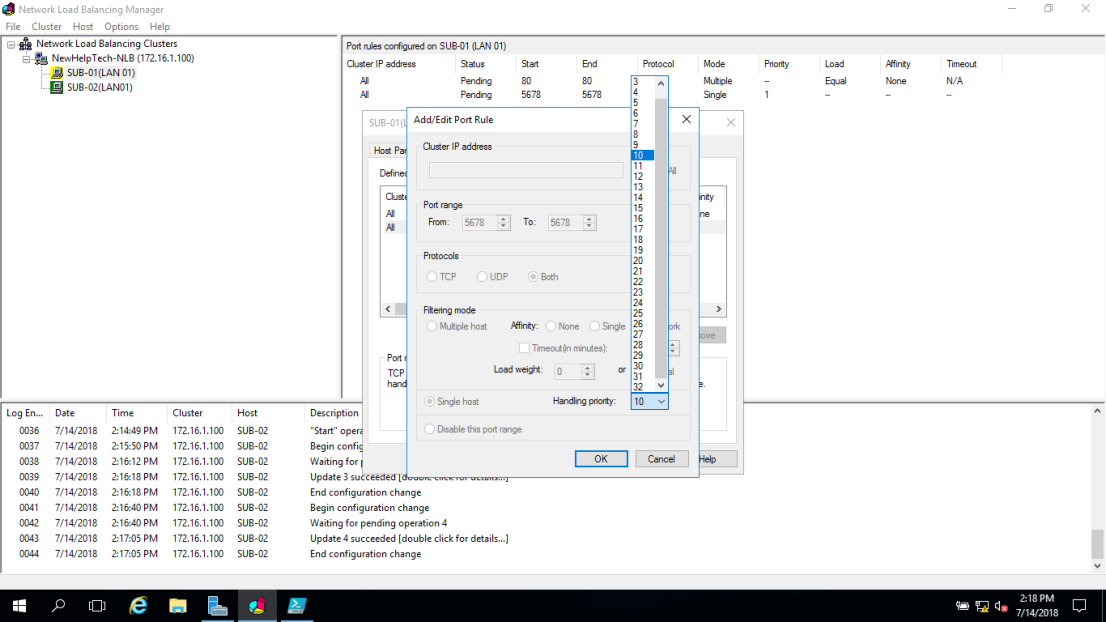
7 – On the Port Rules tab, click Add
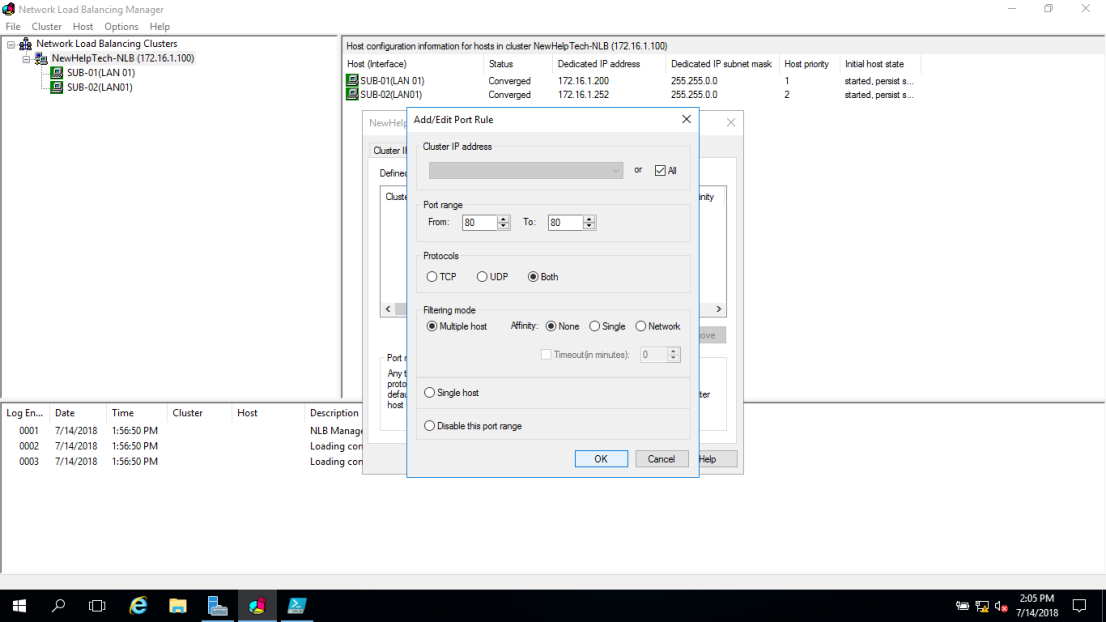
8 – In the Add/Edit Port Rule box, enter the following information, and then click OK
• Port range: 80 to 80
• Protocols: Both
• Filtering mode: Multiple Host
• Affinity: None
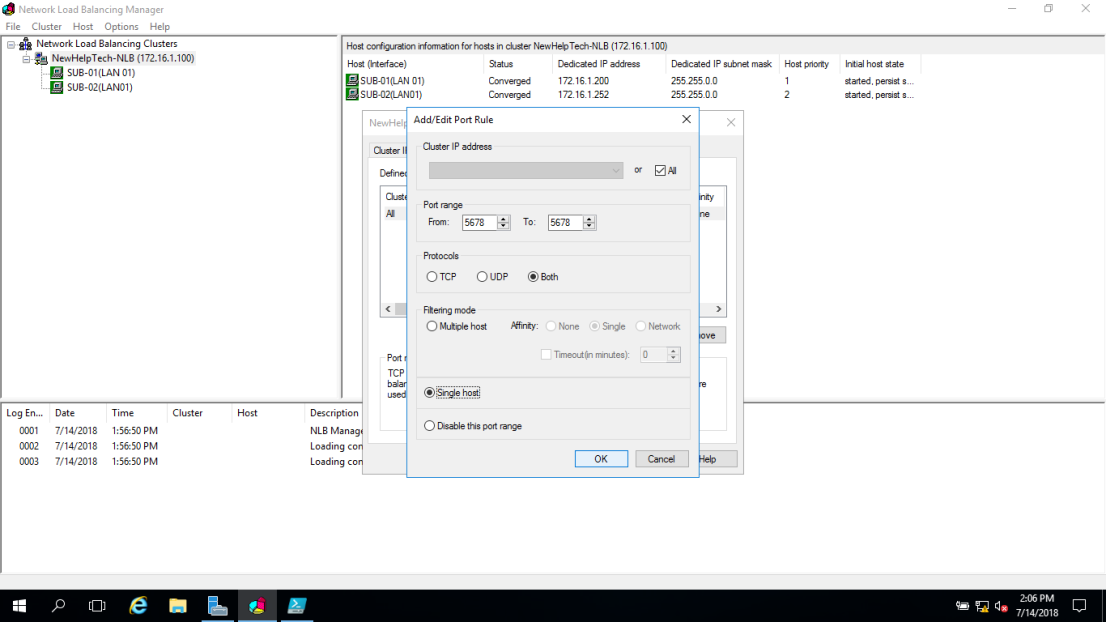
9 – On the Port Rules tab, click Add again
In the Add/Edit Port Rule box, enter the following information, and then click OK
• Port range: 5678 to 5678
• Protocols: Both
• Filtering mode: Single Host
10 – Click OK to close the NewHelpTech-NLB(172.16.1.100)
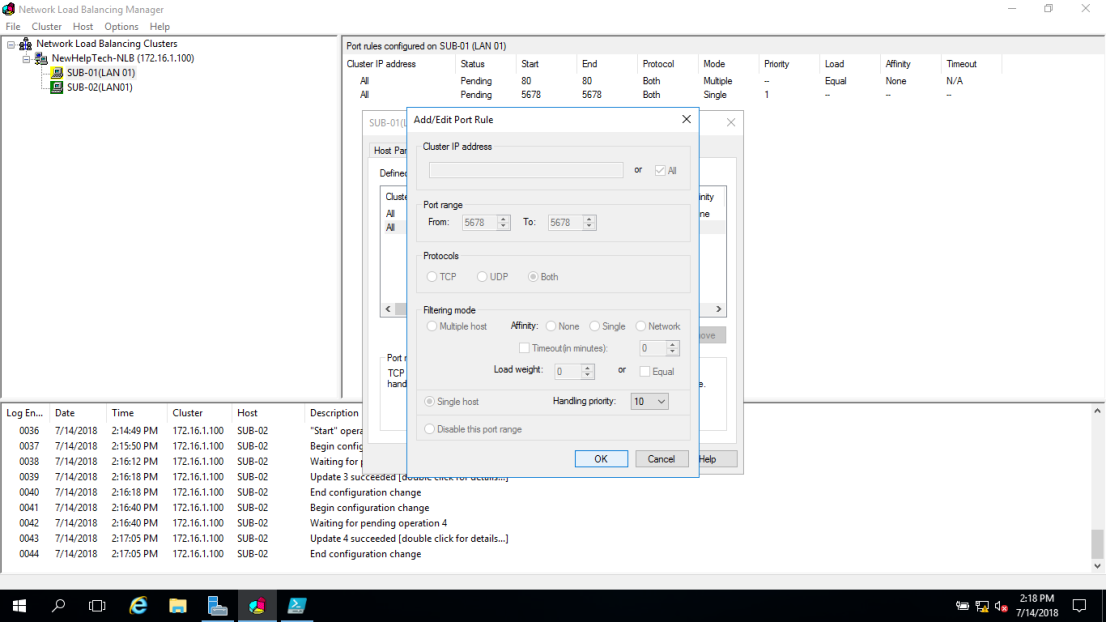
11 – In the Network Load Balancing Manager console, right-click SUB-01, and then click Host Properties

12 – On the Port Rules tab, click the port rule that has 5678 as the Start and End value, and then click Edit
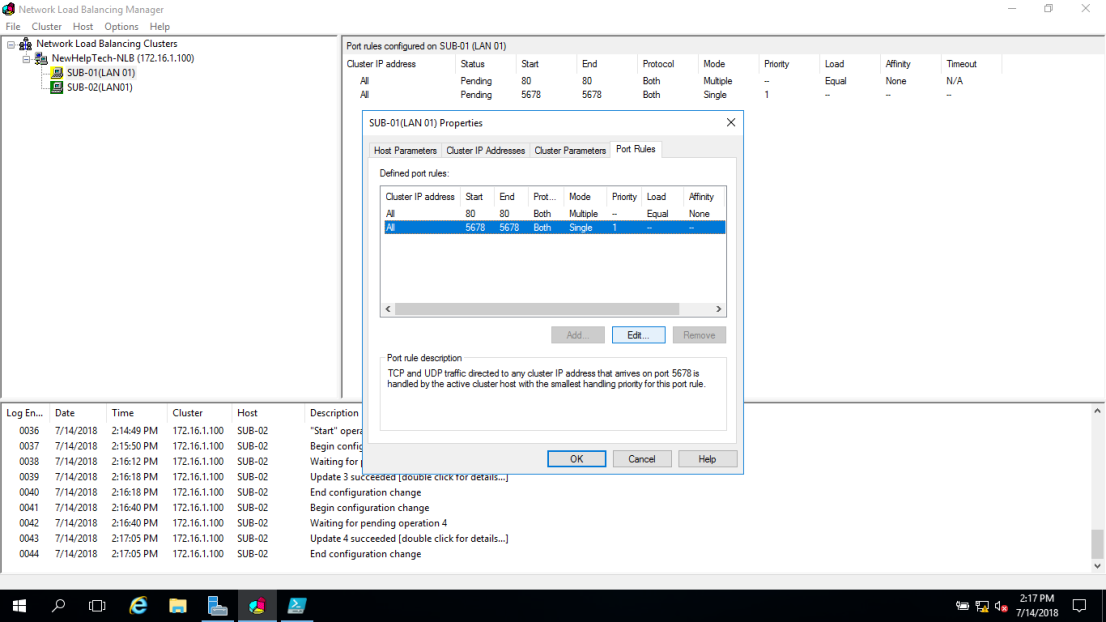
13 – Click the Handling priority value, and change it to 10 and click OK twice to close
Validate port rules
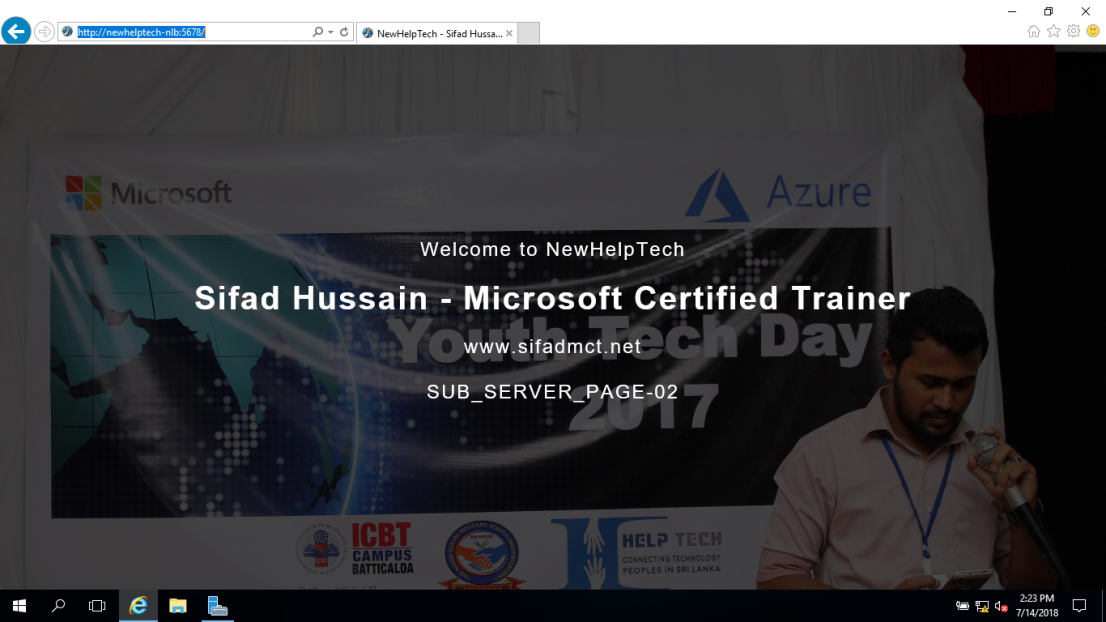
1 – To validate port rules, switch to DC Server, in IE type http://NewHelpTech-NLB:5678, and then Refresh the site few times and verify that you see static basic website
Manage host availability in the NLB cluster
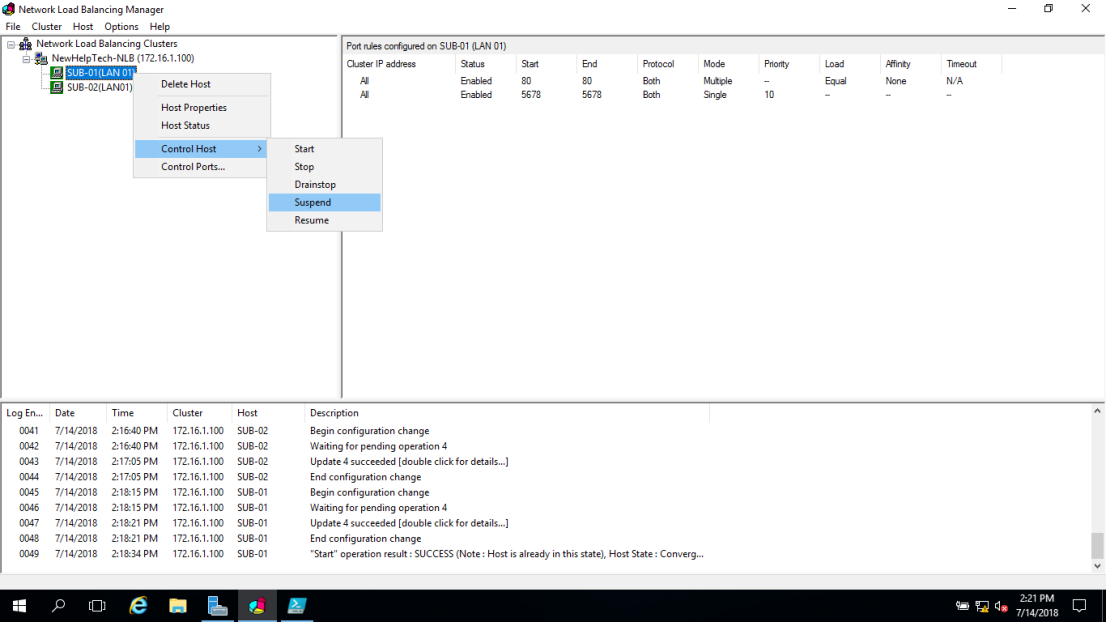
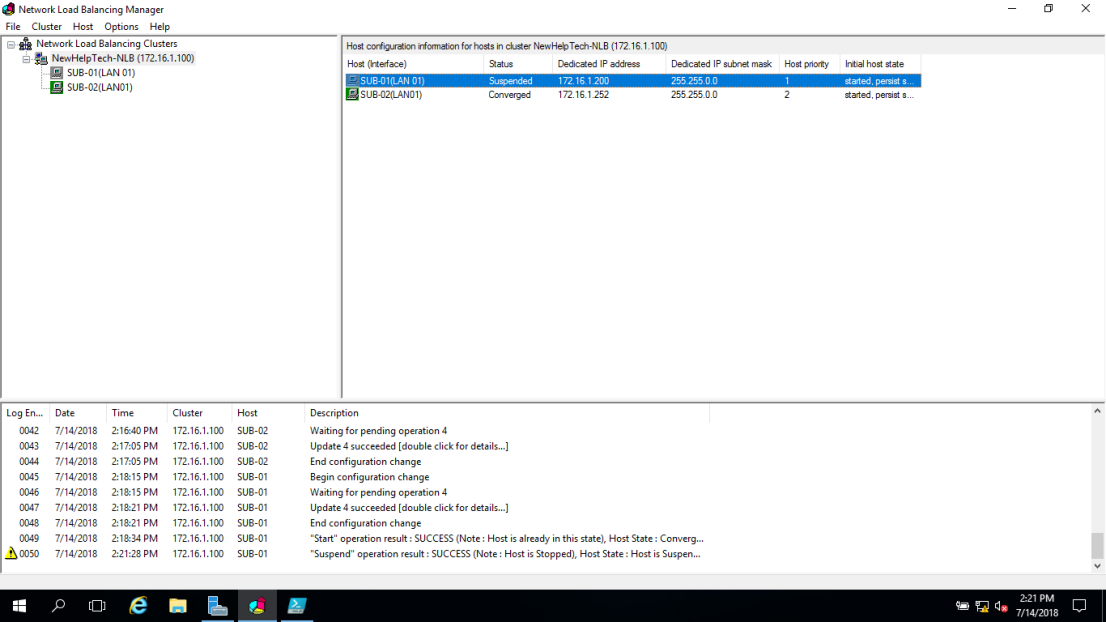
1 – Switch to the SUB-01 server, in the Network Load Balancing Manager console, right-click SUB-01 click Control Host, and then click Suspend
2 – Click the NewHelpTech-NLB node
#_# Verify that node SUB-01 displays as Suspended, and that node SUB-01 displays as Converged
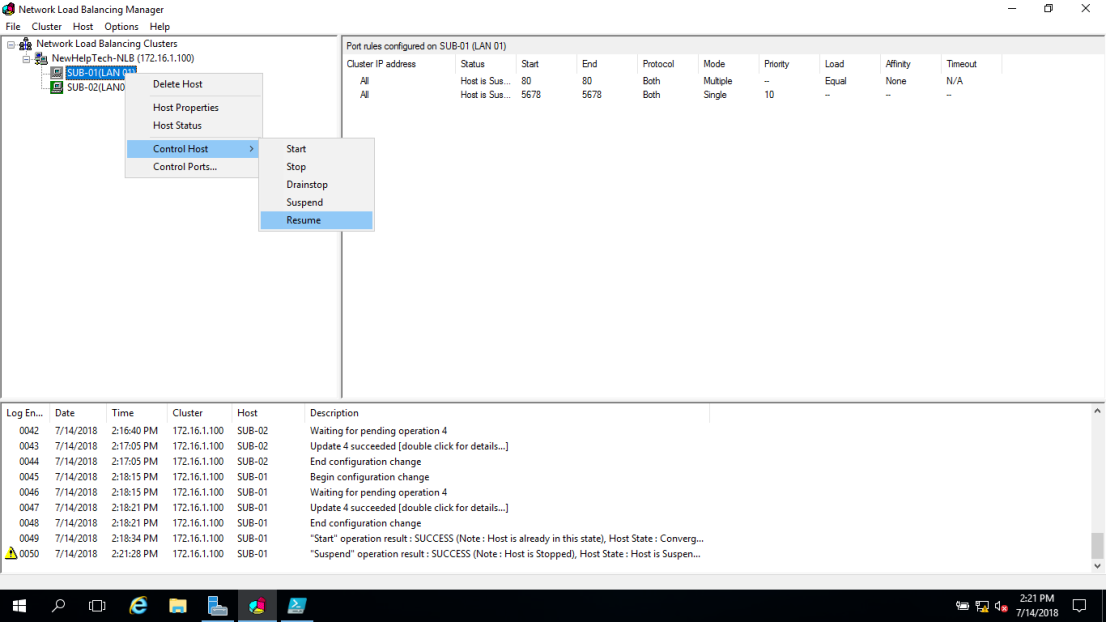
3 – Right-click SUB-01, click Control Host, and then click Resume
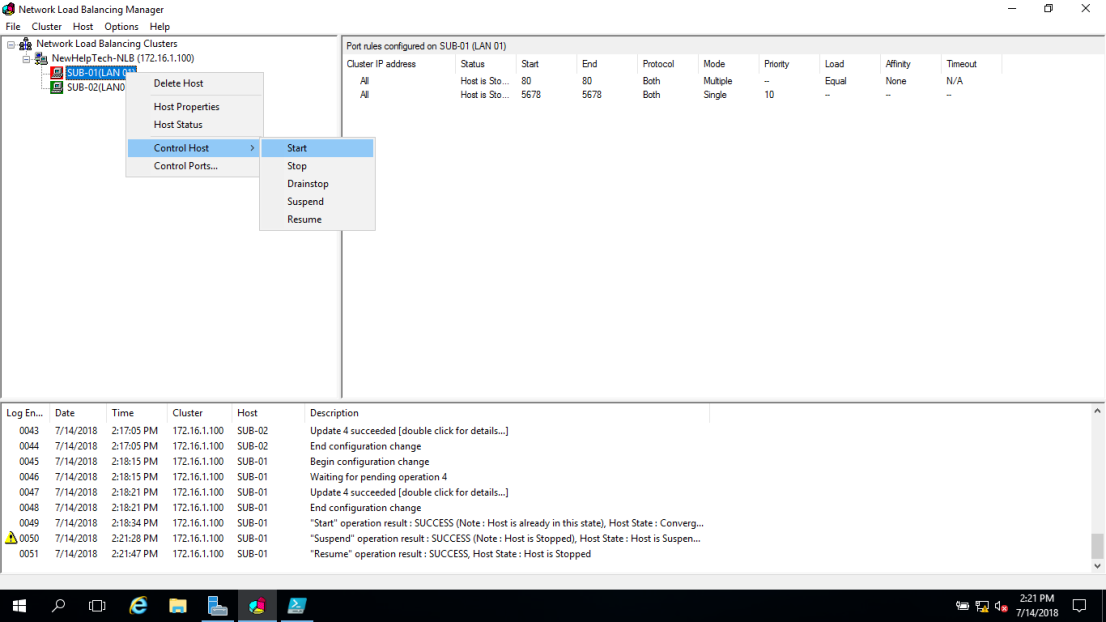
4 – Right-click SUB-01, click Control Host and then click Start
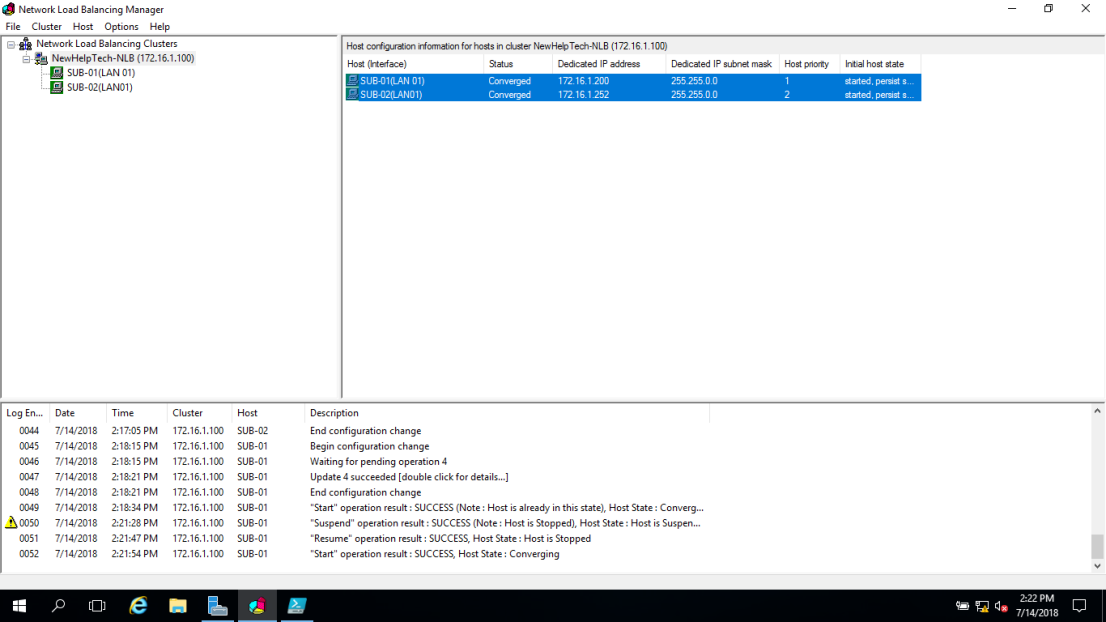
5 – Click the NewHelpTech-NLB node
#_# Verify that both nodes SUB-01 and SUB-02 now display as Converged. You might have to refresh the view
Good luck! Just give it try – I’m sure you’ll love it as well. If you have any comments or questions on feel free to contact me.
That’s all for now. 🙂
В этой статье мы рассмотрим, как обеспечить высокую доступность (отказоустойчивость) фермы из веб серверов IIS (Internet Information Services) на Windows Server с помощью Microsoft Application Request Routing (ARR) и Network Load Balancing (NLB).
Содержание:
- Подготовка инфраструктуры для настройки высокой доступности сайтов IIS
- Установка ARR и URL Rewrite на IIS в Windows Server
- Настройка общей конфигурации IIS
- Настройка NLB в Windows Server
Итак, наша конфигурация отказоустойчивой фермы IIS будет выглядеть следующим образом:
-
web.contoso.com
(192.168.13.222) – DNS имя отказоустойчивого веб сервера, к которому должны обращаться клиенты. Это IP адрес будет доступен через кластер Microsoft NLB. В нашем случае NLB обеспечивать высокую доступность и балансировку нагрузки на веб сервера IIS; -
web1.contoso.com
(192.168.13.20) – первый сервер веб фермы IIS -
web2.contoso.com
(192.168.13.21) – второй сервер нода веб фермы IIS
Подготовка инфраструктуры для настройки высокой доступности сайтов IIS
Создайте в DNS запись для web.contoso.com и IP адреса. Можно создать DNS запись с помощью PowerShell:
Add-DnsServerResourceRecordA -Name web -IPv4Address 192.168.13.222 -ZoneName contoso.com
Установите роль IIS на обоих серверах в необходимой конфигурации, настройте ваш сайт/приложение. В нашем примере я использую IIS в минимальной конфигурации, достаточной для отдачи статической HTML страницы.
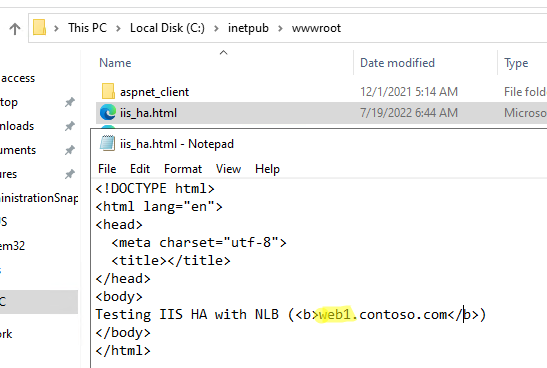
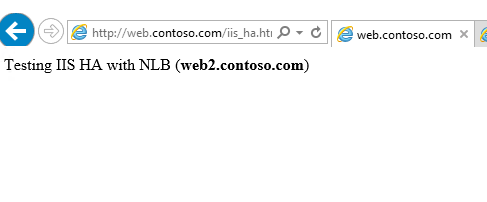
На обоих веб серверах я создал файл
c:intepubiis_ha.html
с простым HTML кодом. Для демонстрации высокой доступности и проверки переключений, HTML файл на каждом сервере содержит имя хоста, на котором он расположен (в продуктивной среде будет использоваться одинаковая конфигурация).
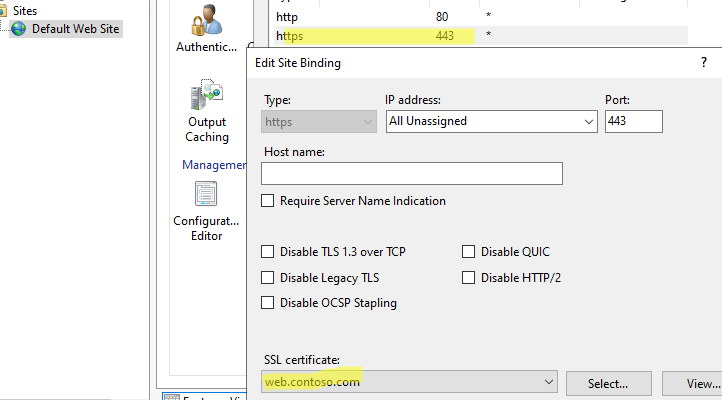
Затем я создал SSL сертификат для имени web.contoso.com и импортировал его в IIS на обоих серверах (в целях тестирования я использую самоподписанный сертификат, созданный с помощью PowerShell).
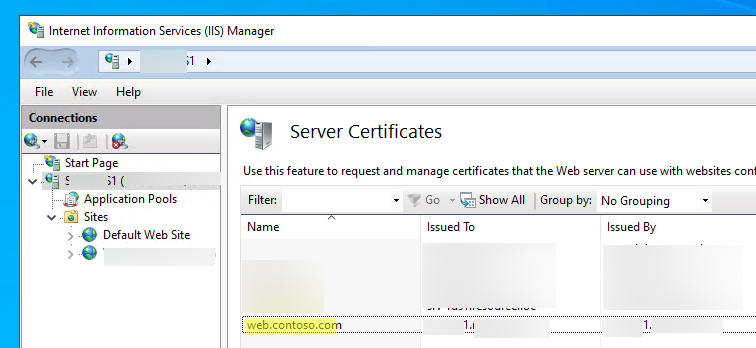
Данный сертификат привязан к сайтам на обоих серверах IIS на порту 443.
Установка ARR и URL Rewrite на IIS в Windows Server
Теперь нужно установить компонент ARR (Application Request Routing) на обоих серверах.
В продуктивных сценариях, когда вы обеспечиваете высокую доступность веб приложения IIS с помощью ARR и NLB, желательно создать для размещения этих служб отдельные сервера (с совмещением ролей ARR и NLB). Например, при настройке высокой доступности для веб-служб Exchange Server (Client Access Services: OWA, ActiveSync, Autodiscovery. и т.д.), не рекомендуется ставить дополнительные службы на сервера Exchange. Также NLB несовместима со службой Microsoft Failover Cluster (не запустятся на одном хосте).
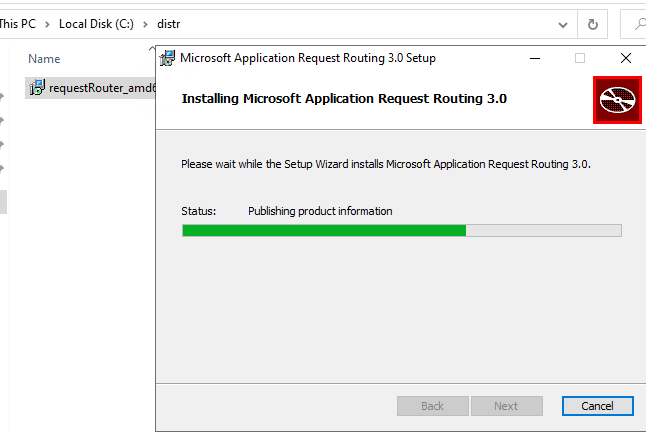
Скачайте Microsoft Application Request Routing 3.0 (x64) и запустите установку
requestRouter_amd64.msi
на обоих серверах (https://www.microsoft.com/web/downloads/platform.aspx).
Также скачайте и установите модуль IIS URL Rewrite 2.1. (https://www.iis.net/downloads/microsoft/url-rewrite).
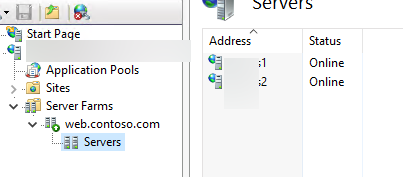
Перезапустите консоль IIS. Теперь нужно создать ферму веб серверов IIS. Щелкните правой кнопкой по Server Farm и выберите Create Server Farm.
Задайте имя фермы
web.contoso.com
и добавьте в нее хосты
web1
и
web2
.
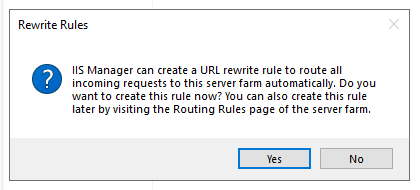
IIS предложит автоматически создать правила URL Rewrite для вашей фермы. Согласитесь с этим.
В настройках фермы IIS:
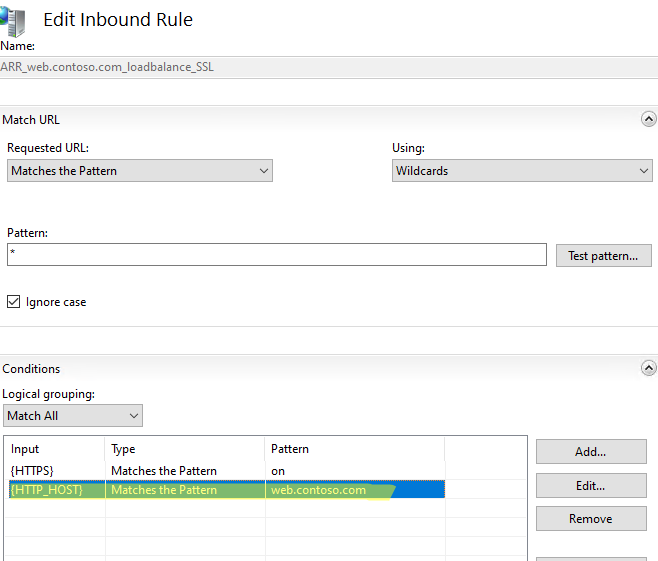
Теперь нужно создать правила перенаправления IIS. Перейдите в раздел URL Rewrite в IIS manager. Одно правило для фермы уже создано (
ARR_web.contoso.com_locadbalance_SS
L).
Добавьте новое условие (condition):
- Condition input:
{HTTP_HOST} -
Matches the pattern - Pattern:
web.contoso.com
Настройка общей конфигурации IIS
Теперь нужно сделать общую конфигурацию IIS для двух серверов. Для этого создайте общую сетевую папку на любом другом сервере (не используйте для размещения этой SMB шары сервера вашей фермы, в целях высокой доступности рекомендуется разместить эту папку на отказоустойчивом файловом кластере или DFS). Создайте сервисную учетную запись в AD (в нашем примере это
contososhared_iis
) и предоставьте ей полные права на эту папку.
Можно создать сетевую папку и назначить права с помощью PowerShell:
New-SmbShare -Name IISshared -Path D:IISshared -FullAccess contosospb_admins -ChangeAccess contososhared_iis
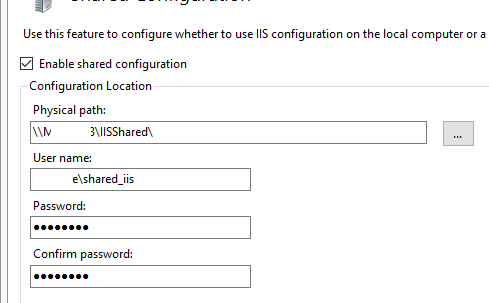
На сервере, на котором вы настраивали ферму, перейдите в раздел IIS -> Shared Configuration. Выберите Export Configuration.
Укажите UNC путь к вашей сетевой папке и пароли для доступа шифрования (нужно использовать стойкий пароль). Нажмите Connect as и укажите учетные данные (contososhared_iis) для доступа к этой папке.
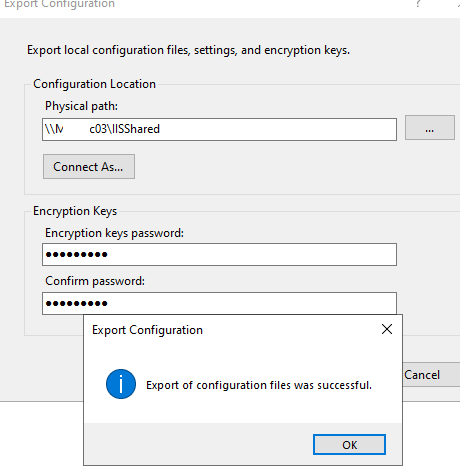
После того, как вы экспортировали вашу конфигурацию, нужно настроить оба сервера IIS на использовать общей конфигурации из сетевой папки.
Включите опцию Enable shared configuration, укажите UNC путь и учетные данные пользователя. Нажмите Apply. Если все прошло успешно, перезапустите IIS и аналогично настройте shared configuration на втором сервере.
Настройка NLB в Windows Server
Теперь нужно установить компонент NLB на обоих серверах и настроить кластер. Установите роли с помощью PowerShell:
Add-WindowsFeature nlb -IncludeManagementTools

Запустите консоль Network Load Balancing Manager (
nlbmgr.exe
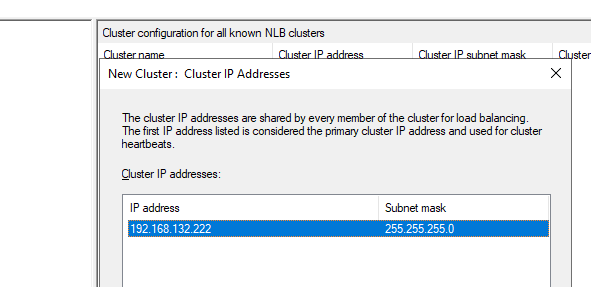
) и создайте новый кластер для IP адреса 192.168.13.222.
Выберите Multicast режим для кластера.
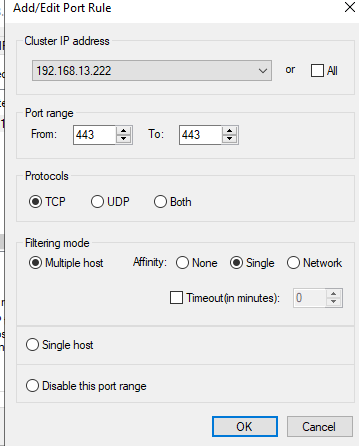
Добавьте правило для порта TCP/443. Выберите:
- Filtering mode: Multiple host
- Affinity: Single
Добавьте второй сервер в NLB кластер.
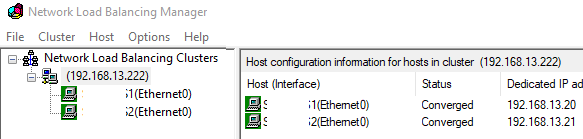
Убедитесь, что у обоих хостов статус изменился Converged.
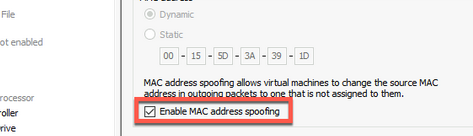
При использовании виртуальных машин, для корректной работы NLB вам нужно разрешить смену MAC адреса в ВМ. В Hyper-V нужно включить опцию Advanced Features -> Enable MAC address spoofing. В VMware vSphere включите опцию MAC Address Change на уровне виртуального коммутатора или группы портов.
Также проверьте, как обрабатывают смену MAC адреса ваши физические коммутаторы.
Теперь можно проверить доступность сайта https://web.contoso.com/iis_ha.html с клиентов. Если вы все настроили правильно, эта страница должна быть доступна.
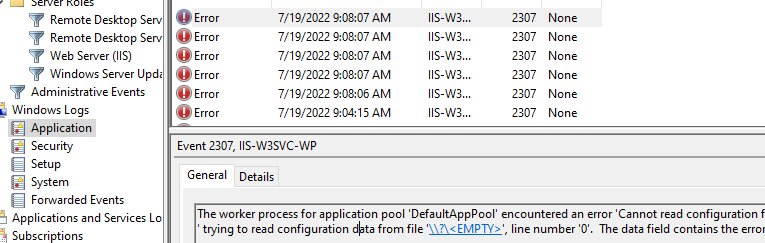
В моем случае все сразу не взлетело. При переходе на целевую веб страницу, пул DefaultAppPool в IIS стал останавливаться с ошибкой Event ID 2307 от IIS-W3SVC-WP
The worker process for application pool 'DefaultAppPool' encountered an error 'Cannot read configuration file ' trying to read configuration data from file '\?<EMPTY>', line number '0'. The data field contains the error code.
Для решения проблемы пришлось выполнить такие команды на обоих серверах:
net stop WAS /y
rmdir /s /q C:inetpubtempappPools
net start W3SVC
Также, отключите стандартное правило для IIS , что исправить ошибку:
HTTP Error 502.4 - Bad Gateway No appropriate server could be found to route the request.
В такой конфигурации веб сервис будет доступен для пользователей при недоступности любой из нод фермы IIS. В этом можно убедиться наглядно, потому что в зависимости от сервера, который обрабатывает вашу сессию вы будете получать свою веб страницу (мы в начале специально сделали разные файлы iis_ha.html).
Если отключить или приостановить один из целевых серверов, то ARR после выполнения Health Check (задержка 5 секунд) перенаправит вас на другой веб сервер.
Не забывайте, что для построения полностью отказоустойчивой конфигурации вам также нужно обеспечить реализацию HA для базы данных, которую используются ваши приложения на IIS. При использовании MS SQL Server можно использовать кластерную конфигурацию или группу высокой доступности SQL Always On.
Такая конфигурация обеспечит высокую доступность веб сервисов IIS, позволить автоматически перенаправить трафик в случае недоступности одного из серверов. Также благодаря NLB вы можете обеспечить распределение и балансировку нагрузки на сайты.
In this blog post series, I’ll show you how to deploy a Microsoft Load Balancing Services (NLBS) Cluster on Windows Server 2016 Server with two nodes In the cluster.
Network Load Balancing Services (NLBS) is a Microsoft implementation of clustering and load balancing that is intended to provide high availability and high reliability, as well as high scalability.
The first NLBS version was released on Windows Server 2003, In Windows Server 2016 we can have up to 32 nodes In an NLB cluster.
NLBS is intended for applications with relatively small data sets that rarely change like stateless applications, and typically include Web, FTP, and VPN servers.
Every client request to a stateless application is a separate transaction, so it is possible to distribute the requests among multiple servers to balance the load. One attractive feature of NLBS is that all servers in a cluster monitor each other with a heartbeat signal, so there is no single point of failure.
Important: Because my NLB cluster will run on a VM I need to enable Mac Address Spoofing on the NLB Hyper-V virtual machines using the cmdlets below (VMs need to be off when running cmdlet)
Get-VMNetworkAdapter -VMName nlb01 | Set-VMNetworkAdapter -MacAddressSpoofing On

In my deployment, I have:
- 2 X Hyper-V VMs running Windows Server 2016 standard edition
- Windows Firewall Disabled
- Mac Address Spoofing enabled
To get started, I’ll Install the NLB Service and the management console on my two Servers using the cmdlet below:
Add-WindowsFeature nlb,rsat-nlb

I also use PowerShell to install it in on the second host without login to the Server using the cmdlet
Add-WindowsFeature nlb,rsat-nlb -ComputerName nlb01

Once done, I can open the console from the Administrative Tools page
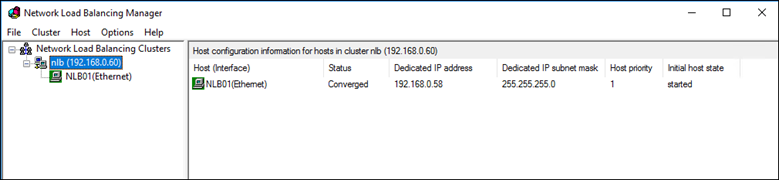
In my case I have two nodes In the cluster with the IP addresses:
- 192.168.0.58
- 192.168.0.59
The Cluster IP will be 192.168.0.60 ( This Is the address that will be balanced and the users will use to access the application on the cluster).
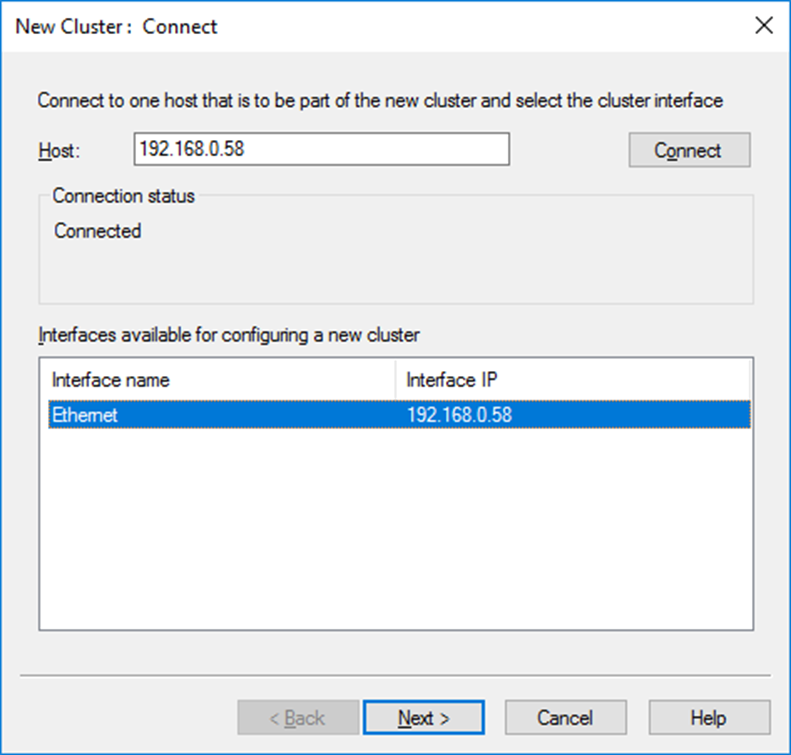
To create a new Cluster, Right click on the NLB header and click New Cluster
Type the name of the first node In the cluster and click connect.
Note: Make sure you disable the FW on the node
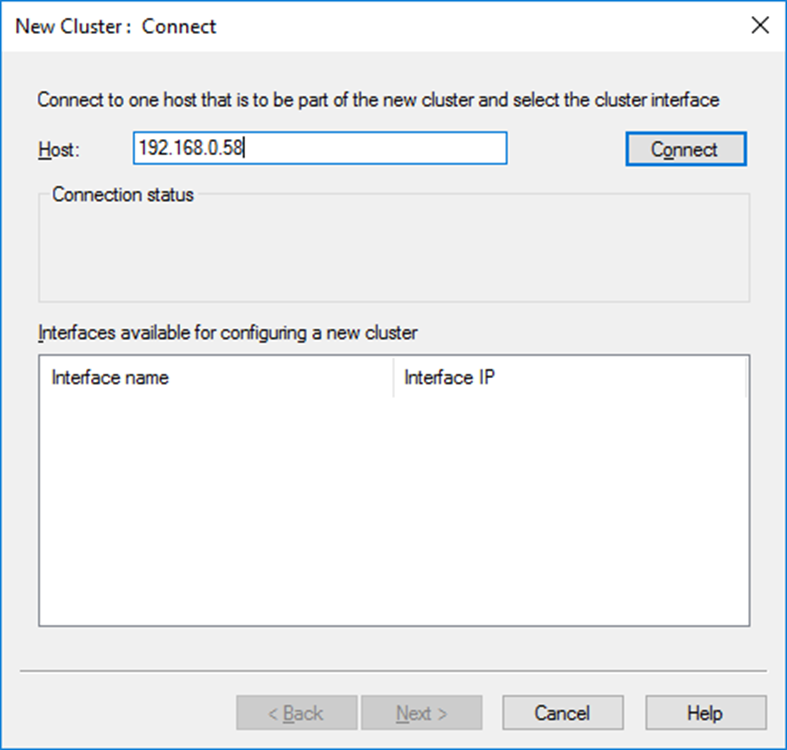
Once connected successfully, Click next
In the page below, We could set the node priority and Initial host state
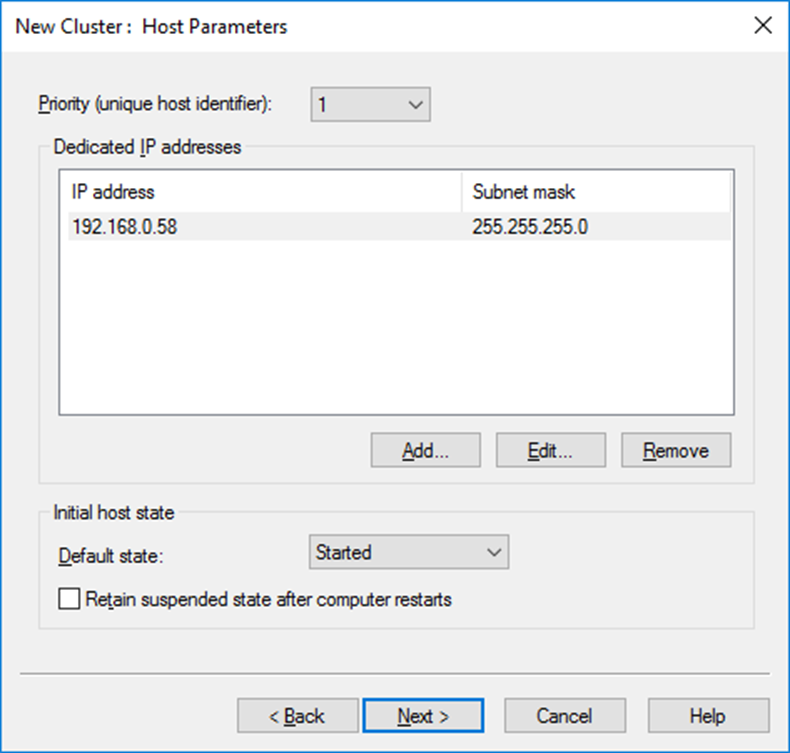
Click next
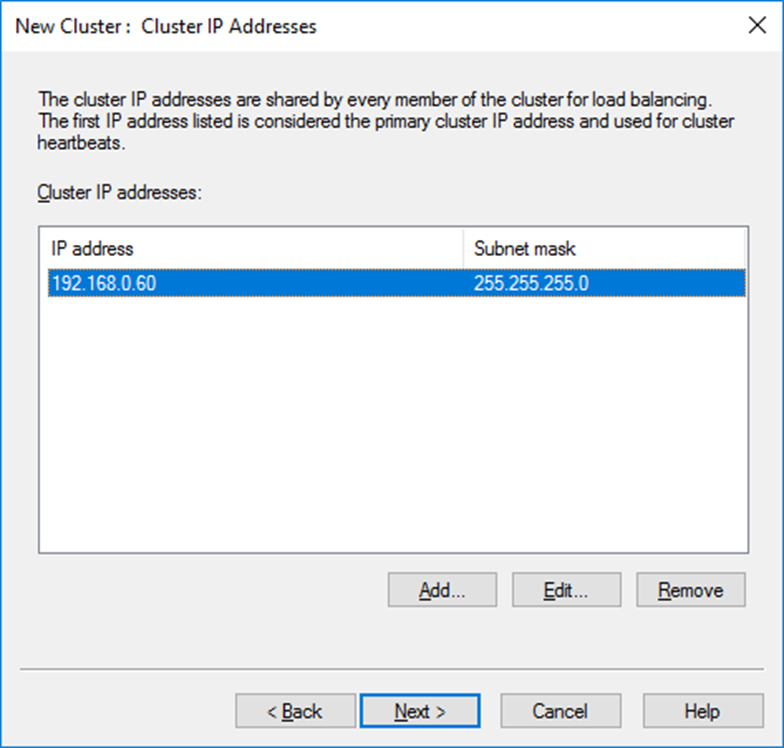
In the next screen, I’ll type the Cluster IP address which Is the IP address we will use for the application that will be balanced by the cluster.
We could also give a host name.
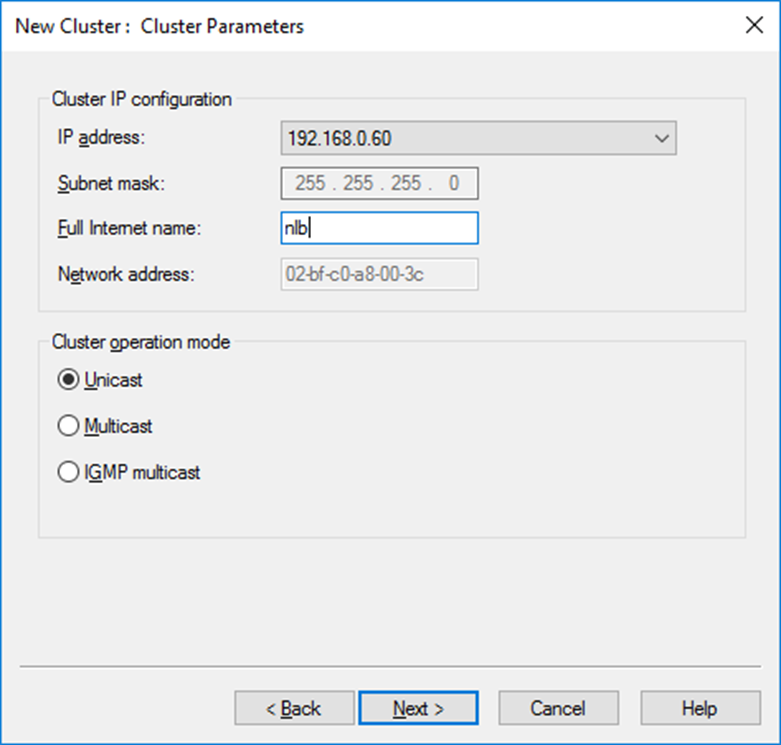
In the port rule leave as it is for now
Done, The Cluster Is now Configured.
In the next article, I’ll show you how to add the 2nd node.
The Network Load Balancing (NLB) feature distributes traffic across several servers by using the TCP/IP networking protocol. By combining two or more computers that are running applications into a single virtual cluster, NLB provides reliability and performance for web servers and other mission-critical servers.
The servers in an NLB cluster are called hosts, and each host runs a separate copy of the server applications. NLB distributes incoming client requests across the hosts in the cluster.
In this example we’ll create NLB cluster from 2 nodes (nlb1 and nlb2) which will be hosting IIS site
Installing NLB Cluster and IIS roles
invoke-command nlb1,nlb2 {Install-WindowsFeature nlb -IncludeAllSubFeature -IncludeManagementTools}
invoke-command nlb1,nlb2 {Install-WindowsFeature nlb -IncludeAllSubFeature -IncludeManagementTools}
Creating NLB cluster
On any cluster node run following PowerShell command:
New-NlbCluster -InterfaceName ethernet -ClusterName 'iis_cluster' -ClusterPrimaryIP 192.168.0.10 -SubnetMask 255.255.255.0 -OperationMode Unicast
NLB cluster named IIS with IP 192.168.0.10,unicast mode is created
There are following operation modes:
Unicast – Each NLB cluster node replaces its real (hard coded) MAC address with a new one (generated by the NLB software) and each node in the NLB cluster uses the same (virtual) MAC
Multicast – NLB adds a layer 2 MAC address to the NIC of each node. Each NLB cluster node basically has two MAC addresses, its real one and its NLB generated address.
IGMP multicast ensures that traffic intended for an NLB cluster passes through only those ports serving the cluster hosts and not all switch ports
Adding NLB node:
Add-NlbClusterNode -NewNodeName nlb1 -NewNodeInterface 'Ethernet' -InterfaceName 'Ethernet'
Setting NLB cluster ports and port filtering mode
Filtering modes:
The None option specifies that multiple connections from the same client IP address can be handled by different cluster hosts
The Single Direct traffic to a single host.
Multiple Hosts: Distribute traffic between the Network Load Balancing (NLB) cluster servers.
Get-NlbClusterPortRule | Set-NlbClusterPortRule -NewIP 192.168.0.10 -newProtocol tcp -NewStartPort 80 -NewEndPort 80 -newmode multiple
Setting load weight
The load weight applies only for the Multiple hosts filtering mode. When using the Multiple hosts filtering mode,the load weight specifies the relative amount of load-balanced network traffic that this node should handle for the associated port rule.
Allowed values range from 0 (zero) to 100. To prevent a host from handling any network traffic, set the load weight to 0 (zero).
Get-NlbClusterNode -NodeName nlb1 | Get-NlbClusterPortRule | Set-NlbClusterPortRuleNodeWeight -LoadWeight 50
Setting NLB node priority
Each cluster host is assigned a unique host priority in the range of 1 to 32, where lower numbers denote higher priorities.
The host with the highest host priority (lowest numeric value) is called the default host. It handles all client traffic for the virtual IP addresses
that is not specifically intended to be load-balanced.
This ensures that server applications not configured for load balancing only receive client traffic on a single host.
If the default host fails, the host with the next highest priority takes over as default host.
This command sets priority 32 for node nlb1
Set-NlbClusterNode -HostName nlb1 -HostPriority 32 -InterfaceName ethernet
The Affinity can be set only when Multiple hosts filtering mode is applied.
The Network option specifies that NLB direct multiple requests from the same TCP/IP Class C address range to the same cluster host. Enabling Network affinity instead of Single affinity ensures that clients that use multiple proxy servers to access the cluster have their TCP connections directed to the same cluster host.
Get-NlbClusterPortRule | Set-NlbClusterPortRule -NewAffinity single
Get-NlbClusterNode -NodeName nlb1 | fl *
Invoke-Command nlb2 {get-nlbclusternode -NodeName nlb2 | fl * }

Because nlb2 has highest priority (1) requests are redirected this node
Test NLB:
on nlb1:
del C:inetpubwwwrootiisstart.htm
echo "This page is hosted on nlb1 node :-)" > C:inetpubwwwrootindex.html
On nlb2:
del C:inetpubwwwrootiisstart.htm
echo "This page is hosted on nlb1 node :-)" > C:inetpubwwwrootindex.html

Stop nlb2 node from nlb1
Invoke-Command nlb2 {Stop-NlbClusterNode -HostName nlb2}

Windows Server 2016 Network Load Balancing. You can use Network Load Balancing to manage two or more servers as a single virtual cluster. Network Load Balancing enhances the availability and scalability of Internet server applications such as those used on web, FTP, firewall, proxy, virtual private network (VPN), and other mission-critical servers.
New in Windows Server 2016 is it includes a new Azure-inspired Software Load Balancer (SLB) as a component of the Software Defined Networking (SDN) infrastructure. Use SLB instead of NLB if you are using SDN, are using non-Windows workloads, need outbound network address translation (NAT), or need Layer 3 (L3) or non-TCP based load balancing. You can continue to use NLB with Windows Server 2016 for non-SDN deployments.
So We got now two Load Balancing features :
Software Load Balancing (SLB) for SDN
Software Defined Networking (SDN) provides a method to centrally configure and manage physical and virtual network devices such as routers, switches, and gateways in your datacenter. Virtual network elements such as Hyper-V Virtual Switch, Hyper-V Network Virtualization, and Windows Server Gateway are designed to be integral elements of your software defined networking infrastructure. While you can still use your existing physical switches, routers, and other hardware devices, you can achieve deeper integration between the virtual network and the physical network if these devices are designed for compatibility with software defined networking.
Network Load Balancing (NLB) for non-SDN
For this demo I created a NLB script that can be found here Create a Windows Server 2016 NLB Network Load Balancing farm https://gallery.technet.microsoft.com/Create-a-Windows-Server-05a13f14
I use a couple of Windows Server 2016 server for the Load Balancing each node has two network adapters and runs IIS with a default website

Network Load Balancing is not nic teaming as nic teaming is on the same host and Network Load Balancing is combining all nodes to one VIP Virtual IP address.
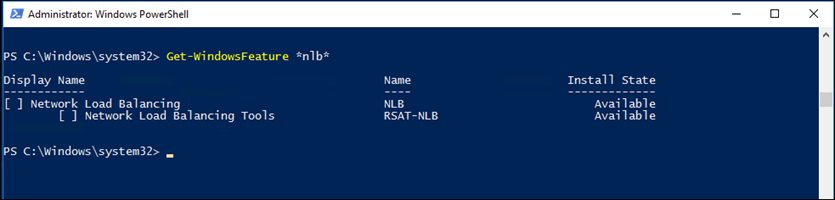
First we install the NLB feature on each node.
Install-WindowsFeature NLB –IncludeManagementTools
To view a complete list of NLB CMDlets type the following CMDlet, Get-command -module NetworkLoadBalancingClusters

To Create a New NLB Cluster you can do this in the GUI or in Powershell

First I rename the Network Adapter to get a better overview
#Rename NIC
Rename-NetAdapter -Name «Ethernet» -NewName «NLB»
#Create NLB
New-NLBCluster –Interface “NLB” -OperationMode Unicast -ClusterPrimaryIP -ClusterName WS2016NLB –verbose
Showing the NLB cluster info
Get-NLBClusterNode | Format-List *

then I removed all the default rules why would you NLB all the ports ?
#Removing default port rule for the NLB Cluster
Write-Host «Removing default port rule…» -ForegroundColor yellow
Get-NlbClusterPortRule -HostName . | Remove-NlbClusterPortRule -Force
#Adding port rules 80
Write-Host «Added port rule for http (tcp 80)» -ForegroundColor yellow
Add-NlbClusterPortRule -Protocol Tcp -Mode Multiple -Affinity Single -StartPort 80 -EndPort 80 -InterfaceName $InterfaceName -IP $ClusterPrimaryIP| Out-Null
#Adding port rules 443
Write-Host «Added port rule for https (tcp 443)» -ForegroundColor yellow
Add-NlbClusterPortRule -Protocol Tcp -Mode Multiple -Affinity Single -StartPort 443 -EndPort 443 -InterfaceName $InterfaceName -IP $ClusterPrimaryIP| Out-Null
Now that Port 80 and 443 are in the NLB we can add some nodes
As I added the -Affinity Single option keep in mind that your application support this option. Running websites parts from different servers is sometimes a pain for the developer.
The Affinity parameter is applicable only for the Multiple hosts filtering mode.
- The None option specifies that multiple connections from the same client IP address can be handled by different cluster hosts (there is no client affinity). To allow Network Load Balancing to properly handle IP fragments, you should avoid using None when selecting UDP or Both for your protocol setting.
- The Single option specifies that NLB should direct multiple requests from the same client IP address to the same cluster host. This is the default setting for affinity. You can optionally modify the NLB client affinity to direct all client requests from a TCP/IP Class C address range (instead of a single IP address) to a single cluster host by enabling the Network option instead of the Single option. This feature ensures that clients that use multiple proxy servers to access the cluster can have their TCP connections directed to the same cluster host.
- The Network option specifies that NLB direct multiple requests from the same TCP/IP Class C address range to the same cluster host. Enabling Network affinity instead of Single affinity ensures that clients that use multiple proxy servers to access the cluster have their TCP connections directed to the same cluster host.
The use of multiple proxy servers at the client’s site causes requests from a single client to appear to originate from different computers. Assuming that all of the client’s proxy servers are located within the same address range, Network affinity ensures that client sessions are properly handled. If you do not need this capability, use Single affinity to maximize scaled performance.
adding a second node is easy in Powershell or do this in the GUI add node and follow the steps.
$InterfaceName = “NLB”
$Node2Fqdn=”MVPNLB502.mvp.local”
Get-NlbCluster -HostName $env:COMPUTERNAME | Add-NlbClusterNode -NewNodeName $Node2Fqdn -NewNodeInterface $InterfaceName –Verbose

and as you can see if you don’t rename all the nic adapters it looks a bit messy. If you ever need to troubleshoot then it is easy to get NLB traffic and or other network traffic.
Now that the NLB cluster is ready we can use it for say a webserver. make sure the DNS Record is created in the DNS and If you are using multiple Cluster Virtual IP’s make sure they are also in the DNS. I always use an IP for the cluster and for the websites I use separate IP’s and all sites running on different IP’s / NLB VIP If I need to change some thing on the webserver it has no impact on all the other servers. I also Added a few more NLB nodes. that has already a configured website.
Now to get this to work with IIS

That is right page not found. Check the DNS see if the record is created. and make sure the website IIS is running on this IP
Go to the IIS manager and check the website bindings, default it is listening on all IP but this is not the behavior that I want I want a NLB. So we need to set the website on the NLB IP configured earlier. When Having multiple IP on the NLB pick the right IP!


Remember this you need to do this on all the Webservers!

For creating a NLB farm you can use my script that is posted in the TechNet gallery.
Create a Windows Server 2016 NLB Network Load Balancing farm https://gallery.technet.microsoft.com/Create-a-Windows-Server-05a13f14
Flickr Tags: Windows Server 2016,CloudOS
Follow Me on Twitter @ClusterMVP
Follow My blog https://robertsmit.wordpress.com
Linkedin Profile Http://nl.linkedin.com/in/robertsmit
Google Me : https://www.google.nl
Bing Me : http://tinyurl.com/j6ny39w
LMGTFY : http://lmgtfy.com/?q=robert+smit+mvp+blog
![]()
Robert Smit is Senior Technical Evangelist and is a current Microsoft MVP in Clustering as of 2009.
Robert has over 20 years experience in IT with experience in the educational, health-care and finance industries.
Robert’s past IT experience in the trenches of IT gives him the knowledge and insight that allows him to communicate effectively with IT professionals
who are trying to address real concerns around business continuity, disaster recovery and regulatory compliance issues. Robert holds the following certifications:
MCT — Microsoft Certified Trainer, MCTS — Windows Server Virtualization, MCSE, MCSA and MCPS. He is an active participant in the Microsoft newsgroup community and is currently focused on Hyper-V, Failover Clustering, SQL Server, Azure and all things related to Cloud Computing and Infrastructure Optimalization.
Follow Robert on Twitter @ClusterMVP
Or follow his blog https://robertsmit.wordpress.com
Linkedin Profile Http://nl.linkedin.com/in/robertsmit
Robert is also capable of transferring his knowledge to others which is a rare feature in the field of IT. He makes a point of not only solving issues but also of giving on the job training of his colleagues.
A customer says » Robert has been a big influence on our technical staff and I have to come to know him as a brilliant specialist concerning Microsoft Products. He was Capable with his in-depth knowledge of Microsoft products to troubleshoot problems and develop our infrastructure to a higher level. I would certainly hire him again in the future. »
Details of the Recommendation: «I have been coordinating with Robert implementing a very complex system. Although he was primarily a Microsoft infrastructure specialist; he was able to understand and debug .Net based complext Windows applications and websites. His input to improve performance of applications proved very helpful for the success of our project
View all posts by Robert Smit [MVP]
Contents
Presentation of NLB
Network Load Balancing (NLB) is a feature built into Windows that allows the implementation of load balancing at the network level. It is often used with IIS / FTP / RDS.
NLB works with a virtual IP address that is available to all hosts in the cluster.
NLB supports up to 32 nodes on the same cluster, according to Microsoft best practices it is advisable to create clusters of maximum 8 nodes.
The NLB feature relies on network-level distribution, one of the limitations of this solution is that the heatbeats tests monitor whether the hosts are online and not the service. If the web service of one of the hosts is non-functional but the host responds to the HB, requests will be sent to the host.
Representation of an NLB cluster in monodiffussion :
Prerequisites
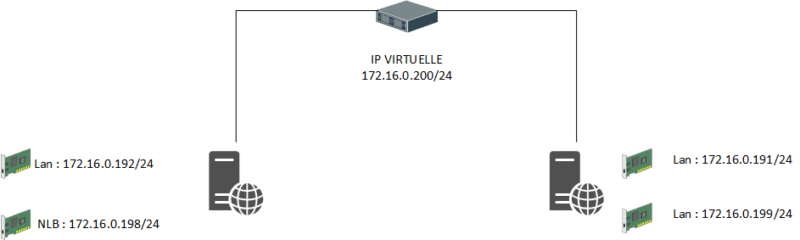
Setting up a Network Load Balancing Cluster you need:
- At least two servers with the same service installed (for this lab I used two IIS web servers) and two network cards. A card will be for server management and a dedicated NLB cluster card. If the NLB cluster is configured in Multidiffussion it is not necessary to have two network cards.
- At least 3 IPs: 1 IP for the cluster that will be virtual and an IP address for each node
If your servers are under Hyper-V, you must activate the MAC address spoofing on network adapters dedicated to the NLB cluster.

Modes of transmission
Unicast: the default mode, it will disable the MAC address of the network card and replace it with an identical virtual address on all nodes.
Multicast: recommended mode, it can be used with one or more network cards. With this mode, the network adapter will have two MAC addresses, the one on the network adapter and the virtual MAC address of the cluster.