Network Time Protocol (NTP) runs on the Transport Layer port 123 UDP and enables accurate time synchronization for network computers. This irons out time inconsistencies on servers and clients during file logging or replication of server databases among other resources.
In this article, we’ll outline the process of installing, configuring, and querying an NTP server on Windows Server 2019.
NTP Server
NTP servers utilize the Network Time Protocol to send time signals to servers across the globe upon request. NTP servers use the Universal Time Coordinated (UTC) time source for time signal synchronization.
The main purpose of NTP servers is to provide time synchronization for servers and computer networks with other major network servers and clients across the globe. In turn, this streamlines communications and transactions all over the world.
Installing and Configuring an NTP Server on Windows Server 2019
The process of installing, configuring, and querying an NTP Server on Windows Server 2019 is quite straightforward.
Set the NTP service to Automatic option
To start off, Hit Windows Key + R to launch the Run dialogue. Next, type services.msc and hit ENTER.
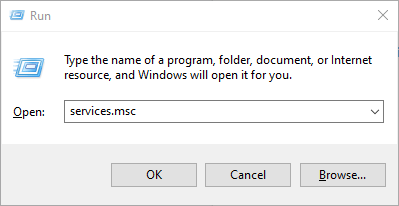
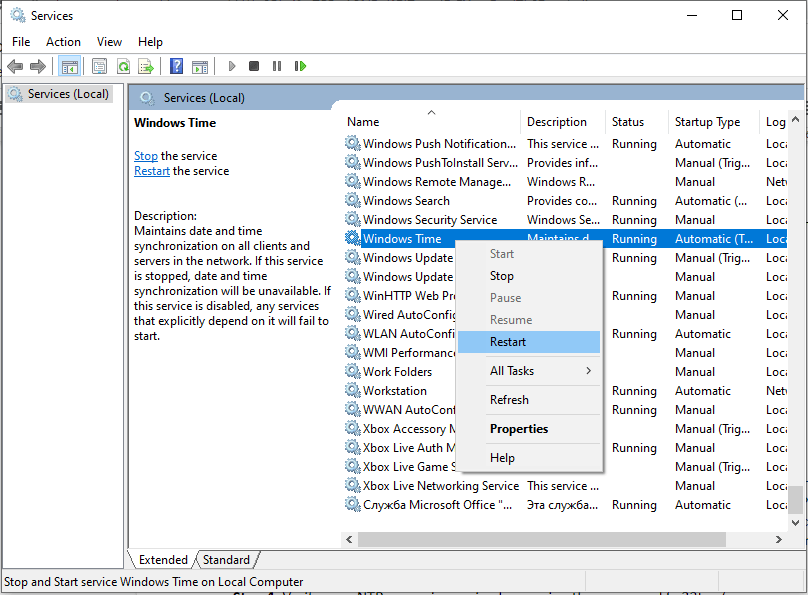
In the ‘Services’ window, locate the service ‘Windows Time’. Right-click and select the ‘Properties’ option as shown:
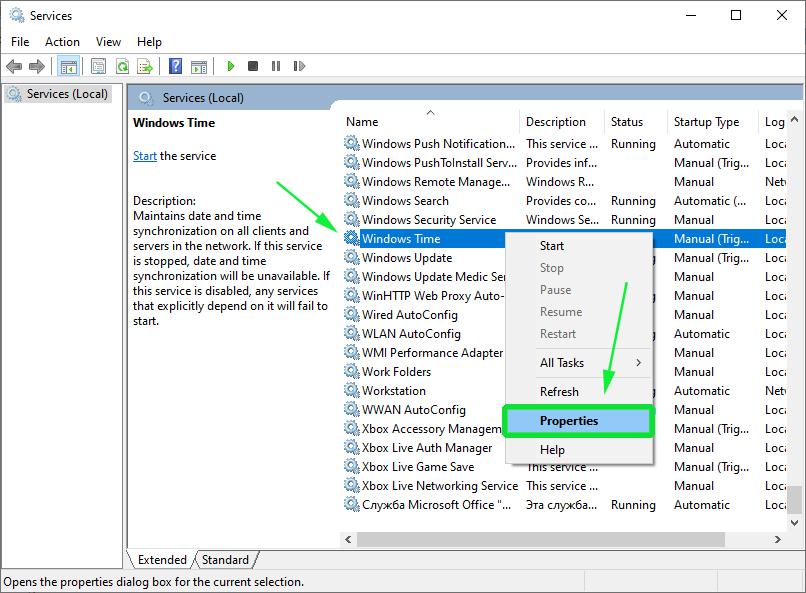
On the pop-up window, select the Startup type as ‘Automatic’.

Finally, click on ‘OK’ and then ‘Apply’.
Configuring NTP Server using Registry Editor
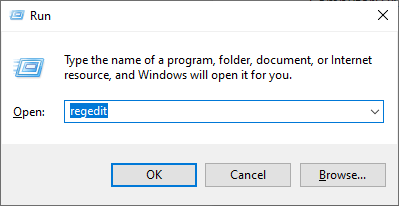
As before, launch the run dialogue by pressing Windows Key + R. Then type ‘regedit’ and hit ENTER.
The Registry editor will be launched as shown:
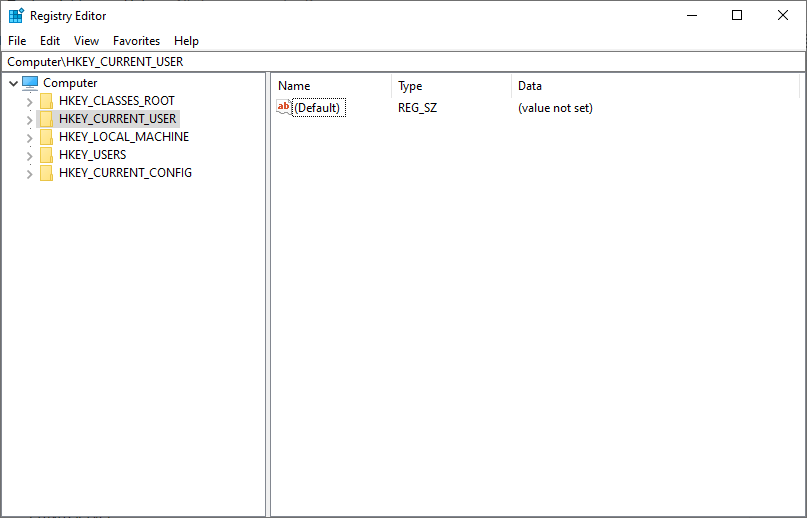
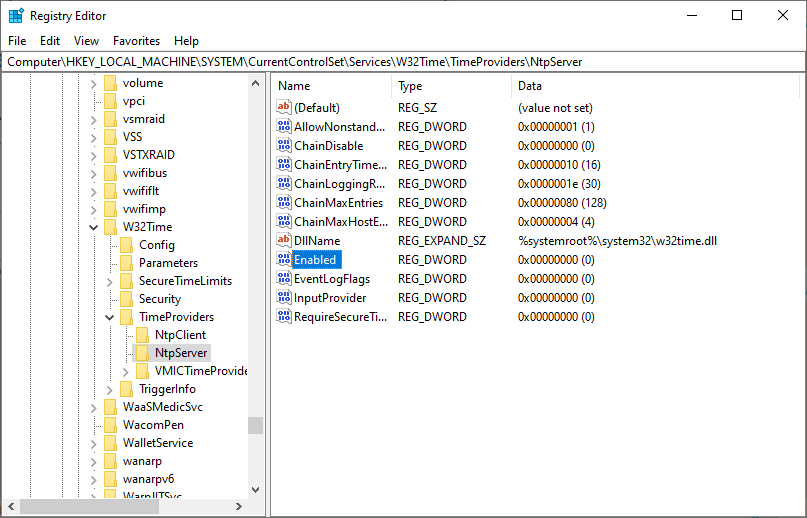
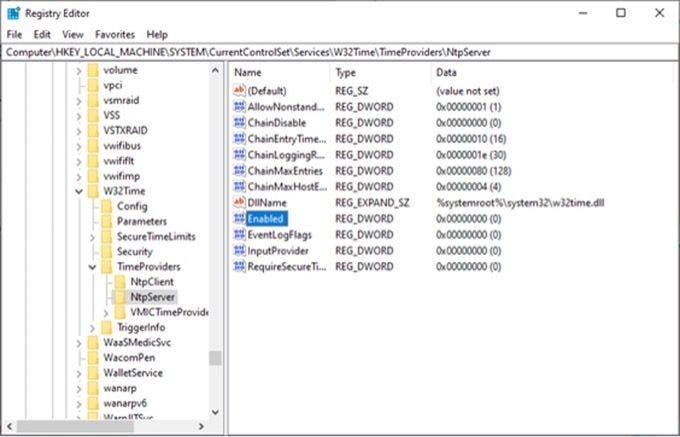
Navigate to the path shown below:
ComputerHKEY_LOCAL_MACHINESYSTEMCurrentControlSetServicesW32TimeTimeProvidersNtpServer
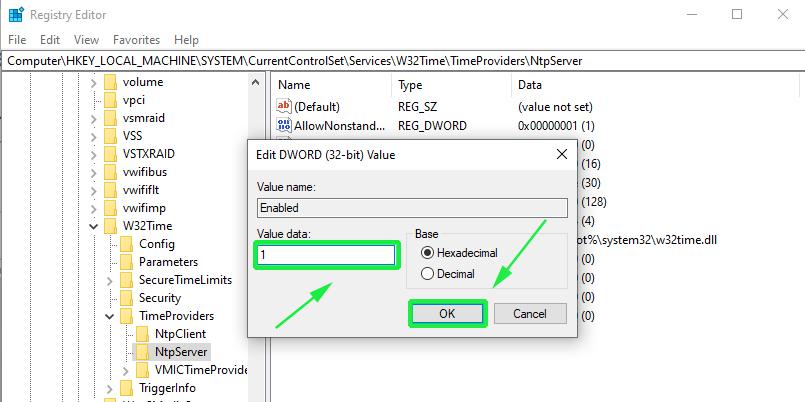
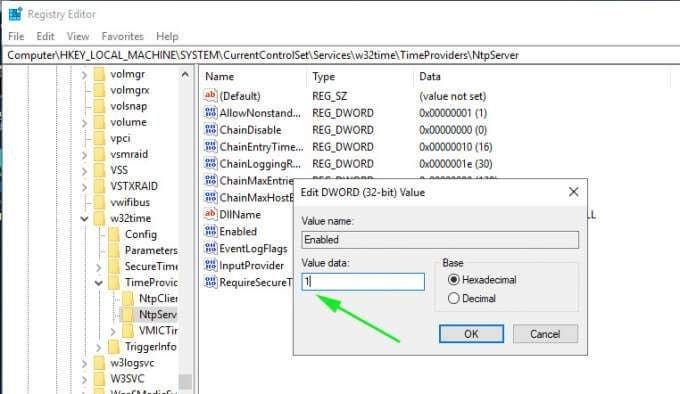
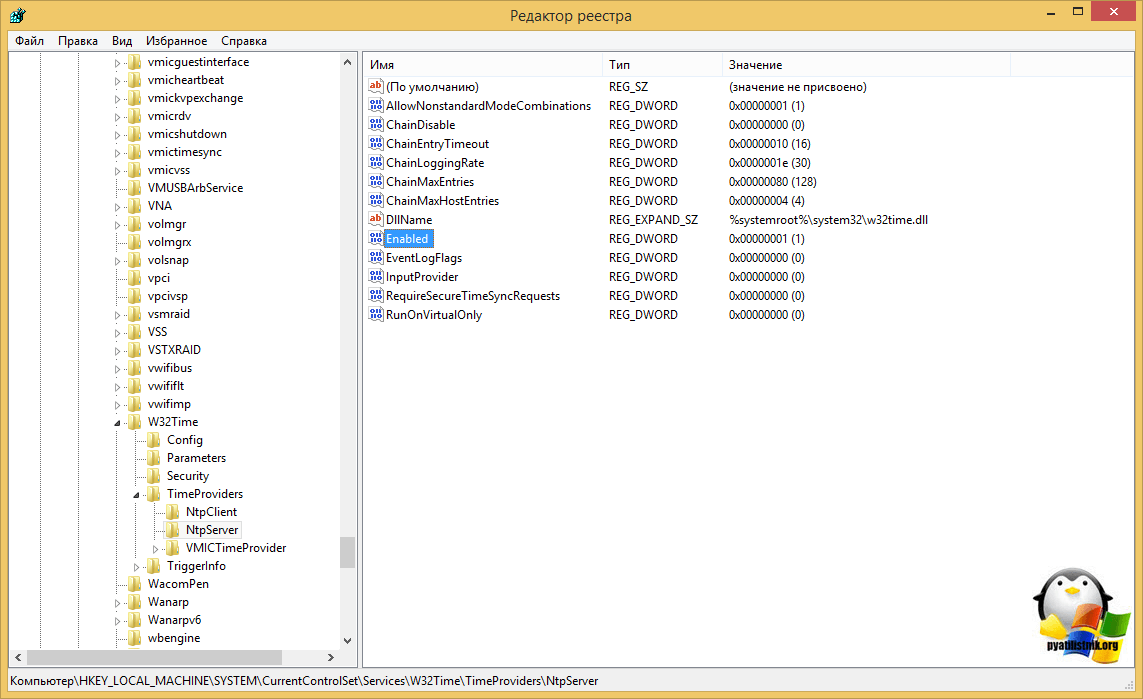
On the right pane, locate and double-click the ‘Enabled’ file as shown:
Set the Value data to 1 and click OK.
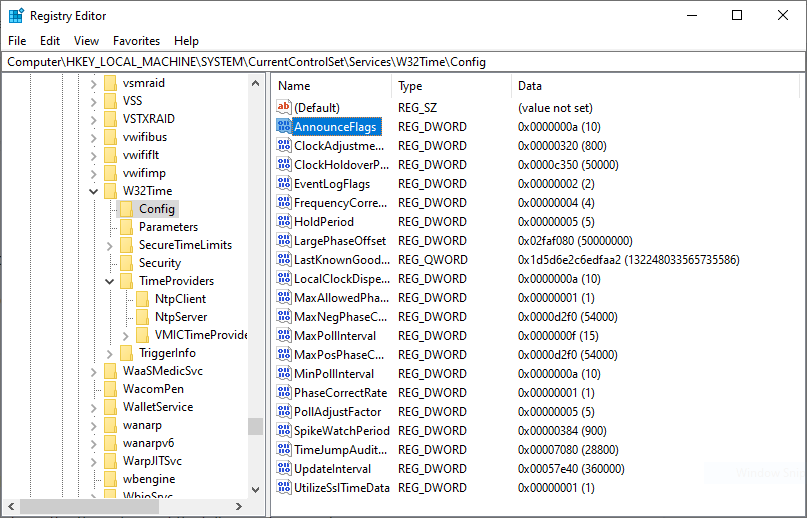
Next, follow this path.
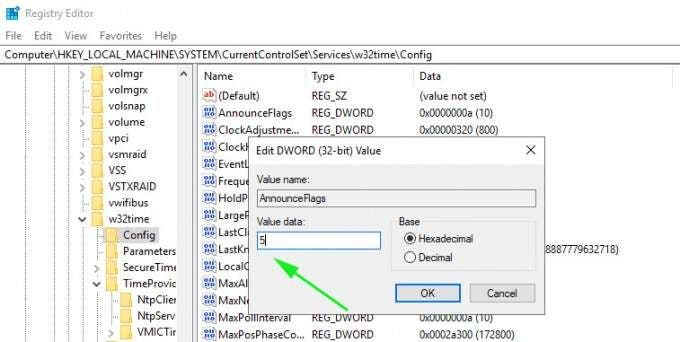
Computer>HKEY_LOCAL_MACHINE>SYSTEM>CurrentControlSet>Services>W32Time>Config
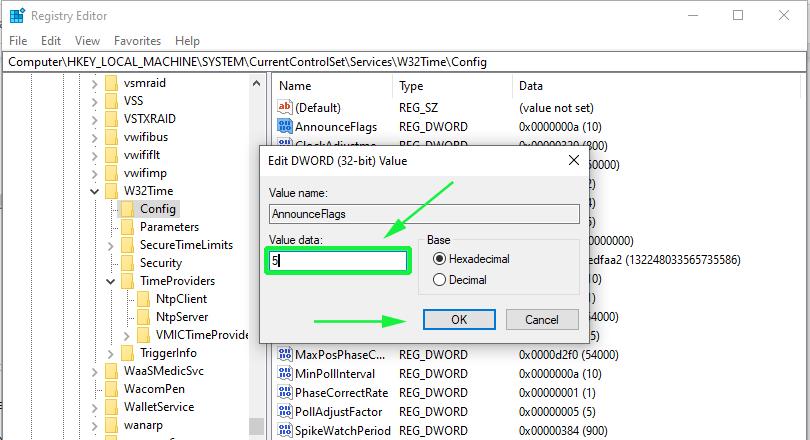
At the right pane locate the ‘Announce Flags’ file.
Double click on the file and set its value to 5 in the ‘Value Data’ section.
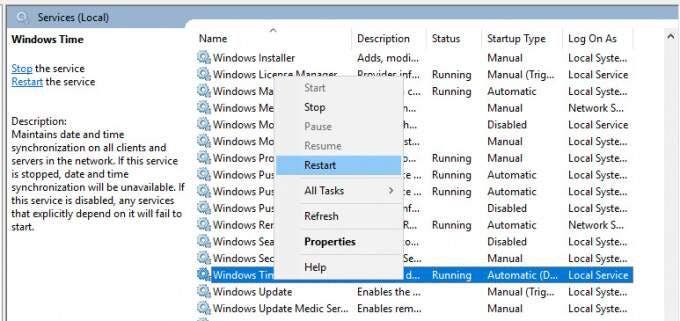
Finally, reboot the NTP server for the changes to take place. Head back to the services Window, right-click on ‘Windows Time’ and select ‘Restart’
Configuring NTP Server on Windows 2019 using Windows PowerShell
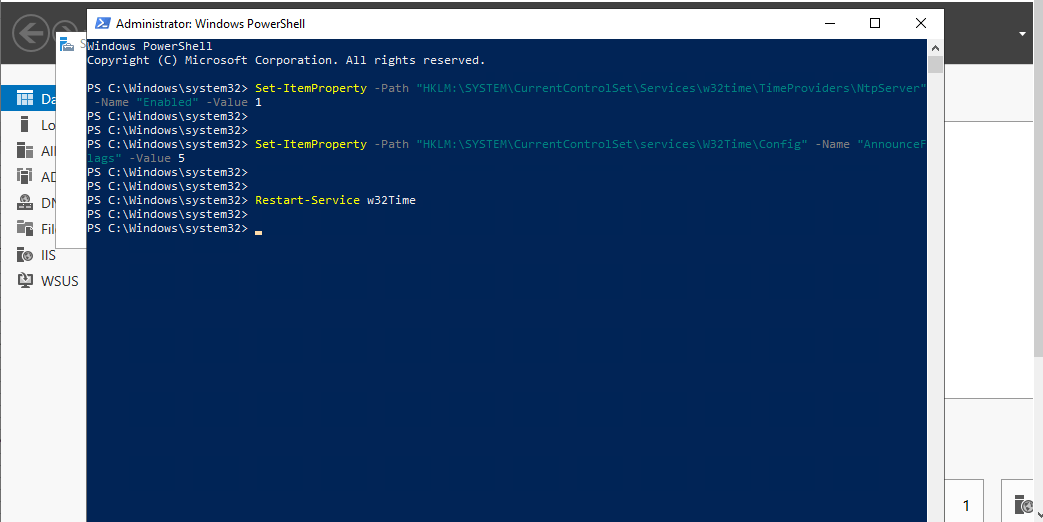
If you love working in Powershell, launch Powershell as Administrator and enable NTP server using the command:
Set-ItemProperty -Path “HKLM:SYSTEMCurrentControlSetServicesw32timeTimeProvidersNtpServer” -Name “Enabled” -Value 1
Next, configure Announce Flags value as shown:
Set-ItemProperty -Path “HKLM:SYSTEMCurrentControlSetservicesW32TimeConfig” -Name “AnnounceFlags” -Value 5
Finally, restart the NTP server using the command:
Restart-Service w32Time
Important Note: UDP port 123 must be open for the NTP server traffic to reach your Windows Server 2019. If the NTP servers are unreachable, you can check your firewall settings to fix this.
Other useful commands
- w32tm /query /configuration to check and shows the NTP server configuration.
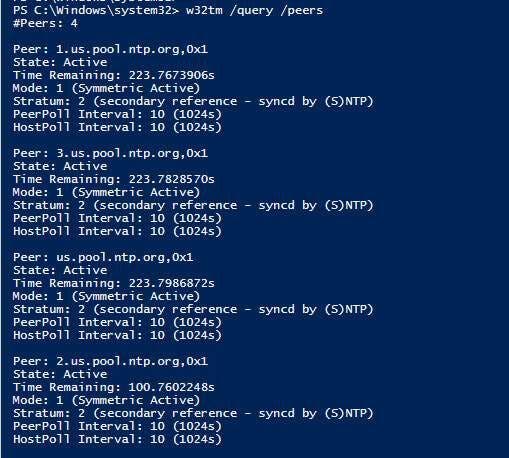
- w32tm /query /peers for checking the list of NTP servers configured alongside their configuration status
- w32tm /resync /nowait to force-synchronize time with your NTP server.
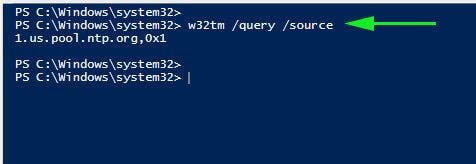
- w32tm /query /source to show the source of the time.
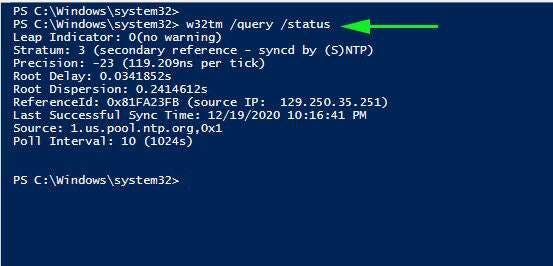
- w32tm /query /status to reveal NTP time service status.
Final take
Now your Windows Server 2019 clock is synchronized with time the NTP server’s pool.ntp.org and works as NTP client. You can achieve full network and accompanying infrastructure time synchronization by synchronizing all network workstations, servers, routers, hubs, and switches.
Since NTP servers operate over the UDP protocol using TCP/IP, these network infrastructures must be working efficiently for effective NTP server operation. In case you want to make time servers on windows server 2019 hosted on a virtual machine, you should disable the virtual machine time synchronization settings and sync their time with the domain Windows Server 2019.
Maintaining accurate time on your server is critical largely because many services and IT applications rely on accurate time settings to function as expected. These include logging services, monitoring and auditing applications, and database replication to mention a few.
Time skew in servers, and any client systems for that matter, is undesirable and usually causes conflict in time-critical applications. To maintain accurate time settings on your server and across the network by extension, it’s preferred to install and enable a NTP server on your server.

What is an NTP server?
NTP, short for Network Time Protocol, is a protocol that synchronizes time across network devices. It listens on UDP port 123 and always ensures that time inconsistencies across the server and client systems are mitigated and that client systems are always in sync with the server.
NTP server refers to a network device or a service that fetches time from an external time source and syncs the time across the network using the NTP protocol. This guide will focus on installing NTP service on Windows server 2019.
How Does NTP Work ?
Being a protocol, NTP requires a client-server architecture. The NTP client residing on a Windows PC, for example, initiates a time request exchange with the NTP server.
A time-stamp data exchange happens between the server and client and this helps in adjusting the clock on client’s systems to the highest degree of accuracy to match the time on the NTP server. In this guide, we will walk you through the installation and configuration of NTP server on Windows Server 2019.

There are several ways of setting up NTP server and we will look at each in turn.
In Windows Server environments, there is a special Windows time service that handles time synchronization between the server and the client systems. This is known as Windows Time service. PowerShell provides a command-line tool known as w32tm.exe and comes included in all versions of Windows from Windows XP and Windows Server 2008 to the latest versions of each OS.
Using the w32tm.exe utility, you can configure your Windows system to sync with online time servers. Usually, this is the tool of choice when setting up and monitoring time on your Windows Server system.
Using the command-line utility is quite straightforward.
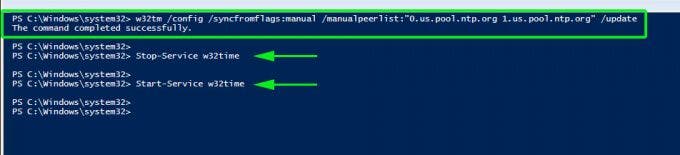
For example, to set the Server to point to 2 different time servers, namely 0.us.pool.ntp.org and 1.us.pool.ntp.org , launch PowerShell as the Administrator and run the command below
w32tm /config /syncfromflags:manual /manualpeerlist:”0.us.pool.ntp.org 1.us.pool.ntp.org” /update
Then restart Windows Time service using the commands:
Stop-Service w32time
Start-Service w32time
Here’s a snippet of the commands.
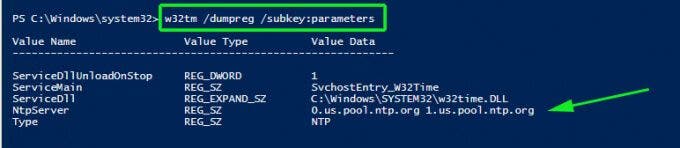
You can thereafter confirm the values of NTP servers configured in the registry by running this command:
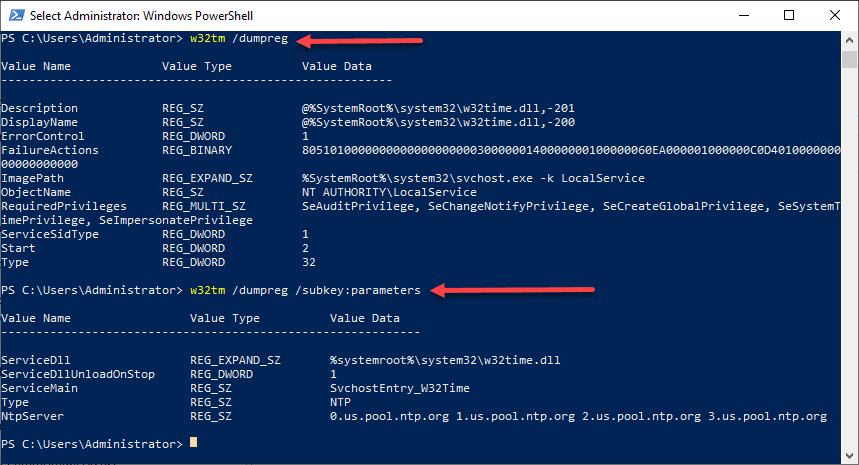
w32tm /dumpreg /subkey:parameters
Configure NTP Server on Windows Server 2019 using Registry editor
The second method of installing and configuring the NTP server is using the registry editor. If you are not a fan of the Windows PowerShell, then this will truly come in handy.
To get started, open the registry editor. Press ‘Windows key + R’ and type ‘regedit’ and hit ENTER. The windows registry will be launched as shown below.
Next, head over to the path shown below
ComputerHKEY_LOCAL_MACHINESYSTEMCurrentControlSetServicesW32TimeTimeProvidersNtpServer
On the right pane. Be sure to find & double-click the file labelled ‘Enabled’ in the diagram shown below.
Next, In the ‘value data’ text field, set the value to ‘1’ and click the ‘Ok’ button.
Next, head over to the path:
ComputerHKEY_LOCAL_MACHINESYSTEMCurrentControlSetServicesW32TimeConfig
In the right pane, double click the ‘Announce Flags’ file.
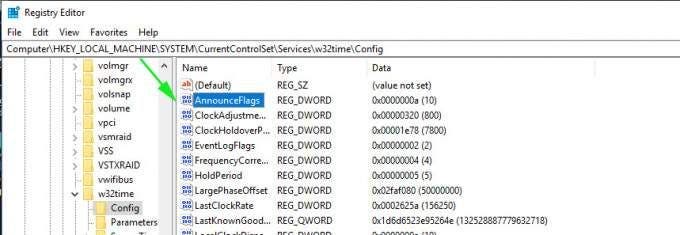
Double-click the file and in the Value data text field, type the value ‘5’ and click ‘OK’.
For the changes to come into effect, you need to reboot the NTP server by heading to the services Window. To achieve this, press ‘Windows key + R’ and type ‘services.msc’. Scroll and find ‘Windows Time’, right-click on it and select the ‘Restart’ option.
Useful w32tm commands
Once you have set up your NTP server, you can use the following commands to verify various aspects of the server:
To check the status of the NTP server, run the command:
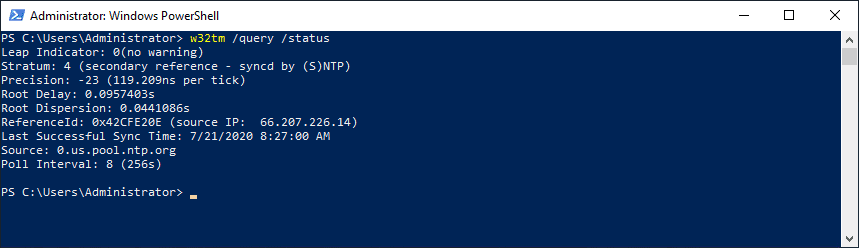
w32tm /query /status
To reveal the current NTP pool being used to sync time with execute:
w32tm /query /source
You can also display a list of NTP time servers along with their configuration status as shown.
w32tm /query /peers
To display NTP server configuration settings, run the command:
w32tm /query /source
This shows quite a wealth of information.

Final Take
We cannot stress enough how important it is to maintain accurate time and date settings on your server. As you have seen, setting up an NTP server on your Windows server instance is quite easy and straight forward.
Once you have configured the NTP service on your server, other domain controllers in your environment will sync with this server and the Windows clients in the domain will sync with the domain controllers. Hopefully, you can now install and configure NTP on Windows Server 2019.
Содержание
- Ntp сервер настройка windows 2019
- Синхронизация времени в Active Directory
- Конфигурация NTP-сервера на корневом PDC
- Включение синхронизации внутренних часов с внешним источником
- Задание списка внешних источников для синхронизации
- Задание интервала синхронизации с внешним источником
- Установка минимальной положительной и отрицательной коррекции
- Все необходимое одной строкой
- Полезные команды
- Настройка NTP сервера и клиента групповой политикой
- Особенности виртуализированных контроллеров домена
- How to Configure NTP Server on Windows Server 2019
- NTP Server
- Installing and Configuring an NTP Server on Windows Server 2019
- Configuring NTP Server using Registry Editor
- Configuring NTP Server on Windows 2019 using Windows PowerShell
- Other useful commands
- Final take
Ntp сервер настройка windows 2019

Добрый день уважаемые читатели и гости блога pyatilistnik.org, как много люди говорят о времени, что оно быстро или медленно бежит, и все понимают, что оно бесценно и важно. Так и в инфраструктуре Active Directory, она является одним из важнейших факторов, правильного функционирования домена. В домене все друг другу доверяют, и один раз авторизовавшись и получив все тикеты от Kerberos, пользователь ходит куда угодно, ограничиваясь лишь своими доступными правами. Так вот если у вас не будет точного времени на ваших рабочих станциях к контроллеру домена, то можете считать, что у вас начинаются серьезные проблемы, о которых мы поговорим ниже и рассмотрим как их устранить с помощью настройки NTP сервера в Windows.
Синхронизация времени в Active Directory
Среди компьютеров, участвующих в Active Directory работает следующая схема синхронизация времени.
- Контроллер корневого домена в лесу AD, которому принадлежит FSMО-роль эмулятора PDC (назовем его корневым PDC), является источником времени для всех остальных контроллеров этого домена.
- Контроллеры дочерних доменов синхронизируют время с вышестоящих по топологии AD контроллеров домена.
- Рядовые члены домена (сервера и рабочие станции) синхронизируют свое время с ближайшим к ним доступным контроллером домена, соблюдая топологию AD.
Корневой PDC может синхронизировать свое время как со внешним источником, так и с самим собой, последнее задано конфигурацией по умолчанию и является абсурдом, о чем периодически намекают ошибки в системном журнале.
Синхронизация клиентов корневого PDC может осуществятся как с его внутренних часов, так и с внешнего источника. В первом случае сервер времени корневого PDC объявляет себя как «надежный» (reliable).
Далее я приведу оптимальную с моей точки зрения конфигурацию сервера времени корневого PDC, при которой сам корневой PDC периодически синхронизирует свое время от достоверного источника в интернете, а время обращающихся к нему клиентов синхронизирует со своими внутренними часами.
Вводим netdom query fsmo. В моем примере, роль PDC и NTP сервера, принадлежит контроллеру dc7

Конфигурация NTP-сервера на корневом PDC
Конфигурирование сервера времени в Windows (NTP-сервера) может осуществляться как с помощью утилиты командной строки w32tm, так и через реестр. Где возможно, я приведу оба варианта. Но в начале посмотрите полностью ваши настройки на компьютере, делается это командой:
EventLogFlags: 2 (Локально)
AnnounceFlags: 10 (Локально)
TimeJumpAuditOffset: 28800 (Локально)
MinPollInterval: 6 (Локально)
MaxPollInterval: 10 (Локально)
MaxNegPhaseCorrection: 172800 (Локально)
MaxPosPhaseCorrection: 172800 (Локально)
MaxAllowedPhaseOffset: 300 (Локально)
FrequencyCorrectRate: 4 (Локально)
PollAdjustFactor: 5 (Локально)
LargePhaseOffset: 50000000 (Локально)
SpikeWatchPeriod: 900 (Локально)
LocalClockDispersion: 10 (Локально)
HoldPeriod: 5 (Локально)
PhaseCorrectRate: 7 (Локально)
UpdateInterval: 100 (Локально)
NtpClient (Локально)
DllName: C:Windowssystem32w32time.dll (Локально)
Enabled: 1 (Локально)
InputProvider: 1 (Локально)
CrossSiteSyncFlags: 2 (Локально)
AllowNonstandardModeCombinations: 1 (Локально)
ResolvePeerBackoffMinutes: 15 (Локально)
ResolvePeerBackoffMaxTimes: 7 (Локально)
CompatibilityFlags: 2147483648 (Локально)
EventLogFlags: 1 (Локально)
LargeSampleSkew: 3 (Локально)
SpecialPollInterval: 3600 (Локально)
Type: NT5DS (Локально)
NtpServer (Локально)
DllName: C:Windowssystem32w32time.dll (Локально)
Enabled: 1 (Локально)
InputProvider: 0 (Локально)
AllowNonstandardModeCombinations: 1 (Локально)
VMICTimeProvider (Локально)
DllName: C:WindowsSystem32vmictimeprovider.dll (Локально)
Enabled: 1 (Локально)
InputProvider: 1 (Локально)
Включение синхронизации внутренних часов с внешним источником
Объявление NTP-сервера в качестве надежного
- [HKEY_LOCAL_MACHINESYSTEMCurrentControlSetServicesW32TimeConfig]
«AnnounceFlags»=dword:0000000a - w32tm /config /reliable:yes
NTP-сервер по умолчанию включен на всех контроллерах домена, однако его можно включить и на рядовых серверах.
- [HKEY_LOCAL_MACHINESYSTEMCurrentControlSetServicesW32TimeTimeProvidersNtpServer]
«Enabled»=dword:00000001
Задание списка внешних источников для синхронизации
- [HKEY_LOCAL_MACHINESYSTEMCurrentControlSetServicesW32TimeParameters]
«NtpServer»=»time.nist.gov,0x8 ntp1.imvp.ru,0x8 ntp2.imvp.ru,0x8 time.windows.com,0x8 ru.pool.ntp.org,0x8» - w32tm /config /manualpeerlist:»time.nist.gov,0x8 ntp1.imvp.ru,0x8 ntp2.imvp.ru,0x8 time.windows.com,0x8 ru.pool.ntp.org,0x8″

Флаг 0×8 на конце означает, что синхронизация должна происходить в режиме клиента NTP, через предложенные этим сервером интервалы времени. Для того, чтобы задать свой интервал синхронизации, необходимо использовать флаг 0×1.
Задание интервала синхронизации с внешним источником
Время в секундах между опросами источника синхронизации, по умолчанию 900с = 15мин. Работает только для источников, помеченных флагом 0×1.
- [HKEY_LOCAL_MACHINESYSTEMCurrentControlSetServicesW32TimeTimeProvidersNtpClient]
«SpecialPollInterval»=dword:00000384
Установка минимальной положительной и отрицательной коррекции
Максимальная положительная и отрицательная коррекция времени (разница между внутренними часами и источником синхронизации) в секундах, при превышении которой синхронизация не происходит. Рекомендую значение 0xFFFFFFFF, при котором коррекция сможет производиться всегда.
[HKEY_LOCAL_MACHINESYSTEMCurrentControlSetServicesW32TimeConfig]
«MaxPosPhaseCorrection»=dword:FFFFFFFF
«MaxNegPhaseCorrection»=dword:FFFFFFFF
Все необходимое одной строкой
w32tm.exe /config /manualpeerlist:»time.nist.gov,0x8 ntp1.imvp.ru,0x8 ntp2.imvp.ru,0x8 time.windows.com,0x8 pool.ntp.org,0x8″ /syncfromflags:manual /reliable:yes /update
Полезные команды
- Применение внесенных в конфигурацию службы времени изменений
w32tm /config /update - Принудительная синхронизация от источника
w32tm /resync /rediscover - Отображение состояния синхронизации контроллеров домена в домене
w32tm /monitor - Отображение текущих источников синхронизации и их статуса
w32tm /query /peers
Настройка NTP сервера и клиента групповой политикой
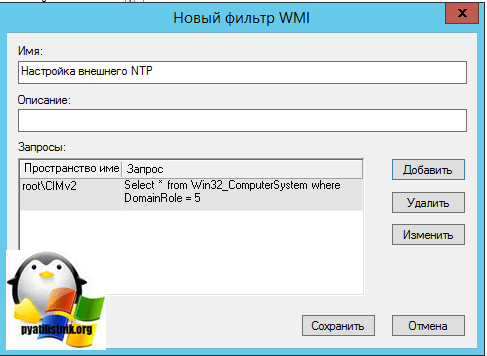
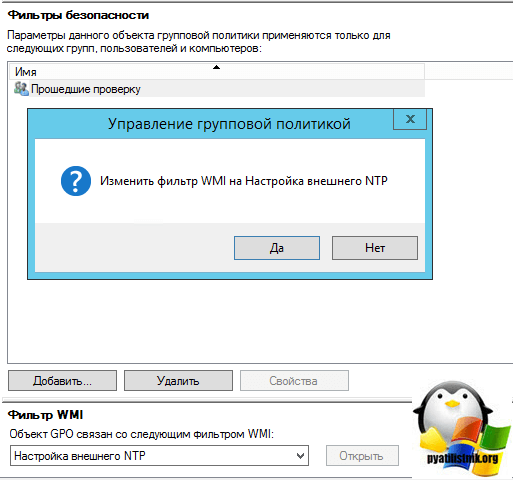
Раз уж у нас с вами домен Active Directory, то глупо не использовать групповые политики, для массовой настройки серверов и рабочих станций, я покажу как настроить ваш NTP сервер в windows и клиента. Открываем оснастку «Редактор групповых политик». Перед тем как настроить наш NTP сервер в Windows, нам необходимо создать WMI фильтр, который будет применять политику, только к серверу мастера PDC.
Вводим имя запроса, пространство имен, будет иметь значение «rootCIMv2» и запрос «Select * from Win32_ComputerSystem where DomainRole = 5». Сохраняем его.
Затем вы создаете политику на контейнере Domain Controllers.
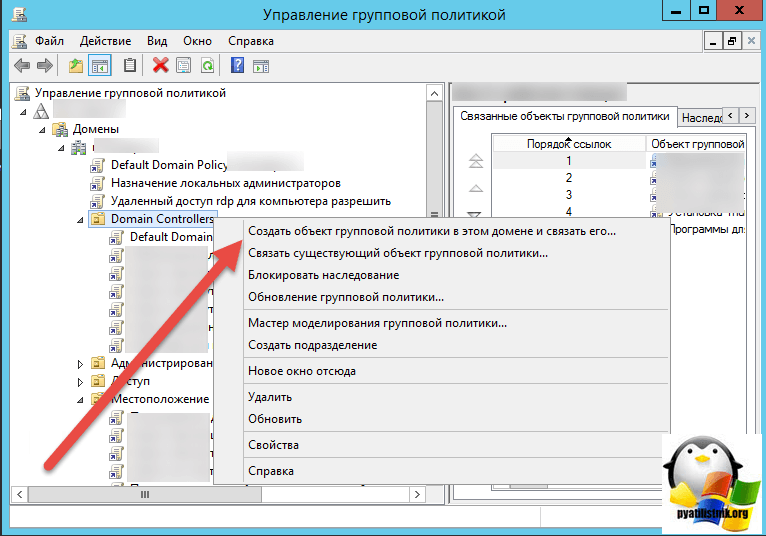
В самом низу политики применяете ваш созданный WMI фильтр.
Переходим в ветку: Конфигурация компьютера > Политики > Административные шаблоны > Система > Служба времени Windows > Поставщики времени.
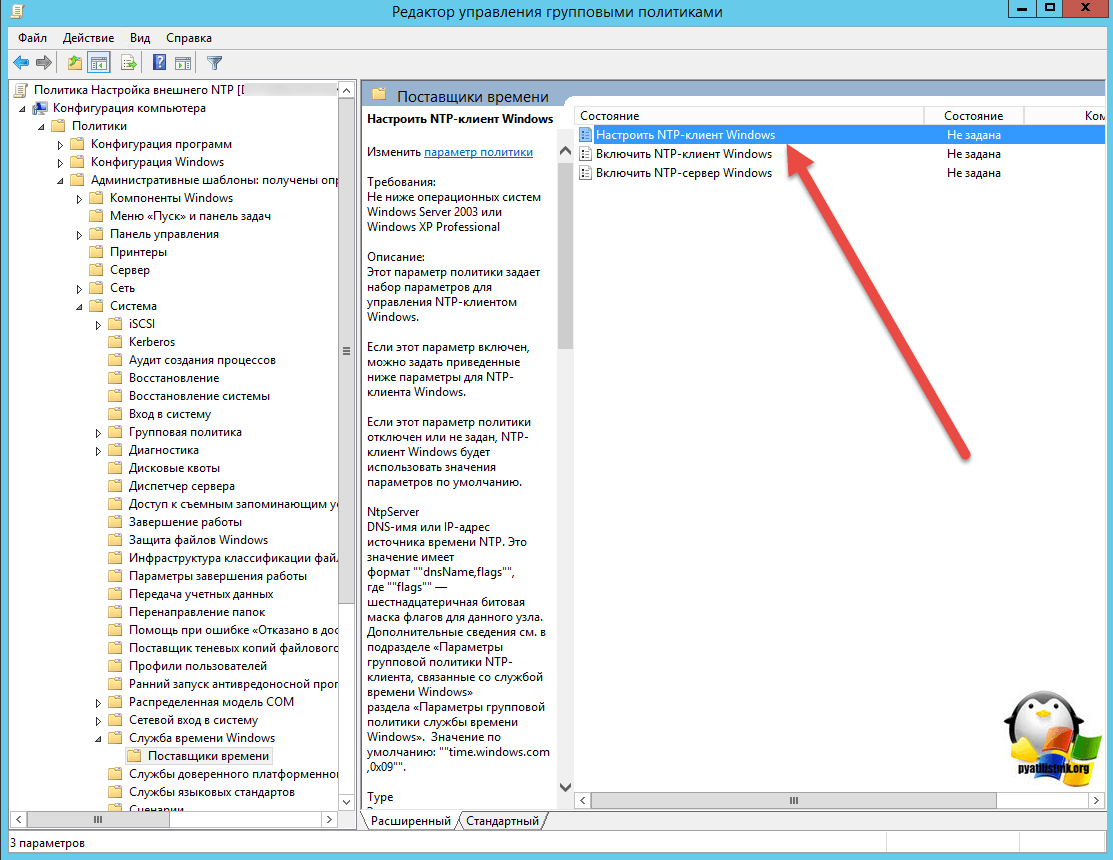
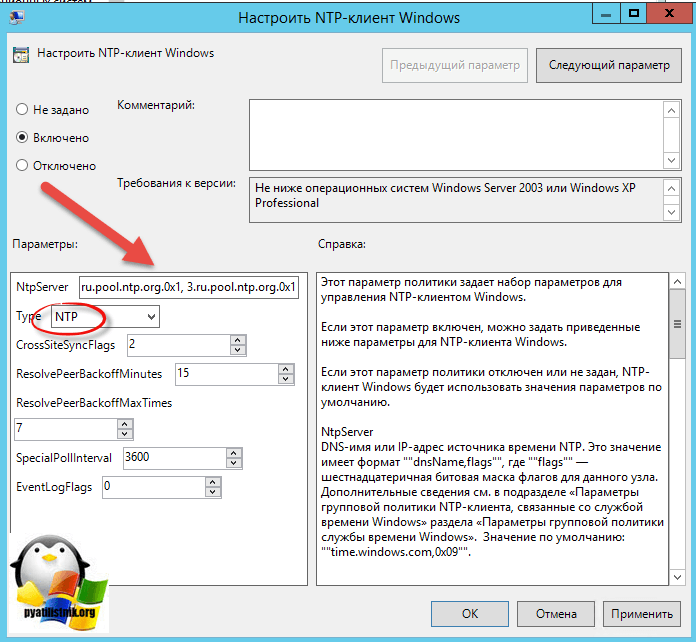
Тут открываем политику «Настроить NTP-клиент Windows». Задаем параметры
- NtpServer: 0.ru.pool.ntp.org,0x1 1.ru.pool.ntp.org,0x1 2.ru.pool.ntp.org,0x1 3.ru.pool.ntp.org,0x1
- Type: NTP
- CrossSiteSyncFlags: 2. Двойка означает, если этот параметр равен 2 (Все), можно использовать любого участника синхронизации. Это значение игнорируется, если не задано значение NT5DS. Значение по умолчанию: 2 (десятичное) (0x02 (шестнадцатеричное))
- ResolvePeerBackoffMinutes: 15. Это значение, выраженное в минутах, определяет интервал ожидания службы W32time перед попыткой разрешения DNS-имени в случае неудачи. Значение по умолчанию: 15 минут
- Resolve Peer BAckoffMaxTimes: 7. Это значение определяет число попыток разрешения DNS-имени, предпринимаемых службой W32time перед перезапуском процесса обнаружения. При каждом неудачном разрешении DNS-имени интервал ожидания перед следующей попыткой удваивается. Значение по умолчанию: семь попыток.
- SpecilalPoolInterval: 3600. Это значение параметра NTP-клиента, выраженное в секундах, определяет частоту опроса настроенного вручную источника времени, который использует особый интервал опроса. Если для параметра NTPServer установлен флаг SpecialInterval, клиент использует значение, заданное как SpecialPollInterval, вместо значений MinPollInterval и MaxPollInterval, чтобы определить частоту опроса источника времени. Значение по умолчанию: 3600 секунд (1 час).
- EventLogFlags: 0
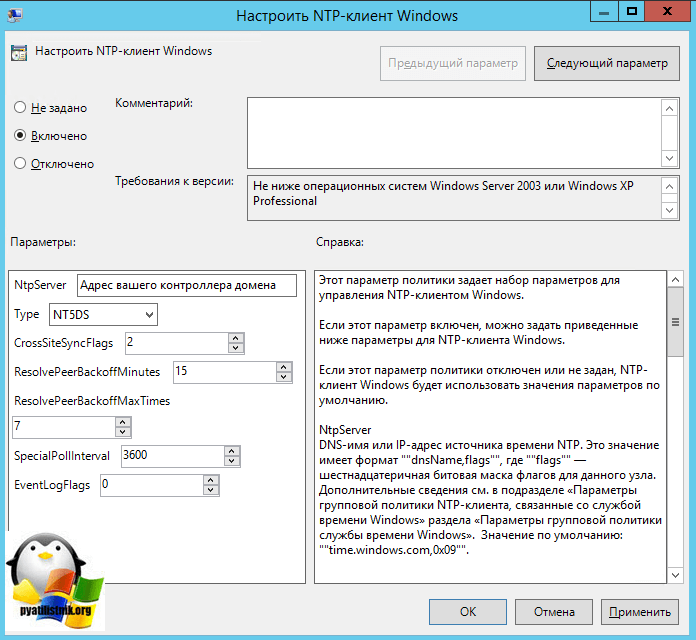
Делаем отдельную групповую политику для клиентских рабочих машин, вот с такими параметрами.
- NtpServer: Адрес вашего контроллера домена с ролью PDC.
- Type: NT5DS
- CrossSiteSyncFlags: 2
- ResolvePeerBackoffMinutes: 15
- Resolve Peer BAckoffMaxTimes: 7
- SpecilalPoolInterval: 3600
- EventLogFlags: 0
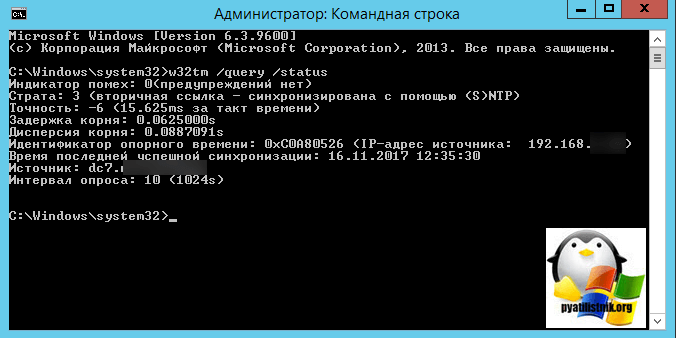
Далее идем на клиента и обновляем групповые политики gpupdate /force и вводим команду w32tm /query /status
Особенности виртуализированных контроллеров домена
Контроллеры домена, работающие в виртуализированной среде, требуют к себе особенного отношения.
- Средства синхронизации времени виртуальной машины и хостовой ОС должны быть выключены. Во всех адекватных системах виртуализации (Microsoft, vmWare и т. д.) присутствуют компоненты интеграции гостевой ОС с хостовой, которые значительно повышают производительность и управляемость гостевой системой. Среди этих компонентов всегда есть средство синхронизации времени гостевой ОС с хостовой, которое очень полезно для рядовых машин, но противопоказано для контроллеров домена. Потому как в этом случае весьма вероятен цикл, при котором контроллер домена и хостовая ОС будут синхронизировать друг друга. Последствия печальны.
- Для корневого PDC синхронизация с внешним источником должна быть настроена всегда. В виртуальной среде часы не настолько точны как в физической, потому как виртуальная машина работает с виртуальным процессором и прерываниями, для которых характерно как замедление, так и ускорение относительно «обычной» частоты. Если не настроить синхронизацию виртуализированного корневого PDC с внешним источником, время на всех компьютерах предприятия может убегать/отставать на пару часов в сутки. Не трудно представить неприятности, которые может принести такое поведение.
Источник
How to Configure NTP Server on Windows Server 2019
Network Time Protocol (NTP) runs on the Transport Layer port 123 UDP and enables accurate time synchronization for network computers. This irons out time inconsistencies on servers and clients during file logging or replication of server databases among other resources.
In this article, we’ll outline the process of installing, configuring, and querying an NTP server on Windows Server 2019.
NTP Server
NTP servers utilize the Network Time Protocol to send time signals to servers across the globe upon request. NTP servers use the Universal Time Coordinated (UTC) time source for time signal synchronization.
The main purpose of NTP servers is to provide time synchronization for servers and computer networks with other major network servers and clients across the globe. In turn, this streamlines communications and transactions all over the world.
Installing and Configuring an NTP Server on Windows Server 2019
The process of installing, configuring, and querying an NTP Server on Windows Server 2019 is quite straightforward.
Set the NTP service to Automatic option
To start off, Hit Windows Key + R to launch the Run dialogue. Next, type services.msc and hit ENTER.
In the ‘Services’ window, locate the service ‘Windows Time’. Right-click and select the ‘Properties’ option as shown:
On the pop-up window, select the Startup type as ‘Automatic’.
Finally, click on ‘OK’ and then ‘Apply’.
Configuring NTP Server using Registry Editor
As before, launch the run dialogue by pressing Windows Key + R. Then type ‘regedit’ and hit ENTER.
The Registry editor will be launched as shown:
Navigate to the path shown below:
ComputerHKEY_LOCAL_MACHINESYSTEMCurrentControlSetServicesW32TimeTimeProvidersNtpServer
On the right pane, locate and double-click the ‘Enabled’ file as shown:
Set the Value data to 1 and click OK.
Next, follow this path.
Computer>HKEY_LOCAL_MACHINE>SYSTEM>CurrentControlSet>Services>W32Time>Config
At the right pane locate the ‘Announce Flags’ file.
Double click on the file and set its value to 5 in the ‘Value Data’ section.
Finally, reboot the NTP server for the changes to take place. Head back to the services Window, right-click on ‘Windows Time’ and select ‘Restart’
Configuring NTP Server on Windows 2019 using Windows PowerShell
If you love working in Powershell, launch Powershell as Administrator and enable NTP server using the command:
Set-ItemProperty -Path “HKLM:SYSTEMCurrentControlSetServicesw32timeTimeProvidersNtpServer” -Name “Enabled” -Value 1
Next, configure Announce Flags value as shown:
Set-ItemProperty -Path “HKLM:SYSTEMCurrentControlSetservicesW32TimeConfig” -Name “AnnounceFlags” -Value 5
Finally, restart the NTP server using the command:
Restart-Service w32Time
Important Note: UDP port 123 must be open for the NTP server traffic to reach your Windows Server 2019. If the NTP servers are unreachable, you can check your firewall settings to fix this.
Other useful commands
- w32tm /query /configuration to check and shows the NTP server configuration.
- w32tm /query /peers for checking the list of NTP servers configured alongside their configuration status
- w32tm /resync /nowait to force-synchronize time with your NTP server.
- w32tm /query /source to show the source of the time.
- w32tm /query /status to reveal NTP time service status.
Final take
Now your Windows Server 2019 clock is synchronized with time the NTP server’s pool.ntp.org and works as NTP client. You can achieve full network and accompanying infrastructure time synchronization by synchronizing all network workstations, servers, routers, hubs, and switches.
Since NTP servers operate over the UDP protocol using TCP/IP, these network infrastructures must be working efficiently for effective NTP server operation. In case you want to make time servers on windows server 2019 hosted on a virtual machine, you should disable the virtual machine time synchronization settings and sync their time with the domain Windows Server 2019.
Источник
Tutorial Configure NTP Server in Windows Server 2019. It is important to have accurate timing on all clients and servers. If time is not accurate on computers, serious network problems will occur. Fortunately, Windows has taken this into account. The service Network Time Protocol (NTP) has been around since Windows XP and Windows Server 2003. Also, most Unix and Linux versions of the NTP service supported the first version.
In this article, we will teach you how to configure the NTP server in windows server 2019.
You can Choose your perfect Windows VPS Server Packages from eldernode.
A) Open the Registry Editor
1. Click on the start menu and search for the Run.
2. Type Regedit and hit Enter. A window will open as shown below.
3. In the window that opens, select HKEY_LOCAL_MACHINE.
4. Follow the path below to reach the NtpServer option.
SYSTEM>CurrentControlSet>Services>W32Time>TimeProviders>NtpServer 5. On the right page, double-click Enabled.
In the Value data section, change the value from 0 to 1 and click ok.
6. Continue the path below until you reach the config option.
Computer>HKEY_LOCAL_MACHINE>SYSTEM>CurrentControlSet>Services>W32Time>Config. From the page on the right, double-click AnnounceFlags and change its value to 5 and click ok.
The following options explain the information about AnnounceFlags:
0x00 Not a time server
0x01 Always time server
0x02 Automatic time server
0x04 Always reliable time server
0x08 Automatic reliable time server
default value for domain members and stand-alone clients and servers is 10.
B) Restart NTPServer
1. Open the Services by searching in start menu or hitting on the windows key.
2. In the window that opens, select the windows time option. Then right-click on it and select Restart.
C) Open UDP port 123 in Firewall
You can follow the Learn how to open a port on a Windows firewall.
Note that this port is UDP and not TCP.
Dear user, we hope you would enjoy this tutorial, you can ask questions about this training in the comments section, or to solve other problems in the field of Eldernode training, refer to the Ask page section and raise your problem in it as soon as possible. Make time for other users and experts to answer your questions.
Goodluck.
You may also be interested in some related articles:
В этом видео мы изучим протокол NTP и настроем его на Windows Server 2019.
-
Виктор Черемных -
13 июля, 2021 -
No Comments
Добавить комментарий
Ваш адрес email не будет опубликован. Обязательные поля помечены *
Комментарий *
Имя *
Email *
Сайт
Группа в VK
Обнаружили опечатку?
Сообщите нам об этом, выделите текст с ошибкой и нажмите Ctrl+Enter, будем очень признательны!
Свежие статьи

Создание общего Samba ресурса на Astra Linux Special Edition 1.7
30.01.2023

Добавление общей smb папки на Astra Linux Special Edition 1.7
27.01.2023

Создание общей папки для Astra Linux Special Edition 1.7 на VirtualBox
25.01.2023

#10. Настройка оценок и отчетов в системе Moodle
23.01.2023

Программный комплекс ViPNet Client
23.01.2023
Облако меток
PrevБазовая настройка Windows Server 2019
Создание DNS сервера на Windows Server 2019Next
Похожие статьи

Настройка файлового сервера на Windows Server 2019
В этом видео вы научитесь создавать и настраивать файловый сервер на Windows Server 2019.

Создание виртуальных машин в Hyper-V
В этом видео вы научитесь создавать виртуальные машины, коммутаторы и диски в Hyper-V.

Установка Windows Admin Center
В этом видео вы научитесь устанавливать Windows Admin Center для управления Windows Server.

Установка, настройка и обзор Hyper-V на Windows Server 2019
В этом видео вы научитесь устанавливать и настраивать гипервизор Hyper-V на Windows Server 2019.

There is no question about it, having accurate time in your environment set in critical infrastructure systems is a must. Many business-critical applications and infrastructure systems rely on accurate time synchronized between them to ensure the system functions as expected. Time skew can cause all kinds of weirdness when it is misconfigured or out of sync between different servers/systems. This is especially true in a Windows Server Active Directory domain. Having accurate time between a client computer and domain controllers is essential. Let’s take a look at how to set ntp server Windows 2016 or Windows 2019 to see how this can be easily carried out.
What is NTP?
Wen it comes to synchronizing time in most enviornments, Network Time Protocol (NTP) is the protocol that is used to ensure accurate time across your environent. In most environments, NTP servers, special time servers, are configured that provide an external time source for which your internal servers can synchronize with.
There are several widely known NTP IP addresses on the Internet that provide reliable time sources for your network. The NTP.org servers are one such set of time servers that provide an NTP source for configuration.
There are a few NTP values to be aware of:
- NTP Server – This is a specialized server that is able to detremine the precise time from an external timing reference such as GPS and passes these precise time values on to your network
- Offset – This is the difference in time between the external time server and the time on a local client computer. The larger the offset, the more inaccurate the timing source is.
- Delay – This is the value of the round-trip time (latency) of the timing message between the client to the server and back again.
How Time is synchronized in a Windows Server domain
In a Windows domain, Microsoft has default configuration in place that takes care of a good portion of the NTP configuration. Starting with Windows 2000 Server, Windows clients are configured as NTP Clients. When configured as an NTP client, Windows computers only attempt to contact the domain controller for NTP synchronization or a manually specified NTP server.

Microsoft has made the domain controller the default in a Windows domain since it makes sense that clients already have a secure channel established with DCs for other types of communications. Additionally, accurate and synchronized time between domain controllers and clients is especially important for all kinds of things such as logins, group policy synchronization and other tasks/operations.
The order of operations or hierarchy in a Windows domain is as follows:
- Domain members attempt to synchronize time with any domain controller located in the domain
- Domain controllers synchronize with a more authoritative domain controller
- The first domain controller that is installed in the environment is automatically configured to be a reliable time source.
- Other than the first domain controller installed, the PDC emulator (if role has been moved from the first DC installed) generally holds the position of best time source.
An important point to consider and that comes into play when thinking about why we set ntp server in Windows 2016 or Windows 2019 is the authoritative domain controller must have a reliable source to synchronize with as well. This is generally an external time server outside of the domain hierarchy.
Now that we know how the domain hierarchy for time is configured, how is the external time source configured on your domain controller that is configured as the reliable source of time?
Configuring Windows Time Service with W32tm.exe
When it comes to Windows Server environments like Windows Server 2016 or Windows Server 2019, there is a special Windows service that controls the time synchronization of your Windows hosts. This is the Windows Time Service.
Microsoft provides a command line tool to interact with the Windows Time Service called W32tm.exe. This has been included in Windows operating systems since Windows XP/Windows 2003 and later. It can be used to configure Windows Time service parameters as well as diagnose time service problems. This is generally the tool of choice when it comes to configuring, monitoring, and administering Windows Time.
Using the W32tm.exe utility is fairly straightforward. It can be used from a normal command prompt as well as from a PowerShell prompt. There are several command parameters included that allow not only configuring the NTP servers you want to query, but also parameters that allow viewing the low level registry configuration as well as the synchronization status.
You can read the official Microsoft KB on the Windows Time service and the W32tm.exe utility here:
- https://docs.microsoft.com/en-us/windows-server/networking/windows-time-service/windows-time-service-tools-and-settings
However, there are a few commands I would like to show you for the purposes of configuring your Domain controller that is to be the reliable time source (PDC Emulator) for your domain.
The first command is the command line entry to specify your NTP servers, which in this case I am using the NTP.org servers to set as the source of my NTP synchronization.
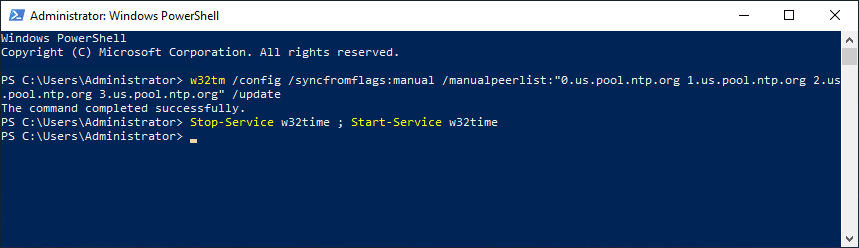
w32tm /config /syncfromflags:manual /manualpeerlist:"0.us.pool.ntp.org 1.us.pool.ntp.org 2.us.pool.ntp.org 3.us.pool.ntp.org" /update

Stop-Service w32time
Start-Service w32time
If you want to view the status of the NTP synchronization on your server after you have configured the values and restarted the w32time service, you can use the following command:
w32tm /query /status
You can also check the values configured in your registry key hkey local machine system currentcontrolset services w32time config using the commands below. You can drill into the configuration parameters using the /dumpreg /subkey command.
w32tm /dumpreg

w32tm /dumpreg /subkey:parameters
Final Thoughts
As shown, you can easily set NTP Server Windows 2016 or Windows 2019 using the w32tm command utility that allows interacting with the time service in Windows Server.
In a Windows domain, you want to configure your authoritative time source domain controller, which by default is the PDC Emulator, to pull time information from an authoritative source like NTP.org or some other reliable NTP time server.
After configuring the time source, the other domain controllers will synchronize with this server and then the Windows clients joined to the domain will synchronize with the domain controllers that have the corrected time from the authoritative server.