В больших компьютерных сетях, когда рабочее место пользователя не привязано к определенному компьютеру удобно использовать перемещаемые профили пользователей.
Рассмотрим процесс настройки перемещаемых профилей пользователей с использованием групповой политики.
Первым делом, создадим специальную группу. Назовем ее, к примеру, Users with roaming profiles.

Сразу после создания группы можно определить для кого и на каком компьютере будут действовать перемещаемые профили.
Поскольку нас интересует создание перемещаемых профилей для всех пользователей мы добавим в группу Users with roaming profiles всех пользователей домена и все компьютеры домена.

На этом подготовка группы закончена, переходим к работе с файловой системой. На сервере, который будет хранилищем перемещаемых профилей создадим новый общий ресурс.

Если не стоит задачи управлять общим ресурсом (к примеру создавать квоты и ограничения), то выбираем профиль SMB Share ProFile

Если требуется настройка квот и ограничений, либо общий ресурс создается на удаленном сервере то потребуется установка дополнительных компонентов.

Если нужно создать общий ресурс на удаленном сервере, то Компоненты ролей должны быть установлены на управляемом и управляющем серверах.
После установки дополнительных компонентов перейдем непосредственно к созданию общей папки.
Определяем параметры Общего ресурса. К этому моменту папка для хранение перемещаемых профилей должна быть создана.


На следующем шаге включим галочку Enable acces-based enumeration. В этом случае пользователь будет иметь доступ только к файлам своего профиля.

Для организации совместного доступа потребуется произвести настройку прав
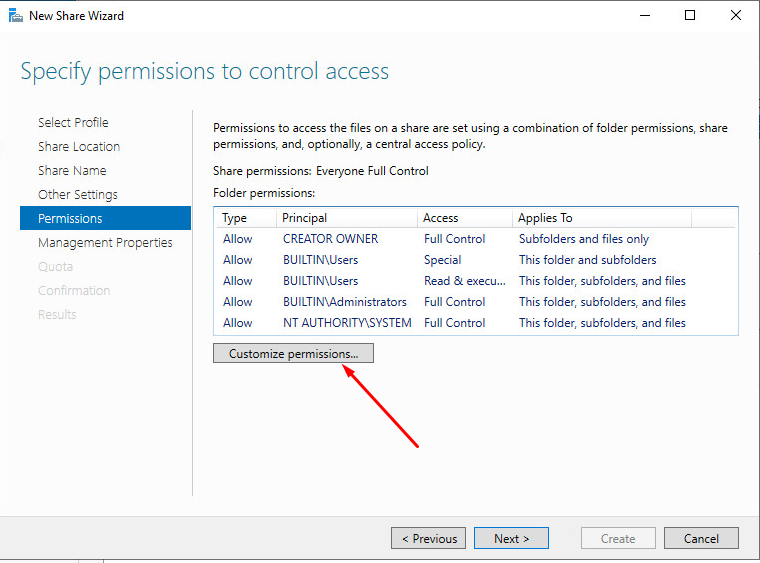
В частности нужно отключить наследование

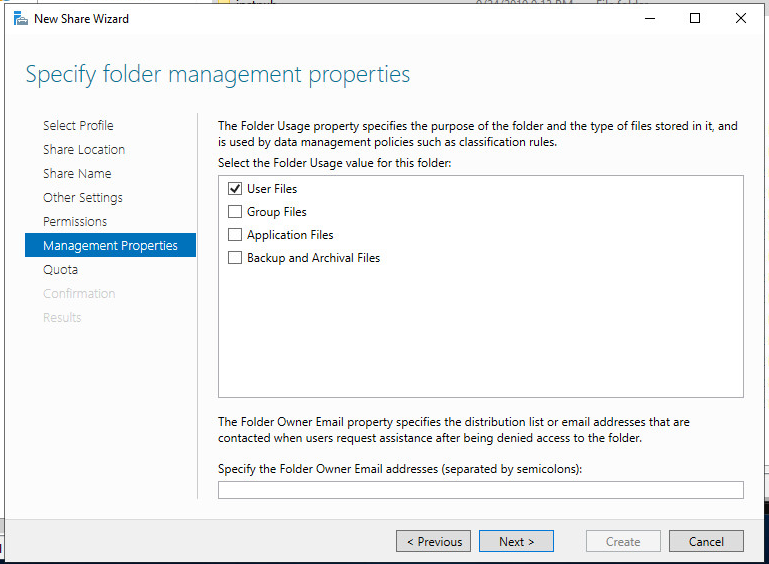
Выбираем пункт

В данном примере нас будут интересовать только пользовательские файлы
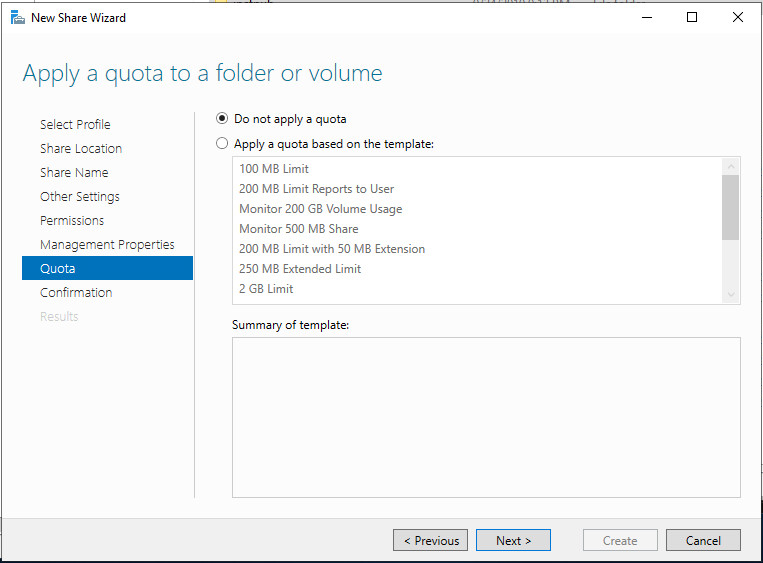
Если добавление квот не требуется, продолжим работу мастера
Подготовка общего ресурса завершена, осталось все проверить и нажать кнопку Create.

Создав общий ресурс перейдем в редактор групповой политики для окончательно настройки перемещаемых профилей.
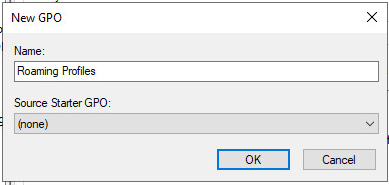
Создадим новый объект групповой политики
Откроем его для изменения и найдем параметр Set roaming path for all users logging omto this computer в ветке Computer Configuration-Profiles- Administartive Template Policity definitions-System-User Profile

Указываем путь к созданной ранее общей папке

Технология Microsoft FSLogix используется для управления профилями пользователей и позволяет заменить перемещаемые профили (Roaming Profiles) и User Profile Disks (UPD) в сценариях RDS, VDI и Windows Virtual Desktop (WVD). Сервис FSLogix позволяет динамически подключать контейнеры с профилями пользователей из сетевых ресурсов. Возможно использование как в on-premises решениях, так и в Azure (в качестве хранилища профилей можно использовать Azure Files). В этой статье мы рассмотрим, как использовать перемещаемые профили пользователей FSLogix вместо User Profile Disks в RDS развертываниях Windows Server 2019/2022.
Содержание:
- Для чего нужные контейнеры FSLogix?
- Установка и настройка FSLogix для профилей пользователей на Windows Server 2019 RDS
- Расширенная настройка профилей FSLogix на Windows Server RDS
Для чего нужные контейнеры FSLogix?
Концепция FSLogix похоже на привычную технологию RDS User Profile Disks (UPD), когда профили пользователей хранятся в виде виртуальных VHDX дисков и подключаются по сети при входе пользователя в систему. Однако FSLogix позволяет преодолеть многие недостатки UPD в средах RDS и позволяет:
- Существенно увеличить скорости загрузки профиля по сети, и как следствие уменьшается время входа/выхода в систему для пользователя;
- Оптимизирован для приложений Office 365 (Microsoft 365 for Enterprise);
- Один и тот же профиль можно использовать в разных RDS коллекциях, и фермах RDS VDI и даже физических компьютерах;
- Профиль FSLogix можно подключать сразу в несколько сессий (на чтение);
- В UPD поисковый индекс Windows очищается при выходе пользователя и его нужно генерировать заново в следующий раз. В FSLogix можно сохранять индекс в перемещаемом профиле;
- Обеспечивает доступность файлов кэша Outlook (OST, Outlook Cached Mode), индекса (поиска) Outlook, кэша и данных MS Teams и т.д.
- Перемещаемые FSLogix профили можно исопльзовать даже на отдельностоящих хостах RDSH.
Решение FSLogix бесплатно для использования в on-premises развертываниях RDS, при условии, что у вас приобретены RDS CAL и установлены на сервере лицензирования RDS.
Установка и настройка FSLogix для профилей пользователей на Windows Server 2019 RDS
Рассмотрим, как установить и настроить FSLogix для терминальной RDS фермы на базе Windows Server 2019.
- Скачайте FSLogix по этой ссылке (https://aka.ms/fslogix/download, около 180 Мб). Доступ к утилите свободный;
- Распакуйте архив и установите агент FSLogic FSLogix_Appsx64ReleaseFSLogixAppsSetup.exe на RDSH сервера;
- Затем скопируйте файлы административных политик FSLogix в центральное хранилище административных шаблонов GPO на контроллере домена (fslogix.admx в PolicyDefinitions, и fslogix.adml в PolicyDefinitionsen-US).
Создайте на файловом сервере сетевую папку, в которой будут хранится контейнеры с профилями пользователей FSLogic. Например, \msk-fsShareProfiles.
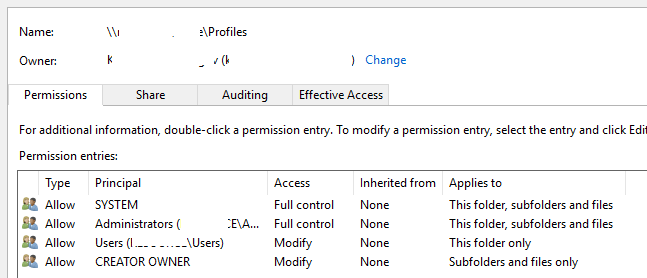
Задайте следующие NTFS права доступа на сетевую папку:
| User Account | Folder | Permissions |
|---|---|---|
| Users | This Folder Only | Modify |
| Creator / Owner | Subfolders and Files Only | Modify |
Теперь вы можете создать GPO для настройки параметров FSLogix для RDS серверов.
Откройте консоль управления доменными GPO (
gpmc.msc
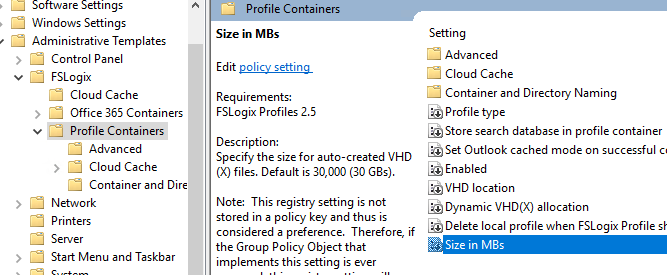
), создайте новую политику и назначьте ее на OU с вашими RDSH серверами. Разверните Computer Configuration -> Policies -> Administrative Templates -> FSLogix. Настройте следующие параметры GPO:
- Profile Containers -> Enabled – включить профили FSLogix;
- Profile Containers -> VHD Location – указать UNC путь к каталогу профилей (\msk-fsShareProfiles);
- Profile Containers -> Delete local profile when FSLogix Profile should apply – удалить локальный профиль при использовании FSLogix;
- Profile Containers -> Size in MB – максимальный размер файла профиля, по умолчанию 30000 (30 Гб);
- Profile Containers -> Dynamic VHD(X) allocation = Enabled. Если не включить эту политику, то VHD/VHDX диски профилей пользователей сразу создаются максимального размера;
- Profile Containers -> Advanced -> Prevent login with temporary profile – не создавать временные профили пользователей;
- Profile Containers -> Advanced -> Prevent login with failure – запретить вход при неполадках FSLogix;
- Profile Containers -> Advanced -> Locked VHD retry count = 3, указать количество попыток VHD(X) файл, если он заблокирован другим процессом;
- Profile Containers -> Container and Directory Naming -> Virtual disk type – использовать VHDX тип виртуального диска для профиля вместо стандартного VHD;
- Profile Containers -> Container and Directory Naming -> Swap directory name components – использовать %username%_SID в качестве формата для каталогов профилей пользователей (вместо SID_%username%);
- Profile Containers -> Store search database in profile container = Disabled (не хранить в профиле индексную базу Windows Search);
- Enable logging = All logs enabled — включить логи FSLogix
- Path to logging files – путь к логам FSLogix (\msk-fsShareFSLogixLogs %COMPUTERNAME%);
- Days to keep log files – сколько дней хранить логи (7 дней достаточно).
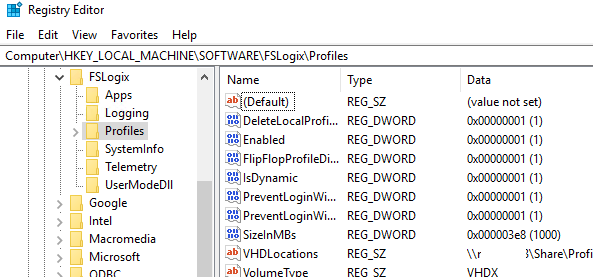
Перезагрузите Windows Server, чтобы применить новые настройки GPO. Системные настройки профилей FSLogix хранятся в следующей ветке реестра HKLMSOFTWAREFSLogixProfiles.
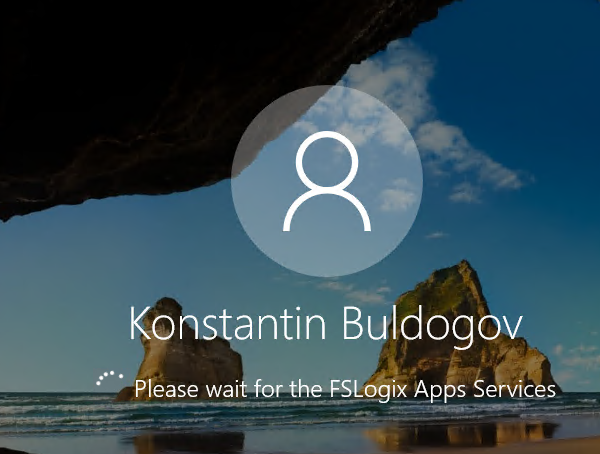
Теперь при входе RDP пользователя на экране должно появляться уведомление:
Please wait for the FSLogix Apps Services
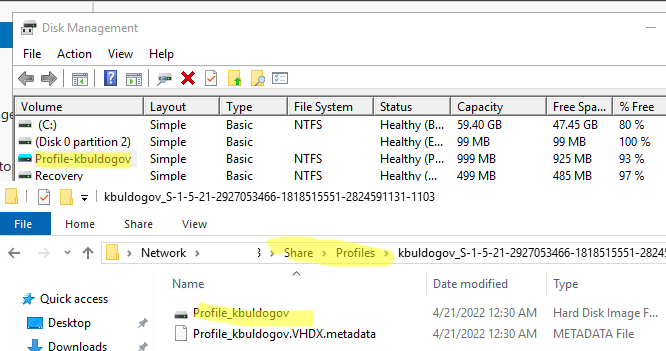
После входа вы можете запустить консоль управления дисками (Disk Management) и убедиться, что FSLogix профиль пользователя смонтирован как VHDX диск. В указанном сетевом каталоге при этом появился новый каталог для профиля пользователя.
В каталоге
C:Program FilesFSLogixApp
s есть несколько дополнительных утилит для администратора:
Расширенная настройка профилей FSLogix на Windows Server RDS
При установке агента FSLogixAppsSetup на сервере, в списке локальных групп появляются несколько дополнительных групп. Вы можете вывести этот список с помощью командлета Get-LocalGroup:
Get-LocalGroup -Name "*fslo*"
- FSLogix ODFC Exclude List — Members of this group are on the exclude list for Outlook Data Folder Containers
- FSLogix ODFC Include List — Members of this group are on the include list for Outlook Data Folder Containers
- FSLogix Profile Exclude List — Members of this group are on the exclude list for dynamic profiles
- FSLogix Profile Include List — Members of this group are on the include list for dynamic profiles

Эти группы позволяют указать пользователей или группы, для которых нужно включить или отключить создание профилей FSLogix.
По умолчанию перемещаемые профили создаются для всех пользователей. Чтобы иметь возможность локального входа на сервер для группы администраторов при неполадках FSLogix, нужно добавить группу администраторов в локальную группу FSLogix Profile Exclude List.
Проще всего это сделать с помощью групповой политики Restricted Group (Computer Configuration -> Windows Settings -> Security Settings -> Restricted Groups -> Add Group -> FSLogix Profile Exclude List) или Group Policy Preferences (Computer Configuration –> Preferences –> Control Panel Settings –> Local Users and Group –> New -> Local Group -> FSLogix Profile Exclude List).
Более подробно использование GPO для добавления пользователей в локальные группы описано в отдельной статье.
Чтобы исключить определенные каталоги из перемещаемого профиля FSLogix, вы можете использовать файл redirection.xml. Каталоги из этого файла перенаправляются в локальные папки на диске сервера.
Путь к этому XML файлу с настройками задается в параметре GPO FSLogix -> Profile Containers -> Advanced -> Provide RedirXML file to customize redirections. Можно исключить Temp папки, каталоги кеша IE, Chrome и т.д.
Пример такого файла указан ниже:
<?xml version="1.0"?>
<FrxProfileFolderRedirection ExcludeCommonFolders="0">
<Excludes>
<Exclude Copy="0">AppDataLocalLow</Exclude>
<Exclude Copy="0">AppDataLocalPackages</Exclude>
<Exclude Copy="0">AppDataLocalMicrosoftWindowsTemporary Internet Files</Exclude>
<Exclude Copy="0">AppDataLocalMicrosoftWindowsExplorer</Exclude>
<Exclude Copy="0">AppDataLocalMicrosoftWindowsWebCache</Exclude>
<Exclude Copy="0">AppDataLocalTemp</Exclude>
<Exclude Copy="0">AppDataLocalDiagnostics</Exclude>
<Exclude Copy="0">AppDataLocalComms</Exclude>
<Exclude Copy="0">AppDataLocalGoogleChromeUser DataDefaultCache</Exclude>
</Excludes>
</FrxProfileFolderRedirection>
Проанализируйте профили пользователей и установленные программы и добавьте в файл новые исключения.
Добавьте исполняемые файлы FSLogix в исключения вашего антивируса (frxdrv.sys, frxdrvvt.sys, frxccd.sys, frxccd.exe, frxccds.exe, frxsvc.exe).
| title | description | ms.topic | author | ms.author | ms.date |
|---|---|---|---|---|---|
|
Deploy primary computers for Folder Redirection and Roaming User Profiles |
How to enable primary computer support and designate primary computers for users with Folder Redirection and Roaming User Profiles. |
article |
JasonGerend |
jgerend |
06/06/2019 |
Deploy primary computers for Folder Redirection and Roaming User Profiles
Applies to: Windows Server 2022, Windows 10, Windows 8, Windows 8.1, Windows Server 2019, Windows Server 2016, Windows Server 2012, Windows Server 2012 R2
This topic describes how to enable primary computer support and designate primary computers for users. Doing so enables you to control which computers use Folder Redirection and Roaming User Profiles.
[!IMPORTANT]
When enabling primary computer support for Roaming User Profiles, always enable primary computer support for Folder Redirection as well. This keeps documents and other user files out of the user profiles, which helps profiles remain small and sign on times stay fast.
Prerequisites
Software requirements
Primary computer support has the following requirements:
- The Active Directory Domain Services (AD DS) schema must be updated to include Windows Server 2012 schema additions (installing a Windows Server 2012 domain controller automatically updates the schema). For information about updating the AD DS schema, see Adprep.exe integration and Running Adprep.exe.
- Client computers must run Windows 10, Windows 8.1, Windows 8, Windows Server 2019, Windows Server 2016, Windows Server 2012 R2, or Windows Server 2012.
[!TIP]
Although primary computer support requires Folder Redirection and/or Roaming User Profiles, if you are deploying these technologies for the first time, it is best to set up primary computer support before enabling the GPOs that configure Folder Redirection and Roaming User Profiles. This prevents user data from being copied to non-primary computers before primary computer support is enabled. For configuration information, see Deploy Folder Redirection and Deploy Roaming User Profiles.
Step 1: Designate primary computers for users
The first step in deploying primary computers support is designating the primary computers for each user. To do so, use Active Directory Administration Center to obtain the distinguished name of the relevant computers and then set the msDs-PrimaryComputer attribute.
[!TIP]
To use Windows PowerShell to work with primary computers, see the blog post Digging a little deeper into Windows 8 Primary Computer.
Here’s how to specify the primary computers for users:
- Open Server Manager on a computer with Active Directory Administration Tools installed.
- On the Tools menu, select Active Directory Administration Center. Active Directory Administration Center appears.
- Navigate to the Computers container in the appropriate domain.
- Right-click a computer that you want to designate as a primary computer and then select Properties.
- In the Navigation pane, select Extensions.
- Select the Attribute Editor tab, scroll to distinguishedName, select View, right-click the value listed, select Copy, select OK, and then select Cancel.
- Navigate to the Users container in the appropriate domain, right-click the user to which you want to assign the computer, and then select Properties.
- In the Navigation pane, select Extensions.
- Select the Attribute Editor tab, select msDs-PrimaryComputer and then select Edit. The Multi-valued String Editor dialog box appears.
- Right-click the text box, select Paste, select Add, select OK, and then select OK again.
Step 2: Optionally enable primary computers for Folder Redirection in Group Policy
The next step is to optionally configure Group Policy to enable primary computer support for Folder Redirection. Doing so enables a user’s folders to be redirected on computers designated as the user’s primary computers, but not on any other computers. You can control primary computers for Folder Redirection on a per-computer basis, or a per-user basis.
Here’s how to enable primary computers for Folder Redirection:
- In Group Policy Management, right-click the GPO you created when doing the initial configuration of Folder Redirection and/or Roaming User Profiles (for example, Folder Redirection Settings or Roaming User Profiles Settings), and then select Edit.
- To enable primary computers support using computer-based Group Policy, navigate to Computer Configuration. For user-based Group Policy, navigate to User Configuration.
- Computer-based Group Policy applies primary computer processing to all computers to which the GPO applies, affecting all users of the computers.
- User-based Group Policy to applies primary computer processing to all user accounts to which the GPO applies, affecting all computers to which the users sign on.
- Under Computer Configuration or User Configuration, navigate to Policies, then Administrative Templates, then System, then Folder Redirection.
- Right-click Redirect folders on primary computers only, and then select Edit.
- Select Enabled, and then select OK.
Step 3: Optionally enable primary computers for Roaming User Profiles in Group Policy
The next step is to optionally configure Group Policy to enable primary computer support for Roaming User Profiles. Doing so enables a user’s profile to roam on computers designated as the user’s primary computers, but not on any other computers.
Here’s how to enable primary computers for Roaming User Profiles:
- Enable primary computer support for Folder Redirection, if you haven’t already.
This keeps documents and other user files out of the user profiles, which helps profiles remain small and sign on times stay fast. - In Group Policy Management, right-click the GPO you created (for example, Folder Redirection and Roaming User Profiles Settings), and then select Edit.
- Navigate to Computer Configuration, then Policies, then Administrative Templates, then System, and then User Profiles.
- Right-click Download roaming profiles on primary computers only, and then select Edit.
- Select Enabled, and then select OK.
Step 4: Enable the GPO
Once you have completed configuring Folder Redirection and Roaming User Profiles, enable the GPO if you have not already. Doing so permits it to be applied to affected users and computers.
Here’s how to enable the Folder Redirection and/or Roaming User Profiles GPOs:
- Open Group Policy Management
- Right-click the GPOs that you created, and then select Link Enabled. A checkbox should appear next to the menu item.
Step 5: Test primary computer function
To test primary computer support, sign in to a primary computer, confirm that the folders and profiles are redirected, then sign in to a non-primary computer and confirm that the folders and profiles are not redirected.
Here’s how to test primary computer functionality:
-
Sign in to a designated primary computer with a user account for which you have enabled Folder Redirection and/or Roaming User Profiles.
-
If the user account has signed on to the computer previously, open a Windows PowerShell session or Command Prompt window as an administrator, type the following command and then sign off when prompted to ensure that the latest Group Policy settings are applied to the client computer:
-
Open File Explorer.
-
Right-click a redirected folder (for example, the My Documents folder in the Documents library), and then select Properties.
-
Select the Location tab, and confirm that the path displays the file share you specified instead of a local path. To confirm that the user profile is roaming, open Control Panel, select System and Security, select System, select Advanced System Settings, select Settings in the User Profiles section and then look for Roaming in the Type column.
-
Sign in with the same user account to a computer that is not designated as the user’s primary computer.
-
Repeat steps 2–5, instead looking for local paths and a Local profile type.
[!NOTE]
If folders were redirected on a computer before you enabled primary computer support, the folders will remain redirected unless the following setting is configured in each folder’s folder redirection policy setting: Redirect the folder back to the local userprofile location when the policy is removed. Similarly, profiles that were previously roaming on a particular computer will show Roaming in the Type columns; however, the Status column will show Local.
More information
- Deploy Folder Redirection with Offline Files
- Deploy Roaming User Profiles
- Folder Redirection, Offline Files, and Roaming User Profiles overview
- Digging a little deeper into Windows 8 Primary Computer
В начале февраля выбрал для пробы один узел терминальной фермы на Windows Server 2012 R2 и запустил обновление до Windows Server 2019. Февраль на исходе, я в отпуске, катюсь на горных лыжах, а миграция всё ещё идёт: на ферме всего навсего пара тысяч с хвостиком профилей.
В общем, это совсем не рабочий сценарий.
Единственный вариант ускорить процесс это удалить все профили перед миграцией. Это можно сделать простым скриптом, который использует WMI Win32_UserProfile. После обновления профилей миграция пролетит быстро.
Что если профили содержат важную информацию и вам нужно всё же перенести её в новые профили? Тут вам придётся разработать план работ, который отражает вашу конкретную конфигурацию. Ничего универсального не существует (если только что-то коммерческое).
Если у вас терминальная ферма и профили лежат на шаре, то удаление вышеупомянутым скриптом затронет только локальные копии, на шаре информация сохранится.
Если профили только локальные (один сервер), то придется сделать их копию.
Если у вас была настроена переадресация папок профиля спомощью групповых политик, то после создания новых профилей переадресация восстановится, и пользователи увидят свои файлы. Это удобно для упрощения миграции.
Если вы используете персональные виртуальные диски для профилей пользователей терминальной фермы, то опять у вас много забот, и нужен специальный план.
Кстати, профили теперь имеют суффикс V6. Да, Windows 10 начала с V5, а теперь уже V6. Какая-то бесконечная миграция профилей.
Подробная история профилей Windows https://www.ivanti.com/blog/a-brief-history-of-windows-profiles
Официальная статья на эту тему https://support.microsoft.com/en-us/help/3056198/roaming-user-profiles-versioning-in-windows-10-and-windows-server
Filed under: Remote Desktop, Windows, Windows 10 | Tagged: Remote Desktop, Windows |
| title | description | TOCTitle | ms.topic | author | manager | ms.date | ms.author |
|---|---|---|---|---|---|---|---|
|
Deploying Roaming User Profiles |
Learn more about: Deploying Roaming User Profiles |
Deploying Roaming User Profiles |
article |
JasonGerend |
brianlic |
06/07/2019 |
jgerend |
Deploying Roaming User Profiles
Applies to: Windows Server 2022, Windows 10, Windows 8.1, Windows 8, Windows 7, Windows Server 2019, Windows Server 2016, Windows Server 2012 R2, Windows Server 2012, Windows Server 2008 R2
This topic describes how to use Windows Server to deploy Roaming User Profiles to Windows client computers. Roaming User Profiles redirects user profiles to a file share so that users receive the same operating system and application settings on multiple computers.
For a list of recent changes to this topic, see the Change history section of this topic.
[!IMPORTANT]
Due to the security changes made in MS16-072, we updated Step 4: Optionally create a GPO for Roaming User Profiles in this topic so that Windows can properly apply the Roaming User Profiles policy (and not revert to local policies on affected PCs).
[!IMPORTANT]
User customizations to Start is lost after an OS in-place upgrade in the following configuration:
- Users are configured for a roaming profile
- Users are allowed to make changes to Start
As a result, the Start menu is reset to the default of the new OS version after the OS in-place upgrade. For workarounds, see Appendix C: Working around reset Start menu layouts after upgrades.
Prerequisites
Hardware requirements
Roaming User Profiles requires an x64-based or x86-based computer; it isn’t supported by Windows RT.
Software requirements
Roaming User Profiles has the following software requirements:
-
If you are deploying Roaming User Profiles with Folder Redirection in an environment with existing local user profiles, deploy Folder Redirection before Roaming User Profiles to minimize the size of roaming profiles. After the existing user folders have been successfully redirected, you can deploy Roaming User Profiles.
-
To administer Roaming User Profiles, you must be signed in as a member of the Domain Administrators security group, the Enterprise Administrators security group, or the Group Policy Creator Owners security group.
-
Client computers must run Windows 10, Windows 8.1, Windows 8, Windows 7, Windows Vista, Windows Server 2012 R2, Windows Server 2012, Windows Server 2008 R2, or Windows Server 2008.
-
Client computers must be joined to the Active Directory Domain Services (AD DS) that you are managing.
-
A computer must be available with Group Policy Management and Active Directory Administration Center installed.
-
A file server must be available to host roaming user profiles.
- If the file share uses DFS Namespaces, the DFS folders (links) must have a single target to prevent users from making conflicting edits on different servers.
- If the file share uses DFS Replication to replicate the contents with another server, users must be able to access only the source server to prevent users from making conflicting edits on different servers.
- If the file share is clustered, disable continuous availability on the file share to avoid performance issues.
-
To use primary computer support in Roaming User Profiles, there are additional client computer and Active Directory schema requirements. For more information, see Deploy Primary Computers for Folder Redirection and Roaming User Profiles.
-
The layout of a user’s Start menu won’t roam on Windows 10, Windows Server 2019, or Windows Server 2016 if they’re using more than one PC, Remote Desktop Session Host, or Virtualized Desktop Infrastructure (VDI) server. As a workaround, you can specify a Start layout as described in this topic. Or you can make use of user profile disks, which properly roam Start menu settings when used with Remote Desktop Session Host servers or VDI servers. For more info, see Easier User Data Management with User Profile Disks in Windows Server 2012.
Considerations when using Roaming User Profiles on multiple versions of Windows
If you decide to use Roaming User Profiles across multiple versions of Windows, we recommend taking the following actions:
- Configure Windows to maintain separate profile versions for each operating system version. This helps prevent undesirable and unpredictable issues such as profile corruption.
- Use Folder Redirection to store user files such as documents and pictures outside of user profiles. This enables the same files to be available to users across operating system versions. It also keeps profiles small and sign-ins quick.
- Allocate sufficient storage for Roaming User Profiles. If you support two operating system versions, profiles will double in number (and thus total space consumed) because a separate profile is maintained for each operating system version.
- Don’t use Roaming User Profiles across computers running Windows Vista/Windows Server 2008 and Windows 7/Windows Server 2008 R2. Roaming between these operating system versions isn’t supported due to incompatibilities in their profile versions.
- Inform your users that changes made on one operating system version won’t roam to another operating system version.
- When moving your environment to a version of Windows that uses a different profile version (such as from Windows 10 to Windows 10, version 1607—see Appendix B: Profile version reference information for a list), users receive a new, empty roaming user profile. You can minimize the impact of getting a new profile by using Folder Redirection to redirect common folders. There isn’t a supported method of migrating roaming user profiles from one profile version to another.
Step 1: Enable the use of separate profile versions
If you are deploying Roaming User Profiles on computers running Windows 8.1, Windows 8, Windows Server 2012 R2, or Windows Server 2012, we recommend making a couple of changes to your Windows environment prior to deploying. These changes help ensure that future operating system upgrades go smoothly, and facilitate the ability to simultaneously run multiple versions of Windows with Roaming User Profiles.
To make these changes, use the following procedure.
-
Download and install the appropriate software update on all computers on which you’re going to use roaming, mandatory, super-mandatory, or domain default profiles:
- Windows 8.1, or Windows Server 2012 R2: install the software update described in article 2887595 in the Microsoft Knowledge Base (when released).
- Windows 8 or Windows Server 2012: install the software update described in article 2887239 in the Microsoft Knowledge Base.
-
On all computers running Windows 8.1, Windows 8, Windows Server 2012 R2, or Windows Server 2012 on which you will use Roaming User Profiles, use Registry Editor or Group Policy to create the following registry key DWORD Value and set it to
1. For information about creating registry keys by using Group Policy, see Configure a Registry Item.HKEY_LOCAL_MACHINESYSTEMCurrentControlSetServicesProfSvcParametersUseProfilePathExtensionVersion[!WARNING]
Incorrectly editing the registry may severely damage your system. Before making changes to the registry, you should back up any valued data on the computer. -
Restart the computers.
Step 2: Create a Roaming User Profiles security group
If your environment is not already set up with Roaming User Profiles, the first step is to create a security group that contains all users and/or computers to which you want to apply Roaming User Profiles policy settings.
- Administrators of general-purpose roaming user profiles deployments typically create a security group for users.
- Administrators of Remote Desktop Services or virtualized desktop deployments typically use a security group for users and the shared computers.
Here’s how to create a security group for Roaming User Profiles:
-
Open Server Manager on a computer with Active Directory Administration Center installed.
-
On the Tools menu, select Active Directory Administration Center. Active Directory Administration Center appears.
-
Right-click the appropriate domain or OU, select New, and then select Group.
-
In the Create Group window, in the Group section, specify the following settings:
- In Group name, type the name of the security group, for example: Roaming User Profiles Users and Computers.
- In Group scope, select Security, and then select Global.
-
In the Members section, select Add. The Select Users, Contacts, Computers, Service Accounts or Groups dialog box appears.
-
If you want to include computer accounts in the security group, select Object Types, select the Computers check box and then select OK.
-
Type the names of the users, groups, and/or computers to which you want to deploy Roaming User Profiles, select OK, and then select OK again.
Step 3: Create a file share for roaming user profiles
If you do not already have a separate file share for roaming user profiles (independent from any shares for redirected folders to prevent inadvertent caching of the roaming profile folder), use the following procedure to create a file share on a server running Windows Server.
[!NOTE]
Some functionality might differ or be unavailable depending on the version of Windows Server you’re using.
Here’s how to create a file share on Windows Server:
-
In the Server Manager navigation pane, select File and Storage Services, and then select Shares to display the Shares page.
-
In the Shares tile, select Tasks, and then select New Share. The New Share Wizard appears.
-
On the Select Profile page, select SMB Share – Quick. If you have File Server Resource Manager installed and are using folder management properties, instead select SMB Share — Advanced.
-
On the Share Location page, select the server and volume on which you want to create the share.
-
On the Share Name page, type a name for the share (for example, User Profiles$) in the Share name box.
[!TIP]
When creating the share, hide the share by putting a$after the share name. This hides the share from casual browsers. -
On the Other Settings page, clear the Enable continuous availability checkbox, if present, and optionally select the Enable access-based enumeration and Encrypt data access checkboxes.
-
On the Permissions page, select Customize permissions…. The Advanced Security Settings dialog box appears.
-
Select Disable inheritance, and then select Convert inherited permissions into explicit permission on this object.
-
Set the permissions as described in Required permissions for the file share hosting roaming user profiles and shown in the following screen shot, removing permissions for unlisted groups and accounts, and adding special permissions to the Roaming User Profiles Users and Computers group that you created in Step 1.

Figure 1 Setting the permissions for the roaming user profiles share
-
If you chose the SMB Share — Advanced profile, on the Management Properties page, select the User Files Folder Usage value.
-
If you chose the SMB Share — Advanced profile, on the Quota page, optionally select a quota to apply to users of the share.
-
On the Confirmation page, select Create.

Required permissions for the file share hosting roaming user profiles
| User Account | Access | Applies to |
|---|---|---|
| System | Full control | This folder, subfolders and files |
| Administrators | Full Control | This folder only |
| Creator/Owner | Full Control | Subfolders and files only |
| Security group of users needing to put data on share (Roaming User Profiles Users and Computers) | List folder / read data (Advanced permissions) Create folders / append data (Advanced permissions) |
This folder only |
| Other groups and accounts | None (remove) |
Step 4: Optionally create a GPO for Roaming User Profiles
If you do not already have a GPO created for Roaming User Profiles settings, use the following procedure to create an empty GPO for use with Roaming User Profiles. This GPO allows you to configure Roaming User Profiles settings (such as primary computer support, which is discussed separately), and can also be used to enable Roaming User Profiles on computers, as is typically done when deploying in virtualized desktop environments or with Remote Desktop Services.
Here’s how to create a GPO for Roaming User Profiles:
-
Open Server Manager on a computer with Group Policy Management installed.
-
From the Tools menu select Group Policy Management. Group Policy Management appears.
-
Right-click the domain or OU in which you want to setup Roaming User Profiles, then select Create a GPO in this domain, and Link it here.
-
In the New GPO dialog box, type a name for the GPO (for example, Roaming User Profile Settings), and then select OK.
-
Right-click the newly created GPO and then clear the Link Enabled checkbox. This prevents the GPO from being applied until you finish configuring it.
-
Select the GPO. In the Security Filtering section of the Scope tab, select Authenticated Users, and then select Remove to prevent the GPO from being applied to everyone.
-
In the Security Filtering section, select Add.
-
In the Select User, Computer, or Group dialog box, type the name of the security group you created in Step 1 (for example, Roaming User Profiles Users and Computers), and then select OK.
-
Select the Delegation tab, select Add, type Authenticated Users, select OK, and then select OK again to accept the default Read permissions.
This step is necessary due to security changes made in MS16-072.
[!IMPORTANT]
Due to the security changes made in MS16-072A, you now must give the Authenticated Users group delegated Read permissions to the GPO — otherwise the GPO won’t get applied to users, or if it’s already applied, the GPO is removed, redirecting user profiles back to the local PC. For more info, see Deploying Group Policy Security Update MS16-072.
Step 5: Optionally set up Roaming User Profiles on user accounts
If you are deploying Roaming User Profiles to user accounts, use the following procedure to specify roaming user profiles for user accounts in Active Directory Domain Services. If you are deploying Roaming User Profiles to computers, as is typically done for Remote Desktop Services or virtualized desktop deployments, instead use the procedure documented in Step 6: Optionally set up Roaming User Profiles on computers.
[!NOTE]
If you set up Roaming User Profiles on user accounts by using Active Directory and on computers by using Group Policy, the computer-based policy setting takes precedence.
Here’s how to set up Roaming User Profiles on user accounts:
-
In Active Directory Administration Center, navigate to the Users container (or OU) in the appropriate domain.
-
Select all users to which you want to assign a roaming user profile, right-click the users and then select Properties.
-
In the Profile section, select the Profile path: checkbox and then enter the path to the file share where you want to store the user’s roaming user profile, followed by
%username%(which is automatically replaced with the user name the first time the user signs in). For example:\fs1.corp.contoso.comUser Profiles$%username%To specify a mandatory roaming user profile, specify the path to the NTuser.man file that you created previously, for example,
fs1.corp.contoso.comUser Profiles$default. For more information, see Create mandatory user profiles. -
Select OK.
[!NOTE]
By default, deployment of all Windows® Runtime-based (Windows Store) apps is allowed when using Roaming User Profiles. However, when using a special profile, apps are not deployed by default. Special profiles are user profiles where changes are discarded after the user signs out:To remove restrictions on app deployment for special profiles, enable the Allow deployment operations in special profiles policy setting (located in Computer ConfigurationPoliciesAdministrative TemplatesWindows ComponentsApp Package Deployment). However, deployed apps in this scenario will leave some data stored on the computer, which could accumulate, for example, if there are hundreds of users of a single computer. To clean up apps, locate or develop a tool that uses the CleanupPackageForUserAsync API to clean up app packages for users who no longer have a profile on the computer.
For additional background information about Windows Store apps, see Manage Client Access to the Windows Store.
Step 6: Optionally set up Roaming User Profiles on computers
If you are deploying Roaming User Profiles to computers, as is typically done for Remote Desktop Services or virtualized desktop deployments, use the following procedure. If you are deploying Roaming User Profiles to user accounts, instead use the procedure described in Step 5: Optionally set up Roaming User Profiles on user accounts.
You can use Group Policy to apply Roaming User Profiles to computers running Windows 8.1, Windows 8, Windows 7, Windows Vista, Windows Server 2019, Windows Server 2016, Windows Server 2012 R2, Windows Server 2012, Windows Server 2008 R2, or Windows Server 2008.
[!NOTE]
If you set up Roaming User Profiles on computers by using Group Policy and on user accounts by using Active Directory, the computer-based policy setting takes precedence.
Here’s how to set up Roaming User Profiles on computers:
-
Open Server Manager on a computer with Group Policy Management installed.
-
From the Tools menu, select Group Policy Management. Group Policy Management will appear.
-
In Group Policy Management, right-click the GPO you created in Step 3 (for example, Roaming User Profiles Settings), and then select Edit.
-
In the Group Policy Management Editor window, navigate to Computer Configuration, then Policies, then Administrative Templates, then System, and then User Profiles.
-
Right-click Set roaming profile path for all users logging onto this computer and then select Edit.
[!TIP]
A user’s home folder, if configured, is the default folder used by some programs such as Windows PowerShell. You can configure an alternative local or network location on a per-user basis by using the Home folder section of the user account properties in AD DS. To configure the home folder location for all users of a computer running Windows 8.1, Windows 8, Windows Server 2019, Windows Server 2016, Windows Server 2012 R2, or Windows Server 2012 in a virtual desktop environment, enable the Set user home folder policy setting, and then specify the file share and drive letter to map (or specify a local folder). Do not use environment variables or ellipses. The user’s alias is appended to the end of the path specified during user sign on. -
In the Properties dialog box, select Enabled
-
In the Users logging onto this computer should use this roaming profile path box, enter the path to the file share where you want to store the user’s roaming user profile, followed by
%username%(which is automatically replaced with the user name the first time the user signs in). For example:\fs1.corp.contoso.comUser Profiles$%username%To specify a mandatory roaming user profile, which is a preconfigured profile to which users cannot make permanent changes (changes are reset when the user signs out), specify the path to the NTuser.man file that you created previously, for example,
\fs1.corp.contoso.comUser Profiles$default. For more information, see Creating a Mandatory User Profile. -
Select OK.
Step 7: Optionally specify a Start layout for Windows 10 PCs
You can use Group Policy to apply a specific Start menu layout so that users see the same Start layout on all PCs. If users sign in to more than one PC and you want them to have a consistent Start layout across PCs, make sure that the GPO applies to all of their PCs.
To specify a Start layout, do the following:
- Update your Windows 10 PCs to Windows 10 version 1607 (also known as the Anniversary Update) or newer, and install the March 14th, 2017 cumulative update (KB4013429) or newer.
- Create a full or partial Start menu layout XML file. To do so, see Customize and export Start layout.
- If you specify a full Start layout, a user can’t customize any part of the Start menu. If you specify a partial Start layout, users can customize everything but the locked groups of tiles you specify. However, with a partial Start layout, user customizations to the Start menu won’t roam to other PCs.
- Use Group Policy to apply the customized Start layout to the GPO you created for Roaming User Profiles. To do so, see Use Group Policy to apply a customized Start layout in a domain.
- Use Group Policy to set the following registry value on your Windows 10 PCs. To do so, see Configure a Registry Item.
| Action | Update |
|---|---|
| Hive | HKEY_LOCAL_MACHINE |
| Key path | SoftwareMicrosoftWindowsCurrentVersionExplorer |
| Value name | SpecialRoamingOverrideAllowed |
| Value type | REG_DWORD |
| Value data | 1 (or 0 to disable) |
| Base | Decimal |
- (Optional) Enable first-time logon optimizations to make signing in faster for users. To do so, see Apply policies to improve sign-in time.
- (Optional) Further decrease sign-in times by removing unnecessary apps from the Windows 10 base image you use to deploy client PCs. Windows Server 2019 and Windows Server 2016 don’t have any pre-provisioned apps, so you can skip this step on server images.
-
To remove apps, use the Remove-AppxProvisionedPackage cmdlet in Windows PowerShell to uninstall the following applications. If your PCs are already deployed you can script the removal of these apps using the Remove-AppxPackage.
- Microsoft.windowscommunicationsapps_8wekyb3d8bbwe
- Microsoft.BingWeather_8wekyb3d8bbwe
- Microsoft.DesktopAppInstaller_8wekyb3d8bbwe
- Microsoft.Getstarted_8wekyb3d8bbwe
- Microsoft.Windows.Photos_8wekyb3d8bbwe
- Microsoft.WindowsCamera_8wekyb3d8bbwe
- Microsoft.WindowsFeedbackHub_8wekyb3d8bbwe
- Microsoft.WindowsStore_8wekyb3d8bbwe
- Microsoft.XboxApp_8wekyb3d8bbwe
- Microsoft.XboxIdentityProvider_8wekyb3d8bbwe
- Microsoft.ZuneMusic_8wekyb3d8bbwe
-
[!NOTE]
Uninstalling these apps decreases sign-in times, but you can leave them installed if your deployment needs any of them.
Step 8: Enable the Roaming User Profiles GPO
If you set up Roaming User Profiles on computers by using Group Policy, or if you customized other Roaming User Profiles settings by using Group Policy, the next step is to enable the GPO, permitting it to be applied to affected users.
[!TIP]
If you plan to implement primary computer support, do so now, before you enable the GPO. This prevents user data from being copied to non-primary computers before primary computer support is enabled. For the specific policy settings, see Deploy Primary Computers for Folder Redirection and Roaming User Profiles.
Here’s how to enable the Roaming User Profile GPO:
- Open Group Policy Management.
- Right-click the GPO that you created and then select Link Enabled. A checkbox appears next to the menu item.
Step 9: Test Roaming User Profiles
To test Roaming User Profiles, sign in to a computer with a user account configured for Roaming User Profiles, or sign in to a computer configured for Roaming User Profiles. Then confirm that the profile is redirected.
Here’s how to test Roaming User Profiles:
-
Sign in to a primary computer (if you enabled primary computer support) with a user account for which you have enabled Roaming User Profiles enabled. If you enabled Roaming User Profiles on specific computers, sign in to one of these computers.
-
If the user has previously signed in to the computer, open an elevated command prompt, and then type the following command to ensure that the latest Group Policy settings are applied to the client computer:
-
To confirm that the user profile is roaming, open Control Panel, select System and Security, select System, select Advanced System Settings, select Settings in the User Profiles section and then look for Roaming in the Type column.
Appendix A: Checklist for deploying Roaming User Profiles
| Status | Action |
|---|---|
| ☐ ☐ ☐ ☐ ☐ |
1. Prepare domain — Join computers to domain — Enable the use of separate profile versions — Create user accounts — (Optional) Deploy Folder Redirection |
| ☐ | 2. Create security group for Roaming User Profiles — Group name: — Members: |
| ☐ | 3. Create a file share for Roaming User Profiles — File share name: |
| ☐ | 4. Create a GPO for Roaming User Profiles — GPO name: |
| ☐ | 5. Configure Roaming User Profiles policy settings |
| ☐ ☐ ☐ |
6. Enable Roaming User Profiles — Enabled in AD DS on user accounts? — Enabled in Group Policy on computer accounts? |
| ☐ | 7. (Optional) Specify a mandatory Start layout for Windows 10 PCs |
| ☐ ☐ ☐ ☐ |
8. (Optional) Enable primary computer support — Designate primary computers for users — Location of user and primary computer mappings: — (Optional) Enable primary computer support for Folder Redirection — Computer-based or User-based? — (Optional) Enable primary computer support for Roaming User Profiles |
| ☐ | 9. Enable the Roaming User Profiles GPO |
| ☐ | 10. Test Roaming User Profiles |
Appendix B: Profile version reference information
Each profile has a profile version that corresponds roughly to the version of Windows on which the profile is used. For example, Windows 10, version 1703 and version 1607 both use the .V6 profile version. Microsoft creates a new profile version only when necessary to maintain compatibility, which is why not every version of Windows includes a new profile version.
The following table lists the location of Roaming User Profiles on various versions of Windows.
| Operating system version | Roaming User Profile location |
|---|---|
| Windows XP and Windows Server 2003 | \<servername><fileshare><username> |
| Windows Vista and Windows Server 2008 | \<servername><fileshare><username>.V2 |
| Windows 7 and Windows Server 2008 R2 | \<servername><fileshare><username>.V2 |
| Windows 8 and Windows Server 2012 | \<servername><fileshare><username>.V3 (after the software update and registry key are applied)\<servername><fileshare><username>.V2 (before the software update and registry key are applied) |
| Windows 8.1 and Windows Server 2012 R2 | \<servername><fileshare><username>.V4 (after the software update and registry key are applied)\<servername><fileshare><username>.V2 (before the software update and registry key are applied) |
| Windows 10 | \<servername><fileshare><username>.V5 |
| Windows 10, version 1703 and version 1607 | \<servername><fileshare><username>.V6 |
Appendix C: Working around reset Start menu layouts after upgrades
Here are some ways to work around Start menu layouts getting reset after an in-place upgrade:
-
If only one user ever uses the device and the IT Admin uses a managed OS deployment strategy such as Configuration Manager they can do the following:
-
Export the Start menu layout with Export-Startlayout before the upgrade
-
Import the Start menu layout with Import-StartLayout after OOBE but before the user signs in
[!NOTE]
Importing a StartLayout modifies the Default User profile. All user profiles created after the import has occurred will get the imported Start-Layout.
-
-
IT Admins can opt to manage Start’s Layout with Group Policy. Using Group Policy provides a centralized management solution to apply a standardized Start Layout to users. There are 2 modes to modes to using Group Policy for Start management. Full Lockdown and Partial Lockdown. The full lockdown scenario prevents the user from making any changes to Start’s layout. The partial lockdown scenario allows user to make changes to a specific area of Start. For more info, see Customize and export Start layout.
[!NOTE]
User made changes in the partial lockdown scenario will still be lost during upgrade. -
Let the Start layout reset occur and allow end users to reconfigure Start. A notification email or other notification can be sent to end users to expect their Start layouts to be reset after the OS upgrade to minimized impact.
Change history
The following table summarizes some of the most important changes to this topic.
| Date | Description | Reason |
|---|---|---|
| May 1st, 2019 | Added updates for Windows Server 2019 | |
| April 10th, 2018 | Added discussion of when user customizations to Start are lost after an OS in-place upgrade | Callout known issue. |
| March 13th, 2018 | Updated for Windows Server 2016 | Moved out of Previous Versions library and updated for current version of Windows Server. |
| April 13th, 2017 | Added profile information for Windows 10, version 1703, and clarified how roaming profile versions work when upgrading operating systems—see Considerations when using Roaming User Profiles on multiple versions of Windows. | Customer feedback. |
| March 14th, 2017 | Added optional step for specifying a mandatory Start layout for Windows 10 PCs in Appendix A: Checklist for deploying Roaming User Profiles. | Feature changes in latest Windows update. |
| January 23rd, 2017 | Added a step to Step 4: Optionally create a GPO for Roaming User Profiles to delegate Read permissions to Authenticated Users, which is now required because of a Group Policy security update. | Security changes to Group Policy processing. |
| December 29th, 2016 | Added a link in Step 8: Enable the Roaming User Profiles GPO to make it easier to get info on how to set Group Policy for primary computers. Also fixed a couple references to steps 5 and 6 that had the numbers wrong. | Customer feedback. |
| December 5th, 2016 | Added info explaining a Start menu settings roaming issue. | Customer feedback. |
| July 6th, 2016 | Added Windows 10 profile version suffixes in Appendix B: Profile version reference information. Also removed Windows XP and Windows Server 2003 from the list of supported operating systems. | Updates for the new versions of Windows, and removed info about versions of Windows that are no longer supported. |
| July 7th, 2015 | Added requirement and step to disable continuous availability when using a clustered file server. | Clustered file shares have better performance for small writes (which are typical with roaming user profiles) when continuous availability is disabled. |
| March 19th, 2014 | Capitalized profile version suffixes (.V2, .V3, .V4) in Appendix B: Profile version reference information. | Although Windows is case insensitive, if you use NFS with the file share, it’s important to have the correct (uppercase) capitalization for the profile suffix. |
| October 9th, 2013 | Revised for Windows Server 2012 R2 and Windows 8.1, clarified a few things, and added the Considerations when using Roaming User Profiles on multiple versions of Windows and Appendix B: Profile version reference information sections. | Updates for new version; customer feedback. |
More information
- Deploy Folder Redirection, Offline Files, and Roaming User Profiles
- Deploy Primary Computers for Folder Redirection and Roaming User Profiles
- Implementing User State Management
- Microsoft’s Support Statement Around Replicated User Profile Data
- Sideload Apps with DISM
- Troubleshooting packaging, deployment, and query of Windows Runtime-based apps
| title | description | TOCTitle | ms.topic | author | manager | ms.date | ms.author |
|---|---|---|---|---|---|---|---|
|
Deploying Roaming User Profiles |
Learn more about: Deploying Roaming User Profiles |
Deploying Roaming User Profiles |
article |
JasonGerend |
brianlic |
06/07/2019 |
jgerend |
Deploying Roaming User Profiles
Applies to: Windows Server 2022, Windows 10, Windows 8.1, Windows 8, Windows 7, Windows Server 2019, Windows Server 2016, Windows Server 2012 R2, Windows Server 2012, Windows Server 2008 R2
This topic describes how to use Windows Server to deploy Roaming User Profiles to Windows client computers. Roaming User Profiles redirects user profiles to a file share so that users receive the same operating system and application settings on multiple computers.
For a list of recent changes to this topic, see the Change history section of this topic.
[!IMPORTANT]
Due to the security changes made in MS16-072, we updated Step 4: Optionally create a GPO for Roaming User Profiles in this topic so that Windows can properly apply the Roaming User Profiles policy (and not revert to local policies on affected PCs).
[!IMPORTANT]
User customizations to Start is lost after an OS in-place upgrade in the following configuration:
- Users are configured for a roaming profile
- Users are allowed to make changes to Start
As a result, the Start menu is reset to the default of the new OS version after the OS in-place upgrade. For workarounds, see Appendix C: Working around reset Start menu layouts after upgrades.
Prerequisites
Hardware requirements
Roaming User Profiles requires an x64-based or x86-based computer; it isn’t supported by Windows RT.
Software requirements
Roaming User Profiles has the following software requirements:
-
If you are deploying Roaming User Profiles with Folder Redirection in an environment with existing local user profiles, deploy Folder Redirection before Roaming User Profiles to minimize the size of roaming profiles. After the existing user folders have been successfully redirected, you can deploy Roaming User Profiles.
-
To administer Roaming User Profiles, you must be signed in as a member of the Domain Administrators security group, the Enterprise Administrators security group, or the Group Policy Creator Owners security group.
-
Client computers must run Windows 10, Windows 8.1, Windows 8, Windows 7, Windows Vista, Windows Server 2012 R2, Windows Server 2012, Windows Server 2008 R2, or Windows Server 2008.
-
Client computers must be joined to the Active Directory Domain Services (AD DS) that you are managing.
-
A computer must be available with Group Policy Management and Active Directory Administration Center installed.
-
A file server must be available to host roaming user profiles.
- If the file share uses DFS Namespaces, the DFS folders (links) must have a single target to prevent users from making conflicting edits on different servers.
- If the file share uses DFS Replication to replicate the contents with another server, users must be able to access only the source server to prevent users from making conflicting edits on different servers.
- If the file share is clustered, disable continuous availability on the file share to avoid performance issues.
-
To use primary computer support in Roaming User Profiles, there are additional client computer and Active Directory schema requirements. For more information, see Deploy Primary Computers for Folder Redirection and Roaming User Profiles.
-
The layout of a user’s Start menu won’t roam on Windows 10, Windows Server 2019, or Windows Server 2016 if they’re using more than one PC, Remote Desktop Session Host, or Virtualized Desktop Infrastructure (VDI) server. As a workaround, you can specify a Start layout as described in this topic. Or you can make use of user profile disks, which properly roam Start menu settings when used with Remote Desktop Session Host servers or VDI servers. For more info, see Easier User Data Management with User Profile Disks in Windows Server 2012.
Considerations when using Roaming User Profiles on multiple versions of Windows
If you decide to use Roaming User Profiles across multiple versions of Windows, we recommend taking the following actions:
- Configure Windows to maintain separate profile versions for each operating system version. This helps prevent undesirable and unpredictable issues such as profile corruption.
- Use Folder Redirection to store user files such as documents and pictures outside of user profiles. This enables the same files to be available to users across operating system versions. It also keeps profiles small and sign-ins quick.
- Allocate sufficient storage for Roaming User Profiles. If you support two operating system versions, profiles will double in number (and thus total space consumed) because a separate profile is maintained for each operating system version.
- Don’t use Roaming User Profiles across computers running Windows Vista/Windows Server 2008 and Windows 7/Windows Server 2008 R2. Roaming between these operating system versions isn’t supported due to incompatibilities in their profile versions.
- Inform your users that changes made on one operating system version won’t roam to another operating system version.
- When moving your environment to a version of Windows that uses a different profile version (such as from Windows 10 to Windows 10, version 1607—see Appendix B: Profile version reference information for a list), users receive a new, empty roaming user profile. You can minimize the impact of getting a new profile by using Folder Redirection to redirect common folders. There isn’t a supported method of migrating roaming user profiles from one profile version to another.
Step 1: Enable the use of separate profile versions
If you are deploying Roaming User Profiles on computers running Windows 8.1, Windows 8, Windows Server 2012 R2, or Windows Server 2012, we recommend making a couple of changes to your Windows environment prior to deploying. These changes help ensure that future operating system upgrades go smoothly, and facilitate the ability to simultaneously run multiple versions of Windows with Roaming User Profiles.
To make these changes, use the following procedure.
-
Download and install the appropriate software update on all computers on which you’re going to use roaming, mandatory, super-mandatory, or domain default profiles:
- Windows 8.1, or Windows Server 2012 R2: install the software update described in article 2887595 in the Microsoft Knowledge Base (when released).
- Windows 8 or Windows Server 2012: install the software update described in article 2887239 in the Microsoft Knowledge Base.
-
On all computers running Windows 8.1, Windows 8, Windows Server 2012 R2, or Windows Server 2012 on which you will use Roaming User Profiles, use Registry Editor or Group Policy to create the following registry key DWORD Value and set it to
1. For information about creating registry keys by using Group Policy, see Configure a Registry Item.HKEY_LOCAL_MACHINESYSTEMCurrentControlSetServicesProfSvcParametersUseProfilePathExtensionVersion[!WARNING]
Incorrectly editing the registry may severely damage your system. Before making changes to the registry, you should back up any valued data on the computer. -
Restart the computers.
Step 2: Create a Roaming User Profiles security group
If your environment is not already set up with Roaming User Profiles, the first step is to create a security group that contains all users and/or computers to which you want to apply Roaming User Profiles policy settings.
- Administrators of general-purpose roaming user profiles deployments typically create a security group for users.
- Administrators of Remote Desktop Services or virtualized desktop deployments typically use a security group for users and the shared computers.
Here’s how to create a security group for Roaming User Profiles:
-
Open Server Manager on a computer with Active Directory Administration Center installed.
-
On the Tools menu, select Active Directory Administration Center. Active Directory Administration Center appears.
-
Right-click the appropriate domain or OU, select New, and then select Group.
-
In the Create Group window, in the Group section, specify the following settings:
- In Group name, type the name of the security group, for example: Roaming User Profiles Users and Computers.
- In Group scope, select Security, and then select Global.
-
In the Members section, select Add. The Select Users, Contacts, Computers, Service Accounts or Groups dialog box appears.
-
If you want to include computer accounts in the security group, select Object Types, select the Computers check box and then select OK.
-
Type the names of the users, groups, and/or computers to which you want to deploy Roaming User Profiles, select OK, and then select OK again.
Step 3: Create a file share for roaming user profiles
If you do not already have a separate file share for roaming user profiles (independent from any shares for redirected folders to prevent inadvertent caching of the roaming profile folder), use the following procedure to create a file share on a server running Windows Server.
[!NOTE]
Some functionality might differ or be unavailable depending on the version of Windows Server you’re using.
Here’s how to create a file share on Windows Server:
-
In the Server Manager navigation pane, select File and Storage Services, and then select Shares to display the Shares page.
-
In the Shares tile, select Tasks, and then select New Share. The New Share Wizard appears.
-
On the Select Profile page, select SMB Share – Quick. If you have File Server Resource Manager installed and are using folder management properties, instead select SMB Share — Advanced.
-
On the Share Location page, select the server and volume on which you want to create the share.
-
On the Share Name page, type a name for the share (for example, User Profiles$) in the Share name box.
[!TIP]
When creating the share, hide the share by putting a$after the share name. This hides the share from casual browsers. -
On the Other Settings page, clear the Enable continuous availability checkbox, if present, and optionally select the Enable access-based enumeration and Encrypt data access checkboxes.
-
On the Permissions page, select Customize permissions…. The Advanced Security Settings dialog box appears.
-
Select Disable inheritance, and then select Convert inherited permissions into explicit permission on this object.
-
Set the permissions as described in Required permissions for the file share hosting roaming user profiles and shown in the following screen shot, removing permissions for unlisted groups and accounts, and adding special permissions to the Roaming User Profiles Users and Computers group that you created in Step 1.
Figure 1 Setting the permissions for the roaming user profiles share
-
If you chose the SMB Share — Advanced profile, on the Management Properties page, select the User Files Folder Usage value.
-
If you chose the SMB Share — Advanced profile, on the Quota page, optionally select a quota to apply to users of the share.
-
On the Confirmation page, select Create.
Required permissions for the file share hosting roaming user profiles
| User Account | Access | Applies to |
|---|---|---|
| System | Full control | This folder, subfolders and files |
| Administrators | Full Control | This folder only |
| Creator/Owner | Full Control | Subfolders and files only |
| Security group of users needing to put data on share (Roaming User Profiles Users and Computers) | List folder / read data (Advanced permissions) Create folders / append data (Advanced permissions) |
This folder only |
| Other groups and accounts | None (remove) |
Step 4: Optionally create a GPO for Roaming User Profiles
If you do not already have a GPO created for Roaming User Profiles settings, use the following procedure to create an empty GPO for use with Roaming User Profiles. This GPO allows you to configure Roaming User Profiles settings (such as primary computer support, which is discussed separately), and can also be used to enable Roaming User Profiles on computers, as is typically done when deploying in virtualized desktop environments or with Remote Desktop Services.
Here’s how to create a GPO for Roaming User Profiles:
-
Open Server Manager on a computer with Group Policy Management installed.
-
From the Tools menu select Group Policy Management. Group Policy Management appears.
-
Right-click the domain or OU in which you want to setup Roaming User Profiles, then select Create a GPO in this domain, and Link it here.
-
In the New GPO dialog box, type a name for the GPO (for example, Roaming User Profile Settings), and then select OK.
-
Right-click the newly created GPO and then clear the Link Enabled checkbox. This prevents the GPO from being applied until you finish configuring it.
-
Select the GPO. In the Security Filtering section of the Scope tab, select Authenticated Users, and then select Remove to prevent the GPO from being applied to everyone.
-
In the Security Filtering section, select Add.
-
In the Select User, Computer, or Group dialog box, type the name of the security group you created in Step 1 (for example, Roaming User Profiles Users and Computers), and then select OK.
-
Select the Delegation tab, select Add, type Authenticated Users, select OK, and then select OK again to accept the default Read permissions.
This step is necessary due to security changes made in MS16-072.
[!IMPORTANT]
Due to the security changes made in MS16-072A, you now must give the Authenticated Users group delegated Read permissions to the GPO — otherwise the GPO won’t get applied to users, or if it’s already applied, the GPO is removed, redirecting user profiles back to the local PC. For more info, see Deploying Group Policy Security Update MS16-072.
Step 5: Optionally set up Roaming User Profiles on user accounts
If you are deploying Roaming User Profiles to user accounts, use the following procedure to specify roaming user profiles for user accounts in Active Directory Domain Services. If you are deploying Roaming User Profiles to computers, as is typically done for Remote Desktop Services or virtualized desktop deployments, instead use the procedure documented in Step 6: Optionally set up Roaming User Profiles on computers.
[!NOTE]
If you set up Roaming User Profiles on user accounts by using Active Directory and on computers by using Group Policy, the computer-based policy setting takes precedence.
Here’s how to set up Roaming User Profiles on user accounts:
-
In Active Directory Administration Center, navigate to the Users container (or OU) in the appropriate domain.
-
Select all users to which you want to assign a roaming user profile, right-click the users and then select Properties.
-
In the Profile section, select the Profile path: checkbox and then enter the path to the file share where you want to store the user’s roaming user profile, followed by
%username%(which is automatically replaced with the user name the first time the user signs in). For example:\fs1.corp.contoso.comUser Profiles$%username%To specify a mandatory roaming user profile, specify the path to the NTuser.man file that you created previously, for example,
fs1.corp.contoso.comUser Profiles$default. For more information, see Create mandatory user profiles. -
Select OK.
[!NOTE]
By default, deployment of all Windows® Runtime-based (Windows Store) apps is allowed when using Roaming User Profiles. However, when using a special profile, apps are not deployed by default. Special profiles are user profiles where changes are discarded after the user signs out:To remove restrictions on app deployment for special profiles, enable the Allow deployment operations in special profiles policy setting (located in Computer ConfigurationPoliciesAdministrative TemplatesWindows ComponentsApp Package Deployment). However, deployed apps in this scenario will leave some data stored on the computer, which could accumulate, for example, if there are hundreds of users of a single computer. To clean up apps, locate or develop a tool that uses the CleanupPackageForUserAsync API to clean up app packages for users who no longer have a profile on the computer.
For additional background information about Windows Store apps, see Manage Client Access to the Windows Store.
Step 6: Optionally set up Roaming User Profiles on computers
If you are deploying Roaming User Profiles to computers, as is typically done for Remote Desktop Services or virtualized desktop deployments, use the following procedure. If you are deploying Roaming User Profiles to user accounts, instead use the procedure described in Step 5: Optionally set up Roaming User Profiles on user accounts.
You can use Group Policy to apply Roaming User Profiles to computers running Windows 8.1, Windows 8, Windows 7, Windows Vista, Windows Server 2019, Windows Server 2016, Windows Server 2012 R2, Windows Server 2012, Windows Server 2008 R2, or Windows Server 2008.
[!NOTE]
If you set up Roaming User Profiles on computers by using Group Policy and on user accounts by using Active Directory, the computer-based policy setting takes precedence.
Here’s how to set up Roaming User Profiles on computers:
-
Open Server Manager on a computer with Group Policy Management installed.
-
From the Tools menu, select Group Policy Management. Group Policy Management will appear.
-
In Group Policy Management, right-click the GPO you created in Step 3 (for example, Roaming User Profiles Settings), and then select Edit.
-
In the Group Policy Management Editor window, navigate to Computer Configuration, then Policies, then Administrative Templates, then System, and then User Profiles.
-
Right-click Set roaming profile path for all users logging onto this computer and then select Edit.
[!TIP]
A user’s home folder, if configured, is the default folder used by some programs such as Windows PowerShell. You can configure an alternative local or network location on a per-user basis by using the Home folder section of the user account properties in AD DS. To configure the home folder location for all users of a computer running Windows 8.1, Windows 8, Windows Server 2019, Windows Server 2016, Windows Server 2012 R2, or Windows Server 2012 in a virtual desktop environment, enable the Set user home folder policy setting, and then specify the file share and drive letter to map (or specify a local folder). Do not use environment variables or ellipses. The user’s alias is appended to the end of the path specified during user sign on. -
In the Properties dialog box, select Enabled
-
In the Users logging onto this computer should use this roaming profile path box, enter the path to the file share where you want to store the user’s roaming user profile, followed by
%username%(which is automatically replaced with the user name the first time the user signs in). For example:\fs1.corp.contoso.comUser Profiles$%username%To specify a mandatory roaming user profile, which is a preconfigured profile to which users cannot make permanent changes (changes are reset when the user signs out), specify the path to the NTuser.man file that you created previously, for example,
\fs1.corp.contoso.comUser Profiles$default. For more information, see Creating a Mandatory User Profile. -
Select OK.
Step 7: Optionally specify a Start layout for Windows 10 PCs
You can use Group Policy to apply a specific Start menu layout so that users see the same Start layout on all PCs. If users sign in to more than one PC and you want them to have a consistent Start layout across PCs, make sure that the GPO applies to all of their PCs.
To specify a Start layout, do the following:
- Update your Windows 10 PCs to Windows 10 version 1607 (also known as the Anniversary Update) or newer, and install the March 14th, 2017 cumulative update (KB4013429) or newer.
- Create a full or partial Start menu layout XML file. To do so, see Customize and export Start layout.
- If you specify a full Start layout, a user can’t customize any part of the Start menu. If you specify a partial Start layout, users can customize everything but the locked groups of tiles you specify. However, with a partial Start layout, user customizations to the Start menu won’t roam to other PCs.
- Use Group Policy to apply the customized Start layout to the GPO you created for Roaming User Profiles. To do so, see Use Group Policy to apply a customized Start layout in a domain.
- Use Group Policy to set the following registry value on your Windows 10 PCs. To do so, see Configure a Registry Item.
| Action | Update |
|---|---|
| Hive | HKEY_LOCAL_MACHINE |
| Key path | SoftwareMicrosoftWindowsCurrentVersionExplorer |
| Value name | SpecialRoamingOverrideAllowed |
| Value type | REG_DWORD |
| Value data | 1 (or 0 to disable) |
| Base | Decimal |
- (Optional) Enable first-time logon optimizations to make signing in faster for users. To do so, see Apply policies to improve sign-in time.
- (Optional) Further decrease sign-in times by removing unnecessary apps from the Windows 10 base image you use to deploy client PCs. Windows Server 2019 and Windows Server 2016 don’t have any pre-provisioned apps, so you can skip this step on server images.
-
To remove apps, use the Remove-AppxProvisionedPackage cmdlet in Windows PowerShell to uninstall the following applications. If your PCs are already deployed you can script the removal of these apps using the Remove-AppxPackage.
- Microsoft.windowscommunicationsapps_8wekyb3d8bbwe
- Microsoft.BingWeather_8wekyb3d8bbwe
- Microsoft.DesktopAppInstaller_8wekyb3d8bbwe
- Microsoft.Getstarted_8wekyb3d8bbwe
- Microsoft.Windows.Photos_8wekyb3d8bbwe
- Microsoft.WindowsCamera_8wekyb3d8bbwe
- Microsoft.WindowsFeedbackHub_8wekyb3d8bbwe
- Microsoft.WindowsStore_8wekyb3d8bbwe
- Microsoft.XboxApp_8wekyb3d8bbwe
- Microsoft.XboxIdentityProvider_8wekyb3d8bbwe
- Microsoft.ZuneMusic_8wekyb3d8bbwe
-
[!NOTE]
Uninstalling these apps decreases sign-in times, but you can leave them installed if your deployment needs any of them.
Step 8: Enable the Roaming User Profiles GPO
If you set up Roaming User Profiles on computers by using Group Policy, or if you customized other Roaming User Profiles settings by using Group Policy, the next step is to enable the GPO, permitting it to be applied to affected users.
[!TIP]
If you plan to implement primary computer support, do so now, before you enable the GPO. This prevents user data from being copied to non-primary computers before primary computer support is enabled. For the specific policy settings, see Deploy Primary Computers for Folder Redirection and Roaming User Profiles.
Here’s how to enable the Roaming User Profile GPO:
- Open Group Policy Management.
- Right-click the GPO that you created and then select Link Enabled. A checkbox appears next to the menu item.
Step 9: Test Roaming User Profiles
To test Roaming User Profiles, sign in to a computer with a user account configured for Roaming User Profiles, or sign in to a computer configured for Roaming User Profiles. Then confirm that the profile is redirected.
Here’s how to test Roaming User Profiles:
-
Sign in to a primary computer (if you enabled primary computer support) with a user account for which you have enabled Roaming User Profiles enabled. If you enabled Roaming User Profiles on specific computers, sign in to one of these computers.
-
If the user has previously signed in to the computer, open an elevated command prompt, and then type the following command to ensure that the latest Group Policy settings are applied to the client computer:
-
To confirm that the user profile is roaming, open Control Panel, select System and Security, select System, select Advanced System Settings, select Settings in the User Profiles section and then look for Roaming in the Type column.
Appendix A: Checklist for deploying Roaming User Profiles
| Status | Action |
|---|---|
| ☐ ☐ ☐ ☐ ☐ |
1. Prepare domain — Join computers to domain — Enable the use of separate profile versions — Create user accounts — (Optional) Deploy Folder Redirection |
| ☐ | 2. Create security group for Roaming User Profiles — Group name: — Members: |
| ☐ | 3. Create a file share for Roaming User Profiles — File share name: |
| ☐ | 4. Create a GPO for Roaming User Profiles — GPO name: |
| ☐ | 5. Configure Roaming User Profiles policy settings |
| ☐ ☐ ☐ |
6. Enable Roaming User Profiles — Enabled in AD DS on user accounts? — Enabled in Group Policy on computer accounts? |
| ☐ | 7. (Optional) Specify a mandatory Start layout for Windows 10 PCs |
| ☐ ☐ ☐ ☐ |
8. (Optional) Enable primary computer support — Designate primary computers for users — Location of user and primary computer mappings: — (Optional) Enable primary computer support for Folder Redirection — Computer-based or User-based? — (Optional) Enable primary computer support for Roaming User Profiles |
| ☐ | 9. Enable the Roaming User Profiles GPO |
| ☐ | 10. Test Roaming User Profiles |
Appendix B: Profile version reference information
Each profile has a profile version that corresponds roughly to the version of Windows on which the profile is used. For example, Windows 10, version 1703 and version 1607 both use the .V6 profile version. Microsoft creates a new profile version only when necessary to maintain compatibility, which is why not every version of Windows includes a new profile version.
The following table lists the location of Roaming User Profiles on various versions of Windows.
| Operating system version | Roaming User Profile location |
|---|---|
| Windows XP and Windows Server 2003 | \<servername><fileshare><username> |
| Windows Vista and Windows Server 2008 | \<servername><fileshare><username>.V2 |
| Windows 7 and Windows Server 2008 R2 | \<servername><fileshare><username>.V2 |
| Windows 8 and Windows Server 2012 | \<servername><fileshare><username>.V3 (after the software update and registry key are applied)\<servername><fileshare><username>.V2 (before the software update and registry key are applied) |
| Windows 8.1 and Windows Server 2012 R2 | \<servername><fileshare><username>.V4 (after the software update and registry key are applied)\<servername><fileshare><username>.V2 (before the software update and registry key are applied) |
| Windows 10 | \<servername><fileshare><username>.V5 |
| Windows 10, version 1703 and version 1607 | \<servername><fileshare><username>.V6 |
Appendix C: Working around reset Start menu layouts after upgrades
Here are some ways to work around Start menu layouts getting reset after an in-place upgrade:
-
If only one user ever uses the device and the IT Admin uses a managed OS deployment strategy such as Configuration Manager they can do the following:
-
Export the Start menu layout with Export-Startlayout before the upgrade
-
Import the Start menu layout with Import-StartLayout after OOBE but before the user signs in
[!NOTE]
Importing a StartLayout modifies the Default User profile. All user profiles created after the import has occurred will get the imported Start-Layout.
-
-
IT Admins can opt to manage Start’s Layout with Group Policy. Using Group Policy provides a centralized management solution to apply a standardized Start Layout to users. There are 2 modes to modes to using Group Policy for Start management. Full Lockdown and Partial Lockdown. The full lockdown scenario prevents the user from making any changes to Start’s layout. The partial lockdown scenario allows user to make changes to a specific area of Start. For more info, see Customize and export Start layout.
[!NOTE]
User made changes in the partial lockdown scenario will still be lost during upgrade. -
Let the Start layout reset occur and allow end users to reconfigure Start. A notification email or other notification can be sent to end users to expect their Start layouts to be reset after the OS upgrade to minimized impact.
Change history
The following table summarizes some of the most important changes to this topic.
| Date | Description | Reason |
|---|---|---|
| May 1st, 2019 | Added updates for Windows Server 2019 | |
| April 10th, 2018 | Added discussion of when user customizations to Start are lost after an OS in-place upgrade | Callout known issue. |
| March 13th, 2018 | Updated for Windows Server 2016 | Moved out of Previous Versions library and updated for current version of Windows Server. |
| April 13th, 2017 | Added profile information for Windows 10, version 1703, and clarified how roaming profile versions work when upgrading operating systems—see Considerations when using Roaming User Profiles on multiple versions of Windows. | Customer feedback. |
| March 14th, 2017 | Added optional step for specifying a mandatory Start layout for Windows 10 PCs in Appendix A: Checklist for deploying Roaming User Profiles. | Feature changes in latest Windows update. |
| January 23rd, 2017 | Added a step to Step 4: Optionally create a GPO for Roaming User Profiles to delegate Read permissions to Authenticated Users, which is now required because of a Group Policy security update. | Security changes to Group Policy processing. |
| December 29th, 2016 | Added a link in Step 8: Enable the Roaming User Profiles GPO to make it easier to get info on how to set Group Policy for primary computers. Also fixed a couple references to steps 5 and 6 that had the numbers wrong. | Customer feedback. |
| December 5th, 2016 | Added info explaining a Start menu settings roaming issue. | Customer feedback. |
| July 6th, 2016 | Added Windows 10 profile version suffixes in Appendix B: Profile version reference information. Also removed Windows XP and Windows Server 2003 from the list of supported operating systems. | Updates for the new versions of Windows, and removed info about versions of Windows that are no longer supported. |
| July 7th, 2015 | Added requirement and step to disable continuous availability when using a clustered file server. | Clustered file shares have better performance for small writes (which are typical with roaming user profiles) when continuous availability is disabled. |
| March 19th, 2014 | Capitalized profile version suffixes (.V2, .V3, .V4) in Appendix B: Profile version reference information. | Although Windows is case insensitive, if you use NFS with the file share, it’s important to have the correct (uppercase) capitalization for the profile suffix. |
| October 9th, 2013 | Revised for Windows Server 2012 R2 and Windows 8.1, clarified a few things, and added the Considerations when using Roaming User Profiles on multiple versions of Windows and Appendix B: Profile version reference information sections. | Updates for new version; customer feedback. |
More information
- Deploy Folder Redirection, Offline Files, and Roaming User Profiles
- Deploy Primary Computers for Folder Redirection and Roaming User Profiles
- Implementing User State Management
- Microsoft’s Support Statement Around Replicated User Profile Data
- Sideload Apps with DISM
- Troubleshooting packaging, deployment, and query of Windows Runtime-based apps