В интернете очень мало информации о hMailServer. А та что есть — неполная. Я решил немного развеять облака над этой темой и написать цикл статей про этот почтовый сервер. Сегодня просто установим hMailServer.
Конфигурация установки:
- операционная система Windows Server 2016,
- версия БД MySQL 8.0.15,
- версия hMailServer 5.6.8 — Build 2431 (BETA).
Ссылки
Сайт разработчика:
https://www.hmailserver.com/
hMailServer — бесплатный почтовый сервер для Windows
Установка hMailServer
Подготовка к установке
.NET Framework 3.5
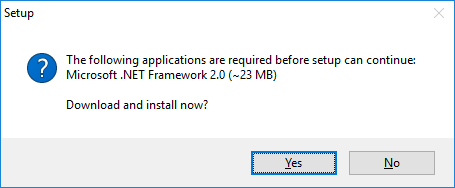
Для работы hMailServer требует .NET Framework 2.0. Этот пакет встроен в инсталлятор, но почему-то у меня выдаёт ошибку. Скорее всего потому, что в Windows Server 2016 .NET Framework 2.0 входит в .NET Framework 3.5. Чтобы не наступить на грабли, устанавливаем .NET Framework 3.5 перед установкой hMailServer.
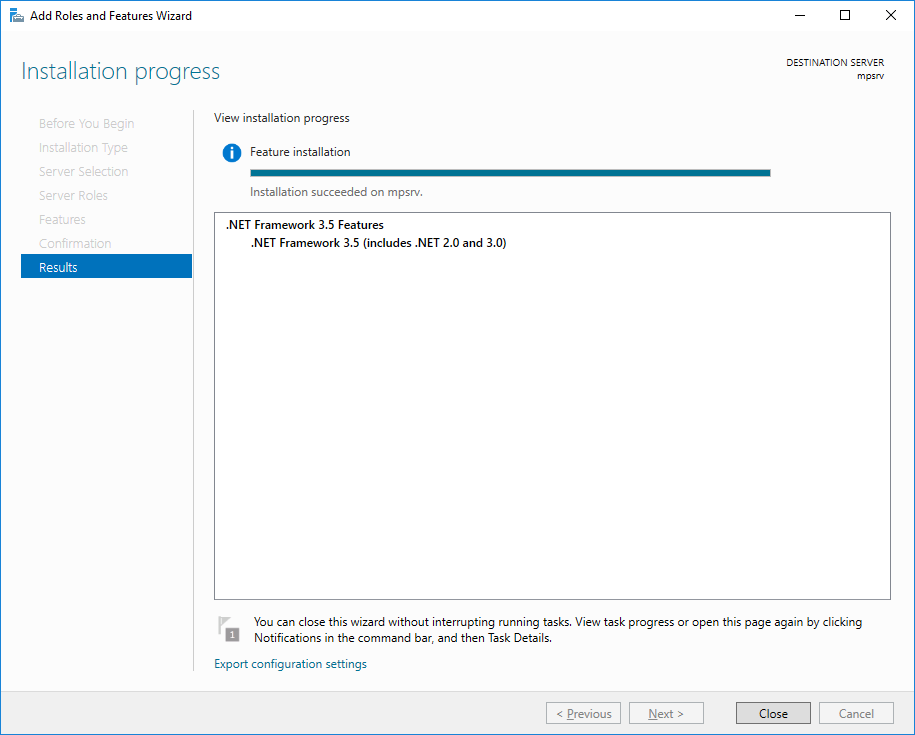
Включить Framework 3.5 на Windows Server 2012 R2
В Server Manager > Add Roles and Features выбираем в Features галкой пункт .NET Framework 3.5 (includes .NET 2.0 and 3.0)
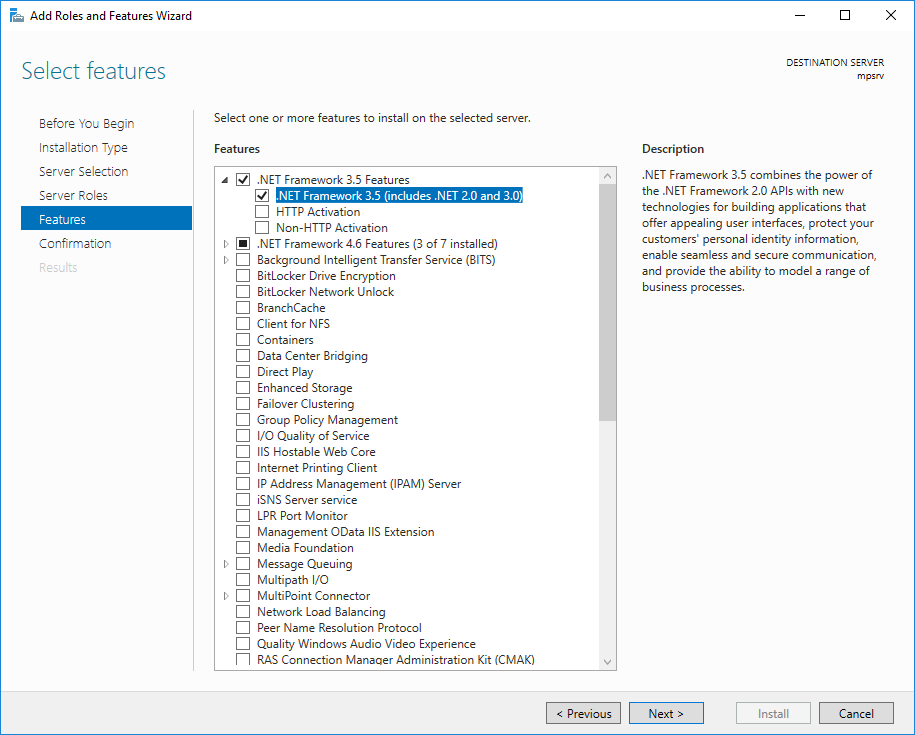
Next. Устанавливается пакет.
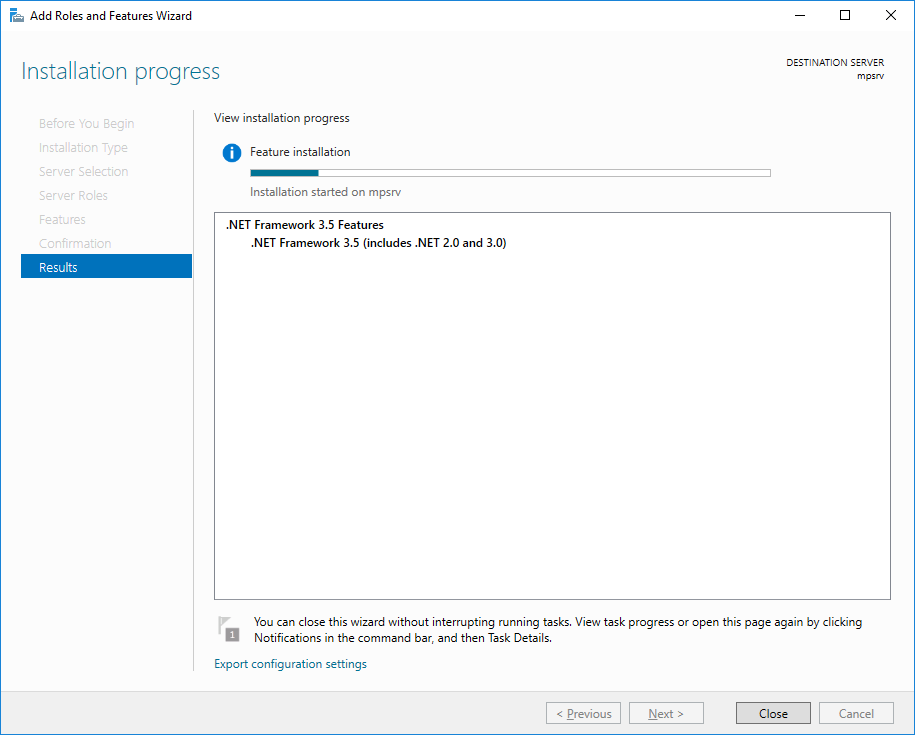
Installation succeeded.
MySQL 8.0
Сами почтовые сообщения хранятся на жестком диске в формате MIME. Для хранения настроек и индексов использует базы данных:
- Microsoft SQL Server 2000 and later
- Microsoft SQL Server Compact Edition (CE)
- MySQL 4 and later
- PostgreSQL
В инсталлятор встроена Microsoft SQL Server Compact Edition (CE), но есть ньюанс:
Please Note: The bundled Microsoft SQL Server Compact Edition (MS SQL CE) is not supported by Microsoft for Windows 8, Windows 8.1, Windows 10, Server 2012, Server 2016. You will need to use an external database with these Operating Systems.
Я пробовал два варианта баз данных: Microsoft SQL Server 2008 и MySQL 8.0. С MSSQL проблем не возникло. С MySQL пришлось покорячиться — нужно доставать 32-битную библиотеку libmysql.dll, сразу и не понял где её брать.
Сегодня поставим hMailServer с настройками для MySQL 8.0.15, поскольку этот вариант БД настраивается только после пинка. Если MySQL у вас ещё не стоит — поставим:
Установка MySQL 8 на Windows Server 2016
hMailServer при установке сам создаёт схему «hmailserver». Для этого ему нужен пользователь и пароль. Чтобы не давать ему рута, можно заранее создать пользователя.
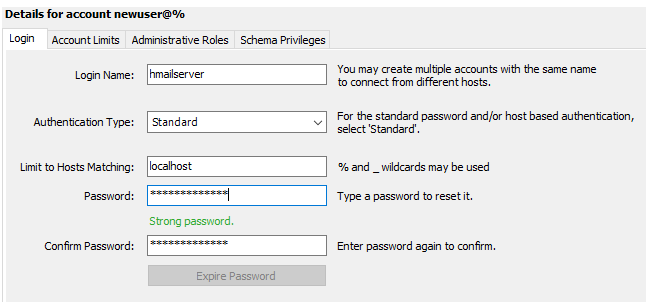
Пользователю нужно дать привилегии на схему «hmailserver».
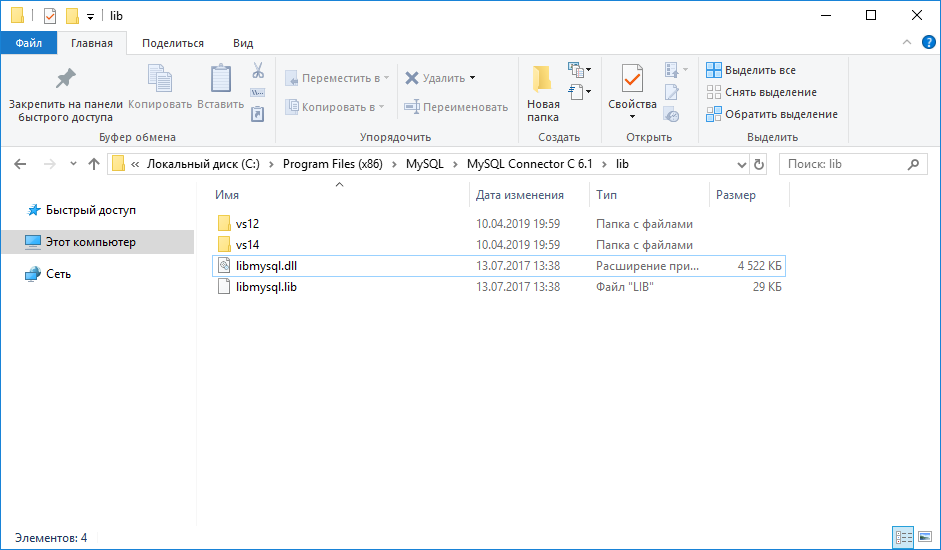
libmysql.dll — 32-бит
Библиотека libmysql.dll не входит в пакет поставки hMailServer, её придётся заранее достать. Проблема в том, что MySQL 8.0 теперь поставляется в 64-битном режиме, и библиотека от него не подойдёт. Я нашёл нужную библиотеку в MySQL Connector C 6.1, который можно установить из дистрибутива с MySQL 8.0, там есть 32-битная версия libmysql.dll.
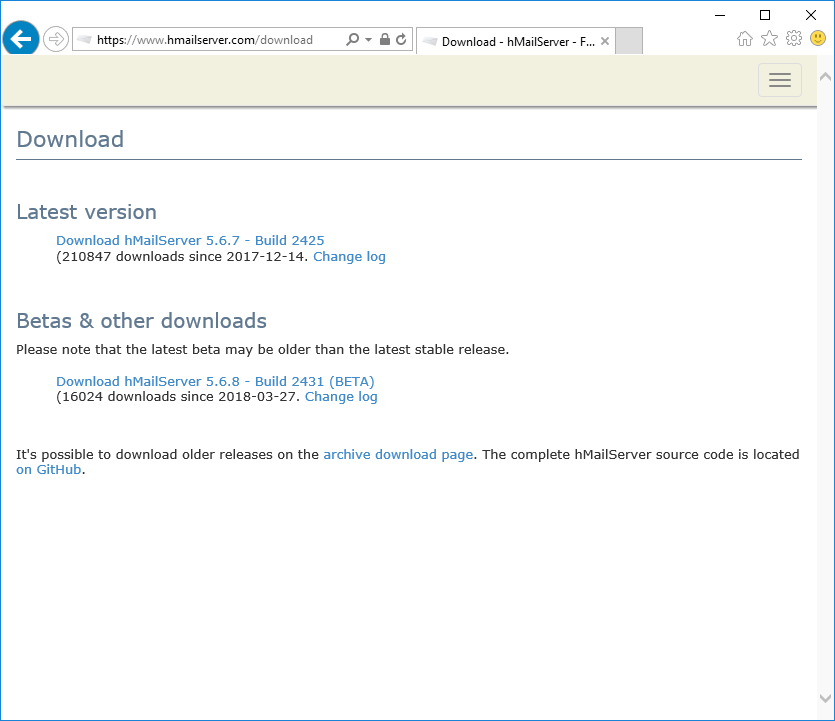
Дистрибутив
Качаем дистрибутив hMailServer:
https://www.hmailserver.com/download
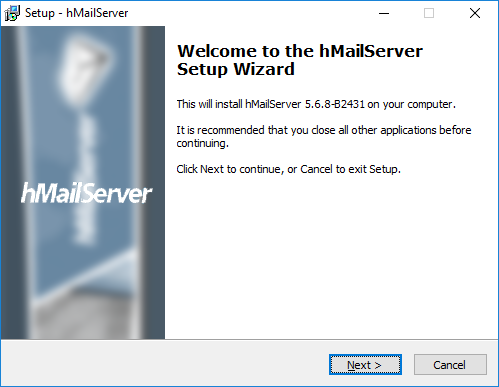
Установка
Запускаем hMailServer-5.6.8-B2431.exe, лучше под админом.
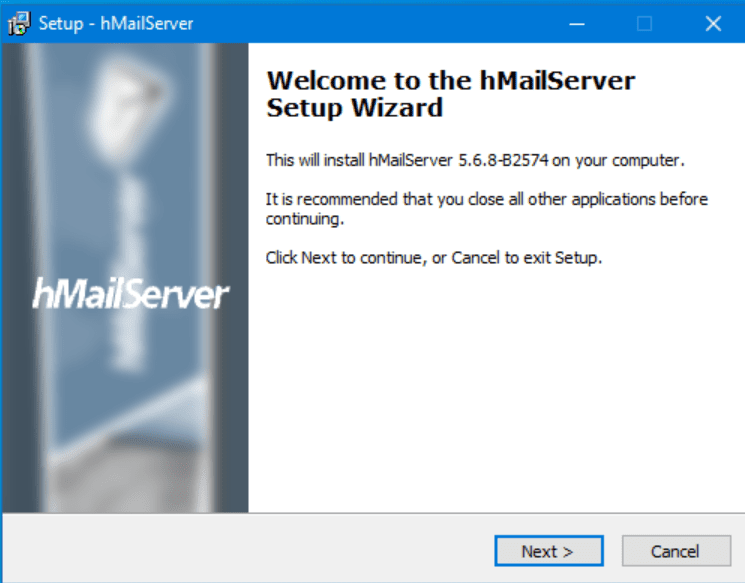
Next.
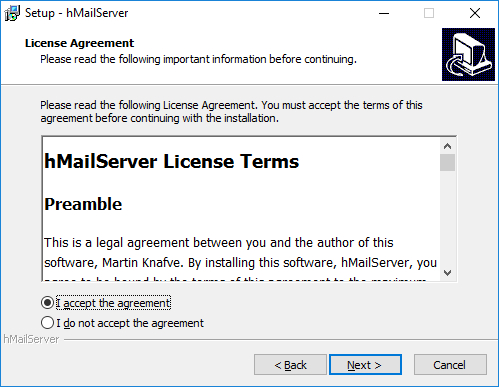
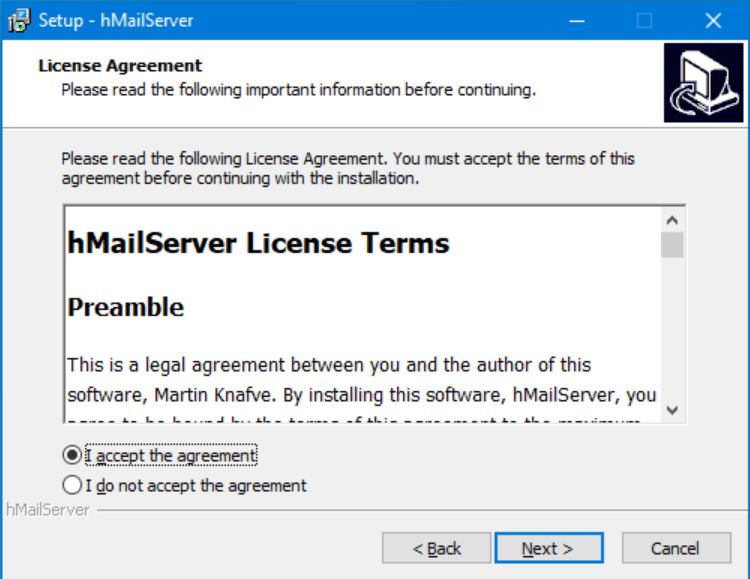
Принимаем лицензионной соглашение. Next.
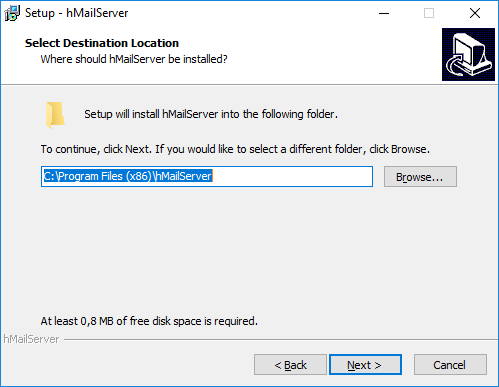
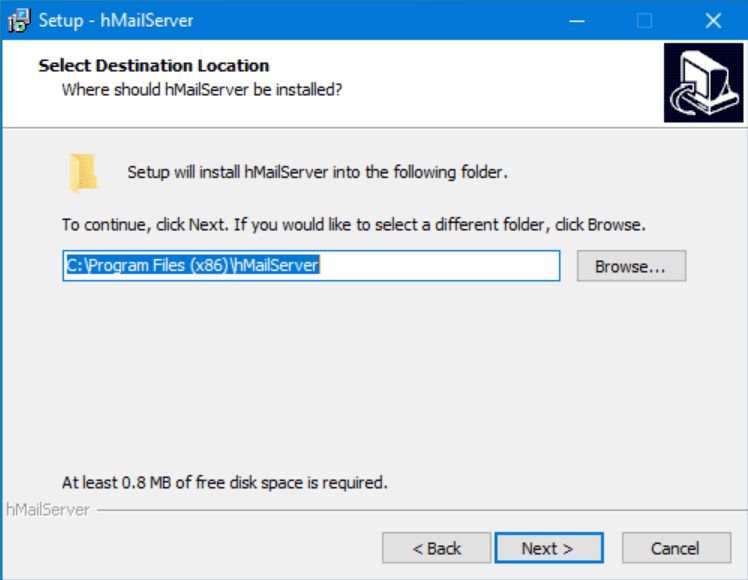
Выбираем папку установки. При выборе папки нужно помнить, что файлы писем будут храниться внутри. Next.
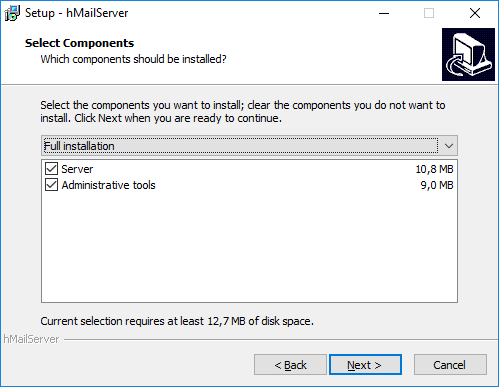
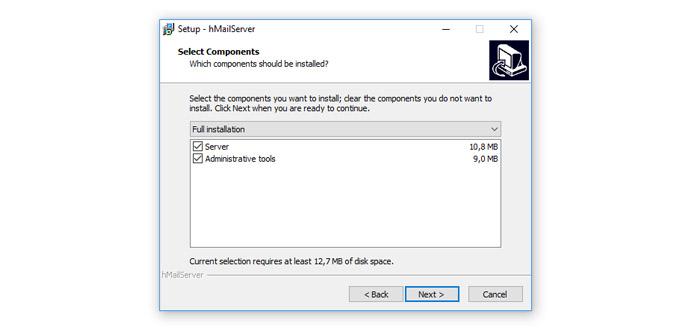
Устанавливаем сам почтовый сервер и средства администрирования. Next.
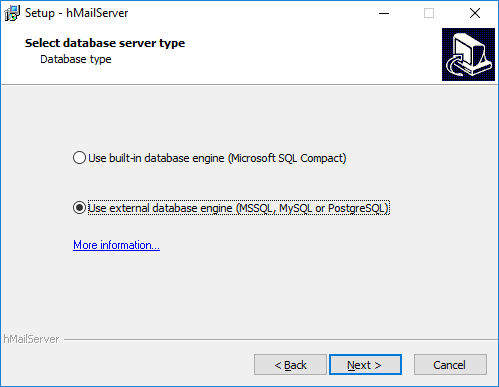
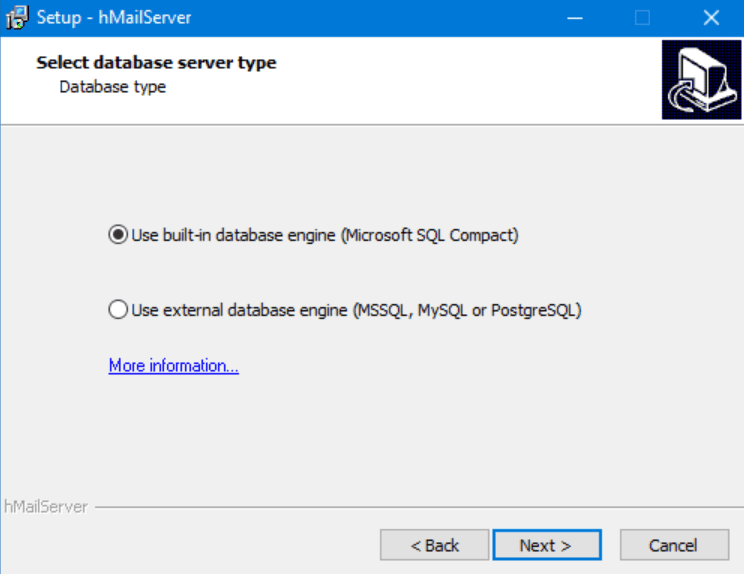
Выбираем Use external database engine (MSSQL, MySQL or PostgreSQL). Next.
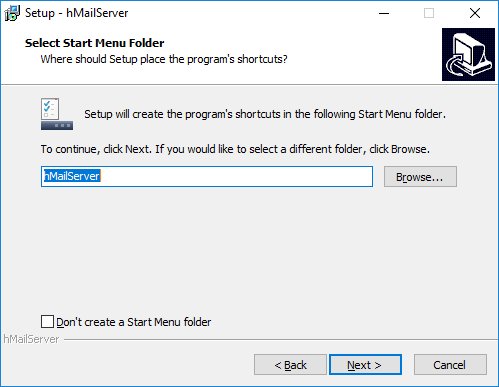
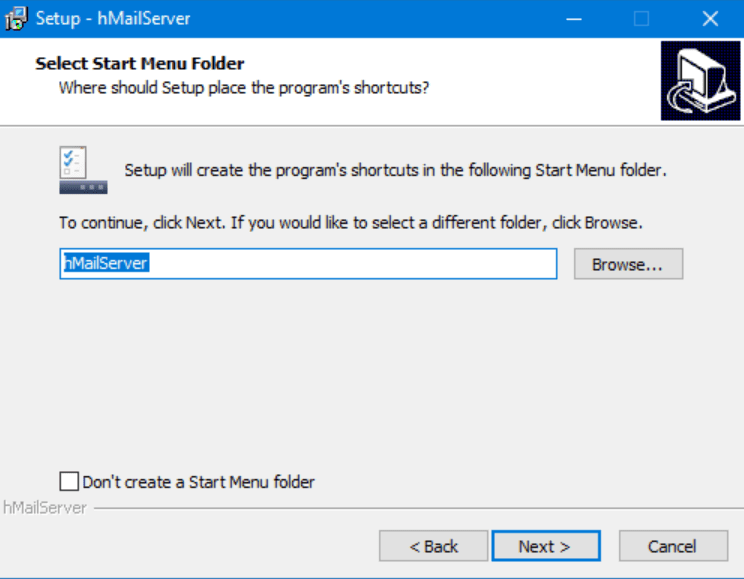
Папка в стартовом меню, оставляем как есть. Внутри будут полезные ссылки:
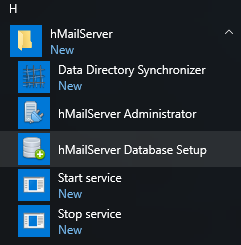
Например, настройку БД после установки можно запустить потом отдельно hMailServer Database Setup.
Next.
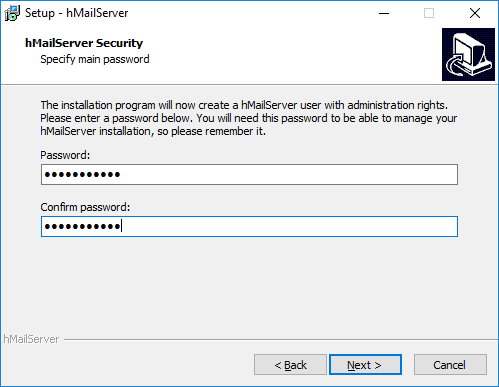
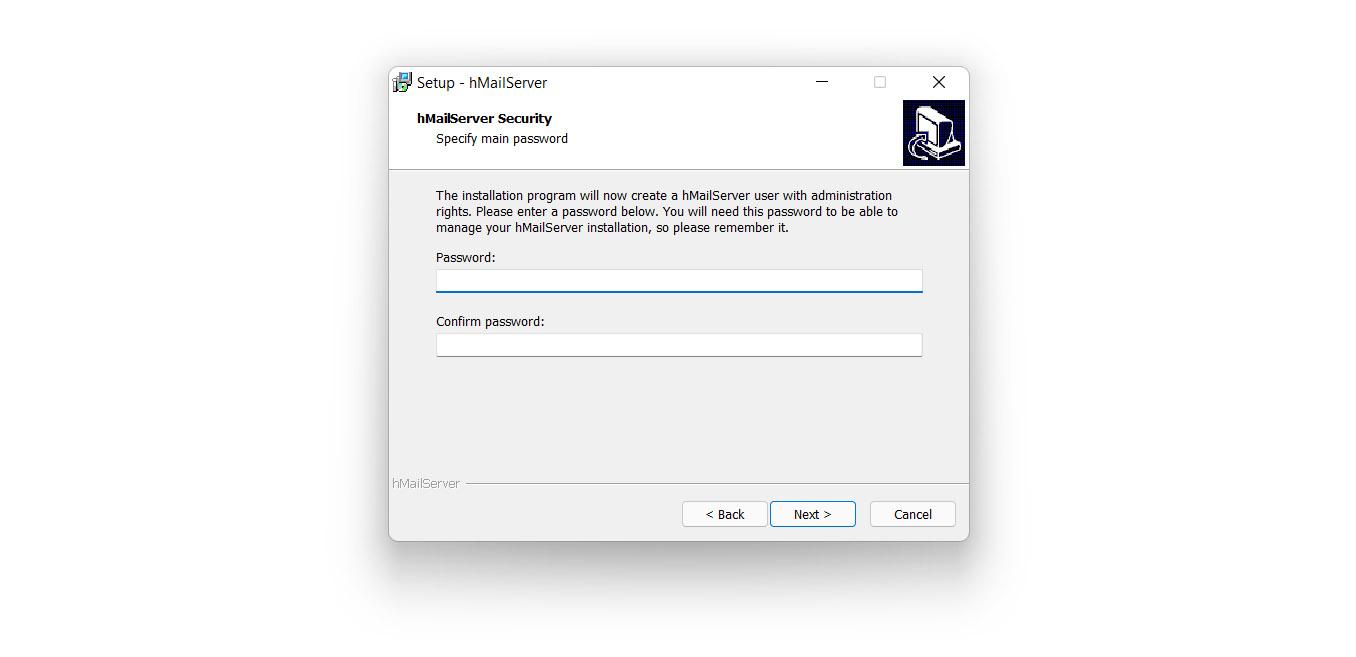
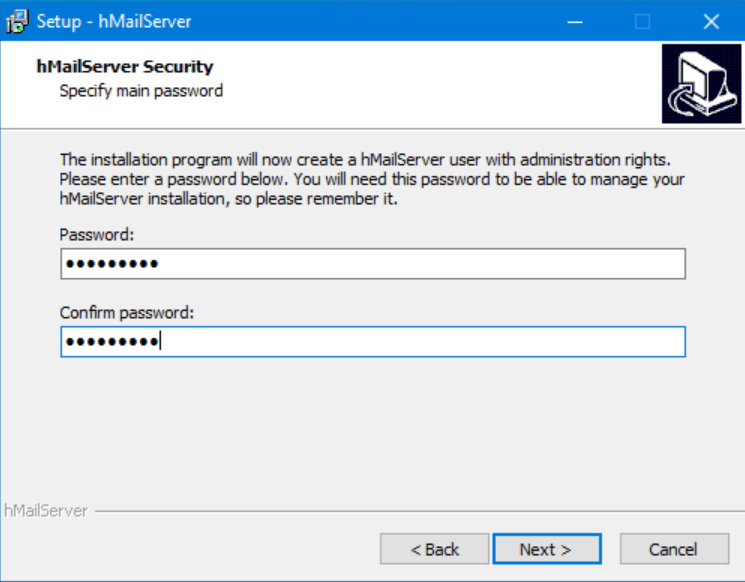
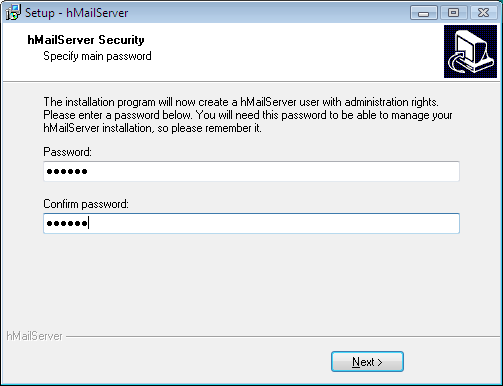
Задаём пароль администратора hMailServer. Next.
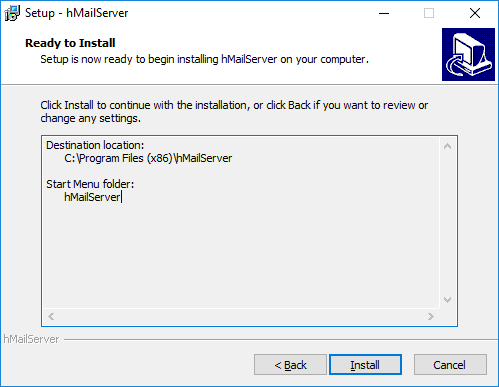
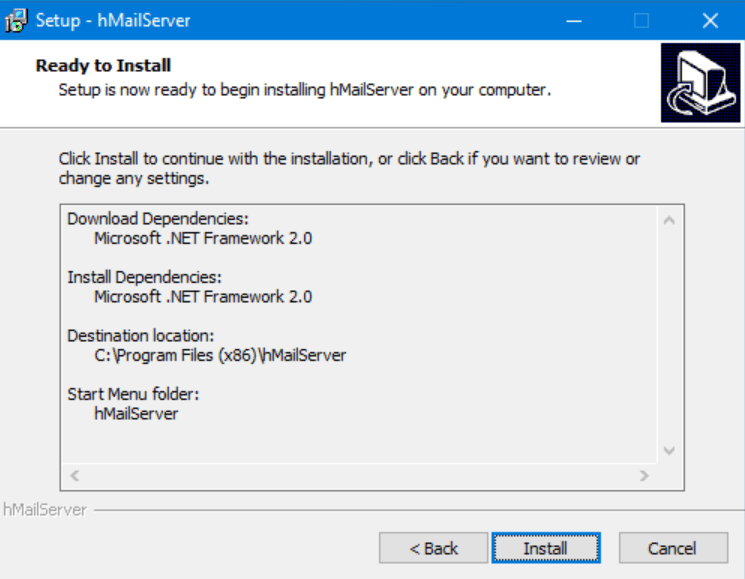
Install.
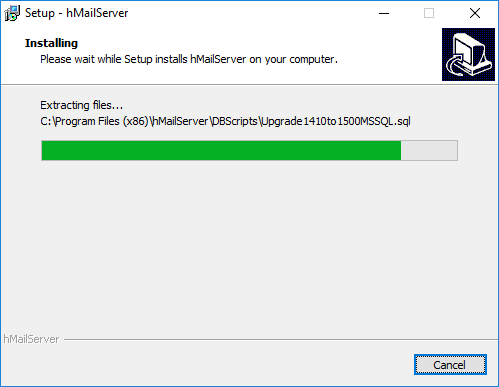
Начинается процесс установки. После окончания установки автоматически запустится hMailServer Database Setup:
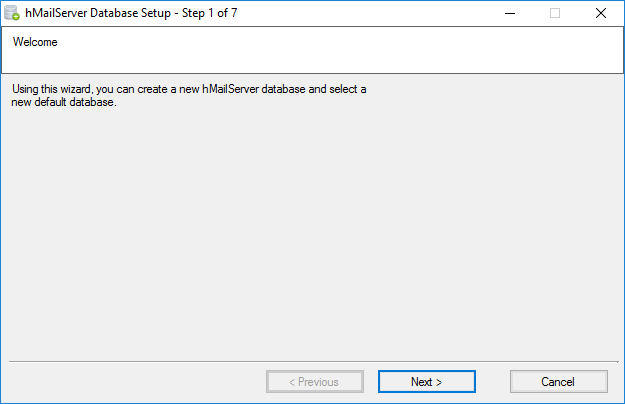
Первый шаг информационный. Next.
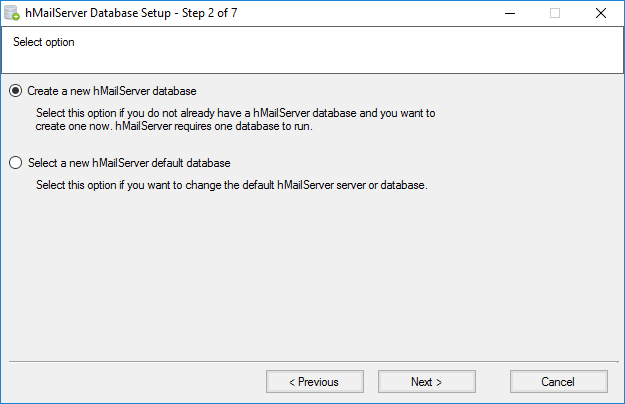
На втором шаге вы можете создать новую базу или выбрать ранее существующую. Я создаю новую:
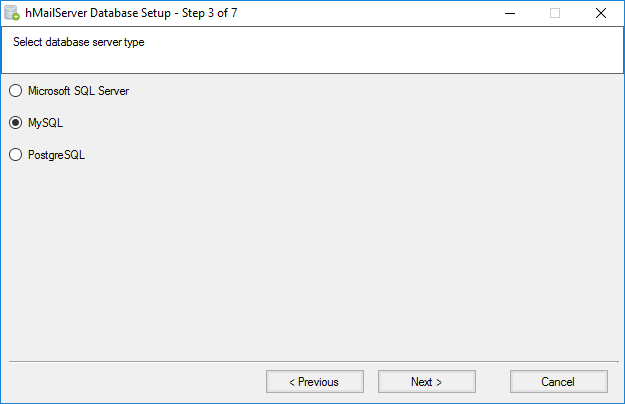
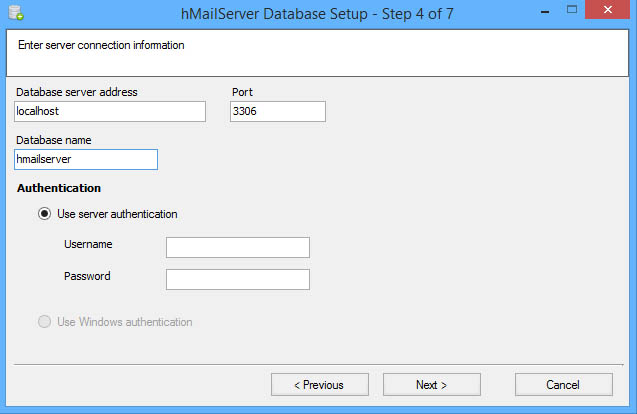
На третьем шаге выбираем тип БД, я выбираю MySQL. Next.
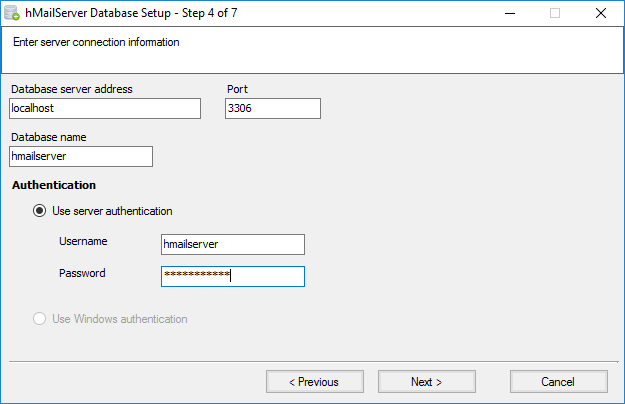
Четвёртый шаг — указываем настройки сервера и базы MySQL. Next.
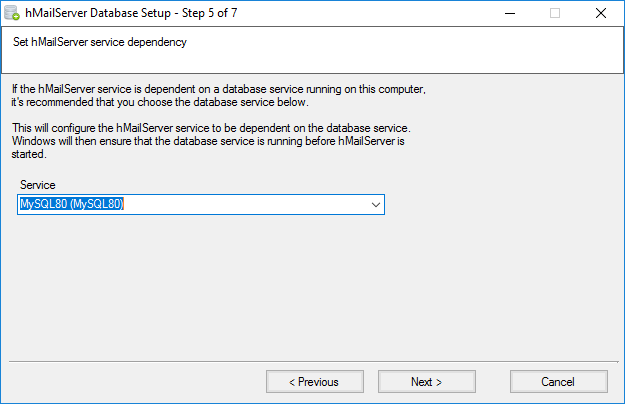
Пятый шаг. Здесь можно выбрать сервис, от которого будет зависеть hMailServer. Удобная штука. Выбираем сервис MySQL80(MySQL80). Теперь сервис hMailServer запуститься только после сервиса MySQL. Next.
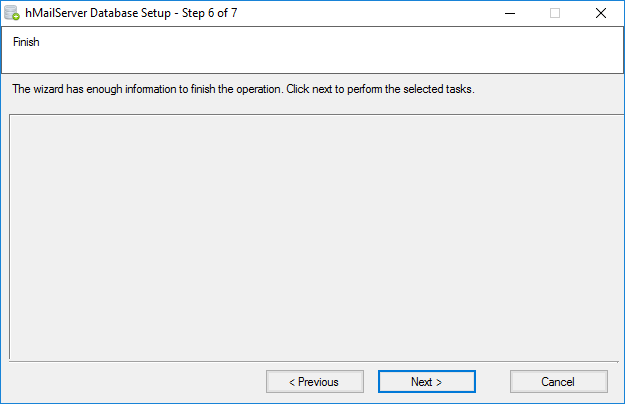
На шестом шаге у инсталлятора уже достаточно данных для установки. Next.
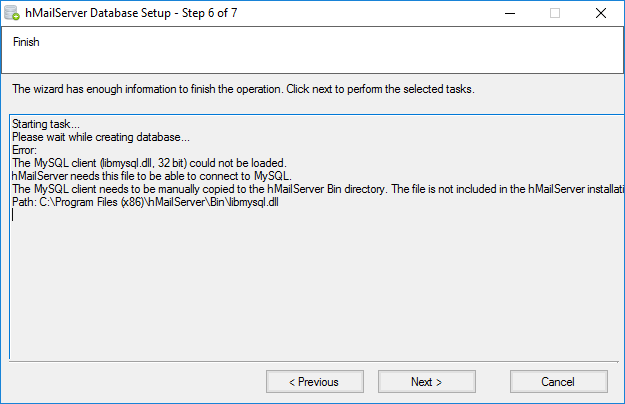
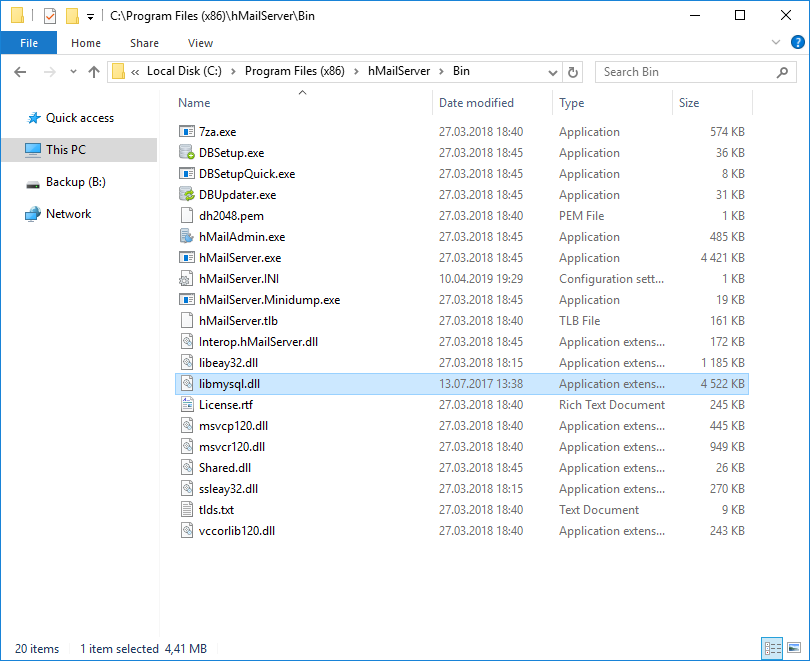
Тут резко выясняется, что для работы с БД инсталлятору требуется 32-битная библиотека libmysql.dll. Её я достал уже в подготовительном шаге. Нам пишут, что этот файл нужно положить вот сюда: «C:Program Files (x86)hMailServerBinlibmysql.dll«. Засовываем библиотеку туда:
Next.

Установка БД завершена. Close.
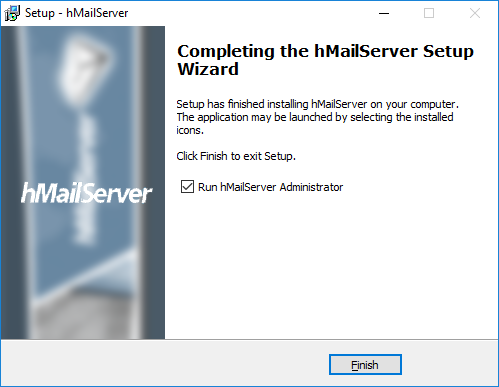
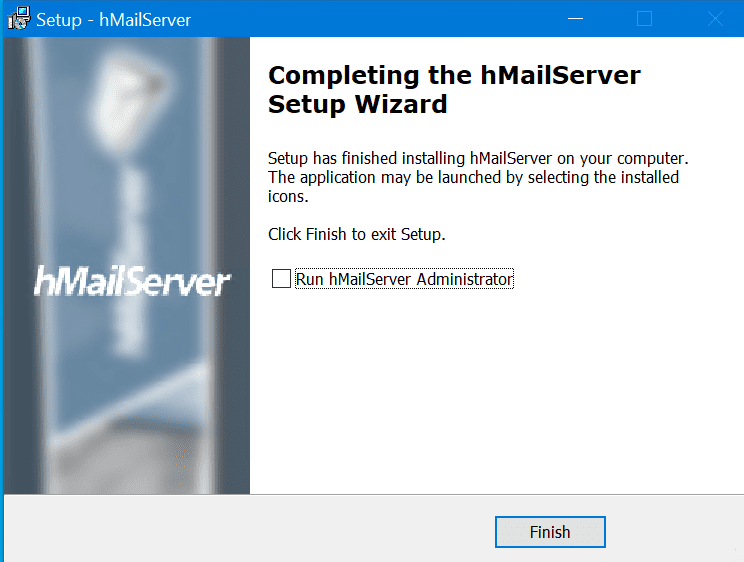
Можно оставить галку для запуска hMailServer. Finish.
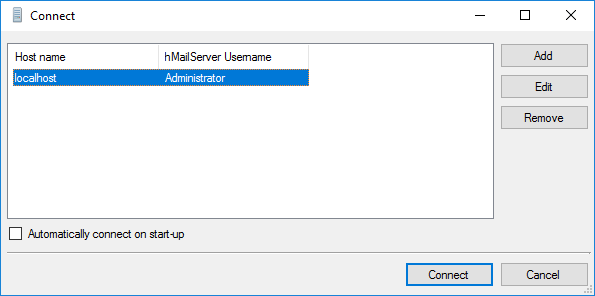
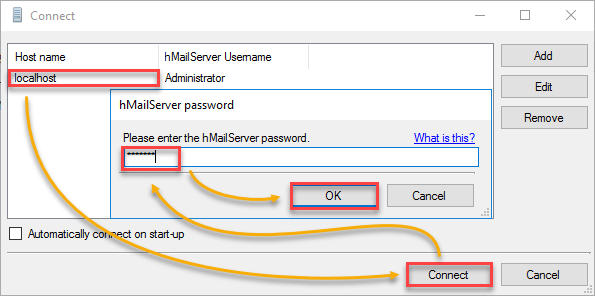
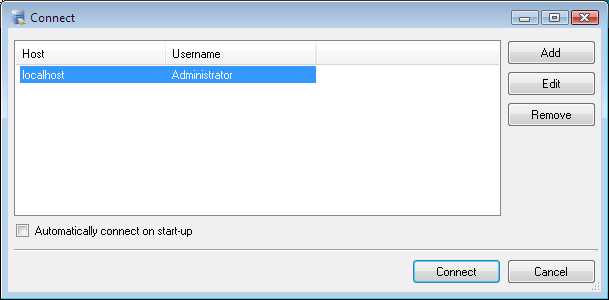
Входим под админом.

Указываем пароль администратора hMailServer. OK.
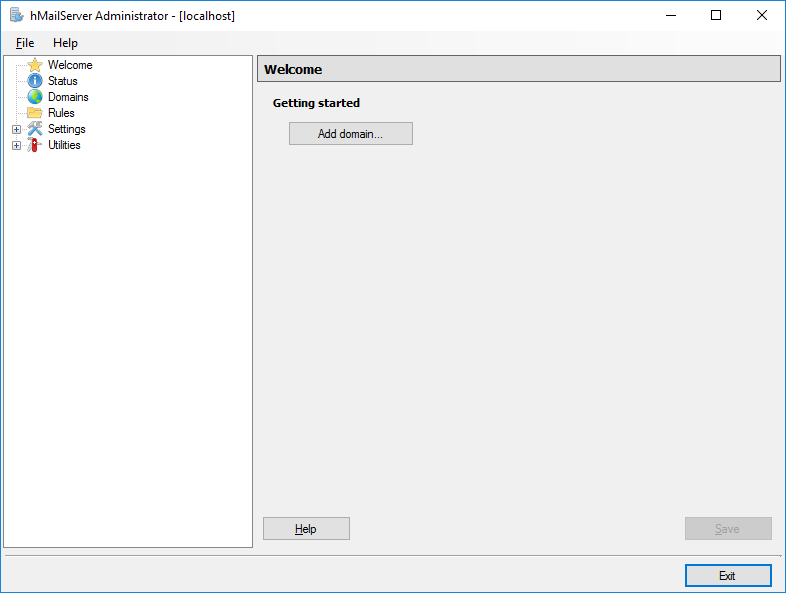
Всё работает.
Известные проблемы
Can’t create database
В 6 шаге настройки БД показывается ошибка:
Can’t create database «hmailserver»; database exists.
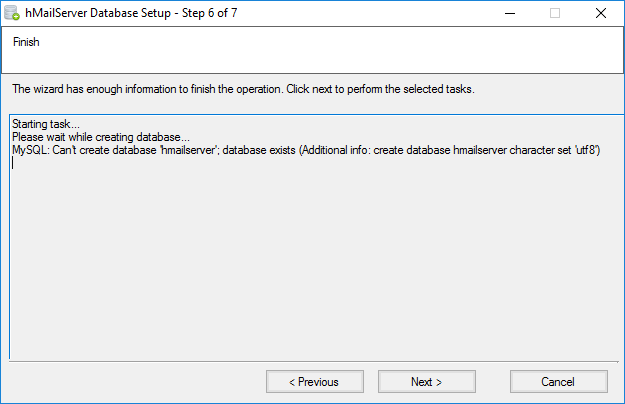
Вы заранее создали схему hmailserver. Снесите её, инсталлятор сам создаст.
Не установили .NET Framework 3.5
Если инсталлятор не нашел .NET Framework 2.0, то он его попробует поставить:
Запустит пакет.
Поставит.
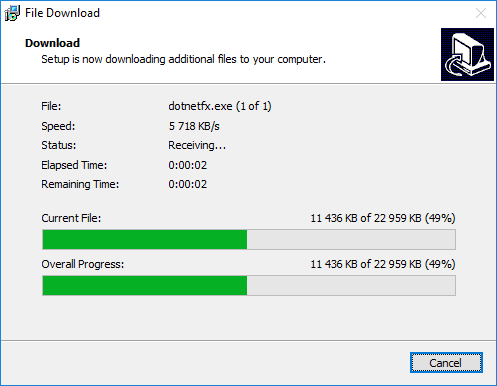
И не сможет довести дело до конца.
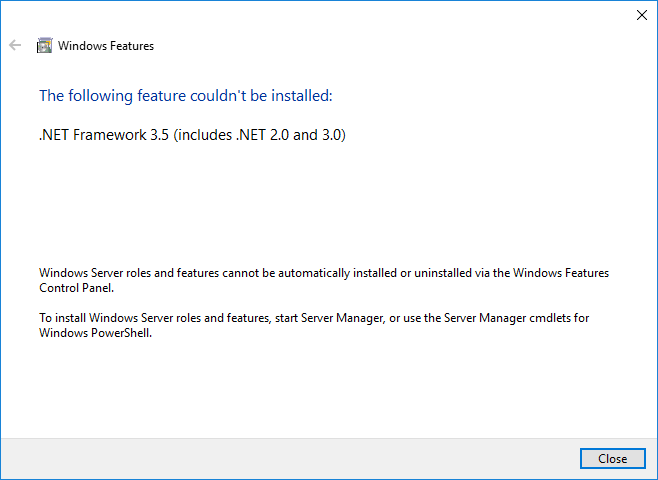
Потому что нужно заранее поставить .NET Framework 3.5, в подготовительном этапе мы должны были это сделать.
Database is not available
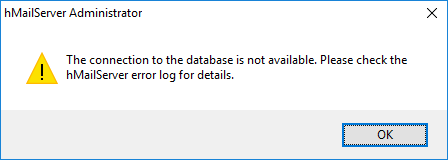
Иногда инсталлятор открывает окно настройки БД под основным окном. Если базу не настроить — появится такая ошибка. Возможно также, что вы случайно закрыли настройку базу, можно запустить заново hMailServer Database Setup.
The phrase “mail server” is almost synonymous with the name Microsoft Exchange. You don’t have to choose Microsft Exchnage. Instead, you can set up the free mail server called hmailserver!
And if you’re interested in trying it out, then you’re in luck! Because in this article, you will learn about the basic requirements and how to install hMailServer and set it up as a mailbox and SMTP server.
By the end of this article, you will have learned how to perform basic configuration tasks such as adding domains, users, SSL certificates, and using SMTP smart host for external email delivery.
Preparing Your Environment
This article will be a walkthrough about installing and configuring hMailServer on a single server. If you plan to follow along with the examples, you will need to prepare some requirements.
- A Windows Server 2016 computer.
- Download the latest copy of hMailServer from this link.
- An email client used for accessing email accounts. In this article, Mozilla Thunderbird will be used.
- (Optional) Active Directory. This is only needed if you will create hMailServer email users based on Active Directory users. Otherwise, you can still create email users without it.
- (Optional) A valid SSL certificate to encrypt email client connections. You can get an SSL certificate for free from Let’s Encrypt. The certificate must be in PEM format. It’s okay if you don’t have this, hMailServer will still work without encryption.
Database Requirements
hMail Server can be installed with a built-in database (Microsoft SQL Server Compact Edition (CE)). It is suitable for testing, small deployment, or personal installations.
However, if you plan to use hMailServer commercially or in production, you will need an external database instead. If you choose to use an external database, the following database engines are supported by hMailServer.
- Microsoft SQL Server 2000 or later
- MySQL
- PostgreSQL
In this article, only the built-in database will be used.
Network and Port Requirements
The following ports must be allowed in your network. Depending on your planned usage (i.e., IMAP only, no POP3), you may opt to leave some ports that will not be used.
- 25 (SMTP)
- 465 (SMTP SSL/TLS)
- 587 (SMTP Submission)
- 110 (POP3)
- 995 (POP3 SSL/TLS)
- 143 (IMAP)
- 993 (IMAP SSL/TLS)
DNS Record Requirements
Mail systems rely heavily on DNS for email delivery to function correctly. So proper DNS records must be in place, both for internal and external resolution.
To keep things simple, in this article:
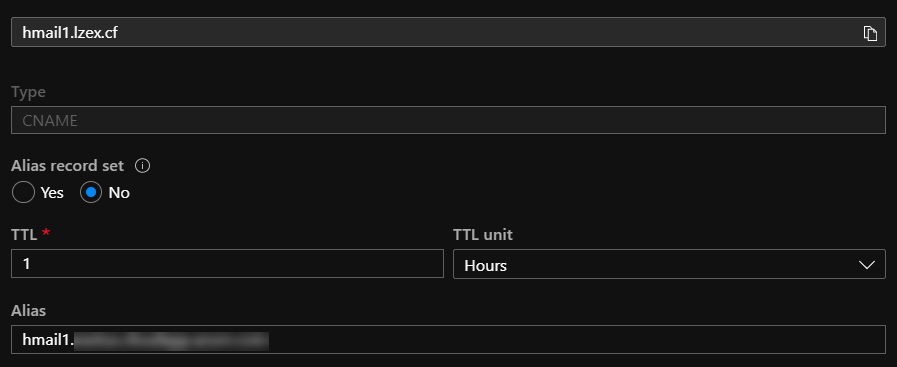
- Only one DNS (A) record will be used for the internal DNS – which is the FQDN of the server where hMail Server will be installed. In this article, the server address is hmail1.lzex.cf.
(Optional) Two DNS records will be used for the external DNS.
- An MX record that will be used for mail delivery pointed to the external address of the hMailServer.
- A CNAME record that will be used for client connection (IMAP, POP3, SMTP), also pointed to the external address of the hMailServer.
For a complete list of system requirements, visit the hMailServer’s System Requirement page.
Installing hMailServer
To perform an hMailServer installation is a fairly straightforward process. It is a wizard-based installation type, which means that you will only be clicking on buttons.
- Locate the installation file that you’ve downloaded and then launch it. Then, click Next on the welcome page.
- In the License Agreement page, you must accept the terms. Click Next.
- Next, either select a custom path or leave the default path where the hMailServer will be installed. Then, click Next.
- You are not presented with two options; Full Installation or Custom. Select Full Installation to install both the server and admin tools. Then click Next.
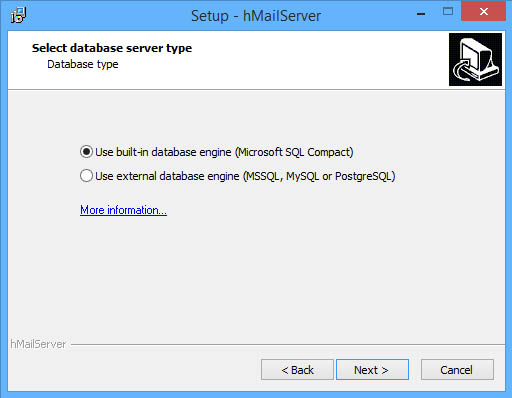
- Next, choose the database server type. In this article, the built-in database engine will be used. Then click Next.
- Click Next on the Select Start Menu Folder page to leave it to its default value.
- Next, you need to specify a password for the hMailServer instance that you are installing. Make sure to remember this password.
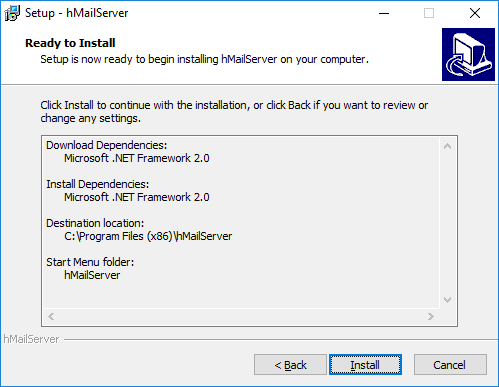
- You’ll be shown a summary of the installation options you chose. Click on the Install button to being the installation process.
- Wait for the installation to complete, then click Finish.
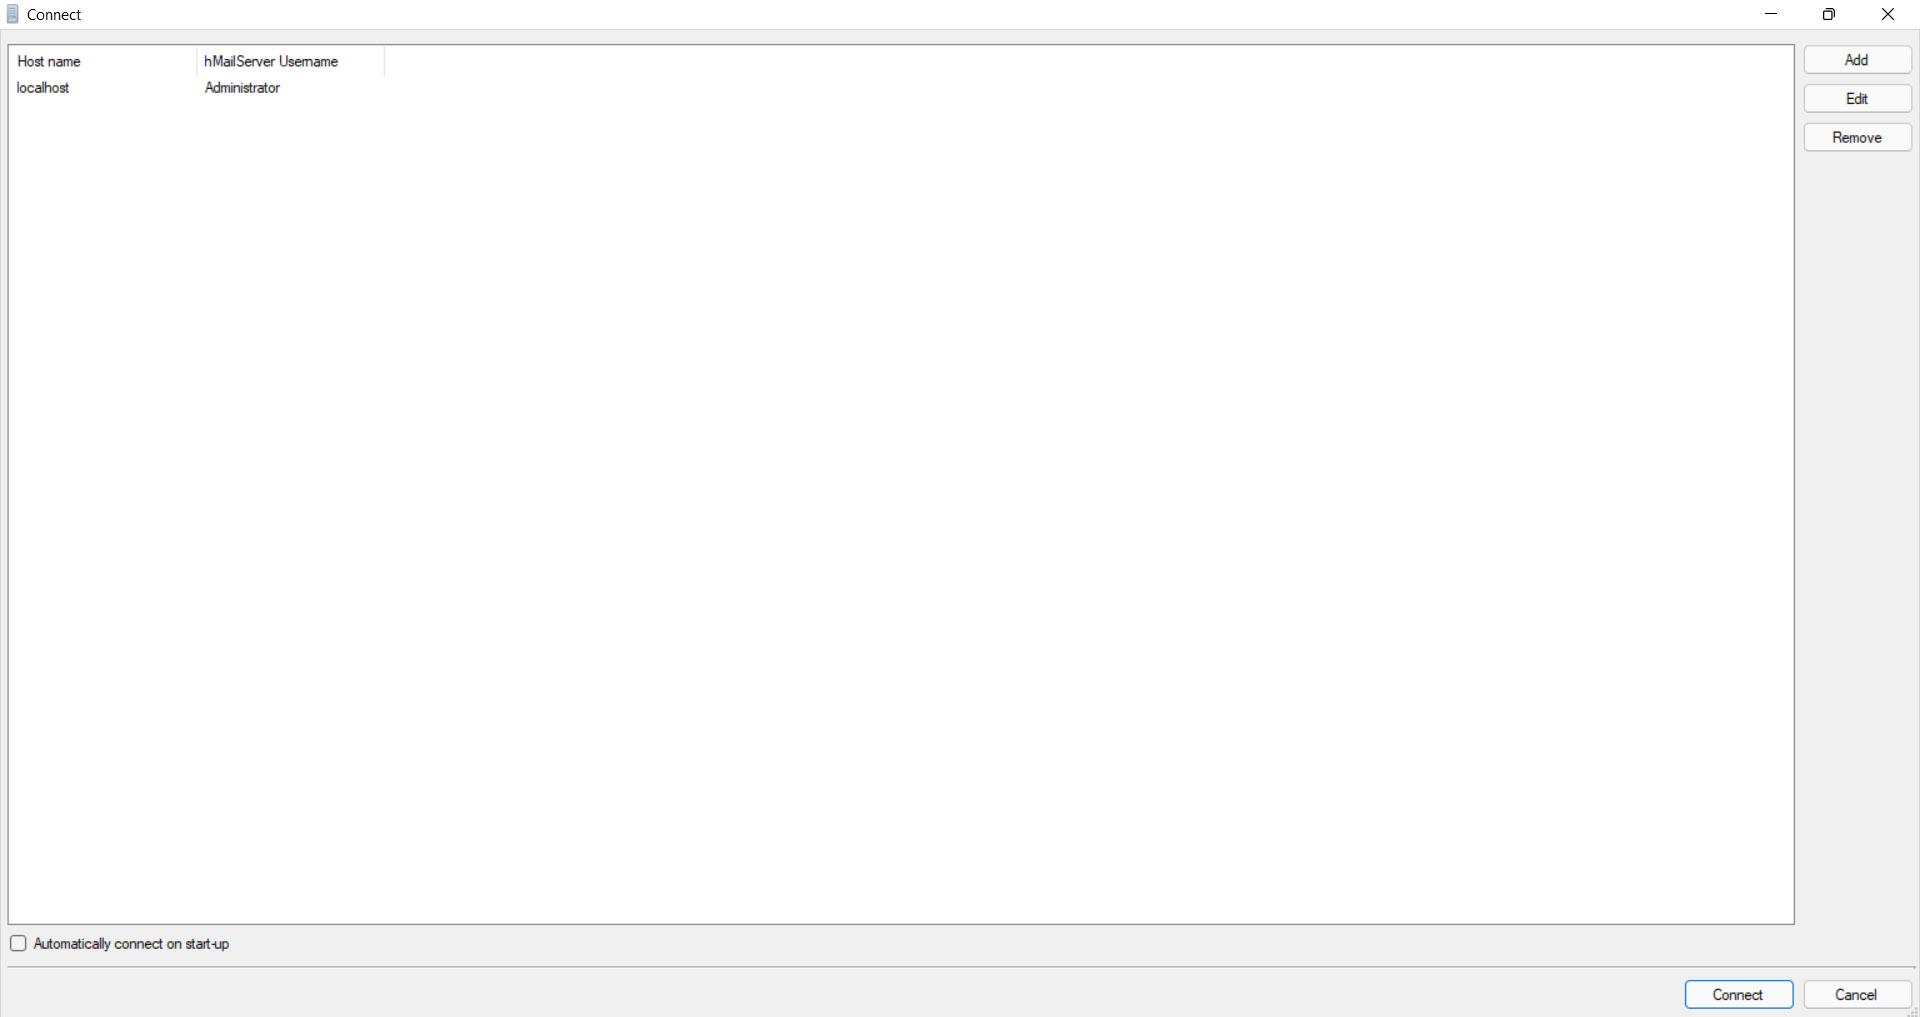
- On the Connect window, select the instance of hMailServer and click on Connect. Enter your password when prompted, then click OK.
And that’s it! You have successfully installed your first hMailServer.
Adding Domains to Hmailserver
Just installing hMailServer is not enough to make it usable. You still need to configure things like domain(s), users, ports, and relay settings.
Before you can add users, you must first add an email domain. This must be the email domain that you’ve prepared and plan to use for your email address.
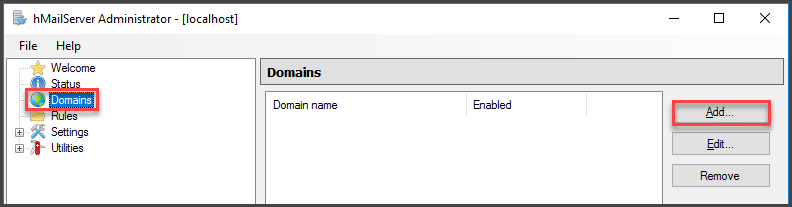
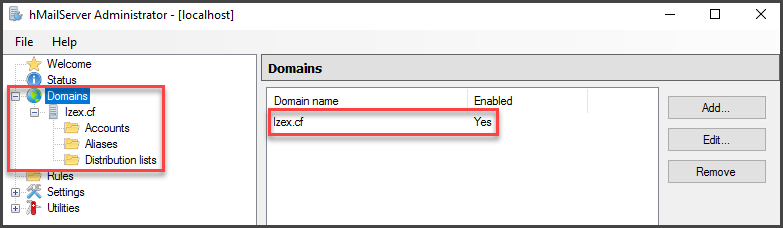
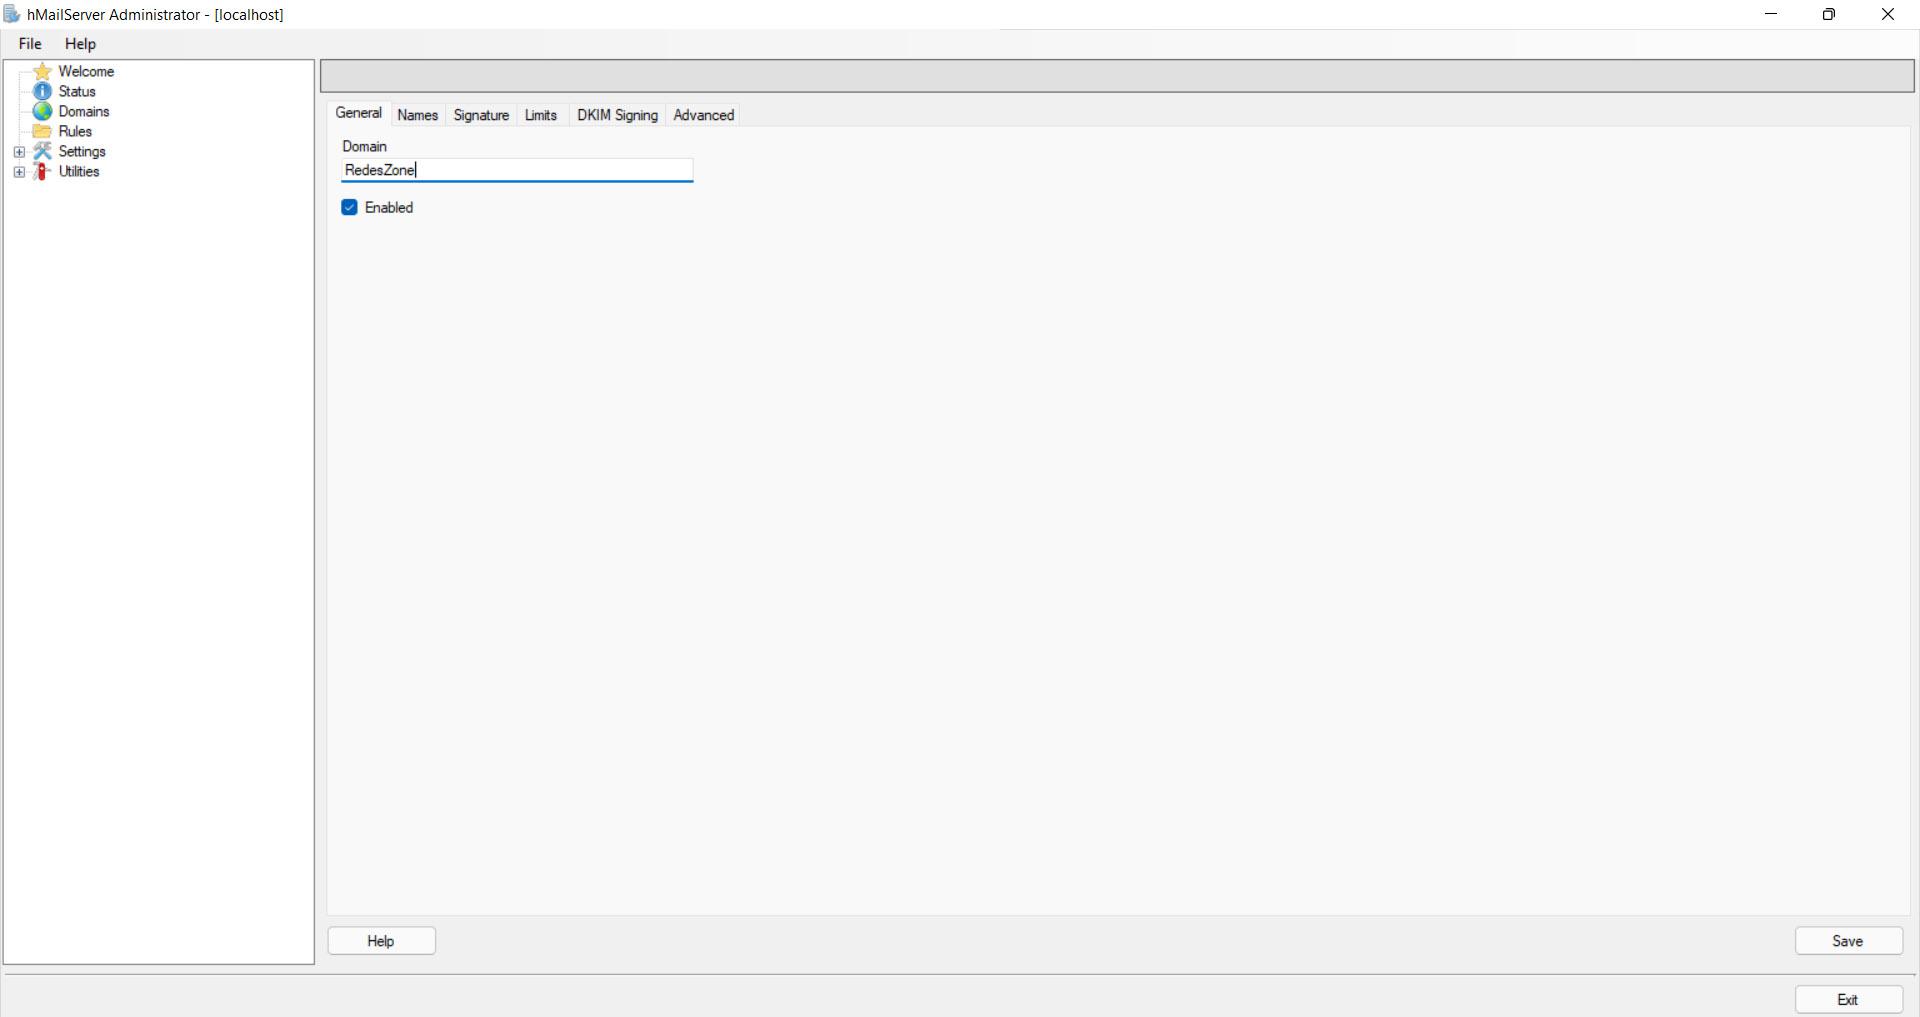
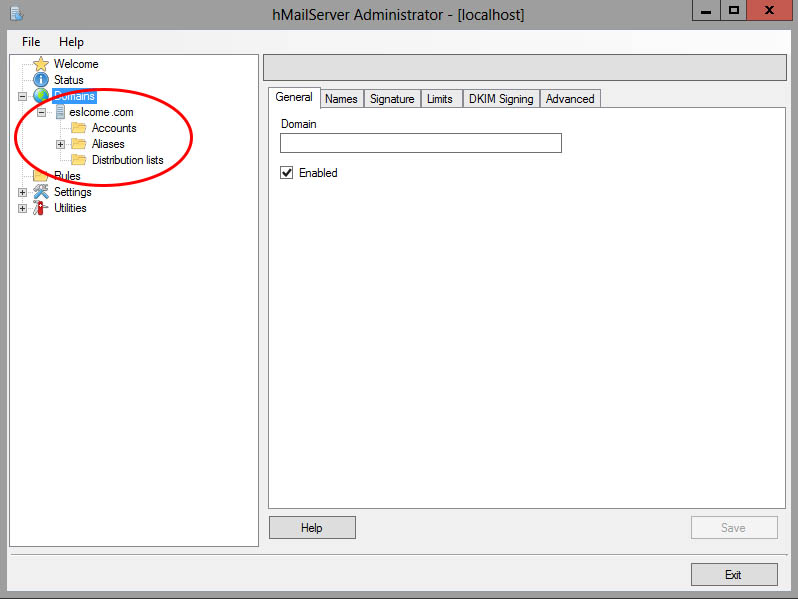
To add a new domain, in the hMailServer Administrator (admin console window), click on Domains. You will notice that the list of domains is empty – which is to be expected. Click on Add.
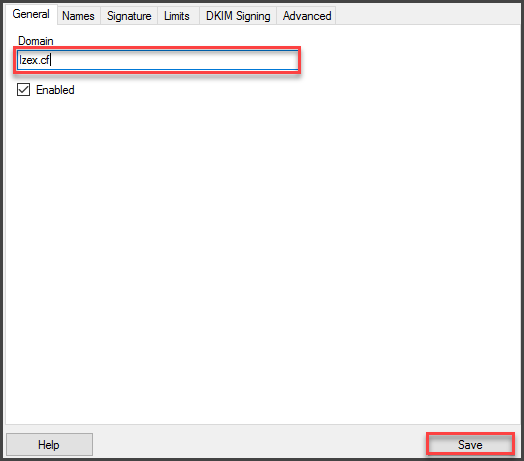
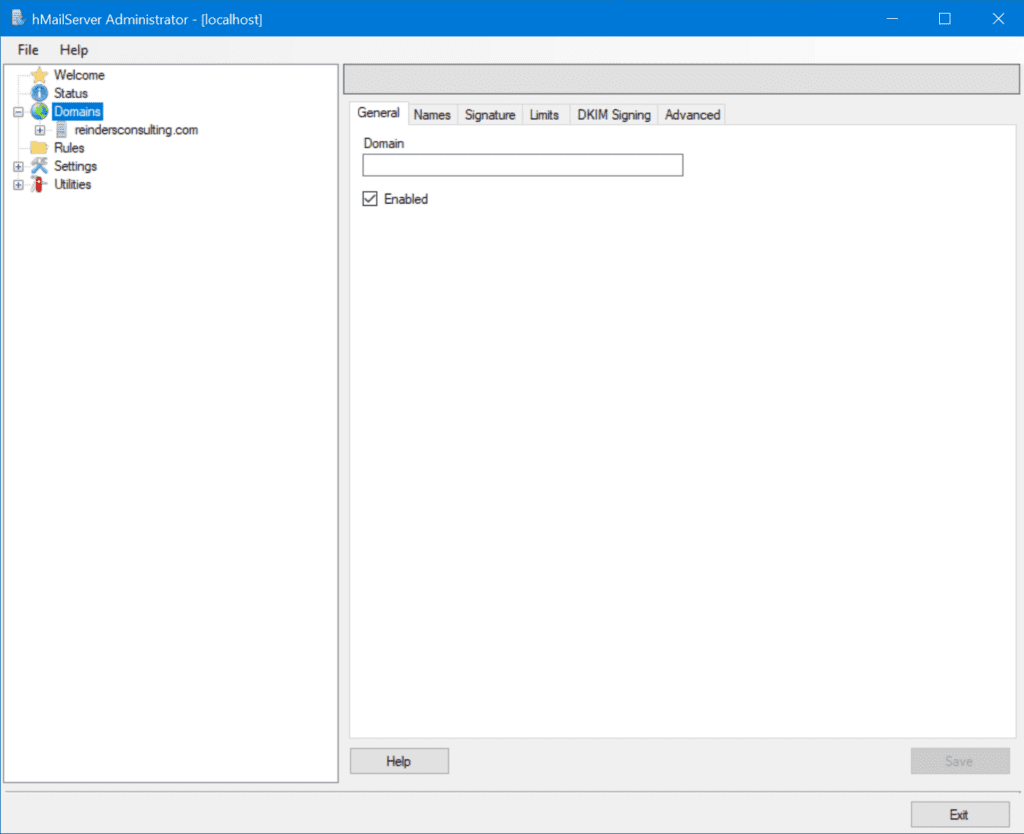
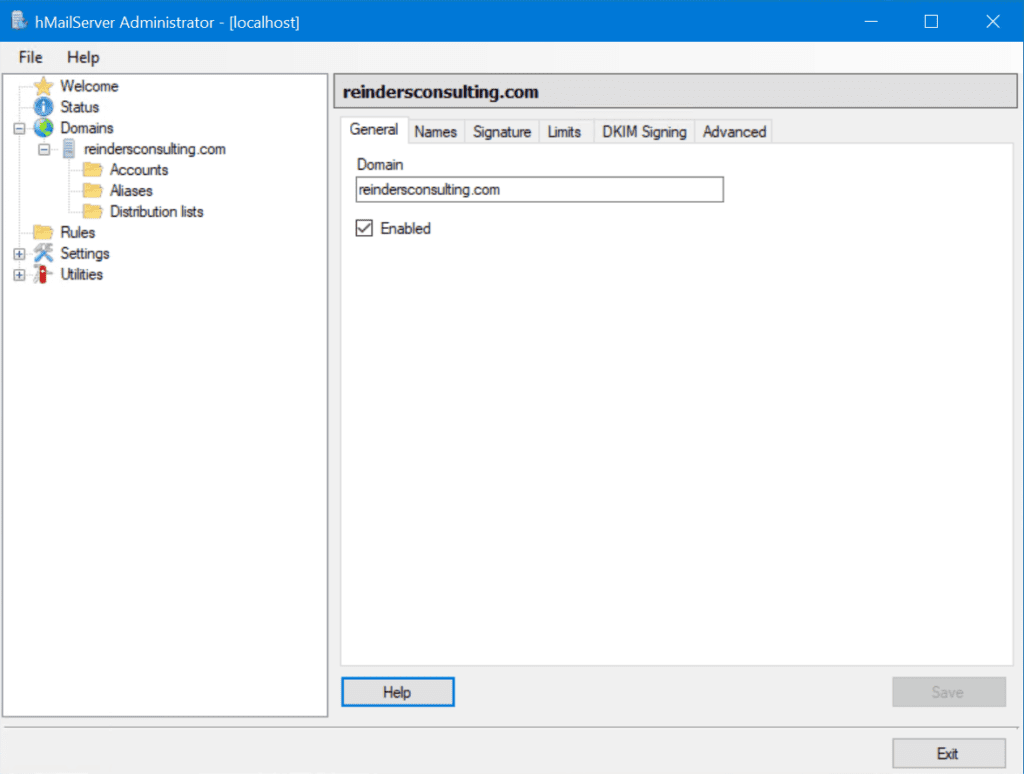
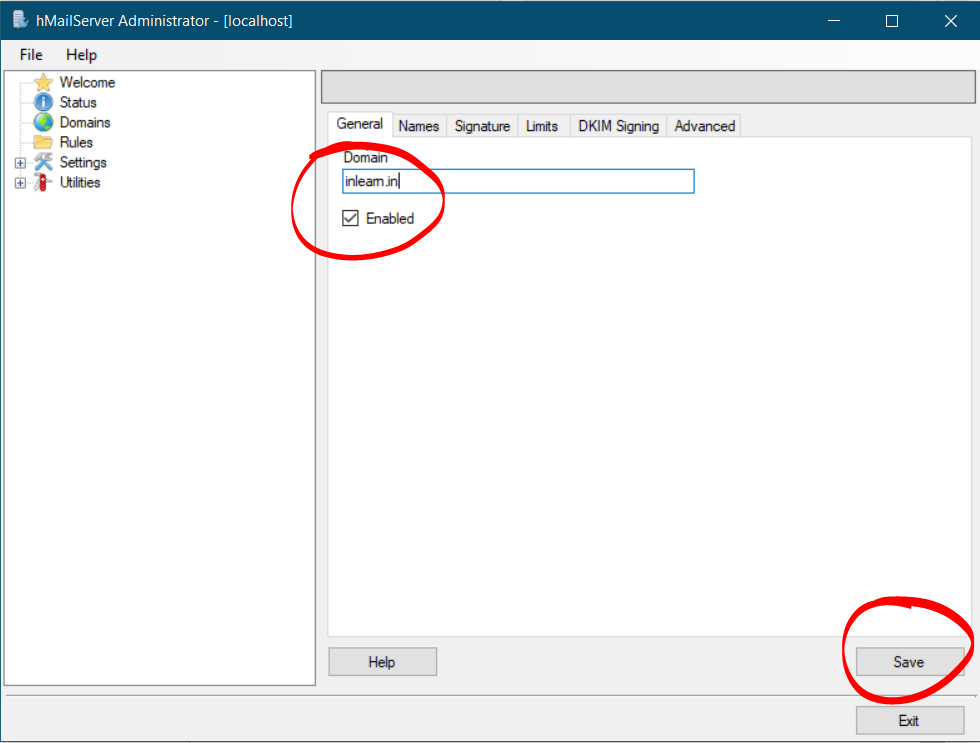
Next, type in your domain in the Domain box. Make sure that the Enabled checkbox is checked, then click Save.
Note that there are more configurations available for the domain, like the message size limits and default signatures. Feel free to configure those if you prefer.
After clicking on Save, as you can see below, a new domain has been created and added to the Domains list.
Adding Users to Hmailserver
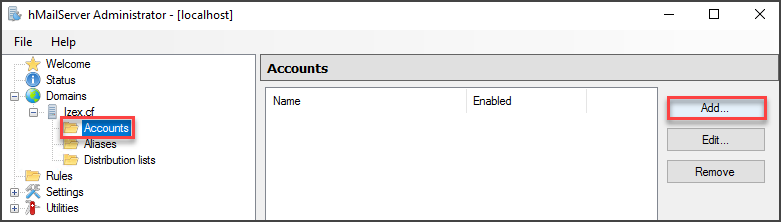
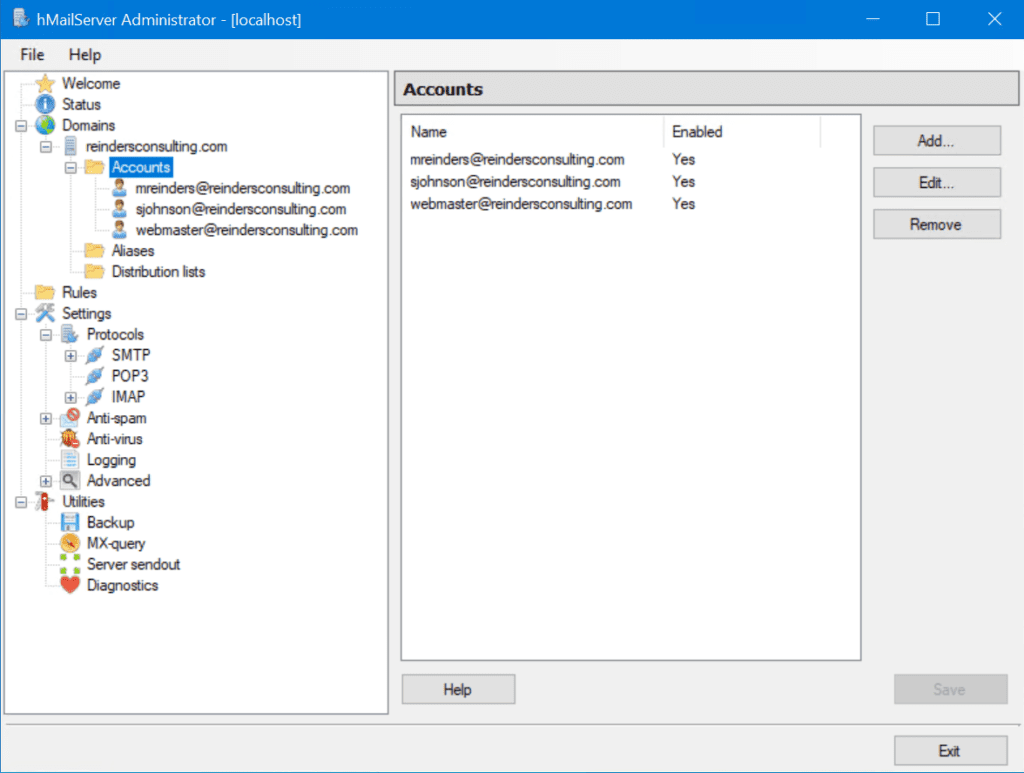
Now that the domain is added, email accounts can now be added under that domain.
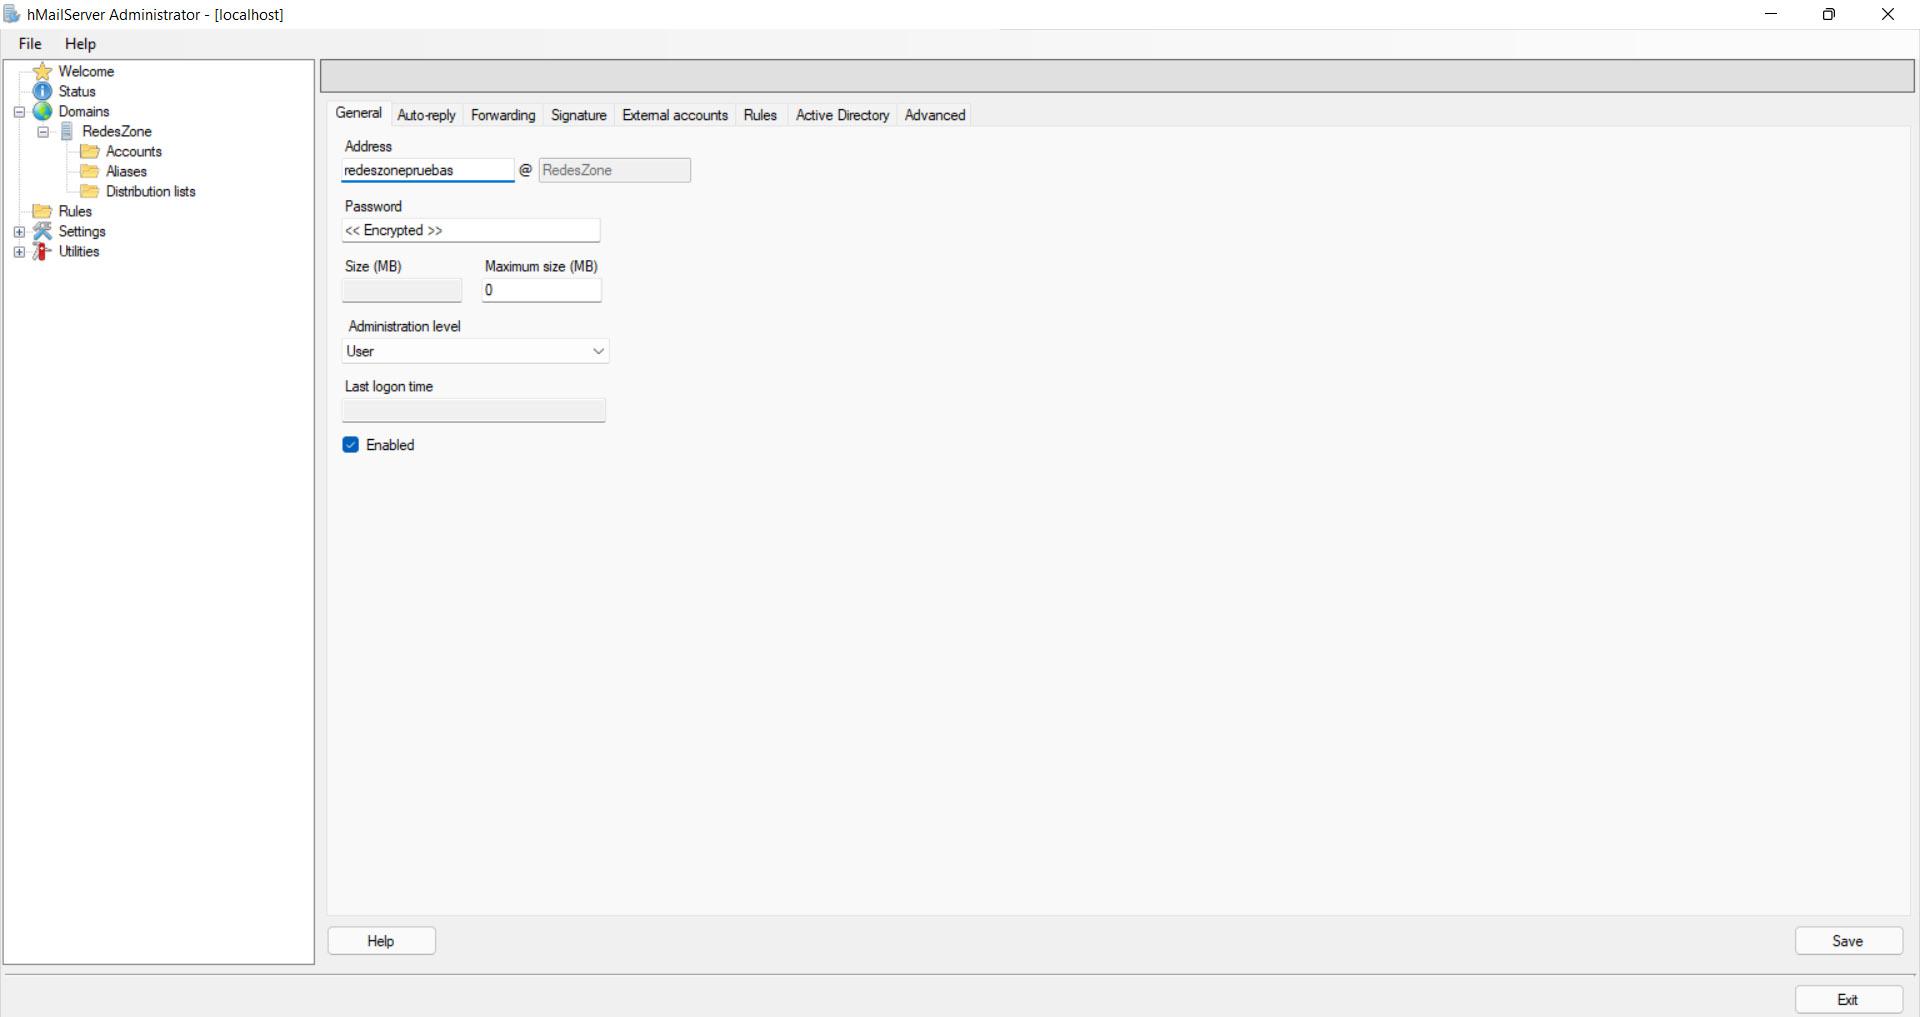
To add a new account, click on the Account folder under the domain. Then, click on the Add button on the right.
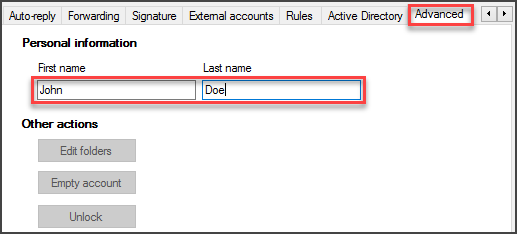
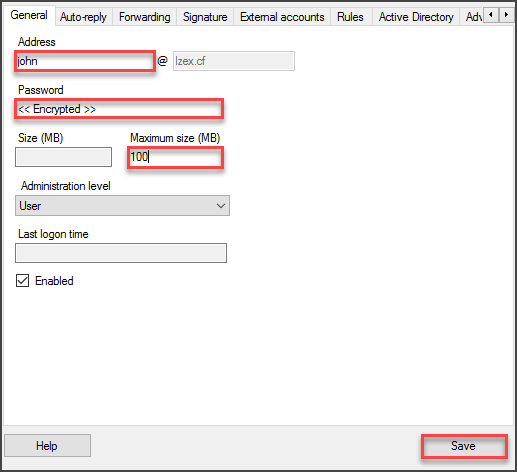
Go to the Advanced tab and specify the First name and Last name of the new user.
Then, go to the General tab, type in the address and password of the account you are creating. It is also recommended to set a maximum size for the user’s mailbox. When you’re done, click on Save.
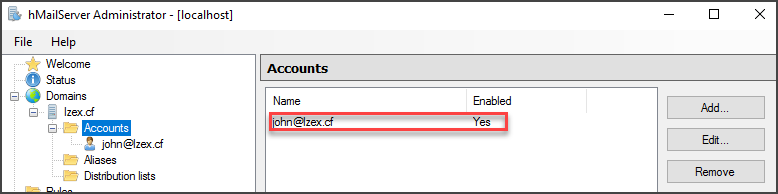
As you can see from the image below, the new email account has been created.
Integrating Users with Active Directory
You can modify existing users or create new users and connect them with Active Directory. Integrating an hMailServer user with Active Directory ensures that your users can use their domain credentials to log in to their hMailServer accounts.
Suppose that you have already created the account and want to integrate it with AD, follow these steps.
First, locate and edit the account in the hMailServer admin console. Then, go to the Active Directory tab.
Next, put a check on the Active Directory account box. Enter the active directory domain in the Domain box, and the user name in the User name box. When you’re done editing, click Save.
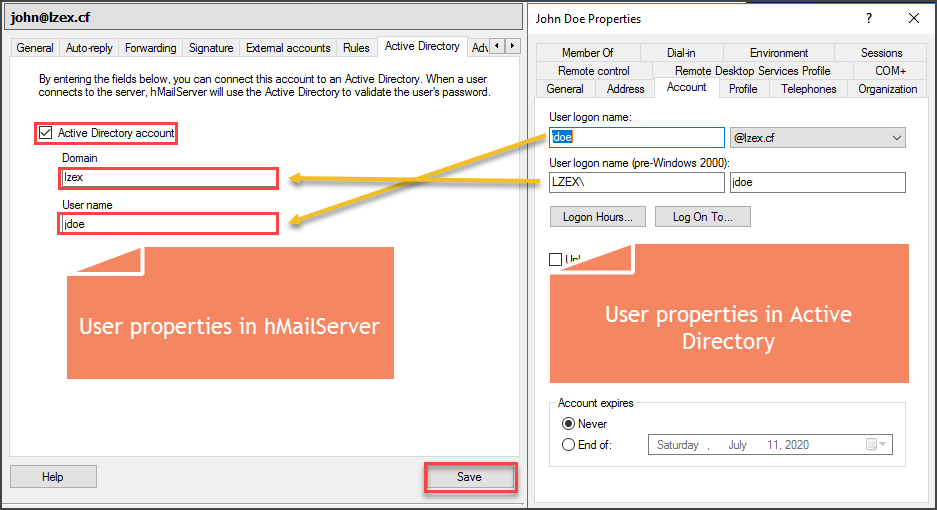
As you can see from the image above, the hMailServer user has a corresponding Active Directory account. The user can now use his AD domain credentials to access his hMailServer email account.
Adding a User from Active Directory
Instead of creating a user and then integrate it with Active Directory, there is also an option to directly create a user in hMailServer from an existing Active Directory user object.
From the admin console, right-click on the Accounts folder —> click on Add AD Account.
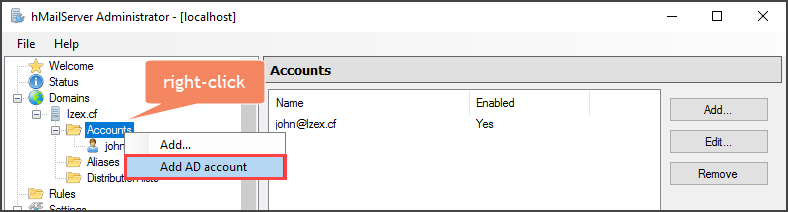
Next, select the domain from the dropdown list. In this example, there’s only one domain available. Then, from the list of users, select the user that you want to create an email account for. Click OK.
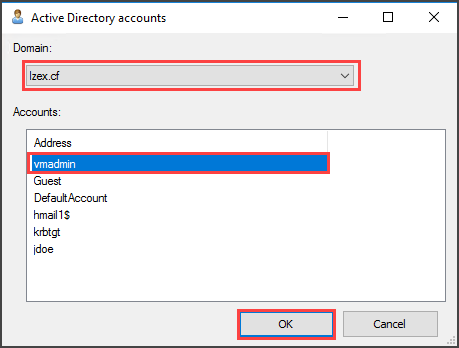
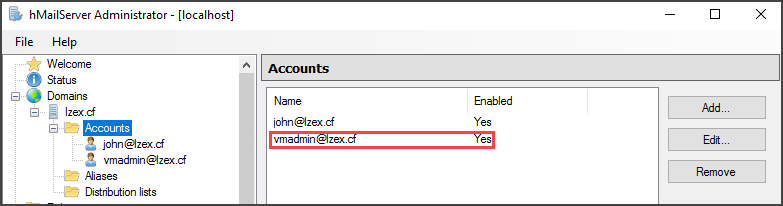
As you can see from the screenshot below, a new user has been created in hMailServer based on the Active Directory user account vmadmin.
Testing Email Client Setup and Mailbox Access (Unencrypted)
The hMailServer configuration you’ve done so far is enough to work for internal and external email access.
In this example, the specific email client being used is Mozilla Thunderbird. Feel free to use any other email clients that support IMAP, POP3, and SMTP configurations.
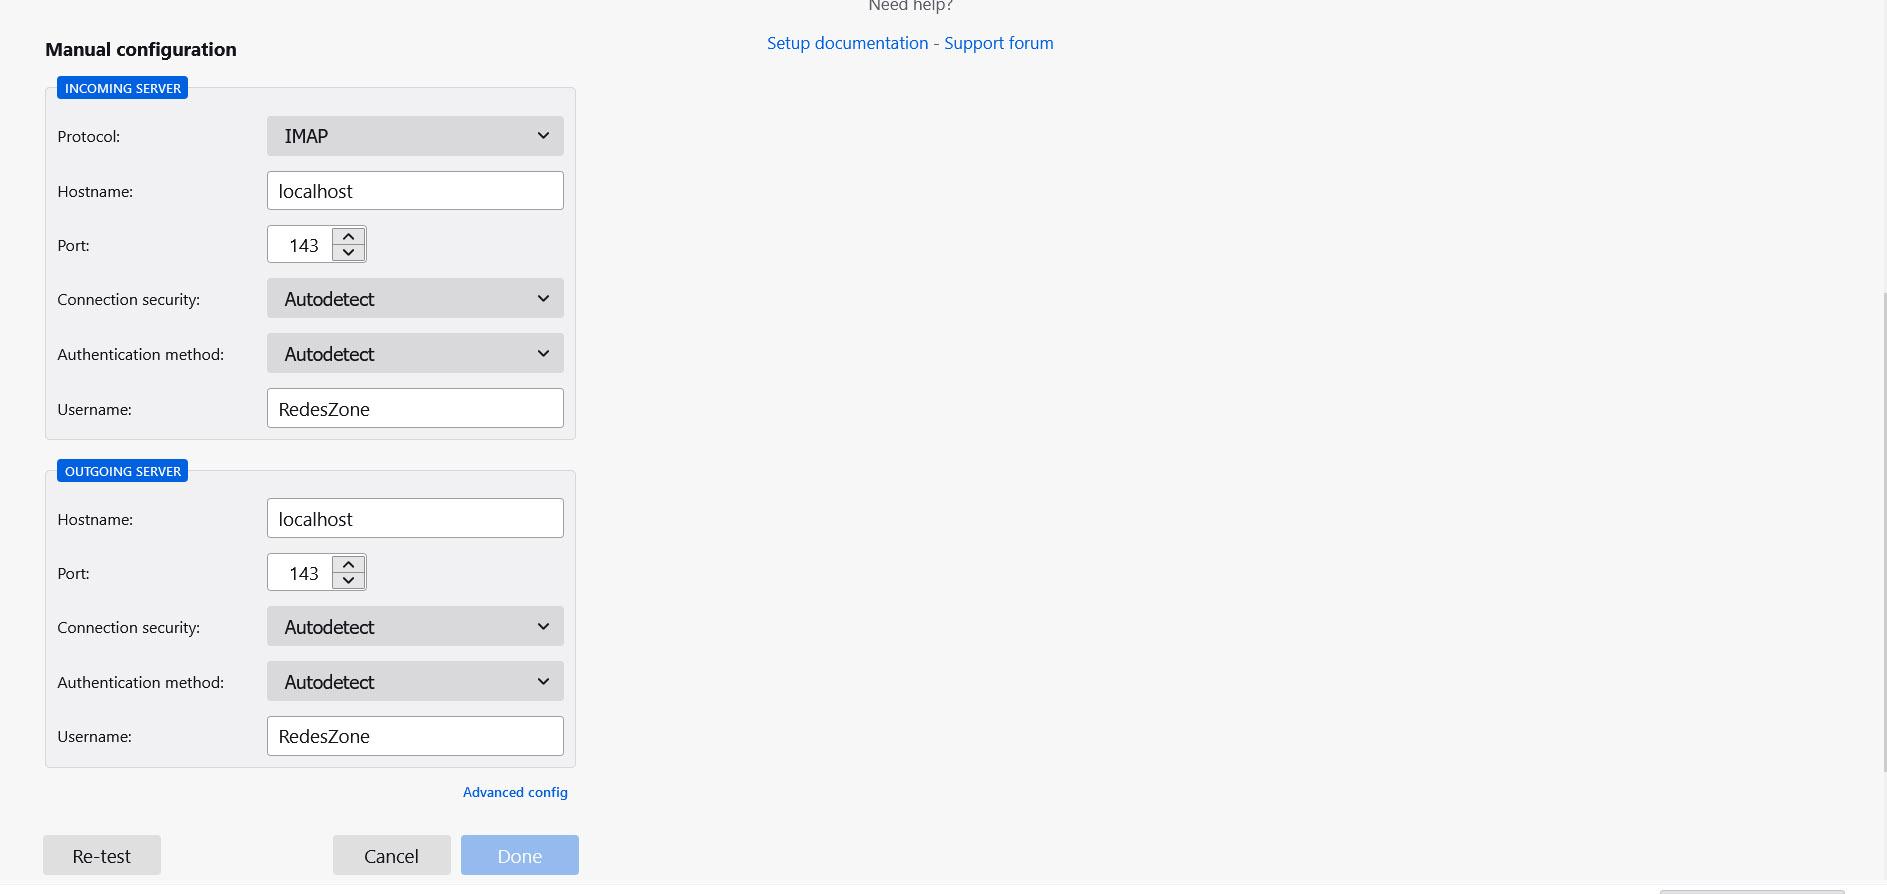
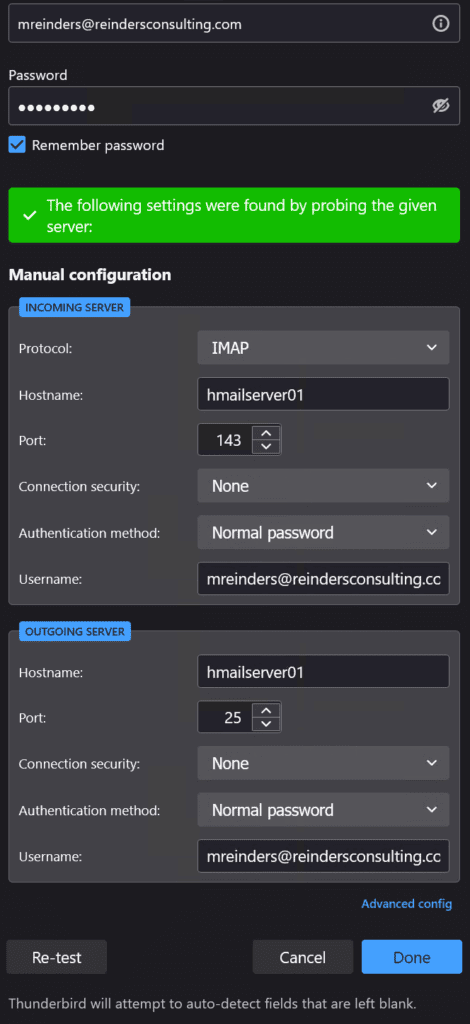
The mail client configuration below is specific to this example. Take note of the server hostname, port number, and SSL values.
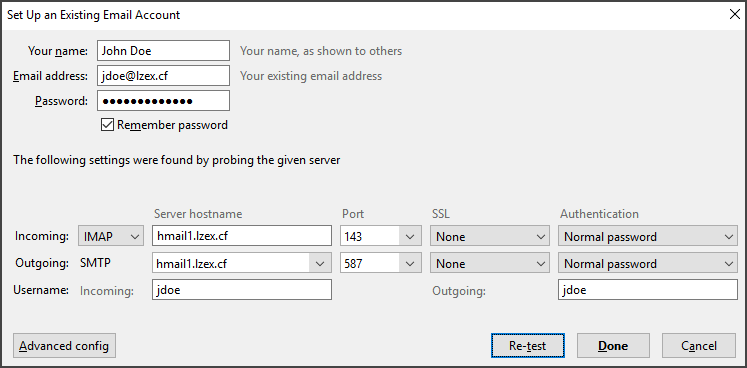
As you can see from the screenshot above, the SSL values for incoming and outgoing mail server are None. When you click Done, you will get a warning message that the incoming and outgoing settings are not using any encryption, as shown in the image below.
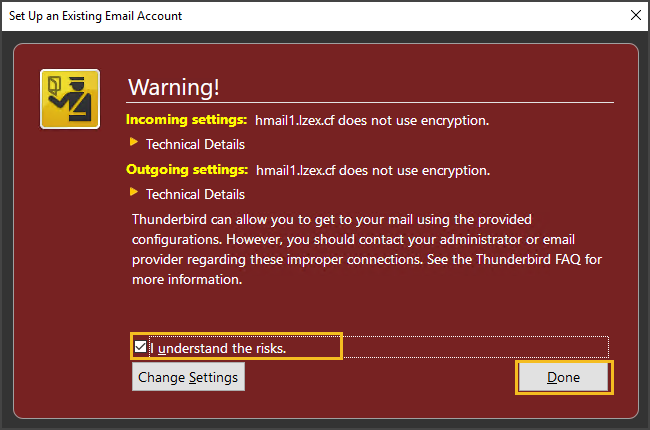
To proceed with the account setup, check the box that says I understand the risks. Click Done.
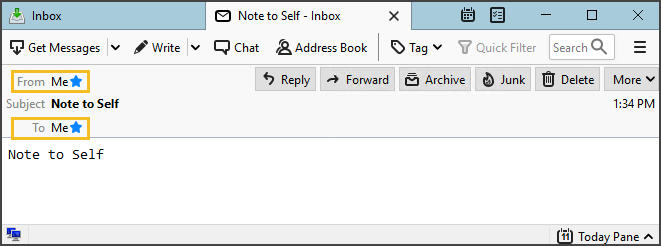
Once the account setup is done, the next test is to send a test email to the same account and confirm that the email was sent and received. The screenshot below shows that the test email was delivered.
Securing Client Connections with SSL Certificates
In the previous section, you’ve seen that the current hMailServer setup so far does not include encryption for client connections in IMAP, POP3, and SMTP. Needless to say, adding encryption to your mail client connectivity for security and protection.
In this section, you’ll learn how to add an SSL certificate for authentication and encryption and assign the certificate to POP3, IMAP, and SMTP.
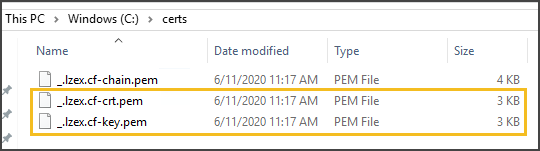
Before you proceed, you must have the PEM format certificate file and keyavailable. In this example, the certificate files are located in c:certs.
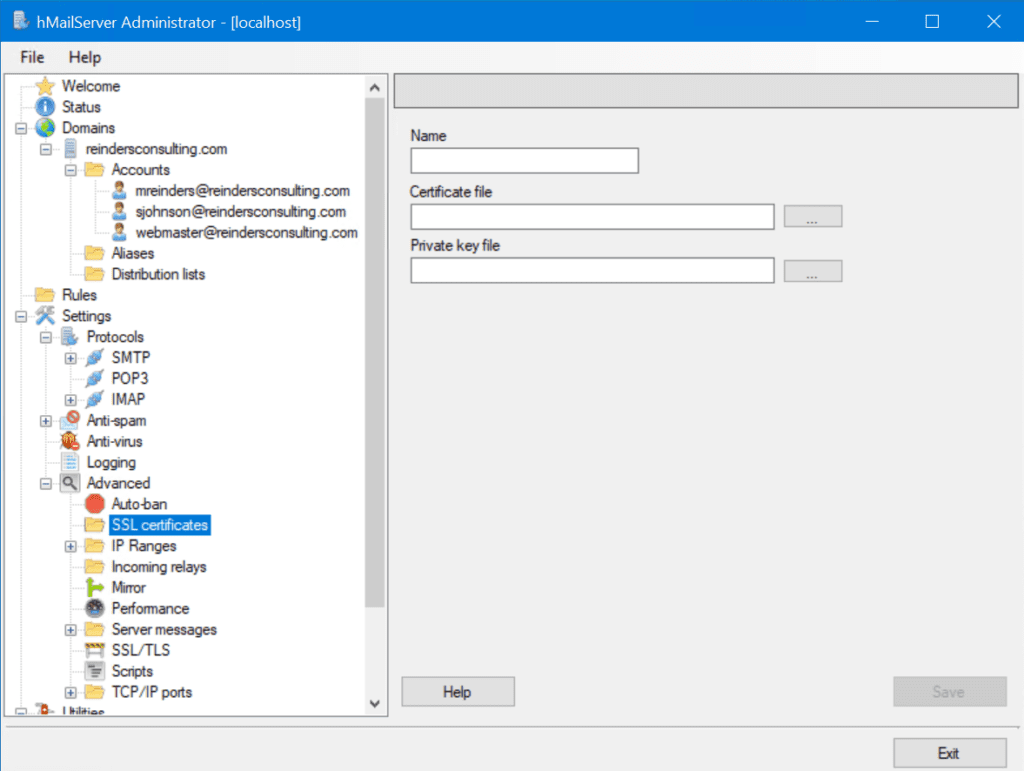
Importing an SSL Certificate
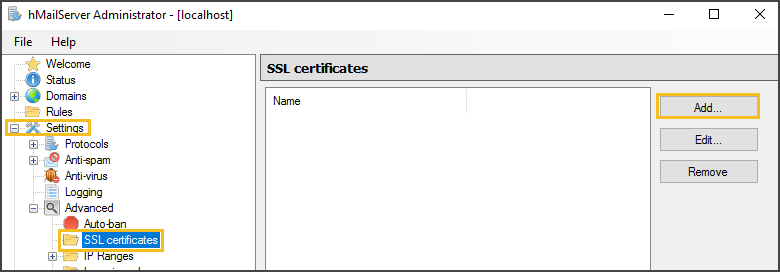
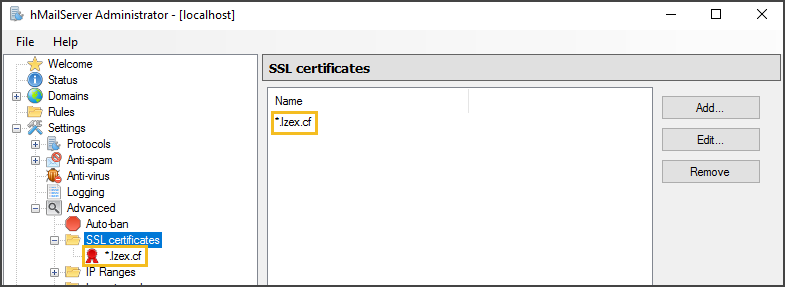
Back in the admin console, go to Settings —> Advanced —> SSL Certificates. It is expected that the list of certificates is empty. Click on Add.
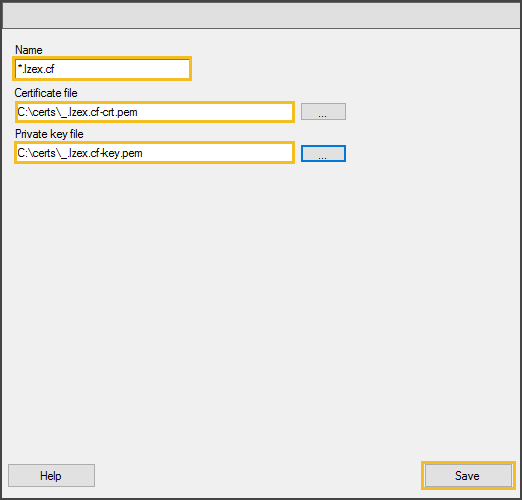
Next, specify a Name that you want your certificate to be identified as. This can be any name, but it is recommended to use the certificate’s subject name instead. Then, provide the location of the Certificate file and Private key file. Click on Save.
The new SSL certificate will be added to the list of certificates that are available for hMailServer’s use.
Now that the SSL certificate is added, you can start assigning it to the protocol ports.
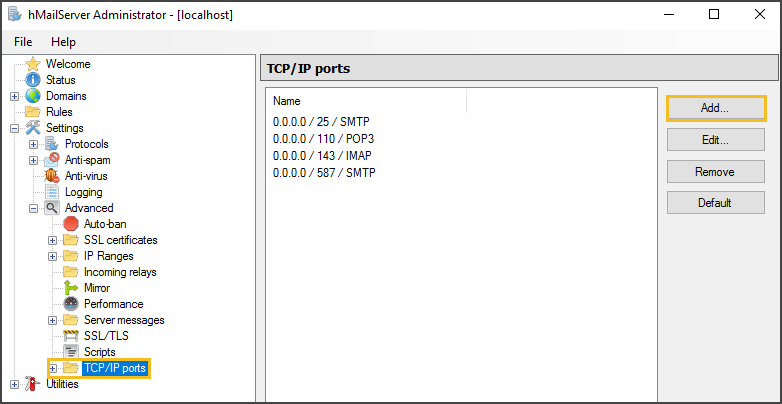
Assigning an SSL Certificate to TCP/IP Ports
Go to the TCP/IP Ports folder. You should see a list of ports already configured. Click on Add to create a new TCP/IP port binding.
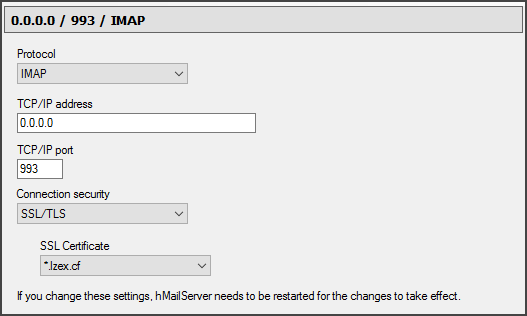
Create a new entry for IMAP with these settings.
- Protocol: IMAP
- TCP/IP address: 0.0.0.0
- TCP/IP port: 993
- Connection security: SSL/TLS
- SSL Certificate: select your certificate from the list
The new entry should look similar to what’s shown in the screenshot below.
You may be prompted to restart the hMailServer, do not restart yet because you will still create the entries for POP3 and SMTP.
Now, follow the repeat the same procedure above to create the POP3 TCP/IP secured port.
Use the below values for the new POP3 TCP/IP port.
- Protocol: POP3
- TCP/IP address: 0.0.0.0
- TCP/IP port: 995
- Connection security: SSL/TLS
- SSL Certificate: select your certificate from the list

Lastly, create the new SMTP port with these settings below.
- Protocol: SMTP
- TCP/IP address: 0.0.0.0
- TCP/IP port: 465
- Connection security: SSL/TLS
- SSL Certificate: select your certificate from the list
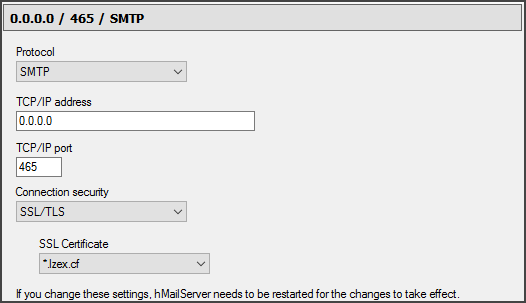
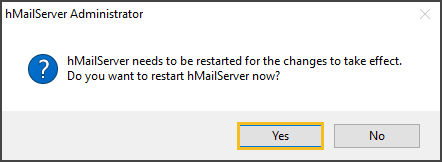
This time, when prompted to restart the hMailServer, click Yes.
You have successfully created the new TCP/IP ports secured with an SSL certificate. You should now see a list similar to the screenshot below.
At this point, it is up to you to decide if you want to delete the old TCP/IP port entries.
Testing Email Client Setup and Mailbox Access (Encrypted)
Now that an SSL certificate has been installed in hMailServer, go back to your email client and reconfigure your email account to use the following settings, as shown in the screenshot below.
Take note of the Port and SSL values having changes to the new TCP/IP port configuration that you created in the previous section. Below is where you will set up both incoming (IMAP) and outgoing (SMTP authentication).
After configuring the email account, you should be able to access the mailbox and send/receive emails using the new IMAP and SMTP ports.
Also, the warning message about the incoming mail server and outgoing mail server settings being unencrypted is no longer displayed.
Configuring an SMTP Smart Host for External Mail Delivery in Hmailserver
By default, hMailServer uses DNS-MX lookup to determine where emails to external domains must be delivered. This means that if port 25 is allowed in your network/firewall, hMailServer can attempt to deliver external messages to the intended destination.
This default setup could be enough for some organizations, but most organizations are using a perimeter SMTP service. Perimeter email servers may be cloud hosted or on-premise. These perimeter mail services are, most of the time, provide email hygiene services as well.
If you have such services and would like to utilize them, you can configure hMailServer to use your perimeter mail server as a smart host for delivering external messages.
To configure an SMTP relayer or smart host for your hMailServer, follow these steps.
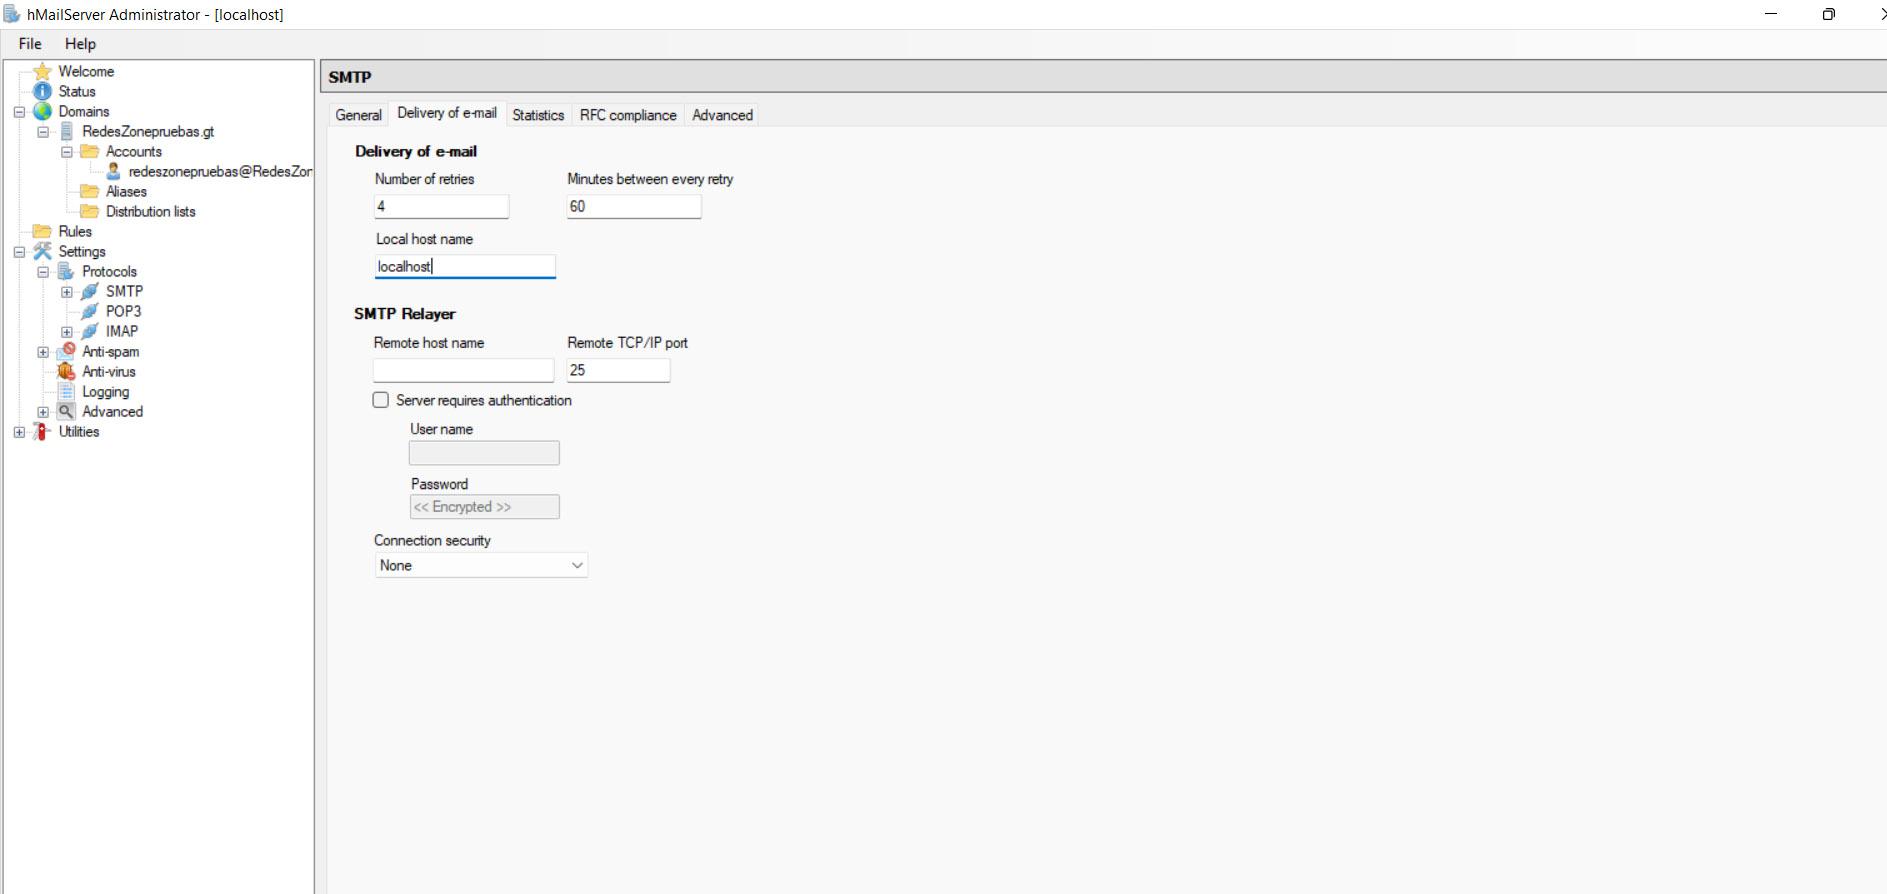
In the hMailServer admin console, go to Settings —> Protocols —> SMTP. Next, go to the Delivery of e-mail tab.
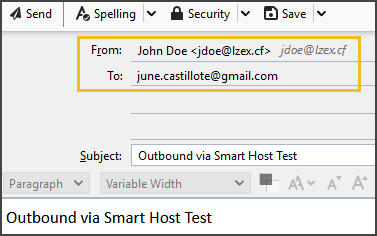
Then, enter the name of your hMailServer that is published in your public DNS record. In this example, the public-facing hostname of the email server is hmail1.lzex.cf.
Next, fill out the SMTP Relayer settings with the values of your SMTP smart host. In this example, hMailServer will be configured to use SendGrid Email Delivery Service as the smart host.
Don’t forget to click Save once you’re done supplying the values required.
Testing External Email Delivery
To test that the SMTP smart host configuration is working, the best way
The best way to confirm if the SMTP smart host configuration is working is by:
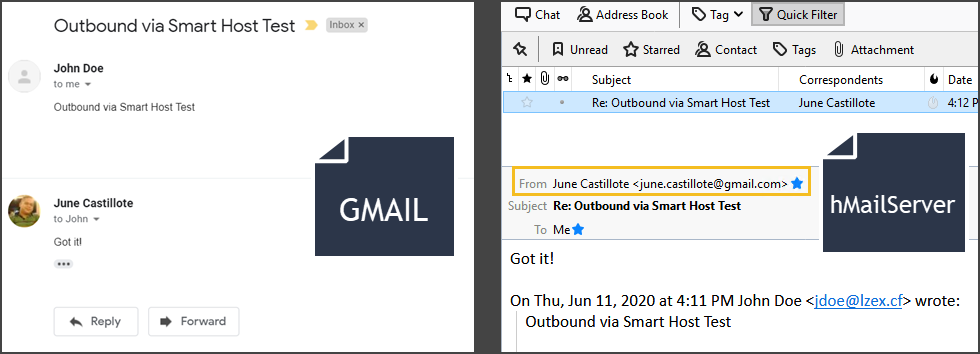
- Sending an email to an external domain (e.g., gmail.com) and confirm that the message was delivered.
- Reply to the email and confirm that the reply was received.
In this example, a message will be sent from the hMailServer user [email protected] to a gmail.com recipient.
As you can see from the screenshot of the email below, the message was received by the gmail.com recipient, and the reply was delivered back to the hMailServer user mailbox.
Conclusion
You’ve made it to end, congratulations!
In this article, you’ve learned about the basic requirements for building a successful hMailServer email system. Then, you’ve learned how to install hMailServer on a single machine.
You’ve seen the step-by-step instructions on how to configure hMailServer to have a new domain and add new users from scratch or from existing Active Directory accounts. Moreover, you’ve learned the difference between the encrypted and unencrypted server connections and how to use an SSL certificate to secure TCP/IP ports for POP3, SMTP, and IMAP.
What you’ve learned here is just the basics of configuring a functional hMailServer mail server. There are many more customization and configuration that can be done with hMailServer that could not be covered in this article.
Some of the advanced configurations include attaching a spam filter, installing a webmail server, and scripting. It’s up to you now if you want to pursue learning more about hMailServer and improve your skills.
Further Reading
- hMailServer Documentation
- What Is DNS? | How DNS Works
- Email Protocols – POP3, SMTP and IMAP Tutorial
- How To Get Started Using OpenSSL With PowerShell
- Send-MailMessage: The PowerShell Way to Send Email
Содержание
- Зачем нужен собственный почтовый сервер?
- Как использовать hMailServer в Windows
- Настройте учетную запись в Thunderbird
- Conclution
Зачем нужен собственный почтовый сервер?
Вам может быть интересно, что на самом деле использовать собственный почтовый сервер для . Правда в том, что с этой опцией у вас будет полный контроль над электронной почтой. Вы сможете лучше управлять любой электронной почтой, которую вы получаете или отправляете. Он не будет размещаться на сервере, отличном от вашего.
Одним из преимуществ является то, что вы сможете воспользоваться больше функций сервера . Вы сможете настроить его в соответствии со своими интересами, при необходимости увеличить пространство, добавить функции, которые могут быть доступны для повышения удобства использования, и т. д. Вы не будете настолько ограничены параметром, таким как Gmail, что вам придется адаптироваться к тому, что он предложения.
Охранник это еще одна причина использовать собственный почтовый сервер. В этом случае вы сможете убедиться, что конфигурация соответствует вашим потребностям и функциям, с которыми вы собираетесь работать. Ваши электронные письма не будут доступны на стороннем сервере, где может произойти утечка и попасть в чужие руки.
Короче говоря, создание собственного почтового сервера позволит нам иметь лучшие функции и имеют широкий спектр возможностей. Безопасность и гибкость будут присутствовать всегда.
Первое, что нам нужно сделать, чтобы начать использовать hMailServer в Windows, — это перейти на его веб-сайт Честного ЗНАКа и скачать приложение . Там нам нужно перейти в раздел загрузки, загрузить и установить последнюю доступную версию. Это бесплатная программа, и она автоматически запустит процесс.
Вы должны выбрать полная установка вариант, отмечая два варианта, которые появляются на экране. Это быстрый процесс, поэтому переход к следующему окну не займет много времени.
В процессе установки мы увидим, что нас просят пароль для начала . Это так, поскольку для создания сервера вам нужны права администратора, поэтому нам нужно будет ввести пароль и нажать «Далее», чтобы продолжить процесс.
После завершения мы можем запустить приложение. Обычно это занимает не более нескольких секунд, в зависимости от характеристик нашего оборудования. Мы заканчиваем, и мы можем выполнить его. Появится окно, как мы видим на изображении ниже. Вы должны нажмите Connect .
Когда мы дадим Подключиться и введем пароль, который мы ранее настроили, откроется новое окно. Мы можем дать Создать новый домен и поместите имя, которое мы хотим. Также настройте различные параметры, такие как максимальный размер писем, подпись и т. д.
После того, как имя было создано, которое в нашем случае мы указали в этой статье, мы должны перейти к Учетные записи . Он появляется в меню слева. Там мы даем «Добавить», и появятся разные поля, которые мы должны заполнить. Мы можем указать желаемое имя и ряд правил. У нас должен быть предварительный доступ к доменному имени верхнего уровня и его DNS настройки для его работы.
В разделе «Протоколы», который появляется слева, вы должны нажать на SMTP и Доставка электронной почты . Там вы должны указать localhost как имя локального хоста.
Доступны различные параметры, такие как установка спам-фильтра, установка места, где будут сохраняться электронные письма и т. д. Варианты очень разнообразны, и вы можете изменить их в соответствии со своими интересами.
Настройте учетную запись в Thunderbird
После выполнения шагов, которые мы объяснили, нам понадобится Клиент Thunderbird . Там мы можем настроить учетную запись электронной почты, и для этого вам необходимо загрузить приложение. Нам придется отправиться к ним веб-сайт Честного ЗНАКа и загрузите самую последнюю доступную версию.
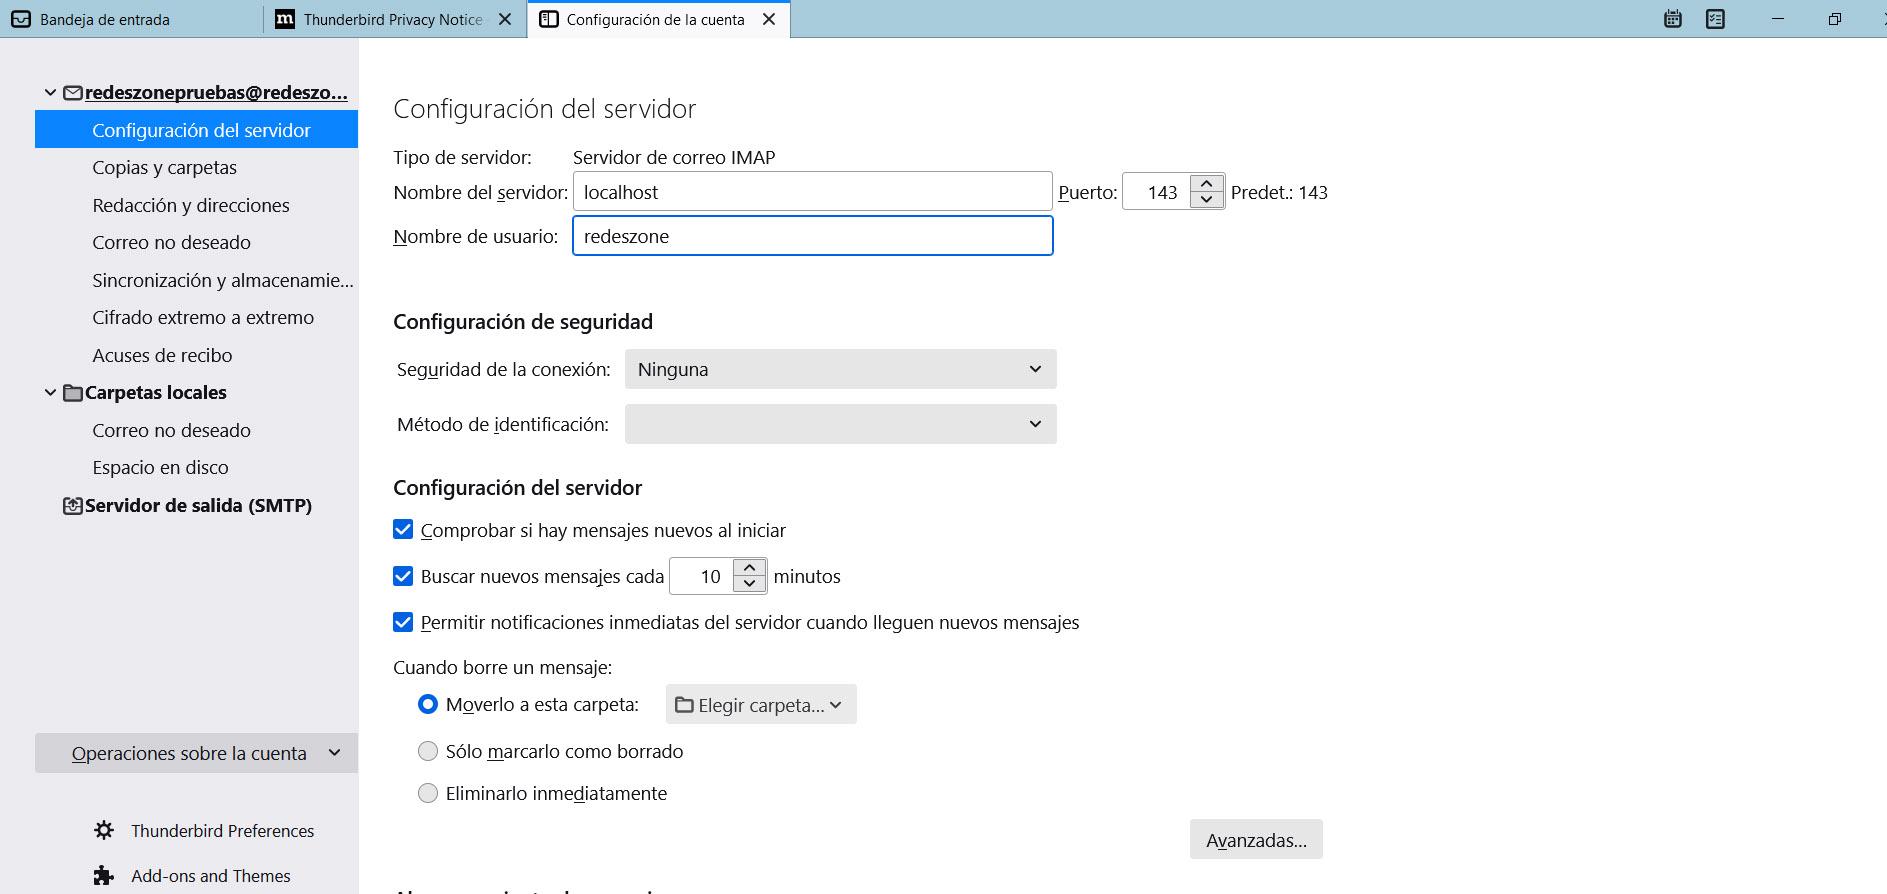
Когда мы находимся на необходимом шаге, имя хоста сервера должно быть локальный , как это включено в hMailServer. В зависимости от конфигурации этой программы нам нужно будет указать 143 для порта IMAP, 993 для IMAP через SSL/TLS и 465 или 587 для порта SMTP.
Когда мы настроим это, мы уже можем использовать его в качестве нашего частного почтового сервера в Windows. Мы сможем полностью контролировать и использовать электронную почту более безопасным способом, не завися от сторонних сервисов.
В расширенных настройках вы найдете множество доступных опций. Например, вы сможете изменить настройки безопасности, проверить, есть ли новые сообщения при запуске, как часто и т. д. Ряд опций, которые вы увидите в Приложение Тандерберд .
Имейте в виду, что Thunderbird — это бесплатное приложение с открытым исходным кодом. Это параметр, который многие пользователи принимают во внимание, чтобы повысить безопасность и конфиденциальность при использовании электронной почты.
Conclution
Короче говоря, если вы хотите управлять своим собственным почтовый сервер в Windows , вы сможете сделать это с помощью этих двух программ, которые мы показали. Это бесплатные приложения, которые можно легко настроить. Оттуда вы сможете получать электронные письма на свой компьютер с Windows и всегда иметь полный контроль над ними.
Необходимо, чтобы у вас был доступ к доменное имя верхнего уровня , а также его DNS, чтобы правильно его настроить. Оттуда вы можете создать нужную учетную запись и назначить хороший пароль, чтобы учетная запись была полностью защищена. Вы также всегда можете изменить некоторые параметры для дальнейшего повышения защиты.
Если вы ищете максимальную безопасность и полный контроль, это, безусловно, хороший вариант. Кроме того, как вы видели, вам не нужно ничего платить за его использование или выполнять сложные настройки, помимо шагов, которые мы видели как в hMailServer, так и в Thunderbird.

hMailServer is a free email server for organizations, businesses, and individuals which is easy to install and simple to use. Find out how to install and configure hMailServer in this overview.
Table of Contents
- What is hMailServer?
- The core features of hMail Server
- Is hMailServer secure?
- How to install hMailServer
- Prerequisites
- Network and port requirements
- Hardware requirements
- Database requirements
- Installation
- DNS configuration
- Firewall / Router ports
- Specifying a public host name and SMTP relayer
- Prerequisites
- Adding a new domain and accounts
- Connecting hMailServer with Active Directory
- Encrypting emails with SSL certification
- Setting up an account in Outlook or other email clients
- Conclusion
What is hMailServer?
Have you ever wondered if there were any decent alternatives to Microsoft Exchange as your mail server? Well, there is! hMailServer is an open-source, free email server for Microsoft Windows environments.
Honestly, I wasn’t aware of this solution. It was first developed in late 2002 by Martin Knafve. Since that time, it has become one of the most popular email servers for Windows.
After looking over its features, it does remind me of MDaemon back in the 90s. Those were the days…
The core features of hMail Server
The main components of hMailServer include a simple installation and configuration procedure, built-in security measures (support of SSL certificates, integration with virus scanners, email black list servers, and SPF/MX lookups), integrations with other software products via a COM library, and many more. I’ll get into more of these features later on.
Is hMailServer secure?
The security of hMailServer depends on what steps you take during its initial setup, installation, and configuration. Out of the box, it won’t be secure. There will be no secure email transfer occurring at all.
The default ports like 110 (POP3), 25 (SMTP), 143 (IMAP) are insecure. However, when you add an SSL certificate and create new bindings in the software, you’ll gain secure transfer of email via ports 995 (POP3 SSL), 465 (SMTP SSL), and 993 (IMAP SSL).
I highly recommend you purchase a 3rd-party SSL certificate for the hostname of your new hMailServer before sending or receiving emails, especially for a professional business email account. Leaving an insecure POP3/SMTP email server on the Internet is not the smartest thing to do these days.
How to install hMailServer
Next, I’ll go through the basics of the installation of hMailServer.
Ready to download hMailServer? Great. You can visit the download page of hMailServer to obtain the installation program via this download link. As of this writing, I’ll be installing version 5.6.8 (build 2574) released in October of 2021.
Prerequisites
There are a few high-level prerequisites you’ll need to consider when planning your installation. I cover hardware, software, and database requirements below. But here are a few others not to forget.
Network and port requirements
You need to make sure some combination of these ports are open on your server and in your firewall-protected network.
- 25 (SMTP)
- 465 (SMTP SSL/TLS)
- 587 (SMTP Send)
- 110 (POP3)
- 995 (POP3 SSL/TLS)
- 143 (IMAP)
- 993 (IMAP SSL/TLS)
Also, you will be needing a few DNS records on the Internet to facilitate other email servers being able to route your email to your hMailServer. This includes MX records, A records, and maybe even a CNAME record. I’ll address this down below.
Hardware requirements
There really aren’t any ‘hard’ requirements. Looking at the software’s homepage, there are no specific memory, CPU, disk storage requirements. I would imagine 4GB of memory would be a good minimum, at least a 2-core server or 2 vCPU virtual machine (VM) would suffice, for the basics.
If you are planning to use this to handle hundreds of users, then you would want to make sure you have 8, 16, or more GBs of RAM, plenty of disk storage, and 4, 6, or 8+ vCPUs to handle the load. Not only will your users be making POP3/IMAP connections to the server, but the server will also be receiving inbound emails and sending emails out to the Internet.
Here are the ‘supported’ operating systems to run version 5.6.x of hMailServer:
- Windows Server 2012
- Windows Server 2008
- Windows Server 2003
- Windows 7
- Windows Vista
- Windows XP Professional SP3
Disclaimer: Only the top version of Windows above is supported by Microsoft (and Windows Server 2012/R2 goes out of support in October 2023!). I highly suggest NOT using it. Let me trim this down to a list that you should use:
- Windows Server 2022
- Windows Server 2019
- Windows Server 2016
Although these newer server OSes aren’t listed on their homepage, you should feel confident installing the software on newer versions of Windows Server. I’ll be installing the software on a Windows Server 2022 VM.
Database requirements
You have a few options when it comes to database engines to house your email configuration and mailbox databases. hMailServer comes with SQL Server Compact Edition (CE) that you can use for testing and non-commercial use cases. If you plan to create a commercial email server, you need to choose one of these external database engines:
- MySQL 4 & MySQL 5
- MSSQL aka Microsoft SQL Server 2000, 2005, and 2008.
- PostgreSQL 8
And, to add to this, I would highly assume you could use a supported version of Microsoft’s SQL Server, too, including:
- SQL Server 2019
- SQL Server 2017
- SQL Server 2016
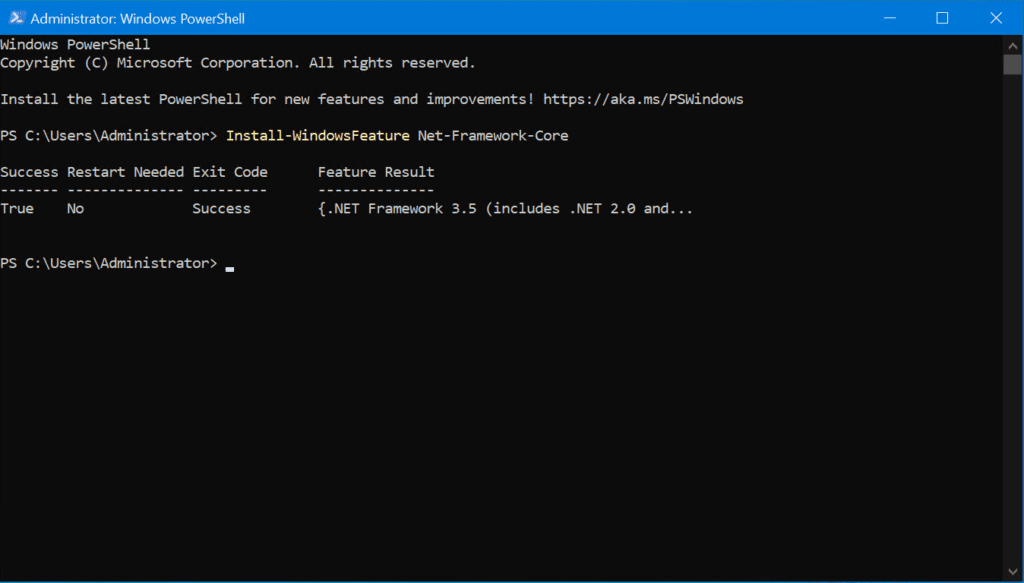
And, lest I forget, there is one more lovely prerequisite you need to be aware of: ‘.NET Framework 2.0’. Yes, this software was built against the .NET Framework 2.0 SDK, so we need to make sure we have the runtime installed. Thankfully, we simply need to install the ‘.NET Framework 3.5 Feature’ as this includes .NET 2.0 and 3.0. Let me show you how to do that with PowerShell.
Launch an administrative PowerShell prompt by right-clicking on the Start button and clicking ‘Windows PowerShell (Admin)’.
Enter the following command.
Install-WindowsFeature Net-Framework-Core
And, we’re all set!
Installation
Let’s go through the installation wizard next. Double-click on the downloaded file to start the Setup program.
Click Next and then choose to accept the license agreement.
If you want to change the destination folder for the software, go ahead. The default location is in the program files folder on your C: drive. Then, click Next.
I recommend keeping the ‘Full installation’ type. Click Next.

Choosing the database server type, you can choose between the built-in (Microsoft SQL Compact), or an external choice (full MS SQL Server, MySQL, or PostgreSQL). For these purposes, I’ll keep the built-in and click Next.
You can change the name of the Start Menu folder if you want. Click Next.
Here, you’ll need to enter an administrative password for the administrative user being created by Setup. Be sure to make this password secure, and don’t lose it! You’ll need it to configure the software.
Here’s the ‘Ready to Install’ screen. If you need to make any changes, feel free to go back and make them, then click Install.
Congratulations, the hMailServer software is now installed.
To handle server administration, let’s launch ‘hMailServer Administrator’ from the Start Menu.
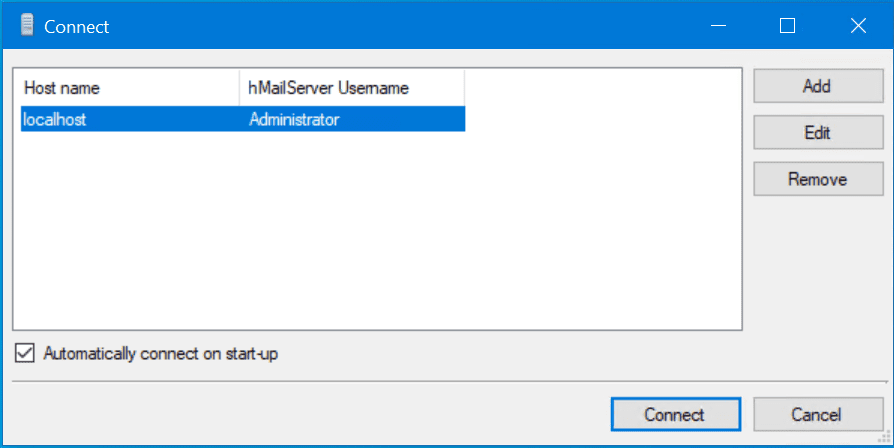
Go ahead and check the box ‘Automatically connect on start-up’ to bypass this in the future. If you happen to have a remote hMailServer, you could enter its hostname, Fully Qualified Domain Name (FQDN), or IP address here using the administrative management tools.
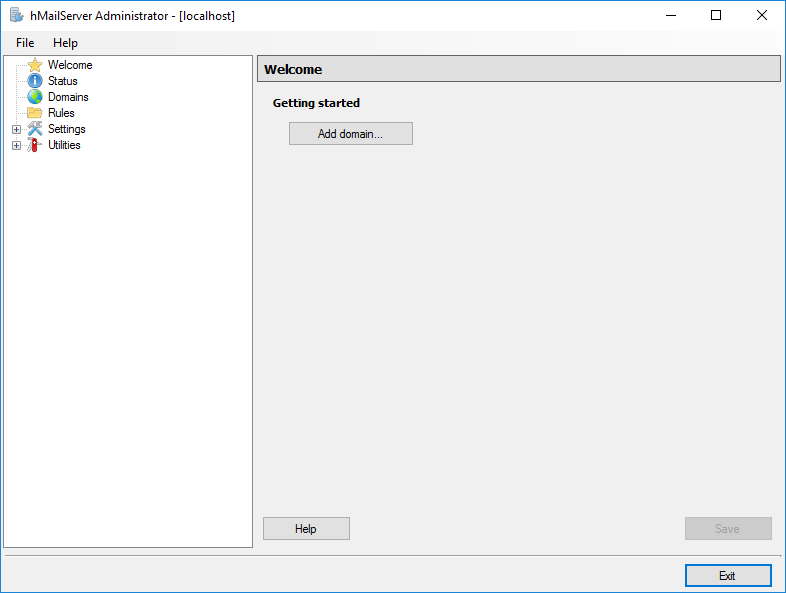
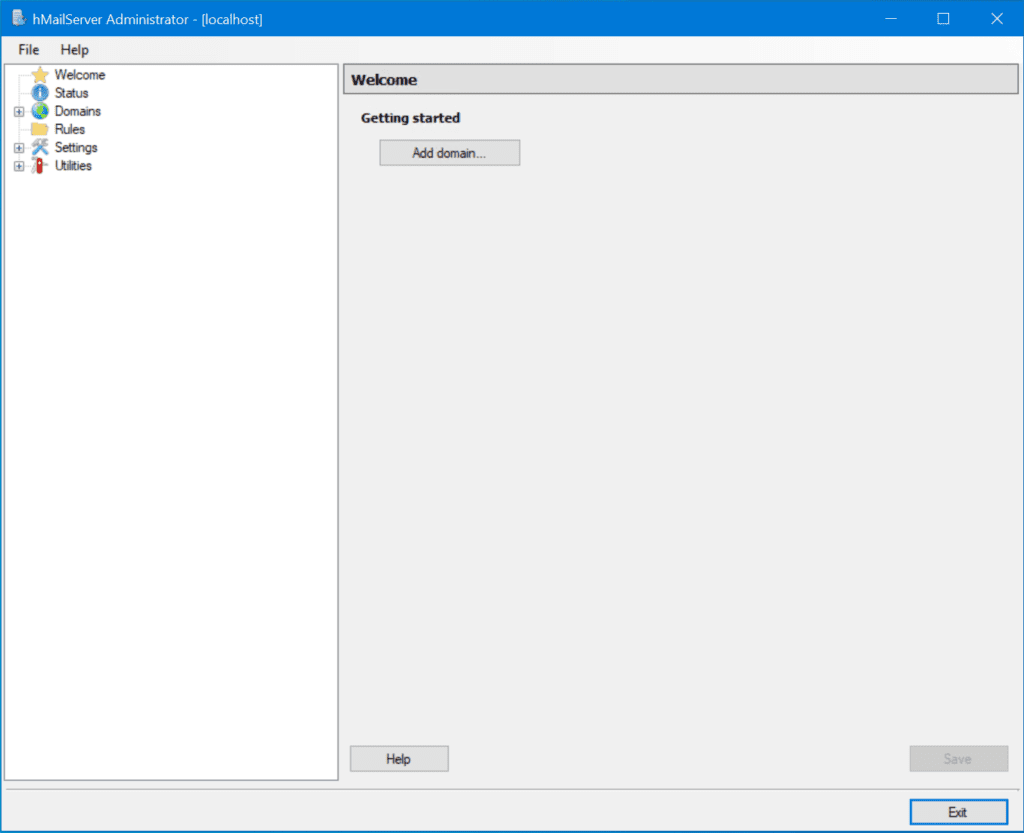
Click Connect and enter the hMailServer admin password you created during Setup. Here’s the Welcome page.
DNS configuration
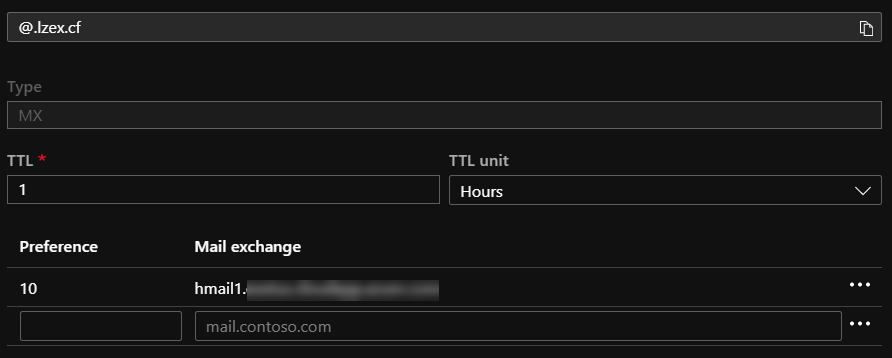
As I mentioned above, there are a few DNS records that will be required for the full functionality of the software to work. First, let’s handle external records (on the Internet). The first is an MX record.
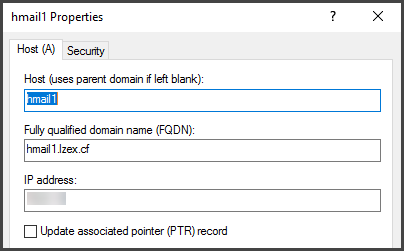
An MX DNS record is a record that tells how/where to deliver an email to a specific domain. This record needs to point to the ‘external’ [IP] Address of your hMailServer. As an example, an email destined to @reindersconsulting.com could go through hmail.reindersconsulting.com.
Next, you would need an external A record. This tells DNS servers what IP address is associated with hmail.reindersconsulting.com.
Your network administrators would be able to assign an external IP address for your hMailServer. A common scenario is having a ‘one to one’ NAT setup on your edge firewall. This allows inbound traffic to your hMailServer’s external IP Address to ‘translate’ to its internal (LAN) IP Address (say, 10.0.1.154).
Now, to cover internal records, the simplest scenario is an A record for your hMailServer’s hostname pointing to its internal (LAN) IP Address. You could have ‘hmailserver01.reinders.local’ point to 10.0.1.154.
This is the absolute simplest setup. You can do additional research on more sophisticated DNS configurations.
Firewall / Router ports
As I hinted at above, you will need a few ports open on your edge router or firewall to allow outgoing traffic to flow between your hMailServer and the Internet. Let’s assume you’re using only secure (SSL) traffic. In that case, you could ask your network team to open the following ports inbound from the Internet to the local (LAN) IP address of your hMailServer.
- 465 (Secure SMTP)
- 995 (Secure POP3 – If needed)
- 993 (Secure IMAP)
Specifying a public host name and SMTP relayer
To allow for inbound email traffic from the Internet, you need to specify a public hostname of the computer you installed hMailServer on. You do that via Settings -> Protocols -> SMTP.
Next, click on the Delivery of e-mail tab.
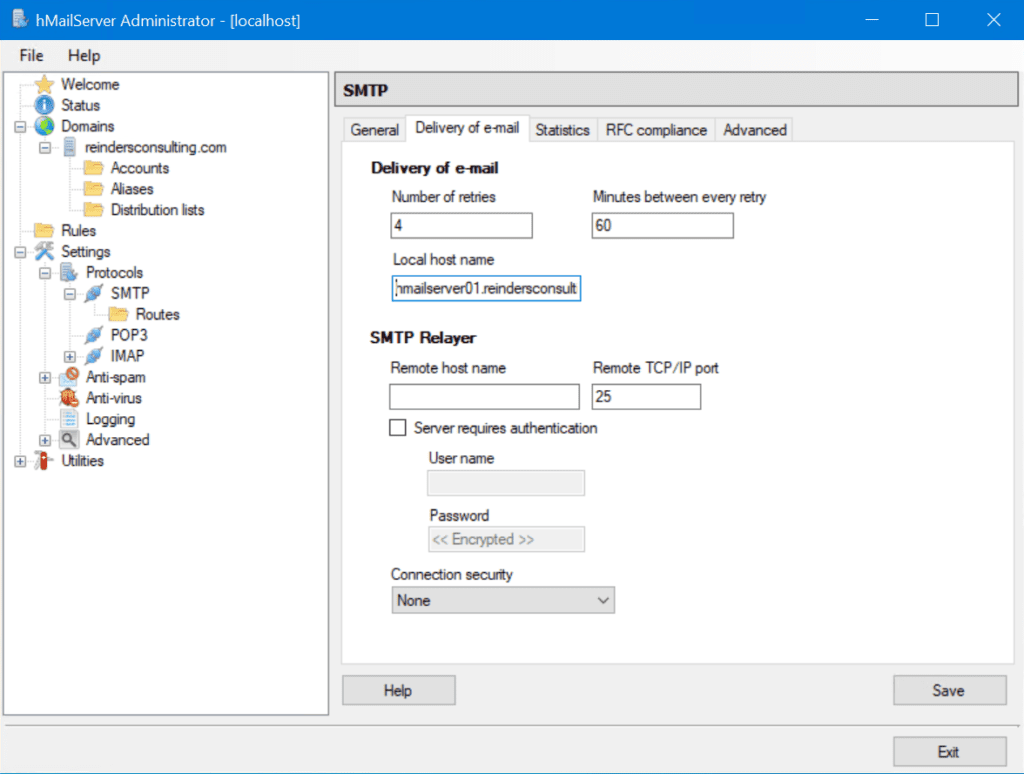
In the ‘Local host name’ field, I could enter ‘hmailserver01.reindersconsulting.com. Now, in order for that to work, I would need to make sure I had an external (Internet) DNS A record for that hostname to point to the external IP address of my server.
In terms of outbound email, it’s typical for company networks to block port 25 outbound directly from a server to the Internet. This is done for security purposes. However, you can check to see if your server has the ability to send on port 25 or not.
Go to a command prompt/Terminal and enter this command:
telnet mail.hmailserver.com 25

This means you can’t send email directly from the server you’re on. It helps to alleviate rogue SMTP servers from spamming the Internet and blocking out one or more of your external (public-facing) IP addresses.
So, we can use an SMTP relay to send emails to your ISP’s email server. Letting internet service providers handle this task is very wise and efficient. They can then handle the task of determining where the emails should go (based on DNS and MX record lookups) and deliver the emails. You can specify these SMTP settings on the same page as above.
Under the ‘SMTP Relayer’ field, enter the server in the ‘Remote host name’ field and the TCP/IP port. For example, the company that provides my Internet connection (ISP) is AT&T. I looked up online what their email settings are for email applications:
- For sending email, the DNS name is smtp.mail.att.net. So, I would enter that in the Remote host name field, enter port 465 or 587 (for Secure SMTP or SMTP Submission), and then check the box for ‘Server requires authentication’.
- Next, I would enter my main AT&T account details, username and password in the respective fields.
Adding a new domain and accounts
Alright, let’s add our domain name to the system. We can do this by clicking the ‘Add domain’ button on the Welcome page, or by clicking on Domains and clicking the ‘Add…’ button.
I’ll go ahead and enter an example domain and click ‘Save’.
Next, we’ll add a few users. Under our domain name, click Accounts, then on the ‘Add…’ button. I’ll add a few users here by adding the email address, the password, a maximum size for messages (in MB), and any other features required.
Connecting hMailServer with Active Directory
To help ease the administrative burden around managing accounts and passwords, you can integrate hMailServer with your local Active Directory (AD). You can modify users or create new users using the ‘Active Directory’ tab.
The first scenario is if you have an existing account and want to integrate it with AD. To do so, click on the account and click the ‘Active Directory’ tab. Then, click the checkbox next to ‘Active Directory account’, enter the AD domain in the Domain box, and the username (SAMAccountName) in the ‘User name’ box. Then, click Save.
This will facilitate the credentials when the user checks for emails in their email application. They will be able to enter their AD username and password to retrieve their email from hMailServer.
The other main scenario allows you to add an existing AD user into hMailServer. To do this, right-click on the ‘Accounts’ folder, and choose ‘Add AD account’. Next, you choose your AD domain from the ‘Domain:’ dropdown, then select your account from the ‘Accounts:’ field.
Encrypting emails with SSL certification
As you’ve noticed thus far, the initial setup and configuration of the server does not include secure email traffic. In order to button up your new email server, you’ll need an SSL certificate for authentication and encryption from a trusted Certification Authority (CA) like DigiCert, SSLS.com, or CheapSSLSecurity.com to name a few.
You can follow the instructions from the SSL cert provider to obtain your certificate. Be sure to get the SSL cert in the PEM format, compatible with hMailServer. You’ll need the file and the private key files available.
To import your new certificate, go to Settings -> Advanced -> SSL Certificates. Click ‘Add…’
Type in what you want the Name to be. It’s probably best to use your certificate’s ‘Subject Name’. Then, browse to the ‘Certificate file’ and the ‘Private key file.’ Next, click Save.
Now that the SSL certificate is added, you need to ‘bind’ it to your secure ports. In the Advanced section, browse to ‘TCP/IP ports’.

Because we are using secure ports, we need to add one. Click ‘Add’ and enter the SMTP information per the screenshot.
The only other step you would take, of course, is to choose your new SSL certificate from the ‘SSL Certificate’ dropdown. You can perform the same steps for POP3 and IMAP by using the same essential fields, the same certificate, but use ports 995 for POP3 and 993 for IMAP. Easy as pie!
Setting up an account in Outlook or other email clients
There are many email client programs compatible with IMAP/POP3/SMTP including Microsoft Outlook, even Outlook Express. Let me try another alternative, Mozilla Thunderbird, to at least verify the server settings get discovered correctly. After downloading and installing Mozilla Thunderbird from this link, I launched it and entered some of the basic information.
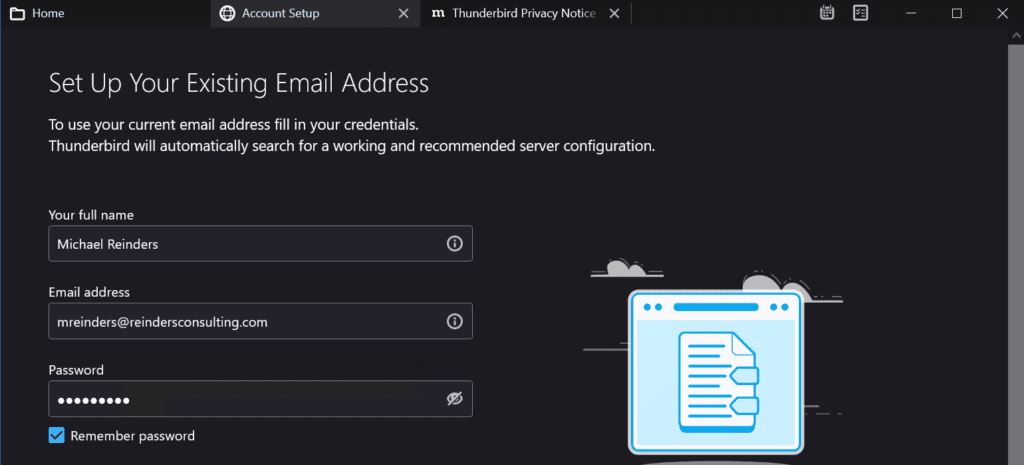
Although not everything worked during the first test, I went ahead and clicked the Re-Test button at the bottom after entering the hostname as ‘hmailserver01’, my email address – ‘mreinders@reindersconsulting.com’, and IMAP as the protocol. It then ‘probed’ the server and filled in the rest of the information correctly.
After I clicked ‘Done’, I got the following warning message.
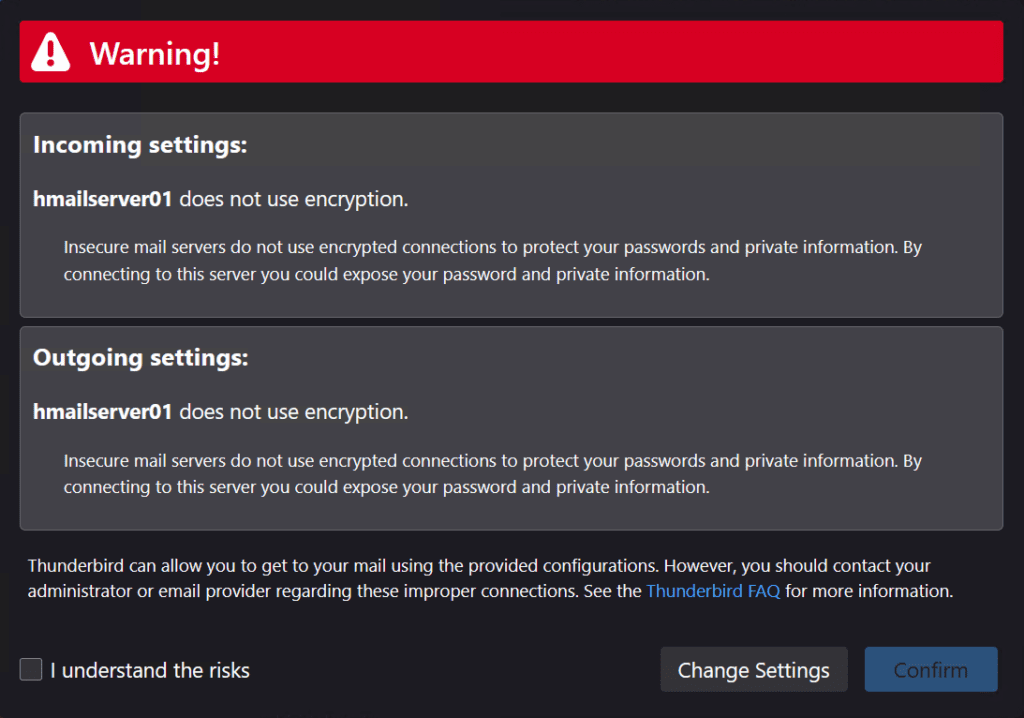
This confirms that we are not using encryption to make the connection to the email server. It’s outside the scope of this article to go through all the necessary steps to enable SSL encryption on our hMailServer.
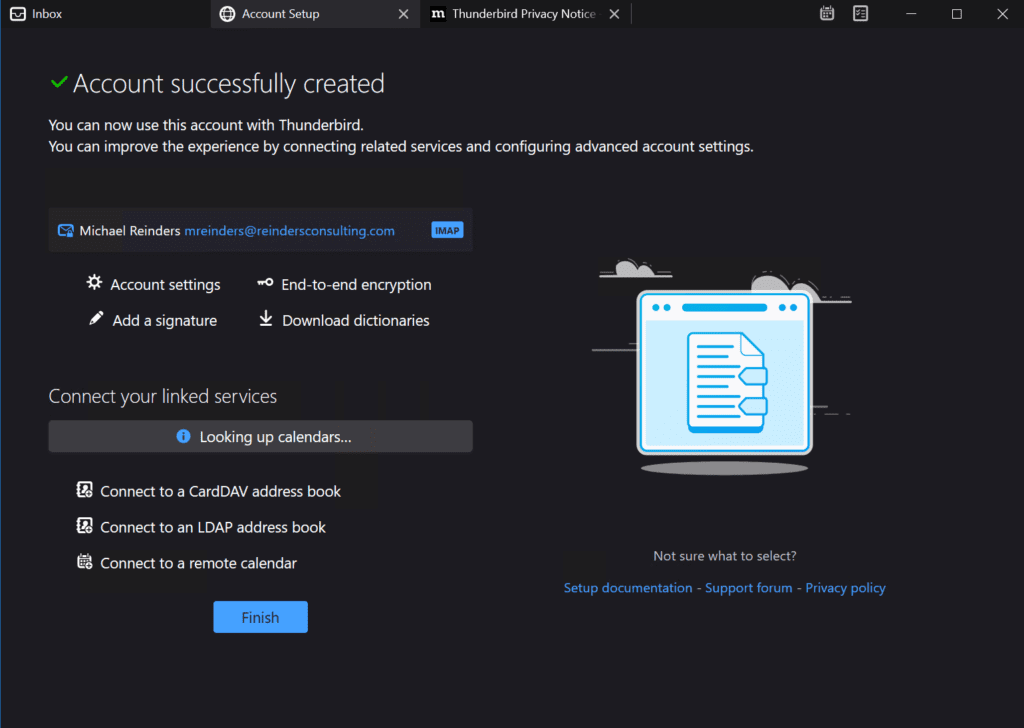
Anyway, we have Thunderbird configured with our email account!
And, just to confirm that checking emails is working, I went to Settings -> Logging, checked the ‘Enabled’ box at the top, also checked ‘Application’ and ‘IMAP’, and clicked Save.
I then went to Thunderbird and clicked the ‘Get Messages’ at the top. I went back to hMailServer, clicked on ‘Show logs’, and saw our successful IMAP connection attempt.

Conclusion
As you can see, setting up hMailServer is considerably less daunting than setting up Microsoft Exchange Server. You only really need some external DNS records and an SSL certificate for secure encryption and email traffic, and you can have this solution up and running in only an hour or two with the info provided here.
As a reminder, these are only the basics of what you can do with hMailServer. There are integrations with 3rd-party webmail solutions like RoundCube and SquirrelMail. There are different hMailServer services, too, including Spam protection, built-in backup, server-side rules, and more.
If you run a website on your Windows Server, you probably also want to be able to receive email. There is an application called hMailServer that allows you to manage your mail server with a simple GUI. In this tutorial, we’re going to install hMailServer and test receiving email.
Prerequisites
- Verify the server’s outbound port status.
Step 1: Installing hMailServer
The first thing we need to do is to download hMailServer. The downloads are available on the offical site. Download the latest version.
Launch the setup when you’ve downloaded the .exe file. Click «Next» and agree to the license agreement. Select «Full installation», because we’re not going to manage another server, but we’re going to use this server as the mail server.
Click «Install» to proceed. The installation takes about 20 seconds.
Step 2: Adding a domain
When you start hMailServer, you will see that there’s only one server that you can connect to: localhost. This is the mail server. Double-click the mail server to connect to it.
When you connect for the first time, you will see that no domains have been added yet. Add one by clicking «Add domain…». You will be able to receive email on that domain name. Now enter your domain name and save.
You will see that your domain name has been added to «Domains» in the sidebar.
Step 3: Adding an email account
Now that we have added the domain, we are able to add an email account. Click «Accounts» in the sidebar. All email addresses will then appear. A new account can be added by clicking «Add…».
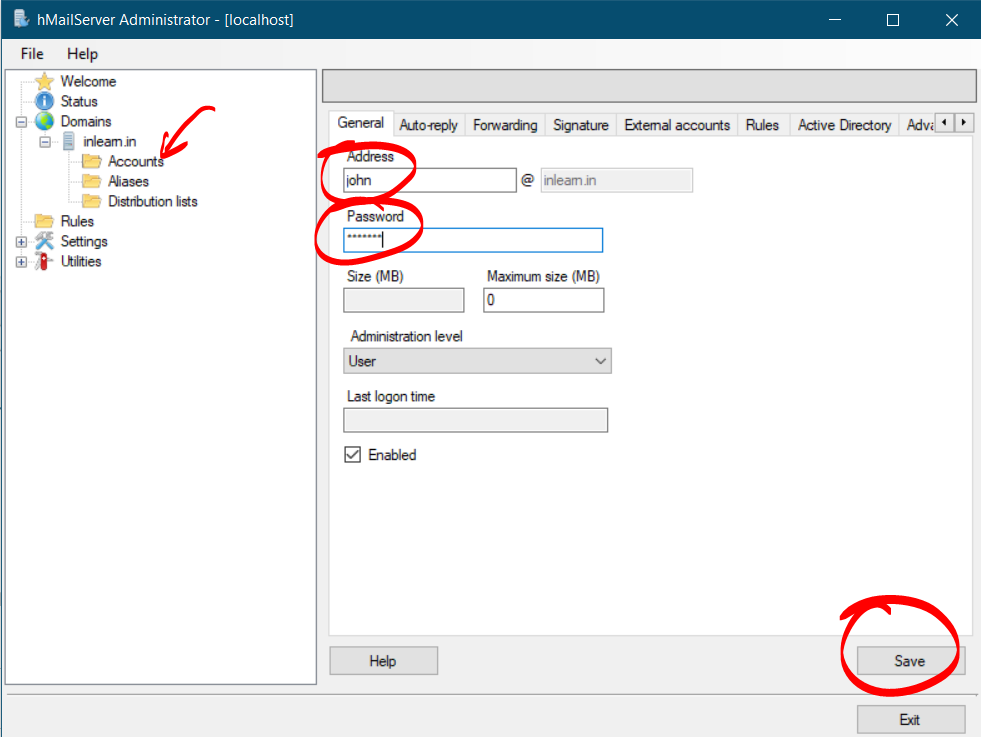
The address is the first part of the email address you’re going to create. Say you want to add «info@example.com» — you would input «info» into the address field. Enter your password where it says «<< Encrypted >>». You can set the maximum disk space that an email address can use. This is specified with the «Maximum size» option. Note that this unit is in MB. Click «Save».
Step 4: Configuring hMailServer
In order to ensure that hMailServer works, there are a few things we need to do.
First, go to «Settings -> Protocols -> SMTP -> Delivery of e-mail». You need to use your ISP’s SMTP relayer if you have a dynamic IP. If not, you can leave this field empty.
Step 5: Setting your DNS
In order for your mail to even arrive at the mail server, you need to add an MX record to your domain. This process varies depending on the registrar you used to purchase your domain. If you’re not sure how to add an MX record, contact your registrar.
Step 6: Opening your firewall
You need to open some ports in your firewall in order for the mail server to be able to send and receive mail. These ports are:
-
25 and 110 for SMTP and POP
-
143 for IMAP
Step 7: Accessing your email
At this point, we have a mail server setup. To access your mail server, you can setup a web mail client, or an application on your computer such as Outlook or Thunderbird. If you use an application on your computer, the username should be your email address and the authentication type is «password».
Table of Contents
- Overview
- Installation
- Choose the Database
- Connect hMailServer to the Database
- Configuration
- Setup the MX Records
- Add a domain
- Configure E-Mail Accounts, Aliases and Distribution lists
- Accounts
- Aliases
- Distribution lists
- Enable POP3 and/or IMAP protocols
- Enable the SMTP protocol
- Setup the access permission rules
- Configure deliveries
- Require SMTP authentication
- Conclusions
Being able to send and receive e-mail message without relying to external services is often an handy feature of any dedicated server, be it a dedicated/hosted one or a VPS/cloud-based solution. In order to do so, you would want to consider the most widely used MHS (acronym for message-handling services) software available for your operating system of choose:
- Exim (Unix-like, free/GNU)
- Postfix (Unix-like, free/IBM Public License)
- Sendmail (Unix-like, free/BSD License)
- Microsoft Exchange (Windows, closed-source/commercial)
Believe it or not, these players handle over the 80% of the e-mail traffic on a world-wide scale. You might also have noticed that they are either Unix only or Commercial, meaning that if you’re using a Windows server you’ve got to pay another bill. If you’re up for it, here’s a link to buy a Microsoft Exchange: if you’re looking for a way to save some cache you could give a chance to hSendMail, a not-yet-so-much-known Open Source Mail Server for Windows developed by Martin Knafve — recently released upon AGPL license -which this post is mostly about.
Overview
In this post we’ll test the 5.6 hMailServer build — january 2015 — which is fully compatible with all Windows server and desktop major versions and builds from XP/2003 to Windows Server 2012 R2 and Windows 10. The software is bundled with a a really good pack of features: it supports all the MTA protocols & standards (POP3, SMTP, IMAP), a web-based Administration and/or e-mail handling management GUI available in all major languages, an extensive and well-written documentation available either online and offline, plus a lot of advanced features such as:
- Virtual domains
- Built-in backup
- SSL encryption
- Anti-spam
- Anti-virus
- Scripting
- Server-side rules
- Multilingual
- Routing
- MX backup
- Multihoming
- SQL backend
On top of that, thanks to its highly-customizable configuration settings and interface, you can also configure it as the default WebMail client for some of the most-used Ajax/PHP/.NET e-mail handling web-based frameworks (RoundCube, SquirrelMail, etc.). Not bad at all, isn’t it?
Installation
First thing you’ve to do is to download the latest version of hMailServer from the Download section of its official site. The installation is straight and forward, but in case you need help you can take a look to the official documentation’s installation guide chapter. Pay close attention when the setup wizard will prompt you to select the Database type you’ll want to use:
Choose the Database
As of today, hMailServer v5.6 currently supports four different database types:
- Microsoft SQL Server (2000 o superiore)
- Microsoft SQL Server Compact Edition (CE)
- MySQL 4 or higher (5.x being totally fine)
- PostgreSQL
The database of choice will be used to store some configuration options and, most importantly, the message base with all their indexes: that’s why it’s really important to choose something reliable, expecially if you’re setting up a production environment. The authors, other than reminding us that Microsoft SQL Server CE is not allowed to host commercial products, suggest the use of Microsoft SQL Server or PostgreSQL for their performance, security and overall integrity benchmarks. Our setup, proudly working since many years, proudly uses a 5.x build of the standard MySQL Community Edition: we never regretted that choice, so we can’t do anything but suggest you to use that aswell if you’re not fond of the two big giants above.
At the end of the installation process you will be asked to enter an administration password: this password will be prompted upon all connections from the administration tool to the hMailServer local instance:
Choose a well-suited password and write it down in a safe place, then double-click on the hMailServer Administrator icon you’ll find in your desktop and/or Startup panel. You’ll be prompted to select the instance where you wish to connect to, since the administration interface can be used to connect to multiple hMailServer installations as long as they are reachable via DCOM/RPC. If you only need accessing the one you just installed on localhost you won’t have any trouble finding it:
Connect hMailServer to the Database
If you’ve chosen MS SQL Compact Edition you can skip this paragraph, as you won’t be asked to do anything: otherwise, you’ll need to go through a small wizard to allow hMailServer connecting to your DB type of choice. First thing you’ll be asked for is if you want to use an existing DB or create a new one, then you’ll be asked for the connection parameters: ensure to select an username with the proper rights: at least read, write, create/drop tables and, if you issued for a new database to be created, create database.
Configuration
Configuring hMailServer is quite simple: the GUI interface is split upon a number of section, each one of them dedicated to a single aspect, protocol or job type. In the following paragraph we’ll dig through the most important ones in order to build a fully-featured Mail Server which will be capable of handling the most common task. First thing we’ll have to do is to setup the mail transportation related sections: POP3, IMAP and SMTP for one or more domains you own. In order to do that you’ll need to:
- setup the MX Records for each domain, basically routing them to your server.
- create an entry for that domain to hMailServer’s configuration.
- configure the mail boxes, the alias and/or the distribution lists using the hMailServer GUI interface.
- enable the SMTP, POP3 and/or IMAP protocols in hMailServer.
Setup the MX Records
In order to be able to manage the e-mail directed to your domain(s) you need to properly handle their MX Records, which basically are the informations received by the other mail servers when they lookup your domain in order to see where to actually route your messages: if you rely upon external, third-party e-mail handling services — such as the one from your hosting provider — your domain MX Records will be configured to point on them. In order to edit your MX Records, enter in the DNS management panel for your domain and add (or change) their IP.
Once you do that, you will have to wait some hours (usually 12-24) to have your changes propagated throughout the whole internet. After this time, each and every e-mail addressed to @yourdomain.ext will be handled over your server.
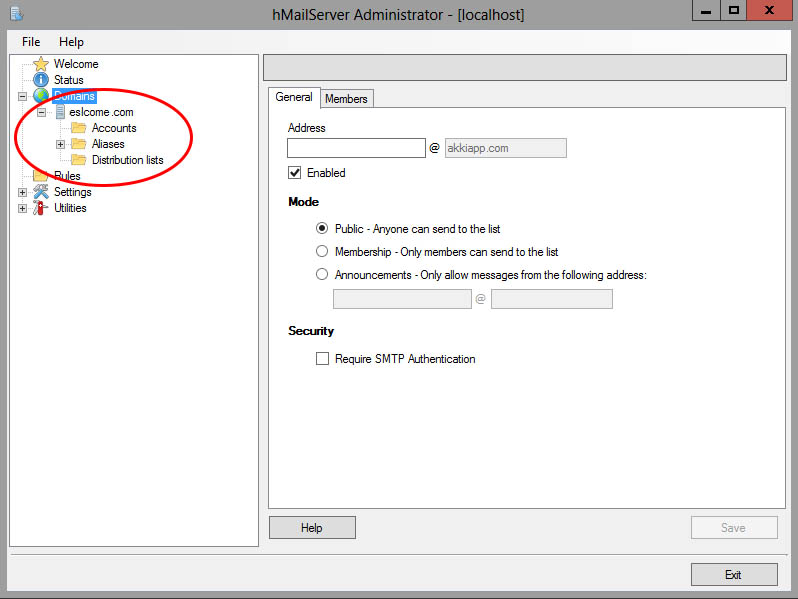
Add a domain
Go to the Welcome screen and click on Add Domain… to bring a tabbed settings panel into view: insert the hostname of the domain you want to configure into the General tab (hostname.com format): you can also configure one or more domain aliases — as long as you need them. Once you’re done, click on the Save button to the lower-right: a new entry will be created, along with three sub-folders for the Accounts, Aliases and Distribution lists related to this domain.
Configure E-Mail Accounts, Aliases and Distribution lists
For each domain defined under the the Domains node you’ll be able to create as many Accounts, Aliases and Distribution Lists as you want to. Let’s see how each one of them actually works.
Accounts
Each Account is basically a dedicated mailbox in the format of [email protected]: once created, the server will accept e-mail messages sent to this address and store them into its database. For each Account name you will also be asked to define a password, which will be used to grant access to hMailServer‘s POP3 and/or IMAP services to receive and send e-mail. Adding accounts is basically what you need to do for each and every e-mail you want to create for yourself and/or for any of your users.
Aliases
An alias, just like the name suggests, is nothing more than an alternative name for an existing account (and its related e-mail address). As soon as you create an alias and bind it to an account, each e-mail sent to [email protected] will we accepted by the server and routed to the [email protected] address. Creating one or more alias is often an excellent way to manage e-mail received by multiple senders ([email protected], [email protected], [email protected] and so on) and still receive them using a single, centralized e-mail address.

For further information about e-mail aliases we strongly suggest you to read this Wikipedia page.
Please notice that hMailServer allows you to create aliases for any e-mail address, alias or distribution list (see below), including those not managed by it: meaning that you’ll be able to create aliases for your gmail address, just to make an example.
Distribution lists
A Distribution list is rather similar to an alias, except that it routes a copy of each received messages to multiple e-mail addresses instead of just one: those among you that are familiar with how mailing-lists work will find that Distribution lists are pretty much that. You will be also able to choose who can send messages to the list: hMailServer supports three configuration modes: Public (everyone can send messages, including non-subscribers), Membership (subscribers only) or Announcements (only a single e-mail address). To keep it simple, use Public if you need to host an open, support-based mailing-lists, Announcements for newsletters or similar one-way-only communications, and Membership for any other scenario.
Enable POP3 and/or IMAP protocols
The last step we need to handle is to ensure that POP3 and/or IMAP are properly configured. Open the hMailServer’s management interface and expand the Protocols node:
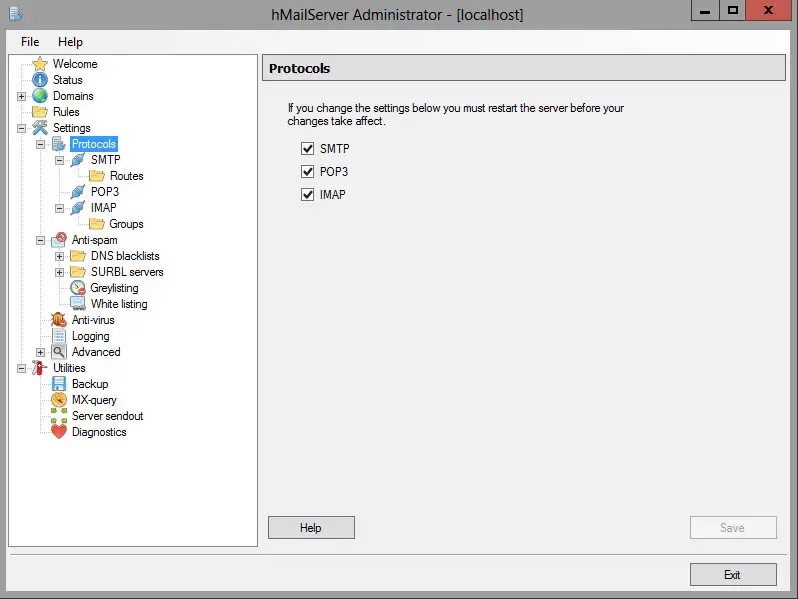
Ensure that the checkboxes near to the protocols you want to activate for your users are checked. In case you also want to activate the SMTP server (to send e-mail messages) you can take the chance to enable such protocol now (see below). For additional info regarding POP3, IMAP and SMTP procotols we strongly suggest reading this post from the hMailServer official docs.
Enable the SMTP protocol
Let’s now see how we can configure hMailServer to send our e-mail messages using SMTP. Here are the required steps to perform:
- Enable the SMTP protocol (if you didn’t do that already)
- Setup the access permission rules.
Open the hMailServer administration interface and go to the Protocols section: ensure that the SMTP protocol is enabled.
Setup the access permission rules
When activating an SMTP service, it is essential to correctly set the access permissions to the service in order to prevent your server from falling prey to spam-bots or other automatic mechanisms in the perennial search for poorly protected systems through which to convey potentially inappropriate e-mails.
Open the hMailServer management panel and go to Advanced -> IP Ranges. Expand the item with a click of the mouse and check the settings related to IP addresses inside the local network (localhost) or coming from outside (internet). Besides setting specific IP classes you can also enable or disable POP3, IMAP and SMTP services selectively for each of them.
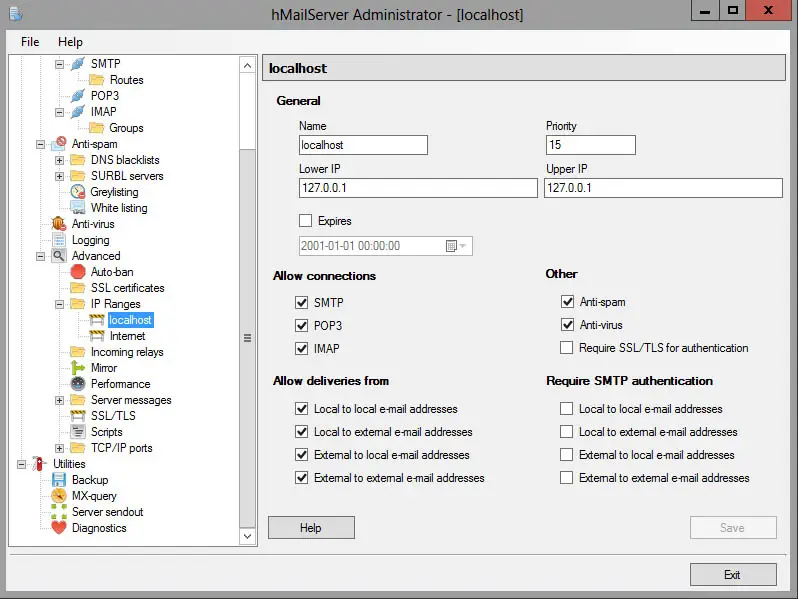
Configure deliveries
The four checkboxes in the Allow deliveries from section allow you to configure the e-mail forwarding permissions. In detail:
- Local to Local allows (or denies) sending emails from and sent to internal mailboxes (i.e. managed by / configured on hMailServer).
- Local to External allows (or denies) sending emails from internal mailboxes (see above) and sent to external mailboxes (or any other mailbox not managed by the local hMailServer instance).
- External to Local allows (or denies) sending emails from external mailboxes and sent to internal mailboxes.
- External to External allows (or denies) sending emails from and sent to external mailboxes.
Require SMTP authentication
Similarly, the four checkboxes present in the Require SMTP authentication section will allow you to request or not the need for authentication for the four possibilities described in the previous paragraph.
As we can see, hMailServer allows you to configure a different management of the Allow deliveries from and Require SMTP authentication permissions for each range of IPs that we are going to define: this feature is particularly convenient in some situations, for example when you need to configure a SMTP server that allows unauthenticated access for the use of the PHP mail() function: which, as many will know, does not allow you to specify authorization credentials, a problem I addressed in a previous article and with respect to which hMailServer, if properly confiured, it represents a possible solution.
IMPORTANT: By default, hMailServer does not require SMTP authentication to send mail received from a service that shows up with local IP address (localhost, 127.0.0.1), as can be seen by looking at the screenshot shown above. As for the services that connect with any external IP, it is usually a good idea to disable authentication if the recipient is an internal mailbox (i.e. managed by / configured on hMailServer) so as to allow external SMTP servers to send e-mails to the local instance: it is strongly recommended — or better to say, a duty — to request authentication for any sending to external mailboxes (local to external, external to external) so as to prevent our server from be used by spam services or malicious scripts to convey potentially unwanted messages.
Conclusions
That’s it for now: the overview provided should allow you to configure the service with all its basic functionality. For any other configuration needs I suggest referring to the excellent hMailServer official documentation.

21.10.2020
17,676
0
Do you want to create a free mail server for your company? Here we will provide you with a step-by-step guide on how to install and configure a mail server on your Windows Server with various types of software: hMailServer, MailEnable, and, Apache James.
The solution will work no matter if you have purchased a Cloud Server or a Dedicated Server with Windows Server 2012, 2016, or 2019.
Apart from a server, you will also need a domain and some basic DNS knowledge.
Before installing an email server on Windows Server
Before installing the mail server, we will need a .NET Framework and IIS for hMailServer and EnableMail.
Installing .NET Framework 3.5 or .NET. 4.7 and IIS
If you don’t have a preliminary setup, you can install it from the Server Manager. Go to “Manage” (up on the right corner) and select “Add features and Roles”. There you just need to click on “Next” a few times and eventually you will see all the features. Search for the features you need and select them, then click on “Install”.
For Apache James we need Java Runtime Environment. You can download it from Oracle’s page and install it.
What is hMailServer?
The hMailServer is a handy free (AGPLv3) software that serves as a mail server for Windows Server. Many people choose it, including governments, because it is relatively easy to use, has a rich set of features, and is of course, free!
hMailServer features:
- SMTP, POP3, IMAP for sending and receiving mails.
- Built-in backup is always welcome
- SSL encryption for better security
- Anti-spam for a cleaner inbox
- An Anti-virus that stops most of the malicious software
- Web administration for remote controlling
hMailServer installation
- Downloading hMailServer.
Go to this address and proceed with the download.
- Installation.
Open the file you downloaded. Click “Next”, then select “I accept the agreement” and again “Next”. We recommend the full installation of the next step. It includes “Server” and “Administrative Tools”.
Press “Next”. After that, you can select “build-in database” for this example, but you already have another one, you can select the second option.
The last step is important too. It includes selecting a strong password for your mail server.
Now you only need to choose the setup folder and then run the software. The next step is configuration.
- Configuring the mail server.
The first part is to click on “Connect” and use your password to enter.
Now click “Add domain”. Type in your domain and press “Save”.
From the left menu go to the folder “Accounts”. Add “Address”, for example, charley@YOURDOMAIN.COM. Here you can define the password, the size of the mailbox, and the maximum size of each file.
Now go to “Settings”, “Protocols” and select “SMTP”. You will need to add the localhost of your server with a valid IP address. Later you need to add an A record that resolves the localhost to its IP and a PTR record for a reverse DNS lookup that resolves the IP to the hostname. The name of your server can be mail.YOURDOMAIN.COM.
Let’s also add an Auto-ban. Go to “Advanced” and select “Auto-ban”. Put the default domain and your password and then adjust the settings. Enable the setting. This will stop IP addresses if they continue to try to log in.
Now let’s go to “IP ranges”. Select “TCP/IP ports” and configure the SMTP, IMAP, and POP3 ports for this mail server. SMTP – 25, 587, POP3 – 110 and IMAP – 143. When we open these ports, this will allow the mail server to receive mails.
- Again some DNS work. You will need to add an SPF record to show that this mail server is authorized to send mails from your domain. You will need to add the domain and IP address in the SPF record.
Add an MX record too, for the incoming mails. The record will provide information, which enables accepting mails on behalf of the domain.
What is MailEnable?
MailEnable is another excellent proposal if you have a Windows Server. It is a paid mail server, but there is a free version too (the Standard). It is one of the most popular mail servers for Windows.
There are 4 versions:
- Standard (Free)
- Professional (starting at 349 USD)
- Enterprise (starting at 699 USD)
- Premium (starting at 1098 USD)
It is popular of its integration with Outlook and its set of features similar to Microsoft Exchange.
MailEnable features
- Supports SMTP, IMAP, and POP3 (All versions)
- Webmail for easy access through the web (All versions)
- Contacts, Calendars, Schedule Tasks (All versions)
- Anti-Spam (All versions)
- Media players for videos and audio for the attached files (All versions)
- ActiveSync (cost extra) for iOS and Android. (Professional and up)
- Content filtering (Professional and up)
- Antivirus (Professional and up)
- Outlook MAPI Connector for MS Outlook (Enterprise, unlimited for the Premium)
- Collaboration and sharing (Enterprise, Premium)
How to install MailEnable?
- Downloading MailEnable.
Go to the MailEnable website and after that go to the download page. Choose the right version for you. The standard versión is free. You could try it out before deciding on an upgrade or a purchase of a more advanced version.
- Installation.
Open the file. The first window will be general information about the software, press “Next”. It will be followed by a License Agreement, click “Yes”. Write the owner’s details. The next step is to select what you want to install and where to install it– “WebMail Service (Server)”. The next screen will ask you about the Program Manager group, just leave it as it is and click “Next”. Here comes an important step, “Repository”. This is the location of the messages’ data. Choose and press “Next”.
- Creating a post office.
The post office unites all of your domains under one hat. You will need a strong password for it. At this point, you will be asked your domain name, DNS host (the IP address/es for the domain), and port for the SMTP (25). Click “Next” and wait for the installation.
- WebMail.
You need to select which website are you going to install it for. If you have one, leave it to “Default”.
- Configuration of the DNS.
To be sure that your mail server operates correctly, you will need a few DNS records. You will need to have a fixed IP address and create an A record with your domain and its IP address. You will need MX records for the incoming mail server pointing to the A record.
Some more necessary DNS settings include the enablement of DNS Forwarding. You will also have to create a Reverse Lookup Zone. You can do it from the DNS Manager by selecting “New Zone”. Inside this zone, you will need a PTR record.
- DKIM enable.
DKIM is an encryption method that verifies the message. To start using it, you will need to go to the administration console – “Servers”, “Localhost”, and “Extensions”. Click with the right button on the “Domain Keys (DKIM). Select the “Enable DomainKeys Identified Mail (DKIM)” functionality on this server.
To configure it go to the administration console and “MailEnable management > Messaging Manager > Post Offices > (postofficename) > Domains”. On your domain select properties and go to “DKIM”, “Configure”. There click on the “Sign outgoing messages” box. From there you can choose an encryption algorithm, the canonicalization one, impose body hash length limit, and include user identity. After that, you need to configure a selector. The selector is the combination of a public and private key. When you click on “new” you will need to give it a unique name and size of the key. The selector can work in “test mode, granularity (for specific users), notes“ and make this active selector (for all outgoing messages).
The final step is to select a Selector and copy the text. You will need to add a new TXT DNS record with the text from it and put it in a subdomain _domainkey subdomain with the same name as the selector.
- Mailbox configuration.
To create mailboxes, you need to use the administration console – “Messaging Manager > Post Offices > (postofficename) > Mailboxes”. Click on the “New Mailbox”, type in a name and password. Click ok and you are done.
What is Apache James?
Apache James (Java Apache Mail Enterprise Server) is an open-source mail server. It is free under the Apache License 2.0 and completely written in Java
There is a small group of developers (currently 30) who work for the Apache Software Foundation, creating the Apache James mail server. The group is active and there are frequently new features added to the software. Just don’t expect the same level of complexity as MailEnable.
Apache James features
- Supports SMTP, IMAP, and POP3
- jSPF, a java SPF
- jDKIM, a java DKIM
- FetchMail
Installing Apache James
- Installation.
It is a very different method of installation compared to the last examples. First, visit the download page and get the Apache James Server for your mail server.
Then go to the installation folder, where you want it to be, and unpack it. That’s the installation process, now we need to configure it. This is the hard part.
You will need to install a database.
Configure it. After unpacking, the configuration folder will be in ./conf/META-INF folder. There you need to change a few things: the postmaster address, open port 25 for SMTP, port 110 for POP3, and 143 for IMAP4.
Create an A record
Add your domain, the default is localhost, you can change it.
Configure pop3 server by choosing the right port for it and you can add SSL too.
The Imap4 port should be set to 143.
Configure the Smtp server to work on port 25.
Run it. Go to the directory where you put the installation archive. Run the James Apache with the command $cd bin and then $ ./james start.
Create a domain
Use the command $ cd bin and $ james-cli –h localhost –p 9999 addomain mydomain.tld. Change the domain to your domain.
Create users with the command $ james-cli –h localhost –p 9999 adduser myuser@mydomain.tld mypassword and respectively change the user and domain you want, followed by space and the password for the user.
You can see additional components here. We recommend that you use at least jSPF and jDKIM.
You can use it with a client like Mozilla Thunderbird.
Firewall configuration
Let’s check if the ports that we have set in the software are open. If they are not, we can open then in Windows Firewall. Open it and go to “Inbound Rules”. There we will put “New Rule”. Choose “Port” and “Next”. Here write down the same port from before – 25, 110, 143, and 587 (or the one you have put). In the next window select “Allow The Connection” and “Next”. Select all of the available – “Domain”, “Private” and “Public”. In the last step, write down a name corresponding to the rule. For example, “Ports for the mail server”.
Conclusion
Installing a fully working mail server is not that hard, as many will tell you. You can do it in a few easy steps, if you choose the right software. You can set it up and run it in a day.
Yes, you will need some basic knowledge about how servers work and what they need. But nothing is too hard to learn and there is enough information on the Internet with detailed instructions.
hMmailServer is a good solution for a mail server. It is free and relatively easy to use and there are enough professional features that can serve the needs of an average company.
MailEnable has a good enough Standard version, the free one. It is fine for those of you who need just an email server without additional features for sharing and cooperative work. It could get expensive in its Premium version, although not as much as most of the paid solutions.
Apache James is a smaller project. It is harder to set up and you will need more Java knowledge. The good part is it is free and there is a good chance it will remain that way for a long time.
If you want to check out a paid solution, Microsoft Exchange would be a solid choice.
Creating and setting up of mail server on Windows is not as difficult as perceived. But if you are looking for open-source free software to create mail/SMTP server, you certainly have very few choices. One of the open-source software for Windows mail servers is hMailServer. It installs just like any other software, but configuration could be tricky. There is one more software in my knowledge for Windows, which is free, is Axigen.
In this tutorial, you will learn to install and configure hMailServer. In some other tutorial, I will discuss Axigen as well.
Requirement for hMailServer
You will need
- a domain name
- a Windows Machine. It could be Windows 10, Windows Server 2016, 2019, or any other Windows edition.
I recommend getting Windows Server from Turnkey Internet or anywhere you like, just make sure port 25 is open. Best thing is about turnkey is you can buy and apply Windows license from somewhere and pay them just for VPS. This might save some money for you.
Testing for Open Port 25 on Windows
On Windows 10 go to control panel and search for “Windows Features”
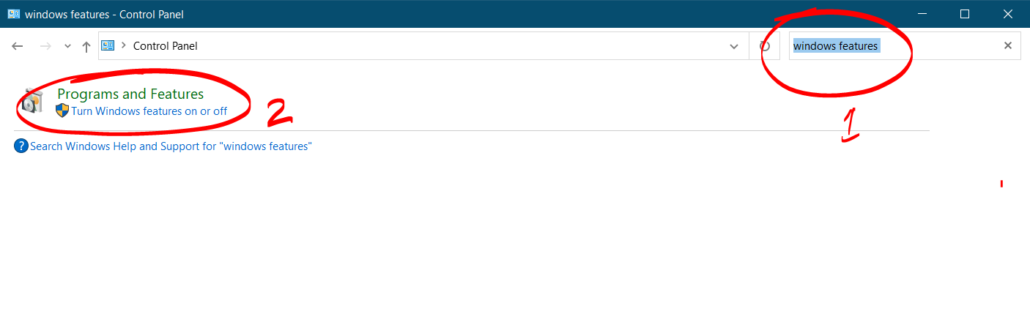
Now go to Turn Windows features on or off and look for telnet. Check the box in front of it and click OK.

After that open command prompt and type
If you get connected message then all is well, otherwise your port 25 is blocked.
Getting & Installing hmailserver
To get hmailserver just go their website and download. Install it as any software and follow the screenshots below. During installation you will be asked to create password. This password will be needed every time you start hmailserver.
Configuring hMailServer
After installation on first run you will be asked for password to start.
Adding Domain
After that, on next screen add domain as follows.
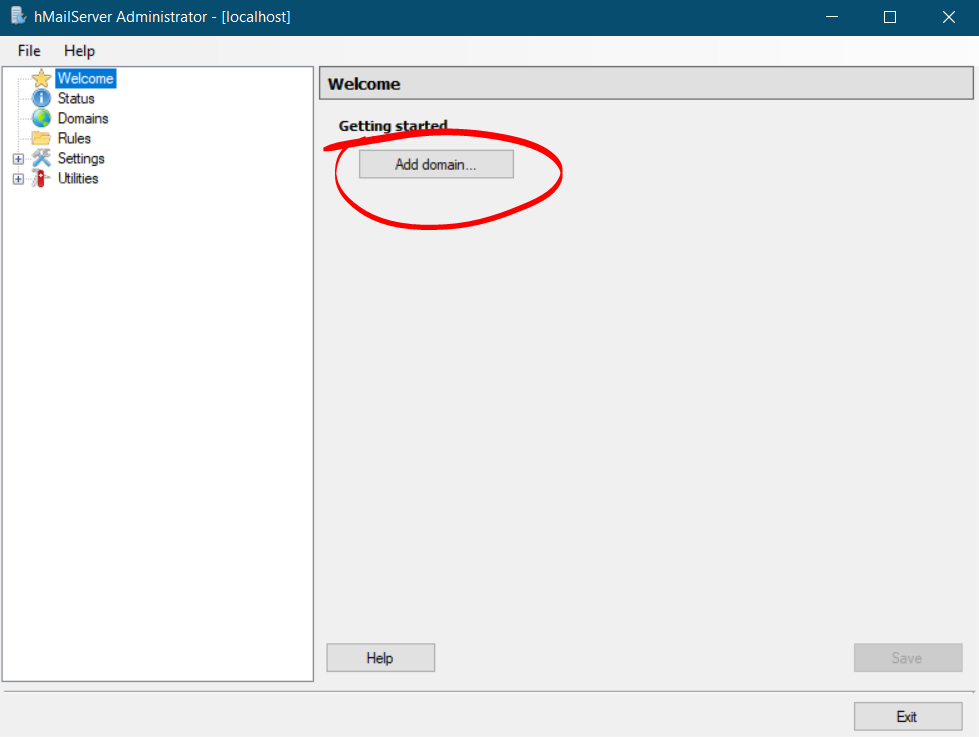
Next type the domain name and save.
Adding Accounts
After that, you need to add account for the domain. Simply go to Accounts and then Add.
On following screen enter username and password, then save.
Generate and add DKIM key to hMailServer
In order to generate DKIM key to hMailServer, you need openssl key generator. Just download from the following link
Alternatively, you can also download it from here. Next install the openssl and open command prompt on your Windows.
Generating DKIM key on Windows
On command prompt (cmd) type
cd C:Program FilesOpenSSL-Win64bin
Next, execute the following command to generate the key
openssl.exe genrsa -out dkim.private.key 1024
openssl.exe rsa -in dkim.private.key -out dkim.public.key -pubout -outform PEM
If you get any error, run cmd as administrator. You will get output as follows.
C:WINDOWSsystem32>cd C:Program FilesOpenSSL-Win64bin

C:Program FilesOpenSSL-Win64bin>openssl.exe genrsa -out dkim.private.key 1024
Generating RSA private key, 1024 bit long modulus (2 primes)
............+++++
.......+++++
e is 65537 (0x010001)

C:Program FilesOpenSSL-Win64bin>openssl.exe rsa -in dkim.private.key -out dkim.public.key -pubout -outform PEM
writing RSA key

C:Program FilesOpenSSL-Win64bin>
Now you will see two files at C:Program FilesOpenSSL-Win64bin. One is dkim.private.key and another dkim.public.key. Next, you need to tell hMailServer the location of dkim.private.key and the selector. Here you can use any alphanumeric as a selector but I am going to use mail
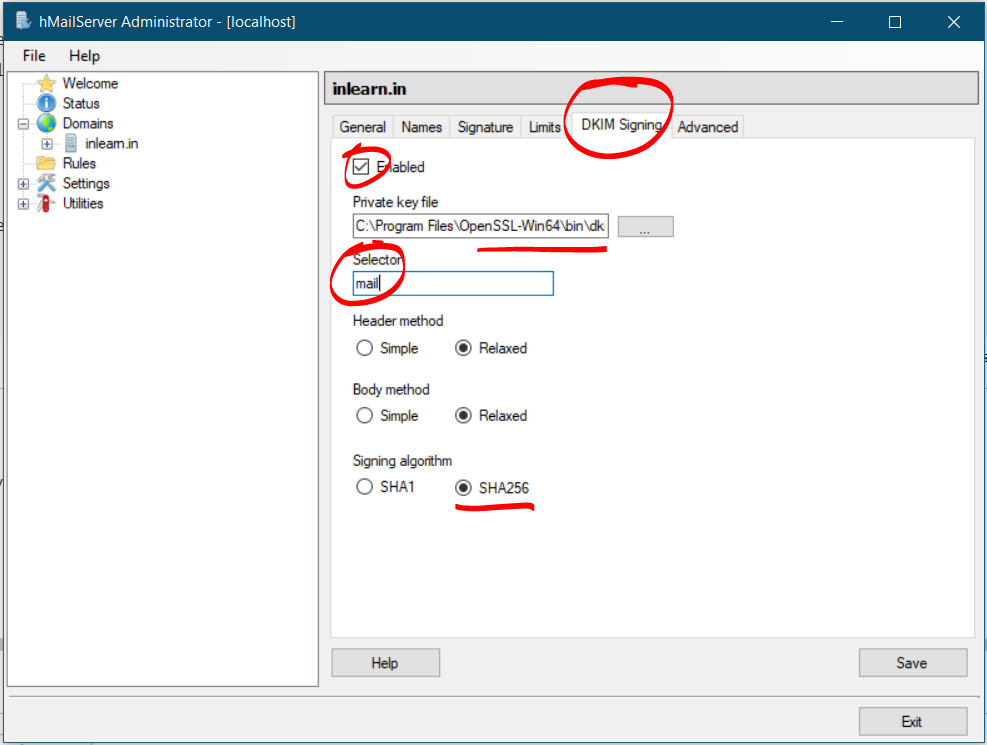
Next, you open dkim.public.key in notepad and follow the steps to create DKIM record for your domain.
Configuring DNS records
You need to create following DNS records in your domain. Login to your domain registrar and look for DNS management.
| Type | Host | Value |
| A | Your Server IP address | |
| TXT | @ | v=spf1 a mx ip4:192.168.10.10 ~all |
| TXT | _dmarc | v=DMARC1; p=quarantine; rua=mailto:dmarc@yourdomain.com; ruf=mailto:dmarc@yourdomain.com; sp=quarantine |
| TXT | mail._domainkey | v=DKIM1; k=rsa; p=MIGfMA0GCSqGSIb3DQ…………; |
After this, you can test your email server. For testing, I am going to use Thunderbird. You can also download any desktop based software to test. You can also check hmailserver outlook settings tutorial if you wanted to use outlook with hmailserver.
Enter the following SMTP details in the software.
| Host | localhost |
| User | user@yourdomain.com |
| Password | You chose |
| Port | 587 |
| TLS | None |
After that, you can send test email to your Gmail.
Conclusion
Creating MailServer on Windows would have been tedious task, but thanks to hmailserver it’s super easy. This is boon for the people, who are unable to get with nitty-gritty of Linux.