PostgreSQL — это бесплатная объектно-реляционная СУБД с мощным функционалом, который позволяет конкурировать с платными базами данных, такими как Microsoft SQL, Oracle. PostgreSQL поддерживает пользовательские данные, функции, операции, домены и индексы. В данной статье мы рассмотрим установку и краткий обзор по управлению базой данных PostgreSQL. Мы установим СУБД PostgreSQL в Windows 10, создадим новую базу, добавим в неё таблицы и настроим доступа для пользователей. Также мы рассмотрим основы управления PostgreSQL с помощью SQL shell и визуальной системы управления PgAdmin. Надеюсь эта статья станет хорошей отправной точкой для обучения работы с PostgreSQL и использованию ее в разработке и тестовых проектах.
Содержание:
- Установка PostgreSQL 11 в Windows 10
- Доступ к PostgreSQL по сети, правила файерволла
- Утилиты управления PostgreSQL через командную строку
- PgAdmin: Визуальный редактор для PostgresSQL
- Query Tool: использование SQL запросов в PostgreSQL
Установка PostgreSQL 11 в Windows 10
Для установки PostgreSQL перейдите на сайт https://www.postgresql.org и скачайте последнюю версию дистрибутива для Windows, на сегодняшний день это версия PostgreSQL 11 (в 11 версии PostgreSQL поддерживаются только 64-х битные редакции Windows). После загрузки запустите инсталлятор.

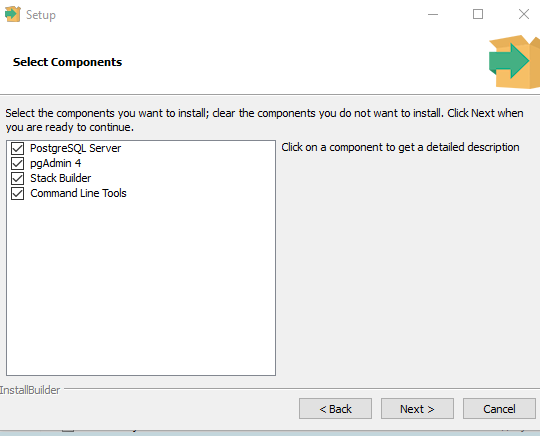
В процессе установки установите галочки на пунктах:
- PostgreSQL Server – сам сервер СУБД
- PgAdmin 4 – визуальный редактор SQL
- Stack Builder – дополнительные инструменты для разработки (возможно вам они понадобятся в будущем)
- Command Line Tools – инструменты командной строки
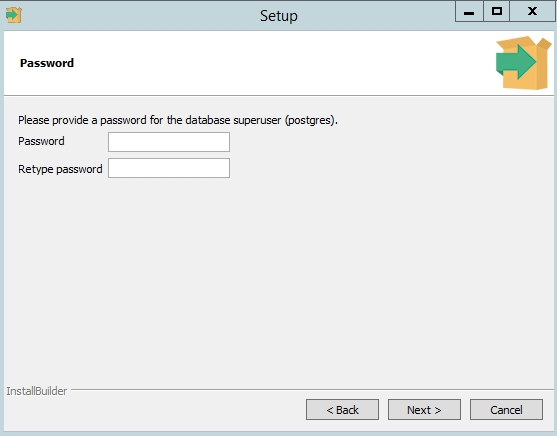
Установите пароль для пользователя postgres (он создается по умолчанию и имеет права суперпользователя).
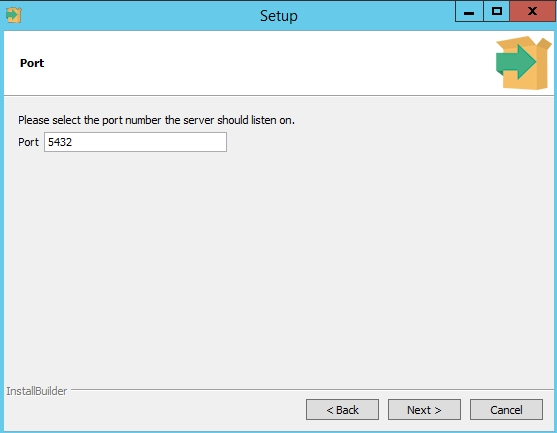
По умолчание СУБД слушает на порту 5432, который нужно будет добавить в исключения в правилах фаерволла.
Нажимаете Далее, Далее, на этом установка PostgreSQL завершена.
Доступ к PostgreSQL по сети, правила файерволла
Чтобы разрешить сетевой доступ к вашему экземпляру PostgreSQL с других компьютеров, вам нужно создать правила в файерволе. Вы можете создать правило через командную строку или PowerShell.
Запустите командную строку от имени администратора. Введите команду:
netsh advfirewall firewall add rule name="Postgre Port" dir=in action=allow protocol=TCP localport=5432
- Где rule name – имя правила
- Localport – разрешенный порт
Либо вы можете создать правило, разрешающее TCP/IP доступ к экземпляру PostgreSQL на порту 5432 с помощью PowerShell:
New-NetFirewallRule -Name 'POSTGRESQL-In-TCP' -DisplayName 'PostgreSQL (TCP-In)' -Direction Inbound -Enabled True -Protocol TCP -LocalPort 5432
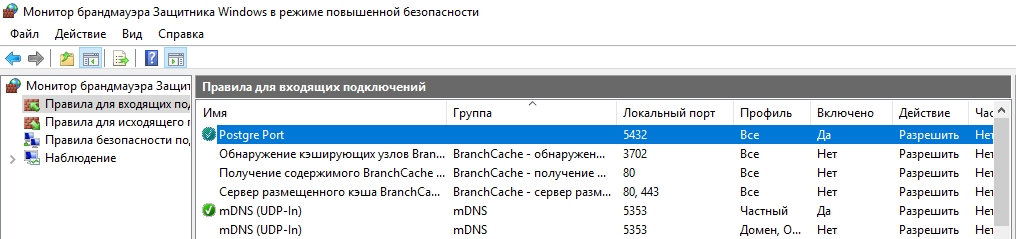
После применения команды в брандмауэре Windows появится новое разрешающее правило для порта Postgres.
Совет. Для изменения порта в установленной PostgreSQL отредактируйте файл postgresql.conf по пути C:Program FilesPostgreSQL11data.
Измените значение в пункте
port = 5432
. Перезапустите службу сервера postgresql-x64-11 после изменений. Можно перезапустить службу с помощью PowerShell:
Restart-Service -Name postgresql-x64-11

Более подробно о настройке параметров в конфигурационном файле postgresql.conf с помощью тюнеров смотрите в статье.
Утилиты управления PostgreSQL через командную строку
Рассмотрим управление и основные операции, которые можно выполнять с PostgreSQL через командную строку с помощью нескольких утилит. Основные инструменты управления PostgreSQL находятся в папке bin, потому все команды будем выполнять из данного каталога.
- Запустите командную строку.
Совет. Перед запуском СУБД, смените кодировку для нормального отображения в русской Windows 10. В командной строке выполните:
chcp 1251 - Перейдите в каталог bin выполнив команду:
CD C:Program FilesPostgreSQL11bin

Основные команды PostgreSQL:

PgAdmin: Визуальный редактор для PostgresSQL
Редактор PgAdmin служит для упрощения управления базой данных PostgresSQL в понятном визуальном режиме.
По умолчанию все созданные базы хранятся в каталоге base по пути C:Program FilesPostgreSQL11database.
Для каждой БД существует подкаталог внутри PGDATA/base, названный по OID базы данных в pg_database. Этот подкаталог по умолчанию является местом хранения файлов базы данных; в частности, там хранятся её системные каталоги. Каждая таблица и индекс хранятся в отдельном файле.
Для резервного копирования и восстановления лучше использовать инструмент Backup в панели инструментов Tools. Для автоматизации бэкапа PostgreSQL из командной строки используйте утилиту pg_dump.exe.
Query Tool: использование SQL запросов в PostgreSQL
Для написания SQL запросов в удобном графическом редакторе используется встроенный в pgAdmin инструмент Query Tool. Например, вы хотите создать новую таблицу в базе данных через инструмент Query Tool.
- Выберите базу данных, в панели Tools откройте Query Tool
- Создадим таблицу сотрудников:
CREATE TABLE employee
(
Id SERIAL PRIMARY KEY,
FirstName CHARACTER VARYING(30),
LastName CHARACTER VARYING(30),
Email CHARACTER VARYING(30),
Age INTEGER
);
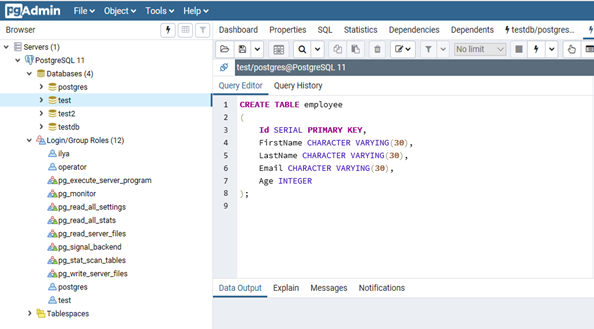
Id — номер сотрудника, которому присвоен ключ SERIAL. Данная строка будет хранить числовое значение 1, 2, 3 и т.д., которое для каждой новой строки будет автоматически увеличиваться на единицу. В следующих строках записаны имя, фамилия сотрудника и его электронный адрес, которые имеют тип CHARACTER VARYING(30), то есть представляют строку длиной не более 30 символов. В строке — Age записан возраст, имеет тип INTEGER, т.к. хранит числа.
После того, как написали код SQL запроса в Query Tool, нажмите клавишу F5 и в базе будет создана новая таблица employee.
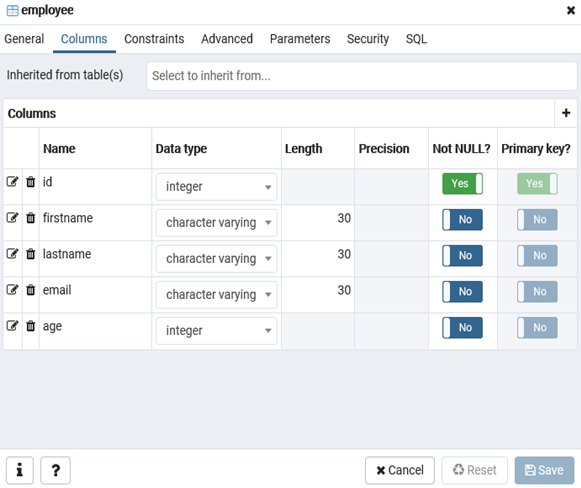
Для заполнения полей в свойствах таблицы выберите таблицу employee в разделе Schemas -> Tables. Откройте меню Object инструмент View/Edit Data.
Здесь вы можете заполнить данные в таблице.
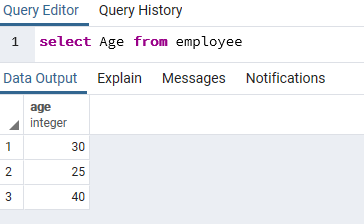
После заполнения данных выполним инструментом Query простой запрос на выборку:
select Age from employee;
Настройка удаленного подключения к БД PostgreSQL 13 на сервере Ubuntu 18 LTS из ОС Windows 10 утилиты pgAdmin 4, двумя способами: подключение с помощью SSH туннеля и прямое подключение к серверу PostgreSQL.
💡 Я рекомендую использовать подключение через SSH туннель, простое в настройке и безопасное. При использовании SSH туннеля, порт PostgreSQL не открывается для внешних подключений.
Для использования SSH туннеля, необходимо настроить SSH сертификаты входа на Ubuntu.
pgAdmin — самая популярная и многофункциональная платформа для администрирования и разработки с открытым исходным кодом для PostgreSQL, самой совершенной базы данных с открытым исходным кодом в мире.
Официальный сайт pgAdmin
Узнать расположение файлов конфигурации PostgreSQL: postgresql.conf, pg_hba.conf.
ps aux | grep postgres | grep -- -DУзнать порт PostgreSQL командой:
grep -H '^port' /etc/postgresql/*/main/postgresql.conf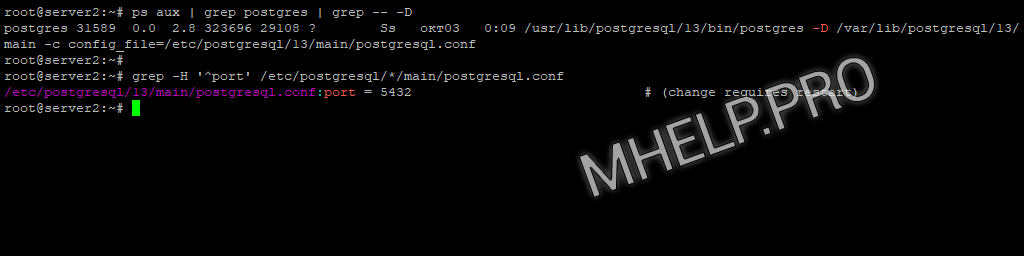
В примере, файл конфигурации PostgreSQL располагается по пути /etc/postgresql/13/main/postgresql.conf, порт подключения 5432.
Содержание
- SSH туннель к PostgreSQL
- Прямое подключение к PostgreSQL
- Частые вопросы
Статья на других языках:
🇺🇸 – How to Setup Remote Access to PostgreSQL Database from Windows
🇪🇸 – Cómo configurar el acceso remoto a la base datos PostgreSQL desde Windows
SSH туннель к PostgreSQL
Подключение к серверу PostgreSQL с использованием SSH туннеля. При выборе такого типа подключения никаких дополнительных настроек на сервере PostgreSQL не требуется.
Настройка pgAdmin на Windows 10:
- Запускаем pgAdmin
- Создаем новое подключение к серверу: Object -> Create -> Server;
- Вкладка General:
- Name: название сервера (произвольное);
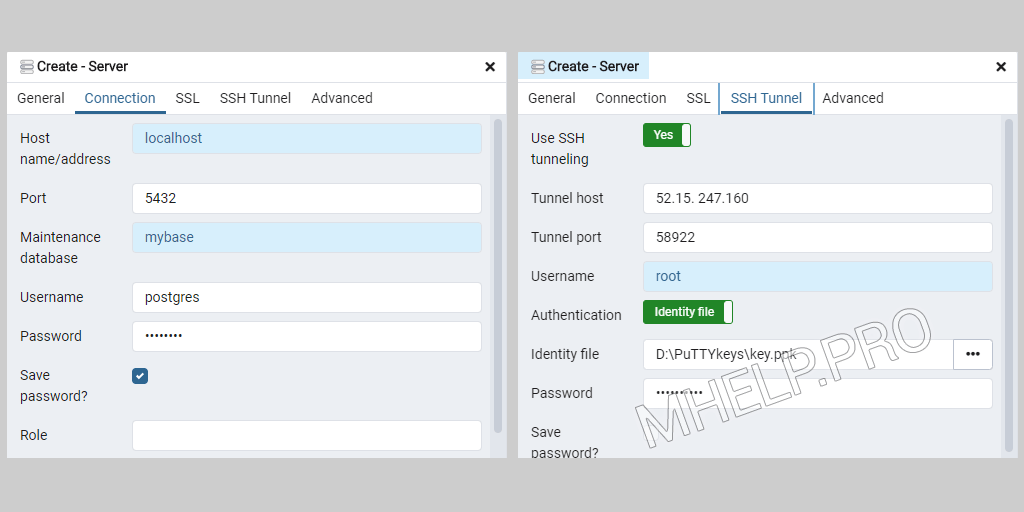
- Вкладка Connection:
- Host Name: localhost;
- Port: 5432;
- Maintenance database: mybase;
- Username: postgres;
- Вкладка SSH Tunnel:
- Use SSH tunneling: Yes;
- Tunnel host: myserver-IP;
- Tunnel port: 58222;
- Username: root;
- Authentication: Identity file;
- Identity file: path_key.
💡 В качестве ключа указываем приватный ключ id_rsa из Настройка SSH сертификатов на сервере. Как изменить порт SSH в Частые вопросы.
Прямое подключение к PostgreSQL
Для настройки прямого подключения к PostgreSQL вносим изменения в файлы конфигурации postgresql.conf и pg_hba.conf
Настройка PostgreSQL
postgresql.conf
Файл postgresql.conf находится в папке установки PostgreSQL.
sudo nano /etc/postgresql/13/main/postgresql.confРаскомментируем или добавим строку:
listen_addresses = '*'Мы разрешили прослушивание запросов от всех IP-адресов.
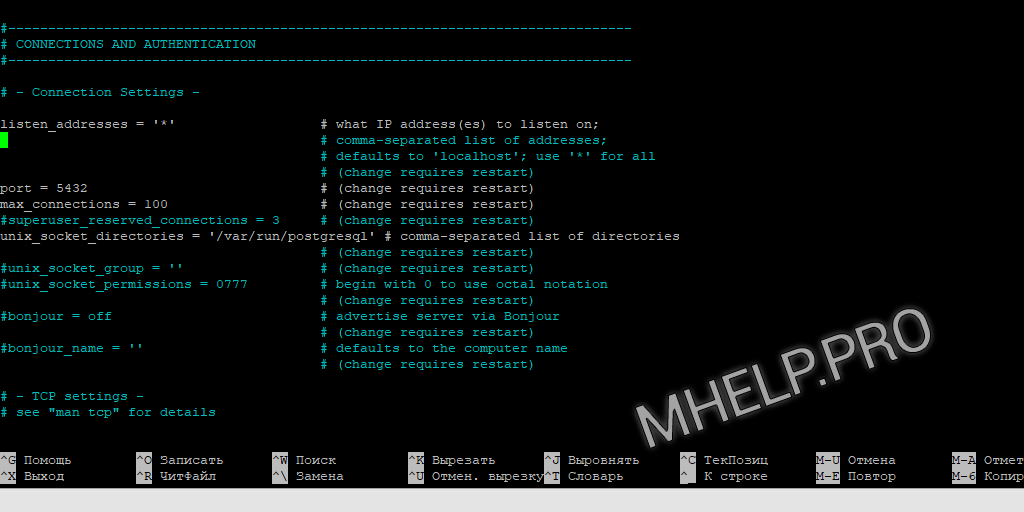
💡 Возможные варианты:listen_addresses = '0.0.0.0' чтобы слушать все IPv4;listen_addresses = '::' чтобы слушать все IPv6;listen_addresses = 'your.host.ip.adress' определенный адрес или список адресов через запятую.
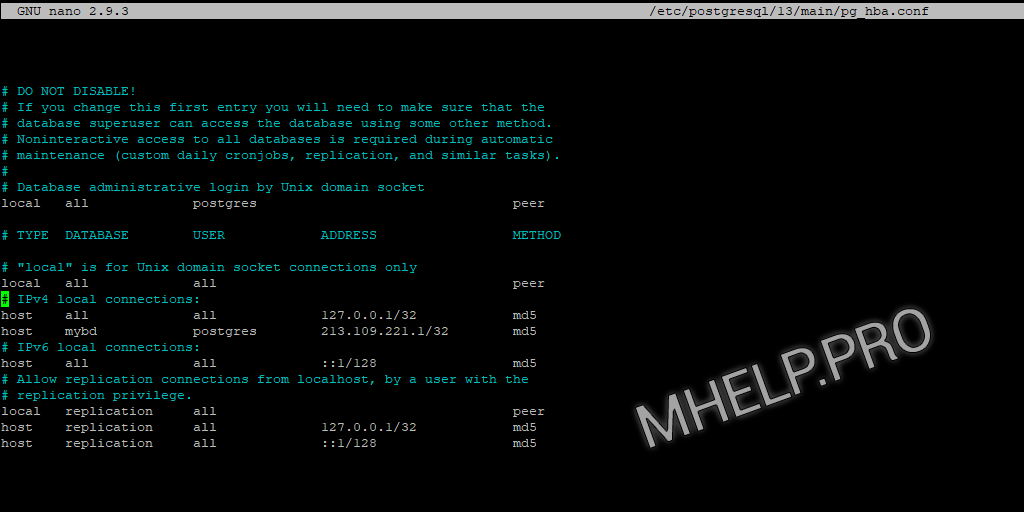
pg_hba.conf
Файл pg_hba.conf находится в папке установки PostgreSQL.
Открываем на редактирование:
sudo nano /etc/postgresql/13/main/pg_hba.confДобавляем запись в секцию # IPv4 local connections:
host mybd postgres 41.223.232.15/32 md5Запись разрешает подключение к БД mybd пользователю postgres с IP адресом 41.223.232.15, используя пароль.
После изменения файлов конфигурации, перезапустите службу PostgreSQL.
systemctl restart postgresqlНастройка pgAdmin
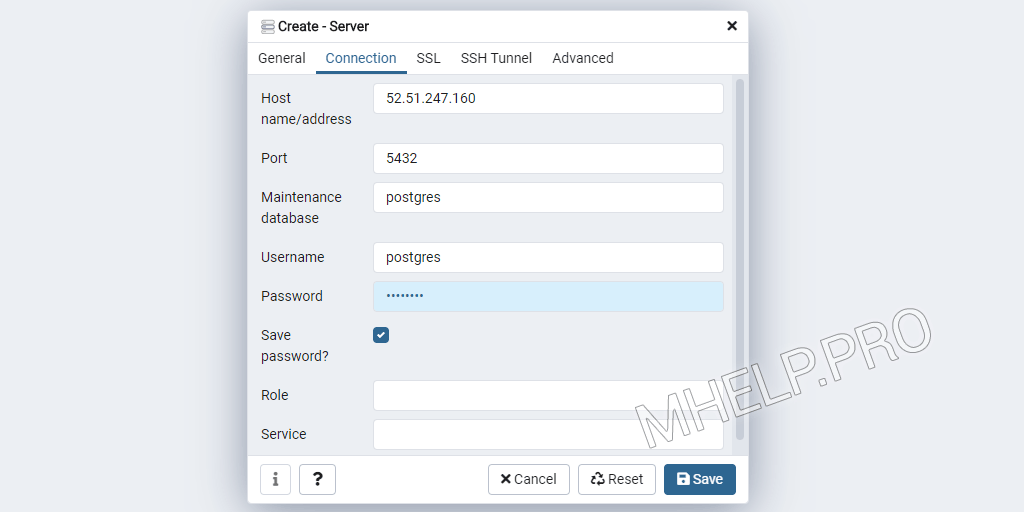
Настройка прямого подключения к базе данных PostgreSQL через интернет или локальную сеть используя pgAdmin.
- Запустите pgAdmin
- Создаем новое подключение к серверу: Object -> Create -> Server;
- Вкладка General:
- Name: название сервера (произвольное);
- Вкладка Connection:
- Host Name: RemoteServerIP;
- Port: 5432;
- Maintenance database: mybase;
- Username: postgres.
Частые вопросы
PostgreSQL как узнать расположение файлов конфигурации?
ps aux | grep postgres | grep — -D
PostgreSQL как узнать порт?
grep -H ‘^port’ /etc/postgresql/*/main/postgresql.conf
SSH как узнать или изменить порт подключения?
Файл /etc/ssh/sshd_config , строка port.
Как настроить удаленное подключение к БД PostgreSQL из Windows обсуждалось в этой статье. Я надеюсь, что теперь вы сможете настроить pgAdmin для подключения к PostgreSQL (прямое подключение или используя SSH туннель). Однако, если вы столкнетесь с каким-то проблемами при настройке сервера или pgAdmin, не стесняйтесь написать в комментариях. Я постараюсь помочь.
Client authentication is controlled by a configuration file, which traditionally is named pg_hba.conf and is stored in the database cluster’s data directory. (HBA stands for host-based authentication.) A default pg_hba.conf file is installed when the data directory is initialized by initdb. It is possible to place the authentication configuration file elsewhere, however; see the hba_file configuration parameter.
The general format of the pg_hba.conf file is a set of records, one per line. Blank lines are ignored, as is any text after the # comment character. A record can be continued onto the next line by ending the line with a backslash. (Backslashes are not special except at the end of a line.) A record is made up of a number of fields which are separated by spaces and/or tabs. Fields can contain white space if the field value is double-quoted. Quoting one of the keywords in a database, user, or address field (e.g., all or replication) makes the word lose its special meaning, and just match a database, user, or host with that name. Backslash line continuation applies even within quoted text or comments.
Each record specifies a connection type, a client IP address range (if relevant for the connection type), a database name, a user name, and the authentication method to be used for connections matching these parameters. The first record with a matching connection type, client address, requested database, and user name is used to perform authentication. There is no “fall-through” or “backup”: if one record is chosen and the authentication fails, subsequent records are not considered. If no record matches, access is denied.
A record can have several formats:
localdatabaseuserauth-method[auth-options] hostdatabaseuseraddressauth-method[auth-options] hostssldatabaseuseraddressauth-method[auth-options] hostnossldatabaseuseraddressauth-method[auth-options] hostgssencdatabaseuseraddressauth-method[auth-options] hostnogssencdatabaseuseraddressauth-method[auth-options] hostdatabaseuserIP-addressIP-maskauth-method[auth-options] hostssldatabaseuserIP-addressIP-maskauth-method[auth-options] hostnossldatabaseuserIP-addressIP-maskauth-method[auth-options] hostgssencdatabaseuserIP-addressIP-maskauth-method[auth-options] hostnogssencdatabaseuserIP-addressIP-maskauth-method[auth-options]
The meaning of the fields is as follows:
local-
This record matches connection attempts using Unix-domain sockets. Without a record of this type, Unix-domain socket connections are disallowed.
host-
This record matches connection attempts made using TCP/IP.
hostrecords match SSL or non-SSL connection attempts as well as GSSAPI encrypted or non-GSSAPI encrypted connection attempts.Note
Remote TCP/IP connections will not be possible unless the server is started with an appropriate value for the listen_addresses configuration parameter, since the default behavior is to listen for TCP/IP connections only on the local loopback address
localhost. hostssl-
This record matches connection attempts made using TCP/IP, but only when the connection is made with SSL encryption.
To make use of this option the server must be built with SSL support. Furthermore, SSL must be enabled by setting the ssl configuration parameter (see Section 19.9 for more information). Otherwise, the
hostsslrecord is ignored except for logging a warning that it cannot match any connections. hostnossl-
This record type has the opposite behavior of
hostssl; it only matches connection attempts made over TCP/IP that do not use SSL. hostgssenc-
This record matches connection attempts made using TCP/IP, but only when the connection is made with GSSAPI encryption.
To make use of this option the server must be built with GSSAPI support. Otherwise, the
hostgssencrecord is ignored except for logging a warning that it cannot match any connections. hostnogssenc-
This record type has the opposite behavior of
hostgssenc; it only matches connection attempts made over TCP/IP that do not use GSSAPI encryption. database-
Specifies which database name(s) this record matches. The value
allspecifies that it matches all databases. The valuesameuserspecifies that the record matches if the requested database has the same name as the requested user. The valuesamerolespecifies that the requested user must be a member of the role with the same name as the requested database. (samegroupis an obsolete but still accepted spelling ofsamerole.) Superusers are not considered to be members of a role for the purposes ofsameroleunless they are explicitly members of the role, directly or indirectly, and not just by virtue of being a superuser. The valuereplicationspecifies that the record matches if a physical replication connection is requested, however, it doesn’t match with logical replication connections. Note that physical replication connections do not specify any particular database whereas logical replication connections do specify it. Otherwise, this is the name of a specific PostgreSQL database. Multiple database names can be supplied by separating them with commas. A separate file containing database names can be specified by preceding the file name with@. user-
Specifies which database user name(s) this record matches. The value
allspecifies that it matches all users. Otherwise, this is either the name of a specific database user, or a group name preceded by+. (Recall that there is no real distinction between users and groups in PostgreSQL; a+mark really means “match any of the roles that are directly or indirectly members of this role”, while a name without a+mark matches only that specific role.) For this purpose, a superuser is only considered to be a member of a role if they are explicitly a member of the role, directly or indirectly, and not just by virtue of being a superuser. Multiple user names can be supplied by separating them with commas. A separate file containing user names can be specified by preceding the file name with@. address-
Specifies the client machine address(es) that this record matches. This field can contain either a host name, an IP address range, or one of the special key words mentioned below.
An IP address range is specified using standard numeric notation for the range’s starting address, then a slash (
/) and a CIDR mask length. The mask length indicates the number of high-order bits of the client IP address that must match. Bits to the right of this should be zero in the given IP address. There must not be any white space between the IP address, the/, and the CIDR mask length.Typical examples of an IPv4 address range specified this way are
172.20.143.89/32for a single host, or172.20.143.0/24for a small network, or10.6.0.0/16for a larger one. An IPv6 address range might look like::1/128for a single host (in this case the IPv6 loopback address) orfe80::7a31:c1ff:0000:0000/96for a small network.0.0.0.0/0represents all IPv4 addresses, and::0/0represents all IPv6 addresses. To specify a single host, use a mask length of 32 for IPv4 or 128 for IPv6. In a network address, do not omit trailing zeroes.An entry given in IPv4 format will match only IPv4 connections, and an entry given in IPv6 format will match only IPv6 connections, even if the represented address is in the IPv4-in-IPv6 range. Note that entries in IPv6 format will be rejected if the system’s C library does not have support for IPv6 addresses.
You can also write
allto match any IP address,samehostto match any of the server’s own IP addresses, orsamenetto match any address in any subnet that the server is directly connected to.If a host name is specified (anything that is not an IP address range or a special key word is treated as a host name), that name is compared with the result of a reverse name resolution of the client’s IP address (e.g., reverse DNS lookup, if DNS is used). Host name comparisons are case insensitive. If there is a match, then a forward name resolution (e.g., forward DNS lookup) is performed on the host name to check whether any of the addresses it resolves to are equal to the client’s IP address. If both directions match, then the entry is considered to match. (The host name that is used in
pg_hba.confshould be the one that address-to-name resolution of the client’s IP address returns, otherwise the line won’t be matched. Some host name databases allow associating an IP address with multiple host names, but the operating system will only return one host name when asked to resolve an IP address.)A host name specification that starts with a dot (
.) matches a suffix of the actual host name. So.example.comwould matchfoo.example.com(but not justexample.com).When host names are specified in
pg_hba.conf, you should make sure that name resolution is reasonably fast. It can be of advantage to set up a local name resolution cache such asnscd. Also, you may wish to enable the configuration parameterlog_hostnameto see the client’s host name instead of the IP address in the log.These fields do not apply to
localrecords.Note
Users sometimes wonder why host names are handled in this seemingly complicated way, with two name resolutions including a reverse lookup of the client’s IP address. This complicates use of the feature in case the client’s reverse DNS entry is not set up or yields some undesirable host name. It is done primarily for efficiency: this way, a connection attempt requires at most two resolver lookups, one reverse and one forward. If there is a resolver problem with some address, it becomes only that client’s problem. A hypothetical alternative implementation that only did forward lookups would have to resolve every host name mentioned in
pg_hba.confduring every connection attempt. That could be quite slow if many names are listed. And if there is a resolver problem with one of the host names, it becomes everyone’s problem.Also, a reverse lookup is necessary to implement the suffix matching feature, because the actual client host name needs to be known in order to match it against the pattern.
Note that this behavior is consistent with other popular implementations of host name-based access control, such as the Apache HTTP Server and TCP Wrappers.
IP-addressIP-mask-
These two fields can be used as an alternative to the
IP-address/mask-lengthnotation. Instead of specifying the mask length, the actual mask is specified in a separate column. For example,255.0.0.0represents an IPv4 CIDR mask length of 8, and255.255.255.255represents a CIDR mask length of 32.These fields do not apply to
localrecords. auth-method-
Specifies the authentication method to use when a connection matches this record. The possible choices are summarized here; details are in Section 21.3. All the options are lower case and treated case sensitively, so even acronyms like
ldapmust be specified as lower case.trust-
Allow the connection unconditionally. This method allows anyone that can connect to the PostgreSQL database server to login as any PostgreSQL user they wish, without the need for a password or any other authentication. See Section 21.4 for details.
reject-
Reject the connection unconditionally. This is useful for “filtering out” certain hosts from a group, for example a
rejectline could block a specific host from connecting, while a later line allows the remaining hosts in a specific network to connect. scram-sha-256-
Perform SCRAM-SHA-256 authentication to verify the user’s password. See Section 21.5 for details.
md5-
Perform SCRAM-SHA-256 or MD5 authentication to verify the user’s password. See Section 21.5 for details.
password-
Require the client to supply an unencrypted password for authentication. Since the password is sent in clear text over the network, this should not be used on untrusted networks. See Section 21.5 for details.
gss-
Use GSSAPI to authenticate the user. This is only available for TCP/IP connections. See Section 21.6 for details. It can be used in conjunction with GSSAPI encryption.
sspi-
Use SSPI to authenticate the user. This is only available on Windows. See Section 21.7 for details.
ident-
Obtain the operating system user name of the client by contacting the ident server on the client and check if it matches the requested database user name. Ident authentication can only be used on TCP/IP connections. When specified for local connections, peer authentication will be used instead. See Section 21.8 for details.
peer-
Obtain the client’s operating system user name from the operating system and check if it matches the requested database user name. This is only available for local connections. See Section 21.9 for details.
ldap-
Authenticate using an LDAP server. See Section 21.10 for details.
radius-
Authenticate using a RADIUS server. See Section 21.11 for details.
cert-
Authenticate using SSL client certificates. See Section 21.12 for details.
pam-
Authenticate using the Pluggable Authentication Modules (PAM) service provided by the operating system. See Section 21.13 for details.
bsd-
Authenticate using the BSD Authentication service provided by the operating system. See Section 21.14 for details.
auth-options-
After the
auth-methodfield, there can be field(s) of the formname=valuethat specify options for the authentication method. Details about which options are available for which authentication methods appear below.In addition to the method-specific options listed below, there is a method-independent authentication option
clientcert, which can be specified in anyhostsslrecord. This option can be set toverify-caorverify-full. Both options require the client to present a valid (trusted) SSL certificate, whileverify-fulladditionally enforces that thecn(Common Name) in the certificate matches the username or an applicable mapping. This behavior is similar to thecertauthentication method (see Section 21.12) but enables pairing the verification of client certificates with any authentication method that supportshostsslentries.On any record using client certificate authentication (i.e. one using the
certauthentication method or one using theclientcertoption), you can specify which part of the client certificate credentials to match using theclientnameoption. This option can have one of two values. If you specifyclientname=CN, which is the default, the username is matched against the certificate’sCommon Name (CN). If instead you specifyclientname=DNthe username is matched against the entireDistinguished Name (DN)of the certificate. This option is probably best used in conjunction with a username map. The comparison is done with theDNin RFC 2253 format. To see theDNof a client certificate in this format, doopenssl x509 -in myclient.crt -noout --subject -nameopt RFC2253 | sed "s/^subject=//"
Care needs to be taken when using this option, especially when using regular expression matching against the
DN.
Files included by @ constructs are read as lists of names, which can be separated by either whitespace or commas. Comments are introduced by #, just as in pg_hba.conf, and nested @ constructs are allowed. Unless the file name following @ is an absolute path, it is taken to be relative to the directory containing the referencing file.
Since the pg_hba.conf records are examined sequentially for each connection attempt, the order of the records is significant. Typically, earlier records will have tight connection match parameters and weaker authentication methods, while later records will have looser match parameters and stronger authentication methods. For example, one might wish to use trust authentication for local TCP/IP connections but require a password for remote TCP/IP connections. In this case a record specifying trust authentication for connections from 127.0.0.1 would appear before a record specifying password authentication for a wider range of allowed client IP addresses.
The pg_hba.conf file is read on start-up and when the main server process receives a SIGHUP signal. If you edit the file on an active system, you will need to signal the postmaster (using pg_ctl reload, calling the SQL function pg_reload_conf(), or using kill -HUP) to make it re-read the file.
Note
The preceding statement is not true on Microsoft Windows: there, any changes in the pg_hba.conf file are immediately applied by subsequent new connections.
The system view pg_hba_file_rules can be helpful for pre-testing changes to the pg_hba.conf file, or for diagnosing problems if loading of the file did not have the desired effects. Rows in the view with non-null error fields indicate problems in the corresponding lines of the file.
Tip
To connect to a particular database, a user must not only pass the pg_hba.conf checks, but must have the CONNECT privilege for the database. If you wish to restrict which users can connect to which databases, it’s usually easier to control this by granting/revoking CONNECT privilege than to put the rules in pg_hba.conf entries.
Some examples of pg_hba.conf entries are shown in Example 21.1. See the next section for details on the different authentication methods.
Example 21.1. Example pg_hba.conf Entries
# Allow any user on the local system to connect to any database with
# any database user name using Unix-domain sockets (the default for local
# connections).
#
# TYPE  DATABASE        USER            ADDRESS                 METHOD
local   all             all                                     trust

# The same using local loopback TCP/IP connections.
#
# TYPE  DATABASE        USER            ADDRESS                 METHOD
host    all             all             127.0.0.1/32            trust

# The same as the previous line, but using a separate netmask column
#
# TYPE  DATABASE        USER            IP-ADDRESS      IP-MASK             METHOD
host    all             all             127.0.0.1       255.255.255.255     trust

# The same over IPv6.
#
# TYPE  DATABASE        USER            ADDRESS                 METHOD
host    all             all             ::1/128                 trust

# The same using a host name (would typically cover both IPv4 and IPv6).
#
# TYPE  DATABASE        USER            ADDRESS                 METHOD
host    all             all             localhost               trust

# Allow any user from any host with IP address 192.168.93.x to connect
# to database "postgres" as the same user name that ident reports for
# the connection (typically the operating system user name).
#
# TYPE  DATABASE        USER            ADDRESS                 METHOD
host    postgres        all             192.168.93.0/24         ident

# Allow any user from host 192.168.12.10 to connect to database
# "postgres" if the user's password is correctly supplied.
#
# TYPE  DATABASE        USER            ADDRESS                 METHOD
host    postgres        all             192.168.12.10/32        scram-sha-256

# Allow any user from hosts in the example.com domain to connect to
# any database if the user's password is correctly supplied.
#
# Require SCRAM authentication for most users, but make an exception
# for user 'mike', who uses an older client that doesn't support SCRAM
# authentication.
#
# TYPE  DATABASE        USER            ADDRESS                 METHOD
host    all             mike            .example.com            md5
host    all             all             .example.com            scram-sha-256

# In the absence of preceding "host" lines, these three lines will
# reject all connections from 192.168.54.1 (since that entry will be
# matched first), but allow GSSAPI-encrypted connections from anywhere else
# on the Internet.  The zero mask causes no bits of the host IP address to
# be considered, so it matches any host.  Unencrypted GSSAPI connections
# (which "fall through" to the third line since "hostgssenc" only matches
# encrypted GSSAPI connections) are allowed, but only from 192.168.12.10.
#
# TYPE  DATABASE        USER            ADDRESS                 METHOD
host    all             all             192.168.54.1/32         reject
hostgssenc all          all             0.0.0.0/0               gss
host    all             all             192.168.12.10/32        gss

# Allow users from 192.168.x.x hosts to connect to any database, if
# they pass the ident check.  If, for example, ident says the user is
# "bryanh" and he requests to connect as PostgreSQL user "guest1", the
# connection is allowed if there is an entry in pg_ident.conf for map
# "omicron" that says "bryanh" is allowed to connect as "guest1".
#
# TYPE  DATABASE        USER            ADDRESS                 METHOD
host    all             all             192.168.0.0/16          ident map=omicron

# If these are the only three lines for local connections, they will
# allow local users to connect only to their own databases (databases
# with the same name as their database user name) except for administrators
# and members of role "support", who can connect to all databases.  The file
# $PGDATA/admins contains a list of names of administrators.  Passwords
# are required in all cases.
#
# TYPE  DATABASE        USER            ADDRESS                 METHOD
local   sameuser        all                                     md5
local   all             @admins                                 md5
local   all             +support                                md5

# The last two lines above can be combined into a single line:
local   all             @admins,+support                        md5

# The database column can also use lists and file names:
local   db1,db2,@demodbs  all                                   md5
In order to remotely access a PostgreSQL database, you must set the two main PostgreSQL configuration files:
postgresql.conf
pg_hba.conf
Here is a brief description about how you can set them (note that the following description is purely indicative: To configure a machine safely, you must be familiar with all the parameters and their meanings)
First of all configure PostgreSQL service to listen on port 5432 on all network interfaces in Windows 7 machine:
open the file postgresql.conf (usually located in C:Program FilesPostgreSQL9.2data) and sets the parameter
listen_addresses = '*'
Check the network address of WindowsXP virtual machine, and sets parameters in pg_hba.conf file (located in the same directory of postgresql.conf) so that postgresql can accept connections from virtual machine hosts.
For example, if the machine with Windows XP have 192.168.56.2 IP address, add in the pg_hba.conf file:
host all all 192.168.56.1/24 md5
this way, PostgreSQL will accept connections from all hosts on the network 192.168.1.XXX.
Restart the PostgreSQL service in Windows 7 (Services-> PosgreSQL 9.2: right click and restart sevice). Install pgAdmin on windows XP machine and try to connect to PostgreSQL.
Содержание
- Как настроить удаленное подключение к PostgreSQL
- Установка pgAdmin 4 на Windows 10 и настройка подключения к PostgreSQL
- Установка pgAdmin 4 на Windows 10
- Шаг 1 – Скачивание дистрибутива программы pgAdmin 4
- Шаг 2 – Запуск программ установки pgAdmin 4
- Шаг 3 – Принятие условий лицензионного соглашения
- Шаг 4 – Выбор каталога для установки pgAdmin 4
- Шаг 5 – Настройка ярлыка pgAdmin 4
- Шаг 6 – Запуск установки pgAdmin 4
- Шаг 7 – Завершение установки pgAdmin 4
- Запуск pgAdmin 4 в Windows 10
- Настройка русского языка в pgAdmin 4
- Настройка подключения к PostgreSQL
- Написание SQL запросов в Query Tool (Запросник)
- Видео-инструкция – Установка pgAdmin 4 на Windows 10 и настройка подключения к PostgreSQL
- Как настроить удаленное подключение к БД PostgreSQL из Windows
- Содержание
- SSH туннель к PostgreSQL
- Прямое подключение к PostgreSQL
- Настройка PostgreSQL
- postgresql.conf
- pg_hba.conf
- Настройка pgAdmin
- Частые вопросы
- How to Setup Remote Access to PostgreSQL Database from Windows
- Content
- SSH tunnel to PostgreSQL
- Direct connection to PostgreSQL
- PostgreSQL setup
- postgresql.conf
- pg_hba.conf
- pgAdmin setup
- Установка и базовая настройка PostgreSQL в Windows 10
- Установка PostgreSQL 11 в Windows 10
- Доступ к PostgreSQL по сети, правила файерволла
- Утилиты управления PostgreSQL через командную строку
- PgAdmin: Визуальный редактор для PostgresSQL
- Query Tool: использование SQL запросов в PostgreSQL
Как настроить удаленное подключение к PostgreSQL
По умолчанию, сервер баз данных pgsql разрешает подключение только с локального компьютера. Данная инструкция показывает, как разрешить подключения с удаленных систем. Она написана на примере Linux CentOS и PostgreSQL 9.5.
Для начала посмотрим путь расположения конфигурационного файла postgresql.conf:
Команда выдаст, примерно, следующее:
* нас интересует строчка /db/pgsql/postgresql.conf — это путь расположения нужного нам конфигурационного файла.
Теперь открываем на редактирование основной файл конфигурации PostgreSQL:
* напоминаю, что начало пути /db/pgsql может быть другим. Мы его получили командой ps.
Находим и редактируем следующее:
* по умолчанию, параметр закомментирован и настроен на прослушивание запросов только с локального сетевого интерфейса. В данном примере мы разрешили прослушивание запросов на всех IP-адресах (*), но, если требуется более безопасная настройка, можно просто перечислить последние через пробел.
После открываем на редактирование следующий конфигурационный файл:
и внизу добавляем следующую строку:
host all all 192.168.0.10/32 password
* в данном примере мы разрешаем удаленные подключения к серверу с компьютера 192.168.0.10. Доступ предоставляется всем учетным записям и всем базам (значение all). При желании, вместо all можно указать конкретные данные для повышения безопасности.
Чтобы изменения вступили в силу, перезапускаем службу postgresql:
# systemctl restart postgresql-9.5
Проверить подключение можно с удаленного компьютера следующей командой:
* где 192.168.0.15 — IP-адрес сервера баз данных; usersql — имя учетной записи, от которой идет подключение.
Источник
Установка pgAdmin 4 на Windows 10 и настройка подключения к PostgreSQL
Приветствую всех посетителей сайта Info-Comp.ru! Сегодня мы рассмотрим процесс установки pgAdmin 4 на операционную систему Windows 10, а также настроим подключение к удаленному серверу PostgreSQL.

pgAdmin 4 – бесплатная программа с графическим интерфейсом для разработки баз данных PostgreSQL.
Установка pgAdmin 4 на Windows 10
Если PostgreSQL устанавливается на Windows, то в процессе этой установки можно сразу же установить и pgAdmin 4, однако если предполагается, что PostgreSQL будет работать на отдельном сервере, а подключаться к нему мы будем удаленно с клиентского компьютера, например, PostgreSQL мы установили на сервер Linux, то на клиентском компьютере, с которого мы будем подключаться и работать с PostgreSQL, необходимо установить pgAdmin 4, не устанавливая при этом сам сервер PostgreSQL, так как он там просто не нужен. Именно эта ситуация и будет рассмотрена в данной статье, т.е. мы установим только pgAdmin 4, не устанавливая PostgreSQL.
Сейчас мы рассмотрим все шаги, которые необходимо выполнить, чтобы установить pgAdmin 4 на Windows 10.
Шаг 1 – Скачивание дистрибутива программы pgAdmin 4
Первое, что нам нужно сделать – это скачать дистрибутив данной программы.
Для этого переходим на официальный сайт в раздел «Download».
Затем выбираем операционную систему, на которую мы будет устанавливать pgAdmin 4, в нашем случае «Windows», далее выбираем версию pgAdmin 4, актуальная версия располагается сверху.
Щелкаем по соответствующей ссылке, в результате нас перенесет на сайт PostgreSQL, так как pgAdmin – это официальный инструмент для работы с PostgreSQL, здесь нам нужно выбрать тип (т.е. разрядность) нашей операционной системы, кликаем по соответствующей ссылке.
В итоге должен загрузиться исполняемый файл (в моем случае pgadmin4-4.28-x64.exe) размером чуть более 100 мегабайт.

Шаг 2 – Запуск программ установки pgAdmin 4
Запускаем скаченный файл.
В окне приветствия нажимаем «Next».

Шаг 3 – Принятие условий лицензионного соглашения
Далее, принимаем условия лицензионного соглашения, для этого отмечаем пункт «I accept the agreement» и нажимаем «Next».

Шаг 4 – Выбор каталога для установки pgAdmin 4
Потом мы можем указать путь к каталогу, в который будет установлена программа, однако можно оставить и по умолчанию, нажимаем «Next».

Шаг 5 – Настройка ярлыка pgAdmin 4
В данном окне в случае необходимости можно настроить ярлык для запуска pgAdmin 4.

Шаг 6 – Запуск установки pgAdmin 4
Все готово для установки, нажимаем «Install».

Установка началась, она продлится буквально пару минут.

Шаг 7 – Завершение установки pgAdmin 4
Установка будет завершена, когда появится следующее окно, жмем «Finish» (если галочка «Launch pgAdmin 4» будет стоять, то после нажатия на кнопку «Finish» запустится программа pgAdmin 4).

Запуск pgAdmin 4 в Windows 10
Для запуска pgAdmin 4 можно использовать ярлык в меню «Пуск».
pgAdmin 4 имеет веб интерфейс, поэтому после запуска у Вас должен запуститься браузер, а в нем открыться приложение pgAdmin 4.
При первом запуске pgAdmin 4 появится окно «Set Master Password», в котором мы должны задать «мастер-пароль», это нужно для дополнительного шифрования паролей, которые мы будем сохранять, например, для того чтобы каждый раз при подключении к серверу PostgreSQL не вводить пароль пользователя (галочка «Сохранить пароль»).
Вводим и нажимаем «ОК».

После этого отобразится интерфейс pgAdmin 4.

Настройка русского языка в pgAdmin 4
По умолчанию интерфейс pgAdmin 4 на английском языке, если Вас это не устраивает, Вы можете очень просто изменить язык на тот, который Вам нужен. pgAdmin 4 поддерживает много языков, в том числе и русский.

Затем найти пункт «User Languages», и в соответствующем поле выбрать значение «Russian». Для сохранения настроек нажимаем «Save», после этого перезапускаем pgAdmin 4 или просто обновляем страницу в браузере.

В результате pgAdmin 4 будет русифицирован.

Настройка подключения к PostgreSQL

В итоге запустится окно «Создание сервера», в котором на вкладке «Общие» нам нужно ввести название сервера (это название придумываете Вы сами, оно будет отображаться в обозревателе).

А на вкладке «Соединение» указать IP адрес сервера и данные пользователя, под которым мы подключимся к серверу. В моем случае указан системный пользователь postgres.
Ставим галочку «Сохранить пароль», для того чтобы сохранить пароль и каждый раз не вводить его (благодаря функционалу «мастер-пароля» все сохраненные таким образом пароли будут дополнительно шифроваться).

В результате мы подключимся к серверу PostgreSQL, в обозревателе будут отображены все объекты, которые расположены на данном сервере.

Чтобы убедиться в том, что все работает, давайте напишем простой запрос SELECT, который покажет нам версию сервера PostgreSQL.
Для написания SQL запросов в pgAdmin 4 используется инструмент Query Tool или на русском «Запросник», его можно запустить с помощью иконки на панели или из меню «Инструменты», предварительно выбрав базу данных.

Именно здесь и пишутся все SQL запросы и инструкции.
Чтобы узнать версию PostgreSQL, вводим следующий SQL запрос.
Для выполнения запроса нажимаем на кнопку «Выполнить» (Execute).
В результате сервер покажет нам версию PostgreSQL.

Заметка! Если Вас интересует язык SQL, то рекомендую почитать книгу «SQL код» – это самоучитель по языку SQL для начинающих программистов. В ней очень подробно рассмотрены основные конструкции языка.
Видео-инструкция – Установка pgAdmin 4 на Windows 10 и настройка подключения к PostgreSQL
На сегодня это все, надеюсь, материал был Вам полезен и интересен, пока!
Источник
Как настроить удаленное подключение к БД PostgreSQL из Windows
Настройка удаленного подключения к БД PostgreSQL 13 на сервере Ubuntu 18 LTS из ОС Windows 10 утилиты pgAdmin 4, двумя способами: подключение с помощью SSH туннеля и прямое подключение к серверу PostgreSQL.
💡 Я рекомендую использовать подключение через SSH туннель, простое в настройке и безопасное. При использовании SSH туннеля, порт PostgreSQL не открывается для внешних подключений.
pgAdmin — самая популярная и многофункциональная платформа для администрирования и разработки с открытым исходным кодом для PostgreSQL, самой совершенной базы данных с открытым исходным кодом в мире.
Официальный сайт pgAdmin
Узнать расположение файлов конфигурации PostgreSQL: postgresql.conf, pg_hba.conf.
Узнать порт PostgreSQL командой:
В примере, файл конфигурации PostgreSQL располагается по пути /etc/postgresql/13/main/postgresql.conf, порт подключения 5432.
Содержание
SSH туннель к PostgreSQL
Подключение к серверу PostgreSQL с использованием SSH туннеля. При выборе такого типа подключения никаких дополнительных настроек на сервере PostgreSQL не требуется.
Настройка pgAdmin на Windows 10:
💡 В качестве ключа указываем приватный ключ id_rsa из Настройка SSH сертификатов на сервере. Как изменить порт SSH в Частые вопросы.
Настройки pgAdmin для подключения через SSH туннель
Прямое подключение к PostgreSQL
Для настройки прямого подключения к PostgreSQL вносим изменения в файлы конфигурации postgresql.conf и pg_hba.conf
Настройка PostgreSQL
postgresql.conf
Файл postgresql.conf находится в папке установки PostgreSQL.
Раскомментируем или добавим строку:
Мы разрешили прослушивание запросов от всех IP-адресов.
💡 Возможные варианты:
listen_addresses = ‘0.0.0.0’ чтобы слушать все IPv4;
listen_addresses = ‘::’ чтобы слушать все IPv6;
listen_addresses = ‘your.host.ip.adress’ определенный адрес или список адресов через запятую.
pg_hba.conf
Файл pg_hba.conf находится в папке установки PostgreSQL.
Открываем на редактирование:
Добавляем запись в секцию # IPv4 local connections:
Запись разрешает подключение к БД mybd пользователю postgres с IP адресом 41.223.232.15, используя пароль.
После изменения файлов конфигурации, перезапустите службу PostgreSQL.
Настройка pgAdmin
Настройка прямого подключения к базе данных PostgreSQL через интернет или локальную сеть используя pgAdmin.
Частые вопросы
Как настроить удаленное подключение к БД PostgreSQL из Windows обсуждалось в этой статье. Я надеюсь, что теперь вы сможете настроить pgAdmin для подключения к PostgreSQL (прямое подключение или используя SSH туннель). Однако, если вы столкнетесь с каким-то проблемами при настройке сервера или pgAdmin, не стесняйтесь написать в комментариях. Я постараюсь помочь.
Источник
How to Setup Remote Access to PostgreSQL Database from Windows
Setting up a remote connection to the PostgreSQL 13 database on the Ubuntu 18 LTS server from Windows 10 using the pgAdmin 4 utility, in two ways: connecting using an SSH tunnel and connecting directly to the PostgreSQL server.
💡 I recommend using an SSH tunnel, which is easy to set up and secure. When using an SSH tunnel, the PostgreSQL port does not open for external connections.
pgAdmin is the most popular and feature rich Open Source administration and development platform for PostgreSQL, the most advanced Open Source database in the world.
PgAdmin official website
Find out the location of PostgreSQL configuration files: postgresql.conf, pg_hba.conf.
Find out the PostgreSQL port with the command:
In the example, the PostgreSQL configuration file is located at /etc/postgresql/13/main/postgresql.conf, connection port 5432.
Content
SSH tunnel to PostgreSQL
Connect to PostgreSQL server using SSH tunnel. When choosing this type of connection, no additional settings are required on the PostgreSQL server.
Setting Up pgAdmin on Windows 10:
💡 Specify the id_rsa private key from Configuring SSH certificates on the server as a key. How to change SSH port in FAQ.
PgAdmin settings for connecting via SSH tunnel
Direct connection to PostgreSQL
To set up a direct connection to PostgreSQL, we make changes to the postgresql.conf and pg_hba.conf configuration files
PostgreSQL setup
postgresql.conf
The postgresql.conf file is located in the PostgreSQL installation folder.
Let’s uncomment or add the line:
We have allowed requests from all IP addresses.
💡 Possible options:
listen_addresses = ‘0.0.0.0’ to listen to all IPv4;
listen_addresses = ‘::’ to listen to all IPv6;
listen_addresses = ‘your.host.ip.adress’ specific address or list of addresses separated by commas.
pg_hba.conf
The pg_hba.conf file is located in the PostgreSQL installation folder.
Add an entry to the # IPv4 local connections section:
The entry allows the user postgres with IP address 41.223.232.15 to connect to the mybd database using a password.
After the changes, restart the PostgreSQL service.
pgAdmin setup
Setting up a direct connection to the PostgreSQL database via the Internet or local network using pgAdmin.
File /etc/ssh/sshd_config, line Port.
How to Setup Remote Access to PostgreSQL Database from Windows was discussed in this article. I hope you can now configure pgAdmin to connect to PostgreSQL (direct connection or using SSH tunnel). However, if you run into any problems while configuring the server or pgAdmin, feel free to write in the comments. I will try to help.
Источник
Установка и базовая настройка PostgreSQL в Windows 10
PostgreSQL — это бесплатная объектно-реляционная СУБД с мощным функционалом, который позволяет конкурировать с платными базами данных, такими как Microsoft SQL, Oracle. PostgreSQL поддерживает пользовательские данные, функции, операции, домены и индексы. В данной статье мы рассмотрим установку и краткий обзор по управлению базой данных PostgreSQL. Мы установим СУБД PostgreSQL в Windows 10, создадим новую базу, добавим в неё таблицы и настроим доступа для пользователей. Также мы рассмотрим основы управления PostgreSQL с помощью SQL shell и визуальной системы управления PgAdmin. Надеюсь эта статья станет хорошей отправной точкой для обучения работы с PostgreSQL и использованию ее в разработке и тестовых проектах.
Установка PostgreSQL 11 в Windows 10
Для установки PostgreSQL перейдите на сайт https://www.postgresql.org и скачайте последнюю версию дистрибутива для Windows, на сегодняшний день это версия PostgreSQL 11 (в 11 версии PostgreSQL поддерживаются только 64-х битные редакции Windows). После загрузки запустите инсталлятор.
В процессе установки установите галочки на пунктах:
Установите пароль для пользователя postgres (он создается по умолчанию и имеет права суперпользователя).
По умолчание СУБД слушает на порту 5432, который нужно будет добавить в исключения в правилах фаерволла.
Нажимаете Далее, Далее, на этом установка PostgreSQL завершена.
Доступ к PostgreSQL по сети, правила файерволла
Чтобы разрешить сетевой доступ к вашему экземпляру PostgreSQL с других компьютеров, вам нужно создать правила в файерволе. Вы можете создать правило через командную строку или PowerShell.
Запустите командную строку от имени администратора. Введите команду:
netsh advfirewall firewall add rule name=»Postgre Port» dir=in action=allow protocol=TCP localport=5432
Либо вы можете создать правило, разрешающее TCP/IP доступ к экземпляру PostgreSQL на порту 5432 с помощью PowerShell:
После применения команды в брандмауэре Windows появится новое разрешающее правило для порта Postgres.
Более подробно о настройке параметров в конфигурационном файле postgresql.conf с помощью тюнеров смотрите в статье.
Утилиты управления PostgreSQL через командную строку
Рассмотрим управление и основные операции, которые можно выполнять с PostgreSQL через командную строку с помощью нескольких утилит. Основные инструменты управления PostgreSQL находятся в папке bin, потому все команды будем выполнять из данного каталога.
Основные команды PostgreSQL:
PgAdmin: Визуальный редактор для PostgresSQL
Редактор PgAdmin служит для упрощения управления базой данных PostgresSQL в понятном визуальном режиме.
По умолчанию все созданные базы хранятся в каталоге base по пути C:Program FilesPostgreSQL11database.
Для каждой БД существует подкаталог внутри PGDATA/base, названный по OID базы данных в pg_database. Этот подкаталог по умолчанию является местом хранения файлов базы данных; в частности, там хранятся её системные каталоги. Каждая таблица и индекс хранятся в отдельном файле.
Для резервного копирования и восстановления лучше использовать инструмент Backup в панели инструментов Tools. Для автоматизации бэкапа PostgreSQL из командной строки используйте утилиту pg_dump.exe.
Query Tool: использование SQL запросов в PostgreSQL
Для написания SQL запросов в удобном графическом редакторе используется встроенный в pgAdmin инструмент Query Tool. Например, вы хотите создать новую таблицу в базе данных через инструмент Query Tool.
CREATE TABLE employee
(
Id SERIAL PRIMARY KEY,
FirstName CHARACTER VARYING(30),
LastName CHARACTER VARYING(30),
Email CHARACTER VARYING(30),
Age INTEGER
);
Id — номер сотрудника, которому присвоен ключ SERIAL. Данная строка будет хранить числовое значение 1, 2, 3 и т.д., которое для каждой новой строки будет автоматически увеличиваться на единицу. В следующих строках записаны имя, фамилия сотрудника и его электронный адрес, которые имеют тип CHARACTER VARYING(30), то есть представляют строку длиной не более 30 символов. В строке — Age записан возраст, имеет тип INTEGER, т.к. хранит числа.
После того, как написали код SQL запроса в Query Tool, нажмите клавишу F5 и в базе будет создана новая таблица employee.
Здесь вы можете заполнить данные в таблице.
После заполнения данных выполним инструментом Query простой запрос на выборку:
select Age from employee;
Источник
 Обновлено: 03.04.2021
Опубликовано: 11.10.2016
Что такое PostgreSQL простыми словами.
По умолчанию, сервер баз данных pgsql разрешает подключение только с локального компьютера. Данная инструкция показывает, как разрешить подключения с удаленных систем. Она написана на примере Linux CentOS и PostgreSQL 9.5.
Для начала посмотрим путь расположения конфигурационного файла postgresql.conf:
# su — postgres -c «psql -c ‘SHOW config_file;'»
Команда выдаст, примерно, следующее:
——————————————
/db/pgsql/postgresql.conf
(1 row)
* нас интересует строчка /db/pgsql/postgresql.conf — это путь расположения нужного нам конфигурационного файла.
Теперь открываем на редактирование основной файл конфигурации PostgreSQL:
# vi /db/pgsql/postgresql.conf
* напоминаю, что начало пути /db/pgsql может быть другим. Мы его получили командой ps.
Находим и редактируем следующее:
listen_addresses = ‘*’
* по умолчанию, параметр закомментирован и настроен на прослушивание запросов только с локального сетевого интерфейса. В данном примере мы разрешили прослушивание запросов на всех IP-адресах (*), но, если требуется более безопасная настройка, можно просто перечислить последние через пробел.
После открываем на редактирование следующий конфигурационный файл:
# vi /db/pgsql/pg_hba.conf
и внизу добавляем следующую строку:
host all all 192.168.0.10/32 password
* в данном примере мы разрешаем удаленные подключения к серверу с компьютера 192.168.0.10. Доступ предоставляется всем учетным записям и всем базам (значение all). При желании, вместо all можно указать конкретные данные для повышения безопасности.
Чтобы изменения вступили в силу, перезапускаем службу postgresql:
# systemctl restart postgresql-9.5
Проверить подключение можно с удаленного компьютера следующей командой:
# psql -h 192.168.0.15 -U usersql
* где 192.168.0.15 — IP-адрес сервера баз данных; usersql — имя учетной записи, от которой идет подключение.
![]()
Была ли полезна вам эта инструкция?
Да Нет
In order to remotely access a PostgreSQL database, you must set the two main PostgreSQL configuration files:
postgresql.conf
pg_hba.conf
Here is a brief description about how you can set them (note that the following description is purely indicative: To configure a machine safely, you must be familiar with all the parameters and their meanings)
First of all configure PostgreSQL service to listen on port 5432 on all network interfaces in Windows 7 machine:
open the file postgresql.conf (usually located in C:Program FilesPostgreSQL9.2data) and sets the parameter
listen_addresses = '*'
Check the network address of WindowsXP virtual machine, and sets parameters in pg_hba.conf file (located in the same directory of postgresql.conf) so that postgresql can accept connections from virtual machine hosts.
For example, if the machine with Windows XP have 192.168.56.2 IP address, add in the pg_hba.conf file:
host all all 192.168.56.1/24 md5
this way, PostgreSQL will accept connections from all hosts on the network 192.168.1.XXX.
Restart the PostgreSQL service in Windows 7 (Services-> PosgreSQL 9.2: right click and restart sevice). Install pgAdmin on windows XP machine and try to connect to PostgreSQL.