In this blog, we are covering steps on how to configure proxy settings using group policy preferences in windows server 2019 Active Directory.
A proxy server can act as an intermediary between the user’s computer and the Internet to prevent the attack and unauthorized access.
For this demo, as usual, I used my existing Domain Controller VM (ws2k19.dc01.mylab.local) and my Windows 10 Client VM (ws10-cli01.mylab.local).
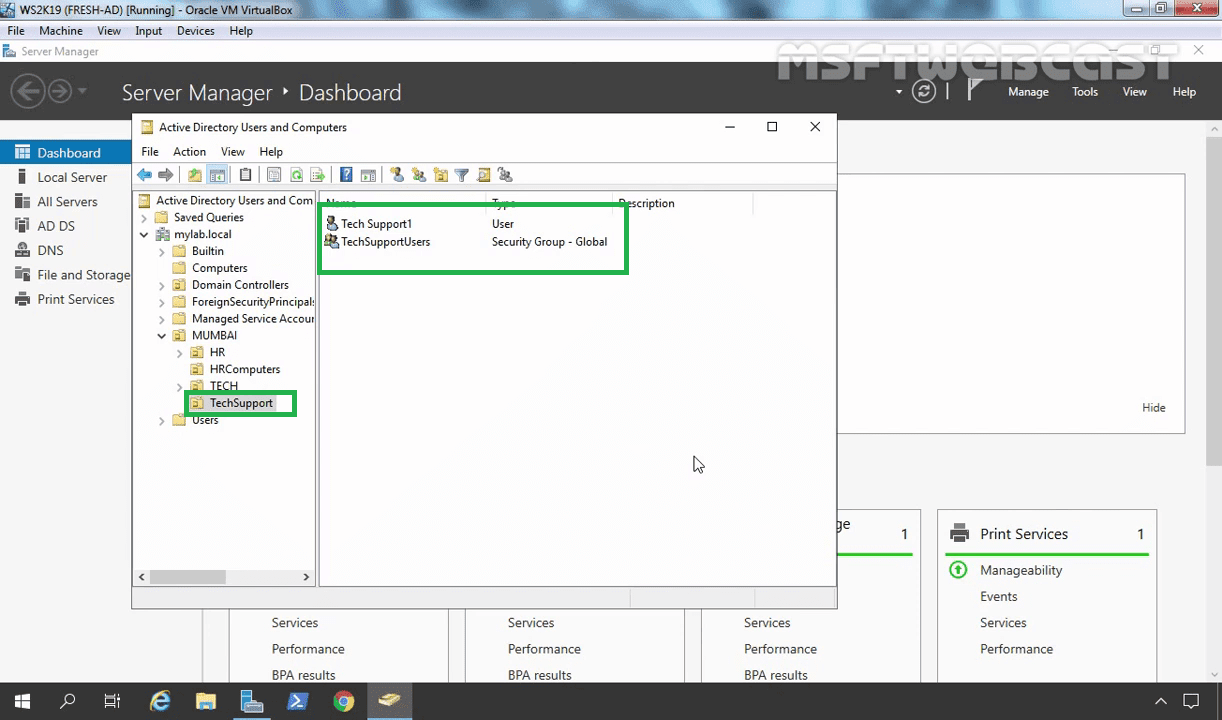
For this example, I have created one OU name TechSupport. We are going to link the group policy object to this OU.
- User: Tech Support1
- Group: TechSupportUsers
Create a Group Policy Object to apply proxy server settings:
On server manager console, click on Tools and select Group Policy Management.

In the Group Policy Management Console, right-click on group policy objects and select new.

Specify a proper name (Configure Proxy Settings GPO) to the new group policy object. Click on OK.

On the newly created group policy object right-click and select the edit option.
(Note: You can apply this group policy setting to the User account and Computer account. But for this guide, we will apply this policy on user account only)

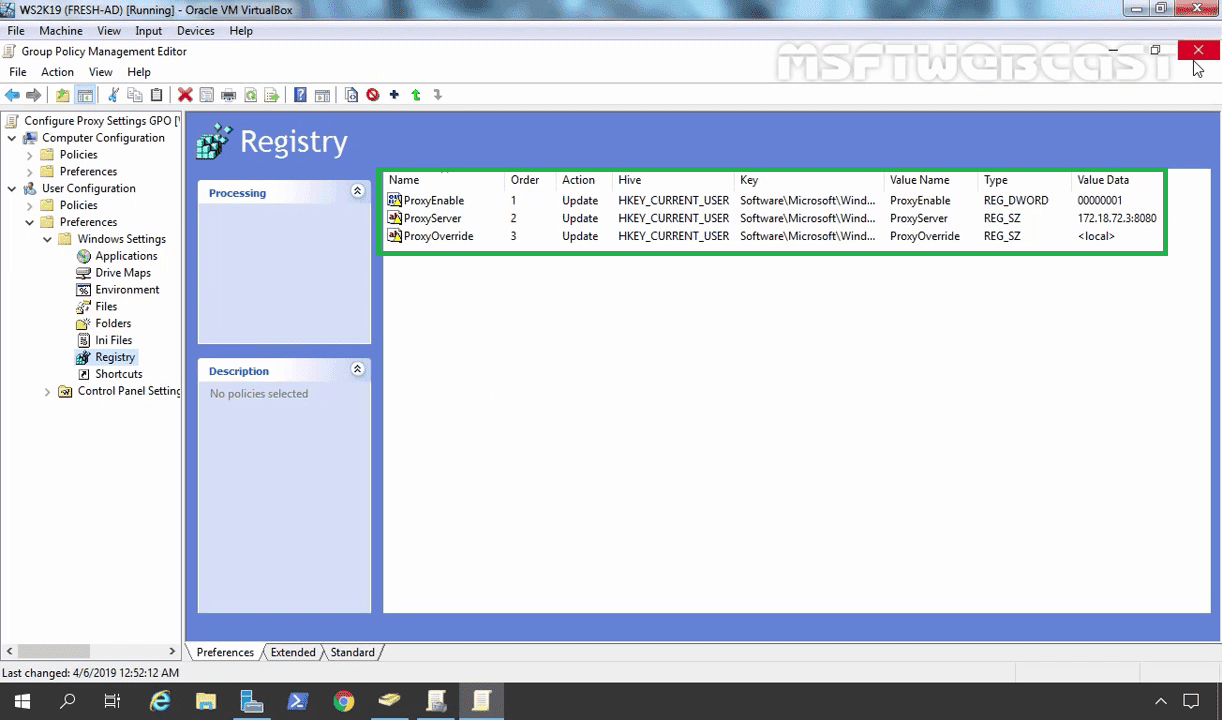
Navigate to User Configuration -> Preferences -> Windows Settings -> Registry.

1. Enable Proxy Settings:
Right-click on Registry, Select New –> Registry Item.

This step will enable proxy settings in the web browser.
In the New Registry Properties, fill the information fields as below:
- Key path: SoftwareMicrosoftWindowsCurrentVersionInternet Settings.
- Value name: ProxyEnable
- Value type: REG_DWORD
- Value data: 00000001
Click on Apply and OK to save the settings.

2. Specify the Proxy Server Address:
Right-click on Registry, Select New –> Registry Item.
This step will specify the proxy server’s IP address and port number.
In the New Registry Properties, fill the information fields as below:
- Key path: SoftwareMicrosoftWindowsCurrentVersionInternet Settings
- Value name: ProxyServer
- Value type: REG_SZ
- Value data: 172.18.72.3:8080 (Where 172.18.72.3 is the IP address of the proxy server and 8080 is the port of the proxy service.)
Click on Apply and OK to save the settings.

3. Bypass Proxy Server for Local Addresses:
Right-click on Registry, Select New –> Registry Item.
This step will enable the bypass proxy server for the local address setting. This step is optional.
- Key path: SoftwareMicrosoftWindowsCurrentVersionInternet Settings
- Value name: ProxyOverride
- Value type: REG_SZ
- Value data: <local>
Click on Apply and OK to save the settings.

Once configured, close the group policy editor console.
Link group policy object:
In the Group Policy Management Console, right-click on the Domain/OU where you want to link the group policy object. (In our case, OU will be TechSupport.)

Select Link an existing GPO. Select the GPO (In our, case it will be Configure Proxy Settings GPO).
Click on the OK button.

Test the result:
On the client computer, Login with the user account Tech Support1.

Open the Microsoft Edge web browser.
Click on three dots to open the settings menu.
Click on the Advanced button.
Click on open proxy settings.
Under Manual proxy setup, we can verify the proxy settings which we have configured using group policy preferences.

If the policy is not applying on the user account, manually update the group policy by using the gpupdate /force command.
Thank you for reading this blog post.
Post Views: 4,506
В этой статье мы рассмотрим, как централизованно задать настройки прокси на компьютерах с Windows 10 в домене Active Directory с помощью групповых политик. Большинство распространенных браузеров (таких как Microsoft Edge, Google Chrome, Internet Explorer, Opera) и большинство приложений автоматически используют для доступа в интернет параметры прокси сервера, заданные в Windows. Также мы рассмотрим, как задать параметры системного WinHTTP прокси.
Содержание:
- Как задать параметры прокси сервера в Windows через GPO?
- Настройка параметров прокси через реестр и GPO
- Настройка параметров WinHTTP прокси групповыми политиками
В этой статье мы рассмотрим особенности настройки прокси сервера политиками в поддерживаемых версиях Windows (Windows 10, 8.1 и Windows Server 2012/2016/2019). Обратите внимание, что в снятых с поддержки Windows 7/Server 2008R2, Windows XP/Windows Server 2003 параметры прокси сервера задаются по другому.
Как задать параметры прокси сервера в Windows через GPO?
До выхода Windows Server 2012/Windows 8 для настройки параметров Internet Expolrer (и в том числе настроек прокси) использовался раздел Internet Explorer Maintenance (IEM) из пользовательской секции GPO (User configuration –> Policies –> Windows Settings –> Internet Explorer Maintenance). В современных версиях Windows 10 /Windows Server 2016/2019 этот раздел отсутствует. 
В новых версиях Windows для настройки параметров IE и прокси в редакторе GPO нужно использовать предпочтения групповых политик GPP (Group Policy Preferences). Также есть вариант использования специального расширения Internet Explorer Administration Kit 11 (IEAK 11) – но применяется он редко.
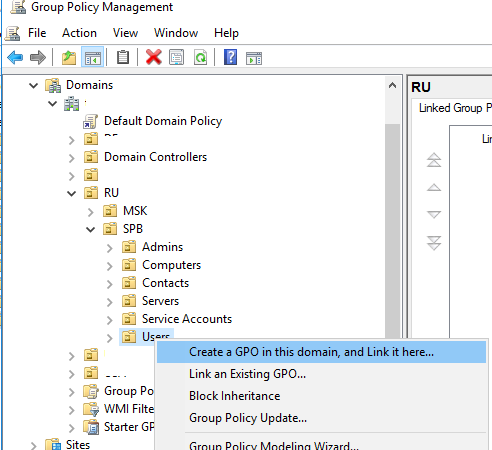
Откройте консоль редактора доменных GPO (Group Policy Management Console –
GPMC.msc
), выберите OU с пользователями, для которых нужно назначить параметры прокси-сервера и создайте новую политику Create a GPO in this domain, and Link it here.
Перейдите в раздел User Configuration -> Preferences -> Control Panel Settings -> Internet Settings. В контекстном меню выберите пункт New -> и выберите Internet Explorer 10.

Для настройки параметров прокси в Windows 10/Windows Server 2016 нужно использовать пункт Internet Explorer 10.
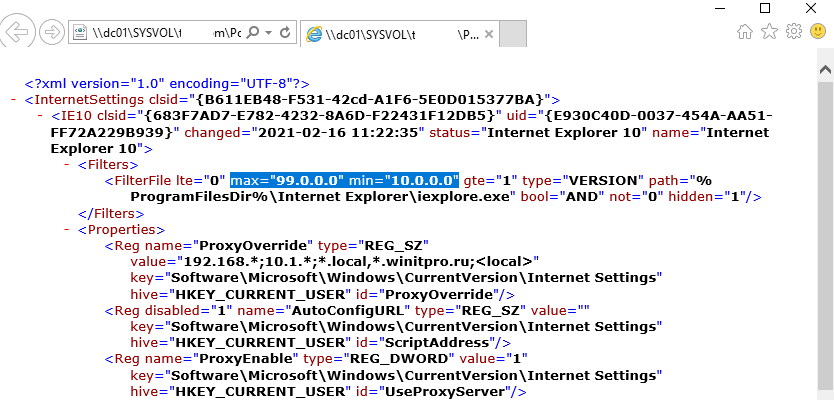
Совет. Несмотря на то, что отдельной настройки для Internet Explorer 11 нет, политика Internet Explorer 10 будет применяться на все версии IE >=10 (в файле политики InternetSettings.xml можно увидеть, что опция действительна для всех версии IE, начиная c 10.0.0.0 и заканчивая 99.0.0.0). Все версии Internet Explorer ниже 11 на данный момент сняты с поддержки Microsoft и более не обновляются.
<FilterFile lte="0" max="99.0.0.0" min="10.0.0.0" gte="1" type="VERSION" path="%ProgramFilesDir%Internet Exploreriexplore.exe" bool="AND" not="0" hidden="1"/>
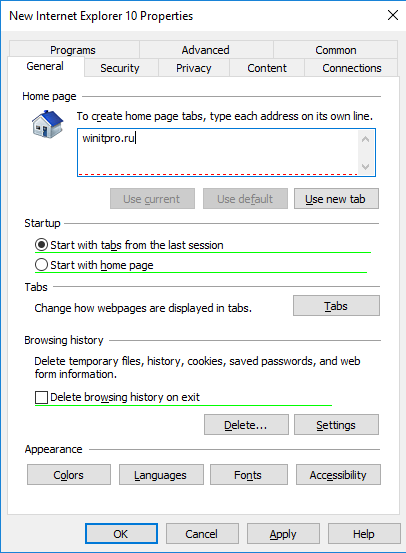
Перед вами появится специальная форма, практически полностью идентичная настройкам параметра обозревателя в панели управления Windows. Например, вы можете указать домашнюю страницу (Вкладка General, поле Home page).
Важно. Не достаточно просто сохранить внесенные изменения в редакторе политики. Обратите внимание на красные и зеленые подчеркивания у настраиваемых параметров Internet Explorer 10. Красное подчеркивание говорит о том, что эта настройка политики не будет применяться. Чтобы применить конкретную настройку, нажмите F5. Зеленое подчеркивание у параметра означает, что этот параметр IE будет применяться через GPP.
Доступные функциональные клавиши
- F5 – Включить все настройки на текущей вкладке
- F6 – Включить выбранный параметр
- F7 – Отключить выбранный параметр
- F8 – Отключить все настройки на текущей вкладке
Чтобы указать параметры прокси-сервера, перейдите на вкладку Connections и нажмите кнопку Lan Settings). Прокси сервер можно настроить одним из следующих способов:
- Automatically detect settings — автоматическое определение настроек прокси с помощью файла wpad.dat;
- Use automatic configuration script — скрипт автоконфигурации (proxy.pac);
- Proxy Server – можно вручную указать IP адрес или DNS имя прокси сервера и порт подключения. Это самый простой способ настроить прокси в Windows, его и будем использовать.
Поставьте галку Use a proxy server for your LAN, а в полях Address и Port соответственно укажите IP/FQDN имя прокси-сервера и порт подключения.
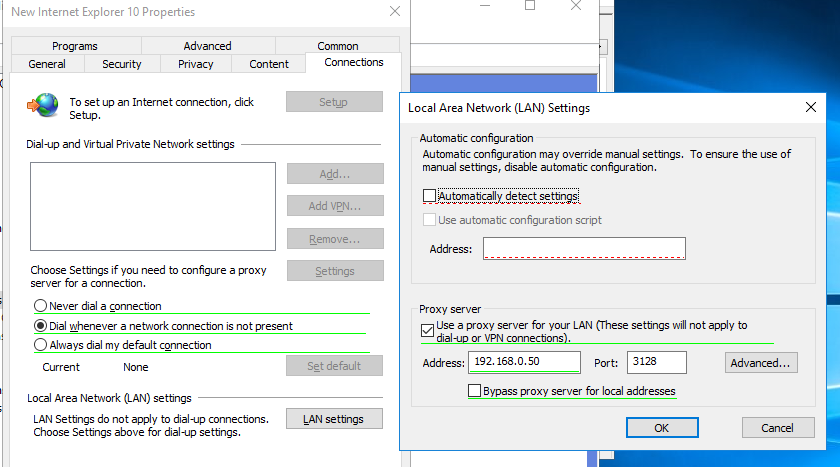
Включив опцию Bypass Proxy Server for Local Addresses можно запретить приложениям (в том числе браузеру) использовать прокси-сервер при доступе к локальным ресурсам (в формате
http://intranet
). Если вы используете адреса ресурсов вида
https://winitpro.ru
или
http://192.168.20.5
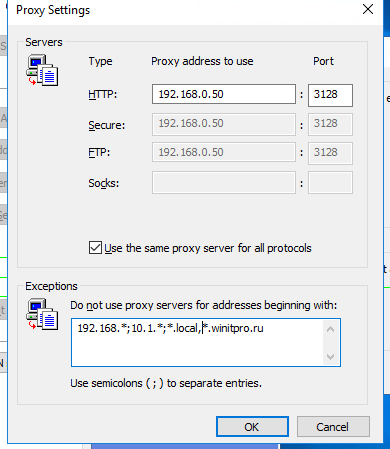
, то эти адреса не распознаются Windows как локальные. Эти адреса и адреса других ресурсов, для доступа к которым не нужно использовать прокси, нужно указать вручную. Нажмите кнопку Advanced и в поле Exceptions введите адреса в формате:
10.*;192.168.*;*.loc;*.contoso.com
Совет. Параметры прокси-сервера в Google Chrome можно задать централизованно через GPO с помощью специальных административных шаблонов. Для Mozilla Firefox можно использовать такое решение.
После сохранения политики вы можете просмотреть XML файл с заданными настройками браузера в каталоге политики на контроллере домена \DC1SYSVOLwinitpro.ruPolicies(PolicyGuiID) UserPreferencesInternetSettingsInternetSettings.xml

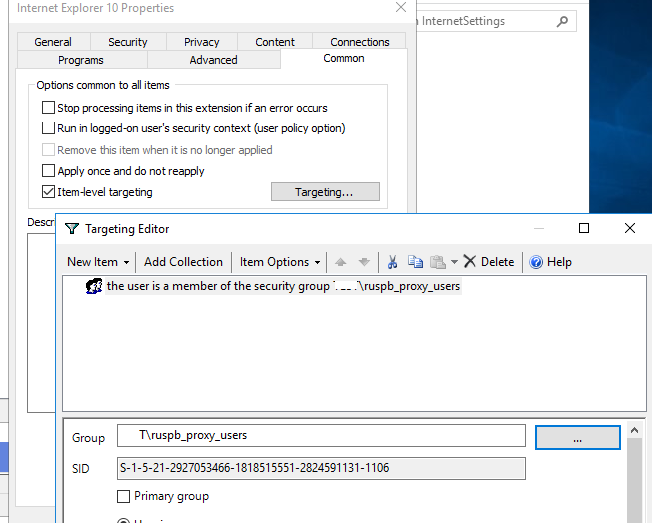
В GPP есть возможность более тонко нацелить политику на клиентов. Для этого используется GPP Item Level Targeting. Перейдите на вкладку Common, включите опцию Item-level targeting -> Targeting.
В открывшейся форме укажите условия применения политики. В качестве примера я указал, что политика настройки прокси будет применена только к пользователям, которые состоят в доменной группе ruspb_proxy_users. Вы можете использовать собственную логику назначения параметров прокси (в зависимости от IP подсети, сайта AD и т.д.).
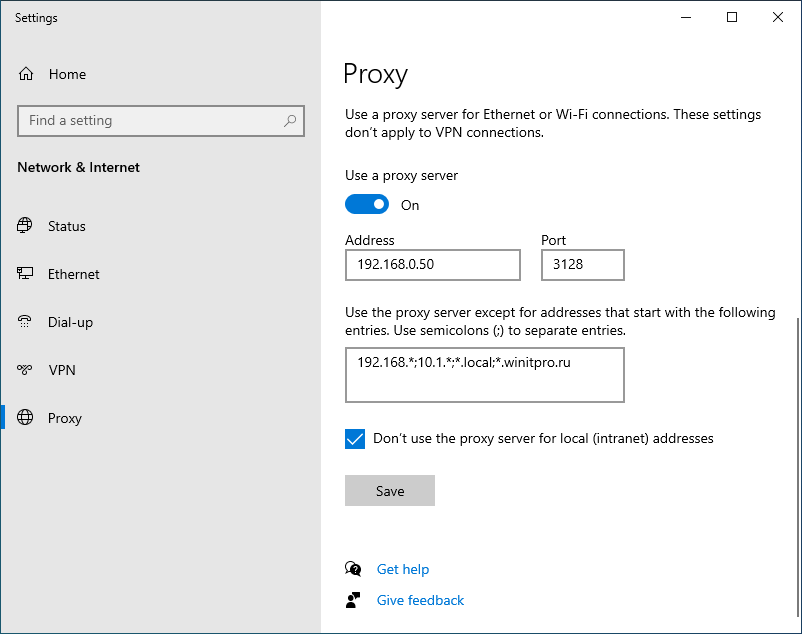
Осталось назначить политику IE на контейнер с пользователями и обновить политики на них. После обновления политики на компьютерах пользователей должны примениться новые настройки прокси в IE. В Windows 10 текущие параметры прокси можно посмотреть в разделе Settings -> Network and Internet -> Proxy. Как вы видите, на компьютере теперь заданы настройки прокси, указанные в доменной политике.
Чтобы запретить пользователям менять настройки прокси-сервера, воспользуйтесь этой статьей.
Настройка параметров прокси через реестр и GPO
Кроме того, настроить параметры IE можно и через реестр, политиками GPP. К примеру, чтобы включить прокси для пользователя нужно настроить следующие параметры реестра в ветке HKEY_CURRENT_USERSoftwareMicrosoft WindowsCurrentVersionInternet Settings.
Перейдите в редакторе GPO в раздел User Configuration -> Preferences -> Windows Settings -> Registry и создайте три параметра реестра в указанной ветке:
-
ProxyEnable
(REG_DWORD) =
00000001 -
ProxyServer
(REG_SZ) =
192.168.0.50:3128 -
ProxyOverride
(REG_SZ) =
*winitpro.ru;https://*.contoso.com;192.168.*;<local>
Здесь также можно использовать Item level targeting для более тонкого нацеливания политик. 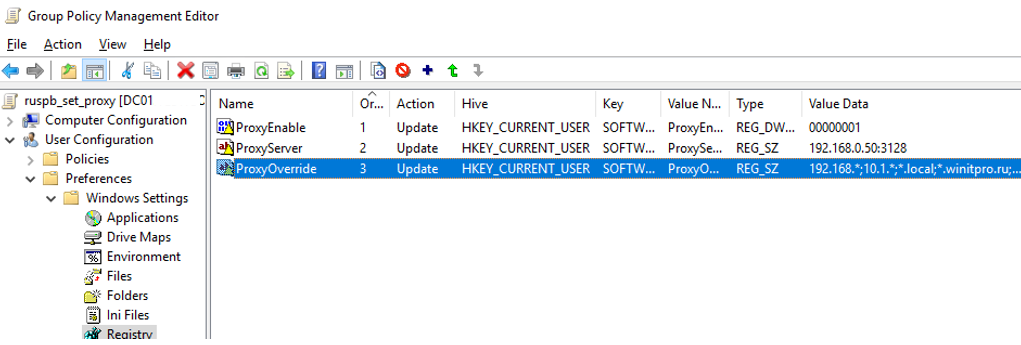
Если вам нужно создать политики не для каждого пользователя (per-user), а для всех пользователей компьютера (per-computer), используйте параметры GPP из раздела GPO Computer Configuration -> Preferences -> Windows Settings -> Registry. Используйте аналогичные параметры реестра в ветке HKEY_LOCAL_MACHINESoftwarePoliciesMicrosoftWindowsCurrentVersionInternet Settings.
Настройка параметров WinHTTP прокси групповыми политиками
Некоторые системные сервисы или приложения (например, служба обновлений Wususerv или PowerShell) по-умолчанию не используют пользовательские настройки прокси сервера из параметров Internet Explorer. Чтобы такие приложения работали корректно и получали доступ в интернет, вам нужно задать в Windows настройки системного прокси WinHTTP.
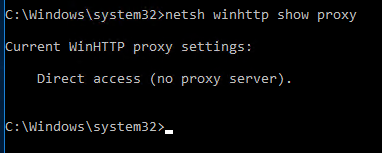
Чтобы проверить, настроен ли на вашем компьютере WinHTTP прокси, выполните команду:
netsh winhttp show proxy
Ответ “
Direct access (no proxy server)
” говорит о том, что прокси не задан, система использует прямой интернет доступ.
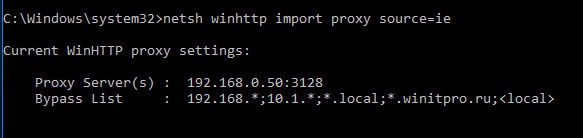
Вы можете задать на компьютере прокси для WinHTTP вручную командой:
netsh winhttp set proxy 192.168.0.50:3128 "localhost;192.168.*;*.winitpro.com"
Или импортировать настройки прокси из параметров Internet Explorer теекщего пользователя:
netsh winhttp import proxy source=ie
Однако настроить WinHTTP через GPO не получится – в редакторе GPO нет соответствующего параметра, а в реестре параметры хранятся в бинарном виде и не подходят для прямого редактирования.
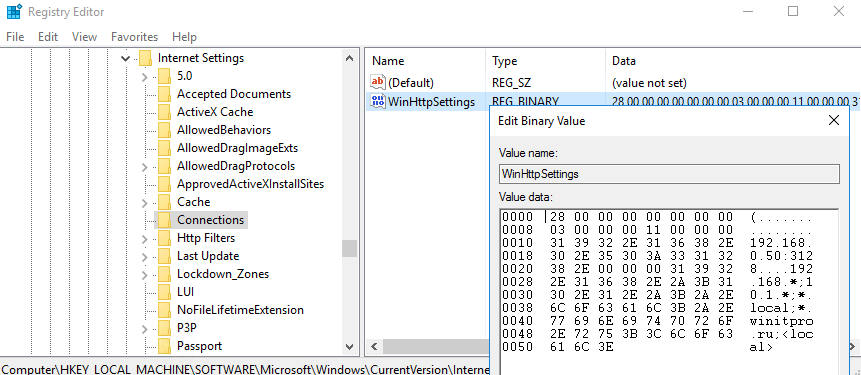
Единственный вариант задать параметры WinHTTP прокси – настроить их на эталонном компьютере, выгрузить значение параметра WinHttpSettings в ветке реестра HKLMSOFTWAREMicrosoftWindowsCurrentVersionInternet SettingsConnections в reg файл и распространить этот параметр на компьютеры в домене через GPP registry.
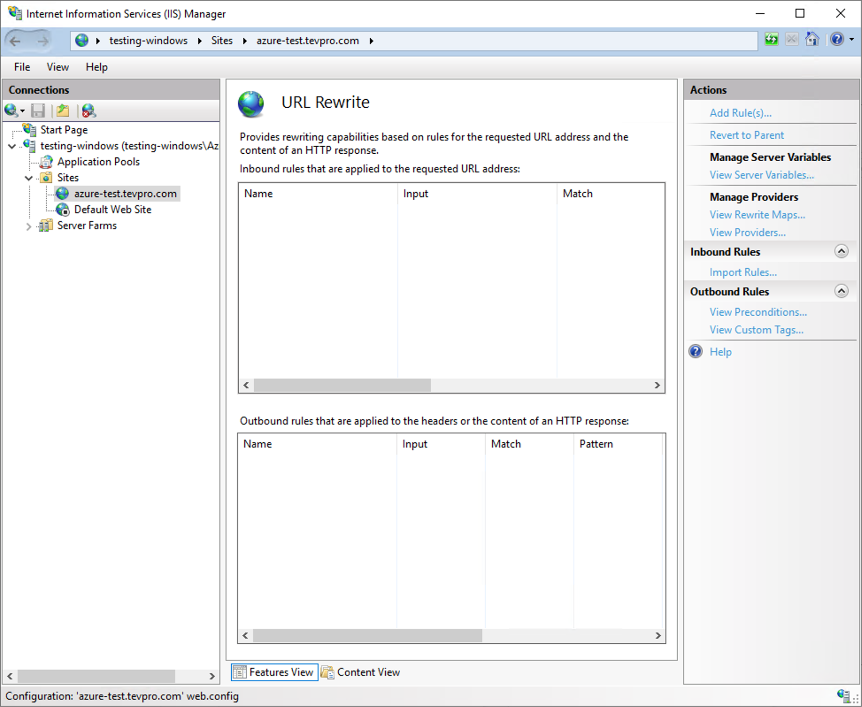
Client’s with a need to secure legacy servers behind a reverse proxy server have an option to use Microsoft IIS. While we typically recommend using a Linux server that has NGINX installed, we understand the need for such a use case and feel it’s important to demonstrate this basic technique.
We’ll be using a VM running Windows Server 2019 with IIS 10 installed. The IIS extension we’ll use is called URL Rewrite and has been around since IIS 7, so this technique should work well with older versions of IIS.
Assumptions
We won’t cover the basics of spinning up a VM running Windows Server on Microsoft Azure in this article. For more information on that topic, check out this great Microsoft Quickstart Tutorial on setting up a VM and installing IIS.
This article assumes you have the following items setup prior to starting this tutorial:
- Azure Portal — you will need a Microsoft Azure account.
- Azure Windows VM — we will be running Windows Server 2019 for this tutorial.
- IIS — we have installed IIS 10.
- Domain Name — you will need access to a domain or use a dynamic DNS service.
- DNS — we have setup azure-test.tevpro.com to point to the public IP of our VM.
Step 1: Install URL Rewrite
We have installed IIS 10 using a simple PowerShell command.
Doing so will setup and configure IIS using all the basic defaults that come with IIS.
Install-WindowsFeature -name Web-Server -IncludeManagementTools
The first thing we need to do is install an IIS extension called URL Rewrite. This will allow us to configure IIS to act as a reverse proxy server.
On the server you choose as your reverse proxy, download and install the URL Rewrite extension taking all the defaults when installing.
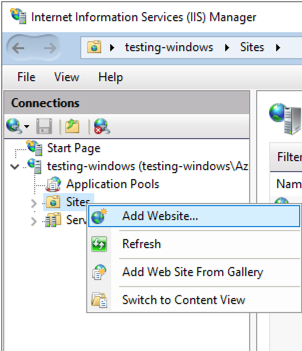
Step 2: Setup a Website
To begin, open up IIS manager and create a new website to use as your reverse proxy end-point. It should look like this:
Right click on Sites, then select Add Website.
Next, fill in some details about the website. For our example, we will create a new sub-domain for our Tevpro.com website.
Note: Even though we aren’t setting up an actual website, we still need to create a folder somewhere for our dummy site. Here, we created a test folder under our websites folder.
Once you have completed the form, click OK.

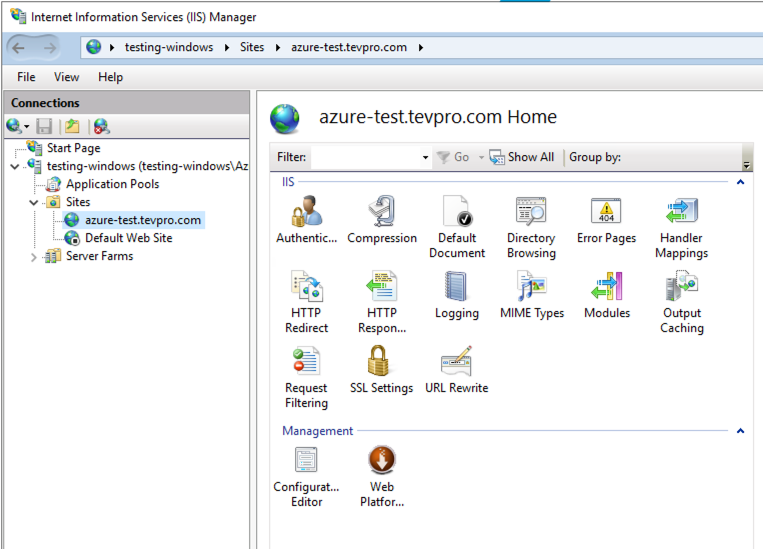
After clicking OK, we should see our website.
When selected, we should see the following options. Notice the URL Rewrite option that shows up after we successfully installed the extension. This is what we will use to configure our reverse proxy.
Step 3: Configure URL Rewrite
After we have setup our new website, that will act as our public end-point, we need to configure it as our reverse proxy.
To do this, double click on the URL Rewrite option under our website (shown in Figure 3).
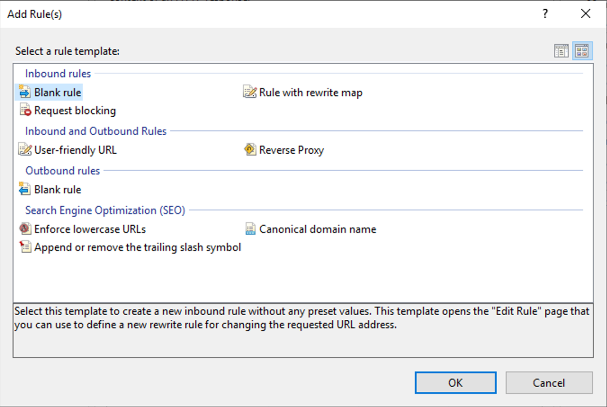
Next, click the Add Rule(s) item from the Actions section on the far right.
This will bring up the following dialog, under Inbound rules. Select Blank rule and click OK.
For our example, the configuration is pretty straightforward. It’s outside of the scope of this article, but know you can get more complex in the pattern matching and route handling.
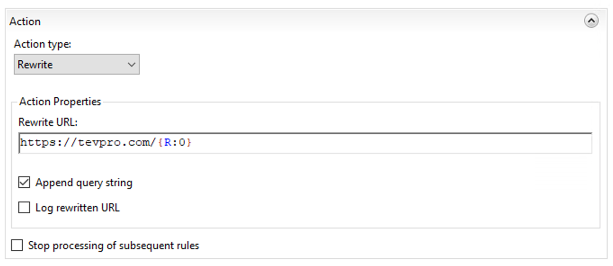
First, we need to provide a name for our rule, add a pattern for how we want to match incoming request, and set the rewrite URL.
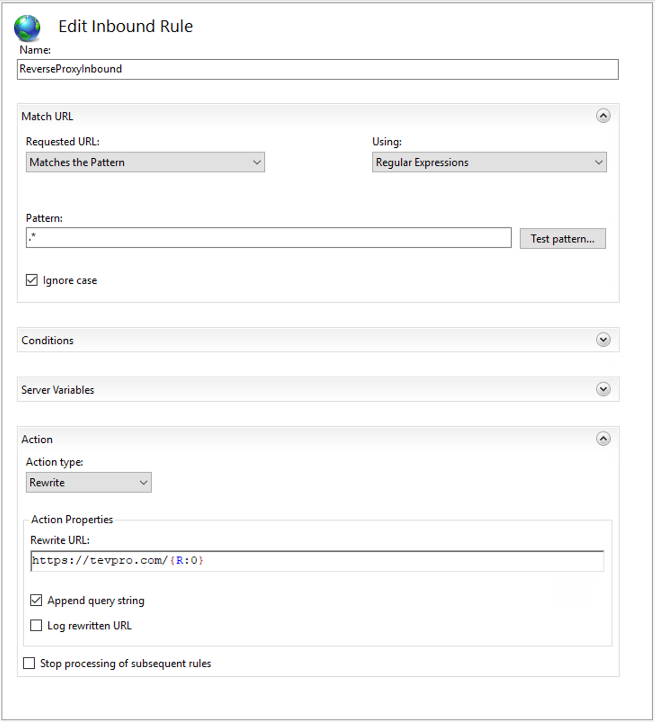
Breaking this step down a bit further, the pattern is how we want to handle capturing incoming request to the website we setup to act as our reverse proxy (azure-test.tevpro.com).
Since we want to be very broad and capture everything, our regex is quite simple. We want to match everything after the domain name, which is what «.*» will do for us.
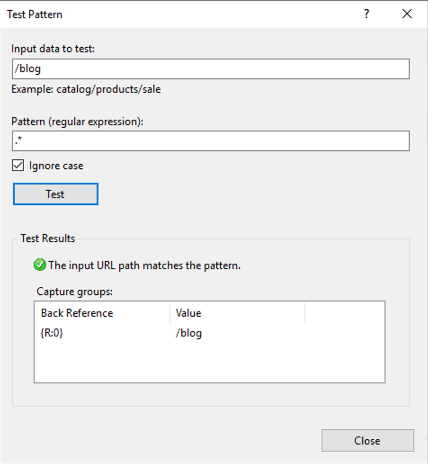
Click the Test pattern… button and a tool dialog pops up that allows us to test our pattern. We want to make sure that anytime someone visits azure-test.tevpro.com/blog, we capture anything after the domain name. This way we ensure when we rewrite the URL, we can point to the right location.
Take note of the capture group {R:0}. We will use this to configure our rewrite URL.
Taking a closer look at our action section, we see the Rewrite URL input field. This field indicates where we want our website to point. Since we want to route back to our website, we put in the URL and append the regex capture group {R:0} from the previous test pattern.
This will forward any request coming into our reverse proxy to the origin server tevpro.com keeping the URL fully intact.
Once you have finished setting up the new rule, click Apply.
And viola. We have configured our new website to act as a reverse proxy.
Note: Since we require SSL for our website, we configured SSL for our test server. That’s beyond the scope of this article, however we used Let’s Encrypt.
Step 4: Test the Reverse Proxy
Now that we have completed the reverse proxy configuration, we need to test our new website.
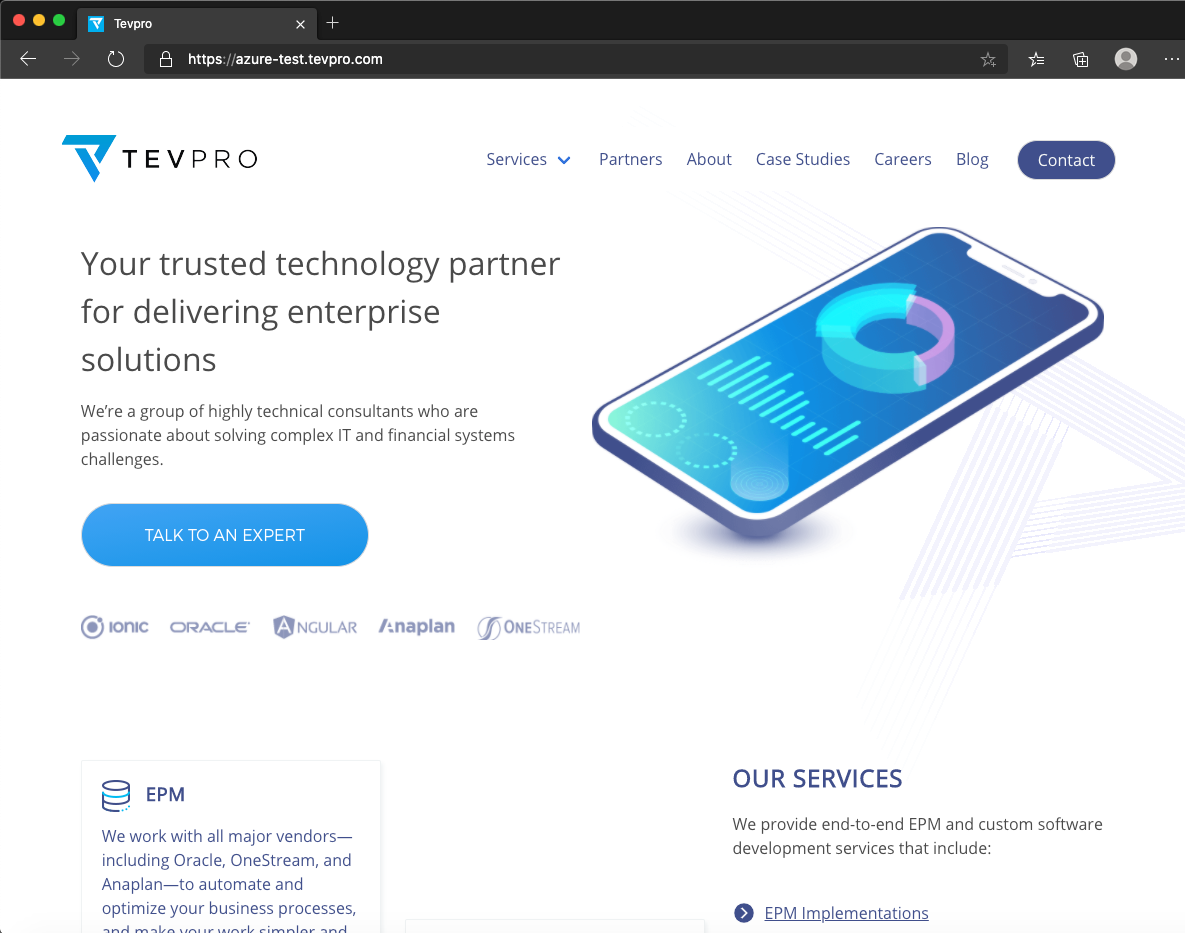
We expect that anytime a user visits the URL, azure-test.tevpro.com, we’ll automatically reroute the corresponding request to tevpro.com.
As you can see below, when we type the URL into our web browser, we see the Tevpro.com website. It is actually being masked behind our reverse proxy website. Pretty cool, right?
Conclusion
As you can see, it’s pretty simple technique to set up a reverse proxy server using IIS. The IIS extension does most of the heavy lifting and can be used for more complex routing when needed.
Whether you’re trying to protect a legacy system or add an extra layer in front of your existing website to make migrations easier, this approach has worked well over the years.
At Tevpro, we have helped countless clients improve their business with even the most basic techniques and technology solutions. We’re here to help clients discover their potential in a range of solutions, and weigh pros/cons, so that they are empowered to make the best decision for their business.
Feel free to reach out to us on Twitter or via email with any questions.
Photo by Science in HD
Содержание
- Install-Web Application Proxy
- Syntax
- Description
- Examples
- Example 1: Configure Web Application Proxy on the server
- Parameters
- Прокси-служба веб-приложения в Windows Server
- Новые возможности прокси веб-приложения
- Best practices for securing Active Directory Federation Services
- Standard deployment topology
- Hardening your AD FS servers
- Ports required
- Communication between Federation Servers
- Azure AD Connect and Federation Servers/WAP
- WAP and Federation Servers
- WAP and Users
- Endpoints enabled
- [Optional] Min set of endpoints proxy enabled for Azure AD / Office 365
- Extended protection for authentication
- To verify the settings, you can do the following:
- Congestion control to protect the federation service
- To verify the settings, you can do the following:
- Standard HTTP request checks at the proxy
- Recommended security configurations
- Best practice for securing and monitoring the AD FS trust with Azure AD
- Additional security configurations
- Extranet «soft» lockout protection for accounts
- Disable WS-Trust Windows endpoints on the proxy i.e. from extranet
- Differentiate access policies for intranet and extranet access
- Require Multi factor authentication (MFA)
- Hardware Security Module (HSM)
- Публикация Exchange Server с помощью ADFS / Web Application Proxy
- Публикация Exchange Server с помощью ADFS / Web Application Proxy
- Подготовка служб ADFS к публикации Exchange
- Интеграция Exchange инфраструктуры с ADFS
- Публикация Exchange с помощью Web Application Proxy
Install-Web Application Proxy
Configures Web Application Proxy on the server.
Syntax
Description
The Install-WebApplicationProxy cmdlet configures Web Application Proxy on the current server.
The FederationServiceName parameter specifies the Federation Service that provides authentication for Web Application Proxy. The FederationServiceTrustCredential parameter specifies the Active Directory Federation Services (AD FS) identity that is authorized to register new Federation server proxies. The CertificateThumbprint parameter specifies the thumbprint of the certificate that Web Application Proxy uses to identify the server to users as a proxy for the Federation Service. You can also specify the name of a forward proxy, the HTTPS port for the Web Application Proxy server, and the port for the Transport Layer Security (TLS) client.
Examples
Example 1: Configure Web Application Proxy on the server
This example configures Web Application Proxy on the local server.
The second command configures Web Application Proxy on the local server. The command specifies the name of the Federation Service for which Web Application Proxy provides an AD FS proxy. The command specifies the thumbprint of the certificate that Web Application Proxy presents to users to identify the Web Application Proxy server as a proxy for the Federation Service.
Parameters
Specifies the certificate thumbprint, as a string, of the certificate that Web Application Proxy presents to users to identify the Web Application Proxy as a proxy for the Federation Service. The thumbprint is 40 hexadecimal characters.
The certificate must be in the Personal store for the local computer. You can use a simple certificate, a subject alternative name (SAN) certificate, or a wildcard certificate.
| Type: | String |
| Position: | Named |
| Default value: | None |
| Accept pipeline input: | False |
| Accept wildcard characters: | False |
Specifies the name of a Federation Service. This is the Federation Service for which Web Application Proxy provides AD FS proxy functionality and stores the configuration of the Federation Service.
| Type: | String |
| Position: | Named |
| Default value: | None |
| Accept pipeline input: | False |
| Accept wildcard characters: | False |
Specifies a PSCredential object that contains the credentials of the AD FS identity that is authorized to register new Federation server proxies. Specify an account that has permissions to manage the Federation Service.
| Type: | PSCredential |
| Position: | Named |
| Default value: | None |
| Accept pipeline input: | False |
| Accept wildcard characters: | False |
Specifies the DNS name and port number of an HTTP proxy that this federation server proxy uses to obtain access to the federation service. Specify the value for this parameter in the following format: FQDN:PortNumber. For example, to specify a forward proxy with a host name of «proxy01» that is located within the corp.contoso.com domain and that can be reached using the HTTP port of 8080 would be «proxy-01.corp.contoso.com:8080». Note: This parameter applies only to Federation Services proxy. It does not apply for application publishing.
| Type: | String |
| Position: | Named |
| Default value: | None |
| Accept pipeline input: | False |
| Accept wildcard characters: | False |
Specifies the HTTPS port for the Web Application Proxy server. The default value is 443.
| Type: | Int32 |
| Position: | Named |
| Default value: | None |
| Accept pipeline input: | False |
| Accept wildcard characters: | False |
Specifies the port for the TLS client. Web Application Proxy uses this port for user certificate authentication. The default value is 49443.
Источник
Прокси-служба веб-приложения в Windows Server
применимо к: Windows server 2022, Windows server 2019, Windows server ® 2016
Это содержимое относится к локальной версии прокси веб-приложения. Чтобы обеспечить безопасный доступ к локальным приложениям в облаке, ознакомьтесь с содержимым AD application proxy Azure.
В этом разделе описано, что нового и изменено в прокси веб-приложения для Windows Server 2016. Новые функции и изменения, перечисленные здесь, скорее всего, оказывают наибольшее влияние на работу с предварительной версией.
Новые возможности прокси веб-приложения
Предварительная проверка подлинности при публикации приложений HTTP Basic
HTTP Basic — это протокол авторизации, используемый многими протоколами, включая ActiveSync, для подключения полнофункциональных клиентов, включая смартфоны, с почтовым ящиком Exchange. Прокси веб-приложения обычно взаимодействует с AD FS с использованием перенаправлений, которые не поддерживаются клиентами ActiveSync. Эта новая версия прокси веб-приложения обеспечивает поддержку публикации приложения с помощью HTTP Basic, позволяя приложению HTTP получить отношение доверия с проверяющей стороной, не относящейся к утверждениям, для приложения с служба федерации.
Доменная публикация приложений с подстановочными знаками
для поддержки таких сценариев, как SharePoint 2013, внешний URL-адрес приложения теперь может содержать подстановочный знак, позволяющий публиковать несколько приложений из определенного домена, например https://*. sp-apps. contoso. com. это упростит публикацию SharePoint приложений.
Перенаправление трафика HTTP в HTTPS
Чтобы пользователи могли получить доступ к приложению, даже если в URL-адресе не введено значение HTTPS, прокси веб-приложения теперь поддерживает перенаправление HTTP в HTTPS.
Теперь можно опубликовать приложения HTTP, используя сквозную предварительную проверку подлинности.
Публикация приложений шлюза удаленный рабочий стол
Новый журнал отладки для улучшения устранения неполадок и Улучшенный журнал службы для полного аудита и улучшенной обработки ошибок
Улучшения пользовательского интерфейса консоль администратора
Распространение IP-адреса клиента в серверные приложения
Источник
Best practices for securing Active Directory Federation Services
This document provides best practices for the secure planning and deployment of Active Directory Federation Services (AD FS) and Web Application Proxy. It contains information about the default behaviors of these components and recommendations for additional security configurations for an organization with specific use cases and security requirements.
This document applies to AD FS and WAP in Windows Server 2012 R2, 2016, and 2019. These recommendations can be used whether the infrastructure is deployed in an on premises network or in a cloud hosted environment such as Microsoft Azure.
Standard deployment topology
For deployment in on-premises environments, we recommend a standard deployment topology consisting of one or more AD FS servers on the internal corporate network, with one or more Web Application Proxy (WAP) servers in a DMZ or extranet network. At each layer, AD FS and WAP, a hardware or software load balancer is placed in front of the server farm and handles traffic routing. Firewalls are placed as required in front of the external IP address of the load balancer in front of each (FS and proxy) farm.

AD FS requires a full writable Domain Controller to function as opposed to a Read-Only Domain Controller. If a planned topology includes a Read-Only Domain controller, the Read-Only domain controller can be used for authentication but LDAP claims processing will require a connection to the writable domain controller.
The following is a list of best practices and recommendations for hardening and securing your AD FS deployment.
Ports required
The below diagram depicts the firewall ports that must be enabled between and amongst the components of the AD FS and WAP deployment. If the deployment does not include Azure AD / Office 365, the sync requirements can be disregarded.
Note that port 49443 is only required if user certificate authentication is used, which is optional for Azure AD and Office 365.

Port 808 (Windows Server 2012R2) or port 1501 (Windows Server 2016+) is the Net.TCP port AD FS uses for the local WCF endpoint to transfer configuration data to the service process and PowerShell. This port can be seen by running Get-AdfsProperties | select NetTcpPort. This is a local port that will not need to be opened in the firewall but will be displayed in a port scan.
Communication between Federation Servers
Federation servers on an AD FS farm communicate with other servers in the farm and the Web Application Proxy (WAP) servers via HTTP port 80 for configuration synchronization. Making sure that only these servers can communicate with each other and no other is a measure of defense in depth.
Organizations can do this by setting up firewall rules on each server allowing inbound communication from the IP addresses from other servers in the farm and WAP servers. Please note that some Network Load Balancers (NLB) use HTTP port 80 for probing the health on individual federation servers. Please make sure that you include the IP addresses of the NLB in the configured firewall rules.
Azure AD Connect and Federation Servers/WAP
This table describes the ports and protocols that are required for communication between the Azure AD Connect server and Federation/WAP servers.
| Protocol | Ports | Description |
|---|---|---|
| HTTP | 80 (TCP/UDP) | Used to download CRLs (Certificate Revocation Lists) to verify SSL certificates. |
| HTTPS | 443(TCP/UDP) | Used to synchronize with Azure AD. |
| WinRM | 5985 | WinRM Listener |
WAP and Federation Servers
This table describes the ports and protocols that are required for communication between the Federation servers and WAP servers.
| Protocol | Ports | Description |
|---|---|---|
| HTTPS | 443(TCP/UDP) | Used for authentication. |
WAP and Users
This table describes the ports and protocols that are required for communication between users and the WAP servers.
| Protocol | Ports | Description |
|---|---|---|
| HTTPS | 443(TCP/UDP) | Used for device authentication. |
| TCP | 49443 (TCP) | Used for certificate authentication. |
For additional information on required ports and protocols required for hybrid deployments see the document here.
For detailed information about ports and protocols required for an Azure AD and Office 365 deployment, see the document here.
Endpoints enabled
When AD FS and WAP are installed, a default set of AD FS endpoints are enabled on the federation service and on the proxy. These defaults were chosen based on the most commonly required and used scenarios and it is not necessary to change them.
[Optional] Min set of endpoints proxy enabled for Azure AD / Office 365
Organizations deploying AD FS and WAP only for Azure AD and Office 365 scenarios can limit even further the number of AD FS endpoints enabled on the proxy to achieve a more minimal attack surface. Below is the list of endpoints that must be enabled on the proxy in these scenarios:
| Endpoint | Purpose |
|---|---|
| /adfs/ls | Browser based authentication flows and current versions of Microsoft Office use this endpoint for Azure AD and Office 365 authentication |
| /adfs/services/trust/2005/usernamemixed | Used for Exchange Online with Office clients older than Office 2013 May 2015 update. Later clients use the passive adfsls endpoint. |
| /adfs/services/trust/13/usernamemixed | Used for Exchange Online with Office clients older than Office 2013 May 2015 update. Later clients use the passive adfsls endpoint. |
| /adfs/oauth2 | This one is used for any modern apps (on-prem or in cloud) you have configured to authenticate directly to AD FS (i.e. not through AAD) |
| /adfs/services/trust/mex | Used for Exchange Online with Office clients older than Office 2013 May 2015 update. Later clients use the passive adfsls endpoint. |
| /adfs/ls/federationmetadata/2007-06/federationmetadata.xml | Requirement for any passive flows; and used by Office 365 / Azure AD to check AD FS certificates. |
AD FS endpoints can be disabled on the proxy using the following PowerShell cmdlet:
Extended protection for authentication
Extended protection for authentication is a feature that mitigates against man in the middle (MITM) attacks and is enabled by default with AD FS.
To verify the settings, you can do the following:
The setting can be verified using the below PowerShell cmdlet.
Congestion control to protect the federation service
The federation service proxy (part of the WAP) provides congestion control to protect the AD FS service from a flood of requests. The Web Application Proxy will reject external client authentication requests if the federation server is overloaded as detected by the latency between the Web Application Proxy and the federation server. This feature is configured by default with a recommended latency threshold level.
To verify the settings, you can do the following:
Standard HTTP request checks at the proxy
The proxy also performs the following standard checks against all traffic:
Recommended security configurations
Ensure all AD FS and WAP servers receive the most current updates The most important security recommendation for your AD FS infrastructure is to ensure you have a means in place to keep your AD FS and WAP servers current with all security updates, as well as those optional updates specified as important for AD FS on this page.
The recommended way for Azure AD customers to monitor and keep current their infrastructure is via Azure AD Connect Health for AD FS, a feature of Azure AD Premium. Azure AD Connect Health includes monitors and alerts that trigger if an AD FS or WAP machine is missing one of the important updates specifically for AD FS and WAP.
Information on installing Azure AD Connect Health for AD FS can be found here.
Best practice for securing and monitoring the AD FS trust with Azure AD
When you federate your AD FS with Azure AD, it is critical that the federation configuration (trust relationship configured between AD FS and Azure AD) is monitored closely, and any unusual or suspicious activity is captured. To do so, we recommend setting up alerts and getting notified whenever any changes are made to the federation configuration. To learn how to setup alerts, see Monitor changes to federation configuration.
Additional security configurations
The following additional capabilities can be configured optionally to provide additional protections to those offered in the default deployment.
With the extranet lockout feature in Windows Server 2012 R2, an AD FS administrator can set a maximum allowed number of failed authentication requests (ExtranetLockoutThreshold) and an observation window s time period (ExtranetObservationWindow). When this maximum number (ExtranetLockoutThreshold) of authentication requests is reached, AD FS stops trying to authenticate the supplied account credentials against AD FS for the set time period (ExtranetObservationWindow). This action protects this account from an AD account lockout, in other words, it protects this account from losing access to corporate resources that rely on AD FS for authentication of the user. These settings apply to all domains that the AD FS service can authenticate.
You can use the following Windows PowerShell command to set the AD FS extranet lockout (example):
For reference, the public documentation of this feature is here.
Disable WS-Trust Windows endpoints on the proxy i.e. from extranet
WS-Trust Windows endpoints (/adfs/services/trust/2005/windowstransport and /adfs/services/trust/13/windowstransport) are meant only to be intranet facing endpoints that use WIA binding on HTTPS. Exposing them to extranet could allow requests against these endpoints to bypass lockout protections. These endpoints should be disabled on the proxy (i.e. disabled from extranet) to protect AD account lockout by using following PowerShell commands. There is no known end user impact by disabling these endpoints on the proxy.
If your AD FS farm runs on Windows Internal Databases (WID) and has a secondary AD FS server, after disabling the endpoints on primary server, wait for the SYNC to occur on secondary nodes before restarting the AD FS service on them. Use the PowerShell command Get-AdfsSyncProperties on the secondary node to track last SYNC process.
Differentiate access policies for intranet and extranet access
AD FS has the ability to differentiate access policies for requests that originate in the local, corporate network vs requests that come in from the internet via the proxy. This can be done per application or globally. For high business value applications or applications with sensitive or personally identifiable information, consider requiring multi factor authentication. This can be done via the AD FS management snap-in.
Require Multi factor authentication (MFA)
AD FS can be configured to require strong authentication (such as multi factor authentication) specifically for requests coming in via the proxy, for individual applications, and for conditional access to both Azure AD / Office 365 and on premises resources. Supported methods of MFA include both Microsoft Azure MFA and third party providers. The user is prompted to provide the additional information (such as an SMS text containing a one time code), and AD FS works with the provider specific plug-in to allow access.
Supported external MFA providers include those listed in this page, as well as HDI Global.
Hardware Security Module (HSM)
In its default configuration, the keys AD FS uses to sign tokens never leave the federation servers on the intranet. They are never present in the DMZ or on the proxy machines. Optionally to provide additional protection, we recommend protecting these keys in a hardware security module (HSM) attached to AD FS. Microsoft does not produce an HSM product, however there are several on the market that support AD FS. In order to implement this recommendation, follow the vendor guidance to create the X509 certs for signing and encryption, then use the AD FS installation powershell commandlets, specifying your custom certificates as follows:
Источник
Публикация Exchange Server с помощью ADFS / Web Application Proxy
Публикация Exchange Server поможет в решении задачи удаленного доступа к почтовой инфраструктуре из сети Интернет. Разнообразие средств довольно велико. Среди них присутствуют как коммерческие решения, так и решения с открытым кодом. В рамках данной статьи, будет рассмотрен вариант использования служб федерации Active Directory (ADFS) и их компонента Web Application Proxy.
Публикация Exchange Server с помощью ADFS / Web Application Proxy
Ранее, в 2014 году, я уже затрагивал данную тему в одноименном цикле статей. Тогда преаутентификация достигалась с помощью Integrated Windows Authentication, публикация с помощью WAP. Основная проблема данного метода в том, что сервера WAP должны были присутствовать в домене Active Directory. Это, в свою очередь, накладывало определенные ограничения и вопросы с точки зрения сетевой безопасности.
С того времени произошло уж очень много интересного в развитии продуктов. Во-первых, начиная с Exchange 2013 SP1 появилась возможность аутентификации в OWA и ECP с помощью ADFS. Во-вторых, сервисы федерации обзавелись новым функционалом безопасности. Это дает хорошее основание переписать материал используя новые возможности продуктов. В более ранних статьях я уже делал обзор и развертывание служб федерации. Они пригодятся, если ранее вы не сталкивались с конфигурированием данного сервиса:
Итак, в контексте задачи публикации Exchange Server, компоненты служб федерации будут выполнять следующее:
К процессу публикации стоит относить не только OWA и ECP, но и другие веб сервисы Exchange. Например, веб-каталоги ActiveSync, EWS и другие. Для их публикации будет использоваться Pass-through метод преаутентификации службами ADFS.
Подготовка служб ADFS к публикации Exchange
Первый шаг состоит в подготовке служб ADFS к публикации Exchange. Но, перед тем как начинать, в Exchange инфраструктуре должны быть корректно настроены URL адреса веб-каталогов OWA и ECP. Если это не сделано, статья «Конфигурирование пространства имен в Exchange Server» поможет вам в этом.
В самом ADFS потребуется создать два новых отношения доверия с проверяющей стороной (Relying Party Trust) для OWA и ECP. В этом поможет PowerShell скрипт, который необходимо выполнить на master ноде:
Не забудьте поменять переменные URL адресов OWA и ECP на собственные.
Результат его работы:
 Создание Relying Party Trust для Exchange (OWA / ECP) в ADFS
Интеграция Exchange инфраструктуры с ADFS
На каждом сервере Exchange c Client Access Services необходимо выполнить еще один PowerShell скрипт:
Обратите внимание, что указаны переменные ADFSSigningCertificateThumbprint и ADFSIssuerURL. Значение первой можно получить в оснастке ADFS:
 SSL сертификаты в ADFS оснастке
Открыв свойства сертификата ADFS Signing. Более подробно о типах SSL сертификатов в ADFS можно ознакомится в этой статье.
 Получение Thumbprint сертификата ADFS Signing
Этот сертификат необходимо экспортировать и импортировать в доверенные ЦС каждого Exchange сервера.
Значение второй переменной можно получить подставить FQDN фермы ADFS. Выполняем его в Exchange Management Shell.
 Результат выполнения скрипта на Exchange сервере
Перегружаем IIS командой IISReset.
После перезагрузки веб сервера и его инициализации можно выполнить проверку работоспособности. Перейдем на URL ECP.
 Проверка аутентификации в Exchange ECP
Автоматически отработает перенаправление на страницу входа ADFS, где необходимо пройти аутентификацию.
В случае если ADFS Signing сертификат не был импортирован в доверенные ЦС Exchange сервера, будет получена ошибка WrongAudienceUriOrBadSigningCert:
 Ошибка WrongAudienceUriOrBadSigningCert при аутентификации с помощью ADFS
После добавления сертификата ошибка пропала, и аутентификация в Exchange с помощью ADFS получилась.
 Успешная аутентификация в Exchange с помощью ADFS
Публикация Exchange с помощью Web Application Proxy
Завершающим шагом будет публикация веб-каталогов Exchange сервера в сеть Интернет. Перейдем на сервер Web Application Proxy и откроем оснастку управления. В ней необходимо запустить мастер добавления новой публикации и выбрать тип ADFS:
 Публикация Exchange Server в Web Application Proxy
Далее, выбираем тип преаутентификации MSOFBA:
 Выбор типа преаутентификации в Web Application Proxy
На следующей странице выбираем из списка Exchange Control Panel:
 Выбор Relying Party в Web Application Proxy
На завершающем этапе, добавляем конфигурацию публикации:
 Конфигурация публикации веб-приложения Exchange в Web Application Proxy
Аналогичным образом настраиваем OWA.
Оставшиеся каталоги (RPC, EWS, OAB, Autodiscover), будут опубликованы так же, но с отличием в методе преаутентификации. Они не могут использовать аутентификацию на основе утверждений, поэтому будет использоваться Pass—through. Единственное исключение составит каталог Autodiscover, так как в его случае публикация осуществляется отдельного поддомена autodiscover. Это требование работы механизма, заложенного в процесс автообнаружения конфигурации Exchange.
В перечисленных выше веб-каталогах отсутствует каталог, отвечающий за подключение мобильных клиентов по протоколу ActiveSync. Начиная с версии ADFS 4.0 (Windows Server 2016), в функционале служб федерации появилась поддержка метода аутентификации HTTP Basic. Этот факт позволит выполнять преаутентификацию клиентов службами федерации, а не перенаправлять не аутентифицированные запросы прямиком на Exchange инфраструктуру. О том как это настроить, в скором времени, выйдет отдельная статья.
На этом все. Если у вас возникли какие-либо вопросы, пожалуйста, пишите в комментарии.
Источник
В этой статье мы рассмотрим, как централизованно настроить параметры прокси на компьютерах с Windows 10 в домене Active Directory с помощью групповой политики. Наиболее распространенные браузеры (такие как Microsoft Edge, Google Chrome, Internet Explorer, Opera) и большинство приложений автоматически используют настройки прокси-сервера, установленные в Windows, для доступа в Интернет. Мы также увидим, как настроить системные параметры WinHTTP-прокси.
В этой статье мы рассмотрим особенности настройки прокси-сервера с политикой в поддерживаемых версиях Windows (Windows 10, 8.1 и Windows Server 2012/2016/2019). Обратите внимание, что в снятых с производства Windows 7 / Server 2008R2, Windows XP / Windows Server 2003 настройки прокси-сервера устанавливаются по-другому.
Как задать параметры прокси сервера в Windows через GPO?
До выпуска Windows Server 2012 / Windows 8 для настройки параметров Internet Explorer (включая настройки прокси). Этот раздел отсутствует в современных версиях Windows 10 / Windows Server 2016/2019.

В более новых версиях Windows необходимо использовать настройки групповой политики (GPP) для настройки параметров Internet Explorer и прокси-сервера в редакторе GPO. Также есть возможность использовать специальное расширение Internet Explorer Administration Kit 11 (IEAK 11), но оно используется редко.
Откройте редактор GPO домена консоли управления групповой политикой (
GPMC.msc
), выберите подразделение с пользователями, которым вы хотите назначить параметры прокси-сервера, и создайте новую политику. Создайте GPO в этом домене и подключите его здесь.

Перейдите в Конфигурация пользователя -> Настройки -> Настройки панели управления -> Настройки Интернета. В контекстном меню выберите New -> и выберите Internet Explorer 10.
Для настройки параметров прокси в Windows 10 / Windows Server 2016 необходимо использовать пункт Internet Explorer 10.
Совет. Хотя для Internet Explorer 11 нет отдельной настройки, политика Internet Explorer 10 будет применяться ко всем версиям IE> = 10 (в файле политики InternetSettings.xml можно увидеть, что этот параметр действителен для всех версий IE, начиная с 10.0).0.0 и заканчивая 99.0.0.0). Все версии Internet Explorer до 11 больше не поддерживаются Microsoft и больше не обновляются.
<FilterFile lte="0" max="99.0.0.0" min="10.0.0.0" gte="1" type="VERSION" path="%ProgramFilesDir%Internet Exploreriexplore.exe" bool="AND" not="0" hidden="1"/>
Перед вами появится специальный модуль, практически полностью идентичный настройкам опции Интернет в Панели управления Windows. Например, вы можете указать домашнюю страницу (вкладка «Общие», поле «Домашняя страница).
Важный. Недостаточно просто сохранить изменения в редакторе политик. Обратите внимание на красные и зеленые подчеркивания для настраиваемых параметров Internet Explorer 10. Красное подчеркивание означает, что этот параметр политики не будет применяться. Чтобы применить определенный параметр, нажмите F5. Зеленое подчеркивание рядом с параметром означает, что параметр IE будет применяться через GPP.
Доступны функциональные клавиши
- F5 – включить все настройки в текущей вкладке
- F6 – включить выбранную опцию
- F7 – отключить выбранную опцию
- F8 – отключить все настройки в текущей вкладке
Чтобы указать параметры прокси, перейдите на вкладку «Подключения» и нажмите кнопку «Параметры локальной сети»). Прокси-сервер можно настроить одним из следующих способов:
- Автоопределение настроек – автоматическое определение настроек с помощью файла wpad.dat;
- Использовать скрипт автоматической настройки – скрипт автоматической настройки (proxy.pac);
- Прокси-сервер: вы можете вручную указать IP-адрес или DNS-имя прокси-сервера и порт подключения. Это самый простой способ настроить прокси в Windows, и мы будем его использовать.
Установите флажок Использовать прокси-сервер для вашей локальной сети и в полях Адрес и Порт, соответственно, укажите IP / FQDN прокси-сервера и порт подключения.
Включив параметр Обход прокси-сервера для локальных адресов, вы можете запретить приложениям (включая браузер) использовать прокси-сервер при доступе к локальным ресурсам (в формате
http://intranet
). Если вы используете адреса ресурсов, такие как
https://winitpro.ru
или
http://192.168.20.5
, эти адреса не распознаются Windows как локальные. Эти адреса и адреса других ресурсов, для доступа к которым прокси не требуется, необходимо указать вручную. Нажмите кнопку «Дополнительно» и в поле «Исключения» введите адреса в формате:
10.*;192.168.*;*.loc;*.contoso.com
Совет. Настройки прокси-сервера в Google Chrome можно настроить централизованно через GPO с помощью специальных административных шаблонов. Для Mozilla Firefox вы можете использовать это решение.
После сохранения политики вы можете просмотреть XML-файл с указанными настройками браузера в каталоге политики на контроллере домена \ DC1 SYSVOL winitpro.ru Policies (PolicyGuiID) User Preferences InternetSettings InternetSettings xml
GPP имеет возможность более тонко нацеливать политику на клиентов. Для этого используется таргетинг на уровне элемента GPP. Перейдите на вкладку Общие, включите параметр Таргетинг на уровень элемента -> Таргетинг.
В открывшейся форме укажите условия применения политики. Например, я указал, что политика конфигурации прокси будет применяться только к пользователям, которые являются членами доменной группы ruspb_proxy_users. Вы можете использовать собственную логику для назначения параметров прокси (в зависимости от IP-подсети, сайта AD и т.д.).
Осталось назначить политику IE контейнеру с пользователями и обновить политики для них. После обновления политик на компьютерах пользователей следует применить новые настройки прокси в IE. В Windows 10 текущие настройки прокси-сервера можно посмотреть в разделе «Настройки» -> «Сеть и Интернет» -> «Прокси-сервер». Как видите, теперь компьютер настроен с параметрами прокси, указанными в политике домена.
Используйте эту статью, чтобы запретить пользователям изменять настройки прокси-сервера.
Настройка параметров прокси через реестр и GPO
Кроме того, вы можете настроить параметры IE через реестр, используя политики GPP. Например, чтобы включить прокси для пользователя, вам необходимо настроить следующие параметры реестра в ветке HKEY_CURRENT_USER Software Microsoft Windows CurrentVersion Internet Settings.
Перейдите в редактор GPO в разделе User Configuration -> Preferences -> Windows Settings -> Registry и создайте три значения реестра в указанной ветке:
-
ProxyEnable(REG_DWORD) =
00000001 -
ProxyServer(REG_SZ) =
192.168.0.50:3128 -
ProxyOverride(REG_SZ) =
*winitpro.ru;https://*.contoso.com;192.168.*;<local>
Здесь вы также можете использовать таргетинг на уровне элементов, чтобы точно настроить таргетинг по критериям.
Если вам нужно создать политики не для каждого пользователя (для каждого пользователя), а для всех пользователей компьютера (для каждого компьютера), используйте настройки GPP из GPO Computer Configuration -> Preferences -> Windows Settings -> Registry section. Используйте те же параметры реестра в ветке HKEY_LOCAL_MACHINE Software Policies Microsoft Windows CurrentVersion Internet Settings.
Настройка параметров WinHTTP прокси групповыми политиками
Некоторые системные службы или приложения (например, служба обновлений Wususerv или PowerShell) по умолчанию не используют настраиваемые параметры прокси-сервера из параметров Internet Explorer. Чтобы эти приложения работали должным образом и имели доступ к Интернету, параметры прокси-сервера системы WinHTTP должны быть настроены в Windows.
Чтобы проверить, настроен ли на вашем компьютере прокси WinHTTP, выполните команду:
netsh winhttp show proxy
Ответ «
Direct access (no proxy server)
» означает, что прокси не установлен, система использует прямой доступ в Интернет.
Вы можете вручную настроить прокси для WinHTTP на своем компьютере с помощью команды:
netsh winhttp set proxy 192.168.0.50:3128 "localhost;192.168.*;*.winitpro.com"
Или импортируйте настройки прокси из настроек Internet Explorer текущего пользователя:
netsh winhttp import proxy source=ie
Однако вы не сможете настроить WinHTTP через GPO – в редакторе GPO нет соответствующего параметра, а параметры хранятся в реестре в двоичном формате и не подходят для прямого редактирования.
Единственный способ установить параметры прокси WinHTTP – это настроить их на эталонном компьютере, загрузить значение параметра WinHttpSettings в ветку реестра HKLM SOFTWARE Microsoft Windows CurrentVersion Internet Settings Connections в reg-файле и передать его параметр на компьютер в домене через реестр GPP.
Источник изображения: winitpro.ru
- Remove From My Forums
-
Вопрос
-
Добрый день. Чтобы не создавать еще один вопрос, как разрешить в Serve 2019 выполнение GPO для IE 1011 (прописать настройки proxy сервера), есть параметр реестра?
-
Разделено
2 марта 2019 г. 17:09
вопрос находился внутри несвязанного обсуждения
-
Разделено
Ответы
-
Добрый день. Чтобы не создавать еще один вопрос, как разрешить в Serve 2019 выполнение GPO для IE 1011 (прописать настройки proxy сервера), есть параметр реестра?
думаю что для 2019 сервера
ничего не поменялось в настройках проксинайти ваш вопрос про прокси и ответ на него проще, когда он выделен в отдельное обсуждение, поэтому если вопрос не касается вашего старого обсуждения лучше создайте новое
текущий вопрос я выделю сам в новое обсуждение
The opinion expressed by me is not an official position of Microsoft
-
Предложено в качестве ответа
Vector BCOModerator
5 марта 2019 г. 14:49 -
Помечено в качестве ответа
Petko KrushevMicrosoft contingent staff, Owner
6 марта 2019 г. 9:19
-
Предложено в качестве ответа
The article shows how to use Active Directory Group Policies (GPOs) to configure proxy server settings on domain-joined computers running Windows 10/11 and Windows Server 2022/2019/2016/2012R2. These proxy server settings are used by all modern browsers, including Internet Explorer 11 (reached end of support on June 2022), Google Chrome, Microsoft Edge, Opera, and Mozilla Firefox (with the option Use system proxy settings enabled by default).
How to Set Proxy Settings via Group Policy?
To manage the browser’s proxy server settings on a Windows computer, you can use Group Policy Preferences (GPP) or Internet Explorer Administration Kit 11 (IEAK 11). In order to set proxy settings via GPO on users’ computers in the AD domain, perform the following actions:
- Open Group Policy Management Console (gpmc.msc);
- Select the Active Directory OU for which you want to apply the new proxy settings. In this example, we want to apply a proxy settings policy to user OU (OU=Users,OU=California,OU=USA,DC=theitbros,DC=com);
- Right-click on OU and select Create a GPO in this domain and link it here;

- Specify a policy name, for example, CA_Proxy;

- Click on the policy and select Edit;

- Expand the following section: User Configuration > Preferences > Control Panel Settings > Internet Settings. Right-click and select New > Internet Explorer 10 (this policy will also be applied for the IE 11);
Note. In previous versions of Internet Explorer (6, 7, and 9) to configure Internet Explorer settings you needed to use the following section in the Group Policy Editor console: User configuration > Policies > Windows Settings > Internet Explorer Maintenance. However, in Internet Explorer 10 (which firstly appeared on Windows Server 2012 and Windows the Internet Explorer Maintenance (IEM) section was removed from GPO Editor. Moreover, this section also disappeared in Windows 7/Windows Server 2008 R2 after Internet Explorer 10 or 11 was installed. If you try to apply the IEM policy to a computer with IE 10 or 11, it won’t work;

- On the standard window with the Internet Explorer settings, go to the Connections tab and press the LAN Settings button;

- Tick the checkbox “Use a proxy server for your LAN” and specify the Address and Port of your proxy server (for example, 192.168.1.11, port 3128). To enable this option, press the F6 button (underline for that setting will change the color from red to green). To disable a specific policy setting press F7 (disable the option “Automatic detect settings” this way).Tip. The green underscore for the IE parameter means this setting is enabled and will be applied through Group Policy. Red underlining means the setting is configured, but disabled. To enable all settings on the current tab, press F5. To disable all policies on this tab use the F8 key. Note the Bypass Proxy Server for Local Addresses option. When this policy setting is enabled, local resources are always accessed directly, not through a proxy server. Windows automatically recognizes the address of the format http://theitbros as local and IE when accessing them bypasses the proxy (Local addresses are all URLs without a domain suffix). However, it is important to note that the addresses of the format http://forum.theitbros.local or http://192.168.0.50 can’t be recognized by the system as a local. In order to avoid using a proxy to access such resources, you need to configure exceptions for them using the policy Do not use proxy servers for addresses beginning with (see below);

- If you need to specify the list of address exceptions, click Advanced. In the field Do not use proxy servers for addresses beginning with specify the list of IP addresses or domains (this option allows you to bypass the proxy for the specified domains/IP addresses). You can use the wildcards in proxy exception list. The exclusion list is a simple string with the list of DNS names and/or IP addresses (values in the list must be separated by a semicolon). For example:
192.*;*.theitbros.com

- Press OK twice to save settings.


 the Internet Explorer Maintenance (IEM) section was removed from GPO Editor. Moreover, this section also disappeared in Windows 7/Windows Server 2008 R2 after Internet Explorer 10 or 11 was installed. If you try to apply the IEM policy to a computer with IE 10 or 11, it won’t work;


Note. This rule only works for Internet Explorer 10 and Internet Explorer 11. For earlier IE versions, you need to create separate rules.
It remains to update group policy settings on client computers (with the gpupdate command: gpupdate /force), and check proxy settings in IE (Control Panel > Network and Internet > Internet Options > Connections > LAN Settings).

If you want the proxy server settings to be applied to users based on the IP subnet where their devices are located, you can use the GPP Item Level-Targeting. To do this, switch to the Common tab in the policy settings and check the Item-Level Targeting option. Click on the Targeting button.

Select New Item > IP address ranges. Specify the range of IP addresses in your subnet for which you want to apply proxy settings.

Save the policy settings. Similarly, create several IE policies with proxy settings for different IP subnets.

As a result, the proxy settings for the users will be applied depending on the IP network (office) in which they work (convenient for mobile employees with laptops).
Tip. To configure the new IE policy from Windows Server 2008/R2, you need to download Administrative Templates for Internet Explorer, and copy files Inetres.admx and Inetres.adml to the folder %SYSTEMROOT%PolicyDefinitions.
When a policy with proxy server settings is applied to a user computer, it changes the values of the registry settings under the following key: HKEY_CURRENT_USERSOFTWAREMicrosoftWindowsCurrentVersionInternet Settings.

Accordingly, you can directly configure the IE proxy settings in registry. In order to configure proxy setting for a current user on your computer, you can use the following PowerShell script:
$proxyregkey = "HKCU:SoftwareMicrosoftWindowsCurrentVersionInternet Settings"

Set-ItemProperty -Path $proxyregkey -Name ProxyEnable -Value 1

Set-ItemProperty -Path $proxyregkey -Name ProxyServer -Value "192.168.1.11:3128"

Set-ItemProperty -Path $proxyregkey -Name ProxyOverride -Value '10.*;192.168.*;*.theitbros.com;<local>'

Set-ItemProperty -Path $proxyregkey-Name AutoDetect -Value 0

This means that you can deploy the same registry settings with your proxy configuration to domain-joined computers using GPO (Group Policy Preferences, to be more precise).
Create a new GPO and expand the GPP section User Configuration > Preferences > Registry and create 3 registry parameters in the registry key HKCUSOFTWAREMicrosoftWindowsCurrentVersionInternet Settings]:
- ProxyEnable (REG_DWORD) = 00000001;
- ProxyServer (REG_SZ) = 192.168.1.11:3128;
- ProxyOverride (REG_SZ) = 192.*;*.theitbros.com.

Proxy Settings for Computers in Group Policy
By default, IE proxy settings are per user. However, you can use the different GPO to apply proxy settings to all users of the computer. To do this, go to the following section in the GPO Editor console: Computer Configuration > Administrative Templates > Windows Components > Internet Explorer. Enable the policy Make proxy settings per-machine (rather than per user).
Note. The same setting can be enabled through the registry:
$proxyregkey = "HKLMSoftwarePoliciesMicrosoftWindowsCurrentVersionInternet Settings"
New-ItemProperty -Path $proxyregkey -Name ProxySettingsPerUser  -Value 0

To apply settings to computer objects, also enable the policy Configure user Group Policy loopback processing mode under the Computer Configuration > Policies > Administrative Templates > System > Group Policy. Select the Merge mode in the policy settings.
How to Apply WinHTTP Proxy Settings via GPO?
By default, the WinHTTP service does not use the proxy settings configured in Internet Explorer. As a result, some system services (including the Windows Update service: Wususerv) won’t be able to access the Internet.
Check current WinHTTP proxy settings with the command:
netsh.exe winhttp show proxy

To enable WinHTTP proxy for a computer through a GPO, you must configure a special registry parameter.
First, you need to configure a proxy for WinHTTP on the reference computer. The easiest way is to import proxy settings from IE:
netsh winhttp import proxy source=ie

These settings will be saved in the WinHttpSettings parameter under the registry key HKEY_LOCAL_MACHINESOFTWAREMicrosoftWindowsCurrentVersionInternet SettingsConnections.

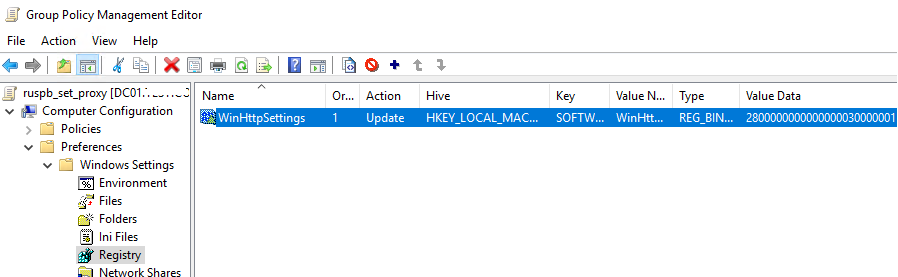
Now open your proxy GPO and go to Computer Configuration > Preferences > Windows Settings > Registry > New > Registry Wizard.
Select Local computer and specify the full path to the WinHttpSettings parameter.

It remains to click Finish, update the policy on computers, and make sure the WinHTTP proxy settings are applied successfully.
How to Prevent Users from Changing Proxy Settings in Browsers?
By default, if you configure the proxy server settings in Windows through the GPO, computer users can change the proxy settings themselves.
Note that proxy settings in Windows can be edited using both IE options and the modern Settings control panel.

You can prevent users from changing proxy settings in Windows using the “Prevent changing proxy settings” additional GPO option. This parameter is present in both the user and computer GPO sections.
- Computer Configuration > Policies > Administrative Templates > Windows Components – Internet Explorer
- User Configuration > Policies > Administrative Templates > Windows Components Internet Explorer

If you enable this policy and apply it to the domain computer, then the fields with proxy settings in Windows will be blocked, and the caption will appear below: Some settings are managed by your system administrator.

Hint. Settings in the Computer Configuration section take precedence over user settings.
Typically, you want to use a more flexible way of granting permissions to change proxy settings on computers. For example, you can restrict proxy settings for all users except members of the ca_workstation_admins Active Directory group.
- Create a new GPO with proxy settings (or edit an existing one);
- Go to Group Policy Preferences (User Configuration > Preferences > Windows Settings > Registry) and create two registry values:
The first parameter prohibits changing proxy settings:
Hive: HKEY_CURRENT_USER

Key Path: SoftwarePoliciesMicrosoftInternet ExplorerControl Panel

Value name: Proxy

Value type: REG_DWORD

Value data: 00000001
The second parameter blocks the launch of the IE window with proxy settings:
Hive: HKEY_CURRENT_USER

Key Path: SoftwarePoliciesMicrosoftInternet ExplorerRestrictions

Value name: NoBrowserOptions

Value type: REG_DWORD

Value data: 00000001
- These policies will apply to all computer users;
- To prevent policies from applying to a specific security group, you need to copy these two parameters, set a larger Order, and change their values to 00000000;
- Then open the properties of each of these two registry settings, go to Common > Item level targeting > Targeting;
- Create a new targeting rule: New > Security Group > provide a group name (ca_workstation_admins);

- Create a similar targeting rule for the second registry parameter;
- As a result, if a user from the specified group logs on to the computer, the proxy settings for him won’t be locked.

It is also worth noting that for .NET Core 3.0 applications (including PowerShell Core 7.x) you can set proxy server settings using the following Windows environment variables:
- HTTP_PROXY:
- HTTPS_PROXY
- ALL_PROXY
- NO_PROXY
You can create and distribute these environment variables to domain user computers using GPP. Just create the required environment variables under Computer Configuration > Preferences > Windows Settings > Environment.

- About
- Latest Posts

I enjoy technology and developing websites. Since 2012 I’m running a few of my own websites, and share useful content on gadgets, PC administration and website promotion.