В этой статье мы рассмотрим, как централизованно задать настройки прокси на компьютерах с Windows 10 в домене Active Directory с помощью групповых политик. Большинство распространенных браузеров (таких как Microsoft Edge, Google Chrome, Internet Explorer, Opera) и большинство приложений автоматически используют для доступа в интернет параметры прокси сервера, заданные в Windows. Также мы рассмотрим, как задать параметры системного WinHTTP прокси.
Содержание:
- Как задать параметры прокси сервера в Windows через GPO?
- Настройка параметров прокси через реестр и GPO
- Настройка параметров WinHTTP прокси групповыми политиками
В этой статье мы рассмотрим особенности настройки прокси сервера политиками в поддерживаемых версиях Windows (Windows 10, 8.1 и Windows Server 2012/2016/2019). Обратите внимание, что в снятых с поддержки Windows 7/Server 2008R2, Windows XP/Windows Server 2003 параметры прокси сервера задаются по другому.
Как задать параметры прокси сервера в Windows через GPO?
До выхода Windows Server 2012/Windows 8 для настройки параметров Internet Expolrer (и в том числе настроек прокси) использовался раздел Internet Explorer Maintenance (IEM) из пользовательской секции GPO (User configuration –> Policies –> Windows Settings –> Internet Explorer Maintenance). В современных версиях Windows 10 /Windows Server 2016/2019 этот раздел отсутствует. 
В новых версиях Windows для настройки параметров IE и прокси в редакторе GPO нужно использовать предпочтения групповых политик GPP (Group Policy Preferences). Также есть вариант использования специального расширения Internet Explorer Administration Kit 11 (IEAK 11) – но применяется он редко.
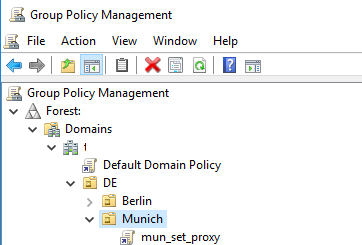
Откройте консоль редактора доменных GPO (Group Policy Management Console –
GPMC.msc
), выберите OU с пользователями, для которых нужно назначить параметры прокси-сервера и создайте новую политику Create a GPO in this domain, and Link it here.
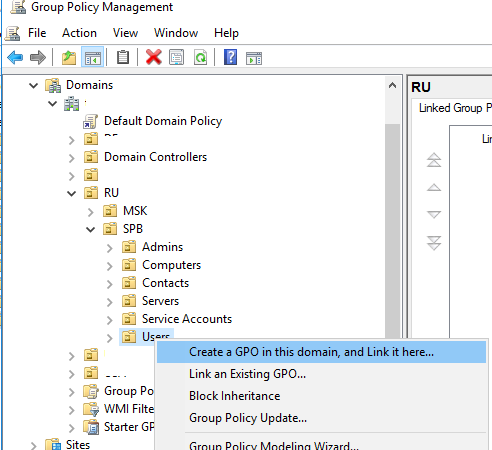
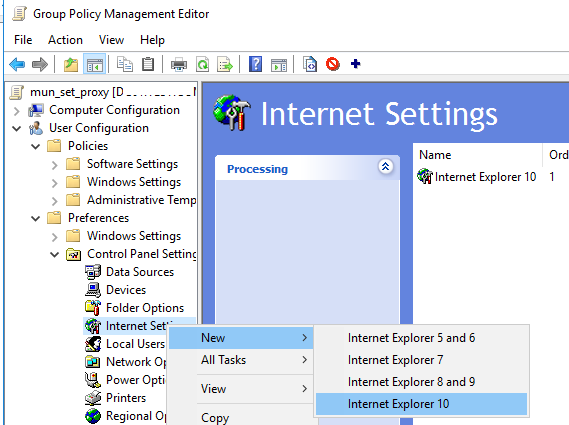
Перейдите в раздел User Configuration -> Preferences -> Control Panel Settings -> Internet Settings. В контекстном меню выберите пункт New -> и выберите Internet Explorer 10.

Для настройки параметров прокси в Windows 10/Windows Server 2016 нужно использовать пункт Internet Explorer 10.
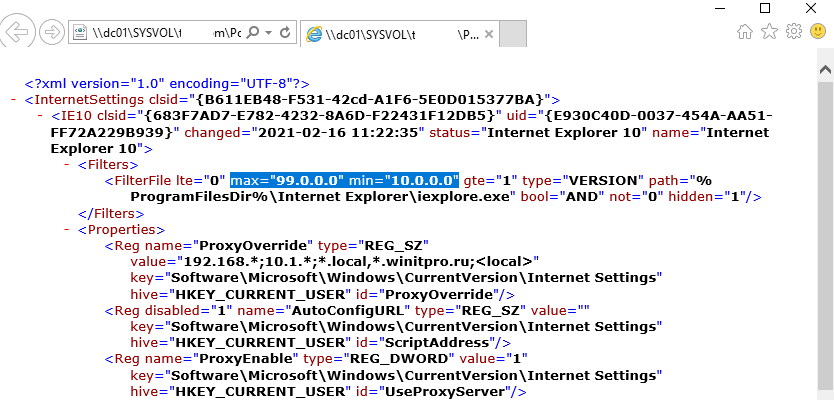
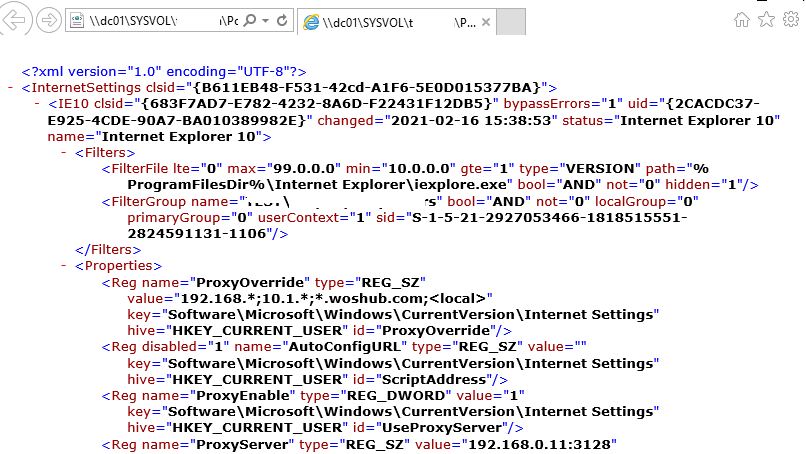
Совет. Несмотря на то, что отдельной настройки для Internet Explorer 11 нет, политика Internet Explorer 10 будет применяться на все версии IE >=10 (в файле политики InternetSettings.xml можно увидеть, что опция действительна для всех версии IE, начиная c 10.0.0.0 и заканчивая 99.0.0.0). Все версии Internet Explorer ниже 11 на данный момент сняты с поддержки Microsoft и более не обновляются.
<FilterFile lte="0" max="99.0.0.0" min="10.0.0.0" gte="1" type="VERSION" path="%ProgramFilesDir%Internet Exploreriexplore.exe" bool="AND" not="0" hidden="1"/>
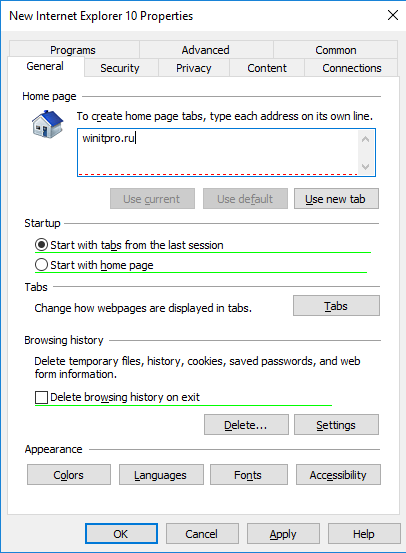
Перед вами появится специальная форма, практически полностью идентичная настройкам параметра обозревателя в панели управления Windows. Например, вы можете указать домашнюю страницу (Вкладка General, поле Home page).
Важно. Не достаточно просто сохранить внесенные изменения в редакторе политики. Обратите внимание на красные и зеленые подчеркивания у настраиваемых параметров Internet Explorer 10. Красное подчеркивание говорит о том, что эта настройка политики не будет применяться. Чтобы применить конкретную настройку, нажмите F5. Зеленое подчеркивание у параметра означает, что этот параметр IE будет применяться через GPP.
Доступные функциональные клавиши
- F5 – Включить все настройки на текущей вкладке
- F6 – Включить выбранный параметр
- F7 – Отключить выбранный параметр
- F8 – Отключить все настройки на текущей вкладке
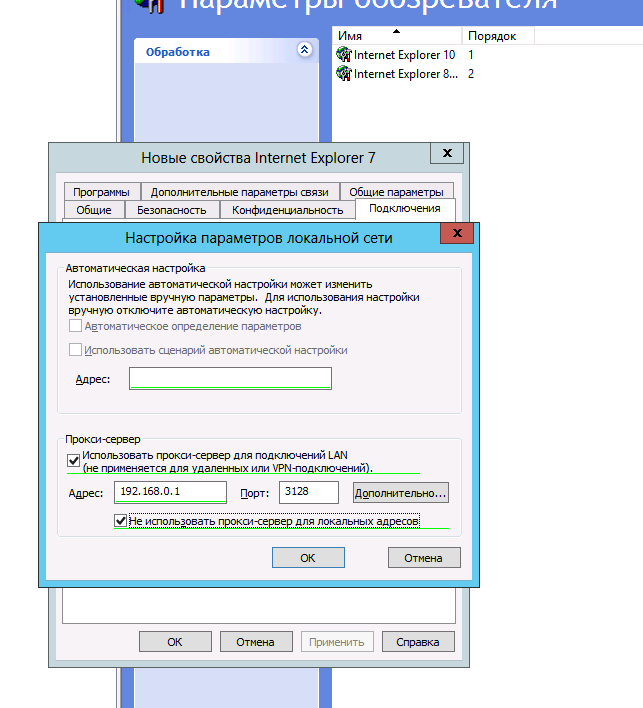
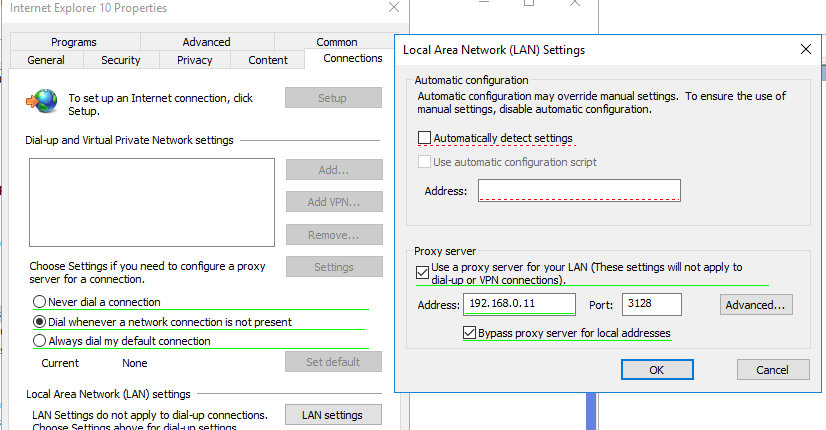
Чтобы указать параметры прокси-сервера, перейдите на вкладку Connections и нажмите кнопку Lan Settings). Прокси сервер можно настроить одним из следующих способов:
- Automatically detect settings — автоматическое определение настроек прокси с помощью файла wpad.dat;
- Use automatic configuration script — скрипт автоконфигурации (proxy.pac);
- Proxy Server – можно вручную указать IP адрес или DNS имя прокси сервера и порт подключения. Это самый простой способ настроить прокси в Windows, его и будем использовать.
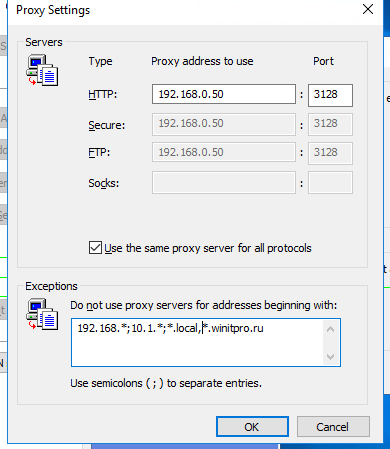
Поставьте галку Use a proxy server for your LAN, а в полях Address и Port соответственно укажите IP/FQDN имя прокси-сервера и порт подключения.
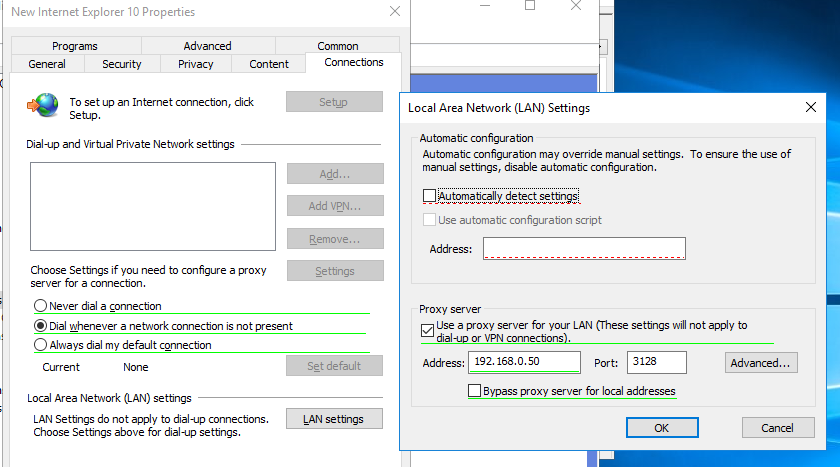
Включив опцию Bypass Proxy Server for Local Addresses можно запретить приложениям (в том числе браузеру) использовать прокси-сервер при доступе к локальным ресурсам (в формате
http://intranet
). Если вы используете адреса ресурсов вида
https://winitpro.ru
или
http://192.168.20.5
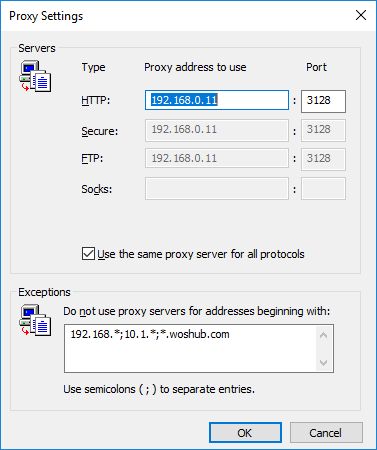
, то эти адреса не распознаются Windows как локальные. Эти адреса и адреса других ресурсов, для доступа к которым не нужно использовать прокси, нужно указать вручную. Нажмите кнопку Advanced и в поле Exceptions введите адреса в формате:
10.*;192.168.*;*.loc;*.contoso.com
Совет. Параметры прокси-сервера в Google Chrome можно задать централизованно через GPO с помощью специальных административных шаблонов. Для Mozilla Firefox можно использовать такое решение.
После сохранения политики вы можете просмотреть XML файл с заданными настройками браузера в каталоге политики на контроллере домена \DC1SYSVOLwinitpro.ruPolicies(PolicyGuiID) UserPreferencesInternetSettingsInternetSettings.xml

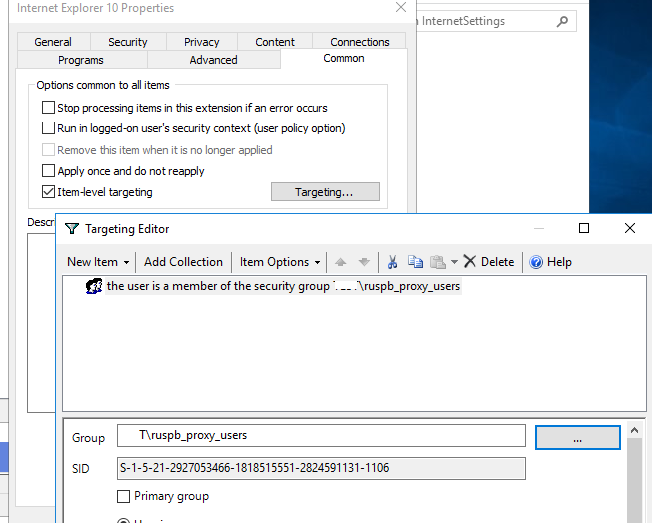
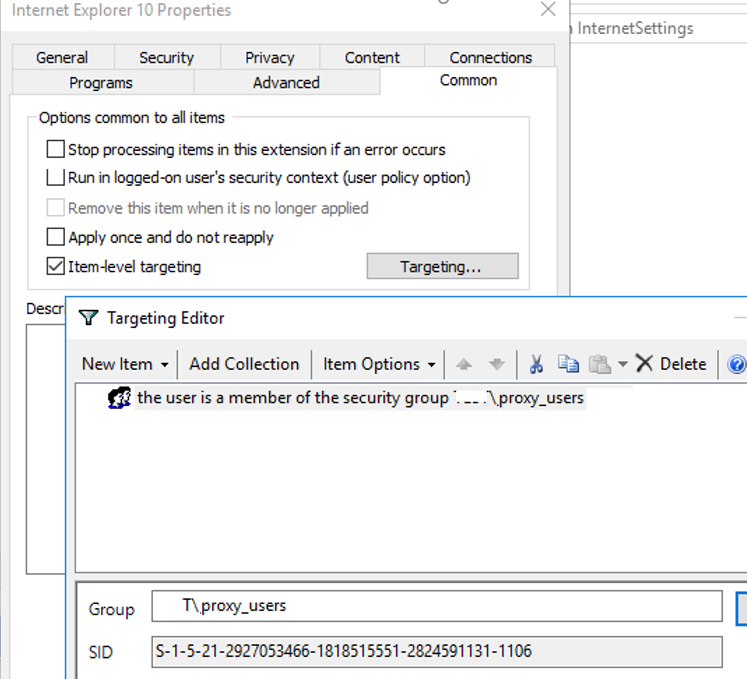
В GPP есть возможность более тонко нацелить политику на клиентов. Для этого используется GPP Item Level Targeting. Перейдите на вкладку Common, включите опцию Item-level targeting -> Targeting.
В открывшейся форме укажите условия применения политики. В качестве примера я указал, что политика настройки прокси будет применена только к пользователям, которые состоят в доменной группе ruspb_proxy_users. Вы можете использовать собственную логику назначения параметров прокси (в зависимости от IP подсети, сайта AD и т.д.).
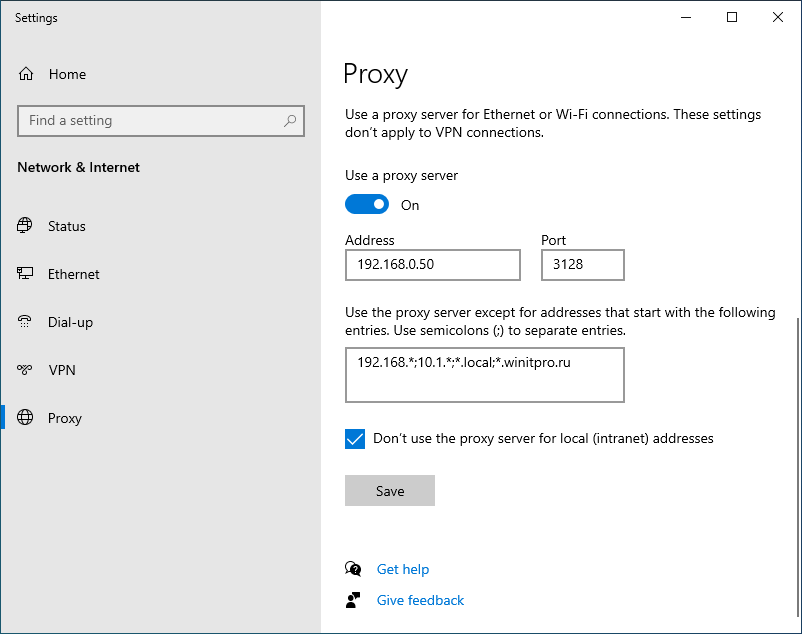
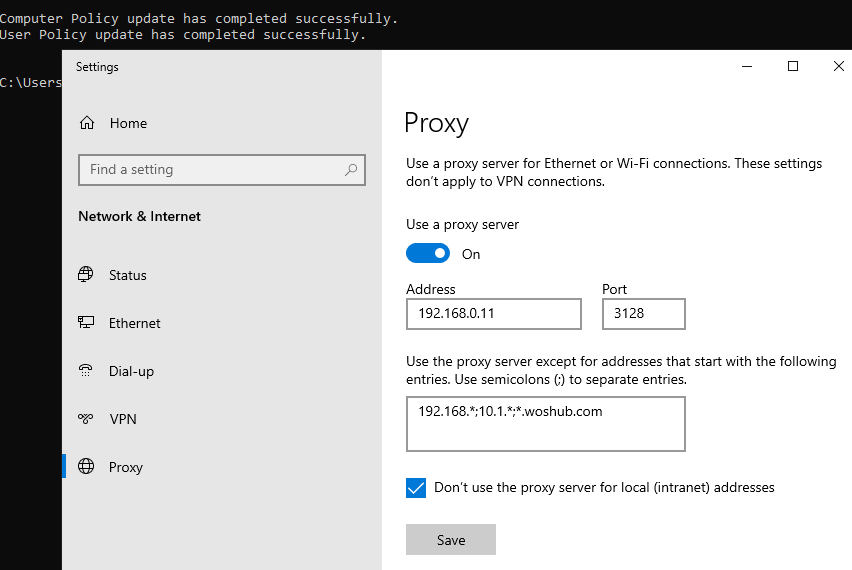
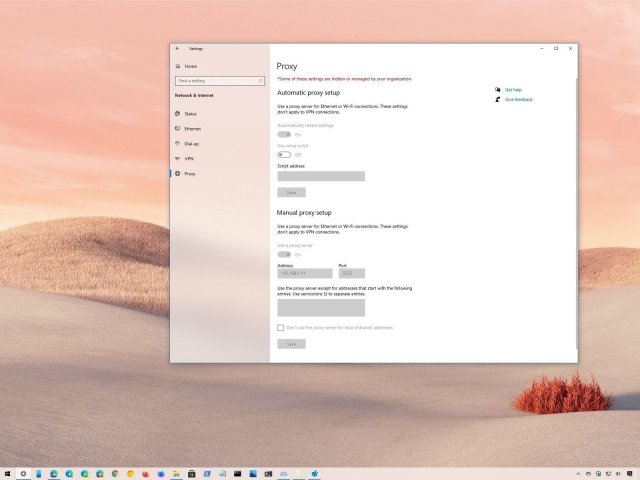
Осталось назначить политику IE на контейнер с пользователями и обновить политики на них. После обновления политики на компьютерах пользователей должны примениться новые настройки прокси в IE. В Windows 10 текущие параметры прокси можно посмотреть в разделе Settings -> Network and Internet -> Proxy. Как вы видите, на компьютере теперь заданы настройки прокси, указанные в доменной политике.
Чтобы запретить пользователям менять настройки прокси-сервера, воспользуйтесь этой статьей.
Настройка параметров прокси через реестр и GPO
Кроме того, настроить параметры IE можно и через реестр, политиками GPP. К примеру, чтобы включить прокси для пользователя нужно настроить следующие параметры реестра в ветке HKEY_CURRENT_USERSoftwareMicrosoft WindowsCurrentVersionInternet Settings.
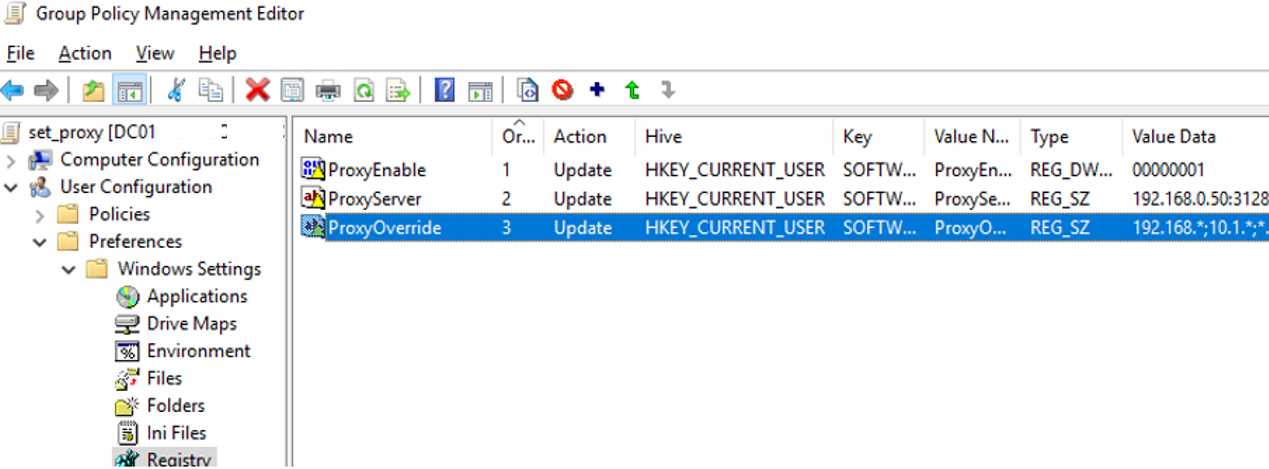
Перейдите в редакторе GPO в раздел User Configuration -> Preferences -> Windows Settings -> Registry и создайте три параметра реестра в указанной ветке:
-
ProxyEnable
(REG_DWORD) =
00000001 -
ProxyServer
(REG_SZ) =
192.168.0.50:3128 -
ProxyOverride
(REG_SZ) =
*winitpro.ru;https://*.contoso.com;192.168.*;<local>
Здесь также можно использовать Item level targeting для более тонкого нацеливания политик. 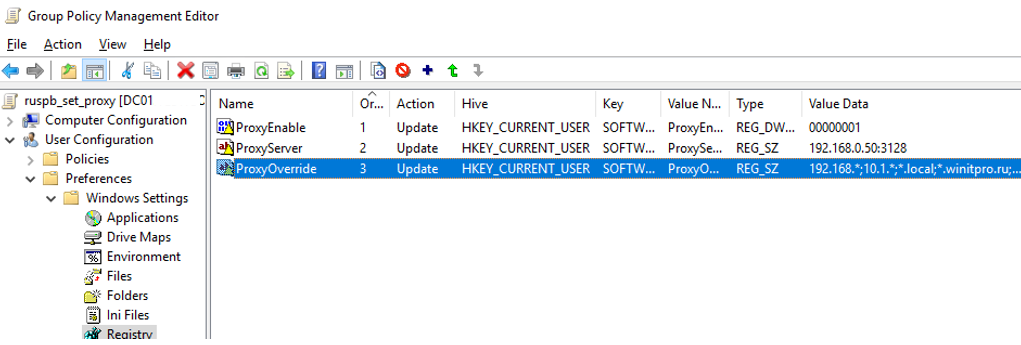
Если вам нужно создать политики не для каждого пользователя (per-user), а для всех пользователей компьютера (per-computer), используйте параметры GPP из раздела GPO Computer Configuration -> Preferences -> Windows Settings -> Registry. Используйте аналогичные параметры реестра в ветке HKEY_LOCAL_MACHINESoftwarePoliciesMicrosoftWindowsCurrentVersionInternet Settings.
Настройка параметров WinHTTP прокси групповыми политиками
Некоторые системные сервисы или приложения (например, служба обновлений Wususerv или PowerShell) по-умолчанию не используют пользовательские настройки прокси сервера из параметров Internet Explorer. Чтобы такие приложения работали корректно и получали доступ в интернет, вам нужно задать в Windows настройки системного прокси WinHTTP.
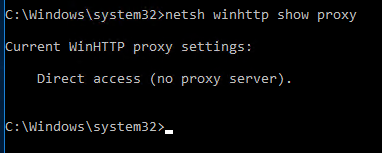
Чтобы проверить, настроен ли на вашем компьютере WinHTTP прокси, выполните команду:
netsh winhttp show proxy
Ответ “
Direct access (no proxy server)
” говорит о том, что прокси не задан, система использует прямой интернет доступ.
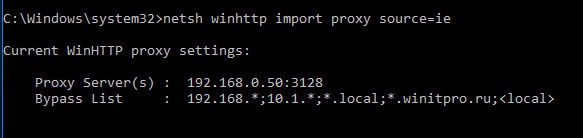
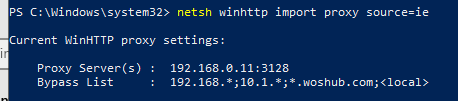
Вы можете задать на компьютере прокси для WinHTTP вручную командой:
netsh winhttp set proxy 192.168.0.50:3128 "localhost;192.168.*;*.winitpro.com"
Или импортировать настройки прокси из параметров Internet Explorer теекщего пользователя:
netsh winhttp import proxy source=ie
Однако настроить WinHTTP через GPO не получится – в редакторе GPO нет соответствующего параметра, а в реестре параметры хранятся в бинарном виде и не подходят для прямого редактирования.
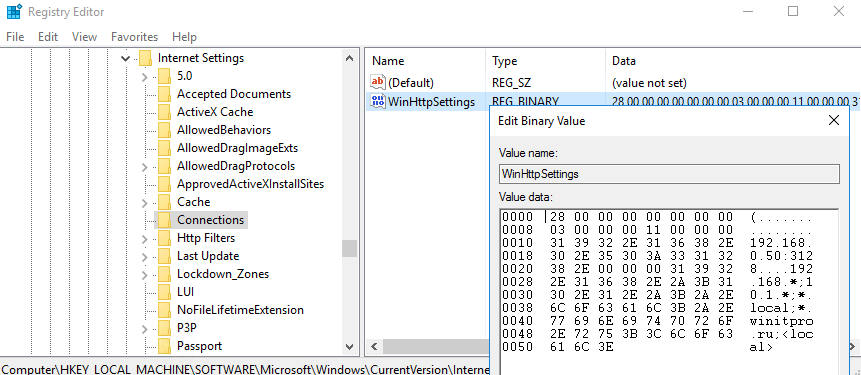
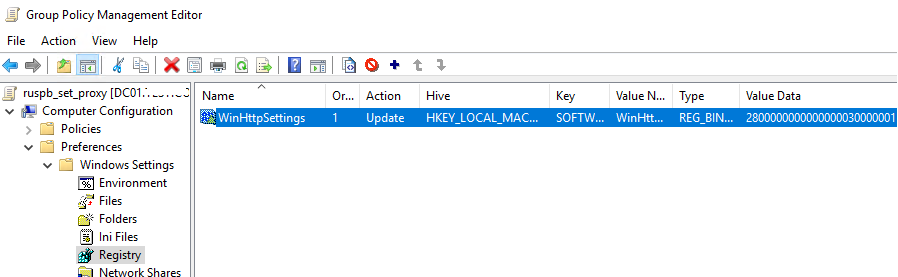
Единственный вариант задать параметры WinHTTP прокси – настроить их на эталонном компьютере, выгрузить значение параметра WinHttpSettings в ветке реестра HKLMSOFTWAREMicrosoftWindowsCurrentVersionInternet SettingsConnections в reg файл и распространить этот параметр на компьютеры в домене через GPP registry.
The article shows how to use Active Directory Group Policies (GPOs) to configure proxy server settings on domain-joined computers running Windows 10/11 and Windows Server 2022/2019/2016/2012R2. These proxy server settings are used by all modern browsers, including Internet Explorer 11 (reached end of support on June 2022), Google Chrome, Microsoft Edge, Opera, and Mozilla Firefox (with the option Use system proxy settings enabled by default).
How to Set Proxy Settings via Group Policy?
To manage the browser’s proxy server settings on a Windows computer, you can use Group Policy Preferences (GPP) or Internet Explorer Administration Kit 11 (IEAK 11). In order to set proxy settings via GPO on users’ computers in the AD domain, perform the following actions:
- Open Group Policy Management Console (gpmc.msc);
- Select the Active Directory OU for which you want to apply the new proxy settings. In this example, we want to apply a proxy settings policy to user OU (OU=Users,OU=California,OU=USA,DC=theitbros,DC=com);
- Right-click on OU and select Create a GPO in this domain and link it here;

- Specify a policy name, for example, CA_Proxy;

- Click on the policy and select Edit;

- Expand the following section: User Configuration > Preferences > Control Panel Settings > Internet Settings. Right-click and select New > Internet Explorer 10 (this policy will also be applied for the IE 11);
Note. In previous versions of Internet Explorer (6, 7, and 9) to configure Internet Explorer settings you needed to use the following section in the Group Policy Editor console: User configuration > Policies > Windows Settings > Internet Explorer Maintenance. However, in Internet Explorer 10 (which firstly appeared on Windows Server 2012 and Windows the Internet Explorer Maintenance (IEM) section was removed from GPO Editor. Moreover, this section also disappeared in Windows 7/Windows Server 2008 R2 after Internet Explorer 10 or 11 was installed. If you try to apply the IEM policy to a computer with IE 10 or 11, it won’t work;

- On the standard window with the Internet Explorer settings, go to the Connections tab and press the LAN Settings button;

- Tick the checkbox “Use a proxy server for your LAN” and specify the Address and Port of your proxy server (for example, 192.168.1.11, port 3128). To enable this option, press the F6 button (underline for that setting will change the color from red to green). To disable a specific policy setting press F7 (disable the option “Automatic detect settings” this way).Tip. The green underscore for the IE parameter means this setting is enabled and will be applied through Group Policy. Red underlining means the setting is configured, but disabled. To enable all settings on the current tab, press F5. To disable all policies on this tab use the F8 key. Note the Bypass Proxy Server for Local Addresses option. When this policy setting is enabled, local resources are always accessed directly, not through a proxy server. Windows automatically recognizes the address of the format http://theitbros as local and IE when accessing them bypasses the proxy (Local addresses are all URLs without a domain suffix). However, it is important to note that the addresses of the format http://forum.theitbros.local or http://192.168.0.50 can’t be recognized by the system as a local. In order to avoid using a proxy to access such resources, you need to configure exceptions for them using the policy Do not use proxy servers for addresses beginning with (see below);

- If you need to specify the list of address exceptions, click Advanced. In the field Do not use proxy servers for addresses beginning with specify the list of IP addresses or domains (this option allows you to bypass the proxy for the specified domains/IP addresses). You can use the wildcards in proxy exception list. The exclusion list is a simple string with the list of DNS names and/or IP addresses (values in the list must be separated by a semicolon). For example:
192.*;*.theitbros.com

- Press OK twice to save settings.


 the Internet Explorer Maintenance (IEM) section was removed from GPO Editor. Moreover, this section also disappeared in Windows 7/Windows Server 2008 R2 after Internet Explorer 10 or 11 was installed. If you try to apply the IEM policy to a computer with IE 10 or 11, it won’t work;


Note. This rule only works for Internet Explorer 10 and Internet Explorer 11. For earlier IE versions, you need to create separate rules.
It remains to update group policy settings on client computers (with the gpupdate command: gpupdate /force), and check proxy settings in IE (Control Panel > Network and Internet > Internet Options > Connections > LAN Settings).

If you want the proxy server settings to be applied to users based on the IP subnet where their devices are located, you can use the GPP Item Level-Targeting. To do this, switch to the Common tab in the policy settings and check the Item-Level Targeting option. Click on the Targeting button.

Select New Item > IP address ranges. Specify the range of IP addresses in your subnet for which you want to apply proxy settings.

Save the policy settings. Similarly, create several IE policies with proxy settings for different IP subnets.

As a result, the proxy settings for the users will be applied depending on the IP network (office) in which they work (convenient for mobile employees with laptops).
Tip. To configure the new IE policy from Windows Server 2008/R2, you need to download Administrative Templates for Internet Explorer, and copy files Inetres.admx and Inetres.adml to the folder %SYSTEMROOT%PolicyDefinitions.
When a policy with proxy server settings is applied to a user computer, it changes the values of the registry settings under the following key: HKEY_CURRENT_USERSOFTWAREMicrosoftWindowsCurrentVersionInternet Settings.

Accordingly, you can directly configure the IE proxy settings in registry. In order to configure proxy setting for a current user on your computer, you can use the following PowerShell script:
$proxyregkey = "HKCU:SoftwareMicrosoftWindowsCurrentVersionInternet Settings"

Set-ItemProperty -Path $proxyregkey -Name ProxyEnable -Value 1

Set-ItemProperty -Path $proxyregkey -Name ProxyServer -Value "192.168.1.11:3128"

Set-ItemProperty -Path $proxyregkey -Name ProxyOverride -Value '10.*;192.168.*;*.theitbros.com;<local>'

Set-ItemProperty -Path $proxyregkey-Name AutoDetect -Value 0

This means that you can deploy the same registry settings with your proxy configuration to domain-joined computers using GPO (Group Policy Preferences, to be more precise).
Create a new GPO and expand the GPP section User Configuration > Preferences > Registry and create 3 registry parameters in the registry key HKCUSOFTWAREMicrosoftWindowsCurrentVersionInternet Settings]:
- ProxyEnable (REG_DWORD) = 00000001;
- ProxyServer (REG_SZ) = 192.168.1.11:3128;
- ProxyOverride (REG_SZ) = 192.*;*.theitbros.com.

Proxy Settings for Computers in Group Policy
By default, IE proxy settings are per user. However, you can use the different GPO to apply proxy settings to all users of the computer. To do this, go to the following section in the GPO Editor console: Computer Configuration > Administrative Templates > Windows Components > Internet Explorer. Enable the policy Make proxy settings per-machine (rather than per user).
Note. The same setting can be enabled through the registry:
$proxyregkey = "HKLMSoftwarePoliciesMicrosoftWindowsCurrentVersionInternet Settings"
New-ItemProperty -Path $proxyregkey -Name ProxySettingsPerUser  -Value 0

To apply settings to computer objects, also enable the policy Configure user Group Policy loopback processing mode under the Computer Configuration > Policies > Administrative Templates > System > Group Policy. Select the Merge mode in the policy settings.
How to Apply WinHTTP Proxy Settings via GPO?
By default, the WinHTTP service does not use the proxy settings configured in Internet Explorer. As a result, some system services (including the Windows Update service: Wususerv) won’t be able to access the Internet.
Check current WinHTTP proxy settings with the command:
netsh.exe winhttp show proxy

To enable WinHTTP proxy for a computer through a GPO, you must configure a special registry parameter.
First, you need to configure a proxy for WinHTTP on the reference computer. The easiest way is to import proxy settings from IE:
netsh winhttp import proxy source=ie

These settings will be saved in the WinHttpSettings parameter under the registry key HKEY_LOCAL_MACHINESOFTWAREMicrosoftWindowsCurrentVersionInternet SettingsConnections.

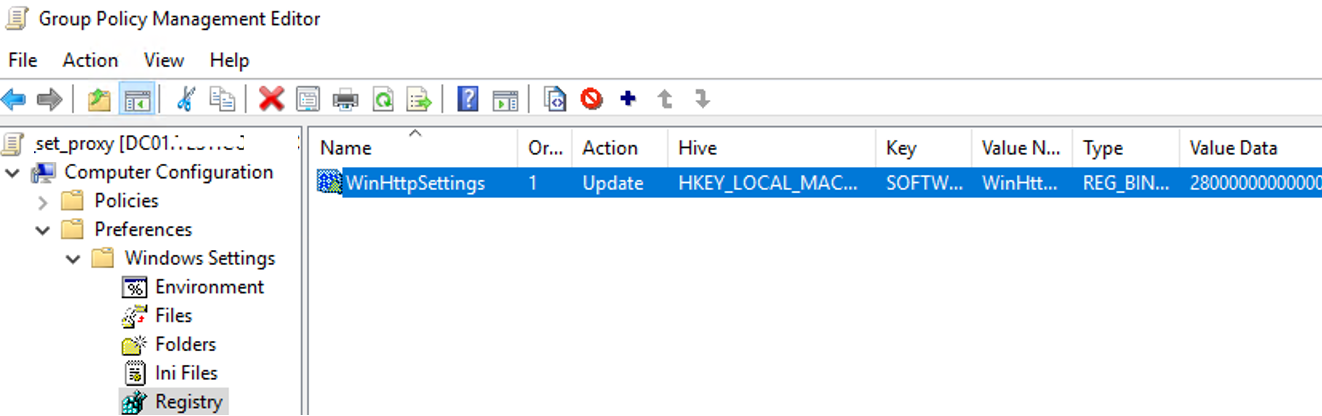
Now open your proxy GPO and go to Computer Configuration > Preferences > Windows Settings > Registry > New > Registry Wizard.
Select Local computer and specify the full path to the WinHttpSettings parameter.

It remains to click Finish, update the policy on computers, and make sure the WinHTTP proxy settings are applied successfully.
How to Prevent Users from Changing Proxy Settings in Browsers?
By default, if you configure the proxy server settings in Windows through the GPO, computer users can change the proxy settings themselves.
Note that proxy settings in Windows can be edited using both IE options and the modern Settings control panel.

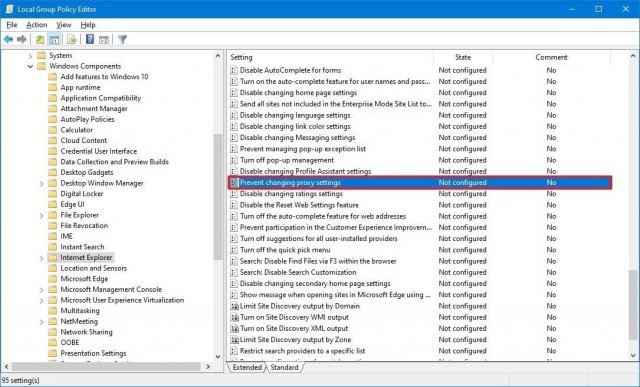
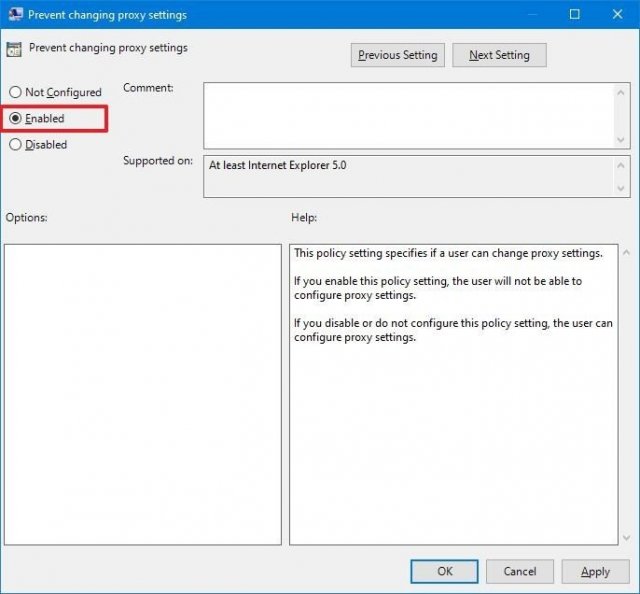
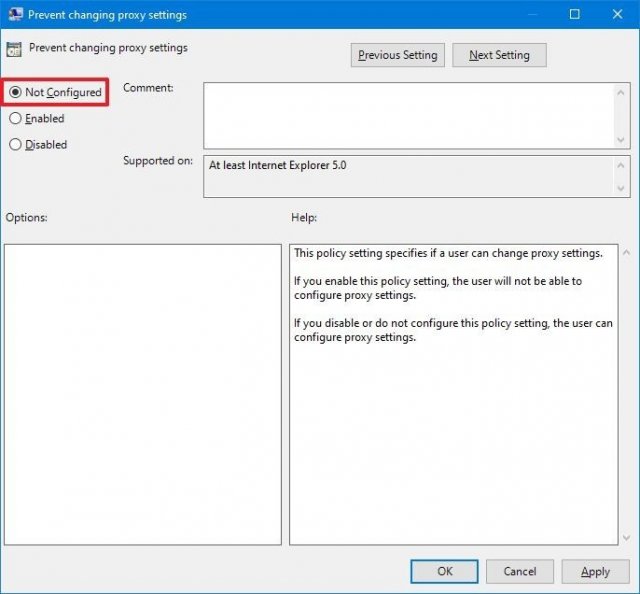
You can prevent users from changing proxy settings in Windows using the “Prevent changing proxy settings” additional GPO option. This parameter is present in both the user and computer GPO sections.
- Computer Configuration > Policies > Administrative Templates > Windows Components – Internet Explorer
- User Configuration > Policies > Administrative Templates > Windows Components Internet Explorer

If you enable this policy and apply it to the domain computer, then the fields with proxy settings in Windows will be blocked, and the caption will appear below: Some settings are managed by your system administrator.

Hint. Settings in the Computer Configuration section take precedence over user settings.
Typically, you want to use a more flexible way of granting permissions to change proxy settings on computers. For example, you can restrict proxy settings for all users except members of the ca_workstation_admins Active Directory group.
- Create a new GPO with proxy settings (or edit an existing one);
- Go to Group Policy Preferences (User Configuration > Preferences > Windows Settings > Registry) and create two registry values:
The first parameter prohibits changing proxy settings:
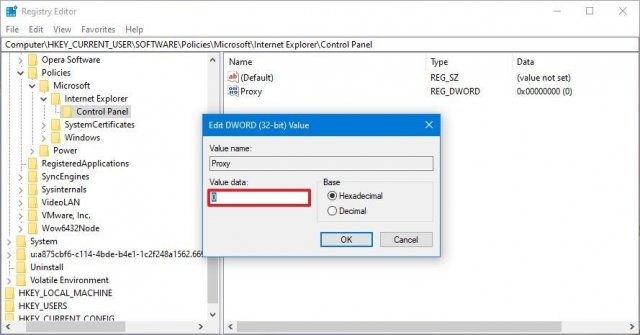
Hive: HKEY_CURRENT_USER

Key Path: SoftwarePoliciesMicrosoftInternet ExplorerControl Panel

Value name: Proxy

Value type: REG_DWORD

Value data: 00000001
The second parameter blocks the launch of the IE window with proxy settings:
Hive: HKEY_CURRENT_USER

Key Path: SoftwarePoliciesMicrosoftInternet ExplorerRestrictions

Value name: NoBrowserOptions

Value type: REG_DWORD

Value data: 00000001
- These policies will apply to all computer users;
- To prevent policies from applying to a specific security group, you need to copy these two parameters, set a larger Order, and change their values to 00000000;
- Then open the properties of each of these two registry settings, go to Common > Item level targeting > Targeting;
- Create a new targeting rule: New > Security Group > provide a group name (ca_workstation_admins);

- Create a similar targeting rule for the second registry parameter;
- As a result, if a user from the specified group logs on to the computer, the proxy settings for him won’t be locked.

It is also worth noting that for .NET Core 3.0 applications (including PowerShell Core 7.x) you can set proxy server settings using the following Windows environment variables:
- HTTP_PROXY:
- HTTPS_PROXY
- ALL_PROXY
- NO_PROXY
You can create and distribute these environment variables to domain user computers using GPP. Just create the required environment variables under Computer Configuration > Preferences > Windows Settings > Environment.

- About
- Latest Posts

I enjoy technology and developing websites. Since 2012 I’m running a few of my own websites, and share useful content on gadgets, PC administration and website promotion.
Индивидуальный подход
Доверительные партнерские отношения, подробное изучение сферы деятельности клиентов, особенностей организации их работы позволяют нам четко определять необходимые тактические и стратегические задачи, что поднимает наших партнеров на более высокий уровень среди конкурентов.
Подробнее
Гарантия качеcтва
Выполнение поставленных задач в максимально короткие сроки. Надежность и высокий профессионализм. «Прозрачная» ценовая политика. Предоставление любой информации клиенту, касающейся текущей работы и расходов. Мы полностью отвечаем за качество выполненных работ и соответствие вашим желаниям.
Подробнее
Решение задач любой сложности
Для нас нет ничего невозможного! Реализация любых целей по оригинальным проектам. Все работы выполняются квалифицированными специалистами, регулярно проходящими плановое обучение и аттестацию.
Подробнее

9 октября 2015
Если у вас нет возможности к каждому подходить и изменять прокси-сервер на компьютере. Сделаем это через групповые политики.
1. На контроллере домена запускаем редактор групповых политик (windows+r) пишем gpmc.msc, нажимаем ок.
2. Нажимаем правой кнопкой мыши на политику и выбираем Изменить.

3. В открывшемся окне выбираем Конфигурация пользователя —> Параметры панели управления —> Параметры обозревателя

4. В правой области нажимаем правой кнопкой мыши и наводим на создать и выбираем нужную версию Internet Explorer.
5. Откроется Свойства обозревателя.
6. Переходим во вкладку Подключения, нажимаем на Настройка сети.
Важно!
Для того что бы поле было подчеркнуто зеленым нужно нажать клавишу F5.
Т.к. при красном подчеркивание политика не сработает.
7. Вводим нужные наш ip адрес прокси сервера и порт.
8. Ставим не использовать прокси-сервер для локальных адресов.
9. Нажимаем ок.
10. После перезагрузки на каждом компьютере применяться политика и автоматически пропишется прокси-сервер.
In this article, we’ll take a look at how to centrally configure proxy settings on Windows 10 computers in a domain using Group Policy. Most popular browsers (such as Microsoft Edge, Google Chrome, Internet Explorer, Opera) and most applications automatically use the proxy settings set in Windows to access the Internet. We’ll also look at how to set up WinHTTP proxy settings on Windows.
Contents:
- How to Set Proxy Settings on Windows via GPO?
- Configure Proxy Setting via Registry and GPO
- Change WinHTTP Proxy Settings via GPO
In this article, we will look at the specifics of configuring a proxy server through Group Policy in supported versions of Windows (Windows 10, 8.1, and Windows Server 2012/2016/2019). Note that proxy settings are set differently in Windows 7/Server 2008R2, Windows XP/Windows Server 2003 with discontinued support.
How to Set Proxy Settings on Windows via GPO?
Originally, to centrally configure Internet Explorer settings (including proxy settings) using Group Policies in the Active Directory domain environment, the Internet Explorer Maintenance (IEM) policy was used. This policy option was located in the user GPO section: User configuration –> Policies –> Windows Settings –> Internet Explorer Maintenance. But since Windows Server 2012/Windows 8, the IEM policy has been deprecated. This section is missing in modern versions of Windows 10/Windows Server 2016/2019.

On the latest Windows versions, you must use Group Policy Preferences (GPP) to configure IE and proxy settings in the GPO Editor. There is also the option of using a special extension of Internet Explorer Administration Kit 11 (IEAK 11) – but it is rarely used.
Open the domain GPO Editor console (Group Policy Management Console – GPMC.msc), select the OU with the users to which you want to apply proxy settings, and create a new policy Create a GPO in this domain, and Link it here.
Go to User Configuration -> Preferences -> Control Panel Settings -> Internet Settings. In the context menu, select New -> Internet Explorer 10.
To configure proxy settings on Windows 10/Windows Server 2016, you need to use the Internet Explorer 10 item.
Tip. Although there is no separate option for Internet Explorer 11, the Internet Explorer 10 policy should apply to all versions of IE above 10 (in the InternetSettings.xml policy file, you can see that the option is valid to all IE versions from 10.0.0.0 to 99.0.0.0).
<FilterFile lte="0" max="99.0.0.0" min="10.0.0.0" gte="1" type="VERSION" path="%ProgramFilesDir%Internet Exploreriexplore.exe" bool="AND" not="0" hidden="1"/>
A special Group Policy Preferences IE form will appear in front of you, almost completely identical to the Internet Options settings in the Windows Control Panel. For example, you can specify a home page (General tab -> Home page field).
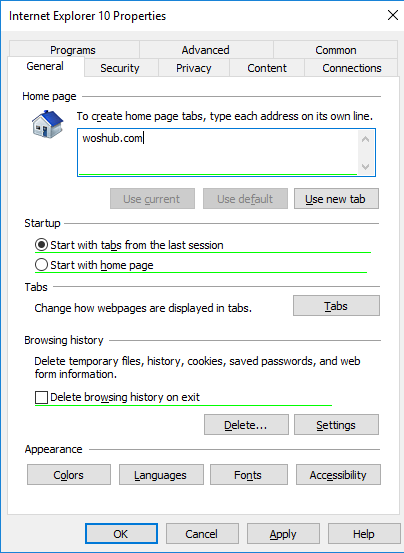
Important. It is not enough to simply save your changes in the Group Policy Editor. Notice the red and green underlines for the Internet Explorer 10 configurable settings. A red underline indicates that the setting won’t be applied. To save and apply a specific setting, press F5. A green underline of a parameter means that this IE parameter will be applied via GPP.
The following function keys are available:
- F5 – Enable all settings on the current tab
- F6 – Enable the selected setting
- F7 – Disable the selected setting
- F8 – Disable all settings in the current tab
To specify proxy settings, go to the Connections tab and click the Lan Settings button. The proxy server can be configured in one of the following ways:
- Automatically detect settings – automatic detection of settings using the wpad.dat file;
- Use automatic configuration script – auto-configuration script (proxy.pac);
- Proxy Server – the IP address or DNS name of the proxy server is specified directly in the policy settings. This is the easiest way, and we will use it.
Check the option Use a proxy server for your LAN, and specify the IP/FQDN name of the proxy server and the connection port in the corresponding Address and Port fields.
By enabling the Bypass proxy server for local addresses option, you can prevent applications (including the browsers) from using a proxy server when accessing local resources (in the format http://localnetwork). If you use resource addresses like http://web1.woshub.loc or http://192.168.1.5, then these addresses are not recognized by the Windows as local ones. These addresses and addresses of other resources, for access to which you do not need to use a proxy, must be specified manually. Press Advanced button and add this addresses to the field Do not use proxy servers for addresses beginning with in the following format: 10.1.*;192.168.*;*.woshub.loc;*.local.net.
Tip. Proxy settings in Google Chrome also can be set through the GPO using special administrative templates. Also, you can install the ADMX templates for Mozilla Firefox.
After you save the policy, you can view the InternetSettings.xml file with the specified browser settings in the policy folder on the domain controller:
\UKDC1SYSVOLwoshub.comPolicies{PolicyGuiID}UserPreferencesInternetSettingsInternetSettings.xml

GPP allows you to more finely target policy to users/computers. For this, GPP Item Level Targeting is used. Go to the Common tab, enable the option Item-level targeting -> Targeting.
In the form that opens, specify the conditions for applying the policy. As an example, I indicated that the proxy configuration policy will be applied only to users who are members of the proxy_users domain security group. You can use your own logic for assigning proxy parameters.
It remains to link the proxy policy to the AD container with the users and update policy settings on them. After applying policies on the users’ computers, new IE settings should be used. You can check the current proxy settings on Windows 10 in the Settings -> Network and Internet -> Proxy. As you can see, the computer now uses the proxy settings specified in the domain policy.
To prevent users from changing the proxy server settings, you can use this article.
Configure Proxy Setting via Registry and GPO
In addition, you can configure IE settings through the registry using GPP policies. For example, to enable proxy server, you need to configure the following registry parameter in the registry key HKEY_CURRENT_USERSoftwareMicrosoft WindowsCurrentVersionInternet Settings. In the GPO editor go to the section User Configuration -> Preferences -> Windows Settings -> Registry and create three registry parameters under the specified reg key:
ProxyEnable(REG_DWORD) =00000001ProxyServer(REG_SZ) =192.168.0.11:3128ProxyOverride(REG_SZ) =https://*.woshub.com;192.168.*;10.1.*;*.contoso.com;<local>
You can also use Item-level targeting here to target your policy settings for specific users/devices.
If you need to create proxy policies not per-user, but for the entire computer (per-computer), use the GPP settings from the GPO section Computer Configuration -> Preferences -> Windows Settings -> Registry. Set the same registry parameters under the registry key HKEY_LOCAL_MACHINESoftwarePoliciesMicrosoftWindowsCurrentVersionInternet Settings.
Change WinHTTP Proxy Settings via GPO
Some system services or applications (for example, the Wususerv update service or PowerShell) don’t use user’s proxy settings by default. For such applications to work correctly and access the Internet, you need to configure the WinHTTP proxy settings in Windows.
To check if WinHTTP proxy is configured on your computer, run the command:
netsh winhttp show proxy
The answer “Direct access (no proxy server)” means that no proxy is set. 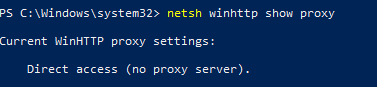
You can manually set a proxy for WinHTTP on your computer with the command:
netsh winhttp set proxy proxy.woshub.com:3128 "localhost;10.1.*;192.168.*;*.woshub.com"
Or import proxy settings from user’s Internet Explorer settings:
netsh winhttp import proxy source=ie
However, you won’t be able to configure WinHTTP through the GPO – there is no corresponding parameter in the GPO editor, and the parameter are stored in binary registry attribute that is not suitable for direct editing.
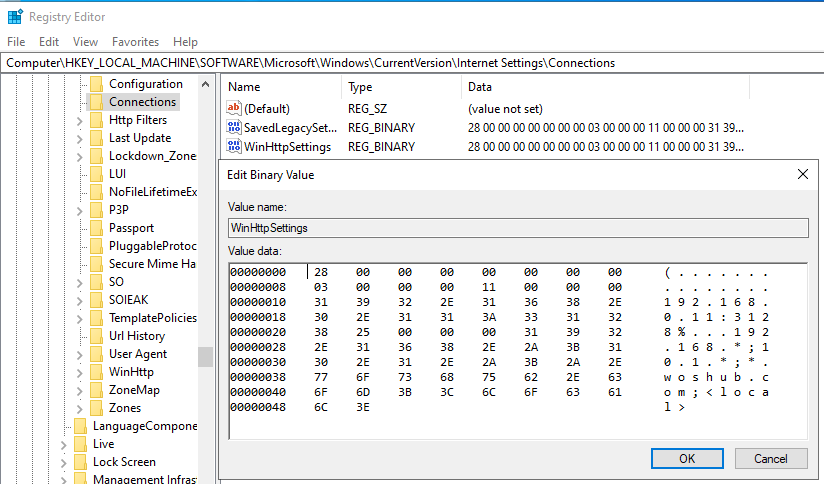
The only way to set WinHTTP proxy settings on Windows via GPO is to configure WinHTTP proxy on the reference computer, export the value of the WinHttpSettings parameter from the registry key HKLMSOFTWAREMicrosoftWindowsCurrentVersionInternet SettingsConnections, and deploy this parameter to domain computers through the GPP registry extension.
Не было никогда и вот опять…
Задача банальна: задать всем через GPO параметры прокси-сервера.
Создана групповая политика и слинкована в корень домена
Параметры определены в разделе: User Configuration / Preferences / Control Panel Settings / Internet Settings
Созданы два параметра для IE 10 и 8+9.
Задана стартовая страница, на вкладке Connections / LAN Settings указан адрес прокси-сервера с портом, установлена галочка Bypass proxy server for local addresses, а так же в Advanced указаны localhost и несколько сетей, находящихся в других офисах
через «;».
При таком подходе, после обновления политики устанавливается параметр прокси-сервер и его порт, ставится галочка Bypass proxy server for local addresses, но сети в Advanced не появляются и стартовая страница тоже не меняется.
Загуглил решение — определение прокси через реестр.
Убил эту политику, создал новую, в которой установил три ключа по пути:
1. HKEY_CURRENT_USERSoftwareMicrosoftInternet ExplorerMain
Start Page REG_SZ «ссылка на корпоративный сайт»
2. HKEY_CURRENT_USERSoftwareMicrosoftWindowsCurrentVersionInternet Settings
ProxyOverride REG_SZ «<local>;127.0.0.1;192.168.1.0/24»
Стартовая страница появилась, параметры прокси — нет. Галочки включения прокси сервера и отключение прокси для локальных адресов установлены, но поля пустые и браузер через прокси не ходит.
Удалил эту политику и сделал третий вариант — стартовую страницу определяю через реестр, а остальные политики через…политики=) Масло масляное)
Осталось разобраться со вкладкой Advanced — не получается определить параметры хоть ты тресни.
При получении результирующей политики на компьютере (rsop.msc), политики, определяющей прокси, вообще нет, но если результат просчитать через групповые политики на контроллере, то там все показывается (возможно так и должно быть?)
Совсем забыл, клиенты Windows 10 Pro, домен на 2012R2/2008R2 серверах, уровень 2008.
Прокси-сервер располагается между вашим компьютером и интернетом, получая данные из веба от лица пользователя. Есть три причины применять прокси: конфиденциальность, скорость и отслеживание трафика.
Конфиденциальность является наиболее важным преимуществом, поскольку позволяет работать в интернете анонимно. Компьютер запрашивает информацию через прокси, а не напрямую с сайта. Затем сервер передаёт информацию клиенту, скрывая его публичный сетевой адрес.
Прокси-сервер также может улучшать скорость доступа в интернет или уменьшать пропускную способность. Например, если у организации в сети есть прокси, когда делается запрос, сервер кеширует веб-страницу в базу данных и предлагает её другим пользователям, если они запросят эту же информацию. Организации могут использовать прокси для мониторинга сайтов, на которые заходят их сотрудники. Это позволяет создавать белые и чёрные списки сайтов.
Поскольку есть так много причин применять прокси, в зависимости от вашего окружения иногда может потребоваться запретить пользователю менять настройки прокси в Windows 10 или запретить им использовать прокси вовсе.
Какой бы ни была причина, Windows 10 предлагает по меньшей мере два метода отключения настроек прокси при помощи реестра и редактора локальных групповых политик.
В этой статье мы рассмотрим шаги по отключению настроек прокси в приложении «Параметры», чтобы пользователи не могли внести изменения. Мы также рассмотрим шаги по активации настроек, если прокси вам больше не нужен или если функция была отключена по ошибке.
Как отключить настройки прокси в Windows 10
В Windows 10 можно отключить настройки прокси в приложении «Параметры». Можно использовать редактор групповых политик и реестр.
Подсказка. Если вы хотите запретить пользователю менять кастомную конфигурацию, сначала нужно настроить прокси, затем отключить настройки при помощи описанных ниже шагов.
Отключение настроек через редактор групповых политик
Если у вас Windows 10 Pro (или Enterprise), проще всего запретить пользователю менять настройки прокси через редактор локальных групповых политик.
Для исключения возможности менять настройки прокси в Windows 10 сделайте следующее.
- Нажмите на кнопку «Пуск».
- Введите в поиск gpedit.msc и нажмите OK для открытия редактора локальных групповых политик.
- Перейдите по адресу Конфигурация пользователя > Административные шаблоны > Компоненты Windows > Internet Explorer.
- На правой стороне дважды кликните на политику «Запретить изменение параметров прокси».
- Выберите вариант «Включено».
- Нажмите кнопку «Применить».
- Нажмите кнопку OK.
После завершения этих шагов настройки прокси в приложении «Параметры» и через настройки интернета будут недоступны для пользователей. Если вы прежде задали кастомную конфигурацию прокси, она останется доступной, но пользователи не смогут менять её.
Отключение настроек прокси через реестр
Если у вас Windows 10 Home, там нет редактора локальных групповых политик. В таком случае можно отключить политику «Запретить изменение параметров прокси» при помощи изменения реестра.
Предупреждение. Редактирование реестра является рискованным делом и может привести к непоправимому ущербу для операционной системы. Рекомендуется выполнить полное резервное копирование компьютера, прежде чем вносить изменения в реестр.
Для отключения настроек прокси сделайте следующие.
- Нажмите на кнопку «Пуск».
- Введите в поиск regedit и откройте редактор реестра.
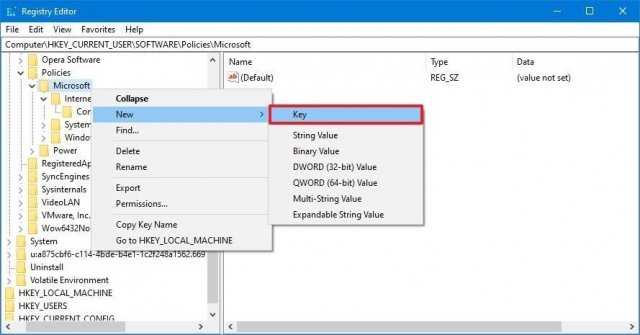
- Перейдите по адресу HKEY_CURRENT_USERSoftwarePoliciesMicrosoft.
Подсказка. На Windows 10 можно копировать и вставлять путь в адресной строке реестра, чтобы быстро попасть по нужному адресу.
- Правой кнопкой мыши нажмите на папку Microsoft, выберите подменю «Новый» и опцию «Ключ».
- Назовите ключ Internet Explorer и нажмите ввод.
- Правой кнопкой мыши нажмите на только что созданный ключ, выберите подменю «Новый» и опцию «Ключ».
- Назовите ключ Control Panel и нажмите ввод.
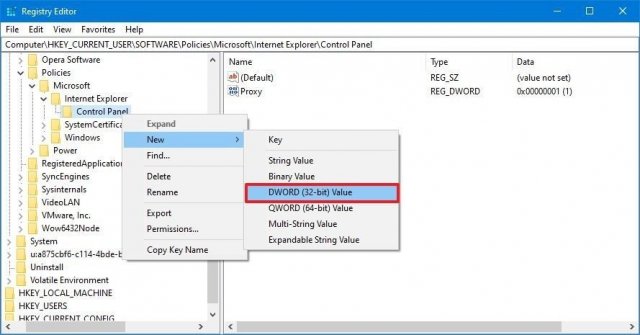
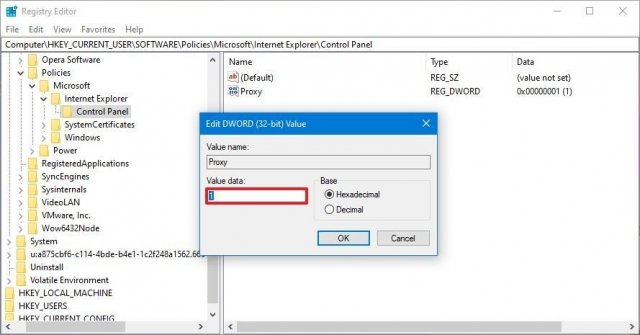
- Правой кнопкой мыши нажмите на созданный ключ Control Panel, выберите подменю «Новый» и выберите опцию DWORD (32-bit) Value.
- Назовите ключ Proxy и нажмите ввод.
- Дважды кликните по созданному параметру DWORD и поменяйте значение с 0 на 1.
- Нажмите кнопку OK.
- Перезагрузите компьютер.
После завершения этих действий настройки прокси нельзя будет менять в приложении «Параметры» или через старую страницу «Настройки интернета». Как и в случае применения редактора локальных групповых политик, если вы раньше создали кастомные настройки прокси, они продолжат оставаться доступными, но пользователи не смогут вносить в них изменения.
Как активировать настройки прокси на Windows 10
Если вы хотите отменить изменения или вы администратор устройства и настройки прокси в приложении «Параметры» неактивны, можно использовать редактор локальных групповых политик или реестр для активации функции.
Активация прокси через групповые политики
Для включения возможности менять настройки прокси на Windows 10 сделайте следующее.
- Нажмите на кнопку «Пуск».
- Введите в поиск gpedit.msc и нажмите OK для раскрытия редактора локальных групповых политик.
- Перейдите по адресу Конфигурация пользователя > Административные шаблоны > Компоненты Windows > Internet Explorer.
- На правой стороне дважды нажмите на политику «Запретить изменение параметров прокси».
- Выберите вариант «Не задано».
- Нажмите кнопку «Применить».
- Нажмите кнопку OK.

После этого настройки прокси в приложении «Параметры» перестанут быть неактивными и можно будет менять их.
Активация настроек прокси через реестр
Чтобы настройки прокси стали доступными в приложении «Параметры» и в настройках интернета, используйте реестр.
- Нажмите на кнопку «Пуск».
- Введите в поиск regedit и откройте редактор реестра.
- Перейдите по следующему пути:
HKEY_CURRENT_USERSoftwarePoliciesMicrosoftInternet ExplorerControl PanelПодсказка. На Windows 10 можно копировать и вставлять путь в адресной строке реестра, чтобы быстро попасть по нужному адресу.
- Дважды нажмите на значение Proxy DWORD на правой стороне и поменяйте значение с 1 на 0.
- Нажмите кнопку OK.
- Перезагрузите компьютер.
После этого настройки прокси снова будут доступны в Windows 10.
Пересмотрел кучу мануалов и кучу видео. Везде одно и тоже: делаем 3 параметра в реестре, добавляем в настройках IE — все. НО не работает.
1. Как убрать галочку «Определять параметры автоматически» ?
2. Как поставить палочку «Использовать прокси» ?


-
Вопрос задан24 янв.
-
208 просмотров
1.
HKCUSoftwareMicrosoftWindowsCurrentVersionInternet SettingsAutoDetect : REG_DWORD : 02.
HKCUSoftwareMicrosoftWindowsCurrentVersionInternet SettingsProxyEnable : REG_DWORD : 1Пригласить эксперта
Никто через реестр уже не делает.
Для изменения настроек прокси есть стандартные настройки в GPO Preferences, например тут
User Configuration -> Preferences -> Control Panel Settings -> Internet Settings
-
Показать ещё
Загружается…
07 февр. 2023, в 13:40
15000 руб./за проект
07 февр. 2023, в 12:54
30000 руб./за проект
07 февр. 2023, в 12:49
300 руб./за проект
Минуточку внимания
Wondering how to Configure Proxy Settings on Windows Using Group Policy? We can help you.
Most popular browsers and applications use the proxy settings set in Windows to access the Internet.
As part of our Server Management Services, we assist our customers with several Windows queries.
Today, let us see how to centrally configure proxy settings on Windows in a domain using Group Policy.
Configure Proxy Settings on Windows Using Group Policy
In order to configure the proxy settings, our Support Techs suggest the following methods.
Set Proxy Settings on Windows via GPO
Originally, to centrally configure Internet Explorer settings via GPO, the Internet Explorer Maintenance (IEM) policy was used.
We can find it under, User configuration –> Policies –> Windows Settings –> Internet Explorer Maintenance.
However, since Windows Server 2012/Windows 8, this section is missing in modern versions.
On the latest Windows versions, we must use Group Policy Preferences (GPP) to configure IE and proxy settings in the GPO Editor.
To do so, we open the domain GPO Editor console, select the OU with the users to which we want to apply proxy settings. Then we create a new policy Create a GPO in this domain and Link it.
We go to User Configuration -> Preferences -> Control Panel Settings -> Internet Settings. In the context menu, select New -> Internet Explorer 10.
On the other hand, on Windows 10/Windows Server 2016, we need to use the Internet Explorer 10 item.
Although there is no separate option for Internet Explorer 11, the Internet Explorer 10 policy should apply to all versions of IE above 10.
We will get Group Policy Preferences IE forms, almost completely identical to the Internet Options settings in the Windows Control Panel.
For example, we can specify a home page (General tab -> Home page field).
To save and apply a specific setting, ensure to press F5. A green underline of a parameter means that this IE parameter will apply via GPP.
Similarly, we can specify proxy settings in the Connections tab and click the Lan Settings button.
We configure the proxy server in one of the following ways:
- Automatically detect settings – automatic detection of settings using the wpad.dat file
- Use automatic configuration script – auto-configuration script (proxy.pac)
- Proxy Server – the IP address or DNS name of the proxy server is specified directly in the policy settings. We use it.
Check the option Use a proxy server for our LAN. Then we specify the IP/FQDN name of the proxy server and the connection port in the corresponding Address and Port fields.
If we enable the Bypass proxy server for local addresses option, we prevent applications from using a proxy server when accessing local resources.
Addresses of other resources, for access to which we do not need to use a proxy, must be specified manually. Press the Advanced button and add these addresses to the field Do not use proxy servers for addresses beginning with in the following format: 10.1.*;192.168.*;*.bobcares.com;*.local.net.
We can also set proxy settings in Google Chrome through the GPO using special administrative templates.
After we save the policy, we can view the InternetSettings.xml file with the specified browser settings in the policy folder on the domain controller:
\UKDC1SYSVOLbobcares.comPolicies{PolicyGuiID}UserPreferencesInternetSettingsInternetSettings.xml
GPP allows to more finely target policy to users/computers. For this, GPP Item Level Targeting is used. Go to the Common tab, enable the option Item-level targeting -> Targeting.
In the form that opens, we specify the conditions for applying the policy. We can use our own logic to assign proxy parameters.
It remains to link the proxy policy to the AD container with the users and update policy settings on them.
After applying policies on the users’ computers, we use the new IE settings.
We can check the current proxy settings on Windows 10 in the Settings -> Network and Internet -> Proxy.
Configure Proxy Setting via Registry and GPO
In addition, we can configure IE settings through the registry using GPP policies.
For example,
To enable a proxy server, we configure the following registry parameter in the registry key HKEY_CURRENT_USERSoftwareMicrosoft WindowsCurrentVersionInternet Settings.
In the GPO editor, under User Configuration -> Preferences -> Windows Settings -> Registry and create three registry parameters under the specified reg key:
- ProxyEnable (REG_DWORD) = 00000001
- ProxyServer (REG_SZ) = 192.168.0.11:3128
- ProxyOverride (REG_SZ) = https://*.bobcares.com;192.168.*;10.1.*;*.contoso.com;
We create proxy policies not per-user, but for the entire computer. To do so, we use the GPP settings from the GPO section Computer Configuration -> Preferences -> Windows Settings -> Registry.
Set the same registry parameters under the registry key HKEY_LOCAL_MACHINESoftwarePoliciesMicrosoftWindowsCurrentVersionInternet Settings.
Change WinHTTP Proxy Settings via GPO
Some system services or applications do not use the user’s proxy settings by default. For such applications to work, we configure the WinHTTP proxy settings in Windows.
To check if WinHTTP proxy is configured on our computer, we run:
netsh winhttp show proxy
The “Direct Access (no proxy server)” output means no proxy is set.
We can manually set a proxy for WinHTTP on our computer. To do so, we run:
netsh winhttp set proxy proxy.bobcares.com:3128 “localhost;10.1.*;192.168.*;*.bobcares.com”
Or we import proxy settings from the user’s Internet Explorer settings:
netsh winhttp import proxy source=ie
However, this will not configure WinHTTP through the GPO.
The only way is to configure WinHTTP proxy on the reference computer.
Then we export the value of the WinHttpSettings parameter from the registry key HKLMSOFTWAREMicrosoftWindowsCurrentVersionInternet SettingsConnections.
Finally, we deploy this parameter to domain computers through the GPP registry extension.
[Need help with the procedures? We are available 24*7]
Conclusion
In short, we saw how our Support Techs configure Proxy Settings on Windows using Group Policy.
PREVENT YOUR SERVER FROM CRASHING!
Never again lose customers to poor server speed! Let us help you.
Our server experts will monitor & maintain your server 24/7 so that it remains lightning fast and secure.
GET STARTED
var google_conversion_label = «owonCMyG5nEQ0aD71QM»;
Обновлено 11.12.2019
![]() Добрый день! Уважаемые читатели и гости одного из крупнейших IT порталов Pyatilistnik.org. В прошлый раз мы с вами разобрали, как скопировать файл и папку через групповую политику. Сегодня мы вновь воспользуемся их возможностями и рассмотрим ситуацию, при которой вам необходимо настроить запрет изменения настроек прокси-сервера с помощью GPO для браузеров Internet Explorer, Google Chrome, Mozilla Firefox, Yandex браузер. Мы рассмотрим для чего это нужно, что это даст в практическом выражении для системного администратора.
Добрый день! Уважаемые читатели и гости одного из крупнейших IT порталов Pyatilistnik.org. В прошлый раз мы с вами разобрали, как скопировать файл и папку через групповую политику. Сегодня мы вновь воспользуемся их возможностями и рассмотрим ситуацию, при которой вам необходимо настроить запрет изменения настроек прокси-сервера с помощью GPO для браузеров Internet Explorer, Google Chrome, Mozilla Firefox, Yandex браузер. Мы рассмотрим для чего это нужно, что это даст в практическом выражении для системного администратора.
Для чего нужно убирать возможность изменения настроек прокси-сервера
Перед практической частью я бы хотел описать реальные случаи из своей практики, где мне пришлось ограничивать пользователей в данном вопросе.
- Первый пример, я работаю в очень крупной компании, это подразумевает. что некоторые мелкие или рутинные задачи проектов или под проектов могут выполнять подрядчики. Для подрядчиков есть отдельный терминальный стол, где они варятся. Для некоторых из них необходимы особые условия, например запрет выхода в интернет, но при этом иметь возможность обращаться к локальным ресурсам. Особо продвинутые могут попытаться найти бесплатные адреса прокси и прописать их в браузере, чтобы этого не произошло необходимо убрать у них возможность менять настройки прокси-сервера.
- Второй пример, это RDS ферма, где так же работают сотрудники компании. Они выходят в интернет через определенный шлюз. Чтобы это не обойти прописав в настройках сторонний прокси сервер, нужно заблокировать у них такую возможность. На самом деле вариантов применения очень много.
Методы запрета изменения настроек прокси сервера
В данном примере я покажу вам несколько вариантов, которые вы сможете использовать по своим требованиям. Первый вариант, это использование ISE настроек групповой политики, второй вариант, это использование ключей реестра.
Благодаря данной инструкции вы сможете запретить изменение настроек прокси в Internet Explorer, Google Chrome, Mozilla Firefox, Yandex браузер, в разделе прокси-сервер в Windows 10
И так у меня в домене Active Directory есть компьютер W10CL02 под управление операционной системы Windows 10 и пользователь Барбоскин Геннадий.
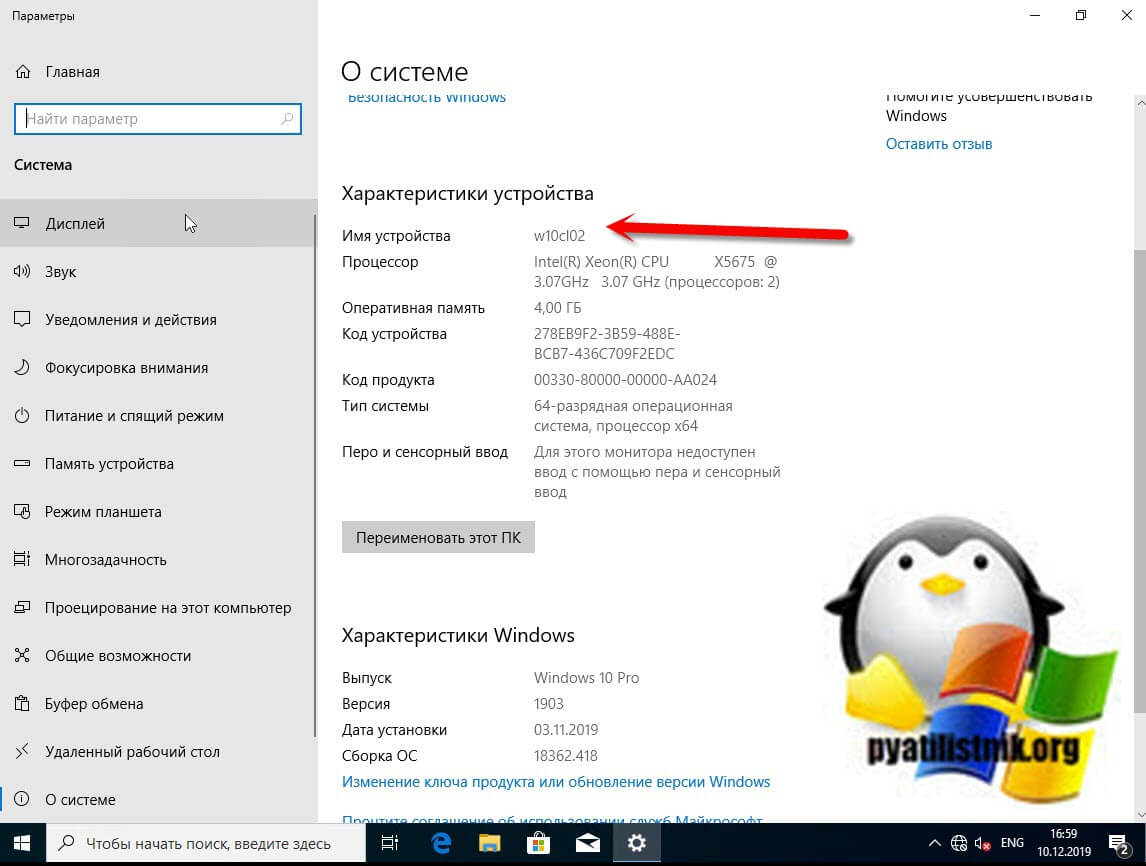
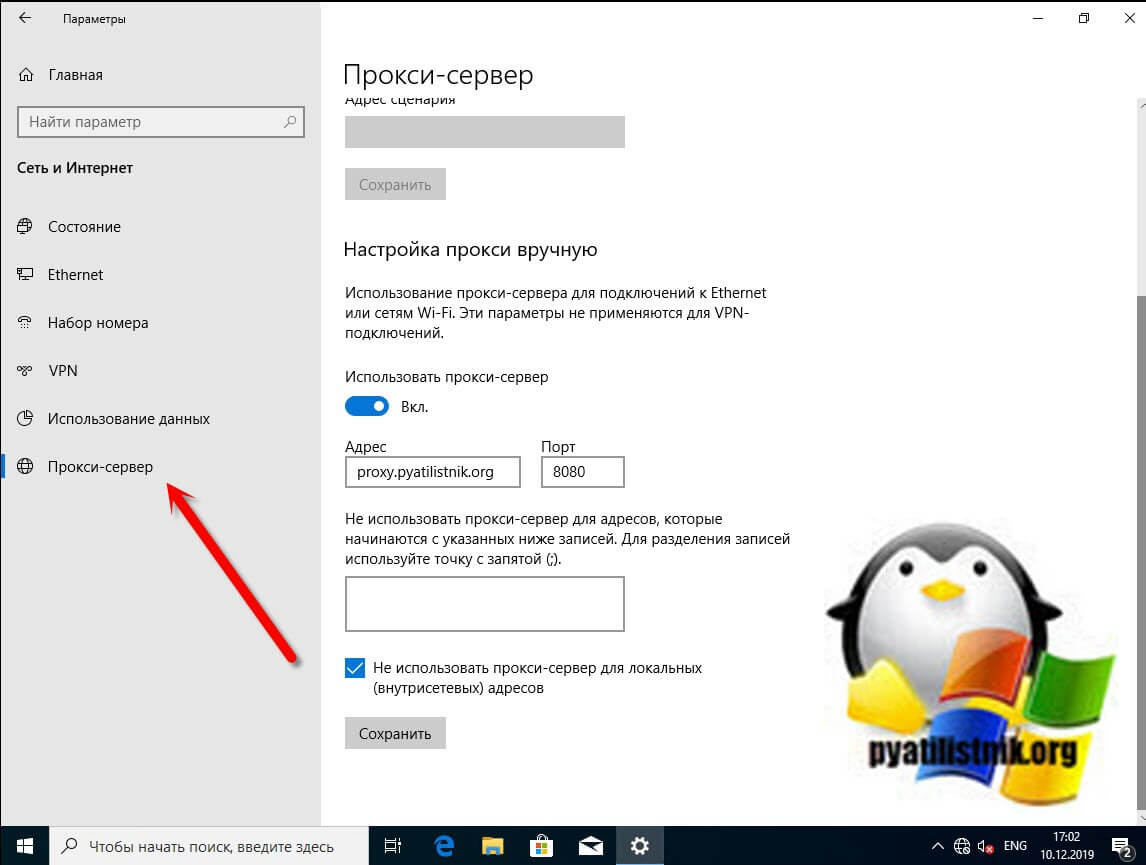
Мне бы хотелось запретить ему изменять настройки прокси сервера в Internet Explorer и в настройках Proxy на уровне системы. В прошлый раз мы с вами через групповые политики назначили на его компьютере свои настройки прокси-сервера, которые были прописаны в настройках «Параметры — Прокси сервер«
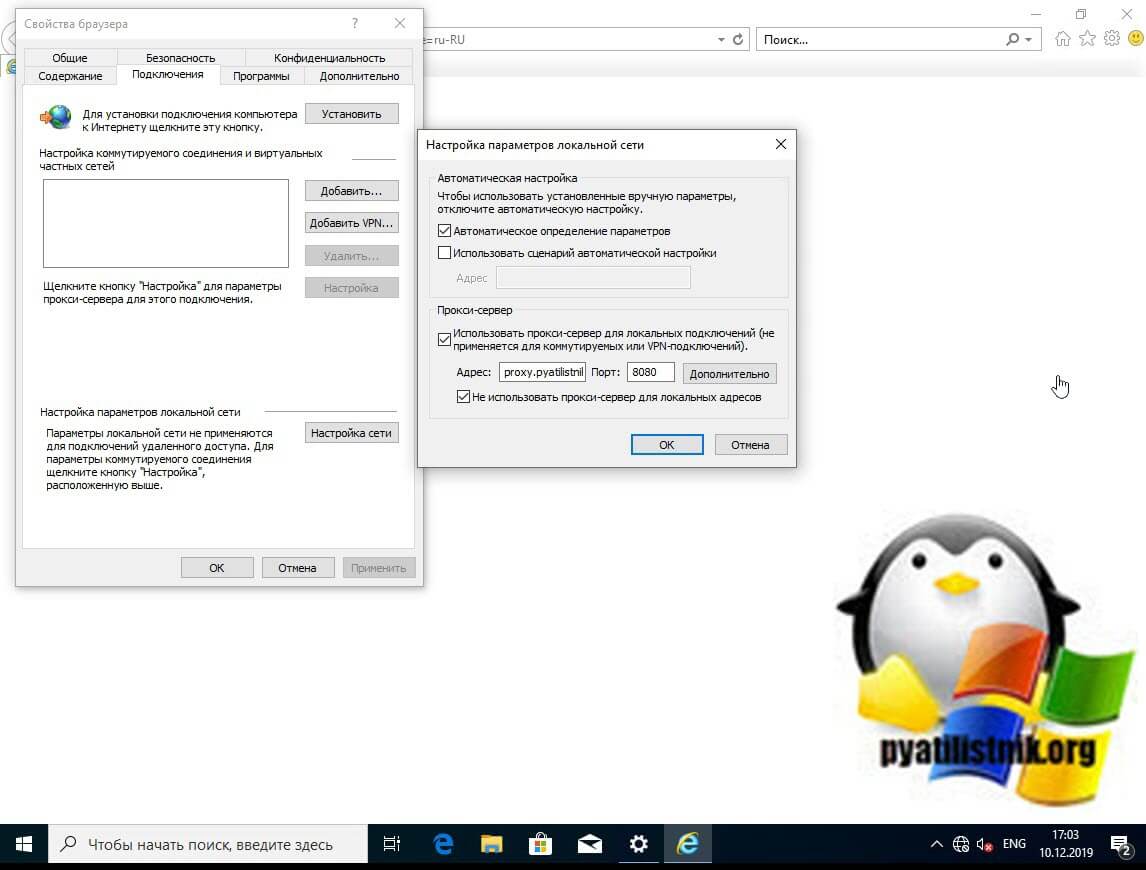
или же в «Настройках параметров локальной сети» в Internet Explore 11.
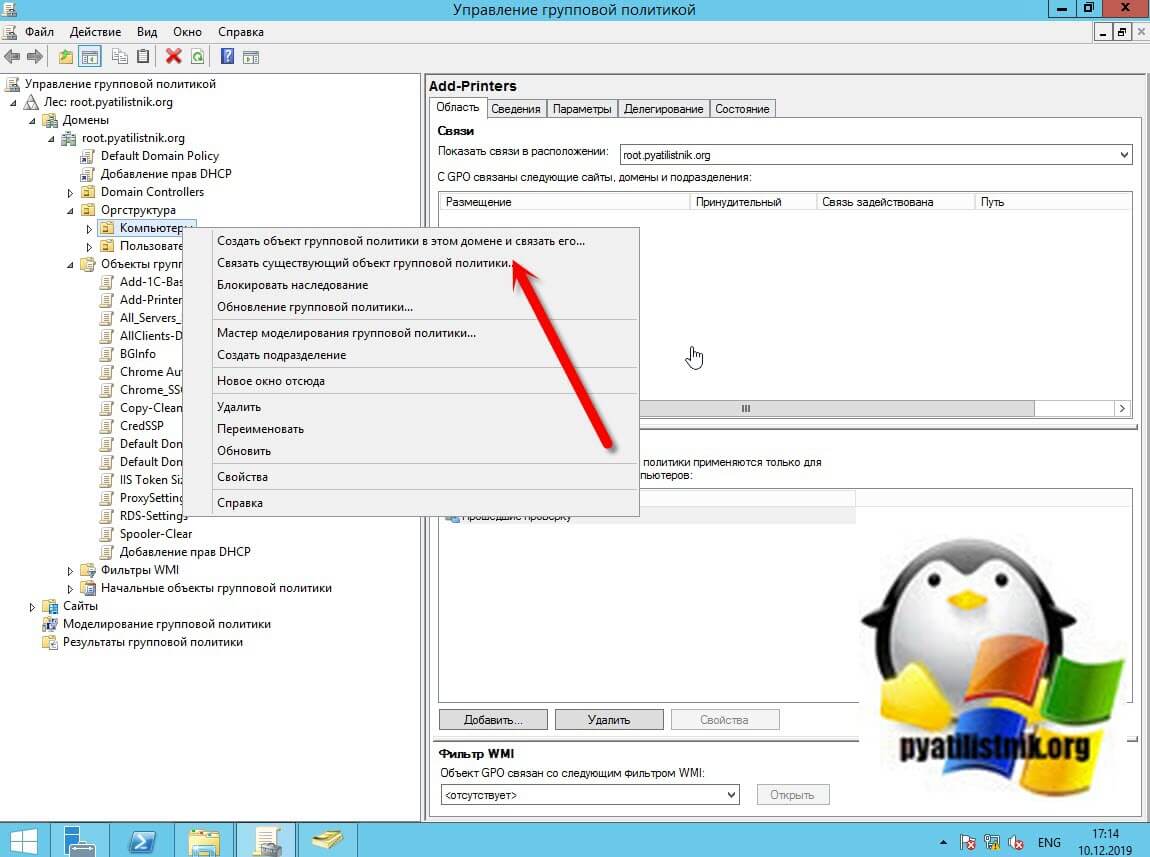
Вся проблема заключается в том, что Геннадий умеет изменять эти настройки и знает, что для этого не требуется наличие административных прав в системе. Это не порядок и давайте это исправлять. Откройте оснастку «Управление групповой политикой», можно из окна выполнить, введя gpmc.msc
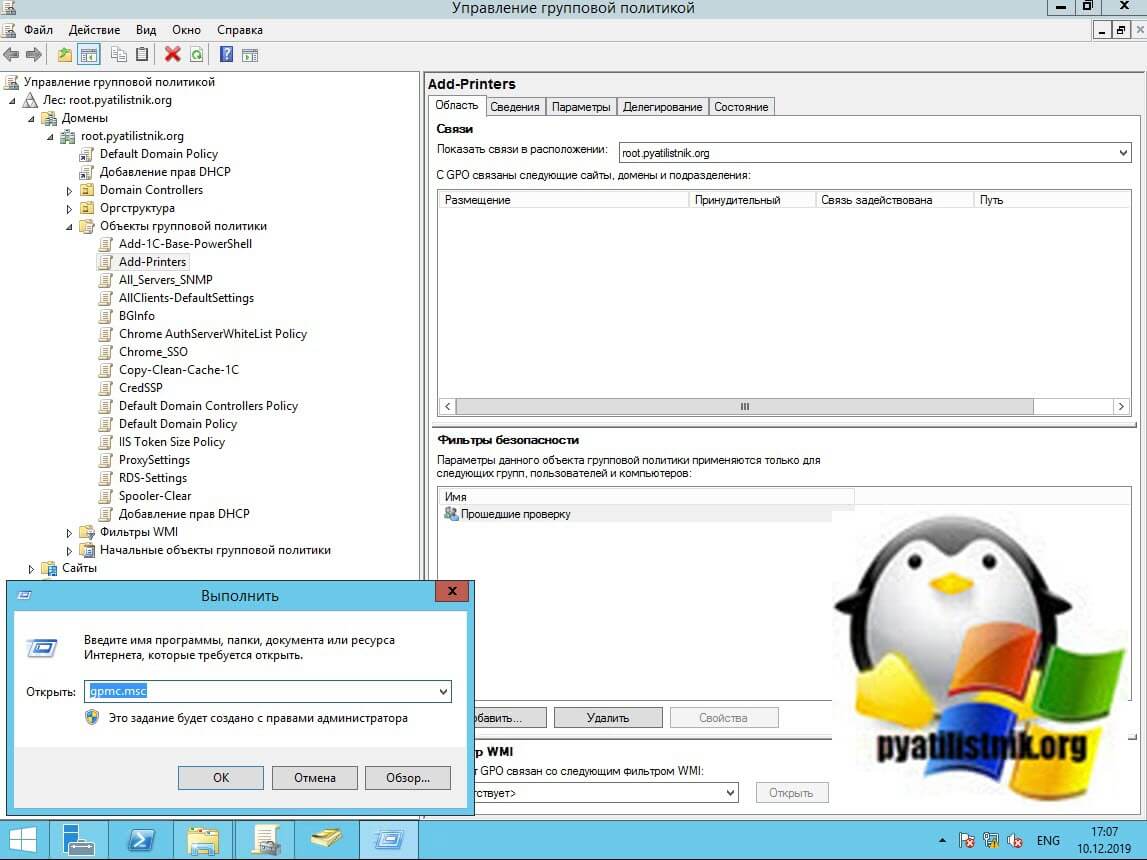
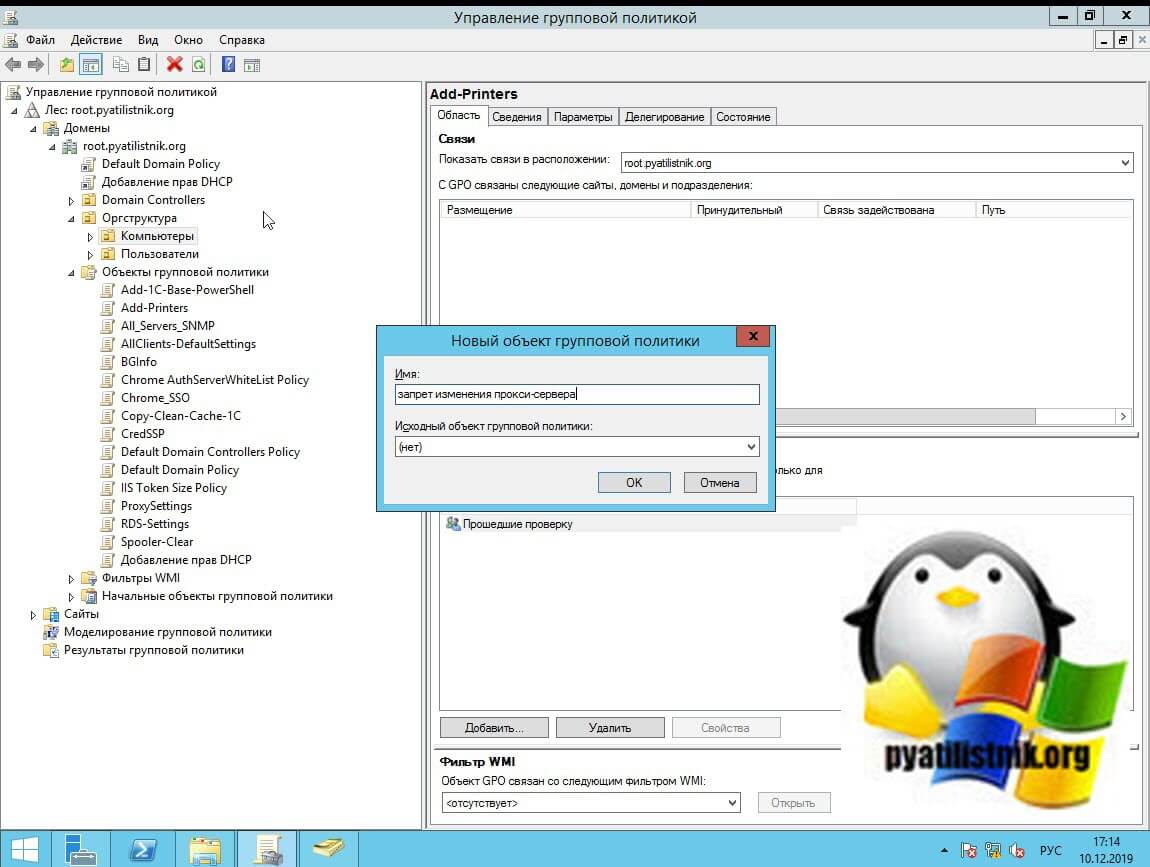
Найдите ваше организационное подразделение к которому вы будите применять объект групповой политики, тут нужно не забывать, что вы можете настроить ограничение на уровне пользователя или на уровне компьютера, если сделаете на уровне компьютера, то это будет распространяться на всех его пользователей, обычно это делают на терминальных серверах. В моем примере я сделаю настройку для компьютера, но и покажу и для пользователя. Создаем новый объект GPO и задаем ему нужное вам имя. Переходим к ее редактированию.
Откройте ветку настроек, если для компьютера:
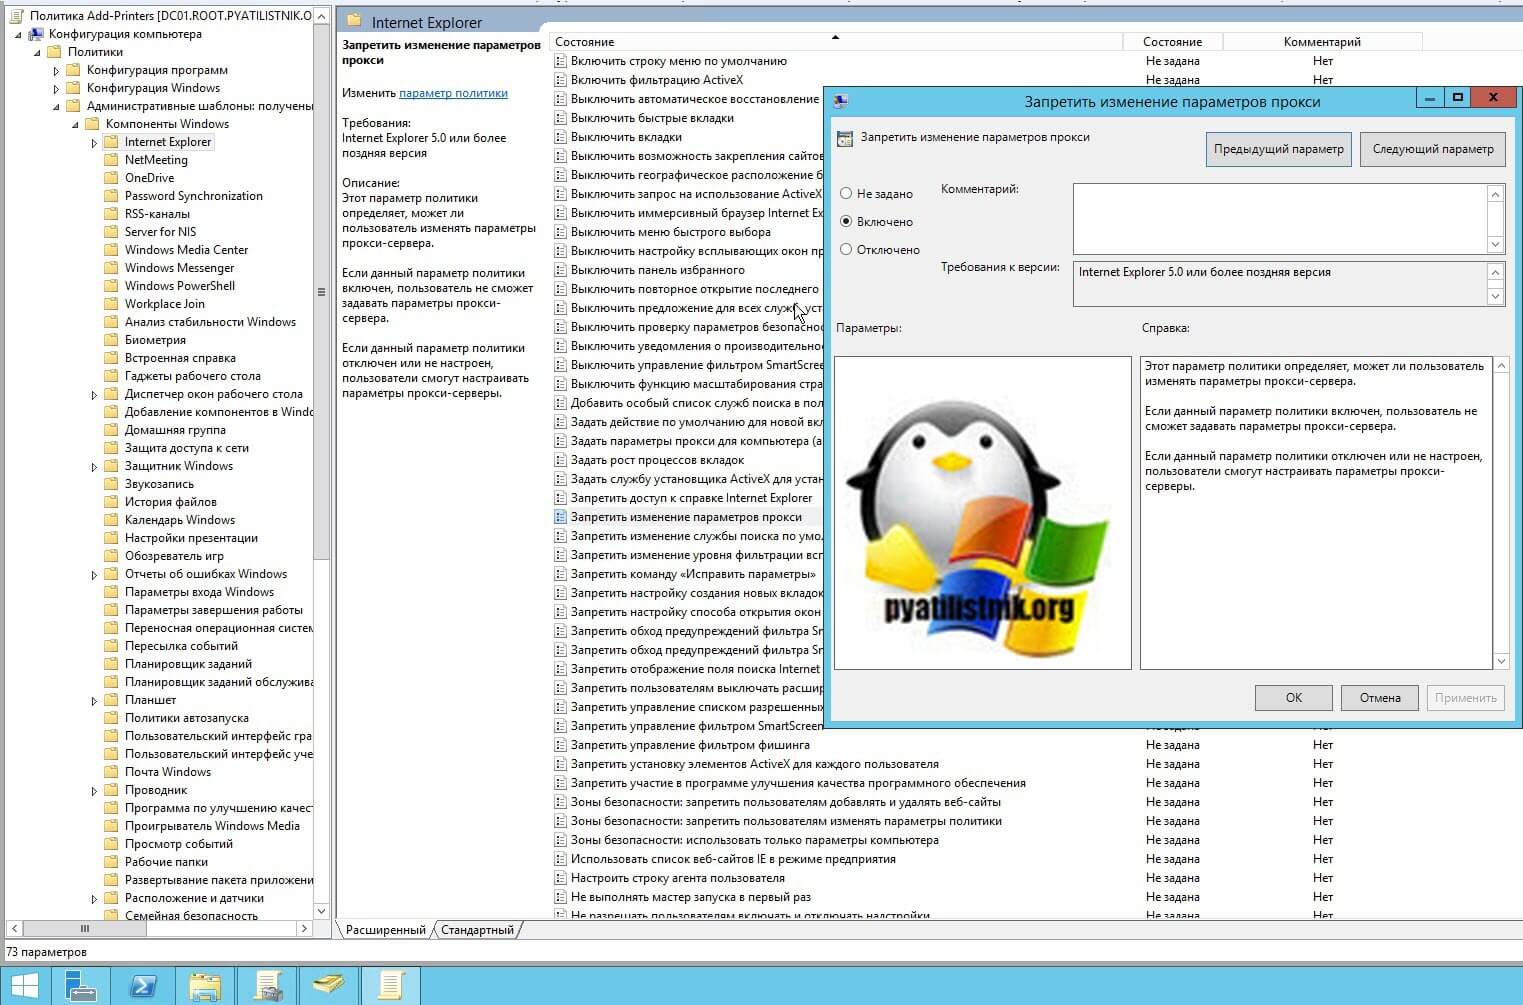
Конфигурация компьютера — Политики — Административные шаблоны — Компоненты Windows — Internet Explorer — Запретить изменение параметров прокси (Computer Configuration — Administrative Templates — Windows Components — Internet Explorer — Prevent changing proxy settings)
Включение параметра «Запретить изменение параметров прокси» отнимет права на изменение данной функции.
Откройте ветку настроек, если для пользователя:
Конфигурация пользователя — Политики — Административные шаблоны — Компоненты Windows — Internet Explorer — Запретить изменение параметров прокси (User Configuration — Administrative Templates — Windows Components — Internet Explorer — Prevent changing proxy settings)
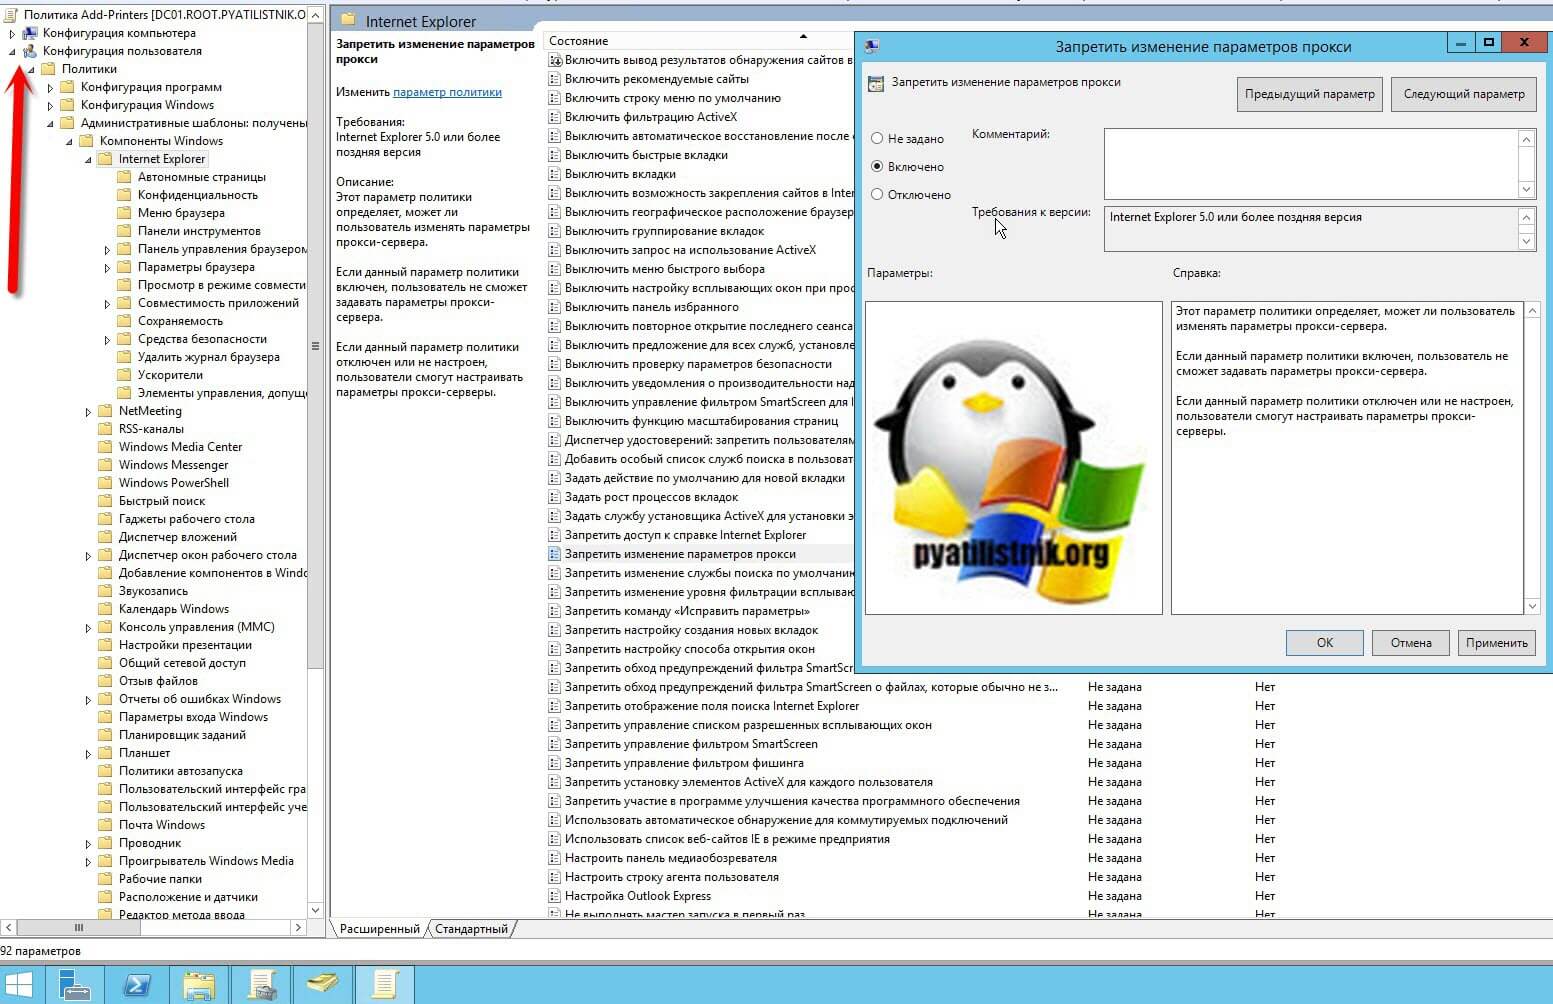
хочу напомнить, что настройки на уровне компьютера более приоритетнее, чем политика на пользователя, поэтому если на уровне компьютера стоит запрет, а на уровне пользователя разрешение, то суммарным результатом будет запрет
Произведем обновление групповых политик на компьютере пользователя и проверим результат нашей политики по ограничению настроек прокси-сервера. Если политика была нацелена на компьютер, то она применится сразу ,если на пользователя ,то ему придется произвести выход из системы, чтобы увидеть данные настройки. При следующей авторизации я зашел в настройки Internet Explorer, где я вижу, что политика успешно отработала.

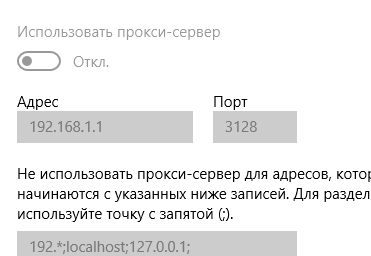
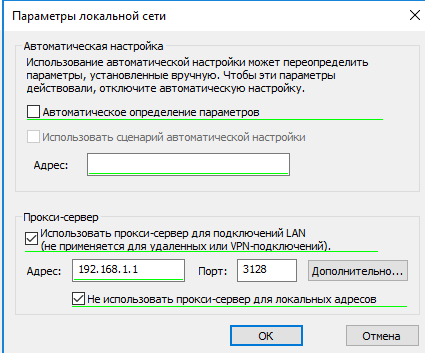
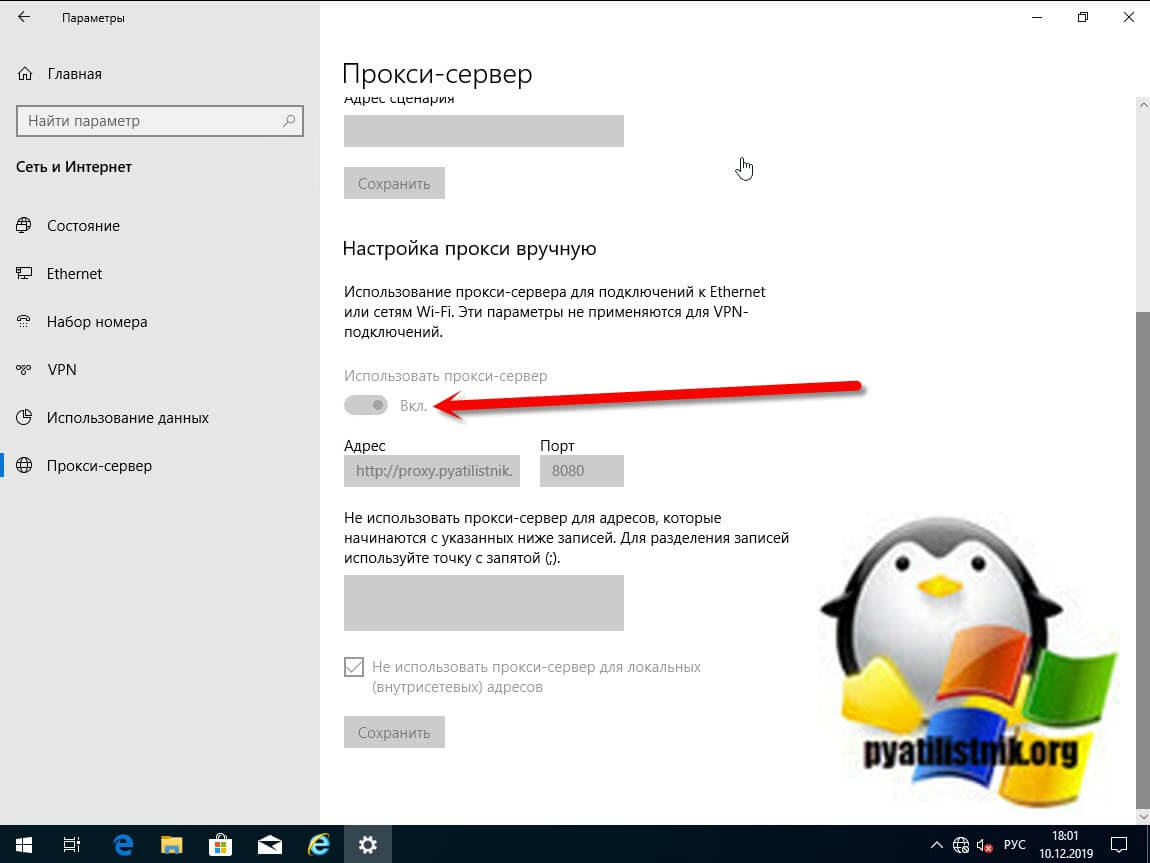
На вкладке «Подключения — Настройки сети» я не могу взаимодействовать со вкладкой «Прокси-сервер: использовать прокси-сервер для локальных подключений (не применяется для коммутируемых или VPNподключений)», она просто неактивна.
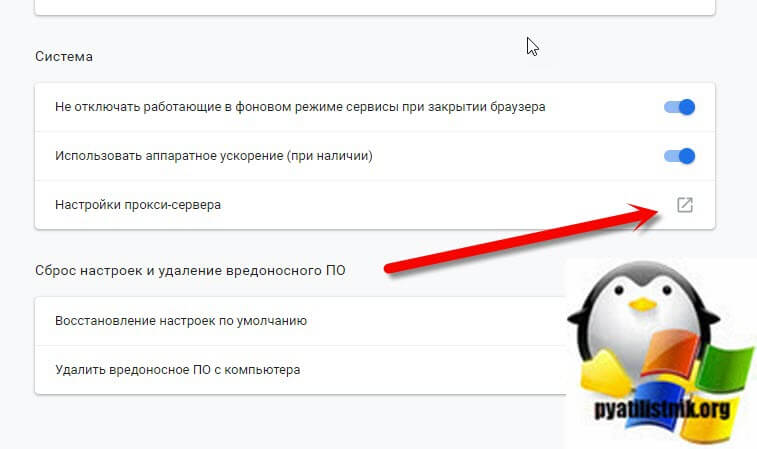
Если попытаться изменить настройки для Google Chrome или Mozilla, то вас перекинет в параметры Windows или же на вкладку подключений Internet Explorer, где вы так же не сможете ничего изменить.
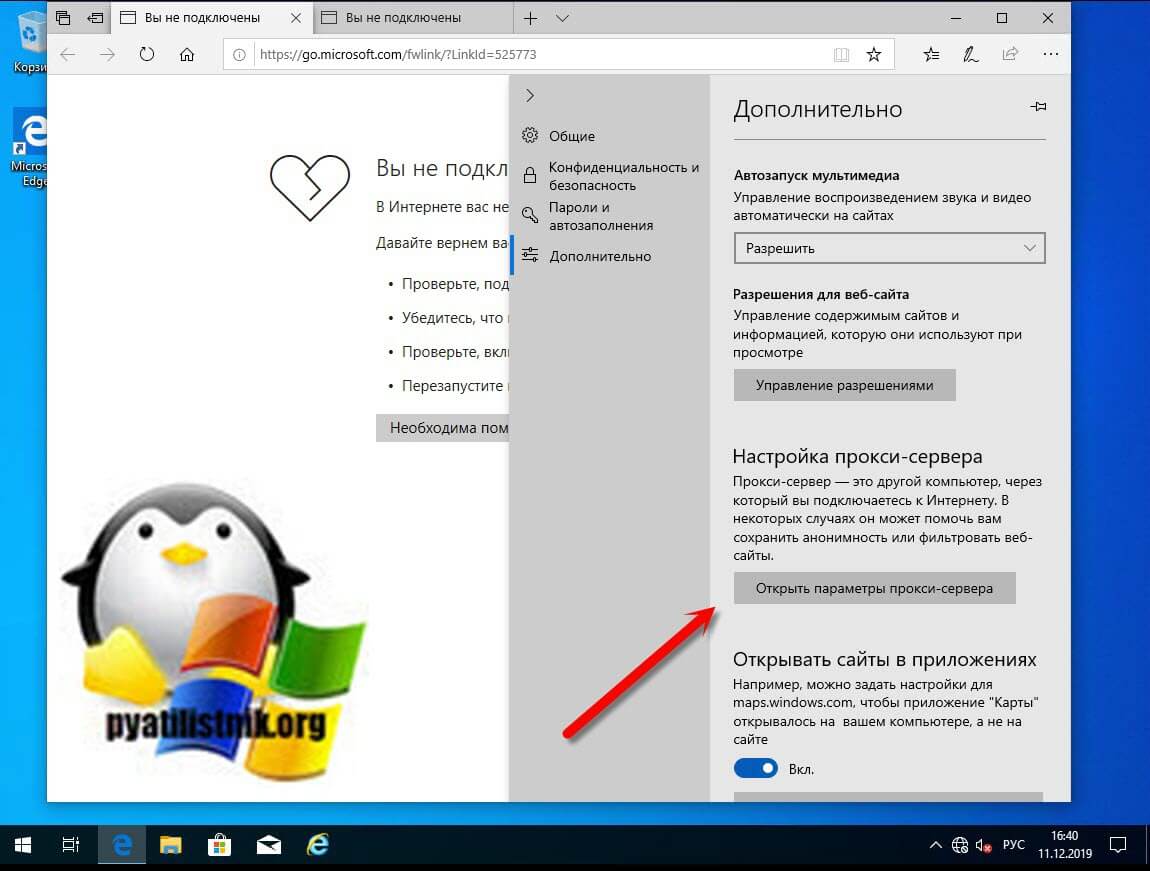
В Edge та же песня, из вкладки «Дополнительно — Открыть параметры прокси-сервера«
То же самое можно проверить в параметрах Windows 10 в разделе «Прокси-сервер», где у меня не активен ползунок «использовать прокси-сервер«. Ограничения отлично работают.
Как включить запрет изменения настроек прокси через реестр Windows
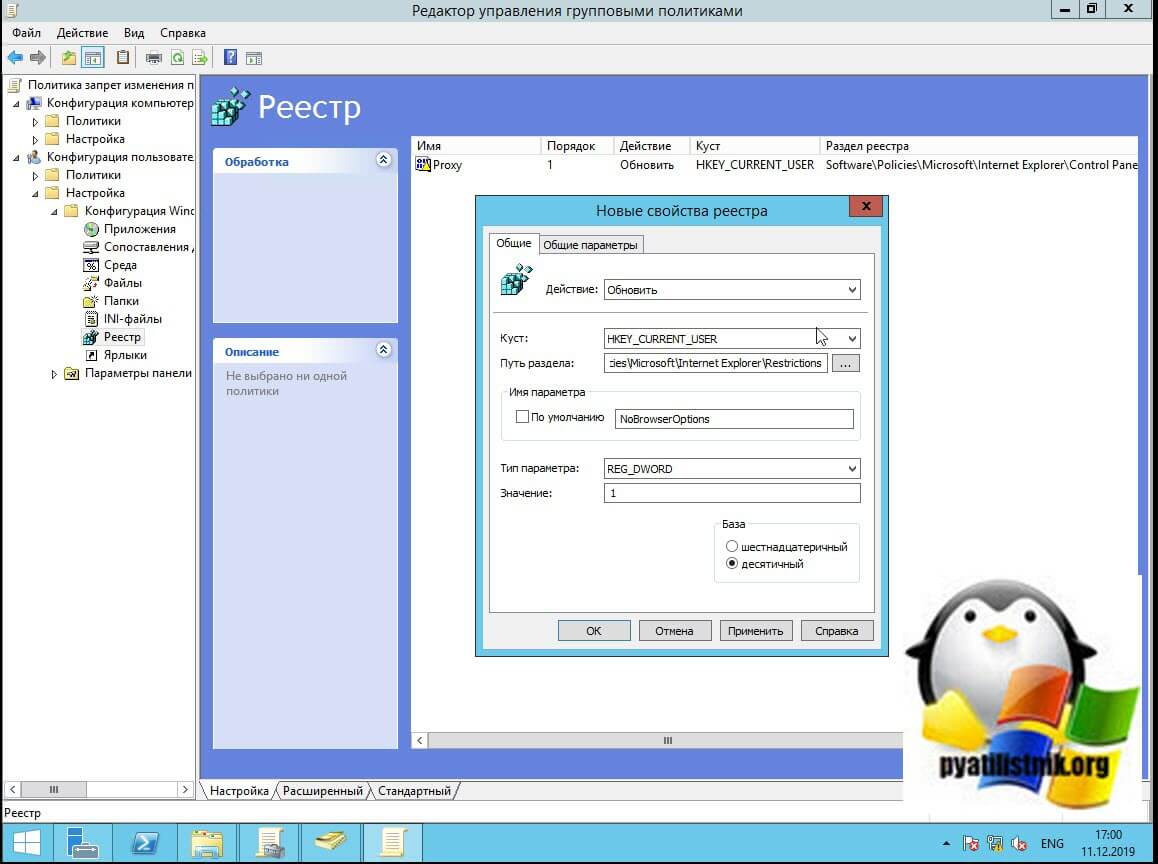
Если вы не в курсе, то любые настройки которые вы меняете через групповые политики и расширения ISE, это просто изменение ключей реестра Windows на удаленной системе. Зная, это вы можете производить ограничения и через ключи, которые можете распространять через скрипты, туже групповую политику. Нам потребуется создать два ключа реестра, делать я это буду так же через объект GPO созданный ранее, но уже вам необходимо будет перейти в раздел преференций:
Конфигурация пользователя — Настройки Конфигурация Windows — Реестр (User Configuration — Preferences — Windows Settings — Registry)
тут необходимо будет кликнуть правым кликом мыши по пустому пространству и создать новый элемент реестра.
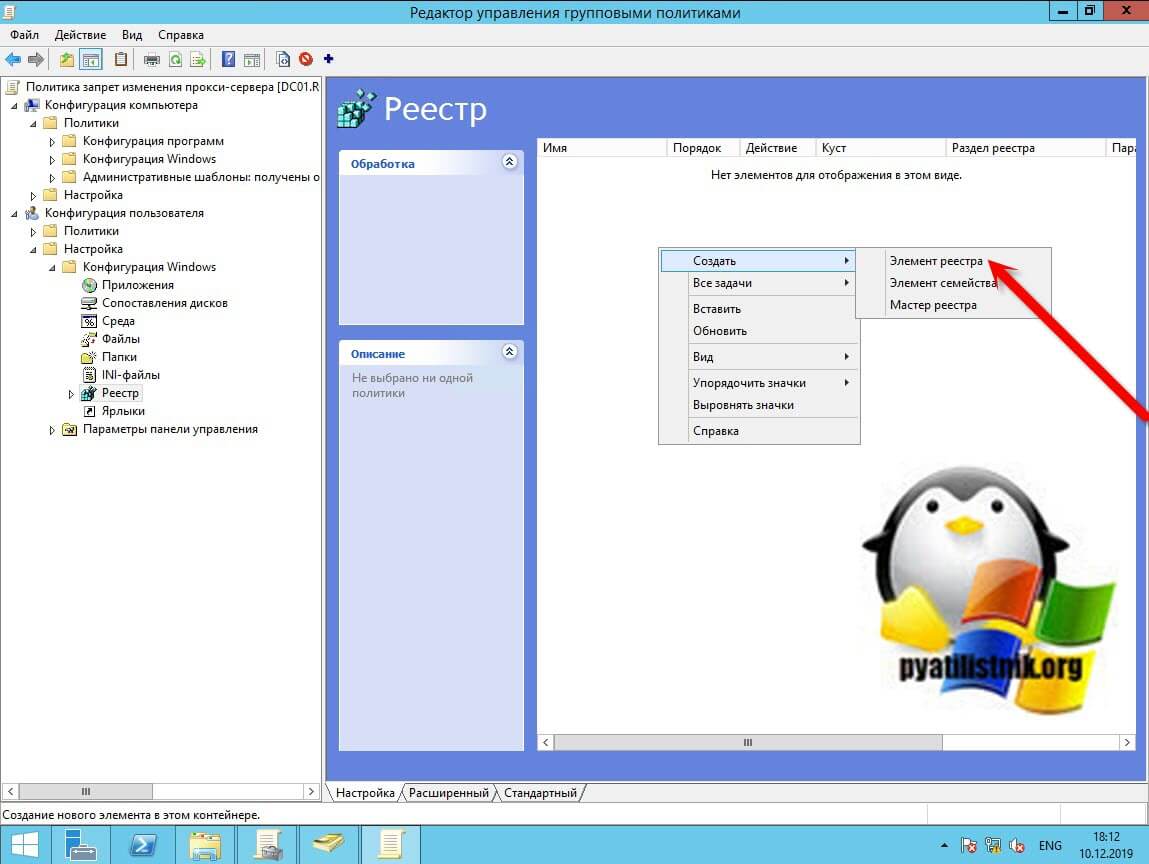
В свойствах окна нужно настроить:
- В области «действие» выберите пункт «Обновить», в результате этого действия существующий параметр реестра будет обновлен
- В разделе «Куст» выберите HKEY_CURRENT_USER
- В пути к разделы укажите SoftwarePoliciesMicrosoftInternet ExplorerControl Panel
- В имени параметра пропишите Proxy
- Тип параметра будет REG_DWORD
- Значение 1, будет активировать запрет на изменение настроек прокси-сервера в Windows для любого браузера Internet Explorer, Google Chrome, Mozilla Firefox, Yandex браузер.
- База — укажите десятичный формат
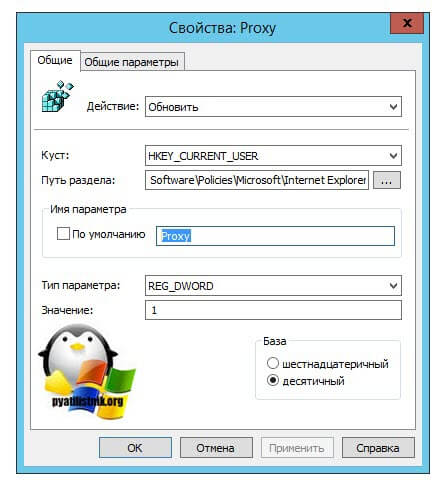
У меня получилось вот так

Если вы хотите вообще ограничить просмотр свойств Internet Explorer, то можете создать ключ NoBrowserOptions:
В свойствах окна нужно настроить:
- В области «действие» выберите пункт «Обновить», в результате этого действия существующий параметр реестра будет обновлен
- В разделе «Куст» выберите HKEY_CURRENT_USER
- В пути к разделы укажите SoftwarePoliciesMicrosoftInternet ExplorerRestrictions
- В имени параметра пропишите NoBrowserOptions
- Тип параметра будет REG_DWORD
- Значение 1, будет активировать запрет на доступ к свойствам IE
- База — укажите десятичный формат
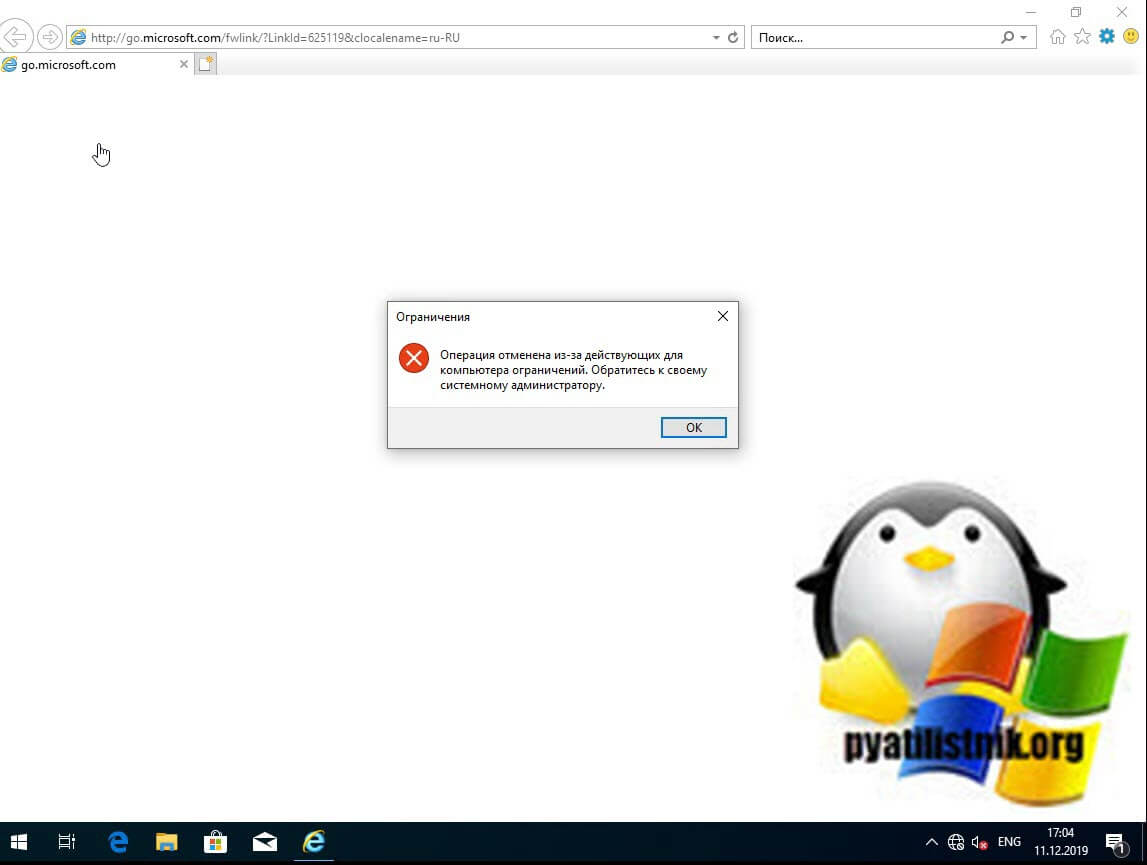
теперь попытавшись открыть свойства Internet Explorer у вас появится предупреждение:
Операция отменена из-за действующих для компьютера ограничений. Обратитесь к своему системному администратору
Вообще полный список ключей для изменения настроек Internet Explorer вы можете найти по ссылке слева. Так же хочу отметить, что вы легко можете вносить изменения в реестре и на не доменных рабочих станциях, для этого вам нужны права администратора. дающие права на удаленное подключение к реестру. Так же вы можете использовать ветки реестра и значения в своих скриптах на базе PowerShell, вариантов уйма.
Если вам лень самим создавать эти ключи реестра, то я подготовил для вас уже готовые, вам осталось их просто скачать
На этом у меня все, мы с вами разобрали методы запрещающие изменять настройки прокси-сервера в браузерах Internet Explorer, Google Chrome, Mozilla Firefox, Yandex браузер. С вами был Иван Семин, автор и создатель IT портала Pyatilistnik.org. До скорых встреч.