Содержание:развернуть
- Системные требования
- Как установить
-
На Windows
-
На Mac OS
-
На Linux
- Подготовка к работе и настройка
-
Настройки интерфейса
-
Настройка интерпретатора
-
Настройка виртуального окружения
- Запуск скриптов в консоли
- Отладчик (debugger) в Pycharm
- Deploy на удаленный хост
- Макросы
- Полезные хоткеи и фишки
- ТОП 7 полезных плагинов для Pycharm
- Что делать, если PyCharm не видит модули Python?
Twitter, Pinterest, HP, Symantec, Groupon. Как думаете, что у них общего 🤔? Не сомневаюсь, ответ вам известен. Но помимо того, что это крупнейшие на мировом IT-рынке компании, есть и более специфичная деталь: те их сотрудники, кто программирует на языке Python, пишут свой код в среде разработки PyCharm.
Талантливые ребята из JetBrains разработали одну из наиболее используемых IDE в мире для этого языка программирования.
В начале 2019 года компания JetBrains опросила почти 7000 разработчиков. 42% опрошенных, которые пишут на Python, выбрали PyCharm как основную IDE для своей работы.
PyCharm кроссплатформенна и совместима с Windows, Linux и MacOS. Она поддерживает, как вторую, так и третью версию Питона и, кроме всего прочего, имеет красивый и функциональный UI.
Инструменты и функции, предоставляемые этой интегрированной средой, помогают Python-программистам быстро и эффективно писать код, синхронизироваться с системой контроля версий, использовать фреймворки и плагины, позволяя при этом настроить интерфейс так, как удобно самому пользователю и даже дают возможность дополнительного расширения IDE.
В PyCharm, конечно же, есть встроенный анализатор кода, который действительно помогает при его написании. Благодаря анализатору можно весьма комфортно перемещаться по проекту, использовать быстрый поиск, а также исправлять ошибки, которые PyCharm любезно подсвечивает и подробно описывает.
Тут реализованы системы автодополнения и контроля качества кода в соответствии со стандартом PEP8. Всё для того, чтобы сделать текст ваших программ красивее, чище и структурированнее.
В интегрированной среде от JetBrains поддерживаются основные современные Python-фреймворки для веб-разработки, в ней вы сможете работать с Jupyter-notebook, подключать Anaconda, а также прочие библиотеки для научных вычислений и Data Science. Но, как говорится — «И это ещё не всё!». Помимо, собственно, питона, PyCharm отлично ладит и с другими языками программирования — JS, TypeScript-а, SQL или шаблонизаторами.
Системные требования
Официальные системные требования последней версии PyCharm выглядят так:
ОС:
- Windows — Microsoft Windows 10 64-битили Windows 8 64-бит;
- macOS — macOS 10.13 или выше;
- Linux — среда GNOME или KDE.
RAM: не менее 2 ГБ, но рекомендуется 8 ГБ;
Место на диске: установка потребует 2,5 ГБ, рекомендуется использование SSD;
Разрешение экрана: не менее 1024×768 пикселей;
Python: Python 2.7, Python 3.5 или более поздняя версия;
При этом разработчики обращают внимание пользователей macOS и Linux на то, что JBR 11 поставляется в комплекте с PyCharm, и дополнительно устанавливать Java им не нужно.
В самих системных требованиях нет ничего особенного, однако хочется отметить, что IDE прекрасно себя чувствует и на Windows 7, а к рекомендациям по поводу 8 ГБ оперативной памяти и использования SSD стоит тщательным образом прислушаться, не прогадаете 😉.
Как установить
Процесс установки вкратце описан на официальном сайте для каждой из поддерживаемых ОС:
На Windows
- Запускаете файл
pycharm.exe. - Следуете инструкциям инсталл-мастера.
- Выбираете нужные параметры установки.
- Готово.
На Mac OS
- Сперва следует скачать файл
pycharm.dmg. - Затем смонтировать диск в вашей системе.
- И, наконец, необходимо скопировать PyCharm в Applications.
На Linux
- Файл
pycharm.tar.gzнужно скопировать в выбранную папку. - Обязательно убедитесь, что у вас есть права доступа RW для данного каталога.
- Распакуйте pycharm.tar.gz используя команду:
tar -xzf pycharm-2020.1.2.tar.gz - Будьте внимательны: архив НЕЛЬЗЯ РАСПАКОВЫВАТЬ в папку с существующей инсталляцией.
- Теперь можно запустить
pycharm.shиз каталогаbin.
Подготовка к работе и настройка
Перед тем, как приступить к разработке в PyCharm, вам нужно создать проект, поскольку все дальнейшие манипуляции будут происходить именно в нём и на его основе.
Чтобы начать новый проект, нажмите New Project и придумайте ему имя. Теперь можно приступить к настройке.
Настройки интерфейса
Несмотря на то, что разработчики из JetBrains начинали свой путь в России, смена языка интерфейса в среде разработки не предусмотрена, поэтому к вашим услугам будет лишь родной язык Уильяма Шекспира.
Зато вы можете изменить сами шрифты и их размеры, пройдя по пути:
File -> Settings -> editor -> font
Поменять цветовую схему UI:
File -> Settings -> editor -> color scheme
И сконфигурировать множество других аспектов, вроде общих настроек, конфигураций прокрутки, настроек цвета для каждого доступного языка и так далее. Для всего этого есть редактор:
file -> settings -> editor
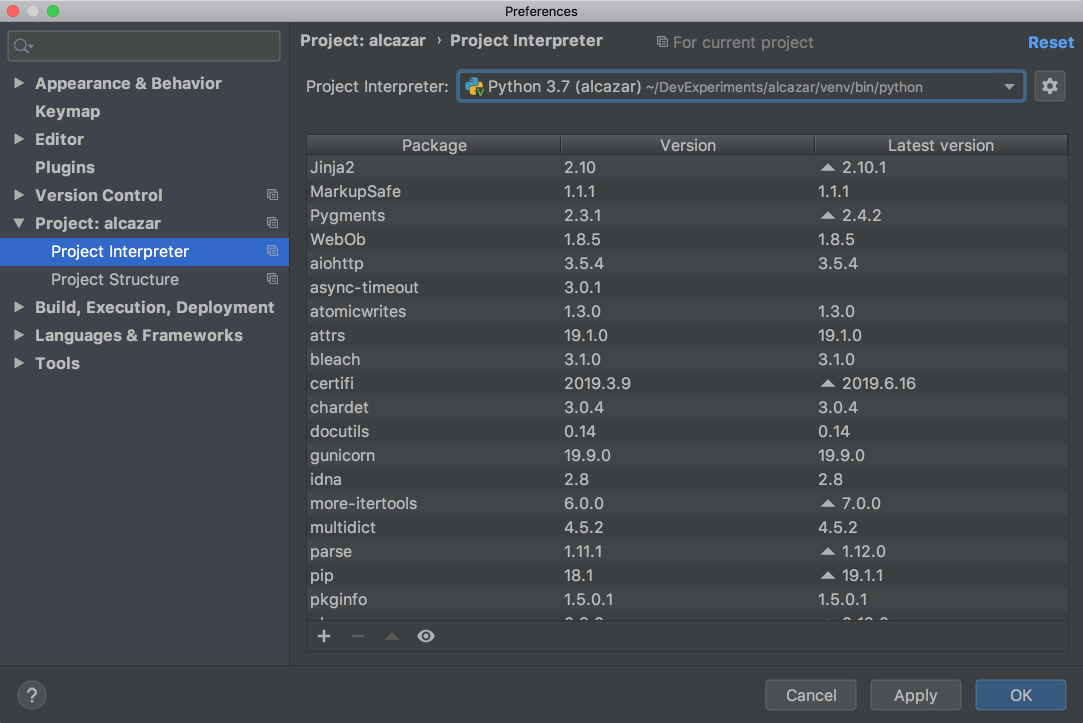
Настройка интерпретатора
Скачать интерпретатор вы можете с официального сайта Python. Если в ваши планы не входит работа с библиотеками, которые есть только во второй версии языка, то стоит качать последний релиз Python 3.
![]()
О том, как установить Python:
Для использования установленного интерпретатора, выберите его в настройках:
File -> Settings -> Project:<name> -> Project Interpreter
💭 Если PyСharm не видит интерпретатор, попробуйте добавить его вручную. Для этого:
- Нажмите на шестеренку в верхнем правом углу, выберите «Add..«.
- Далее выберите «System Interpreter«;
- Нажмите на 3 точки «…» справа от поля в выбором интерпретатора;
- Укажите путь до интерпретатора.
Настройка виртуального окружения
Если по долгу программистской службы вам приходится работать с несколькими проектами, то определенно не помешает настройка и подключение виртуального окружения.
Venv — это, грубо говоря, директория, содержащая ссылку на интерпретатор и набор установленных библиотек. Виртуальное окружение “изолирует” ваши проекты, и помогает, в частности, не запутаться в разных версиях библиотек, адаптированных для каждого из них по отдельности.
![]()
Подробнее про виртуальное окружение:
Если вы настроили виртуальное окружение заранее, PyCharm покажет уведомление, в котором предложит использовать его в проекте. Если уведомления нет, вы всегда можете настроить и изменить его вручную в настройках:
File -> Settings -> Project:<name> -> Project Interpreter
Также в этом меню можно создать виртуальные окружения с нуля. Для этого:
- Нажмите на шестеренку в верхнем правом углу, выберите «Add..«.
- Выберите «Virual Enviroment» и задайте параметры.
Venv создано и готово к работе 👌.
Окружение Pipenv создается аналогичным образом
Запуск скриптов в консоли
Чтобы запустить код в PyCharm, нужно выбрать интерпретатор в настройках (как это сделать я писал чуть выше).
Также, перед запуском своего кода в PyCharm необходимо добавить конфигурацию (чтобы IDE понимал, какой файл ему запускать и по каким правилам). Изначально, если проект новый, конфигурации нет, и кнопка запуска не активна.
Чтобы запустить код в новом проекте, зайдите в
Run -> Run
или выполните комбинацию:
Alt + Shift + F10
Откроется диалоговое окно в выбором файла, который необходимо запустить.
После запуска, откроется терминал, в котором вы увидите результат выполнения своего скрипта и сообщение о том, что процесс завершился с кодом 0 (0 означает успешное завершение).
Далее, когда конфигурация создана и сохранена, запускать свой код на выполнения можно комбинацией:
Shift + F10
☝️ Если скрипт не запускается, возможно вы не сохранили конфигурацию или PyCharm не видит интерпретатор. Настроить или создать конфигурацию можно в меню «Edit Configurations..«, которое находится сверху справа, около кнопки «Run».
Есть еще один способ запуска кода:
- Внизу окна программы кликните на «Terminal«.
- Напишите в терминале
python <name>.pyилиpython3 <name>.py.
💁♂️ В целях обучение, вам может понадобиться быстро писать и проверять Python-инструкции. Для этого в PyCharm-е реализован интерактивный режим (по аналогии с IDLE). Чтобы его вызвать, достаточно нажать на «Python Console» внизу слева.
Отладчик (debugger) в Pycharm
Отладка — чрезвычайно полезный инструмент. С помощью него можно пошагово исполнять программный код. Интерпретатор переходит в особый режим, фиксируя на каждом этапе выполнения текущее состояние программы. Т.е. для каждой строки кода вам будет представлен мини-отчёт, в котором можно посмотреть актуальные значения всех переменных и проследить таким образом весь процесс их изменения.
Находясь в руках опытного разработчика, отладчик сокращает время поиска ошибок на порядки.
Для старта отладки, нужно поставить так называемую точку останова. Это красный кружок напротив строки кода.
Вы можете установить её где захотите, но чаще всего точку следует ставить там, где интерпретатор увидел ошибку.
Для запуска кода в режиме отладки нажмите на значок в «жука» в левом верхнем углу:
Или выполните комбинацию:
Shift + F9
Отладка началась.
Теперь, нажимая F8, можно последовательно шагать по строчкам кода и смотреть текущее состояние всей программы.
«Шагать» можно и через F7, но в таком случае дебаггер будет совершать «Шаг с заходом». Т.е. при встрече вызова функции он будет заходить в её описание и последовательно проходить по инструкциям.
Все варианты навигации в режиме отладки можно посмотреть в окне «Debugger»:
Для каждой кнопки существует свой hotkey — чтобы увидеть его, достаточно навести курсор на нужную кнопку.
Deploy на удаленный хост
Развернуть и отправить код на сервер возможно прямиком из PyCharm.
Инструмент не доступен в бесплатной комьюнити-версии
Чтобы добавить удалённый сервер, первым делом перейдём в:
Tools -> Deployment -> Configuration
Здесь сначала вводим имя, а затем настраиваем данные сервера. Потом вводим имя и пароль пользователя и проверяем соединение при помощи кнопки Test Connection.
Переключаемся на следующую вкладку под названием Mappings. Мапы здесь — это соответствия между путями на вашем компьютере и путями на сервере. Производим и применяем настройки.
Теперь можно производить deploy:
Tools -> Deployment -> Upload to <your_host_name>
💡 Лайфхак: для удобной работы можно настроить автоматический деплой на удаленный сервер после каждого «сохранения». Для этого перейдите в Tools -> Deployment -> Options и выберите On explicit save action (Ctrl + S).
Макросы
Макросы, как и многие другие вещи нужны исключительно для облегчения нашей с вами жизни. Они позволяют автоматизировать ряд повторяющихся процедур, которые вы чаще всего выполняете во время написания кода. Вы можете записывать, редактировать и воспроизводить макросы, назначать им ярлыки и даже делиться ими.
Чтобы создать или настроить свой собственный макрос, вам нужно выбрать:
Edit -> Macros -> Start Macro Recording
После записи макроса, нажмите Stop Macro Recording.
Полезные хоткеи и фишки
⚡ Как поменять цвет консоли в pycharm.
Поменять цвет консольного бэкграунда или шрифтов предельно просто: для этого нужно всего лишь зайти в настройки цветовой схемы и изменить их так, как того пожелает ваш внутренний дизайнер:
File -> Settings -> Editor -> Color Scheme
⚡ Поиск по всему проекту.
- Для поиска по коду во всем проекта, выполните комбинацию
Ctrl + Shift + F. - Для поиска всего и вся во всём проекте дважды нажимаем клавишу
Shift.
⚡ Хоткеи по запуску и дебаггингу.
С помощью комбинации клавиш Shift + F10 можно запустить ваш проект, а нажав Shift + F9 — начать его отладку.
⚡ Закомментировать сразу несколько строк.
Комментирование кода ещё никогда не было таким простым: вы мышкой выделяете нужные строки, а затем нажимаете Ctrl + /.
Повторив то же самое действие на том же самом месте, вы выполните раскомментирование кода.
⚡ Отступы.
- Отступ —
Tab. - Для нескольких строк выделите нужные строки и нажмите
Tab. - Для обратного отступа (отступа в левую сторону) —
Shift + Tab.
⚡ Некоторые горячие клавиши.
Ctrl + Alt + L— автоформатирование кода по PEP 8.Ctr + Z— отмена последнего выполненного действия.Ctr + Up/Down— прокрутка без изменения позиции курсора.Ctr + D— дублировать строку.Tab / Shift + Tab— увеличить / уменьшить отступ.Ctr + Space— выводит предложения по автозаполнению.
Тут шпаргалка по хоткеям в Pycharm.
ТОП 7 полезных плагинов для Pycharm
Меню установки плагинов находится в:
File -> Settings -> Plugins
Для установки плагина достаточно написать его название в строке поиска, найти плагин и нажать «Install«.
⭐ Вот список полезных плагинов, которые стоит установить:
- Highlight Bracket Pair (описание) — плагин позволяет не запутаться в излюбленном занятии программистов — поиске соответствия между открывающими и закрывающими скобками.
- Grep Console (описание) — расширение функционала стандартной консоли PyCharm — изменение цвета для разного типа сообщений, вкладки в консоли, аналог
grepдля вывода и т.д. - Pylint (описание) — Python линтер. После установки появится меню «Pylint» в нижнем левом углу. Для работы плагина необходимо установить модуль pylint (
python -m pip install pylintилиpython3 -m pip install pylint), и в настройках PyCharm указать путь до него (в Windows он обычно лежит в папкеC:<python_path>Scripts, а в Linux путь до pylint можно узнать с помощьюwhich pylint). - DeepBugs for Python — ищет потенциальные баги и проблемы, связанные с качеством кода используя модели машинного обучения.
Другие полезные плагины:
- Python Smart Execute (описание) — комбинация Alt + Shift + A копирует выделенный код в Python-консоль и выполняет его.
- MyPy (описание) — плагин для проверки типов (type hinting) и анализатор исходного кода для Python. После установки появится меню «MyPy» в нижнем левом углу.
- CodeGlance (описание) — добавляет мини-карту (minimap) кода в окне редактора справа.
Что делать, если PyCharm не видит модули Python?
Если у вас возникла подобная проблема, то в первую очередь стоит проверить настройки интерпретатора.
Вариант №1 — сброс настроек и выборе новой версии интерпретатора. Настройки находятся тут:
Settings -> Project:<project_name> -> Project Interpreter
Вариант №2 — По умолчанию PyCharm ищет модули начиная от корня проекта. Подскажите PyCharm, где находится директория с вашими модулями. Для этого в проводнике слева щелкните по директории (правой кнопкой мыши), и в контекстном меню выберите Mark Directory As -> Sources Root.
Python interpreters in PyCharm
To work with your Python code in PyCharm, you need to configure at least one Python interpreter. You can use a system interpreter that is available with your Python installation. You can also create a Virtualenv, Pipenv, Poetry, or Conda virtual environment. A virtual environment consists of a base interpreter and the installed packages.
With PyCharm Professional, you can also configure interpreters to execute your Python code on remote environments by using SSH, Vagrant, Docker, Docker Compose, or WSL (only for Windows).

When you configure a Python interpreter, you need to specify the path to the Python executable in your system. So, before configuring a Python interpreter, you need to ensure that you’ve downloaded Python and installed it in your system and you’re aware of a path to it. You can create several Python interpreters based on the same Python executable. This is helpful when you need to create different virtual environments for developing different types of applications. For example, you can create one virtual environment based on Python 3.6 to develop Django applications and another virtual environment based on the same Python 3.6 to work with scientific libraries.
Python interpreters can be configured for a new project or for the current project (you can create a new interpreter or use one of the existing interpreters).
Configuring an existing Python interpreter
At any time, you can switch the Python interpreter either by using the Python Interpreter selector or in Settings.
Switch the Python interpreter using the Python Interpreter selector
-
The Python Interpreter selector is located on the status bar. It is the most convenient and quickest way to switch the Python interpreter. Just click it and select the target interpreter:


Switch the Python interpreter in the IDE settings
-
Press Ctrl+Alt+S to open the IDE settings and select .
-
Expand the list of the available interpreters and click Show All.

-
Select the target interpreter.

When PyCharm stops supporting any of the outdated Python versions, the corresponding Python interpreter is marked as unsupported.


When you change an SSH interpreter, you might need to synchronize the local content with the target server. Mind a notification balloon in the lower-right corner:

You can choose to perform one of the following actions:
-
Auto-upload files to the server
-
Synchronize files and then enable auto-uploading
Modify a Python interpreter
-
Press Ctrl+Alt+S to open the IDE settings and select .
-
Expand the list of the available interpreters and click Show All.
-
You can modify the path to the Python executable in the Interpreter path field.
To change the interpreter name, select the target interpreter and click
 .
. 
The Python interpreter name specified in the Name field, becomes visible in the list of available interpreters. Click OK to apply the changes.

 .
. 

Remove a Python interpreter
If you no longer need a Python interpreter for a project, you can remove it from the project settings.
-
Do one of the following:
-
Press Ctrl+Alt+S to open the IDE settings and select .
-
Click the Python Interpreter selector and choose Interpreter Settings.
-
-
Expand the list of the available interpreters and click Show All.
-
Choose the interpreter that you want to remove and click
.
 .
.
Creating a new Python interpreter
Configuring local Python interpreters
To configure a local Python interpreter for the current project, follow one of the procedures below:
Configure a system interpreter
-
Ensure that you have downloaded and installed Python on your computer.
- Installing Python on Windows from Microsoft Store
-
If you are on Windows, you can download Python from the Microsoft Store and install it as a Python interpreter. Once the Python application is downloaded from the Microsoft Store, it becomes available in the list of the Python executables.
 Note that interpreters added from the Microsoft Store installations come with some limitations. Because of restrictions on Microsoft Store apps, Python scripts may not have full write access to shared locations such as
 TEMPand the registry.
-
Do one of the following:
-
Click the Python Interpreter selector and choose Add New Interpreter.
-
Press Ctrl+Alt+S to open Settings and go to . Click the Add Interpreter link next to the list of the available interpreters.
-
Click the Python Interpreter selector and choose Interpreter Settings. Click the Add Interpreter link next to the list of the available interpreters.
-
-
Select Add Local Interpreter.
-
In the left-hand pane of the Add Python Interpreter dialog, select System Interpreter.

-
In the Interpreter field, type the fully-qualified path to the required interpreter executable, or click
and in the Select Python Interpreter dialog that opens, choose the desired Python executable.
You will need admin privileges to install, remove, and upgrade packages for the system interpreter. When attempting to install an interpreter package through an intention action, you might receive the following error message:
 As prompted, consider using a virtual environment for your project.
 -
Click OK to complete the task.
 Note that interpreters added from the Microsoft Store installations come with some limitations. Because of restrictions on Microsoft Store apps, Python scripts may not have full write access to shared locations such as
 and in the
 As prompted, consider using a virtual environment for your project.
For more information, see Configure a system interpreter.
Create a virtualenv environment
-
Do one of the following:
-
Click the Python Interpreter selector and choose Add New Interpreter.
-
Press Ctrl+Alt+S to open Settings and go to . Click the Add Interpreter link next to the list of the available interpreters.
-
Click the Python Interpreter selector and choose Interpreter Settings. Click the Add Interpreter link next to the list of the available interpreters.
-
-
Select Add Local Interpreter.
-
In the left-hand pane of the Add Python Interpreter dialog, select Virtualenv Environment.
-
The following actions depend on whether you want to create a new virtual environment or to use an existing one.
- New virtual environment
-
-
Specify the location of the new virtual environment in the Location field, or click
and browse for the desired location in your file system. The directory for the new virtual environment should be empty. -
Choose the base interpreter from the list, or click
and find the desired Python executable in your file system. -
Select the Inherit global site-packages checkbox if you want all packages installed in the global Python on your machine to be added to the virtual environment you’re going to create. This checkbox corresponds to the
--system-site-packagesoption of the virtualenv tool.
-
- Existing virtual environment
-
-
Choose the desired interpreter from the list.
-
If the desired interpreter is not on the list, click
, and then browse for the desired Python executable (for example, venv/bin/python on macOS or venvScriptspython.exe on Windows).
The selected virtual environment will be reused for the current project.
-
-
Click OK to complete the task.

 and browse for the desired location in your file system. The directory for the new virtual environment should be empty.
 and find the desired Python executable in your file system.
For more information, see Configure a virtual environment.
Create a conda environment
-
Ensure that Anaconda or Miniconda is downloaded and installed on your computer, and you’re aware of a path to its executable file.
Refer to the installation instructions for more details.
-
Do one of the following:
-
Click the Python Interpreter selector and choose Add New Interpreter.
-
Press Ctrl+Alt+S to open Settings and go to . Click the Add Interpreter link next to the list of the available interpreters.
-
Click the Python Interpreter selector and choose Interpreter Settings. Click the Add Interpreter link next to the list of the available interpreters.
-
-
Select Add Local Interpreter.
-
In the left-hand pane of the Add Python Interpreter dialog, select Conda Environment.
-
The following actions depend on whether you want to create a new conda environment or to use an existing one.
- New conda environment
-
-
Select the Python version from the list.
-
Normally, PyCharm will detect conda installation.
Otherwise, specify the location of the conda executable, or click
to browse for it. -
Specify the environment name.
-
- Existing conda environment
-
-
Choose the desired environment from the list.
The selected conda environment will be reused for the current project.
-
-
Click OK to complete the task.

For more information, see Configure a conda virtual environment.
Create a pipenv environment
-
Do one of the following:
-
Click the Python Interpreter selector and choose Add New Interpreter.
-
Press Ctrl+Alt+S to open Settings and go to . Click the Add Interpreter link next to the list of the available interpreters.
-
Click the Python Interpreter selector and choose Interpreter Settings. Click the Add Interpreter link next to the list of the available interpreters.
-
-
Select Add Local Interpreter.
-
In the left-hand pane of the Add Python Interpreter dialog, select Pipenv Environment.

-
Choose the base interpreter from the list, or click
and find the desired Python executable in your file system. -
If you have added the base binary directory to your
PATHenvironmental variable, you don’t need to set any additional options: the path to the pipenv executable will be autodetected.If the pipenv executable is not found, follow the pipenv installation procedure to discover the executable path, and then paste it in the Pipenv executable field.
-
Click OK to complete the task.

Once all the steps are done, the new pipenv environment is set for your project and the packages listed in the Pipfile are installed.
If you open a project with a Pipfile file added but no any interpreter configured, PyCharm offers you to use Pipenv environment.
![]()
If you select this option, PyCharm sets pipenv for you automatically. Alternatively, you can click Configure Python interpreter to follow the standard workflow.
Similarly, when you open a project with a Pipfile file in PyCharm for the very first time, for example, by checking it out from the Version Control, the Pipenv virtual environment will be configured automatically.
When you have set the Pipenv virtual environment as a Python interpreter, all available packages are added from the source defined in Pipfile . The packages are installed, removed, and updated in the list of the packages through pipenv rather than through pip.
For more information, see Configure a Pipenv environment.
Create a Poetry environment
-
Do one of the following:
-
Click the Python Interpreter selector and choose Add New Interpreter.
-
Press Ctrl+Alt+S to open Settings and go to . Click the Add Interpreter link next to the list of the available interpreters.
-
Click the Python Interpreter selector and choose Interpreter Settings. Click the Add Interpreter link next to the list of the available interpreters.
-
-
Select Add Local Interpreter.
-
In the left-hand pane of the Add Python Interpreter dialog, select Poetry Environment.
-
The following actions depend on whether you want to create a new Poetry environment or to use an existing one.
- New Poetry environment
-
-
Select Poetry Environment.
-
Choose the base interpreter from the list, or click
and find the desired Python executable in your file system. -
If PyCharm doesn’t detect the poetry executable, specify the following path in the Poetry executable field, replacing
jetbrainswith your username:/Users/jetbrains/Library/Application Support/pypoetry/venv/bin/poetry
C:UsersjetbrainsAppDataRoamingpypoetryvenvScriptspoetry.exe
/home/jetbrains/.local/bin/poetry
-
- Existing Poetry environment
-
-
Make sure that the project directory contains a pyproject.toml file.
-
Select Existing environment. Then expand the Interpreter list and choose the desired interpreter.
-
If the desired interpreter is not on the list, click
, and then browse for the Python executable within the previously configured Poetry environment.
The selected Poetry environment will be reused for the current project.
-
-
Click OK to complete the task.

For more information, see Configure a Poetry environment.
Configuring remote Python interpreters
When a remote Python interpreter is added, at first the PyCharm helpers are copied to the remote host. PyCharm helpers are needed to run remotely the packaging tasks, debugger, tests and other PyCharm features.
Next, the skeletons for binary libraries are generated and copied locally. Also, all the Python library sources are collected from the Python paths on a remote host and copied locally along with the generated skeletons. Storing skeletons and all Python library sources locally is required for resolve and completion to work correctly.
PyCharm checks remote helpers version on every remote run, so if you update your PyCharm version, the new helpers will be uploaded automatically, and you don’t need to recreate remote interpreter. SFTP support is required for copying helpers to the server.
Configure a WSL interpreter
-
Do one of the following:
-
Click the Python Interpreter selector and choose Add New Interpreter.
-
Press Ctrl+Alt+S to open Settings and go to . Click the Add Interpreter link next to the list of the available interpreters.
-
Click the Python Interpreter selector and choose Interpreter Settings. Click the Add Interpreter link next to the list of the available interpreters.
-
-
Select On WSL.
-
Wait until PyCharm detects Linux on your machine and completes introspection. Press Next to proceed:

-
In the left-hand pane of the dialog, select the type of the WSL interpreter you want to create: Virtual Environment, Conda Environment, or System Interpreter.

For a system interpreter, just provide the path to the Python executable in the selected Linux distribution.
For virtual and conda environments, you can provide a path to a Python executable of an existing environment in the selected Linux distribution or create a new environment based on the specified Python.


Once done, the new interpreter will be added to your project, and the default mnt mappings will be set.
For more information, see Configure an interpreter using WSL.
Configure an interpreter using Vagrant
-
Ensure that the following prerequisites are met (outside of PyCharm):
-
One of supported Vagrant providers is installed on your computer.
-
Vagrant is installed on your computer, and all the necessary infrastructure is created.
-
The parent folders of the following executable files have been added to the system
PATHvariable:-
vagrant.bat or vagrant from your Vagrant installation. This should be done automatically by the installer.
-
VBoxManage.exe or VBoxManage from your Oracle’s VirtualBox installation.
-
-
The required virtual boxes are created.
-
-
Make sure that the Vagrant plugin is enabled.
-
Ensure that you have properly initiated and started Vagrant. Basically, you need to open the Terminal window and execute the following commands:
$ vagrant init ubuntu/trusty64
and
$ vagrant up
See Vagrant documentation for more information.
-
Do one of the following:
-
Click the Python Interpreter selector and choose Add New Interpreter.
-
Press Ctrl+Alt+S to open Settings and go to . Click the Add Interpreter link next to the list of the available interpreters.
-
Click the Python Interpreter selector and choose Interpreter Settings. Click the Add Interpreter link next to the list of the available interpreters.
-
-
Select On Vagrant.
-
Specify the path to the Vagrant instance folder in Vagrant Instance Folder.
Wait until you see a link in Vagrant Host URL.
-
In the New Target: Vagrant dialog, click the browse icon
next to the Vagrant Instance Folder field, and specify the desired Vagrant instance folder.This results in showing the link to Vagrant Host URL.

-
In the next field, PyCharm will display the path to the Python executable. Press «Next» to proceed.
-
You can create a virtual environment (venv or conda) or use a system Python interpreter for the target Vagrant instance. Note that virtual environment must be configured and available in the specified Vagrant instance folder. Otherwise, the corresponding lists will be empty.

Clik Create to complete the task.


For more information, see Configure an interpreter using Vagrant.
Configure an interpreter using SSH
-
Ensure that there is an SSH server running on a remote host, since PyCharm runs remote interpreters via ssh-sessions.
-
Do one of the following:
-
Click the Python Interpreter selector and choose Add New Interpreter.
-
Press Ctrl+Alt+S to open Settings and go to . Click the Add Interpreter link next to the list of the available interpreters.
-
Click the Python Interpreter selector and choose Interpreter Settings. Click the Add Interpreter link next to the list of the available interpreters.
-
-
Select On SSH.
-
Select an option to create a new SSH connection, then specify server information (host, port, and username).

Alternatively, you can select Existing and choose any available SSH configuration from the list. To create a new SSH configuration, follow the steps below:
- Creating an SSH configuration
-
-
Click
next to the list of configurations:
-
Click
, disable the Visible only for this project checkbox, and fill in the required fields: -
Once done, the newly created SSH configuration will appear in the list of available configurations. It will also become available in the SSH Deployment Configurations settings. Click Next to proceed:
-
-
In the next dialog window, provide the authentication details to connect to the target server.
Select Password or Key pair (OpenSSH or PuTTY) and enter your password or passphrase. If Key pair (OpenSSH or PuTTY) is selected, specify:
-
Private key: location of the file with a private key
-
Passphrase: similar to a password, it serves to encrypt the private key.
Click Next to proceed.
-
-
Wait until PyCharm completes the introspection of the SSH server.

-
In the next dialog, select a type of Python environment to configure on the SSH server.

You can create a new virtual environment, select an existing one, or use a system interpreter.
-
Select the Inherit global site-packages checkbox if you want all packages installed in the global Python on your machine to be added to the virtual environment you’re going to create. This checkbox corresponds to the
--system-site-packagesoption of the virtualenv tool. -
You can configure the path mappings between your local project and the server. To do that, click the Browse icon in the Sync folders field and enter the path to the local project folder and the path to the folder on the remote server.
Click Create to complete adding the interpreter.
-


 , disable the


For more information, see Configure an interpreter using SSH.
Configure an interpreter using Docker
-
Do one of the following:
-
Click the Python Interpreter selector and choose Add New Interpreter.
-
Press Ctrl+Alt+S to open Settings and go to . Click the Add Interpreter link next to the list of the available interpreters.
-
Click the Python Interpreter selector and choose Interpreter Settings. Click the Add Interpreter link next to the list of the available interpreters.
-
-
Select On Docker.
-
Select an existing Docker configuration in the Server dropdown.
Alternatively, select Create new and perform the following steps to create a new Docker configuration:
- Create a Docker configuration
-
Click New to add a Docker configuration and specify how to connect to the Docker daemon.
The connection settings depend on your Docker version and operating system. For more information, see Docker connection settings.
The Connection successful message should appear at the bottom of the dialog.
-
Select Pull to pull pre-built images from a Docker registry, and specify
python:latestin the Image tag field. Alternatively, you can configure PyCharm to build images locally from a Dockerfile.
Optionally, specify the docker build options.
-
Wait for PyCharm to connect to the Docker daemon and complete the container introspection.
-
Next, select an interpreter to use in the Docker container. You can choose any virtualenv or conda environment that is already configured in the container or select a system interpreter.
-
Click OK.
The configured remote interpreter is added to the list.


For more information, see Configure an interpreter using Docker.
Configure an interpreter using Docker Compose
-
Do one of the following:
-
Click the Python Interpreter selector and choose Add New Interpreter.
-
Press Ctrl+Alt+S to open Settings and go to . Click the Add Interpreter link next to the list of the available interpreters.
-
Click the Python Interpreter selector and choose Interpreter Settings. Click the Add Interpreter link next to the list of the available interpreters.
-
-
Select On Docker Compose.
-
Select an existing Docker configuration in the Server dropdown.
Alternatively, select Create new and perform the following steps to create a new Docker configuration:
- Create a Docker configuration
-
Click New to add a Docker configuration and specify how to connect to the Docker daemon.
The connection settings depend on your Docker version and operating system. For more information, see Docker connection settings.
The Connection successful message should appear at the bottom of the dialog.
-
In Configuration files, specify the docker-compose.yml file. Also select the service.

Optionally, specify environment variables.
-
Wait until PyCharm creates and configures a new target:

-
Next, select an interpreter to use in the container. You can choose any virtualenv or conda environment that is already configured in the container, or select a system interpreter.
-
Click OK.
The configured remote interpreter is added to the list.


For more information, see Configure an interpreter using Docker Compose.
Setting the default interpreter
In PyCharm, you can specify an interpreter that will be automatically set for all newly created projects.
-
From the main menu, select (on Window and Linux) or (on macOS).
-
Select Python Interpreter settings. Then either choose an existing interpreter from the Python interpreter list of click
to add a new interpreter. Click OK to save the changes.The change will become effective for all newly created projects in PyCharm.
 to add a new interpreter. Click
 Managing interpreter packages
For each interpreter, you can install, upgrade, and delete Python packages. By default, PyCharm uses pip to manage project packages. For Conda environments you can use the Conda package manager.

PyCharm smartly tracks the status of packages and recognizes outdated versions by showing the number of the currently installed package version (column Version), and the latest available version (column Latest version). When a newer version of a package is detected, PyCharm marks it with the arrow sign  and suggests to upgrade it.
By default, the Latest version column shows only stable versions of the packages. If you want to extend the scope of the latest available versions to any pre-release versions (such as beta or release candidate), click Show early releases.
You can upgrade several packages at once. Hold Cmd (macOS) or Ctrl on (Unix or Windows), left-click to select several items in the list of packages, and then click Upgrade.
See the detailed instructions:
-
How to install a package
-
How to upgrade the package
-
How to uninstall the package
Last modified: 24 January 2023
Как программист, вы должны сосредоточиться на бизнес-логике и создании полезных приложений для ваших пользователей. При этомPyCharm byJetBrains экономит ваше время, заботясь о рутине и облегчая ряд других задач, таких как отладка и визуализация.
В этой статье вы узнаете о:
-
Установка PyCharm
-
Написание кода в PyCharm
-
Выполнение вашего кода в PyCharm
-
Отладка и тестирование вашего кода в PyCharm
-
Редактирование существующего проекта в PyCharm
-
Поиск и навигация в PyCharm
-
Использование контроля версий в PyCharm
-
Использование плагинов и внешних инструментов в PyCharm
-
Использование функций PyCharm Professional, таких как поддержка Django и научный режим
В этой статье предполагается, что вы знакомы с разработкой Python, и в вашей системе уже установлена какая-то форма Python. Python 3.6 будет использоваться для этого урока. Скриншоты и демонстрации предоставлены для macOS. Поскольку PyCharm работает на всех основных платформах, вы можете увидеть немного разные элементы пользовательского интерфейса и, возможно, потребуется изменить определенные команды.
Note:
PyCharm выпускается в трех редакциях:
-
PyCharm Edu предоставляется бесплатно и в образовательных целях.
-
PyCharm Community также бесплатен и предназначен для разработки на чистом Python.
-
PyCharm Professional платный, имеет все, что есть в версии Community, а также очень хорошо подходит для веб-разработки и научных разработок с поддержкой таких фреймворков, как Django и Flask, Database и SQL, а также научных инструментов, таких как Jupyter.
Чтобы узнать больше об их различиях, ознакомьтесь сPyCharm Editions Comparison Matrix от JetBrains. У компании также естьspecial offers для студентов, преподавателей, проектов с открытым исходным кодом и других кейсов.
Установка PyCharm
В этой статье будет использоваться PyCharm Community Edition 2019.1, поскольку она бесплатна и доступна на любой основной платформе. Только раздел о профессиональных функциях будет использовать PyCharm Professional Edition 2019.1.
Рекомендуемый способ установки PyCharm -JetBrains Toolbox App. С его помощью вы сможете устанавливать различные продукты JetBrains или несколько версий одного и того же продукта, обновлять, выполнять откат и легко удалять любые инструменты при необходимости. Вы также сможете быстро открыть любой проект в нужной IDE и версии.
Чтобы установить приложение Toolbox, обратитесь кdocumentation от JetBrains. Это автоматически даст вам правильные инструкции в зависимости от вашей ОС. В случае, если она не распознает вашу ОС правильно, вы всегда можете найти ее в раскрывающемся списке в правом верхнем углу:
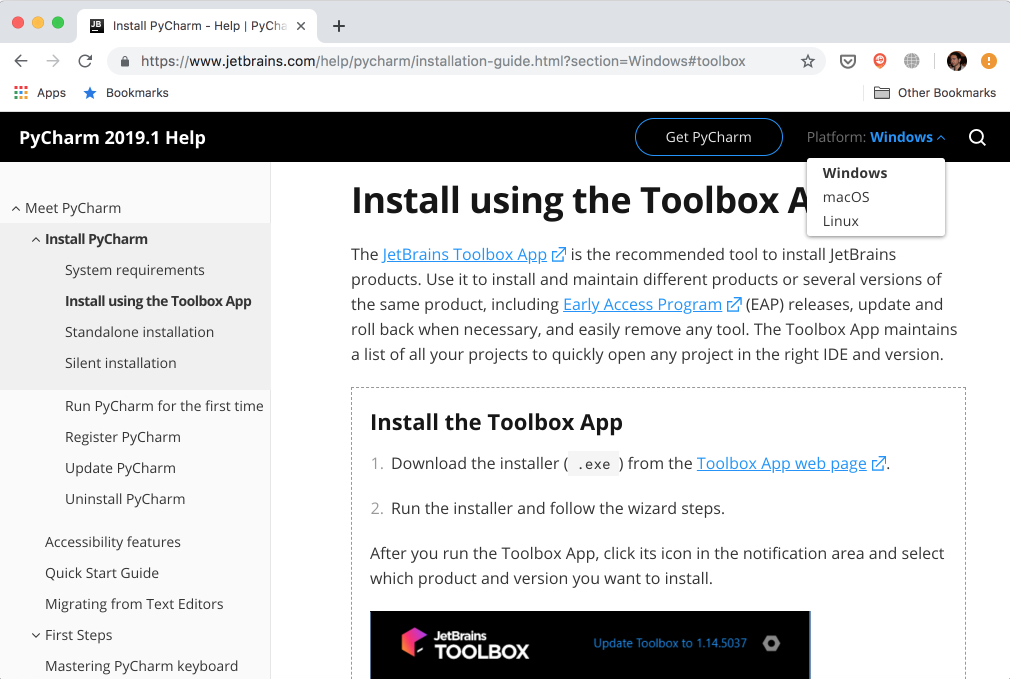
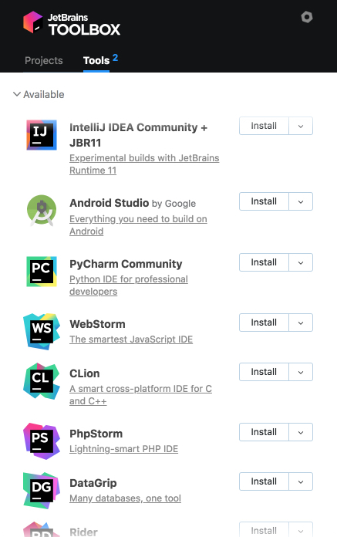
После установки запустите приложение и примите пользовательское соглашение. На вкладкеTools вы увидите список доступных продуктов. Найдите там сообщество PyCharm и нажмитеInstall:
Вуаля! У вас есть PyCharm на вашем компьютере. Если вы не хотите использовать приложение Toolbox, вы также можете выполнитьstand-alone installation of PyCharm.
Запустите PyCharm, и вы увидите всплывающее окно настроек импорта:

PyCharm автоматически определит, что это новая установка, и выберет для васDo not import settings. ЩелкнитеOK, и PyCharm попросит вас выбрать схему раскладки клавиатуры. Оставьте значение по умолчанию и щелкнитеNext: UI Themes справа внизу:
Затем PyCharm попросит вас выбрать темную тему под названием Darcula или светлую тему. Выберите то, что вам больше нравится, и нажмитеNext: Launcher Script:
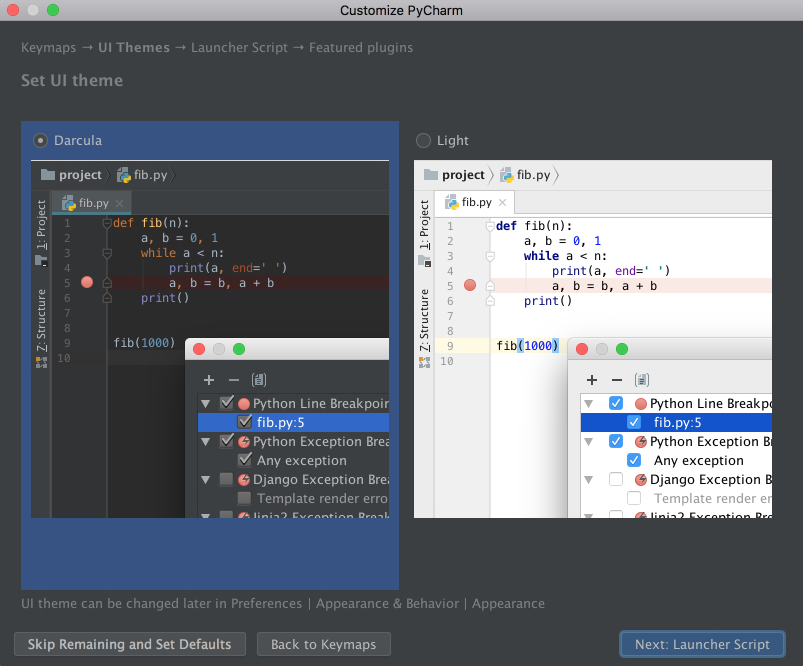
В этом уроке я буду использовать темную тему Даркула. Вы можете найти и установить другие темы какplugins или какimport them.
На следующей странице оставьте значения по умолчанию и щелкнитеNext: Featured plugins. Там PyCharm покажет вам список плагинов, которые вы, возможно, захотите установить, потому что большинству пользователей нравится их использовать. ЩелкнитеStart using PyCharm, и теперь вы готовы написать код!
Написание кода в PyCharm
В PyCharm вы все делаете в контекстеproject. Таким образом, первое, что вам нужно сделать, это создать.
После установки и открытия PyCharm вы попадаете на экран приветствия. НажмитеCreate New Project, и вы увидите всплывающее окноNew Project:
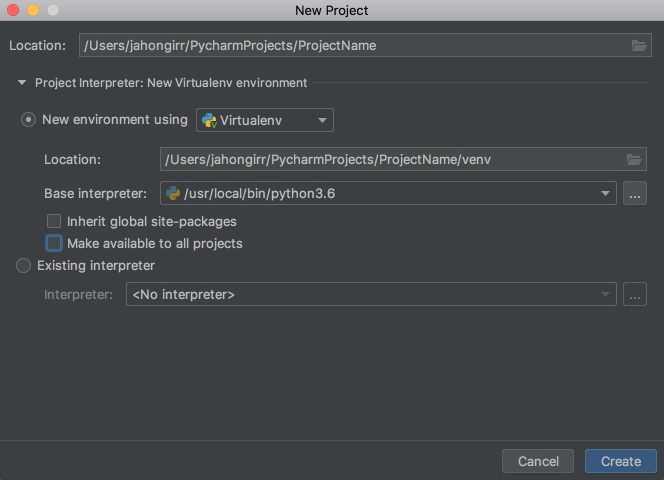
Укажите местоположение проекта и разверните раскрывающийся списокProject Interpreter. Здесь у вас есть возможность создать новый интерпретатор проекта или повторно использовать существующий. ВыберитеNew environment using. Рядом с ним у вас есть раскрывающийся список для выбора одного изVirtualenv,Pipenv илиConda, которые являются инструментами, которые помогают разделить зависимости, необходимые для разных проектов, путем создания изолированные среды Python для них.
Вы можете выбрать то, что вам нравится, но для этого урока используетсяVirtualenv. При желании вы можете указать местоположение среды и выбрать базовый интерпретатор из списка, который представляет собой список интерпретаторов Python (таких как Python2.7 и Python3.6), установленных в вашей системе. Обычно с настройками по умолчанию все в порядке. Затем вы должны выбрать блоки для наследования глобальных пакетов сайтов в вашей новой среде и сделать их доступными для всех других проектов. Оставьте их невыбранными.
ЩелкнитеCreate в правом нижнем углу, и вы увидите созданный новый проект:
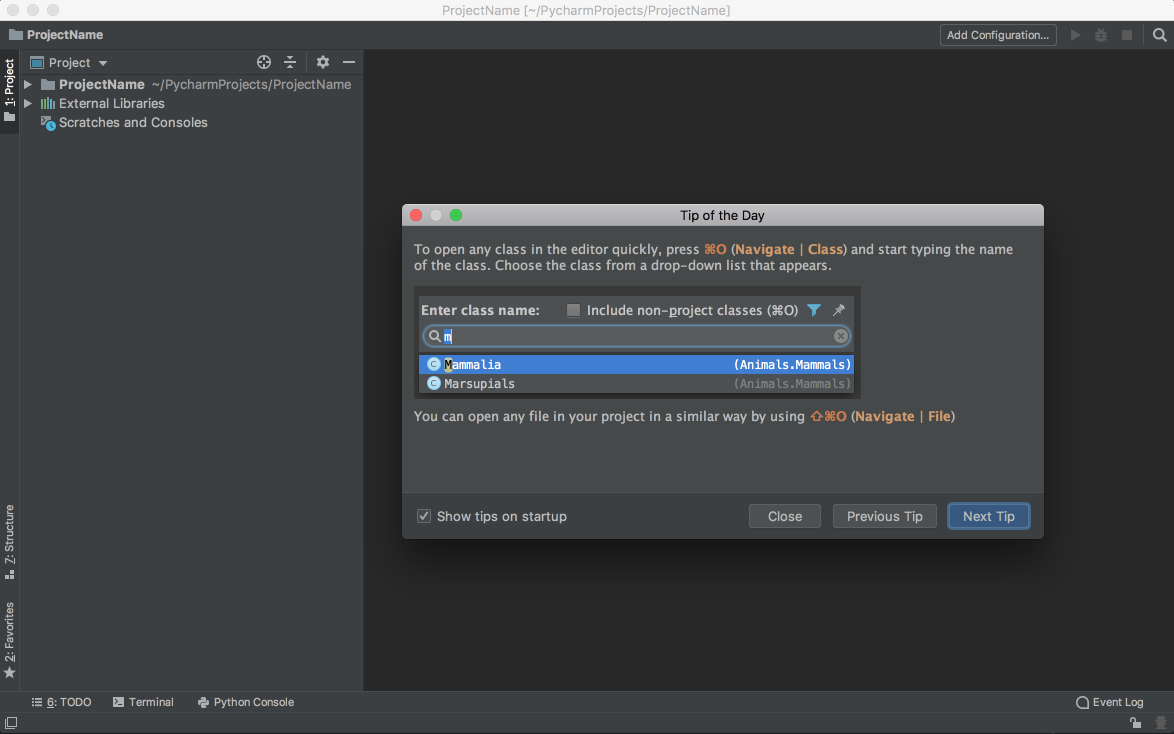
Вы также увидите небольшое всплывающее окноTip of the Day, в котором PyCharm дает вам один трюк, который нужно изучить при каждом запуске. Идите и закройте это всплывающее окно.
Настало время начать новую программу на Python. ВведитеCmd[.kbd .key-n]#N## if you are on Mac or [.keys]#[.kbd .key-alt]##Alt##[.kbd .key-insert]#Ins #, если вы работаете в Windows или Linux. Затем выберитеPython File. Вы также можете выбратьFile → New из меню. Назовите новый файлguess_game.py и щелкнитеOK. Вы увидите окно PyCharm, подобное следующему:
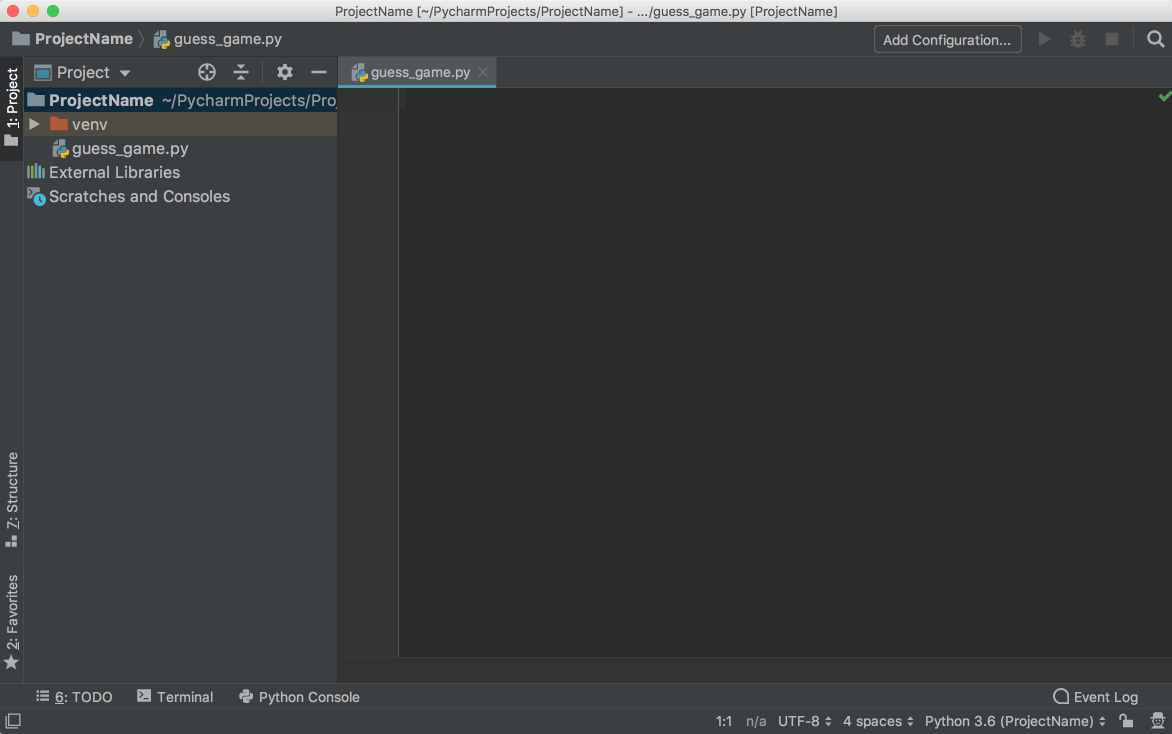
Для нашего тестового кода давайте быстро создадим простую игру на угадывание, в которой программа выбирает число, которое должен угадать пользователь. Для каждого предположения программа скажет, было ли предположение пользователя меньше или больше секретного числа. Игра заканчивается, когда пользователь угадывает число. Вот код для игры:
1 from random import randint
2
3 def play():
4 random_int = randint(0, 100)
5
6 while True:
7 user_guess = int(input("What number did we guess (0-100)?"))
8
9 if user_guess == randint:
10 print(f"You found the number ({random_int}). Congrats!")
11 break
12
13 if user_guess < random_int:
14 print("Your number is less than the number we guessed.")
15 continue
16
17 if user_guess > random_int:
18 print("Your number is more than the number we guessed.")
19 continue
20
21
22 if __name__ == '__main__':
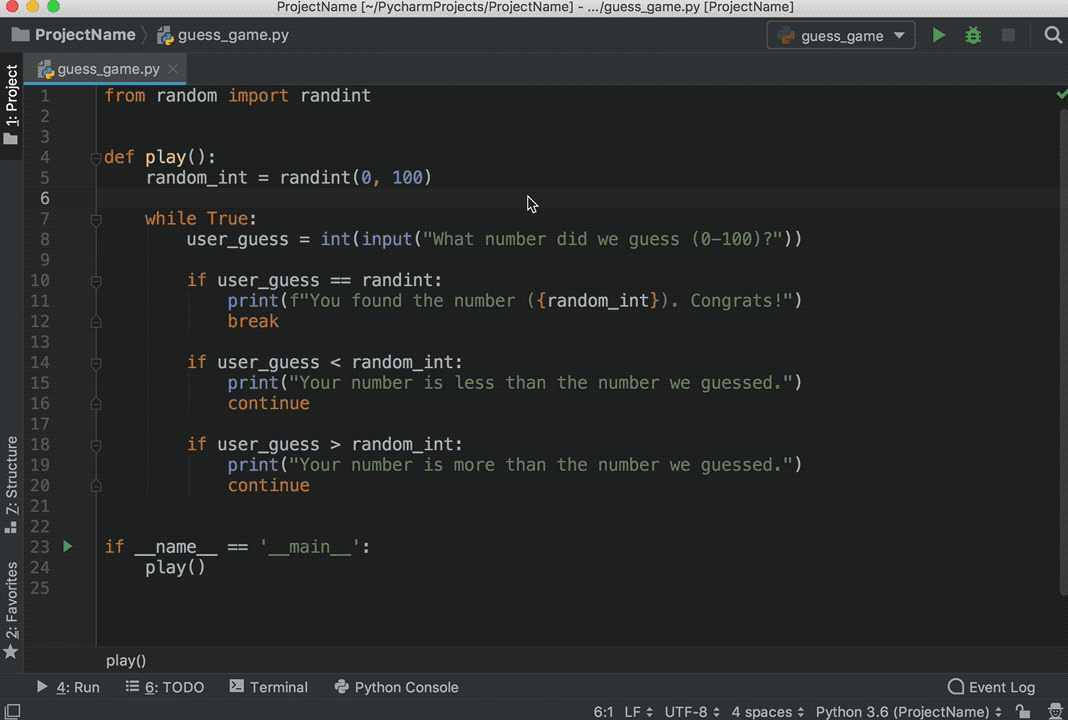
23 play()Введите этот код напрямую, а не копировать и вставлять. Вы увидите что-то вроде этого:

Как видите, PyCharm предоставляетIntelligent Coding Assistance автозавершение кода, инспекцию кода, выделение ошибок на лету и предложения по быстрому исправлению. В частности, обратите внимание, как когда вы набираетеmain и затем нажимаете вкладку, PyCharm автоматически завершает за вас все предложениеmain.
Также обратите внимание, как, если вы забыли ввестиif перед условием, добавить.if, а затем нажать[.kbd .key-tab]#Tab #, PyCharm исправит предложениеif за вас. То же самое и сTrue.while. ЭтоPyCharm’s Postfix completions работает на вас, чтобы уменьшить количество обратных переходов курсора.
Запуск кода в PyCharm
Теперь, когда вы написали код, пришло время запустить его.
У вас есть три способа запуска этой программы:
-
Используйте ярлыкCtrl[.kbd .key-shift]##Shift##[.kbd .key-r]#R on Mac or [.keys] [.kbd .key-control] Ctrl[.kbd .key-shift]##Shift##[.kbd .key-f10]#F10 в Windows или Linux.
-
Щелкните фон правой кнопкой мыши и выберите в менюRun ‘guess_game’.
-
Поскольку в этой программе есть предложение
__main__, вы можете щелкнуть маленькую зеленую стрелку слева от предложения__main__и выбрать оттудаRun ‘guess_game’.
Используйте любой из приведенных выше вариантов для запуска программы, и вы увидите панель «Run Tool», появившуюся в нижней части окна, с выводом кода, показывающим:
Сыграйте в игру немного, чтобы увидеть, сможете ли вы найти угаданное число. Совет профессионала: начните с 50.
Отладка в PyCharm
Вы нашли номер? Если так, то, возможно, вы увидели что-то странное после того, как нашли номер. Вместо того, чтобы печатать поздравительное сообщение и выходить, программа, кажется, запускается заново. Это ошибка прямо здесь. Чтобы выяснить, почему программа запускается заново, вы должны отладить программу.
Сначала установите точку останова, нажав на пустое место слева от строки № 8:
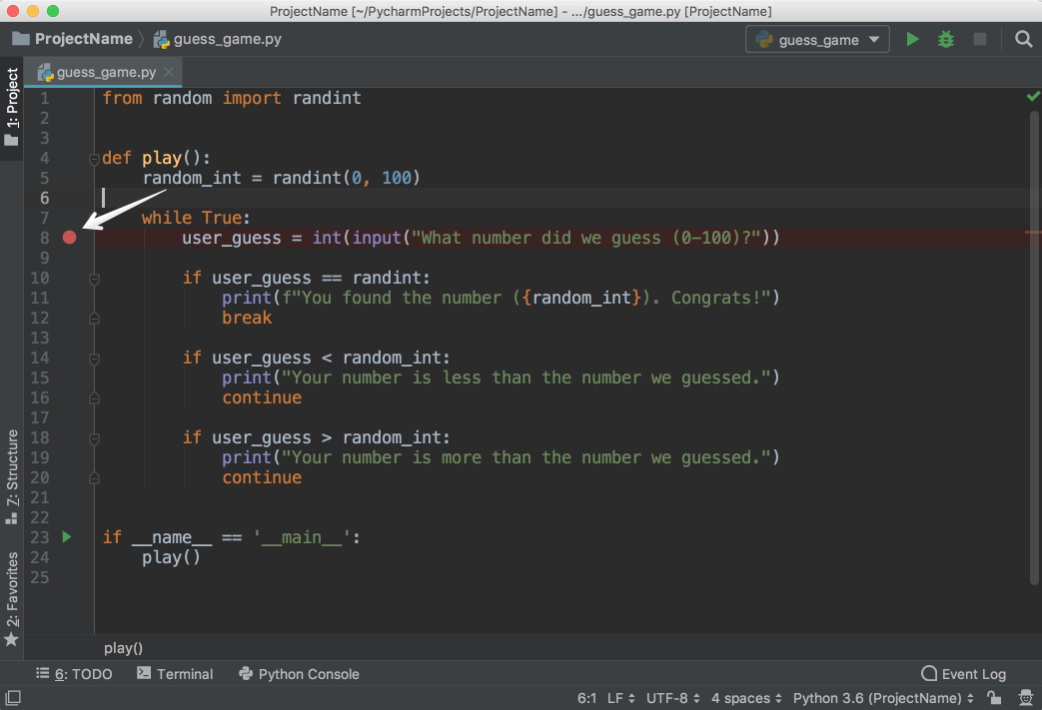
Это будет момент, когда программа будет приостановлена, и вы можете начать исследовать, что пошло не так с этого момента. Затем выберите один из следующих трех способов начать отладку:
-
НажмитеCtrl[.kbd .key-shift]##Shift##[.kbd .key-d]#D on Mac or [.keys] [.kbd .key-shift] Shift[.kbd .key-alt]##Alt##[.kbd .key-f9]#F9 в Windows или Linux.
-
Щелкните фон правой кнопкой мыши и выберитеDebug ‘guess_game’.
-
Щелкните маленькую зеленую стрелку слева от предложения
__main__и выберите оттудаDebug ‘guess_game.
После этого вы увидите открытое окноDebug внизу:

Для отладки программы выполните следующие действия:
-
Обратите внимание, что текущая строка выделена синим цветом.
-
Посмотрите, что
random_intи его значение перечислены в окне отладки. Запишите этот номер. (На рисунке номер 85.) -
При необходимости нажмите[.kbd .key-f8]#F8 to execute the current line and step over to the next one. You can also use [.keys] [.kbd .key-f7] # F7, чтобы перейти кinto функции в текущей строке. Когда вы продолжите выполнять операторы, изменения в переменных будут автоматически отражены в окне отладчика.
-
Обратите внимание, что рядом с открывшейся вкладкой «Отладчик» находится вкладка «Консоль». Эта вкладка Консоль и вкладка Отладчик являются взаимоисключающими. На вкладке Консоль вы будете взаимодействовать с вашей программой, а на вкладке Отладчик вы будете выполнять действия по отладке.
-
Переключитесь на вкладку Консоль, чтобы ввести свое предположение.
-
Введите показанное число и нажмите[.kbd .key-enter]#Enter #.
-
Вернитесь на вкладку «Отладчик».
-
Нажмите[.kbd .key-f8]#F8 # еще раз, чтобы оценить оператор
if. Обратите внимание, что вы сейчас на линии 14. Но подожди минутку! Почему он не пошел на линию 11? Причина в том, что операторifв строке 10 оценивается какFalse. Но почему при вводе выбранного числа он оценивается какFalse? -
Внимательно посмотрите на строку 10 и обратите внимание, что мы сравниваем
user_guessне с тем. Вместо того, чтобы сравнивать его сrandom_int, мы сравниваем его сrandint, функцией, которая была импортирована из пакетаrandom. -
Измените его на
random_int, перезапустите отладку и снова выполните те же действия. Вы увидите, что на этот раз он перейдет к строке 11, а строка 10 будет оценивать какTrue:

Поздравляем! Вы исправили ошибку.
Тестирование в PyCharm
Ни одно приложение не является надежным без юнит-тестов. PyCharm помогает вам писать и запускать их очень быстро и удобно. По умолчаниюunittest используется как средство запуска тестов, но PyCharm также поддерживает другие среды тестирования, такие какpytest,nose,doctest,tox иtrialс. Вы можете, например, включитьpytest для своего проекта следующим образом:
-
Откройте диалоговое окно настроекSettings/Preferences → Tools → Python Integrated Tools.
-
Выберите
pytestв поле Запуск теста по умолчанию. -
ЩелкнитеOK, чтобы сохранить настройки.
В этом примере мы будем использовать средство запуска тестов по умолчаниюunittest.
В том же проекте создайте файл с именемcalculator.py и поместите в него следующий классCalculator:
 1 class Calculator:
 2     def add(self, a, b):
 3         return a + b
 4
 5     def multiply(self, a, b):
 6         return a * b
PyCharm позволяет очень легко создавать тесты для существующего кода. Открыв файлcalculator.py, выполните любое из следующих действий:
-
НажмитеShift[.kbd .key-command]##Cmd##[.kbd .key-t]#T on Mac or [.keys] [.kbd .key-control] Ctrl[.kbd .key-shift]##Shift##[.kbd .key-t]#T в Windows или Linux.
-
Щелкните правой кнопкой мыши фон класса и выберитеGo To иTest.
-
В главном меню выберитеNavigate → Test.
ВыберитеCreate New Test…, и вы увидите следующее окно:
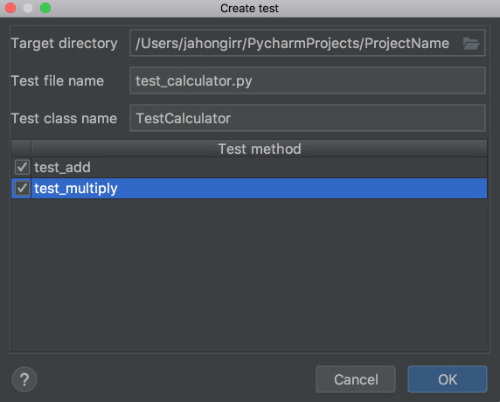
Оставьте значения по умолчаниюTarget directory,Test file name иTest class name. Выберите оба метода и щелкнитеOK. Вуаля! PyCharm автоматически создал файл с именемtest_calculator.py и создал для вас следующие тесты-заглушки:
 1 from unittest import TestCase
 2
 3 class TestCalculator(TestCase):
 4     def test_add(self):
 5         self.fail()
 6
 7     def test_multiply(self):
 8         self.fail()
Запустите тесты одним из следующих способов:
-
НажмитеCtrl[.kbd .key-r]#R## on Mac or [.keys]#[.kbd .key-shift]##Shift##[.kbd .key-f10]#F10 # в Windows или Linux.
-
Щелкните фон правой кнопкой мыши и выберитеRun ‘Unittests for test_calculator.py’.
-
Щелкните маленькую зеленую стрелку слева от имени тестового класса и выберитеRun ‘Unittests for test_calculator.py’.
Вы увидите открытое окно тестов с ошибками всех тестов:
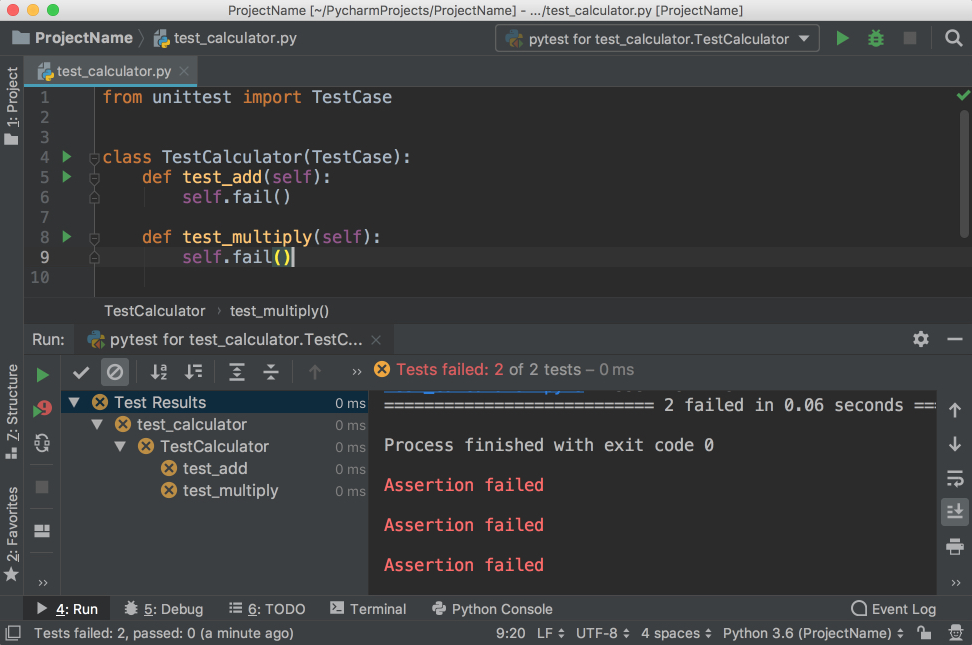
Обратите внимание, что у вас есть иерархия результатов теста слева и вывод терминала справа.
Теперь реализуйтеtest_add, изменив код на следующий:
 1 from unittest import TestCase
 2
 3 from calculator import Calculator
 4
 5 class TestCalculator(TestCase):
 6     def test_add(self):
 7         self.calculator = Calculator()
 8         self.assertEqual(self.calculator.add(3, 4), 7)
 9
10     def test_multiply(self):
11         self.fail()
Запустите тесты еще раз, и вы увидите, что один тест пройден, а другой не пройден. Изучите варианты отображения пройденных тестов, отображения игнорируемых тестов, сортировки тестов по алфавиту и сортировки тестов по продолжительности:
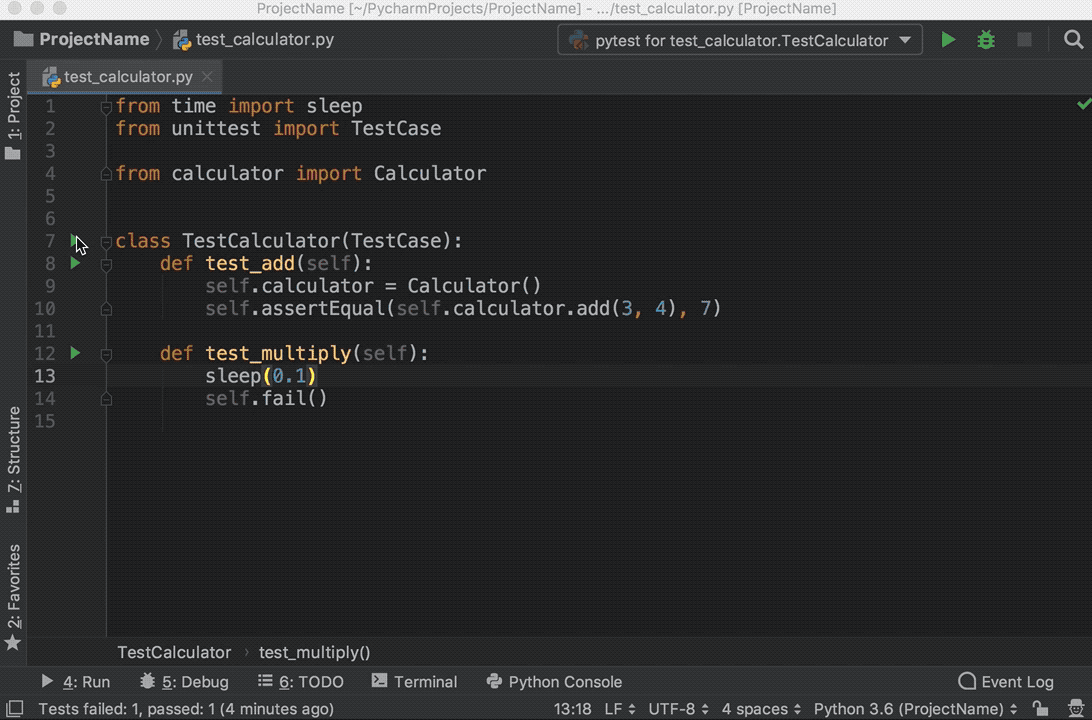
Обратите внимание, что методsleep(0.1), который вы видите в приведенном выше GIF-файле, намеренно используется для замедления одного из тестов, чтобы работала сортировка по продолжительности.
Редактирование существующего проекта в PyCharm
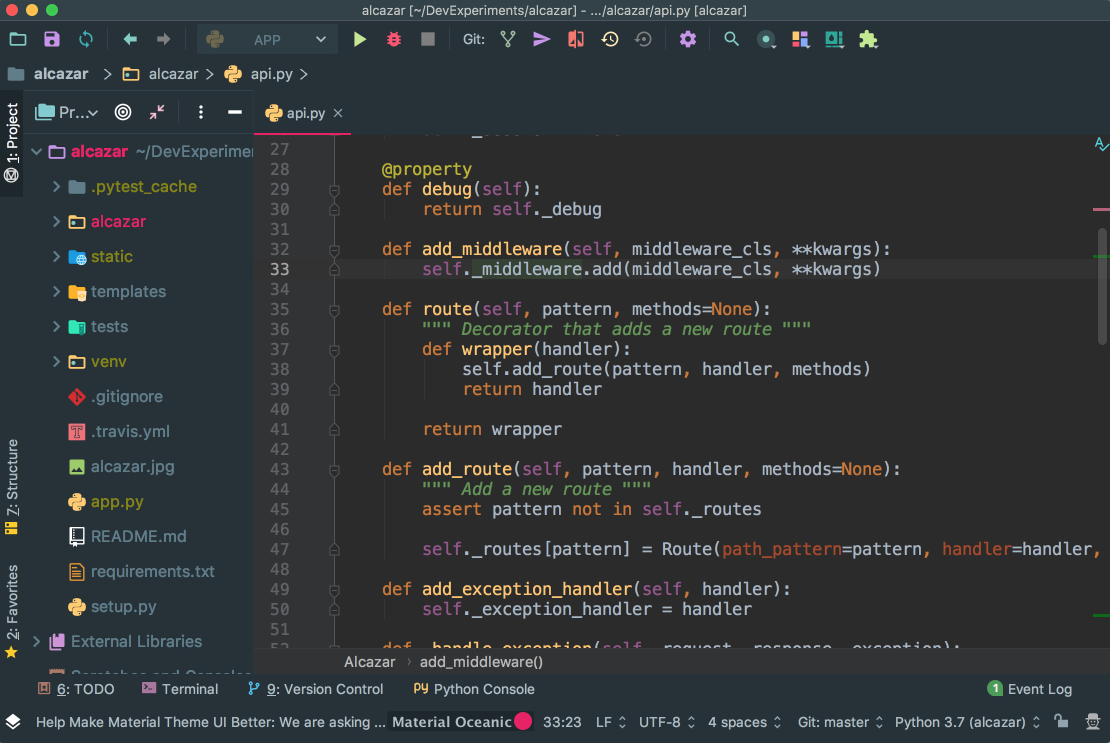
Эти однофайловые проекты отлично подходят для примеров, но вы часто будете работать над гораздо более крупными проектами в течение более длительного периода времени. В этом разделе вы узнаете, как PyCharm работает с большим проектом.
Чтобы изучить возможности PyCharm, ориентированные на проекты, вы будете использовать веб-фреймворк Alcazar, созданный для целей обучения. Чтобы продолжить, скопируйте репо локально:
Если у вас есть проект локально, откройте его в PyCharm одним из следующих способов:
-
ЩелкнитеFile → Open в главном меню.
-
ЩелкнитеOpen наWelcome Screen, если вы там.
После любого из этих шагов найдите папку, содержащую проект на вашем компьютере, и откройте ее.
Если этот проект содержитvirtual environment, тогда PyCharm автоматически использует эту виртуальную среду и сделает ее интерпретатором проекта.
Если вам нужно настроить другойvirtualenv, откройтеPreferences на Mac, нажавCmd[.kbd .key-comma]#,## or _Settings_ on Windows or Linux by pressing [.keys]#[.kbd .key-control]##Ctrl##Alt+[.kbd .key-s]#S # и найдите разделProject: ProjectName. Откройте раскрывающийся список и выберитеProject Interpreter:
Выберитеvirtualenv из раскрывающегося списка. Если его там нет, нажмите кнопку настроек справа от раскрывающегося списка и выберитеAdd…. Остальные шаги должны быть такими же, как когда мы былиcreating a new project.
Поиск и навигация в PyCharm
В большом проекте, где одному человеку трудно запомнить, где все находится, очень важно иметь возможность быстро ориентироваться и находить то, что вы ищете. PyCharm также охватил вас. Используйте проект, который вы открыли в разделе выше, чтобы попрактиковаться в этих сочетаниях клавиш:
-
Searching for a fragment in the current file: НажмитеCmd[.kbd .key-f]#F## on Mac or [.keys]#[.kbd .key-control]##Ctrl##[.kbd .key-f]#F # в Windows или Linux.
-
Searching for a fragment in the entire project: НажмитеCmd[.kbd .key-shift]##Shift##[.kbd .key-f]#F on Mac or [.keys] [.kbd .key-control] Ctrl[.kbd .key-shift]##Shift##[.kbd .key-f]#F в Windows или Linux.
-
Searching for a class: НажмитеCmd[.kbd .key-o]#O## on Mac or [.keys]#[.kbd .key-control]##Ctrl##[.kbd .key-n]#N # в Windows или Linux.
-
Searching for a file: НажмитеCmd[.kbd .key-shift]##Shift##[.kbd .key-o]#O on Mac or [.keys] [.kbd .key-control] Ctrl[.kbd .key-shift]##Shift##[.kbd .key-n]#N в Windows или Linux.
-
Searching all if you don’t know whether it’s a file, class, or a code fragment that you are looking for: Дважды нажмите[.kbd .key-shift]#Shift #.
Что касается навигации, следующие ярлыки могут сэкономить вам много времени:
-
Going to the declaration of a variable: Нажмите[.kbd .key-command]#Cmd on Mac or [.keys] [.kbd .key-control] #Ctrl в Windows или Linux и щелкните по переменной.
-
Finding usages of a class, a method, or any symbol: НажмитеAlt+[.kbd .key-f7]#F7 #.
-
Seeing your recent changes: НажмитеShift[.kbd .key-alt]##Alt##[.kbd .key-c]#C # или перейдите кView → Recent Changes в главном меню.
-
Seeing your recent files: НажмитеCmd[.kbd .key-e]#E## on Mac or [.keys]#[.kbd .key-control]##Ctrl##[.kbd .key-e]#E # в Windows или Linux или перейдите кView → Recent Files в главном меню.
-
Going backward and forward through your history of navigation after you jumped around: НажмитеCmd[.kbd .key-bracket-left]#[## / [.keys]#[.kbd .key-command]##Cmd##[.kbd .key-bracket-right]] on Mac or [.kbd .key-control]Ctrl[.kbd .key-alt]##Alt##[.kbd .key-arrow-left]#Left / [.keys]Ctrl [.kbd .key-alt] ## Alt ##Right # в Windows или Linux.
Использование контроля версий в PyCharm
Системы контроля версий, такие какGit иMercurial, являются одними из самых важных инструментов в современном мире разработки программного обеспечения. Поэтому для IDE важно поддерживать их. PyCharm делает это очень хорошо, интегрируясь с множеством популярных систем VC, таких как Git (иGithub), Mercurial,Perforce иSubversion.
Note:Git используется в следующих примерах.
Настройка VCS
Чтобы включить интеграцию VCS. Перейдите кVCS → VCS Operations Popup… из меню вверху или нажмитеCtrl[.kbd .key-v]#V## on Mac or [.keys]#[.kbd .key-alt]##Alt##[.kbd .key-grave]` ## в Windows или Linux. ВыберитеEnable Version Control Integration…. Вы увидите следующее открытое окно:
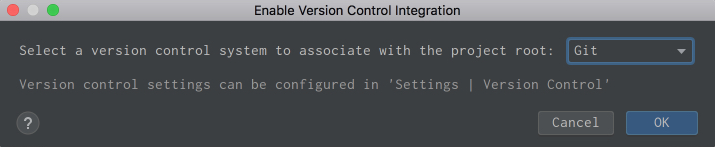
ВыберитеGit из раскрывающегося списка, щелкнитеOK, и у вас включен VCS для вашего проекта. Обратите внимание, что если вы открыли существующий проект с включенным контролем версий, PyCharm увидит это и автоматически включит его.
Теперь, если вы перейдете кVCS Operations Popup…, вы увидите другое всплывающее окно с вариантами выполненияgit add,git stash,git branch,git commit,git push и другие:

Если вы не можете найти то, что вам нужно, вы, скорее всего, сможете найти это, перейдя вVCS в верхнем меню и выбравGit, где вы даже можете создавать и просматривать запросы на вытягивание.
Фиксация и разрешение конфликтов
Это две особенности интеграции VCS в PyCharm, которые я лично использую и получаю огромное удовольствие! Допустим, вы завершили свою работу и хотите ее совершить. Перейдите кVCS → VCS Operations Popup… → Commit… или нажмитеCmd[.kbd .key-k]#K## on Mac or [.keys]#[.kbd .key-control]##Ctrl##[.kbd .key-k]#K # в Windows или Linux. Вы увидите следующее открытое окно:
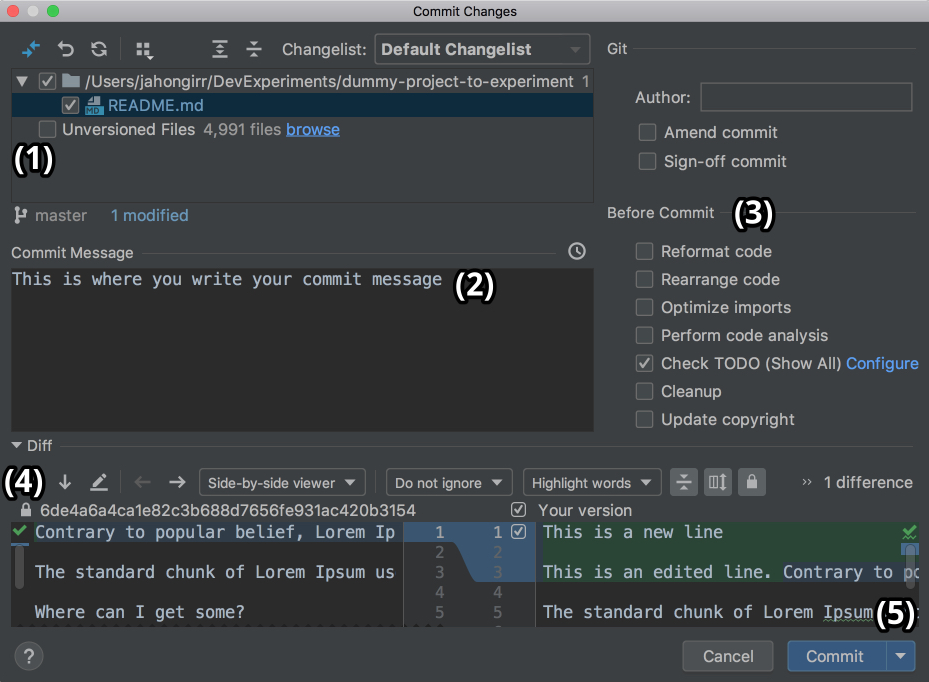
В этом окне вы можете сделать следующее:
-
Выберите файлы для фиксации
-
Напишите ваше сообщение
-
Сделайте всевозможные проверки и очисткуbefore commit
-
Увидеть разницу изменений
-
Зафиксируйте и нажмите сразу, нажав стрелку справа от кнопкиCommit в правом нижнем углу и выбравCommit and Push…
Это может показаться волшебным и быстрым, особенно если вы привыкли делать все вручную в командной строке.
Когда вы работаете в команде,merge conflicts случается. Когда кто-то фиксирует изменения в файле, над которым вы работаете, но их изменения пересекаются с вашими, потому что вы оба изменили одни и те же строки, VCS не сможет определить, стоит ли выбирать ваши изменения или изменения вашего товарища по команде. Таким образом, вы получите эти несчастные стрелки и символы:
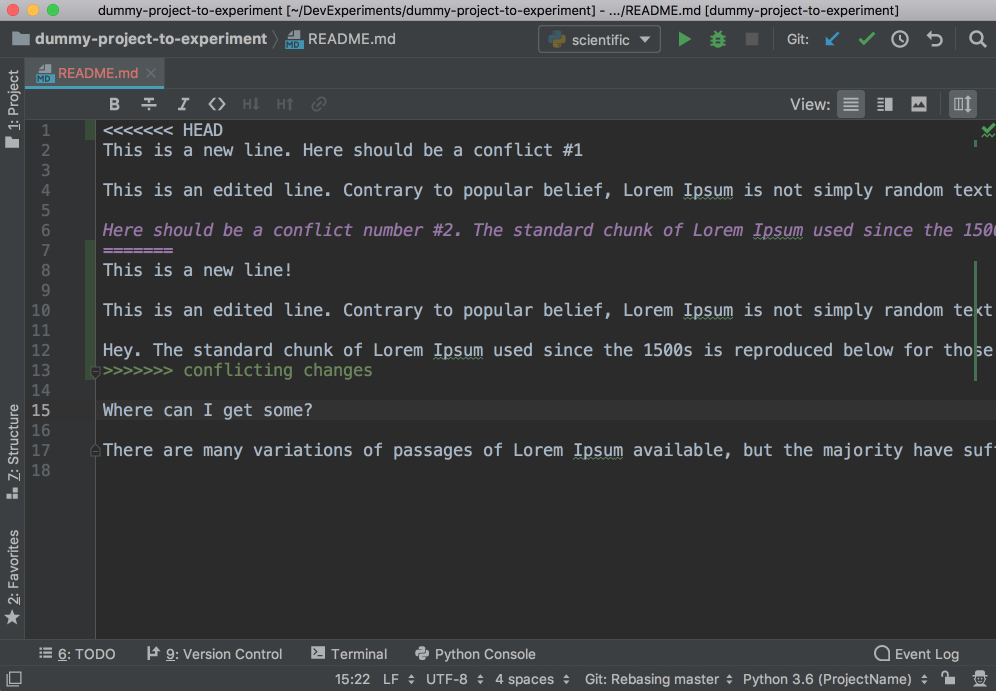
Это выглядит странно, и трудно понять, какие изменения следует удалить, а какие оставить. PyCharm на помощь! У него гораздо приятнее и понятнее способ разрешения конфликтов. Перейдите кVCS в верхнем меню, выберитеGit, а затемResolve conflicts…. Выберите файл, конфликты которого вы хотите разрешить, и нажмитеMerge. Вы увидите следующее открытое окно:
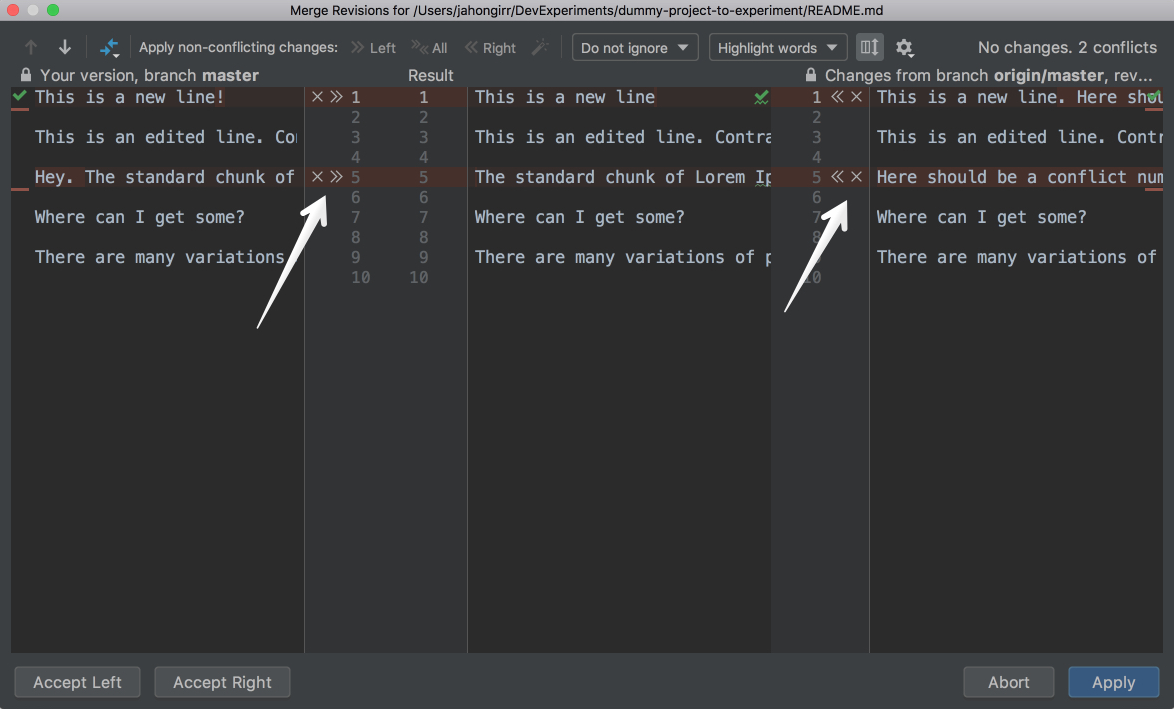
В левой колонке вы увидите ваши изменения. Справа — изменения, внесенные вашим товарищем по команде. Наконец, в среднем столбце вы увидите результат. Конфликтующие строки выделены, и вы можете увидеть маленькиеX и>> /<< прямо рядом с этими строками. Нажмите стрелки, чтобы принять изменения, иX, чтобы отклонить. После устранения всех этих конфликтов нажмите кнопкуApply:

В приведенном выше GIF для первой конфликтующей строки автор отклонил свои изменения и принял изменения своих товарищей по команде. И наоборот, автор принял свои собственные изменения и отклонил своих партнеров по команде для второй конфликтующей строки.
Вы можете сделать гораздо больше с интеграцией VCS в PyCharm. Подробнее см.this documentation.
Использование плагинов и внешних инструментов в PyCharm
Вы можете найти почти все, что вам нужно для разработки в PyCharm. Если вы не можете этого сделать, скорее всего, существуетplugin, который добавляет необходимые вам функции в PyCharm. Например, они могут:
-
Добавить поддержку для различных языков и структур
-
Повысьте свою производительность с помощью ярлыков, средств просмотра файлов и т. Д.
-
Помочь вам выучить новый язык программирования с помощью упражнений по кодированию
Например,IdeaVim добавляет эмуляцию Vim в PyCharm. Если вам нравится Vim, это может быть очень хорошая комбинация.
Material Theme UI изменяет внешний вид PyCharm на внешний вид Material Design:
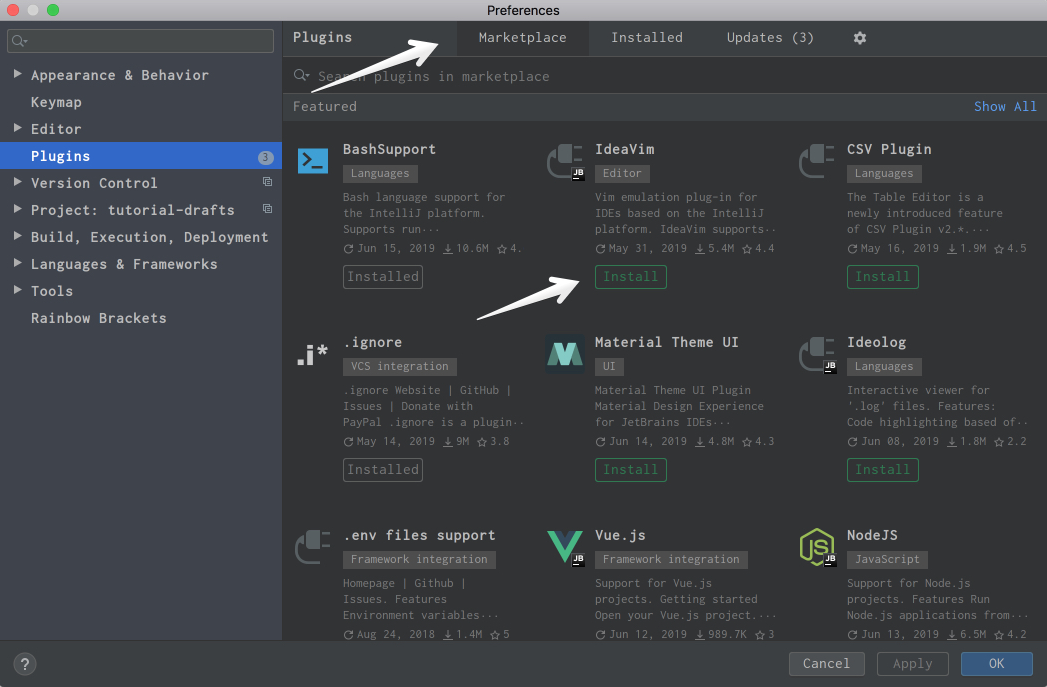
Vue.js добавляет поддержку проектовVue.js. Markdown предоставляет возможность редактировать файлы Markdown в среде IDE и просматривать визуализированный HTML-код в режиме предварительного просмотра. Вы можете найти и установить все доступные плагины, перейдя вPreferences → Plugins на Mac илиSettings → Plugins на Windows или Linux, на вкладкеMarketplace:
Если вы не можете найти нужный плагин и не хотите разрабатывать свой собственный, потому что в PyPI уже есть пакет, вы можете добавить его в PyCharm в качестве внешнего инструмента. Возьмем для примера анализатор кодаFlake8.
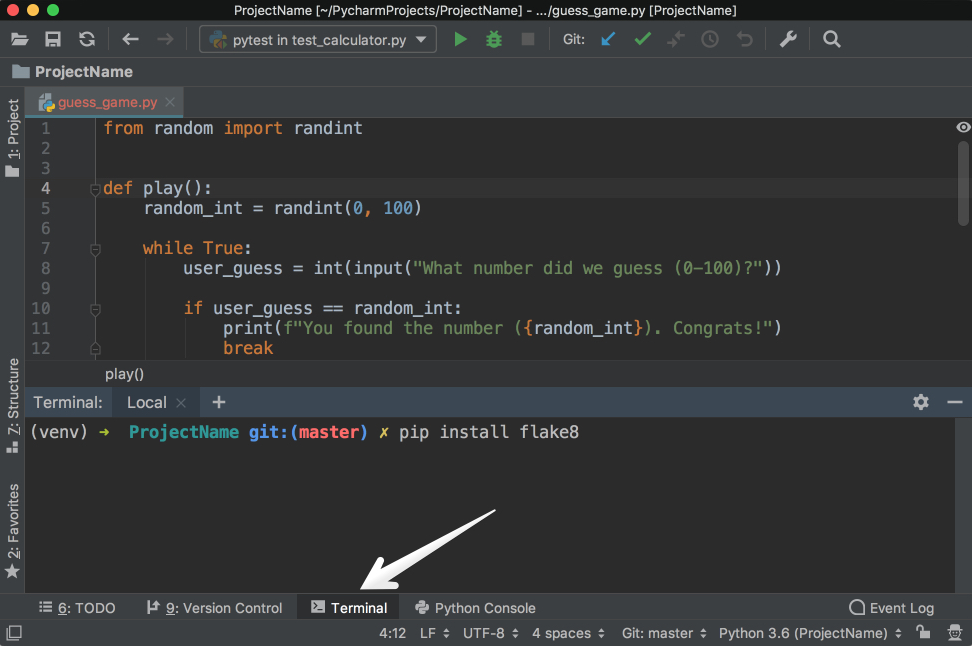
Сначала установитеflake8 в свой виртуальный сервер с помощьюpip install flake8 в приложении терминала по вашему выбору. Вы также можете использовать тот, который интегрирован в PyCharm:
Затем перейдите кPreferences → Tools на Mac илиSettings → Tools на Windows / Linux, а затем выберитеExternal Tools. Затем нажмите маленькую кнопку+ внизу (1). В новом всплывающем окне вставьте детали, как показано ниже, и щелкнитеOK для обоих окон:
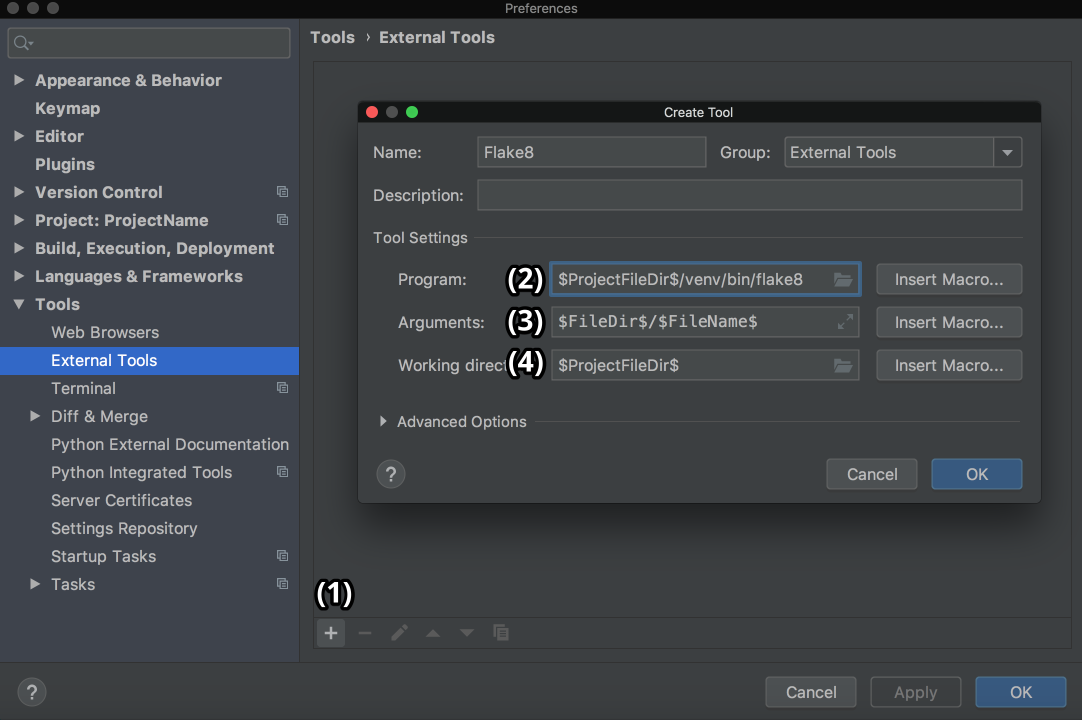
ЗдесьProgram (2) относится к исполняемому файлу Flake8, который находится в папке/bin вашей виртуальной среды. Arguments (3) указывает, какой файл вы хотите проанализировать с помощью Flake8. Working directory — это каталог вашего проекта.
Вы можете жестко указать здесь абсолютные пути для всего, но это будет означать, что вы не сможете использовать этот внешний инструмент в других проектах. Вы сможете использовать его только внутри одного проекта для одного файла.
Поэтому вам нужно использовать что-то под названиемMacros. Макросы — это в основном переменные в формате$name$, которые меняются в зависимости от вашего контекста. Например,$FileName$ — этоfirst.py, когда вы редактируетеfirst.py, иsecond.py, когда вы редактируетеsecond.py. Вы можете просмотреть их список и вставить любой из них, нажав на кнопкиInsert Macro…. Поскольку вы использовали здесь макросы, значения будут меняться в зависимости от проекта, над которым вы сейчас работаете, и Flake8 продолжит правильно выполнять свою работу.
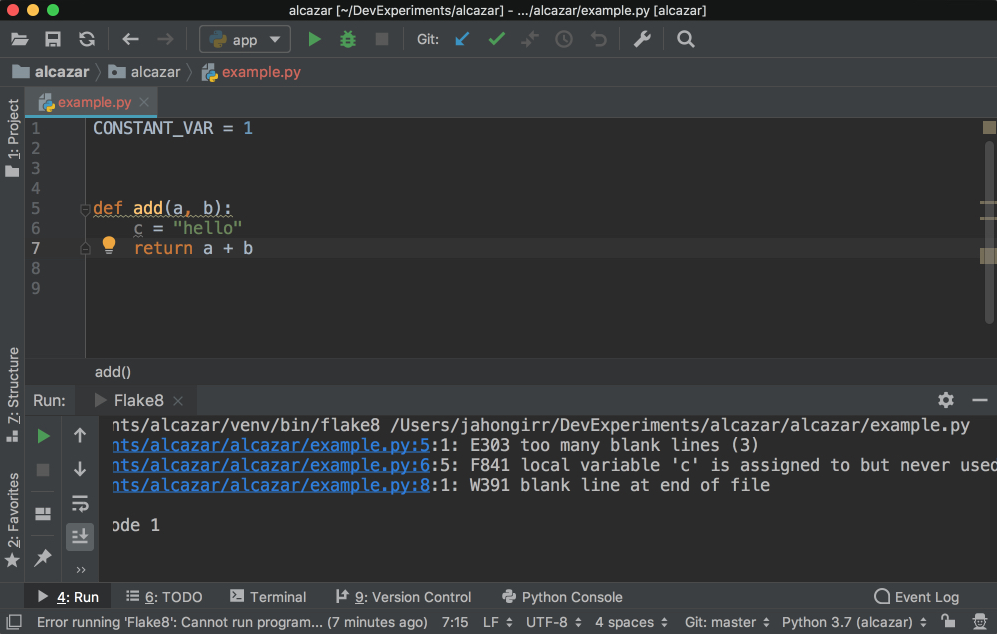
Чтобы использовать его, создайте файлexample.py и поместите в него следующий код:
 1 CONSTANT_VAR = 1
 2
 3
 4
 5 def add(a, b):
 6     c = "hello"
 7     return a + b
Это намеренно нарушает некоторые правила Flake8. Щелкните правой кнопкой мыши фон этого файла. ВыберитеExternal Tools, а затемFlake8. Вуаля! Результат анализа Flake8 появится внизу:
Чтобы сделать его еще лучше, вы можете добавить ярлык для него. Перейдите кPreferences на Mac или кSettings в Windows или Linux. Затем перейдите кKeymap → External Tools → External Tools. Дважды щелкнитеFlake8 и выберитеAdd Keyboard Shortcut. Вы увидите это окно:
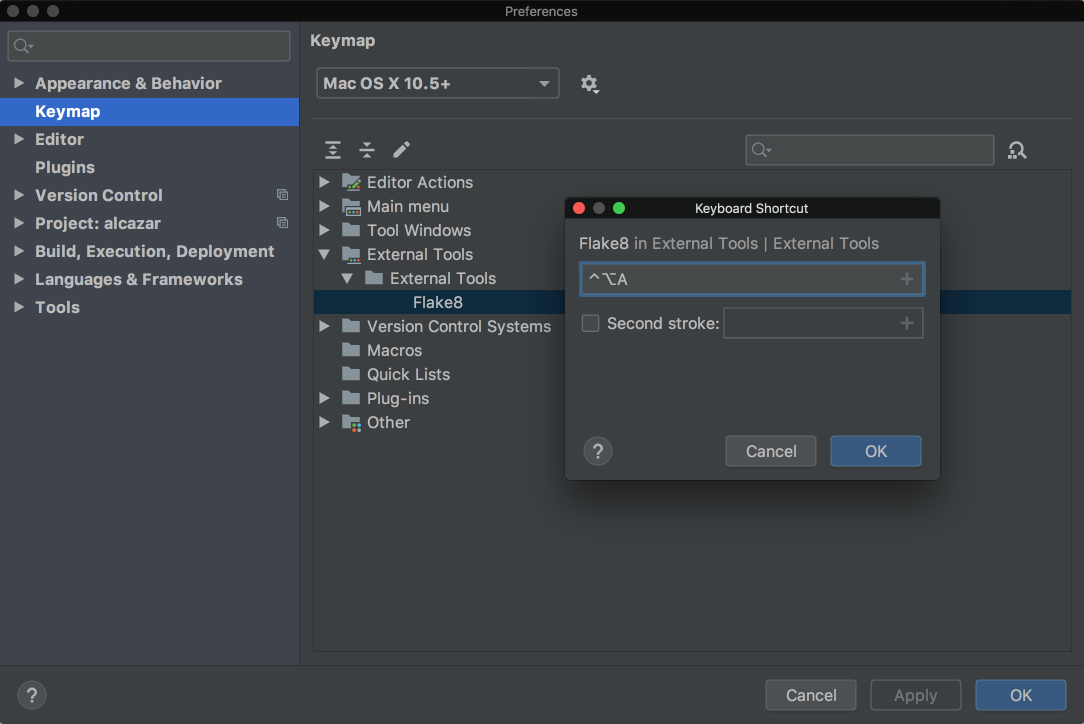
На изображении выше ярлык для этого инструментаCtrl[.kbd .key-alt]##Alt##[.kbd .key-a]#A #. Добавьте желаемый ярлык в текстовое поле и щелкнитеOK для обоих окон. Теперь вы можете использовать этот ярлык для анализа файла, над которым вы сейчас работаете с Flake8.
PyCharm Professional Особенности
PyCharm Professional — это платная версия PyCharm с большим количеством готовых функций и интеграций. В этом разделе вам в основном будут представлены обзоры его основных функций и ссылки на официальную документацию, где каждая функция подробно обсуждается. Помните, что ни одна из следующих функций не доступна в версии для сообщества.
Поддержка Django
PyCharm имеет обширную поддержкуDjango, одного из самых популярных и любимыхPython web frameworks. Чтобы убедиться, что он включен, выполните следующие действия:
-
ОткройтеPreferences на Mac илиSettings в Windows или Linux.
-
ВыберитеLanguages and Frameworks.
-
ВыберитеDjango.
-
Установите флажокEnable Django support.
-
Применять изменения.
Теперь, когда вы включили поддержку Django, ваш путь развития Django будет намного проще в PyCharm:
-
При создании проекта у вас будет выделенный тип проекта Django. Это означает, что при выборе этого типа у вас будут все необходимые файлы и настройки. Это эквивалент использования
django-admin startproject mysite. -
Команды
manage.pyможно запускать прямо внутри PyCharm. -
Поддерживаются шаблоны Django, в том числе:
-
Синтаксис и подсветка ошибок
-
Завершение кода
-
навигация
-
Завершение для имен блоков
-
Завершение для пользовательских тегов и фильтров
-
Быстрая документация по тегам и фильтрам
-
Возможность их отладки
-
-
Завершение кода во всех других частях Django, таких как представления, URL-адреса и модели, а также поддержка анализа кода для Django ORM.
-
Диаграммы зависимостей моделей для моделей Джанго.
Поддержка базы данных
Современная разработка баз данных — сложная задача со множеством вспомогательных систем и рабочих процессов. Вот почему JetBrains, компания, стоящая за PyCharm, разработала для этого автономную среду IDE под названиемDataGrip. Это отдельный продукт от PyCharm с отдельной лицензией.
К счастью, PyCharm поддерживает все функции, доступные в DataGrip, через плагин под названиемDatabase tools and SQL, который по умолчанию включен. С его помощью вы можете запрашивать, создавать и управлять базами данных независимо от того, работают ли они локально, на сервере или в облаке. Плагин поддерживает MySQL, PostgreSQL, Microsoft SQL Server, SQLite, MariaDB, Oracle, Apache Cassandra и другие. Для получения дополнительной информации о том, что вы можете делать с этим плагином, ознакомьтесь сthe comprehensive documentation on the database support.
Визуализация параллелизма потоков
Django Channels,asyncio и недавние фреймворки, такие какStarlette, являются примерами растущей тенденции в асинхронном программировании на Python. Несмотря на то, что асинхронные программы действительно приносят много пользы, известно, что их также сложно писать и отлаживать. В таких случаяхThread Concurrency Visualization может быть именно тем, что доктор прописал, потому что он помогает вам полностью контролировать свои многопоточные приложения и оптимизировать их.
Profiler
Говоря об оптимизации, профилирование — это еще один метод, который вы можете использовать для оптимизации вашего кода. С его помощью вы можете увидеть, какие части вашего кода занимают большую часть времени выполнения. Профилировщик работает в следующем порядке приоритета:
-
vmprof -
yappi -
cProfile
Если у вас не установленыvmprof илиyappi, то он вернется к стандартномуcProfile. Этоwell-documented, поэтому я не буду его здесь повторять.
Научный режим
Python — это не только язык для общего и веб-программирования. Он также стал лучшим инструментом для науки о данных и машинного обучения за последние годы благодаря библиотекам и инструментам, таким какNumPy,SciPy,scikit-learn,Matplotlib,Jupyter. ) s и многое другое. При наличии таких мощных библиотек вам необходима мощная IDE для поддержки всех функций, таких как построение графиков и анализ этих библиотек. PyCharm предоставляет все необходимое в видеthoroughly documented here.
Удаленная разработка
Одной из распространенных причин ошибок во многих приложениях является то, что среды разработки и производства отличаются. Хотя в большинстве случаев невозможно предоставить точную копию производственной среды для разработки, достижение этой цели является достойной.
С PyCharm вы можете отлаживать свое приложение с помощью интерпретатора, расположенного на другом компьютере, например на виртуальной машине Linux. В результате вы можете иметь тот же интерпретатор, что и ваша производственная среда, для исправления и предотвращения множества ошибок, возникающих в результате различий между средой разработки и производственной средой. Обязательно ознакомьтесь сofficial documentation, чтобы узнать больше.
Заключение
PyCharm является одной из лучших, если не лучшими, полнофункциональными, выделенными и универсальными IDE для разработки на Python. Он предлагает массу преимуществ, экономя вам много времени, помогая вам с рутинными задачами. Теперь вы знаете, как с этим работать!
В этой статье вы узнали о многом, в том числе:
-
Установка PyCharm
-
Написание кода в PyCharm
-
Выполнение вашего кода в PyCharm
-
Отладка и тестирование вашего кода в PyCharm
-
Редактирование существующего проекта в PyCharm
-
Поиск и навигация в PyCharm
-
Использование контроля версий в PyCharm
-
Использование плагинов и внешних инструментов в PyCharm
-
Использование функций PyCharm Professional, таких как поддержка Django и научный режим
Если вы хотите что-то спросить или поделиться, пожалуйста, обратитесь к комментариям ниже. ВPyCharm website также есть много дополнительной информации, которую вы можете изучить.
JetBrains PyCharm — это интегрированная среда разработки (IDE), используемая для написания программ на Python. В ней есть инструменты для анализа кода, графический отладчик, встроенное модульное тестирование и поддержка веб-разработки с Django.
Для установки PyCharm сперва нужно установить интерпретатор Python. Дальше — пошаговый процесс установки PyCharm.
- Перейдите на сайт JetBrains https://www.jetbrains.com/pycharm/. PyCharm — это проект JetBrains.

- Нажмите «Download». Произойдет перенаправление на страницу загрузки PyCharm.
- Дальше необходимо выбрать версию PyCharm: Community или Professional. Professional — это платная версия с полным набором функций. Она идеально подходит для профессиональной разработки. Community бесплатная. Ею можно пользоваться благодаря набору базовых возможностей. После нажатия на кнопку «Загрузить» скачивание начнется автоматически.
- Теперь необходимо запустить установку (~ pycharm-community-2019.2). Нажмите «Next».


В статье используется версия pycharm 2019.2. Во время прочтения может быть выпущена новая версия. Учитывайте это, часть
2019.2может быть любой.
- Оставьте папку установки по умолчанию. Это папка
C:Program files(x86)JetBrainsPyCharm Community Edition 2019.2. Если выбрана другая, лучше указать именно это направление. Нажмите «Next». - Поставьте галочки напротив обоих пунктов, если нужен ярлык для рабочего стола. Нажмите «Next».

- Далее установщик попросит указать имя для отображения в стартовом меню. По умолчанию это JetBrains. Нажмите «Install».
- Установка начнется автоматически. Дождитесь завершения.
- После завершения установки поставьте галочку напротив «Run PyCharm Community Edition» для запуска, а затем «Finish».
- Если вы только учите язык Python и установили PyCharm впервые, тогда выберите пункт «I do not have a previous version of PyCharm or I do not want to import my settings» и «ОК».
- PyCharm запустится. Первый раз этой займет больше времени.
- После приветственного окна нажмите «Create New Project».
- Выберите директорию для сохранения проекта. Во втором поле нужно указать местоположение интерпретатора Python (который уже должен быть установлен). Обычно PyCharm находит его самостоятельно. Если не удалось, нужно указать путь к нему и нажать «Create».

- Нажмите «File > New > Python File». Введите название нового файла. Он откроется с чистой консолью. Можно начинать писать программу для проверки. Напишите что-то простое: например, программу, которая выводит «Hello World!» на экран. Используйте этот код, чтобы проверить работу PyCharm.
print("Hello World!")


В любом месте кликните правой кнопкой мыши и выберите «Run». Программа выполнится, а вывод будет показан на экране. Это значит, что PyCharm установлен и готов к работе. Удачи и успехов в изучении Python.
Обучение с трудоустройством
As a programmer, you should be focused on the business logic and creating useful applications for your users. In doing that, PyCharm by JetBrains saves you a lot of time by taking care of the routine and by making a number of other tasks such as debugging and visualization easy.
In this article, you’ll learn about:
- Installing PyCharm
- Writing code in PyCharm
- Running your code in PyCharm
- Debugging and testing your code in PyCharm
- Editing an existing project in PyCharm
- Searching and navigating in PyCharm
- Using Version Control in PyCharm
- Using Plugins and External Tools in PyCharm
- Using PyCharm Professional features, such as Django support and Scientific mode
This article assumes that you’re familiar with Python development and already have some form of Python installed on your system. Python 3.6 will be used for this tutorial. Screenshots and demos provided are for macOS. Because PyCharm runs on all major platforms, you may see slightly different UI elements and may need to modify certain commands.
Installing PyCharm
This article will use PyCharm Community Edition 2019.1 as it’s free and available on every major platform. Only the section about the professional features will use PyCharm Professional Edition 2019.1.
The recommended way of installing PyCharm is with the JetBrains Toolbox App. With its help, you’ll be able to install different JetBrains products or several versions of the same product, update, rollback, and easily remove any tool when necessary. You’ll also be able to quickly open any project in the right IDE and version.
To install the Toolbox App, refer to the documentation by JetBrains. It will automatically give you the right instructions depending on your OS. In case it didn’t recognize your OS correctly, you can always find it from the drop down list on the top right section:
After installing, launch the app and accept the user agreement. Under the Tools tab, you’ll see a list of available products. Find PyCharm Community there and click Install:
Voilà! You have PyCharm available on your machine. If you don’t want to use the Toolbox app, then you can also do a stand-alone installation of PyCharm.
Launch PyCharm, and you’ll see the import settings popup:
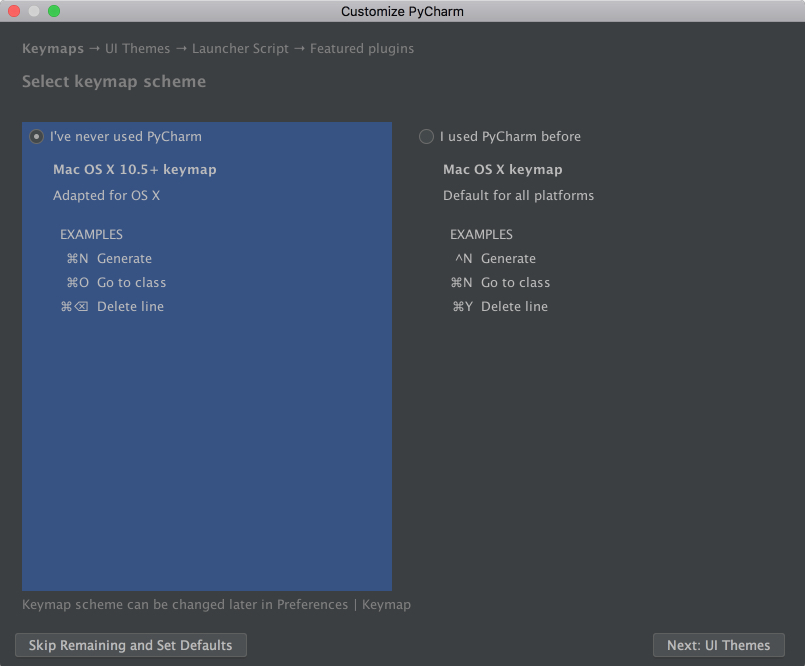
PyCharm will automatically detect that this is a fresh install and choose Do not import settings for you. Click OK, and PyCharm will ask you to select a keymap scheme. Leave the default and click Next: UI Themes on the bottom right:
PyCharm will then ask you to choose a dark theme called Darcula or a light theme. Choose whichever you prefer and click Next: Launcher Script:
I’ll be using the dark theme Darcula throughout this tutorial. You can find and install other themes as plugins, or you can also import them.
On the next page, leave the defaults and click Next: Featured plugins. There, PyCharm will show you a list of plugins you may want to install because most users like to use them. Click Start using PyCharm, and now you are ready to write some code!
Writing Code in PyCharm
In PyCharm, you do everything in the context of a project. Thus, the first thing you need to do is create one.
After installing and opening PyCharm, you are on the welcome screen. Click Create New Project, and you’ll see the New Project popup:
Specify the project location and expand the Project Interpreter drop down. Here, you have options to create a new project interpreter or reuse an existing one. Choose New environment using. Right next to it, you have a drop down list to select one of Virtualenv, Pipenv, or Conda, which are the tools that help to keep dependencies required by different projects separate by creating isolated Python environments for them.
You are free to select whichever you like, but Virtualenv is used for this tutorial. If you choose to, you can specify the environment location and choose the base interpreter from the list, which is a list of Python interpreters (such as Python2.7 and Python3.6) installed on your system. Usually, the defaults are fine. Then you have to select boxes to inherit global site-packages to your new environment and make it available to all other projects. Leave them unselected.
Click Create on the bottom right and you will see the new project created:
You will also see a small Tip of the Day popup where PyCharm gives you one trick to learn at each startup. Go ahead and close this popup.
It is now time to start a new Python program. Type Cmd+N if you are on Mac or Alt+Ins if you are on Windows or Linux. Then, choose Python File. You can also select File → New from the menu. Name the new file guess_game.py and click OK. You will see a PyCharm window similar to the following:
For our test code, let’s quickly code up a simple guessing game in which the program chooses a number that the user has to guess. For every guess, the program will tell if the user’s guess was smaller or bigger than the secret number. The game ends when the user guesses the number. Here’s the code for the game:
 1from random import randint
 2
 3def play():
 4    random_int = randint(0, 100)
 5
 6    while True:
 7        user_guess = int(input("What number did we guess (0-100)?"))
 8
 9        if user_guess == random_int:
10            print(f"You found the number ({random_int}). Congrats!")
11            break
12
13        if user_guess < random_int:
14            print("Your number is less than the number we guessed.")
15            continue
16
17        if user_guess > random_int:
18            print("Your number is more than the number we guessed.")
19            continue
20
21
22if __name__ == '__main__':
23    play()
Type this code directly rather than copying and pasting. You’ll see something like this:
As you can see, PyCharm provides Intelligent Coding Assistance with code completion, code inspections, on-the-fly error highlighting, and quick-fix suggestions. In particular, note how when you typed main and then hit tab, PyCharm auto-completed the whole main clause for you.
Also note how, if you forget to type if before the condition, append .if, and then hit Tab, PyCharm fixes the if clause for you. The same is true with True.while. That’s PyCharm’s Postfix completions working for you to help reduce backward caret jumps.
Running Code in PyCharm
Now that you’ve coded up the game, it’s time for you to run it.
You have three ways of running this program:
- Use the shortcut Ctrl+Shift+R on Mac or Ctrl+Shift+F10 on Windows or Linux.
- Right-click the background and choose Run ‘guess_game’ from the menu.
- Since this program has the
__main__clause, you can click on the little green arrow to the left of the__main__clause and choose Run ‘guess_game’ from there.
Use any one of the options above to run the program, and you’ll see the Run Tool pane appear at the bottom of the window, with your code output showing:
Play the game for a little bit to see if you can find the number guessed. Pro tip: start with 50.
Debugging in PyCharm
Did you find the number? If so, you may have seen something weird after you found the number. Instead of printing the congratulations message and exiting, the program seems to start over. That’s a bug right there. To discover why the program starts over, you’ll now debug the program.
First, place a breakpoint by clicking on the blank space to the left of line number 8:
This will be the point where the program will be suspended, and you can start exploring what went wrong from there on. Next, choose one of the following three ways to start debugging:
- Press Ctrl+Shift+D on Mac or Shift+Alt+F9 on Windows or Linux.
- Right-click the background and choose Debug ‘guess_game’.
- Click on the little green arrow to the left of the
__main__clause and choose Debug ‘guess_game from there.
Afterwards, you’ll see a Debug window open at the bottom:
Follow the steps below to debug the program:
-
Notice that the current line is highlighted in blue.
-
See that
random_intand its value are listed in the Debug window. Make a note of this number. (In the picture, the number is 85.) -
Hit F8 to execute the current line and step over to the next one. You can also use F7 to step into the function in the current line, if necessary. As you continue executing the statements, the changes in the variables will be automatically reflected in the Debugger window.
-
Notice that there is the Console tab right next to the Debugger tab that opened. This Console tab and the Debugger tab are mutually exclusive. In the Console tab, you will be interacting with your program, and in the Debugger tab you will do the debugging actions.
-
Switch to the Console tab to enter your guess.
-
Type the number shown, and then hit Enter.
-
Switch back to the Debugger tab.
-
Hit F8 again to evaluate the
ifstatement. Notice that you are now on line 14. But wait a minute! Why didn’t it go to the line 11? The reason is that theifstatement on line 10 evaluated toFalse. But why did it evaluate toFalsewhen you entered the number that was chosen? -
Look carefully at line 10 and notice that we are comparing
user_guesswith the wrong thing. Instead of comparing it withrandom_int, we are comparing it withrandint, the function that was imported from therandompackage. -
Change it to
random_int, restart the debugging, and follow the same steps again. You will see that, this time, it will go to line 11, and line 10 will evaluate toTrue:
Congratulations! You fixed the bug.
Testing in PyCharm
No application is reliable without unit tests. PyCharm helps you write and run them very quickly and comfortably. By default, unittest is used as the test runner, but PyCharm also supports other testing frameworks such as pytest, nose, doctest, tox, and trial. You can, for example, enable pytest for your project like this:
- Open the Settings/Preferences → Tools → Python Integrated Tools settings dialog.
- Select
pytestin the Default test runner field. - Click OK to save the settings.
For this example, we’ll be using the default test runner unittest.
In the same project, create a file called calculator.py and put the following Calculator class in it:
 1class Calculator:
 2    def add(self, a, b):
 3        return a + b
 4
 5    def multiply(self, a, b):
 6        return a * b
PyCharm makes it very easy to create tests for your existing code. With the calculator.py file open, execute any one of the following that you like:
- Press Shift+Cmd+T on Mac or Ctrl+Shift+T on Windows or Linux.
- Right-click in the background of the class and then choose Go To and Test.
- On the main menu, choose Navigate → Test.
Choose Create New Test…, and you will see the following window:
Leave the defaults of Target directory, Test file name, and Test class name. Select both of the methods and click OK. Voila! PyCharm automatically created a file called test_calculator.py and created the following stub tests for you in it:
 1from unittest import TestCase
 2
 3class TestCalculator(TestCase):
 4    def test_add(self):
 5        self.fail()
 6
 7    def test_multiply(self):
 8        self.fail()
Run the tests using one of the methods below:
- Press Ctrl+R on Mac or Shift+F10 on Windows or Linux.
- Right-click the background and choose Run ‘Unittests for test_calculator.py’.
- Click on the little green arrow to the left of the test class name and choose Run ‘Unittests for test_calculator.py’.
You’ll see the tests window open on the bottom with all the tests failing:
Notice that you have the hierarchy of the test results on the left and the output of the terminal on the right.
Now, implement test_add by changing the code to the following:
 1from unittest import TestCase
 2
 3from calculator import Calculator
 4
 5class TestCalculator(TestCase):
 6    def test_add(self):
 7        self.calculator = Calculator()
 8        self.assertEqual(self.calculator.add(3, 4), 7)
 9
10    def test_multiply(self):
11        self.fail()
Run the tests again, and you’ll see that one test passed and the other failed. Explore the options to show passed tests, to show ignored tests, to sort tests alphabetically, and to sort tests by duration:
Note that the sleep(0.1) method that you see in the GIF above is intentionally used to make one of the tests slower so that sorting by duration works.
Editing an Existing Project in PyCharm
These single file projects are great for examples, but you’ll often work on much larger projects over a longer period of time. In this section, you’ll take a look at how PyCharm works with a larger project.
To explore the project-focused features of PyCharm, you’ll use the Alcazar web framework that was built for learning purposes. To continue following along, download the sample project locally:
Once you have the project downloaded and extracted locally, open it in PyCharm using one of the following methods:
- Click File → Open on the main menu.
- Click Open on the Welcome Screen if you are there.
After either of these steps, find the folder containing the project on your computer and open it.
If this project contains a virtual environment, then PyCharm will automatically use this virtual environment and make it the project interpreter.
If you need to configure a different virtualenv, then open Preferences on Mac by pressing Cmd+, or Settings on Windows or Linux by pressing Ctrl+Alt+S and find the Project: ProjectName section. Open the drop-down and choose Project Interpreter:
Choose the virtualenv from the drop-down list. If it’s not there, then click on the settings button to the right of the drop-down list and then choose Add…. The rest of the steps should be the same as when we were creating a new project.
Searching and Navigating in PyCharm
In a big project where it’s difficult for a single person to remember where everything is located, it’s very important to be able to quickly navigate and find what you looking for. PyCharm has you covered here as well. Use the project you opened in the section above to practice these shortcuts:
- Searching for a fragment in the current file: Press Cmd+F on Mac or Ctrl+F on Windows or Linux.
- Searching for a fragment in the entire project: Press Cmd+Shift+F on Mac or Ctrl+Shift+F on Windows or Linux.
- Searching for a class: Press Cmd+O on Mac or Ctrl+N on Windows or Linux.
- Searching for a file: Press Cmd+Shift+O on Mac or Ctrl+Shift+N on Windows or Linux.
- Searching all if you don’t know whether it’s a file, class, or a code fragment that you are looking for: Press Shift twice.
As for the navigation, the following shortcuts may save you a lot of time:
- Going to the declaration of a variable: Press Cmd on Mac or Ctrl on Windows or Linux, and click on the variable.
- Finding usages of a class, a method, or any symbol: Press Alt+F7.
- Seeing your recent changes: Press Shift+Alt+C or go to View → Recent Changes on the main menu.
- Seeing your recent files: Press Cmd+E on Mac or Ctrl+E on Windows or Linux, or go to View → Recent Files on the main menu.
- Going backward and forward through your history of navigation after you jumped around: Press Cmd+[ / Cmd+] on Mac or Ctrl+Alt+Left / Ctrl+Alt+Right on Windows or Linux.
For more details, see the official documentation.
Using Version Control in PyCharm
Version control systems such as Git and Mercurial are some of the most important tools in the modern software development world. So, it is essential for an IDE to support them. PyCharm does that very well by integrating with a lot of popular VC systems such as Git (and Github), Mercurial, Perforce and, Subversion.
Configuring VCS
To enable VCS integration. Go to VCS → VCS Operations Popup… from the menu on the top or press Ctrl+V on Mac or Alt+` on Windows or Linux. Choose Enable Version Control Integration…. You’ll see the following window open:
Choose Git from the drop down list, click OK, and you have VCS enabled for your project. Note that if you opened an existing project that has version control enabled, then PyCharm will see that and automatically enable it.
Now, if you go to the VCS Operations Popup…, you’ll see a different popup with the options to do git add, git stash, git branch, git commit, git push and more:
If you can’t find what you need, you can most probably find it by going to VCS from the top menu and choosing Git, where you can even create and view pull requests.
Committing and Conflict Resolution
These are two features of VCS integration in PyCharm that I personally use and enjoy a lot! Let’s say you have finished your work and want to commit it. Go to VCS → VCS Operations Popup… → Commit… or press Cmd+K on Mac or Ctrl+K on Windows or Linux. You’ll see the following window open:
In this window, you can do the following:
- Choose which files to commit
- Write your commit message
- Do all kinds of checks and cleanup before commit
- See the difference of changes
- Commit and push at once by pressing the arrow to the right of the Commit button on the right bottom and choosing Commit and Push…
It can feel magical and fast, especially if you’re used to doing everything manually on the command line.
When you work in a team, merge conflicts do happen. When somebody commits changes to a file that you’re working on, but their changes overlap with yours because both of you changed the same lines, then VCS will not be able to figure out if it should choose your changes or those of your teammate. So you’ll get these unfortunate arrows and symbols:
This looks strange, and it’s difficult to figure out which changes should be deleted and which ones should stay. PyCharm to the rescue! It has a much nicer and cleaner way of resolving conflicts. Go to VCS in the top menu, choose Git and then Resolve conflicts…. Choose the file whose conflicts you want to resolve and click on Merge. You will see the following window open:
On the left column, you will see your changes. On the right one, the changes made by your teammate. Finally, in the middle column, you will see the result. The conflicting lines are highlighted, and you can see a little X and >>/<< right beside those lines. Press the arrows to accept the changes and the X to decline. After you resolve all those conflicts, click the Apply button:
In the GIF above, for the first conflicting line, the author declined his own changes and accepted those of his teammates. Conversely, the author accepted his own changes and declined his teammates’ for the second conflicting line.
There’s a lot more that you can do with the VCS integration in PyCharm. For more details, see this documentation.
Using Plugins and External Tools in PyCharm
You can find almost everything you need for development in PyCharm. If you can’t, there is most probably a plugin that adds that functionality you need to PyCharm. For example, they can:
- Add support for various languages and frameworks
- Boost your productivity with shortcut hints, file watchers, and so on
- Help you learn a new programming language with coding exercises
For instance, IdeaVim adds Vim emulation to PyCharm. If you like Vim, this can be a pretty good combination.
Material Theme UI changes the appearance of PyCharm to a Material Design look and feel:
Vue.js adds support for Vue.js projects. Markdown provides the capability to edit Markdown files within the IDE and see the rendered HTML in a live preview. You can find and install all of the available plugins by going to the Preferences → Plugins on Mac or Settings → Plugins on Windows or Linux, under the Marketplace tab:
If you can’t find what you need, you can even develop your own plugin.
If you can’t find the right plugin and don’t want to develop your own because there’s already a package in PyPI, then you can add it to PyCharm as an external tool. Take Flake8, the code analyzer, as an example.
First, install flake8 in your virtualenv with pip install flake8 in the Terminal app of your choice. You can also use the one integrated into PyCharm:
Then, go to Preferences → Tools on Mac or Settings → Tools on Windows/Linux, and then choose External Tools. Then click on the little + button at the bottom (1). In the new popup window, insert the details as shown below and click OK for both windows:
Here, Program (2) refers to the Flake8 executable that can be found in the folder /bin of your virtual environment. Arguments (3) refers to which file you want to analyze with the help of Flake8. Working directory is the directory of your project.
You could hardcode the absolute paths for everything here, but that would mean that you couldn’t use this external tool in other projects. You would be able to use it only inside one project for one file.
So you need to use something called Macros. Macros are basically variables in the format of $name$ that change according to your context. For example, $FileName$ is first.py when you’re editing first.py, and it is second.py when you’re editing second.py. You can see their list and insert any of them by clicking on the Insert Macro… buttons. Because you used macros here, the values will change according to the project you’re currently working on, and Flake8 will continue to do its job properly.
In order to use it, create a file example.py and put the following code in it:
 1CONSTANT_VAR = 1
 2
 3
 4
 5def add(a, b):
 6    c = "hello"
 7    return a + b
It deliberately breaks some of the Flake8 rules. Right-click the background of this file. Choose External Tools and then Flake8. Voilà! The output of the Flake8 analysis will appear at the bottom:
In order to make it even better, you can add a shortcut for it. Go to Preferences on Mac or to Settings on Windows or Linux. Then, go to Keymap → External Tools → External Tools. Double-click Flake8 and choose Add Keyboard Shortcut. You’ll see this window:
In the image above, the shortcut is Ctrl+Alt+A for this tool. Add your preferred shortcut in the textbox and click OK for both windows. Now you can now use that shortcut to analyze the file you’re currently working on with Flake8.
PyCharm Professional Features
PyCharm Professional is a paid version of PyCharm with more out-of-the-box features and integrations. In this section, you’ll mainly be presented with overviews of its main features and links to the official documentation, where each feature is discussed in detail. Remember that none of the following features is available in the Community edition.
Django Support
PyCharm has extensive support for Django, one of the most popular and beloved Python web frameworks. To make sure that it’s enabled, do the following:
- Open Preferences on Mac or Settings on Windows or Linux.
- Choose Languages and Frameworks.
- Choose Django.
- Check the checkbox Enable Django support.
- Apply changes.
Now that you’ve enabled Django support, your Django development journey will be a lot easier in PyCharm:
- When creating a project, you’ll have a dedicated Django project type. This means that, when you choose this type, you’ll have all the necessary files and settings. This is the equivalent of using
django-admin startproject mysite. - You can run
manage.pycommands directly inside PyCharm. - Django templates are supported, including:
- Syntax and error highlighting
- Code completion
- Navigation
- Completion for block names
- Completion for custom tags and filters
- Quick documentation for tags and filters
- Capability to debug them
- Code completion in all other Django parts such as views, URLs and models, and code insight support for Django ORM.
- Model dependency diagrams for Django models.
For more details on Django support, see the official documentation.
Database Support
Modern database development is a complex task with many supporting systems and workflows. That’s why JetBrains, the company behind PyCharm, developed a standalone IDE called DataGrip for that. It’s a separate product from PyCharm with a separate license.
Luckily, PyCharm supports all the features that are available in DataGrip through a plugin called Database tools and SQL, which is enabled by default. With the help of it, you can query, create and manage databases whether they’re working locally, on a server, or in the cloud. The plugin supports MySQL, PostgreSQL, Microsoft SQL Server, SQLite, MariaDB, Oracle, Apache Cassandra, and others. For more information on what you can do with this plugin, check out the comprehensive documentation on the database support.
Thread Concurrency Visualization
Django Channels, asyncio, and the recent frameworks like Starlette are examples of a growing trend in asynchronous Python programming. While it’s true that asynchronous programs do bring a lot of benefits to the table, it’s also notoriously hard to write and debug them. In such cases, Thread Concurrency Visualization can be just what the doctor ordered because it helps you take full control over your multi-threaded applications and optimize them.
Check out the comprehensive documentation of this feature for more details.
Profiler
Speaking of optimization, profiling is another technique that you can use to optimize your code. With its help, you can see which parts of your code are taking most of the execution time. A profiler runs in the following order of priority:
vmprofyappicProfile
If you don’t have vmprof or yappi installed, then it’ll fall back to the standard cProfile. It’s well-documented, so I won’t rehash it here.
Scientific Mode
Python is not only a language for general and web programming. It also emerged as the best tool for data science and machine learning over these last years thanks to libraries and tools like NumPy, SciPy, scikit-learn, Matplotlib, Jupyter, and more. With such powerful libraries available, you need a powerful IDE to support all the functions such as graphing and analyzing those libraries have. PyCharm provides everything you need as thoroughly documented here.
Remote Development
One common cause of bugs in many applications is that development and production environments differ. Although, in most cases, it’s not possible to provide an exact copy of the production environment for development, pursuing it is a worthy goal.
With PyCharm, you can debug your application using an interpreter that is located on the other computer, such as a Linux VM. As a result, you can have the same interpreter as your production environment to fix and avoid many bugs resulting from the difference between development and production environments. Make sure to check out the official documentation to learn more.
Conclusion
PyCharm is one of best, if not the best, full-featured, dedicated, and versatile IDEs for Python development. It offers a ton of benefits, saving you a lot of time by helping you with routine tasks. Now you know how to be productive with it!
In this article, you learned about a lot, including:
- Installing PyCharm
- Writing code in PyCharm
- Running your code in PyCharm
- Debugging and testing your code in PyCharm
- Editing an existing project in PyCharm
- Searching and navigating in PyCharm
- Using Version Control in PyCharm
- Using Plugins and External Tools in PyCharm
- Using PyCharm Professional features, such as Django support and Scientific mode
If there’s anything you’d like to ask or share, please reach out in the comments below. There’s also a lot more information at the PyCharm website for you to explore.
Прежде чем перейти к изучению основ Python, неплохо-бы установить специальную программу для написания кода. Можно, конечно, писать программы в обычном блокноте, но так никто не делает.
Для удобного написания кода предназначены специальные программы, которые существенно облегчают этот процесс.
Они помогают быстрее найти ошибки в коде, дают автоматические подсказки, выделяют цветом синтаксис. И многое-многое другое.
Для написания кода на языке Python сейчас существует огромное количество программ.
Например:
- Visual Studio
- Visual Studio Code
- PyCharm
- Sublime Text
- Atom
- Geany
- и много других вариантов.
Что выбрать — решать вам. Но в настоящее время огромное количество разработчиков на языке Python пишут программы в PyCharm.
Можно сказать, что именно PyCharm стала стандартом для работы с Python.
Если хотите знать мое мнение, то лучше сразу привыкать к PyCharm (но можете выбрать и другой редактор кода).
Но мы сегодня установим именно PyCharm в операционной системе Windows (кстати, PyCharm можно установить и в Linux).
Можете посмотреть видео ниже, или почитать текстовую инструкцию по установке PyCharm, которая находится ниже.
Не забудьте подписаться на мой Видеоканал в Яндекс.Дзен.
Как установить PyCharm?
Идем на официальный сайт разработчика по этой ссылке:
https://www.jetbrains.com/pycharm/download/
и видим два варианта PyCharm для скачивания
- Professional — платная версия
- Community — бесплатная версия
Бесплатной версии Community более чем достаточно, для начала изучения Python
Значит, будем устанавливать именно ее:
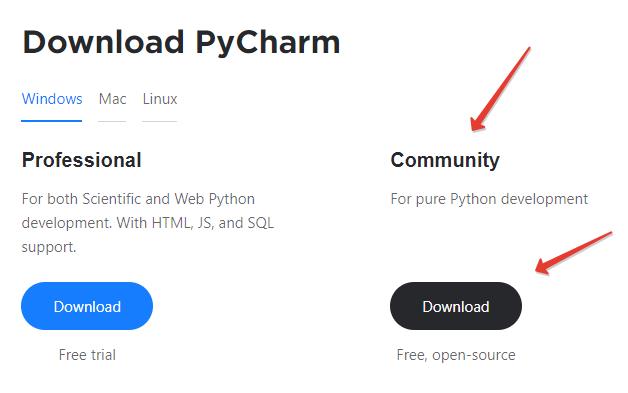
Нажимаем на кнопку Download и скачиваем установочный файл (примерно 300 мегабайт).
Далее все просто. Устанавливаем PyCharm как и любую-другую программу для Windows.
Дважды кликаем по установочному файлу и приступаем к установке:

Видим экран приветствия:
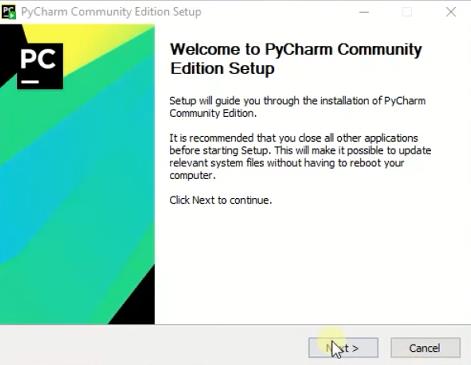
На следующем шаге можно изменить место установки PyCharm.
Я оставил место установки программы без изменений, и нажал на кнопку Next.
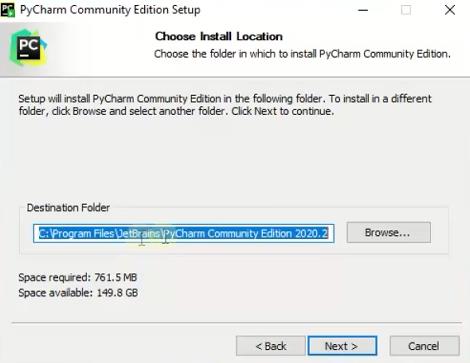
На следующем шаге достаточно поставить «галочку» для того, чтобы создать ярлык запуска программы на рабочем столе компьютера (см. рисунок ниже).
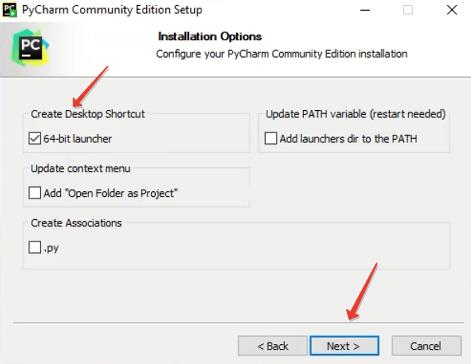
И нажимаем, как нетрудно догадаться, кнопку «Next» =)

На следующем шаге ничего не трогаем, и нажимаем на кнопку «Install».
Пошел процесс установки:

Установка PyCharm успешно завершена:
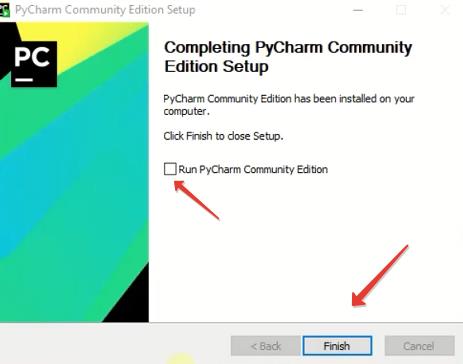
Жмем на кнопку «Finish».
Если хотите, чтобы программа сразу запустилась, то поставьте «галочку», напротив пункта «Run PyCharm».
Или просто запустите при помощи ярлыка, который уже есть на рабочем столе.
Первое, что мы увидим после запуска — это политика конфиденциальности. Придется с ней согласиться:
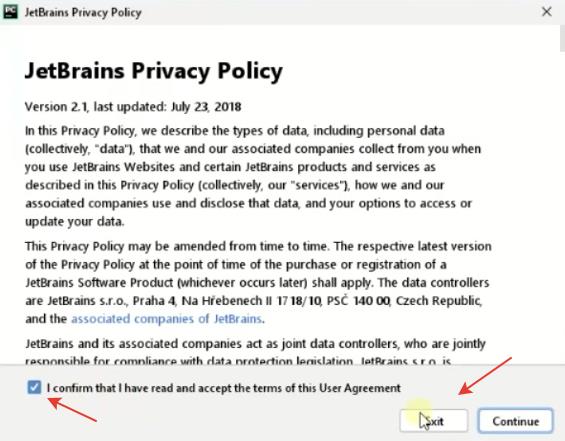
На следующем шаге нам будет предложено поделиться анонимной статистикой использования программы:
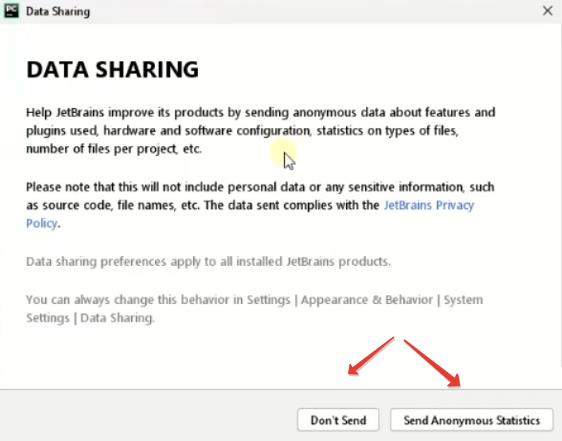
- Если не хотите делиться такими данными, нажмите «Don’t send»
- Если хотите делиться такими данными, то нажмите «Send Anonymous Statistics»
Этот выбор — на ваше усмотрение.
И, наконец, выбираем тему оформления:
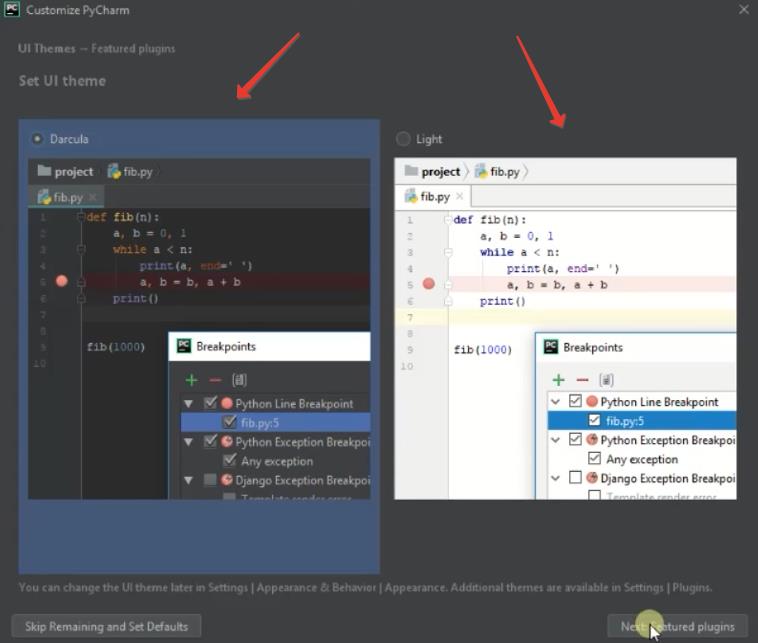
- Темная
- Или светлая
Подозреваю, что большинство выберет темную тему =)
На следующем шаге нам будет предложено создать первый проект.
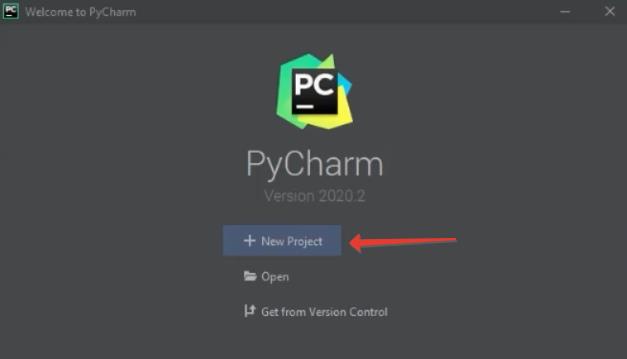
Жмем на кнопку «New Project» и создаем первый проект.
Фактически, нужно создать каталог, где будут храниться файлы наших будущих программ и скриптов.
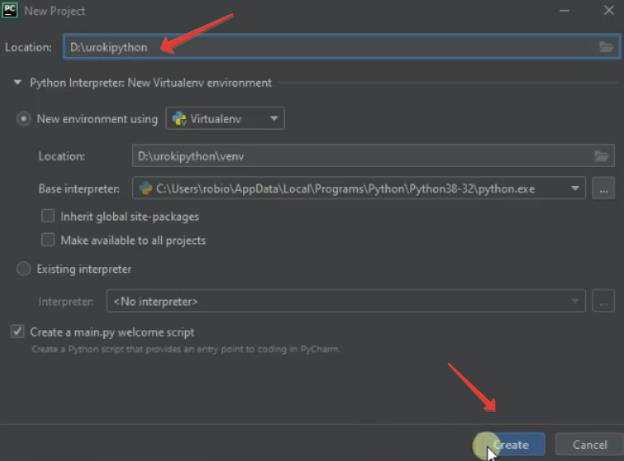
Я создал проект urokipython на диске D. Понятно, что вы можете выбрать любое другое расположением на вашем компьютере.
Нажимаем на кнопку «Create».
Все, мы с вами установили PyCharmи и создали первый проект.
Продолжение следует =)
Уроки по Python 3:
- Урок №1. Стоит ли изучать Python? Почему он стал лучшим «первым» языком программирования для начинающих?
- Урок №2: Как установить Python 3 в Windows и проверка установки в Linux
- Урок №3: PyCharm: пошаговая инструкция по установке IDE для изучения Python
- Урок №4: Переменные в Python: что это такое, как их называть и использовать?
- Урок №5: Комментирование кода в Python
- Урок №6: 3 основных типа данных в Python, с которыми начнем работать сразу: int, float, str
- Урок №7: Числа и операции с ними в Python
- Урок №8: Ввод и вывод данных в Python. Пишем первую программу