В Windows Server 2022/2019/2016 с развёрнутыми службами Remote Desktop Services вы можете установить и настроить новый Remote Desktop Web Client HTML5. Этот веб клиент позволит любым устройствам (iOS, macOS, Android, Linux) получать доступ к вашим RemoteApp приложениям на RDS хостах прямо из любого браузера (не нужно устанавливать отдельный RDP клиент).
Содержание:
- Установка RD Web HTML5 клиента на Windows Server RDS
- Доступ к RDWeb серверу через браузер с HTML5
- Возможные проблемы с веб клиентом Remote Desktop
[contents h2]
Remote Desktop Web Client доступен в виде расширения роли RD Web Access на RDS серверах под управлением Windows Server 2022/2019/2016.
Перед внедрением RD Web Client нужно убедится, что ваша RDS инфраструктура соответствует следующим требованиям:
- Наличие развернутой инфраструктуры RDS (фермы Remote Desktop Services), включающей: шлюз Remote Desktop Gateway, RD Connection Broker и RD Web Access на Windows Server 2022/2019/2016;
- Используются терминальные лицензии (RDS CAL) в режиме Per User;
- На серверах RDS Gateway и Web Access должны использоваться SSL сертификаты, выданные доверенным CA. Поддерживаются бесплатные Let’s Encrypt сертификаты на RDS. Самоподписанные SSL сертификаты можно использовать в ограниченном режиме;
Установка RD Web HTML5 клиента на Windows Server RDS
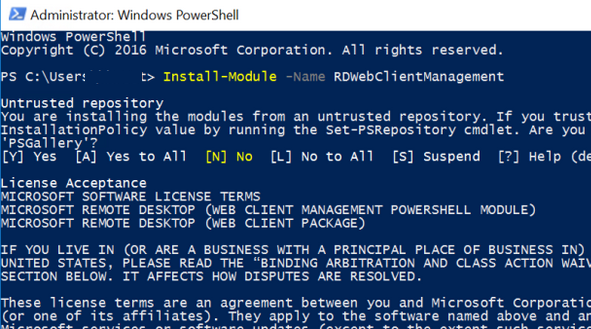
HTML5 RD Web Client не входит в дистрибутив Windows Server. Вам нужно вручную установить модуль RD Web Client Management из галереи скриптов PowerShell.
Для этого установите модуль PowerShellGet на сервере с ролью RD Web Access:
Install-Module -Name PowerShellGet -Force
Перезапустите консоль PowerShell.exe и установите модуль RD Web Client Management:
Install-Module -Name RDWebClientManagement

Чтобы принять лицензионное соглашение Microsoft, введите A.
Теперь нужно установить последнюю версию пакета Web Remote Desktop:
Install-RDWebClientPackage
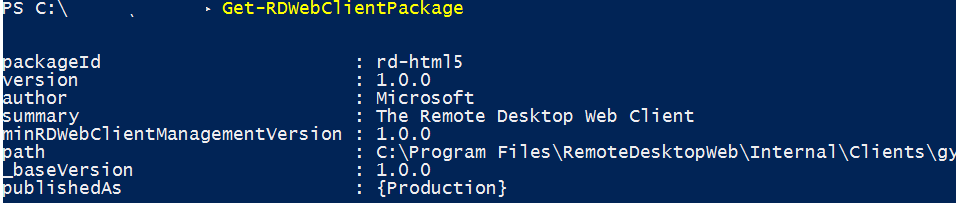
После установки пакета, проверьте его свойства командой:
Get-RDWebClientPackage

Как вы видите, у вас появился пакет rd-html 5.0 версия 1.0.0.
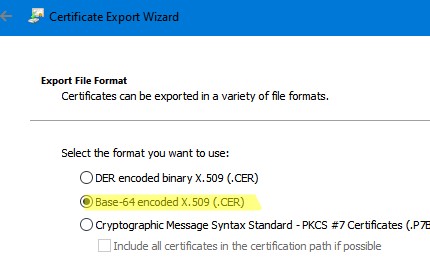
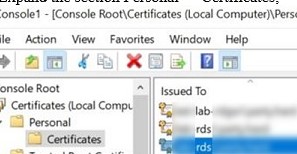
Далее вам нужно экспортировать SSL сертификат с сервера с ролью RDS Connection Broker, использующийся для SSO (Enable Single Sign On) в .cer файл (формат BASE64).
- Запустите консоль управления сертификатами компьютера
certlm.msc
: - Разверните раздел Personal -> Certificates;

- Найдите ваш сертификат, который используется в вашей RDS ферме, щелкните по нему правой кнопкой и выберите select All Tasks -> Export;

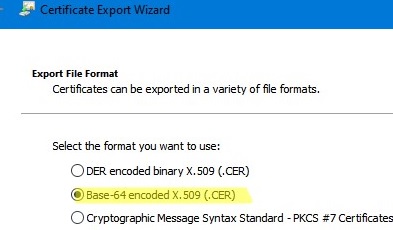
- Выберите формат экспорта Base-64 encoded X.509 (.cer) и укажите имя файла.

Импортируйте сертификат на сервере RD Web Access:
Import-RDWebClientBrokerCert C:RDBroker.cer
Теперь можно опубликовать клиент RD Web:
Publish-RDWebClientPackage -Type Production -Latest

Для тестирования клиента RD Web, можно развернуть клиент с помощью команды:
Publish-RDWebClientPackage -Type Test -Latest
Клиент RD Web позволяет запускать RemoteApps в браузере или через локальный RDP клиент (в этом случае пользователь скачает *.rdp файл). Пользователь может сам выбрать нужные ему режим. Чтобы запуск разрешить RemoteApp только в браузере, выполните команду:
Set-RDWebClientDeploymentSetting -Name "LaunchResourceInBrowser" $true
Доступ к RDWeb серверу через браузер с HTML5
После того, как вы развернули пакет Web Client на RDS сервере, вы можете запустить браузер на клиентском компьютере. Поддерживаются все последние версии браузеров Microsoft Edge, Google Chrome, Safari, Mozilla Firefox. Для доступа к RDS серверам из браузера вам достаточно передать пользователям ссылку на сервер RDWeb.
Обязательно используйте FQDN имя сервера RD для подключения. Обратите внимание, что данное FQDN имя должно содержаться в вашем сертификате RDS развёртывания (проверьте поля Common Name/CN и Subject Alternative Names /SAN).
Откройте URL адрес:
_https://FQDN.server.name/RDWeb/webclient/index.html
Для доступа к тестовой среде используйте адрес:
_https://FQDN.server.name /RDWeb/WebClient-Test/index.html
Имя сервера должно соответствовать имени сервера RD Web Access в сертификате.
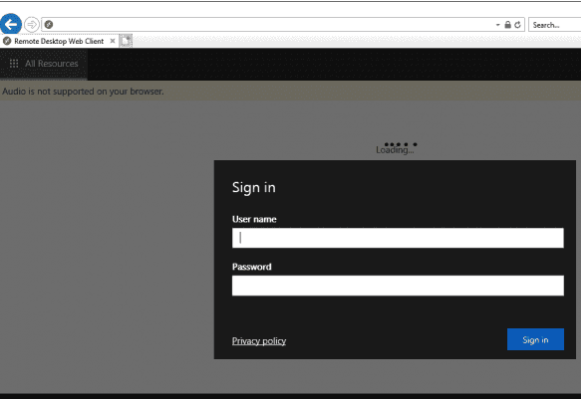
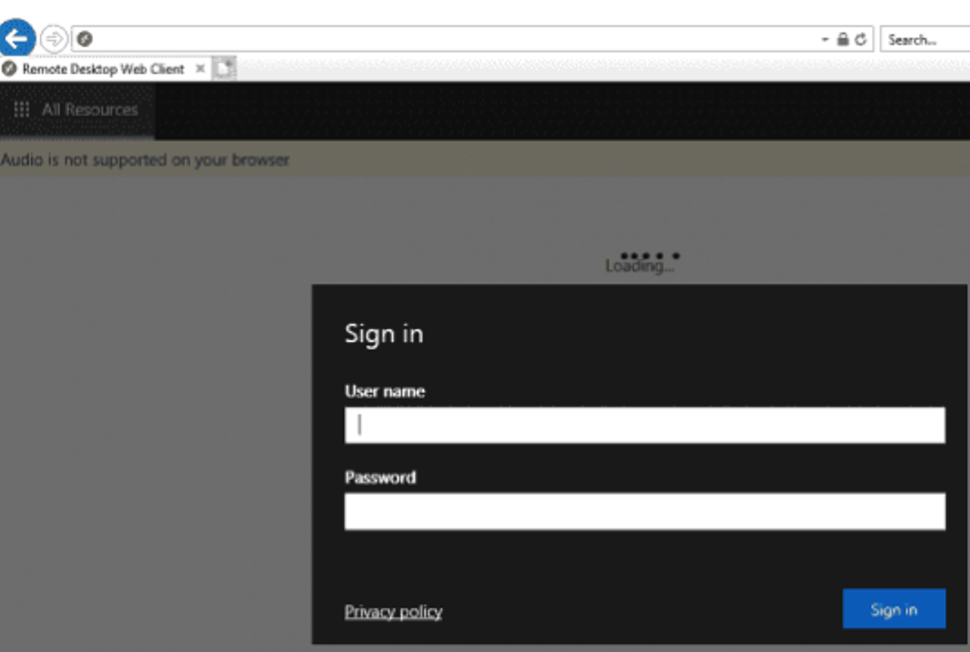
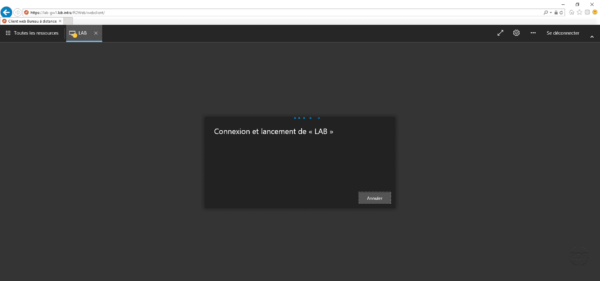
Авторизуйтесь на RDWeb сервере под своей учетной записью.
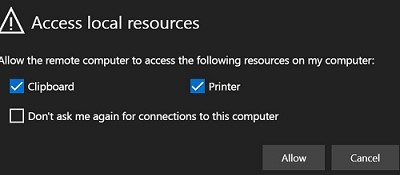
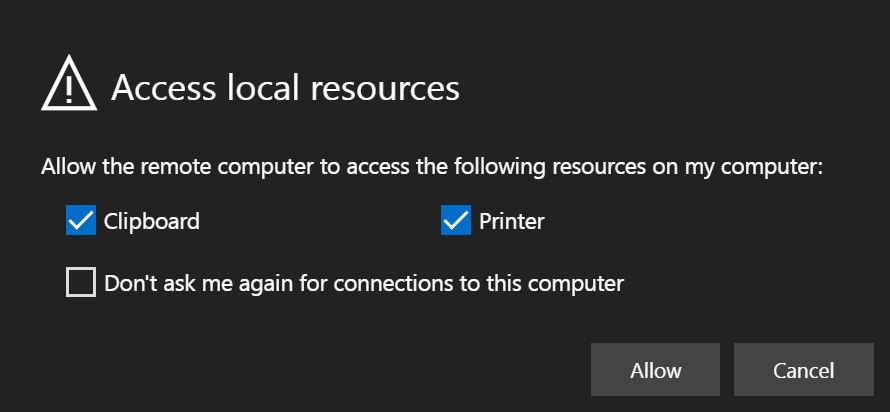
При входе у вас будет запрошено какие локальные ресурсы должны быть доступны в RD сессии. Пока доступно только перенаправление буфера обмена и принтеров (локальные диск и USB устройства через веб-клиент RDP не пробрасываются, нужно использовать полноценный клиент mstsc.exe, RDCMan или аналоги).
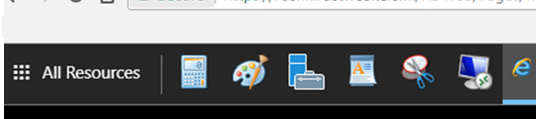
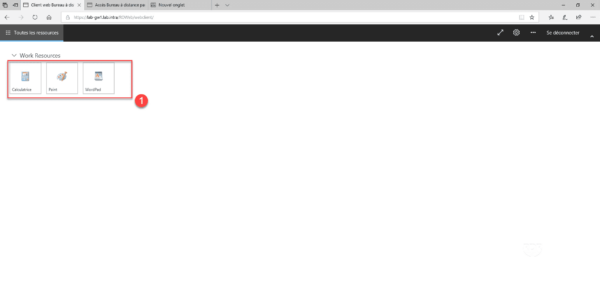
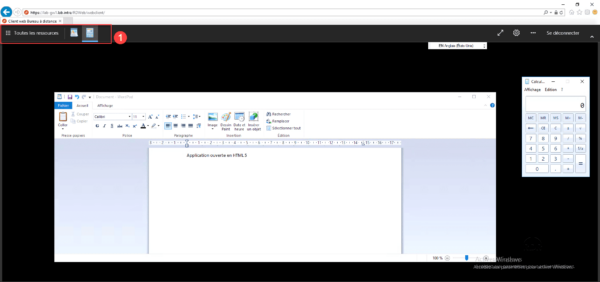
После успешного входа вы увидите все RemoteApp опубликованные в коллекциях. Вы можете переключаться между ними с помощью иконок в верхней части окна.
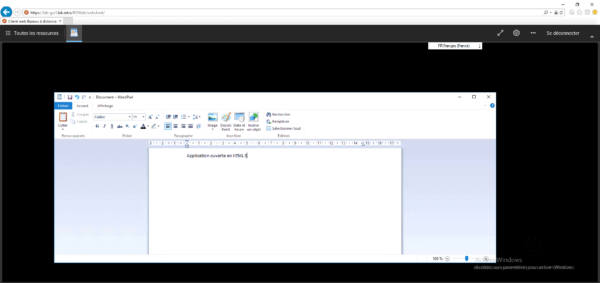
При запуске RemoteApp оно будет отображаться в браузере с возможностью развернуть окно на весь экран.
Печать из RD Web клиента осуществляется через виртуальный PDF принтер (Microsoft Print to PDF). Когда вы отправляете документ на печать в окне веб клиента, браузер предлагает скачать сформированный pdf файл. Вы можете открыть PDF файл а (PDF просмотрщик встроен в браузер Microsoft Edge) и распечатать на локальном принтере.

В HTML5 клиенте доступно динамическое изменение окна удаленного рабочего стола и возможность запуска в полноэкранном режиме. Через буфер обмена можно копировать только текст (файлы, графика через буфер веб клиента не копируются).
Возможные проблемы с веб клиентом Remote Desktop
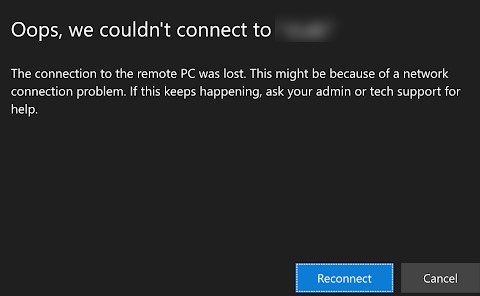
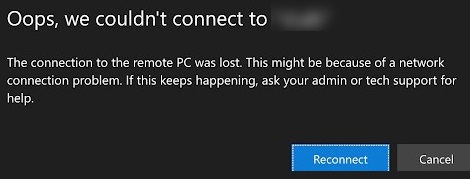
При входе на RD Web Access вы видите список опубликованных приложений Remote App, но при попытке запуска любого из них появляется ошибка:
Oops, we could not connect to Calculator.
The connection to the remote PC was lost. This might be because of a network connection problem. If this keeps happening, ask your administrator or tech support for help.
Не удалось подключиться к Calculator
Потеряно подключение к удаленному компьютеру. Возможно, есть проблема с сетевым подключением. Если это будет повторяться, обратитесь за помощью к своему администратору или специалисту службы технической поддержки.
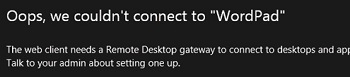
Также может быть ошибка:
The web client needs a Remote Desktop Gateway to connect to desktops and apps.
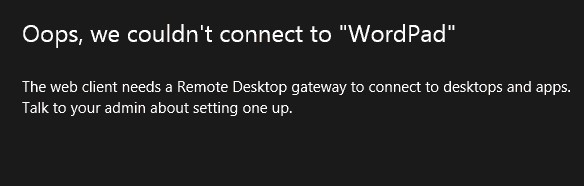
Эти ошибки возникают, если вы развернули ферму RDS без шлюза RD Web Gateway. Если у вас развернут только RD Connection Broker, нужно привязать ваш сертификат RDS на порт 3392. (см описание в разделе Connecting to RD Broker without RD Gateway in Windows Server 2019 — https://learn.microsoft.com/en-us/windows-server/remote/remote-desktop-services/clients/remote-desktop-web-client-admin).
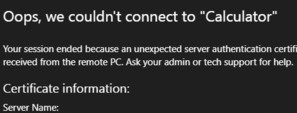
Ошибка:
Your session ended because an unexpected server authentication certificate was received from the remote PC. Ask your admin or tech support for help.
Ваш сеанс завершен, так как от удаленного компьютера получен непредвиденный сертификат проверки подлинности сервера. Обратитесь за помощью к своему администратору или специалисту службы технической поддержки.
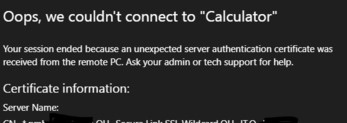
Проверьте корректность вашего RD сертификата (FQDN сервера, которые используется для запуска RD веб клиента должен содержаться в сертификате). Проверьте, что этот сертификат назначен на все роли в вашем развертывании RDS. Отдельно проверьте что этот сертификат задан в настройка сервера RDGW (вкладка SSL Certificates). Если возможно, используйте wildcard сертификат.

Previous Story
Настройка двухфакторной аутентификации (2FA) в Windows с помощью MultiOTP
Next Story
Настройка файла подкачки в Windows 10: как увеличить, изменить, отключить?
Latest from Blog

Полезные советы по Docker Введение Docker позволяет легко помещать приложения и службы в контейнеры, чтобы их
![]()
Как настроить FreePBX с помощью Docker (сборка Docker-контейнера FreePBX). В этом посте мы расскажем о FreePBX , его функциях

Продолжаем изучать работу с единым дистрибутивом платформы 1С:Предприятие для Linux, который появился в версии 8.3.20. В
Установка и обновление сервера 1С:Предприятие после перехода на единый дистрибутив стала еще проще. Но хорошо, если у вас
![]()
Asterisk — это бесплатный инструмент с открытым исходным кодом для создания/разработки коммуникационных приложений. Он был разработан Марком Спенсером из Digium
On Windows Server 2022/2019/2016 with Remote Desktop Services deployed, you can install and configure the new HTML5-based Remote Desktop Web Client. This web client will allow any device (iOS, macOS, Android, Linux) to access your RemoteApps on RDS hosts directly from any browser (no need to install an additional RDP client).
Contents:
- Installing RD Web HTML5 Client on Windows Server RDS
- Connecting to the RDWeb Access Server with Web (HTML5) Client
- Common RD Web Client Errors
Remote Desktop Web Client is available as an RD Web Access role feature on RDS servers running Windows Server 2022/2019/2016.
Before deploying the RD Web Client, you need to make sure that your RDS infrastructure meets the following requirements:
- A deployed RDS farm infrastructure, including Remote Desktop Gateway, RD Connection Broker, and RD Web Access on Windows Server 2022/2019/2016;
- Per User terminal licenses (RDS CAL) are used;
- RDS Gateway and Web Access servers must use SSL certificates issued by a trusted CA. You can use free Let’s Encrypt certificates on RDS or Self-signed SSL certificates (only in limited mode).
Installing RD Web HTML5 Client on Windows Server RDS
HTML5 RD Web Client is not included in the Windows Server distribution. You need to manually install the RD Web Client Management module from the PowerShell Script Gallery.
Install the PowerShellGet module on a server with the RD Web Access role:
Install-Module -Name PowerShellGet -Force
Restart the PowerShell.exe console and install the RD Web Client Management module:
Install-Module -Name RDWebClientManagement
To accept the terms of the Microsoft Licence Agreement, press A.
Then install the latest version of the Web Remote Desktop package:
Install-RDWebClientPackage
After the RDWebClientPackage package is installed, check its properties with the following command:
Get-RDWebClientPackage
As you can see, there appeared rd-html 5.0 package version 1.0.0.
Next, you need to export the SSL certificate from the server with the RDS Connection Broker role used for SSO (Enable Single Sign On) to a .cer file (BASE64 format).
- Open the computer certificate management console
certlm.msc; - Expand the section Personal -> Certificates;

- Find your certificate that is used in your RDS farm, right-click on it, and choose select All Tasks -> Export;

- Select the Base-64 encoded X.509 (.CER) export format and specify a file name.
Import the certificate to the RD Web Access server:
Import-RDWebClientBrokerCert C:RDBrokerCert.cer
Now you can publish the RD Web Client:
Publish-RDWebClientPackage -Type Production -Latest

To test the RD Web Client, you can deploy it with the command:
Publish-RDWebClientPackage -Type Test -Latest
Connecting to the RDWeb Access Server with Web (HTML5) Client
After you have deployed the Web Client package on the RDS server, you can use a browser on a client computer to access RemoteApps and desktops. All the latest versions of Microsoft Edge, Google Chrome, Safari, and Mozilla Firefox are supported. In order to access RDS servers from a browser, just share the URL link to your RDWeb server with your users.
Be sure to use the FQDN of the RD Web server to connect. Note that this FQDN must be in your deployment’s RDS certificate (check the Common Name/CN and Subject Alternative Names /SAN fields)
Open the URL address:
https://RDWebFQDN.server.name/RDWeb/webclient/index.html
To access the test environment, use this URL address:
https://RDWebFQDN.server.name/RDWeb/WebClient-Test/index.html
The server name must match the RD Web Access server name in the SSL certificate.
Sign in to the RDWeb server using your credentials.
During sign-in, you will be prompted about what local resources should be available in your RD session. Only clipboard and printer redirection are available. Currently, the local drives and any USB devices cannot be redirected through the HTML5 RDP client. Instead, use the mstsc.exe client, RDCMan, or analog.
After a successful sign-in, you will see all RemoteApps published in the RD collection. You can switch between them using the icons at the top of the window.

When you run the RemoteApp, it will be displayed in the browser with the option to expand the window to full screen.
You can print from the Remote Desktop Web Client using the PDF Virtual Printer (Microsoft Print to PDF). Then you print something in the RD Web Client window, your browser prompts you to download a PDF file. You can open this PDF (using the built-in Edge PDF viewer or a third-party app) and print it to a local printer.

The dynamic changing of the RD window size and full-screen mode are available in the HTML5 RD web client. You can copy only text via the clipboard to your Remote Desktop session (but not files or graphics).
Common RD Web Client Errors
When you sign in to RD Web Access through the web client, you see a list of published Remote Apps, but when you try to launch any of them, you get an error:
Oops, we could not connect to Calculator. The connection to the remote PC was lost. This might be because of a network connection problem. If this keeps happening, ask your administrator or tech support for help.
There may also be an error:
The web client needs a Remote Desktop Gateway to connect to desktops and apps.
These errors occur if you have deployed an RDS farm without an RD Web Gateway. If you only have RD Connection Broker deployed, you need to bind your RDS certificate to port 3392 (see description in section Connecting to RD Broker without RD Gateway in Windows Server 2019 https://learn.microsoft.com/en-us/windows-server/remote/remote-desktop-services/clients/remote-desktop-web-client-admin).
Error:
Your session ended because an unexpected server authentication certificate was received from the remote PC. Ask your admin or tech support for help.
Check that your RD certificate is correct (the FQDN of the server with RD web client must be contained in the certificate). Verify that this certificate is assigned to all roles in your RDS deployment. Separately, check that this certificate is set in the RDGW server settings (SSL Certificates tab). If possible, use a wildcard certificate.
Коллеги, добрый день. Сегодня мы поговорим о том, как можно предоставить удаленный доступ нашим дорогим пользователям к внутренним ресурсам организации из сети интернет. Обсудим плюсы и минусы подходов, узнаем нюансы конфигурации и эксплуатации сервисов.
Сначала познакомимся с ролью Remore Gateway, затем перейдем к Web Client. Увидим как будет выглядеть подключение со стороны клиента с разных ОС. Также подведем некоторые итоги по проведенной работе.
Remote Desktop Gateway
Описание функционала
Компонент RD Gateway представляет из себя стандартную (доступную из коробки) роль Windows Server. Суть заключается в том, что на периметре локальной сети разворачивается хост на котором инсталлируется компонент RD Gateway. Как нам подсказывает название, он является шлюзом для удаленных подключений. Само подключение производится через RDP клиент (в ОС отличных от Windows может потребоваться поддержка функционала шлюза подключений).
Принципиальным отличием работы компонента от обычного подключения RDP является тот факт, что соединение RDP устанавливается поверх HTTPS (веб-сервер IIS будет инсталлирован автоматически при установке).
Применение этой технологии позволяет более гибко подойти к вопросам публикации, управления и мониторинга удаленных подключений наших коллег:
- По части публикации — нам достаточно опубликовать один порт в сеть интернет, нет необходимости плодить большое количество портов при публикации дополнительных узлов подключения.
- По части управления — мы получаем инструменты политик авторизаций, где мы можем явно указывать: кто, куда и как может подключаться.
- По части мониторинга — мы получаем возможность ведения лога подключений, удачных и неудачных попыток при помощи журналов Windows.
Предварительные требования
- Windows Server 2008+ в качестве ОС узла установки роли.
- Наличие развернутого домена Active Directory.
Наш тестовый стенд
Чтобы легче было понимать материал, опишу нашу тестовую лабораторию на которой мы будем проводить тесты.
Стенд состоит из 4х узлов:
- lab-dc1.party.hard — контроллер домена.
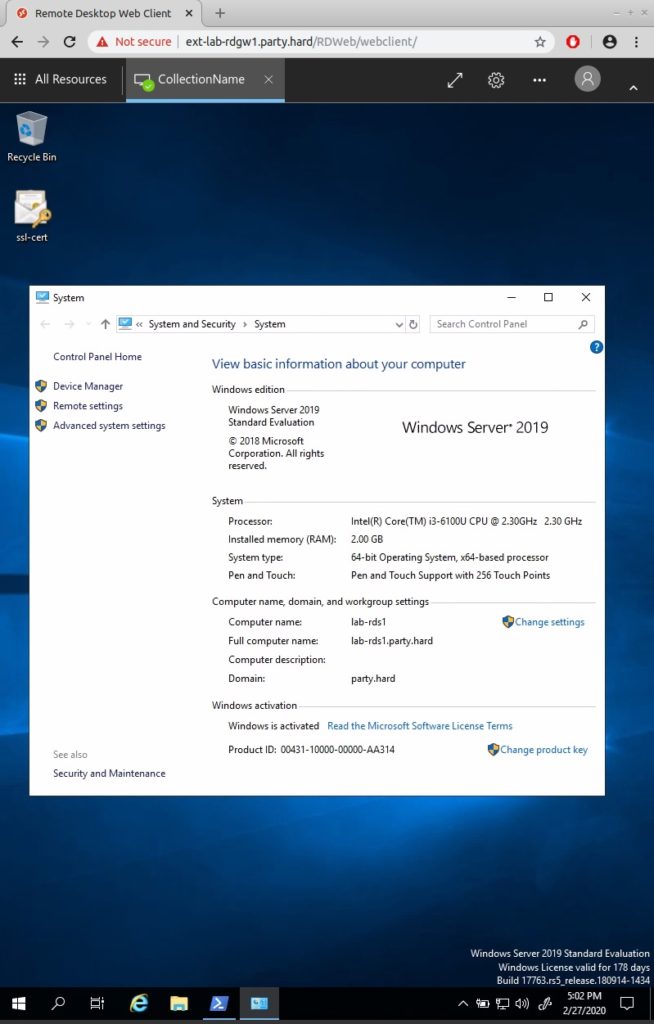
- lab-rds1.party.hard — сервер, на котором уже создано тестовое развертывание служб удаленных рабочих столов.
- lab-rdgw1.party.hard — сервер шлюза удаленных рабочих столов и компонента web client.
- lab-client1 — узел вне домена, моделирует клиентское подключение.
Установка, конфигурация и проверка роли Remote Desktop Gateway
Установить роль возможно произвести разными способами. Мы рассмотрим способ через развертывание служб удаленных рабочих столов.
Установка через развертывание служб удаленных рабочих столов
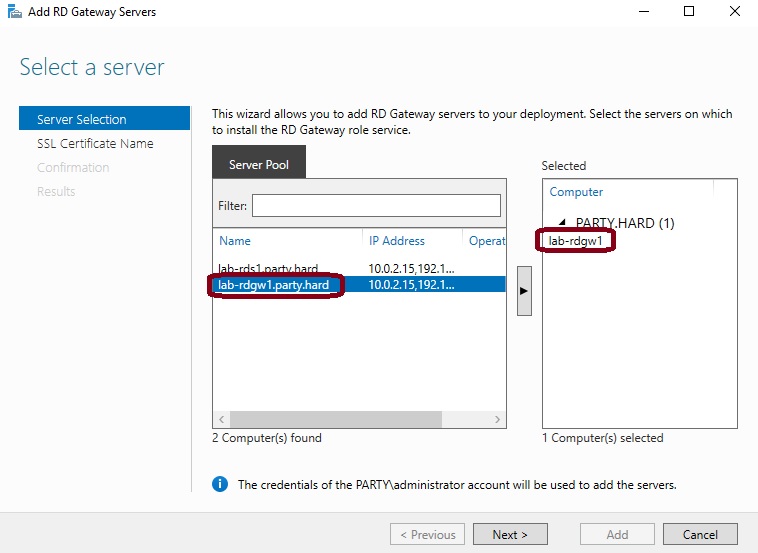
Начнем с сервера lab-rds1.party.hard. Для инсталляции роли нам необходимо в Диспетчере серверов, где уже существует развертывание инфраструктуры RDS, добавить сервер lab-rdgw1.party.hard для управления.
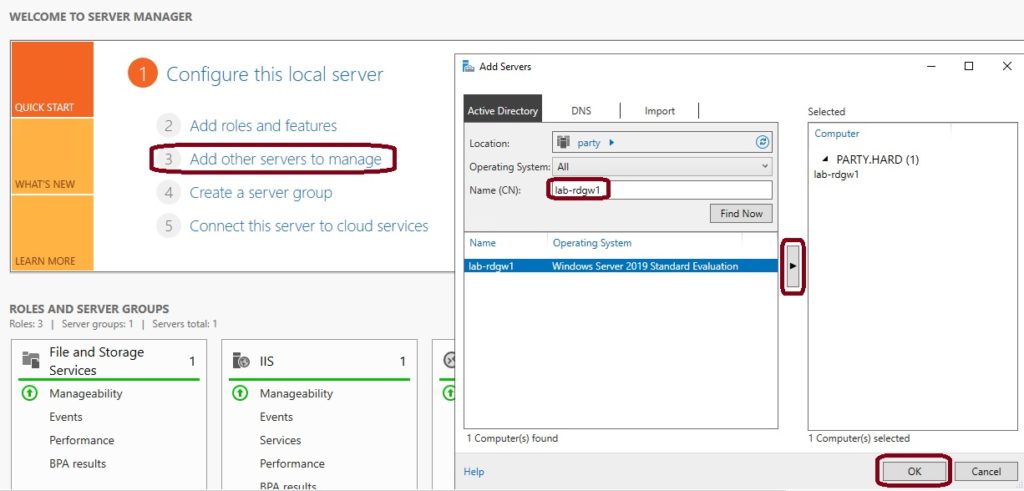
Затем, через иконку RD Gateway, добавить роль узлу lab-rdgw1.party.hard.
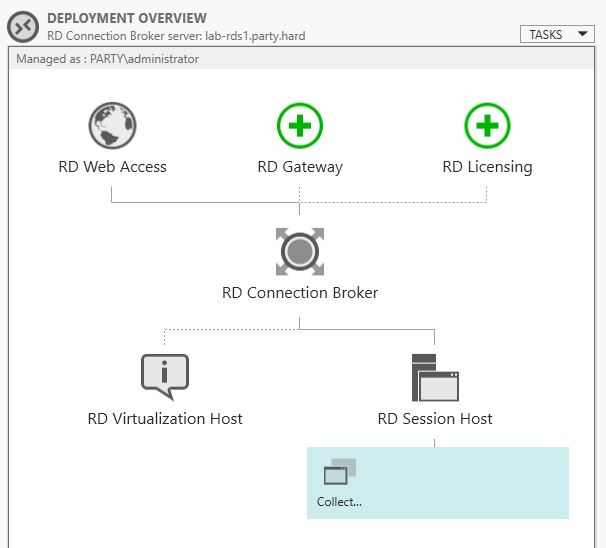
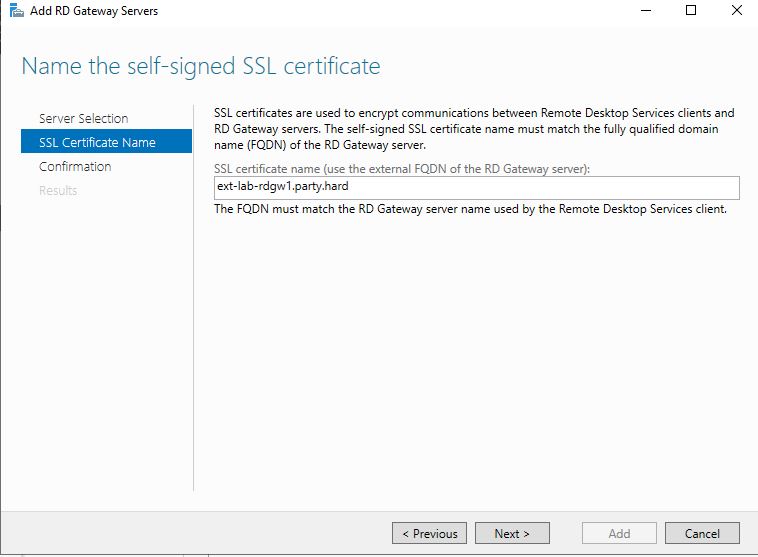
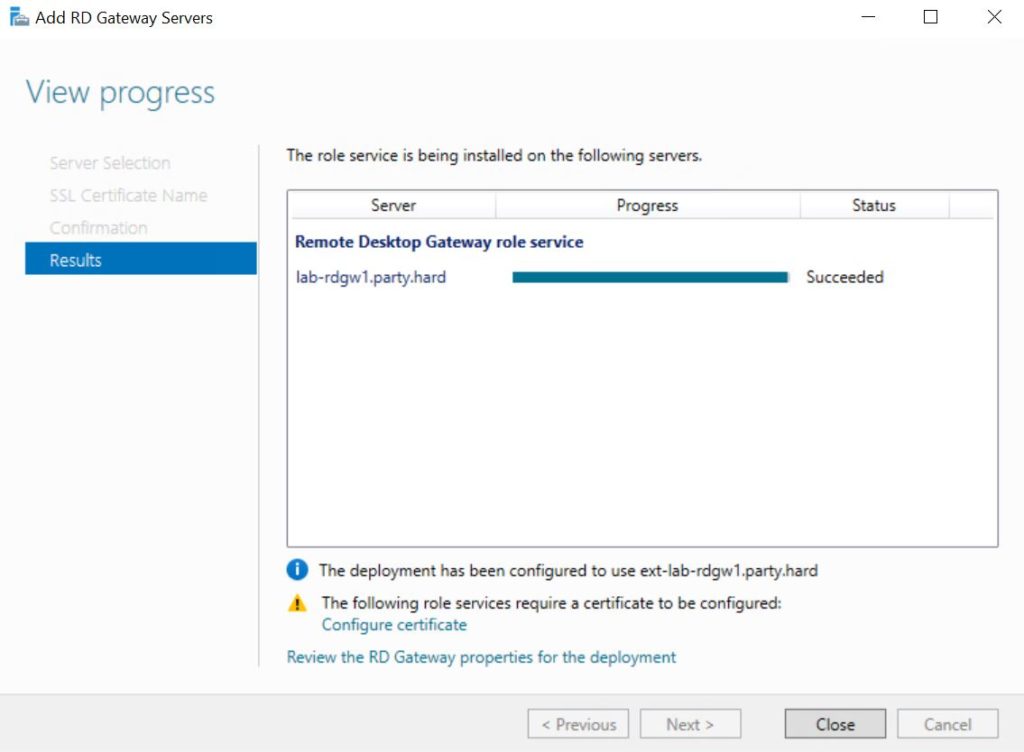
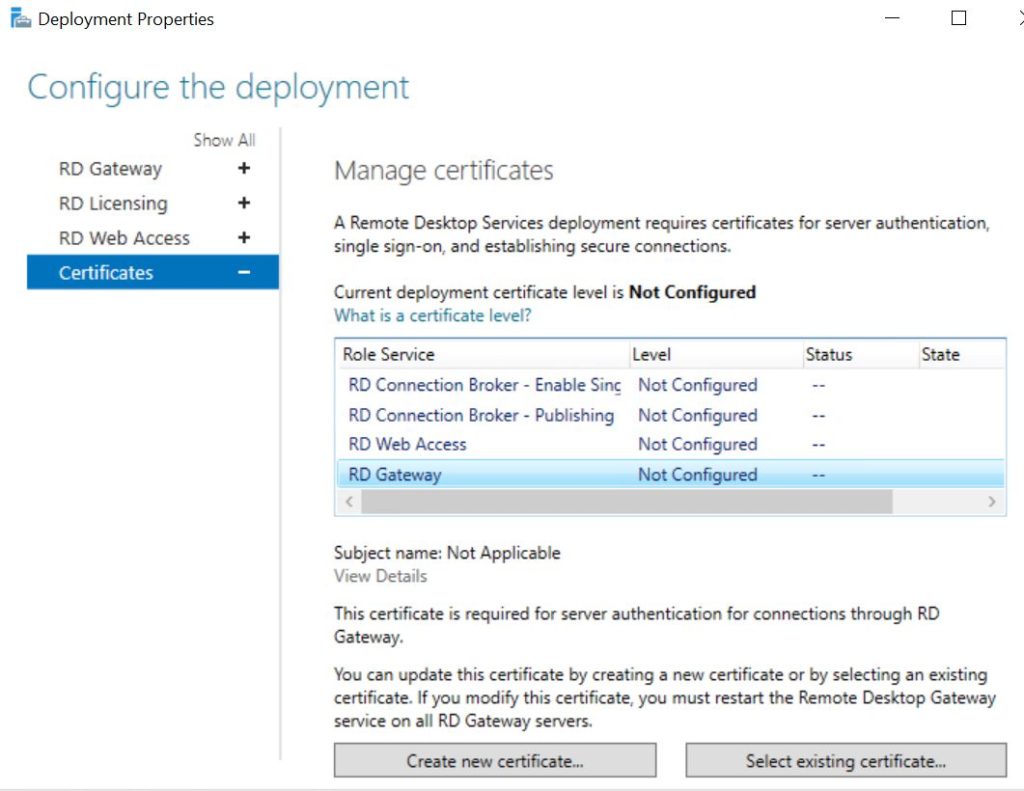
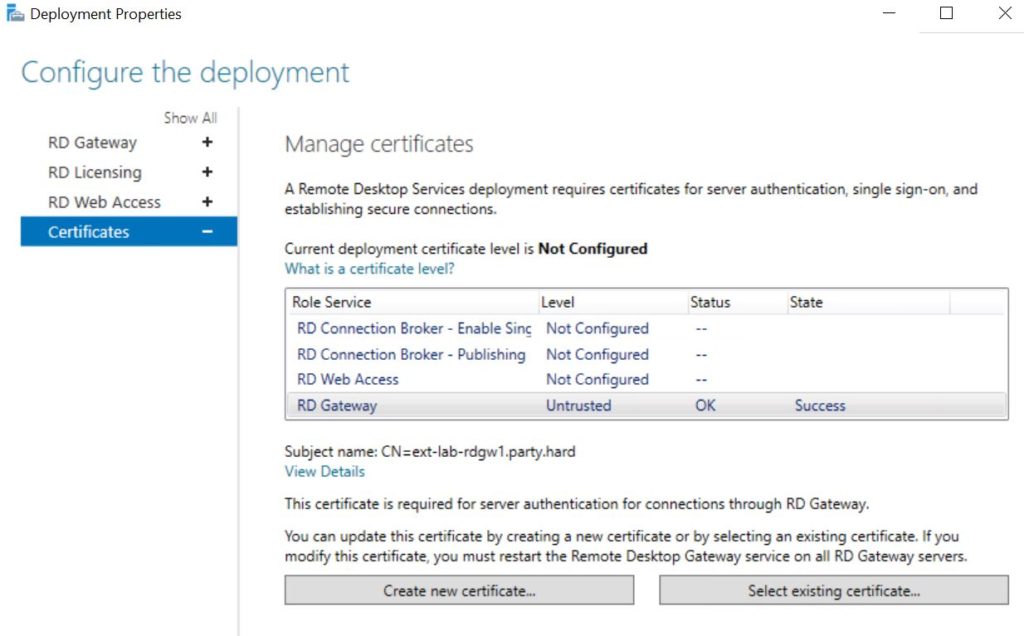
Следующим этапом мы займемся конфигурацией сертификатов.
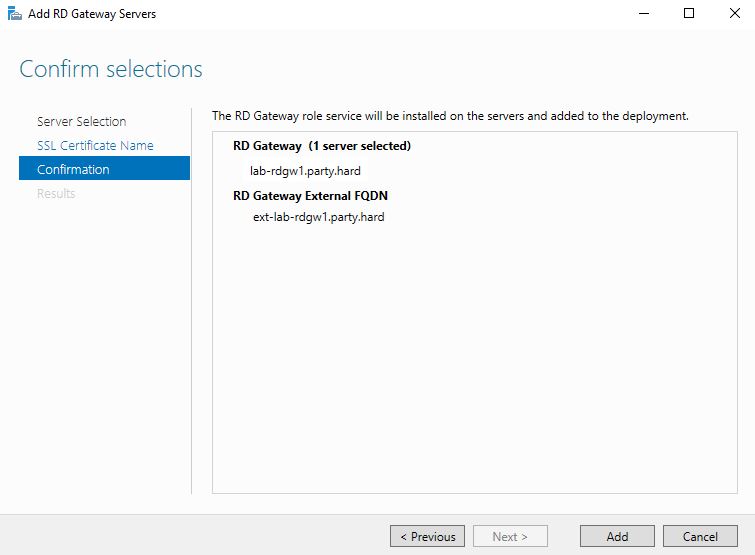
В результате выполненных действий, статус изменится на Готово к применению.

Проверяем подключение со стороны клиента
Поздравляю, мы произвели необходимый минимум для работы Remote Desktop Gateway. Теперь можно проверять как технология выглядит со стороны внешнего пользователя, которому очень хочется получить удаленный доступ.
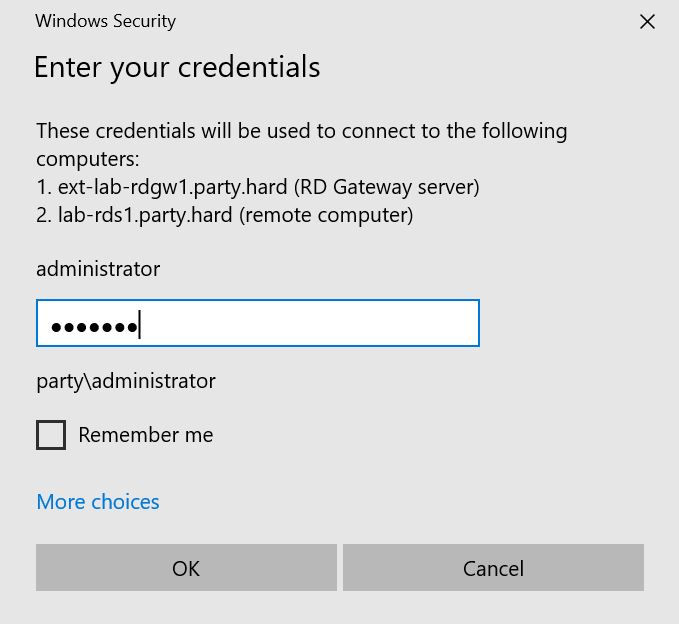
Для этого пользователю понадобиться выполнить подключение через RDP клиент. Введем внешнее имя нашего шлюза, которое мы указывали при конфигурации. Также включим настройку Использовать мои учетные данные шлюза удаленных рабочих столов для удаленного компьютера для того, чтобы не вводить одни и те же учетные данные несколько раз.
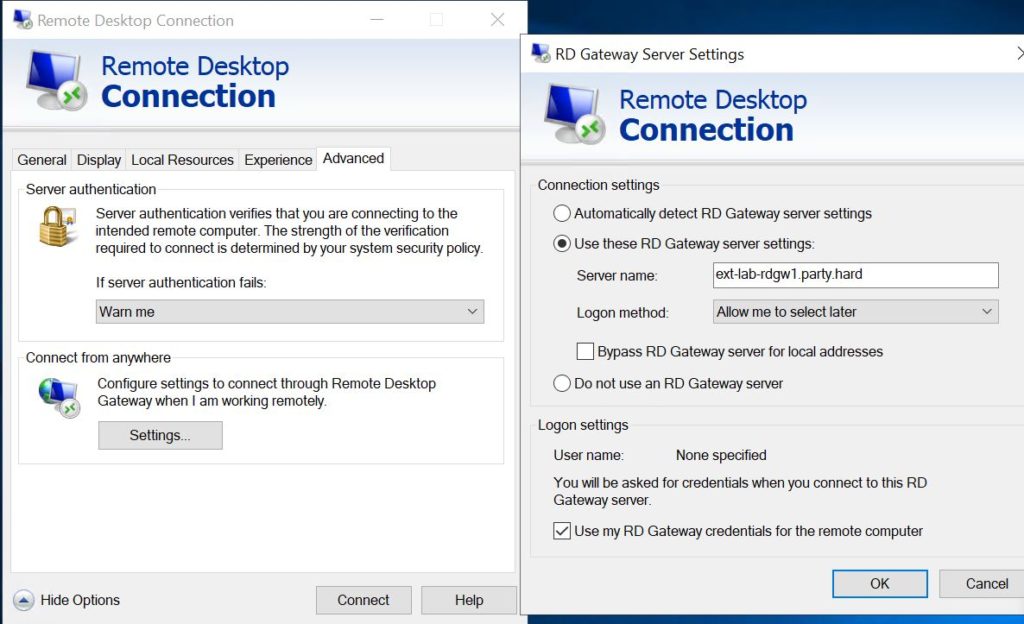
Также необходимо определить внутренний хост к которому необходимо подключиться с указанием учетных данных.
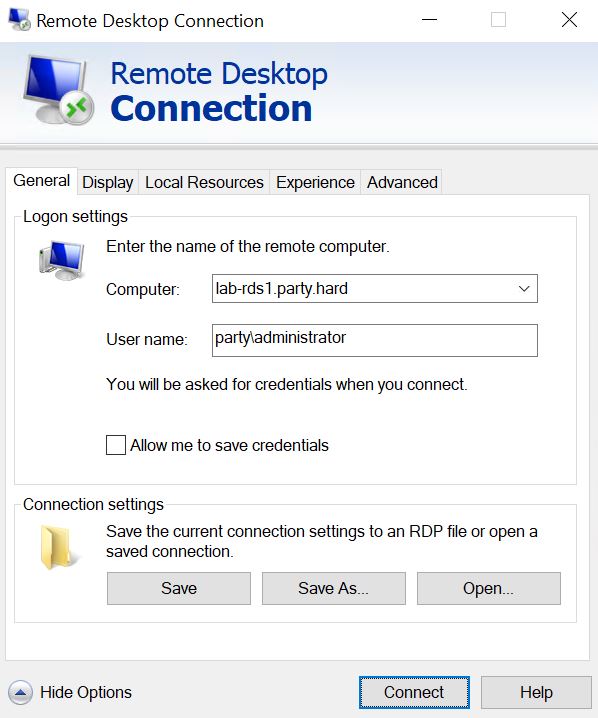
Так выглядит подключение к шлюзу через стандартный RDP клиент Windows.
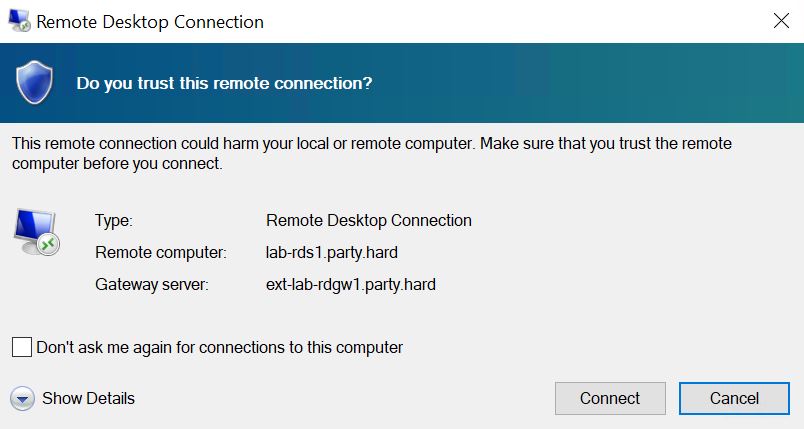
В процессе подключения мы можем увидеть предупреждение о невозможности идентифицировать шлюз. Подобное ошибка обязательно возникнет если клиент не доверяет сертификату шлюза удаленных рабочих столов.

В конечном итоге клиент выполняет RDP соединение с интересующим его хостом, который находится позади шлюза.
Мониторинг удаленных подключений
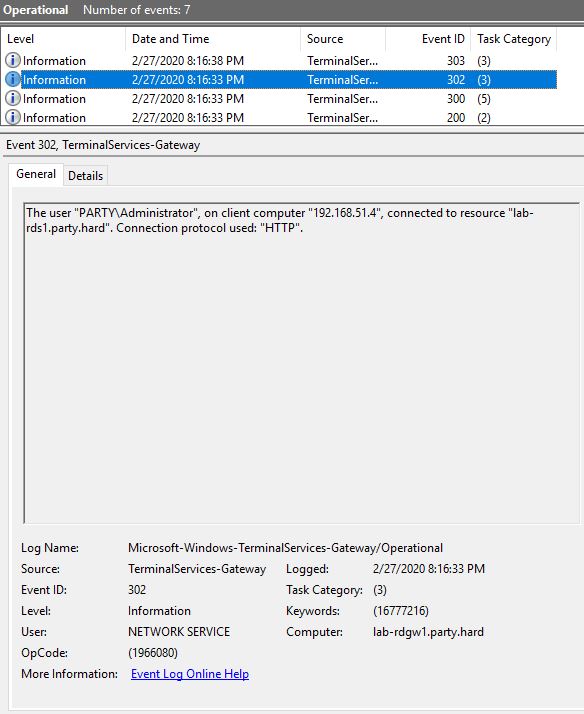
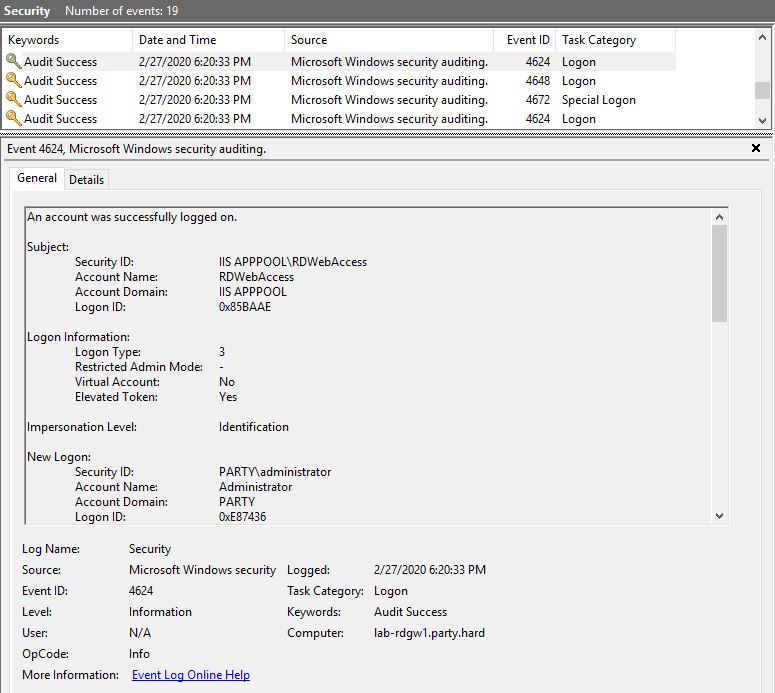
Для того, чтобы узнать информацию об успешных или неудачных попытках подключения к шлюзу мы можем воспользоваться инструментом Просмотр событий. Нужную нам информацию мы найдем журналах Безопасность и Microsoft-Windows-TerminalServices-Gateway.
Для примера я произведу 2 попытки входа.
Первая — учетные данные некорректны.
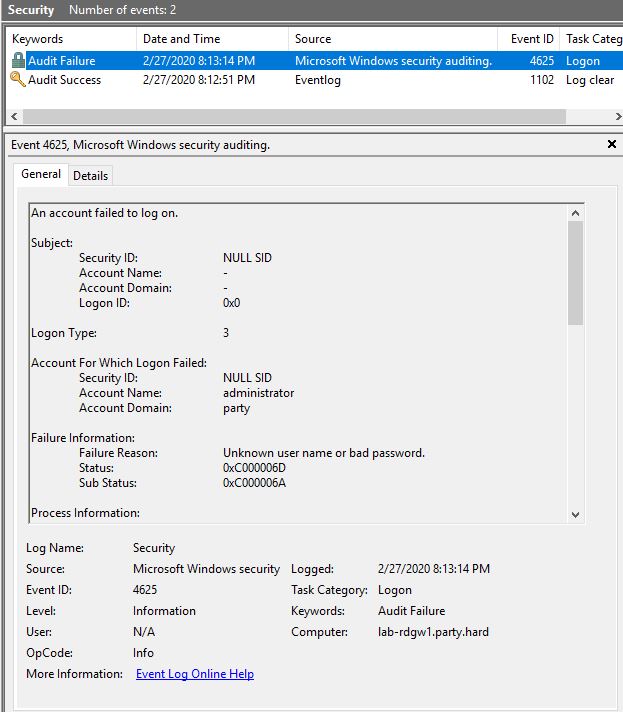
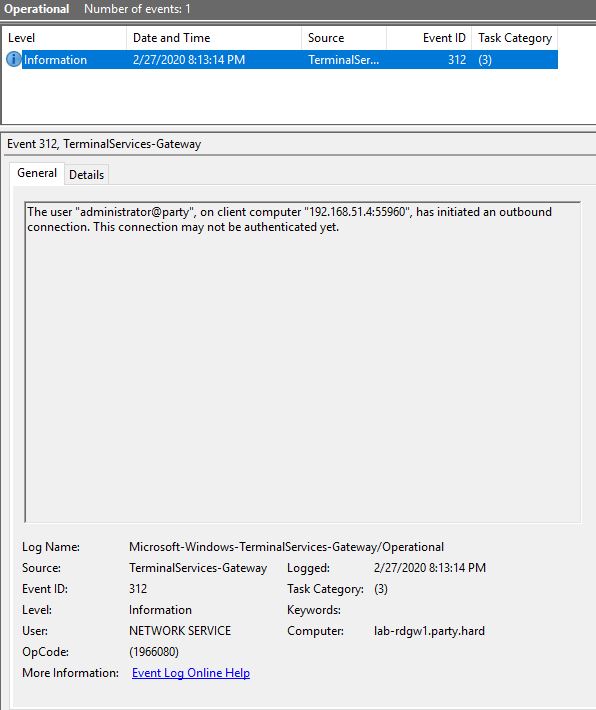
Вторая — учетные данные корректны.

Нюансы эксплуатации
В ходе изучения технологии я столкнулся с несколькими нюансами которые желательно знать перед вводом в эксплуатацию.
Необходимость решения вопроса с SSL сертификатом для подключения к шлюзу
Этот пункт подразумевает обязательное доверие со стороны клиентов к внешнему сертификату безопасности. Проще говоря, если у клиента нет доверия к сертификату, то подключиться к шлюзу не получится.
Вариантов решения не так уж и много:
- Использование самоподписанного сертификата и ручной импорт клиентам в случае если ПК не в домене и автоматизация этого процесса через GPO если ПК в домене.
- Использование бесплатного сертификата Let’s Encrypt (90 дней). О выпуске и установке сертификата вы можете почитать — здесь.
- Покупка сертификата безопасности на год.
Невозможность указать нестандартный порт подключения на старых RDP клиентах Microsoft
Что касается этого пункта, мы можем столкнуться с ситуацией, когда внешний порт уже занят и нам необходимо выбрать другой.
Такой сценарий, безусловно, поддерживается, однако проблемы могут возникнуть на клиентских машинах со старой версией RDP клиента. При попытке указать внешний адрес и порт подключения будет выдаваться ошибка о невозможности выполнения этого действия.
Решение только одно — установка обновления RDP клиента. Начиная с Windows 8 клиент уже обновлен и такой проблемы замечено небыло.
Возможные проблемы при подключении с ОС отличных от Windows
Функционал, необходимый для подключения через шлюз удаленных рабочих столов, интегрирован в стандартный RDP клиент Microsoft. Однако, если необходимо подключаться с других ОС, необходимо предварительно проверить возможность подключения через шлюз.
HTML5 Web client
Описание функционала
Компания Microsoft пошла дальше в вопросах предоставления удаленного доступа пользователям и выпустила специальный Web client компонент, позволяющий подключаться к рабочему столу или RemoteApp приложению через обычный веб-браузер.
Подобный подход имеет большое преимущество перед классическим подключением через шлюз. Теперь мы не зависим от ОС или конфигурации RDP клиента. Нам достаточно иметь на устройстве любой современный браузер для удаленного подключения.
Схема работы примерно та же. Мы организуем хост с установленным компонентом Web Client на периметре сети и публикуем один порт в сеть интернет.
Также у нас появляется возможность игнорировать вопросы связанные с клиентским доверием к SSL сертификатам. Т.к подключение происходит через веб-браузер, мы можем просто закрыть глаза и использовать самоподписанный сертификат для целей удаленного подключения без необходимости получения или приобретения сторонних.
Также прошу обратить внимание, что компонент Web client и роль Remote Desktop Web Access не одно и тоже. RD Web Access позволяет нам публиковать сеансы и RemoteApp приложения, которые, по факту, будут подключаться через RDP. Web client позволяет нам устанавливать сессию непосредственно в веб-браузере.
Предварительные требования
- В сети должно быть сконфигурировано развертывание удаленных рабочих столов.
- Версия ОС на узлах с ролями Connection Broker, Web Access, Session Host, Gateway должна быть Windows Server 2016+.
- Лицензии CAL должны выдаваться на пользователя, не на устройство.
- На узле Web client должно быть установлено обновление KB4025334.
- Наличие развернутого домена Active Directory.
Установка, конфигурация и проверка Web client
В этой статье мы развернем компонент Web client, как и Remote Desktop Gateway, на отдельном узле — lab-rdgw1.party.hard. Воспользуемся уже сконфигурированной инфраструктурой, описанной выше.
Т.к мы планируем развернуть компонент на узле lab-rdgw1.party.hard, нам необходимо установить на него роль Web Access, иначе, мы столкнемся с невозможностью установки Web client.

Для этого воспользуемся способом установки через развертывание служб удаленных рабочих столов и добавим управляемый хост в Диспетчере серверов.
Теперь перейдем к установке роли Web Access. Для этого выберем пункт Добавить сервера Web Access в Обзоре развертывания.
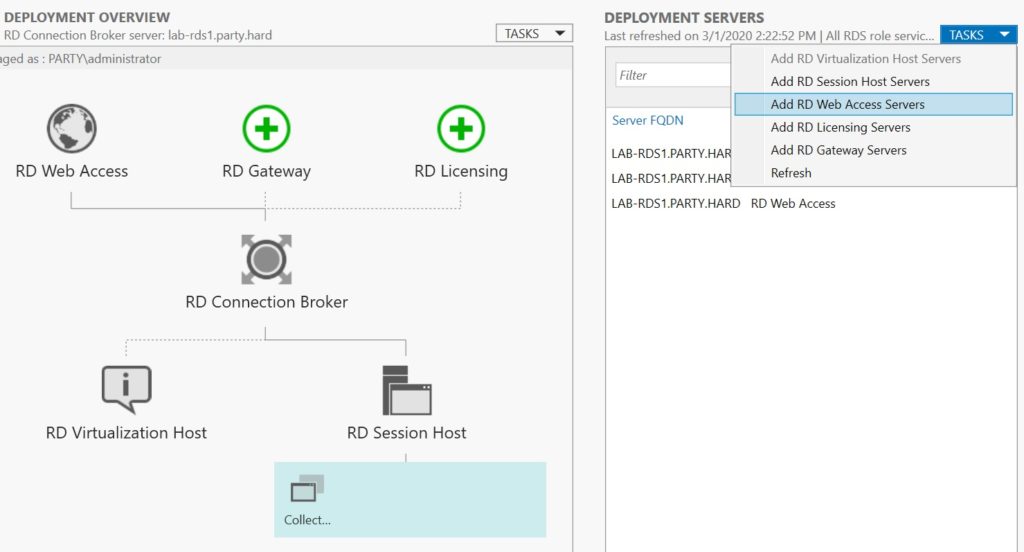
Укажем узел для развертывания роли.
Подтверждаем установку и ждем ее завершения.
Теперь переходим непосредственно к установке Web client. На текущий момент установка компонента возможна только через PowerShell. Может быть, со временем, разработчики добавят возможность установки через GUI.
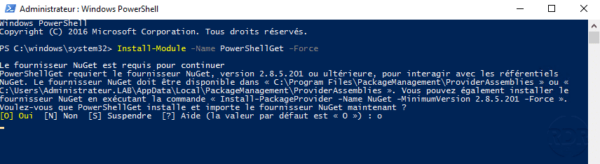
Сперва нам необходимо обновить модуль PowershellGet. Открываем Powershell от имени администратора и вводим:
Install-Module -Name PowerShellGet -Force
Для корректной работы нам нужно закрыть и еще раз открыть Powershell от имени администратора, иначе установленный модуль не будет работать.
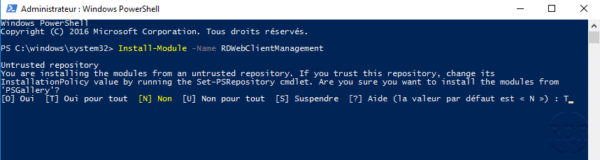
После установки PowershellGet устанавливаем модуль RDWebClientManagement. Для этого вводим в Powershell:
Install-Module -Name RDWebClientManagement
Также подтверждаем установку и соглашаемся с условиями в процессе выполнения командлета.


Теперь установим модуль Web client выполнив в Powershell командлет:
Install-RDWebClientPackage
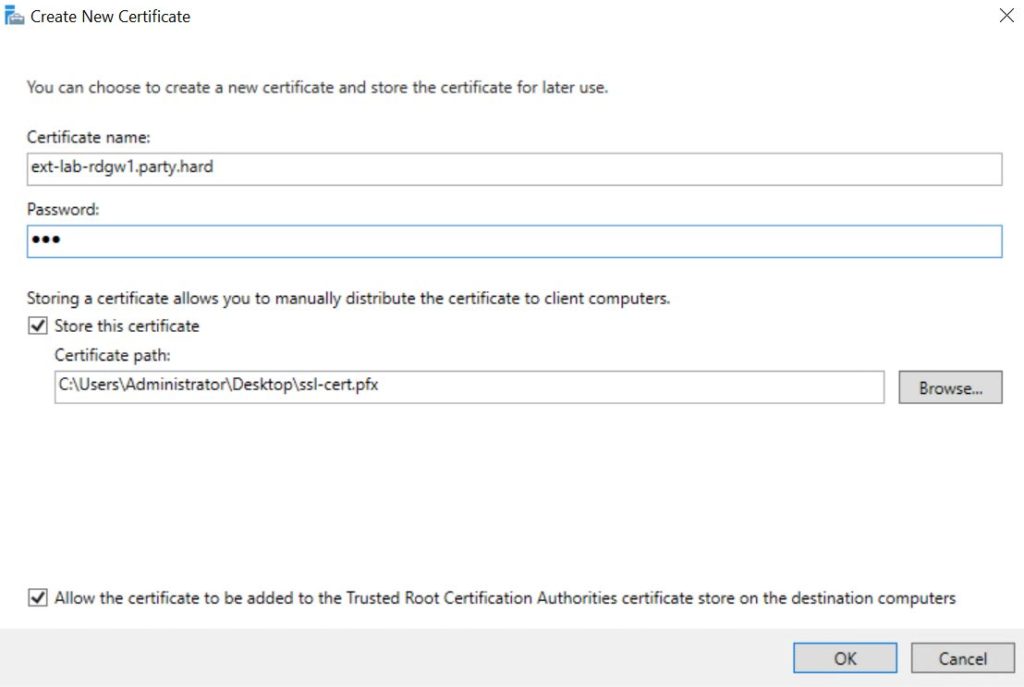
Теперь ненадолго переместимся на узел с ролью RD Connection Broker. Отсюда нам нужен сертификат который уже или будет назначен для роли RD Connection Broker. Так как мы разворачиваем тестовый стенд, нам проще создать новый самоподписанный.
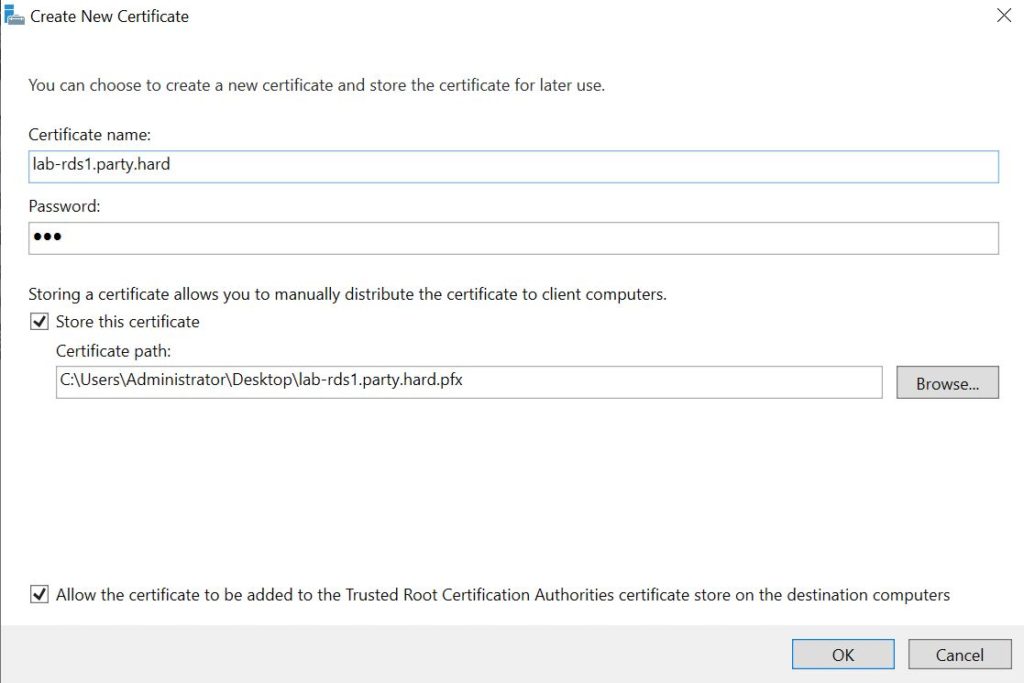

После этого нам необходимо найти его в оснастке Сертификаты учетной записи компьютера в виде ключевой пары .pfx и экспортировать публичную часть.

Только что полученный сертификат переносим на сервер lab-rdgw1.party.hard любым доступным способом и сами возвращаемся на него же. 🙂
Импортируем открытую часть сертификата для развертывания Web client.
Import-RDWebClientBrokerCert "C:usersAdministratorDesktoplab-rds1.party.hard.cer"
И наконец публикуем компонент.
Publish-RDWebClientPackage -Type Production -Latest
Дополнительная литература
Для более подробных инструкций предлагаю посмотреть документацию Microsoft.
https://docs.microsoft.com/en-us/windows-server/remote/remote-desktop-services/clients/remote-desktop-web-client-admin
Проверяем подключение со стороны клиента
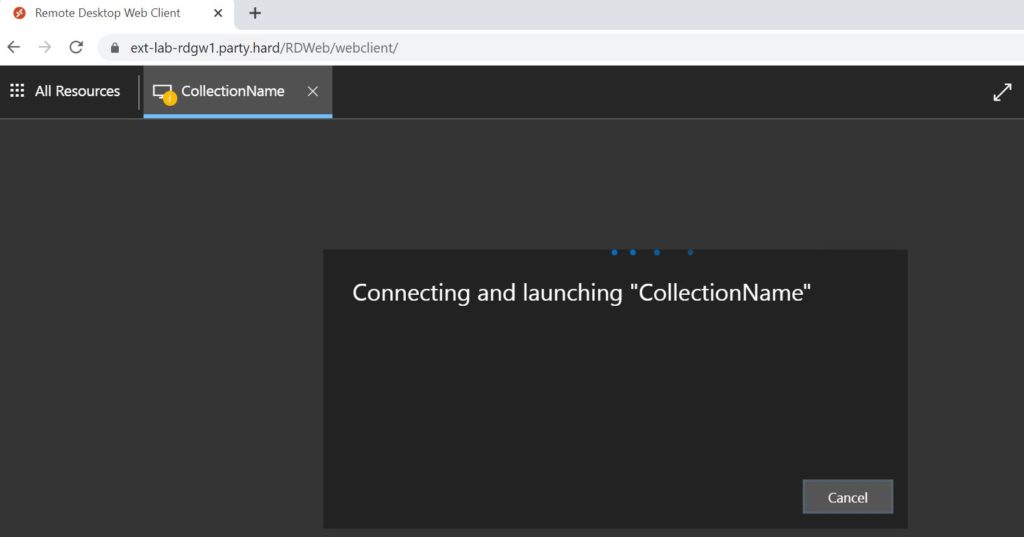
Итак, проверим как наши пользователи будут удаленно подключаться. Для этого запускаем веб-браузер и вводим внешний fqdn-адрес:
https://ext-lab-rdgw1.party.hard/RDWeb/webclient/

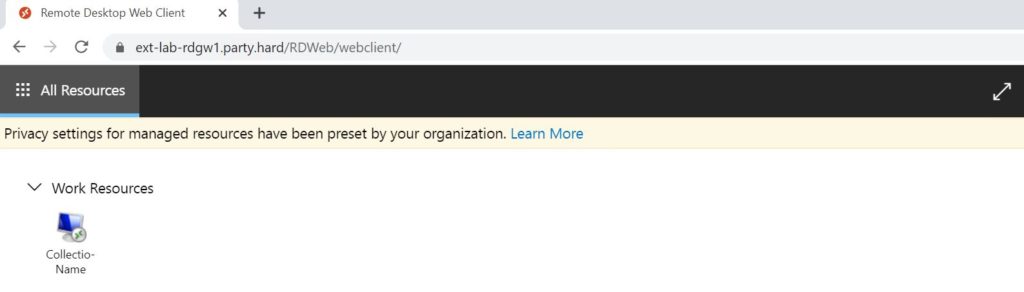
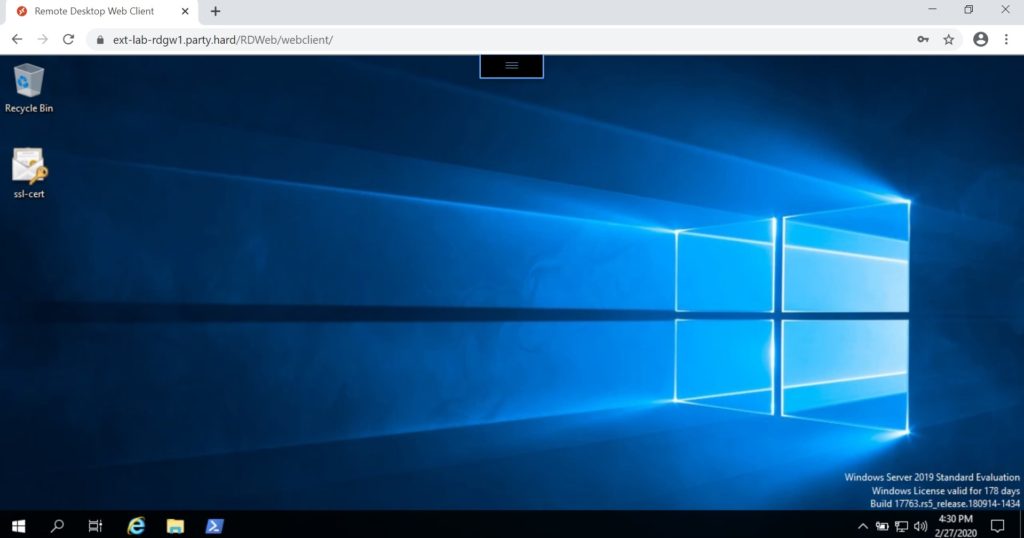
Запустим, единственный в нашем случае, опубликованный ресурс.
Также, для полноты картины, я решил добавить в статью подключение с устройства под управлением Linux.
Для этого точно также запускаем веб-браузер и вводим внешний fqdn-адрес:
https://ext-lab-rdgw1.party.hard/RDWeb/webclient/

Подключение к хостам вне коллекции RDS
У некоторых может возникнуть вопрос:
Возможно ли подключение через веб-браузер к серверам, которые не находятся в коллекции RDS? А к клиентским компьютерам?
Да, такое возможно с небольшой хитростью. Для этого нам необходимо опубликовать RemoteApp приложение удаленного рабочего стола (mstsc) с необходимыми параметрами подключения.
Ниже я покажу пример публикации удаленного подключения к серверу lab-dc1.party.hard.
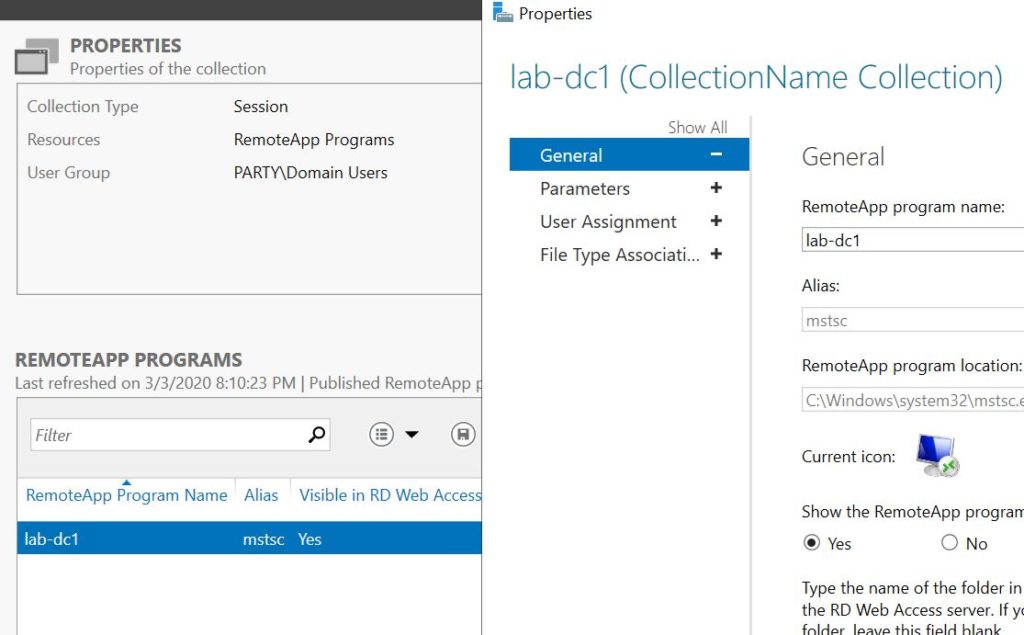
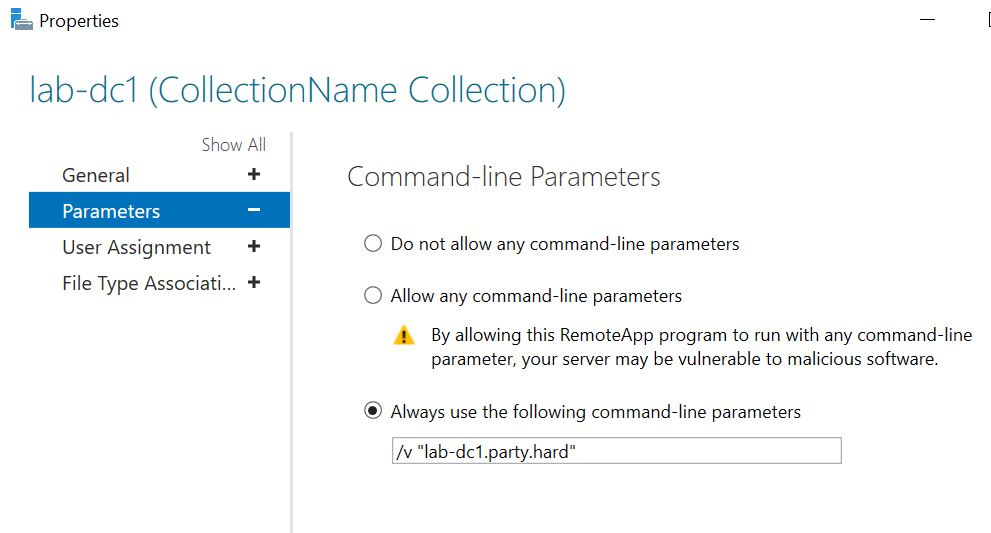
Подход имеет свои недостатки. Таким образом мы, фактически, устанавливаем 2 RDP соединения. Сначала с узлом RDSH и отсюда устанавливаем новое соединение с нужным нам хостом.
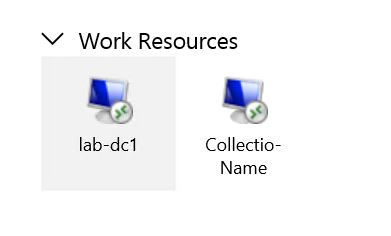
При использовании хитрости описанной выше, наш пользователь увидит в веб-панели только опубликованное приложение, без значка подключения к RDSH узлу коллекции. Это связано с тем, что коллекции могут быть двух типов:
- Сессии
- Приложения RemoteApp
Поэтому, если необходимо сохранить у пользователя как подключение к RDSH узлу, так и к другому серверу или клиентскому компьютеру, необходимо изменить один параметр в реестре.
HKLMSOFTWAREMicrosoftWindows NTCurrentVersionTerminal ServerCentralPublishedResourcesPublishedFarms<collection>RemoteDesktops<collection>ShowInPortal
Значение этого ключа должно быть равно 1.
После изменения значения пользователь увидит оба варианта подключения.
Мониторинг удаленных подключений
Для того, чтобы узнать информацию об успешных или неудачных попытках подключения к Web client мы можем воспользоваться инструментом Просмотр событий. Нужную нам информацию мы найдем журнале Безопасность.
Для примера я произведу 2 попытки входа.
Первая — учетные данные некорректны.
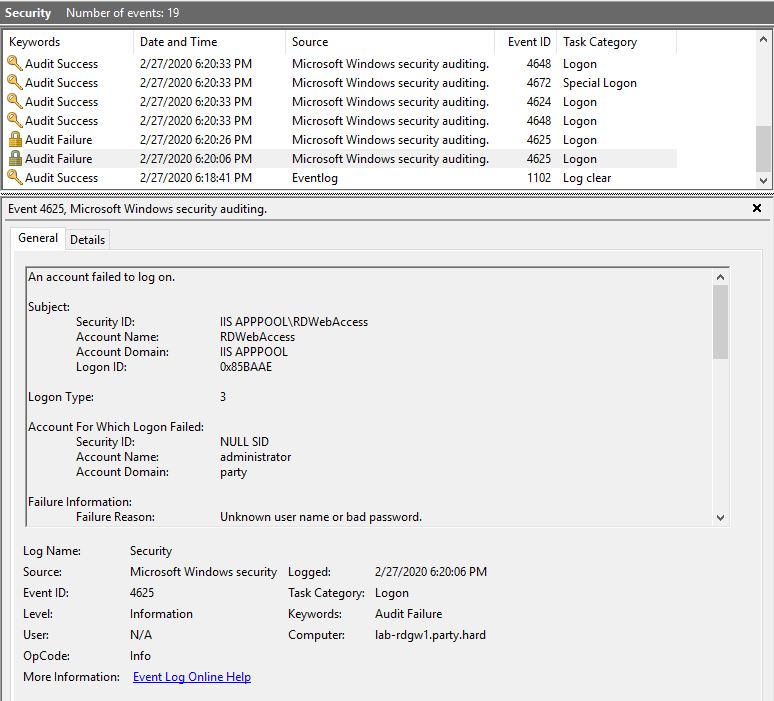
Вторая — учетные данные корректны.
При использовании инструментов для автоматизации процесса можно получить более удобный мониторинг и интегрировать его в другие сервисы (напр. Zabbix).
Нюансы эксплуатации
Отсутствие возможности копирования файлов
К сожалению, на момент публикации статьи в компоненте отсутствует возможность копировать файлы между системами. Возможно, в вашей рабочей деятельности это будет являться важным фактором, поэтому это стоит учитывать.
Двойное RDP подключение к хостам вне коллекции RDS
На текущий момент мне не удалось напрямую подключиться к узлам, которые не находятся в RDS коллекции. Пока что мне известен только способ через двойное подключение, где в качестве прокси будет использован RDSH узел. Для пользователя использование этого метода может стать причиной низкого быстродействия удаленного подключения.
Некорректная работа с NAT
При эксплуатации была выявлена проблема, при которой не удавалось установить соединение с RDSH узлами. В ходе диагностики выяснилось, что если доступ к узлу с компонентом Web Client осуществляется с помощью трансляции портов отличных от 443, то подключение не может быть установлено. Если транслировать внешний порт 443 в такой же внутренний, то подобной проблемы не возникает.
Итоги
Мнение
В ходе знакомства с технологиями у меня сложилось впечатление того, что они неплохо друг друга дополняют и могут практически полностью закрыть потребности как пользователей, так и администраторов.
Большой удачей является тот факт, что обе технологии могут работать вместе в гибридном варианте. Более того, они работают через один порт и через один и тот же сервис IIS, который устанавливается при развертывании, что также упрощает жизнь специалистам по эксплуатации.
Как уже упоминалось выше, при использовании некоторых хитростей можно расширить зону применения (публикация rdp клиента для дальнейшего подключения на компьютеры не входящие в коллекции) и предоставить нашим коллегам удаленный доступ вне зависимости от типа и конфигурации их ОС.
Также администраторы получают возможность централизовано (через свойства коллекций или Active Directory) управлять доступом и заниматься мониторингом подключений. Это очень удобно с точки зрения интеграции с уже существующей инфраструктурой. У специалистов по эксплуатации отпадает необходимость дружить другое ПО с учетными данными пользователей в Active Directory.
Коллеги! Если у вас есть замечания или дополнения по предмету этой статьи, прошу оставить комментарий. Возможно, они кому-то пригодятся в будущем.
| title | description | ms.author | ms.date | ms.topic | author |
|---|---|---|---|---|---|
|
Set up the Remote Desktop web client for your users |
Describes how an admin can set up the Remote Desktop web client. |
helohr |
09/19/2019 |
article |
Heidilohr |
Set up the Remote Desktop web client for your users
The Remote Desktop web client lets users access your organization’s Remote Desktop infrastructure through a compatible web browser. They’ll be able to interact with remote apps or desktops like they would with a local PC no matter where they are. Once you set up your Remote Desktop web client, all your users need to get started is the URL where they can access the client, their credentials, and a supported web browser.
[!IMPORTANT]
The web client does support using Azure AD Application Proxy but does not support Web Application Proxy at all. See Using RDS with application proxy services for details.
What you’ll need to set up the web client
Before getting started, keep the following things in mind:
- Make sure your Remote Desktop deployment has an RD Gateway, an RD Connection Broker, and RD Web Access running on Windows Server 2016 or 2019.
- Make sure your deployment is configured for per-user client access licenses (CALs) instead of per-device, otherwise all licenses will be consumed.
- Install the Windows 10 KB4025334 update on the RD Gateway. Later cumulative updates may already contains this KB.
- Make sure public trusted certificates are configured for the RD Gateway and RD Web Access roles.
- Make sure that any computers your users will connect to are running one of the following OS versions:
- Windows 10
- Windows Server 2008R2 or later
Your users will see better performance connecting to Windows Server 2016 (or later) and Windows 10 (version 1611 or later).
[!IMPORTANT]
If you used the web client during the preview period and installed a version prior to 1.0.0, you must first uninstall the old client before moving to the new version. If you receive an error that says «The web client was installed using an older version of RDWebClientManagement and must first be removed before deploying the new version,» follow these steps:
- Open an elevated PowerShell prompt.
- Run Uninstall-Module RDWebClientManagement to uninstall the new module.
- Close and reopen the elevated PowerShell prompt.
- Run Install-Module RDWebClientManagement -RequiredVersion <old version> to install the old module.
- Run Uninstall-RDWebClient to uninstall the old web client.
- Run Uninstall-Module RDWebClientManagement to uninstall the old module.
- Close and reopen the elevated PowerShell prompt.
- Proceed with the normal installation steps as follows.
How to publish the Remote Desktop web client
To install the web client for the first time, follow these steps:
-
On the RD Connection Broker server, obtain the certificate used for Remote Desktop connections and export it as a .cer file. Copy the .cer file from the RD Connection Broker to the server running the RD Web role.
-
On the RD Web Access server, open an elevated PowerShell prompt.
-
On Windows Server 2016, update the PowerShellGet module since the inbox version doesn’t support installing the web client management module. To update PowerShellGet, run the following cmdlet:
Install-Module -Name PowerShellGet -Force
[!IMPORTANT]
You’ll need to restart PowerShell before the update can take effect, otherwise the module may not work. -
Install the Remote Desktop web client management PowerShell module from the PowerShell gallery with this cmdlet:
Install-Module -Name RDWebClientManagement
-
After that, run the following cmdlet to download the latest version of the Remote Desktop web client:
Install-RDWebClientPackage -
Next, run this cmdlet with the bracketed value replaced with the path of the .cer file that you copied from the RD Broker:
Import-RDWebClientBrokerCert <.cer file path>
-
Finally, run this cmdlet to publish the Remote Desktop web client:
Publish-RDWebClientPackage -Type Production -Latest
Make sure you can access the web client at the web client URL with your server name, formatted as
https://server_FQDN/RDWeb/webclient/index.html. It’s important to use the server name that matches the RD Web Access public certificate in the URL (typically the server FQDN).[!NOTE]
When running the Publish-RDWebClientPackage cmdlet, you may see a warning that says per-device CALs are not supported, even if your deployment is configured for per-user CALs. If your deployment uses per-user CALs, you can ignore this warning. We display it to make sure you’re aware of the configuration limitation. -
When you’re ready for users to access the web client, just send them the web client URL you created.
[!NOTE]
To see a list of all supported cmdlets for the RDWebClientManagement module, run the following cmdlet in PowerShell:Get-Command -Module RDWebClientManagement
How to update the Remote Desktop web client
When a new version of the Remote Desktop web client is available, follow these steps to update the deployment with the new client:
-
Open an elevated PowerShell prompt on the RD Web Access server and run the following cmdlet to download the latest available version of the web client:
Install-RDWebClientPackage -
Optionally, you can publish the client for testing before official release by running this cmdlet:
Publish-RDWebClientPackage -Type Test -Latest
The client should appear on the test URL that corresponds to your web client URL (for example, https://server_FQDN/RDWeb/webclient-test/index.html).
-
Publish the client for users by running the following cmdlet:
Publish-RDWebClientPackage -Type Production -Latest
This will replace the client for all users when they relaunch the web page.
How to uninstall the Remote Desktop web client
To remove all traces of the web client, follow these steps:
-
On the RD Web Access server, open an elevated PowerShell prompt.
-
Unpublish the Test and Production clients, uninstall all local packages and remove the web client settings:
-
Uninstall the Remote Desktop web client management PowerShell module:
Uninstall-Module -Name RDWebClientManagement
How to install the Remote Desktop web client without an internet connection
Follow these steps to deploy the web client to an RD Web Access server that doesn’t have an internet connection.
[!NOTE]
Installing without an internet connection is available in version 1.0.1 and above of the RDWebClientManagement PowerShell module.
[!NOTE]
You still need an admin PC with internet access to download the necessary files before transferring them to the offline server.
[!NOTE]
The end-user PC needs an internet connection for now. This will be addressed in a future release of the client to provide a complete offline scenario.
From a device with internet access
-
Open a PowerShell prompt.
-
Import the Remote Desktop web client management PowerShell module from the PowerShell gallery:
Import-Module -Name RDWebClientManagement
-
Download the latest version of the Remote Desktop web client for installation on a different device:
Save-RDWebClientPackage "C:WebClient"
-
Download the latest version of the RDWebClientManagement PowerShell module:
Find-Module -Name "RDWebClientManagement" -Repository "PSGallery" | Save-Module -Path "C:WebClient"
-
Copy the content of «C:WebClient» to the RD Web Access server.
From the RD Web Access server
Follow the instructions under How to publish the Remote Desktop web client, replacing steps 4 and 5 with the following.
-
You have two options to retrieve the latest web client management PowerShell module:
- Import the Remote Desktop web client management PowerShell module:
Import-Module -Name RDWebClientManagement
- Copy the downloaded RDWebClientManagement folder to one of the local PowerShell module folders listed under $env:psmodulePath, or add the path to the folder with the downloaded files to the $env:psmodulePath.
- Import the Remote Desktop web client management PowerShell module:
-
Deploy the latest version of the Remote Desktop web client from the local folder (replace with the appropriate zip file):
Install-RDWebClientPackage -Source "C:WebClientrdwebclient-1.0.1.zip"
Connecting to RD Broker without RD Gateway in Windows Server 2019
This section describes how to enable a web client connection to an RD Broker without an RD Gateway in Windows Server 2019.
Setting up the RD Broker server
Follow these steps if there is no certificate bound to the RD Broker server
-
Open Server Manager > Remote Desktop Services.
-
In Deployment Overview section, select the Tasks dropdown menu.
-
Select Edit Deployment Properties, a new window titled Deployment Properties will open.
-
In the Deployment Properties window, select Certificates in the left menu.
-
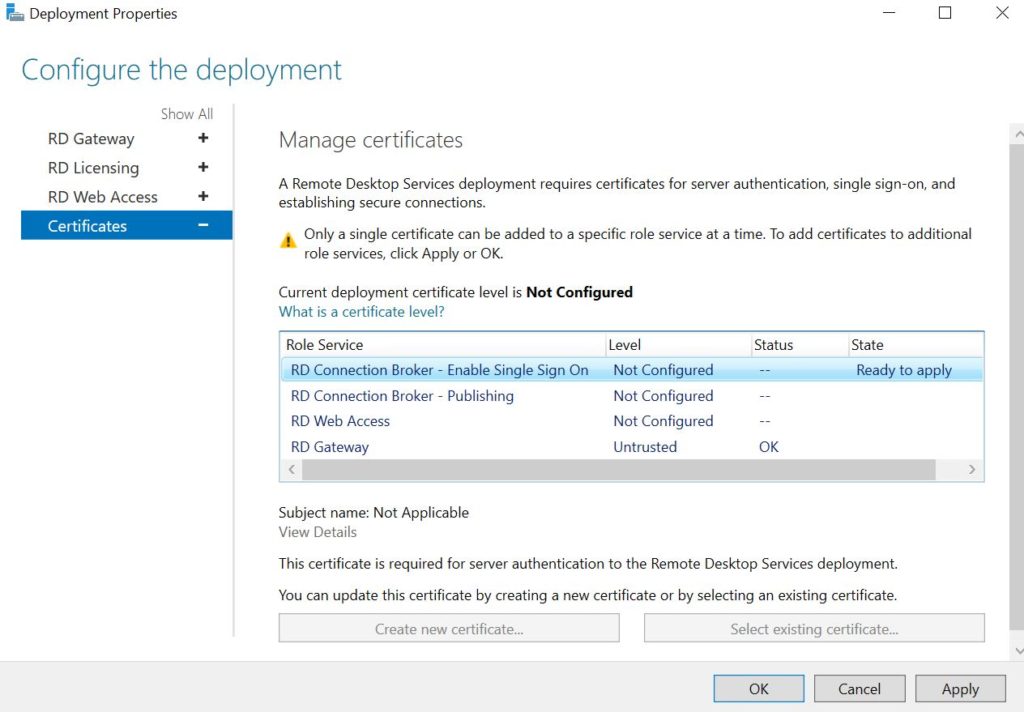
In the list of Certificate Levels, select RD Connection Broker — Enable Single Sign On. You have two options: (1) create a new certificate or (2) an existing certificate.
Follow these steps if there is a certificate previously bound to the RD Broker server
-
Open the certificate bound to the Broker and copy the Thumbprint value.
-
To bind this certificate to the secure port 3392, open an elevated PowerShell window and run the following command, replacing «< thumbprint >» with the value copied from the previous step:
netsh http add sslcert ipport=0.0.0.0:3392 certhash="<thumbprint>" certstorename="Remote Desktop" appid="{00000000-0000-0000-0000-000000000000}"
[!NOTE]
To check if the certificate has been bound correctly, run the following command:In the list of SSL Certificate bindings, ensure that the correct certificate is bound to port 3392.
-
Open the Windows Registry (regedit), go to
HKLMSYSTEMCurrentControlSetControlTerminal ServerWinStationsRDP-Tcpand locate the key WebSocketURI. Next, set the value tohttps://+:3392/rdp/.
Setting up the RD Session Host
Follow these steps if the RD Session Host server is different from the RD Broker server:
-
Create a certificate for the RD Session Host machine, open it and copy the Thumbprint value.
-
To bind this certificate to the secure port 3392, open an elevated PowerShell window and run the following command, replacing «< thumbprint >» with the value copied from the previous step:
netsh http add sslcert ipport=0.0.0.0:3392 certhash="<thumbprint>" appid="{00000000-0000-0000-0000-000000000000}"
[!NOTE]
To check if the certificate has been bound correctly, run the following command:In the list of SSL Certificate bindings, ensure that the correct certificate is bound to port 3392.
-
Open the Windows Registry (regedit) and navigate to
HKLMSYSTEMCurrentControlSetControlTerminal ServerWinStationsRDP-Tcpand locate the key WebSocketURI. The value must be set tohttps://+:3392/rdp/.
General Observations
-
Ensure that both the RD Session Host and RD Broker server are running Windows Server 2019.
-
Ensure that public trusted certificates are configured for both the RD Session Host and RD Broker server.
[!NOTE]
If both the RD Session Host and the RD Broker server share the same machine, set the RD Broker server certificate only. If the RD Session Host and RD Broker server use different machines, both must be configured with unique certificates. -
The Subject Alternative Name (SAN) for each certificate must be set to the machine’s Fully Qualified Domain Name (FQDN). The Common Name (CN) must match the SAN for each certificate.
How to pre-configure settings for Remote Desktop web client users
This section will tell you how to use PowerShell to configure settings for your Remote Desktop web client deployment. These PowerShell cmdlets control a user’s ability to change settings based on your organization’s security concerns or intended workflow. The following settings are all located in the Settings side panel of the web client.
Suppress telemetry
By default, users may choose to enable or disable collection of telemetry data that is sent to Microsoft. For information about the telemetry data Microsoft collects, please refer to our Privacy Statement via the link in the About side panel.
As an administrator, you can choose to suppress telemetry collection for your deployment using the following PowerShell cmdlet:
Set-RDWebClientDeploymentSetting -Name "SuppressTelemetry" $true
By default, the user may select to enable or disable telemetry. A boolean value $false will match the default client behavior. A boolean value $true disables telemetry and restricts the user from enabling telemetry.
Remote resource launch method
[!NOTE]
This setting currently only works with the RDS web client, not the Azure Virtual Desktop web client.
By default, users may choose to launch remote resources (1) in the browser or (2) by downloading an .rdp file to handle with another client installed on their machine. As an administrator, you can choose to restrict the remote resource launch method for your deployment with the following PowerShell command:
Set-RDWebClientDeploymentSetting -Name "LaunchResourceInBrowser" ($true|$false)
By default, the user may select either launch method. A boolean value $true will force the user to launch resources in the browser. A boolean value $false will force the user to launch resources by downloading an .rdp file to handle with a locally installed RDP client.
Reset RDWebClientDeploymentSetting configurations to default
To reset a deployment-level web client setting to the default configuration, run the following PowerShell cmdlet and use the -name parameter to specify the setting you want to reset:
 Reset-RDWebClientDeploymentSetting -Name "LaunchResourceInBrowser"
 Reset-RDWebClientDeploymentSetting -Name "SuppressTelemetry"
Troubleshooting
If a user reports any of the following issues when opening the web client for the first time, the following sections will tell you what to do to fix them.
What to do if the user’s browser shows a security warning when they try to access the web client
The RD Web Access role might not be using a trusted certificate. Make sure the RD Web Access role is configured with a publicly trusted certificate.
If that doesn’t work, your server name in the web client URL might not match the name provided by the RD Web certificate. Make sure your URL uses the FQDN of the server hosting the RD Web role.
What to do if the user can’t connect to a resource with the web client even though they can see the items under All Resources
If the user reports that they can’t connect with the web client even though they can see the resources listed, check the following things:
- Is the RD Gateway role properly configured to use a trusted public certificate?
- Does the RD Gateway server have the required updates installed? Make sure that your server has the KB4025334 update installed.
If the user gets an «unexpected server authentication certificate was received» error message when they try to connect, then the message will show the certificate’s thumbprint. Search the RD Broker server’s certificate manager using that thumbprint to find the right certificate. Verify that the certificate is configured to be used for the RD Broker role in the Remote Desktop deployment properties page. After making sure the certificate hasn’t expired, copy the certificate in .cer file format to the RD Web Access server and run the following command on the RD Web Access server with the bracketed value replaced by the certificate’s file path:
Import-RDWebClientBrokerCert <certificate file path>
Diagnose issues with the console log
If you can’t solve the issue based on the troubleshooting instructions in this article, you can try to diagnose the source of the problem yourself by watching the console log in the browser. The web client provides a method for recording the browser console log activity while using the web client to help diagnose issues.
- Select the ellipsis in the upper-right corner and navigate to the About page in the dropdown menu.
- Under Capture support information select the Start recording button.
- Perform the operation(s) in the web client that produced the issue you are trying to diagnose.
- Navigate to the About page and select Stop recording.
- Your browser will automatically download a .txt file titled RD Console Logs.txt. This file will contain the full console log activity generated while reproducing the target issue.
The console may also be accessed directly through your browser. The console is generally located under the developer tools. For example, you can access the log in Microsoft Edge by pressing the F12 key, or by selecting the ellipsis, then navigating to More tools > Developer Tools.
Get help with the web client
If you’ve encountered an issue that can’t be solved by the information in this article, you can report it on the Azure Virtual Desktop forum of Microsoft Tech Community.
“Finally an HTML5 client for Windows RDS farms”
Presentation
In this tutorial, I explain how to set up the HTML 5 client interface to connect to the RDS farm on Windows.
Until now to connect to Remote Desktop or RemoteApp, it was necessary to have a heavy RDP client.
To connect without a client, it was necessary to implement alternatives such as Citrix Netscaler / StoreFront, Sophos XG …
Since March 2018, Microsoft has previewed an HTML5 client that installs on the server with the RD Web Access role, which allows you to connect to desktops and applications without the need for a heavy client.
Prerequisite
- Servers with Remote Desktop, Service Broker, and Remote Desktop Gateway Web Access roles must be running Windows Server 2016/2019.
- The https://support.microsoft.com/en-us/help/4025334/windows-10-update-kb4025334 update must be installed on the Remote Desktop Gateway server.
- Broker / Gateway / Web Access certificates should not be self-signed. (They can come from a private Authority)
- The license mode must be per user.
Installation HTML5 client
The installation is to be done on the server having the role of Web Access.
Open a PowerShell window and enter the following command to install PowerShellGet.
Install-Module –Name PowerShellGet –Force
Confirm the installation by entering Y.
lose and reopen the PowerShell command prompt.
Enter the following command to install Remote Desktop Web Client Management:
Install-Module -Name RDWebClientManagement
Confirm.
Accept the license.
Enter the following command to install Remote Desktop Web Client:
Install-RDWebClientPackage
Import the broker server certificate:
Import-RDWebClientBrokerCert Cherminducerticatfichier.cer
Publish the RDWC HTML 5 client:
Publish-RDWebClientPackage -Type Production -Latest
Now that the client is installed and configured on the server, we will see how to use it.
Open an internet browser and enter the URL (to adapt): https: //fqdn.rds-web-access/RDWeb/WebClient
Enter valid identifiers.

If no application is deployed in the collection, a link is displayed to connect to desktop 1, click on it.

Validate access to local resources by clicking Allow 1.

Wait while connecting …
The session is open without a heavy client.
If applications are published, click on the application to open 1.
Once the connection is established, use the program.
It is possible to launch several programs, navigation is done using the navigation bar at the top of page 1.
With this HTML5 client, Microsoft is catching up with Citrix and now allows access to the IS with only an internet browser.
Links :
- https://docs.microsoft.com/en-us/windows-server/remote/remote-desktop-services/clients/remote-desktop-web-client-admin
- http://microsoftplatform.blogspot.com/2018/01/html5-client-for-microsoft-remote.html
Hello World,
In our previous post, we have discussed the RDS roles in Windows 2019 Server Preview edition and we have found out that some of the roles (the most important one actually) are not available anymore which make not possible (at the moment), to implement a full RDS 2019 Architecture. While looking and browsing the web and the Microsoft Documentations about RDS (remote Desktop services), we came across this link Set up the Remote Desktop web client for your users
Reading through the documentation page, it seems that in RDS 2016, a new RDP client is available. This new RDP client is not based on any ActiveX components but it’s a pure html 5 RDP client. This was a request or a wish submitted on this web site so time ago. It seems that this request went through…. Actually, it seems that the RemoteApp Azure html client has been integrated in the RDS 2016 solution
In this post, we will try to install it and see how it behave….We didn’t invent anything, all the necessary information can be found here. However, some information or guidance are not up to date anymore…
Let’s do this …
RDWeb Client Requirements and Installation
Overview
The Remote Desktop web client (also called RDP HTML5 Client) basically allows you to access the Remote Desktop infrastructure through a compatible web browser. Some people might say : wait a minute, in previous version, we are also accessing RDS infrastructure through a web interface via the RD Web Access role, right?. So, what’s different ? This is correct. However, the previous RDS version needed Internet explorer and an activeX to have a seamless experience. The Internet explorer is calling the RDP client installed on your Windows machine.
The RDWeb client does not need any ActiveX or any RDP client installed on the machine. A compatible browser is what you need. This means that you can connect to remote Desktop sessions through other browsers like Edge,Firefox,Chrome, and from different platform windows or linux as you do not need a dedicated rdp client…
Our Setup
We have performed a quick installation RDS scenario on a single server where the RD GW, Connection Broker and RD Web access are installed on a single computer

click on Picture for better resolution
Notice also that we have generated self-signed certificates for the RDS server roles for testing purposes. As long as these certificates are trusted within your organization, you should be able to test the RD Web client solution

click on Picture for better resolution
Requirements
To be able to test and install the RDWeb client, you will need to ensure that the following requirements are met
- your RDS Architecture must have the RD Gateway,RD connection broker and RD Web Roles installed on a Windows Server 2016
- Ensure that the licensing mode is set per-user and not per-device
- Clients connecting to your RDS infrastructure needs to be Windows 7 SP or later or Windows 2008 R2 or later
- Public certificates should be configured on RD Gateway and RD Web Server (Preferred). Self signed certificate can be used in a lab or internal environment.
Note:
The documentation also mention to install the Windows 10 KB4025334 update on the RD Gateway. If your system is patched on a regular base, when trying to install this patch, you might get an error stating that this update is not applicable for your system. If this is the case, simply do not install the patch and proceed with the instructions
Update the PowerShellGet module
- The RDWeb Client will be installed on the RDS Server that has the RD Web Access Server role installed. To obtain and install the RDWeb Client package, perform the following actions :
- On the RDWeb Access server, open the powershell command line (as an administrator) and type the following command
- Register-PsRepository -Default
- Install-Module -Name PowerShellGet -Force
- You might get prompted to confirm your selection. press yes and wait for the installation to be completed.

click on Picture for better resolution
- When done, close and open again the PowerShell console with elevated rights
Download and Install the RDWeb client package
To perform the installation, in the PowerShell windows (run as administrator), execute the following commands
Install-Module -Name RDWebClientManagement
Confirm your selection; accept the license and wait for completion.

click on Picture for better resolution

click on Picture for better resolution
Then execute the following command still in powershell
Install-RDWebClientPackage

click on Picture for better resolution
You will see a warning about licensing mode. Ignore it if you have already configured your system accordingly… This is just a reminder
Finally, you will need to import the certificates of the RD Connection broker into the RDWeb Access Server by executing the following command
Import-RDWebClientBrokerCert <%Location of the certificate file (.cer format)%>

click on Picture for better resolution
Quick Note
To obtain the certificate, perform the following actions on the RD Connection broker server
- From an elevated command prompt, type mmc.exe
- In the mmc console, on the top menu, select file> add/remove snapins
- In the Add/Remove Snapins dialog box, select on the left side, Certificates option and click on the add> button
- In the certificates Snap-in select the Computer account option and Press Finish
- Press OK in the Add/Remove Snapins Windows
- In the mmc, navigate to Certificates > Personal > Certificates
- Select the correct certificate, right click on it and select All Tasks > export
- Follow the Wizard and be sure to save the file with the .cer extension
Finally, it’s time to publish the RD Web Client and you do this by executing the following command
Publish-RDWebClientPackage -Type Prodution -Latest

click on Picture for better resolution
Your installation is completed and now it’s time to test it….
Accessing the RDWeb client Page and test it
To use the normal web interface of the RDWeb access server role (the one with the ActiveX component), you would open your browser and type the following (if no url redirection has been set)
https://FQDN of the RDWeb Server/RDweb
To use the RDWeb client page, you will need to use the following url
https://FQDN of the RDWeb Server/RDWeb/Pages/webclient
At this stage, you will reach the familar RD Web access login page

click on Picture for better resolution
After providing the credentials, you will see the new RD Web Client interface

click on Picture for better resolution
If you click on one of the published applications, you will get a first popup showing up asking you about printing and clipboard options. Select your options and press next

click on Picture for better resolution
then you will be asked for user name and password

click on Picture for better resolution
So, there is not real SSO capabilities here. You have to login to the interface and then when you start an application for the first time, you will be prompted again for a password. This will happens only when you start the first application. If you try to open another application just after the first one already running, you will not get prompted for the password
At this stage, you should access the remote desktop session within your browser and you should see which applications are available to you

click on Picture for better resolution
If you RDS collection is configured to allow only Remote Desktop session, you can also have full Desktop access through the Web Browser…..

click on Picture for better resolution
For fun, we have tried to access the RD Web Access server using the new RDWeb client from a Linux machine using Firefox browser and no RDP client installed on it. The results are actually quite good and Linux users can now have access to Microsoft applications through the Remote Desktop solution… Look pretty good ….

click on Picture for better resolution
Final Notes
Keep in mind that this RDWeb client is a preview version and not final. That means that maybe new features would be made available.

click on Picture for better resolution
So far we have performed a really basic test about this new option in the RDS 2016 Architecture solution. We have to perform more testing in order to see if this could be a valid option to be deployed organization wide or should we be keeping a the standard approach with the ActiveX component. We think that in the near feature it will be a mix of both solutions. Web client would be great for Linux users and people using browsers other than Internet explorer.
The RDWeb client is missing some features or we might need to get used to a new way of working. For example, the web client does not provide (yet?) the drive redirection. This might be by design in order to avoid data leakage. Printing feature is also changed apparently. There is no need to redirect to a printer. The Web Client will generate a pdf file that can be printed directly from the client machine…(data leakage issue ?). The RemoteApp concept is a little bit different now. Yes, with RDWeb client, it’s possible to publish applications through a browser but the seamless feature is gone. Some organizations are really using this seamless feature as a way to make application look like installed locally.
We think that RDWeb client is a step in the good direction because there is no more dependencies on Internet Explorer and ActiveX components. On the other hand, using only the RD web client will definitly redefine the way we used to work with RDS solution
Till next time
See ya
Несмотря на то, что Microsoft в последние годы принесла свой RDP-клиент для различных платформ (iOS, macOS, Android, есть даже отдельное приложение UWP для Windows 10), многие пользователи хотели бы получить удаленный RDP-доступ к серверам RDS и опубликованным приложениям любым браузером. Для этих целей Microsoft уже несколько лет разрабатывает отдельный веб-клиент удаленного рабочего стола на основе HTML5. Первая официальная версия RD Web Client была выпущена совсем недавно. В этой статье мы увидим, как установить и настроить веб-клиент удаленного рабочего стола и использовать его для доступа к RemoteApp на сервере RDS под управлением Windows Server 2016 из обычного браузера.
Требования к инфраструктуре веб клиента Remote Desktop
Веб-клиент удаленного рабочего стола по-прежнему доступен как расширение роли веб-доступа к удаленному рабочему столу на серверах RDS под управлением Windows Server 2016/2019.
Перед внедрением веб-клиента удаленного рабочего стола необходимо убедиться, что ваша инфраструктура RDS соответствует следующим требованиям:
- Наличие распределенной инфраструктуры RDS, включая шлюз удаленных рабочих столов, посредник подключений к удаленным рабочим столам и веб-доступ к удаленным рабочим столам на Windows Server 2016/2019;
- Терминальные лицензии (RDS CAL) используются в режиме «на пользователя;
- Серверы шлюза RDS и веб-доступа должны использовать сертификаты SSL, выпущенные доверенным центром сертификации (самозаверяющие сертификаты SSL не могут использоваться);
- В качестве клиента RDP можно использовать только Windows 10 или Windows Server 2008 R2 (или новее);
- На серверах RDS необходимо установить обновление (KB4025334 – от 18 июля 2017 г.) или любое последующее накопительное обновление для Windows Server.
Как мы уже говорили, на данный момент существует версия RD Web Client для Windows Server 2016/2019, но на данный момент этот компонент не входит в дистрибутив WS 2019 и устанавливается отдельно.
На сервере с ролью веб-доступа к удаленному рабочему столу необходимо установить модуль PowerShellGet:
Install-Module -Name PowerShellGet -Force
Закройте консоль PoSh и начните заново. Теперь вам нужно установить модуль управления веб-клиентом удаленного рабочего стола:
Install-Module -Name RDWebClientManagement

Чтобы принять лицензионное соглашение Microsoft, введите A.
Теперь вам нужно установить последнюю версию веб-пакета удаленного рабочего стола:
Install-RDWebClientPackage
После установки пакета проверьте его свойства командой:
Get-RDWebClientPackage

Как видите, у вас есть пакет rd-html 5.0 версии 1.0.0.
Затем вам необходимо экспортировать сертификат SSL, используемый для включения единого входа (SSO), с сервера с ролью брокера RDS в файл .cer (BASE64). Вы можете экспортировать из оснастки управления сертификатами графического компьютера certlm.msc, требуемый сертификат находится в разделе Personal Certificates.
Импортируйте сертификат на веб-сервер удаленного рабочего стола:
Import-RDWebClientBrokerCert C:RDBroker.cer
Теперь вы можете опубликовать веб-клиент удаленного рабочего стола:
Publish-RDWebClientPackage -Type Production -Latest
Чтобы протестировать использование веб-клиента удаленного рабочего стола, вы можете использовать команду:
Publish-RDWebClientPackage -Type Test -Latest
Доступ к RDWeb серверу через браузер с поддержкой HTML5
После того, как вы развернули пакет веб-клиента на сервере RDS, вы можете запустить браузер на клиентском компьютере. Поддерживаются все последние версии браузеров Edge, IE 11, Google Chrome, Safari и Firefox (в то время как веб-клиент RD работает не на всех мобильных устройствах). Чтобы получить доступ к серверам RDS из браузера, просто предоставьте пользователям ссылку на сервер RDWeb.
Открытый URL:
_https://FQDN.server.name/RDWeb/webclient/index.html
Для доступа к тестовой среде используйте адрес:
_https://FQDN.server.name /RDWeb/WebClient-Test/index.html
Имя сервера должно совпадать с именем сервера веб-доступа к удаленным рабочим столам в сертификате.
Войдите на сервер RDWeb, используя свою учетную запись.
При входе в систему вас спросят, какие локальные ресурсы должны быть доступны в сеансе RD. Пока доступно только перенаправление буфера обмена и принтера (локальный диск и USB-устройства не перенаправляются через веб-клиент RDP, вам нужно использовать тяжелый клиент mstsc.exe)
Вы должны увидеть список опубликованных RemoteApps и ссылок RDP. Вы можете переключаться между ними, используя значки в верхней части окна.
Печать из веб-клиента удаленного рабочего стола выполняется через виртуальный принтер PDF (Microsoft Print to PDF). Документ отправляется на печать в окне веб-клиента, и браузер предлагает загрузить сгенерированный файл pdf, который можно открыть и распечатать на локальном принтере.
HTML5 обеспечивает динамическое изменение размера окна удаленного рабочего стола и возможность работы в полноэкранном режиме. Через буфер обмена можно копировать только текст (файлы, графика не копируются через буфер обмена веб-клиента).
интересно, что в веб-клиенте RDP теперь можно увидеть объем памяти и ЦП на сервере RDS, используемый тем или иным приложением. Просто щелкните значок опубликованного приложения.
Источник изображения: winitpro.ru