В этой статье мы покажем, как настроить сервер централизованной аутентификации, авторизации и аккаунтинга (RADIUS) на операционной системе Windows Server 2016, а также как настроить Radius-аутентификацию на Cisco устройствах с помощью службы Политики сети и доступа (Network Policy Server).
RADIUS (англ. Remote Authentication in Dial-In User Service) — протокол для реализации аутентификации, авторизации и сбора сведений об использованных ресурсах, разработанный для передачи сведений между центральным севером и различными сетевым оборудованием и клиентами.
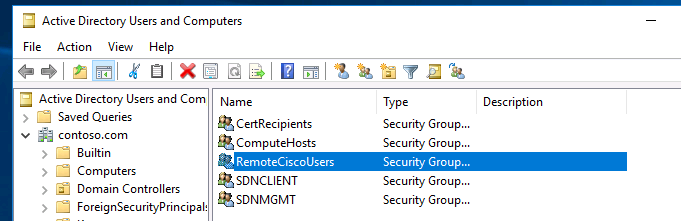
В первую очередь создайте в домене Active Directory группу безопасности AllowRemoteCiscoUsers, в которую нужно добавить пользователей, которым будет разрешена аутентификации на маршрутизаторах и коммутаторах Cisco.
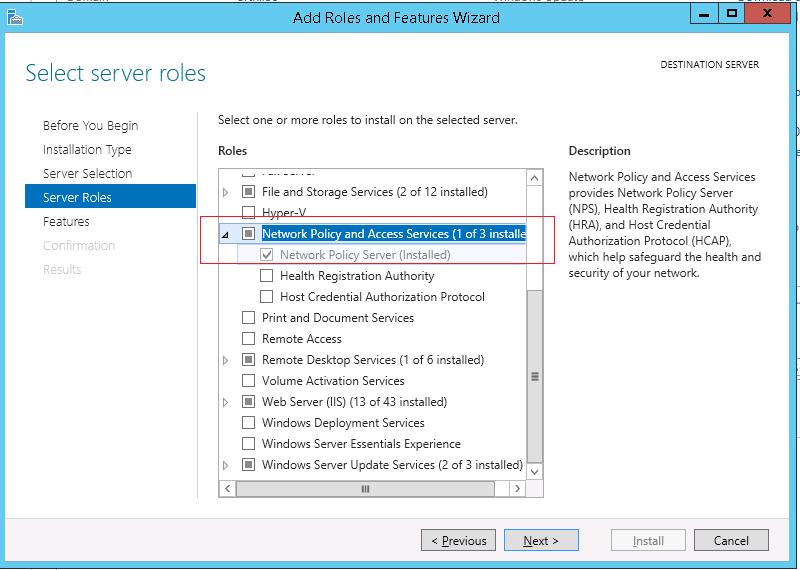
Далее нужно установить на сервере, с помощью которого будет выполнятся аутентификация клиентов и назначаться права доступа, роль RADIUS сервера. Для этого на сервере Windows Server 2016 откройте оснастку Server Manager и вызовите мастер добавления ролей — Add Roles and features.
В открывшемся мастере на шаге выбора ролей отметьте роль Network Policy and Access Services. На шаге выбора служб роли в нашей ситуации достаточно будет выбрать только службу Network Policy Server.
Протокол Remote Authentication Dial In User Service (RADIUS) в Windows Server 2016 включен в состав роли Network Policy Server.
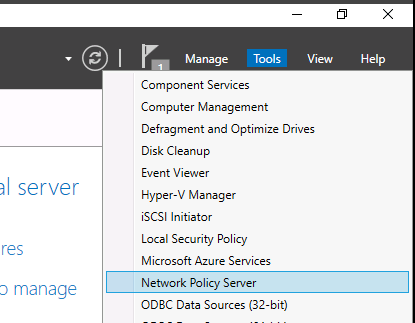
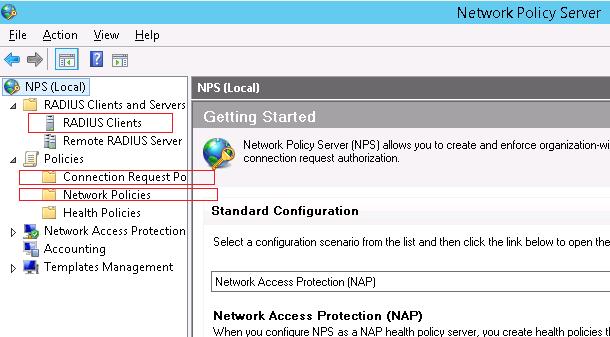
В консоли Server Manager выберите меню Tools и откройте консоль Network Policy Server (nps.msc).
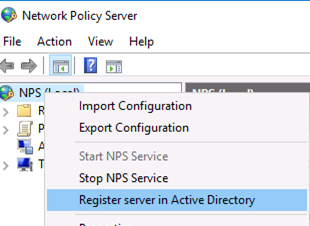
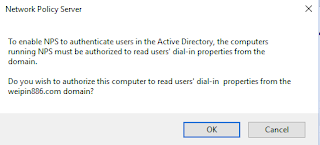
Для полноценного использования NPS-сервера в домене необходимо зарегистрировать его в домене Active Directory. В оснастке на NPS, щелкните ПКМ по вашему NPS узлу и выберите Register server in Active Directory.
Подтвердите регистрацию сервера в Active Directory:
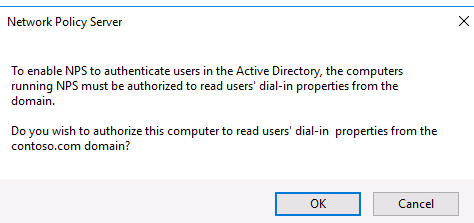
При этом мы должны предоставите серверу полномочия на чтение свойств учётных записей пользователей, касающихся удалённого доступа. Сервер при этом будет добавлен во встроенную доменную группу RAS and IAS Servers.
![]()
Теперь можно добавить клиента Radius. Для этого в дереве консоли NPS разверните раздел RADIUS Clients and Servers и на элементе RADIUS Clients выберите пункт New. 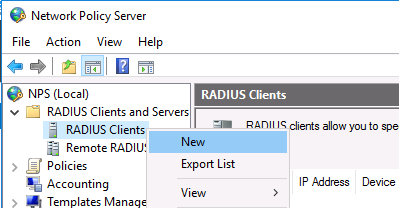
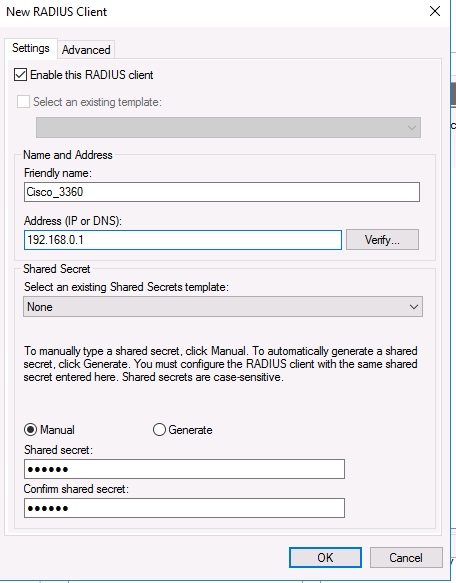
На вкладке Settings заполните поля Friendly name, Client address (можно указать IP адрес или DNS имя подключающегося сетевого устройства) и пароль — Shared Secret + Confirm shared (этот пароль вы будете использовать в настройках коммутатора или маршрутизатора Cisco для установления доверительных отношений с Radius сервером).
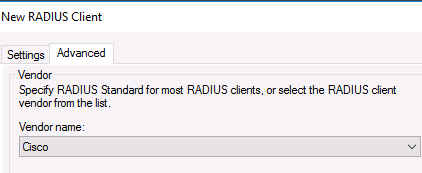
Во вкладке Advanced выберите в поле Vendor name — Cisco.
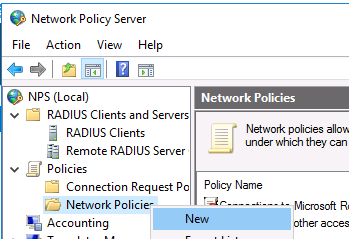
Теперь нужно создать политики доступа на сервере RADIUS. С помощью политик доступа мы свяжем клиента Radius и доменную группу пользователей.
Раскройте ветку Policies —> Network Policies, и выберите пункт меню New:
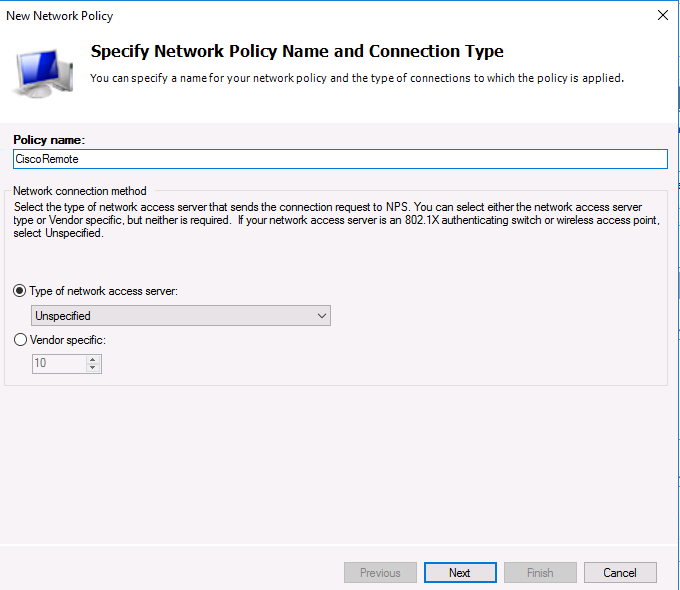
Укажите Имя политики (Policy name). Тип сервера доступа к сети (Type of network access server) оставьте без изменения (Unspecified):
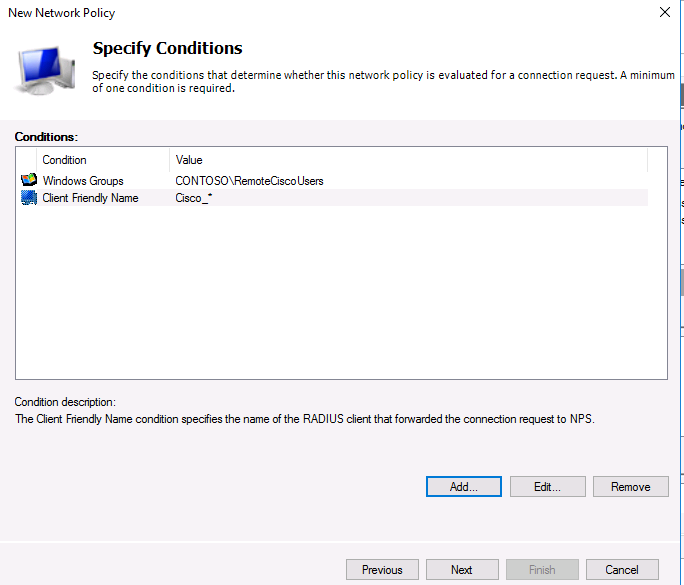
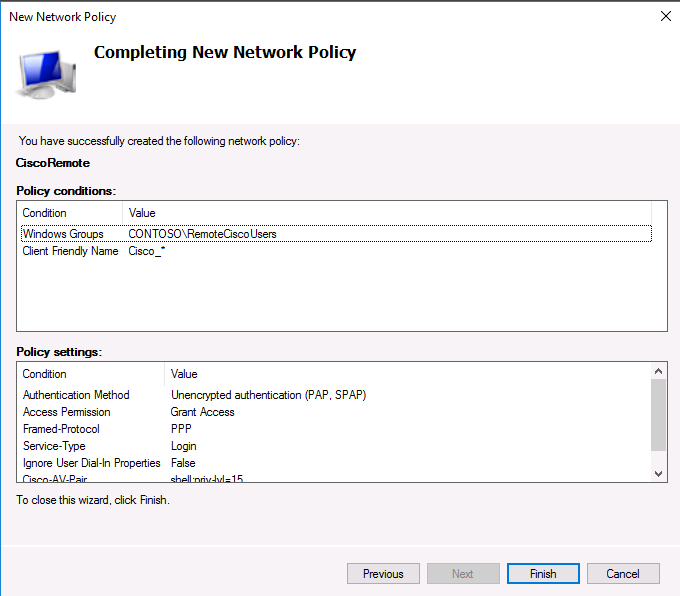
На следующем шаге Specify conditions нам нужно добавить условия, при которых будет применяться данная политика RADIUS. Добавим два условия: вы хотите, что для успешной авторизации пользователь входил в определенную доменную группу безопасности, и устройство, к которому осуществляется доступ, имело определённое имя. С помощью кнопки Add добавим сначала условие, выбрав тип Windows Group (добавьте группу RemoteCiscoUsers) и укажите Client Friendly Name (Cisco_*).
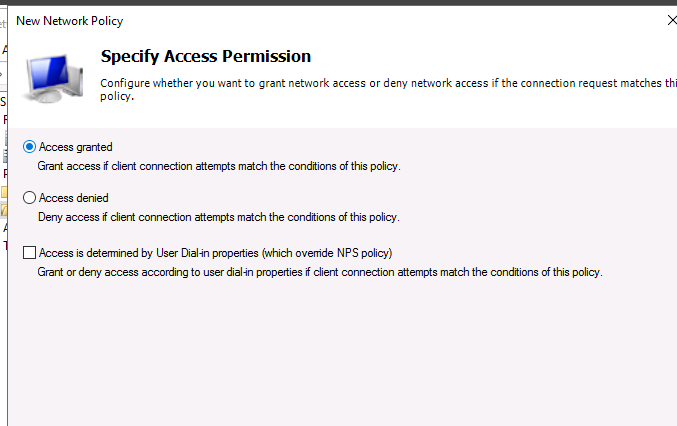
На следующем выберите значение Доступ разрешен (Access Granted).
Т.к. наш коммутатор Cisco поддерживает только метод аутентификации Unencrypted authentication (PAP, SPAP), снимите все остальные флажки. 
Следующий шаг настройки ограничений (Constraints) мы пропустим.
В разделе Configure Settings перейдите секцию RADIUS Attributes -> Standard. Удалите имеющиеся там атрибуты и нажмите кнопку Add.
Выберите Access type -> All, затем Service-Type->Add. Укажите Others=Login. 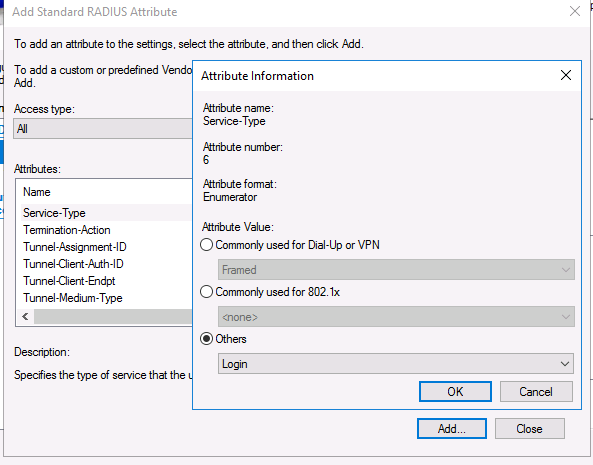
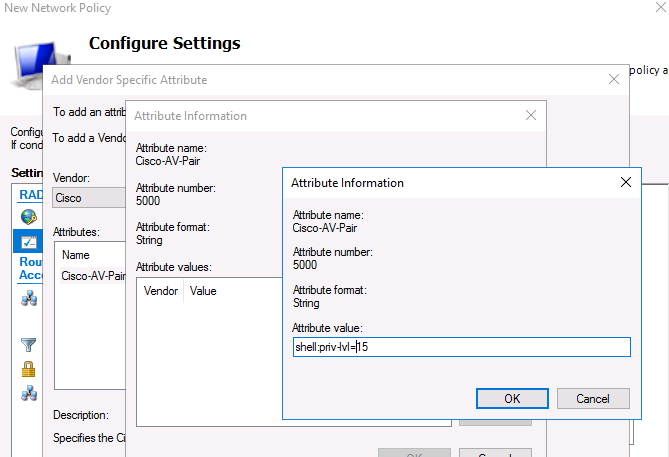
Теперь в секции RADIUS Attributes -> Vendor Specific добавьте новый атрибут. В пункте Vendor, найдите Cisco и нажмите Add. Здесь нужно добавить сведения об атрибуте. Нажмите Add и укажите следующее значение атрибута:
shell: priv-lvl = 15
На последнем экране будут указаны все созданные вами настройки политики NPS. Нажмите Finish:
При создании и планировании политик обратите внимание на то, что имеет значение их порядок. Политики обрабатываются сверху вниз, и все условия очередной политике соблюдены, эта политика применяется к клиенту, а дальнейшая обработка других политик прекращается. То есть с точки зрения безопасности и разрешения конфликтов между политиками правильнее будет располагать политики в порядке возрастания административных полномочий.
После создания политики, можно переходить к настройке маршрутизаторов и коммутаторов Cisco для аутентификации на сервере Radius NPS.
AAA работает таким образом, что, если не получен ответ от сервера, клиент предполагает, что аутентификация не выполнена. Чтобы не потерять доступ к своим сетевым устройствам, которые вы переключаете на авторизацию на Radius сервера, обязательно создайте локальных пользователей на случай если RADIUS сервер станет недоступен по какой-либо причине.
Ниже пример конфигурации для авторизации на Radius (NPS) сервере для коммутатора Cisco Catalyst:
aaa new-model
aaa authentication login default group radius local
aaa authorization exec default group radius if-authenticated
radius-server host 192.168.1.16 key R@diu$pa$$
service password-encryption
На этом минимальная настройка коммутатора закончена и можно испытать новый механизм аутентификации и авторизации в действии.
Наконец «Долгая дорога в дюнах» закончилась, и мы пришли к корпоративному управляемому Wi-fi решению. В начале думали про решение Cisco или Aruba, но к сожалению текущий бюджет никак не располагает к решениям подобного плана. В итоге, в ходе долгих поисков истины и раздумий, решили остановиться на решении Ubnt (отдельно благодарю Александра за нужные советы). Конечно, это не одного поля ягоды с решением Cisco или Aruba, но в текущей ситуации, что есть, то есть.
Как говорил мой командир: «На пожаре и Х… водопровод» (да простят меня за мой русский).
Итак, решение выбрано, задача настроить корпоративный внутренний и гостевой сегменты Wi-fi с авторизацией на Radius сервере.
VPN сервер уже готов, осталось настроить RADIUS, сегодня как раз об этом. На первый взгляд, развернуть и настроить RADIUS сервер, не такая уж сложная задача, но немного загнались с сертификатом, пришлось «поплясать с бубном», ну об этом далее по порядку.
Для начала необходимо запросить сертификат с Центра сертификации, центр сертификации у нас уже есть, поэтому его установку в этом посте я пропущу.
MMC-Файл-Добавить или удалить оснастку-Добавляем Сертификаты-Учетной записи компьютера-Локальным компьютером.
Находим наш центр сертификации

Запрашиваем сертификат (*.p12), сохраняем его на диск, далее устанавливаем его в Личные сертификаты на будущий радиус сервер

Далее добавляем роль самого RADIUS сервера

Далее запускаем Сервер политики сети


Добавляем в раздел RADIUS-клиенты свои Wi-fi точки доступа или сервер управления точками доступа если он поддерживает эту возможность (в этом случае он будет выполнять роль RADIUS клиента)

Общий секрет, указываем тот, который в последствии укажем на Wi-fi точке (IP адрес точки в той подсети, где она находится).
Переходим к политике запросов на подключение


Вот тут, если нажать на:защищенные EAP(PEAP)-Изменить, мы должны видеть свой сертификат, если он был правильно запрошен и установлен.

Далее настраиваем Сетевые политики


На первый взгляд настройка RADIUS сервера на этом закончена, но это еще не все.
На эту тему есть четкие рекомендации, про которые я совсем забыл (спасибо Александру, что он напомнил):
https://technet.microsoft.com/en-us/library/cc754198.aspx?f=255&MSPPError=-2147217396
если сервер не включен в группу RAS and IAS, то его надо туда добавить:
https://msdn.microsoft.com/en-us/library/cc754878(v=ws.11).aspx
На всякий случай проверяем, что все так, как должно быть, открываем на сервере локальную политику (gpedit.msc)
И проверяем следующий пункт

Далее на точке или точках Wi-fi указываем авторизацию WPA Enterprise.

Здесь же хотел поблагодарить Романа, за подробные разъяснения по неясным моментам по серверу управлению Wi-fi и настройкам непосредственно Wi-fi.
И получаем далее авторизуем с доменными учетными данными, пользователей подключаемых к корпоративному Wi-fi.
Почитать по теме можно здесь:
How to Configure Windows 2012 NPS for Radius Authentication with Ubiquiti Unifi
или здесь:
https://habrahabr.ru/post/142070/
Всем хорошей работы!!!
06.12.2016 —
Posted by |
ms windows server 2016
Sorry, the comment form is closed at this time.
RADIUS (Remote Authentication in Dial-In User Service) is a network protocol for the implementation of authentication, authorization, and collecting information about the resources used. It is designed to transfer information between the central platform and network clients/devices. Your remote access (RADIUS) server can communicate with a central server/service (for example, Active Directory domain controller) to authenticate remote dial-in clients and authorize them to access some network services or resources. Thanks to this, you can use a single centralized authentication system in your domain.
In this article, we’ll show how to configure the centralized RADIUS server based on Windows Server 2022, 2019, or 2016 OSs, and how to configure RADIUS authentication on Cisco devices using the Network Policy Server (NPS) service. In this example, the RADIUS will use the AD to authenticate remote users and authorize them to access Cisco and Mikrotik switches/routers (act as RADIUS clients) command-line interface.
Installing Radius Server (NPS) Role on Windows Server 2022/2019/2016
At first, create a new security group in the Active Directory domain (for example, RemoteCiscoUsers) in which you will need to add all users that will be allowed to authenticate on Cisco routers and switches (How to add AD user to group with PowerShell?).

Starting with Windows Server 2008 R2, the RADIUS server functionality was implemented with the Network Policy Services (NPS) role. With the NPS role, you can authenticate remote clients against Active Directory using the Radius protocol.
So, you need to install the RADIUS server role on your Windows Server 2022/2019/2016. Open the Server Manager console and run the Add Roles and Features wizard. The Remote Authentication Dial-In User Service (RADIUS) protocol in Windows Server is a part of the Network Policy Server role. In the wizard that appears, select the Network Policy and Access Services role in the role selection step.
Note. Also, you can install NPS role and management tools from an elevated PowerShell console:
Install-WindowsFeature NPAS –IncludeManagementTools
Check if the NPAS role is installed on your Windows Server host:
Get-WindowsFeature -Name NPAS

After the role installation is completed, open the Network Policy Server (nps.msc) in the Tools menu.

To use the NPS server in the domain, you must register it in the Active Directory. In the NPS snap-in, right-click on a root and select Register server in Active Directory.

Confirm the registration of the server in Active Directory.

Also, you can register your NPS server in Active Directory with a command:
netsh ras add registeredserver
In this case, the server will be given the authority to read the properties of Active Directory user accounts to authenticate users. The server will be added to the built-in domain group RAS and IAS Servers.
![]()
Now you can add the Radius client. Radius client is the device from which your server will receive authentication requests. In this example, it could be a Cisco router, switch, Wi-Fi access point, etc.
To add the new Radius client, expand the RADIUS Clients and Servers section in the NPS console tree and select New on the RADIUS Clients item.

On the Settings tab, fill the fields Friendly name, client Address (you can specify IP address or DNS name), and Shared Secret + Confirm shared password (you will use this password in the configuration of the Cisco switch/router).
Note. The shared secret password is rarely used in huge corporate networks due to the problems with the distribution of shared keys. Instead of shared passwords, it is recommended to use certificates. If you have a corporate Certification Authority deployed to implement PKI infrastructure, you can request and import a *.p12 certificate for the Radius/NPS server. Just add the certificate to the personal certification store of the Local Machine.

In the Advanced tab, select Vendor name – Cisco.

You can use the PowerShell command instead of the NPS GUI to add a new RADIUS client. In this case, you can use the New-NpsRadiusClient PowerShell cmdlet:
New-NpsRadiusClient –Address "192.168.31.1" –Name "cisco2960" –SharedSecret "Zb+kp^JUy]vePb-h.Q*d=weya2AY?hn+npRRp[/J7d"
Configuring NPS Policies on the RADIUS Server
NPS policies allow you to authenticate remote users and grant them access permissions configured in the NPS role. Using NPS access policies, you can make a link to the RADIUS client records and the domain security group that determines the level of access to CISCO devices.
There are two types of policies on a RADIUS server:
- Connection request policies — these policies define a set of conditions that determines which RADIUS servers should authenticate and authorize connection requests received from RADIUS clients;
- Network policies — a set of conditions and settings that allow you to specify who is authorized to connect to your network and a list of assigned access permissions. These policies are processed sequentially from the top to down;
In our case, we will use only the NPS Network policies. Expand the Policies > Network Policies branch and select New:

Specify the Policy name, the type of network access server should remain unchanged (Unspecified).

In the next step Specify conditions, you need to add the conditions under which this RADIUS policy will be applied. Let’s add two conditions — the authorized user must be a member of a specific domain security group, and the device you want to access has a certain name. Use the Add option to create a new condition by selecting the Windows Group type (add the RemoteCiscoUsers group) and specifying the Client Friendly Name (Cisco_*).
Note. The Client Friendly Name field may differ from the DNS name of your device. We will need it in the further steps to identify a specific network device when creating a Remote Access Policy. Using this name, you can specify, for example, a mask by which several different RADIUS clients will be processed by a single access policy.

On the next screen, select Access Granted.

Our Cisco switch supports only the Unencrypted authentication method (PAP, SPAP), so that’s why we’ll uncheck all other options.

Skip the next configuration Constraints step.
In the Configure Settings section, go to the RADIUS Attributes > Standard section. Delete the existing attributes there and click the Add button.
Select Access type > All, then Service-Type > Add. Specify Others = Login.

Now add a new attribute in the RADIUS Attributes > Vendor Specific section. Under Vendor, select Cisco, and click Add. Here you need to add information about the attribute. Click Add and specify the following value:
shell: priv-lvl = 15
This value means that the user authorized by this policy will be granted a maximum (15) administrative access permission on the Cisco device.

The last screen displays all selected NPS policy settings. Click Finish.

Hint. You can back up the current NPS server configuration to the XML file using the command:
Export-NpsConfiguration -Path c:psbackup_nps.xml
If you need to restore the NPS configuration from a previously created backup file, run:
Import-NpsConfiguration -Path c:psbackup_nps.xml
When creating and planning RADIUS policies, pay attention to what matters in their order. Policies are processed from the top to down, and when it turns out that all the conditions in the next policy are met, their further processing is terminated. You can change the priorities of policies in the NPS console using the Processing Order value.

To enable the user account to be used for Radius authentication, open the Active Directory Users and Computers snap-in (dsa.msc), find the user, open its properties, go to the Dial-In tab and select the Control access through NPS Network Policy option in the Network Access Permission section.

Also, you can check the current option value using PowerShell:
Get-ADUser richard.doe -Properties msNPAllowDialin -Server dc1.theitbros.com
If the above command did not return any result (empty), this means that the default value “Control access through NPS Network Policy” is used.
If you want to reset this user attribute to the default state, use the command:
Set-ADUser richard.doe -Clear msNPAllowDialin -Server dc1.theitbros.com
Or you can reset this attribute for all users in the specific Active Directory OU using the LDAP filter:
Get-ADUser -SearchBase "ou=Users,ou=Paris,dc=theitbros,dc=com" -LDAPFilter "(msNPAllowDialin=*)" | % {Set-ADUser $_ -Clear msNPAllowDialin}
Configuring RADIUS Setting on Cisco Devices
After creating the policy, you can proceed to configure your Cisco routers or switches for authentication on the newly installed Radius NPS server.
Because we use domain accounts for authorization, the user credentials must be transmitted over the network in an encrypted form. To do this, disable the telnet protocol on the switch and enable SSHv2 on Cisco using the following commands in configuration mode:
configure terminal
crypto key generate rsa modulus 1024
ip ssh version 2
AAA works in such a way: if the response from the server is not received, the client assumes unsuccessful authentication. Be sure to create a local user in case the RADIUS server is unavailable for some reason.
You can create a local user with the following command:
username cisco_local password $UPerrP@ssw0rd
To make the use of SSH mandatory and disable remote access using Telnet, execute the following commands:
line vty 5 15
transport input ssh
Below is an example of the configuration for authorizing a Radius server for the Cisco Catalyst Switch:
aaa new-model

aaa authentication login default group radius local

aaa authorization exec default group radius if-authenticated

radius-server host 192.168.1.16 key Sfs34e#sf

#Specify your RADIUS server IP address and key for encryption (the shared secret that we specified on the RADIUS server)

service password-encryption

# Enable password encryption
If you have several Radius servers, add them to the group:
aaa group server radius radius_srv_group

server 192.168.1.16

server 192.168.101.16
This completes the minimum switch configuration and you can try to check Radius authentication on your Cisco device.
How to Configure RADIUS Authentication on Microtik (RouterOS) Devices?
In this part, we will show you how to configure RADIUS authentication for VPN user connections via a Mikrotik router (RouterOS based).
Open the Network Policy Server console (nps.msc) and create a new Radius client.
Select New RADIUS Client and configure the following settings:
- Enable this RADIUS Client;
- Friendly Name — enter the name of your Mikrotik router here;
- Address — specific the IP address of the Mikrotik router;
- Specify your Preshared secret key.

Create a new Network Policy with the following settings:
- User Groups — specify the name of the domain user group that is allowed to authenticate on your Mikrotik router;
- Authentication Type — MS-CHAPv2;
- Tunnel Type — Point-to-Point Tunneling Protocol (PPTP);
- Access Permissions — Access granted;
- In the Configure Authentication Methods window, leave only MS-CHAPv2 and allow users to change expired passwords (User can change password after it has expired option);
- Multilink and Bandwidth Allocation Protocol (BAP) – Do not allow Multilink connections;
- In the Standard section, remove Service-Type – Framed and leave only Framed-Protocol PPP;
- Encryptions — leave only the Strongest encryption (MPP 128-bit) method.

Once you have created a new policy, open the Network Policy Server settings.
Leave only the following UDP ports for the RADIUS server communications:
- Authentication — 1812;
- Accounting — 1813.

Check if these UDP ports are open in Microsoft Defender Firewall Rules. If not, open them manually.
Now you need to configure the connection settings for Windows Server RADIUS in the Mikrotik configuration (we assume that PPP VPN Server is already configured on RouterOS to connect users).
Check in the PPTP server settings that only mschap2 is allowed to use for authentication.

Now we need to configure the connection to Radius NPS server. Select New Radius Server and specify the following options:
- Service: ppp;
- Address: IP address of the RADIUS server;
- Secret: preshared key that you specified in the network policy settings;
- Src/ Address: Mikrotik IP address from which traffic will be sent to NPS;
- Authentication Port: 1812;
- Accounting Port: 1813.

Add appropriate access rules to Mikrotik Firewall.
Then go to Secrets > PPP Authentication and Accounting and enable the Use Radius option.

It remains to configure a PPTP VPN connection to your Mikrotik VPN on users’ computers. To authenticate to Mikrotik, users can use their Active Directory accounts (accounts must be added to the AD group that you have specified when creating the Miktotik Network Policy on NPS).
How to Check the NPS/RADIUS Logs on Windows?
To enable NPS Server Radius Authentication logging, you need to enable the Network Policy Server audit policy. You can enable this policy via the local Group Policy Editor or with the following commands:
auditpol /get /subcategory:"Network Policy Server"

auditpol /set /subcategory:"Network Policy Server" /success:enable /failure:enable

Now you can open the Event Viewer console (eventvwr.msc), go to the Windows Logs > Security, and filter the event by the Event ID 6272.
Network Policy Server granted access to a user.

If you need to find all NPS authorizations events for the specific user (Richard.Doe in this example), use the next PowerShell script:
$Query = @"
<QueryList>
<Query Id="0" Path="Security">
<Select Path="Security">
*[EventData[Data[@Name='SubjectUserName'] and (Data=theitbrosrichard.doe')]] and
*[System[(EventID='6272')]]
</Select>
</Query>
</QueryList>
"@
$events = Get-WinEvent -FilterXML $Query
$ipaddr = @{ label="IP"; Expression={$_.properties[9].value} }
$events | select $ipaddr | group "IP" | format-table Count, Name -autosize
- About
- Latest Posts

I enjoy technology and developing websites. Since 2012 I’m running a few of my own websites, and share useful content on gadgets, PC administration and website promotion.
Looking for instructions to configure Radius server on Windows server 2016? This article will guide you in detail on how to do that. Scroll down to read!
Since Radius Server was born, it has brought much more convenience to Windows users. Most of us don’t see what this tool looks like, but we use its applications almost every day.
In today’s article, we will tell you more about this tool, then walk you through the instructions on how to configure Radius server on Windows Server 2016 in detail. Let’s kick right in!
Radius Server And Its Features
In the first part, let’s get to know what this tool is and its main features!
Radius Server Windows
RADIUS is an abbreviation for Remote Authentication in Dial-In User Service. It is known as a protocol used for authenticating and collecting data from the connected resources. RADIUS works by sending information from the headquarters to network devices and vice versa. Users can therefore access the central service to authorize the dial-in devices or services remotely.
Main Features Of Radius Server
There are many positive features about the Radius server. Let’s check one by one:
- Wireless Authentication: The version IEEE 802.11 authentication offers access control to wireless routers, access points, hotspots in EAP/WPA-Enterprise/WPA2-Enterprise modes.
- Multiple authentication backends: The Radius server also supports multiple authentications. It may authenticate against local windows groups, Windows domains, LDAP directories.
- Advanced Radius proxy: The incoming and outgoing forwarded packets are applied for Radius requests.
- Built-in account management: This means using the Radius server, you can modify, add, delete users’ accounts within the database.
- Radius server provides dynamic authorization extensions
- It offers third-party billing system integration as the ClearBox Server may be integrated with SQL-based systems of billing to support the RADIUS server authentication process.
- The protocol offers multiple accounting consumer
- Users can enjoy the cloud integration service by using this protocol
In this part, we are going to focus on how to set up a RAdius server on the Windows Servers 2016 operating system. In addition, users can find here instructions for verification of this program on Cisco devices. Let’s take a closer look!
Setting Up The Radius Server (NPS) Role
To prepare for installing Radius server roles, users are suggested to make a new group of security in the AD domain named RemoteSiscoUsers. After that, add all the users who are going to be involved in Cisco router authentication.
Creating a security group
The point is that from Windows version 2008 R2, the Radius server sets up with the Network Policy Services (NPS) function. This feature helps users authorize faraway clients against AD with the help of the Radius component.
Now, we will guide you on how to setup the radius server function on the Windows Server 2016 operating system. First, open the Service Manager function before launching the Add Roles and Features wizard. You will see a screen open on your desktop; choose the Network Policy and Access Services option.
The thing is you also can use the order statement to install the NPS role by using PowerShell: Install-WindowsFeature NPAS -IncludeManagementTools
After the installation process is accomplished, log in to the Network Policy Server (nps.msc) located in the bar “Tools”.
Choosing Network Policy Server option
The next step is registering your server within the Active Directory. Under the NPS option, click on the right mouse of the root before selecting the Register server within the Active Directory option.
Selecting the Register server in the Active Directory option
Then, users should confirm this process of registration
Confirmation process
Another way of registering the NPS server inside the Active directory is using the order statement: netsh ras add registered server. Hence, the server will join in the built-in group of domains. And it will be given the authority to read the features of Active Directory user accounts.
The server is added in the domain group IAS and RAS Servers
Next, you can put in the Radius client. In this case, your client can be an address for wi-fi accessing, a router, or a switch.
Adding a new Radius client
A setting screen will appear, and it requires users to fill in the necessary information. Users should pay attention to the passwords that were applied in the configuration in the previous stage for the Cisco router.
Filling in the necessary information
Head to the Advanced menu on the right of setting one, choose the Vendor name as Cisco.
Choosing the name of the vendor
You can apply the PowerShell instead of using NPS GUI for the adding function, apply the New-NpsRadiusClient PowerShell cmdlet. New-NpsRadiusClient –Address “192.168.31.1” –Name “cisco2960” –SharedSecret “Zb+kp^JUy]vePb-h.Q*d=weya2AY?hn+npRRp[/J7d”.
Setting Up NPS Policies On The Radius Server
Using NPS policies will help users verify their faraway guests and give permission to access to utilize the NPS role. Also, by applying these policies, users can have a connection to Radius clients’ records, as well as a group of domain security. Policies on the Radius server is grouped into two categories:
- Connection request policies: These include the conditions that allow Radius servers to verify connection requests from its clients.
- Network policies: These policies include settings and conditions that accept you to authorize the network that can link to your server. These are implemented from the beginning to the bottom one by one.
In our situation, we will apply the policies of NPS Network. Here are the details on how to do it. Follow the route Policies > Network Policies option and choose New:
Choosing the new option
Next, select the name of the Policy, and make sure the sort of network server remains unchanged.
Verifying the Policy name
After that, put in the conditions of Radius that you want to apply. Here you have two conditions:
- Authorized user ought to be a part of a group of a domain security
- The wanted access device must have a name.
Here, you can use adding functions to make new conditions by choosing the type of Windows Group and authorizing the Client Friendly Name. Pay attention to the fact that this name is different from the name of the DNS of your device, as it will be used in the upcoming time to identify specific network equipment.
Specifying conditions
Another screen will pop up on your desktop; choose the option Access Granted!
Choosing the access granted option
Then, select the fourth option, let other options be not chosen.
Selecting the fourth option
Now, leave the next step and head into the configure setting board. Follow the route RADIUS Attributes > Standard section. Remove the existing attributes before choosing the adding button. Then, selecting Access type > All, then Service-Type > Add. Specify Others = Login.
Setting up the attributes information
To put in a new attribute to the Radius Attributes, users have to choose the Vendor-Specific section. Add Cisco below the Vendor. And the value, choose the following: shell: priv-lvl = 15. This value stands for your Cisco device will allow a maximum of 15 administrative accesses from authorized users.
Adding the value of attributes
A screening board will appear with all the chosen NPS policy settings.
The accomplished setting
In case users want to back up the current configuration of the NPS server to the XML file, follow the order statement: Export-NpsConfiguration -Path c:psbackup_nps.xml. If they want to restore NPS configuration from a previous backup, they can use the coding line: Import-NpsConfiguration -Path c:psbackup_nps.xml
The factors that impact the order of Radius policies are quite important.
The policies will be implemented from the beginning to the bottom. If all the conditions in the following policy are met, it will lead to the termination of the upcoming processes. To avoid this scenario, users can use the Processing Order value to make the priorities of policy changed.
The list of policy
To activate the account, you will have to open the Active Directory Users and Computers console (dsa.msc). Next, find the users before heading to its properties and choose functions like in the below photo:
Verifying Radius Setting On Cisco Devices
Following the setup Radius server, verifying the Radius setting on Cisco devices is the next step. Because the domain accounts are applied for the process of authorization, the credentials must be changed into encrypted forms. All you have to do here is disabling the telnet component on the switch before activating SSHv2 on Cisco applying the order statement:
- configure terminal
- crypto key generate rsa modulus 1024
- ip ssh version 2
– So the process will work in the way that in case the response of the server might not be received, the client device will summarize the authentication was unsuccessful. Therefore, you should make a local user: username cisco_local password [email protected]
– Next, to make SSH mandatory to use as well as disable faraway access, you should use Telnet and implement the following code lines:
line vty 5 15
transport input ssh
– You can have a look at a configuration process example of a Radius server utilized for Cisco Catalyst Switch:
aaa new-model
aaa authentication login default group radius local
aaa authorization exec default group radius if-authenticated
radius-server host 192.168.1.16 key Sfs34e#sf
#Specify your RADIUS server IP address and key for encryption (the shared secret that we specified on the RADIUS server)
service password-encryption
# Enable password encryption
If you have several Radius servers, add them to the group:
aaa group server radius radius_srv_group
server 192.168.1.16
server 192.168.101.16
The Bottom Line!
After a long time using, we prefer the Radius server because users can use a single centralized authentication system in their domain. Besides, there are many benefits that users can get.
Via this article, we hope you have known how to configure Radius server on Windows Server 2016 operating system. Although the process looks a bit complicated, it is possible to implement. If there are any related questions, don’t hesitate to send us a message. Good luck!
Post Views:
4,487
Window Server 2016 — Configuring Radius Server
Add Roles and Features Wizard, Network Policy and Access Services

Start Installation

Manage > Network Policy Server

Create New Radius Client

Configuring Radius Server for 802.1X Wireless or Wired Connections
Configuring profile name,

Configure an Authentication Method, choose Microsoft: Protected EAP (PEAP)

Leave the Groups column empty and click next until finish.

Remember to Register server in Active Directory

Click on OK
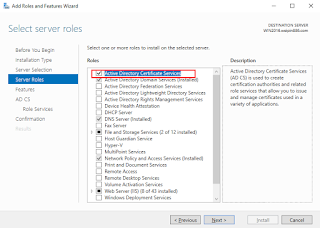
Before proceed to authenticate Wireless Clients using 802.1X, we need to configure Active Directory Certificate Services
Popular posts from this blog
Window Server 2012 Hardening Checklist
FILE SYSTEM Use of secure File System NTFS COMPUTER CONFIGURATION/WINDOWS SETTINGS/SECURITY SETTINGS /ACCOUNT POLICIES ACCOUNT LOCKOUT POLICY:Account lockout threshold 3 invalid logon attempts ACCOUNT LOCKOUT POLICY:Account lockout duration 30 minutes ACCOUNT LOCKOUT POLICY:Reset account lockout counter after 30 minutes PASSWORD POLICY: Enforce password history 6 passwords remembered PASSWORD POLICY: Maximum password age 90 days PASSWORD POLICY: Minimum password age 0 day PASSWORD POLICY: Minimum password length 8 characters PASSWORD POLICY: Password must meet complexity requirements Enabled PASSWORD POLICY: Store password using reversible encryption for all users in the domain Disabled Start > Run > gpmc.msc Default Domain Policy > Edit COMPUTER CONFIGURATION/WINDOWS SETTINGS/SECURITY SETTINGS /LOCAL POLICIES/USER RIGHTS ASSIGNMENT Force shutdown from a remote system Administrators
Window Server 2016 — Configuring ADCA
Add Active Directory Certificate Services Add 4 Services, for EAP-TLS deployment that I will be using later. After installing completed, configure certificate services Configure certification Authority & Web Enrollment Enterprise CA Root CA Create new private key Specify the Cryptographic options Summary Once configured the certificate will be ready Connected and successfully authenticated.
We had to configure RADIUS authentication on multiple servers 2008r2 / 2012 and 2016
On some of the servers we had already Routing and Remote access service running.
When we opened the console it already showed RADIUS ..?

So we where under the impression that this was already installed as part of the Routing and Remote Access Service
But when trying to authenticate nothing was happening … 
After al long time trying to figure out what was wrong, we noticed this …. ?

Even if we could open and configure the RADIUS Client config, it was not installed or running …

SOLUTION :
Make sure the Network Policy Server is installed and running

You need to see the Service Running
![clip_image002[5]](https://audministrator.files.wordpress.com/2018/06/clip_image0025_thumb.jpg?w=644&h=129 "clip_image002[5]")
You will see NPS appearing in the Server Manager too afterwards

Windows 2012 / 2016 see here :

Check the NPS service is running :

No you are ready to configure the RADIUS client policy setup.
And test the the VPN access …
TIP : Don’t forget to give the AD user Access Permissions

Enjoy !
This entry was posted on Monday, June 11th, 2018 at 1:14 pm and is filed under Server, Windows. You can follow any responses to this entry through the RSS 2.0 feed.
You can leave a response, or trackback from your own site.
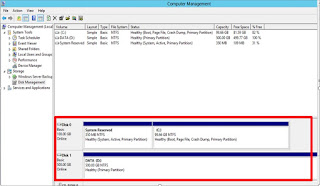
При обслуживании больших сетей системные администраторы часто сталкиваются с проблемами аутентификации на сетевом оборудовании. В частности, довольно сложно организовать нормальную работу нескольких сетевых администраторов под индивидуальными учетными записями на большом количестве оборудования (приходится вести и поддерживать в актуальном состоянии базу локальных учетных записей на каждом устройстве). Логичным решение было бы использовать для авторизации уже существующей базы учетных записей — Active Directory. В этой статье мы разберемся, как настроить доменную (Active Directory) аутентификацию на активном сетевом оборудовании (коммутаторы, маршрутизаторы).
Не все сетевое оборудование популярных вендоров (CISCO, HP, Huawei) поддерживает функционал для непосредственного обращения к каталогу LDAP, и такое решение не будет универсальным. Для решения нашей задачи подойдет протокол AAA (Authentication Authorization and Accounting), фактически ставший стандартом де-факто для сетевого оборудования. Клиент AAA (сетевое устройство) отправляет данные авторизующегося пользователя на сервер RADIUS и на основе его ответа принимает решение о предоставлении / отказе доступа.
Протокол Remote Authentication Dial In User Service (RADIUS) в Windows Server 2012 R2 включен в роль NPS (Network Policy Server). В первой части статьи мы установим и настроим роль Network Policy Server, а во второй покажем типовые конфигурации сетевого устройств с поддержкой RADUIS на примере коммутаторов HP Procurve и оборудования Cisco.
Содержание:
- Установка и настройка сервера с ролью Network Policy Server
- Настройка сетевого оборудования для работы с сервером RADUIS
Установка и настройка сервера с ролью Network Policy Server
Как правило, сервер с ролью NPS рекомендуется устанавливать на выделенном сервере (не рекомендуется размещать эту роль на контроллере домена). В данном примере роль NPS мы будем устанавливать на сервере с Windows Server 2012 R2.
Откройте консоль Server Manager и установите роль Network Policy Server (находится в разделе Network Policy and Access Services).
 После окончания установки запустите mmc-консоль управления Network Policy Server. Нас интересуют три следующих раздела консоли:
- RADIUS Clients — содержит список устройств, которые могут аутентифицироваться на сервере
- Connection Request Policies – определяет типы устройств, которые могут аутентифицироваться
- Network Polices – правила аутентификации
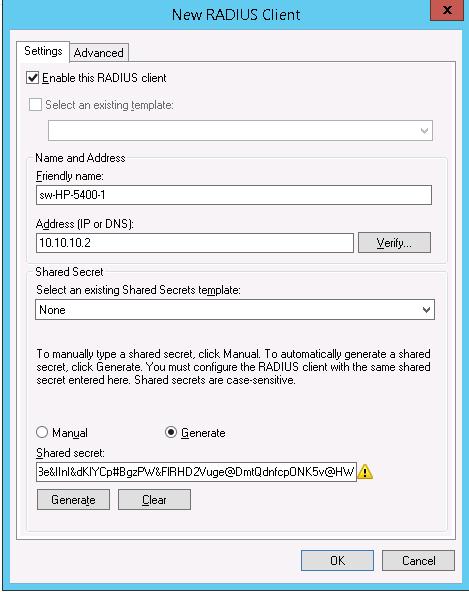
 Добавим нового клиента RADIUS (это будет коммутатор HP ProCurve Switch 5400zl), щелкнув ПКМ по разделу RADIUS Clients и выбрав New. Укажем:
- Friendly Name:sw-HP-5400-1
- Address (IP or DNS): 10.10.10.2
- Shared secret (пароль/секретный ключ): пароль можно указать вручную (он должен быть достаточно сложным), либо сгенерировать с помощью специальной кнопки (сгенерированный пароль необходимо скопировать, т.к. в дальнейшем его придется указать на сетевом устройстве).
 Отключим стандартную политику (Use Windows authentication for all users) в разделе Connection Request Policies, щелкнув по ней ПКМ и выбрав Disable.
Создадим новую политику с именем Network-Switches-AAA и нажимаем далее. В разделе Сondition создадим новое условие. Ищем раздел RADIUS Client Properites и выбираем Client Friendly Name.
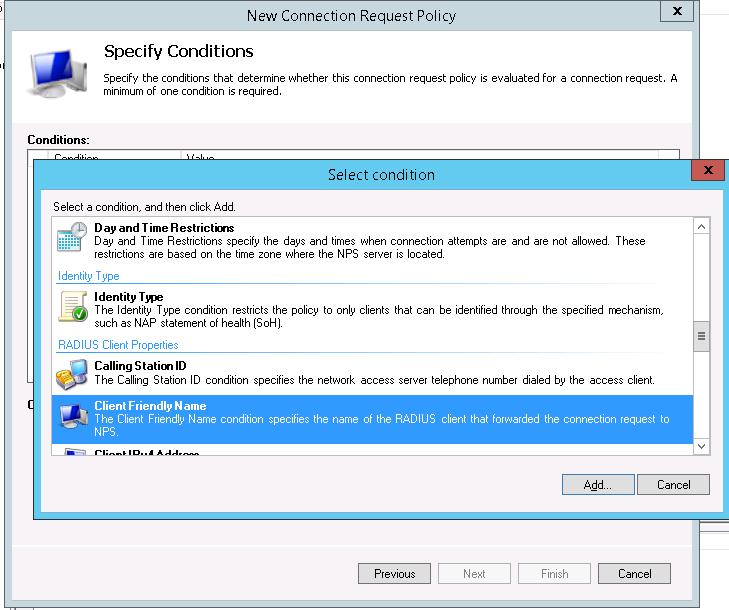 В качестве значения укажем sw-?. Т.е. условие будет применяться для всех клиентов RADIUS, начинающийся с символов :”sw-“. Жмем Next->Next-> Next, соглашаясь со всеми стандартными настройками.
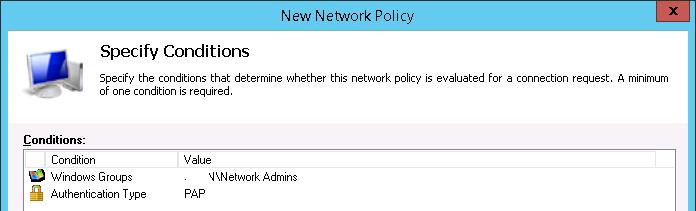
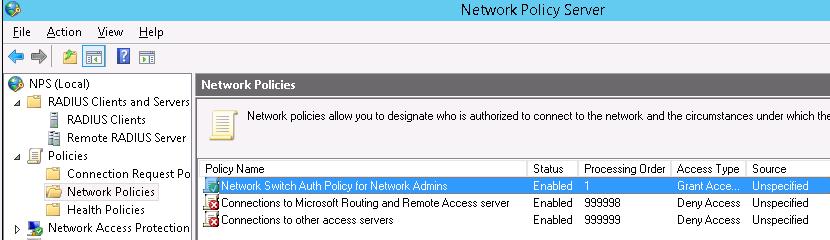
Далее в разделе Network Policies создадим новую политику аутентификации. Укажите ее имя, например Network Switch Auth Policy for Network Admins. Создадим два условия: в первом условии Windows Groups, укажем доменную группу, члены которой могут аутентифицироваться (учетные записи сетевых администраторов в нашем примере включены в группу AD Network Admins) Второе условие Authentication Type, выбрав в качестве протокола аутентификации PAP.
 Далее в окне Configure Authentication Methods снимаем галки со всех типов аутентификации, кроме Unencrypted authentication (PAP. SPAP).
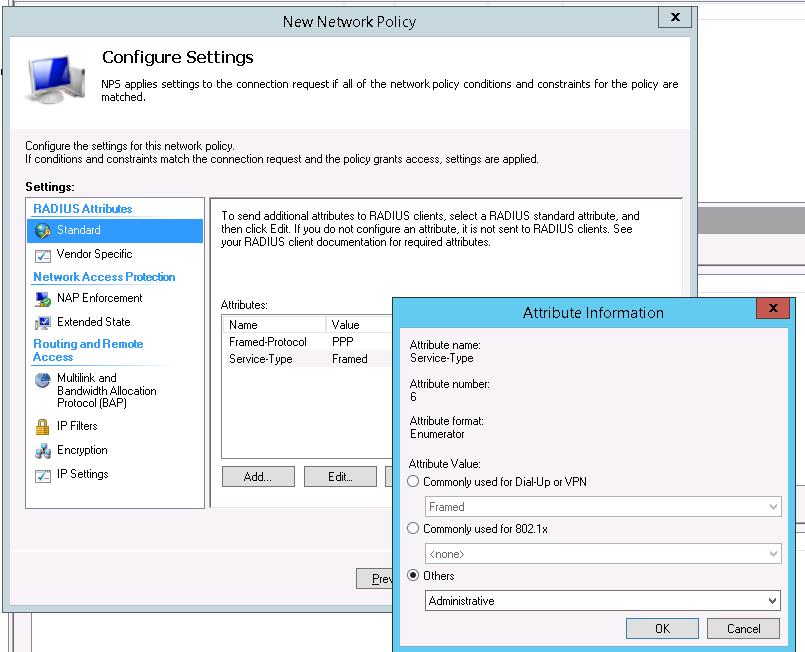
В окне Configure Settings изменим значение атрибута Service-Type на Administrative.
 В остальных случаях соглашаемся со стандартными настройками и завершаем работу с мастером.
И, напоследок, переместим новую политику на первое место в списке политик.
Настройка сетевого оборудования для работы с сервером RADUIS
Осталось настроить наше сетевое оборудование для работы с сервером Radius. Подключимся к нашему коммутатору HP ProCurve Switch 5400 и внесем следующе изменение в его конфигурацию (измените ip адрес сервера Raduis и пароль на свои).
aaa authentication console enable radius local

aaa authentication telnet login radius local

aaa authentication telnet enable radius local

aaa authentication ssh login radius local

aaa authentication ssh enable radius local

aaa authentication login privilege-mode

radius-server key YOUR-SECRET-KEY

radius-server host 10.10.10.44 YOUR-SECRET-KEY auth-port 1645 acct-port 1646

radius-server host 10.10.10.44 auth-port 1645

radius-server host 10.10.10.44 acct-port 1646
Совет. Если в целях безопасности вы запретили подключаться к сетевому оборудованию через telnet, эти строки нужно удалить из конфига:
aaa authentication telnet login radius local

aaa authentication telnet enable radius local
Не закрывая консольное окно коммутатора (это важно!, иначе, если что-то пойдет не так, вы более не сможете подключиться к своему коммутатору), откройте вторую telnet-сессию. Должно появиться новое окно авторизации, в котором будет предложено указать имя и пароль учетной записи. Попробуйте указать данные своей учетной записи в AD (она должна входить в группу Network Admins ). Если подключение установлено – вы все сделали правильно!
 Для коммутатора Cisco конфигурация, предполагающая использование доменных учетных записей для аутентификации и авторизации, может выглядеть так:
Примечание. В зависимости от модели сетевого оборудования Cisco и версии IOS конфигурация может несколько отличаться.
aaa new-model
radius-server host 10.10.10.44 auth-port 1645 acct-port 1646 key YOUR-SECRET-KEY
aaa authentication login default group radius local
aaa authorization exec default group radius local
ip radius source-interface Vlan421
line con 0
line vty 0 4
line vty 5 15
Примечание. В такой конфигурации для аутентификации сначала используется сервер RADIUS, а если он не доступен – локальная учетная запись.
Для Cisco ASA конфигурация будет выглядеть так:
aaa-server RADIUS protocol radius
aaa-server RADIUS host 10.10.10.44 key YOUR-SECRET-KEY
radius-common-pw YOUR-SECRET-KEY
aaa authentication telnet console RADIUS LOCAL
aaa authentication ssh console RADIUS LOCAL
aaa authentication http console RADIUS LOCAL
aaa authentication http console RADIUS LOCAL
Совет. Если что то-не работает, проверьте:
- Совпадают ли секретные ключи на сервере NPS и коммутаторе (для теста можно использоваться простой пароль).
- Указан ли правильный адрес NPS сервера в конфигурации. Пингуется ли он?
- Не блокируют ли межсетевые экраны порты 1645 и 1646 между коммутатором и сервером?
- Внимательно изучите логи NPS сервера