Установка и настройка SMTP сервера на Windows Server 2008 является простым процессом, требующим лишь несколько шагов. В этой статье мы опишем шаг за шаг настройки и установки функции SMTP-сервер и как включить SMTP для передачи сообщений от локального сервера.
Шаг 1:
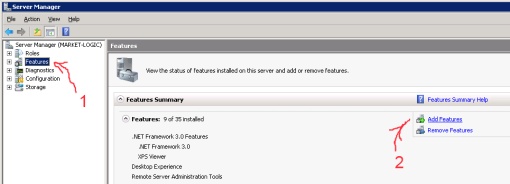
Откройте Server Manager (Правой клавишой на «Мой компьютер» -> «Управление») и выберите Add Features
Шаг 2:
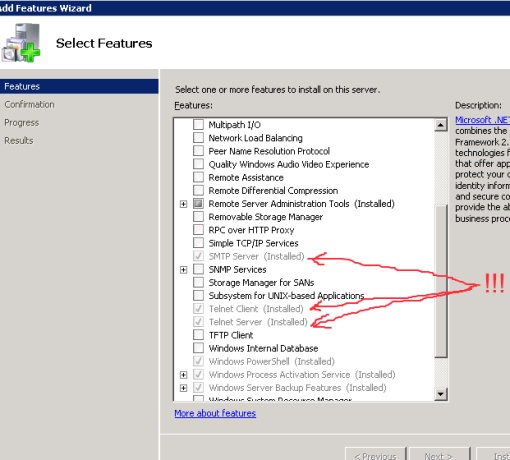
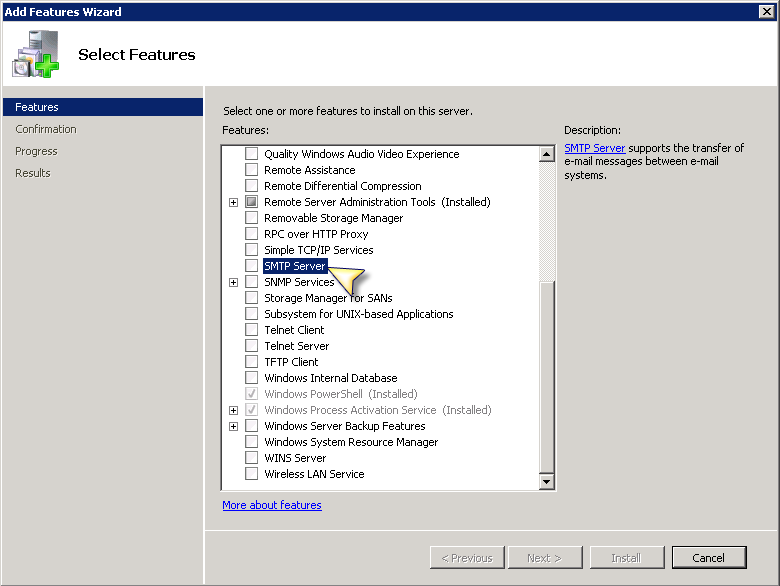
Выбираем SMTP Server (для проверки работы так же можете установить telnet) и устанавливаем необходимые компоненты
Шаг 3:
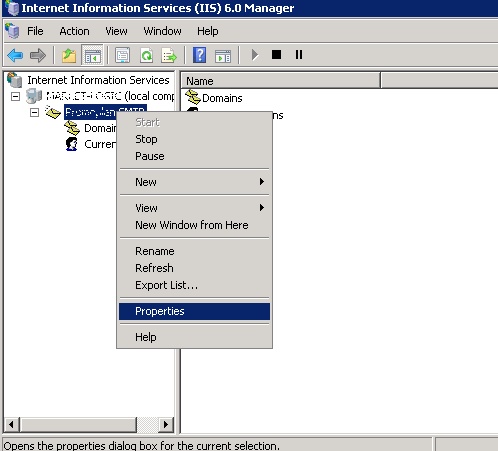
Открываем «IIS 6.0 Manager» он находится в «Control Panel» -> «Administrative Tools» -> «Internet Information Services 6.0»
Шаг 4:
Выбираем меню «Свойства» на SMTP Server
Шаг 5:
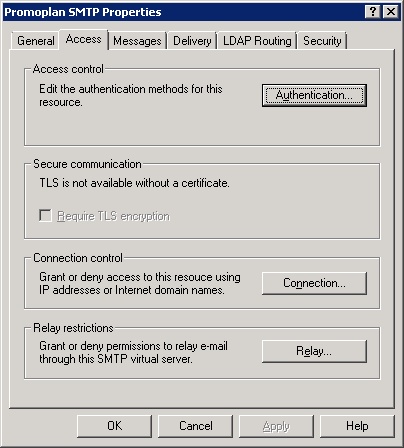
Переходим на закладку «Access» нажимаем на «Relay…»
Шаг 6:
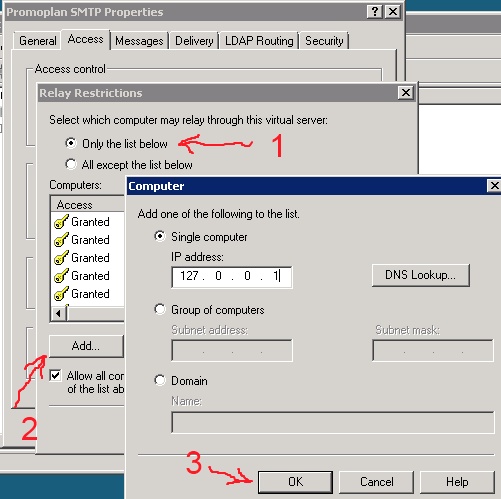
Выбираем пункт «Only the list below» и добавляем в список IP адрес 127.0.0.1
На этом настройка smtp server закончена.
Шаг 7:
Что бы проверить, что все работает можете в командной строку вызвать команду
telnet localhost 25
Если подключились, значит все правильно сделали. (для выхода напишите Quit)
Шаг 8:
Письма могут не приходить:
1) Если в брандмауэре закрыт 25 порт
2) Сам хостинг закрыл 25 порт (у хостинга 1gb он закрыт)
3) IP адрес находиться в спам-списке
3) Не правильно прописали web.config Должно быть так:
<system.net>
<mailSettings>
<smtp deliveryMethod=»SpecifiedPickupDirectory»
from=»support@site.com.ua»>
<specifiedPickupDirectory
pickupDirectoryLocation=»C:inetpubmailrootPickup» />
</smtp>
</mailSettings>
</system.net>
![]() Loading…
Loading…

Иногда требуется SMTP сервер без авторизации для настройки оповещений на эл. почту от приложений осуществляющих мониторинг оборудования сервера или сети. Можно было бы использовать почтовые сервера почтовых провайдеров, например smtp.gmail.com, smtp.mail.ru, smtp.yandex.ru или использовать почту хостинга если б не одно НО, все они требуют авторизации, а большинство программ авторизоваться не умеет. И тут нам в помощь штатные компоненты Windows Server 2008 r2.
Для того что бы установить SMTP сервер необходимо установить компонент Сервер SMTP. Для этого заходим в Диспетчер сервера -> Компоненты -> Добавить компоненты. В открывшемся мастере отмечаем Сервер SMTP, нажимаем далее, проходим все диалоги (дополнительно ничего выбирать не надо, все необходимое будет добавлено автоматически), в конце нажимаем установить и ждем окончания установки.
После того как установка завершилась заходим в Диспетчер служб IIS 6.0. Для этого идем по пути: Пуск -> Администрирование-> Диспетчер служб IIS 6.0. и запускаем.
В открывшемся окне выбираем наш сервер и раскрываем корень и видим «SMTP Virtual Server #1» это и есть наш свежесозданный сервер. Выбираем его ПКМ и нажимаем свойства. Переходим на вкладку Доступ и внизу нажимаем Ретрансляция. В открывшимся окне отмечаем «только компьютеры из списка ниже» (зачем что б кто то еще его использовал) и нажимаем добавить и в открывшейся вкладке вписываем IP 127.0.0.1 т.е. использовать наш SMTP сервер можно будет только локально. Теперь везде нажимаем OK и закрываем. Все сервер установлен и настроен.
Проверить работает ли наш SMTP сервер можно запустив PowerShell и набрав telnet 127.0.0.1 25 или telnet localhost 25 Если подключение произошло, то все сделано правильно и сервер работает.
Теперь в настройках программы которая нам будет слать оповещения указываем в качестве SMTP сервера 127.0.0.1 или localhost, порт 25 и тестируем.
Если при подключении telnet подключение не происходит, а все инструкции написанные выше выполнены точно, то основные проблемы могут быть две:
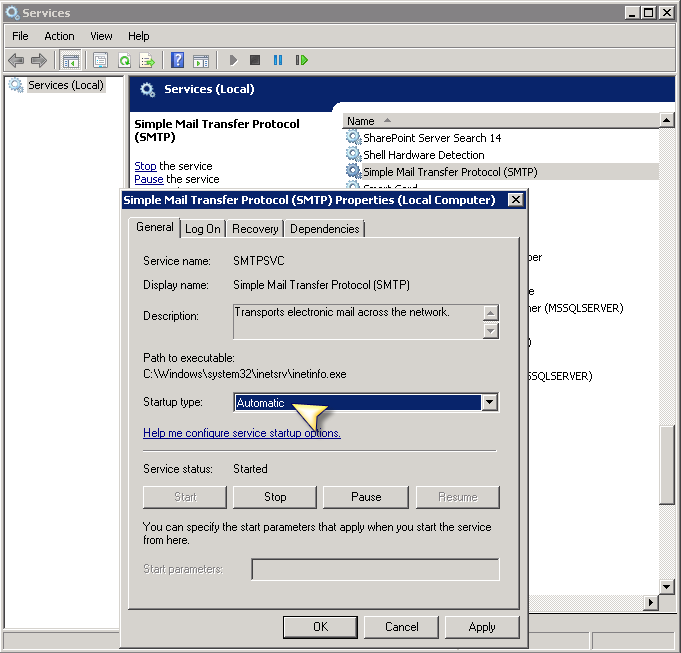
1. Не запущенна служба SMTP сервер. Заходим в службы, проверяем, запуск должен быть Автоматически Если не запущена, запускаем, если запущена идем дальше.
2. Антивирус. Точней не антивирус, а фаервол. Тут в зависимости от установленного настройки будут разные, но суть одна, открыть 25 порт.
Содержание
- Программист ASP.NET MVC C#
- Настраиваем SMTP на Windows Server 2008 R2
- Server 2008 smtp сервер настройка
- Installing the SMTP feature
- Configuring the SMTP Server
- Testing the SMTP Server
- Configuring Windows SMTP Server on Windows 2008 for Relay
- Send Email Directly on TFS
- Contents
- Install SMTP Server
- Configuring the SMTP Service to Auto-Start
- Configuring the SMTP Service for Routing to Alternate SMTP Server
- Internet Information Services (IIS) Manager (IIS 7.0)
- Internet Information Services (IIS) 6.0 Manager
- Command Line
Программист ASP.NET MVC C#

Кнопка для разрабоки, просьба не нажимать

Настраиваем SMTP на Windows Server 2008 R2
Установка и настройка SMTP сервера на Windows Server 2008 является простым процессом, требующим лишь несколько шагов. В этой статье мы опишем шаг за шаг настройки и установки функции SMTP-сервер и как включить SMTP для передачи сообщений от локального сервера.
Откройте Server Manager (Правой клавишой на «Мой компьютер» -> «Управление») и выберите Add Features
Выбираем SMTP Server (для проверки работы так же можете установить telnet) и устанавливаем необходимые компоненты
Открываем «IIS 6.0 Manager» он находится в «Control Panel» -> «Administrative Tools» -> «Internet Information Services 6.0»
Выбираем меню «Свойства» на SMTP Server
Переходим на закладку «Access» нажимаем на «Relay. «
Выбираем пункт «Only the list below» и добавляем в список IP адрес 127.0.0.1
На этом настройка smtp server закончена.
Что бы проверить, что все работает можете в командной строку вызвать команду
telnet localhost 25
Если подключились, значит все правильно сделали. (для выхода напишите Quit)
Письма могут не приходить:
1) Если в брандмауэре закрыт 25 порт
2) Сам хостинг закрыл 25 порт (у хостинга 1gb он закрыт)
Источник
Server 2008 smtp сервер настройка
Иногда требуется SMTP сервер без авторизации для настройки оповещений на эл. почту от приложений осуществляющих мониторинг оборудования сервера или сети. Можно было бы использовать почтовые сервера почтовых провайдеров, например smtp.gmail.com, smtp.mail.ru, smtp.yandex.ru или использовать почту хостинга если б не одно НО, все они требуют авторизации, а большинство программ авторизоваться не умеет. И тут нам в помощь штатные компоненты Windows Server 2008 r2.
Для того что бы установить SMTP сервер необходимо установить компонент Сервер SMTP. Для этого заходим в Диспетчер сервера -> Компоненты -> Добавить компоненты. В открывшемся мастере отмечаем Сервер SMTP, нажимаем далее, проходим все диалоги (дополнительно ничего выбирать не надо, все необходимое будет добавлено автоматически), в конце нажимаем установить и ждем окончания установки.
После того как установка завершилась заходим в Диспетчер служб IIS 6.0. Для этого идем по пути: Пуск -> Администрирование-> Диспетчер служб IIS 6.0. и запускаем.
В открывшемся окне выбираем наш сервер и раскрываем корень и видим «SMTP Virtual Server #1» это и есть наш свежесозданный сервер. Выбираем его ПКМ и нажимаем свойства. Переходим на вкладку Доступ и внизу нажимаем Ретрансляция. В открывшимся окне отмечаем «только компьютеры из списка ниже» (зачем что б кто то еще его использовал) и нажимаем добавить и в открывшейся вкладке вписываем IP 127.0.0.1 т.е. использовать наш SMTP сервер можно будет только локально. Теперь везде нажимаем OK и закрываем. Все сервер установлен и настроен.
Проверить работает ли наш SMTP сервер можно запустив PowerShell и набрав telnet 127.0.0.1 25 или telnet localhost 25 Если подключение произошло, то все сделано правильно и сервер работает.
Теперь в настройках программы которая нам будет слать оповещения указываем в качестве SMTP сервера 127.0.0.1 или localhost, порт 25 и тестируем.
Если при подключении telnet подключение не происходит, а все инструкции написанные выше выполнены точно, то основные проблемы могут быть две:
1. Не запущенна служба SMTP сервер. Заходим в службы, проверяем, запуск должен быть Автоматически Если не запущена, запускаем, если запущена идем дальше.
2. Антивирус. Точней не антивирус, а фаервол. Тут в зависимости от установленного настройки будут разные, но суть одна, открыть 25 порт.
Источник
Installing the SMTP feature
1. Click Start > Run and then enter servermanager.msc in the Open dialogue box then click OK to load Server Manager:
2. Use the Add Features Wizard to select SMTP Server on the Select Features page. To initiate this, right-click on Features and click Add Feature:

3. In the Features section check SMTP Server and click Next:

4. You may see a dialogue box like the one below stating that certain role services and features are required for SMTP:

5. Click Add Required Role Services and then you will return to the previous Features section. Ensure SMTP Server is checked then click Next.
6. In the Web Server (IIS) section, click Next to proceed to the Role Services section:

7. The Role Services should be pre-populated – IIS 6 Management Compatibility should be selected, and below it, IIS 6 Metabase Compatibility and IIS 6 Management Console should also be checked. Click Next to continue:

8. In the Confirmation section click Install:

9. In the Results section click Close to complete the installation of the SMTP Server:

Configuring the SMTP Server
The next step is to configure SMTP. To do so we will need to open Internet Information Services (IIS) Manager 6.
10. Click Start > Run and then enter inetmgr6 in the dialogue box then click OK to load IIS Manager 6.
11. In IIS 6 Manager right-click on SMTP Server and select Properties:

12. In the General tab, unless you want the SMTP Server to use a specific IP address, leave the settings as they are so that the IP address is set to (All Unassigned):

13. To proceed, click on the Access tab:

14. Click on the Authentication button and ensure Anonymous access is checked and then click OK:

15. Once back in the Access tab, click on the Connection button. Select Only the list below and then click Add. Enter 127.0.0.1 as the IP addess and then click OK:

The Connection setting controls which computers can connect to the SMTP server and send mail. By granting only localhost (127.0.0.1) access, limits only the server itself the ability to connect to the SMTP server. This is a requirement for security.
16. Click OK to return to the Access tab and then click on the Relay button. Enter 127.0.0.1 as the IP addess and then click OK:

The Relay section determines which computers can relay mail through this SMTP server. By only allowing the localhost IP address (127.0.0.1) relay permissions it means that only the server itself can relay mail. Conversely, it prevents the SMTP server from being an open relay and being used to send unsolicited spam email by other computers on the internet, which could lead to the SMTP server being blacklisted.
17. Next, go to the Messages tab. Here you can enter an email address where copies of non-delivery reports are sent to. You can also configure the location of the Badmail director, however, the default setting should suffice:

18. Next, go to the Delivery tab:

19. Click on the Outbound Security button and ensure Anonymous access is selected. As the only server that can connect and relay mail through the SMTP server is localhost this security settings is fine:

20. Click OK to return to the Delivery tab and then click on Outbound Connections. Leave the defaults as they are:

21. Click OK to return to the Delivery tab and then click on Outbound Connections, then click on the Advanced button:

Here you will need to enter the fully-qualified domain name of the SMTP server. This will be the host name or A record that has been created in your DNS zone file. This is straight-forward to do but you will have to confirm how you do this with the party that manages DNS for your domain. I have entered mail.vsysad.com as this is fully-qualified. If you click on the Check DNS button you can confirm whether your chosen name resolves successfully. In my case it does as I see the following:

22. Click OK and then OK again to exit the SMTP Virtual Server Properties.
You can also perform this test by running nslookup to confirm the existence of the host name as well as confirming the IP address it resolves to – which should the IP address of your server:

Testing the SMTP Server
The next step is to verify that the SMTP server is able to send email successfully. To do this follow the steps below:
Источник
Configuring Windows SMTP Server on Windows 2008 for Relay
Send Email Directly on TFS
Estimated reading time: 6 minutes
My SMTP mail server requires that email be sent with TLS encryption and on port 587. This makes it problematic for Team Foundation Server (TFS) to send emails directly. To work around the problem, I installed the Windows 2008 SMTP Server service and configured it for relaying to my real SMTP mail server.
Contents
Install SMTP Server
To begin, launch Server Manager and add the SMTP Server feature.
This includes a dialog to add some additional items.
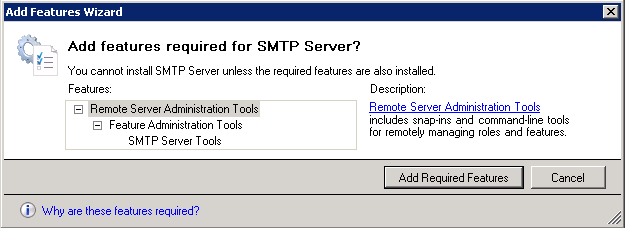
Click Add Required Features and, after the dialog closes, click Next > followed by Install.
The same can be done from the command line using:
Configuring the SMTP Service to Auto-Start
Unfortunately, the service is not configured to auto-start by default so you need to go into the services to change this:
To perform the same action from the command line use the following PowerShell commands:
From DOS you could use sc.exe.
Configuring the SMTP Service for Routing to Alternate SMTP Server
Finally, you need to configure the SMTP Server to redirect to an alternate SMTP server (assuming it is not sending email directly). This involves settings in both IIS 7.0 and IIS 6. Open Internet Information Server (IIS 7.0) and select the server node
Internet Information Services (IIS) Manager (IIS 7.0)
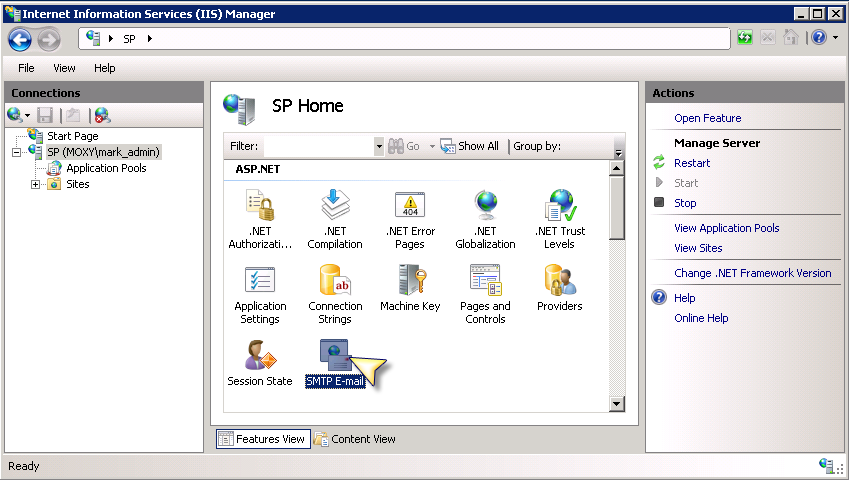
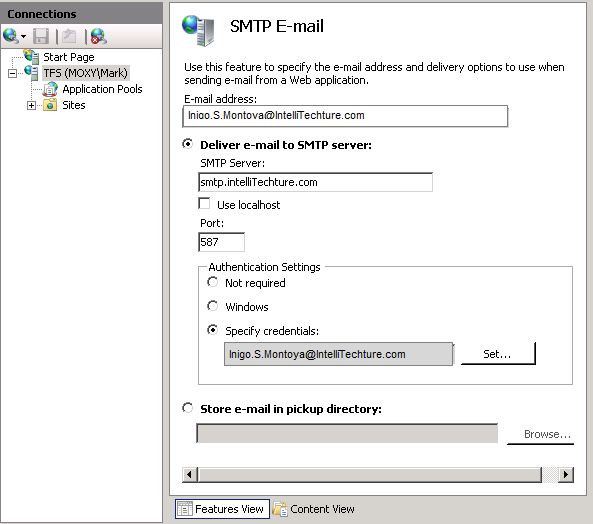
- From inside Internet Information Services (IIS) Manager, browse to the server’s SMTP E-mail feature and open it.

- Inside the SMTP E-mail windows, enter in the “send from” email address, the remote SMTP server DNS name (or IP address) and the remote server port. In addition, select Specify credentials and enter the credentials required to connect to the remote SMTP server.
To perform the same action from the command line use the following commands (Powershell is optional):
Where appcmd.exe is located in %windir%System32inetsrvappcmd.exe.
Internet Information Services (IIS) 6.0 Manager
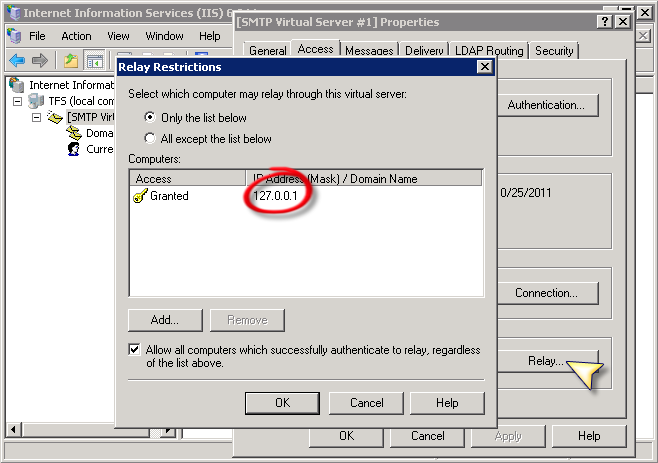
- Launch Internet Information Services (IIS) 6.0 Manager locate the [SMTP Virtual Server #] node and open up the Properties dialog.
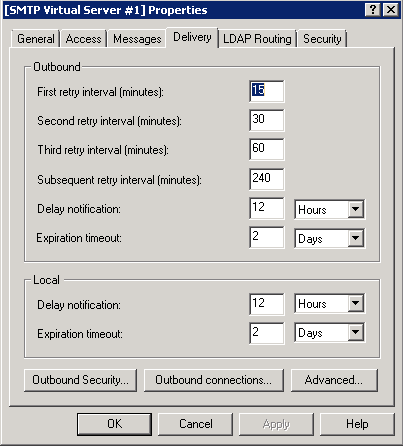
As shows, I just added 127.0.0.1 so that I was only enabling the current box to send via this SMTP Server but you can also add a group of computers by subnet or an entire domain. - Next, navigate to the Delivery tab and modify the settings for all three buttons, Outbound Security…, Outbound connections…, and Advanced….
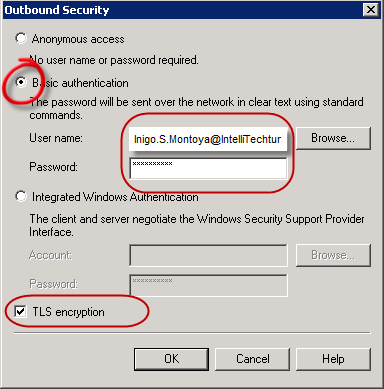
- For Outbound Security, switch to Basic Authentication and enter the remote SMTP Server credentials in addition to checking TLS encryption.
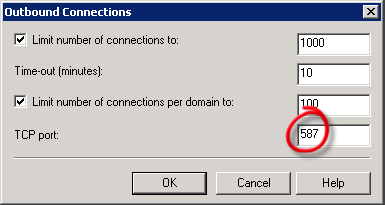
- On the Outbound Connections tab, switch the TCP port to 587 (or whatever port you need).
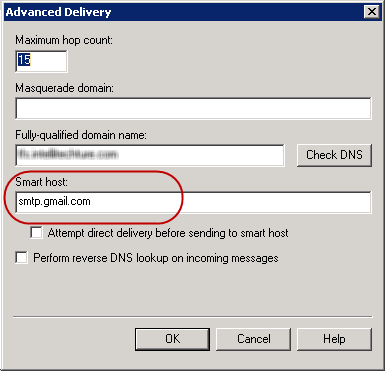
- Finally, on the Advanced Delivery tab, identify the Smart host as the DNS (or IP address) of the remote SMTP server.
For the Fully-qualified domain name refers to the server you are configuring, the one the SMTP-Service is being configure on.
Unfortunately, I didn’t come up with the command line for this particular action. I did find two leads as to where there may be a command line solution, however:
- The first is the smtpsetup.exe program (located in %windir%system32inetsrv). This program takes an INF file with the configuration information.
- Secondly, the configuration information itself is stored in %windir%System32InetsvrMetabase.xml.
Even though figuring out the final command line seemed within reach, I had no information as to how the password was encrypted and stored into the file and without much to go on, I decided to move on.
Command Line
Combining all the command lines together (except for the IIS 6.0 configuration) yields the following:
Note: If you are forwarding to gmail’s SMTP server, here are the settings you need:
SMTP Port: 587
TLS encryption: Checked
Источник
Send Email Directly on TFS
Estimated reading time: 6 minutes
My SMTP mail server requires that email be sent with TLS encryption and on port 587. This makes it problematic for Team Foundation Server (TFS) to send emails directly. To work around the problem, I installed the Windows 2008 SMTP Server service and configured it for relaying to my real SMTP mail server.
Contents
- Install SMTP Server
- Configuring the SMTP Service to Auto-Start
- Configuring the SMTP Service for Routing to Alternate SMTP Server
- Internet Information Services (IIS) Manager (IIS 7.0)
- Internet Information Services (IIS) 6.0 Manager
- Command Line
- Want More?
Install SMTP Server
To begin, launch Server Manager and add the SMTP Server feature.
This includes a dialog to add some additional items.
Click Add Required Features and, after the dialog closes, click Next > followed by Install.
The same can be done from the command line using:
ServerManagerCmd –Install SMTP-Server
Configuring the SMTP Service to Auto-Start
Unfortunately, the service is not configured to auto-start by default so you need to go into the services to change this:
To perform the same action from the command line use the following PowerShell commands:
Get-Service SMTPSvc | Set-Service –StartupType Automatic
From DOS you could use sc.exe.
Configuring the SMTP Service for Routing to Alternate SMTP Server
Finally, you need to configure the SMTP Server to redirect to an alternate SMTP server (assuming it is not sending email directly). This involves settings in both IIS 7.0 and IIS 6. Open Internet Information Server (IIS 7.0) and select the server node
Internet Information Services (IIS) Manager (IIS 7.0)
- From inside Internet Information Services (IIS) Manager, browse to the server’s SMTP E-mail feature and open it.
- Inside the SMTP E-mail windows, enter in the “send from” email address, the remote SMTP server DNS name (or IP address) and the remote server port. In addition, select Specify credentials and enter the credentials required to connect to the remote SMTP server.
To perform the same action from the command line use the following commands (Powershell is optional):
appcmd.exe set config /commit:WEBROOT /section:smtp /from:Inigo.S.Montoya@IntelliTechture.com
/deliveryMethod:Network /network.port:587 /network.defaultCredentials:False
/network.host:smtp.intelliTechture.com /network.userName:Inigo.S.Montoya@intelliTechture.com
/network.password:***
Where appcmd.exe is located in %windir%System32inetsrvappcmd.exe.
Internet Information Services (IIS) 6.0 Manager
- Launch Internet Information Services (IIS) 6.0 Manager locate the [SMTP Virtual Server #] node and open up the Properties dialog.
As shows, I just added 127.0.0.1 so that I was only enabling the current box to send via this SMTP Server but you can also add a group of computers by subnet or an entire domain. - Next, navigate to the Delivery tab and modify the settings for all three buttons, Outbound Security…, Outbound connections…, and Advanced….
- For Outbound Security, switch to Basic Authentication and enter the remote SMTP Server credentials in addition to checking TLS encryption.
- On the Outbound Connections tab, switch the TCP port to 587 (or whatever port you need).
- Finally, on the Advanced Delivery tab, identify the Smart host as the DNS (or IP address) of the remote SMTP server.
For the Fully-qualified domain name refers to the server you are configuring, the one the SMTP-Service is being configure on.
Unfortunately, I didn’t come up with the command line for this particular action. I did find two leads as to where there may be a command line solution, however:
- The first is the smtpsetup.exe program (located in %windir%system32inetsrv). This program takes an INF file with the configuration information.
- Secondly, the configuration information itself is stored in %windir%System32InetsvrMetabase.xml.
Even though figuring out the final command line seemed within reach, I had no information as to how the password was encrypted and stored into the file and without much to go on, I decided to move on.
Command Line
Combining all the command lines together (except for the IIS 6.0 configuration) yields the following:
ServerManagerCmd –Install SMTP-Server $SMTPService = Get-WmiObject win32_service -filter "name='SMTPSvc'"$smtpservice.ChangeStartMode("Automatic")Set-Alias appcmd "$env:windirSystem32inetsrvappcmd.exe"appcmd.exe set config /commit:WEBROOT /section:smtp /from:Inigo.S.Montoya@IntelliTechture.com
/deliveryMethod:Network /network.port:587 /network.defaultCredentials:False
/network.host:smtp.intelliTechture.com /network.userName:Inigo.S.Montoya@intelliTechture.com
/network.password:***
Note: If you are forwarding to gmail’s SMTP server, here are the settings you need:
SMTP Server: smtp.gmail.com
SMTP Port: 587
TLS encryption: Checked
Want More?
Curious about what else you can do with Windows? Check out AAD: How to Clone/Copy a Local Windows 10 Account to an Azure Active Directory Account!

Настройка smtp сервера windows server 2008 r2
Иногда требуется SMTP сервер без авторизации для настройки оповещений на эл. почту от приложений осуществляющих мониторинг оборудования сервера или сети. Можно было бы использовать почтовые сервера почтовых провайдеров, например smtp.gmail.com, smtp.mail.ru, smtp.yandex.ru или использовать почту хостинга если б не одно НО, все они требуют авторизации, а большинство программ авторизоваться не умеет. И тут нам в помощь штатные компоненты Windows Server 2008 r2.
Для того что бы установить SMTP сервер необходимо установить компонент Сервер SMTP. Для этого заходим в Диспетчер сервера -> Компоненты -> Добавить компоненты. В открывшемся мастере отмечаем Сервер SMTP, нажимаем далее, проходим все диалоги (дополнительно ничего выбирать не надо, все необходимое будет добавлено автоматически), в конце нажимаем установить и ждем окончания установки.
После того как установка завершилась заходим в Диспетчер служб IIS 6.0. Для этого идем по пути: Пуск -> Администрирование-> Диспетчер служб IIS 6.0. и запускаем.
В открывшемся окне выбираем наш сервер и раскрываем корень и видим «SMTP Virtual Server #1» это и есть наш свежесозданный сервер. Выбираем его ПКМ и нажимаем свойства. Переходим на вкладку Доступ и внизу нажимаем Ретрансляция. В открывшимся окне отмечаем «только компьютеры из списка ниже» (зачем что б кто то еще его использовал) и нажимаем добавить и в открывшейся вкладке вписываем IP 127.0.0.1 т.е. использовать наш SMTP сервер можно будет только локально. Теперь везде нажимаем OK и закрываем. Все сервер установлен и настроен.
Проверить работает ли наш SMTP сервер можно запустив PowerShell и набрав telnet 127.0.0.1 25 или telnet localhost 25 Если подключение произошло, то все сделано правильно и сервер работает.
Теперь в настройках программы которая нам будет слать оповещения указываем в качестве SMTP сервера 127.0.0.1 или localhost, порт 25 и тестируем.
Если при подключении telnet подключение не происходит, а все инструкции написанные выше выполнены точно, то основные проблемы могут быть две:
1. Не запущенна служба SMTP сервер. Заходим в службы, проверяем, запуск должен быть Автоматически Если не запущена, запускаем, если запущена идем дальше.
2. Антивирус. Точней не антивирус, а фаервол. Тут в зависимости от установленного настройки будут разные, но суть одна, открыть 25 порт.
Источник
Программист ASP.NET MVC C#


Настраиваем SMTP на Windows Server 2008 R2
Установка и настройка SMTP сервера на Windows Server 2008 является простым процессом, требующим лишь несколько шагов. В этой статье мы опишем шаг за шаг настройки и установки функции SMTP-сервер и как включить SMTP для передачи сообщений от локального сервера.
Откройте Server Manager (Правой клавишой на «Мой компьютер» -> «Управление») и выберите Add Features

Выбираем SMTP Server (для проверки работы так же можете установить telnet) и устанавливаем необходимые компоненты

Открываем «IIS 6.0 Manager» он находится в «Control Panel» -> «Administrative Tools» -> «Internet Information Services 6.0»
Выбираем меню «Свойства» на SMTP Server

Переходим на закладку «Access» нажимаем на «Relay. «

Выбираем пункт «Only the list below» и добавляем в список IP адрес 127.0.0.1

На этом настройка smtp server закончена.
Что бы проверить, что все работает можете в командной строку вызвать команду
telnet localhost 25
Если подключились, значит все правильно сделали. (для выхода напишите Quit)
Письма могут не приходить:
1) Если в брандмауэре закрыт 25 порт
2) Сам хостинг закрыл 25 порт (у хостинга 1gb он закрыт)
Источник
Поднимаем простые почтовые службы Windows Server
Введение
Частенько возникает необходимость настроить почтовый обмен в пределах небольшой сети, компов эдак на 10…100…1000. Стоп! Небольшой! Пока остановимся на двух. Касательно нашей маленькой тестовой сети. Итак, задача – поднять два почтовых ящика, наладить обмен почтовыми сообщениями между ними не привлекая никакие дополнительные программные продукты (особенно коммерческие).
Установка почтовых служб.
Открываем мастер добавления компонентов Windows, нам нужно установить простые почтовые службы, для этого нажимаем “Пуск”, переходим на панель управления и в оснастку “Установка или удаление программ”.

Переходим на компоненты Windows и, руководствуясь скриншотом, добавляем службы электронной почты.

Дожидаемся установки компонентов.

Настройка сервера и почтовых ящиков.
Для того, чтобы развернуть сервис обмена электронной почты и настроить почтовые ящики нам нужно запустить оснастку POP3 Service, которая появилась, если мы правильно выполнили предыдущие пункты.

Добавляем новый домен почты, назову его mail.serv.main.com (полное имя).

А теперь добавляем новые почтовые ящики. Команда проста: “Add Mailbox”. Создадим почтовый ящик для user с паролем **** и для admin с паролем ****.

Разумеется, вместо звёздочек будут ваши пароли. Но в рамках нашей задачи используем простое “1234”. Что явно не рекомендовано для боевых серверов.

Проверяем работу почтовых служб.
Для простой проверки посредством клиента telnet мы будем подключаться к нашему серверу на 25-ый порт (для SMTP) и на 110-ый порт (для POP3).
telnet serv.main.com 25
Если вы ошибётесь в наботе MAIL FROM: или RCPT TO: то стирать бэкспейсом бесполезно, команда будет отвергнута. Так что потрудитесь набрать без ошибок. 
Конец сообщения определяется просто точкой.

А теперь прочитаем это письмо, авторизовавшись под admin.
Подключаемся к POP3-серверу.
telnet serv.main.com 110
USER admin@mail.serv.main.com
PASS 1234
LIST
RETR 1
DELE 1
Описания протоколов будут в отдельных статьях, так что пока коротко напишу, что это:
- Авторизация
- Список писем
- Получение письма
- Удаление письма
- Выход
Источник
There has been some confusion about how to setup and configure SMTP on Windows Server 2008 R2. The confusion has arisen due to the SMTP server component not being managed from with IIS 7.5 but is instead managed from the IIS 6 console. In order to have SMTP working you must install IIS 6 as a feature. The following steps will explain how to setup and configure SMTP from start to finish.
Installing the SMTP feature
1. Click Start > Run and then enter servermanager.msc in the Open dialogue box then click OK to load Server Manager:
2. Use the Add Features Wizard to select SMTP Server on the Select Features page. To initiate this, right-click on Features and click Add Feature:
3. In the Features section check SMTP Server and click Next:
4. You may see a dialogue box like the one below stating that certain role services and features are required for SMTP:
5. Click Add Required Role Services and then you will return to the previous Features section. Ensure SMTP Server is checked then click Next.
6. In the Web Server (IIS) section, click Next to proceed to the Role Services section:
7. The Role Services should be pre-populated – IIS 6 Management Compatibility should be selected, and below it, IIS 6 Metabase Compatibility and IIS 6 Management Console should also be checked. Click Next to continue:
8. In the Confirmation section click Install:
9. In the Results section click Close to complete the installation of the SMTP Server:
Configuring the SMTP Server
The next step is to configure SMTP. To do so we will need to open Internet Information Services (IIS) Manager 6.
10. Click Start > Run and then enter inetmgr6 in the dialogue box then click OK to load IIS Manager 6.
11. In IIS 6 Manager right-click on SMTP Server and select Properties:
12. In the General tab, unless you want the SMTP Server to use a specific IP address, leave the settings as they are so that the IP address is set to (All Unassigned):
13. To proceed, click on the Access tab:
14. Click on the Authentication button and ensure Anonymous access is checked and then click OK:
15. Once back in the Access tab, click on the Connection button. Select Only the list below and then click Add. Enter 127.0.0.1 as the IP addess and then click OK:
The Connection setting controls which computers can connect to the SMTP server and send mail. By granting only localhost (127.0.0.1) access, limits only the server itself the ability to connect to the SMTP server. This is a requirement for security.
16. Click OK to return to the Access tab and then click on the Relay button. Enter 127.0.0.1 as the IP addess and then click OK:
The Relay section determines which computers can relay mail through this SMTP server. By only allowing the localhost IP address (127.0.0.1) relay permissions it means that only the server itself can relay mail. Conversely, it prevents the SMTP server from being an open relay and being used to send unsolicited spam email by other computers on the internet, which could lead to the SMTP server being blacklisted.
17. Next, go to the Messages tab. Here you can enter an email address where copies of non-delivery reports are sent to. You can also configure the location of the Badmail director, however, the default setting should suffice:
18. Next, go to the Delivery tab:
19. Click on the Outbound Security button and ensure Anonymous access is selected. As the only server that can connect and relay mail through the SMTP server is localhost this security settings is fine:
20. Click OK to return to the Delivery tab and then click on Outbound Connections. Leave the defaults as they are:
21. Click OK to return to the Delivery tab and then click on Outbound Connections, then click on the Advanced button:
Here you will need to enter the fully-qualified domain name of the SMTP server. This will be the host name or A record that has been created in your DNS zone file. This is straight-forward to do but you will have to confirm how you do this with the party that manages DNS for your domain. I have entered mail.vsysad.com as this is fully-qualified. If you click on the Check DNS button you can confirm whether your chosen name resolves successfully. In my case it does as I see the following:
22. Click OK and then OK again to exit the SMTP Virtual Server Properties.
You can also perform this test by running nslookup to confirm the existence of the host name as well as confirming the IP address it resolves to – which should the IP address of your server:
Testing the SMTP Server
The next step is to verify that the SMTP server is able to send email successfully. To do this follow the steps below:
23. Create a text file on your desktop called email.txt and paste the following into it, remembering to change the email address information to reflect your own details:
From: blog@yourdomain.com
This is the test body of the email
24. Save the changes to email.txt and then copy the file to C:inetpubmailrootPickup. The SMTP server monitors this folder and when it detects the email.txt file, it will read the contents and send the email to the address in the To: section. This should happen almost immediately.
25. Check the email address the email was sent to and it should arrive shortly – the email was sent to my Gmail account:

An alternative way of doing this is to use a script to perform the same email test. Simply save the code below into a file called email.vbs, remembering to change the email address information to reflect your own details:
Dim sch, cdoConfig, cdoMessage
sch = "http://schemas.microsoft.com/cdo/configuration/"
Set cdoConfig = CreateObject("CDO.Configuration")
.Item(sch & "sendusing") = 1 ' cdoSendUsingPort
.Item(sch & "smtpserver") = "127.0.0.1"
' .Item(sch & "smtpserverport") = 25
Set cdoMessage = CreateObject("CDO.Message")
Set .Configuration = cdoConfig
.From = "blog@yourdomain.com"
.To = "email@yourdomain.com"
.TextBody = "This is the test body of the email"
'.AddAttachment "c:imagesmyimage.jpg"
Once the file has been saved to the desktop double-click on it and it should automatically send the the email. A message box pops up to confirm that the email was sent:

Note: You can also use telnet and PowerShell to test mail sending/routing via SMTP Server. Please refer to this post to see how to do this.
That’s all there is to it! Now you have a fully functioning STMP server that can successfully send emails. Many of the companies that I have worked with use this method to send emails generated by their web applications.
Troubleshooting
DNS
It is essential to have DNS setup and working properly, if not you may experience problems with mail delivery. Follow the instructions in this post which shows you how to verify correct DNS configuration using the SMTPDIAG tool. Ensure that you have a PTR record for reverse DNS lookups configured. The PTR record allows your SMTP server’s public IP address to be resolved back to your hostname. Some of the major email hosts use this technique to block spammers. Your web host should have a control panel that allows you to configure reverse DNS if you have a dedicated public IP address. Rackspace Cloud users can follow this link for instructions on how to create a reverse DNS record.
SMTP Folders
If emails are not being successfully delivered you may notice that messages are building up in specific SMTP folders. These are likely to be, but not limited to, Badmail & Queue. Please visit this post to understand the purpose of each SMTP folder and how to approach issues when messages are queuing up in those folders.