Вы можете установить SMTP сервер с помощью встроенных средств во всех версиях Windows Server. Такой SMTP сервер внутри организации может работать в качестве почтового релея, который должен принимать и пересылать через себя SMTP сообщения от различных устройств (к примеру, сендеров, сканеров, устройств СКД и пр.) и приложений (веб приложения, SQL Reporting Services, SharePoint), которым необходимо иметь возможность отправлять почту через SMTP сервер. Такой релей может пересылать сообщения на полноценные Exchange сервер или на публичные почтовые сервисы в Интернет типа Gmail, Mail.ru, Office 365 и т.д (ведь не всегда целесообразно разворачивать полноценную внутреннюю почтовую инфраструктуру на базе Microsoft Exchange Server или других почтовых служб).
В этой статье мы покажем, как установить, настроить и протестировать работу SMTP сервера на Windows Server 2012 R2, 2016 и 2019, который будет функционировать в качестве mail релея. Такой SMTP сервер не хранит почтовые сообщения и на нем отсутствуют почтовые ящики, он сможет только отправлять или пересылать почту.
Содержание:
- Установка службы SMTP на Windows Server 2016/2012 R2
- Настройка SMTP сервера на Windows Server
- Автозапуск службы SMTPSVC
- Проверка работы SMTP сервера на Windows Server
Установка службы SMTP на Windows Server 2016/2012 R2
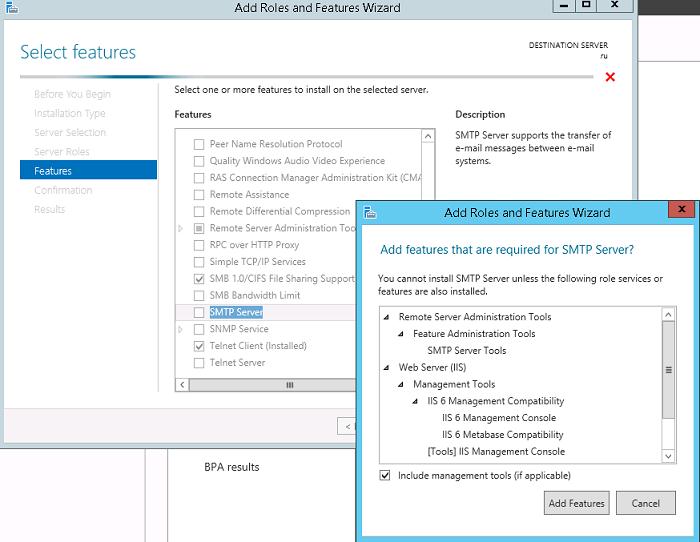
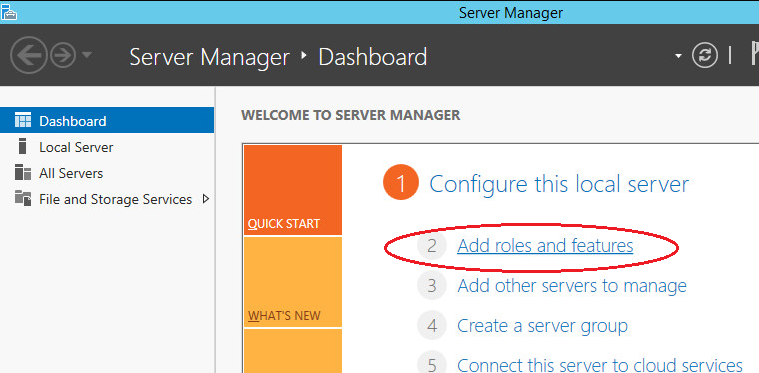
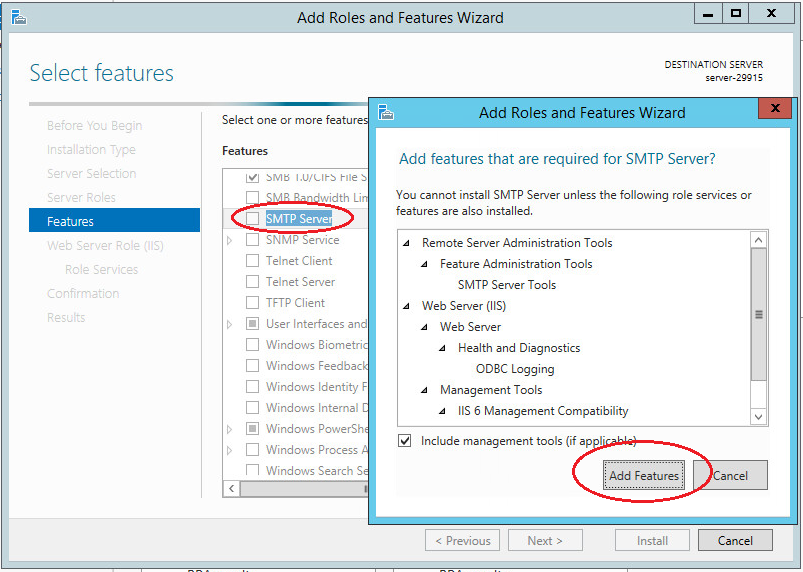
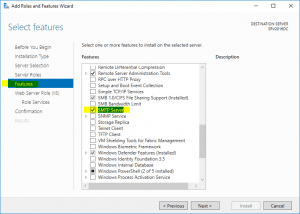
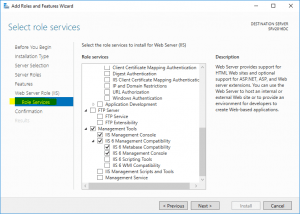
SMTP сервер – это один из компонентов Windows Server, который можно установить через Server Manager. Для этого откройте консоль Server Manager Dashboard (servermanager.exe), перейдите в режим Add roles and features и на этапе выбора функций отметьте чекбокс у пункта SMTP Server. Для управления службой SMTP нужно установить консоли управления, которые входят в комплект роли Web Server IIS (вам будет предложено установить IIS Management Tools).
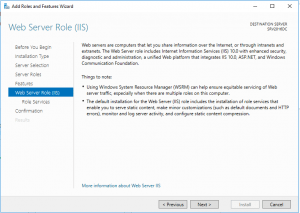
Оставьте все предлагаемые опции роли Web Server (IIS) и запустите установку.

Также вы можете установить компонент SMTP сервера с помощью одной команды PowerShell:
Install-WindowsFeature smtp-server
После окончания установки компонентов может потребоваться перезагрузка системы.
Настройка SMTP сервера на Windows Server
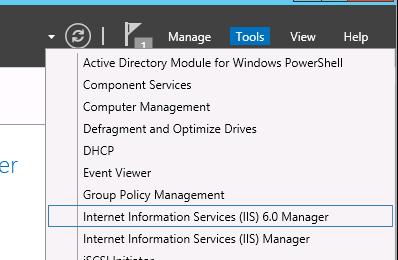
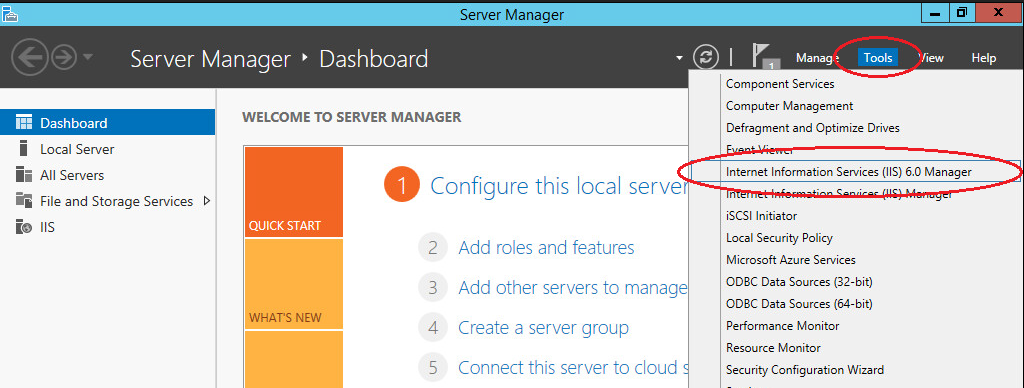
Управляется SMTP сервер консоль управления Internet Information Services (IIS) Manager 6. Открыть эту консоль можно через Server Manager: Tools-> Internet Information Services (IIS) 6.0 Manager или командой inetmgr6.exe.
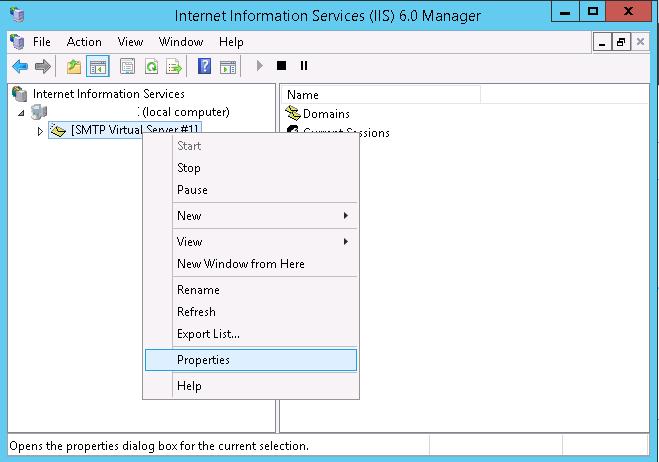
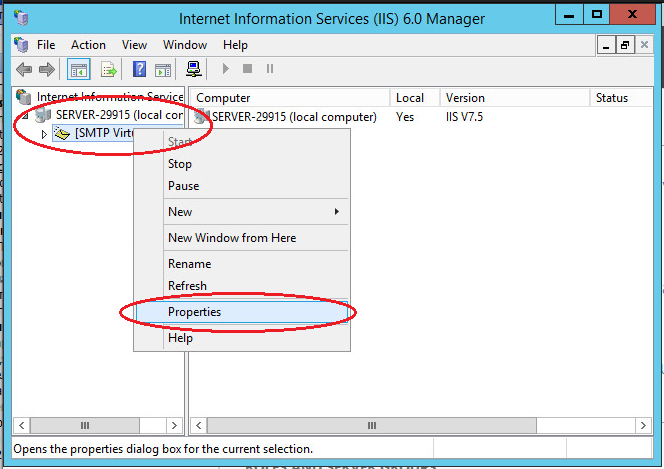
 В консоли IIS 6 Manager разверните ветку с именем сервера, щёлкните ПКМ по SMTP Virtual Server и откройте его свойства.
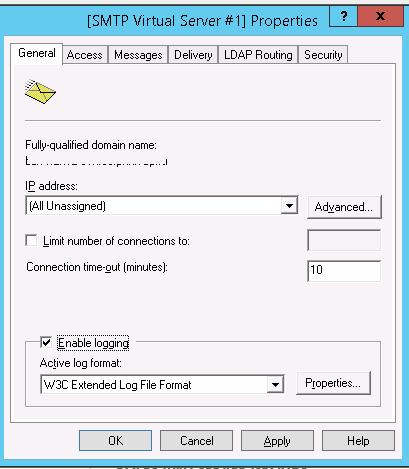
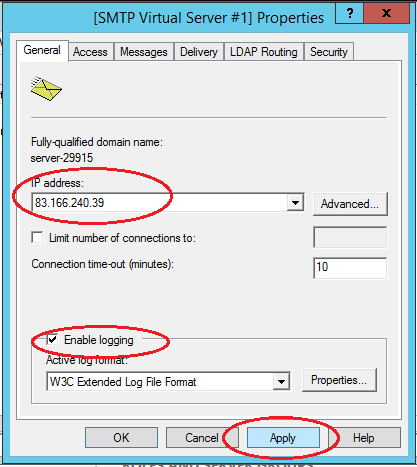
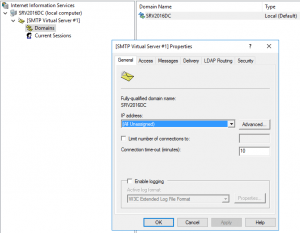
 На вкладке General, если необходимо, выберите IP адрес, на котором должен отвечать SMTP сервер (если у сервера несколько IP адресов), и включите ведение логов Enable logging (чтобы сохранялась информация обо всех полученных письмах).
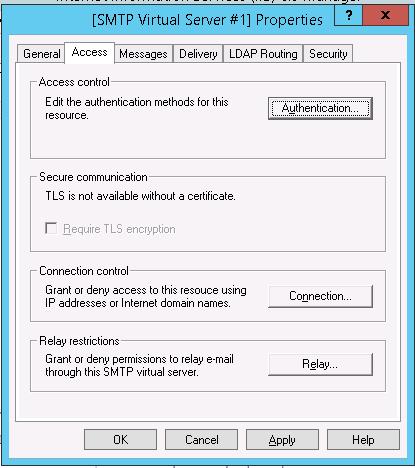
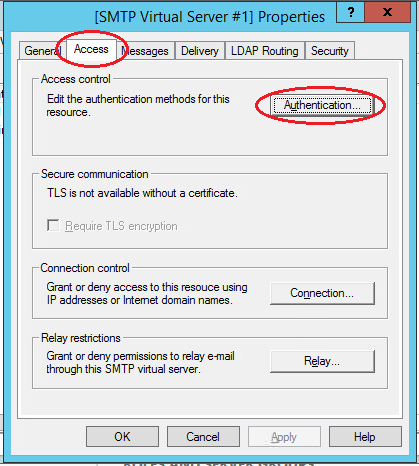
 Затем перейдите на вкладку Access.
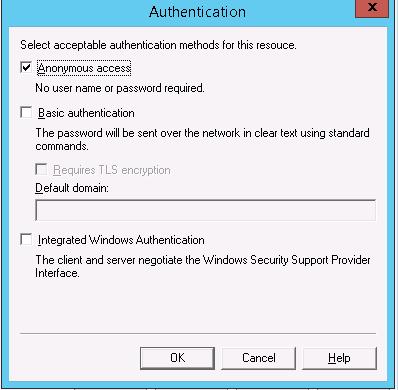
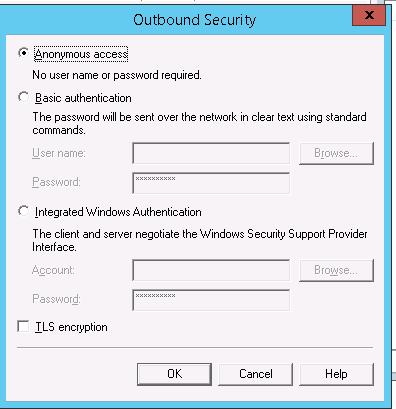
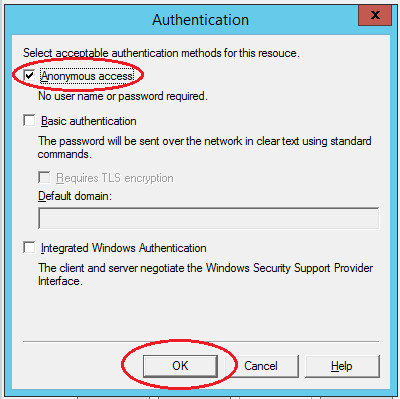
 Здесь нажмите на кнопку Authentication и убедитесь, что разрешен анонимный доступ (Anonymous access).

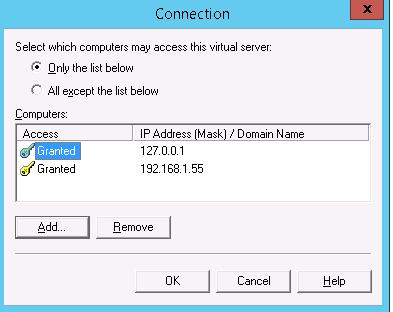
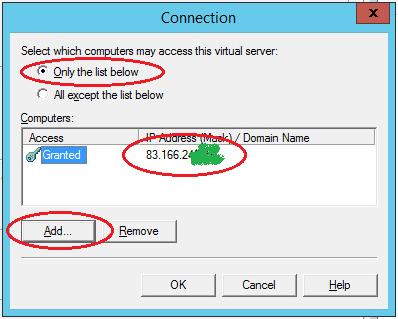
Вернитесь на вкладку Access и нажмите кнопку Connection. Здесь вы можете указать IP адреса устройств, которым разрешено отправлять почту через наш SMTP релей. Нужно выбрать опцию Only the list below и указать список IP адресов, не забыв самого себя (127.0.0.1).
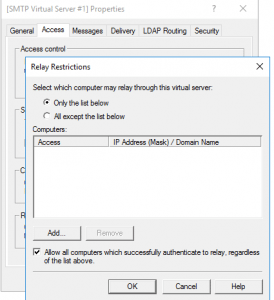
Аналогичным образом настройте список разрешенных IP в настройках Relay (нажмите соответствующую кнопку). В этой секции указано каким IP адресам (или подсетям) можно пересылать почту через ваш SMTP сервер.
Примечание. Как правило, обязательно стоит включать эту опцию, как минимум ограничив список обслуживаемых устройств диапазоном IP адресов. В противном случае ваш SMTP сервер может использоваться спамерами и другими злоумышленниками как открытый релей для массовых почтовых рассылок.
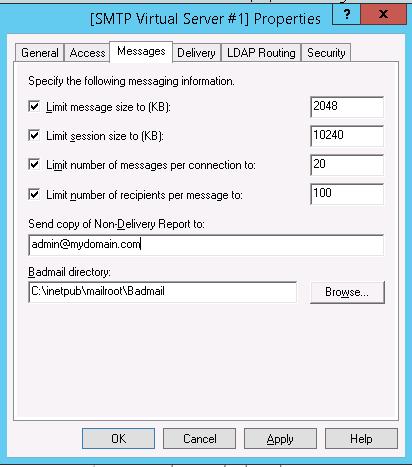
Перейдите на вкладку Messages. Здесь указывается email, на который будут отправляться копии всех NDR отчетов (Send copy of Non-Delivery Report to:). Также здесь можно указать ограничения на максимальный размер писем (Limit message size KB) и количество получателей (Limit number of recepients per message).
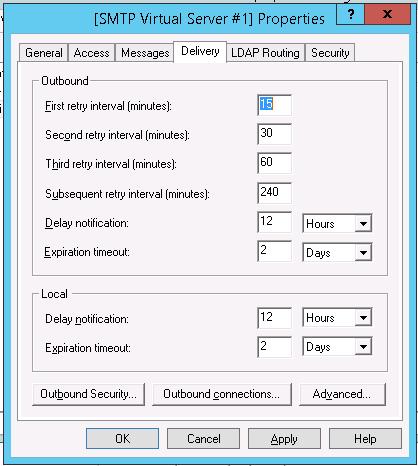
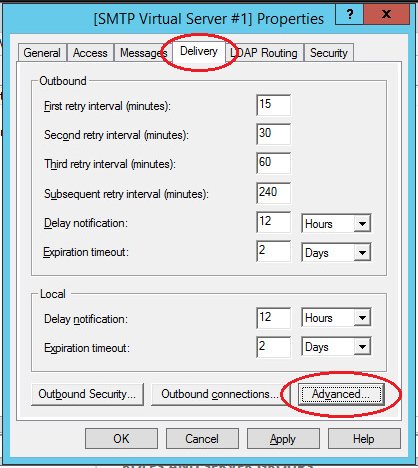
 Перейдите на вкладку Delivery:

Затем нажмите на кнопку Outbound Security. Здесь указывается, как нужно авторизоваться на почтовом сервере, на который ваш SMTP-сервере будет пересылать (relay) всю почту. К примеру, если вся почта будет отправляться на почтовый сервер Gmail и уже с него пересылаться адресатам, вам нужно выбрать тип аутентификации Basic authentication, указав в качестве пользователя и пароля данные для доступа к почтовому ящику на сервисе Gmail (в настройках аккаунта Google нужно разрешить отправку через smtp сервера gmail).

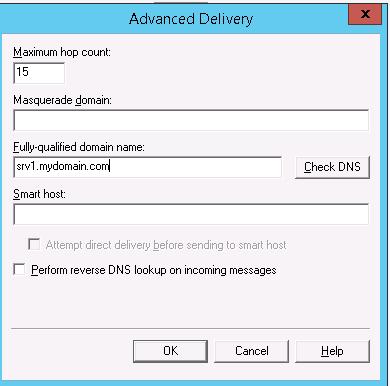
Затем нажмите на кнопку Advanced.
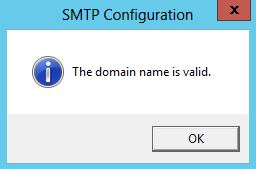
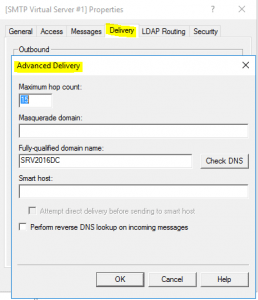
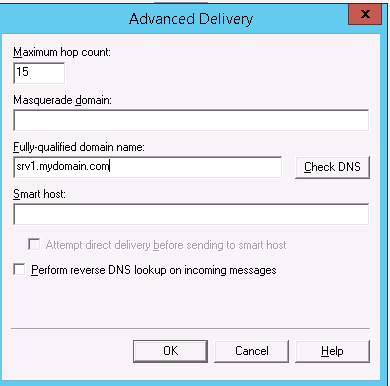 Здесь указывается FQDN имя вашего SMTP сервера. Нажмите кнопку Check DNS, чтобы проверить корректность записи в DNS.
Если сервер должен пересылать почту внешнему smtp серверу, нужно указать его имя в поле Smart host (к примеру smtp.gmail.com или smtp.office365.com).
Некоторые внешние почтовые сервера принимает почту только при использовании защищенного SMTP соединения с помощью TLS Encryption (используется порт TCP 587). Это настраивается в разделе Delivery-> Outbound Security и Outbound Connections. Ознакомитесь с документацией вашего почтового провайдера.
Сохраните настройки SMTP сервера и перезапустите ваш виртуальный SMTP сервер для применения изменений.
Примечание.
- Настройки DNS критичны с точки зрения работоспособности почтовой системы. Если ваш SMTP сервер не может корректно разрешить DNS имена доменов, на которые он пытается отправить письма, доставка не удастся.
- Если ваш сервер сам будет отправлять почту в другие домены, важно, чтобы для вашего адреса была сформирована правильная PTR запись для разрешения обратных DNS запросов. PTR запись для белого IP адреса должна указывать на FQDN имя. В противном случае большинство внешних smtp серверов не будут принимать от вас почту, считая ваш сервер спамерским.
Автозапуск службы SMTPSVC
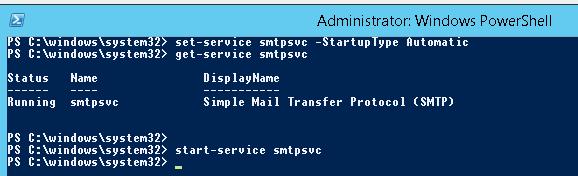
Осталось настроить автозапуск службы SMTP сервера. Быстрее всего это сделать из командной строки PowerShell:
set-service smtpsvc -StartupType Automatic
Запустим службу:
start-service smtpsvc
Проверим, что запущена служба SMTPSVC :
get-service smtpsvc
Status Name DisplayName
—— —- ————
Running smtpsvc Simple Mail Transfer Protocol (SMTP)

Проверка работы SMTP сервера на Windows Server
Ну и последнее, что осталось сделать, проверить работу созданного SMTP сервера. Проще всего это сделать, создав на рабочем столе текстовый файл smtp-test-email.txt и скопировав в него следующий текст, заменив имя отправителя и получателя на ваши.
From: [email protected]
To: [email protected]
Subject: Email test
This is the test email
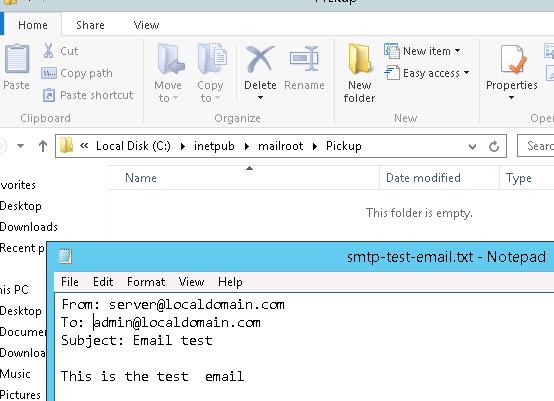
Скопируйте файл smtp-test-email.txt в каталог C:inetpubmailrootPickup. SMTP сервер следит за появлением файлов в этой каталоге и при обнаружении файла прочтет его содержимое и попытается отправить письмо с данной темой и текстом адресату, указанному в разделе To:.
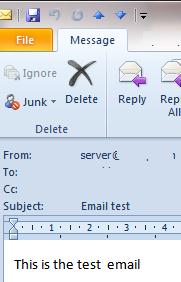
Проверьте ящик получателя, в него должно прийти такое письмо.
Совет. Протестировать работу SMTP сервера можно и из командой строки telnet, скрипта vbs или PowerShell:
Send-MailMessage -SMTPServer localhost -To [email protected] -From [email protected] -Subject "Email test" -Body "This is the test email sent via PowerShell"
Если вы хотите, чтобы вы включили Basic Authentication (Обычная проверка подлинности) для авторизации всех ваших SMTP клиентов (вместо анонимной аутентификации), вы можете отправить письмо с smtp-аутентификацией через telnet следующим образом.
Также убедитесь, что на вашем SMTP сервере не блокируется порт TCP 25 при удаленном подключении (локальным файерволом, антивирусом или межсетевым экраном). Проще всего это сделать с компьютера Windows, IP адрес которого добавлен в разрешенные. Проверку доступности порта можно выполнить с помощью командлета Test-NetConnection:
Test-NetConnection smtpsrv1.name.local –port 25
Если 25 порт блокируется, проверьте настройки Windows Firewall, антивируса и аппаратных межсетевых экранов.
Итак, вы настроили собственный почтовый SMTP релей на Windows Server 2016/2012 R2 и протестировали отправку писем через него.
Вы можете установить SMTP-сервер с помощью инструментов, встроенных во все версии Windows Server. Такой SMTP-сервер в организации может действовать как почтовый ретранслятор, который должен получать и пересылать SMTP-сообщения через себя с различных устройств (например, отправителей, сканеров, устройств контроля доступа и т.д.) и приложений (веб-приложения, SQL Reporting Services, SharePoint), который должен иметь возможность отправлять почту через SMTP-сервер. Такой сервер пересылки может отправлять сообщения на полный сервер Exchange или в общедоступные почтовые службы Интернета, такие как Gmail, Mail.ru, Office 365 и т.д. (В конце концов, не всегда рекомендуется развертывать полную службу внутренней почтовой инфраструктуры на основе Microsoft Exchange Server или других почтовых служб).
В этой статье мы покажем вам, как установить, настроить и протестировать работу SMTP-сервера в Windows Server 2012 R2, 2016 и 2019, который будет работать как почтовый ретранслятор. Такой SMTP-сервер не хранит никаких почтовых сообщений и на нем нет почтовых ящиков, он может только отправлять или пересылать почту.
SMTP-сервер – это один из компонентов Windows Server, который можно установить с помощью диспетчера сервера. Для этого откройте консоль панели мониторинга диспетчера серверов (servermanager.exe), перейдите в режим добавления ролей и компонентов и при выборе функций установите флажок рядом с записью SMTP-сервера. Для управления службой SMTP вам необходимо установить консоли управления, которые поставляются с ролью веб-сервера IIS (вам будет предложено установить Инструменты управления IIS).

Оставьте все параметры, предлагаемые для роли веб-сервера (IIS), и начните установку.

Кроме того, вы можете установить компонент SMTP-сервера с помощью одной команды PowerShell:
Install-WindowsFeature smtp-server
После завершения установки компонента может потребоваться перезагрузка системы.
Настройка SMTP сервера на Windows Server
SMTP-сервером управляет консоль управления Internet Information Services (IIS) Manager 6. Вы можете открыть эту консоль через Server Manager: Инструменты-> Internet Information Services (IIS) 6.0 Manager или с помощью команды inetmgr6.exe.
В консоли диспетчера IIS 6 разверните ветку с именем сервера, щелкните правой кнопкой мыши виртуальный сервер SMTP и откройте его свойства.
На вкладке «Общие» при необходимости выберите IP-адрес, на который должен отвечать SMTP-сервер (если у сервера несколько IP-адресов), и включите параметр «Включить ведение журнала» (для сохранения информации обо всех полученных сообщениях).
Затем перейдите на вкладку «Вход.
Здесь нажмите кнопку «Аутентификация» и убедитесь, что разрешен анонимный доступ).
Вернитесь на вкладку «Вход» и нажмите кнопку «Вход». Здесь вы можете указать IP-адреса устройств, которым разрешено отправлять почту через наш SMTP-ретранслятор. Вы должны выбрать вариант «Только список ниже» и указать список IP-адресов, не забывая о себе (127.0.0.1).
Аналогичным образом настройте список разрешенных IP-адресов в настройках Relay (нажмите соответствующую кнопку). В этом разделе указывается, на какие IP-адреса (или подсети) вы можете отправлять почту через свой SMTP-сервер.
Примечание. Как правило, вам обязательно стоит включить эту опцию, ограничив хотя бы список поддерживаемых устройств диапазоном IP-адресов. В противном случае ваш SMTP-сервер может использоваться спамерами и другими злоумышленниками в качестве открытого ретранслятора для массовой рассылки.
Перейдите на вкладку Сообщения. Здесь вы указываете адрес электронной почты, на который будут отправляться копии всех отчетов о недоставке (Отправить копию отчета о недоставке на адрес :). Также здесь вы можете указать ограничения на максимальный размер сообщения в КБ и количество получателей (Ограничить количество получателей на одно сообщение).
Перейдите во вкладку Доставка:
Затем нажмите кнопку «Безопасность исходящего трафика». Таким образом, вам необходимо войти на почтовый сервер, на который ваш SMTP-сервер будет ретранслировать всю почту. Например, если вся почта будет отправляться на почтовый сервер Gmail и отправляться с него получателям, необходимо выбрать тип аутентификации Обычная аутентификация, указав данные для доступа к почтовому ящику в службе Gmail в качестве пользователя и пароля (в Настройки аккаунта гугл, нужно разрешить отправку через smtp сервер gmail).
Затем нажмите кнопку «Дополнительно.
Здесь указывается полное доменное имя вашего SMTP-сервера. Нажмите кнопку Проверить DNS, чтобы проверить правильность записи DNS.
Если серверу необходимо пересылать почту на внешний smtp-сервер, его имя должно быть указано в поле Smart host (например, smtp.gmail.com или smtp.office365.com).
Некоторые внешние почтовые серверы принимают почту только при использовании безопасного SMTP-соединения с использованием шифрования TLS (используется TCP-порт 587). Это настраивается в Доставке-> Безопасность исходящего трафика и Исходящие соединения. Проверьте документацию вашего почтового провайдера.
Сохраните настройки SMTP-сервера и перезапустите виртуальный SMTP-сервер, чтобы изменения вступили в силу.
Примечание.
- Настройки DNS имеют решающее значение с точки зрения эффективности почтовой системы. Если ваш SMTP-сервер не может правильно разрешить DNS-имена доменов, на которые он пытается отправить электронную почту, доставка не удастся.
- Если ваш сервер сам будет отправлять почту в другие домены, важно, чтобы для вашего адреса была сформирована правильная запись PTR для разрешения обратных DNS-запросов. Запись PTR для белого IP-адреса должна указывать на полное доменное имя. В противном случае большинство внешних SMTP-серверов не будут принимать вашу почту, считая ваш сервер спамом.
Автозапуск службы SMTPSVC
Осталось настроить автоматический запуск службы SMTP-сервера. Самый быстрый способ сделать это – из командной строки PowerShell:
set-service smtpsvc -StartupType Automatic
Запустим сервис:
start-service smtpsvc
Проверяем, что служба SMTPSVC запущена :
get-service smtpsvc
Название штата DisplayName
—— —- ————
Запуск простого протокола передачи почты (SMTP) smtpsvc
Проверка работы SMTP сервера на Windows Server
Ну и последнее, что осталось сделать, это проверить работу созданного SMTP-сервера. Самый простой способ сделать это – создать на рабочем столе текстовый файл smtp-test-email.txt и скопировать в него следующий текст, заменив имена отправителя и получателя своими собственными.
От: server@localdomain.com
Кому: admin@localdomain.com
Тема: тест по электронной почте
Это тестовое письмо
Скопируйте файл smtp-test-email.txt в каталог C: inetpub mailroot Pickup. Сервер SMTP следит за появлением файлов в этом каталоге и, если файл найден, он прочитает его содержимое и попытается отправить электронное письмо с указанной темой и текстом получателю, указанному в разделе Кому:.
Проверьте почтовый ящик получателя на наличие такого письма.
Совет. Вы также можете проверить работу SMTP-сервера из командной строки telnet, сценария vbs или PowerShell:
From: server@localdomain.com
To: admin@localdomain.com
Subject: Email test
This is the test email
Если вы хотите включить базовую аутентификацию для авторизации всех ваших SMTP-клиентов (вместо анонимной аутентификации), вы можете отправить электронное письмо с SMTP-аутентификацией через telnet следующим образом.
Также убедитесь, что TCP-порт 25 не заблокирован на вашем SMTP-сервере при удаленном подключении (через локальный брандмауэр, антивирус или брандмауэр). Проще всего это сделать с компьютера под управлением Windows, IP-адрес которого добавлен к разрешенным. Проверить доступность порта можно с помощью командлета Test-NetConnection:
Send-MailMessage -SMTPServer localhost -To admin@localdomain.com -From server@localdomain.com -Subject "Email test" -Body "This is the test email sent via PowerShell"
Если порт 25 заблокирован, проверьте настройки брандмауэра Windows, антивируса и аппаратного брандмауэра.
Итак, вы настроили почтовый ретранслятор SMTP на Windows Server 2016/2012 R2 и протестировали отправку электронной почты через него.
Источник изображения: winitpro.ru
You can install an SMTP server using built-in tools in all versions of Windows Server. This SMTP server can work as a mail relay service that should receive and send SMTP emails from various devices in the organization (for example, senders, scanners, access control devices, etc.) and applications (web apps, SQL Reporting Services, SharePoint), which should be able to send mail using the SMTP protocol. Such a relay can send messages to your Exchange servers or to public email services such as Gmail, Yahoo, Office 365 (outlook.com), etc. (since it is not always advisable to deploy a full-featured internal email infrastructure based on Microsoft Exchange Server or other email services).
In this article we’ll show how to install, configure and test the SMTP server on Windows Server 2012 R2, 2016 and 2019 serving as a mail relay. This SMTP server can only send or forward emails, and there are no user mailboxes on it.
Contents:
- How to Install SMTP Service on Windows Server 2016 / 2012 R2?
- Configuring SMTP Server on Windows Server
- SMTPSVC Service Auto-Start
- Testing the SMTP Server on Windows
How to Install SMTP Service on Windows Server 2016 / 2012 R2?
SMTP service is one of the built-in features of Windows Server that can be installed through Server Manager. To do it, open the Server Manager Dashboard (servermanager.exe), go to Add roles and features and check SMTP Server when selecting the features to install. To manage the SMTP service, install the management consoles, being a part of Web Server (IIS) role, so you will be prompted to install some IIS components.

Leave all the suggested options of the Web Server (IIS) role and run installation.

You can also install the SMTP server role using the PowerShell command:
Install-WindowsFeature smtp-server
After the components are installed, you may need to restart your server.
Configuring SMTP Server on Windows Server
The SMTP server is still managed using the old school management console Internet Information Services (IIS) Manager 6. You can open this console from the Server Manager: Tools-> Internet Information Services (IIS) 6.0 Manager or with the command inetmgr6.exe.
Expand the branch with your server name in the IIS 6 Manager, right-click SMTP Virtual Server and open its properties.
On the General tab, if necessary, select the IP address on which the SMTP server should respond (if the server has multiple IP addresses), and check the option Enable logging (in order to save information about all received emails to text log files).
Then go to the Access tab.

Here click the Authentication button and make sure that the Anonymous access is enabled.
Go back to the Access tab and click the Connection button. Here you can specify the IP addresses of devices that are allowed to send emails through your SMTP relay. To do it, check the Only the list below and specify the list of IP addresses (subnets), don’t forget about yourself (127.0.0.1).
Configure the same way the list of allowed IPs in the Relay settings (click the corresponding button). This section indicates which IP addresses (or subnets) can relay email through your SMTP server.

Note. As a general rule, it’s worth to check this options and limit the list of accepted devices with the range of IP addresses. Otherwise, your SMTP server may be used by spammers and other attackers as an open relay for mass mailings.
Go to the Messages tab. Here the administrative e-mail address is specified, to which the copies of all NDR messages will be send (Send copy of Non-Delivery Report to:). Also here you can specify the restrictions on the maximum message size (Limit message size KB) and the maximum number of recipients (Limit number of recipients per message).

Go to the Delivery tab.
Then click Outbound Security. Here you specify the way of authentication on the external mail server to which your SMTP server will send (relay) all email messages. For example, if all emails will be forward to Gmail mail server and then sent to the recipients, you need to check the Basic authentication and specify your Gmail mailbox credentials (you must allow to send email via Gmail SMTP in the Google account settings).
Then click Advanced.
Here you specify the FQDN name of your SMTP server. Click the Check DNS button to make sure that the DNS record is valid.

If your server sends mail to an external SMTP server, specify its name in the Smart host field (for example, smtp.gmail.com or smtp.office365.com).
Some public mail servers accept email only when using a secure SMTP connection using TLS Encryption (TCP port 587). You can configure this setting in the section Delivery -> Outbound Security and Outbound Connections. Read the documentation of your email provider.
Save the SMTP server settings and restart your SMTP virtual service to apply the changes.
Note.
- The DNS settings are critical from the point of view of email system health. If your SMTP server cannot correctly resolve DNS names of domains to which it is trying to send email, the delivery will fail.
- If your server sends mail to other domains, it is important that the correct PTR record is created for your IP address in order to resolve reverse DNS lookups. The PTR record for your public IP address should point to your server FQDN name. Otherwise, most external SMTP servers won’t accept email from you, considering your server a spammer one.
SMTPSVC Service Auto-Start
It remains to configure the automatic startup of SMTP service on your Windows Server. You can do it quickly using the PowerShell command prompt:
set-service smtpsvc -StartupType Automatic
Start the service:
start-service smtpsvc
Make sure that the SMTPSVC service is running:
get-service smtpsvc
Status Name DisplayName
—— —- ————
Running smtpsvc Simple Mail Transfer Protocol (SMTP)
Testing the SMTP Server on Windows
The last thing you have to do is to make sure that your SMTP server is working. It is easier to do it by creating a plain-text file smtp-test-email.txt on your desktop and copying the following text to it. Don’t forget to change the sender and recipient names to yours.
From: server@localdomain.com

To: admin@localdomain.com

Subject: Email test

This is the test email

Copy the file smtp-test-email.txt to the C:inetpubmailrootPickup folder. The Windows SMTP server monitors new files appearing in this folder, and if a file is found it will read it contents and try to send an email with the given subject and body to the recipient specified in the To: line.
Check the recipient mailbox, and you will see this e-mail.

Tip. You can test your SMTP server using the telnet command, VBS script or PowerShell:
Send-MailMessage -SMTPServer localhost -To manager@localdomain.com -From server@localdomain.com -Subject "Email test" -Body "This is the test email from PowerShell"
If you have enabled Basic Authentication to authenticate all your SMTP clients (instead of anonymous authentication), you can send an email with the smtp authentication via telnet as follows.
Also, make sure that TCP 25 port is not blocked on your SMTP server by the local firewall or anti-virus software. The easiest way to do this is from a Windows-based computer whose IP address has been added to the allowed connection list. Check availability of port 25 using the Test-NetConnection cmdlet:
Test-NetConnection smtprelay.woshub.com –port 25
If port 25 is blocked, check the settings of Windows Firewall, antivirus and hardware firewalls.
So, you have configured your own SMTP mail relay on Windows Server 2016 / 2012 R2 and tested sending emails through it.
This guide will cover the process of installing and configuring an smtp server on virual servers running Windows operating systems.
What it is
An SMTP server is used to send e-mail for exchange on the Internet and within a local network. Can be used to send system messages and log files.
Installation
First you need to add the missing features.
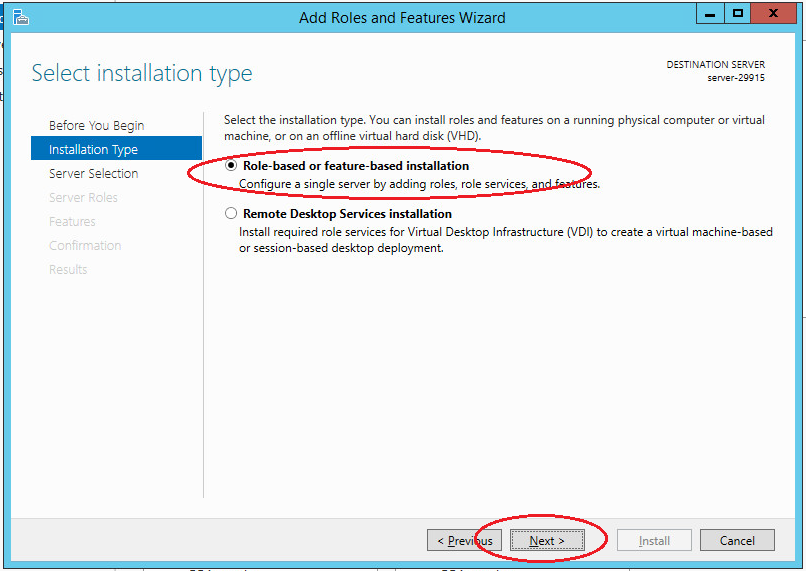
Select “Role-based or feature-based installation” and click “Next”.
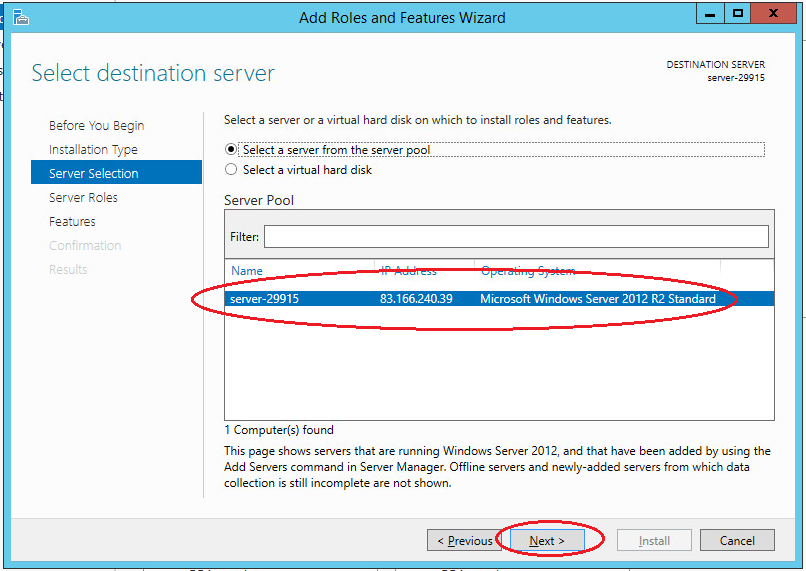
Choose needed server from the pool.
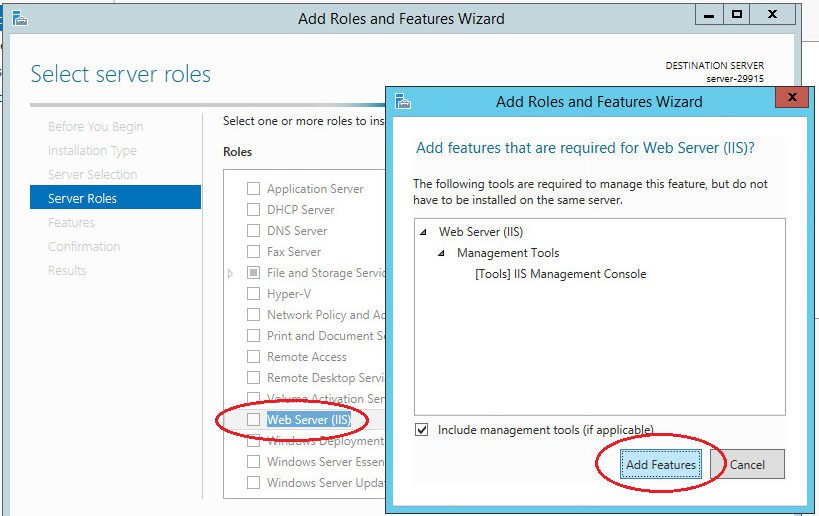
In the next step, select the “Web Server (IIS)” role. In the window that opens, click “Add features”. Web server (IIS) contains consoles to manage the SMTP service.
Next in the list of features, select “SMTP-server”. In the window that opens, click “Add features”.
In the following steps, accept the default settings and complete the installation. Server reboot is not required.
SMTP server setup
You can manage your SMTP server through Internet Information Services (IIS) Manager 6. To open IIS, go to Server Manager and in the menu in the upper right corner select “Tools” -> “IIS 6.0 Manager”.
Expand the branch with the server name, select SMTP Virtual Server and open its properties.
On the “General” tab, select your IP address on which the SMTP server should respond and enable logging to save information about all sent emails.
On the “Access” tab in the “Access Control” section, click the “Authentication” button. In the window that opens, check the box “Anonymous access” so that all users of the server and applications can use the SMTP server.
Next in the “Connection Control” section, click the “Connection” button. In the window that opens, allow access to the SMTP server to only certain computers by adding them to the list and selecting the connection type “Only computers from the list below”.
Note: do not forget to add the IP address of the server on which the SMTP server is configured.

Next, on the “Delivery” tab, click the “Advanced” button. In the window that opens, in the “Fully Qualified Domain Name” field, enter your domain name or IP address.
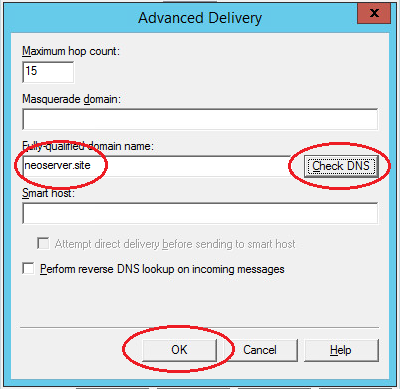
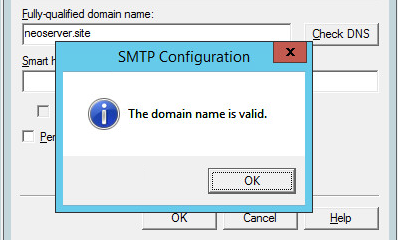
When checking DNS, the domain name must be valid.
Save all made changes.
SMTPSVC autorun service
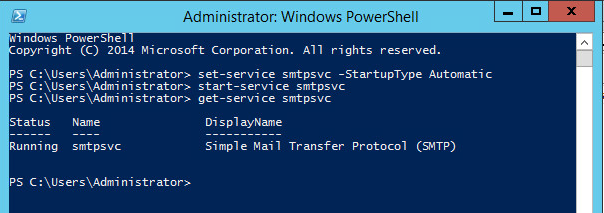
The SMTP server service should start automatically when the server is turned on. To do this, open a command bar and run the following commands:
Start the service;Verify that the SMTPSVC service is running:
SMTP server testing
To check the correctness of the work, create any text document with the txt extension (for example, on the desktop), and enter the following lines, specifying from whom you are sending the letter and to whom:
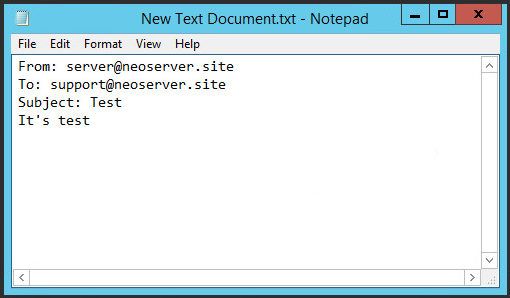
Notes:
- in the mailing address of the sender, specify your domain or ip-address as the domain name, the mailbox name can be any;
- Sent emails get spammed; to prevent this from happening you need to configure SPF and / or DKIM for your domain.
Next, transfer the created file to the C: inetpub mailroot Pickup directory. The file will disappear after a short time. Check the received email.
How to setup SMTP server and what is SMTP server?
SMTP stands for “Simple Mail Transfer Protocol”. A SMTP server is responsible for sending/receiving e-mail messages to/from other smtp servers in Internet community. The mail transferring logic is based on RFC 821 and RFC 5321. Even as of today, communication via email still plays a vital role between companies in day-to-day running business.
Setup SMTP server for Windows 7 or 10?
For macOS users, you can configure SMTP server through macOS Server. For Linux and Unix users, you need extensive server knowledge to sertup SMTP server. For Windows 7 or 10 users? This Windows version is meant for end-users most of the time. However, you can still setup SMTP server through third-party server applications, such as EVO Mail Server or hMailServer. In the meantime, Windows Server require some Windows-server-specialized server ware such as EVO Mail Server, Axigen and Kerio.
How to configure DNS records for SMTP server, such as A, MX, SPF?
For SMTP server to communicate with Internet communicty out there, DNS record assignments are required. Basic DNS records are A and MX records and it would achieve better mail delivery result if SPF is also configured. Steps are simple:
- Log in your DNS service. Here, we use Zoneedit DNS service in the demo below:

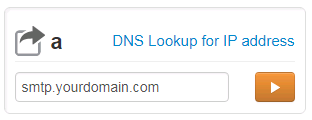
DNS setting for SMTP server - Add A record:

- Enter hostname of your SMTP server, such as smtp.yourdomain.com in HOST field.
- Enter its static IP address in IP Address field.
- Keep TTL default unless you need to modify it for other purposes.
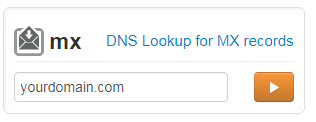
- Add MX record:

- Enter zone or domain that your SMTP server is responsible for, such as yourdomain.com in MAIL FOR ZONE field.
- Enter SMTP server hostname, such as smtp.yourdomain.com in MAIL SERVER field.
- Enter an integer under PREF, such as 10, that defines priority of this SMTP server if you have multiple servers.
- Add SPF record:

- Enter hostname of your SMTP server, such as smtp.yourdomain.com in HOST field.
- Enter parameter string, such as: “v=spf1 ip4:<server_ip> a mx ~all” in TEXT field. The <> brackets should be ignore and simply enter server_ip.
- Keep TTL default unless you need to modify it for other purposes.


How to make SMTP server’s IP stay healthy?
Under normal circumstances, destination SMTP servers on Internet judge whether email messages from your SMTP server are spam or not based on your server IP credential given by anti-spam organizations on Internet. Before we get to know what to check, we need to make sure your SMTP server is using a static IP rather than dynamic one because spammers usually use dynamic IP to distribute spam mails. Consult your Internet service provider on how to obtain a static IP.
Next, there are two anti-spam organization we need to check whether your IP is listed on their list or what reputation your IP has:
- Spamhaus – To check, click on Blocklist Removal Center, enter your IP, and click on Lookup button to check. If you IP is listed, click into each entry and find out what can be done to delist your IP off the list.
- Senderbase – Enter your IP and click on magnifier symbol to find out reputation of your server IP. If your reputation is bad, then it will take time of days, weeks or even months for senderbase is assess whether spam mails are being sent out from your IP. Our suggestion for you is to change a static IP rather than wasting time to wait.
ISP limitation on self-running SMTP server
Before your smtp server setup, consult your ISP on whether it allows you to establish a smtp server. Then, also check whether it allows IP reverse resolution. What is it? The relationship between IP forward resolution and IP reverse resolution is like your name and your phone number on yellow page. We can look up your name and get your phone number on a phone directory. Likewise, when we look up your smtp server host name (for example: smtp.yourdomain.com), we can get your server IP address. Conversely, when we look up your IP address, we should be able to get your smtp server host name. However, for some Internet access subscription, your given static IP address is not allowed to have customized IP reverse resolution value.
How to check if your DNS records are well spreaded out across Internet?
Once your server DNS records kick in, we still cannot be sure whether other smtp server on Internet can find us. We can go to MX TOOLBOX and find out. Basically, we can check 4 DNS records and 1 listing to confirm your SMTP server is ready or not?
- A record

- MX record

- PTR record
- SPF record

- Blacklist

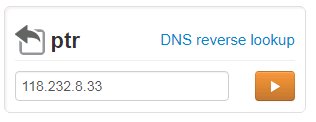
Simply enter value as demonstrated in the screenshots above, there will return results for us to check.
Limitation on EDM (Email Direct Marketing) for SMTP server
If you have a free Gmail, Outlook.com or Yahoo! mail account, then you would probably receive many EDM messages everyday. Some of them are directy dumped to mailbox’s SPAM folder while some of them are in INBOX folder. If you plan to distribute such EDM messages via your SMTP server, then you need to be aware of spam policies on these mail service providers. Please refer to the following list:
- Gmail – Bulk Sender Guidelines
- Outlook.com – Policies, Practices, and Guidelines
- Yahoo! – Yahoo Mail deliverability FAQs
- aol. – Bulk Sender Best Practices & Guidelines
For any additional policy and guideline of other mail service providers, you can google it using keywords such “mail server provider’s name + bulk mail policies” to find out.
How to configure built-in SMTP service on Windows Server?
Previously, we mentioned about how to setup SMTP server on Windows 7 or 10. Now, it is about Windows Server 2008, 2012 or 2016. In fact, Microsoft has implemented a SMTP service in Windows Server. All you need to do is enabling it according to a handy YouTube video tutorial here. However, this SMTP server barely plays a SMTP relay role rather than a comprehensive SMTP solution, such as Exchange Server, Kerio Connect or Axigen Mail Server, in which additional POP3, IMAP and even Groupware features are offered.
How to easily setup SMTP server other than Exchange Server?
For companies that run on Windows Server 2008, 2012, or 2016, Exchange Server is usually deployed along with Active Directory. This integration solution provides an environment where users can connect to synchronization services of messaging, calendar, address book, task on almost every client platforms, such as web browser, mobile devices, various types of laptop and desktop. However, the cost is higher than what medium and small business can afford.
However, EVO Mail Server, to some degree, provides similar services but at a much lower cost for especially those small business companies that cannot afford Exchange budget overhead. To setup, simply follow steps as below:
- Assume you have all DNS parameters for your company’s domain properly configured.
- Download and install EVO Mail Server software as administrator on Windows Server.
- Open EVO Mail Server GUI.

- Enter your company’s domain name next to Prmary Domain under Setting tab.
- Check Status tab and see if there is any issue under Mail, Network & Server sections.

- Create user accounts under Account tab.

- Create email account in mail client software and test sending e-mails.
For a complete tutorial on installing and configuring EVO Mail Server software as well as purchasing and deploying SSL certificate for the server, I have writeen another article detailing all of the above:
Cloud SMTP services
Cloud mailing serivces are becoming more and more popular, it’s convenient and more unlikely to be blocked when using cloud SMTP services. here are a list of cloud mailing services that you can choose:
- Amazon SES: Amazon SES is an email service that provides a way for sending transactional emails and marketing emails.
- MailGun: MailGun is an email service and SMTP provider, which is owned by Rackspace. It allows you to send, receive, track and store emails.

Most may not realize that there is actually a free SMTP server builtin to Windows Server all the way back to Windows 2003 and is IIS 6 technology (I know, try to suppress your nausea). The SMTP server is a feature that can be added to modern Windows Server versions via the Server Manager. Out of curiosity and due to working on a project recently utilizing the SMTP server on a Windows 2012 box, I wanted to see if the SMTP server was still an option in Windows Server 2016 TP4 and the answer is yes.
Installing the SMTP server
This is a feature found in the Add Roles and Features Wizard and is simply listed as SMTP Server.

By default, the feature wizard will add the Management tools for IIS 6 since this is an IIS 6 technology.
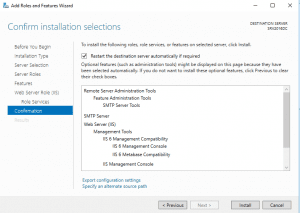
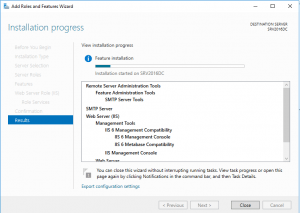
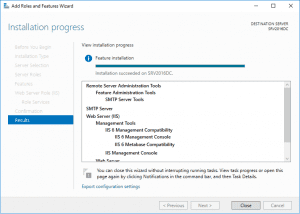
A reboot will not be prompted for adding this feature.
Using the SMTP Server
The SMTP Server is administered through the IIS 6 Management Console. An easy way to get there is to go to a run or command prompt and type inetmgr6.exe. You will see the IIS 6 SMTP Virtual Server manager as show below. If you right click on SMTP Virtual Server, you get a configuration box where you can configure most everything affecting mailflow.
One of the more important areas of the configuration is under Delivery and Advanced where you will see the Advanced Delivery options. Here is where you configure your mail domain.
Testing mailflow
Using powershell we can test mailflow from our SMTP server using the send-mailmessage commandlet. By default however, the server is not set to allow any open relays out of the box.
If you run the send-mailmessage commandlet from the server itself, you need to add the server’s assigned IP address to the allowed to relay list before you test. Below is the default configuration.
After you have added the appropriate IP address, you can open up a powershell prompt and use the following to test SMTP relay
send-mailmessage -from "<[email protected]>" -to "John Doe <[email protected]>" -subject "Test" -body "Testing" -smtpserver 192.168.57.86
Final Thoughts
The SMTP relay included in Windows Server from 2008 forward is a no frills SMTP relay that doesn’t include many options, however, if you are looking for SMTP functionality for an application or for testing, it can come in very handy. It is good to see this feature is still hanging around in Windows Server 2016.
В моем случае, это актуально для тестового виртуального окружения. Windows Server имеет в наборе SMTP сервер, который можно установить из коробки и настроить его в «три» клика. После установки, при помощи SMTP службы можно слать почтовые сообщения, что позволяет как минимум — отсылать тестовые уведомления без установки стороннего софта. Ниже расскажу как установить SMTP сервер и при помощи него отослать из терминала SMTP сообщение на внешний адрес.
Установка SMTP сервера, как роли Windows
- Для установки необходимо запустить Server Manager (Server Manager можно запустить командой
servermanager) - Запустить мастер установки — Add Roles and Features
- Выбрать сервер, на странице выбора ролей, выбрать — SMTP Server
- На запрос об установки необходимых Features, ответить утвердительно
- Next, Next… Install
- Дождаться установки, Close
Настройка SMTP в IIS консоли Windows
- В Server Manager в разделе Tools запустить — Internet Information Services (IIS) 6.0 Manager
- Развернуть дерево IIS до SMTP Virtual Server — ПКМ — Properties

- На вкладке General указать IP server’а

- На вкладке Access указать IP с которых можно будет слать почту через этот сервер

- То же самое делаем с настройками Relay

- При необходимости проверяем настройки вкладки Delivery

Настройка SMTP правила Windows Firewall
- Здесь все просто, необходимо открыть оснастку
wf.msc - Добавить новое Inbound правило для порта 25
Отправка SMTP сообщения из командной строки Windows
Все действия производятся в тестовой среде с доменом — test-lab.local, поэтому далее будет фигурировать имя этого домена. Итак открываем cmd, выполняем:
telnet ad1.test-lab.local 25
Если telnet не установлен, его необходимо установить как фичу в Server Manager — Telnet Client
Отобразится приветственное сообщение:
220 ad1.test-lab.local Microsoft ESMTP MAIL Service, Version: 8.0.9200.16384 ready at Tue, 17 Oct 2017 11:32:00 +0600
Проверяем:
Во ответ должно быть что то вроде:
250 ad1.test-lab.local Hello [10.0.2.4]
Создаем письмо, указываем отправителя:
MAIL FROM: service@test-lab.local
Ответ сервера:
250 2.1.0 service@test-lab.local….Sender OK
Указываем кому:
Ответ сервера:
250 2.1.5 user@ya.ru
Указываем тело письма, тему:
Ответ сервера:
354 Start mail input; end with <CRLF>.<CRLF>
Тема:
SUBJECT: Test mail from TEST ENV
Далее текст письма в конце текста на следующей строке ставим точку:
Ответ:
250 2.6.0 <AD10ayJM47dvbyXvjyT00000001@ad1.test-lab.local>; Queued mail for delivery
Идем на ya.ru (или что там у тебя) проверяем, не забываем смотреть в папку СПАМ…
Доп инфо:
- Отправить почту из терминал клиента Windows