As a part of preparation for monitoring our WIndows Server 2008 R2 using SNMP and Nagios we had to add SNMP Services to few systems which didn’t have it yet. So, based on that fact I thought it might be nice to capture all steps involved in adding SNMP to Windows Server machine. Here you can see steps, screenshots and short description how to achieve that.
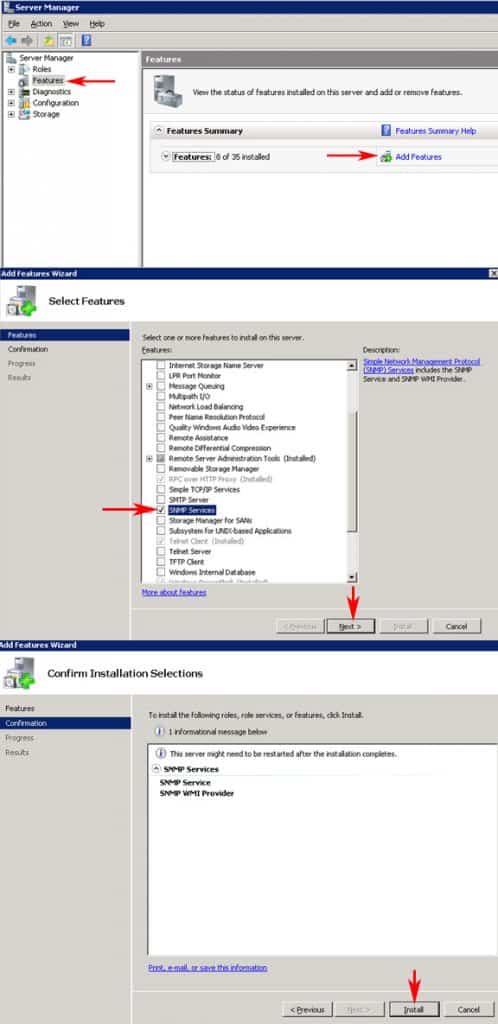
Start Server Manager and go to Features and then click Add Feature

After Add Features Wizard will appear on the screen locate SNMP Services section and add this feature to installation list by ticking checkboxes next to appropriate services on the list as shown on screen below. Then click Next to proceed.

Summary screen will show what services will be installed. Click Install to proceed with installation.

Installation progress will appear once server will be adding desired features to system configuration.

Once additional components will be installed, summary windows will show what features were installed and if installation was successful. Click Close to to finalize Add Feature Wizard.

Now in Server Manager in Features section you can see that SNMP Services are listed as installed components.

It’s time to configure SNMP for serving information to monitoring system, which in our case is Nagios. In order to set parameters on SNMP go to Start / Administrative Tools / Services and then locate SNMP Service on the list. Double click on it.

In SNMP Service Properties (Local Computer) window go to Security tab.
This is place where we can define parameters of SNMP Service:
- Community string – unique keyword which will be presented by monitoring system when accessing information on server via SNMP
- IP address of monitoring system – to narrow down computers which can poll information remotely from server

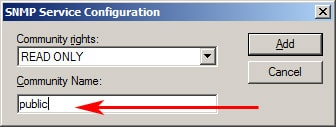
When you click Add in Accepted community names section you can enter Community Name and define Community rights. For us READ ONLY is required as we want to poll information from server only.

Available rights for community strings:
- NONE: Prevents this host from processing any SNMP requests.
- NOTIFY: Allows this host to send only SNMP traps to the community.
- READ ONLY: Prevents this host from processing SNMP SET requests. SNMP managed objects have default values specified by the agent. Some applications may request to modify these values with the SNMP SET command.
- READ WRITE: Allows this host to process SNMP SET requests.
- READ CREATE: Allows this host to create new entries in the SNMP tables.
NOTE: Make sure that Community Name parameter will NOT be any easy dictionary word. Think of it as a password to protect access to information about system.
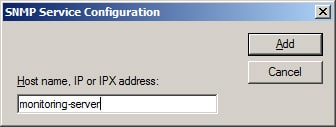
Once Community Name is define click Add in Accept SNMP packets from these hosts. That will allow you to add IP address of the server with monitoring system, which is Nagios in our case. It is highly recommended to narrow down list of IP addresses from which SNMP communication can be received by the server for security reasons.

IP address on the screenshot above is example IP address and you should replace it with IP of your monitoring system.
Once all parameters are configured you can see them in SNMP Service Properties (Local Computer) dialog windows and if everything is fine and according to expectations click OK to approve changes and apply those to SNMP Service.

From now on you can poll information using SNMP from certain IP addresses using Community Strings defined in SNMP Service configuration.
![]()
- Home
- nullServices
- Offshoring
- Software Outsourcing Services
- Technical Expertise
- Mobile Application
- Mobile Application Development
- Mobile Testing
- Augmented Reality
- ibeacon
- Web Solutions
- Web Development
- E-learning
- Learning Management Systems
- NetSupport Solutions
- NetSupport Education Solutions
- E-Learning Projects
Offshoring
Mobile Application
Web Solutions
E-learning
- Offshoring
- nullProducts
- NetSupport
- About NetSupport
- NetSupport Manager
- NetSupport School
- NetSupport DNA (corp)
- NetSupport ServiceDesk
- NetSupport DNA (edu)
- NetSupport Notify
- WhatsUp Gold
- About WhatsUp Gold
- Modules and Capabilities
- WhatsUp Gold Editions
- WhatsUp Gold 2021 version
- Reports
- Orchtech HR
- Purple Bureau
- Purple Bureau SMEs
- Purple Bureau
Netsupport Corperate
WhatsUp Gold
Purple Bureau
- NetSupport
- Projects
- About Us
- About Orchtech
- Our Team
- Distributors/Partners
- Current Job Vacancies
- Funding Bodies
- Our Clients
- Awards
- Contact Us
- Contact Us
- Request a Meeting
![]()
Edit
![]()
About Us
Orchtech is a software development company working in multiple countries worldwide and our experience spans over multiple services/products such as Offshoring/Outsourcing software development, Mobile applications development services, Web development and HR mobile applications for internal employees management.
Contact Info
-
Orman Tower, Floor 12, Apt. 123, 48 Giza Street, Dokki, Giza, Postal code: 12612. -
+20 2 37622752 -
Week Days: 09.00 to 18.00 Saturday & Friday: Closed
Вы установили Windows Server 2008 R2(или другую версию), и теперь хотите собирать информацию о ее работе. Протокола SNMP это отличный способ, чтобы начать сбор статистики. На сервере с Windows будет установлена служба SNMP. Она будет собирать на компьютере статистику работы и выдавать информацию клиентам . На сервере управления(клиент служби SNMP), я буду использовать инструмент, называемый Cacti, который может собирать эту информацию SNMP и генерировать графики от него довольно легко. Более детально про настройки Cacti для Windows мы поговорим в следующий заметке. А пока поговорим про получении SNMP информации от Windows
Установка и настройка Windows SNMP агент
Итак, прежде всего давайте установим SNMP агента Windows службы.
Запустите «Диспетчер сервера».

Перейдите в раздел «Компоненты» и нажмите кнопку «Добавить компоненты».
 Выберите компонент « SNMP» и выберите «службы SNMP». Нажмите кнопку «Далее».
 Нажмите кнопку «Установить» в окне подтверждения, нажмите кнопку «Закрыть» после завершения установки.

Теперь пришло время настроить службы SNMP. Вернувшись в «Диспечер Сервера» в левой панели открываем «Конфигурация» и выберите «Службы». В средней панели находиим и дважды щелкните элемент «Служба SNMP».
 Перейдите на вкладку «Агент» и введите контакты и информация о местоположении. Нажмите кнопку «Применить».
 На вкладке «Безопасность» в соответствии с принятыми названиям нажмите «Добавить».
 Мы будем только читать информацию (а не проводить настройку) на агента SNMP потому выбираем «Только чтение» и введите название. Нажмите кнопку «ОК».
 Теперь нажмите на вторую кнопку «Добавить».
 Введите адрес IP или имя хоста сервера управления Cacti (система которая будет получать информацию от Службы SNMP ) нажмите кнопку «Добавить».
 Убедитесь, что галочка стоит напротив «Принимать пакеты SNMP» для этих машин» и нажмите кнопку ОК.
-

-
August 22 2013, 19:09

- Техника
- Cancel
Некоторое время назад установил сборку Cacti. И настроил сбор основных данных с маршрутизаторов. Теперь наступила пора собрать данные с серверов Windows 2008r2.
Сегодня настроил сбор данных от некоторых серверов. Инструкция http://aaronwalrath.wordpress.com/2010/06/02/monitoring-windows-server-2008-r2-with-snmp-and-cacti/ (перевод на русский здесь http://my-srv.blogspot.ru/2010/07/windows-snmp.html)
Если коротко устанавливаем SNM агент Server ManagerFeatures SummeryAdd Features выбираем SNMP ServiceSNMP Service устанавливаем. Далее запускаем ConfigurationService, находим запущенную службу SNMP Service и выполняем ее настройку (правой кнопкой Properties)
Основной момент: необходимо указать пароль SNMP и ip адрес сервера cacti.
1. Вводим пароль. Конечно пароль должен быть сложнее и конечно READ ONLY (мы только читаем информацию).
2. Вводим IP адрес сервера cacti. Конечно лишнее удаляем.
Далее идет на web-интерфейс сервера DevicesAdd и настраиваем новое устройство. Нажимаем Save. Если все настроили верно вверху появляется подтверждение подключения.
table of Contents
- First step to install SNMP
-
- Open the control panel
- 2. Add roles and features
- 3. Start installing SNMP
- Step 2 set group name
-
- 1. Set the group name
- 2. Open SNMP service
- Extended reading
-
- Public group trap
- 2. Specify a group
- WeChat appreciation
In Windows Server 2008 and Windows Server 2008 R2, SNMP exists in the form of a server function.
This experience will introduce how to install SNMP under Windows Server 2008.
First step to install SNMP
Win + R Enter Control

Open the control panel

2. Add roles and features


3. Start installing SNMP


Step 2 set group name
Open local group strategy
1. Set the group name


Don’t forget to clickApplication (A)。
2. Open SNMP service
Enter command services.msc


Extended reading
Public group trap
With this policy setting, «Trap Configuration» can be implemented for the Simple Network Management Protocol (SNMP) agent.
SNMP is an agreement that makes users remotely managed by polling and setting terminal values and monitoring network events.
With this policy setting, you can configure the host name of the trap message of the group to receive the SNMP service. Trap messages are a warning event or important event that allows SNMP proxy to notify the management system asynchronously.
If this policy setting is enabled, the SNMP service sends the trap message to the host in the «public» community.
If this policy setting is disabled or not configured, the SNMP service will switch the trap configuration configured on the local computer.
Note: This setting is invalid if the SNMP proxy is not installed on the client computer.
Also see the other two SNMP settings: «Specify Allowed Manager» and «Specify Group Name».
2. Specify a group
This Policy Settings Configure a group list defined for the Simple Network Management Protocol (SNMP) service.
SNMP is an agreement that makes users remotely managed by polling and setting terminal values and monitoring network events.
The effective group is a group approved by the SNMP service, and the group is a host group that is managed by SNMP (server, workstation, hub and router). The SNMP service is a managed network node that receives the SNMP packet from the network.
If this policy setting is enabled, the SNMP agent only accepts requests from their approved groups, and this group only allows SNMP read operations.
If this policy setting is disabled or not configured, the SNMP service will switch the valid group configured on the local computer.
Best Practice: For security purposes, it is recommended to limit HKLM Software POLICIES SNMP Parameters ValidCommunities item to only have full control permissions in the local administrator group.
Note: It is recommended to use hidden group names.
Note: This policy setting is invalid if the SNMP proxy is not installed on the client computer.
Also see the other two SNMP settings: «Specify Allow Manager» and «Specify Trap Configuration».
WeChat appreciation

Settings up Microsoft SNMP Service on Windows 7 locally and remotely is something that many admins need to do in their network environments in order to monitor all desktops in their network properly using SNMP.
In order to do this, Windows 7 SNMP Service needs to be installed and configured in order to allow Network monitoring and management software to poll them in order to get information about them.
Automatic Installing and Enabling SNMP Service (Local and on Remote PC/Servers)
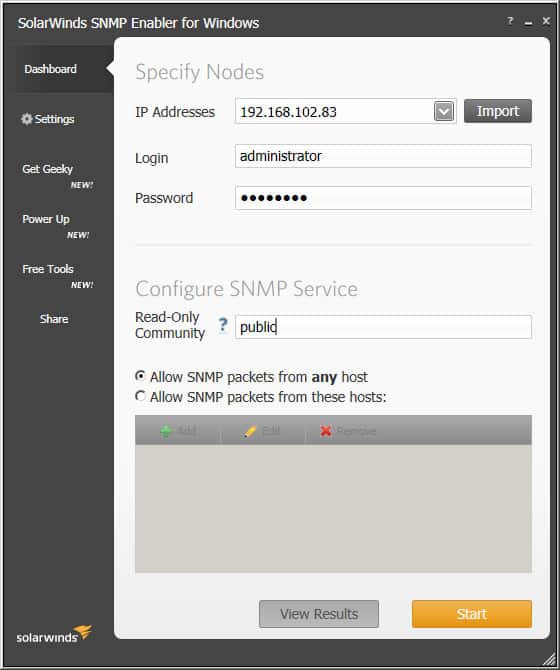
Below we’ve highlighted the manual way of installing and enabling SNMP service on your Windows 7, 2008 Server and 2012 R2 Server installations – its a little hands-on as you can see from the tutorial, so we’ve added this cool tool/utility we found from Solarwinds to enable snmp on your local machine and on your Whole network from one place.
- Download and Install the SNMP Enabler for Windows utility from Solarwinds
- Run the Utility and specify which IP Address you like to remotely Install and Enable SNMP service on.The Utility also allows you to Bulk Enable the Service on multiple Windows 7, Windows 8.1, Windows 10, Windows Server 2008 and Windows Server 2012 R2 by Importing a File with all the IP Addresses listed in there via the “Import” button.(You can export a list of all IP Addresses used from within DHCP server and import into this utility)

- Click the Start button and the utility will go to each IP Address specified and check whether the SNMP Service has been installed already (if it has not, It will Install SNMP Service on that remote server/desktop) and then configure the Community String for you.When it has completed, you will see a screen like the once below:
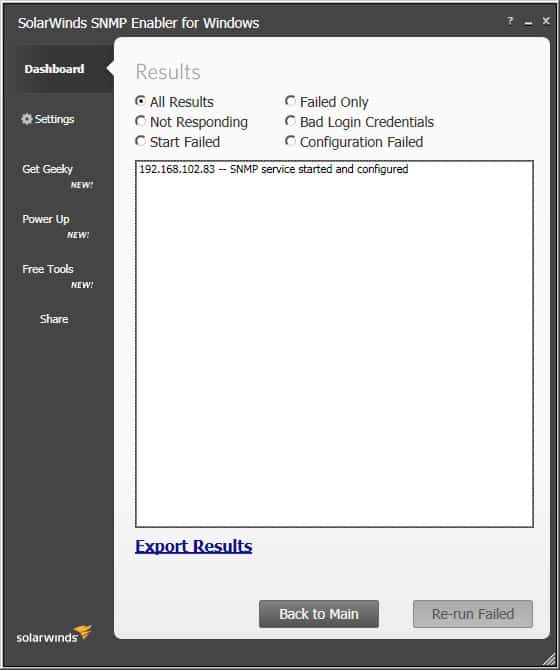
At this point, SNMP Service will be installed along with the Community String enabled and ready to send data out.
Manual Install on Windows 7/2008 Server and 2012 R2 Server
Note: Make sure your using an account that is a member of the “Local Administrators” group or else you’ll have issues with the process below.
-
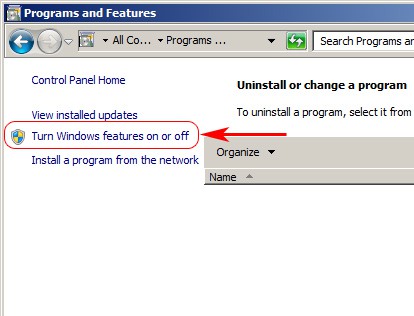
Start > Control Panel > Programs and Features
-
On the Left Sidebar Menu, click on Turn Windows features on or off in the left-hand side of the page.

-
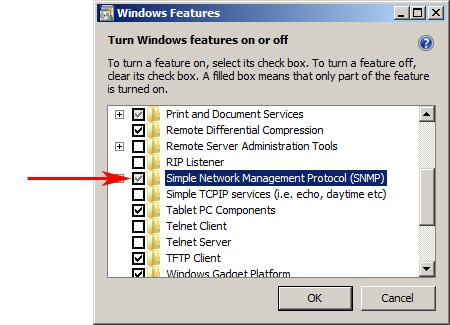
When the “Windows Features” dialog box opens, scroll down and check the “Simple Network Management Protocol” box (see image below), and then click OK.

- For Microsoft Windows 2008 Server, the Server Manager dialog box will open. Click on Features on the left menu, and in the Features dialog box on the right side, click on Add Features and then scroll down and check the “SNMP Services” dialog box and click Next and then click Install. See screenshot below:

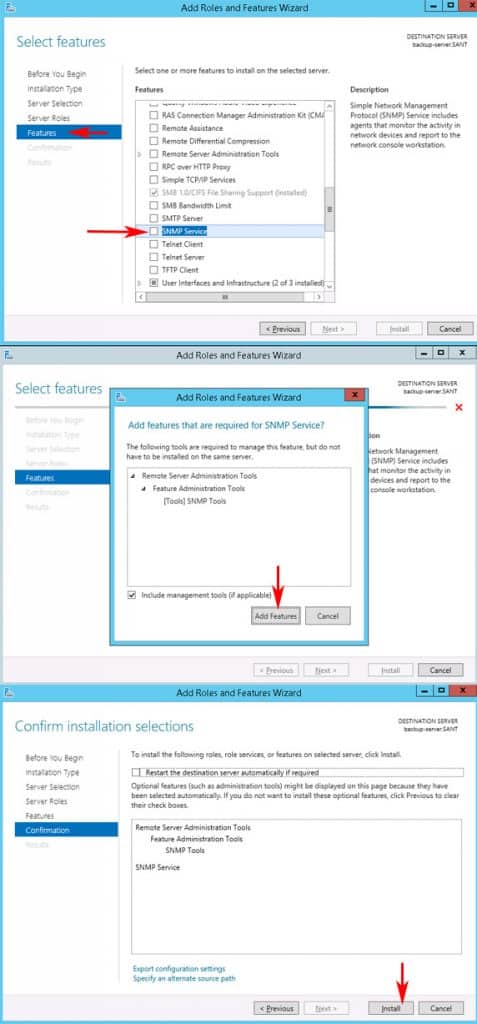
- For Microsoft Windows 2012 R2 Server, the Add Roles and Features wizard will open, click Next for “Role-based or feature-based installation” and then click on Features >
scroll down to SNMP Service and check box > Click Add Features when pop-up box asks you to confirm SNMP Tools installation > Click Next > Click Install. See the screenshots below for step-by-step tutorial:

- For Microsoft Windows 2008 Server, the Server Manager dialog box will open. Click on Features on the left menu, and in the Features dialog box on the right side, click on Add Features and then scroll down and check the “SNMP Services” dialog box and click Next and then click Install. See screenshot below:
-
At this point, you may be Prompted to Insert a Windows 7 Installation disc or may not, depending how you installed your Operating System.
-
The SNMP Service is now set to automatically start with your PC.
You will also need to manually specify a community string within the SNMP service window, as they automatically specify on when you install the service itself. To do so, follow the instructions below:
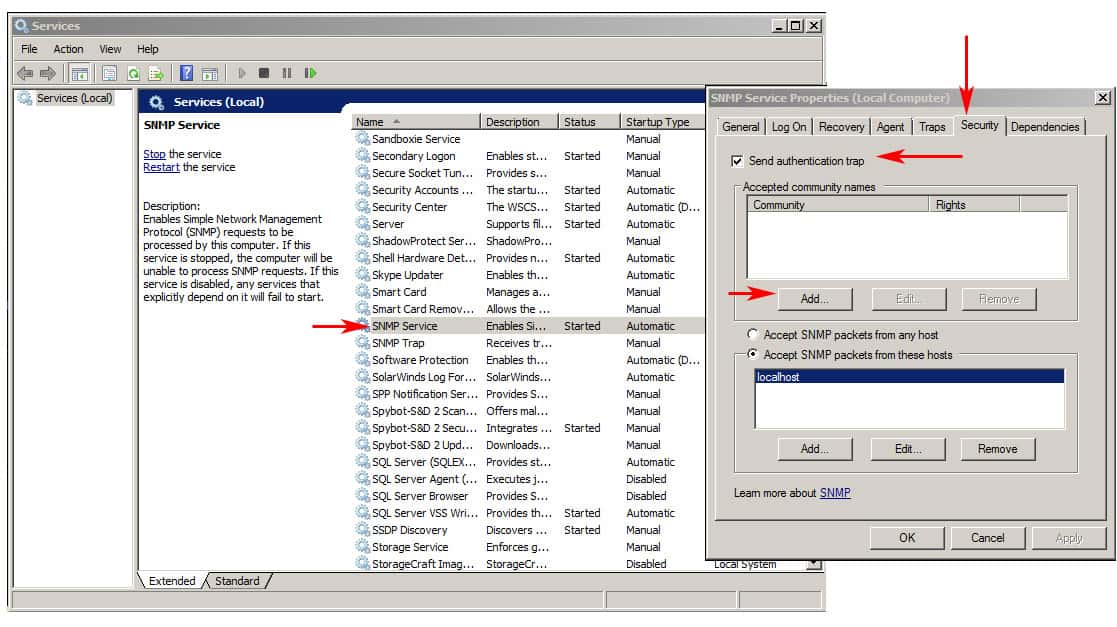
- Start > type in services.msc and press Enter Key to open up the Services Dialog box
- Scroll down to SNMP Service and double-click on it to open up the dialog box for that service
- Click on the Security tab
- Make sure the “Send authentication trap” check box is Checked

- Click “Add” under the “Accepted community names” and add your Community name into the given text field and make sure “READ ONLY” is selected in the Community rights field, then click the ADD button.

- In the field right below the Community string names, you’ll have the option to specify which hosts can poll the device for SNMP information by adding either an IP Address or Host Name – we suggest you add your Host name of your monitoring server to ensure that is the only machine allowed to poll for data.
You should now be able to monitor the given machine using SNMP services, whether its a Windows 7, Window 8, Windows 10 or Windows 2008 Server or Windows 2012 R2 server.
If you want a quick and easy way to Enable this service without going through the hassle of manually doing it, definitely consider grabbing the FREE Tool from Solarwinds to do it from the Link below.
Home
> Monitoring, Windows > Monitoring Windows Server 2008 R2 with SNMP and Cacti
So you have a new Windows Server 2008 R2 installed and now you’d like to start gathering statistics about how it’s performing. The SNMP protocol is a great way to get started. In this tutorial I will install the SNMP agent service on a Windows server and configure it to allow queries from a SNMP based management server. On the management server I will use a tool named Cacti that can collect this SNMP information and generate graphs from it in a fairly easy way. I will assume that you have a server with Cacti already set up. If not, details on how to set up an instance of Cacti on a CentOS Linux server can be found here.
Install and Configure Windows SNMP Agent
Okay first of all let’s install the Windows SNMP agent service.
Start Server Manager.

Scroll down to the Features Summary section and click Add Features.

Under Features open up SNMP Services and check SNMP Service. Click Next.

Click Install at the confirmation screen, then click Close when the install is complete.

Now it is time to configure the SNMP Service. Back in the Server Manager in the left pane open up Configuration and select Services. In the middle Services pane scroll down and double click the SNMP Service.

Click the Agent tab and enter your Contact and Location information. Click Apply.

For now we’ll skip any configuration in the Traps tab. This should only be necessary if you want to configure the SNMP agent to notify our monitoring server of any events without the monitor soliciting the information.
In the Security tab under Accepted Community Names click Add.

We’ll only be reading information (and not setting parameters) on the SNMP agent so keep Read Only and type a Community Name. Using a name other than “public” will help keep unauthorized clients from reading SNMP information from the agent but this is still not completely secure. Click OK.

Now click the second Add button under Accept SNMP Packets.

Type the IP address or hostname of the Cacti management server and click Add.

Make sure that “Accept SNMP packets from these hosts” is still selected, then click OK.
Pages: 1 2