Improve Article
Save Article
Improve Article
Save Article
Written by a Google engineer sublime text is a cross-platform IDE developed in C++ and Python. It has basic built-in support for Python. Sublime text is fast and you can customize this editor as per your need to create a full-fledged Python development environment. You can install packages such as debugging, auto-completion, code linting, etc. There are also various packages for scientific development, Django, Flask, and so on.
Downloading and Installation
Sublime Text 3 can be downloaded from its official site sublimetext.com. To install sublime text 3 on Windows, go through How to install Sublime Text 3 in Windows?
Setting up Environment Variable
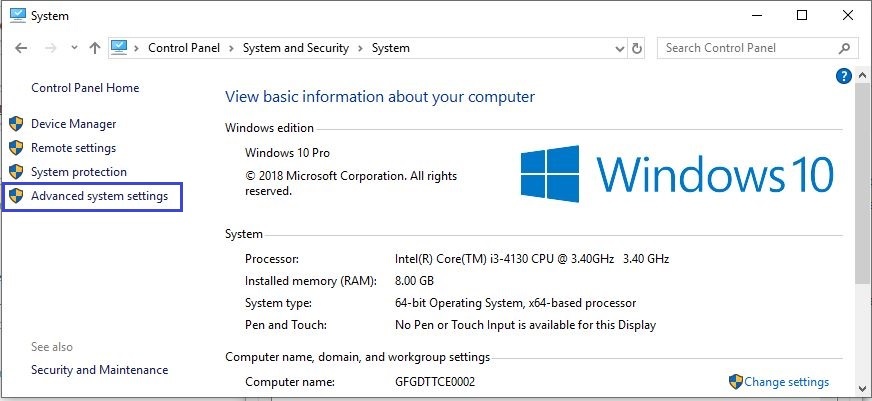
- Step 1: Click the Advanced system settings link.

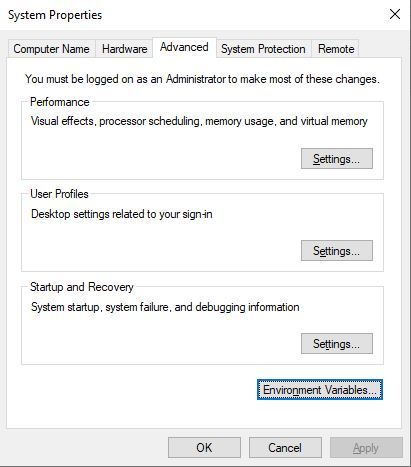
- Step 2: Click Environment Variables. In the section System Variables, find the PATH environment variable and select it. Click Edit. If the PATH environment variable does not exist, click New.


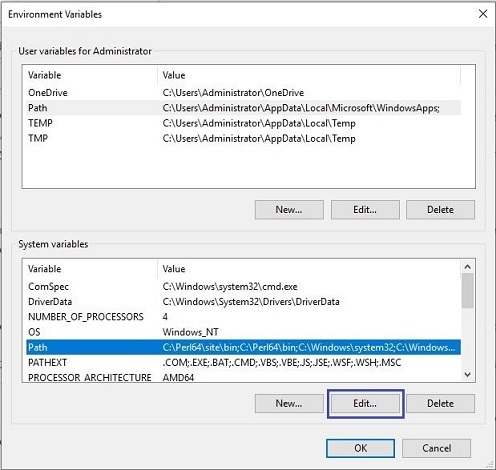
- Step 3: In the Edit System Variable (or New System Variable) window, specify the value of the PATH environment variable. Click OK. Close all remaining windows by clicking OK.
Working on Sublime Text3
Step 1: Create a new file and save it with extension .py for example save it as checkversion.py. Now, Go to Tools -> Build System -> Python then type on your checkversion.py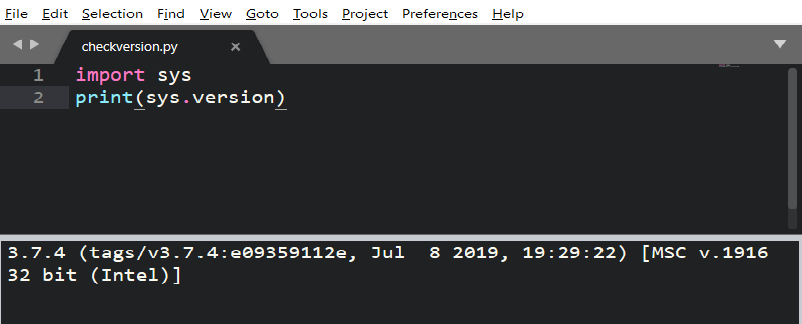
This is showing the version of python. This means python is successfully installed and added in Environment Variable.
Step 2: Add new build system on your Sublime Tools -> Build System -> New Build System and make sure that the new build system has this following command
{
"cmd":["C:/Users/<user>/AppData/Local/Programs/Python/Python37-32/python.exe", "-u", "$file"],
"file_regex": "^[ ]File "(...?)", line ([0-9]*)",
"selector": "source.python"
}
Select your new system build newPython3 and re-run the checkversion.py and now it should be using Python 3
ALL Done…
Now create any file and save it with .py extension
Now you can run your Python code by using CTRL+SHIFT+B and choose from the 2 options.

Improve Article
Save Article
Improve Article
Save Article
Written by a Google engineer sublime text is a cross-platform IDE developed in C++ and Python. It has basic built-in support for Python. Sublime text is fast and you can customize this editor as per your need to create a full-fledged Python development environment. You can install packages such as debugging, auto-completion, code linting, etc. There are also various packages for scientific development, Django, Flask, and so on.
Downloading and Installation
Sublime Text 3 can be downloaded from its official site sublimetext.com. To install sublime text 3 on Windows, go through How to install Sublime Text 3 in Windows?
Setting up Environment Variable
- Step 1: Click the Advanced system settings link.
- Step 2: Click Environment Variables. In the section System Variables, find the PATH environment variable and select it. Click Edit. If the PATH environment variable does not exist, click New.
- Step 3: In the Edit System Variable (or New System Variable) window, specify the value of the PATH environment variable. Click OK. Close all remaining windows by clicking OK.
Working on Sublime Text3
Step 1: Create a new file and save it with extension .py for example save it as checkversion.py. Now, Go to Tools -> Build System -> Python then type on your checkversion.py
This is showing the version of python. This means python is successfully installed and added in Environment Variable.
Step 2: Add new build system on your Sublime Tools -> Build System -> New Build System and make sure that the new build system has this following command
{
"cmd":["C:/Users/<user>/AppData/Local/Programs/Python/Python37-32/python.exe", "-u", "$file"],
"file_regex": "^[ ]File "(...?)", line ([0-9]*)",
"selector": "source.python"
}
Select your new system build newPython3 and re-run the checkversion.py and now it should be using Python 3
ALL Done…
Now create any file and save it with .py extension
Now you can run your Python code by using CTRL+SHIFT+B and choose from the 2 options.
Sublime Text 3 (ST3) is a lightweight, cross-platform code editor known for its speed, ease of use, and strong community support. It’s an incredible editor right out of the box, but the real power comes from the ability to enhance its functionality using Package Control and creating custom settings.
In this article, we’ll look at how to setup Sublime Text for full stack Python development (from front to back), enhance the basic functionality with custom themes and packages, and use many of the commands, features, and keyword shortcuts that make ST3 so powerful.
Note: This tutorial assumes you’re using a Mac and are comfortable with the terminal. If you’re using Windows or Linux, many of the commands will vary, but you should be able to use Google to find the answers quickly given the info in this tutorial.
Before we start, let’s address what I mean exactly by “full stack.”
In today’s world of HTML5 and mobile development, JavaScript is literally everywhere. EVERYWHERE. Python coupled with a framework such as Django or Flask is not enough. To really develop a website from end-to-end, you must be familiar with JavaScript (and the various JavaScript frameworks), REST APIs, responsive design, and of course HTML and CSS, and so on.
Let’s face it: as a programmer, you are like any other craftsman. If you want to be the best you can be, then you need your tools to be sharp. Your development environment must be set up for full stack development—which is exactly what we are going to do right now.
Features
Let’s start by looking at a few of the default features of Sublime Text 3:
-
Split Layouts allow you to arrange your files in various split screens. This is useful when you are doing test driven development (Python code on one screen, test scripts on another) or working on the front end (HTML on one screen, CSS and/or JavaScript on another).

-
Vintage Mode provides you with vi commands for use within ST3.
- Chrome-like Tabs make navigating and editing several files much simpler.
- Automatic loading of the last session re-opens all files and folders you had open when you closed the editor the last time. I leave ST3 open all the time, with various projects open, so if I reset the computer, it opens the files and folders right back up.
- Code Snippets increase your productivity by giving you the ability to create common pieces of code with a single keyword. There are a number of default snippets. To try one for yourself, open a new file, type in
lorem, and press Tab. You should get a paragraph of lorem ipsum text. Also, if you typedefsand then press Tab in a Python file, it will setup a generic function.

Note: You can also create your own snippets: Tools > New Snippet. Refer to the documentation for help, and also check out some of my snippets here.
Customizing Sublime Text 3
After you download ST3, you can customize it.
Install the subl command line tool
Just Like TextMate has the mate command, Sublime Text has a command line tool called subl that allows you to open one file, or an entire directory of files and folders, from the terminal.
To enable this command, create a symbolic link to the subl binary:
$ sudo ln -s /Applications/Sublime Text.app/Contents/SharedSupport/bin/subl /usr/bin/subl
Ensure that the link works by opening Sublime:
If that didn’t work, you probably need to add /bin to your path:
$ echo "export PATH=~/bin:$PATH" >> ~/.profile
Then repeat step one.
Note: If you are still having trouble, check out this article for help. You can also read up on creating the symbolic links in Windows and Linux.
Now you can open a file or directory using the following commands:
# Open the current directory.
$ subl .

# Open a directory called tests.
$ subl ~/Documents/test

# Open a file called text.txt.
$ subl test.txt
If there are spaces in the path, you must surround the entire path in double quotes:
$ subl "~/Documents/test/my test file.txt"
To view all the commands, open up the help file:
Install Package Control
To begin taking advantage of the various packages for extending Sublime’s functionality, you need to manually install the package manager called Package Control. Once you have it installed, you can use it to install, remove, and upgrade all other ST3 packages.
- To install, copy the Python code for Sublime Text 3 found here. Click View > Show Console to open the ST3 console. Paste the code into the console. Press Enter. Reboot ST3.
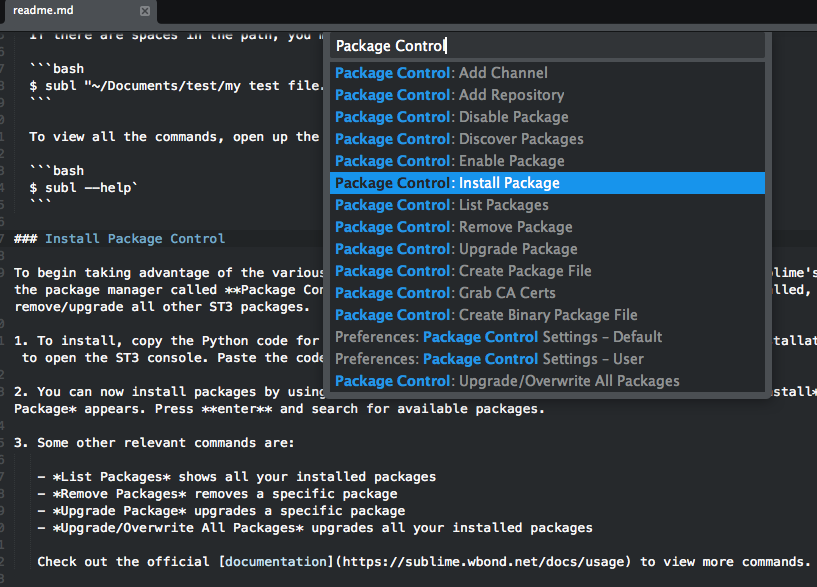
- You can now install packages by using the keyboard shortcut Cmd+Shift+P. Start typing
installuntilPackage Control: Install Packageappears. Press Enter and search for available packages.
Here are some other relevant commands:
List Packagesshows all your installed packages.Remove Packageremoves a specific package.Upgrade Packageupgrades a specific package.Upgrade/Overwrite All Packagesupgrades all your installed packages.
Check out the official documentation to view more commands.
Create a Custom Settings File
You can fully configure Sublime Text using JSON-based settings files, so it’s easy to transfer or synchronize your customized settings to another system. First, we need to create our customized settings. It’s best to create a base file for all environments as well as language-specific settings files.
To set up a base file, click Sublime Text > Preferences > Settings — User. Add an empty JSON object to the file and add your settings like so:
{
  // base settings
  "auto_complete": false,
  "sublimelinter": false,
  "tab_size": 2,
  "word_wrap": true
}
- For language specific settings, click Sublime Text > Preferences > Settings — More > Syntax Specific — User. Then save the file using the following format: LANGUAGE.sublime-settings. For Python-specific settings, save the file as Python.sublime-settings.
- You can obviously configure your settings to your liking. However, I highly recommend starting with my base and Python-specific settings and then making changes as you see fit.
- Optional: You can use Dropbox to sync all your settings. Simply upload your settings files to Dropbox and load them from there to sync the Sublime environments on all your machines.
- A good reference for settings can be found at the Sublime Text Unofficial Documentation.
Themes
ST3 also gives you the option to change the overall theme to better suit your personality. Design your own. Or, if you’re not artistically inclined, you can download one of the various custom themes designed by the Sublime community through Package Control. Check out ColorSublime to preview themes before installing them.
The ever popular Soda Dark Theme and the minimal Flatland are two of my personal favorites.
After installing a theme, make sure to update your base settings through Sublime Text > Preferences > Settings — User:
{
  "theme": "Flatland Dark.sublime-theme",
  "color_scheme": "Packages/Theme - Flatland/Flatland Dark.tmTheme"
}
Packages
Besides the packaged themes, I take advantage of the following packages to speed up my workflow.
Anaconda
Anaconda is the ultimate Python package. It adds a number of IDE-like features to ST3 including the following:
- Autocompletion works by default, but there are a number of configuration options.
- Code linting uses either PyLint or PyFlakes with PEP 8. I personally use a different linting package, as I will explain shortly, so I disable linting altogether within the user-defined Anaconda settings file, Anaconda.sublime-settings, via the file menu: Sublime > Preferences > Package Settings > Anaconda > Settings — User:
{"anaconda_linting": false} - McCabe code complexity checker runs the McCabe complexity checker tool within a specific file. If you’re not familiar with what complexity is, be sure to visit the link above.
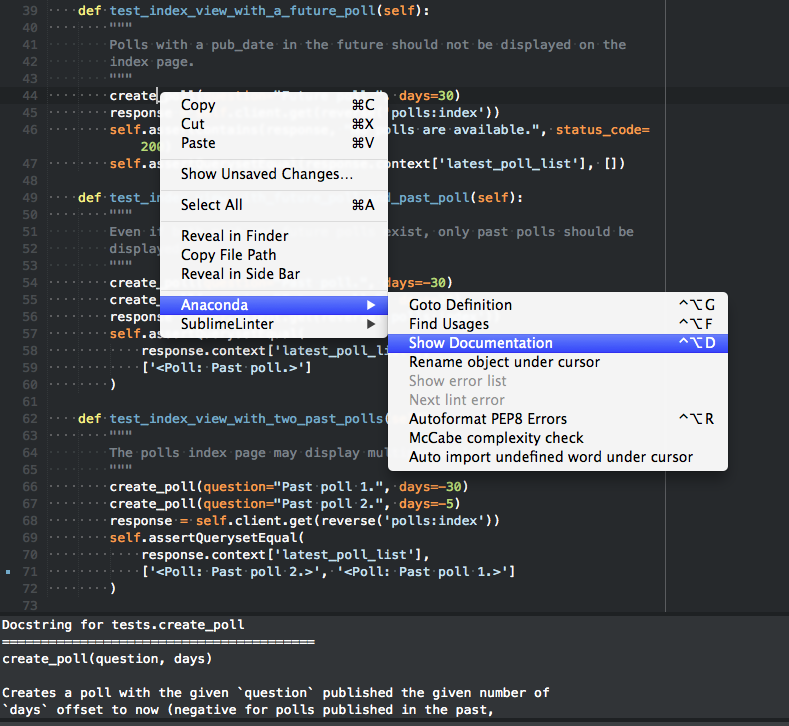
- Goto Definitions finds and displays the definition of any variable, function, or class throughout your entire project.
- Find Usage quickly searches where a variable, function, or class has been used in a specific file.
- Show Documentation shows the docstring for functions or classes (if defined, of course).
You can view all of the features here or within the README file in ST3’s Package Settings: Sublime Text > Preferences > Package Settings > Anaconda > README.
Note: SublimeCodeIntel is another popular package that has many of the same features as Anaconda. I suggest testing them both out.
Djaneiro
Djaneiro supports Django templating and keyword highlighting and provides useful code snippets (tab completions) for Sublime Text. The snippet system is an incredible time-saver. You can create common Django blocks with only a few keystrokes for templates, models, forms, and views. Check out the official documentation to see a list of snippets.
My personal favorites are for templating: var creates {{ }} and tag creates {% %}.
requirementstxt
requirementstxt provides autocompletion and syntax highlighting as well as a nice version management system for your requirements.txt files.
SublimeLinter
SublimeLinter is a framework for ST3 linters. The package itself does not include any actual linters; those must be installed separately via Package Control using the SublimeLinter-[linter_name] naming syntax. You can view official linters here. There are also a number of third party linters, which can be viewed in Package Control. Check out the installation instructions here.
For Python linting, I recommend using SublimeLinter-pyflakes and SublimeLinter-pep8.
I also use SublimeLinter-jshint, SublimeLinter-pyyaml, SublimeLinter-csslint, SublimeLinter-html-tidy, and SublimeLinter-json.
Note: Most of these linters have dependencies associated with them, so please read the installation instructions before installing.
You can customize each linter in the user-defined SublimeLinter.sublime-settings file: Sublime Text > Preferences > Package Settings > SublimeLinter > Settings — User. For example, I ignore the following PEP 8 errors and warnings:
"pep8": {
    "@disable": false,
    "args": [],
    "excludes": [],
    "ignore": "E501,C0301,W0142,W0402,R0201,E1101,E1102,C0103,R0901,R0903,R0904,C1001,W0223,W0232,W0201,E1103,R0801,C0111",
    "max-line-length": 100,
    "select": ""
},
GitGutter
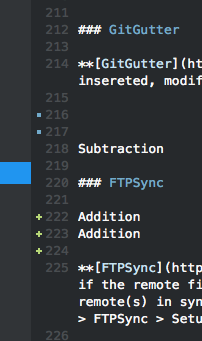
GitGutter shows little icons in ST3’s gutter area that indicate whether a line has been inserted, modified, or deleted since the last commit.
Note: If you want support for a number of distributed version control systems (Git, SVN, Bazaar, and Mercurial), check out Modific.
FTPSync
FTPSync syncs your project with your remote files. Simply open the file to download it (if the remote file is newer than your local file) and upload it to your remote server with every save. That’s a great way to keep your local and remote(s) in sync. You’ll want to make sure to add at least one remote connection by clicking Sublime Text > Preferences > Package Settings > FTPSync > Setup FTPSync.
Sample settings:
{
  "primary": {
    host: "ftp.mywebsite.com",
    username: "johnsmith",
    password: "secretpassword",
    path: "/www/",

    upload_on_save: true,
    tls: true
  }
}
I personally set the password to null because I don’t want it visible in that file. FTPSync just asks for my password after each save.
AdvancedNewFile
AdvancedNewFile is used to create a new folder or file from within ST3 with key bindings alone.
Simply bring up the AdvancedNewFile input through the appropriate key binding. Then, enter the path, along with the file name into the input field. Upon pressing Enter, the file will be created. In addition, if the directories specified do not yet exist, they will be created. By default, the path to the file being created will be filled shown in the status bar as you enter the path information.
For a more detailed explanation on its usage, check out the documentation on GitHub. Be sure to read about Tab Completion as well as Predefined Aliases.
I replaced the normal Cmd+N command to create a new file with AdvancedNewFile by adding the following code to the Key Bindings — User file: Sublime Text > Preferences > Package Settings > AdvancedNewFile > Key Bindings — User:
[
  { "keys": ["cmd+n"], "command": "advanced_new_file_new"}
]
You can also setup a default directory to start with: Sublime Text > Preferences > Package Settings > AdvancedNewFile > Settings — User
{"default_initial": "/Users/michaelherman/Documents/repos"}
Now when I create a new file, the /Users/michaelherman/Documents/repos string is automatically inserted first, since 99% of the time I store all my scripts in that directory.
Emmet
Emmet, previously known as Zen Coding, uses simple abbreviations to generate HTML or CSS code snippets.
For example, if you type a bang, !, and press Tab in an HTML file, then the HTML5 doctype and a few basic tags will be generated:
<!doctype html>
<html lang="en">
<head>
  <meta charset="UTF-8">
  <title>Document</title>
</head>
<body>

</body>
</html>
Check out the official documentation as well as this handy cheat sheet for more info.
Markdown Preview
Markdown Preview is used for previewing and building markdown files.
To use, open the Package Manager and type Markdown Preview to show the available commands:
- Markdown Preview: Python Markdown: Preview in Browser
- Markdown Preview: Python Markdown: Export HTML in Sublime Text
- Markdown Preview: Python Markdown: Copy to Clipboard
- Markdown Preview: GitHub Flavored Markdown: Preview in Browser
- Markdown Preview: GitHub Flavored Markdown: Export HTML in Sublime Text
- Markdown Preview: GitHub Flavored Markdown: Copy to Clipboard
- Markdown Preview: Open Markdown Cheat Sheet
Once converted, the output file will be updated on each subsequent save.
Keyboard Shortcuts
- Goto Anything Cmd+P is used for quickly finding and opening files. Just type in a part of a path and filename within a project and you can easily open that file. This is great for quickly opening files in large Django projects.
- Goto Line Number Ctrl+G takes you to a specific line number in an active file.
- Goto Symbol Cmd+R lists all functions and classes within a file to make them easier to find. Simply start typing the one you want.
- Go to beginning of line Cmd+Left and Go to end of line Cmd+Right help you navigate within lines.
- Delete current line Ctrl+Shift+K deletes the current line.
- Multi-Edit is by far my favorite shortcut:
- Select a word and press Cmd+D to select the next same word. Then press Cmd+D again to select the next same word again, and so on.
- Press Cmd+Left Button to create a cursor for editing everywhere you click.
- Block select Option+Left Button is used to select a block of text. It’s perfect for removing blank space when formatting a CSV file.
Note: For more shortcuts, take a look at this article.
Custom Commands
It’s easy to write your own custom commands and key bindings with Python. I currently use this workflow:
- Copy the path of the current file to the clipboard (link).
- Close all tabs except the active one (link).
Install these by adding the Python files to your /Sublime Text 3/Packages/User directory via the file menu (Sublime > Preferences > Browse Packages) and then opening the User directory. To complete the setup, bind them from the Key Bindings — User file (Sublime Text > Preferences > Package Settings > AdvancedNewFile > Key Bindings — User).
[
  // Copy file name
  {
    "keys": ["cmd+shift+c"],
    "command": "copy_path_to_clipboard"
  },
  // Close all other tabs
  {
    "keys": ["cmd+alt+w"],
    "command": "close_tabs"
  }
]
Additional Resources
- Community-maintained documentation
- Package Manager documentation
- Unofficial documentation reference
- Pimp my Editor — Presentation
Conclusion
I hope that this article was helpful to you and that you were able to integrate some of the above packages and custom settings along with your own based on your personal preferences to improve your workflow.
If you have any questions or suggestions of your own, please let me know in the comments below. Finally, check out the dotfiles folder in this repo to view all the resources that I created. Cheers!
Sublime Text Editor has been around since 2008 and has remained one of the most intuitive, free, and feature-packed code editors on the market. It is great for new and seasoned developers alike, with features like multi-tab select, git integration, key bindings, file patterns, and a native command-line interface to make your workflow more efficient.On top of this, visual customizability allows the developer to create, import, and edit Sublime’s interface themes and color schemes.
By default, you can use it for any programming language — but its Python support is considered one of the best. Why? Because it’s written in C++ and Python. You might even say that Sublime Text is the best code editor to understand Python because it is part Python.
But why, exactly, should you use Sublime Text for Python development?
Why use Sublime Text for Python development?
It only takes three words to sum up the awesomeness of Sublime Text for Python and they are speed, interface, and customization.
Speed
Sublime Text is super fast. Unlike other IDEs that may take a bit of time to boot up and maybe bombard you with a few welcome messages and multi-tabs of text about the editor each time you boot it up, Sublime Text just opens.
Not only that, it opens and leaves exactly where you left off — including unsaved changes and code that may have been lost with any other editor. In a way, it’s like you never left. So there’s no worry about low laptop battery or panic when Windows randomly forces you to restart mid-way through your work. You can close Sublime Text safely and know that everything will return to you intact and without any glitches.
Interface
Sublime Text’s interface is one of the cleanest interfaces for a code editor. With many IDEs, you’re bombarded with options galore, with side and bottom panels that often take up screen real-estate. Sublime Text’s beauty lies in its minimalist approach, showing only what is necessary, which gives you the space to focus on your code.
Opening up a new project won’t close your current project either. Instead, it opens up a completely new window for you to arrange as you wish on your screen. The separation can come in handy when you’re referencing multiple codebases.
Some IDEs and code editors only allow for one project at a time. Sublime Text preserves your open projects and keeps them separated from each other. You don’t need to worry about accidentally editing the wrong files when you’ve got more than a dozen files open.
Customization
Sublime Text comes with a core set of rich features such as key bindings, indentation preferences, spell checks, multi-select, and file patterns. The highlight for Sublime Text is the ability to extend the current functionality with a thing called Packages.
Packages can be anything. This includes plugins, syntax highlighting customization, menus, and code snippets. In a way, packages can be seen as extensions that are pluggable into Sublime to perform whatever task you want.
How to set up Sublime Text for Python development
Step 1: Download Sublime Text and have Python set up on your computer
You can download Sublime Text at sublimetext.com. Once completed, run the .exe file to complete the installation process.
You also need to have Python set up on your computer. If you haven’t already done this, you can download Python from python.org. Select the version of your OS system and follow the installation instructions. If you’re on Windows, just run the .exe file and follow the wizard.
Step 2: Configuring Sublime Text for Python
Sublime Text comes pretty complete and ready for you to code out of the box. However, if you want to leverage Sublime Text for Python, you should install and configure the integrated terminal.
Without further ado, let’s get to installing and configuring the Integrated Terminal.
Go to ‘Command Palette’ located under ‘Tools’.

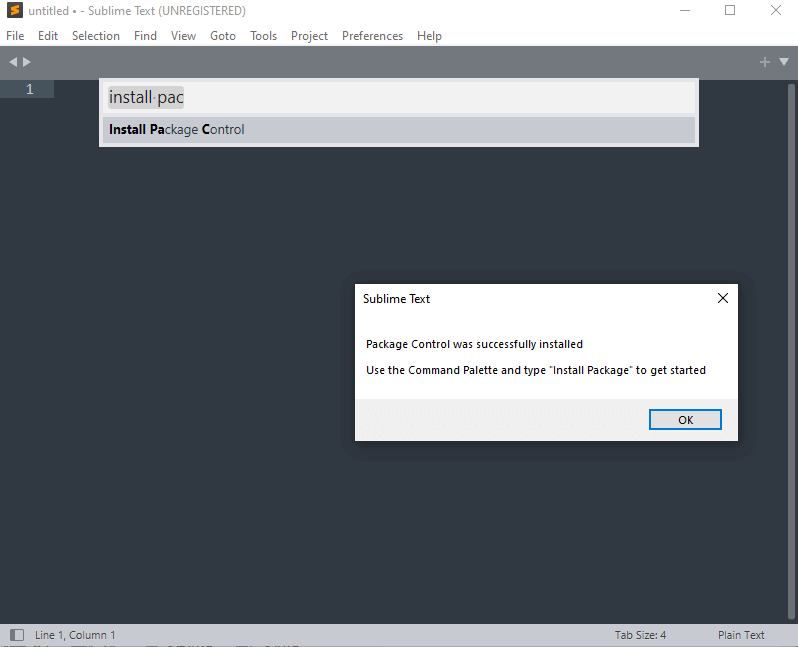
Type in ‘Install Package Control’ and select it from the drop-down that appears. This will install ‘Package Control’ on your Sublime Text editor.

If the install went correctly, you will get a pop-up message like this:

The next thing to do is install ‘Terminus’. To do this, start typing in ‘Package Control’ and select ‘Package Control: Install Package’ from the dropdown list that appears. (If your search bar disappears, just get back into it by navigating to Command Palette again).
This will give you a new dropdown list of available packages that you can install to enhance your Sublime experience.
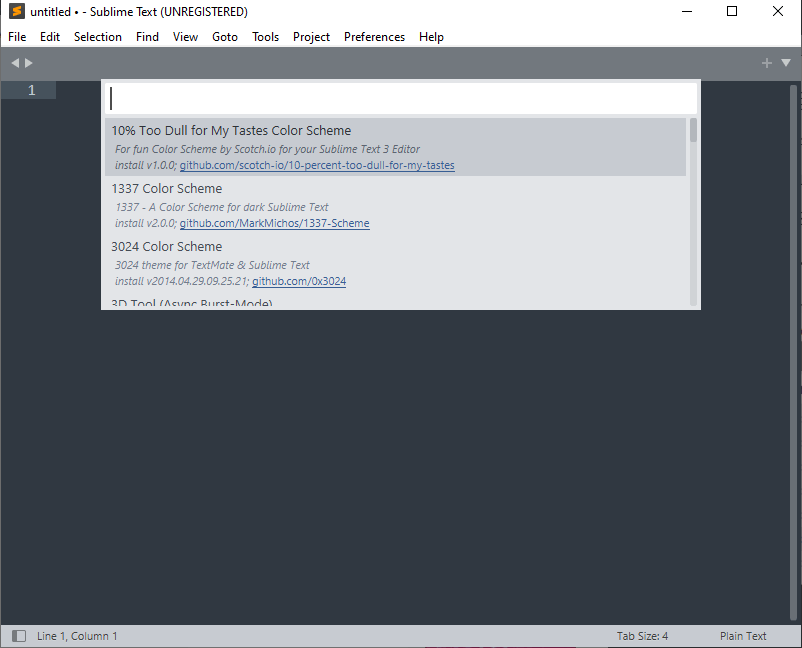
Look for ‘terminus’ and select it.
This will download the package. Once completed, it will appear under ‘Preferences’ > ‘Package Settings’ > ‘Terminus’
You can open up Terminus by opening up ‘Command Palette’ again and typing in ‘Terminus’. Select ‘Terminus: Open Default Shell in Panel’. This will open up your command line.
Here is what it looks like:
The last thing to do is set the syntax to Python by opening up ‘Command Palette’ again and then typing in ‘Python’. Select on the ‘Set Syntax: Python’ option. This will ensure that your highlighting is based on Python syntax, making it easier to read your code.

Now all that’s left to do is run your first Python code. To do this, use your terminal as you would any Python project. In the example below, we have a simple ‘Hello world’ Python script and used Terminus to run it.
Top Sublime Text Packages for Python developers
Using Command Palette, you can install whatever packages you want to enhance your Python workflow. Here is a quick list of the top packages you need to get started.
1. Package Control
Package Control is your main hub for installing packages. You need to install this first before you can install anything. Once installed, you will have the option to select ‘Package Control: Install Package’. This will open up a list of available packages for Sublime Text.
From here you can install any of the dozens of packages available. Navigate to ‘Command Palette’ > type and select ‘Package Control: Install Package’ > search and select the package of your choice and have fun!
2. Tabnine for sublime
Tabnine is an intelligent, AI-driven code completion tool that can cut your coding time, reduce mistakes, and make best practice suggestions. It supports over 30 languages, with Python being one of them.

Once you’ve done that, you will see an ‘Installing package’ message at the bottom of your Sublime Text editor. Once completed, you can start using Tabnine right away.![]()
3. requirementstxt
requirementstxt is a handy plugin that provides syntax highlighting, and easy version management for your requirements.txt files.
4. Anaconda
If you’ve played with requirementstxt and it’s not to your fancy, Anaconda is another good alternative. Anaconda turns your Sublime Text editor into a Python-ready IDE by including autocompletion, code linting, autopep8 formatting, McCabe complexity checker Vagrant and Docker support.
5. AutoPEP8
AutoPEP8 is a package that will automatically format your Python code to PEP 8 style guide for you. This means with your chosen key binding, you can quickly lint spaces to the correct standard.
6. SublimeLinter
Linting is an automated checking tool that checks for style and potential errors in your code. SublimeLinter is a staple linting tool in Sublime Text that is highly supported and frequently updated to ensure that the latest standards are met.
Wrapping it up
Overall, Sublime Text is one of the fastest and responsive free code editors available. When it comes to Python, you don’t need a large suite of packages to get started. Terminus is a handy package to have to give that IDE feel without the lag.
Coding Python in Sublime Text is a no-frills experience. The minimalistic interface makes it a distraction-free area. In addition to this, the large ecosystem of packages ensures that your every development need is met. All you have to do is install it via the ‘Command Palette’.
Tabnine
Tabnine is an intelligent, AI-driven code completion tool that can cut your coding time, reduce mistakes, and make best practice suggestions.
Get Started
На чтение 4 мин. Опубликовано 23.03.2021
Привет разработчикам Python, здесь мы узнаем, как запускать программы python в редакторе Sublime Text 3, загружать и устанавливать Sublime Text 3, устанавливать пакеты и многое другое.
Существуют различные IDE и текстовые редакторы для запуска кода python. Если вы новичок, то это нормально использовать текстовый редактор, но если вы разработчик, то, без сомнения, вы будете знакомы с важностью IDE. И вы также можете обратиться к этой ссылке Best Python IDEs для подробного объяснения Python IDEs . Хотя Sublime Text 3 — это текстовый редактор, но он имеет некоторые IDE-подобные функции, такие как проекты и “сборки” для выполнения других программ изнутри редактора.
Редактор Sublime Text 3
Преимущества
- Это легкий редактор для разработчиков.
- Он наиболее популярен среди разработчиков.
- Самое лучшее в Sublime Text 3 то, что он не требует много места для установки и работать с ним очень удобно и комфортно.
- Sublime Text 3.0 был выпущен 13 сентября 2017 года.
- Он изначально поддерживает множество языков программирования, а также языки разметки.
Особенности Sublime Text 3
- Кросс-платформенный
- Sublime Text 3 может работать на Windows, Linux и Mac.
- Вам нужна только одна лицензия для использования Sublime Text 3 на каждом компьютере, на котором вы хотите использовать Sublime Text 3, независимо от того, какую ОС они используют.
- Мощная экосистема API и пакетов
- Sublime Text 3 предоставляет множество мощных API Python, которые позволяют плагину выполнять множество встроенных функций.
- Sublime Text раскрывает свои внутренние компоненты через интерфейс прикладного программирования (API), с которым программисты могут взаимодействовать с помощью языка программирования Python.
- Встроенный интерпретатор Python включен в редактор. Встроенный интерпретатор полезен для проверки настроек редактора и быстрого тестирования вызовов API при разработке плагинов.
Палитра команд
Это еще одна мощная особенность Sublime Text 3. Он позволяет выполнять различные функции, такие как сортировка, изменение синтаксиса, а также изменение параметров идентификации.
Используя палитру команд, вы можете получить доступ ко многим вещам, таким как обработка проектов sublime, изменение синтаксиса файлов, вызов команд пакета и т. д. Чтобы использовать палитру команд – нажмите ctrl+shift+p, затем выберите команду и нажмите Enter.
Множественный выбор
Это одна из лучших особенностей Sublime Text 3. Используя эту функцию, вы сможете изменять несколько строк одновременно, а также быстрее манипулировать файлами. Он работает как быстрая замена для поиска и замены или для применения одной и той же последовательности изменений к нескольким строкам одновременно.
Чтобы использовать множественное выделение, выделите блок текста, затем нажмите Ctrl+Shift+L, чтобы разделить его на одно выделение в строке, а затем нажмите Ctrl+D, чтобы выбрать следующее вхождение выбранного слова.
Другие Особенности
Помимо вышеперечисленных функций Sublime Text 3 имеет также некоторые другие функции, такие как:
- Функция проверки орфографии
- Автоматическое сохранение
- Настраиваемые привязки клавиш
- Макросы
- Разделение редактирования
- Расширенные настройки
Sublime Run Python Tutorial – Запустите свою первую программу
Без сомнения, Sublime text является самым любимым текстовым редактором в сообществе разработчиков и может служить отличным текстовым редактором Python. Итак, теперь мы увидим, как использовать его для python.
Загрузка и установка
Прежде всего, вы должны скачать его. Ссылка для скачивания-https://www.sublimetext.com/3 Вы увидите описание версии следующим образом:
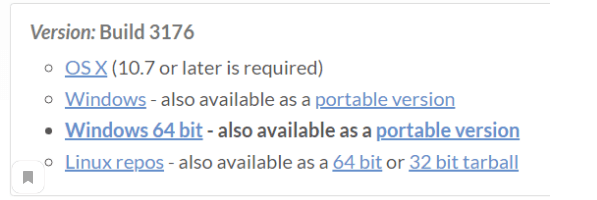
И теперь вы должны выбрать один из них в качестве требования к вашему компьютеру. Установите скачанный файл.
Протестируйте простую программу
Теперь мы увидим выполнение программы python на SublimeText 3. Для этого мы должны сделать вот что:
- Прежде всего откройте свой редактор sublime.
- Создайте новый файл, выполнив следующие действия File->NewFile или нажав ctrl+N .
- Затем сохраните этот файл как yourfilename.py . Расширение должно быть .py .
- Затем напишите свой код.
Здесь берем простую программу, то есть сложение двух чисел. Так что код есть:
num1 = 7
num2 = 9
# Сложите два числа
sum = float(num1) + float(num2)
# Отображение суммы
print(‘Сумма {0} и {1} равна {2}’.format(num1, num2, sum))
Запуск Кода
Перейдите в пункт Инструмент в строке меню, а затем нажмите кнопку Построить систему и внутри нее выберите пункт Python. Затем перейдите в раздел Tool option и нажмите кнопку Build option, которая выполнит ваш код.
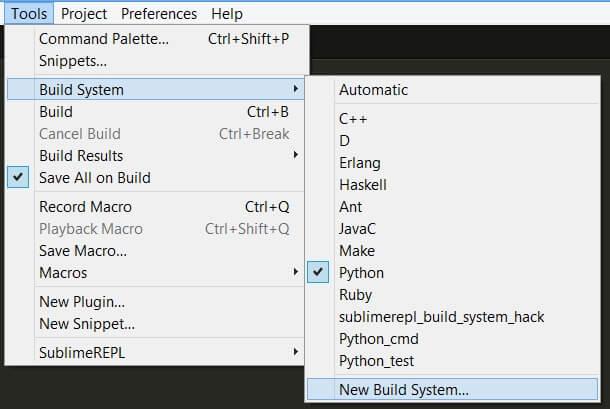
Итак, теперь, запустив приведенный выше код, мы получим следующий вывод:
Сумма 7 и 9 равна 16
Поздравляем, код python успешно работает на sublime! Надеемся, что эта статья будет полезна для вас. И если у вас есть какие-либо вопросы по поводу SublimeText 3, оставляйте свои комментарии!
- Career Tracks
- Java Career Track
- Python Career Track
- Data Science Career Track
- Job Support Program
- Courses
- Java Programming
- Python Programming
- Data Science + Machine Learning
- Django Web Development
- Flask Web Development
- Intro to JavaScript
- SQL & DatabasesFree
- Python APIs & DatabasesFree
- Git & GitHubFree
- Spring FrameworkComing Soon
- Upwork Freelancing Mastery
- Blog
- Reviews
- Log In
- Start For Free
How to Use Sublime Text for Python
by Martin Breuss, CodingNomads
This article was originally published on Medium.com.
Sublime Text’s rich package ecosystem makes it possible to fine-tune the text editor specifically to what you are using it for. Some of the packages are universally helpful, others, such as syntax checking, are specific to the programming language you are working with.
Changing settings is easy and might also help to clarify how to do further customizations — if that is where your ❤ is at.
Keep reading below for step-by-step guidance on how to use Sublime Text for Python.
Sublime Settings
Before moving onto installing plugins, there are a couple of useful settings that can help to tailor your Sublime Text for Python development. Go to Sublime Text → Preferences → Settings and in the Preferences.sublime.settings-User file enter the following rules:
{
    "spell_check": false,
    "rulers":
    [
        72, 79
    ],
    "tab_size": 4,
    "translate_tabs_to_spaces": true,
    "trim_trailing_white_space_on_save": true,
    "ensure_newline_at_eof_on_save": true
}
I personally prefer to keep “spell_check” on false because I don’t like to see red lines everywhere when writing non-dictionary-compliant words. Maybe I’m just damaged by the school system. If you have a different opinion on this, simply set “spell_check” to true.
The magic numbers for the “rulers” setting originate from pythons PEP8. Docstrings and comments should be limited to 72 characters and all other lines should not be longer than 79 characters. The ruler lines can help to remind you when you are approaching these limits.
In good Python fashion we set the “tab_size” to 4 and “translat_tabs_to_spaces” to avoid relationship troubles.
Finally, we can get another PEP8 compliance automation with “ensure_newline_at_eof_on_save” which does just that: adding a single newline at the end of the file when you save the document.
Sublime Text for Python Packages (Plugins)
The next step for how to use Sublime Text for Python is to dive into the pool of great packages for Sublime Text. These packages extend its functionality and can make your life as a programmer easier – and more colorful!
SidebarEnhancement
Power-up for the ST sidebar, introducing useful features such as being able to create new files directly from there and sending files to the recycle bin when they are deleted from inside Sublime.
Anaconda
Note: this is not the popular python distribution often used for data science that goes by the same name.
The Sublime Text Anaconda plugin helps to make ST more IDE-like while keeping it still operating much quicker than most IDEs. It introduces easy access to useful features such as:
- Code autocompletion
- Code linting: syntax errors
- Code linting: highlight and automatically fix PEP8 violations
- Python documentation on class, method or function under the cursor
- Goto Python definition anywhere in the project
- Find object usage across the project
- and lots more…
Auto Docstring
Auto Docstring does just what its name suggests — it allows you to swiftly create a Python docstring template for your selected function, method or class. You can even add docstrings for every function in a file and change between Google and Numpy style even after the docstrings were created. A very basic auto-generated example would look like this:
def my_function():
    """Summary

    Returns:
        TYPE: Description
    """
	return None
SublimeLinter
For Python syntax and PEP8 you could stick with using the linting provided through the Anaconda plugin. However, using SublimeLinter has the advantage that it is extensible also with other linters that are useful for web development. That’s why I would suggest to disable Anaconda’s linter, like so:
Use the file menu: Sublime → Preferences → Package Settings → Anaconda → Settings — User to go to the user-defined Anaconda settings file. Then set: {"anaconda_linting": false}
Now, install SublimeLinter using the Package Manager.
Note: Most of the linters require additional packages to operate correctly, so make sure to read the instructions carefully
SublimeLinter-pyflakes
pyflakes performs syntax checking on python files. This package needs to be installed using pip before adding it to ST with the Package Manager
SublimeLinter-pycodestyle
pycodestyle is the new name of the pep8 package. Install it using pip, then add it to Sublime using the Package Manager for PEP8-compliant code style linting.
Other useful linters for web development:
Djaneiro
This useful plugin adds a couple of handy Django snippets with tab autocompletion into ST to make working on web projects quicker.
E.g. block + TAB generates {% block %}{% endblock %}
Very cool. Check out all it has to offer here!
Git
Allows to do the most common set of git commands from within Sublime Text.
git add, commit, push etc. right from your favorite text editor.
GitGutter
GitGutter helps to keep track of which files have been edited since the last commit. It adds small symbols next to the line numbers that indicate their status in relation to the git repository.
requirementstxt
Introduces syntax highlighting for requirements.txt files. Be good to your 👀!
Markdown Preview
Allows to preview Markdown documents in your browser — build them using different available flavors!
Other useful Web Dev Packages
CSS3
The CSS3 plugin allows for futuristic CSS syntax highlighting. You’ll need to tweak the rest of the settings a bit, but it’s easy to follow along the steps on the site linked above.
ColorHighlighter
This one is fun. Adds more 🌈 to your code. Hex color values will be displayed with the corresponding color as background. Makes it easier to remember what color you were adding where.
Emmet
If you’re excited about automating the repetitive parts of your web development work, then Emmet can be a big help. Install the package, then learn how to benefit: https://docs.emmet.io/cheat-sheet/
Want to learn more?
There you have it, you now have a comprehensive guide for getting started on how to use Sublime Text for Python. With adding these packages and tweaking the settings as mentioned above, Sublime Text becomes a lightweight but powerful editor for web development.
If you are just getting started and are looking for a fun and affordable bootcamp that helps you to learn programming, check out CodingNomads’ upcoming Python courses. 🌇 💻 🎒🏝
More info on how to use Sublime Text for Python:
Plugin Setup:
Learn to increase your performance when working with ST3:
If you’re interested to learn about other Python IDEs:
- Dare2Compete put together a great overview of the best Python IDEs, in addition to Sublime Text.
READ NEXT: How to find a job after a coding bootcamp
Kim Desmond2022-03-31T11:42:20-07:00
Start Today For Free!
Want to speak with a mentor?
Got questions? We’ve got answers! Feel free to schedule a quick 15 minute AMA with a CodingNomads instructor at a time that works best for you! Click here to schedule your call
Contact Info
Let’s be friends
Overview
Python has become one of the most popular programming languages in recent years. There is no doubt that python offers remarkable features for development in areas such as Artificial intelligence, neural networking, big data etc. To take full advantage of these features, the use of an ideal code editor is very crucial. One such exceptional code editor for python is Sublime Text.
In this article, we will look at a step-by-step guide for how to setup Sublime Text for full stack Python development, how to use many of the commands, features, and keyword shortcuts that make Sublime text a powerful tool and how you can enhance some of the basic functionalities using different packages.

Sublime Text is a lightweight, cross-platform code editor mostly popular for its speed, simplicity, ease of use, and robust community support. It is an incredible code editor out of the box even without any add-ons or customizations. Still, the add-on packages and custom settings can be a great level up as it introduces various new features that can significantly enhance the functionalities. The rich package ecosystem offered by sublime text makes it very easy to configure the text editor specifically for what you want to use it for. Some of the packages are universally helpful and improve the ease of use whereas, some are very specific to a field of development.
By default, sublime text can be used with any programming language but its support for Python is considered one of the best. Keep reading below for a complete guide on how to use Sublime Text for Python.
Why you should use sublime text for python?
It only takes these three words to conclude the reason for choosing Sublime Text for Python development, simplicity, Interface and customization. All the features offered by sublime text are targeted at improving the interface and as a result, it makes the code editor extremely simple. On top of that its extensive customizable options make it the ideal choice for a code editor.
1. Simplicity
Being a lightweight code editor, Sublime Text is extremely fast. The creators have also emphasized keeping the experience smooth and simple. The code editor just pops up right away when opened, unlike various other IDEs that take a significant amount of time to boot up and then welcome you with a bombardment of messages and prompts.
Its also autosave features also keep things very simple as you can just leave your work and next time it will open up from exactly where you left off so you will not have to worry about saving your work in case of a low battery or sudden power off.
2. Interface
Sublime Text has taken the minimalist approach for its interface. The interface offered by Sublime text is one of the cleanest interfaces you can get from a code editor. There are no unnecessary side and bottom panels that often takes up a big chunk of screen real-estate, showing only what is required, providing you with enough ground to focus on your code.
The interface also supports multiple projects separately. Opening up a new project will not close your current project instead; it opens up a separate new window for you. This separation could be very useful especially when you are referencing multiple codebases.
3. Customization
Sublime Text offers some rich features out of the box such as indentation preferences, spell checks, key bindings, multi-select, and file patterns. On top of that, the most highlighted customizing feature for Sublime Text is the option to extend the current functionalities using the addons called Packages. These packages can be explained as pluggable extensions to perform additional tasks. We will be discussing some packages for python later in the article.
How to set up Sublime Text for Python development
Note: The following steps are directed for a Windows operating system. These instructions may vary for MACOS and Linux operating systems.
Step 1: Download and install Sublime Text and Python on your device
The latest version of Sublime Text (currently sublime text 4) can be downloaded for free from sublimetext.com. Once downloaded, run the .exe file to complete a simple installation process.
You will also need to have Python installed on your computer. If you have not already done this, you can download and install Python from python.org.
Step 2: Configuring Sublime Text for Python
Sublime Text comes almost configured and ready out of the box. However, if you want to set the Sublime Text for Python, you should install and configure the integrated terminal. To set it up,
- Go to ‘Command Palette’ located under the ‘Tools’ menu.
- Type “Install Package Control” and select it from the drop-down menu. This will install ‘Package Control’ on your Sublime Text editor. If it is successfully installed, a pop-up message will prompt it
- After that, install the ‘Terminus’ by again start typing in the ‘Package Control’ and selecting ‘Package Control: Install Package’ from the dropdown list.
- This will now give you a new dropdown list with all the available packages that you can install to enhance your Sublime Text experience for python.
- Select ‘terminus’ from that list. This will download the ‘terminus’ package. Once completed, it will appear under ‘Preferences’ -> ‘Package Settings’ -> ‘Terminus’.
- You can open up the terminus by opening up the ‘Command Palette’ again and typing in ‘Terminus’. Select ‘Terminus: Open Default Shell in Panel’. This will open up the console.
- The final step of configuration is to set the syntax to Python by opening up the ‘Command Palette’ again and then typing in ‘Python’.
- Select the ‘Set Syntax: Python’ option. This will make sure that your highlighting, colour scheme and auto-indentation are based on Python syntax.
Top Sublime Text Packages for Python developers
Similar to Package control and terminus, Sublime text offers a variety of packages to improve your python coding experience. You can install whatever packages you want using Command Palette just like the process of installing terminus mentioned above.
Package Control is the main package for installing other packages. You need to install it first before you can install anything. Once package control is installed, you will have the option available to select ‘Package Control: Install Package’. This will provide a list of available packages for Sublime Text.
Following are some of the top packages in the sublime text that you should have to get started coding in python using sublime text.
– Tabnine for sublime
Tabnine is an AI-driven code completion package that can cut your coding time and occurring mistakes by making the best practice suggestions. It supports over 30 programming languages and Python is one of them.
– Requirementstxt
Requirementstxt is a very useful package that provides syntax highlighting and easy version management for your requirements.txt files.
– Anaconda
Anaconda is a good alternative to requirementstxt for syntax highlighting and version management. It can turn the Sublime Text editor into a full fledge Python-ready IDE by incorporating code linting, autocompletion, autopep8 formatting, McCabe complexity checker Vagrant and Docker support.
– Git
Git packages allow developers to perform some of the most common git commands from within Sublime Text. You can use commands such as git add, commit, and push right from the sublime text.
– GitGutter
GitGutter package helps in keeping track of files that have been edited since the last commit in git. It adds a small symbol next to the line numbers that indicate the updated status of the git repository.
– Auto Docstring
Auto Docstring package allows the users to create a Python docstring template for a selected method, function or class. It also allows adding docstrings for every function in a code file and change between Google and Numpy style even after the docstrings were created.
– AutoPEP8
AutoPEP8 package automatically formats your Python code into the PEP 8 style guide. It allows you to choose key binding so that you can quickly lint spaces to the correct standard with ease.
– SublimeLinter
SublimeLinter is an automated checking package that checks for errors and styles in your python code. It is one of the best linting packages in Sublime Text that is stable and fully supported. The timely updates also make sure that it always works with the new standards of python.
Wrapping it up
This was a comprehensive guide on how to set up Sublime Text for Python. By adding your required packages and with a little bit of tweaking, Sublime Text will be good to go for your python development.
In conclusion, Sublime Text is one of the best free code editors out there for python. The minimalistic interface makes it easy to use and distraction-free. It is also fast, and lightweight and the large ecosystem of packages can easily take care of all of your development needs.
Also Read: Using Postgresql And Python For Data Evaluation
