| Previous | Table of Contents | Next |
| Auditing Windows Server 2008 R2 File and Folder Access | Building a Windows Server 2008 R2 Network Load Balancing Cluster |
<google>BUY_WINSERV_2008R2</google>
Windows Server 2008 R2 Volume Shadow Copy is a mechanism whereby the contents of shared folders can be automatically backed up at pre-determined intervals to a shadow volume. Once implemented, shadow copy will backup the previous 64 versions of each file in the shadowed volume and provide users with the ability to restore files from any of the previous 64 versions without administrator intervention, enabling users to independently restore deleted, damaged or overwritten files. In addition to restoring individual files to a previous version, shadow copy also provides the ability to restore an entire volume.
Another use for shadow copy is to enable the backup of locked or open files. Ordinarily, if a file is currently open or locked by an application, tools such as Windows Backup will fail to backup the file. Shadow copy aware backup tools are, however, able to avoid this problem by using the Volume Shadow Copy Service API.
Contents
Contents
|
||
Shadow Copy Considerations
There are a number of issues that need to be considered when implementing shadow copy for shared folders. First and foremost the shared folders which are to be shadowed need to be identified. Secondly, a location for the shadow to be stored must be allocated. This can reside either on the same volume as the shared folders, or on a completely different volume or disk drive. Even before any data is shadowed, the shadow copy system requires 300MB of available space. The total amount of space required will depend on the size of the shared folder which is to be shadowed and the frequency and extent to which the files are likely to change (since shadow copy will only take new snapshots of files which have changed since the last snapshot). Finally, the time and frequency of the volume snapshots needs to be defined. By default, Shadow Copy performs a snapshot twice a day at 7:00am and 12:00pm.
Once the Shadow Copy system has been configured the shadow copy client needs to be set up on the systems of any users that are likely to need to be able to restore files in shared folders.

Using Computer Management to Enable and Configure Volume Shadow Copies
Shadow Copy is enabled on a per volume basis. Once configured on a volume, all shared folders residing on that volume will automatically be shadowed. Shadow Copy can be configured either graphically using the Computer Management tool or via the command prompt. Command-line configuration of Shadow Copy will be covered in a later section of this chapter. This section will focus on Computer Management configuration.
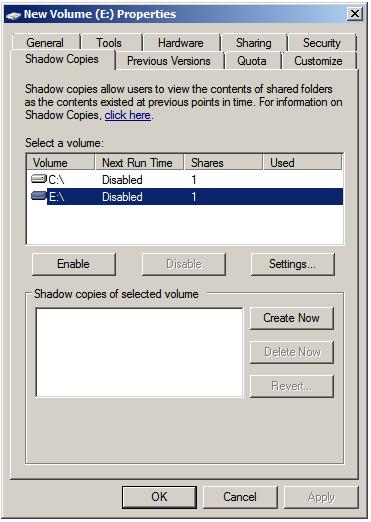
The first step is to launch the Computer Management configuration tool (Start -> All Programs -> Administrative Tools -> Computer Management). Once invoked, select Storage -> Disk Management from the tree in the left panel to display the disk and volume information for the local system. In the graphical view, right click on a volume and select on Properties to launch the properties dialog. In the properties dialog, select the Shadow Copy tab to display the Shadow Copy properties as illustrated in the following figure:
A useful shortcut to access the Shadow Copy property panel is to run vssuirun from a command prompt with elevated privileges.
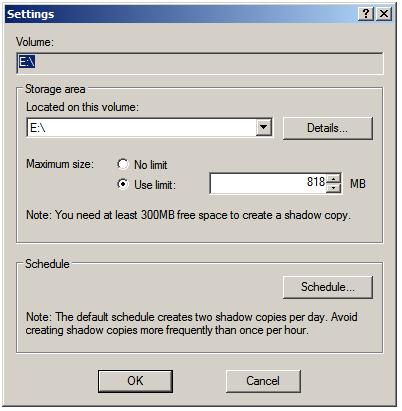
The Select a volume section of the properties dialog lists the volumes present on the local system. Select the volume in this list for which Shadow Copy is to be enabled. With the volume selected click on the Settings button to display the following Shadow Copy Settings dialog box:
<google>WIN28BOX</google>
In the Located on this volume specify the volume on which the shadow copies are to be stored. This can be either the current volume or a different volume on the system. The Details button displays free and total disk space information for the currently specified volume. Once a suitable volume for the shadow copies has been selected the maximum size to be made available for the shadow copies may be defined. This can either be set to Maximum size which will use all available space on the specified volume, or capped to a specific size (keeping in mind that a minimum of 300MB is required for the shadow storage volume even before any snapshots are taken). Shadow Copy uses a differential approach to backing up files in that only files that have changed since the last snapshot are copied. For certain files, Shadow Copy also only copies the part of the file that has changed, rather than the entire file. As such, it is not necessary to reserve 64 times the size of the volume to be copied since only parts of the volume will be copied with each snapshot.
Schedule the shadow copy snapshots by clicking on the Schedule… button. By default, Windows configures two snapshots each day (at 7:00am and 12:00pm respectively). To remove a currently defined snapshot, select it from the drop down list and click on Delete. To modify a run, select it from the drop down list, modify the settings in the lower section of the dialog and click on OK.
To specify additional schedules, click on the New button and specify the days and time of the snapshot. Note that snapshots can also be configured to occur at user logon, system startup and even when the system is idle. In fact, Windows Server 2008 provides considerable flexibility in terms of scheduling shadow copies. It is important to keep in mind, however, that there are disadvantages to running a shadow copy too frequently. Firstly, shadow copies are resource intensive tasks, especially on large volumes where many files are subject to frequent changes. Repeated snapshots during periods when the server is heavily utilized may well degrade overall system performance. Secondly, it is important to keep in mind that Shadow Copy retains the last 64 versions of a file. Therefore, if a snapshot is run every hour, the oldest restore point available to a user will be approximately two and half days in the past. If, on the other hand, snapshots are taken twice a day, the user will have the luxury of restoring a file from a point as much as 32 days ago. It is important, therefore, to strike a balance between longevity and frequency.
The following screenshot illustrates the Shadow Copy scheduling dialog:

Once the schedules have been configured, click on OK to dismiss the scheduling dialog. Click OK once again in the Settings dialog to return to the Shadow Copy properties panel. At this point, the volume for which a schedule has been defined will have a small clock image superimposed over the volume icon and will indicate that 0 bytes of shadow copy storage have been used. The next step is to enable shadow copies on the volume by selecting the volume from the list and clicking on the Enable button. The volume in the list will update to display the date and time of the next scheduled copy and provide a summary of the current level of storage space used for the shadow copies.
To initiate a manual shadow copy now, or at any other time, simply select the volume to be copied from the list in the Shadow Copy properties panel and click on the Create Now button.
Restoring an Entire Volume
To restore an entire volume, access the Shadow Copy property panel either from Computer Management as outline above, or by running vssuirun from a command prompt with elevated privileges. Once loaded, select the desired volume followed by a snapshot from which to restore from the Shadow copies of selected volume list and click on the Revert Now… button. This will revert all shared folders on the selected volume to their state at the point that the selected shadow copy was made.
It is important to note that restoration of entire volumes is not possible on system volumes since this would, in all probability, severely interfere with the current system state.
Configuring and Enabling Shadow Copy from the Command Line
A significant amount of Shadow Copy functionality can be accessed via the command line using the vssadmin tool, which is the focus of this section.
In order to obtain information about shadow copies configured on a system, use vssadmin list shadows:
C:Windowssystem32>vssadmin list shadows
vssadmin 1.1 - Volume Shadow Copy Service administrative command-line tool
(C) Copyright 2001-2005 Microsoft Corp.

Contents of shadow copy set ID: {67f25a62-12f1-4e34-b14a-3b57cb03f4f8}
   Contained 1 shadow copies at creation time: 8/22/2008 12:29:56 PM
      Shadow Copy ID: {bee54c7f-22a4-4bd0-b6c4-20bc51a8cded}
         Original Volume: (E:)\?Volume{9fa5f191-6554-11dd-9ce6-000c295707db}
         Shadow Copy Volume: \?GLOBALROOTDeviceHarddiskVolumeShadowCopy2
         Originating Machine: winserver-2
         Service Machine: winserver-2
         Provider: 'Microsoft Software Shadow Copy provider 1.0'
         Type: ClientAccessible
         Attributes: Persistent, Client-accessible, No auto release, No writers,
 Differential

Contents of shadow copy set ID: {24c56736-d082-4fa5-ac97-961bd708b4d2}
   Contained 1 shadow copies at creation time: 8/22/2008 1:00:04 PM
      Shadow Copy ID: {e5a5d032-5449-4375-b4c2-5adf12fedc5d}
         Original Volume: (E:)\?Volume{9fa5f191-6554-11dd-9ce6-000c295707db}
         Shadow Copy Volume: \?GLOBALROOTDeviceHarddiskVolumeShadowCopy3
         Originating Machine: winserver-2
         Service Machine: winserver-2
         Provider: 'Microsoft Software Shadow Copy provider 1.0'
         Type: ClientAccessible
         Attributes: Persistent, Client-accessible, No auto release, No writers,
 Differential

Contents of shadow copy set ID: {95618a5e-b9f2-4d5c-9654-7fcab5be2c5d}
   Contained 1 shadow copies at creation time: 8/23/2008 7:00:03 AM
      Shadow Copy ID: {012d8105-ab39-4b17-89c9-bb7dfbeeb1f8}
         Original Volume: (E:)\?Volume{9fa5f191-6554-11dd-9ce6-000c295707db}
         Shadow Copy Volume: \?GLOBALROOTDeviceHarddiskVolumeShadowCopy4
         Originating Machine: winserver-2
         Service Machine: winserver-2
         Provider: 'Microsoft Software Shadow Copy provider 1.0'
         Type: ClientAccessible
         Attributes: Persistent, Client-accessible, No auto release, No writers,
 Differential
To obtain information about how shadow copy storage is allocated to shadow copies, use the vssadmin list shadowstorage:
C:Windowssystem32>vssadmin list shadowstorage
vssadmin 1.1 - Volume Shadow Copy Service administrative command-line tool
(C) Copyright 2001-2005 Microsoft Corp.

Shadow Copy Storage association
   For volume: (E:)\?Volume{9fa5f191-6554-11dd-9ce6-000c295707db}
   Shadow Copy Storage volume: (C:)\?Volume{f0c004b0-58c1-11dd-a1fe-000c295707
db}
   Used Shadow Copy Storage space: 1.344 MB
   Allocated Shadow Copy Storage space: 301.078 MB
   Maximum Shadow Copy Storage space: 818 MB
The above command is particularly useful for comparing used and available space for shadow copy storage.
Shadow Copy for a volume may also be enabled from the command-line using vssadmin, the syntax for which is:
vssadmin add shadowstorage /for=volume /on=storevolume
where volume represents the volume on which shadow copy is to be enabled and storevolume is the volume on which the shadow copies are to be stored, for example:
vssadmin add shadowstorage /for=d: /on=e:
The maximum storage size may also be specified using the /maxsize= command-line option:
vssadmin add shadowstorage /for=d: /on=e: /maxsize=8GB
A manual shadow copy of an enabled volume may be triggered from the command prompt at any time by running vssadmin as follows:
C:Windowssystem32>vssadmin create shadow /for=e:
vssadmin 1.1 - Volume Shadow Copy Service administrative command-line tool
(C) Copyright 2001-2005 Microsoft Corp.

Successfully created shadow copy for 'e:'
    Shadow Copy ID: {c9235d96-4ea3-4bc2-b2ee-77397a124914}
    Shadow Copy Volume Name: \?GLOBALROOTDeviceHarddiskVolumeShadowCopy7
Specific shadow copies may also be deleted from the command line either by specifying that the oldest snapshot is to be deleted or by referencing the specific snapshot by its Shadow Copy Id (which can be obtained from the vssadmin list shadows command). For example, to delete the oldest shadow snapshot:
C:Windowssystem32>vssadmin delete shadows /for=e: /oldest
vssadmin 1.1 - Volume Shadow Copy Service administrative command-line tool
(C) Copyright 2001-2005 Microsoft Corp.

Do you really want to delete 1 shadow copies (Y/N): [N]? y

Successfully deleted 1 shadow copies.
Similarly, to delete a specific snapshot from a volume:
C:Windowssystem32>vssadmin delete shadows /shadow={879318ea-2f28-4d0c-b58b-5df5cd761984}
vssadmin 1.1 - Volume Shadow Copy Service administrative command-line tool
(C) Copyright 2001-2005 Microsoft Corp.

Do you really want to delete 1 shadow copies (Y/N): [N]? y

Successfully deleted 1 shadow copies.
The restoration of a shadow from a specific snapshot can be achieved from the command line using the vssadmin revert command combined with the Shadow Copy ID of the required snapshot. Note that the revert cannot be performed if open file handles exist on the volume (the /ForceDismount parameter is available but its use is not recommended since it can result in lost data:
C:Windowssystem32>vssadmin revert shadow /shadow={bf7e3df8-b4f9-4068-b208-3c67
8bc85053}
vssadmin 1.1 - Volume Shadow Copy Service administrative command-line tool
(C) Copyright 2001-2005 Microsoft Corp.

Do you really want to revert to this shadow copy (Y/N): [N]? y
Finally, Shadow Copying on a volume may be disabled via the command prompt using the vssadmin delete shadowstorage command, although the command will only work once all snapshots associated with the volume have been deleted from the shadow storage. Assuming there are no existing shapshots, the following example will disable shadow copy on the volume represented as the e: drive:
vssadmin delete shadowstorage /for=e:
Restoring Shadow Copy Snapshots from Clients
Once shadow copy has been configured for volumes on the server, the next step is to learn how to access the previous version of files from client systems. This is achieved using a feature of Windows Server 2008 R2 and Windows Vista called Previous Versions.
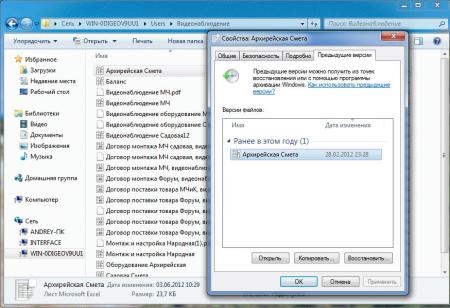
To access previous versions of a file on a client, navigate to the shared folder (or subfolder of a shared folder) or network drive using Start -> Network. Once the desired network drive or shared folder is visible, right click on it and select Restore Previous Versions (or just Previous Versions on Windows Vista). Once selected, the Properties dialog box will appear with the Previous Versions tab pre-selected as illustrated in the following figure:
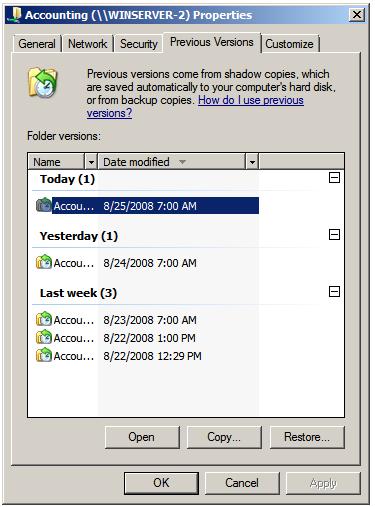
As shown in the previous figure, the Previous Versions property page lists the previous versions of the shared folder that are available for restoration. A number of options are available for each shadow copy snapshot listed in the properties dialog. Open will open the folder in Windows Explorer so that individual files and sub-folders can be viewed and copied. The Copy… button allows the snapshot of the folder and its contents to be copied to a different location. Finally, Restore… restores the folder and files to its state at the time of the currently selected shadow copy snapshot. As outlined in the warning dialog, this action cannot be undone once performed.
<google>BUY_WINSERV_2008R2_BOTTOM</google>
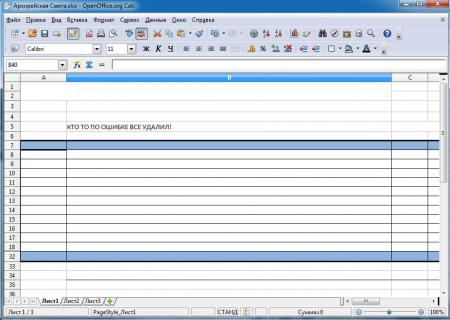
Задался я тут после одного инцидента как сделать быстрый бекап удаленного файла или папки с сетевой папки на сервере и заодно посмотреть кто это сделал.
Ну вопрос, кто это сделал нашли сразу через аудит (это рассмотрит в другой статье)
А вот вопрос, быстрого восстановления файла меня очень сильно заинтересовал. Я по своему обычаю на основной файловой помойке делаю бекап с помощью Acronis и дифференцированного бекапа (это будет отдельная статья)
В итоге решил на файловую помойку прикрутить еще один бекап и тут встал вопрос, либо сделать ее зеркалируемый и что бы один или несколько раз в неделю происходила синхронизация диска например с помощью штатной утилиты robocopy (и ее в одной из статей опишу) либо сделать на теневом копировании. Данный способ после совещания с коллегами был выбран как основой в виду его основного плюса с версиями файла и быстрого восстановления. Сказано сделано.
Поднимаем теневое копирование на Windows Server Standart 2008 R2
Для начала надо включить теневое копирование на диске, для это проделываем следующую операцию:
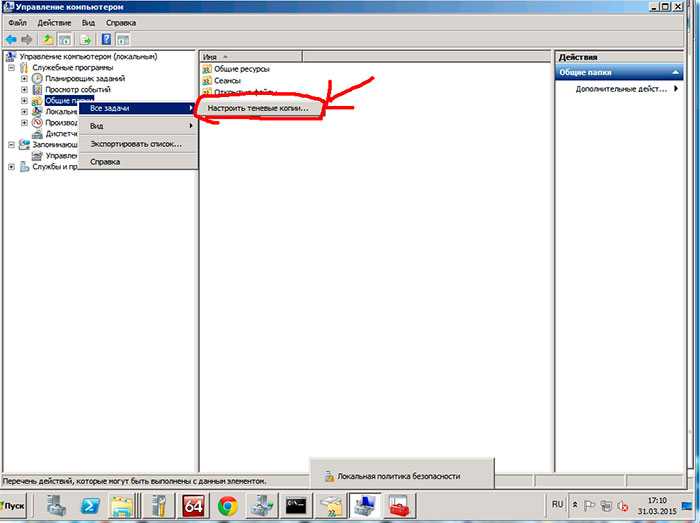
1) Пуск->Мой компьютер -> “щелкаем правой кнопкой” -> Управление Компьютером ->Общие Папки -> “щелкаем правой кнопкой” -> Все задачи -> Настроить теневые копии
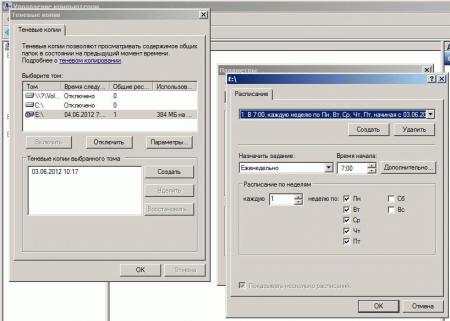
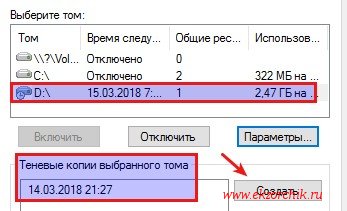
2) Теперь выбираем диск на котором будем делать Теневые копии и нажимаем Параметры. Тут мы задаем место где будут хранится теневые копии и расписание их создания.
3) Далее выбираем диск на котором включаем теневое копирование, в моем случае это будет диск D и сразу при включении он начнем создавать первую копию диска.
тут же будут отражены все копии по времени когда либо создаваемые теневым копированием, которые можно удалять, либо Восстановить, но это я крайне не советую потому как он тогда затрет выбранной копией все что находится в сетевой папке.
Для работы с теневыми копиями и восстановлением файлов будет пользоваться по другому.
Ситуация 1
Допустим у нас теневая копия снимается один раз в день (в конце дня). И Вас просят восстановить файл который нечаянно был перезаписан (название файлов одно и тоже)
наши действия:
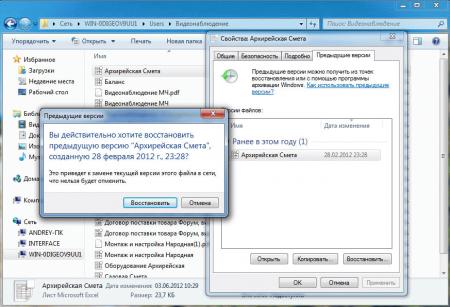
1) “щелкаем правой кнопкой” на файле который надо восстановить -> Свойство -> Предыдущая версия
2) выбираем ту версию которая нам нужна и восстаналиваем

Ситуация 2
К Вам вбегаю манагеры и кричат что кто то удалил их файл или папку с важными документами, а шеф уже ее ждет. 🙂
Действуем так:
1) “щелкаем правой кнопкой” на папке в которой лежал удаленный файл или папка -> Свойство -> Предыдущая версия
2) смотрим последние версии нашего бекапа и восстаналиваем файл или папку
3) ждем от коллег кофе или шоколадку))))
Видео по Теневому копированию (Shadow Copy)
 Наиболее распространенная проблема с которой сталкиваются пользователи и администраторы файловых серверов — это случайное удаление или перезапись файлов. Бороться с этим явлением весьма сложно, технические средства здесь не помогут, а административные часто оказываются неэффективными. Очень часто сотрудники сами случайно перезаписывают нужные файлы. Что делать? Ответ прост — настраивать теневое копирование общих папок.
Научиться настраивать MikroTik с нуля или систематизировать уже имеющиеся знания можно на углубленном курсе по администрированию MikroTik. Автор курса, сертифицированный тренер MikroTik Дмитрий Скоромнов, лично проверяет лабораторные работы и контролирует прогресс каждого своего студента. В три раза больше информации, чем в вендорской программе MTCNA, более 20 часов практики и доступ навсегда.
Теневое копирование — специальный механизм, позволяющий делать копии файлов соответствующее определенному моменту времени, даже если они открыты или заблокированы системой. Теневые копии позволяют просматривать содержимое общих папок по состоянию на тот или иной момент времени в прошлом.
Теневые копии могут быть использованы для восстановления случайно удаленных и случайно перезаписанных файлов, а также позволяет сравнить несколько версий одного файла. Следует помнить, что теневые копии не могут служить заменой резервному копированию в силу ряда ограничений и особенностей о которых мы поговорим ниже.
Теневое копирование поддерживают серверные ОС начиная с Windows Server 2003, клиентское ПО для работы с теневыми копиями доступно начиная с Windows XP SP2.
При использовании теневых копий следует учитывать следующие ограничения:
- При превышении лимита выделенного дискового пространства старые теневые копии будут удалены без возможности восстановления.
- На одном томе может быть не более 64 теневых копий для каждого файла.
- Теневое копирование включается на уровне тома, т.е. нельзя выбрать общие папки и файлы для которых будет или не будет выполнятся теневое копирование.
- На компьютерах с двумя ОС при загрузке более старой системы или при подключении тома к другому ПК теневые копии могут быть повреждены.
Перед тем, как настраивать теневое копирование, следует продумать расписание. Для этого нужно проанализировать активность пользователей и критичность данных, найдя компромисс между частотой создания теневых копий и промежутком времени который должно охватывать теневое копирование. При этом следует отталкиваться от того, потерю какого промежутка рабочего времени можно считать допустимым, после чего рассчитать за какой промежуток времени будет достигнут предел, составляющий 64 копии. Не рекомендуется делать теневые копии чаще чем раз в час. Также продумайте расписание таким образом, чтобы копии делались только в рабочее время.
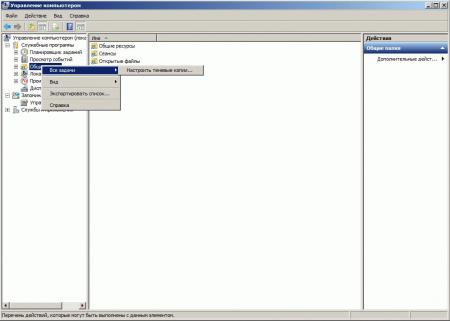
Для включения теневых копий перейдите в оснастку Управление компьютером в меню Администрирование.

В левой части окна найдите пункт Общие папки и, щелкнув правой кнопкой мыши, выберите Все задачи — Настроить теневые копии.
В открывшемся окне выберите том, на котором вы будете включать теневое копирование для общих папок и нажмите Включить, первая теневая копия будет создана немедленно.
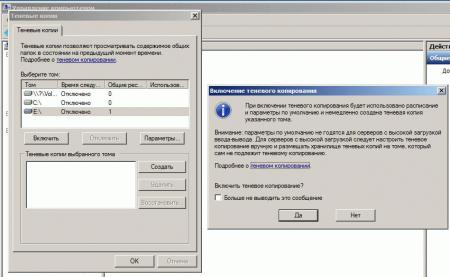
Затем нажмите на кнопку Параметры и укажите размер дискового пространства, выделяемый для хранения теневых копий.
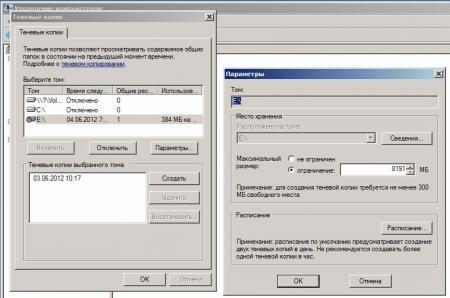
Следующим шагом задайте расписание.
Теперь самое время проверить работу теневых копий в действии. В обучающих целях мы установили небольшой промежуток между созданием теневых копий и провели несколько типовых действий с файлами в общей папке.
Самая распространенная и труднорешаемая проблема — файл перезаписали.
Открываем свойства файла, переходим на закладку Предыдущие версии и выбираем одну из доступных теневых копий (в нашем случае только одна).
Мы можем открыть, восстановить или скопировать файл. Для начала просто откроем.
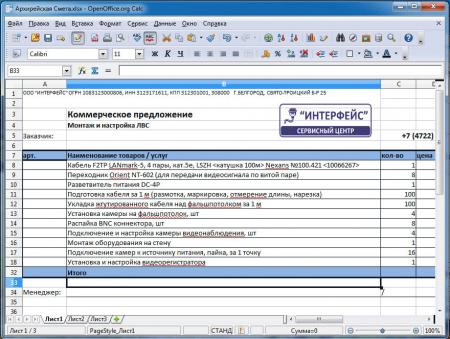
Убедившись, что перед нами необходимая версия файла, мы можем ее восстановить или скопировать, если нам нужны оба варианта файлов.
Для восстановления удаленных файлов откройте свойства папки и выберите одну из ее теневых копий, затем вы можете просмотреть содержащиеся в ней файлы и восстановить нужные. Помните, что из теневой копии файлы можно открыть только на чтение.

Как видим, теневое копирование дает пользователям и администратору богатые возможности по работе предыдущими версиями файлов и папок. Данная технология, в сочетании с правильно настроенным резервным копированием, позволяет обеспечить высокую доступность данных и свести риск их потери к разумному минимуму.
Научиться настраивать MikroTik с нуля или систематизировать уже имеющиеся знания можно на углубленном курсе по администрированию MikroTik. Автор курса, сертифицированный тренер MikroTik Дмитрий Скоромнов, лично проверяет лабораторные работы и контролирует прогресс каждого своего студента. В три раза больше информации, чем в вендорской программе MTCNA, более 20 часов практики и доступ навсегда.
Прочитано:
7 153
Порой сталкиваешься на рабочем месте, что к тебе как к системному администратору обращается пользователь с просьбой восстановить файл который он редактировал весь день, а потом вернулся к рабочему месту, но весь его труд утерян. Да, на его совести тот момент если он отошел от своего компьютера и не заблокировал вручную экран (приучаю нажимать сочетание клавиш: Win + L), а таймаут выставленный групповой политикой еще не активировался. Использовать такую отговорку, что можно восстановить файл(ы) только из вчерашнего бекапа — ну это не профессионализм. Вот в этом случае каждый системный администратор должен совершенствоваться и знать, что система Windows имеет такую важную настройку как использование «Теневых копий».
За основу функции/настройки теневого копирования отвечает служба теневого копирования (Volume Shadow Copies, VSS). Служба VSS применяется ко всему логическому диску и создаем снимок всех находящихся на нем файлов. После через запланированные промежутки времени отслеживает изменения и снова создает снимок.
Покажу на примере, как такая настройка «Теневые копии» включается и что она дает обычному пользователю.
Есть файловый сервер под управлением Windows Server 2016 Standard (на заметку: настройка «Теневые копии» работает и на Server 2008 R2,Server 2012/R2).
На заметку: логический диск с общими папками должен располагаться не на системном диске и не на диске с бекапами — это мое мнение.
На заметку: при использовании настройки «Теневые копии» следует под общие папки (файловый ресурс) заложить большой логический диск для хранения снимков. Если используется система виртуализации Hyper-V или ESXi то проблем с его расширением быть не должно и отрепетирована процедура его расширения.
На логическом диске D: создана папка с именем fileserver и настроена как общая с отключенным наследованием.
Запускаю оснастку «Управление компьютером»:
Win + R → control.exe — Просмотр: Категория — Мелкие значки — «Администрирование» — «Управление компьютером» — «Служебные программы» — и на «Общие папки» через правый клик мышью выбираю «Все задачи» — «Настроить теневые копии», выделяю том, в моем случае том D: и нажимаю «Настроить».
В данных настройках задается максимальный размер использования теневой копии, но не менее 300 МБ. По умолчанию хранилище теневых копий занимает 10 % от размера диска, а в снимках хранятся только изменения, а не сами изменившиеся файлы. Если места не достаточно, то при создании нового снимка старые снимки удаляют.
Как выбрать какой размер задать, прикинем, всего файлов под файловый ресурс 50 Gb, то я бы выбрал 50% от размера диска или: Максимальный размер: => не ограничен.
После нажимаю «Расписание» чтобы указать как часто будут делаться теневые копии. Если обратить внимание на рекомендацию, то не следует указывать создание одной теневой копии в час, вот только здесь уже каждый системный администратор должен все правильно взвесить как отразится потеря данных на продуктивной работе организации. Т.к. у меня жесткий диск под 2Tb, а данных всего 500Gb, то я делаю под себя следующее расписание:
Нажимаю «Дополнительно…»
- Дата начала: текущая дата
- Повторять задание: отмечаю галочкой
- Каждые: 2 часа
- Выполнять: в течение: 10 час
и получается расписание: Каждые 2 часа с 09.00 по 10 час начиная с текущей даты и каждый день.
В процессе эксплуатации я подкорректирую данное расписание.
и нажимаю кнопку Ok окна настройки расписания для тома D: — кнопку OK окна «Параметры» и выделив том D: нажимаю «Создать» тем самым создаю теневую копию текущего диска.
 Из представленного выше скриншота видно, что текущий снимок занимаем целых 2.5G, так что об выделяемом размере под теневые копии каждый должен смотреть самостоятельно.
Также функцию теневые копии можно включить если перейти из оснастки «Управление компьютером» — «Запоминающие устройства» — «Управление дисками» — через правый клик по тому D: вызвать «Свойства» и перейдя во вкладку «Теневые копии».
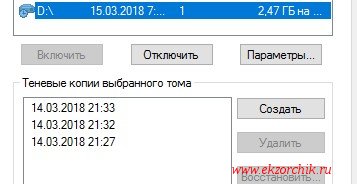
Если сымитировать добавление файлов и последующее нажатие создания снимка можно будет видеть как изменяется размер и количество теневые копий в оснастке тома:
 Итак копии имеются, объясняю пользователю что он может сделать сам на своем рабочем месте если что-то у него пропало.
Под Windows 10 Pro:
Шаг №1: Перейти на файловый ресурс
Шаг №2: По каталогу (или по файлу) внутри которого располагаются его файлы нажать на нем через правый клик мышью перейти на меню «Восстановить прежнюю версию» после чего на вкладку «Предыдущие версии».
Шаг №3: Тут он увидит сделанные снимки и открывая последний ориентируясь на дату и время будут открываться экраны с файлами/или файл за указанный временной промежуток при нажатии на кнопку «Открыть» или через правый клик мышью по нему «Изменить» ту версию где результаты его работы самые последние.
Шаг №4: После чтобы его восстановить нужно либо когда файл найден и открыт сделать «Файл» — «Сохранить как» и сохранить в ту директорию где он был затерев не актуальный или же нажать кнопку «Восстановить» и воспользоваться мастером восстановления:
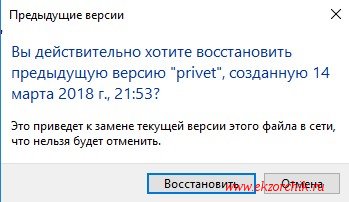 Нажимаю «Восстановить» и получаю сообщение «Файл был успешно переведен в предыдущее состояние».
Шаг №5: Пользователь возвращается к редактированию на том месте файл(ы) которого были восстановлены.
Шаг №6: После этого момента пользователь становится чуть счастливее от того что теперь он сам может это делать и ему не надо писать заявку на helpdesk или подходить к Вам лично.
На заметку: Не советую включать теневые копии на системном диске, т. к. обновления, логирование и многое другое будет все заполоняется никому не нужными снимками и расходуемым местом. Возьмите за правило, один логический диск под систему, другой под данные.
На заметку: если выключить «Теневое копирование тома» в свойства диска, то все снимки будут удалены, а файлы будут оставлены как есть.
На заметку: Теневые копии — это не то же самое что и резервная копия, так что не советую полностью на них надеяться, ведь это всего лишь дельта изменения от первого и последующих снимков, а бекап — это наше все.
Итого, я для себя оформил те моменты с которыми сталкиваешься когда задействуешь «Теневые копии» для тома и что пользователь может сам сделать в случае проблемы с потерей файла(ов).
На этом я прощаюсь, если что будет интересного я дополню данную заметку, а пока собственно и всё, с уважением автор блога Олло Александр aka ekzorchik.
Утилита Shadow
Как подключиться к сессии пользователя (просмотреть экран в режиме «Теневой копии») на Windows Server 2008?
Чтобы наблюдать за другим сеансом необходимо использовать встроенную утилиту Shadow.
Например:
Имеется VDS сервер с ОС Windows Server 2008 Standart.
На нём созданы два пользователя Администратор и User.
Допустим имя нашей учётной записи администратор и мы хотим посмотреть экран сеанса пользователя user.
Чтобы узнать ID сеанса, введите команду query user в командной строке:
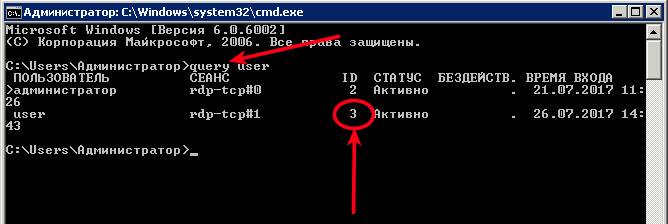
Итак, зная ID сеанса, подключимся к пользователю user в режиме «Теневой копии»:
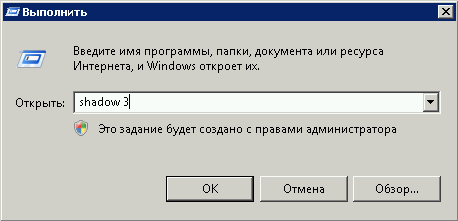
Нажмите «Пуск» —→ «Выполнить» —→ «shadow 3» —→ «Ок»:
Далее увидите следующее сообщение:

В этот момент у пользователя user всплывет окно запроса удаленного управления:
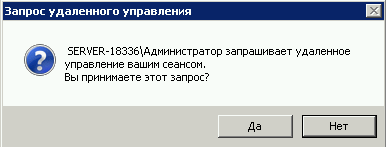
У нас появится доступ, как только пользователь user примет запрос.

Параметры подключения
Чтобы подключаться без запроса, необходимо изменить параметры удалённого управления конкретного пользователя, в данном примере это user.
Перейдите по ветке: «Пуск» —→ «Администрирование» —→ «Управление компьютером» —→ «Локальные пользователи и группы» —→ «Пользователи».
Кликните дважды по имени пользователя и выберите вкладку «Удалённое управление»:
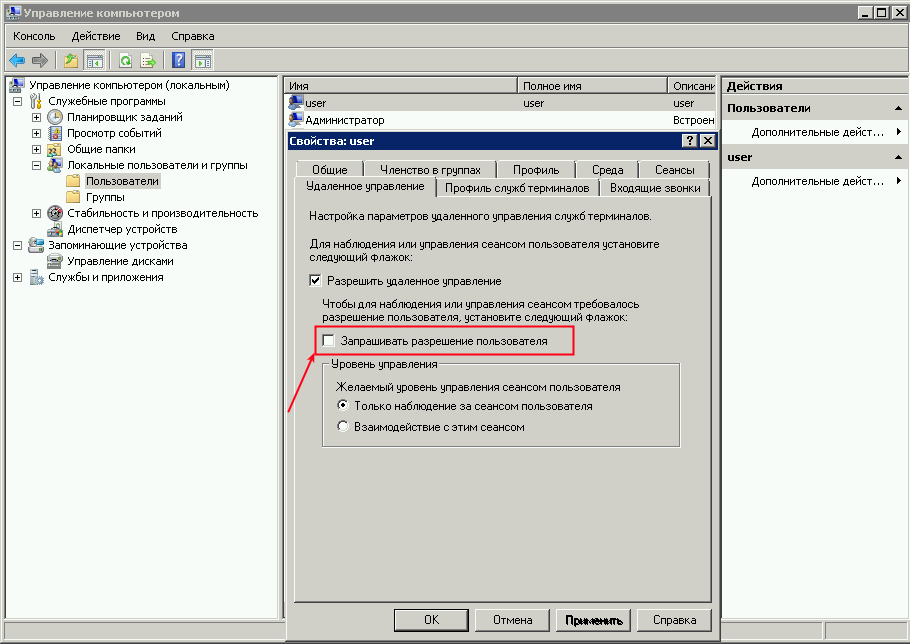
В параметре «Запрашивать разрешение пользователя» снимите галочку и выберите желаемый уровень управления сеансом пользователя.
Нажмите «Применить» —→ «Ок»
Hi,
Yes, the number of copies is limited by the size we allocate to the shadow copy.
Since this is a copy of Windows Server 2008, please perform the following steps to configure the shadow copy.
To create a shadow copy on an NTFS volume with shared folders, follow these steps:
1. Start Computer Management. If necessary, connect to a remote computer.
2. In the console tree, expand Storage and then select Disk Management. The volumes configured on the selected computer are displayed in the details
pane.
3. Right-click Disk Management, point to All Tasks, and then select Configure Shadow Copies.
4. On the Shadow Copies tab, select the volume you want to work within the “Select A Volume” list.
5. Click Settings to configure the maximum size of all shadow copies for this volume and to change the default schedule. When you’re finished,
click OK twice.
6. If necessary, click Enable after you’ve configured the volume for shadow copying. When prompted to confirm this action, click Yes. This creates
the first shadow copy and sets the schedule for later shadow copies.
Note that if you create a run schedule when configuring the shadow copy settings, shadow copying is enabled automatically for the volume when you click
OK to close the Settings dialog box.
For more information, please refer to the following article:
Tip: Create and Restore Shadow Copies on Windows Server 2008
http://technet.microsoft.com/en-us/magazine/dd637757.aspx
Regards,
Please remember to click “Mark as Answer” on the post that helps you, and to click “Unmark as Answer” if a marked post does not actually answer your question. This can be beneficial to other community members reading the thread.
-
Marked as answer by
Arthur_LiMicrosoft contingent staff
Friday, December 17, 2010 4:29 AM
- Remove From My Forums

Управление теневыми копиями в отказоустойчивом кластере.
-
Вопрос
-
Заходим в «диспетчер отказоустойчивости кластеров» — «хранилище», выбираем том, заходим в его свойства, выбираем закладку теневые копии. В этой закладке можно включить-отключить копирование и настроить
расписание. А где настройка размера и места хранения? Вопрос именно о теневом копировании средствами отказоустойчивого кластера. Где и как это настраивается локально на отдельно взятом сервере, мне известно.Буду рад любой информациии по этой теме, т.к. в интернетах ничего не нашлось.
Ответы
-
В итоге: из оснастки кластера включаем задачу теневого копирования и настраиваем расписание, а перед этим из командной строки настраиваем хранилище для теневых копий и его размер (c помощью vssadmin).
Всем участвовавшим спасибо и отдельное спасибо someparty — за направление мыслей в правильное русло.
-
Помечено в качестве ответа
16 сентября 2014 г. 11:42
-
Помечено в качестве ответа