Установка и настройка удаленных рабочих столов на основе Microsoft VDI
 Опубликовано: 17.12.2022
Рабочие столы на основе DVI позволяют создать для каждого пользователя свое рабочее пространство с изолированными настройками. Подключение будет выполняться как на терминальный сервер, только попадать мы будем в изолированную виртуальную машину.
В данной инструкции будут приведены примеры развертывания и настройки роли удаленных рабочих столов на основе Windows Server 2012 R2.
Предварительная настройка инфраструктуры
Выполнение системных настроек
Настройка Active Directory
Подготовка организационных юнитов
Установка роли Hyper-V
Подготовка шаблона виртуальных машин
Развертывание и настройка роли удаленных рабочих столов на основе ВМ
Установка роли
Настройка развертывания
Создание коллекции
Проверка подключения с компьютера клиента
Дополнительная информация
Подготовка сервера
Для развертывания роли VDI необходимо, чтобы в нашей инфраструктуре были серверы со следующими ролями:
- Active Directory Domain Services (AD DS).
- Hyper-V на отдельном сервере от AD DS.
Настройка операционной системы
Подготовим наш сервер к работе. Для этого необходимо:
- Установить обновления.
- Задать статический IP-адрес.
- Переименовать компьютер.
- Указать правильные часовой пояс и время.
AD DS
В сети необходимо наличие активного каталога. Это обязательное требование для поддержки инфраструктуры VDI. При этом, данная роль должна работать на отдельной машине от сервера с ролью VDI.
При отсутствии Active Directory необходимо его установить и настроить. Если мы имеем один единственный сервер, то AD DS можно развернуть на отдельной виртуальной машине, а из самого хоста виртуализации сделать VDI.
Как установить соответствующую роль и создать новый лес с доменом подробнее рассказано в статье по ссылке ниже.
OU
Также нам нужны учетные записи, под которыми мы будем заходить на виртуальные машины. После установки роли AD открываем оснастку Пользователи и компьютеры Active Directory — создаем организационные подразделения для виртуальных машин, учетных записей и сами записи:

* в данном примере мы создали организационный юнит VDI Desktops для компьютеров и VDI Users для пользователей.
Hyper-V
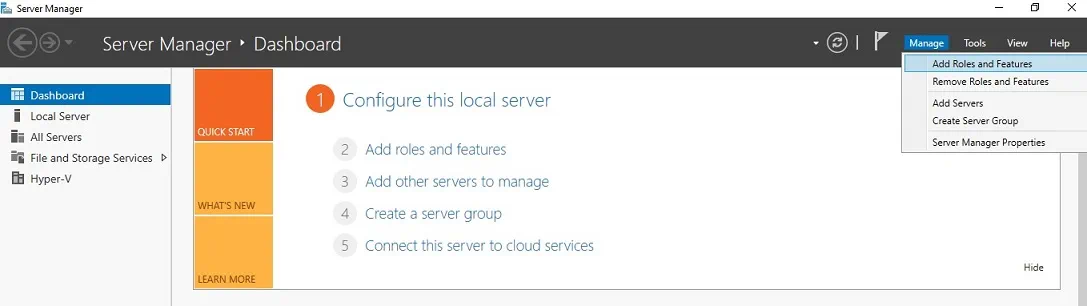
Данная роль является центральной для развертывания VDI. Чтобы ее установить, открываем панель управления сервером — в правой верхней части нажимаем Управление — Добавить роли и компоненты:

В открывшемся окне нажимаем Далее — в окне «Выбор типа установки» оставляем Установка ролей и компонентов:

… Далее. В следующем окне выбираем наш сервер — Далее.
Выбираем роль Hyper-V:

… если откроется дополнительное окно, выбрать Добавить компоненты. Далее.
Кликаем несколько раз Далее до окна «Создание виртуальных коммутаторов» — выбираем сеть, которую будем использовать для виртуальных машин:

… Далее. «Миграция виртуальной машины» — Далее.
В окне «Хранилища по умолчанию» оставьте пути как есть или задайте свои значения:

… Далее — в последнем окне Установить.
Перезагружаем сервер.
Создание шаблона виртуальных машин
Для подготовки системы мы будем использовать встроенную в Windows утилиту sysprep. В процессе ее работы текущая система становится больше неработоспособной. Убедитесь, что в качестве будущего эталона выбрана чистая система без важных данных и настроек.
Создаем виртуальную машину и устанавливаем на нее операционную систему Windows. В моем случае использовалась Windows 10 Pro.
Создать виртуальную машину можно с помощью графического интерфейса (Диспетчер Hyper-V) или команд Powershell.
Далее в рамках подготовки шаблона выполняем:
1. Установку операционной системы.
2. Удаление лишних учетных записей и включение встроенной записи администратора. При необходимости, можно создать дополнительных пользователей.
3. Задаем имя компьютера.
4. Вводим компьютер в домен.
5. Готовим эталонный образ: настраиваем систему по желанию и устанавливаем нужные программы.
Когда виртуальная машина будет готова, открываем командную строку в нашем Windows 10 и выполняем команду:
c:windowssystem32sysprepsysprep.exe /oobe /generalize /shutdown /mode:vm
После недолгого выполнения шаблон будет готов. Напоследок, отключите примонтированный установочный ISO, если он использовался для установки Windows.
Развертывание терминальных служб
Переходим к установке и настройке служб удаленных рабочих столов.
Установка роли удаленных рабочих столов
Открываем панель управления сервером — в правой верхней части нажимаем Управление — Добавить роли и компоненты:
В открывшемся окне нажимаем Далее — в окне «Выбор типа установки» оставляем Установка служб удаленных рабочих столов:

… Далее. В окне «Выбор типа развертывания» оставляем Стандартное развертывание:

… Далее. В окне «Выбор сценария развертывания» оставляем Развертывание рабочих столов на основе виртуальных машин:

… Далее. «Обзор служб ролей» — Далее.
В следующих 3-х окнах нужно выбрать серверы, на которые мы будем развертывать роли «Посредник подключений к удаленному рабочему столу», «Веб-доступ к удаленным рабочим столам», «Узел виртуализации удаленных рабочих столов» — если сервер один, то все данных роли ставим на него.
В окне «Подтверждение выбора» ставим галочку Автоматически перезапускать конечный сервер, если это потребуется и кликаем по Развернуть:

В процессе установки наш сервер перезагрузится. После перезагрузки развертывание продолжится — по окончании процесса закрываем окно:

Настройка свойств развертывания
В панели управления сервером кликаем по Службы удаленных рабочих столов:

В открывшемся окне находим «Обзор развертывания» — кликаем по Задачи — выбираем Изменить свойства развертывания:

В открывшемся окне «Настройка развертывания» переходим в раздел Active Directory — в разделе «Подразделение» выбираем ранее созданный организационный юнит VDI Desktops:

… мы увидим ошибку о том, что наше подразделение неправильно настроено — просто нажимаем Применить — система внесет необходимые настройки и значок ошибки пропадет.
Создание коллекции
Открываем консоль управления сервером, переходим к роли удаленных рабочих столов и кликаем по Коллекции:

Справа нажимаем Задачи и выбираем Создать коллекцию виртуальных рабочих столов:

На странице приветствия просто нажимаем далее:

Вводим имя коллекции (в моем случае, VDI):

На следующей странице у нас есть возможность выбрать тип коллекции — это будет общий пул виртуальных машин или у каждого пользователя своя индивидуальная ВМ. Оставляем по умолчанию:

Выбираем ранее созданный шаблон, на основе которого будут выделяться виртуальные машины:

На следующем этапе мы можем указать файл ответов sysprep для более детальной настройки машины при старте. Мы же оставляем все как есть:

На данном этапе мы выбираем часовой пояс, который нам подходит, а также имя подразделения, куда будут помещаться создаваемые виртуальные машины — в нашем примере это VDI Desktops:

Указываем группу безопасности, пользователям которой будет разрешено подключение по RDS к виртуальным машинам (в моем случае, достаточно Domain Users), также мы можем задать максимальное количество виртуальных машин, которые могут быть созданы на Hyper-V для данной коллекции. Еще мы можем задать свой префикс, который будет использоваться в качестве имени компьютера виртуальной машины:

На следующей странице можно оставить настройки по умолчанию или указать другое количество виртуальных машин, которые будут созданы заранее:

Укажем, где будут храниться виртуальные машины — в выбранной папке будет создан каталог с именем коллекции, а в нем будут создаваться файлы виртуальных машин и дисков:

При желании, мы можем указать общий каталог для хранения профилей пользователей. Это важно, чтобы при подключении к новой виртуальной машине все пользовательские данные сохранялись. Мы же не будем использовать данную возможность:

На последнем шаге мастера мы подтверждаем наши настройки:

Начнется процесс настройки и создания виртуальных машин. В зависимости от их количества, процедура может занять много времени. Ждем — в итоге мы должны увидеть сообщение об успешном создании коллекции:

Я столкнулся с ошибкой:
Не удалось получить подробные сведения о шаблоне виртуального рабочего стола.
В моем случае, проблема была из-за использующегося снапшота для шаблона виртуальной машины. После его удаления проблема исчезла.
Наш сервер готов.
Подключаемся к серверу с клиентского компьютера
Файл для подключения доступен на веб-интерфейсе терминального сервера. Его можно получить, перейдя в браузере по адресу https://<имя сервера RDS>/RDWeb/, введя доменные логин и пароль и выбрав подключение к нашей коллекции:

Для удобства, мы можем скачать данный файл и передать его нужным пользователям.
Запустив коллекцию мы должны получить приглашение на ввод логина и пароля, после чего мы окажемся на созданной по шаблону виртуальной машине.
Если мы хотим подключаться к нашему серверу через Remote Desktop Gateway, то откроем файл подключения к коллекции текстовым редактором и добавим строки:
…
gatewayhostname:s:rdg.dmosk.local
gatewayusagemethod:i:1
…
* где rdg.dmosk.local — адрес шлюза удаленных рабочих столов.
** эти опции могут уже присутствовать в файле, тогда нужно их проверить и при необходимости, отредактировать.
Читайте также
Другие полезные инструкции, которые дополнят данное руководство:
1. Как установить роль контроллера домена на Windows Server.
2. Установка и настройка терминального сервера на Windows Server.
3. Установка и использование Remote Desktop Gateway.
1. Введение
Microsoft давно пытается завоевать рынок виртуализации как десктопной, так и серверной. Не так давно вышла ОС Windows Server 2012 с новым гипервизором Hyper-V 3.0, который теоретически догнал гипервизор от вендора №1 виртуализации – VMware. Но речь пойдет не о серверной виртуализации, а о десктопной. Почему Microsoft? Потому что MS позиционирует свое VDI-решение как наиболее дешевое (и не зря, кстати), что мгновенно сказывается на заинтересованности рынка данным продуктом. Т.к. в VMware уже все понятно (там все хорошо), с Citrix тоже, осталось познать VDI от MS. Итак, каков он, VDI от MS в 2012-м, да и, пожалуй, в 2013-м и может даже 2014м? Да, т.к. большой любитель VMware, поэтому то тут, то там, будут проскакивать сравнения MS vs VMware.
2. Как это работает
На картинке показаны компоненты, необходимые для работы MS VDI (на самом деле если кто хорошо знаком с VMware View, разница невелика):

Прежде всего, нужен клиент – Remote Desktop Client. Да, для клиента сейчас уже лучше всего использовать Windows 8 и Windows 7 SP1, меньше и тем более XP – плохо.
Далее, на картинке показаны следующие компоненты (описание отсюда http://technet.microsoft.com/library/hh831447 и http://technet.microsoft.com/en-us/library/dd560658(v=ws.10).aspx):
· Remote Desktop Web Access (RDWA) — Веб-доступ к удаленным рабочим столам разрешает пользователям доступ к подключению к удаленным рабочим столам и удаленным приложениям RemoteApp через меню Пуск на компьютере, работающем под управлением Windows 8 или Windows 7, либо через веб-браузер. Подключение к удаленным рабочим столам и приложениям RemoteApp предоставляет настраиваемое представление удаленных приложений RemoteApp и рабочих столов на основе сеансов в коллекции сеансов, а также удаленных приложений RemoteApp и виртуальных рабочих столов в коллекции виртуальных рабочих столов. В VMware это собственно View Client, за исключением веб-портала.
· Remote Desktop Gateway (RDG) — Шлюз удаленных рабочих столов (шлюз RD) позволяет авторизованным пользователям подключаться к виртуальным рабочим столам, удаленным приложениям RemoteApp и рабочим столам на основе сеансов во внутренней корпоративной сети с помощью любого устройства, подключенного к Интернету. В VMware некий аналог View Security Server.
· Remote Desktop Session Host (RDSH) — Узел сеансов удаленных рабочих столов позволяет серверу размещать удаленные приложения RemoteApp или рабочие столы на основе сеансов. Пользователи могут подключаться к серверам узла сеансов удаленных рабочих столов в коллекции сеансов, чтобы выполнять программы, сохранять файлы и использовать ресурсы на этих серверах. Проще говоря, это управлялка службами терминалов. У VMware аналогов нет.
· Remote Desktop Virtual Host (RDVH) — Узел виртуализации удаленных рабочих столов объединяется с Hyper-V для развертывания коллекций помещенных в пул или личных виртуальных рабочих столов в организации с помощью подключения к удаленным рабочим столам и приложениям RemoteApp. Проще говоря, машина с ролью гипервизора – на ней должен стоять Hyper-V. В VMware это ESXi.
· Active Directory (AD) – тут все понятно: собственно AD, DNS и DHCP. В данном мануале DHCP сервера нет ввиду технических ограничений сети тестирования – я обошелся статикой, вовремя подменяемой в момент создания пулов машин J
· Licensing Server — Лицензирование удаленных рабочих столов управляет лицензиями, необходимыми для подключения к серверу узла сеансов удаленных рабочих столов или к виртуальному рабочему столу. Лицензирование удаленных рабочих столов можно использовать для установки, выдачи и отслеживания доступности лицензий.
· Remote Desktop Connection Broker (RDCB) – собственно управлялка подключениями. Аналог View Connection Manager.
Для развертывания простого варианта VDI нам потребуется физический сервер с ОС Windows Server 2012 и установленными ролями Hyper-V и RDVH, и две виртуальные машины: на одной будут службы AD, а на второй – роли RDWA и RDCB. Также нужно будет две виртуалки-шаблона с ОС Windows 7 и ОС Windows 8.
Про RemoteFX: протестировать чудеса графики от MS не получится, потому как хоть процессор (Xeon X56xx) и удовлетворяет требованиям RemoteFX, но нет в сервере физической карты GPU.
3. Подготовка инфраструктуры
Для начала подготовим инфраструктуру.
Что нам требуется:
· 1 физический сервер с ОС W2012 и ролями Hyper-V, RDVH: в качестве сервера у меня под рукой оказался Fujitsu PRIMERGY RX300 S6 с двумя Xeon X56xx, 24GB RAM и дисками 6x 300 SAS 15k;
· 1 контроллер домена с ролями ADDS, DNS (2GB, 2 vCPU);
· 1 сервера брокера соединений с ролями RDWA и RDCB (4GB, 2 vCPU;
· Клиент – ноутбук с правленым файлом hosts – в файл добавим инфу о сервере-брокере.
Используемые адреса:
192.168.1.201/24 iRMC управляющий порт сервера
192.168.1.202/24 hvhost01.vdi.local гипервизор, порт 01
192.168.1.203/24 hvhost01.vdi.local гипервизор, порт 02
192.168.1.204/24 msvdi-dc.vdi.local контроллер домена
192.168.1.205/24 msvdi-broker.vdi.local сервер брокера соединений
192.168.1.206/24 win7template шаблон windows 7
192.168.1.207/24 win8template шаблон windows 8
192.168.1.211/24 win7-01 пул windows 7
192.168.1.212/24 win7-02 пул windows 7
192.168.1.213/24 win8-01 пул windows 8
192.168.1.214/24 win8-02 пул windows 8
192.168.1.10/24 gate шлюз
192.168.1.100/24 client ноутбук-клиент
4. Установка Windows Server 2012 и роли Hyper-V. Создание виртуальных машин.
Установка проста – монтируем диск и устанавливаем, затем вводим пароль и делаем базовую настройку – меняем IP на нужный нам (в примере 192.168.1.202 и 203), правим настройки DNS (выставляем адрес будущего сервера DNS 192.168.1.204) , выставляем время, включаем доступ по RDP и переименовываем машину:

Далее, создаем какую-нибудь папку для образов ISO, и копируем в нее образы W2012, W7 и W8 — у меня эта папка C:ISO. Далее, создадим папку для конфигурационных файлов Hyper—V, образов машин и образов десктопов. У меня это E:VMConfig, E:VMVHD и E:VMVDI соответственно.
Далее добавляем роль Hyper—V:

Выбираем установить роли:

Выбираем наш сервер, на котором будут крутиться все виртуальные машины:


Тут ничего не выбираем, просто жмем Next:


Выбираем один адаптер – второй сейчас не нужен, т.к. для каждого адаптера Hyper—V создает свой коммутатор:

Сервер у нас один – никаких миграций не планируется:

Здесь указываем пути, где будут храниться файлы жестких дисков машин и конфигурационные файлы:


Все, роль гипервизора установлена – можно создавать виртуальные машины. Теперь ребут и идем в консоль Hyper—V Manager для создания виртуальных машин:

Создадим виртуальные машины для контроллера домена и брокера – жмем New в панели Hyper—V Manager:

Обзовем машину запланированным именем и раздаем ресурсы.
Дадим контроллеру домена 2GB, а брокеру – 4GB. Десктопам позднее дадим тоже 2.

Выберем, к какому коммутатору будет подключена виртуальная машина:

Каким будет диск виртуальной машины и где он будет лежать (стоит отметить, что диски создаются в Thin-формате, т.е. место на физическом диске используется по требованию):

Далее указываем ранее скопированные нами ISO-образы ОС:

И создаем машину, но пока ее не стартуем:

Теперь дадим машине 2 vCPU (идем в свойства машины), также включим автостарт (нужен чтобы после ребута хоста машины поднимались автоматически):


Далее запуск, и ждем…
Итак, машины проинсталлены:

Стоит отметить, что шаги по созданию виртуальной машины практически идентичны аналогичным шагам в клиенте VMware vSphere Client. Также по ощущениям, создание 2-х машин на 4-х дисках в RAID-5 было уж очень неповоротливым, ОС Windows Server 2012 ставилась порядка 40 минут (ставилось их всего две параллельно). Может сказывается медлительность NTFS over VHD over NTFS? В аналогичных условиях на VMware VMFS (получаем NTFS over VMDK over VMFS) параллельная установка ОС выполняется быстрее.
Теперь установим роль контроллера домена и включим в домен машину-брокер msvdi— broker и собственно хост hvhost01.
Продолжение следует…
This is a work in progress, so please feel free to edit this page and add new items or sections as appropriate.
Table of Contents
- Introduction
- Components required for a Windows Server 2012 VDI environment
- Optional components:
- Overview of the Microsoft VDI environment
- Planning consderations
- Deploying the RDS roles
- Deploy Integration
- Tuning and Optimization
Introduction
Components required for a Windows Server 2012 VDI environment
- Hyper-V server with the ‘RD Virtualization role’ enabled’
- Active Directory domain services
- Server hosting the ‘RD Connection Broker’ role
- Server hosting the ‘RD Session host’role running in redirection mode
- Server hosting the ‘RD Web Access’role if providing access through a web portal is required
- Server hosting the ‘RD Gateway’role if external access to virtual desktops through the internet is required
- Personal or Pooled Windows 7/8.1 VM’s running on the Hyper-V Server virtualization host.
Optional components:
- App-V
- Remote Desktop Services Shared Hosted Apps
- System Center Virtual Machine Manager (SCVMM)
Overview of the Microsoft VDI environment
<add bigger picture including SCVMM & App-V>
Planning consderations
Licensing:
<work in progress>
Server Hardware:
<work in progress>
Networking:
<work in progress>
Storage:
<work in progress>
RD Virtualization Host role:
<work in progress>
RD Virtualization Host is a Remote Desktop Services role service included with Windows Server 2008 R2. RD Virtualization Host integrates with Hyper-V to provide virtual machines that can be used as personal virtual desktops or virtual desktop pools.
An RD Virtualization Host server has the following functions:
Monitoring VM guest sessions and reporting these sessions to the RD Connection Broker server.
Preparing the VM for a remote desktop connection when requested by the RD Connection Broker server.
In order for RD Virtualization Host to perform the above functions, the guest OS must be configured to give permission to RD Virtualization Host. Refer to the Deploying Virtual Desktop Pools by Using Remote Desktop Web Access Step-by-Step Guide for further
details.
RD Connection Broker role:
<work in progress>
The main purpose of this role service is to broker a user connection to an appropriate endpoint. Brokering of the connection involves:
Identifying the VM for the user to make a remote connection.
Preparing the VM for remote connections by communicating with the Remote Desktop Virtualization Host server (for example, waking the VM from a saved state).
Querying the IP address of the VM by communicating with the Remote Desktop Virtualization Host server. This IP address is returned to the Remote Desktop Session Host server running in redirection mode.
Monitoring user sessions in a virtual desktop pool scenario. A user with an existing session in a pool is redirected to the hosting VM.
RD Session host role running in redirection mode:
<work in progress>
The purpose of the RD Session Host server running in redirection mode is to securely redirect an RDP client connection to a VM. The RD Session Host server running in redirection mode does not allow interactive user sessions, unless the user requests an administrative
session by using the ‘/admin’ switch.
When a user requests a VM, the RD Session Host server running in redirection mode queries the RD Connection Broker server. The RD Connection Broker server in turn provisions a VM for the user and returns its IP address to the RD Session Host server running
in redirection mode. The RD Session Host server running in redirection mode will then redirect the RDP client to connect to the VM by using the IP address.
It is recommended that the RD Connection Broker role service reside on the same machine as the RD Session Host server running in redirection mode (as shown in the diagram). However, the scenario where the RD Session Host server running in redirection mode
and the RD Connection Broker role service are on separate machines is also supported.
RD Web Access role:
<work in progress>
RD Web Access provides a user with an aggregated view of remote applications and desktop connections via a web browser. Using RD Web Access, a user can view all remote applications and virtual desktops (personal virtual desktops and virtual desktop pools)
published to that user. VDI VMs are also accessible via the RADC feature (start menu) in Win7 clients.
Refer to the blog post for RD Web Access configuration in a Microsoft VDI deployment.
RD Gateway role:
<work in progress>
RD Gateway is an optional role service in a Microsoft VDI deployment. Its main purpose is to securely route RDP connections over the Internet through a firewall.
Personal or Pooled VDI Desktops:
<work in progress>
Remote Desktop Services Shared Hosted Apps integration:
<work in progress>
App-V:
<work in progress>
App-V can simplify management of Virtual Machine images within a M
icrosoft VDI environment. Using App-V, you can dynamically load and assign applications on a user group basis, reduce application testing, reduce application to application conflicts, and increase application compatibility.
For more information on the next version of App-V refer to Get your applications virtualized on Windows 7 Beta with Microsoft App-V.
SCVMM:
<work in progress>
SCVMM’s console is a one stop shop for VM Management. As part of Microsoft VDI solution it not only provides the Hyper-V UI functionality but enables fast and easy VM provisioning, which is helpful in large deployments.
Source: http://blogs.msdn.com/b/rds/archive/2009/08/19/microsoft-vdi-overview.aspx
Deploying the RDS roles
RD Virtualization Host role:
<work in progress>
RD Connection Broker role:
<work in progress>
RD Session host role running in redirection mode:
<work in progress>
RD Web Access role:
<work in progress>
RD Gateway role:
<work in progress>
Create VM Pools:
<work in progress>
Assign Personal VM’s:
<work in progress>
Deploy Integration
Configure integration with Remote Desktop Services Shared Hosted Apps
App-V:
<work in progress>
SCVMM
<work in progress>
Tuning and Optimization
Antivirus software:
<work in progress>
Disable features/services
<work in progress>
Disable graphical enhancements:
<work in progress>
Deploying Hyper-V VDI: A How-To Guide
In any modern business environment, the ability to access services whenever and wherever they are needed is extremely important. In recent years, virtualization technology has become increasingly advanced, with various functionalities being introduced on a regular basis. As a result, traditional PC infrastructure has been gradually replaced with virtual desktop infrastructure (VDI) which allows you to run and manage multiple virtual machine-based desktops from any device or location. Microsoft has also introduced its own VDI solution which enables access and management of remote desktops and operating systems.
In short, this blog post attempts to answer the following questions:
What is Hyper-V VDI? – Hyper-V VDI is a desktop virtualization solution that can host desktop workloads on a centralized server running in a data center.
What components are required to deploy a Windows Server 2012 VDI environment? – You can use the VDI technology through enabling the following roles:
- Remote Desktop Virtualization Host
- Remote Desktop Session Host
- Remote Desktop Connection Broker
- Remote Desktop Gateway
- Remote Desktop Web Access
- Remote Desktop Licensing
How to deploy a Windows Server 2012 VDI environment? – For this purpose, you need to take the following steps:
- Install the server roles on physical machines or virtual machines
- Create a pooled virtual desktop collection
- Add Remote Desktop Gateway servers
- Add Remote Desktop Connection Brokers
- Add Remote Desktop Web Access
- Add Remote Desktop Licensing
- Add Remote Desktop Virtualization Hosts
After going through the entire deployment process, you get access to enterprise-level desktop virtualization, which can provide you with flexibility, efficiency, scalability, security and many more benefits. Read further to learn more about the Hyper-V VDI environment and how you can protect all your virtual desktops with a single data-protection solution – NAKIVO Backup & Replication.
What Is Hyper-V VDI?
Hyper-V VDI is a centralized desktop delivery solution which enables running virtual desktop instances, including client operating systems (OSes), data, and applications in a server-based virtual machine (VM) in the data center.
To enable Hyper-V VDI, you need two Windows server roles: Hyper-V, which creates and manages VMs, and Remote Desktop Services (RDS), which enables and manages communication between a user and a virtual desktop over the network. With the help of a Remote Desktop Protocol, the user’s input is sent to a remote application and the application’s output is then displayed on the user’s local device.
Thus, a Hyper-V VDI environment can be considered an alternative to traditional PC-based infrastructure. In this case, real physical computers are replaced with virtual desktops. Each user gets access to a dedicated VM that runs a separate OS (such as Windows, Windows Server, and Linux). Some users may be given administrator rights, which allows them to install or delete desktop applications, change system settings, install system updates, etc.
It is extremely difficult to control a large organization with thousands of employees performing thousands of tasks at the same time—even more so if this organization has multiple branches all over the world. As a result, your infrastructure can become exposed to multiple potential threats and dangers. Many organizations decide to deploy the VDI solution in order to address some of their existing desktop management challenges and potential vulnerabilities.
Thus, Hyper-V VDI can help you in the following cases:
- If you would like to deliver secure desktops to unmanaged devices, such as when employees work remotely from home.
- If you are seeking to centrally manage and maintain all remote desktop instances, such as offshore or outsourcing branch offices.
- If you work in a highly-regulated industry and need to ensure that strict security requirements can be met.
- If you need to create a standardized desktop for task workers, who generally perform an established set of tasks.
- If you wish to have access to your workstation at any time and from any device, such as when traveling abroad for a business trip.
To better understand why some business owners choose to build a VDI environment, you need to understand how it works. In a nutshell, the Microsoft VDI technology entails the following:
- Every end user can access their virtual desktop, which is stored on a centralized server, from any device.
- An administrator can grant/deny users access to specific applications from a central management console.
- An administrator can easily identify when licensing is going to expire and determine whether any of your desktop instances requires updates.
- A selected virtual desktop can be maintained and supported by an administrator from a centralized server without having to disrupt the production environment.
- Every end user is assigned a specific VM with dedicated resources. All VMs run in isolation from one another, meaning that they cannot affect one another’s performance and get hold of private data.
- All data is stored on a physical server in the data center, meaning that if a virtual desktop fails, you can still retrieve the required information from a remote server.
- Support and maintenance within the VDI environment is much easier compared to that within a traditional PC infrastructure in that an administrator can easily detect any issues and solve them from a centralized server. This is especially convenient for large enterprises which run multiple datacenters in different locations.
- An end user can connect to their virtual desktop using a thin client, zero client, or thick client, as well as laptops or docking stations, tablets or phones. Note that the device should be connected to a corporate network in order to perform any I/O operations.
- VDI deployment can be scaled up and down on an as-needed basis. Due to the fact that virtual desktop instances are VM-based, expanding your Hyper-V VDI environment is as easy as creating new VMs.
Hyper-V VDI Components
In order to build a Hyper-V VDI environment using a Hyper-V virtualization platform, you should have the following Remote Desktop Services enabled:
- Remote Desktop Virtualization Host, which is a server with the Hyper-V role enabled. The hypervisor helps you host VMs and install desktop OSs on top of them. This way, you can provision each end user with their own workstation.
- Remote Desktop Session Host, which allows multiple end users to access Windows desktops and applications using RemoteApp or the Remote Desktop Connection client.
- Remote Desktop Connection Broker, which enables connection between end users and specific virtual desktops. Remote Desktop Connection Broker can identify whether a user is allowed to connect to a desktop instance and access certain VM data and applications.
- Remote Desktop Gateway, which provides public users with a secure network to connect to Windows desktops and applications.
- Remote Desktop Web Access, which enables users to access virtual desktops and applications through a web page.
- Remote Desktop Licensing, which allows you to manage RD licensing within your Hyper-V VDI environment and ensure that each user and device has an RDS Client Access License (CAL).
Benefits of Deploying Hyper-V VDI
As you can see, Hyper-V VDI is a great option for business owners looking to simplify management over their current production workloads. However, there are even more reasons why you should deploy the Microsoft VDI environment, which we will discuss in detail below:
The benefits of deploying Hyper-V VDI include:
- By consolidating multiple desktop instances on top of a single platform, you can easily manage and control all endpoints.
- IT administrators can easily maintain and provision all available desktops from a centralized server without affecting production environment and users’ productivity.
- With Hyper-V VDI, you can have an easy remote access to your workstation from anywhere in the world.
- All data is stored in a central server, meaning that hardware failures would hardly cause any disruption in your environment. Moreover, if you have a data protection solution installed, it becomes much faster and easier to back up all data from a single location.
- Cost-efficiency. VDI allows you to save money, time, and effort. When compared to a traditional PC infrastructure, a Hyper-V VDI environment requires less hardware resources to support its performance, and it consumes less power thanks to the minimal number of physical servers. Moreover, the entire Hyper-V VDI environment can be supported and maintained by a single IT administrator from a central management console.
How to Deploy Hyper-V VDI
The entire setup process is complex enough to make some business owners abandon the idea of building a Hyper-V VDI environment entirely. Below, I am going to describe the step-by-step process of deploying Hyper-V VDI in Windows Server 2012.
Step 1: Install Remote Desktop Role Services
This section describes which Remote Desktop role services should be installed for Hyper-V VDI deployment.
1. Open Server Manager, click Manage, and select Add Roles and Features.
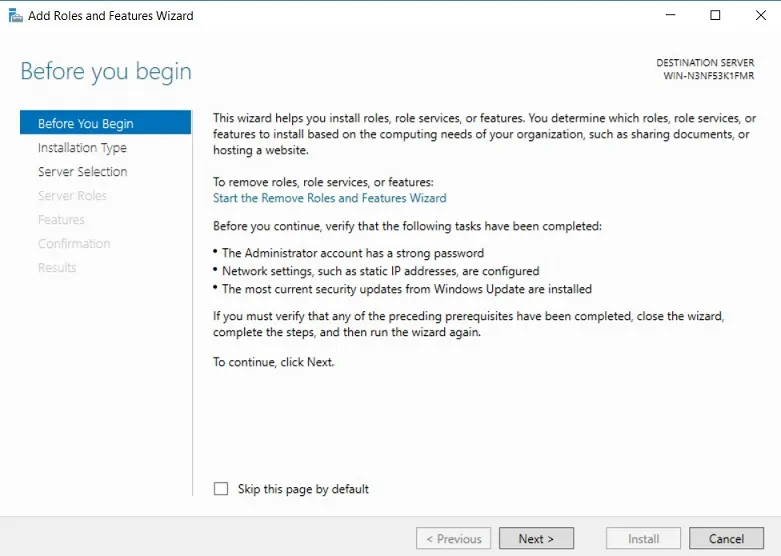
2. The Before You Begin section should open, which describes what you can do using this wizard.
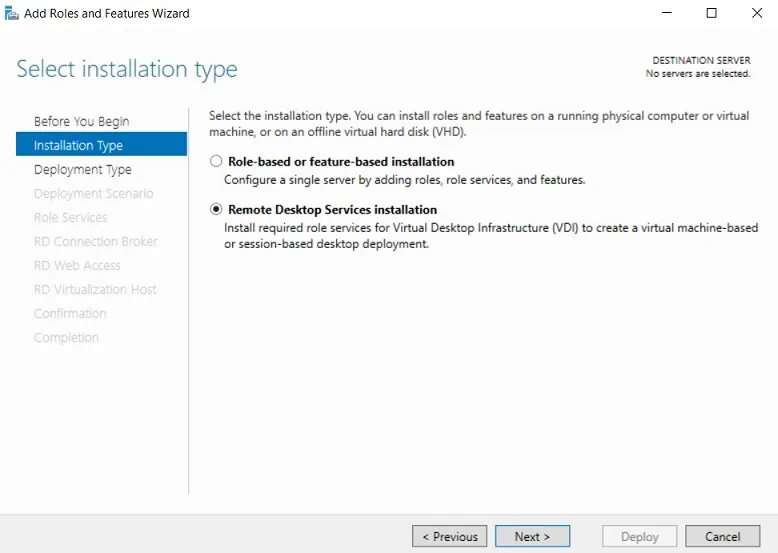
3. In the Installation Type section, click Remote Desktop Services Installation.
4. In the Deployment Type section, click Standard deployment, which enables deployment of Remote Desktop Services across multiple servers.

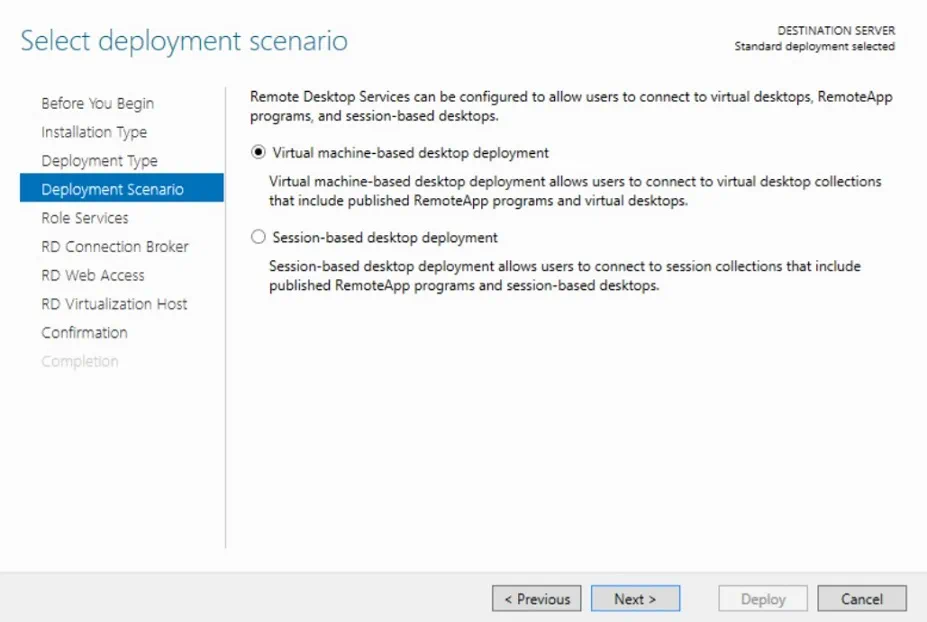
5. In the Deployment Scenario section, click Virtual machine-based desktop deployment in order to enable connection to virtual desktop collections.
6. In the Role Services section, you can see the list of RDS role services to be installed for this VDI deployment. Click Next.

7. In the RD Connection Broker section, look through the list of servers available in the server pool and choose the server where the RD Connection Broker will be installed.
8. In the RD Web Access section, choose the server from the server pool where the RD Web Access role service will be installed.
9. In the RD Virtualization Host section, choose the server from the server pool where the RD Virtualization Host role service will be installed.
10. In the Confirmation section, verify that everything is correct. Check the box Restart the destination server automatically if required and click Deploy.
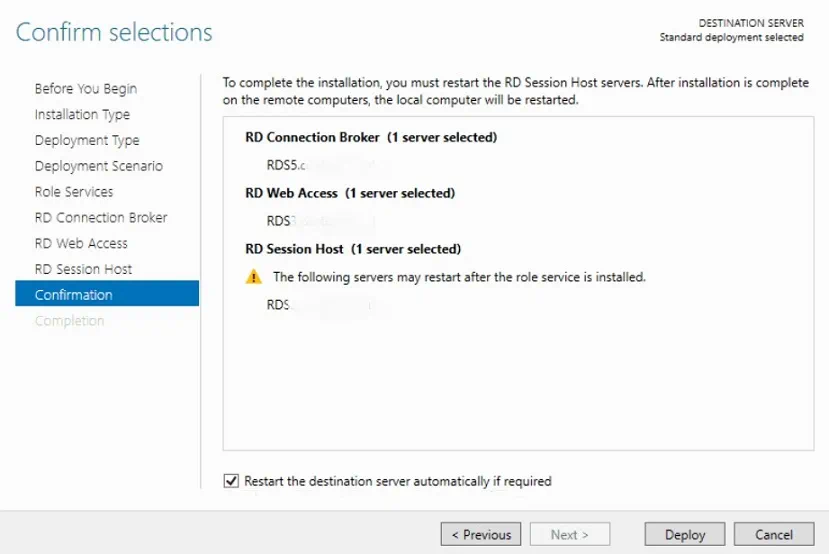
11. In the Completion section, you can monitor the process of installing RDS role services. After the installation operation is complete, the local server should restart automatically.
As a result, you should have the RD Connection Broker, RD Web Access, and RD Virtualization Host installed.
Step 2: Create a pool of managed virtual desktops
The next step is to create a virtual desktop collection, which allows you to build a single platform for running Windows desktops and applications, providing users with access to their personal workstations. Virtual desktop collections can be one of two types: pooled virtual desktop collections, and personal virtual desktop collections. In a pooled desktop collection, multiple users can simultaneously access a shared pool of resources, while in a personal collection session, users should be assigned their personal desktop from within the pool.
Now let’s discover how to create a pooled virtual desktop collection. For this purpose, you should take the following steps:
1. Open Server Manager, select Remote Desktop Services, click Collections, then go to Tasks, and choose Create Virtual Desktop Collection. The Create Collection wizard should open.
2. In the Before You Begin section, read what this wizard allows you to do, and check if your system meets all the requirements.
3. In the Collection Name section, insert the name of your virtual desktop collection.

4. In the Collection Type section, click Pooled virtual desktop collection and check the corresponding box to automatically create and manage virtual desktops.

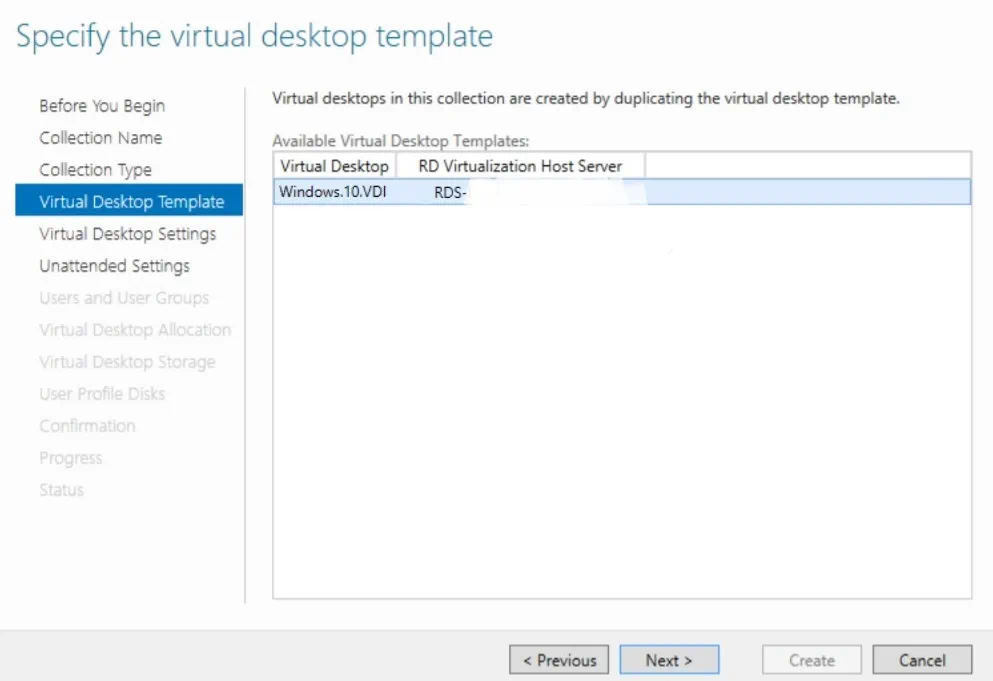
5. In the Virtual Desktop Template section, select one of the available virtual desktop templates. Note that you should create a VM template beforehand using the Sysprep tool as this template is set to be used as a blueprint for creating virtual desktops.
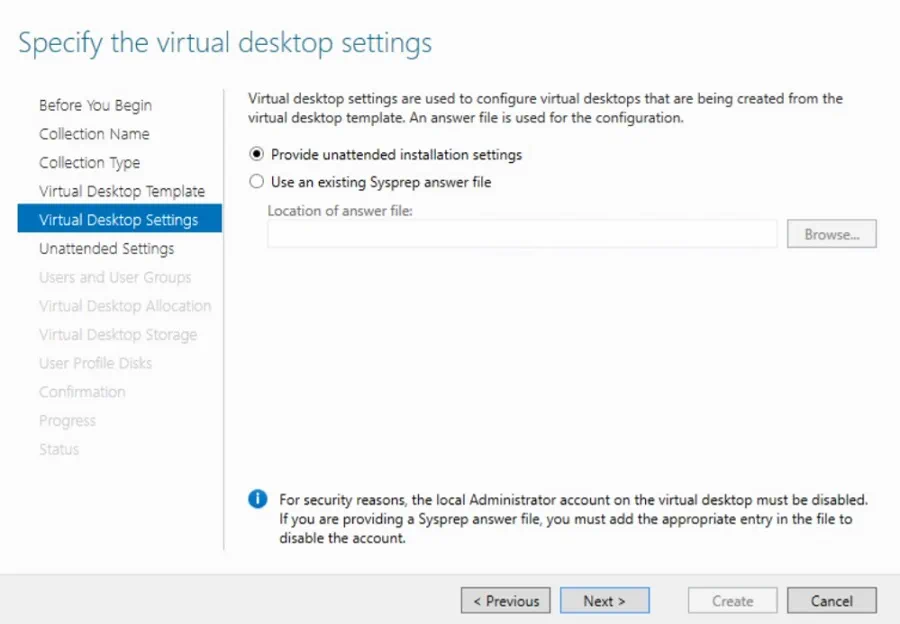
6. In the Virtual Desktop Settings section, select Provide unattended installation settings.
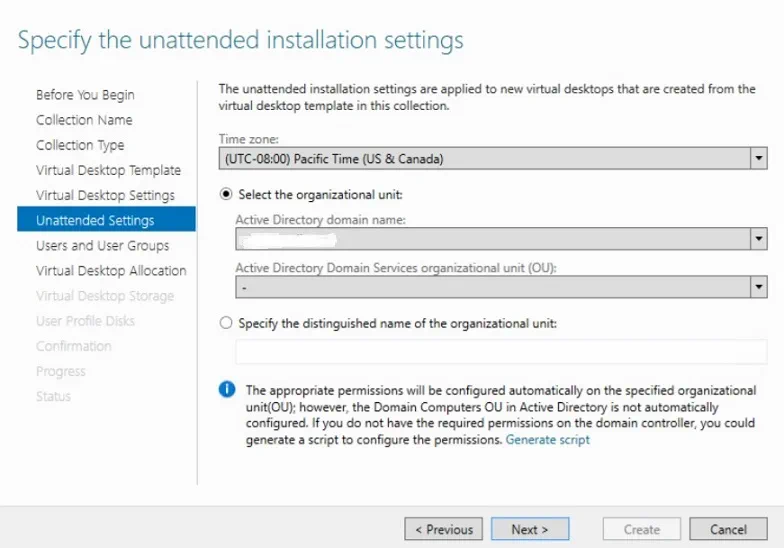
7. In the Unattended Settings section, you can configure the time zone, and check the Select the organizational unit box.
8. In the Users and User Groups section, you can add the user groups that should have access to connect to the desktop collection. Then, you must specify how many virtual desktops should be created in this collection. After that, assign a prefix and suffix to the name of each virtual desktop.

9. In the Virtual Desktop Allocation section, decide how many virtual desktops should be created on each RD Virtualization Host server by entering the number in the New Virtual Desktops column.
10. In the Virtual Desktop Storage section, click Store on each RD Virtualization Host server before checking the Automatically roll back the virtual desktop when the user logs off box.
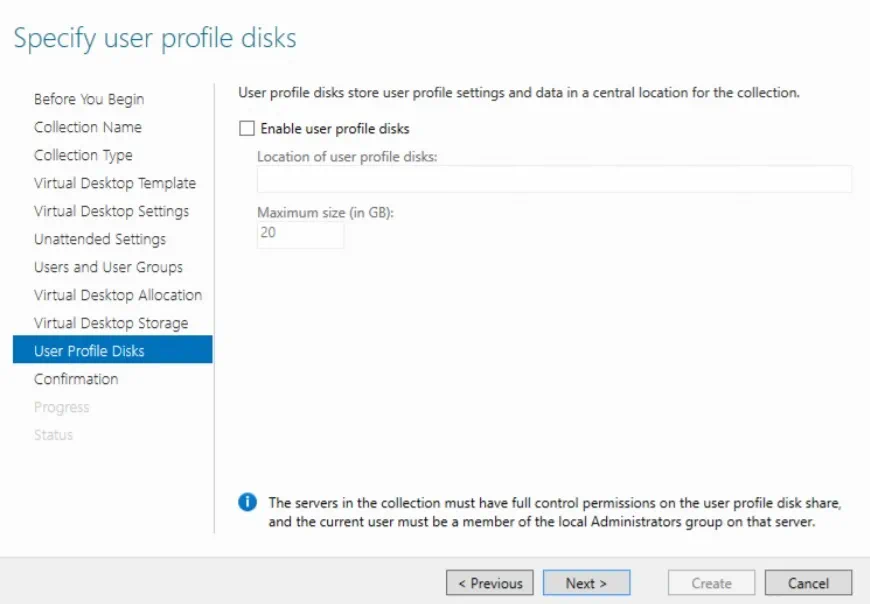
11. In the User Profile Disks section, you can enable user profile disks which can store user profile settings and data. Here, you should specify the location of user profile disks and specify their maximum size in gigabytes.
12. In the Confirmation section, verify the changes that you wish to adopt and click Create.
13. In the Progress section, you can monitor the process of creating a virtual desktop collection. Click Close.

14. Check the status of the virtual desktop collection by entering the Collection section. After that, right-click the VDI collection and select Task Status details. This way, you can see that the virtual desktop has been successfully created.
Data Protection with NAKIVO Backup & Replication
Designed for businesses of all sizes, NAKIVO Backup & Replication offers complete data protection for all of your production workloads, including VMware vSphere Backup, Hyper-V Backup, Microsoft 365 Backup and more. Get the Free Trial now!
Step 3: Deploy the Hyper-V VDI environment
This is the final step in building a Hyper-V VDI environment. Here, you should add RD Gateway servers, RD Connection Brokers, RD Web Access, RD Licensing, and RD Virtualization Hosts to create a highly-available Hyper-V VDI environment.
For this purpose, you should do the following:
- Open Server Manager.
- In the DEPLOYMENT SERVERS section, select TASKS.
- Select Add RD Gateway Servers. Following the prompts, making the necessary adjustments.
Go through all of the options (Add RD Virtualization Host Servers, Add RD Web Access Servers, and Add RD Licensing Servers) and configure them as required. Visit Windows IT Pro Center to learn more about Hyper-V VDI deployment and configuration.
Wrapping Up
Data is considered to be the main asset of many modern organizations, which in turn makes security their highest priority. In VDI environments, all data is stored in the production data center, making it easy for IT administrators to monitor the entire infrastructure, detect any malicious activity, and easily recover critical data and applications, even if one of the virtual desktops fails. However, the fact that all data is stored in a single location doesn’t eliminate system vulnerabilities altogether. In fact, the VDI environment becomes more greatly exposed to other threats and dangers.
If you are considering deploying the Hyper-V VDI environment, your primary concern should be ensuring its protection. Standard measures include securing the physical endpoint, enabling software firewalls, and installing anti-malware products. However, all these approaches are still insufficiently effective for protecting the entire Hyper-V VDI environment. For this purpose, consider installing a full-fledged data protection solution that includes a rich set of data protection options and exclusive features.
NAKIVO Backup & Replication is a reliable and powerful backup and recovery solution, which allows you to protect VMware, Hyper-V, Nutanix, AWS EC2 and Microsoft 365 environments.

Applies to: Windows Server 2012 and 2012 R2
In previous articles, we looked at the deployment steps of a traditional form of Remote Desktop Services (RDS) for 2012 and 2012 R2. Now let’s take a look at the setup of VDI for a 2012 RDS farm. This will be broken down into three parts. In this first part, we will go through the process of deploying the RD Virtualization Host role to a single Hyper-V server in an existing 2012 RDS farm. Then in the second part, we will go through the process of creating a desktop collection and publishing a Windows 7 pooled VDI desktop. Finally in part three, we will go through the process of maintaining a desktop image for a pooled desktop. This portion will cover the maintenance and updating of the main image in a pooled VDI desktop environment.
Part I
Before we begin, we will first need a physical 2012 server with the Hyper-V role installed. In a production environment, a Hyper-V cluster is preferred, however for this example, we will be using a single Hyper-V server for our deployment. This is a single physical domain joined 2012 R2 server running Hyper-V called Lab01. The server must be physical and not a virtual machine. We will add this new RD virtualization host (RDVH) server to our existing RD farm.
To begin, open Server Manager and add the designated RDVH server to be managed.

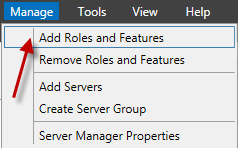
Once added, go to Manage and select Add Roles and Features.
On the Before you Begin Screen, hit next.

On the select installation type screen, select Remote Desktop Services installation and hit next.

Since we are adding the Virtualization Host to an existing RDS farm which is already being managed with Server Manager in the server pool, it will automatically find the RD connection broker as it will be listed in the drop down. Select standard type and hit next.
For the deployment scenario, select virtual machine-based desktop deployment and hit next.

On the review role services page, hit next.

Since our farm is already configured, on the “Select RD Connection Broker server” and the “Select RD Web Access server” screens, the information is automatically added for you. Click next on both screens.


On the Specify RD Virtualization Host Server screen, let’s add our designated Hyper-V server. In this scenario, we are also going to allow the wizard to create a new virtual switch within Hyper-V to be used for our virtual desktops. This step is not required if a virtual switch was already configured on the Hyper-V server. To do so, check the box which says “Create a new virtual switch on the selected servers” and hit next.
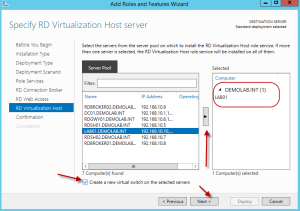
On the confirmation screen, review the settings, then check the box “Restart the destination server automatically if required”. Hit Deploy.

Once it is finished, hit Close to close out of the wizard. If you now look in Hyper-V Manager, you will see a new virtual switch was created and will be used for the virtual desktops.

Now that we have our RD Virtualization Host server deployed, let’s go back into RDMS within Server Manager and edit the deployment properties of our farm.
![]()
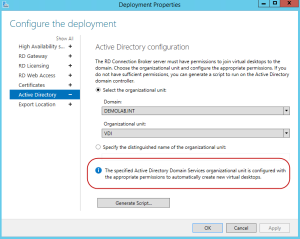
Within the deployment properties, we now have two new sections. One is called Active Directory and the other Export Location.

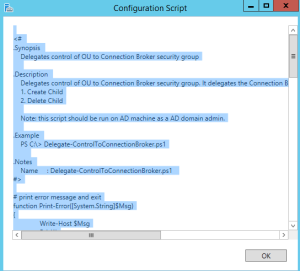
Within the Active Directory section, this is where we can specify the default Active Directory Organizational Unit which will house our VDI desktops. In order for this to work, the RD Connection Brokers will require full control on the security of the OU. Ive already pre-created an OU called VDI, and when I select it, it will give me an error stating the permissions are not correct.

Depending on the level of security with the account you are logged in as, you can hit apply for the correct security permissions to be applied to the OU. In some cases, you may be using an account which does not have access to make this change. In these cases, you can click on Generate Script and it will generate a PowerShell script you can copy and send to an admin who has the correct administrative privileges who can run the script to apply to appropriate permissions.
When the correct permissions are made, you will see the following message stating it is configured with the appropriate permissions.
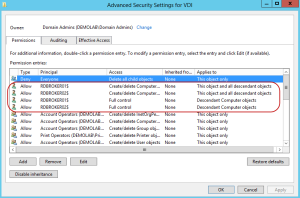
If we look at the security settings for the OU, you can see the correct permissions have been made. It will apply these permissions for each of the RD Connection Brokers in the farm since these will be the servers which will be facilitating the creation and deletion of the virtual desktops.
Finally, let’s look at the Export Location section. Here we can specify the folder where the virtual template, which is used to create the desktops, will be copied to. The default location will be shared on the active RD Connection Broker to a folder called RDVirtualDesktopTemplate. If you already have a folder designated for the virtual template, you can change it here and apply the changes.

Now with our RD Virtualization Host deployed, we are ready to move on and create a new collection to publish our VDI desktops.
© 2014 Eddie Kwasnik “the Wolf” All Rights Reserved
This entry was posted on March 26, 2014, 9:48 am and is filed under MICROSOFT. You can follow any responses to this entry through RSS 2.0.
You can leave a response, or trackback from your own site.
![]()
Доброго
времени суток, я продолжаю освещать новые и обновленные роли и
компоненты в Windows Server 2012, на этот раз в центре внимания роль инфраструктура виртуальных рабочих столов (VDI), а точнее обновленные службы удаленных рабочих столов (Remote Desktop Services, RDS) и их компонент Desktop Virtualization.
Основное отличие Desktop Virtualization от традиционных служб удаленных рабочих столов заключается в том, что конечный пользователь получает не сессию, в рамках которой он пользуется сервером, а полноценную виртуальную машину. Впервые такие возможности появились в Windows Server 2008 R2, а с выходом Windows Server 2012 они вышли на принципиально новый уровень. В веб-касте вы найдете демонстрацию развертывания инфраструктуры виртуальных рабочих столов с коллекцией из трех виртуальных машин на базе Windows 8, а также демонстрацию подключения к коллекции с Windows 8 и Windows 7.
Подробности и видео: LebedevUM.
P.S. Для тех кто давно смотрит мои веб-касты, наверняка обратит внимание, на то что в касте задействовано одновременно 9 машин, а на сервере с RDS: Desktop Virtualization, будут развернуты 3 виртуальные машины и работает сервер с RDS значительно быстрее остальных. Так как об этом наверняка спросят почему так, то отвечу сразу: сервер RDS01 был развернут на новом хранилище с SSD-дисками.
Remote Desktop Services is a server role consists of several role services. Remote Desktop Services (RDS) accelerates and securely extends desktop and applications to any device and anyplace for remote and roaming worker. Remote Desktop Services provide both a virtual desktop infrastructure (VDI) and session-based desktops.
In Windows Server 2012 R2, the following roles are available in Remote Desktop Services:
| Role service name | Role service description |
| RD Virtualization Host | RD Virtualization Host integrates with Hyper-V to deploy pooled or personal virtual desktop collections |
| RD Session Host | RD Session Host enables a server to host RemoteApp programs or session-based desktops. |
| RD Connection Broker | RD Connection Broker provides the following services
|
| RD Web Access | RD Web Access enables you the following services
|
| RD Licensing | RD Licensing manages the licenses for RD Session Host and VDI. |
| RD Gateway | RD Gateway enables you to authorized users to connect to VDI, RemoteApp |
For a RDS lab, you will need following servers.
- RDSVHSRV01- Remote Desktop Virtualization Host server. Hyper-v Server.
- RDSWEBSRV01- Remote Desktop Web Access server
- RDSCBSRV01- Remote Desktop Connection Broker server.
- RDSSHSRV01- Remote Desktop Session Host Server
- FileSRV01- File Server to Store User Profile
This test lab consist of 192.168.1.1/24 subnets for internal network and a DHCP Client i.e. Client1 machine using Windows 8 operating system. A test domain called testdomain.com. You need a Shared folder hosted in File Server or SAN to Hyper-v Cluster as Virtualization Host server. All RD Virtualization Host computer accounts must have granted Read/Write permission to the shared folder. I assume you have a functional domain controller, DNS, DHCP and a Hyper-v cluster. Now you can follow the steps below.
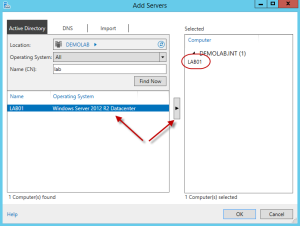
Step1: Create a Server Group
1. Open Server Manager from Task bar. Click Dashboard, Click View, Click Show Welcome Tile, Click Create a Server Group, Type the name of the Group is RDS Servers
2. Click Active Directory , In the Name (CN): box, type RDS, then click Find Now.
3. Select RDSWEBSRV01, RDSSHSRV01, RDSCDSRV01, RDSVHSRV01 and then click the right arrow.
4. Click OK.
Step2: Deploy the VDI standard deployment
1. Log on to the Windows server by using the testdomainAdministrator account.
2. Open Server Manager from Taskbar, Click Manage, click Add roles and features.
3. On the Before You Begin page of the Add Roles and Features Wizard, click Next.
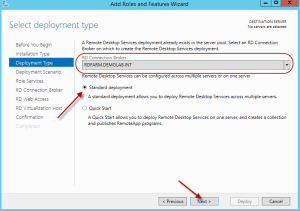
4. On the Select Installation Type page, click Remote Desktop Services scenario-based Installation, and then click Next.

5. On the Select deployment type page, click Standard deployment, and then click Next. A standard deployment allows you to deploy RDS on multiple servers splitting the roles and features among them. A quick start allows you to deploy RDS on to single servers and publish apps.

6. On the Select deployment scenario page, click Virtual Desktop Infrastructure, and then click Next.

7. On the role services page, review roles then click Next.

8. On the Specify RD Connection Broker server page, click RDSCBSRV01.Testdomain.com, click the right arrow, and then click Next.

9. On the Specify RD Web Access server page, click RDSWEBSRV01.Testdomain.com, click the right arrow, and then click Next.

10. On the Specify RD Virtualization Host server page, click RDSVHSRV01.Testdomain.com, click the right arrow, and then click Next. RDSVHSRV01 is a physical machine configured with Hyper-v. Check Create a New Virtual Switch on the selected server.

11. On the Confirm selections page, Check the Restart the destination server automatically if required check box, and then click Deploy.

12. After the installation is complete, click Close.

Step3: Test the VDI standard deployment connectivity
You can ensure that VDI standard deployment deployed successfully by using Server Manager to check the Remote Desktop Services deployment overview.
1. Log on to the DC1 server by using the testdomainAdministrator account.
2. click Server Manager, Click Remote Desktop Services, and then click Overview.
3. In the DEPLOYMENT OVERVIEW section, ensure that the RD Web Access, RD Connection Broker, and RD Virtualization Host role services are installed. If there is an icon and not a green plus sign (+) next to the role service name, the role service is installed and part of the deployment

Step4: Configure FileSRV1
You must create a network share on a computer in the testdomain domain to store the user profile disks. Use the following procedures to connect to the virtual desktop collection:
- Create the user profile disk network share
- Adjust permissions on the network share
Create the user profile disk network share
1. Log on to the FileSRV1 computer by using the TESTDOMAINAdministrator user account.
2. Open Windows Explorer.
3. Click Computer, and then double-click Local Disk (C:).
4. Click Home, click New Folder, type RDSUserProfile and then press ENTER.
5. Right-click the RDSUSERPROFILE folder, and then click Properties.
6. Click Sharing, and then click Advanced Sharing.
7. Select the Share this folder check box.
8. Click Permissions, and then grant Full Control permissions to the Everyone group.
9. Click OK twice, and then click Close.
Setup permissions on the network share
1. Right-click the RDSUSERPROFILE folder, and then click Properties.
2. Click Security, and then click Edit.
3. Click Add.
4. Click Object Types, select the Computers check box, and then click OK.
5. In the Enter the object names to select box, type RDSVHSRV01.Testdomain.com, and then click OK.
6. Click RDSVHSRV01, and then select the Allow check box next to Modify.
7. Click OK two times.
Step5: Configure RDSVHSRV01
You must add the virtual desktop template to Hyper-V so you can assign it to the pooled virtual desktop collection.
Create Virtual Desktop Template in RDSVHSRV01
1. Log on to the RDSVHSRV01 computer as a TestdomainAdministrator user account.
2. Click Start, and then click Hyper-V Manager.
3. Right-click RDSVHSRV01, point to New, and then click Virtual Machine.
4. On the Before You Begin page, click Next.
5. On the Specify Name and Location page, in the Name box, type Virtual Desktop Template, and then click Next.

6. On the Assign Memory page, in the Startup memory box, type 1024, and then click Next.

7. On the Configure Networking page, in the Connection box, click RDS Virtual, and then click Next.

8. On the Connect Virtual Hard Disk page, click the Use an existing virtual hard disk option.

9. Click Browse, navigate to the virtual hard disk that should be used as the virtual desktop template, and then click Open. Click Next.

10. On the Summary page, click Finish.
Step6: Create the managed pooled virtual desktop collection in RDSVHSRV01
Create the managed pooled virtual desktop collection so that users can connect to desktops in the collection.
1. Log on to the RDSCBSRV01 server as a TESTDOMAINAdministrator user account.
2. Server Manager will start automatically. If it does not automatically start, click Start, type servermanager.exe, and then click Server Manager.
3. In the left pane, click Remote Desktop Services, and then click Collections.
4. Click Tasks, and then click Create Virtual Desktop Collection.

5. On the Before you begin page, click Next.
6. On the Name the collection page, in the Name box, type Testdomain Managed Pool, and then click Next.

7. On the Specify the collection type page, click the Pooled virtual desktop collection option, ensure that the Automatically create and manage virtual desktops check box is selected, and then click Next.

8. On the Specify the virtual desktop template page, click Virtual Desktop Template, and then click Next.

9. On the Specify the virtual desktop settings page, click Provide unattended settings, and then click Next. In this step of the wizard, you can also choose to provide an answer file. A Simple Answer File can be obtained from URL1 and URL2
10. On the Specify the unattended settings page, enter the following information and retain the default settings for the options that are not specified, and then click Next.
§ In the Local Administrator account password and Confirm password boxes, type the same strong password.
§ In the Time zone box, click the time zone that is appropriate for your location.
11. On the Specify users and collection size page, accept the default selections, and then click Next.
12. On the Specify virtual desktop allocation page, accept the default selections, and then click Next.
13. On the Specify virtual desktop storage page, accept the default selections, and then click Next.
14. On the Specify user profile disks page, in the Location user profile disks box, type \FileSRV01RDSUserProfile, and then click Next. Make sure that the RD Virtualization Host computer accounts have read and write access to this location.
15. On the Confirm selections page, click Create.
Step8: Test Remote Desktop Services connectivity
You can ensure the managed pooled virtual desktop collection was created successfully by connecting to the RD Web Access server and then connecting to the virtual desktop in the Testdomain Managed Pool collection.
1. Open Internet Explorer.
2. In the Internet Explorer address bar, type https://RDSWEBSRV01.Testdomain.com/RDWeb, and then press ENTER.
3. Click Continue to this website (not recommended).

4. In the Domainuser name box, type TESTDOMAINAdministrator.
5. In the Password box, type the password for the TESTDOMAINAdministrator user account, and then click Sign in.
6. Click Testdomain Managed Pool, and then click Connect.
Relevant Configuration
Remote Desktop Services with ADFS SSO
Remote Desktop Services with Windows Authentication
RDS With Windows Authentication
Remote Desktop Services (RDS) has been improved in Server 2012. Now, RDS allows remote users to gain access to their corporate desktops or published applications running either as sessions on a Remote Desktop Session Host server (using web browser to access, for example) , or virtual machines on a Remote Desktop Virtualization Host server, by using a remoting protocol from various end point devices (unfortunately, Microsoft doesn’t provide any RD clients for Tablet OS=you have to use software from third-party companies). Server 2012 offers two deployment types : virtual-desktop deployment (=VDI) or session-based deployment (=Terminal Services).
Requirements
– Active Directory
– DHCP
– Hyper-V Server
– Sysprepped VHD with Windows 8 or Windows 7 SP1
– Tablet PC or one PC with Windows OS for testing
I’m happy man and I have cluster based on EMC VNX 5100 (FC) attached with two server systems (server01 and server02) joined to forum.local domain. The most important thing that you have to check is NETWORK. During our further deployment steps, RDS will create virtual switch in Hyper-V and randomly assign NIC as connection.This connection MUST have access to your DHCP-server.

Deployment steps
1) Go to Server Manager – Manage – Add Roles and Features

2) Choose “Remote Desktop Services installation”

3) Our way is “Quick Start”. Standard deployment allows you to deploy the main RDS roles (Connection Broker, Gateway and etc) on separate servers and make high available RDS systems. Quick Start install necessary roles on one server (stand-alone deployment)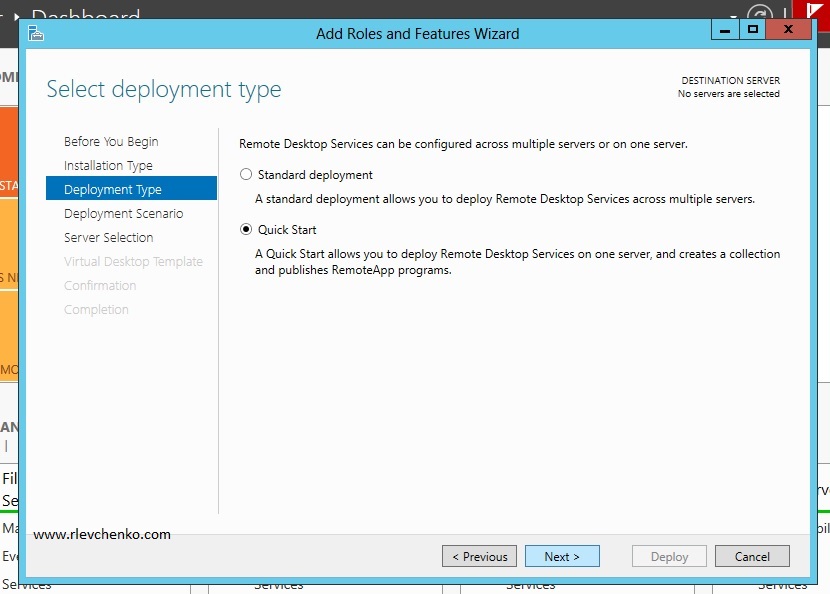
4) Select your server for VDI services. In my cases, it’s SERVER01.forum.local

5) Add your sysprepped VHD. I use VHD with sysprepped WIndows 8 Pro.
To make sysprepped VHD do the following:
- Create VM
- Mount ISO with Windows 8 or Windows 7 SP1
- Install OS
- Run sysprep utility (WIN+R – sysprep)
- Check “Generalize” , shutdown options must be “shutdown”


6) Check “Restart…” and click Deploy

7) After system restart check that all services configures successful and click “Close”

Configuration steps
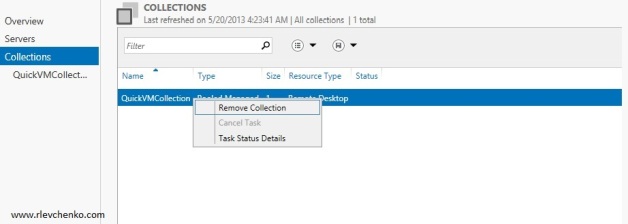
By default, wizard creates virtual desktop collection “QuickVMCollection..” . I won’t use this desktop collection ’cause I want to make another one with my settings (for example, I want to store all VDI desktops on cluster shared volume, enable user profile disks and etc).
1) Go to Remote Desktop Services

2) Delete wizard-created collection
3) Click on “Create virtual..” to create new collection

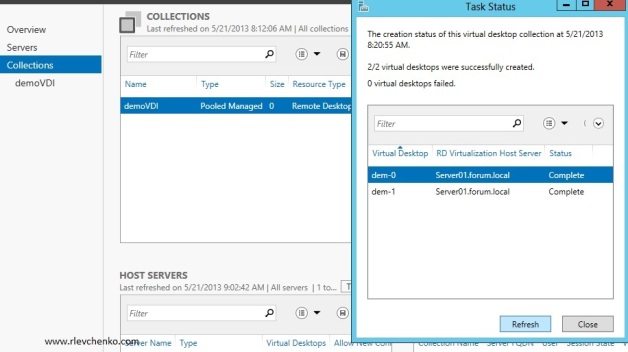
4) Define your settings for the new collection


TESTING
From client PC :
1) Open your browser and type https://FqdnOfRDserver/rdweb

2) Use your domain credentials and click on collection name (in my case, demoVDI) . Check that you can log in to VD.

From Tablet:
*I used smartphone based on Android with PocketCloud Remote Desktop Pro installed
Basic recommendations:
1) Download and install RD client with RD Gateway support (for example, iTap mobile or PocketCloud Remote Desktop Pro)
2) Open your mobile browser
3) Type RD server gateway address (in my case, I use wireless access point with DHCP relay , so I type internal RD server address)
4) Download and open RDP file

P.S. Go ahead and publish your remote App 🙂
UPDATE: Microsoft has released own RDP clients for Android and iOS . More info: http://technet.microsoft.com/en-us/library/dn473009.aspx
Note: you cannot create VDI collection from Gen2 VM (2012 R2) + if you are going to use VDI in production it is required to request and assign appropriate certificates for RDS roles (public <>gw, internally issued <> other roles)