В операционной системе Windows 10 настроить VPN-подключение по протоколу L2TP не составит большого труда — достаточно выполнить все действия, как показано на картинках, и уже через минуту вы сможете анонимно посещать любые сайты, обойти блокировку Вконтакте, безопасно использовать бесплатный Wi-Fi.
1
Кликнуть на иконке сетевого подключения в системном трее, и в появившемся окне выбрать Сетевые параметры.
Далее


4
Указать идентификационные данные:
- Общий ключ — a-secure-psk
- Тип данных для входа — Имя пользователя и пароль
- Имя пользователя — username
- Пароль — password
Для завершения настройки нажать Сохранить.
Важное замечание: имя пользователя и пароль находятся в файле readme.txt, отправленном на Вашу почту после заказа подписки.
Далее
a-secure-psk
username
password


5
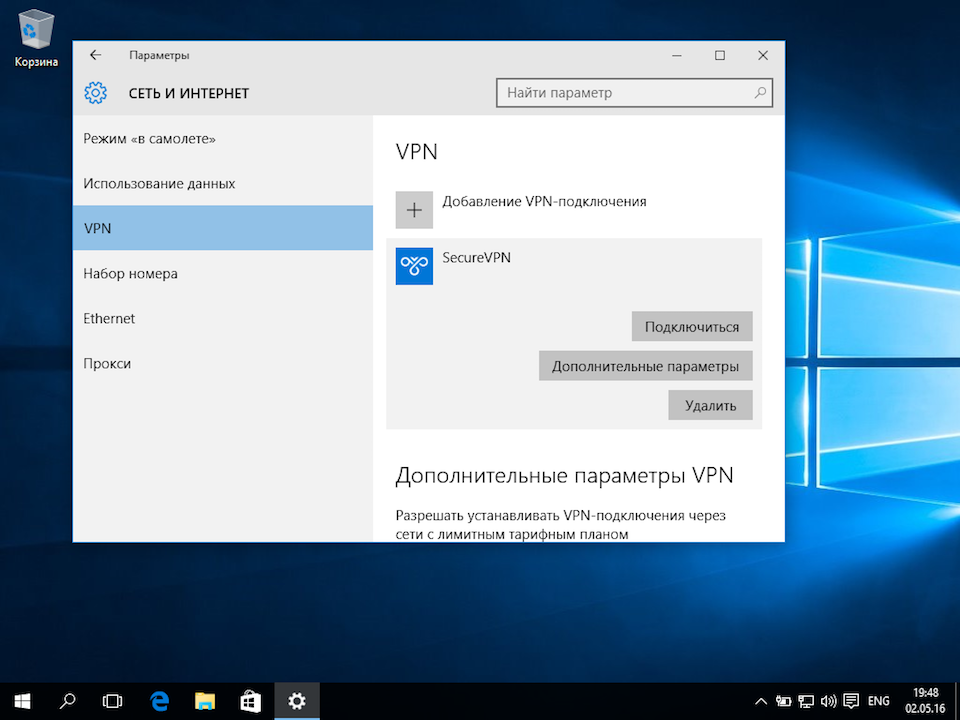
Для подключения выбрать только что созданное соединение, и нажать кнопку Подключиться.
Далее
6
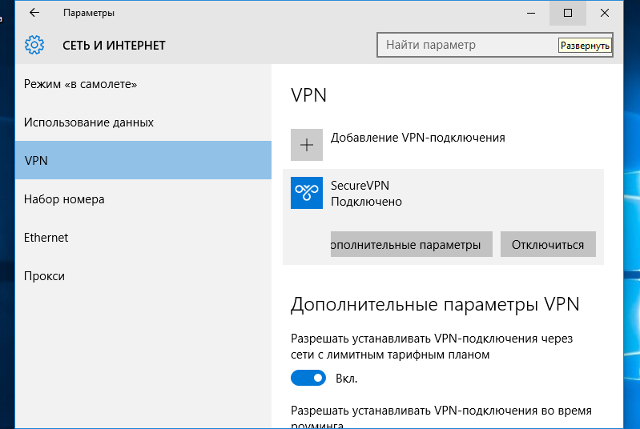
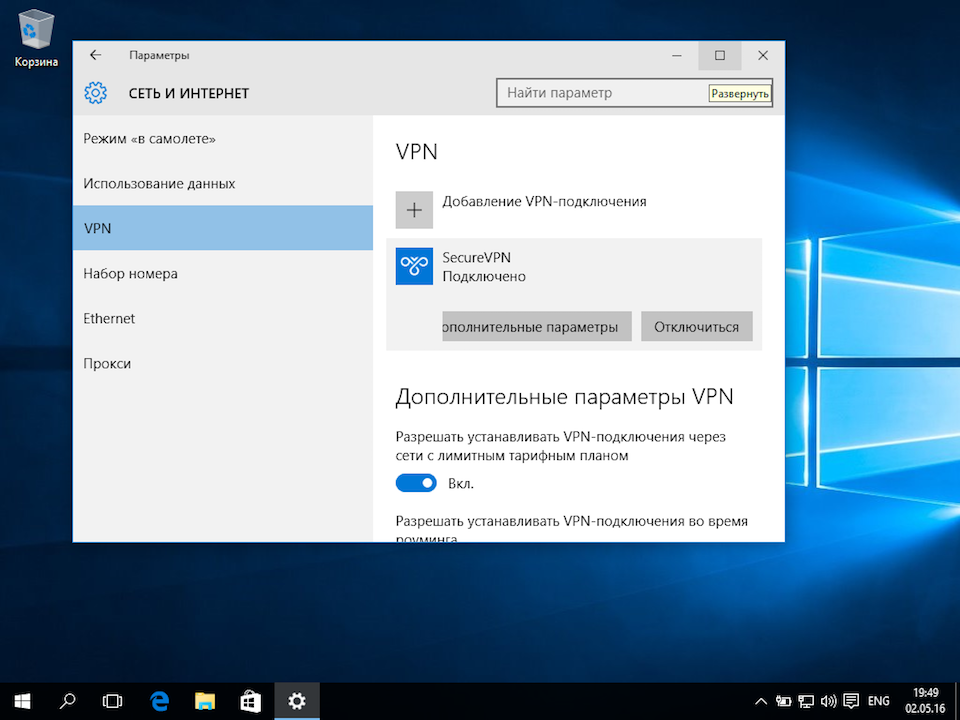
Соединение будет установлено через некоторое время. Для отключения нажать Отключиться.
Далее
8
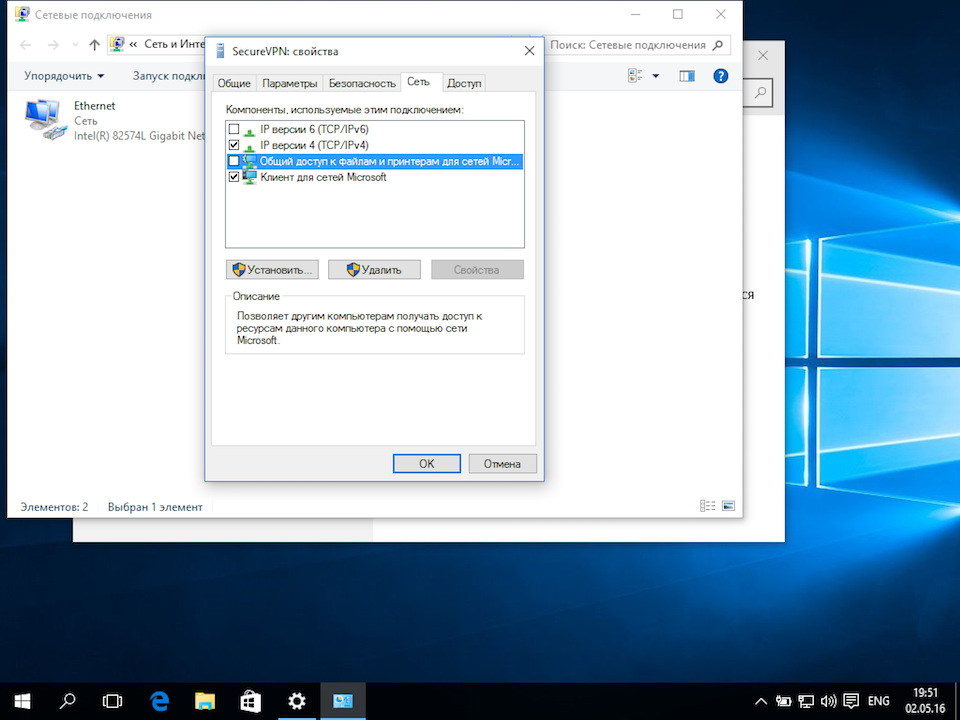
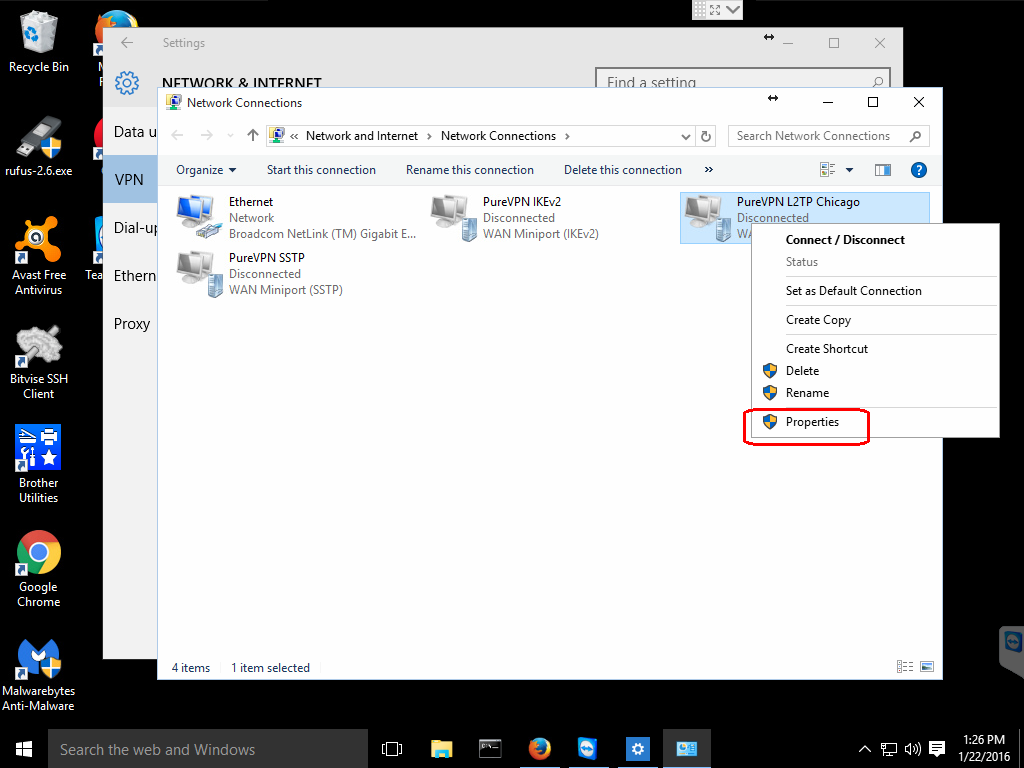
В открывшемся окне Сетевые подключения кликнуть правой кнопкой на созданном подключении, и выбрать Свойства.
Далее


English | 中文
Configure IPsec/L2TP VPN Clients
After setting up your own VPN server, follow these steps to configure your devices. IPsec/L2TP is natively supported by Android, iOS, OS X, and Windows. There is no additional software to install. Setup should only take a few minutes. In case you are unable to connect, first check to make sure the VPN credentials were entered correctly.
- Platforms
- Windows
- OS X (macOS)
- Android
- iOS (iPhone/iPad)
- Chrome OS (Chromebook)
- Linux
- IKEv1 troubleshooting
Windows
You may also connect using IKEv2 mode (recommended).
Windows 11
- Right-click on the wireless/network icon in your system tray.
- Select Network and Internet settings, then on the page that opens, click VPN.
- Click the Add VPN button.
- Select Windows (built-in) in the VPN provider drop-down menu.
- Enter anything you like in the Connection name field.
- Enter
Your VPN Server IPin the Server name or address field. - Select L2TP/IPsec with pre-shared key in the VPN type drop-down menu.
- Enter
Your VPN IPsec PSKin the Pre-shared key field. - Enter
Your VPN Usernamein the User name field. - Enter
Your VPN Passwordin the Password field. - Check the Remember my sign-in info checkbox.
- Click Save to save the VPN connection details.
Note: This one-time registry change is required if the VPN server and/or client is behind NAT (e.g. home router).
To connect to the VPN: Click the Connect button, or click on the wireless/network icon in your system tray, click VPN, then select the new VPN entry and click Connect. If prompted, enter Your VPN Username and Password, then click OK. You can verify that your traffic is being routed properly by looking up your IP address on Google. It should say «Your public IP address is Your VPN Server IP«.
If you get an error when trying to connect, see Troubleshooting.
Windows 10 and 8
- Right-click on the wireless/network icon in your system tray.
- Select Open Network & Internet settings, then on the page that opens, click Network and Sharing Center.
- Click Set up a new connection or network.
- Select Connect to a workplace and click Next.
- Click Use my Internet connection (VPN).
- Enter
Your VPN Server IPin the Internet address field. - Enter anything you like in the Destination name field, and then click Create.
- Return to Network and Sharing Center. On the left, click Change adapter settings.
- Right-click on the new VPN entry and choose Properties.
- Click the Security tab. Select «Layer 2 Tunneling Protocol with IPsec (L2TP/IPSec)» for the Type of VPN.
- Click Allow these protocols. Check the «Challenge Handshake Authentication Protocol (CHAP)» and «Microsoft CHAP Version 2 (MS-CHAP v2)» checkboxes.
- Click the Advanced settings button.
- Select Use preshared key for authentication and enter
Your VPN IPsec PSKfor the Key. - Click OK to close the Advanced settings.
- Click OK to save the VPN connection details.
Note: This one-time registry change is required if the VPN server and/or client is behind NAT (e.g. home router).
To connect to the VPN: Click on the wireless/network icon in your system tray, select the new VPN entry, and click Connect. If prompted, enter Your VPN Username and Password, then click OK. You can verify that your traffic is being routed properly by looking up your IP address on Google. It should say «Your public IP address is Your VPN Server IP«.
If you get an error when trying to connect, see Troubleshooting.
Alternatively, instead of following the steps above, you may create the VPN connection using these Windows PowerShell commands. Replace Your VPN Server IP and Your VPN IPsec PSK with your own values, enclosed in single quotes:
# Disable persistent command history
Set-PSReadlineOption –HistorySaveStyle SaveNothing
# Create VPN connection
Add-VpnConnection -Name 'My IPsec VPN' -ServerAddress 'Your VPN Server IP' ^
  -L2tpPsk 'Your VPN IPsec PSK' -TunnelType L2tp -EncryptionLevel Required ^
  -AuthenticationMethod Chap,MSChapv2 -Force -RememberCredential -PassThru
# Ignore the data encryption warning (data is encrypted in the IPsec tunnel)
Windows 7, Vista and XP
- Click on the Start Menu and go to the Control Panel.
- Go to the Network and Internet section.
- Click Network and Sharing Center.
- Click Set up a new connection or network.
- Select Connect to a workplace and click Next.
- Click Use my Internet connection (VPN).
- Enter
Your VPN Server IPin the Internet address field. - Enter anything you like in the Destination name field.
- Check the Don’t connect now; just set it up so I can connect later checkbox.
- Click Next.
- Enter
Your VPN Usernamein the User name field. - Enter
Your VPN Passwordin the Password field. - Check the Remember this password checkbox.
- Click Create, and then Close.
- Return to Network and Sharing Center. On the left, click Change adapter settings.
- Right-click on the new VPN entry and choose Properties.
- Click the Options tab and uncheck Include Windows logon domain.
- Click the Security tab. Select «Layer 2 Tunneling Protocol with IPsec (L2TP/IPSec)» for the Type of VPN.
- Click Allow these protocols. Check the «Challenge Handshake Authentication Protocol (CHAP)» and «Microsoft CHAP Version 2 (MS-CHAP v2)» checkboxes.
- Click the Advanced settings button.
- Select Use preshared key for authentication and enter
Your VPN IPsec PSKfor the Key. - Click OK to close the Advanced settings.
- Click OK to save the VPN connection details.
Note: This one-time registry change is required if the VPN server and/or client is behind NAT (e.g. home router).
To connect to the VPN: Click on the wireless/network icon in your system tray, select the new VPN entry, and click Connect. If prompted, enter Your VPN Username and Password, then click OK. You can verify that your traffic is being routed properly by looking up your IP address on Google. It should say «Your public IP address is Your VPN Server IP«.
If you get an error when trying to connect, see Troubleshooting.
OS X
You may also connect using IKEv2 (recommended) or IPsec/XAuth mode.
- Open System Preferences and go to the Network section.
- Click the + button in the lower-left corner of the window.
- Select VPN from the Interface drop-down menu.
- Select L2TP over IPSec from the VPN Type drop-down menu.
- Enter anything you like for the Service Name.
- Click Create.
- Enter
Your VPN Server IPfor the Server Address. - Enter
Your VPN Usernamefor the Account Name. - Click the Authentication Settings button.
- In the User Authentication section, select the Password radio button and enter
Your VPN Password. - In the Machine Authentication section, select the Shared Secret radio button and enter
Your VPN IPsec PSK. - Click OK.
- Check the Show VPN status in menu bar checkbox.
- (Important) Click the Advanced button and make sure the Send all traffic over VPN connection checkbox is checked.
- (Important) Click the TCP/IP tab, and make sure Link-local only is selected in the Configure IPv6 section.
- Click OK to close the Advanced settings, and then click Apply to save the VPN connection information.
To connect to the VPN: Use the menu bar icon, or go to the Network section of System Preferences, select the VPN and choose Connect. You can verify that your traffic is being routed properly by looking up your IP address on Google. It should say «Your public IP address is Your VPN Server IP«.
If you get an error when trying to connect, see Troubleshooting.
Android
Important: Android users should instead connect using IKEv2 mode (recommended), which is more secure. Android 12+ only supports IKEv2 mode. The native VPN client in Android uses the less secure modp1024 (DH group 2) for the IPsec/L2TP and IPsec/XAuth («Cisco IPsec») modes.
If you still want to connect using IPsec/L2TP mode, you must first edit /etc/ipsec.conf on the VPN server. Find the line ike=... and append ,aes256-sha2;modp1024,aes128-sha1;modp1024 at the end. Save the file and run sudo service ipsec restart.
Docker users: Add VPN_ENABLE_MODP1024=yes to your env file, then re-create the Docker container.
After that, follow the steps below on your Android device:
- Launch the Settings application.
- Tap «Network & internet». Or, if using Android 7 or earlier, tap More… in the Wireless & networks section.
- Tap VPN.
- Tap Add VPN Profile or the + icon at top-right of screen.
- Enter anything you like in the Name field.
- Select L2TP/IPSec PSK in the Type drop-down menu.
- Enter
Your VPN Server IPin the Server address field. - Leave the L2TP secret field blank.
- Leave the IPSec identifier field blank.
- Enter
Your VPN IPsec PSKin the IPSec pre-shared key field. - Tap Save.
- Tap the new VPN connection.
- Enter
Your VPN Usernamein the Username field. - Enter
Your VPN Passwordin the Password field. - Check the Save account information checkbox.
- Tap Connect.
Once connected, you will see a VPN icon in the notification bar. You can verify that your traffic is being routed properly by looking up your IP address on Google. It should say «Your public IP address is Your VPN Server IP«.
If you get an error when trying to connect, see Troubleshooting.
iOS
You may also connect using IKEv2 (recommended) or IPsec/XAuth mode.
- Go to Settings -> General -> VPN.
- Tap Add VPN Configuration….
- Tap Type. Select L2TP and go back.
- Tap Description and enter anything you like.
- Tap Server and enter
Your VPN Server IP. - Tap Account and enter
Your VPN Username. - Tap Password and enter
Your VPN Password. - Tap Secret and enter
Your VPN IPsec PSK. - Make sure the Send All Traffic switch is ON.
- Tap Done.
- Slide the VPN switch ON.
Once connected, you will see a VPN icon in the status bar. You can verify that your traffic is being routed properly by looking up your IP address on Google. It should say «Your public IP address is Your VPN Server IP«.
If you get an error when trying to connect, see Troubleshooting.
Chrome OS
You may also connect using IKEv2 mode (recommended).
- Go to Settings -> Network.
- Click Add connection, then click Add built-in VPN.
- Enter anything you like for the Service name.
- Select L2TP/IPsec in the Provider type drop-down menu.
- Enter
Your VPN Server IPfor the Server hostname. - Select Pre-shared key in the Authentication type drop-down menu.
- Enter
Your VPN Usernamefor the Username. - Enter
Your VPN Passwordfor the Password. - Enter
Your VPN IPsec PSKfor the Pre-shared key. - Leave other fields blank.
- Enable Save identity and password.
- Click Connect.
Once connected, you will see a VPN icon overlay on the network status icon. You can verify that your traffic is being routed properly by looking up your IP address on Google. It should say «Your public IP address is Your VPN Server IP«.
If you get an error when trying to connect, see Troubleshooting.
Linux
You may also connect using IKEv2 mode (recommended).
Ubuntu Linux
Ubuntu 18.04 (and newer) users can install the network-manager-l2tp-gnome package using apt, then configure the IPsec/L2TP VPN client using the GUI.
- Go to Settings -> Network -> VPN. Click the + button.
- Select Layer 2 Tunneling Protocol (L2TP).
- Enter anything you like in the Name field.
- Enter
Your VPN Server IPfor the Gateway. - Enter
Your VPN Usernamefor the User name. - Right-click the ? in the Password field, select Store the password only for this user.
- Enter
Your VPN Passwordfor the Password. - Leave the NT Domain field blank.
- Click the IPsec Settings… button.
- Check the Enable IPsec tunnel to L2TP host checkbox.
- Leave the Gateway ID field blank.
- Enter
Your VPN IPsec PSKfor the Pre-shared key. - Expand the Advanced section.
- Enter
aes128-sha1-modp2048for the Phase1 Algorithms. - Enter
aes128-sha1for the Phase2 Algorithms. - Click OK, then click Add to save the VPN connection information.
- Turn the VPN switch ON.
If you get an error when trying to connect, try this fix.
Once connected, you can verify that your traffic is being routed properly by looking up your IP address on Google. It should say «Your public IP address is Your VPN Server IP«.
Fedora and CentOS
Fedora 28 (and newer) and CentOS 8/7 users can connect using IPsec/XAuth mode.
Other Linux
First check here to see if the network-manager-l2tp and network-manager-l2tp-gnome packages are available for your Linux distribution. If yes, install them (select strongSwan) and follow the instructions above. Alternatively, you may configure Linux VPN clients using the command line.
Configure Linux VPN clients using the command line
Advanced users can configure Linux VPN clients using the command line. Alternatively, you may connect using IKEv2 mode (recommended), or configure using the GUI. Instructions below are inspired by the work of Peter Sanford. Commands must be run as root on your VPN client.
To set up the VPN client, first install the following packages:
# Ubuntu and Debian
apt-get update
apt-get install strongswan xl2tpd net-tools

# Fedora
yum install strongswan xl2tpd net-tools

# CentOS
yum install epel-release
yum --enablerepo=epel install strongswan xl2tpd net-tools
Create VPN variables (replace with actual values):
VPN_SERVER_IP='your_vpn_server_ip'
VPN_IPSEC_PSK='your_ipsec_pre_shared_key'
VPN_USER='your_vpn_username'
VPN_PASSWORD='your_vpn_password'
Configure strongSwan:
cat > /etc/ipsec.conf <<EOF
# ipsec.conf - strongSwan IPsec configuration file

conn myvpn
  auto=add
  keyexchange=ikev1
  authby=secret
  type=transport
  left=%defaultroute
  leftprotoport=17/1701
  rightprotoport=17/1701
  right=$VPN_SERVER_IP
  ike=aes128-sha1-modp2048
  esp=aes128-sha1
EOF

cat > /etc/ipsec.secrets <<EOF
: PSK "$VPN_IPSEC_PSK"
EOF

chmod 600 /etc/ipsec.secrets

# For CentOS and Fedora ONLY
mv /etc/strongswan/ipsec.conf /etc/strongswan/ipsec.conf.old 2>/dev/null
mv /etc/strongswan/ipsec.secrets /etc/strongswan/ipsec.secrets.old 2>/dev/null
ln -s /etc/ipsec.conf /etc/strongswan/ipsec.conf
ln -s /etc/ipsec.secrets /etc/strongswan/ipsec.secrets
Configure xl2tpd:
cat > /etc/xl2tpd/xl2tpd.conf <<EOF
[lac myvpn]
lns = $VPN_SERVER_IP
ppp debug = yes
pppoptfile = /etc/ppp/options.l2tpd.client
length bit = yes
EOF

cat > /etc/ppp/options.l2tpd.client <<EOF
ipcp-accept-local
ipcp-accept-remote
refuse-eap
require-chap
noccp
noauth
mtu 1280
mru 1280
noipdefault
defaultroute
usepeerdns
connect-delay 5000
name "$VPN_USER"
password "$VPN_PASSWORD"
EOF

chmod 600 /etc/ppp/options.l2tpd.client
The VPN client setup is now complete. Follow the steps below to connect.
Note: You must repeat all steps below every time you try to connect to the VPN.
Create xl2tpd control file:
mkdir -p /var/run/xl2tpd
touch /var/run/xl2tpd/l2tp-control
Restart services:
service strongswan restart

# For Ubuntu 20.04, if strongswan service not found
ipsec restart

service xl2tpd restart
Start the IPsec connection:
# Ubuntu and Debian
ipsec up myvpn

# CentOS and Fedora
strongswan up myvpn
Start the L2TP connection:
echo "c myvpn" > /var/run/xl2tpd/l2tp-control
Run ifconfig and check the output. You should now see a new interface ppp0.
Check your existing default route:
Find this line in the output: default via X.X.X.X .... Write down this gateway IP for use in the two commands below.
Exclude your VPN server’s public IP from the new default route (replace with actual value):
route add YOUR_VPN_SERVER_PUBLIC_IP gw X.X.X.X
If your VPN client is a remote server, you must also exclude your Local PC’s public IP from the new default route, to prevent your SSH session from being disconnected (replace with actual value):
route add YOUR_LOCAL_PC_PUBLIC_IP gw X.X.X.X
Add a new default route to start routing traffic via the VPN server:
route add default dev ppp0
The VPN connection is now complete. Verify that your traffic is being routed properly:
wget -qO- http://ipv4.icanhazip.com; echo
The above command should return Your VPN Server IP.
To stop routing traffic via the VPN server:
route del default dev ppp0
To disconnect:
# Ubuntu and Debian
echo "d myvpn" > /var/run/xl2tpd/l2tp-control
ipsec down myvpn

# CentOS and Fedora
echo "d myvpn" > /var/run/xl2tpd/l2tp-control
strongswan down myvpn
IKEv1 troubleshooting
Read this in other languages: English, 中文.
See also: IKEv2 troubleshooting and Advanced usage.
- Check logs and VPN status
- Windows error 809
- Windows error 789 or 691
- Windows error 628 or 766
- Windows 10 connecting
- Windows 10 upgrades
- Windows DNS leaks and IPv6
- Android MTU/MSS issues
- Android 6 and 7
- macOS send traffic over VPN
- iOS 13+ and macOS 10.15/11+
- iOS/Android sleep mode
- Debian 11/10 kernel
- Other errors
Check logs and VPN status
Commands below must be run as root (or using sudo).
First, restart services on the VPN server:
service ipsec restart
service xl2tpd restart
Docker users: Run docker restart ipsec-vpn-server.
Then reboot your VPN client device, and retry the connection. If still unable to connect, try removing and recreating the VPN connection. Make sure that the VPN server address and VPN credentials are entered correctly.
For servers with an external firewall (e.g. EC2/GCE), open UDP ports 500 and 4500 for the VPN.
Check the Libreswan (IPsec) and xl2tpd logs for errors:
# Ubuntu & Debian
grep pluto /var/log/auth.log
grep xl2tpd /var/log/syslog

# CentOS/RHEL, Rocky Linux, AlmaLinux, Oracle Linux & Amazon Linux 2
grep pluto /var/log/secure
grep xl2tpd /var/log/messages

# Alpine Linux
grep pluto /var/log/messages
grep xl2tpd /var/log/messages
Check the status of the IPsec VPN server:
Show currently established VPN connections:
Windows error 809
Error 809: The network connection between your computer and the VPN server could not be established because the remote server is not responding. This could be because one of the network devices (e.g, firewalls, NAT, routers, etc) between your computer and the remote server is not configured to allow VPN connections. Please contact your Administrator or your service provider to determine which device may be causing the problem.
Note: The registry change below is only required if you use IPsec/L2TP mode to connect to the VPN. It is NOT required for the IKEv2 and IPsec/XAuth modes.
To fix this error, a one-time registry change is required because the VPN server and/or client is behind NAT (e.g. home router). Download and import the .reg file below, or run the following from an elevated command prompt. You must reboot your PC when finished.
-
For Windows Vista, 7, 8, 10 and 11 (download .reg file)
REG ADD HKLMSYSTEMCurrentControlSetServicesPolicyAgent /v AssumeUDPEncapsulationContextOnSendRule /t REG_DWORD /d 0x2 /f -
For Windows XP ONLY (download .reg file)
REG ADD HKLMSYSTEMCurrentControlSetServicesIPSec /v AssumeUDPEncapsulationContextOnSendRule /t REG_DWORD /d 0x2 /f
Although uncommon, some Windows systems disable IPsec encryption, causing the connection to fail. To re-enable it, run the following command and reboot your PC.
-
For Windows XP, Vista, 7, 8, 10 and 11 (download .reg file)
REG ADD HKLMSYSTEMCurrentControlSetServicesRasManParameters /v ProhibitIpSec /t REG_DWORD /d 0x0 /f
Windows error 789 or 691
Error 789: The L2TP connection attempt failed because the security layer encountered a processing error during initial negotiations with the remote computer.
Error 691: The remote connection was denied because the user name and password combination you provided is not recognized, or the selected authentication protocol is not permitted on the remote access server.
For error 789, click here for troubleshooting information. For error 691, you may try removing and recreating the VPN connection, by following the instructions in this document. Make sure that the VPN credentials are entered correctly.
Windows error 628 or 766
Error 628: The connection was terminated by the remote computer before it could be completed.
Error 766: A certificate could not be found. Connections that use the L2TP protocol over IPSec require the installation of a machine certificate, also known as a computer certificate.
To fix these errors, please follow these steps:
- Right-click on the wireless/network icon in your system tray.
- Select Open Network and Sharing Center. Or, if using Windows 10 version 1709 or newer, select Open Network & Internet settings, then on the page that opens, click Network and Sharing Center.
- On the left, click Change adapter settings. Right-click on the new VPN and choose Properties.
- Click the Security tab. Select «Layer 2 Tunneling Protocol with IPsec (L2TP/IPSec)» for Type of VPN.
- Click Allow these protocols. Check the «Challenge Handshake Authentication Protocol (CHAP)» and «Microsoft CHAP Version 2 (MS-CHAP v2)» checkboxes.
- Click the Advanced settings button.
- Select Use preshared key for authentication and enter
Your VPN IPsec PSKfor the Key. - Click OK to close the Advanced settings.
- Click OK to save the VPN connection details.
For reference, see this screenshot of the VPN connection properties dialog.
Windows 10 connecting
If using Windows 10 and the VPN is stuck on «connecting» for more than a few minutes, try these steps:
- Right-click on the wireless/network icon in your system tray.
- Select Open Network & Internet settings, then on the page that opens, click VPN on the left.
- Select the new VPN entry, then click Connect. If prompted, enter
Your VPN UsernameandPassword, then click OK.
Windows 10 upgrades
After upgrading Windows 10 version (e.g. from 1709 to 1803), you may need to re-apply the fix above for Windows Error 809 and reboot.
Windows DNS leaks and IPv6
Windows 8, 10 and 11 use «smart multi-homed name resolution» by default, which may cause «DNS leaks» when using the native IPsec VPN client if your DNS servers on the Internet adapter are from the local network segment. To fix, you may either disable smart multi-homed name resolution, or configure your Internet adapter to use DNS servers outside your local network (e.g. 8.8.8.8 and 8.8.4.4). When finished, clear the DNS cache and reboot your PC.
In addition, if your computer has IPv6 enabled, all IPv6 traffic (including DNS queries) will bypass the VPN. Learn how to disable IPv6 in Windows. If you need a VPN with IPv6 support, you could instead try OpenVPN.
Android MTU/MSS issues
Some Android devices have MTU/MSS issues, that they are able to connect to the VPN using IPsec/XAuth («Cisco IPsec») mode, but cannot open websites. If you encounter this problem, try running the following commands on the VPN server. If successful, you may add these commands to /etc/rc.local to persist after reboot.
iptables -t mangle -A FORWARD -m policy --pol ipsec --dir in
  -p tcp -m tcp --tcp-flags SYN,RST SYN -m tcpmss --mss 1361:1536
  -j TCPMSS --set-mss 1360
iptables -t mangle -A FORWARD -m policy --pol ipsec --dir out
  -p tcp -m tcp --tcp-flags SYN,RST SYN -m tcpmss --mss 1361:1536
  -j TCPMSS --set-mss 1360

echo 1 > /proc/sys/net/ipv4/ip_no_pmtu_disc
Docker users: Instead of running the commands above, you may apply this fix by adding VPN_ANDROID_MTU_FIX=yes to your env file, then re-create the Docker container.
Reference: [1].
Android 6 and 7
If your Android 6.x or 7.x device cannot connect, try these steps:
- Tap the «Settings» icon next to your VPN profile. Select «Show advanced options» and scroll down to the bottom. If the option «Backward compatible mode» exists (see screenshot), enable it and reconnect the VPN. If not, try the next step.
- Edit
/etc/ipsec.confon the VPN server. Find the linesha2-truncbugand toggle its value. i.e. Replacesha2-truncbug=nowithsha2-truncbug=yes, or replacesha2-truncbug=yeswithsha2-truncbug=no. Save the file and runservice ipsec restart. Then reconnect the VPN.
Docker users: You may set sha2-truncbug=yes (default is no) in /etc/ipsec.conf by adding VPN_SHA2_TRUNCBUG=yes to your env file, then re-create the Docker container.
macOS send traffic over VPN
OS X (macOS) users: If you can successfully connect using IPsec/L2TP mode, but your public IP does not show Your VPN Server IP, read the OS X section above and complete these steps. Save VPN configuration and re-connect.
- Click the Advanced button and make sure the Send all traffic over VPN connection checkbox is checked.
- Click the TCP/IP tab, and make sure Link-local only is selected in the Configure IPv6 section.
After trying the steps above, if your computer is still not sending traffic over the VPN, check the service order. From the main network preferences screen, select «set service order» in the cog drop down under the list of connections. Drag the VPN connection to the top.
iOS 13+ and macOS 10.15/11+
If your device running iOS 13+, macOS 10.15 (Catalina), macOS 11 (Big Sur) or above cannot connect, try these steps: Edit /etc/ipsec.conf on the VPN server. Find sha2-truncbug=yes and replace it with sha2-truncbug=no. Save the file and run service ipsec restart. Then reconnect the VPN.
In addition, users running macOS Big Sur 11.0 should update to version 11.1 or newer, to fix some issues with VPN connections. To check your macOS version and update, refer to this article.
iOS/Android sleep mode
To save battery, iOS devices (iPhone/iPad) will automatically disconnect Wi-Fi shortly after the screen turns off (sleep mode). As a result, the IPsec VPN disconnects. This behavior is by design and cannot be configured.
If you need the VPN to auto-reconnect when the device wakes up, you may connect using IKEv2 mode (recommended) and enable the «VPN On Demand» feature. Alternatively, you may try OpenVPN instead, which has support for options such as «Reconnect on Wakeup» and «Seamless Tunnel».
Android devices will also disconnect Wi-Fi shortly after entering sleep mode, unless the option «Keep Wi-Fi on during sleep» is enabled. This option is no longer available in Android 8 (Oreo) and newer. Alternatively, you may try enabling the «Always-on VPN» option to stay connected. Learn more here.
Debian 11/10 kernel
Debian 11 or 10 users: Run uname -r to check your server’s Linux kernel version. If it contains the word «cloud», and /dev/ppp is missing, then the kernel lacks ppp support and cannot use IPsec/L2TP mode. The VPN setup scripts try to detect this and show a warning. In this case, you may instead use IKEv2 or IPsec/XAuth mode to connect to the VPN.
To fix the issue with IPsec/L2TP mode, you may switch to the standard Linux kernel by installing e.g. the linux-image-amd64 package. Then update the default kernel in GRUB and reboot your server.
Other errors
If you encounter other errors, refer to the links below:
- http://www.tp-link.com/en/faq-1029.html
- https://documentation.meraki.com/MX-Z/Client_VPN/Troubleshooting_Client_VPN#Common_Connection_Issues
- https://stackoverflow.com/questions/25245854/windows-8-1-gets-error-720-on-connect-vpn
License
Note: This license applies to this document only.
Copyright (C) 2016-2023 Lin Song 
Inspired by the work of Joshua Lund
This program is free software: you can redistribute it and/or modify it under the terms of the GNU General Public License as published by the Free Software Foundation, either version 3 of the License, or (at your option) any later version.
This program is distributed in the hope that it will be useful, but WITHOUT ANY WARRANTY; without even the implied warranty of MERCHANTABILITY or FITNESS FOR A PARTICULAR PURPOSE. See the GNU General Public License for more details.
L2TP/IPsec is a popular VPN protocol built-in to most modern platforms including Microsoft Windows 10. Using a built-in protocol can be a good choice as you do not have to install any extra applications or worry if they are written securely and bug free. Depending on your provider’s software they can be a little trickier to set up as you need to manually enter in your VPN configuration.
The following tutorial with plenty of screenshots will show you how to set up a L2TP/IPsec VPN on Windows 10 using the built-in capabilities of the operating system.
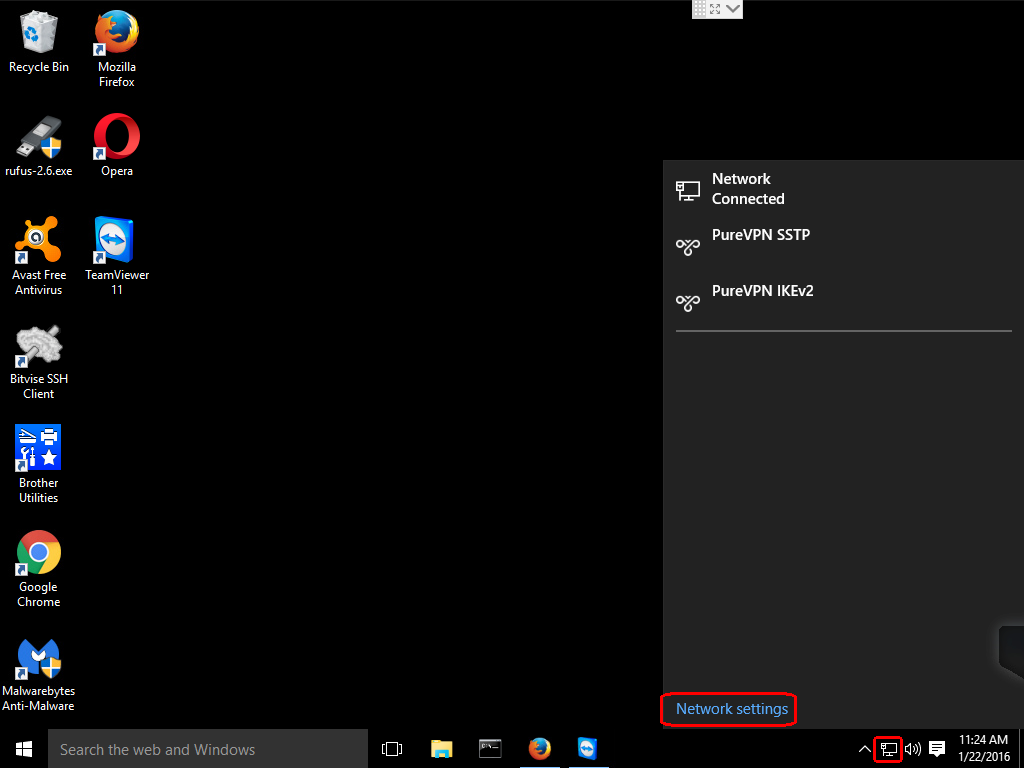
Step 1: Open Network settings
Click on the Network icon on the taskbar and then click on Network settings.
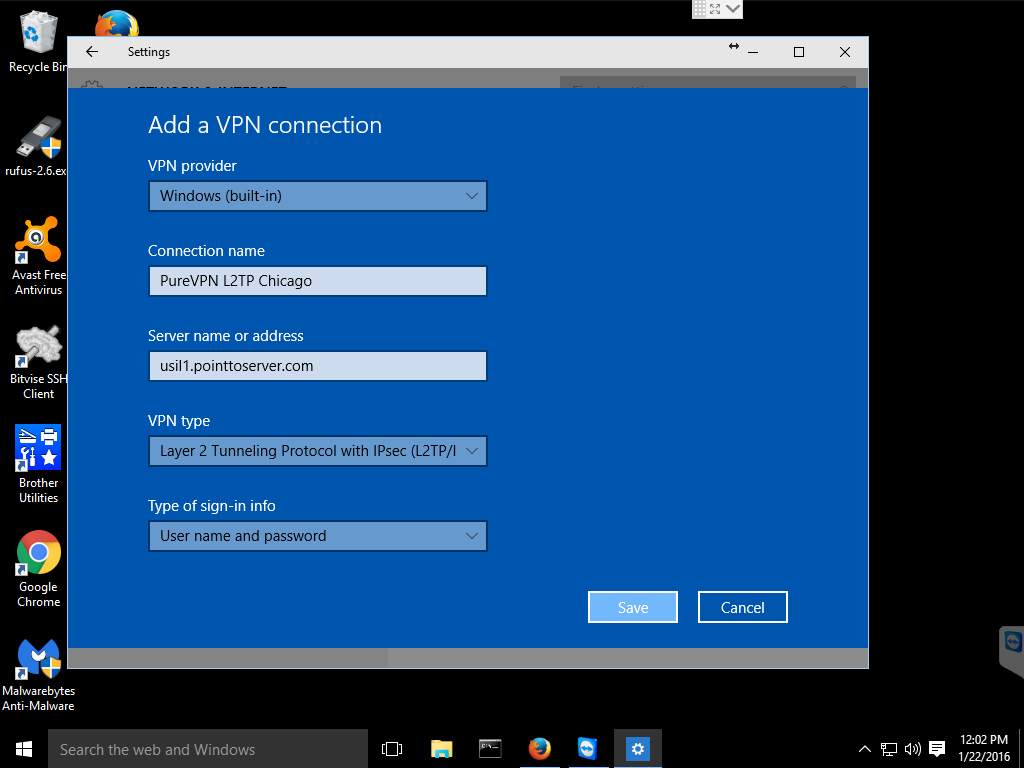
Step 2: Add a VPN connection
Click on the VPN option and then click on the Add a VPN connection.

Step 3: Configure VPN connection
- Left-click the VPN provider drop down menu and select Windows (built-in).
- Click on the Connection name box and enter a name for your connection.
- Click the Server name or address box and enter a FQDN or IP address for your VPN server. Your VPN provider should have a list of their servers available on their website.
- Click the VPN type drop down menu and select Layer 2 Tunneling Protocol with IPsec (L2TP/IPsec).
- Click the Type of sign-in info drop down menu and select User name and password.
Step 4: Enter username and password (optional)
You may need to scroll down in the VPN configuration window to see the rest of the options, depending on the size of your Settings window.
If you desire, you can enter your VPN username and password in the appropriate fields and check the Remember my sign-in info and then you will not be asked for this information every time you activate your VPN connection.
When you are done entering all your information, click on the Save button to save your new VPN connection.

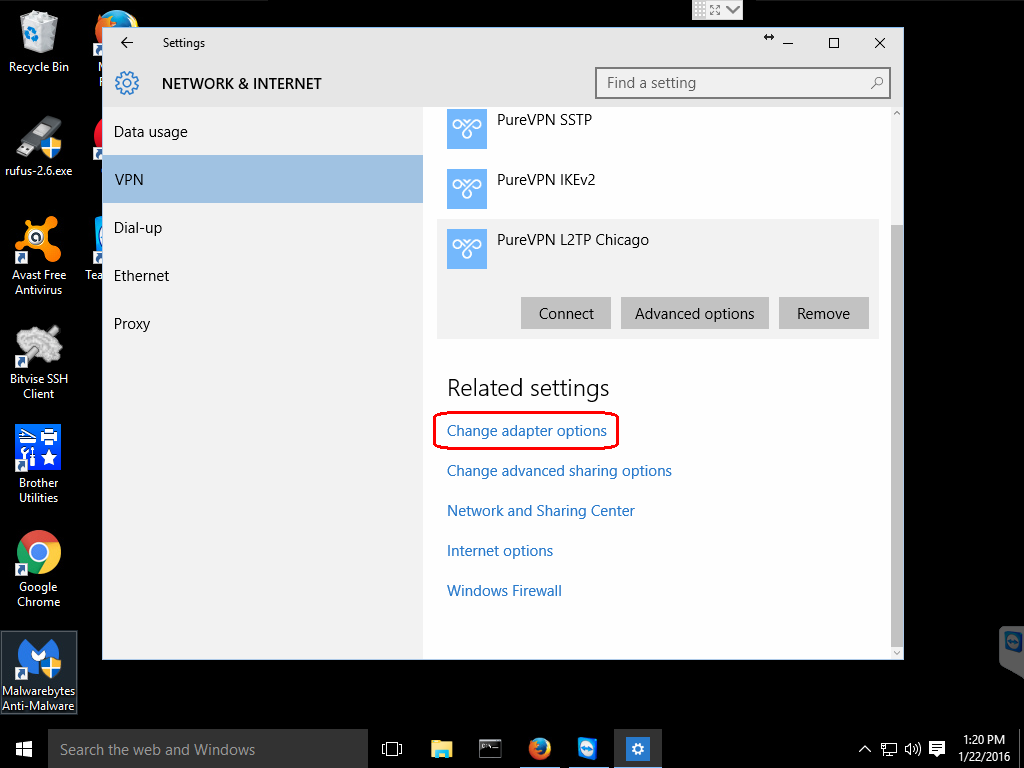
Step 5: Configure advanced settings
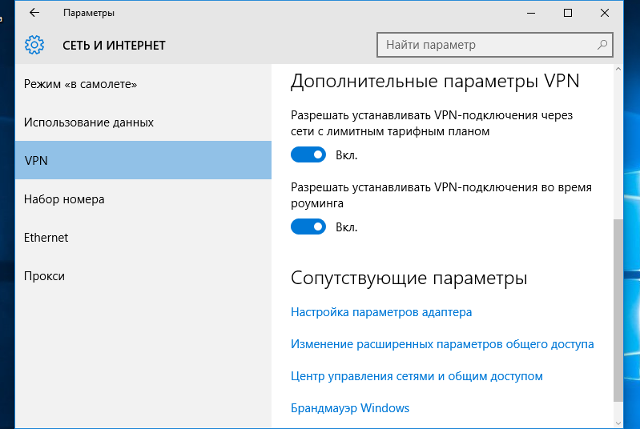
Under Related settings click on the Change adapter options choice.
This will open a new window titled Network Connections. Right-click on your newly created connection and this will bring up another menu. Click on the Properties option in this menu.
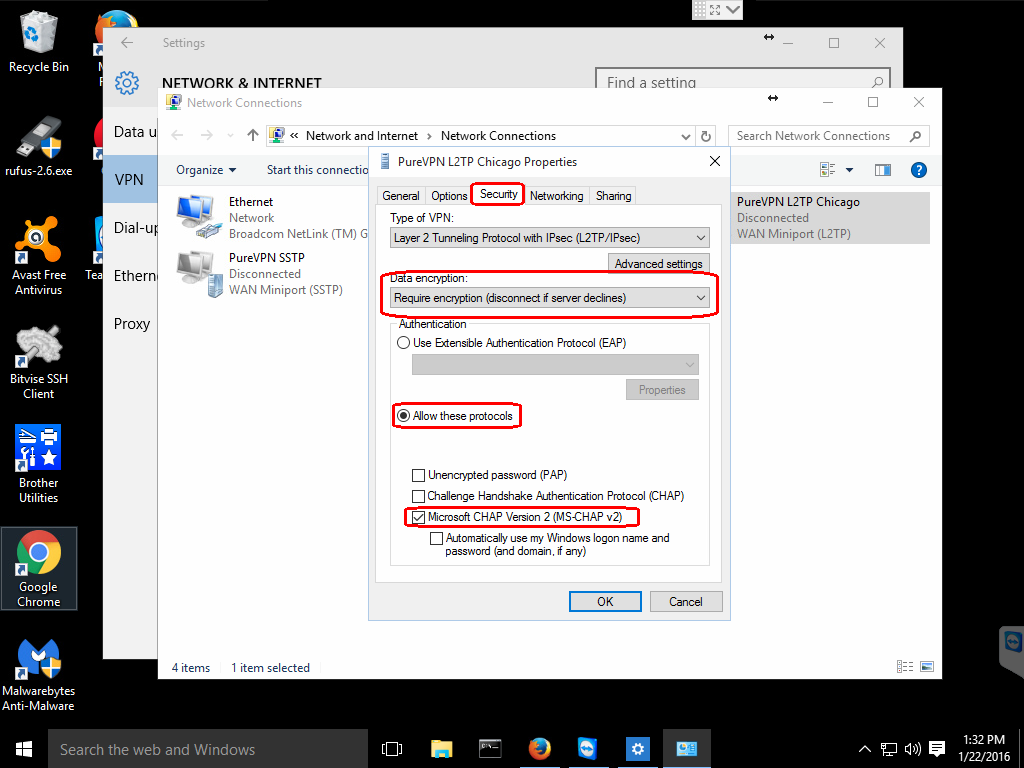
This will open a Properties window for the connection. Select the Security tab in this window.
Under the Data encryption: drop-down menu select Require encryption (disconnect if server declines).
Check the Allow these protocols radio button and ensure that only the Microsoft CHAP Version 2 (MS-CHAP v2) is checked.
There might be cases such as geo-unblocking streaming services where you might not want your connection encrypted. But you would probably be better served by using Smart DNS or some other proxy service for this.
MS-CHAP v2 is the only protocol that is still considered secure.
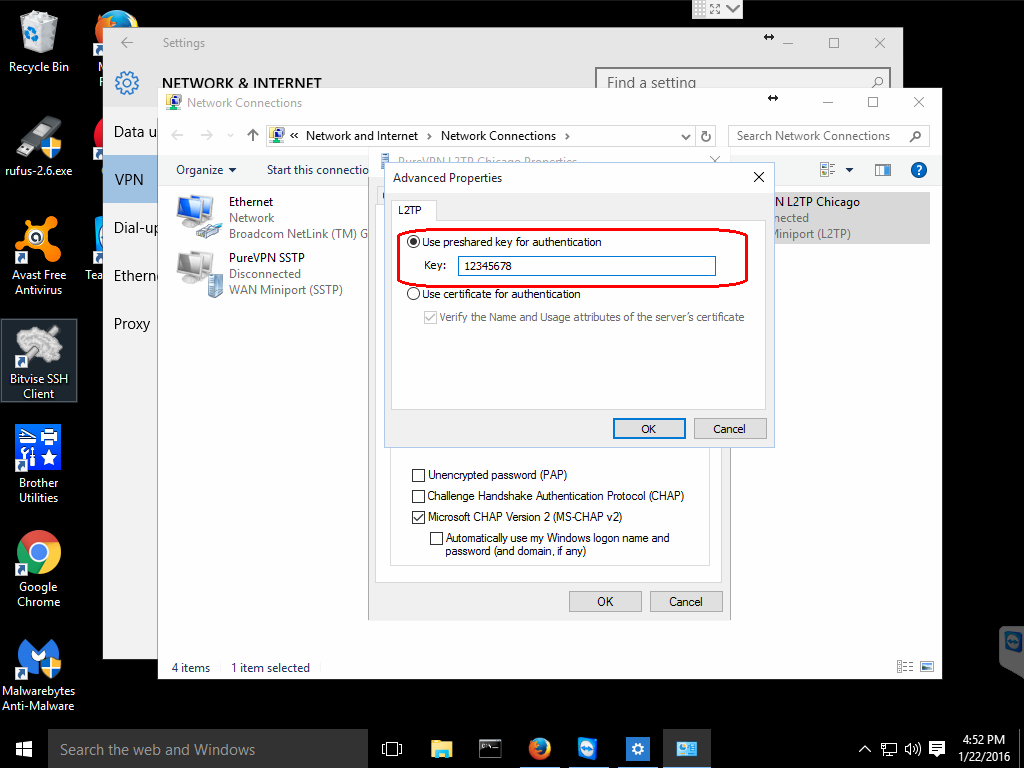
There is still one more setting that you will need to set for most providers. Stay on the Security tab and click the Advanced settings button.
Once you have the advanced settings open, click on the Use preshared key for authentication radio button and enter the key provided by your VPN provider.
Most providers utilize a preshared key for authentication and this should be provided on their website, possibly in the client area or in the tutorials section.
Click the OK button on the Advanced properties. Then click the OK button on the Security tab.
Step 6: Connect to newly configured VPN
If you like, you can close any of the windows that you still have open from configuring your new VPN connection.
Click on the network icon on the taskbar and this will bring up a list of your configured connections.
Then, click on the name you gave your new configuration and this will bring up the NETWORK & INTERNET settings screen.
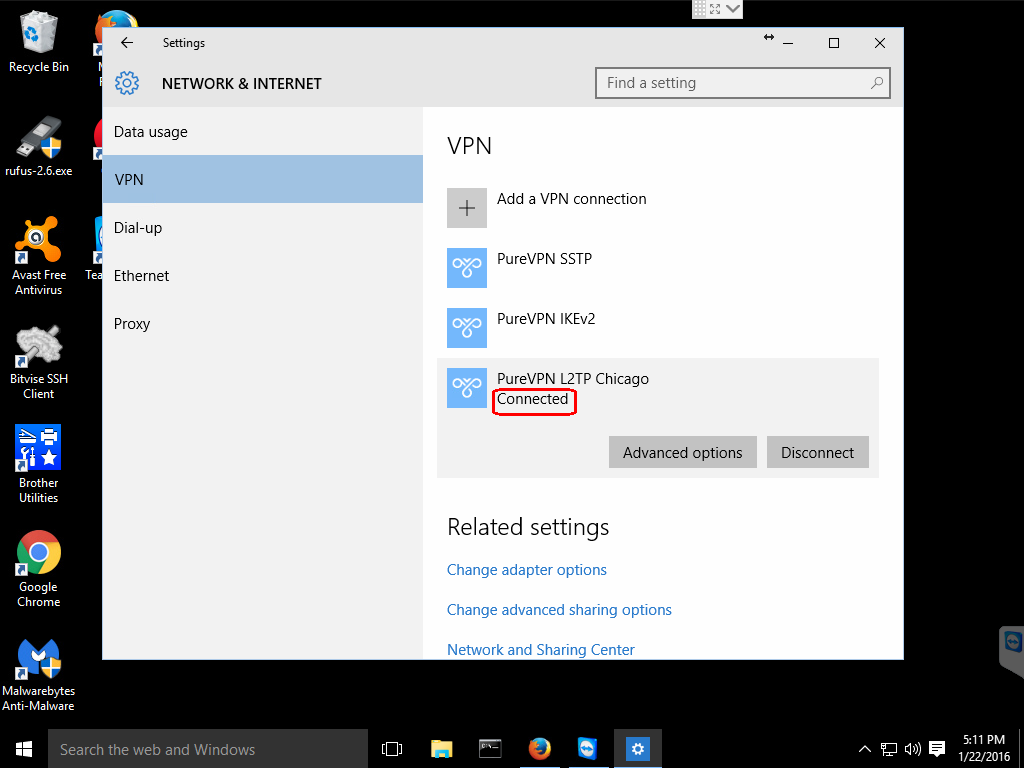
After that, click the name of your new configuration and this will reveal three buttons. Click the Connect button.
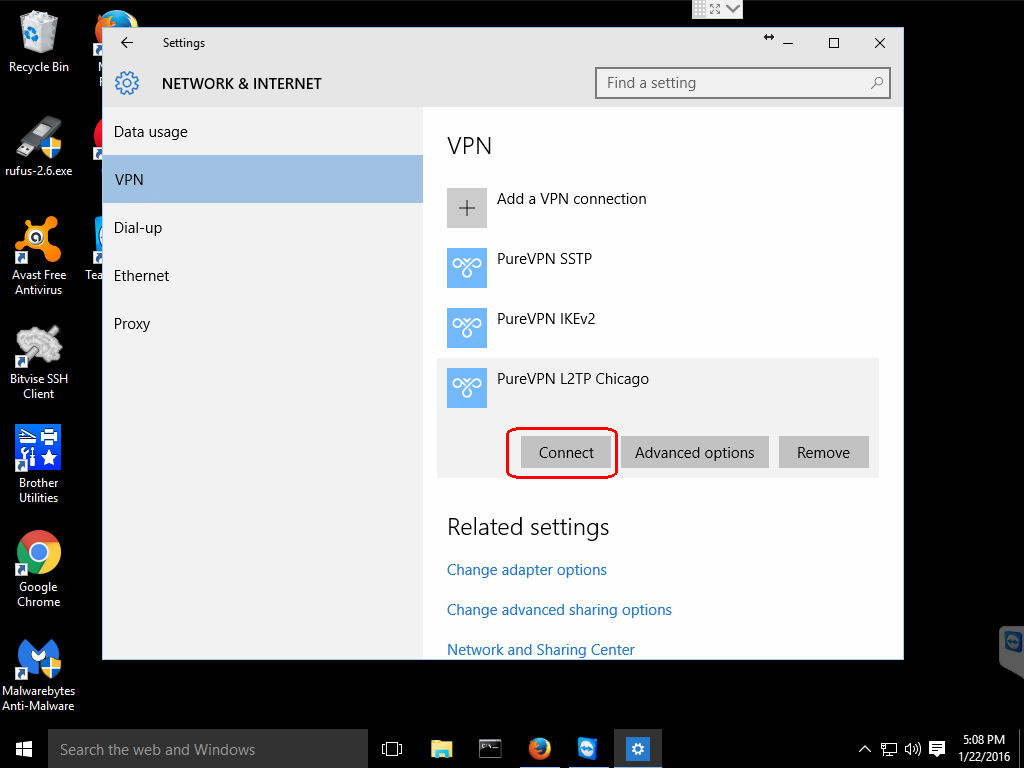
Once you click the Connect button, you will see the Windows 10 spinner and some informative messages and then it should say Connected, if all went well.
It is a good idea to use a tool to check what your IP is, it should now be reported as your VPN server;
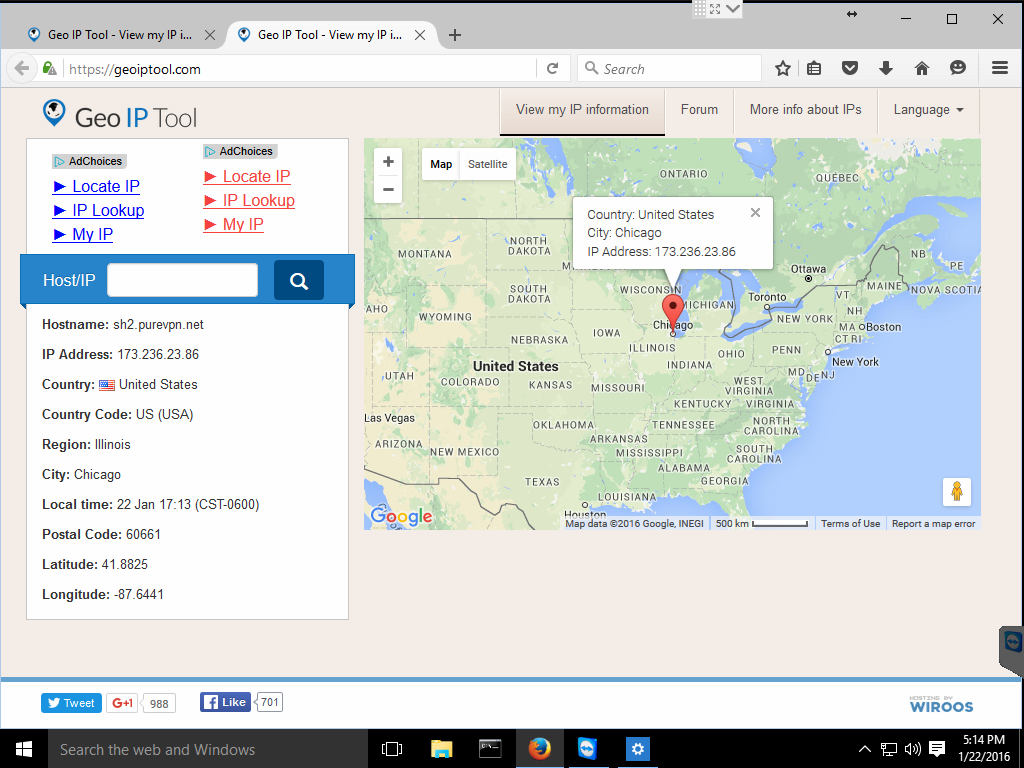
And that is it! I now appear to be coming from the VPN server located in Chicago.
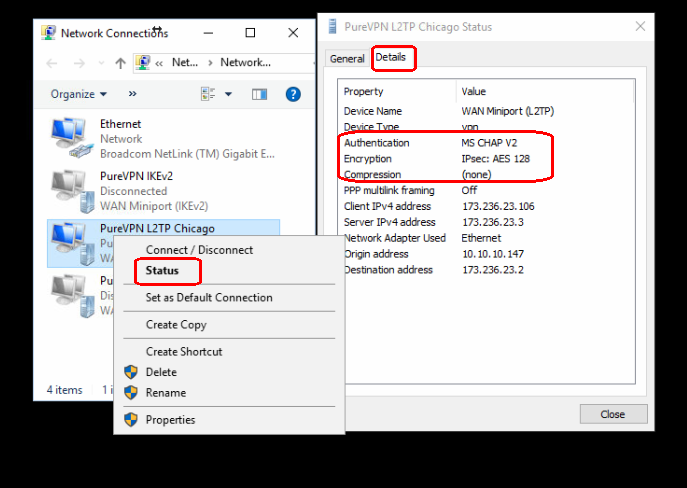
You can also check the network properties to get some information on your connection. Open the NETWORK & INTERNET window again by clicking on the network icon in the taskbar and selecting Network settings.
In the NETWORK & INTERNET window under Related settings select Change adapter options and this will bring up the Network Connections window. Right-click on the icon with the name of your VPN and select Status from that menu.
The General tab has some basic information but if you click on the Details tab you are provided with information about your VPN connection such as the cipher being used.
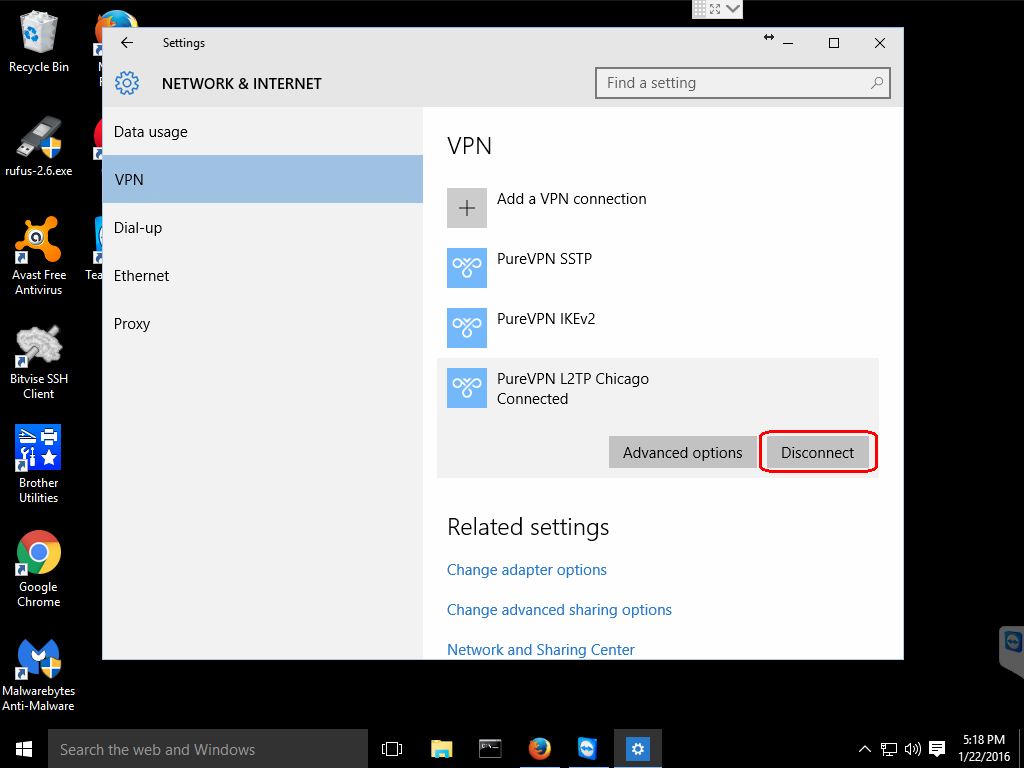
When you wish to disconnect from the VPN, you can click on the network icon and select your VPN connection profile which will bring up the NETWORK & INTERNET setting window again and click the Disconnect button.
That is all there is to setting up a L2TP/IPsec VPN using the built-in Microsoft Windows 10 functionality. I hope you found this tutorial to be useful and are enjoying your new VPN connection.
07.11.2019
Инструкция: Настройка L2TP/IPSec VPN-подключения в ОС Windows
Для клиентов ИТ аутсорсинга мы составляем инструкции по самостоятельной настройке оборудования, данные рекомендации позволяют пользователям произвести настройку в удобное время, например, настроить удаленное подключение домашнего компьютера к рабочей сети.
Вводные данные
Для настройки L2TP/IPSEC VPN-подключения Вам потребуются следующие данные:
- IP-адрес, либо доменное имя VPN-сервер
- Логин VPN-пользователя
- Пароль VPN-пользователя
- Общий ключ шифрования
Эти данные Вы можете получить у контактного лица в Вашей компании.
В зависимости от версии ОС Windows, установленной на Вашем ПК, внешний вид меню настройки VPN-подключения будет различаться. Для того, чтобы определить версию Windows, находясь на рабочем столе системы, одновременно зажмите комбинацию клавиш Win (клавиша с изображением логотипа Windows) + R. В появившемся окне «Выполнить», введите команду «winver» (без кавычек):

Откроется окно «Windows: сведения», в котором будет указана версия Вашей операционной системы:

После того, как Вы выяснили версию Вашей ОС, перейдите к соответствующему ей разделу инструкции.
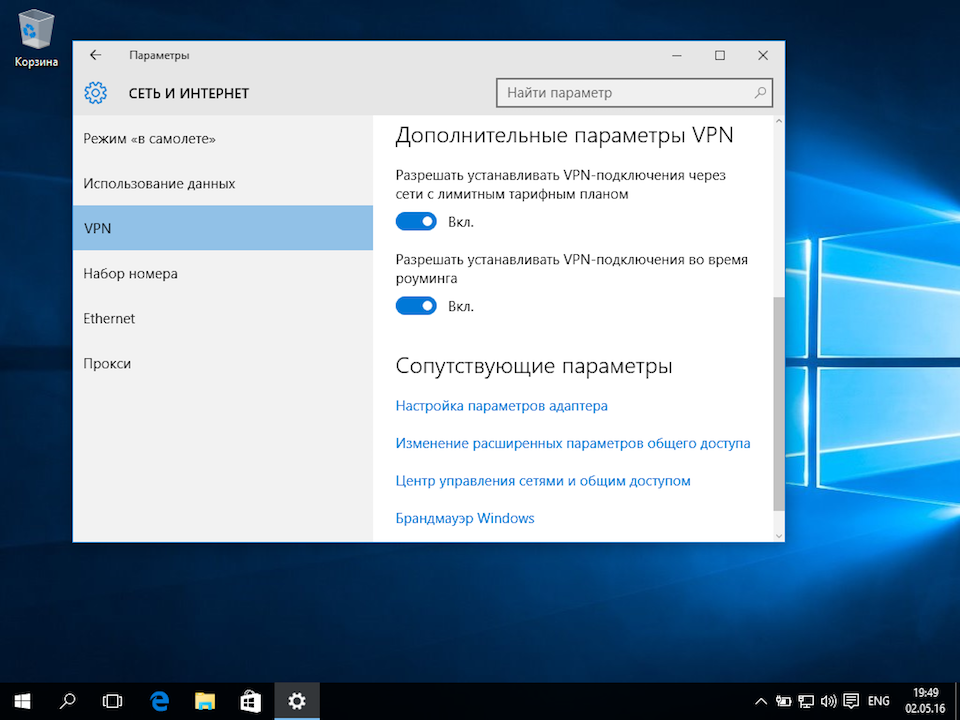
Настройка VPN-подключения в Windows 10
Нажмите правой кнопкой мыши на кнопке меню «Пуск» и выберите из контекстного меня пункт «Параметры»:

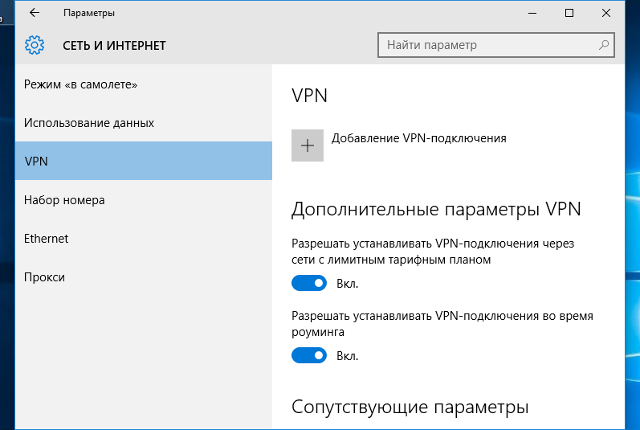
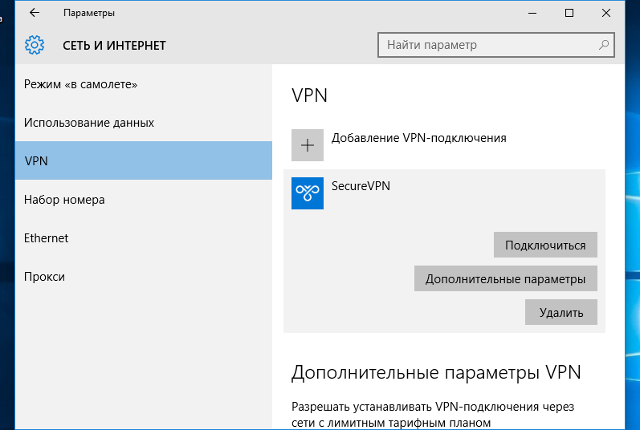
В окне «Параметры» выберите раздел «Сеть и Интернет», затем выберите из списка пункт «VPN» и нажмите кнопку «Добавить VPN-подключение»


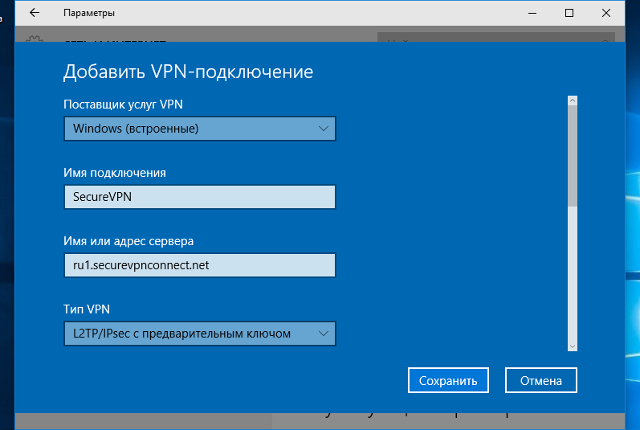
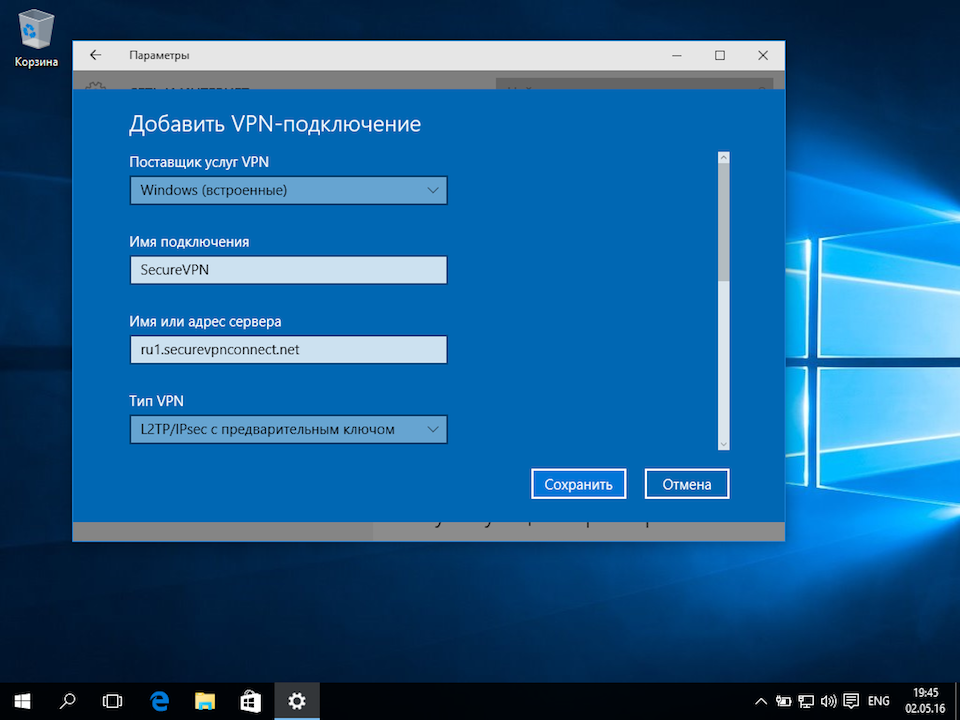
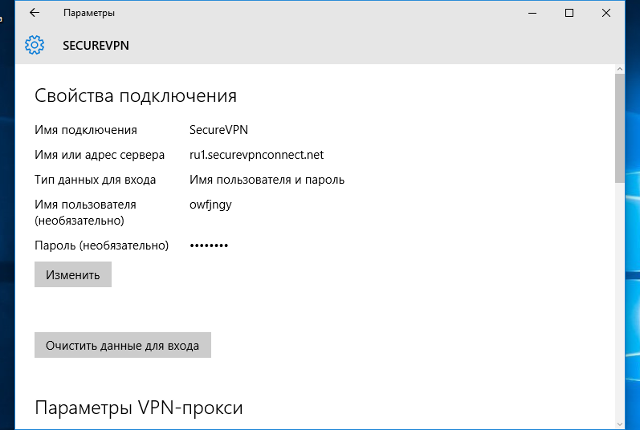
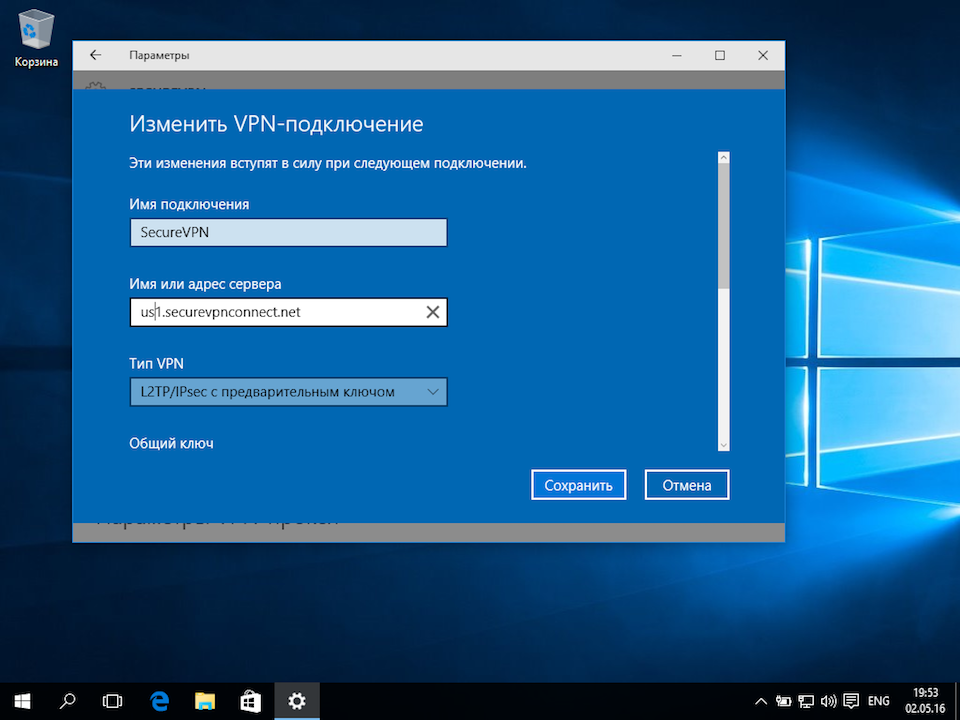
В окне настроек VPN-подключения, укажите следующие значения:
- Поставщик услуг VPN – Windows (встроенные)
- Имя подключения – любое понятное Вам название данной VPN-сети (на технические свойства настраиваемой сети никак не влияет)
- Адрес или имя сервера – IP-адрес, либо доменное имя VPN-сервера
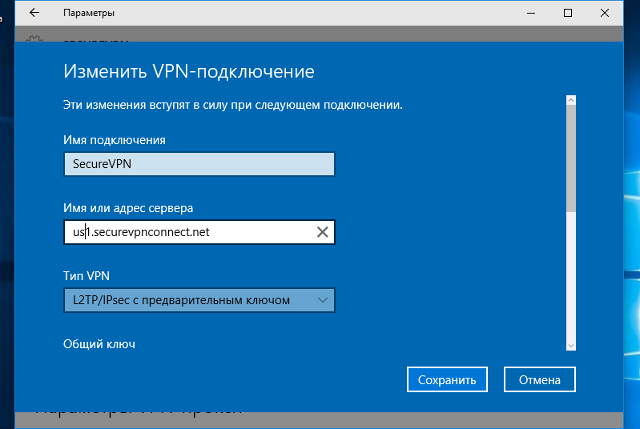
- Тип VPN – L2TP/IPsec с предварительным ключом
- Общий ключ – Общий ключ шифрования
- Тип данных для входа – Имя пользователя и пароль
- Имя пользователя – Логин VPN-пользователя
- Пароль – Пароль VPN-пользователя
После ввода данных нажмите кнопку «Сохранить»:

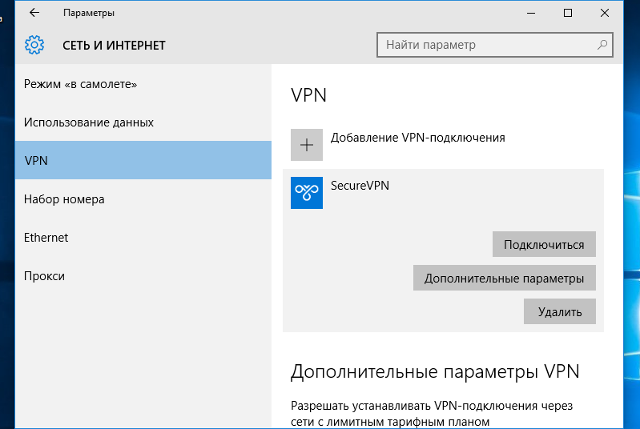
Чтобы подключиться к добавленной сети, в правом нижнем углу экрана (рядом с часами и значком ![]() или
или ![]() ), кликните по нему левой кнопкой мыши, выберите из списка VPN-сеть и нажмите кнопку «Подключить» (отключение производится тем же способом):
), кликните по нему левой кнопкой мыши, выберите из списка VPN-сеть и нажмите кнопку «Подключить» (отключение производится тем же способом):

Об успешном подключении говорит надпись «Подключено», под названием VPN-подключения:

Прим.: опционально для настройки может быть указано, что необходимо отключить «Шлюз в удалённой сети». Для выполнения этой настройки перейдите к соответствующему разделу данной инструкции
Настройка VPN-подключения в Windows 8.1 / Windows 7
Находясь на рабочем столе системы, одновременно зажмите комбинацию клавиш Win (клавиша с изображением логотипа Windows) + R. В появившемся окне «Выполнить», введите команду «control» (без кавычек):

Откройте мастер создания нового подключения («Сеть и Интернет –> Центр управления сетями и общим доступом –> Центр управления сетями и общим доступом –> Создание и настройка нового подключения или сети»):


Следуйте указаниям мастера, как указано на изображениях ниже:


В окне настроек VPN-подключения, укажите следующие значения:
- Адрес в Интернете – IP-адрес, либо доменное имя VPN-сервер
- Имя объекта назначения – любое понятное Вам название данной VPN-сети (на технические свойства настраиваемой сети никак не влияет)
- Нажмите кнопку «Создать»


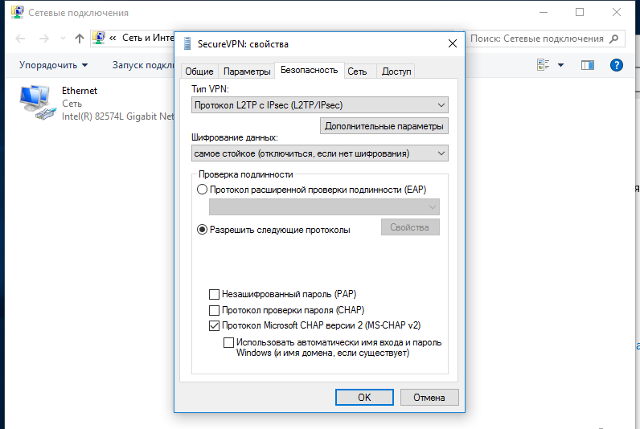
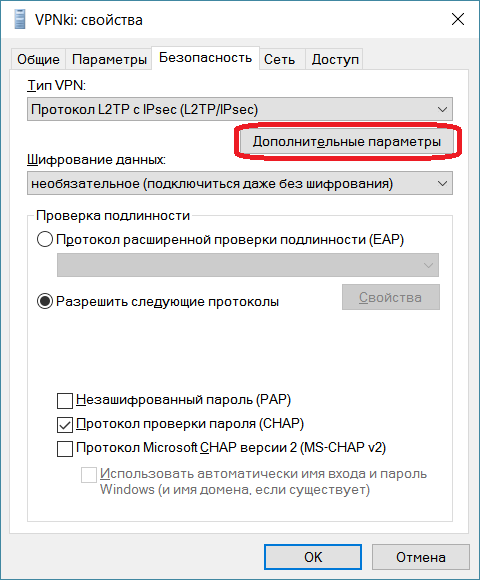
В окне свойств подключения, перейдите на вкладку «Безопасность» и нажмите кнопку «Дополнительные параметры»:

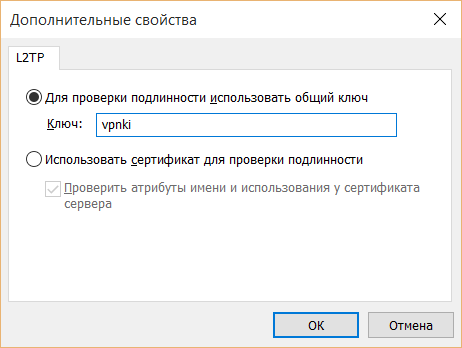
В окне дополнительных свойств, отметьте пункт «Для проверки подлинности использовать общий ключ» и в поле «Ключ» введите общий ключ шифрования, нажмите кнопку «Ок»:

В основном окне свойств подключения, настройте следующие параметры:
- Тип VPN – Протокол L2TP с IPsec (L2TP/IPsec)
- Шифрование данных – обязательное (отключиться, если нет шифрования)
- Разрешить следующие протоколы – Протоколы Microsoft CHAP версии 2 (MS-CHAP v2)

Чтобы подключиться к добавленной сети, в правом нижнем углу экрана (рядом с часами и значком раскладки клавиатуры), найдите значок с изображением сетевого подключения (![]() или
или ![]() ), кликните по нему левой кнопкой мыши, выберите из списка VPN-сеть и нажмите кнопку «Подключить» (отключение производится тем же способом):
), кликните по нему левой кнопкой мыши, выберите из списка VPN-сеть и нажмите кнопку «Подключить» (отключение производится тем же способом):

Рисунок 1. Вид окна подключения в Windows 8.1

Рисунок 2. Вид окна подключения в Windows 7
Об успешном подключении говорит надпись «Подключено», под названием VPN-подключения:

Для отключения от VPN нажмите кнопку «Отключить»:

Прим.: опционально для настройки может быть указано, что необходимо отключить «Шлюз в удалённой сети». Для выполнения этой настройки перейдите к соответствующему разделу данной инструкции.
Как отключить шлюз в удаленной сети
Находясь на рабочем столе системы, одновременно зажмите комбинацию клавиш Win (клавиша с изображением логотипа Windows) + R. В появившемся окне «Выполнить», введите команду «control» (без кавычек):
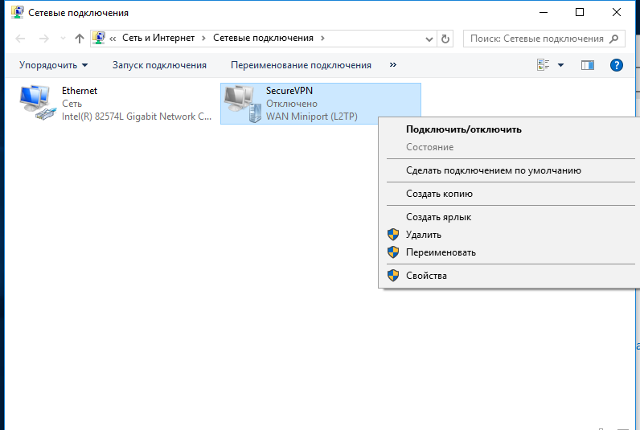
В открывшемся окне «Все элементы панели управления» последовательно перейдите в разделы «Центр управления сетями и общим доступом» -> «Изменения параметров адаптера», кликните правой кнопкой мыши по ярлыку Вашего VPN-подключения и из контекстного меню выберите пункт «Свойства»:

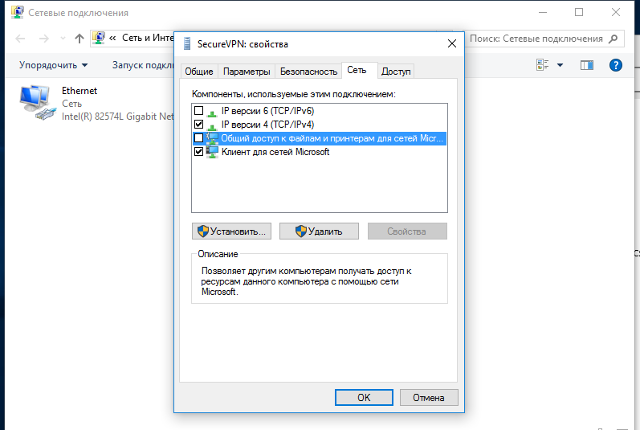
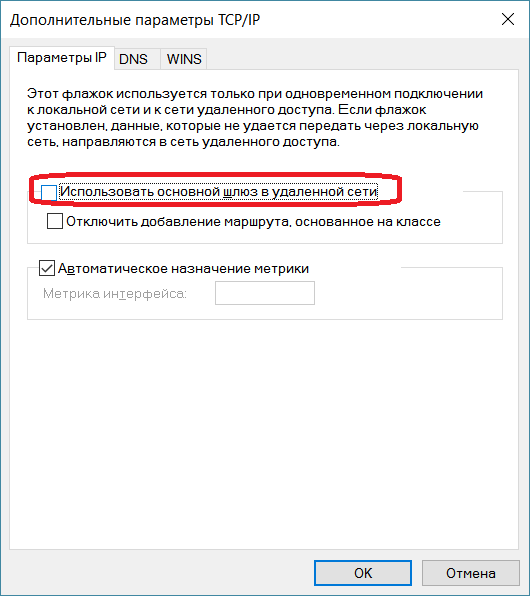
В окне свойств VPN-подключения перейдите на вкладку «Сеть», выделите мышью компонент «IP версии 4 (TCP/IPv4)», нажмите кнопку «Свойства», в следующем окне нажмите кнопку «Дополнительно», в открывшемся окне «Дополнительные параметры TCP/IP» снимите галочку с пункта «Использовать основной шлюз в удалённо сети» и нажимайте кнопку «Ок» во всех открытых на предыдущих шагах окнах.

Настройки на этой странице предназначены для подключения к сервису VPNKI, а не к любому VPN серверу в Интернет.
Перед началом настройки ознакомьтесь с «Общими сведениями» https://vpnki.ru/settings/before-you-begin/main-tech-info
——-
Некоторые важные особенности смотрите в конце страницы!
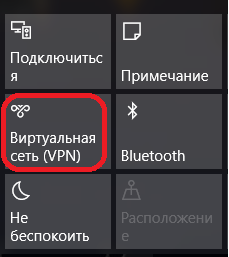
1. Откройте Центр уведомлений в правом нижнем углу экрана:
![]()
2. Далее выберите Виртуальная сеть (VPN):
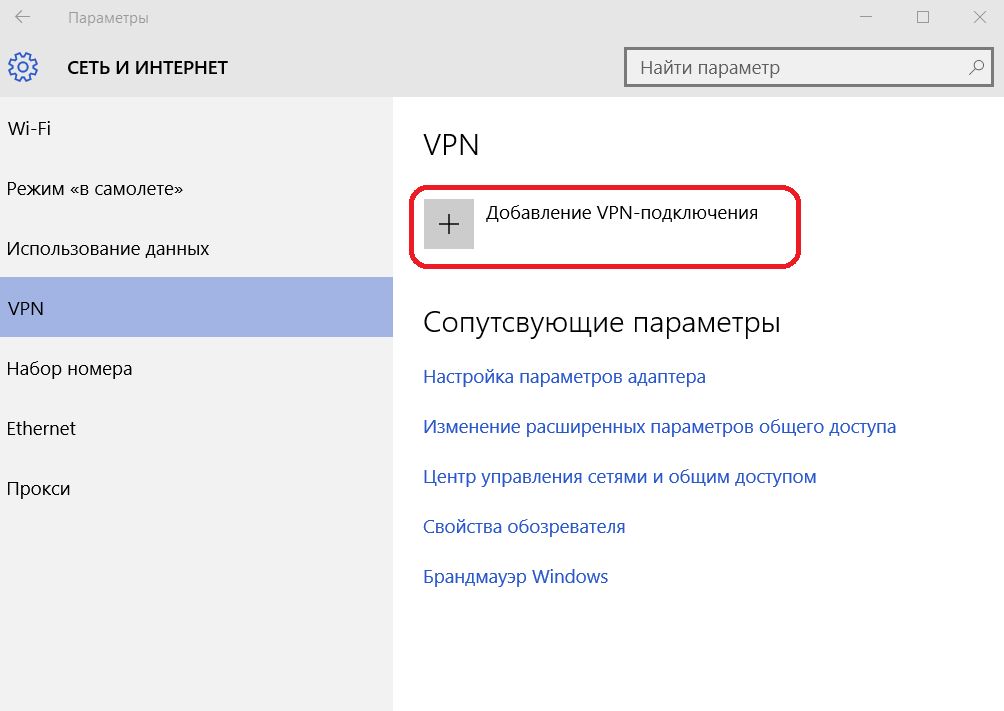
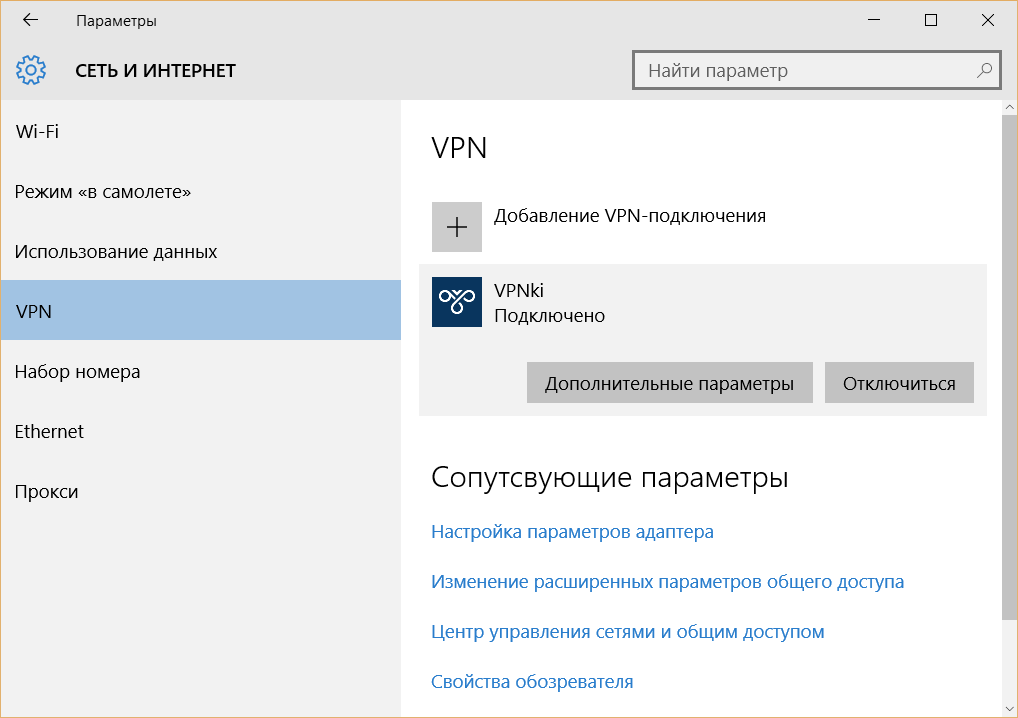
3. В открывшемся окне Параметры во вкладке VPN нажмите на кнопку Добавление VPN-подключения:
4. В окне Добавить VPN-подключение заполните следующие параметры:
Поставщик услуг VPN: Windows (встроенные)
Имя подключения: VPNki
Имя или адрес подключения: msk.vpnki.ru
Тип VPN: Протокол PPTP (либо Протокол L2TP/IPSec)
Тип данных для входа: Имя пользователя и пароль
Имя пользователя и пароль: полученные в системе vpnki (например userXXX) (см. Общие сведения о системе — https://vpnki.ru/settings/before-you-begin/main-tech-info)
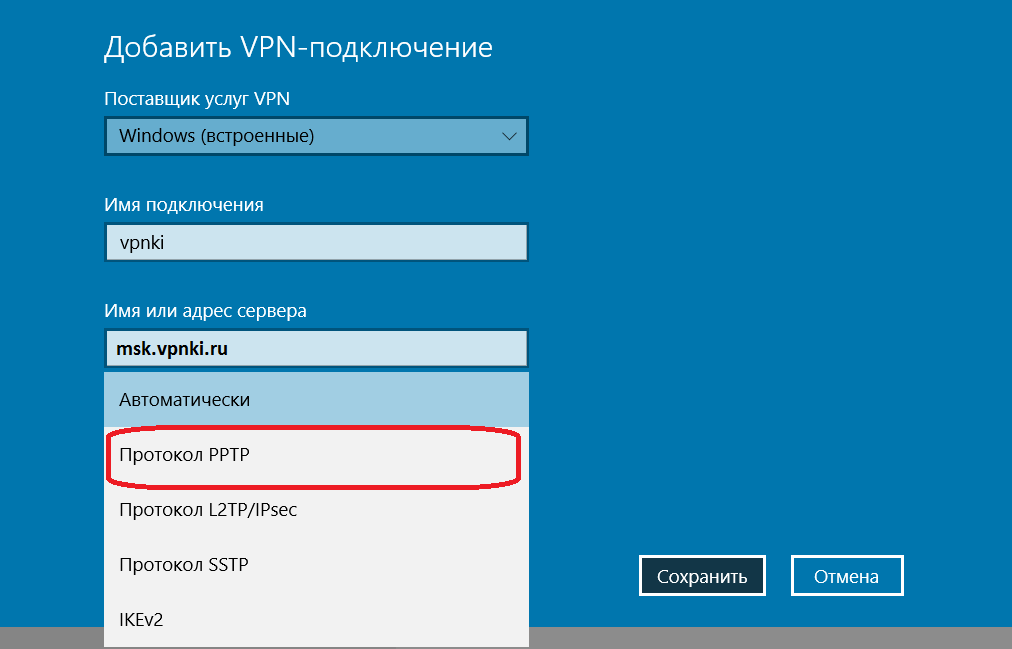
5. Cохраните подключение
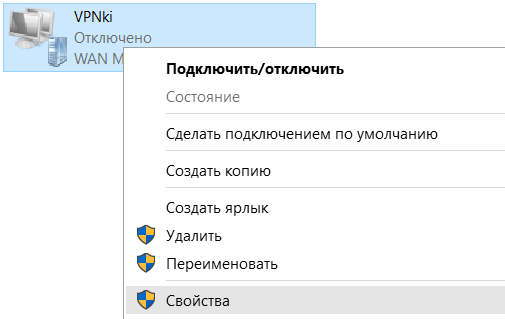
6. Далее выберите пункт Настройка параметров адаптера:

7. Нажмите правой кнопкой мыши на адаптер VPNKI и выберите Свойства:
8. Выберите в списке IP версии 4 (TCP/IPv4) и нажмите кнопку Свойства:
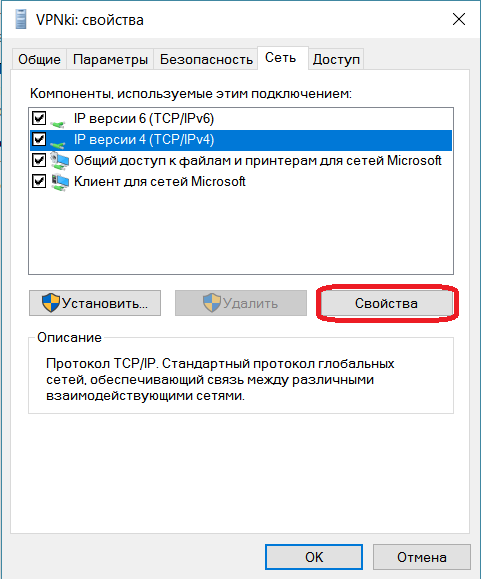
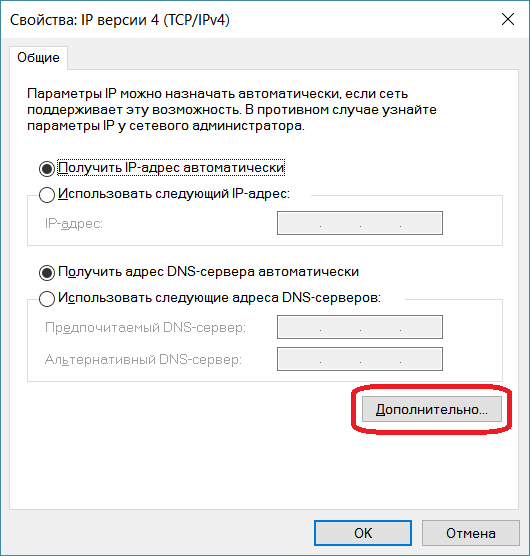
9. Оставьте получение IP-адреса и адреса DNS-сервера автоматически и нажмите кнопку Дополнительно:
10. Во вкладке Параметры IP Снимите галочку с Использовать основной шлюз в удаленные сети и нажмите кнопку OK
11. Далее во вкладке Безопасность в поле Проверка подлинности выберите:
Разрешить следующие протоколы и оставьте только Протокол проверки пароля (CHAP)
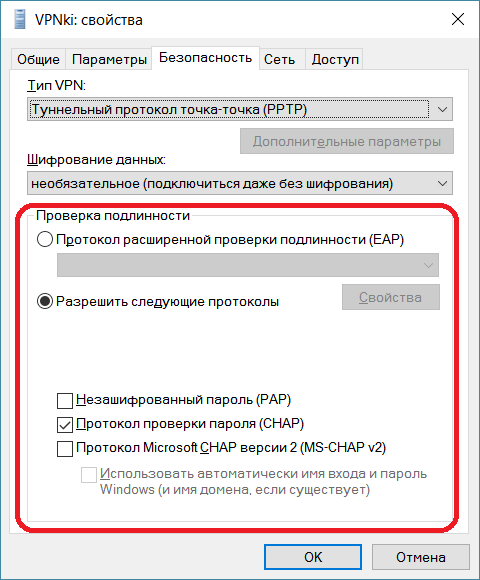
12. (Только для L2TP) нажмите кнопку Дополнительные параметры и выберите
Для проверки подлинности использовать общий ключ и введите ключ: vpnki
13. На этом настройка завершена, нажмите кнопку Подключиться и при успешном подключении
состояние VPNki должно измениться на Подключено
14. Если вам необходимо иметь подключение к удаленной домашней сети (например 192.168.x.x/x), то необходимо сообщить Windows о том, что адреса вашей удаленной сети следует искать в VPN туннеле.
Это можно сделать двумя способами:
— добавив сети 192.168.x.x/x (ваша удаленная сеть) и 172.16.0.0/16 (сеть VPNKI) в таблицу маршрутов при помощи команды route add
— при помощи поступления данных с сервера по протоколу DHCP
Прежде чем сделать выбор вам очень желательно ознакомиться с этой инструкцией и пройти ее до конца.
Особенность 1
Для использования соединения PPTP с шифрованием вам необходимо в настройках соединения:
— использовать авторизацию MS-CHAPv2 и указать что будет использоваться шифрование (см. скриншот п.11)
Для соединения PPTP без шифрования вам необходимо:
— использовать авторизацию CHAP и указать, что шифрование использоваться не будет. (см.скриншот п.11)
Будьте внимательны,
все иные сочетания методов авторизации и шифрования будут приводить к неработоспособности подключения!!!
Особенность 2
Работа протокола PPTP осуществляется с использованием протокола GRE, с которым у некоторых интернет провайдеров России имеются технические сложности. Эти сложности не позволят вам использовать PPTP для построения VPN туннлей. К таким провайдерам относятся МГТС (Московская городская телефонная сеть), Yota, Мегафон. Однако, такая ситуация не во всех частях их сетей.
Для пользователя ситуация будет выглядеть так, что проверка имени пользователя и пароля проходить не будут. Точнее до этого момента даже не дойдет…В пункте меню «События безопасности» вы будете видеть начало успешного подключения и последней будет являться фраза, говорящая о том, что мы готовы проверять имя и пароль, но …
Access granted. No whitelist is set for user. Ready to check username / password.
Отсуствие соединения и дальнейших записей в логе (при том, что вы твердо уверены в том, что логин и пароль верные), скорее всего, говорит о том, что GRE у вашего провайдера не пропускается. Можете погуглить на этот счет.
PS: В целях борьбы с зависшими сессиями мы принудительно отключаем пользовательские туннели с протоколами PPTP, L2TP, L2TP/IPsec через 24 часа после установления соединения. При правильной настройке соединения должны автоматически переустановиться.
Наша система будет работать с многими типами домашних и офисных маршрутизаторов. Более подробно смотрите в разделе по настройке оборудования, а начать настройку лучше с этого примера.
ДОПОЛНИТЕЛЬНО ПО ТЕМЕ
- Немного более подробно про IP адреса можно прочитать на нашем сайте
- Про выход в Интернет через VPN и центральный офис можно почитать здесь
- Про удалённый доступ к компьютеру можно почитать на нашем сайте
- Про VPN и протоколы можно почитать здесь
Configure IPsec/L2TP VPN Clients
Read this in other languages: English, 简体中文.
Note: You may also connect using IKEv2 (recommended) or IPsec/XAuth mode.
After setting up your own VPN server, follow these steps to configure your devices. IPsec/L2TP is natively supported by Android, iOS, OS X, and Windows. There is no additional software to install. Setup should only take a few minutes. In case you are unable to connect, first check to make sure the VPN credentials were entered correctly.
- Platforms
- Windows
- OS X (macOS)
- Android
- iOS (iPhone/iPad)
- Chromebook
- Linux
- Troubleshooting
Windows
ℹ️ You may also connect using IKEv2 mode (recommended).
Windows 11
- Right-click on the wireless/network icon in your system tray.
- Select Network and Internet settings, then on the page that opens, click VPN.
- Click the Add VPN button.
- Select Windows (built-in) in the VPN provider drop-down menu.
- Enter anything you like in the Connection name field.
- Enter
Your VPN Server IPin the Server name or address field. - Select L2TP/IPsec with pre-shared key in the VPN type drop-down menu.
- Enter
Your VPN IPsec PSKin the Pre-shared key field. - Enter
Your VPN Usernamein the User name field. - Enter
Your VPN Passwordin the Password field. - Check the Remember my sign-in info checkbox.
- Click Save to save the VPN connection details.
Note: This one-time registry change is required if the VPN server and/or client is behind NAT (e.g. home router).
To connect to the VPN: Click the Connect button, or click on the wireless/network icon in your system tray, click VPN, then select the new VPN entry and click Connect. If prompted, enter Your VPN Username and Password, then click OK. You can verify that your traffic is being routed properly by looking up your IP address on Google. It should say «Your public IP address is Your VPN Server IP«.
If you get an error when trying to connect, see Troubleshooting.
Windows 10 and 8
- Right-click on the wireless/network icon in your system tray.
- Select Open Network & Internet settings, then on the page that opens, click Network and Sharing Center.
- Click Set up a new connection or network.
- Select Connect to a workplace and click Next.
- Click Use my Internet connection (VPN).
- Enter
Your VPN Server IPin the Internet address field. - Enter anything you like in the Destination name field, and then click Create.
- Return to Network and Sharing Center. On the left, click Change adapter settings.
- Right-click on the new VPN entry and choose Properties.
- Click the Security tab. Select «Layer 2 Tunneling Protocol with IPsec (L2TP/IPSec)» for the Type of VPN.
- Click Allow these protocols. Check the «Challenge Handshake Authentication Protocol (CHAP)» and «Microsoft CHAP Version 2 (MS-CHAP v2)» checkboxes.
- Click the Advanced settings button.
- Select Use preshared key for authentication and enter
Your VPN IPsec PSKfor the Key. - Click OK to close the Advanced settings.
- Click OK to save the VPN connection details.
Note: This one-time registry change is required if the VPN server and/or client is behind NAT (e.g. home router).
To connect to the VPN: Click on the wireless/network icon in your system tray, select the new VPN entry, and click Connect. If prompted, enter Your VPN Username and Password, then click OK. You can verify that your traffic is being routed properly by looking up your IP address on Google. It should say «Your public IP address is Your VPN Server IP«.
If you get an error when trying to connect, see Troubleshooting.
Alternatively, instead of following the steps above, you may create the VPN connection using these Windows PowerShell commands. Replace Your VPN Server IP and Your VPN IPsec PSK with your own values, enclosed in single quotes:
# Disable persistent command history
Set-PSReadlineOption –HistorySaveStyle SaveNothing
# Create VPN connection
Add-VpnConnection -Name 'My IPsec VPN' -ServerAddress 'Your VPN Server IP' -L2tpPsk 'Your VPN IPsec PSK' -TunnelType L2tp -EncryptionLevel Required -AuthenticationMethod Chap,MSChapv2 -Force -RememberCredential -PassThru
# Ignore the data encryption warning (data is encrypted in the IPsec tunnel)
Windows 7, Vista and XP
- Click on the Start Menu and go to the Control Panel.
- Go to the Network and Internet section.
- Click Network and Sharing Center.
- Click Set up a new connection or network.
- Select Connect to a workplace and click Next.
- Click Use my Internet connection (VPN).
- Enter
Your VPN Server IPin the Internet address field. - Enter anything you like in the Destination name field.
- Check the Don’t connect now; just set it up so I can connect later checkbox.
- Click Next.
- Enter
Your VPN Usernamein the User name field. - Enter
Your VPN Passwordin the Password field. - Check the Remember this password checkbox.
- Click Create, and then Close.
- Return to Network and Sharing Center. On the left, click Change adapter settings.
- Right-click on the new VPN entry and choose Properties.
- Click the Options tab and uncheck Include Windows logon domain.
- Click the Security tab. Select «Layer 2 Tunneling Protocol with IPsec (L2TP/IPSec)» for the Type of VPN.
- Click Allow these protocols. Check the «Challenge Handshake Authentication Protocol (CHAP)» and «Microsoft CHAP Version 2 (MS-CHAP v2)» checkboxes.
- Click the Advanced settings button.
- Select Use preshared key for authentication and enter
Your VPN IPsec PSKfor the Key. - Click OK to close the Advanced settings.
- Click OK to save the VPN connection details.
Note: This one-time registry change is required if the VPN server and/or client is behind NAT (e.g. home router).
To connect to the VPN: Click on the wireless/network icon in your system tray, select the new VPN entry, and click Connect. If prompted, enter Your VPN Username and Password, then click OK. You can verify that your traffic is being routed properly by looking up your IP address on Google. It should say «Your public IP address is Your VPN Server IP«.
If you get an error when trying to connect, see Troubleshooting.
OS X
ℹ️ You may also connect using IKEv2 (recommended) or IPsec/XAuth mode.
- Open System Preferences and go to the Network section.
- Click the + button in the lower-left corner of the window.
- Select VPN from the Interface drop-down menu.
- Select L2TP over IPSec from the VPN Type drop-down menu.
- Enter anything you like for the Service Name.
- Click Create.
- Enter
Your VPN Server IPfor the Server Address. - Enter
Your VPN Usernamefor the Account Name. - Click the Authentication Settings button.
- In the User Authentication section, select the Password radio button and enter
Your VPN Password. - In the Machine Authentication section, select the Shared Secret radio button and enter
Your VPN IPsec PSK. - Click OK.
- Check the Show VPN status in menu bar checkbox.
- (Important) Click the Advanced button and make sure the Send all traffic over VPN connection checkbox is checked.
- (Important) Click the TCP/IP tab, and make sure Link-local only is selected in the Configure IPv6 section.
- Click OK to close the Advanced settings, and then click Apply to save the VPN connection information.
To connect to the VPN: Use the menu bar icon, or go to the Network section of System Preferences, select the VPN and choose Connect. You can verify that your traffic is being routed properly by looking up your IP address on Google. It should say «Your public IP address is Your VPN Server IP«.
If you get an error when trying to connect, see Troubleshooting.
Android
ℹ️ You may also connect using IKEv2 (recommended) or IPsec/XAuth mode. Android 12 only supports IKEv2 mode.
- Launch the Settings application.
- Tap «Network & internet». Or, if using Android 7 or earlier, tap More… in the Wireless & networks section.
- Tap VPN.
- Tap Add VPN Profile or the + icon at top-right of screen.
- Enter anything you like in the Name field.
- Select L2TP/IPSec PSK in the Type drop-down menu.
- Enter
Your VPN Server IPin the Server address field. - Leave the L2TP secret field blank.
- Leave the IPSec identifier field blank.
- Enter
Your VPN IPsec PSKin the IPSec pre-shared key field. - Tap Save.
- Tap the new VPN connection.
- Enter
Your VPN Usernamein the Username field. - Enter
Your VPN Passwordin the Password field. - Check the Save account information checkbox.
- Tap Connect.
Once connected, you will see a VPN icon in the notification bar. You can verify that your traffic is being routed properly by looking up your IP address on Google. It should say «Your public IP address is Your VPN Server IP«.
If you get an error when trying to connect, see Troubleshooting.
iOS
ℹ️ You may also connect using IKEv2 (recommended) or IPsec/XAuth mode.
- Go to Settings -> General -> VPN.
- Tap Add VPN Configuration….
- Tap Type. Select L2TP and go back.
- Tap Description and enter anything you like.
- Tap Server and enter
Your VPN Server IP. - Tap Account and enter
Your VPN Username. - Tap Password and enter
Your VPN Password. - Tap Secret and enter
Your VPN IPsec PSK. - Make sure the Send All Traffic switch is ON.
- Tap Done.
- Slide the VPN switch ON.
Once connected, you will see a VPN icon in the status bar. You can verify that your traffic is being routed properly by looking up your IP address on Google. It should say «Your public IP address is Your VPN Server IP«.
If you get an error when trying to connect, see Troubleshooting.
Chromebook
- If you haven’t already, sign in to your Chromebook.
- Click the status area, where your account picture appears.
- Click Settings.
- In the Internet connection section, click Add connection.
- Click Add OpenVPN / L2TP.
- Enter
Your VPN Server IPfor the Server hostname. - Enter anything you like for the Service name.
- Make sure Provider type is L2TP/IPSec + pre-shared key.
- Enter
Your VPN IPsec PSKfor the Pre-shared key. - Enter
Your VPN Usernamefor the Username. - Enter
Your VPN Passwordfor the Password. - Click Connect.
Once connected, you will see a VPN icon overlay on the network status icon. You can verify that your traffic is being routed properly by looking up your IP address on Google. It should say «Your public IP address is Your VPN Server IP«.
If you get an error when trying to connect, see Troubleshooting.
Linux
ℹ️ You may also connect using IKEv2 mode (recommended).
Ubuntu Linux
Ubuntu 18.04 (and newer) users can install the network-manager-l2tp-gnome package using apt, then configure the IPsec/L2TP VPN client using the GUI.
- Go to Settings -> Network -> VPN. Click the + button.
- Select Layer 2 Tunneling Protocol (L2TP).
- Enter anything you like in the Name field.
- Enter
Your VPN Server IPfor the Gateway. - Enter
Your VPN Usernamefor the User name. - Right-click the ? in the Password field, select Store the password only for this user.
- Enter
Your VPN Passwordfor the Password. - Leave the NT Domain field blank.
- Click the IPsec Settings… button.
- Check the Enable IPsec tunnel to L2TP host checkbox.
- Leave the Gateway ID field blank.
- Enter
Your VPN IPsec PSKfor the Pre-shared key. - Expand the Advanced section.
- Enter
aes128-sha1-modp2048for the Phase1 Algorithms. - Enter
aes128-sha1for the Phase2 Algorithms. - Click OK, then click Add to save the VPN connection information.
- Turn the VPN switch ON.
If you get an error when trying to connect, try this fix.
Once connected, you can verify that your traffic is being routed properly by looking up your IP address on Google. It should say «Your public IP address is Your VPN Server IP«.
Fedora and CentOS
Fedora 28 (and newer) and CentOS 8/7 users can connect using IPsec/XAuth mode.
Other Linux
First check here to see if the network-manager-l2tp and network-manager-l2tp-gnome packages are available for your Linux distribution. If yes, install them (select strongSwan) and follow the instructions above. Alternatively, you may configure Linux VPN clients using the command line.
Troubleshooting
Read this in other languages: English, 简体中文.
See also: Check logs and VPN status, IKEv2 troubleshooting and Advanced usage.
- Windows error 809
- Windows error 789 or 691
- Windows error 628 or 766
- Windows 10 connecting
- Windows 10 upgrades
- Windows DNS leaks and IPv6
- Android MTU/MSS issues
- Android 6 and 7
- macOS send traffic over VPN
- iOS 13+ and macOS 10.15/11+
- iOS/Android sleep mode
- Debian 11/10 kernel
- Other errors
- Check logs and VPN status
Windows error 809
Error 809: The network connection between your computer and the VPN server could not be established because the remote server is not responding. This could be because one of the network devices (e.g, firewalls, NAT, routers, etc) between your computer and the remote server is not configured to allow VPN connections. Please contact your Administrator or your service provider to determine which device may be causing the problem.
Note: The registry change below is only required if you use IPsec/L2TP mode to connect to the VPN. It is NOT required for the IKEv2 and IPsec/XAuth modes.
To fix this error, a one-time registry change is required because the VPN server and/or client is behind NAT (e.g. home router). Download and import the .reg file below, or run the following from an elevated command prompt. You must reboot your PC when finished.
-
For Windows Vista, 7, 8, 10 and 11 (download .reg file)
REG ADD HKLMSYSTEMCurrentControlSetServicesPolicyAgent /v AssumeUDPEncapsulationContextOnSendRule /t REG_DWORD /d 0x2 /f -
For Windows XP ONLY (download .reg file)
REG ADD HKLMSYSTEMCurrentControlSetServicesIPSec /v AssumeUDPEncapsulationContextOnSendRule /t REG_DWORD /d 0x2 /f
Although uncommon, some Windows systems disable IPsec encryption, causing the connection to fail. To re-enable it, run the following command and reboot your PC.
-
For Windows XP, Vista, 7, 8, 10 and 11 (download .reg file)
REG ADD HKLMSYSTEMCurrentControlSetServicesRasManParameters /v ProhibitIpSec /t REG_DWORD /d 0x0 /f
Windows error 789 or 691
Error 789: The L2TP connection attempt failed because the security layer encountered a processing error during initial negotiations with the remote computer.
Error 691: The remote connection was denied because the user name and password combination you provided is not recognized, or the selected authentication protocol is not permitted on the remote access server.
For error 789, click here for troubleshooting information. For error 691, you may try removing and recreating the VPN connection, by following the instructions in this document. Make sure that the VPN credentials are entered correctly.
Windows error 628 or 766
Error 628: The connection was terminated by the remote computer before it could be completed.
Error 766: A certificate could not be found. Connections that use the L2TP protocol over IPSec require the installation of a machine certificate, also known as a computer certificate.
To fix these errors, please follow these steps:
- Right-click on the wireless/network icon in your system tray.
- Select Open Network and Sharing Center. Or, if using Windows 10 version 1709 or newer, select Open Network & Internet settings, then on the page that opens, click Network and Sharing Center.
- On the left, click Change adapter settings. Right-click on the new VPN and choose Properties.
- Click the Security tab. Select «Layer 2 Tunneling Protocol with IPsec (L2TP/IPSec)» for Type of VPN.
- Click Allow these protocols. Check the «Challenge Handshake Authentication Protocol (CHAP)» and «Microsoft CHAP Version 2 (MS-CHAP v2)» checkboxes.
- Click the Advanced settings button.
- Select Use preshared key for authentication and enter
Your VPN IPsec PSKfor the Key. - Click OK to close the Advanced settings.
- Click OK to save the VPN connection details.
For reference, see this screenshot of the VPN connection properties dialog.
Windows 10 connecting
If using Windows 10 and the VPN is stuck on «connecting» for more than a few minutes, try these steps:
- Right-click on the wireless/network icon in your system tray.
- Select Open Network & Internet settings, then on the page that opens, click VPN on the left.
- Select the new VPN entry, then click Connect. If prompted, enter
Your VPN UsernameandPassword, then click OK.
Windows 10 upgrades
After upgrading Windows 10 version (e.g. from 1709 to 1803), you may need to re-apply the fix above for Windows Error 809 and reboot.
Windows DNS leaks and IPv6
Windows 8, 10 and 11 use «smart multi-homed name resolution» by default, which may cause «DNS leaks» when using the native IPsec VPN client if your DNS servers on the Internet adapter are from the local network segment. To fix, you may either disable smart multi-homed name resolution, or configure your Internet adapter to use DNS servers outside your local network (e.g. 8.8.8.8 and 8.8.4.4). When finished, clear the DNS cache and reboot your PC.
In addition, if your computer has IPv6 enabled, all IPv6 traffic (including DNS queries) will bypass the VPN. Learn how to disable IPv6 in Windows. If you need a VPN with IPv6 support, you could instead try OpenVPN.
Android MTU/MSS issues
Some Android devices have MTU/MSS issues, that they are able to connect to the VPN using IPsec/XAuth («Cisco IPsec») mode, but cannot open websites. If you encounter this problem, try running the following commands on the VPN server. If successful, you may add these commands to /etc/rc.local to persist after reboot.
iptables -t mangle -A FORWARD -m policy --pol ipsec --dir in
  -p tcp -m tcp --tcp-flags SYN,RST SYN -m tcpmss --mss 1361:1536
  -j TCPMSS --set-mss 1360
iptables -t mangle -A FORWARD -m policy --pol ipsec --dir out
  -p tcp -m tcp --tcp-flags SYN,RST SYN -m tcpmss --mss 1361:1536
  -j TCPMSS --set-mss 1360

echo 1 > /proc/sys/net/ipv4/ip_no_pmtu_disc
Docker users: Instead of running the commands above, you may apply this fix by adding VPN_ANDROID_MTU_FIX=yes to your env file, then re-create the Docker container.
References: [1] [2].
Android 6 and 7
If your Android 6.x or 7.x device cannot connect, try these steps:
- Tap the «Settings» icon next to your VPN profile. Select «Show advanced options» and scroll down to the bottom. If the option «Backward compatible mode» exists (see screenshot), enable it and reconnect the VPN. If not, try the next step.
- Edit
/etc/ipsec.confon the VPN server. Find the linesha2-truncbugand toggle its value. i.e. Replacesha2-truncbug=nowithsha2-truncbug=yes, or replacesha2-truncbug=yeswithsha2-truncbug=no. Save the file and runservice ipsec restart. Then reconnect the VPN.
Docker users: You may set sha2-truncbug=yes (default is no) in /etc/ipsec.conf by adding VPN_SHA2_TRUNCBUG=yes to your env file, then re-create the Docker container.
macOS send traffic over VPN
OS X (macOS) users: If you can successfully connect using IPsec/L2TP mode, but your public IP does not show Your VPN Server IP, read the OS X section above and complete these steps. Save VPN configuration and re-connect.
- Click the Advanced button and make sure the Send all traffic over VPN connection checkbox is checked.
- Click the TCP/IP tab, and make sure Link-local only is selected in the Configure IPv6 section.
After trying the steps above, if your computer is still not sending traffic over the VPN, check the service order. From the main network preferences screen, select «set service order» in the cog drop down under the list of connections. Drag the VPN connection to the top.
iOS 13+ and macOS 10.15/11+
If your device running iOS 13+, macOS 10.15 (Catalina), macOS 11 (Big Sur) or above cannot connect, try these steps: Edit /etc/ipsec.conf on the VPN server. Find sha2-truncbug=yes and replace it with sha2-truncbug=no. Save the file and run service ipsec restart. Then reconnect the VPN.
In addition, users running macOS Big Sur 11.0 should update to version 11.1 or newer, to fix some issues with VPN connections. To check your macOS version and update, refer to this article.
iOS/Android sleep mode
To save battery, iOS devices (iPhone/iPad) will automatically disconnect Wi-Fi shortly after the screen turns off (sleep mode). As a result, the IPsec VPN disconnects. This behavior is by design and cannot be configured.
If you need the VPN to auto-reconnect when the device wakes up, you may connect using IKEv2 mode (recommended) and enable the «VPN On Demand» feature. Alternatively, you may try OpenVPN instead, which has support for options such as «Reconnect on Wakeup» and «Seamless Tunnel».
Android devices will also disconnect Wi-Fi shortly after entering sleep mode, unless the option «Keep Wi-Fi on during sleep» is enabled. This option is no longer available in Android 8 (Oreo) and newer. Alternatively, you may try enabling the «Always-on VPN» option to stay connected. Learn more here.
Debian 11/10 kernel
Debian 11 or 10 users: Run uname -r to check your server’s Linux kernel version. If it contains the word «cloud», and /dev/ppp is missing, then the kernel lacks ppp support and cannot use IPsec/L2TP mode. The VPN setup scripts try to detect this and show a warning. In this case, you may instead use IKEv2 or IPsec/XAuth mode to connect to the VPN.
To fix the issue with IPsec/L2TP mode, you may switch to the standard Linux kernel by installing e.g. the linux-image-amd64 package. Then update the default kernel in GRUB and reboot your server.
Other errors
If you encounter other errors, refer to the links below:
- http://www.tp-link.com/en/faq-1029.html
- https://documentation.meraki.com/MX-Z/Client_VPN/Troubleshooting_Client_VPN#Common_Connection_Issues
- https://stackoverflow.com/questions/25245854/windows-8-1-gets-error-720-on-connect-vpn
Check logs and VPN status
Commands below must be run as root (or using sudo).
First, restart services on the VPN server:
service ipsec restart
service xl2tpd restart
Docker users: Run docker restart ipsec-vpn-server.
Then reboot your VPN client device, and retry the connection. If still unable to connect, try removing and recreating the VPN connection. Make sure that the VPN credentials are entered correctly.
Check the Libreswan (IPsec) and xl2tpd logs for errors:
# Ubuntu & Debian
grep pluto /var/log/auth.log
grep xl2tpd /var/log/syslog

# CentOS/RHEL, Rocky Linux, AlmaLinux & Amazon Linux 2
grep pluto /var/log/secure
grep xl2tpd /var/log/messages

# Alpine Linux
grep pluto /var/log/messages
grep xl2tpd /var/log/messages
Check the status of the IPsec VPN server:
Show currently established VPN connections:
Configure Linux VPN clients using the command line
After setting up your own VPN server, follow these steps to configure Linux VPN clients using the command line. Alternatively, you may connect using IKEv2 mode (recommended), or configure using the GUI. Instructions below are based on the work of Peter Sanford. Commands must be run as root on your VPN client.
To set up the VPN client, first install the following packages:
# Ubuntu and Debian
apt-get update
apt-get install strongswan xl2tpd net-tools

# Fedora
yum install strongswan xl2tpd net-tools

# CentOS
yum install epel-release
yum --enablerepo=epel install strongswan xl2tpd net-tools
Create VPN variables (replace with actual values):
VPN_SERVER_IP='your_vpn_server_ip'
VPN_IPSEC_PSK='your_ipsec_pre_shared_key'
VPN_USER='your_vpn_username'
VPN_PASSWORD='your_vpn_password'
Configure strongSwan:
cat > /etc/ipsec.conf <<EOF
# ipsec.conf - strongSwan IPsec configuration file

conn myvpn
  auto=add
  keyexchange=ikev1
  authby=secret
  type=transport
  left=%defaultroute
  leftprotoport=17/1701
  rightprotoport=17/1701
  right=$VPN_SERVER_IP
  ike=aes128-sha1-modp2048
  esp=aes128-sha1
EOF

cat > /etc/ipsec.secrets <<EOF
: PSK "$VPN_IPSEC_PSK"
EOF

chmod 600 /etc/ipsec.secrets

# For CentOS and Fedora ONLY
mv /etc/strongswan/ipsec.conf /etc/strongswan/ipsec.conf.old 2>/dev/null
mv /etc/strongswan/ipsec.secrets /etc/strongswan/ipsec.secrets.old 2>/dev/null
ln -s /etc/ipsec.conf /etc/strongswan/ipsec.conf
ln -s /etc/ipsec.secrets /etc/strongswan/ipsec.secrets
Configure xl2tpd:
cat > /etc/xl2tpd/xl2tpd.conf <<EOF
[lac myvpn]
lns = $VPN_SERVER_IP
ppp debug = yes
pppoptfile = /etc/ppp/options.l2tpd.client
length bit = yes
EOF

cat > /etc/ppp/options.l2tpd.client <<EOF
ipcp-accept-local
ipcp-accept-remote
refuse-eap
require-chap
noccp
noauth
mtu 1280
mru 1280
noipdefault
defaultroute
usepeerdns
connect-delay 5000
name "$VPN_USER"
password "$VPN_PASSWORD"
EOF

chmod 600 /etc/ppp/options.l2tpd.client
The VPN client setup is now complete. Follow the steps below to connect.
Note: You must repeat all steps below every time you try to connect to the VPN.
Create xl2tpd control file:
mkdir -p /var/run/xl2tpd
touch /var/run/xl2tpd/l2tp-control
Restart services:
service strongswan restart

# For Ubuntu 20.04, if strongswan service not found
ipsec restart

service xl2tpd restart
Start the IPsec connection:
# Ubuntu and Debian
ipsec up myvpn

# CentOS and Fedora
strongswan up myvpn
Start the L2TP connection:
echo "c myvpn" > /var/run/xl2tpd/l2tp-control
Run ifconfig and check the output. You should now see a new interface ppp0.
Check your existing default route:
Find this line in the output: default via X.X.X.X .... Write down this gateway IP for use in the two commands below.
Exclude your VPN server’s public IP from the new default route (replace with actual value):
route add YOUR_VPN_SERVER_PUBLIC_IP gw X.X.X.X
If your VPN client is a remote server, you must also exclude your Local PC’s public IP from the new default route, to prevent your SSH session from being disconnected (replace with actual value):
route add YOUR_LOCAL_PC_PUBLIC_IP gw X.X.X.X
Add a new default route to start routing traffic via the VPN server:
route add default dev ppp0
The VPN connection is now complete. Verify that your traffic is being routed properly:
wget -qO- http://ipv4.icanhazip.com; echo
The above command should return Your VPN Server IP.
To stop routing traffic via the VPN server:
route del default dev ppp0
To disconnect:
# Ubuntu and Debian
echo "d myvpn" > /var/run/xl2tpd/l2tp-control
ipsec down myvpn

# CentOS and Fedora
echo "d myvpn" > /var/run/xl2tpd/l2tp-control
strongswan down myvpn
Credits
This document was adapted from the Streisand project, maintained by Joshua Lund and contributors.
License
Note: This license applies to this document only.
Copyright (C) 2016-2022 Lin Song
Based on the work of Joshua Lund (Copyright 2014-2016)
This program is free software: you can redistribute it and/or modify it under the terms of the GNU General Public License as published by the Free Software Foundation, either version 3 of the License, or (at your option) any later version.
This program is distributed in the hope that it will be useful, but WITHOUT ANY WARRANTY; without even the implied warranty of MERCHANTABILITY or FITNESS FOR A PARTICULAR PURPOSE. See the GNU General Public License for more details.