В начале своего повествования хотел сделать небольшое лирическое отступление на тему нововведений в 2016 сервере Windows.
Еще толком не успел познать 2012 сервер, а уже презентовали 2016, это в стиле Microsoft на всем «рубить бабло».
Сначала думали контроллеры обновить на на платформу 2012, а теперь не ясно есть ли смысл… Может сразу апгрейдить до платформы 2016….
Здесь был интересный пост про изменения в AD:
https://habrahabr.ru/company/netwrix/blog/169393/
https://habrahabr.ru/company/netwrix/blog/169543/
но начинать знакомство с платформой 2016 c апгрейда AD никак не хочется, поэтому решил пока развернуть PPTP сервер. На сегодня PPTP, это не самый актуальный вариант, все же безопасность и все такое (например, Apple в iOS 10 и последних версиях MacOS убрала этот протокол, а жаль, было очень удобно), но иногда PPTP бывает нужен, как запасной парашют, поэтому сегодня о нем.
В целом не увидел глобальных изменений относительно 2012 сервера, в интернете тоже ничего нужного для себя по изменениям не нашел (изменения все больше касаются Hyper-V, которую мы не эксплуатируем), появилось новое оформление? как в новом релизе Windows 10, для сервера это крайне важно и актуально 😦
Ну а теперь непосредственно к PPTP.
Поднимаем роль Удаленный доступ


Так как в моем случае одна сетевая карта, выбираем Особую конфигурацию


Смотрим, что Политика запросов на подключение настроена правильно.

Осталось настроить Сетевую политику

Далее указываем, кому будет разрешено подключаться

Указываем методы проверки подлинности

На этом собственно настройка завершена.
Да, совсем забыл, не забываем «прокинуть» порт PPTP 1723 на наш сервер на Firewall.
Пробуем подключиться с удаленного компьютера, если ошибок нет, то на этом настройка закончена.
Всем хорошей работы!!!
29.11.2016 —
Posted by |
ms windows server 2016
Sorry, the comment form is closed at this time.
In this tutorial you will find step by instructions to setup a PPTP VPN Server 2016, in order to access your local network resources from anywhere in the world. So, if you have a Windows 2016 server with one network card and you want to setup a VPN connection in order to connect and access server or network files from everywhere, continue reading below…*
* Note: If you want to setup a more secure VPN Server for your network, then read this article: How to Setup L2TP VPN Server 2016 with a Custom Preshared Key for Authentication.
How to Install a PPTP VPN Server 2016 (With only One NIC).
To install and configure the Server 2016 to act as a PPTP VPN access server follow the steps below:
Step 1. Install the Routing and Remote Access Role on Server 2016.
Step 2. Enable the Routing and Remote Access on Server 2016.
Step 3. Configure VPN Server Settings (Security, IP Range, etc.).
Step 4. Allow Routing and Remote Access Inbound Traffic in Windows Firewall.
Step 5. Select the VPN Users.
Step 6. Configure the VPN Server to Allow the Network Access.
Step 7. Configure ISP’s Firewall to Allow the PPTP Connections.
Step 8. Setup the PPTP Connection on Clients.
.
Step 1. How to Add Remote Access (VPN Access) Role on a Server 2016.
The first step to setup a Windows Server 2016, as a VPN server is to add the Remote Access role to your Server 2016. *
* Info: For this example we’re going to setup VPN on a Windows Server 2016 machine, named «Srv1» and with IP Address «192.168.1.8».
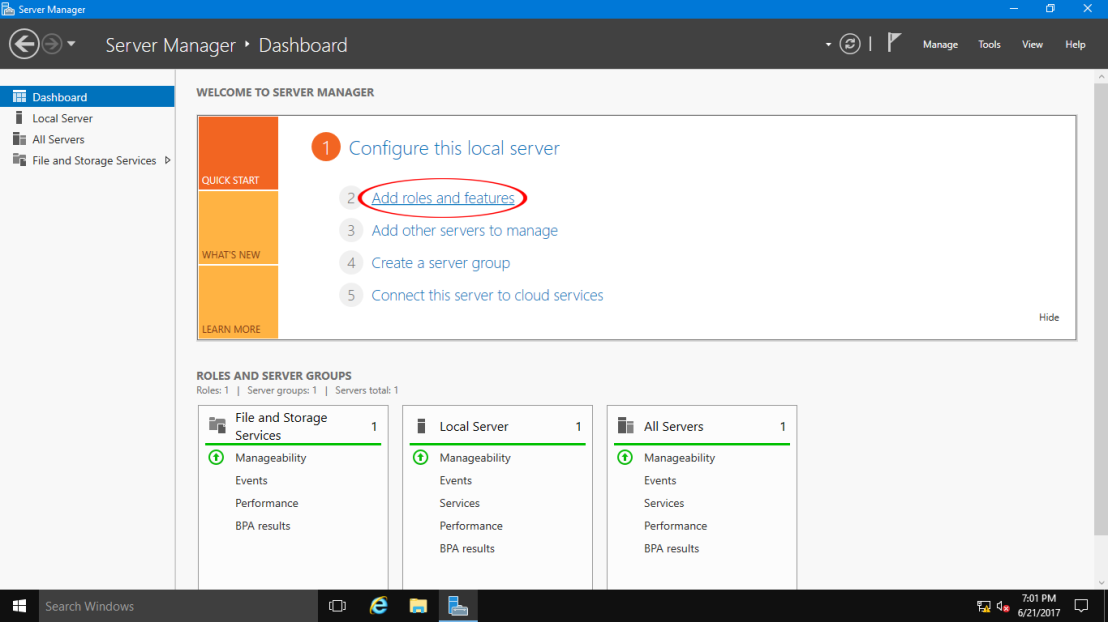
1. To install VPN role on Windows Server 2016, open ‘Server Manager’ and click on Add Roles and Features.

2. At the first screen of ‘Add Roles and Features wizard’, leave the Role-based or feature-based installation option and click Next.

3. At the next screen, leave the default option «Select server from the server pool» and click Next.

4. Then select the Remote Access role and click Next.

5. At ‘Features’ screen leave the default settings and click Next.

6. At ‘Remote Access’ information screen, click Next.

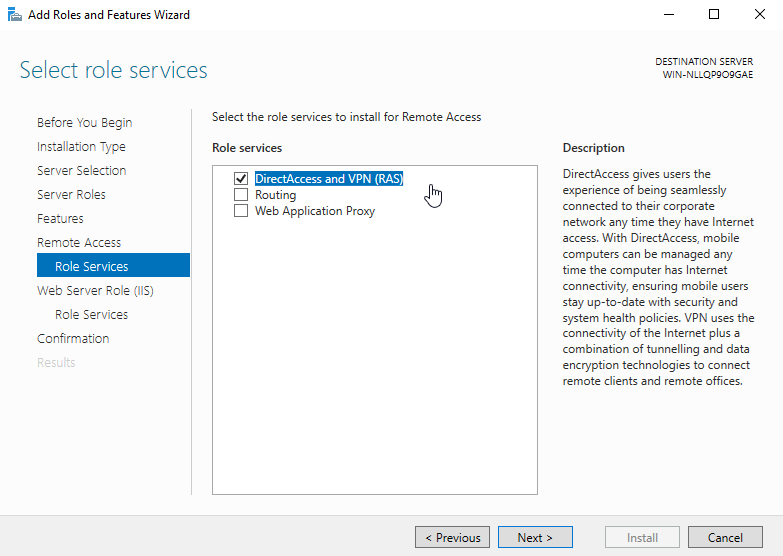
7. At ‘Remote Services’, choose the Direct Access and VPN (RAS) role services and then click Next.

8. Then click Add Features.

9. Click Next again.

10. Leave the default settings and click Next (twice) at ‘Web Server Role (IIS)’ and ‘Role Services’ screens.

11. At ‘Confirmation’ screen, select Restart the destination server automatically (if required) and click Install.

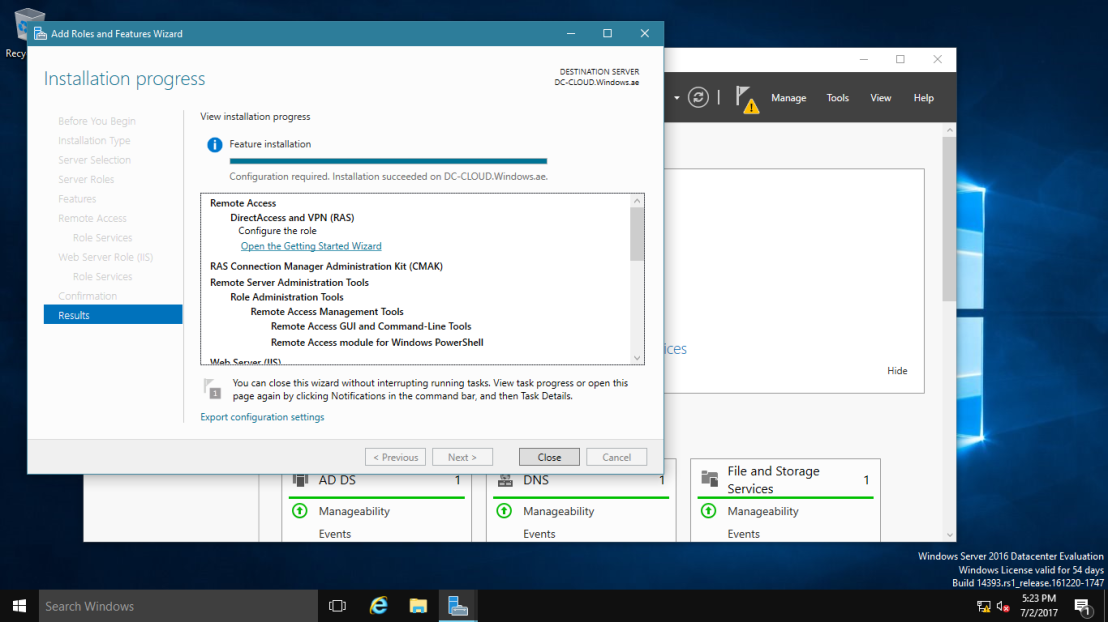
12. At the final screen, ensure that the installation of the Remote Access role is successful and Close the wizard.

13. Then (from Server Manager) Tools menu, click on Remote Access Management.
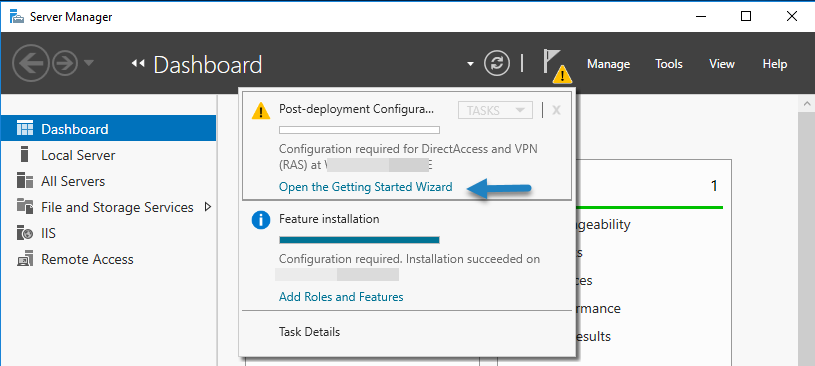
14. Select Direct Access and VPN on the left and then click to Run the Getting Started Wizard.

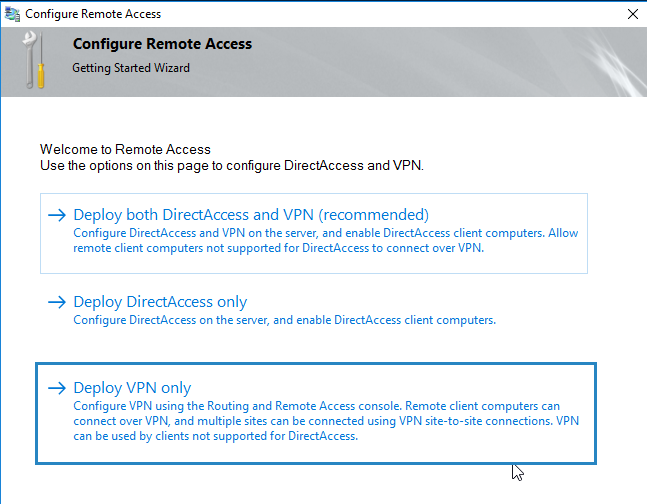
15. Then click Deploy VPN only.

16. Continue to step-2 below to configure Routing and Remote Access.
Step 2. How to Configure and Enable Routing and Remote Access on Server 2016.
The next step is to enable and configure the VPN access on our Server 2016. To do that:
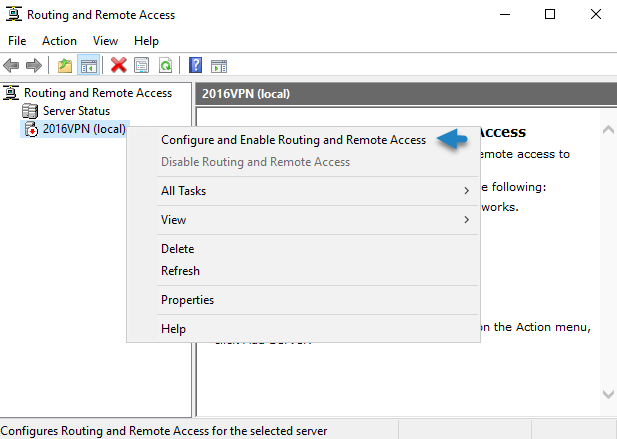
1. Right click on the Server’s name and select Configure and Enable Routing and Remote Access. *
* Note: You can also launch Routing and Remote Access settings, by using the following way:
1. Open Server Manager and from Tools menu, select Computer Management.
2. Expand Services and Applications
3. Right click on Routing and Remote Access and select Configure and Enable Routing and Remote Access.

2. Click Next at ‘Routing and Remote Access Server Setup Wizard’.

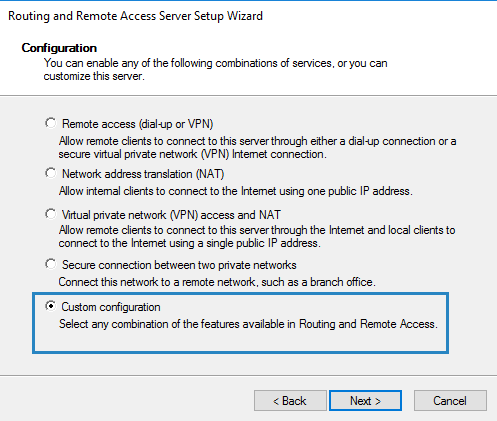
3. Choose Custom configuration and click Next.

4. Select VPN access only in this case and click Next.

5. Finally click Finish. *
* Note: If you receive an error says » Remote Access Service in unable to enable Routing and Remote Access ports in Windows Firewall…», ignore it and click OK to continue.

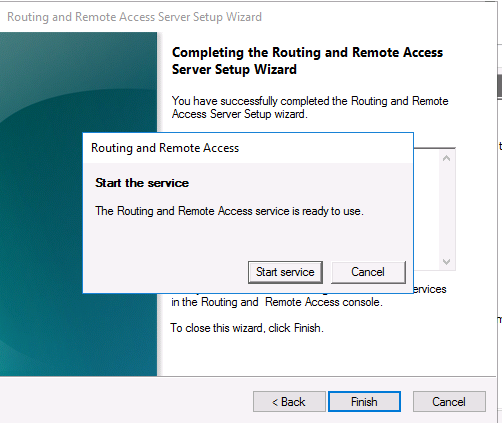
6. When prompted to Start the service click Start.

Step 3. Configure VPN Server Settings (Security, IP Range, etc.)
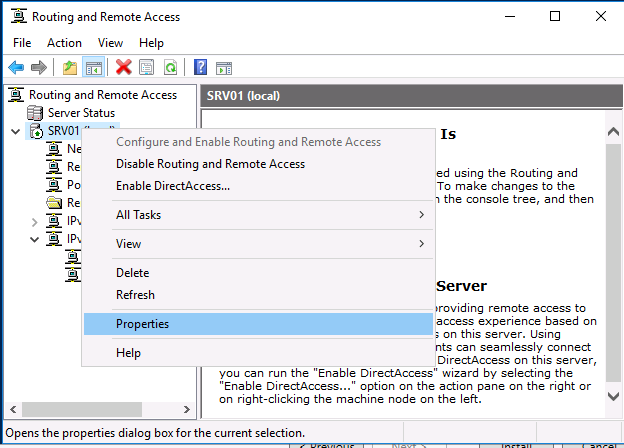
1. At Routing and Remote access panel, right click on your server’s name and select Properties.

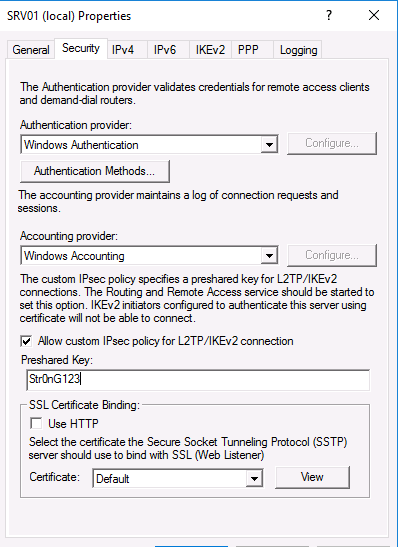
2a. At ‘Security’ tab, select the Windows Authentication as the Authentication Provider. and then click the Authentication Methods button.

2b. Make sure that the Microsoft encrypted authentication version 2 (MS-CHAP v2) is selected and then click OK.

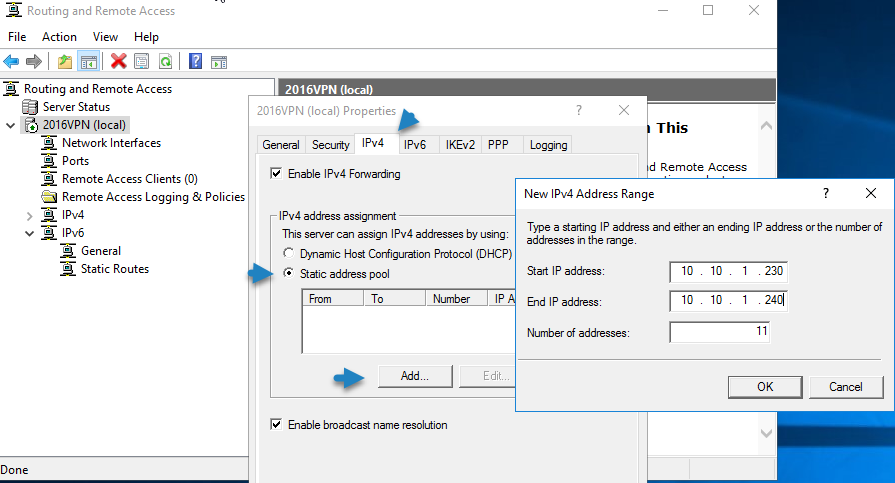
3a. Now select the IPv4 tab, choose the Static address pool option and click Add.

3b. Now type the IP Address Range that will be assigned to VPN clients and click OK twice to close all windows.
e.g. For this example we’re going to use the IP address range: 192.168.1.200 – 192.168.1.209.

Step 4. Allow Routing and Remote Access Inbound Traffic in Windows Firewall
1. Go To Control Panel > All Control Panel Items > Windows Firewall.
2. Click Advanced settings on the left.

3. Select Inbound Rules on the left.
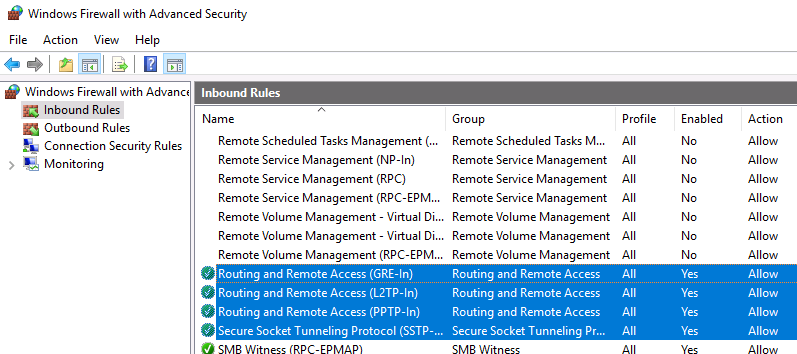
4a. At the right pane, double click at Routing and Remote Access (PPTP-In)

4b. At ‘General’ tab, choose Enabled, Allow the connection and click OK.

5a. Then double click at Routing and Remote Access (GRE-In).

5b. At General tab, choose Enabled, Allow the connection and click OK.

6. Close the Firewall settings and restart your server.
Step 5. How to Select which users will have VPN Access.
Now it’s time to specify which users will be able to connect to the VPN server (Dial-IN permissions).
1. Open Server Manager.
2. From Tools menu, select Active Directory Users and Computers. *
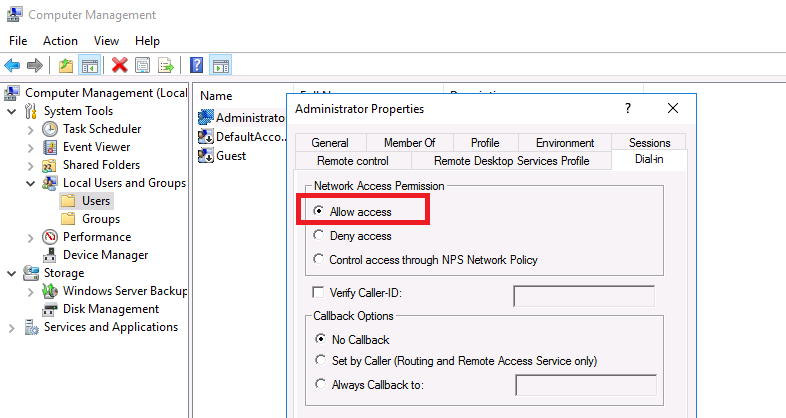
* Note: If your server doesn’t belong to a domain, then go to Computer Management -> Local Users and Groups.

3. Select Users and double click on the user that you want to allow the VPN Access.
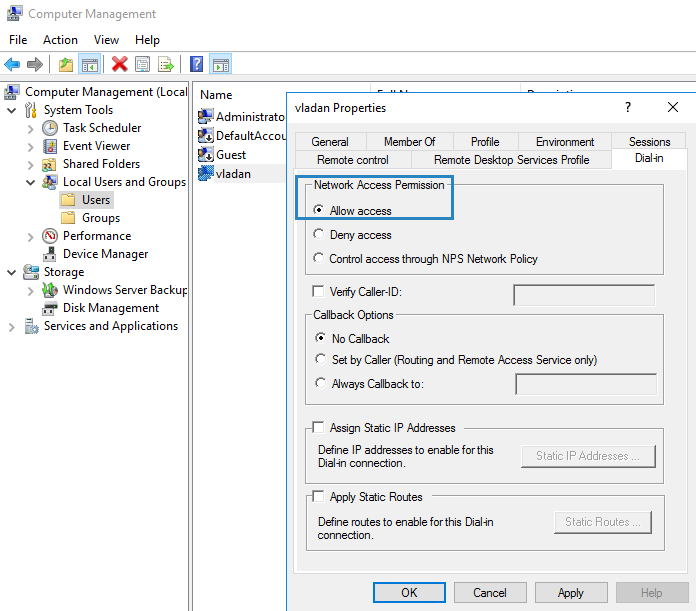
4. Select the Dial-in tab and select Allow access. Then click OK.

Step 6. How to Configure the Network Policy Server to Allow the Network Access.
In order to allow the VPN users to access the network through the VPN connection, proceed and modify the Network Policy Server as follows:

2. Under the NPS (Local) select Network Policies on the left.
3a. Double click at Connections to Microsoft Routing and Remote Access server policy.

3b. At the ‘Overview’ tab, select the following settings and click OK:
-
- Grant access: If the connection request matches this policy.
- Remote Access Server (VPN-Dial up)

4a. Now open the Connections to other access servers policy, select the same settings and click OK.
-
- Grant access: If the connection request matches this
policy. - Remote Access Server (VPN-Dial
up)
- Grant access: If the connection request matches this

5. Close the Network Policy Server settings.

Step 7. How to Configure Firewall to Allow PPTP VPN Access (Port Forwarding).
The next step is allow the PPTP VPN connections on your ISP’s Router/Firewall.
1. At the top of our browser type your router’s IP address: (e.g. «http://192.168.1.1» in this example) and login to router’s web interface.
2. Inside the Router configuration setup, forward the port 1723 to the IP address of the VPN Server. (See your Router’s manual on how to configure Port Forward). *
- For example, if your VPN Server has the IP address «192.168.1.8» then you have to forward the port 1723 to the IP «192.168.1.8».

Step 8. How to Setup the PPTP VPN Connection on CLIENTS *
* Notes & Additional Help:
1. In order to be able to connect to your VPN server from a distance you have to know the public IP Address of the VPN server. To find the pubic IP Address navigate to this link: http://www.whatismyip.com/ (from VPN Server 2016).
2. To ensure that you can always connect to your VPN server it is better to have a Static Public IP Address. To obtain a Static Public IP Address you must contact your internet service provider. If you don’t want to pay for a static IP Address, then you can setup a free Dynamic DNS service (e.g. no-ip.) on your router’s (VPN Server) side.
To setup a PPTP VPN Connection on Windows 10:
1. From Settings ![]() click Network and Internet, OR, right click at the Network icon on the taskbar and choose Open Network & Internet settings.
click Network and Internet, OR, right click at the Network icon on the taskbar and choose Open Network & Internet settings.

2. Click VPN on the left and then click + to Add a VPN connection.

3. At the next screen, fill out the following information and click Save:
a. VPN provider: Select Windows (built-in).
b. Connection name: Type a friendly name for the VPN connection. (e.g.. «VPN_OFFICE»)
c. Server name or address: Type the VPN’s server host name or the public IP address or the VPN server.
d. VPN Type: Use the drop down arrow to select the type of the VPN connection that your company uses. {e.g. «Point to Point Tunneling Protocol (PPTP)»}.
e. Type of sign-in info: Use the drop down arrow and select the authentication type for the VPN connection. (e.g. «User name and password»).
f. User Name: Type the VPN user name.
g. Password: Type the VPN password.
h. Check the «Remember my sign-in info» checkbox, if you want to save your sign-in credentials for the VPN connection and then click Save

4. Under Related settings, choose Change adapter options.

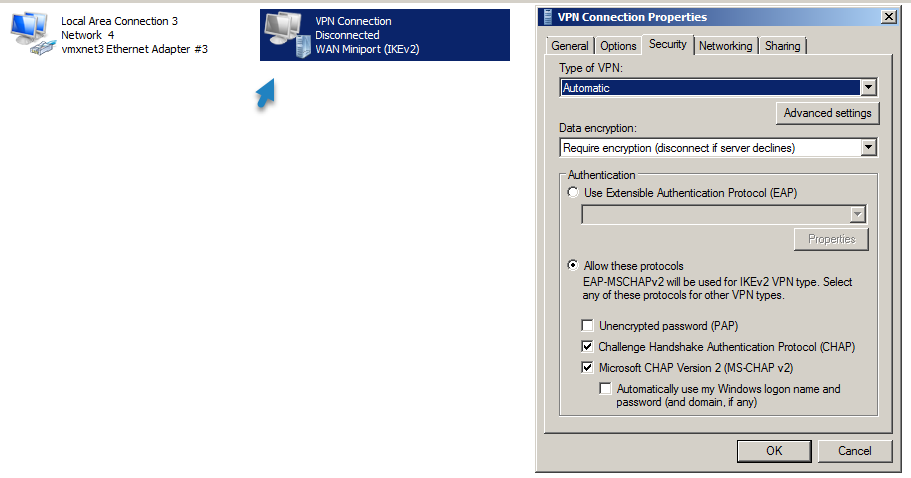
5. Right click on the VPN connection and choose Properties.

6. At Security Tab, select Allow these protocols, and check the following protocols:
-
- Challenge Handshake Authentication Protocol (CHAP)
- Microsoft CHAP Version 2 (MS-SHAP v2)

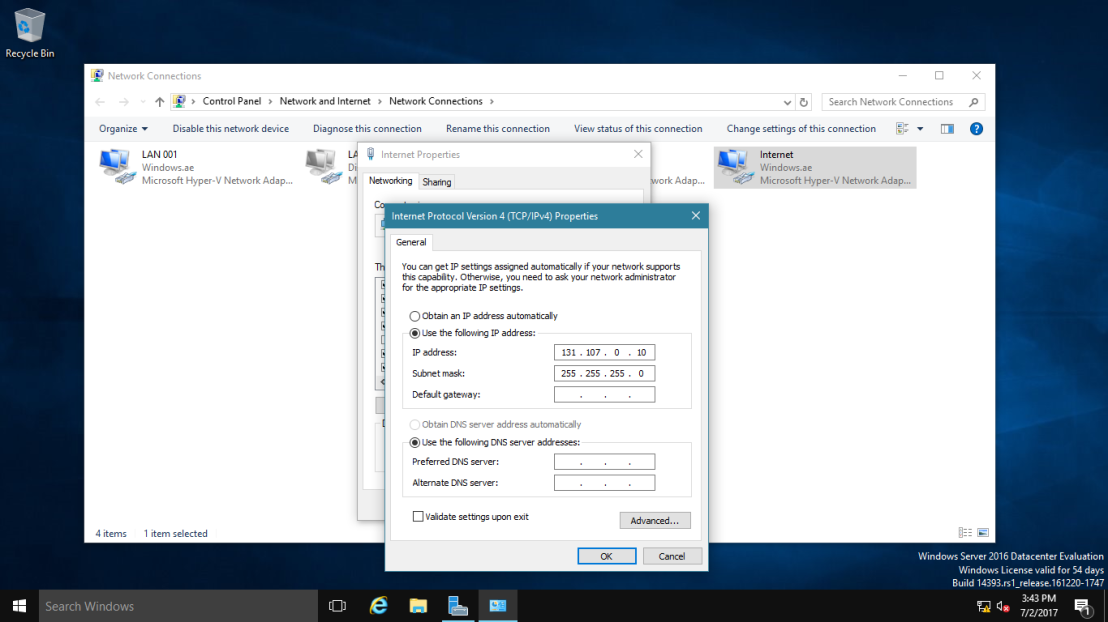
7. At Networking tab, select the Internet Protocol Version 4 (TCP/IPv4) and click Properties.

7a. Click Advanced.

7b. Uncheck the «Use default gateway on remote network» and click OK three (3) times to apply changes and close all windows.

8. Now you’re ready to connect to your VPN Server 2016.

That’s it! Let me know if this guide has helped you by leaving your comment about your experience. Please like and share this guide to help others.
If this article was useful for you, please consider supporting us by making a donation. Even $1 can a make a huge difference for us in our effort to continue to help others while keeping this site free:

If you want to stay constantly protected from malware threats, existing and future ones, we recommend that you install Malwarebytes Anti-Malware PRO by clicking below (we
do earn a commision from sales generated from this link, but at no additional cost to you. We have experience with this software and we recommend it because it is helpful and useful):
Full household PC Protection — Protect up to 3 PCs with NEW Malwarebytes Anti-Malware Premium!
В этом кратком руководстве мы опишем процесс установки и настройке VPN-сервера на базе Windows Server. Все действия, описанные в этой статье, были выполнены на Windows Server 2016, но эта инструкция подходит для любой современной серверной операционной системы Windows, начиная с Windows Server 2008 R2 и заканчивая Windows Server 2016.
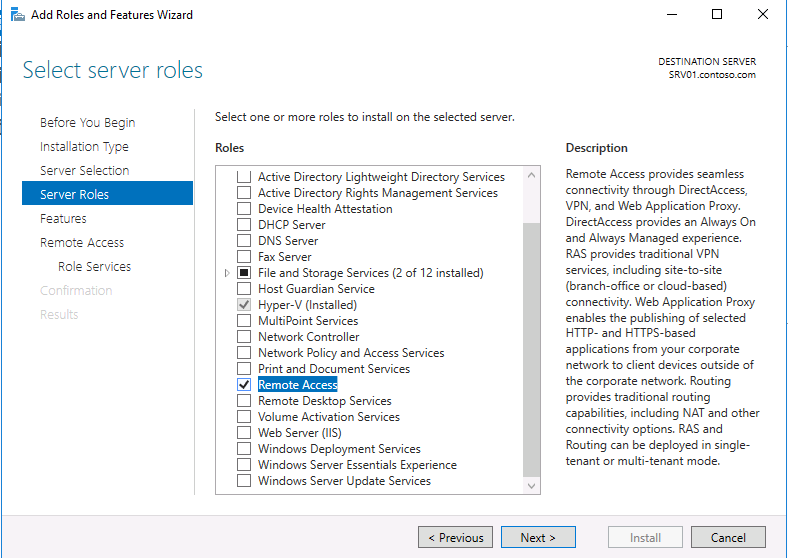
Итак, давайте начнем. Прежде всего нам нужно настроить роль удаленного доступа (Remote Access). Для этого в оснастке Server Manager запустите мастер добавления ролей и выберите роль Remote Access.
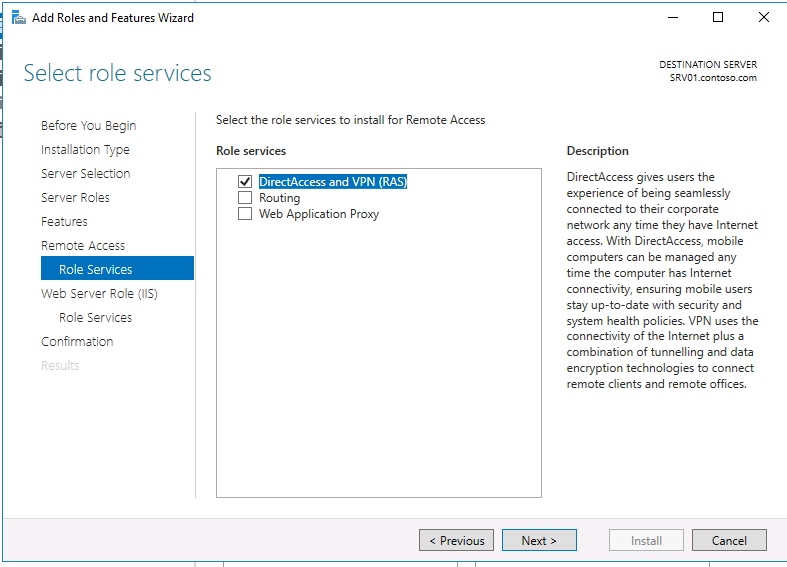
Затем, в списке служб роли выберите опцию «DirectAccess and VPN (RAS)«.
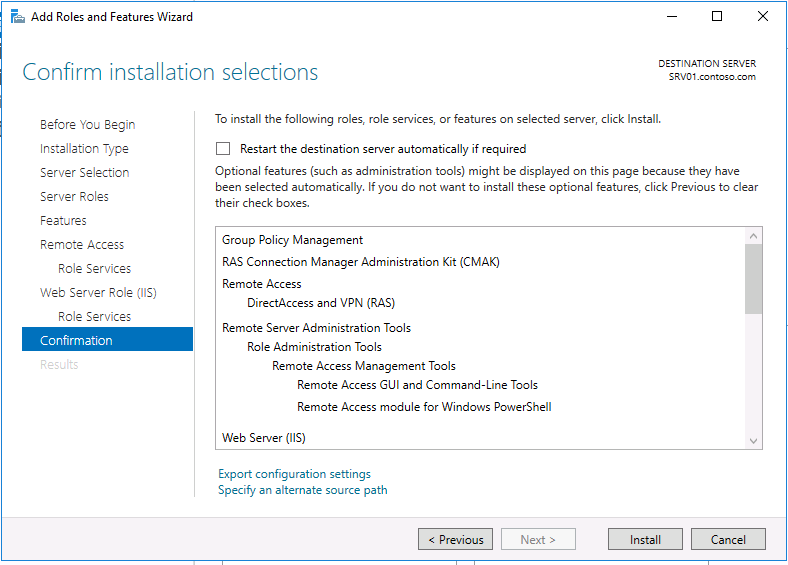
В дополнение к роли удаленного доступа и средствам управления, также автоматически будут установлены веб-сервер IIS и внутренняя база данных Windows (WID). Полный список установленных функций можно просмотреть в окончательном окне мастера, появляющимся перед тем, как вы подтвердите установку.
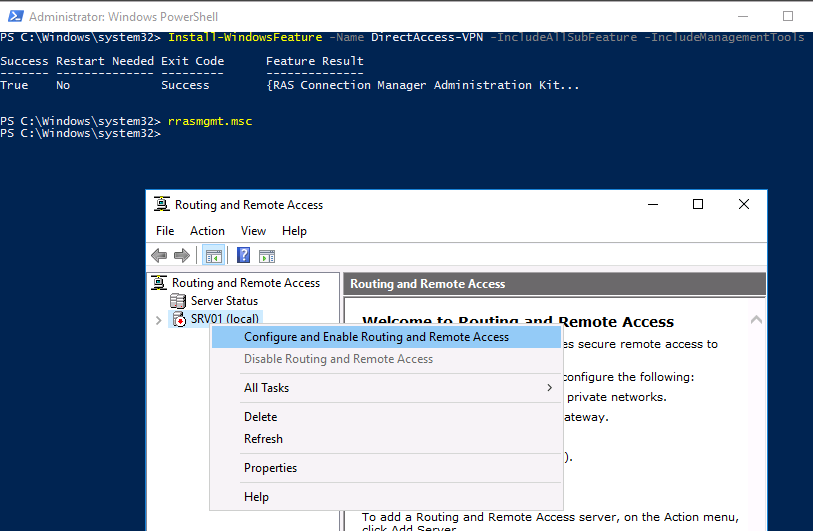
Установить роль Remote Access вместе со всеми необходимыми опциями можно всего одной командой PowerShell:
Install-WindowsFeature -Name DirectAccess-VPN -IncludeAllSubFeature -IncludeManagementTools
После установки роли вам необходимо включить и настроить службу с помощью оснастки «Маршрутизация и удаленный доступ» (Routing and Remote Access) — rrasmgmt.msc.
В оснастке RRAS выберите имя сервера, щелкните правой кнопкой мыши и выберите «Настроить и включить маршрутизацию и удаленный доступ» (Configure and Enable Routing and Remote Access) в открывшемся меню.
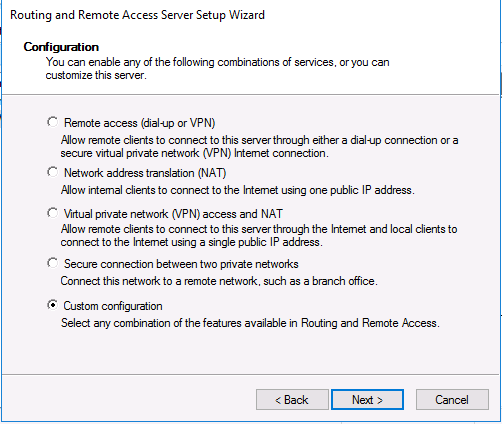
В мастере настройки выберите пункт Custom configuration.
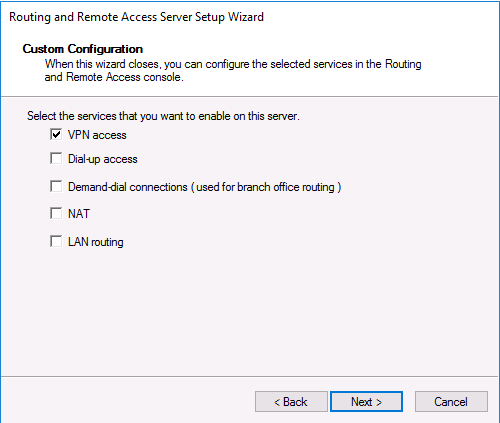
В списке служб выберите опцию VPN access.
После этого система предложит вам запустить службу Маршрутизации и удаленного доступа.
Служба VPN установлена и включена, теперь ее необходимо настроить. Снова откройте меню сервера и выберите пункт «Свойства».
Перейдите на вкладку IPv4. Если у вас нет DHCP-серверов в сети, вам необходимо указать диапазон IP-адресов, которые будут получать клиенты при подключении к VPN-серверу.

Кроме того, на вкладке Security вы можете настроить параметры безопасности — выбрать тип проверки подлинности, установить предварительный общий ключ для L2TP или выбрать сертификат для SSTP.
И еще пара нужных моментов, которые следует иметь в виду при настройке VPN-сервера.
Во-первых, вам нужно указать пользователей, которых будет разрешено подключаться к этому VPN-серверу. Для автономного сервера настройка выполняется локально, в оснастке «Управление компьютером». Чтобы запустить оснастку, вам нужно выполнить команду compmgmt.msc, затем перейдите в раздел «Локальные пользователи и группы». Затем вам нужно выбрать пользователя, открыть его свойства, а на вкладке «Dial-In» отметьте пункт «Разрешить доступ» (Allow access). Если компьютер является членом домена Active Directory, те же настройки можно сделать из оснастки ADUC.
Во-вторых, проверьте, открыты ли все необходимые порты на брандмауэре Windows и межсетевом экране, осуществляющим NAT-трансляцию. Теоретически, когда вы устанавливаете роль RRAS, соответствующие правила автоматически включаются, но на всякий случай проверьте их самостоятельно. Список разрешенных правил для входящего трафика:
- Routing and Remote Access (GRE-In) — протокол 47 (GRE)
- Routing and Remote Access (L2TP-In) – TCP/1701, UDP/500, UDP/4500 и протокол 50 (ESP)
- Routing and Remote Access (PPTP-In) — TCP/1723
- Secure Socket Tunneling protocol (SSTP-in) – TCP/443
Если ваш VPN-сервер находится за NAT, для корректной установки VPN-соединения по протоколу L2TP/ipsec, на стороне клиента необходимо в ветке HKEY_LOCAL_MACHINESYSTEMCurrentControlSetServicesPolicyAgent создать ключ с именем AssumeUDPEncapsulationContextOnSendRule и значением 2.
На этом все. Теперь, когда у вас имеется настроенный VPN-сервер, вы можете подключиться к нему с помощью VPN-клиента.

1
В Мастере добавления ролей и компонентов необходимо отметить галочкой Удаленный доступ и нажать Далее.

2
Переходим на вкладку Службы ролей и отмечаем галочкой DirectAccess и VPN (RAS).

3
В появившемся окне нажимаем кнопку Добавить компоненты.

4
После того как окно закрылось нажимаем Далее.

5
Выбираем пункт Подтверждение и нажимаем Установить.

6
После завершения установки закрываем окно мастера.

7
Заходим в раздел Маршрутизация и удаленный доступ выбираем пункт Настроить и включить маршрутизацию и удаленный доступ.

8
В появившемся мастере жмем Далее.

9
Выбираем Особая конфигурация.

10
Ставим галочку напротив пункта Доступ к виртуальной частной сети (VPN) и жмем Далее.

11
Завершаем работу мастера — жмем Готово.

12
Появится окно с предложением запустить службу. Выбираем Запустить службу.

13
Снова заходим в Маршрутизация и удаленный доступ и выбираем Свойства.

14
Добавляем интервал адресов для VPN соединения — переходим на вкладку IPv4 и жмем Добавить.

15
В появившемся окне заполняем диапазон и жмем ОК.

16
Готово. Сервер настроен. Для того чтобы удаленные пользователи смогли подключиться, разрешаем доступ в свойствах пользователей или групп на вкладке Входящие звонки.

В начало статьи
Не нашли ответа на свой вопрос?
Закажите звонок специалиста!
Закажите звонок специалиста!
Installing and configuring a VPN server using Windows Server 2016 is easy way. By following the guidance in this article, a VPN server can be implemented in just a few minutes.
VPN provides secure access to organizations’ internal data and applications to clients and devices that are using the Internet.
To properly implement and support a VPN environment within your organization, you must understand how to select a suitable tunnelling protocol, configure VPN authentication, and configure the server role to support your chosen configuration.
For this demo purposes, i will be using 2 VM, and 1 Windows 10 client VM which is all running in Hyper-V.
Lets get started VPN configuration.
01 – lets verify the network configuration for VPN Server. (Please Refer to the Pictures)
1 – VPN Server Require 2 NIC :
- Ethernet 1 : LAN
- Ethernet 2 : Internet

Ethernet 1 : LAN

Ethernet 2 : Internet
2 – Windows 10 Client.
- Require 1 NIC :
- Ethernet 1 : Internet

02 – Creating VPNUsers OU & User in Active Directory.
1 – Create a new OU – In the New Object – Organizational Unit dialog box, in the Name box, type VPNUsers, and then click OK.


2 – In the Active Directory Users and Computers console, expand Windows.ae, right-click VPNUsers OU, click New, and then click User.


3 – right-click user, Properties, Allow Access enabled for Remote Access to connect to your VPN Server. and Okay. (Please Refer to the Pictures)


03 – Installation
1 – open your Server Manager and click on Add Roles and Features.
2 – click on Next.

3 – Now select Role-based or feature-based installation option and click on Next.

4 – Now select desired server you’d like to install Routing and Remote Access on.

5 – From the Roles lists select Remote Access and click on Next.

6 – Click Next, no additional features required at this point.

7 – Just click on Next.

8 – In next tab you need to select DirectAccess and VPN (RAS), Click Add Features in the popup window.


9 – On confirmation page click Install to begin.

10 – After installation process is finished, click on Open the Getting Started Wizard.

11 – In this tab press Deploy VPN only.

04 – Configuration
1 – Right click on your server and choose Configure and Enable Routing and Remote Access.

2 – Click on Next.

3 – On the new wizard select Remote Access (dial-up or VPN).

4 – On the next page select VPN.

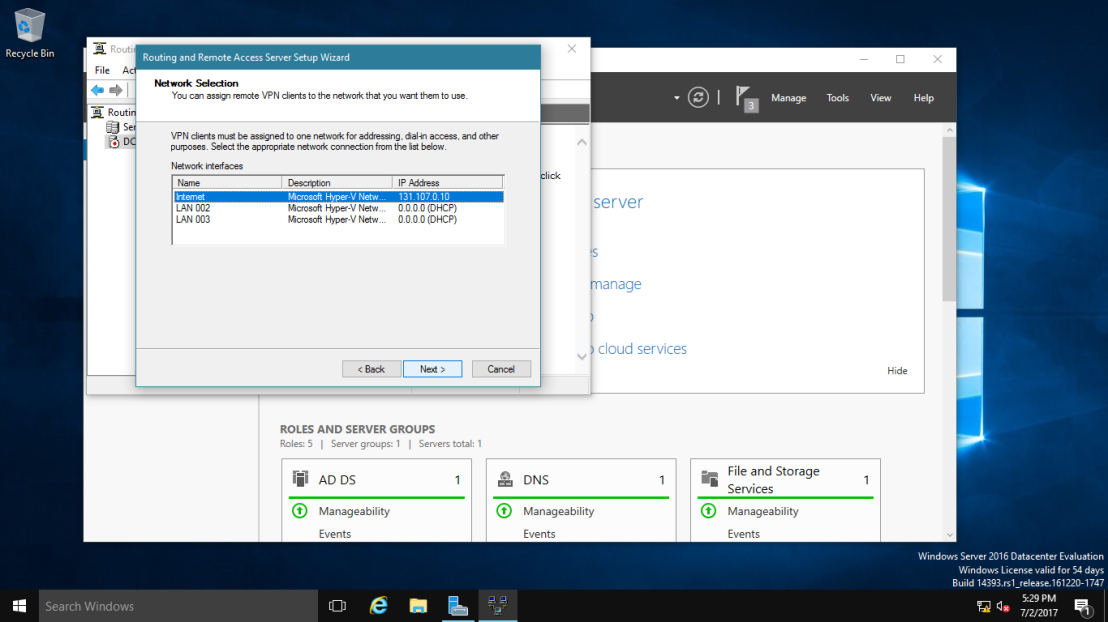
5 – Here select network adapter that connects your server to the Internet.

6 – Here select network adapter that connects your server to the VPN Clients.
7 – Here you can choose the method of distribution for IP addresses – via DHCP or manually. Select the second way.

8 – In this tab press New.

9 – In popup window specify range of IP addresses, press OK, return to previous tab and click on Next.

10 – In this tab you can choose the method of authentification. Select Routing and Remote Access.

11 – Press Finish. and Click Okay, Now configuration is finished.


12 – Next, in the Routing and Remote Access console, expand DC-CLOUD, right-click ports, click Properties.

13 – Verify that 128 ports exist for SSTP, IKEv2, PPTP, and L2TP, then double-click WAN Miniport (SSTP). Maximum ports box, type 5, and then click OK, Routing and Remote Access message box, click Yes.

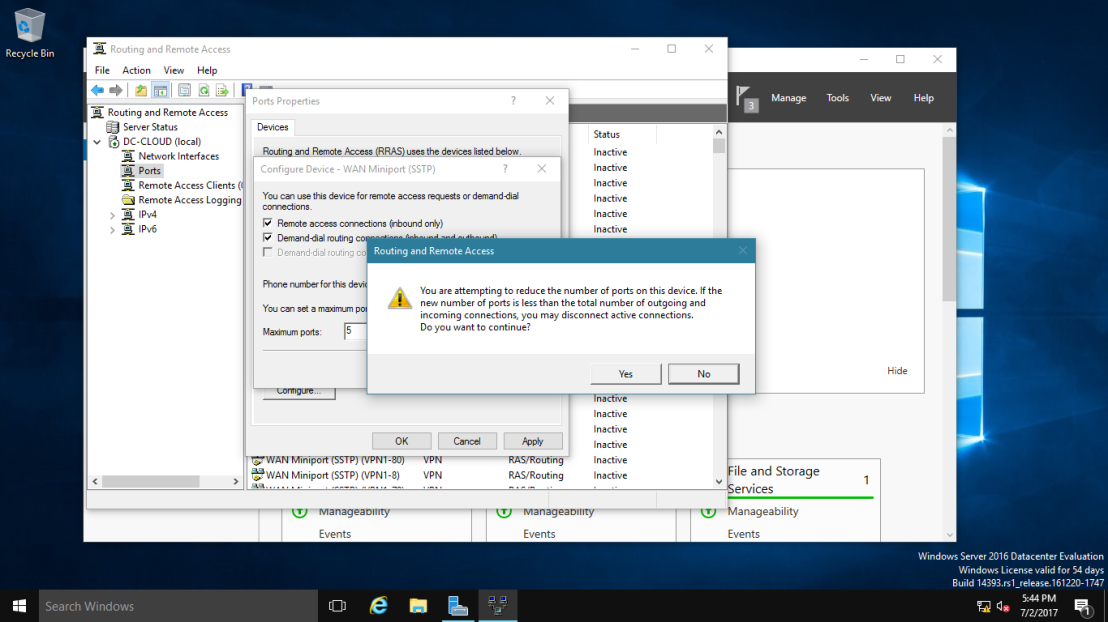
14 – Repeat the same step no:13 for IKEv2, PPTP, and L2TP, then click OK.

05 – Client Connectivity Testing
1 – On the Windows 10 client PC, open Network and Sharing Center, then click Set up a new connection or network.

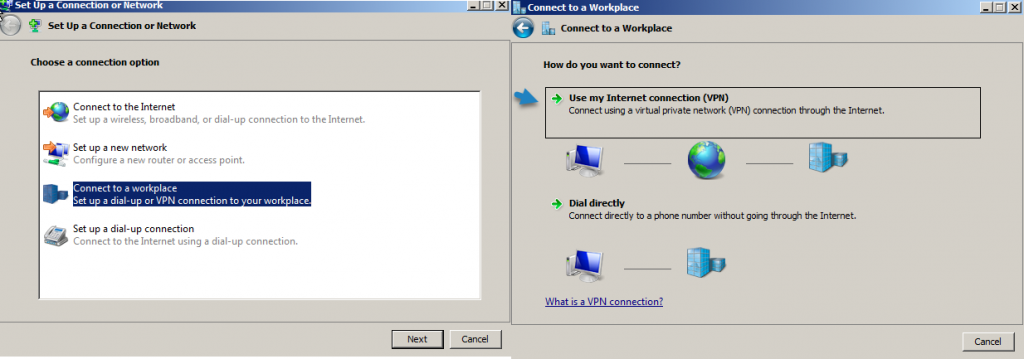
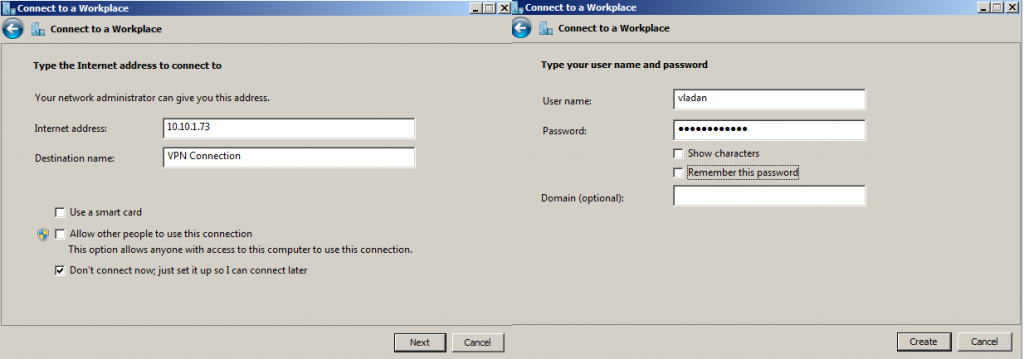
2 – Next, on the Choose a connection option interface, click Connect to a workplace, and then click Next.

3 – On the How do you want to connect? interface, click Use my Internet connection (VPN).

4 – On the Connect to a Workplace interface, click I’ll set up an Internet connection later.

5 – In the Internet address box, type 131.107.0.10 (DC-CLOUD VPN Server IP Address).
— In the Destination name box, type NewHelpTech VPN connection, select Allow other people to use this connection checkbox, and then click Create. —

6 – Next, right click NewHelpTech VPN connection, and then click Connect.


7 – In the sign-in dialog box, type the domain user from VPNUsers OU Name Sifad and box, type Password, and then click OK.

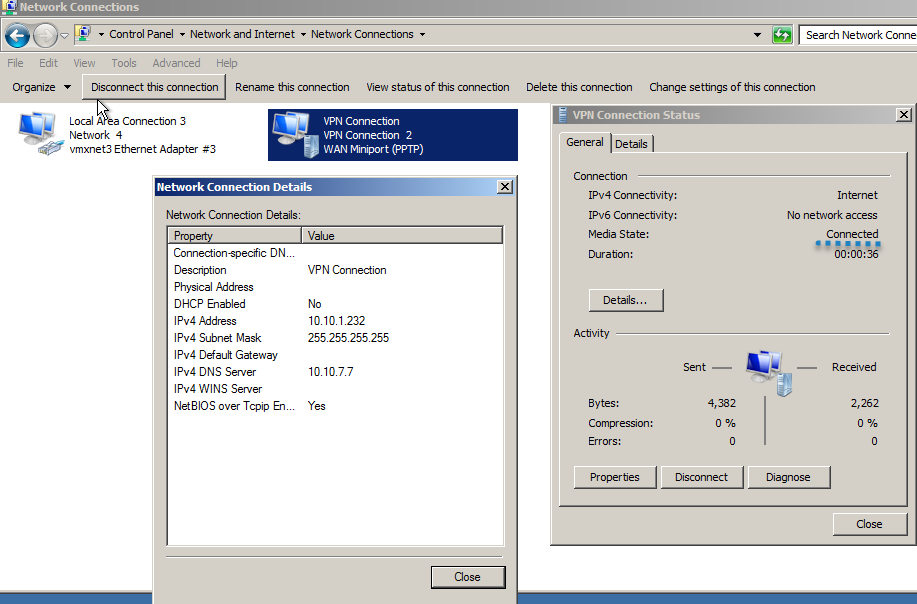
8 – Verify that you are connected to Windows by using a PPTP connection, right click NewHelpTech VPN connection, and then click Status.

 Orait, that all for now, we’ve connected to NewHelpTech VPN connection successfully.
Summary
Implementing a client-based VPN solution for secure remote access using Windows Server 2016 has many advantages over dedicated and proprietary security appliances. Windows-based VPN servers are easy to manage, cost effective, and offer greater deployment flexibility. However, at this point additional configuration is required to properly secure incoming connections.
that’s all for now.., any Doubts type a commend.. 🙂
This post shows you how you can install a VPN Server on Windows Server 2016 Step-by-Step. It shows you how you can easily setup a VPN server for a small environment or for a hosted server scenario. This blog post covers how you can use Windows Server VPN.
This is definitely not a guide for an enterprise deployment, if you are thinking about a enterprise deployment you should definitely have a look at Direct Access.
I already did similar blog posts for Windows Server 2008 R2, Windows Server 2012 and Windows Server 2012 R2.
- How to Install VPN on Windows Server 2012 R2
- How to Install VPN on Windows Server 2012
- How to Install VPN on Windows Server 2008 R2
- How to Install VPN on Windows Server 2019
You can simply follow this step by step guide:
Install the Windows Server VPN Role
First install the “Remote Access” via Server Manager or Windows PowerShell.
Select the “DirectAccess and VPN (RAS)” role services and click next.
On the next steps just use the default settings. After that you can have a look at the overview screen and install the role.
After the features are installed, which can take a while to finish you see the link for the Getting Started Wizard. Click on “Open the Getting Started Wizard“.
Configure Windows Server VPN
This opens a new wizard which will help you to configure the server. On the first screen select “Deploy VPN only“.
This opens the Routing and Remote Access Management Console
Right click on the Server name and click on “Configure and Enable Routing and Remote Access“.
On the new wizard select “Custom configuration“.
Select “VPN Access“.
After you have click finish you can now start the Routing and Remote Access service.
If you have an other firewall between the internet and your Windows Server you have to open the following Firewall port sand forward them to your Windows Server:
For PPTP: 1723 TCP and Protocol 47 GRE (also known as PPTP Pass-through)
For L2TP over IPSEC: 1701 TCP and 500 UDP
For SSTP: 443 TCP
After the installation Users have to be enabled for Remote Access to connect to your VPN Server. On a standalone server this can be done in the Computer Management MMC, in a domain environment this can be done in the user properties of an Active Directory user.
If you don’t have a DHCP Server in your environment you have to add a static IP address pool. This is often needed if you have a single server hosted at a service provider. In the properties of your VPN server you can click on the IPv4 tab and enable and configure the “Static address pool”.
You now have to add a IP address from the same subnet as your static address pool to the network interface of your server, so users can access the server.
I hope this helps you to setup a VPN server in a small environment, lab or hosted server.
Tags: Direct Access, GRE, installation, L2TP, Microsoft, PPTP, RAS, Remote Access, routing, setup, SSTP, VPN, VPN Server, Windows, Windows Server, Windows Server 2016, Windows Server VPN Last modified: April 25, 2019
About the Author / Thomas Maurer

Thomas works as a Senior Cloud Advocate at Microsoft. He engages with the community and customers around the world to share his knowledge and collect feedback to improve the Azure cloud platform. Prior joining the Azure engineering team, Thomas was a Lead Architect and Microsoft MVP, to help architect, implement and promote Microsoft cloud technology.
If you want to know more about Thomas, check out his blog: www.thomasmaurer.ch and Twitter: www.twitter.com/thomasmaurer
I did previously setup during a few occasions, VPN access on Windows Server 2012 R2, but haven’t tested that on the newly released Windows Server 2016.
Remote access role is a VPN which protects the network connection or your remote connection from one side to another and protecting both sides from attacks or data sniffing as VPN protocol uses a tunnel inside of a standard data connection.

Conventional Disaster Recovery options for virtualized IT environments running on Microsoft Windows Server 2016
Learn from this video about:
- What you should prepare your IT environment for
- Storage Replica vs. Veeam Backup & Replication vs. Hyper-V Replica
- Demonstrating each disaster recovery site option in use
Free of Charge. No Registration.
Note: You’ll need to open a TCP port 1723 on your firewall as this port is used for the VPN access.
Also, I’d like to point out that this might not be a guide for enterprise deployment as there you’ll perhaps use a hardware VPN from your router or use a Direct Access feature which however relies on Internet Protocol version six (IPv6) technologies to establish client connections.
How to install VPN on Windows Server 2016 – The steps:
Install a Remote access role via the Add Roles and Features Wizard. Open Server Manager either locally on the server that will host the remote access role or on a computer that has Server Manager configured to connect to the server you’re deploying the role.
Then select Add Roles and Features Wizard from the Manage Menu. Click next on the before you begin page if it is displayed. Then select Role-Based or Feature-Based installation and click next.
On the Select Server Role page, scroll down and then select check box Remote Access. And then click next.

You’ll need to click two more times to get to the Remote access Role Services, where you’ll have to select Direct Access and VPN.
Accept the installation of sub-components, such as IIS… Accept all the defaults.
It will take some time to finish the installation of all components and sub-components.
Then click on the link Open the Getting Started Wizard to open the configuration wizard.
A new window will appear. You’ll need to click Deploy VPN only which will configure VPN by using the Routing and Remote Access console.
After you click on that part, you’ll open the Routing and Remote Access console. Right click on the Server name and click on Configure and Enable Routing and Remote Access.
Note: You can also launch this console via Control Panel > System and Security > Administrative tools.
Click Next and Select Custom Configuration.
So far, it’s been very simple. Let’s go and finish the configuration. All we need to do on the next screen is to tick the checkbox VPN access as we only want this feature to be active.

You’ll then have only one page which displays the summary of your selections. Confirm by clicking the Finish button. After few seconds, you’ll see a pop-up window asking you to start the Routing and Remote Access service. Click on Start Service button.
StarWind HyperConverged Appliance is a turnkey hyper-converged hardware platform fitted into a small two-node footprint. You don’t need anything else to build a budget-friendly new IT infrastructure or upgrade an existing one. All your systems will be “babysitted” by StarWind 24/7/365, troubleshooting any concerns without your involvement. Everything’s operated through a neat web UI. We’ll also migrate your workloads at no extra cost.
Dramatically decrease your CapEx, OpEx, and IT management costs, while visibly increasing return on investment (ROI) with hyperconvergence for ROBO, SMB & Edge from StarWind.
Next Step – Allow some users to connect to your newly configured VPN server
Usually this kind of small environment can be used for system administrators requiring access to remotely installed server, or for a small group of users within an organization. Depending on the architecture, the server can be part of a Microsoft Domain and have a central management of users through an Active Directory (AD) or it can be a standalone server which is just outside of any domain.
For the sake of simplicity, we consider this case, but in both cases, you’ll need to configure at least one user to access through the VPN and we’ll show you how.
So if you’re in “Workgroup” environment you can use a Computer Management Console (MMC), and if you’re in a domain environment this can be done in the user properties of an Active Directory user.
Usually, there is a DHCP server within a company environment. If that’s not the case, you’ll have to add a static address pool.
You can find the settings in the properties of your VPN server, where you can click on the IPv4 tab and enable and configure the Static address pool. Make sure to use the same subnet as your static address of your server.
Well, this is about.
From the client’s perspective. The client has to configure a VPN connection from the client’s end. So, depending on the Operating system the client is using, the setup might differ.
But basically, you’ll should set up new VPN connection.
And then
This will create a new connection within the network connection window there.
To finally get this screen after connecting and entering your password.
Wrap up: Windows Server VPN
This is the simplest way of doing it. It involves, however, opening the TCP 1723 port on the firewall. Note that another solution of remote access exists, but they usually involve installation of third party tools on the server side, and also on the client side.
You may want to avoid installing those tools on company servers and stick to traditional Built-in VPN from Microsoft, for remote administration.
You may also be limited with your budget as those tools usually cost money when used in the enterprise environment on server systems.
- How-to Create Bootable Windows Server 2016 USB Thumb Drive for Installing OS
- Why moving from Windows Server 2012 R2 to 2016 for Hyper-V
- Remove From My Forums
-
Вопрос
-
Всем привет. Проблема следующая: Имеется WIndows Server 2016, на нем развернул VPN(PPTP). В свойствах брандмауэра добавил входящие правила для порта 1723 и GRE. Учетной записи поставил галочку для входящих подключений.
Шлюзом в сети выступает роутер Tp-link 941. В межсетевом экране роутера поставил галочку чтобы пропускал PPTP трафик, также добавил порт 1723.(GRE там найти не могу). Когда пытаюсь подключиться к VPN из локальной сети, выдает
ошибку 720 «Не удается подключится к удаленному компьютеру. Возможно потребуется изменение сетевой настройки подключения», соответственно снаружи выдает тоже самое. DHCP сервер развернут там же на 2016 сервере.
В каком направлении дальше копать?
Ответы
-
-
Помечено в качестве ответа
4 июля 2019 г. 7:27
-
Помечено в качестве ответа
-
Приветствую.
Что в логах сервера и клиента?
Минуя роутер проблема воспроизводится?
В дополнение:
VPN сервер смотрит в интернет либо находится за пограничным роутером?
Как vpn сервер настраивали?
pptp не безопасен, вам стоит воспользоваться советом коллеги, и использовать более безопасные протоколы
Я не волшебник, я только учусь. MCTS, CCNA. Если Вам помог чей-либо ответ, пожалуйста, не забывайте нажать на кнопку «Отметить как ответ» или проголосовать за «полезное сообщение». Disclaimer: Мнения, высказанные здесь,
являются отражением моих личных взглядов, а не позиции работодателя. Вся информация предоставляется как есть, без каких-либо на то гарантий.
Блог IT Инженера,
Яндекс Дзен,
YouTube, GitHub.-
Изменено
Alexander RusinovModerator
9 июня 2019 г. 11:39
Дополнил -
Помечено в качестве ответа
Petko KrushevMicrosoft contingent staff, Moderator
4 июля 2019 г. 7:27
-
Изменено