I had already created an L2TP VPN server in Windows Server 2016 which worked great with my IOS devices but I found did not work so well with Windows 10. Therefore I created an SSTP VPN Server to access my devices via my home broadband connection (Sky Fibre). I found that this works perfectly with all my Windows 10 machines. The main difference between L2TP and SSTP is that for SSTP we need to use certificates. We will cover everything you need to get this up and running below.
Firstly build a Windows 2016 server, VM or physical it doesn’t really matter. I used a VM as I can spin it up/down and snapshot as needed. For notes on installing Windows 2016 Server please see here.
You then need to setup a Certificate Authority (Can be on the same server). Please follow this guide for step by step instructions on setting up a CA to use with your SSTP VPN.
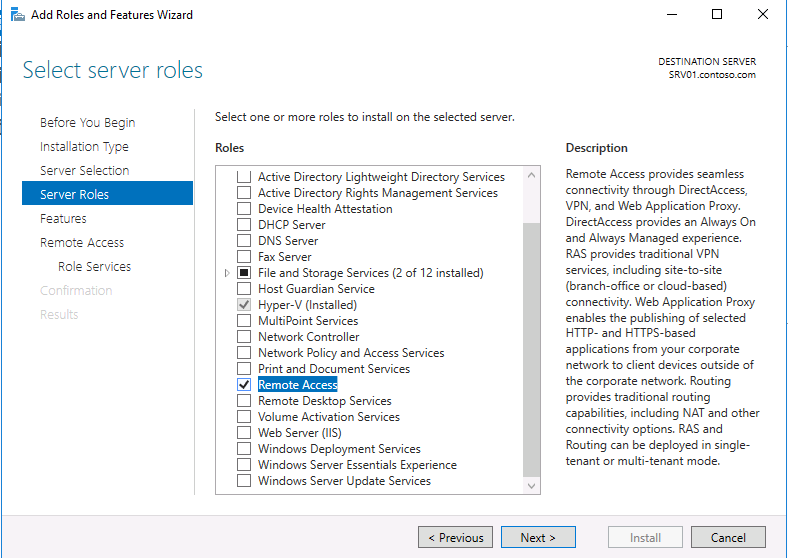
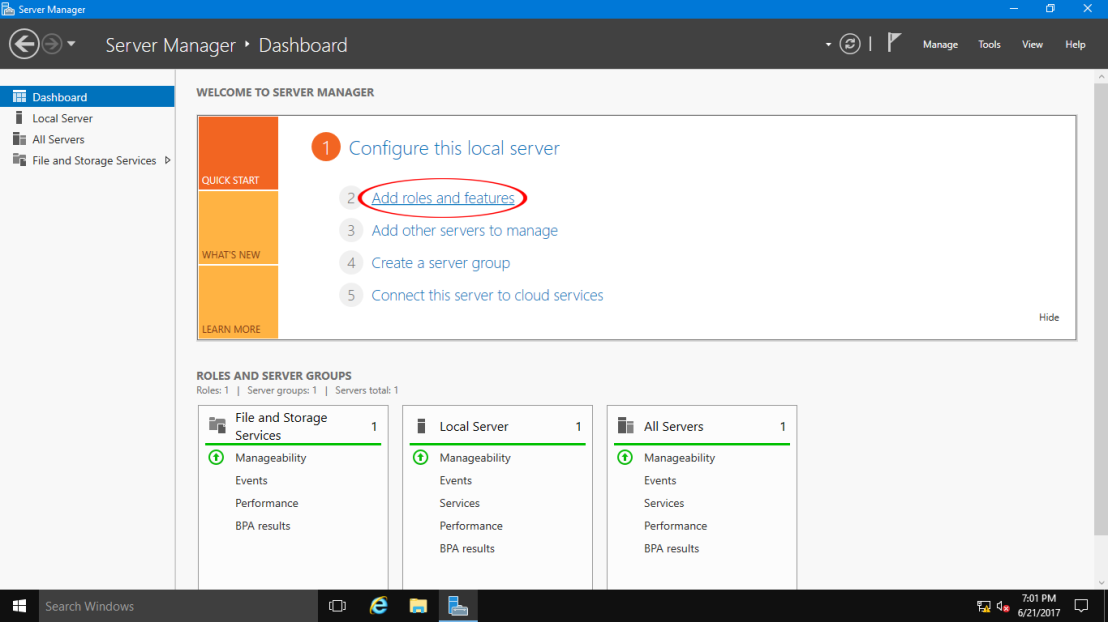
You then need to install the Remote Access role. To do this open Server Manager and start the Add Roles and Features wizard. Select the Remote Access Role and click Next.

Click Next again

Click Next again

Click Add Features and click Next

Click Next

Accept the Web Server Role service selections and click Next

Click Install

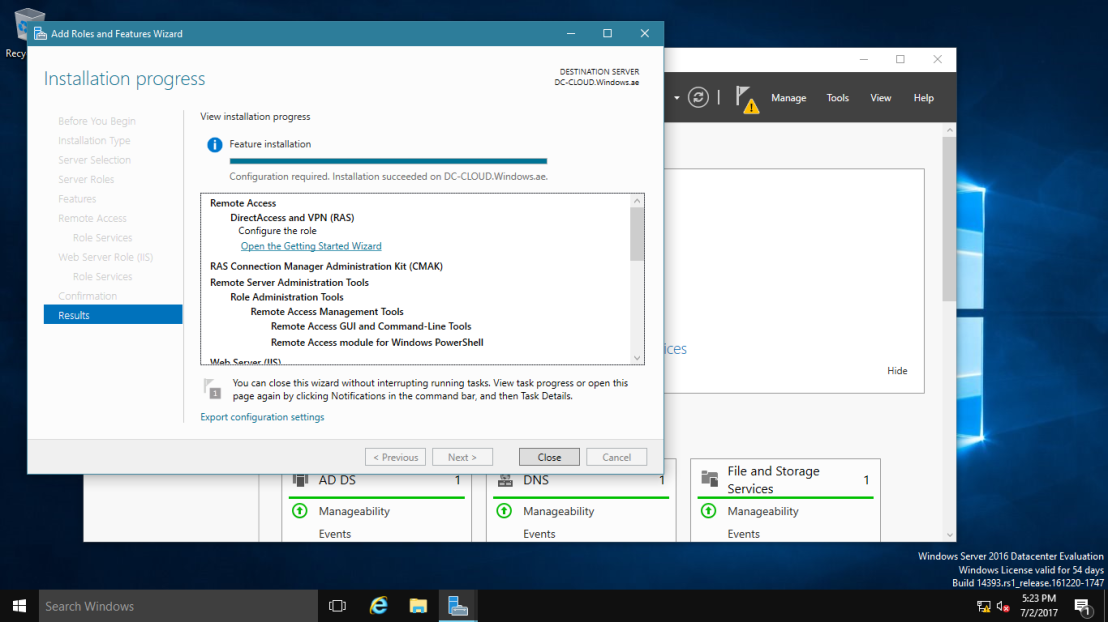
Wait for the installation to finish

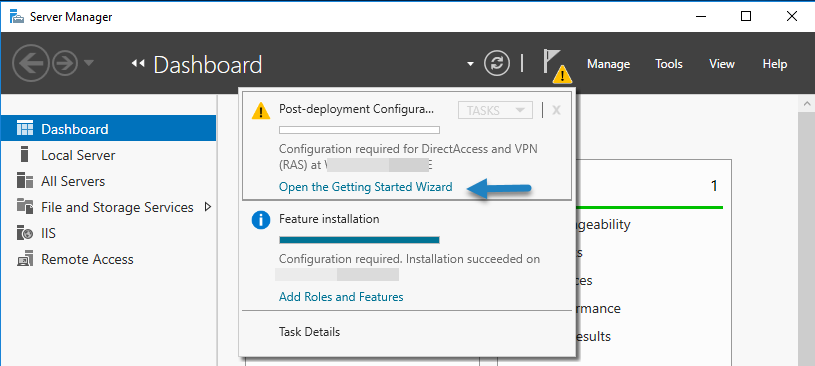
Once the role has installed click the Open he Getting Started Wizard option from the server manager

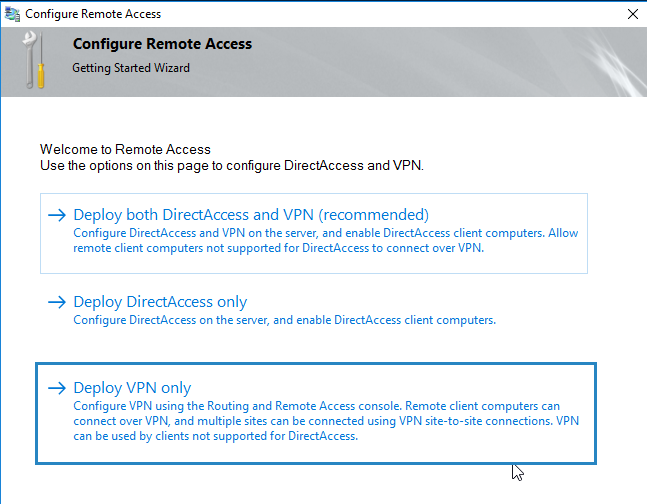
Select Deploy VPN Only

You now have access to the Routing and Remote Access console

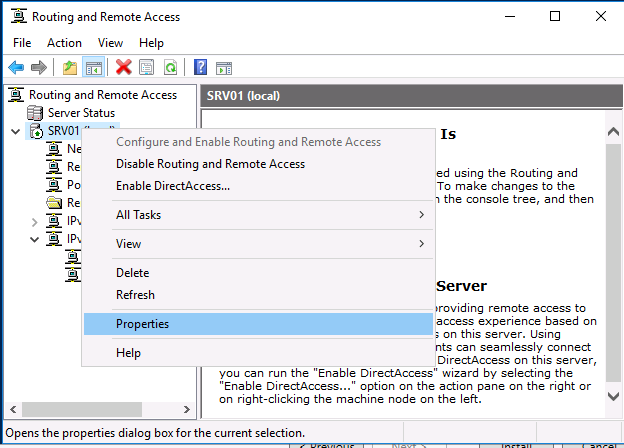
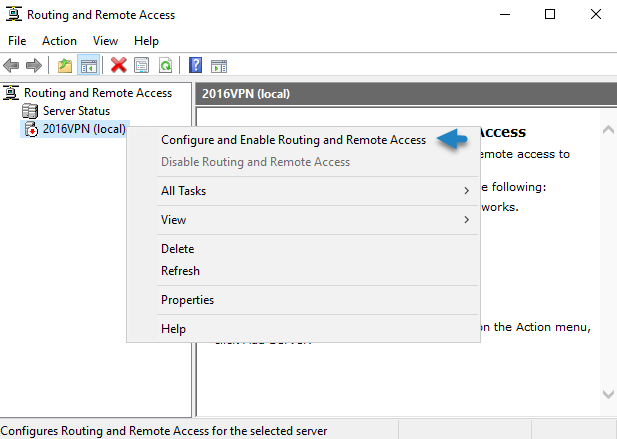
Right click on your server name and select Configure and Enable Routing and Remote Access

Click Next

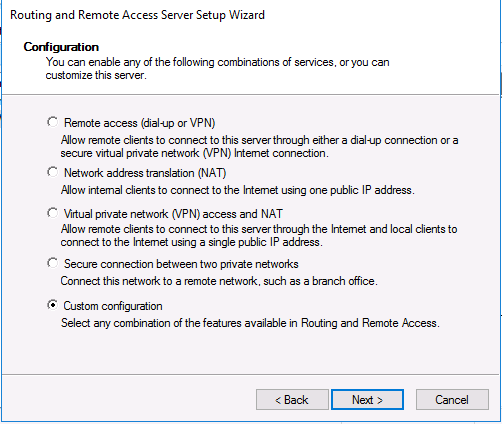
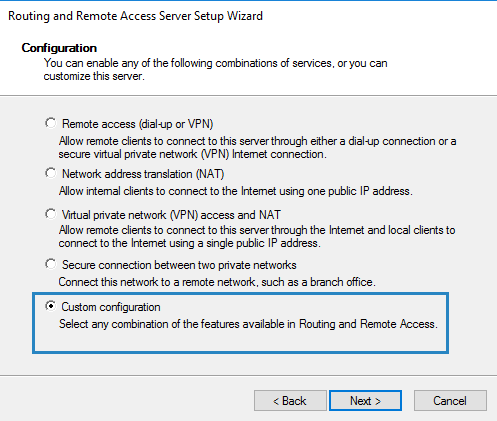
If you only have one network interface select Custom configuration and click Next

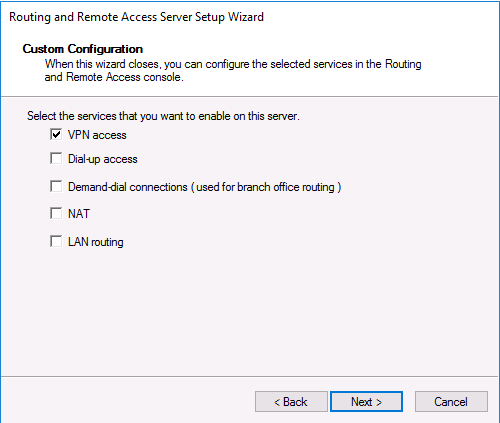
Select VPN Access and click Next
 .
.
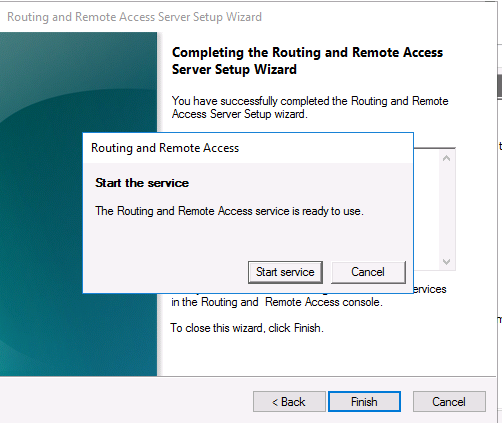
Click Finish

Click Start service

Wait for the service to start

Right click on your server name and click Properties. Leave the general tab as it is and click on Security

Ensure that you only have EAP and MS-CHAP v2 selected

We now need to issue a certificate to the VPN server to enable it to trust incoming SSTP connections. To do this (on the VPN server) click Start>Type certlm.msc to open the local machine certificate mmc.

Right click on Certificates under Personal and click All Tasks>Advanced Operations>Create Custom Request

Click Next and Next again

Accept the defaults and click Next

Expand Details> Click Properties and enter the Friendly name as the VPN server’s external DNS name. If you do not have one you can setup DuckDNS which is a free service as i did. Then click the Subject tab

Add both the Common Name and DNS names as the VPN server’s external DNS name. Then click the Extensions tab

Expand Extended Key Usage and add Client Authentication and Server Authentication, then click Ok and Next

Choose somewhere to save the certificate request and click Finish

Open the Certificate Authority mmc and right click on the server name. Then go to All Tasks> Submit new request. Open the request file that you just saved.

Click Pending Requests and you should see your certificate request in there. Right click on it and click Issue

You can now go to issued certificates and double click on your issued certificate. Click on the details tab and then click Copy to File

Accept the defaults and click Next. Then save the certificate and click Finish

Open the certlm.msc snap-in again and right click on Certificates under personal. Click import and import the certificate you just exported from the Certificate Authority console

Then go back to the Routing and Remote Access console properties and click the security tab. Under SSL Certificate Binding select the certificate that you just created

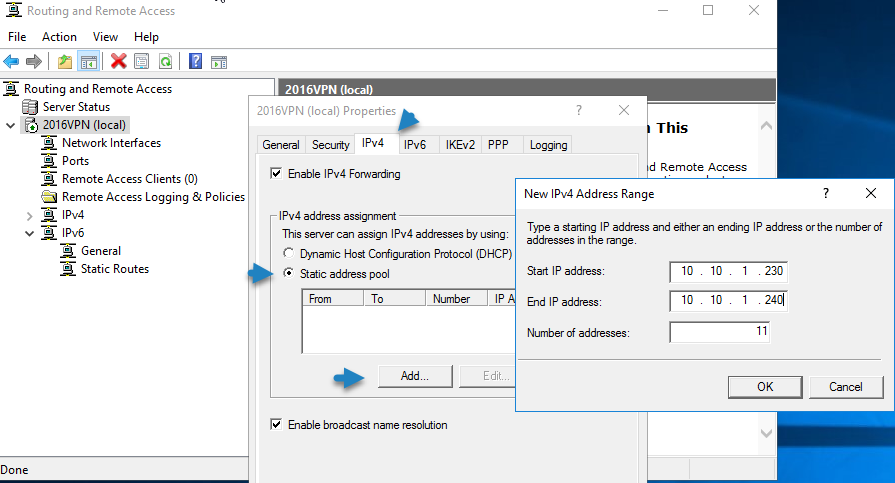
Click the IPv4 tab and select Static address pool. Enter a range of addresses to use for DHCP when on the VPN.

Select the Logging tab and check the Log additional Routing and Remote Access information box

Click OK and you will be prompted to restart the Routing and Remote Access Service, do this now.

Next we need to create a secure user account to access the VPN. Click Start>Run and type compmgmt.msc to access computer management. Right click on Users and click New User. Give the user a name and a strong password.

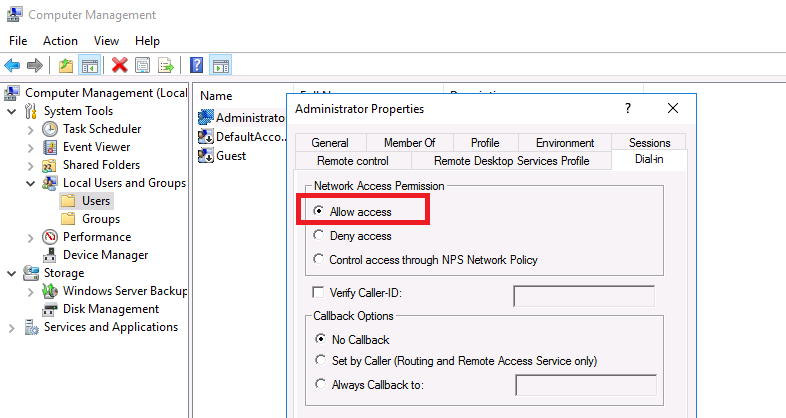
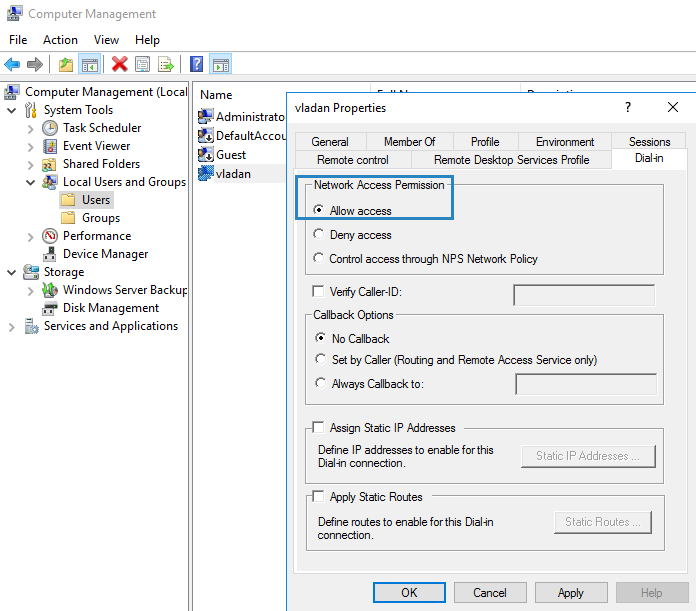
Right click on the user account and click Properties. Click the Dial-in tab and select Allow access, then click OK. If you want to use NPS to control access at this point select Control access through NPS Network Policy.

As I do not have a fixed external IP address for this server and am sitting behind a NAT firewall (Provided by my broadband supplier Sky – which I can’t change) I will need to forward ports from my router to the RRAS VPN server. To do this you will need to set up something like the below:

If you are forwarding all port 443 traffic to this server you may want to restrict access to IIS. You can do this by opening IIS Manager and selecting the default website. You can then click on IP Address and Domain Restrictions.

You can then add a Deny rule. I added 0.0.0.0 (0.0.0.0) as I wanted to restrict all access to IIS.

Next, export the root certificate from your certificate authority by opening the CA console, right clicking on the server name and going to Properties. Click the General tab and View Certificate. Then click details and export the certificate to a file.

Import this to Windows 10 machine in the certlm.msc snap-in but add it to Certifiates under Trusted Root Certification Authorities.
Next you need to create a certificate request on your Windows 10 machine.
To do this (on the Windows 10 client) click Start>Type certlm.msc to open the local machine certificate mmc.
Right click on Certificates under Personal and click All Tasks>Advanced Operations>Create Custom Request
Click Next and Next again
Accept the defaults and click Next
Expand Details> Click Properties and enter the Friendly name as the Windows 10 machine’s name. Then click the Subject tab

Add both the Common Name and DNS names as the VPN server’s external DNS name. Then click the Extensions tab

Expand Extended Key Usage and add Client Authentication then click Ok and Next

Choose somewhere to save the certificate request and click Finish
Open the Certificate Authority mmc and right click on the server name. Then go to All Tasks> Submit new request. Open the request file that you just saved.
Click Pending Requests and you should see your certificate request in there. Right click on it and click Issue
You can now go to issued certificates and double click on your issued certificate. Click on the details tab and then click Copy to File
Accept the defaults and click Next. Then save the certificate and click Finish
Open the certlm.msc snap-in again on the Windows 10 client and right click on Certificates under personal. Click import and import the certificate you just exported from the Certificate Authority console
In Windows 10 click Settings> Network & Internet> VPN and click add a VPN connection. Select Windows (built-in) as the VPN provider and give the connection a name of your choosing. Enter the external DNS name of your VPN server and choose the VPN type as SSTP.
You can then enter the credentials of the VPN user account that we created earlier, then save the connection.

Next open the regedit and go to the below key:
HKEY_LOCAL_MACHINESystemCurrentControlSetServicesSstpsvcParameters
Add a DWORD called NoCertRevocationCheck and set it to a value of 1
It should now connect without any issues.

В этом кратком руководстве мы опишем процесс установки и настройке VPN-сервера на базе Windows Server. Все действия, описанные в этой статье, были выполнены на Windows Server 2016, но эта инструкция подходит для любой современной серверной операционной системы Windows, начиная с Windows Server 2008 R2 и заканчивая Windows Server 2016.
Итак, давайте начнем. Прежде всего нам нужно настроить роль удаленного доступа (Remote Access). Для этого в оснастке Server Manager запустите мастер добавления ролей и выберите роль Remote Access.
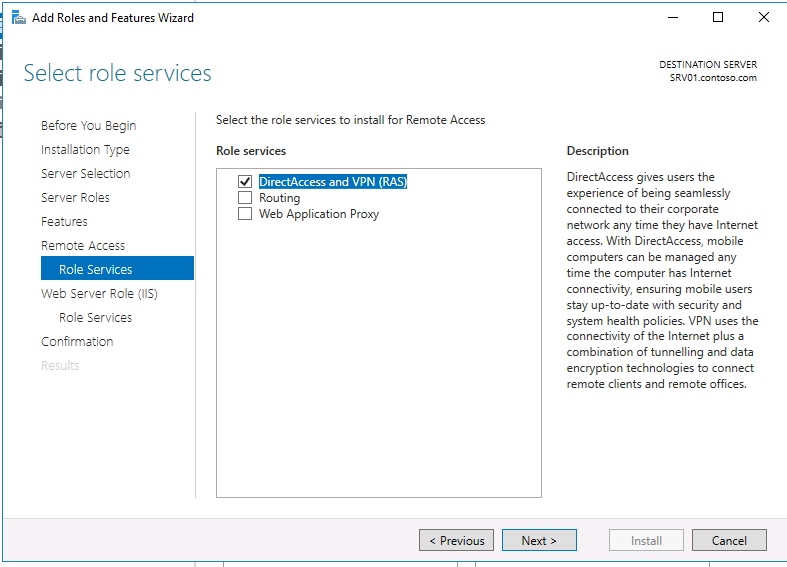
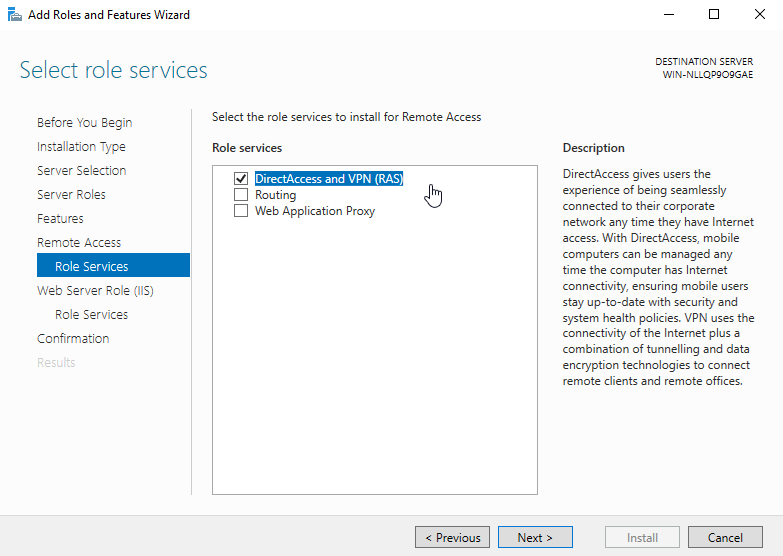
Затем, в списке служб роли выберите опцию «DirectAccess and VPN (RAS)«.
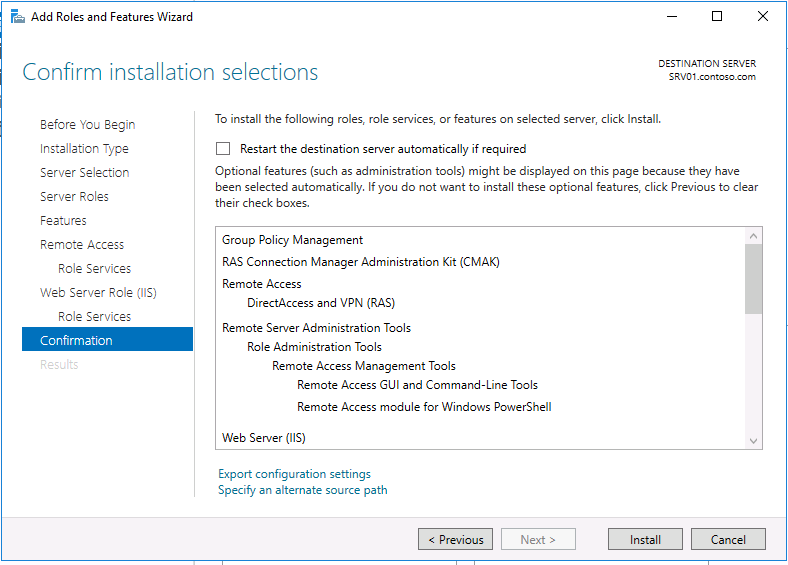
В дополнение к роли удаленного доступа и средствам управления, также автоматически будут установлены веб-сервер IIS и внутренняя база данных Windows (WID). Полный список установленных функций можно просмотреть в окончательном окне мастера, появляющимся перед тем, как вы подтвердите установку.
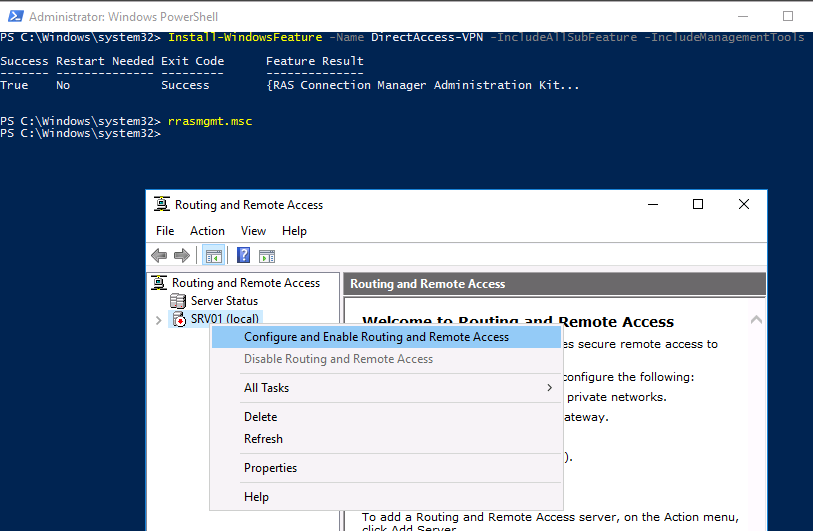
Установить роль Remote Access вместе со всеми необходимыми опциями можно всего одной командой PowerShell:
Install-WindowsFeature -Name DirectAccess-VPN -IncludeAllSubFeature -IncludeManagementTools
После установки роли вам необходимо включить и настроить службу с помощью оснастки «Маршрутизация и удаленный доступ» (Routing and Remote Access) — rrasmgmt.msc.
В оснастке RRAS выберите имя сервера, щелкните правой кнопкой мыши и выберите «Настроить и включить маршрутизацию и удаленный доступ» (Configure and Enable Routing and Remote Access) в открывшемся меню.
В мастере настройки выберите пункт Custom configuration.
В списке служб выберите опцию VPN access.
После этого система предложит вам запустить службу Маршрутизации и удаленного доступа.
Служба VPN установлена и включена, теперь ее необходимо настроить. Снова откройте меню сервера и выберите пункт «Свойства».
Перейдите на вкладку IPv4. Если у вас нет DHCP-серверов в сети, вам необходимо указать диапазон IP-адресов, которые будут получать клиенты при подключении к VPN-серверу.

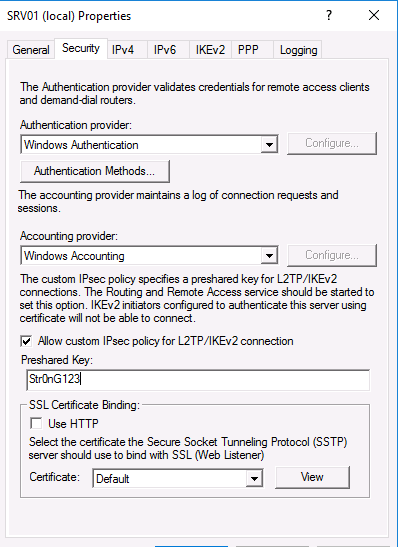
Кроме того, на вкладке Security вы можете настроить параметры безопасности — выбрать тип проверки подлинности, установить предварительный общий ключ для L2TP или выбрать сертификат для SSTP.
И еще пара нужных моментов, которые следует иметь в виду при настройке VPN-сервера.
Во-первых, вам нужно указать пользователей, которых будет разрешено подключаться к этому VPN-серверу. Для автономного сервера настройка выполняется локально, в оснастке «Управление компьютером». Чтобы запустить оснастку, вам нужно выполнить команду compmgmt.msc, затем перейдите в раздел «Локальные пользователи и группы». Затем вам нужно выбрать пользователя, открыть его свойства, а на вкладке «Dial-In» отметьте пункт «Разрешить доступ» (Allow access). Если компьютер является членом домена Active Directory, те же настройки можно сделать из оснастки ADUC.
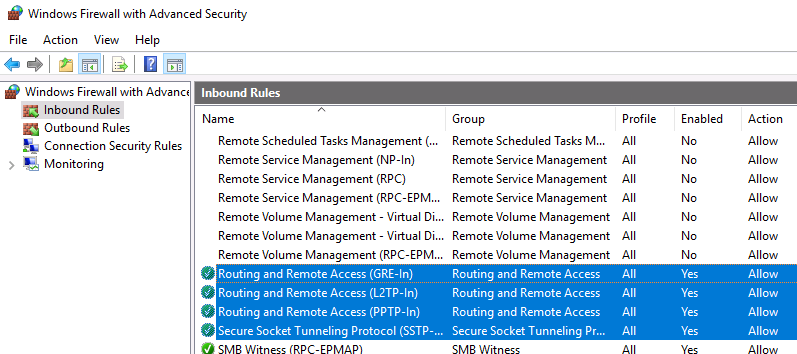
Во-вторых, проверьте, открыты ли все необходимые порты на брандмауэре Windows и межсетевом экране, осуществляющим NAT-трансляцию. Теоретически, когда вы устанавливаете роль RRAS, соответствующие правила автоматически включаются, но на всякий случай проверьте их самостоятельно. Список разрешенных правил для входящего трафика:
- Routing and Remote Access (GRE-In) — протокол 47 (GRE)
- Routing and Remote Access (L2TP-In) – TCP/1701, UDP/500, UDP/4500 и протокол 50 (ESP)
- Routing and Remote Access (PPTP-In) — TCP/1723
- Secure Socket Tunneling protocol (SSTP-in) – TCP/443
Если ваш VPN-сервер находится за NAT, для корректной установки VPN-соединения по протоколу L2TP/ipsec, на стороне клиента необходимо в ветке HKEY_LOCAL_MACHINESYSTEMCurrentControlSetServicesPolicyAgent создать ключ с именем AssumeUDPEncapsulationContextOnSendRule и значением 2.
На этом все. Теперь, когда у вас имеется настроенный VPN-сервер, вы можете подключиться к нему с помощью VPN-клиента.
This post shows you how you can install a VPN Server on Windows Server 2016 Step-by-Step. It shows you how you can easily setup a VPN server for a small environment or for a hosted server scenario. This blog post covers how you can use Windows Server VPN.
This is definitely not a guide for an enterprise deployment, if you are thinking about a enterprise deployment you should definitely have a look at Direct Access.
I already did similar blog posts for Windows Server 2008 R2, Windows Server 2012 and Windows Server 2012 R2.
- How to Install VPN on Windows Server 2012 R2
- How to Install VPN on Windows Server 2012
- How to Install VPN on Windows Server 2008 R2
- How to Install VPN on Windows Server 2019
You can simply follow this step by step guide:
Install the Windows Server VPN Role
First install the “Remote Access” via Server Manager or Windows PowerShell.
Select the “DirectAccess and VPN (RAS)” role services and click next.
On the next steps just use the default settings. After that you can have a look at the overview screen and install the role.
After the features are installed, which can take a while to finish you see the link for the Getting Started Wizard. Click on “Open the Getting Started Wizard“.
Configure Windows Server VPN
This opens a new wizard which will help you to configure the server. On the first screen select “Deploy VPN only“.
This opens the Routing and Remote Access Management Console
Right click on the Server name and click on “Configure and Enable Routing and Remote Access“.
On the new wizard select “Custom configuration“.
Select “VPN Access“.
After you have click finish you can now start the Routing and Remote Access service.
If you have an other firewall between the internet and your Windows Server you have to open the following Firewall port sand forward them to your Windows Server:
For PPTP: 1723 TCP and Protocol 47 GRE (also known as PPTP Pass-through)
For L2TP over IPSEC: 1701 TCP and 500 UDP
For SSTP: 443 TCP
After the installation Users have to be enabled for Remote Access to connect to your VPN Server. On a standalone server this can be done in the Computer Management MMC, in a domain environment this can be done in the user properties of an Active Directory user.
If you don’t have a DHCP Server in your environment you have to add a static IP address pool. This is often needed if you have a single server hosted at a service provider. In the properties of your VPN server you can click on the IPv4 tab and enable and configure the “Static address pool”.
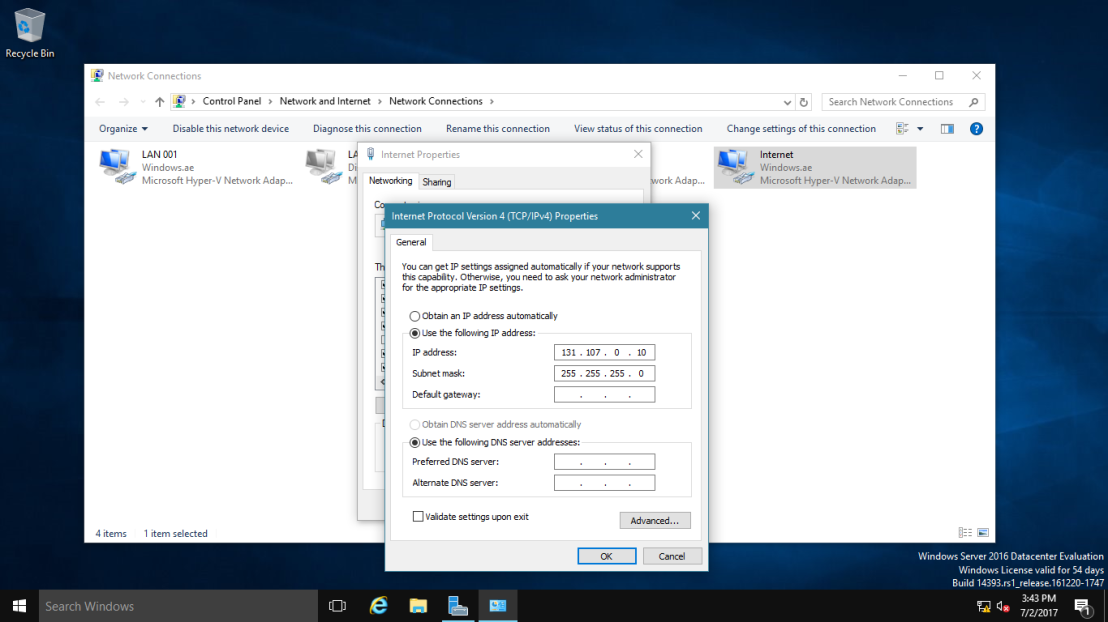
You now have to add a IP address from the same subnet as your static address pool to the network interface of your server, so users can access the server.
I hope this helps you to setup a VPN server in a small environment, lab or hosted server.
Tags: Direct Access, GRE, installation, L2TP, Microsoft, PPTP, RAS, Remote Access, routing, setup, SSTP, VPN, VPN Server, Windows, Windows Server, Windows Server 2016, Windows Server VPN Last modified: April 25, 2019
About the Author / Thomas Maurer

Thomas works as a Senior Cloud Advocate at Microsoft. He engages with the community and customers around the world to share his knowledge and collect feedback to improve the Azure cloud platform. Prior joining the Azure engineering team, Thomas was a Lead Architect and Microsoft MVP, to help architect, implement and promote Microsoft cloud technology.
If you want to know more about Thomas, check out his blog: www.thomasmaurer.ch and Twitter: www.twitter.com/thomasmaurer

1
В Мастере добавления ролей и компонентов необходимо отметить галочкой Удаленный доступ и нажать Далее.

2
Переходим на вкладку Службы ролей и отмечаем галочкой DirectAccess и VPN (RAS).

3
В появившемся окне нажимаем кнопку Добавить компоненты.

4
После того как окно закрылось нажимаем Далее.

5
Выбираем пункт Подтверждение и нажимаем Установить.

6
После завершения установки закрываем окно мастера.

7
Заходим в раздел Маршрутизация и удаленный доступ выбираем пункт Настроить и включить маршрутизацию и удаленный доступ.

8
В появившемся мастере жмем Далее.

9
Выбираем Особая конфигурация.

10
Ставим галочку напротив пункта Доступ к виртуальной частной сети (VPN) и жмем Далее.

11
Завершаем работу мастера — жмем Готово.

12
Появится окно с предложением запустить службу. Выбираем Запустить службу.

13
Снова заходим в Маршрутизация и удаленный доступ и выбираем Свойства.

14
Добавляем интервал адресов для VPN соединения — переходим на вкладку IPv4 и жмем Добавить.

15
В появившемся окне заполняем диапазон и жмем ОК.

16
Готово. Сервер настроен. Для того чтобы удаленные пользователи смогли подключиться, разрешаем доступ в свойствах пользователей или групп на вкладке Входящие звонки.

В начало статьи
Не нашли ответа на свой вопрос?
Закажите звонок специалиста!
Закажите звонок специалиста!
Installing and configuring a VPN server using Windows Server 2016 is easy way. By following the guidance in this article, a VPN server can be implemented in just a few minutes.
VPN provides secure access to organizations’ internal data and applications to clients and devices that are using the Internet.
To properly implement and support a VPN environment within your organization, you must understand how to select a suitable tunnelling protocol, configure VPN authentication, and configure the server role to support your chosen configuration.
For this demo purposes, i will be using 2 VM, and 1 Windows 10 client VM which is all running in Hyper-V.
Lets get started VPN configuration.
01 – lets verify the network configuration for VPN Server. (Please Refer to the Pictures)
1 – VPN Server Require 2 NIC :
- Ethernet 1 : LAN
- Ethernet 2 : Internet

Ethernet 1 : LAN

Ethernet 2 : Internet
2 – Windows 10 Client.
- Require 1 NIC :
- Ethernet 1 : Internet

02 – Creating VPNUsers OU & User in Active Directory.
1 – Create a new OU – In the New Object – Organizational Unit dialog box, in the Name box, type VPNUsers, and then click OK.


2 – In the Active Directory Users and Computers console, expand Windows.ae, right-click VPNUsers OU, click New, and then click User.


3 – right-click user, Properties, Allow Access enabled for Remote Access to connect to your VPN Server. and Okay. (Please Refer to the Pictures)


03 – Installation
1 – open your Server Manager and click on Add Roles and Features.
2 – click on Next.

3 – Now select Role-based or feature-based installation option and click on Next.

4 – Now select desired server you’d like to install Routing and Remote Access on.

5 – From the Roles lists select Remote Access and click on Next.

6 – Click Next, no additional features required at this point.

7 – Just click on Next.

8 – In next tab you need to select DirectAccess and VPN (RAS), Click Add Features in the popup window.


9 – On confirmation page click Install to begin.

10 – After installation process is finished, click on Open the Getting Started Wizard.

11 – In this tab press Deploy VPN only.

04 – Configuration
1 – Right click on your server and choose Configure and Enable Routing and Remote Access.

2 – Click on Next.

3 – On the new wizard select Remote Access (dial-up or VPN).

4 – On the next page select VPN.

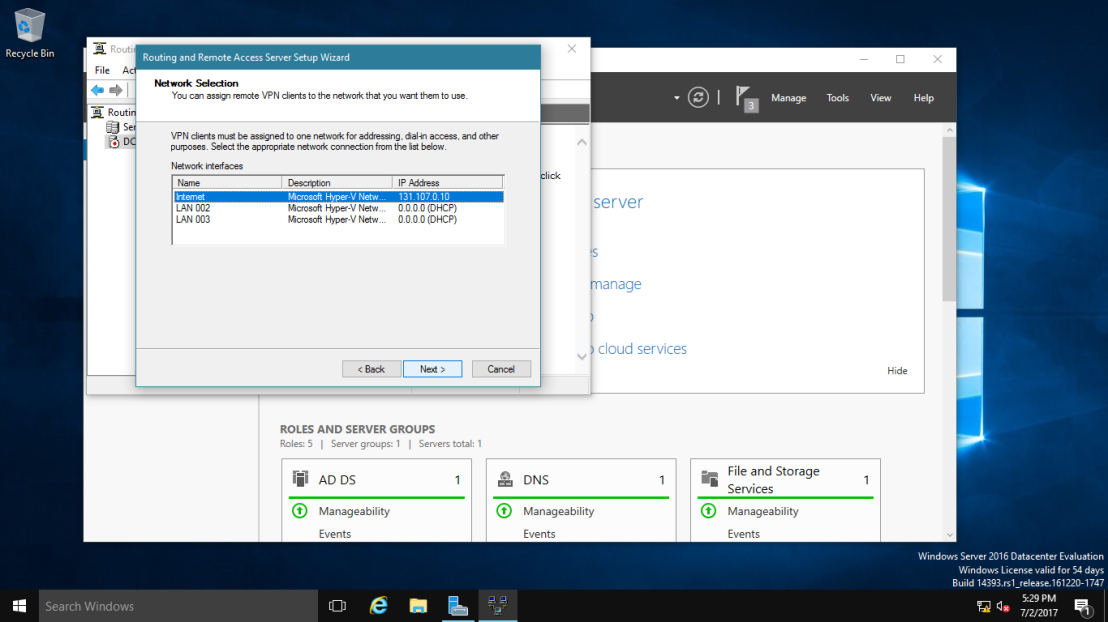
5 – Here select network adapter that connects your server to the Internet.

6 – Here select network adapter that connects your server to the VPN Clients.
7 – Here you can choose the method of distribution for IP addresses – via DHCP or manually. Select the second way.

8 – In this tab press New.

9 – In popup window specify range of IP addresses, press OK, return to previous tab and click on Next.

10 – In this tab you can choose the method of authentification. Select Routing and Remote Access.

11 – Press Finish. and Click Okay, Now configuration is finished.


12 – Next, in the Routing and Remote Access console, expand DC-CLOUD, right-click ports, click Properties.

13 – Verify that 128 ports exist for SSTP, IKEv2, PPTP, and L2TP, then double-click WAN Miniport (SSTP). Maximum ports box, type 5, and then click OK, Routing and Remote Access message box, click Yes.

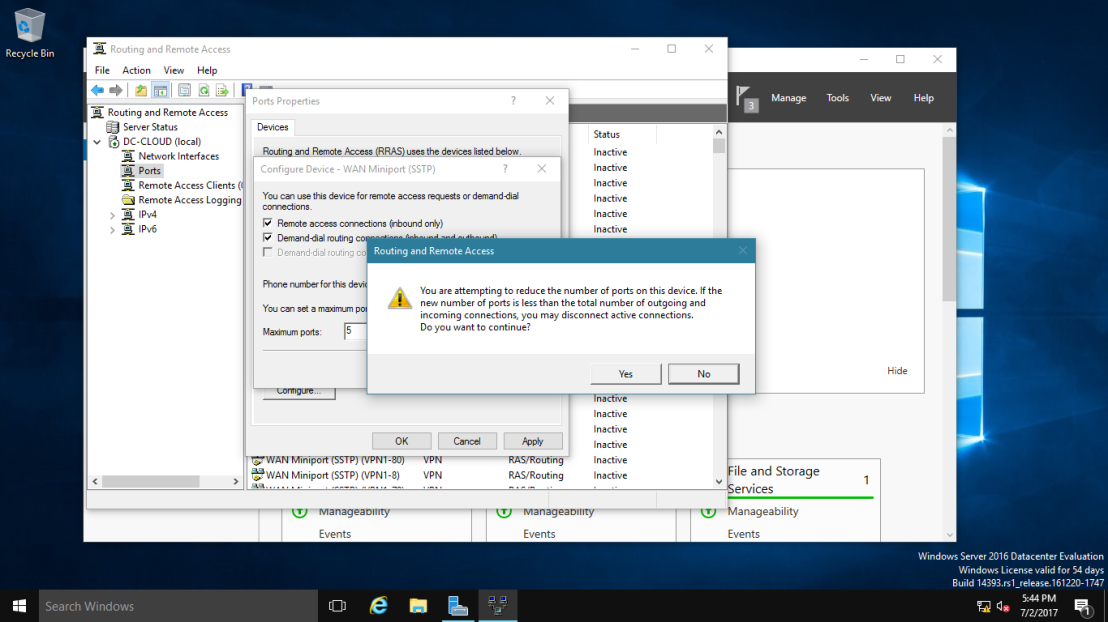
14 – Repeat the same step no:13 for IKEv2, PPTP, and L2TP, then click OK.

05 – Client Connectivity Testing
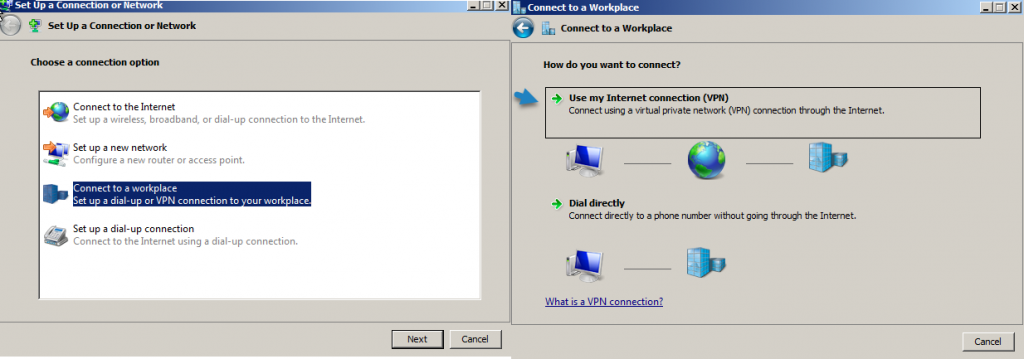
1 – On the Windows 10 client PC, open Network and Sharing Center, then click Set up a new connection or network.

2 – Next, on the Choose a connection option interface, click Connect to a workplace, and then click Next.

3 – On the How do you want to connect? interface, click Use my Internet connection (VPN).

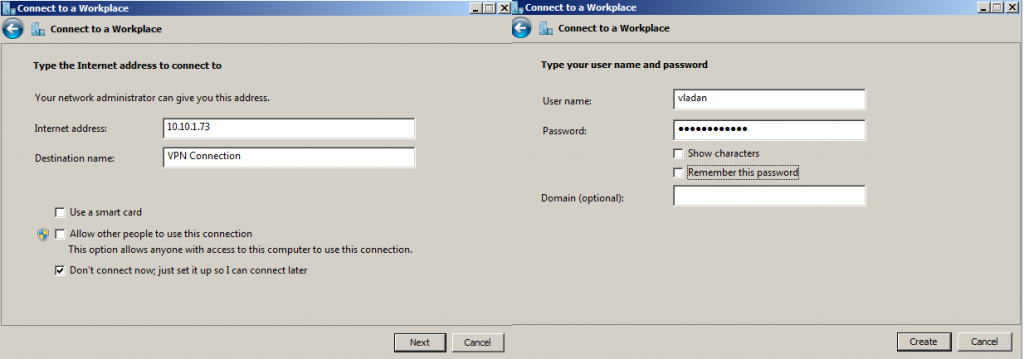
4 – On the Connect to a Workplace interface, click I’ll set up an Internet connection later.

5 – In the Internet address box, type 131.107.0.10 (DC-CLOUD VPN Server IP Address).
— In the Destination name box, type NewHelpTech VPN connection, select Allow other people to use this connection checkbox, and then click Create. —

6 – Next, right click NewHelpTech VPN connection, and then click Connect.


7 – In the sign-in dialog box, type the domain user from VPNUsers OU Name Sifad and box, type Password, and then click OK.

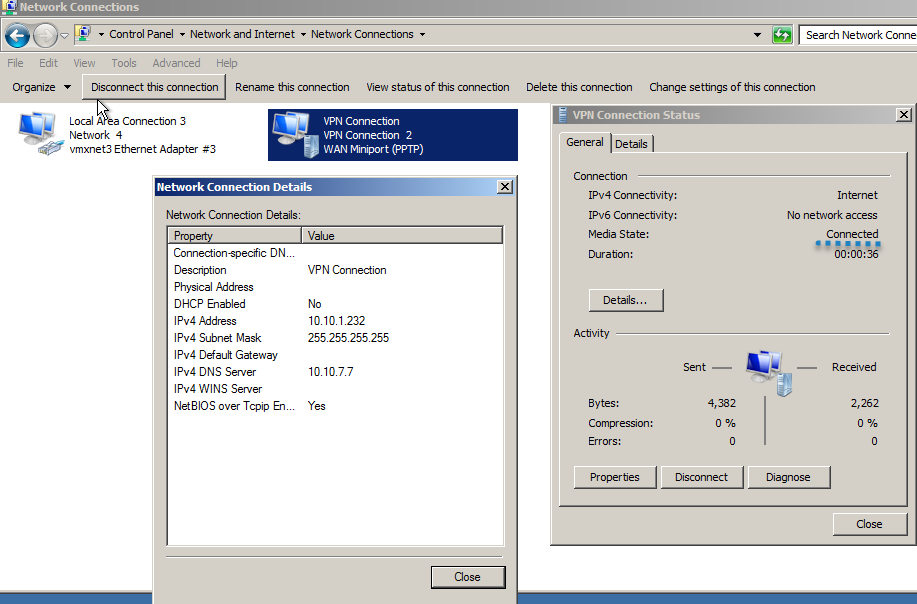
8 – Verify that you are connected to Windows by using a PPTP connection, right click NewHelpTech VPN connection, and then click Status.

 Orait, that all for now, we’ve connected to NewHelpTech VPN connection successfully.
Summary
Implementing a client-based VPN solution for secure remote access using Windows Server 2016 has many advantages over dedicated and proprietary security appliances. Windows-based VPN servers are easy to manage, cost effective, and offer greater deployment flexibility. However, at this point additional configuration is required to properly secure incoming connections.
that’s all for now.., any Doubts type a commend.. 🙂
This video follows on from our last video on how to setup a root CA with OCSP. In this video we show you how to use your self-signed ROOT CA and then your VPN certificate to setup a maximum encryption SSTP or IKEv2 Virtual Private Network (VPN) on Windows Server 2016. This should also work on earlier versions of Windows Server.
Transcript (machine generated so it contains errors)
1. 00:00:00:03 / 00:00:05:56 - in our last video we showed you how to
2. 00:00:02:66 / 00:00:09:77 - set up a certificate authority with the
3. 00:00:05:56 / 00:00:13:41 - OCSP service that basically checks to
4. 00:00:09:77 / 00:00:16:16 - ensure that certificates issued by your
5. 00:00:13:41 / 00:00:21:75 - CA certificate authority are still valid
6. 00:00:16:17 / 00:00:24:90 - etc and that was a lengthy process that
7. 00:00:21:75 / 00:00:29:49 - ones there so basically if you're just
8. 00:00:24:89 / 00:00:35:25 - trying to setup your VPN with SSCP or I
9. 00:00:29:48 / 00:00:37:79 - ke version 2 etc and you've just come to
10. 00:00:35:25 / 00:00:40:28 - this video we suggest that you actually
11. 00:00:37:79 / 00:00:43:01 - go to step 1 which is the previous video
12. 00:00:40:28 / 00:00:46:92 - and in the description we should have
13. 00:00:43:02 / 00:00:49:71 - the link for the previous video ok
14. 00:00:46:92 / 00:00:54:60 - please watch that follow that first set
15. 00:00:49:71 / 00:00:58:17 - up your CA set up your OCSP and then now
16. 00:00:54:60 / 00:01:00:87 - it's quite simple okay so with all the
17. 00:00:58:17 / 00:01:03:89 - previous setup having been done what
18. 00:01:00:86 / 00:01:06:73 - we're trying to do is create a VPN okay
19. 00:01:03:89 / 00:01:10:20 - so it's a virtual private network okay
20. 00:01:06:73 / 00:01:13:85 - where you're able to connect one PC or
21. 00:01:10:20 / 00:01:16:65 - lots of PC's to your server ok in a
22. 00:01:13:85 / 00:01:20:96 - corporate environment under a secure
23. 00:01:16:65 / 00:01:23:18 - encrypted system so you could be working
24. 00:01:20:96 / 00:01:27:00 - from home for example connecting into
25. 00:01:23:18 / 00:01:29:25 - your work server doing all the work that
26. 00:01:27:00 / 00:01:32:67 - you need to do and it's all done by an
27. 00:01:29:25 / 00:01:36:86 - encrypted internet connection using this
28. 00:01:32:67 / 00:01:38:60 - VPN service ok now it's actually quite
29. 00:01:36:86 / 00:01:42:54 - simple how to set it up once you've got
30. 00:01:38:60 / 00:01:46:22 - your previous certificate thing sorted
31. 00:01:42:54 / 00:01:48:11 - out what we need to do is we'll have
32. 00:01:46:22 / 00:01:49:61 - server manager here that basically if
33. 00:01:48:11 / 00:01:51:68 - you get want to get to Adi just click
34. 00:01:49:61 / 00:01:56:93 - over there server manager but we also
35. 00:01:51:68 / 00:02:01:06 - need to now create that VPN certificate
36. 00:01:56:93 / 00:02:08:40 - so I'll show you how MMC
37. 00:02:01:06 / 00:02:10:29 - enter in there and then we add ok
38. 00:02:08:40 / 00:02:13:41 - the bigger templates we need that one
39. 00:02:10:30 / 00:02:15:70 - okay certificates we'll need that one
40. 00:02:13:41 / 00:02:20:19 - and make sure it's computer account
41. 00:02:15:69 / 00:02:22:86 - click Next and finish and then its
42. 00:02:20:19 / 00:02:25:20 - certificate authority we have that one
43. 00:02:22:87 / 00:02:29:98 - in their local computer that's fine
44. 00:02:25:21 / 00:02:33:55 - click finish click OK now we need to
45. 00:02:29:97 / 00:02:37:68 - create that VPN certificate let's just
46. 00:02:33:55 / 00:02:42:52 - call it that ok and we go to the video
47. 00:02:37:68 / 00:02:44:94 - templates double click on that and it
48. 00:02:42:52 / 00:02:47:40 - literally is this certificate with a
49. 00:02:44:94 / 00:02:50:25 - little bit extra so rather than
50. 00:02:47:40 / 00:02:52:44 - modifying this template let's make a
51. 00:02:50:25 / 00:02:57:57 - copy of it first duplicate the template
52. 00:02:52:44 / 00:03:03:29 - and we'll give it a name let's do the
53. 00:02:57:58 / 00:03:06:79 - words like gun general let's call it VPN
54. 00:03:03:30 / 00:03:08:62 - cert ok make sense you can give it a
55. 00:03:06:78 / 00:03:10:38 - village sleep period you can change that
56. 00:03:08:62 / 00:03:12:58 - that's fine if you want to add it into
57. 00:03:10:38 / 00:03:15:60 - active directory you can click that box
58. 00:03:12:58 / 00:03:16:63 - but for what we're doing right now it's
59. 00:03:15:61 / 00:03:19:42 - all good
60. 00:03:16:62 / 00:03:23:01 - okay now compatibility if you want the
61. 00:03:19:41 / 00:03:25:68 - certificates to be readable usable by
62. 00:03:23:02 / 00:03:28:68 - older machines you can have that or you
63. 00:03:25:68 / 00:03:31:24 - can have it all going for the latest
64. 00:03:28:68 / 00:03:34:41 - version backwards compatibility gives
65. 00:03:31:24 / 00:03:37:51 - you a greater number of machines that
66. 00:03:34:41 / 00:03:41:53 - can connect simple as that ok general
67. 00:03:37:50 / 00:03:45:37 - done request handling we want to allow
68. 00:03:41:53 / 00:03:47:80 - private keys to be exported we have our
69. 00:03:45:37 / 00:03:51:06 - cryptography that is fine as you can see
70. 00:03:47:80 / 00:03:55:63 - it's got the CSP it's basically all
71. 00:03:51:06 / 00:03:56:10 - sorted key attestation nothing to add in
72. 00:03:55:62 / 00:03:59:34 - there
73. 00:03:56:11 / 00:04:01:30 - issuance requirements ok you could click
74. 00:03:59:34 / 00:04:03:57 - over there see a certificate manager
75. 00:04:01:30 / 00:04:06:25 - needs to approve the certificate etc
76. 00:04:03:58 / 00:04:07:95 - before it issued but we're trying to
77. 00:04:06:25 / 00:04:10:20 - keep it simple and straightforward as
78. 00:04:07:95 / 00:04:13:98 - possible so server nothing to add their
79. 00:04:10:20 / 00:04:17:28 - subject name this is actually because we
80. 00:04:13:98 / 00:04:20:62 - want to create certain certificates with
81. 00:04:17:28 / 00:04:21:96 - their own special names we're actually
82. 00:04:20:62 / 00:04:24:49 - gonna
83. 00:04:21:97 / 00:04:27:82 - change the setting rather than Active
84. 00:04:24:49 / 00:04:30:06 - Directory generating all the data for us
85. 00:04:27:81 / 00:04:32:05 - automatically which may be what we want
86. 00:04:30:06 / 00:04:34:56 - maybe not what we want we're actually
87. 00:04:32:05 / 00:04:39:12 - going to supply the data ourselves so
88. 00:04:34:56 / 00:04:42:12 - supply in the request okay let's just
89. 00:04:39:12 / 00:04:42:93 - see then to send in template starting to
90. 00:04:42:12 / 00:04:46:50 - write over there
91. 00:04:42:93 / 00:04:49:93 - extensions this is the most important we
92. 00:04:46:50 / 00:04:55:06 - are going to add in here server
93. 00:04:49:93 / 00:04:57:63 - authentication which is very important
94. 00:04:55:06 / 00:05:01:37 - server authentication okay
95. 00:04:57:63 / 00:05:04:95 - we're also going to add client
96. 00:05:01:37 / 00:05:08:58 - authentication so we've added those two
97. 00:05:04:95 / 00:05:14:13 - and where now we could make the
98. 00:05:08:58 / 00:05:20:73 - extensions critical we'll click OK we'll
99. 00:05:14:13 / 00:05:26:19 - click OK on that and now we have a VPN
100. 00:05:20:74 / 00:05:31:72 - cert template created our way now we
101. 00:05:26:19 / 00:05:33:93 - need to just go into not let's just make
102. 00:05:31:72 / 00:05:35:86 - sure we'll go everything running the way
103. 00:05:33:93 / 00:05:38:80 - we want it ok
104. 00:05:35:86 / 00:05:41:56 - in our certificate templates in the
105. 00:05:38:80 / 00:05:42:97 - certificate authority bit ok as you can
106. 00:05:41:56 / 00:05:46:68 - see it's not here
107. 00:05:42:97 / 00:05:50:14 - so we need to bring it in let's click
108. 00:05:46:68 / 00:05:55:38 - new certificate template to issue find
109. 00:05:50:13 / 00:05:58:59 - our VPN cert click ok so now that's part
110. 00:05:55:38 / 00:06:02:25 - of our certificates that we can issue
111. 00:05:58:60 / 00:06:07:62 - you can minimize that for now and in
112. 00:06:02:25 / 00:06:11:22 - personal and ok if we go here you'll see
113. 00:06:07:62 / 00:06:14:22 - that from our previous video a few
114. 00:06:11:22 / 00:06:16:65 - things have been created root
115. 00:06:14:22 / 00:06:19:59 - certificate was also created somewhere
116. 00:06:16:66 / 00:06:26:25 - down here yeah over there
117. 00:06:19:60 / 00:06:28:62 - this one is actually an extra one that
118. 00:06:26:25 / 00:06:33:55 - we don't really need we'll just get rid
119. 00:06:28:62 / 00:06:38:81 - of that ok and now back to personal
120. 00:06:33:55 / 00:06:43:93 - let's create our certificate which is
121. 00:06:38:81 / 00:06:48:90 - sorry there we go all tasks request new
122. 00:06:43:93 / 00:06:53:40 - certificates click mix and you'll see
123. 00:06:48:90 / 00:06:55:75 - that we can now issue that one but
124. 00:06:53:40 / 00:06:57:49 - because we tick that box where we need
125. 00:06:55:75 / 00:07:00:12 - to add our own little bit of information
126. 00:06:57:49 / 00:07:02:37 - you're getting this thing and we click
127. 00:07:00:12 / 00:07:06:50 - on that which gives us the chance to
128. 00:07:02:37 / 00:07:11:80 - enter it now we get a common name and
129. 00:07:06:50 / 00:07:15:75 - this part is basically this server or
130. 00:07:11:80 / 00:07:17:91 - whichever server is your VPN server you
131. 00:07:15:75 / 00:07:19:44 - can have the IP address of it you can
132. 00:07:17:91 / 00:07:22:08 - have the fully qualified domain name
133. 00:07:19:44 / 00:07:25:00 - it's entirely up to you I'm going to add
134. 00:07:22:08 / 00:07:28:17 - in both ok in this case when I do buy
135. 00:07:25:00 / 00:07:31:01 - one so say alright 0.50 yours would
136. 00:07:28:18 / 00:07:35:74 - obviously be different click Add and
137. 00:07:31:01 / 00:07:39:83 - we're also gonna add in VPN server but
138. 00:07:35:74 / 00:07:46:06 - Windows 10 dot interrupt
139. 00:07:39:83 / 00:07:49:68 - click Add click OK and now you'll see
140. 00:07:46:06 / 00:07:53:12 - it's ready to be enrolled and now this
141. 00:07:49:68 / 00:07:56:52 - has been enrolled nice and happy we can
142. 00:07:53:12 / 00:07:58:38 - finish that we can minimize these
143. 00:07:56:52 / 00:08:00:78 - windows are closed these windows it's
144. 00:07:58:38 / 00:08:03:43 - entirely up to you and now we'll show
145. 00:08:00:78 / 00:08:07:77 - you what we need to do on our say
146. 00:08:03:43 / 00:08:12:51 - Windows 10 clients similar system for a
147. 00:08:07:77 / 00:08:15:87 - Windows 7 or a Windows 8.1 etc client
148. 00:08:12:51 / 00:08:18:25 - also so we are now in our Windows 10
149. 00:08:15:87 / 00:08:19:95 - client and just to show that you'll see
150. 00:08:18:25 / 00:08:23:22 - everything is different ok you don't
151. 00:08:19:95 / 00:08:29:91 - have a server manager etc all we need to
152. 00:08:23:22 / 00:08:32:40 - do is go to settings go to network you
153. 00:08:29:91 / 00:08:35:86 - can do it this way as well but we won't
154. 00:08:32:40 / 00:08:41:72 - and this is the easier way also we'll
155. 00:08:35:86 / 00:08:44:25 - find it click on VPN give it a minute to
156. 00:08:41:72 / 00:08:48:07 - start up there we go
157. 00:08:44:25 / 00:08:51:58 - and a VPN connection windows built-in
158. 00:08:48:07 / 00:09:00:01 - give it a name it could be anything okay
159. 00:08:51:58 / 00:09:01:50 - the e and let's call it work like a VPN
160. 00:09:00:00 / 00:09:05:71 - work it could be anything
161. 00:09:01:50 / 00:09:11:03 - server name or IP address we could use
162. 00:09:05:71 / 00:09:13:93 - both okay but if we're outside the
163. 00:09:11:03 / 00:09:15:87 - workplace environment we're at home you
164. 00:09:13:92 / 00:09:18:45 - would want to enter the fully qualified
165. 00:09:15:87 / 00:09:22:09 - domain name which is a publicly
166. 00:09:18:46 / 00:09:32:97 - accessible name so we're gonna add in
167. 00:09:22:09 / 00:09:32:97 - VPN server but Windows 10 ninja okay and
168. 00:09:33:05 / 00:09:39:93 - secure socket tunneling protocol which
169. 00:09:37:14 / 00:09:43:12 - make sure the entire thing is encrypted
170. 00:09:39:94 / 00:09:48:07 - if you just left a point-to-point or
171. 00:09:43:12 / 00:09:52:99 - automatic it will have basically your
172. 00:09:48:07 / 00:09:56:02 - login as encrypted but then all the data
173. 00:09:52:99 / 00:09:58:65 - is not okay so choosing the other ones
174. 00:09:56:01 / 00:10:01:67 - ensures that the data is also accepted
175. 00:09:58:65 / 00:10:05:07 - then username and password all good
176. 00:10:01:67 / 00:10:09:96 - username this I actually need to talk to
177. 00:10:05:08 / 00:10:12:84 - you about because the username that is
178. 00:10:09:97 / 00:10:17:29 - set up in our Active Directory server
179. 00:10:12:84 / 00:10:20:08 - needs a little tick for one setting to
180. 00:10:17:28 / 00:10:25:55 - allow it to actually allow connections
181. 00:10:20:08 / 00:10:31:95 - in but we'll just for now put that there
182. 00:10:25:55 / 00:10:31:94 - and in the password that's it
183. 00:10:38:09 / 00:10:49:16 - okay click Save it will not connect
184. 00:10:44:07 / 00:10:51:51 - because one we have not imported our
185. 00:10:49:15 / 00:10:58:62 - certificate sorry my mistake
186. 00:10:51:50 / 00:11:06:86 - let's open up HTTP our web browser ami
187. 00:10:58:62 / 00:11:10:85 - and HTTP four slash forward slash and
188. 00:11:06:86 / 00:11:10:85 - VPN server
189. 00:11:11:57 / 00:11:29:37 - Windows 10 dot ninja four slash cert SRV
190. 00:11:22:46 / 00:11:35:55 - click enter it will ask for a login ID
191. 00:11:29:37 / 00:11:39:38 - hopefully in a minute and this it's gone
192. 00:11:35:54 / 00:11:45:80 - the back yes it did there we go alright
193. 00:11:39:38 / 00:11:48:67 - we shall give our vp end user and the
194. 00:11:45:80 / 00:11:48:67 - password for that
195. 00:11:56:62 / 00:12:03:98 - okay click okey-dokey and you will come
196. 00:12:01:58 / 00:12:09:25 - up with this window this window
197. 00:12:03:98 / 00:12:11:99 - basically allows you to import the see a
198. 00:12:09:25 / 00:12:14:14 - certificate if we had set up other
199. 00:12:11:99 / 00:12:17:60 - things you could create certificates etc
200. 00:12:14:14 / 00:12:21:88 - via this system but all we need to do is
201. 00:12:17:60 / 00:12:24:74 - bring in the CA click install the CA
202. 00:12:21:88 / 00:12:27:37 - certificate it downloads it it doesn't
203. 00:12:24:74 / 00:12:29:68 - really install it you have to do a
204. 00:12:27:37 / 00:12:36:37 - couple of clicks to get the install part
205. 00:12:29:67 / 00:12:42:00 - start it out click open click install
206. 00:12:36:37 / 00:12:50:33 - certificate local machine click Next
207. 00:12:42:00 / 00:12:54:88 - click yes and place it in our trusted
208. 00:12:50:33 / 00:13:01:10 - root authorities then click Next click
209. 00:12:54:88 / 00:13:05:65 - finish impor successful click close that
210. 00:13:01:10 / 00:13:09:40 - down we can minimize this once we have
211. 00:13:05:65 / 00:13:12:91 - created our VPN system over here we
212. 00:13:09:40 / 00:13:17:08 - brought in our CA certificate what we
213. 00:13:12:91 / 00:13:22:30 - need to now do is basically a couple of
214. 00:13:17:09 / 00:13:24:74 - more steps on our other servers but what
215. 00:13:22:30 / 00:13:26:44 - we could have done those first but I'm
216. 00:13:24:74 / 00:13:27:49 - just going to show you what still needs
217. 00:13:26:45 / 00:13:32:66 - to be done
218. 00:13:27:49 / 00:13:41:18 - back on our VPN server ok we need to
219. 00:13:32:65 / 00:13:44:68 - install next next next the remote access
220. 00:13:41:17 / 00:13:48:25 - rule which is very important and this
221. 00:13:44:69 / 00:13:52:54 - should have been done first but that's
222. 00:13:48:25 / 00:13:56:99 - fine ok click Next click Next we're
223. 00:13:52:53 / 00:13:59:44 - using the direct activist VPN and we're
224. 00:13:56:99 / 00:14:01:97 - also taking routing you could click the
225. 00:13:59:45 / 00:14:05:89 - last one as well but for now that's fine
226. 00:14:01:97 / 00:14:10:86 - click install ok one
227. 00:14:05:88 / 00:14:16:89 - it has installed we do need to set it up
228. 00:14:10:86 / 00:14:19:89 - okay so open the getting side wizard it
229. 00:14:16:89 / 00:14:27:66 - may be hiding let's just sleep nope
230. 00:14:19:89 / 00:14:29:79 - there it is we're deploying VPN and as
231. 00:14:27:66 / 00:14:31:17 - you'll see even though there was a
232. 00:14:29:79 / 00:14:35:25 - little arrow next to it
233. 00:14:31:17 / 00:14:37:65 - it hasn't been configured and that's why
234. 00:14:35:25 / 00:14:39:51 - without this configuration and
235. 00:14:37:65 / 00:14:42:25 - installing this role you will never be
236. 00:14:39:51 / 00:14:45:12 - able to connect up to the VPN server
237. 00:14:42:25 / 00:14:49:37 - okay and this role was added on the VPN
238. 00:14:45:12 / 00:14:53:55 - server itself so configure and enable
239. 00:14:49:37 / 00:14:56:73 - click Next custom configuration if you
240. 00:14:53:55 / 00:15:00:96 - click the first one you need to have two
241. 00:14:56:73 / 00:15:02:64 - NIC card setup we got two NIC card but
242. 00:15:00:97 / 00:15:05:95 - we haven't set the other one up on this
243. 00:15:02:64 / 00:15:09:75 - this is just for demo purposes ok custom
244. 00:15:05:95 / 00:15:12:39 - configuration next now you could just
245. 00:15:09:75 / 00:15:16:14 - stick with VPN access if you're feeling
246. 00:15:12:39 / 00:15:23:33 - generous you go the way down ok click
247. 00:15:16:14 / 00:15:30:42 - Next click finish that next ability
248. 00:15:23:33 / 00:15:34:02 - gives you the chance to use IP addresses
249. 00:15:30:42 / 00:15:36:05 - that are already being used elsewhere
250. 00:15:34:02 / 00:15:38:67 - because that will do an internal
251. 00:15:36:05 / 00:15:42:05 - configuration you should get a little
252. 00:15:38:67 / 00:15:42:05 - pop-up in a minute
253. 00:15:44:45 / 00:15:55:61 - that will basically ask you to start all
254. 00:15:48:87 / 00:15:55:62 - these services there we go start service
255. 00:16:06:11 / 00:16:10:26 - we have and quite a few of them it can
256. 00:16:07:97 / 00:16:18:35 - take a little bit longer than normal
257. 00:16:10:26 / 00:16:21:98 - basically let's now set up our ipv4
258. 00:16:18:35 / 00:16:25:67 - we're actually if you have a DHCP server
259. 00:16:21:98 / 00:16:28:38 - set up to issue automatic addresses then
260. 00:16:25:66 / 00:16:32:44 - you leave the first box set if that is
261. 00:16:28:38 / 00:16:34:51 - not the case you need to create a few IP
262. 00:16:32:45 / 00:16:37:45 - addresses to give out to those Windows
263. 00:16:34:51 / 00:16:40:25 - 10 clients etc client computers
264. 00:16:37:45 / 00:16:42:82 - ok so add and we'll just choose one
265. 00:16:40:25 / 00:16:46:51 - ninety one six eight point zero point
266. 00:16:42:82 / 00:16:53:68 - one and one and I'm going to give 50 of
267. 00:16:46:51 / 00:17:01:66 - them so 192.168.0.1 fine zero like 50
268. 00:16:53:69 / 00:17:03:86 - and now we click over here if you'll see
269. 00:17:01:66 / 00:17:06:50 - it's got windows authentication windows
270. 00:17:03:86 / 00:17:13:50 - attempting if you want to set up a
271. 00:17:06:50 / 00:17:24:04 - passphrase for lttp l2tp etc that's fine
272. 00:17:13:50 / 00:17:27:74 - we need to select our certificate that
273. 00:17:24:04 / 00:17:30:76 - we're going to use to connect ok once
274. 00:17:27:74 / 00:17:33:07 - the root certificate it'll work this one
275. 00:17:30:76 / 00:17:36:47 - should work as well because the one we
276. 00:17:33:07 / 00:17:43:57 - created right now let's click apply it
277. 00:17:36:47 / 00:17:51:81 - will now restart the service and you'll
278. 00:17:43:57 / 00:17:56:16 - see no error has happened you
279. 00:17:51:81 / 00:17:58:56 - add ipv6 access as well it's a fairly
280. 00:17:56:17 / 00:18:01:96 - similar thing you create a prefix and
281. 00:17:58:56 / 00:18:05:07 - then the routing and all that but for
282. 00:18:01:96 / 00:18:08:41 - now we'll just give an ipv4 access which
283. 00:18:05:07 / 00:18:11:47 - is the most popular one that's being
284. 00:18:08:41 / 00:18:15:91 - used right now and we'll click OK the
285. 00:18:11:47 / 00:18:20:00 - spring that then I did mention on our
286. 00:18:15:91 / 00:18:25:18 - Active Directory server for the user
287. 00:18:20:00 / 00:18:28:24 - that we are giving permission to connect
288. 00:18:25:18 / 00:18:28:81 - up into the VPN server we need to tick a
289. 00:18:28:24 / 00:18:31:26 - box
290. 00:18:28:80 / 00:18:34:01 - I'll just quickly move over to our
291. 00:18:31:26 / 00:18:38:50 - Active Directory server and show you
292. 00:18:34:01 / 00:18:40:55 - that little setting in the users so ok
293. 00:18:38:50 / 00:18:44:01 - so now we're on our Active Directory
294. 00:18:40:55 / 00:18:47:20 - server we've opened up server manager
295. 00:18:44:01 / 00:18:51:11 - let's go to tools Active Directory users
296. 00:18:47:20 / 00:18:53:50 - and computers these are all basic
297. 00:18:51:11 / 00:18:56:25 - servers that we've set up for the
298. 00:18:53:50 / 00:18:58:69 - purpose of the video ok you know users
299. 00:18:56:25 / 00:19:01:86 - we had created you could have created a
300. 00:18:58:69 / 00:19:04:72 - separate organizational unit for a
301. 00:19:01:86 / 00:19:08:34 - department etc and then put the user
302. 00:19:04:72 / 00:19:10:50 - within that and all nice and neat but
303. 00:19:08:34 / 00:19:16:26 - for simplicity we've just added the user
304. 00:19:10:50 / 00:19:18:67 - in the main users block and the property
305. 00:19:16:26 / 00:19:22:96 - that we need ok we call them VPN user
306. 00:19:18:67 / 00:19:26:71 - that says login ID as well we need to
307. 00:19:22:96 / 00:19:28:24 - tick this dial-in allow access that's
308. 00:19:26:71 / 00:19:31:53 - the only thing you really need to do
309. 00:19:28:24 / 00:19:33:03 - after you've created a user if you don't
310. 00:19:31:53 / 00:19:37:40 - know how to create a user we'll just
311. 00:19:33:03 / 00:19:43:85 - show you very very quickly and some new
312. 00:19:37:41 / 00:19:49:66 - user give a name ok for example Bob and
313. 00:19:43:85 / 00:19:52:71 - then give a login username click Next
314. 00:19:49:66 / 00:19:55:33 - give a password ok then the user must
315. 00:19:52:72 / 00:19:59:11 - change it next logon or password never
316. 00:19:55:32 / 00:20:02:34 - expires ok if you ever need to stop a
317. 00:19:59:10 / 00:20:04:86 - user accessing services you just click
318. 00:20:02:34 / 00:20:08:13 - on a user and click account is
319. 00:20:04:86 / 00:20:09:54 - Stables the properties which that was
320. 00:20:08:14 / 00:20:14:25 - only those two steps and then you come
321. 00:20:09:54 / 00:20:18:51 - over here and then this a black end okay
322. 00:20:14:25 / 00:20:23:58 - now back to our Windows 10 client okay
323. 00:20:18:51 / 00:20:26:55 - and we're back in our settings VPN the
324. 00:20:23:58 / 00:20:32:39 - VPN that we set up earlier and all we
325. 00:20:26:55 / 00:20:37:24 - really need to do is just connect up as
326. 00:20:32:40 / 00:20:40:38 - you can see the normal network that we
327. 00:20:37:24 / 00:20:44:57 - had before has no internet access and
328. 00:20:40:38 / 00:20:48:16 - everything goes through our VPN settings
329. 00:20:44:57 / 00:20:51:60 - VPN connection ending all right this is
330. 00:20:48:16 / 00:20:53:92 - a little test to make sure everything is
331. 00:20:51:60 / 00:20:59:00 - working fine we'll just click over here
332. 00:20:53:92 / 00:20:59:00 - and go to Google for example
333. 00:20:59:06 / 00:21:27:90 - www.google.com/mapmaker is encrypted if
334. 00:21:23:34 / 00:21:32:55 - you need to use any services etc on your
335. 00:21:27:91 / 00:21:36:61 - work servers you can access them by the
336. 00:21:32:55 / 00:21:40:26 - way they're set up etc okay so that's
337. 00:21:36:60 / 00:21:43:56 - our VPN okay we just thought we'd show
338. 00:21:40:26 / 00:21:46:52 - you how to modify the settings and also
339. 00:21:43:56 / 00:21:49:89 - use i ke version two
340. 00:21:46:52 / 00:21:53:03 - okay so the first thing is you know how
341. 00:21:49:90 / 00:21:57:13 - we got there right click on your
342. 00:21:53:03 / 00:22:00:54 - networking icon at the bottom open
343. 00:21:57:13 / 00:22:03:49 - network and sharing click on your
344. 00:22:00:54 / 00:22:05:61 - Ethernet okay we have not connected so
345. 00:22:03:49 / 00:22:12:37 - you will not have to you just have your
346. 00:22:05:61 / 00:22:16:45 - original system and sorry - take change
347. 00:22:12:36 / 00:22:18:16 - adapter settings this is your VPN
348. 00:22:16:46 / 00:22:21:95 - dr. that we have set up it's like a
349. 00:22:18:17 / 00:22:26:59 - virtual adapter change the things on
350. 00:22:21:95 / 00:22:30:58 - this connection go to security the basic
351. 00:22:26:58 / 00:22:35:89 - when we set it up it's like the secure
352. 00:22:30:57 / 00:22:40:75 - sstp tunneling protocol and it has no
353. 00:22:35:90 / 00:22:43:50 - exception if the server doesn't have
354. 00:22:40:75 / 00:22:49:15 - encryption hey we'll connect anyways we
355. 00:22:43:50 / 00:22:55:50 - suggest you click max drink okay click
356. 00:22:49:15 / 00:23:00:74 - OK and then click on VPN click connect
357. 00:22:55:50 / 00:23:08:05 - give it a few seconds and it's connected
358. 00:23:00:74 / 00:23:10:91 - if you need to use i ke version to you
359. 00:23:08:05 / 00:23:15:50 - just click the same thing security but
360. 00:23:10:91 / 00:23:23:08 - instead of sstp change to itv2 click ok
361. 00:23:15:50 / 00:23:27:79 - click connect and there we go that's all
362. 00:23:23:07 / 00:23:31:33 - done so I hope this video has helped it
363. 00:23:27:79 / 00:23:33:76 - shown you how to set up the VPN
364. 00:23:31:33 / 00:23:37:97 - certificate how to set up the remote
365. 00:23:33:76 / 00:23:40:09 - access service how to then configure all
366. 00:23:37:97 / 00:23:44:02 - the settings and it's also showing you
367. 00:23:40:09 / 00:23:48:13 - how to ensure that you get maximum
368. 00:23:44:02 / 00:23:52:49 - encryption and has shown you to use
369. 00:23:48:14 / 00:23:55:00 - either SSTP or I ke V to hopefully this
370. 00:23:52:49 / 00:23:57:33 - videos helped have a great day and thank
371. 00:23:55:00 / 00:23:57:33 - you for watching
Visit our YouTube channel: https://www.youtube.com/channel/UCFj1BHYIUYfPWPb1Xn5qFIg
Tags: IKEV2 VPN setup, OCSP Certificate Revocation, Root CA, SSTP VPN setup, Windows certificate services, maximum encryption VPN setup, self-signed root certificate generation, setup CA role, setup OCSP role, setup VPN, setup direct access, setup ssl certificates in Windows server., video tutorial, windows server 2012 r2, windows server 2016
In this two part series I will explain how to install an SSTP VPN server and how to deploy the VPN connection to Windows clients.
Contents
- Installing the required roles
- Generating & installing the SSL certificate
- Setting up the VPN
- Connecting a client
- Author
- Recent Posts

Geoff Kendal is a Windows/Linux systems administrator, scripter and problem solver, with over 12 years experience, based in Leeds, UK.
I’m sure most network administrators will know how useful a VPN can be, although we have probably all encountered issues with firewalls not always letting the required traffic through which can prevent them from working. For example for PPTP VPN’s require your router to handle GRE protocol traffic, similarly L2TP requires ESP protocol traffic. The whole point of VPNs is to allow access to your network form anywhere, which is why SSTP VPNs are so great.
SSTP (Secure Socket Tunnelling Protocol) transports your VPN traffic by encapsulating the traffic via an SSL link, all over the standard HTTPS port (TCP 443), which is rarely blocked (most web browsing wouldn’t work without it!). So not only does SSTP get through 99% of firewalls, but it also ensures that your VPN traffic is encrypted.
SSTP is supported on Windows Vista SP1 and later versions of Windows. If you’re also a Mac shop, it isn’t integrated into the OS yet, but there are open source SSTP clients that may help you.
If you’re running Windows 2008/2008R2/2012, you’ve already got everything you need to get started, as it is powered by the Routing and Remote Access Services in Windows server. I’ll be going through setting it up on Windows Server 2012, although the steps on 2008 are essentially the same.
Installing the required roles
Start the ‘Add roles & features’ wizard from server manager, and add the ‘Remote Access’ to the server of your choice. You’ll be prompted to add some other requested roles/features, such as IIS – you will need to add these too.

Adding the IIS & RAS roles
As part of the wizard, we’ll be asked which role services we wish to install, for this go with the default ‘Direct Access & RAS’. Continue through the wizard, and allow the server to restart if required.
Generating & installing the SSL certificate
Once the server has restarted, we will want to obtain a SSL certificate for use by the VPN. For my internal domain, I use a .local extension, so will be generating a certificate signing request (CSR) for my external domain name, then sending it to a certification authority (StartSSL.com in this instance, as they offer free SSL certificates.)
From Server Manager, select ‘Internet Information Services (IIS) manager’ from the tools menu. Once the IIS console has started select the server name in the tree on the left. Once selected, click the ‘Server certificates’ icon in the main area, and select the ‘Create new certificate request’ option from the actions pane on the right.
When creating the CSR, it is critical that the common name is set to the hostname that clients will use to connect to the VPN. For instance, your server may be internally called RAS02.4sysops.local – this obviously won’t resolve externally, so we point vpn.4sysops.com at the server for external clients to use. Further to this, you may need to setup port-forwarding and firewall rules, so that traffic connecting to this external address on port 443 gets directed to your VPN server.

Creating the certificate signing request
In this example we must enter vpn.4sysops.com as the common name. On the next screen in the CSR wizard, ensure that the bit-length is set to 2048 if you are using StartSSL – they won’t accept 1024 bit CSRs.
Finally save the CSR to a file, then open the file in notepad and copy all of the contents to your clipboard.
We will now need to get a certification authority to sign a certificate for us. Provide your certification authority of choice the CSR we just generated via the wizard. Once they have verified your details, they should provide you with a certificate file that we can load into IIS to complete the SSL steps.
Once you have the certificate file, select ‘complete certificate request’ from the IIS actions pane on the right, and browse to the certificate file. You should now see the certificate listed in IIS.
Setting up the VPN
We now need to configure the RAS service. Select ‘Routing and Remote Access’ from the tools menu of server manager. Once the MMC has loaded, right click the server name on the left, and select the configure option. From the wizard, choose the ‘custom’ option at the end of the list. On the following page, tick the VPN checkbox. The wizard will complete, and start the service.

The RRAS configuration wizard
All being well, clients should now be able to connect to the VPN via SSTP, as long as they can make a HTTPS connection to the server name you specified when creating the certificate. You can double check that things are OK by testing with a web browser (i.e. https://vpn.4sysops.com) – You’ll probably just see a 404 error, but as long as there are no certificate errors and you can see the padlock icon, then all is well.
The final stage before we make the connection is to make sure that any users requiring access have dial-in/VPN rights. Find your users in ‘Active Directory Users & Computers’, under the dial-in tab select allow (We’re not using NPS in this basic setup, so that option won’t work).
Connecting a client
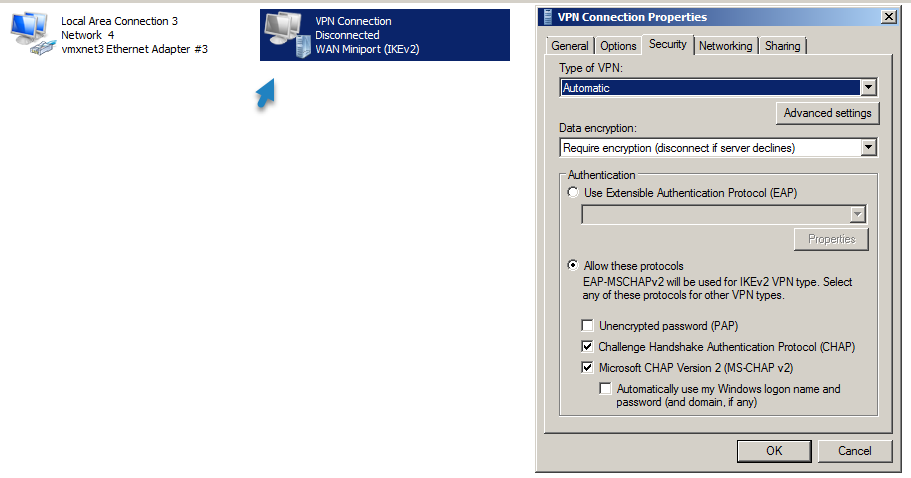
From a client system, create a new VPN connection (Via the Network & Sharing Center ). When creating the connection, ensure that the internet address is the same one as used in the certificate. Once the connection has been created, click the ‘Change adapter settings’ link on the left side of the Network and Sharing Center, and edit the properties of the new VPN connection. On the security tab, change the type to SSTP.

The VPN connection properties
Once this change has been made, we should be able to connect to our SSTP VPN successfully from practically anywhere!
Subscribe to 4sysops newsletter!
In my next article, we’ll look at how we can deploy our SSTP VPN connection to all of our client systems.
I did previously setup during a few occasions, VPN access on Windows Server 2012 R2, but haven’t tested that on the newly released Windows Server 2016.
Remote access role is a VPN which protects the network connection or your remote connection from one side to another and protecting both sides from attacks or data sniffing as VPN protocol uses a tunnel inside of a standard data connection.
Conventional Disaster Recovery options for virtualized IT environments running on Microsoft Windows Server 2016
Learn from this video about:
- What you should prepare your IT environment for
- Storage Replica vs. Veeam Backup & Replication vs. Hyper-V Replica
- Demonstrating each disaster recovery site option in use
Free of Charge. No Registration.
Note: You’ll need to open a TCP port 1723 on your firewall as this port is used for the VPN access.
Also, I’d like to point out that this might not be a guide for enterprise deployment as there you’ll perhaps use a hardware VPN from your router or use a Direct Access feature which however relies on Internet Protocol version six (IPv6) technologies to establish client connections.
How to install VPN on Windows Server 2016 – The steps:
Install a Remote access role via the Add Roles and Features Wizard. Open Server Manager either locally on the server that will host the remote access role or on a computer that has Server Manager configured to connect to the server you’re deploying the role.
Then select Add Roles and Features Wizard from the Manage Menu. Click next on the before you begin page if it is displayed. Then select Role-Based or Feature-Based installation and click next.
On the Select Server Role page, scroll down and then select check box Remote Access. And then click next.

You’ll need to click two more times to get to the Remote access Role Services, where you’ll have to select Direct Access and VPN.
Accept the installation of sub-components, such as IIS… Accept all the defaults.
It will take some time to finish the installation of all components and sub-components.
Then click on the link Open the Getting Started Wizard to open the configuration wizard.
A new window will appear. You’ll need to click Deploy VPN only which will configure VPN by using the Routing and Remote Access console.
After you click on that part, you’ll open the Routing and Remote Access console. Right click on the Server name and click on Configure and Enable Routing and Remote Access.
Note: You can also launch this console via Control Panel > System and Security > Administrative tools.
Click Next and Select Custom Configuration.
So far, it’s been very simple. Let’s go and finish the configuration. All we need to do on the next screen is to tick the checkbox VPN access as we only want this feature to be active.

You’ll then have only one page which displays the summary of your selections. Confirm by clicking the Finish button. After few seconds, you’ll see a pop-up window asking you to start the Routing and Remote Access service. Click on Start Service button.
StarWind HyperConverged Appliance is a turnkey hyper-converged hardware platform fitted into a small two-node footprint. You don’t need anything else to build a budget-friendly new IT infrastructure or upgrade an existing one. All your systems will be “babysitted” by StarWind 24/7/365, troubleshooting any concerns without your involvement. Everything’s operated through a neat web UI. We’ll also migrate your workloads at no extra cost.
Dramatically decrease your CapEx, OpEx, and IT management costs, while visibly increasing return on investment (ROI) with hyperconvergence for ROBO, SMB & Edge from StarWind.
Next Step – Allow some users to connect to your newly configured VPN server
Usually this kind of small environment can be used for system administrators requiring access to remotely installed server, or for a small group of users within an organization. Depending on the architecture, the server can be part of a Microsoft Domain and have a central management of users through an Active Directory (AD) or it can be a standalone server which is just outside of any domain.
For the sake of simplicity, we consider this case, but in both cases, you’ll need to configure at least one user to access through the VPN and we’ll show you how.
So if you’re in “Workgroup” environment you can use a Computer Management Console (MMC), and if you’re in a domain environment this can be done in the user properties of an Active Directory user.
Usually, there is a DHCP server within a company environment. If that’s not the case, you’ll have to add a static address pool.
You can find the settings in the properties of your VPN server, where you can click on the IPv4 tab and enable and configure the Static address pool. Make sure to use the same subnet as your static address of your server.
Well, this is about.
From the client’s perspective. The client has to configure a VPN connection from the client’s end. So, depending on the Operating system the client is using, the setup might differ.
But basically, you’ll should set up new VPN connection.
And then
This will create a new connection within the network connection window there.
To finally get this screen after connecting and entering your password.
Wrap up: Windows Server VPN
This is the simplest way of doing it. It involves, however, opening the TCP 1723 port on the firewall. Note that another solution of remote access exists, but they usually involve installation of third party tools on the server side, and also on the client side.
You may want to avoid installing those tools on company servers and stick to traditional Built-in VPN from Microsoft, for remote administration.
You may also be limited with your budget as those tools usually cost money when used in the enterprise environment on server systems.
- How-to Create Bootable Windows Server 2016 USB Thumb Drive for Installing OS
- Why moving from Windows Server 2012 R2 to 2016 for Hyper-V