
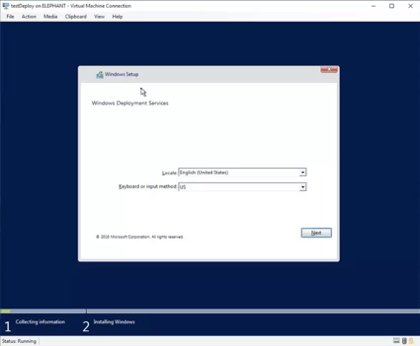
В этом руководстве мы увидим, как использовать пару MDT (Microsoft Deployment Toolkit) и WDS (службы развертывания Windows) для развертывания образов Windows.
Пара WDS и MDT для развертывания образов, начиная с сети (PXE) с WDS и MDT, позволяет настраивать и автоматизировать установку операционных систем в организации.
Цель руководства — использовать WDS для предоставления среды PXE и развертывания образов Windows и MDT для персонализации.
Содержание
- Разница между WDS и MDT
- Установка роли Windows Deployment Services WDS
- Загружаем дополнительные компоненты
- Установка windows ADK
- Настраиваем WDS сервер(Роль Windows Server 2016)
- Настройка Microsoft Deployment Toolkit (MDT)
- Добавляем образ операционной системы в MDT
- Добавляем приложения в MDT
- Файл ответов MDT
- Настройка правил MDT
- Update Deployment Share
- Добавляем Lite-Touch образ на WDS
- Конфигурация DHCP для PXE
Разница между WDS и MDT
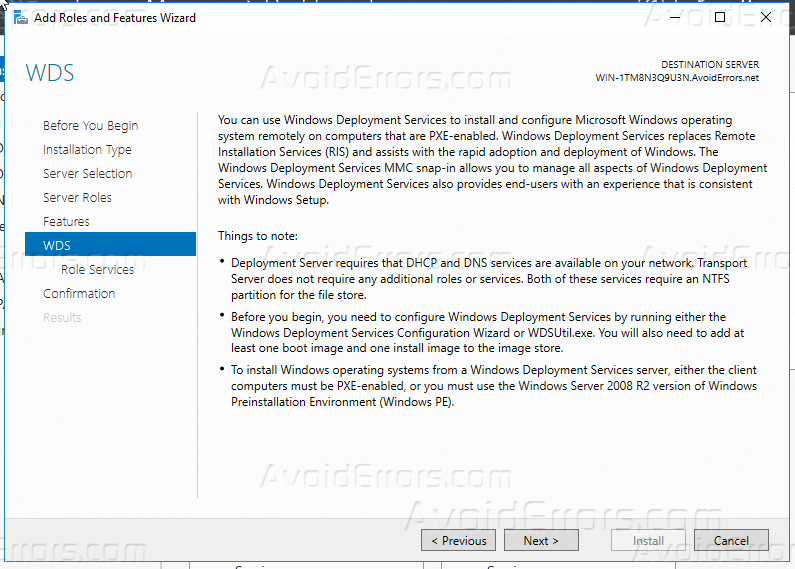
Службы развертывания Windows (WDS) — это серверная технология от Microsoft для выполнения сетевой установки операционных систем Windows (ОС). WDS — это переработанная версия служб удаленной установки (RIS), которая позволяет развертывать операционные системы Windows. Вы можете использовать WDS для настройки новых клиентов через сетевую установку.
Microsoft Deployment Toolkit (MDT): MDT, ранее известный как Business Desktop Deployment, — это бесплатный инструмент для автоматизации развертывания операционных систем Windows и Windows Server, использующий комплект для оценки и развертывания Windows (ADK) для Windows 10. MDT — это унифицированный набор инструменты, процессы и рекомендации по автоматизации развертывания настольных компьютеров и серверов. Вы можете использовать его для создания эталонных образов или в качестве полного решения для развертывания.
MDT использует два способа подключения к серверу по сети: USB-ключ или PXE. Среда предварительного выполнения (PXE) требует использования сервера Windows, настроенного с ролью служб развертывания Windows (WDS).
MDT работает вместе с WDS, предоставляя возможности PXE-сервера в сети и управляя подключением к общему ресурсу MDT с помощью предварительно созданного загрузочного файла MDT. Если вы хотите, чтобы ваши клиенты использовали образы ОС из WDS, вам потребуется импортировать эти загрузочные образы в WDS. WDS также может помочь захватывать образы вашего эталонного устройства и развертывать эти образы с поддержкой драйверов на различных устройствах в вашей среде с помощью PXE. Хотя MDT — это скорее инструмент проектирования, MDT создает загрузочные образы с различными пошаговыми последовательностями развертывания.
Установка роли Windows Deployment Services WDS


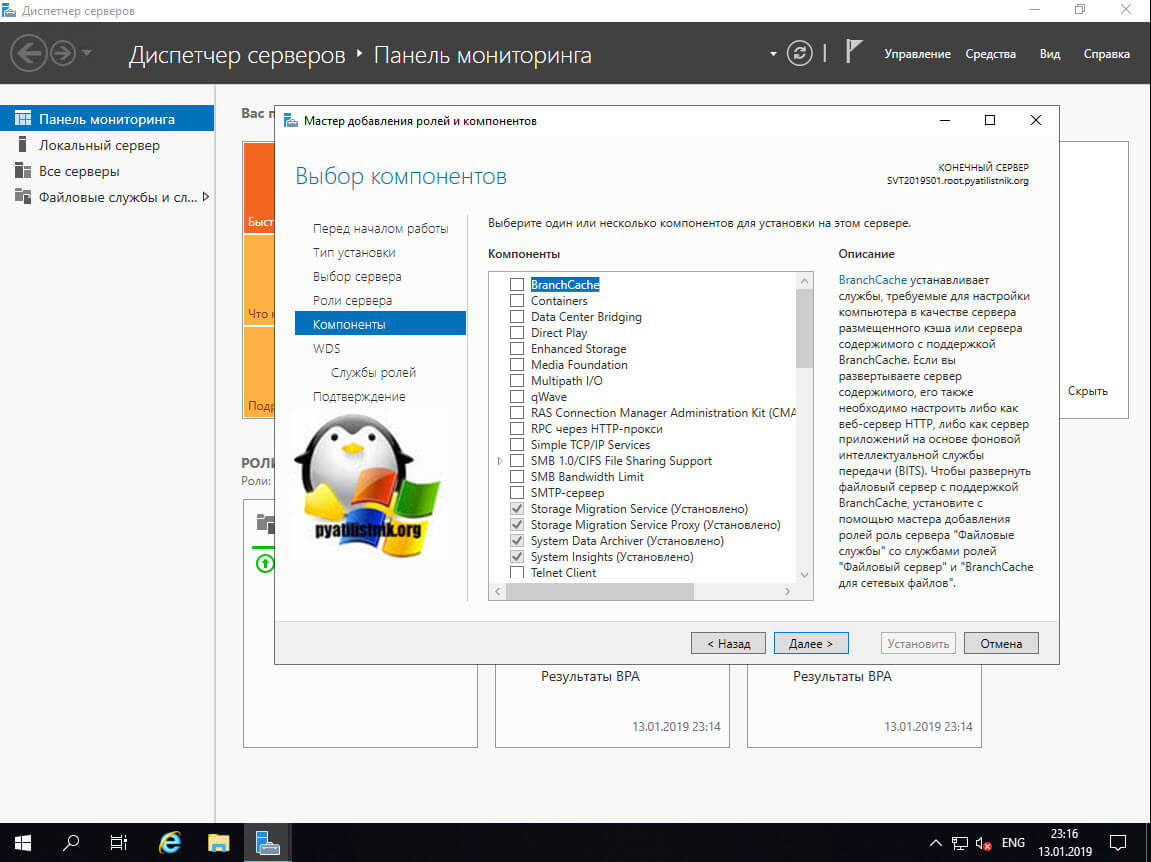
Загружаем дополнительные компоненты
Комплект для оценки и развертывания Windows (Windows ADK) и надстройка Windows PE содержат инструменты, необходимые для настройки образов Windows для крупномасштабного развертывания, а также для проверки качества и производительности вашей системы.
С официального сайта скачиваем :
1) Download the ADK for Windows Server 2022
2) Download the Windows PE add-on for the ADK for Windows Server 2022
Также скачиваем Microsoft Deployment Toolkit (MDT)
Установка windows ADK
- После того как скачали ADK for Windows Server 2022 монтируем скаченный iso файл 20348.1.210507-1500.fe_release_amd64fre_ADK


- Установка надстройки Windows PE для сервера MDT , мы его скачивали по ссылке Windows PE add-on for the ADK for Windows Server 2022. Монтируем образ 20348.1.210507-1500.fe_release_amd64fre_ADKWINPEADDONS


- Загружаем и устанавливаем Microsoft Deployment Toolkit (MDT)


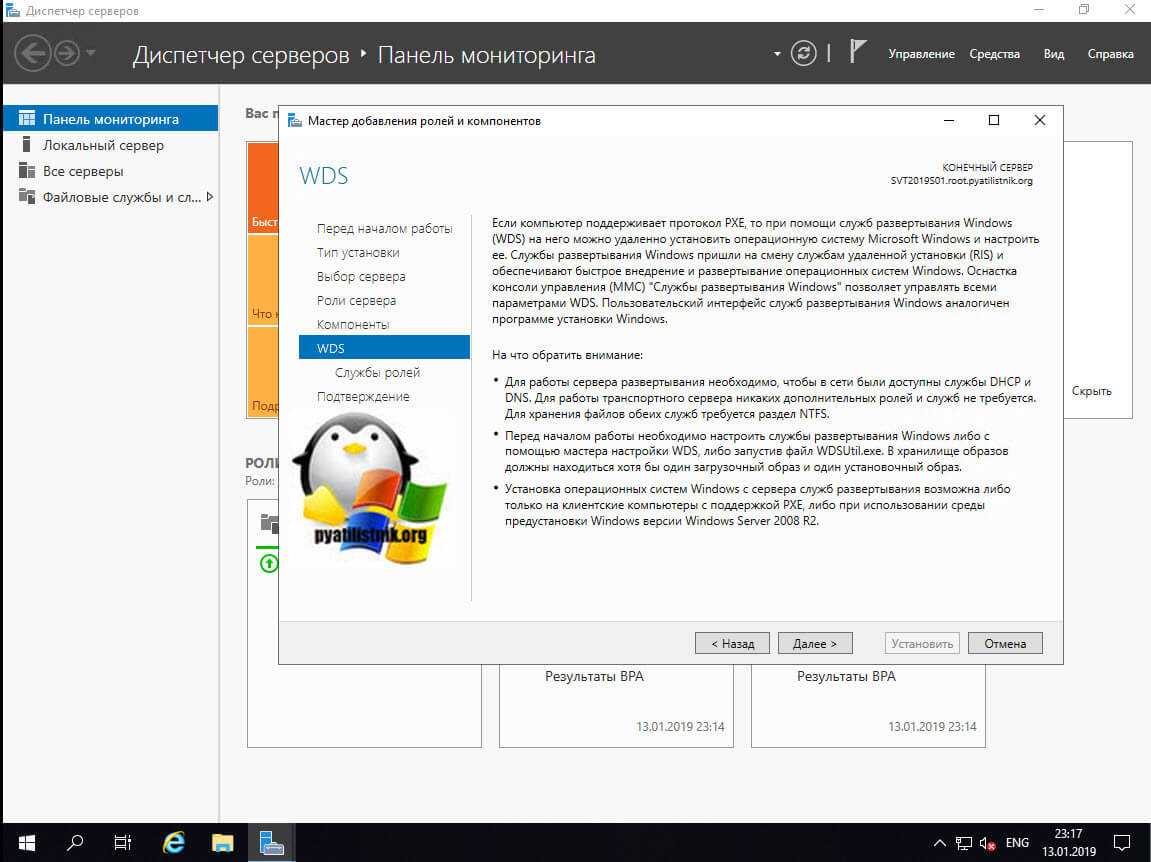
Настраиваем WDS сервер(Роль Windows Server 2016)
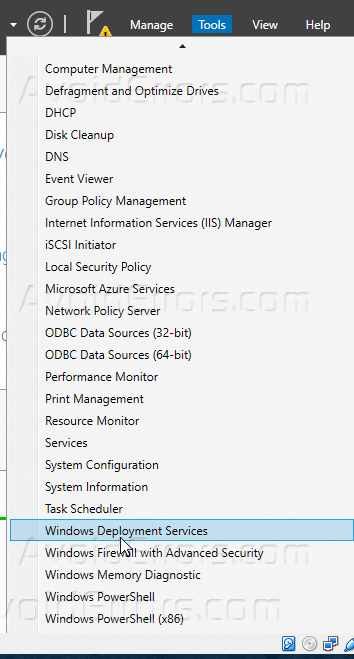
Открываем консоль WDS

Запускаем конфигурирование.

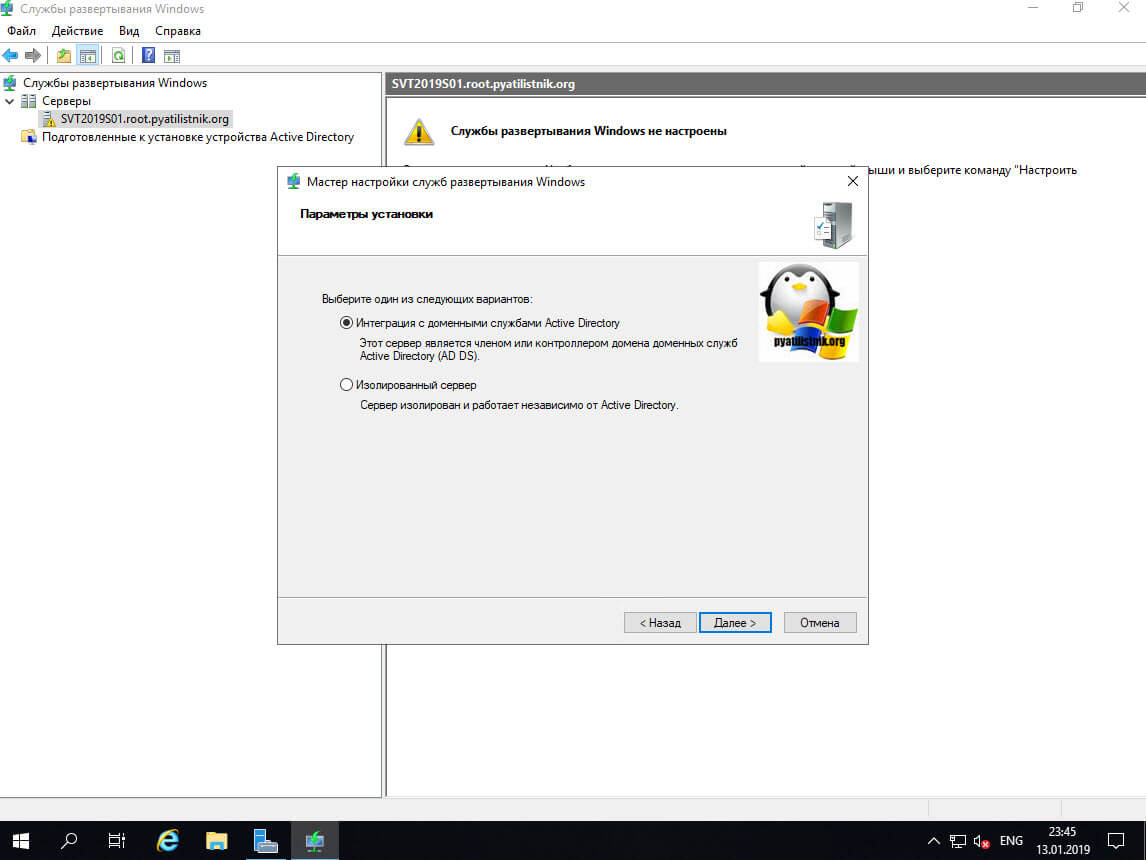
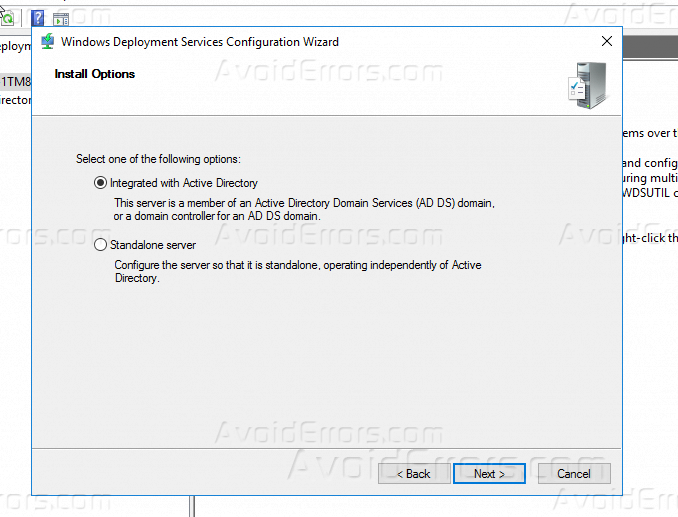
В мастере настройки выбираем интеграцию с доменом.

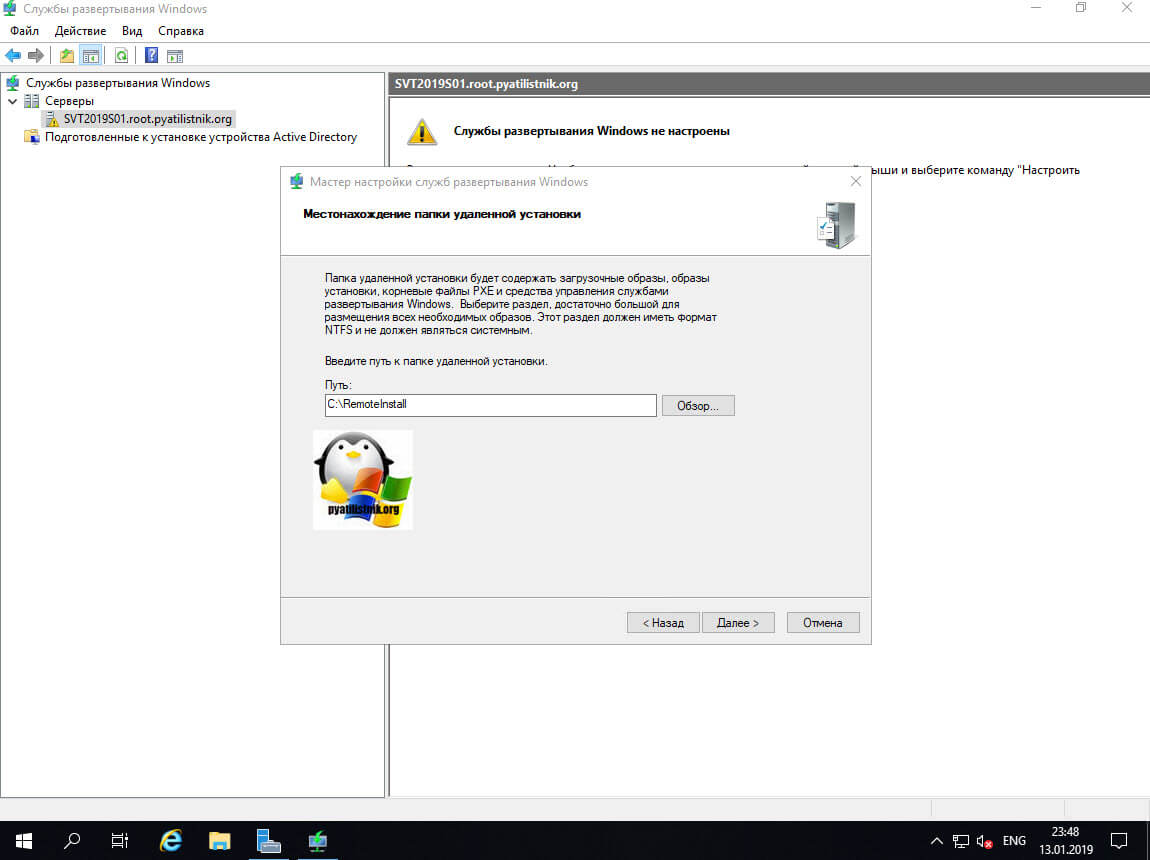
Задаем служебную папку WDS.

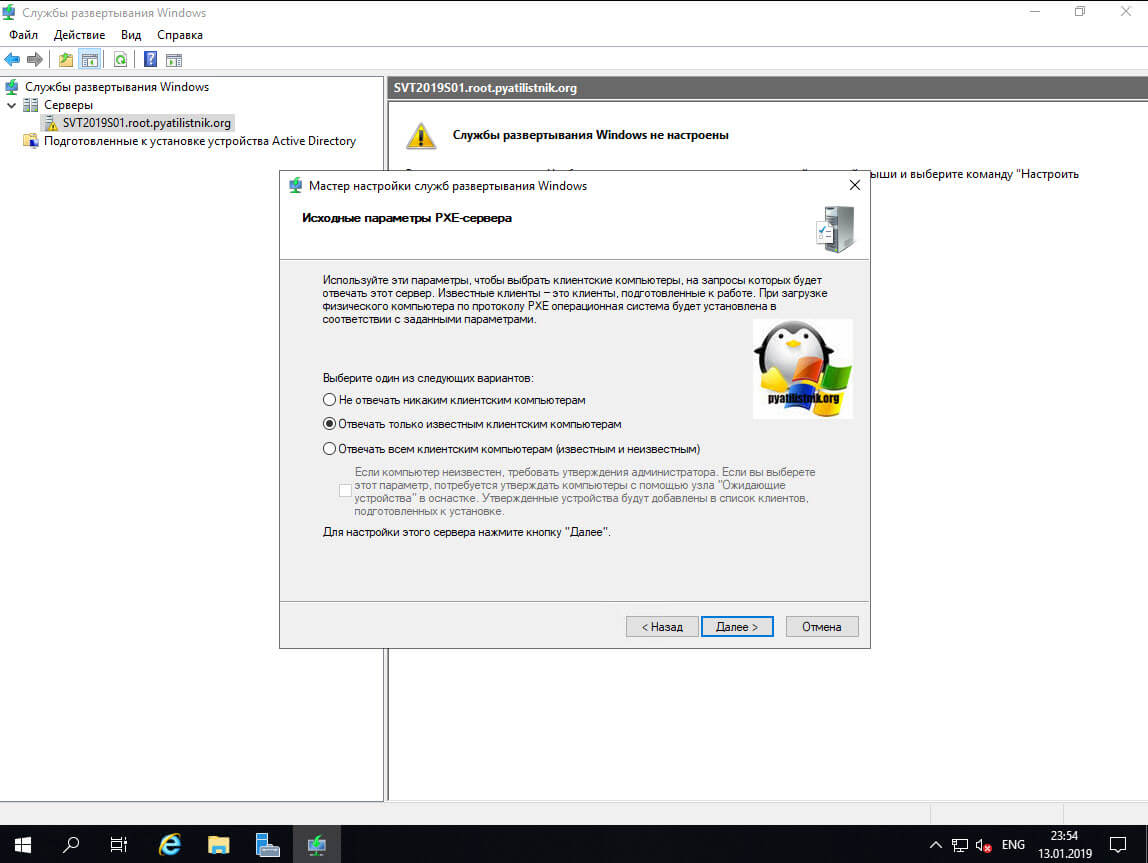
На следующем шаге можно выбрать каким компьютерам будет отвечать сервер WDS:
- Никому не отвечать — можно отключить работу сервера на время настройки или тестирования, например, чтобы пользователи не получали возможные конфликты при установке.
- Отвечать только известным компьютерам — список составляется в консоли и если записи адреса компьютера нет, то он не получит возможность работать с сервером.
- Отвечать всем клиентам — ответ получат все компьютеры. Если установить галку ниже, то при обращении неизвестных устройств (не записанных ранее) в консоли появится запись, что некий компьютер с определенным адресом запрашивает подключение. Можно отклонить или принять и процесс продолжится. Позже эти настройки можно изменить в консоли WDS.


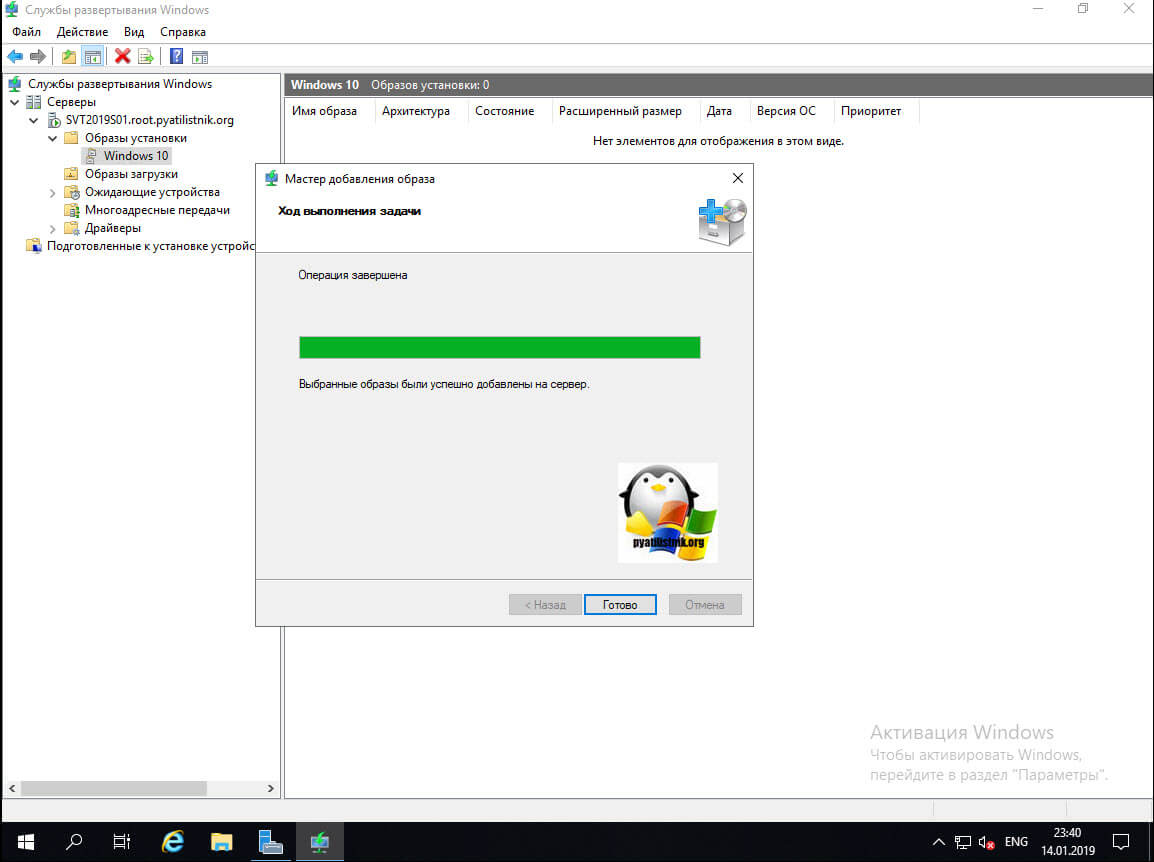
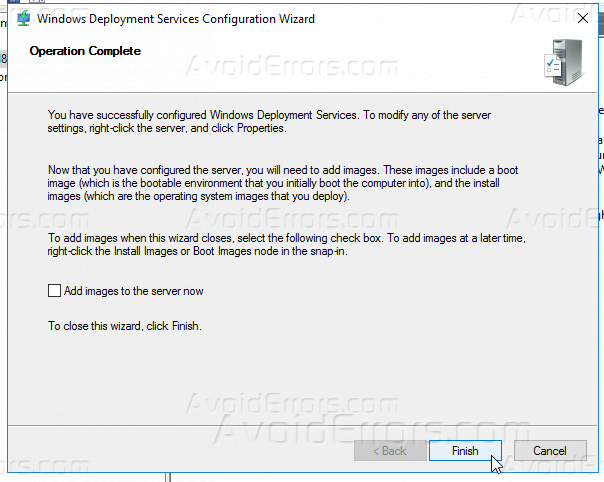
Снимаем галочку — add images to the server now , и жмем Finish.


WDS нам понадобится только для подключения и передачи образов, поэтому без подробного объяснения:
Install Images — установочные образы (не используем);
Boot Images — загрузочные образы (добавим созданные в MDT);
Pending Devices — появляются устройства запрашивающие соединение если включена опция «требуется подтверждение администратора».
Настройка Microsoft Deployment Toolkit (MDT)
запустим Deployment Workbench , как показано ниже

После запуска приложения Microsoft Deployment Toolkit (MDT)
щелкните правой кнопкой мыши Deployment Shares в левой панели навигации и
выберите New Deployment Share .

Откроется мастер создания общего ресурса для развертывания, как показано ниже.
– Если вы хотите изменить путь к общему ресурсу развертывания, используйте кнопку обзора, как показано ниже.

В мастере общего доступа введите имя общего ресурса.
– Убедитесь, что имя общего ресурса совпадает с именем, указанным в указанном выше пути. (По умолчанию имя — DeploymentShare$), я оставлю его таким же
— Затем нажмите «Далее ».

Измените описание общего ресурса развертывания или оставьте значение по умолчанию. Я оставлю этот путь, так как это лабораторная среда.
– Нажмите «Далее».

В окне «Параметры» я выбераю все пункты.
Примечание. Если для вашей среды требуются другие входные данные, отметьте их.
Нажмите «Далее» .

В окнах сводки просмотрите это и нажмите «Далее».

Далее будут созданы общие ресурсы, как показано ниже.

В окне подтверждения нажмите «Готово».
– Общий ресурс развертывания успешно завершен, и MDT успешно настроен.
— Теперь нажмите «Готово».

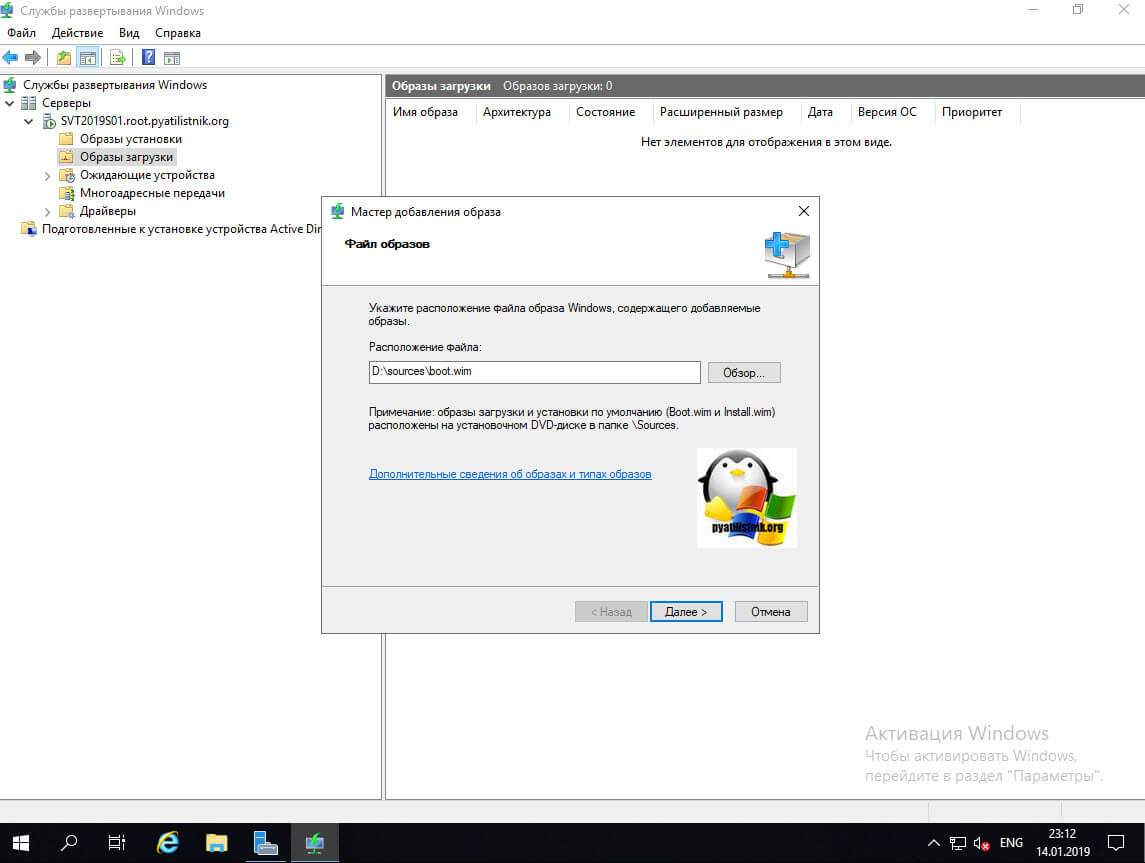
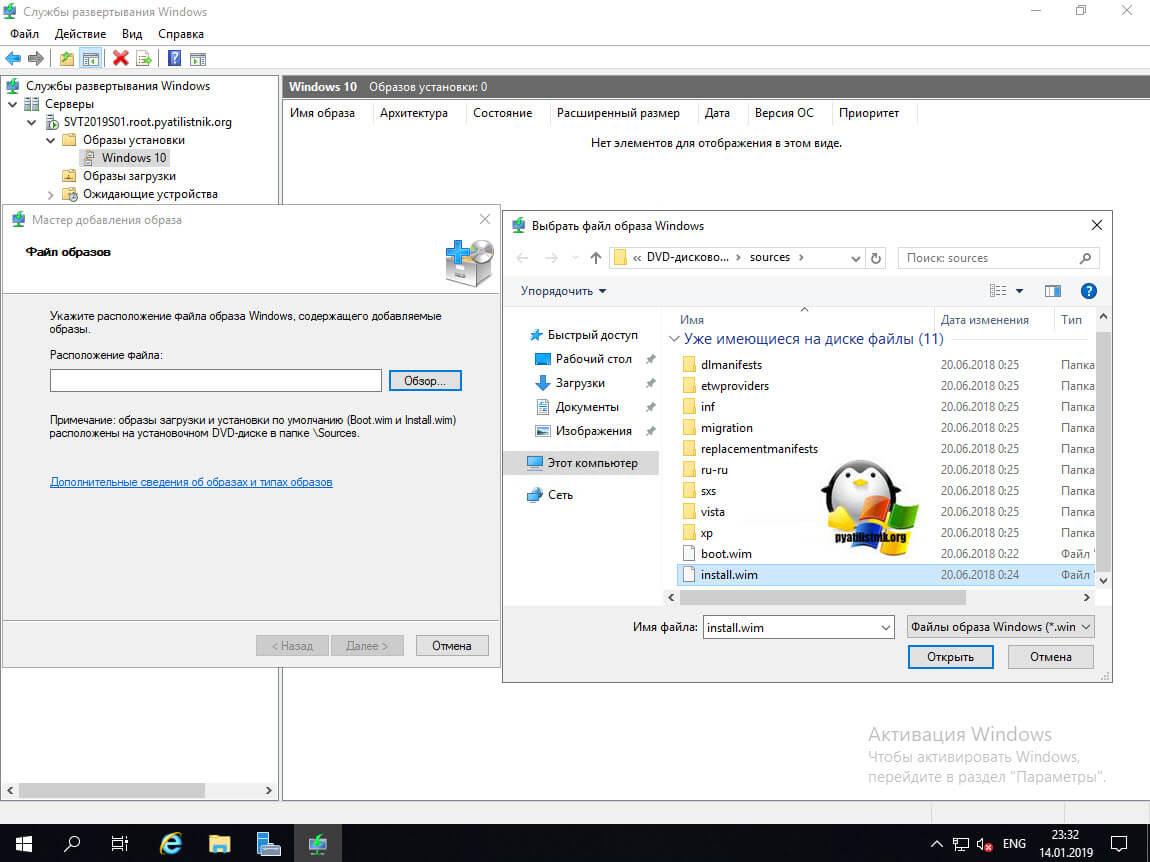
Прежде чем перейти к следующим шагам, убедитесь, что вы примонтировали образ ISO для дальнейшей его модернизации.
Добавляем образ операционной системы в MDT

В консоли Deployment Workbench щелкните правой кнопкой мыши папку операционной системы и
выберите «Импорт операционной системы» .
Общая папка E:DeploymentShare$ может переноситься на другие сервера простым копированием. Отключение и подключение осуществляется в консоли MDT.
Applications — приложения которые устанавливаются на операционную систему;
Operating Systems — операционные системы доступные для загрузочного образа;
Out-of-Box Drivers — драйвера (.inf);
Packages — пакеты обновлений безопасности, сервисные, языковые и т.д. (.cab и .msu);
Task Sequences — последовательность задач установки;
Selection Profiles — логические группы объединения контента;
Linked Deployment Shares — другие подключенные DeploymentShare с других серверов;
Monitoring — при включенной опции отображается ход выполнения установки на клиентах.

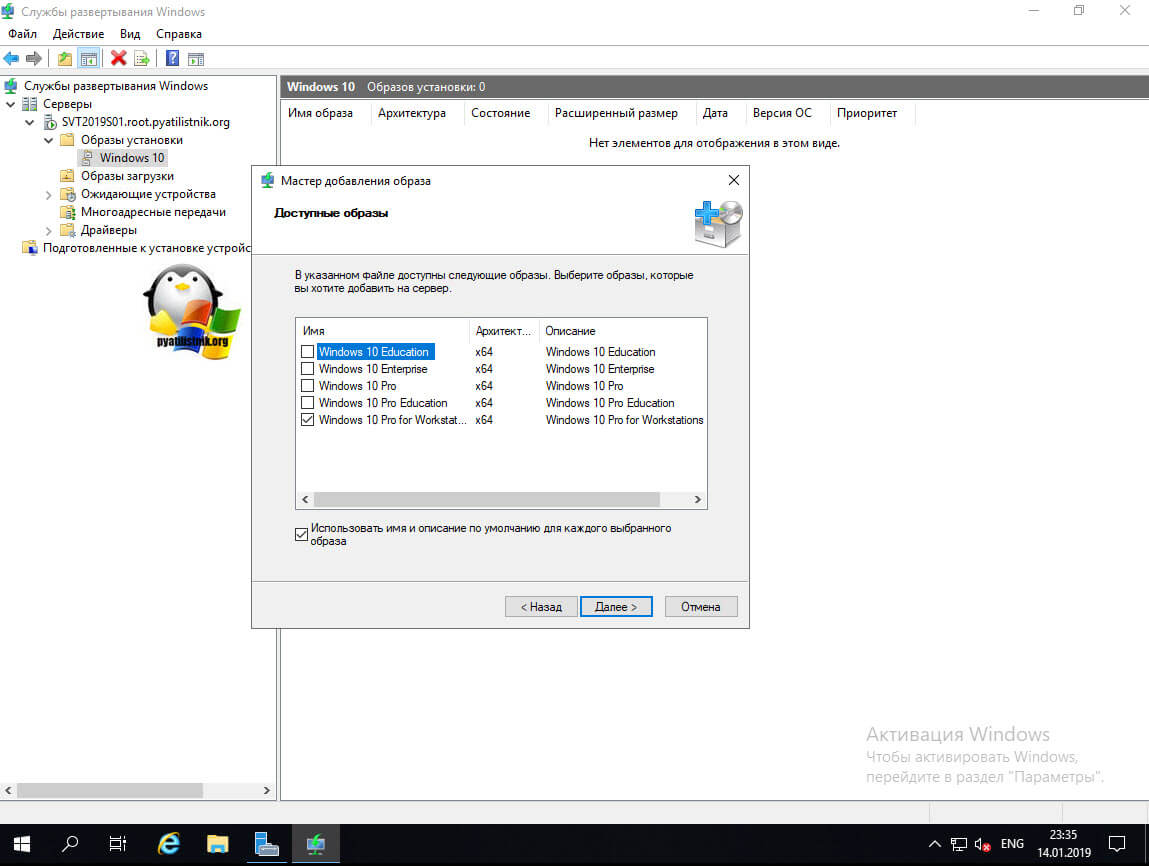
В мастере типов ОС
— нажмите «Полный набор исходных файлов», а затем — нажмите «Далее ».


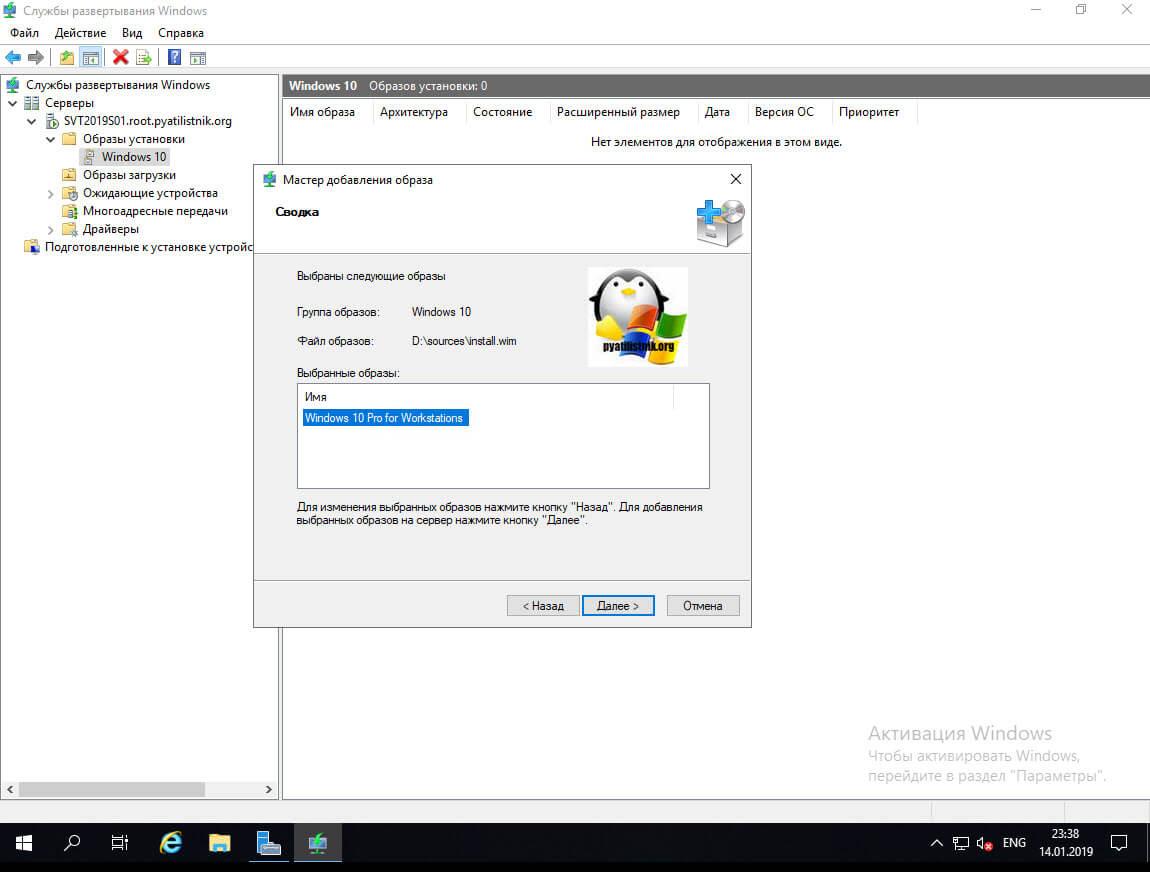
Введите имя каталога( К примеру операционную систему и название билда) назначения и нажмите «Далее» .

Просмотрите сводную страницу и нажмите «Далее» .

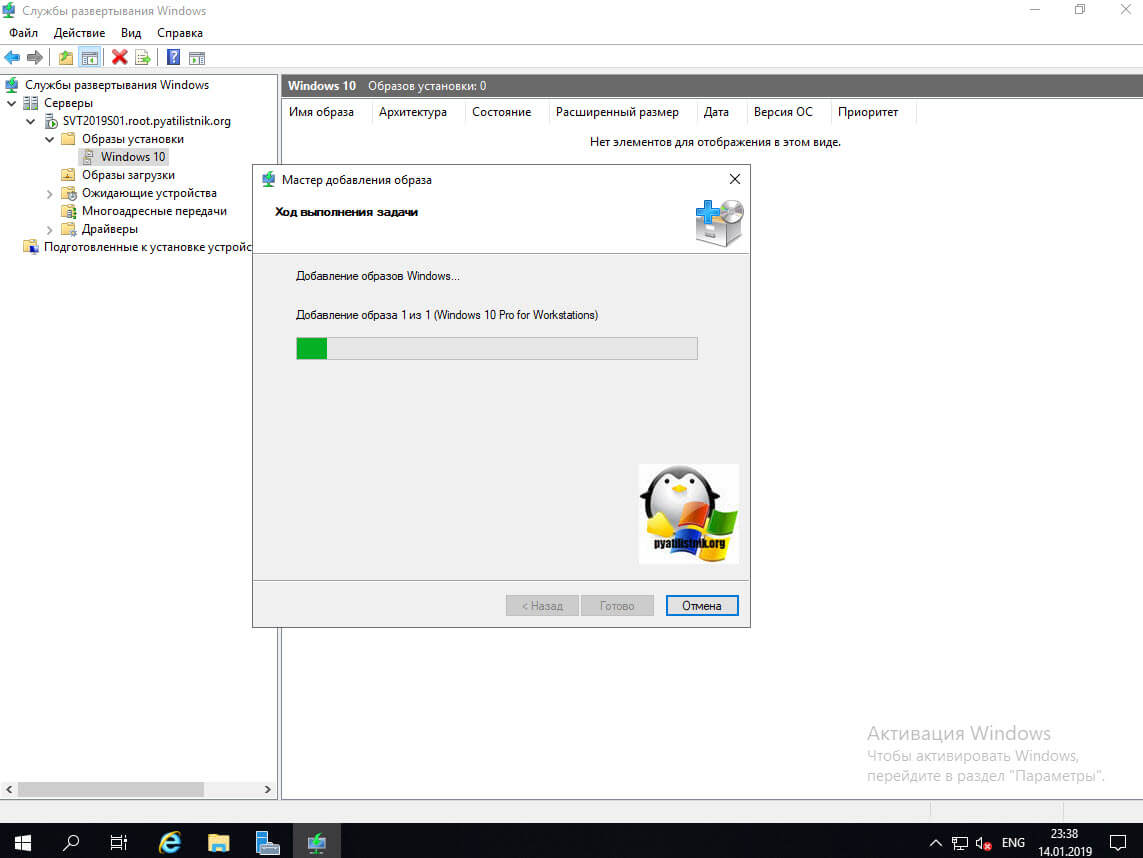
Это продолжит импорт файлов ОС. – На странице подтверждения нажмите «Готово», как показано ниже.


На приведенном ниже снимке экрана видно, что операционная система успешно импортирована.
Можно создавать папки, сортировать разные версии Windows , удалять не нужные редакции.

Добавляем приложения в MDT
– Щелкните правой кнопкой мыши узел приложения.

– В Типе приложения выберите приложение с исходными файлами

На странице сведений вам будет предложено ввести информацию о добавляемом приложении. Другие поля занимают важную информацию только тогда, когда требуется название приложения, что может быть полезно, когда установлены приложения для устранения неполадок в пути.

Теперь просмотрите местоположение, чтобы указать исходную папку для импорта в папку MDT.
– Я выбрал путь загрузки в качестве места для хранения этих файлов.

Укажите имя каталога, который необходимо создать. Пожалуйста, измените имя в соответствии с вашими потребностями.

Введите ключ для тихой установки. я подглядывал тут

А вот еще пример

Просмотрите сводную страницу, как показано ниже, чтобы узнать, что будет импортировано в MDT, и нажмите «Далее».

На странице подтверждения нажмите «Готово», как показано ниже.

На снимке экрана ниже видно, что приложение успешно импортировано.

Файл ответов MDT
Давайте создадим последовательность задач — в консоли Deployment Workbench —
щелкните правой кнопкой мыши Task Sequences , а затем — нажмите New Task Sequences

На странице «Общие настройки» введите следующую информацию ниже.

В мастере выбора шаблона — выберите стандартную последовательность клиентских задач и
— нажмите «Далее» .

Выберите из списка операционную систему, которую вы импортируете, и
нажмите «Далее».

В окне «Укажите ключ продукта» выберите «Не указывать ключ продукта в данный момент» и
нажмите «Далее ».

На странице настроек ОС введите следующую информацию
: если у вас есть домашняя страница в Интернете, введите ее здесь, а затем
— нажмите «Далее» .

В окне «Пароль администратора» укажите пароль и нажмите « Далее ».

Проверьте сводку и нажмите «Далее».

В окне подтверждения нажмите «Готово».

Как мы видим ниже, последовательность задач была успешно создана.

Настройка правил MDT
Настройка правил MDT, среды предустановки Windows и мониторинга
. Этот шаг очень важен, если вы не хотите выполнять большую ручную настройку позже.
– Щелкните правой кнопкой мыши общий ресурс развертывания MDT , а затем
– щелкните Свойства.


Примечание: Если вы оставите правило общего доступа к развертыванию MDT по умолчанию, вам придется много вводить вручную.
Если вы не хотите этого делать. Ниже приведен пример файла правил, используйте этот файл для ускорения процесса.
Файл Rules для ответов при установке операционной системы

[Settings]
Priority=Default
Properties=MyCustomProperty
[Default]
OSInstall=Y
SkipTaskSequence=YES
TaskSequenceID=Server_2016
OSDComputerName=W10RUMSC01#Right("%SerialNumber%",5)#
JoinDomain=pentagon.loc
DomainAdmin=alukashin
DomainAdminDomain=pentagon.loc
DomainAdminPassword=mypassworddomainaccount
MachineObjectOU=OU=Servers,OU=Moscow-CTD,OU=RU,OU=Europe,OU=BV,DC=eua,DC=bvcorp,DC=corp
AdminPassword=mynewpasswordserveraccount
HideShell=YES
SkipUserData=YES
TimeZoneName=N. Central Asia Standard Time
SkipTimeZone=YES
UILanguage=ru-RU
UserLocale=ru-RU
SkipLocaleSelection=YES
SystemLocale=ru-RU
SkipCapture=YES
SkipComputerName=YES
SkipDomainMembership=YES
SkipAdminPassword=YES
SkipProductKey=YES
SkipComputerBackup=YES
SkipBitLocker=YES
SkipSummary=YES
Мини описание
OSInstall=Y //установить операционную систему
JoinDomain=alx*.com //ввести в этот домен
DomainAdmin=alx - имя пользователя используемого для присоединения
DomainAdminDomain=alx*.com //домен пользователя
DomainAdminPassword= //пароль пользователя
AdminPassword= //пароль локального администратора на новой машине
HideShell=YES //скрыть Shell
SkipUserData=NO //пропустить шаг о решении сохранности пользовательских данных (если установка производится поверх существующей системы)
TimeZoneName=N. Central Asia Standard Time //временная зона
SkipTimeZone=YES //пропустить выбор временной зоны
UILanguage=ru-RU //выбор языка интерфейса
UserLocale=ru-RU //выбор местоположения
SkipLocaleSelection=YES //пропустить выбор месторасположения
SystemLocale=ru-RU //выбор языка для non-Unicode программ
SkipCapture=YES //пропустить захват установленной операционной системы
SkipComputerName=NO //пропустить ввод имени компьютера
SkipDomainMembership=YES //пропустить членство в домене
SkipAdminPassword=YES //пропустить пароль администратора
SkipProductKey=YES //пропустить ввод лицензионного ключа
SkipComputerBackup=YES //пропустить выполнение резервного копирования
SkipBitLocker=YES //пропустить настройку шифрования BitLocker
SkipSummary=YES //пропустить страницу с выводом результирующих настроек
EventService=http://server1:9800 //установить сервер назначения для логов
Файл BootStrap.ini для доступа к файловой шаре


[Settings]
Priority=Default
[Default]
DeployRoot=SERVER1DeploymentShare$
UserID=alukashin
UserDomain=pentagon.loc
UserPassword=mydomainpassword
KeyboardLocale=en-US
SkipBDDWelcome=YES
Мини описание
[Settings]
Priority=Default
[Default]
DeployRoot=\SRV04DeploymentShare$
UserID=alx //имя пользователя для доступа к папкам Deployment Share
UserDomain=alx*.com //домен пользователя
UserPassword= //пароль пользователя
KeyboardLocale=en-US //выбор языка
SkipBDDWelcome=YES //пропустить начальную страницу установщика
Если вы после настройки файлов ответа меняете их снова, то вам при Update Deployment Share нужно выбирать Optimize the boot image updating process
Нажмите Apply
Обновите общий ресурс развертывания. Чтобы обновить общий ресурс развертывания, выполните следующие действия.
– Щелкните правой кнопкой мыши общий ресурс развертывания MDT, а затем
– нажмите «Update Deployment Share », чтобы создать файл Windows 10 LiteTouchPE_x64.wim.

В окне «Параметры»
— нажмите «Оптимизировать процесс обновления загрузочного образа», а затем
— нажмите «Далее» .


Как мы видим, шаг процесса обновления настроек общего доступа будет продолжен
. Примечание. Этот процесс займет некоторое время.


После обновления папки Deployment Share будет создан WIM-файл LiteTouch .
– Эти файлы будут расположены в загрузочной папке (C:DeploymentShareBoot ) созданного вами общего ресурса развертывания.
Добавляем Lite-Touch образ на WDS
Чтобы добавить образы Lite-Touch в WDS, выполните следующие действия. На WDS откройте службы развертывания Windows (WDS),щелкните правой кнопкой мыши загрузочные образы, а затем щелкните Добавить загрузочный образ

Откроется мастер добавления изображений, как показано ниже.
– Нажмите «Обзор», затем выберите файл LiteTouch в папке загрузочных файлов на общем ресурсе развертывания, как показано ниже.


Конфигурация DHCP для PXE

Tips
При загрузке по PXE , идет загрузка образа с mdt , появляется окно Microsoft Deployment Toolkit , через некоторое время , не идет считывание ответов , а просто появляется окно cmd
Это из за того , что у вас уже установлена система и вам нужно форматировать жесткий диск через diskpart
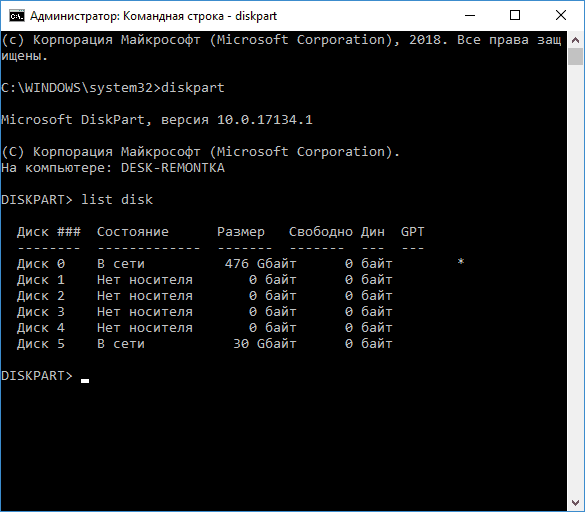
- diskpart
- list disk (вы увидите список подключенных физических дисков, вам нужен номер диска, который будет форматироваться, у меня это 5, у вас будет свой).

- select disk 5
- clean
Windows Deployment Services(WDS) is the key of deploying automated-based installations of standard or custom images to servers in a network. WDS server store the installation files and help you to manage the boot and operating system files used in the network installations. Like capturing image firstly, then deploying them on client computers with all drivers and applications you need for your network. Update operating system, drivers and applications then take an image of the template computer. The computer you take capture image from is called template computer. Sysprep is the tool that you can image through from a template computer and store the image on WDS server to deploy on WDS clients.
WDS makes your life easy. You don’t need to move from one room to another room deploying operating system with needed softwares and drivers. Administrators can make schedule for deployment. Next day when you come and login to your computer, you see the new operating system installed. In addition, drivers and softwares have been installed.
These are some other methods of deploying operating system on client computers:
- DVD: You can go to computers one by one with a shiny disk in hand and install operating system on. For an enterprise network you need lots of disks and it takes a long time. This method can be implemented on
- Bootable Flash memory: You can install operating system using bootable flash memory. When the flash memory is bootable, you copy all operating system files in, and plug the flash to computers. For the process you need lots of flash memories.
Topics covered in this post:
- WDS Advantages
- WDS Images
- Hardware Requirements
- Prerequisites
- Install WDS role Graphically
- Installation WDS role through PowerShell
- WDS Basic Configuration
- Add Install Image
- Add Boot Image
- Conclusion
WDS Advantages:
- Install Windows 7, 8, 8.1 or 10 remotely.
- You can install Windows with needed softwares and drivers simultaneously.
- Install Windows on large number of computers at one time.
WDS Images
WDS uses four image: Install image, Boot image, Discover image and Capture image. The minimum of requirement is boot and install images.
- Install Image: It is the actual operating system. It is found in the operating system mediasourcesinstall.wim.
- Boot Image: It is Windows PE image. You can find it the operating system mediasourcesboot.wim.
- Discover Image: This image is used by WDS clients which don’t support PXE boot. You create the image using boot.wim image from media file and Windows Assessment Tool Kit (ADK) to create a discover image.
- Capture Image: This image is custom install image. You capture the image from a template computer using Sysprep, and deploy the image on client computes.
Hardware Requirements
- RAM: minimum of 2GB
- Processor: 64-bit processor
- Hard Drive Space: At least 6GB
Prerequisites
- AD DS: The deployment server must be either member server (joined to a domain) or a domain controller. If you want to install (AD DS), read this article: Install Active Directory Domain Services (AD DS) on Windows Server 2016
- DNS: An active DNS (Domain Name Services) is required for Preboot eXecution Environment (PXE). Refer to this link for completely step by step guide. Install DNS Server on Windows Server 2016 fully step by step
- DHCP: It is needed for supporting PXE boot. Refer to this link for completely step by step guide. Install DHCP Server on Windows Server 2016 step by step
- NTFS volume: The volume which contains images must be NTFS format.
- Credentials: Make sure that you have logged on with an account that have permissions to do this tasks.
Install Graphically
Undoubtedly the easiest way of installing a role is graphical interface.
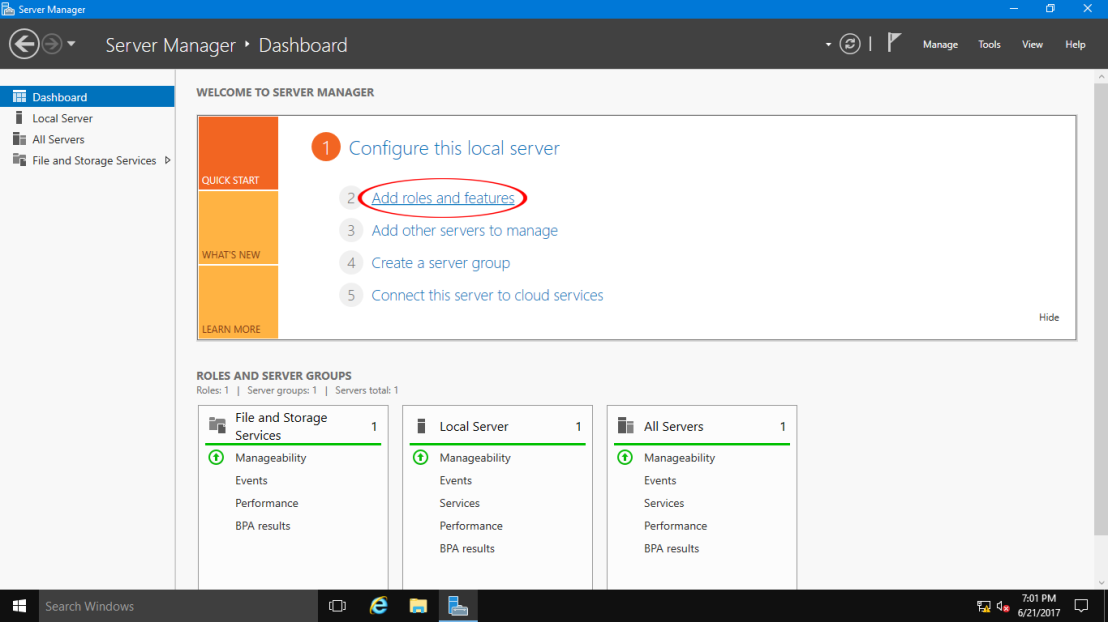
1. First of all press the Start Menu button. Then select the Server Manager.

2. Click on Add roles and features for installing WDS role.

2. Skip the Before you begin page. Leave the Select a server from the server pool checked. From Server Pool select the server which you want to install the role on. Click on Next button.

3. In the Select server roles page, select Windows Deployment Services. A windows pops up and asks you to add some features for management. Click on Add Features button then click on Next button.

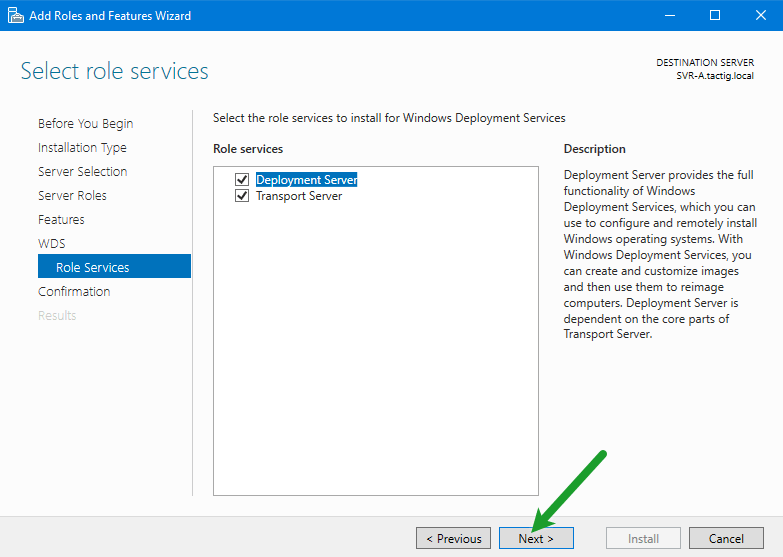
4. You have got nothing to do in Features page. In the WDS page, some essential information is written. In Role Services page you got two options:
- Deployment Server: It is the deployment server with management tools.
- Transport Server: It is WDS core service, but doesn’t include management tools. You need to use scripts for every task that you want to do. Therefor you need to select both of them.
Click on Next button.
5. In the Confirm installation selections page, click on Install button. No reboot is needed after the installation.

Installation through PowerShell
PowerShell is a powerful tool in Windows Server 2016. You need to know how to use it.
1. Press Windows button and select Windows PowerShell. Make sure you run PowerShell as an administrator. Right-click on and click Run as administrator. Also you can run PowerShell as an administrator with command. Open PowerShell as standard user and type this command to run it as an administrator: Start-Processs PowerShell.exe -Verb RunAS. Then press the Enter button.

2. Install-WindowsFeature is a command for installing roles on server. You need to run this command: Install-WindowsFeature -Name WDS -ComputerName <Server_Name> -IncludeManagementTools
After -ComputerName parameter, type your server’s name. In my case it is SVR-A. Then press the Enter button. While WDS installed successfully on your server, the summary would be shown to you. Saying that role installed successfully and no reboot is needed.
The -IncludeMnagementTools parameter installs the management tools. If you don’t type the parameter you won’t have the management tools. It means you just have installed the core services.

WDS Basic Configuration
Finally role was installed. We need to configure WDS server and use it across the network.
1. In Server Manger console, in the menu bar, click on the Tools. Then click on Windows Deployment Service. In addition, you can open it through Run. In the Run just type wdsmgmt.msc and press Enter button.

2. Windows Deployment Services console is opened. But the WDS server is not configured yet. For the purpose, right-click WDS server below the Servers. Select Configure Server.

3. In Install Options page two options are visible. Select the Integrated with Active Directory option if your WDS server is a member of a domain. If it is standalone server, select the Standalone server option. Click on Next button.

4. Select the folder in which you want to store WDS server files, like images and drivers. Click on Browse button and specify the path. Click on Next button.

5. In the Proxy DHCP Server page, leave both Do not listen on DHCP and IPv6 ports and Configure DHCP options for Proxy DHCP options selected. Click on Next button.

6. In PXE Server Initial Settings page, select Respond to known-client computers. This option is secure. Click on Next button.

7. Finally we are done. Below the green line we got a message which says that this serve still can’t respond WDS clients. Finish the wizard.

8. At the very end we can start the WDS server. WDS server is just configured not started. Right-click on WDS server which in my case is SVR-A, hover your mouse point on All Tasks, then click on Start. Soon after the WDS server would be started.

Add Install Image
1. Before you add install image, create some groups for different operating system install images. Before you add an install image, you need to an image group. You can easily manage your image in groups. Right-click on Install image. Click on Add Image group. A small windows opens, type name of the group inside and click on Ok button.

2. Now which groups are created, right-click on the group which you want to add install image in. Select Add Install Image option.

3. Specify the path. The path is simple: Whatever is your file media letter:sourcesinstall.wim. In my case path is E:sourcesinstall.wim. Click on Next button.

4. In the Available page of the wizard, select the install images that you need for your network. I need Windows 10 Pro for my network. While done, click on Next button.

5. It takes a while, when WDS server copies install.wim image from media file. At the end click on Finish button to close the wizard.

Windows 10 Pro Install image was added to WDS server.

Add Boot Image
1. Right-click on Boot Images and click on Add Boot Image.

2. Specify path of the file which contains the image. Install and boot images located in the same folder with Install image. Boot image path: media file:sourcesboot.wim. In my case path is E:sourcesinstall.wim.

3. Name the image. Select a friendly name for the image you can recognize. Click on Next button.

4. Image was added to the server. Finish the wizard by clicking on Finish button.

Microsoft Windows Setup (x64) Boot Image was added to WDS server.

Conclusion
Finally we are done with WDS basic configurations. For any kind of question feel free end leave a comment below the post. Thank you for reading the post.
what is Windows Deployment Services?
With the increase in the number of information technology (IT) solutions in organizations, the number of physical and virtual server images have also increased. Due to this situation, operating system deployments take longer to complete and require valuable organizational resources. As a result, companies are looking for new ways to automate the server deployment process.
Virtual machine environments have become ubiquitous in the datacenter, and having the ability to deploy virtual server roles and workloads while deploying operating systems is an important part of the deployment process.
It provides the following functions:
• Allows you to perform network-based operating system installations.
• Simplifies the deployment process.
• Supports deployment to computers that have no installed operating system.
• Provides end-to-end deployment solutions for both client and server computers.
• Uses existing technologies, such as Windows PE, Windows image file (.wim) and virtual hard disk (.vhd and .vhdx) image files, and image-based deployment.
Infrastructure Requirement :
- 1 DC SERVER (DC-CLOUD) ADDS, DNS, DHCP, WDS.
- 1 NewhelpTech Server PC No Operating System
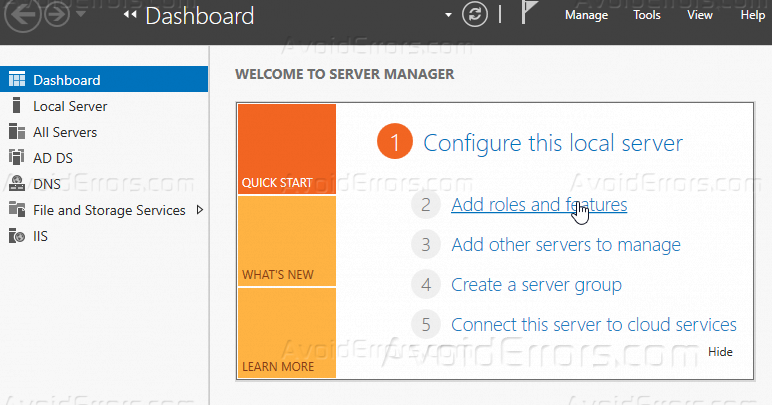
1 – Open Server Manager and then on the Dashboard click Add Roles and Features.
2 – Next, In the Add Roles and Features Wizard box, click Next.

3 – On the Select installation type page, verify that you choose Role-Based or feature-based installation then click Next.

4 – Now select desired server you’d like to install Windows Deployment Services on.

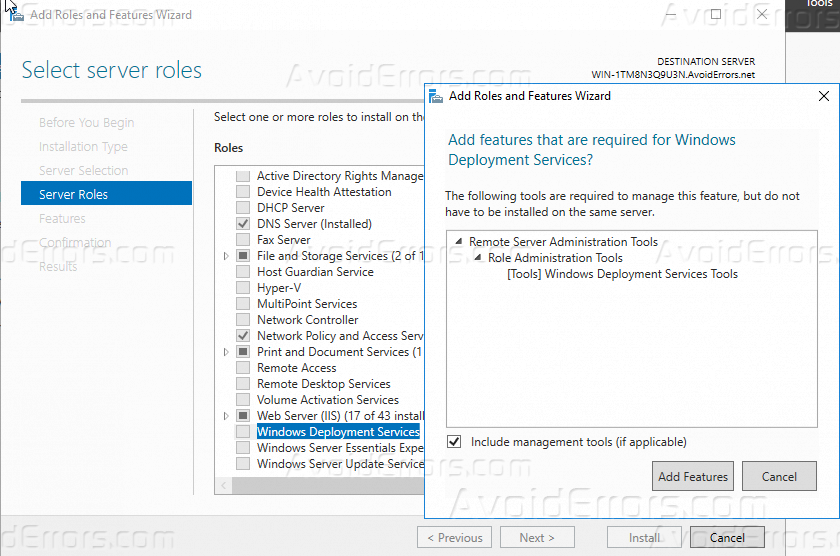
5 – On the Select server roles page, select the Windows Deployment Services Click Add Features in the popup window then click Next.


6 – On the Select features box, click Next.
7 – On the WDS box, review the information presented, and then proceed with Next.

8- On the Select role services box, click Next.

9 – On the Confirm installation selections box, click Install.

10 – Once installation of WDS successful, just click Close.

11 – Next step, we need to configure Windows Deployment Services, open your Server Manager, click Tools, and then click Windows Deployment Services.

12 – on the Windows Deployment Services console, double click Servers, then right-click DC-CLOUD.Windows.ae, and then click Configure Server.

13 – On the Before You Begin box, click Next to proceed.

14 – On the Install Options page, verify that you choose Integrated with Active Directory and then click Next.

15 – On the Remote Installation Folder Location page, you can accept the default location which is C:RemoteInstall and then click Next.

16 – on the System Volume Warning dialog box, click Yes.

17 – Next, on the PXE Server Initial Settings box, click Respond to all client computers (known and unknown), and then click Next, please wait for few second for the process to complete.


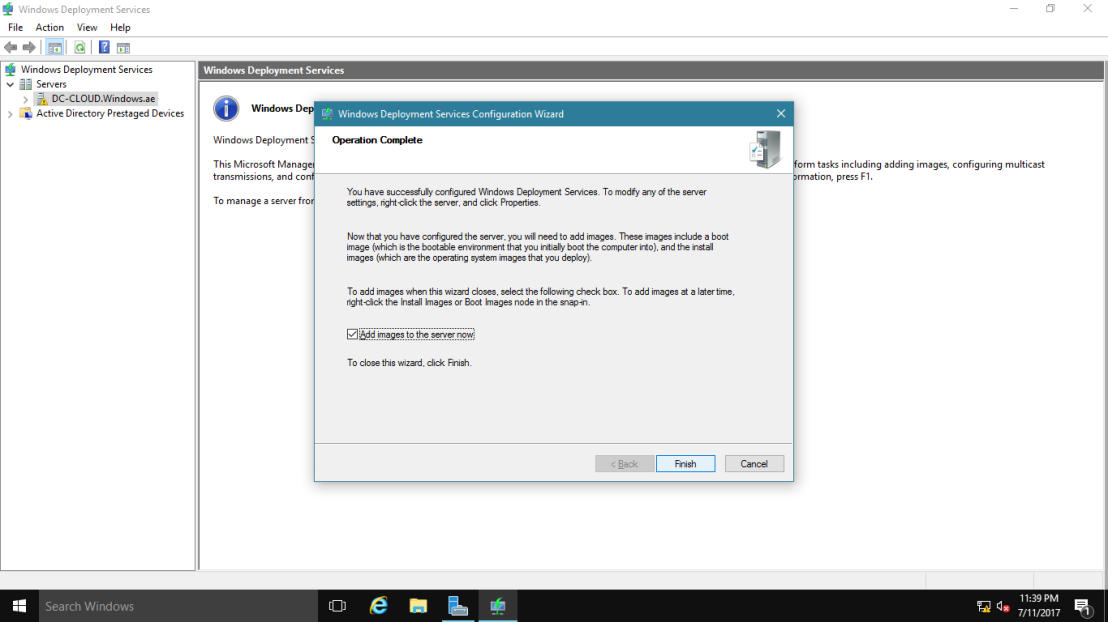
18 – Next, on the Operation Complete box, please clear the Add images to the server now check box, and then click Finish. (I will manually add the Server in the next step).
19 – Before we proceed, please make sure that you already insert your Windows Server 2016, either DVD and ISO format if you are using Hyper-V.

20 – Our next step is to add a boot image into WDS console, so in Windows Deployment Services console, double click DC-CLOUD.Windows.ae and then right-click Boot Images, and then click Add Boot Image.

21 – On the Add Image Wizard, on the Image File page, click Browse, then in Select Windows Image File box, double-click DVD Drive (D:), double-click sources folder, and then double-click boot.wim.

22 – On the Image File box, verify the File Location which is D:sourcesboot.wimand then click Next.

23 – On the Image Metadata box, click Next.

24 – On the Summary box, click Next.

25 – On the Task Progress page, click Finish.

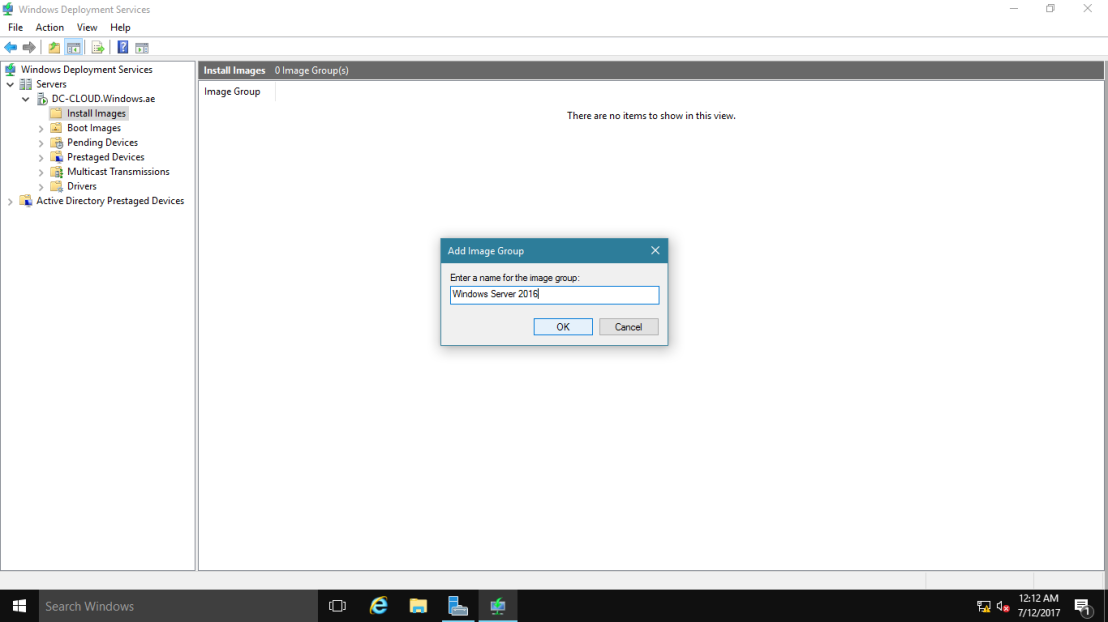
26 – Once you successfully completed add a boot image into WDS, next you need to add an install image into WDS, so in the WDS console, right-click Install Images, and then click Add Image Group.

27 – In the Add Image Group box, type Windows Server 2016, and then click OK.
28 – Next, on the WDS console, right-click Windows Server 2016, and then click Add Install Image.

29 – In the Add Image Wizard box, browse to D:sourcesinstall.wim then click Next.

30 – On the Available Images box, select Windows Server 2016 SERVERDATACENTER only, and then click Next to proceed.

31 – On the Summary box, click Next and wait for few minutes for the process to be completed.

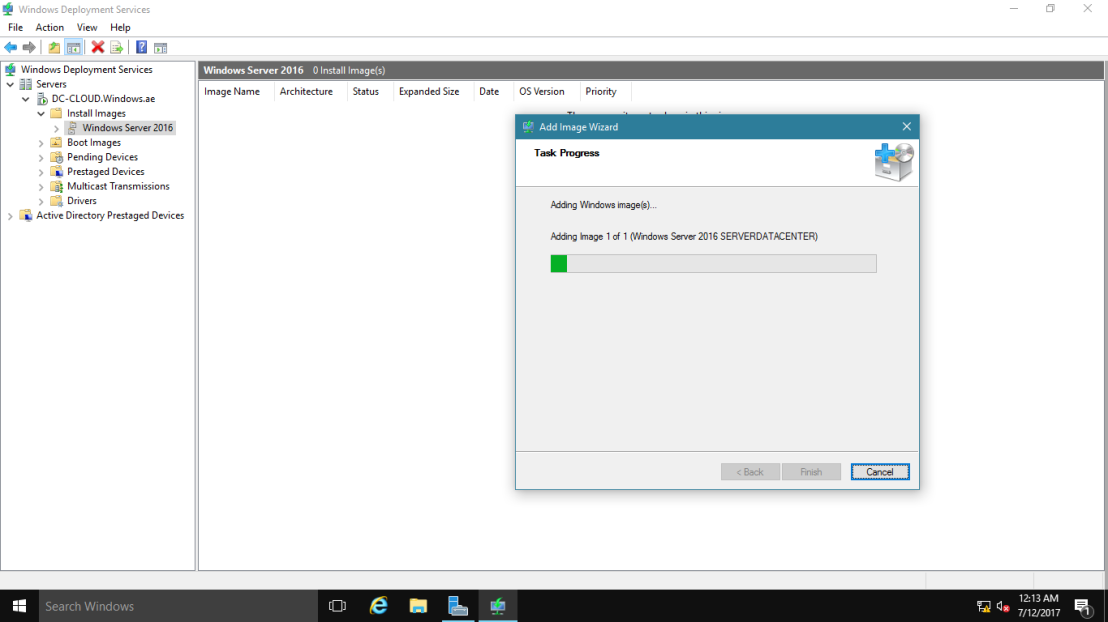
32 – On the Task Progress box, click Finish.

33 – In WDS, right-click DC-CLOUD.Windows.ae, and then click Properties.

we need configure Administrator approval for this deployment to proceed, meaning is I only wants my Sifad NewHelpTech Administrator to deploy this server.
34 – Click the PXE Response tab, and then Select the Require administrator approval for unknown computers check box. On the PXE Response Delay, I choose 3 seconds, and then click OK.

35 – Next, open Windows PowerShell, and type this command :
WDSUTIL /Set-Server /AutoAddPolicy /Message:”Sifad NewhelpTech Server Admin is authorizing this request. Please wait.”


Next, return to our WDS server, what we will do now is to configure a WDS server for multicast transmission (Multi-casting enables you to deploy an image to a large number of client computers without consuming excessive network bandwidth).
36 – In WDS, right-click Multicast Transmissions, and then click Create Multicast Transmission.

37 – Next, on the Transmission Name box, in the Type a name for this transmission field, type NewHelptech Blog Server 2016, and then click Next.

38 – On the Image Selection page, in the Select the image group that contains the image list, click Windows Server 2016, then in the Name list, click Windows Server 2016 SERVERDATACENTER, and then click Next.

39 – On the Multicast Type box, verify that Auto-Cast is selected, and then click Next then Click Finish.


40 – Next, if you using VM as a demo, make sure that you configure the VM for Pre-Boot EXecution Environment (PXE) Booting in your Hyper-V, for example here is my own settings.

41 – Next, turn on the new Server that you want to install the Server 2016 using WDS, in my demo my server will be NewHelpTech Server, when the server turn on, review the Client MAC ADDR, Client IP and Gateway IP, When prompted, press F12 for Network Service Boot.

42 – now you should see the admin approval message.

43 – Now, return to WDS Server, In WDS, click Pending Devices, right-click the pending request, and then click Approve.
 In the Pending Device dialog box, click OK.
44 – Next, go to the NewHelpTech Server 2016 and you should see now our NewHelpTech Server 2016 is loading files from the WDS server.

45 – If the loading files successful, WDS Windows Setup box will appear and you can proceed by clicking Next.

46 – Type a User Name and Password on DC-CLOUD Server.

47 – Next, on the Select the operating system you want to install, you should notice that Windows Server 2016 SERVERDATACENTER is listed, then click Next to proceed with installation.


 Startup your Server System.
that’s all for now.., any Doubts type a commend.. 🙂
In this article, we are going to learn ‘Step by Step Configure WDS Server (Windows Deployment Services) On Windows Server 2016’. Due to the increase in information technology (IT) solutions in organizations, the number of actual and virtual server images has also increased. Due to this situation, the deployment of operating systems takes longer to complete and requires valuable institutional resources. As a result, companies are looking for new ways to automate the service delivery process. Virtual machine environments have become ubiquitous in a datacenter and having the ability to deploy virtual server roles and workloads while deploying an operating system is an important part of the application process.
 On Windows Server 2016")
Step by Step Configure WDS Server (Windows Deployment Services) On Windows Server 2016
Windows Deployment Services (WDS) is a service role that allows you to deploy the Windows operating system to a PXE-enabled client. You can install a Windows operating system on a PXE-capable client without the need for physical media. Besides, it allows you to deploy a Windows operating system to multiple clients at the same time. In this way, reducing the entire installation time. WDS makes your life easier. You do not have to go to another room in the same room to deploy the operating system with the necessary software and drivers. Administrators can schedule schedules for deployment. The next day when you come in and log in to your computer, you will be installing a new operating system. In addition, drivers and software have been installed.
WDS Functions:
• Allows you to install a network-based operating system.
• Facilitate the process of deployment.
• Supports deployment of computers without any installed operating system.
• Provide end-to-end deployment solutions for clients and server computers.
• Use existing technologies like Windows PE, Windows Image File (.wim) and virtual hard disk (.vhd and .vhdx) image files, and image-based deployment.
Hardware Requirements:
- RAM: minimum of 4GB
- Processor: 64-bit processor
- Hard Drive Space: At least 10GB Or Depend On OS ISO and Software’s Size.
Prerequisites to Configure WDS Server:
Before configuring the WDS server, your server must be sure that the following requirements are met.
1)Changed Windows Server Hostname.
2)Turn off Windows Server Firewall.
3)Set Static IP on Windows Server.
 On Windows Server 2016")
Set Static IP on Windows Server
4)Install and Configure DHCP Role.
You have learned in the previous article that ‘How To Configure DHCP Server Role on Windows Server 2016‘ Now let’s configure the DHCP Scope for this. Now go to Server Manager and right-click on the DHCP server and click on DHCP Manager.
 On Windows Server 2016")
Open DHCP Manager
Also Read – How To Configure DHCP Server Role on Windows Server 2016.
Now firstly expand the domain, then right-click on IPV4 and create a new scope.
 On Windows Server 2016")
New Scope
The new scope window will open, then click on Next for further process.
 On Windows Server 2016")
New scope window
Enter a scope name to identify which is the scope, and then click on Next.
 On Windows Server 2016")
scope name
Set the IP address range as the snapshot below. As you set up the IP address range, the IP address will be assigned to the client in the same range. Also, give the Length and Subnet mask and click on Next.
 On Windows Server 2016")
IP address range
If you want to exclude the IP address set in the DHCP server, you can add it to the IP address ‘Exclusions and Delay‘. I’m not adding the IP address, if you want to, you can add the IP address.
 On Windows Server 2016")
Exclusions and Delay
The default 8 days in lease duration is set, which means that the client can use an IP address for 8 days. If you want to change the lease duration, you can change it.
 On Windows Server 2016")
Lease Duration
If you want to have options like DNS servers and WiNS, click the yes button. Then click Next.
 On Windows Server 2016")
Click On Yes
Set the IP address of these routers or default gateways, then click on the add button.
 On Windows Server 2016")
Routers or default Gateways
Enter the DNS server IP addresses that you would like your client to use
 On Windows Server 2016")
DNS server IP addresses
If you do not have a DNS server in the network, use the WINS server.
 On Windows Server 2016")
WINS Server
You can see that all the steps are done, now just click yes to activate the created scope.
 On Windows Server 2016")
activate scope
The created new scope has been completed. Now click Finish.
 On Windows Server 2016")
Finish
Now you can see in the following snap New Scope has been activated.
 On Windows Server 2016")
New Scope activated
Also Read – Configuration Of DHCP Reservation On Windows Server 2016.
Follow the below Steps To Install and Configure WDS Server (Windows Deployment Services) On Windows Server 2016:
Installation of WDS:
Step 1. Open Server Manager.
Step 2. Click Add Role and Features.
Step 3. Read the important requirements and try to meet them (this includes a strong password for the administrator account, stable IP configuration, and installation of the latest security updates). Click next to continue.
Step 4. Choose Roll-based or Feature-based installation and click Next.
Step 5. Select the destination server for WDS from the server pool and click Next.
 On Windows Server 2016")
Select destination server
Step 6. Select Windows Deployment Services from the server role. When you check that option, a new window will pop up. Click Add Features.
Step 7. Click Next two times.
 On Windows Server 2016")
Select Windows Deployment Services
Step 8. Click Next (Leave default selection of both deployment and transport server)
 On Windows Server 2016")
Deployment and Transport Server
Step 9. Click Install
Step 10. Wait for the installation to complete. It may take several minutes to close.
 On Windows Server 2016")
WDS Role Installation Complete
Configuration of WDS:
Step 1. Open Server Manager Dashboard. Tools -> click Windows Deployment Services.
Step 2. Right-click on your WDS server and then click Configure Server.
 On Windows Server 2016")
Configure Server
Step 3. Read the pre-requisites and click next.
Step 4. Choose “Integrate with Active Directory“, If you have configured AD on my network. If you do not have AD configured and you are configuring WDS in standalone mode, select the standalone server. Click Next
 On Windows Server 2016")
Standalone Server
Step 5. Provide a route to your NTFS drive where you want to store a boot image, install images, PXE boot files and WDS management tools. Click Next.
 On Windows Server 2016")
Remote Installation Folder Location
Step 6. I have configured DHCP on the same WDS server. So check both boxes and click next.
 On Windows Server 2016")
Proxy DHCP Server
Step 7. Choose ‘Respond to all client computers‘ (known and unknown).
 On Windows Server 2016")
PXE Server Initial Settings
Step 8. Wait for the wizard to finish (this may take a few minutes to complete).
Step 9. Click Finish.
 On Windows Server 2016")
Finish Windows Deployment Services
Add Install Images to WDS:
When you configure Windows Deployment Services on your server, the next step is to add an image to your WDS to the client machine. There are two types of images that you need to add. There is an install.wim (actual Windows installation files) and the other is boot.wim (used to boot client machines).
Step 1. Open windows deployment services console.
Step 2. Expand your server.
Step 3. Right-click on Install Images and then click Add Install Image.
 On Windows Server 2016")
Windows deployment services console
Step 4. Provide the image group name and then click Next.
 On Windows Server 2016")
Image Group
Step 5. Browse to the source folder (located on your Windows installation CD/DVD or local hard drive).
 On Windows Server 2016")
Browse to the source folder
Step 6. Choose the install.wim file and click Next.
 On Windows Server 2016")
Choose the install.wim file
Step 7. Click Next.
 On Windows Server 2016")
Click Next
Step 8. Select Image and Click Next.
 On Windows Server 2016")
Select Image
Step 9. Check Summary and Click Next.
 On Windows Server 2016")
Check Summary
Step 10. Wait for the file to be copied. (This can take several minutes to complete).
Steps 11. Click On Finish.
 On Windows Server 2016")
Image File Copied
Steps 12. As you can see on the output above we have successfully added the install.wim Image File.
 On Windows Server 2016")
Image Added In WDS
Add Boot Image to WDS:
Step 1. In the Windows deployment services console, right-click boot image.
Step 2. Click on the Add boot image.
 On Windows Server 2016")
Add Boot Image
Step 3. Browse to the source folder of your CD/DVD and locate boot.wim.
 On Windows Server 2016")
Choose the boot.wim file
Step 4. Click Next.
 On Windows Server 2016")
Click Next.
Step 5. Rename Image File and Click Next.
 On Windows Server 2016")
Rename Image File and Click Next
Step 6. Check Summary and Click Next.
 On Windows Server 2016")
Check Summary
Step 7. Wait for the file to be copied. (This can take several minutes to complete).
Steps 8. Click On Finish.
 On Windows Server 2016")
Image File Copied
Steps 9. As you can see on the output above we have successfully added the boot.wim Image File.
 On Windows Server 2016")
Image Added In WDS
Configure DHCP Scope Options:
Enabling bare-metal client systems on Windows Deployment Services (WDS) PXE-boot to kickstart the process of deploying Windows PE on a client system and running the Windows system. In some WDS environments, you might want to configure the following DHCP options to direct your PXE clients to the correct network boot file.
Steps 1. Now go to Server Manager and right-click on the DHCP server and click on DHCP Manager.
Steps 2. Right, click on Scope Options and click Configure Options.
 On Windows Server 2016")
Configure DHCP Scope Options
Steps 3. Add Boot Server Hostname or IP in cope Options.
66 = DNS name of the WDS server
 On Windows Server 2016")
Boot Server Hostname
Steps 4. Option 67 Where can you get the boot file name to configure? This name will be something similar to bootx64wdsnbp.com where this route corresponds to the Remount folder on the WDS server.
67 = boot file name
 On Windows Server 2016")
Boot file Name
Steps 5. Finally, we can start the WDS server. The WWS server has not been configured only. Right-click on the WDS server. hover your mouse over all the tasks, then click Start. Soon after the WDS server starts.
Note – Connect LAN with WDS server to switch or the client computer and start WDS server.
 On Windows Server 2016")
Start the WDS server
As you can see on the output above we have successfully started the WDS server.
 On Windows Server 2016")
WDS Started
Also Read – Step by Step Configure MDT Server (Microsoft Deployment Toolkit) on windows server 2016
Deploy Windows with WDS:
Steps 1. The client will want to install the Windows os of the system. First of all, connect the first WDS server to the client computer with a LAN cable. To confirm the same you can use the DHCP Address Lease.
 On Windows Server 2016")
DHCP Address Lease
Steps 2. Boot Client System With Network.
 On Windows Server 2016")
Boot Client System With Network
Steps 3. Check WDS IP and Hostname and press F12 to Deploy Windows.
 On Windows Server 2016")
Network Service Boot
The machine is booting via network and windows os files loading starts.
 On Windows Server 2016")
The machine is booting via network
Steps 4. Select your location and Keyboard Language.
 On Windows Server 2016")
Select Keyboard Language
Steps 5. Enter WDS Credentials and connect WDS.
 On Windows Server 2016")
WDS Credentials
Now you can install windows on a client computer with a normal windows installation process.
Also Read – System Requirement and Installation Windows Server 2016.
That’s all, In this article, we have explained step by Step Configure WDS Server (Windows Deployment Services) On Windows Server 2016. I hope you enjoy this article. If you like this article, then just share it. If you have any questions about this article, please comment.
Обновлено 19.01.2019
Доброго времени суток. Уважаемые читатели и гости IT блога Pyatilistnik.org. В прошлый раз я с вами разобрал процесс установки Windows Server 2019, после которого мы произвели ее настройку и оптимизацию. Теперь я бы хотел из данного сервера сделать сервис по захвату и установке подготовленных образов операционных систем, для оптимизации и ускорения ввода в эксплуатацию рабочих мест для сотрудников. Для этого как раз и есть роль WDS (Windows Deployment Services), которую мы проинсталлируем и настроим для эксплуатации.
Что такое Windows Deployment Services
Перед тем как мы все установим и настроим, я бы хотел вам привести описание и назначение WDS-сервера. WDS (Windows Deployment Services) — это специальная роль «Службы развертывания Windows» в операционных системах Windows Server, которая необходима для автоматизации установки различных операционных систем Windows по сети посредством протокола PXE. Позволяет одновременно подготавливать хоть 10-20 рабочих и более, без участия администратора, так как позволяет все автоматизировать. В следствие чего вы экономите огромное количество времени. Вот список плюсов:
- Установленные, последние обновления
- Необходимый набор драйверов, под каждое железо
- Предустановленный софт, для каждого отдела
- Файл ответов, для автоматической установки системы на чистые компьютеры
В более крупных организациях, для таких целей, есть более функциональный и сложный продукт SCCM, так что WDS, это его младший брат, для компаний средней и маленькой численности
Перед инсталляцией на пустые рабочие станции, позволяет создать эталонные образы, где вы заранее можете установить все обновления или весь компьютерный софт, который должен присутствовать у конечного пользователя. Ранее я вам уже писал целый цикл статей об автоматизированной установке рабочих мест и даже про отдельный PXE сервер на LInux, который позволял устанавливать помимо Windows, еще и Linux и даже Vmware ESXI, так что советую ознакомиться.
Установка службы WDS
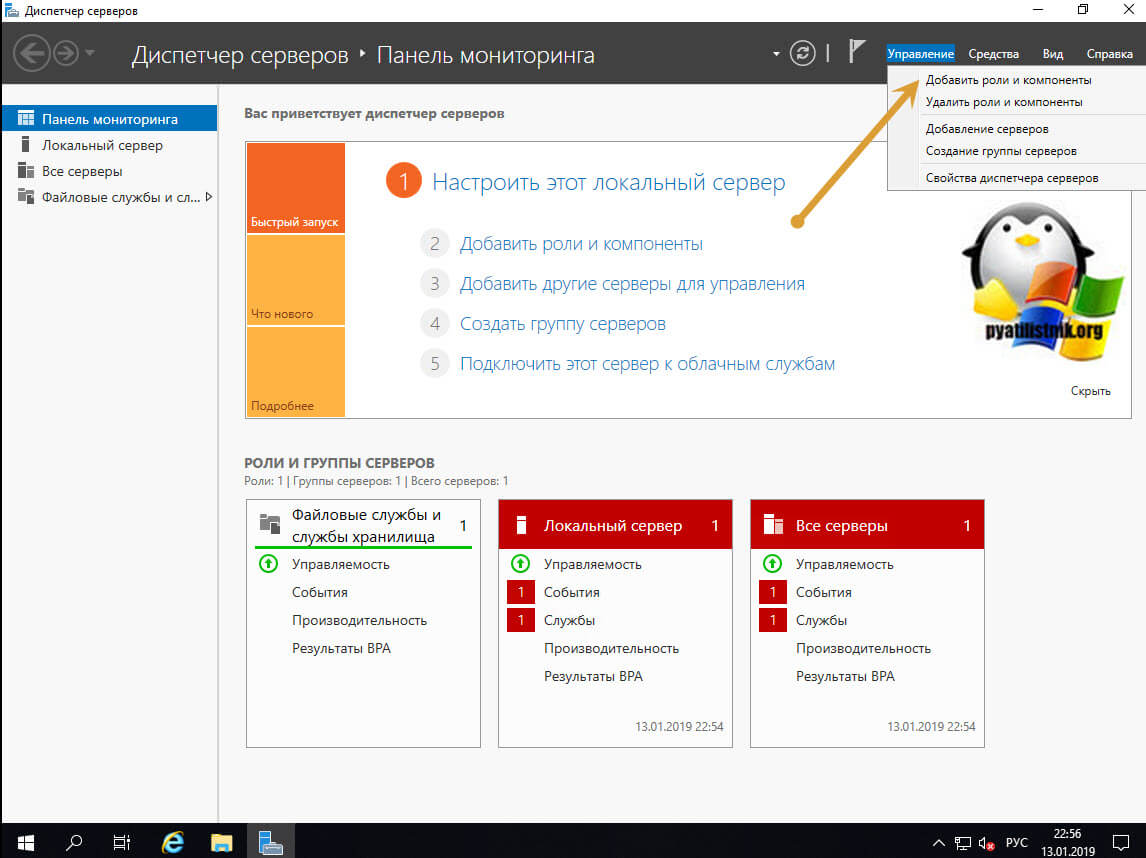
Как производится установка роли в Windows Server 2019 я подробно рассказал, так что о методах я не буду останавливаться. И так открываете диспетчер серверов и в правом верхнем углу выберите пункт «Управление», где нужно добавить роль и компонент.
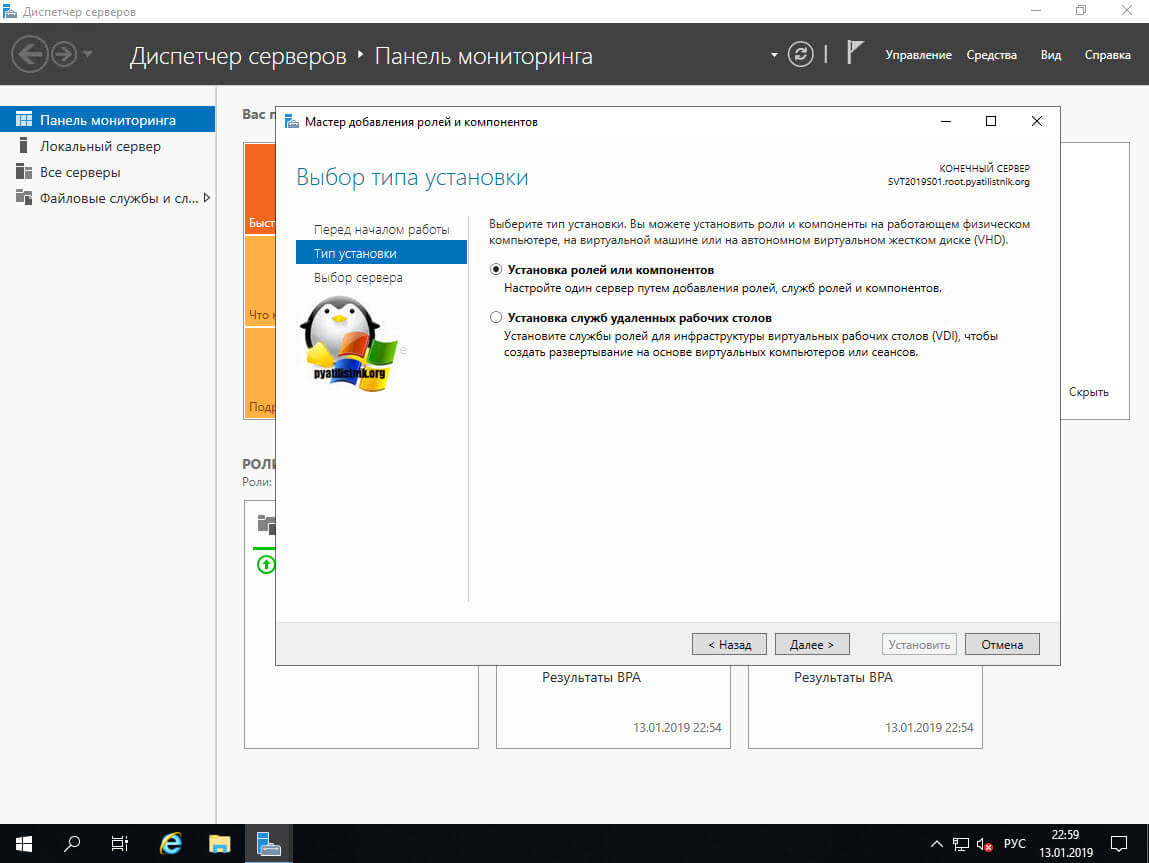
далее вы оставляете стандартный тип установки, VDI нам тут не нужен.
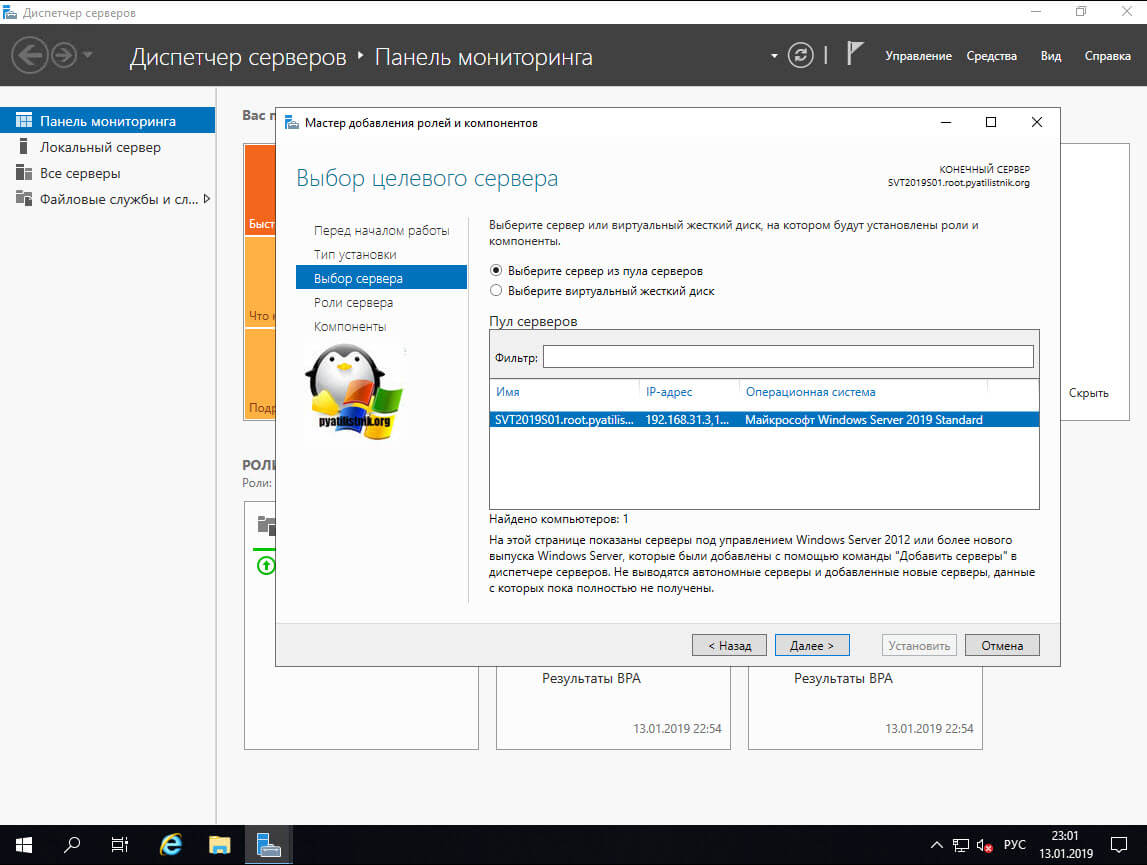
На следующем шаге вы выбираете пул и сервер из пула, в моем примере, это один локальный сервер.
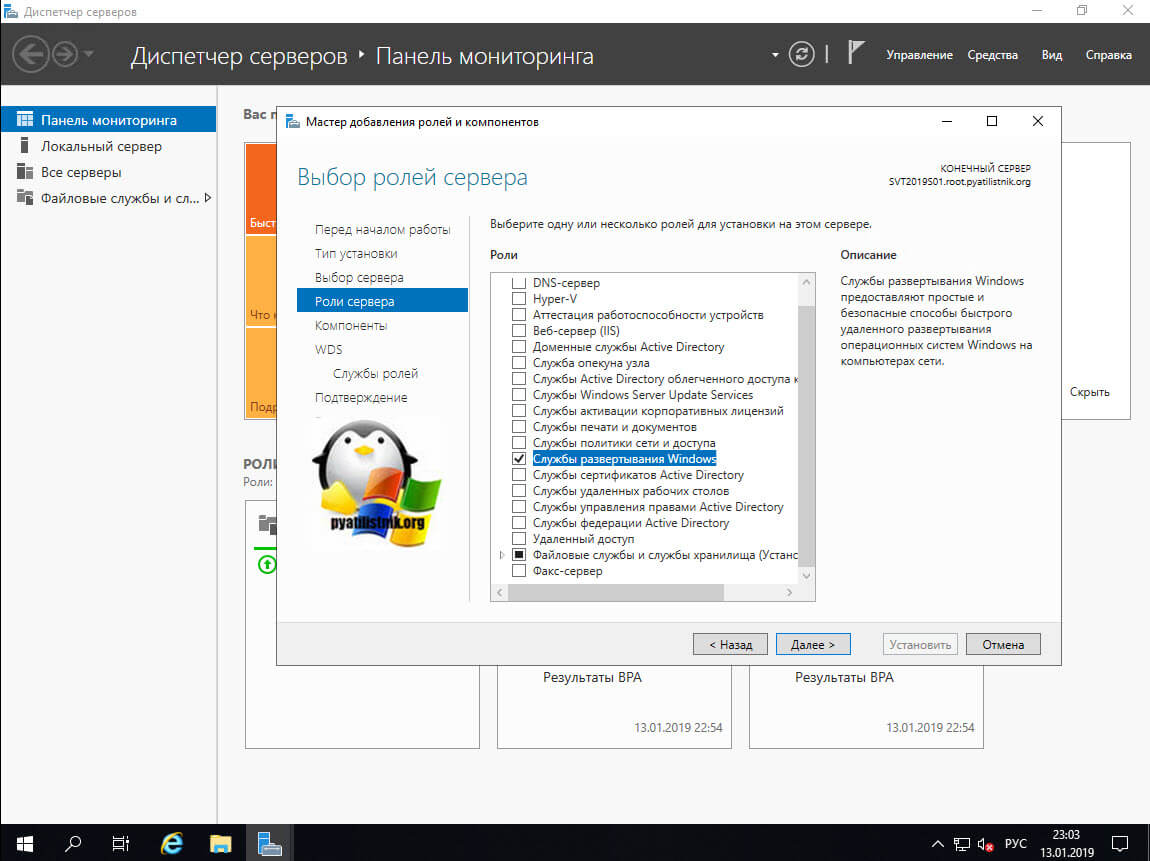
Теперь вам необходимо выбрать роль «Службы развертывания Windows» и нажать далее.
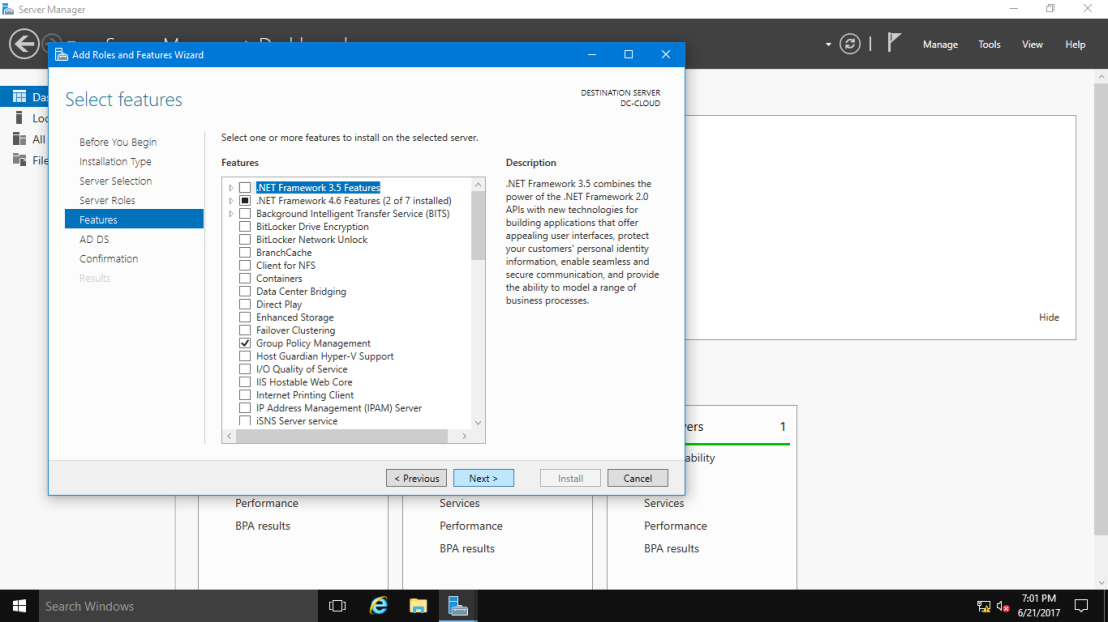
среди компонентов нам ничего не нужно, просто пропускаем это окно.
Теперь у вас появится окно. в котором вам покажут общие сведения, о WDS роли и ее назначении, при каких сценариях ее применяют, нажимаем далее.
Теперь у вас будет выбор компонентов служб развертывания Windows:
- Сервер развертывания — это сама важная часть, позволяющая вам создавать образы и настраивать.
- Транспортный сервер — это сетевые компоненты для развертывания, лучше ставить совместно с сервером развертывания.
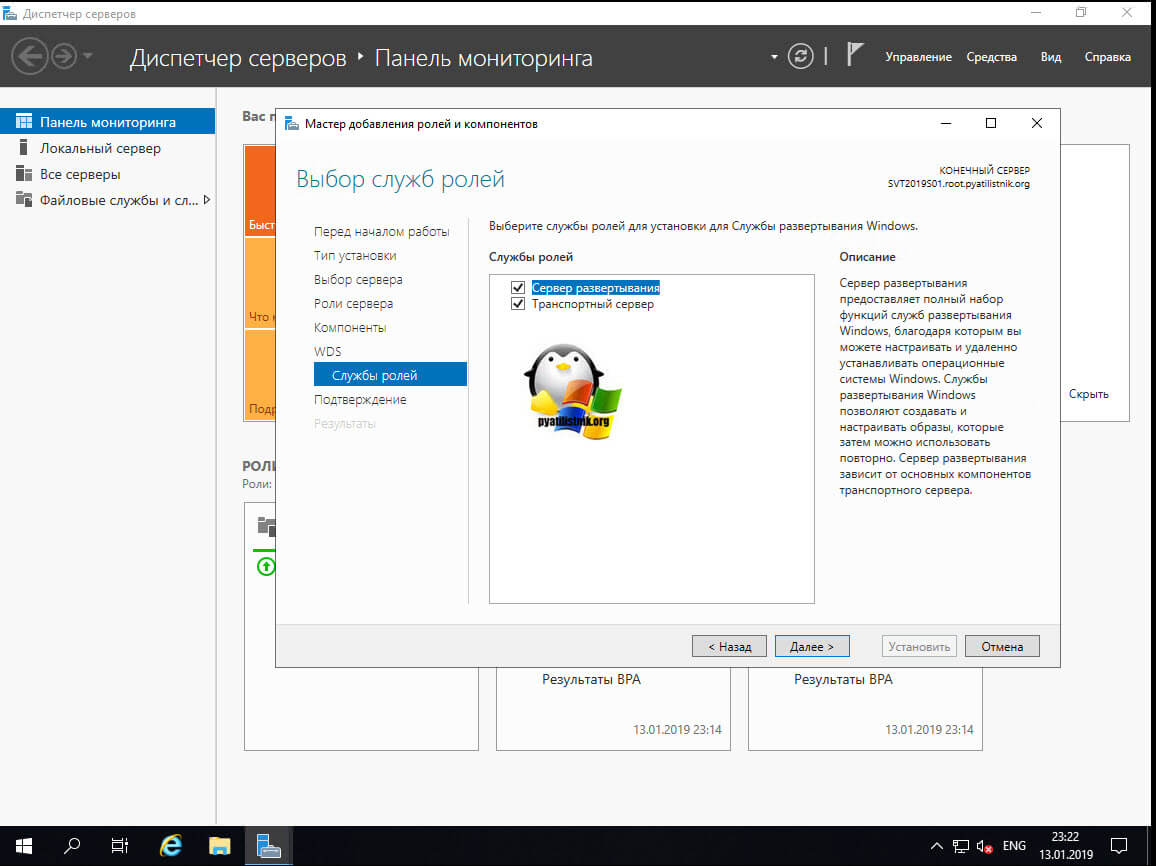
На последнем этапе нажимаем кнопку «Установить»
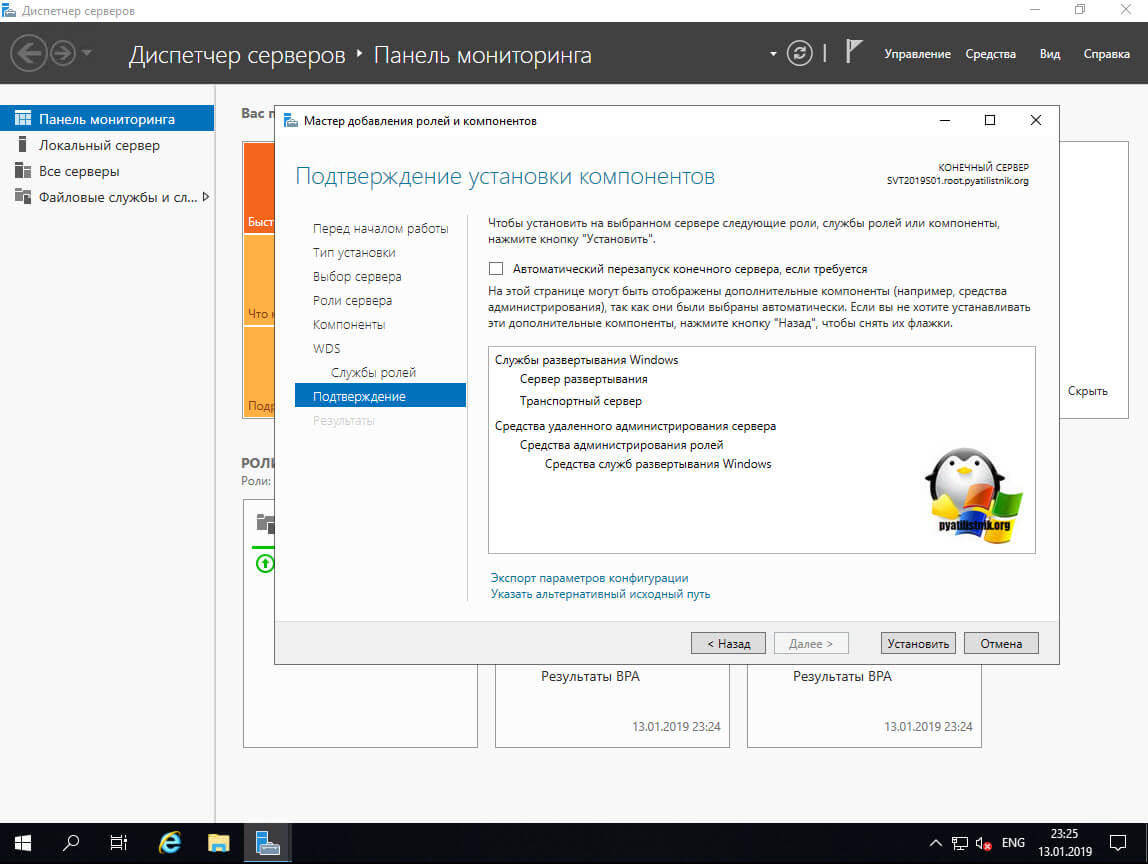
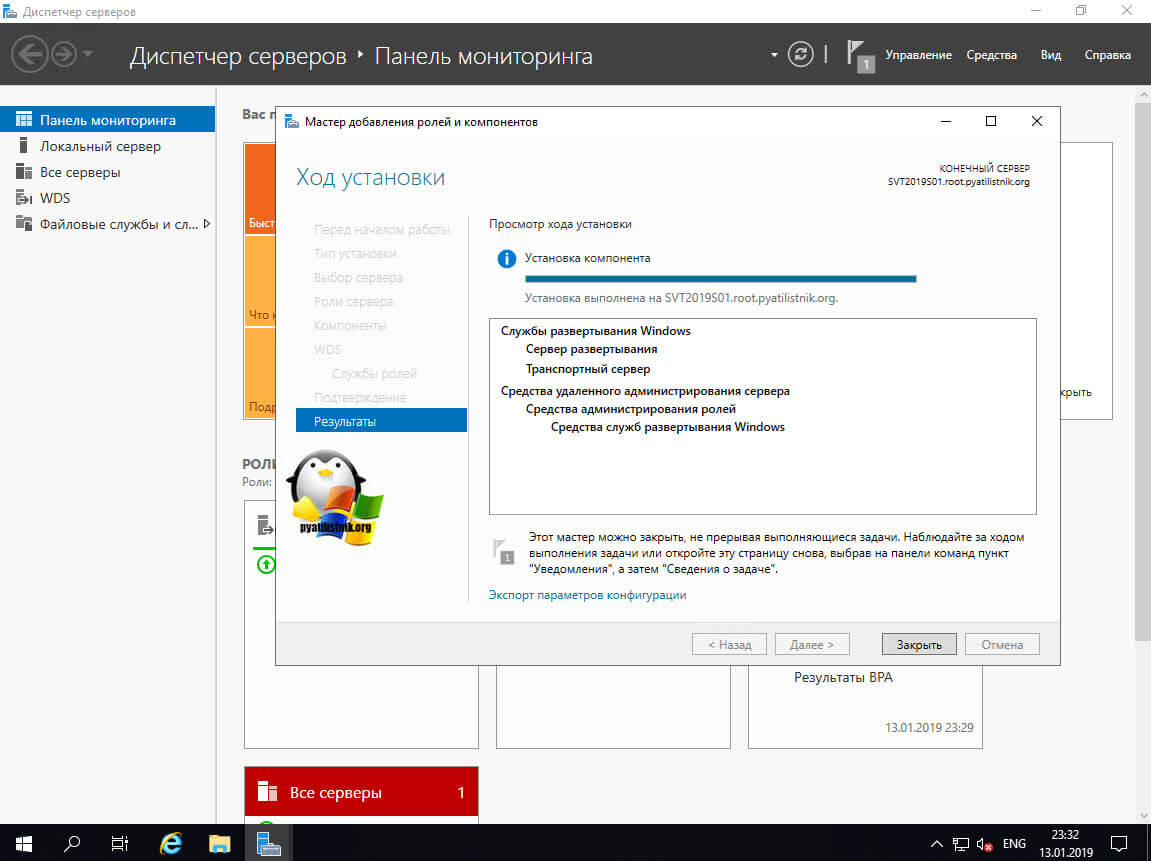
Через минуту инсталляция служб развертывания Windows будет завершена, можно приступать к настройкам.
То же самое можно выполнить в Power Shell, командой:
Install-WindowsFeature wds-deployment -includemanagementtools
Настройка служб развертывания Windows
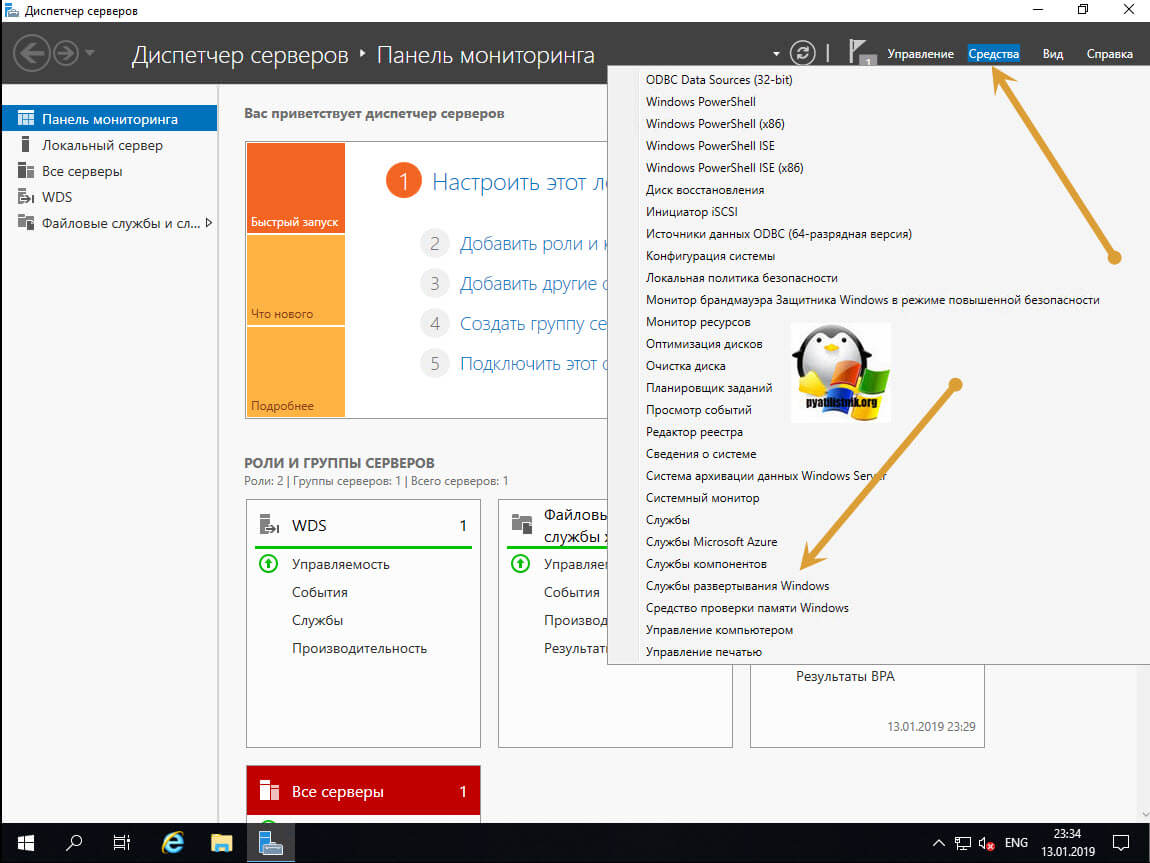
Давайте приступим к настройке WDS на новейшей Windows Server 2019. В диспетчере серверов нажмите кнопку «Средства» и найдите пункт «Службы развертывания Windows».
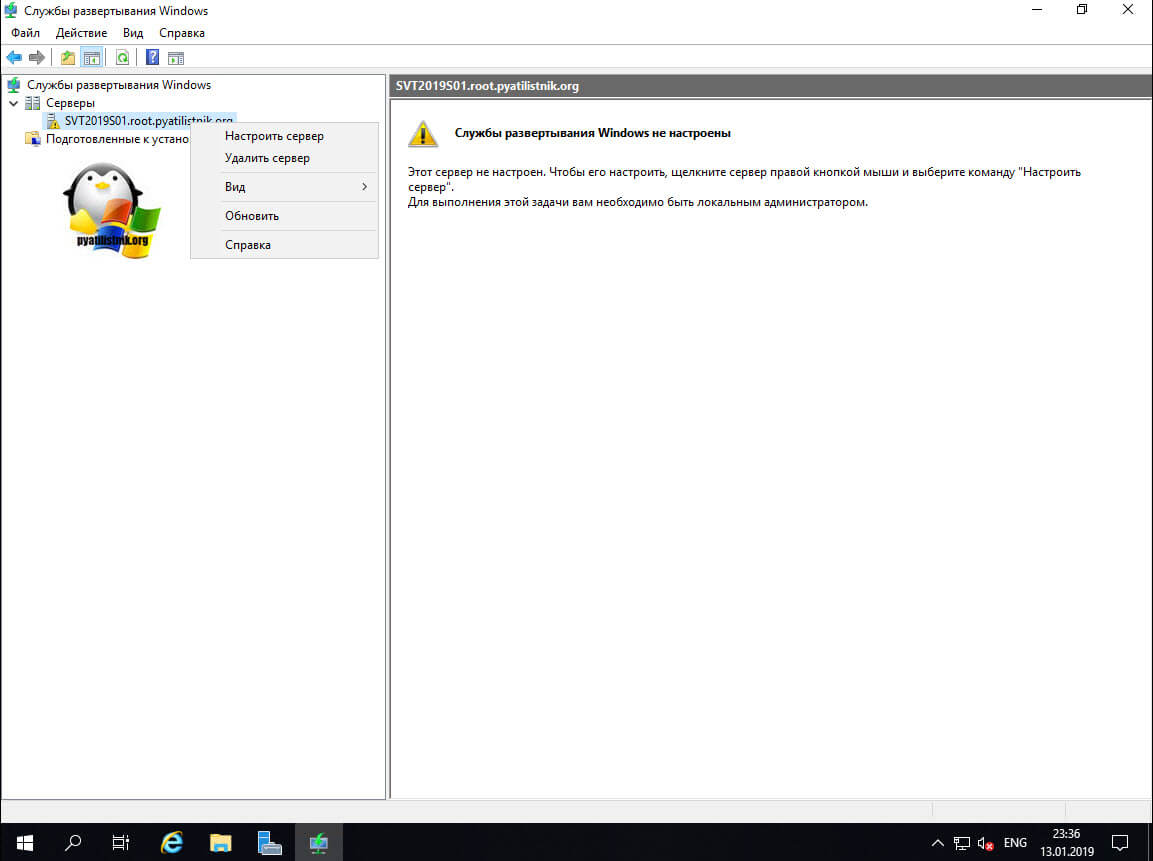
Настройка WDS сервера
В открывшейся оснастке, разверните узел серверы и щелкните по вашему правым кликом и из контекстного меню выберите пункт «Настроить сервер». Обратите внимание, что по умолчанию тут стоит предупредительный знак.
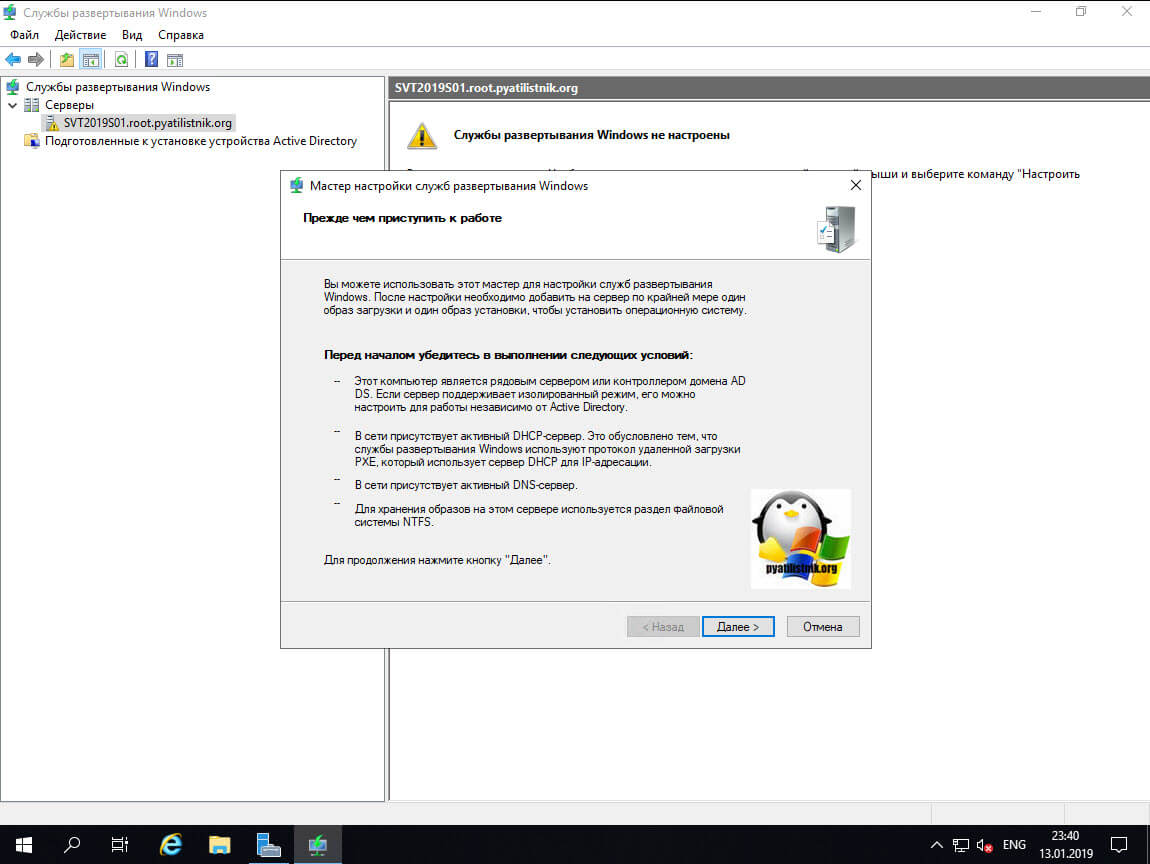
У вас появится окно с необходимыми требованиями для работы WDS сервера:
- Нужно убедиться, что данный сервер не является контроллером домена Active Directory
- В сети должен быть активный DHCP-сервер
- В сети должен быть DNS-сервер
- На папке, где будут хранится образы, должны быть права
Далее вы увидите два варианта работы WDS сервера:
- В качестве интегрированного сервера с доменными службами Active Directory
- В виде изолированного сервера, когда нужно его вынести за пределы AD
Я выберу первый вариант с доменом.
Выбираем папку в которой планируется хранить образы для последующей установки. Старайтесь размещать ее на отдельном диске. Сама папка должна называться Remoteinstall.
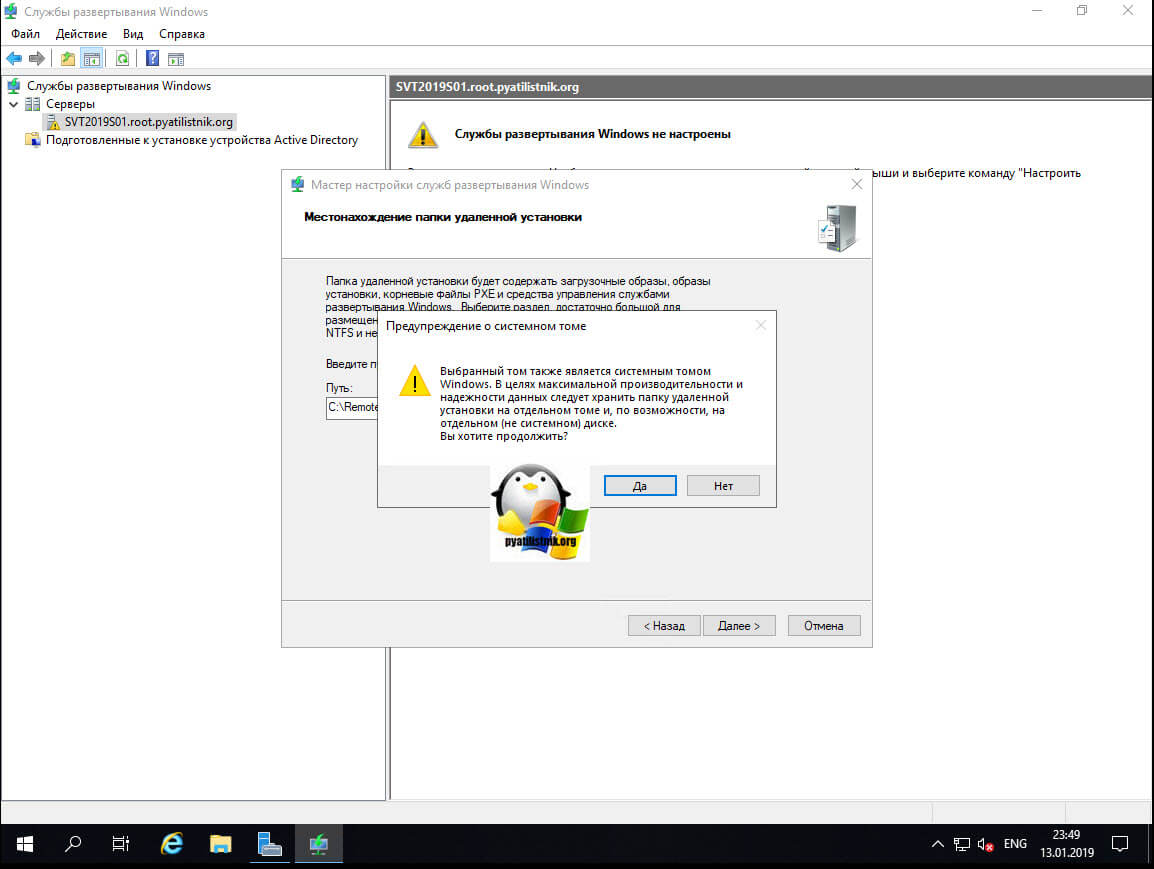
Если все же выберите системный том, то получите предупреждение:
Выбранный том также является системным томом Windows. В целях максимальной производительности и надежности данных следует хранить папку удаленной установки на отдельном томе и, по возможности, на отдельном диске.
Далее вам нужно выбрать поведение при попытке доступа клиентам к WDS серверу:
- Не отвечать никаким клиентским компьютерам — это полностью ручное одобрение перед установкой с сервера развертывания Windows
- Отвечать только известным клиентским компьютерам — это те которые введены в домен или созданы в оснастке ADUC заранее
- Отвечать всем клиентским компьютерам (известным и неизвестным)
Я вам советую выбрать второй вариант, это золотая середина.
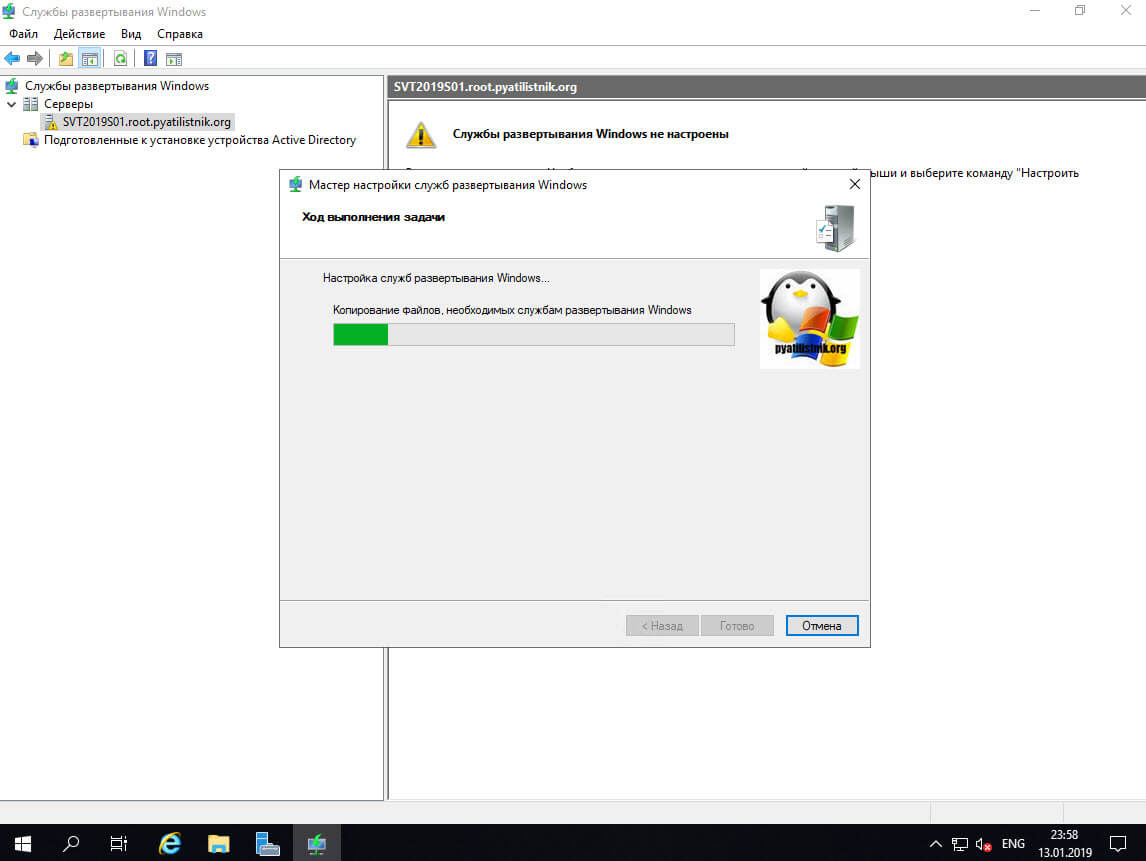
Начнется процесс настройки WDS-сервера и копирование необходимых файлов для служб развертывания.
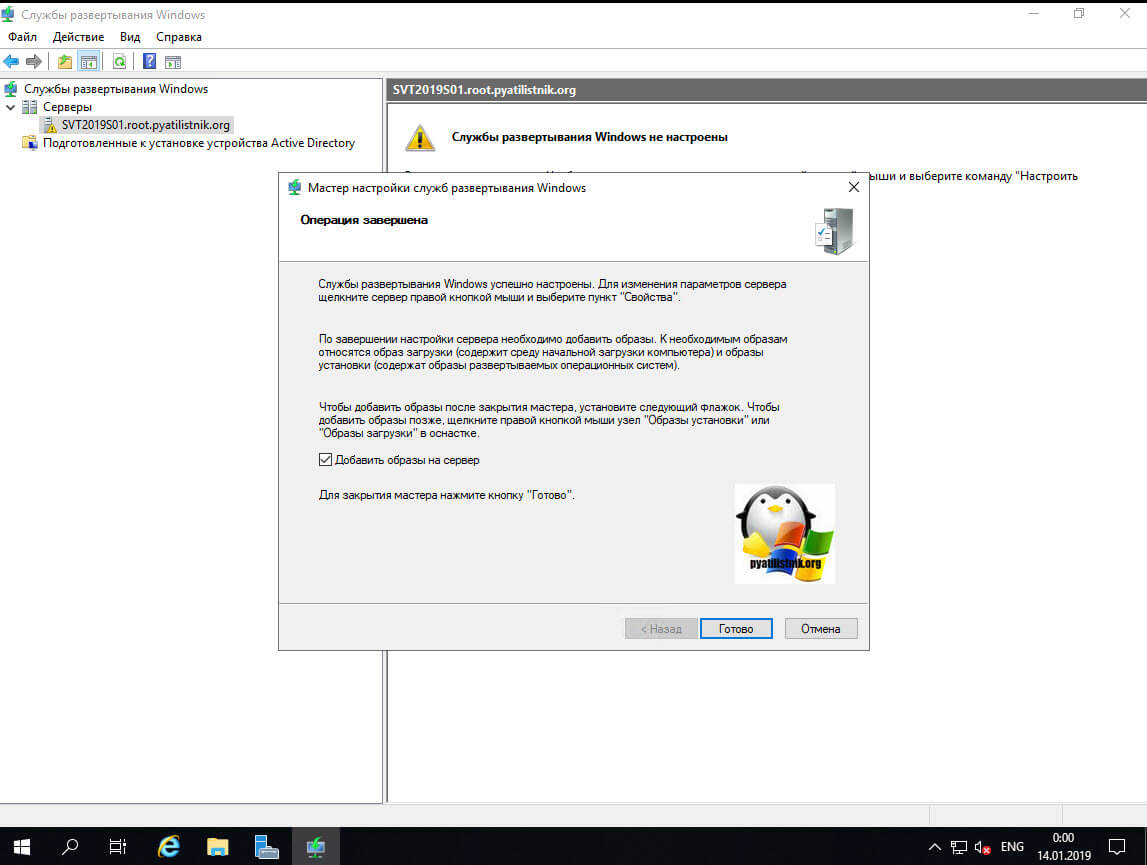
После окончания настройки, вам предложат добавить первый образ на сервер, чем мы и займемся.
Обзор и изменение настроек WDS
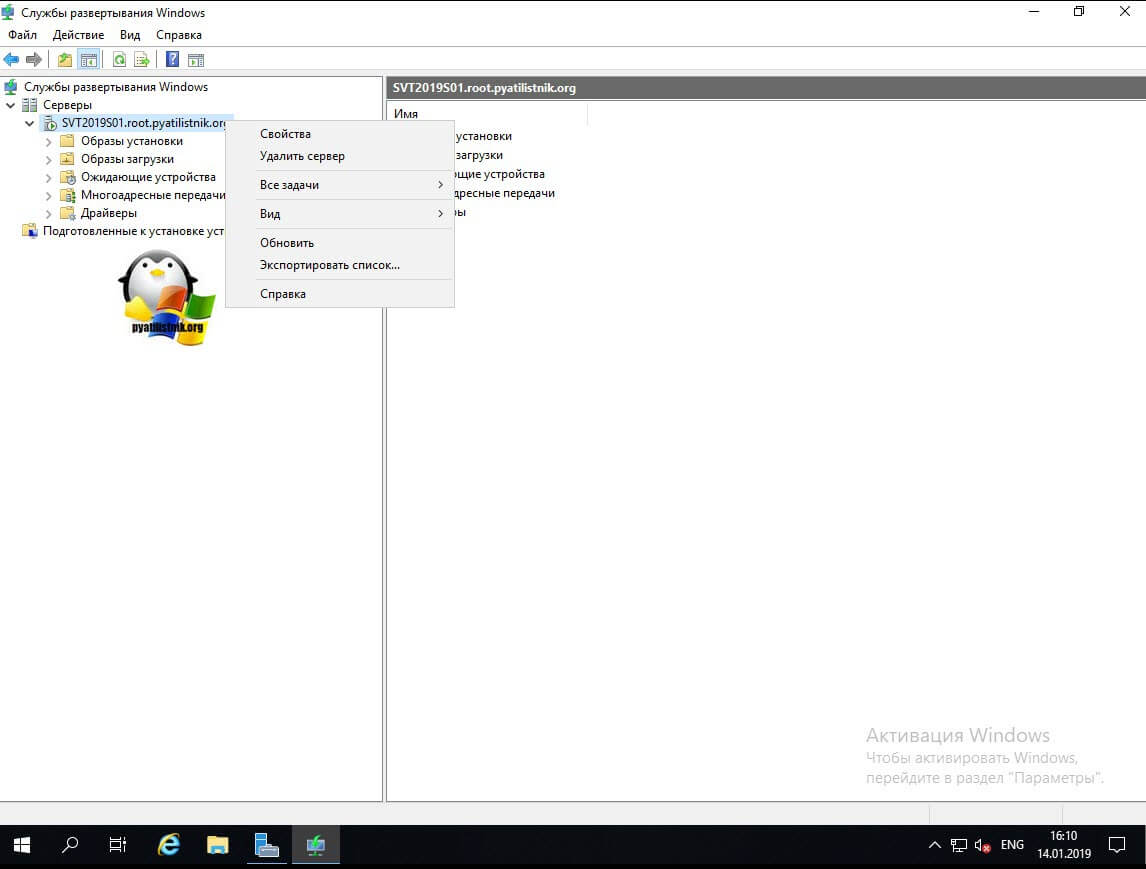
Изменение настроек службы развертывания windows, вы можете осуществить через свойства, вызвав их в контекстном меню.
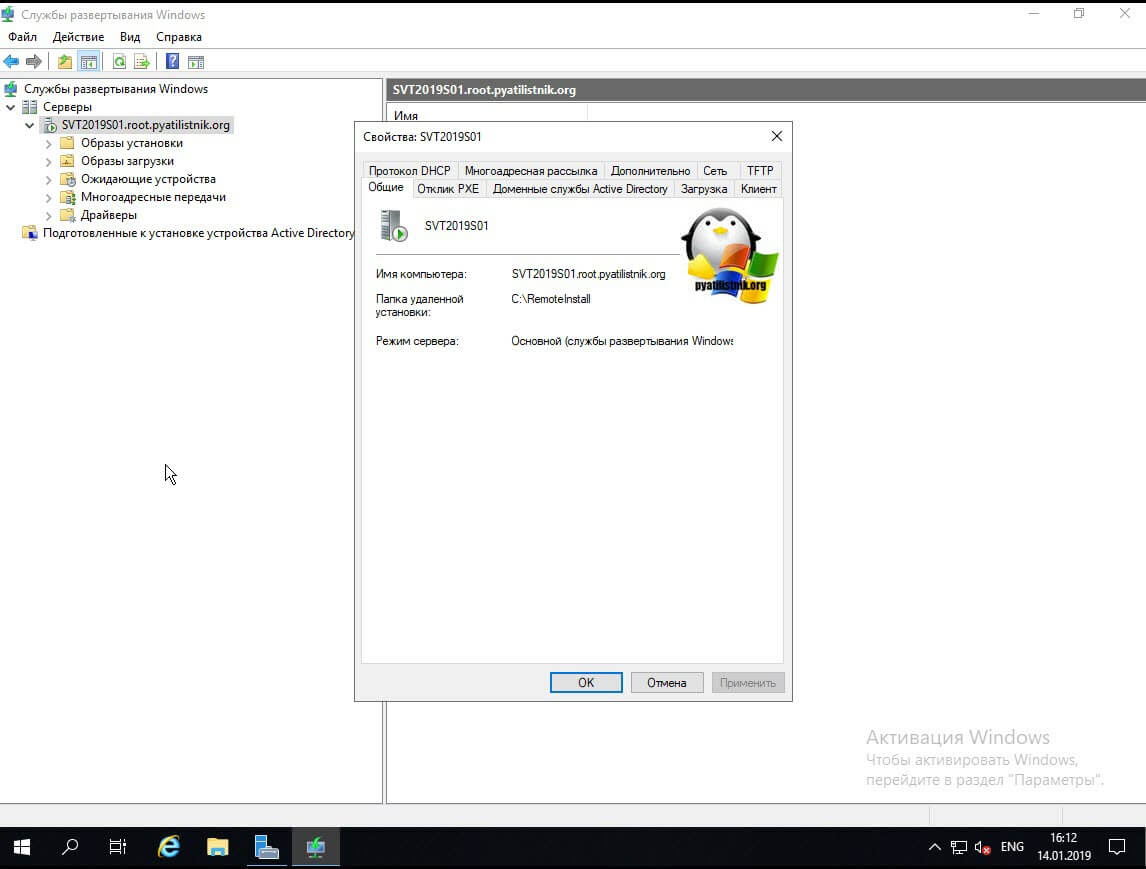
У вас откроется вкладка общие, где вы сможете увидеть имя сервера WDS, папку установки.
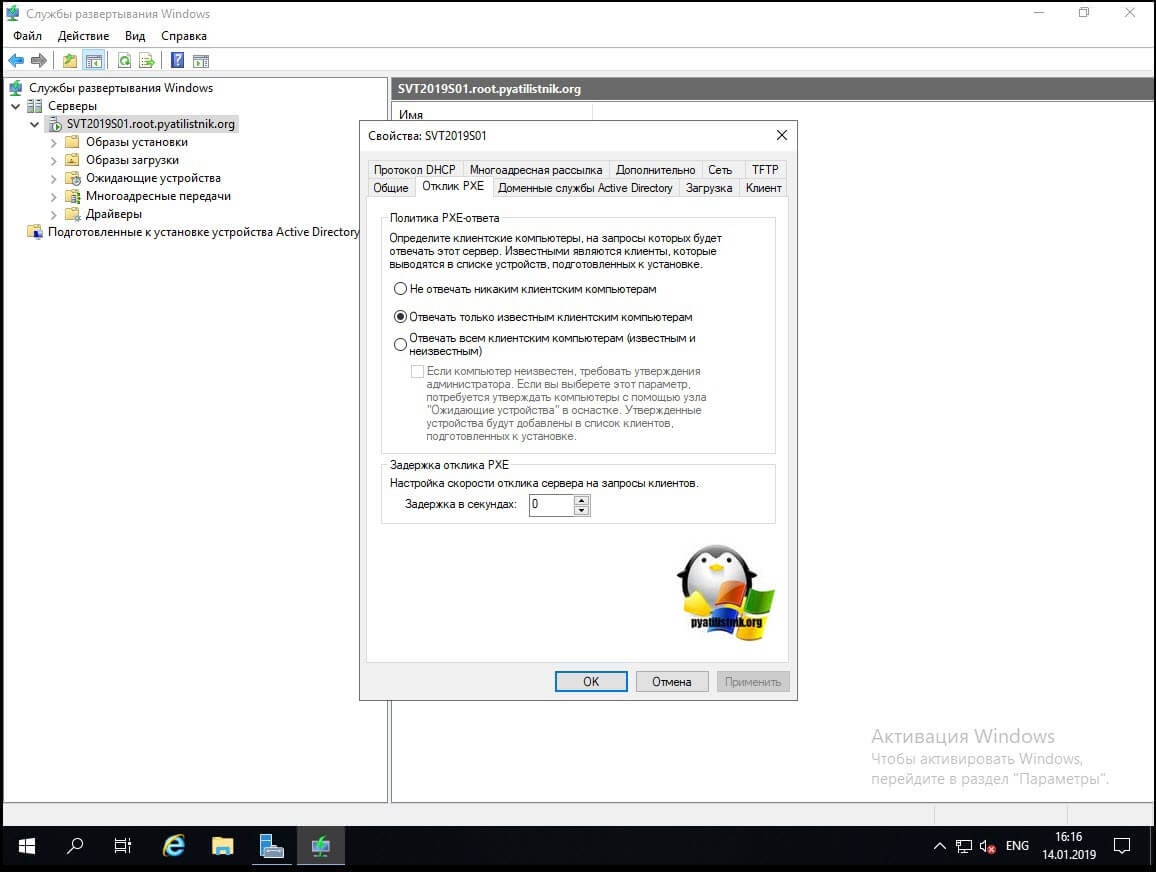
Вкладка «Отклик PXE», поможет вам изменить поведение при ответе клиентам, которые ищут сервер по сети, я вам советую оставлять ответы только известным компьютерам, если же домена Active Directory не будет, то можно выставить обнаружение для всех. Обратите внимание, что вы можете задать таймер скорости ответа в секундах.
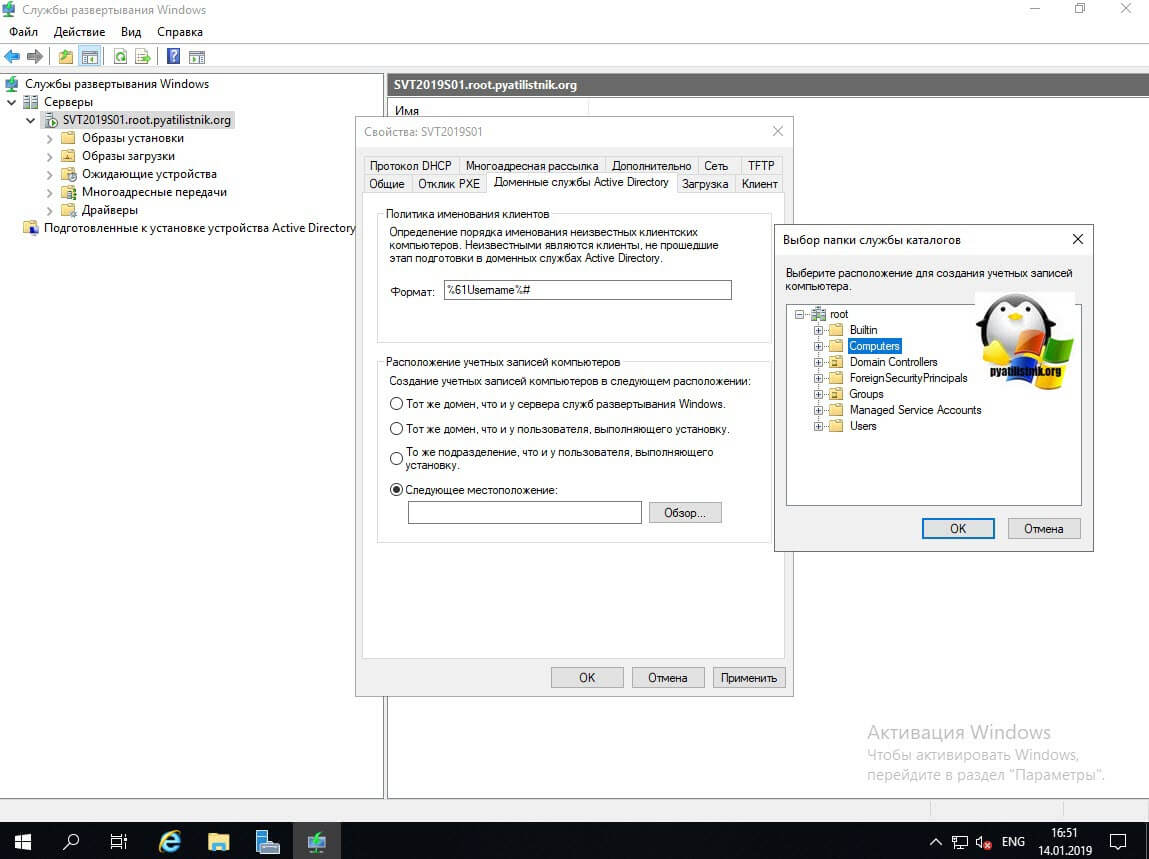
Вкладка «Доменные службы Active Directory», позволяет вам задать две вещи:
- Это формат имени устанавливаемого компьютера
- Место расположения компьютеров, можно указать куда закинуть в домене компьютер, выбрав нужную OU.
По умолчанию в формате имени вы увидите вот такую запись: %61Username%#. Она означает, что для задания имени компьютера будет использоваться первые 61 символа имени пользователя. Имя будет усечено до первых 15 символов имени пользователя.
Политика именования WDS имен:
WDS настраивается с помощью политики именования клиентов, которую можно увидеть в поле «Формат». Политика по умолчанию состоит в том, чтобы называть компьютеры как %61Username%#. Это код или набор инструкций, которые сообщают WDS, как создать имя компьютера.
- %Username- Эта переменная указывает использовать имя пользователя клиента WDS в качестве основы для имени компьютера. Например, если вы запускаете установку от учетной записи службы поддержки и запускаете установку образа, то переменная %Username будет заменена на логин службы поддержки.
- %First — Будет использоваться имя пользователя. Например, Ivan Semin, будет взято Ivan.
- %Last — WDS-сервер возьмет в качестве имени компьютера фамилию пользователя, кто устанавливает его.
- %MAC — MAC-адрес или Ethernet-адрес сетевого адаптера, который используется для установки образа, будет заменен этой переменной.
Эти переменные могут быть объединены. Например, если вы используете %First%Last и развертываете образ, используя учетную запись пользователя Ivan Semin, тогда имя компьютера будет IvanSemin. Вы также можете установить политику именования клиента на что-то вроде %First%Last-PC. В итоге компьютер будет называться IvanSemin-PC. Это потому, что -PC является константой, а не переменной.
Имена компьютеров, как правило, короткие. Они ограничены 15 символами, если вы хотите, чтобы машина присоединилась к домену. Возможно, у вас есть пользователи с очень длинными именами, которые не подходят. Вы можете контролировать, сколько символов будет использоваться из переменной.
Например, если вы хотите использовать шесть символов из фамилии, введите %6Last. Например, развертывание образа с политикой именования клиента %1First%6Last-PC с пользователем Ivan Semin приведет к тому, что компьютер будет называться ISemin-PC.
Что если Иван Семин присоединится к компании и попытается создать для себя компьютер с использованием WDS? Имена компьютеров должны быть уникальными. Используя эту политику именования клиента, его компьютер также должен называться ISemin-PC. Это вызовет проблему.
Числовой счетчик решил бы эту проблему, сделав имя компьютера уникальным. Вы можете сделать это, используя переменную %[n]#. Этот подход позволяет вам добавить инкрементный счетчик из n цифр. Например,%1First%6Last-PC-%2# разрешает добавочный счетчик из двух цифр. В итоге получится ISemin-PC-2.
WDS будет использовать политику именования клиентов для настройки имени компьютера в процессе его установки. Например, вы можете развернуть несколько машин, таких как PYATILISTNIK001, PYATILISTNIK002, PYATILISTNIK003 и PYATILISTNIK004, используя политику именования компьютеров PYATILISTNIK%03#.
Если есть переменная %#, счетчик будет просто увеличиваться, чтобы сгенерировать следующую доступную машину. Например, вы можете вручную построить PYATILISTNIK005 и присоединить его к домену. Следующая машина, созданная WDS, на самом деле не будет PYATILISTNIK005. WDS просто перейдет к PYATILISTNIK006.
WDS присоединит компьютер к домену. Созданный компьютерный объект имеет атрибут netbootGUID. WDS сохранит в этом атрибуте MAC-адрес или GUID аппаратного обеспечения компьютера (физического или виртуального). Это означает, что имя компьютера связано с оборудованием, если MAC / GUID не изменяется или объект компьютера не удаляется.
Вы можете решить перестроить PYATILISTNIK002, развернув на нем образ с помощью WDS. WDS определит MAC или GUID машины. Если это значение будет найдено в netbootGUID существующего объекта компьютера, WDS узнает, как повторно использовать имя компьютера.
Эта функция позволяет использовать большинство доступных номеров в имени компьютера и связывает имя компьютера с оборудованием. Это может быть очень полезно. Вы можете внедрить решение для распространения программного обеспечения или управления компьютером, основанное на имени компьютера. Пользователь может восстановить свой ПК и при этом сохранить те же политики управления, потому что WDS будет повторно использовать свое старое имя компьютера, если MAC / GUID не изменился.
Ниже вы можете задать организационное подразделение, где будут создаваться учетные записи компьютеров, такой аналог утилиты redircmp. Вкладка загрузка, позволит вам задать поведение инициализации сетевой загрузки, она выражается в нескольких условиях, где-либо нужно нажимать специальные клавиши, либо нет.
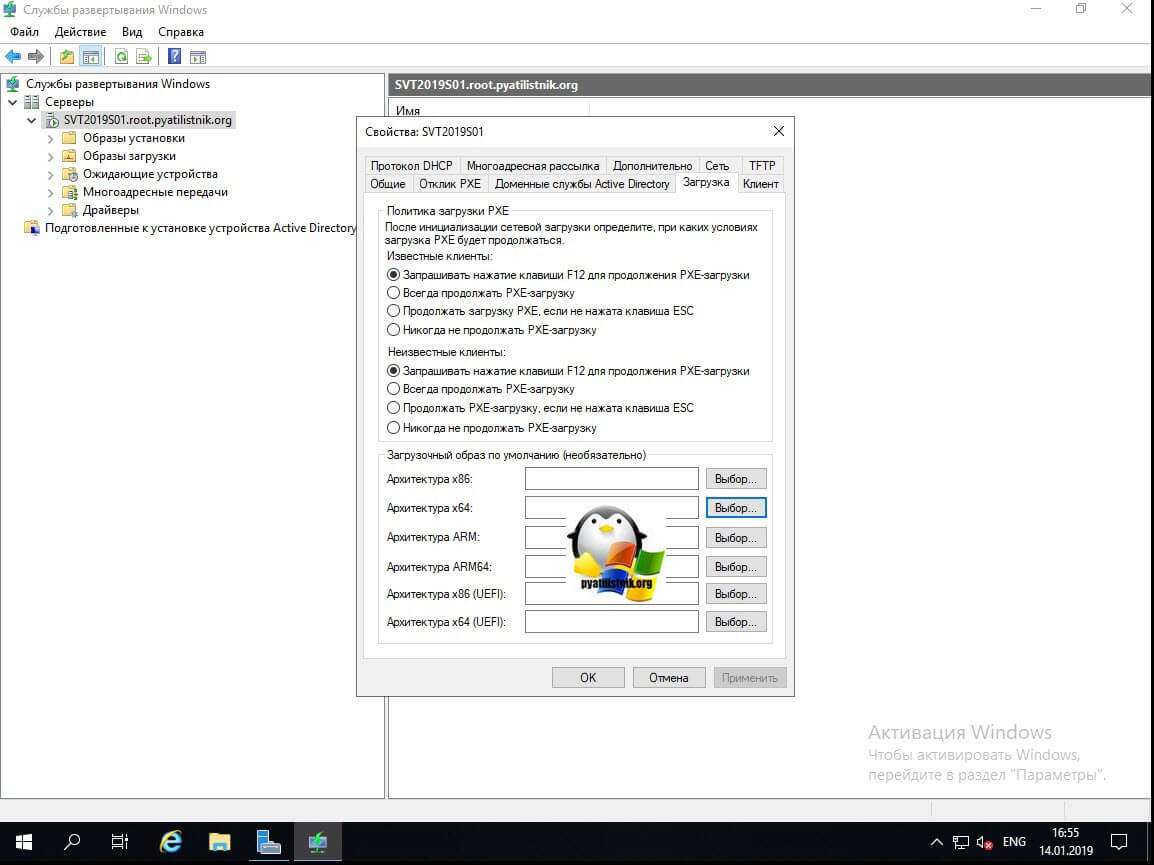
- Запрашивать нажатие клавиши F12 для продолжения загрузки — лучше ее оставить. Приведу пример, когда у вас есть необходимость нажимать дополнительные клавиши, это позволяет защититься от случайных ошибок. Предположим вы переустанавливаете по сети операционную систему на сервере, и хотите тронуть только диск C:, но если у вас стоит автоматическая загрузка, да и еще с автоматическим разбиением дисков, через файл ответов, то вы можете так затереть данные. Или вообще случай из практики, когда коллега по случайности закинул компьютер пользователя не в тот VLAN, а у пользователя ленивый администратор не убрал загрузку с PXE, в итоге человек когда включил с утра компьютер полностью убил свой компьютер, и переустановил его, пришлось восстанавливать его данные.
- Всегда продолжать PXE загрузку
- Продолжить загрузку PXE, если не нажата клавиша ESC
- Никогда не продолжать PXE-загрузку
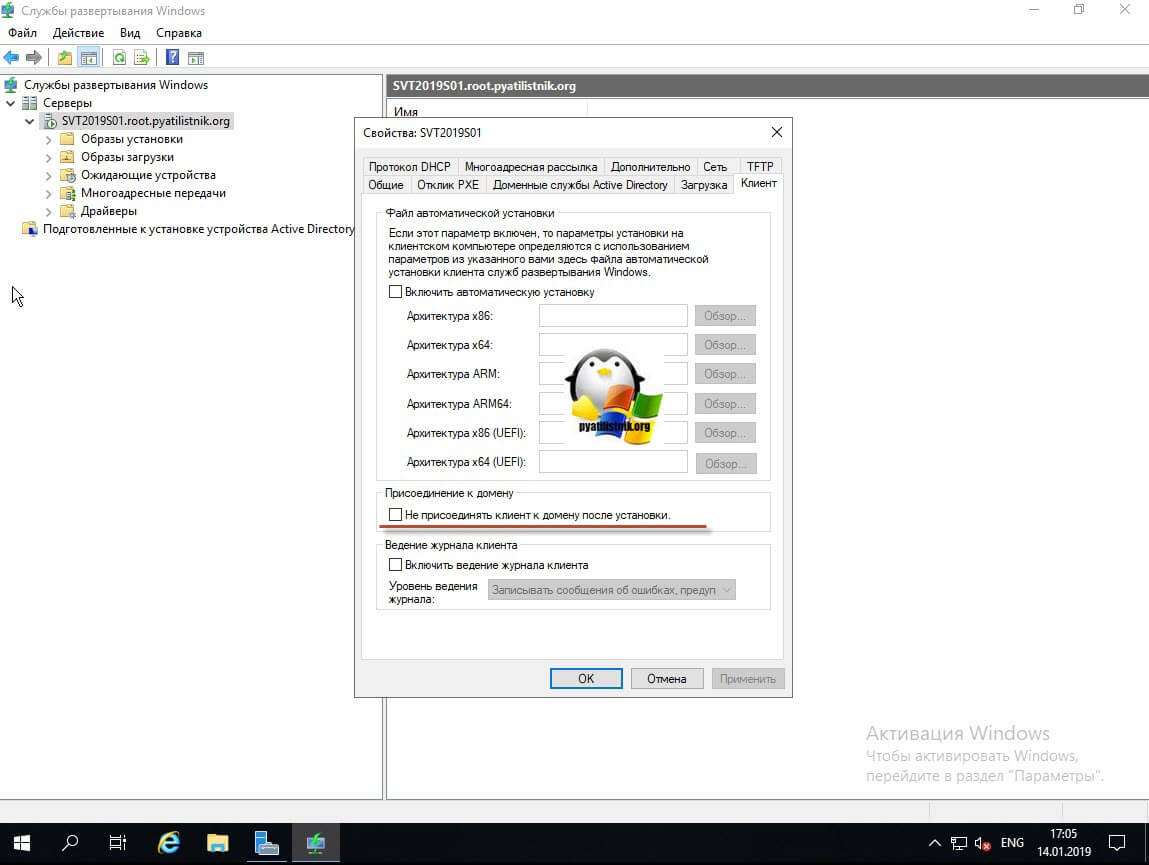
Для неизвестных, не доменных клиентов, вы можете задать такие же настройки.Чуть ниже вы можете для каждой архитектуры задать загрузочный образ по умолчанию, задав их через выбор. Вкладка «Клиент» позволяет вам автоматизировать процесс установки операционной системы и меню установщика, путем подкладывания файла ответов для каждой из архитектур. Подробнее про файл ответов читайте по ссылке слева. Так же вы можете задать, что клиента не нужно присоединять к домену после установки.
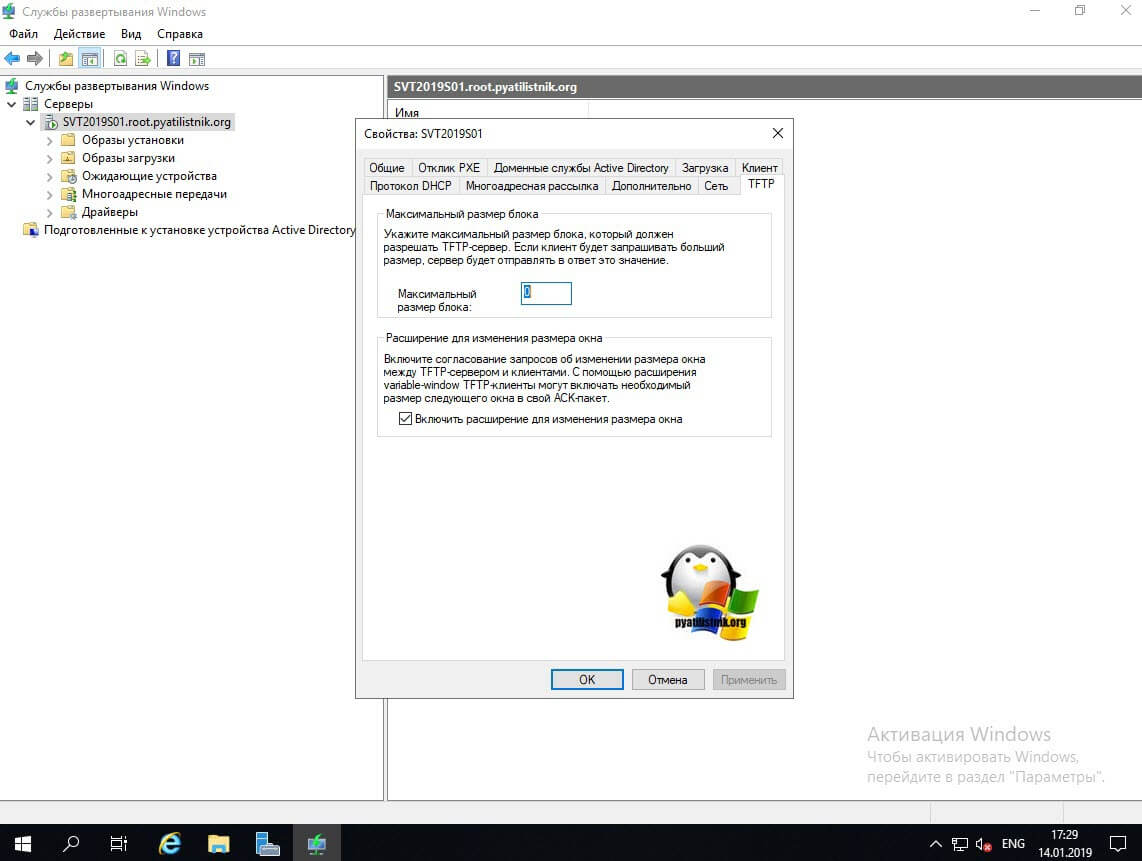
Вкладка TFTP позволит вам задать максимальный размер блока.
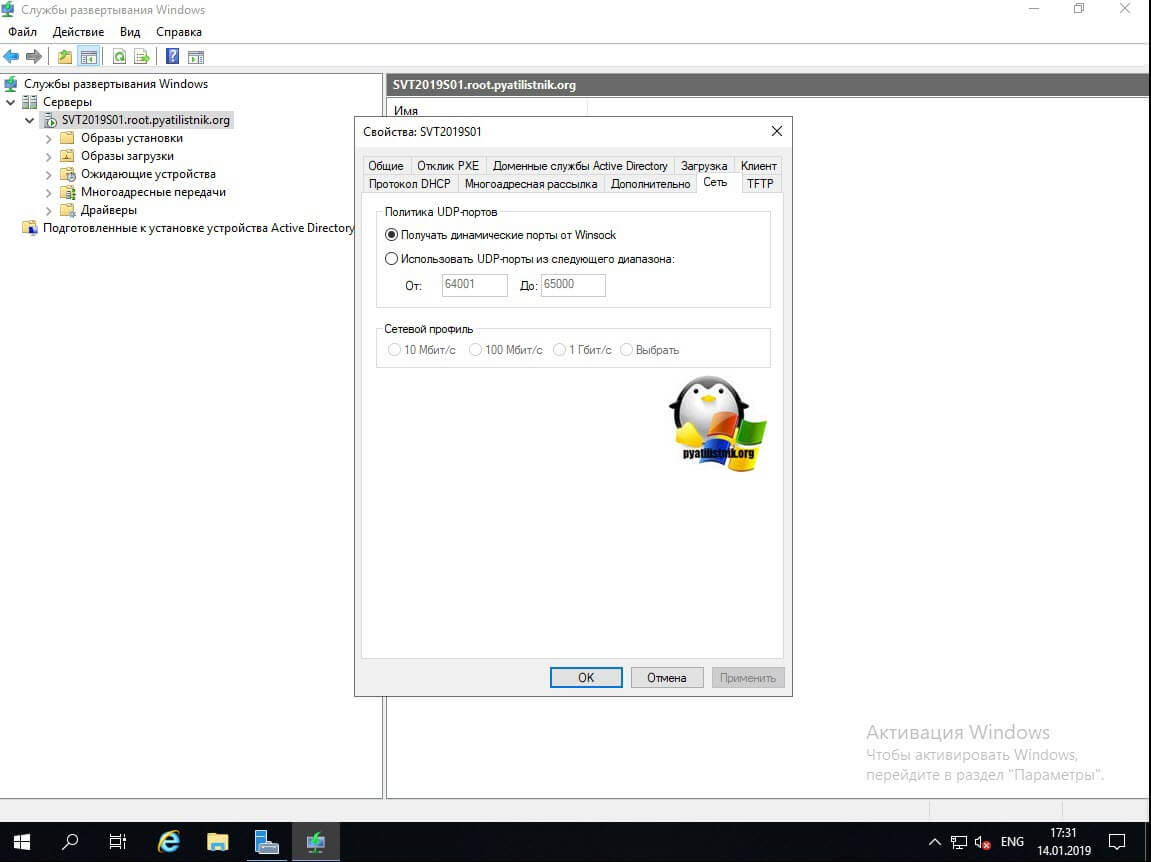
Вкладка «Сеть» позволит определить какие UDP порты и диапазоны будут участвовать в процессе обращения к WDS серверу.
Вкладка «Дополнительно» позволит вам явным образом указать с какими контроллерами домена можно работать, а так же вы сможете провести авторизацию WDS-службы, как DHCP.
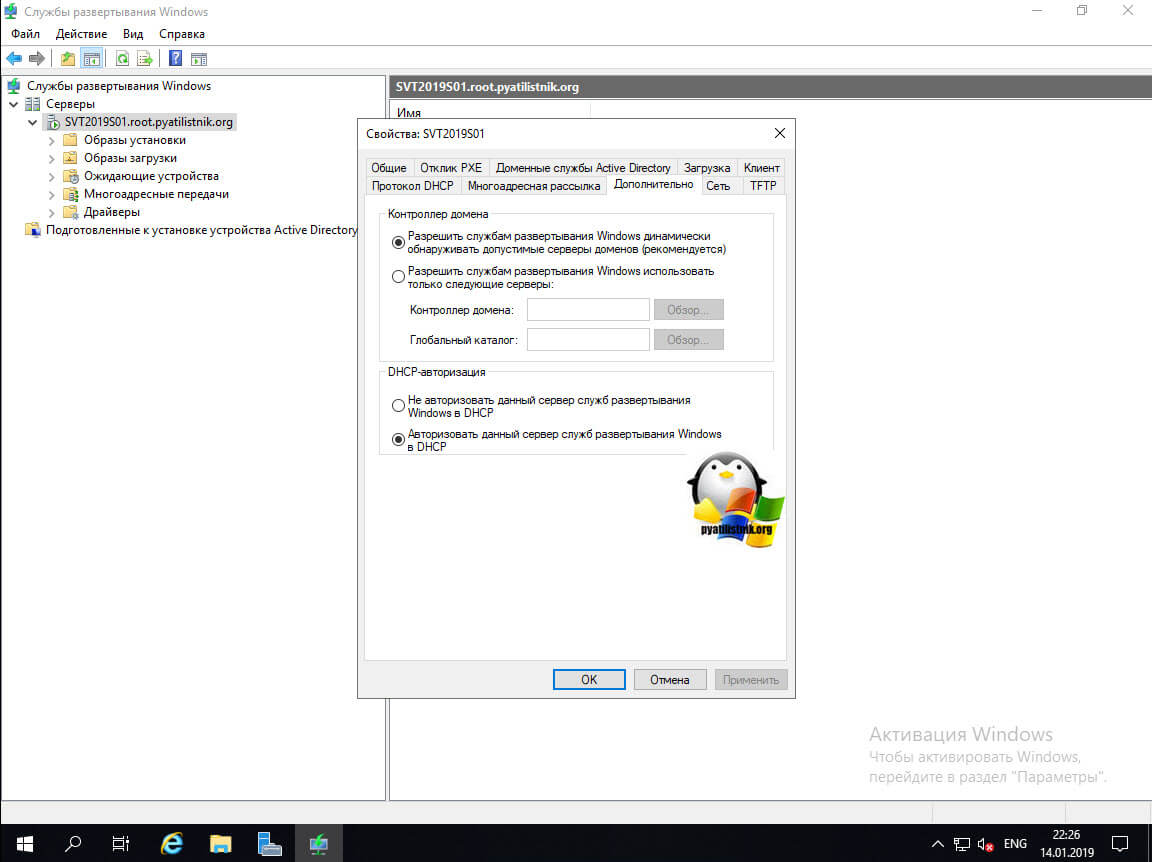
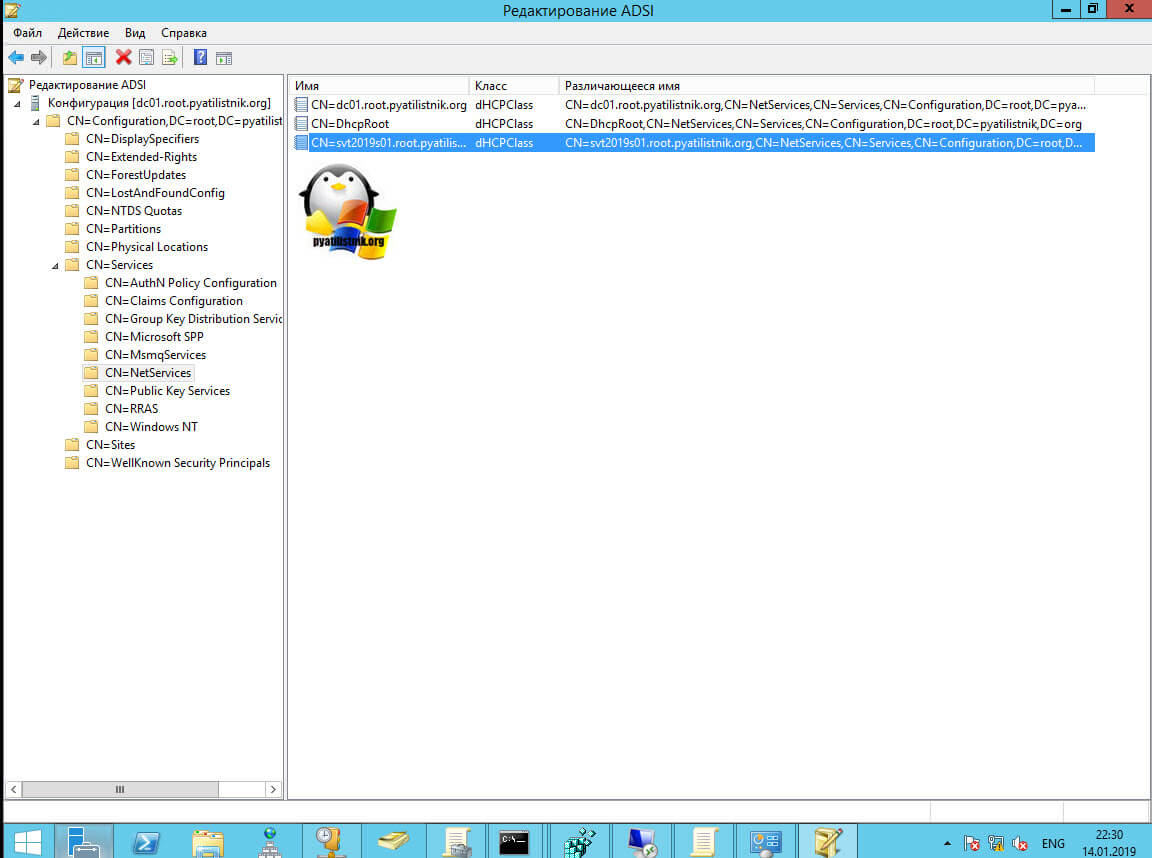
Что из себя представляет авторизация служб развертывания Windows. По сути у вас будет создана запись раздел конфигурации Active Directory, посмотреть можно в редакторе атрибутов по пути:
CN=Configuration,CN=Services,CN=NetServices
Там вы найдете запись типа CN=FQDN-имя вашего сервера, в моем примере, это CN=svt2019s01.root.pyatilistnik.org,CN=NetServices,CN=Services,CN=Configuration,DC=root,DC=pyatilistnik,DC=org.
Авторизовать WDS службу вы можете и через командную строку, через утилиту wdsutil.exe. введите команду:
wdsutil.exe /Set-Server /Authorize:Yes
Чтобы включить запрет не авторизованным компьютерам обращаться к серверу развертывания Windows, выполните:
wdsutil.exe с /Set-Server /RogueDetection:Yes
Если серверы DHCP и WDS установлены на одной машине, то авторизация сервера WDS не будет иметь смысла, так как в этом случае запросы на порт 67 будут обрабатываться сервером DHCP и проверяться будет именно его авторизация. Таким образом, для того, чтобы проверка авторизации проходила как для DHCP, так и для WDS, каждая из этих служб должна функционировать на отдельной машине. Вкладка «Многоадресная рассылка» позволит вам задать диапазоны ip-адресов, которые будут выданы клиентским компьютерам, так же вы можете управлять скоростью заливки:
- Поддерживать одинаковую скорость для всех клиентов многоадресной рассылки в сеансе
- Разделить клиенты на три сеанса (Медленные, средние и быстрые)
- Разделять клиенты на два сеанса (Медленные и быстрые)
- Автоматически отключать клиенты, если скорость меньше указанной
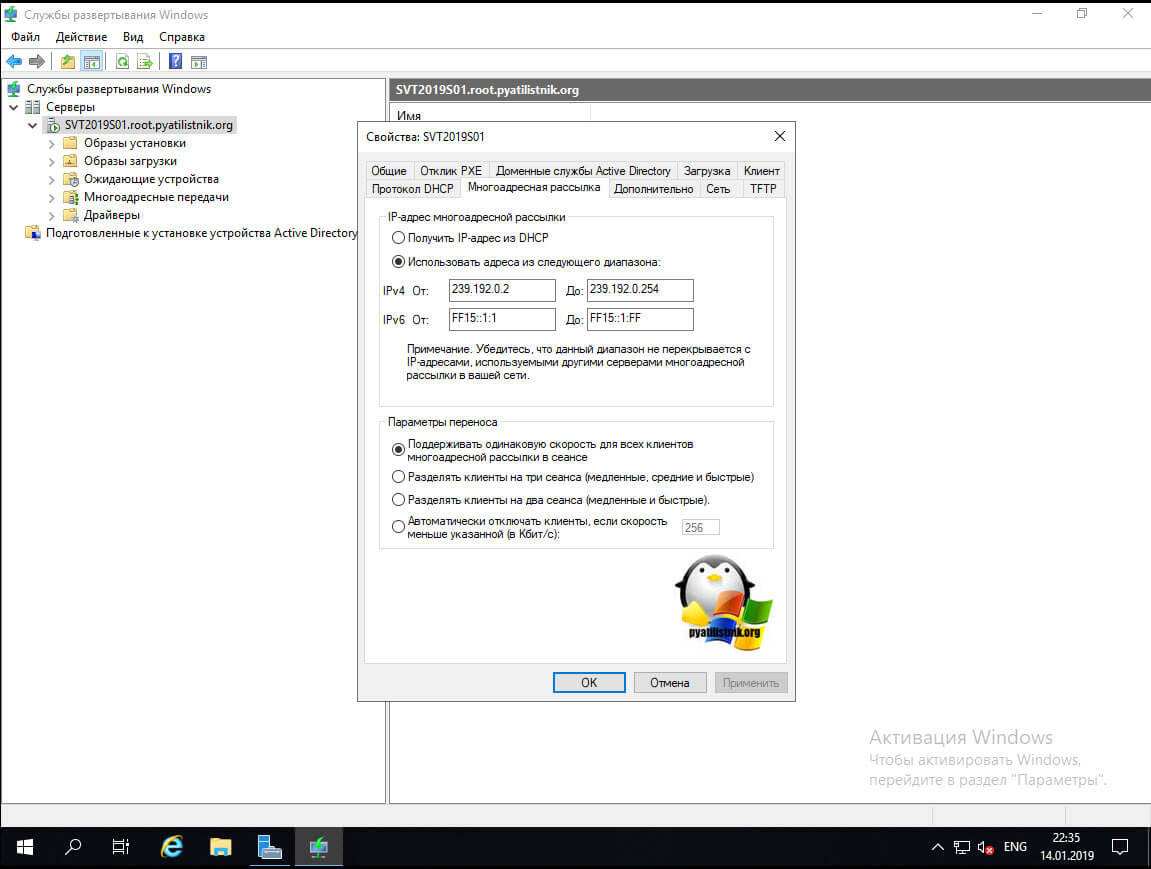
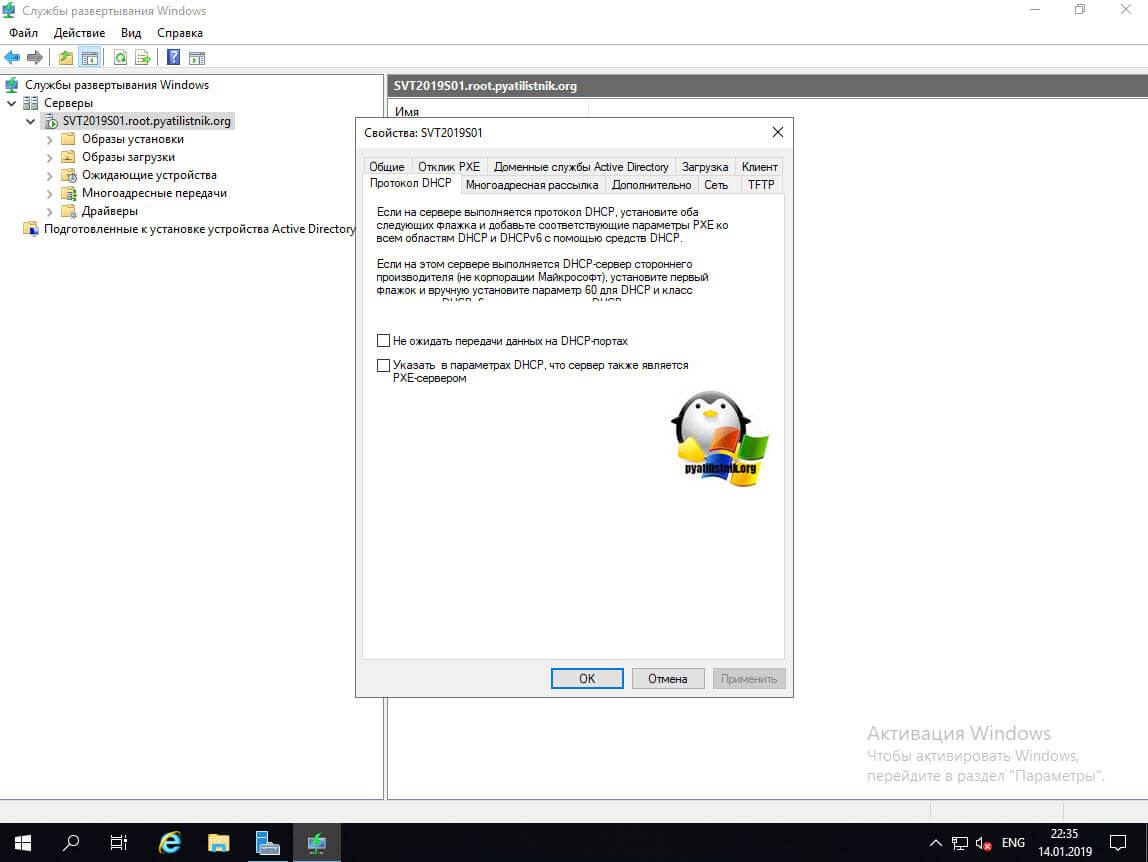
Ну и последняя вкладка «Протокол DCHP», тут вам нужно выставить две галки, если на сервере WDS так же присутствует роль DCHP, иначе будут проблемы с поиском сервиса:
- Не ожидать передачи данных на DCHP портах
- Указать в параметрах DCHP, что сервер так же является PXE-сервером.
На этом обзор настроек можно считать законченным.
Структура WDS сервера
Теперь давайте разберем структуру каталогов на сервере развертывания Windows. У вас тут будет шесть пунктов:
- Образы установки — тут будут хранится по сути сами дистрибутивы Windows, которые вы либо импортируете, либо сами создадите и захватите, тот самый эталонный образ. Именно они будут устанавливаться на конечные клиенты
- Образ загрузки — это по сути меню загрузчика с WinPE образами, которые позволят вам выбрать нужный образ установки и попасть в его меню
- Ожидающие устройства, тут будет список устройств, которые нужно будет одобрять в ручном режиме
- Многоадресные передачи — это режим раскатывания образа сразу на два и более чистых компьютера, подключенных к одному коммутатору и сегменту сети, по сути одновременно будет идти загрузка на все компьютера, тем самым экономя нагрузку на сеть, благодаря хитрому механизму балансировки
- Драйверы — тут у вас будут пакеты драйверов, нужные для интеграции, например для жестких дисков или RAID-массивов, очень частая ситуация, что попав на этап разметки дисков, вы их просто не видите или вообще получаете ошибку 0x80300024
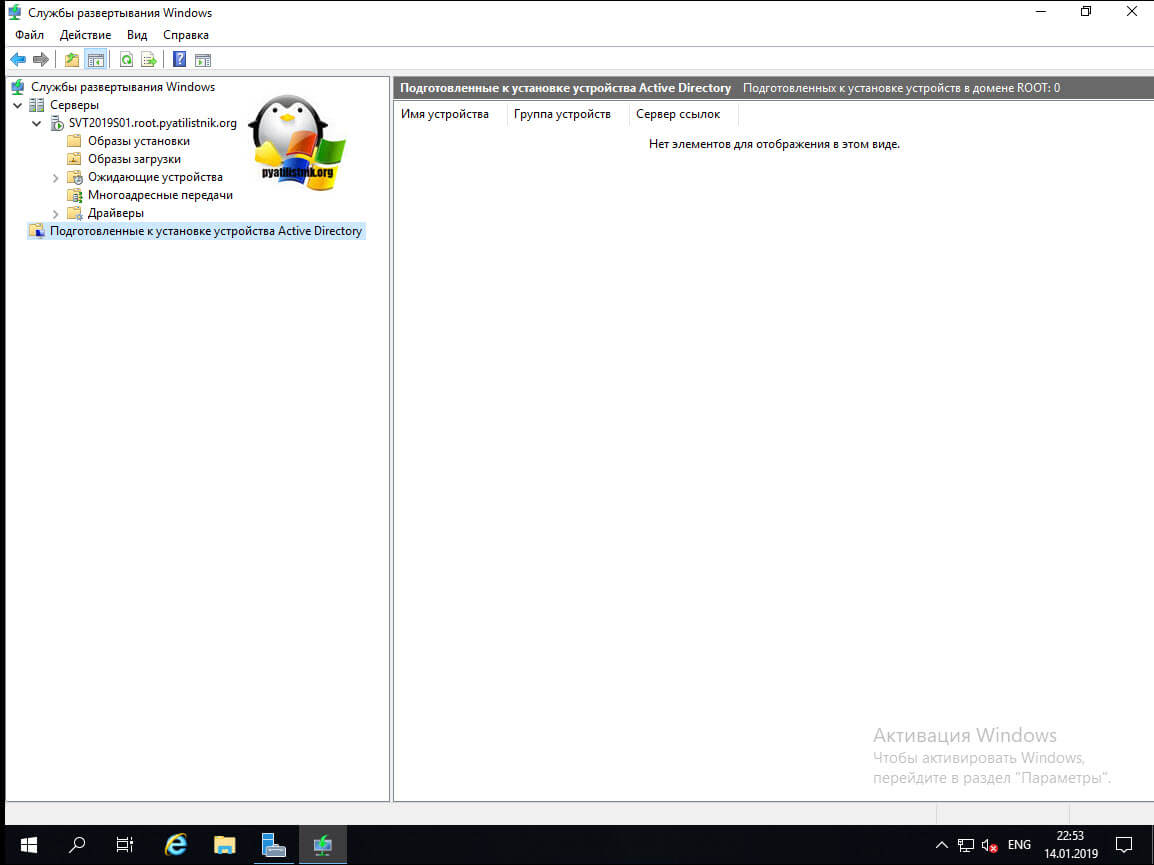
- Подготовленные к установке устройства Active Directory
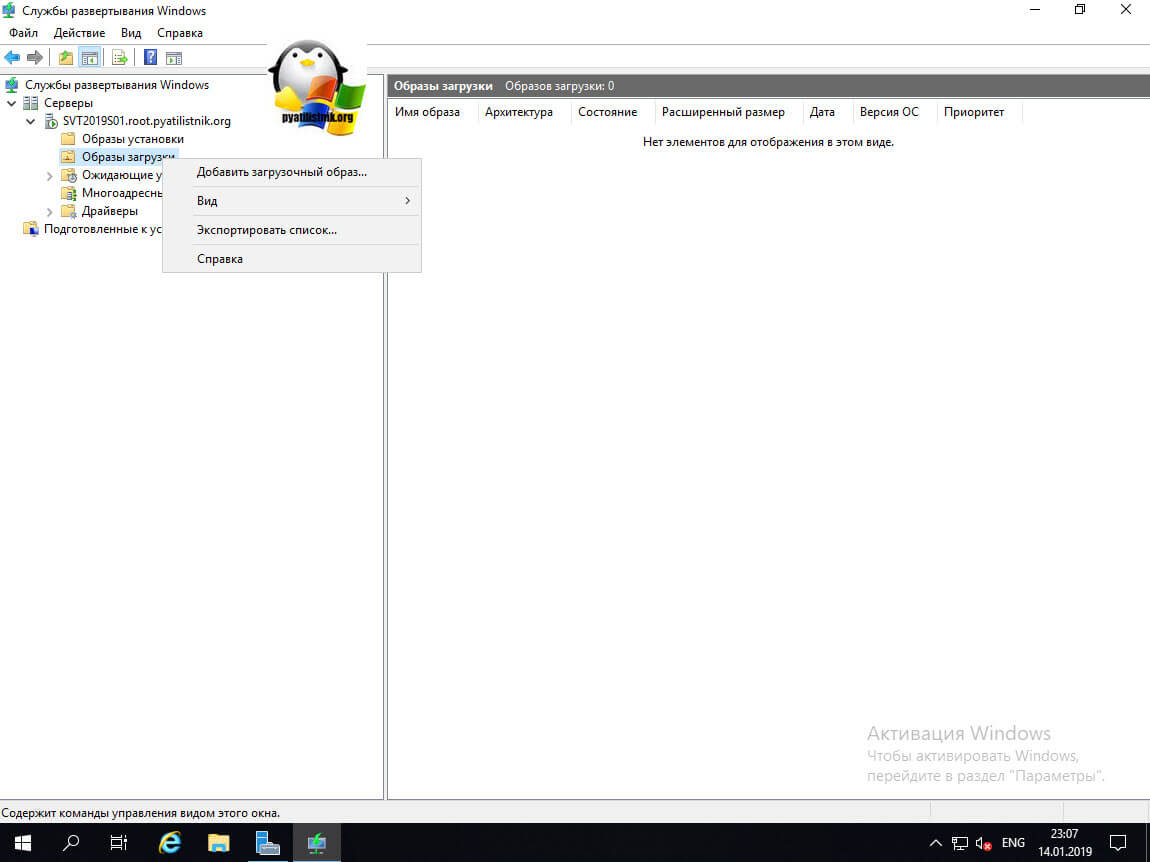
Создание образа загрузки
Первым делом вы должны создать загрузочное меню с загрузочными дисками. Для этого используются оригинальные ISO образы Microsoft. Я в своем примере создам загрузчик Windows 10 1803. Вы его должны смонтировать, чтобы получить каталог файлов. Если у вас физический сервер, например с Windows Server 2008R2, то вы можете ему подсунуть загрузочную флешку. Далее вы щелкаете правым кликом по пункту «Образы загрузки» и выбираете пункт «Добавить загрузочный образ»
В мастере добавления образа нажмите кнопку «Обзор», пройдите в ваш смонтированный диск и перейдите в каталог sources, где вам необходимо найти файл boot.wim. Выберите boot.wim и откройте его.
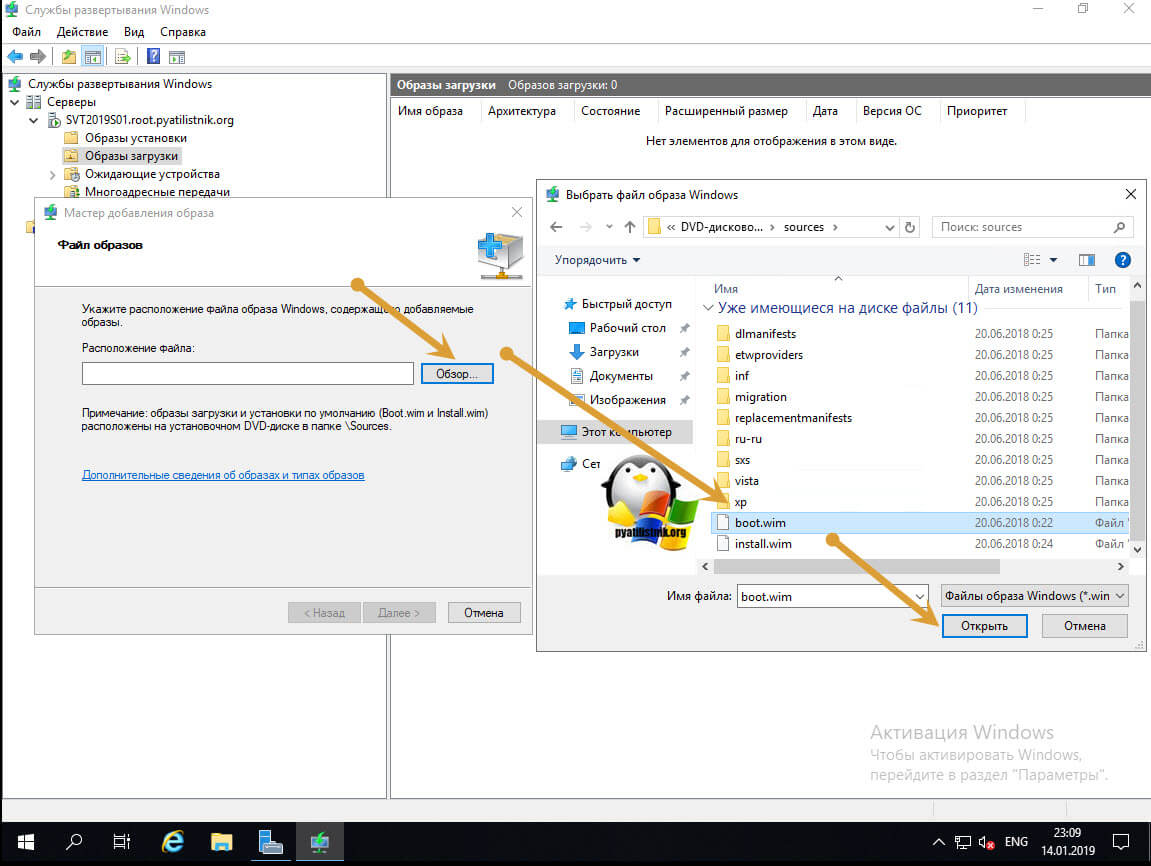
Выбрав загрузчик boot.wim нажмите далее.
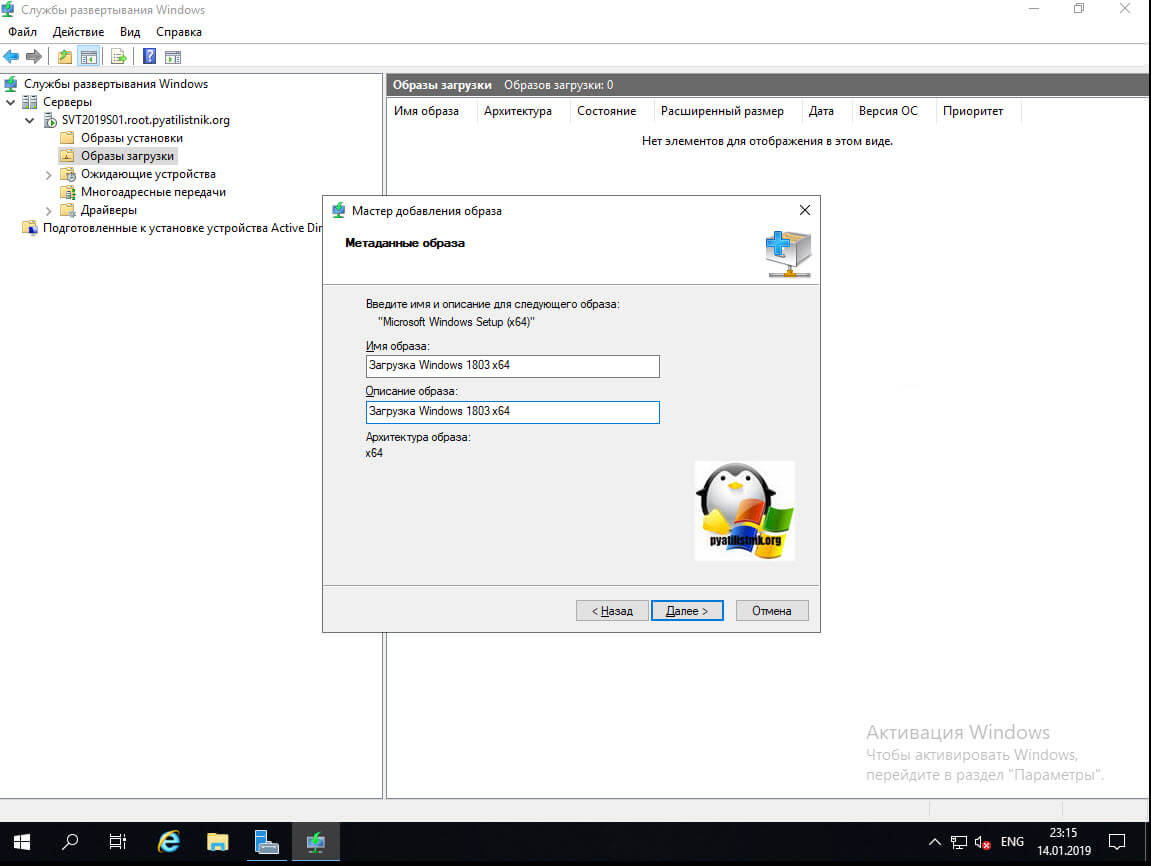
Теперь необходимо заполнить метаданные образа, в имени указываем удобное для себя имя образа и чуть ниже его описание, описание поможет быстро ориентироваться в самой оснастке, когда загрузчиков boot.wim будет много.
На следующем шаге выбираем наш образ и идем далее.
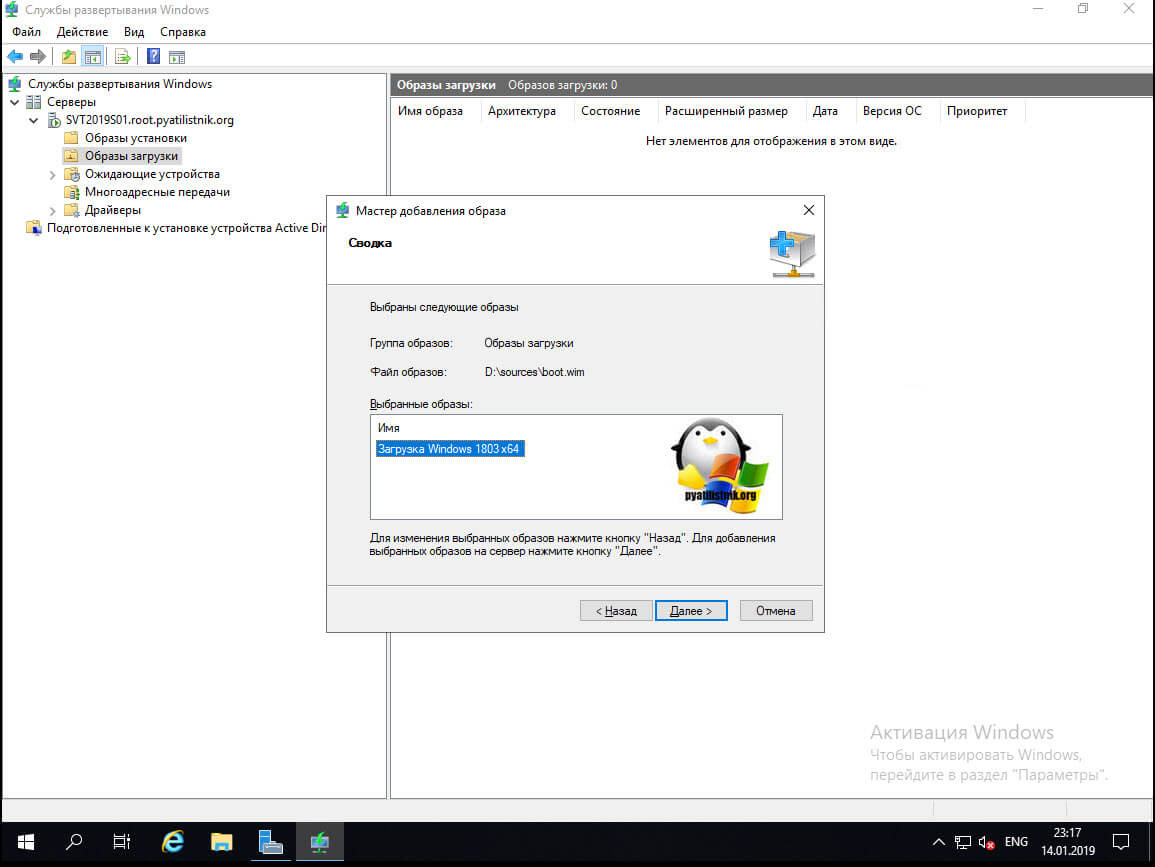
Добавление образа загрузки, сам процесс будет быстрым, так как файлик boot.wim весит всего 445 мегабайт.
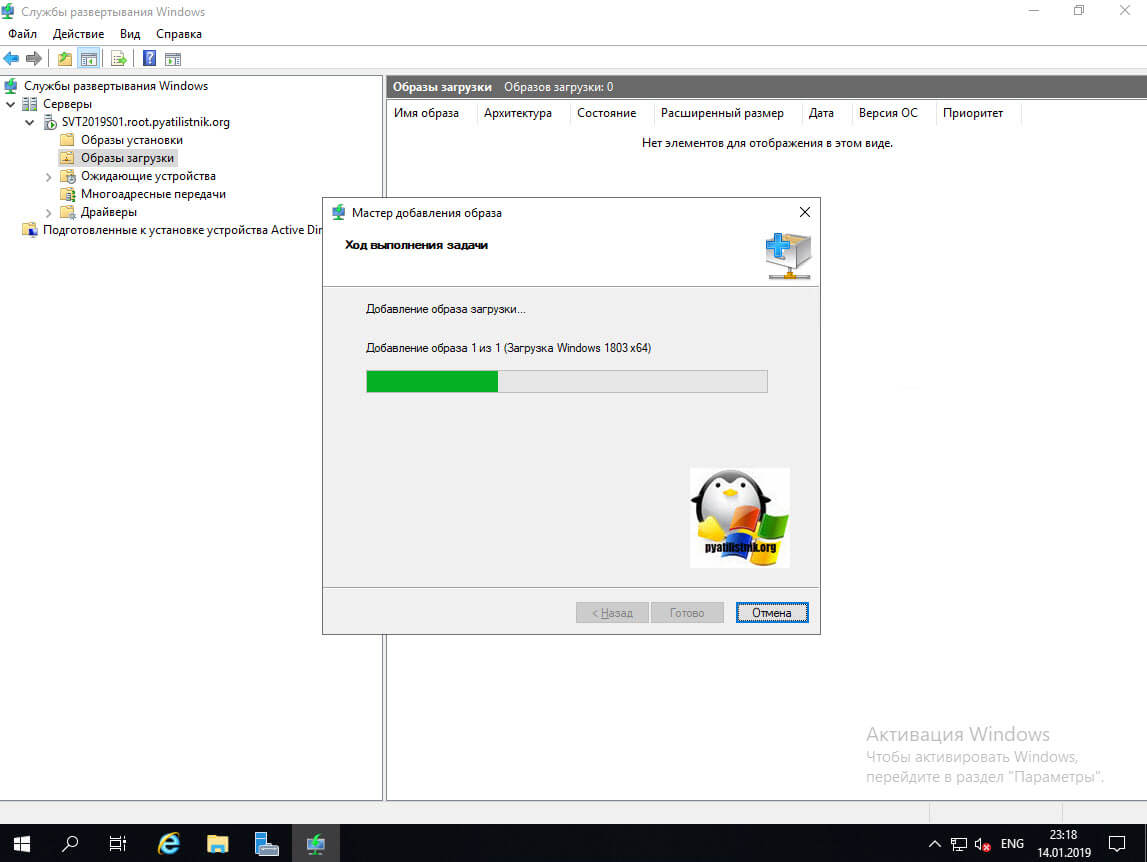
Готово.
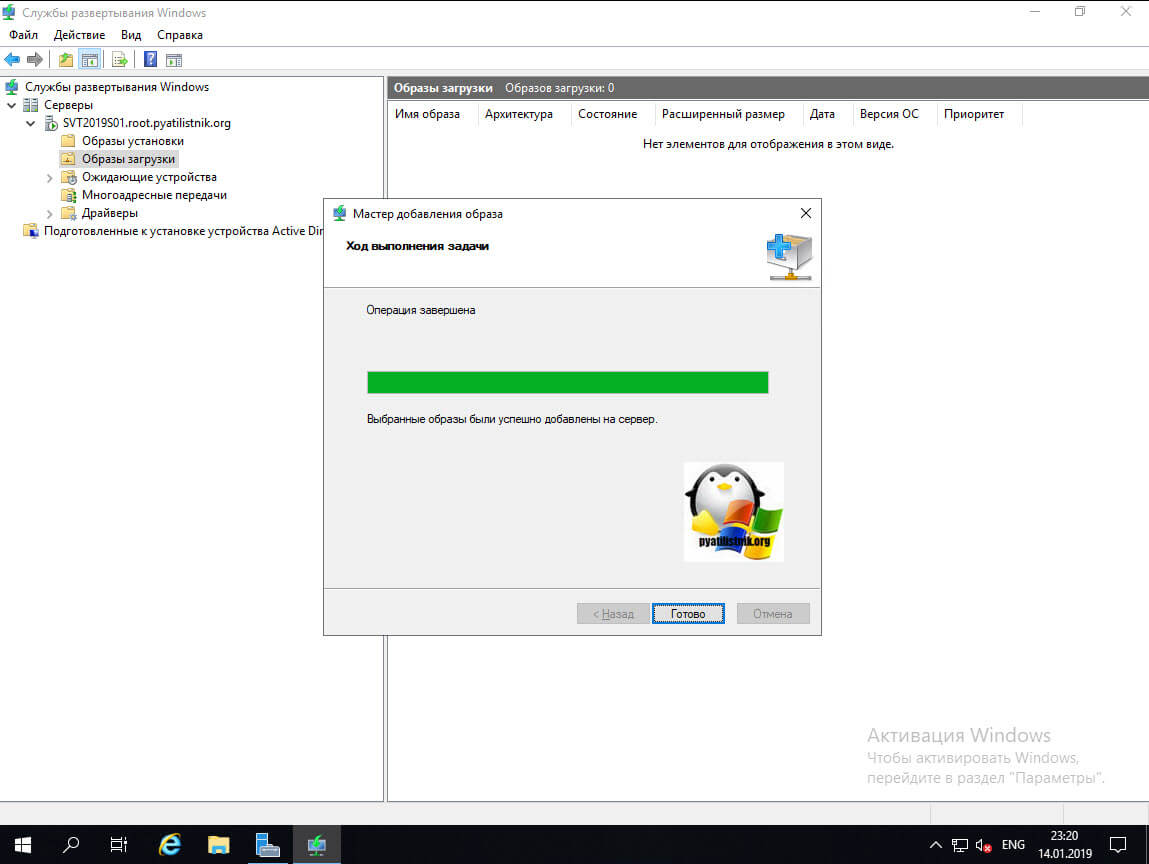
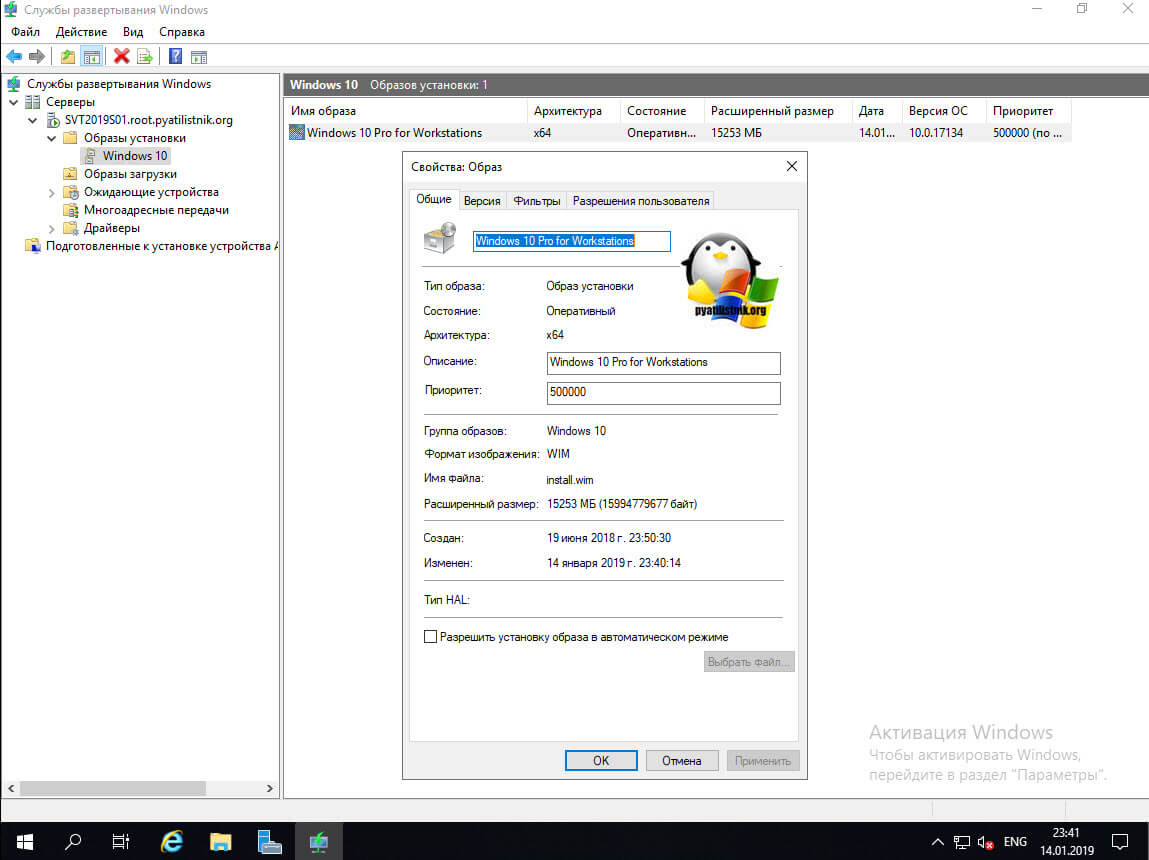
У вас появится запись с именем образа, что мы задавали, в столбцах будет много полезной информации, начиная от размера и заканчивая версией ОС. В свойствах вы можете изменить имя и описание, а так же задать приоритет. Когда загрузчик у нас готов, мы можем создать установочный образ на сервере развертывания Windows.

Создание образа установки на WDS сервере Windows Server 2019
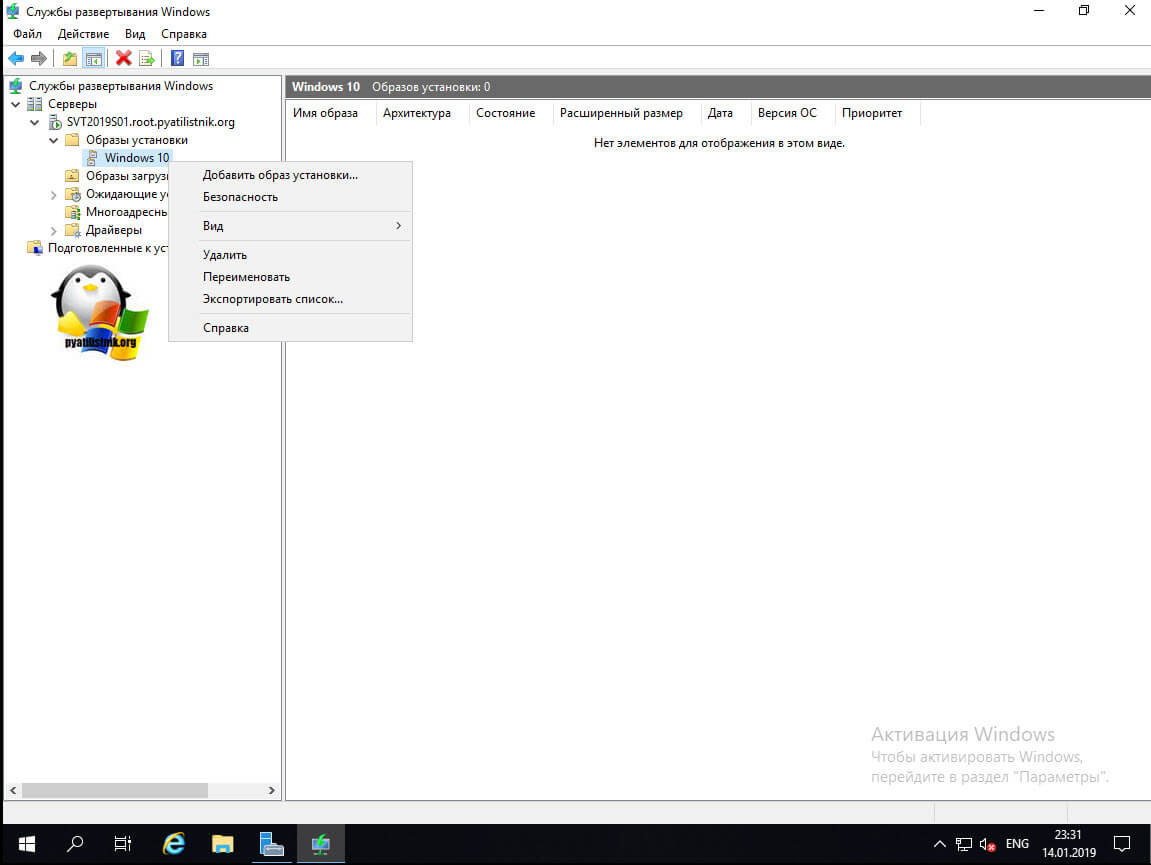
Сам процесс на Windows Server 2019, мало чем отличается от предыдущих версий. Образ установки мы так же найдем на установочном диске с дистрибутивом Windows, но как я и писал выше его можно получать в случае захвата эталонного образа, подготовленного заранее. Перейдите в раздел «Образы установки» и так же через правый клик выберите пункт «Добавить образ установки».
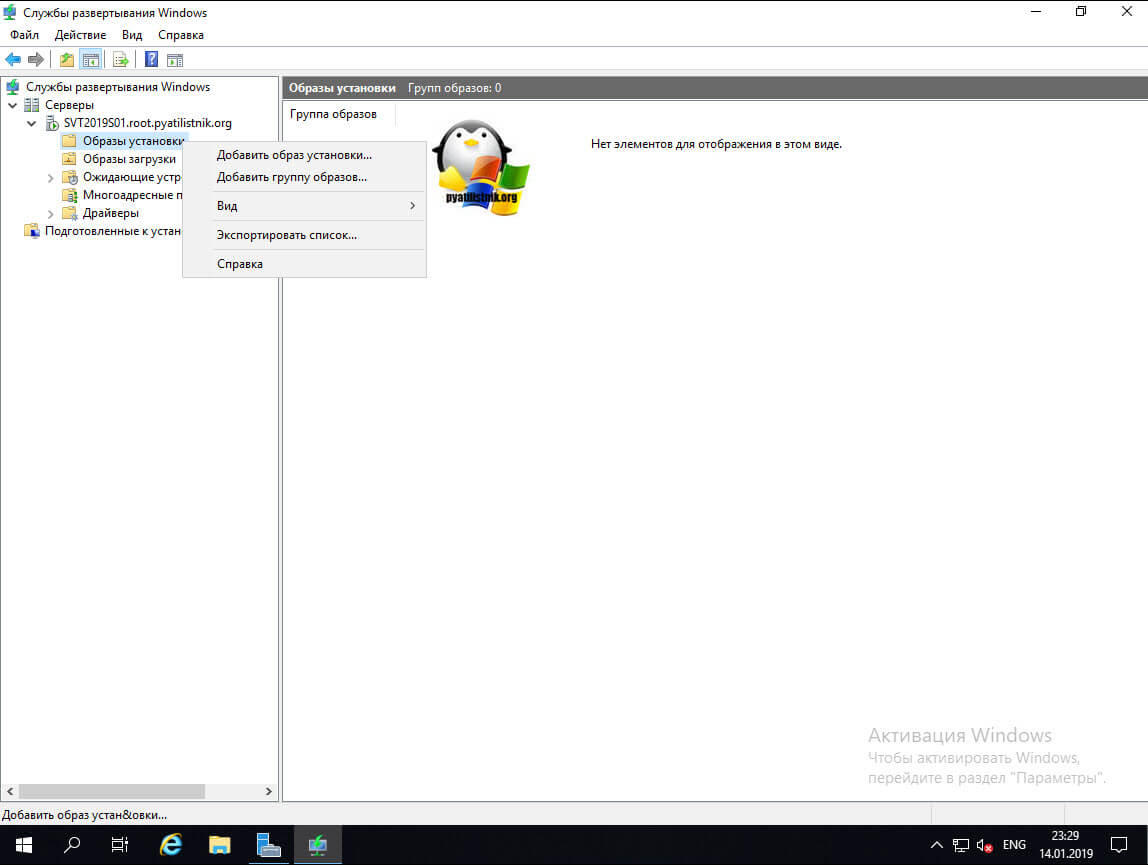
Обратите внимание, что тут можно создать группу, это можно сравнить с категориями, например разбиение по версиям Windows.
Тут в мастере добавления, вам через кнопку обзор нужно найти на дистрибутиве в папке sources файл install.wim, он будет размером более 2 гб, это и есть сам дистрибутив операционной системы Windows в виде такого архива.
На следующем шаге, если у вас в файле install.wim, содержится более одной версии операционной системы, то вам нужно галками проставить ваш выбор, в моем случае, это Windows 10 PRO.
Выбираем ваш образ установки и нажимаем далее.
Сам процесс добавления займет чуть больше времени, так как файл install.wim весит несколько гигабайт.
Все у меня успешно все добавилось.
Как и в случае с загрузочным образом вы в свойствах можете изменить имя установочного образа, его описание.
На вкладке фильтры, вы можете более тонко описать к каким компьютерам можно применять образ, например, к производителям Dell.

На вкладке «Разрешения пользователя» вы можете более выборочно задать, какие пользователи или группы Active Directory, могут его читать, чтобы применить.

Установка Windows 10 с WDS сервера
Когда у нас все готово, мы можем протестировать установку Windows с нашего PXE сервера. Для этого возьмите чистую рабочую станцию, в моем примере, это будет виртуальная машина на гипервизоре VMware ESXI 6.5. Первым делом вам необходимо:
- Либо выставить в биос загрузку с сетевой карты

- Либо выбрать при старте Boot Menu и загрузиться с сетевой карты
так же убедитесь, что у вас в биос включена поддержка PXE протокола

У вас появится окно с предложением нажать клавишу F12 сделаем это.
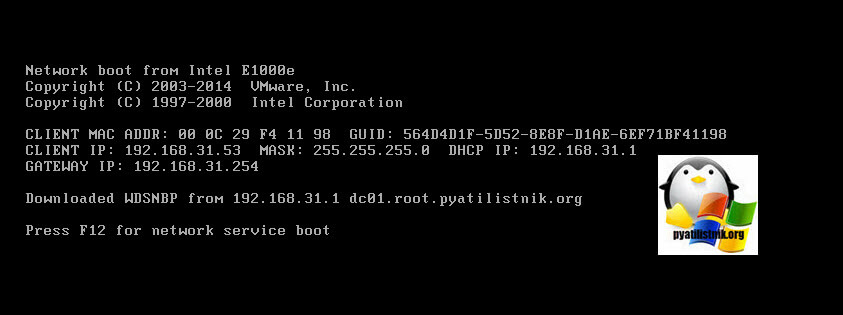
Если у вас все правильно настроено, то у вас начнется загрузка и вы увидите стандартный ползунок загрузки, если в сети вам никто не ответил, то вы получите ошибку:
PXE-E53 No Boot Filename received
PXE-M0F: Exiting intel PXE ROM. Operating System not found
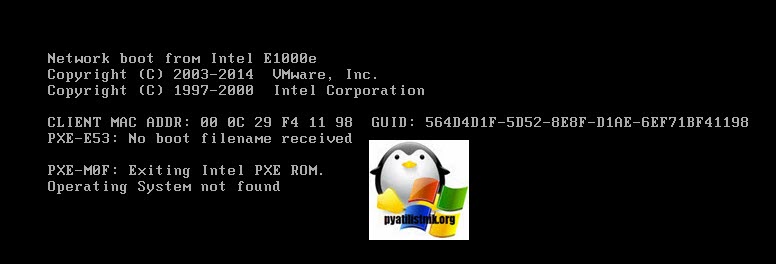
так же вы можете поймать и такую ошибку, если у вас WDS сервер находится на другом хосте от DHCP:
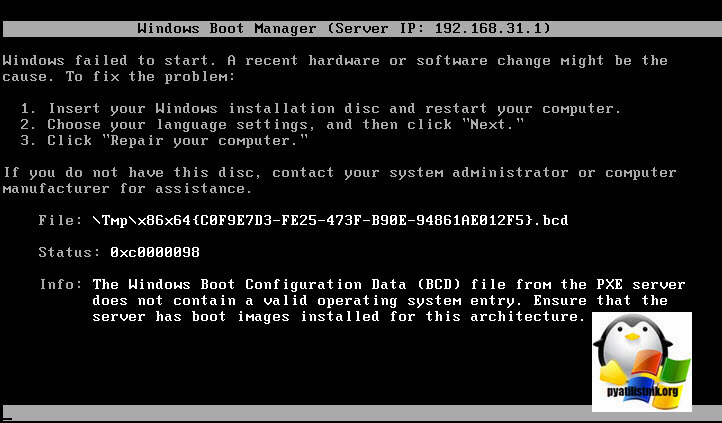
Windows Failed to start. Status 0xc0000098. File tmpGUID.bcd
Как решается ошибка со статусом 0xc0000098 на при загрузке с WDS сервера читайте по ссылке слева.
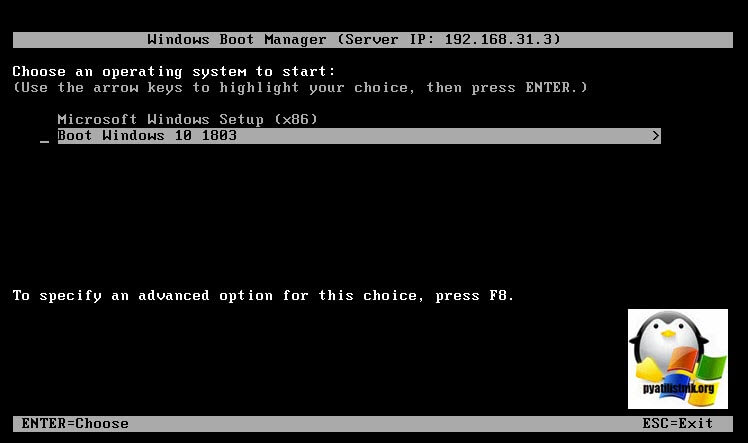
В итоге у вас должно появится окно с выбором загрузчика, их может быть много под каждое поколение и архитектуру ОС.
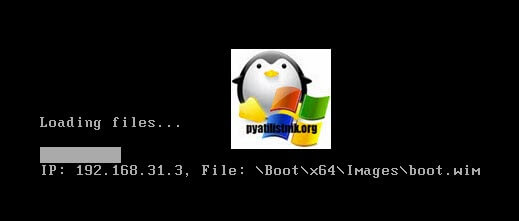
Начнется загрузка файла boot.wim, который находится в текущем загрузчике. Видно к какому ip-адресу обращается клиентский компьютер.
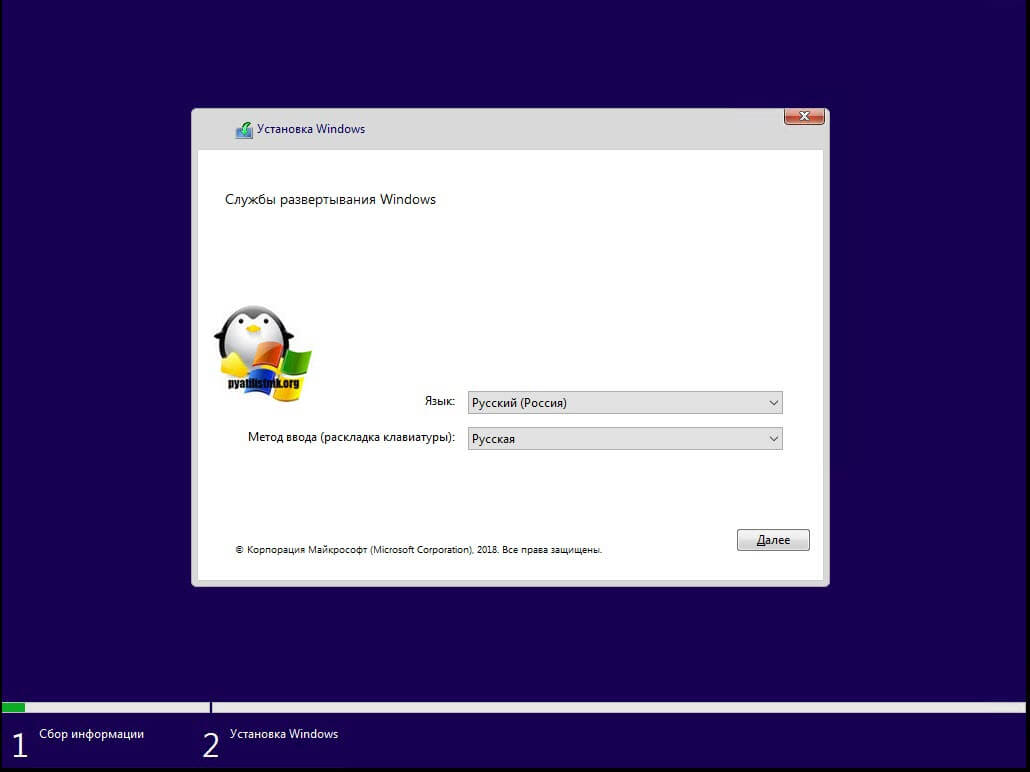
У вас откроется мастер установки Windows, выбираем язык мастера и нажимаем далее.
Вам необходимо авторизоваться, указав учетные данные имеющие доступ к серверу WDS.
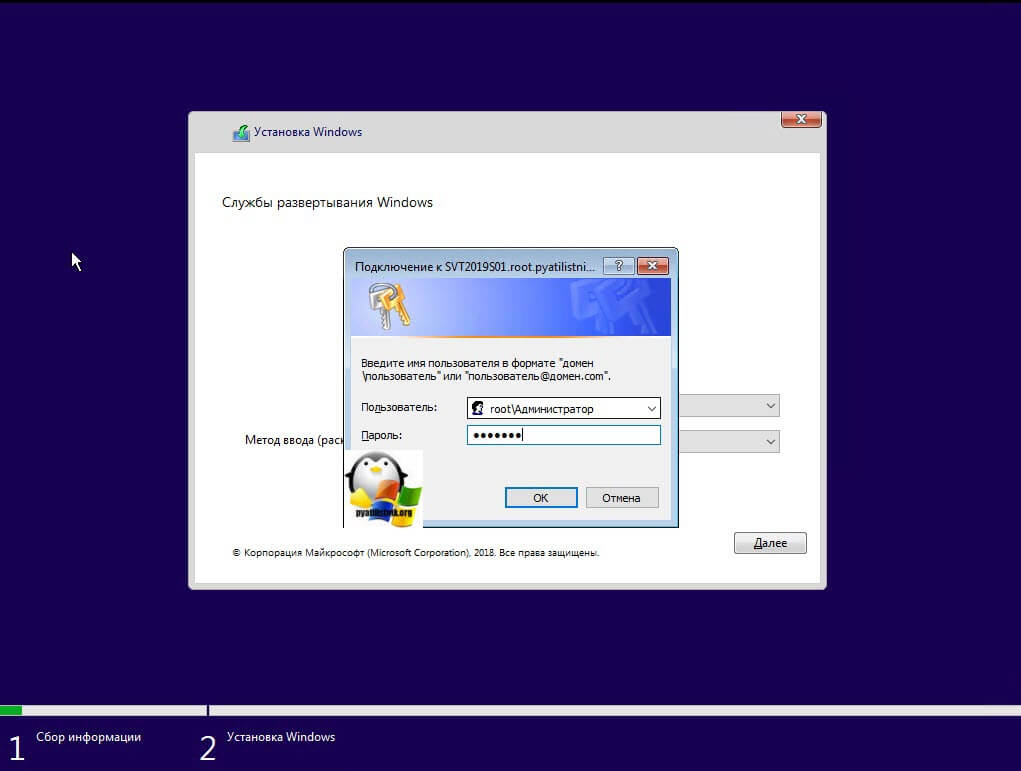
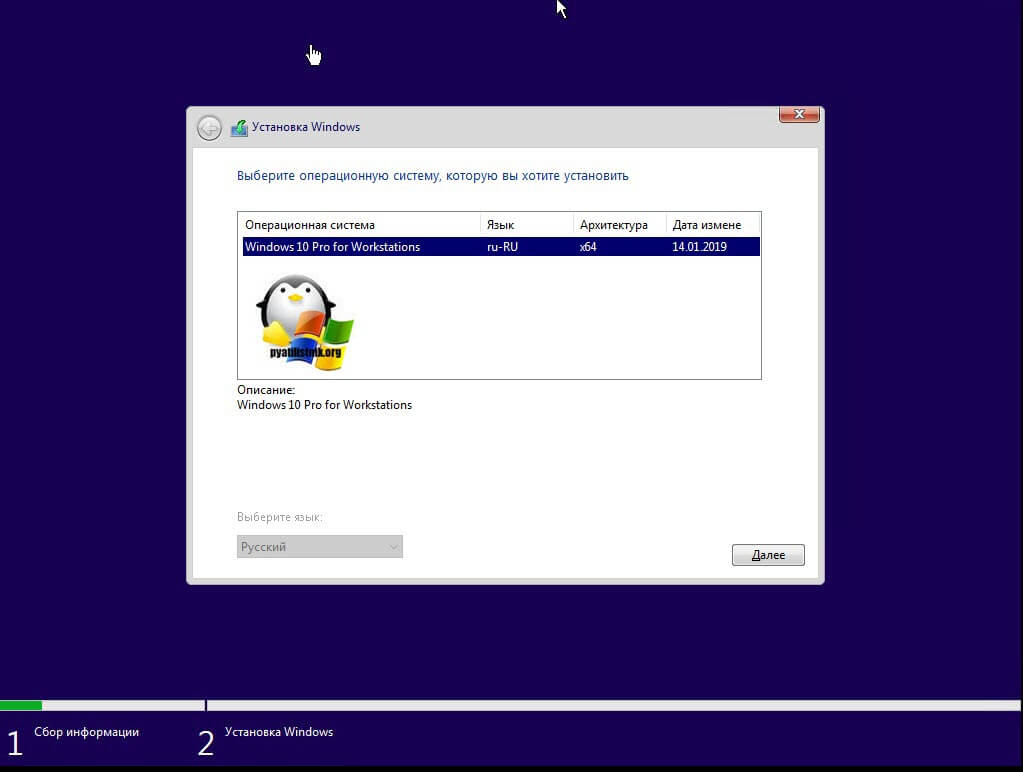
Если все хорошо, то вы увидите на следующем окне список доступных образов установки, в моем случае, это Windows 10 Pro for Workstations.
После чего вы увидите интерфейс разметки и выбора раздела для установки. В следующей статье я подробно расскажу, как вы можете создать свой эталонный образ со всеми обновлениями и установленным софтом, ну и передать его на WDS сервер. Надеюсь было не долго, а с вами Иван Семин .автор и создатель блога Pyatilistnik.org.
Microsoft Windows deployment services (WDS) helps you for Windows deployment of the client computers on your business network environment. The WDS is a server technology from Microsoft for network-based installation of Windows operating systems. It is the successor to Remote Installation Services an old OS deployment service. Here you can learn to configure WDS on Windows Server 2016 for Windows Deployment.
Microsoft WDS is intended to be used for remotely deploying Windows Vista, Windows 7, Windows 8, Windows 10, Windows Server 2008, Windows Server 2012 and Windows Server 2016, but also supports other operating systems because unlike its predecessor RIS, which was a method of automating the installation process, WDS uses disk imaging, in particular, the Windows Imaging Format (WIM).
Install WDS in Windows Server 2016
The above video tutorial explains you to install WDS in Windows server 2016 quickly. For Installing Windows deployment services, you need a virtual server or a physical server.
Install and configure Windows deployment services:
- Prepare Virtual Server.
- Installing Windows Deployment Services.
- Configure WDS.
- Add OS Image.
- Deploy Client OS.
Using WDS is the best way to deploy Windows 10 images on network client machines and network servers.
After watching this video, you must be able to install the WDS server on a virtual server or a physical dedicated server.
The next step, after installing Windows Deployment, you need to configure WDS on Windows Server 2016 for Windows deployment. Just watch the WDS configuration video tutorial.
Good, your Windows Deployment server must be configured accurately. The next step using WDS as the best way to deploy Windows 10 images you have added to WDS.
You can find a step by step configuration of Windows Deployment Services here: Step by step guide to configure WDS.
Best Way to Deploy Windows 10 Images
Here you find the best way to deploy Windows 10 image to the client machines on your business network environment. If your Windows Deployment server configured properly, you can deploy Windows 10 without any problems. Otherwise, you must troubleshoot the Deployment server configuration. Find out the issue and try to solve it or share with us to help you.
No matter, if you faced some Windows deployment issue, just comment us under this post.
How to Capture Windows 10 Reference Image with WDS?
Create and capture Windows 10 reference image is important because that image serves as the foundation for the devices in your organization. In this topic, you will learn how to capture Windows 10 reference image using WDS.
This video is a short lab manual. If you need to know more about capturing an image with Windows Deployment Services read the article “Capture Windows 10 reference image using WDS“.
Windows Deployment Services (WDS) is a server technology from Microsoft for network-based installation of Windows operating systems. It is the successor to Remote Installation Services. WDS is intended to be used for remotely deploying Windows Vista, Windows 7, Windows 8, Windows 10, Windows Server 2008, Windows Server 2012 and Windows Server 2016, but also supports other operating systems because unlike its predecessor RIS, which was a method of automating the installation process, WDS uses disk imaging, in particular, the Windows Imaging Format (WIM).
WDS is included as a Server Role in all 32-bit and 64-bit versions of Windows Server and is included as an optionally installable component with Windows Server 2003 Service Pack 2.
With this tutorial, we are going to explain how you can install and configure WDS role in Windows Server 2016 step by step.
Install WDS Role:
1. Open “Server Manager” and click “Add roles and features” and then click Next twice to skip the introduction pages of the installation wizard.
2. Select your server from the server pool.

3. From the roles list check on “Windows Deployment Services” once you click on it the installation wizard will pop up to add its features click on “Add Features” then click Next.
4. On the Features page of the installation wizard leave it as default and click Next.
5. This is a page about WDS information, you can read it to gain some info and then click Next.
6. Leave the role services that selected as default and click Next.
![]()
7. On the confirmation page of the wizard, click Install.

8. WDS role is installing now once the installation is complete we will move the second part of the tutorial and it’s about how to configure WDS.

After the installation of the role is done successfully please follow the below steps to configure it.
1. From dashboard click on Tools and select “Windows Deployment Services”.
2. On the console page of WDS, expand “Servers” and then right click on your server and click “Configure Server”.

3. On the configuration wizard, you can read the first page and then click Next.

4. On the installation options page, select “Integrated With Active Directory” and then click Next.
5. On this page, select the location that you want to save on it the windows images and the configuration files and then click Next.

6. On the “PXE Server Initial Settings” page choose “Respond to all client computers (Know and unknown)” and click Next.

7. On the Operation Complete page, uncheck “Add images to the server now” and click Finish.
8. Now “Windows Deployment Services” is installed on Windows Server 2016 successfully.

Summary
After this tutorial, you should be able to know how you can install and configure WDS role in Windows Server 2016, if you have any inquiry regarding this tutorial please comment below.
I started this tech blog back in 2011 as a place to write down processes I took to fix my client systems and network. Now I write some tips and tricks to help others with the tech issues that one might encounter.
If you find yourself suddenly having to deploy a lot of workstations at once, Windows Deployment Services (WDS) 2016 is here to help. WDS is a service by Microsoft that allows you to remotely deploy the Windows operating systems across tens, hundreds or even thousands of computers.
You could set up WDS using the boring GUI but if you need to spin up a WDS server in a hurry, PowerShell is your best bet.
In this article, you’re going to learn how to create a PowerShell script to perform all the needed tasks to get a WDS 2016 server up and running from scratch.
Before you get started, be sure you have a Windows Server 2016 or 2019 machine on hand to install and set up WDS on. Also, the demo will use a Windows 10 ISO so be sure you have one available if you’d like to replicate the demo’s results.
Installing the WDS Windows Feature
Let’s start by installing the Windows feature, WDS-Deployment, on the soon-to-be WDS server using the Install-WindowsFeature cmdlet. Be sure to include the management tools to get the WDS MMC and PowerShell module.
Install-WindowsFeature wds-deployment -includemanagementtools
When complete, you should see PowerShell return the following output. The command completed successfully, and a reboot is not required.

Initializing the WDS Server
Now that you have the WDS-Deployment Windows feature installed, you now have access to the wdsutil command-line utility. You’ll use this to initialize the server. To do so, specify where you would like your remote install to be. The
best practice is to use a separate partition. I am placing the command output in a variable because it can spew out some unhelpful warnings.
$wdsUtilResults = wdsutil /initialize-server /remInst:"E:remInstall"
$wdsUtilResults | select -last 1
Just ensure that the last line says, The command completed successfully and you know your WDS server is up and running.
Adding the WDS Boot Image
Next, you need to add a boot image and at least one install image before we can really do anything with it, so import the boot.wim file.
Specify the path to a Windows 10 ISO mounted on our WDS server. This can take 30 seconds or so to import. We’re getting closer to setting up WDS PowerShell!
# Import the WinPE image from your install media
Import-WdsBootImage -Path "D:sourcesboot.wim"
Next, import the install image. This is the image that will actually be deployable after you’re done. You should create an image group to store it in. This can be named whatever you want, but you will want to logically group your images somehow.
I will call mine group desktops.

A WIM on an install media can have several images on it. We can use the Get-WindowsImage command to list the images.
Get-WindowsImage -imagePath "D:sourcesinstall.wim" | select Imagename
Then use the image name you want to import with the Import-WDSInstallImage command.
$imageName = 'Windows 10 Pro'
Import-WdsInstallImage -ImageGroup "desktops" -Path "D:sourcesinstall.wim" -ImageName $imageName
This import will take much longer because it’s a full operating system image.
At this point, the WDS server is ready to test. You can either configure PXE boot or create and use a discovery image to test. I’ll boot to an image I already have made on our test machine.
After the discovery media boots, you can then begin setting up all options necessary to deploy Windows 10 to your remote machines.
Conclusion
WDS is a handy service to get Windows deployed on many computers at once. If you need a free remote-deployment tool that gets the job done, be sure to take WDS for a test run. While you’re at it, copy out the following PowerShell code shown in the
demo to make it easy to get up and running quickly.
Install-WindowsFeature wds-deployment -includemanagementtools
$wdsUtilResults = wdsutil /initialize-server /remInst:"E:remInstall"
# Import the WinPE image from your install media
Import-WdsBootImage -Path "D:sourcesboot.wim"
$imageName = 'Windows 10 Pro'
Import-WdsInstallImage -ImageGroup "desktops" -Path "D:sourcesinstall.wim" -ImageName $imageName
Службы развертывания Windows (WDS) — отличное дополнение к набору продуктов Windows. В стандартной конфигурации WDS обеспечивает развертывание виртуальных машин (ВМ) Windows, а если внести небольшие изменения, его можно использовать также для создания серверов Linux и VMware. Причем все это можно сделать из меню загрузки с возможностью выбора Preboot eXecution Environment (PXE).
Чтобы настроить WDS для развертывания систем Windows и Linux, необходимо внести несколько изменений в командной строке. По сути, нужно заменить загрузчик PXE, используемый Windows, на загрузчик для Linux. После этого создается пункт меню, позволяющий меню загрузки PXE для Linux переключаться на меню Windows для загрузки Windows, а для создания веб-интерфейса для загрузки файлов конфигурации Linux используется IIS.
Настройки WDS, которые я использую сейчас, позволяют развертывать Windows, CentOS и ESXi. Именно об этих трёх операционных системах пойдет речь в этой статье, однако можно использовать и другие.
На пустом сервере Windows мне нужно выделить диск C: объемом 60 ГБ для операционной системы и диск WDS объемом 300 ГБ для различных файлов WIM, необходимых для развертывания Windows, и для файлов установки Linux.
Установка и настройка выполняются в несколько этапов:
Настройка сервера WDS
На сервере должны быть установлены WDS и IIS. Это можно сделать с помощью программы Windows Server Manager или с помощью PowerShell.
Install-WindowsFeature –name Web-server -includemanagementtools

Install-Windowsfeature –name WDS -includemanagementtools
Теперь, когда у нас установлен базовый сервер служб развертывания Windows, нужно внести некоторые изменения в пул DHCP. При желании можно добавить вторую сетевую плату на этот сервер и создать выделенную сеть, но я лично хочу иметь возможность создавать серверы в основной сети, поэтому предпочитаю обновлять центральный сервер DHCP с помощью дополнительных атрибутов DHCP WDS:
Я использую следующие настройки DHCP:

«Имя узла сервера загрузки» — IP-адрес сервера WDS.
«Имя файла загрузки» — исполняемый файл WDS, который должен быть запущен клиентом.
Три других параметра — стандартные для большинства настроек DHCP.
Запустите мастер настройки на сервере WDS и завершите настройку WDS. Я предлагаю сделать несколько небольших изменений в настройках.
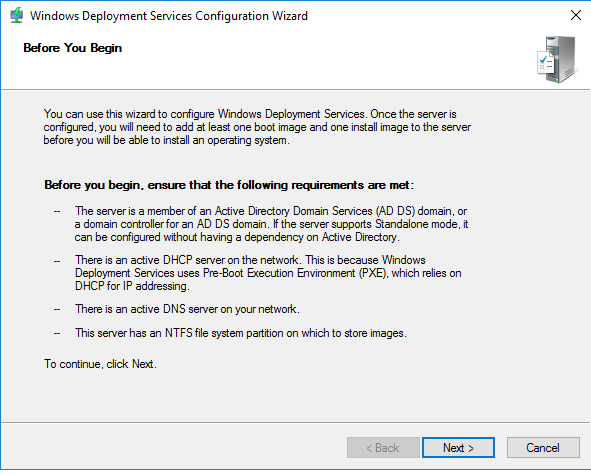

Сервер можно интегрировать с AD, поскольку в этот момент мы настраиваем параметры Windows, но я предпочитаю автономный сервер, который отвечает на все запросы без предварительного размещения в AD.

Я меняю C:RemoteInstall на E:RemoteInstall. E: — это второй диск, который я добавляю на сервер WDS специально для файлов WIM, файлов Linux и т. п.

Как я уже сказал, я хочу, чтобы сервер PXE сам отвечал на все запросы, не тратя времени на получение подтверждения от AD.
Последний параметр, который надо изменить, находится в меню PXE. Для этого нужно запустить консоль развертывания WDS, щелкнуть правой кнопкой мыши на имени сервера и изменить значение параметра на вкладке загрузки с «Require the user to press F12 key to continue the PXE boot» («Пользователь должен нажать клавишу F12 для продолжения загрузки PXE») на «Always continue the PXE boot» («Всегда продолжать загрузку PXE»).

Теперь в WDS можно добавить файлы .WIM. Достаточно скопировать файлы «boot.wim» и «install.wim» из образа 2016 ISO, и вы сможете развернуть образы Windows с помощью WDS.
Вы сможете запустить ВМ с помощью загрузки PXE и открыть стандартный экран загрузки WDS, на котором будет только ОС Windows. На этом этапе стоит протестировать развертывание и убедиться, что все работает, потому что теперь мы начинаем вносить фундаментальные изменения в WDS, которые позволят использовать службы для установки Linux и ESXi.
Сервер WDS уже может выполнить развертывание образов Windows, но мы хотим, чтобы он делал не только это. Он должен также справляться с образами Linux, поэтому первым делом мы меняем загрузчик WDS на загрузчик Linux PXE.
Для этого нужно скачать sysLinux. НЕ СКАЧИВАЙТЕ версии позже 3.86 — они не будут работать с ESXi, поскольку их установщик по-прежнему использует версию 3.86.
Скачав sysLinux 3.86, распакуйте архив во временную папку. Теперь нужно переместить несколько файлов. Это самая занудная часть процесса установки, которая требует аккуратности!
Извлеките из архива sysLinux 3.86:
- corepxeLinux.0
com32menuvesamenu.c32
com32moduleschain.c32 - Переименуйте pxeLinux.0 to pxeLinux.com
- Скопируйте файлы в папки remoteinstallbootx64 и remoteinstallbootx86
- В обеих папках x86 и x64 переименуйте pxeboot.n12 в pxeboot.0
Из командной строки выполните следующие команды, чтобы заменить загрузчик по умолчанию на загрузчик Linux PXE:
wdsutil /set-server /bootprogram:bootx86pxeLinux.com /architecture:x86

wdsutil /set-server /N12bootprogram:bootx86pxeLinux.com /architecture:x86

wdsutil /set-server /bootprogram:bootx64pxeLinux.com /architecture:x64

wdsutil /set-server /N12bootprogram:bootx64pxeLinux.com /architecture:x64
Наконец, в обеих папках x86 и x64 создайте подпапки с именем pxeLinux.cfg, а в них создайте файл с именем «default» и скопируйте в него следующий текст, чтобы настроить меню загрузки:
DEFAULT vesamenu.c32
PROMPT 0
NOESCAPE 0
ALLOWOPTIONS 0
# Timeout in units of 1/10 s
TIMEOUT 0
MENU MARGIN 10
MENU ROWS 16
MENU TABMSGROW 21
MENU TIMEOUTROW 26
MENU COLOR BORDER 30;44 #20ffffff #00000000 none
MENU COLOR SCROLLBAR 30;44 #20ffffff #00000000 none
MENU COLOR TITLE 0 #ffffffff #00000000 none
MENU COLOR SEL 30;47 #40000000 #20ffffff
MENU BACKGROUND flow.jpg
MENU TITLE PXE Boot Menu
#—
LABEL wds
MENU LABEL Windows Deployment Services
MENU DEFAULT
KERNEL pxeboot.0
#—
LABEL CentOS68
MENU LABEL CentOS 6.8
KERNEL /web/CentOS/6.8/images/pxeboot/vmlinuz
append initrd=/web/CentOS/6.8/images/pxeboot/initrd.img root=/dev/ram0 init=/Linuxrc ramdisk_size=100000 ks=https://[IP-адрес сервера WDS]/CentOS/6.8/centos-base-ks.cfg
#—
LABEL CentOS72
MENU LABEL CentOS 7.2
KERNEL /web/CentOS/7.2/images/pxeboot/vmlinuz
append initrd=/web/CentOS/7.2/images/pxeboot/initrd.img
#—
LABEL VMWare500U3
MENU LABEL VMWare 5.0.0 U3
KERNEL /web/VMWare/5.0.0/U3/mboot.c32
APPEND -c /web/VMWare/5.0.0/U3/boot.cfg
#—
LABEL VMWare553b
MENU LABEL VMWare 5.5 U3b
KERNEL /web/VMWare/5.5.0/U3b/mboot.c32
APPEND -c /web/VMWare/5.5.0/U3b/boot.cfg
#—
LABEL VMWare60
MENU LABEL VMWare 6.0
KERNEL /web/VMWare/6.0/mboot.c32
APPEND -c /web/VMWare/6.0/boot.cfg
#—
LABEL VMWare65
MENU LABEL VMWare 6.5
KERNEL /web/VMWare/6.5/mboot.c32
APPEND -c /web/VMWare/6.5/boot.cfg
#—
LABEL Abort
MENU LABEL AbortPXE
Kernel abortpxe.0
#—
LABEL local
MENU LABEL Boot from Harddisk
LOCALBOOT 0
Type 0x80
Изменение настроек IIS
IIS необходимы для размещения установочных файлов CentOS и ESXi. Я всегда создаю структуру веб-файлов на VMDK. Она выглядит так:
E:web — корневой каталог, на который указывает IIS
E:webcentos7.x7.1 — файлы установки CentOS 7.1
E:webvmware6.5 — файлы установки VMware 6.5
В IIS необходимо включить просмотр файлов, чтобы установщик Linux и установщик VMware могли их извлечь.
Запустите программу администрирования IIS, выберите свой сервер -> Сайт по умолчанию -> Просмотр каталога и включите его.

Полезно также настроить защищенное соединение с сервером по протоколу HTTPS.
Добавление Linux
Теперь можно добавить Linux. Я делаю так:
Скачиваю самую маленькую ISO-версию CentOS (как правило, это образ minimal), монтирую образ ISO и копирую его содержимое в директорию «E:webcentos7.x7.[версия]» или другую, которую легко запомнить. После этого можно добавить, например, kickstart-файл, чтобы автоматизировать установку. Вот пример строк, которые я добавляю к файлу pxeLinux.cfg, используемому по умолчанию:
LABEL CentOS72
MENU LABEL CentOS 7.2
KERNEL /web/CentOS/7.2/images/pxeboot/vmlinuz
append initrd=/web/CentOS/7.2/images/pxeboot/initrd.img inst.repo=[IP-адрес сервера WDS]/CentOS/7.2 ks=[IP-адрес сервера WDS]/CentOS/7.2/centos-base-ks.cfg
Добавление VMware
И наконец, давайте добавим ESXi 6.5. Для этого тоже надо просто скопировать все файлы из ISO-образа VMware в соответствующую папку на сервере WDS, но после этого надо изменить файл boot.cfg в папке VMware, удалив пробелы. Это выглядит так:

В заключение скажу, что изменение настроек сервера WDS, IIS и различных файлов конфигурации может потребовать некоторых усилий, но, сделав это, вы сможете использовать меню PXE для переключения на WDS и выбрать любую ОС Windows, которая поддерживает WIM-файлы. С ее помощью можно также запускать установку Linux или VMware в полностью автоматическом режиме. Кроме того, для удобства вы можете добавить и другие приложения, такие как GParted и Memtest.
We know that the big selling points of Windows Deployment Services or WDS is that number one it doesn’t cost extra money, it’s included in Windows Server, but number two it provides us with PXE boot and multicast technology. So WDS fits into any self respecting operating system or server deployment infrastructure. In this and in the next post we’ll talk about initial configuration, as well as the PXE stuff that you have to set up, that connects WDS with your DHCP services as well. We’ll then talk about configuring and managing boot, install and discover images. These are the different kinds of images that WDS could potentially use for booting a machine, for installing an operating system.
WDS is kind of the combination of a couple of different solutions all into one. We have to have WDS itself because that’s the tool where the images are stored. That’s the tool where the images are delivered from. But it’s also a way to get machines connected up to WDS and bootstrapped into that WinPE environment. So a large portion of this initial configuration is not only getting WDS up and running, getting the different kinds of images pulled into WDS, but also the connection over to our DHCP services as well so make sure that you have DHCP server up and running as well.
INFRASTRUCTURE
DC01 –> Domain Controller and DHCP
WDS –> WDS Server (Domain joined)
Our first step in deploying WDS is to go and install WDS role. You can use Server Manager to install it or you can run powershell as admin and type in
Install-WindowsFeature WDS -IncludeAllSubFeature -IncludeManagementTools
Once done type in WDSMGMT to open windows deployment services. (You can access it through Server Manager as well. Click on Tools –> Windows Deployment Services)
Our next step is to click on Servers and then in drop down, right-click on your server and click on Configure Server.

On Before you begin page click Next.
On the Install Options page we have to identify what kind of installation we want to do for this instance of WDS. Now, in a lot of environments where you’re deploying machines, and those machines are going to be on the same active directory domain as the WDS server, well, you can use integrated with active directory here. But there is also option to create a stand-alone server, which does not necessarily preclude you from automatically inserting these machines you’ll be provisioning into your active directory domain. Now, more often than not, a lot of people like to create a separate server that’s perhaps even on a separate network. A lot of times, the network team prefers to keep the kinds of multicast traffic that WDS can use for that activity away from the rest of the network. It can kind of oversaturate the network if it’s configured in the wrong way. And so, for that reason, you’ll see a lot of situations where stand-alone servers are configured that are disconnected from active directory. But later on, as we go through the configuration of these machines, you can tell the machine to connect to your active directory once it’s provisioned but for the sake of simplicity we’ll go through an integrated with active directory configuration here. It kind of makes a few items just a little bit simpler. Click Next

On Remote Installation Folder Location, here we can configure path to our remote installation folder. Now, I’ll put this on the C drive, but this can contain a lot of content, because you’re going to be putting operating system images on it, so make sure you have plenty of space in whatever this location is. You’ll get a little error message if you try to choose the system volume as opposed to a different volume.


Now, here we have the next option of determining how we want our PXE server to respond to incoming clients as they may attempt to request an image from our WDS solution. By default, we won’t actually respond to any client computers, or I could choose to respond to known or known and unknown client computers. Remember that any machine where in the BIOS, you’ve configured the network boot higher up in the boot order, any of those machines will attempt to connect to your PXE server first before any of the other boot options that exist. And so you have to kind of be careful with this configuration here. I tend to set mine to known and unknown but require administrator approval for the unknown computers. Once done click next

When you click next, it will then go through the initial configuration of Windows Deployment Services. We still have quite a few other configurations we’ve got to do for WDS to even function. The next step is to actually identify what kind of images we want to import here onto this server. For our purposes, there are actually two different kinds of images that we’re interested in, the first of which will be a boot image. This boot image will be that little micro version of windows, the Windows PE instance, that bootstraps the client to the point where it can then request the install image, which is the second type of image we’re going to import. These boot and install images are available on the windows iso. What I did is I unpacked the iso and copied it to C:Windows Server 2016 ImagesUnpacked. You will find boot.wim and install.wim in sources folder. (When you install windows server, in most cases, you will have 4 options (both full and core standard and datacenter edition. I removed all except standard core so I will only have 1 option to install)).

Click Finish

Here we need to provide the path to location where those 2 .wim files are


Image Group page, I’m going to create an image group called Windows Server 2016 Standard Core and choose Next.

Once I do that, you’ll see we found one image, as well as one boot image.

When we click next, it will then go through the process of adding both the boot image and the install image here to our Windows Deployment Services location.

Now, If you remember we had option to specify remote installation location which I chose to be C:remote install, folder that we created as kind of the WDS working folder, where all of its content gets stored. One of the things that this process is doing is, it’s creating kind of a framework of different files that we’ll later be dropping content into.

Once done, We will see our boot and install images in our deployment. This is the copy of Windows that I’m going to later deploy out to a machine.
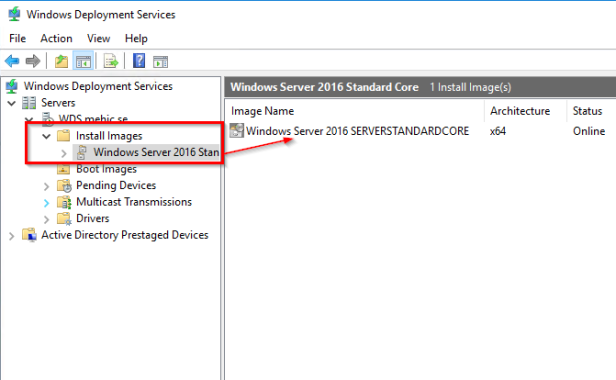
Then the boot image is what we use to actually boot that machine so that it could actually receive that copy of Windows. These two images in consort are what are necessary to get WDS to deploy an operating system out to an waiting client.

For us to get any further, we’ve got to go through a series of tabs here that are under the properties of our WDS server to configure it so that it behaves the way that we’re looking for. Let’s right-click on WDS server and select Properties, and you can see this long list of tabs here that I want to step through one at a time.

PXE Response –> the first is PXE response tab, which allows us to identify what the PXE response policy will be for this environment. I’m going to choose again the check box here to require administrator approval for any of those unknown computers that are coming in.
Delay in seconds –> if I have a couple of different PXE servers out there, I can choose to delay the PXE response so that clients would actually have the abilities to get their PXE response from some other server first. In most cases, you typically only have a single PXE server in an environment, so the configuration of a PXE response delay is not something you would necessarily do.

ADDS –> here we can configure the client naming policies or essentially how any unknown client computers are going to be named. In the next post , I will show you a much better way in which you can configure this client naming policy as opposed to just creating machines with a random computer name. Under computer account location is where we can identify where we want to create the computer accounts for the machines that we’re deploying. That will be in the same domain as our WDS server. That can be in the same domain as the user of the same organizational unit, or I can choose a specific organizational unit here in my domain. So, for example, the Windows Server 2016 organizational unit. This gives me the flexibility of ensuring that any new computers coming online are going to end up in that correct OU so they get group policy.

Boot Section, here under this section is where we can identify some of the boot characteristics. For Known clients I will choose the default option but for Unknow clients I will select Always continue the PXE boot because this allows me to just simply plug in the machine and turn it on, and it will automatically get an operating system deployed to it.

Down at the bottom we have the abilities to choose a default boot image. I will select boot image that I imported but for the most part, unless you go about customizing your WinPE environment, you won’t find yourself doing anything here with these default boot images. I’ll choose this just so that we can just see that in fact, this is one way that we can define what that correct WIM file should be.

Client section, under here is where we can identify some additional configurations that will further configure the machine as we go through this OS deployment. Now, one of which here is this unattend file, and these unattend files are a really slick way for you to take a machine that would normally be just a regular machine right out of the box, and provide a little additional configuration at the moment it’s deployed. The creation of these unattend files is something that happens using a completely different tool for example the Windows System Image Manager. We can then configure in which domain would you like to be a part of, what is the name of the administrator account, what’s the initial password, do you want the user to have to see that “Hi” screen that appears when they first log in etc. so like this we can create an zero-touch installation.

DHCP section, I am not running DHCP on this machine and I don’t have non-microsoft DHCP server so I don’t need to check these boxes.

Multicast section, a lot of network engineers don’t like having multicast passing around on their network. WDS, however, uses multicast in the situation where you have multiple machines getting an operating system deployment at the same time. So this tab provides you the abilities to define a specific set of multicast addresses, or also to obtain those IP addresses from DHCP. Most often, you find the bottom check box here that is checked, and then these are just configured with the defaults.
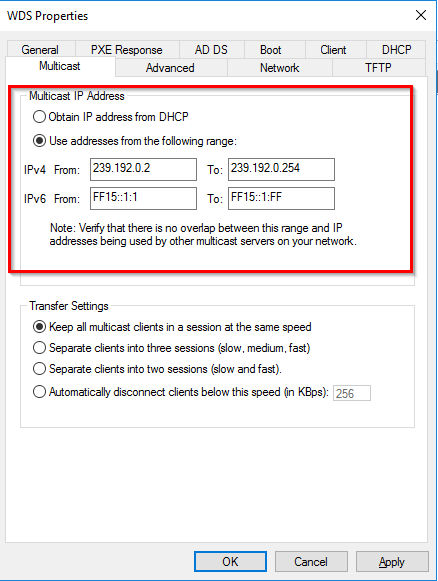
Transfer Settings
One of the other big issues with using multicast is that a multicast is a one to many transfer, and so each machine that is participating in that multicast transmission needs to keep up with all the other machines. What this means is that the slowest of those machines really drives the performance of that multicast transmission. Here within WDS, you have the abilities to then kind of kick off the island the slowest of the clients, if you want, by choosing any of the three bottom items down here. I am deploying only one machine so I will leave the defaults

Advanced, under Advanced is where we can configure some additional configurations. Number one is whether or not we want WDS to dynamically determine which domain controller it should use. That will most generally be the closest domain controller, or, if for some reason, it’s not finding the right domain controller, you can specify second checkbox WDS should use the following servers.
DHCP Authorization –> Notice that by default, we are not authorizing this WDS server in DHCP, but we want to click this box down here at the bottom to authorize WDS. This will be necessary so that WDS and DHCP can handshake when it comes time to handoff an incoming client over here for an OS deployment.

Network and TFTP tabs –> We have two final tabs to go through, the first of which is our Network tab here, where we can identify what our UDP port policy will be. UDP actually can be used to increase the throughput for deploying these OS images, and then we can choose essentially what ports we’re going to be using for our UDP port policy here. And then for TFTP, it’s the TFTP protocol that is used to transfer that initial boot over to our awaiting clients. For the most part, just leave these as the defaults. So this is essentially the configuration of our WDS server.
With these configurations now in place, in the second post we will spend some time talking about the images themselves and we will see how we can deploy them to our machines.
Stay Tuned!
Cheers,
Nedim