From Wikipedia, the free encyclopedia
A taskbar is an element of a graphical user interface which has various purposes. It typically shows which programs are currently running.
The specific design and layout of the taskbar varies between individual operating systems, but generally assumes the form of a strip located along one edge of the screen. On this strip are various icons which correspond to the windows open within a program. Clicking these icons allow the user to easily switch between programs or windows, with the currently active program or window usually appearing differently from the rest. In more recent versions of operating systems, users can also «pin» programs or files so that they can be accessed quickly, often with a single click. Due to its prominence on the screen, the taskbar usually also has a notification area, which uses interactive icons to display real-time information about the state of the computer system and some of the programs active on it.
With the rapid development of operating systems and graphical user interfaces in general, more OS-specific elements have become integrated into and become key elements of the taskbar.
Early implementations[edit]
Windows 1.0[edit]
Windows 1.0, released in 1985, features a horizontal bar located at the bottom of the screen where running programs reside when minimized (referred to as «iconization» at the time), represented by icons. A window can be minimized by double-clicking its title bar, dragging it onto an empty spot on the bar, or by issuing a command from one of its menus. A minimized window is restored by double-clicking its icon or dragging the icon out of the bar.
The bar features multiple slots for icons and expands vertically to provide the user with more rows as more slots are needed. Its color is the same as that of the screen background, which can be customized. Minimized windows can be freely placed in any of the empty slots. Program windows cannot overlap the bar unless maximized.
The Start button did not make an appearance in these early implementations of the taskbar, and would be introduced at a much later date with the release of Windows 95.
![]()
Appearance of the bar used for holding minimized windows in Windows 1.0
Arthur[edit]
Another early implementation can be seen in the Arthur operating system from Acorn Computers. It is called the icon bar[1] and remains an essential part of Arthur’s succeeding RISC OS operating system. The icon bar holds icons which represent mounted disc drives and RAM discs, running applications and system utilities. These icons have their own context-sensitive menus and support drag and drop behaviour.
![]()
Appearance of Acorn’s icon bar in 1987 under Arthur, after launching a number of devices and applications
Amiga[edit]
AmigaOS featured various third party implementations of the taskbar concept, and this inheritance is present also in its successors. For example, AmiDock, born as third-party utility, has then been integrated into AmigaOS 3.9 and AmigaOS 4.0.[2] The AROS operating system has its version of Amistart that is provided with the OS and free to be installed by users, while MorphOS has been equipped with a dock utility just like in AmigaOS or Mac OS X.
Microsoft Windows[edit]
The default settings for the taskbar in Microsoft Windows place it at the bottom of the screen and includes from left to right the Start menu button, Quick Launch bar, taskbar buttons, and notification area. The Quick Launch toolbar was added with the Windows Desktop Update and is not enabled by default in Windows XP. Windows 7 removed the Quick Launch feature in favor of pinning applications to the taskbar itself. On Windows 8 and Windows Server 2012, a hotspot located in the bottom-left corner of the screen replaced the Start button, although this change was reverted in Windows 8.1 and Windows Server 2012 R2.
The taskbar was originally developed as a feature of Windows 95, but it was based on a similar user interface feature called the tray that was developed as part of Microsoft’s Cairo project.[3][4][5]
With the release of Windows XP, Microsoft changed the behavior of the taskbar to take advantage of Fitts’s law by removing a border of pixels surrounding the Start button which did not activate the menu, allowing the menu to be activated by clicking directly in the corner of the screen.[6]
![]()
![]()
A standard Windows XP taskbar with multiple tasks running. Note the Quick Launch toolbar, introduced in Windows 95 OSR 2.5. When the notification area is full, it can be expanded.
![]()
The taskbar in Windows Vista. The design is quite similar to Windows XP, but with a whole new Start button, Windows Aero, transparency on the taskbar, and more updated icons added to it.
![]()
The taskbar in Windows 7 hides application names in favor of large icons that can be «pinned» to the taskbar even when not running.
![]()
The taskbar in Windows 8. Note that the Start button is missing in this version of Windows (in favor of the Charms menu) and the Metro apps that are running are not shown in the taskbar.
![]()
The taskbar in Windows 8.1. The Start button has returned to this version of Windows, and Metro apps that are running are now shown by default on the taskbar.
![]()
The taskbar in Windows 10, in Desktop mode, on the RTM version (1507). The next major revision to the taskbar came in Windows 10, where icons for Search and Task View have been added. Also, the shortcut to Action Center is visible (the icon for Action Center has been moved to the right when the Windows Anniversary Update came along).
![]()
The taskbar in Windows 10, in tablet mode, on the RTM version (1507). The next major revision to the taskbar came in Windows 10, where icons for Search and Task View have been added. Also, the shortcut to Action Center is visible (the icon for Action Center has been moved to the right when the Windows Anniversary Update came along).
![]()
The taskbar in Windows 10, in Desktop mode, on version 22H2. New features got added to the taskbar like News and Interests, and Search spotlight and are shown by default on a clean install.
![]()
The taskbar in Windows 10, in Tablet (handheld) mode, on version 22H2.
![]()
The taskbar in Windows 11, in version 22H2, with the icons at the center by default.
![]()
The taskbar in Windows 11, in version 22H2, with the icons at the left.
Taskbar elements[edit]
- The Start button, a button that invokes the Start menu (or the Start screen in Windows 8.1). It appears in Windows 9x, Windows NT 4.0 and all its successors, except Windows 8 and Windows Server 2012.
- The Quick Launch bar, introduced on Windows 95 and Windows NT 4.0 through the Windows Desktop Update for Internet Explorer 4 and bundled with Windows 95 OSR 2.5 Windows 98, contains shortcuts to applications. Windows provides default entries, such as Launch Internet Explorer Browser, and the user or third-party software may add any further shortcuts that they choose. A single click on the application’s icon in this area launches the application. This section may not always be present: for example it is turned off by default in Windows XP and Windows 7.
- The Windows shell places a taskbar button on the taskbar whenever an application creates an unowned window: that is, a window that does not have a parent and that is created according to normal Windows user interface guidelines. Typically all Single Document Interface applications have a single taskbar button for each open window, although modal windows may also appear there.
- Windows 98 and Windows Desktop Update for Windows 95 introduced the ability to minimize foreground windows by clicking their button on the taskbar. They also introduced DeskBands (band objects).[7][8]
- Windows 2000 introduced balloon notifications.
- Windows Me added an option to disable moving or resizing the taskbar.
- Windows XP introduced taskbar grouping, which can group the taskbar buttons of several windows from the same application into a single button. This button pops up a menu listing all the grouped windows when clicked. This keeps the taskbar from being overcrowded when many windows are open at once.
- Windows Vista introduced window previews which show thumbnail views of the application in real-time. This capability is provided by the Desktop Window Manager. The Start menu tooltip no longer says «Click here to begin» but now says simply «Start».
- Windows 7 introduced jumplists which are menus that provide shortcuts to recently opened documents, frequently opened documents, folders paths (in case of Windows Explorer), or various options (called Tasks) which apply to that specific program or pinned website shortcut. Jump lists appear when the user right-clicks on an icon in the taskbar or drags the icon upwards with the mouse left click. Recent and frequent files and folders can be pinned inside the jump list.
- Windows 7 introduced the ability to pin applications to the taskbar so that buttons for launching them appear when they are not running. Previously, the Quick Launch was used to pin applications to the taskbar; however, running programs appeared as a separate button.
- Windows 7 removed several classic taskbar features.
- Deskbands are minimized functional, long-running programs, such as Windows Media Player. Programs that minimize to deskbands are not displayed in the taskbar.[9]
- The notification area is the portion of the taskbar that displays icons for system and program features that have no presence on the desktop as well as the time and the volume icon. It contains mainly icons that show status information, though some programs, such as Winamp, use it for minimized windows. By default, this is located in the bottom-right of the primary monitor (or bottom-left on languages of Windows that use right-to-left reading order), or at the bottom of the taskbar if docked vertically. The clock appears here, and applications can put icons in the notification area to indicate the status of an operation or to notify the user about an event. For example, an application might put a printer icon in the status area to show that a print job is under way, or a display driver application may provide quick access to various screen resolutions. The notification area is commonly referred to as the system tray, which Microsoft states is wrong,[10][11][12] although the term is sometimes used in Microsoft documentation,[13][14][15] articles,[16] software descriptions,[17] and even applications from Microsoft such as Bing Desktop. Raymond Chen suggests the confusion originated with systray.exe, a small application that controlled some icons within the notification area in Windows 95.[5] The notification area is also referred to as the status area by Microsoft.[18][19][20]
- In older versions of Windows the notification area icons were limited to 16 colors. Windows Me added support for high color notification area icons.
- Starting with Windows XP, the user can choose to always show or hide some icons, or hide them if inactive for some time. A button allows the user to reveal all the icons.
- Starting with Windows Vista, the taskbar notification area is split into two areas: one reserved for system icons including clock, volume, network and power; the other for applications.
- Since the Windows 95 Desktop Update, the Quick Launch bar featured Show desktop as one of its default shortcuts which automatically minimizes all opened applications, redundant with the Winkey-D key combination. On Windows 7, a dedicated Show desktop button was placed to the right of the notification area and could not be removed. With the «Peek» option enabled, hovering over the button hides all opened windows to expose the desktop (leaving outlines of them on-screen). On Windows 10, the «Show desktop» widget changed yet again, being reduced to a narrow iconless strip at the far right of the taskbar.
Customization[edit]
The Windows taskbar can be modified by users in several ways. The position of the taskbar can be changed to appear on any edge of the primary display (except in Windows 11, where the taskbar is permanently fixed at the bottom of the screen and cannot be moved to the top, left, or right side). Up to and including Windows Server 2008, the taskbar is constrained to single display, although third-party utilities such as UltraMon allow it to span multiple displays. When the taskbar is displayed vertically on versions of Windows prior to Windows Vista, the Start menu button will only display the text «Start» or translated equivalent if the taskbar is wide enough to show the full text.[21] However, the edge of the taskbar (in any position) can be dragged to control its height (width for a vertical taskbar); this is especially useful for a vertical taskbar to show window titles next to the window icons.
Users can resize the height (or width when displayed vertically) of the taskbar up to half of the display area. To avoid inadvertent resizing or repositioning of the taskbar, Windows XP and later lock the taskbar by default.[22][23] When unlocked, «grips» are displayed next to the movable elements which allow grabbing with the mouse to move and size. These grips slightly decrease amount of available space in the taskbar.
The taskbar as a whole can be hidden until the mouse pointer is moved to the display edge, or has keyboard focus. The Windows 7+ taskbar does not allow pinning any arbitrary folder to the taskbar, it gets pinned instead to the jumplist of a pinned Explorer shortcut, however third party utilities such as Winaero’s Taskbar Pinner can be used to pin any type of shortcut to the Taskbar.[24]
Desktop toolbars[edit]
Other toolbars, known as «Deskbands», may be added to the taskbar.[25] This feature, along with many other taskbar features is currently absent in Windows 11. Windows includes the following deskbands but does not display them by default (except the Quick Launch toolbar in certain versions and configurations).
- Address. Contains an address bar similar to that found in Internet Explorer. (not available in Windows XP SP3, due to legal restrictions).
- Windows Media Player. Optionally shown when the Windows Media Player is minimized.(Windows XP, Windows Vista)
- Links. Shortcuts to items located in the user’s Links folder. Usually shortcuts to internet sites.
- Tablet PC Input Panel. Contains a button to show the Tablet PC input panel for ink text entry.
- Desktop. Contains shortcuts to items contained on the user’s desktop. Since the taskbar is always shown, this provides easy access to desktop items without having to minimize applications.
- Quick Launch. Contains shortcuts to Internet Explorer, email applications and a link to display the desktop. Windows Vista adds a link to the Flip 3D feature.
- Language. Contains shortcuts to quickly change the desired language for the keyboard to follow.
In addition to deskbands, Windows supports «Application Desktop Toolbars» (also called «appbands») that supports creating additional toolbars that can dock to any side of the screen, and cannot be overlaid by other applications.[26]
Users can add additional toolbars that display the contents of folders. The display for toolbars that represent folder items (such as Links, Desktop and Quick Launch) can be changed to show large icons and the text for each item. Prior to Windows Vista, the Desktop Toolbars could be dragged off the taskbar and float independently, or docked to a display edge. Windows Vista greatly limited, but did not eliminate the ability to have desktop toolbar not attached to the taskbar.[27] Windows 7 has deprecated the use of Floating Deskbands altogether; they only appear pinned into the Taskbar.
- Upon opening the Taskbar properties on Windows 95 and Windows 98 whilst holding down the CTRL key, an extra tab for DeskBar Options is shown, but no part of it can be used. The DeskBar option was a feature that was never included within these versions of Windows.[28]
macOS[edit]
Classic Mac OS did not display a taskbar onscreen by default. Application switching prior to Mac OS 8.5 was done by clicking on an application’s window or via a pull-down menu at the right end of the menu bar. Prior to version 8.5 the menu’s title was the icon of the foreground application. Version 8.5 introduced the ability to optionally also display the application name and to «tear off» the menu by dragging the title with the mouse. The torn off menu was displayed as a palette. The palette window could be configured using AppleScript to appear much like a taskbar, with no title bar and fixed to one edge of the screen. No control panel was provided by Apple to access this functionality, but third-party developers quickly wrote applications that allowed users unfamiliar with AppleScript to customize their application palettes. Third party taskbars such as DragThing were a popular category of shareware on these systems.
The Dock, as featured in macOS and its predecessor NeXTSTEP, is also a kind of taskbar. The macOS Dock is application-oriented instead of window-oriented. Each running application is represented by one icon in the Dock regardless of how many windows it has on screen. A textual menu can be opened by right-clicking on the dock icon that gives access to an application’s windows. Mac OS X 10.2 added the ability for an application to add items of its own to this menu. Minimized windows also appear in the dock, in the rightmost section, represented by a real-time graphical thumbnail of the window’s contents. The trash can is also represented in the Dock, as a universal metaphor for deletion. For example, dragging selected text to the trash should remove the text from the document and create a clipping file in the trash.
The right side of macOS’s Menu bar also typically contains several notification widgets and quick access functions, called Menu extras.

Unix-like operating systems[edit]
KDE Plasma[edit]
In KDE Plasma 5, taskbar uses Widgets, called «Plasmoids», as elements in taskbar. In the update 5.20 (November 2020) they updated the taskbar to look more like Windows 10 by only displaying icons by default and grouping application windows together. [29]
![]()
The new taskbar of Plasma 5.20
GNOME[edit]
GNOME 2 used its own type of taskbar, known as panels (the program responsible for them is therefore called gnome-panel). By default, GNOME 2 usually contains two full-width panels at the top and bottom of the screen. The top panel usually contains navigation menus labeled Applications, Places, and System in that order. These menus hold links to common applications, areas of the file system, and system preferences and administration utilities, respectively.
![]()
Default top panel appearance from Ubuntu 6.10 to 8.04
![]()
Default bottom panel from Ubuntu 6.10 to 8.04
The top panel usually contains a clock and notification area, while the bottom panel contains buttons for navigating between virtual desktops, the window list proper, and a button which minimizes all windows (similarly to Windows’ Show desktop button). The contents of panels are handled by widgets called panel applets, which can consist of application shortcuts, search tools, or other tools. The contents of the panels can be moved, removed, or configured in other ways.
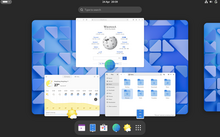
GNOME Shell Activities Overview which showcases the Dash
In GNOME 3, panels are replaced by GNOME Shell, which consists of a bar across the top of the screen with an Activities button on the left, a clock in the centre, and a notification area on the right. GNOME Shell does not contain a traditional taskbar; users can manage windows, virtual desktops, and launch applications from either a «Dash» on the side of the screen, or by searching from Activities Overview, which is displayed by clicking on the Activities button. GNOME 3.8 introduces Classic Mode, which re-implements certain aspects of GNOME 2’s desktop as an alternate desktop environment that can be selected at the login screen. [30]
Other Unix environments[edit]
These desktop environments provide their own implementation of a taskbar:
- Cinnamon
- MATE
- LXDE
- Xfce
- Trinity Desktop (based on KDE3’s Kicker)
Standalone window managers that provide an integrated taskbar include:
- Fluxbox
- FVWM95
- IceWM
- JWM
- qvwm
- WindowLab
- Window Maker
Programs that offer standalone taskbars for desktop environments or window managers without one include Avant Window Navigator, pypanel, fbpanel, perlpanel, tint2, and others.
References[edit]
- ^ Dan Ryan (13 April 2011). History of Computer Graphics: DLR Associates Series. AuthorHouse. p. 358. ISBN 978-1-4567-5115-9. Retrieved 13 June 2013.
- ^ Amiga Amidock Homepage
- ^ US patent 5825357, Malamud, Marceau, Grauman, Levien, Oran, Bolnick, Barnes, Johnson, Scott, «Continuously accessible computer system interface», issued 1998-10-20, assigned to Microsoft Corporation
- ^ Kent Sullivan (April 17, 1996). «The Windows 95 User Interface: A Case Study in Usability Engineering». CHI 96 Design Briefs. Archived from the original on October 22, 2008. Retrieved 2008-10-22.
- ^ a b Chen, Raymond (September 10, 2003). «Why do some people call the taskbar the «tray»?». The Old New Thing. Microsoft. Retrieved 2021-08-12.
{{cite web}}: CS1 maint: url-status (link) - ^ Harris, Jensen (August 22, 2006). «Giving You Fitts». Jensen Harris: An Office User Interface Blog. Microsoft. Retrieved 2008-01-14.
- ^ Creating Custom Explorer Bars, Tool Bands, and Desk Bands
- ^ The Next Windows: Windows 98
- ^ «Windows Vista Developer Center — The Windows desktop». Archived from the original on 2010-01-27. Retrieved 2008-05-27.
- ^ «How to remove items from the notification area in Windows 2000». November 1, 2006. Retrieved 2008-10-21.
- ^ «Microsoft Style Guide: System Tray». Retrieved 2020-02-10.
- ^ «Notification Area». Microsoft Developer Network. Archived from the original on 2010-01-27. Retrieved 2008-05-27.
- ^ «How To Manipulate Icons in the System Tray with Visual Basic». 2004-07-15. Retrieved 2009-01-23.
- ^ «How to use the System Tray directly from Visual Basic». 2006-09-26. Retrieved 2009-01-23.
- ^ «System Tray Icon Sample». Retrieved 2009-01-23.
- ^ «System Tray Balloon Tips and Freeing Resources Quickly in .NET». November 2002. Retrieved 2009-01-23.
- ^ «Microsoft Time Zone». Microsoft. 2004-10-20. Retrieved 2009-01-23.
- ^ «The Taskbar». Retrieved 2011-06-09.
- ^ «Shell_NotifyIcon Function». Retrieved 2011-06-09.
- ^ «How To Manipulate Icons in the System Tray with Visual Basic». Retrieved 2011-06-09.
- ^ Chen, Raymond (September 20, 2003). «When I dock my taskbar vertically, why does the word «Start» disappear?». The Old New Thing. Microsoft. Retrieved 2008-04-20.
- ^ «Differences with Windows XP Home Edition». Windows XP Resource Kit. Microsoft. November 3, 2005. Retrieved 2008-04-20.
- ^ «Cannot Move or Resize the Taskbar or Any Toolbars on the Taskbar (MSKB279774)». Knowledge Base. Microsoft. January 25, 2006. Retrieved 2008-04-20.
- ^ Taskbar Pinner
- ^ «Notification Area». Windows Vista User Experience Guidelines. Microsoft. Archived from the original on 2008-10-15. Retrieved 2008-04-20.
- ^ «Using Application Desktop Toolbars». Microsoft.
- ^ Create a shortcut toolbar on the desktop
- ^ DeskBar Options Tab in Taskbar Properties Is Not Functional
- ^ «Plasma 5.20: One absolutely massive release». KDE Community. 2020-10-13. Retrieved 2022-05-20.
- ^ «GNOME 3.8 Release Notes». help.gnome.org. Retrieved 2022-05-20.
From Wikipedia, the free encyclopedia
A taskbar is an element of a graphical user interface which has various purposes. It typically shows which programs are currently running.
The specific design and layout of the taskbar varies between individual operating systems, but generally assumes the form of a strip located along one edge of the screen. On this strip are various icons which correspond to the windows open within a program. Clicking these icons allow the user to easily switch between programs or windows, with the currently active program or window usually appearing differently from the rest. In more recent versions of operating systems, users can also «pin» programs or files so that they can be accessed quickly, often with a single click. Due to its prominence on the screen, the taskbar usually also has a notification area, which uses interactive icons to display real-time information about the state of the computer system and some of the programs active on it.
With the rapid development of operating systems and graphical user interfaces in general, more OS-specific elements have become integrated into and become key elements of the taskbar.
Early implementations[edit]
Windows 1.0[edit]
Windows 1.0, released in 1985, features a horizontal bar located at the bottom of the screen where running programs reside when minimized (referred to as «iconization» at the time), represented by icons. A window can be minimized by double-clicking its title bar, dragging it onto an empty spot on the bar, or by issuing a command from one of its menus. A minimized window is restored by double-clicking its icon or dragging the icon out of the bar.
The bar features multiple slots for icons and expands vertically to provide the user with more rows as more slots are needed. Its color is the same as that of the screen background, which can be customized. Minimized windows can be freely placed in any of the empty slots. Program windows cannot overlap the bar unless maximized.
The Start button did not make an appearance in these early implementations of the taskbar, and would be introduced at a much later date with the release of Windows 95.
![]()
Appearance of the bar used for holding minimized windows in Windows 1.0
Arthur[edit]
Another early implementation can be seen in the Arthur operating system from Acorn Computers. It is called the icon bar[1] and remains an essential part of Arthur’s succeeding RISC OS operating system. The icon bar holds icons which represent mounted disc drives and RAM discs, running applications and system utilities. These icons have their own context-sensitive menus and support drag and drop behaviour.
![]()
Appearance of Acorn’s icon bar in 1987 under Arthur, after launching a number of devices and applications
Amiga[edit]
AmigaOS featured various third party implementations of the taskbar concept, and this inheritance is present also in its successors. For example, AmiDock, born as third-party utility, has then been integrated into AmigaOS 3.9 and AmigaOS 4.0.[2] The AROS operating system has its version of Amistart that is provided with the OS and free to be installed by users, while MorphOS has been equipped with a dock utility just like in AmigaOS or Mac OS X.
Microsoft Windows[edit]
The default settings for the taskbar in Microsoft Windows place it at the bottom of the screen and includes from left to right the Start menu button, Quick Launch bar, taskbar buttons, and notification area. The Quick Launch toolbar was added with the Windows Desktop Update and is not enabled by default in Windows XP. Windows 7 removed the Quick Launch feature in favor of pinning applications to the taskbar itself. On Windows 8 and Windows Server 2012, a hotspot located in the bottom-left corner of the screen replaced the Start button, although this change was reverted in Windows 8.1 and Windows Server 2012 R2.
The taskbar was originally developed as a feature of Windows 95, but it was based on a similar user interface feature called the tray that was developed as part of Microsoft’s Cairo project.[3][4][5]
With the release of Windows XP, Microsoft changed the behavior of the taskbar to take advantage of Fitts’s law by removing a border of pixels surrounding the Start button which did not activate the menu, allowing the menu to be activated by clicking directly in the corner of the screen.[6]
![]()
![]()
A standard Windows XP taskbar with multiple tasks running. Note the Quick Launch toolbar, introduced in Windows 95 OSR 2.5. When the notification area is full, it can be expanded.
![]()
The taskbar in Windows Vista. The design is quite similar to Windows XP, but with a whole new Start button, Windows Aero, transparency on the taskbar, and more updated icons added to it.
![]()
The taskbar in Windows 7 hides application names in favor of large icons that can be «pinned» to the taskbar even when not running.
![]()
The taskbar in Windows 8. Note that the Start button is missing in this version of Windows (in favor of the Charms menu) and the Metro apps that are running are not shown in the taskbar.
![]()
The taskbar in Windows 8.1. The Start button has returned to this version of Windows, and Metro apps that are running are now shown by default on the taskbar.
![]()
The taskbar in Windows 10, in Desktop mode, on the RTM version (1507). The next major revision to the taskbar came in Windows 10, where icons for Search and Task View have been added. Also, the shortcut to Action Center is visible (the icon for Action Center has been moved to the right when the Windows Anniversary Update came along).
![]()
The taskbar in Windows 10, in tablet mode, on the RTM version (1507). The next major revision to the taskbar came in Windows 10, where icons for Search and Task View have been added. Also, the shortcut to Action Center is visible (the icon for Action Center has been moved to the right when the Windows Anniversary Update came along).
![]()
The taskbar in Windows 10, in Desktop mode, on version 22H2. New features got added to the taskbar like News and Interests, and Search spotlight and are shown by default on a clean install.
![]()
The taskbar in Windows 10, in Tablet (handheld) mode, on version 22H2.
![]()
The taskbar in Windows 11, in version 22H2, with the icons at the center by default.
![]()
The taskbar in Windows 11, in version 22H2, with the icons at the left.
Taskbar elements[edit]
- The Start button, a button that invokes the Start menu (or the Start screen in Windows 8.1). It appears in Windows 9x, Windows NT 4.0 and all its successors, except Windows 8 and Windows Server 2012.
- The Quick Launch bar, introduced on Windows 95 and Windows NT 4.0 through the Windows Desktop Update for Internet Explorer 4 and bundled with Windows 95 OSR 2.5 Windows 98, contains shortcuts to applications. Windows provides default entries, such as Launch Internet Explorer Browser, and the user or third-party software may add any further shortcuts that they choose. A single click on the application’s icon in this area launches the application. This section may not always be present: for example it is turned off by default in Windows XP and Windows 7.
- The Windows shell places a taskbar button on the taskbar whenever an application creates an unowned window: that is, a window that does not have a parent and that is created according to normal Windows user interface guidelines. Typically all Single Document Interface applications have a single taskbar button for each open window, although modal windows may also appear there.
- Windows 98 and Windows Desktop Update for Windows 95 introduced the ability to minimize foreground windows by clicking their button on the taskbar. They also introduced DeskBands (band objects).[7][8]
- Windows 2000 introduced balloon notifications.
- Windows Me added an option to disable moving or resizing the taskbar.
- Windows XP introduced taskbar grouping, which can group the taskbar buttons of several windows from the same application into a single button. This button pops up a menu listing all the grouped windows when clicked. This keeps the taskbar from being overcrowded when many windows are open at once.
- Windows Vista introduced window previews which show thumbnail views of the application in real-time. This capability is provided by the Desktop Window Manager. The Start menu tooltip no longer says «Click here to begin» but now says simply «Start».
- Windows 7 introduced jumplists which are menus that provide shortcuts to recently opened documents, frequently opened documents, folders paths (in case of Windows Explorer), or various options (called Tasks) which apply to that specific program or pinned website shortcut. Jump lists appear when the user right-clicks on an icon in the taskbar or drags the icon upwards with the mouse left click. Recent and frequent files and folders can be pinned inside the jump list.
- Windows 7 introduced the ability to pin applications to the taskbar so that buttons for launching them appear when they are not running. Previously, the Quick Launch was used to pin applications to the taskbar; however, running programs appeared as a separate button.
- Windows 7 removed several classic taskbar features.
- Deskbands are minimized functional, long-running programs, such as Windows Media Player. Programs that minimize to deskbands are not displayed in the taskbar.[9]
- The notification area is the portion of the taskbar that displays icons for system and program features that have no presence on the desktop as well as the time and the volume icon. It contains mainly icons that show status information, though some programs, such as Winamp, use it for minimized windows. By default, this is located in the bottom-right of the primary monitor (or bottom-left on languages of Windows that use right-to-left reading order), or at the bottom of the taskbar if docked vertically. The clock appears here, and applications can put icons in the notification area to indicate the status of an operation or to notify the user about an event. For example, an application might put a printer icon in the status area to show that a print job is under way, or a display driver application may provide quick access to various screen resolutions. The notification area is commonly referred to as the system tray, which Microsoft states is wrong,[10][11][12] although the term is sometimes used in Microsoft documentation,[13][14][15] articles,[16] software descriptions,[17] and even applications from Microsoft such as Bing Desktop. Raymond Chen suggests the confusion originated with systray.exe, a small application that controlled some icons within the notification area in Windows 95.[5] The notification area is also referred to as the status area by Microsoft.[18][19][20]
- In older versions of Windows the notification area icons were limited to 16 colors. Windows Me added support for high color notification area icons.
- Starting with Windows XP, the user can choose to always show or hide some icons, or hide them if inactive for some time. A button allows the user to reveal all the icons.
- Starting with Windows Vista, the taskbar notification area is split into two areas: one reserved for system icons including clock, volume, network and power; the other for applications.
- Since the Windows 95 Desktop Update, the Quick Launch bar featured Show desktop as one of its default shortcuts which automatically minimizes all opened applications, redundant with the Winkey-D key combination. On Windows 7, a dedicated Show desktop button was placed to the right of the notification area and could not be removed. With the «Peek» option enabled, hovering over the button hides all opened windows to expose the desktop (leaving outlines of them on-screen). On Windows 10, the «Show desktop» widget changed yet again, being reduced to a narrow iconless strip at the far right of the taskbar.
Customization[edit]
The Windows taskbar can be modified by users in several ways. The position of the taskbar can be changed to appear on any edge of the primary display (except in Windows 11, where the taskbar is permanently fixed at the bottom of the screen and cannot be moved to the top, left, or right side). Up to and including Windows Server 2008, the taskbar is constrained to single display, although third-party utilities such as UltraMon allow it to span multiple displays. When the taskbar is displayed vertically on versions of Windows prior to Windows Vista, the Start menu button will only display the text «Start» or translated equivalent if the taskbar is wide enough to show the full text.[21] However, the edge of the taskbar (in any position) can be dragged to control its height (width for a vertical taskbar); this is especially useful for a vertical taskbar to show window titles next to the window icons.
Users can resize the height (or width when displayed vertically) of the taskbar up to half of the display area. To avoid inadvertent resizing or repositioning of the taskbar, Windows XP and later lock the taskbar by default.[22][23] When unlocked, «grips» are displayed next to the movable elements which allow grabbing with the mouse to move and size. These grips slightly decrease amount of available space in the taskbar.
The taskbar as a whole can be hidden until the mouse pointer is moved to the display edge, or has keyboard focus. The Windows 7+ taskbar does not allow pinning any arbitrary folder to the taskbar, it gets pinned instead to the jumplist of a pinned Explorer shortcut, however third party utilities such as Winaero’s Taskbar Pinner can be used to pin any type of shortcut to the Taskbar.[24]
Desktop toolbars[edit]
Other toolbars, known as «Deskbands», may be added to the taskbar.[25] This feature, along with many other taskbar features is currently absent in Windows 11. Windows includes the following deskbands but does not display them by default (except the Quick Launch toolbar in certain versions and configurations).
- Address. Contains an address bar similar to that found in Internet Explorer. (not available in Windows XP SP3, due to legal restrictions).
- Windows Media Player. Optionally shown when the Windows Media Player is minimized.(Windows XP, Windows Vista)
- Links. Shortcuts to items located in the user’s Links folder. Usually shortcuts to internet sites.
- Tablet PC Input Panel. Contains a button to show the Tablet PC input panel for ink text entry.
- Desktop. Contains shortcuts to items contained on the user’s desktop. Since the taskbar is always shown, this provides easy access to desktop items without having to minimize applications.
- Quick Launch. Contains shortcuts to Internet Explorer, email applications and a link to display the desktop. Windows Vista adds a link to the Flip 3D feature.
- Language. Contains shortcuts to quickly change the desired language for the keyboard to follow.
In addition to deskbands, Windows supports «Application Desktop Toolbars» (also called «appbands») that supports creating additional toolbars that can dock to any side of the screen, and cannot be overlaid by other applications.[26]
Users can add additional toolbars that display the contents of folders. The display for toolbars that represent folder items (such as Links, Desktop and Quick Launch) can be changed to show large icons and the text for each item. Prior to Windows Vista, the Desktop Toolbars could be dragged off the taskbar and float independently, or docked to a display edge. Windows Vista greatly limited, but did not eliminate the ability to have desktop toolbar not attached to the taskbar.[27] Windows 7 has deprecated the use of Floating Deskbands altogether; they only appear pinned into the Taskbar.
- Upon opening the Taskbar properties on Windows 95 and Windows 98 whilst holding down the CTRL key, an extra tab for DeskBar Options is shown, but no part of it can be used. The DeskBar option was a feature that was never included within these versions of Windows.[28]
macOS[edit]
Classic Mac OS did not display a taskbar onscreen by default. Application switching prior to Mac OS 8.5 was done by clicking on an application’s window or via a pull-down menu at the right end of the menu bar. Prior to version 8.5 the menu’s title was the icon of the foreground application. Version 8.5 introduced the ability to optionally also display the application name and to «tear off» the menu by dragging the title with the mouse. The torn off menu was displayed as a palette. The palette window could be configured using AppleScript to appear much like a taskbar, with no title bar and fixed to one edge of the screen. No control panel was provided by Apple to access this functionality, but third-party developers quickly wrote applications that allowed users unfamiliar with AppleScript to customize their application palettes. Third party taskbars such as DragThing were a popular category of shareware on these systems.
The Dock, as featured in macOS and its predecessor NeXTSTEP, is also a kind of taskbar. The macOS Dock is application-oriented instead of window-oriented. Each running application is represented by one icon in the Dock regardless of how many windows it has on screen. A textual menu can be opened by right-clicking on the dock icon that gives access to an application’s windows. Mac OS X 10.2 added the ability for an application to add items of its own to this menu. Minimized windows also appear in the dock, in the rightmost section, represented by a real-time graphical thumbnail of the window’s contents. The trash can is also represented in the Dock, as a universal metaphor for deletion. For example, dragging selected text to the trash should remove the text from the document and create a clipping file in the trash.
The right side of macOS’s Menu bar also typically contains several notification widgets and quick access functions, called Menu extras.
Unix-like operating systems[edit]
KDE Plasma[edit]
In KDE Plasma 5, taskbar uses Widgets, called «Plasmoids», as elements in taskbar. In the update 5.20 (November 2020) they updated the taskbar to look more like Windows 10 by only displaying icons by default and grouping application windows together. [29]
![]()
The new taskbar of Plasma 5.20
GNOME[edit]
GNOME 2 used its own type of taskbar, known as panels (the program responsible for them is therefore called gnome-panel). By default, GNOME 2 usually contains two full-width panels at the top and bottom of the screen. The top panel usually contains navigation menus labeled Applications, Places, and System in that order. These menus hold links to common applications, areas of the file system, and system preferences and administration utilities, respectively.
![]()
Default top panel appearance from Ubuntu 6.10 to 8.04
![]()
Default bottom panel from Ubuntu 6.10 to 8.04
The top panel usually contains a clock and notification area, while the bottom panel contains buttons for navigating between virtual desktops, the window list proper, and a button which minimizes all windows (similarly to Windows’ Show desktop button). The contents of panels are handled by widgets called panel applets, which can consist of application shortcuts, search tools, or other tools. The contents of the panels can be moved, removed, or configured in other ways.
GNOME Shell Activities Overview which showcases the Dash
In GNOME 3, panels are replaced by GNOME Shell, which consists of a bar across the top of the screen with an Activities button on the left, a clock in the centre, and a notification area on the right. GNOME Shell does not contain a traditional taskbar; users can manage windows, virtual desktops, and launch applications from either a «Dash» on the side of the screen, or by searching from Activities Overview, which is displayed by clicking on the Activities button. GNOME 3.8 introduces Classic Mode, which re-implements certain aspects of GNOME 2’s desktop as an alternate desktop environment that can be selected at the login screen. [30]
Other Unix environments[edit]
These desktop environments provide their own implementation of a taskbar:
- Cinnamon
- MATE
- LXDE
- Xfce
- Trinity Desktop (based on KDE3’s Kicker)
Standalone window managers that provide an integrated taskbar include:
- Fluxbox
- FVWM95
- IceWM
- JWM
- qvwm
- WindowLab
- Window Maker
Programs that offer standalone taskbars for desktop environments or window managers without one include Avant Window Navigator, pypanel, fbpanel, perlpanel, tint2, and others.
References[edit]
- ^ Dan Ryan (13 April 2011). History of Computer Graphics: DLR Associates Series. AuthorHouse. p. 358. ISBN 978-1-4567-5115-9. Retrieved 13 June 2013.
- ^ Amiga Amidock Homepage
- ^ US patent 5825357, Malamud, Marceau, Grauman, Levien, Oran, Bolnick, Barnes, Johnson, Scott, «Continuously accessible computer system interface», issued 1998-10-20, assigned to Microsoft Corporation
- ^ Kent Sullivan (April 17, 1996). «The Windows 95 User Interface: A Case Study in Usability Engineering». CHI 96 Design Briefs. Archived from the original on October 22, 2008. Retrieved 2008-10-22.
- ^ a b Chen, Raymond (September 10, 2003). «Why do some people call the taskbar the «tray»?». The Old New Thing. Microsoft. Retrieved 2021-08-12.
{{cite web}}: CS1 maint: url-status (link) - ^ Harris, Jensen (August 22, 2006). «Giving You Fitts». Jensen Harris: An Office User Interface Blog. Microsoft. Retrieved 2008-01-14.
- ^ Creating Custom Explorer Bars, Tool Bands, and Desk Bands
- ^ The Next Windows: Windows 98
- ^ «Windows Vista Developer Center — The Windows desktop». Archived from the original on 2010-01-27. Retrieved 2008-05-27.
- ^ «How to remove items from the notification area in Windows 2000». November 1, 2006. Retrieved 2008-10-21.
- ^ «Microsoft Style Guide: System Tray». Retrieved 2020-02-10.
- ^ «Notification Area». Microsoft Developer Network. Archived from the original on 2010-01-27. Retrieved 2008-05-27.
- ^ «How To Manipulate Icons in the System Tray with Visual Basic». 2004-07-15. Retrieved 2009-01-23.
- ^ «How to use the System Tray directly from Visual Basic». 2006-09-26. Retrieved 2009-01-23.
- ^ «System Tray Icon Sample». Retrieved 2009-01-23.
- ^ «System Tray Balloon Tips and Freeing Resources Quickly in .NET». November 2002. Retrieved 2009-01-23.
- ^ «Microsoft Time Zone». Microsoft. 2004-10-20. Retrieved 2009-01-23.
- ^ «The Taskbar». Retrieved 2011-06-09.
- ^ «Shell_NotifyIcon Function». Retrieved 2011-06-09.
- ^ «How To Manipulate Icons in the System Tray with Visual Basic». Retrieved 2011-06-09.
- ^ Chen, Raymond (September 20, 2003). «When I dock my taskbar vertically, why does the word «Start» disappear?». The Old New Thing. Microsoft. Retrieved 2008-04-20.
- ^ «Differences with Windows XP Home Edition». Windows XP Resource Kit. Microsoft. November 3, 2005. Retrieved 2008-04-20.
- ^ «Cannot Move or Resize the Taskbar or Any Toolbars on the Taskbar (MSKB279774)». Knowledge Base. Microsoft. January 25, 2006. Retrieved 2008-04-20.
- ^ Taskbar Pinner
- ^ «Notification Area». Windows Vista User Experience Guidelines. Microsoft. Archived from the original on 2008-10-15. Retrieved 2008-04-20.
- ^ «Using Application Desktop Toolbars». Microsoft.
- ^ Create a shortcut toolbar on the desktop
- ^ DeskBar Options Tab in Taskbar Properties Is Not Functional
- ^ «Plasma 5.20: One absolutely massive release». KDE Community. 2020-10-13. Retrieved 2022-05-20.
- ^ «GNOME 3.8 Release Notes». help.gnome.org. Retrieved 2022-05-20.
Содержание
- Олимпиада по информатике 8 класс, задания с ответами
- Олимпиада по информатике 8 класс
- Скачайте задания, заполнив форму!
- Тестовые задания
- Открытые вопросы
- Ответы на тесты
- Ответы на открытие вопросы
- Что такое панель задач: где она находится, и какие элементы в себя включает
- Что это такое
- Как настроить
- Через персонализацию
- Через контекстное меню
- Из каких элементов состоит
- Кнопка меню «Пуск»
- Поиск
- Кнопка «Представления задач»
- Панель быстрого запуска
- Область ярлыков запущенных программ
- Панель инструментов
- Область уведомлений
- Заключение
Олимпиада по информатике 8 класс, задания с ответами
На этой странице вашему вниманию предложены олимпиадные задания по информатике для 8 класса. Вы сможете использовать их на уроке для того, чтобы помочь восьмиклассникам подготовиться к участию в олимпиаде. Олимпиадные задания сложнее и интереснее тех, с которыми они сталкиваются на уроках. Упражняясь в их решении, ученики не просто закрепят теоретический материал, а еще и научатся применять его на практике.
Задания олимпиады по информатике дополняются ответами и решениями. Это позволяет использовать их не только на уроке, но и дома, ведь любой ученик сможете проверить и оценить свои знания самостоятельно, сверившись с правильным ответом.
Олимпиада по информатике 8 класс
Скачайте задания, заполнив форму!
Тестовые задания
1. Назовите фамилию известного математика, предложившего формулу для вычисления количества информации в случае различных вероятностей событий.
А) Б.Гейтс
Б) К.Шеннон
В) Д.Буль
Г) Р.Флойд
2. Устройство, обеспечивающее обмен информацией с контроллерами периферических устройств, называется:
А) AGP-шина
Б) процессор
В) звуковая карта
Г) PCI-шина
3. Что из перечисленного является полным именем файла?
А) Turbo Pascalreadme.txt
Б) С:Program FilesTurbo Pascalreadme.txt
В) Turbo Pascalreadme.txt
Г) readme.txt
4. Как называется один из режимов Windows, позволяющий переключается в режим энергосбережения, сохраняя при этом рабочие файлы и программы на жесткий диск и позволяя безопасно выключить компьютер?
А) Ждущий режим / Сон
Б) Спящий режим / Гибернация
В) Безопасное выключение компьютера
Г) Безопасный режим
5. Назовите элемент панели задач рабочего стола Windows, используемый для нужд длительно запущенных, но при этом не постоянно используемых программ.
А) Системный трей
Б) Быстрый запуск
В) Меню “пуск”
Г) Рабочий стол
6. Текстовый редактор, входящий в стандартный пакет программного обеспечений Microsoft Windows и позволяющий сохранять форматированный текст, называется:
А) Notepad (Блокнот)
Б) Microsoft Office Word
В) WordPad
Г) Acrobat Reader
7. Что из перечисленного является правильным адресом ячейки электронной таблицы?
А) 12
Б) 1B
В) AA
Г) F1
8. Какой из перечисленных объемов информации эквивалентен по значению 2 килобайтам?
А) 2000 байт
Б) 16384 бита
В) 1 мегабайт
Г) 2024 байта
9. Какой из перечисленных протоколов предназначен для передачи файлов в компьютерных сетях?
А) ftp
Б) http
В) IP
Г) www
10. Какой из перечисленных программных продуктов входит в состав стандартного программного обеспечения Microsoft Windows?
А) Microsoft Office
Б) Paint
В) WinRAR
Г) Opera
Открытые вопросы
Вопрос 1
Укажите через запятую в порядке возрастания все основания систем счисления, в которых число семнадцать имеет младшим разрядом двойку
Вопрос 2
Определите информационный объем документа в килобайтах, если известно, что в нем 32 страницы. На каждой странице по 64 строки и каждая строка содержит 56 символ, при этом 1 символ кодируется восьмибитовым способом. Ответ записать в виде целого числа.?
Вопрос 3
Ученики 8 класса Андрей, Егор, Ксюша и Игорь занимались факультативными занятиями по информатике, биологии, английскому языку и математике. Известно, что каждый ученик занимался только одним факультативом, и никакой факультатив не посещали два ученика. Ксюша и Игорь никогда не посещали факультатив информатики. Андрей вместе с учеником, посещавшим факультатив математики, ходили в гости к любителю английского языка. Ксюша никогда не посещала факультативных занятий по английскому языку, а Андрей на последнем факультативе изучал строение кольчатого червя. Кто из ребят занимался английским языком?
Вопрос 4
«Шифр Цезаря». Этот шифр реализует следующее преобразование текста: каждая буква исходного текста заменяется третьей после неё буквой в алфавите, который считается написанным по кругу. Используя этот шифр, расшифруйте слово НУЛТХСЁУГЧЛВ
Вопрос 5
Выясните, сколько битов несёт каждое двузначное целое число (отвлекаясь от его конкретного значения).
Ответы на тесты
| Тестовое задание | № 1 | № 2 | № 3 | № 4 | № 5 |
| Ответ | Б | Г | Б | Б | А |
| Тестовое задание | № 6 | № 7 | № 8 | № 9 | № 10 |
| Ответ | В | Г | Б | А | Б |
Ответы на открытие вопросы
Ответ на вопрос 1:
3, 5, 15
Ответ на вопрос 2:
112
Ответ на вопрос 3:
Игорь
Ответ на вопрос 4:
Криптография
Ответ на вопрос 5:
1 способ.
Пусть имеется число ХУ.
Тогда Nx = 9, т.е. Ix ≈3,1; Nу = 10, т.е. Iу ≈3,2. =>Vxy = 6,3 бита.
2 способ.
1 символ в памяти ПК несёт 1 байт информации, => Vxy = 2 байта = 16 бит.
Что такое панель задач: где она находится, и какие элементы в себя включает
Здравствуйте, уважаемые читатели. Продолжаем с вами изучение компьютера. И сегодня я отвечу вам на часто задаваемый вопрос новичками, которые только начали свой путь в этом направлении.
И вопрос этот звучит так: Что такое панель задач и где она находится? Но я думаю, что с этим вопросом будет уместно разобрать также основные ее настройки и элементы.
Я уже затрагивал в одной из статей эту тему, но думаю, что информация в ней неполная, так как основной вопрос в той статье звучал так: Рабочий стол Windows: что это такое и как его настроить. А панель задач можно отнести к его элементам.
Давайте не будем отвлекаться от сегодняшней темы и приступим
И прежде чем начать хочу сказать, что для владельцев ноутбуков, у которых установлена виндовс эта статья будет также актуальной. Так как панель задач на стационарных ПК и ноутбуках практически ничем не отличаются.
Что это такое
Начнем с определения.
Панель задач (taskbar) – это элемент интерфейса, который играет важную роль в управлении компьютером. После загрузки операционной системы по умолчанию располагается внизу рабочего стола.
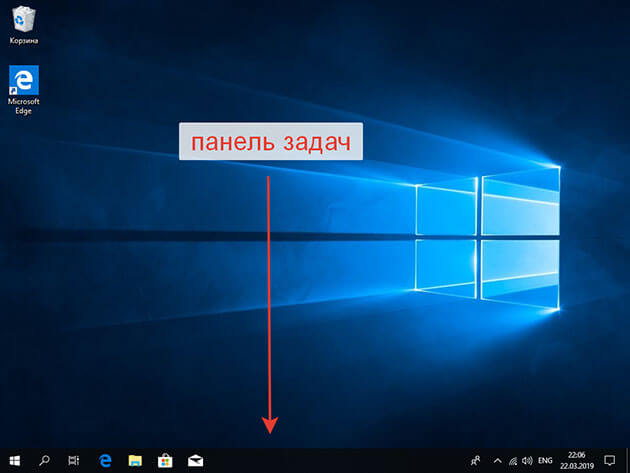
Используется в основном для быстрого запуска нужных программ и дальнейшего слежения за ними.
А также можно осуществлять следующие действия:
- Следить за временем и датой
- Управлять громкостью колонок
- Менять язык
- Отслеживать программы, работающие в фоновом режиме
- Просматривать системные уведомления
- Осуществлять поиск файлов находящихся в компьютере
Через кнопку меню «Пуск» можно получить доступ не только к запуску программ, но и ко всем настройкам вашего ПК
К сведению. Первая версия этой панели была представлена корпорацией Майкрософт в 1995 году.
Как настроить
К ее настройкам можно попасть двумя способами:
- через персонализацию
- контекстное меню
Через персонализацию
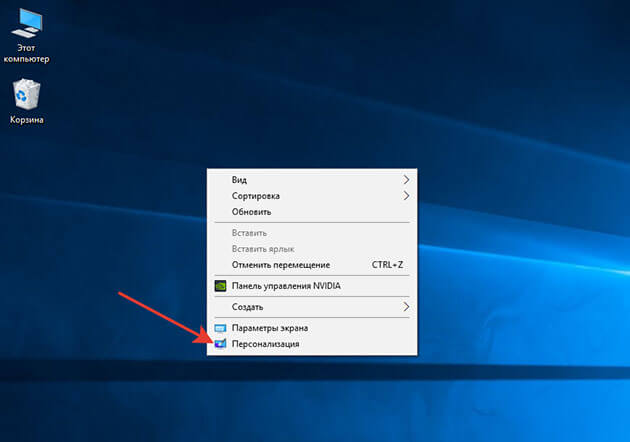
Для доступа к персонализации наводим на пустое место рабочего стола курсор мыши и нажимаем правую кнопку.
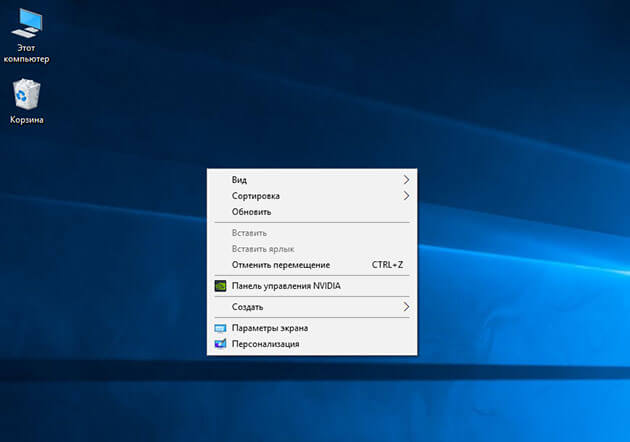
В появившемся меню выбираем «персонализация»
В открывшемся окне с левой стороны ищем «панель задач» и жмем на нее.
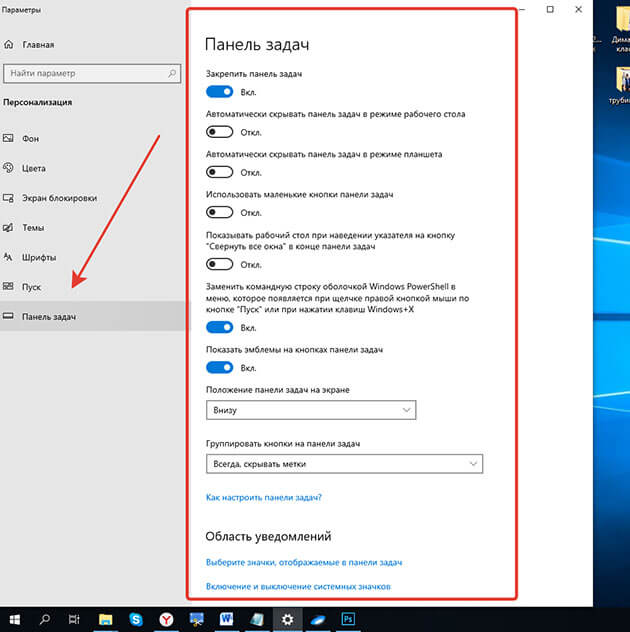
В открывшемся списке настраиваем этот элемент интерфейса под свои нужды.
Давайте всё-таки рассмотрим основные моменты:
1 Закрепить панель задач. Если выключить это параметр то можно наведя на границу панели курсор мыши, расширить ее, тем самым увеличить ее площадь.
2 Скрывать панель задач. При включенном параметре она появляется только при наведении на нее мыши. При выключенном параметре ее видно всегда.
3 Автоматически скрывать … Этот параметр актуален для планшетов.
4 Использовать маленькие кнопки. Здесь все понятно уменьшает размер кнопок находящихся на панели.
5 Показывать рабочий стол. Тут кому как нравится, у меня он выключен.
6 Заменить командную строку оболочкой Windows PowerShell … Если вы не являетесь IT-специалистом то она вам не к чему. Оставьте ее как есть.
7 Показать эмблемы на кнопках панели задач. Здесь я думаю тоже все понятно. Внимание! Данный параметр не работает при включенной настройке «Использовать маленькие кнопки»
8 Положение панели задач на экране. Есть четыре варианта настройки. Внизу (устанавливается по умолчанию), вверху, справа и слева. Ставьте как вам удобнее. У меня установлено снизу.
9 Группировка кнопок на панели задач. Включает или выключает названия рядом с иконками программ. Здесь тоже как вам нравится. У меня включено «Всегда скрывать метки»
10 Дальше идет ссылка на инструкцию по пользованию от производителей.
11 Потом идут настройки области уведомлений. О них мы поговорим чуть ниже. Так что читайте статью до конца.
12 Ниже показаны параметры для тех, у кого установлено несколько дисплеев.
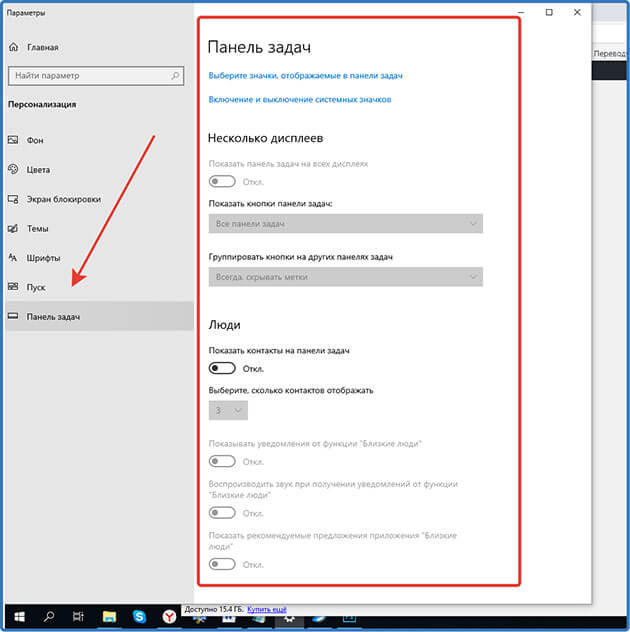
13 При включении параметра «Люди» появится значок, нажав на который откроется область, где можно закрепить ваши контакты из скайпа или электронной почты.
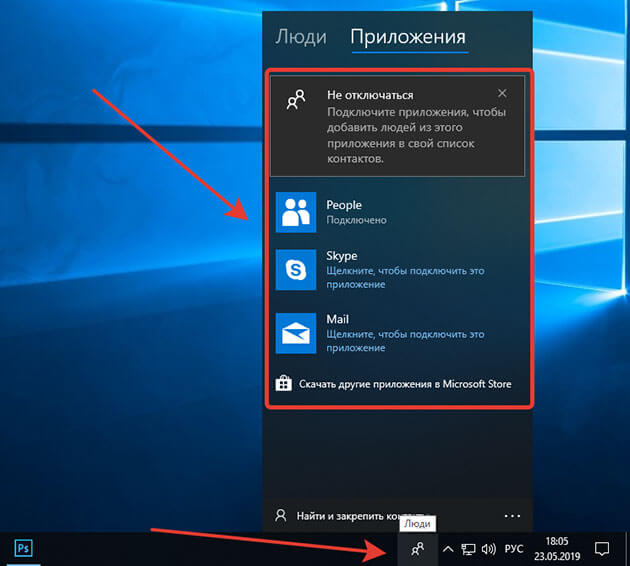
У меня настройка выключена, так как она мне не нужна. Но вы можете попробовать.
В этих параметрах нет ничего сложного. Устанавливаем нужный параметр, смотрим, что получилось если не подходит, то возвращаем предыдущий вариант или выбираем следующий.
Если у вас вдруг возникнут сложности с настройками, пишите о них в комментариях, будем разбираться.
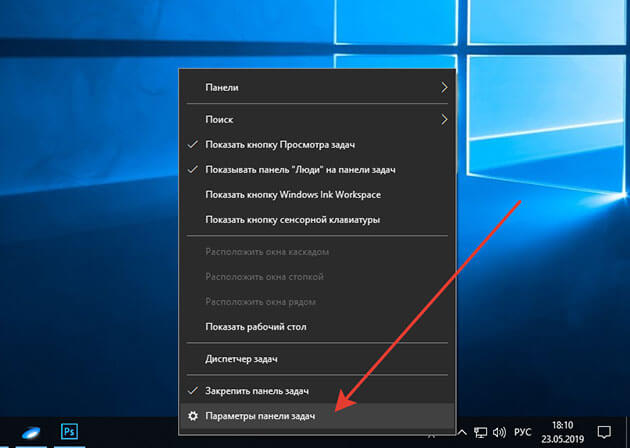
Через контекстное меню
Второй вариант немного проще вызываем контекстное меню, наведя мышью на свободную область самой панели и в самом низу выбираем «Параметры панели задач» и попадаем в тоже окно, что и в первом варианте.
С настройками, думаю все понятно, давайте теперь рассмотрим, из каких элементов она состоит, и как их настраивать.
Из каких элементов состоит
И так давайте рассмотрим основные элементы панели для Windows 10.
Внимание! Большинство из них присутствуют и в Windows 7. Можете сами убедиться, посмотрев скриншот.
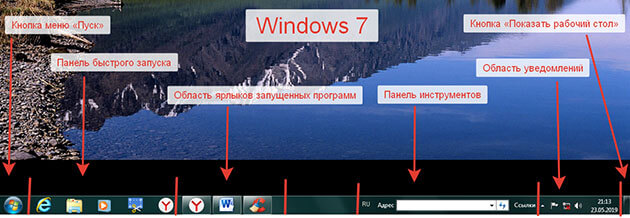

Как видно на скриншоте панель задач включает в себя следующие элементы:
- Кнопка меню «Пуск»
- Поиск
- Кнопка «Представления задач»
- Панель быстрого запуска
- Область ярлыков запущенных программ
- Панель инструментов
- Область уведомлений
- Кнопка «Показать рабочий стол»
Давайте рассмотрим каждый из них подробнее
Кнопка меню «Пуск»
При нажатии на нее открывает меню «Пуск», которое, несомненно, можно назвать главным в Windows.

Так как с помощью него мы получаем не только доступ к программам, но и к настройкам самой операционной системы.
Нажав на кнопку «Пуск» правой кнопкой мыши откроется список ссылок для перехода к различным настройкам, а также здесь можно завершить работу или выйти из системы.

Основные же возможности и функции данного меню мы с вами рассмотрим в отдельной статье, так как они довольно таки обширны.
Если не хотите пропустить подписывайтесь на обновления. Как это сделать, можно узнать из статьи «Как подписаться на обновления блога»
Поиск
Осуществляет поиск на компьютере приложений, файлов, настроек, а также возможен поиск результатов в интернете.
При нажатии на изображение увеличительного стекла откроется небольшое окно, где есть поле для ввода текста.
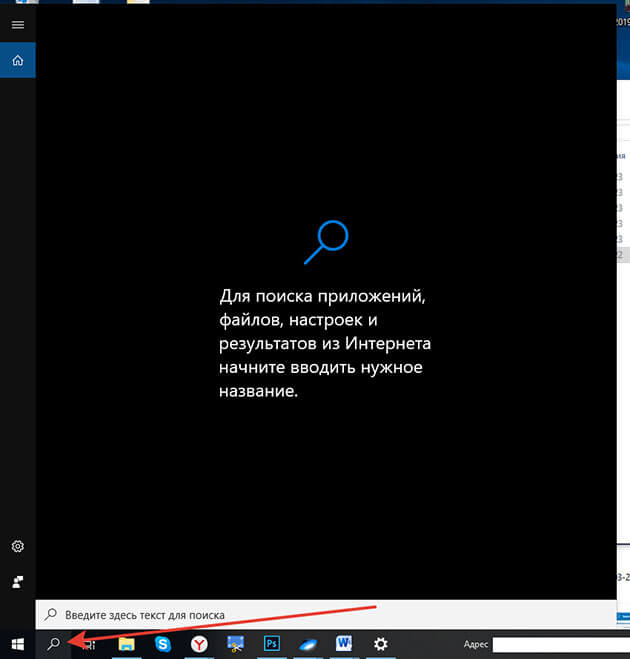
Пишите, что надо найти и вам высвечиваются результаты поиска.
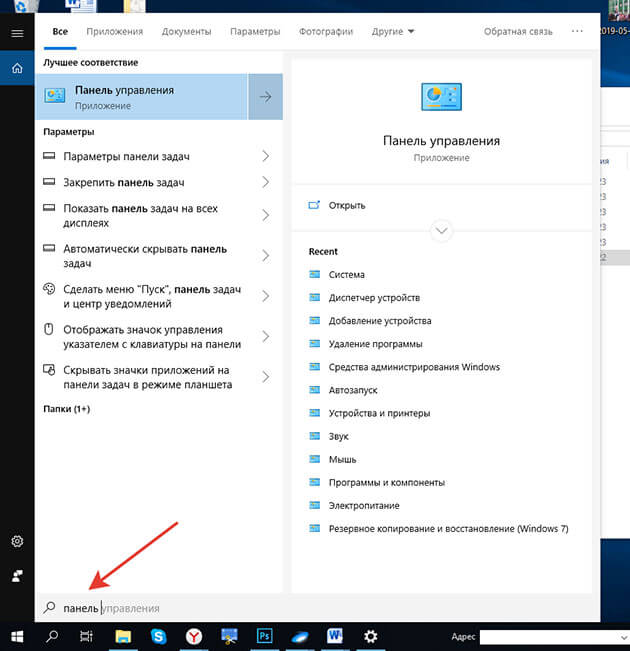
Вот небольшой пример я ввел слово «панель». На скриншоте показаны результаты.
Кнопка «Представления задач»
Нажав на нее, открывается небольшое окно, в котором показывается запущенные на данный момент приложения.
А в самом верху можно создать несколько рабочих столов для выполнения различных задач.
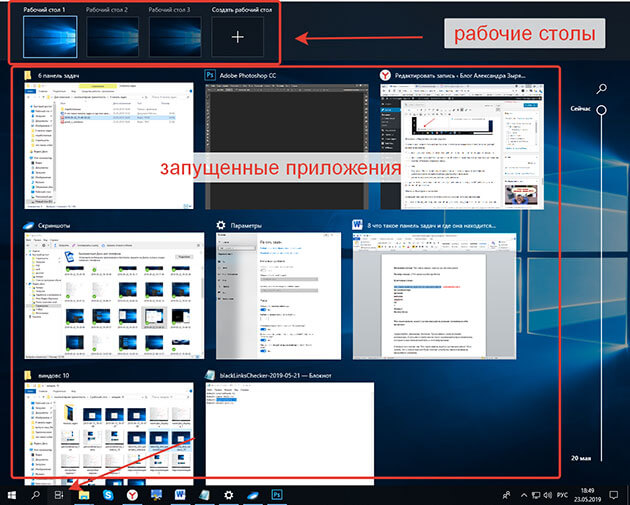
Это фишка создана для удобства одновременной работы в нескольких приложениях, не позволяя пользователю путаться в открытых окнах.
- На одном рабочем столе у вас открыты папки, в которые вы копируете файлы,
- На втором можно открыть браузеры для работы в интернете
- Третий вы используете для работы с документами
Эта функция создана только в виндовс 10 . Для реализации ее в других ОС требуется установка специальной программы.
И таких полезных фишек ваш компьютер таит огромное множество, а узнать о них можно изучив – 25 бесплатных уроков компьютерной грамотности .
Панель быстрого запуска
Предназначена для быстрого запуска программ ярлыки, которых закреплены.
Для того чтобы закрепить ярлык нужной программы надо курсором мыши навести на нужную программу и нажать правую кнопку мыши. В появившемся меню выбрать «Закрепить на панели задач»
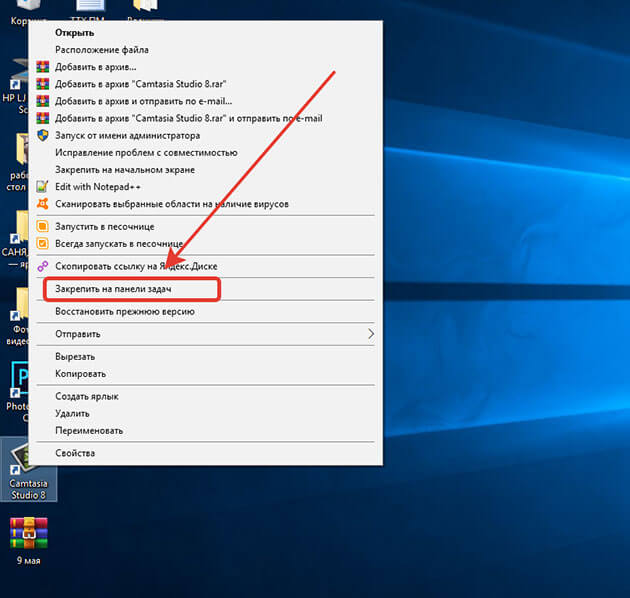
Также вы можете закрепить любую программу из меню «пуск»
Нажимаем меню «Пуск» наводим на нужную программу курсором мыши и нажимаем правой кнопкой. В открывшемся окошке жмем «дополнительно» и выбираем «Закрепить на панели задач»

Вот так все просто.
Область ярлыков запущенных программ
В данной области отображаются ярлыки запущенных программ и приложений.
Для того чтобы не перепутать с программами закрепленными на панели ярлыки запущенных помечаются снизу полосками.

Панель инструментов
Кроме панели быстрого доступа, которая установлена уже по умолчанию, можно добавить и другие называемые «инструменты»
Добавляются они через контекстное меню, как его вызвать я описывал в этой статье, выше смотрите пункт «Как настроить»
В контекстном меню в самом верху наводим курсор мыши на «панели».
Справа или слева откроется дополнительное окошко, где есть список уже созданных панелей.
А также с помощью нижнего пункта вы можете создать любую другую панель, которая вам нужна.

Добавляются и убираются панели инструментов наведением на них курсором мыши и нажатием левой кнопки.
Лично я считаю, что они бесполезны и поэтому я их полностью выключаю.
Область уведомлений
Данную область еще называют «Системным треем» но это неофициальное название и многие его просто не знают.
В области уведомлений находится:
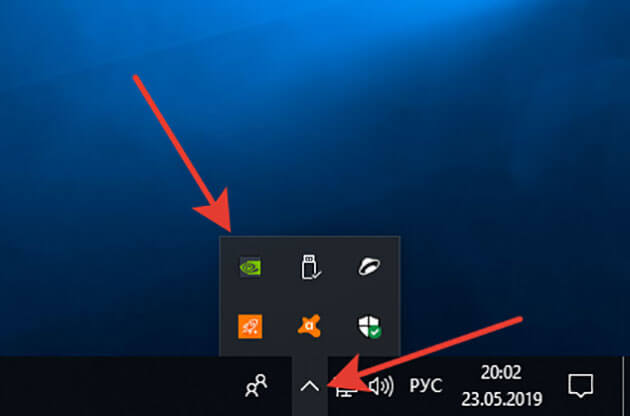
1 Изображение стрелочки «вверх», при нажатии которой отображаются значки программ запущенных в фоновом режиме.
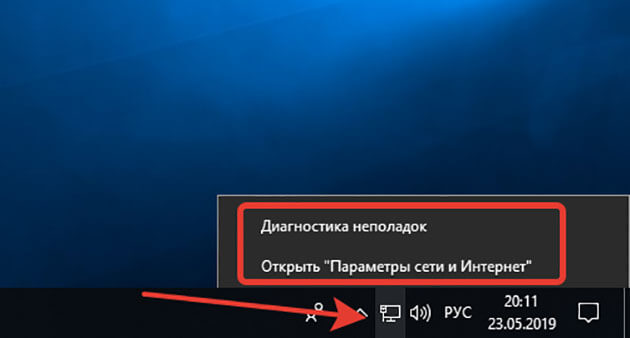
2 Значок, который показывает, подключен или не подключен компьютер к интернету.
При нажатии на него правой кнопкой мыши можно произвести диагностику неполадок подключения и открыть окно, где можно настроить параметры сети и интернет.
3 Значок небольшого динамика, при нажатии на который, показывается какое устройство подключено к компьютеру для воспроизведения звука, а также ползунковый регулятор звука этого устройства.
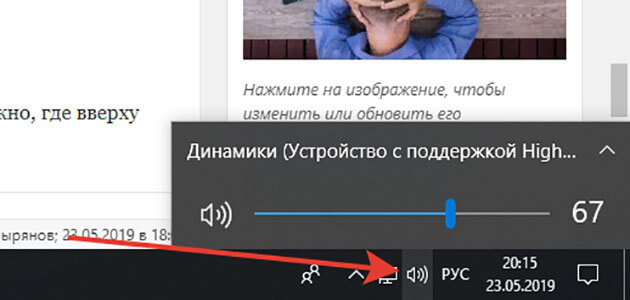
Здесь же можно поменять устройство (если только вы точно уверены название указанного устройства не совпадает с подключенным ) и настроить громкость.
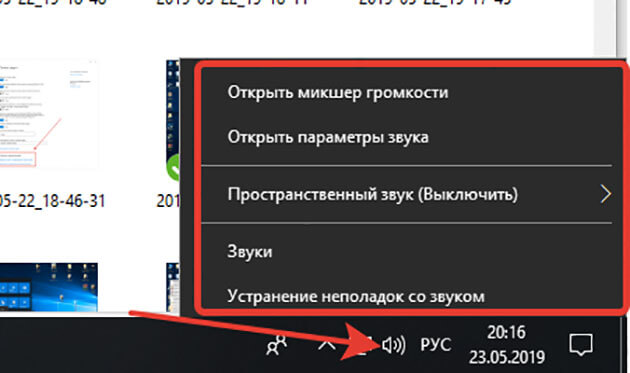
А при нажатии на него правой кнопкой мыши откроется меню, через которое можно перейти к различным настройкам, а также провести диагностику неполадок.
4 Языковая панель. Показывает, какой язык в данный момент включен для ввода. Здесь также можно настроить через нажатие на иконку.

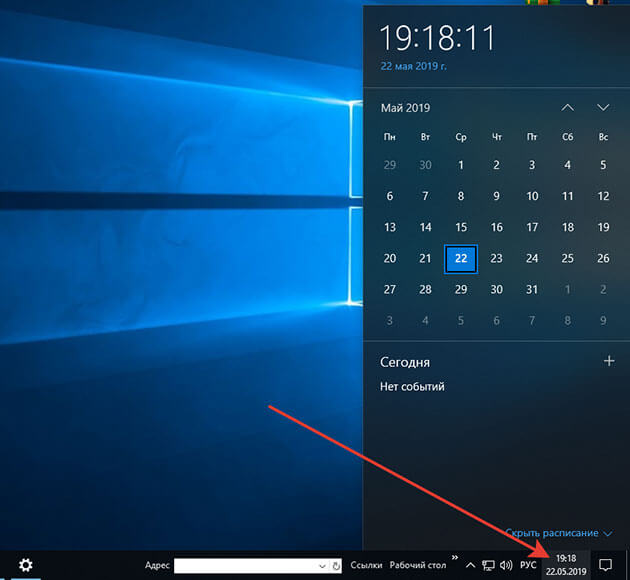
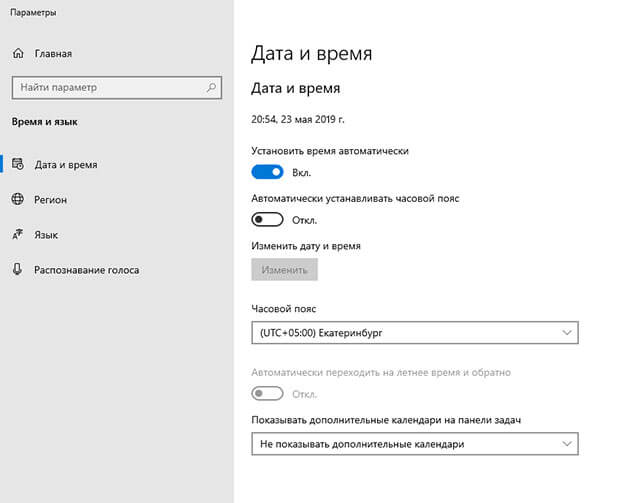
5 Системный значок «Часы». Здесь отображается текущие дата и время. При нажатии на значок открывается календарь.
Для выставления нужного значения наводим на значок курсор мыши, и жмем правой кнопкой. В появившемся меню выбрать «Настройка даты и времени»
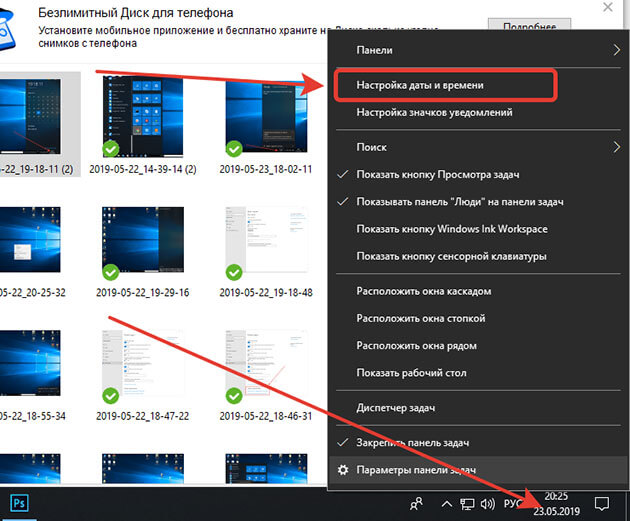
После этого откроется окно с настройками.
6 Значок уведомлений, при нажатии на который открывается небольшое окно, где вверху отображаются уведомления системы.
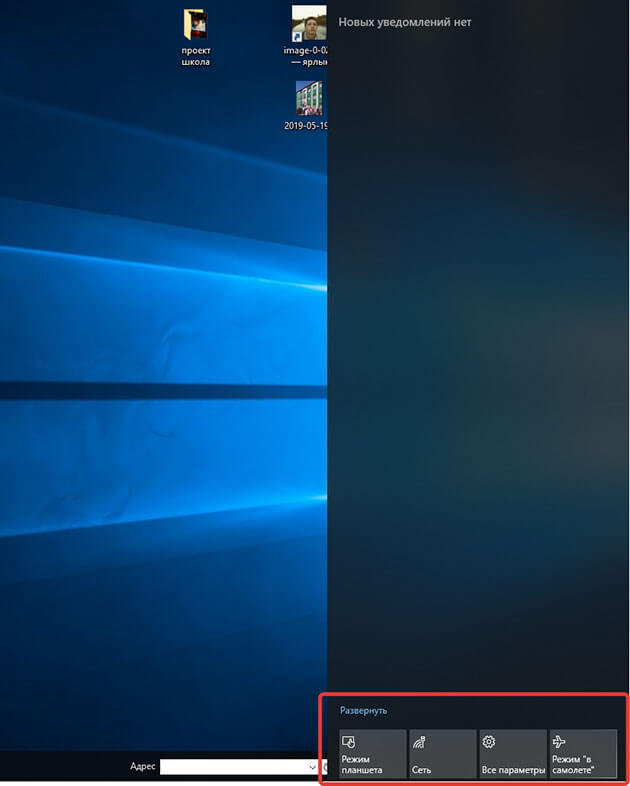
А снизу доступны некоторые настройки:
Можно включить или выключить режим планшета
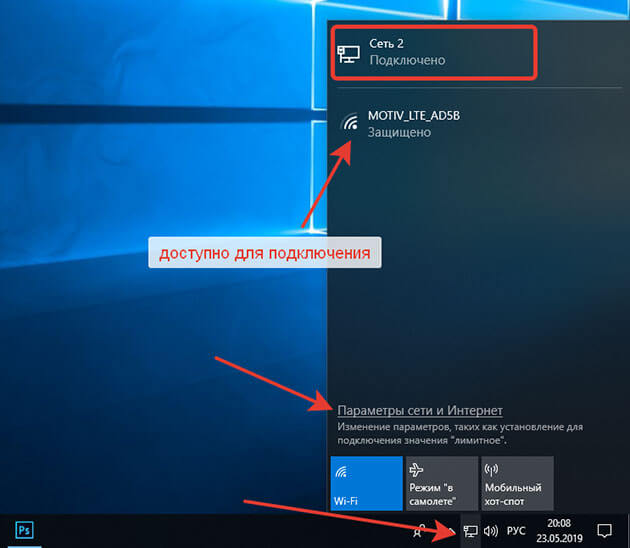
При нажатии на значок сети откроется окно, где показано, к какой сети подключен ПК и какие доступны для подключения.
А также можно перейти по ссылке к основным настройкам сети. Включить режим «В самолёте»
Или перейти к основным параметрам Windows.
А при нажатии правой кнопкой мыши откроется окошко с настройками самих уведомлений.

7 Кнопка «Свернуть все окна»
Нажимая ее, сворачиваются все открытые окна, тем самым открывая нам рабочий стол. Так что некоторые пользователи ее так и называют «Показать рабочий стол».

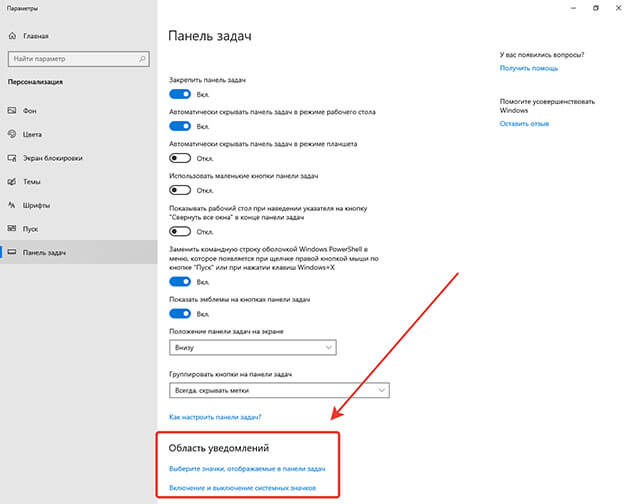
Осталось нам разобрать две настройки, которые предназначены именно для области уведомлений.
Через контекстное меню переходим в «параметры панели задач» и там и там находим следующие пункты:
- Выбрать значки, отображаемые в панели задач
- Включение и выключение системных значков
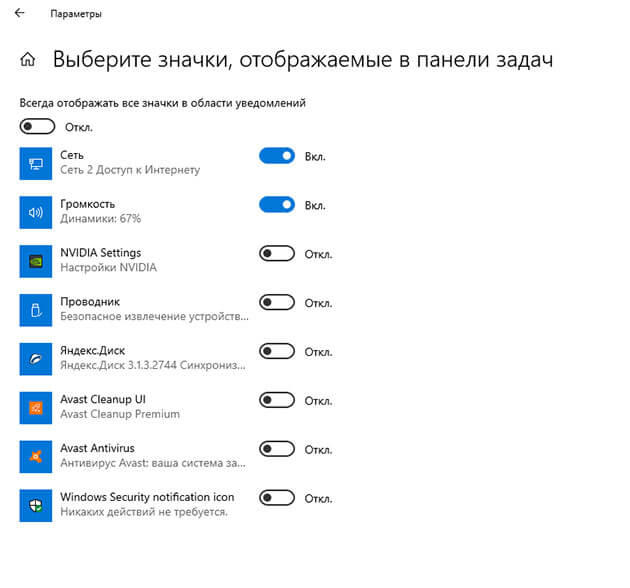
Нажимаем на первую и выбираем, какие именно значки программ будут отображаться в области уведомлений
Переходим по второй ссылке и настраиваем отображение системных значков.

Внимание! Значок питание можно активировать только на ноутбуках и планшетах он оповещает о оставшемся заряде батареи.
Настраивайте панель задач под ваши запросы и пользуйтесь с удовольствием.
На сегодня все. Остались вопросы задайте их в комментариях к статье.
Заключение
Надеюсь, уважаемые читатели, что мои статьи помогают вам осваивать компьютер. И с каждой статьей вы становитесь более уверенным пользователем. Тем самым открывая для себя новый мир возможностей.
Но помимо тех знаний, которые я вам даю, стоит задуматься об эффективности использования компьютера. Поэтому я рекомендую задействовать секреты продуктивной работы за компьютером , которые помогут вам работать быстрее и удобнее.
На этом сегодня все! Понравилась статья? Поделитесь ей своими друзьями в социальных сетях.
А также напоминаю, что на блоге проводится конкурс «Удачливый комментатор» с денежными призами. Принимайте участие и выигрывайте.
Подписывайтесь на обновления и не пропустите статьи с полезной информацией. Всем пока!
После
запуска операционной системы Windows
XP на экране
появляется электронный рабочий стол
(рис. 1), на котором расположены значки
приложений и документов, к которым
наиболее часто обращается пользователь.
Все окна располагаются поверх рабочего
стола, и их можно перемещать,
увеличивать, уменьшать или убирать.
Окна могут полностью или частично
перекрывать друг друга. Рабочий
стол позволяет
запускать программы, настраивать систему
и выполнять другие действия. Размеры и
количество рисунков и надписей на
рабочем столе могут сильно различаться
в зависимости от особенностей
настройки конкретной копии системы на
вашем компьютере. Однако в любом случае
в нижней части рабочего стола расположена
полоса, называемая Панель
задач (рис.
1).
Панель
задач.
Основное
назначение Панели
задач —
отображение запущенных программ в виде
кнопок и значков, а также быстрое
переключение между ними.

Рис.1.
Рабочий стол
В ид
ид
панели задач представлен на рис. 2.
Рис.
2. Элемент экрана Панель
задач
Панель задач содержит
следующие элементы:
1.Кнопка
Пуск (Start),
которая предназначена для вызова
главного меню.
2.Кнопка
открытого документа.
Нажатие этой кнопки позволяет быстро
перейти в выбранное окно.
3.
На Панели
задач могут
быть установлены панели инструментов,
такие, как Адрес, Ссылки, Рабочий стол,
Быстрый запуск или может создаваться
новая панель инструментов. На рис. 2
представлена панель «Быстрый запуск»,
на которой установлены значки приложений.
4.
Индикатор переключения русского и
английского языков.
5.
Значки
служебных программ.
6.
Индикатор времени (часы).
Кнопка
Пуск
–
кнопка вызова Главного
меню.
При помощи этого меню осуществляется
быстрый доступ к программам, документам
и другим объектам, включенным в меню
Пуск.
Имеется возможность запустить программу
из командной строки, обратиться к
справочной информации, найти нужный
файл или папку. Стандартными пунктами
этого меню являются:
-
Программы.
Это каскадное меню дает быстрый доступ
ко всем стандартным программам, которые
поставляются в составе Windows. -
Документы.
Этот пункт содержит подменю с пятнадцатью
последними документами и папками, с
которыми работали. -
Настройка.
Это каскадное меню дает возможность
доступа к Панели
управления
(используется для конфигурирования
системы), к папке Принтеры
(которая позволяет управлять всеми
имеющимися принтерами) и к листам
свойств самой Панели
задач. -
Найти.
Этот пункт меню позволяет найти файл
или папку в компьютере или в сети, а
также найти в сети определенный
компьютер. -
Справка.
Открывает справочную систему Windows. -
Выполнить.
Эта команда обеспечивает быстрый запуск
программ из командной строки. Используется
когда необходимо ввести команду с
указанием параметров, например команду
format
a:. -
Остановка.
Эта команда появляется в меню Пуск,
если данный ПК поддерживает режим
экономии питания. Она используется для
перевода ПК в этот режим. -
Завершение
работы.
Используется для завершения работы с
Windows
с запросами о характере завершения
работы. Windows
–
это сложная графическая среда, поэтому,
завершая работу с ней, нельзя просто
взять и выключить компьютер. В этом
случае можно потерять данные. Утилита
«Завершение работы» выведет простое
диалоговое окно со следующими
возможностями завершения: выключить
компьютер; перезагрузить компьютер;
перезагрузить компьютер в режиме
MS-DOS,
приостановить работу компьютера. При
завершении работы будет проконтролирован
факт закрытия всех открытых приложений
и записи несохраненных документов.
Если
позиция меню имеет треугольник, острием
обращенный вправо, то стоит задержать
на ней курсор мыши и из нее выпадет
очередное подменю. Система меню, при
которой пункты могут содержать подпункты,
каскадные меню или комбинации того и
другого, автоматически открывающиеся
при установке на позицию пункта курсора,
называется каскадным
меню.
Значки.Значки
являются средством отображения различных
объектов, например приложений (программ),
устройств, файлов и папок.
Ярлыки. Ярлыки
являются средствами быстрого доступа
к объектам. Ярлык объекта – это путь к
объекту. Ярлык содержит в себе только
ссылку на объект (программу, файл, папку,
принтер и т.д.). Файл документа может
храниться, например, в каталоге
WORDDOCUMENTS,
но может быть представлен значком наРабочем столе. Сам файл документа
не существует наРабочем столе.
Вместо этого наРабочий столпомещен
специальный файл связи. Когда выполняется
двойной щелчок на ярлыке,Windowsиспользует информацию, которая хранится
в файле связи, чтобы найти и открыть
объект, связанный с этим ярлыком.
Квадратик
со стрелкой в левом нижнем углу значка
означает, что этот объект – ярлык.
Ярлыки
объектов позволяют сделать объект
доступным из разных мест. Ярлык к
программе, документу или принтеру может
быть создан в любой папке, а также на
Рабочем
столе. Создать
ярлык так
же легко, как и скопировать или переместить
объект – эти операции очень похожи.
Чтобы
поместить ярлык на Рабочий
стол
необходимо:
1)
выделить объект (файл, папку, принтер
или компьютер), для которого необходимо
создать ярлык;
2)
выбрать в меню Файл
команду Создать
ярлык,
3) перетащить ярлык на
Рабочий стол.
Примечание.
Еще создать ярлык можно при помощи
перетаскивания правой клавишей мыши и
при помощи пункта контекстного меню
Создать
ярлык.
Удалить
ярлык можно
перетаскиванием его в корзину, командой
Удалить
или клавишей Del.
Удаление ярлыка на сам объект не влияет.
Отображение
объектов.
Для обозначения различных объектов в
Windows
используются графические символы.
Отдельные
файлы объединяют в папки. Папки являются
средством организации и представления
системных ресурсов ПК (каталогов, файлов
и т. д.). Папка может содержать другие
папки (вложенные папки), программы, а
также такие объекты, как, например,
принтеры и диски. Например:
-

– папка;

– исполняемый
файл MS-DOS;– командный
файл MS-DOS;
– гибкий
магнитный диск.
Открыть
папку
или запустить
объект на
выполнение можно несколькими способами:
-
Необходимо
дважды щелкнуть левой кнопкой мышки
на выбранном объекте. -
Выделить
одним щелчком левой кнопкой мышки
выбранный объект и нажать на клавиатуре
ENTER. -
Необходимо
щелчком правой кнопкой мышки на нужном
объекте или в контекстном меню выбрать
команду Открыть.
Соседние файлы в предмете [НЕСОРТИРОВАННОЕ]
- #
- #
- #
- #
- #
- #
- #
- #
16.03.2016399.36 Кб205М1.doc
- #
16.03.2016301.06 Кб309М6.doc
- #
- #

Опубликовано 26.05.2022
Содержание:
- 1 Что делает панель задач
- 2 Как добавить значки на панель задач
- 3 Как убрать значки с панели задач Windows 10
- 4 Почему не получается удалить значки с панели задач
- 5 Как вернуть панель задач, когда она совсем пропала
- 5.1 Панель скрыта пользователем
- 5.2 Как переместить панель задач обратно
- 5.3 Полностью пропала панель задач — что делать
- 5.4 Почему пропала панель задач Windows — иные причины
- 6 Пропала панель задач «Виндовс» — анализируем посредством командной строки
- 7 Заключение
Что делает панель задач
Панель задач — встроенная функция всех версий Windows. Обычно эта полоса со значками программ расположена внизу рабочего стола. Здесь размещены самые нужные пользователю приложения, добавленные им самим либо системой. Главное назначение элемента — удобный и быстрый доступ к наиболее популярным программам, значки которых легко добавить и удалить. Ниже мы подробнее рассмотрим, как работать в панели задач, а также, что делать, если она исчезла с экрана.
Как добавить значки на панель задач
Для добавления значков пользователь применяет следующие способы:
- Захватывает ярлык программы с рабочего стола ЛКМ (обязательно удерживая ее), перетаскивает и сбрасывает иконку на панель. На рабочем столе ярлык останется.
- Находит нужную программу в «Пуск». Кликает по ней ПКМ и среди дополнительных действий выбирает закрепление на панели задач (не все приложения закрепляются подобным образом).

- Персонализирует элемент под свои интересы в настройках, которые вызывает win+I. Нужен отдел персонализации, но он доступен, если только Windows активирована. В противном случае система не даст внести изменения, блокируя все кнопки.

Если ваша операционная система Windows активирована, то пролистывайте перечень настроек вниз и персонализируйте панель задач под свои запросы.
Как убрать значки с панели задач Windows 10
Убрать значок программы еще проще. Кликаем ПКМ по более ненужному элементу и выбираем из списка опцию открепления.

Также персонализируем системный элемент из меню настроек, вызываемого через win+I.
Почему не получается удалить значки с панели задач
В определенный момент система может не ответить пользователю, который решил удалить ненужные значки. Причиной этому могут быть различные сбои в работе элемента. Рассмотрим другие способы удаления значков.
- Воспользуемся тем же методом через меню «Пуск». Кликаем ПКМ по названию программы и в дополнительных действиях выбираем открепление.

- Если не помогает, пробуем полностью удалить программу. Желательно использовать сторонний софт, чтобы ликвидировать все ненужные «хвосты». Но можно применить и штатные средства ОС. Нажимаем win+I и переходим в «Система». Здесь производим нужные действия.

После удаления приложения значок тоже должен исчезнуть с панели задач, а ярлык — с рабочего стола. Если этого не произошло, удаляем их вручную через ПКМ. По завершении всех манипуляций заново инсталлируем программу.
- Удаляем ярлыки из каталога TaskBar на диске C. Предварительно включаем отображение скрытых элементов.

Проходим путь Users→«Имя пользователя»→AppData→Roaming→Microsoft→Internet Explorer→Quick Launch→User Pinned→TaskBar. Здесь удаляем ненужный ярлык через ПКМ и проверяем, исчез ли он с панели задач. В противном случае снова пробуем убрать его вручную с помощью правой кнопки мыши.
Как вернуть панель задач, когда она совсем пропала
Исчезновение панели задач с рабочего стола обусловлено множеством причин — от сбоя в системе до вирусных атак. Рассмотрим несколько способов возврата элемента на прежнее место. Первым делом перезагрузите свой компьютер и, если это не решило проблему, читайте далее.
Панель скрыта пользователем
Проверим, возможно, панель задач была скрыта пользователем. Наведите курсор туда, где элемент был ранее, а также проведите по всем краям рабочего стола. Если системный элемент при этих манипуляциях появляется в каком-либо месте, отключим в настройках опцию, которая отвечает за ее сокрытие.
- Кликаем win+r и применяем control.
- В блоке «Оформление и …» находим раздел «Панель задач и…».
- Если ваша Windows активирована, настройте ее параметры под свои желания.

После проведенных манипуляций панель задач должна появиться на прежнем месте.
Как переместить панель задач обратно
Если ваша панель задач «убежала» в другое место и теперь отображается слева, справа или сверху рабочего стола, то при желании ее легко вернуть на привычную позицию. Делаем это через свойства системы, как описано в предыдущем блоке.
Как переместить панель задач обратно
Или кликаем ПКМ по панели задач и снимаем отметку с «Закрепить…».

Теперь захватываем панель задач на свободном поле ЛКМ и перетаскиваем ее в удобное место, где снова закрепляем.
Полностью пропала панель задач — что делать
Если панель задач пропала совсем и ее никак нельзя обнаружить, то попробуем перезапустить работу проводника. Не дало результата? Тогда перезапустим сам процесс Explorer.exe, отвечающий за функционирование панели задач, проводника, кнопки «Пуск» и т. д. Возможно, сбой в его работе явился причиной неполадок. Используем win+r и Explorer.exe. Откроется окно «Проводника». Перезагружаем компьютер и проверяем, наладило ли это работу.
Также воспользуемся настройками. Снова применим win+r и control, как было описано выше, и проверим, не скрыт ли элемент автоматически.

Все установлено корректно, но элемент не отображается? Попробуем изменить его параметры (к примеру, месторасположение) и убедиться, что он появился в соответствии с заданными настройками. После этого элемент можно вернуть на начальные позиции.
Почему пропала панель задач Windows — иные причины
Причиной пропажи элемента с рабочего стола также могут быть:
- Комбинирование нескольких мониторов. Если вы используете в «Виндовс» 10 два монитора либо подключаете к ТВ ноутбук, то системный элемент отобразится только на одном экране. Проверьте, действительно ли проблема в этом. Нажмите win+p и укажите другой режим (но не «Расширить»).

- Стороннее программное обеспечение. Некоторые приложения влияют на корректное отображение панели задач. Чтобы выявить причину неполадок, выполните загрузку ОС в безопасном режиме. Если все функционирует нормально, поищите проблемное приложение. Возможно, это одна из недавно установленных программ. Также проверьте автозагрузку. Комбинирование нескольких мониторов. Если вы используете в «Виндовс» 10 два монитора либо подключаете к ТВ ноутбук, то системный элемент отобразится только на одном экране. Проверьте, действительно ли проблема в этом. Нажмите win+p и укажите другой режим (но не «Расширить»).
- Некорректные системные файлы. Возможно, их целостность была повреждена, особенно, если недавно ваша система обновлялась. Скорее всего, здесь поможет только чистая переустановка Windows.
- Неполадки в работе видеоадаптера. Удалите драйвера и проверьте, видно ли теперь панель задач. Инсталлируйте актуальные официальные драйвера.
- Настройки системы. Снова зайдите в меню персонализации (в блок «Цвета») и деактивируйте параметр прозрачности.

Также необходимо проверить настройки режима планшета. Некоторые пользователи по незнанию включают его случайно. Применим win+I и перейдем в блок «Система», а затем в параметры режима планшета. Установите настройки, соответствующие вашим запросам.

Пропала панель задач «Виндовс» — анализируем посредством командной строки
Чтобы система нашла поврежденные файлы, проанализируем ситуацию с помощью командной строки, открытой от имени админа. Используем sfc /scannow и «Энтер». Система проанализирует файлы и, если найдет среди них проблемные, предложит способы устранения ошибок.
Заключение
Мы с вами рассмотрели множество способов, позволяющих вернуть или убрать значки с панели задач, а также найти сам элемент, который иногда пропадает с рабочего стола. Есть и более сложные методы, но непрофессионалам лучше их не применять. Ведь любые изменения (внесенные, например, в редактор реестра) или сброс панели задач посредством создания специальных файлов могут навредить работе операционной системы, и здесь понадобится помощь специалиста. В любых затруднительных ситуациях обращайтесь к сотрудникам компании «АйТи Спектр». Мы проведем тщательную диагностику оборудования и решим проблемы.
С помощью меню “Пуск” можно начать любую работу. Панель задач – элемент рабочего стола. В “Трее” находятся часы, и другие маленькие значки программ.
 Здравствуйте, уважаемые читатели Soft & Apps!
В сегодняшнем уроке мы поговорим об основных элементах рабочего стола!
По порядку разберемся, какие функции выполняет каждый из них и как они настраиваются.
Поэтому по окончанию урока, Вы сможете выполнить некоторые настройки компьютера, исключительно под себя, т.е. так как удобно именно Вам!
Содержание
- Панель задач и “Трей”
- Настройка
- Область уведомлений
- Меню “Пуск”
- Настройка меню “Пуск”
Панель задач и “Трей”
Панель задач – элемент рабочего стола, как правило, располагается в нижней части экрана, в виде горизонтальной полоски.
 Щелкните по картинке для увеличения
Условно ее можно разделить на четыре части:
Первая – кнопка “Пуск” (о ней позже).
Вторая – панель быстрого запуска. Позволяет запуск программы одним щелчком мыши.
Третья – свободная область. На ней отображаются иконки открытых и свернутых окон, позволяет переключаться между окнами.
Четвертая – “Трей” (область уведомления). В “Трее” находятся часы, и другие маленькие значки программ, так же тут отображаются различные уведомления.
Настройка
Настроить панель задач можно следующим образом:
Щелкните правой кнопкой мышки в свободном месте на панели и зайдите в “Свойства”.

Пройдемся по пунктам.
1. Закрепить панель задач – убрав галочку с этого пункта, Вы сможете перемещать панель, т.е. расположить ее сверху или по бокам. Для этого нужно нажать левой кнопкой мышки на свободную область и не отпуская потянуть панель туда куда нужно.
2. Автоматически скрывать панель задач – если поставить галочку здесь, то панель скроется из виду, и будет появляться, только когда Вы направите курсор мышки в ее область.
3. Использовать маленькие значки – панель станет более компактная.
4. Положение панели задач на экране – панель автоматически переместится на указанную позицию.
5. Кнопки панели задач – если убрать группировку, то каждое окно на панели будет отображаться отдельно. Будет неудобно при работе с большим количеством окон.
Область уведомлений
Нажав кнопку “Настроить”, можно задать параметры для значков в трее!

После каждого изменения настроек можете нажимать кнопку “Применить” и смотреть на изменения. Как только все настройки будут выполнены, нажимайте “ОК”.
Меню “Пуск”
С помощью меню “Пуск” можно начать любую работу! Потому что здесь отображаются как стандартные, так и установленные программы. Здесь Вы получаете доступ к локальным дискам, папкам “Документы”, “Изображения” и т.д. И именно в пуске находятся кнопки “Панель управления” и “Завершение работы”.
Теперь давайте разберемся, как там все устроено.

Меню “Пуск” можно разделить на две части: левая и правая.
Левая часть:
1. В левой части отображаются ярлыки часто используемых программ. Появляются они автоматически и их расположение зависит от того как часто Вы используете ту или иную программу. Но любой ярлык можно закрепить, после чего он будет отображаться там не зависимо от того пользуетесь Вы им или нет.
Для этого щелкните правой кнопкой мыши по любому ярлыку, который нужно закрепить в меню “Пуск”, (причем не важно, где он находится, главное чтоб это был ярлык), затем выберете нужный пункт, как видите так же его можно закрепить и на панели задач!
 Обычный ярлык с рабочего стола
Я закреплю его и там, и там. Вот что получилось!

В верхней части меню и на панели задач появился значок этой программы, который уже никуда не денется, пока я сам его не уберу. Тем же способом можно добавить еще несколько значков.
Убираются они так же, через правую кнопку!
Под ярлыками находится кнопка “Все программы”, нажав на нее, Вы получите список установленных программ, там же Вы найдете стандартные программы.
Еще чуть ниже располагается строка поиска. Она поможет найти программу, папку или файл по названию, если Вы забудете где они находятся!
Правая часть:
В правой части нет ничего особенного. Просто Вы можете быстро получить доступ к стандартным папкам, а так же выключить компьютер.
Настройка меню “Пуск”
Щелкните правой кнопкой мышки на панели задач, зайдите в “Свойства” и перейдите на вкладку “Меню Пуск”.

Тут можно задать действие для кнопки питания. Не думаю, что ее стоит менять, но Вам виднее 🙂
Ниже располагаются две галочки.
Если Вы уберете первую, то в меню “Пуск” перестанут отображается программы, которые Вы часто используете (останутся только закрепленные).

Если убрать вторую, то перестанет отображаться список последних файлов, с которыми работала та или иная программа.

Теперь нажимаем кнопку “Настроить”.

В этом окне можно указать, какие папки будут показаны в правой части меню!
Нажав на кнопку “Параметры по умолчанию”, вернутся все стандартные настройки! Так что, можете смело экспериментировать!
На этом всё! До встречи на следующих уроках! 🙂
Если Вы считаете эту информацию полезной то, пожалуйста поделитесь ей с друзьями в социальных сетях! При возникновении вопросов, обязательно задавайте их в комментариях!