При установке Windows часто может возникнуть такая проблема — на этапе «Где вы хотите установить Windows» вы видите пустое окно и не можете продолжить установку, т.к. нет выбора диска
Сопровождается это подписью: «Нам не удалось найти драйверы. Чтобы получить драйвер запоминающего устройства, нажмите кнопку «Загрузить Драйвер»
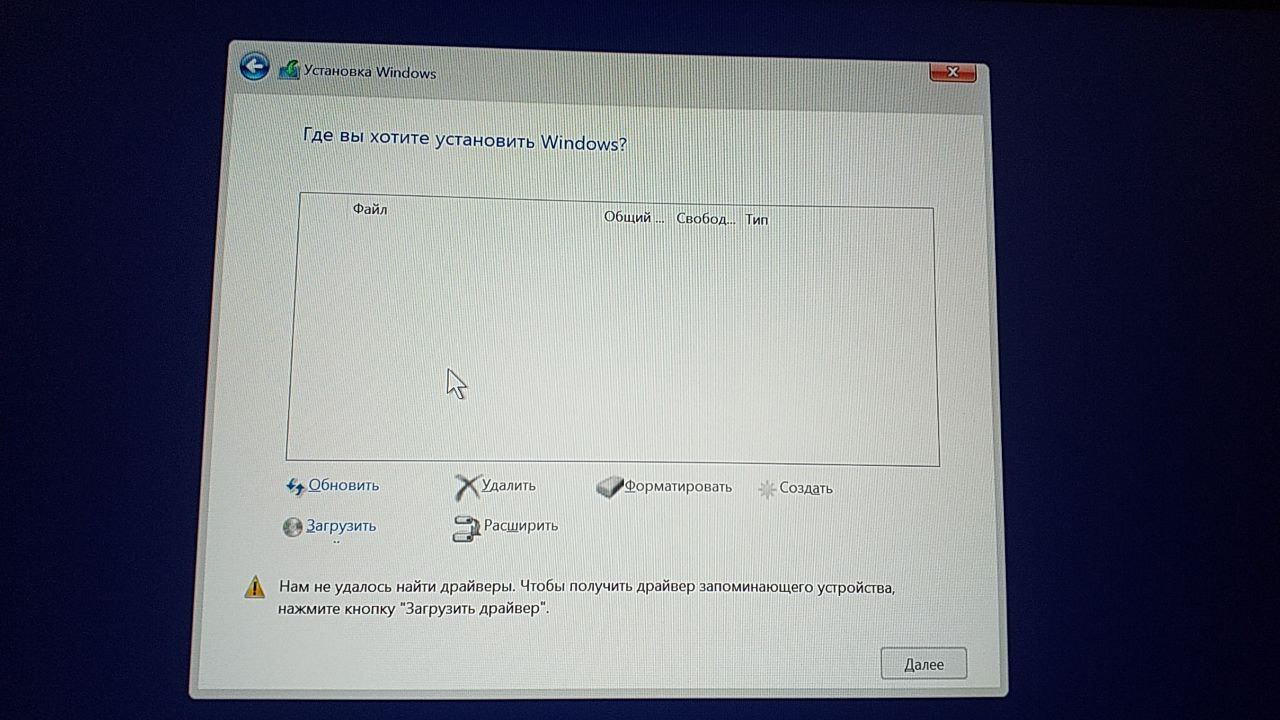
Ниже мы разберем почему возникает эта ошибка и как ее исправить
Почему не видит жесткий диск при установке системы Windows 7 / 8 или Windows 10 / 11
Такая ошибка чаще всего возникает в двух случаях:
- Вы купили новый компьютер без системы. Производитель не предусмотрел наличие драйвера
- Вы поменяли диск. А для нового диска у вас нет нужного драйвера
Но, независимо от причины ее появления способ решения одинаковый — скачать драйвер диска
Как скачать драйвер диска для установки Windows
Перейдите на официальный сайт производителя вашего ноутбука / ПК и попробуйте найти драйвер. В названии драйвера обычно содержаться слова SATA / RAID / Intel RST
Если с поиском на официальном сайте возникли трудности — введите в поисковике google или yandex запрос: «IRST» + «модель вашего ноутбука / материнской платы»
Если ваш ПК работает на AMD — то попробуйте поиск по ключу «SATA/RAID драйвер» + «марка компьютера, ноутбука или материнской платы».
Как установить драйвер на флешку
- После скачивания драйвера, кликните по файлу правой кнопкой мыши и нажмите извлечь

Если файл драйвера в формате .exe — запустите файл и выберите извлечь
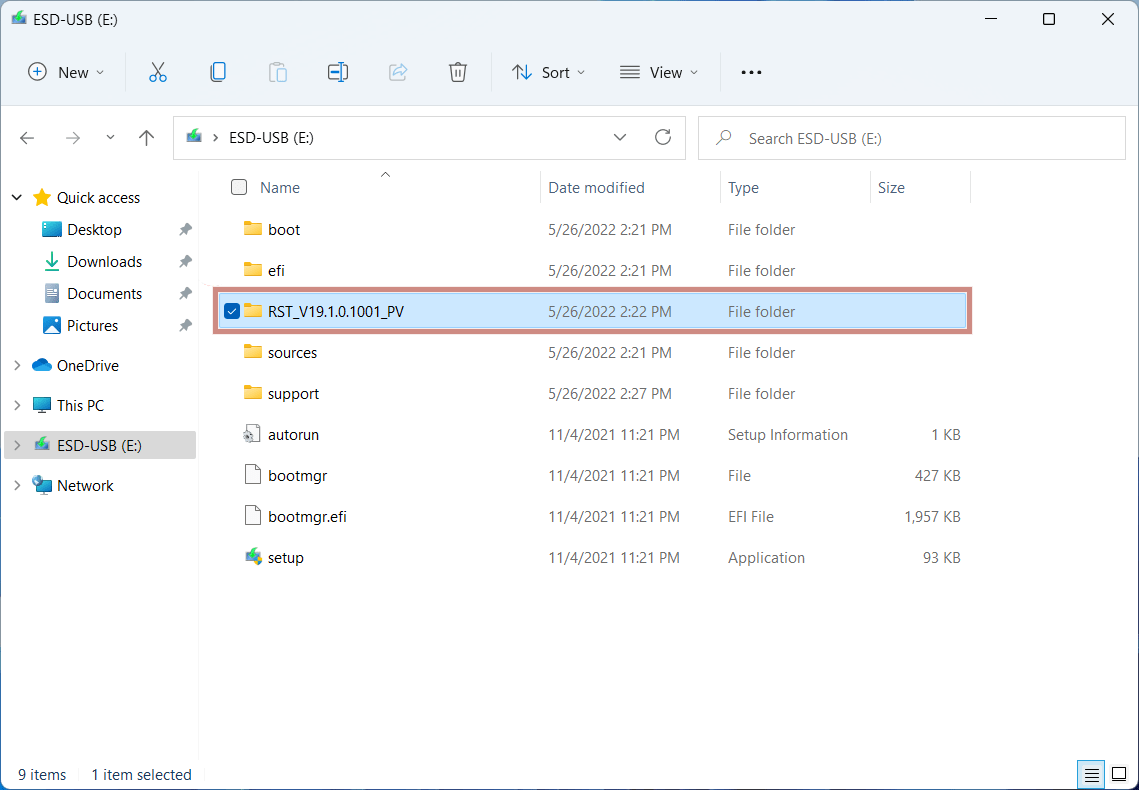
- Перенесите разархивированную папку на установочную флешку

- Далее перейдите в установку Windows на этап выбора диска и нажмите «Загрузить»

- В открывшимся окне нажмите обзор и выберите только что перенесенную папку и нажмите ОК

- Далее установите драйвера

- Готово! Теперь при установке Windows у вас будет возможность выбрать диск


![]() Большое спасибо за прочтение статьи. Зарегистрируйтесь сейчас и получите 200 бонусных рублей!
Большое спасибо за прочтение статьи. Зарегистрируйтесь сейчас и получите 200 бонусных рублей!
Вам может быть интересно

В статье мы рассмотрим последовательность действий для создания установочного дистрибутива Windows на flash-карте. Всего представлено…
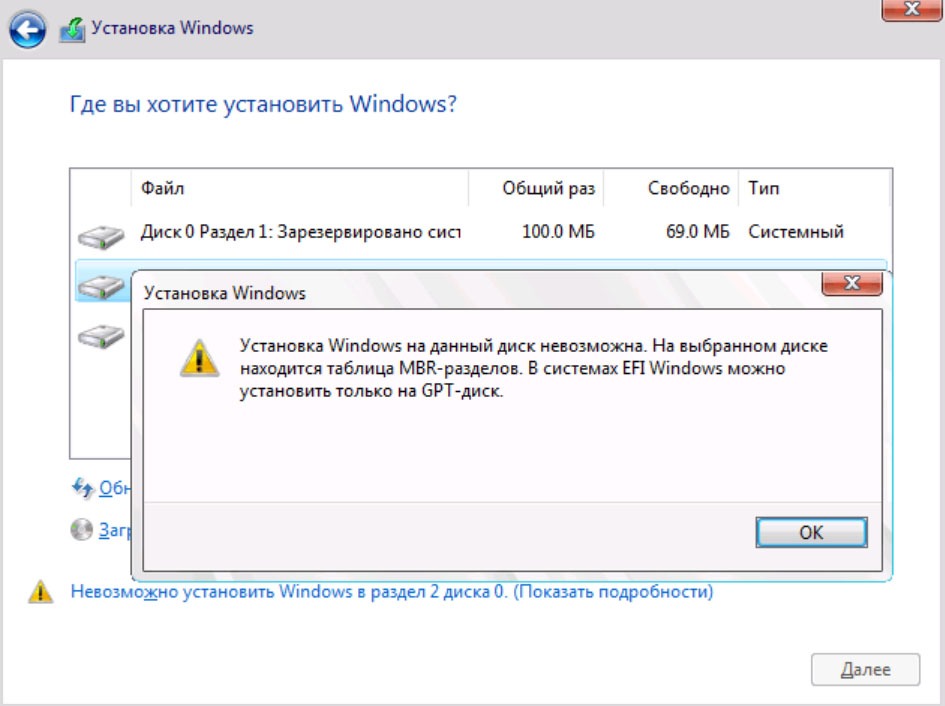
На этапе выбора диска у вас может возникнуть ошибка: Установка Windows на данный диск невозможна….
Простое обновление Windows 10 Home до Windows 10 Pro с помощью ключа Если вам необходимо…

Добрый день.
Решил обновить свой ПК на i7 9700k OEM и материнскую плату MSI Z390 MPG GAMING EDGE AC;
оперативную память 2x Hynix ddr 4 -8 Гб 2133 DIMM, ssd Intel 545s 256 gb и msi gtx 970 пока оставил от предыдущей сборки.
При попытке установить с виндовс 10 с загрузочной флешки (UEFI, создана через утилиту с сайта майкрософт) происходи первоначальная установка, но после перезагрузки установка не продолжается, а начинается с самого начала.
Вытаскивание флешки приводит к появлению надписи ”Reboot and Select proper Boot device or Insert Boot Media in selected Boot device and press a key_ z”.
Если же оставить флешку, но в настройках биоса выставить приоритет загрузки с ssd (не UEFI), то при первичной установка виндовс меняется разрешение экрана и установщик просит сменить MBR на GPT (изменение сильно помогает, после перезагрузки установка начинается с самого начала).
Пытался установиться с загрузочной флешки Сергея Стрельца.
Дошёл до установки через WinNTSeup, столкнулся со следующей проблемой
при кодировании диска MBR раздел:
MBR — желтый (главная загрузочная запись, желтый — незагрузочный, требуется обновление) попытки скорректировать через Bootice “Process MBR” ощутимого результата не принесли, хотя надпись “successfully changed the MBR of the disk” появлялась;
BOOTMGR PBR — желтый (загрузочный раздел, желтый — незагрузочный, требуется обновление) форматирование тоже не принесло изменений;
EFI PART — красный («первичный раздел активен», но красный похоже что говорит об обратном) здесь не до конца понял, кнопка активации в Bootice не активна но и А в разделе Atc. нет
При кодировании в GPT ситуация с разделами аналогичная ( кроме раздела GPT, он зелёный).
Возможности не обращать внимание на цвета разделов нет, поскольку при дальнейшей установки появляются различные ошибки.
Как в моём случае всё-таки установить виндовс?
__________________
Помощь в написании контрольных, курсовых и дипломных работ, диссертаций здесь
Здравствуйте! Вопрос такой. Купил у приятеля практически новый ноутбук и хочу переустановить на нём заново Windows 10, но процесс установки прерывается ошибкой «Установка Windows на данный диск невозможна. Выбранный диск имеют стиль разделов GPT». Интересно, что я делаю не так?
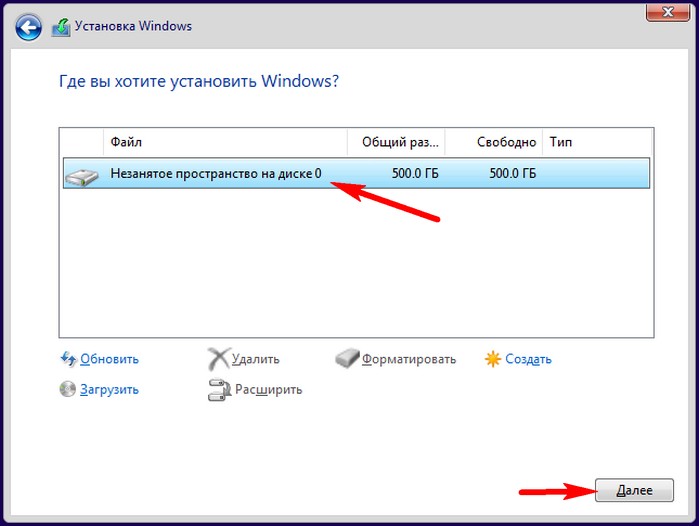
Создал, как обычно, установочную флешку с Win 10, загрузил с неё ноут, затем выбрал самый большой раздел на жёстком диске объёмом 500 Гб, выделил его левой кнопкой мыши, но кнопка «Далее» не активна и вышло предупреждение «Невозможно установить Windows в раздел 4 диска 0. (Показать подробности)».
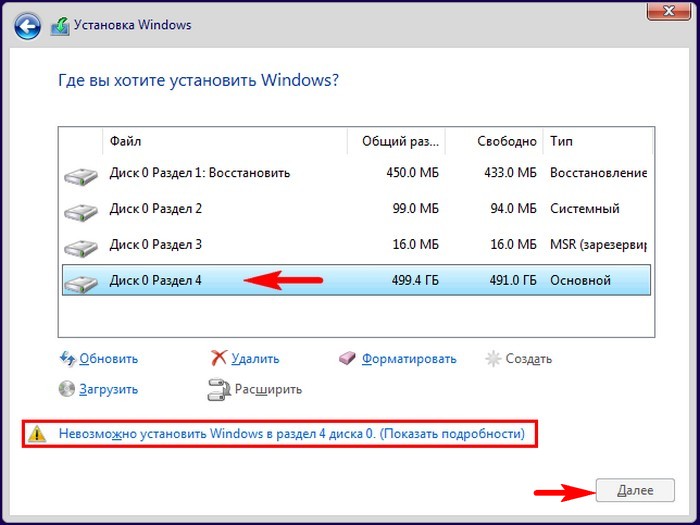
Если нажать на предупреждение, то и выходит ошибка.
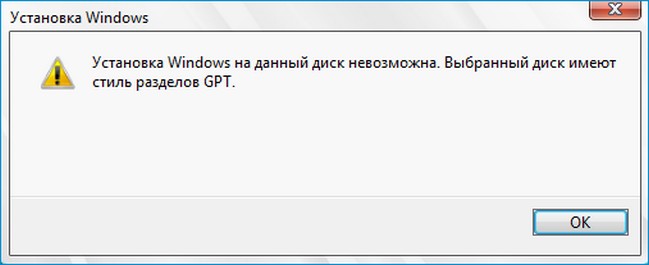
Установка Windows на данный диск невозможна. Выбранный диск имеют стиль разделов GPT
Автор Владимир!
Привет всем! Большинство опытных пользователей знает, что такая ошибка может выйти только по нескольким причинам.
1. В БИОСе вашего ноутбука отключен интерфейс UEFI, а жёсткий диск имеет новый стиль GPT. Простыми словами, наш читатель скорее всего экспериментировал с настройками BIOS ноутбука и отключил в нём интерфейс UEFI и опцию Secure Boot. Это значит, что БИОС ноутбука стал работать в обычном режиме, а в этом случае новая разметка дисков — GPT не поддерживается, поэтому и появилась ошибка при установке системы — «Установка Windows на данный диск невозможна. Выбранный диск имеют стиль разделов GPT»
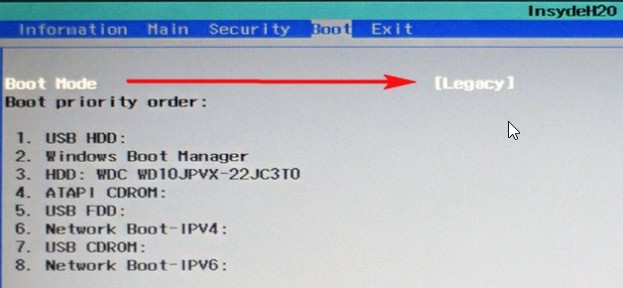
2. Или у вас компьютер с обычным БИОС без UEFI (а может вы специально отключили в нём этот интерфейс), но подсоединённый к ПК жёсткий диск имеет стиль GPT. В этом случае при установке OS тоже выйдет такая ошибка.
Как бы то ни было, избавиться от этой ошибки можно включив в БИОСе интерфейс UEFI, в этом случае Windows установится на диск GPT.
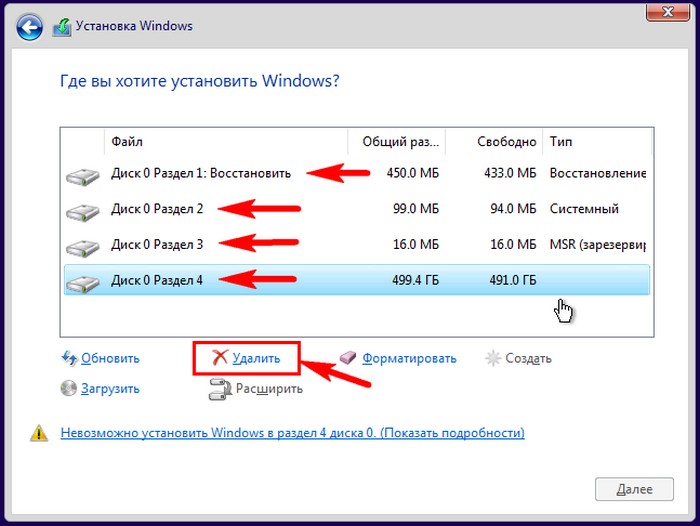
Если по каким-то причинам UEFI вам не нужен, то просто конвертируйте жёсткий диск из стиля GPT в MBR и продолжите установку системы. Сделать это можно двумя способами.
Первый, самый простой.
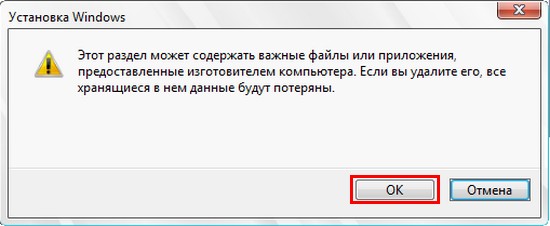
В программе установки Windows выделяем поочерёдно каждый раздел на Диске 0 и выбираем «Удалить». Будьте осторожны. Если у вас несколько дисков в системе, например есть ещё Диск 1, то на нём разделы удалять не нужно.
ОК.
Когда все разделы на жёстком диске будут удалены и он будет представлять из себя одно нераспределённое пространство, то выделите это пространство левой кнопкой мыши и нажмите на кнопку «Далее»
Вот и всё!
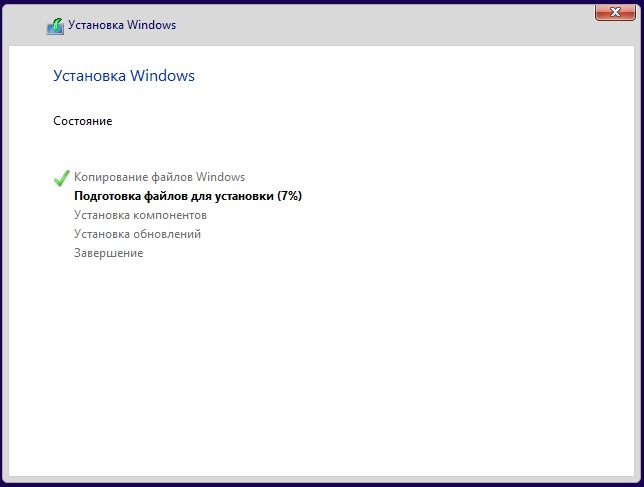
Начнётся обычный процесс инсталляции Windows 10 на ваш компьютер или ноутбук.
Второй способ посложнее.
В окне установки системы открываем командную строку клавиатурным сочетанием Shift+F10.
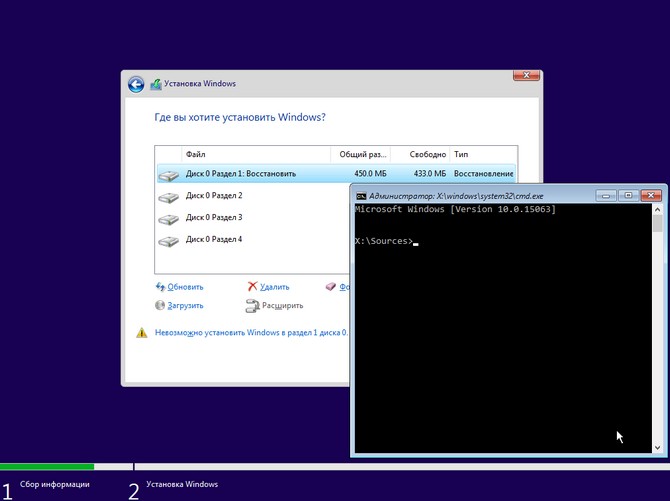
В открывшейся командной строке вводим команды:
diskpart
lis dis (выводим в список все подключенные к компьютеру диски)
sel dis 0 (выбираем единственный Диск 0)
clean (производим удаление всех разделов с диска)
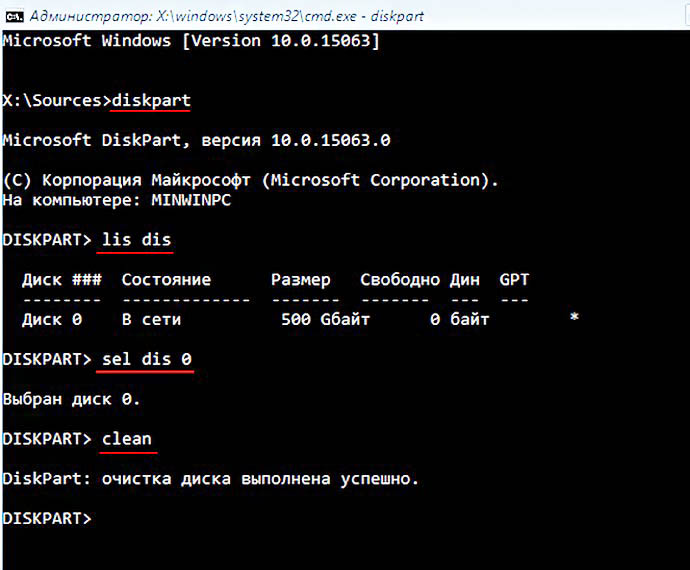
Закрываем командную строку и жмём «Обновить».
Finish up installing Windows 10 in just a few simple steps
by Aleksandar Ognjanovic
Aleksandar’s main passion is technology. With a solid writing background, he is determined to bring the bleeding edge to the common user. With a keen eye, he always… read more
Updated on December 12, 2022
Reviewed by
Vlad Turiceanu

Passionate about technology, Windows, and everything that has a power button, he spent most of his time developing new skills and learning more about the tech world. Coming… read more
- Windows 10 installation has failed can occur due to installed components, so be sure to remove them before trying to upgrade.
- Certain software, such as your antivirus, can prevent Windows installation from working properly.
- In some instances, performing a clean reinstall is the only way to fix this issue for good.
XINSTALL BY CLICKING THE DOWNLOAD FILE
This software will repair common computer errors, protect you from file loss, malware, hardware failure and optimize your PC for maximum performance. Fix PC issues and remove viruses now in 3 easy steps:
- Download Restoro PC Repair Tool that comes with Patented Technologies (patent available here).
- Click Start Scan to find Windows issues that could be causing PC problems.
- Click Repair All to fix issues affecting your computer’s security and performance
- Restoro has been downloaded by 0 readers this month.
Upgrading from one version of Windows to another is usually seamless, you start the process and wait for it to finish. And while that’s usually the case, update issues can sometimes occur.
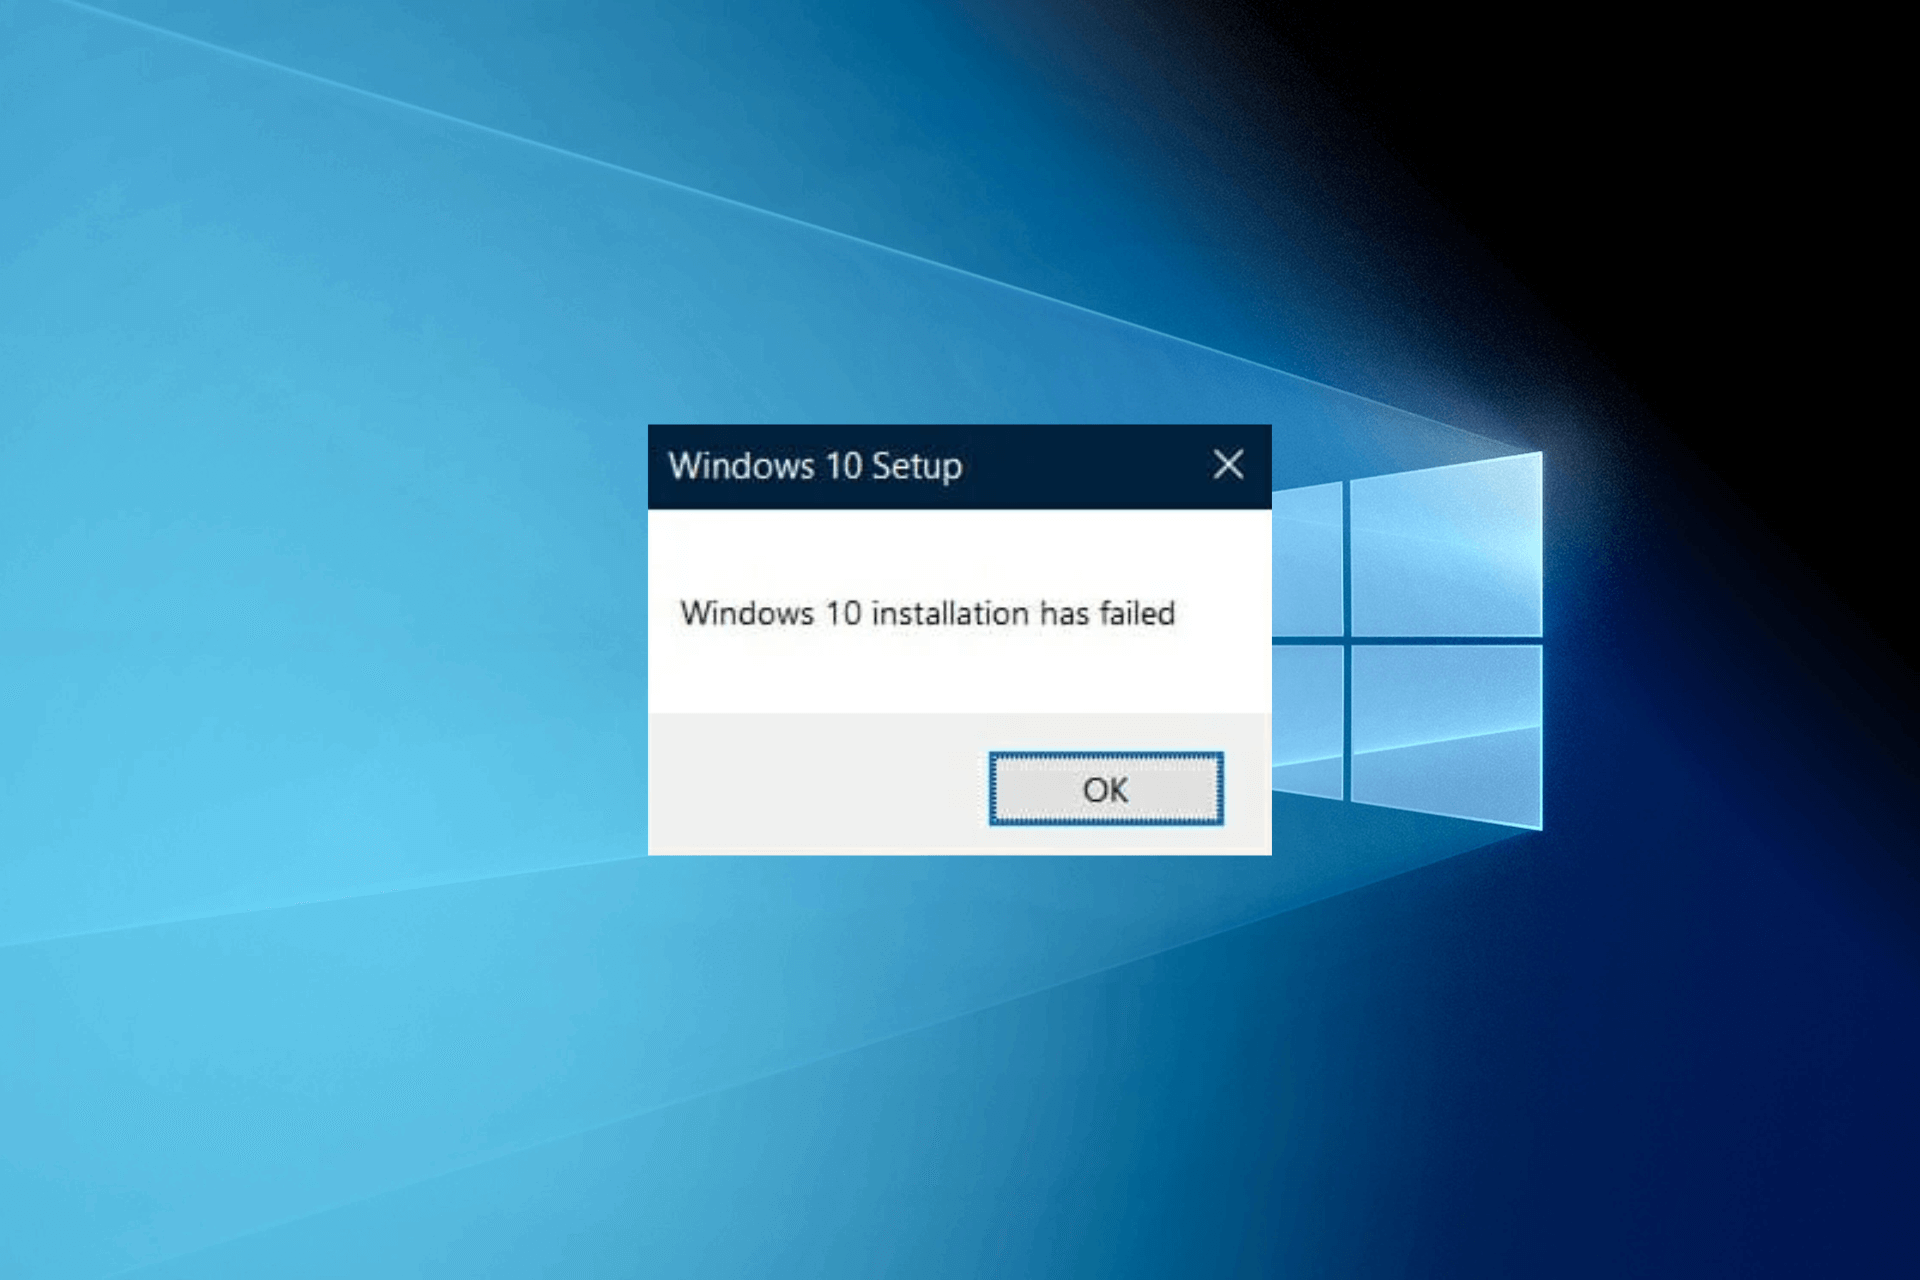
Namely, lots of users, after seemingly completing the installation, were prompted with the Windows 10 installation has failed error. They had to start again but the results were the same.
This can be a problem, especially if you’re eager to try the new version of Windows, but luckily, there are several methods you can use to fix it in no time.
To address this, we prepared a list of possible solutions that can come in handy. In case you’re still stuck with this installation error, make sure to check the steps we provided below.
- What to do if Windows 10 installation has failed when using the Media Creation Tool?
- Why Windows 10 installation failed?
- How do I fix Windows 10 installation failed?
- 1. Unplug all peripheral devices
- 2. Uninstall the language pack
- 3. Uninstall third-party antivirus
- 4. Choose to keep only files when asked
- 5. Rebuild BCD
- 6. Upgrade Windows 10 with installation media
- 7. Perform a clean install
- What to do if Windows installation has failed on Windows 11?
- What are Windows 11’s requirements?
- Which versions of Windows are affected by this issue?
- What is a clean install?
If Windows couldn’t be installed, then the issue is most likely your installation media. In that case, we recommended that you download the ISO again and recreate the bootable drive.
Many reported their Windows 10 installation has failed in safe OS phase, and this occurs because certain installation components are damaged, so they’ll need to be created again.
If Windows cannot install the required files, inspect your hardware, and make sure that there aren’t any hardware incompatibilities.
Why Windows 10 installation failed?
There are several reasons why you might encounter this error message, and it usually appears due to installed components or security software.
Connected peripherals can also be a problem, so be sure to remove them before trying to install Windows. Lastly, file corruption could be the cause of this problem as well.
How do I fix Windows 10 installation failed?
As mentioned, many different factors can cause this error. Before we move on to tested ways you can fix this error, we recommend you run some preliminary checks, just to make sure the issue isn’t actually way simpler than you thought.
- Restart your device – although frequently overlooked because it’s so simple, restarting gives your system a chance to close off any unnecessary processes and reconfigure, allowing it to work a little better
- Clean your disk – use the Disk Cleanup utility to get rid of temp or system files that can take up space or interfere with your updates
- Make sure you meet the system requirements, otherwise, the installation cannot be completed:
- RAM: 1GB for 32-bit and 2GB for 64 bit
- Hard disk space: 16 GB for 32-bit and 20 GB for 64 bit
- CPU: 1GHz or faster
- Screen resolution: 800 x 600
- Graphics: Microsoft DirectX 9 or later with WDDM 1.0 driver
- Internet access
1. Unplug all peripheral devices
Before starting the update disconnect all your nonessential peripherals. This includes printers, gamepads, external drives, and similar devices.
After disconnecting them, start the upgrade process. If the process is successful, connect your devices again.
2. Uninstall the language pack
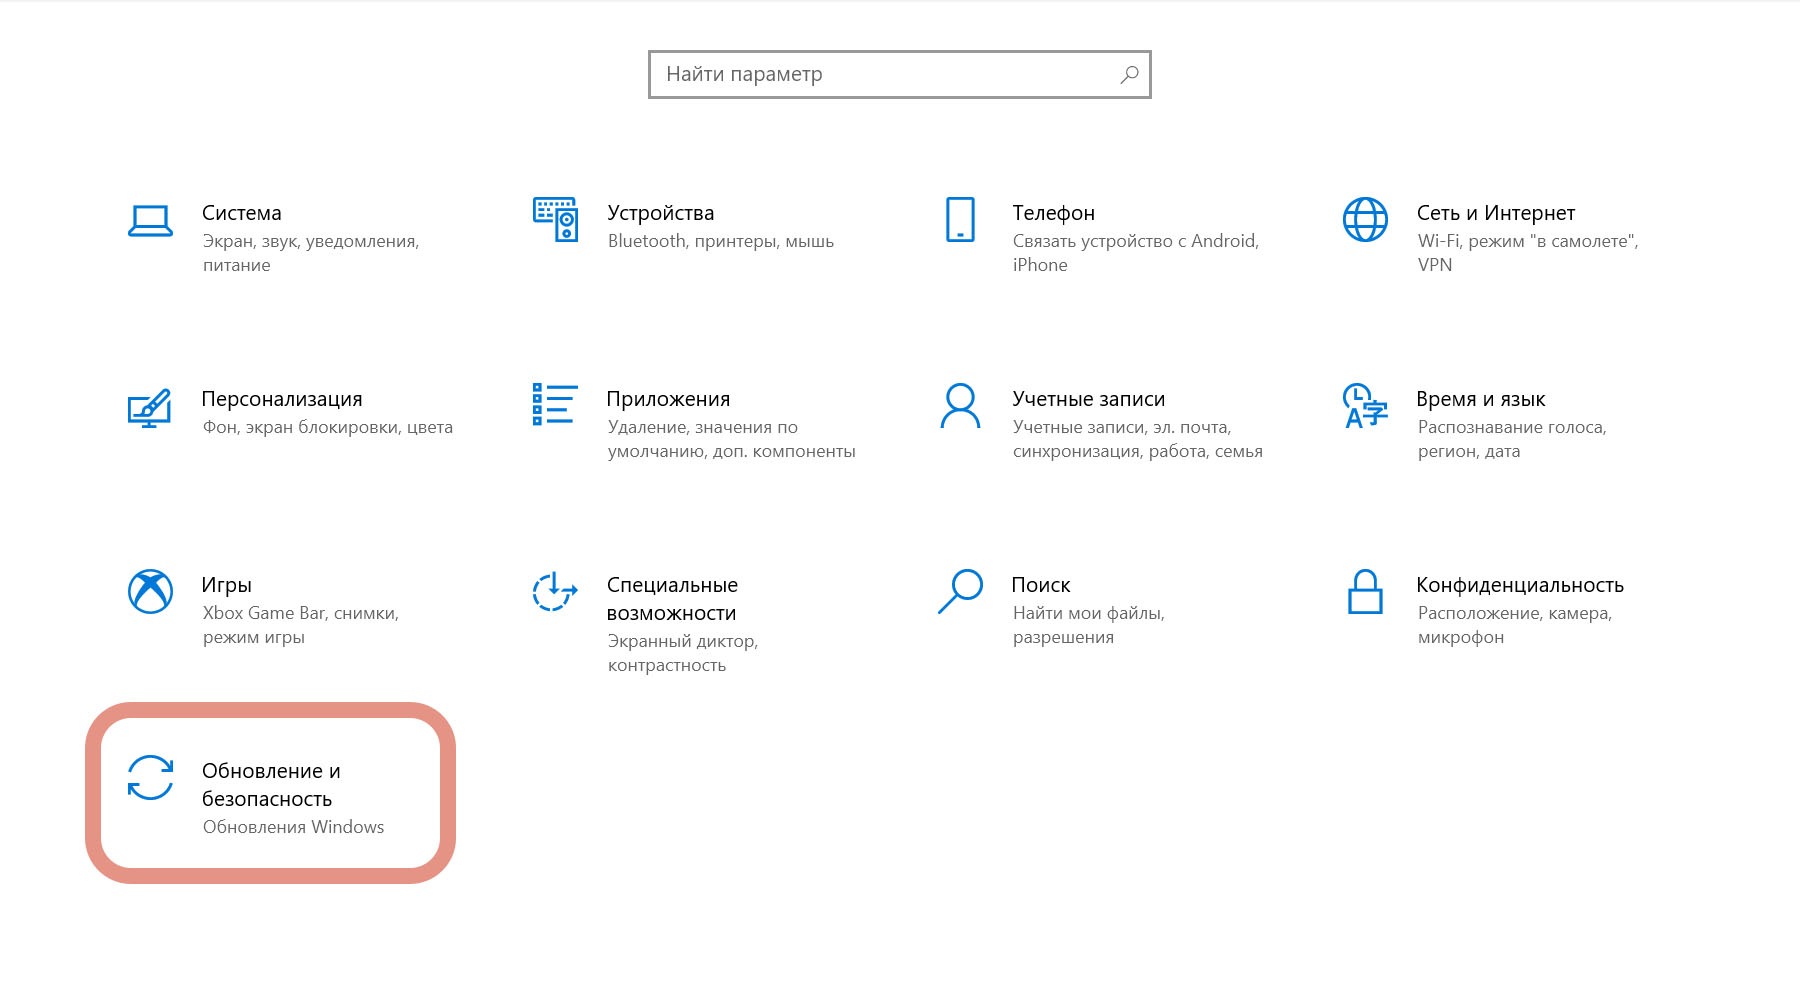
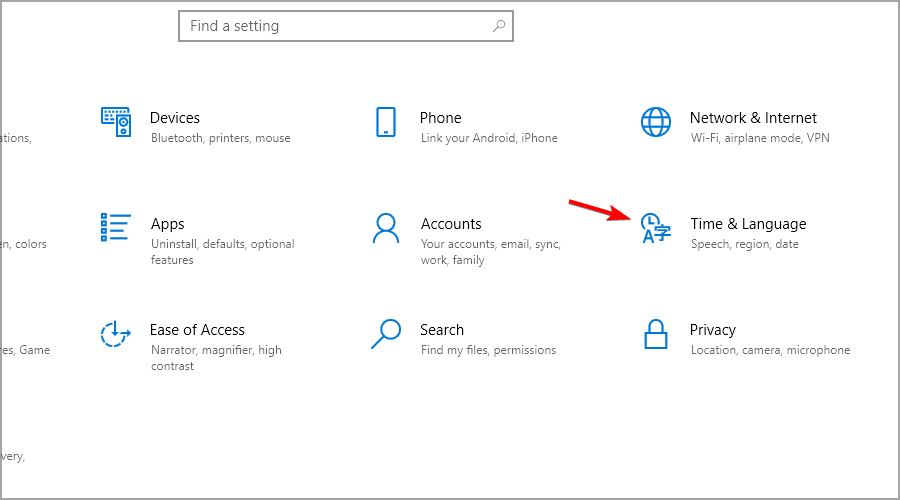
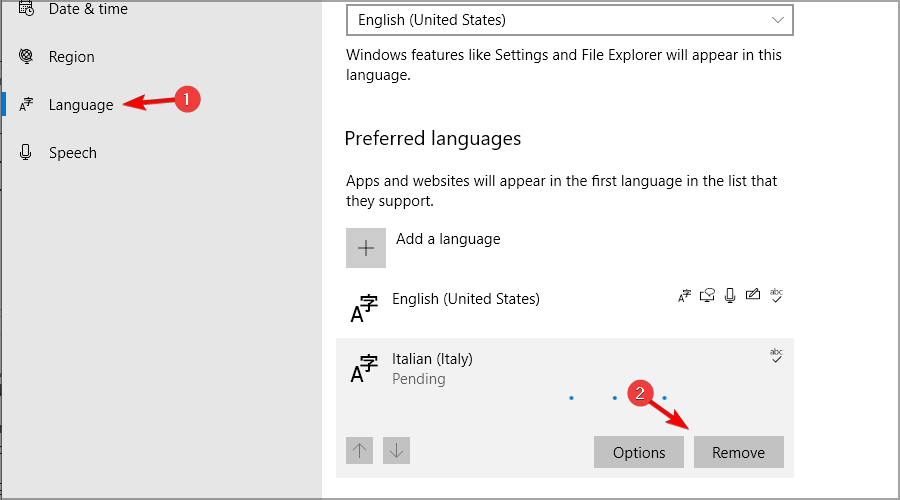
- Press Windows key + I.
- Navigate to the Time & Language section.

- Go to the Language in the left pane. In the right pane, select all non-English languages that you have and click on Remove.
- After removing all of them, check if the problem is resolved.
If you’re having any issues with this solution, be sure to visit our guide and see what to do if you can’t remove keyboard language.
3. Uninstall third-party antivirus
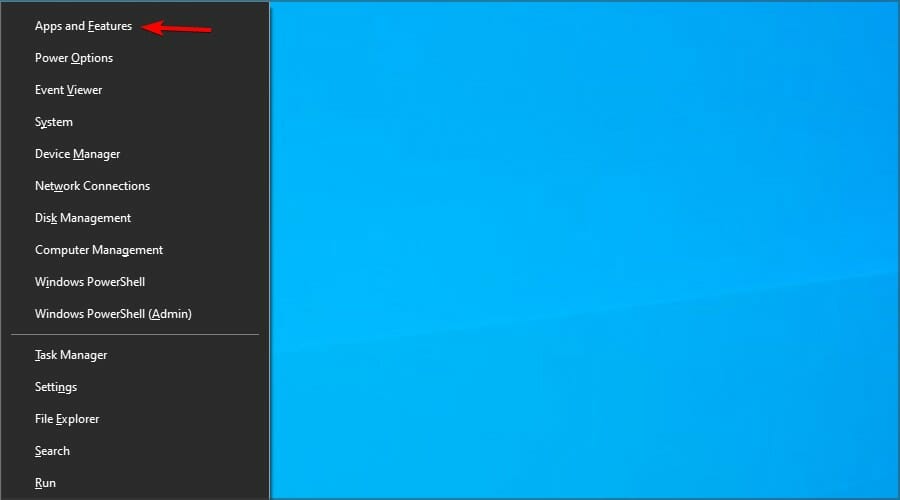
- Press Windows key + X and select Apps and Features from the menu.
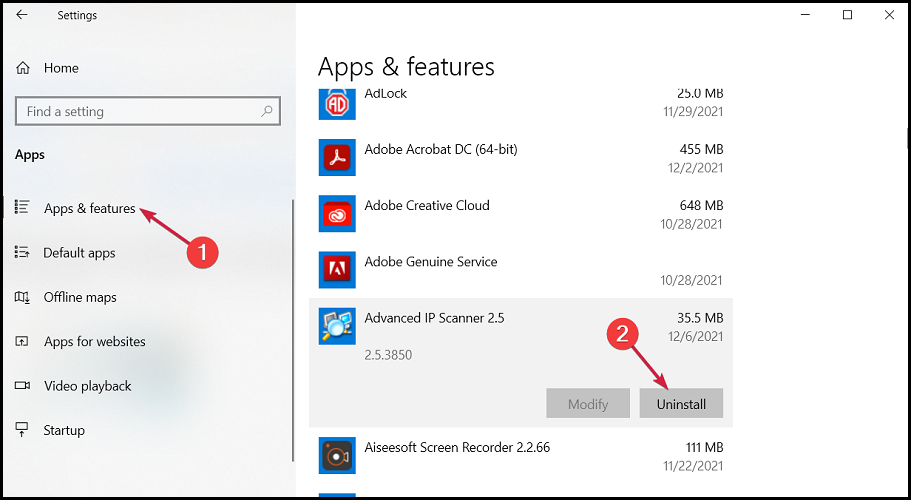
- Select your antivirus software and click on Uninstall.

- Follow the instructions on the screen to remove it.
- After removing the software, try to perform the upgrade again.
4. Choose to keep only files when asked
- Start the upgrade process.
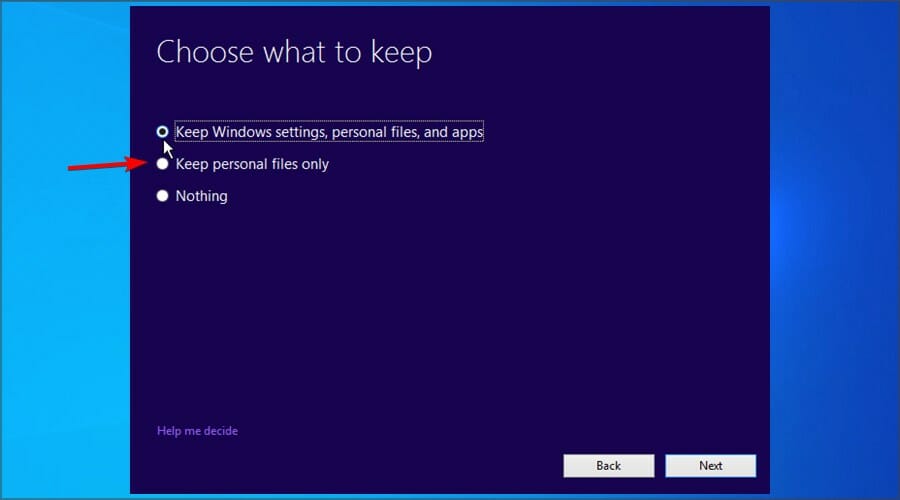
- Follow the instructions on the screen until you reach the Choose what to keep screen.
- Select the option to Keep personal files only.
- Follow the instructions to complete the process.
5. Rebuild BCD
Another way to fix Windows installation failure is to rebuild the Boot Configuration Data. You can do this via the built-in command-line tool called Command Prompt.
1. Open the Start Menu and click the Power button.
Some PC issues are hard to tackle, especially when it comes to corrupted repositories or missing Windows files. If you are having troubles fixing an error, your system may be partially broken.
We recommend installing Restoro, a tool that will scan your machine and identify what the fault is.
Click here to download and start repairing.
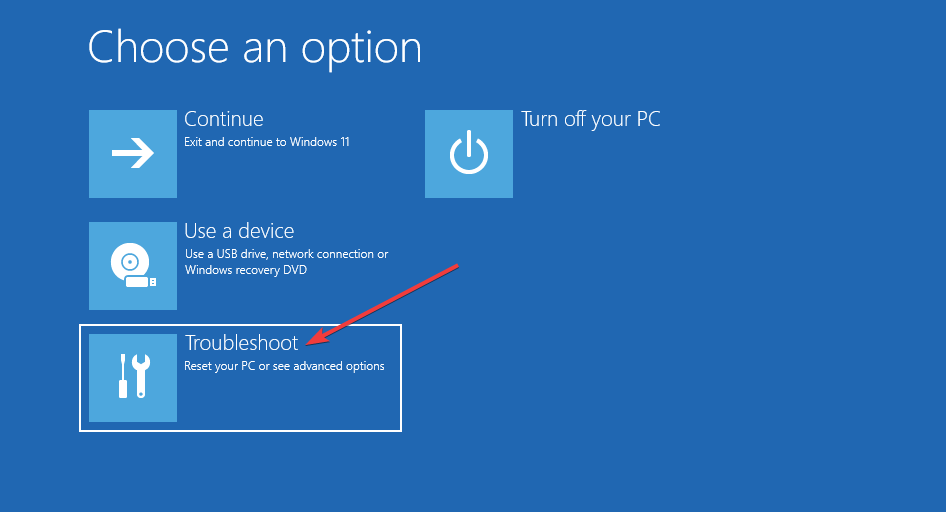
2. Press and hold the Shift key and select Restart.

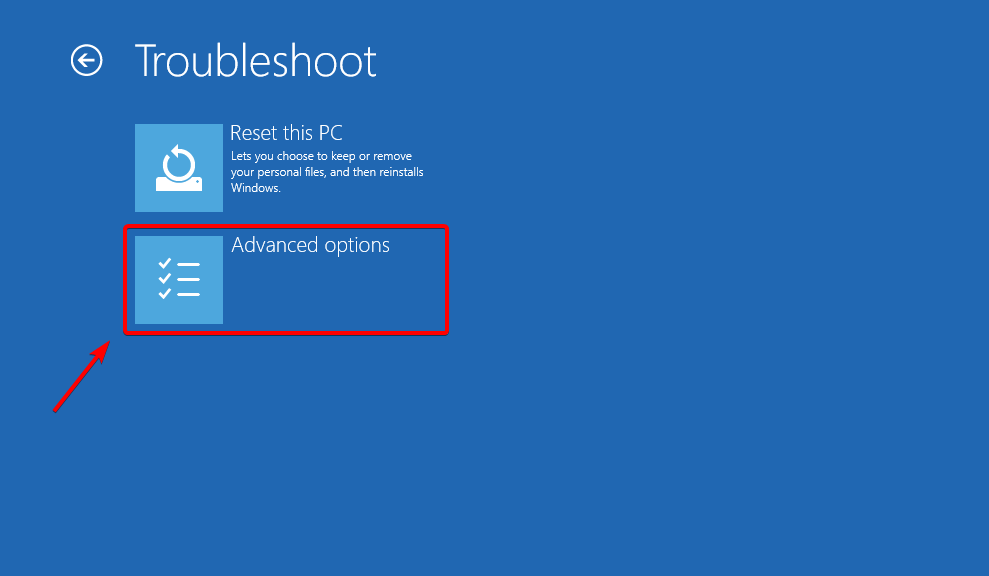
3. Choose the Troubleshoot option.
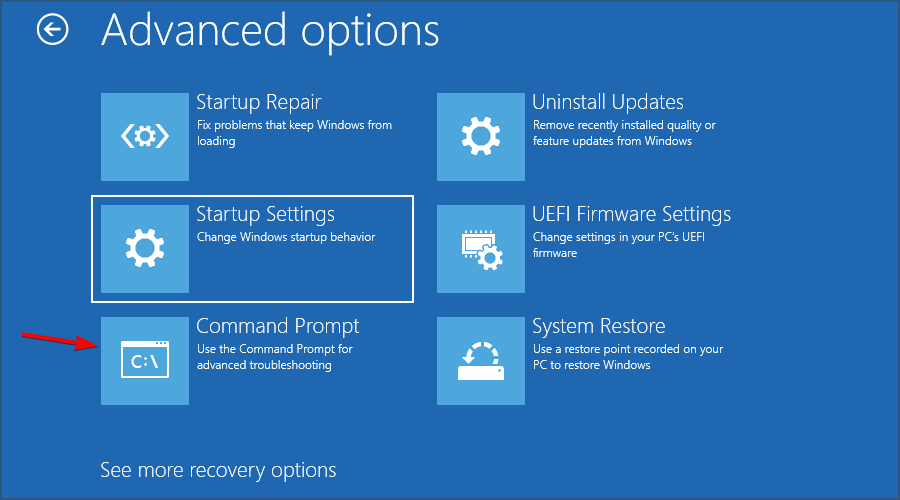
4. Select Advanced options.
5. Open Command Prompt. Select your account and enter the password if asked.
6. Run the following commands one by one:
bootrec /FixMbr

bootrec /FixBoot

bootrec /ScanOs

bootrec /RebuildBcd
7. This should finalize the repair procedure and you should be able to upgrade your PC without any problems.
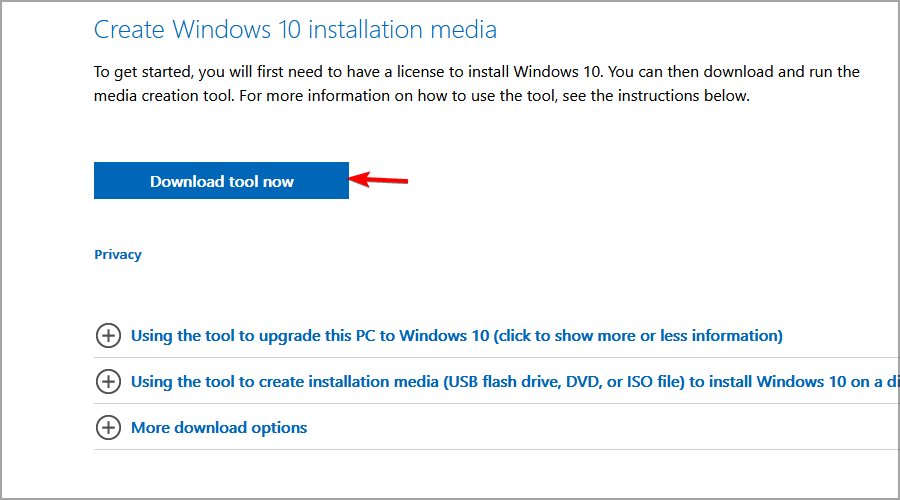
6. Upgrade Windows 10 with installation media
- Download the Media Creation Tool.
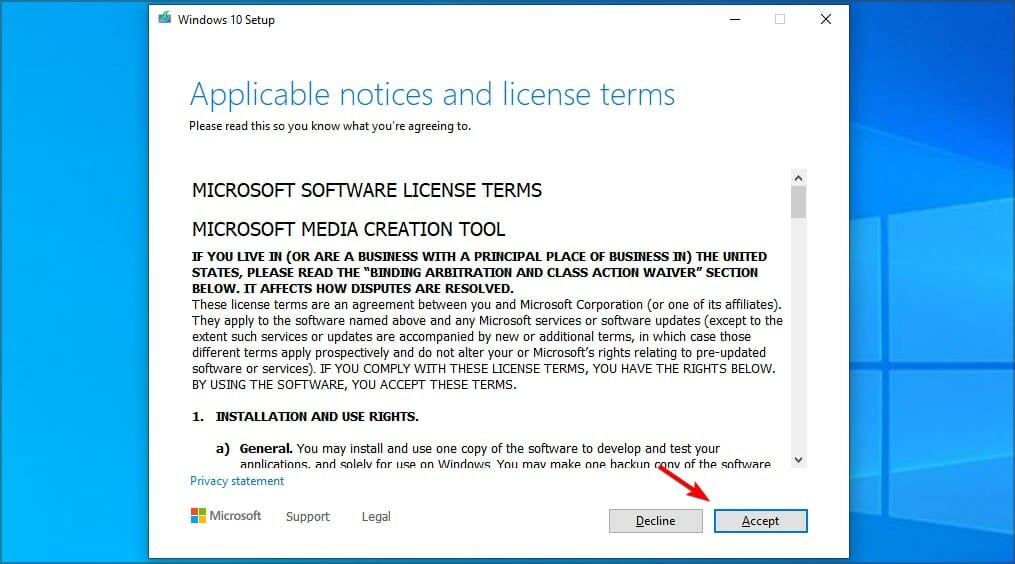
- Once the application is downloaded, run it.
- Accept the terms of service.

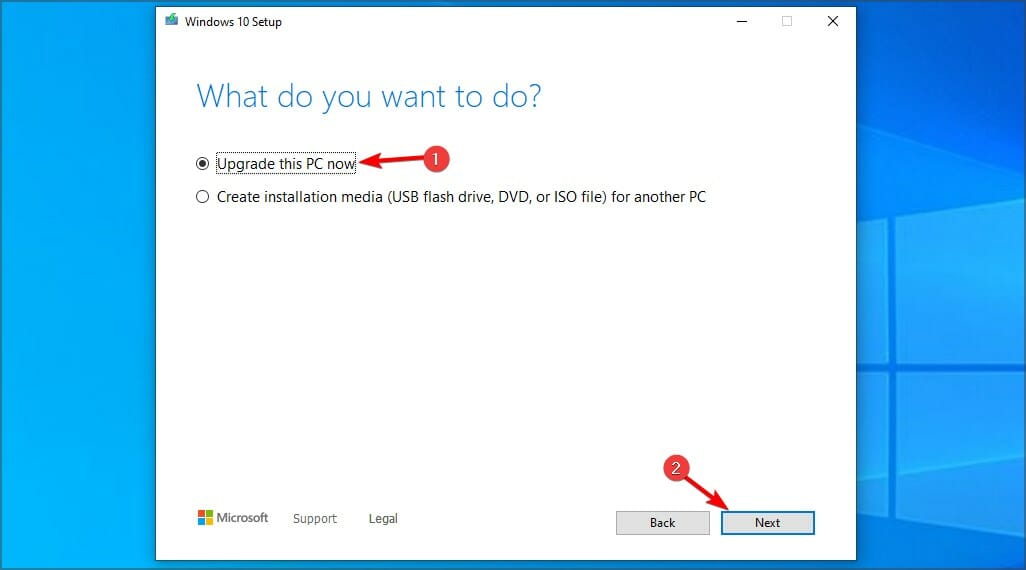
- Choose the option to upgrade your PC.

- Wait while Windows downloads the necessary files. This can take a while depending on your Internet speed.
- Follow the instructions on the screen to complete the upgrade process.
7. Perform a clean install
- Download the Media Creation Tool and run it.
- Connect an empty USB flash drive to your PC.
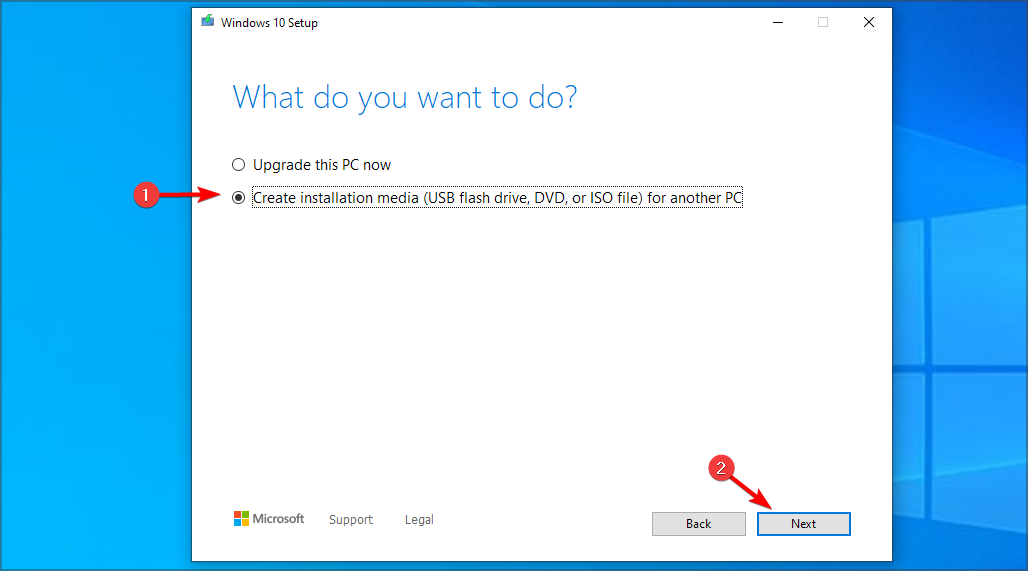
- Select the option to Create installation media.

- Choose your flash drive from the list.
- Wait for the process to complete. This can take a while depending on your Internet speed.
- Restart your PC.
- Now keep pressing the boot menu key while your PC boots. The key is different for each motherboard brand, and it’s shown briefly while the PC starts.
- Select your USB flash drive from the list.
- Follow the instructions on the screen to complete the process.

- FIX: Windows installation encountered an unexpected error
- SOLVED: Windows 10 Upgrade Assistant errors
- How to Fix Time on Windows 10 [Clock is Wrong]
- 5 Ways to Fix The Remote Procedure Call Failed in Windows 11
- Steam Won’t Open on Windows 11: How to Fix It
- How to Find & Change Mac address on Windows 11
What to do if Windows installation has failed on Windows 11?
- Restart your PC and keep pressing F2 to enter BIOS.
- Once you enter BIOS, navigate to the Security section.
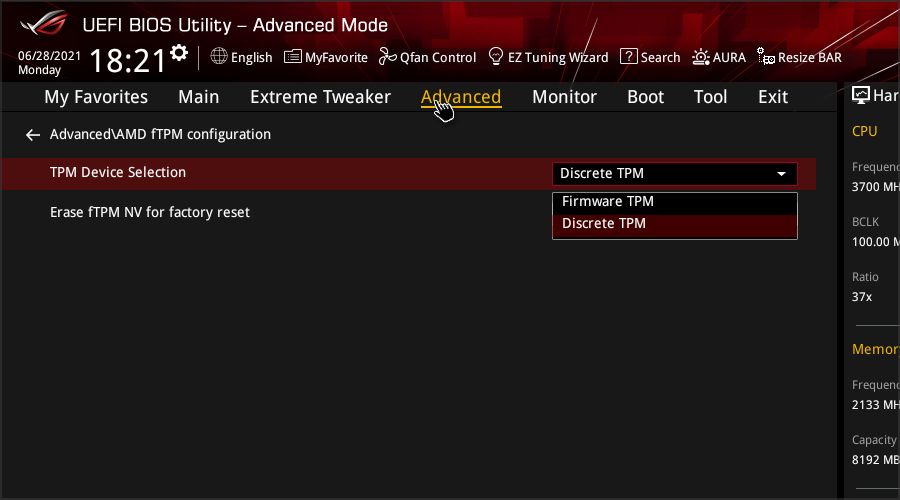
- Look for PTT of TPM option, and enable it.
- Optional: You can also enable Secure Boot.
- Save changes and try to perform the installation again.
For more information, we suggest visiting our guide on how to enable TPM in different versions of BIOS.
What are Windows 11’s requirements?
- CPU: 1Ghz, dual-core, 64-bit compatible processor
- RAM: 4GB
- Storage: 64GB or more
- Firmware: UEFI with Secure Boot support
- TPM: TPM 2.0
If needed, you can even install Windows 11 without TPM, but this might be a security risk, so it’s not recommended.
Which versions of Windows are affected by this issue?
Windows installation has failed message is a generic error, and as such, it can appear on almost any version of Windows.
All editions seem to be affected by this issue, and many have reported Windows 11 installation problems, so even the latest version is affected by this issue.
What is a clean install?
A clean install is a process in which you use Windows 11 installation media to reinstall your operating system from scratch.
Usually, a clean install means that you’ll format your system drive to have a fresh start without any applications or files. If you choose to do this, we strongly advise you to back up your files beforehand.
Fixing the Windows 11 installation has failed installation error is relatively simple, and you should be able to fix it using our solutions.
In case the issue is still there, your only option might be to create a bootable flash drive and clean install Windows.
Did you find a different solution for this issue? If so, feel free to share it with us in the comments section below.
Still having issues? Fix them with this tool:
SPONSORED
If the advices above haven’t solved your issue, your PC may experience deeper Windows problems. We recommend downloading this PC Repair tool (rated Great on TrustPilot.com) to easily address them. After installation, simply click the Start Scan button and then press on Repair All.
![]()
Newsletter
Finish up installing Windows 10 in just a few simple steps
by Aleksandar Ognjanovic
Aleksandar’s main passion is technology. With a solid writing background, he is determined to bring the bleeding edge to the common user. With a keen eye, he always… read more
Updated on December 12, 2022
Reviewed by
Vlad Turiceanu
Passionate about technology, Windows, and everything that has a power button, he spent most of his time developing new skills and learning more about the tech world. Coming… read more
- Windows 10 installation has failed can occur due to installed components, so be sure to remove them before trying to upgrade.
- Certain software, such as your antivirus, can prevent Windows installation from working properly.
- In some instances, performing a clean reinstall is the only way to fix this issue for good.
XINSTALL BY CLICKING THE DOWNLOAD FILE
This software will repair common computer errors, protect you from file loss, malware, hardware failure and optimize your PC for maximum performance. Fix PC issues and remove viruses now in 3 easy steps:
- Download Restoro PC Repair Tool that comes with Patented Technologies (patent available here).
- Click Start Scan to find Windows issues that could be causing PC problems.
- Click Repair All to fix issues affecting your computer’s security and performance
- Restoro has been downloaded by 0 readers this month.
Upgrading from one version of Windows to another is usually seamless, you start the process and wait for it to finish. And while that’s usually the case, update issues can sometimes occur.
Namely, lots of users, after seemingly completing the installation, were prompted with the Windows 10 installation has failed error. They had to start again but the results were the same.
This can be a problem, especially if you’re eager to try the new version of Windows, but luckily, there are several methods you can use to fix it in no time.
To address this, we prepared a list of possible solutions that can come in handy. In case you’re still stuck with this installation error, make sure to check the steps we provided below.
- What to do if Windows 10 installation has failed when using the Media Creation Tool?
- Why Windows 10 installation failed?
- How do I fix Windows 10 installation failed?
- 1. Unplug all peripheral devices
- 2. Uninstall the language pack
- 3. Uninstall third-party antivirus
- 4. Choose to keep only files when asked
- 5. Rebuild BCD
- 6. Upgrade Windows 10 with installation media
- 7. Perform a clean install
- What to do if Windows installation has failed on Windows 11?
- What are Windows 11’s requirements?
- Which versions of Windows are affected by this issue?
- What is a clean install?
If Windows couldn’t be installed, then the issue is most likely your installation media. In that case, we recommended that you download the ISO again and recreate the bootable drive.
Many reported their Windows 10 installation has failed in safe OS phase, and this occurs because certain installation components are damaged, so they’ll need to be created again.
If Windows cannot install the required files, inspect your hardware, and make sure that there aren’t any hardware incompatibilities.
Why Windows 10 installation failed?
There are several reasons why you might encounter this error message, and it usually appears due to installed components or security software.
Connected peripherals can also be a problem, so be sure to remove them before trying to install Windows. Lastly, file corruption could be the cause of this problem as well.
How do I fix Windows 10 installation failed?
As mentioned, many different factors can cause this error. Before we move on to tested ways you can fix this error, we recommend you run some preliminary checks, just to make sure the issue isn’t actually way simpler than you thought.
- Restart your device – although frequently overlooked because it’s so simple, restarting gives your system a chance to close off any unnecessary processes and reconfigure, allowing it to work a little better
- Clean your disk – use the Disk Cleanup utility to get rid of temp or system files that can take up space or interfere with your updates
- Make sure you meet the system requirements, otherwise, the installation cannot be completed:
- RAM: 1GB for 32-bit and 2GB for 64 bit
- Hard disk space: 16 GB for 32-bit and 20 GB for 64 bit
- CPU: 1GHz or faster
- Screen resolution: 800 x 600
- Graphics: Microsoft DirectX 9 or later with WDDM 1.0 driver
- Internet access
1. Unplug all peripheral devices
Before starting the update disconnect all your nonessential peripherals. This includes printers, gamepads, external drives, and similar devices.
After disconnecting them, start the upgrade process. If the process is successful, connect your devices again.
2. Uninstall the language pack
- Press Windows key + I.
- Navigate to the Time & Language section.
- Go to the Language in the left pane. In the right pane, select all non-English languages that you have and click on Remove.
- After removing all of them, check if the problem is resolved.
If you’re having any issues with this solution, be sure to visit our guide and see what to do if you can’t remove keyboard language.
3. Uninstall third-party antivirus
- Press Windows key + X and select Apps and Features from the menu.
- Select your antivirus software and click on Uninstall.
- Follow the instructions on the screen to remove it.
- After removing the software, try to perform the upgrade again.
4. Choose to keep only files when asked
- Start the upgrade process.
- Follow the instructions on the screen until you reach the Choose what to keep screen.
- Select the option to Keep personal files only.
- Follow the instructions to complete the process.
5. Rebuild BCD
Another way to fix Windows installation failure is to rebuild the Boot Configuration Data. You can do this via the built-in command-line tool called Command Prompt.
1. Open the Start Menu and click the Power button.
Some PC issues are hard to tackle, especially when it comes to corrupted repositories or missing Windows files. If you are having troubles fixing an error, your system may be partially broken.
We recommend installing Restoro, a tool that will scan your machine and identify what the fault is.
Click here to download and start repairing.
2. Press and hold the Shift key and select Restart.
3. Choose the Troubleshoot option.
4. Select Advanced options.
5. Open Command Prompt. Select your account and enter the password if asked.
6. Run the following commands one by one:
bootrec /FixMbr

bootrec /FixBoot

bootrec /ScanOs

bootrec /RebuildBcd
7. This should finalize the repair procedure and you should be able to upgrade your PC without any problems.
6. Upgrade Windows 10 with installation media
- Download the Media Creation Tool.
- Once the application is downloaded, run it.
- Accept the terms of service.
- Choose the option to upgrade your PC.
- Wait while Windows downloads the necessary files. This can take a while depending on your Internet speed.
- Follow the instructions on the screen to complete the upgrade process.
7. Perform a clean install
- Download the Media Creation Tool and run it.
- Connect an empty USB flash drive to your PC.
- Select the option to Create installation media.
- Choose your flash drive from the list.
- Wait for the process to complete. This can take a while depending on your Internet speed.
- Restart your PC.
- Now keep pressing the boot menu key while your PC boots. The key is different for each motherboard brand, and it’s shown briefly while the PC starts.
- Select your USB flash drive from the list.
- Follow the instructions on the screen to complete the process.
- FIX: Windows installation encountered an unexpected error
- SOLVED: Windows 10 Upgrade Assistant errors
- How to Fix Time on Windows 10 [Clock is Wrong]
- 5 Ways to Fix The Remote Procedure Call Failed in Windows 11
What to do if Windows installation has failed on Windows 11?
- Restart your PC and keep pressing F2 to enter BIOS.
- Once you enter BIOS, navigate to the Security section.
- Look for PTT of TPM option, and enable it.
- Optional: You can also enable Secure Boot.
- Save changes and try to perform the installation again.
For more information, we suggest visiting our guide on how to enable TPM in different versions of BIOS.
What are Windows 11’s requirements?
- CPU: 1Ghz, dual-core, 64-bit compatible processor
- RAM: 4GB
- Storage: 64GB or more
- Firmware: UEFI with Secure Boot support
- TPM: TPM 2.0
If needed, you can even install Windows 11 without TPM, but this might be a security risk, so it’s not recommended.
Which versions of Windows are affected by this issue?
Windows installation has failed message is a generic error, and as such, it can appear on almost any version of Windows.
All editions seem to be affected by this issue, and many have reported Windows 11 installation problems, so even the latest version is affected by this issue.
What is a clean install?
A clean install is a process in which you use Windows 11 installation media to reinstall your operating system from scratch.
Usually, a clean install means that you’ll format your system drive to have a fresh start without any applications or files. If you choose to do this, we strongly advise you to back up your files beforehand.
Fixing the Windows 11 installation has failed installation error is relatively simple, and you should be able to fix it using our solutions.
In case the issue is still there, your only option might be to create a bootable flash drive and clean install Windows.
Did you find a different solution for this issue? If so, feel free to share it with us in the comments section below.
Still having issues? Fix them with this tool:
SPONSORED
If the advices above haven’t solved your issue, your PC may experience deeper Windows problems. We recommend downloading this PC Repair tool (rated Great on TrustPilot.com) to easily address them. After installation, simply click the Start Scan button and then press on Repair All.
![]()
Newsletter
Убедитесь, что с диском всё в порядке, а дистрибутив системы корректно записан на флешку.
1. Несоответствие устройства системным требованиям
Если компьютер слишком старый, то Windows 10 на него не установится. Поэтому проверьте, достаточно ли мощная у вас система.
Microsoft выдвигает к компьютерам пользователей «десятки» ряд требований. Но на практике этого мало. Система установится, но комфортно работать с ней не удастся. Из документа Microsoft для разработчиков можно узнать настоящие системные требования к Windows 10. Убедитесь, что ПК соответствует им.
- Процессор: Intel i3 / i5 / i7 / i9-7x, Core M3-7xxx, Xeon E3-xxxx и Xeon E5-xxxx, AMD 8-го поколения (A Series Ax-9xxx, E-Series Ex-9xxx, FX-9xxx) или ARM64 (Snapdragon SDM850 или новее).
- ОЗУ: 4 ГБ для 32-разрядной версии, 16 ГБ для 64-разрядной версии.
- SSD/NVMe: не менее 128 ГБ для 64-разрядной и 32-разрядной ОС.
- Видеокарта: DirectX 9 или новее.
- Разрешение дисплея: 800 × 600, минимальный размер диагонали для основного дисплея — 7 дюймов или больше.
Имейте в виду, что если устанавливать систему на HDD, а не на SSD, то диск будет сильно тормозить производительность. Для компьютера, который не соответствует указанным критериям, лучше подойдут легковесные дистрибутивы Linux.
2. Нехватка места на диске
Windows 10 нужно как минимум 20 Гб свободного пространства. Если вы пытаетесь установить систему на раздел диска меньшего размера, она уведомит вас об ошибке. «Десятка» уверяет, что ей достаточно 10 Гб, но это без учёта обновлений и сторонних программ. 100 Гб хватит с запасом.
3. Отсутствие подходящего раздела
Надпись «Нам не удалось создать новый или найти существующий раздел» означает, что на вашем диске не получается создать новые разделы для Windows 10. Такое случается, если раньше там была установлена какая-либо операционная система.
Windows 10, в отличие от Linux, не дружит с другими операционками и предпочитает полностью занимать отведённый ей носитель. Всего можно создавать до четырёх физических разделов на диске, и «десятка» запросто может задействовать все. Она помечает их как «Основной», «Системный», «Восстановление» и MSR (Microsoft Reserved Partition, необходим для создания виртуальных дополнительных разделов).
Если на диске раньше была другая ОС, перед установкой Windows 10 лучше удалить все разделы и дать системе создать их заново.
Перед этим скопируйте с вашего диска все данные, которые нужно сохранить, и поместите их в надёжное место.
Нажмите «Удалить» и сотрите все разделы. Затем создайте новый, щёлкнув на «Создать», и установите систему как обычно. Помните: если вы планируете одновременно использовать Windows 10 и Linux, то сначала нужно поставить «десятку».
4. Проблемы с жёстким диском или SSD
Система может выдать ошибку «Windows не удаётся установить необходимые файлы» и отобразить при этом код 0x8007025D. Скорее всего, проблема в жёстком диске или SSD. Вот что можно с этим сделать:
- Убедитесь, что в разделе, куда устанавливается Windows 10, достаточно свободного места.
- Отключите все посторонние носители: флешки, внешние диски, а также внутренние SSD и HDD, на которые в данные момент не производится установка. Если у вас есть оптический привод, его тоже стоит отключить.
- При разметке диска сотрите все разделы с помощью кнопки «Удалить» и позвольте Windows 10 создать их заново, как описано в пункте 3.
- Попробуйте установить «десятку» на другой потенциально рабочий диск. Если всё прошло гладко, значит, дефектный лучше выбросить.
5. Проблемы с установочной флешкой или образом диска
Ошибка «Windows не удаётся установить необходимые файлы» и зависание системы на логотипе Windows ещё до появления установщика могут сигнализировать о проблемах с флешкой или ISO-образом диска. Вот что можно предпринять:
- Скачайте ISO с Windows 10 с сайта Microsoft при помощи Media Creation Tool. Никаких посторонних «репаков» и торрент-трекеров.
- Попробуйте другую флешку. Возможно, эта повреждена.
- Запишите скачанный в Media Creation Tool образ не в самом приложении, а в программе Rufus. Перед началом в разделе «Показать расширенные параметры форматирования» включите галочку напротив «Проверить на плохие блоки».
- Скачайте образ ISO и запишите загрузочную флешку не на том компьютере, на котором вы делали это раньше. Возможно, у него проблемы с ОЗУ и образ записался с ошибкой.
- Если у вас старый компьютер или новое железо, но подержанный корпус, проблема может скрываться в USB-портах. Попробуйте подключить флешку к другому порту, лучше всего к одному из тех, что сзади, прямо на материнской плате.
6. Ошибка при обновлении старой Windows
Если вы устанавливаете Windows 10 не через загрузочную флешку, а обновляете текущую систему, например с помощью установщика Update Assistant, можете столкнуться с ошибкой. Чаще всего она будет иметь код 80070005. Это происходит потому, что установщик не может получить доступ к файлам и папкам в уже работающей системе. В таком случае:
- Отключите все антивирусы и брандмауэры.
- Удалите с системного диска лишние программы, папку Windows.Old и личные файлы, которые его загромождают.
- Перезагрузитесь и запустите процесс обновления заново.
- Если программа установки выдаёт конкретный код ошибки, поищите его в поддержке Microsoft и следуйте рекомендациям.
- Запишите загрузочную флешку и запустите процесс обновления с неё. Выберите вариант «Обновление», а не «Выборочная».
7. Зависание во время загрузки обновлений
Иногда Windows 10 останавливает установку на этапе загрузки обновления. Причина — плохое соединение с серверами Microsoft. В таком случае отключите интернет на время установки «десятки», отсоединив кабель от компьютера. Когда система уютно разместится на диске в офлайн-режиме и запустится, вернёте кабель на место и обновитесь.
8. Windows 10 не может обнаружить диск для установки
Вы успешно загрузились с флешки, прочли лицензионное соглашение и готовы начать установку Windows, но система просто не отображает ваш носитель в окне выбора дисков. В таком случае попробуйте подключить SSD или жёсткий диск, на который собрались устанавливать систему, к другому SATA-порту и другим SATA-кабелем. В комплекте с материнской платой их обычно хотя бы два. Возможно, предыдущие были неисправны.
Ещё один вариант решения проблемы — переставить ваш SSD-накопитель в другой слот M.2 на материнской плате (скорее всего, таковой имеется).
На многих материнских платах только один слот M.2 может быть загрузочным, и если вы изначально поставили носитель не в тот слот, то перестановка решит проблему.
9. Проблемы с оборудованием
Если предыдущие шаги не помогли, загвоздка может быть в неисправных устройствах, подсоединённых к вашему компьютеру.
Дальнейшие советы подойдут для продвинутых пользователей. Если вы раньше не заглядывали в свой системный блок, лучше обратитесь к специалисту.
Отключите внешние носители, кроме установочного, и прочее оборудование. У ноутбука оставьте только шнур питания. К настольным ПК должны быть подключены только монитор, мышь и клавиатура.
Удалите из системного блока всё, что не является необходимым для загрузки. Вытащите все планки оперативной памяти кроме одной, удалите все накопители кроме того, на который устанавливаете систему, отсоедините внешние приводы и вентиляторы корпуса (процессорный кулер не трогайте).
Установите систему и убедитесь, что она запускается. Затем подключайте удалённые комплектующие по одному, каждый раз предварительно выключая питание компьютера. Так вы сможете выявить неисправное устройство.
Читайте также 🤔💻☝
- Как отключить залипание клавиш в Windows
- Что делать, если не запускается Windows
- 12 программ на Windows 10, которые вы должны удалить прямо сейчас
- 10 лучших программ для создания загрузочной флешки
- 6 способов сбросить пароль в Windows 10