Многие пользователи Windows 10 сообщили, что Windows не может получить доступ к общей папке на их ПК. Это может быть реальной проблемой, поскольку препятствует обмену ценной информацией.
Хотя существуют различные факторы, которые могут вызвать эту проблему, мы подготовили подробные решения, которые помогут вам решить эту проблему без особых усилий.
Ниже приведены некоторые факторы, которые могут привести к недоступности общей папки:
- Неправильные сетевые настройки: если на вашем ПК отключена функция обнаружения сети, вы не сможете получить доступ к общей папке. Вам нужно только включить функцию, и проблема будет решена.
- Недоступность настройки общего доступа к папкам. Иногда эта проблема может возникать из-за того, что у вас нет настроек для доступа к общей папке на вашем ПК. Эта функция должна быть доступна на вашем ПК по умолчанию, но вы можете установить ее, если это не так.
1. Проверьте наличие настройки общего доступа к папкам на вашем ПК.
- Нажмите Windows клавишу + I , чтобы открыть приложение «Настройки», и выберите «Сеть и Интернет».

- Теперь нажмите «Изменить параметры адаптера».

- Найдите свое сетевое подключение, щелкните его правой кнопкой мыши и выберите «Свойства».

- Перейдите к области Это подключение использует следующие элементы, а затем найдите Общий доступ к файлам и принтерам для сетей Microsoft.
- Если опция доступна, просто установите флажок рядом с ней; в противном случае продолжайте.
- Нажмите «Установить».
- После этого нажмите ОК.
- Выйдите из окна и перезагрузите компьютер.


Если вы не можете получить доступ к общей папке в Windows 10, первое, что нужно сделать, это проверить свою систему, чтобы убедиться, что настройка общего доступа к файлам доступна. Обычно эта настройка встроена в Windows; таким образом, он обычно присутствует.
Если проблема не устранена, вы можете попробовать следующее исправление.
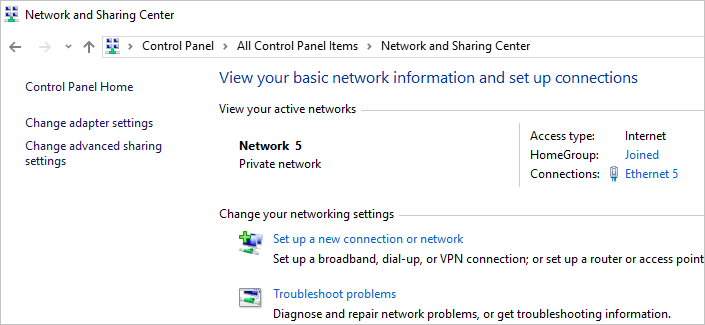
2. Включите сетевое обнаружение
- Откройте приложение «Настройки» и выберите «Сеть и Интернет».
- На левой панели щелкните либо Wi-Fi, либо Ethernet (в зависимости от типа подключения).
- В меню «Связанные настройки» нажмите «Изменить дополнительные параметры общего доступа».
- Установите переключатель, чтобы включить параметр Включить сетевое обнаружение.
- Наконец, нажмите Сохранить изменения.


Если вы столкнулись с ошибкой Windows 10, которая не может получить доступ к общей папке, рекомендуется проверить, доступна ли сеть вашего ПК для других компьютеров.
3. Проверьте учетные данные вашего ПК
- Нажмите Windows клавишу, введите control и выберите Панель управления.

- Выберите параметр «Учетные записи пользователей».
- Теперь выберите Диспетчер учетных данных.
- Найдите и щелкните Учетные данные Windows.
- Выберите Добавить учетные данные Windows.
- Добавьте соответствующие данные, такие как имя пользователя администратора, пароль и IP-адрес хост-компьютера.
- Сохраните изменения, нажав ОК.


Если вы не можете получить доступ к общей папке на своем ПК, у вас могут возникнуть проблемы с учетными данными.
4. Включите все сетевые службы
Если вы не можете получить доступ к общей папке на своем ПК, убедитесь, что вы включили все соответствующие сетевые службы на своем ПК. Ниже приведен список соответствующих служб, которые должны быть включены и запускаться автоматически для работы общего доступа к файлам:
- IPv6
- Обнаружение SSDP
- Публикация
- Поставщик обнаружения функций
- DNS-клиент
- Группа одноранговой сети
- Хозяин
- Результат обнаружения функции
- Хост устройства UPnP
- Провайдер домашней группы
- Слушатель домашней группы.
5. Запустите средство устранения неполадок с общей папкой.
- Нажмите Windows клавишу + I и выберите «Обновление и безопасность».
- Выберите «Устранение неполадок» на левой панели и нажмите «Дополнительные средства устранения неполадок».
- Теперь выберите параметр «Общие папки» и нажмите «Запустить средство устранения неполадок».


Специальное средство устранения неполадок в Windows 10 специально разработано для исправления подобных ошибок. Если вы по-прежнему не можете получить доступ к общим папкам, может быть полезно запустить средство устранения неполадок.
Ну вот. Это несколько решений, которые могут помочь вам исправить Windows 10, которая не может получить доступ к общей папке. Решения максимально подробны, и вам нужно только внимательно следовать шагам.
Не стесняйтесь сообщить нам в разделе комментариев, если эти решения помогли вам решить проблему.
Windows 10 File Sharing feature enables users to quickly share files with computers inside the local network they create, which is very convenient and safe. However, many users have met the same issue after update 1803, 1809, or 1903, which is Windows 10 file sharing not working. Here we provide 8 feasible ways to fix Windows 10 network sharing not working.
| Reasons for Network Sharing not Working | Workable Solutions |
|---|---|
| Case 1. File Sharing Misuse (Easiest) | 1. Enable File Sharing Properly 2. Turn Password Protection Off |
| Case 2. Computer Adaption Problems | 1. Add a Windows Credential 2. Disable IPv6 3. Change File Sharing Connection 4. Disable Antivirus |
| Case 3. Windows Update Problems | 1. Enable the SMB 1.0/CIFS Support 2. Update Windows to the latest version |
| Case 4. Fail to resolve the problem by 8 fixes | Use File Sharing alternative — EaseUS Todo PCTrans |
P.S. At first, it would be a good choice to restart your computer if the file sharing not working problem occurs because of the associated service not starting. If it doesn’t work, try the follow-up methods.
About Fixing Windows 10 Network Sharing Not Working
When the problem arises, the computers on the network might not find each other, or users can’t access the files of another PC, or users can’t see shared folders.
Whatever the cause, it is important that you fix the issue instantly. 8 Methods demonstrated below are effective ways to check out. Moreover, EaseUS Todo PCTrans, a great PC data transfer tool, works as a workaround for you if all of these solutions fail. After fixing Windows 10 file sharing not working, you can do file sharing between Windows 7 and Windows 10.
1. Enable and Use File Sharing Properly
File sharing can only work when you enable sharing settings correctly. Besides, you also have to share data in the right way. For that, follow these steps:
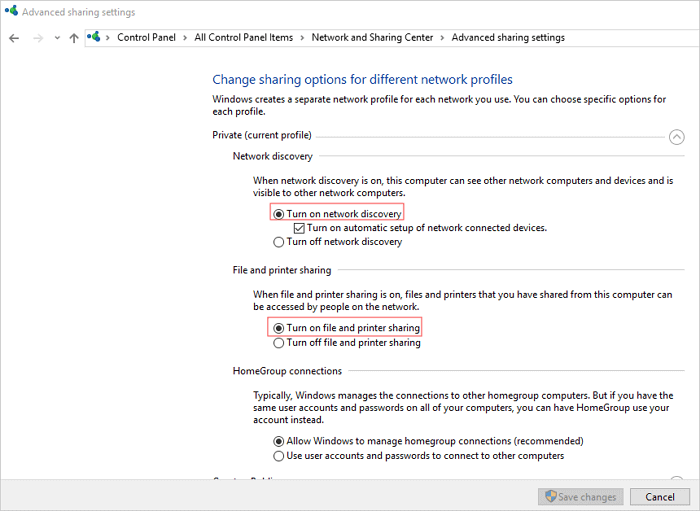
Step 1. Click «Start» > «Control Panel» > «Network and Sharing Center» > «Advanced sharing settings«.
Step 2. Under Private (current profile), check «Turn on network discovery» and «Turn on file and printer sharing«. Click «Save changes» to confirm.
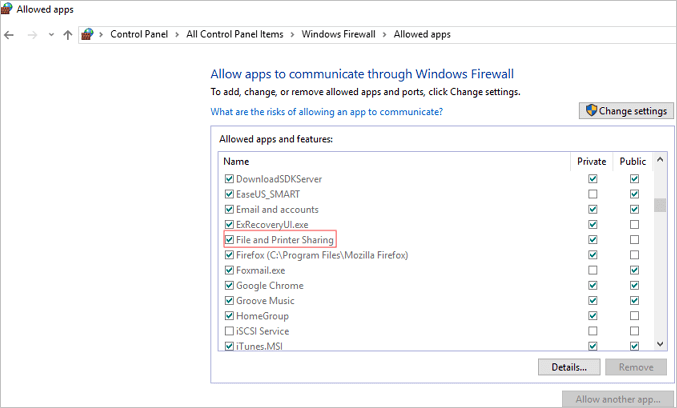
To make sure the problem can be solved, allow File and Printer Sharing in Windows firewall settings.
Step 1. Click «Start» > «Control Panel» > «Windows Firewall» > «Allow a program through Windows Firewall«.
Step 2. In the pop-up window, check «File and Printer Sharing» in the list. Then, click «OK«.
If this doesn’t work, you can also try disabling the Windows Defender temporarily to check if that helps in solving the issue.
How to share files exactly
Step 1. Right-click on the file you want to share. Click «Properties» > «Sharing» > «Advanced Sharing«.
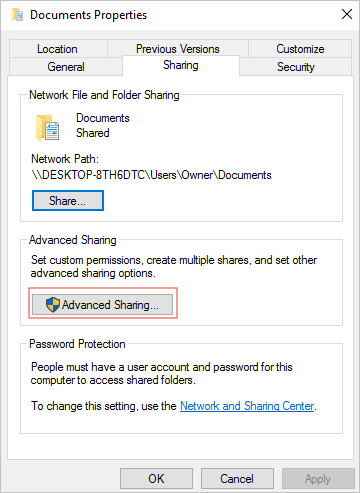
Step 2. Check «Share this folder«, then click «Apply» and «OK«. You can click the «Permissions» option to set the permissions for files as per your need.
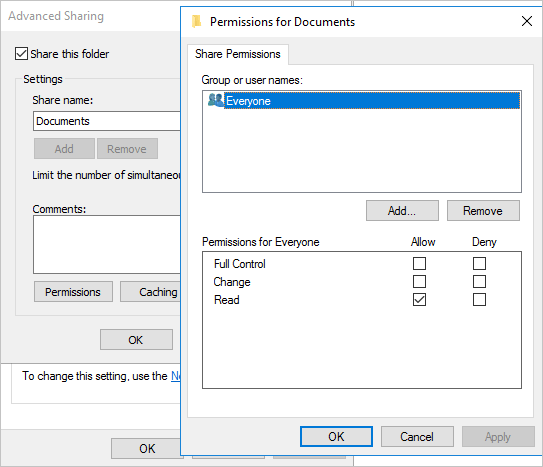
The above steps make your folder accessible to all the users in your local network. If you want to share with specific users, you can click the «Share» button in Step 1 to select.
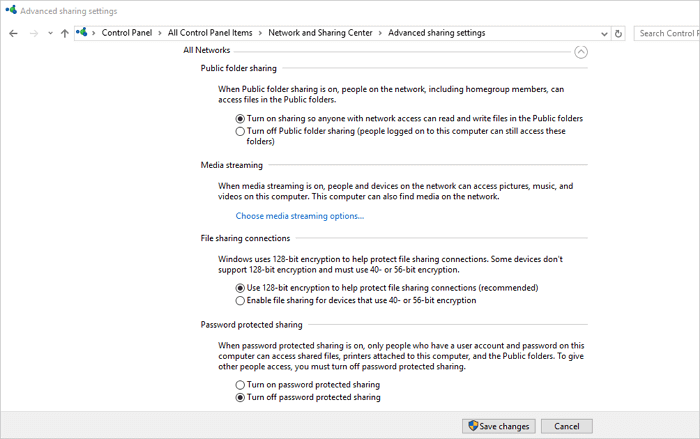
2. Turn Password Protection off
When Password protected sharing is turned on, the file sharing might fail because other users either need to have a user account on your PC, or they should know your username and password. Hence, to fix file sharing not working, you can try to disable this feature.
Step 1. Go to «Control Panel» > «Network and Sharing Center» > «Change advanced sharing settings«.
Step 2. Then, under All Networks, check «Turn off password protected sharing«, and click on «Save changes«.
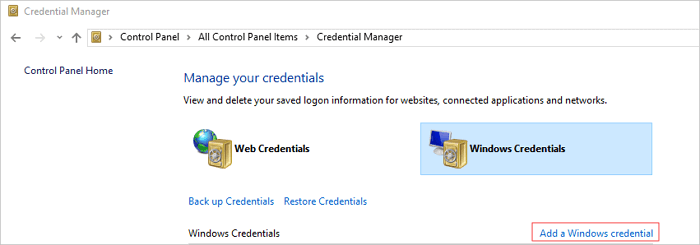
3. Add a Windows Credential
If you fail to access a specific folder when connecting to a remote server computer for file sharing, you might want to add a credential to fix the problem. In order to proceed, you will need to know the network address, username, and password of the remote computer or server.
Step 1. Open «Control Panel«, and click on «Credentials Manager«.
Step 2. Select «Windows Credentials» and click the «Add a Windows credential» button.
Enter the target computer’s IP address in the Internet or network address and enter User name and Password respectively. This will hopefully resolve the problem with File sharing.
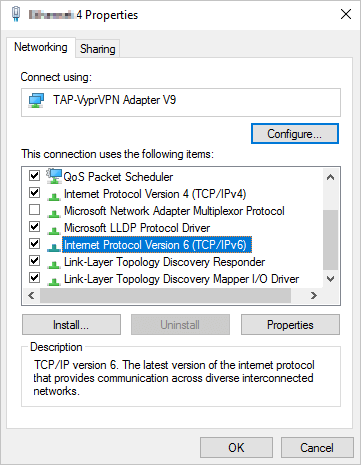
4. Disable IPv6
Many users have reported that disabling IPv6 on their computers can resolve the file sharing problem, so try it out.
Step 1. Open «Control Panel» and click on «Network and Sharing Center«.
Step 2. Click «Change adapter settings«. Double-click on your active Network Adapter on the Internet Connection window.
Step 3. Click «Properties» and find the «Internet Protocol Version 6» entry on the list. Uncheck it and click «OK«. Then, restart your computer and see if the problem still exists.
5. Change File Sharing Connections
Windows uses 128-bit encryption to help protect file sharing connections. Some devices don’t support 128-bit encryption and must use 40- or 56-bit encryption. So, you need to switch between these two sharing connections based on the actual situation.
Step 1. Open «Control Panel» > click «Network and Sharing Center» > choose «Change advanced sharing settings«.
Step 2. Under «All Networks«, find «File sharing connections«. You can try both 120-bit encryption and 40- or 56- bit encryption alternatively.
6. Disable Antivirus on your PC
Sometimes, the antivirus may prevent Windows file sharing. So, try disabling it temporarily and see if it solves the issue. And you can upgrade your antivirus to its latest version.
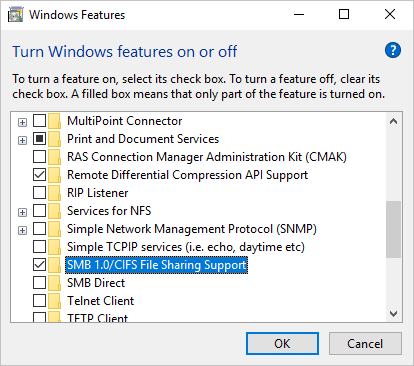
7. Enable the SMB 1.0/CIFS File Sharing Support
The recent Windows 10 update might have disabled the SMB feature that is necessary for fire sharing. Fix this issue and turn on SMB 1.0 in the Windows Features window.
Step 1. Open the «Control Panel«. Click on «Programs and Features«.
Step 2. Click «Turn Windows features on or off» at the left pane. On the pop-up windows, scroll down to find and check the «SMB 1.0/CIFS File Sharing Support» feature. Then, click «OK» and reboot the computer.
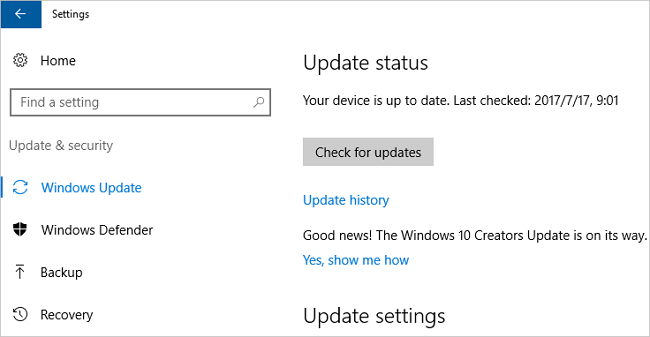
8. Update Windows to the Latest Version
Windows 10 files sharing not working may be due to bugs in the update. The latest versions of Windows 10 seem to have resolved this problem. Thus, upgrade to the latest windows version if you haven’t done it yet.
Step 1. Open «Settings» on your Windows PC. Go to «Update & security» and click on the «Check for updates» button under the Update status to check whether there is a new version of Windows available.
Step 2. If there is one, install the update immediately and restart your computer afterward.
We’ve given you all the possible solutions in the above content, which can be done directly on the Windows computer. We hope they would have helped you fix the Windows 10 file sharing not working issue and you can share files between two computers again.
If you’ve tried them all, but nothing worked, don’t be discouraged. You still have a good choice, which is using a reliable Windows 10 file sharing alternative to finish PC data transfer.
How to Transfer Data from One PC to Another with File Sharing Alternative in Windows 10
Windows 10 file sharing can be affected by many factors. Once it works improperly, it might be difficult for you to resolve the problem timely. To ensure a successful and smooth PC data transfer, the file sharing software — EaseUS Todo PCTrans is what exactly you need. Being a user-friendly PC transfer tool, EaseUS Todo PCTrans enables you to transfer data, applications, and account settings from one PC to another in one-click. It provides three easy transfer ways in all.
- PC to PC Transfer: Connect two Windows laptops/PCs by the network, and move your files, apps & accounts off the old PC to a new one wirelessly
- Backup & Restore: Make images of files, folders, or software on the previous computer, and transfer to the next one. It also works as a backup.
- App Migration: Move installed software to another drive locally, and free up space to settle down low disk space issue.
Now, download and use this PC file transfer as an effective workaround to fix Windows 10 file sharing not working problem.
Step 1. Launch EaseUS Todo PCTrans on your source and target computers, connect both PCs via the internet.
1. At the «PC to PC» section, click «PC to PC» to continue.

2. Select your target computer via its device name, then enter its account password or verification code and select the transfer direction. Then click «Connect» to continue.
You can check the verification code on the right top of «PC to PC» mainscreen on the target computer.

Step 2. Select the categories Applications, Files, and Accounts to transfer via the internet.
If you want to transfer data selectively, click «Edit» under each category, and choose the specific items.

Step 3. Click «Transfer» to start transferring your apps/files/accounts from one computer to another computer via the Internet.

Windows 10 Network Sharing Not Working FAQ
1. How to enable File Sharing properly?
- Click «Start» > «Control Panel» > «Network and Sharing Center» > «Advanced sharing settings». Choose «Turn on network discovery» and «Turn on file and printer sharing» under the Private (current profile).
- Change Windows firewall settings: Choose «Start» > «Control Panel» > «Windows Firewall» > «Allow a program through Windows Firewall» > «File and Printer Sharing»
2. How do I fix Network Sharing Not Working?
Targeting File Sharing misuse, computer adoption problem, Windows update and more, we highly recommend 8 workable solutions to fix Windows 10 sharing not working.
- 1. Enable and Use File Sharing Properly
- 2. Turn Password Protection Off
- 3. Add a Windows Credential
- 4. Disable IPv6
- 5. Change File Sharing Connections
- 6. Disable Antivirus on Your PC
- 7. Enable the SMB 1.0/CIFS File Sharing Support
- 8. Update Windows to the Latest Version
Windows 10 File Sharing feature enables users to quickly share files with computers inside the local network they create, which is very convenient and safe. However, many users have met the same issue after update 1803, 1809, or 1903, which is Windows 10 file sharing not working. Here we provide 8 feasible ways to fix Windows 10 network sharing not working.
| Reasons for Network Sharing not Working | Workable Solutions |
|---|---|
| Case 1. File Sharing Misuse (Easiest) | 1. Enable File Sharing Properly 2. Turn Password Protection Off |
| Case 2. Computer Adaption Problems | 1. Add a Windows Credential 2. Disable IPv6 3. Change File Sharing Connection 4. Disable Antivirus |
| Case 3. Windows Update Problems | 1. Enable the SMB 1.0/CIFS Support 2. Update Windows to the latest version |
| Case 4. Fail to resolve the problem by 8 fixes | Use File Sharing alternative — EaseUS Todo PCTrans |
P.S. At first, it would be a good choice to restart your computer if the file sharing not working problem occurs because of the associated service not starting. If it doesn’t work, try the follow-up methods.
About Fixing Windows 10 Network Sharing Not Working
When the problem arises, the computers on the network might not find each other, or users can’t access the files of another PC, or users can’t see shared folders.
Whatever the cause, it is important that you fix the issue instantly. 8 Methods demonstrated below are effective ways to check out. Moreover, EaseUS Todo PCTrans, a great PC data transfer tool, works as a workaround for you if all of these solutions fail. After fixing Windows 10 file sharing not working, you can do file sharing between Windows 7 and Windows 10.
1. Enable and Use File Sharing Properly
File sharing can only work when you enable sharing settings correctly. Besides, you also have to share data in the right way. For that, follow these steps:
Step 1. Click «Start» > «Control Panel» > «Network and Sharing Center» > «Advanced sharing settings«.
Step 2. Under Private (current profile), check «Turn on network discovery» and «Turn on file and printer sharing«. Click «Save changes» to confirm.
To make sure the problem can be solved, allow File and Printer Sharing in Windows firewall settings.
Step 1. Click «Start» > «Control Panel» > «Windows Firewall» > «Allow a program through Windows Firewall«.
Step 2. In the pop-up window, check «File and Printer Sharing» in the list. Then, click «OK«.
If this doesn’t work, you can also try disabling the Windows Defender temporarily to check if that helps in solving the issue.
How to share files exactly
Step 1. Right-click on the file you want to share. Click «Properties» > «Sharing» > «Advanced Sharing«.
Step 2. Check «Share this folder«, then click «Apply» and «OK«. You can click the «Permissions» option to set the permissions for files as per your need.
The above steps make your folder accessible to all the users in your local network. If you want to share with specific users, you can click the «Share» button in Step 1 to select.
2. Turn Password Protection off
When Password protected sharing is turned on, the file sharing might fail because other users either need to have a user account on your PC, or they should know your username and password. Hence, to fix file sharing not working, you can try to disable this feature.
Step 1. Go to «Control Panel» > «Network and Sharing Center» > «Change advanced sharing settings«.
Step 2. Then, under All Networks, check «Turn off password protected sharing«, and click on «Save changes«.
3. Add a Windows Credential
If you fail to access a specific folder when connecting to a remote server computer for file sharing, you might want to add a credential to fix the problem. In order to proceed, you will need to know the network address, username, and password of the remote computer or server.
Step 1. Open «Control Panel«, and click on «Credentials Manager«.
Step 2. Select «Windows Credentials» and click the «Add a Windows credential» button.
Enter the target computer’s IP address in the Internet or network address and enter User name and Password respectively. This will hopefully resolve the problem with File sharing.
4. Disable IPv6
Many users have reported that disabling IPv6 on their computers can resolve the file sharing problem, so try it out.
Step 1. Open «Control Panel» and click on «Network and Sharing Center«.
Step 2. Click «Change adapter settings«. Double-click on your active Network Adapter on the Internet Connection window.
Step 3. Click «Properties» and find the «Internet Protocol Version 6» entry on the list. Uncheck it and click «OK«. Then, restart your computer and see if the problem still exists.
5. Change File Sharing Connections
Windows uses 128-bit encryption to help protect file sharing connections. Some devices don’t support 128-bit encryption and must use 40- or 56-bit encryption. So, you need to switch between these two sharing connections based on the actual situation.
Step 1. Open «Control Panel» > click «Network and Sharing Center» > choose «Change advanced sharing settings«.
Step 2. Under «All Networks«, find «File sharing connections«. You can try both 120-bit encryption and 40- or 56- bit encryption alternatively.
6. Disable Antivirus on your PC
Sometimes, the antivirus may prevent Windows file sharing. So, try disabling it temporarily and see if it solves the issue. And you can upgrade your antivirus to its latest version.
7. Enable the SMB 1.0/CIFS File Sharing Support
The recent Windows 10 update might have disabled the SMB feature that is necessary for fire sharing. Fix this issue and turn on SMB 1.0 in the Windows Features window.
Step 1. Open the «Control Panel«. Click on «Programs and Features«.
Step 2. Click «Turn Windows features on or off» at the left pane. On the pop-up windows, scroll down to find and check the «SMB 1.0/CIFS File Sharing Support» feature. Then, click «OK» and reboot the computer.
8. Update Windows to the Latest Version
Windows 10 files sharing not working may be due to bugs in the update. The latest versions of Windows 10 seem to have resolved this problem. Thus, upgrade to the latest windows version if you haven’t done it yet.
Step 1. Open «Settings» on your Windows PC. Go to «Update & security» and click on the «Check for updates» button under the Update status to check whether there is a new version of Windows available.
Step 2. If there is one, install the update immediately and restart your computer afterward.
We’ve given you all the possible solutions in the above content, which can be done directly on the Windows computer. We hope they would have helped you fix the Windows 10 file sharing not working issue and you can share files between two computers again.
If you’ve tried them all, but nothing worked, don’t be discouraged. You still have a good choice, which is using a reliable Windows 10 file sharing alternative to finish PC data transfer.
How to Transfer Data from One PC to Another with File Sharing Alternative in Windows 10
Windows 10 file sharing can be affected by many factors. Once it works improperly, it might be difficult for you to resolve the problem timely. To ensure a successful and smooth PC data transfer, the file sharing software — EaseUS Todo PCTrans is what exactly you need. Being a user-friendly PC transfer tool, EaseUS Todo PCTrans enables you to transfer data, applications, and account settings from one PC to another in one-click. It provides three easy transfer ways in all.
- PC to PC Transfer: Connect two Windows laptops/PCs by the network, and move your files, apps & accounts off the old PC to a new one wirelessly
- Backup & Restore: Make images of files, folders, or software on the previous computer, and transfer to the next one. It also works as a backup.
- App Migration: Move installed software to another drive locally, and free up space to settle down low disk space issue.
Now, download and use this PC file transfer as an effective workaround to fix Windows 10 file sharing not working problem.
Step 1. Launch EaseUS Todo PCTrans on your source and target computers, connect both PCs via the internet.
1. At the «PC to PC» section, click «PC to PC» to continue.
2. Select your target computer via its device name, then enter its account password or verification code and select the transfer direction. Then click «Connect» to continue.
You can check the verification code on the right top of «PC to PC» mainscreen on the target computer.
Step 2. Select the categories Applications, Files, and Accounts to transfer via the internet.
If you want to transfer data selectively, click «Edit» under each category, and choose the specific items.
Step 3. Click «Transfer» to start transferring your apps/files/accounts from one computer to another computer via the Internet.
Windows 10 Network Sharing Not Working FAQ
1. How to enable File Sharing properly?
- Click «Start» > «Control Panel» > «Network and Sharing Center» > «Advanced sharing settings». Choose «Turn on network discovery» and «Turn on file and printer sharing» under the Private (current profile).
- Change Windows firewall settings: Choose «Start» > «Control Panel» > «Windows Firewall» > «Allow a program through Windows Firewall» > «File and Printer Sharing»
2. How do I fix Network Sharing Not Working?
Targeting File Sharing misuse, computer adoption problem, Windows update and more, we highly recommend 8 workable solutions to fix Windows 10 sharing not working.
- 1. Enable and Use File Sharing Properly
- 2. Turn Password Protection Off
- 3. Add a Windows Credential
- 4. Disable IPv6
- 5. Change File Sharing Connections
- 6. Disable Antivirus on Your PC
- 7. Enable the SMB 1.0/CIFS File Sharing Support
- 8. Update Windows to the Latest Version
Как в Windows Server 2019 включить сетевое обнаружение
На компьютерах, которые должны подключаться к общей сетевой папке, перейдите в «Изменение расширенных параметров общего доступа» и выберите опцию «Включить сетевое обнаружение»:
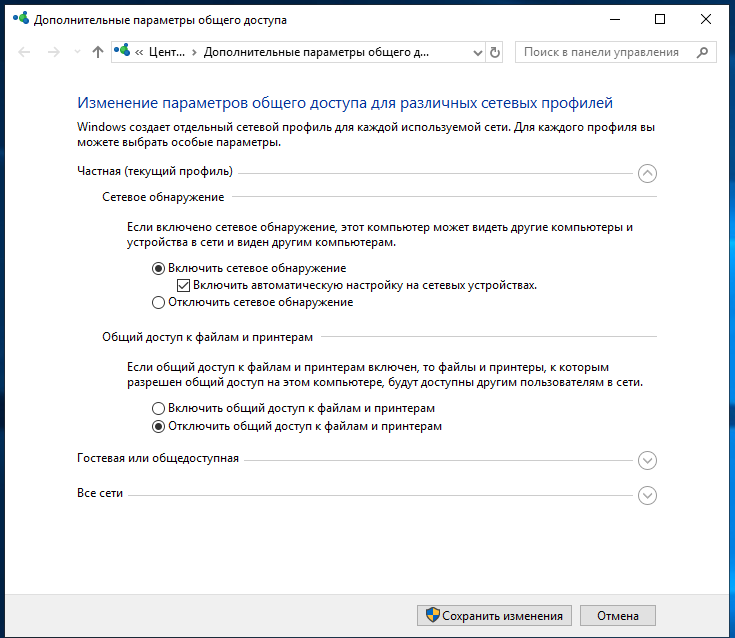
Затем нажмите кнопку «Сохранить изменения».
Вновь откройте «Изменение расширенных параметров общего доступа» и проверьте сделанные настройки.
В настоящее время Windows Server 2019 не сохраняется «Включить сетевое обнаружение».
Для включения сетевого обнаружения (network discovery) необходимо, чтобы были запущены определённую службы.
Откройте services.msc и убедитесь, что запущены следующие службы:
- DNS Client
- Function Discovery Resource Publication
- SSDP Discovery
- UPnP Device Host
Если у вас русскоязычная версия, то службы называются так:
- DNS-клиент
- Публикация ресурсов обнаружения функций
- Обнаружение SSDP
- Узел универсальных PnP
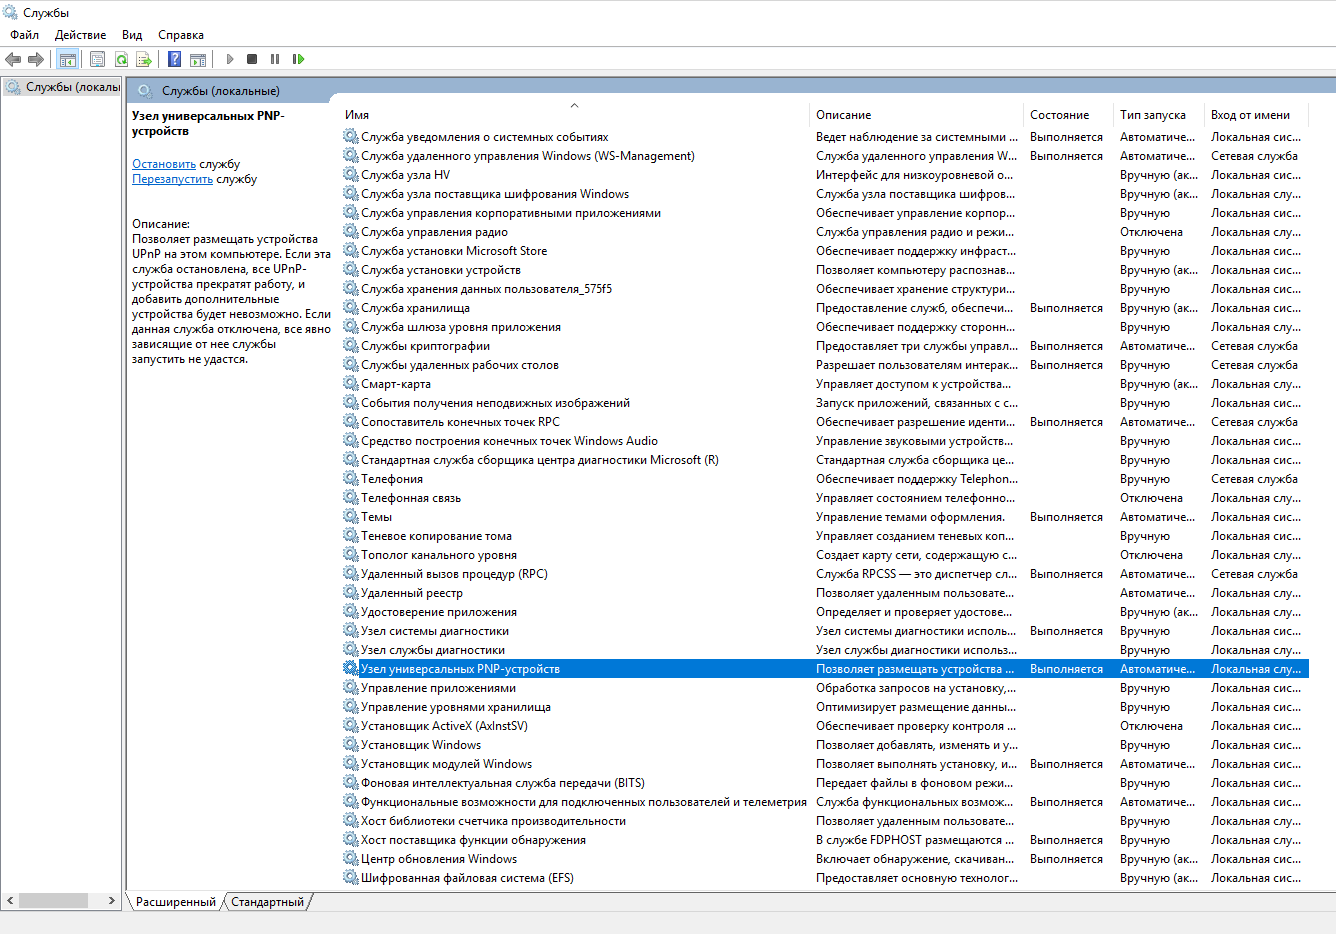
Затем снова включите сетевое обнаружение — теперь настройка должна сохраняться и SMB и другие связанные функции должны работать.
Связанные статьи:
- Как создать общую сетевую папку на Windows (100%)
- Как подключиться к сетевой папке в Windows (SMB) (100%)
- Имя компьютера Windows 10 и Windows 11: как изменить и использовать (100%)
- Как включить административные общие ресурсы в ОС Windows 10, 8 или 7 (C$, D$, $admin и другие) (100%)
- Как указать другое имя пользователя или пароль при доступе к сетевой папке Windows (100%)
- Нужно ли оставить ноутбук подключённым все время к электросети? (RANDOM — 50%)
Updated: 11.01.2021 at 20:11
Содержание
- Общий доступ к файлам и папкам в Виндовс 10
- Вариант 1: Доступ для пользователей одного ПК
- Вариант 2: Доступ для пользователей в сети
- Заключение
- Вопросы и ответы
Общий доступ представляет собой отличный инструмент, если за компьютером работает несколько пользователей с разными учётными записями (например, рабочей и личной). В нашем сегодняшнем материале мы хотим познакомить вас с методами включения этой функции в операционной системе Виндовс 10.
Под общим обычно подразумевается сетевой и/или локальный вариант доступа, а также соз. В первом случае это означает предоставление разрешений на просмотр и изменение файлов другим пользователям одного компьютера, во втором – предоставление аналогичных прав для пользователей локальной сети или интернета. Рассмотрим оба варианта.
Читайте также: Включение общего доступа к папкам на компьютере с Windows 7
Вариант 1: Доступ для пользователей одного ПК
Для предоставления общего доступа локальным пользователям нужно действовать по такому алгоритму:
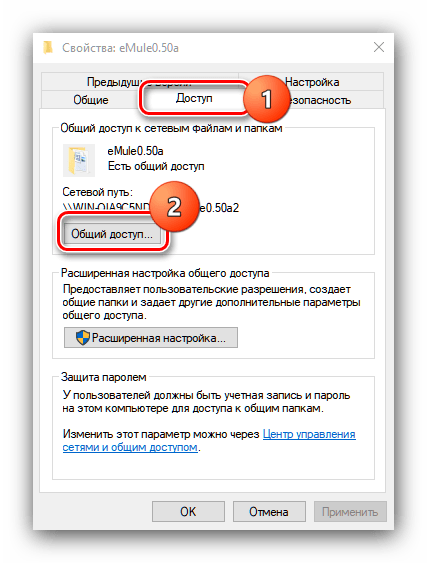
- Перейдите к директории или разделу HDD, который желаете расшарить, выделите его и нажмите правую кнопку мыши, после чего выберите «Свойства» в контекстном меню.
- Откройте вкладку «Доступ», где нажмите на кнопку «Общий доступ».
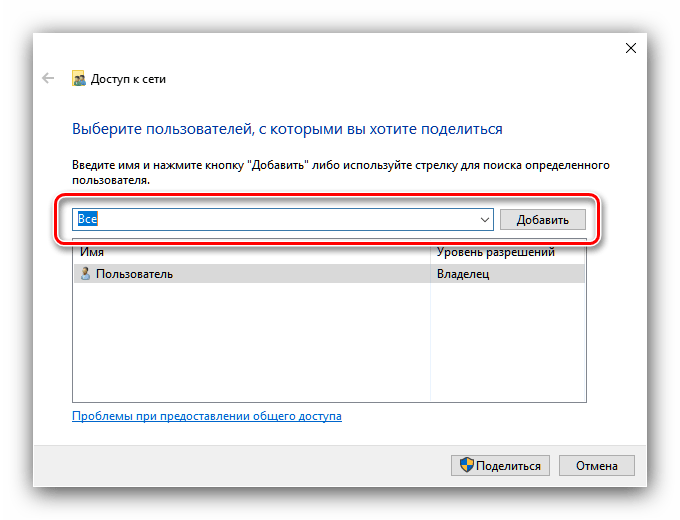
- Следующее окошко позволяет выдать права просмотра или изменения выбранного каталога разным пользователям. Если требуется выбрать все категории юзеров компьютера, следует вручную написать слово Все в строке поиска и воспользоваться кнопкой «Добавить». Этот же способ можно применять для выбора какого-то конкретного профиля.
- Опция «Уровень разрешений» позволяет настроить права на чтение и запись файлов в расшаренной директории – вариант «Чтение» подразумевает только просмотр, тогда как «Чтение и запись» разрешает изменять содержимое каталога. Кроме того, из этого меню можно удалить пользователя, если он добавлен по ошибке.
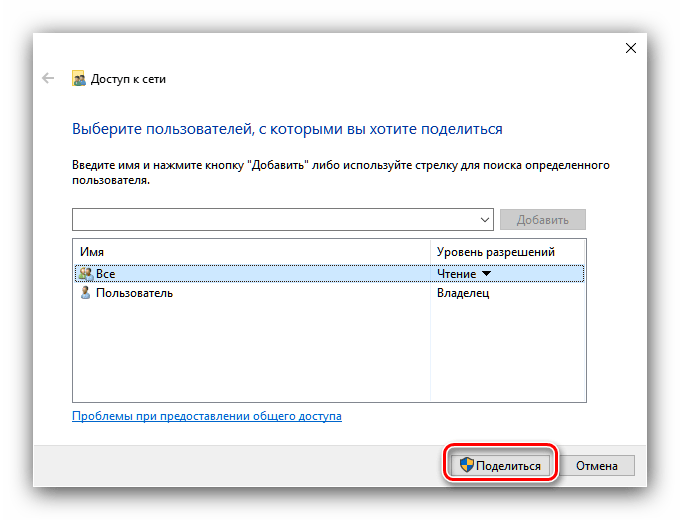
- После того как вы настроили все необходимые параметры, нажмите «Поделиться» для сохранения изменений.

Отобразится информационное окно с подробностями работы общего доступа – для его закрытия нажмите «Готово».


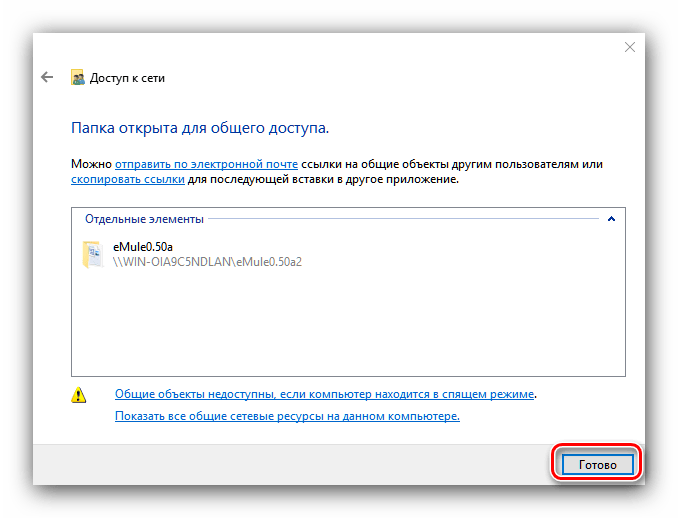
Таким образом мы предоставили права общего доступа к выбранной директории локальным пользователям.
Вариант 2: Доступ для пользователей в сети
Настройка сетевого варианта общего доступа не слишком отличается от локального, но имеет свои особенности — в частности, может потребоваться создать отдельную сетевую папку.
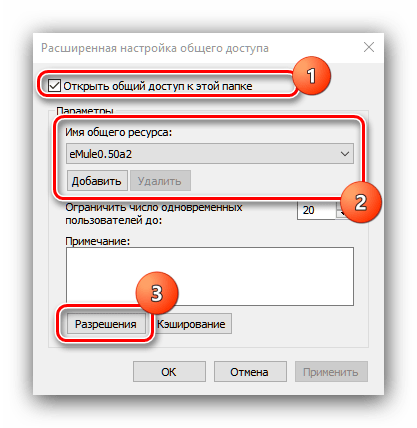
- Проделайте шаги 1-2 из первого способа, но на этот раз воспользуйтесь кнопкой «Расширенная настройка».
- Отметьте пункт «Открыть общий доступ к этой папке». Затем задайте наименование каталога в поле «Имя общего ресурса», если это требуется – именно выбранное здесь имя будут видеть подключенные пользователи. После щёлкните «Разрешения».
- Далее воспользуйтесь элементом «Добавить».

В следующем окошке обратитесь к полю ввода имён объектов. Напишите в нём слово СЕТЬ, обязательно большими буквами, после чего последовательно кликните по кнопкам «Проверить имена» и «ОК». - По возвращении в предыдущее окошко выделите группу «Сеть» и установите требуемые разрешения чтения-записи. Воспользуйтесь кнопками «Применить» и «ОК» для сохранения введённых параметров.
- Последовательно закройте открытие окошки кнопками «ОК» в каждом из них, затем вызовите «Параметры». Проще всего это проделать с помощью «Пуска».


Читайте также: Что делать, если не открываются «Параметры» Windows 10
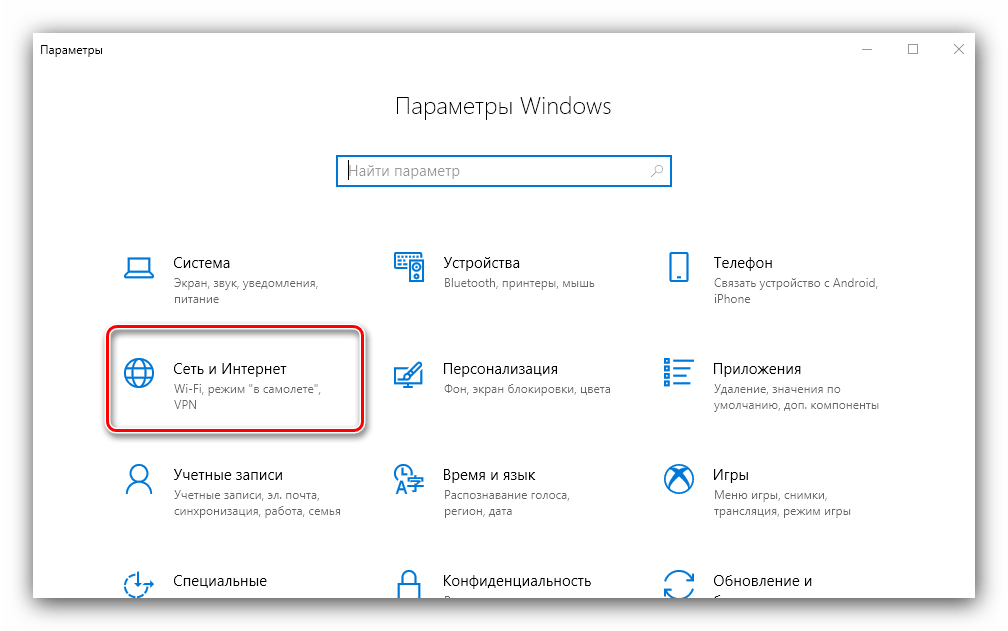
- Нужные нам опции находятся в разделе «Сеть и интернет», выберите их.
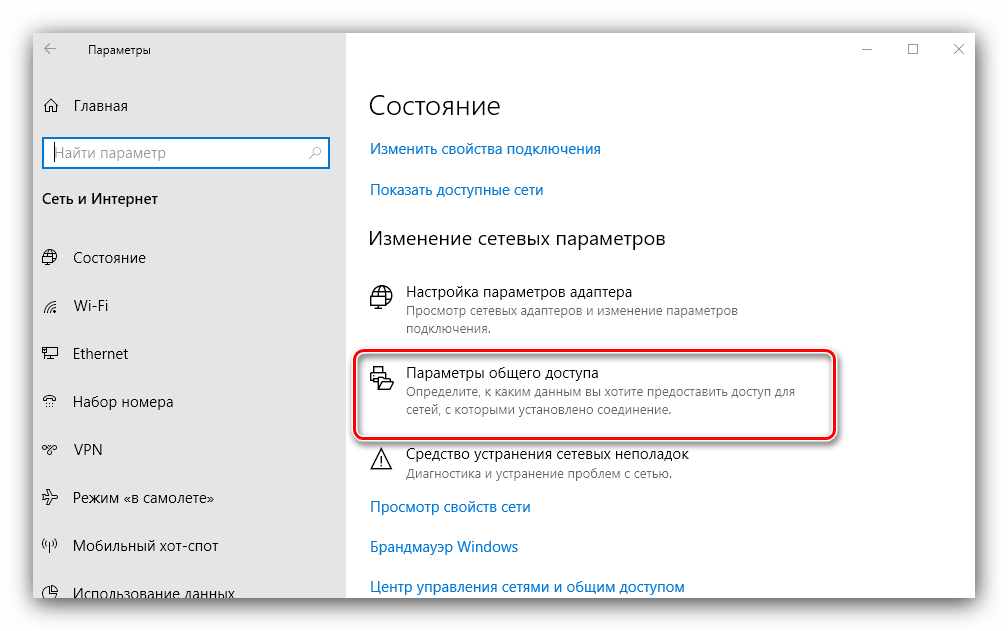
- Далее найдите блок опций «Изменение сетевых параметров» и выберите вариант «Параметры общего доступа».
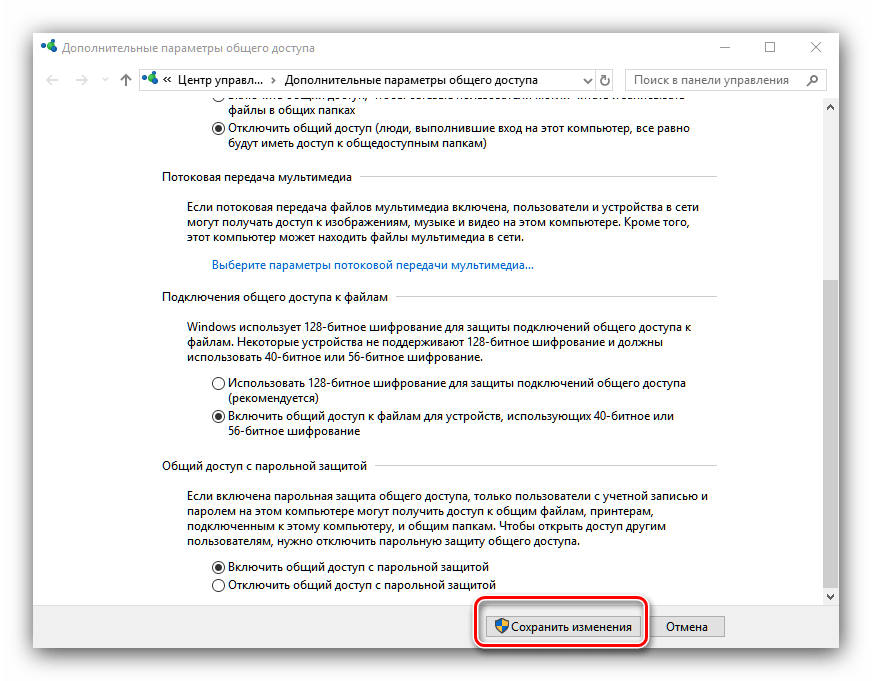
- Раскройте блок «Частная», где отметьте чекбоксы включения сетевого обнаружения и общего доступа к файлам и папкам.
- Далее разверните раздел «Все сети» и перейдите к подразделу «Общий доступ с парольной защитой». Здесь отметьте чекбокс «Отключить общий доступ с парольной защитой».
- Проверьте правильность ввода всех требуемых параметров и воспользуйтесь кнопкой «Сохранить изменения». После этой процедуры перезагрузка компьютера обычно не требуется, но в целях профилактики сбоев её лучше выполнить.


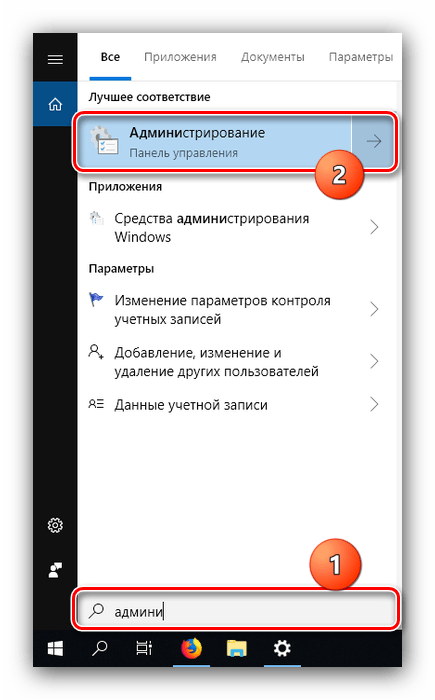
На случай, если оставлять компьютер вообще без защиты не хочется, можно воспользоваться возможностью предоставления доступа учётным записям, у которых есть пустой пароль. Это делается следующим образом:
- Откройте «Поиск» и начинайте писать администрирование, после чего кликните по найденному результату.
- Откроется каталог, где следует найти и запустить приложение «Локальная политика безопасности».
- Раскройте последовательно директории «Локальные политики» и «Параметры безопасности», затем найдите в правой части окна запись с именем «Учётные записи: разрешить использование пустых паролей» и сделайте по ней двойной щелчок мышью.
- Отметьте вариант «Отключить», после чего воспользуйтесь элементами «Применить» и «ОК» для сохранения изменений.


Заключение
Мы рассмотрели методы предоставления общего доступа пользователям к отдельным каталогам в Windows 10. Операция не представляет собой сложности, и справиться с ней смогут даже неопытные юзеры.
Еще статьи по данной теме:
Помогла ли Вам статья?
На чтение 4 мин. Просмотров 4.5k. Опубликовано 03.09.2019
Многие пользователи Windows 10 сообщили, что Windows не может получить доступ к общей папке на своем ПК. Это может быть проблемой, и в сегодняшней статье мы собираемся показать вам, как решить эту проблему.
Что я могу сделать, если у меня нет доступа к общей папке в Windows 10? Первое, что вы должны сделать, чтобы решить эту проблему, – включить общий доступ к папкам и обнаружение сети. Для этого просто проверьте окно настроек сети. Если проблема все еще существует, убедитесь, что необходимые службы запущены и настроены на автоматический запуск.
Содержание
- Что делать, если общая папка недоступна в Windows 10?
- 1. Проверьте наличие настроек общего доступа к папкам на вашем ПК
- 2. Включить обнаружение сети
- 3. Проверьте учетные данные вашего ПК
- 4.Включить все сетевые сервисы
- 5. Запустите средство устранения неполадок с общей папкой
Что делать, если общая папка недоступна в Windows 10?
- Проверьте наличие настроек общего доступа к папкам на вашем компьютере .
- Включить обнаружение сети
- Проверьте учетные данные вашего компьютера
- Включить все сетевые службы
- Запустите средство устранения неполадок с общей папкой
1. Проверьте наличие настроек общего доступа к папкам на вашем ПК
Если вы не можете получить доступ к общей папке в Windows 10, первое, что нужно сделать, – это проверить вашу систему, чтобы убедиться, что настройки общего доступа к файлам доступны. Обычно эта настройка встроена в Windows; таким образом, это обычно присутствует.
Чтобы выполнить эту проверку, следуйте инструкциям ниже:
-
Откройте меню «Пуск» и нажмите Настройки .
-
Выберите Сеть и Интернет .
- В разделе Сеть и Интернет выберите Центр управления сетями и общим доступом .
-
Теперь нажмите Изменить настройки адаптера .
-
Найдите свое сетевое подключение, нажмите на него правой кнопкой мыши и выберите Свойства .
-
Перейдите в область Это соединение использует следующие элементы , а затем найдите Общий доступ к файлам и принтерам для сетей Microsoft .
- Если опция доступна, просто установите флажок рядом с ней; в противном случае продолжайте.
- Нажмите Установить.
- После этого нажмите ОК .
- Выйдите из окна и перезагрузите компьютер.


Если проблема не устранена, вы можете попробовать следующее исправление.
2. Включить обнаружение сети
В случае, если у вас Windows 10 не удается получить доступ к общей папке , рекомендуется проверить, обнаруживается ли сеть вашего компьютера другими компьютерами. Чтобы настроить обнаружение сети в Windows 10, выполните следующие простые действия:
- Откройте Настройки приложения .
- Выберите Сеть и Интернет .
-
На левой панели выберите Wi-Fi или Ethernet (в зависимости от типа подключения).
-
В меню Связанные настройки нажмите Изменить дополнительные параметры общего доступа .
-
В разделе Дополнительные параметры проверьте, включен ли параметр Сделать этот компьютер доступным для обнаружения (Вкл.). Если он не включен (Выкл.), Просто включите его, переключив кнопку на Вкл.
- Затем нажмите Сохранить изменения .


Если проблема не устраняется после обнаружения вашего ПК, очевидно, есть еще один фактор в игре. Таким образом, вы можете попробовать следующее решение.
- ЧИТАЙТЕ ТАКЖЕ : исправлено: PIN-код не работает в Windows 10
3. Проверьте учетные данные вашего ПК
Если вы не можете получить доступ к общей папке на вашем компьютере, возможно, у вас есть проблемы с учетными данными. Однако это можно исправить, выполнив следующие действия:
- Откройте меню «Пуск» и найдите панель управления .
-
Выберите Панель управления .
-
Перейдите на страницу Аккаунты пользователей и нажмите на нее.
-
В разделе Аккаунты пользователей найдите и выберите Диспетчер учетных данных .
-
Найдите и нажмите Учетные данные Windows .
-
Выберите Добавить учетные данные Windows .
-
Добавьте другие важные данные, такие как имя пользователя администратора, пароль и IP-адрес хост-компьютера.
- Сохраните изменения, нажав ОК .


Если проблема не устраняется после запуска, попробуйте следующее решение.
4.Включить все сетевые сервисы
Если вы не можете получить доступ к общей папке на вашем ПК, убедитесь, что вы включили все соответствующие сетевые службы на вашем ПК. Ниже приведен список соответствующих служб, которые должны быть включены и запущены автоматически, чтобы общий доступ к файлам работал:
- IPv6
- Обнаружение SSDP
- Публикация
- Поставщик обнаружения функций
- DNS-клиент
- Группа одноранговых сетей
- Хост
- Результат обнаружения функции
- Хост устройства UPnP
- Поставщик домашней группы
- Слушатель домашней группы.
Если проблема не устранена, вы можете попробовать следующее решение.
5. Запустите средство устранения неполадок с общей папкой
В Windows 10 имеется специальное средство устранения неполадок, специально разработанное для устранения таких ошибок, как эта. Если вы по-прежнему не можете получить доступ к общим папкам, может помочь запуск средства устранения неполадок. Вы можете сделать это, выполнив следующие действия:
-
Перейдите в Настройки . Найдите и нажмите Обновление и безопасность .
-
Выберите Устранение неполадок> Общие папки .
-
Следуйте инструкциям на экране, чтобы завершить процесс.
- Выйдите из программы и перезагрузите компьютер.


Итак, вот несколько решений, которые могут помочь вам исправить Windows 10, не имеющую доступа к общей папке. Не стесняйтесь сообщить нам в разделе комментариев, если эти решения помогли вам решить проблему.