Get back to dragging files in no time!
by Kazim Ali Alvi
Kazim has always been fond of technology, be it scrolling through the settings on his iPhone, Android device, or Windows. And at times, unscrewing the device to take… read more
Updated on January 31, 2023
Reviewed by
Vlad Turiceanu

Passionate about technology, Windows, and everything that has a power button, he spent most of his time developing new skills and learning more about the tech world. Coming… read more
- The Windows 11 drag and drop feature is not working properly for many users.
- Upgrading to Windows 11 22H2 is likely to fix this, but the update comes with many bugs right now.
- We have found a workaround to make your tasks easier.
- You can use the split-screen option, modify the Registry, or opt for a third-party tool, amongst others, to combat the problem.
XINSTALL BY CLICKING THE DOWNLOAD FILE
- Download Restoro PC Repair Tool that comes with Patented Technologies (patent available here).
- Click Start Scan to find Windows 11 issues that could be causing PC problems.
- Click Repair All to fix issues affecting your computer’s security and performance
- Restoro has been downloaded by 0 readers this month.
Of all the changes that users noticed in Windows 11, drag and drop not working was something that struck them the most. This feature has been a part of the Windows ecosystem for a long time and going by the comments, users are not pleased with its discontinuation.
A feature that we all heavily relied on is absent from Windows 11. Users thought of it to be a bug in the initial version but Microsoft was quick to acknowledge that the feature has been removed.
Other changes pertaining to the taskbar include the inability to launch the Task Manager from the right-click context menu, and dropping apps in the taskbar to create their shortcut.
So, what do you do when the Windows 11 drag and drop not working issue occurs?? There are a few workarounds that could get you similar results and we have listed them all in the following sections. Else, you can get used to the new interface and execute tasks accordingly.
4 Solutions when you can’t drag and drop in Windows 11
It has been reported that users who upgraded to Windows 11 22H2 can now use the drag-and-drop feature properly.
However, at the time of writing this article, the Windows 11 22H2 update is full of bugs, so it may be recommended to wait a bit more before trying it out. In case you decide to skip the update for now, you should use the solutions below:
- 4 Solutions when you can’t drag and drop in Windows 11
- 1. Use the Alt + Tab shortcut
- 2. Open the two windows in split screen
- 3. Use the cut and paste operation
- 4. Modify the Registry
- Is drag and drop available in Windows 11?
1. Use the Alt + Tab shortcut
- Navigate to the location where the file/folder that you want to move is saved.
- Select it, press and hold the left mouse button, and drag the file a little.

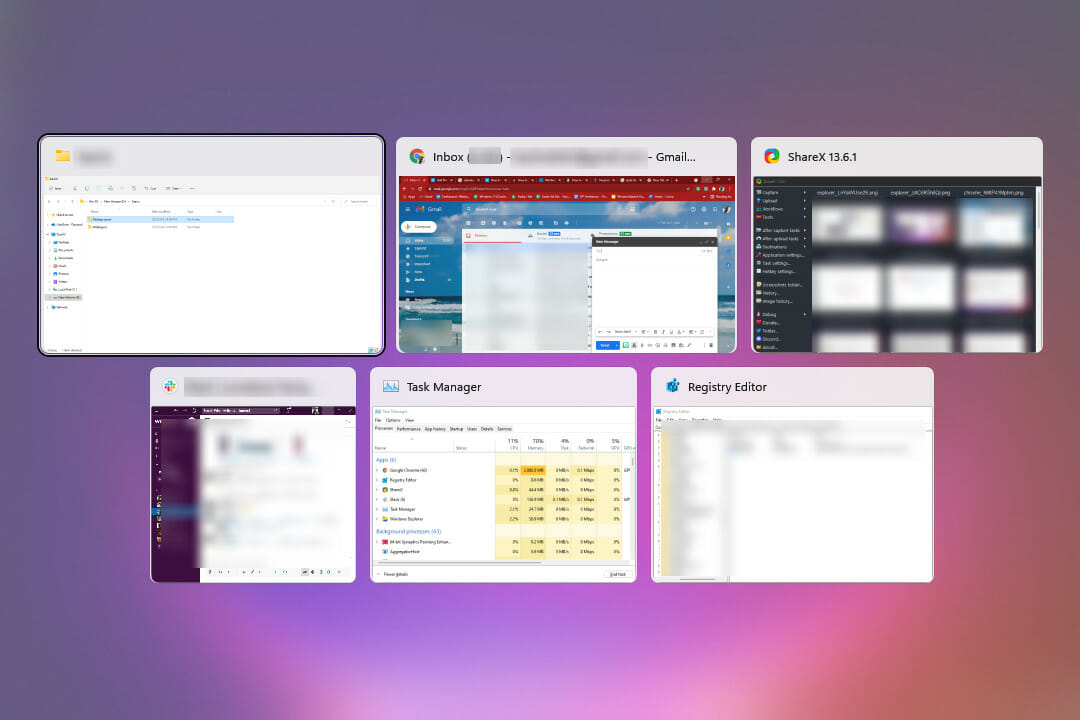
- With the file still grabbed, press the Alt + Tab keys to view all the apps open in the taskbar.

- This will launch a new screen where all the open apps will be listed as separate tiles. The currently open window or the one that was last opened will be listed first, the one before it would be listed next, and the same sequence will be followed.
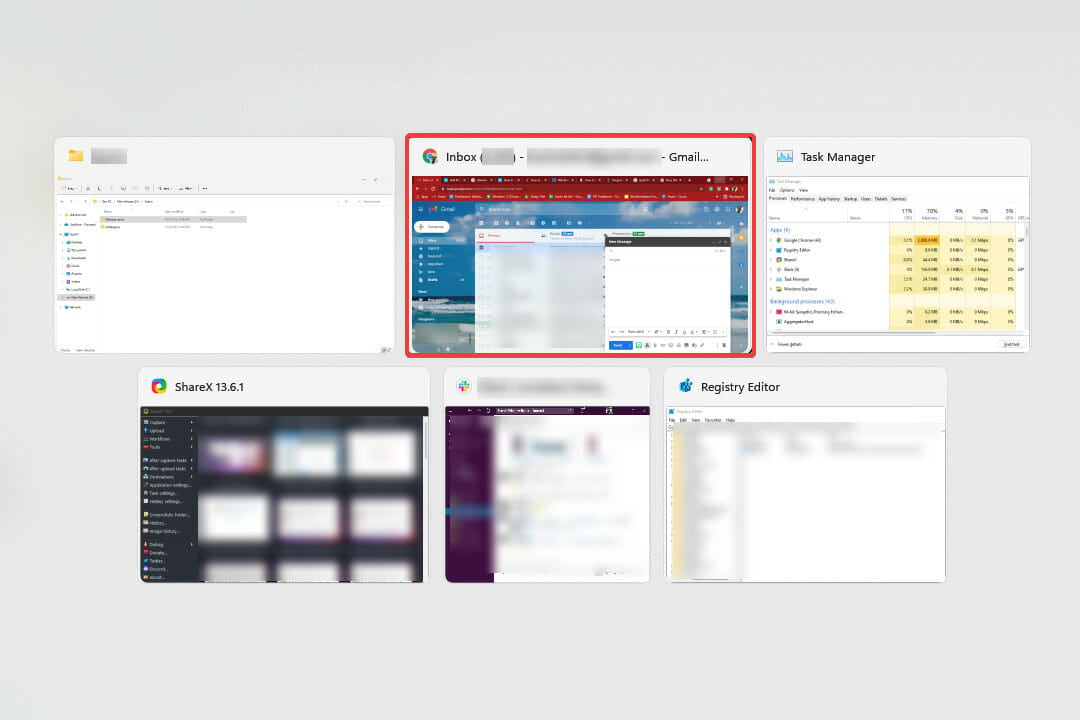
- Now, while holding the Alt key, press Tab to navigate through the open windows.
- Release Alt when the desired destination is selected.
- Once the destination window launches, release the left click to drop the file.
This way you can easily move files between apps and get rid of the Windows 11 drag and drop feature not working problem.
Although it will take you some time to get acquainted with the process, once that phase is over, you will find this method convenient and quick. Just practice for a while until you get a knack for it.
2. Open the two windows in split screen
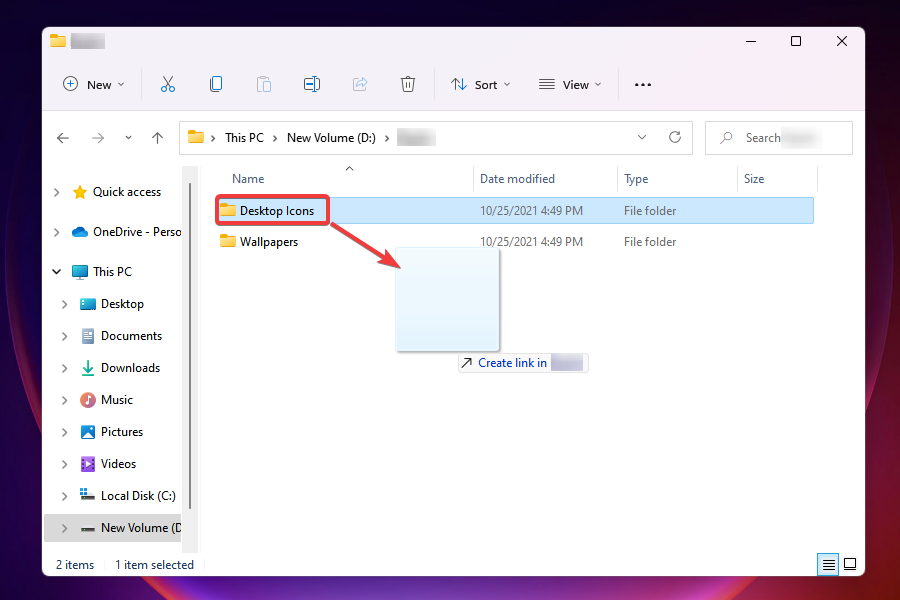
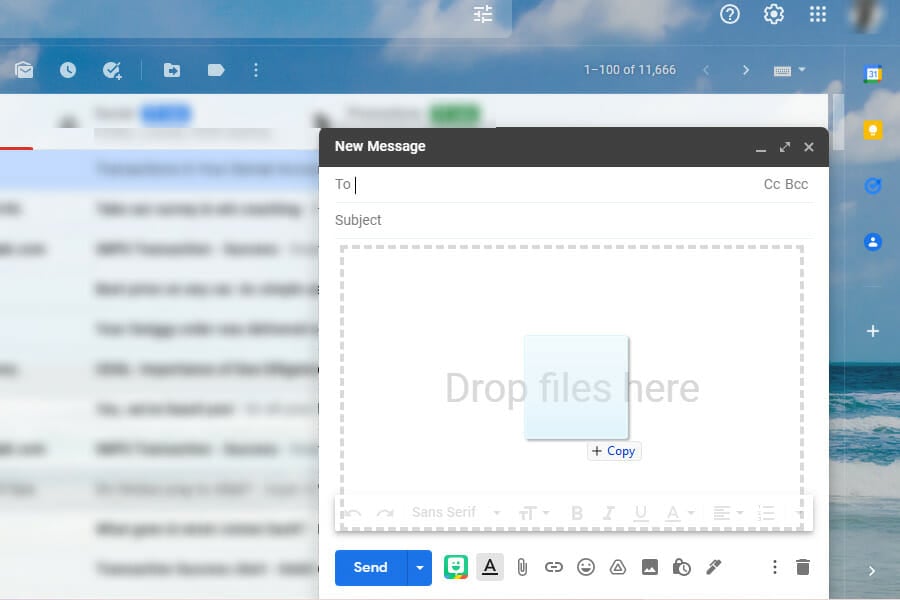
- Launch both the windows amongst which you want the drag and drop the file or folder.
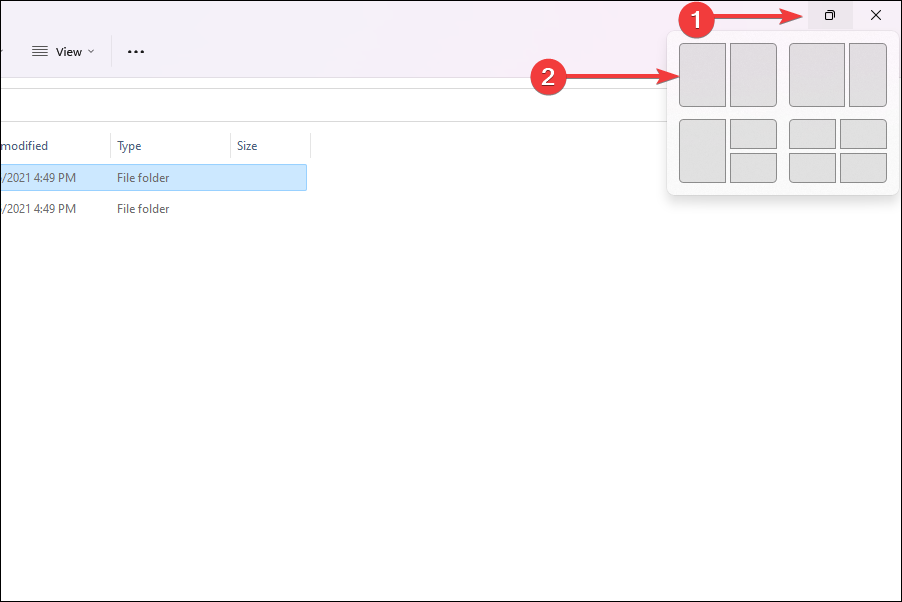
- Open the one where the file to be dragged and dropped is saved, hover the cursor over the maximize button, and select the first option to snap the current window into half of the screen.

- In the other half, you will find listed all the additonal open apps. Select the one where you want to drop the file/folder.

- Now, select the file that is to be moved. Press and hold the left mouse button, drag the file across windows and release the click when you reach the other one.

- The file will now be moved to the destination.
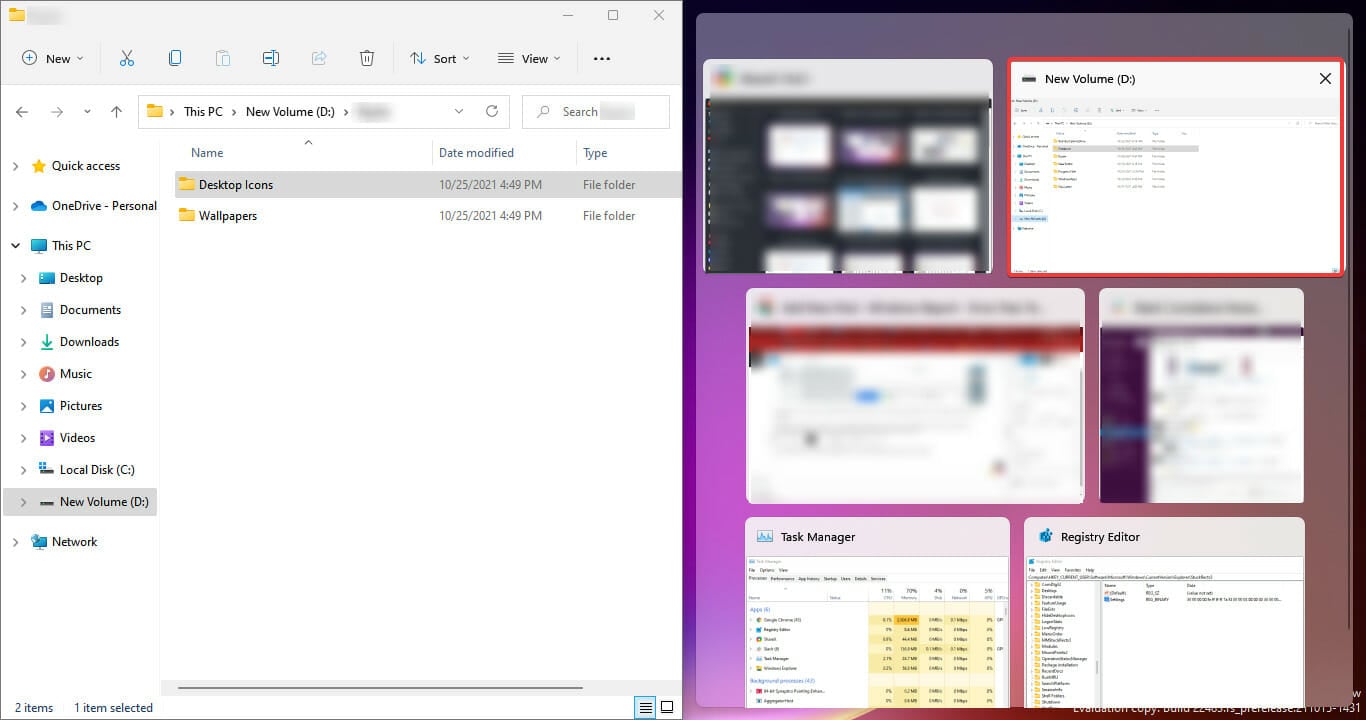
The split-screen method in Windows 11 works great if you just have to move files between two locations. In the above case, we took two File Explorer windows, however, you can replace one or both of them with other apps. This is a quick solution to the annoying drag and drop problem.
For some apps, there may be an additional confirmation box to complete the drag and drop procedure. Choose the appropriate response and get done with it.
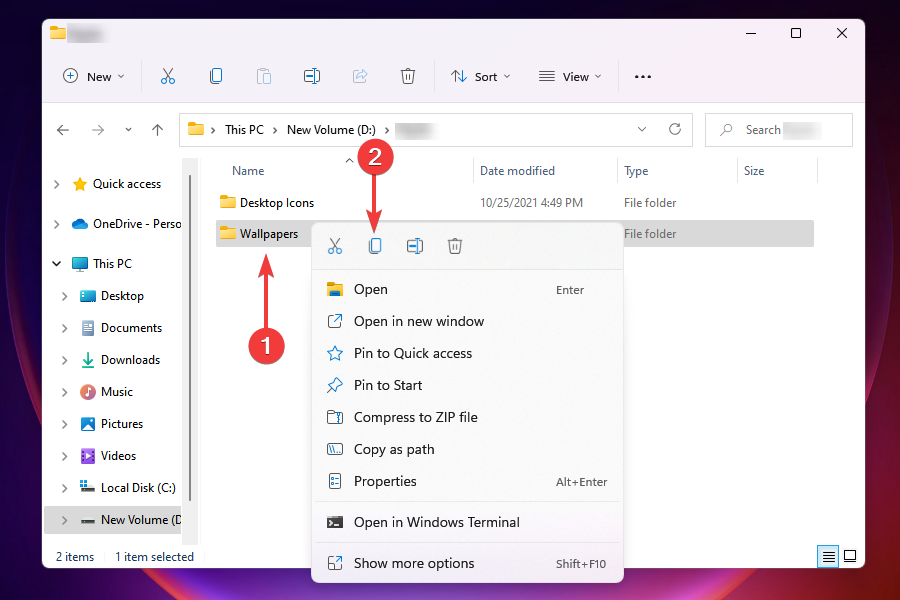
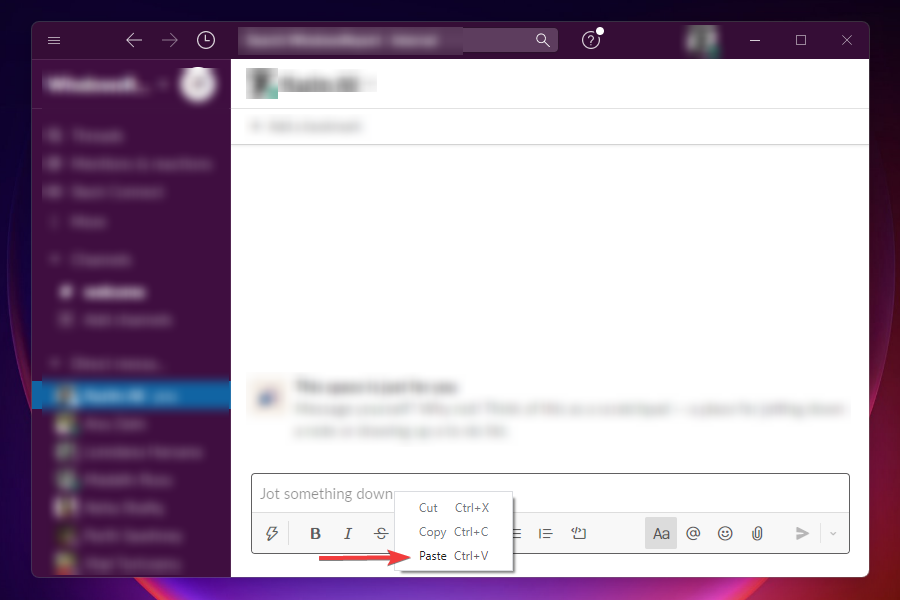
3. Use the cut and paste operation
- Launch the program where the file to be moved is stored.
- Right-click on it and select Cut, or as the procedure may be for that particular program.
- Now, navigate to the destination, i.e., the program where you want to move the file/folder.
- Right-click and select Paste, or according to the procedure for that particular program.
Again, a simple workaround for drag and drop not working in Windows 11. However, it’s not as effective as the other two since it requires a tad more time and effort.
Also, some apps don’t support the Cut operation, in which case, you will have to copy the file/folder and move it to the desired location. Once done, go to the source and delete the concerned file.
Some PC issues are hard to tackle, especially when it comes to corrupted repositories or missing Windows files. If you are having troubles fixing an error, your system may be partially broken.
We recommend installing Restoro, a tool that will scan your machine and identify what the fault is.
Click here to download and start repairing.
Those who prefer the keyboard shortcuts can use Ctrl + X to Cut, Ctrl + C to Copy, and Ctrl + V to Paste.
4. Modify the Registry
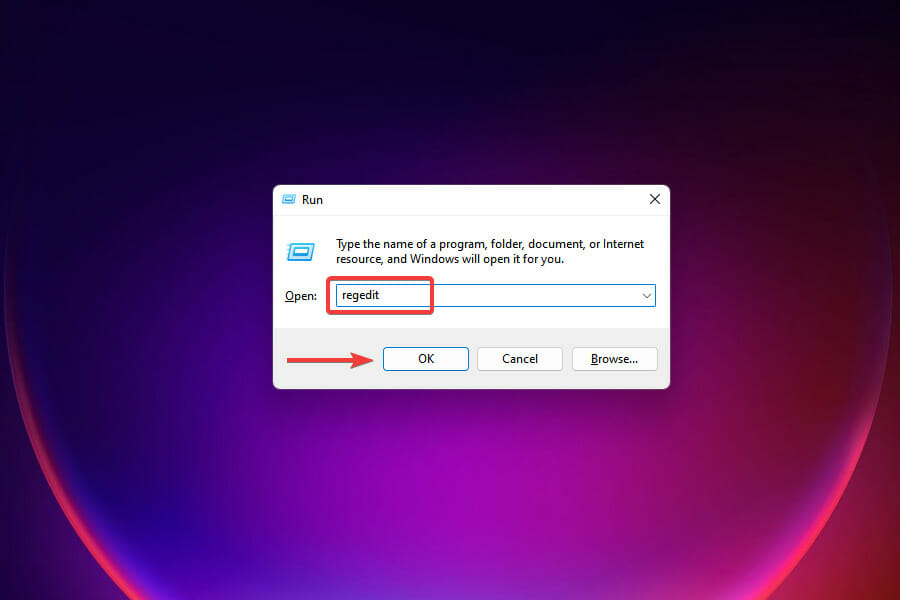
- Press Windows + R to launch the Run command.
- Type regedit in the text field, and either click on OK or press Enter to launch the Registry Editor.
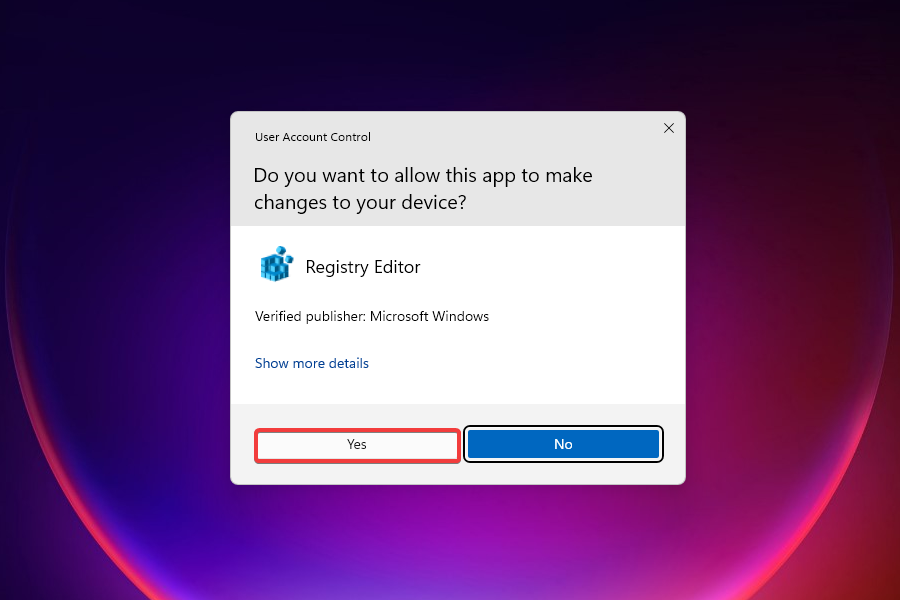
- Click Yes on the UAC prompt that appears.
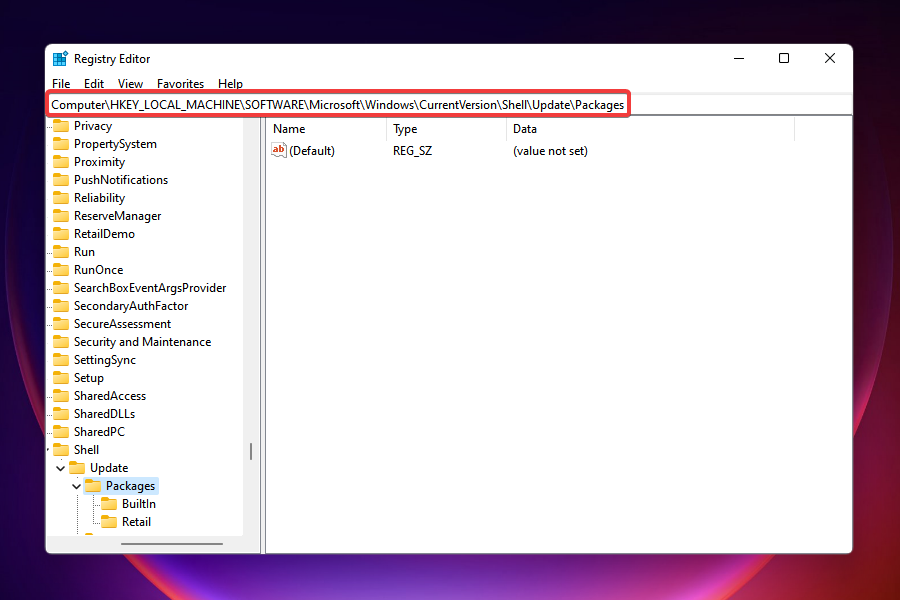
- Now either navigate to the following path using the pane on the left, or paste it in the address bar at the top and hit Enter:
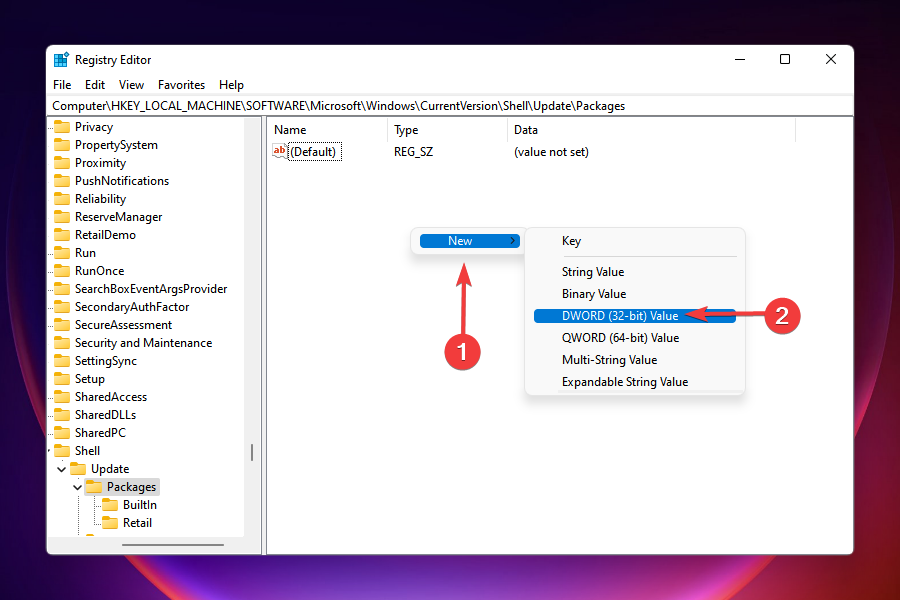
HKEY_LOCAL_MACHINESOFTWAREMicrosoftWindowsCurrentVersionShellUpdatePackages - Right-click on the empty space, hover the cursor over New, select DWORD (32-bit) Value, and name it as UndockingDisabled. This key will fix the problem in no time.
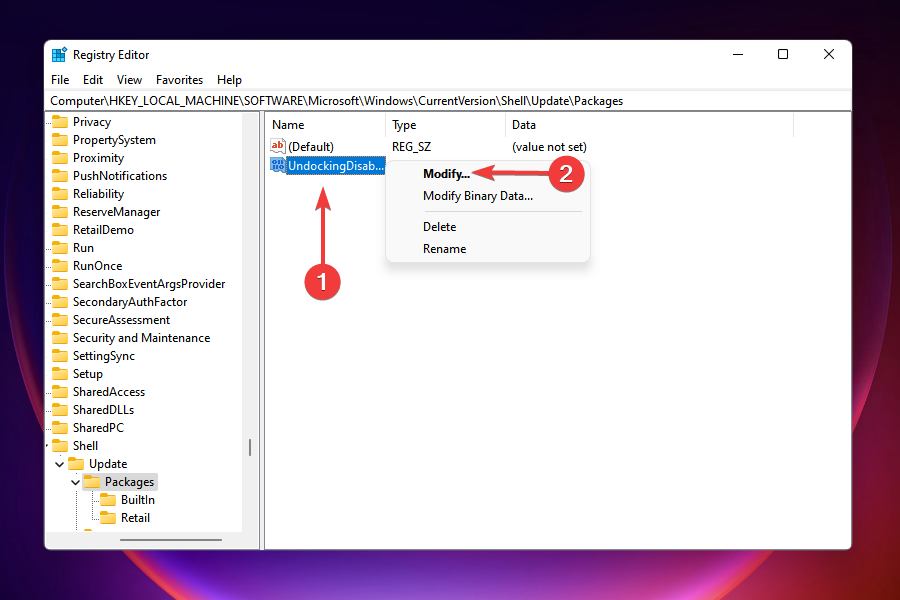
- Right-click on it and select Modify from the context menu.
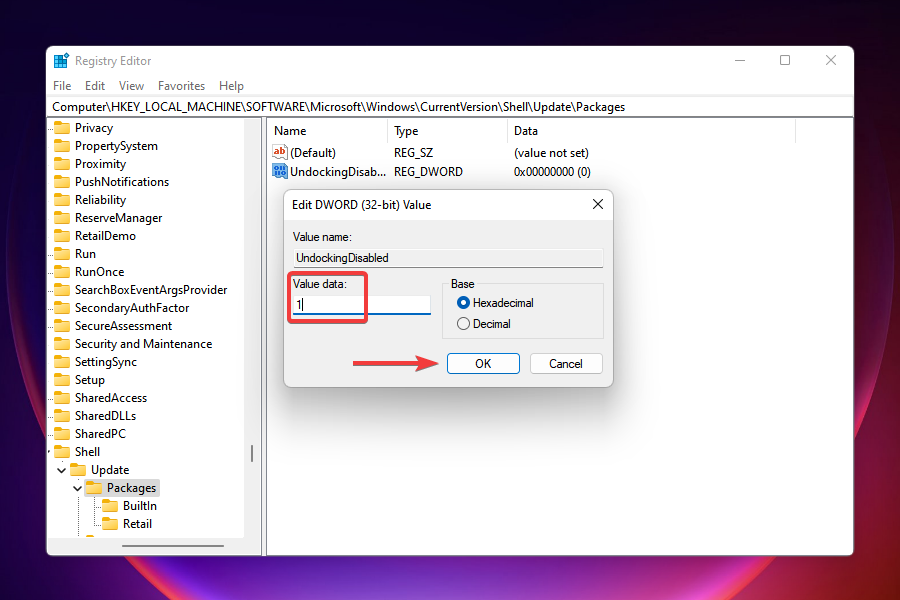
- Enter 1 in the field under Value data and click on OK to save the changes.
- Close the Registry Editor.
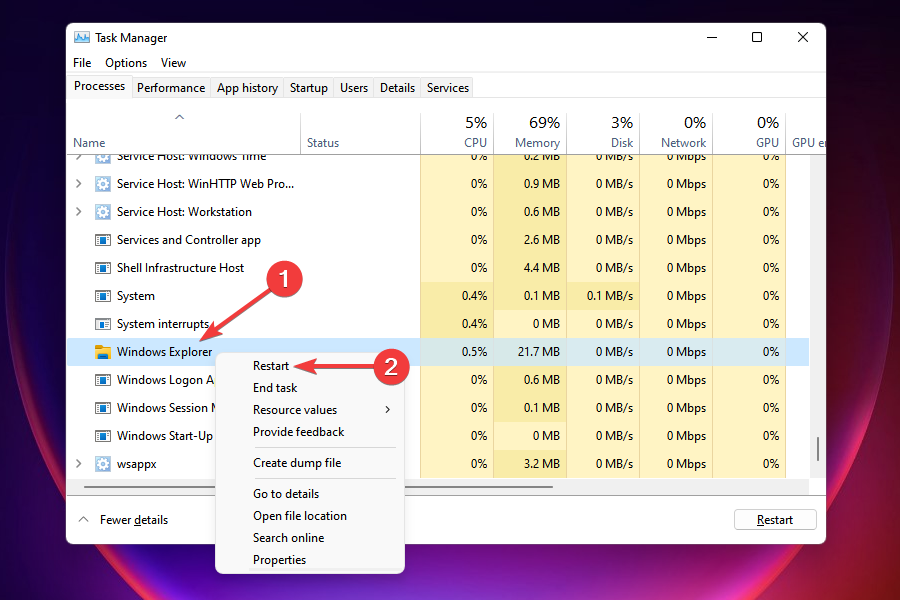
- You wouldn’t notice any immediate change, since it requires restarting Windows Explorer. There are two ways to do that, either restart the computer or the process itself from Task Manager. We will go with the latter.
- Press Ctrl + Shift + Esc to launch Task Manager.
- Locate the Windows Explorer process, right-click on it, and select Restart from the context menu.
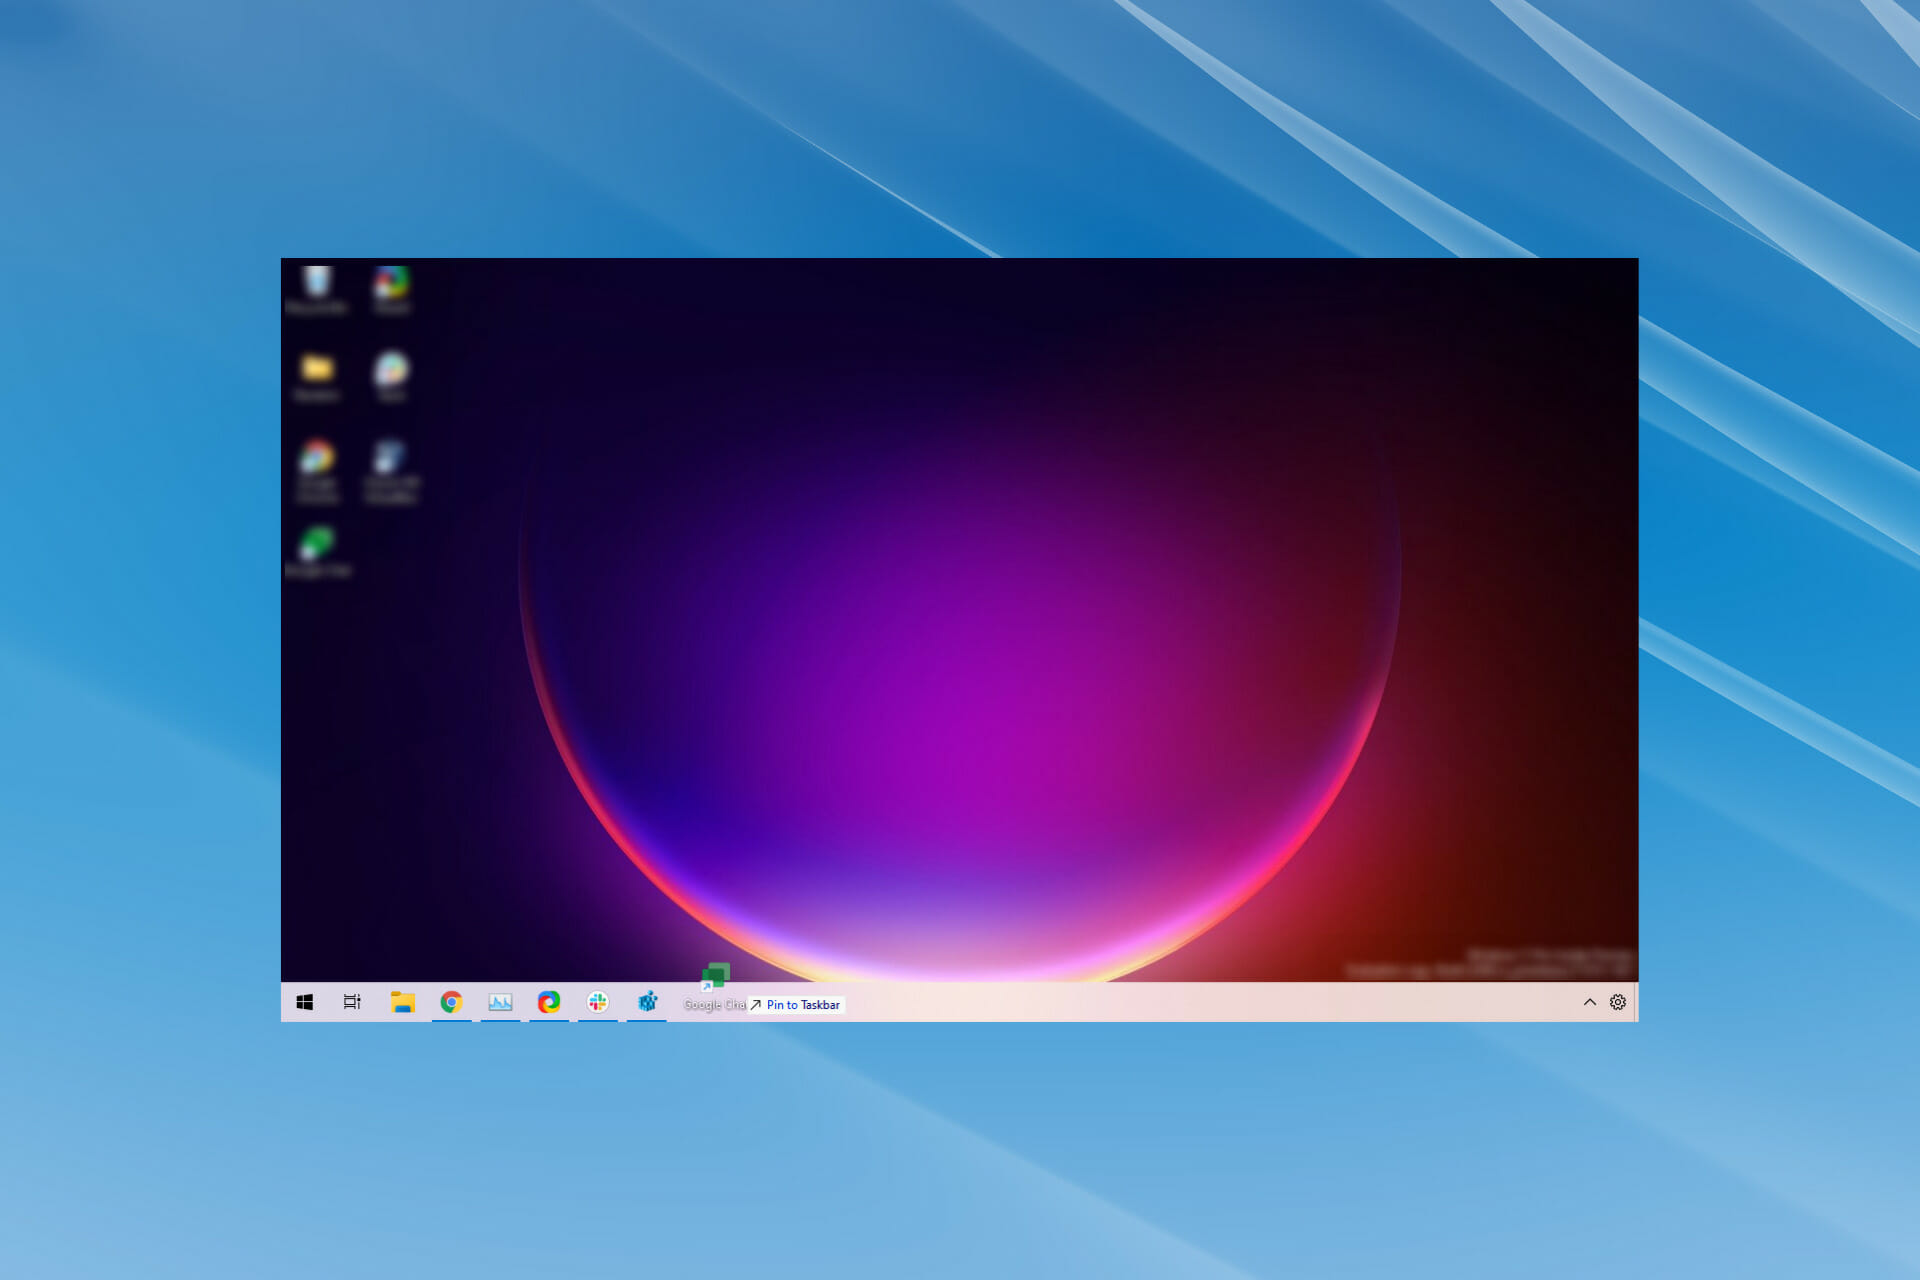
The taskbar may disappear for a few moments and once it reappears, you will notice that the icons are all aligned to the left. You can now easily pin items to the taskbar as we did in the previous iterations of Windows.
- Copy paste not working on Windows 10/11 [Full Fix]
- 5 Ways to Fix The Remote Procedure Call Failed in Windows 11
- Steam Won’t Open on Windows 11: How to Fix It
- How to Find & Change Mac address on Windows 11
- Windows 11 Mail App Showing Html Code: How to Fix It
But, there’s a major downside to this method. After making changes to the registry, you wouldn’t be able to launch the Start or Search menu, and Cortana if it’s enabled, by clicking the respective buttons in the taskbar. However, they can still be accessed via other methods.
In case you are willing to make the sacrifice, no other method mentioned above can match the effectiveness of this one.
- 5 Ways to Fix The Remote Procedure Call Failed in Windows 11
- Steam Won’t Open on Windows 11: How to Fix It
Is drag and drop available in Windows 11?
After the drag and drop not working in Windows 11 problem was raised by several users, Microsoft issued a response a couple of years ago:
Currently, dragging a file onto an app in the taskbar to open it in that app is not supported in Windows 11, but we appreciate all your feedback, and we’ll continue to use it to help guide the future of features like this.
Based on this statement, we had expected the drag and drop feature somewhere down the line from Microsoft. Luckily, it did go live and Windows 11 22H2 users can now use it.
If the above solutions don’t meet your requirements or some critical functionalities are still left out, you can find a way to bring back the old taskbar and Start menu.
These are all the methods you can go for when the drag and drop function is not working in Windows 11. Although they aren’t as good as the built-in functionality, they do the trick until Microsoft releases a similar feature.
Once you have the drag and drop working in Windows 11, pin as many apps to the taskbar. Or, drop files to the processes in the taskbar to launch in that particular app.
Even more, apply these useful tips if the left mouse button drag doesn’t work. Even though it is a Windows 10 guide, rest assured they are the same as in Windows 11.
And if you change your mind and roll back to the previous OS, take a look at these quick fixes if you can’t drag and drop items in Windows 10. Moving paragraphs, files, or folders around will work like a charm once again.
Let us know your thoughts on Microsoft killing the drag and drop operation and the method you opted for in the comments section below.
Still having issues? Fix them with this tool:
SPONSORED
If the advices above haven’t solved your issue, your PC may experience deeper Windows problems. We recommend downloading this PC Repair tool (rated Great on TrustPilot.com) to easily address them. After installation, simply click the Start Scan button and then press on Repair All.
![]()
Newsletter
Get back to dragging files in no time!
by Kazim Ali Alvi
Kazim has always been fond of technology, be it scrolling through the settings on his iPhone, Android device, or Windows. And at times, unscrewing the device to take… read more
Updated on January 31, 2023
Reviewed by
Vlad Turiceanu
Passionate about technology, Windows, and everything that has a power button, he spent most of his time developing new skills and learning more about the tech world. Coming… read more
- The Windows 11 drag and drop feature is not working properly for many users.
- Upgrading to Windows 11 22H2 is likely to fix this, but the update comes with many bugs right now.
- We have found a workaround to make your tasks easier.
- You can use the split-screen option, modify the Registry, or opt for a third-party tool, amongst others, to combat the problem.
XINSTALL BY CLICKING THE DOWNLOAD FILE
- Download Restoro PC Repair Tool that comes with Patented Technologies (patent available here).
- Click Start Scan to find Windows 11 issues that could be causing PC problems.
- Click Repair All to fix issues affecting your computer’s security and performance
- Restoro has been downloaded by 0 readers this month.
Of all the changes that users noticed in Windows 11, drag and drop not working was something that struck them the most. This feature has been a part of the Windows ecosystem for a long time and going by the comments, users are not pleased with its discontinuation.
A feature that we all heavily relied on is absent from Windows 11. Users thought of it to be a bug in the initial version but Microsoft was quick to acknowledge that the feature has been removed.
Other changes pertaining to the taskbar include the inability to launch the Task Manager from the right-click context menu, and dropping apps in the taskbar to create their shortcut.
So, what do you do when the Windows 11 drag and drop not working issue occurs?? There are a few workarounds that could get you similar results and we have listed them all in the following sections. Else, you can get used to the new interface and execute tasks accordingly.
4 Solutions when you can’t drag and drop in Windows 11
It has been reported that users who upgraded to Windows 11 22H2 can now use the drag-and-drop feature properly.
However, at the time of writing this article, the Windows 11 22H2 update is full of bugs, so it may be recommended to wait a bit more before trying it out. In case you decide to skip the update for now, you should use the solutions below:
- 4 Solutions when you can’t drag and drop in Windows 11
- 1. Use the Alt + Tab shortcut
- 2. Open the two windows in split screen
- 3. Use the cut and paste operation
- 4. Modify the Registry
- Is drag and drop available in Windows 11?
1. Use the Alt + Tab shortcut
- Navigate to the location where the file/folder that you want to move is saved.
- Select it, press and hold the left mouse button, and drag the file a little.
- With the file still grabbed, press the Alt + Tab keys to view all the apps open in the taskbar.
- This will launch a new screen where all the open apps will be listed as separate tiles. The currently open window or the one that was last opened will be listed first, the one before it would be listed next, and the same sequence will be followed.
- Now, while holding the Alt key, press Tab to navigate through the open windows.
- Release Alt when the desired destination is selected.
- Once the destination window launches, release the left click to drop the file.
This way you can easily move files between apps and get rid of the Windows 11 drag and drop feature not working problem.
Although it will take you some time to get acquainted with the process, once that phase is over, you will find this method convenient and quick. Just practice for a while until you get a knack for it.
2. Open the two windows in split screen
- Launch both the windows amongst which you want the drag and drop the file or folder.
- Open the one where the file to be dragged and dropped is saved, hover the cursor over the maximize button, and select the first option to snap the current window into half of the screen.
- In the other half, you will find listed all the additonal open apps. Select the one where you want to drop the file/folder.
- Now, select the file that is to be moved. Press and hold the left mouse button, drag the file across windows and release the click when you reach the other one.
- The file will now be moved to the destination.
The split-screen method in Windows 11 works great if you just have to move files between two locations. In the above case, we took two File Explorer windows, however, you can replace one or both of them with other apps. This is a quick solution to the annoying drag and drop problem.
For some apps, there may be an additional confirmation box to complete the drag and drop procedure. Choose the appropriate response and get done with it.
3. Use the cut and paste operation
- Launch the program where the file to be moved is stored.
- Right-click on it and select Cut, or as the procedure may be for that particular program.
- Now, navigate to the destination, i.e., the program where you want to move the file/folder.
- Right-click and select Paste, or according to the procedure for that particular program.
Again, a simple workaround for drag and drop not working in Windows 11. However, it’s not as effective as the other two since it requires a tad more time and effort.
Also, some apps don’t support the Cut operation, in which case, you will have to copy the file/folder and move it to the desired location. Once done, go to the source and delete the concerned file.
Some PC issues are hard to tackle, especially when it comes to corrupted repositories or missing Windows files. If you are having troubles fixing an error, your system may be partially broken.
We recommend installing Restoro, a tool that will scan your machine and identify what the fault is.
Click here to download and start repairing.
Those who prefer the keyboard shortcuts can use Ctrl + X to Cut, Ctrl + C to Copy, and Ctrl + V to Paste.
4. Modify the Registry
- Press Windows + R to launch the Run command.
- Type regedit in the text field, and either click on OK or press Enter to launch the Registry Editor.
- Click Yes on the UAC prompt that appears.
- Now either navigate to the following path using the pane on the left, or paste it in the address bar at the top and hit Enter:
HKEY_LOCAL_MACHINESOFTWAREMicrosoftWindowsCurrentVersionShellUpdatePackages - Right-click on the empty space, hover the cursor over New, select DWORD (32-bit) Value, and name it as UndockingDisabled. This key will fix the problem in no time.
- Right-click on it and select Modify from the context menu.
- Enter 1 in the field under Value data and click on OK to save the changes.
- Close the Registry Editor.
- You wouldn’t notice any immediate change, since it requires restarting Windows Explorer. There are two ways to do that, either restart the computer or the process itself from Task Manager. We will go with the latter.
- Press Ctrl + Shift + Esc to launch Task Manager.
- Locate the Windows Explorer process, right-click on it, and select Restart from the context menu.
The taskbar may disappear for a few moments and once it reappears, you will notice that the icons are all aligned to the left. You can now easily pin items to the taskbar as we did in the previous iterations of Windows.
- Copy paste not working on Windows 10/11 [Full Fix]
- 5 Ways to Fix The Remote Procedure Call Failed in Windows 11
- Steam Won’t Open on Windows 11: How to Fix It
- How to Find & Change Mac address on Windows 11
- Windows 11 Mail App Showing Html Code: How to Fix It
But, there’s a major downside to this method. After making changes to the registry, you wouldn’t be able to launch the Start or Search menu, and Cortana if it’s enabled, by clicking the respective buttons in the taskbar. However, they can still be accessed via other methods.
In case you are willing to make the sacrifice, no other method mentioned above can match the effectiveness of this one.
- 5 Ways to Fix The Remote Procedure Call Failed in Windows 11
- Steam Won’t Open on Windows 11: How to Fix It
Is drag and drop available in Windows 11?
After the drag and drop not working in Windows 11 problem was raised by several users, Microsoft issued a response a couple of years ago:
Currently, dragging a file onto an app in the taskbar to open it in that app is not supported in Windows 11, but we appreciate all your feedback, and we’ll continue to use it to help guide the future of features like this.
Based on this statement, we had expected the drag and drop feature somewhere down the line from Microsoft. Luckily, it did go live and Windows 11 22H2 users can now use it.
If the above solutions don’t meet your requirements or some critical functionalities are still left out, you can find a way to bring back the old taskbar and Start menu.
These are all the methods you can go for when the drag and drop function is not working in Windows 11. Although they aren’t as good as the built-in functionality, they do the trick until Microsoft releases a similar feature.
Once you have the drag and drop working in Windows 11, pin as many apps to the taskbar. Or, drop files to the processes in the taskbar to launch in that particular app.
Even more, apply these useful tips if the left mouse button drag doesn’t work. Even though it is a Windows 10 guide, rest assured they are the same as in Windows 11.
And if you change your mind and roll back to the previous OS, take a look at these quick fixes if you can’t drag and drop items in Windows 10. Moving paragraphs, files, or folders around will work like a charm once again.
Let us know your thoughts on Microsoft killing the drag and drop operation and the method you opted for in the comments section below.
Still having issues? Fix them with this tool:
SPONSORED
If the advices above haven’t solved your issue, your PC may experience deeper Windows problems. We recommend downloading this PC Repair tool (rated Great on TrustPilot.com) to easily address them. After installation, simply click the Start Scan button and then press on Repair All.
![]()
Newsletter
 Одним из самых неприятных для меня «нововведений» Windows 11 стало отключение возможности перетаскивать файлы (Drag and Drop) на значки открытых программ в панели задач. Если ранее, отыскав в проводнике нужный файл, я мог перетащить его на значок свёрнутой программы, и она открывалась, готовая «принять» этот файл, теперь это не работает.
В предварительных сборках это можно было исправить в редакторе реестра, но этот способ больше не работает. Есть информация, что в будущих версиях ОС эту функциональность вернут. Однако для того, чтобы включить поддержку перетаскивания файлов уже сейчас, придётся прибегнуть к сторонним средствам — бесплатной утилите Windows11DragAndDropToTaskbarFix.
Включение поддержки Drag and Drop для панели задач в Windows11DragAndDropToTaskbarFix
Единственная задача бесплатной программы Windows11DragAndDropToTaskbarFix — вернуть прежнее поведение панели задач Windows 11 при перетаскивании файлов на значки открытых программ. Использование очень простое:
- Скачайте последнюю версию утилиты с официальной страницы разработчика и сохраните файл в удобное вам расположение. Учитывайте, что фильтр SmartScreen в Microsoft Edge и Windows могут блокировать загрузку и запуск файла как малоизвестного.
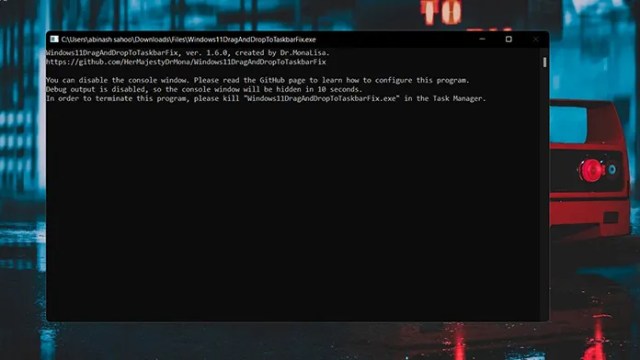
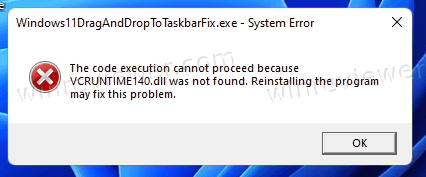
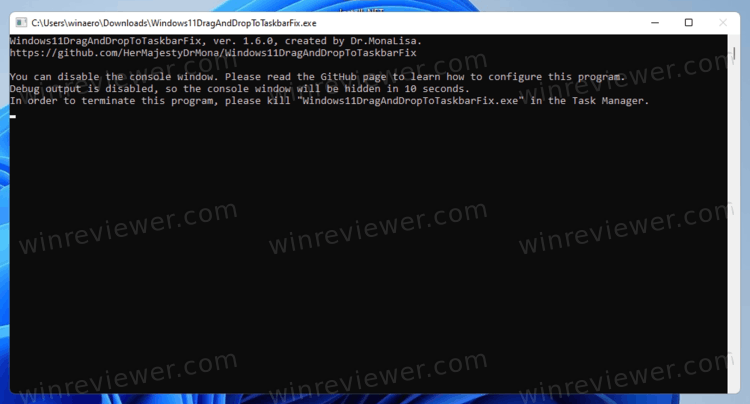
- Запустите программу (при сообщениях о том, что система не обнаружила файлы VCRUNTIME140_1.DLL и другие, используйте эту инструкцию). После запуска откроется окно командной строки, которое через короткое время само закроется.

- Сразу после этого вы сможете перетаскивать файлы и другие элементы на значки открытых программ в панели задач Windows 11.


Дополнительно, в папке с программой вы можете создать файл конфигурации с именем Windows11DragAndDropToTaskbarFixConfig.txt и добавить в него параметры, такие как включение автоматического запуска Windows11DragAndDropToTaskbarFix при входе в систему. Подробнее о файле конфигурации можно прочитать на официальной странице.
В моем тесте утилита исправно работает, из замеченных нюансов:
- При перетаскивании файлов всё так же отображается красный перечеркнутый значок «запрета действия» (но на работоспособность не влияет).
- В отзывах о проблемах с программой на GitHub есть информация о том, что при использовании нескольких мониторов, на втором монитора программа может работать неправильно.
При работе утилита не показывает своих значков в панели задач или области уведомлений: если вам требуется закрыть её, используйте диспетчер задач.
Прошло больше месяца с момента официального выпуска Windows 11. Со временем мы увидели множество улучшений, включая возможность даже устанавливать приложения Android в вашу систему. Хотя все это звучит хорошо, в Windows 11 все еще есть несколько проблем, над которыми нужно работать. По какой-то причине возможность перетаскивания файлов для открытия запущенным приложением отсутствует. С самого начала инсайдерской сборки Windows 11 до текущей стабильной версии эта функция отсутствовала.
К счастью, есть несколько способов вернуть эту функцию. Продолжайте читать, чтобы узнать, как включить функцию перетаскивания файлов для панели задач Windows 11.
Так же, как кнопка «Пуск» и меню «Пуск», которые продолжают существовать, пользователи также считают, что функция перетаскивания файлов на панель задач не должна быть удалена. Это всегда была удобная функция и продолжает использоваться. Однако Microsoft решила вернуть эту функцию и представит ее сначала инсайдерам к концу года, а затем широкой публике к началу следующего года. Итак, на данный момент есть несколько обходных путей, которые можно использовать для имитации перетаскивания файлов на панель задач в Windows 11.
Включение перетаскивания файлов на панели задач Windows 11
Сообщество, как всегда, быстро предложит решение, чтобы вернуть эту важную функцию, пока Microsoft не выпустит ее в качестве обновления. В любом случае, есть два простых способа вернуть эту удобную функцию. Давайте взглянем.
Метод 1 —
Первый способ — использовать простой инструмент, доступный на GitHub. Этот инструмент под названием Windows11DragAndDropToTaskbarFix помогает вернуть полезную функцию в Windows 11. Настройка для включения этой функции довольно проста. Следуйте инструкциям ниже.
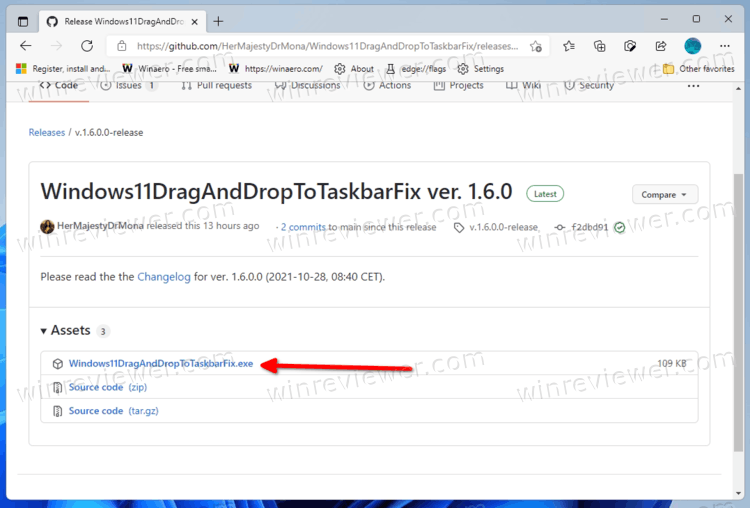
- Прежде всего, вам нужно будет перейти на эту страницу GitHub, чтобы загрузить инструмент.

- Чтобы загрузить установочный файл, просто щелкните ссылку exe, которая находится прямо под заголовком Assets.
- Установка весит всего 109 КБ. Файл должен быть скачан мгновенно.
- Загрузив файл, дважды щелкните его, чтобы запустить. Windows может выдать предупреждение о том, что у файла есть непроверенный издатель.
- Просто нажмите кнопку «Выполнить».
- Теперь программа откроет окно консоли.
- Вам вообще ничего не нужно делать. Окно также автоматически закроется.
- Вот и все. Вот как вы можете включить перетаскивание файлов на панель задач в Windows 11.
- Если вы хотите закрыть приложение, просто откройте диспетчер задач и щелкните вкладку «Процесс».
- Теперь найдите процесс Windows 11 Drag and Drop Taskbar Fix и щелкните его правой кнопкой мыши.
- В контекстном меню выберите опцию «Завершить процесс». Функция будет закрыта сразу.
- Чтобы восстановить его, просто запустите exe-файл, и все готово.


Способ 2
Второй способ — это еще один простой способ включить эту функцию. Для этого вам необходимо загрузить приложение из Microsoft Store. Итак, если у вас нет учетной записи Microsoft, входящей в вашу систему, пришло время сделать это, поскольку Магазин требует, чтобы у вас была учетная запись Microsoft для загрузки приложений и даже публикации отзывов.
- Откройте Microsoft Store и перейдите к окну поиска, которое находится посередине вверху экрана.
- Введите перетаскивание. Нажмите клавишу ввода, чтобы выполнить поиск в приложении.
- В результате вы увидите первое приложение с надписью Drag and Drop Toolbar для Windows 11. Нажмите здесь.
- Теперь нажмите синюю кнопку Get в левой части экрана. Приложение начнет загружаться на ваш компьютер.
- Приложение весит всего 1,1 МБ. Итак, это должна быть быстрая загрузка.
- После загрузки нажмите кнопку «Открыть» в Microsoft Store.
- В тот момент, когда вы откроете приложение, вы получите уведомление о том, что приложение настроено на запуск при запуске Windows.
- Кроме того, вы увидите небольшой лоток в верхней части экрана.
- Чтобы перетащить файлы в любую запущенную программу, просто перетащите файл вверх и наведите указатель мыши на панель. Затем вы можете просто перетащить файл в открытую программу, и все готово.
- Конечно, он не помещается внизу, где находится панель задач, но он все равно выполняет свою работу.


Заключение
Итак, вот оно. Вы можете использовать два разных способа переноса файлов D5ag и Drop на панель задач на вашем ПК с Windows 11. Если вы все еще используете Windows 10, вам следует придерживаться ее до тех пор, пока функция не будет развернута с помощью обновления для Windows 11. После того, как функция будет официально интегрирована в ОС, для ее использования не потребуется использовать сторонние приложения..
Какой из двух методов вам больше подходит? Сообщите нам об этом в комментариях ниже. Также поделитесь этой статьей со своими друзьями.
ЭКСКЛЮЗИВЫ ДЛЯ ПРЕМЬЕР-ЧЛЕНОВ: Найдите эти эксклюзивные предложения для участников Amazon Prime на динамики, смарт-телевизоры, смарт-часы и многое другое!
Пользователям Windows нравится удобство использования функции перетаскивания при навигации по файлам на компьютере. Простое перетаскивание файла или изображения на панель задач или в другое место упрощает и ускоряет выполнение задач.
К сожалению, пользователи ПК с Windows 11 жаловались на то, что они не находят функцию перетаскивания на своем новом устройстве. Если вы обновили ОС Windows с 10 до 11, вы заметите, что перетаскивание файлов больше не работает.
Хотя пользователи считают это проблемой и ошибкой Windows, это не всегда так. По данным Microsoft, функция перетаскивания недоступна на компьютерах с Windows 11. Microsoft была процитирована с этим заявлением, «В настоящее время перетаскивание файла в приложение на панели задач, чтобы открыть его в этом приложении, не поддерживается в Windows 11, но мы ценим все ваши отзывы и продолжим использовать их, чтобы помочь определить будущее таких функций. ”

Разочаровывает то, что вы не используете одну из самых полезных функций операционной системы Windows. Для некоторых пользователей возврат к Windows 10 может быть хорошим выходом. Если ваша функция перетаскивания по-прежнему доступна, но на вашем компьютере с Windows 11 возникают ошибки, вы можете попробовать приведенные ниже решения.
Решение № 1. Завершите задачу приложения в диспетчере задач.
- Нажмите кнопку «Пуск».
- Выберите Диспетчер задач.
- Найдите проблемное приложение и щелкните его правой кнопкой мыши.
- Выберите Завершить задачу.
Решение № 2. Установите обновления на ПК с Windows 11.
- Нажмите кнопку Windows.
- Перейдите к настройкам.
- Выберите Центр обновления Windows.
- Щелкните Проверить наличие обновлений.
- Нажмите «Перезагрузить сейчас».
Решение № 3. Выполните сканирование SFC и DISM
- Нажмите кнопку Windows.
- Найдите PowerShell.
- Щелкните Запуск от имени администратора.
- Введите следующую команду: sfc /scannow.
- После завершения сканирования введите следующую команду: DISM /Online /Cleanup-Image /RestoreHealth.
Несколько обходных путей для получения функции перетаскивания на ПК с Windows 11
Однако есть также обходные пути, которые вы можете использовать в качестве альтернативы функции перетаскивания на компьютерах с Windows 11.
Метод № 1. Используйте сочетание клавиш Alt + Tab на ПК.
- Выберите файл, который вы хотите перетащить.
- Нажмите и удерживайте левую кнопку мыши, перетаскивая файл.
- Продолжайте удерживать левую кнопку мыши и нажимайте клавиши Alt+Tab.
- Продолжайте удерживать клавишу Alt, несколько раз нажимая клавишу Tab для просмотра приложений.
- Как только вы найдете местоположение приложения, отпустите клавиши Alt и Tab.
- Теперь отпустите левую кнопку мыши, чтобы перетащить файл.
Способ №2 – Вырезать и вставить файлы
- Перейдите к местоположению вашего файла и найдите свой файл.
- Щелкните его правой кнопкой мыши.
- Выберите Вырезать.
- Перейдите в папку назначения.
- Щелкните правой кнопкой мыши в любом месте окна.
- Выберите Вставить.
Способ № 3. Используйте разделенный экран для перетаскивания файлов в Windows 11.
- Запустите текущее местоположение вашего файла.
- Теперь откройте в другом окне место назначения вашего файла.
- Расположите оба окна рядом на экране.
- Нажмите и удерживайте файл, который хотите перетащить.
- Перетащите его в папку назначения и отпустите, чтобы удалить.
Способ № 4 — отредактируйте его через реестр
- Нажмите клавишу Windows + R, чтобы открыть диалоговое окно «Выполнить».
- Введите regedit.
- Нажмите Да.
- Перейдите по следующему пути: HKEY_LOCAL_MACHINESOFTWAREMicrosoftWindowsCurrentVersionShellUpdatePackages.
- Щелкните правой кнопкой мыши на пустом месте.
- Выберите НОВОЕ > Значение Dword (32-разрядное).
- Введите следующее имя: UndockingDisabled.
- Дважды щелкните папку.
- Установите для данных значения значение 1.
- Нажмите «ОК».
Была ли статья полезной? Вы можете рассказать нам в разделе комментариев ниже.
СКИДКИ НА AMAZON TRADE-IN: Обменяйте и сэкономьте на новом устройстве Fire TV прямо сейчас!
Существует способ включить перетаскивание файлов на панель задач в Windows 11 для их открытия в запущенных приложениях. К сожалению, эта полезная функция не была добавлена в Windows 11. Панель задач в ней не позволяет перетаскивать документы на кнопки приложений.
Одна из новых функций Windows 11 — панель задач. Он отображает кнопку меню «Пуск» и запущенные приложения, выровненные по центру. Кроме того, область значков в трее работает иначе. Например, значки сети, звука и батареи представляют собой одну большую кнопку, которая при щелчке по ней открывает новую панель «Быстрые настройки».
Хотя косметические изменения не имеют большого значения, и значки по центру на панель задач можно легко отключить, есть и более серьезные недостатки. Панель задач потеряла контекстное меню. Он открывает только приложение «Настройки» и ничего больше, даже нет привычного пункта «Диспетчер задач».
Другая регрессия заключается в том, что панель задач не позволяет перетаскивать файлы на кнопки запущенного приложения. Раньше вы могли найти нужный файл в проводнике и быстро перетащить его на кнопку на панели задач. Целевое приложение откроется на экране с открытым перетаскиваемым документом, как только вы отпустите левую кнопку мыши.
Это больше не работает. В Windows 11 отображается только красный значок «Отмена», указывающий на то, что функция не поддерживается.
Разработчики могут восстановить эту функциональность в следующих выпусках Windows 11, но не в текущем. К счастью, существует стороннее решение, исправляющее работу панели задач в стабильном выпуске Windows 11. Приложение под названием Windows11DragAndDropToTaskbarFix — это то, что нам нужно, чтобы включить перетаскивание файлов на панель задач в Windows 11.
- Скачайте Windows11DragAndDropToTaskbarFix с GitHub. Это приложение с открытым исходным кодом.

- Разблокируйте загруженный исполняемый файл.
- Запустите файл. Если вы получаете сообщение об ошибке отсутствия файла vcruntime140_1.dll, загрузите и установите файл vc_redist.x64.exe для среды выполнения C ++ с сайта Microsoft.

- Приложение откроет окно консоли, которое автоматически закроется через несколько секунд.

- Теперь вы можете перетаскивать документы на кнопки панели задач, чтобы открывать их непосредственно в запущенных приложениях.

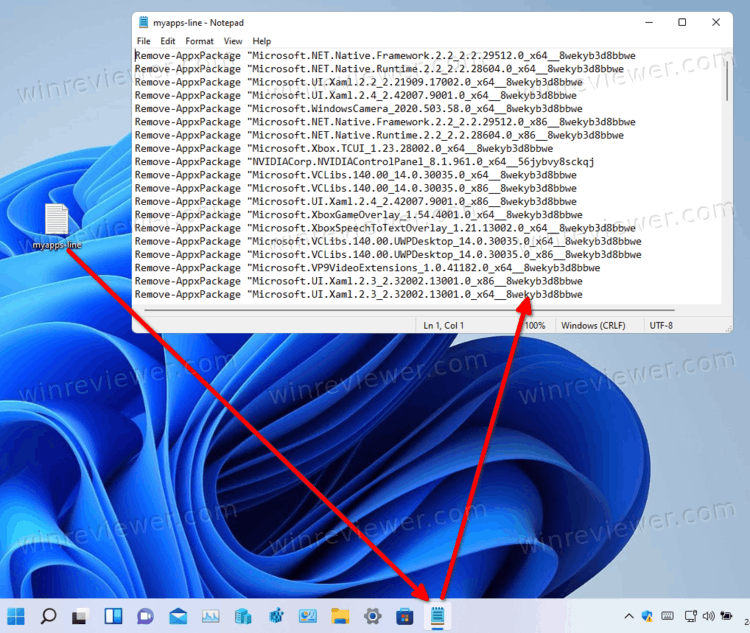
Готово! Это самый простой способ включить функцию перетаскивания файлов для панель задач в Windows 11.
Приложение не отображает значок на панели задач, а также не отображает значок в области уведомлений. Таким образом, чтобы выйти из него, вам нужно убить его процесс с помощью диспетчера задач или выполнив команду taskkill /IM Windows11DragAndDropToTaskbarFix.exe /F в Терминале Windows.
Настройка программы Windows11DragAndDropToTaskbarFix
Приложение поддерживает настройку с помощью текстового файла конфигурации. Вам необходимо вручную создать файл с именем Windows11DragAndDropToTaskbarFix.txt в той же папке, где находится файл Windows11DragAndDropToTaskbarFix.exe.
Это обычный текстовый файл, который может содержать несколько параметров. Вы можете узнать о них больше на домашней странице приложения.
Стоит отметить пару из них.
AutomaticallyRunThisProgramOnStartup = 0 | 1— запускать приложение автоматически при запуске системы. 0 означает отключено, используется по умолчанию.- ShowConsoleWindowOnStartup = 1 | 0 — показать или скрыть окно консоли. 1 по умолчанию.
Приложение работает вполне достойно. Однако с ним всё же есть небольшая проблема. Хотя вы можете перетаскивать документы на панель задач, на ней по-прежнему отображается значок отмены. Вот с этим ничего сделать нельзя.
![]()
В любом случае, приложение кажется важным решением для новичков в Windows 11, которые полагаются на функцию панели задач Drap-n-drop.
Источник: Winaero
💡Узнавайте о новых статьях быстрее. Подпишитесь на наши каналы в Telegram и Twitter.
Судя по тому, что вы читаете этот текст, вы дочитали эту статью до конца. Если она вам понравилась, поделитесь, пожалуйста, с помощью кнопок ниже. Спасибо за вашу поддержку!
Панель задач в Windows 11 создавалась с нуля на основе Edge WebViews и при этом растеряла часть привычных и важных для пользователей возможностей. Вы не поверите, но теперь нельзя просто так взять и перенести приложение на Панель задач. Как нельзя перенести файл на приложение в Панели чтобы открыть его.
У этой проблемы нет решения, но есть несколько обходных путей с различным уровнем удобства. Расскажу о каждом из них.
Используйте Alt + Tab
Раньше вы могли перенести файл на иконку приложения в Панели задач и сразу же открыть его. Теперь так сделать нельзя, но есть обходное решение в виде переключения окон с помощью Alt + Tab.
К сожалению, до нажатия этой комбинации горячих клавиш придётся сначала запустить конечное приложение. То есть если вы хотите открыть файл в Photoshop через перенос, то сначала нужно открыть Photoshop.
Когда всё готово, начните перетаскивать нужный файл. Не отпуская кнопку мыши, с помощью Alt + Tab переключитесь на окно нужного приложения. Перенесите файл в него. Удобно? Ещё бы! Лучше, чем было.
Перенос между двумя приложениями или папками
Если вы хотите перенести файл между двумя приложениями, самым простым способом теперь будет – расположить окна рядом. А затем перенести файл.
Установка StartAllBack
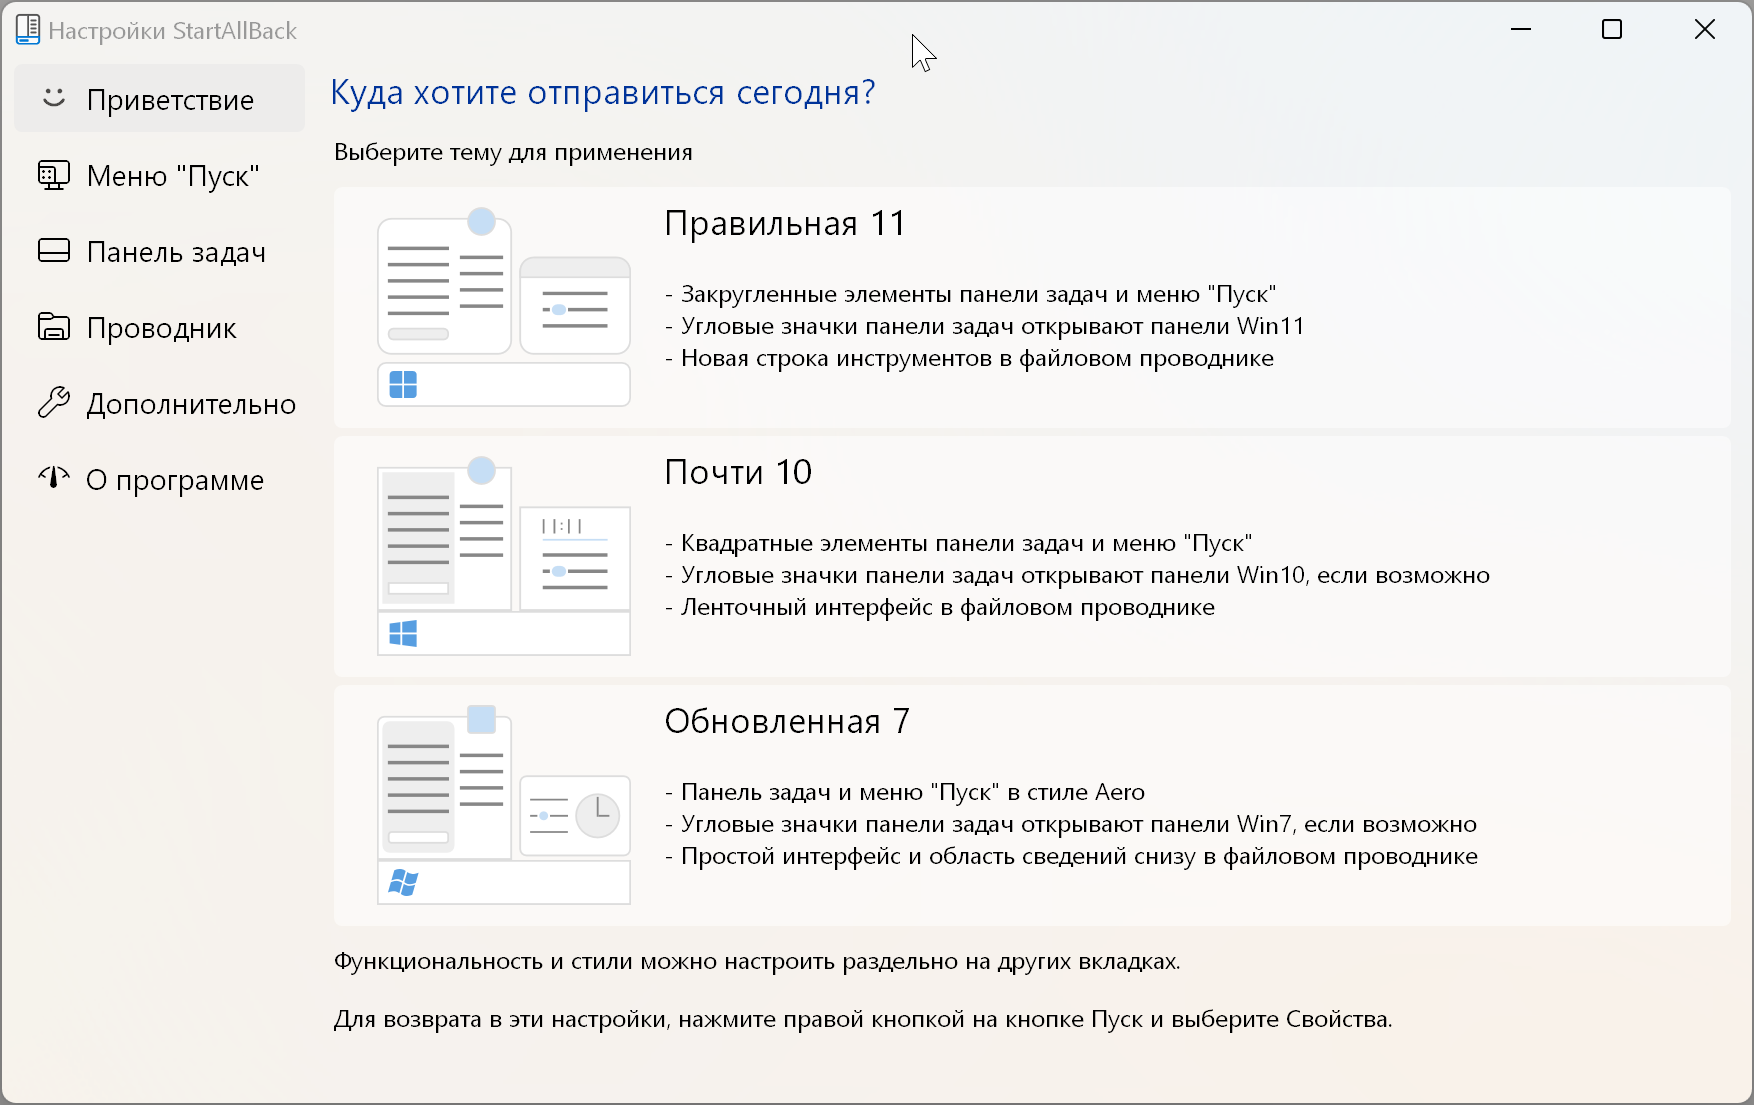
Как всегда, есть альтернативные решения от разработчиков. В этот раз нам понадобится приложение StartAllBack, которое старается вернуть всё как было.
К сожалению, на данный момент перенос на Панель задач работает не для всех приложений. Но разработчики знают о проблеме и постоянно вносят улучшения в свою программу.
Сразу после установки вы получаете старую добрую Панель задач из Windows 10 со всеми её возможностями. Ну или около того.
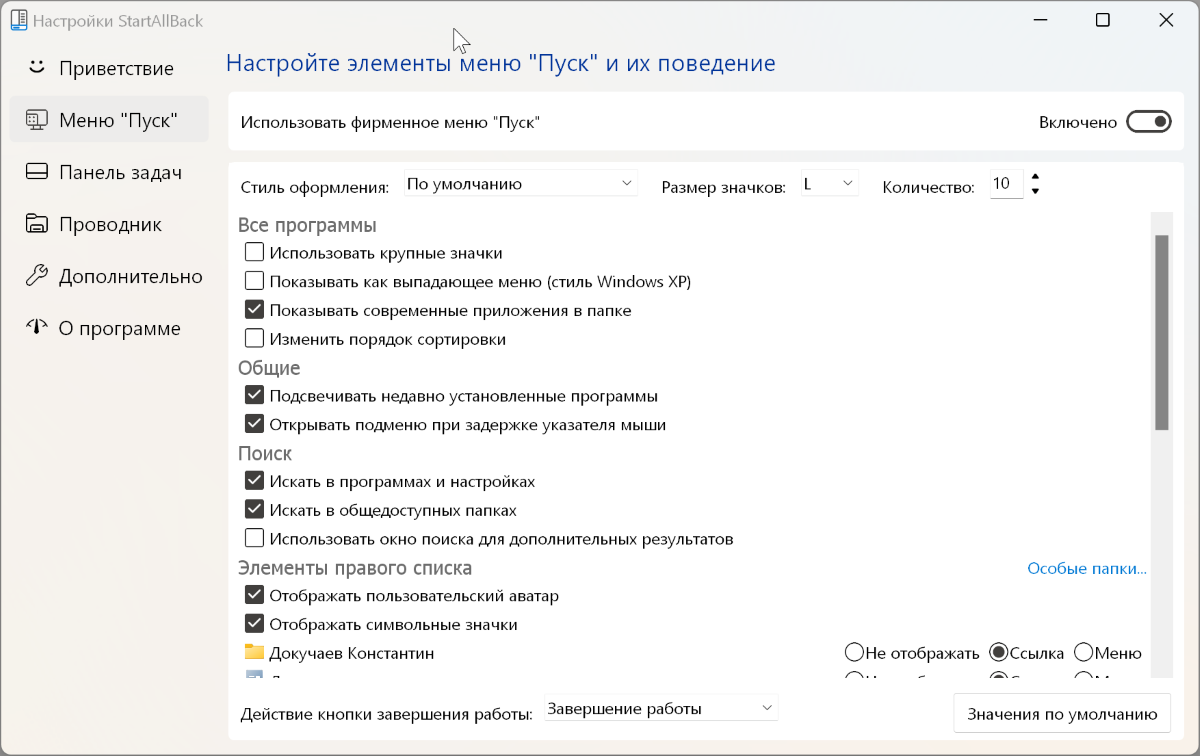
В настройках приложения можно поменять стиль и поведение новой старой Панели задач.
Изменение реестра
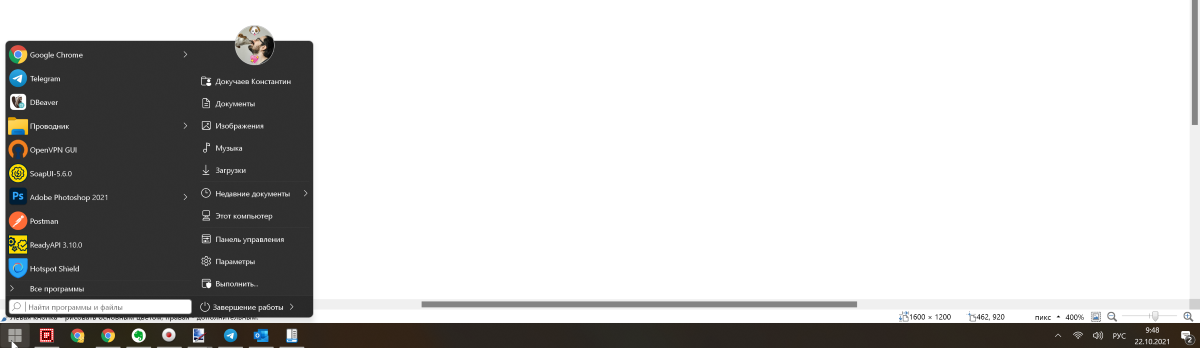
У этого способа есть минус. После его применения у вас перестанут работать кнопка Пуск, поиск и кортана. Иконки будут по-прежнему отображаться, но на этом всё.
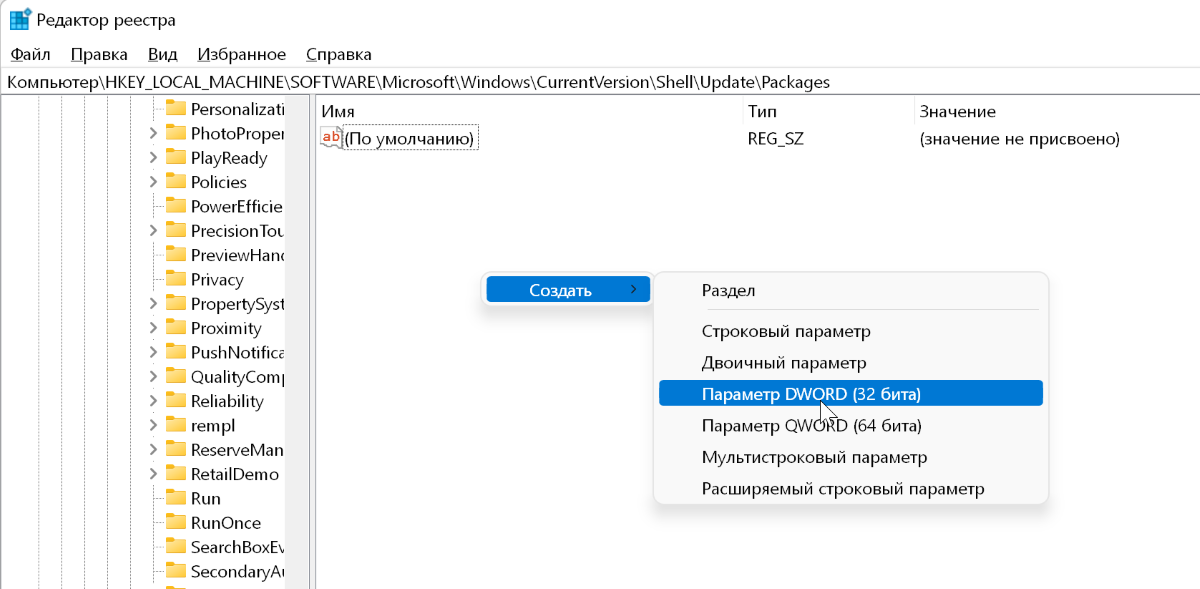
Откройте редактор реестра и перейдите в нём по пути HKEY_LOCAL_MACHINESOFTWAREMicrosoftWindowsCurrentVersionShellUpdatePackages
В каталоге создайте новый Параметр DWORD (32 бита) с названием UndockingDisabled.
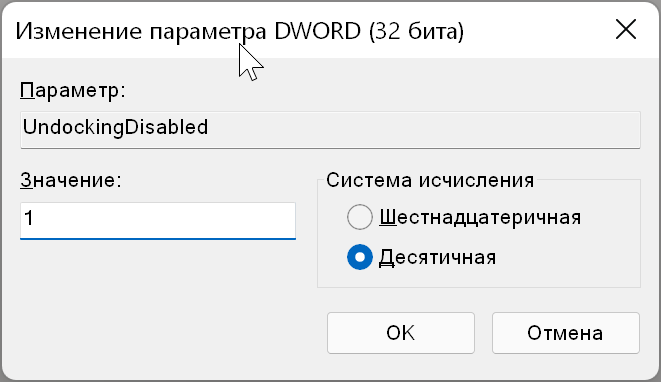
Перейдите к редактированию ключа. Выберите десятичную систему исчисления и укажите значение 1.
Закройте редактор реестра и перезагрузите компьютер. Теперь всё должно работать.
Для меня самым крутым решением из всех оказалась установка StartAllBack, что я и рекомендую сделать вам. Теперь моя Панель задач находится сверху, а можно сделать сбоку. При этом работает перенос файлов и превью папок.

