Присутствие VPN-решений в современном состоянии вычислительных технологий достигло своего апогея. А поскольку Windows 10 является одной из наиболее часто используемых операционных систем, большая часть виртуальных частных сетей работает под управлением Microsoft Windows.
Хотя они в основном работают хорошо, существуют определенные проблемы, особенно после крупных обновлений Windows, таких как обновление за октябрь 2018 года и обновление за май 2019 года.
Эти проблемы довольно часто встречаются после каждого нового основного выпуска, и мы решили предоставить вам список возможных решений, которые должны помочь вам решить их.
Если вы вдруг столкнулись с множеством проблем с VPN после обновления Windows, обязательно ознакомьтесь с ними ниже.
- Обновите Windows 10 снова
- Переустановите драйверы
- Изменить реестр
- Переустановите VPN
- Отключить антивирус
- Отключить IPv6
- Устранить неисправность соединения
- Сброс вашего компьютера до заводских настроек
1: обновить Windows 10
Кажется, что обновления Windows 10, более или менее, работают в той же последовательности. Корпорация Майкрософт предоставляет серьезное обновление, чтобы внести улучшения, появилось большое количество ошибок, и затем они, ошеломленные большой обратной реакцией сообщества, в конечном итоге выдвигают соответствующие исправления как можно скорее.
Вот как это в основном работает. Поскольку это широко распространенная проблема, которая возникла в основном после некоторых обновлений, они вскоре предоставили разрешение.
Многие пользователи, у которых возникли проблемы с VPN после обновления, через некоторое время разбираются, обновляя Windows 10. Итак, убедитесь, что у вас установлены все доступные обновления, и попробуйте снова запустить VPN. Если вы не можете заставить его работать независимо, обязательно переходите к альтернативным шагам.
Вот как проверить наличие доступных обновлений в Windows 10:
- Нажмите клавишу Windows + I, чтобы вызвать приложение « Настройки».

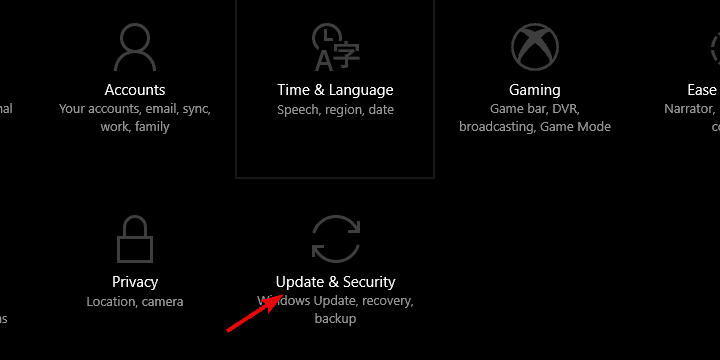
- Выберите « Обновления и безопасность».
- Выберите Центр обновления Windows на левой панели.
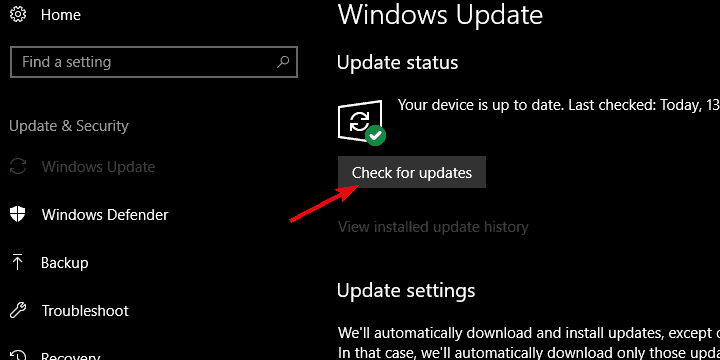
- Нажмите на кнопку « Проверить наличие обновлений ».


Если вы хотите избежать проблем с VPN, вызванных Центром обновления Windows, очевидным решением будет просто заблокировать обновления. Вот идеальный и простой в использовании инструмент для этого.
Имейте в виду, что не установка последних обновлений безопасности может представлять угрозу для вашего ПК. Поэтому используйте этот метод только в крайних случаях, когда вам действительно нужен VPN.
2: переустановите драйверы
Некоторые пользователи решили проблему, полностью удалив все сетевые адаптеры, но вы можете указать переустановку драйверов WAN Miniport.
В любом случае, мы все знаем, как общеизвестно, что Windows 10 управляет драйверами и как общие и обязательные драйверы могут оказывать незаконное влияние на производительность и стабильность системы.
Чтобы избежать этого, вы можете переустановить драйверы, измененные последним обновлением, и позволить им переустанавливать самостоятельно. Кроме того, вторичные драйверы, предоставляемые сторонним VPN, лучше, чем те, которые предоставляет Центр обновления Windows.
Таким образом, вы также можете удалить их и VPN, а затем просто получить их, переустановив VPN с нуля. Если вы хотите безопасно и надежно удалить программное обеспечение VPN с вашего компьютера, чтобы просто установить его снова, вы можете использовать один из этих инструментов удаления.
Вот как переустановить сетевые драйверы WAN Miniport в Windows 10:
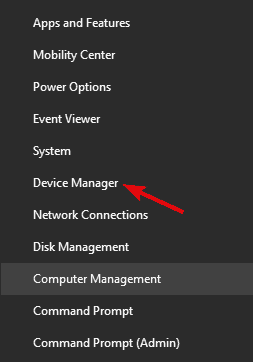
- Щелкните правой кнопкой мыши Пуск и выберите Диспетчер устройств в меню PowerUser.
- Разверните раздел Сетевые адаптеры.
- Щелкните правой кнопкой мыши каждый отдельный драйвер WAN Miniport и удалите его.
- Перезагрузите компьютер и снова откройте диспетчер устройств.
- Перейдите к сетевым адаптерам, щелкните правой кнопкой мыши каждый отдельный минипорт и установите его.
- Попробуйте запустить VPN еще раз.


Обновлять драйверы автоматически (рекомендуется)
После удаления драйверов мы рекомендуем переустановить / обновить их автоматически. Загрузка и установка драйверов вручную — это процесс, который несет в себе риск установки неправильного драйвера, что может привести к серьезным сбоям в работе вашей системы.
Более безопасный и простой способ обновления драйверов на компьютере с Windows — использование автоматического инструмента. Мы настоятельно рекомендуем инструмент обновления драйверов Tweakbit.
Он автоматически идентифицирует каждое устройство на вашем компьютере и сопоставляет его с последними версиями драйверов из обширной онлайн-базы данных.
Вот как это работает:
-
- Загрузите и установите TweakBit Driver Updater
- После установки программа начнет сканирование вашего компьютера на наличие устаревших драйверов автоматически. Driver Updater проверит установленные вами версии драйверов по своей облачной базе данных последних версий и порекомендует правильные обновления. Все, что вам нужно сделать, это дождаться завершения сканирования.
- По завершении сканирования вы получите отчет обо всех проблемных драйверах, найденных на вашем ПК. Просмотрите список и посмотрите, хотите ли вы обновить каждый драйвер по отдельности или все сразу. Чтобы обновить один драйвер за раз, нажмите ссылку «Обновить драйвер» рядом с именем драйвера. Или просто нажмите кнопку «Обновить все» внизу, чтобы автоматически установить все рекомендуемые обновления.
Примечание. Некоторые драйверы необходимо устанавливать в несколько этапов, поэтому вам придется нажимать кнопку «Обновить» несколько раз, пока не будут установлены все его компоненты.
Отказ от ответственности: некоторые функции этого инструмента не являются бесплатными.
3: Изменить реестр
Как отметили некоторые технически подкованные пользователи, эта ошибка может иметь корни в PolicyEditor. Это основная часть платформы Windows, которая регулирует политику безопасности и доступа для всех отдельных пользователей на одном компьютере.
Чтобы решить эту возможную проблему с VPN, нам нужно изменить параметры политики, вставив исключение для UDP. Теперь лучший способ сделать это — использовать редактор реестра.
Конечно, с помощью этого инструмента мы перемещаемся в опасной зоне, поэтому будьте осторожны и ничего не удаляйте, находясь там.
Следуйте этим инструкциям, чтобы получить доступ к редактору реестра и создать новый вход, который должен повторно включить VPN в Windows 10:
-
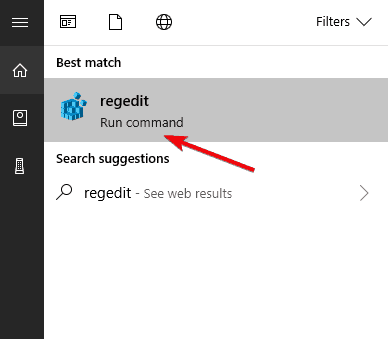
- В строке поиска Windows введите regedit и откройте regedit из списка результатов.
- Сделайте резервную копию вашего реестра.
- Перейдите в это место:
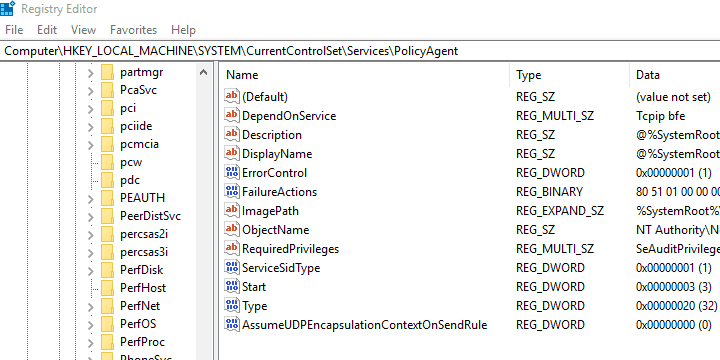
- ComputerHKEY_LOCAL_MACHINESYSTEMCurrentControlSetServicesPolicyAgent
- Щелкните правой кнопкой мыши пустую область в правом окне и выберите «Создать»> «DWORD».
- Назовите новый ввод DWORD AssumeUDPEncapsulationContextOnSendRule.
- Измените его значение на 2 и сохраните его.
- Закройте редактор реестра и перезагрузите компьютер.
- В строке поиска Windows введите regedit и откройте regedit из списка результатов.


4: переустановить VPN
Так как проблемы, вызванные обновлением, могут затрагивать как сторонние VPN, так и встроенные Windows VPN, соответственно, мы решили охватить оба.
Что касается первого, если вы уверены, что до обновления все было в порядке, а затем все вдруг пошло на юг, мы советуем вам переустановить клиент, который вы используете.
Переустановка — это также реинтеграция VPN в измененное системное окружение, так что это может помочь. Кроме того, пока мы работаем над этим, не забудьте приобрести последнюю версию вашего VPN на ваш выбор.
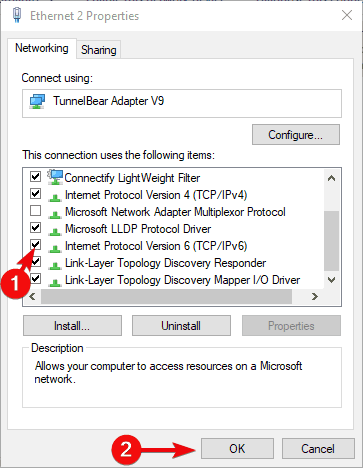
Мы обязательно продемонстрировали всю процедуру и решили использовать TunnelBearVPN в качестве примера, но это относится ко всем решениям VPN в целом. Обязательно следуйте инструкциям, которые мы предоставили ниже:
- В панели поиска Windows введите Control и откройте панель управления из списка результатов.
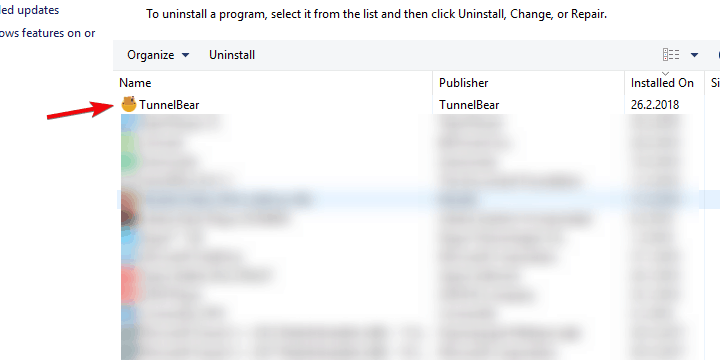
- В представлении «Категория» нажмите « Удалить программу» в разделе «Программы».
- Щелкните правой кнопкой мыши по вашему VPN— решению и удалите его.
- Используйте IObit Uninstaller Pro (рекомендуется) или любой другой сторонний деинсталлятор, чтобы очистить все оставшиеся файлы и записи реестра, сделанные VPN.
- Перезагрузите компьютер.
- Загрузите последнюю версию VPN на ваш выбор (CyberGhostVPN — наш выбор) и установите ее.

5: отключить антивирус
Другая возможная причина этой ошибки может заключаться в стороннем антивирусе или некоторых его дочерних компаниях. Современные антивирусные решения часто бывают в костюмах, которые включают сторонние меры безопасности брандмауэра.
Они пригодятся, особенно если вы достаточно осведомлены, чтобы настроить их, но, с другой стороны, известны конфликтами со службами Windows.
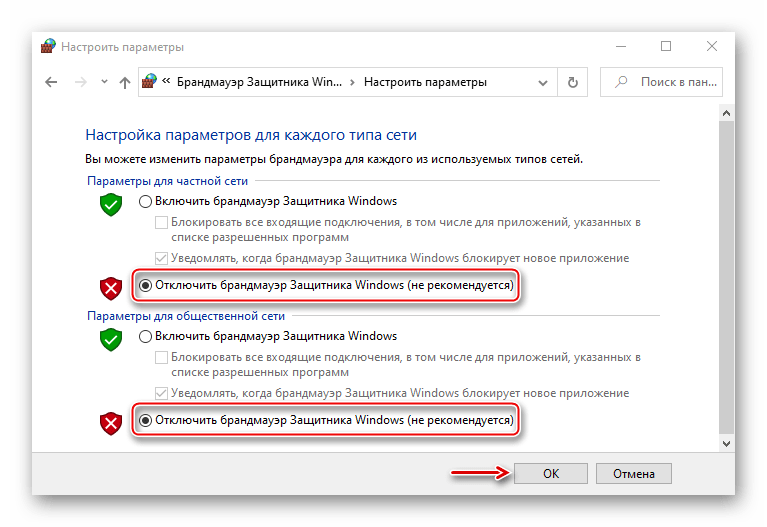
Если вы используете VPN через Windows 10 VPN, предоставленную Microsoft, обязательно отключите сторонний брандмауэр, прежде чем делать это. Или, что еще лучше, ради устранения неполадок полностью отключите антивирус и оттуда отойдите.
Кроме того, убедитесь, что ваш собственный брандмауэр Windows не препятствует доступу VPN к удаленным серверам. Вот как добавить исключение в брандмауэр Windows, выполнив несколько простых шагов:
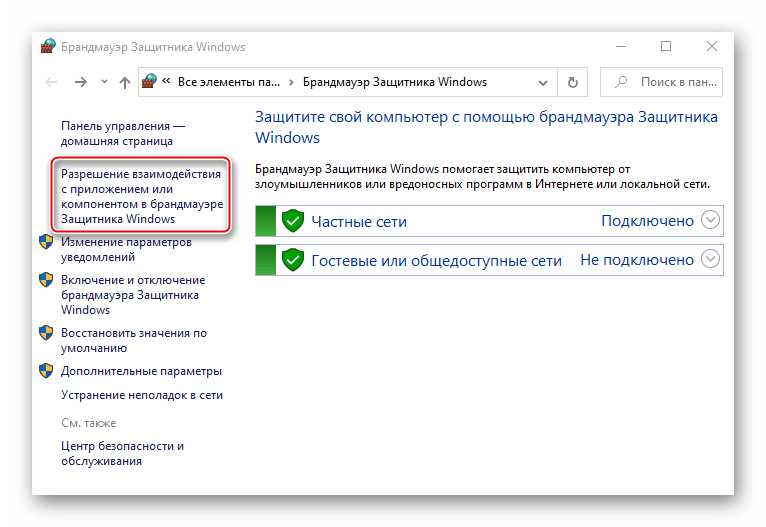
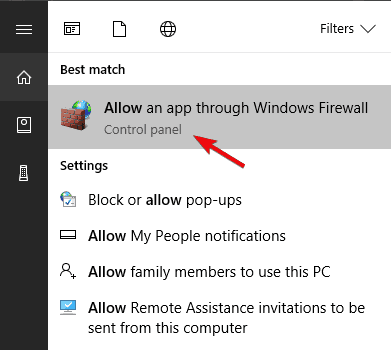
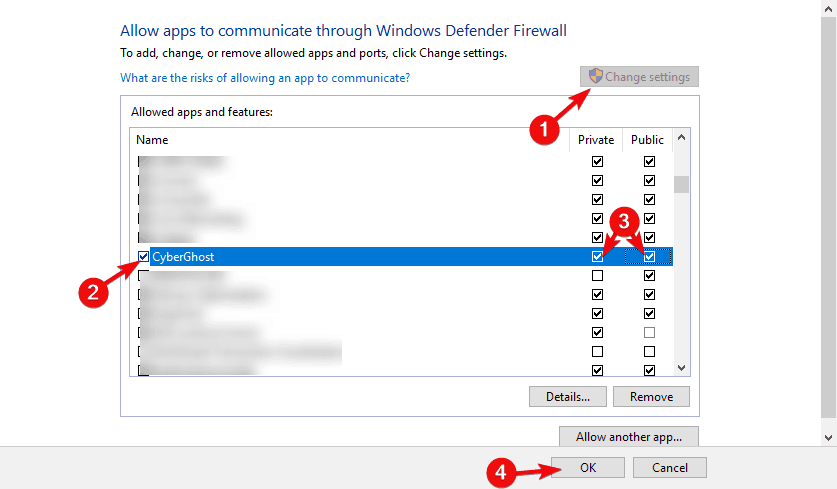
- На панели поиска Windows введите Разрешить и выберите « Разрешить приложение через брандмауэр Windows ».
- Нажмите на кнопку « Изменить настройки ».
- Найдите свой VPN в списке и установите флажок рядом с ним. Также убедитесь, что включены как публичные, так и частные сети.
- Подтвердите изменения и попробуйте снова подключиться через VPN.
Многие пользователи столкнулись с проблемами безопасности после отключения своего антивируса! Держите свой антивирус и VPN в этом руководстве.
6: отключить IPv6
Проблемы с подключением, с или без VPN, довольно часто встречаются после каждого нового крупного обновления. Крупные обновления, как правило, вносят определенные изменения в настройки вашего адаптера, делая его непригодным для использования в процессе .
Теперь на шаге 7 мы попытаемся обратиться к универсальным настройкам соединения, но этот шаг касается только IPv6. А именно, для пользователей со старой конфигурацией проблема может возникнуть из-за конфликта с интернет-протоколом.
Большинство пользователей, которым этот шаг был полезен, отключили IPv6, но вы можете попробовать отключить IPv4 и придерживаться IPv6.
Если вы не уверены, как отключить IPv6 (или IPv4, его более старый вариант), выполните следующие действия:
- Введите Control на панели поиска Windows и откройте панель управления из списка результатов.
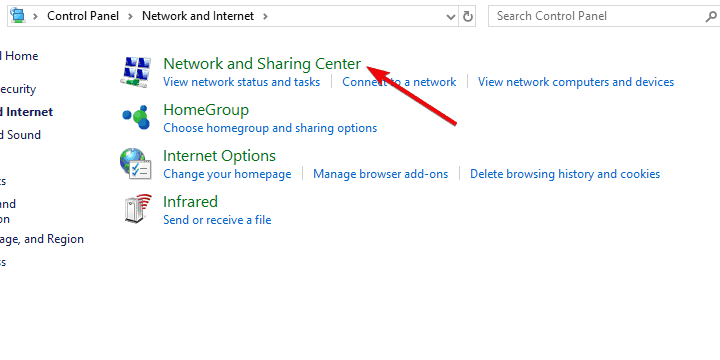
- Откройте Сеть и Интернет, а затем Центр управления сетями и общим доступом.
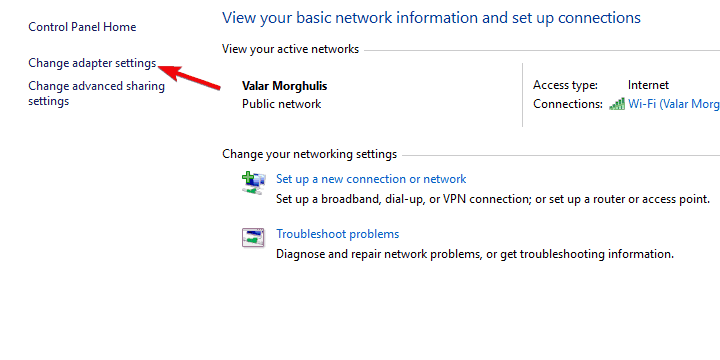
- Выберите « Изменить настройки адаптера » на левой панели.
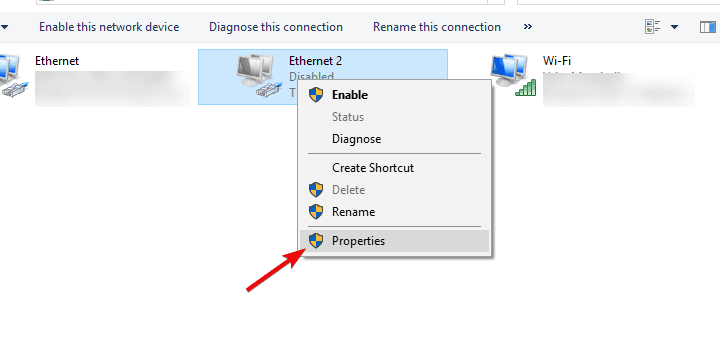
- Щелкните правой кнопкой мыши на сетевом адаптере VPN и откройте Свойства.
- Снимите флажок рядом с IPv6 и подтвердите изменения.
- Попробуйте запустить VPN позже.


Если этот метод не работает, вы должны снова включить IPv6. Проверьте это полное пошаговое руководство, чтобы сделать это.
7. Устраните неполадки в вашем соединении
Мы не хотим показывать пальцем в сторону VPN, пока не устраним все возможные проблемы с подключением.
Другими словами, убедитесь, что вы можете подключиться без VPN в первую очередь. Если это не так, мы советуем вам выполнить стандартные действия по устранению неполадок и перейти оттуда.
Если вы попали в середину и не знаете, что делать, вот несколько действий, которые вы должны рассмотреть:
- Перезагрузите ваш роутер и / или модем.
- Флеш DNS.
- Перезапустите связанные службы.
- Запустите выделенное средство устранения неполадок подключения.
- Отключить межсетевой экран маршрутизатора.
- Обновите прошивку роутера.
- Сброс маршрутизатора / модема до заводских настроек.
8: Сброс вашего компьютера до заводских настроек
Наконец, если ни одно из решений не оказалось полезным, мы рекомендуем восстановить заводские настройки вашего компьютера.
Мы хорошо понимаем, что это далеко от желаемого результата, но если вы не в состоянии играть в карты и сильно полагаетесь на VPN, это решение может оказаться не таким смешным, как кажется на первый взгляд.
Прежде чем делать это, обязательно сделайте резервную копию всех данных из системного раздела в раздел данных, внешний жесткий диск или облачную службу по вашему выбору.
Если вы не уверены, как восстановить на компьютере Windows 10 значения по умолчанию и обновить его в процессе, следуйте приведенным ниже инструкциям:
- В строке поиска Windows введите Восстановление и откройте Параметры восстановления.
- В разделе « Перезагрузить этот компьютер » нажмите кнопку « Начать ».
- Выберите, хотите ли вы сохранить или удалить файлы из системного раздела и нажмите «Далее».
- Следуйте инструкциям до полного восстановления системы до заводских значений.
- Установите VPN снова, и проблема, вызванная обновлением, должна исчезнуть.


Содержание
- Важная информация
- Способ 1: Переустановка сетевых адаптеров
- Способ 2: Изменение параметров реестра
- Способ 3: Настройка антивирусного ПО
- Способ 4: Отключение протокола IPv6
- Способ 5: Остановка службы Xbox Live
- Вопросы и ответы

Виртуальная частная сеть (VPN) – это сеть, состоящая из двух и более дозволенных узлов, а также программное обеспечение, которое позволяет скрывать реальные IP-адреса и надежно шифровать весь трафик. Таким образом эта технология обеспечивает высокую конфиденциальность и безопасность в интернете, а также позволяет посещать заблокированные ресурсы. Тем не менее даже при правильной настройке иногда к ВПН не удается подключиться. Сегодня мы расскажем, как можно исправить эту проблему на компьютере с Windows 10.
Важная информация
В первую очередь убедитесь, что у вас есть интернет. Для этого попробуйте открыть какой-нибудь сайт обычным способом. При отсутствии соединения сначала придется его восстановить. О том, как это сделать, мы писали в отдельных статьях.
Подробнее:
Исправляем проблему с подключением к Wi-Fi сети в Windows 10
Исправляем проблему с отсутствием интернета в Windows 10
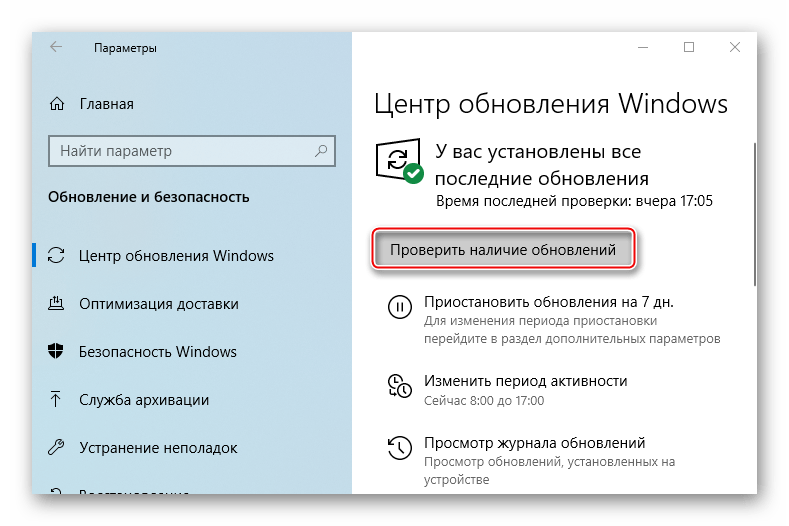
Убедитесь, что вы пользуетесь последней версией Виндовс 10. Для этого проверьте наличие обновлений к ней. О том, как обновить «десятку», мы рассказывали в другой статье.
Подробнее: Как обновить Windows 10 до последней версии
Причиной отсутствия подключения может быть конкретный ВПН-сервер. В этом случае попробуйте поменять его, например, выберите из списка сервер другой страны.
Если для реализации виртуальной частной сети используется стороннее ПО, а не встроенная в Windows функция, сначала попробуйте обновить его, а при отсутствии такой возможности просто переустановите.
Способ 1: Переустановка сетевых адаптеров
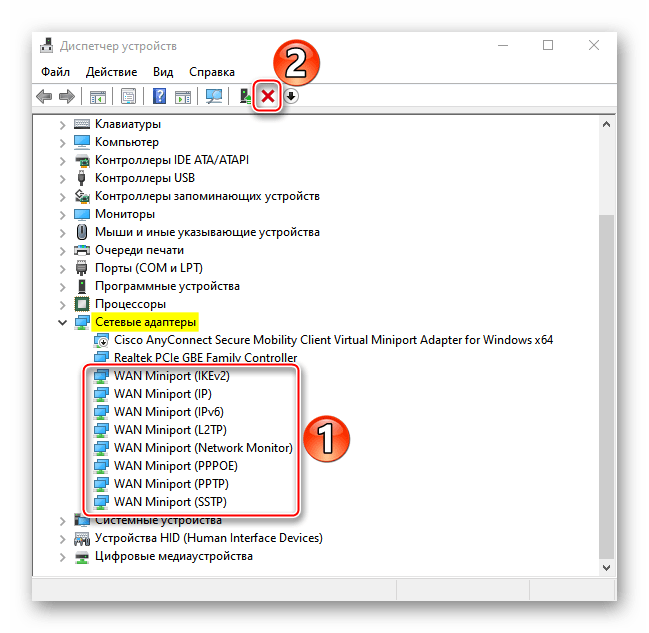
В зависимости от установленного на компьютере оборудования (сетевая карта, датчики Wi-Fi и Bluetooth) в «Диспетчере устройств» будет отображено несколько сетевых адаптеров. Там же будут устройства WAN Miniport – системные адаптеры, которые как раз используются для ВПН-подключения через различные протоколы. Для решения проблемы попробуйте переустановить их.
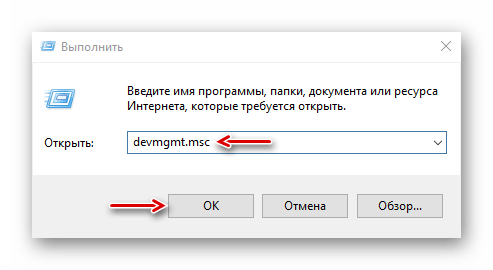
- Сочетанием клавиш Win+R вызываем окно «Выполнить», вводим команду
devmgmt.mscи жмем «OK».

Читайте также:
Вызов оснастки «Выполнить» в ОС Windows 10
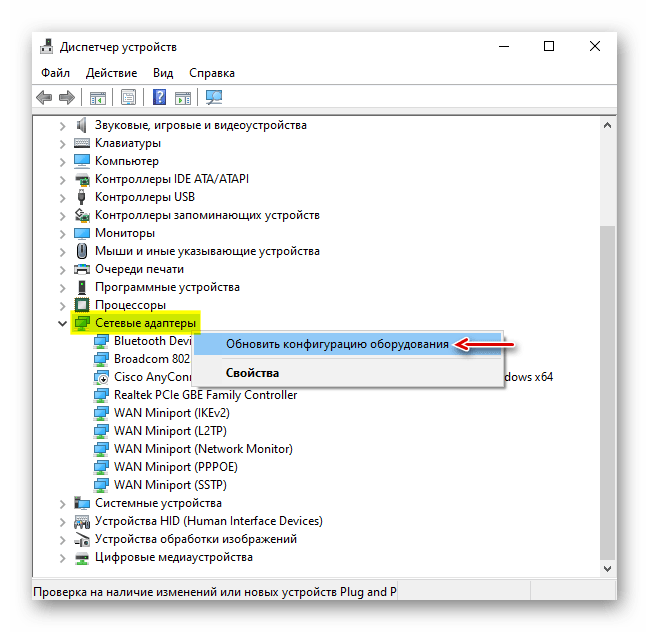
Как открыть «Диспетчер устройств» в Windows 10 - Открываем вкладку «Сетевые адаптеры» и удаляем все устройства WAN Miniport.
- Щелкаем правой кнопкой мышки по вкладке «Сетевые адаптеры» и жмем «Обновить конфигурацию оборудования». Устройства вместе с драйверами будут снова переустановлены. Перезагружаем компьютер.
Способ 2: Изменение параметров реестра
При использовании подключения L2TP/IPsec внешние компьютеры-клиенты под управлением Windows могут не подключиться к VPN-серверу, если он находится за NAT (устройство для преобразования частных сетевых адресов в публичные). Согласно статье, размещенной на странице поддержки Microsoft, обеспечить связь между ними можно, если дать понять системе, что сервер и ПК-клиент находятся за устройством NAT, а также разрешить UDP-портам инкапсулировать пакеты по L2TP. Для этого в реестре необходимо добавить и настроить соответствующий параметр.
- В окне «Выполнить» вводим команду
regeditи жмем «OK».

Читайте также: Как открыть реестр в Windows 10
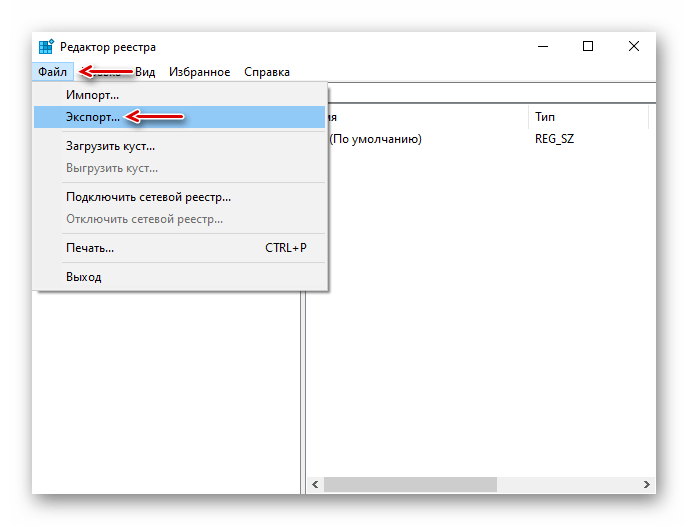
- Работать будем с разделом «HKEY_LOCAL_MACHINE (HKLM)», поэтому сначала делаем его резервную копию. Выделяем ветку, открываем вкладку «Файл» и щелкаем «Экспорт».
- Выбираем место сохранения копии, указываем ее имя и жмем «Сохранить».

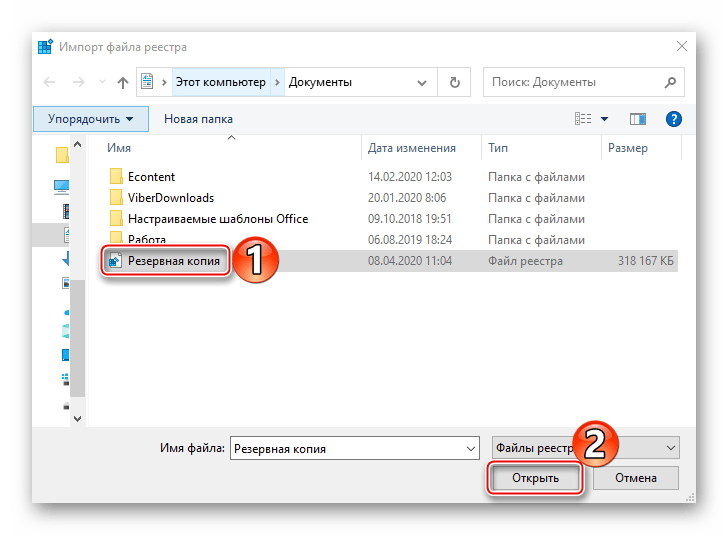
Чтобы потом восстановить раздел, открываем вкладку «Файл» и выбираем «Импорт».

Находим сохраненную копию реестра и нажимаем «Открыть».
- Переходим по пути:
HKLMSYSTEMCurrentControlSetServicesPolicyAgentВ правой части реестра щелкаем правой кнопкой мышки по свободной области, жмем «Создать» и выбираем «Параметр DWORD (32 бита)».
- В названии файла вписываем:
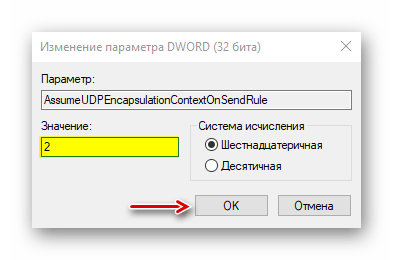
AssumeUDPEncapsulationContextOnSendRule
- Щелкаем правой кнопкой мышки по созданному файлу и жмем «Изменить».
- В поле «Значение» вводим 2 и щелкаем «OK». Перезагружаем компьютер.


Также важно, чтобы на роутере были открыты UDP-порты, необходимые для работы L2TP (1701, 500, 4500, 50 ESP). О пробросе портов на маршрутизаторах разных моделей мы подробно писали в отдельной статье.
Подробнее:
Как открыть порты на роутере
Как открыть порты в брандмауэре Windows 10

Способ 3: Настройка антивирусного ПО
Брандмауэр Windows 10 или файервол антивирусной программы могут блокировать любые подключения, которые считают незащищенными. Чтобы проверить эту версию, отключите на время защитное ПО. О том, как это сделать, мы подробно писали в других статьях.
Подробнее:
Как отключить антивирус
Как отключить брандмауэр Windows 10
Долго оставлять систему без антивирусного ПО не рекомендуется, но если она блокирует ВПН-клиент, его можно добавить в список исключений антивируса или брандмауэра Виндовс. Информация об этом есть в отдельных статьях у нас на сайте.
Подробнее:
Как добавить программу в исключения антивируса
Как добавить программу в исключения брандмауэра Windows 10
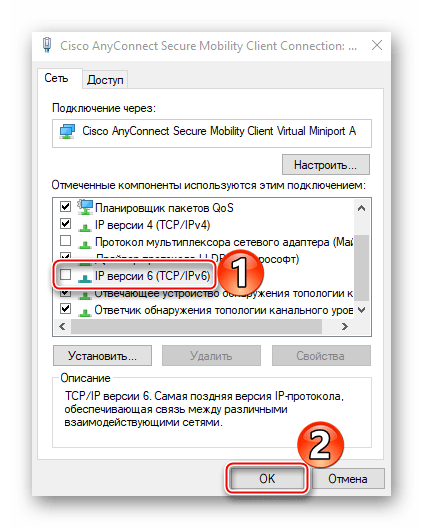
Способ 4: Отключение протокола IPv6
VPN-подключение может оборваться из-за утечки трафика в публичную сеть. Нередко причиной этому становится протокол IPv6. Несмотря на то что ВПН обычно работает с IPv4, в операционной системе по умолчанию включены оба протокола. Поэтому IPv6 также может использоваться. В этом случае попробуйте отключить его для конкретного сетевого адаптера.
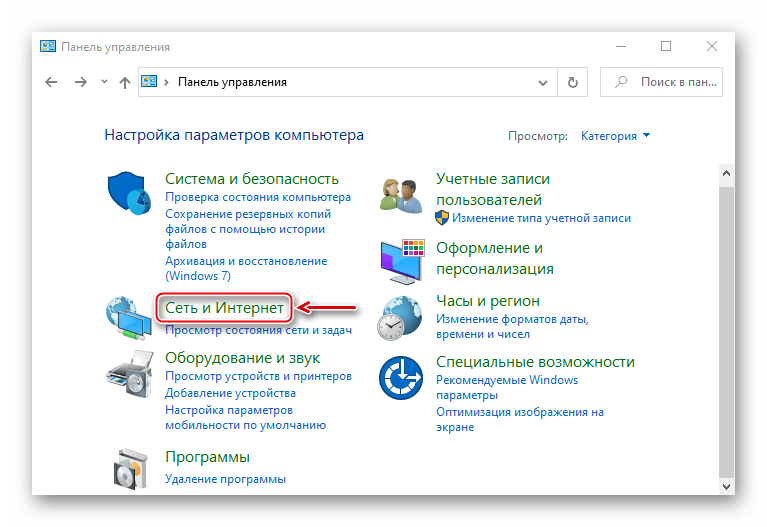
- В поиске Windows вводим «Панель управления» и открываем приложение.

Читайте также: Открытие «Панели управления» на компьютере с Windows 10
- Заходим в «Сеть и Интернет».
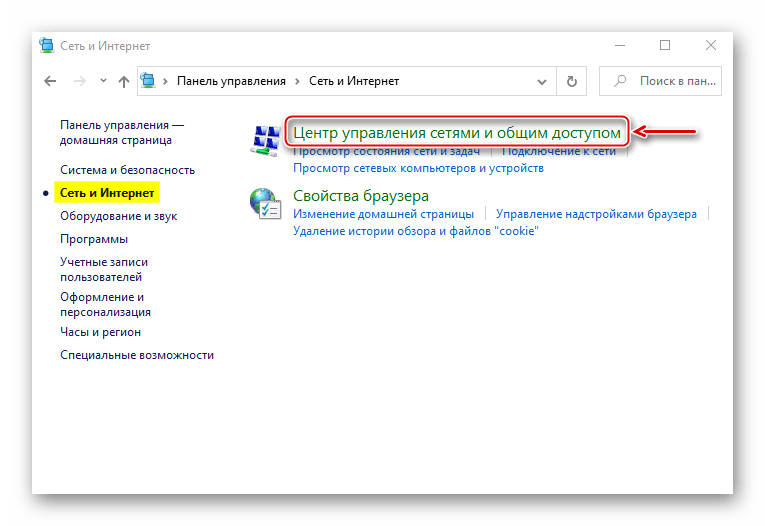
- Открываем «Центр управления сетями и общим доступом».
- Входим в раздел «Изменение параметров адаптера».
- Жмем правой кнопкой мышки по сетевому адаптеру, через который реализуется VPN, и открываем «Свойства».
- Снимаем галочку напротив IPv6 и нажимаем «OK». Перезагружаем компьютер.


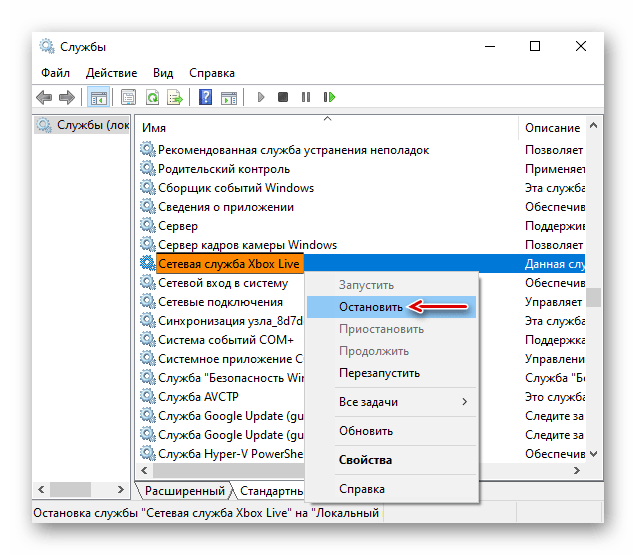
Способ 5: Остановка службы Xbox Live
На стабильность ВПН-соединения может влиять разное ПО, включая системные компоненты. Например, согласно обсуждениям на форумах, многие пользователи смогли решить проблему путем остановки службы Xbox Live.
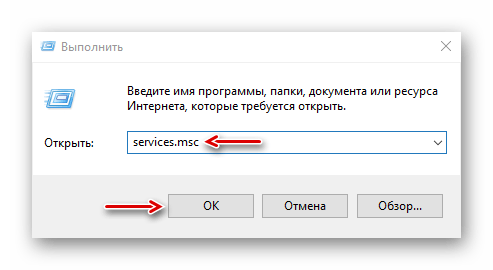
- В окне «Выполнить» вводим команду
services.mscи жмем «OK».
Читайте также: Запуск оснастки «Службы» в ОС Windows 10
- Находим компонент «Сетевая служба Xbox Live». Если она запущена, щелкаем по ней правой кнопкой мышки и жмем «Остановить».
Надеемся вы решили проблему с подключением к VPN в Windows 10. Мы рассказали о наиболее распространенных и общих способах. Но если вам не помогли наши рекомендации, обратитесь в службу поддержки поставщика ВПН. Со своей стороны, они должны помочь, особенно если вы оплатили услугу.
Consider professional VPN to avoid Windows update errors
by Aleksandar Ognjanovic
Aleksandar’s main passion is technology. With a solid writing background, he is determined to bring the bleeding edge to the common user. With a keen eye, he always… read more
Updated on September 9, 2022
Reviewed by
Edgar Nicov

Since the dial-up Internet era, Edgar was interested in online resources. From forums to e-commerce websites, he started digging into how those resources could generate revenue. Today he… read more
- Usually, VPNs and Windows 10 running devices pair up smoothly.
- However, it seems that updates can throw this collaboration off the track.
- If your VPN went south after installing the latest Windows 10 updates, you need to take action.
- Check out our guide and learn how to restore your VPN functionality with ease.
The presence of VPN solutions in the current state of computing technologies reached its peak. And since Windows 10 is one of the most used operative systems, a large chunk of the Virtual Private Networks run on Microsoft’s Windows.
Although they mostly work well, reports say that VPN is not working after Windows 10 updates, especially after the major Windows Updates.
These issues are quite common after every new major release and we decided to provide you with a list of possible solutions that should help you address them.
If you’re suddenly stroke with a plethora of VPN issues after a Windows update, make sure to check them out below.
Can’t connect to any VPN after today’s Windows Updates Windows 10?
This occurring error on Windows 10 affects all users that install a specific Patch Tuesday update. This can interfere with the built-in VPN and prevent connecting to the network.
You may encounter this issue and it’s better to have the knowledge. This is how other similar users describe this VPN problem:
- Forticlient VPN not connecting Windows 10 (a network error prevented updates from being downloaded)
- Cisco VPN not working after the Windows 10 update
- Windows 10 update breaks L2TP VPN- the L2TP connection attempt failed because the security layer encountered a processing error
- The service profile is damaged. reinstall the service profile
- The remote access service IP configuration is unusable
- Windows 10 built-in VPN not connecting
- VPN connection not showing in Network Connections Windows 10
- Windows 10 VPN not working after sleep
- Windows 11 update breaks VPN
These are the most reported issues by users regarding this update error. Therefore, let’s tackle the subject and see how to resolve it.
How can I fix VPN issues on Windows 10 after updates?
1. Use a proper VPN client
In order to avoid issues and errors, we strongly recommend choosing a reliable and compatible VPN.
Our VPN of choice is ExpressVPN, a world-class VPN that brings all those professional privacy and security-oriented features to the table but without you having to break the bank to acquire a subscription. It’s actually very affordable.
Crafted for the Windows 10 architecture, it will seamlessly blend with your system and grant you the security you seek.
Kape Technologies-owned ExpressVPN has OpenVPN, PPTP, IPSEC/L2TP, and SOCKS5 (Proxy) technologies.
In fact, the industry-standard OpenVPN offers you the highest level of encryption via secure VPN tunnels.
Speaking about tunneling technology, the VPN uses a global VPN Tunnel Network powered by multiple gateways with worldwide access and unlimited bandwidth.
ExpressVPN
Install the latest Windows 10 updates without fearing privacy breaches. Team up with this authorized VPN!
2. Update Windows 10
- Press Windows key + I to summon the Settings app.

- Select Updates & Security.
- Select Windows Update from the left pane.
- Click on the Check for updates button.
It seems that the Windows 10 Updates function, more or less, in the same sequence. Microsoft provides a major update in order to bring improvements, a large variety of bugs appear, and they then, overwhelmed by the large community backlash, end up pushing appropriate fixes as soon as possible.
That’s how it basically works. Since this is a widespread problem and it mostly occurred after some updates, they provided the resolution soon.
A lot of users who experienced issues with VPN after an update, get things sorted out after some time by updating Windows 10.
So, make sure that you have all available updates installed and try running the VPN again. In case you’re unable to make it work regardless, make sure to move to alternative steps.
Here’s how to check for available updates in Windows 10:
If you want to avoid VPN issues triggered by Windows Update, the obvious solution is to simply block the updates.
Keep in mind that not installing the latest security patches may pose a threat to your PC. Therefore, use this method only in extreme cases where you really need your VPN.
3. Reinstall drivers
- Right-click on Start and select Device Manager from the PowerUser menu.

- Expand the Network adapters section.
- Right-click on every individual WAN Miniport driver and uninstall it.
- Restart your PC and open Device Manager again.
- Navigate to Network Adapters, right-click every individual Miniport, and install it.
- Try running the VPN again.

Certain users resolved the issue by completely uninstalling all Network adapters, but you can settle for reinstalling WAN Miniport drivers.
Either way, we all know how notoriously Windows 10 manages drivers and how the generic and mandatory drivers can have an illicit effect on system performance and stability.
In order to avoid this, you can reinstall drivers changed by the last update and let them reinstall on their own. Also, secondary drivers provided by a third-party VPN are better than the ones Windows Update provides.
So, you can also uninstall them and the VPN, and then just obtain them by reinstalling your VPN from scratch.
Here’s how to reinstall WAN Miniport network drivers in Windows 10:
Update drivers automatically (suggested)
After you have uninstalled your drivers, we recommend reinstalling/updating them automatically.
Downloading and installing drivers manually is a process that carries the risk of getting the wrong driver installed, which may lead to serious malfunctions in your system.
The safer and easier way to update drivers on a Windows computer is by using a professional tool.
It will automatically identify each device on your computer and matches it with the latest driver versions from an extensive online database.
⇒ Get DriverFix
4. Edit registry
- In the Windows Search bar, type regedit and open regedit from the list of the results.

- Backup your registry.
- Navigate to this location:
-
ComputerHKEY_LOCAL_MACHINESYSTEMCurrentControlSetServicesPolicyAgent
-
- Right-click on the blank area in the right window and select New > DWORD.
- Name the new DWORD input
AssumeUDPEncapsulationContextOnSendRule - Change its value to 2 and save it.
- Close Registry Editor and restart your PC.
As some tech-savvy users noted, this error can have roots in the Policy Editor. This is the main part of the Windows platform and it regulates the security and access policy for all individual users on one machine.
In order to address this possible instigator of the problem with VPN, we’ll need to change the policy settings by inserting an exception for UDP. Now, the best way to do so is to use Registry Editor.
Of course, with this tool we’re roaming in the dangerous area, so make sure to act with caution and don’t delete anything while there.
Follow these instructions to access Registry Editor and create a new input which should re-enable VPN in Windows 10:
5. Reinstall VPN
- In the Windows Search bar, type Control and open Control Panel from the list of results.

- From the Category view, click Uninstall a program under Programs.
- Right-click on your VPN solution and Uninstall it.
- Use CCleaner or any other third-party uninstaller to clean all remaining files and registry entries the VPN has made.
- Restart your PC.
- Download the latest version of the VPN of your choice and install it.

Since the update-inflicted issues can affect both third-party VPNs and built-in Windows VPN, respectively, we decided to cover both.
Regarding the former, if you’re sure that everything was running smoothly before the update and then things suddenly went south, we advise you to reinstall the client you use.
Reinstallation is also the re-integration of the VPN into changed system surroundings, so this just might help. Also, while we’re at it, don’t forget to acquire the latest version of your VPN of choice.
We make sure to showcase the whole procedure, and decided to use TunnelBearVPN as the example, but this applies to all VPN solutions in general. Make sure to follow the instructions we provided below:
6. Disable antivirus
- In the Windows Search bar, type Allow and select Allow an app through Windows Firewall.

- Click on the Change settings button.
- Find your VPN on the list and check the box beside it. Also, make sure that both Public and Private networks are enabled.

- Confirm changes and try connecting through a VPN again.
Another possible reason for this error can lie in the third-party antivirus or some of its subsidiaries. Contemporary antivirus solutions often come in suits that include third-party Firewall security measures.
They do come in handy, especially if you’re knowledgeable enough to customize them, but are, on the other hand, known for conflicting with Windows services.
If you run a VPN through a Windows 10 antivirus provided by Microsoft, make sure to disable the third-party firewall before doing so.
Or even better, for the sake of troubleshooting, disable the antivirus completely and move from there.
Also, make sure that your native Windows Firewall isn’t preventing VPN from accessing the remote servers. Here’s how to add an exception to Windows Firewall in a few simple steps:
7. Disable IPv6
- Type Control in the Windows Search bar and open Control Panel from the list of results.
- Open Network and Internet and then Network and Sharing Center.
- Select Change adapter settings from the left pane.
- Right-click on VPN network adapter and open Properties.
- Uncheck the box beside IPv6 and confirm changes.

- Try running a VPN afterward.
Connection issues, with or without VPN, are rather common after every new major update. Major updates tend to make certain changes to your adapter settings, making it unusable in the process.
Now, in step 7 we’ll try to address all-around connection settings, but this step concerns only IPv6. Namely, for users with the older configuration, the problem might occur due to conflict with the Internet Protocol.
Most users who found this step helpful disabled IPv6, but you can try disabling IPv4 and stick with IPv6, too.
If you’re not sure how to disable IPv6 (or IPv4, its older variation), follow the steps below:
If this method didn’t work, you should enable IPv6 back on. Check out this complete step-by-step guide to do that.
8. Troubleshoot your connection
We don’t want to point fingers at the VPN until we eliminate all possible connection issues.
In other words, make sure that you can connect without a VPN in the first place. If that’s not the case, we advise you to perform standard troubleshooting steps and move from there.
If you’re caught in the middle and unsure what to do, here are some actions that you should consider:
- Reset your router and/or modem.
- Flush DNS.
- Restart related services.
- Run dedicated Connection troubleshooter.
- Disable the router’s firewall.
- Update the router’s firmware.
- Reset router/modem to factory settings.
9. Reset your PC to factory settings
Finally, if none of the solutions proved helpful, we recommend resetting your PC to its factory values.
If you’re not sure how to reset your Windows 10 machine to default values and refresh it in the process, follow the instructions we provided below:
Which Windows Update is causing VPN issues?
There are multiple Windows 10 updates that can affect your VPN, so you should be aware. More exactly, the specific updates that can break your VPN are KB5009543 and KB5009566.
Besides that, you can encounter other Windows update versions such as 1903, 20h2, 2004, 1909, 2022
How do I uninstall a Windows update?
- In the Start Menu, click on Settings.

- Now, click on the Windows Update section.
- Press the Update history button.

- Scroll down and click on Uninstall updates.
- Find the broken updates and uninstall them.

This should conclude it. In case you’re still unable to use your VPN on Windows 10 after an update, make sure to send a ticket to both Microsoft and your VPN provider.
Also, if you’re having issues with the business network, contact your network administrator. At least one should give you the helping hand, and chances are that the paid VPN service provider will be the one.
Either way, make sure to tell us if you have an alternative solution or a question regarding the ones we provided above.
Your connection is not secure — websites you visit can find out your details:
-
- Your IP Address:
loading

Companies can sell this information, alongside your location and internet provider name, and profit from it by serving targeted ads or monitoring your data usage.
We recommend Private Internet Access, a VPN with a no-log policy, open source code, ad blocking and much more; now 79% off.
![]()
Newsletter
Consider professional VPN to avoid Windows update errors
by Aleksandar Ognjanovic
Aleksandar’s main passion is technology. With a solid writing background, he is determined to bring the bleeding edge to the common user. With a keen eye, he always… read more
Updated on September 9, 2022
Reviewed by
Edgar Nicov
Since the dial-up Internet era, Edgar was interested in online resources. From forums to e-commerce websites, he started digging into how those resources could generate revenue. Today he… read more
- Usually, VPNs and Windows 10 running devices pair up smoothly.
- However, it seems that updates can throw this collaboration off the track.
- If your VPN went south after installing the latest Windows 10 updates, you need to take action.
- Check out our guide and learn how to restore your VPN functionality with ease.
The presence of VPN solutions in the current state of computing technologies reached its peak. And since Windows 10 is one of the most used operative systems, a large chunk of the Virtual Private Networks run on Microsoft’s Windows.
Although they mostly work well, reports say that VPN is not working after Windows 10 updates, especially after the major Windows Updates.
These issues are quite common after every new major release and we decided to provide you with a list of possible solutions that should help you address them.
If you’re suddenly stroke with a plethora of VPN issues after a Windows update, make sure to check them out below.
Can’t connect to any VPN after today’s Windows Updates Windows 10?
This occurring error on Windows 10 affects all users that install a specific Patch Tuesday update. This can interfere with the built-in VPN and prevent connecting to the network.
You may encounter this issue and it’s better to have the knowledge. This is how other similar users describe this VPN problem:
- Forticlient VPN not connecting Windows 10 (a network error prevented updates from being downloaded)
- Cisco VPN not working after the Windows 10 update
- Windows 10 update breaks L2TP VPN- the L2TP connection attempt failed because the security layer encountered a processing error
- The service profile is damaged. reinstall the service profile
- The remote access service IP configuration is unusable
- Windows 10 built-in VPN not connecting
- VPN connection not showing in Network Connections Windows 10
- Windows 10 VPN not working after sleep
- Windows 11 update breaks VPN
These are the most reported issues by users regarding this update error. Therefore, let’s tackle the subject and see how to resolve it.
How can I fix VPN issues on Windows 10 after updates?
1. Use a proper VPN client
In order to avoid issues and errors, we strongly recommend choosing a reliable and compatible VPN.
Our VPN of choice is ExpressVPN, a world-class VPN that brings all those professional privacy and security-oriented features to the table but without you having to break the bank to acquire a subscription. It’s actually very affordable.
Crafted for the Windows 10 architecture, it will seamlessly blend with your system and grant you the security you seek.
Kape Technologies-owned ExpressVPN has OpenVPN, PPTP, IPSEC/L2TP, and SOCKS5 (Proxy) technologies.
In fact, the industry-standard OpenVPN offers you the highest level of encryption via secure VPN tunnels.
Speaking about tunneling technology, the VPN uses a global VPN Tunnel Network powered by multiple gateways with worldwide access and unlimited bandwidth.
ExpressVPN
Install the latest Windows 10 updates without fearing privacy breaches. Team up with this authorized VPN!
2. Update Windows 10
- Press Windows key + I to summon the Settings app.
- Select Updates & Security.
- Select Windows Update from the left pane.
- Click on the Check for updates button.
It seems that the Windows 10 Updates function, more or less, in the same sequence. Microsoft provides a major update in order to bring improvements, a large variety of bugs appear, and they then, overwhelmed by the large community backlash, end up pushing appropriate fixes as soon as possible.
That’s how it basically works. Since this is a widespread problem and it mostly occurred after some updates, they provided the resolution soon.
A lot of users who experienced issues with VPN after an update, get things sorted out after some time by updating Windows 10.
So, make sure that you have all available updates installed and try running the VPN again. In case you’re unable to make it work regardless, make sure to move to alternative steps.
Here’s how to check for available updates in Windows 10:
If you want to avoid VPN issues triggered by Windows Update, the obvious solution is to simply block the updates.
Keep in mind that not installing the latest security patches may pose a threat to your PC. Therefore, use this method only in extreme cases where you really need your VPN.
3. Reinstall drivers
- Right-click on Start and select Device Manager from the PowerUser menu.
- Expand the Network adapters section.
- Right-click on every individual WAN Miniport driver and uninstall it.
- Restart your PC and open Device Manager again.
- Navigate to Network Adapters, right-click every individual Miniport, and install it.
- Try running the VPN again.
Certain users resolved the issue by completely uninstalling all Network adapters, but you can settle for reinstalling WAN Miniport drivers.
Either way, we all know how notoriously Windows 10 manages drivers and how the generic and mandatory drivers can have an illicit effect on system performance and stability.
In order to avoid this, you can reinstall drivers changed by the last update and let them reinstall on their own. Also, secondary drivers provided by a third-party VPN are better than the ones Windows Update provides.
So, you can also uninstall them and the VPN, and then just obtain them by reinstalling your VPN from scratch.
Here’s how to reinstall WAN Miniport network drivers in Windows 10:
Update drivers automatically (suggested)
After you have uninstalled your drivers, we recommend reinstalling/updating them automatically.
Downloading and installing drivers manually is a process that carries the risk of getting the wrong driver installed, which may lead to serious malfunctions in your system.
The safer and easier way to update drivers on a Windows computer is by using a professional tool.
It will automatically identify each device on your computer and matches it with the latest driver versions from an extensive online database.
⇒ Get DriverFix
4. Edit registry
- In the Windows Search bar, type regedit and open regedit from the list of the results.
- Backup your registry.
- Navigate to this location:
-
ComputerHKEY_LOCAL_MACHINESYSTEMCurrentControlSetServicesPolicyAgent
-
- Right-click on the blank area in the right window and select New > DWORD.
- Name the new DWORD input
AssumeUDPEncapsulationContextOnSendRule - Change its value to 2 and save it.
- Close Registry Editor and restart your PC.
As some tech-savvy users noted, this error can have roots in the Policy Editor. This is the main part of the Windows platform and it regulates the security and access policy for all individual users on one machine.
In order to address this possible instigator of the problem with VPN, we’ll need to change the policy settings by inserting an exception for UDP. Now, the best way to do so is to use Registry Editor.
Of course, with this tool we’re roaming in the dangerous area, so make sure to act with caution and don’t delete anything while there.
Follow these instructions to access Registry Editor and create a new input which should re-enable VPN in Windows 10:
5. Reinstall VPN
- In the Windows Search bar, type Control and open Control Panel from the list of results.
- From the Category view, click Uninstall a program under Programs.
- Right-click on your VPN solution and Uninstall it.
- Use CCleaner or any other third-party uninstaller to clean all remaining files and registry entries the VPN has made.
- Restart your PC.
- Download the latest version of the VPN of your choice and install it.
Since the update-inflicted issues can affect both third-party VPNs and built-in Windows VPN, respectively, we decided to cover both.
Regarding the former, if you’re sure that everything was running smoothly before the update and then things suddenly went south, we advise you to reinstall the client you use.
Reinstallation is also the re-integration of the VPN into changed system surroundings, so this just might help. Also, while we’re at it, don’t forget to acquire the latest version of your VPN of choice.
We make sure to showcase the whole procedure, and decided to use TunnelBearVPN as the example, but this applies to all VPN solutions in general. Make sure to follow the instructions we provided below:
6. Disable antivirus
- In the Windows Search bar, type Allow and select Allow an app through Windows Firewall.
- Click on the Change settings button.
- Find your VPN on the list and check the box beside it. Also, make sure that both Public and Private networks are enabled.
- Confirm changes and try connecting through a VPN again.
Another possible reason for this error can lie in the third-party antivirus or some of its subsidiaries. Contemporary antivirus solutions often come in suits that include third-party Firewall security measures.
They do come in handy, especially if you’re knowledgeable enough to customize them, but are, on the other hand, known for conflicting with Windows services.
If you run a VPN through a Windows 10 antivirus provided by Microsoft, make sure to disable the third-party firewall before doing so.
Or even better, for the sake of troubleshooting, disable the antivirus completely and move from there.
Also, make sure that your native Windows Firewall isn’t preventing VPN from accessing the remote servers. Here’s how to add an exception to Windows Firewall in a few simple steps:
7. Disable IPv6
- Type Control in the Windows Search bar and open Control Panel from the list of results.
- Open Network and Internet and then Network and Sharing Center.
- Select Change adapter settings from the left pane.
- Right-click on VPN network adapter and open Properties.
- Uncheck the box beside IPv6 and confirm changes.
- Try running a VPN afterward.
Connection issues, with or without VPN, are rather common after every new major update. Major updates tend to make certain changes to your adapter settings, making it unusable in the process.
Now, in step 7 we’ll try to address all-around connection settings, but this step concerns only IPv6. Namely, for users with the older configuration, the problem might occur due to conflict with the Internet Protocol.
Most users who found this step helpful disabled IPv6, but you can try disabling IPv4 and stick with IPv6, too.
If you’re not sure how to disable IPv6 (or IPv4, its older variation), follow the steps below:
If this method didn’t work, you should enable IPv6 back on. Check out this complete step-by-step guide to do that.
8. Troubleshoot your connection
We don’t want to point fingers at the VPN until we eliminate all possible connection issues.
In other words, make sure that you can connect without a VPN in the first place. If that’s not the case, we advise you to perform standard troubleshooting steps and move from there.
If you’re caught in the middle and unsure what to do, here are some actions that you should consider:
- Reset your router and/or modem.
- Flush DNS.
- Restart related services.
- Run dedicated Connection troubleshooter.
- Disable the router’s firewall.
- Update the router’s firmware.
- Reset router/modem to factory settings.
9. Reset your PC to factory settings
Finally, if none of the solutions proved helpful, we recommend resetting your PC to its factory values.
If you’re not sure how to reset your Windows 10 machine to default values and refresh it in the process, follow the instructions we provided below:
Which Windows Update is causing VPN issues?
There are multiple Windows 10 updates that can affect your VPN, so you should be aware. More exactly, the specific updates that can break your VPN are KB5009543 and KB5009566.
Besides that, you can encounter other Windows update versions such as 1903, 20h2, 2004, 1909, 2022
How do I uninstall a Windows update?
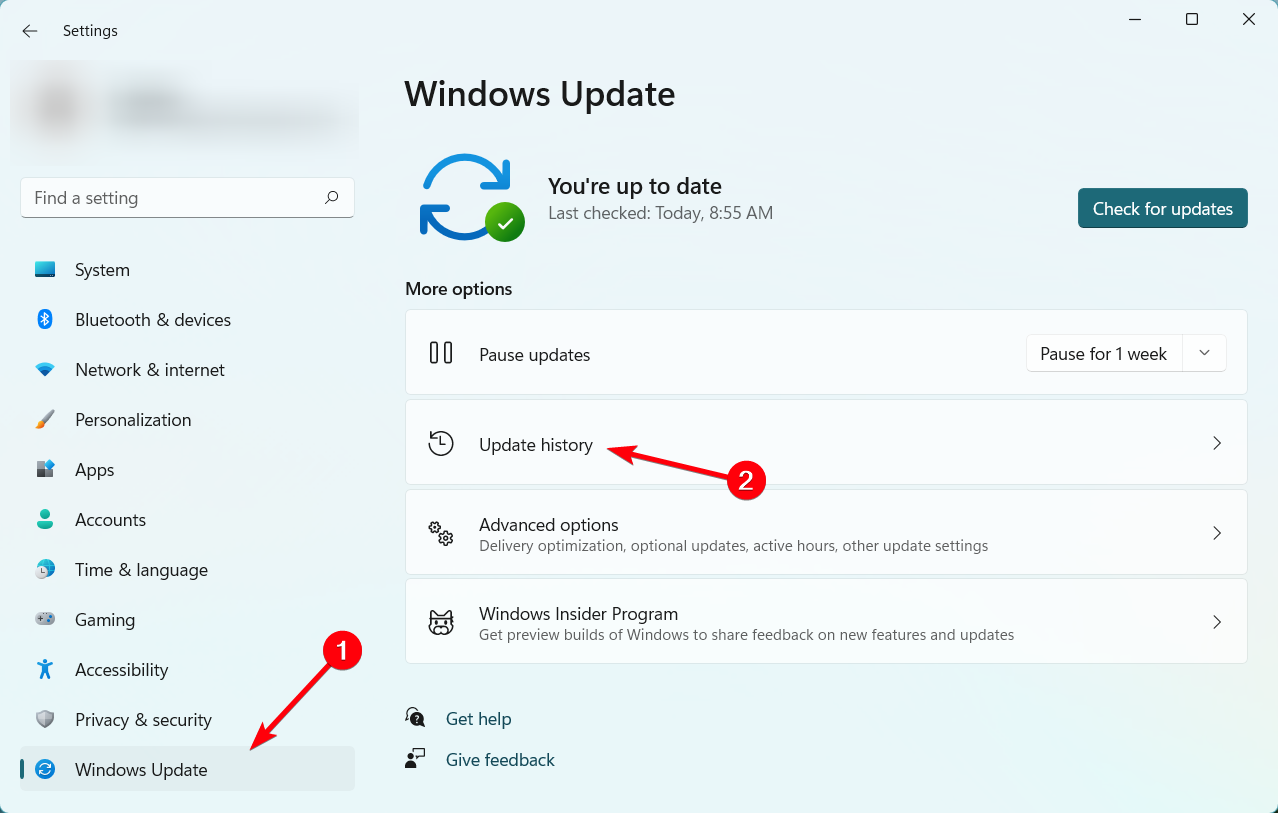
- In the Start Menu, click on Settings.
- Now, click on the Windows Update section.
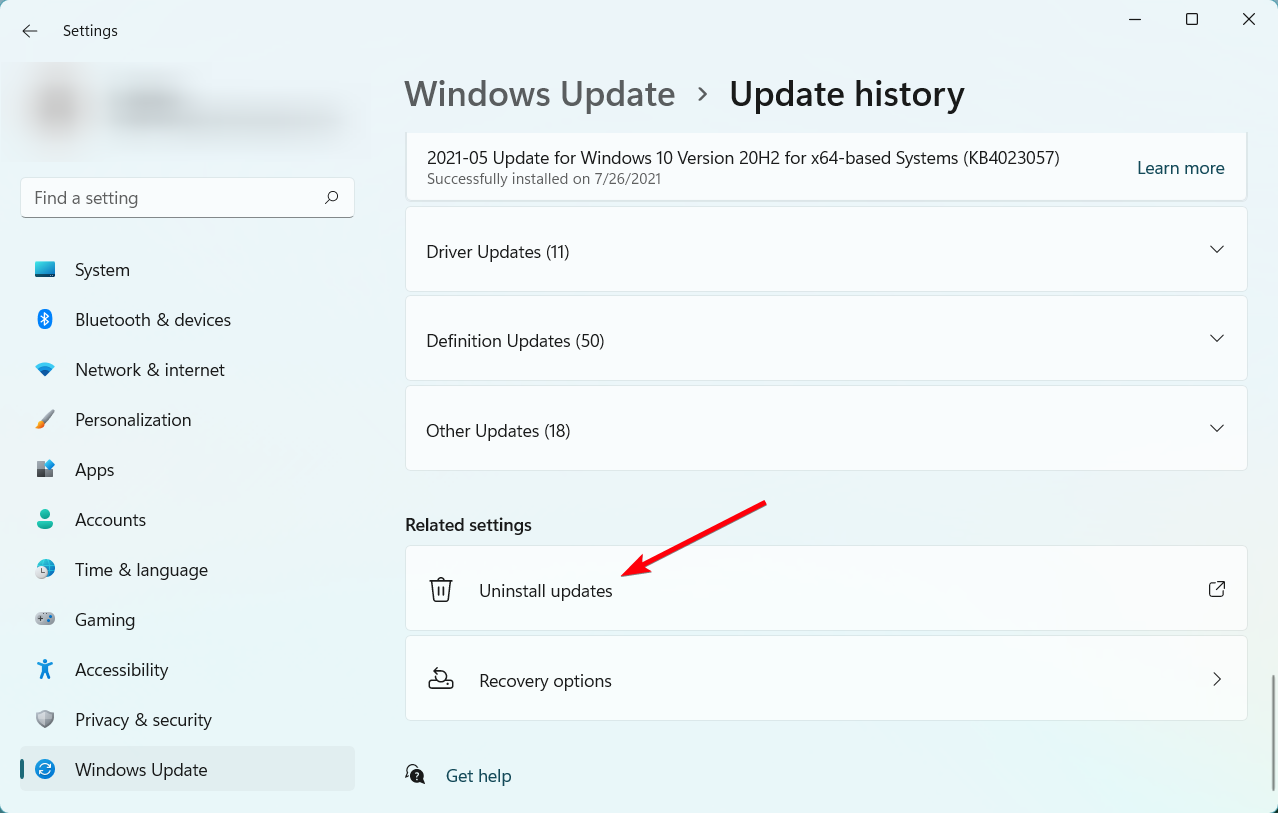
- Press the Update history button.
- Scroll down and click on Uninstall updates.
- Find the broken updates and uninstall them.
This should conclude it. In case you’re still unable to use your VPN on Windows 10 after an update, make sure to send a ticket to both Microsoft and your VPN provider.
Also, if you’re having issues with the business network, contact your network administrator. At least one should give you the helping hand, and chances are that the paid VPN service provider will be the one.
Either way, make sure to tell us if you have an alternative solution or a question regarding the ones we provided above.
Your connection is not secure — websites you visit can find out your details:
-
- Your IP Address:
loading
Companies can sell this information, alongside your location and internet provider name, and profit from it by serving targeted ads or monitoring your data usage.
We recommend Private Internet Access, a VPN with a no-log policy, open source code, ad blocking and much more; now 79% off.
![]()
Newsletter
Столкнулся недавно с проблемой, когда ни одна программа VPN для компьютера или ноутбука с Windows 11/10 не подключается к серверам. Проблему неработающих VPN-программ удалось решить в пару кликов, и вот разберем, как это сделать.
Устранить ошибку подключения VPN программ
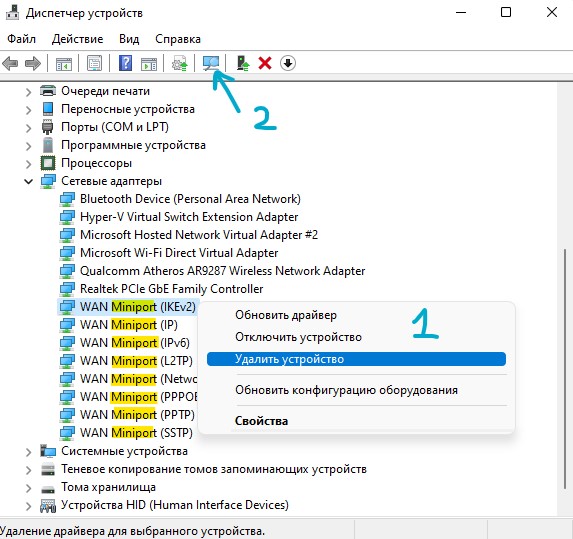
1. Нажмите Win+X и выберите Диспетчер устройств. Далее развернете графу Сетевые адаптеры и удалите все протоколы Wan Miniport, после чего нажмите сверху на обновить конфигурацию оборудования. Если, ВПН программы не подключаются, то перезагрузите компьютер.
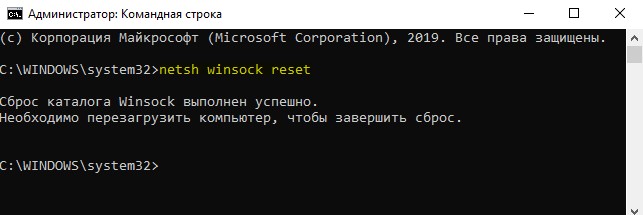
2. Если выше способ не помог, то сбросим сетевые протоколы, IP и кэш, чтобы ВПН программы смогли подключаться к серверам. Для этого запустите командную строку от имени администратора и введите ниже команды по очереди, после чего перезагрузитесь.
netsh winsock resetipconfig /flushdnsnetsh int ip reset resettcpip.txtipconfig /renew
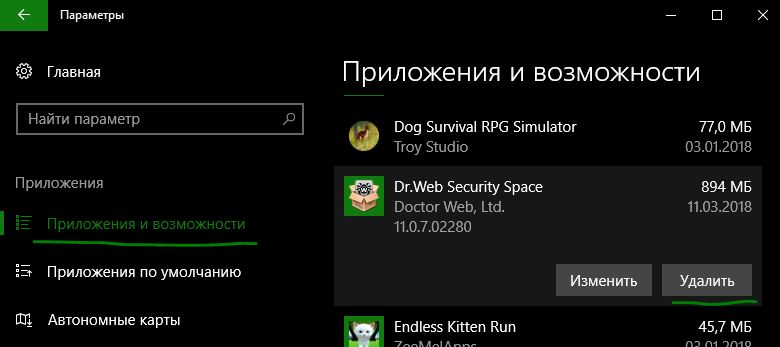
3. Если VPN программы не подключаются на компьютере с Windows 11/10 к своим серверам, то удалите сторонний антивирус, так как он может блокировать соединение. Именно нужно удалить его полностью, так как встроенные брандмауэры могут продолжать работать, если антивирус отключить на время.
- Удаление антивирусов полностью при помощи специальных утилит
Смотрите еще:
- Скачать и настроить OpenVPN для Windows 11/10
- Настройка VPN подключения в Windows 11
- Ошибка 720 при подключении к интернету в Windows 10
- WiFi не подключается после сна или гибернации в Windows 10
- Сейчас это устройство не подключено к компьютеру (Код 45)
[ Telegram | Поддержать ]
Ранее на этой неделе Microsoft выпустила очередное накопительное обновление для поддерживаемых версий Windows, которое устраняет ряд опасных уязвимостей, а также приносит исправления, направленные на повышение стабильности работы программной платформы. Теперь же стало известно, что обновление может вызывать проблемы с VPN-подключением в Windows 10 и Windows 11.

Источник изображения: XDA-Developers
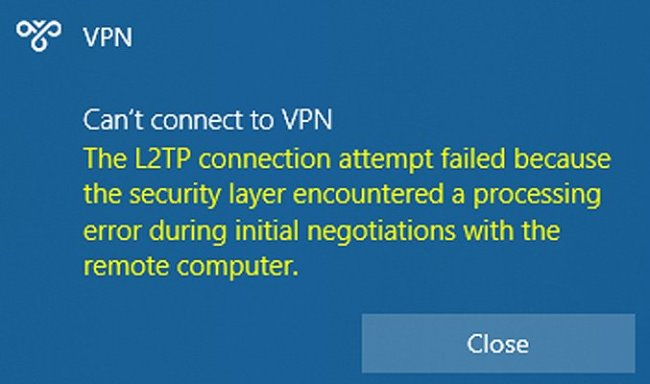
На это указывают сообщения пользователей, которые появились на форуме поддержки Microsoft и в разных сообществах, таких как Reddit. В некоторых случаях после загрузки упомянутого обновления пользователи не могут установить VPN-подключение с помощью встроенного в Windows клиента. При попытке подключения появляется сообщение: «Не удалось подключиться к VPN. Попытка L2TP-подключения не удалась из-за ошибки, произошедшей на уровне безопасности во время согласования с удалённым компьютером». При этом в средство просмотра событий Windows выдаёт ошибку с кодом 789 и сообщает, что подключение не удалось установить.
По данным источника, чаще всего проблема возникает при использовании встроенного VPN-клиента Windows, но с ней также можно столкнуться в случае взаимодействия со сторонними решениями, такими как Ubiquiti, SonicWall, Cisco Meraki и др. В настоящее время наиболее простой способ решения рассматриваемой проблемы заключается в удалении недавнего накопительного обновления. Для этого необходимо из «Центра обновления Windows» открыть «Журнал обновлений» и удалить нужный пакет из списка (KB5009566 для Windows 11 и KB5009543 для Windows 10).
Очевидно, в скором времени Microsoft выпустит внеплановый патч для устранения упомянутой проблемы. На данный момент неизвестно, когда это может произойти.
Если вы заметили ошибку — выделите ее мышью и нажмите CTRL+ENTER.