
- Remove From My Forums
Включить сетевое обнаружение — не запоминает положение галочки при сохранении.
-
Общие обсуждения
-
Для того что бы сделать общий доступ к файлам и принтеру необходимо включить сетевое обнаружение в Центр управления сетями и общим доступомДополнительные параметры общего доступа. После выбора пункта «Включить сетевое обнаружение» и нажав кнопку сохранить изменения система не сохраняет выбор. В чем может быть проблема?
Спасибо.
-
Изменен тип
Igor Leyko
1 ноября 2010 г. 7:24
давность
-
Изменен тип
Все ответы
-
Все что там написано, а так же на страницах что указаны в ссылка сделал, все равно не сохраняется галочка((
-
В правилах бранмауэра правила «Обнаружение сети» есть?
-
Он отключен. — Используется фаэрвол у касперыча, но в тот момент касперский был отключен.
-
Если брандмауэр отключён, то «Обнаружение сети» должно работать и выставление всяких там галочек на её работоспособность не повлияет. У меня тоже показывает, что сетевое обнаружение отключено, но на самом деле оно работает, потомучто все такие фичи я напрямую через правила брандмауэра редактирую без использования кликабельного интерфейса.
Содержание
- Не сохраняются настройки общего доступа windows 10
- Не сохраняются настройки общего доступа windows 10
- Как настроить локальную сеть в Windows 10? Параметры общего доступа и общий доступ к папке в Windows 10
- Подготовка к настройке локальной сети в Windows 10
- Настройка параметров общего доступа в Windows 10
- Доступ к общим папкам с другого компьютера в локальной сети
- Как открыть общий доступ к папке в Windows 10?
- Как отключить общий доступ к папке или файлу в Windows 10?
- Как посмотреть все папки и файлы, к которым открыт общий доступ на компьютере?
- Послесловие
- В Windows Server 2019 не сохраняется «Включить сетевое обнаружение» (РЕШЕНО)
- Как в Windows Server 2019 включить сетевое обнаружение
- Связанные статьи:
- Рекомендуется Вам:
- Comments
- Не сохраняются настройки общего доступа windows 10
Не сохраняются настройки общего доступа windows 10

Сообщения: 52185
Благодарности: 15073
Для обнаружения сети необходимо, чтобы службы DNS-клиента, публикации ресурсов для обнаружения функций, обнаружения протокола SSDP и узла универсальных PNP-устройств были запущены, сетевому обнаружению было разрешено подключение через брандмауэр Windows, а другие брандмауэры не влияли на сетевое обнаружение.
Если же вы забыли свой пароль на форуме, то воспользуйтесь данной ссылкой для восстановления пароля.
Сообщения: 2
Благодарности: 1
» width=»100%» style=»BORDER-RIGHT: #719bd9 1px solid; BORDER-LEFT: #719bd9 1px solid; BORDER-BOTTOM: #719bd9 1px solid» cellpadding=»6″ cellspacing=»0″ border=»0″>
Иду в «Центр управления сетями и общим доступом» > «Изменить дополнительные параметры общего доступа», там «Включить сетевое обнаружение». Включаю, настраиваю общий доступ к файлампринтерам, нажимаю «Сохранить изменения» и меня возвращает в «Центр управления сетями и общим доступом», при этом настройки не сохраняются. В чем может быть проблема? »

Сообщения: 25157
Благодарности: 3792
А для предотвращения возникновения этой и еще тонны проблем нужно просто не отключать службы. »
» width=»100%» style=»BORDER-RIGHT: #719bd9 1px solid; BORDER-LEFT: #719bd9 1px solid; BORDER-BOTTOM: #719bd9 1px solid» cellpadding=»6″ cellspacing=»0″ border=»0″>
Сообщения: 52185
Благодарности: 15073
Не удалось запустить службу Рабочая станция на Локальный компьютер
Ошибка 1068: Не удалось запустить дочернюю службу.
Сообщения: 52185
Благодарности: 15073
Источник
Не сохраняются настройки общего доступа windows 10
Сообщения: 52185
Благодарности: 15073
Для обнаружения сети необходимо, чтобы службы DNS-клиента, публикации ресурсов для обнаружения функций, обнаружения протокола SSDP и узла универсальных PNP-устройств были запущены, сетевому обнаружению было разрешено подключение через брандмауэр Windows, а другие брандмауэры не влияли на сетевое обнаружение.
Если же вы забыли свой пароль на форуме, то воспользуйтесь данной ссылкой для восстановления пароля.
Сообщения: 2
Благодарности: 1
» width=»100%» style=»BORDER-RIGHT: #719bd9 1px solid; BORDER-LEFT: #719bd9 1px solid; BORDER-BOTTOM: #719bd9 1px solid» cellpadding=»6″ cellspacing=»0″ border=»0″>
Иду в «Центр управления сетями и общим доступом» > «Изменить дополнительные параметры общего доступа», там «Включить сетевое обнаружение». Включаю, настраиваю общий доступ к файлампринтерам, нажимаю «Сохранить изменения» и меня возвращает в «Центр управления сетями и общим доступом», при этом настройки не сохраняются. В чем может быть проблема? »
Сообщения: 25157
Благодарности: 3792
А для предотвращения возникновения этой и еще тонны проблем нужно просто не отключать службы. »
» width=»100%» style=»BORDER-RIGHT: #719bd9 1px solid; BORDER-LEFT: #719bd9 1px solid; BORDER-BOTTOM: #719bd9 1px solid» cellpadding=»6″ cellspacing=»0″ border=»0″>
Сообщения: 52185
Благодарности: 15073
Не удалось запустить службу Рабочая станция на Локальный компьютер
Ошибка 1068: Не удалось запустить дочернюю службу.
Сообщения: 52185
Благодарности: 15073
Источник
Как настроить локальную сеть в Windows 10? Параметры общего доступа и общий доступ к папке в Windows 10
Раньше я уже публиковал подробную инструкцию по настройке локальной сети в Windows 10. Но для настройки использовал домашнюю группу, которую из Windows 10 (в версии 1803 и выше) удалили. А это значит, что старая инструкция больше не актуальная, так как домашней группы в Windows 10 1803 больше нет. Но весь функционал конечно же сохранился, и в десятке по прежнему можно предоставить общий доступ к папкам и принтерам, открыть общий доступ к определенной папке, получить сетевой доступ к другим компьютерам и т. д. Так даже проще и лучше, убрали ненужные настройки. Домашняя группа использовалась для упрощения настройки локальной сети и предоставления общего доступа к файлам и принтерам. Но по факту, она только усложняла процесс настройки локальной сети своими запутанными настройками. Проще вручную открыть общий доступ и расшарить папку по сети, чем возиться с настройкой домашней группы.
Подготовка к настройке локальной сети в Windows 10
Сделать это не сложно. В свойствах Ethernet подключения:

В свойствах Wi-Fi сети:

Необходимый сетевой профиль подключению присвоили, можно переходить к настройке локальной сети.
Настройка параметров общего доступа в Windows 10
Нам нужно открыть окно «Дополнительные параметры общего доступа». Это можно сделать через «Центр управления сетями и общим доступом», или в параметрах, в разделе «Сеть и Интернет» – «Параметры общего доступа».

Для профиля «Частная (текущий профиль)» нам нужно установить такие настройки:

Так же меняем следующие настройки для профиля «Все сети»:

Обязательно нажимаем на кнопку «Сохранить изменения»!
Все! Настройка локальной сети в Windows 10 завершена.
Доступ к общим папкам с другого компьютера в локальной сети
Можно сразу перейти в проводник, на вкладку «Сеть». Если сетевое обнаружение на этом компьютере отключено, то вы увидите сообщение: «Сетевое обнаружение отключено. Сетевые компьютеры и устройства не видны».

Нажимаем «OK» и сверху появится желтая полоска, где можно «Включить сетевое обнаружение и общий доступ к файлам».

А если сети, к которой вы подключены присвоен статус «Общедоступные», то появится еще одно окно. Выберите следующий пункт: «Нет, сделать сеть, к которой подключен этот компьютер, частной».

После этого на вкладке «Сеть» в проводнике сразу появляться «Компьютеры». Наш компьютер так же будет отображаться вместе с другими компьютерами из локальной сети.

Как открыть общий доступ к папке в Windows 10?
В Windows 10 предоставить общий доступ к файлу или папке (расшарить папку) можно буквально за несколько секунд. Еще я покажу, как закрыть общий доступ к папке/файлу и посмотреть, к каким папкам предоставлен общий доступ.
Просто нажимаем правой кнопкой мыши на любую папку или файл, наводим курсор на меню «Предоставить доступ к» и выбираем «Отдельные люди».


Для пользователя «Все», (или нового пользователя) можно изменить права доступа к файлу или папке в Windows 10. По умолчанию папка/файл доступен только для чтения. Можно установить «Чтение и запись». Тогда другие пользователи по сети смогут менять/удалять файлы в папке, записывать новые, редактировать файлы.


Чтобы зайти в папку, к которой мы открыли общий доступ не обязательно использовать адрес. На другом компьютере можно просто перейти в раздел «Сеть» в проводнике Windows. Открываем нужный компьютер из нашей локальной сети и переходим в общую папку, к которой мы только что открыли доступ.

Так как я установил для этой папки права на чтение и запись, то без проблем могу редактировать, удалять и создавать новые файлы в этой папке. Права применяются ко всем файлам в расшаренной папке.
Как отключить общий доступ к папке или файлу в Windows 10?
Просто нажимаем на папку или файл правой кнопкой мыши, выбираем «Предоставить доступ к» и нажимаем на «Сделать недоступными».

Вот так просто в Windows 10 можно закрыть общий доступ к папке/файлу.
Как посмотреть все папки и файлы, к которым открыт общий доступ на компьютере?
Для этого нужно в проводнике перейти по адресу \localhost

Откроется папка, в которой будут отражаться другие папки и файлы, к которым на данном компьютере открыт общий доступ.
Послесловие
Для меня, как и наверное для многих, локальная сеть, это всегда было что-то сложное и непонятное. Вроде понимаешь для чего она нужна и как ею можно пользоваться, но не совсем понятно, как она работает и как ее настроить. Какие-то непонятные и запутанные параметры, общий доступ, права, учетные записи и т. д., но если во всем разобраться, а еще лучше самостоятельно настроить, то сразу понимаешь, что в этом нет ничего сложного. Даже без этой домашней группы, которую убрали в Windows 10 1803 все можно без проблем настроить и использовать общий доступ к файлам, папкам и принтерам в локальной сети.
Оставляйте свои комментарии, вопросы и дополнения. Если я что-то забыл, или написал не так – поделитесь полезной информацией в комментариях! С удовольствием отредактирую и дополню статью.
Источник
В Windows Server 2019 не сохраняется «Включить сетевое обнаружение» (РЕШЕНО)
Как в Windows Server 2019 включить сетевое обнаружение
На компьютерах, которые должны подключаться к общей сетевой папке, перейдите в «Изменение расширенных параметров общего доступа» и выберите опцию «Включить сетевое обнаружение»:

Затем нажмите кнопку «Сохранить изменения».
Вновь откройте «Изменение расширенных параметров общего доступа» и проверьте сделанные настройки.
В настоящее время Windows Server 2019 не сохраняется «Включить сетевое обнаружение».
Для включения сетевого обнаружения (network discovery) необходимо, чтобы были запущены определённую службы.
Откройте services.msc и убедитесь, что запущены следующие службы:
Если у вас русскоязычная версия, то службы называются так:

Затем снова включите сетевое обнаружение — теперь настройка должна сохраняться и SMB и другие связанные функции должны работать.
Связанные статьи:
Рекомендуется Вам:
Дякую! Допомогли вирішити дану проблему )
Не помогло. Брэндмауэр отключил даже. И все равно сервер никто не может дажи пинговать. Хотя сервак пингует ПК
А что именно не помогло исправить? Настройка не сохраняется? Эта заметка посвящена тому, как включить конкретную настройку.
Если у вас другие проблемы с доступом к сетевой папке, то посмотрите, например, разделы, посвящённые созданию сетевых папок с паролем и без пароля. Там же написано, как подключаться к сетевой папке — нюансов много.
Что касается пинга Windows хостов, то особо на это не стоит обращать внимания, так как по умолчанию все Windows машины настроены не отвечать на пинги. То есть если машина не отвечает на пинг, то это не означает, например, что не будет доступа к сетевой папке, которая размещена на ней.
Источник
Не сохраняются настройки общего доступа windows 10
Сообщения: 52185
Благодарности: 15073
Для обнаружения сети необходимо, чтобы службы DNS-клиента, публикации ресурсов для обнаружения функций, обнаружения протокола SSDP и узла универсальных PNP-устройств были запущены, сетевому обнаружению было разрешено подключение через брандмауэр Windows, а другие брандмауэры не влияли на сетевое обнаружение.
Если же вы забыли свой пароль на форуме, то воспользуйтесь данной ссылкой для восстановления пароля.
Сообщения: 2
Благодарности: 1
» width=»100%» style=»BORDER-RIGHT: #719bd9 1px solid; BORDER-LEFT: #719bd9 1px solid; BORDER-BOTTOM: #719bd9 1px solid» cellpadding=»6″ cellspacing=»0″ border=»0″>
Иду в «Центр управления сетями и общим доступом» > «Изменить дополнительные параметры общего доступа», там «Включить сетевое обнаружение». Включаю, настраиваю общий доступ к файлампринтерам, нажимаю «Сохранить изменения» и меня возвращает в «Центр управления сетями и общим доступом», при этом настройки не сохраняются. В чем может быть проблема? »
Сообщения: 25157
Благодарности: 3792
А для предотвращения возникновения этой и еще тонны проблем нужно просто не отключать службы. »
» width=»100%» style=»BORDER-RIGHT: #719bd9 1px solid; BORDER-LEFT: #719bd9 1px solid; BORDER-BOTTOM: #719bd9 1px solid» cellpadding=»6″ cellspacing=»0″ border=»0″>
Сообщения: 52185
Благодарности: 15073
Не удалось запустить службу Рабочая станция на Локальный компьютер
Ошибка 1068: Не удалось запустить дочернюю службу.
Сообщения: 52185
Благодарности: 15073
Источник
Adblock
detector
Сообщения: 52205
Благодарности: 15083
Для обнаружения сети необходимо, чтобы службы DNS-клиента, публикации ресурсов для обнаружения функций, обнаружения протокола SSDP и узла универсальных PNP-устройств были запущены, сетевому обнаружению было разрешено подключение через брандмауэр Windows, а другие брандмауэры не влияли на сетевое обнаружение.
Если же вы забыли свой пароль на форуме, то воспользуйтесь данной ссылкой для восстановления пароля.
Сообщения: 2
Благодарности: 1
» width=»100%» style=»BORDER-RIGHT: #719bd9 1px solid; BORDER-LEFT: #719bd9 1px solid; BORDER-BOTTOM: #719bd9 1px solid» cellpadding=»6″ cellspacing=»0″ border=»0″>
Иду в «Центр управления сетями и общим доступом» > «Изменить дополнительные параметры общего доступа», там «Включить сетевое обнаружение». Включаю, настраиваю общий доступ к файлампринтерам, нажимаю «Сохранить изменения» и меня возвращает в «Центр управления сетями и общим доступом», при этом настройки не сохраняются. В чем может быть проблема? »
Сообщения: 25157
Благодарности: 3792
А для предотвращения возникновения этой и еще тонны проблем нужно просто не отключать службы. »
Сообщения: 52205
Благодарности: 15083
» width=»100%» style=»BORDER-RIGHT: #719bd9 1px solid; BORDER-LEFT: #719bd9 1px solid; BORDER-BOTTOM: #719bd9 1px solid» cellpadding=»6″ cellspacing=»0″ border=»0″>
Не удалось запустить службу Рабочая станция на Локальный компьютер
Ошибка 1068: Не удалось запустить дочернюю службу.
Сообщения: 52205
Благодарности: 15083
Источник
Не сохраняются настройки общего доступа windows 10
Сообщения: 52205
Благодарности: 15083
Для обнаружения сети необходимо, чтобы службы DNS-клиента, публикации ресурсов для обнаружения функций, обнаружения протокола SSDP и узла универсальных PNP-устройств были запущены, сетевому обнаружению было разрешено подключение через брандмауэр Windows, а другие брандмауэры не влияли на сетевое обнаружение.
Если же вы забыли свой пароль на форуме, то воспользуйтесь данной ссылкой для восстановления пароля.
Сообщения: 2
Благодарности: 1
» width=»100%» style=»BORDER-RIGHT: #719bd9 1px solid; BORDER-LEFT: #719bd9 1px solid; BORDER-BOTTOM: #719bd9 1px solid» cellpadding=»6″ cellspacing=»0″ border=»0″>
Иду в «Центр управления сетями и общим доступом» > «Изменить дополнительные параметры общего доступа», там «Включить сетевое обнаружение». Включаю, настраиваю общий доступ к файлампринтерам, нажимаю «Сохранить изменения» и меня возвращает в «Центр управления сетями и общим доступом», при этом настройки не сохраняются. В чем может быть проблема? »
Сообщения: 25157
Благодарности: 3792
А для предотвращения возникновения этой и еще тонны проблем нужно просто не отключать службы. »
Сообщения: 52205
Благодарности: 15083
» width=»100%» style=»BORDER-RIGHT: #719bd9 1px solid; BORDER-LEFT: #719bd9 1px solid; BORDER-BOTTOM: #719bd9 1px solid» cellpadding=»6″ cellspacing=»0″ border=»0″>
Не удалось запустить службу Рабочая станция на Локальный компьютер
Ошибка 1068: Не удалось запустить дочернюю службу.
Сообщения: 52205
Благодарности: 15083
Источник
В Windows Server 2019 не сохраняется «Включить сетевое обнаружение» (РЕШЕНО)
Как в Windows Server 2019 включить сетевое обнаружение
На компьютерах, которые должны подключаться к общей сетевой папке, перейдите в «Изменение расширенных параметров общего доступа» и выберите опцию «Включить сетевое обнаружение»:

Затем нажмите кнопку «Сохранить изменения».
Вновь откройте «Изменение расширенных параметров общего доступа» и проверьте сделанные настройки.
В настоящее время Windows Server 2019 не сохраняется «Включить сетевое обнаружение».
Для включения сетевого обнаружения (network discovery) необходимо, чтобы были запущены определённую службы.
Откройте services.msc и убедитесь, что запущены следующие службы:
Если у вас русскоязычная версия, то службы называются так:

Затем снова включите сетевое обнаружение — теперь настройка должна сохраняться и SMB и другие связанные функции должны работать.
Связанные статьи:
Рекомендуется Вам:
Comments
Дякую! Допомогли вирішити дану проблему )
Не помогло. Брэндмауэр отключил даже. И все равно сервер никто не может дажи пинговать. Хотя сервак пингует ПК
А что именно не помогло исправить? Настройка не сохраняется? Эта заметка посвящена тому, как включить конкретную настройку.
Если у вас другие проблемы с доступом к сетевой папке, то посмотрите, например, разделы, посвящённые созданию сетевых папок с паролем и без пароля. Там же написано, как подключаться к сетевой папке — нюансов много.
Что касается пинга Windows хостов, то особо на это не стоит обращать внимания, так как по умолчанию все Windows машины настроены не отвечать на пинги. То есть если машина не отвечает на пинг, то это не означает, например, что не будет доступа к сетевой папке, которая размещена на ней.
Источник
Adblock
detector
Закрыть доступ к компьютеру из сети. Не сохраняются настройки «Центр управления сетями и общим доступом»
Чтобы закрыть доступ к компьютерам из сети нужно в «Центр управления сетями и общим доступом» > «Изменить дополнительные параметры общего доступа», там жму «Выключить сетевое обнаружение», выключаю общий доступ к файлампринтерам, нажимаю «Сохранить изменения» и меня возвращает в «Центр управления сетями и общим доступом», при этом настройки не сохраняются.
Чтобы это исправить необходимо включить и запустить следующие службы:
- Брандмауэр Windows
- DNS-клиент (DNS Client)
- Публикация ресурсов обнаружения функции (Function Discovery Resource Publication)
- Узел универсальных PNP-устройств (UPnP Device Host)
- Обнаружение протокола SSDP (SSDP Discovery)
Также нужно, чтобы другие брандмауэры не влияли на сетевое обнаружение. Лично у меня был выключен брандмауэр Windows, из-за этого не работало.
Затем идем в «Свойства» компьютера, «свойства системы», заходим — «удаленные сеансы» и убираем «галочки» в «Разрешить отправку приглашения удаленному помощнику» и в пункте — «Разрешить удаленный доступ к компьютеру». На этом всё.
Помогло http://manaeff.ru/forum/viewtopic.php?f=4&t=1056
Страницу просмотрели: 5 100
Как в Windows Server 2019 включить сетевое обнаружение
На компьютерах, которые должны подключаться к общей сетевой папке, перейдите в «Изменение расширенных параметров общего доступа» и выберите опцию «Включить сетевое обнаружение»:

Затем нажмите кнопку «Сохранить изменения».
Вновь откройте «Изменение расширенных параметров общего доступа» и проверьте сделанные настройки.
В настоящее время Windows Server 2019 не сохраняется «Включить сетевое обнаружение».
Для включения сетевого обнаружения (network discovery) необходимо, чтобы были запущены определённую службы.
Откройте services.msc и убедитесь, что запущены следующие службы:
- DNS Client
- Function Discovery Resource Publication
- SSDP Discovery
- UPnP Device Host
Если у вас русскоязычная версия, то службы называются так:
- DNS-клиент
- Публикация ресурсов обнаружения функций
- Обнаружение SSDP
- Узел универсальных PnP

Затем снова включите сетевое обнаружение — теперь настройка должна сохраняться и SMB и другие связанные функции должны работать.
Связанные статьи:
- Как создать общую сетевую папку на Windows (100%)
- Как подключиться к сетевой папке в Windows (SMB) (100%)
- Имя компьютера Windows 10 и Windows 11: как изменить и использовать (100%)
- Как включить административные общие ресурсы в ОС Windows 10, 8 или 7 (C$, D$, $admin и другие) (100%)
- Как указать другое имя пользователя или пароль при доступе к сетевой папке Windows (100%)
- Нужно ли оставить ноутбук подключённым все время к электросети? (RANDOM — 50%)
Updated: 11.01.2021 at 20:11
Windows 10 File Sharing feature enables users to quickly share files with computers inside the local network they create, which is very convenient and safe. However, many users have met the same issue after update 1803, 1809, or 1903, which is Windows 10 file sharing not working. Here we provide 8 feasible ways to fix Windows 10 network sharing not working.
| Reasons for Network Sharing not Working | Workable Solutions |
|---|---|
| Case 1. File Sharing Misuse (Easiest) | 1. Enable File Sharing Properly 2. Turn Password Protection Off |
| Case 2. Computer Adaption Problems | 1. Add a Windows Credential 2. Disable IPv6 3. Change File Sharing Connection 4. Disable Antivirus |
| Case 3. Windows Update Problems | 1. Enable the SMB 1.0/CIFS Support 2. Update Windows to the latest version |
| Case 4. Fail to resolve the problem by 8 fixes | Use File Sharing alternative — EaseUS Todo PCTrans |
P.S. At first, it would be a good choice to restart your computer if the file sharing not working problem occurs because of the associated service not starting. If it doesn’t work, try the follow-up methods.
About Fixing Windows 10 Network Sharing Not Working
When the problem arises, the computers on the network might not find each other, or users can’t access the files of another PC, or users can’t see shared folders.
Whatever the cause, it is important that you fix the issue instantly. 8 Methods demonstrated below are effective ways to check out. Moreover, EaseUS Todo PCTrans, a great PC data transfer tool, works as a workaround for you if all of these solutions fail. After fixing Windows 10 file sharing not working, you can do file sharing between Windows 7 and Windows 10.
1. Enable and Use File Sharing Properly
File sharing can only work when you enable sharing settings correctly. Besides, you also have to share data in the right way. For that, follow these steps:
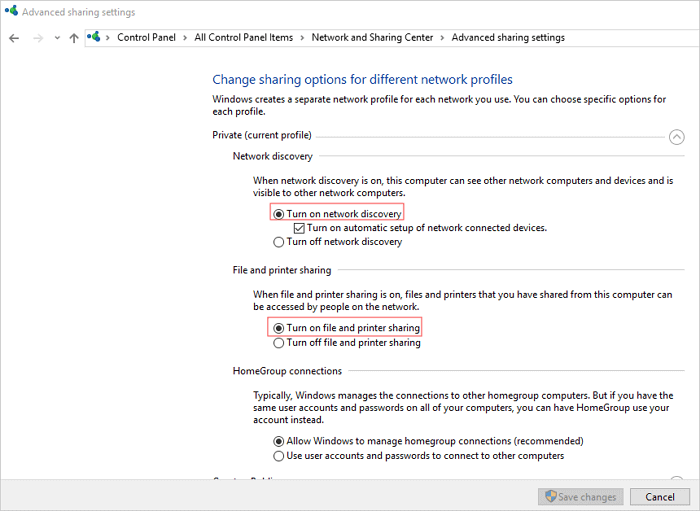
Step 1. Click «Start» > «Control Panel» > «Network and Sharing Center» > «Advanced sharing settings«.
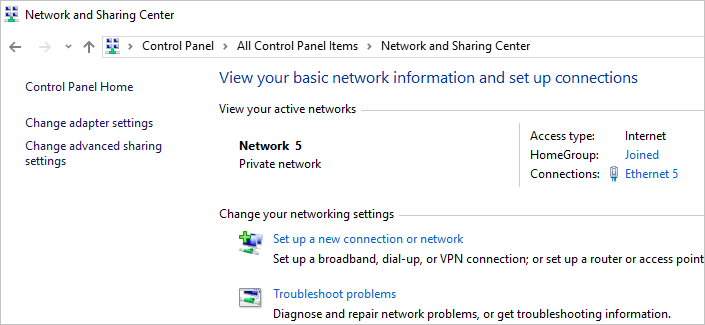
Step 2. Under Private (current profile), check «Turn on network discovery» and «Turn on file and printer sharing«. Click «Save changes» to confirm.
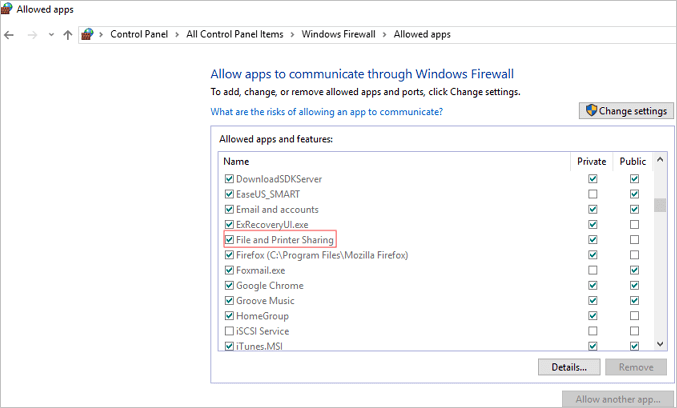
To make sure the problem can be solved, allow File and Printer Sharing in Windows firewall settings.
Step 1. Click «Start» > «Control Panel» > «Windows Firewall» > «Allow a program through Windows Firewall«.
Step 2. In the pop-up window, check «File and Printer Sharing» in the list. Then, click «OK«.
If this doesn’t work, you can also try disabling the Windows Defender temporarily to check if that helps in solving the issue.
How to share files exactly
Step 1. Right-click on the file you want to share. Click «Properties» > «Sharing» > «Advanced Sharing«.
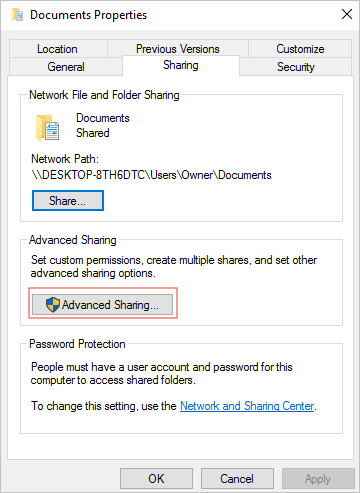
Step 2. Check «Share this folder«, then click «Apply» and «OK«. You can click the «Permissions» option to set the permissions for files as per your need.
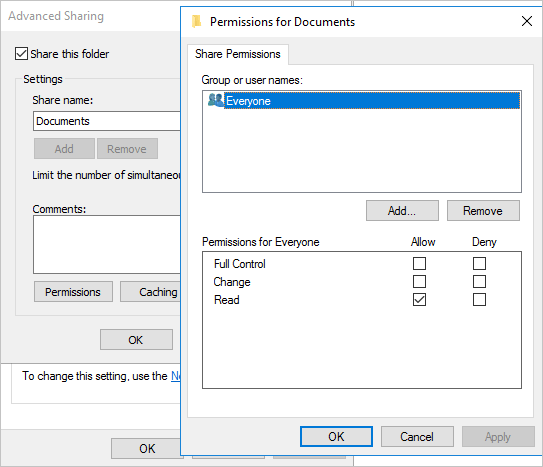
The above steps make your folder accessible to all the users in your local network. If you want to share with specific users, you can click the «Share» button in Step 1 to select.
2. Turn Password Protection off
When Password protected sharing is turned on, the file sharing might fail because other users either need to have a user account on your PC, or they should know your username and password. Hence, to fix file sharing not working, you can try to disable this feature.
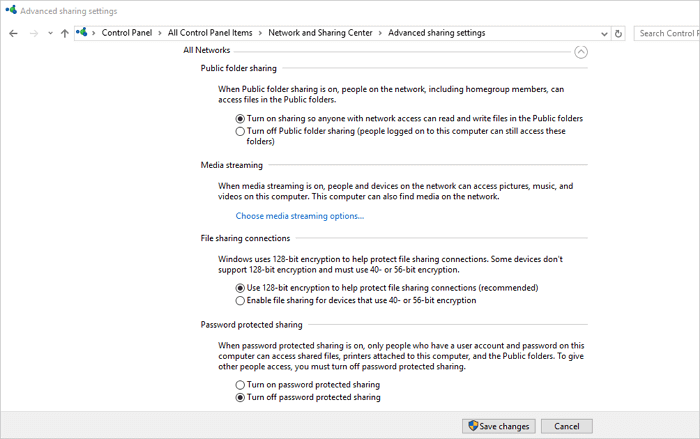
Step 1. Go to «Control Panel» > «Network and Sharing Center» > «Change advanced sharing settings«.
Step 2. Then, under All Networks, check «Turn off password protected sharing«, and click on «Save changes«.
3. Add a Windows Credential
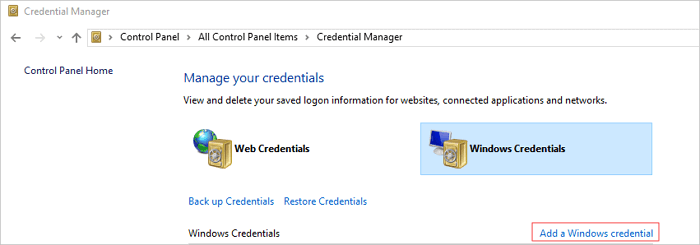
If you fail to access a specific folder when connecting to a remote server computer for file sharing, you might want to add a credential to fix the problem. In order to proceed, you will need to know the network address, username, and password of the remote computer or server.
Step 1. Open «Control Panel«, and click on «Credentials Manager«.
Step 2. Select «Windows Credentials» and click the «Add a Windows credential» button.
Enter the target computer’s IP address in the Internet or network address and enter User name and Password respectively. This will hopefully resolve the problem with File sharing.
4. Disable IPv6
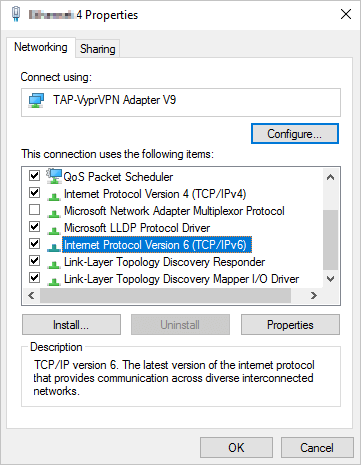
Many users have reported that disabling IPv6 on their computers can resolve the file sharing problem, so try it out.
Step 1. Open «Control Panel» and click on «Network and Sharing Center«.
Step 2. Click «Change adapter settings«. Double-click on your active Network Adapter on the Internet Connection window.
Step 3. Click «Properties» and find the «Internet Protocol Version 6» entry on the list. Uncheck it and click «OK«. Then, restart your computer and see if the problem still exists.
5. Change File Sharing Connections
Windows uses 128-bit encryption to help protect file sharing connections. Some devices don’t support 128-bit encryption and must use 40- or 56-bit encryption. So, you need to switch between these two sharing connections based on the actual situation.
Step 1. Open «Control Panel» > click «Network and Sharing Center» > choose «Change advanced sharing settings«.
Step 2. Under «All Networks«, find «File sharing connections«. You can try both 120-bit encryption and 40- or 56- bit encryption alternatively.
6. Disable Antivirus on your PC
Sometimes, the antivirus may prevent Windows file sharing. So, try disabling it temporarily and see if it solves the issue. And you can upgrade your antivirus to its latest version.
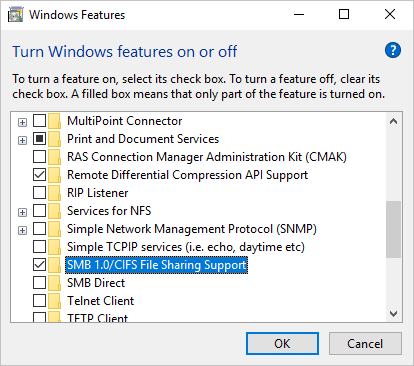
7. Enable the SMB 1.0/CIFS File Sharing Support
The recent Windows 10 update might have disabled the SMB feature that is necessary for fire sharing. Fix this issue and turn on SMB 1.0 in the Windows Features window.
Step 1. Open the «Control Panel«. Click on «Programs and Features«.
Step 2. Click «Turn Windows features on or off» at the left pane. On the pop-up windows, scroll down to find and check the «SMB 1.0/CIFS File Sharing Support» feature. Then, click «OK» and reboot the computer.
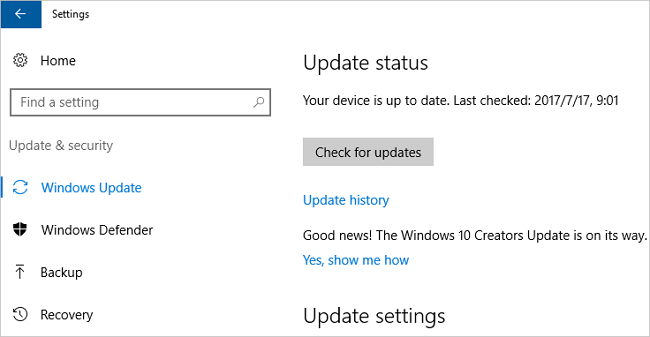
8. Update Windows to the Latest Version
Windows 10 files sharing not working may be due to bugs in the update. The latest versions of Windows 10 seem to have resolved this problem. Thus, upgrade to the latest windows version if you haven’t done it yet.
Step 1. Open «Settings» on your Windows PC. Go to «Update & security» and click on the «Check for updates» button under the Update status to check whether there is a new version of Windows available.
Step 2. If there is one, install the update immediately and restart your computer afterward.
We’ve given you all the possible solutions in the above content, which can be done directly on the Windows computer. We hope they would have helped you fix the Windows 10 file sharing not working issue and you can share files between two computers again.
If you’ve tried them all, but nothing worked, don’t be discouraged. You still have a good choice, which is using a reliable Windows 10 file sharing alternative to finish PC data transfer.
How to Transfer Data from One PC to Another with File Sharing Alternative in Windows 10
Windows 10 file sharing can be affected by many factors. Once it works improperly, it might be difficult for you to resolve the problem timely. To ensure a successful and smooth PC data transfer, the file sharing software — EaseUS Todo PCTrans is what exactly you need. Being a user-friendly PC transfer tool, EaseUS Todo PCTrans enables you to transfer data, applications, and account settings from one PC to another in one-click. It provides three easy transfer ways in all.
- PC to PC Transfer: Connect two Windows laptops/PCs by the network, and move your files, apps & accounts off the old PC to a new one wirelessly
- Backup & Restore: Make images of files, folders, or software on the previous computer, and transfer to the next one. It also works as a backup.
- App Migration: Move installed software to another drive locally, and free up space to settle down low disk space issue.
Now, download and use this PC file transfer as an effective workaround to fix Windows 10 file sharing not working problem.
Step 1. Launch EaseUS Todo PCTrans on your source and target computers, connect both PCs via the internet.
1. At the «PC to PC» section, click «PC to PC» to continue.

2. Select your target computer via its device name, then enter its account password or verification code and select the transfer direction. Then click «Connect» to continue.
You can check the verification code on the right top of «PC to PC» mainscreen on the target computer.

Step 2. Select the categories Applications, Files, and Accounts to transfer via the internet.
If you want to transfer data selectively, click «Edit» under each category, and choose the specific items.

Step 3. Click «Transfer» to start transferring your apps/files/accounts from one computer to another computer via the Internet.

Windows 10 Network Sharing Not Working FAQ
1. How to enable File Sharing properly?
- Click «Start» > «Control Panel» > «Network and Sharing Center» > «Advanced sharing settings». Choose «Turn on network discovery» and «Turn on file and printer sharing» under the Private (current profile).
- Change Windows firewall settings: Choose «Start» > «Control Panel» > «Windows Firewall» > «Allow a program through Windows Firewall» > «File and Printer Sharing»
2. How do I fix Network Sharing Not Working?
Targeting File Sharing misuse, computer adoption problem, Windows update and more, we highly recommend 8 workable solutions to fix Windows 10 sharing not working.
- 1. Enable and Use File Sharing Properly
- 2. Turn Password Protection Off
- 3. Add a Windows Credential
- 4. Disable IPv6
- 5. Change File Sharing Connections
- 6. Disable Antivirus on Your PC
- 7. Enable the SMB 1.0/CIFS File Sharing Support
- 8. Update Windows to the Latest Version
Windows 10 File Sharing feature enables users to quickly share files with computers inside the local network they create, which is very convenient and safe. However, many users have met the same issue after update 1803, 1809, or 1903, which is Windows 10 file sharing not working. Here we provide 8 feasible ways to fix Windows 10 network sharing not working.
| Reasons for Network Sharing not Working | Workable Solutions |
|---|---|
| Case 1. File Sharing Misuse (Easiest) | 1. Enable File Sharing Properly 2. Turn Password Protection Off |
| Case 2. Computer Adaption Problems | 1. Add a Windows Credential 2. Disable IPv6 3. Change File Sharing Connection 4. Disable Antivirus |
| Case 3. Windows Update Problems | 1. Enable the SMB 1.0/CIFS Support 2. Update Windows to the latest version |
| Case 4. Fail to resolve the problem by 8 fixes | Use File Sharing alternative — EaseUS Todo PCTrans |
P.S. At first, it would be a good choice to restart your computer if the file sharing not working problem occurs because of the associated service not starting. If it doesn’t work, try the follow-up methods.
About Fixing Windows 10 Network Sharing Not Working
When the problem arises, the computers on the network might not find each other, or users can’t access the files of another PC, or users can’t see shared folders.
Whatever the cause, it is important that you fix the issue instantly. 8 Methods demonstrated below are effective ways to check out. Moreover, EaseUS Todo PCTrans, a great PC data transfer tool, works as a workaround for you if all of these solutions fail. After fixing Windows 10 file sharing not working, you can do file sharing between Windows 7 and Windows 10.
1. Enable and Use File Sharing Properly
File sharing can only work when you enable sharing settings correctly. Besides, you also have to share data in the right way. For that, follow these steps:
Step 1. Click «Start» > «Control Panel» > «Network and Sharing Center» > «Advanced sharing settings«.
Step 2. Under Private (current profile), check «Turn on network discovery» and «Turn on file and printer sharing«. Click «Save changes» to confirm.
To make sure the problem can be solved, allow File and Printer Sharing in Windows firewall settings.
Step 1. Click «Start» > «Control Panel» > «Windows Firewall» > «Allow a program through Windows Firewall«.
Step 2. In the pop-up window, check «File and Printer Sharing» in the list. Then, click «OK«.
If this doesn’t work, you can also try disabling the Windows Defender temporarily to check if that helps in solving the issue.
How to share files exactly
Step 1. Right-click on the file you want to share. Click «Properties» > «Sharing» > «Advanced Sharing«.
Step 2. Check «Share this folder«, then click «Apply» and «OK«. You can click the «Permissions» option to set the permissions for files as per your need.
The above steps make your folder accessible to all the users in your local network. If you want to share with specific users, you can click the «Share» button in Step 1 to select.
2. Turn Password Protection off
When Password protected sharing is turned on, the file sharing might fail because other users either need to have a user account on your PC, or they should know your username and password. Hence, to fix file sharing not working, you can try to disable this feature.
Step 1. Go to «Control Panel» > «Network and Sharing Center» > «Change advanced sharing settings«.
Step 2. Then, under All Networks, check «Turn off password protected sharing«, and click on «Save changes«.
3. Add a Windows Credential
If you fail to access a specific folder when connecting to a remote server computer for file sharing, you might want to add a credential to fix the problem. In order to proceed, you will need to know the network address, username, and password of the remote computer or server.
Step 1. Open «Control Panel«, and click on «Credentials Manager«.
Step 2. Select «Windows Credentials» and click the «Add a Windows credential» button.
Enter the target computer’s IP address in the Internet or network address and enter User name and Password respectively. This will hopefully resolve the problem with File sharing.
4. Disable IPv6
Many users have reported that disabling IPv6 on their computers can resolve the file sharing problem, so try it out.
Step 1. Open «Control Panel» and click on «Network and Sharing Center«.
Step 2. Click «Change adapter settings«. Double-click on your active Network Adapter on the Internet Connection window.
Step 3. Click «Properties» and find the «Internet Protocol Version 6» entry on the list. Uncheck it and click «OK«. Then, restart your computer and see if the problem still exists.
5. Change File Sharing Connections
Windows uses 128-bit encryption to help protect file sharing connections. Some devices don’t support 128-bit encryption and must use 40- or 56-bit encryption. So, you need to switch between these two sharing connections based on the actual situation.
Step 1. Open «Control Panel» > click «Network and Sharing Center» > choose «Change advanced sharing settings«.
Step 2. Under «All Networks«, find «File sharing connections«. You can try both 120-bit encryption and 40- or 56- bit encryption alternatively.
6. Disable Antivirus on your PC
Sometimes, the antivirus may prevent Windows file sharing. So, try disabling it temporarily and see if it solves the issue. And you can upgrade your antivirus to its latest version.
7. Enable the SMB 1.0/CIFS File Sharing Support
The recent Windows 10 update might have disabled the SMB feature that is necessary for fire sharing. Fix this issue and turn on SMB 1.0 in the Windows Features window.
Step 1. Open the «Control Panel«. Click on «Programs and Features«.
Step 2. Click «Turn Windows features on or off» at the left pane. On the pop-up windows, scroll down to find and check the «SMB 1.0/CIFS File Sharing Support» feature. Then, click «OK» and reboot the computer.
8. Update Windows to the Latest Version
Windows 10 files sharing not working may be due to bugs in the update. The latest versions of Windows 10 seem to have resolved this problem. Thus, upgrade to the latest windows version if you haven’t done it yet.
Step 1. Open «Settings» on your Windows PC. Go to «Update & security» and click on the «Check for updates» button under the Update status to check whether there is a new version of Windows available.
Step 2. If there is one, install the update immediately and restart your computer afterward.
We’ve given you all the possible solutions in the above content, which can be done directly on the Windows computer. We hope they would have helped you fix the Windows 10 file sharing not working issue and you can share files between two computers again.
If you’ve tried them all, but nothing worked, don’t be discouraged. You still have a good choice, which is using a reliable Windows 10 file sharing alternative to finish PC data transfer.
How to Transfer Data from One PC to Another with File Sharing Alternative in Windows 10
Windows 10 file sharing can be affected by many factors. Once it works improperly, it might be difficult for you to resolve the problem timely. To ensure a successful and smooth PC data transfer, the file sharing software — EaseUS Todo PCTrans is what exactly you need. Being a user-friendly PC transfer tool, EaseUS Todo PCTrans enables you to transfer data, applications, and account settings from one PC to another in one-click. It provides three easy transfer ways in all.
- PC to PC Transfer: Connect two Windows laptops/PCs by the network, and move your files, apps & accounts off the old PC to a new one wirelessly
- Backup & Restore: Make images of files, folders, or software on the previous computer, and transfer to the next one. It also works as a backup.
- App Migration: Move installed software to another drive locally, and free up space to settle down low disk space issue.
Now, download and use this PC file transfer as an effective workaround to fix Windows 10 file sharing not working problem.
Step 1. Launch EaseUS Todo PCTrans on your source and target computers, connect both PCs via the internet.
1. At the «PC to PC» section, click «PC to PC» to continue.
2. Select your target computer via its device name, then enter its account password or verification code and select the transfer direction. Then click «Connect» to continue.
You can check the verification code on the right top of «PC to PC» mainscreen on the target computer.
Step 2. Select the categories Applications, Files, and Accounts to transfer via the internet.
If you want to transfer data selectively, click «Edit» under each category, and choose the specific items.
Step 3. Click «Transfer» to start transferring your apps/files/accounts from one computer to another computer via the Internet.
Windows 10 Network Sharing Not Working FAQ
1. How to enable File Sharing properly?
- Click «Start» > «Control Panel» > «Network and Sharing Center» > «Advanced sharing settings». Choose «Turn on network discovery» and «Turn on file and printer sharing» under the Private (current profile).
- Change Windows firewall settings: Choose «Start» > «Control Panel» > «Windows Firewall» > «Allow a program through Windows Firewall» > «File and Printer Sharing»
2. How do I fix Network Sharing Not Working?
Targeting File Sharing misuse, computer adoption problem, Windows update and more, we highly recommend 8 workable solutions to fix Windows 10 sharing not working.
- 1. Enable and Use File Sharing Properly
- 2. Turn Password Protection Off
- 3. Add a Windows Credential
- 4. Disable IPv6
- 5. Change File Sharing Connections
- 6. Disable Antivirus on Your PC
- 7. Enable the SMB 1.0/CIFS File Sharing Support
- 8. Update Windows to the Latest Version