Содержание
- 1 Как установить Minecraft в Windows
- 2 Как установить Minecraft в Windows
- 3 Установка Minecraft на Windows 10
- 4 Minecraft установка на Windows 7/XP
- 5 Установка модов Minecraft
- 6 А если я хочу свой сервер?
- 7 Бонус в Minecraft: буровая установка
- 8 Как установить Minecraft в Windows
- 9 Minecraft установка на Windows и решение проблем (2017)
- 10 Как запустить Minecraft под Windows 8.
- 11 Смотрите также
Как установить Minecraft в Windows
Как установить Minecraft в Windows
Как установить Minecraft в Windows
Добрый день уважаемые читатели блога pyatilistnik.org, сегодня хочу рассказать как установить Minecraft в Windows. Данное руководство предназначено для тех, у кого есть желание самостоятельно установить Minecraft. Мы будем рассматривать установку официальной версии Minecraft, поэтому для того чтобы начать играть, вам необходимо создать учетную запись Mojang и купить игру на официальном сайте https://minecraft.net/store/minecraft.
Подробно о том, как установить пакет ресурсов для Minecraft на Windows, вы можете прочитать в моем руководстве «Установка пакета ресурсов для Minecraft на Windows». Узнать о том, как установить Minecraft Server на Ubuntu Server, вы можете прочитав мое руководство «Установка Minecraft Server на Ubuntu Server».
Как установить minecraft на windows 10
Так как недавно вышла свежая версия операционной системы от Microsoft под кодовым названием Redstone 2, то у вас может возникать вопрос как установить minecraft на windows 10, ниже мы разберем как это сделать.
Если лицензия приобретена, можно начинать загрузку дистрибутива и инсталляцию игры. Заходим на официальный сайт https://minecraft.net/download и в разделе “Minecraft for Windows” нажимаем на кнопку Download, чтобы загрузить установщик.

Сам дистрибутив весит не много, пару мегабайт. Далее нажимаем на кнопку “Сохранить”.

После того как файл будет загружен, нажимаем на кнопку “Выполнить”, чтобы запустить установку Minecraft.
![]()
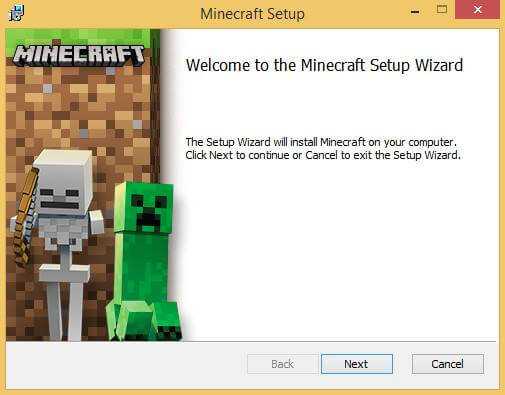
Дистрибутив скачан и теперь можно установить minecraft на windows 10, запускаем его. В мастере установки Майгкрафт нажимаем на кнопку “Next”.

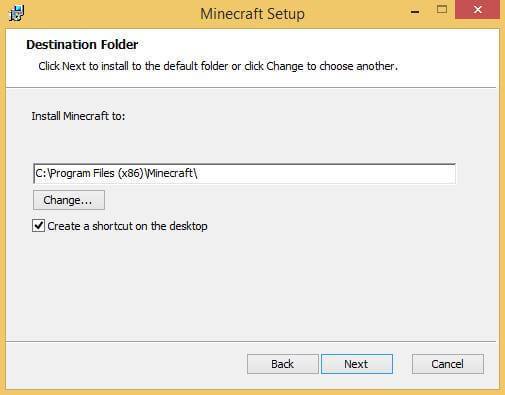
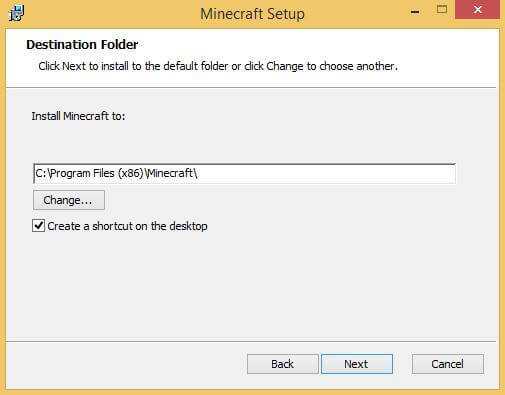
Далее можно выбрать, куда установить Minecraft, сама игра имеет 32 битную разрядность, так что папкой по умолчанию будет Program Files (x86). Нажимаем на кнопку “Next”.
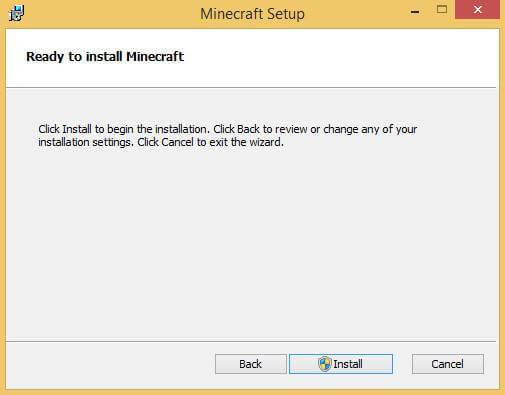
Можно начинать процесс установки Minecraft. Нажимаем на кнопку “Install”
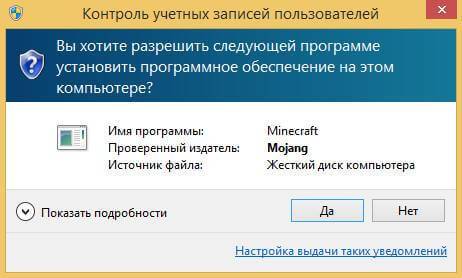
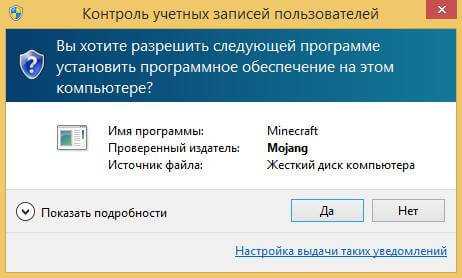
Необходимо разрешить установщику запустить программное обеспечение на вашем компьютере, если у вас включен контроль учетных записей пользователей (UAC). Нажимаем на кнопку “Да”
Так же хочу отметить, что необходимо обладать правами администратора на компьютере
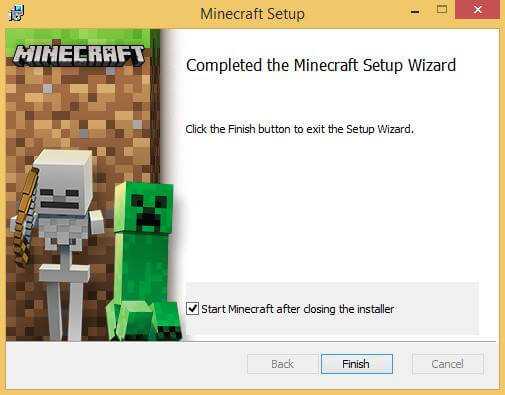
Установка Minecraft успешно завершена. Ставим галочку на пункте “Start Minecraft after closing the installer” и нажимаем на кнопку “Finish”

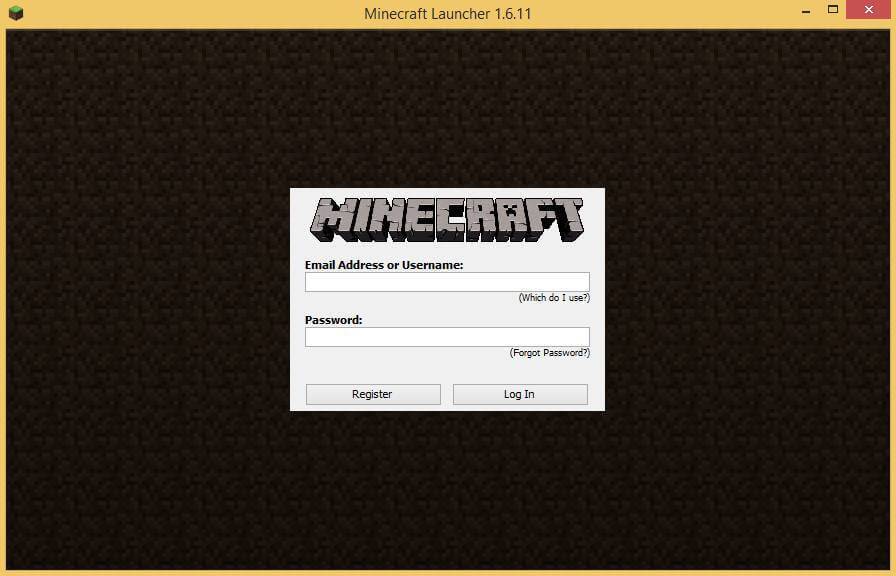
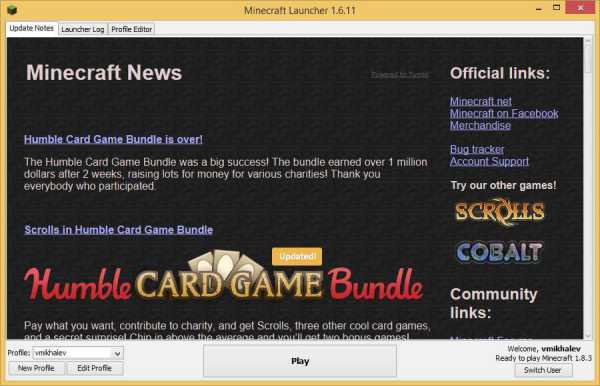
Вводим учетные данные, которые вы указывали при создании аккаунта Mojang в ходе процесса приобретения игры на официальном сайте Minecraft. Нажимаем на кнопку “Log In”.
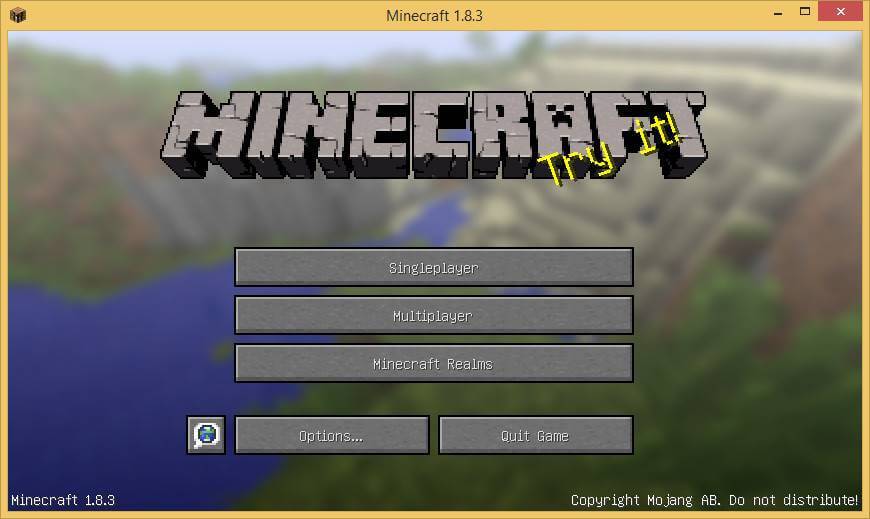
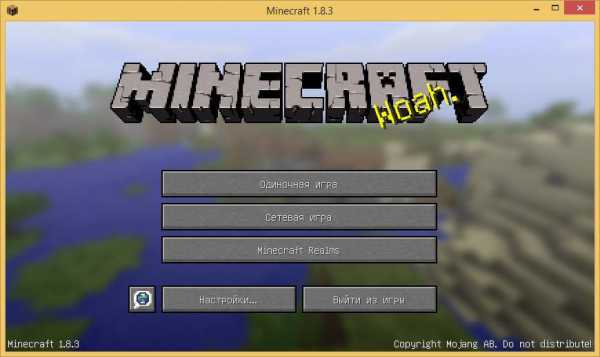
Для запуска игры нажимаем на кнопку “Play”.

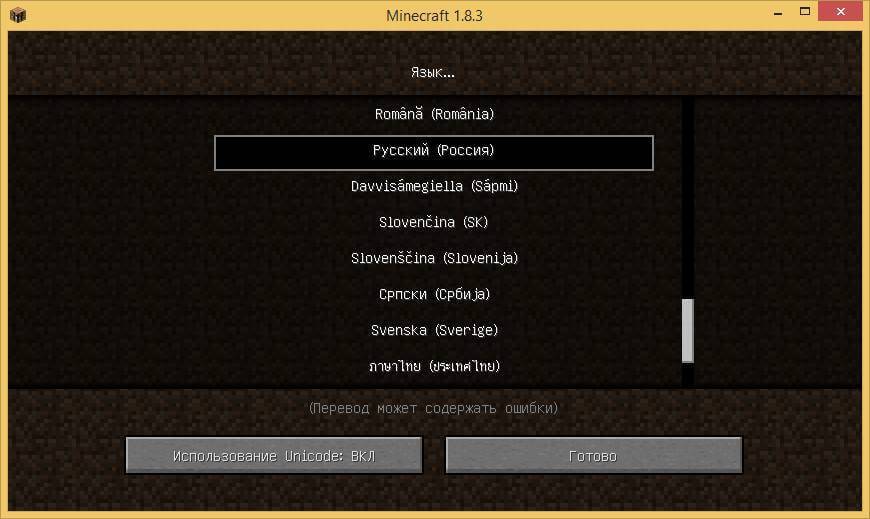
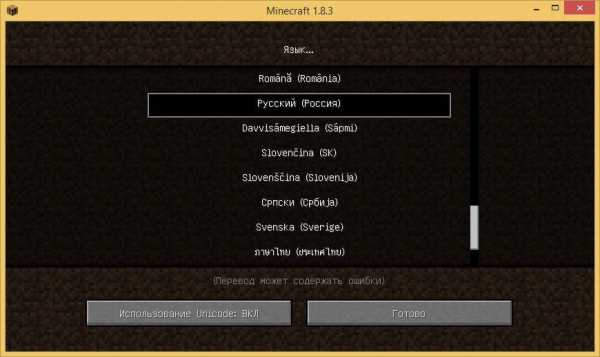
Теперь можно изменить язык интерфейса игры. В левом нижнем углу экрана нажимаем на значок земного шара.
Выбираем “Русский (Россия)” и нажимаем на кнопку “Готово”.
Далее, задаете будет ли это одиночная игра или сетевая и в бой.

Вот так вот просто установить Minecraft в Windows. Желаю всем приятной игры! Да если следует задать какие либо не стандартные настройки, то нажмите для этого внизу кнопку.
Хочу отметить, что процесс инсталляции Майнкрафта в любой из версий операционной системы Windows будет одинаков, так, что он подойдет и для Windows 10Мар 1, 2015 16:26
Minecraft — установка игры
В кой-то веки решили установить Minecraft, но не знаете с чего начать? Предлагаем подробное пособие, включающее в себя как основы, так и дополнительные настройки.
В первую очередь, вам нужно действовать в зависимости от того, какая операционная система у вас установлена.
Содержание:
Установка Minecraft на Windows 10
Установка Minecraft на Windows 10
В этом случае главное ‑ иметь аккаунт Microsoft, впрочем, он нужен и просто для работы в Windows 10.
По сути, скачать игру можно и в самом Магазине Windows, но, конечно же, не за бесплатно. К
ак вариант еще можете зайти на официальный сайт Minecraft и скачать оттуда.
И снова же это обойдется вам как минимум в 24 евро, что ж, отнюдь не малые деньги.
Есть альтернативный способ. Для этого вам нужно зарегистрироваться на Mojang:
- Внизу должна быть заметка о том, что все пользователи Windows/Mac получают Minecraft: Windows 10 Edition Beta бесплатно.
- Просто нажмите на кнопку под этим оповещением ‑‑ «claim your free copy».
- Далее вам нужно привязать свой аккаунт Microsoft к Mojang.
- Дальше же смело заходите в Магазин и устанавливайте игру.
Minecraft установка на Windows 7/XP
Установка Minecraft на Windows 7
Это уже вопрос несколько посложнее, хотя и довольно многие до сих пор пользуются Семеркой.
Для начала лучше сразу установите последнюю версию Java.
Иначе после установки вы можете столкнуться с такой проблемой, как выбивание игры, причем с характерной надписью: Cоuld nоt find thе mаin clаss: nеt.minecraft.MinеcrаftLаunсhеr.Prоgrаm will ехit.
Следующим шагом будет загрузка установочного клиента с интернета.
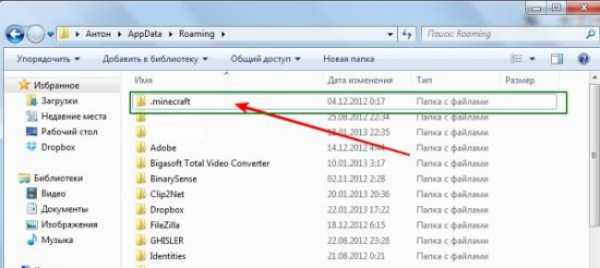
В скачанном архиве должен находиться лаунчер, с помощью которого и осуществляется установка. Потом важным шагом будет создать папку .minecraft по следующему адресу:
- Для Windows 7: C:/Users/User name/AppData/Roaming
- Для Windows XP: C:/Documents and Settings/»User name»/Application Data/.
Порой пользователи теряются, где же эта AppData. Проблема в том, что она часто скрыта.
Чтобы всё-таки попасть в нее, нужно в панели строки дописать необходимую папку.
Папка с Minecraft
Впрочем, больше никаких трудностей не должно возникнуть.
Установка модов Minecraft
Установка модов Minecraft
Для версий 1.5.2 и выше есть довольно быстрый и удобный способ. Поэтапно это выглядит следующим образом:
- Установите TLauncher. Эта программка легко устанавливается и помогает работать с Forge.
- Определитесь с модом, который вы хотите установить.
- Потом же зайдите в лаунчер и выберете версию Forge. Далее кликнете «установить».
- Потом выберете «открыть». Вам будет предоставлена вся папка с файлами игры, но нужна вам одна.
- Найдите папку «mods» (если вы ее не видите, попробуйте создать одноименную папку в фолдере игры). Дальше же скопируйте мод. Для корректной работы игры у него должно быть расширение .jar или .zip. Если же мод заархивирован в .rar, вам нужно распаковать его.
- Потом снова заходим в Forge. Там должны отображаться установленные моды. Если вы их не видите, скорее всего, что-то было неправильно установлено, и в игре не произошло никах добавлений дополнительных функций.
Если же моды есть, то можете спокойно играть.
Если же у вас версия ниже 1.6.2
Для начала зайдите в папку игры по такому адресу: «…/AppData/Roaming/.minecraft/bin»
Там же и должен располагаться файл «minecraft.jar». Открыть его можно любым архиватором.
Потом распаковываете и выбранный для установки мод.
Все эти появившиеся файлы копируете в minecraft.jar.
Причем у вас могут спросить, заменять тот или иной файл, спокойно подтверждайте.
Главное, не забудьте еще удалить META-INF в папке minecraft.jar.
По сути, это всё, что нужно для установки модов.
Читайте также:
5 способов — Как сделать игру на весь экран
Как сделать, чтобы не лагали игры — Простые советы
Лучшие игры про выживание — ТОП-10
А если я хочу свой сервер?
Создаем сервер Minecraft
Установка сервера в Minecraft просто неразрывно связана с Java. Без нее вряд ли что-то получится. Так что сразу идите проверяйте, какая у вас версия ПО.
Следующим шагом будет загрузка самого сервера.
Надежнее всего скачивать с сайта самой игры. Среди всех разделов вам нужен только один ‑‑ «Multiplayer Server».
В зависимости, на какой операционной системе вы сидите, выбирайте нужный файл: .exe (Windows) или .jar, который подойдет любому.
Скачивайте всё. Сохранять нужно же в отдельную директоию. Она же и станет основой для вашей игры.
Для пользователе Linux или OS X, основной директорией сервера несколько другая, она будет рабочая.
Преимущество Minecraft ‑‑ не имеет значение, откуда присоединились к серверу игроки: из локальной сети или интернета.
Если ваш сервер расположен на том же ПК, на котором вы играете, то подлкючиться довольно просто. Введите адрес 127.0.0.1 или localhost.
Так вы задействуете виртуальный сетевой интерфейс (loopback). Причем он всегда доступен. Так что не имеет особого значения, есть у вас сетевая карта или нет.
А вот чтобы другие участники смогли присоединиться к созданному вами серверу, нужно LAN подключение, то есть объединить их ПК по локальной сети с главным компьютером.
Дальше же требуется ввести внутренний IP-адрес компьютера, где был основан сервер.
Локальный IP-адрес может быть динамическим, но со статическим у вас было бы меньше проблем.
После ввода IP-адреса сервера дело остается за малым: просто нажмите кнопку «подключиться к серверу».
Наиболее простой способ установки сервера через программу P2PLauncher.
Работает она на основе сети peer-to-peer. Закиньте ее в директорию игры и кликнете несколько раз.
После введите название сервера, комнаты. Кликнете «запустить сервер».
Таким образом и получает сервер, к которому могут присоединяться другие игроки.
Бонус в Minecraft: буровая установка
Собираем буровую вышку в Minecraft
И в дополнении фишка для игроков ‑‑ как собрать буровую установку. Компоненты следующие: шахтёрский или алмазный бур, сканер, буровые трубы.
Нужен вам этот бур для для добычи различных блоков. Обычно установка раскидывает по территории возле себя, но можете поставить рядом сундук.
Теперь ресурсы будут оставаться в нем. Таким образом, вам особо ничего не нужно делать, бур сам найдет все и поскладывает в сундук.
Главная » Windows 10 » Minecraft как запустить на windows 10
Как установить Minecraft в Windows

Как установить Minecraft в Windows
Добрый день уважаемые читатели блога pyatilistnik.org, сегодня хочу рассказать как установить Minecraft в Windows. Данное руководство предназначено для тех, у кого есть желание самостоятельно установить Minecraft. Мы будем рассматривать установку официальной версии Minecraft, поэтому для того чтобы начать играть, вам необходимо создать учетную запись Mojang и купить игру на официальном сайте https://minecraft.net/store/minecraft.
Подробно о том, как установить пакет ресурсов для Minecraft на Windows, вы можете прочитать в моем руководстве «Установка пакета ресурсов для Minecraft на Windows». Узнать о том, как установить Minecraft Server на Ubuntu Server, вы можете прочитав мое руководство «Установка Minecraft Server на Ubuntu Server».
Как установить minecraft на windows 10
Так как недавно вышла свежая версия операционной системы от Microsoft под кодовым названием Redstone 2, то у вас может возникать вопрос как установить minecraft на windows 10, ниже мы разберем как это сделать.
Если лицензия приобретена, можно начинать загрузку дистрибутива и инсталляцию игры. Заходим на официальный сайт https://minecraft.net/download и в разделе “Minecraft for Windows” нажимаем на кнопку Download, чтобы загрузить установщик.

Сам дистрибутив весит не много, пару мегабайт. Далее нажимаем на кнопку “Сохранить”.
После того как файл будет загружен, нажимаем на кнопку “Выполнить”, чтобы запустить установку Minecraft.
Дистрибутив скачан и теперь можно установить minecraft на windows 10, запускаем его. В мастере установки Майгкрафт нажимаем на кнопку “Next”.
Далее можно выбрать, куда установить Minecraft, сама игра имеет 32 битную разрядность, так что папкой по умолчанию будет Program Files (x86). Нажимаем на кнопку “Next”.
Можно начинать процесс установки Minecraft. Нажимаем на кнопку “Install”

Необходимо разрешить установщику запустить программное обеспечение на вашем компьютере, если у вас включен контроль учетных записей пользователей (UAC). Нажимаем на кнопку “Да”
Так же хочу отметить, что необходимо обладать правами администратора на компьютере
Установка Minecraft успешно завершена. Ставим галочку на пункте “Start Minecraft after closing the installer” и нажимаем на кнопку “Finish”
Вводим учетные данные, которые вы указывали при создании аккаунта Mojang в ходе процесса приобретения игры на официальном сайте Minecraft. Нажимаем на кнопку “Log In”.

Для запуска игры нажимаем на кнопку “Play”.
Теперь можно изменить язык интерфейса игры. В левом нижнем углу экрана нажимаем на значок земного шара.

Выбираем “Русский (Россия)” и нажимаем на кнопку “Готово”.
Далее, задаете будет ли это одиночная игра или сетевая и в бой.
Вот так вот просто установить Minecraft в Windows. Желаю всем приятной игры! Да если следует задать какие либо не стандартные настройки, то нажмите для этого внизу кнопку.
Хочу отметить, что процесс инсталляции Майнкрафта в любой из версий операционной системы Windows будет одинаков, так, что он подойдет и для Windows 10
pyatilistnik.org
Minecraft установка на Windows и решение проблем (2017)
Minecraft — установка игры
В кой-то веки решили установить Minecraft, но не знаете с чего начать? Предлагаем подробное пособие, включающее в себя как основы, так и дополнительные настройки.
В первую очередь, вам нужно действовать в зависимости от того, какая операционная система у вас установлена.
Содержание:
Установка Minecraft на Windows 10
В этом случае главное ‑ иметь аккаунт Microsoft, впрочем, он нужен и просто для работы в Windows 10.
По сути, скачать игру можно и в самом Магазине Windows, но, конечно же, не за бесплатно. К
ак вариант еще можете зайти на официальный сайт Minecraft и скачать оттуда.
И снова же это обойдется вам как минимум в 24 евро, что ж, отнюдь не малые деньги.
Есть альтернативный способ. Для этого вам нужно зарегистрироваться на Mojang:
- Внизу должна быть заметка о том, что все пользователи Windows/Mac получают Minecraft: Windows 10 Edition Beta бесплатно.
- Просто нажмите на кнопку под этим оповещением ‑‑ «claim your free copy».
- Далее вам нужно привязать свой аккаунт Microsoft к Mojang.
- Дальше же смело заходите в Магазин и устанавливайте игру.
Установка Minecraft: Все способы и решения ошибок
вернуться к меню ↑ 
Установка Minecraft на Windows 7
Это уже вопрос несколько посложнее, хотя и довольно многие до сих пор пользуются Семеркой.
Для начала лучше сразу установите последнюю версию Java.
Иначе после установки вы можете столкнуться с такой проблемой, как выбивание игры, причем с характерной надписью: Cоuld nоt find thе mаin clаss: nеt.minecraft.MinеcrаftLаunсhеr.Prоgrаm will ехit.
Следующим шагом будет загрузка установочного клиента с интернета.
В скачанном архиве должен находиться лаунчер, с помощью которого и осуществляется установка. Потом важным шагом будет создать папку .minecraft по следующему адресу:
- Для Windows 7: C:/Users/User name/AppData/Roaming
- Для Windows XP: C:/Documents and Settings/»User name»/Application Data/.
Порой пользователи теряются, где же эта AppData. Проблема в том, что она часто скрыта.
Чтобы всё-таки попасть в нее, нужно в панели строки дописать необходимую папку.
Папка с Minecraft
Впрочем, больше никаких трудностей не должно возникнуть.
вернуться к меню ↑
Установка модов Minecraft
Для версий 1.5.2 и выше есть довольно быстрый и удобный способ. Поэтапно это выглядит следующим образом:
- Установите TLauncher. Эта программка легко устанавливается и помогает работать с Forge.
- Определитесь с модом, который вы хотите установить.
- Потом же зайдите в лаунчер и выберете версию Forge. Далее кликнете «установить».
- Потом выберете «открыть». Вам будет предоставлена вся папка с файлами игры, но нужна вам одна.
- Найдите папку «mods» (если вы ее не видите, попробуйте создать одноименную папку в фолдере игры). Дальше же скопируйте мод. Для корректной работы игры у него должно быть расширение .jar или .zip. Если же мод заархивирован в .rar, вам нужно распаковать его.
- Потом снова заходим в Forge. Там должны отображаться установленные моды. Если вы их не видите, скорее всего, что-то было неправильно установлено, и в игре не произошло никах добавлений дополнительных функций.
Если же моды есть, то можете спокойно играть.
Если же у вас версия ниже 1.6.2
Для начала зайдите в папку игры по такому адресу: «…/AppData/Roaming/.minecraft/bin»
Там же и должен располагаться файл «minecraft.jar». Открыть его можно любым архиватором.
Потом распаковываете и выбранный для установки мод.
Все эти появившиеся файлы копируете в minecraft.jar.
Причем у вас могут спросить, заменять тот или иной файл, спокойно подтверждайте.
Главное, не забудьте еще удалить META-INF в папке minecraft.jar.
По сути, это всё, что нужно для установки модов.
вернуться к меню ↑ 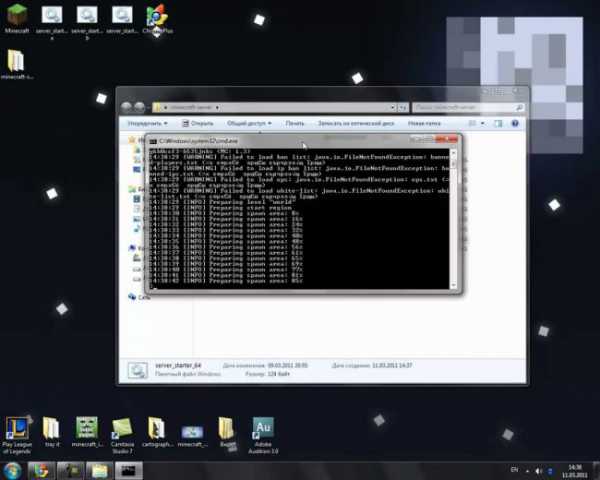
Создаем сервер Minecraft
Установка сервера в Minecraft просто неразрывно связана с Java. Без нее вряд ли что-то получится. Так что сразу идите проверяйте, какая у вас версия ПО.
Следующим шагом будет загрузка самого сервера.
Надежнее всего скачивать с сайта самой игры. Среди всех разделов вам нужен только один ‑‑ «Multiplayer Server».
В зависимости, на какой операционной системе вы сидите, выбирайте нужный файл: .exe (Windows) или .jar, который подойдет любому.
Скачивайте всё. Сохранять нужно же в отдельную директоию. Она же и станет основой для вашей игры.
Для пользователе Linux или OS X, основной директорией сервера несколько другая, она будет рабочая.
Преимущество Minecraft ‑‑ не имеет значение, откуда присоединились к серверу игроки: из локальной сети или интернета.
Если ваш сервер расположен на том же ПК, на котором вы играете, то подлкючиться довольно просто. Введите адрес 127.0.0.1 или localhost.
Так вы задействуете виртуальный сетевой интерфейс (loopback). Причем он всегда доступен. Так что не имеет особого значения, есть у вас сетевая карта или нет.
А вот чтобы другие участники смогли присоединиться к созданному вами серверу, нужно LAN подключение, то есть объединить их ПК по локальной сети с главным компьютером.
Дальше же требуется ввести внутренний IP-адрес компьютера, где был основан сервер.
Локальный IP-адрес может быть динамическим, но со статическим у вас было бы меньше проблем.
После ввода IP-адреса сервера дело остается за малым: просто нажмите кнопку «подключиться к серверу».
Наиболее простой способ установки сервера через программу P2PLauncher.
Работает она на основе сети peer-to-peer. Закиньте ее в директорию игры и кликнете несколько раз.
После введите название сервера, комнаты. Кликнете «запустить сервер».
Таким образом и получает сервер, к которому могут присоединяться другие игроки.
вернуться к меню ↑ 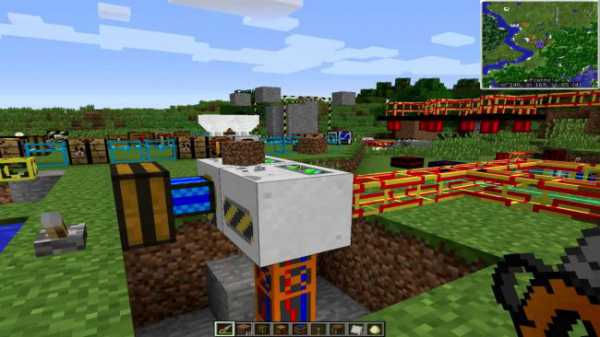
Собираем буровую вышку в Minecraft
И в дополнении фишка для игроков ‑‑ как собрать буровую установку. Компоненты следующие: шахтёрский или алмазный бур, сканер, буровые трубы.
Нужен вам этот бур для для добычи различных блоков. Обычно установка раскидывает по территории возле себя, но можете поставить рядом сундук.
Теперь ресурсы будут оставаться в нем. Таким образом, вам особо ничего не нужно делать, бур сам найдет все и поскладывает в сундук.
Выбор редакции
geek-nose.com
Как запустить Minecraft под Windows 8.
Всем привет! Сегодня захотел установить всем известную игру Minecraft, но какого было моё удивление, когда лаунчер игры запустился, но не было видно игровых серверов и новостей. На всякий случай я скачал другой, но это не дало никакого эффекта. По началу я подумал что брандмауэр моего антивируса блокирует эту игру. Но его отключение не дало никаких результатов.
Набрав в поисковой строке Гугла “Minecraft Windows 8”, я нашёл интересную информацию о том, что Маркус Перссон (Markus Persson), разработчик игры, получил от компании Microsoft предложения адаптировать его игру под Windows 8, на что Маркус ответил “чтобы они перестали разрушать ПК как открытую игровую платформу. Нотч считает, что лучше не делать Minecraft для Windows 8, чем играть на нём.”
Но всё таки есть один выход, конечно полной гарантии нету что она может полноценно запустится, и пойти без глюков, но попробовать стоит, у меня запустилось, правда и наблюдались иногда зависания и вылеты.
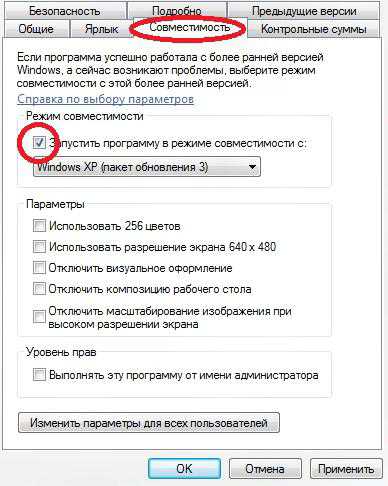
Нажимаете правой кнопкой мыши на лаунчере майнкрафта, и выберете пункт “свойства”, после чего в открывшемся окне выберете вкладку “совместимость” и поставьте галочку «запустить программу в режиме совместимости с» , как это указано ниже на рисунке. Режим совместимости оставьте как есть “Win Xp”. После чего закрывайте окно, и запускайте игру.
inflife.ru
Смотрите также
</table>Используемые источники:
- http://pyatilistnik.org/kak-ustanovit-minecraft-v-windows/
- http://geek-nose.com/minecraft-ustanovka/
- https://htfi.ru/windows_10/minecraft_kak_zapustit_na_windows_10.html
Verify that Minecraft and Forge versions are the same
by Matthew Adams
Matthew is a freelancer who has produced a variety of articles on various topics related to technology. His main focus is the Windows OS and all the things… read more
Published on September 2, 2022
Reviewed by
Vlad Turiceanu

Passionate about technology, Windows, and everything that has a power button, he spent most of his time developing new skills and learning more about the tech world. Coming… read more
- Minecraft Forge not installing on Windows 10 can be due to outdated or corrupted Java software or Windows firewall blocks.
- Some users might be able to fix Minecraft Forge not installing by reinstalling the required software.
- Changing firewall settings might help when Minecraft Forge won’t install.
- Built-in Windows 10 recovery tools might also come in handy when the Minecraft Forge installer is not working.
XINSTALL BY CLICKING THE DOWNLOAD FILE
This software will repair common computer errors, protect you from file loss, malware, hardware failure and optimize your PC for maximum performance. Fix PC issues and remove viruses now in 3 easy steps:
- Download Restoro PC Repair Tool that comes with Patented Technologies (patent available here).
- Click Start Scan to find Windows issues that could be causing PC problems.
- Click Repair All to fix issues affecting your computer’s security and performance
- Restoro has been downloaded by 0 readers this month.
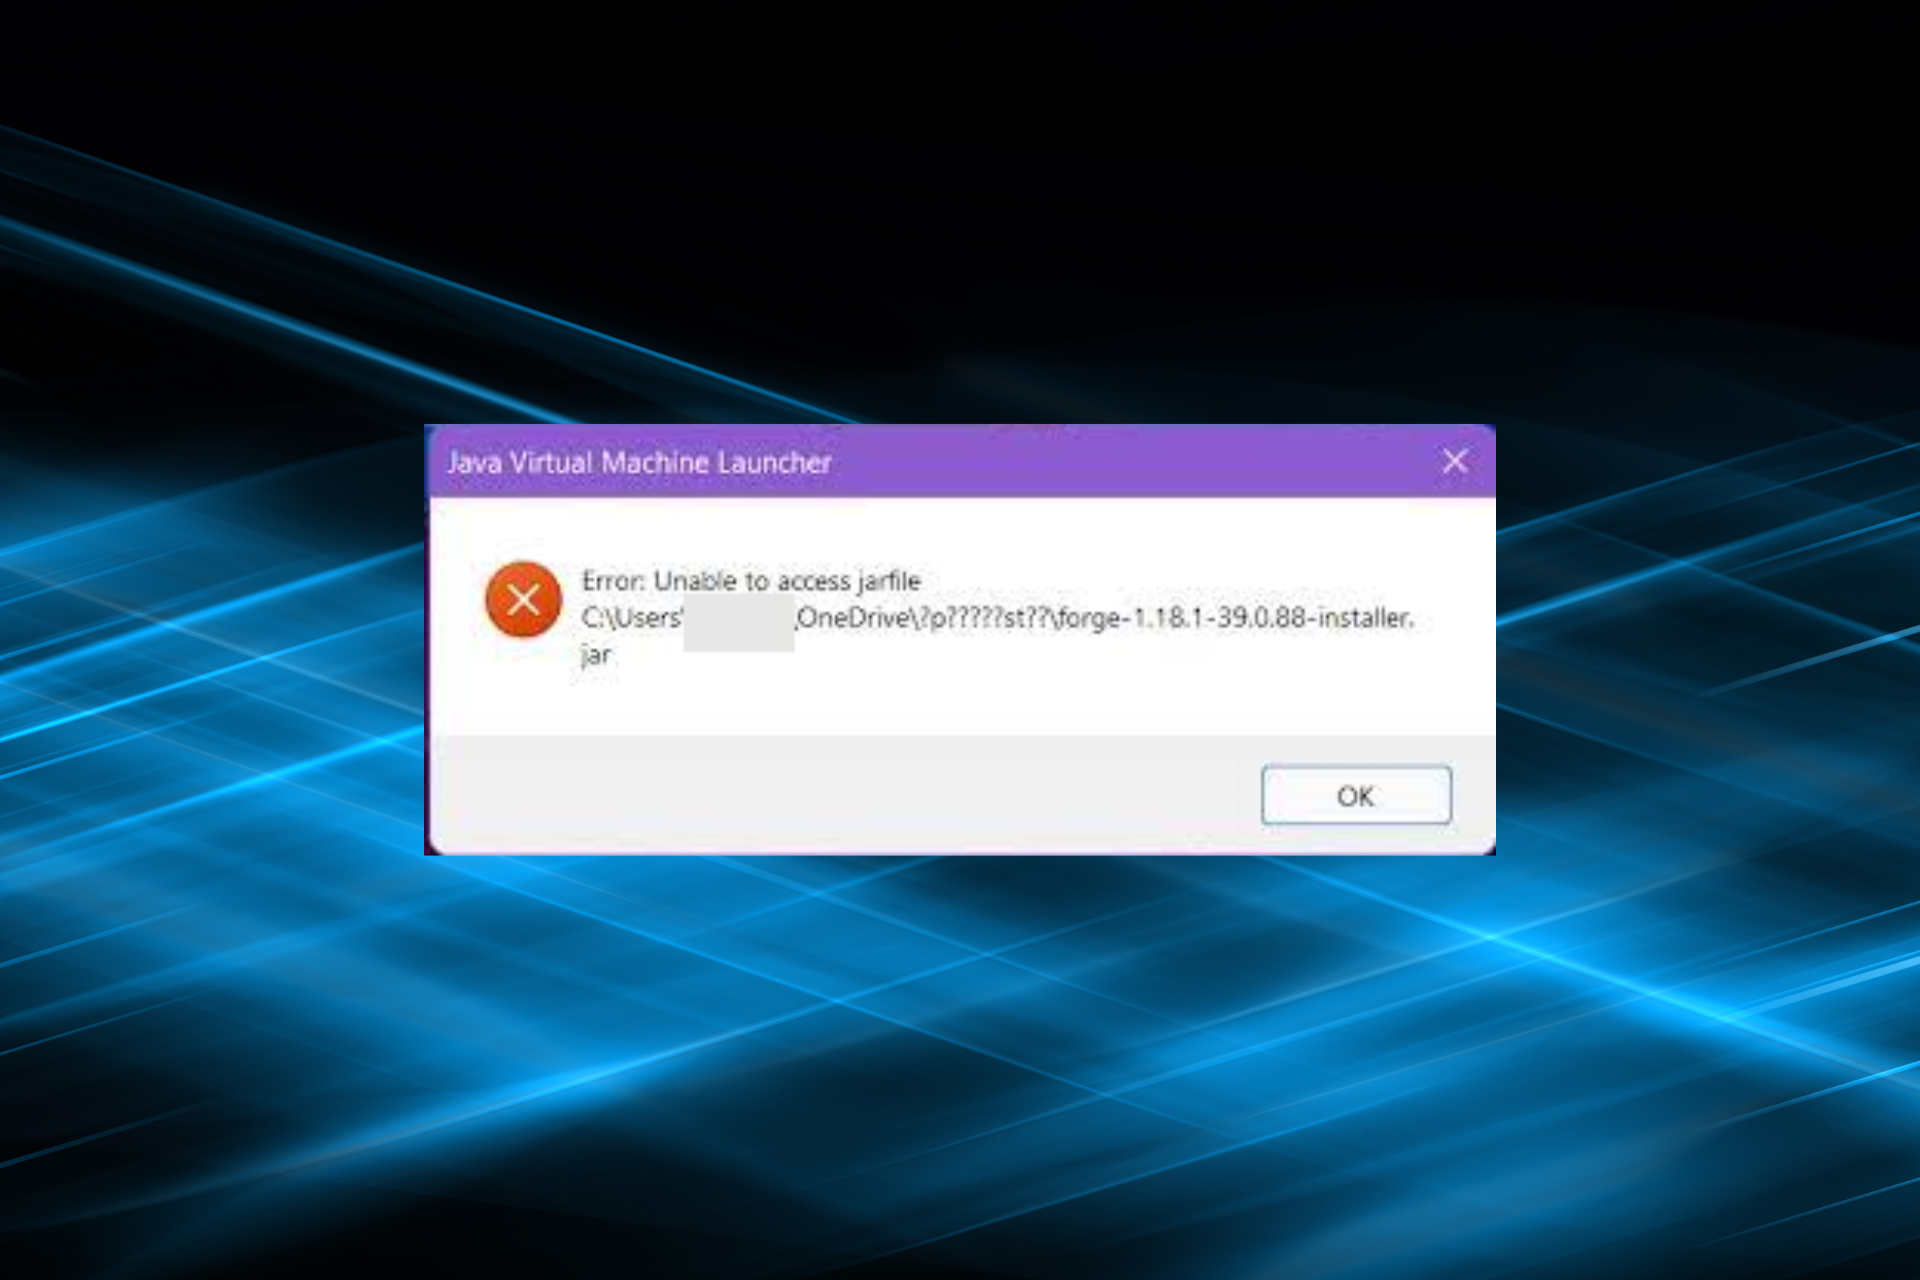
The Minecraft Forge modding API and loader provides players with new ways to play Minecraft. However, some players have reported in forums that the Minecraft Forge installer is not opening on their system.
Some of those cite a Forge install error message that states, These libraries failed to download. And being unable to install Java Minecraft Forge affects the whole experience.
So, let’s find out why Forge is not installing on your PC and the solutions that worked for most users.
Why cant I install Forge?
Note that Forge only works for the Java version of Minecraft. So, the Forge installer would not be working for the Minecraft MS Store app.
Also, if you are using an outdated version of Java, the Forge installer won’t open. Even using a version released very recently can also lead to issues owing to the presence of bugs in it.
The best way is to uninstall Java, and then use the version recommended by Forge when downloading it.
Also, the antivirus or firewall on your computer may be behind Minecraft Forge not installing. Disabling them should do the trick.
Lastly, if the Forge installer opens and then closes, check whether you have provided administrative privileges, i.e., are running it as an administrator.
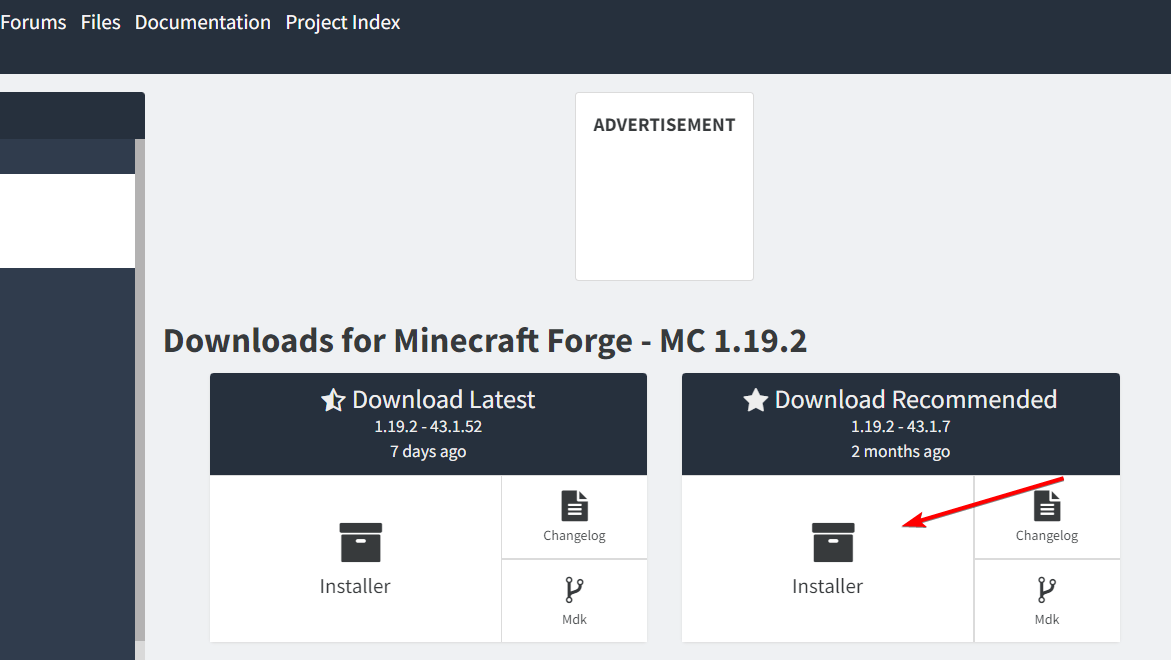
How do I install Forge 2022?
- Head to the download page then hit the Installer button.

- Next, press the Skip button in the top right corner then wait for the file to download.

- Simply opening the installer that you downloaded will start the process of installing the software. Make sure that the Install Client option is still selected.
- Launch Minecraft and make sure the profile is set to forge when it asks you. When the game loads, you will see that there is a new Mods option available at the beginning of the experience.
- You will now have access to the Mods folder, and you can use Minecraft Forge to add all of your preferred mods to the game.

How do I fix Forge installer error?
- Why cant I install Forge?
- How do I install Forge 2022?
- How do I fix Forge installer error?
- 1. Update Minecraft Java to the latest version
- 2. Restart your internet router
- 3. Reinstall Java
- 4. Uninstall Minecraft completely
- 5. Disable Windows Defender Firewall
- 6. Install Minecraft Forge via PowerShell
- 7. Reset Windows
- How do I install mods without Forge?
1. Update Minecraft Java to the latest version
- Open your Minecraft Launcher app.
- Click the drop-down menu to the left of the Play button.

- Then select Latest release on the menu to update the game.
- When you’re sure your Minecraft game is the latest version, download the latest Forge version from the official website.

The Forge version you download and try to install must match your current Minecraft Java game version. To verify, check Minecraft’s version at the bottom-left corner of its menu screen.
2. Restart your internet router
To restart (not reset) your router, simply unplug the cable from the back of it. Wait for about 10-20 seconds, and then plug the router back in.
Wait for about five minutes for all the router’s lights to come back on. Then try installing Minecraft Forge again.
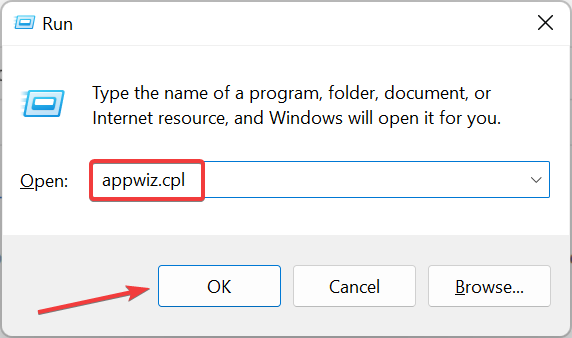
3. Reinstall Java
If the Minecraft Forge installer is not opening in Windows 11, an effective solution would be to reinstall Java. Oftentimes, corruption or problems with the app can lead to issues, and reinstalling is the only viable fix.
- Press Windows + R to open the Run command, type appwiz.cpl in the text field, and click OK.
2. Next, select Java from the list of programs, and click Uninstall.
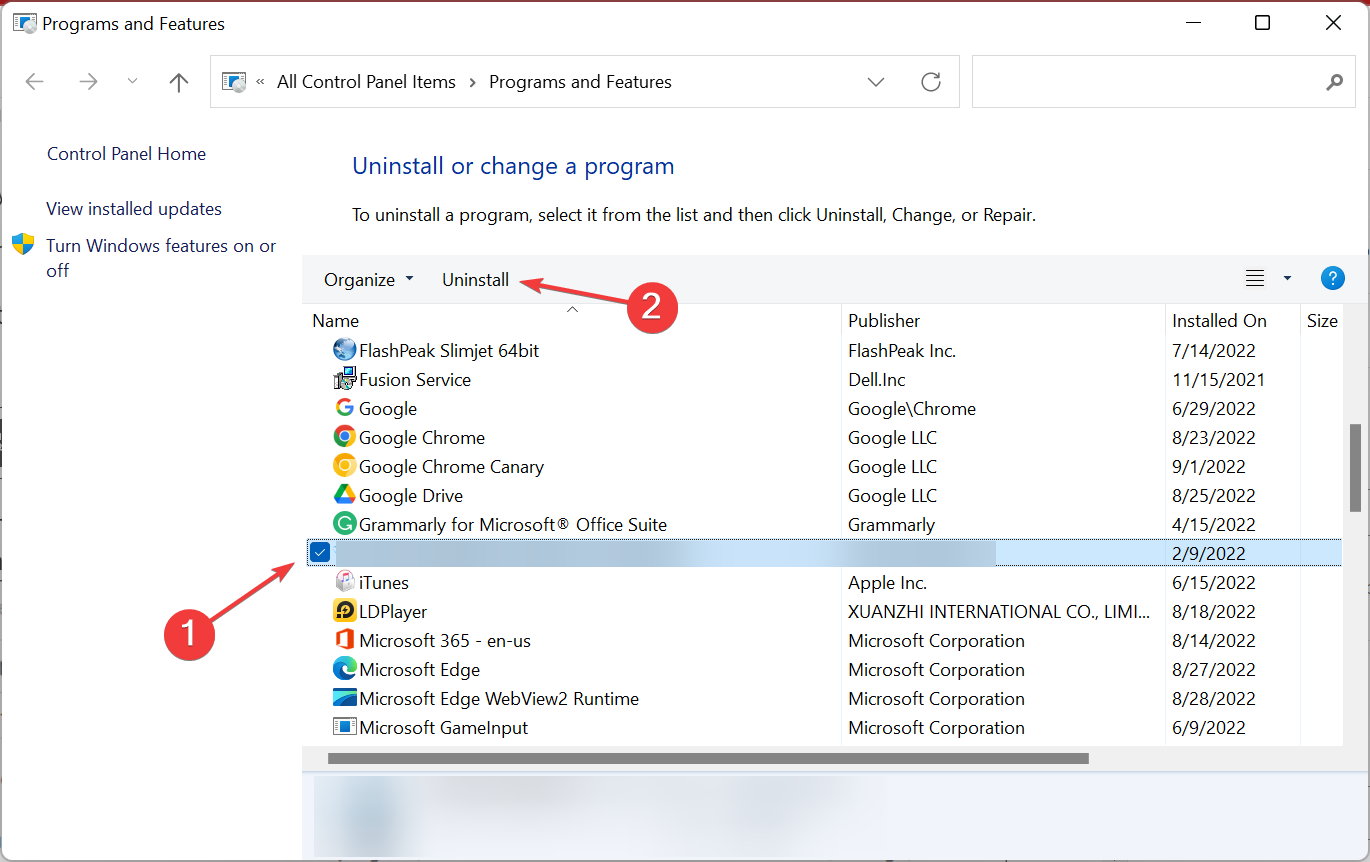
3. Follow the on-screen instructions to complete the process.
4. Restart Windows for the changes to come into effect.
5. Open the Java download page in a browser and click Download Java button.
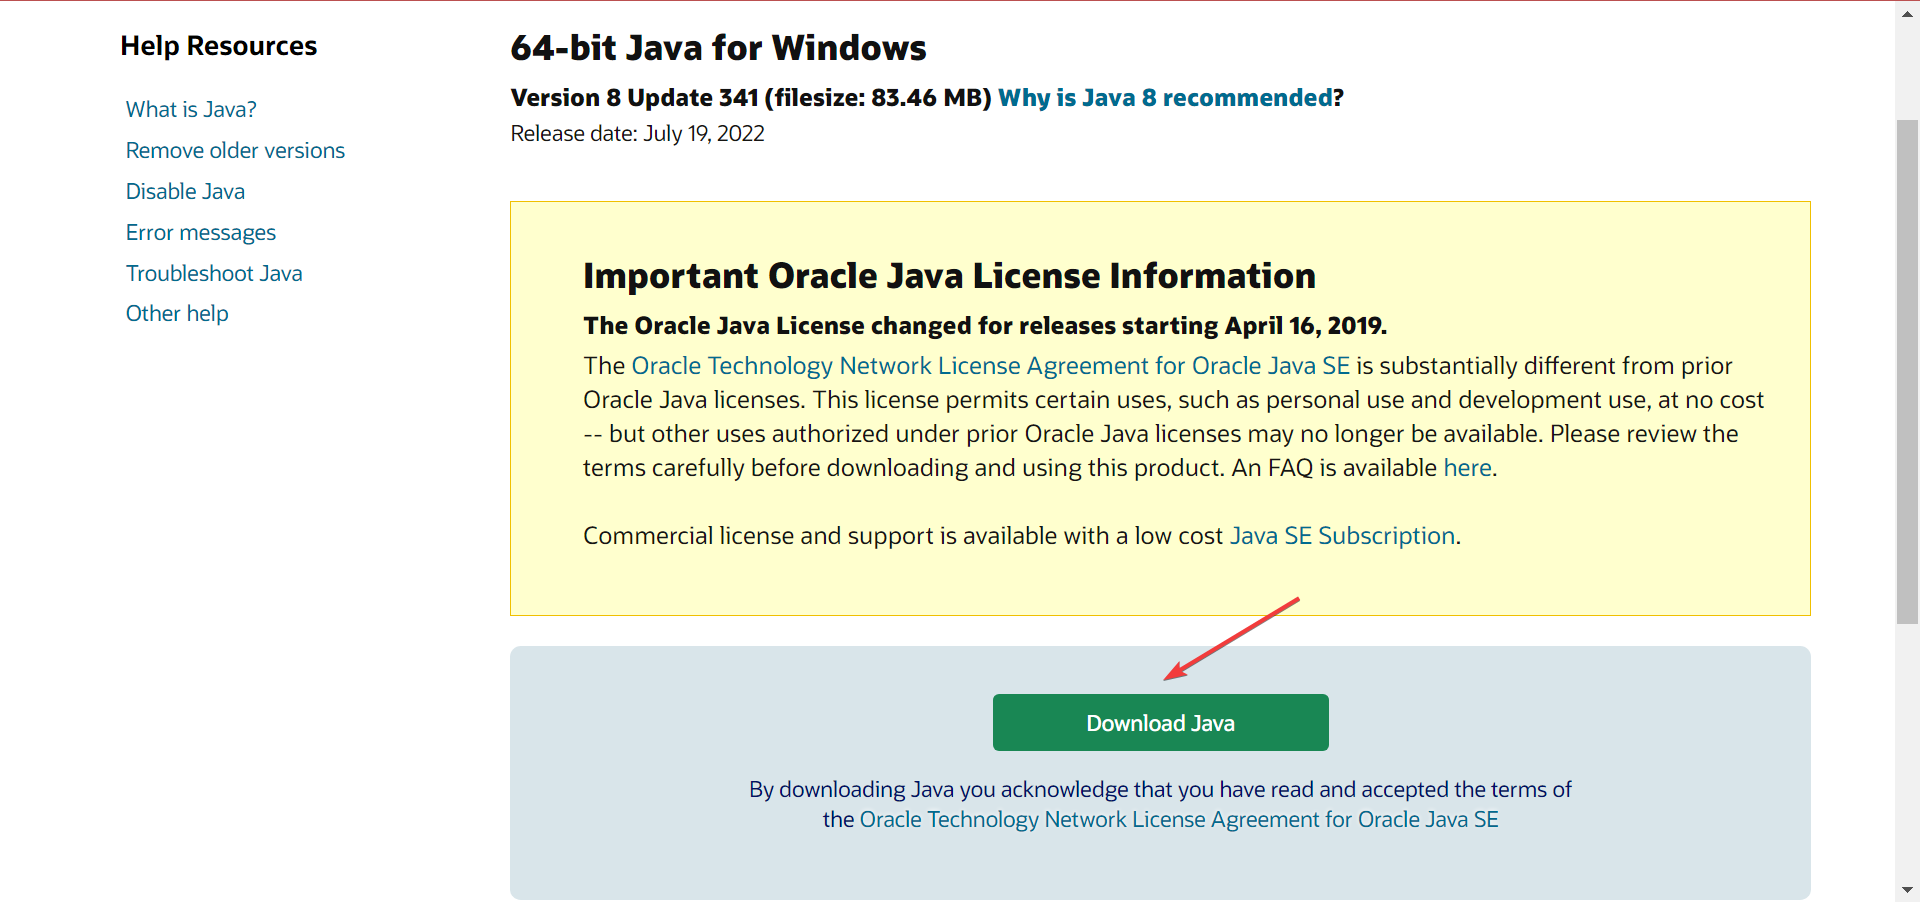
6. Once done, launch the Java installer package and follow the on-screen instructions to complete the process.
4. Uninstall Minecraft completely
Uninstalling Minecraft and reinstalling the latest game version could do the trick for some players. You can thoroughly uninstall Minecraft with IObit Uninstaller.
Some PC issues are hard to tackle, especially when it comes to corrupted repositories or missing Windows files. If you are having troubles fixing an error, your system may be partially broken.
We recommend installing Restoro, a tool that will scan your machine and identify what the fault is.
Click here to download and start repairing.
That’s a highly-rated third-party uninstaller tool that can eradicate all leftover residual files for Minecraft along with the game.
Whatever software you need to remove, you’ll find CCleaner to be an invaluable tool. With it, you can remove Windows updates, browser toolbars and extensions, and UWP apps.
It is also worth noting that manual removal of Minecraft is rarely 100 percent effective.
As a result, we recommend that you use specialized remover software, such as the CCleaner uninstaller and cleaning program.
CCleaner is a valuable software for cleaning the system of temporary and unwanted files as well as resolving registry issues, making it ideal for completely removing Minecraft for a clean reinstall.
Find Minecraft in the list and click on it once to highlight it. Then, on the right, click the Uninstall option, and the operation will begin; simply wait for it to finish, then restart your PC and reinstall Minecraft if desired.
Therefore, with this reliable uninstaller tool, you will erase even the most stubborn apps or programs out there in just a few clicks.
CCleaner
Clean your PC of junk files and incompatibilities with a simple scan.
5. Disable Windows Defender Firewall
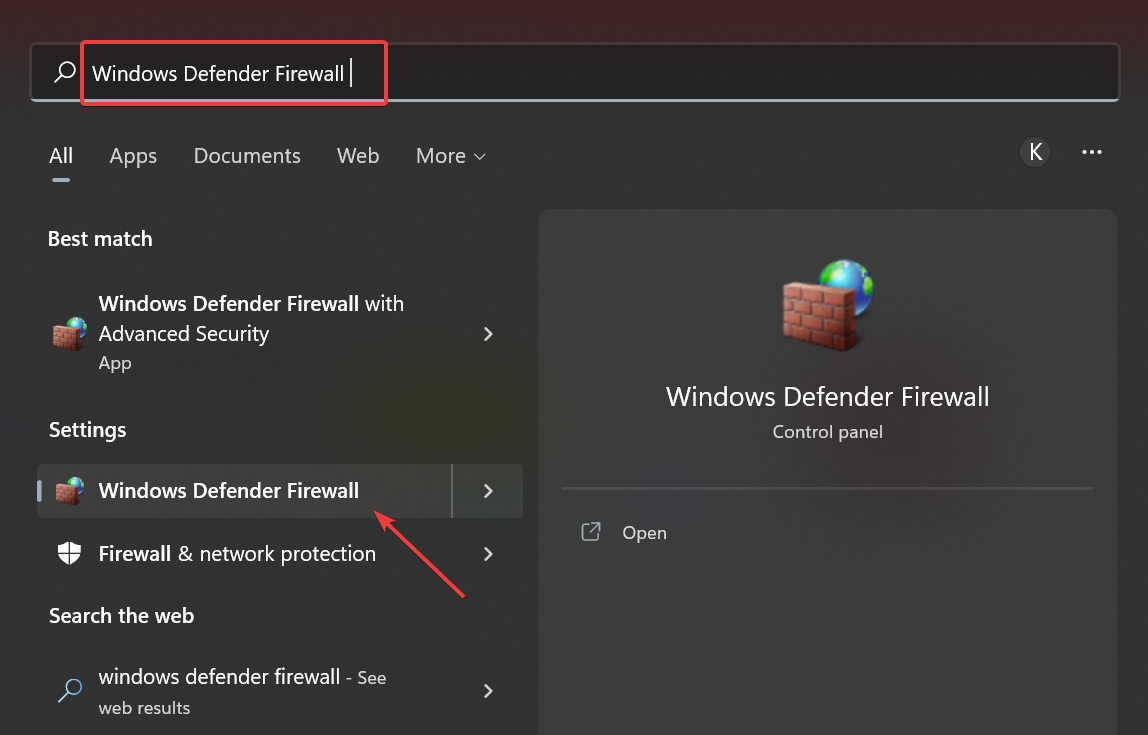
- Press Windows + S to open the Search menu, enter Windows Defender Firewall in the text field, and click on the relevant search result.

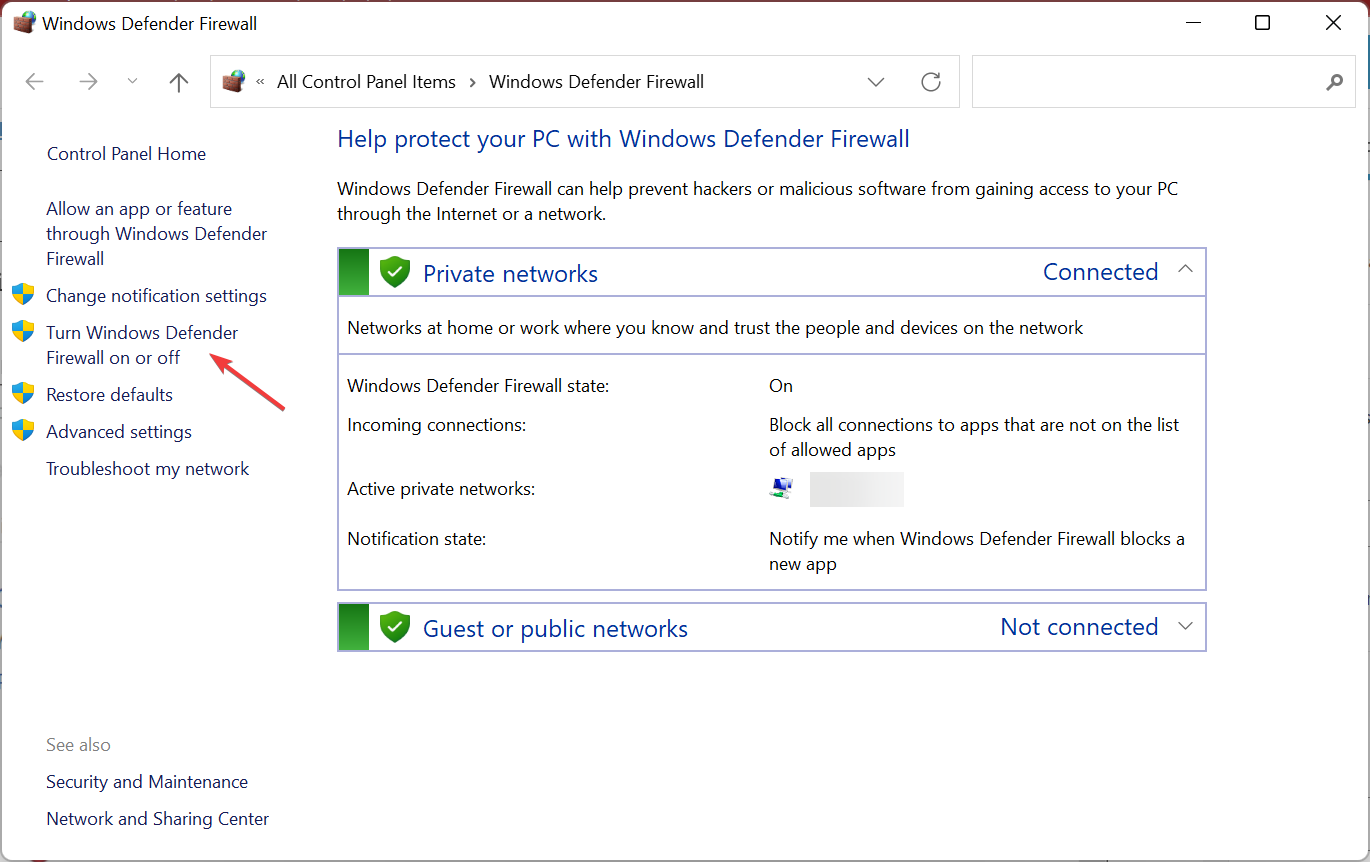
- Click Turn Windows Defender Firewall on or off on the left.

- Select Turn off Windows Defender Firewall option for both Private network settings and Public network settings, and then click on OK to save the changes.
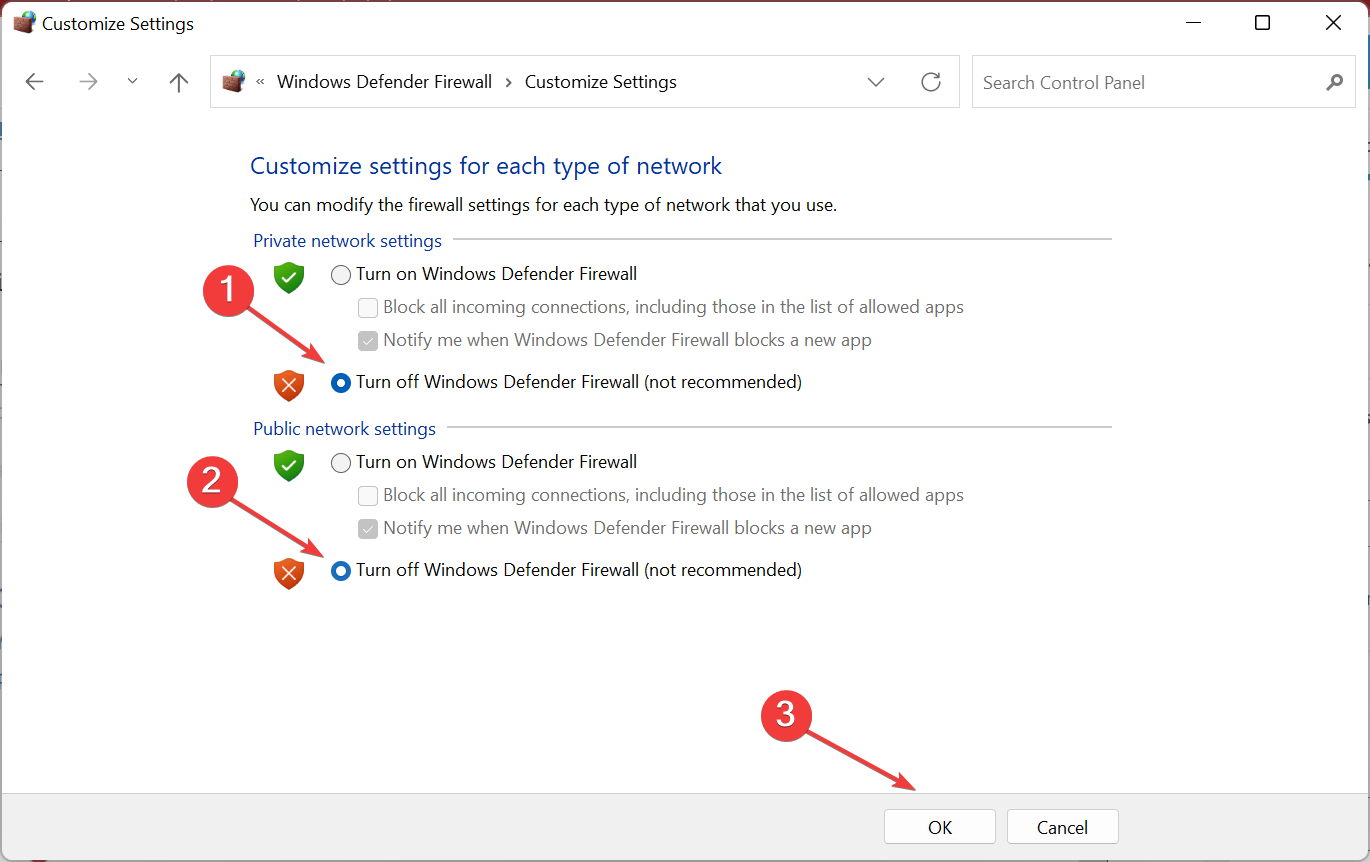
Once done, try installing Minecraft Forge with the firewall disabled, and verify if the Forge 1.8.9 installer is not working. If that’s the case, head to the next method.
Also, whether the fix works or not, make sure to re-enable Firewall after you are done trying since it’s a critical protection tool, and disabling it is not advisable.
6. Install Minecraft Forge via PowerShell
- Press Windows + E to open the File Explorer, and navigate to the folder that stores the Minecraft Forge installer file.
- Right-click the Minecraft Forge installer file, select Rename, and then enter forge.JAR.
- Hold the Space key, right-click anywhere within the folder that includes the forge.JAR file and select Open PowerShell window here.
- Next, input the PowerShell command and press Enter:
java -Xnx2G -jar forge.jar

That’s it! If Minecraft Forge installer was not opening earlier, it should now. In case the error persits, head to the last method.
7. Reset Windows
Resetting Windows 10 might seem a bit drastic, but some users have confirmed doing so can fix Minecraft Forge installation issues. However, you will need to reinstall the software previously installed on the computer after resetting Windows 10.
Also, if you are running the latest iteration of the OS, here’s how you can reset Windows 11 to its factory settings.
After you are done resettings the OS, the install process should go through, and you would now be able to tell others how to install Minecraft Forge, and help them troubleshoot issues with it.
How do I install mods without Forge?
While you would require Forge to use most mods, there are other applications that too work well. One of the most prominently used ones is Fabric, an effective mod loader.
Many users rely on Fabric instead of Forge for its simple design and high-performance. So, if you can’t find out how to download Forge on Windows 10, Fabric will come to your rescue.
So, these are some of the best ways to fix things when Minecraft Forge installer is not opening in Windows. The methods would work if Forge verion 1.12 is not installing.
Also, find out how to install Minecraft on Windows, and steer clear of errors.
Tell us which fix worked for you in the comments section below.
Still having issues? Fix them with this tool:
SPONSORED
If the advices above haven’t solved your issue, your PC may experience deeper Windows problems. We recommend downloading this PC Repair tool (rated Great on TrustPilot.com) to easily address them. After installation, simply click the Start Scan button and then press on Repair All.
![]()
Newsletter
Verify that Minecraft and Forge versions are the same
by Matthew Adams
Matthew is a freelancer who has produced a variety of articles on various topics related to technology. His main focus is the Windows OS and all the things… read more
Published on September 2, 2022
Reviewed by
Vlad Turiceanu
Passionate about technology, Windows, and everything that has a power button, he spent most of his time developing new skills and learning more about the tech world. Coming… read more
- Minecraft Forge not installing on Windows 10 can be due to outdated or corrupted Java software or Windows firewall blocks.
- Some users might be able to fix Minecraft Forge not installing by reinstalling the required software.
- Changing firewall settings might help when Minecraft Forge won’t install.
- Built-in Windows 10 recovery tools might also come in handy when the Minecraft Forge installer is not working.
XINSTALL BY CLICKING THE DOWNLOAD FILE
This software will repair common computer errors, protect you from file loss, malware, hardware failure and optimize your PC for maximum performance. Fix PC issues and remove viruses now in 3 easy steps:
- Download Restoro PC Repair Tool that comes with Patented Technologies (patent available here).
- Click Start Scan to find Windows issues that could be causing PC problems.
- Click Repair All to fix issues affecting your computer’s security and performance
- Restoro has been downloaded by 0 readers this month.
The Minecraft Forge modding API and loader provides players with new ways to play Minecraft. However, some players have reported in forums that the Minecraft Forge installer is not opening on their system.
Some of those cite a Forge install error message that states, These libraries failed to download. And being unable to install Java Minecraft Forge affects the whole experience.
So, let’s find out why Forge is not installing on your PC and the solutions that worked for most users.
Why cant I install Forge?
Note that Forge only works for the Java version of Minecraft. So, the Forge installer would not be working for the Minecraft MS Store app.
Also, if you are using an outdated version of Java, the Forge installer won’t open. Even using a version released very recently can also lead to issues owing to the presence of bugs in it.
The best way is to uninstall Java, and then use the version recommended by Forge when downloading it.
Also, the antivirus or firewall on your computer may be behind Minecraft Forge not installing. Disabling them should do the trick.
Lastly, if the Forge installer opens and then closes, check whether you have provided administrative privileges, i.e., are running it as an administrator.
How do I install Forge 2022?
- Head to the download page then hit the Installer button.
- Next, press the Skip button in the top right corner then wait for the file to download.
- Simply opening the installer that you downloaded will start the process of installing the software. Make sure that the Install Client option is still selected.
- Launch Minecraft and make sure the profile is set to forge when it asks you. When the game loads, you will see that there is a new Mods option available at the beginning of the experience.
- You will now have access to the Mods folder, and you can use Minecraft Forge to add all of your preferred mods to the game.
How do I fix Forge installer error?
- Why cant I install Forge?
- How do I install Forge 2022?
- How do I fix Forge installer error?
- 1. Update Minecraft Java to the latest version
- 2. Restart your internet router
- 3. Reinstall Java
- 4. Uninstall Minecraft completely
- 5. Disable Windows Defender Firewall
- 6. Install Minecraft Forge via PowerShell
- 7. Reset Windows
- How do I install mods without Forge?
1. Update Minecraft Java to the latest version
- Open your Minecraft Launcher app.
- Click the drop-down menu to the left of the Play button.
- Then select Latest release on the menu to update the game.
- When you’re sure your Minecraft game is the latest version, download the latest Forge version from the official website.
The Forge version you download and try to install must match your current Minecraft Java game version. To verify, check Minecraft’s version at the bottom-left corner of its menu screen.
2. Restart your internet router
To restart (not reset) your router, simply unplug the cable from the back of it. Wait for about 10-20 seconds, and then plug the router back in.
Wait for about five minutes for all the router’s lights to come back on. Then try installing Minecraft Forge again.
3. Reinstall Java
If the Minecraft Forge installer is not opening in Windows 11, an effective solution would be to reinstall Java. Oftentimes, corruption or problems with the app can lead to issues, and reinstalling is the only viable fix.
- Press Windows + R to open the Run command, type appwiz.cpl in the text field, and click OK.
2. Next, select Java from the list of programs, and click Uninstall.
3. Follow the on-screen instructions to complete the process.
4. Restart Windows for the changes to come into effect.
5. Open the Java download page in a browser and click Download Java button.
6. Once done, launch the Java installer package and follow the on-screen instructions to complete the process.
4. Uninstall Minecraft completely
Uninstalling Minecraft and reinstalling the latest game version could do the trick for some players. You can thoroughly uninstall Minecraft with IObit Uninstaller.
Some PC issues are hard to tackle, especially when it comes to corrupted repositories or missing Windows files. If you are having troubles fixing an error, your system may be partially broken.
We recommend installing Restoro, a tool that will scan your machine and identify what the fault is.
Click here to download and start repairing.
That’s a highly-rated third-party uninstaller tool that can eradicate all leftover residual files for Minecraft along with the game.
Whatever software you need to remove, you’ll find CCleaner to be an invaluable tool. With it, you can remove Windows updates, browser toolbars and extensions, and UWP apps.
It is also worth noting that manual removal of Minecraft is rarely 100 percent effective.
As a result, we recommend that you use specialized remover software, such as the CCleaner uninstaller and cleaning program.
CCleaner is a valuable software for cleaning the system of temporary and unwanted files as well as resolving registry issues, making it ideal for completely removing Minecraft for a clean reinstall.
Find Minecraft in the list and click on it once to highlight it. Then, on the right, click the Uninstall option, and the operation will begin; simply wait for it to finish, then restart your PC and reinstall Minecraft if desired.
Therefore, with this reliable uninstaller tool, you will erase even the most stubborn apps or programs out there in just a few clicks.
CCleaner
Clean your PC of junk files and incompatibilities with a simple scan.
5. Disable Windows Defender Firewall
- Press Windows + S to open the Search menu, enter Windows Defender Firewall in the text field, and click on the relevant search result.
- Click Turn Windows Defender Firewall on or off on the left.
- Select Turn off Windows Defender Firewall option for both Private network settings and Public network settings, and then click on OK to save the changes.
Once done, try installing Minecraft Forge with the firewall disabled, and verify if the Forge 1.8.9 installer is not working. If that’s the case, head to the next method.
Also, whether the fix works or not, make sure to re-enable Firewall after you are done trying since it’s a critical protection tool, and disabling it is not advisable.
6. Install Minecraft Forge via PowerShell
- Press Windows + E to open the File Explorer, and navigate to the folder that stores the Minecraft Forge installer file.
- Right-click the Minecraft Forge installer file, select Rename, and then enter forge.JAR.
- Hold the Space key, right-click anywhere within the folder that includes the forge.JAR file and select Open PowerShell window here.
- Next, input the PowerShell command and press Enter:
java -Xnx2G -jar forge.jar
That’s it! If Minecraft Forge installer was not opening earlier, it should now. In case the error persits, head to the last method.
7. Reset Windows
Resetting Windows 10 might seem a bit drastic, but some users have confirmed doing so can fix Minecraft Forge installation issues. However, you will need to reinstall the software previously installed on the computer after resetting Windows 10.
Also, if you are running the latest iteration of the OS, here’s how you can reset Windows 11 to its factory settings.
After you are done resettings the OS, the install process should go through, and you would now be able to tell others how to install Minecraft Forge, and help them troubleshoot issues with it.
How do I install mods without Forge?
While you would require Forge to use most mods, there are other applications that too work well. One of the most prominently used ones is Fabric, an effective mod loader.
Many users rely on Fabric instead of Forge for its simple design and high-performance. So, if you can’t find out how to download Forge on Windows 10, Fabric will come to your rescue.
So, these are some of the best ways to fix things when Minecraft Forge installer is not opening in Windows. The methods would work if Forge verion 1.12 is not installing.
Also, find out how to install Minecraft on Windows, and steer clear of errors.
Tell us which fix worked for you in the comments section below.
Still having issues? Fix them with this tool:
SPONSORED
If the advices above haven’t solved your issue, your PC may experience deeper Windows problems. We recommend downloading this PC Repair tool (rated Great on TrustPilot.com) to easily address them. After installation, simply click the Start Scan button and then press on Repair All.
![]()
Newsletter
Купил Minecraft Java and Bedrock Edition ключ на стороннем сайте за 500 рублей, Java Edition скачалось без проблем, а вот с Windows 10 проблема. При чем и Java Edition и Windows 10 указываются как приобретенные товары.
Когда активировал ключ на основном акке, то скачал лаунчер майнкрафта через приложение Xbox. Через лаунчер скачал сначала Java Edition. Потом, когда начал качать Windows 10 Edition, то меня перебросило в MS Store, а там у меня зашло через второй акк. В итоге сначала произошла ошибка, я перезашел с основного и после этого пошла такая ошибка. Возможно, проблема началась с этого.
При скачке Minecraft Windows 10 сначала останавливается на «Приобретение лицензии» затем происходит ошибка
Помогите пожалуйста. Пробовал уже WpSystem в WpSystem.old переименовывать, удалять все файлы из AppData/Roaming/.minecraft, переустанавливать MS Store и т.п, но не помогает. У самого Win 10 стоит.
На чтение 2 мин. Просмотров 619 Опубликовано 03.09.2019
Minecraft, вероятно, самая популярная игра в мире, и Microsoft поступила правильно, когда включила эту игру в Windows Store. Но некоторые игроки сообщают, что не могут загрузить игру из-за ошибки 0x803f7003, поэтому вот несколько советов, если вы тоже столкнулись с этой проблемой.

Содержание
- Не можете скачать Minecraft из Магазина Windows? Следить за этим
- Решение 1. Попробуйте обновить загрузку несколько раз
- Решение 2 – Сброс Windows Store
Не можете скачать Minecraft из Магазина Windows? Следить за этим
Решение 1. Попробуйте обновить загрузку несколько раз
Я знаю, что это звучит как глупое решение, на самом деле это совсем не похоже на решение, но некоторые пользователи сообщали, что они могли нормально загружать Minecraft после многократного нажатия кнопки загрузки, поэтому прежде чем делать что-либо еще, Можно отправить несколько минут несколько раз, нажав кнопку загрузки снова и снова.

Если это действительно окажется неправильным «решением», то проблема, вероятно, находится в Магазине Windows, поэтому вы должны что-то с этим сделать.
Решение 2 – Сброс Windows Store
Как я уже сказал, проблема, вероятно, кроется в Магазине Windows, поэтому первое, что вы можете сделать, это сбросить Магазин Windows, а затем снова попытаться загрузить Minecraft. Вот как можно сбросить Windows Store:
- Перейдите в Поиск и введите wsreset.exe
- Нажмите Enter и дайте процессу сбросить ваш Windows Store
Теперь снова войдите в свою учетную запись Microsoft и попробуйте скачать Minecraft. Если проблема не устранена, обратитесь к нашей статье о решении проблем Магазина Windows для получения дополнительных решений.
Если вы все еще не можете загрузить игру из Магазина Windows, вам следует поискать дополнительные решения на форумах Minecraft и Windows, надеюсь, эти ребята нашли другое решение.
Если у вас есть какие-либо другие проблемы, связанные с Windows 10, вы можете найти решение в разделе исправлений Windows 10.